
My Mini 14 quest for accuracy is over. I have the answer and an honest-to-God 1.5 MOA Mini 14. With open sights. At 100 yards. Yippeeee!
It’s been an interesting journey.
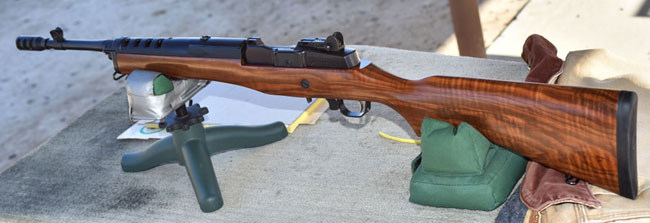
Davidson’s Circassian Mini 14
I like rifles with fine walnut, and about a decade ago when Davidson’s (a large Ruger distributor) offered a limited quantity of Mini 14 rifles with Circasssian walnut stocks, I had to have one. Most of the Circassian Mini 14 rifles had very plain wood, but when I saw the one you see here, I pulled the Buy Now trigger. That’s a light trigger, I’ve learned. If it’s for a rifle with highly-figured walnut, in my case you might even say it’s a hair trigger.

The problem I had is that Davidson’s Circassian Mini 14 wasn’t legal in California because of its two 30-round magazines and flash suppressor. Here in the Peoples Republik of Kalifornia (Gavinland, if you will), we can’t have mags that hold more than 10 rounds, and semi-auto rifles with flash suppressors are verboten. So I had the rifle shipped with no magazines to an outfit with a Class III license, and they replaced the flash suppressor with a muzzle brake. Then I had to wait my state-mandated 10-day cooling off period. After I had chilled sufficiently, the rifle was mine.
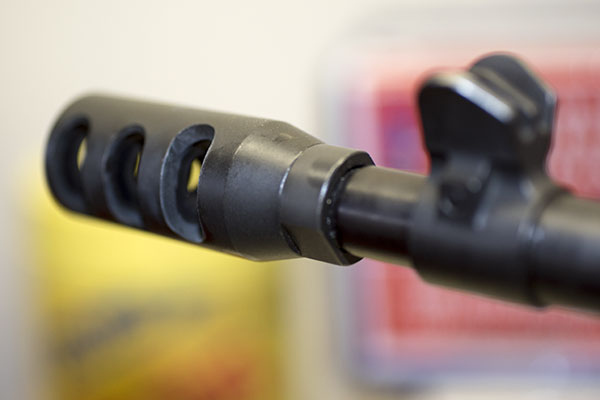
I think the muzzle brake looks better than the flash suppressor, and I don’t need a 30-round magazine. I hated the idea of leaving those 30-round mags with the guy I bought the rifle from (they were worth about $80), but hey, our mush-minded legislators think they made the Golden State safer and that’s what matters.
My rifle has a 16-inch barrel (most Mini 14 rifles have 18-inch barrels), which looks cool but it is not conducive to great accuracy. There’s nothing inherent to the shorter barrel in and of itself that hurts accuracy, but what that shorter barrel does is reduce the sight radius. A longer sight radius offers an accuracy advantage, a shorter one can work against accuracy.
The bottom line? The rifle is beautiful. I shoot it a lot, and whenever I’m on the range with it, folks are taken with it. It draws a crowd. You just don’t see Mini 14 rifles with wood like mine. But it wasn’t terribly accurate. I was going to change that. And I did.
The First Accuracy Mod: Tech-Sights
I did not like the standard rear sight on my Mini 14. To adjust elevation, you had to loosen the windage adjustment and then rotate the entire rear aperture, and to adjust windage you had to loosen both Allen screws at the base of the sight and move it. There was not indexing for windage, so where you ended up was only repeatable with a repeated fire, check the point of impact, loosen the sight, adjust, tighten the sight, fire again, and repeat until you were happy. I also didn’t like the range of elevation adjustment on the stock sight; it seemed liked the aperture had to be way too high to bring my shots to the point of aim.
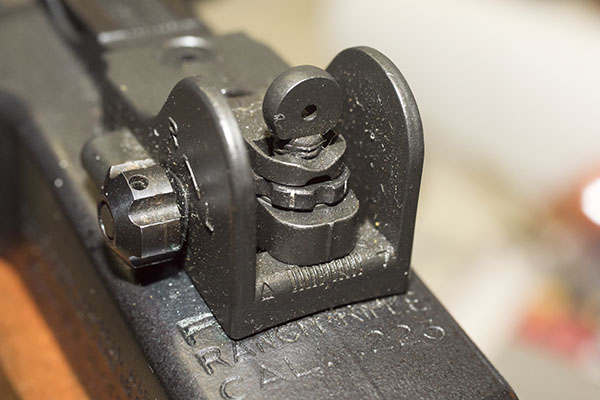
The hot setup is a replacement rear sight from Tech-Sights. It was about $70, but it was well worth it. The Tech-Sights rear sight is click adjustable for both windage and elevation, and it is repeatable when I make adjustments. It’s a much better mousetrap.
Mini 14 Accuracy Loads
I tried different reloading recipes until the cows come home, and over the last decade, I’ve converged on two that gave the best results in my Mini 14. Both use inexpensive Hornady full metal jacket boat tail bullets. The first is the 55-grain Hornady FMJBT with 26.2 grains of IMR 4320 propellant, a Winchester small rifle primer, and a cartridge overall length of 2.255 inches. That’s a near max load, and the only reason I don’t run it up to the max load is the 26.2 grains damn near fill the .223 case. The second favored load is the Hornady 62-grain FMJBT bullet with 23.2 grains of ARComp propellant. I use the same primer and overall cartridge length as the first load.
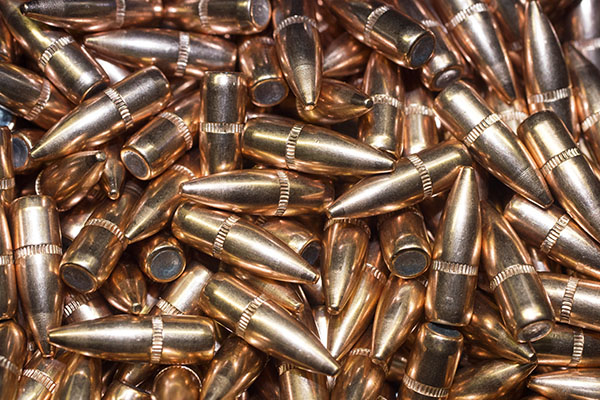
Either bullet (Hornady’s 55-grain or 62-grain FMJBT) can usually be purchased for something between $7.50 and $8.00 per hundred when they are on sale. I probably get 10 emails a day from the different reloading houses advertising their sales, and when they throw free shipping into the mix, I’m in. You usually have to order above $100 in stuff to get the free shipping, and that’s why I have 1400 of the 62-grain Hornady bullets inbound. I’ll burn through those in 6 months or so. Yeah, I shoot my Mini 14 a lot.
I don’t crimp the bullets in either of the above loads, and I’ve found that what kind of brass I use doesn’t make a difference in group size. Using brass from different manufacturers does move the group around, though, so when I load, I do so using only one kind of brass for each lot of ammo. For me, that is usually either Remington or military brass. I have a good supply of both.
Factory versus Reloaded Ammo in the Mini 14
There may be good factory ammo out there that groups well in the Mini 14, but I haven’t found it. I buy bulk factory only to get the brass (believe it or not, when loaded bulk ammo goes on sale, I can actually buy it for less than what unprimed brass costs). When I shoot the bulk factory ammo, the accuracy is truly abysmal. At 100 yards from a bench rest, a 20-shot Remington bulk ammo group spans about 12 inches. For all you keyboard commandos out there…I know, you can do better. One guy keeps commenting that he can shoot the lock off a Cadillac with his Mini 14. Whatever. I’m reporting my results, and with factory ammo, they’re terrible.
With either of the two reloading recipes described above, I can get the group size down to about the size of the 9-ring on a 100-yard target. That’s a big improvement from factory ammo and the other loads I’ve tried. The problem, though, was the rifle wasn’t consistent. I could get a good group, but then the next one would open up. Then I’d get another good group, but it would shift on the target from the last group.
Bedding the Mini 14 Action
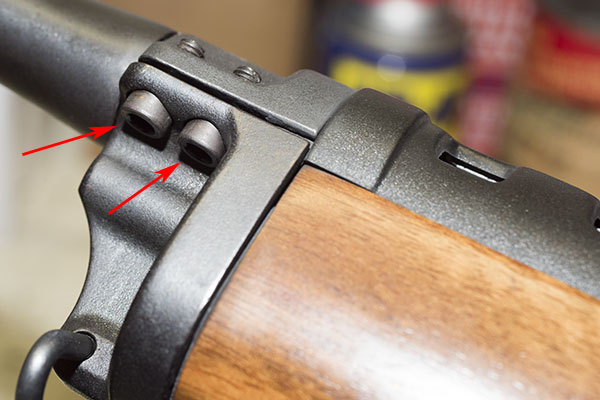
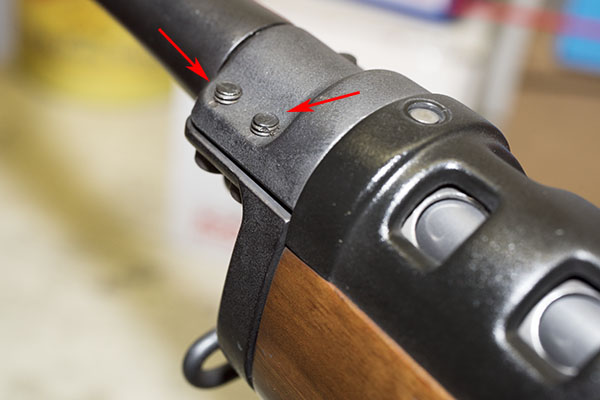
Past accuracy quests with bolt action rifle always included bedding the action. What that means is creating a glass-fiber-impregnated epoxy bed for the barreled action in the stock. It’s a lot trickier on a Garand-style rifle (which the Mini 14 is) than a bolt action, because the Garand-type action doesn’t have a conventional recoil lug or action screws. On the Mini 14, two tabs on the receiver fit into sheet metal inserts in the stock, and the trigger group’s trigger guard pivots to lock the whole mess (barreled action, stock, and trigger group) together. On my rifle, I could detect a minor amount of play between the stock and the barreled action, both fore-and-aft and left-to-right.
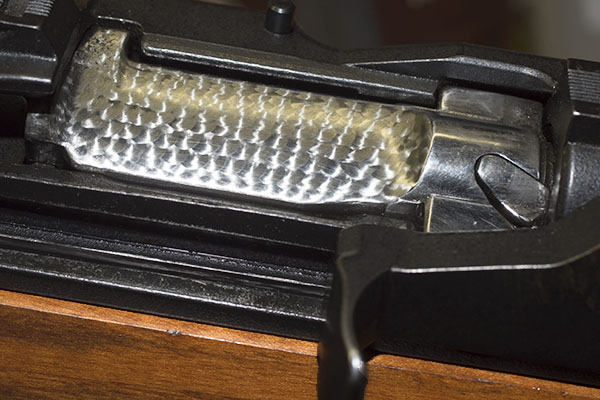
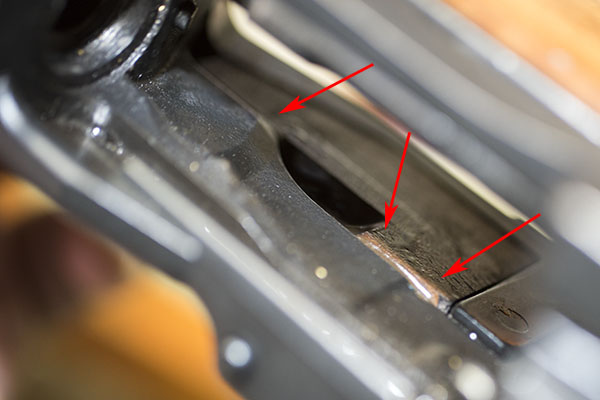
I used Brownell’s Acraglas as the bedding compound, and after reading and watching everything I could on the Internet about glass bedding a Mini 14, I did so with mine. It turned out well, I think. There is zero play between the barreled action and the stock now.
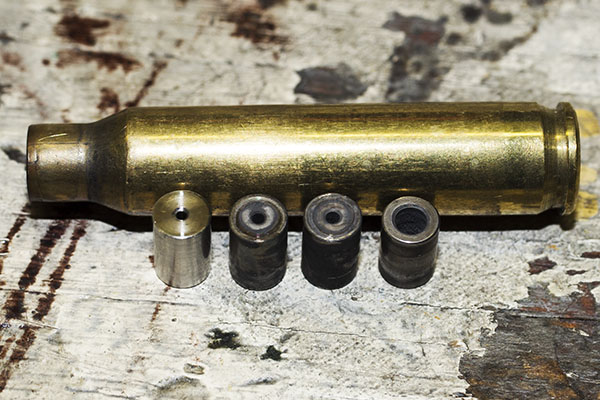
ASI’s Mini 14 Gas Port Kit
I wrote about this before in a previous blog. The Mini 14 throws brass into the next county, and that’s a real pain in the ass. I’ve actually dented cars behind the firing line with brass ejected from my Mini 14. The reason the Mini’s ejection is so violent is that Ruger overdesigned the ejection approach to make the rifle reliable. Ruger uses a gas port with an approximate 0.085-inch-diameter opening to port propellant gas to the op rod, and that pretty much guarantees that no matter what type of ammo you’re shooting, the rifle will function. It’s way more gas pressure than the op rod needs, though, and the ejection is so energetic that the barreled action doesn’t stay in the same place after each round. That hurts accuracy.
As an aside, the Mini 14 is kind of like the AK 47 with regard to its ejection energy. Both rifles have excess margin in the extraction and ejection gas porting design to make sure they always work.
The ASI gas port kit includes four bushings with different diameter ports, and the idea is you try each one to find the bushing that gives you reliable function. You want to use the smallest one possible consistent with reliable operation. I’ve tried all four and I’m now at the 0.050-inch port (the largest one in the ASI kit), and it is usually reliable, but not always. I still get an occasional failure to extract. I may take the smallest one (with its 0.035-inch bore) and have it opened up to 0.060 inch, but that will come later. I’m not going into combat with my Mini 14, so I can tolerate the occasional failure to extract. I like to think of my Mini 14 as a SHTF rifle, but truth be told, I’m more concerned about shooting tiny groups than I am about doomsday scenarios. Your mileage may vary.
I think the reason the largest of the ASI ports still sometimes fails to extract is because my rifle has that short 16-inch barrel, which imparts a little less of a gun gas pressure pulse to the op rod than would a rifle with an 18-inch barrel. It may be another disadvantage of the shorter barrel.
ASI Gas Ports and Glass Bedding
My last Mini 14 blog was on the effects of both the glass bedding and the ASI gas port. Both of these upgrades made a difference, but the rifle still wasn’t where I wanted it to be from an accuracy perspective. Interestingly, the dispersion got smaller top to bottom, but it was still about the same left to right as it had been with my preferred 62-grain bullet load.
5.56 NATO versus .223 Ammunition
Ah, here’s where things start to get both technical, and to ballistics geeks like me and you, extremely interesting. You might be wondering why this blog is suddenly going tangential into a discussion of 5.56 NATO ammunition and the .223 Remington commercial cartridge. Bear with me and it will all come together.
As we proceed, keep this in mind: Even though the Ruger Mini 14 is marked as a caliber .223 rifle, it has a 5.56mm NATO chamber.
For starters, there is a difference between the two cartridges (they are loaded to different pressure levels, with the 5.56mm NATO cartridge loaded to higher pressure than the .223 Remington cartridge), but the 5.56mm NATO and commercial .223 Remington share identical exterior dimensions. Military (i.e., NATO) ammo has thicker case walls, which means the interior volume decreases slightly, but on the outside, the dimensions are the same.
Okay, the above addresses the two cartridges. Now, let’s consider the two chambers (the part of the rifle that surrounds the cartridge). There are lots of differences between the chambers in a 5.56 NATO rifle versus a rifle chambered for the .223 Remington cartridge. The first is the leade (the distance between the case mouth and where the rifling begins in the barrel). Rifles chambered for the 5.56 NATO round have approximately twice the leade as do rifles chambered for the .223 Remington cartridge. That’s what allows the 5.56 NATO round to be loaded hotter than .223 Remington cartridge (it’s exactly the same thing you see in a Weatherby rifle; they are cut with longer leades to allow loading the cartridges hotter for more velocity). Because longer leades allow loading a cartridge hotter (the bullet is free to move a little more before the rifling resists it), the longer leade allows higher muzzle velocities. But longer leades may allow the bullet to tilt a bit before it hits the rifling, so rifles with longer leades tend to be less accurate. In a bolt action or single shot rifle, you could account for this by seating the bullet out further in the cartridge case to get it closer to the rifling, but you can’t do that in the Mini 14. If you seat the bullet out further, the cartridges won’t fit in the magazine.
All that business above about the 5.56mm NATO chamber’s longer leade is interesting, but it’s not the primary concern here. The bigger concern as it pertains to the Mini 14 (and its 5.56mm NATO chamber) is that the 5.56 NATO chamber is slightly larger than is a chamber for the .223 Remington cartridge. That’s to meet the military’s combat reliability requirements (a rifle with more clearance between the chamber and the cartridge is less likely to jam). The difference in the two cartridges’ chamber dimensi0ns is shown in the chart below.
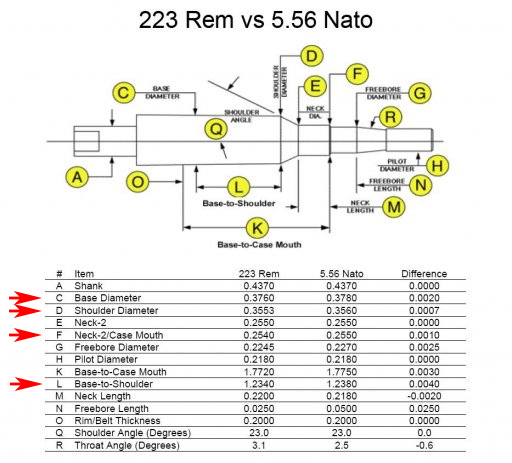
In particular, note Dimensions C, D, F, and L, which govern the length, neck location, and diameter of the chamber. As you can see above, they are all larger for the 5.56mm NATO chambered rifle, and like I said above, the Mini 14 has a 5.56mm NATO chamber. The cartridge has a lot more clearance between the case and chamber walls in the Mini 14 than it would in a rifle with a .223 Remington chamber. The cartridge can move around in the Mini 14’s chamber, and that hurts accuracy. Big time, as it turns out.
With one exception in the Mini 14 family (that was the Mini 14 Target, which was kind of a commercial flop), the Mini 14 has a 5.56mm NATO chamber, because Ruger designed the rifle to work with either 5.56mm NATO ammunition or .223 Remington commercial ammunition. What that means to us is that the rifle is not optimized for accuracy. There’s a greater bullet jump from the cartridge case to the rifling, and there’s more clearance around the cartridge due to the slightly larger chamber. Both work against optimal accuracy.
Neck Sizing Mini 14 Brass
Well, that chamber issue sure had my attention as a potential significant contributor to the Mini 14’s accuracy woes. It made me wonder: Would neck sizing the brass (rather than full length resizing) make a difference? Maybe the Ruger’s chamber is just too loose to be accurate, I thought.
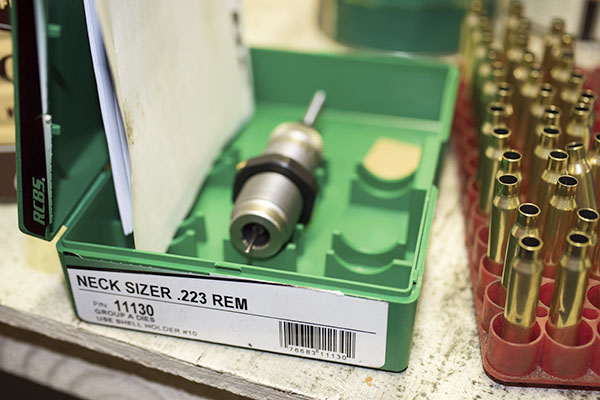
So what is neck sizing? There are two approaches to resizing brass during the reloading process. The first is that you full length resize the brass, which brings it back to factory specification. The entire case is resized, including its diameter along the full length of the cartridge case, the case neck diameter, and the location and angle of the case shoulder (you know, where it necks down to the part of the case that holds the bullet). The other approach is to neck size only, and the idea here is you leave most of the case (in its post-fired condition) alone and only resize the part of the case that holds the bullet. The concept is that the case has formed (we call it fireforming) to the exact dimensions of the chamber in which it was fired, and resizing only the neck assures a near perfect fit of the reloaded cartridge in the rifle that previously fired it. It should be a near perfect fit around the case diameter and from the case shoulder to the bolt face. It should theoretically improve accuracy because the cartridge and its bullet are in exactly the same position for each shot.
I know you usually would not ordinarily neck size brass for ammo to be fired in a semi-auto rifle, as it could degrade reliability. But my thinking was maybe the Ruger’s chamber is so big it would work. As a first step, I tried an empty case that had been fired in the Mini to see if it chambered and extracted easily. It did.

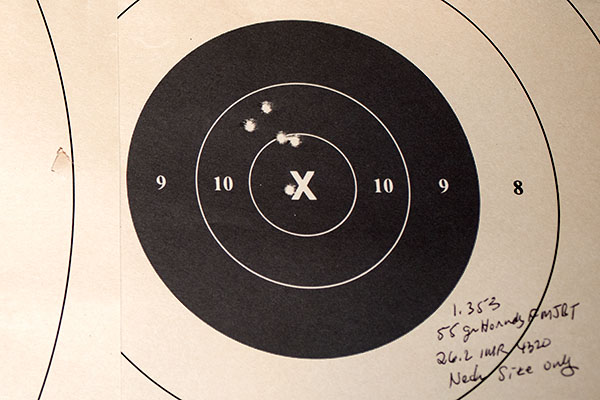
There are two approaches to neck sizing brass. One is that you can use the full length resizing die, but you don’t screw it into the press all the way. The intent is that it resizes the case neck but not the case body. The problem with this approach is that it is hard to get most of the case neck without the full length resizing die contacting the cartridge case body. I tried this as a first approach, though, and the results on the target were dramatic. Using the last of my 62-grain Hornady FMJBT bullets and 23.2 grains of ARComp propellant, I was now reliably getting groups I could mostly keep in the black at 100 yards. Yowzers!
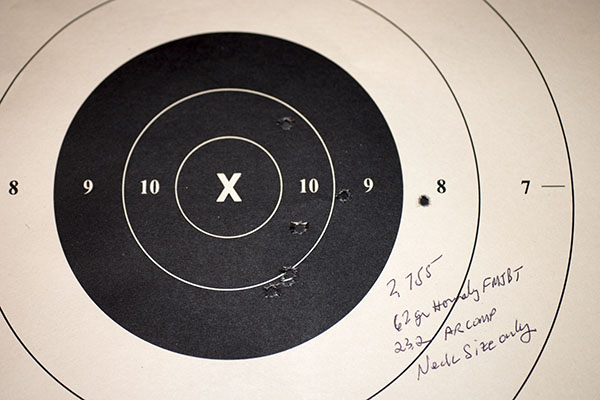
I ordered the RCBS neck size only .223 die on Amazon and when it arrived the next day, I loaded ammo with what had been my best load with the 55-grain Hornady FMJBT bullet (and that was 26.2 grains of IMR 4320 propellant). How did it work? Read on, my friends.
The Sweet Feel of an Accurate Mini 14
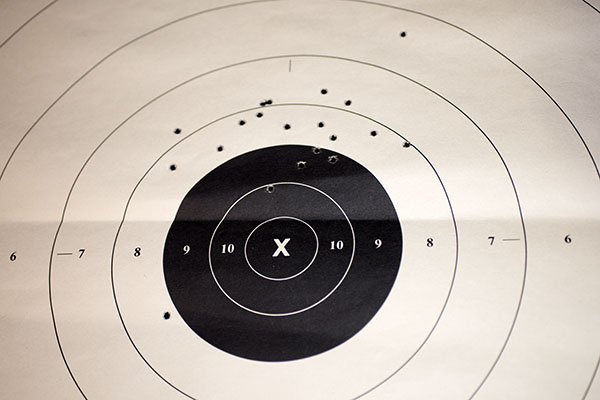
Ah, the sweet feel of success. I was out of my 62-grain Hornady bullets (more are on the way as I write this blog), so like I said above I used my other favorite load with Hornady’s 55-grain bullets. That load worked even better, and surprisingly, it required no sight adjustment from the 62-grain bullet load.
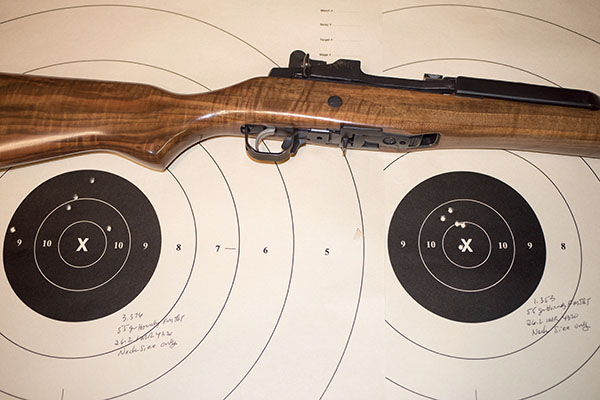
I had two targets set up at the 100-yard line (the two you see above), and I first shot the target on the left. I could see the holes with my 20X spotting scope, and it felt mighty good to see them all plunk right into the bullseye. Then I fired on the target on the right, and when I checked it in the spotting scope, I thought I had done well, but I wasn’t sure. The way the light was hitting the target I couldn’t count five holes through the spotting scope. At the next line break, my buddy Greg and I walked down to the targets and at first, I was disappointed. I could see only four holes in the target on the right, and I thought I had missed altogether with my fifth shot. I mentioned that to Greg, and then he pointed to the fifth hole. It was hiding right alongside the X.
As I said at the beginning of this admittedly long blog, this has been an interesting journey. I think everything I did to this rifle helped to improve its accuracy, but the major contributors have been finding the right load, glass bedding, and neck sizing. Your mileage may vary (every rifle is different). I’ve found what works for me.
See Our Other Mini 14 Blogs
I mentioned several earlier Mini 14 blogs. Here are links to our Mini 14 posts:
The Quest for Mini 14 Accuracy Continues
Politics, Pundits, and More
Mini 14 Marksmanship
TJ’s Custom Gunworks
Do You Feel Lucky?
A Tale of Three Garands
Refinishing the Mini 14
See Our Other Tales of the Gun
We have lots of cool gun stories on both handguns and rifles. You can see them here!
Way to stay at it!
I didn’t realize how much work I put into this rifle until I wrote that blog.
I am currently looking for a Ruger Mini 14, thanks to you. I am blaming everything I do on you. That aside, when you come out here you need to provide me with the techno assist on the new toy.
Will do, Chief.
Yep, amazing tenacity, Joe. Took what most folks would have given up long ago as a task that would never jell, and muscled (and noodled) it through to a successful completion. Congratulations.
But you know, hitting a winner once in a row is not completely assuring. I have a Mini 14, too, and think you should probably do the whole thing all over again with it to be sure you really have the secret sauce figured out .
Good work, and great article…
Thanks, Greg. Yeah, we need to organize a Mini 14 match.
I have been disappointed with my Mini 14 Rancher. Wide and inconsistent groups at 70yds. But, I don’t reload. What can I do?
Ray, there’s no magic wand or silver bullet here (other than moving closer to the target). You can try different brands of factory ammo, and that may or may not be helpful. My guess is that it won’t be. I tell people to start reloading if they are looking for greater accuracy. You can get into reloading with a Lee kit for a relatively small amount of money. Or, you can buy a bolt action rifle (which will probably be more accurate). We have a couple of articles on the ExNotes blog on reloading.