Today is a special day. Memorial Day is an official American holiday, always falling on the last Monday in May. The holiday was originally called Decoration Day, it started in the years after the Civil War, and it became an official Federal holiday in 1971. The concept was at first intended to honor those lost during the Civil War, but as our nation soldiered on, Memorial Day came to recognize and pay tribute to those lost in all our wars.
The Vietnam War dominated the news and our lives in my earlier years. I missed that one by a fluke of timing, but I knew three fine young men who made the ultimate sacrifice: Stephen Ponty (he was only 19 when he died in Vietnam), Timothy Ochs (who was 21 when he died over there), and Gary Buttenbaum (who was 23 when he was killed in action in Vietnam). All three were from my neighborhood in central Jersey, and they were just a bit older than me. I never met Colin MacManus (Captain MacManus was 25 when he was killed), but I feel like I know him and I think about him a lot, too. I think about all of them, and I wonder what they might have become had they returned from Vietnam. I’ve seen their names (along with more than 58,000 others) on the Wall in Washington, DC. Not that I need to. I know who they are.
You don’t thank veterans for their service on Memorial Day (that’s what Veteran’s Day is for); you remember and think about those who did not come home. I usually head to the range on Memorial Day with two of my favorite military weapons (the Garand and the 1911), and I think about Tim, Steve, Gary, and Colin. Rest in peace, my brothers. Your memories live on.
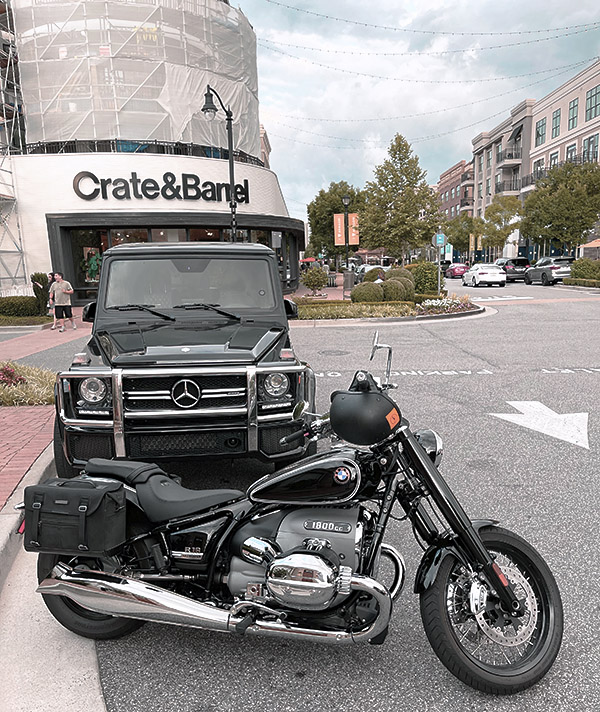
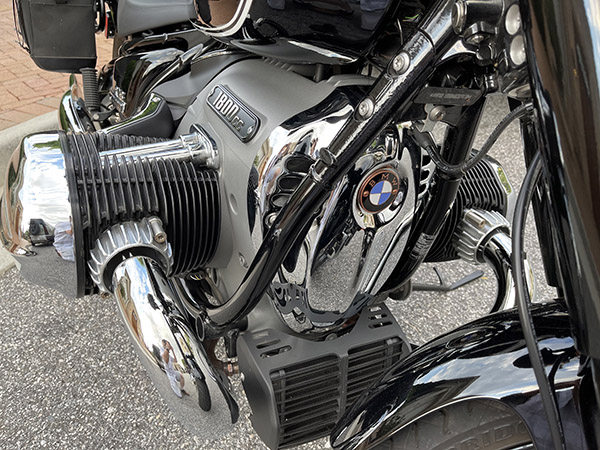
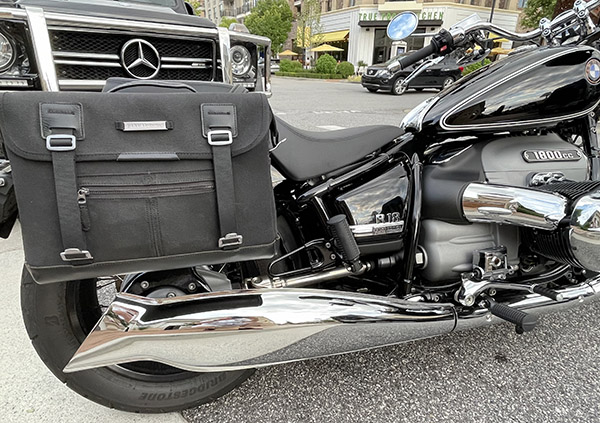
A colossal motorcycle, and I generally don’t like colossal motorcycles, but the BMW R 18 is somehow strangely appealing to me. It’s beautiful, actually. It’s the first one I’ve seen. Gresh did a Dream Bike piece on this bike when BMW first released the concept. Unlike most concept vehicles, the R 18 crossed the great divide and made it into production. This was the first one I’ve seen. I wouldn’t buy an R 18, but that doesn’t stop me from admiring it.
Did I mention this thing is colossal?
I recently stayed in Alpharetta, Georgia, while on my latest secret mission. While on the Alpharetta assignment, my digs were a fancy hotel called the Avalon. It’s in a high end mall with outdoor shops and a setup intended to evoke feelings of an earlier time. You know, Main Street USA, with downtown shops and apartments above the shops. It’s a trend in new shopping malls that I like and apparently so do a lot of other people.
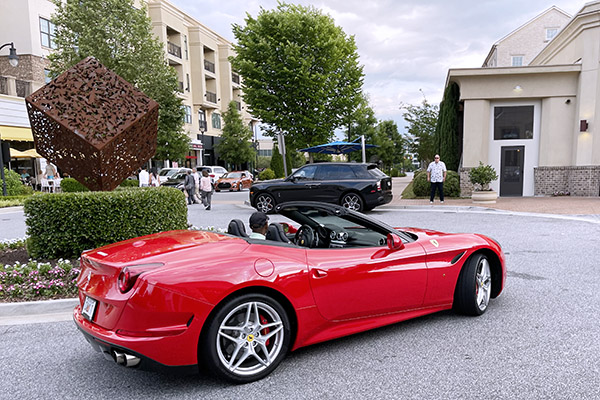
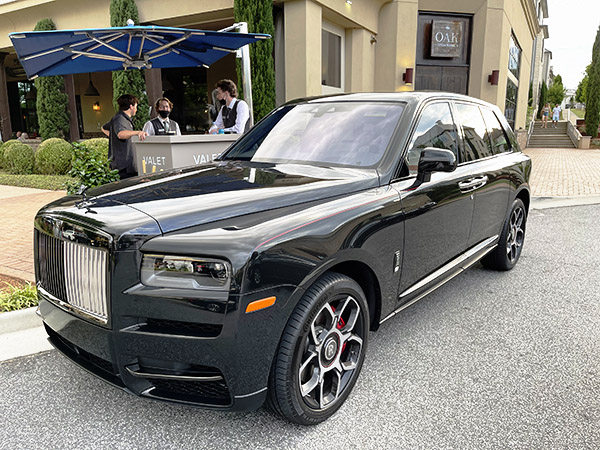
In the evening the Avalon mall is a place to be seen with high end driveway jewelry, and the R 18 seemed right at home parked between a Mercedes UberWagen and a Rolls Royce SUV while Ferraris, Lambos, and McClarens growled by at 10 miles per hour. For you BMW types, not to worry: Avalon has the requisite Starbuck’s.
I did mention this motorcycle is huge, didn’t I? How’s a 68-inch wheelbase and a 761-pound weight sound?
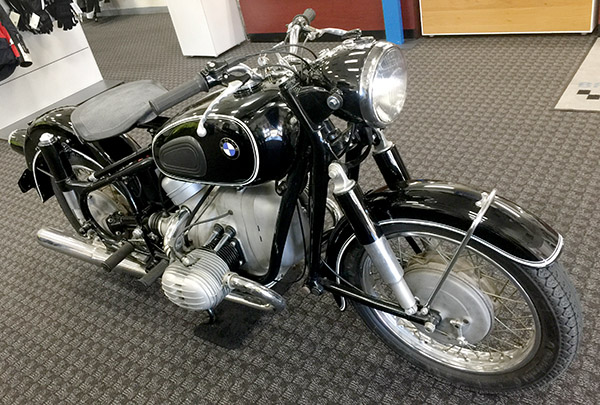
The idea behind the R 18 was to create an obese cruiser evoking BMW’s earlier history. Not too far back, mind you. They didn’t want to put swastikas on the thing (something BMW doesn’t really mention in their history…I suppose it wouldn’t be “woke”), but the ’60s were safe and the R60 styling works. Take a look at this R60 I photographed at Bob Brown’s So Cal BMW shop and you’ll see what I mean.
BMW is obviously positioning the R 18 against Harley and other lardass cruisers, and they more than succeeded. In fact, I’d say they out-Harleyed Harley. To me, the last Big Twin Harley that had the right look was the Evo-engine Softails. Everything since from “The Motor Company” looks out of proportion to me. And for the uninitiated, “The Motor Company” is how rugged individualists who dress alike, have the same belt size and tattoos, and shop at the same do-rag supplier refer to Harley-Davidson. The implication, of course, is that there is only one company that matters manufacturing internal combustion engines. Ah, ignorance is so bliss. Anyway, the R 18 is kind of like the Evo Softails: It is colossal, but all the pieces seem to fit well with each other and it successfully chasm crosses to an earlier, presumably better, Horst-Wessel-free time. I like it.
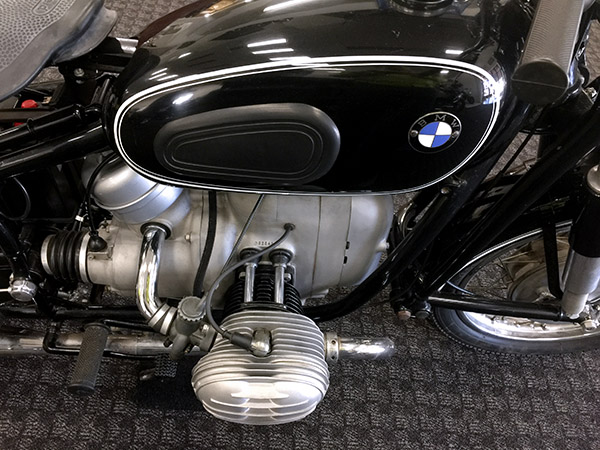
A few more styling comparisons between the old and the new…
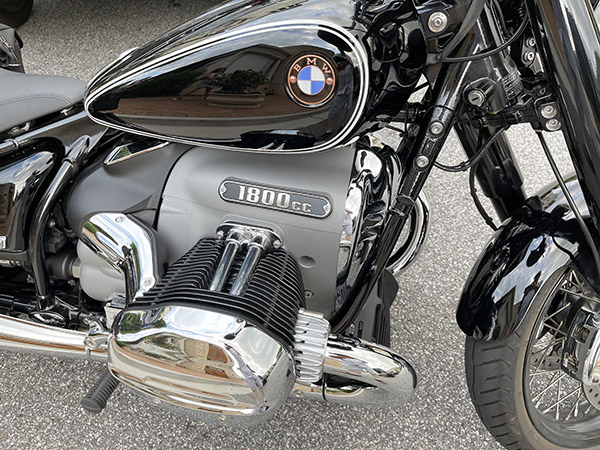
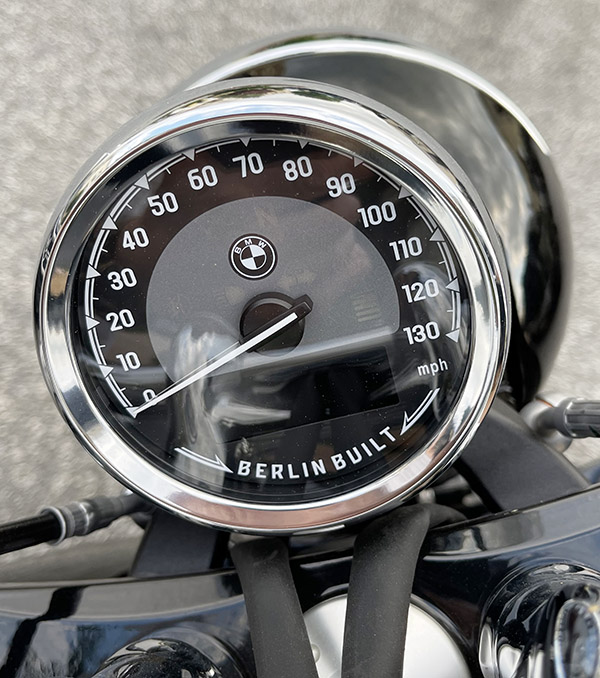
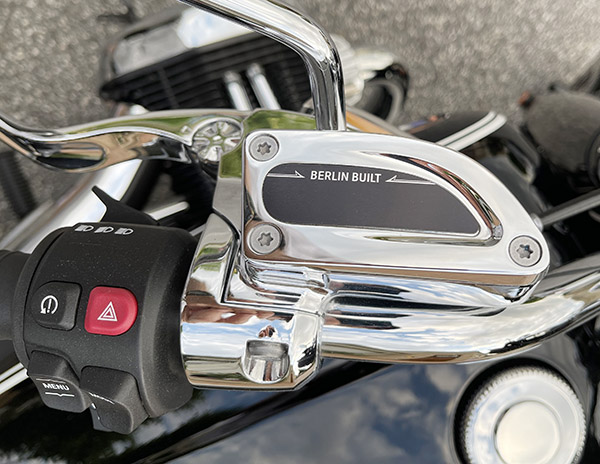
Like Harley and the whole Made in ‘Murica shtick, BMW is capitalizing on a “Berlin Built” mantra.
Berlin Built. Seriously?
Berlin Built. I can’t make this stuff up, folks.
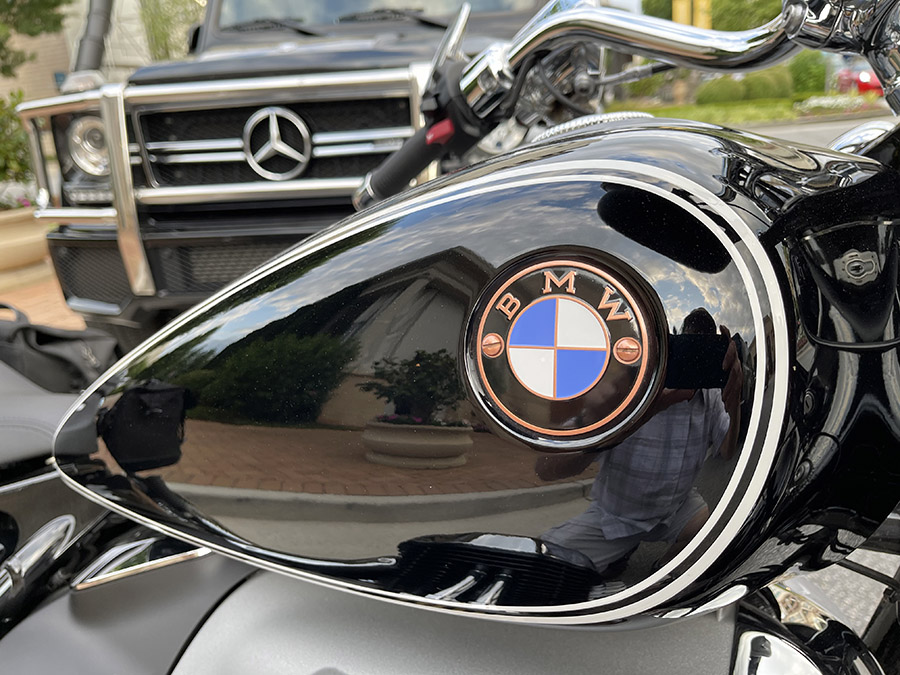
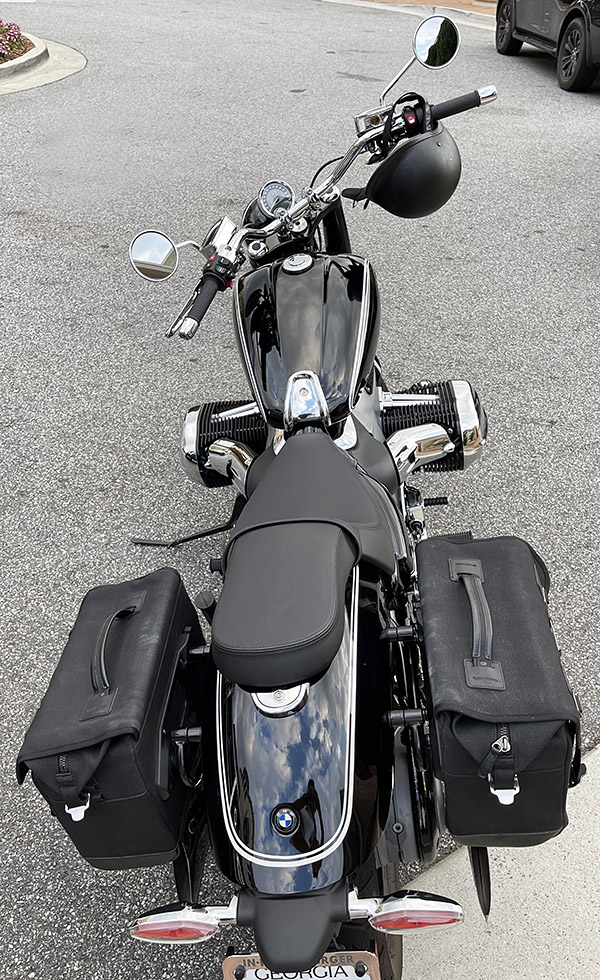
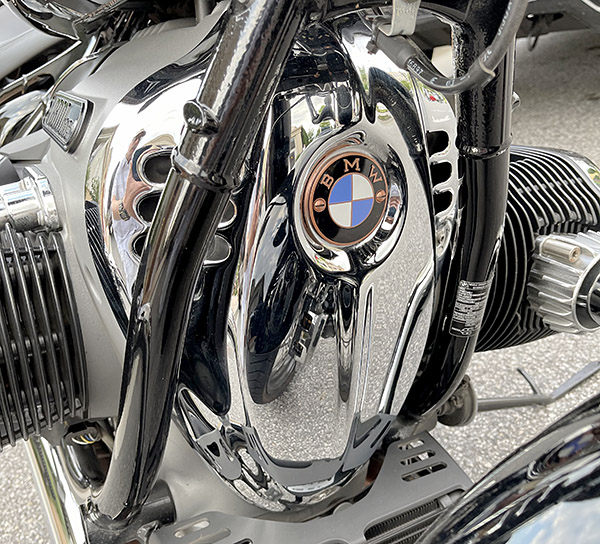
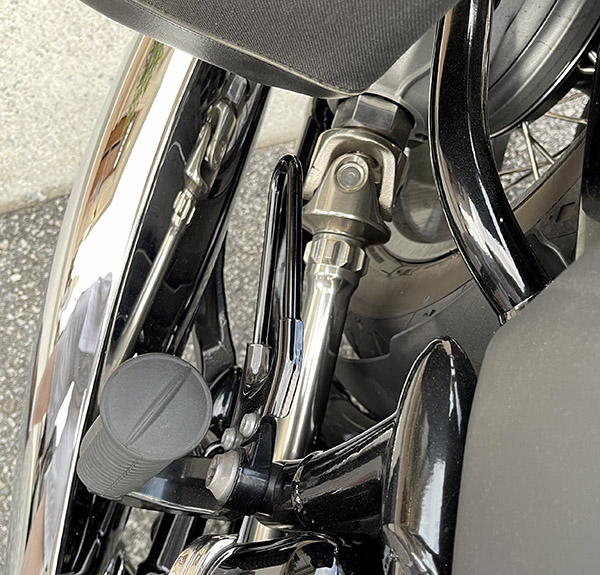
I was getting into photographing the R 18, and as I was doing so, I hoped the owner would appear so I could ask him a few questions about the motorcycle (maybe that’s sexist; for all I knew, the owner might be a woman). That didn’t happen, but I sure had fun working my iPhone magic on this two ton Teutonic twin…
The R 18 styling works for me. I like the old-style BMW roundels, the steelhead trout mufflers (my term, not Berlin’s), the exposed shaft drive, and more. If it were me, I would have made the bike a bit smaller, I would have found a way to incorporate a finned version of the GS1250 engine, and maybe I would have used Earles forks rather the R 18’s telescoping front end. But hey, I don’t sell zillions of motorcycles a year and the Boys from Bavaria do. As UberCycles go, the R 18’s approximately $20K entry ticket doesn’t seem out of line. It’s not my cup of kartoffelsuppe, but I think the bike is beautiful.
Never miss an ExNotes blog! Sign up here for free!
Whenever I’m not riding motorcycles I like to break things into smaller pieces. It makes life just that bit less tiresome and one of the best ways to break stuff is with a jackhammer. A real jackhammer weighs 90 pounds and is pneumatic, also called air-operated. I used to run one when I worked in construction. A 90-pound hammer is a wonderful tool, and the weight is not a burden since you don’t really lift the thing often. I’ve found laying the hammer on your leg and pivoting the 90 to relocate the chisel is easiest. It seems like the heavier a hammer is the less vibration is transmitted to you hands. Less vibration means fewer blisters and less hand-bleeding. Properly handled you can run a 90-pound machine all day long as your pants slowly become covered in compressor oil blown from the hammer’s exhaust port.
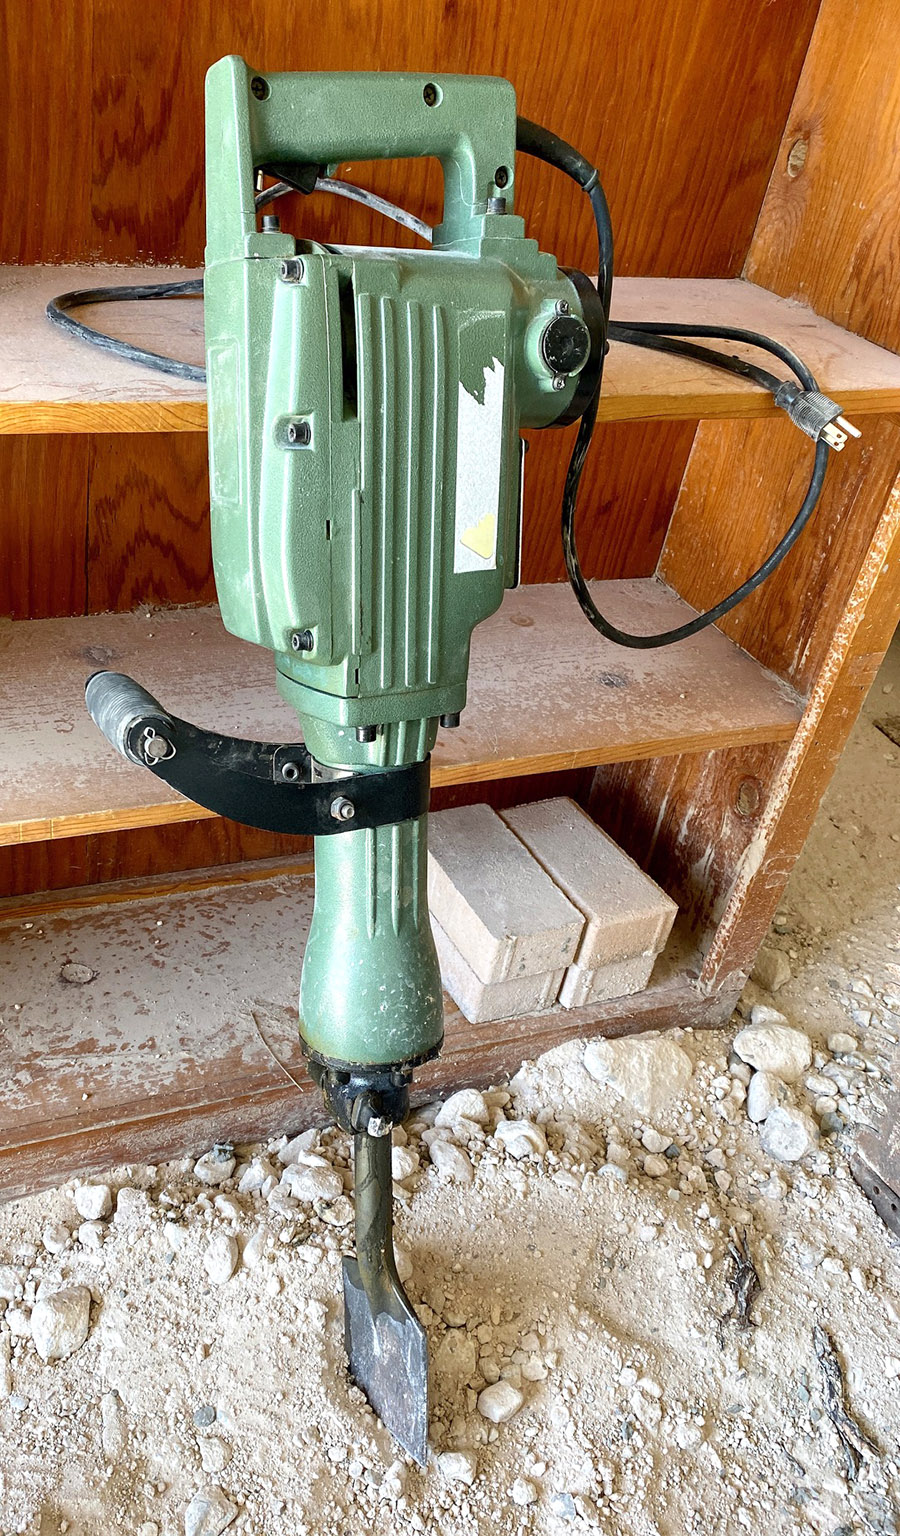
As fine a proposition as a 90-pound hammer is, for most homeowners the large, engine-driven compressor required to supply enough air is a deal killer. For more refined destruction and with a nod to apartment dwellers look to the many 35-pound electric jackhammers sold everywhere.
I bought this TR Industrial 35-pound jackhammer several years ago for a concrete spalling repair job. The job required a lot of work on a scaffold so I didn’t want a big, heavy hammer to lift. The TR worked great and when the job was done I put it away in the included storage case.
Fast-forward three house moves and I had forgotten all about the TR hammer. It wasn’t until I was almost finished with the shed footing project that I remembered the thing and dragged it out to break up the hard, rocky ground the shed sits on. What an improvement over the pickaxe! The TR cut my digging time and was less tiring to use. It felt like I was cheating.
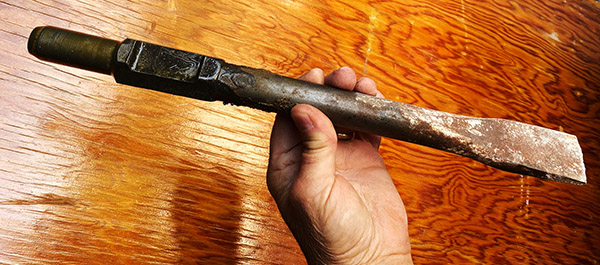
The TR jackhammer came with two tool bits: a flat chisel and a pointed bit. The flat chisel is great for breaking rocks and concrete. Remember, don’t start in the middle, you have to work from the edge when breaking concrete so that the broken piece has somewhere to go. If you’ve used a 90-pound air hammer don’t expect the blows from an electric 35-pounder to have the same effect. Everything will take longer.
I haven’t used this point bit yet but then I haven’t done everything yet either. It may come in handy on extra hard or thick concrete. Maybe I’ll split logs with it.
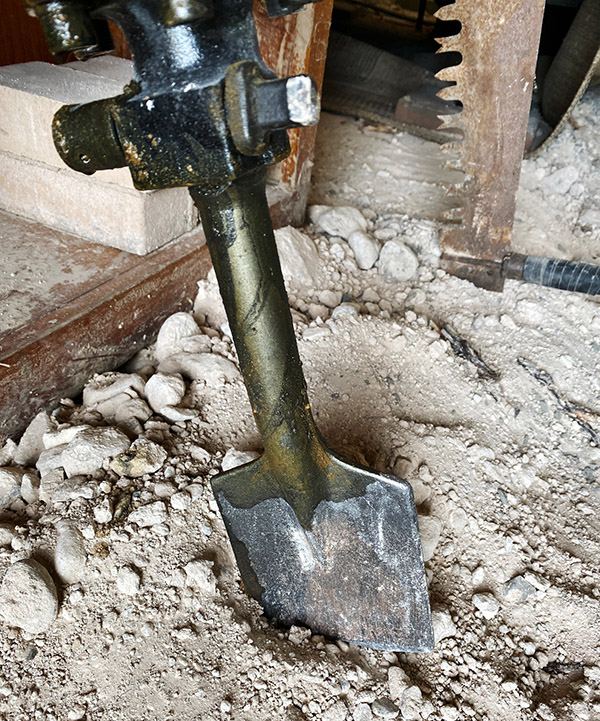
I recently bought a clay spade for the TR hammer and it is perfect for the ground conditions at Tinfiny Ranch. You wouldn’t use a clay spade on concrete but for rocky soil it plows right through. When lightly excavating an area to be formed, say you need to remove 2 inches of fill; the wide paddle makes it easy to eyeball grade and loosen just the top layer while not unduly disturbing the ground underneath.
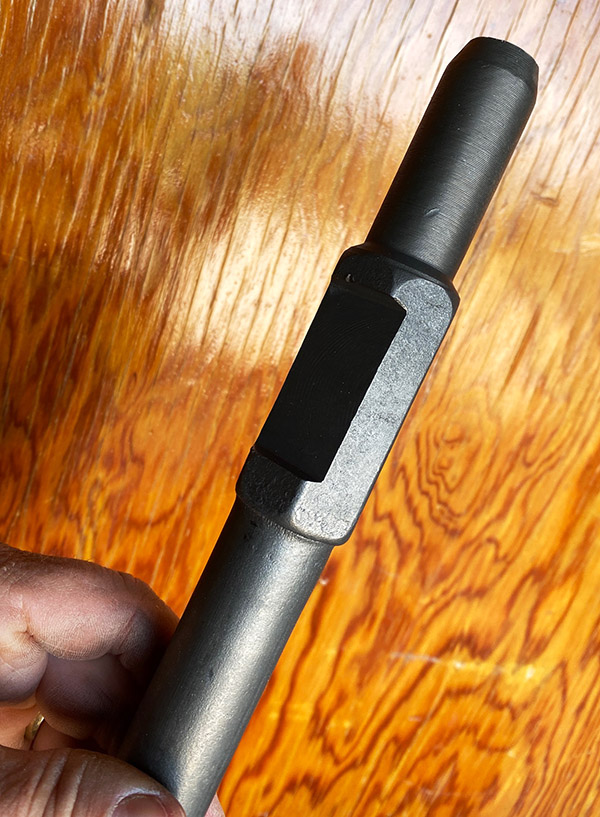
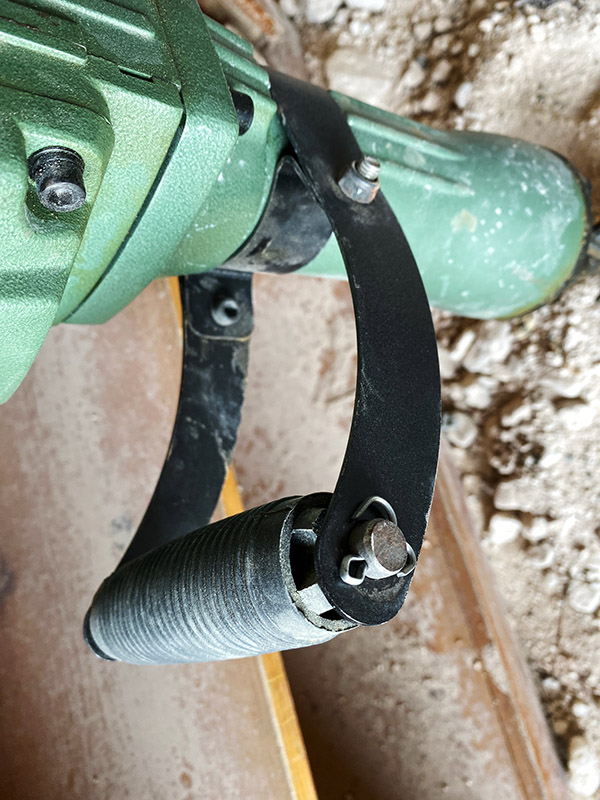
Not all hammer bits are the same. The TR takes this hex style but note the impact end is round. Some bits are hex all the way, some are fluted, and little ones have a mushroom shape. Bits for the TR are plentiful and easy to order online.
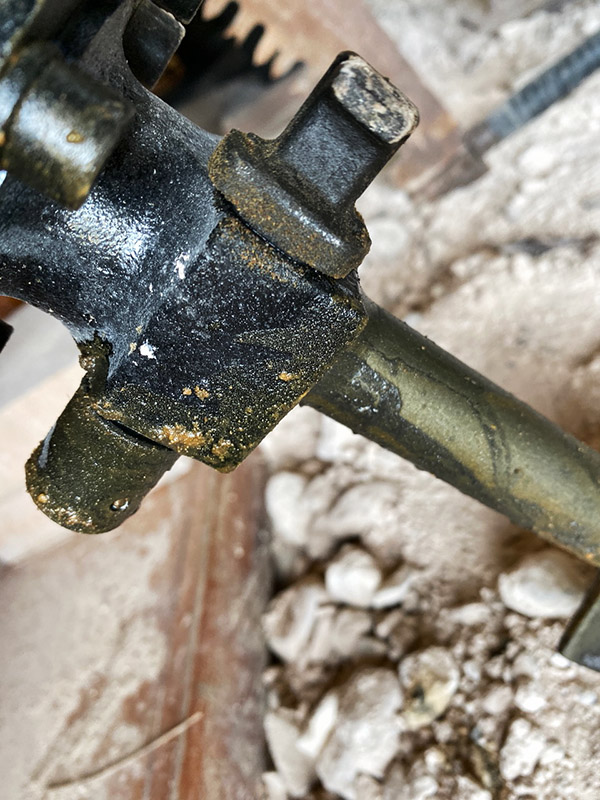
To change the bit you pull this little spring-loaded widget out and rotate it. Insert the bit with the cutaway facing the widget and reverse the operation. Bit changing takes seconds and the bits stay put.
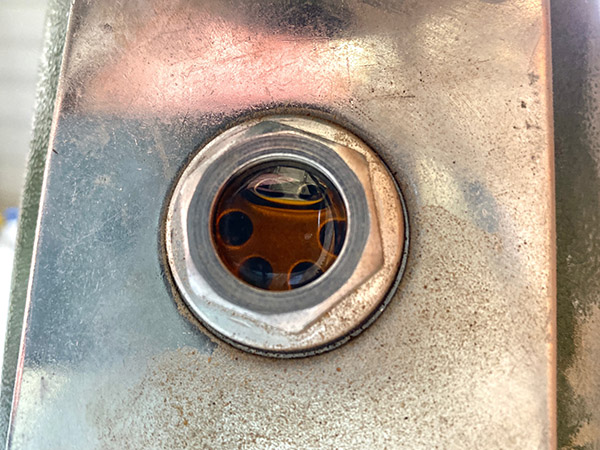
All jackhammers are oily but the electric ones are less so. There is an oil reservoir built into the TR hammer. Regular motor oil is recommended. To fill the hammer you unscrew the sight glass and dump whatever slippery stuff you have inside. If you ran the hammer for 8 hours you might need to refill the reservoir but for my sporadic use a fill lasts months. Note that oil will leak out of the machine even if you’re not using it, so plan accordingly.
One of the things I don’t like on the TR jackhammer is the side handle. It looks flimsy as hell and no amount of tightening will keep it in place. I thought about wrapping duct tape around the hammer to make the handle fit tighter but decided the tape would just wear off in a few minutes. Since you don’t really push on the hammer I leave the thing as-is with the floppy handle. The floppy handle is convenient in tight quarters, swapping sides is easy.
The TR hammer is probably cloned from a well-known brand and there are quite a few hammers that look exactly like the TR on eBay and Amazon. The design seems to be open source now and I can’t comment on the quality of those other clones. I will say that which factory a tool or motorcycle engine comes from is important. There’s a lot of variation in things that look the same.
I give the TR Industrial version high marks and can recommend it if you like to break things. My hammer is an older version no longer produced but the one in the link is an updated machine with better electrical isolation for the operator. This might be important if you work in wet areas.
By any reasonable measure, Rodolfo Fierro was a world class SOB. I know it’s not nice to speak ill of the dead, but old Rodolfo shucked this mortal coil more than a hundred years ago and I’m going to take a chance. Bear with me.
I am a big fan of the Colt and Smith and Wesson 1917 .45 ACP revolvers and all their modern derivations. You’ve read my scribblings (or tappings?) here on the ExNotes blog about the virtually new 1917 Colt I scored a couple of years ago, and you know I’m not above bragging about a group or two I’ve shot with my Model 625 Smith. You can read all about that sort of thing on our Tales of the Gun page.
Keep us going…click on the popup ads!
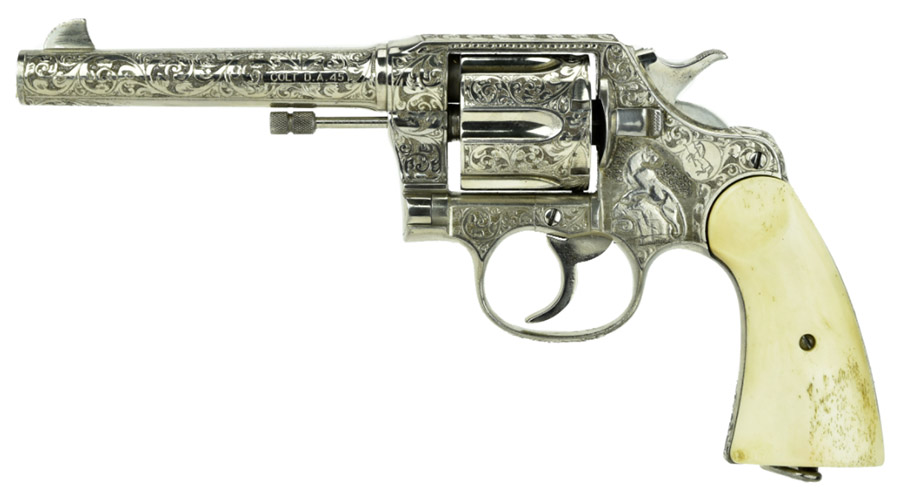
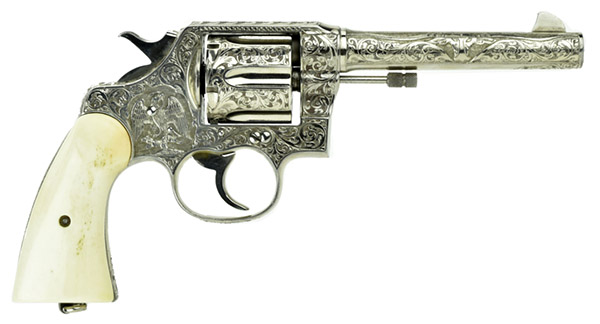
Anyway, to get back to the main attraction (which is the beautiful nickel-plated and engraved 1917 you see here), a few years ago I bought a very cool Marlin from Collectors Firearms in Houston, Texas. They are good people and as luck would have it, I had a secret mission in Houston a week ago. Hmmm, I thought. As long as I was headed to the Lone Star state it might be a good idea to stop in at Collectors, and before we left the Peoples Republik of Kalifornia I went online to see what Collectors had in stock. That’s when the revolver in these photos appeared.
Wow! My life suddenly somehow felt incomplete. I needed that revolver. Nickel plating. Engraving. Ivory grips. .45 ACP. An Army 1917. Want. Need. Gotta have. I was a dog in heat.
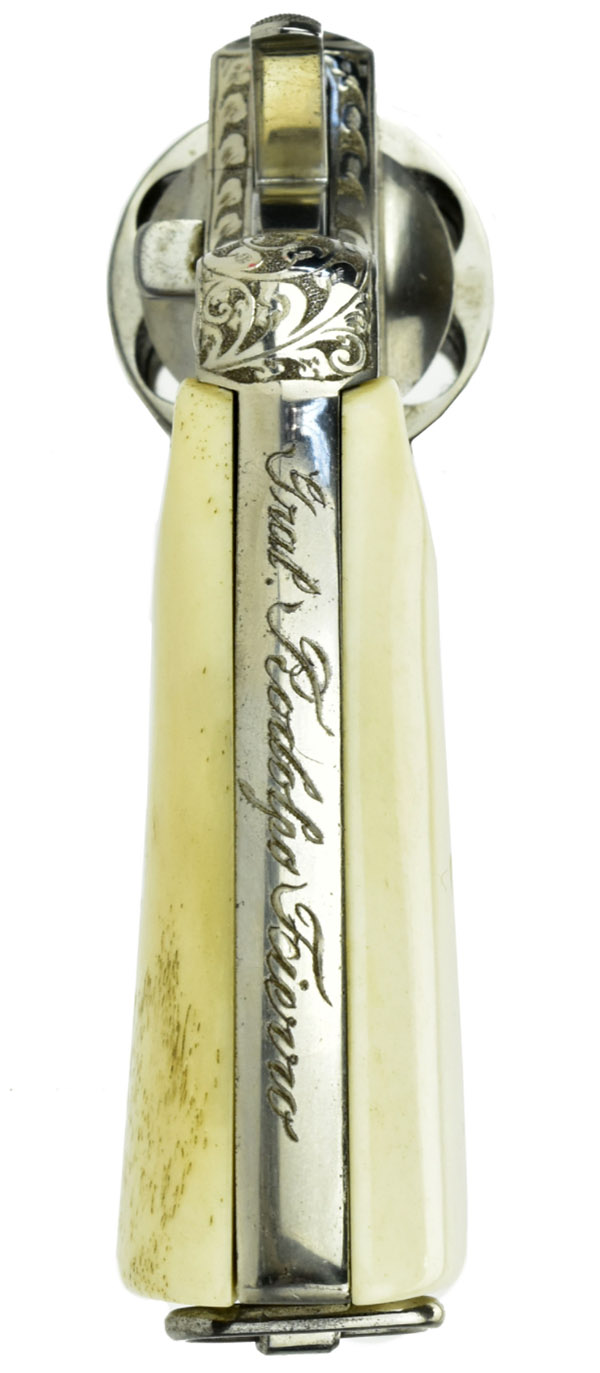
I studied the photos, of which there were many, and I noticed the following on the revolver’s frame:
General Rodolfo Fierro. Who the hell was he? So I Googled the name, and wow, what a mean bastard he was. Turns out old Rodolfo was Pancho Villa’s darker side, and he was the one who handled the dirty work for Villa. I won’t belabor all his dastardly deeds (you can Google the name yourself), but as dastardly bastards go, this guy was as bad as it gets.
But wow, the gun was a 1917 Colt (a favorite), it was highly engraved, it was advertised as being in good shape, and I wanted it. At $4950, the price was way out of my range. But the provenance…the provenance of this Colt was incredible. And the photos…take a look:
Collectors Firearms had a brief description on their website that was even more enticing:
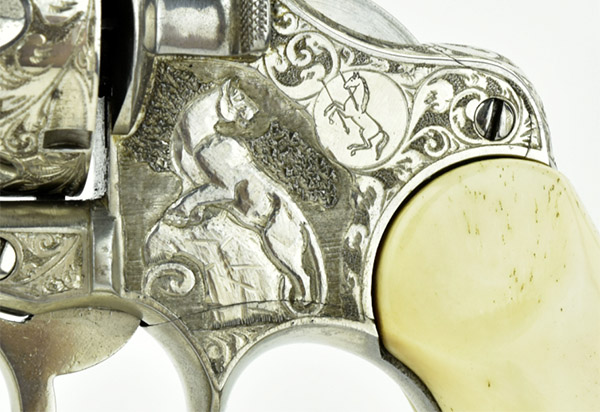
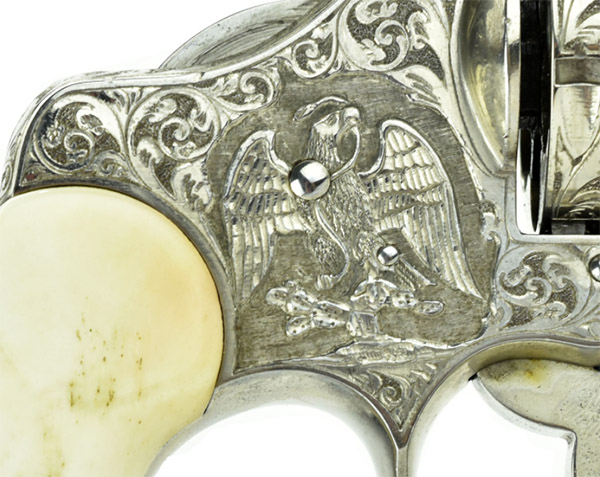
Colt 1917 .45 ACP caliber revolver. Beautifully engraved and chiseled Colt .45 ACP revolver. This revolver is extensively engraved with traditional Colt style scroll work. The right-side of the frame has a relief chiseled figure of the Mexican Seal of an eagle and snake with cactus in the foreground. The left-side of frame is a relief chiseled figure of a puma braced on a rock. Bore is excellent. Action works perfectly. Barrel length is 5½”. The grips are of old mellow ivory. The backstrap is engraved “Gral Rodolfo Fierro” AKA “The Butcher.” Fierro was a known associate of Pancho Villa. Revolver has 100% of its nickel finish. Barrel has a relief chiseled figure of a longhorn steer. Very handsome and striking revolver!
So I was about 80% of the way there, thinking I could probably Presbyterian these guys down (it’s an inside joke shared by Members of the Tribe), sell a bunch of other stuff, and I would ride with Rodolfo. Visiting Collectors Firearms became an imperative and after finishing my secret mission stuff, Sue and I rolled in to that magnificent firearms emporium on that fine Texas morning.
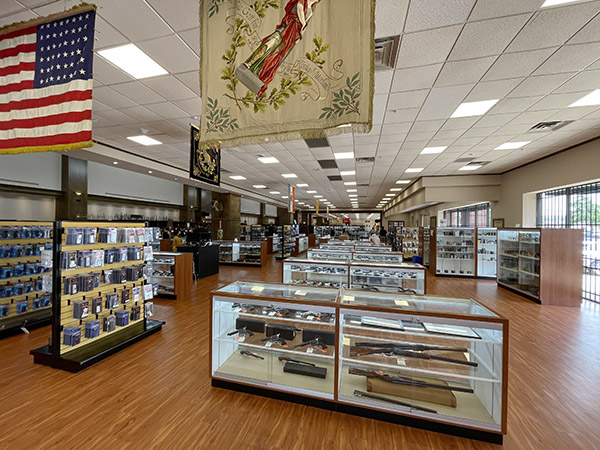
Collectors Firearms is huge, possibly the largest high-end gun store I’ve ever visited. Folks, trust me on this…if you’re ever in Houston and you want to see some really cool stuff, you absotively have to see this place.
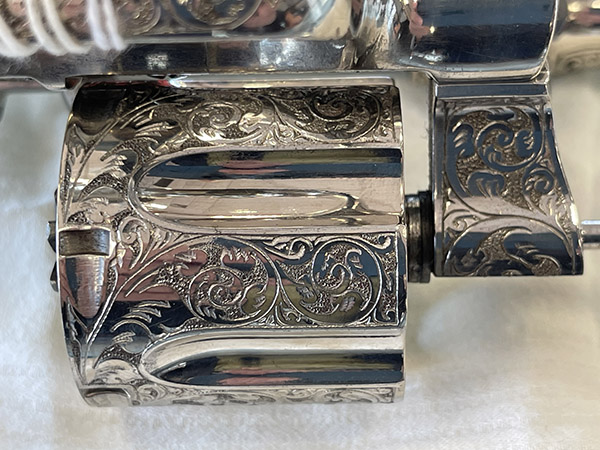
It took the kid who attended to us a few minutes to locate the Rodolfo Fierro revolver, and when he did, I was stunned. The nickel plating and engraving were absolutely magnificently executed, far more so than revealed by the website photos above. Somehow, the nickel finish and engraving made the revolver seem even larger than it actually is (and it’s a big gun). I shot a few photos with my iPhone, and I’ll share one with you here:
So I thought about that revolver the rest of the time I was in Texas and then I thought about it more when I returned home, the gears turning with what I might have to sell to get it.
And then it hit me. In researching old Rodolfo and all the evil he brought to those in his orbit, I found out that while there is some uncertainty about his date of birth, there’s none whatsoever about when he died. That was in 1915 when he drowned in quicksand after being thrown from his horse, weighed down by gold he had presumably stolen.
1915. Got it? That’s the year old Rodolfo had to stand before his Maker and answer for all his sins. You see, 1915 was two years before Colt introduced the 1917 Army .45 ACP revolver, and that tells me there’s no way this gun was carried by that bloodthirsty SonuvaYouKnowWhat. Whew! Just saved myself $4950 on that one.
Winter’s bony fingers have released their icy grip so now is not the time to be testing a hand warmer. But we don’t follow the rules or the seasons here at ExhaustNotes. We do what we want, see? The Man and his stifling rules don’t apply to cool kids and the ExhaustNotes staff are cool with a bullet. I did test the Ocoopa hand warmer in cooler weather a few months ago so stock up now while the heat is on and Ocoopa has to give the things away.
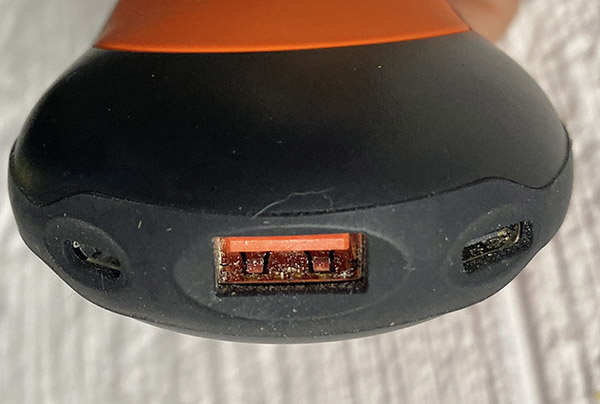
The Ocoopa hand warmer is a neat little device that replaces those old fashioned lighter-fluid type that if they didn’t set you on fire would kill you with fumes spilling up from your jacket. How it works is unclear but the unit charges from most any USB wall pig and then you select one of three heat settings and the sucker gets hot.
Pop one in your cell phone pocket of your jacket and cold rides become just that bit more toasty. It’s like having a live kitten in your pocket but without the constant need for feeding and potty breaks.
I’ve found the highest and best use for the Ocoopa hand warmer is camping. Last time I slept inside a polyester house in the woods the temperature was in the mid 30’s at night. I fired up the Ocoopa and tucked in my sleeping bag. The thing was on low, I slept like a six-legged baby atop Chernobyl’s concrete sarcophagus. The Ocoopa was still going strong in the morning so I left it on low to see how long the thing would heat.
Turns out the Ocoopa lasts around 12 hours. You really only need the low setting because medium and high are too hot to put near your body. Maybe a couple layers of thermal underwear could work with medium. High must be used for baking.
When it’s not cold outside the Ocoopa will also charge your phone or whatever plugs into a USB and you can recharge the thing from your motorcycle if the bike has a jack, Jack.
I’m not able to tell you about the lifespan of the machine or if it will catch on fire during the night but I will do a follow up report should events demand one. I’ll go ahead and recommend the thing just for keeping me warm in the polyester house.
Never miss an ExNotes blog, Dudes and Dudettes! Sign up here for free!
More ExNotes product reviews? Hey, no problem: Just click here!
Everybody has their preferred riding schtick and for me it’s international motorcycle travel. Anyone can ride their cruiser to a local hangout for a beer or their GS to Starbuck’s for a $6 cup of coffee. My riding is all about crossing international borders and collecting cool photos in places most two-legged mammals only dream about. Just to make a point, I once rode a 150cc scooter (my CSC Mustang) to Cabo San Lucas and back. The day after we returned, I needed something at Costco and I rode the little CSC there. When I parked it, a beer-bellied dude in a gigondo 4×4 pickup told me, “that’s a little cute bike.” He didn’t intend it to be a compliment.
“Thanks,” I said.
“I ride a (brand name deleted to protect the guilty),” he announced, his chest swelling with Made in ‘Merica pride to the point it almost equalled his waistline. “We ride all over.” He emphasized the “all” to make sure I got the point.
“Cool,” I said. “Where do you go?”
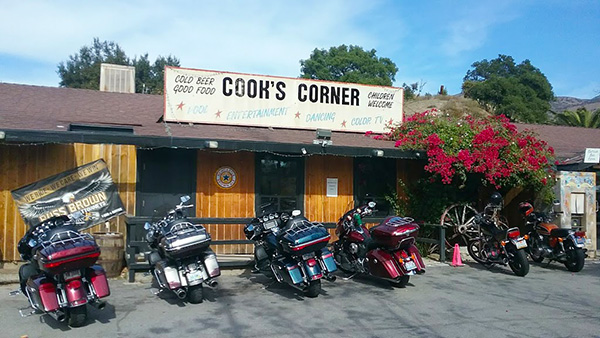
Cook’s Corner, the ultimate So Cal burger/biker stand.
“Last week,” he told me, “we rode to Cook’s Corner!”
Cook’s Corner is a southern California burger joint about 40 miles from where we were talking.
“Where do you all go on that little thang?” He actually said “you all” and “thang,” but he didn’t have the accent to match the colloquialisms. Okay, I had the guy dialed.
“Well, we rode to Cabo San Lucas and back last week.” I said.
Mr. 4×4’s jaw dropped. Literally. He looked at me, speechless, dumbfoundedly breathing through his open mouth. Without another word he climbed into his big truck and rode off. Our conversation was over. So much for the biker brotherhood, I guess.
My 150cc CSC Baja Blaster. I had a lot of fun and covered a lot of miles on that little Mustang.
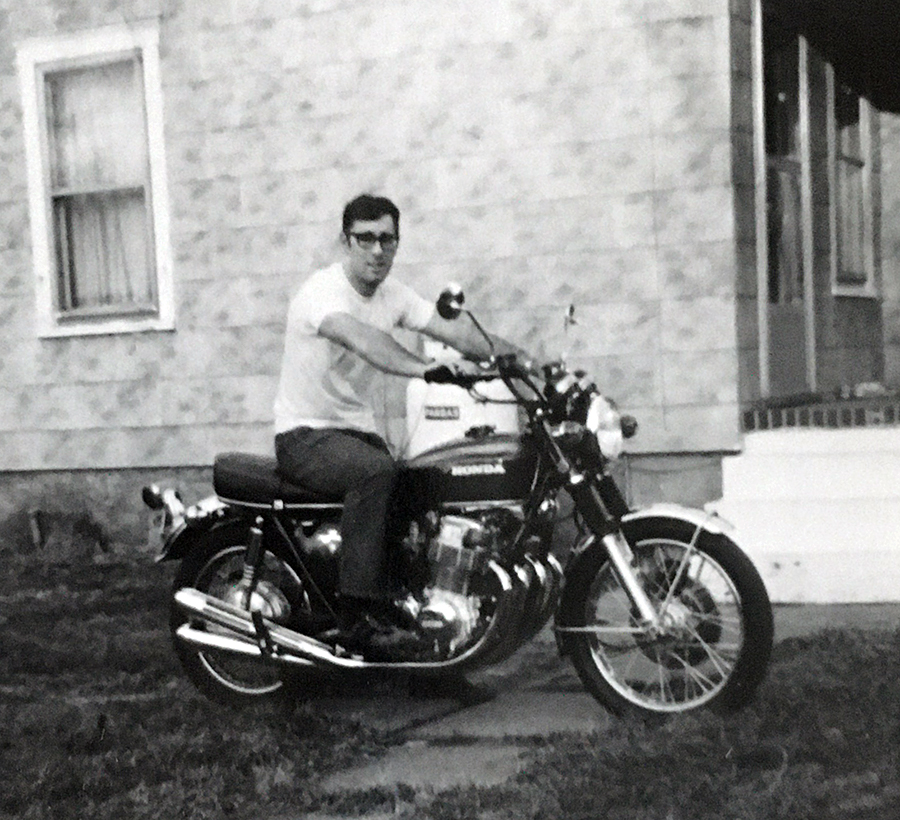
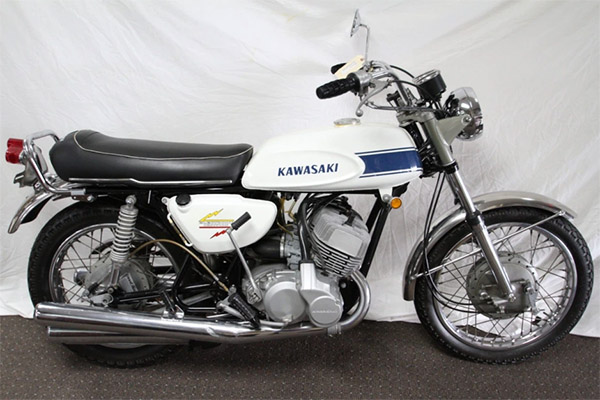
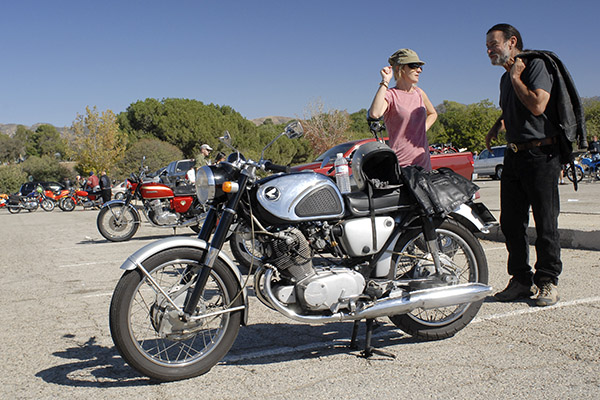
The international motorcycle travel bug bit me when I was still in school. I had a ’71 Honda 750 Four back in the day (that’s me 50 years ago in the big photo up top). One of my Army ROTC buddies had the first-year Kawasaki 500cc triple. It was a hellaciously-fast two stroke with a white gas tank and blue competition stripes. We were in New Jersey and we wanted to do something different, so we dialed in Canada as our destination. They say it’s almost like going to another country.
And so we left. Our gear consisted of jeans, tennis shoes, windbreaker jackets, and in a nod toward safety, cheap helmets (ATGATT hadn’t been invented yet). We carried whatever else we needed in small gym bags bungied to our seats. Unfortunately, in those days “whatever else we needed” did not include cameras so I don’t have any photos from that trip. That’s okay, because all they would have shown was rain.
A 1969 Kawasaki 500cc, two-stroke triple. Widowmakers, they were called, in a nod to their often unpredictable handling.
As two Army guys about to become Second Louies, we joked about being draft dodgers in reverse. We were looking forward to active duty (me in Artillery and Keith in Infantry). We were going to Canada not to duck the draft, but as a fling before wearing fatigues full time. We didn’t really know what we were doing, so we took freeways all the way up to the border. It rained nearly the entire time. All the way up and all the way back. We bought sleeping bags because they looked cool on the bikes (it was a Then Came Bronson thing), but we stayed in hotels. It was raining too hard to camp, and besides, the sleeping bags were soaked through and we didn’t think to bring a tent. We got as far as Montreal, which seemed far enough to give us Canada bragging rights. We spent that single Montreal night in a cheap dive and pointed the bikes south the next day.
These days, I know to check the weather, bring rain gear (even if none is forecast), and study a map to find the most interesting roads (rather than the fastest). But hey, we were young and dumb, it was an adventure ride, it crossed an internationational border, and riding four days in a steady cold rain was a lot of fun. I didn’t think so at the time, but that’s how I remember it today. In fact, I remember that ride like it was last month. And it got me hooked on international motorcycle adventures. Canada was to be the first of many.
Never miss an ExNotes blog. Sign up here for free, unless you have a .ru in your email address!
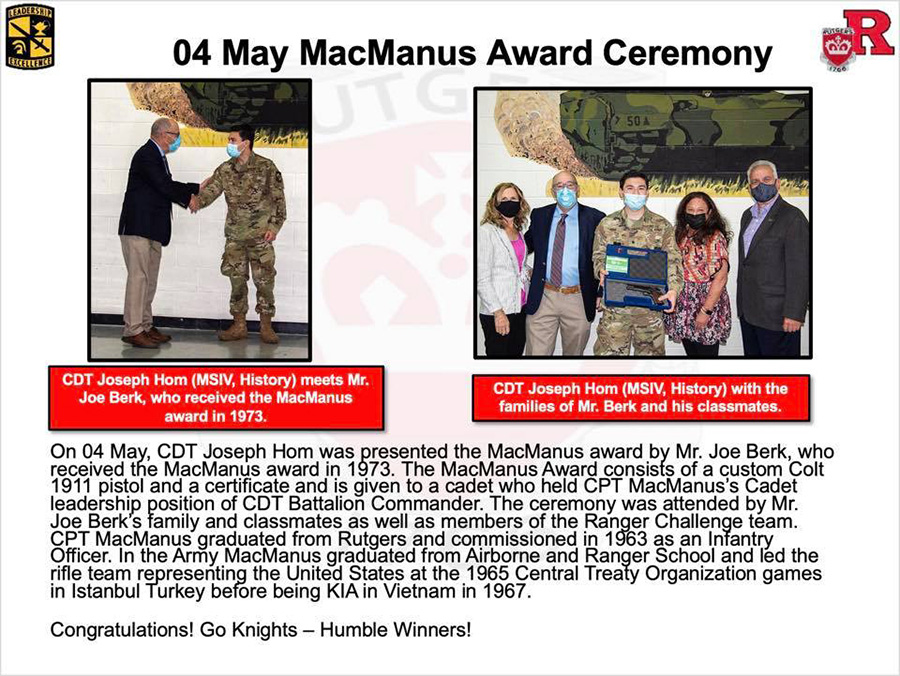
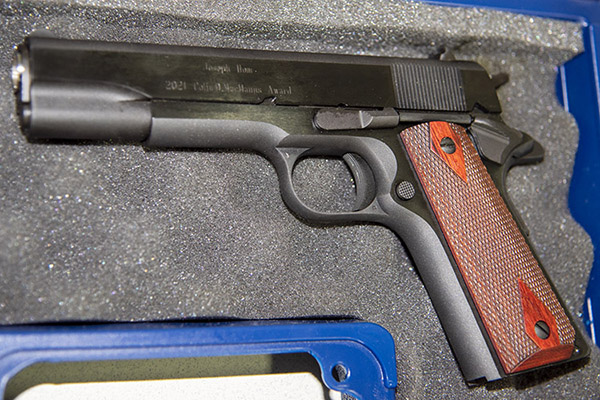
Earlier this month we had a quick trip back to New Jersey for the 2021 MacManus Award. You’ve read about the MacManus Award earlier on these pages. It’s the presentation of a 1911 .45 Auto to the outstanding Rutgers University Reserve Officers Training Corps graduating cadet.
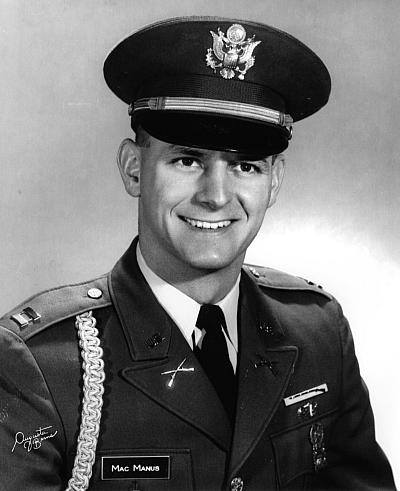
US Army Captain Colin D. MacManus, Rutgers University ’63.
The award honors Captain Colin D. MacManus, a US Army Airborne Ranger who was killed in action in Vietnam in 1967. Good buddies Dennis, Tim, Javier, and I revived the MacManus Award, and it’s a tradition we will keep alive.
The 2021 MacManus Award, a Colt 1911 presented to Cadet Joseph Hom.The 1973 Colin D. MacManus 1911 and a couple of 5-shot, 25-yard hand held groups I fired with it.
You know, I sometimes hear people my age talk about younger folks in a disparaging manner and lament a notion that young people today are somehow less motivated than we were. When I meet people like Joe Hom and his classmates, I know that’s not true. It’s reassuring and invigorating to meet these folks and when I do, I know our future is in good hands.
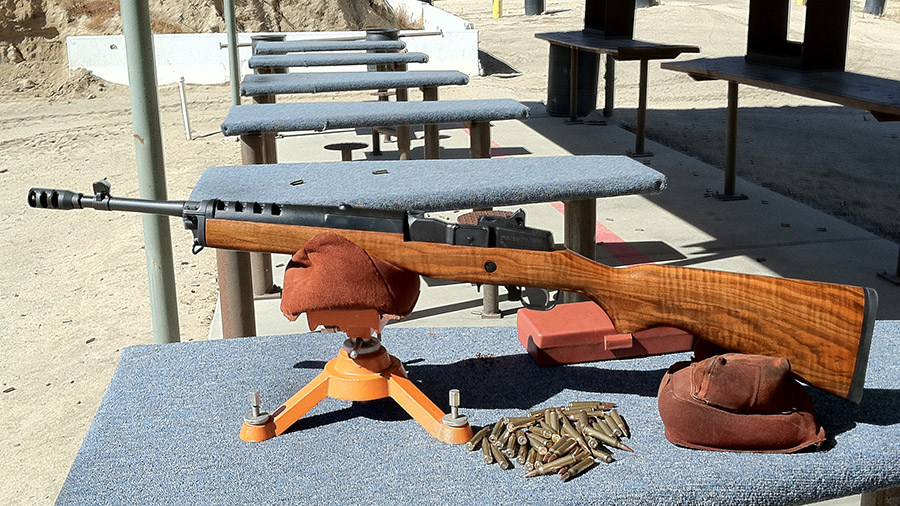
I love the Ruger Mini 14 and I’ve written several blogs on it (I’ll give you a link at the end of this blog). The Mini 14 is not the most accurate rifle I’ve ever shot, but there’s something about it that just makes it fun. I think if Ruger had introduced the Mini 14 a few years earlier it might have been the next US service rifle instead of Mattel’s M-16. That statement might get a few trolls’ shorts in a knot, but hey, they’re young. They’ll get over it.
Photos from the original GunBroker.com ad for my Mini 14. It was a limited production item with a Circassian walnut stock. Very few had wood this highly figured.
I took my Mini to the West End Gun Club a couple of weeks ago to see what impact (if any) a new Lee factory crimp die had on accuracy. Usually when I reload rifle cartridges with jacketed bullets I don’t crimp. Part of this is because it’s a bit difficult to get a consistent crimp if the brass is not trimmed to exactly the same length, and part of it is I often find I don’t need to trim my brass to get good accuracy. That’s not to say case neck tension isn’t critical (it is; lube a couple of bullets before seating them and see how far out of the group they print). But it you don’t crimp, you rely on friction between the case neck and the bullet to control the case’s grip, and friction is a tough thing to control. Crimping should make the grip on the bullet more consistent (or so the theory goes). Crimping is also thought to provide more complete combustion, reducing pressure variability and the inaccuracies associated with it.
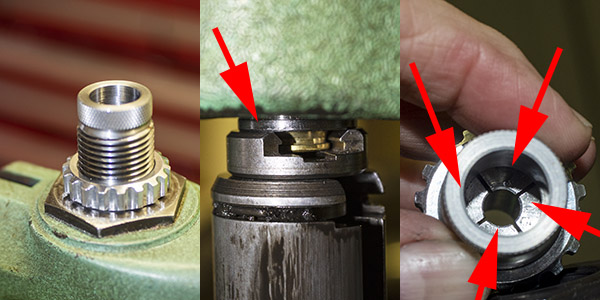
Conventional reloading dies rely on a reduced diameter in the bullet seating die, which rolls the case mouth into the bullet to achieve a crimp (such a crimp is called a roll crimp). Lee’s factory crimp die uses a different approach. It has four collets (each forms a quadrant) that work at 90 degrees to the case to crimp the brass. The collets are activated by the die’s base during the reloading press upstroke.
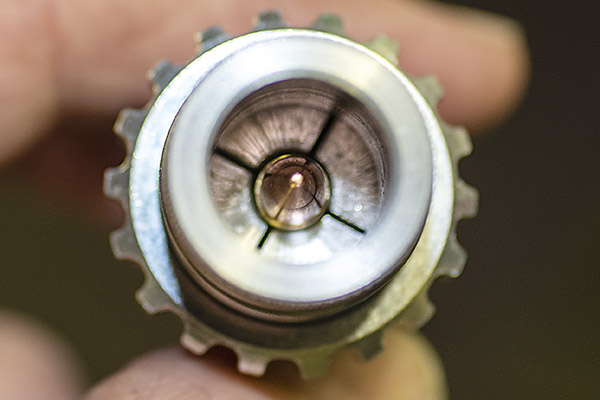
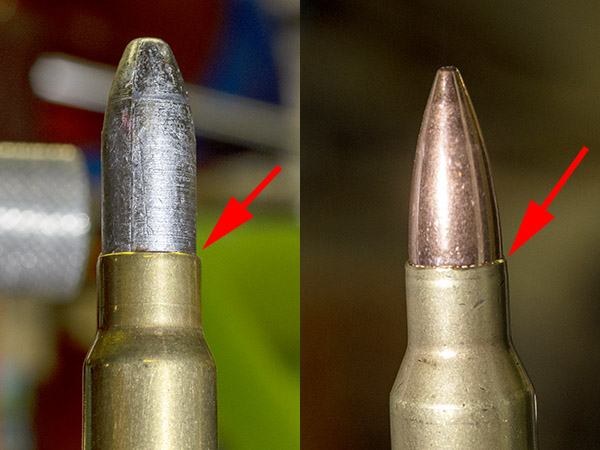
A .223 Lee factory crimp die. This is the last step in the reloading process. The die is screwed into the press after the bullet has been seated to the desired depth (left photo); the amount the die is screwed into the press controls the interface between the shell holder and the die (center photo). When the ram is fully raised, the die has collets that compress the brass horizontally around the case mouth (right photo), thereby crimping the bullet in place in the same manner as factory ammunition.The view from above. The collets squeeze the brass around the bullet to crimp it in the case.A 7.65x53mm Belgian Mauser round with a cast bullet roll crimped in place (left), and a .223 Remington/5.56mm NATO cartridge crimped with the Lee factory crimp die. The difference is subtle, but you can see it if you look closely.
I loaded 15 rounds crimped in the Lee factory crimp die, and I used another 15 rounds without the crimp. I shot two targets at 100 yards from a rest using iron sights, with 15 rounds for each target. The target on the left is with no crimp, the one on the right is with the Lee factory crimp die (and I used a heavy crimp). The brass was fireformed in this rifle and neck sized only to get a good fit in the Mini 14’s 5.56 NATO chamber, which (as you know) is slightly larger than the .223 Remington cartridge. In prior load development work, I found that neck sized only brass is much more accurate in the Mini 14.
15 uncrimped .223 rounds at 100 yards (left target) and 15 rounds crimped with the Lee factory crimp die (right target).
The first five shots using uncrimped reloads all went into the left target’s 10-ring, so I thought I was doing pretty well. Then I switched to the Lee factory crimp die ammo on the right target. The first shot felt weird, and it did not fully extract. I think it was the one that went way low. The next four all went into the 10 ring. On the next five rounds (again, using the Lee die ammo on the right target), the first one did the same thing (it failed to extract and it went low). I fired one more magazine of Lee crimped ammo and all five worked okay.
Somewhere in those first two magazines of the Lee crimped ammo, I had two light primer strikes that did not fire. I extracted and chambered them again and they fired on the second attempt. I didn’t know why those two rounds had light primer strikes. Maybe the round had not fully chambered? Maybe because the Lee factory crimp die distorted the case mouth or something and it didn’t fully chamber? Or maybe something was interfering with the firing pin’s travel? I didn’t know and I wouldn’t find out until I disassembled rifle.
Then I fired 10 more uncrimped rounds at the target on the left and I had one failure to eject. My Mini 14 sometimes acts funny like that with the neck sized brass. It’s not a duty gun, so I thought I could live with an occasional failure to eject. But I don’t like it.
So back to those misfires. In the past, I’ve had to clean debris from around the firing pin, and it looked to me like it might be time to do that again. That could account for the two light firing pin strikes I had.
One other thing…I had painted the front sight with red nail polish, and that actually made the front sight’s top edge harder to see. I want to go back to the plain blued front sight.
I also want to adjust the Lee factory crimp for less of a crimp. These first rounds used a max crimp. I didn’t trim the brass for this test because it was only fired once, but I don’t know how even (in length) it was. I used bulk Remington loaded ammo to get the brass (having fired it previously in the Mini 14) because a couple of years ago that stuff actually cost less than unprimed brass. But inexpensive bulk ammo is not precision made and I suspect the case length had some variation (my suspicions were later confirmed, as you’ll read below).
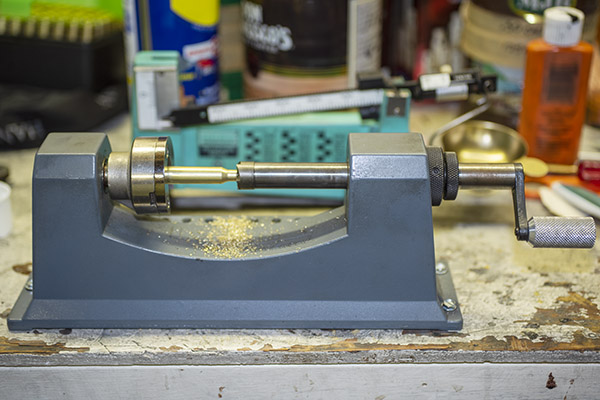
A Lyman case trimmer I’ve been using for nearly 50 years. The Lee factory crimp die does not require case trimming, but the cases had enough length variability that I decided to trim them anyway. Cases that are too long can interfere with the bolt fully closing and raise chamber pressures.
When I reloaded the rounds fired in this test, I checked a few case lengths after neck sizing. The “trim to” length (per the Hornady manual) is supposed to be 1.750 inches, with a max case length of 1.760 inches. These cases (after two firings and neck sizing) were all over the map. They ranged from 1.752 to 1.780. That alone could account for some of the anomalies described above. I ran them all through the trimmer and reloaded a hundred for the next range visit. I backed off a bit on the Lee factory crimp die, too, as my good buddy Robby suggested.
I gave the Mini 14 a good cleaning and I was surprised at how filthy it was. This is not a rifle that I clean religiously…I’ll shoot it on several outings before cleaning (heresy, I know, but hey…it is what it is). I wanted to grab a few photos of what a funky Mini 14 can look like, but my hands were so dirty and greasy I didn’t want to handle my Nikon camera. After the most recent range visit, I Hoppes No 9’ed the Mini 14 bore for a couple days to get all the copper out (you know, until the patches came out with no green).
There were bits of what appeared to be very thin sheet brass in the bolt around the firing pin as well as a whole bunch of greasy carbon residue in the bolt. That could account for the couple of misfires. Removing the firing pin is not an easy job (it takes a special tool I don’t have or want); the drill here was to shpritz the hell out of the bolt with carb cleaner and work the firing pin back and forth to push the nasty stuff out. The thin brass bits might have been primer cup material. Or they might have been chips from the extraction operation that found their way into the bolt and were peened flat. There’s no way of telling, as some of that ejected brass ends up in the next county (a trait Mini 14s are famous for). By the way, when you’re working with that carb cleaner, you need to do it outdoors where there’s plenty of fresh air. It’s highly flammable and if I use that stuff indoors, I get lightheaded and nauseated pretty quickly.
There was a lot of carbon gunk in the stock channel clear back into the action. There was also a lot of carbon in and on the guide rod, as well as around the extractor. This could account for the occasional failures to eject. I blew it all out with WD 40 (in the stock) and carb cleaner (for the metal pieces). There was so much carbon residue in the stock’s barrel channel that I thought I might have a leak around the gas port, but I didn’t see any carbon residue around the gas port and I’ve got the Allen bolts around that part tightened as tight as I dare go. I tried the smaller diameter aftermarket gas ports last year, but every one of them gave me unreliable function, so I went back to the stock port.
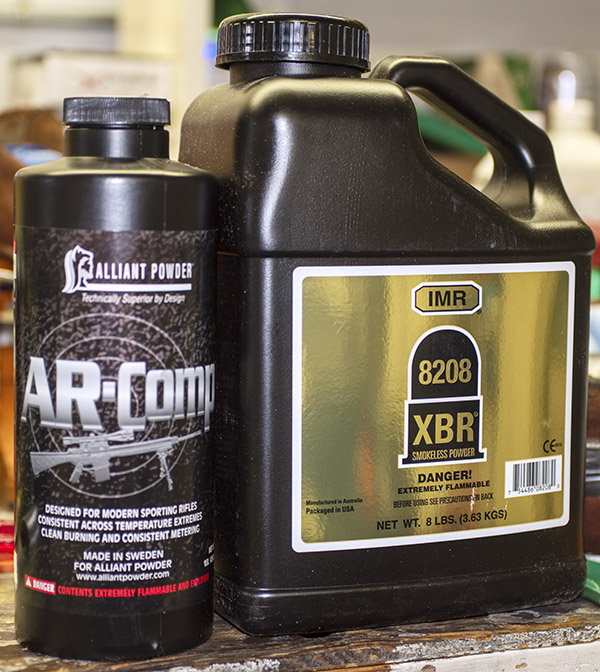
I’ve got a little more than a pound of ARComp, and that has been my “go to” Mini 14 powder for several years. When things started to get tight last year, my reloading outlet had an 8-pound bottle of XBR 8208 (it was the last bottle of anything he had). I had never heard of that powder before but I figured it would work in something, and in poking around on the Internet I found that 8208 gets the nod as a great powder for the .223 cartridge. The hundred rounds I just loaded are with ARComp, but I think I will do another 100 or so with different 8208 charges to see how they do. I’ve still got several hundred 62-grain Hornady full metal jacket bullets and I have another 500 55-grain bullets that just arrived from Midway. And I have small rifle primers and a potful of .223 brass. Unlike a lot of folks, I’m in good shape for .223 for a while (and no, I don’t want to sell or trade any components).
What’s the bottom line to all this? Did the Lee factory crimp die improve accuracy? The short answer is: I don’t know yet. I think it does, but I had too many other things going on with the rifle and the brass to be sure. If you ignore the first two rounds that went low, I think the accuracy edge goes to the Lee crimped ammo. Bear in mind that I was shooting with iron sights at 100 yards, so the differences may be more due to me than anything else. There were only four rounds outside the 10 ring with the Lee ammo; the uncrimped ammo had six rounds outside the 10-ring. But again, it’s iron sights at 100 yards, so who knows?
I’m going to share this post on Facebook, and you can bet some yahoo will tell me that he shoots 1/2-inch groups at 200 yards with open sights on his Mini 14 all day long. Hey, it’s the Internet. You have to ignore those buttheads. As far as the Lee factory crimp die’s accuracy edge goes, I think it’s real. I’ll find out for sure (maybe) the next time I go to the range. Everything in the Mini is clean, lightly oiled, and ready for action. We’ll see what happens on the next outing, and you’ll read about here on the ExNotes blog.
I was a 14-year-old kid in the 8th grade and I had just discovered motorcycles. A senior in our combined junior high and high school named Walt had a brand new 1964 Triumph Tiger back in the day when the Tiger was Triumph’s 500cc twin. It was the most beautiful thing I’d ever seen (with the possible exception of Raquel Welch and one or two young ladies in my class). But Raquel was beyond my reach, and come to think of, so were those other young ladies. The Tiger? It was right there. I could stare at it anytime I could get out in the parking and it wouldn’t care or complain. And stare I did; so much so I’m surprised I didn’t wear the paint off. White and gold with a cool parcel grid on the gas tank and perfect proportions, I knew that some day I’d own one. Ultimately I did, but I’m saving that one for another blog.
We didn’t have the Internet in those days. Come to think of it, we didn’t have cell phones or computers, either. We actually talked to people, and if we took pictures, we used this stuff called film that had to be sent off to be developed, but that’s a story for another blog, too.
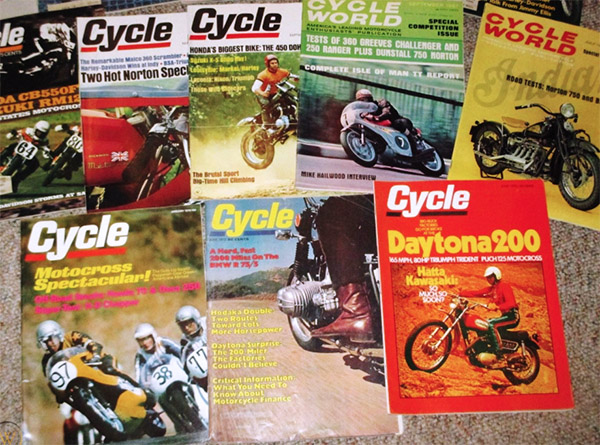
My world revolved around glorious motorcycle magazines in the 1960s. Actual print magazines. It was a wonderful era.
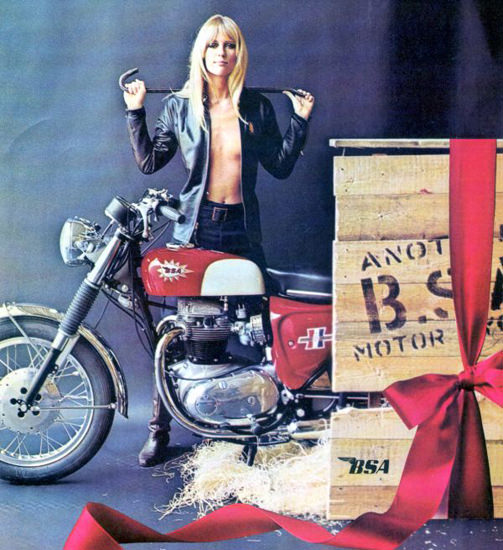
What we did have were glorious motorcycle magazines with even more glorious ads. The BSA ads were the best, with scantily-clad women in an era when the term sexism implied a pervert of some sort and the phrase “politically correct” was decades into the future.
A BSA ad from around 1967. Life was good.
Their awesome ads notwithstanding, I didn’t want a BSA. I wanted a Triumph. It had to be like Walt’s, with those extravagant big chrome exhausts and Triumph’s perfectly-pinstriped paint. The magazine ads all had a snail mail address (that’s the only kind of address there was back then) and an invitation to write for more info, and write I did. It wasn’t long before I had amassed an impressive collection of colorful brochures from the likes of Triumph, BSA, Norton, Harley, Honda, and more.
The planets came into alignment for me as several things happened. Dad started reading the brochures and that piqued his interest. He wasn’t a motorcycle guy, but the ads worked their magic. It was an era where advertising worked, I guess. Then one of Dad’s buddies, another trapshooter named Cliff, stopped by with a new Honda Super Hawk. In those days, the Super Hawk was an electric-start, twin-carbed, 305cc twin. Cliff let Dad ride it in the field behind our house and praise the Lord, Dad was hooked. Between my enthusiasm and the motorcycle industry’s advertising experts, he never had a chance.
A restored mid-60s Honda 305cc Super Hawk. Twin carbs, electric start, twin leading shoe front brake, flawless paint, no oil leaks, and all for just over $600. Did I mention life was good?
Dad was a little intimidated by the idea of starting his motorcycling career with a monstrous 305cc machine (remember all those nicest people you met on a 50cc Honda Cub?). He found an ad for a slightly used 160cc baby Super Hawk and that was his first motorcycle. It lasted all of two months. Dad took it for a service to Sherm Cooper’s Cycle Ranch and he came home with a new Super Hawk. Wow. I thought that would last for a while, but between the brochures, my inputs about Triumph Bonnevilles, and apparently a bit of salesmanship by old Sherm, a year after that Dad traded the Super Hawk for a new ’66 Bonneville. Wow again!
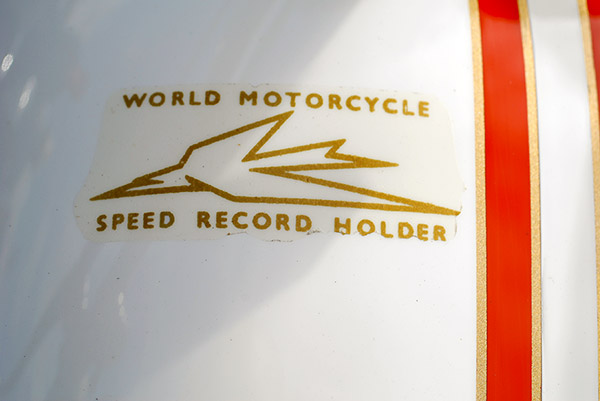
That’s what they were back in the day, and every new Triumph had a decal to remind you (and others) of that fact.
The Bonneville was stunning. Triumph went to 12-volt electrics in ’66, a smaller gas tank in ivory white with a cool orange competition stripe, and stainless steel fenders. And, of course, that World Motorcycle Speed Record Holder decal that adorned the tank of every new Triumph (Triumph held the record in those days, prompting the decal and the name of their flagship motorcycle). I was too young to drive but not too young to ride, and on more than a few occasions if Dad noticed the Bonneville odometer showing more miles than when he last rode it, he didn’t say anything.
Dad was a craftsman and a perfectionist. An upholsterer by profession and a tinkerer by nature, he added custom touches to the Bonneville that took it from awesome to amazing. He had a polishing machine in the basement and after what seemed like days of buffing (and several cloth polishing wheels) the fenders went from brushed stainless to a mirrored glaze that completely transformed the Triumph. And the seat…he outdid himself on that one. Remember that orange competition stripe I mentioned above? Dad’s seat continued it. The stock seat went from gray and black to a tank-matching ivory white, pleated with a perfectly-matched orange stripe that ran the length of the seat. The tank’s stripes were bordered with gold pinstriping; Dad incorporated matching gold piping on the seat’s pleats. The overall effect just flat worked. It looked like the Triumph had gone under a set of sprayers with ivory white, orange, and gold paint. Between the seat and the polished fenders, the bike had a jewel-like finished appearance that made it look like Triumph’s stylists had finished what they started. It was stunning.
This was not Dad’s actual Bonneville nor is it mine (I can only wish), but it is a near perfect 1966 Triumph Bonneville photographed at the Hansen Dam Britbike meet. Dad’s had a seat that continued the tank colors. The bike above has the stock brushed stainless steel fenders; Dad’s were mirror polished. I don’t have a photo of Dad’s Bonneville; all this happened before my interest in photography.
Sherm Cooper saw the seat Dad had recovered and he was floored by it. “Where did you get that?” he asked, and when he learned that Dad stitched it himself (after all, he was an upholsterer), Dad’s business suddenly included Triumph and Honda seats in all manner of colors, including lots of metalflake naugahyde. Dad was making “glitter sitters” before they became well known back in the ’60s.
The Triumph was in many ways less sophisticated than the Honda, but it was infinitely cooler. The styling was way better in my 14-year-old mind. It didn’t have an electric starter, but that made it better to me. You had to tickle each of the Amal carbs with this little button on each of their float bowls until gasoline flowed out around the button, and then give it a kick. It usually started on the first kick. It was a form of intimacy with the machine, something the Honda neither needed nor wanted. The Triumph, though…it needed you. Marlon Brando, move over (Johny rode a Triumph in Rebel Without A Cause, you know). The sound of a Triumph Bonneville was beyond awesome. It was the perfect motorcycle, but alas, it was not to last. Dad lost interest in riding and sold the Bonneville. A few years later (when I was finally legal with an actual motorcycle driver’s license) I bought a 90cc Honda and then a CB 750 Four. It wouldn’t be until 1979 that I bought a new Triumph Bonneville, but that’s a story for another blog, too. Stay tuned, and you’ll get to read it here.
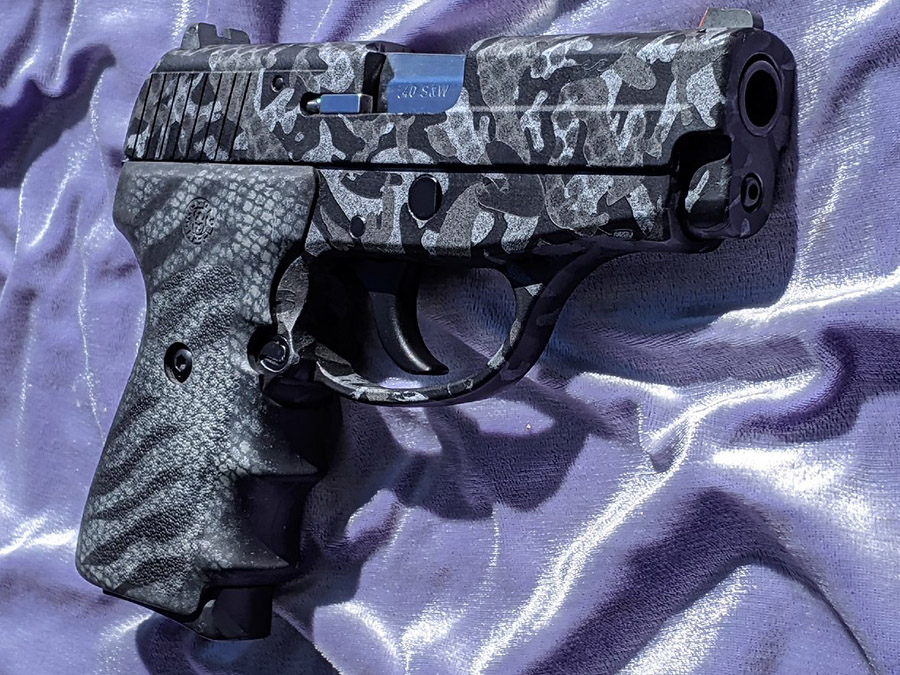
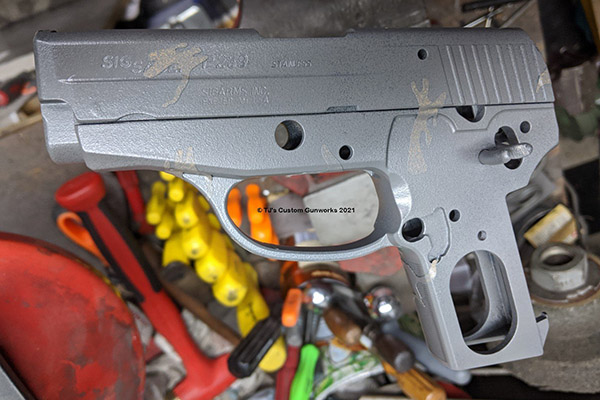
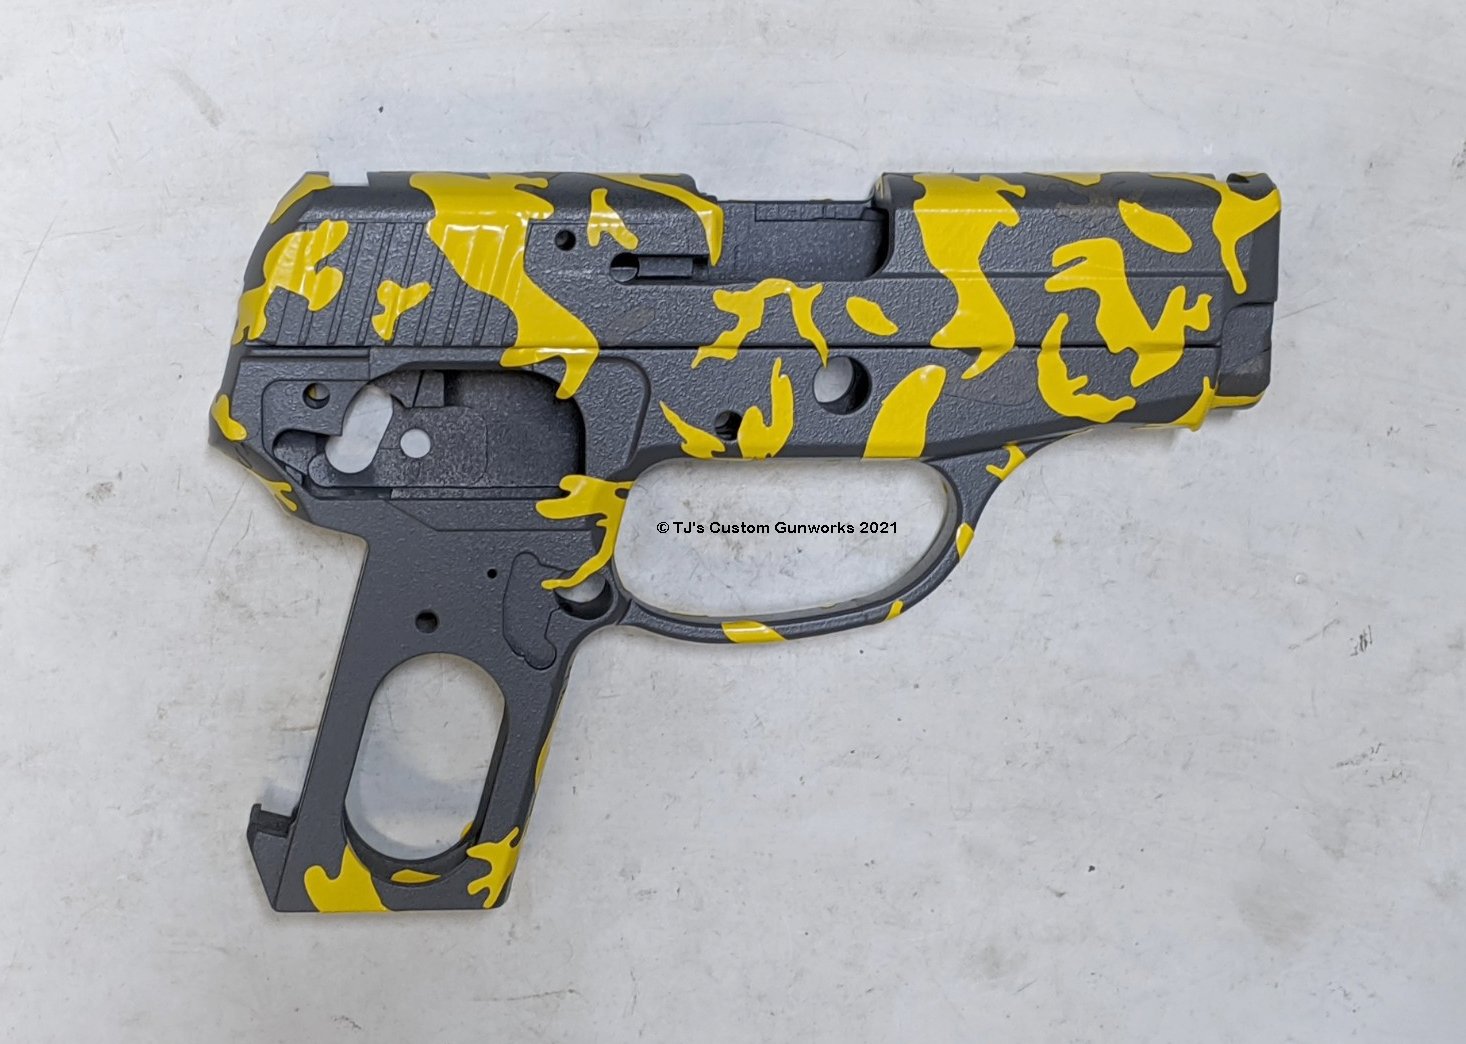
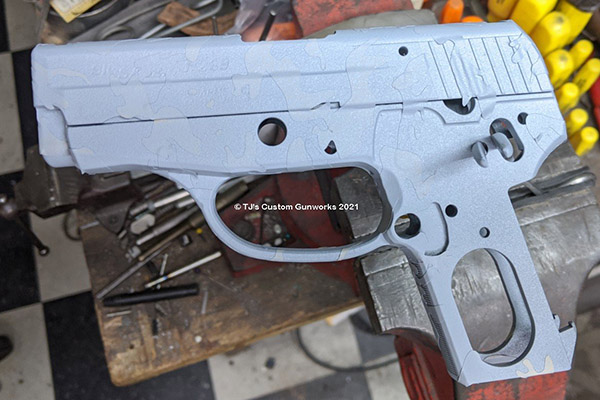
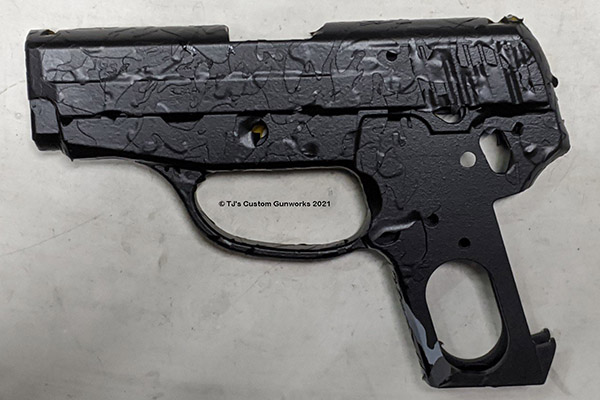
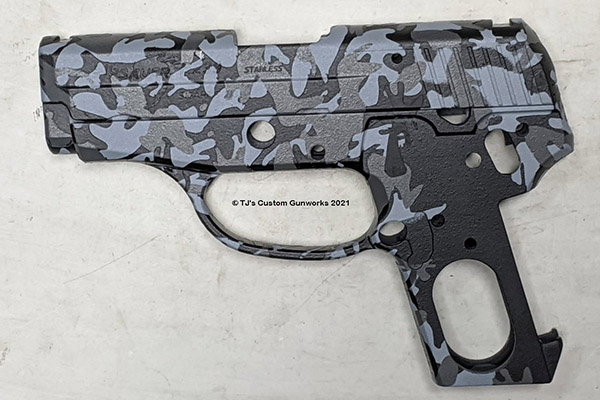
A couple of months ago I shared a photo of a very cool SIG 239 that good buddy TJ had finished in Urban Camo (it’s the one you see in the photo above). I was intrigued by the finish, and as TJ walked me through the steps, I started to get an appreciation for how much work is involved. Here’s the process as TJ explained it to me:
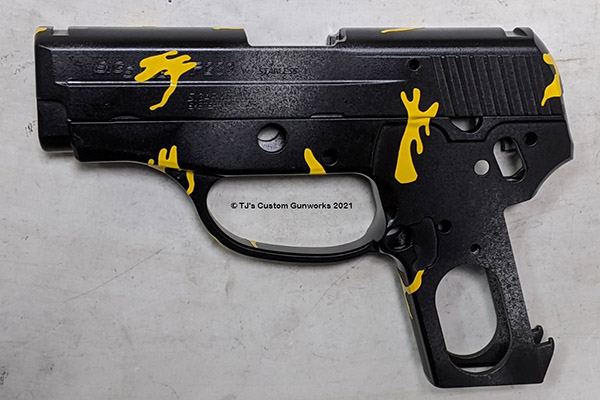
Step 1: Disassemble, clean and inspect the firearm. Step 2: Sand blast or other surface preparation. Step 3: Apply base coat (black Duracoat for the gun you see above). Step 4: Add camo stickers to create pattern. Step 5: Spray light grey Duracoat. Step 6: Add more camo stickers to create pattern. Step 7: Spray dark grey Duracoat to create pattern. Step 8: Add more camo stickers to create pattern. Step 9: Spray base coat again (black Duracoat for the gun you see above). Step 10: Remove all camouflage stickers and inspect gun. Step 11: Overspray muting stripes (netted flat black). Step 12: Spray clear coat. Step 13: Clean excess Duracoat from holes, rails, etc. Step 14: Reassemble and oil firearm.
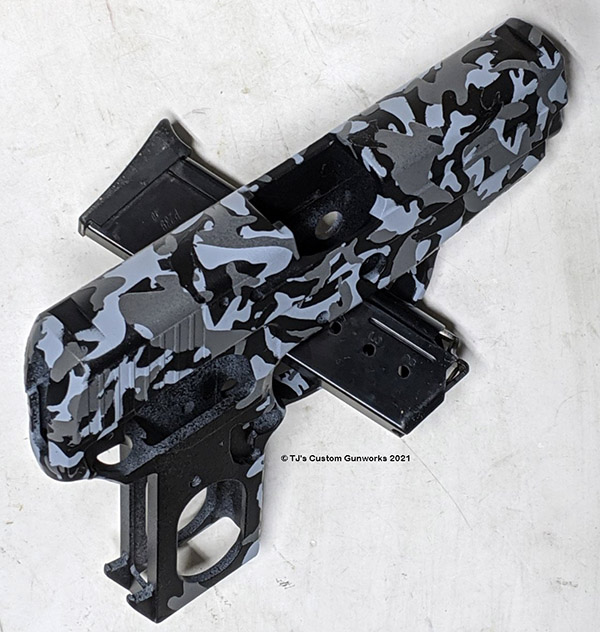
Here’s what it looks like as the gun proceeds through the urban camo application process:
The above makes for a good-looking gun and a durable finish. After it’s fully cured, it’s relatively impervious to solvents or gun oils.
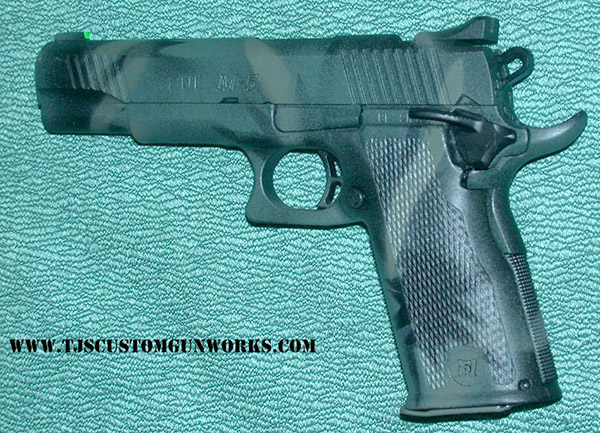
TJ can do other finishes as well, including a soft camouflage done without the tape described above (freehand spots or stripes).
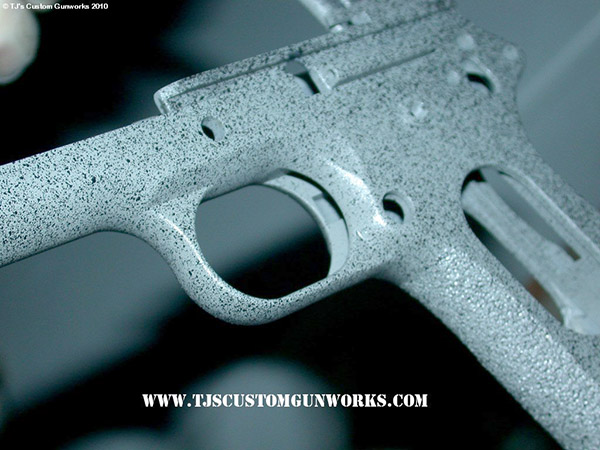
TJ can also do speckling (like you see below), which is a good finish for hiding pitting and other surface imperfections.
If you would like to get a feel for a few of the other finishes TJ offers, you might take a look at his website at www.TJsCustomGunworks.com.