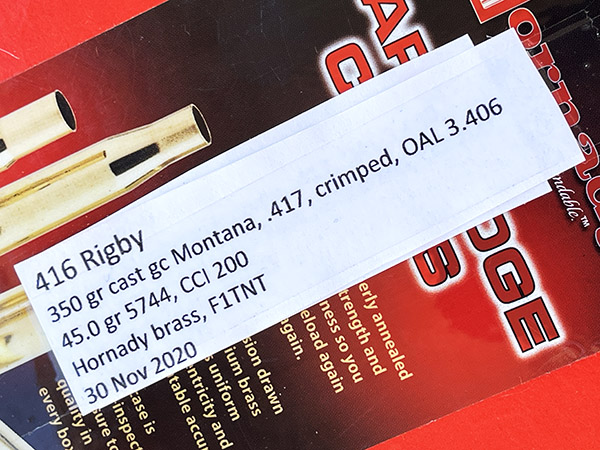
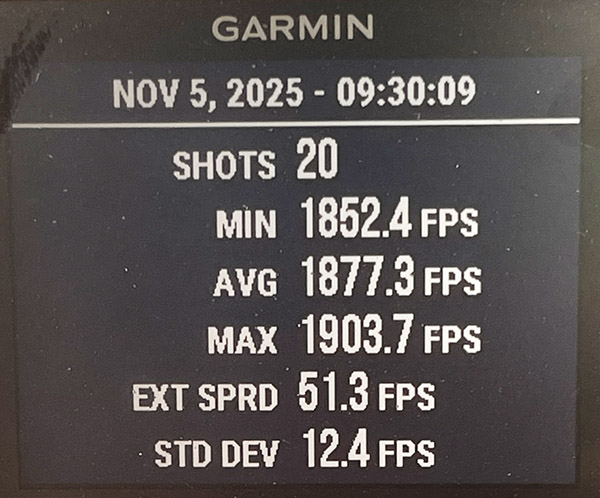
Make no mistake: Even a reduced load in the mighty .416 Rigby is a high-energy proposition. I use 350-grain cast bullets from the Montana Bullet Company, and my Lyman cast bullet reloading manual shows the accuracy load to be 45.0 grains of 5744 propellant. The reloading manual says that’s the lightest 5744 load with the 350-grain cast bullet, and that same manual says the load is good for 1779 fps. In my rifle, it was a full 100 fps faster, with a very tight standard deviation. A 350-grain bullet at 1877 fps is going to settle most discussions pretty quickly, I think.
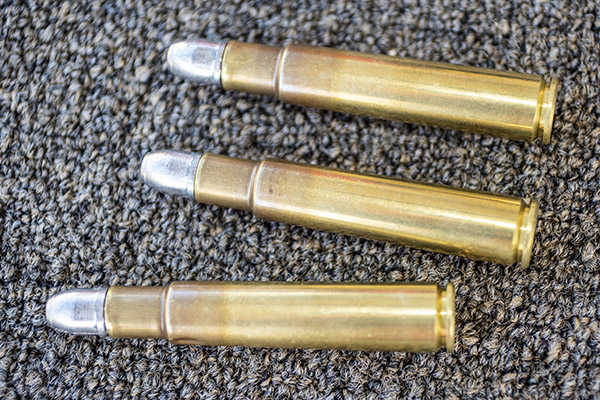
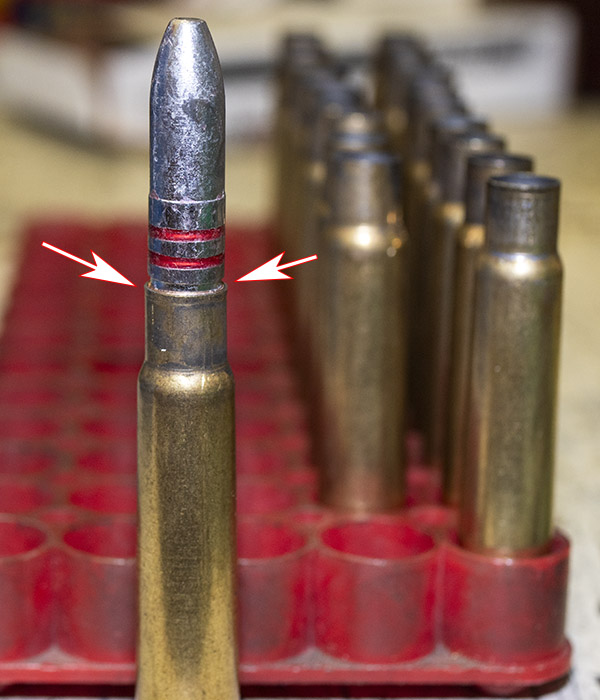
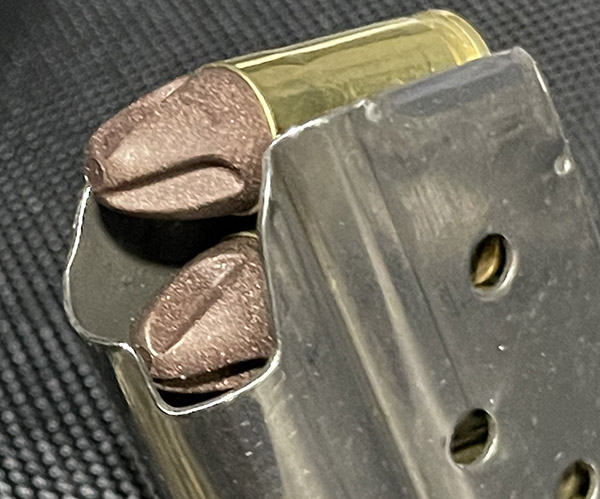
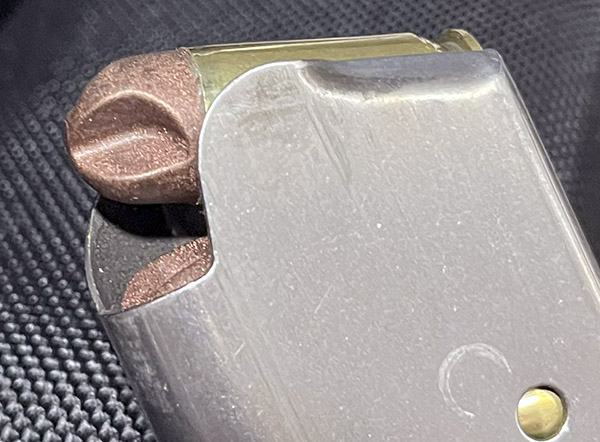
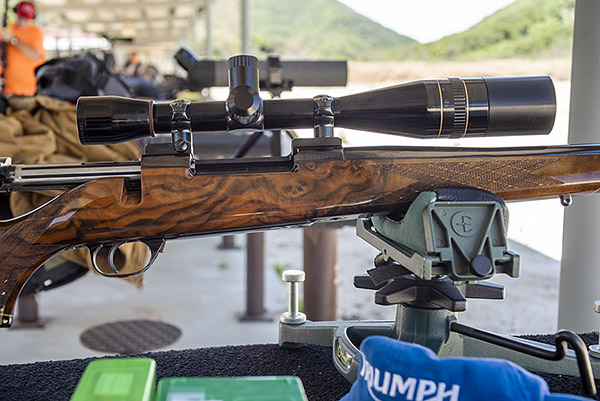
.416 Rigby ammo, loaded with Montana cast bullets.The .416 Rigby is a big cartridge. It’s shown here with a .45 70 and several .45 ACP rounds.
The .416 Rigby was originally developed in 1911 by John Rigby and Sons, a British rifle manufacturer, as a cartridge designed for hunting dangerous game (you know, like cape buffalo, elephants, and other stray critters not likely to be encountered on this continent). But the cartridge is a cool one, and that was enough for me to buy the rifle. The factory load is a 400-jacketed bullet at 2,370 fps (with prices ranging from $170 to $270 per box of 20 rounds), and that’s good for anything that walks, breathes, or grows, probably including more than a few dinosaurs. Those are steep prices, working out to about $8.50 to $13.50 every time you pull the trigger. Me? I reload with cast bullets. It’s still not cheap to send lead downrange, but it’s way cheaper than shooting the factory stuff.
I had not realized it had been so long since I previously shot the .416 (as my reloads indicated).Chrono results for my .416 Rigby ammo. That’s a tight standard deviation. This is a great load.
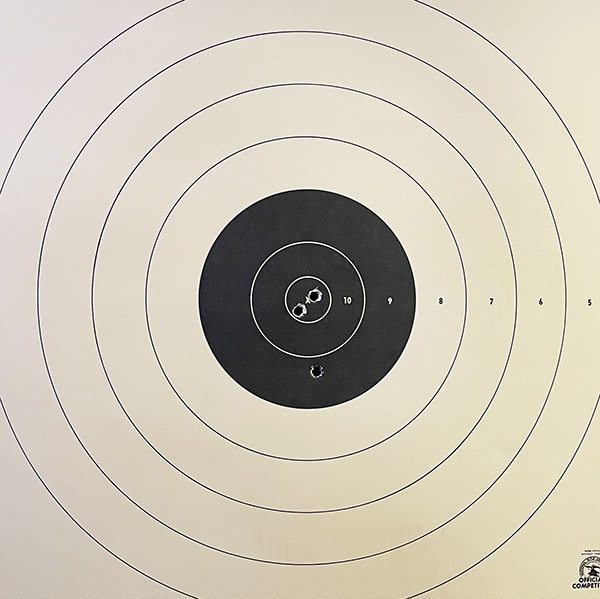
The Lyman manual is right; this is an accurate load. At least it was for me at 50 yards.
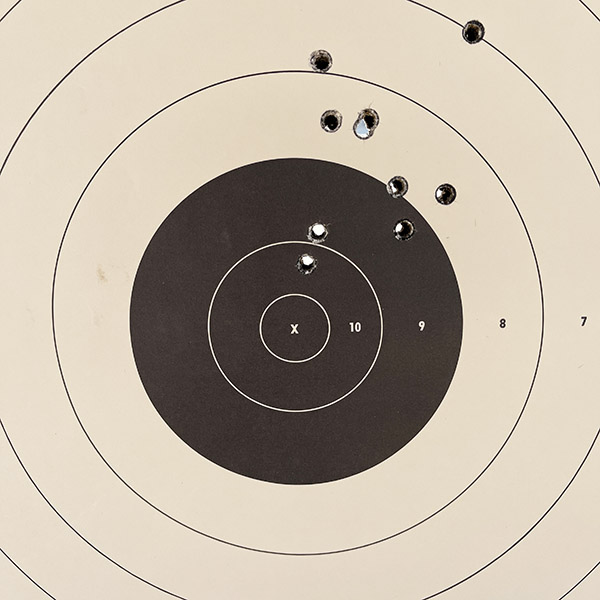
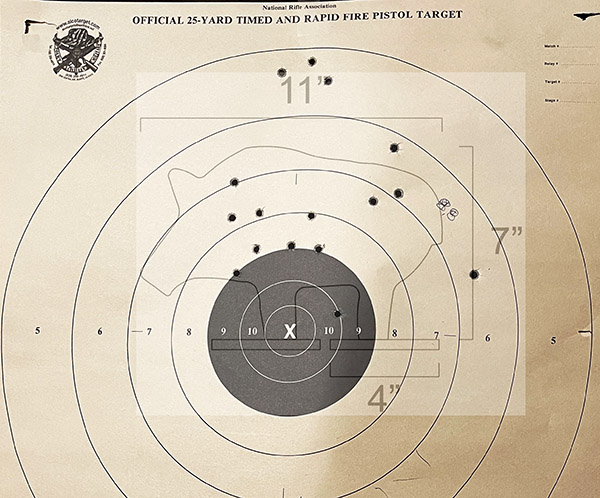
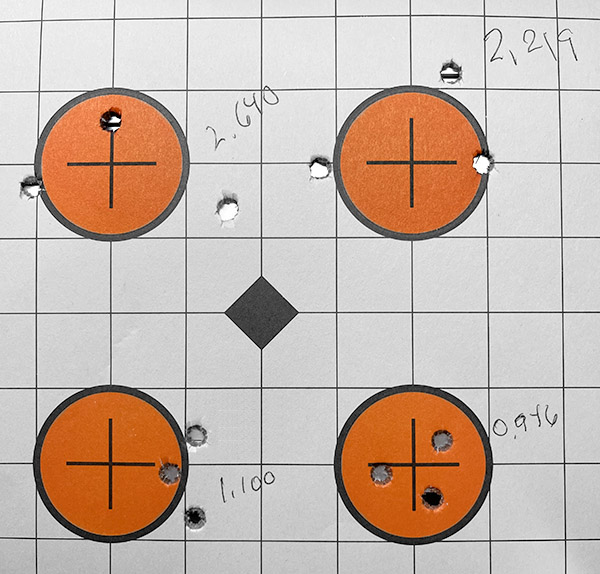
Three shots at 50 yards with the .416 Rigby. That’s not too bad for an old man shooting an elephant rifle with open sights.
I then tried the Rigby at 100 yards. At 100 yards, my accuracy was poor, but that was me (not the rifle or the ammo). I had a difficult time finding and focusing on the front sight. It’s a function of age and the little front sight brass dot, and a pair of new glasses. I had a tough time seeing the front sight with my new specs; it kept blurring together with the black bullseye. The easy answer would be a scope, but the rifle is already heavy and maybe I’m too much of a purist; a scope on an elephant gun seems kind of silly. I have a scope on my .458 Ruger Model 77 and I like it, but the Rigby wearing a scope doesn’t go down well for me.
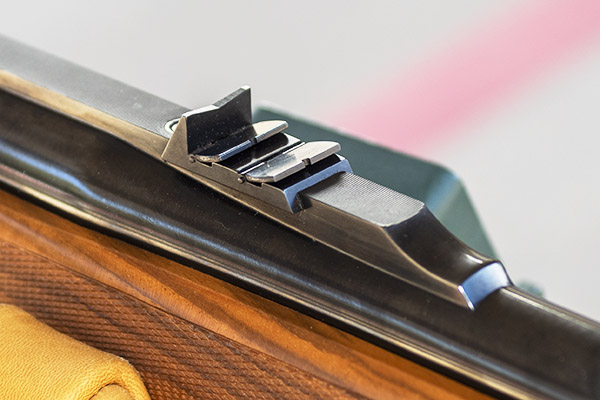
The Ruger’s rear sight. It’s a classy affair, with a fixed V-notch always up (it’s what you see here). For longer distances, each of the two blades behind the fixed blade can fold up. The two folding blades each have a U-notch, which is easier to see.
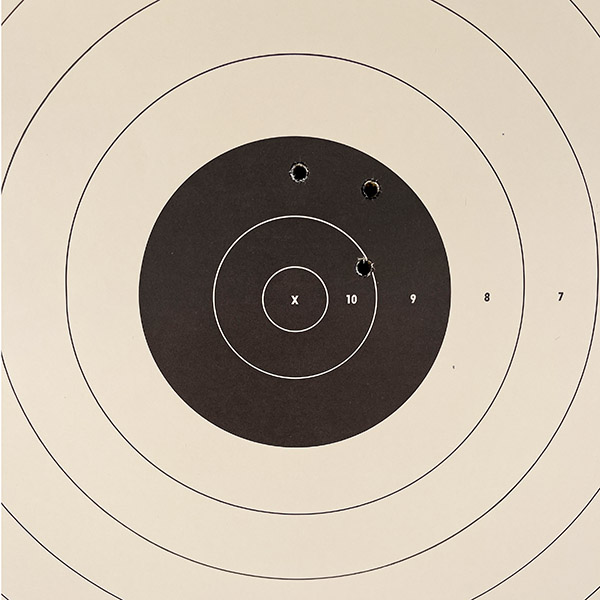
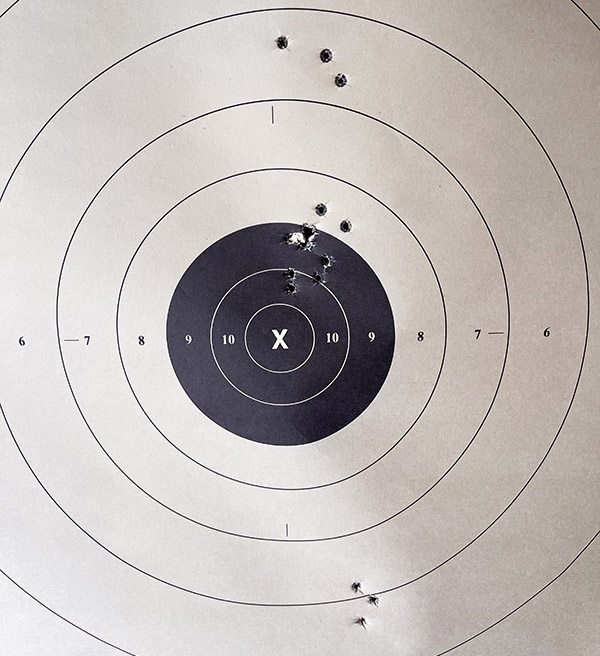
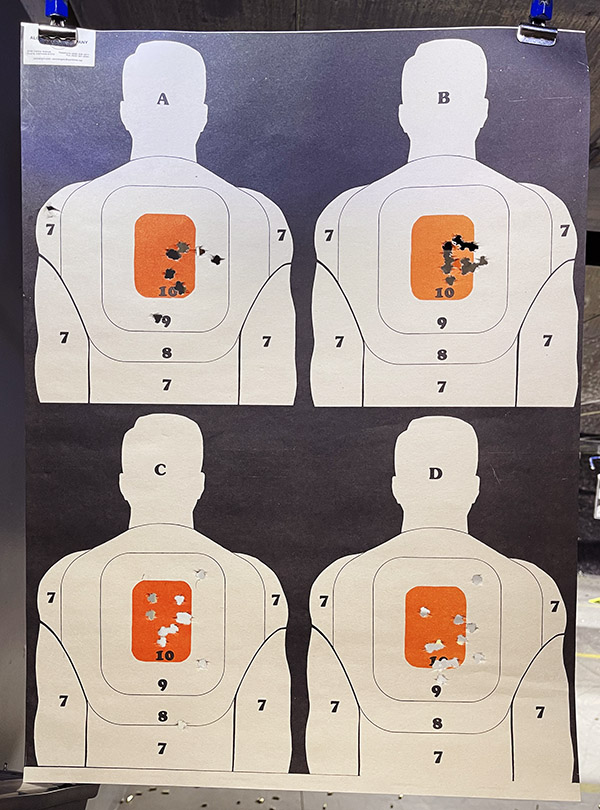
When I returned home I reloaded my spent .416 Rigby brass, grabbed my old glasses, and headed out to the West End Gun Club again. Things at 100 yards improved immediately. I fired the first three shots you see below using the lowest rear sight (the V, with no U-notch; it is fixed in the up position). I couldn’t see the bullet holes at 100 yards with the naked eye (hell, I could barely see the target), so I took a peek through my spotting scope and was pleasantly surprised.
Three shots at 100 yards with the fixed V-notch rear sight. Life is good.
That target looked good to me (and knowing I was going to photograph it for the blog I didn’t want to ruin it with additional shots). For those first three shots, though, I struggled to keep the front sight in focus and seated above the rear sight’s fixed V-notch. I decided to fold up the first blade, which is a little taller than the fixed V-notch. Seeing the front sight (and staying focused on it) in that first foldup blade’s U-notch is much easier, but the rear sight was taller. I expected the next shots to go high (which they did in a surprisingly big way…they were a good six inches above the bullseye). Two can play this game, I thought, so I walked downrange and put up a third target. I fired my remaining rounds while holding the top of the front sight about one bullseye diameter below my normal aim point (which is 6:00 on the bullseye). I guess you could call that Kentucky elevation.
10 shots at 100 yards. Not bad, but too high. I would have liked for that group to all be in the black.
The results were not bad. What I really need (maybe) is a taller front sight, and I’m casting about to try to find one of those. I have a call into the Williams Gun Sight company; maybe they will have something that will work. The reason I said maybe, though, is that several years ago with this rifle and the same load, the sights were spot on for me at both 50 and 100 yards. It could be that I was simply a better shot several years ago. I’ll try it again before I replace the front sight.
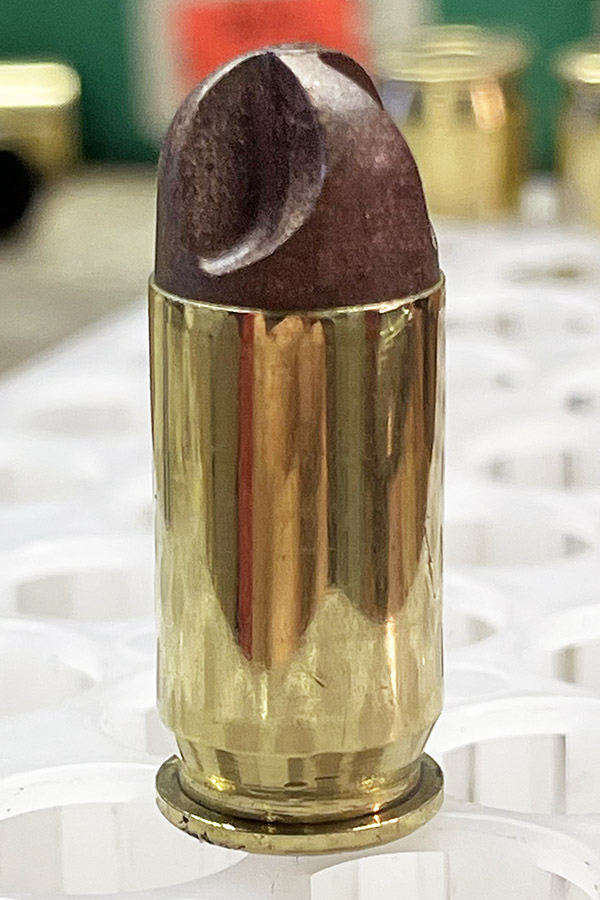
The .416 Rigby’s front sight. It may need to be taller for the load I am using. Note that there’s very little leading in the bore. That’s because the Montana bullets are hard cast, gas-checked, and appropriately sized.
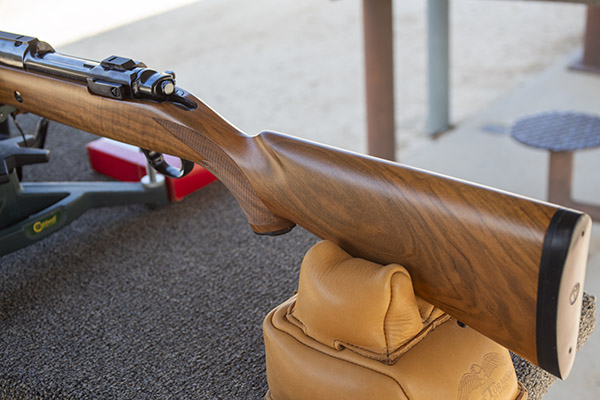
Here are two more photos of the Rigby, showing its beautiful and highly-figured Circassian walnut stock. This rifle was a real find. It’s one I’ll never sell.
Ruger .416 Rigby RSM Magnum, port side. It looks even better in person.Ruger .416 Rigby RSM Magnum, starboard side. It’s surprisingly easy to shoot with cast bullets.
I named my .416 rifle Eleanor (get it? Eleanor Rigby?). It’s the only gun I’ve ever owned that I named. I bought the rifle for well under what it’s worth off the used gun rack at Turner’s in West Covina (a locale with demographics more in tune with bangers and black plastic 9mm pistols). I paid a thousand bucks for Eleanor; these rifles typically go for around $2500 when they show up on the used gun market. There are a couple on Gunbroker.com right now; one is listed at $3,000 and the other at $7,000 (hope springs eternal, I guess). Ruger quit making these a couple of decades ago because they were too expensive to manufacture, making the small number they did manufacture instantly collectible.
I want to use this rifle with open sights on my next pig hunt. That would be challenging on several fronts:
I want to try for a Russian boar (instead of the more plentiful Ossabaw hogs I previously shot).
I want to use open sights (instead of the scoped rifles I previously used).
I’ll have to lug this anchor-weight firearm up and down in the Arizona hills where I hunt (instead of the lighter rifles I used on my prior hunts).
It should be fun. Stay tuned. You’ll get to read about it here.
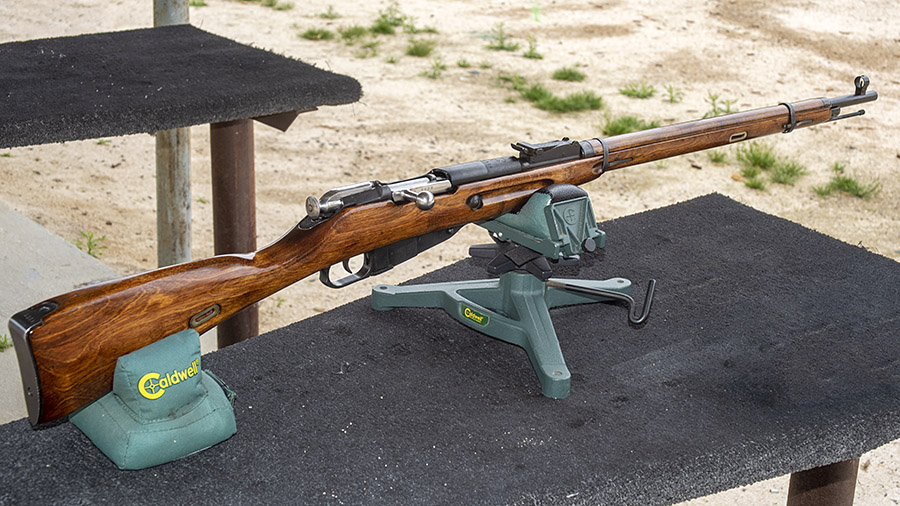
One of my favorite rifles is the Enfield No. 4 Mark 2, a bolt action rifle just dripping with history and charisma. The No. 4 Mark 2 was the last in the Enfield rifle series, with a run of 59,000 produced by Britain’s Fazakerly armory for Ireland in the 1950s. It was the last Enfield in a long line of continuously improved rifle designs, and it includes a much-improved trigger design. Most of these Irish rifles were never issued and many were sold in their unfired, cosmoline-laden condition. Mine comes from that group. It’s the one in which I tested the reloaded ammo featured in this blog series.
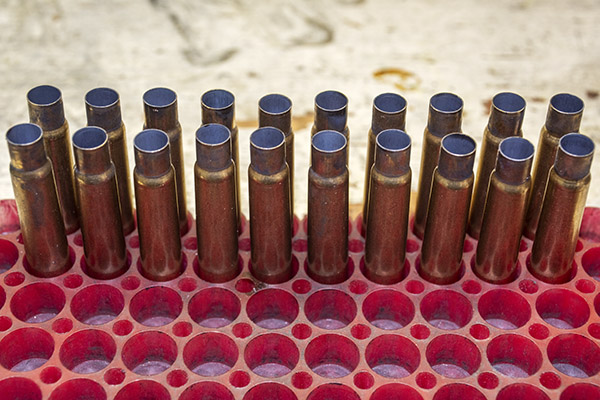
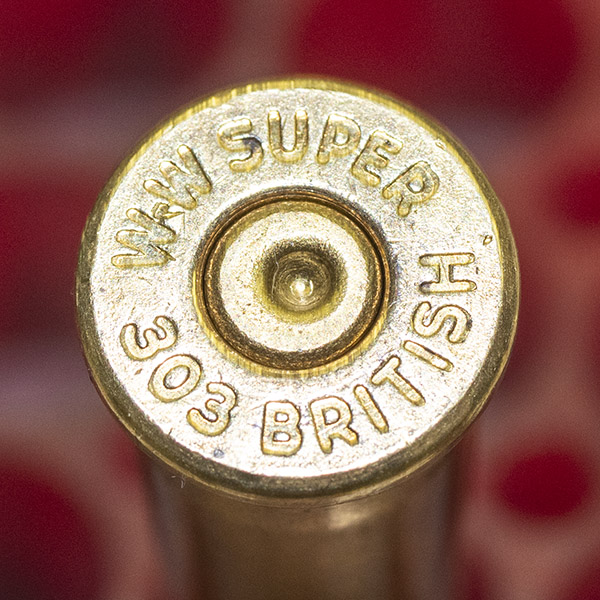
Once-fired .303 British cartridge cases. They almost look like scaled-down .375 H&H cases.A close-up view of the .303 British case after firing. These cartridge cases are ready for the reloading process.The headstamp. These are Winchester cases. Note the spent and indented primer, which will be removed in the case resizing process.
I have a stash of once-fired .303 British brass acquired from generous friends over the years. I will reload them with 200-grain cast bullets made by good buddy Roy Hursman, sized to 0.313 inches, which I also use in my Modelo 1909 Argentine Mauser and Mosin-Nagant rifle. I thought they might work well in the Enfield (and they did; I’ll tell you a bit about that here and provide much more detail in Part 3 of this series).
The cast lead bullets I load in my .303 British ammo. These weigh 200 grains. They have been lubed (the red grease in the lube grooves), gas checked (the copper cap on the base), and swaged down to 0.313 inches. They work great in the 7.65 Belgian Mauser, 7.62x54R Russian, and .303 British cartridges.
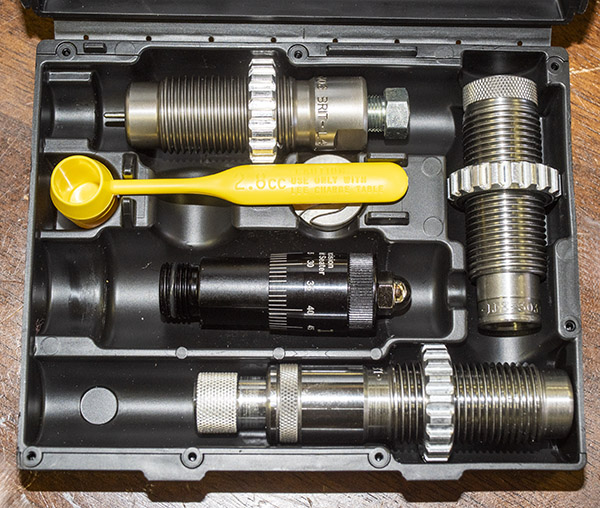
What I didn’t have in my shop was a set of dies in .303 British. I naturally turned to Lee Precision. I believe in Lee reloading equipment. I have their dies for the .22 Hornet, .22 250, .243 Winchester, 6.5 Creedmoor, .30 Carbine, .30 40 Krag, .300 H&H, .300 Weatherby, .38 Special/.357 Magnum, .44 Special/.44 Magnum, .45 ACP, .45 Colt, and probably a few others I can’t remember as I type this blog. I also use other Lee reloading equipment. I think their Classic Turret Press is the best reloading press of its type for loading handgun cartridges. The bottom line here is that I’ve never been disappointed with Lee products, and I say that as a guy who has been using Lee gear for 50 years.
I ordered Lee’s Ultimate 4-die set, and what I received surprised me. I received the four dies (which I expected) and a micrometer bullet seating attachment (which I did not). Each Lee die set also includes a little packet of case lube for the resizing operation (it’s not shown in the photos below). It’s a nice touch; Lee basically gives you everything but the reloading press and the components (bullets, brass, primers, and powder) to load a specific cartridge with each of their die sets.
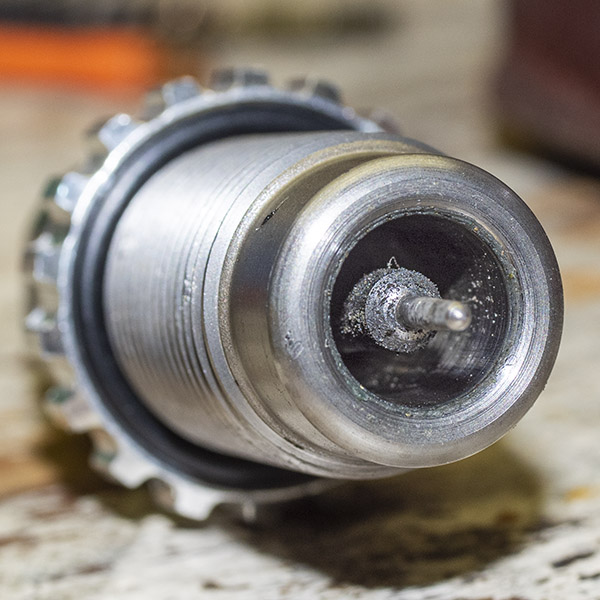
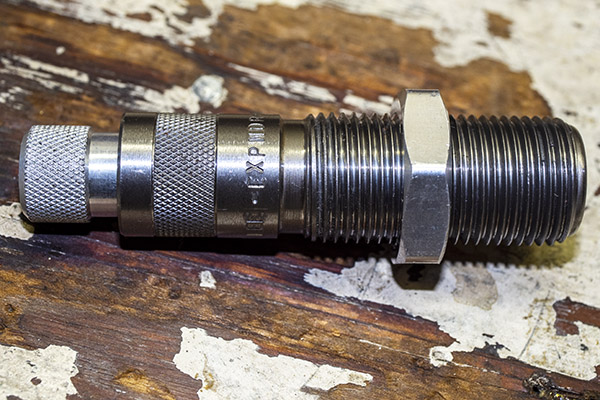
The Lee ULee Ultimate 4-Die set includes four dies normally included in a single box. My set included a micrometer bullet seating attachment not evaluated in this blog series (although I will evaluate it in a future blog). The fourth die (the collet die) was provided in a separate container (see below). In the photo above, we have the full-length resizing die (top), the bullet seating die (bottom), the factory crimp die (right), the micrometer bullet seating feature, the shell holder, and a measuring cup (not used by me). Lee also provides a small pack of case lube (not shown here).The Lee collet neck sizing die, used in lieu of the full-length resizing die to neck size the brass case.
I won’t get into the micrometer bullet seater in this three-part .303 British Lee die set review (that review will occur down the road a bit).
The Lee Ultimate 4-die set includes two resizing dies (a full-length resizing die, and a collet die for neck sizing only), a bullet seating die (that also includes a roll crimping feature), and a separate crimping die for applying what Lee calls a factory crimp. The die set also includes a shell holder (a nice touch, as other manufacturer’s die sets do not) and a powder scoop. I’ve never used the powder scoop; I use a more precise powder dispenser.
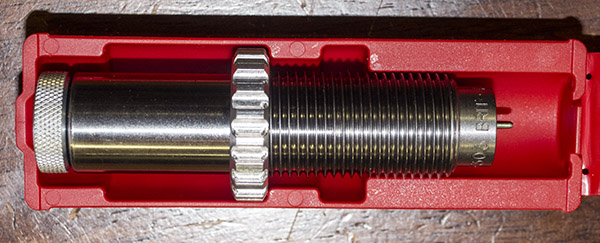
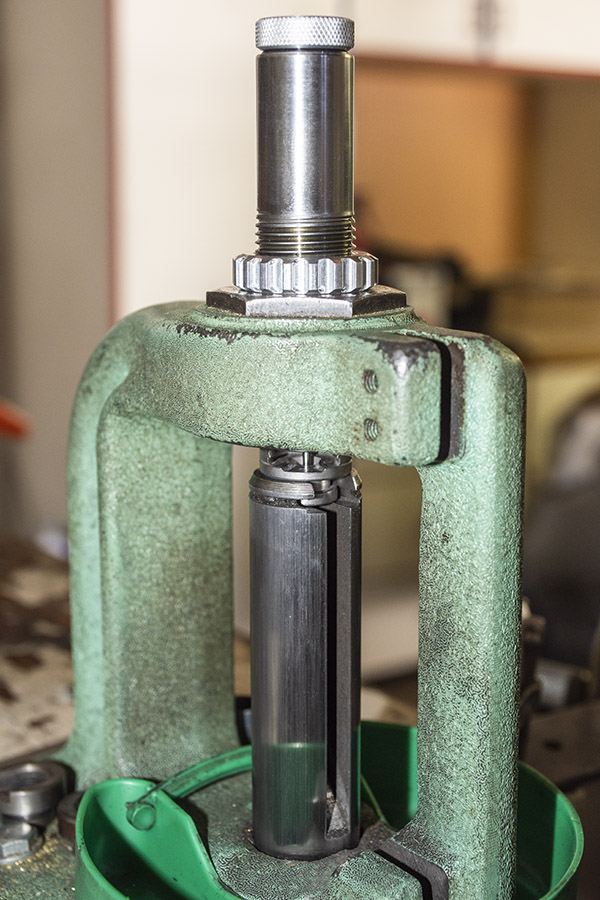
The once-fired brass I had on had was good stuff. It was in the original factory boxes and it was in good shape. Because the rifles it had been fired in previously were not my Enfield, I knew I would have to full length resize the brass first to return each case to factory dimensions. To do that, I mounted the Lee shellholder in my press, ran the press all the way up, and then installed the full-length resizing die, screwing it down in the press until it contacted the shell holder. I then retracted the press ram, turned the die another 1/8 of a turn into the press, and locked the die in place with its locking ring.
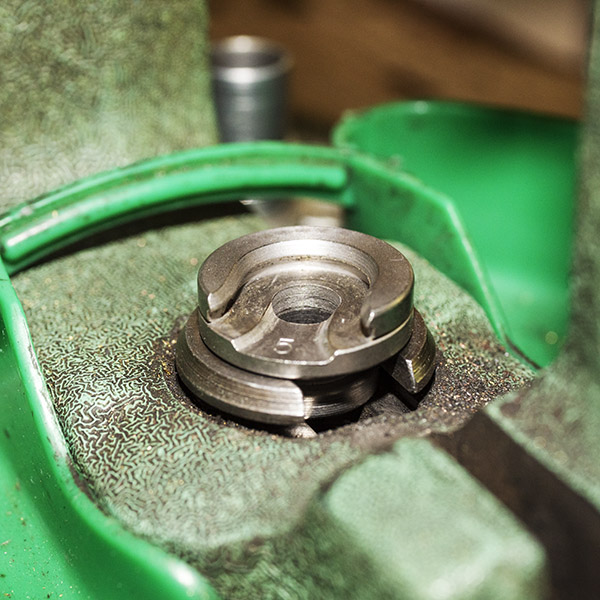
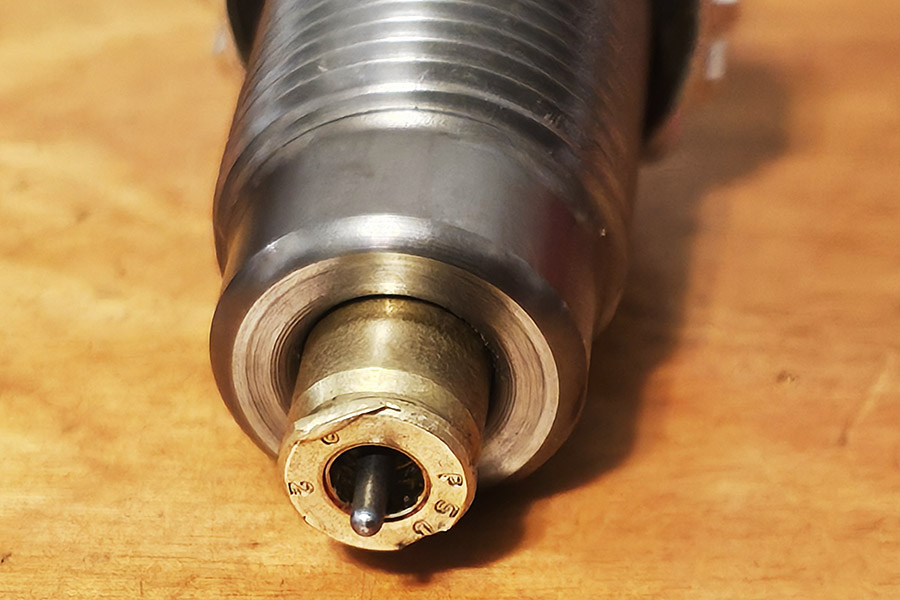
The Lee .303 British shell holder installed in my reloading press. It snaps into place. Dies and shell holders are typically interchangeable between reloading press and die manufacturers. I use a single-stage RCBS Rockchucker reloading press; Lee dies and shell holders fit it perfectly.Lee’s full-length resizing die installed in the press. This die simultaneously resizes a fired case to factory specification and punches out the spent primer. Note the locking ring on the die body.The business end of the Lee full-length resizing die after resizing a bunch of cases. This photo shows the decapping pin, which removes the old primer.
I lubed each case with the lube Lee provided and ran it through the full-length resizing die, which simultaneously brought the cases back to factory dimensions and removed each case’s spent primer. The full-length resizing dies does both steps in one operation.
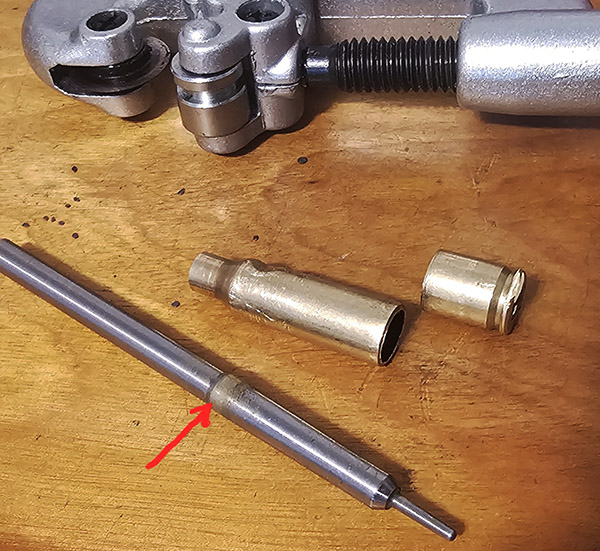
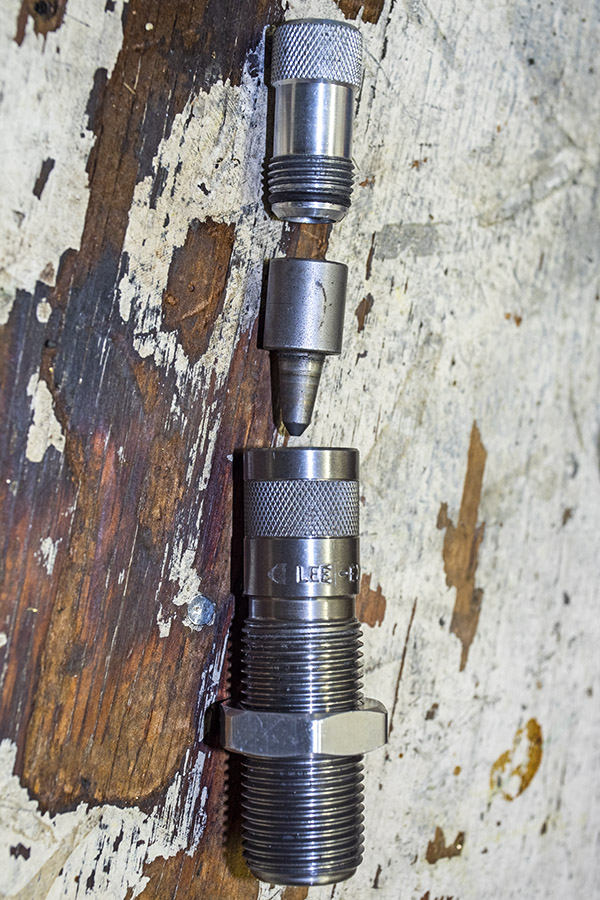
I intended using cast bullets in the .303 Enfield, so for me the reloading process included an additional step: Flaring the case mouth. Case mouth flaring allows cast bullets to enter the cartridge case without the case shaving any lead from the bullet. To flare the case mouths, I use a Lee universal flaring tool I purchased decades ago. It’s a clever die set that uses a cone to impart a slight bellmouth to the case.
Lee’s Universal Case Mouth Expander. I bought this in the 1970s and I’m still using it.The Lee Universal Case Mouth Expander disassembled. The amount the case mouth is flared is determined by how far the die body is screwed into the reloading press, and by how far the adjuster (top item in this photo) is screwed into the die body. The cone (shown in the middle of this photo) is what flares the case mouth. Lee provides two cones; one of small-to-medium calibers (shown here), and one for larger calibers (not shown here).When empty cartridge cases are run into the Lee Universal Case Mouth Expander) it imparts a slight flare to the case mouth. If you do it right, you can barely see the flare (as is the case for the case shown here) and the bullet enters the case with no lead shaving.
The approach to case mouth flaring is to install the Lee Universal Case Mouth Expander in the press and adjust it to impart just enough flare to allow the bullet’s base to enter the case. You don’t need much flare (less is more here; too much will work harden the brass unnecessarily). I’ll jump ahead a bit and mention here that if you can find that happy spot where you flare the case mouth just enough to allow the bullet to enter the case, you won’t have to crimp the case mouth later to eliminate the flare.
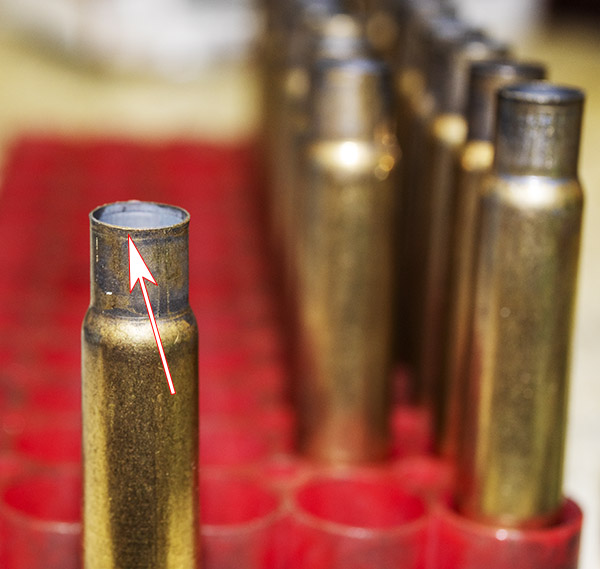
A perfectly-flared case mouth, with just enough flare to allow a bullet to start into the case without shaving any lead.
After completing the above full-length resizing and flaring, I reloaded 20 rounds (like you see in the photo at the top of this blog). Then I did what I always do: I labeled the box of reloaded ammo. After that, I fired the reloaded ammo in my Enfield.
I’m not going to cover the rest of the reloading process in Part 1 of this series, but I will in Parts 2 and 3. I’m jumping ahead here by mentioning firing the full-length resized ammo because I wanted brass that had been fired in my rifle. Ammo fired in my rifle would be perfectly formed to my rifle’s chamber, which is minutely different than other rifles’ chambers. That’s because of rifle chamber dimensioning tolerances. The once-fired brass I had was fired in other rifles, so I needed to shoot it in my rifle so the cases conformed to my chamber.
How did the full-length resized .303 ammo shoot? Very well, thank you. Take a look.
This was the first time I had fired this ammo in my rifle, so I needed to dial it in. The first three rounds went low at 50 yards (the nice tight group at about 5:30 on the outer edge of the 6-ring), so I ran the Enfield’s ladder aperture sight up. Oops, too much, which resulted in the group high in the 6-ring. I went down half the distance on the rear aperture, and the next three rounds were just above the bullseye. Down a click or two more, and the rifle was on the money. In case you were wondering, I used 21.0 grains of IMR 4227 and a Winchester large primer (but more on the load in Part 2 of this series).
Having fired my full-length resized ammo in my Enfield, the fired brass could now be neck sized instead of full-length resized. The idea behind neck sizing is that the clearance between the chamber and the brass case is greatly reduced by neck sizing (as opposed to full-length resizing), and theoretically, neck sizing should result in increased accuracy because the case won’t be rattling around in the chamber. There are a couple of another advantages to neck sizing, too. One is that it works the brass less, so it should last longer. A third advantage is that you don’t have to lube and then clean the cases. They can be neck sized without using lubricant. I’ll say more on that in a moment. Not having to lube (and then cleaning the lube from the cases) greatly speeds up the reloading process.
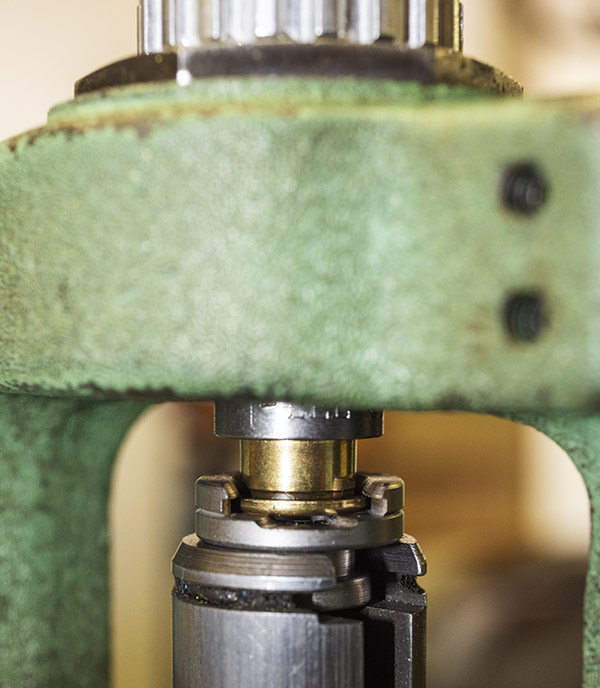
Now that I had brass cases that had been fired in my rifle, I installed and adjusted the Lee collet die in my press. The collet die performs two operations. It has a decapping pin that punches out the spent primer, and it has a set of four collets that compress the case neck around a spindle to bring it back to new brass factory dimensions (that’s the neck sizing operation). You can adjust the die’s depth in the press to adjust the final inside diameter of the case neck, which is a very useful feature to have. Ideally, the resized case neck inside diameter should only be 0.001 to 0.002 inch smaller than the bullet diameter. That amount of case neck inside diameter undersizing will allow the case the grip the bullet firmly so that it won’t push into or pull out of the case. You could make it tighter and still seat the bullet, but doing so would expand the case mouth more with the bullet’s insertion, and that is not desirable. It would distort the case and possibly introduce non-concentricity or angular misalignment between the bullet and the case, and that would hurt accuracy.
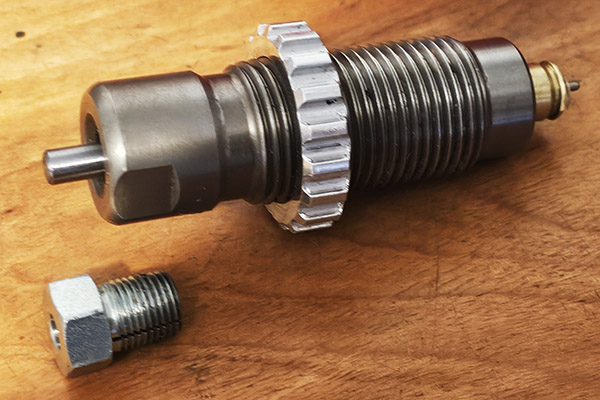
The Lee collet die installed in my RCBS Rockchucker press. This die will neck size the case instead of full-length resizing it.A .303 case entering the Lee Collet Die. By adjusting the depth to which the Collet Die is screwed into the press, you can control the neck-sized-only cases’ neck diameters. I adjusted the die to provide a 0.312 neck inside diameter, which gives 0.001-inch interference between the bullet and the case neck.
After completing the die seating depth adjustment, I had the case mouth diameter exactly where I wanted it: 0.312 inches. My cast bullets were at 0.313 inches, so I was good to go.
Not the world’s best photo (mea culpa). Parallax makes the inside diameter in this photo look like 0.313 inches; it was actually reading 0.312 inches. That’s what I wanted.
Next up will be our Part 2 of the Lee .303 British Ultimate 4-Die set review. Stay tuned.
So far, I am very impressed with this set of Lee dies. I’m not surprised, though. As I mentioned earlier, I’ve been using Lee equipment for decades, and it has always pegged the needle on my quality meter. These dies are good at any price. The fact that they cost less than any of the competitors’ products is a huge plus.
People reload ammunition for different reasons. It used to be you could save money by reloading, and I suppose for the more exotic cartridges (any Weatherby ammo, the big elephant rounds like .458 Win Mag, the .416 Rigby, etc.) that’s still the case. It’s not the case for the more common rounds like 9mm, .45 ACP, and .223 Remington; bulk ammo for those is so inexpensive you’d be hard pressed to reload for as little as that ammo costs. Sometimes people reload because factory ammo is no longer available or it’s very tough to find. But most of us reload for accuracy. We can experiment with different combinations of components and tailor a combo to a particular firearm to find the sweet spot…that combination of components that provides the tightest groups. I’m in that category; it’s why I reload.
When I’m testing for accuracy and I get a tight group, I always wonder: Is it because of the combination of components, or is it just a random event? Usually, if the group size is repeatable, we conclude that it is the component combination, and not just a random good group that results from all the planets coming into alignment. But is there a better way? You know, one that shows with more certainty that it’s the component combination, and not just a fluke?
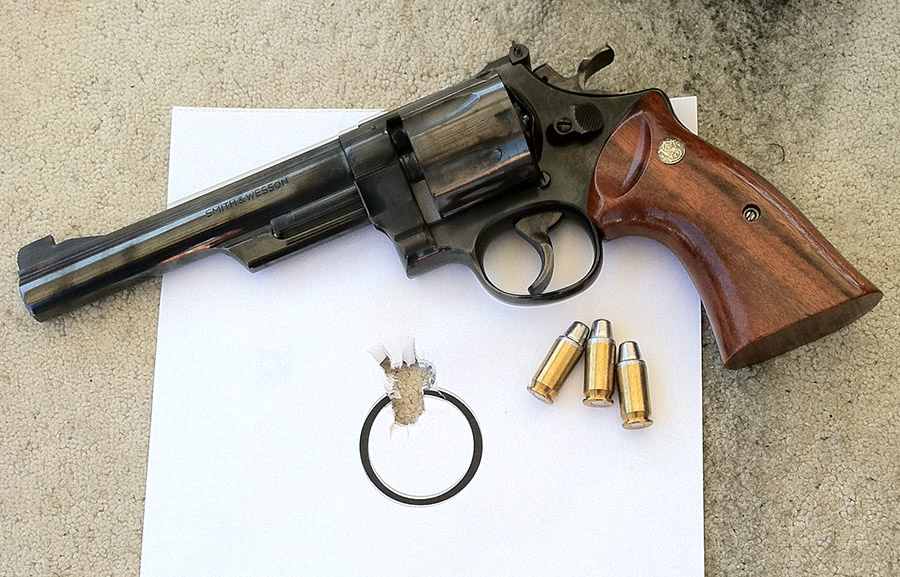
This article is a bit different. It’s not just a story about a gun or about reloading ammunition. It includes those things, but it’s more. This story is about applying the Taguchi design of experiments technique to .45 ACP load development for ammo to be used in a Smith and Wesson Model 25 revolver (the one you see in the photo above).
I’m guessing you probably never heard of Taguchi. That’s okay; most folks have not. Taguchi testing is a statistical design of experiments approach that allows evaluating the impact of several variables simultaneously while minimizing sample size. The technique is often used in engineering development activities, and I used it regularly when I was in the aerospace world. The technique was pioneered by Genichi Taguchi in Japan after World War II, and made its way to the US in the mid-1980s. I used the Taguchi technique when I ran engineering and manufacturing groups in Aerojet Ordnance (a munitions developer and manufacturer) and Sargent Fletcher Company (a fuel tank and aerial refueling company).
Taguchi testing is a powerful technique because it allows identifying which variables are significant and which are not. Engineers are interested in both. It lets you know which variables you need to control tightly during production (that is, which tolerances have to be tight), and it identifies the others that are not so critical. Both are good things to know. If we know which variables are significant and where they need to be, we can change nominal values, tighten tolerances, and maybe do other things to achieve a desired output. If we know which variables are not significant, it means they require less control. We can loosen tolerances on these variables, and most of the time, that means costs go down.
Like I said above, I used Taguchi testing in an engineering and manufacturing environment with great success. The Taguchi approach did great things for us. When I worked in the cluster bomb business, it allowed us to get the reliability of our munitions close to 100%. When I worked in a company that designed and manufactured aerial refueling equipment (think the refueling scene in the movie, Top Gun), it helped us to identify and control factors influencing filament-wound F-18 drop tanks. In that same company, it helped us fix a 20-year-old reliability problem on a guillotine system designed to cut and clamp aerial refueling hoses if failures elsewhere in the refueling system prevented rewinding the hose. You don’t want to land in an airplane trailing a hose filled with JP4 jet fuel. Good stuff, Taguchi testing is.
As you know from reading our other Tales of the Gun stories, the idea in reloading is to find the secret sauce…the perfect recipe of bullet weight, propellant, brass case manufacturer, and more, to find the best accuracy for a given firearm. Hey, I thought…I could apply the Taguchi technique to this challenge.
When you do a Taguchi experiment, you need to define a quantifiable output variable, and you need to identify the factors that might influence it. The output variable here is obvious: It’s group size on the target. The input variables are obvious, too. They would include propellant type, propellant charge, primer type, bullet weight, brass type, bullet seating depth, and bullet crimp. We’re trying to find which of these factors provides the best accuracy. I wanted to turn my Model 25 Smith and Wesson into a hand-held tack driver.
The Model 25 is an N-frame Smith and Wesson revolver chambered for the .45 ACP pistol cartridge. It is a superbly accurate handgun, as attested to by the target above.
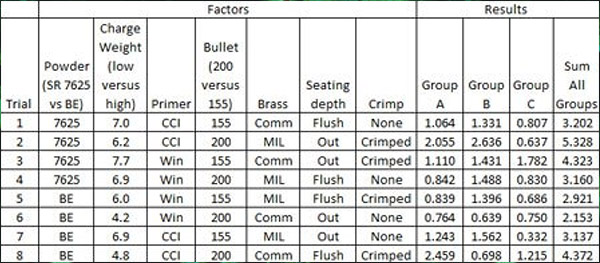
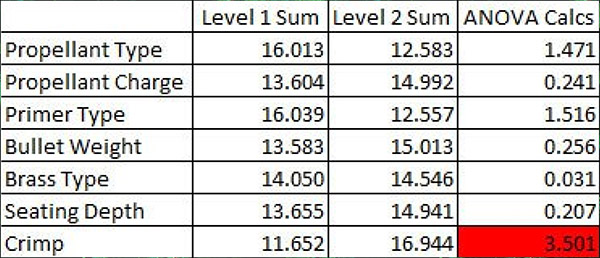
When Taguchi developed his testing approach, he made it simple for his followers. One of the things he did was define a simple test matrix, which he called an L8 orthogonal array. It sounds complicated, but it’s not. It just means you can evaluate up to seven different input variables with each at two different levels. That’s a bit complicated, but understanding it is a little easier if you see an example. Here’s what the standard Taguchi L8 orthogonal array (along with the results) looked like for my Model 25 load development testing:
As the above table shows, three sets of data were collected. I tested each load configuration three times (Groups A, B, and C), and I measured the group size of each 3-shot group. Those group sizes became the output variables.
The next step involved taking the above data and doing a standard Taguchi ANOVA (that’s an acronym for analysis of variance). ANOVA is the statistical method used for evaluating the output data (in our case, the group sizes) to assess which of the above input variables most influenced accuracy. That’s a complex set of calcs greatly simplified by using Excel. The idea here is to find the factor with the largest ANOVA result. You see, any time you measure a set of results, there’s going to be variation in the results. Where it gets complicated is the variation can be due to randomness (the variation in the results that would occur if you left all of the inputs the same). Or, the variation can be due to something we changed. We want to know if the differences are due to something we did (like changing or adjusting a component) or if they are due to randomness alone. I cranked through the ANOVA calcs with Excel, and here’s what I obtained…
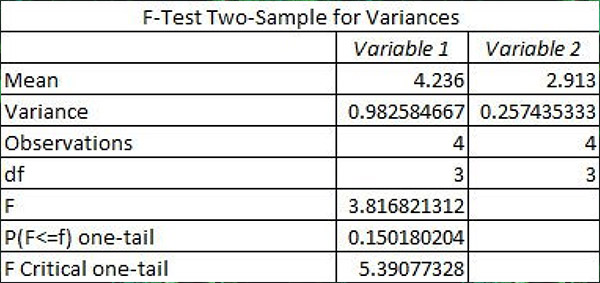
The above results suggest that crimping (squeezing the bullet by slightly deforming the case mouth inward) has the greatest effect on accuracy (it had the largest ANOVA calculated result). The results suggest that cartridges with no crimp are more accurate than rounds with the bullet crimped. But it’s a suggestion only; it doesn’t mean it’s true. The next step is to evaluate if the differences are statistically significant, and doing that requires the next step in the ANOVA process. This gets really complicated (hey, I’m an engineer), but the bottom line is that we’re going to calculate a number called the f-ratio, and then compare our calculated f-ratio to a reference f-ratio. If the calculated f-ratio (the one based on the test results above) exceeds the reference f-ratio, it means that crimping versus no crimping makes a statistically significant difference in accuracy. If it not not exceed the reference f-ratio, it means the difference is due to randomness. Using Excel’s data analysis feature (the f-test for two samples, for you engineers out there) on the crimp-vs-no-crimp results shows the following:
Since the calculated f-ratio (3.817) does not exceed the critical f-ratio (5.391), I could not conclude that the findings are statistically significant. What that means is that the difference in accuracy for the crimped versus uncrimped rounds is due to randomness alone.
Whew! So what does all the above mean?
All right, here we go. This particular revolver shot all of the loads extremely well. Many of the groups (all fired at a range of 50 feet) were well under an inch. Operator error (i.e., inaccuracies resulting from my unsteadiness) overpowered any of the factors evaluated in this experiment. In other words, my unsteadiness was making a far bigger difference than any change in the reloading recipe.
Although the test shows that accuracy results were not significantly different, this is good information to know. What it means is that all of the test loads (the different reloading recipes) are reasonably accurate. If I had used a machine rest, I might have seen a statistically significant difference. Stated differently, the test told me that I needed to use a machine rest with this gun to see which load parameters were really playing a role in accuracy. Without it, my flaky shooting skills (or as the statisticians like to say, my randomness) overpowered any accuracy gains to be realized by playing with component factors.
That said, though, I like that 4.2 grains of Bullseye load with the 200 grain semi-wadcutter bullet, and it’s what I load for my Model 25. But I now know…the gun shoots any of these loads well, and crimping versus no crimping doesn’t really make a difference.
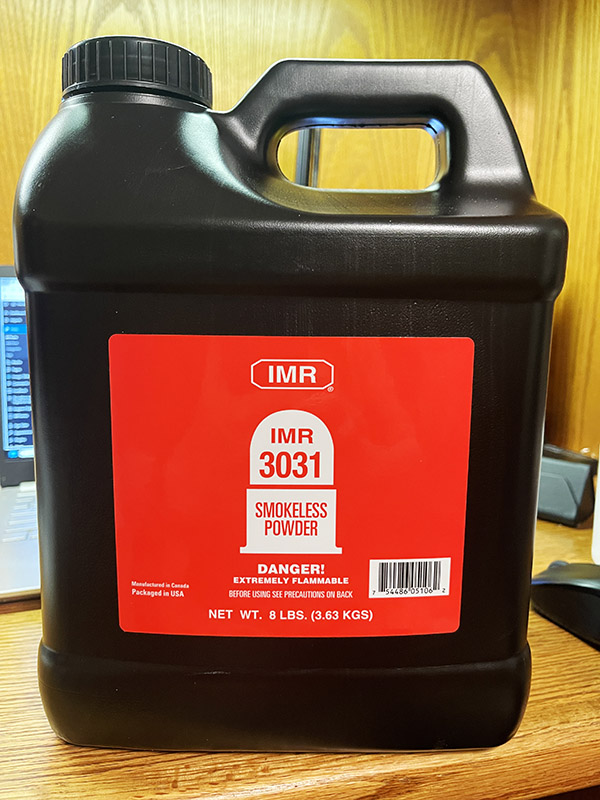
I recently bought an 8-lb container of IMR 3031 on the theory that the time to buy something is when you see it, and I’ve been researching loads for various cartridges using that powder.
IMR 3031, and lots of it.
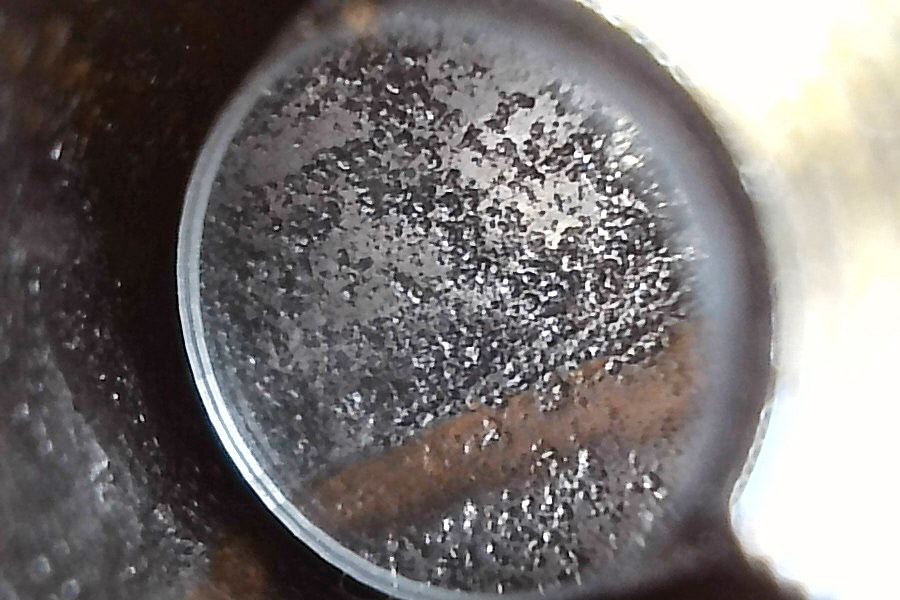
IMR 3031 doesn’t appear too often in modern reloading manuals, which struck me as odd because when I first started playing with things that go bang it seemed like 3031 was an almost universal propellant, good for whatever ails you. So I dug out some reloading manuals from the 1970s, and as I expected, 3031 showed up for a bunch of different cartridges. One of them is 7.62x54R, and I wanted to see if I could develop a decent load for my Mosin-Nagant. I should point out at this point that there’s nothing special about my 1940 Tula Mosin (other than the fact that it’s one of my favorite rifles). In fact, the barrel looks more like a sewer pipe than a precision shooting instrument.
My Mosin-Nagant’s bore. It ain’t pretty.
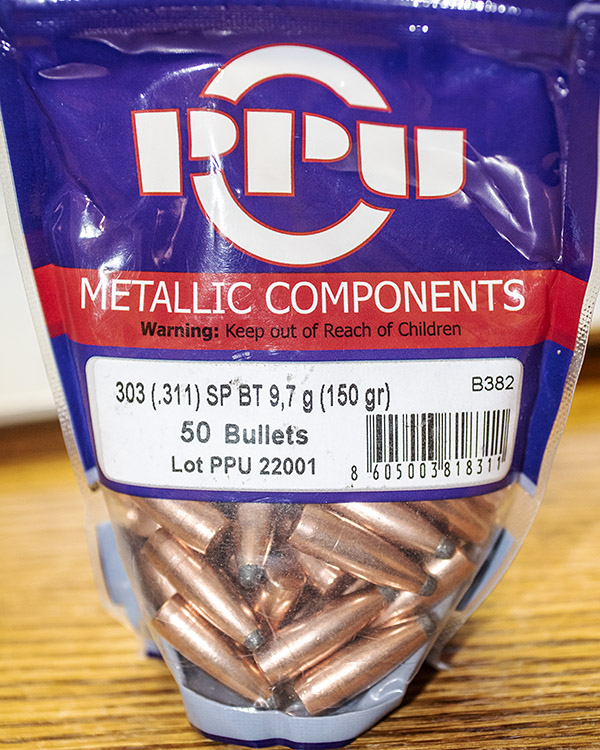
I loaded the ammo for this test series with the PPU Partizan 150-grain, 0.311-inch diameter, jacketed softpoint boattail bullet. These are relatively inexpensive bullets (they go for around $.30 each from Graf’s, which I guess is cheap by today’s standards). These bullets pop up for sale occasionally, and a while back I bought 500 of them.
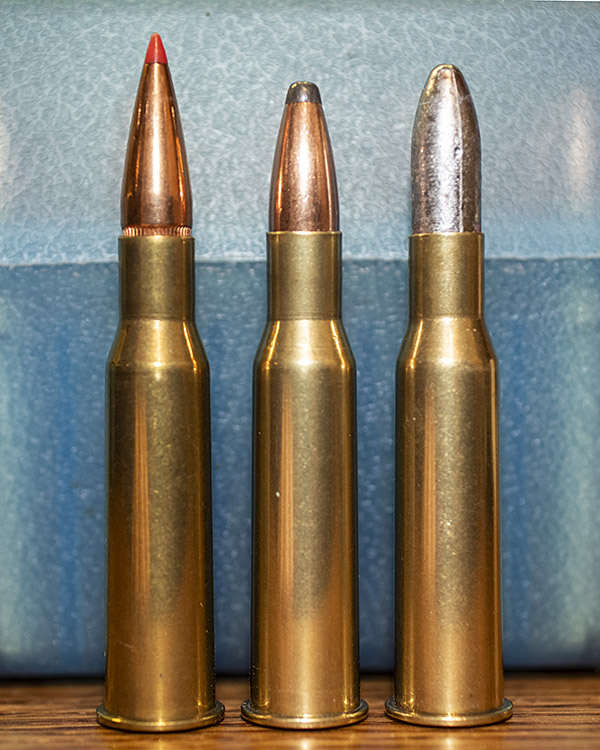
PPU bullets. They are relatively inexpensive. Sometimes they go on sale.Three different 7.62x54R reloads. From left to right, it’s the Hornady V-Max bullet, the PPU jacketed softpoint bullet, and a cast lead bullet. I shot only the PPU bullets for this blog.
My testing consisted of five different IMR 3031 loads to see how they performed at 100 yards. The drill was to fire 10 rounds each at charges of 39.0, 40.0, 41.0, 42.0, and 43.0 grains. I used PRVI Partizan brass and Winchester primers, and I seated the bullets for an overall cartridge length of 2.790 inches with no crimp. Here’s what I found:
The chrono and accuracry results. 42.0 grains of IMR 3031 seems to be the sweet spot.A 100-yard target group with the 42.0 grain IMR 3031 load.
The sweet spot appears to be right about 41.0 to 42.0 grains of IMR 3031 (the target above is with 42.0 grains). The standard deviation is smaller for the 42.0-grain load with the same group size, so that’s what I’m going with. Recoil was moderate with all loads; none of the loads showed any pressure signs. None of the above were compressed charges. The 43.0-grain load had a smaller standard deviation, but the group opened up and shifted to the left, so I’m going to call the 42.0-grain load good. It’s as good as the groups I was getting with IMR 4320, which had previously been my Mosin accuracy load.
Before any of you out there in the blogosphere get your shorts in a knot about using older reloading manuals, I realize the manual companies (and others who parrot them) advise against doing so. The theory is that the propellant formulations have changed and what the old manuals show as a safe load may not necessarily be so today. I get it. That’s why I start testing at the bottom of the range and work up, looking for pressure signs along the way. The current and the 2007 Hornady manuals do not list IMR 3031 for the 7.62x54R. The 1973 Hornady manual (the first one I ever bought when I was just getting started in this game) shows a max of 44.4 grains with a 150-grain bullet, which is why I stopped my initial testing at 43.0 grains. None of the loads I tested showed any pressure signs and recoil was moderate with all loads. I think the new manuals feature new powders because the powder companies pay for the manuals to include their newest stuff. I don’t think they do it because the powders are necessarily better. Maybe I’m wrong. I’m a cynical old fart.
I should point out that my findings are not rigorous for two reasons:
I’m not that good a shot, and
My eyes are not what they used to be. It’s getting increasingly more difficult to get the front sight in sharp focus (ah, to be 72 again…). I do the best I can.
But I’m still out there having fun, and that’s what important.
I’ve written a lot about the Mosin-Nagant 91/30 rifle. Here are my earlier posts:
I recently received my order of Inceptor ARX 118-grain .45 ACP bullets. I had previously loaded 9mm ammo with ARX 65-grain bullets and I was pleased with them, so I wanted to try the ARX bullets in the .45, too.
I compared how two 1911s performed on my local indoor pistol range, firing with a two-hand hold (but without a rest) at 10 yards. I used nearly identical 1911 Springfield target pistols, one in 9mm and the other in .45. The .45 1911 is as it came from the factory; this gun has had no custom work done to it other than installing a one-piece guide rod. The 9mm 1911 had the same one-piece guide rod, along with other custom touches by good buddy TJ at TJ’s Custom Gunworks. The 9mm 1911 has a much crisper and lighter trigger, it is an absolute delight to shoot, and it is my favorite handgun.
The two Springfield 1911s used in this test., shown here with cast bullet loads. The testing described herein used ARX composite bullets, as shown in the photo at the top of this blog.
The ARX bullets are different than anything I’ve used before. They are a mix of copper particles suspended in a polymer matrix. The ARX bullets are much lighter than cast or jacketed bullets, with consequently dramatically higher muzzle velocities. They are not marketed as frangible bullets. They are intended to produce a larger wound cavity and I suppose because of that they could be considered a better defense round. I’m not interested in any of that. I’ll never hunt with either a 9mm or a .45, and although I sometimes carry a 1911 chambered in .45 ACP or my 9mm S&W Shield, when I do so it is always with factory ammunition. Nope, my interested was a result of my buddy Robby gave me a few 9mm ARX bullets and I fell in love with them. The ARX bullets are less expensive than cast or jacketed bullets and they are accurate. For a range rat like me, that’s a good deal.
I reloaded all ammo used in this test series with my Lee turret press, a great setup that consistently produces superior ammo. This photo shows a completed ARX .45 ACP round. Here’s our earlier review of the Lee gear.
9mm 1911 ARX Results
I wrote about my initial impressions with the 65-grain 9mm ARX bullets previously (they were all good), so for this first portion of the comparison there’s not too much that’s new other than this load’s attaining 100% reliability in holding the slide back after the last round.
9mm ammo loaded with the ARX 65-grain polymer composite bullet. After my first trial with these bullets, I ordered a bunch.9mm ARX bullets loaded in my 1911’s magazine.
My 9mm load uses 5.2 grains of Winchester’s 231 propellant, with the bullets seated to an overall cartridge length of 1.135 inches. I used CCI 500 primers and mixed brass for the loads you see here (I am lazy and I didn’t want to sort the 9mm brass). I loaded these on my Lee turret press using Lee dies (including the factory crimp die). I took the load data directly from Inceptor’s website. This load is a max load in their standard load listings (i.e., it is below the +P loads the Inceptor data also lists).
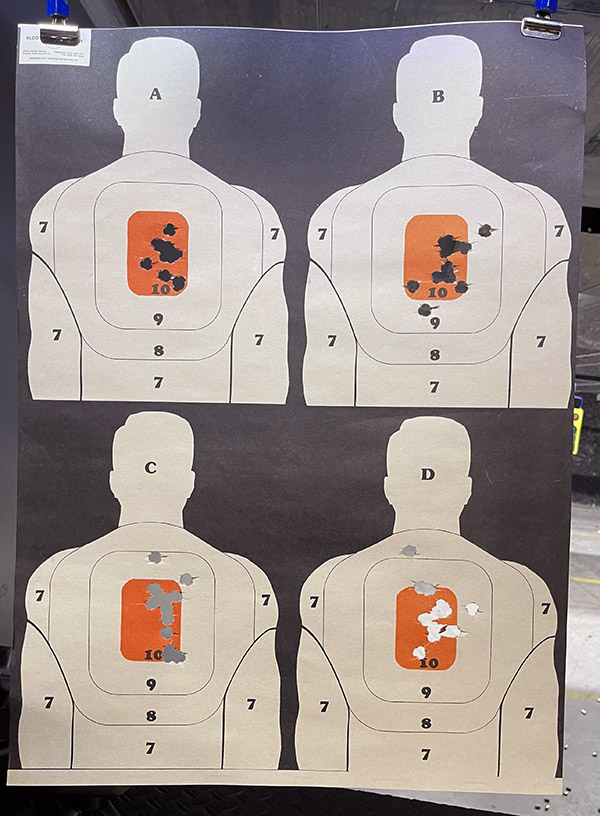
I shot at the Alco four-silhouette target (it has four quarter-sized silhouettes on each sheet), and I sent either 12 or 13 rounds downrange on each silhouette. That made for a total of 50 rounds on each target.
The Alco Targets 4-silhouette target. I shot 12 rounds at the top left target ,13 rounds at the top right target, 12 rounds at the bottom left target, and 13 rounds at the bottom right target. That top right target is pretty sweet.
The 9mm ARX load functioned perfectly in my 1911. There were no failures to feed or eject and the pistol stayed open after the last shot fired. This is an accurate load. The flyers are due to yours truly, not the gun or the load. Maybe if I had sorted the brass they would be a little better, but these are good enough for my purposes.
These 9mm bullets only weigh 65 grains. They step out sharply, but the recoil is low (perceptibly lower than what I would feel with a 115 or 124-grain cast or jacketed bullet). Velocities are high for a 9mm (which are typically in the 1100 fps range with cast or jacketed bullets). The Inceptor data for my load showed that they achieved 1433fps with 5.2 grains of HP38 propellant (which is the same powder as Winchester 231). Their results were with a 4-inch barrel. My 1911 has a 5-inch barrel; I achieved an average velocity of 1626fps, or nearly 200fps faster than what Inceptor achieved in their testing. To add a little more context to these findings, I previously tested this load in my S&W Shield (which has a 3.1-inch barrrel). In the Shield, this load averaged 1364fps. The bottom line? My results are consistent with the Inceptor load data.
Take a look at the Garmin chrono data for this load in the 1911.
Yikes! These are smoking hot 9mm rounds!
In my prior test of this load in the Springfield 1911 and the S&W Shield, I found that the 1911 would not hold the slide back after the last shot (the Shield didn’t have that problem). In that earlier initial test, I used a two-hand hold and I rested my arms on the bench. I think that might have caused the 1911’s problem with holding the slide open after the last shot. In the range session yesterday, I used a two-hand hold, but I did not rest my arms on the bench (and the gun functioned perfectly, holding the slide open after the last shot on every 5-shot string). The 5.2-grain Winchester 231 load is a good one for the 9mm. It’s accurate, the recoil is light, and reliability is superb.
.45 ACP ARX Bullet Testing
I next moved on to test the 118-grain ARX bullets in my .45 ACP Springfield 1911.
A cartridge that looks like a drill bit! ARX bullets in the .45 ACP make for an interesting and handsome round.
The .45 ACP load used the ARX 118-grain bullet with 9.1 grains of Power Pistol, a Winchester large pistol primer, and Winchester brass, all loaded on the Lee turret press with a Lee crimp die. The .45 ACP load data also came from the Inceptor site. The site lists three powders; the only one I had on hand was Power Pistol. The 9.1 grains of Power Pistol is at the top of their non+P range. It is not a +P load. Ordinarily I would not start testing at the top of the listed propellant weight range, and I probably shouldn’t have done so here (more on that a paragraph or two down).
.45 ACP ARX bullets loaded in my 1911’s mag. Everything works. They look cool.
The Inceptor load recommended a cartridge overall length of 1.26 inches. I loaded with a cartridge overall length of 1.250 inches, which is what I have used in all my other .45 ACP loads. That length fits well in the magazine. I don’t think the additional 1/100 of an inch Inceptor specified would cause interference between the ammo and the forward inside magazine edge, but it’s close and in any event, I wanted to stick with the cartridge length that has always worked for me in the past.
The .45 loads felt hot to me. I think that’s primarily because I have been shooting my 9mm handguns lately. A few of the cartridge cases showed a little (very little) primer flattening. I’m not sure if that was due to firing the round or if it was due to me putting extra effort into primer seating during the reloading process. The .45 ACP is a powerful cartridge, and when I haven’t shot one in a while, it can seem even more powerful.
Same target, different cartridge. That top left target has 12 rounds through it and it is what I’d like to do all the time. When it happens, it’s its own reward.
Accuracy was about the same as with the 9mm. I thought both were good. There were occasional flyers, but that was undoubtedly me and not the gun or the load. Again, I shot offhand for all of these groups, so I wasn’t expecting one-hole results.
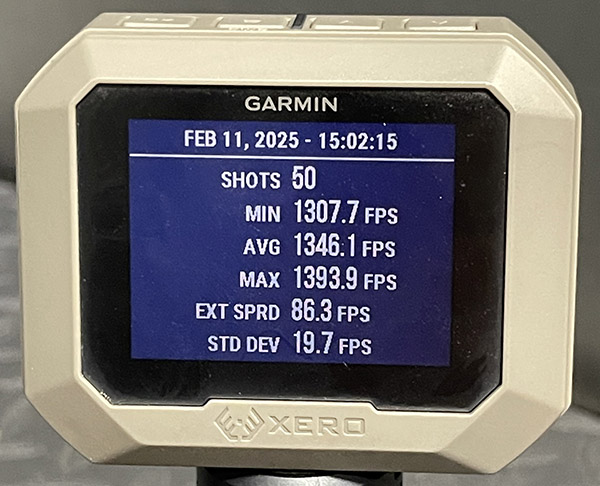
1346fps from a .45 Auto! The chrono tells the story!
Velocities were very much higher than what I’ve seen with other bullets in any .45 ACP. I had previously loaded .45 ACP with all kinds of cast and jacketed bullets ranging from 185-grain wadcutters to 230-grain full metal jacket projectiles. They would typically see velocities of 700fps to maybe 900fps. Some folks load the .45 a little hotter than that with cast or jacketed bullets. I’ve never felt a need to. But those ARX 118-grain bullets! Wow! The Inceptor load data said I would see 1,317fps with 9.1 grains of Power Pistol propellant (and for their .45 ACP testing, Inceptor used a 5-inch barrel); my ammo averaged 1346fps. Extreme spread and standard deviation were low; both extreme spread and standard deviation were similar to what my 9mm ARX loads achieved.
Feed and ejection were flawless in my Springfield 1911. That said, I am going to drop the load down to 8.7 and 8.5 grains of Power Pistol and try that for the next load. If I get good groups and reliable function, that’s where I’ll load in the future.
The Bottom Line
These are good bullets, and I think they represent a huge step forward. They are the first really new thing to come along in the reloading game in a long time.
Surprisingly, both the 9mm and the .45 put the bullets where I wanted them, with no sight adjustments from my previous lead or jacketed bullet loads. I expected both the 9mm and .45 ACP ARX loads to shoot low, but they did not. The sights were right on the money.
I didn’t see any copper fouling from the bits of copper mixed in the ARX bullets’ copper/polymer matrix. There’s a tiny bit of blue/purple fouling from the bullet polymer, but it’s very minimal and it’s only in the grooves. I had not cleaned either the 9mm or the .45 1911 after earlier range sessions with cast and plated bullets and the bores were dirty when I started shooting the ARX bullets. Both guns were cleaner after shooting the ARX bullets than they are after shooting cast or jacketed bullets. Bore cleanliness is a big plus here.
Price is another advantage; the 9mm bullets are $57/1000 and the .45 ACP bullets are $65/500 (I think the .45 bullet price at $65/100 is an increase from what I paid a couple of weeks ago). I’ve ordered ARX bullets three times now; on all three orders, they did not charge sales tax. I guess the sales tax is included in the retail price already. Whatever. I’m an anti-tax guy. Whether it’s real or imagined, not paying sales tax is plus in my book.
I’m not going to hunt with either my 9mm or my 1911, but here in California, these bullets should meet our lead-free bullet criteria. Similarly, the bullets are not hollow points. Some places (San Francisco and all of New Jersey come to mind) have outlawed hollow point bullets. These bullets should be okay in places where hollow points are outlawed.
I’ll be ready. Will you?
As mentioned near the start of this blog, the drill-bit-like bullet profile creates a much larger wound channel. The idea is that bullet spin allows the bullet to grab onto tissue and propel it outward. There are some YouTube videos that purport to show this in ballistic gelatin. I suppose if you were defending yourself against a bad guy made of ballistic gelatin (think Steve McQueen and the 1958 classic, The Blob) these would be the preferred bullet. None of that matters to me, and from a defense perspective it’s probably moot (especially with the .45). Dead is dead, and with a .45, I’m guessing a larger wound channel won’t make a bad guy any deader. My interest is in how well the ARX bullets shoot on paper, and they do that extremely well.
Fifty years ago I used to be a pretty good metallic silhouette shooter. I would like to return to that game. It would be nice to be 25 years old again, too, but that’s not in the cards. Metallic silhouette shooting, though…I think I can turn the clock back on that one.
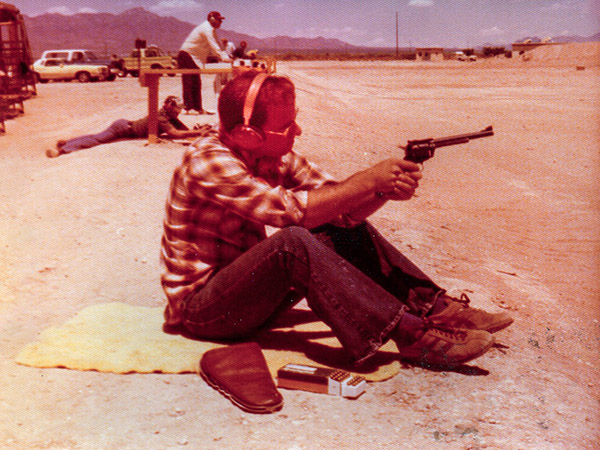
Participating in a Fort Bliss metallic silhouette competition in 1976. One of the revolvers I shot in those days was a .44 Magnum Ruger Super Blackhawk (shown above); the other was a .357 Magnum Model 27 Smith and Wesson.
If you haven’t figured it out yet, that’s where this story is going. Ponce de León went looking for his fountain of youth. Me? I just want to knock over a few metal chickens, pigs, turkeys, and rams. Like I did 50 years ago.
My friends at the range are surprised when I shoot at 100 yards with a revolver. That’s because they’ve never shot a handgun metallic silhouette course. In that game, there are four courses of fire:
Chickens at 50 yards (10 shots)
Pigs at 100 yards (10 shots)
Turkeys at 150 yards (10 shots)
Rams at 200 yards (10 shots)
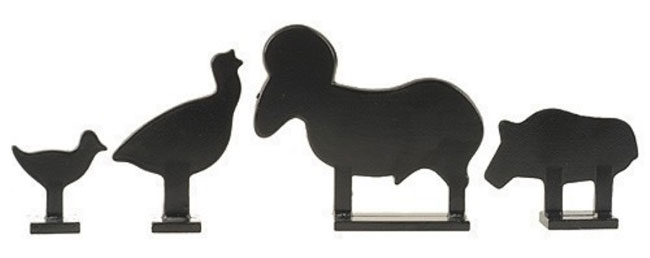
The targets are sized so that each subtends about the same angle. That means the pigs (actually, they are supposed to be javelinas) are bigger than the chickens, the turkeys are bigger than the pigs, and the rams are bigger than the turkeys.
Chicken, turkey, ram, and pig targets.
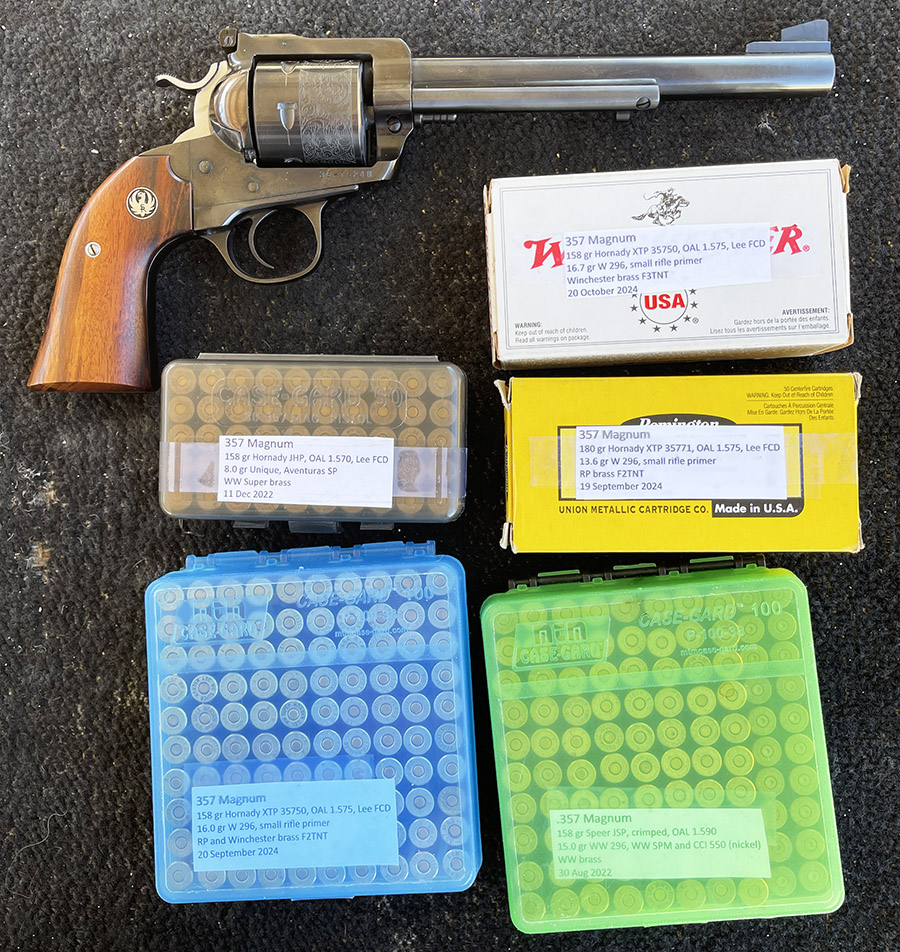
The hardest target to hit is the turkey (it is narrower than the other targets); the hardest target to knock over is the ram (it is big and heavy). Simply hitting doesn’t count; you have to knock the targets over. The 200-yard ram weighs about 55 pounds. Back in the day, I used to be able to knock them over with a .357 Magnum. My load was a 200-grain cast bullet and 13.0 grains of Winchester 296. It was more reliable than a 240-grain 44 Magnum load because the .357 bullet is more aerodynamic and it retained more energy downrange.
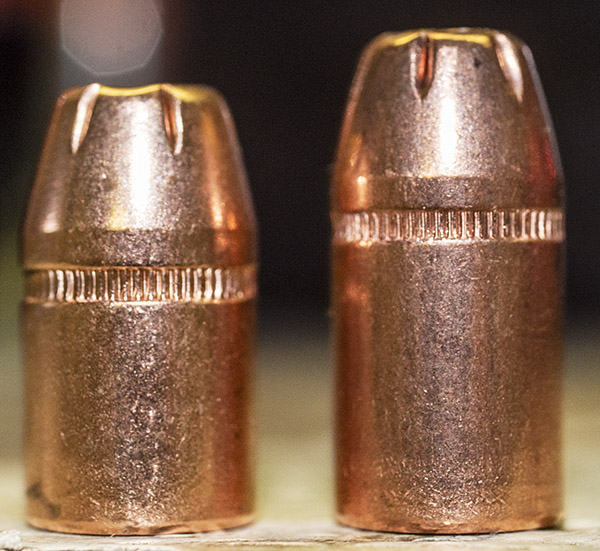
I’ve been evaluating loads for the .357 Ruger Bisley for metallic silhouette competition, and load development is progressing. I’ve mostly been playing with Hornady’s 158-grain jacketed hollowpoint XTP bullet, but I’ve also tried their 180-grain XTP. In my Bisley the 180-grain Hornady is a very accurate load.
Hornady’s 158-grain XTP bullet (left) and 180-grain XTP bullet (right).
The two bullets are identical above the cannelure. The difference is bullet length behind the cannelure.
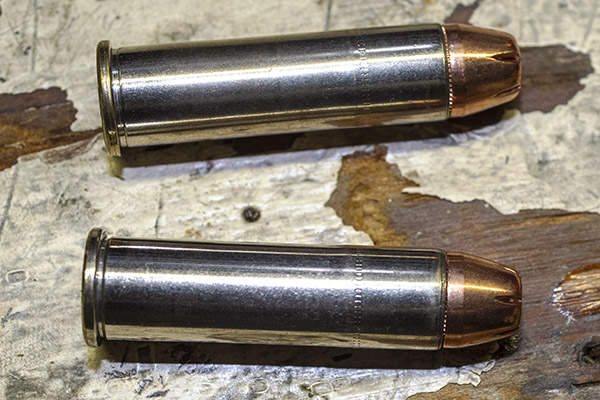
Two .357 Magnum cartridges loaded with the 158-grain XTP bullet (top) and 180-grain bullet (bottom). After loading, the cartridges appear to be identical.
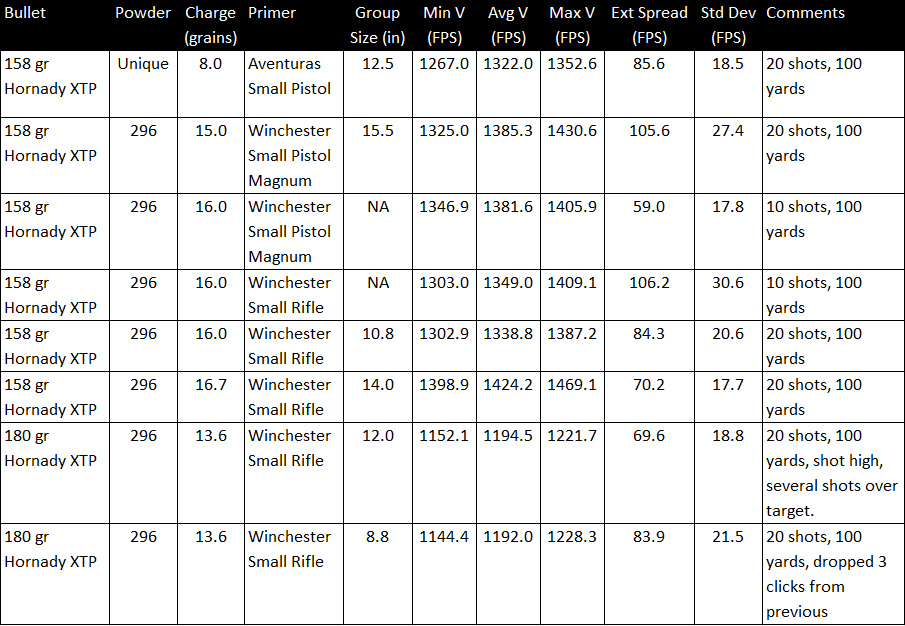
I’ve been keeping track of the loads, the velocities, and the accuracy on 100-yard targets. The Bisley shoots best with the 180-grain Hornady XTP bullets and 13.6 grains of 296 powder. I used small rifle primers. I’ll try the same load with small pistol magnum primers to see if I get a velocity gain and if the groups get better. In prior tests with the 158-grain Hornady bullets, there didn’t seem to be a velocity increase in going from small rifle to small pistol magnum primers. We’ll see if the same holds true for the 180-grain bullets.
Here’s a 100-yard target with the actual size of the 100-yard pig overlayed on it. That silhouette is one I grabbed off the Internet. It is smaller than what I remember (and certainly smaller than any javelina I’ve ever seen, other than babies). But it’s useful for assessing my progress in getting a useable Bisley load. I used the 180-grain bullets for the group you see below.
A target shot at 100 yards, with a pig imposed on it. I think the actual target is a little larger. This isn’t a bad 100-yard revolver group, but I want to tighten it up.
Real javelinas are not quite that small, and they’re mean as hell. You don’t want to tangle with a javelina.
The real deal: Mamá Javelina con su bebé. Folks tell me I was in a bad spot when I took this photo. It was dark and I couldn’t see the javelina except when the flash fired. I didn’t know where to focus, so I just kept twisting the lens and firing successive shots. Only one was in focus. I didn’t know this lady was with her baby until I saw the photo later.
Winchester’s 296 powder is my preferred propellant as it usually gives great velocity and accuracy. Winchester 296 is prone to gas cutting, though. That’s what occurs on the underside of the revolver’s top strap (the part of the frame that goes over the cylinder). Hot gases and powder escape between the barrel and cylinder gap and cut into the frame. From what I’ve read, it tends to cut as you see in the photo below, and then it doesn’t get any worse. I think that’s because as the cutting gets deeper, the distance to the bottom of the cut increases.
Flame cutting on the Bisley top strap induced by hot 296 loads.
I’ve seen gas cutting in handguns after putting lots of 296-powered rounds through them (and that’s what I intend to continue to do with the Bisley). We’ll find out if it is self-limiting.
The plan is to continue to practice (a lot) and continue the load development effort. So far, 13.6 grains of 296 and the 180-grain Hornady bullet get the nod. Then I have to zero the revolver at 50, 100, 150, and 200 yards. Fortunately, my club (the West End Gun Club) has a range that goes out that far. Then I’m going to find someplace that has handgun metallic silhouette shooting and knock down a few targets. It’s going to be fun.
Notice anything flaky about the bullets above? At first, I didn’t. But it’s there. Read on, my friends.
I confirmed a couple of good loads for the .30 06 Weatherby this morning and several months of trying different bullet weights, powders, powder charges, seating depths, and more. In the past, one of my favorite bullets for both the .30 06 and .300 H&H cartridges has been the Winchester 150-grain jacketed softpoint so I wanted to try these again, but they have been unavailable for a long time.
When the Winchester bullets finally came back on the market again a few months ago, I bought 1000. Sometimes they grouped well in my Weatherby, at other times they did not. I got to where I worked up a load with 51.0 grains of IMR 4064 (a max load for this bullet) and that had shown promise, but I’d get a good group and then a bad one. I was pretty sure it wasn’t me being flaky behind the gun; things looked good through the scope when I pulled the trigger.
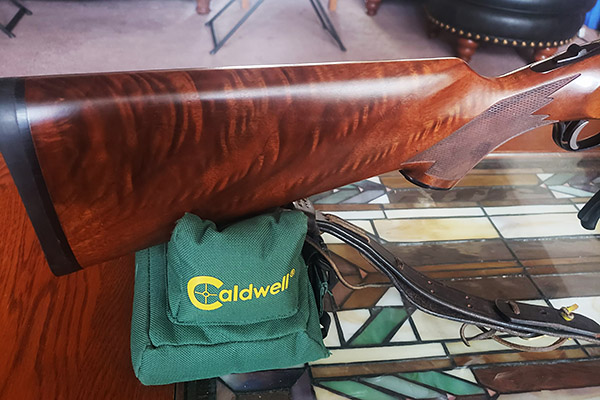
My 40-year-old Weatherby Mk V, chambered in .30 06 Springfield. It’s a beautiful rifle.That’s a 1980s-ish 12X Leupold Silhouette scope on the Weatherby.
I found that how I positioned the rifle in the Caldwell rest made a difference. If I had the rifle positioned so that the rest was just forward of the rifle’s floorplate, it grouped well; if I had the rifle positioned further back, it did not group as well. Even while taking care to appropriately position the rifle, though, the Winchester bullets grouped erratically. I’d get good groups and then I’d get bad groups.
Then one day after another frustratingly inconsistent range session, I returned home, cleaned the rifle, resized the brass, threw the brass in the tumbler, and was reloading it with the above load when I noticed that the bullet cannelures were not at consistent heights above the case mouth after seating the bullets. Hmmmm.
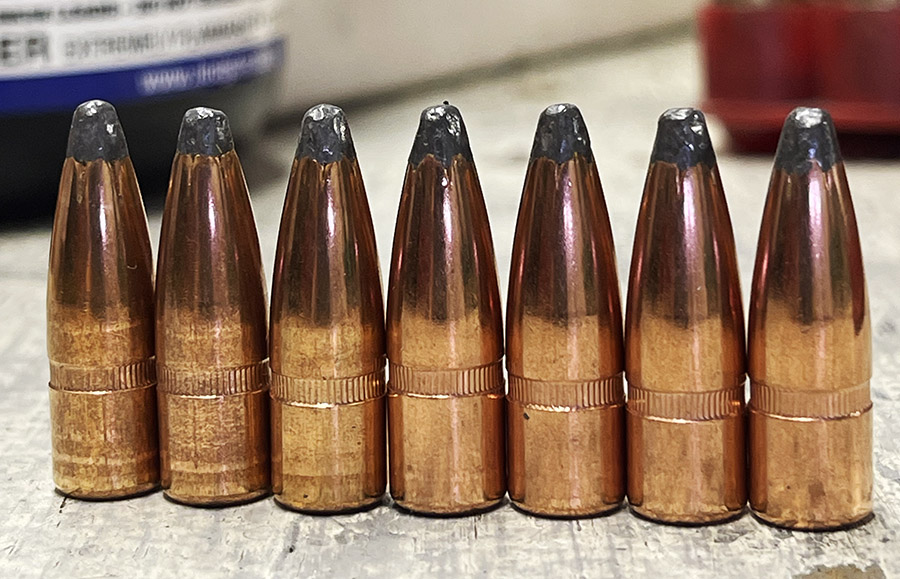
Winchester 150-gr JSP bullets. Note the cannelure location inconsistences.
So I lined up some bullets on the bench, and son of a gun, the cannelures were all over the place on the bullets (with regard to height above the bullet base). I bitched to Winchester about this through their website and they agreed to refund what I had paid for the bullets. They even had a UPS guy stop by and give me a prepaid shipper to return them. I didn’t want to, though, because the bullets had done well in the past, and I still wasn’t certain that the cannelure location issue was affecting accuracy.
So I reloaded another 12 rounds and before I did so, I sorted the Winchester bullets by cannelure height. I loaded 6 cartridges with bullets that had cannelures at what appeared to be approximately the same location, and I took the bullets I had screened with what were obvious cannelure location differences and loaded 6 more rounds. The next morning I got out early to beat the heat and set up a 100 yard target at the West End Gun Club. I proved my hypothesis: The cannelure height variability was degrading accuracy significantly.
The top two groups had bullets with inconsistent cannelure heights. The bottom two groups had bullets with cannelure heights that were located in approximately the same spot, and the groups with those bullets were much smaller.
The group sizes for bullets with the same cannelure locations returned minute-of-angle groups; the group sizes for bullets with random cannelure height locations were more than twice the size of the consistent-cannelure-location bullets. Duh. I proved (at least to myself) that this cannelure height location issue is making a difference. I can hypothesize that cannelure location can affect the bullet’s center of gravity, center of pressure, drag, and perhaps other aerodynamic and mass properties characteristics. The bottom line to me is that cannelure location variability plays a big role. Winchester screwed the pooch when they made these bullets, which is a shame. I should also mention that these bullets were not sold as seconds. They were supposed to be good bullets. An old line company with a name like Winchester ought to be making a quality product, but they clearly are not. That notwithstanding, I think I’ll keep the bullets and sort them. I’ll use what I cull out for open sight rifles, or maybe I’ll sell them to a gas station and they can melt them down for wheel weights.
Yeah, I could just send the bullets back. To Winchester’s credit, they were willing to refund what I had paid for the bullets. But they disappointed me, and I have to tell you, I spent a lot of time and money in wasted components trying to shoot good groups with lousy bullets. What I’d really like is a note from Winchester telling me they’ve fixed the problem, and then I’d buy another thousand bullets.
You might wonder: Why not just use Hornady’s comparable 150-grain jacketed soft point bullet? It’s a logical question. I tried that with the same load, and it wasn’t as accurate as the screened Winchester bullets (even though the cannelure location was consistent on the Hornady bullets).
I did find a Hornady bullet and a load that worked well in this rifle, though, and that’s the 130-grain Hornady jacketed soft point bullet with 53.0 grains of IMR 4320 (a max load, so work up to it). It shoots slightly high and to the right compared to the load above. IMR 4320 is no longer in production, but I have a stash and I’ll continue to use it. This load is also extremely accurate in my Ruger No. 1A.
Wondering about the chrono results for the loads described above? Here they are, as shot from my 26-inch barreled Weatherby Mark V:
150-grain Winchester Loads
150-grain Winchester jacketed soft point bullet, 51.0 grains of IMR 4064, no crimp, cartridge overall length 3.250 inches, Fiocchi large rifle primer, inconsistent bullet height cannelure
Min velocity: 2861.7 fps
Avg velocity: 2891.8 fps
Max velocity: 2909.8 fps
Extreme spread: 48.1 fps
Standard deviation: 15.9 fps
150-grain Winchester jacketed soft point bullet, 51.0 grains of IMR 4064, no crimp, cartridge overall length 3.250 inches, Fiocchi large rifle primer, screened for consistent bullet height cannelure
Min velocity: 2902.9 fps
Avg velocity: 2912.5 fps
Max velocity: 2933.1 fps
Extreme spread: 30.2 fps
Standard deviation: 10.0 fps
130-grain Hornady Load
Load: 130-grain Hornady jacketed soft point bullet, 53.0 grains of IMR 4320, no crimp, cartridge overall length 3.095 inches, Fiocchi large rifle primer
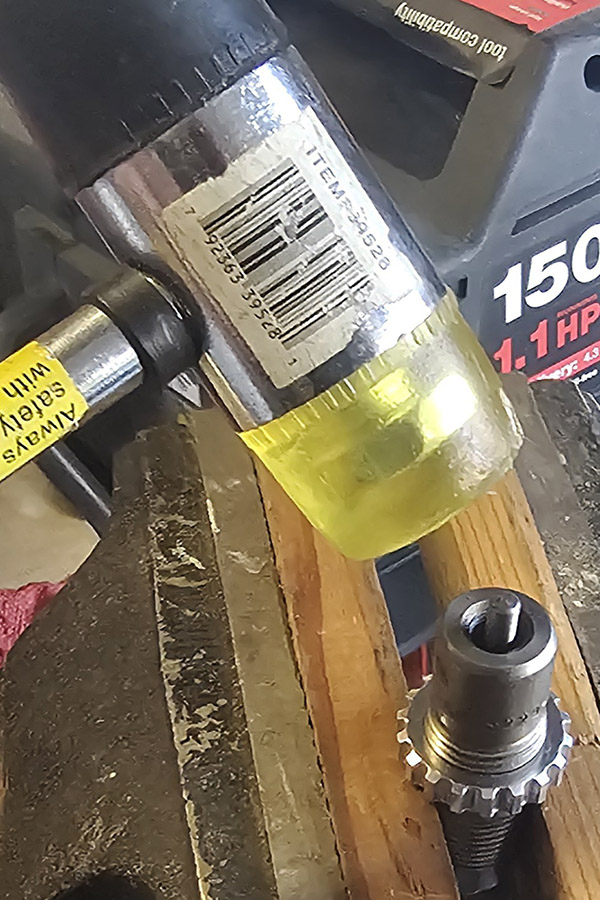
A problem that sometimes occurs when we reload is that a case gets stuck in the decapper/expander die (also known as the resizing die). This can result from not adequately lubricating the case prior to running it into die, or not cleaning a new die prior to use. The case gets stuck in the die, and when you attempt to extract it on the reloading press down stroke, the shell holder deforms the case’s rim and it pulls free of the shellholder. Getting the stuck case out can be problematic.
A friend just bought a new set of Lee .223 dies and forgot to clean out the decapper/expander die. The result was a stuck case (as you can see in the photo above). Here’s the easy way to remove stuck cases using tools that can all be bought at your local hardware store.
1. Remove the die and take off the pin retainer using the proper 1/2″ box and 3/4″ open wrenches. No crescent wrenches, pliers or vice grips!
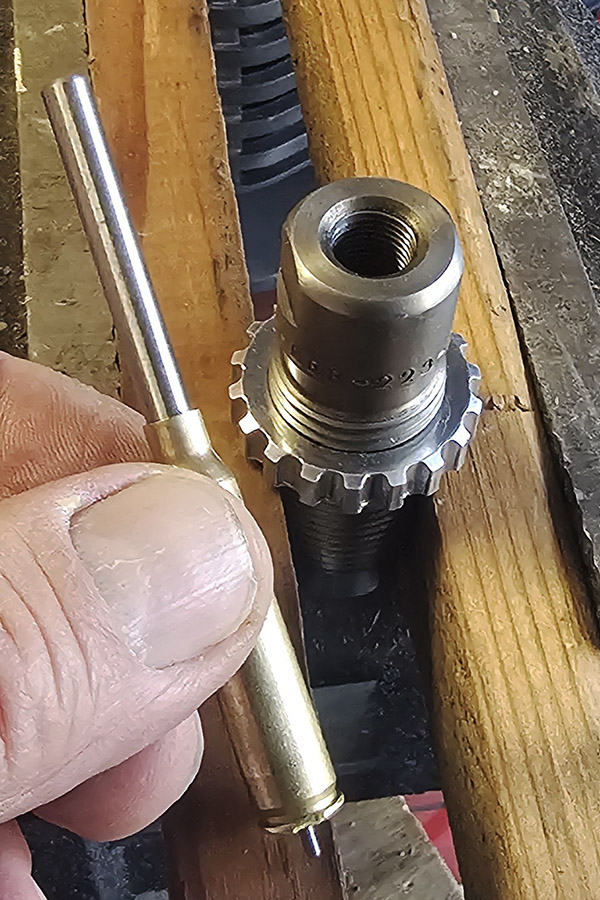
2. Put the die in a well-padded vise and knock the pin down with a brass or hard plastic mallet. The brass mallet or brass punch works best.
3. The expander pin will remain in the case. It will be loose and rattle around a bit, but still trapped inside the case.
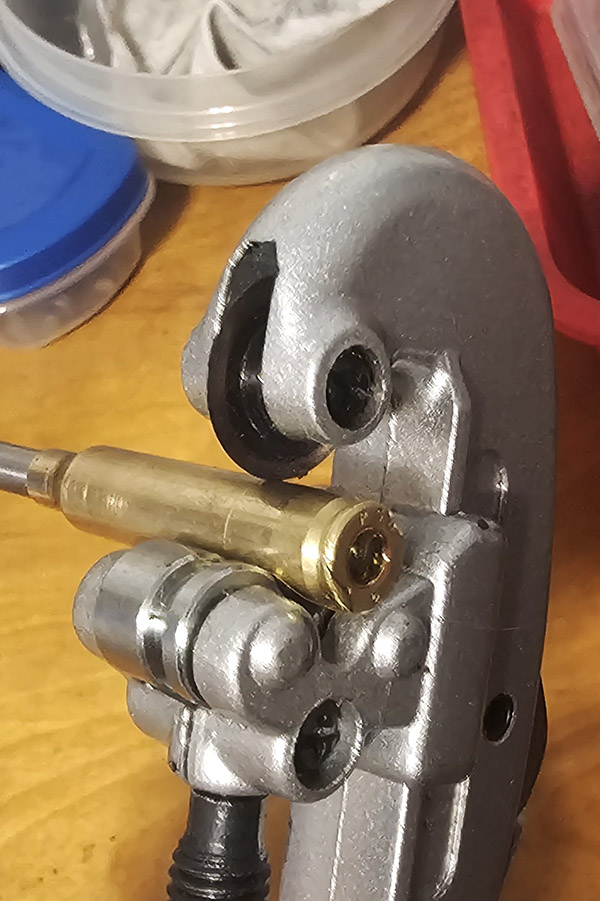
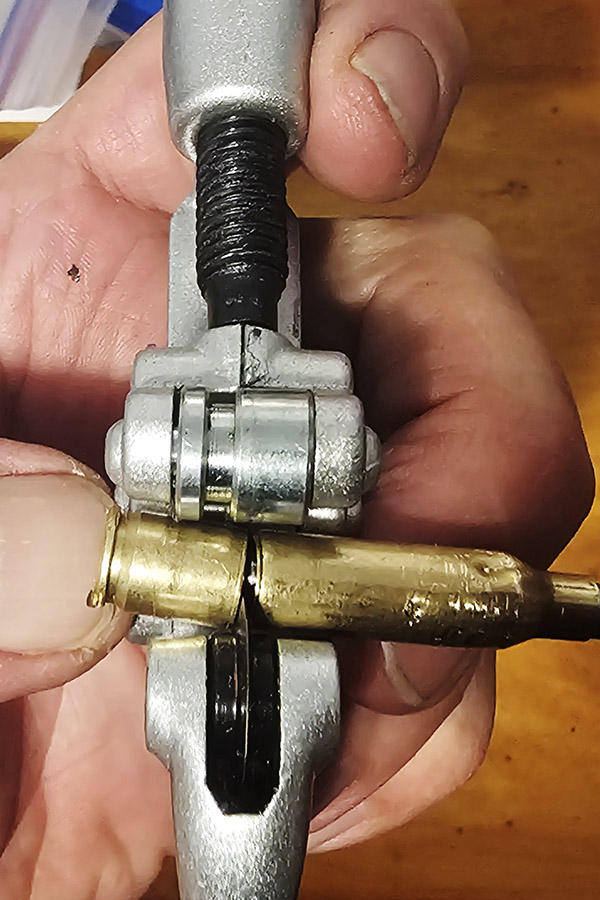
4. Use a small tubing cutter to remove the base of the case.
5. Clean up and polish the expander pin using a non-abrasive wheel or a Scotch Brite pad with soap and water. Get all that factory gunk out of the sizing die body too. I use brake cleaner, but WD 40 will also loosen the factory crud.
6. Reassemble everything with the pin lining up with the top of the retaining nut. Secure VERY tightly again using the proper wrenches.
Your die will now be better than new because the factory gunk is gone and the expander pin has been polished.
Make sure to use a good case lube on all bottle necked rifle calibers. I’m not a huge fan of the white Lee water soluble case lube but it works. I prefer to use spray lubes such as Lyman or Hornady One Shot.
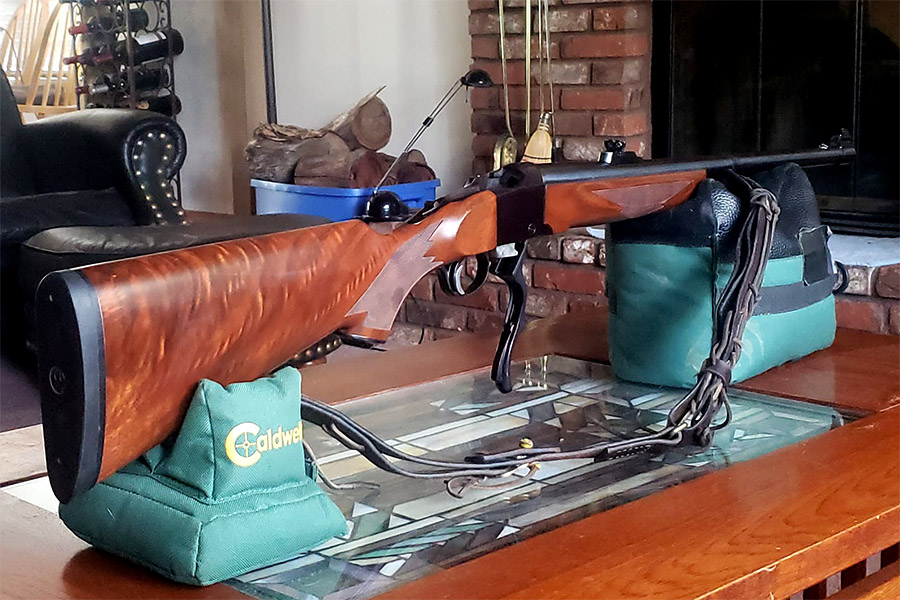
I’ve never had any desire to hunt African game and I probably never will. But I’ve enjoyed reading about the African plains rifles since I was a kid in junior high school. Bringing a copy of Guns & Ammo magazine to school would probably get you a quick trip to the principal’s office these days…but I digress.
Exquisite walnut is often found on the older Ruger No. 1 rifles.
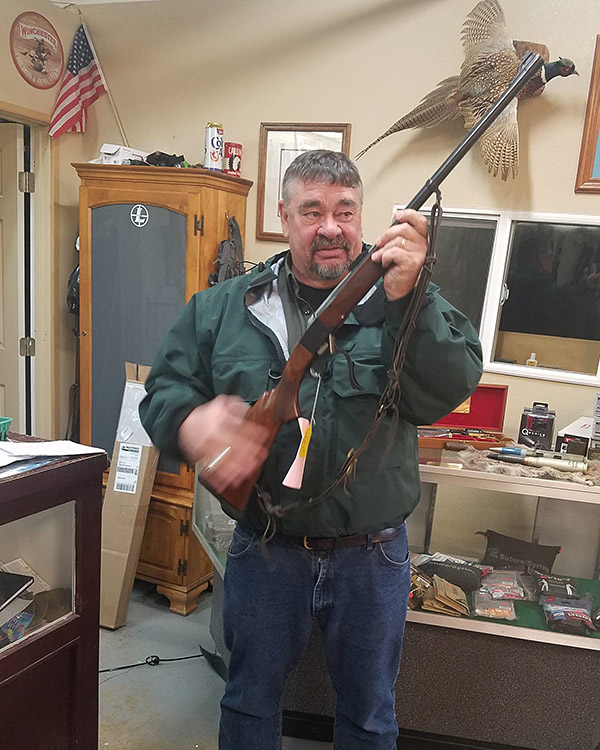
Quite a few years ago I saw an old Ruger No.1 Tropical in the consignment rack of a small gun shop that is now long gone. The owner said, “just pick it up and feel the heft.” And of course, I did and the next thing you know we were talking price, knowing I would never pay $2,000 for a collectible Ruger No. 1. Shaun confided in me that the rifle’s owner couldn’t find the obsolete 405 ammo for it anywhere and he wasn’t a handloader, so he wanted to sell the rifle. Another problem with the rifle was that a previous owner had cut down the front sight, probably because he had been shooting handloads with .41 caliber pistol bullets. So we settled on $500 and I became the owner of my first “unobtainable” Ruger No. 1!
In the gun shop years ago eyeing the Ruger No. 1. Salesman Shaun said, “hand me your phone and let me take a photo of you so you can see how good you look with that rifle!” Shaun passed away a couple of years ago, but I know he smiled down from Heaven yesterday as I fired the Ruger No. 1H Tropical for the first time. And he was right, this gun was meant for me!
It took me a lot of searching over the past few years, but I finally located a set of 405 Win reloading dies, the shell holder, and all the components to bring this rifle back to life.
Hornady had made a run of new 405 Winchester brass and I was lucky enough to find a new old stock box of 50 shells. I also located some new Barnes .412, 300-grain TSX bullets.
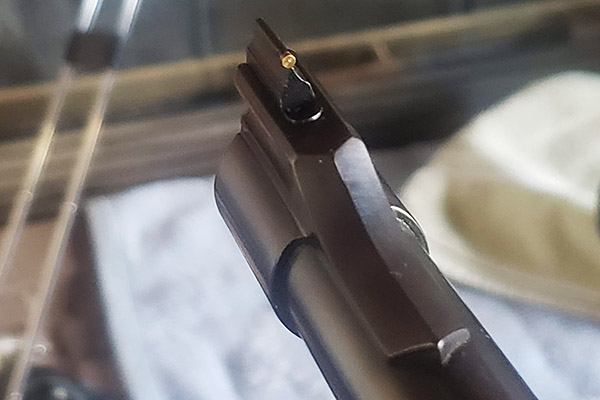
The first step in restoring the old 1H Tropical was to contact Ruger and purchase a new gold bead front sight. That was a simple install as the blade is held in place by a small detent spring.
New Ruger NOS gold bead front sight blade installed.
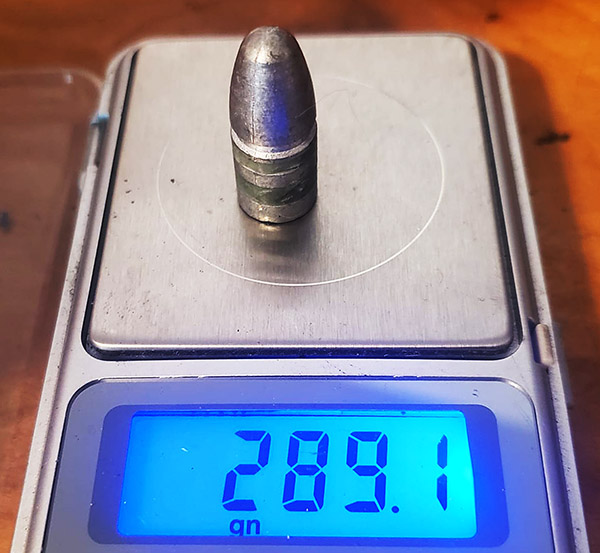
Not wanting to use the expensive Barnes TSX bullets quite yet, lead bullets were cast from lead wheel weights with a bit of tin added using a Lyman 412263 plain base mold to cast 288 grain bullets. These were sized to 0.413 inch and lubed with Alox. Lyman has since discontinued this fine old bullet mold.
A Lyman 412263 bullet, lubed and sized.
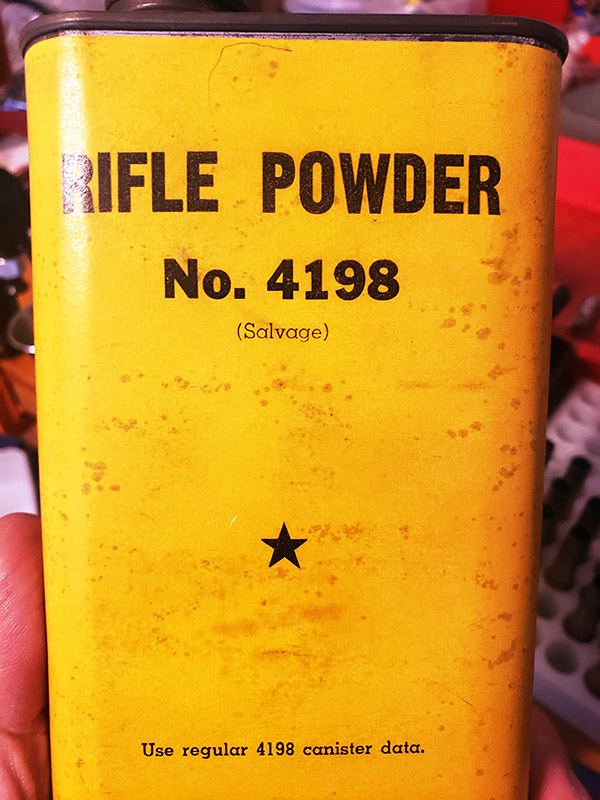
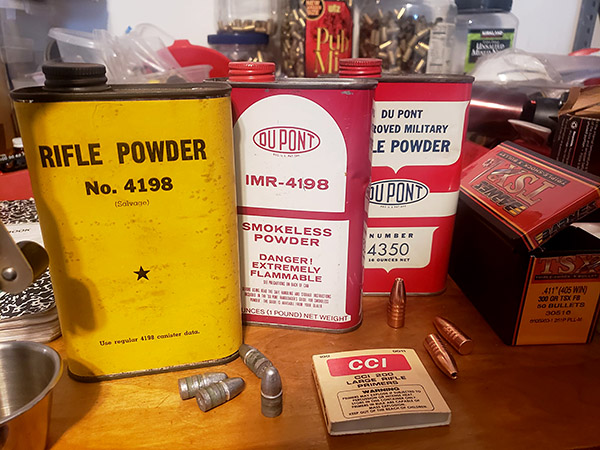
Finally, yesterday morning I decided it was time to resurrect this old rifle! Besides, the project would give me the opportunity to test some old “salvage” Hodgdon 4198 powder I’ve had sitting on the shelf for nearly two decades. The powder is probably from the 1950s or early 1960s. I also had some ancient CCI 200 large rifle primers on hand.
Hodgdon “salvage” 4198 smokeless powder. The powder is probably WW II US Military surplus powder that Hogdon bought in bulk and repackaged in the late 1950s or early 1960s.Vintage components for a vintage cartridge.
I loaded 20 rounds of 405 Winchester ammo using the cast lead bullets and a starting load of 38.5 grains of 4198 and headed down the hill with good friend Yvon to an informal shooting range on BLM land.
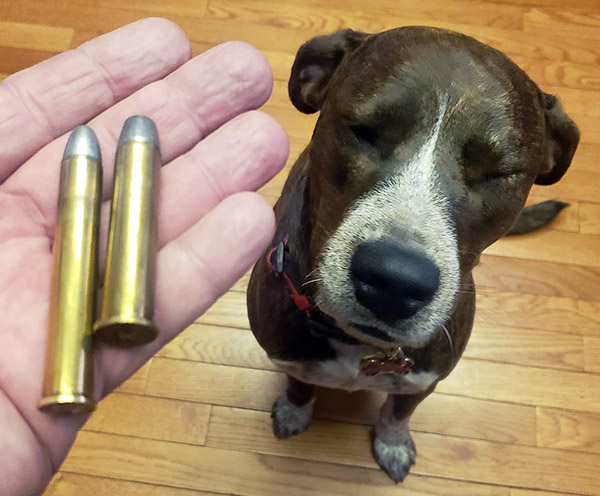
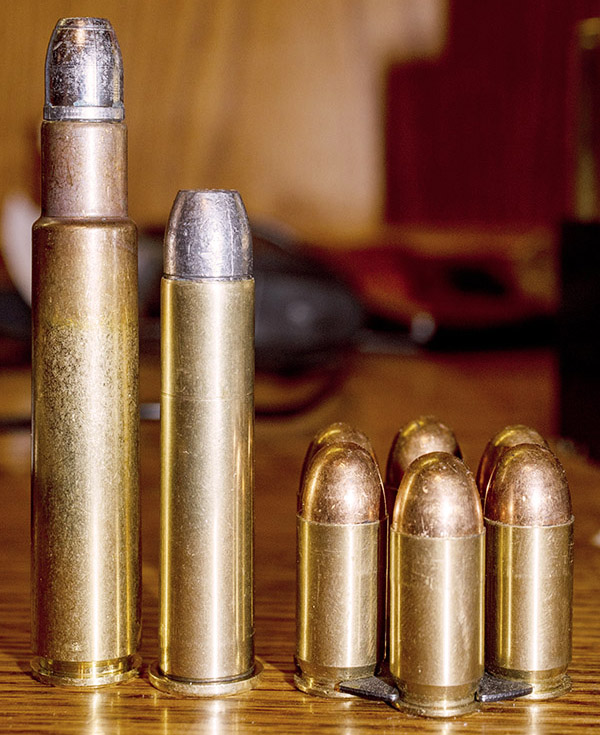
The obsolete 405 Winchester cartridge (left) and the popular 45-70 Government cartridge (right) used by 1880s plains buffalo hunters of the American west. I don’t shoot buffalo and never will. But I enjoy reviving and firing old guns!
Let me say that this Ruger No. 1H Tropical in 405 Winchester lives again. It shoots incredibly tight groups with the cast bullets and gold bead open sights.
My next project will be to develop a non-lead hunting load using the 300 grain Barnes TSX bullets.
Bringing life back into old obsolete rifles can be tons of fun.
A quick preface before you read Joe Cota’s blog: Wow, we are up to three Joes on ExNotes…Joe Gresh, me, and now, Joe Cota. Joe Cota has contributed a few blogs to us previously (before we implemented our new writers program). When Joe most recently sent this in, I felt it was time to include him as one of our regulars, and with this blog, he is. Joe is one of the good guys. He is a professional geologist, an active off-road racer in Baja California, a handloader and bullet caster of 18 years, and an avid flintlock rifle and pistol shooter. Joe lives in the San Bernardino Mountains of Southern California. When not working or racing trucks and buggies in Mexico, Joe can be found fly fishing at his summer home on the Henry’s Fork River in eastern Idaho.
– Joe Berk
Written on Christmas Day, 2023
Merry Christmas to all 🎄❄️🎅!
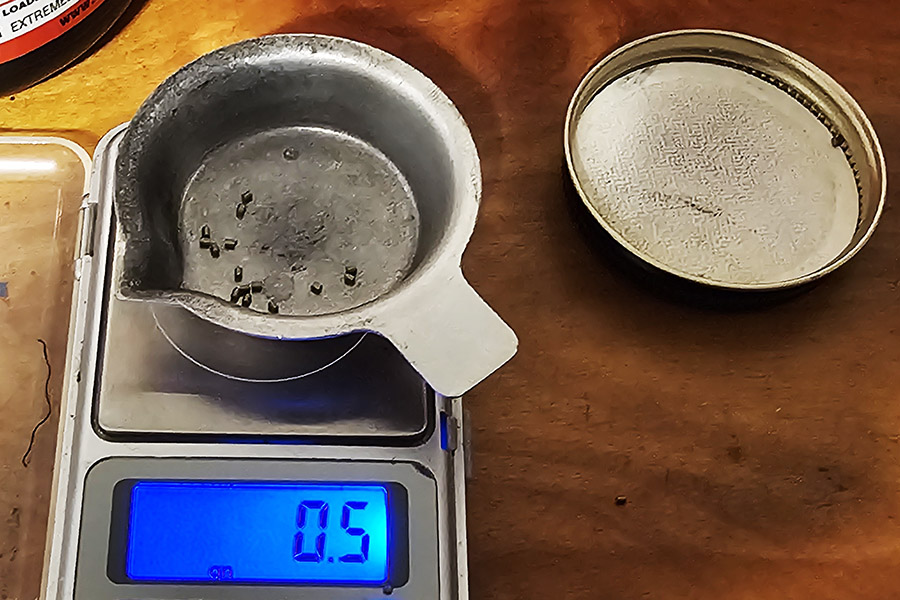
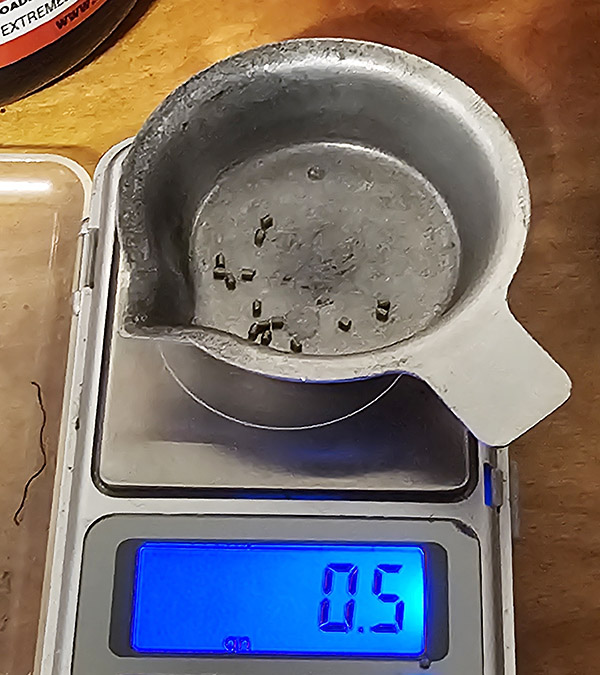
A lot of you will be casting and handloading today, some with their new reloading equipment! Here’s something for your consideration that came up on another message board. Powder weight weenies will argue that all handloaders MUST unequivocally weigh each and every single powder charge to one tenth of a grain of powder or less. Some wildly claim that a half-grain (0.5-grain) of powder makes a 50 to 100 feet per second difference or more in rifle cartridge velocity while others often use this as flawed reasoning as back-up for claiming that volume-based powder dispensers, such as the Lee Auto Disc used on turret presses, are highly inaccurate and produce terrible and unacceptable ammunition. This could not be further from the truth! Let’s bust some reloading myths.
The variation that my ancient Lee Auto Disk throws is about 0.1 to 0.2 grain, depending on if I am using ball powders versus extruded powders. The photos below is what 0.5 grain of Hodgdon H4831 SC extruded rifle powder looks like. For reference, the variation in powder charges that my Lee Auto Disc throws is less than half of the 0.5 grain of H4831 shown in the photo.
So what does a half-grain of powder actually mean in terms of velocity in a typical big game hunting rifle? Let’s explore a real life example. I load .300 Weatherby Magnum ammunition with 168-grain bullets and H4831SC powder. Per the Hodgdon Reloading Data Center, the starting load is 74 grains (which provided 2,865 feet per second in their test rifle) and the maximum load is 81 grains (which provided 3107 feet per second in their rifle). That’s a 242 feet per second difference in velocity over a full 7-grain powder spread. Interpolating these results linearly (a 242 feet per second velocity difference over a 7-grain propellant spread) means that each additional grain of propellant over the minimum powder charger yields an additional 34 feet per second. Therefore, a half grain of powder would make only 17 feet per second difference in velocity! Everyone who uses a chronograph knows that 17 feet per second is typically only a fraction of the extreme velocity spread most rifles and rifle ammo produce.
What about pistol handloads? Take the .45 Colt, using a 255-grain cast lead bullet and Winchester W231 ball powder. The starting load is 5.1 grains (which provides 677 feet per second) and the maximum load is 6.9 grains (which provides 917 feet per second). Using the same methodology as the above rifle computations and comparisons, each 0.1 grain of W231 powder equates to only about 13 feet per second. Again, this is far less than the extreme spread one can expect in .45 Colt ammo.
Does case size matter? I believe it does, but not that much. Take the .223 Remington cartridge, for example, loading 55-grain Hornady bullets with Winchester 748 powder. Straight from the Hornady manual (the 7th Edition), 1 grain of powder between starting and max loads for this combination is 100 feet per second per grain of powder, or 10 feet per second for each 0.1 grain. And again, 10 feet per second is only a fraction of the extreme spread one could expect from perfectly identical powder charges.
So variations in powder volume does matter a little more in the smaller rifle cartridges, but not enough to make anyone steer clear of auto powder dispensers on turret presses versus individually weighing each charge. Richard Lee was right when he wrote in his Modern Reloading book that powder volume is more critical than weight and that one should periodically weigh a charge only as a double check for volume.
So there’s little justification for being a Tenth of a Grain Weight Weenie! Don’t be THAT guy who bashes turret press and powder dispenser users based on misconceptions posted by folks on the Internet.
Happy handloading and a prosperous new year to all!


 2. Put the die in a well-padded vise and knock the pin down with a brass or hard plastic mallet. The brass mallet or brass punch works best.