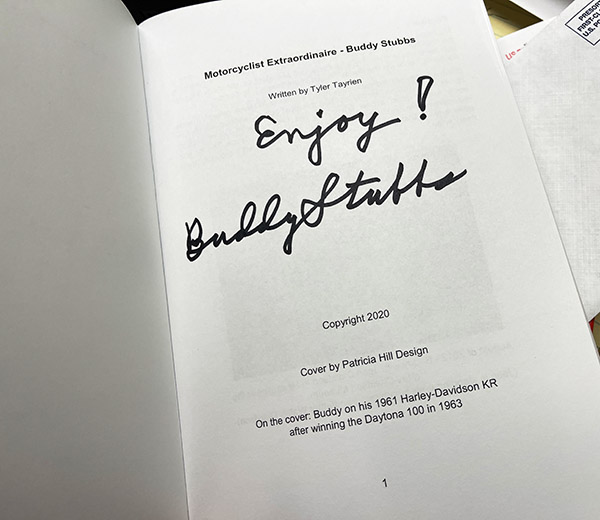
Not too long ago, I posted a blog about the Buddy Stubbs Motorcycle Museum in Phoenix, Arizona. Sue and I visited it for an upcoming Motorcycle Classics magazine Destinations piece. While I was there, I saw a book about Buddy Stubbs (Motorcyclist Extraordinaire: Buddy Stubbs), and I picked up a copy. I finished reading it last night and I thought I’d share my thoughts with you.
Written by Tyler Tayrien (who also wrote Arena, a book about Sam Arena’s motorcycle racing career), I’d give it a solid 8 out of 10 points. The subject matter is superb; the writing and editing are good but not great. I already wrote about Buddy Stubb’s history, his dealership, and a bit of his background in my recent blog about the Buddy Stubbs Museum, so I won’t go into that in too much detail here.
What’s great about Motorcyclist Extraordinaire: Buddy Stubbs is that the subject of this book (Mr. Stubbs) has had such an interesting life. It would be hard for a book covering this topic to be dull. What’s also great about the book is that Buddy Stubbs’ racing contemporaries are the guys I followed when I was a teenager and a young man: Riders like Dick Mann, Gary Nixon, Cal Rayborn, Roger Reiman, Bart Markel, Kenny Roberts, and others. These guys were the kings of flat track, motocross, and road racing back in the day, and reading about them from another rider’s perspective made the book even more interesting.
Motorcyclist Extraordinaire: Buddy Stubbs has a lot of photos, and maybe that’s one of its weak points, but I can’t blame the author for that. Most of the photos (maybe all of them) were from earlier printed photos shot with film, I’m guessing many were shot in black and white, and these were scanned for inclusion in the book. It’s hard to get a decent image using that approach, but when working with these kinds of archival prints, there’s really no other way to do it. The downside is that many of the photos are grainy and lack clarity. That’s not intended to be a criticism; it’s just an observation.
Motorcyclist Extraordinaire: Buddy Stubbs covers Buddy Stubbs’ life, his experiences in buying and building up the dealership, his marriages, his automobile and motorcycle racing, his cars, and the motorcycle museum. Mr. Stubbs is in his mid-80s today. I’m sorry I didn’t get to meet him while I was in the dealership, but I did get an autographed copy of his book. That’s cool.
My minor criticisms aside, I think that Motorcyclist Extraordinaire: Buddy Stubbs is an excellent read. My advice to you is to pick up a copy. I think you will enjoy it.
Sue and I recently flew to Minnesota as part of Sue’s quest to visit all 50 states. I’d been there a few years ago for a business trip when I worked in the bomb business. We were having problems with a booster for one of munitions, and I visited the factory in Edina to seek assistance in finding the root cause. The factory was underground in an old Nike Hercules missile command center. It was a bit scary, being around all those explosives and the intermittent hisses from the air moisturizers (if the humidity dropped below a certain level, electrostatic discharges could induce inadvertent ignitions, hence the moisturizers).
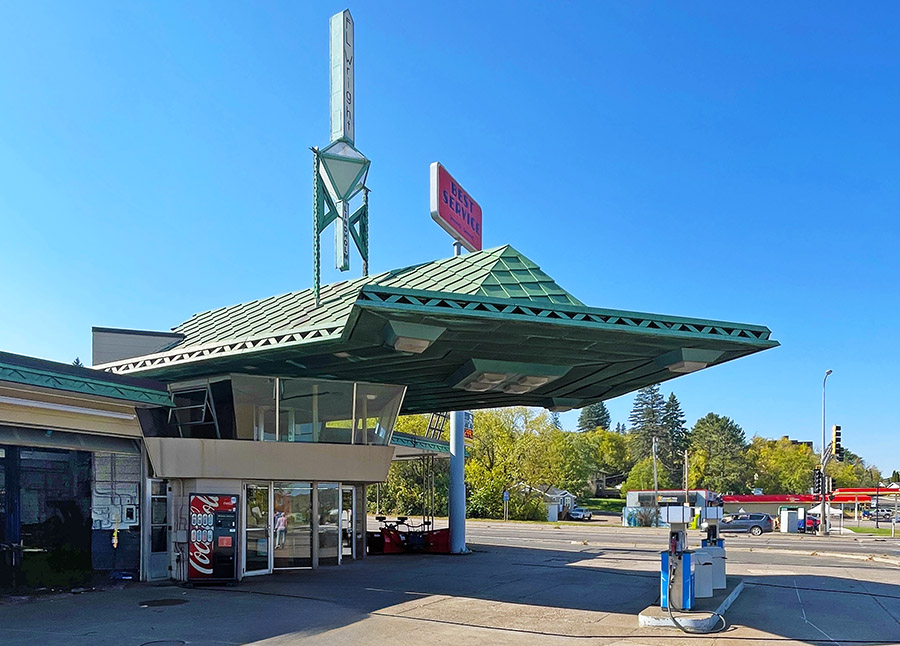
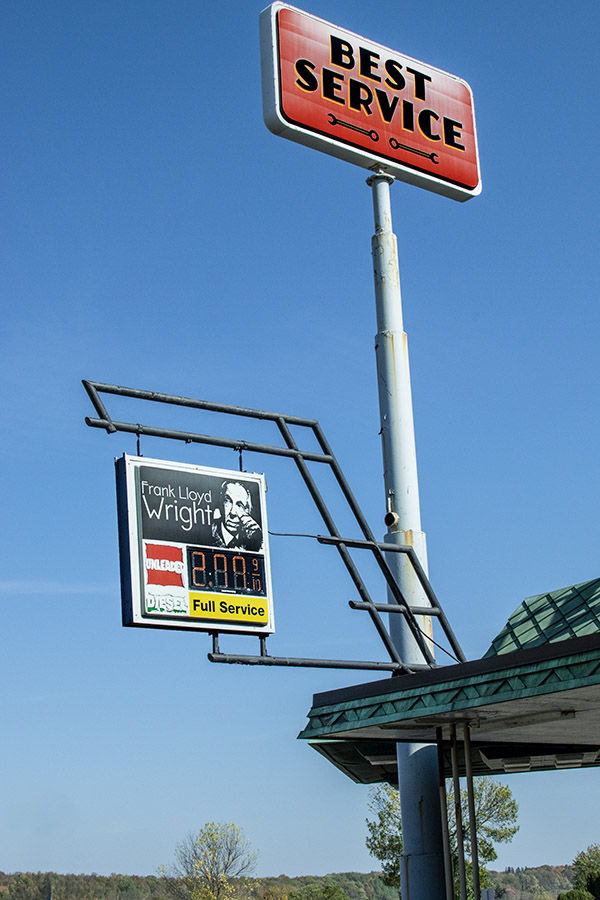
This trip would involve no such scary bomb factory visits. In fact, there were a lot of cool things we saw in Minnesota. One was a Frank Lloyd Wright gas station.
Without setting out to do so, we’ve become a bit of a Frank Lloyd Wright website. We featured his architecture a couple of times already, once with an article by yours truly about the Fallingwater home in western Pennsylvania, and more recently with Joe Gresh’s recent piece on Taliesen West, the Frank Lloyd Wright desert home in Arizona. Architectural Digest magazine is not looking over its shoulder at ExhaustNotes, but it’s interesting that Mr. Wright’s genius has found its way into a motorcycle and gun blog.
So, about that Frank Lloyd Wright gas station: Sue found it while researching cool things to see in Minnesota. It’s a little out of character for Mr. Wright, you know, designing a gas station. It’s located in the small town of Cloquet. It came about when a guy who worked in the oil biz (a guy with evidently lots of money), one R.W. Lindholm, had Wright design a home in 1952. Lindholm liked it. In fact, he liked it so much that when Wright approached him about designing a gas station, Lindholm agreed. Lindholm wanted to beautify gas station design; Wright wanted to create a gas station that could be used as a community center and gathering place.
If that sounds goofy to you (and it did to me when I first read about it), think again. When I was a teenager with a GTO (a decidedly dangerous combination), I and all of my gearhead buddies used to hang out at Herbie Eckert’s gas station. Herbie was a kid in my high school class who’s Dad owned an Empire gas station in New Jersey. I hung out there most of the time with my GTO, Ralph Voorhees was there with his GTO, Bobby O’Connell was there with his Hemi Road Runner, Vernie Frantz was there with his 409 Chevy, and, well, you get the idea. It sort of seemed natural back then in the late 1960s. Yeah, the concept works: A gas station as a community center. Especially if you’re a community of gearheads. I don’t think that’s quite what Frank Lloyd Wright or Mr. Lindholm had in mind, but hey, it worked for us.
Wright’s gas station design was built in 1958. It was the only gas station ever designed by Frank Lloyd Wright, and it’s still in use today. It’s listed on the National Register of Historic Places. When we visited, the gas station was open, but the place was pretty much empty other than one other car that had stopped for the same reason we did: To take pictures. Frank Lloyd Wright’s design was a success in that his $20,000 gas station (four times the cost of a typical gas station in 1958), came into being, but it never realized Wright’s vision in becoming a community center. Maybe it’s because there were too many people like me, Vernie, Bobby, and Ralph hanging around the place. We must have scared them all away.
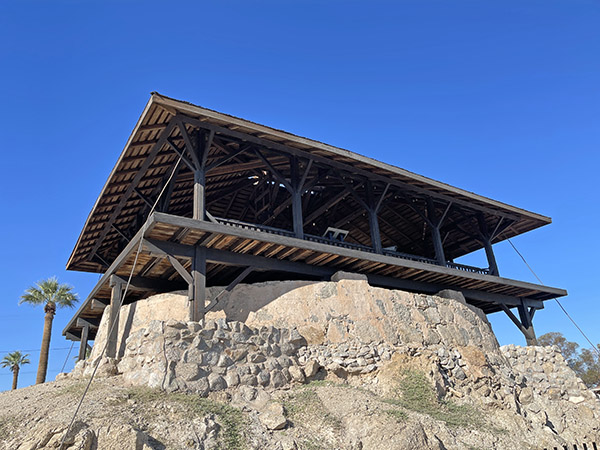
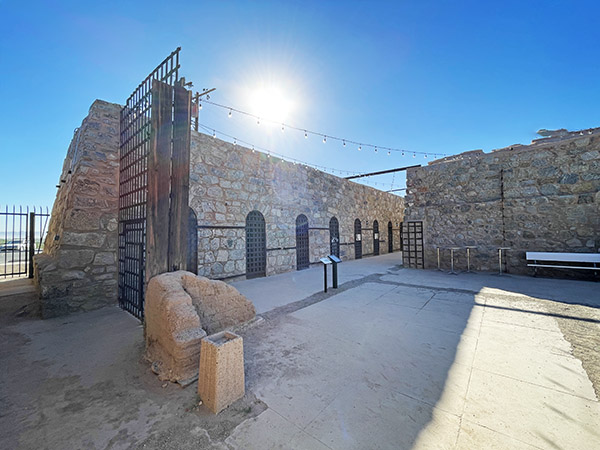
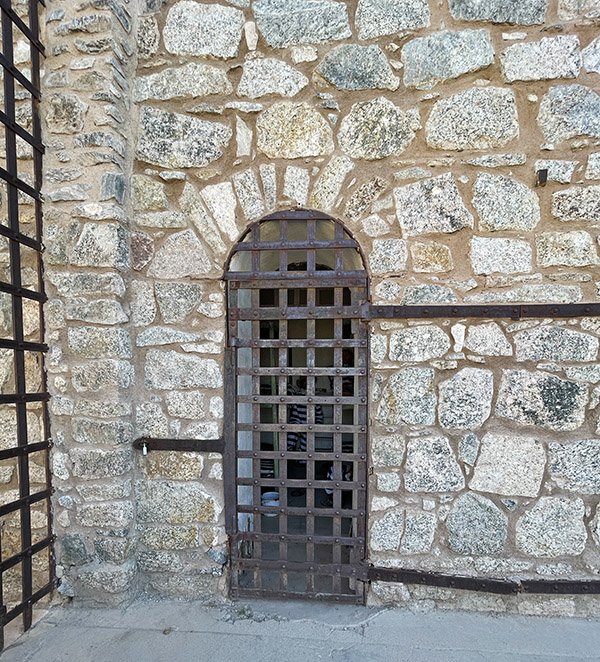
There were four territorial prisons in the early western United States: Wyoming, Montana, Idaho, and Yuma. I’ve been to two of them. Sue and I visited the Old Idaho State Penitentiary last year (it was awesome), and most recently, the Yuma Territorial Prison tucked away in the southwestern corner of Arizona. Years ago, I’d been to the Yuma Territorial Prison on a motorcycle ride with good buddy Dick Scott. It was way more primitive then; it wasn’t much more than a few remains of the original prison with not much identified. That’s not the case today.
After catching up with John at dinner over fish tacos the night before, we had a nice breakfast the next day at the Yuma Denny’s (don’t laugh, it’s my favorite place for breakfast when I’m on the road). After that, it was on to the Yuma prison.
The Tower overlooking the Yuma Prison.
On this trip, Sue and I were on our way home after visiting the Buddy Stubbs Motorcycle Museum in Phoenix (it was awesome) and we decided to divert down to Yuma to visit with my motorcycle riding and hunting buddy, Baja John. It was a good visit.
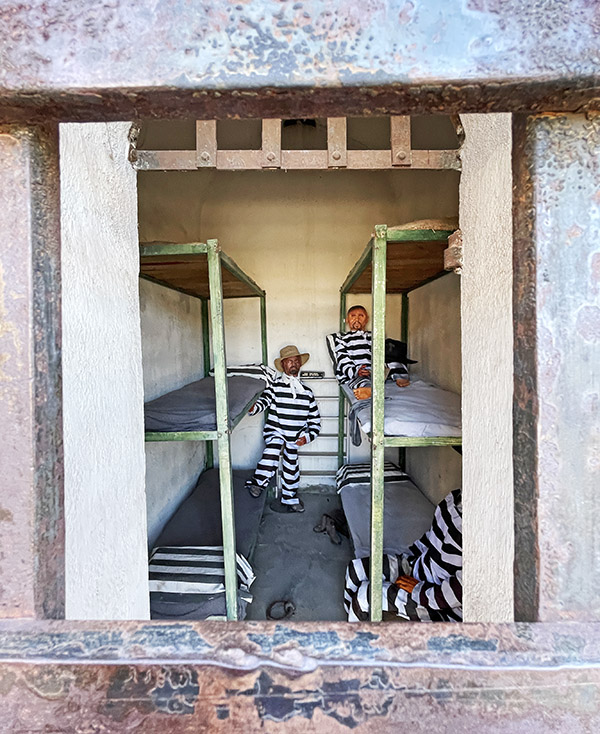
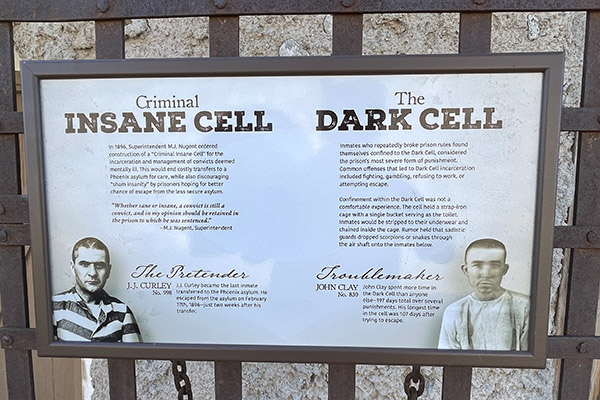
Yuma often sees temperatures over 110 degrees, and sometimes 120 degrees, during the summer months. It must have been brutal being incarcerated there.Bleak. Desolate. Dehumanizing. I see nothing wrong here.If you were an inmate, you’d be home now…Six to a cell. Impressive. High density housing.The Yuma Prison apparently had some interesting houseguests.
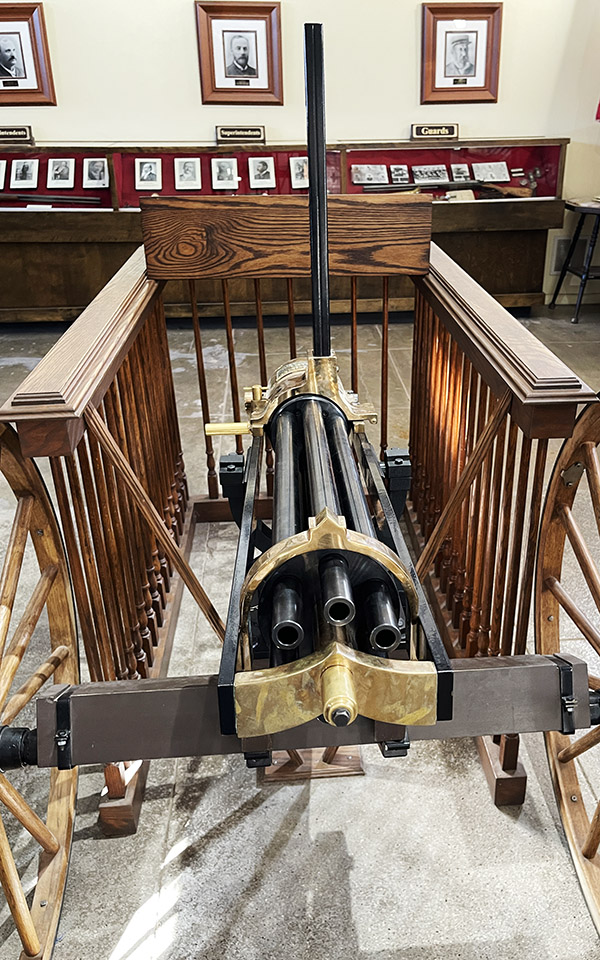
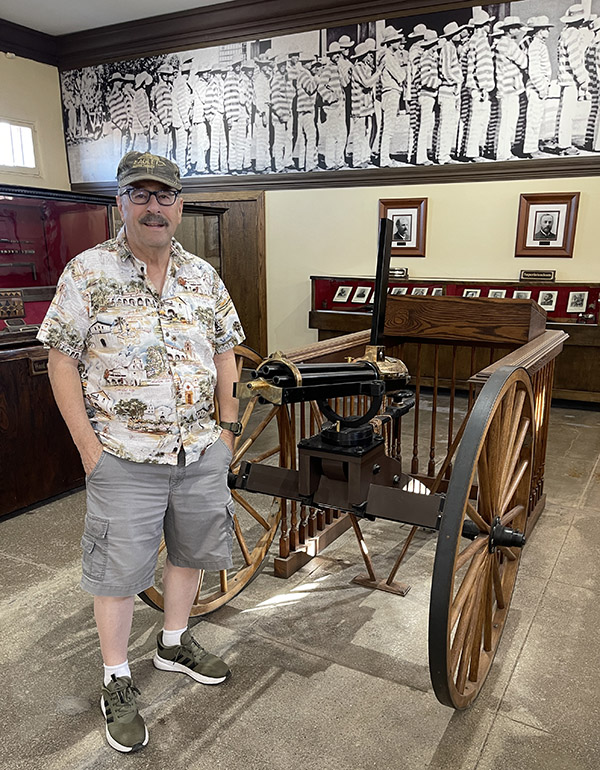
As soon as you enter the Yuma Territorial Prison State Park, there’s a very nice museum. One of the displays that immediately caught my eye was a Gatling Gun.
A Gatling in the Yuma Prison museum.The obligatory Gatling pose.
I like Gatling guns. You should, too, and as I always say, don’t way for the movie. Buy the book…
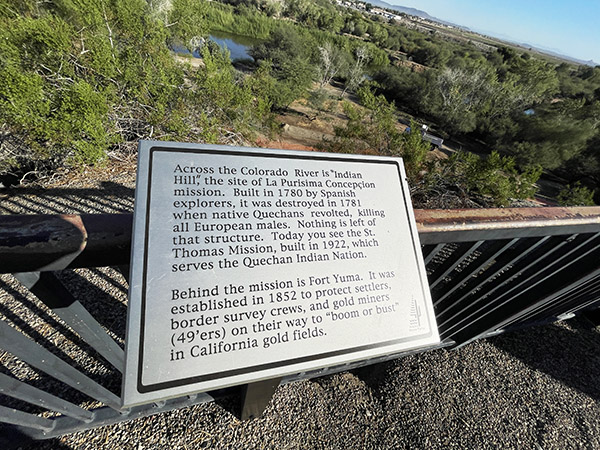
As mentioned above, Yuma is located in the southwestern corner of Arizona directly across the Colorado River from California. It was an interesting and vital stop for many ’49ers who entered California seeking gold. There are scenic overlooks that allow a clear Colorado River view.
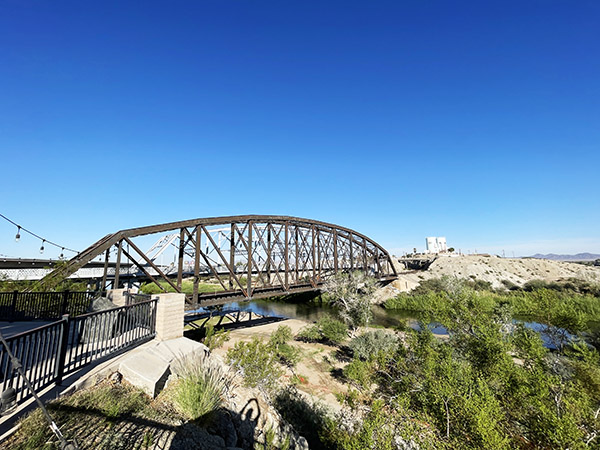
That’s the Colorado River, and just across it lies California, the home of high gas prices and left-wing lunacy.A railroad bridge across Colorado.
We had a good time at the Yuma Prison State Park. John is still there, hoping to get out soon based on good behavior. We’ll see.
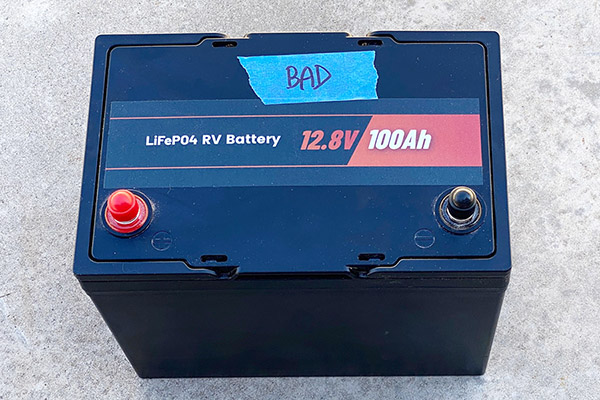
You’ve probably read the story of my new, solar, mondo lithium battery bank. It consists of 16, 12-volt, 100ah lithium batteries and so far is working well. What you don’t know is I actually have 17 lithium batteries.
This one was dead on arrival. Before tossing it, I decided to see what’s in the box.
When I ordered the batteries one of them was dead on arrival. Like zero volts. This is a huge red flag because the LiFePo battery is know for its ability to hold a charge for long periods of time. I tried connecting a battery charger to the thing but all I got were sparks.
CT contacted the seller and they said it’s normal and to jump the battery with another (good) battery. I tried that and got even bigger sparks. The thing was shorted internally. CT went back and forth with them, and they wouldn’t send another battery. They did give us a refund, though, so it was all good and I bought another battery of a different brand.
Once the new bank was online and operating well, I broke down all the shed-filling, cardboard packaging for 17 batteries and hauled it off to the La Luz dump (a very fine dump). This left me with a lone, dead lithium battery. I was going to toss it out anyway, so I decided to open it up and see what a lithium battery looks like inside.
The top part of the battery box snaps into the bottom but I didn’t know that, so I set the circular saw to about 1/16″ depth and (after taking the battery outside in case it burst into flames) cut the top off.
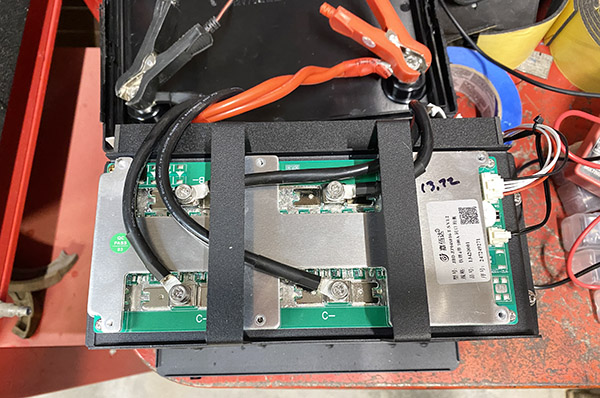
The top part was still attached. I didn’t want to cut any deeper because I had no idea what was inside. Wedging a flat-head screwdriver under the saw-cut lip and working it around the perimeter of box released the lid. Turns out I didn’t need the circular saw. After removing the lid, the internal parts easily slid out of the box, all in a nice, neat tray.
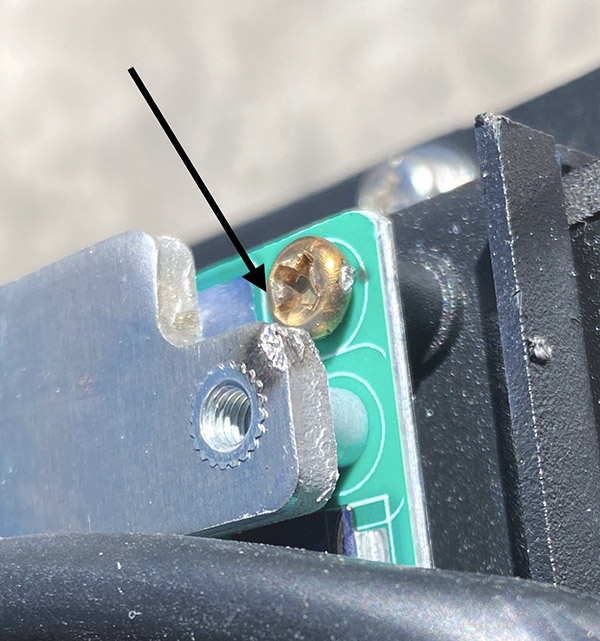
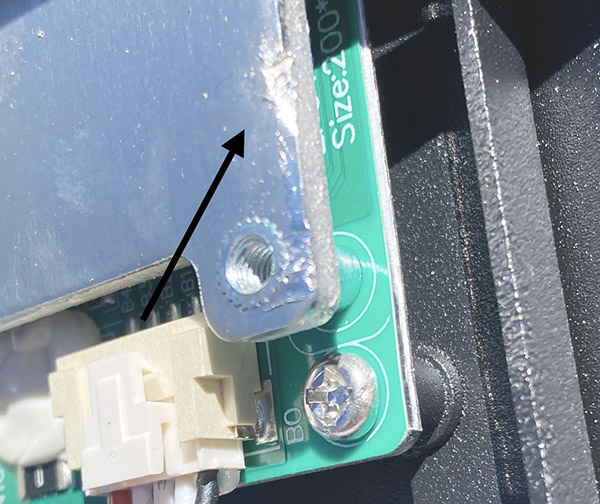
Once the thing was apart the problem was obvious. Both the positive and negative wiring to the output posts were shorted out on the big, metal plate. The shorted metal plate covers the battery monitor circuit board.
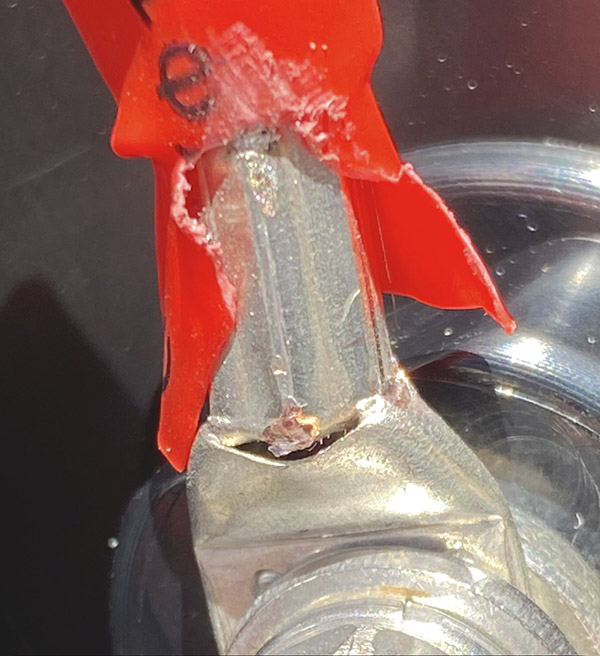
This is where the battery was shorted.Insulation chafing on the positive side.Another shorted area.
The negative switch is how the battery monitor connects the internal bits with the external world. Over charge the battery? The battery monitor switch switches it off. Short out the battery? The battery monitor switch switches it off. Drain the battery too low? The battery monitor switch switches it off. For all I know there’s a high/low temperature cut off in the thing.
The heart and soul of the battery are these four big 3+volt, 100ah cells wired in series by those welded jumpers.
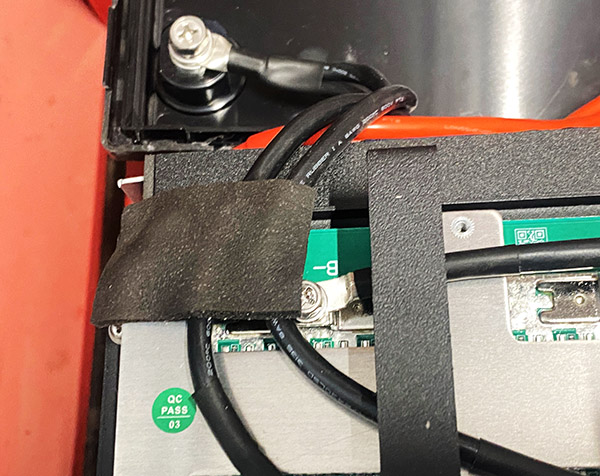
It turns out whoever built the battery put the terminals to the output posts on upside down. This moved the barrel/crimp part of the wire connection that much closer to the metal plate.
Under the metal plate sits the battery monitor system board. It connects to each individual cell and also saved the battery from bursting into flame from the short circuit.
All things considered, if you’re going to screw up the battery this was the least damaging way to do it. Since the + and – were directly shorted before it got to them, the electronics and lithium cells weren’t involved the short circuit. The battery monitor system kept the thing from burning up due to the short.
I added a bit of insulation to the burned areas that were shorted.
Once the lid was off and the source of the short removed, the battery showed voltage again. Pretty cool. I gave the battery a charge and all seemed normal. I load tested the thing at 100 amps and it held voltage fine. You know what this means.
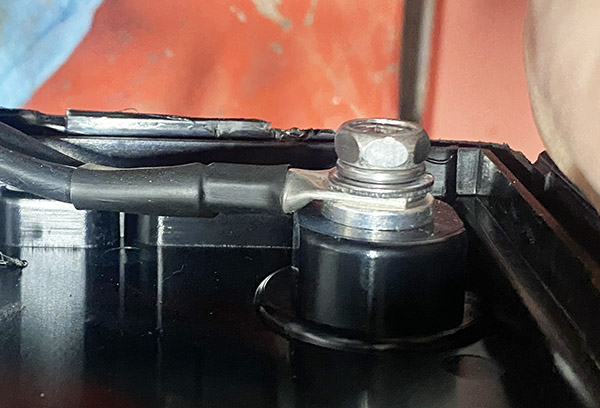
The fix was as easy as flipping these connections 180 degrees. Photo shows the connection already flipped. The other way they contacted metal.
The fix was as simple as flipping the wire terminals over allowing that extra 3/16″ clearance. I reassembled the guts into the battery and snapped the lid back on and now I have an extra, good lithium battery. While technically it’s a free battery I have some time in the repair. Now I know what’s inside the black box. I’ll probably run some gorilla tape around the box so the iffy lid attachment stays put and call it a win.
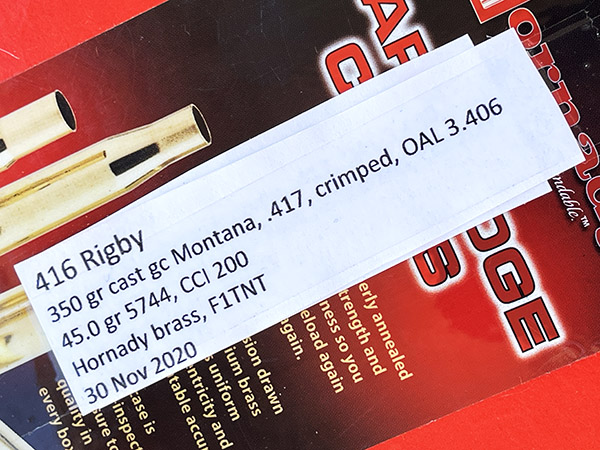
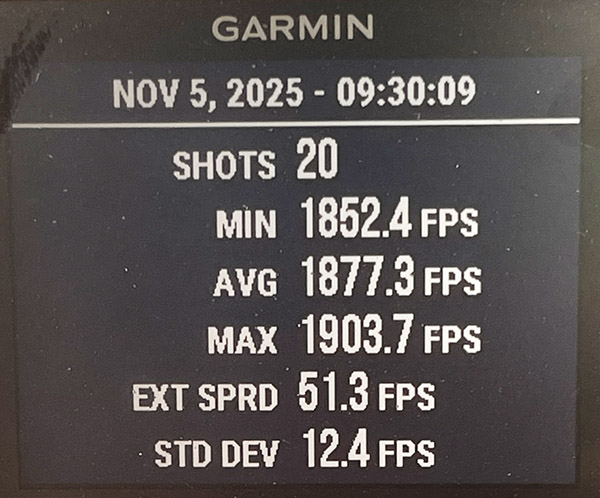
Make no mistake: Even a reduced load in the mighty .416 Rigby is a high-energy proposition. I use 350-grain cast bullets from the Montana Bullet Company, and my Lyman cast bullet reloading manual shows the accuracy load to be 45.0 grains of 5744 propellant. The reloading manual says that’s the lightest 5744 load with the 350-grain cast bullet, and that same manual says the load is good for 1779 fps. In my rifle, it was a full 100 fps faster, with a very tight standard deviation. A 350-grain bullet at 1877 fps is going to settle most discussions pretty quickly, I think.
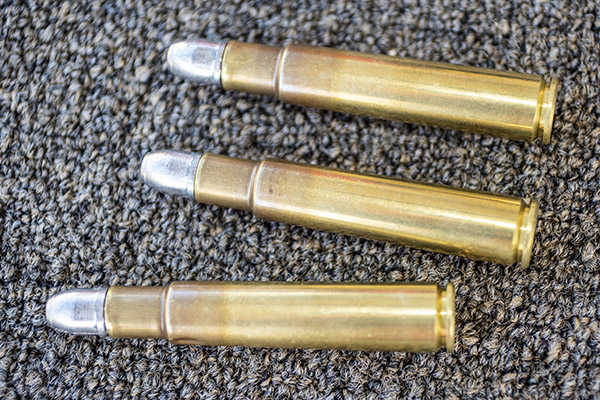
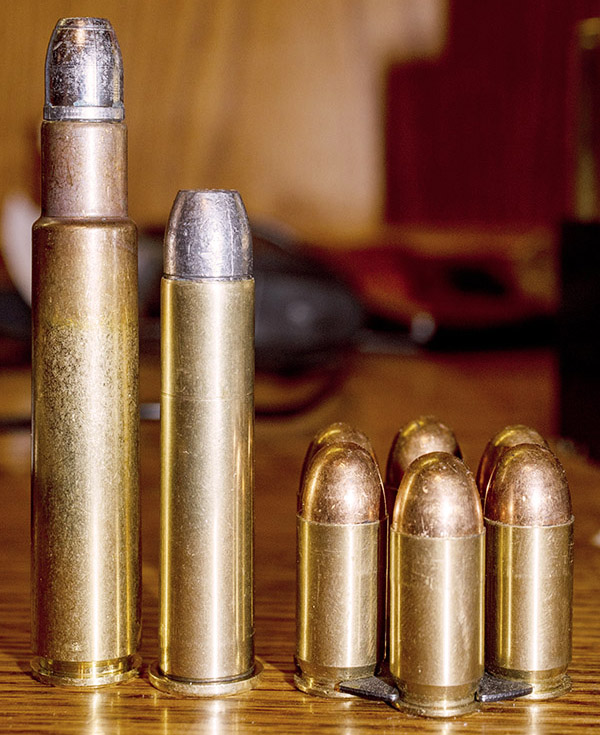
.416 Rigby ammo, loaded with Montana cast bullets.The .416 Rigby is a big cartridge. It’s shown here with a .45 70 and several .45 ACP rounds.
The .416 Rigby was originally developed in 1911 by John Rigby and Sons, a British rifle manufacturer, as a cartridge designed for hunting dangerous game (you know, like cape buffalo, elephants, and other stray critters not likely to be encountered on this continent). But the cartridge is a cool one, and that was enough for me to buy the rifle. The factory load is a 400-jacketed bullet at 2,370 fps (with prices ranging from $170 to $270 per box of 20 rounds), and that’s good for anything that walks, breathes, or grows, probably including more than a few dinosaurs. Those are steep prices, working out to about $8.50 to $13.50 every time you pull the trigger. Me? I reload with cast bullets. It’s still not cheap to send lead downrange, but it’s way cheaper than shooting the factory stuff.
I had not realized it had been so long since I previously shot the .416 (as my reloads indicated).Chrono results for my .416 Rigby ammo. That’s a tight standard deviation. This is a great load.
The Lyman manual is right; this is an accurate load. At least it was for me at 50 yards.
Three shots at 50 yards with the .416 Rigby. That’s not too bad for an old man shooting an elephant rifle with open sights.
I then tried the Rigby at 100 yards. At 100 yards, my accuracy was poor, but that was me (not the rifle or the ammo). I had a difficult time finding and focusing on the front sight. It’s a function of age and the little front sight brass dot, and a pair of new glasses. I had a tough time seeing the front sight with my new specs; it kept blurring together with the black bullseye. The easy answer would be a scope, but the rifle is already heavy and maybe I’m too much of a purist; a scope on an elephant gun seems kind of silly. I have a scope on my .458 Ruger Model 77 and I like it, but the Rigby wearing a scope doesn’t go down well for me.
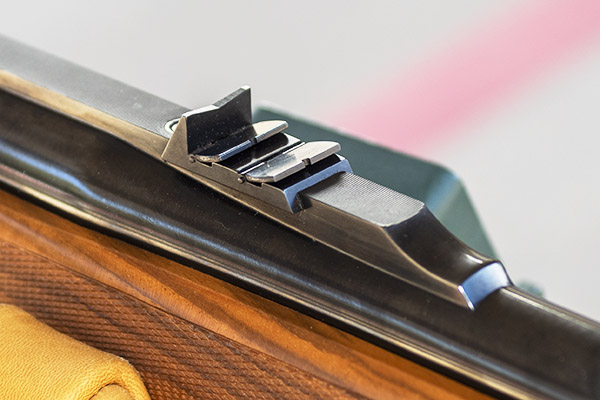
The Ruger’s rear sight. It’s a classy affair, with a fixed V-notch always up (it’s what you see here). For longer distances, each of the two blades behind the fixed blade can fold up. The two folding blades each have a U-notch, which is easier to see.
When I returned home I reloaded my spent .416 Rigby brass, grabbed my old glasses, and headed out to the West End Gun Club again. Things at 100 yards improved immediately. I fired the first three shots you see below using the lowest rear sight (the V, with no U-notch; it is fixed in the up position). I couldn’t see the bullet holes at 100 yards with the naked eye (hell, I could barely see the target), so I took a peek through my spotting scope and was pleasantly surprised.
Three shots at 100 yards with the fixed V-notch rear sight. Life is good.
That target looked good to me (and knowing I was going to photograph it for the blog I didn’t want to ruin it with additional shots). For those first three shots, though, I struggled to keep the front sight in focus and seated above the rear sight’s fixed V-notch. I decided to fold up the first blade, which is a little taller than the fixed V-notch. Seeing the front sight (and staying focused on it) in that first foldup blade’s U-notch is much easier, but the rear sight was taller. I expected the next shots to go high (which they did in a surprisingly big way…they were a good six inches above the bullseye). Two can play this game, I thought, so I walked downrange and put up a third target. I fired my remaining rounds while holding the top of the front sight about one bullseye diameter below my normal aim point (which is 6:00 on the bullseye). I guess you could call that Kentucky elevation.
10 shots at 100 yards. Not bad, but too high. I would have liked for that group to all be in the black.
The results were not bad. What I really need (maybe) is a taller front sight, and I’m casting about to try to find one of those. I have a call into the Williams Gun Sight company; maybe they will have something that will work. The reason I said maybe, though, is that several years ago with this rifle and the same load, the sights were spot on for me at both 50 and 100 yards. It could be that I was simply a better shot several years ago. I’ll try it again before I replace the front sight.
The .416 Rigby’s front sight. It may need to be taller for the load I am using. Note that there’s very little leading in the bore. That’s because the Montana bullets are hard cast, gas-checked, and appropriately sized.
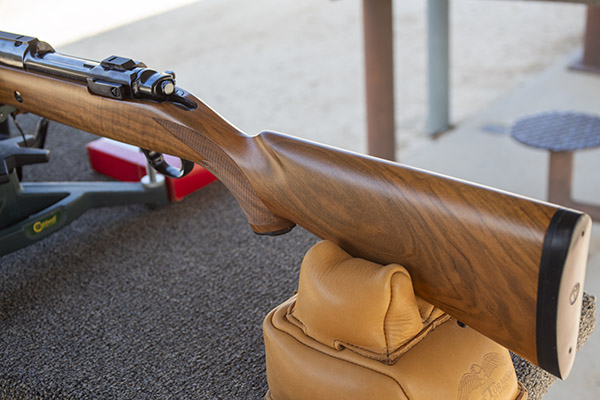
Here are two more photos of the Rigby, showing its beautiful and highly-figured Circassian walnut stock. This rifle was a real find. It’s one I’ll never sell.
Ruger .416 Rigby RSM Magnum, port side. It looks even better in person.Ruger .416 Rigby RSM Magnum, starboard side. It’s surprisingly easy to shoot with cast bullets.
I named my .416 rifle Eleanor (get it? Eleanor Rigby?). It’s the only gun I’ve ever owned that I named. I bought the rifle for well under what it’s worth off the used gun rack at Turner’s in West Covina (a locale with demographics more in tune with bangers and black plastic 9mm pistols). I paid a thousand bucks for Eleanor; these rifles typically go for around $2500 when they show up on the used gun market. There are a couple on Gunbroker.com right now; one is listed at $3,000 and the other at $7,000 (hope springs eternal, I guess). Ruger quit making these a couple of decades ago because they were too expensive to manufacture, making the small number they did manufacture instantly collectible.
I want to use this rifle with open sights on my next pig hunt. That would be challenging on several fronts:
I want to try for a Russian boar (instead of the more plentiful Ossabaw hogs I previously shot).
I want to use open sights (instead of the scoped rifles I previously used).
I’ll have to lug this anchor-weight firearm up and down in the Arizona hills where I hunt (instead of the lighter rifles I used on my prior hunts).
It should be fun. Stay tuned. You’ll get to read about it here.
I finally made the leap. My solar system went online in 2018 and except for a few snow days has produced reliable power in all that time. We’ve had around 30 power outages at the grid-tied Carriage House (some 5 minutes, some 5 hours) during the same time span.
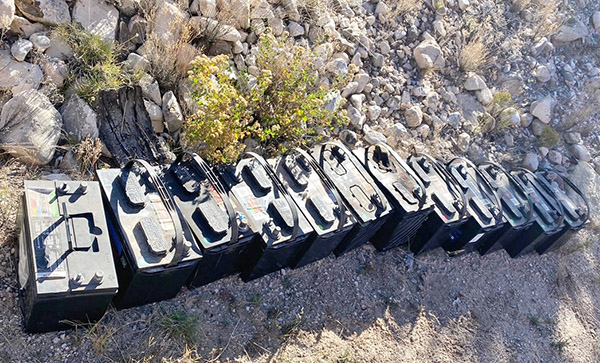
The old, lead-acid bank gave great service but it is time to step into the future. I’ll be keeping the best of the old ones for a power source in the green house.
Initially we went with plain old lead-acid batteries because they were a third the cost of lithium batteries. The lead-acids worked well and since they’ve been around hundreds of years it was easy to predict performance and longevity.
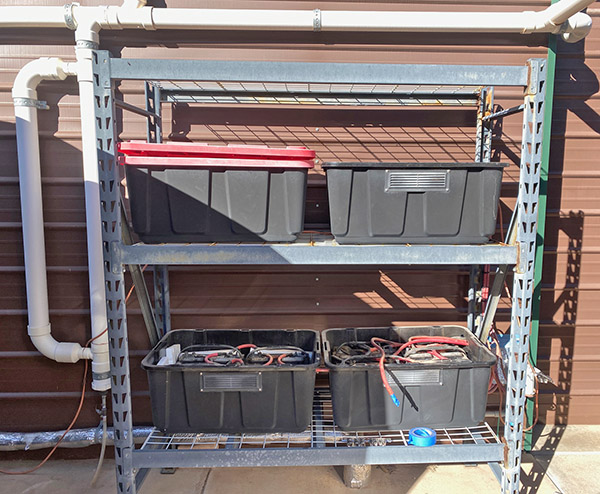
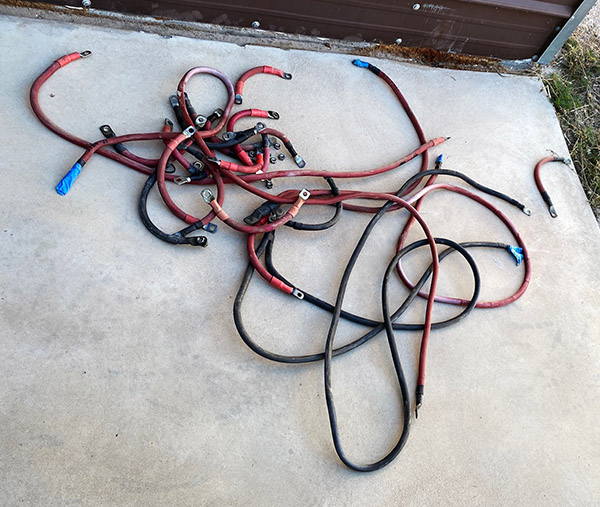
The jumper cables are messy but effective.The old bank was four boxes on two shelves. I never did get around to filling the last box.
The battery bank started small with just 4 batteries and grew with our budget to 12 total. There are two of the original 2018 batteries still functioning and I’ve replaced three batteries that failed. It’s easy to tell a bad lead-acid in a battery bank: it’s the hot one.
I haven’t been religious about topping up the electrolyte so some of the batteries might have failed due to misuse. Regardless, I’m happy with their performance and the lead-acids did me right.
Last year I noticed lithium batteries dropping in price. They ended up costing the same as the cheap Walmart lead-acids I was using. With new tariffs looming I decided to make the switch. I bought one batch in January and another batch in March, depending on whatever sale was on. My cost averaged around $119 per 12-volt, 100-ah battery. I wasn’t brand loyal, whatever was cheapest was fine by me.
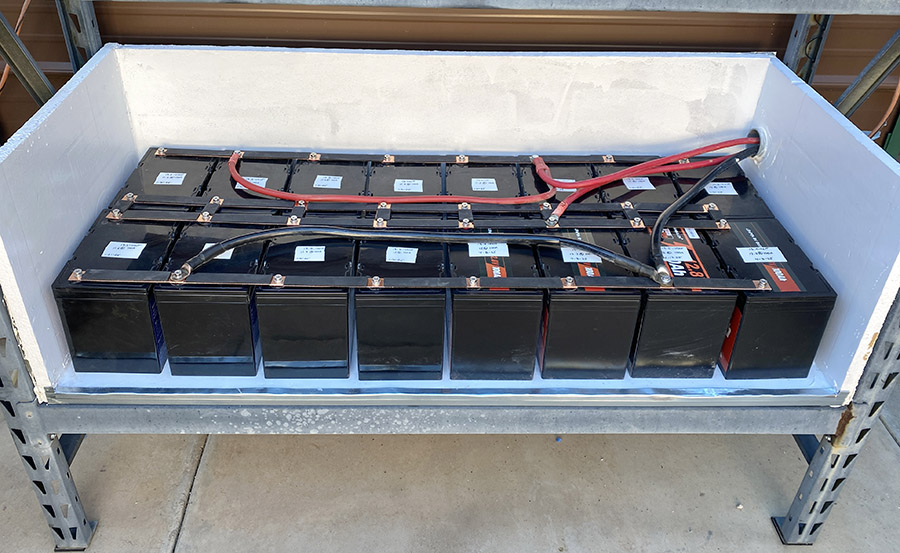
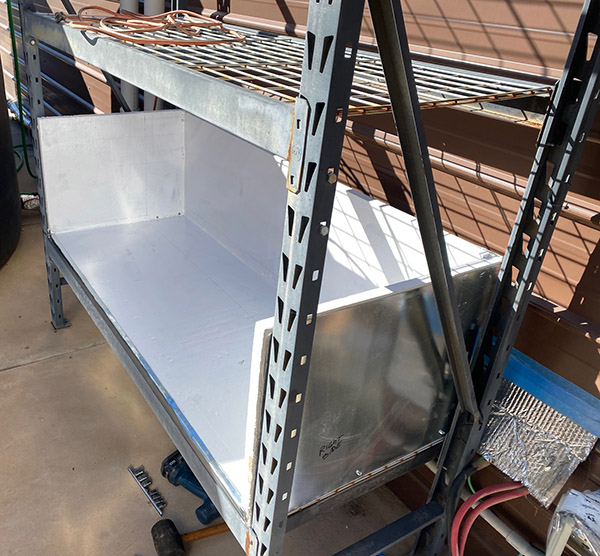
With winter approaching and long cold nights of pipe heaters draining storage I built an insulated box to hold the new batteries. Advantages with the lithium are 16 batteries fit on one shelf, weight is half of lead acid, and there’s no need for a sealed battery box as there’s no acid to leak.
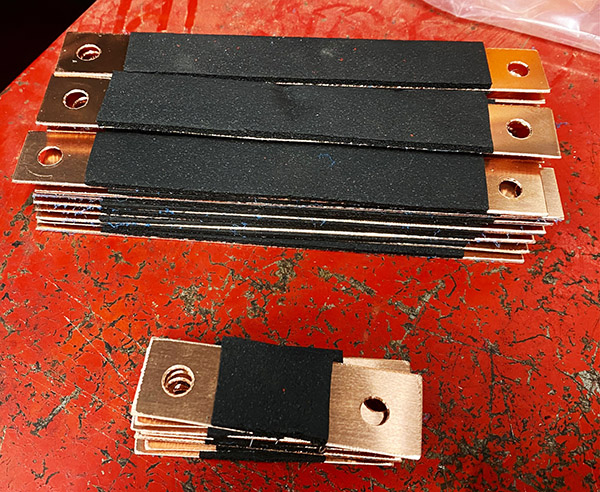
Most of this was replaced by copper bars.Lots of copper buss bars took a couple days to make. Foam on top to prevent shorts in case a chunk of metal lands on the bank.
I also took the opportunity to clean up the installation, getting rid of messy-looking jumper cables and replacing them with solid copper buss bars. With everything on one shelf I eliminated several feet of cabling which can only be good.
Lithium batteries need a bit more charging voltage so I cranked up the solar regulator a 1/2 volt or so. I also reset the inverter charger setting to one more like lithium.
The batteries have sat on the shed floor for 6-8 months so when I connected them up to the solar they sucked a steady diet of 55 amps from the sun.
Theoretically I have 19,000 watts of storage now, more than double the 7200 watts of the old, lead-acid battery bank. In actuality it’s probably 80% of 19,000 watts because you don’t want to drain the batteries flat.
The new box is 1-inch foam skinned with sheet metal. Hopefully it will slow a fire.All the batteries on one shelf cuts down on cabling. Buss bars make a tidier installation. With no acid fumes connections should stay cleaner. What’s not to like?
Some disadvantages to lithium batteries are they are more affected by cold temperatures (hence the insulated battery box), they are limited to 100-amp output per battery (not a problem as my inverter draws 250-amp max), and I can’t really think of any others.
Time will tell if the lithium batteries last the 10-year claimed life span. I’ve pre-tested each battery’s load capacity and marked the results on top of the battery. I should be able to compare results in the future to see if individual battery performance degrades. All in, I’m happy with the new batteries. Hopefully I’ll have about a 3-day reserve for those snow days.
Oh, and those tariffs? They don’t seem to apply to lithium batteries as you can still get 12-v, 100-ah lithiums for $119 on Amazon.
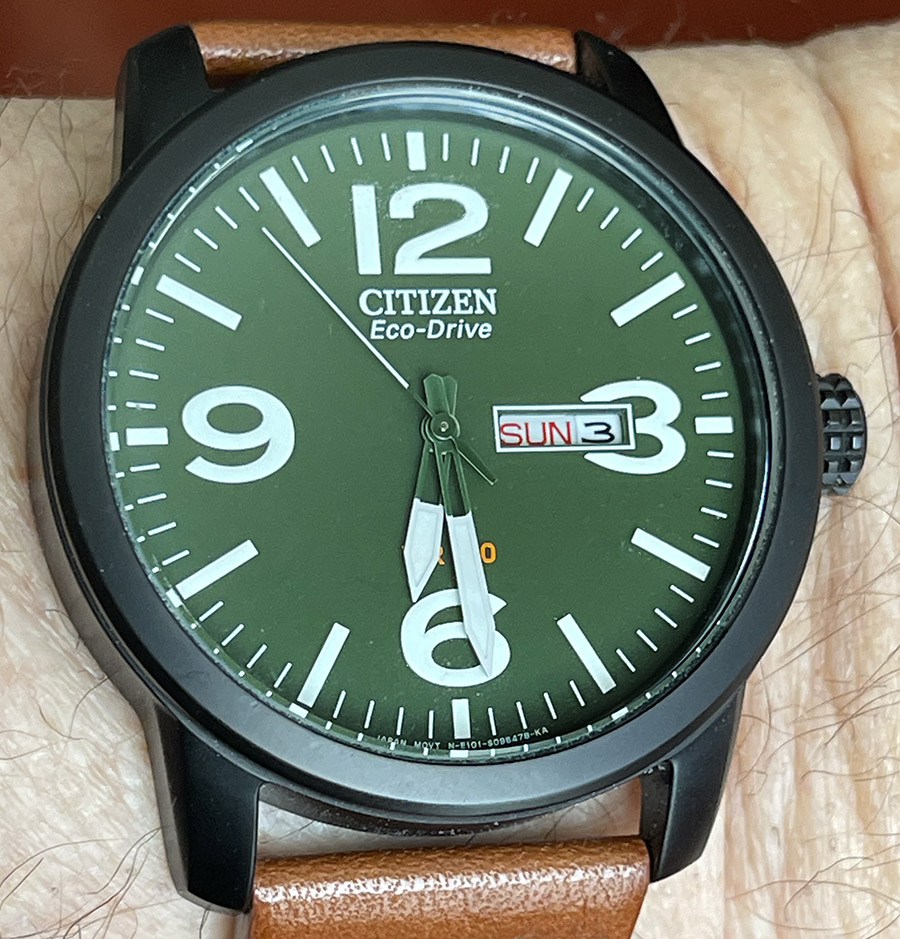
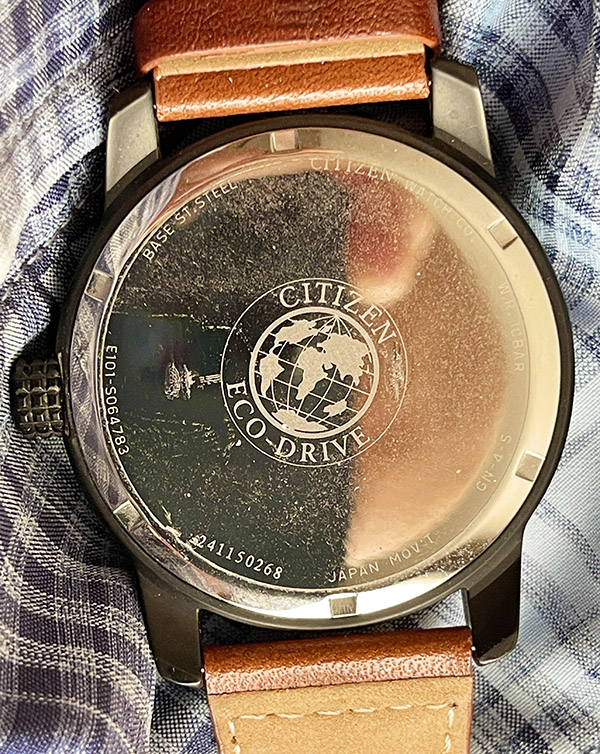
You’d think with my old-age eyesight and need for bigger letters and numbers I’d wear the Citizen watch you see above more often, but the fact is I don’t. I bought it years ago when I was a yuppie, and I wore it a little, but it just hasn’t had much wrist time in the last couple of decades. But it still works well, and it’s still got those big numbers. I need those now.
The Citizen uses their E101 solar-powered quartz movement and like all Citizens, Seikos, Casios, and Orients that use a quartz movement, it is phenomenally accurate. I’m talking in the range of seconds per month. I never thought I’d need a watch that accurate, and I probably don’t, but I enjoy having one. It’s one of the reasons I almost never wear an automatic (i.e., mechanical) watch anymore. They just don’t have the kind of accuracy I’ve become accustomed to.
Another feature on the watch you see here is the lume. It’s incredible. At night, the numbers and those big hands jump out at you. Other than having a backlit Casio or Timex, the lume on this watch makes it one of the easiest to read in darkness I’ve ever owned.
Once this watch is charged after being in the light, it keeps running for a long time. If I leave it on the shelf for months, it still keeps running. Evidently, room lighting is enough to keep it charged. When it does run down, it doesn’t take very long for it to come alive when it sees sunlight again.
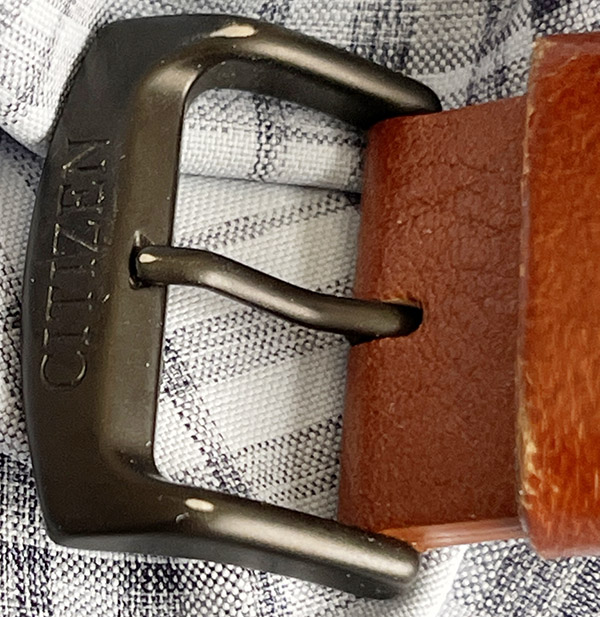
What surprised me is that even though I’ve owned this watch for more than 20 years (it’s probably closer to 30 years), you can still buy this model at a relatively modest price. The exact colors you see here are no longer available, but the basic watch design is, and to me the new colors are just as attractive as the old. Here’s the same watch in a brushed stainless finish with a canvas strap. I like this look a lot.
I’m tempted to buy the watch you see above, but I already have plenty of watches. You can buy the above watch on Amazon for $184, or better yet, from Jomashop for a paltry $124. That’s a hell of a deal.
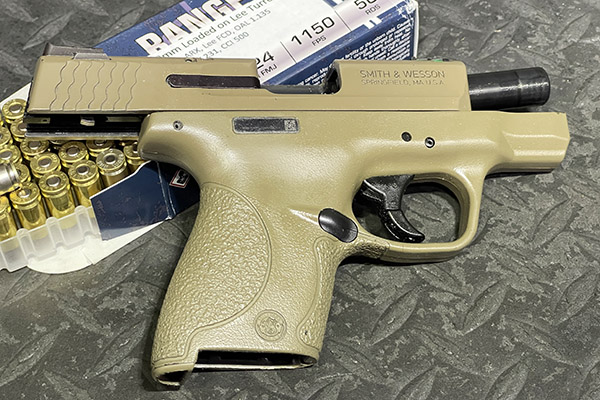
I had not been to the indoor handgun range for a couple of weeks, and recent post on Facebook about close-range, rapid-fire shooting made me want to try the same. Most of the time, I’m a target shooter, which usually involves longer distances and careful aim. This would be different: 10 feet and firing as quickly as possible. What slowed my aim was not recoil or the ability to find the front sight; it was the target moving. At that short distance, and with a hanging target, muzzle blast made the target move around. The results were relatively acceptable.
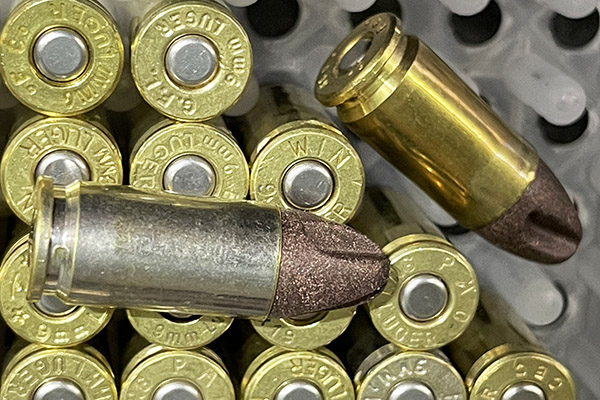
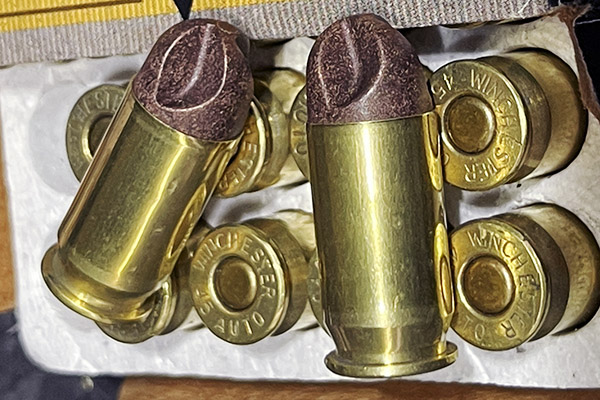
The two guns were the Springfield Target 1911 (in .45 ACP) and the 9mm Smith and Wesson Shield, and the loads were with the ARX bullets I’ve written about before. In the .45, the load I use is 8.8 grains of Power Pistol and 118-grain ARX bullets. In the 9mm, it’s 5.2 grains of Winchester 231 and 65-grain ARX bullets. Both loads are completely reliable, the ammo feeds beautifully, and they group with target handgun accuracy.
I buy the targets you see at the top of this blog from Alco, which is in nearby Duarte. For that target above, I put 25 rounds on each of those upper little silhouettes with the 9mm Shield, and then I did the same with the .45 on the lower two silhouettes. The .45 is more accurate, but it’s a big gun and it’s not comfortable for concealed carry. The little Smith and Wesson Shield is much better for that job.
I haven’t done a knife story in awhile, but that doesn’t mean I haven’t been buying. Some of these online knife stores’ websites are addictive, and the Chicago Knife Works site certainly falls into that category. It’s fun just perusing their offerings. Sometimes, I’ll see something that piques my interest and then I’ll search on a feature that a particular knife has. That occurred recently when I saw a folder I likes with bone handles (or scales, to use knife aficionado terminology).
Bone as a scale material is intriguing to me, partly because I like the way it looks, partly because it looks like ivory, and partly because of a recent visit to the fabled Colt Custom Shop in West Hartford, Connecticut. When I saw an artist crafting custom grips on a Colt 1873 Single Action Army, I asked about the material (knowing that ivory was no longer available). The answer, as good friend and Colt factory guide Tim told me, was bone. Giraffe bone, to be specific. I would never have imagined.
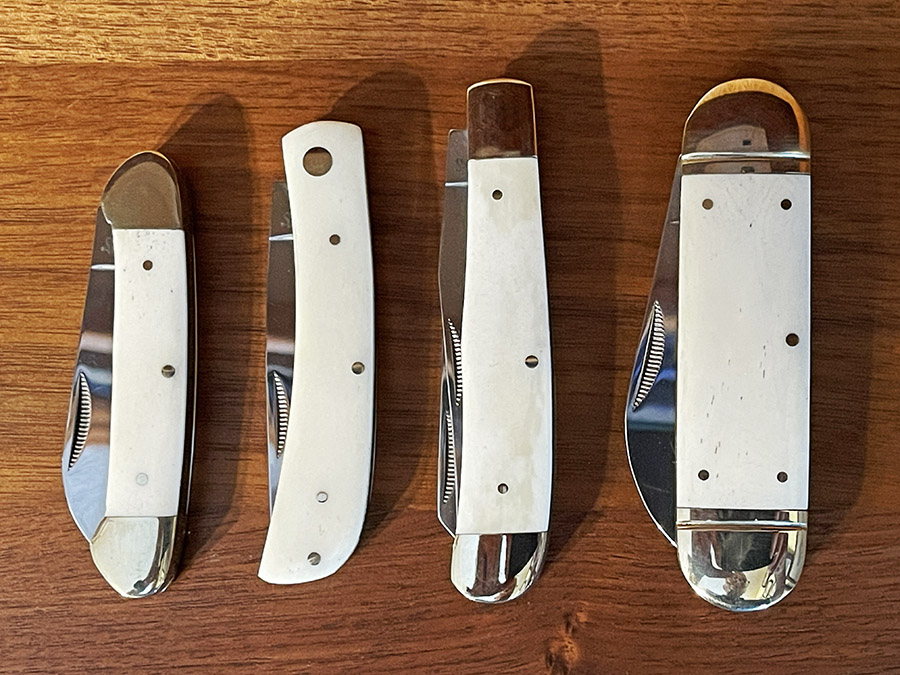
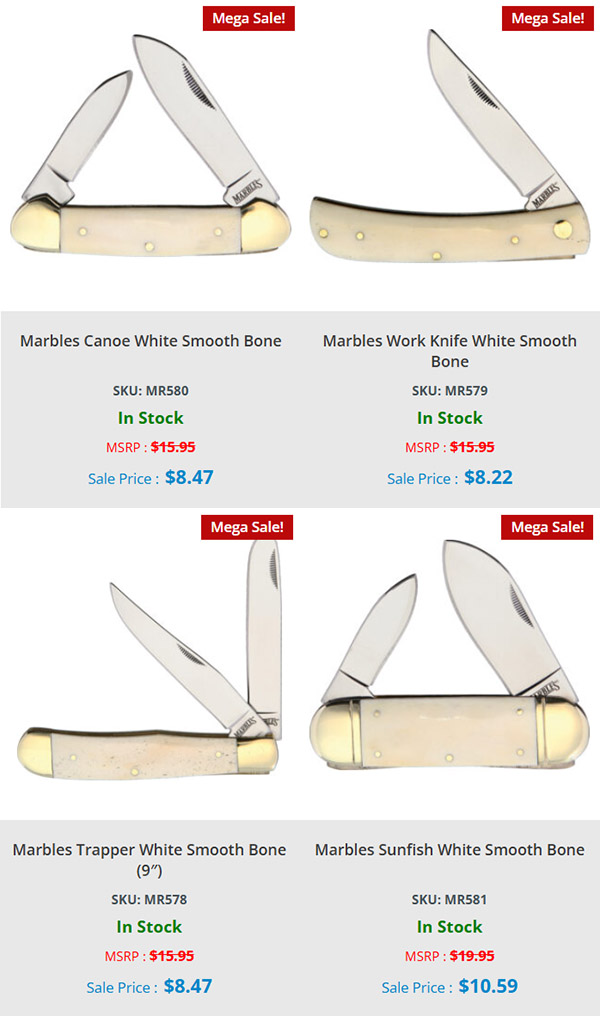
Anyway, to get back to the main attraction, I saw a Marbles folding knife with white bone scales on the Chicago Knife Works site and I liked it, so I searched on all Marbles folders with bone scales. What the site’s search returned was intriguing.
I liked every one of the knives I saw, and Chicago Knife Works‘ prices are so reasonable I pulled the trigger on all of them. Cheap fun, and they looked good on the Chicago Knife Works site. They arrived a few days later (all the above, with shipping, was only about $50), and I can tell you they look even better in person.
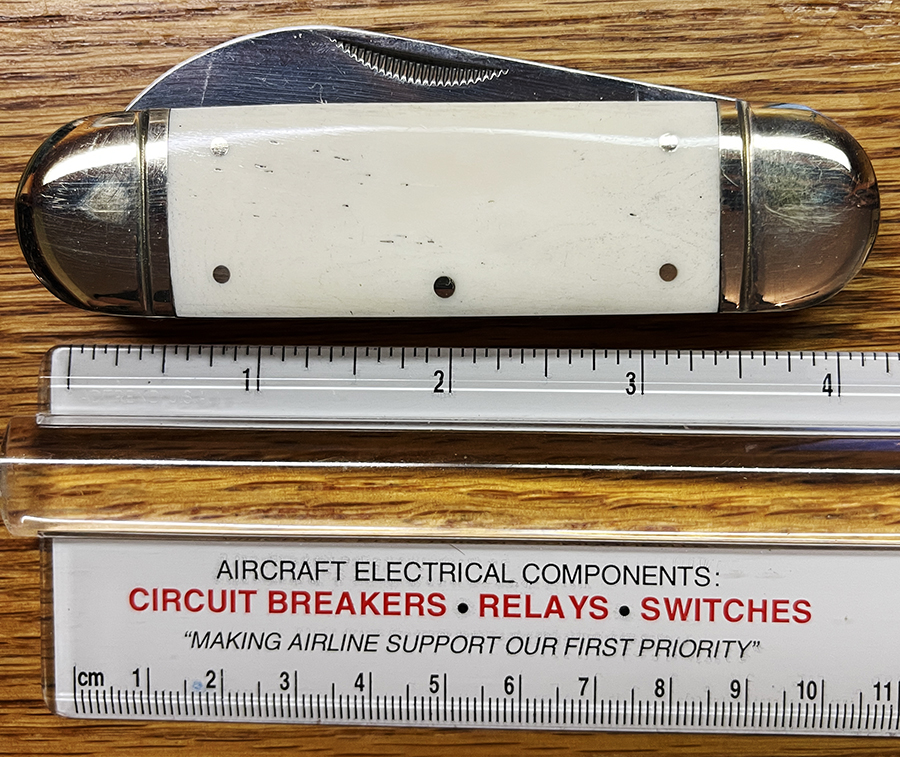
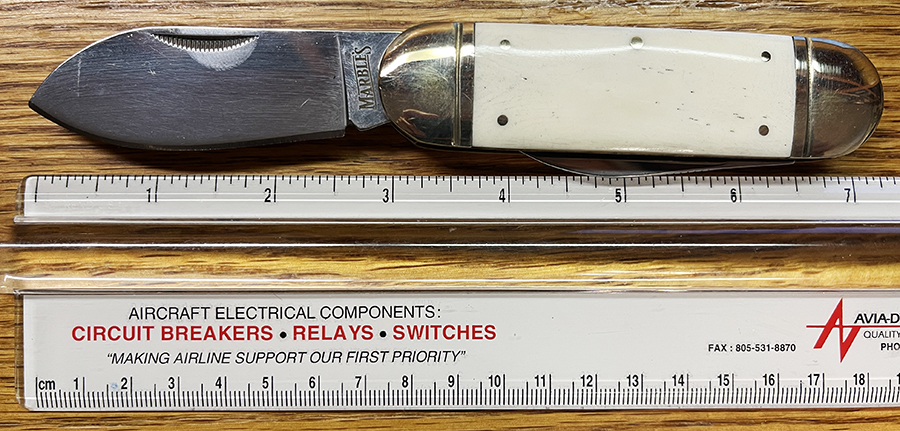
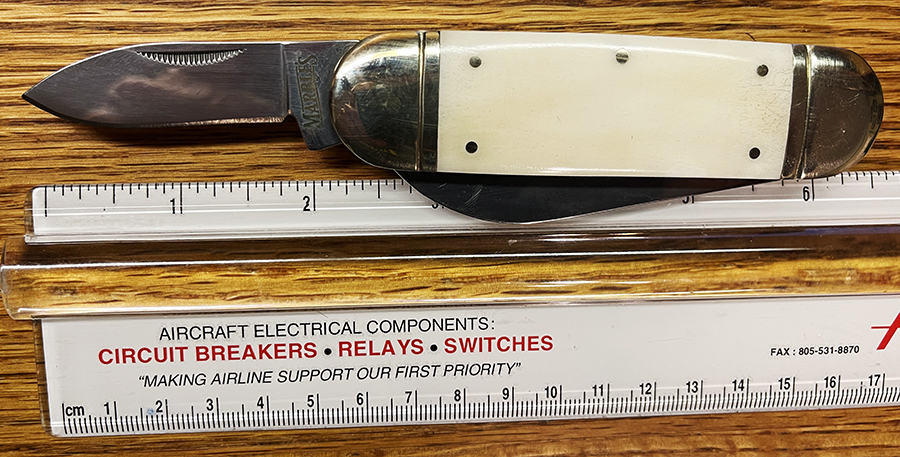
All the knives are appealing, and I like the white bone appearance. The canoe style is one I’ve written about before, and in my opinion, it is about the perfect-sized pocketknife for pocket carry. It has two blades and both are razor sharp. The work knife (also known as a sodbuster) is a single-bladed knife and its name comes from the fact that it is designed to be used by a working man (like a farmer). The trapper knife (as you might have guessed) is the design preferred by trappers. It has two blades: One with a clip point and the other with a spey blade (we’ve mentioned those before; my Case Stockman knife also has a spey blade). And finally, there’s that gorgeous two-bladed sunfish knife, which is a big knife. It gets its name from its sunfish-like shape.
The Sunfish is a physically big knife, as the following photos show:
I can’t say which of the above knives I like the best, so I’ll cut to the chase and tell you that I like them all. So much so, I continued the quest for knives with white bone scales.
Most recently, I purchased a large folder (the Rough Ryder Deer Slayer) from another knife supplier only because Chicago Knife Works didn’t have it in stock. I’ve written about it before.
I like the look and size of the Deer Slayer so much that I started poking around to see if that knife was available with white bone scales. It was. The manufacturer this time is Hen and Rooster, and I was able to order it from Chicago Knife Works.
I guess I should say the importer, not the manufacturer, as I suspect the same manufacturer makes knives for several importers with slight differences to meet the importers’ marketing strategies. I don’t have the Hen and Rooster knife yet, but when I get it, I’ll post a few photos in a future blog.
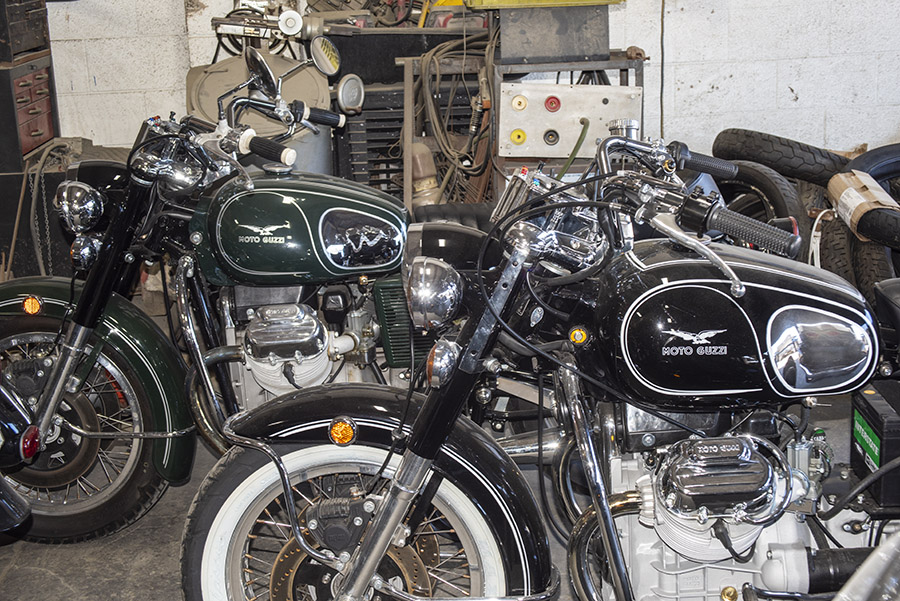
As the title implies, last week was quite a week, and a lot of it focused on Moto Guzzi stuff. The Roman gods are sending me a message, I think, but old age and big bucks will most likely keep my desire to own a vintage Guzzi suppressed. And there’s been some pocketknife stuff, too, leading into the age-old Chinese quality discussion. I’ll get to that in a minute.
The guts of a Guzzi in the Cycle Garden shop. This is a cool place in a hot locale (temperatures sometimes approach 120 degrees in Indio).
I spent Monday morning at Cycle Garden in Indio, California, getting tutored by good buddy Steve on the finer points of Guzzi fork rebuilding. It’s for a piece I’m doing on that topic, and the folks at Cycle Garden couldn’t have been more welcoming. These guys know their stuff, as well they should: They are the largest, busiest, and probably the best in the world at concours-level Guzzi restorations. I developed a bad case of the “I wants” for a restored Guzzi after seeing some of the bikes at the top of this blog, but it’s probably not in the cards.
Just forking around out in the desert…
After treating me to a cup of his famous home-roasted and ground coffee, Steve showed some of the bikes to me. There’s not a single part on a Cycle Gardens restoration Guzzi that isn’t touched during the restoration (both 0n the motorcycle and in the engine). How much? Somewhere in the neighborhood of $40,000 to $50,000. A look at any of the Cycle Garden bikes easily confirms the value is there. But my wallet is light enough already. Watch for more on the Cycle Garden shop; it’s amazing.
The man, the Moto Guzzi, and the legend: Chris Donaldson sitting across the table from yours truly. Buy the book on Amazon. Buy mine, too!
On Friday, I visited another Guzzi shop 130 miles to the west, this time to meet with and interview Chris Donaldson. Chris wrote Going the Wrong Way, the story of his ride around the world on a Moto Guzzi. He just flew into Los Angeles from Ireland to ride across the US. We had a nice meeting, and you’ll be hearing more about Chris in a subsequent blog.
One the pocketknife front, it’s been mostly good (and the good will be featured in upcoming blogs) with several new additions to the collection. But there’s been a couple of bad apples, and that’s increased my smarts about what to look for in a pocketknife.
The Schrade stag-handled folding hunter. The blade wobbled in the knife body when closed. Back it went. I’m still waiting for a replacement. It’s made in China.
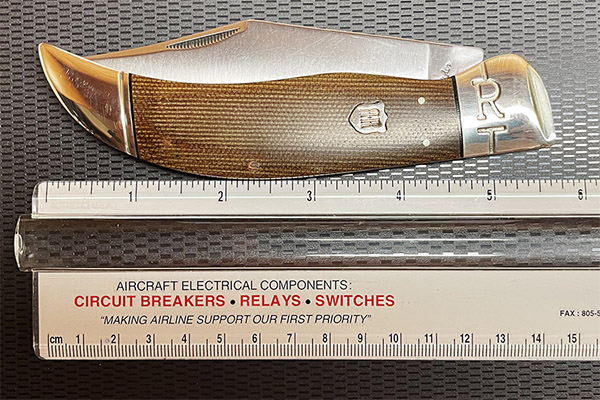
The first was a large Buck-110-style Schrade folding hunter with stunning stag grips. The knife arrived and I loved the look of it, but it had a defect. With the blade closed, it wobbled inside the knife body. In my opinion, it should have no side-to-side play, so back it went. I don’t want my money back; I just want a good knife. We’ll see what happens.
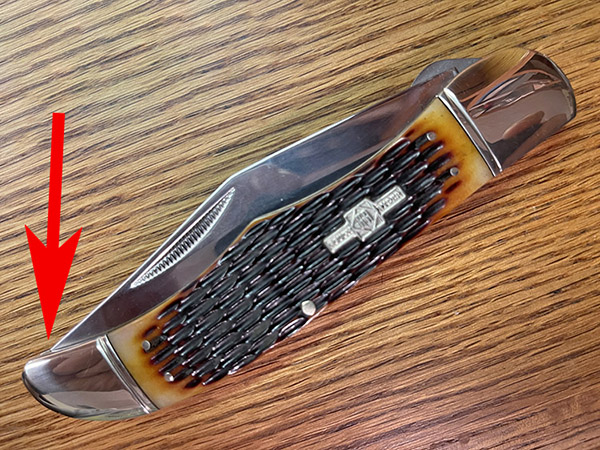
The Rough Rider Large Hunter. I love the design, but the knife is no good. The tip lies above the line of the knife body when the knife is closed. Muey malo, mi amigo. This is also a Chinese knife.
The next was another beautiful large hunter, this time from Rough Rider. It’s a beautiful knife, but it arrived with a different problem. On this one, when the knife is closed the tip of the blade sits slightly proud of the knife body, and that means you can catch your hand on it. Who would think to check for this? Apparently, not the folks who manufacture the knife, and not the folks who sell them, either. I bought one from Amazon, and I returned it the next day. I wanted the knife, though, so I ordered it again from Chicago Knife Works. Wouldn’t you know it? The replacement knife had the same problem. Size notwithstanding, it’s an inexpensive knife, but apparently they’re all bad (at least based on my sample of two).
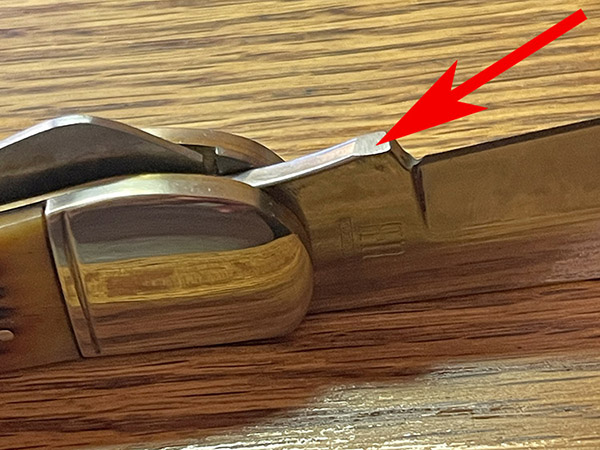
The Rough Rider’s kick. Grinding it down didn’t fix the problem.
I tried grinding down the Rough Rider’s kick (the part of the blade that controls how far it goes into the knife body when it closes), but that didn’t fix the problem. It’s an inexpensive knife (only about $15) and I’m not going to bother returning it. I’ll just look at it from time to time. It will remind me that I’m not as smart as I sometimes think I am.
Stay tuned, my friends. There’s more coming your way.


 I’m tempted to buy the watch you see above, but I already have plenty of watches. You can buy the above watch on Amazon for $184, or better yet, from