I saw the advertisement for The Bomber in our local Holloman Bookoo website. Holloman Bookoo is like Craigslist but more local. There may be other BooKoo sites but I haven’t searched for them because the stuff for sale is too far away. This story gets a bit complicated but I was searching for a drive train to scavenge for Brumby, my Jeep YJ.
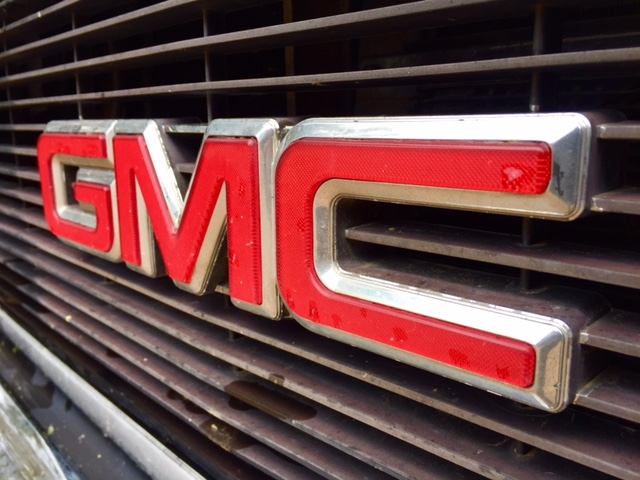
The Bomber, a half-ton 1990 4X4 GMC Suburban, had 3:73 axles, a running throttle-body fuel-injected small-block engine and was the last year of the solid front axle Suburbans. 1989 and 1990 were odd years for Suburbans because the rest of GM’s truck line changed body styles in 1988. For some reason the Suburban didn’t make the cut and soldiered on with the classic Square Body until joining the rest of the gang in 1991. Except for logos, the Chevy and GMC versions are pretty much exactly alike.
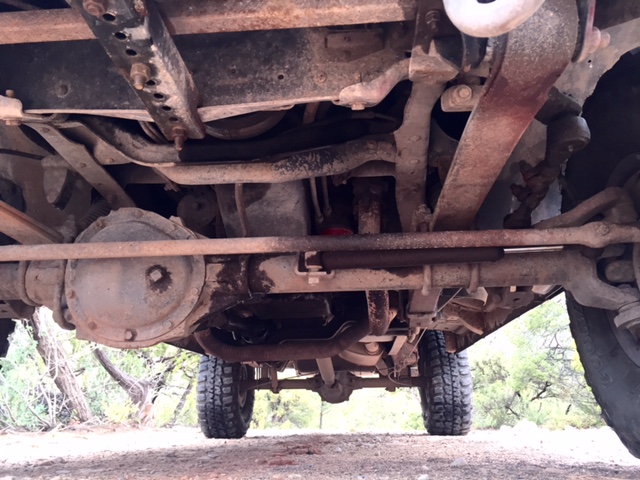
The Bomber’s half-ton, six-lug front axle is GM’s take on a Dana 44. I watched a Dirt Every Day video that said 1989/1990 models received axle shaft upgrades and were maybe a bit better than the D44. All this was good news for Brumby because the transmission had lost a gear and the little YJ desperately needed more power.
The Bomber’s owner wanted $1800. I drove the big beast around and offered him $1500. It was too easy; did I leave money on the table? CT (my wife) was a little unsure about my plan to strip out the Bomber for a pie-in-the-sky plan to boost the Jeep’s power. The worst time to plan an engine-axle swap is when you have no place to work and are trying to find a house to live in so I put the ménage on the back burner and busied myself with the mundane tasks of life.
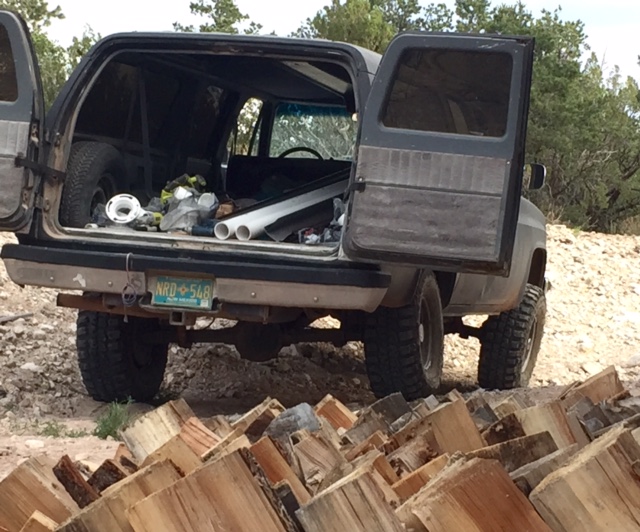
The old GMC ran well and I started using it to haul materials. The thing had crazy stiff springs on the rear axle: I could load 2 tons without the axle bottoming out. The 350 small-block, while no powerhouse, could pull the grade to my house without exploding into bits. The door sticker says “Built Flint Tough” and they mean it. The added advantage of a low-range transfer case and four-wheel drive meant I could haul a 10,00 pound, concrete mixer with a yard and a half of mud up Tinfiny’s steep, slippery driveway.
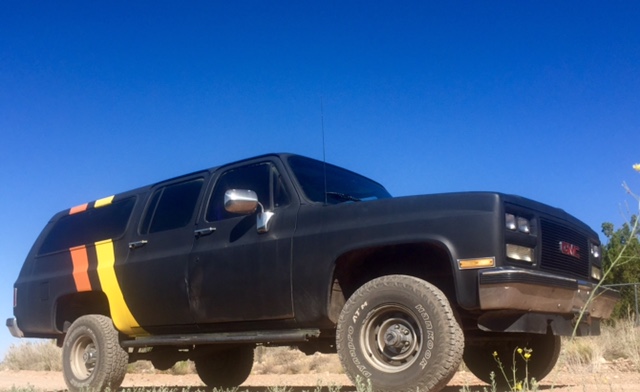
The Bomber came with a custom paint job that could not have been more out of place. It was shocking. CT recommended I cover over the Starsky & Hutch themed wagon if I ever wanted her to ride in the thing. It took less than a quart of BBQ black to roll over the offending stripes. Not that it looks good now, but at least people run away slower.
Shod with smallish but almost new 31” tires, the bomber looked a little cheesy in the tire division. Bigger, 33” tires that would fill the wheel wells were ordered from Wal-Mart. Just like that the Bomber’s value doubled. I put the 31” tires on Brumby the Jeep. Remember the Jeep? The reason I bought the Bomber?
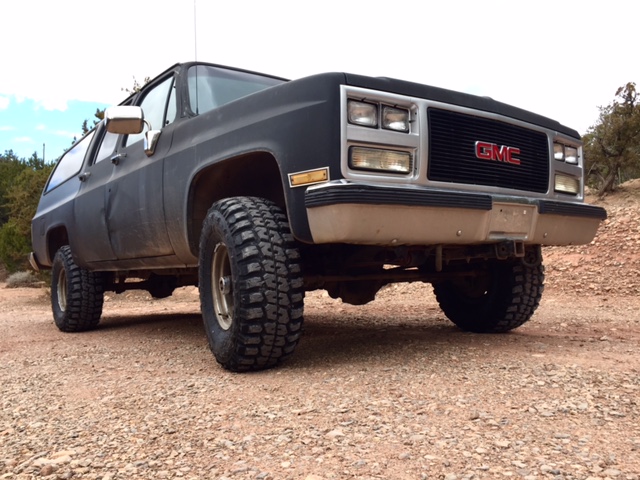
The thing is, a Suburban is handy as hell to have around. I can load it up with bags of concrete or building materials and everything stays dry. We went camping in the beast; there’s over 8 feet of room for bedding if you fold the seats down. The body is dented but rust free. I use the ‘Burb for garbage dump runs and to scare people.
I’ve grown attached to the Bomber. You’ll hear no more talk of swapping drive trains. In fact a whole new list of projects has been created. I need to remove all the interior plastic and rugs from the passenger doors rearward because it’s too hard to keep clean. I want the cargo area bare metal so I can hose it out. The stupid wooden overhead console has to go because I keep hitting my head on the edge. Then the automatic transmission needs to be swapped out for a 4-speed manual. I can’t stand automatics. It’ll need a decent paint job at some point and a roof rack with one of those tents on top.
Worst of all I’m still on the lookout for a V-8 drive train to swap into the Jeep.
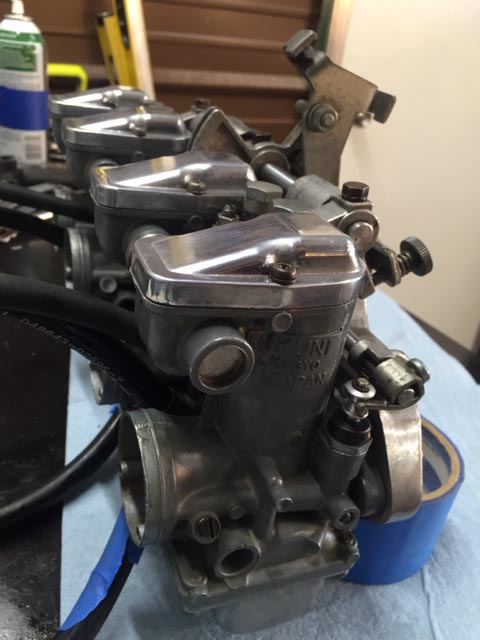
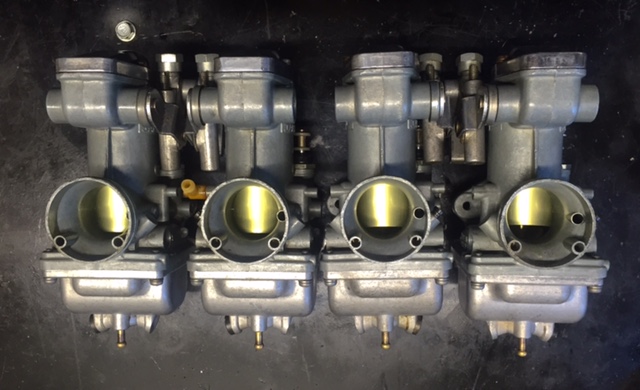
I finally got Zeds’ carburetors reassembled onto the rack. I’ve synchronized the 4 carbs as close as I can. The Z1 repair book I have gives a down wind, throttle-slide gap to strive for and after I got that adjustment close I moved over to the upwind side and used a small drill bit as a standard to fine tune the gap. For me, it’s easier to work that side. I use a drag/feel type of measurement. You slide the bit back and forth to sense the tension between the slide and the lower carb venturi and then try to get them all the same. You’ve got it close when the next bit under is loose and the next bit over won’t go.
After trimming some rubber flashing where the brass manifold vacuum ports enter the new rubber manifolds I managed to get them installed without stripping any more 6mm screws. The manifold clamps are soaking in Evapo-rust as we type.
The Z1 uses a fancy-for-the-time crankcase vent system. Mounted on the rear of the top crankcase is a plenum to catch oil mist and condense it back into the engine. I took this apart because the hose leading from the vent to the air cleaner box was missing and I wanted to be sure some sort of oil loving spider did not take up residence inside. Luckily it was clean inside so I gave the can a quick polish and reassembled the thing.
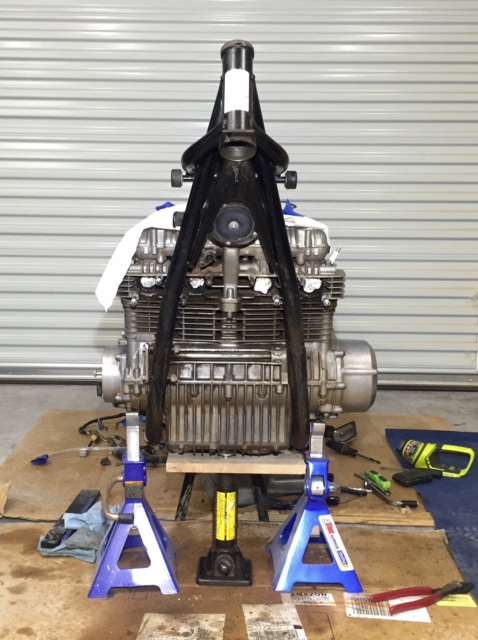
Next I checked the valve adjustment because I’ll be starting the beast soon and I don’t want to fight the system if the valves are way out of adjustment. Before removing the valve cover I marked the front in case it matters.
The cams and valve shims look unworn. This bike shows 41,000 miles on the odometer! If this were a Honda the cam lobes would be galled. I know this because almost every Honda I’ve owned galled its cam lobes.
The valves are close enough to start the engine, two are on the tight side and two are on the loose side. Four valves are within spec. I’ll recheck everything after starting the engine in case a chunk of carbon or a mouse paw is affecting these readings.
Zed’s clutch cable is in bad shape so I removed the clutch actuator housing/sprocket cover for replacement and cleaning/lube/adjustment. Inside I found the neutral light indicator switch broken off. I don’t think a ton of oil would have spewed out as the hole is not pressurized but it most likely would have leaked.
Zed appears to be going backwards but trust me she’s making progress. With the front of the bike jacked up you couldn’t miss the loose steering head bearings. Rather than just tighten them I took the forks apart to re-grease them. Much like removing the sprocket cover it’s a good thing I did. The top bearing looks fine but the bottom is pretty rusty. I’ve cleaned this mess up and in a pinch the bottom bearing, while pitted, could be used again but I’ll order new bearings. I’m in no mood to take the front apart again.
Zed’s fork seals were leaking. Another stroke of luck as the oil kept the lower section of the fork tubes from rusting. Under the headlamp ears the rust is worse. I’ll clean it off and coat that section with grease when I reassemble the forks. You’ll never see it. I’ve started cleaning the fork legs in preparation for disassembly. You probably already know this but remember to loosen the big bolt on top of the fork tube before removing the tubes and loosen the allen-head bolt on the bottom of the fork sliders (under the axle boss) before removing that big top bolt.
My buddy Skip sent what we hope is the correct spark advancer unit so Zed should have everything it needs to start soon. I’m a little concerned that I can only find first gear and neutral in the transmission. Hopefully, once the engine starts and oil is slung around the gearbox will shift.
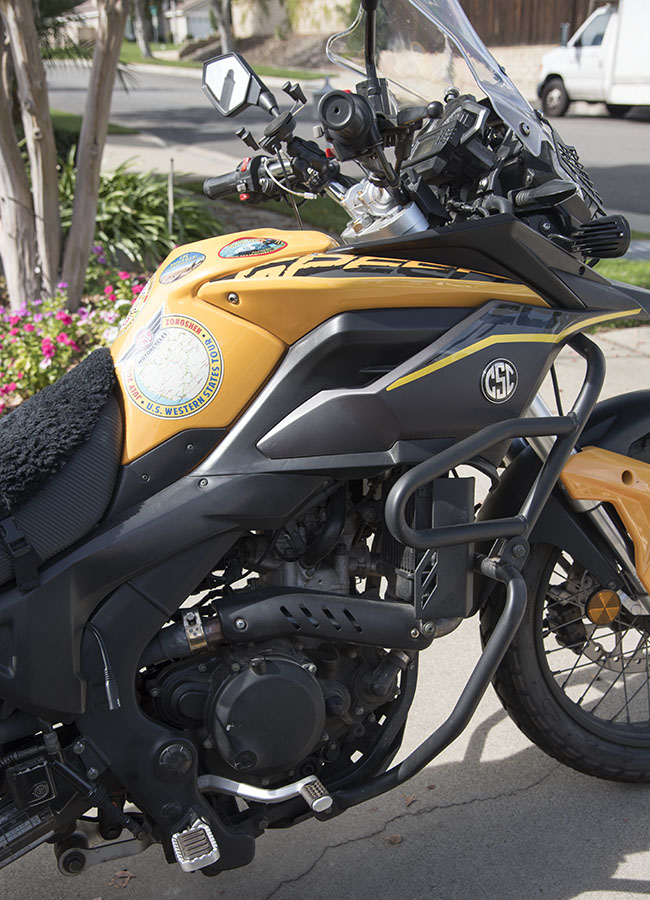
This is a continuation of the preceding blog comparing the new CSC RX4 to the RX3 motorcycle. I probably should have waited until I had taken all of the photos and organized the comparison into discrete areas (like wheels, tires, brakes, and so on), but you’re going to have to deal with the ramblings of a disorganized mind (and that would be mine). With apologies in advance, my ramblings will ramble on in no particular order.
With that as a preface, let’s take a look at the fuel tanks. First up is the RX4 tank, and the big news is that it holds 5.3 gallons instead of the RX3’s 4.2 gallons. Here’s the RX4 tank…
The RX4 fuel tank. The colors are stunning. It holds 5.3 gallons.
You can’t help but notice the paint on this motorcycle. CSC received three bikes for the U.S. certification effort…one in silver, one in red, and one in orange. My bike has the metalflake orange color and it’s visually arresting (it will stop you in your tracks when you see it). Here’s a close up…
Metalflake orange. It’s beautiful. It’s the new fastest color.
There are really three or four colors going on here. One is the metalflake orange. Another is the metallic silver on the tank’s side panels. A third is the even darker metallic gray on yet another side panel (you’ll see that in another photo below). And the fourth is the black of the frame and the molded plastic body bits. It all comes together nicely.
You can compare that to the orange on my 2015 RX3…
My orange RX3. This is the 2015 model, which is little bit different than the later CSC orange on newer RX3 motorcycles.
I mentioned the RX4’s 5.3 gallon capacity. Okay, let me explain a bit more. I haven’t attempted to actually run the thing dry and put 5.3 gallons of gasolina in the tank. 5.3 gallons is the figure Zongshen provided. The RX3’s spec is 4.2 gallons, but that’s not the right number. The RX3’s tank would hold 4.2 gallons if there was nothing else in it, but the tank is also occupied by the float for the sending unit and the fuel pump, and they both take up space. Gerry and I once took a bone dry RX3 tank with the fuel pump and sending unit in it to a gas station, and after really finessing the gas station pump, we were able to coax 3.9 gallons into the RX3 tank. I don’t know if the same situation applies to the RX4 tank. Maybe that 5.3 gallon statistic is really 5.o gallons.
The other thing going on in the RX3 is that the fuel gage and the fuel warning light indicate you are out of fuel when there’s still something close to a gallon left in the tank. As it was explained to me by the guys in Chongqing, that’s to make sure the fuel pump is always surrounded by fuel (it’s how the fuel pump is cooled). I don’t know if the same situation applies to the RX4 fuel tank. I have to get more miles on the bike to let you know.
So, let me do what I have a bad habit of doing, and that’s go tangential for a bit to tell you a little bit more about the RX3 tank, and in particular, the tank on my RX3. You’ll notice that my tank has a panel with a decal that says “Speed” on it. That was the first year of the RX3, and I guess it was Zongshen’s idea of making the motorcycle convey a fast image. The Internet weenies had a lot of fun with that. When they cornered me on it, I told them that CSC originally asked that the bike’s name be “Methamphetamine,” but we would have had to make the font so small you couldn’t read it. That got a laugh and the Speed teasing ended. Mercifully, CSC changed the name to “Adventure” the following year. There’s no such name label or decal on the RX4. I think that’s a good thing.
You probably notice all of the other decals on my RX3’s fuel tank. I like to think of them as campaign ribbons. We put one on their for each of the Baja runs, the 5000-mile Western America Adventure Run, and the Destinations Deal tour. I like them.
Moving right along, here’s a side view of the RX4 showing the engine and fuel tank, and then a similar photo of the RX3…
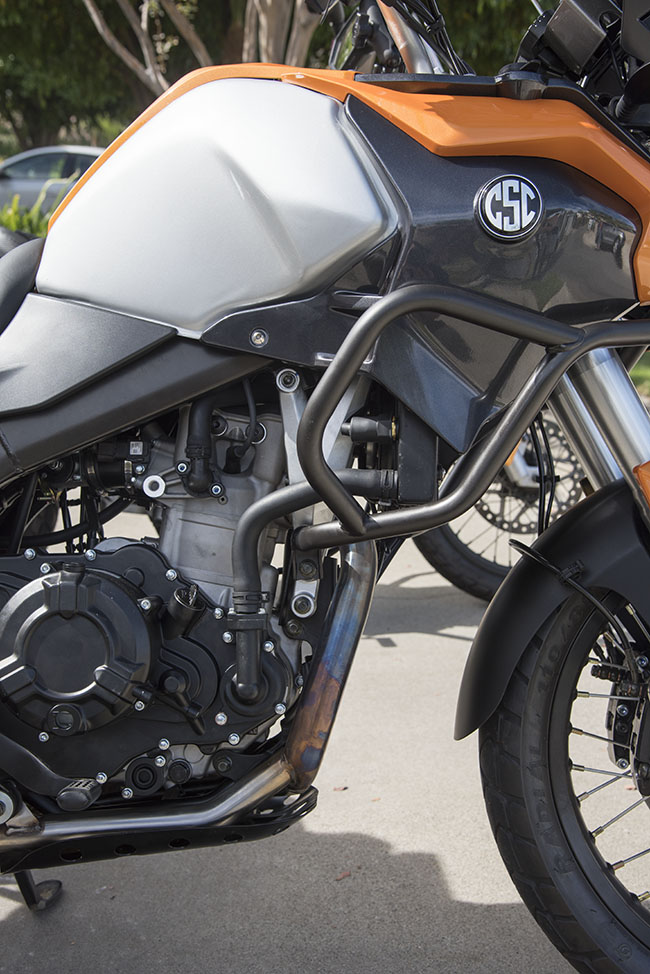
Right side engine and fuel tank view of the RX4. Note the four colors, the engine guards, the engine cylinder head casting, the crank position windows (on the cylinder head), and the oil accoutrements.The RX3 fuel tank and engine viewed from the right side of the motorcycle.
There’s a lot to take in on those two right side views. Here we go, folks.
I guess the first thing to notice are the engine guards. In the old days, we used to call them crash guards, but these days it’s more correct to say engine guards. Whatever. Anyway, on the RX3, the engine guards extend all the way to the bottom of the engine. On the RX4, they only cover the upper portion of the bike. I don’t know why that is. It might be that if you drop the RX4 on its side, the upper portion is enough. But I don’t know this, and I’m not going to drop both bikes on their sides to find out.
On the RX4, the crank position windows are on the right side of the engine. You can see them just behind the spark plug on the cylinder on the right side. On the RX3, those viewing ports are on the left side of the engine.
The crank position viewing windows. On the RX3, they are on the left side of the engine. One the RX4, they are on the right side of the engine.
The RX3 has an upswept exhaust pipe; on the RX4, the exhaust pipe heads south to run underneath the engine, and then heads north again to an upswept exhaust pipe (you can’t see that in the above photo). While some might view the RX4 exhaust routing as less than desirable from an offroad perspective, I’m okay with it. The RX4 has a steel engine skid plate, and the RX4’s exhaust routing makes getting to the oil fill port a lot easier (it’s just aft of the water pump).
You’ll notice that the cylinder, cylinder head, and upper engine mount castings are all much heftier than are those on the RX3. If you look at the cylinder head casting just aft of the cylinder head, you’ll see a weird-looking ribbed triangular extension with a threaded hole in it. It’s on both sides of the engine.
A fixturing attach point, or perhaps to mount the engine in another bike?
With that threaded hole, it looks like Zongshen left a part off the bike (there’s nothing there). My guess is that this feature is either used to support the engine when it is moving down the assembly line, or that it is there for mounting the engine in another frame (perhaps one of the Dakar rally bikes). I’d like to see Zongshen remove that part of the casting on the RX4 engine; it serves no purpose on the RX4 other than to add weight to a bike that doesn’t need to take on ballast.
The RX4 appears to have the same arrangement for the oil filter and the oil strainers as does the RX3. One strainer is accessible via a threaded cover on both sides of the crankcase; the oil filter is located beneath a cover on the right side of the engine.
Clockwise from 10:00: Small oil filler access hole and large oil filler access hole (just like the RX3), oil strainer cap (just like the RX3; there’s another on the other side of the engine), oil filter cover (just like the RX3), and oil view port (just like the RX3).
That’s enough for today, my friends. We’ll have another RX3 and RX4 micro-comparison posted tomorrow. I’m going to take a break and get out and ride the RX4 for awhile…
Wow, where to begin? I thought I would do this in a single blog, but I quickly realized it’s going to take more than a few.
Joe Gresh thought it would be a good idea to do a comparison between the RX3 and the RX4, and since he’s the brains in this outfit (I’m the good looks), I started the photos for the comparo earlier today. There’s a lot to discuss, and I don’t want to try to cram it all into a “Gone With The Wind” single blog.
So, here we go with the first set of comparisons, and I guess as good a place to get started as any is with a shot from the rear of both bikes…
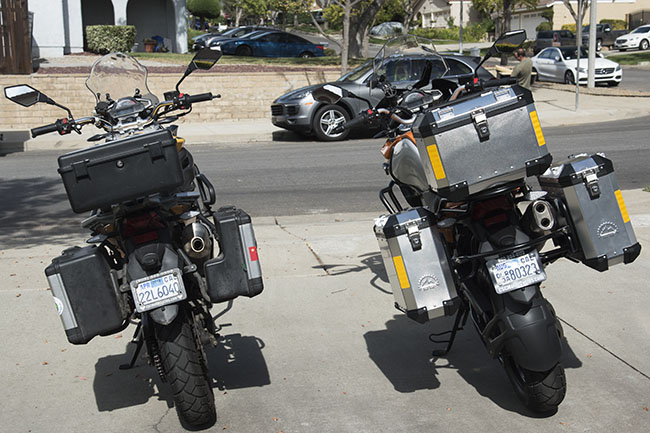
My RX3 on the left, and the new RX4 on the right. The RX4 has a 19-inch front wheel (the RX3 has an 18-inch front wheel). As a result, the RX4 leans a little bit more to the left than does the RX3 when on the sidestand.
You’ll notice that my RX3 has the stock plastic luggage and the RX4 has the optional Tourfella aluminum luggage. The RX4 will come stock with the same plastic panniers as the RX3, but it will have a taller tailbox than the current RX3 design. The current RX3 tailbox won’t close with a full face helmet, but the taller stock plastic tailbox to be provided on the RX4 will. I’m hoping the 2019 RX3 will have the taller tailbox, too.
The Tourfella luggage is a great option. Both sets of luggage are lockable; the stock plastic bags use the bike’s ignition key. The Tourfella luggage has a separate key. The Tourfella bags have considerably more capacity than the stock plastic bags, and when I rode in Colombia with good buddies Juan and Carlos, my AKT RS3 (a carbureted RX3) had the Tourfella bags. You get a huge increase in capacity (which is nice), but the aluminum bags are wider and I’m guessing they are heavier. You’ll see a slight decrease in fuel economy and top speed with the larger bags on an RX3; I don’t know what they’ll do to both stats on an RX4.
I like the looks of both sets of luggage. I’m a guy who travels light, so the stock bags have been good enough for me on my adventure tours. One other minor disadvantage of the Tourfellas is they are wide. I scraped a taxi splitting lanes when debarking from a ferry ride down the Magdalena River in Colombia. Joe Gresh’s RX3 had the Tourfellas in China, and I watched him have the same problem a couple of times when splitting traffic there. But those big aluminum Tourfellas sure are nice. They are a high quality bit of kit, too. And like I said, you can carry a lot of stuff in those aluminum boxes.
Here are photos shot from the rear of each bike, starting with the new RX4…
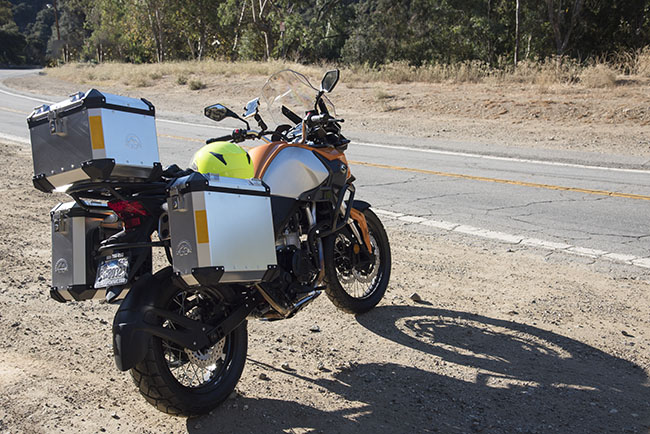
The Tourfella luggage on the RX4. It’s 34-inches across those two aluminum panniers. That’s wider than the bike’s handlebars.
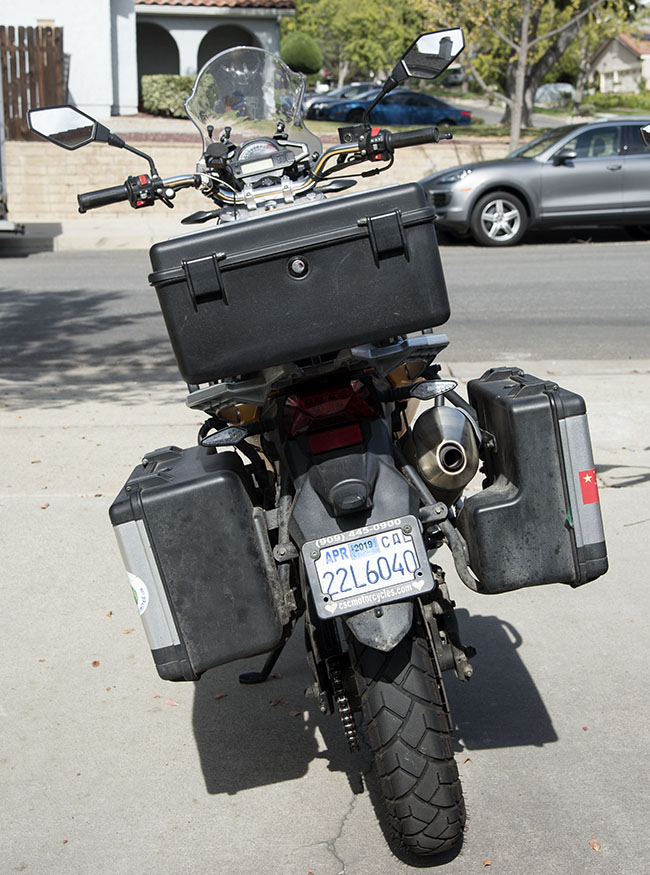
And here’s my RX3. It’s one of the very first delivered to the United States, and I’ve done some serious traveling with this motorcycle. It has the stock plastic luggage.
A dirty bike that’s seen a lot of miles…my kind of machine. The width across the stock RX3 panniers is 29 inches (they are 5 inches narrower than the Tourfellas in the above photo, and they are 2 inches narrower than the RX3’s handlebars). I don’t know what the width of the stock luggage will be on the RX4.
Next up are two photos of the exhaust outlets. On the RX4, the muffler has two openings, suggesting the bike is a twin (it’s not; it’s a single like the RX3).
The RX4 muffler. It’s stainless steel, and it contains the bike’s catalytic converter. Two openings aside, the bike is a single. The exhaust note is sweet. I’ll do a video in a future blog.The RX3 muffler, with its single outlet. It’s also a stainless steel muffler, and it has an awesome exhaust note.
As I mentioned in my earlier blog on the RX4, the new bike sounds like the RX3, but you can tell it has a bigger and stronger engine. Both bikes sound almost as if they have a custom pipe. They are both actually a little bit louder than I’d like, but the sound is great. Good ExhaustNotes, I’d say.
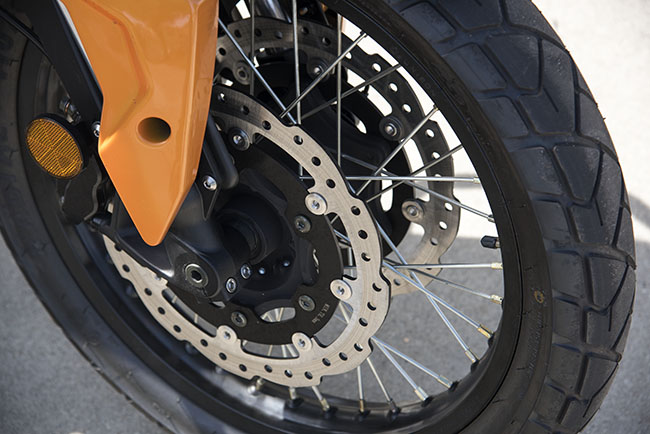
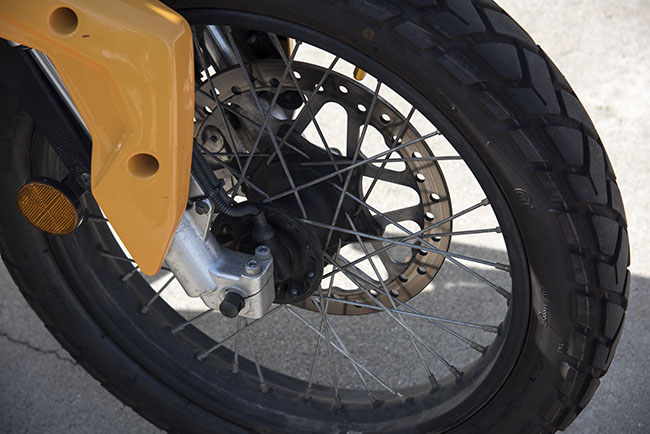
Moving to the other end of both motorcycles, let’s take a look at the front brakes. The RX4 has twin-piston calipers and dual disks…
Dual discs on the RX4. The braking is a bit stronger than an RX3 with the CSC larger single disk.
The RX3 has a single disk with a twin-piston caliper up front. My bike has the CSC larger diameter brake rotor. I think this is a worthwhile addition to the RX3, but I also think the stock RX3 brake is sufficient.
The larger diameter front disk rotor on my RX3. It works well.
If you look closely at both of the above photos, you’ll see the two front wheels are different. I’ve already mentioned the RX4’s 19-inch front wheel (the RX3 has a standard 18-inch diameter front wheel, with a 19-inch wheel available as an accessory from CSC). What is also shown (but maybe is not so obvious) is that the RX4 has aluminum rims, while the RX3 has steel rims. I think that might be what makes the RX4 handle so well. Aluminum wheels mean less unsprung weight, and they also make a motorcycle handle more crisply.
The production RX4 motorcycles will have anti-skid braking, and unlike the the 2018 RX3 ABS, you’ll be able to turn the ABS off on the RX4. That’s something you dirt denizens asked for, and your voices have been heard. The RX4 will come standard with wire wheels (like you see in these photos), and cast aluminum wheels with tubeless tires will be an option. The RX4 wire wheels require tubes.
Here are couple of tangential thoughts intended for the wizards at Zongshen (they read ExhaustNotes, too, you know). I’d like you guys to consider adding the dual discs, the aluminum-rimmed wire wheels, and the switchable anti-skid braking on the 2019 RX3. That would make an already great motorcycle even better, I think.
Both the RX3 and the RX4 have Cheng Shin (CST) tires. They’re bigger on the RX4 (more on that in the next blog). These are good tires. They hook up well and they last a long time. I get about 6,000 miles out of a rear tire on my RX3, and as is the case with most motorcycles, the front tires last about twice as long as the rear tires.
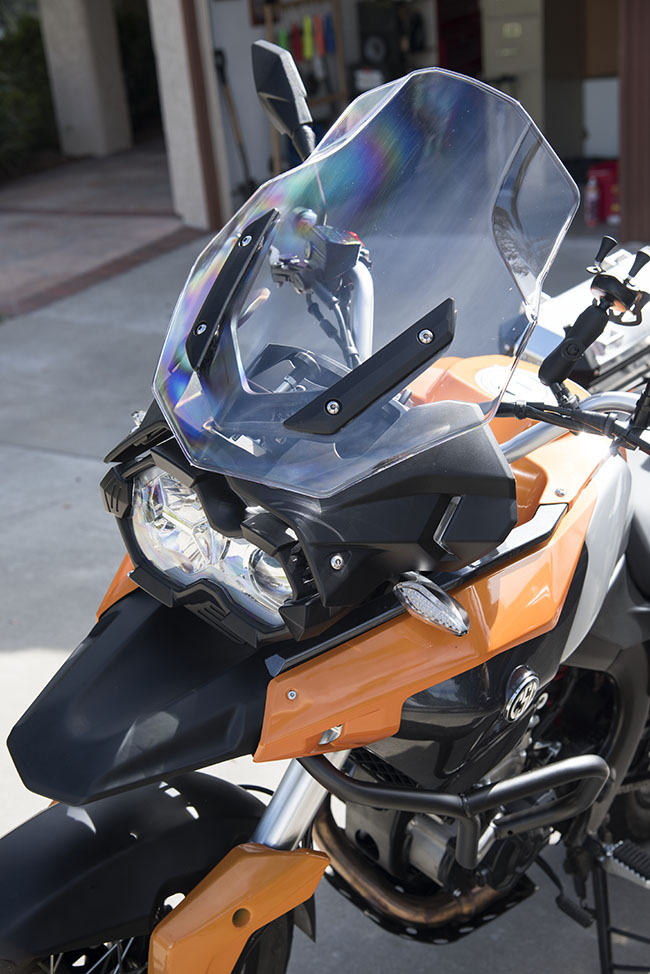
Staying at the front of the motorcycle, let’s now take a look at the face of both bikes. This is my RX3…
The iconic look of the RX3 motorcycle.
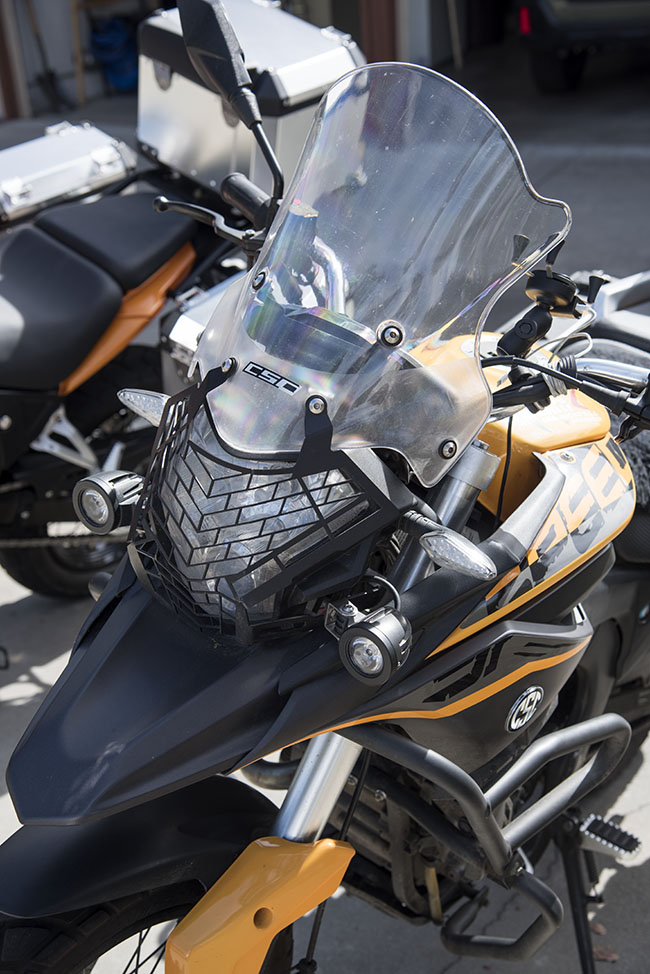
CSC changed the windshield and headlight design on the RX4. During my trips to Chongqing, I saw that Zongshen evaluated using the same RX3 windshield and headlight on the RX4. I thought keeping the windshield would have been a good idea, but hey, what do I know? The RX3 windshield has been universally praised by everyone who has ridden an RX3, including every magazine that tested the bike. It is a good design. It just works…there’s no turbulence, and it’s well below your line of sight. But like I said, who am I? I don’t make a million motorcycles a year. Zongshen does.
The RX3 headlight…well, that’s not the RX3’s strong point. Being charitable, I’d say it’s anemic. I don’t ride at night if I can avoid it, but I recognize that the stock headlight doesn’t light up the world the way I’d like it to. The spotlights you see on my bike are from AKT Motos in Colombia. I had them on the RS3 I rode there, and I liked them so much that my good buddy Enrique Vargas gave a pair to me when I left his beautiful country. CSC sells accessory spotlights, too, but I kept the AKT Motos lamps on my bike. I use the spotlights as headlights on my RX3 when I ride at night. Many folks who buy an RX3 put a brighter bulb in the headlight, and that works well. I have one that my good buddy TK gave to me, but I haven’t put it on my bike yet.
You’ll also notice the very cool headlight guard on my bike. That was another gift from Enrique in Colombia. CSC now sells a similar headlight guard. Mine is Colombian, and I’ve kept it instead of the CSC headlight guard because it was a gift and I like it.
Onward and upward…here’s the front end of the new RX4…
A clean, modern look: The RX4 front end.
The RX4 headlight and windshield design are much changed from the RX3. Like I said above, CSC could have gone with a front end look identical to the RX4, but they opted instead for the new look. It’s grown on me. I would be okay with either one, and at first I recommended staying with the RX3 look because I feel it is an iconic Zongshen motorcycle face, but I like the new look, too. The new RX4 windshield is adjustable (the RX3 one is not). The headlight is a completely different design, and later tonight, I’m going to move both bikes onto the street to see how the headlight illumination patterns compare. I’ll try to get some photos so you can see the difference.
I’ll write more comparing the two bikes in the next several blogs. This blog is already longer than I intended, and there’s a lot more to cover in these comparisons.
You know it’s coming, folks. Like I always say: Stay tuned.
I’ve been spending some time with Zed’s carburetors, working on details that required home-brewed engineering. The Mikuni carbs on Zed don’t have a traditional choke (a flap that blocks air going into the carb causing a rich mixture) but we still call it a choke. Instead, Zed’s carbs employ an enrichener circuit, which is more like a tiny, completely separate carburetor grafted onto the main body of the carb. Sort of like the brain inside Krang’s stomach on the Teenage Mutant Ninja Turtles cartoon. The enrichener has its own air intake on the upwind side of the throttle slide. This fuel circuit is fixed; no adjustment needed and is controlled by a plunger on the downwind side of the throttle slide. Lifting the plunger allows air to flow through the tiny carburetor at a pre-set fuel/air mixture and if everything else is right, helps a cold Kawasaki engine start better.
One of Zed’s four carbs was missing the little plastic bobbin that slides over the enrichener plunger shaft and is held onto the shaft by a tiny Jesus Clip. Two small fingers connected to the choke rail act on this bobbin and without it the plunger won’t lift. I Googled for a bit but could not find the bobbin part so I attempted to make one. I drilled a plunger-rod sized hole through a small piece of nylon and chucked the nylon into a Ryobi drill. Using a flat file I machined the nylon as the drill motor spun: a New Mexican hand-lathe. It worked great until the center of the bobbin got too thin and the whole mess spun out of control leaving me with a distorted pile of junk.
Back to square one. I noticed how the bobbin was nearly the same size as the pop rivets I’d been using to assemble parts of Tinfiny’s generator room. I have about 500 of these rivets in stock so I could afford to lose a few. Knocking the pin out of the pop rivet revealed a bore just a wee bit small for the plunger shaft but it was not a problem to run a drill bit through making the bore an exact fit for the plunger. A pop rivet only has one flanged side so I repeated the process on a second rivet, cut the two rivets to equal the length of a factory bobbin and assembled the mess. I cannot wait for a hard-core Z1 enthusiast to happen upon the aluminum bobbin. It’ll probably cause a heart attack as most Z1 fans are around 75 years old.
Between the throttle linkage pivots on each set of two carbs there are little dust covers made from a treated black paper. Or maybe the dust covers are rubber, I can’t tell. Three of the four covers were broken on Zed. The covers go over the springs and ball joints on the linkage. They don’t seal all that well but might keep a larger bug from crawling in there.
This is a part I didn’t bother looking for because I can make new ones in less time than it takes to look them up and order them. I used the thin plastic lid from a box of self-tapping sheet metal screws. Without a lid you know the screws are going to end up scattered across the shed floor. The dust covers didn’t come out as nice as I would have liked. Luckily, once installed you can’t see the things.
On the Z1 900cc, each set of two carbs share a fuel inlet pipe. The pipe goes between the carbs and is a metal Tee fitting with thick rubber o-rings cast onto the straight section of the Tee. This rubber hardens and shrinks resulting in a loose, leaky fit. You can buy new ones for 34 dollars but if you’ve read Zed’s Not Dead this far you know what is going to happen next.
I cut the rubber away from the fuel pipe and polished the exposed metal to ensure a smooth sealing surface. Then I drilled a small hole near the end of the pipe in order to install a pin (made from the drill bit). The pin is the same length as the width of the fuel inlet bore so once it is installed in the carb body the pin can’t fall out.
Now I used a ¼-inch length of rubber fuel hose (be sure to use the non-reinforced hose as cloth reinforcing strands will wick fuel, causing a leak) and slid this hose onto the fuel Tee. Next came washers and finally the pin. The assembly fits snugly into the carburetors. It helps to put the fuel feed hose on before you slide the carbs together. Hopefully it won’t leak.
I’ve got the carbs assembled onto the rack and everything seems to work smoothly. I’ll be testing the float levels on the bench and will sync the throttle slides as close as I can get them. The idea being all four slides move the same distance in unison. Even if they’re not perfect the bike should run reasonably well. Later, manifold vacuum gauges can be used to adjust the carbs for any slight differences between cylinders.
I get four motorcycle magazines: Motorcycle Classics, RoadRUNNER, American Iron, and Motorcyclist. Every once in a while, a story comes along that goes way beyond simply being good. The current issue of Motorcycle Classics has such a story: Tempting Fate: Around the World on Ducati 175 Tourismos. Landon Hall is the Motorcycle Classics Managing Editor, and he (along with Richard Backus, the head honcho) have a winning formula: A great team of writers and photographers, an eye for a great story, a focus on vintage bikes, and the ability to pull it all together in every issue. I once told Landon that each time I get the latest copy of Motorcycle Classics, I get concerned because it is so good I don’t know how they’ll be able to do better in the next issue. And then they do. Every time.
World travelers from the 1950s…two well-worn Ducati 175s.
The story, Tempting Fate: Around the World on Ducati 175 Tourismos , is about two young Italians (Leopoldo Tartarini and Giorgio Monetti) who went around the world on Ducati 175cc motorcycles in the early 1950s. The tale appealed to me immediately because it involved a long journey on small displacement motorcycles, and the writing and the photography sealed the deal (Hamish Cooper penned the story and Phil Aynsley did the photography). The details made it come alive, like this one: Ducati actually issued these guys handguns as part of their kit (Steve Seidner, are you getting my drift here?). And more. Lots more. Trust me on this: You’ll enjoy this article.
More good info…the index page for our ExhaustNotes gun stories is up, and you can get to it here:
One of my moto buddies stopped by Tinfiny Ranch, our high desert lair in New Mexico, and in the course of showing him around the property we got to talking about how incomplete everything was. He called it the 70% rule. As in 70% is close enough and time to move on to another project.
I blame it on my upbringing because I was raised in a house that was under construction for 16 of the 19 years I lived at home. There were additions, a second floor added, Walls knocked out and relocated, wall unit air conditioners installed and all manner of improvements that never saw completion. Oh, the stuff was sort of finished. The air conditioners worked fine but were never trimmed out, leaving a jagged edge around the face. The second floor had a beautiful staircase and the roof didn’t leak but it was still bare walls and floors when I left home for good. Same for the upstairs bathroom: the plumbing was stubbed out but the fixtures never were installed. The cats loved it up there. They had the whole floor to themselves.
Finishing just doesn’t seem that important to me. I’ve got the off-grid solar panel system working in Tinfiny’s large metal shed. Except it needs more batteries to complete the storage system. I have the 3000-watt array connected to four group 31 batteries, which the solar can charge in about an hour of sunshine. The rest of the day the solar power is wasted. I need about 12 more batteries to give the solar panels something to keep them busy. And I’ve yet to run the 12-volt circuits or the 24-volt circuits but I do have some LED lights and 120-volt outlets.
I’d like to have a concrete floor in Tinfiny’s shed. I’ve been working on it. Sadly, only around 25% of the floor is concrete leaving 75% (AKA the lion’s share) dirt. It’s a solid sort of dirt though, and not much water runs under the building’s edge when it rains, unless it rains really hard. Then it gets a bit muddy. It would have been a heck of a lot easier to pour the slab first, then put the building up but that ship has sailed.
I’ve nearly finished the water system. There’s a 2500-gallon tank being fed rainwater from half of the shed roof. I plan to gutter the other half some day but first I have to finish those 24-volt circuits to get the pressure pump working. I know the pump works ok because I’ve rigged it up to an 18-volt Ryobi battery. It’s just temporary, you know? There’s a pesky leak on one of the Big Blue filters. I’ve taken the canister apart several times but it still leaks from the large o-ring recessed into the canister. I leave the Ryobi battery out of the jury-rigged power connector when I don’t need water. That slows the leak quite a bit.
When you are off-grid you need a generator as backup in case a series of cloudy days runs the battery-bank down. Of course, the generator needs its own well-ventilated, soundproofed shed to keep the generator out of the elements and not drive everyone within a 4 square mile area crazy. I have almost finished the generator shed. I’ve got the floor poured, the wiring to the solar-generator transfer switch installed and complete but for some reason the wheels came off and the project stalled.
Lately I’ve been tinkering with an old Kawasaki Z900. If I run true to form and leave it 70% finished something will have to give. I could eliminate the brakes or maybe run 3 sparkplugs instead of 4. Tinfiny Ranch has more examples of my inability to complete a project. I estimate around 30% more. Hey wait a minute, this means we are nearly 70% done with this story. I guess that’s close enough.
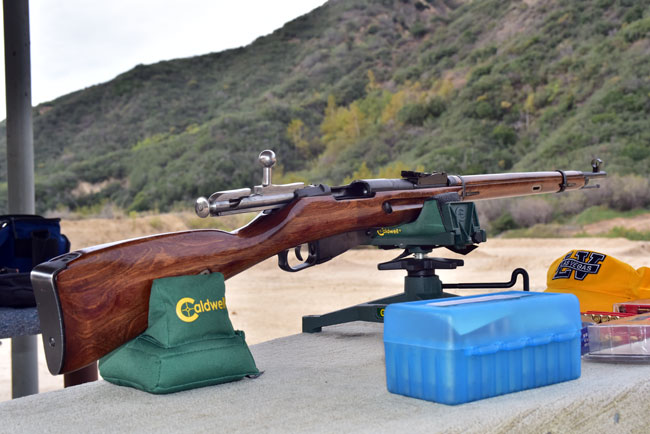
A thing of great beauty…10 hand-rubbed coats of TruOil, glass bedding, a trigger job, and a consistent 10-ring shooter. My Mosin is 75 years old.
I’ve written before about the Mosin-Nagant rifle, and I thought I would return to that topic to tell you a little bit about how I got into playing with these fine old Russian infantry rifles.
I had seen Mosin-Nagants on the discount racks at what I had always considered low end gun outlets (Big 5 Sporting Goods and other general purpose stores), but I never considered purchasing one. The Mosins on the rack were filthy, caked in cosmoline with dinged-up stocks. They initially sold for $59 here in the US a few years ago, and they looked like $59 rifles to me. Cheap. Not up to my standards. I was and still am a gun snob. I thought the Mosins were too dirty to even handle, let alone purchase. Nope, not my speed, I thought. Any rifle that Big 5 was selling for $59 was not worth my time or consideration. Ah, if only I knew where prices were headed, and just how good these rifles are.
Fast forward a bit, and I was teaching a class on engineering creativity at Cal Poly Pomona. One of the techniques engineers can use to inspire their creativity is called TRIZ. It’s a technique that came to us from the old Soviet Union, and it involves looking at older designs in different product areas for ideas. A classic example is Paul Mauser’s bolt action rifle, which is said to have been based on a common gate latch (in fact, I used of photo illustrating this as the cover shot for Unleashing Engineering Creativity).
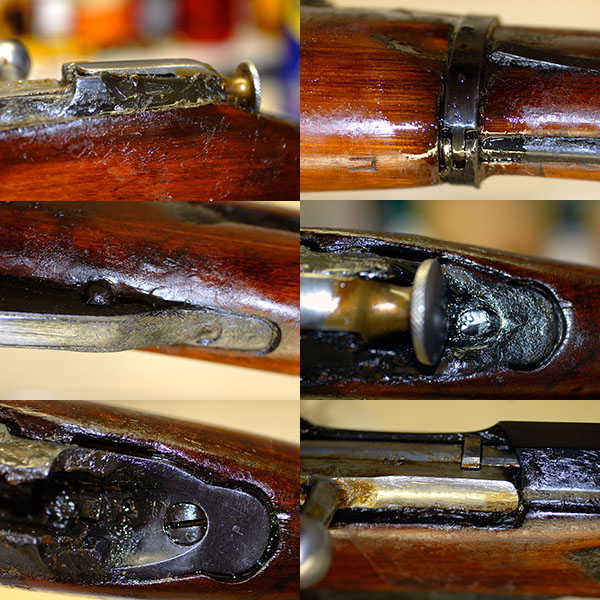
One of my young students approached me after class to tell me about the Mosin-Nagant he and his father had purchased (at Big 5) for under a hundred bucks, and how much fun they were having with it. That planted a seed, and when I stopped in for my weekly gun-gazing fix at a local gun shop later that week, I bought a Mosin they had on the rack for $129. The kid who showed it to me put it in the box when I started my 10-day waiting period (here in the Peoples Republik of Kalifornia we have a lot of goofy gun laws). What neither that young man nor I knew was that there was a bayonet in the Mosin-Nagant’s cardboard box, and when he slid the rifle into it, the bayonet scratched the hell out of the stock.
Live and learn, I guess. I wasn’t upset. In fact, I was glad. The rifle was inexpensive enough that I saw the bayonet scar as an opportunity to completely strip the rifle down, do a trigger job, glass bed the action, and refinish the stock. I did, and the rifle went from being a banged-up, gouged-up, cosmoline-encrusted derelict to…well, a thing of great beauty. I kid you not, as the saying goes. Every time I take my Mosin to the range, I get compliments. It’s the rifle you see in the photo at the top of this blog.
Russians like cosmoline, I guess. The cosmonauts apply it liberally.
But that’s not the whole story. The rest of this story is that the thing can shoot. I only shoot my own reloads, and the results are phenomenal. I have a jacketed bullet load I use and another load for cast bullets . Both are extremely accurate. My $139 Mosin is the most accurate open-sighted rifle I’ve ever shot. Who knew?
That accuracy thing is not unique to my rifle. My good buddy Paul bought a Mosin after listening to me rave about my Russky rifle (in fact, several of my friends bought their own Russian war horses after listening to me babble on and on about mine). Paul found out his rifle was a former sniper weapon, and he asked me to try it. I did. I put three of my reloads through it, and after firing the first shot, I thought I missed on the second two (the target was 50 yards downrange, and all I could see at that distance was one hole). When I looked through the spotting scope, though, it told a different story.
Paul’s sniper, after I put three rounds downrange. I offered to buy Paul’s rifle and start the 10-day People’s Republik waiting period immediately. “Nyet,” was his only reply.
The Mosin sniper rifles are amazingly accurate. When the U.S. military equips snipers, our armorers build the rifles from the ground up to assure extreme accuracy. The Russians did it differently. The Russians built approximately 17 million Mosin-Nagants from 1891 on, and they range fired every one of them. When they found a rifle that was particularly accurate, it was designated as a sniper weapon. It was one of those rifles you see in the photo above.
The price on Mosin rifles is climbing. Today they go for something north of $300. But trust me on this: They are still a bargain at that price. And wow, can they ever shoot. If you’ve ever thought about buying one, there’s no time like right now. I think prices are going to continue to climb.
We include gun stories here on the ExNotes blog because we like to shoot and we like to write about shooting. The feedback we get from you, our motorcycle blog followers, tells us you enjoy reading about gun stuff. The collection of ExNotes gun stories continues to grow, and we want to make it easy for you to find it. So, another bit of news…we’ve added a Tales of the Gun index page on the ExNotes site!
A stunning RX4 in the San Gabriel Mountains. The paint is pearlescent metalflake orange, the new fastest color.
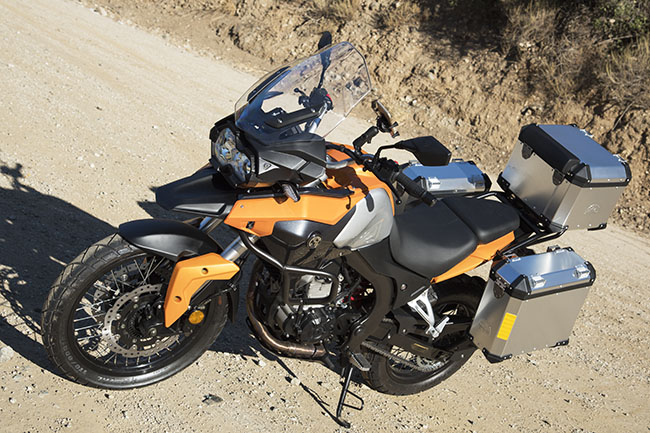
I rode my TT 250 to the CSC plant early today and picked up a new RX4. Steve asked me to ride the RX4, make observations, and write about the new bike on the ExhaustNotes and CSC blogs. I’ll be preparing several blogs on the RX4; this is the first of many.
I rode my favorite Azusa Canyon, East Fork Road, Glendora Mountain Road, and Glendora Ridge Road route. It’s one of my favorite rides, it’s just under 50 miles of the best riding on the planet, and I knew it would give me a good chance to wring out the bike’s handling. The RX4’s handling was my biggest concern going into this review, as the RX4 I first rode in China two years ago left a bad taste. That early bike was porky and it handled poorly.
First significant observation: The RX4’s handling is phenomenal. It’s really, really good. I’ll get to that in more detail, but I wanted to mention that first.
Tourfella bags…lots of capacity.
Next, let me tackle the weight issue. That was another one of my earlier concerns, but not anymore. The RX3 has a published weight of 386 lbs. The RX4 has a published weight of 450 lbs. I never put much stock in any published weight figures, because I know how the manufacturers calculate weight. They do it the same way we did it in the defense industry: Mass properties analysis. Some engineering weenie tucked away in a cubicle looks at the dimensions of every part, calculates each part’s volume, identifies the part’s material and its density, and puts it all together in a spreadsheet to calculate total weight. It’s a scientific guess. They’re always low compared to reality.
Me? I go by what the bike feels like and how it handles. Sometimes if there’s a scale handy I’ll do something old-fashioned and actually weigh the thing. My KLR 650, for example, had a published weight of something in the low-400-lb range. We had a scale when I worked at Layne, and I rode the KLR onto it one night and saw that my Kawasaki actually tipped the scales at well over 560 lbs. So much for published weights.
So, the RX4 is heavier than the RX3. No, I didn’t have a scale available, so I didn’t weigh it today and I don’t know if that 450 lb number is accurate or not. The weight concerned me big time in China two years ago, and then again when I first sat on the new RX4 last week. Last week, it was mostly because the bike felt heavy when I tipped it off the sidestand. Last week, the RX4 had the CSC tall seat on it. And, the RX4 has a 19-inch front wheel (the RX3 has an 18-inch front wheel). The bigger wheel and the tall seat make the bike taller, and that 19-inch front wheel means the bike leans at a perceptibly steeper angle on the sidestand, so tipping it to vertical (off the sidestand) made for a noticeable increase in effort compared to my RX3. First order of business was to have the boys put the stock seat on the new RX4 (it takes the same seat as the RX3). That alone made it easier to get off the sidestand. But yeah, it’s heavier than the RX3. Is it a problem? Read on, my friends.
It was on to my ride, where I would soon learn if the RX4’s added weight adversely impacts handling.
Let me get to the good stuff. I was soon on Highway 39 and in the twisties. The bottom line? The bike handles phenomenally well. It feels more planted than the RX3 and handled the twisties just fine. Actually, it was great. The bike handles better than the RX3, and the RX3 is a sweet handling ride.
I wanted to stop for photos on 39 (I have a few favorite photo op spots), but truth be told, I was having too much fun riding the thing. The RX4 sounds a lot like the RX3, but the exhaust note (love that phrase) is a bit deeper and a bit louder. Not objectionably so, but it’s noticeable.
I stopped for a few photos on the East Fork Road, and then I was on Glendora Mountain Road. I had the road to myself and it was a glorious morning. Cool, crisp, California mountain air. Life is good.
Glendora Moutain Road is all tight uphill twisties. This stretch climbs sharply and it literally has no straights; it’s curve city all the way to the top. To cut to the chase here, it was on this stretch that I could feel the RX4’s huge improvement over the RX3. In the lower rev ranges, the RX4 has more grunt than the RX3, but it’s not a dramatic difference. It just has more oomph in the 3500-5000 rpm range.
Then I noticed a couple of things: I was getting through this stretch way faster than I would on my RX3, and I wasn’t rowing up and down through the gears like I would on my RX3. I just left the RX4 in 3rd and throttled up and down as needed. The bike wasn’t in its power band yet (and it’s not broken in yet), but it liked being in 3rd powering up into the San Gabriels. Then I noticed something else: This bike handles. It’s rock solid and it doesn’t seem to have any lean angle limits. Oh, I know it does and at some point something would have to scrape, but let me tell you, I was surprised at how good I must have looked carving my way up there this morning. I kind of wished somebody had been there to YouTube the thing. I was cooking. I’m not normally a guy who cooks, but I sure was cooking this morning.
The run east on Glendora Ridge Road was similarly exciting (I mean that in a good way). From the time I left Highway 39, all the way up on Glendora Mountain Road, and then all the way to Mt. Baldy Village on Glendora Ridge Road, I had the road to myself. I didn’t see a single other car or motorcycle. That doesn’t happen too often. Like I said, it was a glorious morning.
Up on Glendora Ridge Road. I was the only guy up there this morning.
A quick check on my GPS shows the RX4 speedo to have the characteristic Zongshen 10-12% optimism built in. The speedo reads faster than you are actually going, just like it does on my RX3. I don’t know why these guys won’t correct this. I tried. Hey, it is what it is.
More impressions: The peg to seat distance felt very slightly cramped for me with the stock seat. It wasn’t a big deal. I guess I need to find something negative to say to be like one of the magazine guys, and so far, this and the speedo error are it. I have the tall seat on my RX3 (which is a better deal from a comfort perspective). I may have Steve put the tall seat back on the RX4. There may be an opportunity down the road for CSC to offer a footpeg lowering kit. But it’s not a deal breaker. I guess I’d say the RX4 felt about like my Triumph Tiger used to feel.
A lot of guys want to know about the brakes. They’re a significant step up from the RX3’s stock brakes. The RX4 has dual disks up front. I have the large diameter aftermarket front brake on my RX3, and the RX4 subjectively felt maybe a little bit better than that. On that subject, though, I will tell you that I think the whole issue of the RX3 standard front brake has been overblown. I made a comment about the magazine guys having to find something to bitch about to prove they are objective and not unduly influenced by advertising dollars. On the RX3 it was the front brake. I never quite got that, though. I had a Harley Softail and a KLR 650 before I got my RX3, and the stock RX3 front brake was better than either of those bikes.
I like the headlight on the RX4. I have no idea how good it is at night (that will come later); my comment is based on the looks of the thing. The way it works it has a trace light around the headlight (that’s the daytime light). You can either switch the headlight on, or leave the lights on auto and when it gets dark, the lights will come on automatically. When I first saw this headlight in China, I thought it looked too much like BMW’s GS headlight design, but it’s grown on me. You can bet some Internet weenie will make a snarky comment about Zongshen copying BMW. Throw ’em a bone, boys. They gotta bitch about something.
The RX4 headlight. I don’t yet know how it does at night. I sure like the look!
The bike I’m riding has a pearlescent metalflake orange and silver paint theme. It’s beautiful. I don’t know what colors CSC will specify for their production order, but I hope this one makes it to our shores. It’s way nicer, I think, than the standard RX3 orange. I know that orange bikes are faster, too. It’s a win-win.
My RX4 has the optional Tourfella aluminum bags and top case. I rode with these through the Andes in Colombia (I like being able to say that). The Tourfella luggage capacity is amazing. They are huge, though, and I know on an RX3 I can feel the difference in handling between the stock bags and the Tourfella bags (on an RX3, the stock bags are faster). I didn’t have an RX4 with stock bags to make a similar comparison. It’s a tough question; I don’t what I would do on a new RX4. I do like those big aluminum boxes, though.
So, my first impression is that the RX4 is an awesome motorcycle. The handling is great. It just seems to find its way through the corners and the added power makes the bike feel more planted and more stable, if that makes sense to you. I would say it’s the bike’s strongest point.
Steve told me the RX4 is going to sell for $5,895. That’s $2,000 more than an RX3. Is it worth it? In my opinion, yes (assuming you’ve got the shekels). But I will also say this: The RX3 is one hell of a motorcycle, and I like the idea of a 250 for serious adventure touring in less developed countries. We’re a freeway country. In other parts of the world, freeways are rare or non-existent. Don’t get me wrong; I’ve done a lot of freeway miles on my RX3 and it’s quite capable in that environment. But the RX4 would probably be better on the freeway. I say that having ridden no freeways on the RX4. Yet. All in good time.
There’s a lot more coming on this bike, folks. I’m just getting started. Top end, high speed long distance touring, fuel economy, freeway handling, and more…I’ll get into all of that. I’ve got a lot going on back at the ranch right now, but I may see a quick two-day ride through Baja on this bike. Hey, I gotta probe for weaknesses, or this wouldn’t be a complete report.
One last thing…somebody asked the spoke diameter. Before I forget, Joey measured that for me before my ride this morning. It’s 3.5mm up front, and 4.0mm in the rear.
A symphonic ’79 CBX with a wail as sweet as sugar…
Air-conditioning is a luxury in my world. Compressors, evaporators, electric clutches, if that junk fails I never bother to repair it because my trucks are not worth the investment. Running without AC requires open windows and I heard the 4-cylinder sport bike coming up behind me on the left. He was about three car lengths back and well up into the RPM range. You may not like that sound but it was music to my ears.
The main point is I heard him. So many motorcycle anti-noise campaigners claim that exhaust noise is one direction and useless as a safety measure. Like no one in front of you can hear your blat-blat-blat. The naysayers turn into online audio engineers describing the physics of sound and how loud pipes can’t possibly alert anyone to your presence. And they are full of crap. I heard the bike coming up behind me.
Go ahead and argue sound is annoying on a motorcycle. Push for better rider training. Explain to me how citizens shouldn’t be disturbed from their slumber as they text down the highway running over anything not traveling their same speed and trajectory. Say that loud motorcycles are causing Cagers to dislike us and that lawmakers will try and ban us. It all may be true. Those are worthwhile arguments.
But don’t tell me you can’t hear loud pipes. With your widows up and the stereo blazing away you probably can’t but there are other, less-insulated road users that can hear the outside world. Bicyclists, walkers and people without air conditioning will be alerted to your motorcycle long before you collide with them. Electric car owners report that pedestrians wander in front of their silent rides. That kind of stuff won’t happen to a drag-piped, stretched-swingarm Hayabusa spinning 9000 rpm.
Loud pipes can’t be both annoying and unheard on the road. The effect is even more pronounced in town: A straight-piped hog announces itself blocks away. The damn thing sounds like a bear rifling through garbage cans but I know it’s out there somewhere because I can hear the big V-twin stumble and fart like internal combustion is not settled science.
Sure, pipes make more noise towards the back because that’s the direction they are pointed. Would it be so bad if some Whopper-eating, stereo-adjusting, GPS-programming car driver heard you a few hundred feet before running your annoying ass over? If sound doesn’t equal safety then why are street-driven motorcycles equipped with horns? You can’t have it both ways.
The Greshqvarna….
Personally I don’t like loud pipes. They wear me down on long trips so I mostly run stock mufflers. My Husky came with an aftermarket muffler that is pretty loud but I leave it on out of inertia.
Has anyone’s life been saved by a loud exhaust system? Who knows? It’s difficult to prove a negative, something that didn’t happen. Trying to work within the system or to curry favor from others by silencing your motorcycle is a mug’s game. Run whatever exhaust system you prefer. Motorcycles, loud or quiet, are going to be annoying to the general public. Our very existence seems dangerous to them and their anger towards us isn’t noise related. It’s because we are not following the rules.


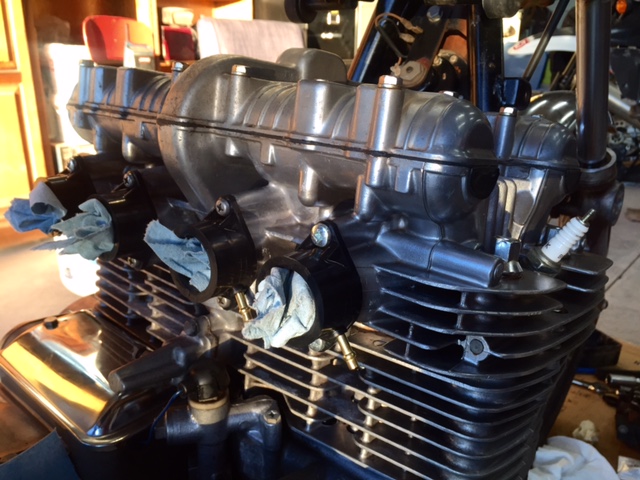 After trimming some rubber flashing where the brass manifold vacuum ports enter the new rubber manifolds I managed to get them installed without stripping any more 6mm screws. The manifold clamps are soaking in Evapo-rust as we type.
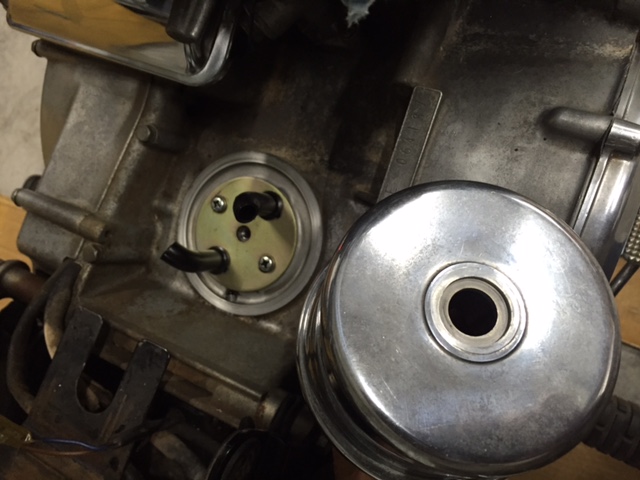 Next I checked the valve adjustment because I’ll be starting the beast soon and I don’t want to fight the system if the valves are way out of adjustment. Before removing the valve cover I marked the front in case it matters.
 The cams and valve shims look unworn. This bike shows 41,000 miles on the odometer! If this were a Honda the cam lobes would be galled. I know this because almost every Honda I’ve owned galled its cam lobes.
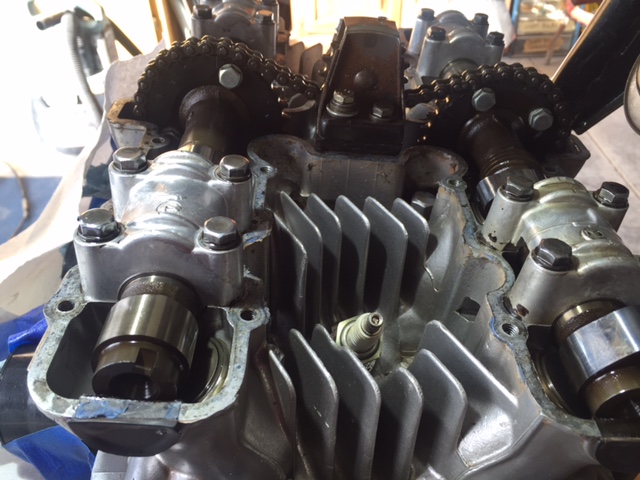 The valves are close enough to start the engine, two are on the tight side and two are on the loose side. Four valves are within spec. I’ll recheck everything after starting the engine in case a chunk of carbon or a mouse paw is affecting these readings.
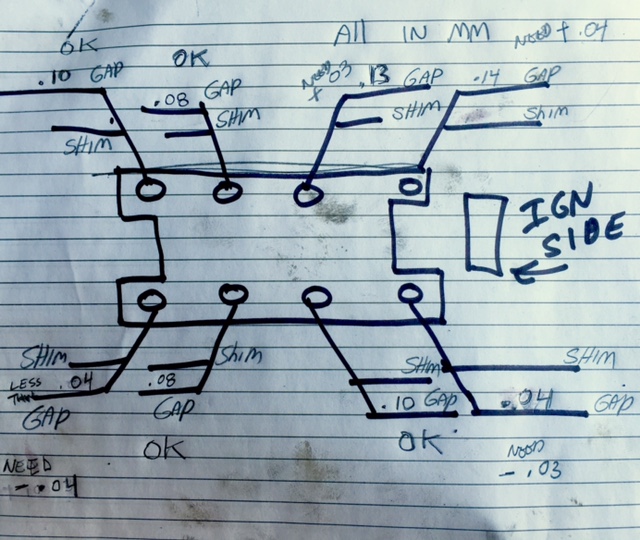 Zed’s clutch cable is in bad shape so I removed the clutch actuator housing/sprocket cover for replacement and cleaning/lube/adjustment. Inside I found the neutral light indicator switch broken off. I don’t think a ton of oil would have spewed out as the hole is not pressurized but it most likely would have leaked.
 Zed appears to be going backwards but trust me she’s making progress. With the front of the bike jacked up you couldn’t miss the loose steering head bearings. Rather than just tighten them I took the forks apart to re-grease them. Much like removing the sprocket cover it’s a good thing I did. The top bearing looks fine but the bottom is pretty rusty. I’ve cleaned this mess up and in a pinch the bottom bearing, while pitted, could be used again but I’ll order new bearings. I’m in no mood to take the front apart again.
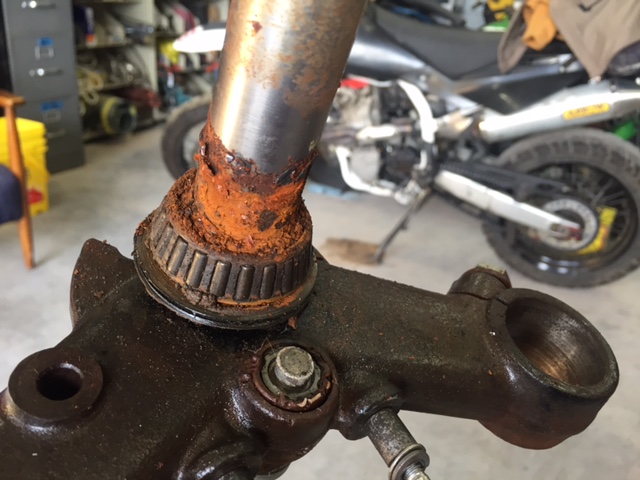 Zed’s fork seals were leaking. Another stroke of luck as the oil kept the lower section of the fork tubes from rusting. Under the headlamp ears the rust is worse. I’ll clean it off and coat that section with grease when I reassemble the forks. You’ll never see it. I’ve started cleaning the fork legs in preparation for disassembly. You probably already know this but remember to loosen the big bolt on top of the fork tube before removing the tubes and loosen the allen-head bolt on the bottom of the fork sliders (under the axle boss) before removing that big top bolt.
 My buddy Skip sent what we hope is the correct spark advancer unit so Zed should have everything it needs to start soon. I’m a little concerned that I can only find first gear and neutral in the transmission. Hopefully, once the engine starts and oil is slung around the gearbox will shift.
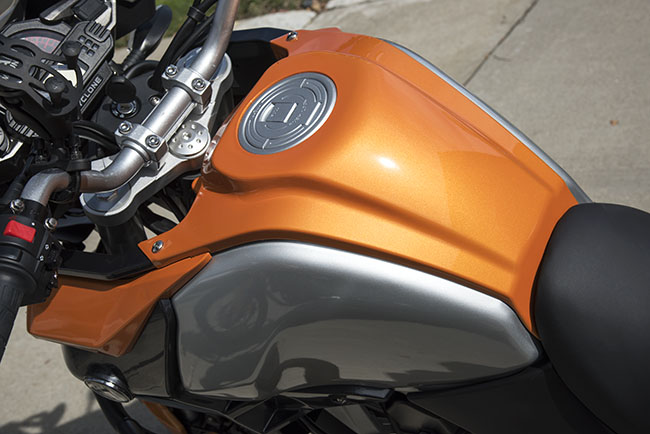


 I’ve been spending some time with Zed’s carburetors, working on details that required home-brewed engineering. The Mikuni carbs on Zed don’t have a traditional choke (a flap that blocks air going into the carb causing a rich mixture) but we still call it a choke. Instead, Zed’s carbs employ an enrichener circuit, which is more like a tiny, completely separate carburetor grafted onto the main body of the carb. Sort of like the brain inside Krang’s stomach on the Teenage Mutant Ninja Turtles cartoon. The enrichener has its own air intake on the upwind side of the throttle slide. This fuel circuit is fixed; no adjustment needed and is controlled by a plunger on the downwind side of the throttle slide. Lifting the plunger allows air to flow through the tiny carburetor at a pre-set fuel/air mixture and if everything else is right, helps a cold Kawasaki engine start better.
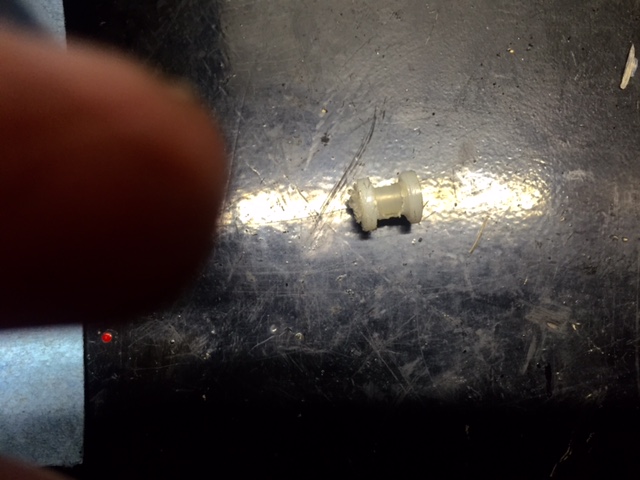 Back to square one. I noticed how the bobbin was nearly the same size as the pop rivets I’d been using to assemble parts of Tinfiny’s generator room. I have about 500 of these rivets in stock so I could afford to lose a few. Knocking the pin out of the pop rivet revealed a bore just a wee bit small for the plunger shaft but it was not a problem to run a drill bit through making the bore an exact fit for the plunger. A pop rivet only has one flanged side so I repeated the process on a second rivet, cut the two rivets to equal the length of a factory bobbin and assembled the mess. I cannot wait for a hard-core Z1 enthusiast to happen upon the aluminum bobbin. It’ll probably cause a heart attack as most Z1 fans are around 75 years old.
 Between the throttle linkage pivots on each set of two carbs there are little dust covers made from a treated black paper. Or maybe the dust covers are rubber, I can’t tell. Three of the four covers were broken on Zed. The covers go over the springs and ball joints on the linkage. They don’t seal all that well but might keep a larger bug from crawling in there.
 This is a part I didn’t bother looking for because I can make new ones in less time than it takes to look them up and order them. I used the thin plastic lid from a box of self-tapping sheet metal screws. Without a lid you know the screws are going to end up scattered across the shed floor. The dust covers didn’t come out as nice as I would have liked. Luckily, once installed you can’t see the things.
 On the Z1 900cc, each set of two carbs share a fuel inlet pipe. The pipe goes between the carbs and is a metal Tee fitting with thick rubber o-rings cast onto the straight section of the Tee. This rubber hardens and shrinks resulting in a loose, leaky fit. You can buy new ones for 34 dollars but if you’ve read Zed’s Not Dead this far you know what is going to happen next.
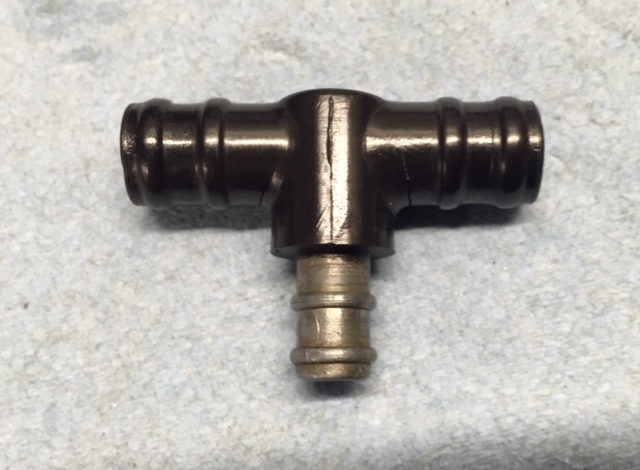 I cut the rubber away from the fuel pipe and polished the exposed metal to ensure a smooth sealing surface. Then I drilled a small hole near the end of the pipe in order to install a pin (made from the drill bit). The pin is the same length as the width of the fuel inlet bore so once it is installed in the carb body the pin can’t fall out.
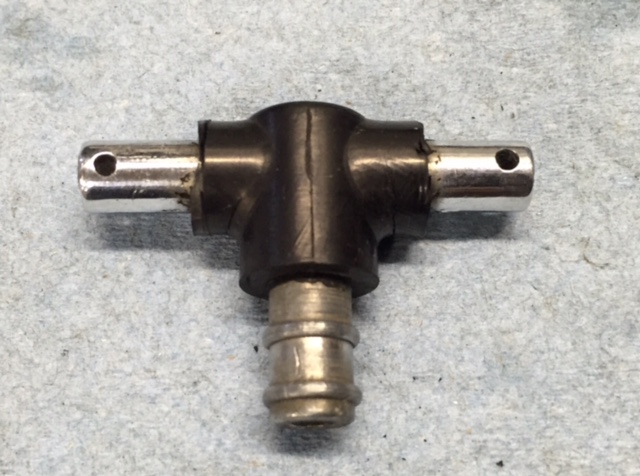 Now I used a ¼-inch length of rubber fuel hose (be sure to use the non-reinforced hose as cloth reinforcing strands will wick fuel, causing a leak) and slid this hose onto the fuel Tee. Next came washers and finally the pin. The assembly fits snugly into the carburetors. It helps to put the fuel feed hose on before you slide the carbs together. Hopefully it won’t leak.
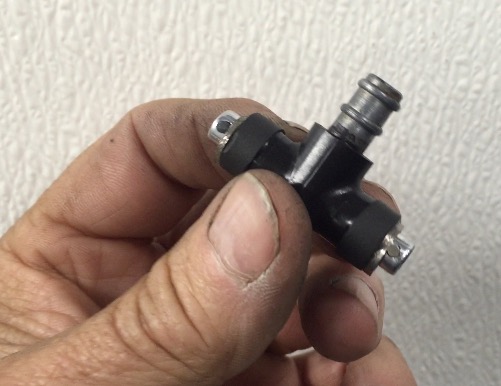 I’ve got the carbs assembled onto the rack and everything seems to work smoothly. I’ll be testing the float levels on the bench and will sync the throttle slides as close as I can get them. The idea being all four slides move the same distance in unison. Even if they’re not perfect the bike should run reasonably well. Later, manifold vacuum gauges can be used to adjust the carbs for any slight differences between cylinders.

 One of my moto buddies stopped by Tinfiny Ranch, our high desert lair in New Mexico, and in the course of showing him around the property we got to talking about how incomplete everything was. He called it the 70% rule. As in 70% is close enough and time to move on to another project.
 I’d like to have a concrete floor in Tinfiny’s shed. I’ve been working on it. Sadly, only around 25% of the floor is concrete leaving 75% (AKA the lion’s share) dirt. It’s a solid sort of dirt though, and not much water runs under the building’s edge when it rains, unless it rains really hard. Then it gets a bit muddy. It would have been a heck of a lot easier to pour the slab first, then put the building up but that ship has sailed.
 I’ve nearly finished the water system. There’s a 2500-gallon tank being fed rainwater from half of the shed roof. I plan to gutter the other half some day but first I have to finish those 24-volt circuits to get the pressure pump working. I know the pump works ok because I’ve rigged it up to an 18-volt Ryobi battery. It’s just temporary, you know? There’s a pesky leak on one of the Big Blue filters. I’ve taken the canister apart several times but it still leaks from the large o-ring recessed into the canister. I leave the Ryobi battery out of the jury-rigged power connector when I don’t need water. That slows the leak quite a bit.
 When you are off-grid you need a generator as backup in case a series of cloudy days runs the battery-bank down. Of course, the generator needs its own well-ventilated, soundproofed shed to keep the generator out of the elements and not drive everyone within a 4 square mile area crazy. I have almost finished the generator shed. I’ve got the floor poured, the wiring to the solar-generator transfer switch installed and complete but for some reason the wheels came off and the project stalled.
 Lately I’ve been tinkering with an