Cast Bullets in a 7mm Magnum Ruger No. 1

A 200th Year Ruger No. 1S in 7mm Remington Magnum. With factory-level jacketed bullet loads, recoil is attention-getting.  With cast bullets, this magnum is a lot easier to shoot.  I shot cast bullets for the first time in this rifle this week.

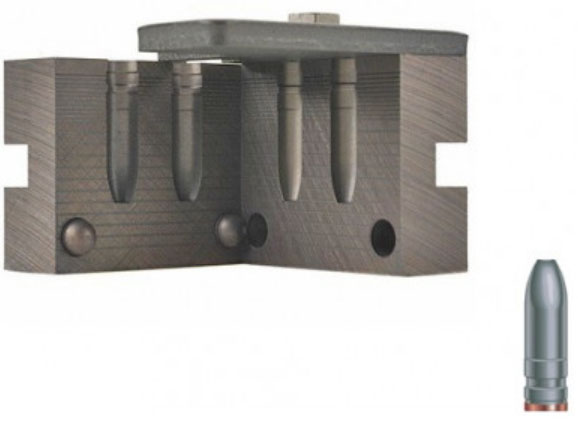
When I was younger, I made my own bullets by casting them out of molten lead.  I cast bullets until I decided there wasn’t enough time to do everything I want to do.   Shooting can be a full time hobby, reloading can be a full time hobby, and casting can be a full time hobby.  There’s a little motorcycle riding and some writing thrown in there, too.  Something had to give, so a few years ago I sold all my bullet casting gear.

I still enjoy reloading and shooting cast bullets, though, for a lot of reasons.  Lighter recoil, cheaper bullets (usually), less barrel wear, and the big factor:  It’s fun and it’s challenging.  This fascination with cast bullets, for me, started when I ran with a bunch of gunsels in El Paso and one of the guys decided it would be fun if we had a cast bullet rifle bullseye competition.  Being mostly engineers, we reckoned that big bore rifles would be the way to go, as the larger bullet diameters and weights would tend to make bullet weight differences and imperfections negligible.  The first rifle I ever shot a cast bullet in was a .458 Win Mag.  I was hooked after the first shot, mostly because there was far less recoil than shooting jacketed factory ammo and the experience was much more enjoyable.  Then I fired four more shots and when I saw the 1-inch group at 100 yards (from a .458 Win Mag!) I was hooked.  We all shot big bores in those days:  .458s, .45 70s, .375 H&H Magnums, and such.  Cast bullets in these big calibers can be amazingly accurate.

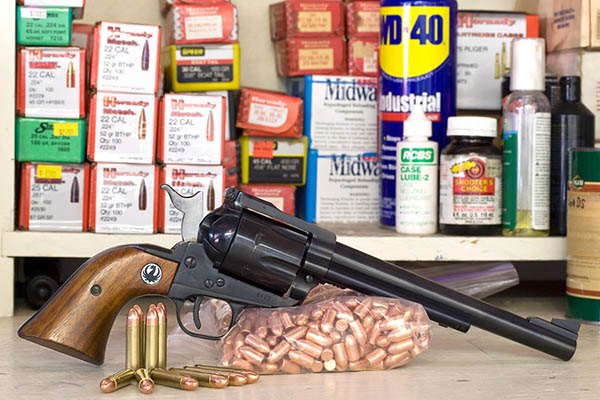
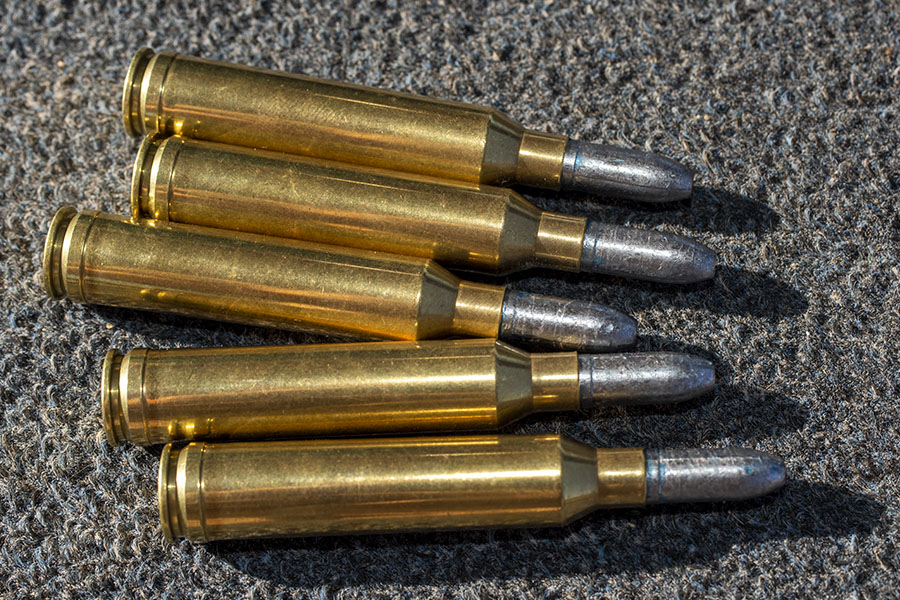
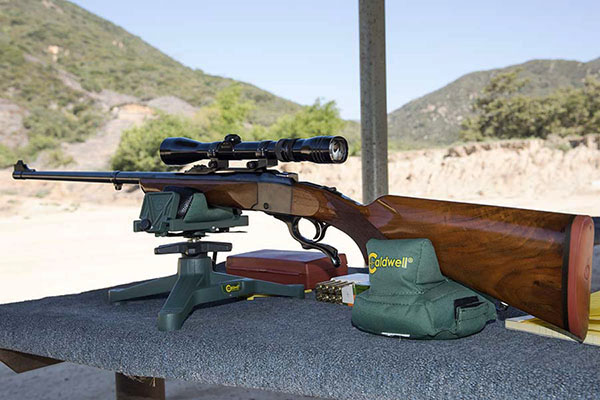
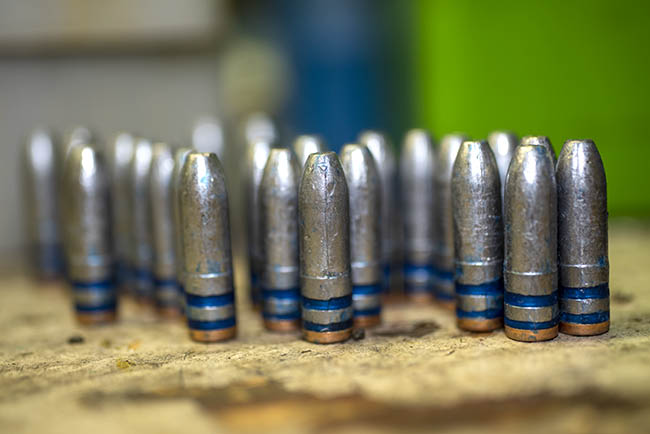
Anyway, I fell in love with cast bullets and I’ve been shooting them ever since, but these days I buy my cast bullets.  I have a local source for cast bullets, and I have a few I like that I order online or pick up at my dealer (that’s Phillips Wholesale in Covina, California). I also poke around a bit on the Internet and a few weeks ago I found Gardner’s Cache, another commercial bullet casting operation.  What had my attention immediately is that Jim Gardner’s prices are relatively low, he’s a veteran, and he had something I had not been able to find elsewhere at a decent price:  7mm cast rifle bullets.  I wanted to try cast bullets in a couple of 7mm rifles (one being the Ruger No. 1 that you see at the top of this blog), so I ordered a box of 250.  Then USPS lost the shipment.  I filled out an online lost shipment report, the boys in blue located my bullets, and a few days later they arrived.   The Gardner bullets look great.

Beautiful cast Gardner 7mm bullets. Casting quality is high, and I was hoping accuracy would match. It did. I’m a happy camper.

I could see that the casting quality was high, so just for grins I measured 30 projectiles to get a feel for the variability.

In 30 bullets, the range of weights did not exceed 1.6 grains. The mean is the average weight, and the standard deviation is a measure of the variability around the average value.

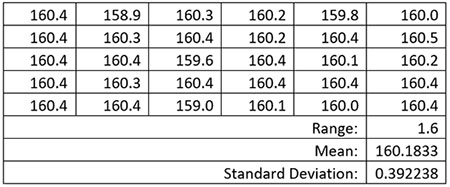
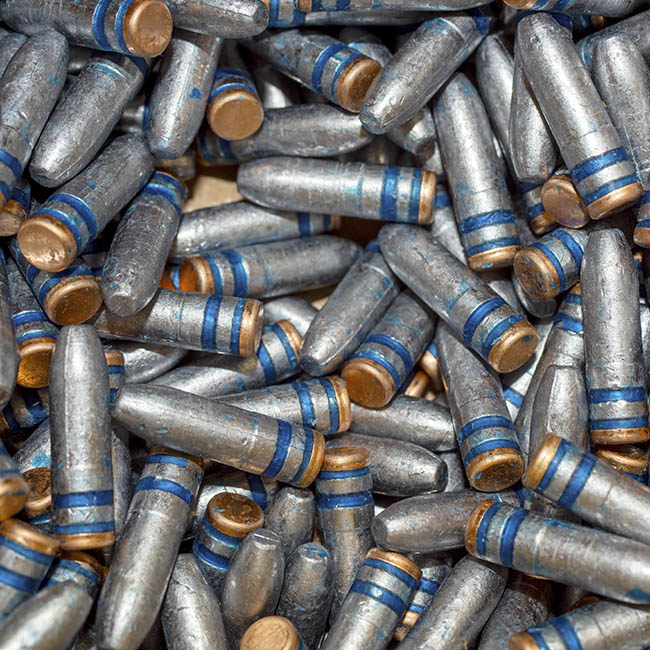
It was good.   You ordinarily get a lot more variability with cast bullets then you do with jacketed bullets, but the Gardner bullets were more consistent than other cast bullets I’ve used.  As I reviewed the data, it suddenly hit me that these  were supposed to be 145-grain bullets.  I could see from the bullets’ configuration that they matched the RCBS No. 82150 bullet mold, but what the mold maker tells you the bullet is supposed to weigh and what they actually weigh seldom line up.  I had seen this before with other cast bullets.

The RCBS No. 82150 bullet mold.  It’s not uncommon for the specified bullet weight to be different than what the mold actually throws, and that was the case here.
I like these bullets so much I had to grab another photo of them. The copper cap at the bullet’s base is called a gas check. It protects the back of the bullet from hot propellant gases and reduces barrel leading. The blue stuff is bullet lubricant, which eases the bullet’s passage through the bore and also helps to reduce leading.

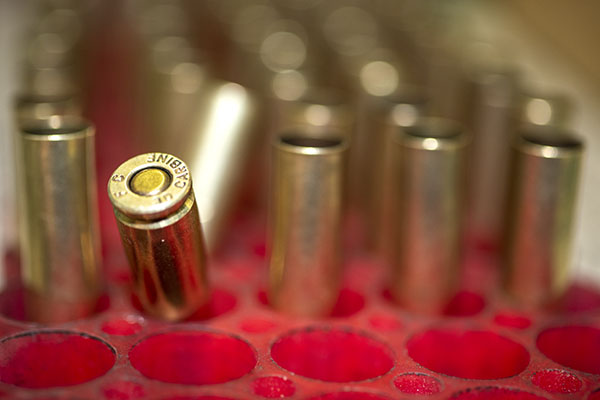
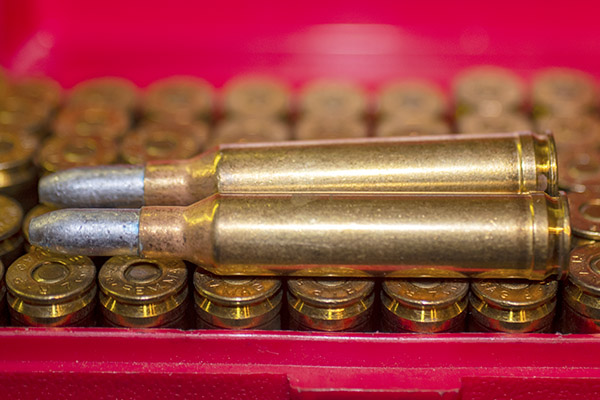
I loaded several configurations with my new Gardner cast bullets in virgin Remington brass I had on the shelf, and the cartridges looked good.

Loaded 7mm Remington Magnum ammo, waiting to be range tested. You can’t buy this kind of ammunition; you have to reload your own.

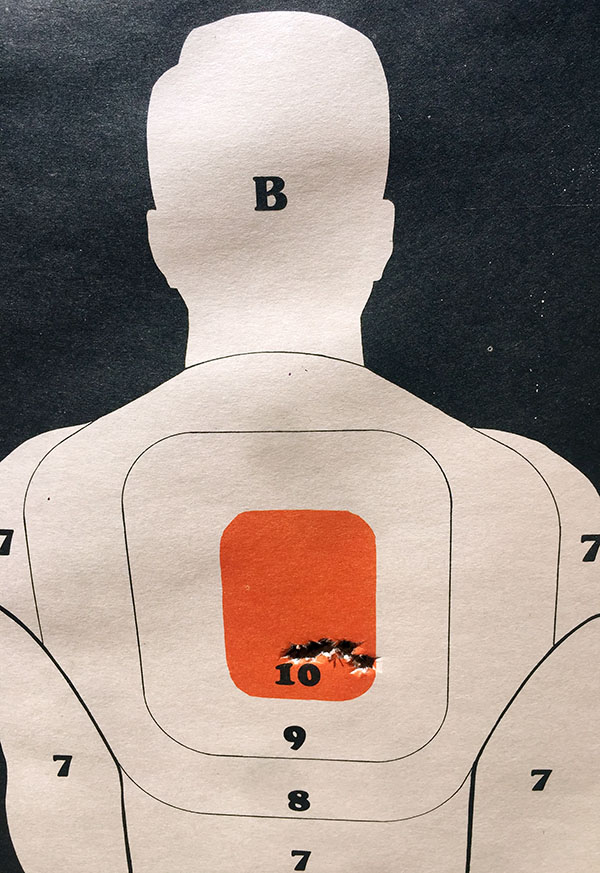
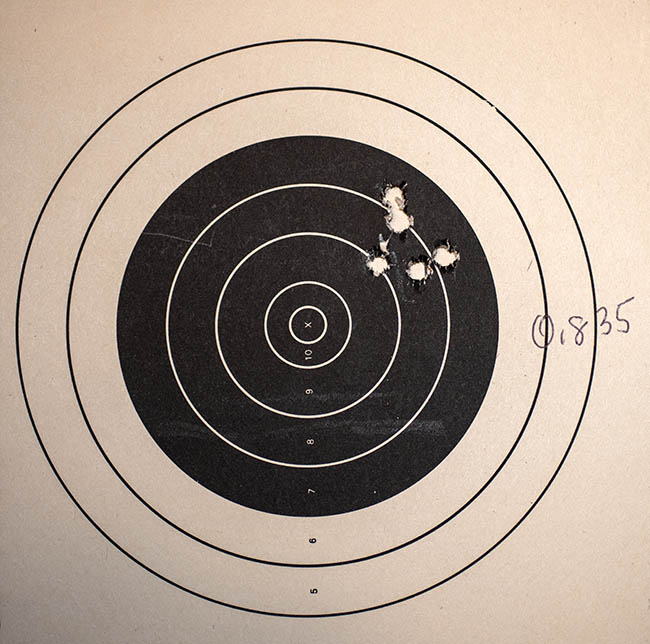
I went to the range the next day with the 7mm Remington Magnum Ruger No. 1 and my new cast bullet load, and after getting set up I fired the first load (with Unique propellant) at a single pistol target at 50 yards.  The rifle had been zeroed for a factory equivalent jacketed load, and the results were very predictable.  Whenever I’ve taken a centerfire rifle zeroed for factory ammo and shot cast bullets in it, the load is always about 10 inches low at 50 yards.

Two good groups (both around 1.5 inches) at 50 yards. The low group was fired with the scope still adjusted for jacketed ammo, and it was predictably 10 inches low. 80 clicks up on the Weaver and we’re in the money.

The required telescopic sight adjustment in going from jacketed to cast is something I know by heart:  80 clicks up.  You can see the first five-shot group at 6:00 in the 5-ring on the above target.  Windage looked about right, so I went 80 clicks up on the Ruger’s Weaver 3×9 scope.  Each click is 1/4-inch at a hundred yards so that means a click is 1/8-inch at 50 yards, and I had to go up 10 inches.  10 inches is 80 clicks.  I made that adjustment and oila, the second group was right where I wanted it.  It was exactly the same as the amount of elevation I had to crank into my .30 06 Browning B78 when going from jacketed to cast bullets.

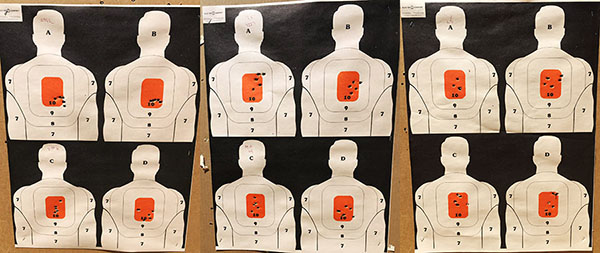
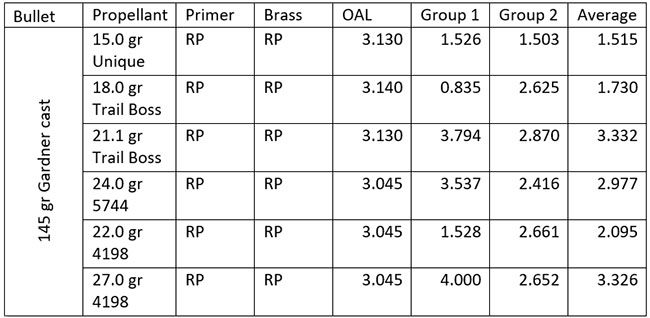
Then I moved over to the other targets I had set up at 50 yards.  I’d like to tell you that all groups were tight, but hey, you do this to find out what works and what doesn’t.  My best group of the day was with 18.0 grains of Trail Boss propellant, but it wasn’t as consistent as the Unique load was.

Not bad, but not consistent. The next group with this same load was 3.140 inches. Was it me, was it the rifle, was it the bullet, or was it the load? We’ll find out on the next outing.  This might have been a 1.6-inch group at 100 yards, and that ain’t bad.

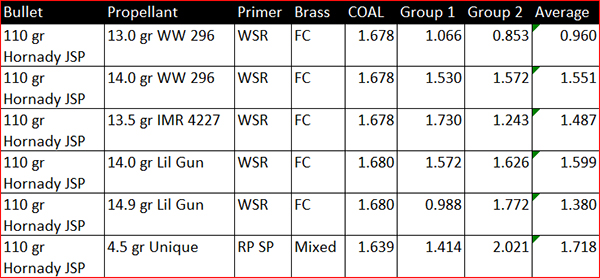
Here’s what I experienced with the first six loads I’ve tried with these bullets.   Yep, there’s a lot of variability on some, but I’m encouraged.

Accuracy results from the first six loads I tried with my 7mm Remington Magnum cast loads. I’ll focus primarily on Unique and Trail Boss, and seat the bullets out a little further for a longer overall cartridge length on the next set of loads.

I’ve already loaded more 7mm ammo with the Unique and Trail Boss loads, and I’m also going to try IMR 4227.  I don’t think that 4227 will do as well as the first two loads, though.  We’ll see.  After that, I’m moving the targets out to 100 yards.   That will be interesting, and when I do, you’ll see the results here on the ExNotes blog.

I already used about half of the 250 Gardner bullets that came in the first box.  The results in my Ruger No. 1 made me a happy camper and I ordered another 1000 7mm rifle bullets a few days ago.  If you want good cast bullets at a great price, you might take a look at Jim’s website.


More Tales of the Gun are waiting for you here!


Never miss an ExNotes blog!


Hit those pop up ads!

4 Things You Need To Survive Motorcycle Touring With Covid-19

With the advent of a killer virus sweeping the nation, traveling long distance by motorcycle has become more complicated. We used to hop on our motorcycles, ride all day and then in the evening get a room at the cheapest motel we could find. Those days are over. Don’t get me wrong; motels are still an option, much like Russian roulette is a fun parlor game. Go ahead, pull back those sheets and crawl inside. Did the maid really disinfect the room? Was the last traveler teeming with the virus, coughing and spitting his way to sleep? What can you touch and what can’t you touch?

Nowadays to go anywhere far on a motorcycle you’ll need to be able to camp, and not at commercial campgrounds either. Campground bathhouses were never a sterile environment in the first place, now they seem like a damp Club Med for viruses. I’ll take my chances with the bears, you know? I’m talking rough camping: riding into a National Forest, finding an out of the way spot with nice soft grass and bedding down for the night.

The first thing you’ll need is a tent. In my younger days I spent many uncomfortable nights sleeping out in the open. I’d pull over, toss a plastic tarp on the ground and just lay down. That was the full extent of my camping preparation. I’ve since learned that biting bugs, rain and animals make having a tent the way to go. I bought this small, old school style pup tent because I’m done setting up the flex-pole igloo type tents. Small pup tents are smaller and lighter than igloos and there are too many stressed elements in an igloo. Every Igloo tent I’ve owned ended up tearing.

I’m going to assume you already own a sleeping bag (everyone should). In addition to the sleeping bag an air mattress will drastically improve your chances of falling asleep inside that claustrophobic pup tent. If you’re 20 years old you could probably forgo the air mattress. I’m using one with a built in pump instead of the self-inflating type for two reasons. Number one is an inflatable packs down much smaller than a self-inflating type. Number two is the self-inflating pads compress and after a few minutes you’re on the ground anyway. The need to keep the size and weight of your camping gear to a minimum will become apparent when you start loading your motorcycle.

Hard-core riders can get away without a camp stove but I’m not a hard-core rider. I need my coffee in the morning or a can of warm soup in the evening. Unfortunately, while the burner itself is tiny, carrying one of these small, gas-powered stoves requires a bunch of other gear. I have one pot to boil water or soup, extra water to clean up the mess and then there’s the gas bottle, which is like three times the size of the camp stove. Not to mention the stuff you are going to cook. It’s a space and weight commitment you may not want to make. Plain old water and candy bars will work fine if it’s only a one-night road trip.

Now we are getting into purely luxury items. When you rough camp in the forest there are never picnic tables, benches, fire rings or screaming children. This type of folding camp chair can really make a campsite feel like home. There are two basic styles of small camp chairs, the tripod type and the X type. I prefer the X-type because they are less prone to sink into soft ground…like the ground you find in a forest. The tripod type is much easier to fold up so you’ll have to make your choice based on terrain and patience level.

All the gear in this story can be purchased for less than one night’s stay at a motel so there’s the cost savings to be considered. I can pack everything in one medium-sized stuff bag and bungee the mess to my motorcycle. It’s not an easy way to travel for sure but with many national and state parks closed now it’s about the only way to travel. I’ve recently purchased all the camping gear you see above attempting to make my pack smaller and lighter. And I’ve succeeded: It’s easily half the size and weight of my old camping gear. I’ve yet to use it in anger but that will change soon. My riding buddy Mike and I are going on a several day ride and since we are old, lung impaired and clinging to life by a thread we both feel like rough camping is the safest option Covid-wise.


Catch up on our most recent blogs here!

Hasty Conclusions:  First Look at Viking Cycle’s Warlock Jacket

 Viking Cycle sent Joe Berk a new jacket to test and since I’m the loyal, half-witted sidekick, Berk made sure I got one, too. Viking Cycle was just in time with their products because the heat in New Mexico was getting a bit much for me. I was tempted to go bare on my motorcycle. The folks at Viking Cycle let me pick whichever jacket I wanted and I chose the Warlock, a mesh jacket that should flow plenty of air. I went with the high viz color because car drivers, along with Americans in general, are getting more careless in their comportment. And I look cool besides.

Viking Cycle’s prices are incredibly low. The Warlock mesh in several colors retails for just $54.99 and if you give Viking your email (or invent a new one) they will knock 15% off the already ridiculously low price. All the Viking gear is very economical (check out their website). If you’ve been paying attention to ExhaustNotes you know I’m a cheap bastard. The Warlock appeals to me in that place where my miser instinct festers.

The Warlock comes with a zip-in, vest-style liner, which I promptly removed and tossed into the growing pile of other inner liners. I don’t use them and on a mesh jacket it would defeat the purpose of the mesh. Instead I’ll toss a rain jacket over the Warlock if it gets too cool. Colder still and I’ll put a shirt on underneath the mesh. It’s all about the layers, man.

Kind of a neat feature that I’ve never seen before is the front-pocket lanyard. I guess you can clip your house keys or 9mm semi-automatic pistol to the lanyard and it will prevent them from falling onto the ground when you’re retrieving other items from the pocket. There are four front pockets and one inner pocket. The pockets are plastic so they should delay rainwater from getting inside but if it’s raining you will probably have the whole jacket covered anyway. The Warlock has back armor, elbow armor, and chest armor. The elbow armor slips into a hook-and-loop pouch and sometimes when I slide my arm into the sleeves my finger will catch on the pouch. Not a big deal but since I have not tested the jacket yet I have to come up with something.

The Warlock is made in Pakistan which should appeal to my anti-China friends (I’m talking to you, Keith). To tell you the truth I’m not sure if we are at war with Pakistan or not but it can’t hurt to outsource some of our manufacturing to a wide variety of countries just to keep the world’s economy humming.

I like the fit of my XL Warlock. The arms are slim so they shouldn’t flap around yet the middle is suitably sized for a well-fed Westerner like me. As far as quality goes, the Warlock looks like any other mesh motorcycle jacket. I mean, I’m not a seamstress, I don’t see any glaring problems. I will need to put a few thousand miles on the Warlock mesh jacket to see if anything goes pear-shaped. Unfortunately it’s been raining like mad here in New Mexico and I don’t want to get my motorcycle dirty. Keep watching this space for a full road test of the Warlock.


See more ExhaustNotes product reviews here!

Ruger’s .30 Carbine Blackhawk

I had a hard time selecting the title for this blog.  I ultimately went with the one you see above because I think it will show up better on the search engines.  But I almost went with Stupid is as Stupid Does (you know, from the Forrest Gump movie).   Read on.  You’ll see.

I am a big fan of the Ruger Blackhawk, and I wanted to try something different a few years ago, so I bought an older .30 Carbine Blackhawk on Gunbroker.  I was excited about getting it, but I have to tell you that revolver had issues, one of which led to its ultimate destruction.  One issue was that every case stuck in the cylinder after firing, and the other issue was that the cartridges dragged on the frame and the cylinder wouldn’t turn freely.

The first Ruger .30 Carbine I owned. It was the original design, informally referred to as the Old Model. It was a beautiful handgun, but it had problems.

I doped out the cylinder drag issue fairly quickly.  You have to trim the brass after nearly ever firing, and you have to make absolutely certain the primer is at or below flush after seating (something you should do for all cartridges).  The .30 Carbine is a cartridge that is unusually sensitive to all this in the Blackhawk.  .30 Carbine cases shrink in length when fired, and then they grow in length when you resize them.   The cartridge headspaces on the case mouth so case length is critical, and the .30 Carbine case seems to grow and shrink more than others.  Let it get too long, even by just a few thousandths, and the based of the cartridge will drag on the frame and the cylinder won’t turn freely.  I learned to check case length every time I reload this cartridge, and I usually have to trim about half of them.

I use a old Lyman case trimmer I’ve had since the 1970s. It’s a little manual lathe (I’ll let Gresh handle the big ones).  That’s a .30 Carbine case you see in there.

The next issue is primer seating.  Even though I clean the primer pockets each time I reload, I found that a handheld priming tool won’t always fully seat primers in a .30 Carbine case.  Hey, I’m not looking for an argument here and if you can do this with your hand priming tool, more power to you.  I’m telling what my experience has been.  I have another priming setup (also made by Lee), and it’s the Auto Prime tool that mounts on the press.  It positively seats the primer below flush on every cartridge.  It’s what I use now when priming .30 Carbine cases.

A Lee Auto Prime tool mounted on an RCBS Rockchucker reloading press. The shell holder mounts on top of the tool (upper arrow). A ram (lower arrow) pushes a machined rod that seats the primers.
A .30 Carbine brass case in the shell holder waiting for its primer.
A Winchester Small Rifle primer properly seated in a Federal .30 Carbine cartridge case.

All the above is a prelude.  I fixed the cylinder drag issue on my first .30 Carbine Blackhawk using the reloading process shown above, but I still had the extraction problem.  The cases just did not want to leave the cylinder. The extractor rod was bending and the cases still wouldn’t extract.  It was so bad that I usually had to take the cylinder out of the revolver to drive the cases out with a cleaning rod.  I tried everything to fix that problem.  I polished the chambers and I swabbed them with alcohol to remove any traces of oil (an oily chamber or cartridge case allows brass to flow into any machine marks in the chamber, locking it in place), but I still had the extraction problem.

Then I tried lighter loads.  A little bit lighter wasn’t doing it with the propellants I had been using, so I went to Trail Boss (a powder known for working well with lighter loads).  That’s how I got in trouble.  You have to understand that reloading manuals don’t include data on Trail Boss for many cartridges, and in particular, there was no data in any of the several reloading manuals I own on using this powder with the .30 Carbine.  The Trail Boss manufacturer’s guidance is to load to the base of the bullet for a max load, and not less than 70% of that amount as a minimum load.  I loaded at just under the max load.

I thought I was doing pretty good when I fired the first Trail Boss load and ejected the case.  It extracted easily.  This is progress, I remember thinking.  Things are looking good.  So I fired the remaining four rounds.  Then I walked downrange to check the target.

Hmmmm.  That’s odd.  Not a single shot was on the target.  My first thoughts were the load was either terribly inaccurate, or it was so light the bullets were hitting below the target.   Then, when I walked back  to the firing line, I saw it:  A sickening glint of copper peeking out of the Blackhawk’s barrel.  A stuck bullet.  Five of them, actually.  I got a bullet stuck in the bore and didn’t realize it.  Then I had fired another, and another, and…well, you know.  They liked that barrel, those bullets did, and that’s where they stayed.  I felt even worse when I ran my fingers along the length of the barrel.  I could feel the swells in its diameter from each bullet to the next.  Good Lord, they build Rugers tough (that’s why I’m here to tell this story).  Forrest Gump has nothing on me.  Like I said at the beginning of this blog, stupid is as stupid does.  The weird part to me was that I couldn’t feel anything different when firing the gun.

I was embarrassed and thoroughly disgusted.  It was the dumbest thing I’d ever done.  When I got home I put the gun in the back of my safe and I left it there for a year.   I didn’t want to think about it and I didn’t want to see it.  But I knew it was there, bearing silent witness to my stupidity.  I wanted to get it fixed, but I didn’t want to admit to anyone I had done something so dumb.  The barrel was toast, and the revolver’s frame looked a little distorted to me.  Best to just forget about it.  Maybe save it for a gun buyback program.

Then one day I figured I had waited long enough, and I called Ruger.  I told them my story and the nice lady on the other end told me I wasn’t the first one to call with stuck bullets in the barrel.  I felt a little better.  I asked if they could re-barrel my Blackhawk.  Sure, she  said, and off it went.  A few days later Ruger called me, and that same nice lady told me a new barrel would be $400.48, but they weren’t too sure about the gun’s structural integrity.  Or, they could sell me a brand new Blackhawk.  How much would that be, I asked.  $400.48, she said.  Ah, I get it.  What they were really telling me is to buy the new gun at the steeply-discounted price (MSRP on  a new .30 Carbine Blackhawk is $669).  I was in. Here’s my credit card number.  Send me the new gun.

So I received the Blackhawk, but like its predecessor it went in the safe.  I still didn’t want to be reminded of what I had done.  And, I had managed to convince myself that shooting a 40,000 psi M1 Carbine cartridge in a handgun maybe was just not meant to be.  What I was really afraid of was that the new Blackhawk would have case extraction issues like the first one.

Another three years went by, and then something clicked: I woke up and felt like shooting my .30 Carbine revolver.  I can’t say why it took three years.  It just did.  I had the urge and I loaded a box of .30 Carbine ammo in different flavors to test what worked best.  And a couple of days ago, we went to the range.

How did it go?  In a word, awesome.  Take a look:

Six different loads tested on two targets each. All groups are 5 shots, and all are at 15 yards.
The loads.  My .30 Carbine New Model Blackhawk seems to like everything.

This new .30 Carbine Ruger Blackhawk revolver liked every load I tested.  One was exceptional:

The secret sauce: 13.0 grains of 296 and the 110-grain Hornady jacketed soft point bullet. It’s consistent, too.

Shooting a .30 Carbine Blackhawk is fun.  You get massive muzzle blast, a huge muzzle flash, and major noise (hey, 40,000 psi is 40,000 psi), but little recoil.  And, as the above target and load data show, it is accurate.  This puppy can shoot.

You know what else?  The spent brass practically fell out of the cylinder when I emptied it.  The extraction problem is gone.  I’m wondering if something was wrong with the first .30 Carbine Blackhawk that caused the pressures to go excessively high and seize the brass cases in the cylinder (the chamber exit bores could have been too small, or maybe the barrel was undersized).  I’ll never know, but I don’t care.  This new Blackhawk is a honey.


A bit about the gear I use in my .30 Carbine reloading activities.  I use Lee dies, although just about .30 Carbine reloading dies will do the trick.  I normally stick with RCBS reloading gear, but I could get the Lee dies quicker so that’s what I bought.   I like them.  Most of my other reloading gear is RCBS, including the RCBS powder dispenser, the RCBS Rockchucker press, and the scale.  Again, any brand will work.  In looking at the prices for RCBS gear, I notice that it has become fairly expensive.  If you want to get into reloading for a lot less, you might take a look at this LEE PRECISION Anniversary Challenger Kit.  It contains most of what you need except for the dies.  Knowing what I know after having been a reloader for 50 years, it’s what I would buy if I was starting out all over again.


Keep us afloat…please click on those popup ads!


More Tales of the Gun stuff?  Just click right here!

South By South Bend: Part 2

 The South Bend lathe project has been waylaid by several factors, none of them your fault. I did manage to wire the 4-pole, two-position, center-off toggle switch into the Harbor Freight ½ horsepower motor. So now I have forward and reverse. I’ll probably never use reverse but it’s good to have it in case you want to cut from the backside.

I could have made the motor reverse with a three-pole switch but since the motor is wired high voltage (240vac) you want all hot legs disconnected when the switch is in the off position. And I had the switch. The switch connections started out simple enough but soon I had wire coming out my ears. I ended up having to double up the metal junction box to allow enough space for the spaghetti.

I normally don’t like complicated things but I couldn’t come up with a better way and it was like 115 degrees in the shed. Not a good temperature for thinking. I’ve included a shot of the Harbor Freight motor’s faceplate in case anyone can come up with a simpler way of reversing the motor.

After the motor was running I had to file the 3/4-inch to 5/8-inch shaft-sleeve as it was too tight from the factory. I also cut down the tall key that was included in the sleeve package. The new belt is narrower than the original, or maybe not. The old one was pretty rotten. As it is situated, the inner face of the belt contacts the center of the motor pulley. The V-sides are supposed to do the contacting around here. I forget if A is wider than B in belt-speak but I’ll have to do a little work on the belt and pulleys. The thing works like it is so that’s good enough for now.

I’ve been relearning the various levers and knobs on the South Bend, levers and knobs that I knew blindfolded 40 years ago. My first cuts were ragged, a combination of no end support on the work piece and a cutting tool that has been in the lathe for eternity. I’ve since quelled the shaking by using a live center. That one change improved the appearance of the machined surface by 42%. The tool is still not what I want as it is tearing material more than cutting. I might try some of these newfangled carbide tools, the ones with a three-sided cutting edge that you can swap as it gets dull.

I’ve machined my test piece to roughly 5/8” so my next trick will be to dig around the junk box and see if I can find a thread cutting tool. You need a V with the correct angle. Watch this space for the threaded rod or mangled mess. I’ll also go over the remaining tooling I have for the South Bend. I’ve lost a lot of stuff over the years but there are still toys like steady rests, faceplates, and lathe dogs to clean up and experiment with.


You can read the first part of South Bend story here.

Slow Ride Home

The other day while surfing the offerings on Prime, we found Slow Ride Home, an indy movie about eight scooter dudes riding 3,700 miles from Jacksonville, Florida to Seattle.  The bikes were Yamaha Zumas, the displacement was 125cc, the top speed was 40 mph, some of it was kind of silly, and the language was crude, but hey, it was a good flick.  What struck me immediately were the similarities between this ride and the long-distance group rides I led for CSC Motorcycles.  Listening to the complaints about getting everybody on the road each morning was pure deja vu.  If you rode with me on any of those rides, you’ll really appreciate this one, and even if you didn’t, you’ll still like Slow Ride Home. There’s no hidden messages and this is not a movie that makes you think, and that’s what made it fun.

Here’s your link to Slow Ride Home.

A recommended TT250 toolkit…

We’ve been featuring toolkits and rider resources in recent blogs, and here’s another one.  It’s based on tailoring a toolkit for a specific bike (in this case, the CSC TT250).  It’s from a blog I wrote for CSC about 4 years ago when I led a group of TT250 riders through northern Baja.  The idea is to carry a tool for every likely need, without carrying any unnecessary tools.  This blog should be particularly useful for TT250 riders.  The concept can be extended to any motorcycle.


Originally posted on October 13, 2016

I promised a recommended TT250 toolkit a few blogs back, and this afternoon I put together a list of the tools I’m going to bring with me on the Baja trip.   The Internet being what it is, I have no doubt this will spark a firestorm of controversy from those of you who have different ideas.  Hey, as my personal hero (that would be Dubya) once said, bring it on.   Seriously.  If there’s something you think I missed, let us know and if I think it makes sense I’ll add it to the list.   That last part is important.  I’m bringing along the tools I think I might need in the unlikely event something goes south.   I’m not planning on doing an engine rebuild on the side of the road.  Knock wood, I’ve only ever had one serious breakdown on any of my rides (and it wasn’t on a Chinese bike; in fact, it was on a bike that costs about 10 times what a new TT250 goes for…and that bike didn’t come with any tools).

The TT250 comes with a modest tool kit mounted in a container along the frame, as you see below.

They say halitosis is better than no breath at all, and that’s kind of how I feel about the tool kits that come with new motorcycles (indeed, as mentioned above, some new motorcycles don’t include any tools).

Here’s what you get with the stock TT250 tool kit:

It includes a screwdriver with both blade and Phillips head drives, two wrenches with 8mm, 10mm, 13m, and 15mm ends, and a pressed steel socket that you’re supposed to turn with the screwdriver shaft.  The problem is that I don’t think that pressed steel socket would hold its shape under serious torque (and even if it did, and you probably couldn’t exert enough torque with the screwdriver shaft to adequately tighten or loosen the larger fasteners or the spark plug).

I took a hard look at the nuts and bolts on my TT250 this morning, and here’s what I’m putting in my tool kit for Baja:

From left to right, here you go:

    • A reversible drive screwdriver with both Phillips and blade drives.  It’s a big screwdriver, but I like the thing.   It’s one of those tools that’s gone on all of my rides.
    • A 17mm wrench.   There are a lot of 17mm bolts and nuts on the TT250, including the oil drain plug.  It’s a must-have item.
    • A cool wrench that has both 18mm and 19mm box ends.  This will come in handy for both the front and rear axles.
    • A crescent wrench.  This is a catchall and it’s a good thing to have.  I could have left out several other wrenches and just taken the crescent, but I wanted the others.
    • I kept the two wrenches that come with the standard TT250 tool kit.  They fit virtually all of the smaller fasteners on the bike.
    • A small channel lock pliers.   I mainly carry these because I once read about a guy using them when he lost his shift lever.   I’ve never had that happen, but these things were on sale for a buck at a Lowe’s and I couldn’t pass them up.   If I ever lose a shift lever, I’ll be good to go.
    • A pair of pliers.  These came with my 1965 Honda Super 90 tool kit, which I bought in 1966.  I’ve had them with me on every ride ever since.
    • Allen drives in 4mm (for the fuel tank filler cap), 5mm (for the body panels), and 6mm (for the handlebar clamps).  I could have bought one of those pocketknife-like things that have a bunch of Allen drives, but these are the only three I think I’ll need and I didn’t want to add the bulk of the larger multi-driver tool.
    • A spark plug socket.   You might wonder why I don’t have a socket driver for it.  The 18mm wrench fits it perfectly.

And that’s about it, folks.  All of the above won’t fit in the little plastic case the original factory tool kit occupied, so they’ll go in a tool roll that’s going in my soft luggage.   That plastic box for the original tool kit?   I may use it to carry a burrito.


Want to see our other rider tool and resources blogs?   Here you go:

Rider Tools.  Good buddy Mike Huber, our paratrooper-at-large, wrote a concise compendium of website and other resources every adventure rider needs to know.

Rider Tools: Part 2.  This blog covers the tools Joe Gresh carries with him.  It’s a good one.  He saved my butt in Baja with that jump start gizmo!

Baja Spares.  This is a list of the stuff I take with me when I ride in Baja.

Another 1917 S&W Record!

It had to happen, I guess.  We recently blogged about a Smith and Wesson 1917 .45 ACP revolver that sold for what, to me, was the incredibly high price of $2,525.  A couple of days ago, I saw another one that grabbed my attention.  It’s a Gunbroker.com auction for an N-frame Smith, but not just any N-frame:  This one is the original that Indiana Jones used in his first movie (Raiders of the Lost Ark).  I know, strictly speaking, it’s not a 1917.  But it’s built on the N-frame and chambered for a close-relative, the British .455 Webley.  This revolver played a key role in several Raiders scenes, including the Cairo swordsman and many others.

If you’re interested in bidding, the Indiana Jones revolver is on Gunbroker.com.  The good news is the minimum bid is the same as the Buy Now price.  The bad news?  That price is a cool $5,000,000.


More Tales of the Gun stories are here!

Big Boy!

Maybe it’s a guy thing. For me, motorcycles and trains go together like coffee and a donut. There’s the obvious: The travel and adventure suggested by motorcycles and trains.  There’s the subtle: The mechanical beauty, be it a locomotive or a motorcycle. There’s the analogy, one I often use for a fast motorcycle: This thing pulls like a locomotive. It’s an expression that makes no sense, considering the leisurely acceleration of a locomotive compared to even a small motorcycle (in engineering terms, you just can’t defeat f = ma). I still use that expression, though. It conveys power, an attribute I apply to my motorcycles.

Like a lot of guys, I grew up in the Lionel era, dividing my drooling between things like the maroon Pennsylvania Railroad GG-1 locomotives that ran by our place and a variety of British vertical twins (all of which I knew had to pull, you know, like a locomotive).

I had lunch one day a few years ago with the guys at our local BMW dealership (I don’t own a BMW, but they let me hang around).  One of the boys was pumped because he had seen Big Boy at the Pomona Fairgrounds earlier. Only half-listening to the conversation, I thought he was talking about a hamburger, and then I realized it was a steam locomotive. My Lionel antenna immediately went up and like everyone else at the table, I started paying attention. To cut to the chase, we decided to visit Big Boy after our lunch that afternoon.

As you can see from the photo, luck was with us.  We had a great lunch and then we snuck into the Pomona fairgrounds to see Big Boy. I grabbed all of these photos with my iPhone. They would have been better if I had my Nikon, but you go to war with the army you have, and all I had was a phone.

I didn’t know really anything about the Big Boy locomotives, so when I got home I Googled it.  These locomotives, and 4014 in particular, have a fascinating story.  They are the largest and probably the most famous steam locomotives ever manufactured.  Old 4014 has been restored to operating condition by Union Pacific’s Heritage Fleet operation in Cheyenne, Wyoming (the photos you’re seeing here are before the restoration).  As part of the restoration, 4014 was converted to use fuel oil instead of coal for the boiler.   It was an obvious move.  I mean, where do you go to buy coal these days?

Only 25 Big Boys were ever built, and they all went to the Union Pacific Railroad.  They were manufactured by the American Locomotive Company in the early 1940s.   Their primary purpose was to pull long and heavy trains (up to 4,040 tons) through the Wasatch Mountains and the main rail lines between Ogden and Cheyenne.  They were designed for 80 mph, but 60 mph was their normal cruising speed. Big Boys produced 6000 horsepower and God only knows how much torque.  They were 132 long (including the tender) and they weighed 1.2 million pounds.  The tender could carry 24,000 gallons of water and 28 tons of coal.  The locomotive is articulated (it’s so long that the wheels are hinged and can turn with respect to each other to get through curves).  Old 4014 was first delivered to the Union Pacific in 1941 and retired in 1961, and during that period, it traveled over a million miles.

Very cool stuff, folks, made all the more interesting by the fact that No. 4014 finished its restoration in 2019 and entered service for special runs.   It would sure be cool to take a trip on one of those special runs.  That would be a real adventure.


More railroad posts?  Hey, take a look at these:

The Nevada Northern: It’s Worth a Trip To Ely
Golden Spike National Historic Park
A TT250 Ride

Tools For a Motorcycle Trip Part 2: You’ll Need a Luggage Rack

ExhaustNotes.us contributor Mike Huber recently wrote a story about tools to carry on a motorcycle trip. The story threw me because I was expecting a list of actual tools. Instead, Huber wrote about high tech software and hardware to make a motorcycle trip safer and more enjoyable. He should know as he lives on a motorcycle.

I’m always scratching for something to write about. The Internet consumes content at an incredible pace so I figured I’d steal Huber’s idea and write about the tools I carry on a motorcycle. This tool set may seem like a lot but I bring it along on a 7-mile run to the post office or a cross-country ride. Much like a large, ugly tail rack I won’t leave home on a motorcycle without tools.

If your bike has a kick-starter these little jump starters are not a must-have but with a high-compression 500cc single cylinder and no kick starter the Husqvarna is a bear to push start with a dead battery. Luckily I haven’t needed to jump the Husky yet but I have used the jump starter to start cars, other motorcycles (see Royal Enfield Bullet) and just yesterday I used it to start the back-up generator when the power went out at Tinfiny Ranch.

My nephew, Anthony gave me this one and it’s a pricy unit but you can find them on Amazon for as low as $25. I have a cheapie in every car and they work well. Not only will the tiny, lightweight battery jumpstart a diesel tractor or large cruise ship, it will charge your cell phone many times over. The only flaw with them is that they hold a charge for so long you tend to forget about them. Remember to recharge the thing every 6 months or so.

If you have a 12-volt system, not a given with old motorcycles, a small electric air compressor will save you hours of pumping after fixing a flat tire. This one is Slime brand but any of them will work. For some reason I frequently get flat tires so this pump sees regular action.

Of course a pump is useless without a patch kit. Most of my motorcycles still run inner tubes, which are a PITA, compared to tubeless tires. If you can find access to the hole without further damaging the tube patching is easy and reliable. I also carry a spare tube in case a tube becomes irreparable from my ham-fisted repair attempts.

A Leatherman multi-tool pocketknife covers a lot of bases and takes up little space. There are other brands of multi-tool and they are ok but I still think the Leatherman is the best of the bunch. Leatherman also has a great warranty. If you break a blade just send it back and Leatherman will send you a new knife. I’ve done it twice and had no issues.

An assortment of basic tools will get you out of trouble most times. I carry vise grips, tire irons, a decent multi-tip screwdriver, a few wrenches and ¼-inch sockets with driver, and a little flashlight. Vise grips will most likely damage whatever you use them on but they will get the job done and you can replace the chewed up parts when you get back home. The small aluminum tin case seen in the cover photo contains a universal cable repair kit. This is a neat item with several different cable ends and a length of cable. The various ends screw on so you can make a temporary cable for damn near any motorcycle. I’ve never used this item but I will be well-chuffed (warning: Brit slang!) if I ever do need the thing.

I also carry a spare master link, electric tape for those melt downs, a bit of bailing wire, tie wraps and a length of measuring tape. The measuring tape is super for seal cleaning or shimming or even measuring.

In addition to the basic tool set I add a few motorcycle brand-specific bits as I swap the tool set from bike-to-bike. A tube of Seal All rides with me on the Kawasaki 900 because the gas tank was very rusty and might spring a leak at any time. The Yamaha 360 gets a flywheel puller, a jug of two-stroke oil and a 21-inch front tube that will fit both wheels if it has too. The Husqvarna gets a 17-inch tube to suit its odd-sized wheels.

The tool kit rolls up in a canvas bag along with a few paper towels. No two ways about it, this kit is heavy. I look at it this way: The extra weight of the tools is offset by the lightness of my soul knowing I have the ability to fix most any minor problem on the road.


Hey, check out our ExhaustNotes.us home page, where we now have a quick index to our most recent blogs!