The .45-70 Government cartridge was destined for obsolescence in the middle of the last century and then a curious thing happened: Ruger chambered their No. 1 single shot rifle for it and Marlin did the same with an adaptation of their lever action rifle a short while later.
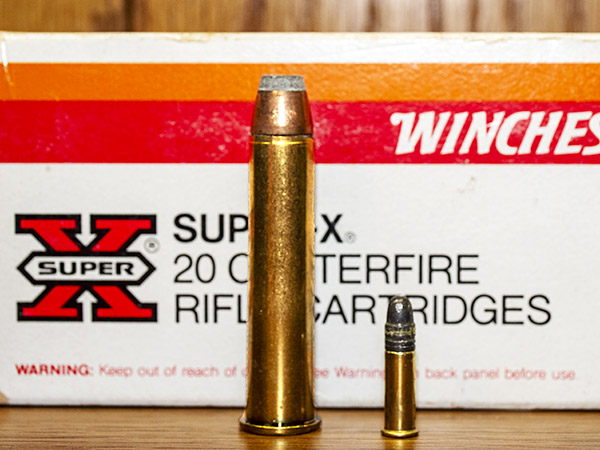
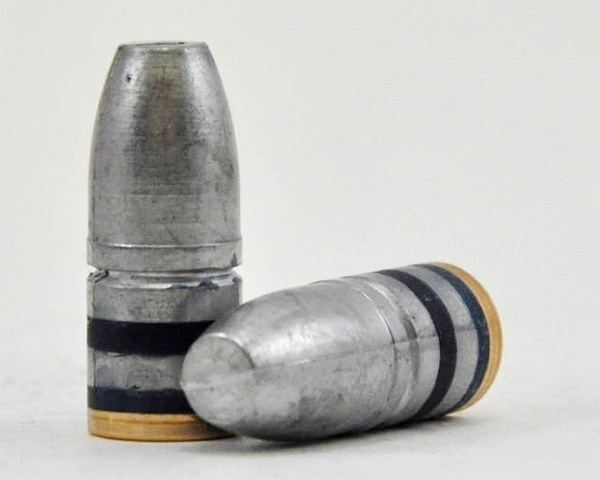
300-grain .45 70 Winchester and .22 LR Federal cartridges.
When Marlin and Ruger came on board with their .45 70 rifles, there was suddenly significant interest in the cartridge. I fell in love with the .45 70 when I bought a Ruger No. 1 in 1976 (a rifle I still have), and I’ve been reloading the cartridge ever since. I’ve owned several No. 1 Rugers, a few Ruger No. 3 rifles, a bunch of Marlin .45 70s, and a replica 1886 Winchester (by Chiappa, with wood that is way nicer than anything from Winchester).
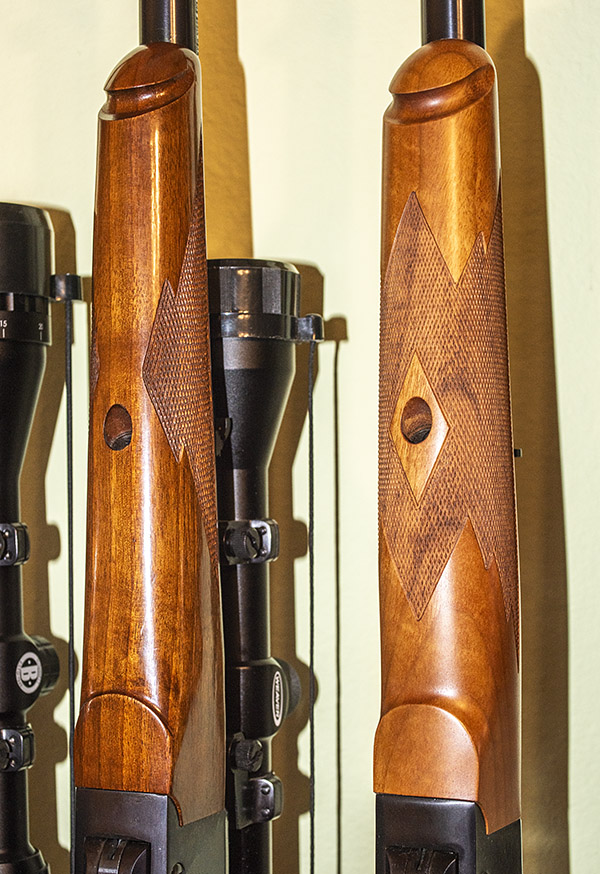
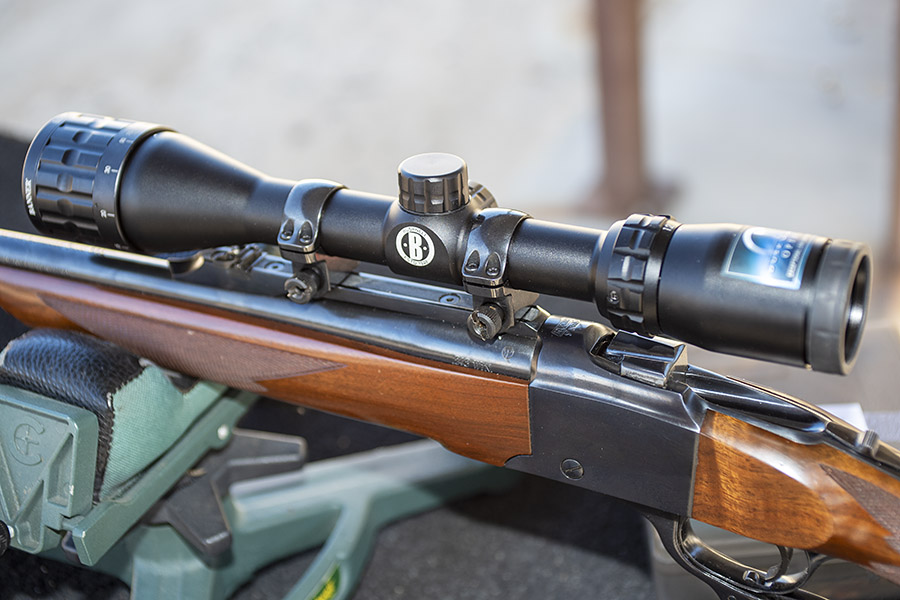
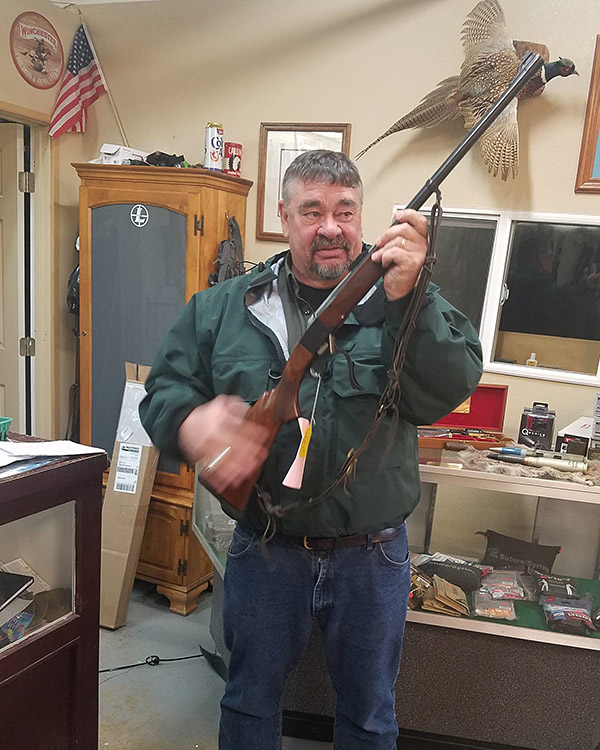
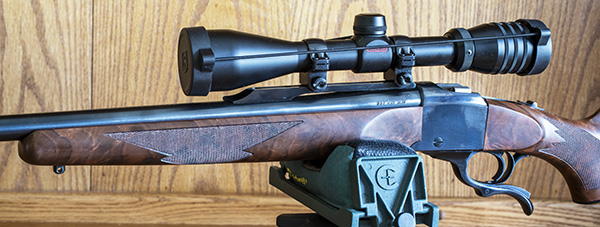
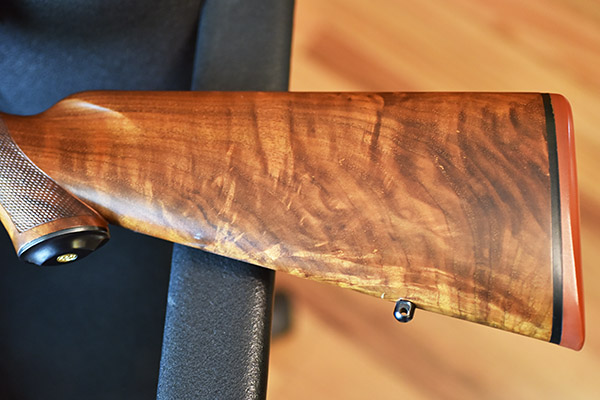
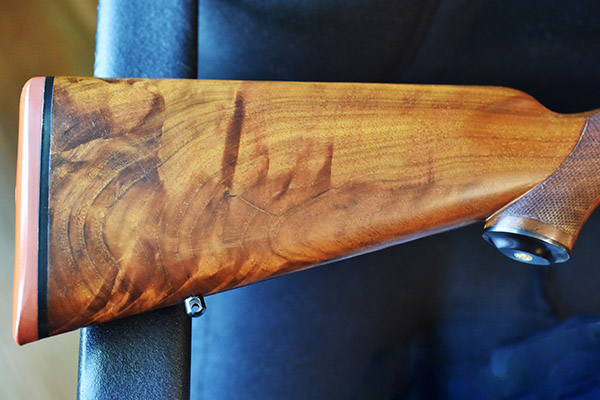
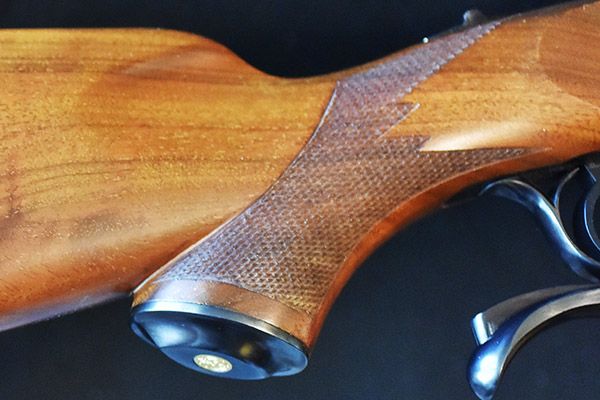
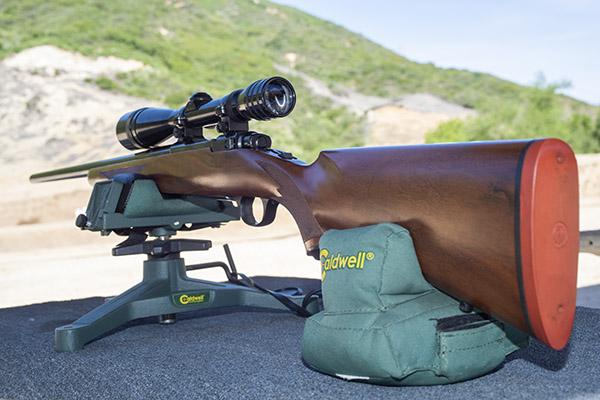
Starboard side of the Ruger Circassian .45 70 No. 1 rifle with 26-inch barrel.Yep. The .45 70 was adopted as the official US Army cartridge in 1873, hence the “Gov’t” designation sometimes seen with the cartridge name.In addition to its Circassian walnut and 26-inch barrel, these rifles included wrap-around checkering on the forearm. The standard checkering pattern for a Ruger No. 1 is shown on the rifle to the left.
All these manufacturers have offered special editions of their .45 70 rifles. One of the more recent offerings from Ruger was a 26-inch barreled No. 1 with a Circassian walnut stock. When it was first offered about 7 years ago by Lipsey’s (a Ruger distributor), it was a limited run of only 250 rifles. They sold out immediately and folks still wanted these, so Lipsey’s and Ruger offered a second run of 250 rifles. I wanted one with fancy wood, but none of the Circassian Rugers I saw online had wood nice enough to be interesting. Even though the rifles had Circassian walnut, all the ones I saw were plain and straight grained. Then one day I wandered into a local gun shop and I saw the rifle you see here. It caught my eye immediately and at first I couldn’t believe what I was seeing. These rifles were next to impossible to find and here was one right in front of me. It was pricey, but I Presbyterianed the guy down to $1050 (you fellow Members of the Tribe will get it) and I pulled the trigger (figuratively speaking).
Ruger’s more recent .45 70 No. 1 rifles have a short leade (the distance between the forward edge of the cartridge case and where the rifling starts). Mine won’t chamber cartridges with 400-grain and above bullets. In fact, I had some ammo I had loaded with an old batch of Hornady’s 300-grain jacketed hollow points, and this ammo wouldn’t chamber, either. I examined the profile of my old 300-grain Hornady bullets and compared it to pictures of the current Hornady 300-grain bullets, and it was obvious the older bullets had a more gradual ogive (the curved portion of the bullet’s profile). I ordered a box of the current Hornady 300-grain slugs, I loaded them, and the ammo chambered in this rifle easily. In researching this issue on the Internet, the issue of recent Ruger .45 70 rifles’ shorter leades is a complaint that’s popped up more than once. One guy even sent his rifle to Ruger, but he said Ruger measured the chamber and returned it to him with no work done (according to him, Ruger said the rifle met SAAMI chamber spec requirements). It’s not really an issue to me; if I want to shooter the heavier bullets I’ll use a different .45 70 rifle.
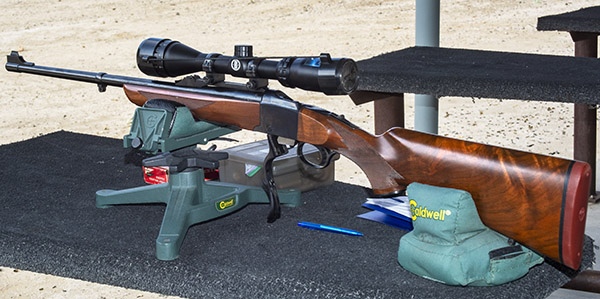
I had some Winchester factory .45 70 cartridges in my ammo locker, including the Winchester load with 300-grain hollow point bullets. I thought I would shoot those to see how they did in the Circassian No. 1.
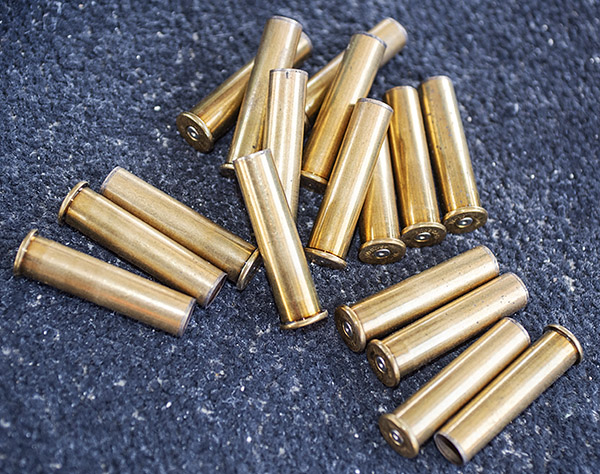
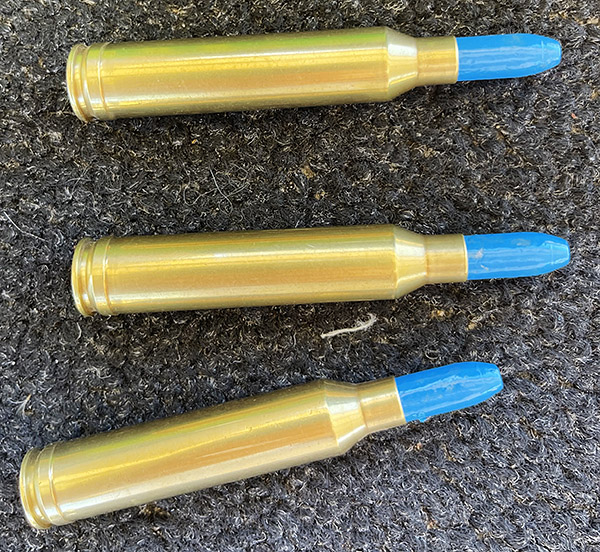
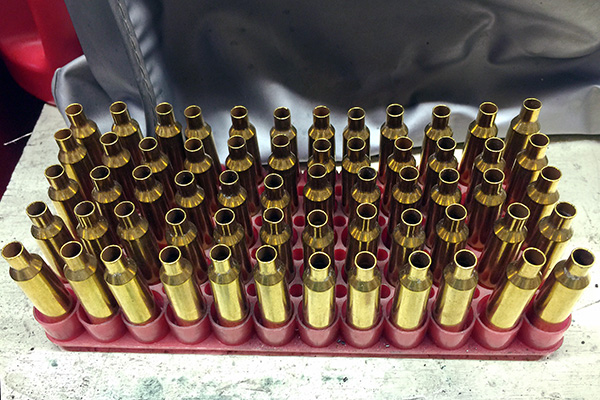
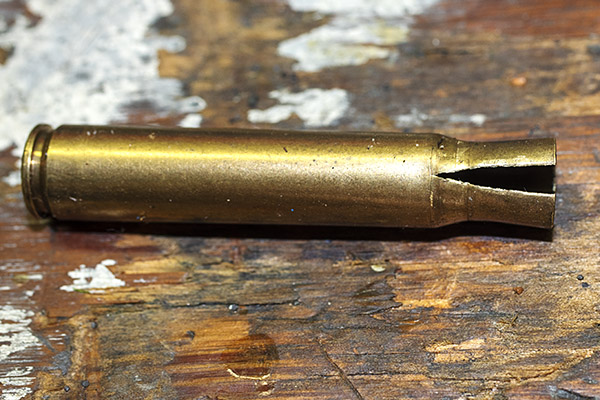
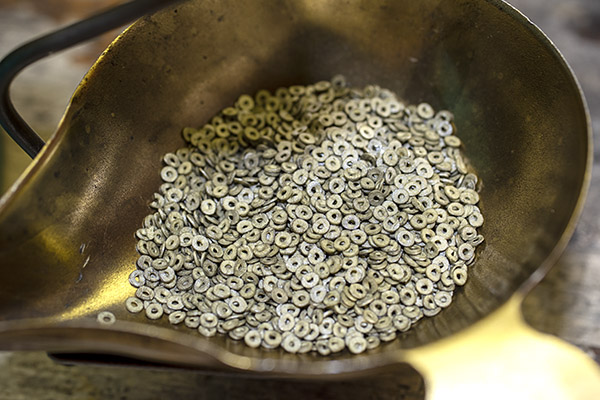
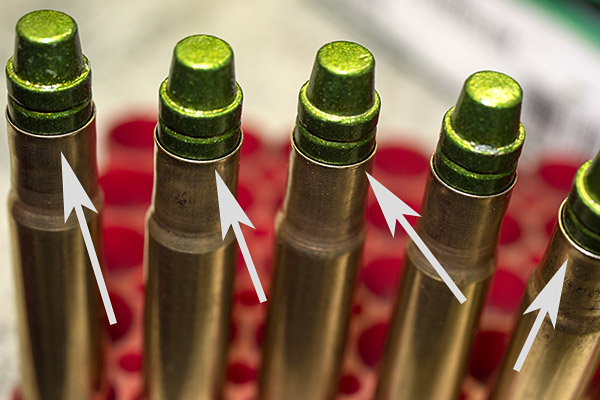
A big ol’ .45 70 hollow point cartridge.Spent cases destined for reloading. This is one of my favorite cartridges to reload.
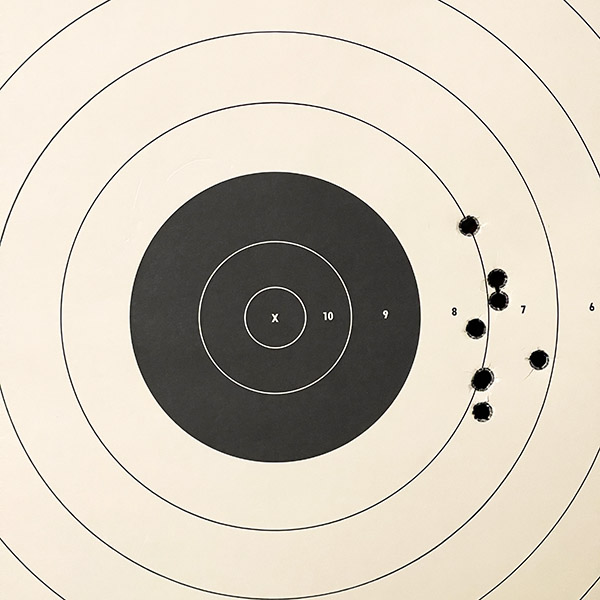
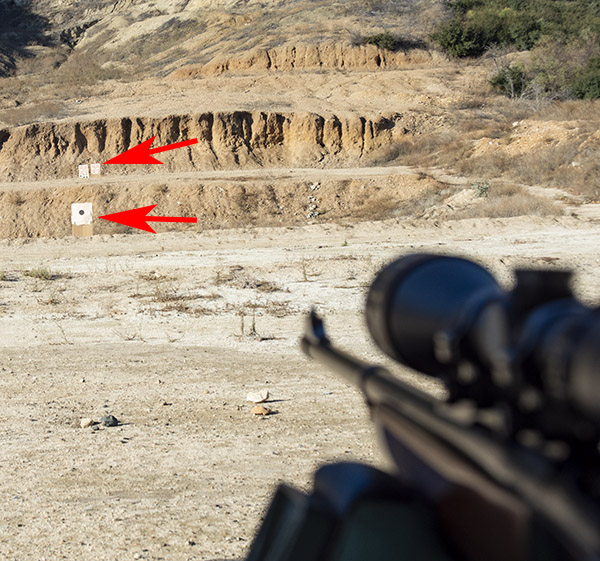
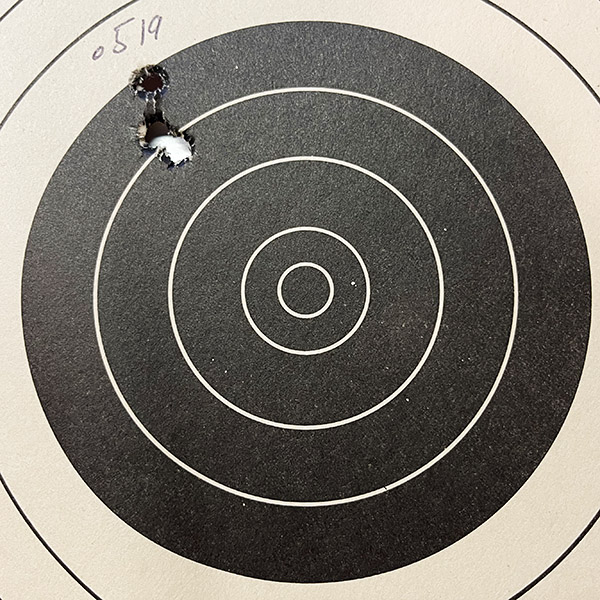
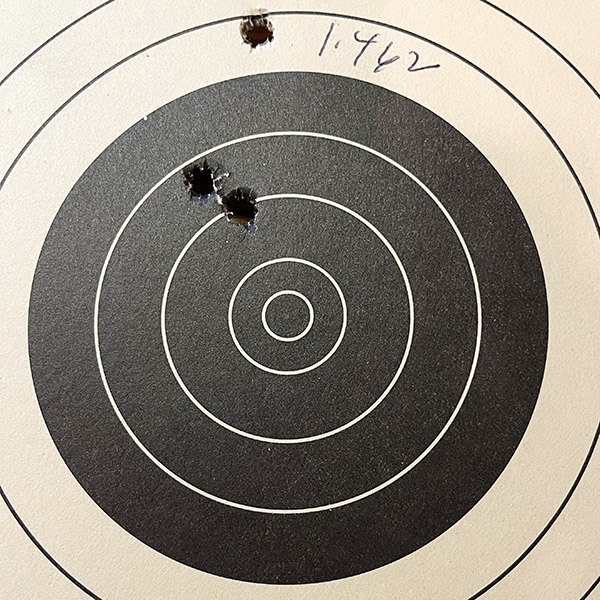
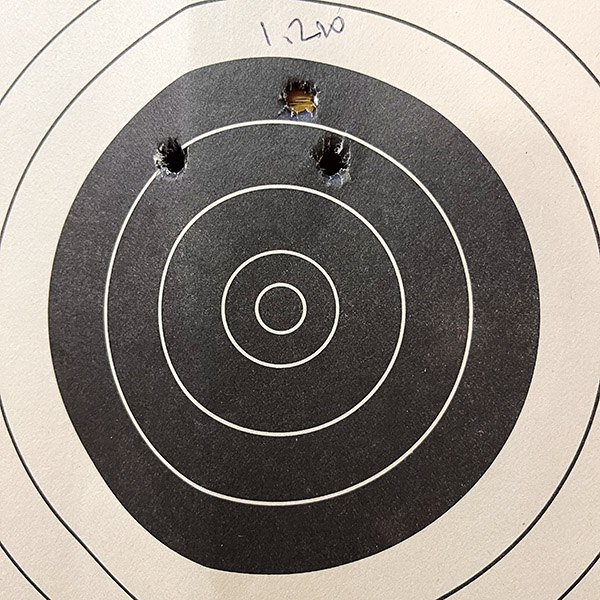
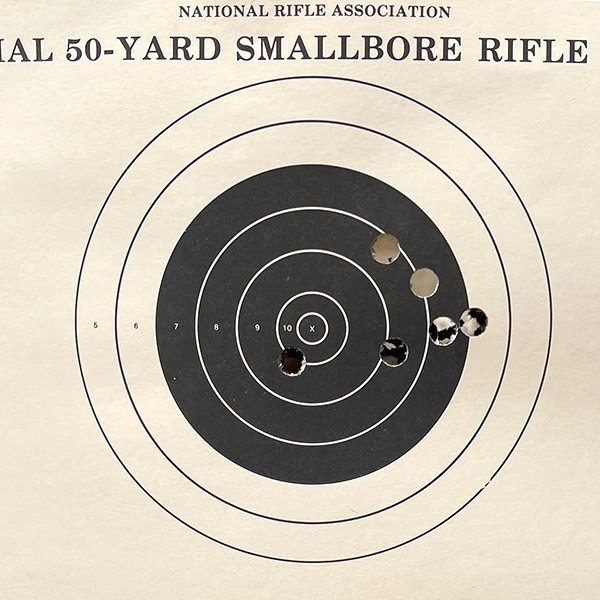
My first shots were at 50 yards, and the Ruger grouped nicely. The shots were biased very slightly to the right. That’s okay, because the Ruger rear sight is adjustable for both windage and elevation. I didn’t bother making the adjustments on the range, as it was a fairly windy day. I’ll make the adjustments, if necessary, on the next trip.
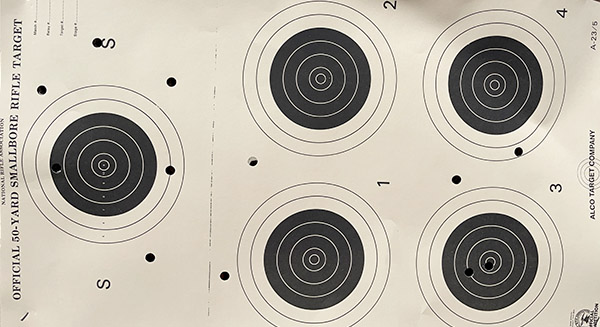
50-yard groups with the Circassian No. 1. The groups are biased to the right, some more than others (a function of how I held the rifle for each group). Ignore the upper right target and the circled holes to the right of the bullseye; those were from a .243 I had out on the same day.
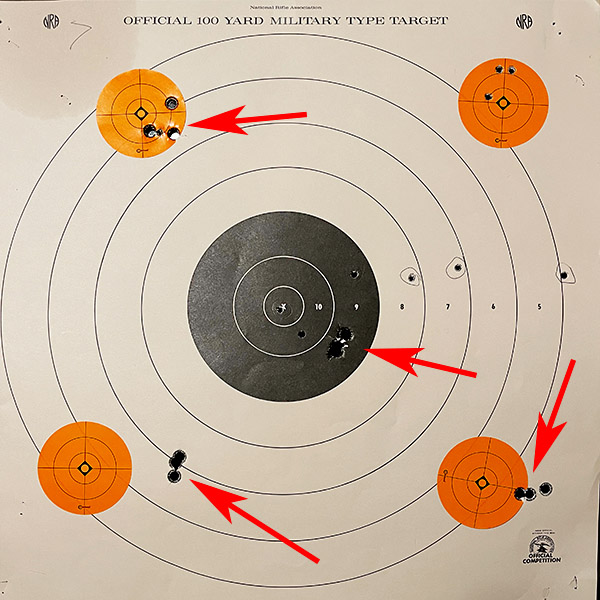
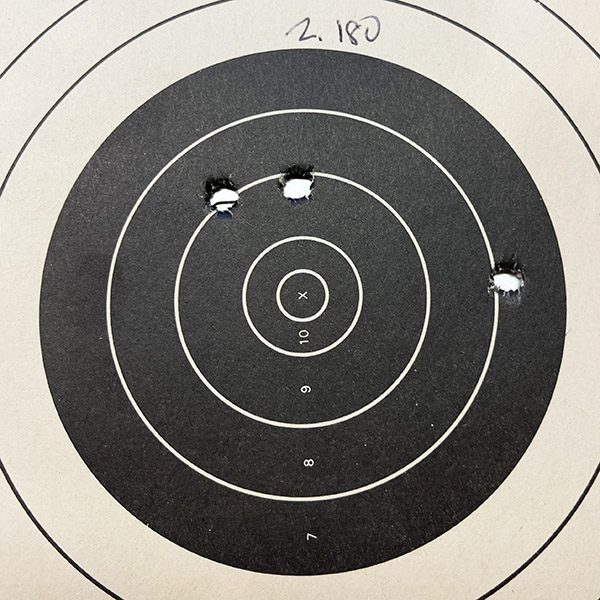
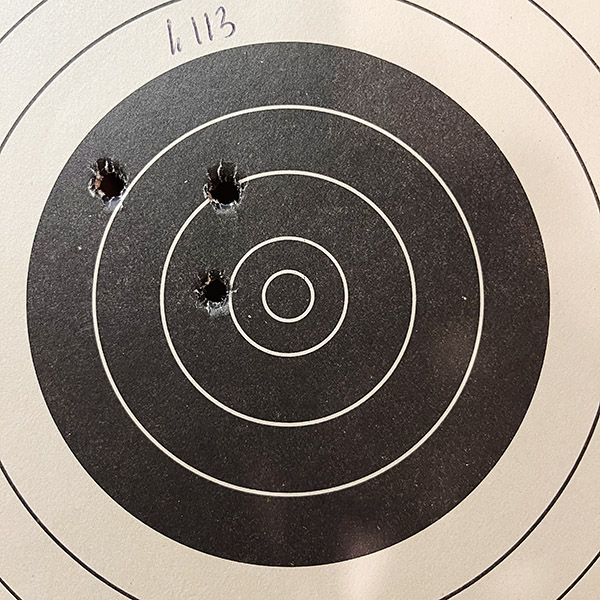
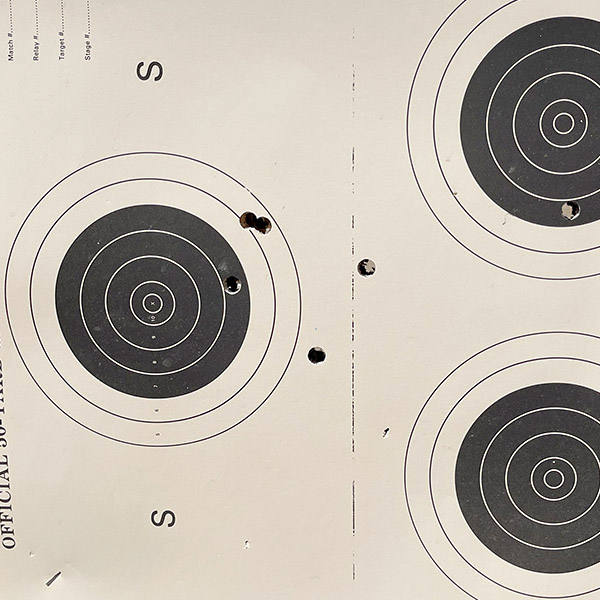
I then set up a standard 100-yard target (at 100 yards). There were 20 rounds in the box of Winchester .45 70 ammo and I had already shot four 3-shot groups at 50 yards. That left eight rounds to play with at 100 yards, and play around I did.
Eight shots at 100 yards. I need to move the rear sight a bit to the left. The vertical stringing is most likely a function of not allowing the barrel to cool between shots.
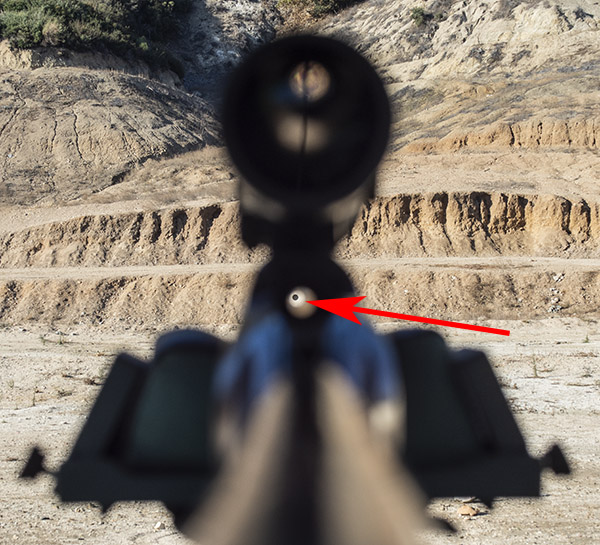
The results surprised me. I was holding on the bullseye at 6:00, and those big 300-grain hollowpoints hit at about the right elevation. As was the case with the 50-yard targets, the point of impact was biased to the right. The first three made a tight group and then the shots climbed as I progressed through the eight. The vertically strung group was only about an inch in width. The stringing is almost certainly due to barrel heating and the barrel being deflected up by the forearm (it’s not free floated). I was pleased with the results. It told me that I could leave the elevation adjusted for 50 yards and it would still be spot on at 100. On my next range outing with this ammo, I’ll adjust the rear sight to the left a scosh and take my time between shots to preclude the stringing. Even with the stringing you see in the above target, it’s not too shabby for a 100-yard group with open sights.
More blogs on this and other .45 70 rifles? You bet!
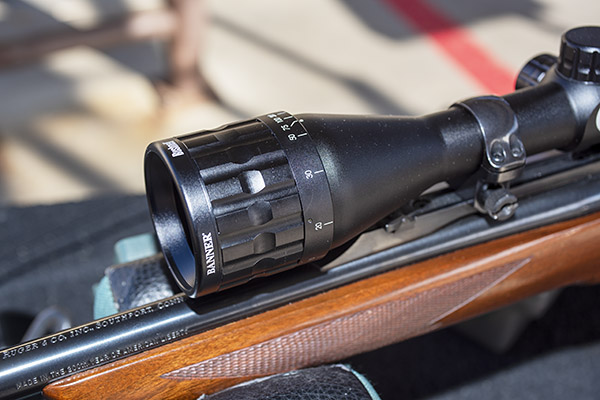
Bushnell scopes have been around forever and they are kind of a generic scope…just as effective as the name brand medication but at a fraction of the cost. I’ve had several that came with rifles I bought, but I never bought a new one until recently. I’m glad I did. I bought the Bushnell Banner 4×12 and it’s a great scope.
The 4×12 Bushnell Banner scope. It’s a surprisingly good scope for well under $100.
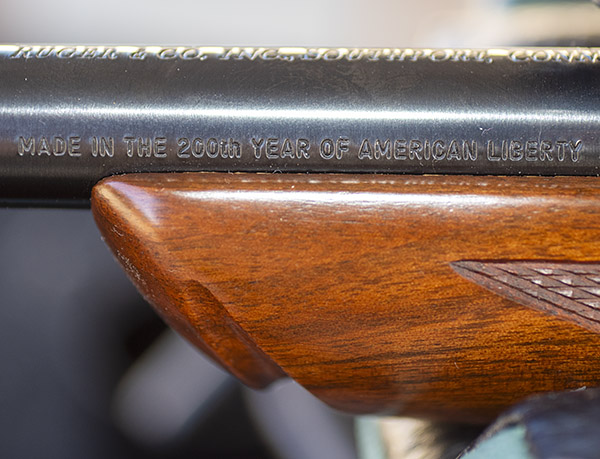
The story goes like this: I won a Ruger No. 1 in 243 Winchester in an online auction about 15 years ago. The rifle was a 200th year Liberty model, it looked good, and I stashed it in the safe. I shot it for the first time a month ago, and that’s when I learned I had an accuracy issue. The Ruger came with a period-correct 4×12 Weaver (long since discontinued), which provided plenty of magnification but my groups were embarrassing.
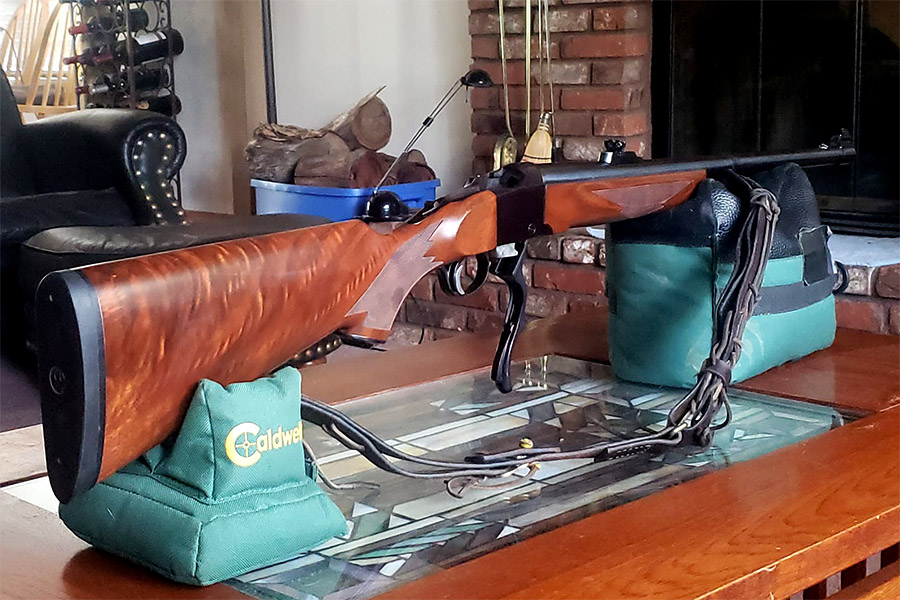
The .243 Ruger No. 1 on the range. The rifle is wearing the new Bushnell Banner 4×12 scope in this photo.
Let’s go tangential for a second or two: The “4×12” I use above refers to the scope’s variable magnification, which ranges from 4 times actual size to 12 times actual size. With a good scope (one offering optical clarity), you can see the bullet holes in the target at 100 yards when the scope is zoomed up to 12 times actual size.
The Ruger American Bicentennial inscription. It’s on all Rugers made in 1976.
For hunting, I always prefer a straight 4-power scope (i.e., a nonvariable) because of its wider field of view and the fact that I can still hold a pretty tight group with a 4-power scope. Magnifying the target four times is good enough for hunting. That’s especially true on a deer-sized target, but it’s good enough even on rabbits. I’ve sent a lot of Texas jacks to the promised land with a simple 4-power Redfield on my .30 06 Ruger No. 1.
The scope companies pretty much all say that you should keep a variable scope at low magnification to acquire the target, and then zoom it up for a more precise aim. But I’ll tell you that’s just marketing hype, it’s laughable, and it’s a lot of baloney. When I’m hunting and I see a game animal, the adrenal glands go into overdrive. It’s all I can do to remember to take the safety off, and I can remember a few times when I forgot to do that. The thought of seeing a target, acquiring it in the scope at low magnification, taking the safety off, lowering the rifle, increasing the zoom, raising the rifle again, reacquiring the target, and then squeezing the trigger is ludicrous. Nope, for hunting purposes, a straight 4-power scope is the way to go for me. On the other hand, when I’m on the range, I just leave the variable scopes at their highest magnification. In short, I don’t need a zoomable scope. But the marketing guys know better, I guess, and that means they weather vane to variable scopes. That’s pretty much all you see these days.
But I digress. Let’s get back to the main attraction, and that’s the new Bushnell Banner 4×12 scope on my .243 No. 1 rifle. This all started when I loaded some brass good buddy Johnnie G sent my way. The rifle would not consistently hold a zero, and even when it did, it shot grapefruit-sized groups. My thought was that the old 4×12 Weaver scope that came with the rifle had conked out, so I replaced it with another inexpensive scope I had laying around (an older Bushnell Banner 3×9 scope that is probably 50 years old). While mounting the older 3×9 Bushnell, I checked both Ruger rings (front and rear) to make sure they were secure. They seemed to be, but they were not (more on that below). I took the No. 1 (now wearing the older model Bushnell Banner) to the range. The accuracy situation did not improve.
The 4-12X Weaver scope that came with the 200th year .243 Ruger No. 1. That scope may still be good; I’ll have to mount it on another rifle to confirm that.
So I removed the older 3×9 Bushnell and the Ruger rings. That’s when I discovered that the front ring was not secure. It had felt like it was, but it fooled me (which is not too hard to do). Ruger provides rings with their centerfire rifles and they are good, but the rings on this rifle were muey screwed up. The clamp (the bolt with the angled head) on the front ring was mangled, and both the nut and the clamp were gunked up with some sort of adhesive (probably Loctite, but who knows). I think what had happened was the clamp could be tightened on the mangled part of the clamp’s angled surface. The buggered-up clamp was not properly positioned in the mounting surface and the caked-on adhesive compounded the felony. Under recoil, the forward ring was moving around.
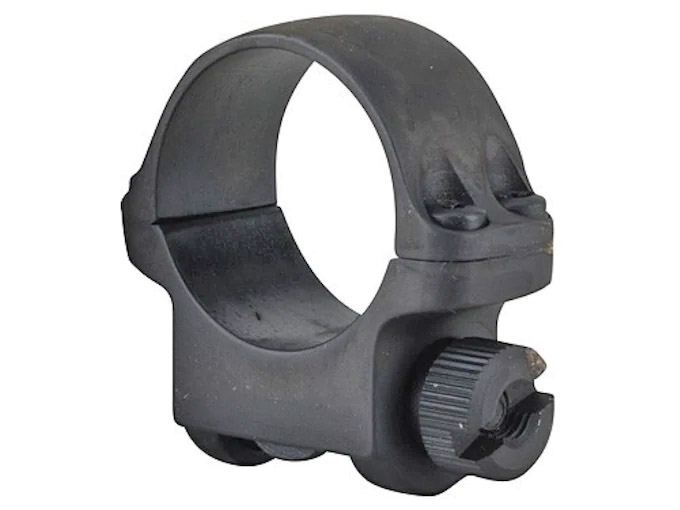
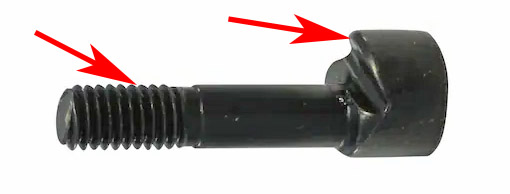
A Ruger scope ring. Ruger provides two of these with each of their centerfire rifles.The Ruger scope ring clamp. It’s a bolt with an angled surface (denoted by the right arrow) that clamps onto a machined crescent on the rifle’s scope mounting surface. The threads on mine were caked with an adhesive.The Ruger scope ring nut. It’s what threads on to the clamp shaft in the photo above.
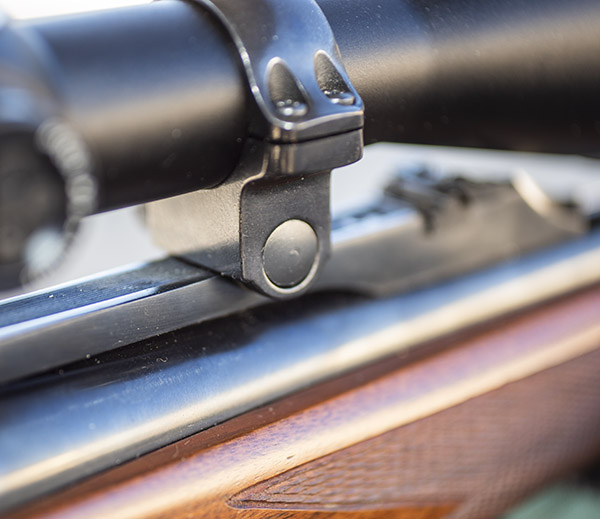
The Ruger No. 1’s forward scope ring. This was not firmly mounted because the clamp had been damaged by Bubba gunsmithing. God must love Bubbas; He sure made a lot of them.
I recut the clamp ‘s angled surface with a file to eliminate the mangled portion and reblued the clamp using Birchwood Casey Cold Blue, and I wire-brushed as much of the adhesive as I could from the clamp’s threaded shaft with a bore brush. I then worked the clamp into the nut until I cleaned out the remaining adhesive on the nut. I reinstalled the ring and satisfied myself that this time it was secure.
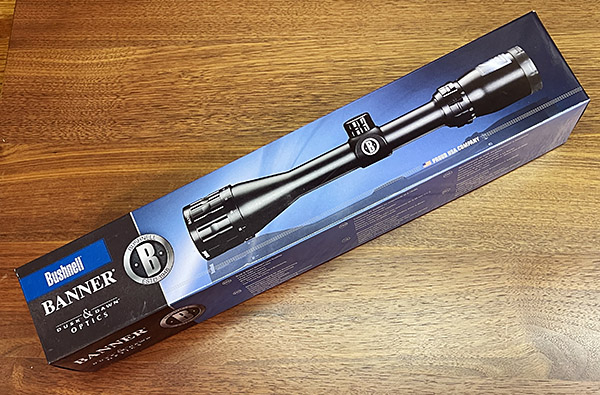
The Bushnell Banner box. The scope was nicely packaged.The Bushnell Banner’s parallax adjustment ring. These really work.The Bushnell Banner’s quick adjust focusing rear ring. It’s a nice feature.The Bushnell Banner’s adjustment knobs after their covers had been removed. These have a nice feel, with a distinct tactile click for each 1/4-inch adjustment. You don’t need any tools to make these adjustments. It’s first class.
When my new 4×12 Bushnell Banner scope arrived a few days after I ordered it on Amazon, I was impressed with its appearance. I even liked the box. I looked through the scope and was impressed with its optical clarity. These inexpensive Banner scopes have continued to improve over the years, and this one looks great.
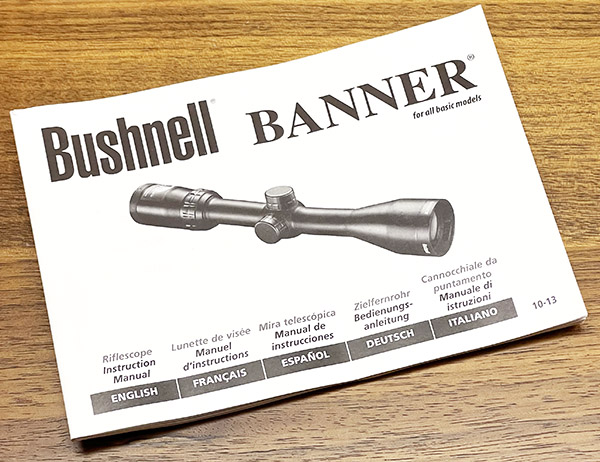
The Bushnell Banner’s operator’s manual. It contains basic information about mounting and boresighting the scope.
The Bushnell scope has a lifetime warranty and it came with what I thought was an impressively thick operating manual. The manual is printed in five languages (English, French, German, Italian, and Spanish), so it was only one fifth as thick as it first appeared to be. But it was still a good manual. The scope also came with lens covers, which is a nice touch.
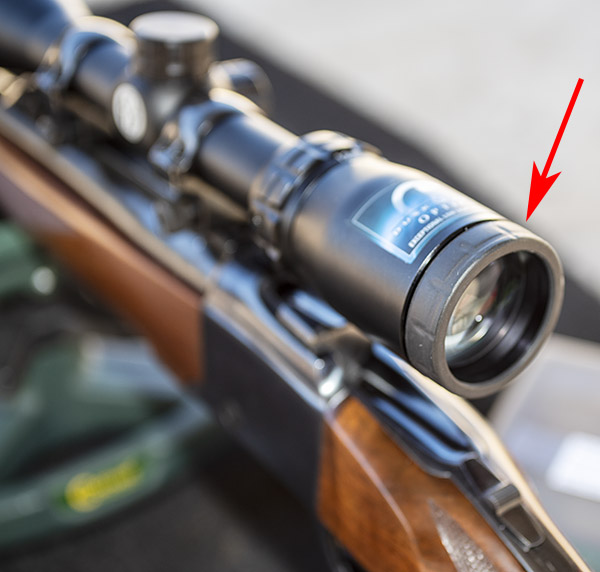
The Bushnell has other features that are important to me. It has a quick focus ring at the rear to focus the reticle, and it has a parallax adjustment feature on the objective end (the front of the scope). Parallax adjustment has become increasingly important to me; it minimizes the scope’s susceptibility to slightly different eye positions. You adjust for parallax by moving your eye around and making sure the reticle stays centered on the target.
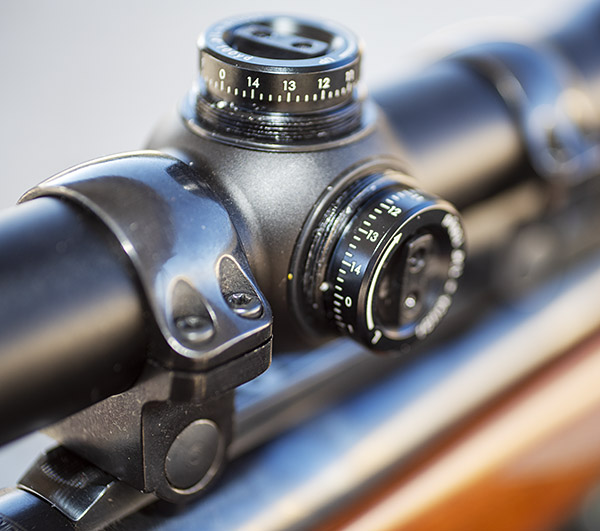
The Bushnell has removable windage and elevation adjustment dial covers, and windage and elevation adjustment can be made by hand (no special tools are required). Each click represents 1/4-inch of movement on a 100-yard target, which is pretty much the standard on scopes.
The Bushnell has a 40mm objective lens, which I think is about right. It looks right and still allows the scope to be mounted low on the rifle. Some scopes go bigger with 50mm objectives, but I think they look silly. These bugeye scopes have to sit higher on the rifle (which makes sighting through them difficult). Nope, for me a 40mm objective is as big as I care or need to go.
Although I own a boresigting device that mounts on the barrel, I prefer not to use it. The thought of potentially damaging a rifle’s crown, which a boresighting device can do, is not something I want to entertain. I boresight the old-fashioned way: I’ll set the rifle up in a rest, look through the bore (from the breech end) and move the rifle around until a 50-yard target is centered in the bore. Then, without moving the rifle, I’ll adjust the scope’s windage and elevation until the reticle is approximately centered on the target. Once I’ve done that, I’ll fire one shot and see where it hits. I’ve actually done this and had the impact be on the target with that first shot, but it took four shots this time. After each shot, I adjusted the windage and elevation to get the next shot two inches below my point of aim at 50 yards, and then switch to a target at 100 yards to finalize the adjustment.
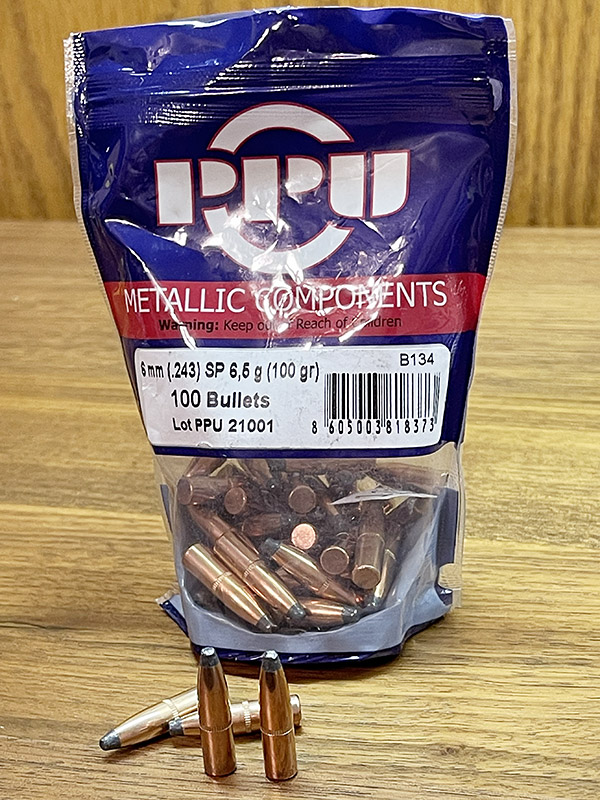
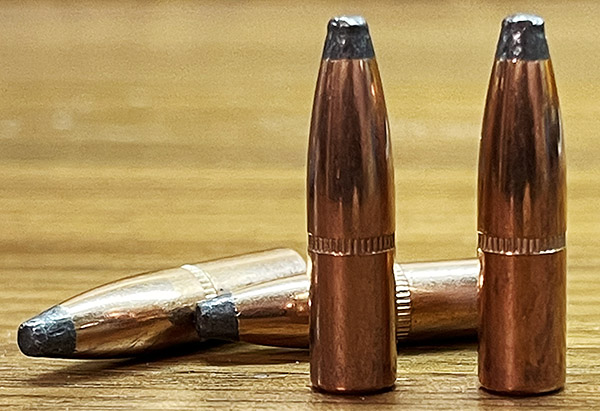
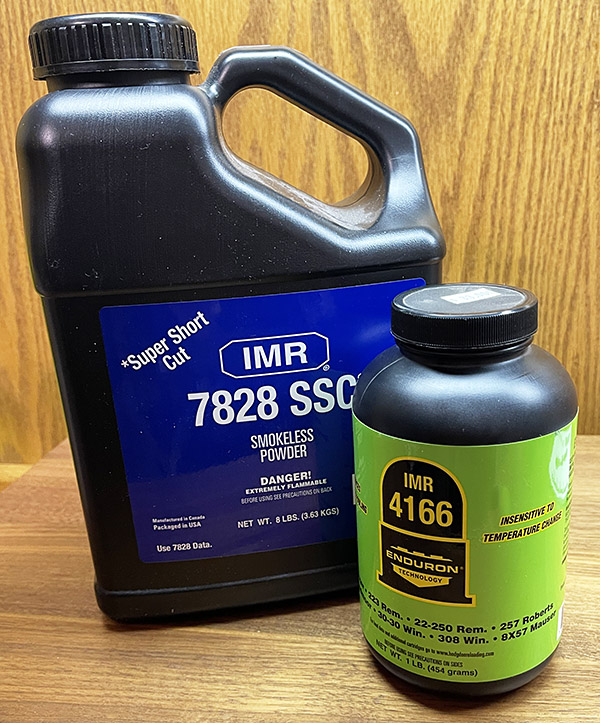
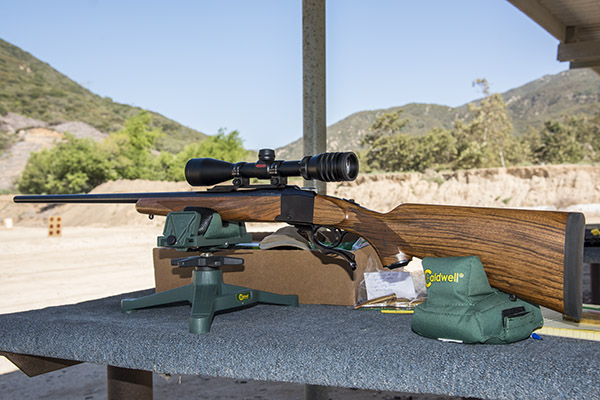
On the range at the West End Gun Club. The first target is at 50 yards; the second set of targets is at 100 yards. I used the first target for boresighting and initial scope adjustment.To boresight the scope, you look for the target through the rifle’s bore. It appears to be a little offset in this photo because it was difficult to get the camera aligned with the bore, but you get the idea. You want the target centered when looking through the barrel.I used PPU (PRVI Partizan) 100-grain jacketed soft point bullets for this round of load development. The Ruger has a 1 twist in 10 inches rate. A 100-grain bullet is right at the edge of stability with this twist rate; lighter bullets should be more accurate.Another shot of the PPU 100-grain bullets. There’s a long bearing area on that bullet.I used two propellants for this test series: IMR 7828 and IMR 4166. The IMR 4166 performed better than the IMR 7828 load and it reduced the copper fouling in the bore.
For this outing, I had loaded two groups of .243 ammo, both using PRVI Partizan 100-grain jacketed soft point bullets. One load had 43.0 grains of IMR 7828 propellant; the other group had 34.5 grains of IMR 4166 propellant. I used the IMR 4166 ammo last. IMR 4166 was one of those new powders that is supposed to not leave copper deposited in the rifling (I’ll explain why I used the past tense in a second). I wanted to use it to minimize the cleaning after shooting the rifle.
So how did it all work? The IMR 7828 load didn’t perform well as the IMR 4166 load. The IMR 7828 load was shooting 2 1/2 to 4-inch groups. Part of that was due to the Ruger’s twist rate (1 in 10), which is marginal for a heavy (for the .243) 100-grain bullet. But I was surprised with the last group of the day, which was with IMR 4166 powder.
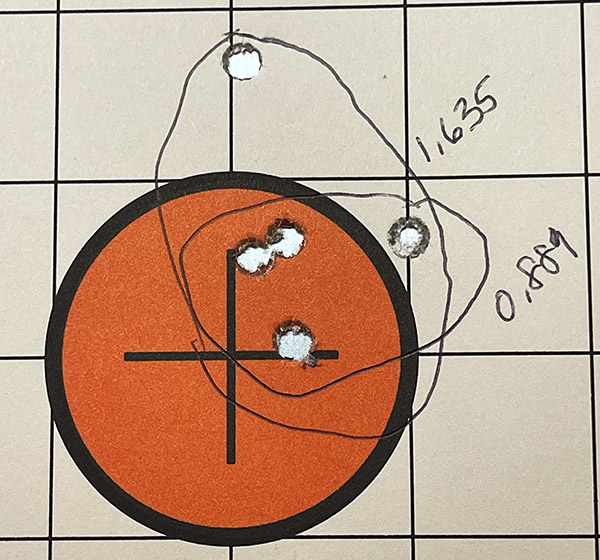
The last shots of the day, and the last of the loads with IMR 4166 propellant.
Four of the five shots went into 0.889 inch; the fifth shot opened the group up to 1.635 inches. That fact that the IMR 4166 grouped much better might be due to the fact the propellant may have removed some of the copper fouling (it appeared to have a lot less copper fouling when I cleaned the rifle later), it might be due to the fact that IMR 4166 is a faster powder compared to IMR 7828, it might have been me, or it might be a statistical fluke. You might think this would push me to develop a load with IMR 4166, but unfortunately the powder has been discontinued (I’m on my last bottle). Future load development work for this rifle will be with lighter bullets and other powders with burn rates similar to IMR 4166. Varget comes to mind. I’ll keep you posted.
I know, I’m digressing again. I started out with the intent to do a product review on the Bushnell Banner 4×12 scope, which I think I did, but I morphed into a bit of load development work for the .243 Ruger No. 1. On my intended topic: The Bushnell Banner is a great scope, and it performs way beyond what it’s sub-$100 price would indicate (I paid $72 for mine on Amazon). If you’re looking for a good low-priced scope, the Bushnell is hard to beat. I like it so much I’m going to by another one for another Ruger, but that’s a story for another time.
I’ve never had any desire to hunt African game and I probably never will. But I’ve enjoyed reading about the African plains rifles since I was a kid in junior high school. Bringing a copy of Guns & Ammo magazine to school would probably get you a quick trip to the principal’s office these days…but I digress.
Exquisite walnut is often found on the older Ruger No. 1 rifles.
Quite a few years ago I saw an old Ruger No.1 Tropical in the consignment rack of a small gun shop that is now long gone. The owner said, “just pick it up and feel the heft.” And of course, I did and the next thing you know we were talking price, knowing I would never pay $2,000 for a collectible Ruger No. 1. Shaun confided in me that the rifle’s owner couldn’t find the obsolete 405 ammo for it anywhere and he wasn’t a handloader, so he wanted to sell the rifle. Another problem with the rifle was that a previous owner had cut down the front sight, probably because he had been shooting handloads with .41 caliber pistol bullets. So we settled on $500 and I became the owner of my first “unobtainable” Ruger No. 1!
In the gun shop years ago eyeing the Ruger No. 1. Salesman Shaun said, “hand me your phone and let me take a photo of you so you can see how good you look with that rifle!” Shaun passed away a couple of years ago, but I know he smiled down from Heaven yesterday as I fired the Ruger No. 1H Tropical for the first time. And he was right, this gun was meant for me!
It took me a lot of searching over the past few years, but I finally located a set of 405 Win reloading dies, the shell holder, and all the components to bring this rifle back to life.
Hornady had made a run of new 405 Winchester brass and I was lucky enough to find a new old stock box of 50 shells. I also located some new Barnes .412, 300-grain TSX bullets.
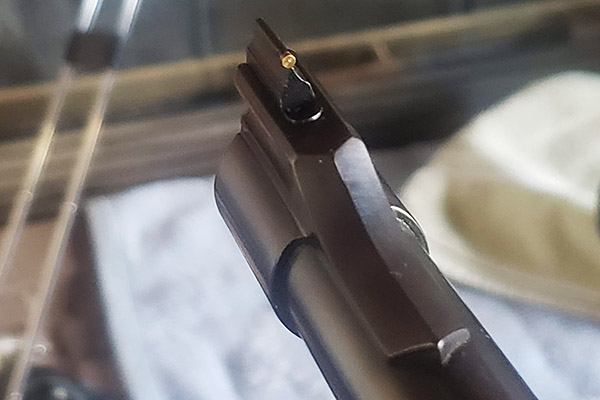
The first step in restoring the old 1H Tropical was to contact Ruger and purchase a new gold bead front sight. That was a simple install as the blade is held in place by a small detent spring.
New Ruger NOS gold bead front sight blade installed.
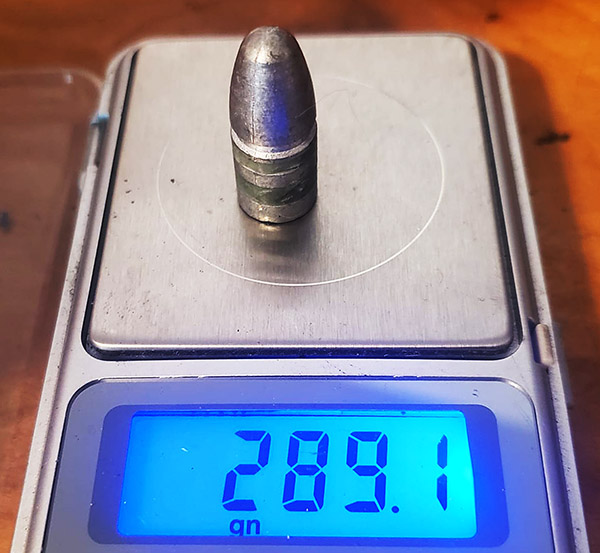
Not wanting to use the expensive Barnes TSX bullets quite yet, lead bullets were cast from lead wheel weights with a bit of tin added using a Lyman 412263 plain base mold to cast 288 grain bullets. These were sized to 0.413 inch and lubed with Alox. Lyman has since discontinued this fine old bullet mold.
A Lyman 412263 bullet, lubed and sized.
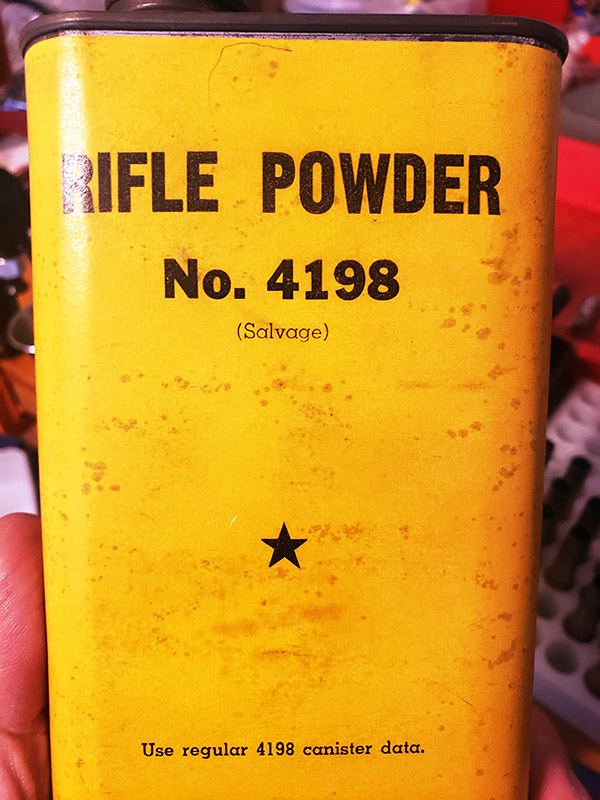
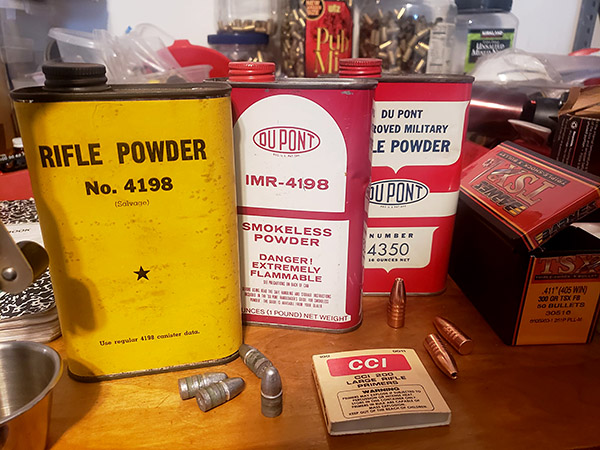
Finally, yesterday morning I decided it was time to resurrect this old rifle! Besides, the project would give me the opportunity to test some old “salvage” Hodgdon 4198 powder I’ve had sitting on the shelf for nearly two decades. The powder is probably from the 1950s or early 1960s. I also had some ancient CCI 200 large rifle primers on hand.
Hodgdon “salvage” 4198 smokeless powder. The powder is probably WW II US Military surplus powder that Hogdon bought in bulk and repackaged in the late 1950s or early 1960s.Vintage components for a vintage cartridge.
I loaded 20 rounds of 405 Winchester ammo using the cast lead bullets and a starting load of 38.5 grains of 4198 and headed down the hill with good friend Yvon to an informal shooting range on BLM land.
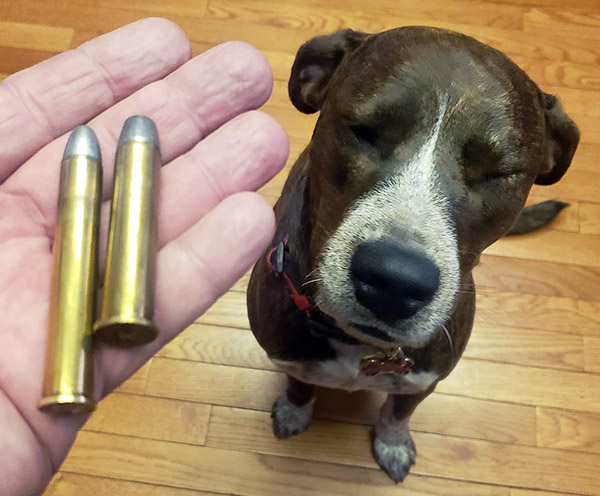
The obsolete 405 Winchester cartridge (left) and the popular 45-70 Government cartridge (right) used by 1880s plains buffalo hunters of the American west. I don’t shoot buffalo and never will. But I enjoy reviving and firing old guns!
Let me say that this Ruger No. 1H Tropical in 405 Winchester lives again. It shoots incredibly tight groups with the cast bullets and gold bead open sights.
My next project will be to develop a non-lead hunting load using the 300 grain Barnes TSX bullets.
Bringing life back into old obsolete rifles can be tons of fun.
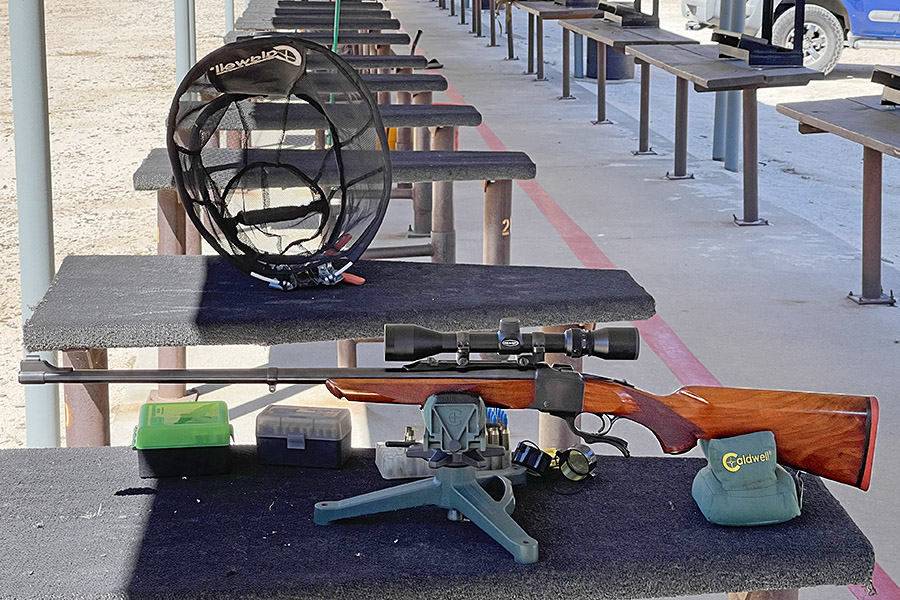
I had a good morning at the West End Gun Club recently. I shot the 6.5 Creedmoor rifles, a .223 Browning Micro Medallion, and Jim Gardner’s powder-coated cast bullets in a 7mm Remington Magnum Ruger No. 1. I might get around to writing about the other rifles, but for today, the focus is on the 7mm Magnum No. 1 and powder-coated cast bullets. I’ve written about shooting 7mm cast bullets in the No. 1 before; those results were mediocre and the barrel leaded enough after five rounds that accuracy went to hell (I had to clean the bore with a bristle brush after ever group). The powder coating Jim applies makes a difference. The Gardner powder-coated bullets did not lead the barrel (at all) and the results were good. I think I’ve finally found a decent cast bullet load for this rifle.
I have had a lot of difficulty making this rifle perform with the powder-coated cast bullets. It was apparent they weren’t leading like my other cast bullets had, but they weren’t very accurate. Neck sizing only, which often improves accuracy, compounded the felony. It didn’t work well at all, mostly because I couldn’t chamber most of the rounds (even though they had been fired in the same 7mm Magnum Ruger No. 1 rifle). I also tried seating the bullets further out, but one got stuck when I chambered a round and when I removed it, the bullet came out of the case and Trail Boss propellant spilled all over the guts of the rifle. That led to it not extracting, so I had to disassemble the action and clean everything. I also tried crimping, but those rounds weren’t any better.
This morning’s batch were full length resized, not trimmed, and not crimped. I flared the case mouth just a tiny bit to let the Gardner powder -coated bullets enter without shaving any of the powder coating or the lead, and I seated them a little deeper so that they did not contact the rifling. When I seated the bullets this time, they expanded the case mouth just enough to eliminate the flare. This batch chambered easily.
I had one round left over from a previous batch, and I fired it first (all shots are and groups discussed here were 50 yards from a rest). That one round was left over because it wouldn’t chamber the previous time I had the rifle out because the case had deformed slightly when I overcrimped it. I had to run that round through the full length resizer (bullet and all, with the decapping pin removed) so it would chamber. It was my first shot of the day and it shot a little to the right (as you can see above). That first group was the biggest group of the morning.
I then shot four more groups, and all the rest grouped nicely.
At 50 yards, these aren’t what I would call amazing groups, but they are getting better and that one half-inch group shows promise. I bought a thousand of the Gardner powder coated bullets, so it’s nice to know I can get then to work. The powder charge was 18 grains of Trail Boss, dispensed (not individually measured). I may go out to a hundred yards on the next outing to see how they perform. But where they are, I’d feel comfortable chasing rabbits with them.
The tricks to this load were full length resizing, no crimp, very slight case mouth flare, 18.0 grains of Trail Boss, Winchester large rifle primers, Remington brass, and a cartridge overall length of 3.127 inches. I’m going to try this load again. The brass is in the tumbler now.
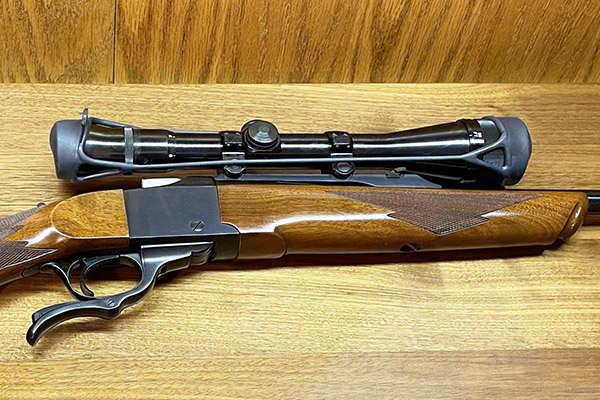
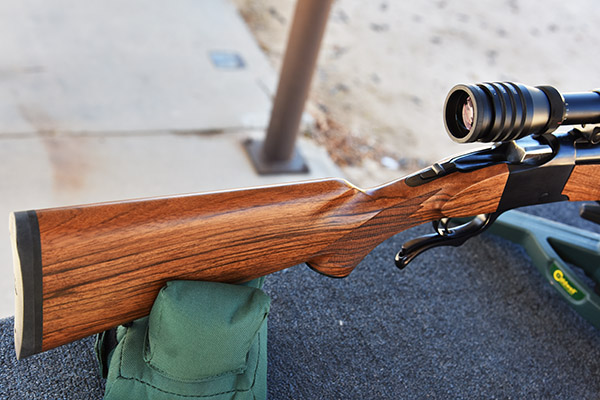
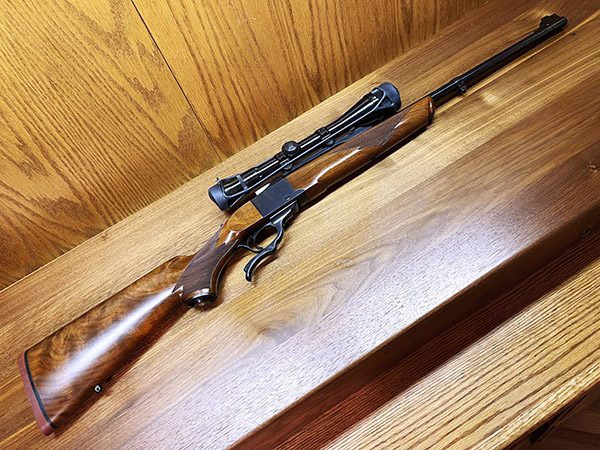
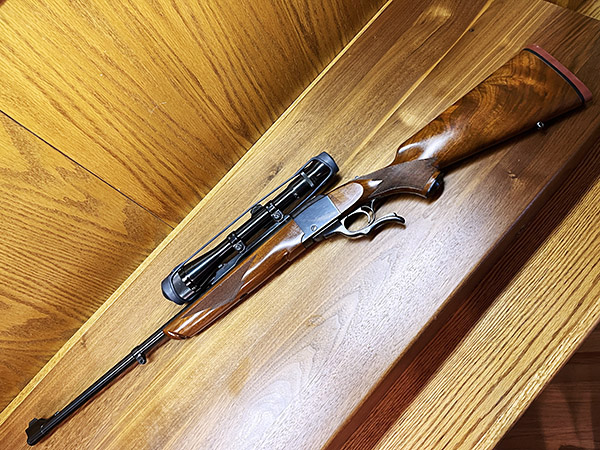
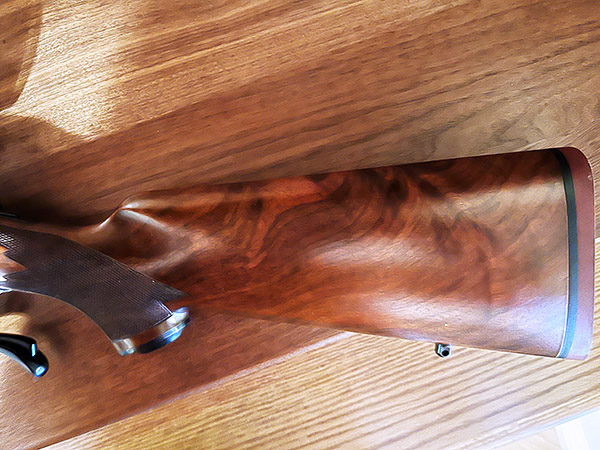
I promised a story on the Ruger No. 1 photo I shared a little while ago and this is it. It’s on my Ruger No. 1 chambered in .257 Weatherby. I’ll try to keep it short, but there’s a lot to this story. The bottom line up front: Ruger’s customer service is among the best in the business. They are one of two companies that all others should emulate (Leupold is the other). Ruger’s No. 1 single shot rifles are the most elegant rifles in the world. That’s a strong statement and you might disagree, but hey, it’s a free country and if you want to disagree, it’s okay by me. Go ahead and be wrong. I know that after seeing the photo at the top of this blog, you have to be wondering if the stock looks as good from the other side. The answer is yes.
The .257 Weatherby No. 1 from the starboard side. Red ped, exotic walnut, and a fabulous cartridge with a laser-like trajectory.
Back to the tale: Ruger has essentially discontinued the No. 1, but that’s okay. Inexpensive and tasteless rifles with black Tupperware stocks are all the rage now and if they float your boat, more power to you. But it’s not me. I own a few Ruger No. 1 rifles and their value has increased tenfold since I started collecting back in the 1970s. Not that I’m interested in selling; that’s not going to happen. I mention the No. 1 rifles’ appreciation just because…well, I’m not sure why. It makes me feel good, and that’s enough.
The .257 Weatherby cartridge. The parent cartridge was the .300 H&H Magnum. Roy Weatherby blew out the case with a rounded bottleneck, trimmed it back a bit, and voila, 4,000 feet per second. The cartridge is also known as the .257 Roy, to honor its creator, Roy Weatherby. Weatherby felt the .257 Weatherby cartridge was his finest creation.Solids made by Barnes work best in the .257 Weatherby. Jacketed bullets can distintegrate in flight due to velocity, aerodynamic heating, and rotational inertia, as evidenced by the tell-tale molten lead spiral seen on this 100-yard target.
The .257 Weatherby cartridge is brilliant. It’s one of the fastest in the world at around 4,000 feet per second, which creates a unique problem: If you do not load with the right projectiles, the bullets travel so fast they tend to disintegrate in flight. The Ruger No. 1 in .257 Roy has a 28-inch barrel (two inches longer than the original Weatherby Mk V rifles in which it debuted back in the 1950s), and that extra two inches bumps the velocity up even more than the fabled round was achieving in its namesake Weatherby rifles (they have 26-inch barrels). The bottom line here is that you almost have to use monolithic (and expensive) Barnes bullets (they are solid copper, not lead sheathed in a copper jacket) to push the bullets at their max velocity without the bullets coming apart in flight. There’s something appealing about that. I like it.
The original Circassian walnut on the Ruger No. 1 wasn’t bad, but it cracked during load development. I wanted something as good on the replacement lumber. The first set didn’t answer the mail for me.Another view of the rifle’s original stock. It looked good. I still have this stock, with a small crack in the wrist.
So, back to the main story. When Ruger first announced their limited run of the No. 1 in .257 Weatherby, I started watching the ads on Gunbroker.com for one with nice wood. It took a little while, but I found one and I pounced. I encountered the bullet disintegration problems mentioned above, I got some good advice from a guy I met on Facebook, and I got the rifle to group under an inch using Barnes monolithic copper bullets. Then while at the range one day I noticed the stock had cracked. My heart was as broken as the Circassian walnut stock, and the rifle went back to Ruger. I told them the story about wanting good wood, and they did their best to oblige. I also told them to make sure the stock was relieved behind the tang, as the first stock (the one that cracked) was not and that was what had caused the stock to split.
When the rifle came back, the stock had been relieved but the inletting and the gap between the receiver and the stock was excessive. The wood was not as good the original set, but it was not bad. The inletting was the real disappointment. I shot it a bit and the rifle grouped well, but it looked ridiculous with the gap around the receiver. I put the gun in the safe and it remained there for a year. Then one night I had a few beers and I wrote an email to Ruger. I wasn’t too complimentary. I told them the story. The beer helped get it all out.
I had an email from Ruger the next morning, and at their request I returned the rifle to them again. A few days later I received an email from a guy in Ruger’s No. 1 shop. He sent a photo of a matched stock and fore end that had just come in, he said. and he told me it was probably the last they would ever receive of this quality. Did I want it? Hell yes, I said. That was followed by another email: What color pad did I want? Red is the more collectible of the two colors (the older Ruger No. 1s had red pads; they switched to a black pad back in the 1980s. Red it would be.
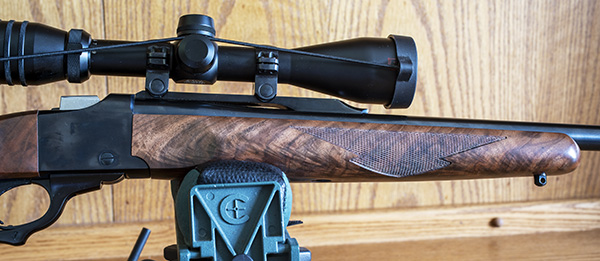
When the restocked Ruger arrived (this rifle had now worn three sets of lumber), I was totally blown away. The wood is exquisite on both sides of the stock and the fore end. I’m pleased with the photos you see here, but trust me on this, they don’t do the wood justice. The fore end matches the stock on both sides. The figure is what stockmakers would grade as XXX and the rifle is just stunning. If there’s such a thing as rifle porn, this is it. And it’s XXX rated.
The Ruger No. 1 fore end on the right side. The fore end and the stock almost certainly came from the same tree.The fore end from the left side.The entire rifle from the right.The entire rifle from the left side. This model is called a No. 1B. It has a standard weight barrel and a beavertail fore end.
So there you have it: Two promises fulfilled. When you buy a Ruger, if you’re not pleased they will make it right. I promised you the story on this amazing set of walnut furniture. And if you are wondering, the answer is no. The rifle is not for sale.
It seems I am the only one of your ExNotes writers not on the road. Joe Gresh rode his resurrected Kawasaki ZRX to Laguna Seca (where he is camping and spectating this weekend), Bobbie Surber rode her Triumph Tiger up to Canada for a Horizons Unlimited event, and Mike Huber is rolling around the Pacific Northwest on his recently repaired BMW GS (presumably headed for the same event as Bobbie in Canada). I need to get out on my Enfield. Soon, my friends, soon.
Me? I’m home, continuing to play with things that go bang. That big photo up above? It’s a Ruger No. 1 in .257 Weatherby, with the best piece of wood I’ve ever seen. Keep an eye on the ExNotes blog; we’ll have a story on how my .257 Roy No. 1 came to wear such exquisite lumber.
Stay tuned; there’s good scribblings coming from all of us.
I know what you’re thinking: This is going to be a blog either for or against conservatives.
Nope. It’s not. We don’t do politics here on ExhaustNotes. This story is about a Ruger No. 1 that shot far to the right and how I fixed it. If you want politics, watch the news or pick up a newspaper and take in what passes for journalism these days.
This is ExhaustNotes. We’re pure. All we care about are good stories and you clicking on the popup ads.
One of my good buddies bought a very slightly used Ruger No. 1 several years ago (it appeared to be unused) after hearing me rave about how classy these rifles are. It’s the one you see in the photo at the top of this blog. This Ruger No. 1 is particularly desirable. It is chambered in .22 250 (a wonderful cartridge), it has fantastic wood, it is an early production model (the serial number dates it to 1971), it has the early style checkering pattern, it has a red pad, and it is a pre-warning gun. My buddy and I both bought Ruger No. 1 rifles that day. His was the .22 250 you see here, and I bought one chambered in .22 Hornet.
Highly-figured walnut, a red ped, and old style checkering…it doesn’t get any better than this.
Both the .22 250 and the .22 hornet are stellar cartridges, but the .22 250 holds a special place in my heart. The first Ruger No. 1 I ever saw was in a sporting goods store in Bound Brook, New Jersey, and it was chambered in .22 250. The Ruger No. 1 had only recently been introduced, and my father really wanted the one we saw that day. Like all Ruger No. 1 rifles it was elegant, and as a varmint hunter Dad was in love with the .22 250. We didn’t get it, but seeing how excited Dad was left me with a lifelong appreciation for any Ruger No. 1 and the .22 250 cartridge.
The flip side.A close up of the original Ruger No. 1 checkering pattern.
So my friend bought the .22 250 (as I mentioned above) but on our first trip to the range his .22 250 was a disappointment. It shot way to the right at 50 yards, even with the scope’s adjustment all the way to the left. It was a frustrating day for him. My buddy removed the scope rings and found that one of them had been bubba’d (the victim of incompetent gunsmithing). It had been crudely filed in an apparent attempt to get the rifle on target. Bubba (the guy who did the work) didn’t understand what he was doing (or how Ruger’s ring design worked) because the material he had removed didn’t shift the scope alignment with the bore (if ignorance is bliss, Bubba was indeed a happy guy). My friend bought a new set of Ruger scope rings and remounted the scope. It made no difference; the rifle still shot far to the right. I was starting to understand why the rifle looked like new. Whoever owned it before encountered the rifle’s bias to the right, couldn’t fix it, and gave up on it.
Resized, polished, and trimmed .22-250 brass waiting for powder and bullets. This is a great cartridge.
At that point, my friend lost interest in the rifle, too, and I picked it up from him. It made for an interesting project. I put a different scope on the rifle (a Leupold I had used on other rifles), but the problem was not the scope. The rifle still shot way to the right.
Help us bring more content to you: Please click on the popup ads!
In the past when I had encountered this problem, it had always been due to poor forearm bedding. I closely examined the Ruger and determined that the rear of the forearm had clearance between the forearm and the receiver on the right side, but it was contacting the receiver on the left side. That would push the barrel to the right, and it could cause the strong rightward bias this rifle exhibited. You’d be surprised; it doesn’t take much pressure on a rifle barrel to push the point of impact significantly off center. I removed the forearm, delicately sanded it at the rear to have the same forearm-to-receiver clearance on both sides, and remounted it. At the next range session, I saw that my efforts had no impact. The rifle still printed far to the right and the group size was running 2 ½ to 3 inches at 100 yards. It was terrible.
A closeup photo showing intimate contact between the rear of the forearm and the front of the receiver on the left side. On the right, there was clearance. This could have been the cause of the problem, but it wasn’t.
I next tried shimming the scope. Using thin metal shims, I angled the scope enough in its rings to get its range of adjustment on target. But I still had to have the scope cranked all the way to the left, and the rifle still grouped poorly. The scope shims were a Mickey Mouse, Bandaid approach. I knew this wasn’t the solution.
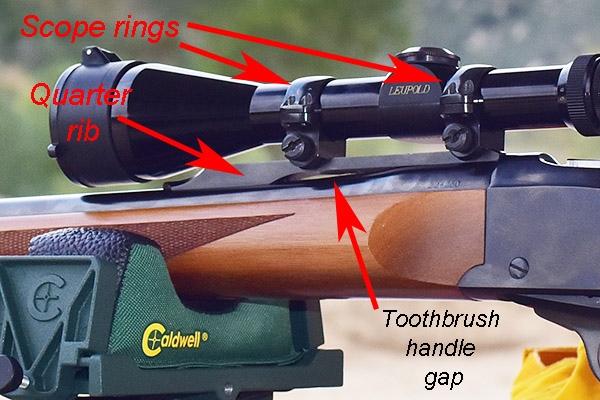
Sometimes when you can’t find the answer to a problem, the best thing to do is ignore it for a while. I put the rifle in the safe and forgot about it for a few weeks. Then one day when I was driving back from one of our adventures, my mind drifted back to the Ruger. The Ruger No. 1 has a very slick quarter rib at the top rear of the barrel. The scope rings attach to it, and the scope mounts in those rings. I wondered: What if that rib was mounted at an angle to the barrel’s bore? The solution, I thought, might be a new quarter rib.
I called Ruger’s customer service (a marvelously responsive organization) and told them about my problem and that I thought I needed a new quarter rib. A few days later, I had one. At that point, things became even more interesting. The older Ruger No. 1 rifles (including my .22 250) had quarter ribs that mounted with two Allen-head screws, and the barrel had a pin that fit into a hole in the quarter rib. The quarter rib Ruger had just sent to me had two holes for the mounting screws, but no hole for the pin on the barrel. I thought about that and it made sense; the barrel pin was a belt-and-suspenders feature and it was unnecessary. Ruger made the right engineering decision to eliminate it. I thought I could just drill a hole in the new quarter rib or I could pull the pin from the barrel. I would soon learn that neither one of these solutions was going to happen.
My first step was to remove the Ruger’s quarter rib. That’s when the fun began. As I mentioned earlier, the quarter rib is secured to the barrel with two Allenhead screws. The problem I immediately ran into was that the Allen socket is very small, and those screws were originally installed with a lot of torque. I put a small Allen wrench on each screw and both wouldn’t budge. I had an Allen socket head and a ratchet that would give me more leverage, but the screws were so secure I was afraid I would round out their Allen sockets trying to remove them. I was getting nowhere with the little Allen wrench. In for a penny, in for a pound, I thought. I mounted the Allen socket on my ratchet and, with great trepidation, starting putting more torque on each screw. It worked. Both screws came out with their Allen heads intact. They hadn’t been Loctited; they were just torqued by a madman (or a madwomen), or more likely, somebody at Ruger with a power tool.
The Ruger No. 1 scope mounting system.
Okay, the screws were out, so I thought I could now remove the quarter rib. “Thought” is the operative word in that sentence. That quarter rib wasn’t going anywhere. It was wedged onto the barrel like it was welded. There is a small gap between the bottom of the quarter rib and the top of the barrel (you can see it in the photo above), but I didn’t want to stick a screwdriver in there to pry the quarter rib off. It would have scarred the barrel or the quarter rib or both. I needed something softer that wouldn’t mar the barrel or the quarter rib.
If you’re like me, you save old toothbrushes and use them when cleaning your guns. I thought I could use one of mine. Its plastic handle wouldn’t damage anything. The toothbrush handle was too thick to fit in the gap, so I filed it down to create a wedge. That got the handle in between the quarter rib and the barrel, but the quarter rib wasn’t going anyplace. I worked on it for 20 minutes until I broke the toothbrush handle in two. So I filed down another toothbrush handle. Three modified toothbrushes and an hour later, the Ruger’s quarter rib came off.
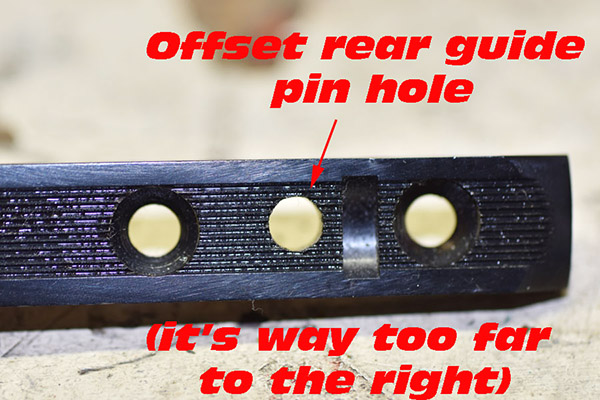
My initial thought was that what had made the rib so hard to remove was that its rear was interfering with the front of the receiver. That was sort of the issue, but it wasn’t induced by the quarter rib’s length or the receiver’s dimensions. I looked closely at the quarter rib and then I was really surprised. The hole for the barrel pin was off center. By a lot. Wow, I thought. That would certainly push the barrel to one side. It was what had been causing the rifle to shoot way to the right. It was a subtle anomaly. Who would have thought this had been the problem?
Whoa…something slipped while this part was being machined!
I was surprised that Ruger was able to assemble the rifle, but then I remembered what I had thought about earlier. Ruger probably used a powered screwdriver when installing the quarter rib’s Allen screws, and the technician who assembled the rifle probably did not notice the increased torque required to install the screws. The conversion of screw torque to linear force is extreme; I once participated in a fatality investigation where an operator sheared a munitions safety pin screwing on a submunition parachute without realizing what he had done (and the device detonated). But I digress; back to the Ruger story.
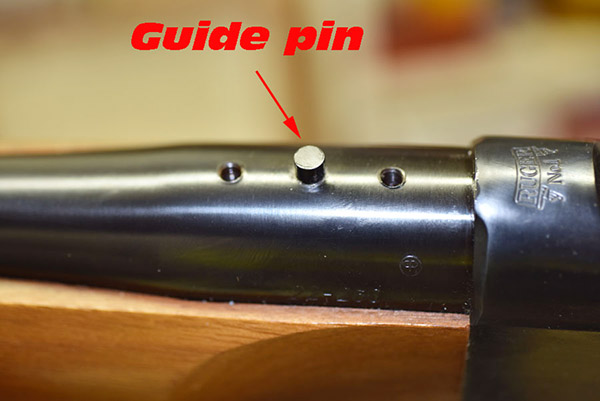
Older Ruger No. 1 rifles used a guide pin on the barrel. This was an unnecessary feature and it was later eliminated.
I examined the barrel pin (the pin that fit into the barrel to help locate the quarter rib). It was a press fit in the barrel, and it was obvious it wasn’t going any place. I thought about trying to pull it out with a pair of visegrips, but again, I didn’t want to bubba up this beautiful rifle. That meant I wasn’t going to use the new quarter rib Ruger had sent to me. When I tried to put the old quarter rib back on the barrel, the misalignment between the barrel rib hole and the screw holes was obvious. After thinking about this a bit (and realizing the barrel pin was unnecessary), I concluded that the best fix would be to simply enlarge the offset rib hole so that it allowed clearance between the barrel pin and the quarter rib hole.
I took a small circular file to the quarter rib hole and got nowhere fast. The quarter rib had been hardened to about two million on the Rockwell C scale. To enlarge the hole, I would have to grind it. I mounted a small rotary stone on my Dremel tool and went to work like a demented dentist. It took a while, but I finally enlarged the hole enough so that the quarter rib and its mounting screws could be installed and removed from the barrel easily. I used cold blue to blue the quarter rib’s hole inside diameter (where I had removed material), remounted the quarter rib, reinstalled the Ruger scope rings, remounted the scope, and headed to the West End Gun Club.
Three-shot groups at 100 yards. This is a very accurate rifle.
The trip to the range was extremely satisfying. The rifle’s extreme right bias completely disappeared, and after a few adjustment shots, the holes on the target were in the black. More surprisingly, the Ruger’s groups shrank dramatically. The No. 1 had been a 2 ½ to 3 minute of angle shooter before I corrected the quarter rib mounting issue; now it was a sub-MOA rifle. Life was (and still is) good. I love my Ruger No. 1 rifles, and I especially love this .22 250. I have two other Rugers chambered in .22 250. One is an unfired 200th year No. 1 with even better walnut (see below). The other is a tang safety Model 77 with the heavy varmint barrel (also see below). I could be talked into selling these two rifles, but not the .22 250 featured in this blog. I’m keeping that one for the duration.
My other .22 250 No. 1. It’s unfired. Nice wood, wouldn’t you say?A Model 77V tang safety. It’s a pre-warning, heavy barreled .22 250 that is extremely accurate.
The .35 Whelen is an interesting cartridge. A wildcat formed by necking .30 06 brass up to .35 caliber, it’s been called the poor man’s .375 H&H, but the price of ammo would suggest it’s anything but a poor man’s cartridge. A box of 20 factory rounds when I checked just a few minutes ago ranged from a low of $50 to a high of $72. For 20 rounds? Gimme a break!
My .35 Whelen Ruger No. 1. They didn’t make too many of these and mine has exceptional Circassian walnut. It’s not for sale.
I like to shoot, but I’m a cheap SOB and truth be told, I don’t like beating my self up with factory .35 Whelen recoil. Roll that up with the good luck I’ve been having with good buddy Ralph’s Boudreau Bullets in several handguns and I wondered: Could I have Ralph make .35 caliber powder-coated pistol bullets sized to .359 inches? You see, cast pistol bullets for the .38 Special or .357 Mag are ordinarily sized to .358 inches (the sizing operation occurs after the bullets are cast when they are swaged down to the desired diameter). But .358-inch diameter bullets probably wouldn’t work in the Whelen. The .35 Whelen rifle has a bore of .359 and shooting bullets sized to .358 would allow the propellant gases to escape around the bullet as it traveled down the barrel. That would melt the sides of the bullet and create God-awful leading. A tighter fit (with .359 bullets) ought to work better, and powder-coated cast pistol bullets are inexpensive. Inexpensive is good. Did I mention I’m a cheap SOB?
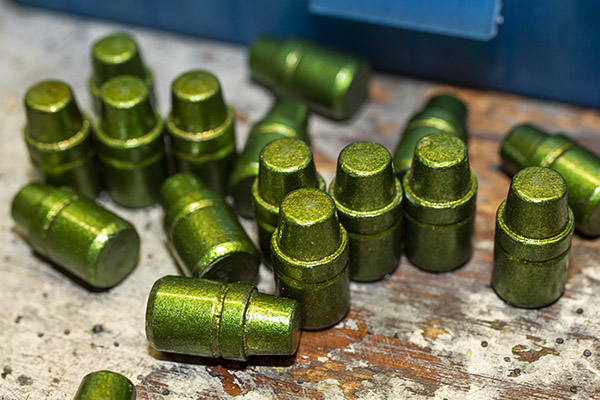
Boudreau 158-grain powder-coated pistol bullets with candy apple green powder coating. These are sized to .359.
I’ve loaded jacketed pistol bullets in the .35 Whelen before, I’ve loaded cast pistol bullets, and I’ve also loaded cast rifle bullets from Montana Bullet Works. The Montana bullets are great and the Whelen performed well with them. The jacketed pistol bullets worked well. The cast pistol bullets I tried before didn’t work well (you can read about that here). The premium cast Montana Bullet Works bullets are not cheap (nor should they be). I wanted something inexpensive so that I could play with the Whelen at recoil levels comparable to a .22. Maybe Ralph’s powder-coated pistol bullets would work.
Montana Bullet Works cast rifle bullets. These are very accurate, but they cost as much as jacketed rifle bullets.
Ralph obliged, and when my .359 158-grain cast semi-wadcutters arrived, the fun began. I did my research on the Internet about what loads other folks had used with cast pistol bullets in the .35 Whelen, or at least I attempted to. Like everything else on the Internet, opinions were all over the map.
I make .35 Whelen brass from older .30 06 brass that I had already reloaded a few times by running the cases through a .35 Whelen full length resizer. Not every case survived the neck expanding operation.Loaded .35 Whelen ammunition with Boudreau’s 158-grain powder-coated bullets. Later loads seated the bullets out further for an overall cartridge length of 2.910 inches. I don’t use a crimp on these bullets and I neck size only.
I initially went with what one forum commenter fervently quoted: Low charges of Trail Boss were the way to go with 158-grain cast bullets. He was wrong, as least as far as my Ruger No. 1 is concerned. I tried 13.0 grains and the groups at 50 yards were (no kidding) about a foot in diameter. This might be okay for a shotgun, but not a rifle. The groups were lousy, but I noticed that the bore was clean. Ralph’s powder coating, which had worked well in keeping a handgun bore clean, worked well in the longer rifle barrel as well.
These groups were typical of all loads tried (except the last one).A nice clean bore with Trail Boss powder. There was no leading.
I next tried Unique propellant (first with 13.0 grains, and then with 15.0 grains), which had worked well for me in the past in a variety of cast rifle loads for other cartridges. Nope, both of these loads shot lousy groups, too, and they leaded the bore way more than Trail Boss. Trail Boss is actually a faster powder than Unique, so the slower-burning Unique was driving the bullets to higher velocities.
Bore leading with Unique. This stuff doesn’t dissolve with Hoppe’s or any other commonly-used bore solvent. You’ve got to scrub it out with a bore brush.
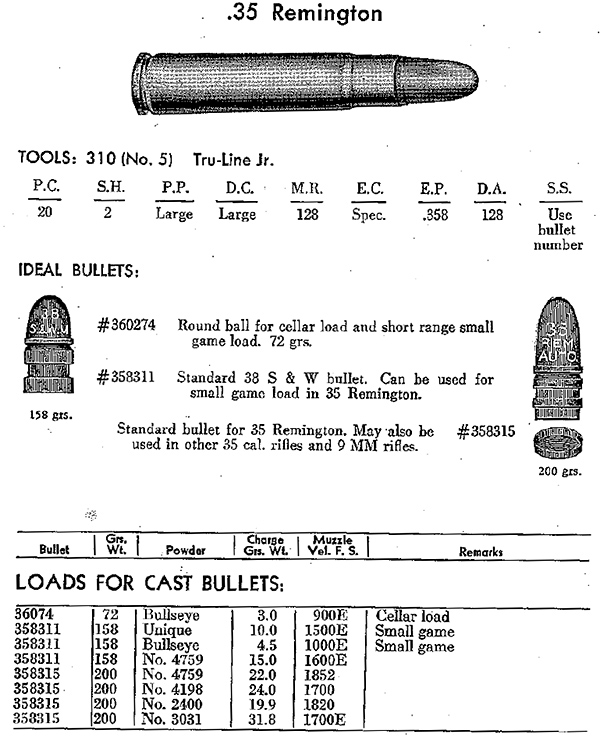
Then it was on to Bullseye. I found a few references to these loads in various forum comments, but Bullseye is a dicey powder and I wanted a better load data source than some yahoo on a gun forum. I hit paydirt when I found an old Ideal reloading manual and it had a Bullseye load for the .35 Remington (the .35 Whelen was still a wildcat cartridge when this manual was published and there was no load data for it). I figured with the .35 Whelen’s bullet weight and case volume, I wouldn’t get into trouble using the .35 Remington load. I tried it and I tried a few others with a bit more powder (there were no pressure signs), but nope, it was not to be. I still had terrible groups at 50 yards.
Loads from an old Ideal reloading manual. It was a place to start.Bullseye loads in the .35 Whelen produced no leading.
Hmmmm. Maybe it’s a powder position thing, I wondered. I called Ralph at Boudreau’s Bullets and chatted with him. Ralph explained that when the powder doesn’t fill the case, powder position makes a huge difference in accuracy even in a 9mm pistol cartridge. Okay, I can fix that, I thought. So after loading my brass again with the same light Bullseye loads, I inserted a cleaning patch in each cartridge to hold the powder up against the primer. Still no cigar, though: The groups remained stuck on atrocious. It was cool, however, seeing the cleaning patch threads dissipate downrange in the scope after each shot. One good thing that came out of the Bullseye loads was that they didn’t lead the bore. Well, maybe two good things: I didn’t blow myself up. Okay, three good things: None of the bullets stuck in the bore.
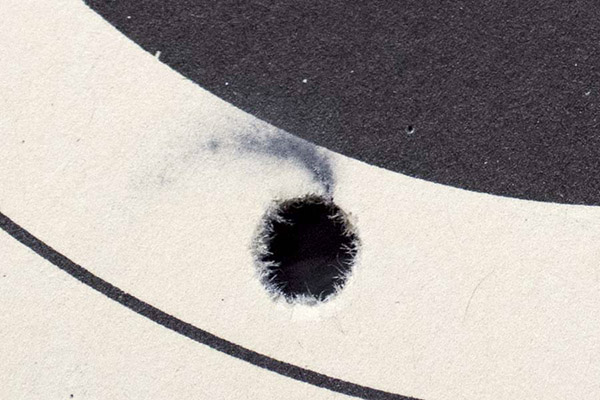
I was just about ready to give up trying to make the powder-coated .359 Boudreau bullets work in the Whelen when my mind returned to the powder position question. Okay, I thought, the cleaning patch wad trick (a noble thought) was a bust. But Trail Boss might still be the way to go, even though the lighter load wouldn’t group. Those earlier 13.0-grain Trail Boss loads left a lot of unoccupied space in the case. The beauty of Trail Boss is that you can load all the way up to the bullet base (thereby completely eliminating the powder position issue, as the case will be full) without overpressurizing the cartridge. So that’s what I did. I measured where the base of the bullet would be at a cartridge overall length of 2.910 inches and I filled a case to that level with Trail Boss. The magic number was 19.3 grains. I adjusted my powder dispenser and went to work.
19.3 grains of Trail Boss powder in my RCBS powder scale. The powder flakes look like little Cheerios.19.3 grains of Trail Boss in the .35 Whelen cases. The powder stack just touches the bullet base. The propellant is held in place and it provides a nice, even, repeatable burn.
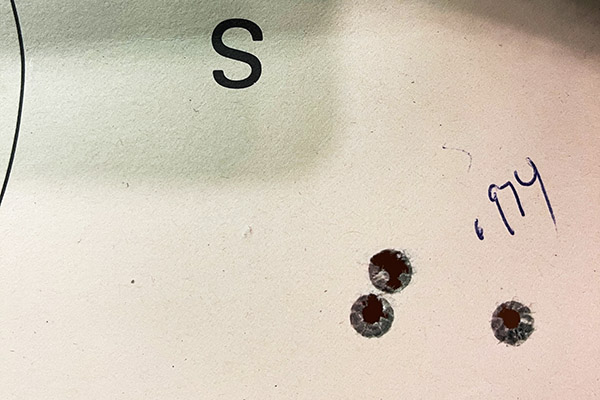
The next day I was on the range at the West End Gun Club. I’d been reading more forum posts about 158-grain semi-wadcutter bullets in .35 Whelen and the feel I got from them was that most people were shooting at 25 yards. You know, turning a grizzly bear rifle into a close-range gopher grabber. Okay, that’s an old reloaders trick: You want tighter groups, just move the target closer. So for the first six of my 19.3-grain Trail Boss loads, I shot at a 25-yard target and wowee: Finally, a group!
19.3 grains of Trail Boss and the 158-grain Boudreau powder-coated bullets at 25 yards.
It wasn’t a great group (I’ve shot tighter groups at 25 yards with a handgun), but it was a group. It was a clear indication I was on to something. So I next set up a target at 50 yards.
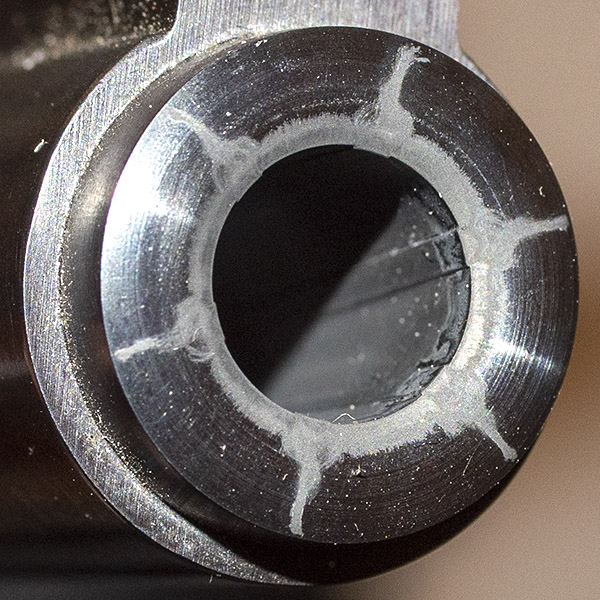
The same 19.3 grains of Trail Boss at 50 yards. I can’t explain that flyer off to the right. But the other five rounds were looking better. More work is necessary. I have a path forward.
That group was gratifying. I can’t explain the one flyer off to the right (the trigger broke cleanly on that shot and it felt like it should have grouped with the others…maybe it hit a fly on the way to the target). The other five shots went into a group about the size of the bullseye, but biased to the right. That’s one thing I noticed with all of these light loads: They shoot to the right.
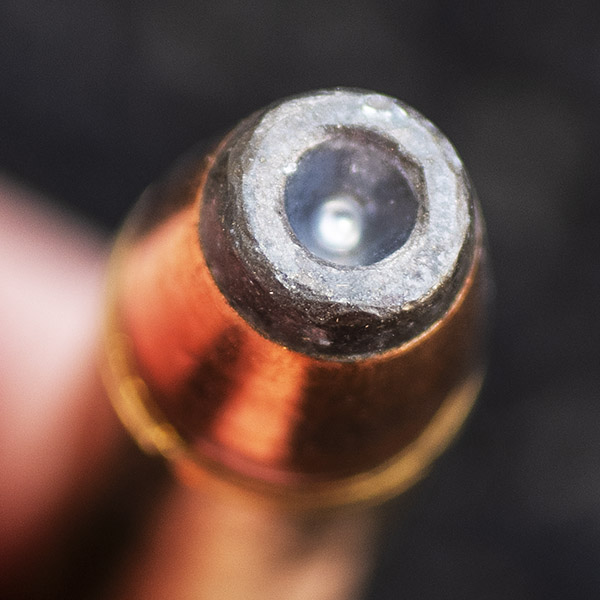
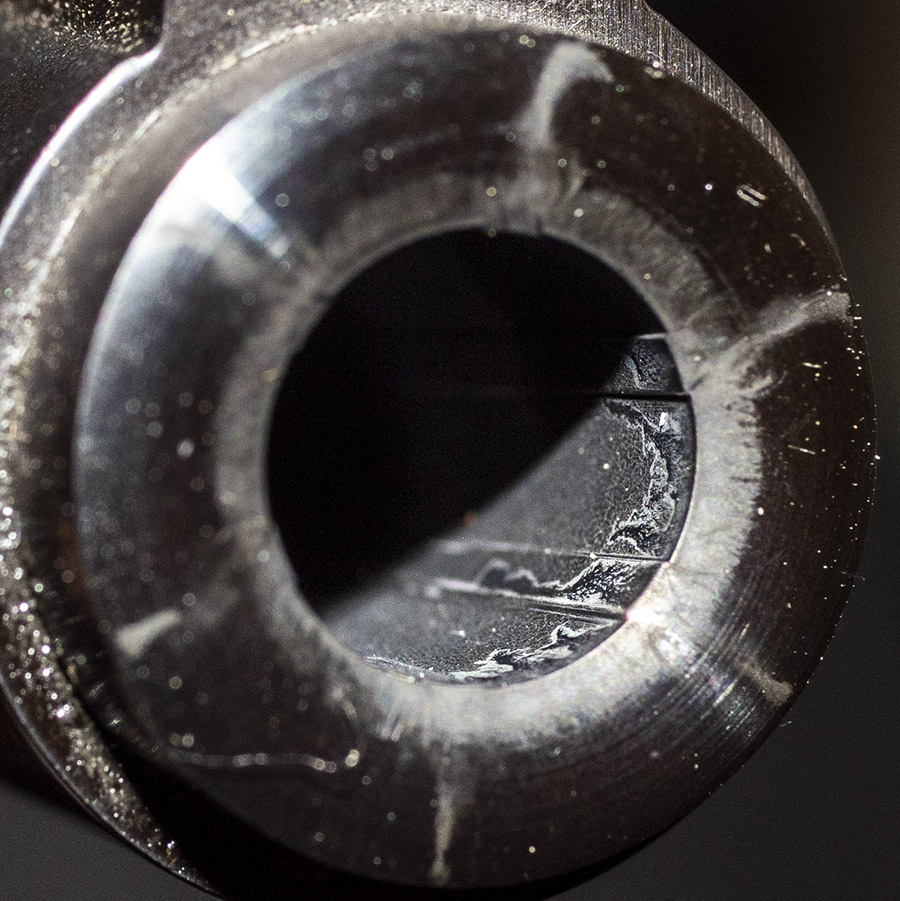
When I returned home, I photographed the muzzle. It’s the photo at the top of this blog. I was pleased to see how clean it was. It had the same appearance as occurred before with 13.0 grains of Trail Boss. There was a kind of swirly thing going on near the muzzle inside the bore; I think that is a combination of melted lead and powder-coating paint behind the bullet as it exits the bore. The rifling was clean, as in no lead.
There are a few more things I should mention: When you’re loading at these reduced levels, the brass doesn’t really expand or stretch. Neck sizing works just fine. Also, when you’re loading cast bullets, you have to flare the brass case’s mouth (I use a Lee tool for this) so that the bullet can get an easy start into the case. If you don’t flare the case, you’ll shave the powder coating and lead off the sides of the bullet, both of which will degrade accuracy. And one more note…you’ll see in these photos that I seat the bullets pretty far out for an overall cartridge length of 2.910 inches. The bullets are not contacting the rifling at that length, and there’s enough of the bullet in the case to keep it aligned. I’m not worried about setback (the bullets moving under recoil) because the Ruger No. 1 is a single-shot rifle.
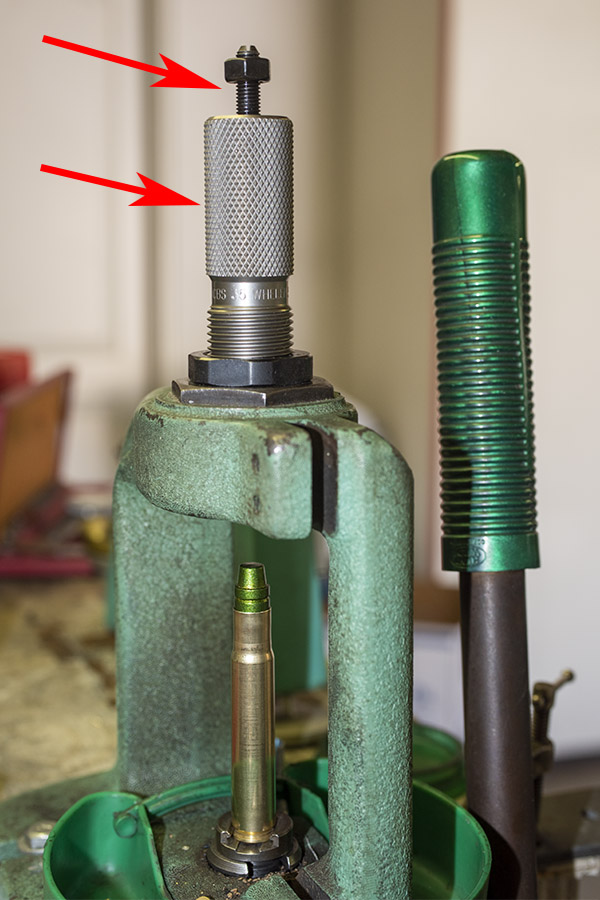
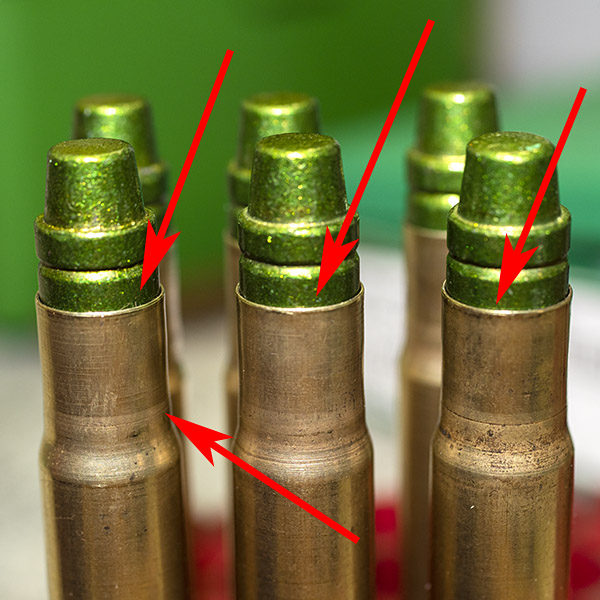
The gray arrows point to a very slight flare. You have to flare the cases before seating the bullets or the case will shave the bullet as it is inserted into the cartridge case.The bullet seating and crimping die in my RCBS Rockchucker press. Seating and crimping are performed in two separate steps.
After I seat all the bullets to the correct depth, I then back way off on the bullet seater (again, denoted by the upper arrow in the above photograph). I’ll next screw in the die body (denoted by the lower arrow) until the reduced crimping radius in the die body interior contacts the mouth of the cartridge. At that point, I’ll adjust the die by screwing it in just a little bit further. What I’m doing is adjusting the die so that it removes the flare, but does not crimp the case mouth. You can see the results (i.e., the case mouth flare removed) noted by the red arrows in the photo below.
The upper arrows show the case mouth after the crimping die has removed the case mouth flare. These are not crimped; I adjusted the die to just remove the flare. The lower red arrow indicates the depth to wihch I neck sized these cases.
Back to the cost issue: As you read at the start of this blog, a box of 20 rounds of .35 Whelen factory ammo goes for anywhere between $50 and $72. By my computations, the reloads you read about here cost under $6 for a box of 20 rounds.
So what’s next? Well, the brass is in the tumbler and I’m going to load more. Same load, which kicks about like a .22. Then I’ll try reducing the load slightly to see if that improves things. Stay tuned; you’ll be able to read all about it right here on the ExNotes blog.
I’ve been a Ruger No. 1 fan for close to 50 years. It started with one I’ve written about before, and that is a Ruger No. 1A chambered in the awesome .30 06 Government cartridge. I’ve spent time on the range and I’ve hunted with this rifle, and it is probably my all-time favorite firearm.
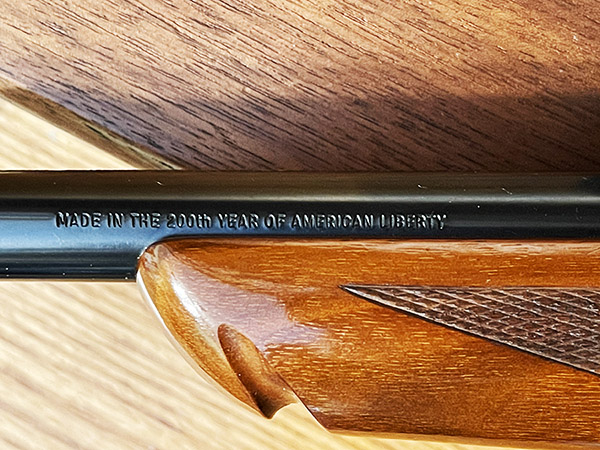
What attracted me to the No. 1 was my father’s fascination with the rifle (he never owned one, but he wanted to), the beautiful and exquisitely figured walnut Ruger used on these rifles, and their style. To me, they just look right. My fixation started in 1976. Ruger roll-stamped every firearm they manufactured with “Made in the 200th Year of American Liberty” that year.
Rugers with this roll-marked stamp are known as Liberty or Bicentennial guns.Like I said, the walnut on my Ruger .30 06 is exquisite on both sides.As I said, the highly-figured walnut is exquisite on both sides of this .30 06.
The Ruger No. 1 came in different configurations, and the ones you see here are what Ruger called the 1A. They had 22-inch barrels, iron sights, and the Alex Henry fore end (that’s the fore end with the notch at the front). There are all sorts of suppositions about what why the notch was originally included on the Farquharson rifles that influenced the Ruger No. 1 design, but no one seems to know for sure. I just like the look of the thing. To me, these rifles are elegant. They’re not particularly light, but they’re short and it’s easy to get around in the woods with one. Back in the day, I bought a straight 4X Redfield scope and a still prefer a 4X non-variable scope for hunting (even though it’s tough to find one these days; high-powered variable scopes are all the rage).
Those west Texas days back in the ’70s were good. We spent a lot of time (essentially every weekend) out in the desert north of Fabens chasing jackrabbits and coyotes, and the No. 1 you see here sent a lot of those critters to the Promised Land. Jackrabbits were grand fun. It was hard to believe how big some of them were.
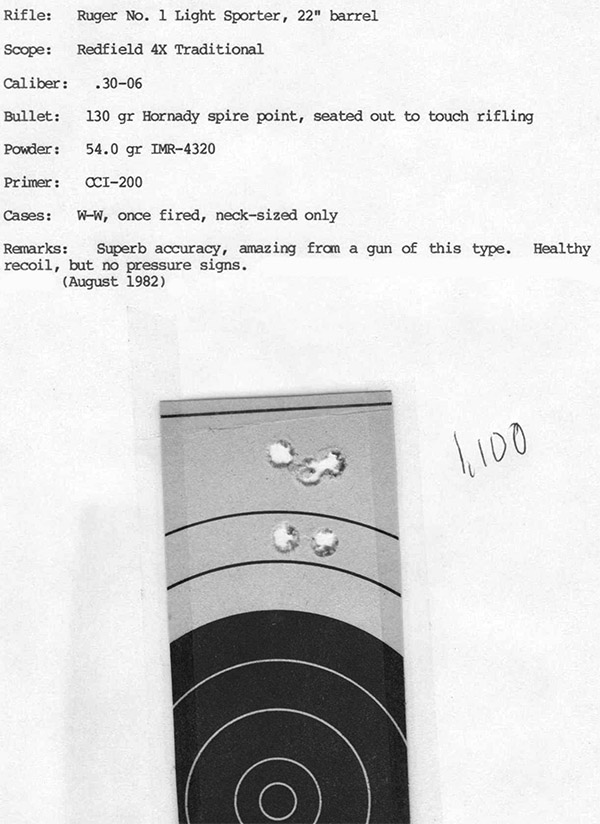
The accuracy load for my .30 06 No. 1 is the 130-grain Hornady jacketed softpoint bullet over a max load of IMR 4320 propellant. IMR 4320 is no longer in production, but I’ve got about 10 pounds of it so I’m good for a while. The rifle will put that load into an inch at 100 yards all day long, and the 130 grain Hornady bullet seems to be perfect for jackrabbits. Yeah, I know, that’s maybe a little more power than needed for Peter Cottontail, but hey, like Donald Rumsfeld used to say: You go to war with the army you have.
Gee whiz…a group I shot 40 years ago!
The .30 06 also does well with other loads. I was on the range with the ammo I had on hand a week or so ago with heavier bullets and I was pleased with the results. I tried 180 grain Remington bullets loaded on top of 48.0 grains of IMR 4064. Those loads shot low and had perceptibly heavier recoil, but they grouped under an inch at 100 yards.
Three shots at 100 yards with the Ruger .30 06 No. 1A. The load was the 180 grain Remington jacketed soft point bullet and 48.0 grains of IMR 4064, with military brass and a CCI 200 primer.
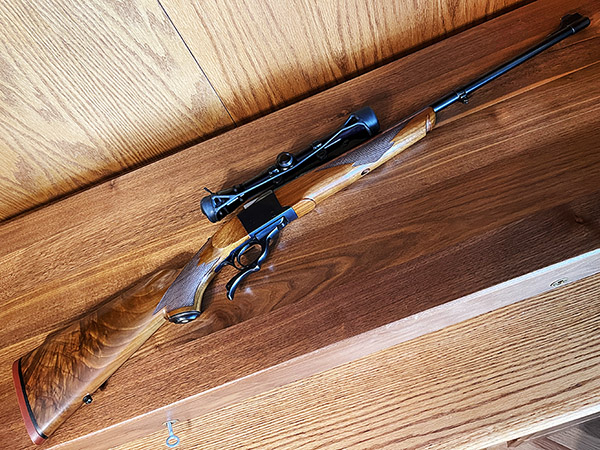
The title of this blog is A Tale of Two Bicentennial No. 1 Rugers, and that brings us to the second rifle. I was in Ohio on a secret mission about 15 years ago and the guy I visited there learned of my interest in guns. He took me to a local shop that only sold through an online auction (that was the gunshop’s business model). When we arrived, I quickly noticed another Ruger No. 1A, this time chambered in .243 Winchester. It was a bicentennial rifle, it looked to be a near twin to my .30 06 1A, and I had to have it. I tried to buy it while I was there and have shipped to my FFL holder in California, but the owner confirmed what my friend told me…I had to bid on it at auction. I did, and I won the auction at $650. Bear in mind that these rifles’ list price in 1976 was $265, and they typically sold at $239 back then. If you think I got scalped, think again. I won the auction, and the MSRP on these rifles today is something around $2,000. And the ones made back in the 1970s are, in my opinion, of much higher quality in terms of walnut figure, checkering, and other attributes.
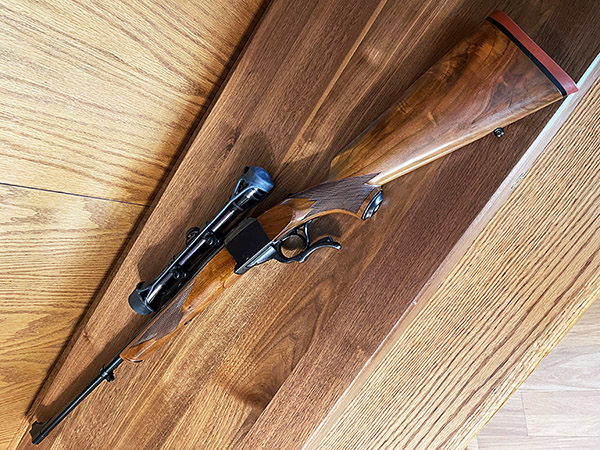
A .243 Winchester Ruger No. 1. It wears a period correct El Paso Weaver 4×12 telescopic sight.The left side of the .243 No. 1.Ruger used to put fancy walnut on the No. 1 rifles. Today, not so much.A fancy walnut, red pad Ruger No. 1. Sweet!Like the .30 06 No. 1 featured above, this .243 is also a Liberty gun.
Most recently, good buddy John gave me a bunch of assorted brass and I started loading bits and pieces of it. I loaded the .30 40 Krag and wrote about it a week or so ago. There were a few pieces of .243 Winchester brass and that had me thinking about the .243 No. 1 in this blog. You see, I bought that rifle, stuck it in the safe, and never fired it. That was a character flaw I knew I needed to address.
I thought I had a set of .243 dies, but I was surprised to find I did not. I had some ammo, so I guess at some point I had .243 dies. I bought a new set of Lee dies, and I already had some .243 bullets. And as it turns out, the Lyman reloading manual lists IMR 4350 as the accuracy load for 60 grain bullets, and I had some. I only loaded six rounds (using the brass John gave to me), and I thought I needed to buy .243 brass (everybody is sold out of .243 brass right now). Then I started poking around in my brass drawer and it turns out I have five boxes of new Winchester 243 brass. I swear I’m gonna find Jimmy Hoffa or an honest politician in my components storage area one of these days.
The Tula factory ammo I had didn’t shoot worth a damn. Tula is cheap ammo, this stuff was old, and it grouped around 2.9 to 3.5 inches at 100 yards. I also had some very old reloads that had 100 grain Sierra bullets and 34.0 grains of IMR 4064, and it did only marginally better. The six rounds I loaded myself with the brass good buddy John provided was better. At least I think it was better. I used 65 grain Hornady V-Max bullets and 43.2 grains of IMR 4350 powder. I had one good group and one lousy group. But hey, Rome wasn’t built in a day, and I’m just getting started. I’ll buy some heavier 6mm bullets (.243 is 6mm), I’ll try them with a few different loads, and you’ll get to read about it here on the ExNotes blog.
More stories on Ruger single-shot rifles (the No. 1 and the No. 3) are here.
I am a fan of both the No. 1 and the No. 3 Ruger single shot rifles. The No. 1 is the more elegant rifle with a fancier lever, a pistol grip stock, checkering, a rubber shoulder pad, a slick quarter rib, fancier walnut, and more. The No.3 was the economy version without checkering, plain walnut, an aluminum (and later plastic) shoulder pad, and a no frills look. When I started collecting these rifles in 1976, the No. 1 was chambered in contemporary cartridges and priced at $265. The No. 3 came in classic chamberings; in 1976 that included .22 Hornet, .30-40 Krag, and .45-70. Ruger listed the No. 3 at $165, and you could buy them all day long for $139. Which I did. In 1976, I bought No. 3 rifles in all three chamberings. All had the “Made in the 200th Year of American Liberty” inscription.
Take a look at the finish on this Ruger No. 3. It’s better than how they came from the factory.
I was younger and dumber in those days, and I stupidly sold all three rifles within a year of purchasing them. The Hornet went to Army buddy Jim, the .45-70 went to another Army buddy also named Jim, and the .30-40 was traded for something else I can’t remember. If you’re reading this blog, you realize the phrase “stupidly sold” is redundant. We have all sold guns we wish we kept.
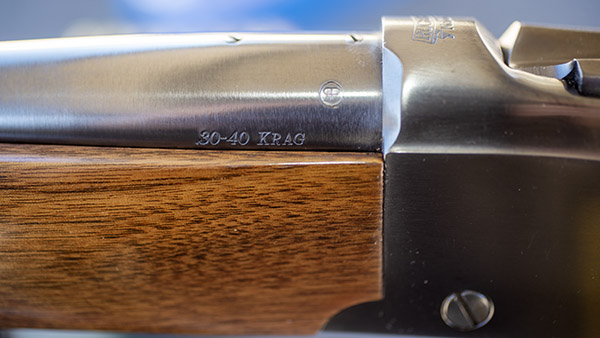
Ruger has to have one of the best fonts ever for chambering designation.
I wanted to undo the wrong I did, and about 15 years ago I started a search to replace my No. 3 rifles. The .45-70 was the easiest to find and the .22 Hornet followed shortly thereafter. The prices had gone up (used, they were going for about $650-$700 back then). The .30-40 Krag was tougher to find. I’m assuming it was because Ruger made fewer of them. Then I spotted something I had to have: An unfired .30-40 No. 3 advertised on Gunbroker, and it had significantly nicer wood then No. 3 rifles typically have. I had to own it and I paid top dollar. When I called the shop, I used my American Express card instead of a certified check because I was eager to get it. I had to pay a 4% premium, but that turned out to be a good thing (more on that in a second).
Unusually highly-figured walnut on a No. 3 Ruger.
The shop that sold it to me did something stupid. They shipped the rifle in the original box with no additional padding and they didn’t insure it. You could get away with shipping a No. 1 Ruger in the original box, as they were stout and contained big pieces of foam padding. The No. 3 had a flimsy cardboard box in keeping with the No. 3’s lower price. You can guess where this story is going.
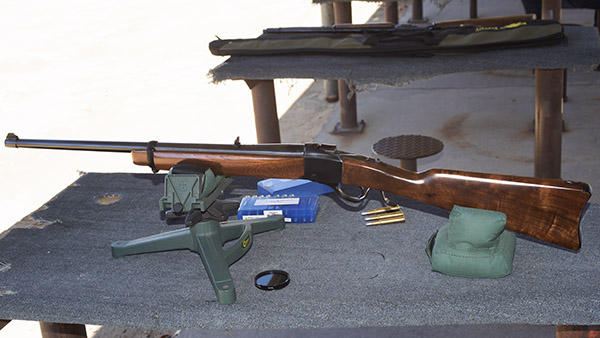
A view of the No. 3’s port side at the West End Gun Club.
Yep, the rifle arrived with the stock broken at the wrist. Wow. The wood was as beautiful as it looked in the Gurnbroker.com ad, but it was busted. I had a brand new, unfired 200th year No. 3 in .30-40 Krag with nice wood and its collector value was ruined. Like the box, I was crushed.
I called the shop owner, who turned out to be a real prick. “It’s your problem, and it’s between you and the US Post Office,” he told me. “You didn’t tell me to insure it, so I didn’t. Once it leaves here, it’s yours.” I told him I was going to have the stock repaired and I offered to split the cost with him, but he kept repeating his mantra: Once it leaves here, it’s yours.
Keep us publishing: Please click on the popup ads!
I told this sad story the next day during our usual geezer gathering at Brown’s BMW in Pomona, and good buddy Dave asked if the gun shop had asked me about insurance. “Nope, he never asked and I didn’t mention having it insured. I guess I just assumed it would be.” Dave explained that I was right to make that assumption, so I called the shop owner again, I explained to him I had learned about insurance responsibilities, and I again offered to split the repair cost. He said no again.
Then I remembered I had used my credit card. I called American Express, I explained the situation, and I told them it would cost about $275 to have the stock repaired and refinished. Not a problem, the guy on the other end of the line said, and just like that, he took $275 off the charge and said that the shop owner had 30 days to appeal. He didn’t, and that was that.
I sent the rifle off and when it came back I was both pleased and disappointed. I had asked the place I use for such work to match the original Ruger finish, but they did not. Instead, it was a much deeper and more glorious oil finish. It was nicer than the original finish, but it wasn’t original. That was good news and bad news. I had planned to keep the gun in its unfired condition, but now that it was busted, repaired, and refinished, it would be a shooter (that was the good news).
You can just barely see where the crack was in the stock wrist, but that’s because I used flash for this photo. In normal light, you really can’t see it.
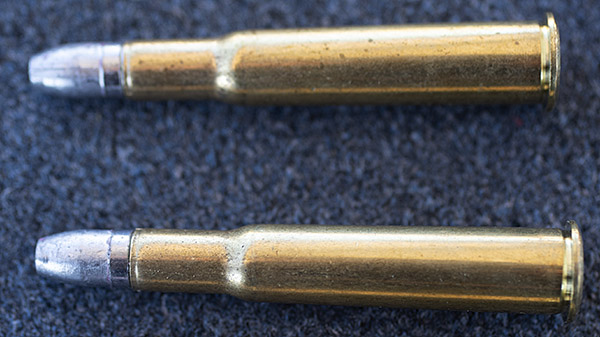
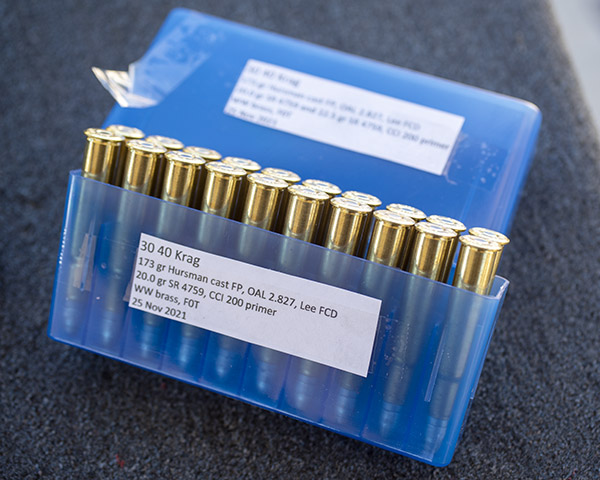
I didn’t shoot the No. 3 immediately. This all happened 15 years ago before I retired and before COVID hit. I recently decided I needed to shoot the .30-40, so I ordered unprimed brass and Lee’s Ultimate four die set. Both were initially unavailable, but they came in and I was in business. I already had large rifle primers, a stash of what has to be one of the best powders ever for cast bullets (SR 4759), and a bunch of 173-grain gas checked bullets.
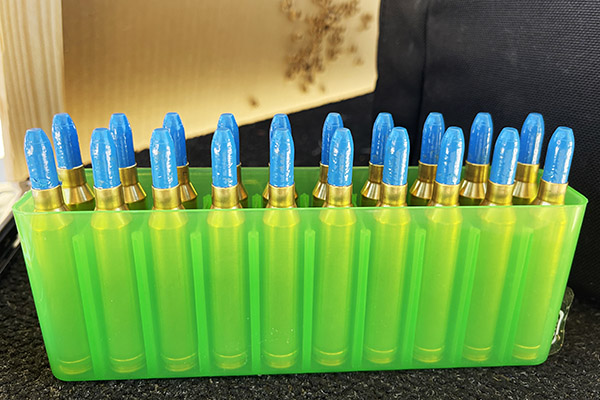
.30-40 Krag ammo in new brass, loaded by yours truly.Ready for the range.
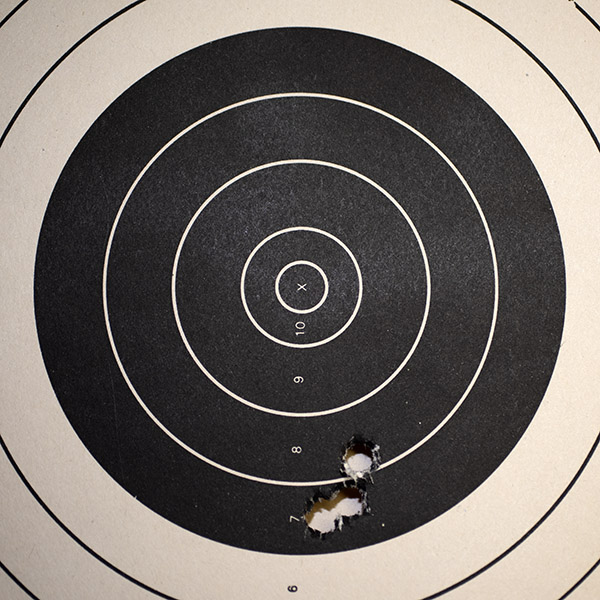
I seated the cast bullets to the crimping groove and used the Lee factory crimp die, and the cartridges looked great. I tried a number of different SR 4759 powder charge levels in the Lyman cast bullet manual. When I fired on the 50-yard line at the West End Gun Club using the rifle’s open sights, I found that 20.0 grains of SR 4759 is my accuracy load.
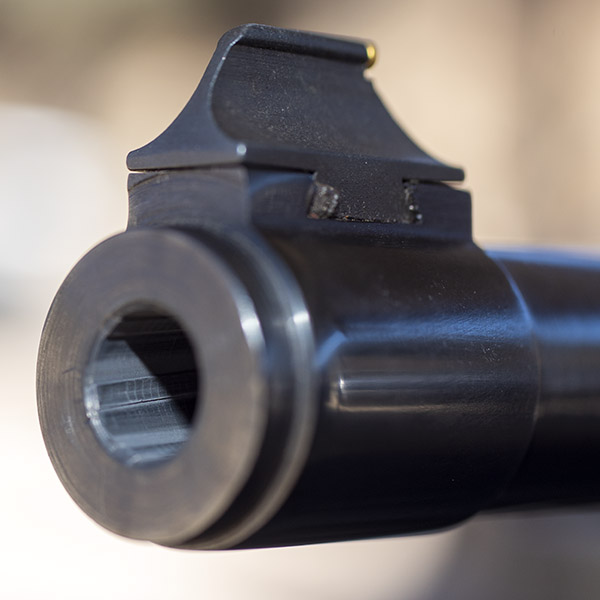
I held at 6:00, and the rounds shot very close to point of aim at 50 yards. The target was mounted on its side, as you see it here.Very modest bore leading in the No. 3. That SR 4759 load with the 173-grain bullet is accurate even with the Ruger’s factory iron sights.
The .30-40 Krag is an interesting cartridge. It was the US Army’s standard chambering after they phased out the .45-70 Springfield. The new rifle was the 1892 Krag-Jorgensen rifle made at the Springfield Arsenal. It was the first military cartridge designed for smokeless (as opposed to black) powder, and it originally fired a 230-grain jacketed bullet. The .30-40 is a rimmed cartridge that looks a lot like the 7.62x54R Russian cartridge (which came out just one year earlier). The ballistics of both are fairly close to the .308 Winchester (which is the 7.62 NATO round we currently use).
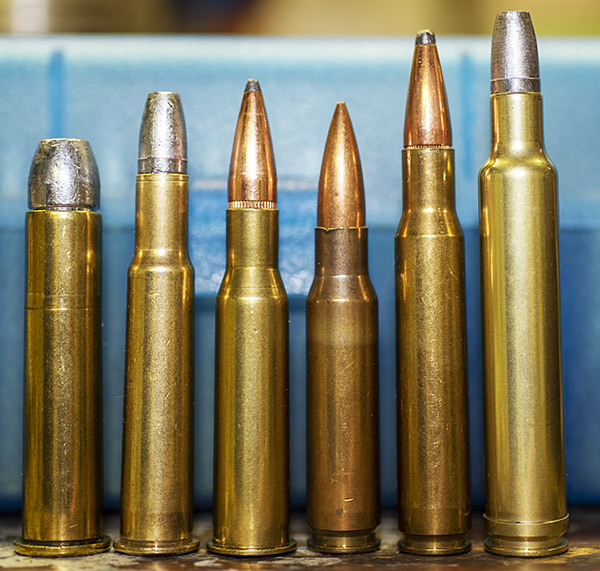
.45-70, .30-40 Krag, 7.62x54R Russian, .308 Winchester (7.62 NATO), .30 06, and .300 Weatherby cartridges. The .300 Weatherby is the fiercest recoiling cartridge in the group when loaded with jacketed bullets at factory velocities (the cartridge shown here is loaded with a cast bullet). With the exception of the .300 Weatherby, Gatling guns have been chambered in each of these cartridges. Modern mini-guns are electrically-powered Gatlings chambered in 7.62 NATO (.308 Winchester).
After our experiences in the Spanish-American War, our government load plant created and issued a hotter version of the .30-40 Krag in an attempt to match the speed and ballistics of the Spanish 7mm Mauser round, but the Krag rifles started cracking bolts. All the .30-40 Krag ammo was recalled and reconfigured with the original, lower pressure load. The .30-40 Krag was also used in the Gatling gun. You can read about that here:
The .30-40 Krag only lasted about a decade in US government service. It was replaced with the .30-03 in 1903 (which was soon replaced with the .30-06, which became one of the most popular hunting cartridges ever). The history of this fine old cartridge is interesting; shooting it with cast bullets in a sleek Ruger No. 3 is good old fun. I might never have known that if the stock had not broken.