When I got home yesterday from a routine 10-year colonoscopy exam (the prep was the worst part), I took a short nap, later in the evening the little lady went outside for something and brought in a package that had been sitting unguarded on my front doorstep probably since mid-morning. To make matters worse, it had been shipped it in a clearly marked ASUS Workbook computer box, complete with carry handle!
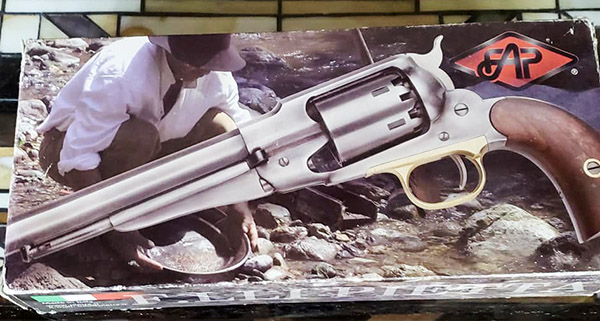
I opened the package today and the gun far exceeded my expectations! Man, this piece is so very cool. The Navy Arms box is complete with some minor scuffing. All the paperwork is present as near as I can tell.
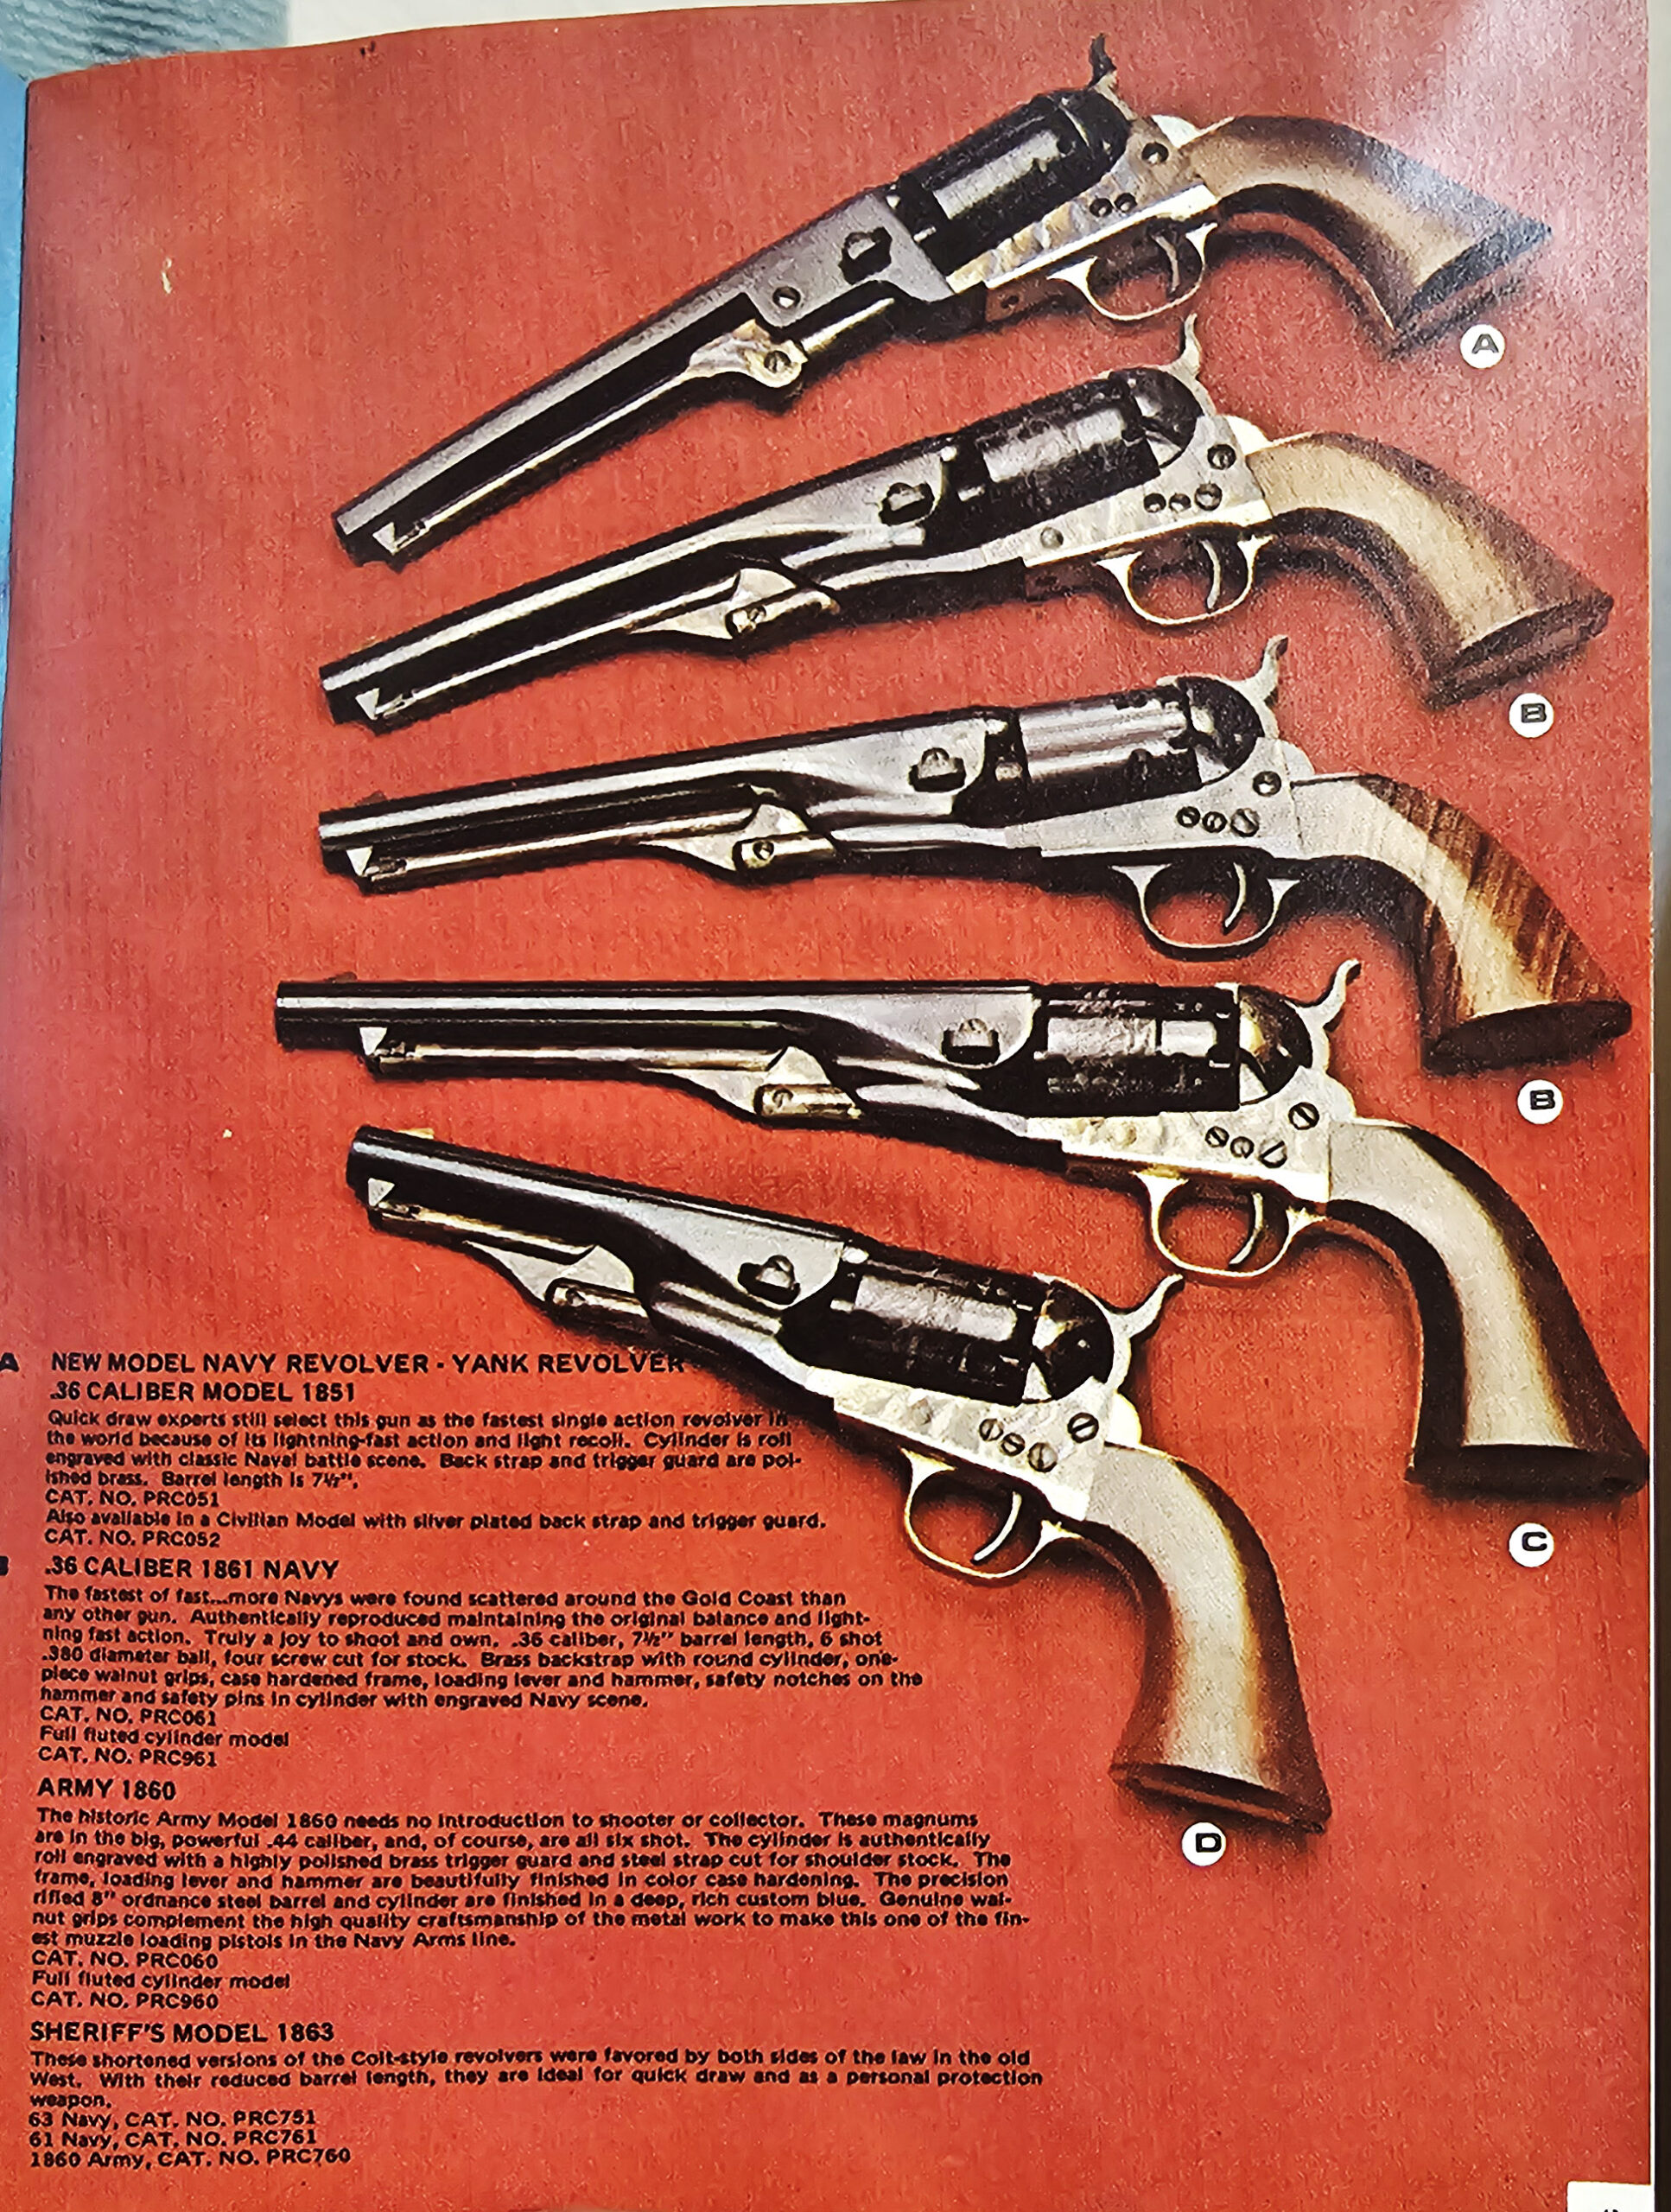
Here are two pages from the catalog. You can click on the two images below to see larger versions that make reading the print easier.
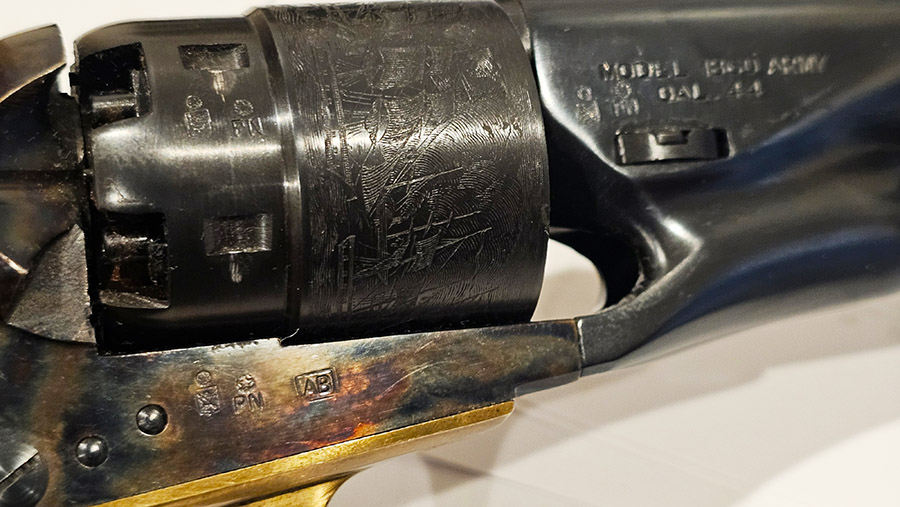
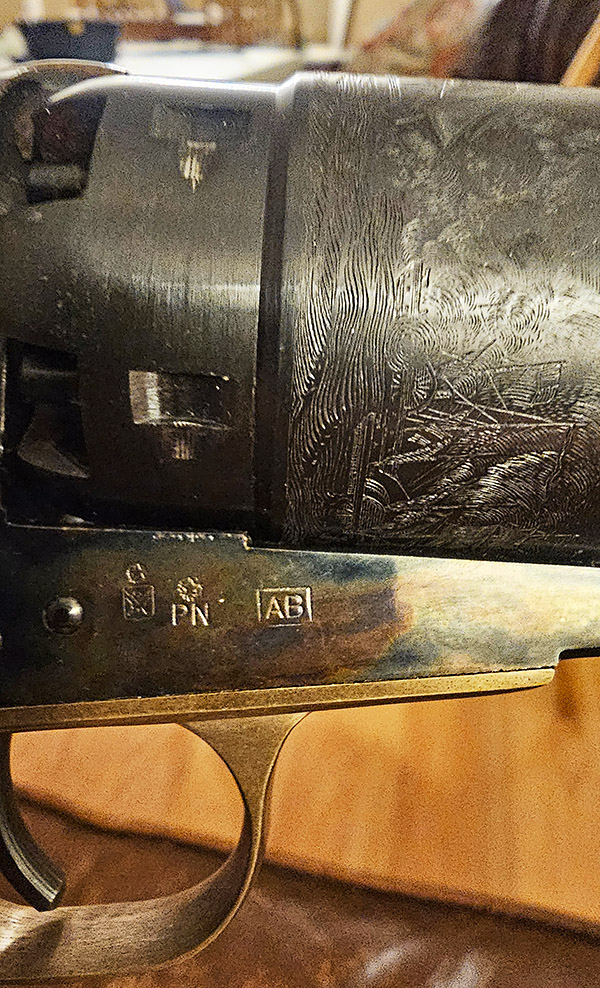
There is also a color catalog. My gun is letter C in the catalog photo which proclaims it to be “one of the finest muzzle loading pistols in the Navy Arm line.” After handling the gun, I believe them. Oddly, nothing in the package I’ve seen in my brief review indicates that this gun was manufactured by Uberti, but the Uberti crest stamped inconspicuously on the frame tells me that it was.
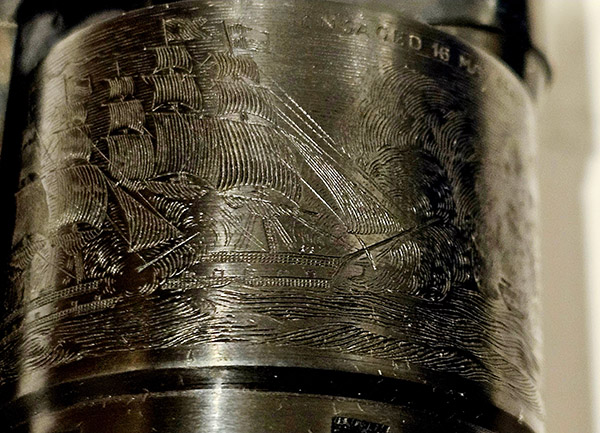
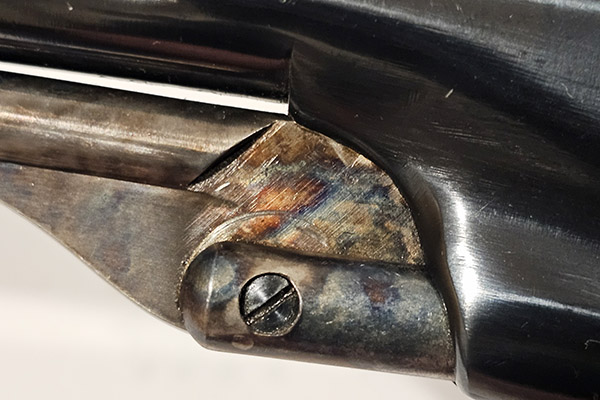
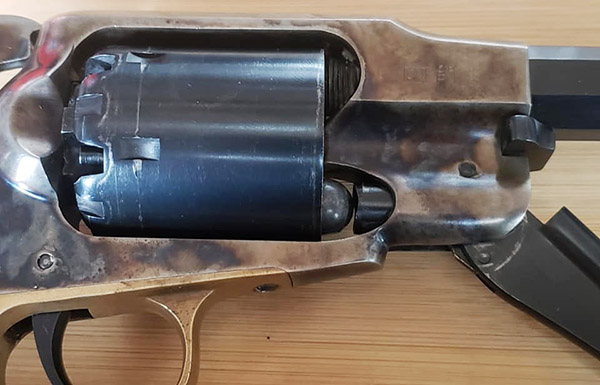
The AB stamp on the gun translates to a 1976 date of manufacture. Totally unexpected by me, the frame, hammer, and loading lever are all beautifully case color hardened steel. Oh, man the photos don’t do any justice to the vibrant colors! The barrel is a highly polished deep blue having a mirror-like finish. The brass trigger guard is a little dull, but not tarnished at all after spending the past 48 years in its oiled plastic bag time capulsule. Oh, and that super fine ocean battle scene either engraved or rolled onto the cylinder is simply immaculate! The walnut stocks deep grain really showcases this piece.
Well, I have to catch up on my office work today, so I am just put everything back in the Navy Arms box for now. Maybe I’ll have some time over the coming weekend to clean it up and put on a fresh coat of oil. Until then I imagine there will be a considerable amount of daydreaming about this piece going on upstairs.
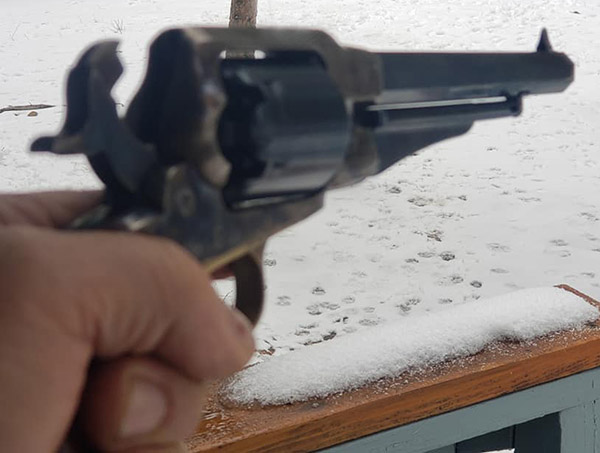
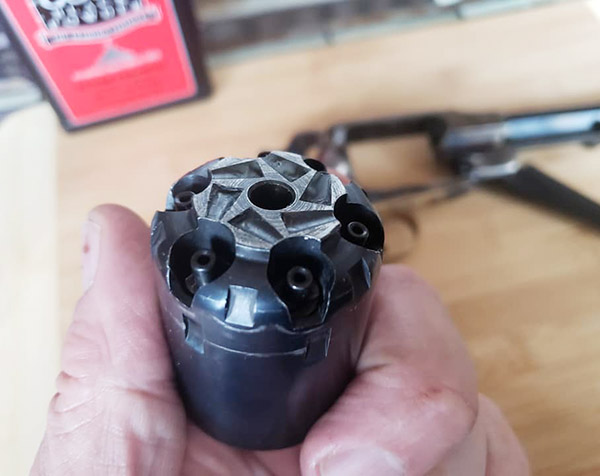
For now, enjoy these updated photos. The gun still hasn’t been cleaned. I Can’t wait to shoot it. Yeah, I know, I know. There may be a few folks who say the gun has survived 48 years without being fired and should stay that way. Well, it probably had been proof fired in Italy at the factory, but there is no evidence of it except for the factory proof markings. My thinking is that this isn’t an original Colt 1860 Army and I paid only a couple beans for it including shipping, so why not wake it up from its long hibernation and have a blast?
We forwarded Joe’s photos and request for info to my good buddy Paul, who is our resident blackpowder firearms guru. Here’s what Paul had to say:
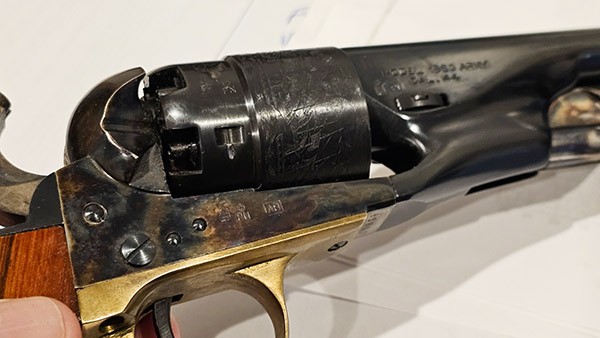
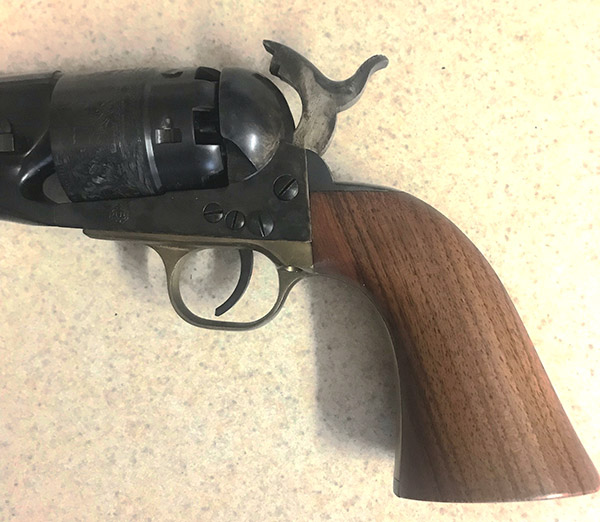
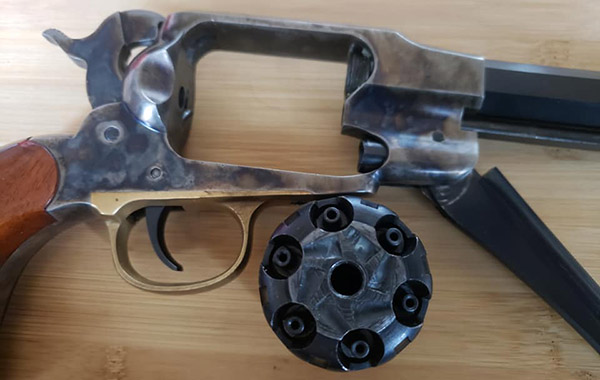
Those two extra screws are for a shoulder stock. You remove those screws and put the shoulder stock on then secure the stock with those screws. That gun is desirable because of that feature. If he had the shoulder stock it would be worth three or more times what the gun alone is worth. That gun looks like new – I wish I owned it! Not too many people purchased a shoulder stock for those guns that’s why you don’t see them often and when you do they cost BIG MONEY.
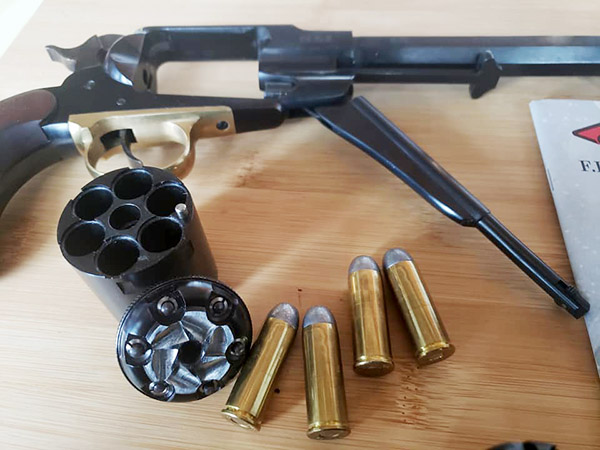
There were a few different styles being sold back in the ’60s & ’70s. I looked on YouTube for some questions that I had and found that some of the shoulder stocks did not need to remove those screws. The stock only used those screws to pivot the stock attachment area on, then the claw would grip a notch in the bottom of the grip frame. Some guns would be cut under the recoil shield on both sides of the shield for the front of the shoulder stock to hook under so they did not need those screws. Have a look on YouTube to get a better picture of what I am referring to. By the way it looks like a great gun!
Good inputs, Paul, and thanks very much for the explanation!
My “new” in the box never fired Colt 1860 Army clone was imported by Navy Arms some 45 or so years ago. It hasn’t arrived yet but should be in the mail any day now.
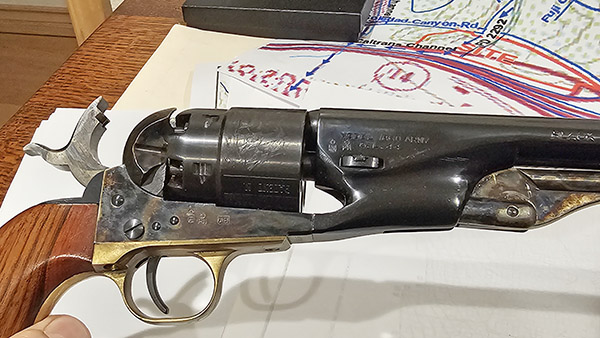
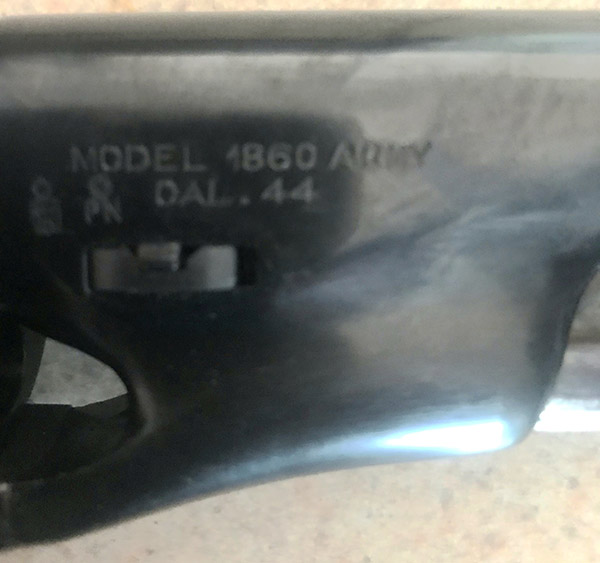
After purchasing it, I was looking more carefully at the photos and I am a bit perplexed. It definitely had four screws. The barrel is stamped “Model 1860 Army Cal 44.” This one appears to be by Uberti.
I had never heard of a four screw Colt 1860 Army before, but I had seen online photos of what I believe was described as a four screw Colt 1861 Navy.
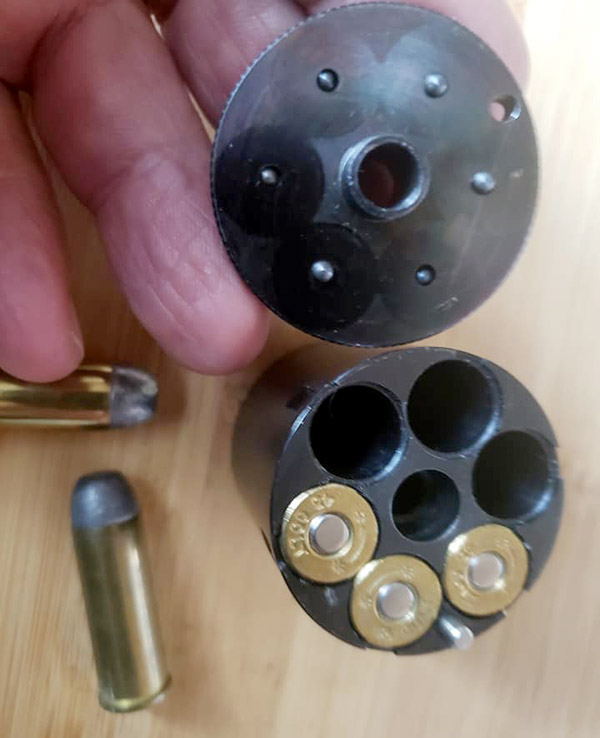
These are the only photos I have for now and they are not really all that clear. The guy says it’s still covered in packing grease and he’s only had it out of the plastic bag twice in the 40-some years since he bought it, including last week to take these photos. It looks like it might have some sort of cylinder engraving, but wouldn’t that be a Navy and not the Army model?
Does anyone know what we have here? Did Navy Arms import a lot of these four screw early Army versions, or more of the standard three screw guns? Was this gun made by Gregoreli & Uberti, Uberti, or is it something else?
Were these guns good shooters? I’m not expecting too much out of it as I know it won’t be anywhere near as nice as my Uberti 1858 New Army (which is shown above), but heck, it was almost free. I never pass up the opportunity to buy interesting and unique guns at bargain prices.
Stay tuned for Part 2 when I finally see what it is I bought.
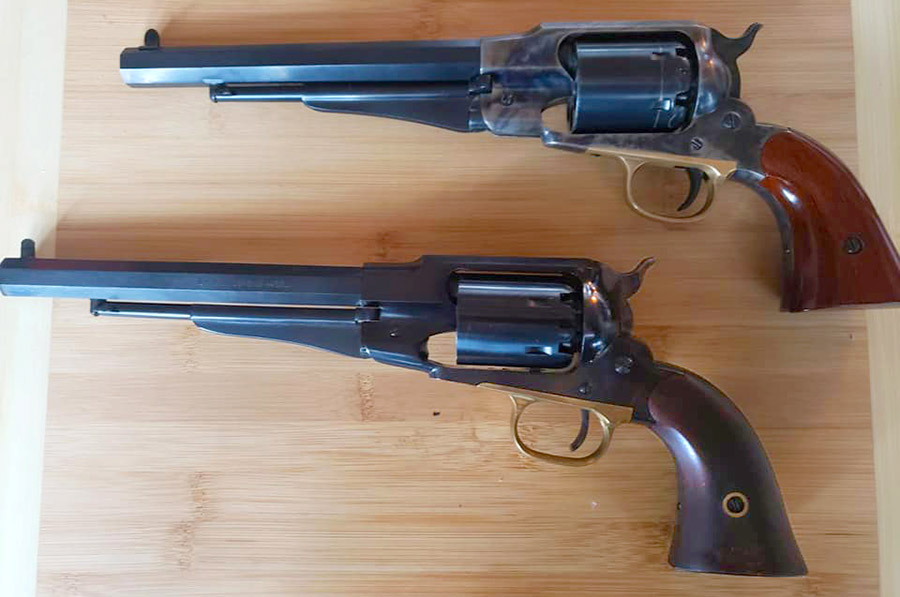
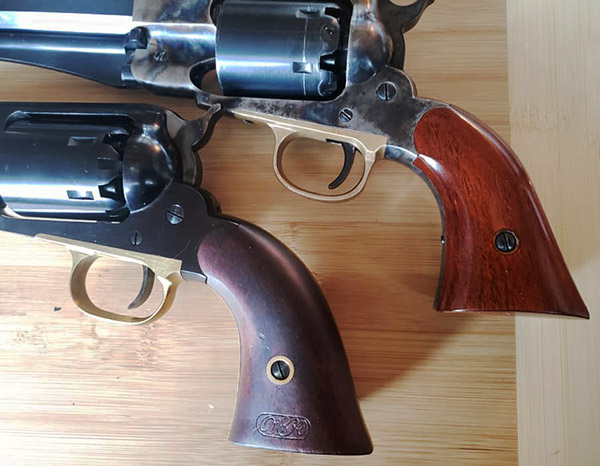
This blog compares two modern Italian reproductions of the famed .44 caliber 1858 Remington New Model Army revolver. One is manufactured by A. Uberti S.p.A. (it’s the one on top in the big photo above); the other is by F.LLI Pietta (the revolver on the bottom). Here’s another shot of the two:
The Uberti in on top right, the Pietta is on lower left.
The 1858 Remington New Model Army was a competitor to Colt’s blackpowder percussion sidearm. The Army went with both versions but primarily bought the Colt (it was 50 cents cheaper than the Remington). Then the Colt factory had a fire in 1864. At that point, the Army starting buying Remingtons in quantity. The Remington was considered to be the stronger revolver because it has a top strap over the cylinder (the Colt does not), and some folks feel the Remington is easier to aim because the rear sight is cut into the frame (instead of the hammer, as on the Colt). And there are other advantages to the Remington, which Jose covers. With that as a background, here’s Jose’s article on the modern Uberti and Pietta reproductions. All photos in this blog are by Jose.
Help us publish: Please click on the popup ads!
If you’ve never fired a percussion revolver you’re really missing out on huge part of firearms history. But maybe you didn’t know that even here in California you can order one of these fine blackpowder revolvers online or over the phone with a credit card and have it shipped to your doorstep without background check or going through an FFL. Your state rules may vary.
Cap and ball packpowder sidearms were a huge part of arms on both sides during the American Civil War. The Union Army had a contract for the Colt 1860 Army, but when Colt could not keep up with demand Remington Model 1858’s were ordered. Many troops preferred the Remington over the Colt for a number of reasons. The Remington has a top strap making it stronger, and the Colt was prone to having loose percussion caps jam the cylinder.
Uberti 1858 Remington Revolver
I’ve had the Uberti for about 10 years. It’s an awesome piece of fine craftsmanship. There is nothing cheap about this revolver, the fit and finish are supurb. The cylinder and barrel are a deep blue, the steel frame is color case hardened, and the trigger guard is polished brass, ans walnut stocks, giving it a very classy look. The gun is a six shot .44 cal, rifled 8-inch barrel with 1:18 LH twist, and weighs in at 2.7 pounds.
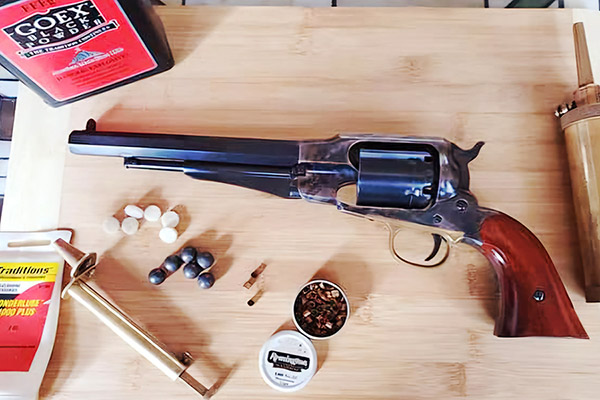
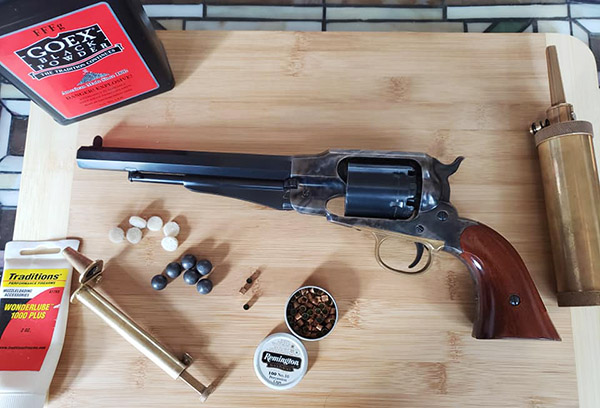
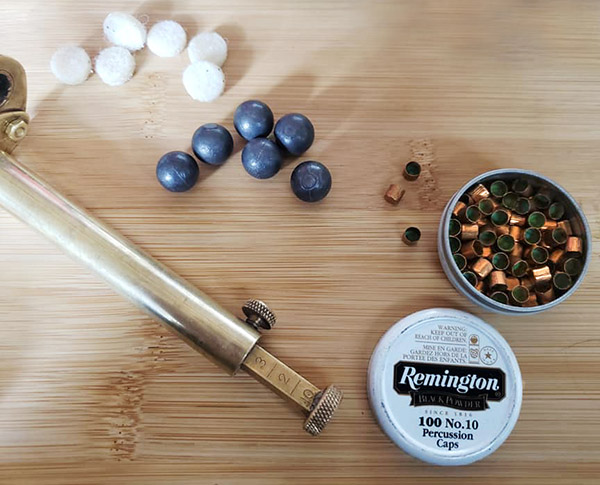
454 cal pure lead balls, Remington #10 percussion caps, waxed felt wads, and the Uberti 1858 New Army.Powder measure, balls, waxed felt wads, and caps.
I use .454-inch diameter balls cast from pure soft lead (stick on wheel weights or plumbers lead, BRN 7) weighing in at 143 grains. It fires best when loaded with 35 grains of FFF blackpowder (I don’t like substitute synthetics), a felt pad soaked in bore butter over the powder, and the ball over the top. The felt over the powder charge prevents a chain fire from jumping between cylinders, and also adds some lube to the barrel between rounds helping prevent a buildup of powder. Either Remington or CCI #10 percussion caps provide the spark.
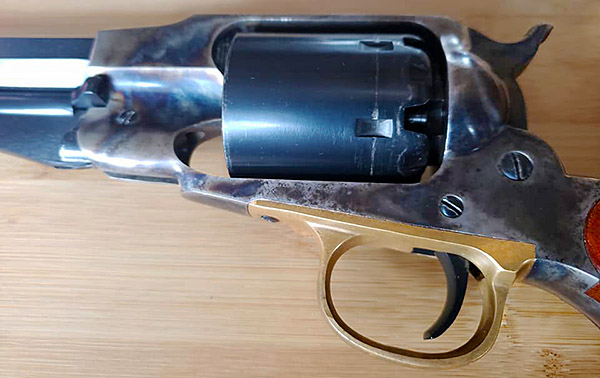
The color case hardened steel frame on this model Uberti is off set nicely by its polished brass trigger guard.The loading lever on the Remington 1858 is used to ram the ball into each cylinder, after loading powder and waxed wad. The percussion caps are placed on the cylinder nipples only after all cylinders have been loaded.The cylinder doesn’t require removal between loadings, only for cleaning.
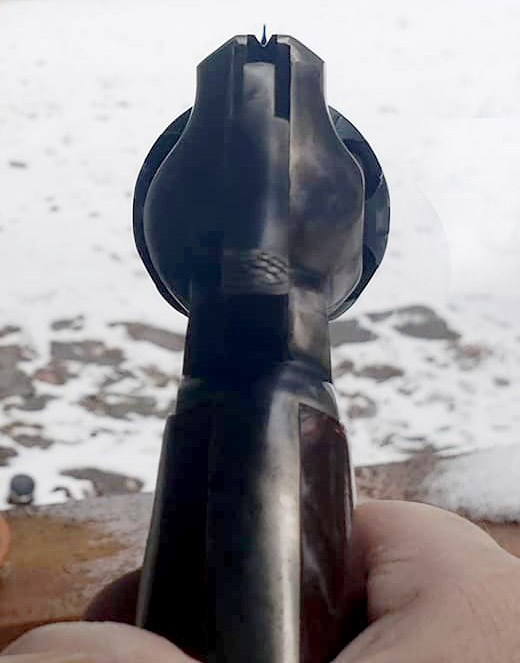
The Uberti is very well balanced and feels good in the hand. The cylinder locks up very tightly. There are noches between the cylinder nipples to rest the hammer on making it safe to carry with all six cylinders loaded. The rear sight is a V-notch on the top strap, unlike the Colt 1860 which has the notch on the hammer because the 1860 lacks a top strap. It’s no exaggeration that out to 40 yards my the Uberti 1858 holds about as tight a group as my Ruger Super Blackhawk .44 mag!
The Remington 1858 has a top strap over the cylinder making it stronger than the Colt 1860 and older firearms. It also allows for placement of a stable V-notch rear sight as opposed to the Colt’s rear site which is a simple notch filed on the back of the hammer.Nice sight picture. This Uberti has a 1:18 barrel groove twist and holds groups as tight as my Ruger Super Blackhawk out to about 40 yards.
Properly cleaning and blackpowder revolver after a day in the field is a good exercise in gunsmithing. The revolver should be entirely disassembled, down to the Springs, removing hammer from the frame, cylinder pin, loading lever, trigger, mainspring, nipples from the cylinder – everything except for removing the barrel from the frame and front sight.
The notchs between the nipples are for the hammer to rest, allowing the six-gun to be safely carried with all cylinders loaded.
A good set of gunsmithing drivers and properly fittjng nipple wrench are mandatory to keep from damaging the screws. Owning a blackpowder revolver will help anyone gain confidence to start Barking simple dunsmithing repairs and parts replacements on other types of firearms. If you don’t already have a blackpowder gun order one today! They are a blast.
Pietta 1858 Remington Revolver
This one was recently purchased because the price was right. It looks like it has never been fired, and I’ve not fired it yet, either. The specs are essentially the same as the Uberti; however, the claimed weight of the Pietta is only 2.4 pounds compared to Uberti’s 2.7 pounds. For whatever reason the Uberti feels much lighter and more well balanced. The Pietta is noticeably front heavy. The Pietta has a little play at cylinder lockup. The hammer pull and trigger feel smooth and crisp, similar to the Uberti.
The Pietta, another quality Italian replica in a slightly lower price range.
The really nice thing about the Pietta is that it came with an optional .45 Colt conversion cylinder. I’ve always wanted to get a conversion cylinder for my Uberti but they are very expensive, about 2/3 what I paid for the gun, and they always seem to be out of stock.
This Pietta came with a .45 Colt conversion cylinder.The conversion cylinder has an upper plate that holds a separate firing pin for each cylinder.
The conversion cylinder for the Pietta fits very nice, locks up tightly, and came with a box and a half of .45 Colt ammo which I have no intentions of using. Remington first started converting Model 1858 revolvers to .46 cal rimfire metallc cartridges in 1868. These were still blackpowder cartridges as smokless powder hadn’t yet been developed. So I will hand load .45 cartridges for the Pietta using blackpowder to stay traditional.
I’m looking forward to shooting these two together on a side-by-side comparison soon. For now, I hope you enjoy the photos.
This is my tale about restoring a very ugly and broken vintage 1968 Ruger Blackhawk that had the safety conversion done by the Ruger factory. I think Skeeter Skelton would have approved! (Skeeter Skelton was an American lawman and prolific gunwriter well known to firearm enthusiasts.)
First, a little background on the single action revolver, or “sixgun” as they are called. In 1872 the US government was looking for a new service revolver to replace its older Colt and Remington cap-and-ball revolvers used in the Civil War. Colt developed a sixgun that utilized the then new technology metallic cartridge. Colt was the successful contractor and their cartridge gun was adopted by the government in 1873 as the 1873 Colt Single Action Army. The 1873 Colt SAA was shortly thereafter offered to the civilian market and became very popular with ranchers, lawmen, cowboys and bad guys alike. The “Peacemaker” (as Colt’s SAA became known) was priced around $15, which was most of a drover’s wages for a month.
After WWII a new-fangled gizmo called television started to become affordable. In 1948 about 1% of American households owned a television, and by 1955, 75% of American households owned at least one television set (black and white with “rabbit ears” antenna, of course). The TV set became the center of the living room, and the entire family would gather around the “set” after dinner. Hollywood’s golden age of TV westerns from the mid-1950’s through the 1960’s produced an astounding number of instant hits with shows like Have Gun Will Travel, Rawhide, Wanted Dead or Alive, and The Rifleman. All of them featured the Colt SAA and Winchester repeating rifles, or the “lever gun.” Every red-blooded American boy and his father and his uncles and even some moms wanted to own and shoot their very own Peacemaker. But there was a problem: The Colt sixguns were expensive and often not available.
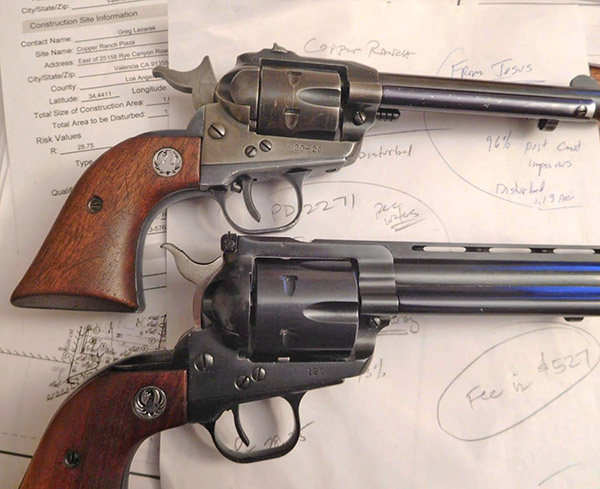
My beautiful all original 1969 Ruger Single Six (top), the ugly vent ribbed 1968 Ruger Blackhawk “parts gun” (bottom). The Single Six is Ruger’s .22 Long Rifle sixgun; the Blackhawk is the larger centerfire cartridge sixgun. Note the three screws on both sixguns and the square-faced, non-notched hammer on the Single Six in the half-cocked position. This Single Six was my first handgun given to me by Mom & Dad brand new for Christmas as a young man 13 years of age. It has a fair amount of holster wear from hunting, backpacking, camping, etc. over many years of honest use. I own up to evey scratch and ding on this well-used sixgun, and I’d never want to refinish or change a thing. When Ruger’s free retrofit advertising campaign first appeared in 1975 issues of Guns & Ammo magazine, I was tempted to send mine in to make it like the New Model but didn’t want to part with the gun for a few weeks. In hindsight, I’m sure glad that I didn’t fall for it.
That’s when Bill Ruger decided to give the public what they wanted. In 1953 Ruger introduced the Single Six revolver chambered in .22 Long Rifle. It was a sixgun for every boy! Two years later in 1955 Ruger introduced its Blackhawk in .357 Magnum. This was a sixgun for every man! They were and still are wildly popular. About 700,000 of the pre-1973 Ruger Single Six .22 revolvers were made, and well over a million New Model Single Six .22 revolvers were made after 1973. I’ll defer the exact number manufactured to the Ruger historians.
Ruger’s Single Six and the original Blackhawk single action revolvers were patterned after Colt’s SAA. The Ruger has a similar shape, size, look and feel as the Colt on the outside. But on the inside Ruger made some improvements. Ruger’s guns used modern high-strength carbon steel. Colt’s action ran on leaf springs prone to breakage. Ruger replaced the brittle leaf springs with much tougher coil springs made from piano wire. The Ruger guns are much tougher than the Colt.
One of the infamous traits both Ruger’s initial guns and the Colts share is the first small hammer cock position called the “safety” is not safe. A gun with all six cylinders loaded, if accidently dropped, is prone to the safety failing (resulting in a negligent discharge). Therefore both the Colt and pre-1973 Rugers should only be carried with five rounds loaded and the hammer down over an empty chamber. These pre-1973 Ruger sixguns are known as the “three-screw” Rugers, as identified by the three plainly visible screws on the left side of the frame, just as the Colts have three screws. The original Rugers are also called Old Models, for reasons that become clear in a minute.
As the story goes, someone who didn’t follow what is clearly stated in Ruger’s owner manual to carry only with the hammer over an empty chamber, dropped their Old Model Ruger, fully loaded with six rounds, and shot himself in the leg. Apparently, there were other negligent discharges and expensive lawsuits. This prompted Ruger’s engineers to develop a safer design Ruger sixgun. This newer design is called the New Model Blackhawk. New Model Rugers can safely be carried with all six chambers loaded. Beginning in 1973 all the New Model Rugers have what’s called the “transfer bar safety.” It basically works by making a mill cut in the front (or face) of the hammer so that in the down position the hammer face can’t possibly touch the frame-mounted firing pin. When cocked back in the shooting position, a steel bar (the transfer bar) attached to the trigger mechanism is raised. When the trigger is depressed, the transfer bar fills the gap between the milled cutout on the hammer face and the firing pin, effectively “transferring” the hammer’s impact to the firing pin.
The 1973 and later New Model Rugers are easily identified because they do not have the three screws. They have instead two pins. Another difference is that there is no “half cock” position for loading the gun. The cylinder freely rotates for loading simply by opening the loading gate. The New Model Rugers work well enough but do not have the distinctive feel and clicking sound while cocking the hammer as do the Colts and old three screw Rugers. The New Model trigger is not quite as smooth as the older designs because of increased drag and the friction of the transfer bar as it moves into position. Some shooters claim they don’t notice the differences between the two, but I own both and I can feel the difference.
In 1975, Ruger engineers devised a method of retrofitting all of the “unsafe” pre-1973 sixguns with a makeshift transfer bar. They ran a campaign in the gun periodicals that prompted owners to ship their old guns to Ruger and they would “upgrade” the older guns to make them safe to carry with all six chambers loaded.
It remains unknown how many owners sent their guns back to Ruger, but apparently there were thousands because we see many of these retrofitted guns on the used gun market today. They are three screw guns that function similar to the New Model two pin guns, but unfortunately the trigger pull on the converted guns is absolutely terrible. The retrofit-style transfer bar scrapes up along the back side of the frame causing an awful, gritty, jerky feel. To make matters worse, the retrofit cylinder base pin is fitted with a small spring-loaded pin that also drags against the transfer bar to push it out and over the firing pin on its upward travel. If the retracting pin gets stuck, the transfer bar pushes into the firing pin, locking up the gun. The retrofitted three screw Rugers are pretty bad, taking all the smoothness from the action.
Ruger reportedly returned the retrofitted guns back to their owners with the original parts sealed a small plastic bag. Many of these plastic parts bags have been separated from the converted guns (they were either lost or thrown away). Ruger doesn’t offer any of these old parts for sale to the public, as they consider them unsafe. If an old unconverted three screw is sent in Ruger for any type of repair, they will return it to its owner with the transfer bar conversion installed, whether the owner asks for it or not. In fact, Ruger will not work on an unconverted old model gun without doing the conversion.
Unconverted three screw models (i.e., unaltered Old Model Rugers) today command premium prices among collectors. Even with the parts bag, the converted Old Models will never realize their true collector value because Ruger has permanently marked the converted guns with an “R” on the frame. The stamp is concealed underneath the grip frame to prove that the factory had done the conversion even if an owner wished to restore it back to its unaltered condition. Ruger will install the Old Model conversions but only if the owner sends the gun to them for installation, and Ruger will stamp the frame showing that they did the conversion.
Converted Old Model Rugers having the afterthought safety conversion are generally not very good shooters. However, restored back to original, these guns make very nice non-collectible shooters for those able to locate the original parts. The Old Model unconverted guns handle much better than the New Model guns, provided a most important safety rule is strictly adhered to. That rule is to never carry the restored-to-original Old Model Ruger with the hammer over a loaded cylinder. This brings us to the point of this story.
Six years ago I stumbled upon an Old Model 1968 three-screw Blackhawk being sold as a parts gun at the Ventura Crossroads gun show. The cylinder was totally locked up due to the transfer bar conversion (as described above). However, the asking price was so low that I won’t tell you the cost because you wouldn’t believe me. Besides being broken it had a ventilated rib that I had never seen before on any Blackhawk. It was truly an ugly duckling Ruger Old Model Blackhawk! But it had a great finish and the original factory grips, so I went for it without haggling over the price. Man, I’m not kidding. This gun’s price was so low it was almost free.
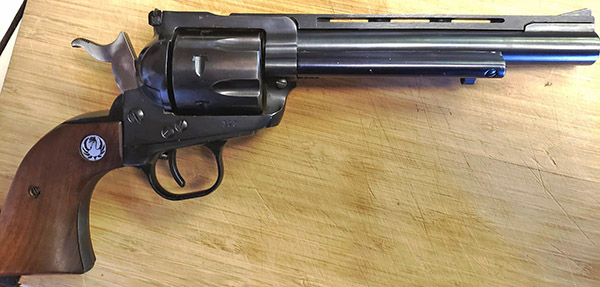
The Poly Choke fake ventilated rib glued onto a Blackhawk barrel is just about the ugliest thing somebody could do to a Ruger. Trying to make it look like a Colt Python? Well, you failed!Close up of the Poly Choke fake rib. It does absolutely NOTHING to improve the gun
After the 10-day cooling off period, I brought the ugly little Old Model sixgun home, along with a brand-new, high-quality gunsmith screwdriver set. After disassembling the Ruger, I found that the cylinder was frozen because of the factory safety conversion. After cleaning it up and freeing the cylinder, the gun had the absolute worst sandy, gritty, heavy sticky trigger I’ve ever experienced. It now worked but it had a terrible action, and it was still the ugliest Blackhawk I had ever seen.
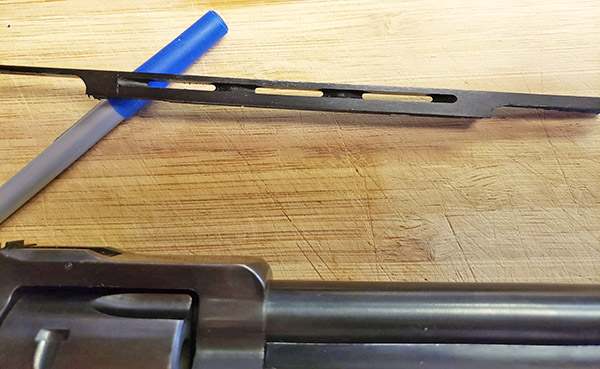
After more research I found that Ruger never made a Blackhawk with a ventilated rib. This gun had a phony aftermarket glued-on rib made by the Poly Choke company. I guess the owner wanted something that looked like a Colt Python and decided to dress up the Ruger for Halloween. I managed to pull the fake ventilated rib off without causing any damage to the barrel, but it wasn’t easy. The Poly Choke adhesive was pretty tough. After pulling the rib off, the remaining glue was removed using brake cleaner spray. By now the gun was looking pretty good again, but the action still sucked.
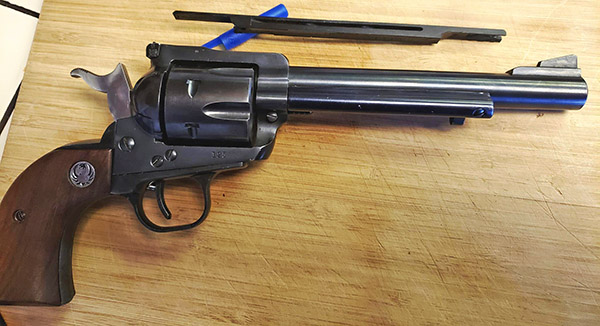
With the Poly Choke rib removed, the “parts gun” is beginning to look like a Blackhawk again. Note the flat hammer face. This photo was taken after the transfer bar conversion had been removed and factory original parts installed.
To smooth up the action, I removed the transfer bar conversion and replaced it with factory original parts to restore it to the original, classic “5-shooter” configuration. Unfortunately, the gun didn’t come with the old parts bag but I was determined to restore it. Now before any of the do-gooder Ralph Nader safety types out there proclaim “how irresponsible of you,” allow me to ask if you’ve ever seen an original Colt SAA with a safety conversion? Well, no, you have not because Colt had the good sense to not ruin their guns with an ill-designed stopgap transfer bar safety.
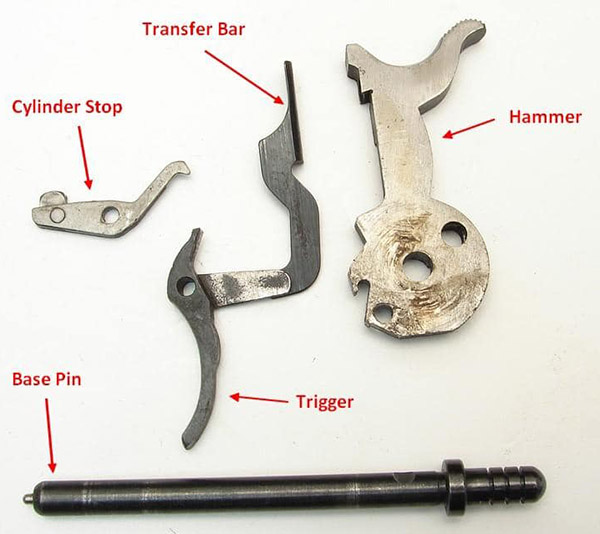
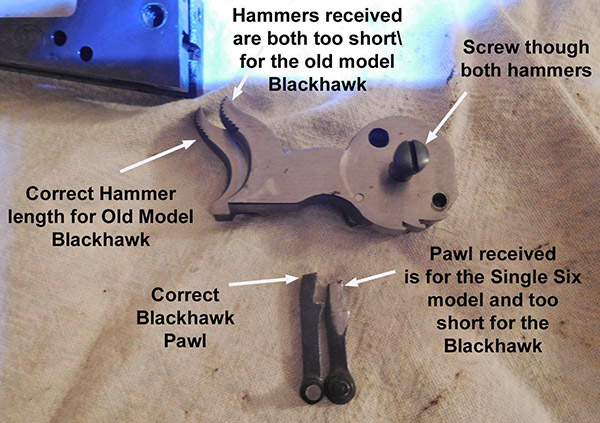
Finding the original parts for an Old Model Ruger is very difficult. Each part had to be purchased separately. It took several months to find all the parts and there were some hiccups along the way. Upon receiving some parts advertised as original Blackhawk parts, such as the hammer, I found that they were original parts for a Single Six model and were not compatible with the Blackhawk. Eventually all the original parts were acquired. The parts included a new hammer, trigger, base pin, cylinder stop, spring, screw, and pawl. The photos and captions tell the story about what it takes to restore converted guns and illustrates the differences between the original and retrofit parts.
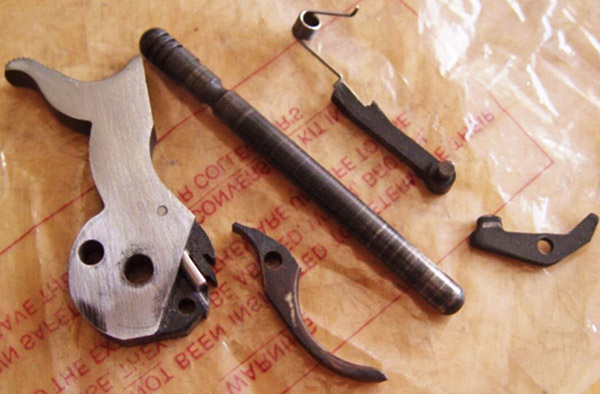
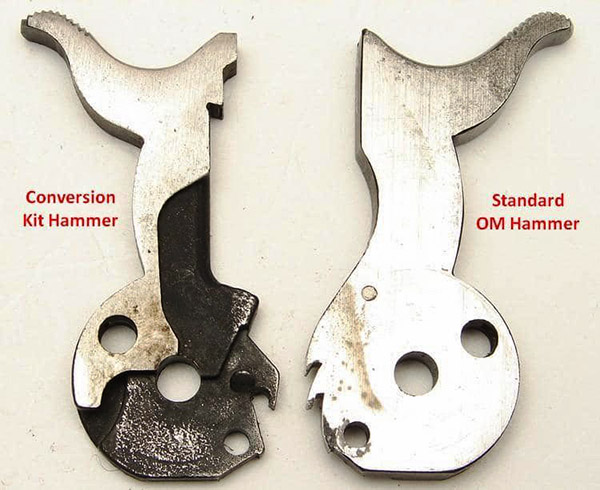
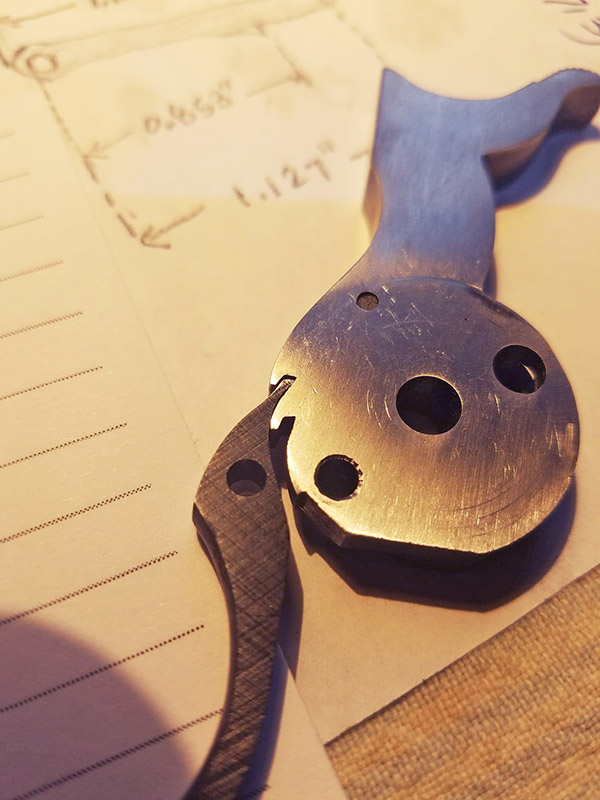
Factory transfer bar safety conversion parts. Note that this is not the same parts set as the transfer bar parts that come installed with New Model Blackhawks. These transfer bar safety conversion parts were specially designed to fit on the old three screw models and are not interchangeable with the two pin new models. In this photo the transfer bar appears to be connected to the trigger, but that’s not the case. The transfer bar has a hole that aligns with the trigger pivot bolt.Original Old Model unconverted parts. This is an image that shows the contents of a returned parts bag that was offered for sale on the internet many years ago. Unfortunately, it was not available when I restored by Blackhawk and I had to locate the parts individually.Comparison of the original flat-faced hammer (right) and the conversion hammer (left). Note that the conversion hammer has been milled on the face to create a space between the frame-mounted firing pin and hammer while the hammer is down and the transfer bar retracted. The side of the conversion hammer is also recessed for clearance of the long arm of the transfer bar. The transfer bar has friction along this part of the hammer. The front face of the transfer bar also rubs against the back of the frame. All of this creates unwanted friction that gives the converted gun a gritty feel. Also note the three notches on the original hammer for the safe, half-cock, and full-cock trigger positions. The conversion hammer lacks the three clicks that give the Old Model Ruger and Colt SAA their classic feel and sound.When mixing and matching parts as you can find them, the trigger is not likely to be the same as the one that came with the hammer as a matched set and will likely need minor honing of the sear and hammer notches for proper fit. This is an opportunity to make the trigger pull better.One of the pitfalls of buying used gun parts on the internet is that the seller doesn’t always know what he is selling. The Ruger Single Six and Blackhawk trigger groups are not the same. Here’s an example of some of the Single Six parts that were sold to me as Blackhawk parts. The Single Six’s hammer and pawl are both shorter than those of the Blackhawk.
To make a long story short, all the original parts cost more than what I paid for the gun. But it was worth it. This is the smoothest Blackhawk trigger ever, and the accuracy is awesome. Only hand loaded, home cast Elmer Keith style bullets have been fired through it since acquired by me.
This Old Model Ruger has become one of my favorite .357 Magnum sixguns and I think that Skeeter would have approved of how this “parts gun” was salvaged.
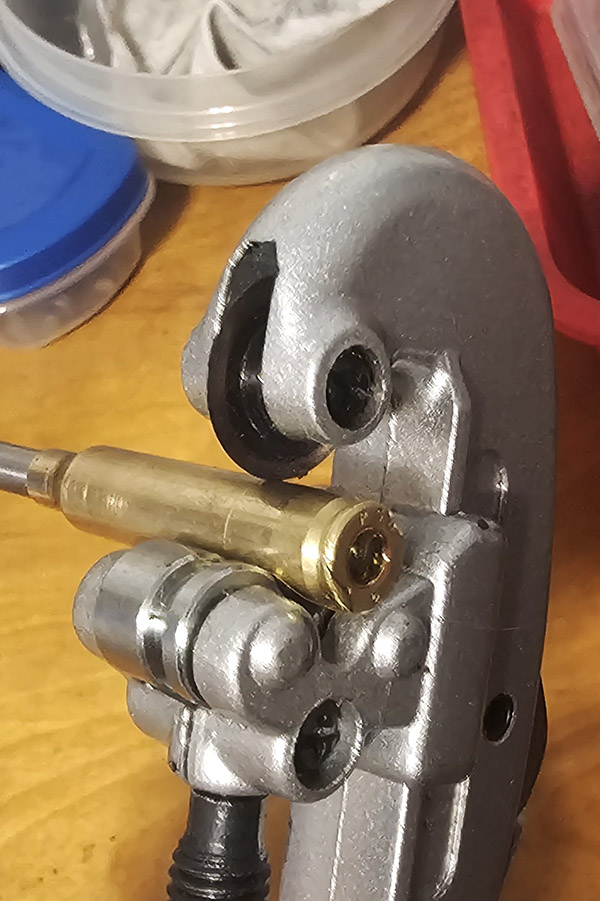
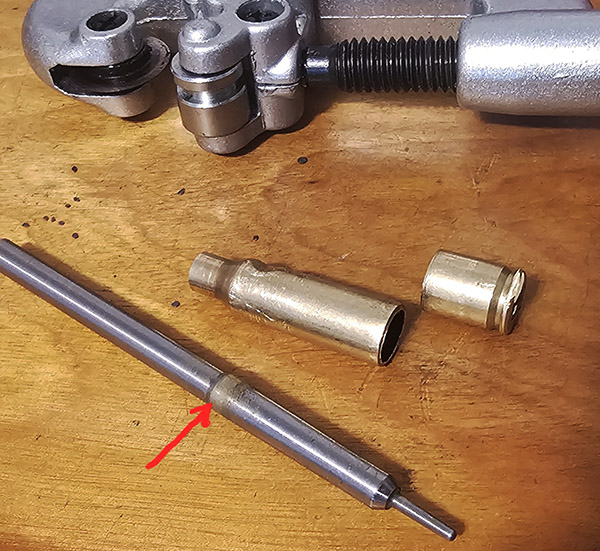
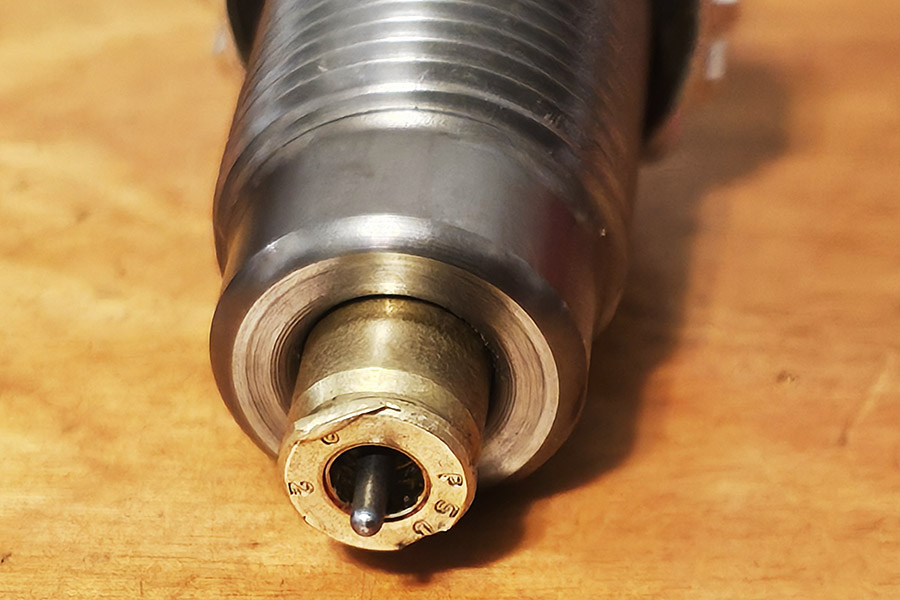
A problem that sometimes occurs when we reload is that a case gets stuck in the decapper/expander die (also known as the resizing die). This can result from not adequately lubricating the case prior to running it into die, or not cleaning a new die prior to use. The case gets stuck in the die, and when you attempt to extract it on the reloading press down stroke, the shell holder deforms the case’s rim and it pulls free of the shellholder. Getting the stuck case out can be problematic.
A friend just bought a new set of Lee .223 dies and forgot to clean out the decapper/expander die. The result was a stuck case (as you can see in the photo above). Here’s the easy way to remove stuck cases using tools that can all be bought at your local hardware store.
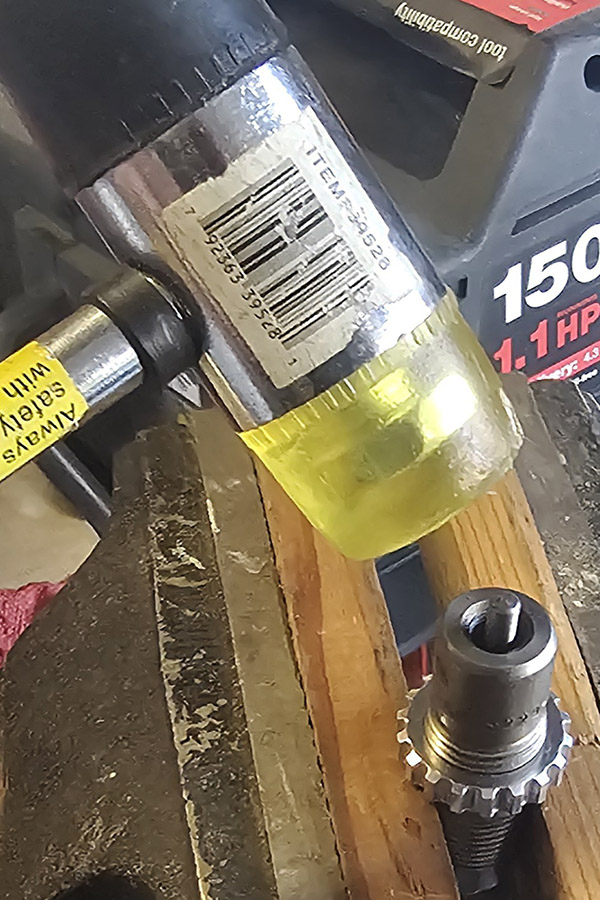
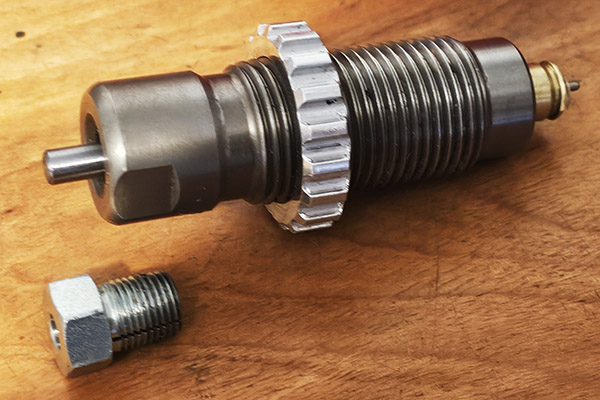
1. Remove the die and take off the pin retainer using the proper 1/2″ box and 3/4″ open wrenches. No crescent wrenches, pliers or vice grips!
2. Put the die in a well-padded vise and knock the pin down with a brass or hard plastic mallet. The brass mallet or brass punch works best.
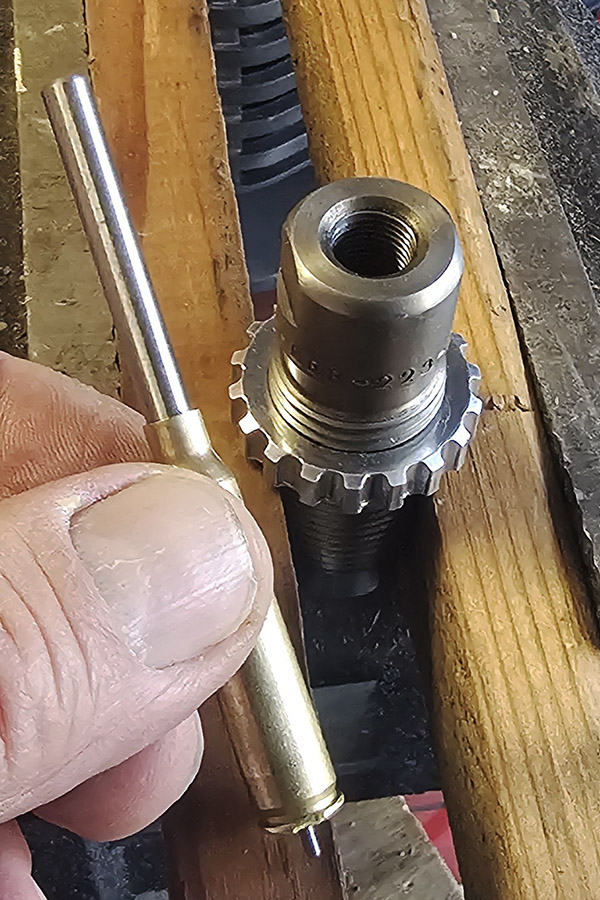
3. The expander pin will remain in the case. It will be loose and rattle around a bit, but still trapped inside the case.
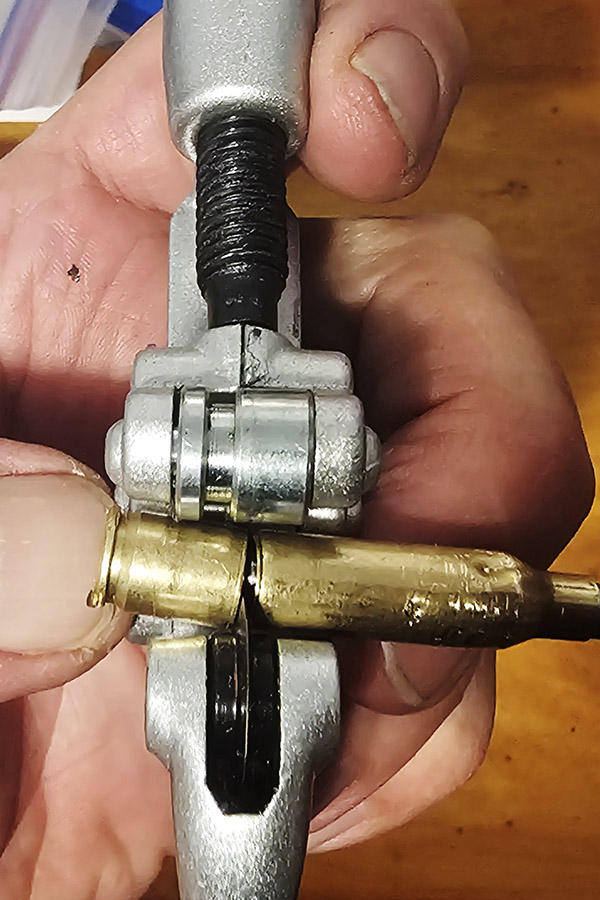
4. Use a small tubing cutter to remove the base of the case.
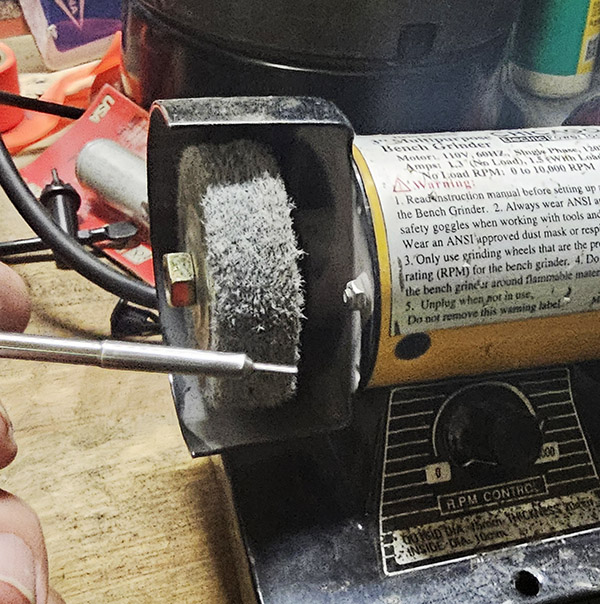
5. Clean up and polish the expander pin using a non-abrasive wheel or a Scotch Brite pad with soap and water. Get all that factory gunk out of the sizing die body too. I use brake cleaner, but WD 40 will also loosen the factory crud.
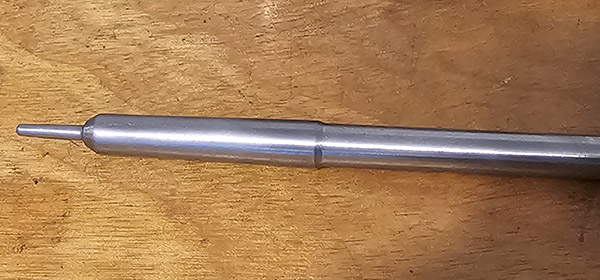
6. Reassemble everything with the pin lining up with the top of the retaining nut. Secure VERY tightly again using the proper wrenches.
Your die will now be better than new because the factory gunk is gone and the expander pin has been polished.
Make sure to use a good case lube on all bottle necked rifle calibers. I’m not a huge fan of the white Lee water soluble case lube but it works. I prefer to use spray lubes such as Lyman or Hornady One Shot.
I’ve never had any desire to hunt African game and I probably never will. But I’ve enjoyed reading about the African plains rifles since I was a kid in junior high school. Bringing a copy of Guns & Ammo magazine to school would probably get you a quick trip to the principal’s office these days…but I digress.
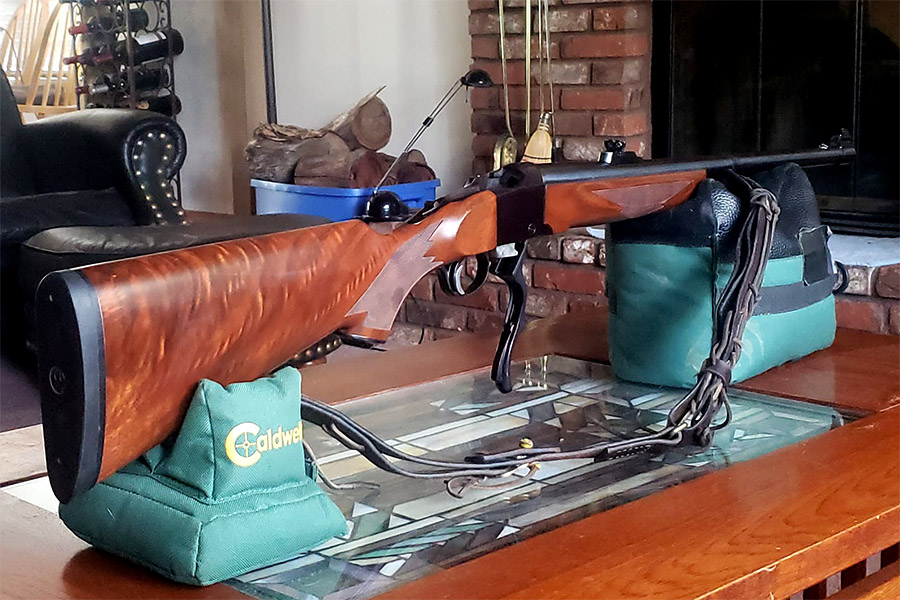
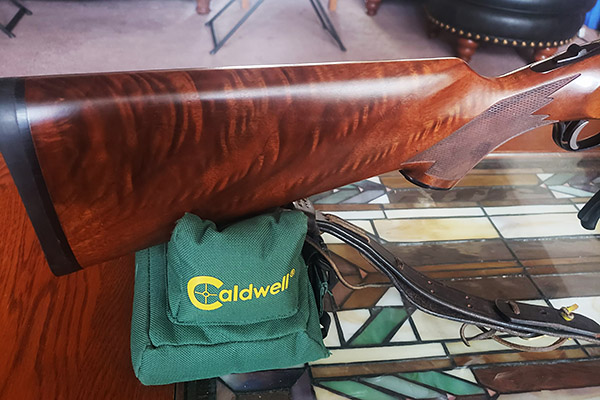
Exquisite walnut is often found on the older Ruger No. 1 rifles.
Quite a few years ago I saw an old Ruger No.1 Tropical in the consignment rack of a small gun shop that is now long gone. The owner said, “just pick it up and feel the heft.” And of course, I did and the next thing you know we were talking price, knowing I would never pay $2,000 for a collectible Ruger No. 1. Shaun confided in me that the rifle’s owner couldn’t find the obsolete 405 ammo for it anywhere and he wasn’t a handloader, so he wanted to sell the rifle. Another problem with the rifle was that a previous owner had cut down the front sight, probably because he had been shooting handloads with .41 caliber pistol bullets. So we settled on $500 and I became the owner of my first “unobtainable” Ruger No. 1!
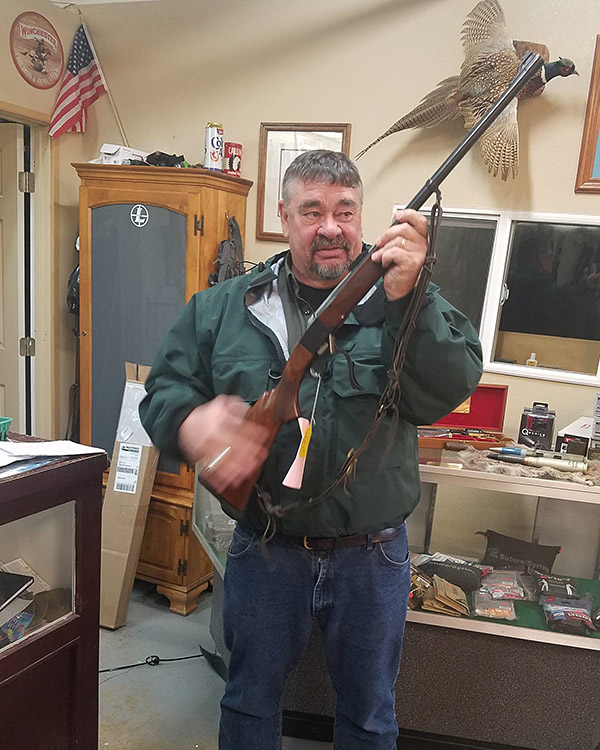
In the gun shop years ago eyeing the Ruger No. 1. Salesman Shaun said, “hand me your phone and let me take a photo of you so you can see how good you look with that rifle!” Shaun passed away a couple of years ago, but I know he smiled down from Heaven yesterday as I fired the Ruger No. 1H Tropical for the first time. And he was right, this gun was meant for me!
It took me a lot of searching over the past few years, but I finally located a set of 405 Win reloading dies, the shell holder, and all the components to bring this rifle back to life.
Hornady had made a run of new 405 Winchester brass and I was lucky enough to find a new old stock box of 50 shells. I also located some new Barnes .412, 300-grain TSX bullets.
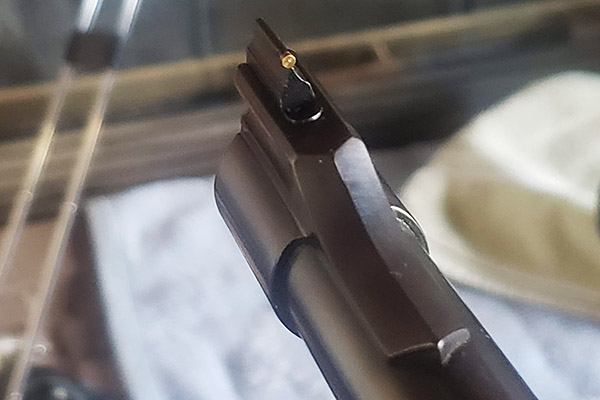
The first step in restoring the old 1H Tropical was to contact Ruger and purchase a new gold bead front sight. That was a simple install as the blade is held in place by a small detent spring.
New Ruger NOS gold bead front sight blade installed.
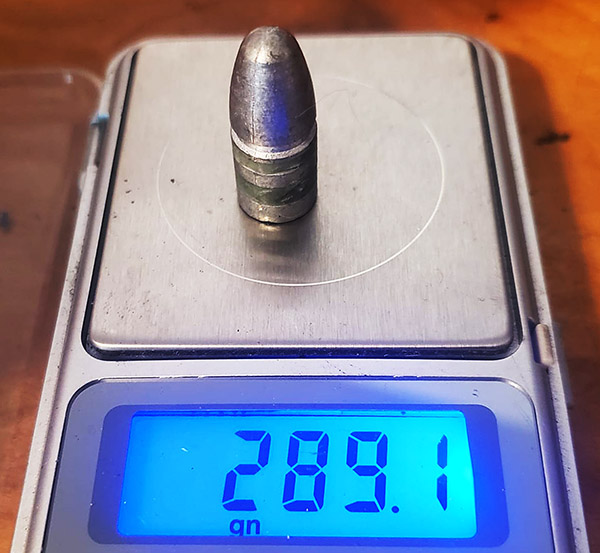
Not wanting to use the expensive Barnes TSX bullets quite yet, lead bullets were cast from lead wheel weights with a bit of tin added using a Lyman 412263 plain base mold to cast 288 grain bullets. These were sized to 0.413 inch and lubed with Alox. Lyman has since discontinued this fine old bullet mold.
A Lyman 412263 bullet, lubed and sized.
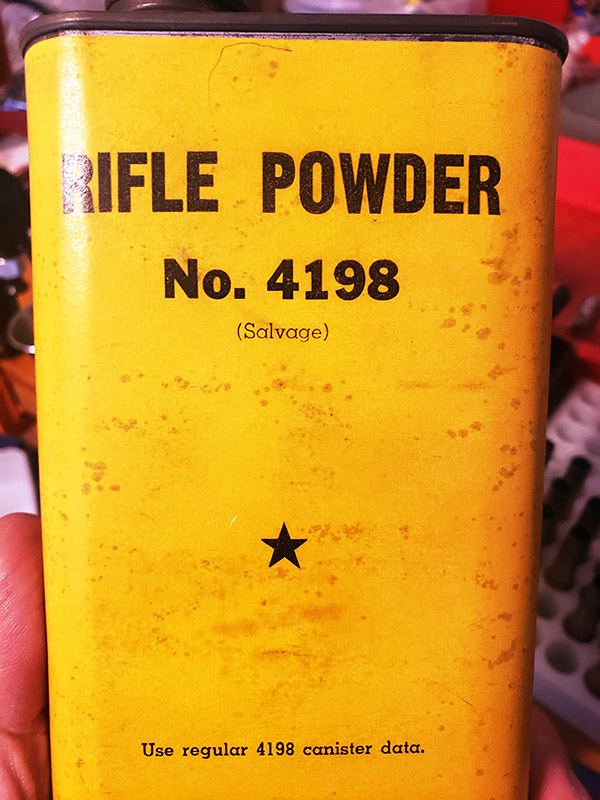
Finally, yesterday morning I decided it was time to resurrect this old rifle! Besides, the project would give me the opportunity to test some old “salvage” Hodgdon 4198 powder I’ve had sitting on the shelf for nearly two decades. The powder is probably from the 1950s or early 1960s. I also had some ancient CCI 200 large rifle primers on hand.
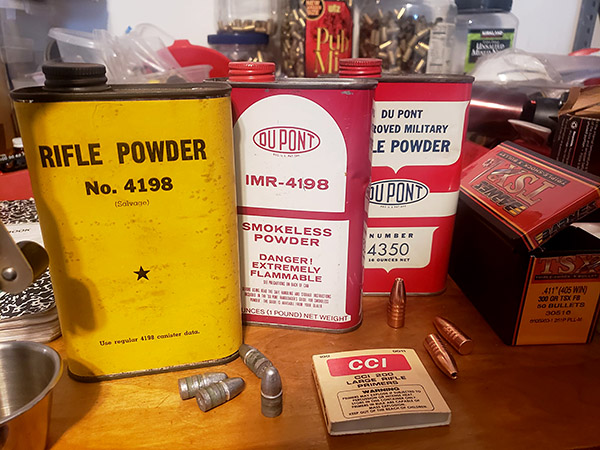
Hodgdon “salvage” 4198 smokeless powder. The powder is probably WW II US Military surplus powder that Hogdon bought in bulk and repackaged in the late 1950s or early 1960s.Vintage components for a vintage cartridge.
I loaded 20 rounds of 405 Winchester ammo using the cast lead bullets and a starting load of 38.5 grains of 4198 and headed down the hill with good friend Yvon to an informal shooting range on BLM land.
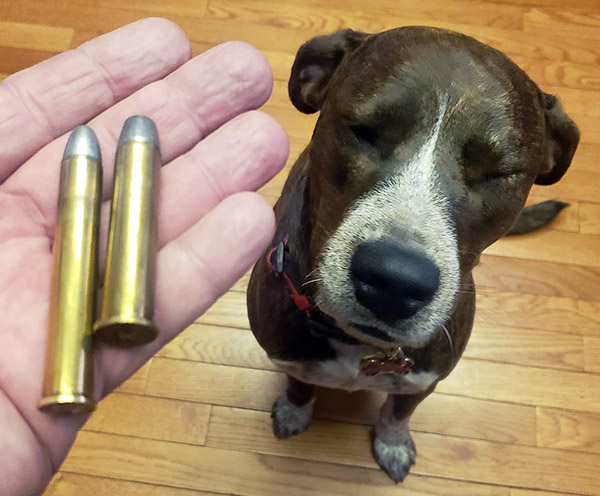
The obsolete 405 Winchester cartridge (left) and the popular 45-70 Government cartridge (right) used by 1880s plains buffalo hunters of the American west. I don’t shoot buffalo and never will. But I enjoy reviving and firing old guns!
Let me say that this Ruger No. 1H Tropical in 405 Winchester lives again. It shoots incredibly tight groups with the cast bullets and gold bead open sights.
My next project will be to develop a non-lead hunting load using the 300 grain Barnes TSX bullets.
Bringing life back into old obsolete rifles can be tons of fun.
A quick preface before you read Joe Cota’s blog: Wow, we are up to three Joes on ExNotes…Joe Gresh, me, and now, Joe Cota. Joe Cota has contributed a few blogs to us previously (before we implemented our new writers program). When Joe most recently sent this in, I felt it was time to include him as one of our regulars, and with this blog, he is. Joe is one of the good guys. He is a professional geologist, an active off-road racer in Baja California, a handloader and bullet caster of 18 years, and an avid flintlock rifle and pistol shooter. Joe lives in the San Bernardino Mountains of Southern California. When not working or racing trucks and buggies in Mexico, Joe can be found fly fishing at his summer home on the Henry’s Fork River in eastern Idaho.
– Joe Berk
Written on Christmas Day, 2023
Merry Christmas to all 🎄❄️🎅!
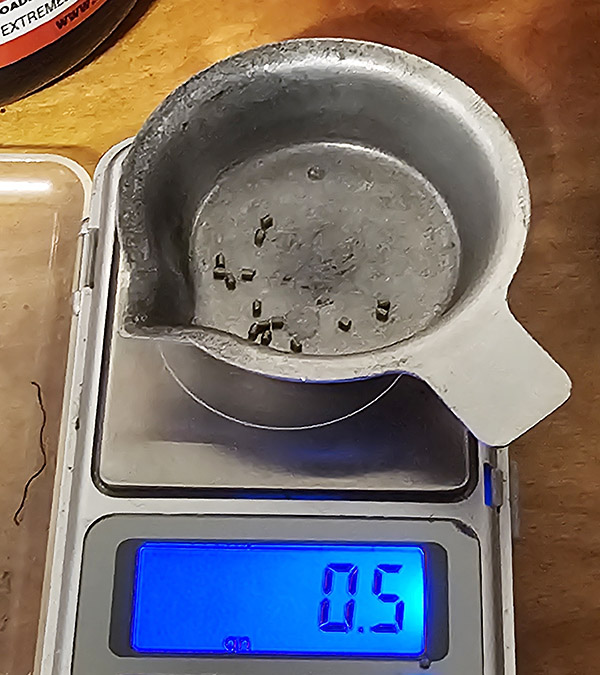
A lot of you will be casting and handloading today, some with their new reloading equipment! Here’s something for your consideration that came up on another message board. Powder weight weenies will argue that all handloaders MUST unequivocally weigh each and every single powder charge to one tenth of a grain of powder or less. Some wildly claim that a half-grain (0.5-grain) of powder makes a 50 to 100 feet per second difference or more in rifle cartridge velocity while others often use this as flawed reasoning as back-up for claiming that volume-based powder dispensers, such as the Lee Auto Disc used on turret presses, are highly inaccurate and produce terrible and unacceptable ammunition. This could not be further from the truth! Let’s bust some reloading myths.
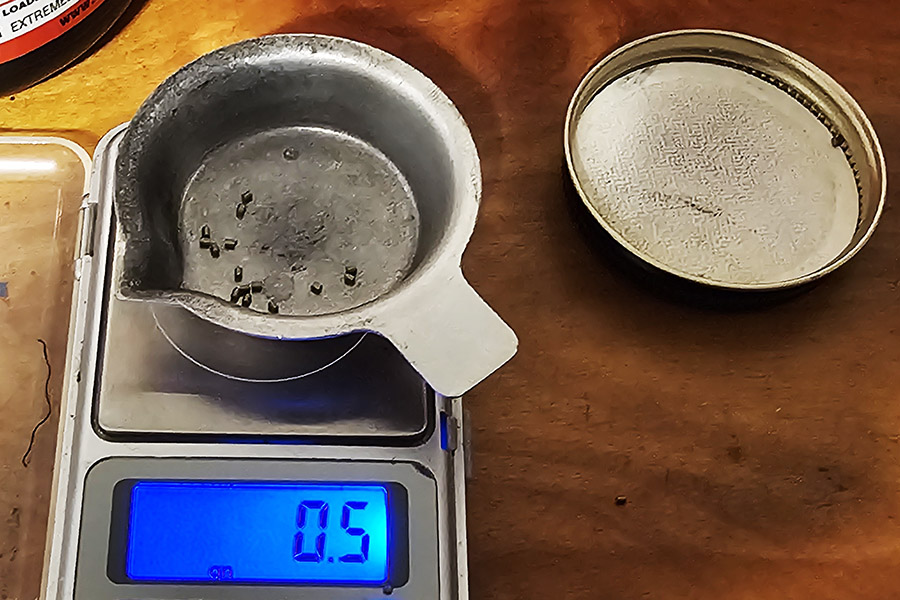
The variation that my ancient Lee Auto Disk throws is about 0.1 to 0.2 grain, depending on if I am using ball powders versus extruded powders. The photos below is what 0.5 grain of Hodgdon H4831 SC extruded rifle powder looks like. For reference, the variation in powder charges that my Lee Auto Disc throws is less than half of the 0.5 grain of H4831 shown in the photo.
So what does a half-grain of powder actually mean in terms of velocity in a typical big game hunting rifle? Let’s explore a real life example. I load .300 Weatherby Magnum ammunition with 168-grain bullets and H4831SC powder. Per the Hodgdon Reloading Data Center, the starting load is 74 grains (which provided 2,865 feet per second in their test rifle) and the maximum load is 81 grains (which provided 3107 feet per second in their rifle). That’s a 242 feet per second difference in velocity over a full 7-grain powder spread. Interpolating these results linearly (a 242 feet per second velocity difference over a 7-grain propellant spread) means that each additional grain of propellant over the minimum powder charger yields an additional 34 feet per second. Therefore, a half grain of powder would make only 17 feet per second difference in velocity! Everyone who uses a chronograph knows that 17 feet per second is typically only a fraction of the extreme velocity spread most rifles and rifle ammo produce.
What about pistol handloads? Take the .45 Colt, using a 255-grain cast lead bullet and Winchester W231 ball powder. The starting load is 5.1 grains (which provides 677 feet per second) and the maximum load is 6.9 grains (which provides 917 feet per second). Using the same methodology as the above rifle computations and comparisons, each 0.1 grain of W231 powder equates to only about 13 feet per second. Again, this is far less than the extreme spread one can expect in .45 Colt ammo.
Does case size matter? I believe it does, but not that much. Take the .223 Remington cartridge, for example, loading 55-grain Hornady bullets with Winchester 748 powder. Straight from the Hornady manual (the 7th Edition), 1 grain of powder between starting and max loads for this combination is 100 feet per second per grain of powder, or 10 feet per second for each 0.1 grain. And again, 10 feet per second is only a fraction of the extreme spread one could expect from perfectly identical powder charges.
So variations in powder volume does matter a little more in the smaller rifle cartridges, but not enough to make anyone steer clear of auto powder dispensers on turret presses versus individually weighing each charge. Richard Lee was right when he wrote in his Modern Reloading book that powder volume is more critical than weight and that one should periodically weigh a charge only as a double check for volume.
So there’s little justification for being a Tenth of a Grain Weight Weenie! Don’t be THAT guy who bashes turret press and powder dispenser users based on misconceptions posted by folks on the Internet.
Happy handloading and a prosperous new year to all!


 2. Put the die in a well-padded vise and knock the pin down with a brass or hard plastic mallet. The brass mallet or brass punch works best.