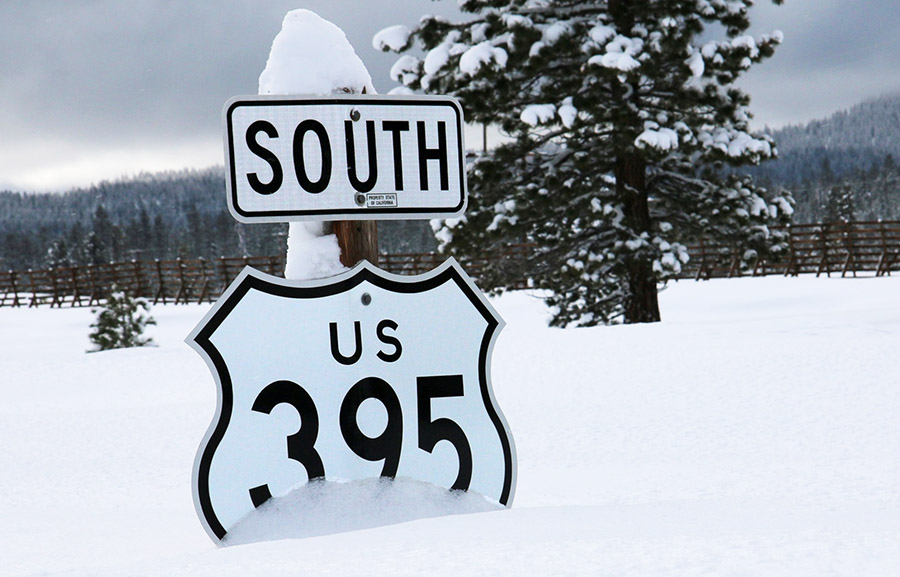
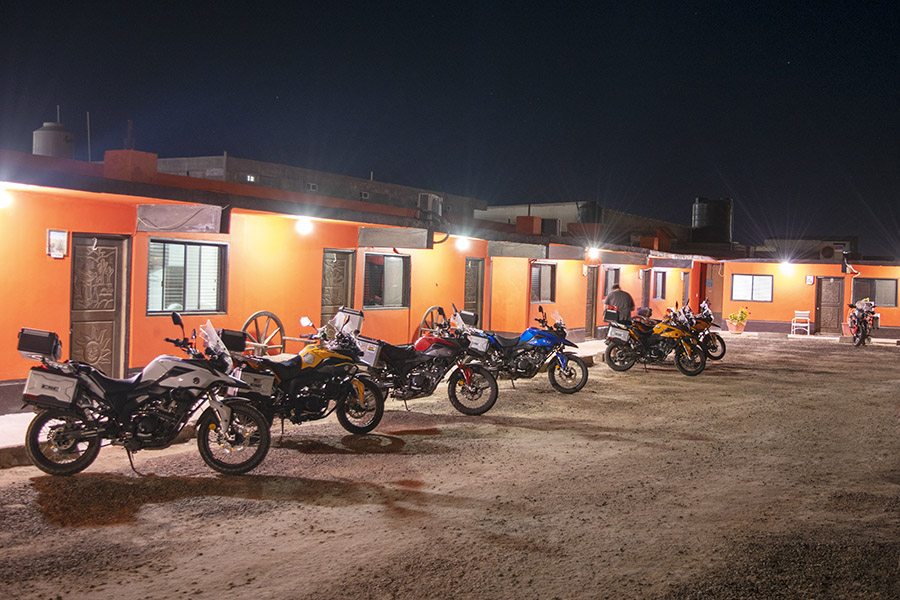
Highway 395 closed yesterday just north of Bridgeport due to snow. I know that road well. I’ve ridden it a bunch of times and it’s a favorite, but wow, the weather can turn on a dime up there. Once you leave Bishop heading north, the elevation goes up abruptly, and in the next 30 miles or so it can go from cold to damn cold mighty quickly.
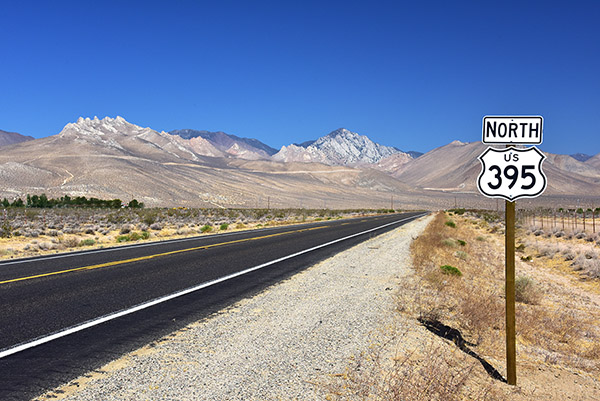
Highway 395 in warmer times. As I recall, temperatures were in the triple digits when I shot this photo around Manzanar.
I once rode my KLR 650 up to Lake Tahoe on a press junket and the weather was okay. Moderate, not too cold, nice riding weather on the roads in and around Tahoe. The ride home was something else, though. Tahoe is pretty high in elevation and I dropped maybe two or three thousand feet coming down the mountain to Highway 395. That’s when the cold really set in. I had good gear on, but no electric vest, and the cold was brutal. I stopped at the Bridgeport Inn maybe a hundred miles down the road and went in for breakfast. Well, that’s not entirely true. I went in to warm up, and I wanted to just sit there for a couple of hours sipping coffee after breakfast. It worked, but it took a while.
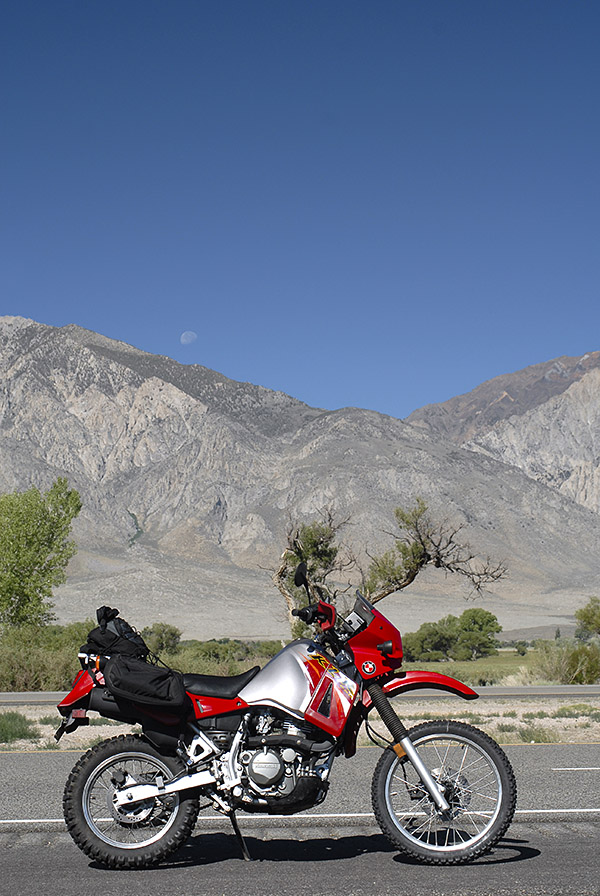
The KLR 650 on Highway 395, with the Sierra Nevada Mountains in the background. It was cold going north; it was way colder coming home. This is an interesting photo – you can see the moon peeking out just above the mountains.
You know, the funny thing is that another hundred miles or so south when I rolled through Adelanto on the 395, it was so hot I took most of that gear off. The temperature had gone from near freezing on the 395 north of Bridgeport to nearly 100 degrees down in the desert.
The KLR 650 was a good road bike and a great traveling companion. I rode it all over Baja and through a lot of the American Southwest. It’s gone down the road now (I sold it to a friend of a friend who may still have it). Good fuel economy, it could touch 100 mph on a good day, and the thing was just comfortable. The ergonomics were perfect for me. It was was one of the great ones.
I remember the bad weather rides way better than any of the ones with clear skies and moderate temperatures. That ride back from Tahoe will stay with me for a long time.
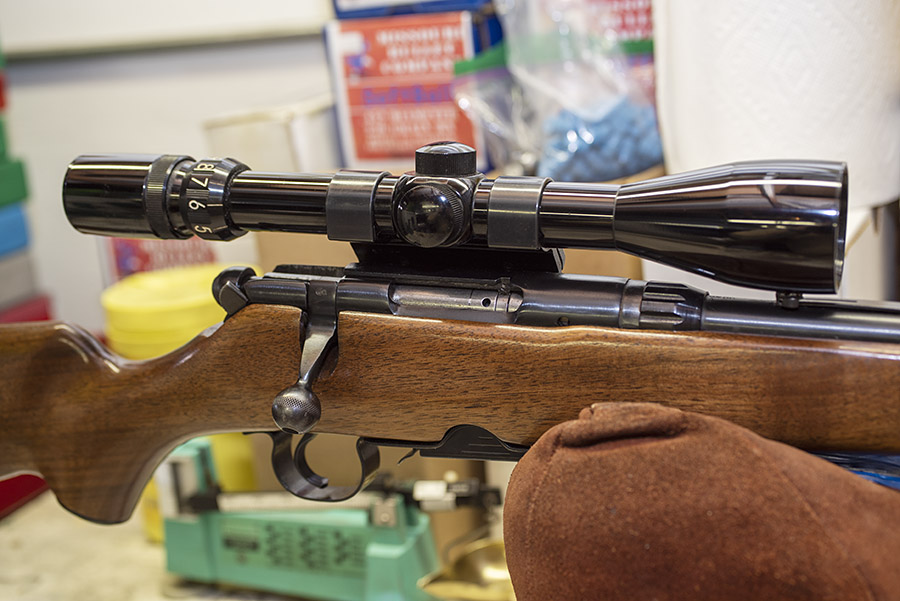
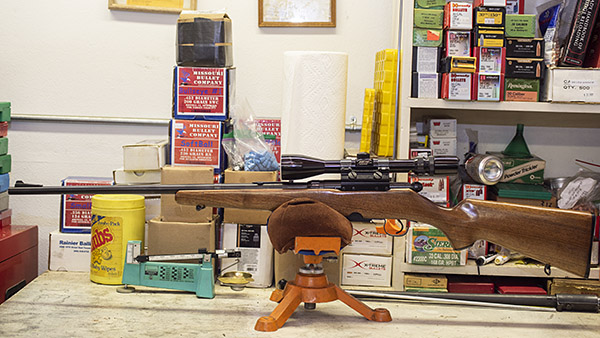
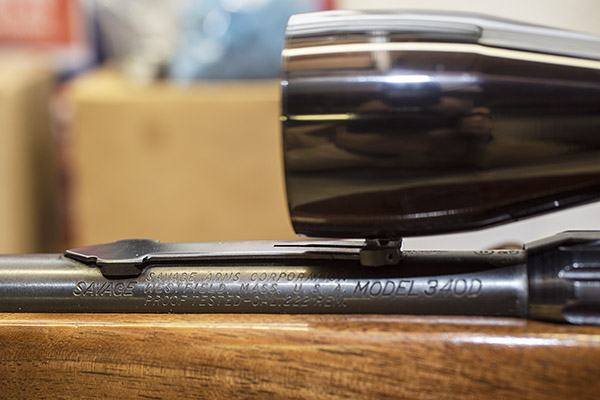
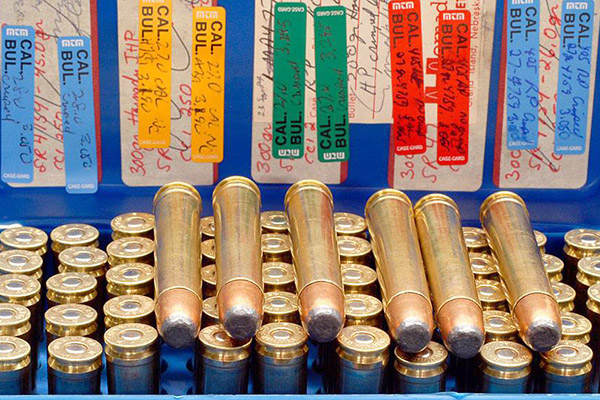
The .222 Remington, known as the triple deuce, is an inherently accurate cartridge. I have an old Savage 340 chambered for this cartridge and I’ve written about it before. The Savage was inexpensive and the stock was well worn (it was only $180 from a local shop used gun rack maybe 3 or 4 years ago). I bought it because I never had a triple deuce and I wanted a refinishing project.
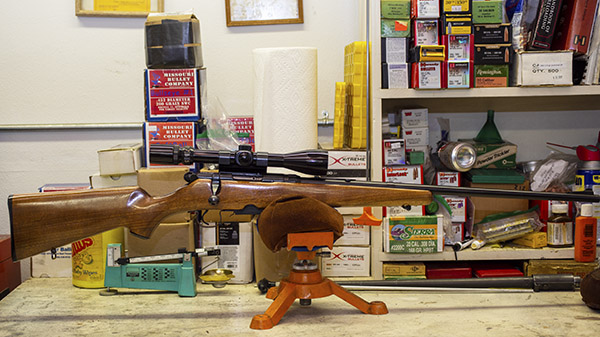
The refinished Savage 340. Port, and…..starboard. It looks brand new. It’s at least 50 years old.
The Savage 340 was an economy rifle back in the day. I have a library of old Gun Digest books, and my 1956 Shooter’s Bible shows that it sold for $62.
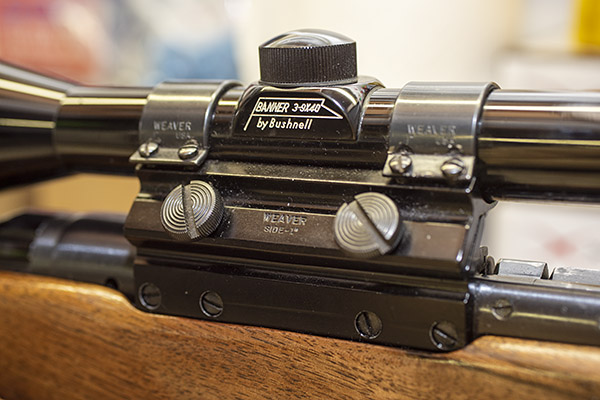
The refinish, with TruOil, turned out well.Mine is a 340D. I think that means it was the Deluxe model.Note the cantilevered Weaver mount and the Bushnell 3×9 Banner (an el cheapo model if ever there was one) were included with the rifles’ $180 price at Turner’s.The detachable box magazine. The bluing is in excellent original condition on this rifle.
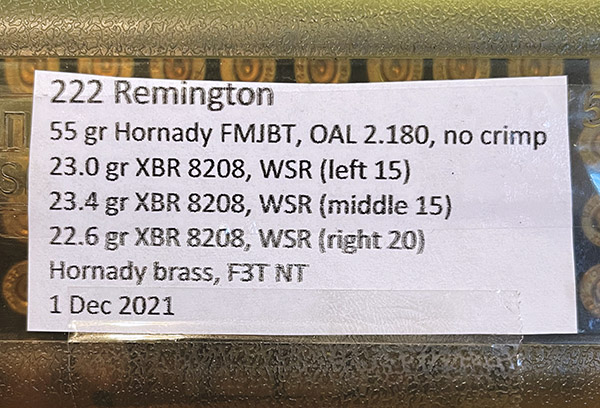
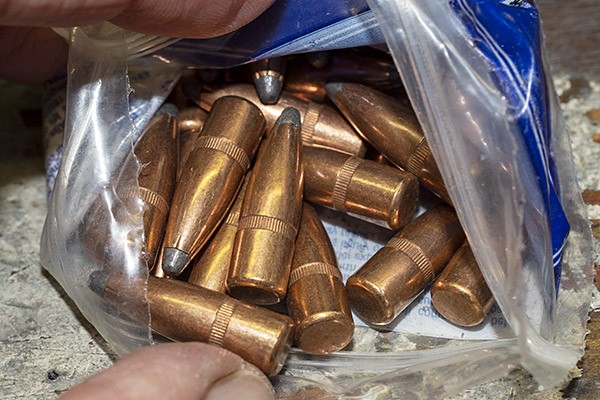
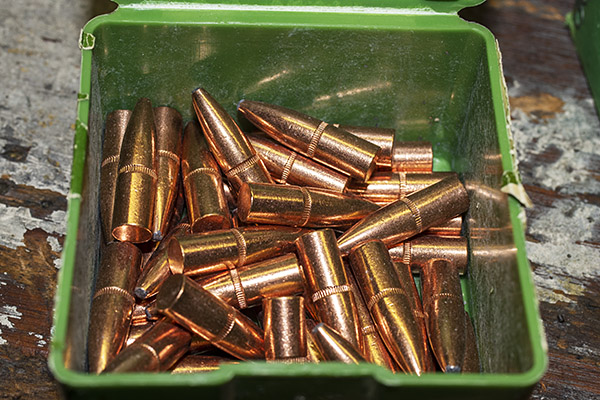
I recently bought an 8-pound bottle of XBR 8208 propellant (these days, you buy what’s available), and I wanted to see where the accuracy was with this propellant and 55-grain full metal jacket boat tail Hornady bullets. I use these bullets in my Mini 14, and I was pretty sure they would do well in the .222 Savage, too.
Loads for testing in the Savage.
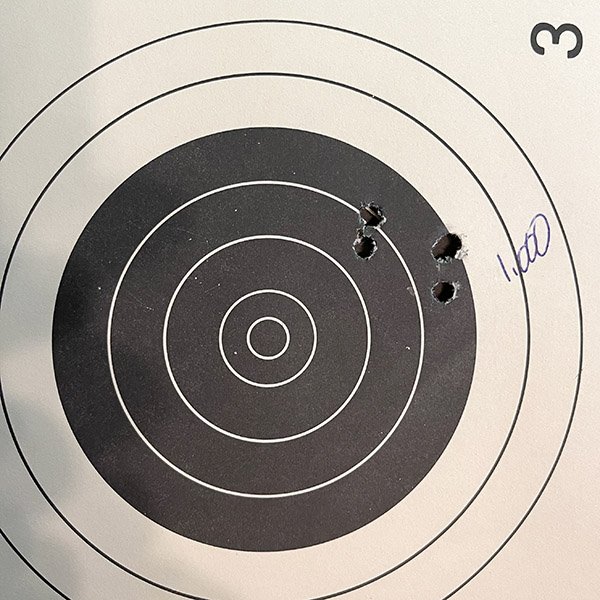
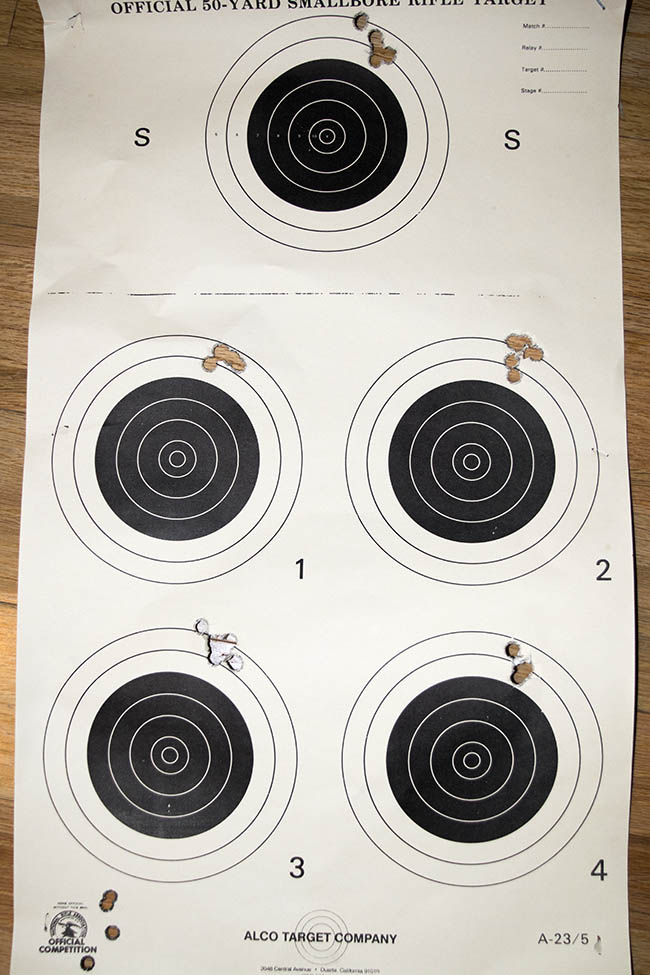
The accuracy load for the Savage is 23.4 grains of XBR 8208. Not bad for $180, a little elbow grease, a little TruOil, and an hour on the range at 100 yards.
For a pencil weight barrel and a really screwy bedding approach, the Savage did very well.And another. You gotta love conistency.
The rifle could do better. The stock has a lot of drop at the heel and it is designed for the iron sights on the rifle. And that would be okay, but the Savage has a scope on it and I wanted to play with it. It’s difficult to get a consistent cheek weld because of the scope’s height and the stock’s drop (I’m shooting with my chin almost on the stock). I may cast about for one of those leather cheek pads that lace onto a rifle, or I may leave it as is.
This lightweight and accurate rifle would be a hoot chasing jackrabbits in west Texas, which is what I spent a lot of my earlier years doing. Maybe someday I’ll go back.
About those other links…here’s the series on refinishing the Savage:
A day or two before Joe Gresh and I began our ride across China on Zongshen RX3 motorcycles, the Chinese took us to dinner in Chongqing, the megacity in which the Zongshen company is located. It was a typical summer night in Chongqing, which is to say it was hot, humid, and steamy. Sultry is a word that comes to mind. Exotic is another one.
Chongqing is where two of the world’s great rivers meet (the Jialing and the Yangtze). Downtown Chongqing is in the center. We were returning from dinner on the south shore of the Yangtze River (the lower river in the map) when I grabbed the photo you see above with my Nikon. Where it says Yuzhong…we were right about where the g is in that word.
Chongqing is huge. How big? We think New York is big (and it is) with 8 million people. Chongqing has 34 million people. It’s hard to imagine, and it’s hard to imagine we rode 250cc motorcycles through it (as well as many other Chinese megacities). I like everything about Chongqing, and you’ll see more favorite photos from there in upcoming ExNotes blogs. But this one stands out for me.
You can read more about what we saw in China in Riding China.
Earlier Phavorite Photos? You bet! Click on each to get their story.
I’ve been on a tear the last few weeks, playing with the Mk V 300 Weatherby and developing loads for it. I developed loads with cast bullets and with jacketed bullets, and at reduced-load levels and at factory ammo levels.
The Internet weenies advise going hotter with this cartridge to get better accuracy, but I don’t want more accuracy that badly (don’t get me wrong; I like accuracy, but not at the expense of this kind of recoil). The recoil with this cartridge is severe. I shot some sub-minute-of-angle groups with the 180 grain Remington jacketed softpoint bullets. I also had a few larger groups, but I’m chalking that up to the wind and me still being a bit recoil sensitive. For me, it’s close enough to call it done.
All groups presented here were at 100 yards from my Mk V Weatherby. It has a walnut stock and a 26-inch barrel. I bought this rifle about 10 years ago but I had not shot it much until recently. I have a 4×16 Weaver on this rifle and all groups were with the scope at 16X. The scope is no longer available, but it is a good one.
This Mk V initially had a terrible trigger. It was creepy and gritty, and it was so bad it surprised me. I was thinking about spending another $200 on a Timney trigger and then a funny thing happened: The trigger suddenly and spontaneously improved. It’s about a three-pound trigger now with zero creep. Don’t ask me how or why. Maybe there was some grit in the trigger, or maybe there was a burr somewhere in the mechanism. Whatever it was, it’s gone.
I now use a Caldwell shoulder pad for the full bore stuff. It helps tremendously with recoil, but it is probably degrading my shooting position because of the unnatural stretch to get a good scope picture and cheek weld. Even with that pad, though, I still get kissed by the scope on occasion. The rifle likes to let me know who’s the boss.
The Caldwell shoulder pad really helped tame the 300 Weatherby’s recoil.
Cast bullets are okay for light loads and practicing, but to keep the groups below 3 inches, I had to use a bore brush between every group. If I didn’t bore brush it every three shots, the groups opened up. If I use a bore brush and run it through the barrel three or four times after each group I can keep my shots in the black.
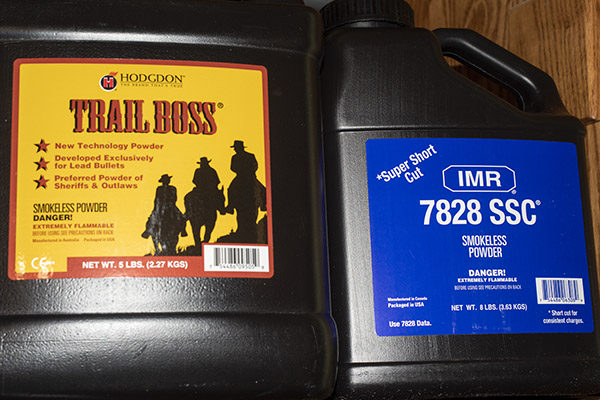
After calling Hodgdon to make sure I wouldn’t blow myself up, I tried a few jacketed loads with 130 grain Hornady and 150 grain Winchester bullets and Trail Boss powder. They grouped okay. The jacketed bullets with Trail Boss were more accurate than the cast bullets, but not as good as the full bore stuff. It’s good to know, but I’ll reserve the Trail Boss for cast loads.
Hornady 130 grain jacketed soft point bullets. In my 30 06 Ruger No. 1 with IMR 4320 powder these bullets will group under an inch all day long.Winchester 150 grain jacketed soft point bullets. These bullets shoot into a half inch from my 30 06 Winchester Model 70.Remington 180 grain jacketed soft point bullets. These bullets shoot well in any rifle I’ve tried them in (a single-shot Browning 30 06 B78, a custom Howa 1500 30 06, a Ruger 308 GSR Scout rifle, and others). They are no longer available, which is a pity.200 grain Sierra jacketed hollowpoint boat tail bullets my good buddy Marty gave to me.
I shot neck sized brass with the Trail Boss cast and jacketed loads because the Trail Boss loads don’t expand the case very much and it’s easier to reload if I neck size only. I don’t have to lube the cases and it goes a lot faster.
180 grain cast .309 bullets from my good buddy Roy.
The Trail Boss sweet spot with cast bullets is 20.0 grains. That’s near the bottom of the charge range. I went down to 19.5 grains and there was no improvement in group size. I went above 20.0 grains and the groups opened up. I’m a quick study. 20.0 grains. Got it.
I tried neck sizing only (instead of full length resizing) with full bore loads and I found that was not the way to go. I had a lot of cases that wouldn’t extract when I shot neck sized only full bore loads, and then I found when I neck sized a case it stuck it in the chamber even without firing (it was difficult to extract). Full bore loads have to be full length resized in my 300 Weatherby (with an extra quarter turn on the sizing die after it touches the shell holder for this rifle; that’s a trick a tech rep at Sierra turned me on to). The cases expand too much if you neck size only after firing full bore loads.
With cast bullets, crimping the bullet is necessary for better accuracy. Not crimping opened up the groups substantially. Crimping brought them back down. But that’s only with cast bullets. For jacketed bullets, the rifle doesn’t care if you crimp them or not. There’s no accuracy gains to be had with crimping jacketed bullets in my rifle.
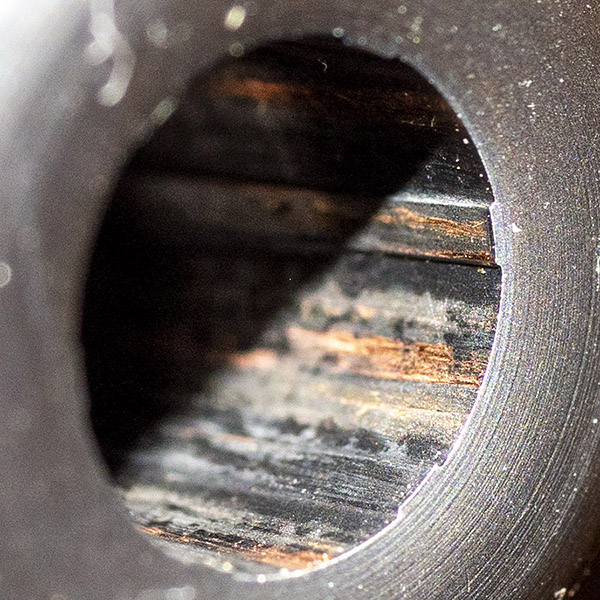
Keeping the bore clean makes a difference (duh), and you need to get up close to make sure the bore is clean. Simply judging cleanliness by the patch coming out clean isn’t good enough. After my patches were coming out clean, I took a photo of the muzzle. I looked at it on my computer and I was shocked. Before examining the photo, I thought this was a clean barrel:
A macro photograph of the Weatherby’s muzzle after I thought it was relatively clean.
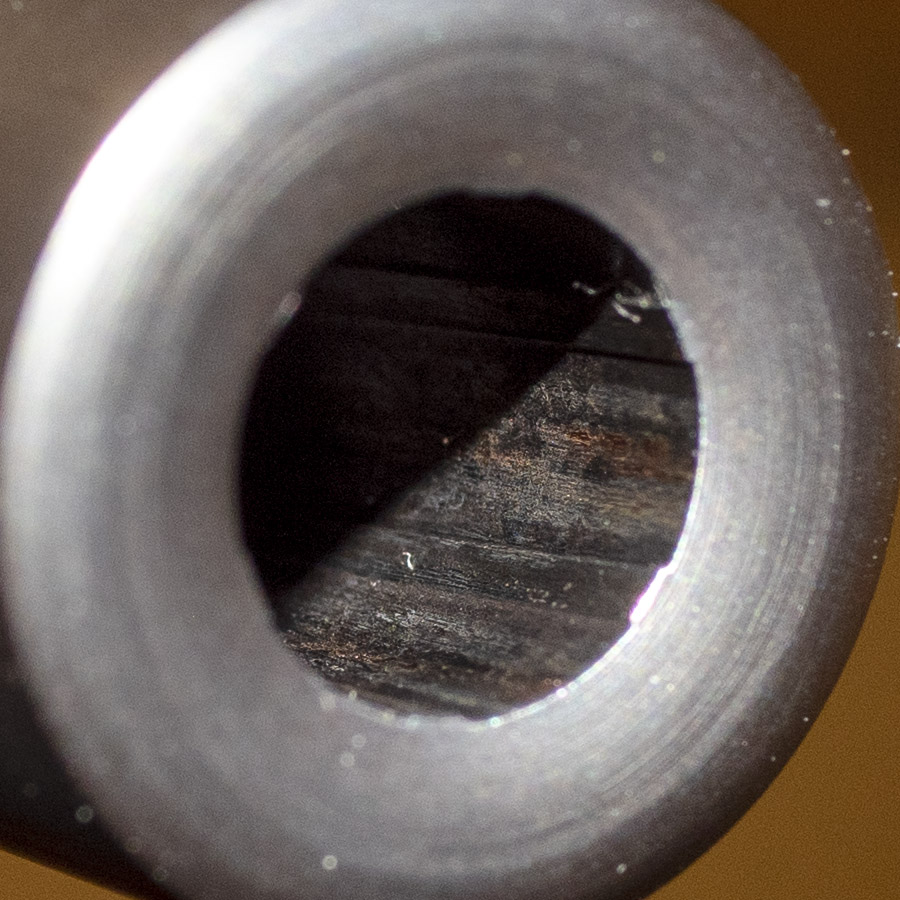
I realized I still had a lot of copper and lead streaking in the barrel and I went to work on it with Hoppes No. 9 and Butch’s Bore Shine. That reduced most of the copper, but the lead was not giving up. A bit of online research, and what do you know: Solvents (like Hoppes or Butch’s) don’t affect lead at all. I’ve been a shooter for 50 years and that was news to me. Nope, lead has to be mechanically removed. I soaked a pad with Kroil penetrating oil, ran it through the bore and let it soak for a while, and then I ran a bore brush down the barrel repeatedly. It was better, but it needed more. I repeated the process several times over the next two days and got the bore down to this:
The Weatherby muzzle after a much more stringent cleaning. Additional effort did not remove the minute streaks of remaining lead and copper.
The bore wouldn’t get any cleaner that what you see above. To the naked eye, it looks clean. But then, to the naked eye the first photo looked clean. I was probably penalizing my inspection with that macro photo. I know I could probably get it cleaner with something like JB Bore Paste, but I’m hesitant to use an abrasive in the bore.
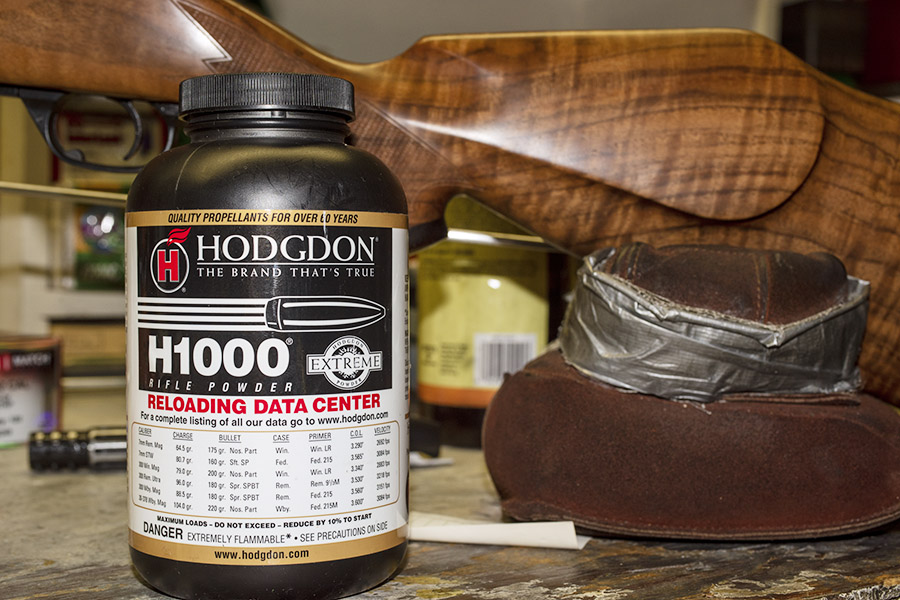
It’s Trail Boss for cast and reduced jacketed loads, and IMR 7828 for the factory level loads.H1000 is a powder I had not previously tried in the 300 Weatherby. That’s the Mk V behind it. Weatherby has discontinued walnut stocks on their regular production rifles; they are still available on rifles through the Weatherby Custom Shop. Nothing looks better than fancy walnut, in my opinion.
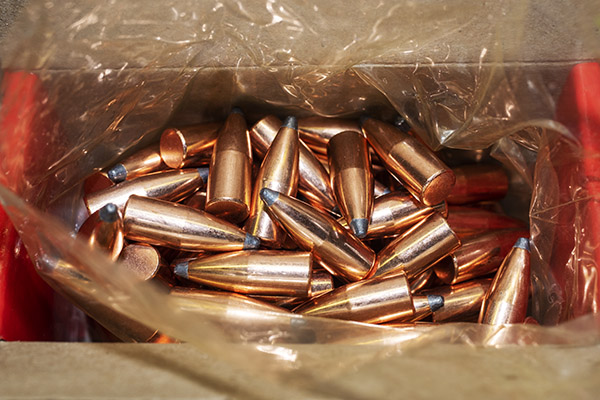
I loaded various permutations of IMR 7828 and H1000 propellants, and the Sierra 200-grain jacketed hollowpoint boat tail and Remington 180-grain jacketed soft point bullets for the factory level loads.
So how did the above combinations perform at 100 yards? Take a look:
The rifle is unquestionably capable of better results than you see above, but not with me. I’m usually not recoil shy, but this 300 Weatherby at factory ammo levels is a bit beyond what I’m willing to live with on a regular basis. A better rifleman could probably keep most of the above loads below an inch. But an inch and half is good enough for me, and several of the factory-level loads above did that. I can hunt with this rifle, and that’s what I’m going to do.
So what’s next? I found a couple of boxes of 180 grain Hornady jacketed soft point bullets, and I have a few Nosler 180 grain bullets as well. I’m going to try a few loads with them. I haven’t tried too many loads with lighter bullets, mostly because earlier results were disappointing. But I haven’t given up on the lighter bullets. I’m going to revisit a few loads with them. And I have a couple of powders I want to try as well. Bottles of powder don’t last long with a 300 Weatherby, though, when you look at kind of powder charges these cases demand. When you’re dispensing 80 grains of propellant per round, 100 rounds of 300 Weatherby consumes an entire bottle of powder. And powders (like everything else) are somewhat difficult to find these days.
Truth be told, the 300 Weatherby is specialty item, and it’s a punishing beast. It’s surprising how much of an increase in recoil there is in going from a 30 06, a 300 H&H, or a 7mm Magnum (in either Remington or Weatherby flavors) to a 300 Weatherby. But shooting the 300 Weatherby is fun in its own way. I sure enjoy mine.
If you shoot a 300 Weatherby, we’d like to hear your thoughts on the cartridge and the rifle. Please leave a comment here on the ExNotes blog.
More Tales of the Gun…revolvers, rifles, pistols, pellet guns, reloading, and more. It’s all right here!
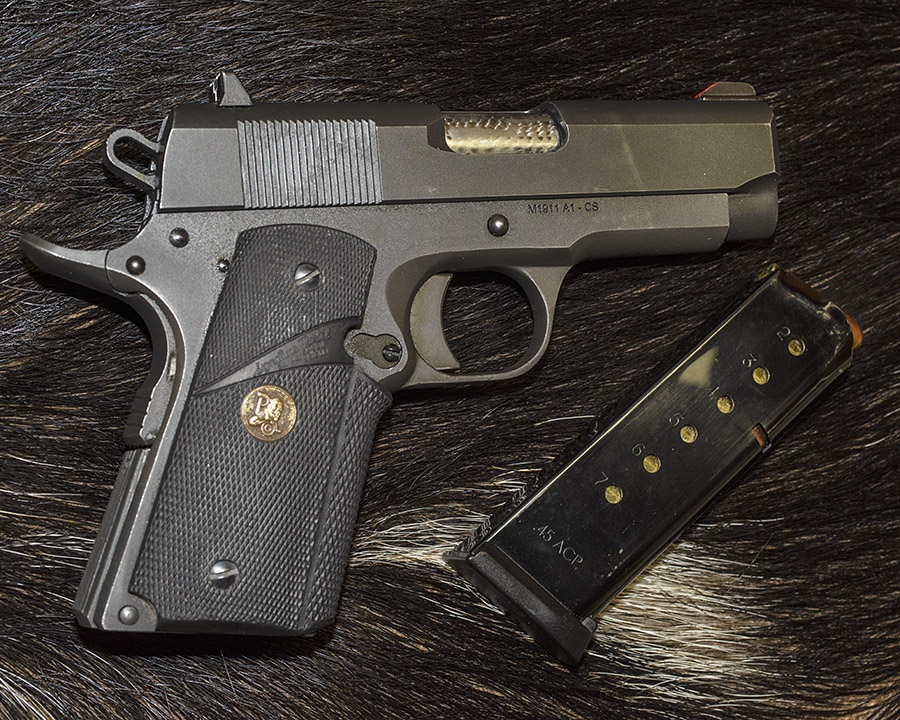
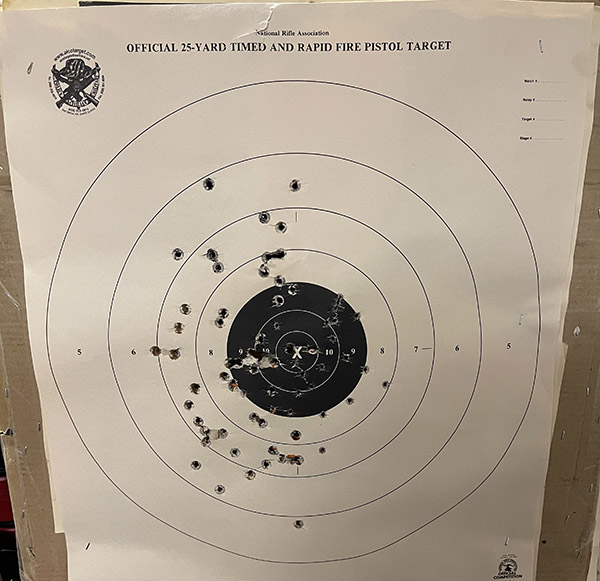
The last time I had the Compact 1911 on the range, I shot worse than usual. At 25 yards (with me resting my arms on the bench), I can typically keep my shots in the black with the Rock Compact. This is how I shot last week:
Maybe adequate for defense purposes and probably close enough for government work, but terrible shooting.
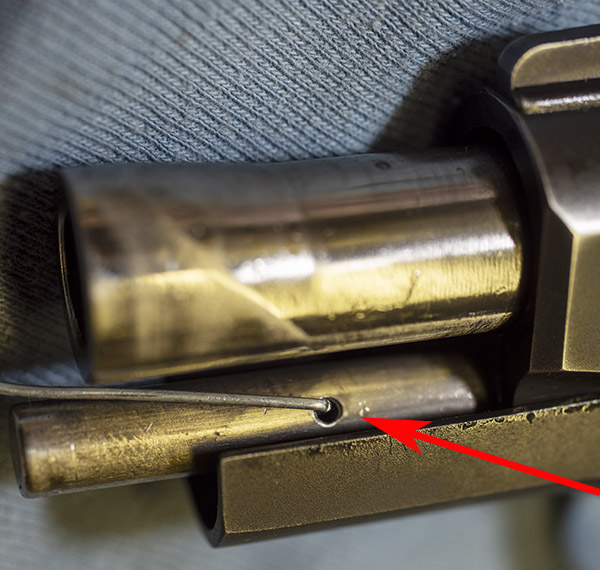
That’s pitiful (there’s a few 9mm holes on that target above; ignore those). Then I noticed the slide was not going fully back into battery, which was something new to me. It wasn’t jammed, it just needed a slight nudge to finish the trip home.
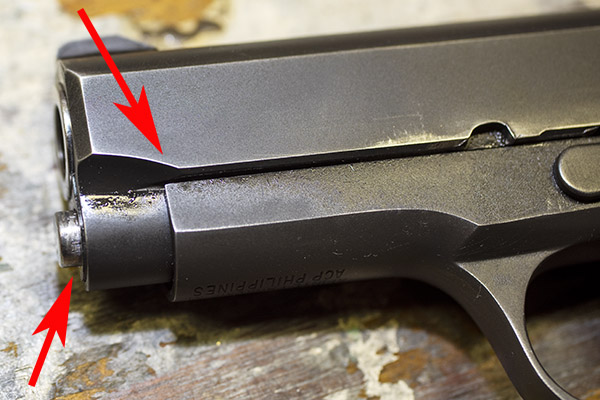
The slide sitting about a tenth of an inch from returning to battery.
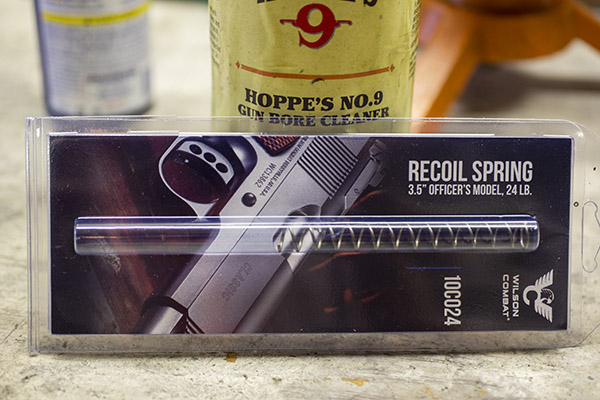
Another view of the slide not returning to battery. “Battery” means fully forward, ready to fire the next round.I knew that Compact 1911 recoil springs fatigue earlier than the springs in full-sized 1911s, but this one snuck up on me. Armscor (the Rock Island Armory folks who manufactured my Compact 1911) were out of stock, so I ordered a new spring from Wilson Combat. Wilson Combat is a recognized “go to” shop in the 1911 world. I received my new recoil spring a few days later.
A brand-new Wilson Combat 24-pound recoil spring.
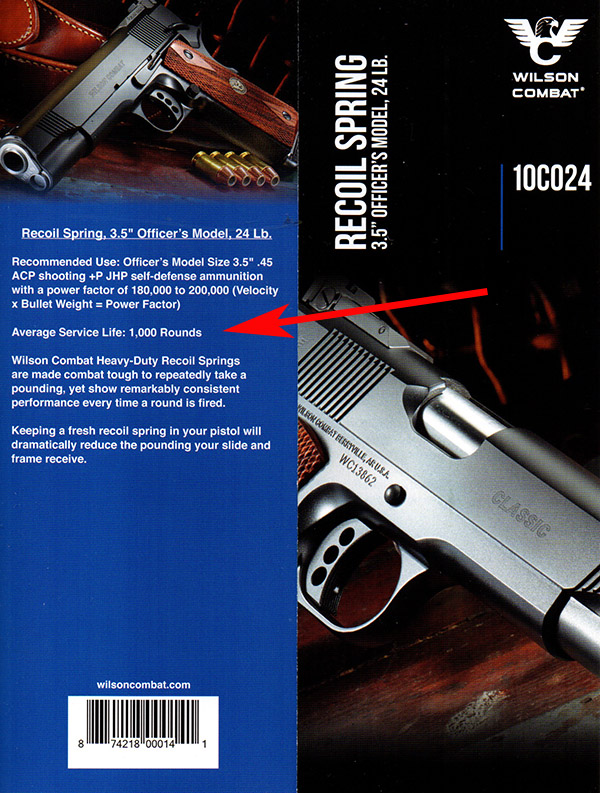
Online research said the life of these springs in a Compact 1911 is only about 2000 rounds, tops. That surprised me. The literature from Wilson surprised me even more:
The Wildon Combat bubble-pack literature.
1000 rounds. That’s 10 boxes of ammo. Wow. I probably had several times that many rounds through my Rock. Small wonder the slide wasn’t returning to battery.
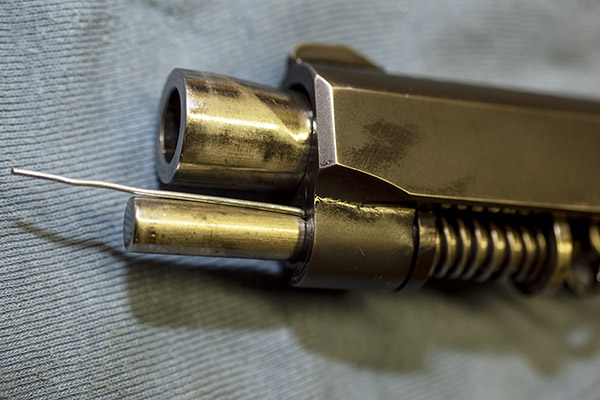
When the spring arrived, I was eager to put it in my 1911. I dropped the magazine and cleared the weapon:
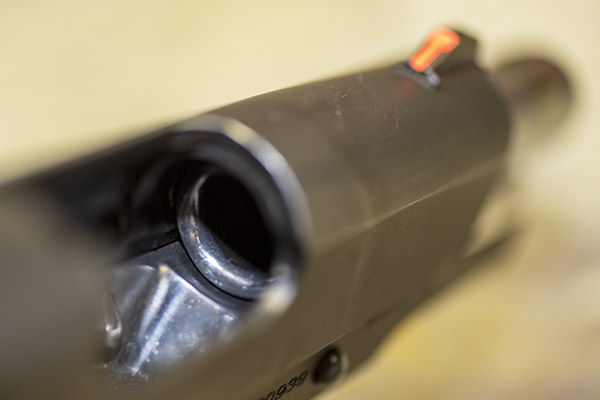
The TJ-customized and polished feed ramp and chamber entrance on the Rock Island Armory Compact 1911. Yep, it’s empty.
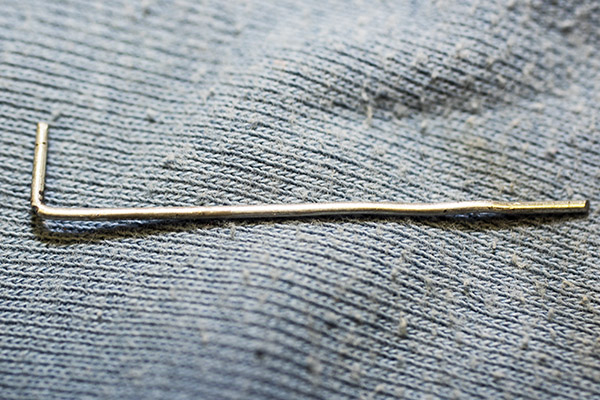
Then it was time to turn to my custom, German tool steel, carefully configured to exacting tolerances, Rock Island Armory Compact 1911 disassembly tool. It’s a bent paper clip:
A bent paper clip 1911 disassembly aid.
The drill is to lock the slide back, put the paper clip in the guide rod hole, and ease the slide gently forward to engage the paper clip.
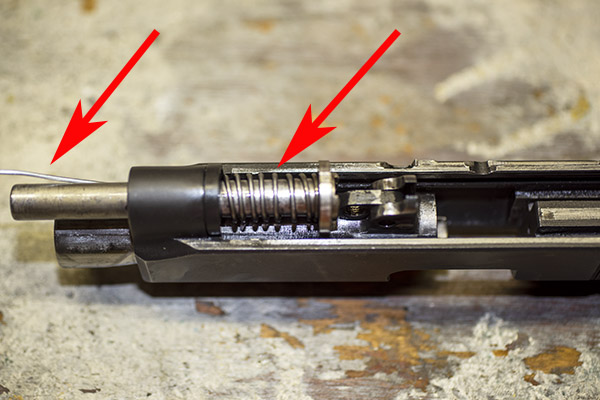
The 1911 guide rod hole that accepts the paper clip disassembly aid.With the slide forward on the guide rod, held in place by the paper clip You bend the paper clip so that the guide rod, recoil plug, and recoil spring can be pushed rearward in the slide to remove these three components as a subassembly).
Once I had the slide forward, with the paper clip disassembly aid in place like you see above, I withdrew the slide release from the left side of the pistol. At that point, the entire slide assembly can slide forward off the receiver.
Another view from underneath the slide.
The next step was to extract the recoil spring, the guide rod, and the recoil plug out of the slide. It’s best to leave the paper clip in the guide rod (i.e., with the recoil spring still compressed), and then slide the entire recoil plug/recoil spring/guide rod rearward as a unit out of the slide. After that, I pushed down on the recoil plug, withdrew the paper clip from the guide rod, and released the compression on the spring. I was careful when I did this; parts could go flying if I just let them go. Don’t ask me how I know this.
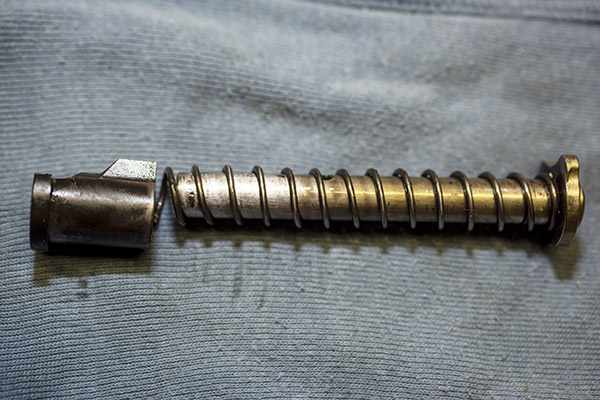
The recoil plug, the guide rod, and the recoil spring removed from the slide with the paper clip removed.
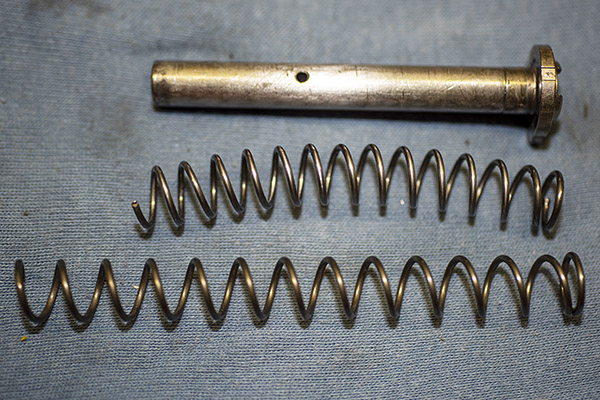
Here’s what the guide rod, the original recoil spring, and the new Wilson Combat recoil spring look like. The new spring is on the bottom:
Quite a difference, huh? In case you were wondering, both springs have 14 coils.
I think the new spring wire diameter is larger than the original spring wire diameter. I didn’t think to measure it before I installed it; I will do so the next time I have the gun apart. And there’s a huge difference in free length, as you can see in the above photo.
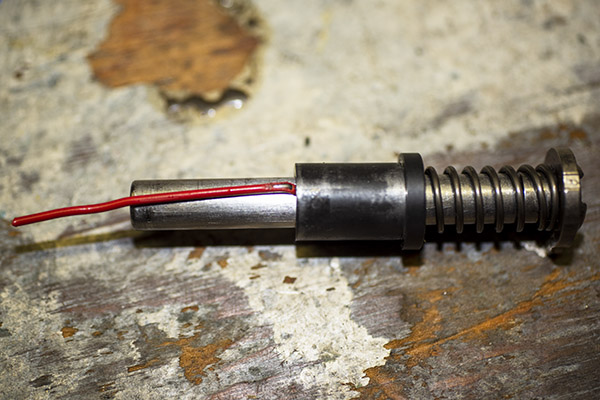
Installing the new spring on the guide rod with its recoil plug was a challenge. I had make to a tool to compress the spring and the recoil plug enough to get a paper clip on the guide rod to hold everything together so I could install it in the slide. Again, I was super careful. I didn’t want to release these parts, and I always wear eye protection when I do this sort of thing. A lot of people get hurt by being careless with springs.
The reassembled recoil plug, recoil spring, and guide rod, ready for insertion in the slide.
At this point, I reinstalled the subassembly in the slide, I slid the slide onto the receiver, and then I reinstalled the slide stop.
Once the gun was back together, the first time I tried to rack the slide I was shocked. I couldn’t pull the slide all the way back. I muscled it and then did so several times, and it seems to be okay now, but wow, it is stiff. The 24-pound recoil spring is way stronger than what the Compact 1911 had in it. That’s the bad news. The good news is that the problem with the slide not returning to battery is gone.
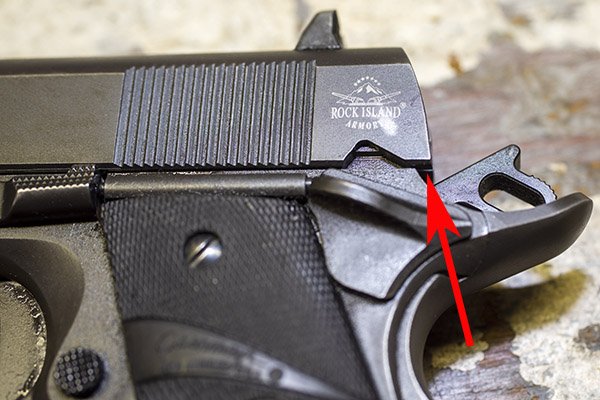
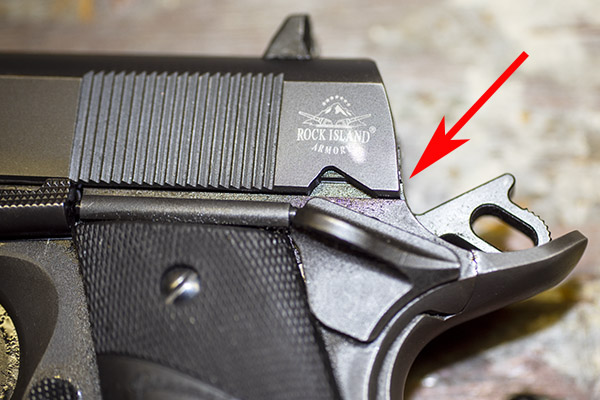
The Compact with the slide in battery.
You know, I was playing around with the Compact 45 when I was cleaning it before the above spring replacement and I noticed that because the slide only went limply into battery there was a lot more play between the receiver and the slide. I thought maybe it was me, but I noticed the accuracy was really falling off the last couple of times I shot it. I’ll bet when the recoil spring holds the slide firmly in battery keeps the slide in the same spot each time. With a weak spring, it stands to reason that the slide would swim around a bit more and accuracy would suffer. I shook the gun in my hand with the old spring in it, and it rattled just like the 1911s I carried in the Army. I’ll bet they all had worn recoil springs, too.
When testing a recoil spring to see if it’s the right one, the drill is to load one round in the magazine, fire it, and if the slide locks back after that round (as it is supposed to do), the spring is good. I tried that with seven rounds of factory hardball and the new Wilson Combat 24-pound recoil spring, and it worked each time. Then I tried my 230-grain cast hardball load with 5.6 grains of Unique (my reloads are less potent but way more accurate than factory ammo), and it worked great. Then I tried my 185-grain cast semi-wadcutter load (with 5.0 grains of Bullseye; my Compact 1911 accuracy load), and it worked great. It’s a little easier to rack the slide now, but it’s still way stiffer than it was before.
Like 1911 stories? Or maybe other handgun stories? Or good reloading info? Hey, it’s all available on Tales of the Gun!
Help us keep the content coming: Please click on the popup ads!
More stories on the Rock Island Armory Compact? Yes, indeed!
Good buddy Peter and I go back about 40 years now. That’s hard to believe when I think about it….he must be pretty old now. We grew up together in the So Cal aerospace industry, chasing each other across companies that made bombs, aerial refueling equipment, helicopter blades, and more. We’re both retired now, and we’re both enjoying life. Peter and I have a lot in common (you might remember him as Python Pete), including an interest in guns, motorcycles (Peter bought one of the first RX3 motorcycles to arrive in America), photography, and travel. Peter and his wife recently wrapped up an epic road trip in the starship Wingnutz (it’s the roadburner you see above), and he wrote a guest blog for us showing just a few of the highlights. Here you go, folks…it’s a great read. Enjoy!
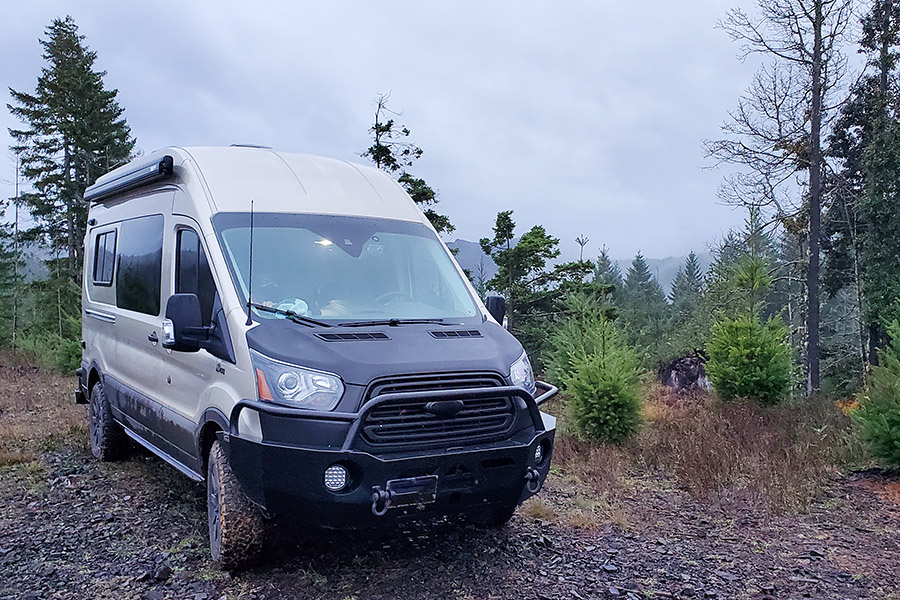
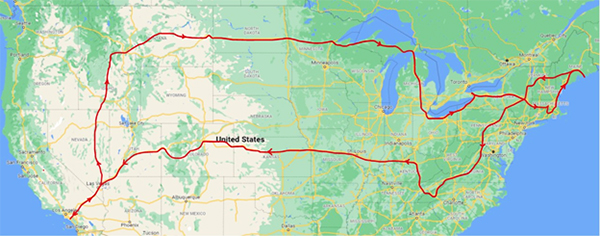
My wife, Sasi, and I went on an epic road trip a couple of months ago. The impetus for this trip was our nephew’s wedding in Massachusetts. We figured this was the perfect opportunity to camp our way across America (and get the hell out of California for a while). The vehicle for this journey was a 2019 Ford Transit van that we had converted into a 4×4 camper van. This van is pretty much self-contained and we can live off the grid for three or four days before we have to resupply the water tank. With this setup we can choose not to stay in campgrounds thereby avoiding other cranky people.
Map showing the general route we took.
Starting in So Cal we drove north through Nevada. At our first campsite in Nevada at Pahranagat National Wildlife Refuge, we watched in utter amazement one evening as a hawk used its talons to snatch a bat right out of the air mid-flight no more than 15 feet directly in front of us. Never saw that before.
We continued north into Idaho and Montana enjoying the spectacular scenery of the Sawtooth and Bitterroot Mountains. One day we drove a measly 50 miles because we just kept finding fantastic sights and places to camp. Our campsites in this area were usually way up dirt roads next to streams (with very cold, invigorating water…like 44 °F cold.) and a couple of times at altitudes exceeding 8,000 feet. We thought we were gonna see and smell a lot of smoke from all the fires in the Pacific Northwest, but nada. This is definitely an area we are going back to in order to explore more extensively. We spent too much time in this area jeopardizing an on time arrival to the wedding.
So, we quickly made up time heading east across the Northern Plains to the Upper Peninsula of Michigan. You don’t wanna see people? The UP is one place to do that as it’s pretty sparsely populated and very heavily forested. The few locals we encountered were extremely friendly and helpful. Sasi was excited to be able to pick wild blackberries at our campsite which was just off a snowmobile trail. There was no snow as it was late August and nobody else was crazy enough to drive something other than a snowmobile on this trail. Solitude is great as it gives you the opportunity to observe and listen to the wildlife (the forest kind of wildlife as opposed to the city kind).
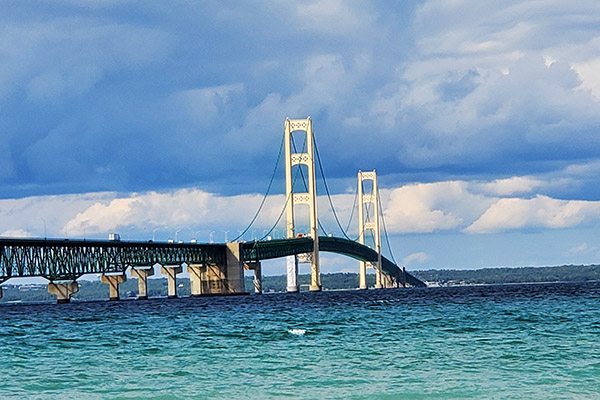
The Mackinac Bridge, five miles long connecting the UP to the rest of Michigan
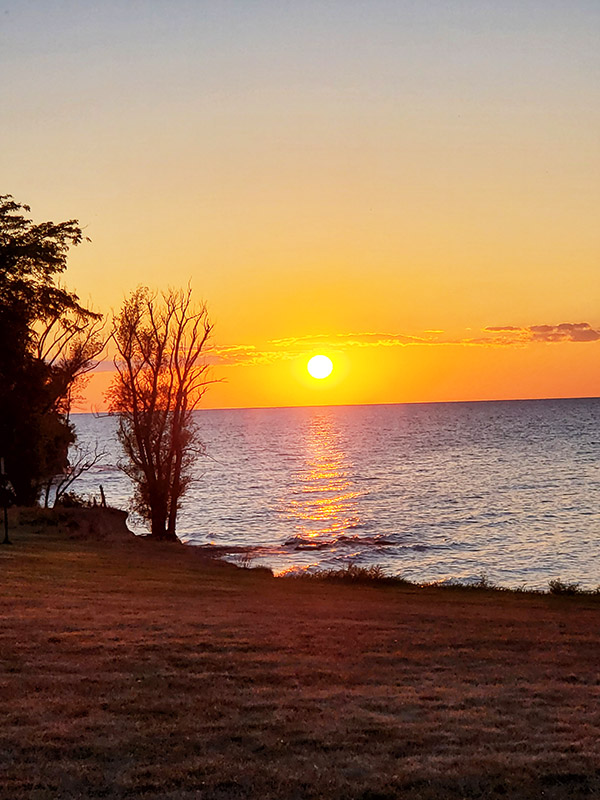
Next significant stop was Niagara Falls which was one of the highlights for Sasi. It was her first visit and she was absolutely overwhelmed as was I even though I’ve visited before. We walked to all the scenic overlooks and did the Maid of the Mist boat tour (worth it). Joe spoke previously of these electric motor driven boats. They are indeed quite quiet; however, the falling water is not. Our campsite in this area was on Lake Ontario and in the evening, we could see the sparkling lights of Toronto across the lake. Unfortunately, we could not visit the Canucks because of crazy COVID-related border rules.
Sunset over Lake Ontario
Off to the wedding in the Boston area. It was nice.
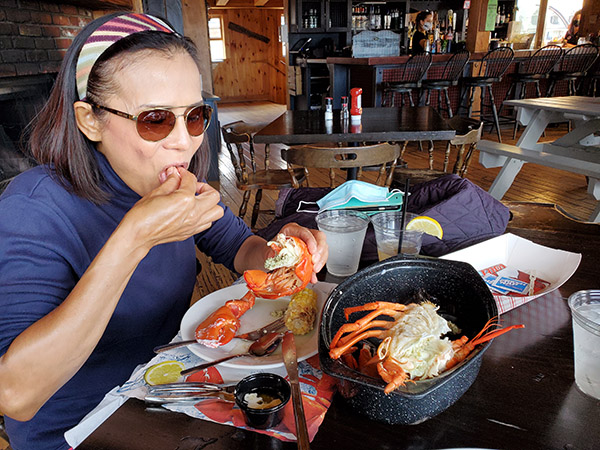
The next highpoint of the trip was to eat live Maine lobster in Bar Harbor, Maine. This is a beautiful island and although there were way too many tourists visiting, we managed to get a table in an otherwise deserted restaurant overlooking the water. The lobster has a better, fresher taste in Maine than the so-called live Maine lobster we get in California. The food was amazing and so was the scenery as we drove around the island after lunch.
Sasi’s live Maine lobster, finally!
I wanted to go see the northern parts of Maine because the maps show hardly any roads in that area. Hell, we have a 4×4 so who needs roads, right? “Wrong!” said the boss/copilot/navigator/cook/wife. Never piss off any of those people or you will regret it many times over (I keep learning). So, we headed west into New Hampshire and Vermont and bought copious amounts of locally sourced maple syrup.
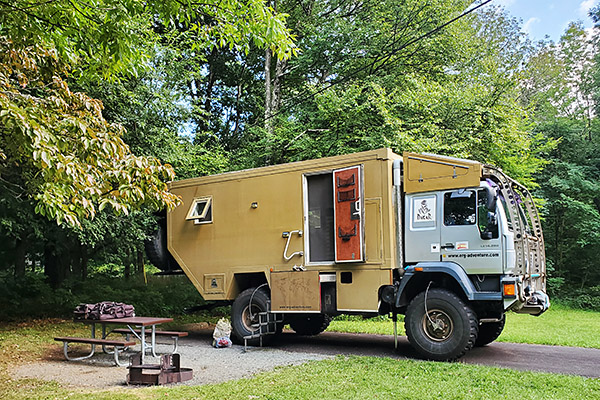
We followed the Appalachian Mountains south all the way to the Smokey Mountains in Tennessee. We did not see Dolly Parton but did find great places to camp including one place where we met a couple from Spain who are five years into traversing a good part of the world in their custom RV that looks more like a military vehicle than an RV. See www.erg-adventure.com.
One beast of an RV Carlos and Magy are using to see the world
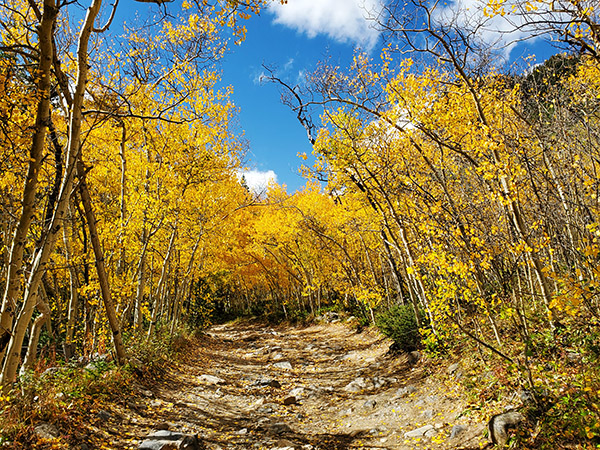
We then meandered kind of Northwest and finally just west across the very flat Great Plains stopping for a few days in Colorado to visit family we had not seen in two years. A few more incredible campsites came our way in the Rockies. The Forest Rangers here were super nice in guiding us to the out of the way camping spots we prefer.
Hell yes, lets go!Aspen trees changing color on our type of road
We finally made it home after five weeks, 30 states and 9,000 spectacular miles. Don’t ask about fuel economy because a 4×4 van does not understand economy. However, you can’t put a price on the sights and experiences we enjoyed on this trip!
That’s an awesome story, Peter, and it looks like you and Sasi had an amazing adventure. Thanks very much for sharing it with us!
In Part 4 of the KLR Chronicles I managed to damage the water pump oil seal. Never one to stand pat, in Part 5 I damaged the new water pump ceramic seal. It wasn’t easy and I’m still not sure how it happened.
After cleaning off the old gasket material stuck to the clutch cover I managed to get the new oil seal installed without drama. Next I used a suitable sized socket to pound the new ceramic seal into the water pump housing. This all went well and as such was probably where I broke the seal.
The clutch cover has two locating dowels but the gasket was sort of floppy and would slip out of place when I tried to install the cover. I ran down to NAPA and picked up a can of spray gasket High Tack goo and used that to hold the gasket while I messed with the cover.
Reassembling the mess was easy from then on and I filled the radiator with new coolant expecting success. I took the bike for a short ride and dammed if the water pump wasn’t leaking worse than when I started. Resigned to never getting the bike going I removed the water pump cover and water pump impeller. I thought maybe the impeller o-ring was the culprit so dismantled the cover and replaced the o-ring and tried again. It still leaked. Dismantling the pump for third time was when I found the crack.
The ceramic seal is a multi part extravaganza consisting of a flat seal area, a spring, a rubber bellows and the metal ring part that fits into the housing. I tried pulling the ceramic part off but it just crumbled. It took a bit of tugging to remove the bellows and spring from the metal. And then I remembered that when I removed the old seal the spring, bellows and seal fell out into my hand. This made me think that the old seal wasn’t leaking at the ceramic interface and, in fact, was leaking between the bellows and the metal ring part.
If you’ve followed my mechanical exploits you can guess what happens next. I cleaned the metal ring (still stuck in the housing) and the old seal bellows. Then I blobbed black RTV silicone on the ring and glued the old seal/spring/bellows into the new ring.
And it worked! The water pump no longer leaked. This kind of repair is not the sort of thing you want to rely on 50 miles out into the desert so I’ll have to order yet another water pump seal. This time I’ve got an idea and will try something different to remove the metal ring. I hope to not pull the clutch cover again. We will see.
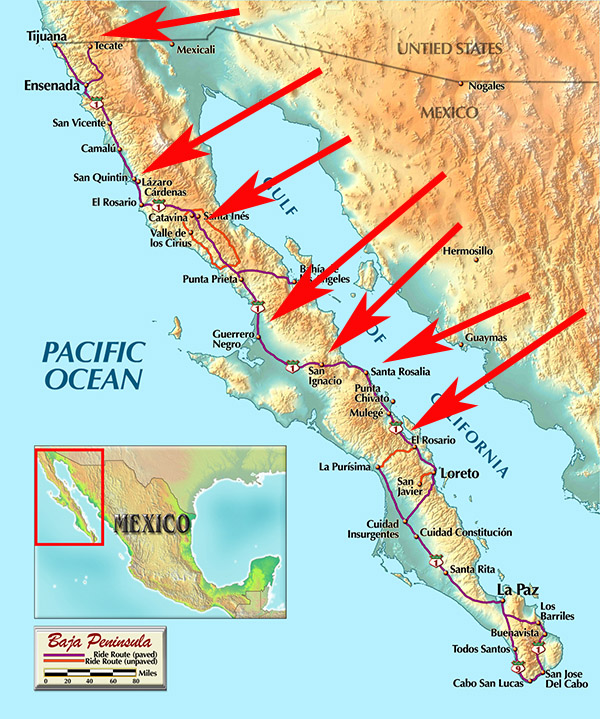
Baja is a motorcycling paradise and I have a bunch of favorite destinations there. Seven of them, to be precise, although truth be told, I like everything in Baja except for Tijuana and maybe La Paz and Loreto. That said, my favorites are:
Tecate
San Quintin
Cataviña
Guerrero Negro
San Ignacio
Santa Rosalia
Concepcion Bay
Here’s where they are on a map:
So what’s so great about these places? Read on, my friends.
Tecate
Tecate is the gateway to the middle of northern Baja, and it’s the easiest point of entry. Both Tijuana and Mexicali are too big and too complicated, and the Mexican Customs guys are too official in those bigger cities. Tecate is a friendly place. The last time I picked up a tourist visa in Tecate, the Customs officer tried to sell me salsa he and his family made as a side gig. That’s what the place is like. I love it.
If you’re into fine dining (not as in expensive dining, but just great food), it’s hard to go wrong anywhere in Baja. Tecate has some of the best, from street taco vendors to Malinalli’s to Amore’s. I could spend a week just in Tecate. It’s that good.
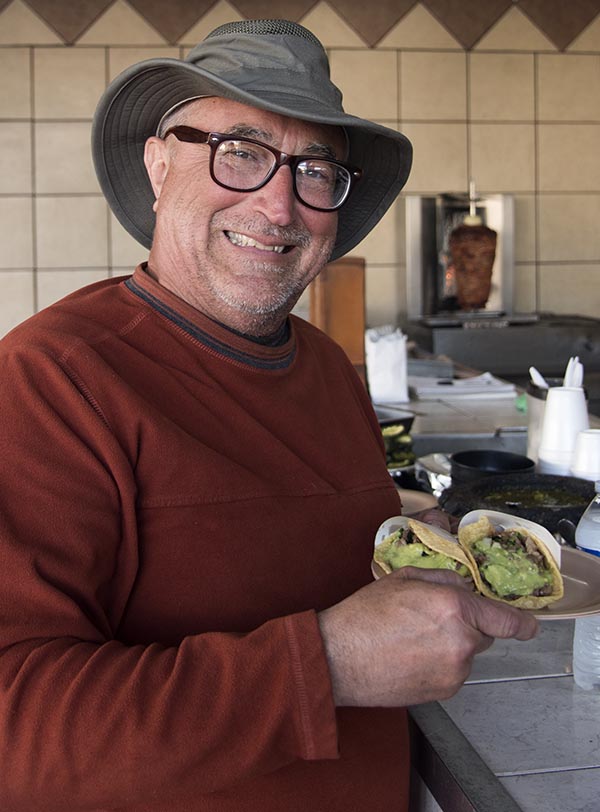
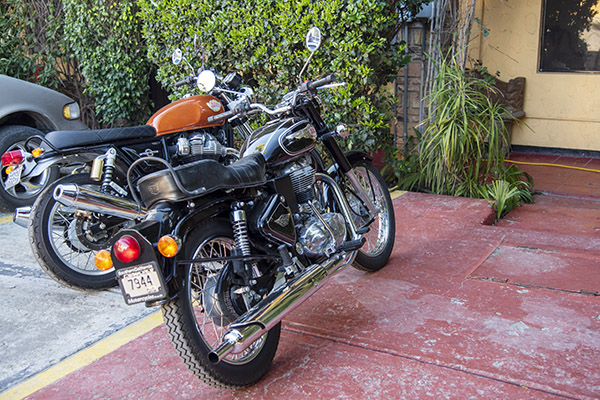
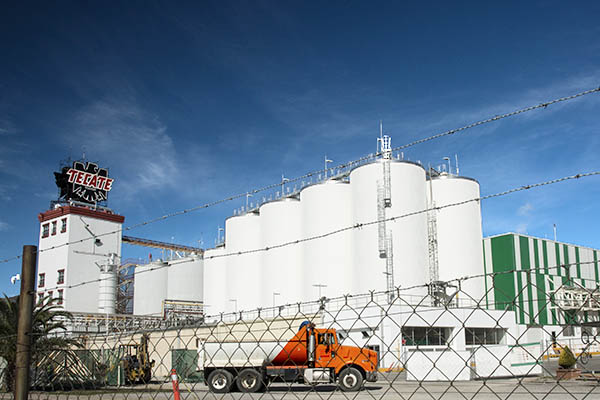
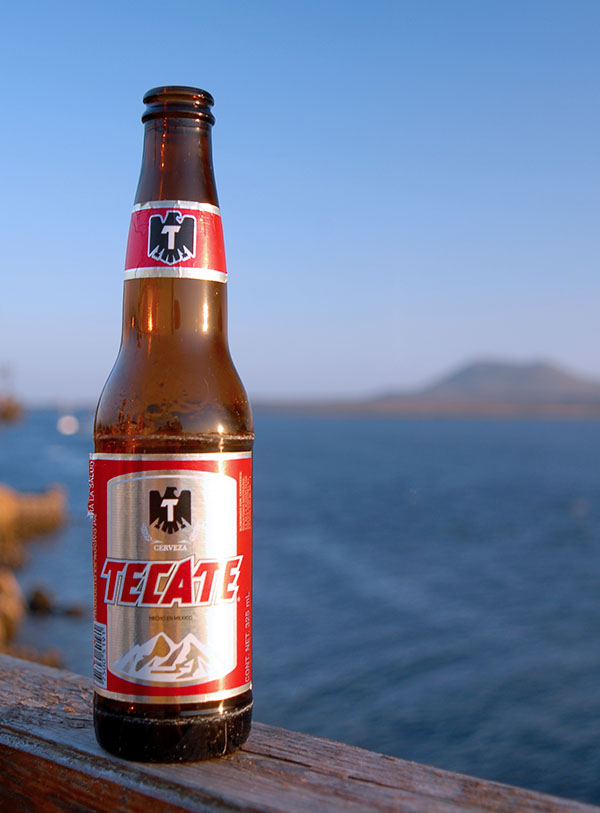
Uncle Joe Gresh with street tacos in Tecate. Wow, were they ever good.The buffet at Malinalli’s is regional, awesome, and inexpensive. It’s a hidden treasure.Dos Joes’ motos on an Enfield expedition that took us through Tecate.The Tecate brewery dominate the Tecate skyline and is visible from just about anywhere in town. A can of ice cold Tecate with sea salt around the rim and a bit of lime juice…life doesn’t get any better.
San Quintin
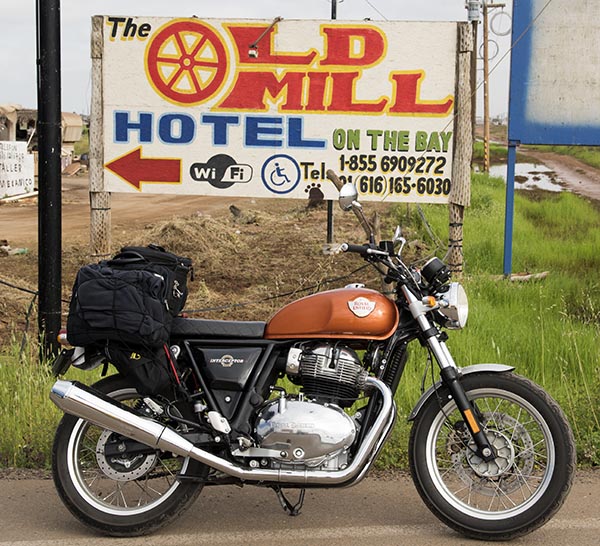
San Quintin is 186.4 miles south of the border on Baja’s Pacific coast. It’s usually a quiet ag town that has a lot of things going for it, including interesting hotels, good food, and Bahia San Quintin. The Old Mill hotel and its associated restaurant, Eucalipto, is my personal favorite. The hotel is about 4 miles west of the Transpeninsular Highway, and what used to be a harrowing soft sand ride to it is now easy peasy…the road is paved and riding there is no longer a test of your soft sand riding skills. The Eucalipto restaurant is second to none.
What could be better than an ice cold Tecate overlooking Bahia San Quintin after a day’s riding in Baja? We once saw a California gray whale from this very spot.
A man, a motorcycle, and Mexico….the sign on the Transpenisular Highway pointing toward Bahia San Quintin and the Old Mill Hotel. The bike? That’s the 650cc Royal Enfield, perfect for riding Baja. But then just about any motorcycle is perfect for riding Baja.Bahia San Quintin at dawn. It’s an awesome spot.Uncle Joe enjoying breakfast in the Old Mill’s Eucalipto. It is an exquisite restaurant.
You’ll notice at the top of my scribblings about San Quintin I said it is usually a quiet town. The one exception for us was when there was a labor riot and we were caught in it. The Mexican infantryman about 80 miles north of San Quintin told me the road was closed, but his English matched my Spanish (neither are worth a caca), and without me understanding what I was riding into, he let me proceed. It’s not an experience I would care to repeat. But it’s the only event of its type I ever experienced in Old Mexico, and I’d go back in a heartbeat.
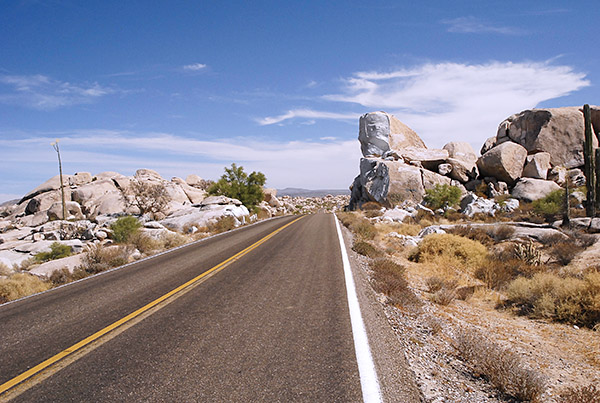
The Cataviña Boulder Fields
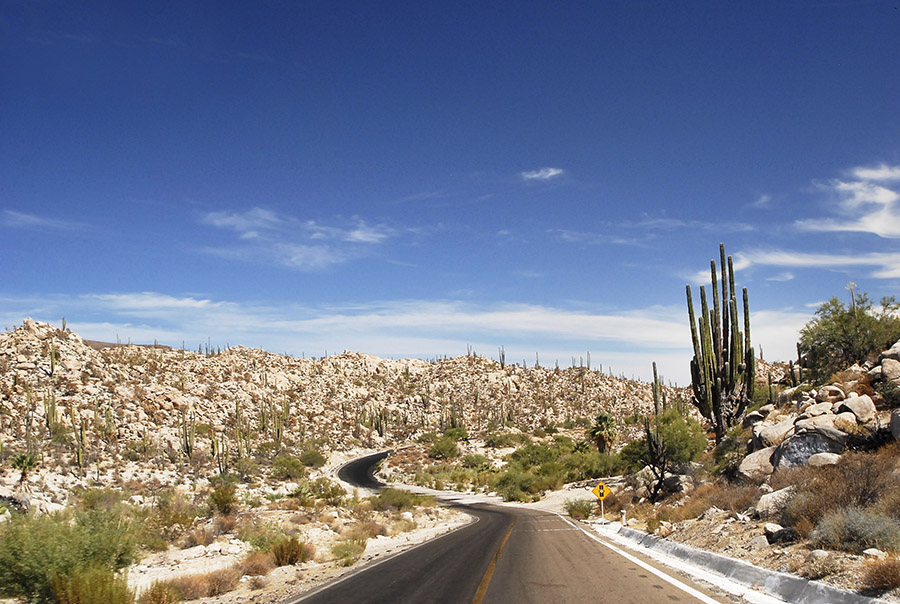
Ah, Cataviña. Rolling down the Transpeninsular Highway, about 15 miles before you hit the wide spot in the road that is Cataviña you enter the boulder fields. Other-worldly is not too strong a description, and if the place wasn’t so far south of the border it would probably be used more often by Hollywood in visits to other planets. The boulders are nearly white, they are huge, and the juxtaposition of their bulk with the bright blue sky punctuated by Cardon cactus.
Pastel geology. The area really is as beautiful as the photos depict it to be.
I get a funny feeling every time I enter this part of Baja. Not funny as in bad, but funny as in I feel like I’m where I belong. I once rolled through this region in the early morning hours with my daughter and she told me “you know, it’s weird, Dad. I feel like I’m home.” She understood (as in completely understood) the magic that is Baja.
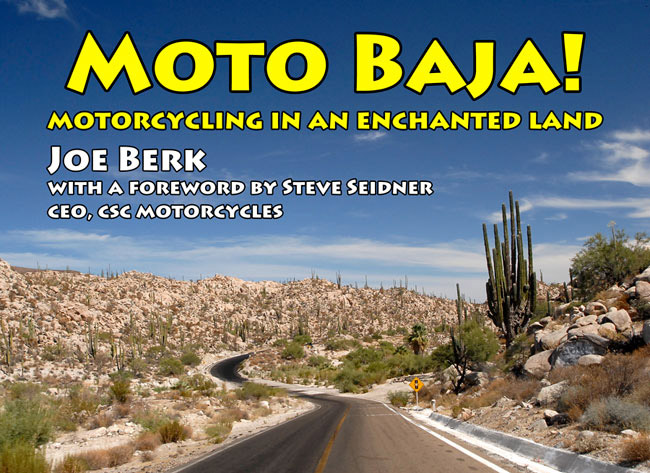
I like the area and its stark scenery so much that one of my photos became the cover of Moto Baja! I grabbed that shot from the saddle at about 30 mph on a CSC 150 Mustang replica, which I subsequently rode all the way down to Cabo San Lucas (that story is here).
You should buy a copy or three. They make great gifts.
Every time I roll through Cataviña with other riders, the dinner conversation invariably turns to how the boulders formed. When I was teaching at Cal Poly Pomona, I asked one of my colleagues in the Geology Department. He know the area as soon as I mentioned it. The answer? Wind erosion.
Guerrero Negro
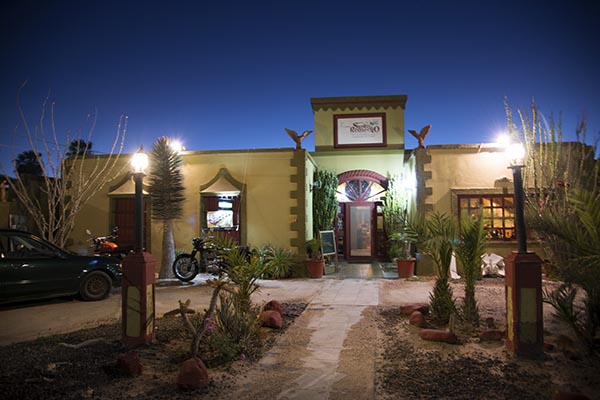
The Black Warrior. The town is named after a ship that went down just off its coast. It’s a salt mining town exactly halfway down the peninsula, and it’s your ticket in for whale watching and the best fish tacos in Baja (and that’s saying something). I’ve had a lot of great times in Guerrero Negro. It’s about 500 miles south of the border. You can see the giant steel eagle marking the 28th Parallel (the line separating Baja from Baja Sur) a good 20 miles out, and from there, it’s a right turn for the three mile ride west into town. Malarrimo’s is the best known hotel and whale watching tour, but there are several are they are all equally good. It you can’t get a room at Malarrimo’s, try the Hotel Don Gus.
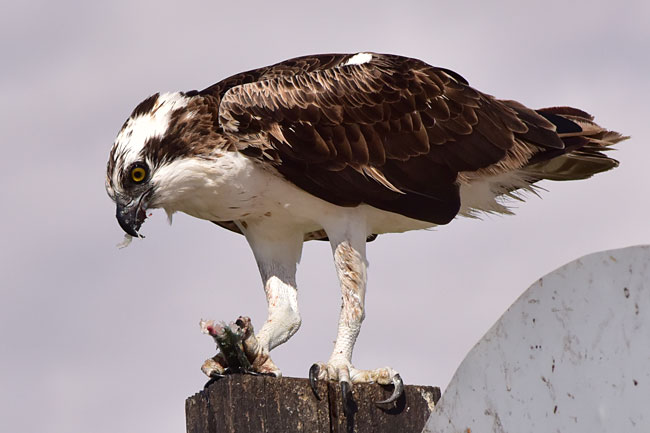
CSC RX3 motorcycles at the Hotel Don Gus. We used to do annual Baja tours with CSC…those were fun times and great trips, and introduced a lot of folks to the beauty of Baja.What it’s all about…getting up close and personal with the California gray whales. They are in town from January through March.Tony, taco chef extraordinaire. You might think I’m exaggerating. I’m not.It’s worth the 500-miles trek to Guerrero Negro just to savor Tony’s fish tacos. You might think I’m exaggerating. But like I said above…I’m not.Man does not live by fish tacos alone, so for breakfast or dinner, it’s either the restaurant at Malaririmo’s or the San Remedio, a block north of the main drag into town. You won’t be disappointed at either.Sue’s photo of a Guerrero Negro osprey enjoying some sushi.
After you leave Guerrero Negro and continue south, the Transpeninsular Highway turns southeast to take you diagonally across the Baja peninsula. About 70 miles down the road (which is about half the distance to the eastern shores of Baja and the Sea of Cortez along Mexico Highway 1) you’ll see the turn for San Ignacio. It’s another one of Baja’s gems.
San Ignacio
San Ignacio is an oasis in the middle of the desert that forms much of Baja. The Jesuits introduced date farming to the region hundreds of years ago, and it’s still here in a big way. Leave Guerrero Negro, head southeast on Mexico Highway 1, and 70 miles later you run into a Mexican Army checkpoint, a series of switchbacks through a lava field, and when you see the date palms, turn right.
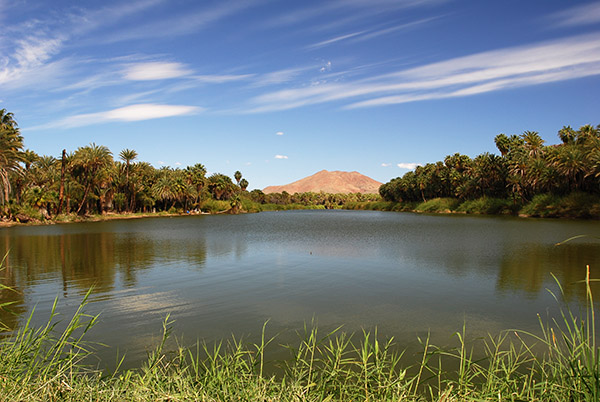
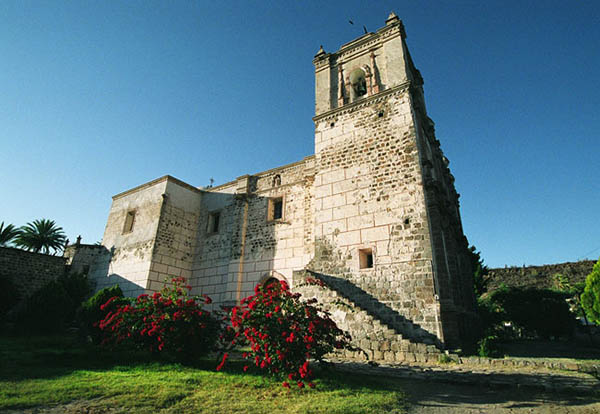
An oasis is usually formed by a volcano, and when a volcano is done discussing politics, it forms a lake. That’s the San Ignacio volcano and its lake, visible on the left as you ride into town.The San Ignacio church, built as a mission in the 1700s, dominates the center of San Ignacio. It’s a beautiful spot, one of the most photogenic in all of Baja.Another photo of the San Ignacio Mission. You’ll want to grab some photos in San Ignacio.Dates? Nope, not on that trip, but dates are one of the things San Ignacio is known for. I’ll bet they are delicious.
San Ignacio has a town square that’s right out of central casting, there’s a little restaurant that serves the best chile rellenos in all of Mexico (I’m not exaggerating), and the place just has a laid back, relaxing feel about it.
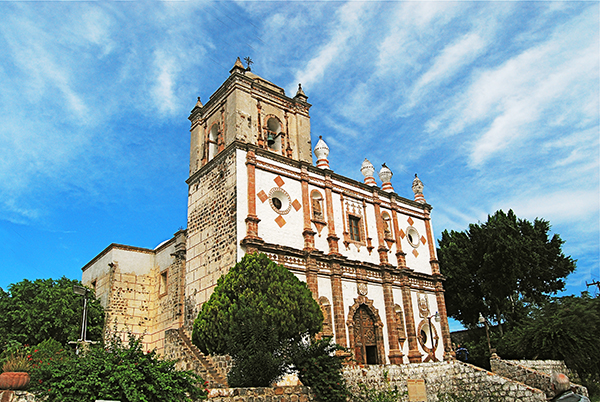
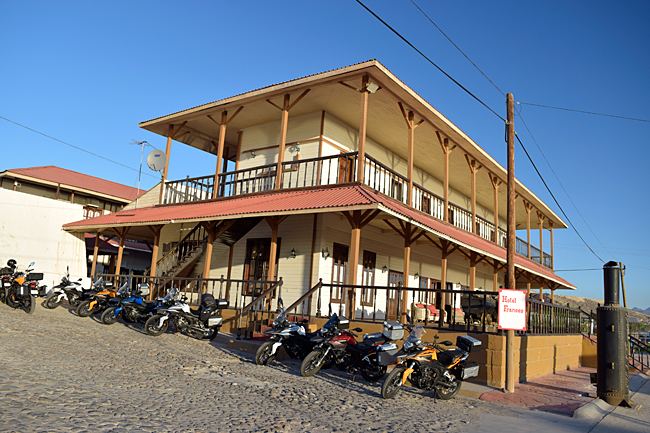
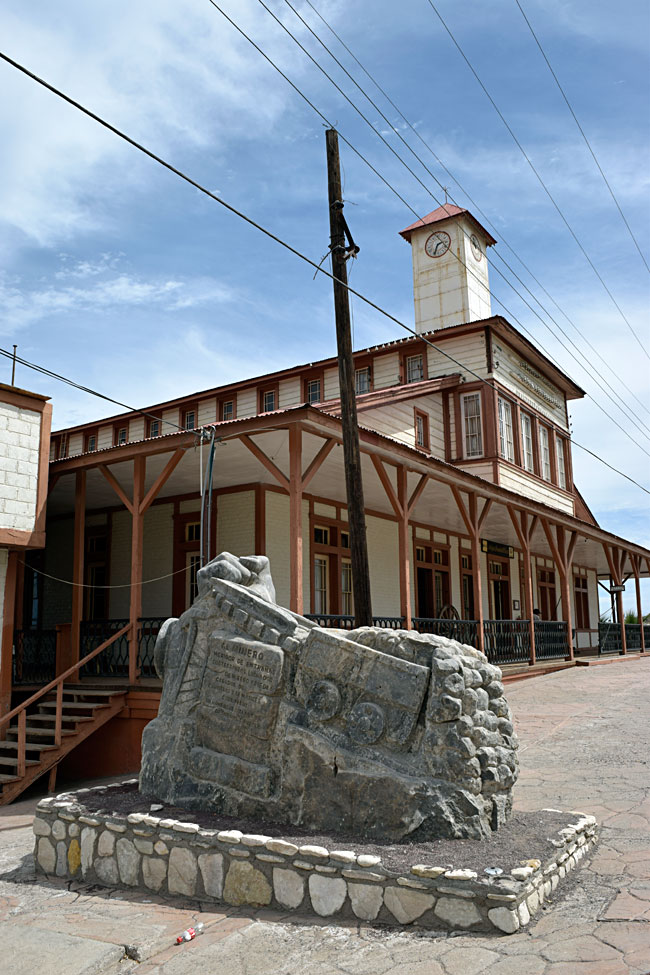
Santa Rosalia
You know, this town is another one of Baja’s best kept secrets. As you travel south on Highway 1, San Ignacio is the first town you encounter after traveling diagonally across the peninsula. Folks dismiss it because it’s an industrial town, but they do so in ignorance. There’s a lot of cool stuff in this place.
The ride into Santa Rosalia a few years ago with novelist Simon Gandolfi, Arlene Battishill, J Brandon, John Welker, and yours truly. That’s a dead fish I’m holding. We did a round trip to Cabo San Lucas on 150cc Mustang replicas, just to say that we could.
One of the things that’s unique about Santa Rosalia is the all-wooden architecture. The town was originally built by a French mining company (Boleo) and they built it they way they did in France. Like the Hotel Frances, which sits high on a mesa overlooking the town and the Sea of Cortez. I love staying there.
The Hotel Frances. It used to be a brothel.
There’s a cool mining musuem a block or two away from the Frances, and it’s worth a visit, too.
The mining museum in Santa Rosalia.
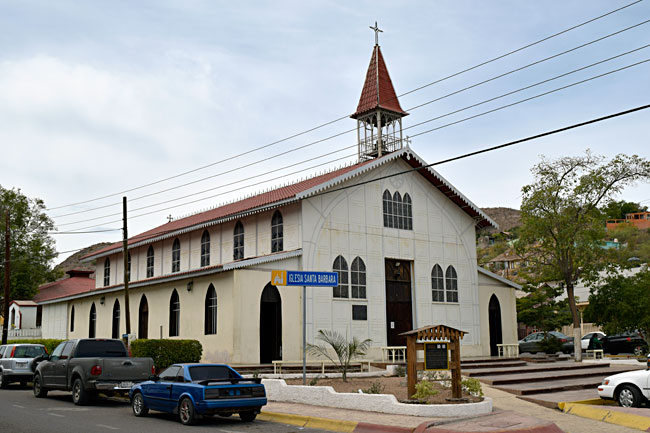
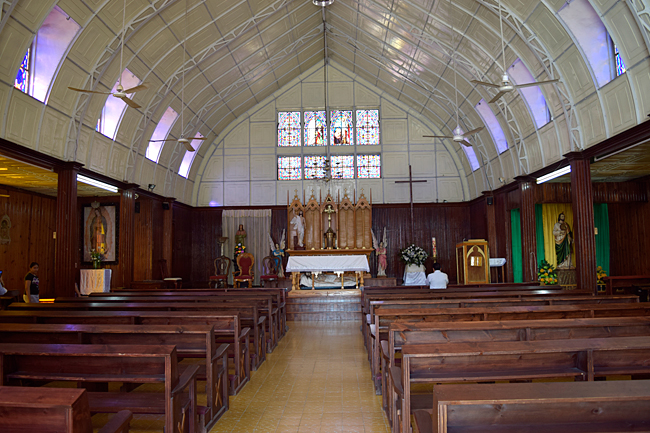
There are many cool things in Santa Rosalia, and one of the best is the Georg Eiffel church. It was designed by the same guy guy who did the Eiffel town.
Santa Rosalia’s church. It’s an unexpected delight. And I’m not even Catholic.Inside Santa Rosalia’s Georg Eiffel church.Stained glass. Photos ops abound in Santa Rosalia.
I’ve heard people dismiss Santa Rosalia as a gritty, industrial place not worth a stop. Trust me on this: They’re wrong. It’s one of my favorite Baja spots.
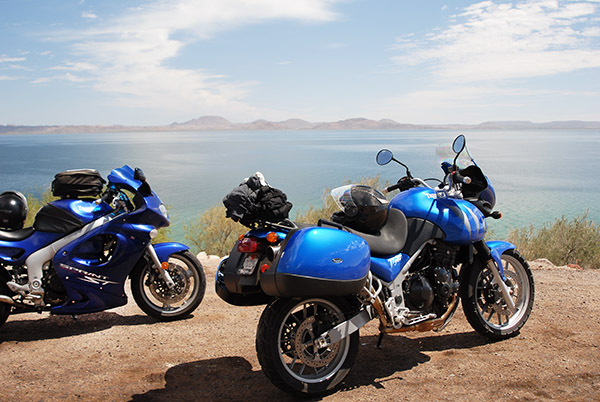
Bahía Concepción
Concepción Bay is easily the most scenic spot in Baja. It’s just south of Mulege (another delightful little town, and the subject of an upcoming ExNotes blog). Bahía Concepción runs for maybe 20 miles along the eastern edge of the Baja peninsula. I’ve seen whales from the highway while riding along its edge, the beaches are magnificent, and the photo ops just don’t stop. The contrast between the mountains and Cardon cactus on one side and the pelicans diving into bright green water is view from the saddle you won’t soon forget.
On one of many rides along Bahía Concepción, good buddy Joe Lee and yours truly rode our Triumph Triples. This is a favorite shot of mine.Besides “wow,” what can I say?World-famous novelist and motorcycle adventurer Simon Gandolfi andn yours truly on 150cc scooters. We were on our way back from Cabo San Lucas when we stopped for this Bahía Concepción photo. Hardtail 150cc scooters. Up and down the length of Baja. I think about that ride every time I see a GS parked at a Starbuck’s.
So there you have it: My take on seven favorite spots in Baja? How about you? Do you have any favorite Baja destinations? Let us know here in the comments sction!
The year was 1974. I had just finished grad school and I was at Fort Bliss, Texas, for the Basic Course and the Chaparral/Vulcan Course, which is to say I was there for another five months of school before heading overseas. There was no such thing as Gunbroker.com yet…in fact, there wasn’t a dotcom anything yet…this was all well before the Internet. But we had The Shotgun News, a print publication that served much the same purpose. I studied that newspaper like a Democrat looking for something new to tax.
Ruger did a very limited run of their Model 77 in .458 Winchester Magnum back in the early 1970s, and within that limited run, they did a few with Circassian walnut. I might be wrong, but I think this was the first limited production anything Ruger did with Circassian walnut. I read the ad and I immediately knew I had to have one.
Man, I was hooked. I needed a .458 Mag elephant gun. My Army gun was a 20mm Vulcan, and by comparison, the .458 didn’t seem so big. The rifle was $340 from J&G Rifles in Prescott, Arizona (an outfit that I think still exists), and in those days it was as easy as picking up the phone, sending a check, and having them ship the rifle to a local dealer. The amount seems laughably low today, but $340 was a big nut back in 1974. I borrowed the money from my sister and the rifle was on its way to Barney’s Guns out in the west Texas town of El Paso. God bless Marty Robbins and all that is west Texas. I loved it out there.
Not knowing too much about hunting elephants, I bought three boxes of .458 factory ammo with predictable results: Today, nearly 50 years later, I still have most of that factory ammo in its original yellow Winchester boxes. You see, there weren’t too many elephants in El Paso, and that ammo redefined recoil for me. Just a few rounds of the 500-grain, 2100 feet per second factory fodder convinced me there had to be a better way, and there was. I’ve loaded literally thousands of rounds in .458 Win Mag over the last 50 years, virtually all of it at .45-70 levels. It’s actually a nice shooting rifle when you drop it from “elephant” to “buffalo” on the energy meter. And that’s still plenty potent. People used to kill buffalo with 400-grain pills at 1200 feet per second (they killed nearly all of them, actually).
I picked up a Redfield straight 4-power scope that is still putting the crosshairs where I want the bullets go (I think it was something like $30 at one of the K-Marts in El Paso). Not surprisingly, the Circassian .458 is very accurate with both jacketed and cast bullets. It can easily put five rounds into an inch at 100 yards.
Every once in a while I’ll go on a tear experimenting with new loads, and I suppose when I exhaust my supply of 405-grain Remington jacketed softpoint bullets and SR 4759 propellant I’ll get serious about that, but for now I have a good stash of the Remington bullets and SR 4759. I’ll probably still be working my way through that stash when I ride off into the sunset. And when I enter the Happy Hunting Grounds, I’ll rub elbows with Karamojo Bell, Frederick Courtney Selous, Peter Capstick, and others who chased elephants in Africa and we can compare notes.
My buddies and I hunted jack rabbits out in the desert east of El Paso near Fabens, and I had a lot of fun with the .458. Yeah, it was massive overkill. But some of those jacks were big, man. Not that I needed a .458 Winchester Magnum elephant gun. But who buys these things because they need them?
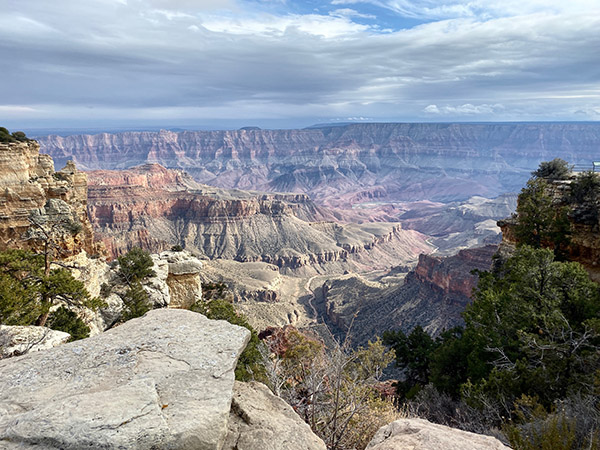
Berk recently did a story on the Grand Canyon and I have visited the park many times. I’ve never made it to the North Rim however, and a trip to Las Vegas, Nevada was a wonderful opportunity to check out the other side of that great big hole in the ground as it was practically on the way. If you plan on going know that the North Rim closes around the end of November. When we arrived a few days before Thanksgiving the ranger station, restaurant, gift shop and lodge were all closed. The park was still open but the place was deserted. Only us and a few other cars were at the park that day.
National Park fees are getting kind of pricey. 35 dollars was the day pass fee except there was no one to collect the money. There was an electronic-pay box near the Ranger Station. Several of the other visitors were poking and prodding at the box but no one was having any success actually paying. Payees would stab their card in and look to the waiting customers as if to say, “What do I do now?” Someone else would try to help the lost soul but we were getting nowhere. I never got a chance at the box because we decided it must be out of service and besides we were just taking a drive through.
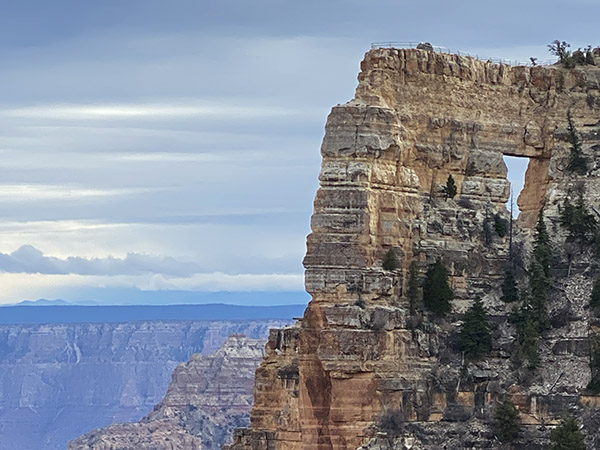
The North Rim is quite a bit different than the South Rim. For one, it’s about 1000 feet higher in elevation. The slope is different also: rain water on the North Rim flows into the canyon while rain water flows away from the canyon on the South Rim. What this means is that the South Rim is relatively straight along the edge with many places to pull over and gaze at the canyon, The North Rim has fjord-like canyons that intersect the Colorado River gorge at right angles so getting to view points means longer drives and some backtracking to get to the next one. There are fewer car-accessible spots on the North Rim and in fact most of it is hiking material. I don’t hike.
There are supposed to be bison running around but except for chipmunks we saw very little wildlife mostly due to the onset of winter. The critters were probably settling in snug somewhere we couldn’t see. The view points may be fewer but the views are still spectacular at the North Rim. My cell phone camera was dwarfed by the immensity of the scene and the photos you see in this story reflect that tiny little sensor.
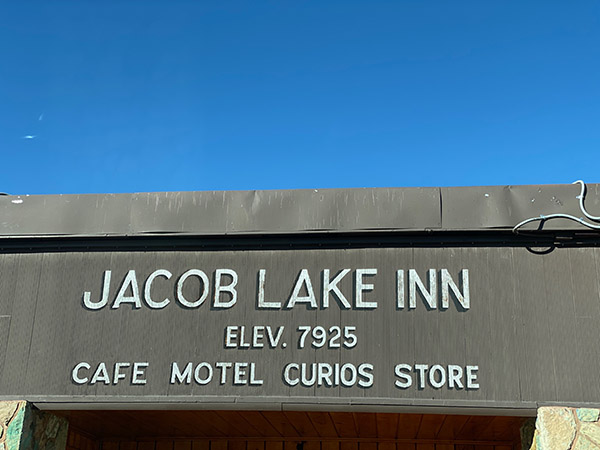
The North Rim is kind of far from anywhere; the closest lodging we could find was at the Jacob Lake Lodge. The Jacob Lake Lodge is an all-in-one resort with rooms, a gift shop, a nice place to eat and a gas station. The staff was made up of bright young college students who work several-month shifts then go back to school. There are staff accommodations on site. CT and I were amazed at how smart, kind and genuinely good people these kids were. The entire place was run by 20 year-olds, not an adult in sight.
Jacob Lake Lodge is open year around and is worth a visit even if the North Rim is closed. There is a big fireplace and comfy seats to sit in as you pen manifestos or just check your email. The logs are 3 feet long and the fire is tended to by the 20-somethings. The drive up on 89A takes you from mostly desert to pine forests in a few miles. I’ll be going back again because I missed Jacob Lake’s famous pie due to eating so much food. You should go, too.
Here’s a link to our earlier Grand Canyon story, and here’s a link to our Reviews page (it has other National Parks).