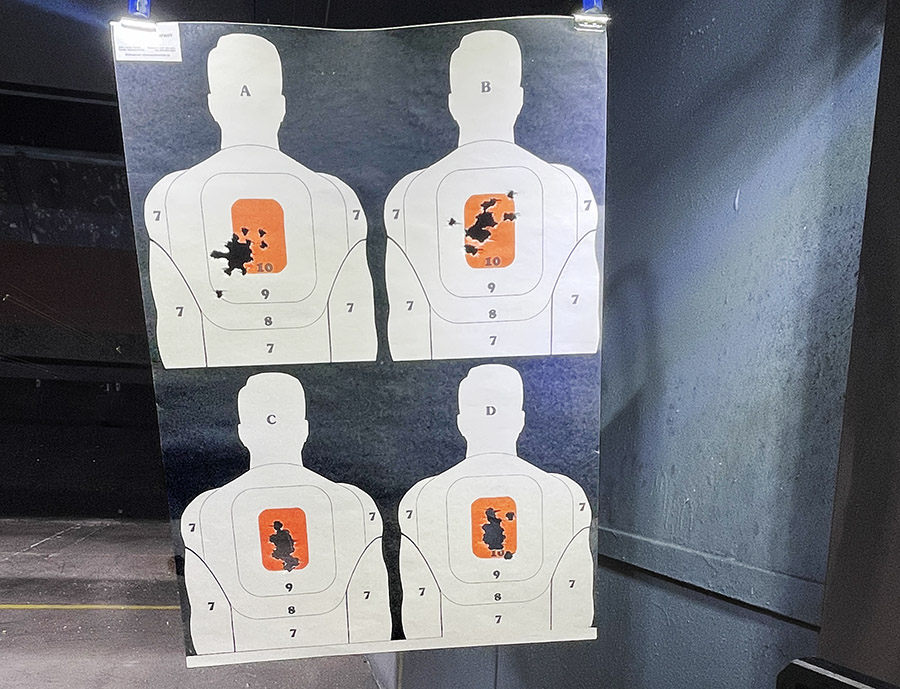
I had not been to the indoor handgun range for a couple of weeks, and recent post on Facebook about close-range, rapid-fire shooting made me want to try the same. Most of the time, I’m a target shooter, which usually involves longer distances and careful aim. This would be different: 10 feet and firing as quickly as possible. What slowed my aim was not recoil or the ability to find the front sight; it was the target moving. At that short distance, and with a hanging target, muzzle blast made the target move around. The results were relatively acceptable.
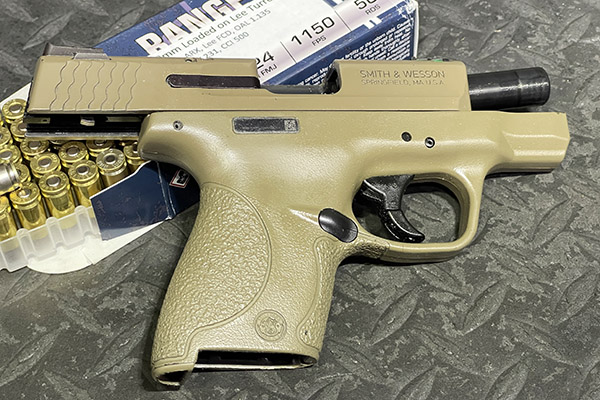
The two guns were the Springfield Target 1911 (in .45 ACP) and the 9mm Smith and Wesson Shield, and the loads were with the ARX bullets I’ve written about before. In the .45, the load I use is 8.8 grains of Power Pistol and 118-grain ARX bullets. In the 9mm, it’s 5.2 grains of Winchester 231 and 65-grain ARX bullets. Both loads are completely reliable, the ammo feeds beautifully, and they group with target handgun accuracy.
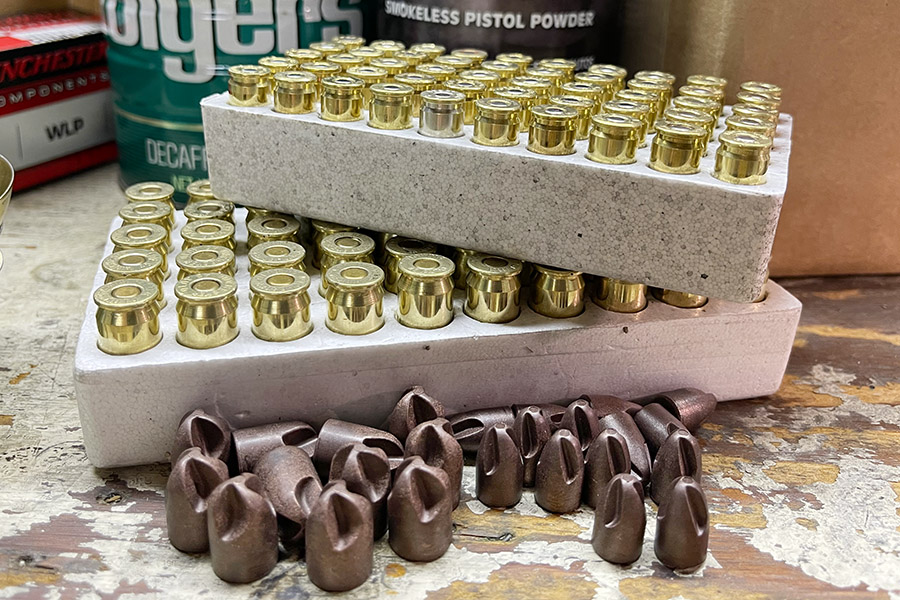
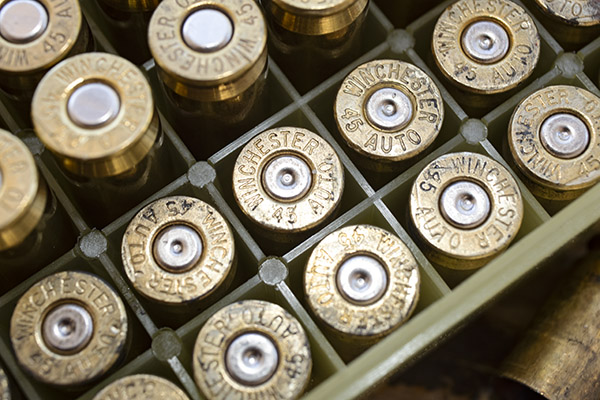
I buy the targets you see at the top of this blog from Alco, which is in nearby Duarte. For that target above, I put 25 rounds on each of those upper little silhouettes with the 9mm Shield, and then I did the same with the .45 on the lower two silhouettes. The .45 is more accurate, but it’s a big gun and it’s not comfortable for concealed carry. The little Smith and Wesson Shield is much better for that job.
About seven years ago I did a blog on CSM (Command Sergeant Major) Emory L. Hickman, the man who taught me how to shoot a 1911. He passed away several decades ago at the tender young age of 49, a victim of exposure to Agent Orange in Vietnam. Here are the original blogs I wrote about him:
I enjoyed writing those blogs, and I enjoyed the time I spent with the Command Sergeant Major. I met him when I was a second lieutenant going to graduate school at Rutgers in 1973. As a brand-new second looey, I didn’t really know what a Sergeant Major was (let alone a Command Sergeant Major). I learned when I went on active duty they are at the pinnacle of the US Army’s noncommissioned officer corps, and I would further learn that they are treated with reverence by soldiers of all ranks (up to and including general officers). CSM Hickman taught me how to shoot the .45 ACP 1911, and he taught me well. I still do pretty good on the pistol range, even as a guy who can properly be considered a geezer.
So where am I going with this?
About a week ago, I received a request to add an email address to our list of ExhaustNotes subscribers. I evaluate every one of those requests, because if I just let any old address onto the list, I would be bombarded with spam emails and blog comments. I sort of get bombarded anyway, but personally approving or disapproving every request keeps the spam bots and Russian bad guys at bay (if there’s a .ru in your email address or any Cyrillic characters in your message, don’t waste your time).
What raised my “likely spam” antenna was that this recent request included an email address based on CSM Hickman’s name. I figured it was one of those spoofing deals, like when you get an email from yourself offering deals that are too good to be true. Those get immediately deleted. I deleted this subscription request and promptly forgot about it.
A week later, I received an email (instead of just a subscription request) from the same CSM Hickman address, with a note that the writer was CSM Hickman’s son. He asked me to call him at the included phone number. I wasn’t about to ignore that, so I called, and in a few seconds I was chatting with Emory L. Hickman, Jr. Wow!
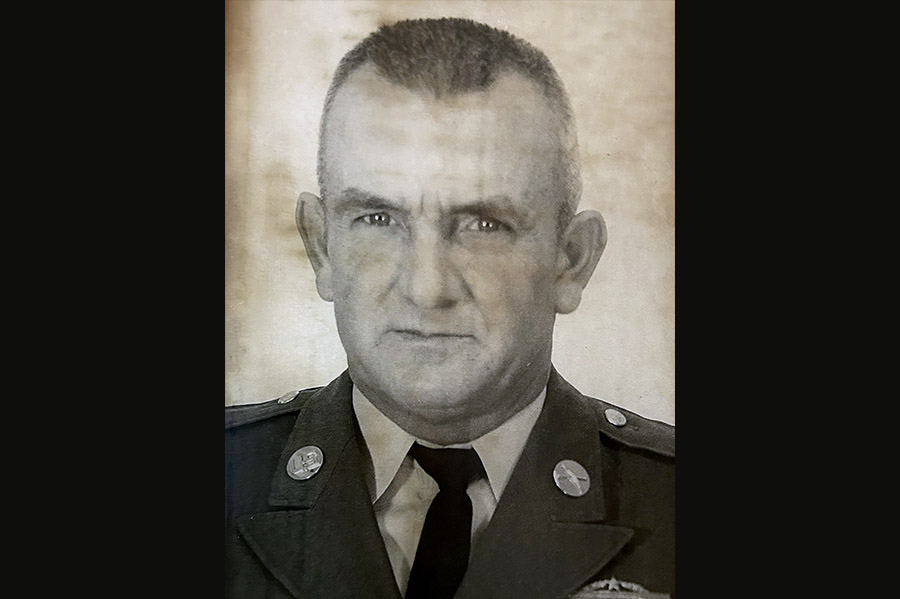
As it turns out, Emory L. Hickman, Jr., is just a few years younger than me. We had a marvelous conversation, we chatted about his dad (the Command Sergeant Major), and we chatted about our kids (there’s an Emory L. Hickman III, too, and he’s the one who found the blogs I previously wrote about CSM Hickman). Emory, Jr., told me that he and his family enjoyed the blogs enormously. That’s good and hearing it made me feel good. I had a lot of fun writing those stories and recalling my days on the Rutgers pistol range with the original Emory Hickman. You know, in that photo atop this blog (Emory, Jr., sent it to me a few days ago), CSM Hickman looks like an imposing guy. To the North Koreans, the VC, and the NVA, he was. But to me, he was simply a nice, southern gentlemen with a quiet way about him. He was a wonderful teacher. I think about him every time I pick up a 1911, including the time when I won the Army’s 38th Brigade pistol championship in Korea.
Emory, Jr., and I talked about his father and I told him one of my favorite stories. CSM Hickman was coaching me and I was getting better, but the improvement wasn’t what I wanted. I asked the Command Sergeant Major if he thought I should get my Colt 1911 accurized.
“May I try your pistol, Sir?” he asked. Here was this guy, a career Army man more than twice my age (at the pinnacle of the NCO ranks) calling me “Sir.” It was heady stuff.
“Sure,” I said. I dropped the mag, locked the slide back, checked to make sure the pistol was unloaded, and handed it to him. CSM Hickman loaded five rounds in the magazine, put the mag in the gun, aimed the 1911, and fired five shots at the tiny bullseye 50 feet away. When the thunder died, there was one ragged hole in the center of the bullseye. You could have covered that single ragged hole with a nickel. I was speechless. I had no idea such a thing was even possible.
“Maybe at some point in the future, Sir,” the Command Sergeant Major said in response to my thought about accurizing the pistol, “but I think it’s good enough for now.”
When you’re a retired engineer who likes to play with guns…well, read on.
After my great results with 8.8 grains of Power Pistol under the 118-grain ARX bullet in the .45 ACP, I learned that Power Pistol is no longer available. That was good news and bad news. The bad news is I that I can no longer get that powder. The good news is that I already have something like 850 loaded rounds with Power Pistol (those will last me for a while). More good news is that I have an excuse (not that I needed one) to find another load for my .45 with the ARX bullets.
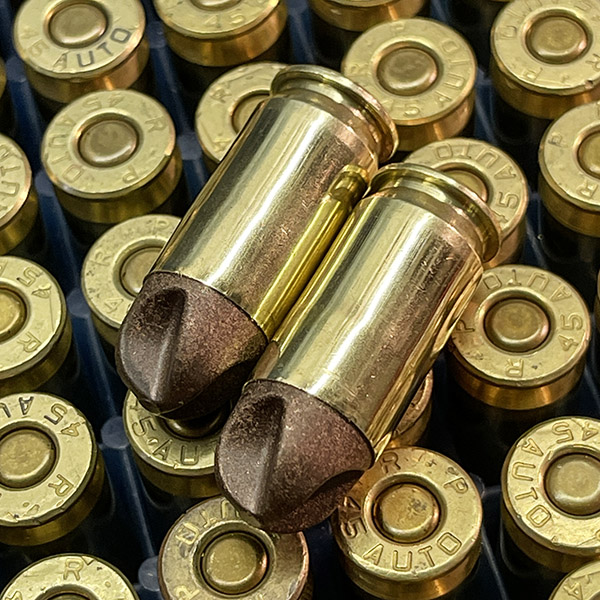
.45 ACP cartridges reloaded with ARX 118-grain poly/copper composite bullet.
Winchester’s 231 worked great in the 9mm and I had some on hand, so that’s what I thought I would try next. Inceptor lists two load ranges; I stuck to the standard (i.e., non +P) range. With the 118-grain .45 ARX bullets, Inceptor showed the Winchester 231 propellant range to be 6.3 to 7.0 grains. I loaded at 6.8 and 7.0 grains. I test fired at 10 yards, just as I had done before with the Power Pistol loads.
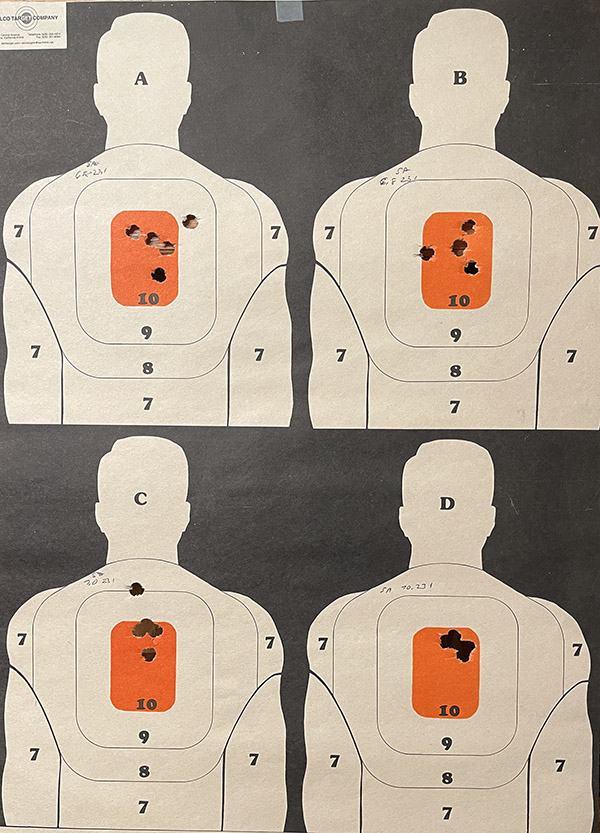
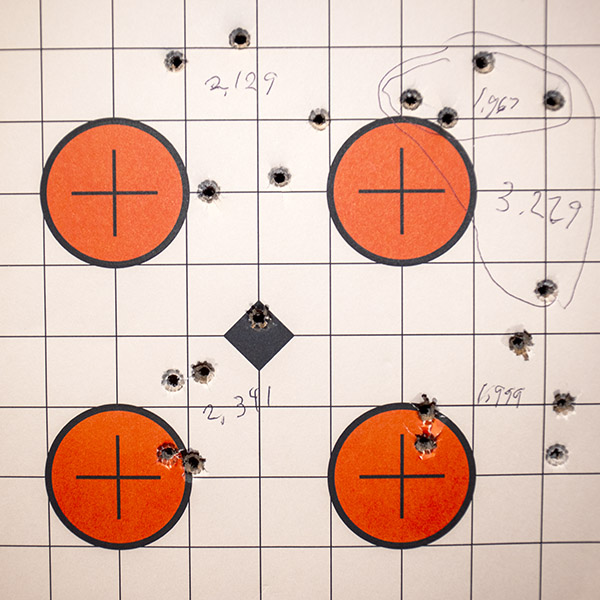
In the full-sized Springfield Armory 1911, both 6.8 and 7.0 grains of 231 functioned reliably. The 7.0 grain group was noticeably tighter than the 6.8 grain load. The two targets on top were with 6.8 grains of 231; the two on the bottom were with 7.0 grains. The two 7.0-grain groups were right on top of each other if you look at both targets. There was one flyer in the first group, and that’s due to me. The second group was one ragged hole. This is a good load in the 5-inch Springfield 1911.
The top two targets were shot with 6.8 grains of Winchester 231; the bottom two were with 7.0 grains of 231. There are five shots on the bottom right target; they cut one ragged hole.
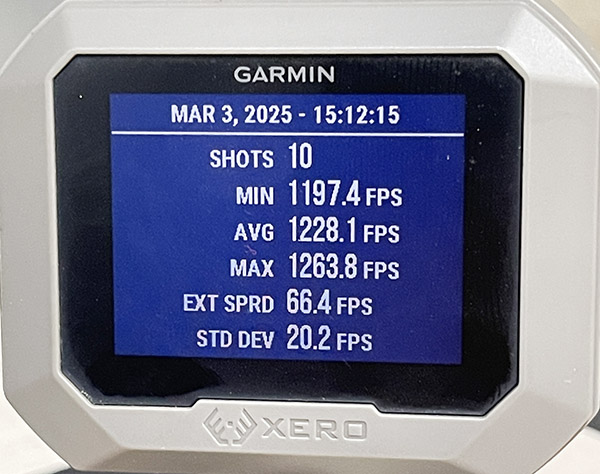
From a velocity and velocity variation perspective, the Springfield 6.8-grain load was tighter, but I’m sticking with the 7.0-grain load (it grouped better). If there was a difference in felt recoil between the two loads, I couldn’t detect it. Here’s the chrono readout for the Springfield and the 6.8-grain load:
The 6.8-grain 231 load chrono results.
Here’s the chrono result for the Springfield and the 7.0-grain load:
The 7.0-grain chrono results. The extra 0.2 grains of propellant bumped the average velocity 57 fps.
As a point of reference, the average velocity with the 8.8-grain Power Pistol load was 1299 fps, so this is only a little bit slower (16 fps, to be exact). The bottom line is that the 7.0-grain 231 load is a suitable substitute for the 8.8-grain Power Pistol load in the full-sized 1911.
I next turned to the Rock Island Armory Compact. It’s one my good buddy TJ of TJ’s Custom Guns worked over for me and it is superbly accurate and reliable with conventional cast and jacketed bullets. The Compact has a 3 1/2-inch barrel. The ARX bullets did not perform well with either powder (Winchester 231 or Power Pistol) in the Compact 1911. They tumbled in flight and they were not accurate. The 7.0-grain 231 load functioned the pistol reliably, ejected all cartridge cases, and held the slide open after the last round. The 6.8-grain 231 load worked the slide and it stayed open after the last round, but on the last round the cartridge case remained in the chamber. These factors (along with the poor accuracy and the tumbling in flight) showed the ARX bullets and 231 are not good in my Compact 1911.
I tried the ARX bullets with my prior 8.8-grain Power Pistol load in the Compact 1911 Everything on the gun functioned the way it should (I had reliable ejection and the slide stayed back on the last round), but the accuracy was poor and the bullets tumbled in flight just as they had with the 231 loads. The shorter 3 1/2-inch barrel just doesn’t give the bullets enough velocity to stabilize.
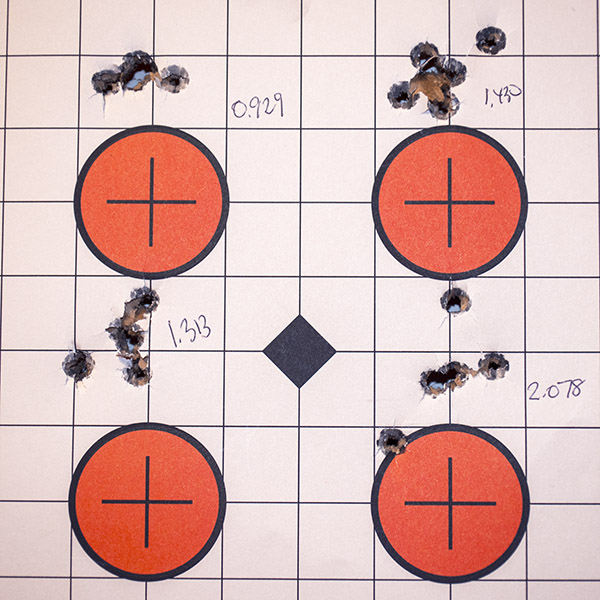
Here’s what the targets looked like with the Compact 1911. The left top is the 6.8-grain 231 load, the top right is the 7.0-grain W31 load, and the bottom two are with 8.8 grains of Power Pistol. Accuracy was terrible with all, and like I mentioned above, all loads exhibited tumbling. This is why we test loads. Some work, some work wonderfully well, and some don’t work at all.
Whoa! Things went to hell in a handbasket with the ARX bullets in my Compact 1911.
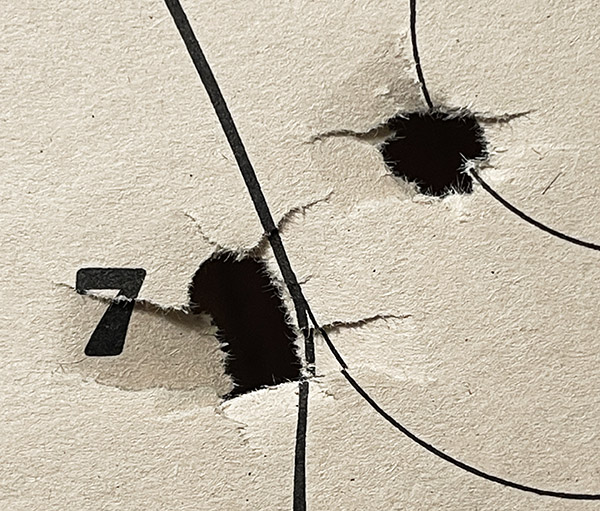
Here’s a closeup of the tumbling. It’s obvious what’s going on here.
The bullets tumbled in flight when fired in the Compact Rock. The lower left shot was flying sideways as it passed through the target.
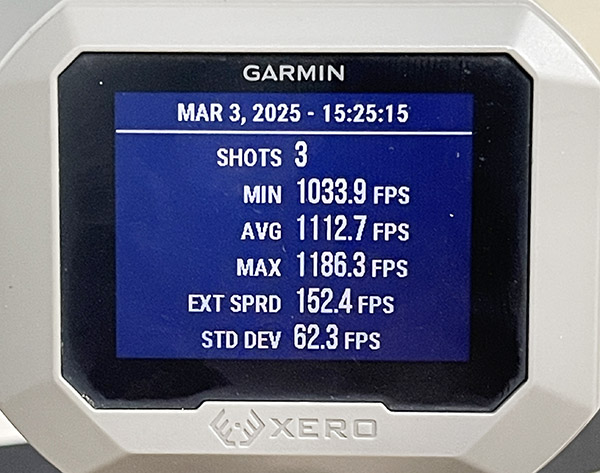
These bullets need a minimum velocity to stabilize, and the Compact 1911’s shorter barrel isn’t delivering it. Here are the chrono results for the 6.8-grain 231 load (the chrono didn’t pick up a couple of the shots):
Lower velocity = less stability. Things fell apart with the Compact’s shorter barrel.
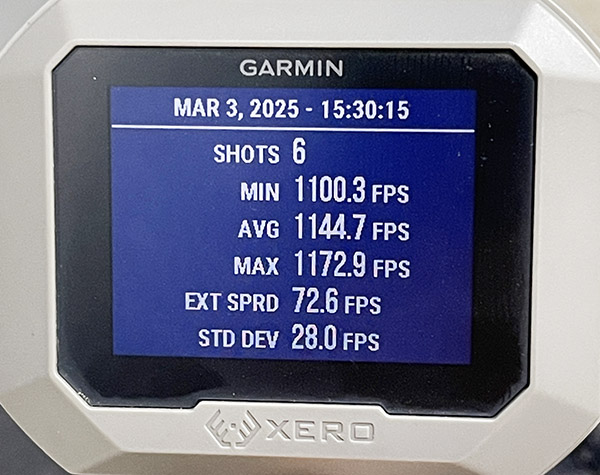
Here are the results for the 7.0-grain 231 load:
The chrono picked up a round fired by someone else. It didn’t matter; the results were not good at these lower velocities.
I didn’t bother chronographing the Power Pistol load in the Compact when I saw that those were tumbling, too.
It appears that the .45 bullets need something above approximately 1200 fps to stabilize. I’ll probably next test the 7.0-grain 231 load at 25 yards and 50 yards in the Springfield 1911 to see if the bullets are stable at those longer ranges. I don’t know how much velocity they’ll give up as a function of range and I’m not willing to stand downrange with the chrono to catch them as they fly by.
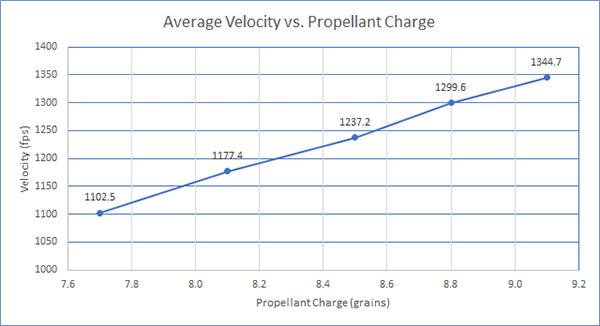
This is what happens when you’re retired, it’s raining, and you have access to an indoor handgun range. In the last blog, I wrote about much I liked the ARX 118-grain .45 ACP Inceptor composite bullets. I also mentioned that I felt the 9.1-grain Power Pistol load was a bit hot for my tastes. So I continued the .45 ACP ARX bullet load development effort. I loaded 10 rounds each with the 118-grain bullets at 9.1 grains of Power Pistol (same as before), and then I loaded 10 rounds with 8.8 grains, 8.5 grains, 8.1 grains, and 7.7 grains of Power Pistol. I chronographed everything and fired at the same 10-yard distance as I had in the last blog, using the same two hand hold with no pistol rest. Just like before.
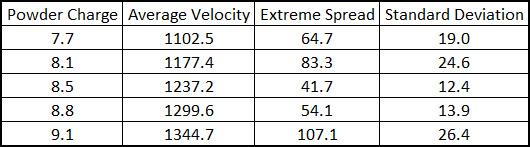
Here’s the data:
In my Springfield 1911 Target Model, all loads functioned perfectly. The loads were 100% reliable (at least with my 10 round sample size) for feed, function, and holding the slide open on the last shot.
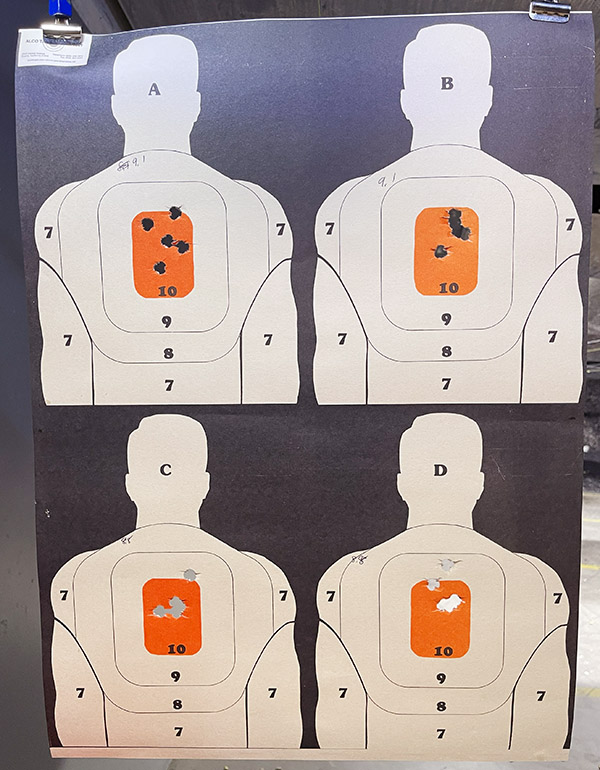
As I had for the initial tests, I used the Alco target with four silhouettes on each sheet.
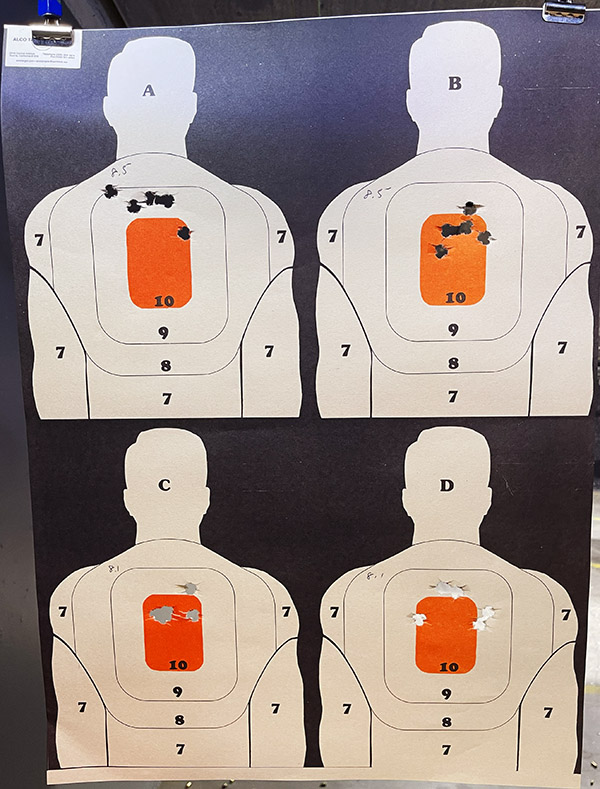
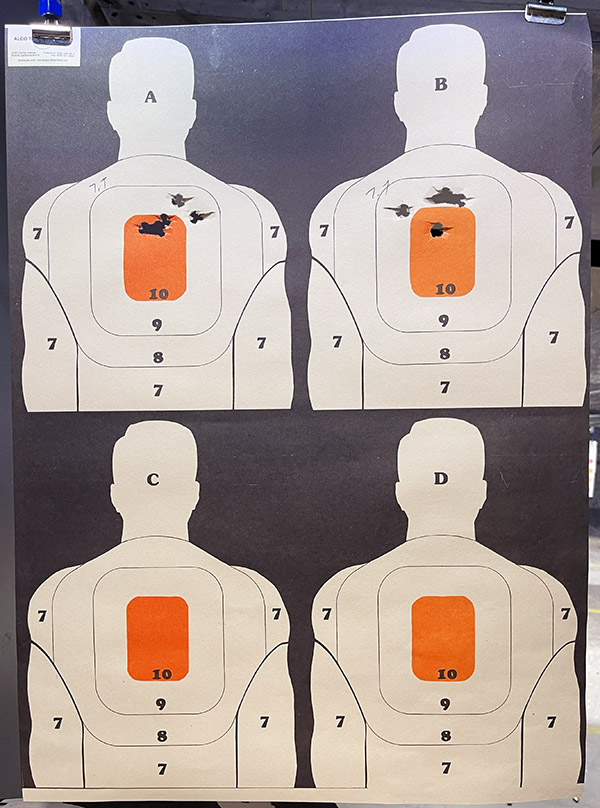
Here’s the target for the 9.1 grains and 8.8 grains of Power Pistol. The two top targets are with 9.1 grains, the two bottom targets are with 8.8 grains.The top two targets are with 8.5 grains of Power Pistol; the bottom two are with 8.1 grains of Power Pistol.These two targets are with 7.7 grains. I didn’t use the bottom two targets.
Three points are noted:
As the loads get lighter, the bullets print higher on the target. That’s because the bullets are in the barrel longer as the gun is in recoil.
The 8.8-grain load groups appear to be the most accurate. I had a flyer or two on each target, but I had several rounds make one ragged hole on each target.
Recoil was a little bit less with the 8.8-grain load compared to the 9.1-grain load. I gave up about 45 fps in average velocity (from the 9.1-grain load), but hey, it’s a .45. Who cares? The target will never feel the difference.
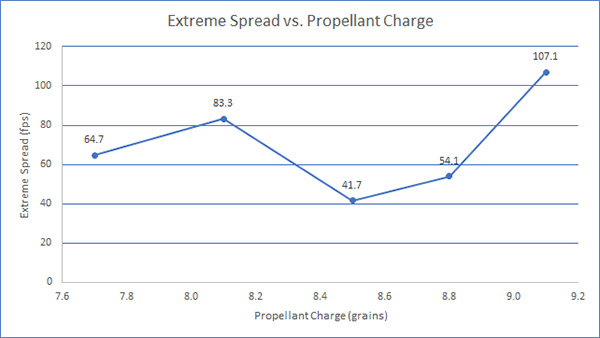
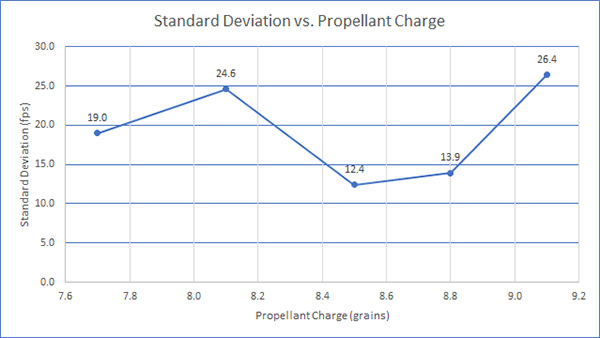
Just to see if I still could rustle up my Excel skills, I put together three x-y plots showing the chrono data.
Average velocity appears to linearly correlate with powder charge (that bit of info and three bucks will get you a cup of coffee at Starbucks). That’s not always the case, especially as you approach maximum powder charges.Extreme spread was minimized at 8.5 grains of propellant. It was still low at 8.8 grains.In line with the extreme spread findings (see above), the standard deviations were similarly low at 8.5 and 8.8 grains of propellant.
Based on the above, I decided that 8.8 grains of Power Pistol is the l load I am going with for the ARX .45 ACP bullets. You might wonder why I didn’t select 8.5 grains, as that loading provided the lowest extreme spread and standard deviation. The simple answer is that lower extreme spreads and standard deviations do not always correlate with the tightest groups. If they did, I could simply take the suggested accuracy loads in the Lyman manual and run with them (Lyman bases their accuracy load selection based on standard deviation and extreme spread), but I’ve found that my accuracy loads are often not what the reloading manuals claim to be the most accurate. Another reason is that my Lyman manuals don’t include data for the ARX composite bullets. Results on paper are what count. For this bullet in my 1911, that appears to be 8.8 grains of Power Pistol. Yeah, it could just be me getting lucky with my handheld accuracy tests, but it’s me doing the shooting, and it’s me making the selection.
Both extreme spread and standard deviation are measures of velocity variation. Of the two, I prefer standard deviation as the more meaningful. The standard deviation (represented by the Greek letter σ) is a statistics parameter representing spread around the average. What it means is that approximately 99.7% of the velocities for all shots fired will lie within the range of the average velocity minus 3σ to the average velocity plus 3σ. The average velocity for the 8.8-grain load is 1299.6fps, so our ±3σ range is 1257.9fps to 1340.7fps. If you’ve ever heard people talk about Six Sigma quality programs, they are referring to minimizing variability to ±3σ (±3σ represents a total of 6σ). It’s a fancy way of saying the odds of being outside a ±3σ range are about 1 in 1000 (it’s actually about 3 in 1000 based on that 99.7% value mentioned above; calling it 1 in 1000 is an approximation). If you understand this, you already understand more than most people who toss around 6σ terminology. I’ve spent a lot of my career in manufacturing, engineering, and quality assurance, and I can guarantee you that most people who say 6σ have no idea what they are talking about.
To get back to the main topic, I am impressed with the ARX bullets. I ordered another 2000 as I was wrapping up this blog (and by the time you read this, I will already have them). If you haven’t tried the ARX bullets, you might think about doing so.
I recently received my order of Inceptor ARX 118-grain .45 ACP bullets. I had previously loaded 9mm ammo with ARX 65-grain bullets and I was pleased with them, so I wanted to try the ARX bullets in the .45, too.
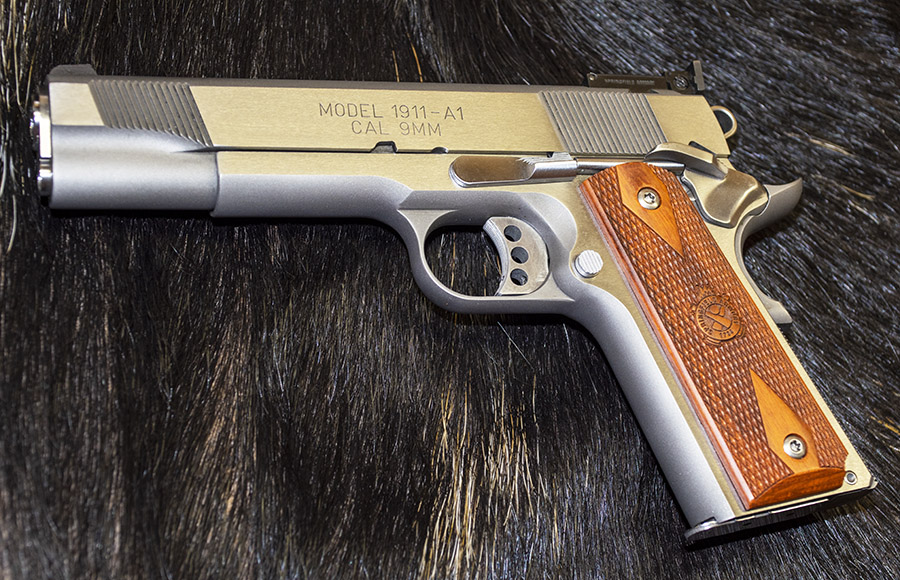
I compared how two 1911s performed on my local indoor pistol range, firing with a two-hand hold (but without a rest) at 10 yards. I used nearly identical 1911 Springfield target pistols, one in 9mm and the other in .45. The .45 1911 is as it came from the factory; this gun has had no custom work done to it other than installing a one-piece guide rod. The 9mm 1911 had the same one-piece guide rod, along with other custom touches by good buddy TJ at TJ’s Custom Gunworks. The 9mm 1911 has a much crisper and lighter trigger, it is an absolute delight to shoot, and it is my favorite handgun.
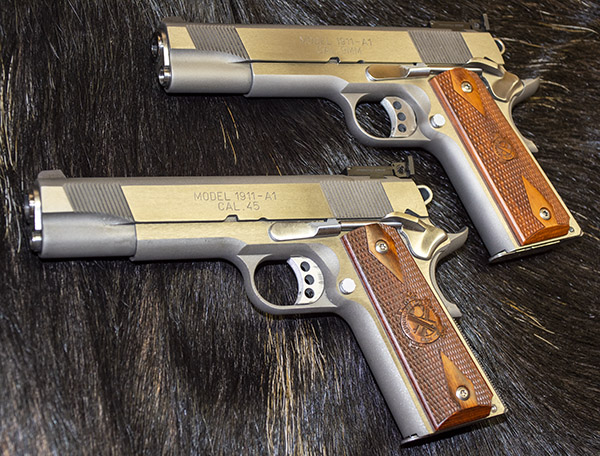
The two Springfield 1911s used in this test., shown here with cast bullet loads. The testing described herein used ARX composite bullets, as shown in the photo at the top of this blog.
The ARX bullets are different than anything I’ve used before. They are a mix of copper particles suspended in a polymer matrix. The ARX bullets are much lighter than cast or jacketed bullets, with consequently dramatically higher muzzle velocities. They are not marketed as frangible bullets. They are intended to produce a larger wound cavity and I suppose because of that they could be considered a better defense round. I’m not interested in any of that. I’ll never hunt with either a 9mm or a .45, and although I sometimes carry a 1911 chambered in .45 ACP or my 9mm S&W Shield, when I do so it is always with factory ammunition. Nope, my interested was a result of my buddy Robby gave me a few 9mm ARX bullets and I fell in love with them. The ARX bullets are less expensive than cast or jacketed bullets and they are accurate. For a range rat like me, that’s a good deal.
I reloaded all ammo used in this test series with my Lee turret press, a great setup that consistently produces superior ammo. This photo shows a completed ARX .45 ACP round. Here’s our earlier review of the Lee gear.
9mm 1911 ARX Results
I wrote about my initial impressions with the 65-grain 9mm ARX bullets previously (they were all good), so for this first portion of the comparison there’s not too much that’s new other than this load’s attaining 100% reliability in holding the slide back after the last round.
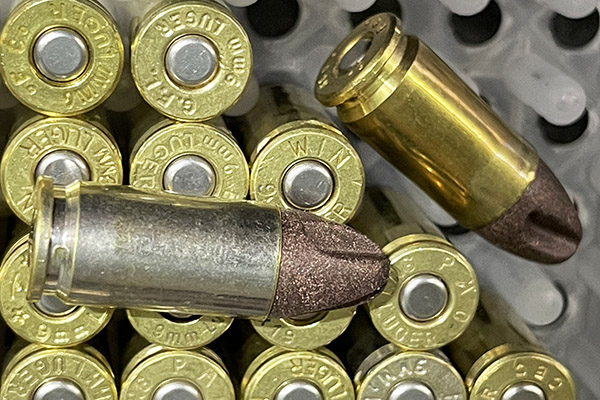
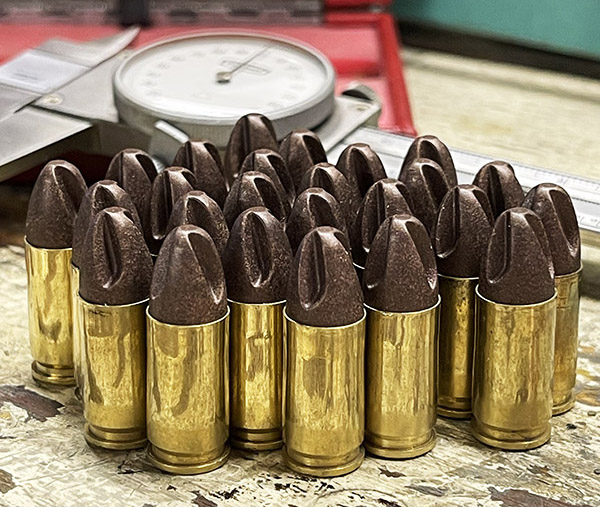
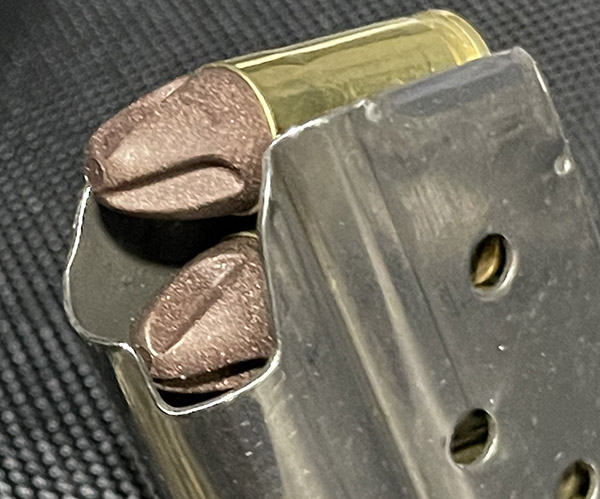
9mm ammo loaded with the ARX 65-grain polymer composite bullet. After my first trial with these bullets, I ordered a bunch.9mm ARX bullets loaded in my 1911’s magazine.
My 9mm load uses 5.2 grains of Winchester’s 231 propellant, with the bullets seated to an overall cartridge length of 1.135 inches. I used CCI 500 primers and mixed brass for the loads you see here (I am lazy and I didn’t want to sort the 9mm brass). I loaded these on my Lee turret press using Lee dies (including the factory crimp die). I took the load data directly from Inceptor’s website. This load is a max load in their standard load listings (i.e., it is below the +P loads the Inceptor data also lists).
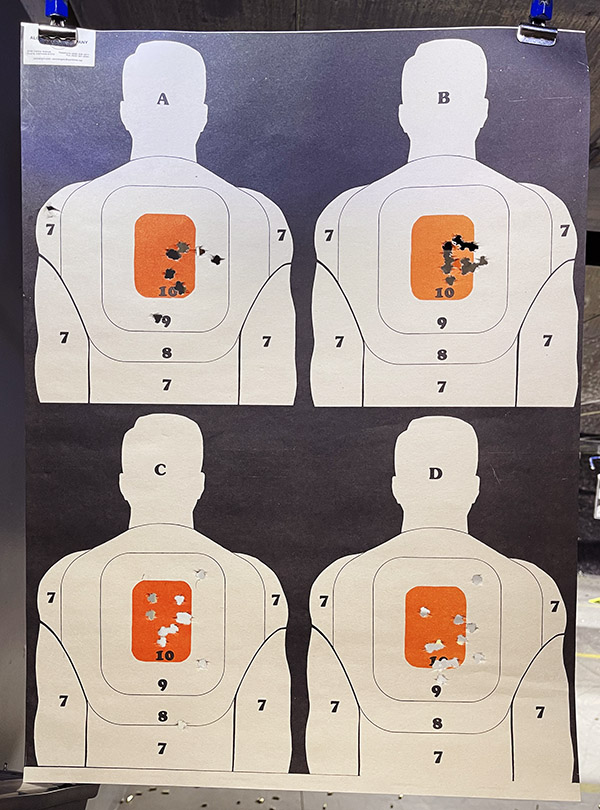
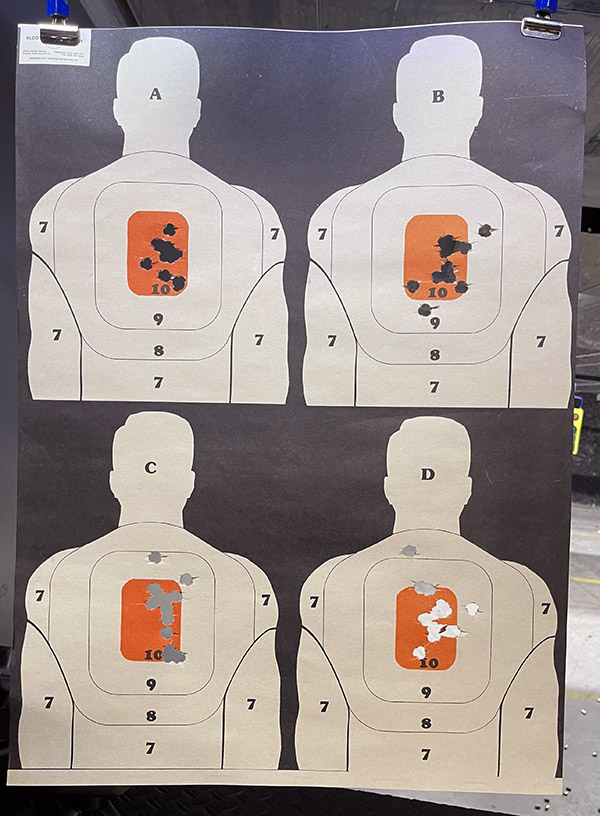
I shot at the Alco four-silhouette target (it has four quarter-sized silhouettes on each sheet), and I sent either 12 or 13 rounds downrange on each silhouette. That made for a total of 50 rounds on each target.
The Alco Targets 4-silhouette target. I shot 12 rounds at the top left target ,13 rounds at the top right target, 12 rounds at the bottom left target, and 13 rounds at the bottom right target. That top right target is pretty sweet.
The 9mm ARX load functioned perfectly in my 1911. There were no failures to feed or eject and the pistol stayed open after the last shot fired. This is an accurate load. The flyers are due to yours truly, not the gun or the load. Maybe if I had sorted the brass they would be a little better, but these are good enough for my purposes.
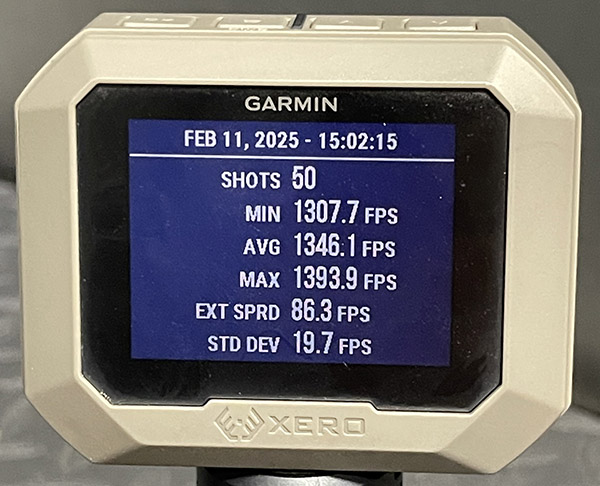
These 9mm bullets only weigh 65 grains. They step out sharply, but the recoil is low (perceptibly lower than what I would feel with a 115 or 124-grain cast or jacketed bullet). Velocities are high for a 9mm (which are typically in the 1100 fps range with cast or jacketed bullets). The Inceptor data for my load showed that they achieved 1433fps with 5.2 grains of HP38 propellant (which is the same powder as Winchester 231). Their results were with a 4-inch barrel. My 1911 has a 5-inch barrel; I achieved an average velocity of 1626fps, or nearly 200fps faster than what Inceptor achieved in their testing. To add a little more context to these findings, I previously tested this load in my S&W Shield (which has a 3.1-inch barrrel). In the Shield, this load averaged 1364fps. The bottom line? My results are consistent with the Inceptor load data.
Take a look at the Garmin chrono data for this load in the 1911.
Yikes! These are smoking hot 9mm rounds!
In my prior test of this load in the Springfield 1911 and the S&W Shield, I found that the 1911 would not hold the slide back after the last shot (the Shield didn’t have that problem). In that earlier initial test, I used a two-hand hold and I rested my arms on the bench. I think that might have caused the 1911’s problem with holding the slide open after the last shot. In the range session yesterday, I used a two-hand hold, but I did not rest my arms on the bench (and the gun functioned perfectly, holding the slide open after the last shot on every 5-shot string). The 5.2-grain Winchester 231 load is a good one for the 9mm. It’s accurate, the recoil is light, and reliability is superb.
.45 ACP ARX Bullet Testing
I next moved on to test the 118-grain ARX bullets in my .45 ACP Springfield 1911.
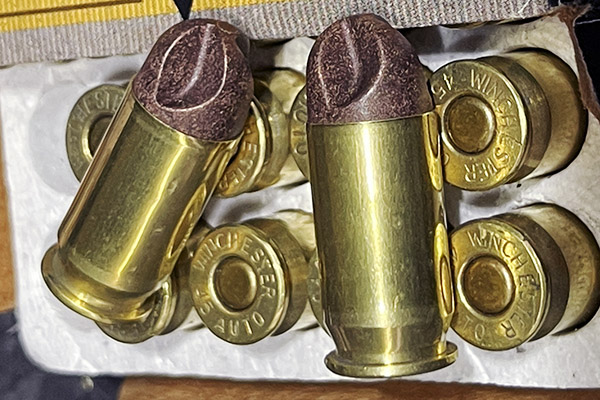
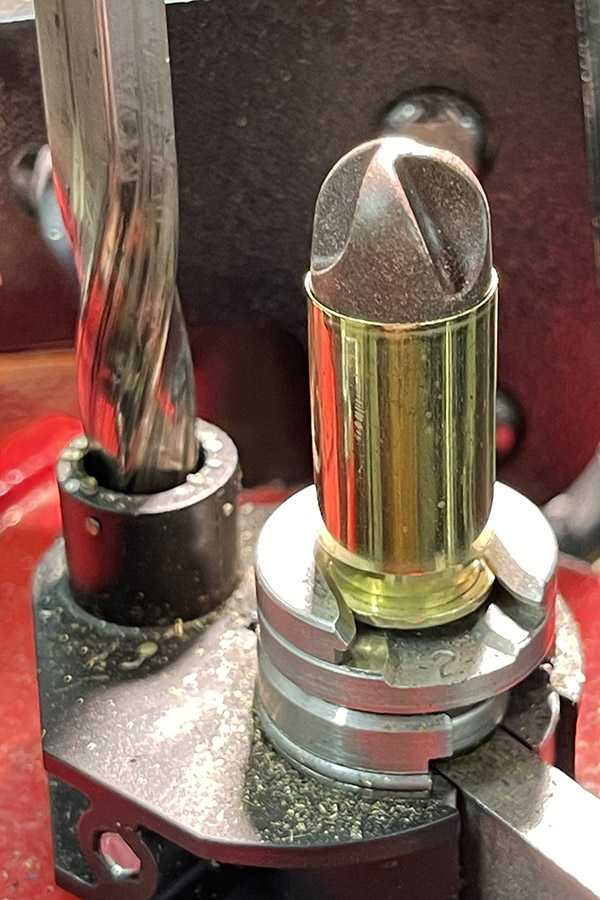
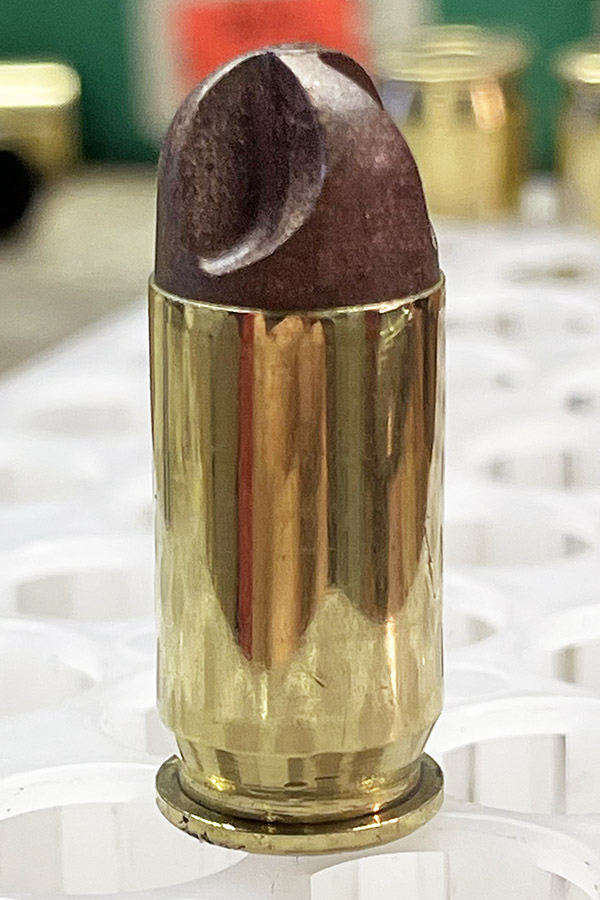
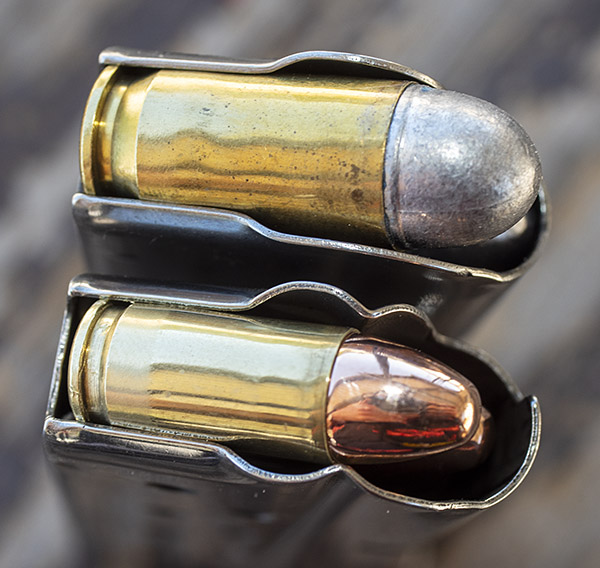
A cartridge that looks like a drill bit! ARX bullets in the .45 ACP make for an interesting and handsome round.
The .45 ACP load used the ARX 118-grain bullet with 9.1 grains of Power Pistol, a Winchester large pistol primer, and Winchester brass, all loaded on the Lee turret press with a Lee crimp die. The .45 ACP load data also came from the Inceptor site. The site lists three powders; the only one I had on hand was Power Pistol. The 9.1 grains of Power Pistol is at the top of their non+P range. It is not a +P load. Ordinarily I would not start testing at the top of the listed propellant weight range, and I probably shouldn’t have done so here (more on that a paragraph or two down).
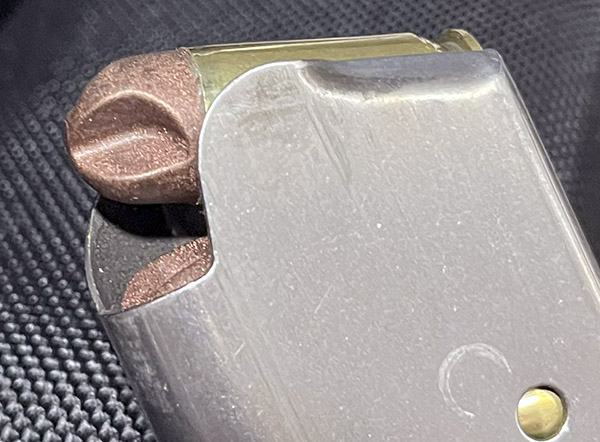
.45 ACP ARX bullets loaded in my 1911’s mag. Everything works. They look cool.
The Inceptor load recommended a cartridge overall length of 1.26 inches. I loaded with a cartridge overall length of 1.250 inches, which is what I have used in all my other .45 ACP loads. That length fits well in the magazine. I don’t think the additional 1/100 of an inch Inceptor specified would cause interference between the ammo and the forward inside magazine edge, but it’s close and in any event, I wanted to stick with the cartridge length that has always worked for me in the past.
The .45 loads felt hot to me. I think that’s primarily because I have been shooting my 9mm handguns lately. A few of the cartridge cases showed a little (very little) primer flattening. I’m not sure if that was due to firing the round or if it was due to me putting extra effort into primer seating during the reloading process. The .45 ACP is a powerful cartridge, and when I haven’t shot one in a while, it can seem even more powerful.
Same target, different cartridge. That top left target has 12 rounds through it and it is what I’d like to do all the time. When it happens, it’s its own reward.
Accuracy was about the same as with the 9mm. I thought both were good. There were occasional flyers, but that was undoubtedly me and not the gun or the load. Again, I shot offhand for all of these groups, so I wasn’t expecting one-hole results.
1346fps from a .45 Auto! The chrono tells the story!
Velocities were very much higher than what I’ve seen with other bullets in any .45 ACP. I had previously loaded .45 ACP with all kinds of cast and jacketed bullets ranging from 185-grain wadcutters to 230-grain full metal jacket projectiles. They would typically see velocities of 700fps to maybe 900fps. Some folks load the .45 a little hotter than that with cast or jacketed bullets. I’ve never felt a need to. But those ARX 118-grain bullets! Wow! The Inceptor load data said I would see 1,317fps with 9.1 grains of Power Pistol propellant (and for their .45 ACP testing, Inceptor used a 5-inch barrel); my ammo averaged 1346fps. Extreme spread and standard deviation were low; both extreme spread and standard deviation were similar to what my 9mm ARX loads achieved.
Feed and ejection were flawless in my Springfield 1911. That said, I am going to drop the load down to 8.7 and 8.5 grains of Power Pistol and try that for the next load. If I get good groups and reliable function, that’s where I’ll load in the future.
The Bottom Line
These are good bullets, and I think they represent a huge step forward. They are the first really new thing to come along in the reloading game in a long time.
Surprisingly, both the 9mm and the .45 put the bullets where I wanted them, with no sight adjustments from my previous lead or jacketed bullet loads. I expected both the 9mm and .45 ACP ARX loads to shoot low, but they did not. The sights were right on the money.
I didn’t see any copper fouling from the bits of copper mixed in the ARX bullets’ copper/polymer matrix. There’s a tiny bit of blue/purple fouling from the bullet polymer, but it’s very minimal and it’s only in the grooves. I had not cleaned either the 9mm or the .45 1911 after earlier range sessions with cast and plated bullets and the bores were dirty when I started shooting the ARX bullets. Both guns were cleaner after shooting the ARX bullets than they are after shooting cast or jacketed bullets. Bore cleanliness is a big plus here.
Price is another advantage; the 9mm bullets are $57/1000 and the .45 ACP bullets are $65/500 (I think the .45 bullet price at $65/100 is an increase from what I paid a couple of weeks ago). I’ve ordered ARX bullets three times now; on all three orders, they did not charge sales tax. I guess the sales tax is included in the retail price already. Whatever. I’m an anti-tax guy. Whether it’s real or imagined, not paying sales tax is plus in my book.
I’m not going to hunt with either my 9mm or my 1911, but here in California, these bullets should meet our lead-free bullet criteria. Similarly, the bullets are not hollow points. Some places (San Francisco and all of New Jersey come to mind) have outlawed hollow point bullets. These bullets should be okay in places where hollow points are outlawed.
I’ll be ready. Will you?
As mentioned near the start of this blog, the drill-bit-like bullet profile creates a much larger wound channel. The idea is that bullet spin allows the bullet to grab onto tissue and propel it outward. There are some YouTube videos that purport to show this in ballistic gelatin. I suppose if you were defending yourself against a bad guy made of ballistic gelatin (think Steve McQueen and the 1958 classic, The Blob) these would be the preferred bullet. None of that matters to me, and from a defense perspective it’s probably moot (especially with the .45). Dead is dead, and with a .45, I’m guessing a larger wound channel won’t make a bad guy any deader. My interest is in how well the ARX bullets shoot on paper, and they do that extremely well.
Back in the 1970s I was a falling plate competitor. That competition involved knocking over a set of steel plates at a relatively short distance, usually with something in .38 Special or .45 ACP. In those days, nobody competed with a 9mm; the 9mm pistols had not made the inroads they enjoy today. A lot of guys competed with 1911s or modified K-frame S&Ws; I was a bit of an oddball and I used an N-frame Smith and Wesson .44 Magnum (with light .44 Specials, as the shot-to-shot recovery was faster and the .44 Special easily knocked the plates down). We shot from the ready position, with the gun held at an angle to the ground. The video below gives you an idea what the falling plate game looks like:
There were variations of this competition. The most exciting one was a bowling pin competition, which involved clearing a half dozen bowling pins from a table. In that one, you needed a .44 or a .45; the .38 Special didn’t have the energy to clear a bowling pin off the table. Both competitions were all about speed; whoever knocked all the plates over (or blew away all of the bowling pins) in the shortest time won.
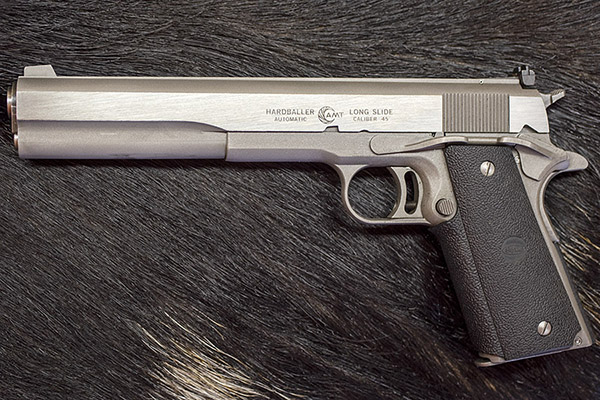
Other similar competitions involved drawing the gun from a holster, and I wanted to shoot my AMT Long Slide Hardballer, a really cool 7-inch-barreled 1911. It’s the one Arnold Schwarzenegger used in Terminator.
An AMT (Arcadia Machine and Tool) Long Slide Hardballer. The story on it is here.
I needed a holster long enough to hold the Long Slide AMT 1911, and at that time there were none on the market. Other holsters could hold either 5-inch or 4 ¼-inch 1911s, but nobody had anything for the 7-inch AMT. Hold that thought. I’ll come back to it shortly.
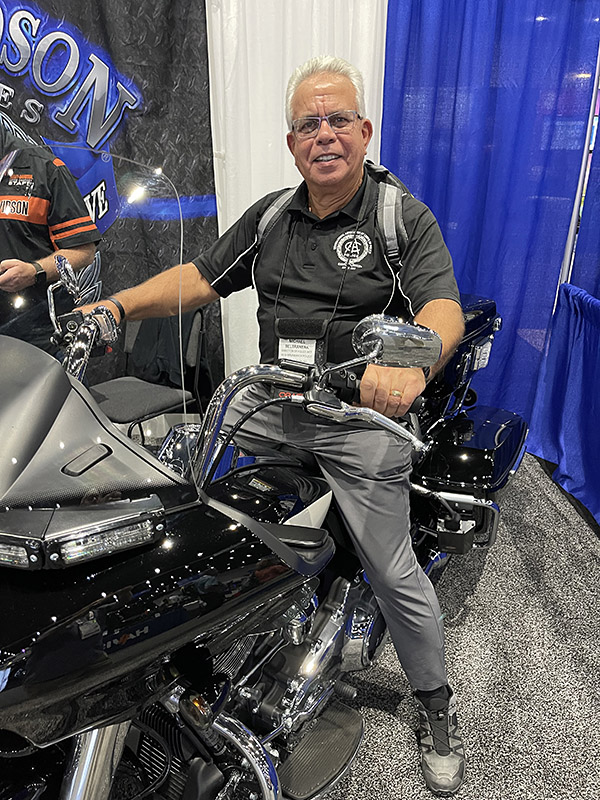
I’ve written about good buddy Mike here on the blog before. Mike and I have been buddies since junior high school. He went on to become Chief of the New Brunswick Police Department. We still talk every week. Mike deputized me a couple of times when he attended the International Association of Chiefs of Police conventions. I’d always ask for a gun, and the answer was always no. But we had a lot of fun at those conventions.
The Director at the International Association of Chiefs of Police 2023 convention. I was his administrative assistant on that adventure. That story is here.
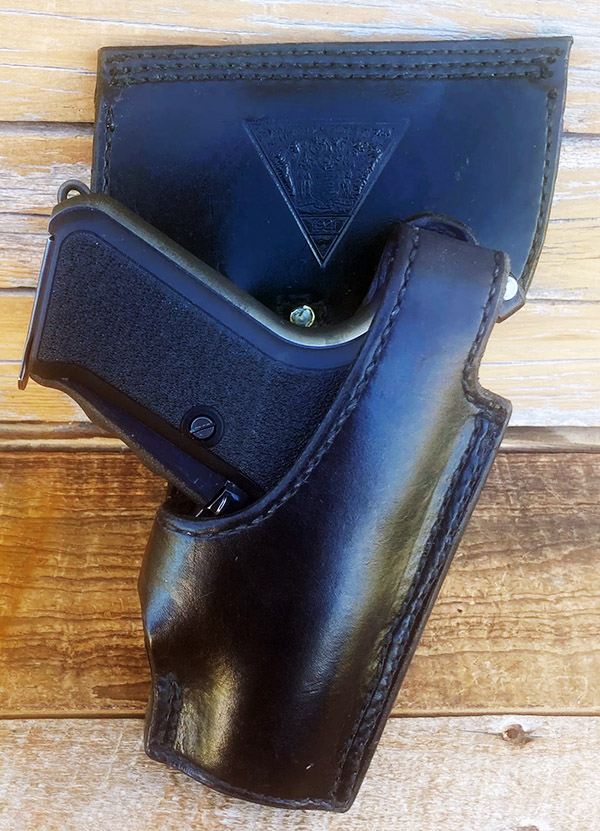
Mike called me last week. He was pumped up. He found his old New Brunswick Police Department duty holster from the days when they carried Heckler & Koch P7M8 9mm squeeze cocker semi-autos. That was the gun the New Jersey State Troopers adopted back in the ‘80s.
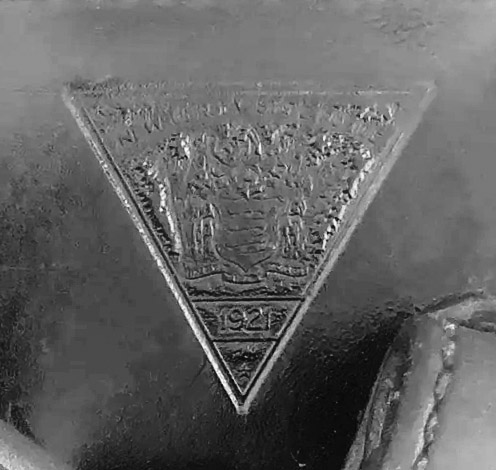
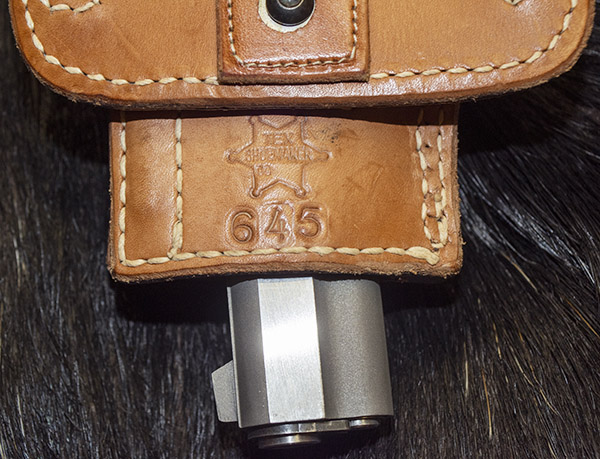
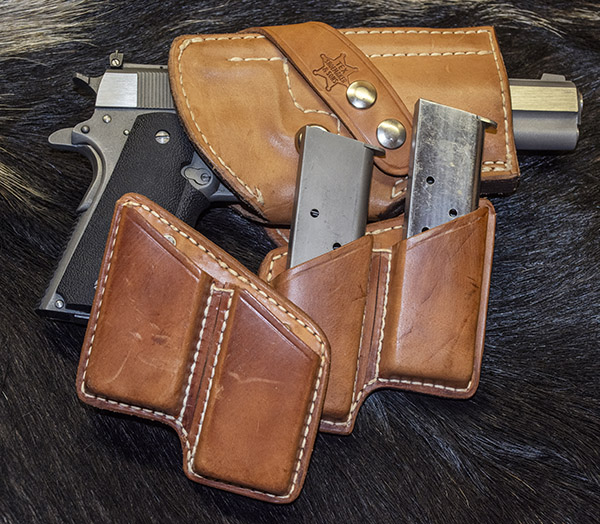
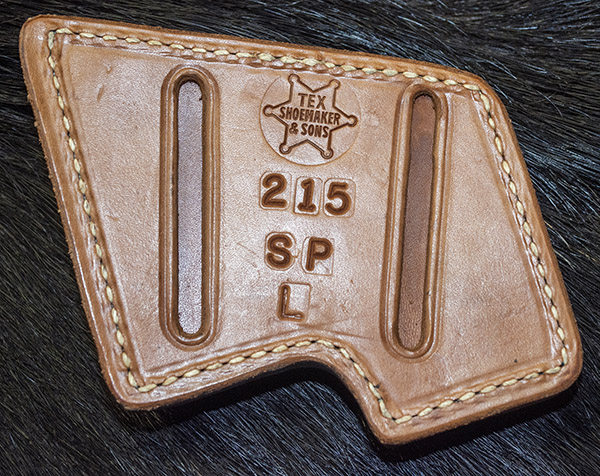
A New Jersey State Trooper Heckler & Koch P7M8 and its Tex Shoemaker holster.The NJSP emblem embossed on the Tex Shoemaker holster.
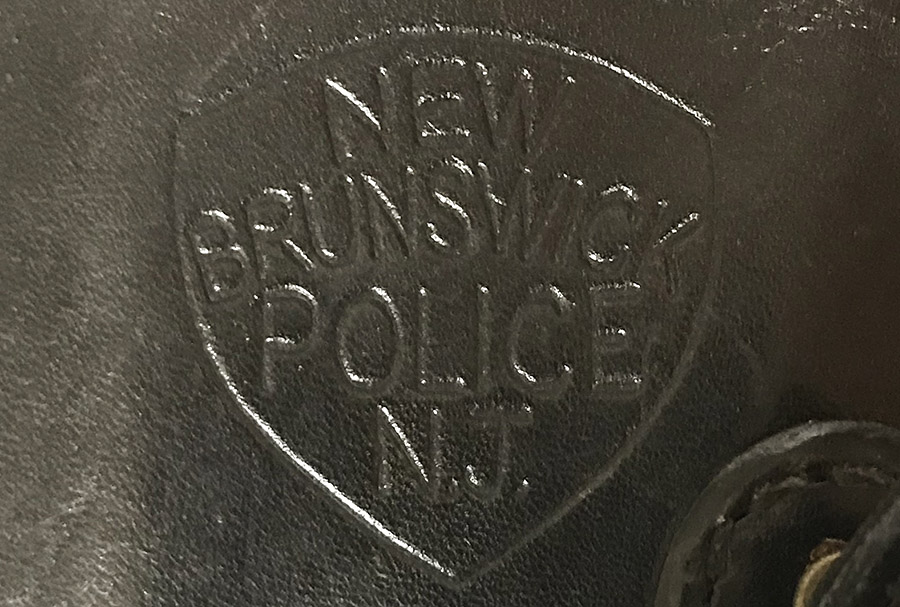
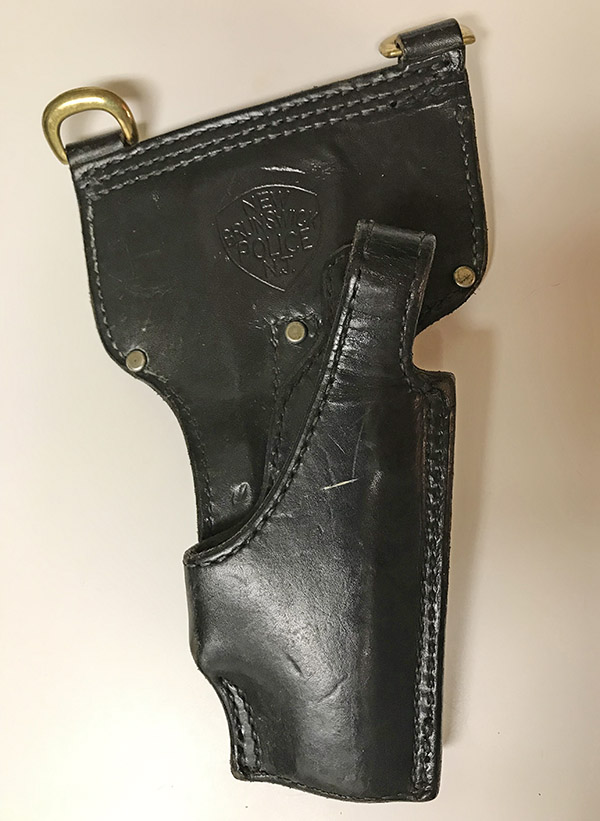
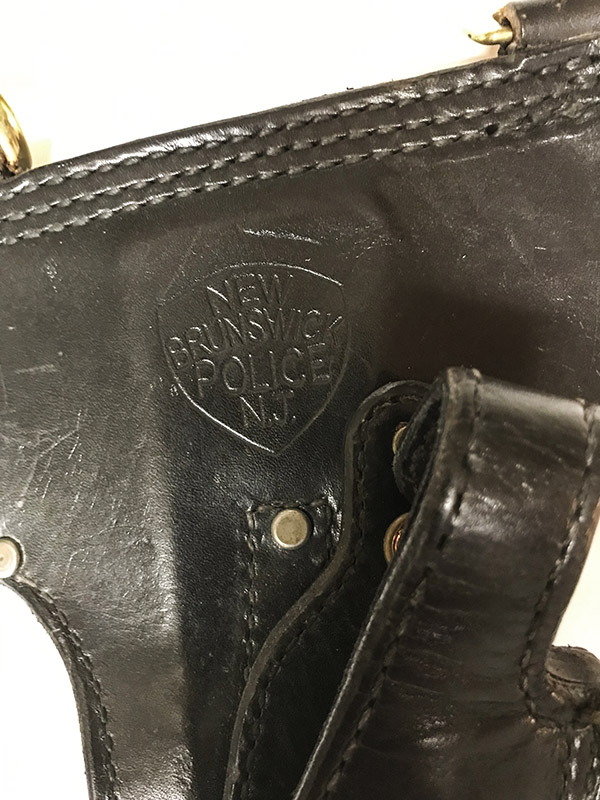
The New Jersey State Police had custom holsters crafted for their handguns by the Tex Shoemaker company, a legend in the holster business. They also had Shoemaker emboss the NJSP emblem in the leather. Not to be outdone, the New Brunswick Police Department also adopted the Heckler & Koch P7M8 9mm semi-auto, and they, too went to Tex Shoemaker for holsters embossed with the NBPD emblem. Mike had one when he served, and it was this holster he recently found. The Tex Shoemaker H&K police duty holsters have become collectible items, with this particular model appearing on Ebay for $300. Mike is going to donate his to the New Brunswick Police Department Headquarters display case. I think that’s pretty cool.
Good buddy Mike’s Heckler & Koch P7M8 Tex Shoemaker holster.The Heckler & Koch P7M8 holster with an embossed New Brunswick Police department emblem.
So I was thinking about this story and Mike’s holster and then I remembered: Hey, I have a Tex Shoemaker holster, and mine is brand new. The Tex Shoemaker company was located in San Dimas, which is not very far from my home. They closed up shop in 2019 (I’m assuming it fell victim to the pandemic, the move toward plastic holsters, and competition from the plastic holster manufacturers). Whatever the reason, it’s a pity. Shoemaker’s was an old line holster manufacturer started by Tex Shoemaker, a former lawman who started out making holsters in his garage. Their quality was unsurpassed.
When I needed a quick draw holster for my anticipated pistol competition (as described at the beginning of this blog), I couldn’t find anyone in the ‘80s who was making a holster for the AMT Long Slide Hardballer. I searched the yellow pages for holster companies (this was all pre-Internet), and that’s when I learned that the Tex Shoemaker company was nearby. I called them and explained what I wanted. I spoke with a nice guy who told me he didn’t know of anybody making a holster for the Long Slide 1911, but Shoemaker was experimenting with a new break-front holster that would handle all 1911 barrel lengths. He explained that it wasn’t on the market yet, but I could swing by and take a look at it.
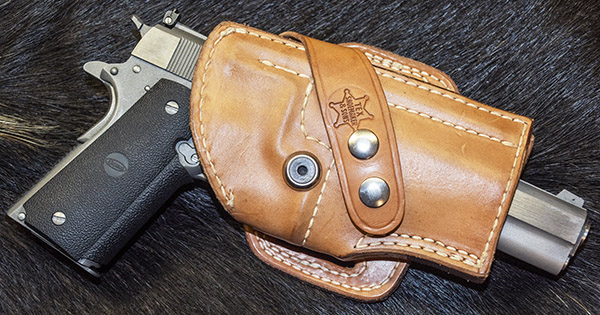
My AMT Long Slide in it’s Tex Shoemaker experimental holster.The Tex Shoemaker logo.
Sue and I rode over to Shoemaker’s that day. It was a factory and they didn’t have a retail facility, so I walked up to the loading dock, looked up at a guy standing above me, and explained why I was there. A minute later that same nice guy I had spoken with on the phone appeared with the holster he told me about on the phone. I had my Long Slide with me and we tried the big 1911 in it; the fit was perfect. He also had two magazine holders (together they could hold four magazines). The holster was just what the doctor ordered, and I told him that even though it wasn’t commercially available yet, I’d like to buy it. He smiled, gave all three items to me, and told me there was no charge.
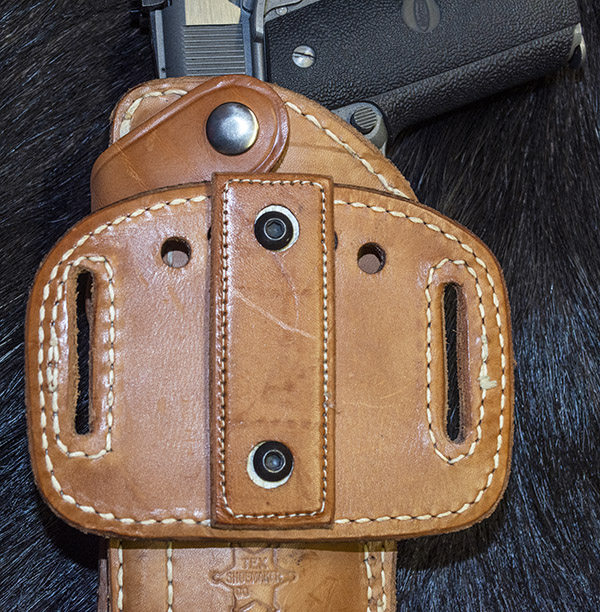
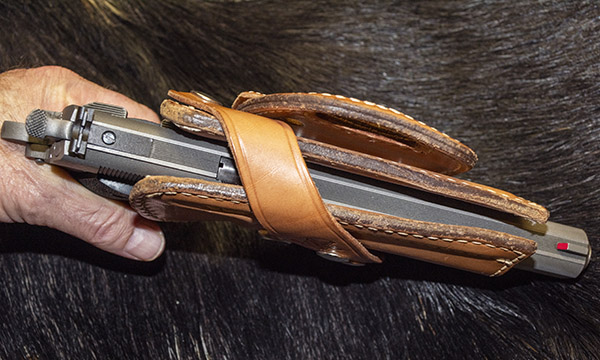
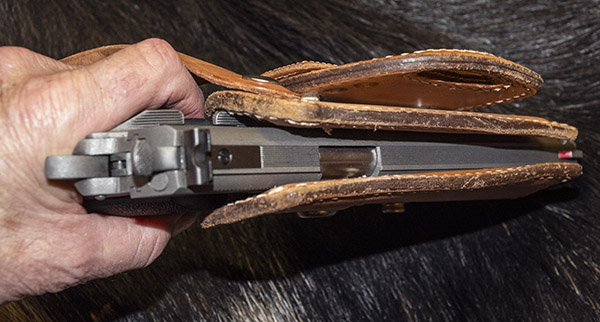
The Tex Shoemaker holster is adjustable for draw angle. It’s a cool feature.For normal carry, the pistol is secured with a cross strap.For quick draw work, the cross strap is removed. The holster has a strong clamp spring inside the leather that secures the pistol. When drawn, the pistol can be snapped forward without withdrawing upward from the holster.The Long Slide Hardballer, the Tex Shoemaker holster, and two Tex Shoemaker magazine holders.The Tex Shoemaker logo on the back of a magazine holder.
I was shocked when that nice man told me there was no charge, and then I realized I didn’t even know who he was. I introduced myself, and as we shook hands, he told me his name: Randy Shoemaker. Randy Shoemaker was Tex Shoemaker’s son.
I never pursued quick draw competition. I had visions of shooting myself in the foot, and it just wasn’t something I wanted to do. But I sure enjoy owning my Tex Shoemaker leather. Maybe someday, I’ll enter the Quick Draw McGraw games. In the meantime, here’s an unashamedly doctored video of me playing around a few years ago at the West End Gun Club.
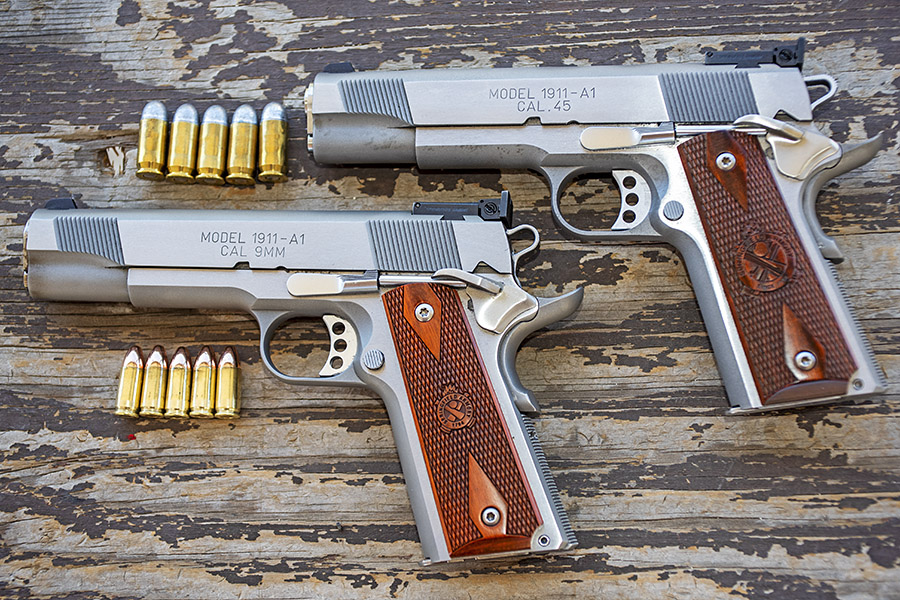
If I had a dime for every article and Internet post comparing the 9mm to the .45 ACP cartridge (and the guns that shoot them) I could probably pay cash for a new Ferrari. That said, I make no apologies for this being another one. In this case (and for this article), one of the variables I have sort of eliminated is the gun. Both are Springfield Target model 1911 autos in stainless steel. They’re the two pistols you see in the photo above.
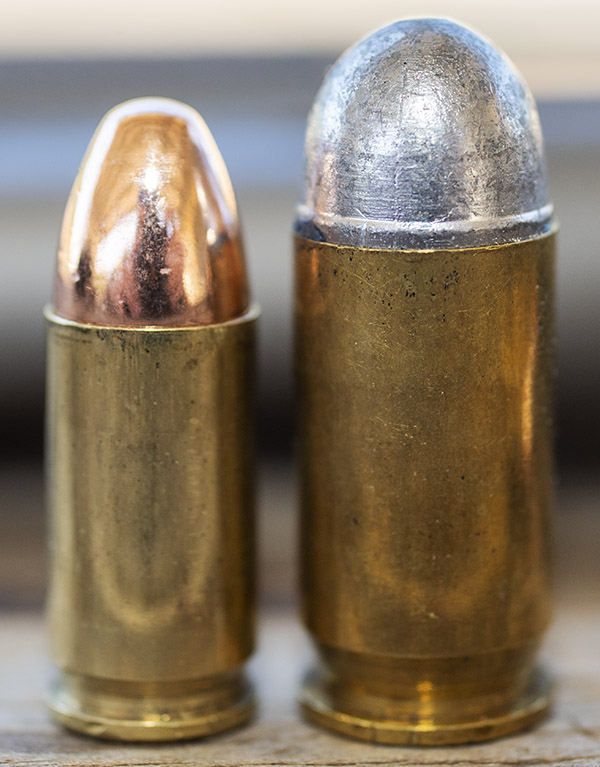
Here’s a macro photo of the 9mm cartridge (designed in 1901; also known as the 9×19 and the 9mm Luger) and the .45 ACP cartridge (designed in 1904). Both of the rounds shown below are my reloads, which I prefer over factory ammo for many reasons. We’ve written a lot about reloading both cartridges, and you can find those articles here.
I like these kinds of photos. The photo shows the 9mm cartridge (arguably the most popular handgun cartridge in the world) and the .45 ACP.
For this comparison, I used the Springfield Armory magazines that came with of the two 1911s. Here’s what the ammo looks like in the magazines.
Loaded .45 ACP and 9mm magazines. The .45 mag holds 7 rounds; the 9mm mag holds 9 rounds. I’ve read that the average number of shots fired in an armed confrontation (not counting military actions) is less than two.
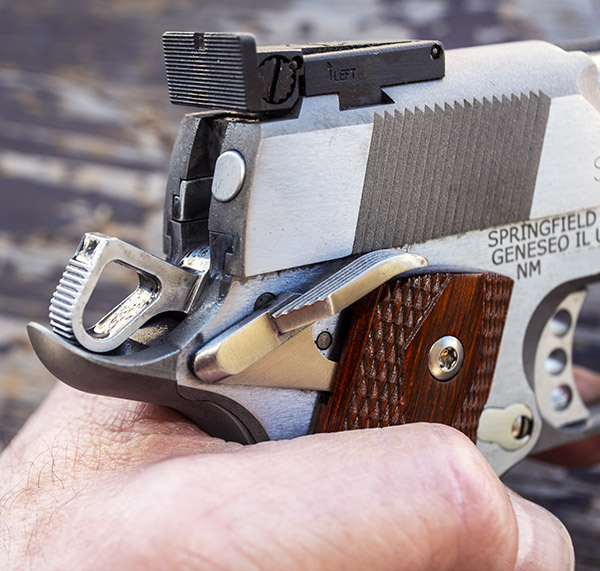
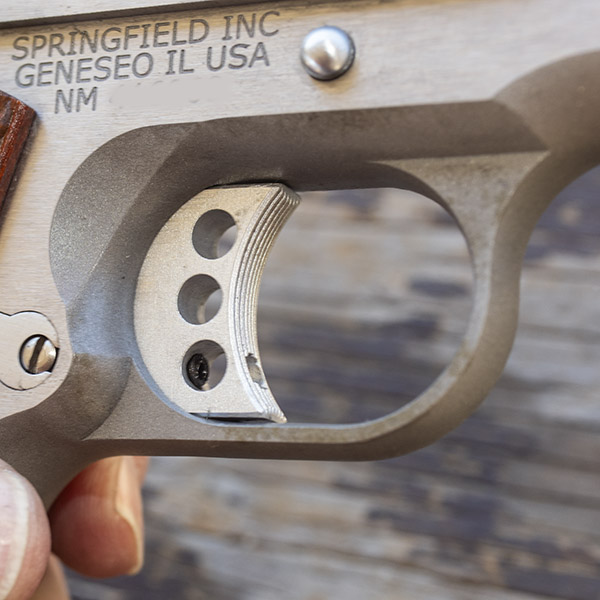
The Springfield target guns have nice features, including click adjustable rear sights, dovetailed and pinned front sights, ambidextrous safeties, target triggers, skeletonized hammers, and more. I didn’t like the two-piece guide rods that came with both guns (you need a tool to unscrew the two-piece guide rods for takedown). Another two-piece guide rod issue is that they constantly unscrew. I immediately replaced those in both guns with one-piece guide rods.
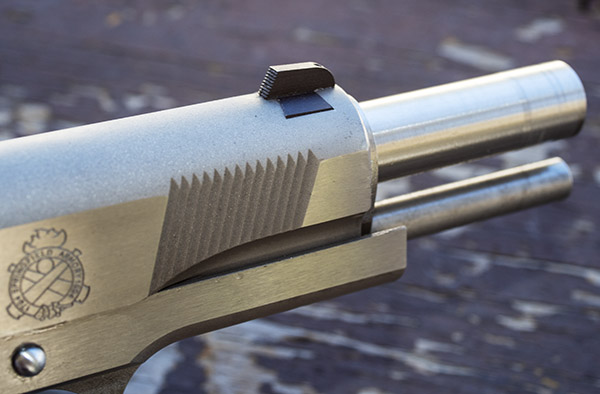
A few of the features included on these Springfield 1911 target models are skeletonized hammers (a useless feature, in my opinion), a click adjustable rear sight (a very useful feature), an extended grip safety (another useless feature), and an ambidextrous thumb safety (yet another useless feature). I prefer wraparound Pachmayr-style rubber grips, but the Springfield Armory exotic wood checkered grips look cool.The Springfield Target model front sights are dovetailed and pinned to the slide. The one on my 9mm still came loose when the retaining pin backed out. The .45 front sight has stayed put. You can see the one-piece guide rod below the barrel; it’s a feature I added to both 1911s.
What has been a disappointment on the .45 Springfield was that the stainless steel was not properly passivated (it came this way from the factory). The gun exhibited minor corrosion in a few spots after a while, which is unacceptable for a stainless steel firearm. It’s the only stainless steel gun I’ve ever owned that did this. The corrosion comes right off with a bronze bristle brush and the steel beneath it then looks pristine, but you shouldn’t have to do this with a stainless steel firearm, much less one purchased new.
My 9mm 1911 had a problem with its front sight. The pin securing it in place backed out under recoil. I contacted Springfield about that and they sent an oversized pin. It similarly backed out. I applied Loctite to the pin and very lightly peened the edges at the top of its hole in the front sight, and that seems to have fixed the problem.
Neither of the above issues should have been present. I’ve purchased three new Springfield Armory firearms over the years and every one of them has had an issue. My Springfield M1A rifle had two issues: The magazines were extremely tight going into the receiver, and the ejected .308 cartridge cases were striking and damaging the stock. I sent the rifle back to Springfield. Springfield fixed the magazine fit issue (that fix worked) and they attempted to address the cartridges impacting the stock (that fix did not work). The cartridge cases still hit the stock after being ejected (even after Springfield did a ham-fisted job removing wood in the impact area), so I put electrician’s tape on the stock where the spent cases impact before I take it to the range. The rifle is quite accurate, but damn, you shouldn’t have to deal with issues like this on a new gun. I believe these things speak to a generally sad state of affairs in Springfield’s quality assurance and process control. But I’m going off track a bit. Let’s get back to the topic of this article, and that’s the two 1911 Springfields.
Corrosion on the Springfield Armory .45 ACP 1911. I believe the stainless steel was improperly passivated. I removed the tarnish/oxidation with a bronze brush and it has stayed off.My .45 reloads. I’ve been shooting this same recipe for more than 50 years. It works, so why mess with it? .45 ACP brass can be reloaded many, many times (and this brass has been).
In my most recent outing with both 1911s, the .45 was significantly more accurate. I believe that to generally be the case when comparing the .45 ACP and 9mm Luger cartridges, and this range day was no exception. The 9mm load I used was a 124-grain Xtreme plated roundnose bullet over 5.5 grains of Accurate No. 5 propellant. The .45 ACP load was a 230-grain Missouri cast roundnose bullet over 5.6 grains of Unique propellant (an accuracy load that always works for me). I shot the targets shown below on the 50-foot West End Gun Club handgun range using a two-hand hold supported by a rest beneath my hands.
The 9mm 1911 grouped just over 2 inches, which is typical for this load. This same handgun has done much better with other loads, which is outlined in earlier blogs on 9mm cast bullet loads and 9mm jacketed bullets loads.
The 9mm grouped okay, but not great. I’ve shot other loads in this handgun that were much more accurate, but I didn’t have any of those loads in the ammo locker the day I went to the range. If you would like to know about this, you can read about my 9mm ammo development efforts with the 9mm 1911 (and other handguns) using cast bullets and jacketed bullets.
Groups with the Springfield Armory .45 ACP 1911. Point of aim was at 6:00 on each target. Shooter fatigue is what opened up the last group.
The .45 1911 grouped very well. It’s a funny thing: The 9mm 1911 has way less recoil than the .45 and the trigger on my 9mm 1911 has been tuned to perfection by good buddy TJ (you can read about that here), but I shoot better with a .45 (and I always have). The .45 1911 barks like a Rottweiler and it kicks like a mule, but the thing is just flat accurate.
So there you have it: Another take on the rehashed ad infinitum 9mm versus .45 ACP argument. If you have an opinion, please weigh in with a comment or two below.
If you would like to read a bit more about how to shoot a handgun well, that story is here.
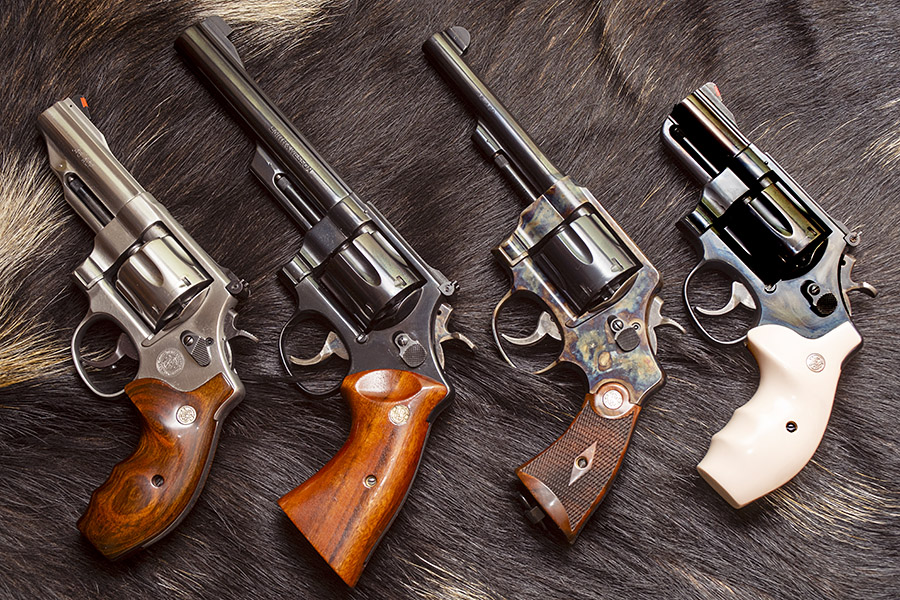
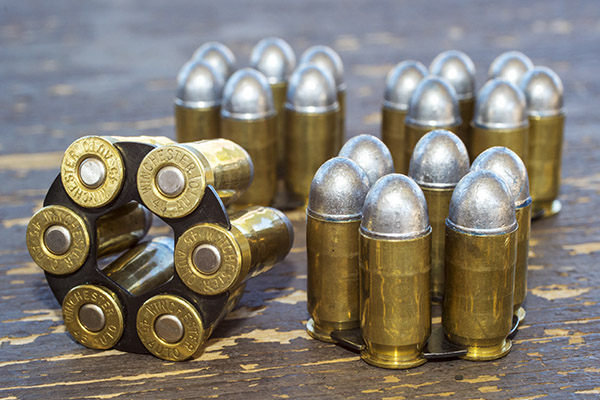
When most folks think of the .45 ACP cartridge, they think of the 1911 and other semi-auto handguns. The big .45 also makes an ideal wheelgun cartridge, especially in N-frame Smith and Wessons. I own four (the ones you see above) and I shoot them all.
The .45 ACP Revolver Story
Smith and Wesson forayed into the .45 ACP revolver business when Colt couldn’t keep up with the demand for its 1911 semi-auto in World War I. The Army asked both Smith and Colt to make .45 ACP versions of their large-frame double action handguns, both manufacturers did, and the Army designated both revolvers as the Model 1917.
After the World War I, the 1917 revolvers became available to civilians. Colt left the .45 ACP revolver business, but Smith and Wesson soldiered on, and to this day Smith still offers several different models.
Shooting .45 ACP ammo in a revolver requires a clip. You have to snap the rounds into the clip so they will fire and extract in a revolver. At one point, the 1917 revolvers were popular enough that Remington introduced the .45 AutoRim cartridge, which is a rimmed version of the .45 ACP that allows use of the cartridge in a revolver without the clip.
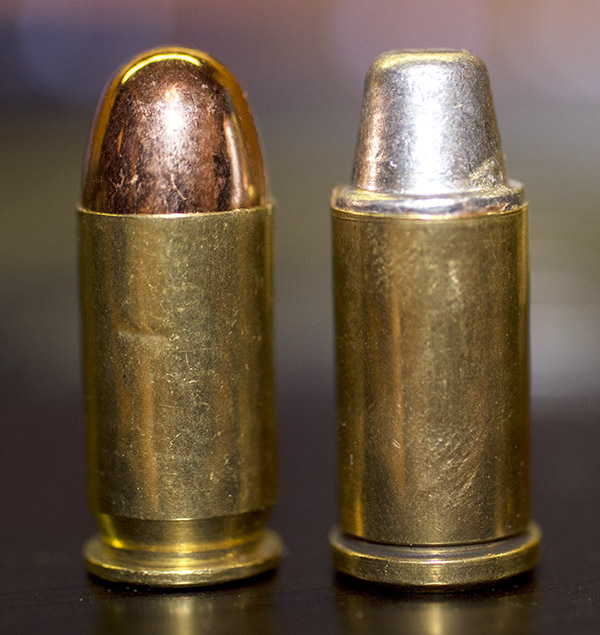
.45 ACP rounds in a star clip. I have a tool that makes it easy to insert cartridges in the clips and remove the empty cases after shooting. In World War I, clips held only three rounds (you needed two to load six rounds in a 1917 revolver).A .45 ACP round (left) and a .45 AutoRim cartridge (right). Note the difference in rim configuration at the base of each cartridge. I’ve experimented with both ACP and AutoRim brass in my .45 ACP revolvers; both deliver comparable accuracy.
Over the years Smith and Wesson has manufactured several .45 ACP revolver models. I’d like to own them all, but there’s only so much room in the safe and Susie’s willingness to indulge my gun collecting. The four this blog addresses are:
The Model of 1955
A Jovino snubnose
Smith’s reincarnated and Turnbull-finished Model 1917
The Performance Center Model 625.
Info on each follows.
The Model of 1955
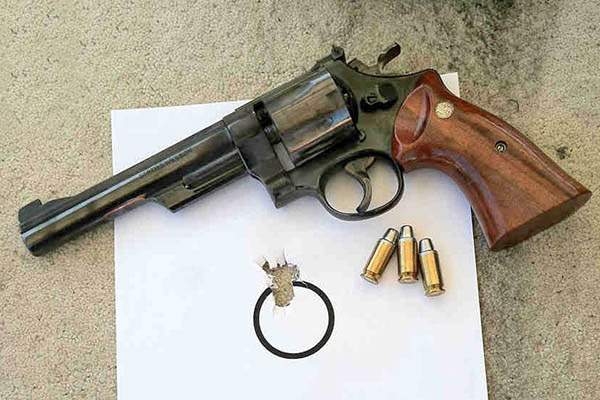
Smith introduced the Model of 1955 as an alternative to the 1911 semi-auto for bullseye target competition. Mine was made in the 1970s. I bought it from Rutgers Guns in Highland Park, New Jersey shortly after I left the Army (Rutgers Guns had no connection to Rutgers University other than geography). I paid around $200 for it new.
A typical Model of 1955 three-shot 50-foot group. This gun shoots everything well.
The Model of 1955 has Smith and Wesson’s target trigger and target hammer, and it has target sights (with a Patridge style sight in front). It originally had checkered grips, but shortly after I bought it I put a set of smooth grips on it. I think the smooth grips both look and feel better. Back in the day, you could purchase those grips new for around $25. Today, a set from that era (like the ones you see above) would fetch $300 to $400. The Model of 1955 has the highly polished and deep blue finish that is the hallmark of earlier Smith and Wesson revolvers. It is a beautiful handgun.
I never tried a load in the Model of 1955 that didn’t do well; every powder and every bullet combination I loaded grouped well. In the nearly 50-years that I’ve owned this revolver, I’ve only seen one other guy on the range with the same gun. I asked him what load he used and he told me the gun likes everything; every load he ever tried shot well, too. That said, the load I use is typically 4.2 grains of Bullseye and a 200-grain semi-wadcutter bullet. I use Lee’s Deluxe 4-die set and I crimp the bullets with their factory taper crimp die to assure easy chambering and to prevent bullet pull under recoil (although recoil with this load is light).
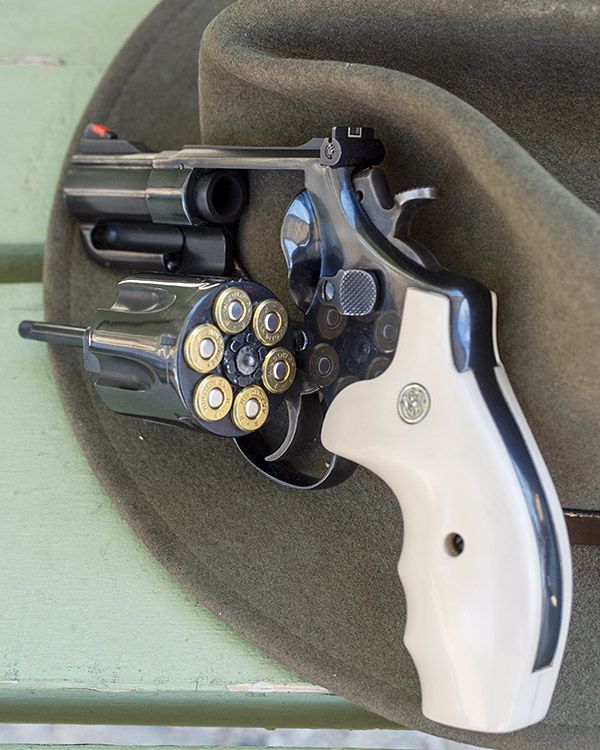
The Jovino Snubbie
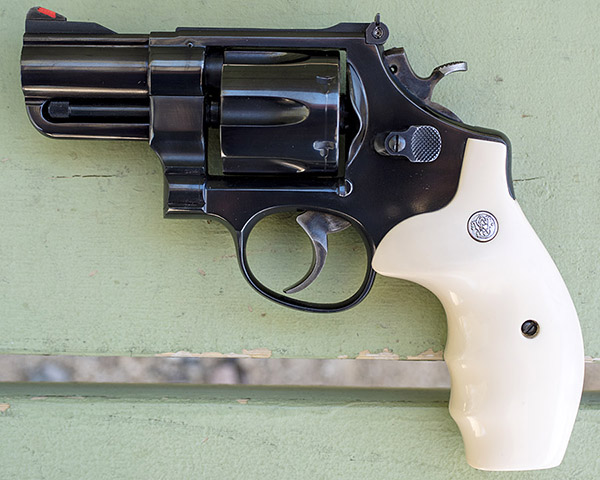
The Jovino snubnose revolver is a rare animal, one of 650 customized by New York City’s John Jovino Gun Shop (which no longer exists; when it closed, Jovino was the oldest gun shop in the country).
The Jovino snubnose .45 ACP revolver. It’s a real rarity.
Back in the 1980s, Jovino’s built custom guns. Their main clients were the NYPD and other police departments, so many of the Jovino customs tended to be duty-oriented carry weapons. Jovino bought 6 1/2-inch barreled Smiths like the one you see above and turned them into 2 1/2-inch snubnose revolvers. The conversion was not just a simple chop job, though. Here’s what Jovino did to these guns:
Shortened the factory barrel to 2 1/2 inches.
Installed a crane lock to replace the ejector rod lock.
Relocated the red ramp front sight.
Rounded the butt to the S&W K frame round butt configuration.
Tuned the double and single action trigger.
Radiused the hammer spur.
Polished the trigger face.
Fitted Pachmayr rubber grips.
Reblued the cut barrel (the new bluing is actually a bit darker and more polished than the stock bluing).
The original grips that came with the Jovino snubbie were rubber Pachmayrs, but I wanted the look of ivory grips. That’s when I found out that the Jovino guns did not have a standard N-frame rounded grip profile. It took a lot of patient sanding and polishing to get the fake ivory grips to fit. I like the look.
The grips look good. So does the revolver. One of the Jovino custom touches was to round the hammer spur profile. I like what they did.
The double action trigger on the Jovino is incredibly smooth. The slick trigger and the red ramp and white outline sights work together well, and the gun is very accurate. I’ve never seen another one of these guns on the range, so the exclusivity factor is there, too.
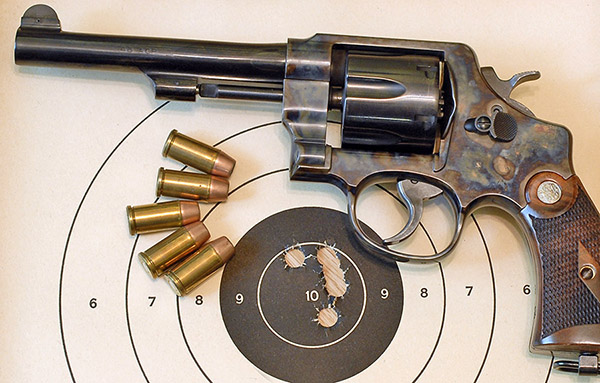
Smith and Wesson’s Reincarnated 1917
Smith’s resurrected Model 1917 .45 ACP revolver, shown here with AutoRim ammo.
About 20 years ago Smith and Wesson introduced a reissue of its World War I Model 1917 for a very short time, and as part of that deal, the new Smith included Turnbull color case hardening. I saw one of the Turnbull 1917 revolvers at a local Bass Pro and it sat in the display case for months. Bass Pro had it marked down to $695 and it still hadn’t moved. I asked the kid behind the counter what they would take for it; he read the price tag and told me $695. Would you consider less, I asked. I’d have to ask the manager, he said, looking at me and not moving. Why don’t you do that, I answered. He finally realized his job was to sell stuff and I was a real live customer, so he took off in search of the boss.
“We’ll take 30 off,” Junior said when he returned.
“Is that percent, or dollars?” I asked.
He smiled. “Dollars.” It was still a hell of a deal, so I pulled the trigger. Today if I wanted to sell this gun I could probably get $1500 for it. But I don’t want to sell it, and I never will.
Another view of the 1917, its glorious Turnbull color case hardening, and .45 ACP ammo loaded in clips.
I don’t shoot my Turnbull 1917 all that often; my preference is the Model 625 described below. The 1917 groups well, but its small checkered grips are punishing. This is another cool gun. I’ve never seen another one on the range.
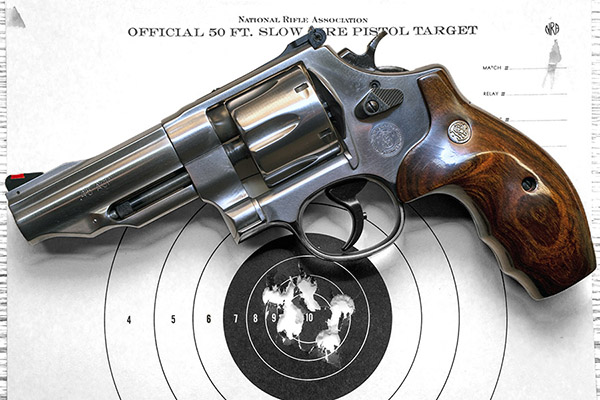
Smith’s Performance Center Model 625
The Performance Center is Smith’s marketing shtick for guns that have been slicked up a bit, which is Smith and Wesson’s way of saying they build Performance Center guns with the attention to detail that used to be standard on all Smith and Wessons. This one has a good trigger, a different barrel contour, blended edges on the front of the cylinder, and probably a few other niceties I can’t remember right now.
This revolver originally had clown-like, awkward, red-white-and-blue grips. I quickly swapped the goofy factory grips for what were advertised as rosewood grips from a third-party vendor (they weren’t rosewood at all; they were instead fabricated of cheap laminated and dyed wood, as I found out when I refinished them). But my custom grips fit my hands much better, and this is an extremely accurate revolver. I also installed a red ramp front sight and a white outline rear site. The white outline rear sight Smith sells today has barely-visible gray lines and the red is not as bright as it used to be, but they are better than the gold dot front sight and plain black rear sight that came on the gun (I don’t like gold dot front sights).
Six rounds at 50 feet, standing, from the Performance Center .45 ACP Model 625. This revolver has grips I refinished and a red ramp and white outline set of sights. The target shown here was shot with the 200-grain semi-wadcutter bullet and 6.0 grains of Unique.
My usual accuracy load for the 625 is a cast 200-grain semiwadcutter bullet (sized to .452 inches) over 4.2 grains of Bullseye. Another load that works well is the same bullet with 6.0 grains of Unique (it’s the load I used on the target above).
After reading about the above Smith and Wesson .45 ACP revolvers, you might have two questions:
I had a chance to fire the new SIG M18 9mm handgun, which was recently added to the California Department of Justice roster of approved handguns here in the People’s Republik. I was impressed with the M18’s accuracy, grouping, comfort level, feel, and sights. I love the desert tan colors. I was not impressed with the trigger (more on that in a bit).
It was a good day on my local indoor pistol range, and as I was leaving, my good buddy Shannon asked where I’ve been (I hadn’t been there in a few weeks). “Overseas,” I told her. She then pointed to the new M18 SIGs they had in the display case and asked if I’d like to try one. That reminded me of the old joke about the guy with the wooden eye. I responded with an affirmative and rhetorical, “Would I?”
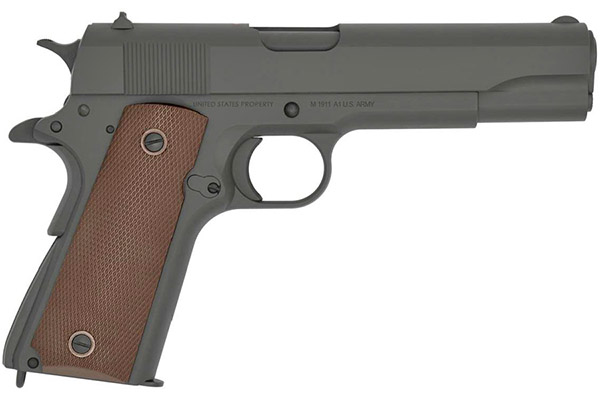
The venerable 1911. It’s chambered in .45 ACP. All steel and with a Parkerized finish, as God intended. In my opinion, you can’t improve on perfection, but the Army had other ideas.
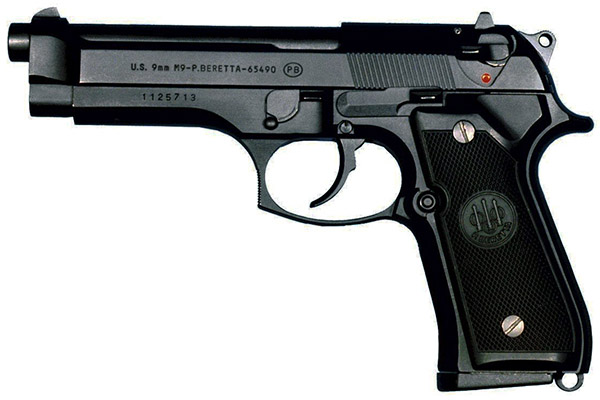
A bit of background: The US Army and I have something in common: We change handguns on a regular basis. The Army had been using the venerable .45 ACP 1911 since about, well, 1911. It served the Army well (and still serves well in certain special ops units), but the Army decided it wanted something better. That led to adoption of the 9mm Beretta 92 (designated as the M9 for the military) in 1985. I never cared for the Beretta, so I’ve never owned one and I can’t tell you anything about how it shoots or feels. The M9 had pushed out my beloved 1911, so I didn’t like it. Period. No handling or testing required.
The Army wanted a smaller pistol cartridge, and it settled on the Beretta M9. The M9 has an aluminum frame. Bob likes it.
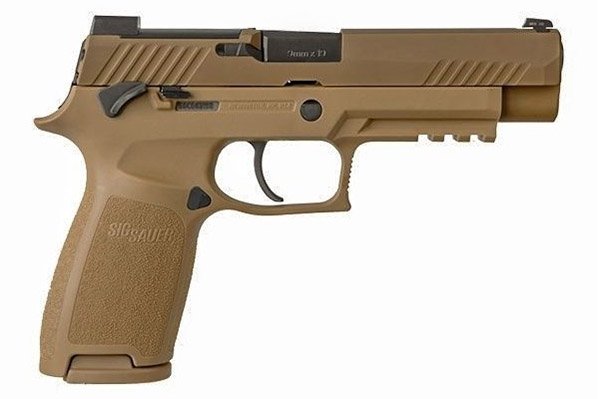
The Army quickly decided it didn’t much like the Beretta, either. But the Army is big and it moves slowly when it’s not lobbying for more funding from Congress, and it wasn’t until 2017 that they decided to go with a militarized version of the 9mm SIG P320. There are two versions of the new military handgun: The M17, which has a 4.7-inch barrel, and the M18, with a 3.9-inch barrel. Both are full sized handguns with magazines carrying a gazillion rounds, and until recently, neither was available to lowly and untrustworthy civilians here in the People’s Republik of Kalifornia. Nah, scratch that. Lowly or not, trustworthy or not, no California civilians could purchase either of the new SIGS, although weirdly, we could purchase the civilian gun from which it was derived, the SIG P320. Go figure.
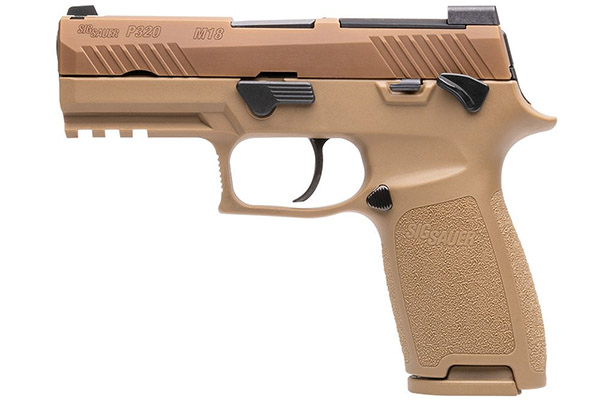
The SIG P320, the gun the M17 and M18 handguns are based on. All three guns (the P320, the M17, and the M18) have a polymer gripframe. You can tell they’re swell (I’m not going to explain that comment; you have to be old enough to get it).The 9mm SIG M17. Note the longer barrel length.The gun I fired: The SIG M18.
The SIG M18 recently appeared on the California Department of Justice approved handguns roster. That’s just a bit on the weird side, too, because the M18 is the version with the shorter (i.e., slightly more concealable) barrel. You’d think in their wholesome attempts to keep us pure our legislators would have approved the longer-barreled M17. Maybe they will in the future.
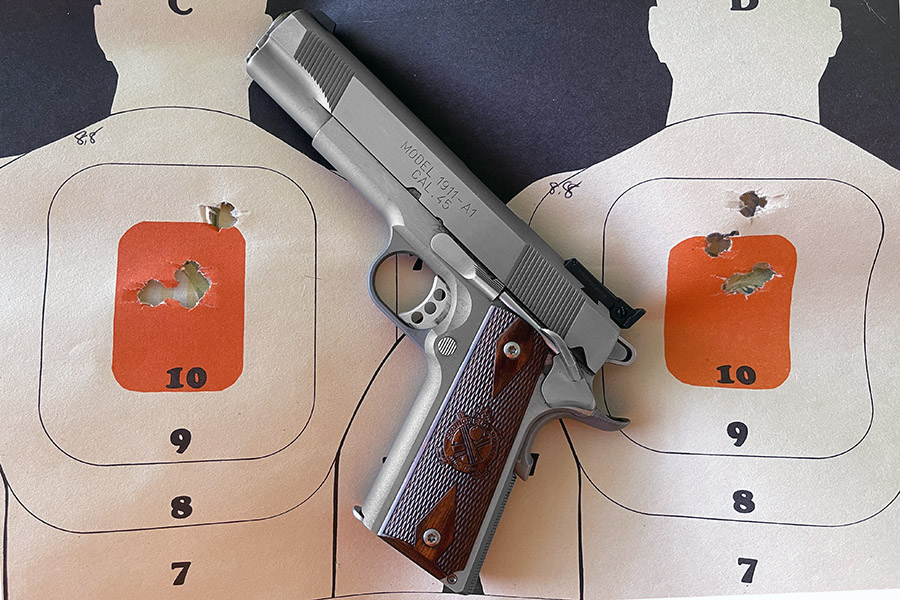
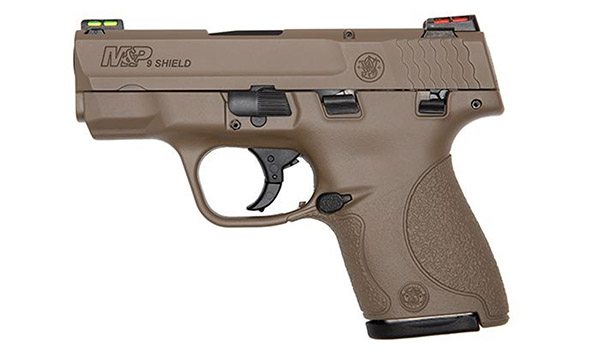
The Rock Island Compact 1911. This is a short barreled, shorter grip frame 1911 chambered in .45 ACP.My Smith and Wesson Shield. It has a very short barrel compared to either the SIG M17 or M18, which makes my shooting with it a bit less accurate.
I had fun on the range. I shot a box of .45 ammo in my Compact 1911, and then two boxes of ammo in my Smith and Wesson Shield. I was doing pretty good with both, too. It’s a pleasant way to spend an afternoon. As I was leaving the range, Shannon told me about the new M18s they had in stock and offered a trial run, so I put a box of 50 rounds through one of them.
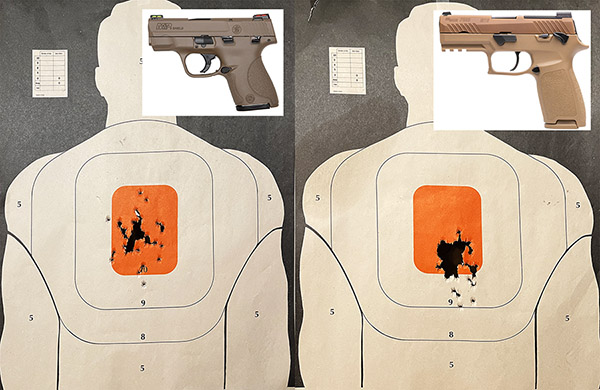
I used a 6:00 hold on the orange bullseye on both targets, and I fired 50 rounds at each. The Shield target is on the left; the SIG target is on the right. Both guns are good enough; the M18 is surprisingly accurate.
As I said above, I didn’t care for the M18 trigger (the M18 is a striker-fired handgun; give me a hammer-fired gun any day). But the thing was accurate, even with the Joe Biden trigger (it was clumsy and creepy). I put nearly all 50 rounds through a single jagged hole at my point of aim 10 yards downrange, and then I started hitting low with the last few rounds. The few that dropped a bit below the orange bullseye were entirely due to me being tired and shaky (it wasn’t the gun; I was coming up on 200 rounds in that range session and I’m an old man). The bottom line: I like the new M18. A lot. I may buy one somewhere down the road, unless the M17 gets approved in California first.
As mentioned in recent blogs on my 9mm Springfield Armory 1911, I took the gun to TJ’s Custom Gunworks to have it repaired and customized. I have the gun back now and I am very satisfied with the work.
When I took the 1911 to TJ, I asked him to repair the damage I did to my 1911 and to add several custom touches. That’s what he did, and I’ll describe them below. Most of the photos in this blog are from TJ. I took a few, too.
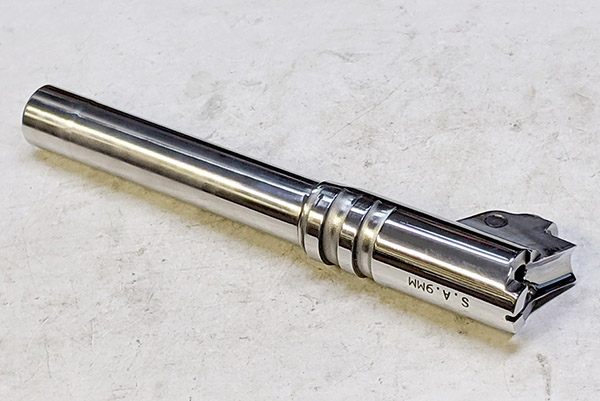
Fortunately, the 1911’s barrel was not damaged (the cartridge blew apart; the barrel and chamber survived). TJ polished the barrel, the chamber, and the ramp. The reinvigorated barrel looks great and it adds to the 1911’s appearance.
The polished 1911 barrel.It looks great, doesn’t it?
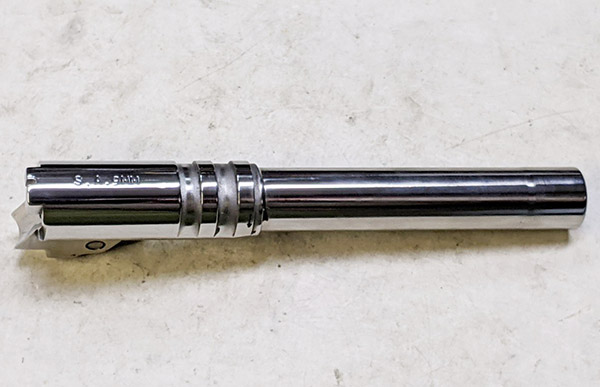
TJ polished the 1911’s ramp and chamber. This helps to prevent feed failures and assists in extraction. The polished ramp also helps to prevent bullet pushback into the case as the ramp is pushed from the magazine into the chamber.
The feed ramp before polishing.The feed ramp after polishing.
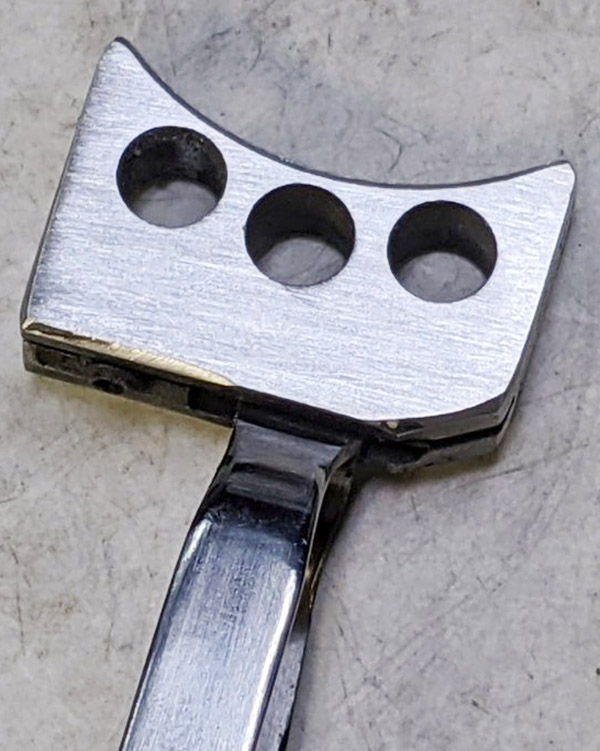
The trigger was in bad shape after the 9mm cartridge went into its sudden unintended disassembly mode. TJ cleaned it up, but I’m going to have him fit a new target trigger at some point in the future.
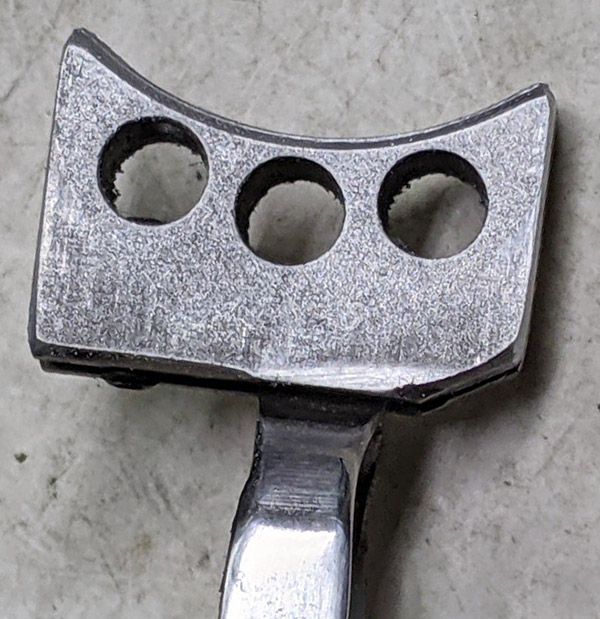
The rigger before TJ cleaned and finished it.The trigger and its bracket after brushing and polishing.
While TJ was in the gun, he removed and replaced the Springfield Armory firing pin and firing pin spring (which he does on all the Springfield Armory 1911s that come into his shop). Springfield uses a titanium firing pin and a heavier firing pin spring, which is a bad combination. I’ve had occasional misfires with my Springfield, and the primers have previously always shown light firing pin strikes. With the new Wilson firing pin and firing pin spring TJ installed, that problem is in the rear-view mirror (where it belongs).
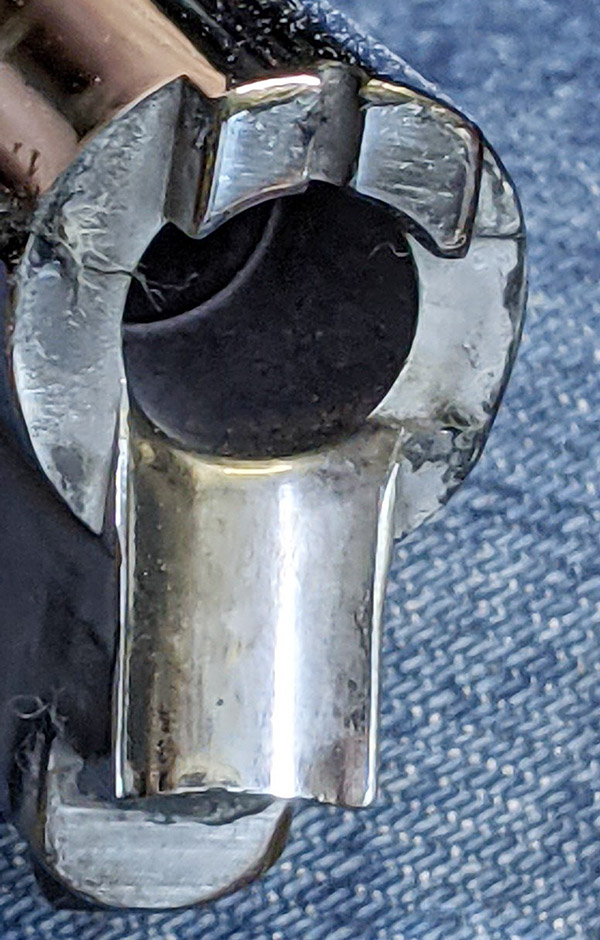
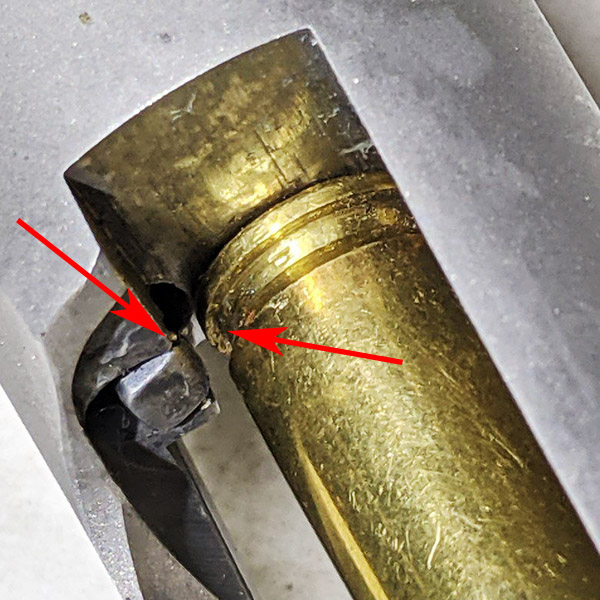
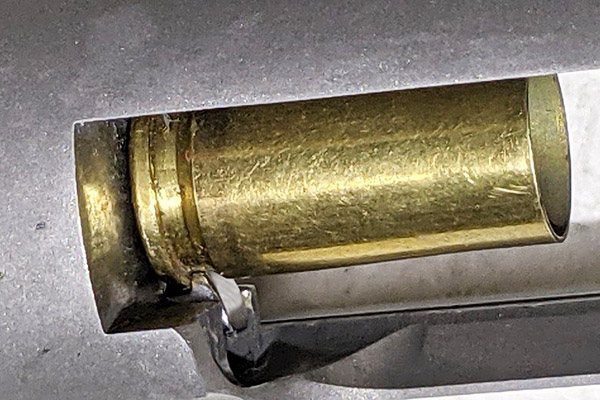
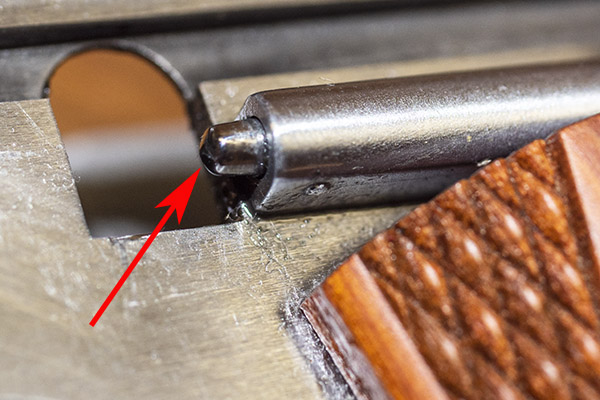
TJ found that the extractor on my Springfield Armory 1911 was terrible. I thought that might be due the base of the cartridge bursting, but it was not. It was just a factory goof up. The photo TJ included shows the extractor about as I remembered it before the event that set all this in motion. The extractor had been extremely difficult to remove from the slide when I disassembled it for cleaning, but I never thought to check if it was engaging the cartridge (the gun had been ejecting). You would think an outfit like Springfield would know what they are doing in this area, but apparently they did not. TJ fit a new extractor to fix that problem.
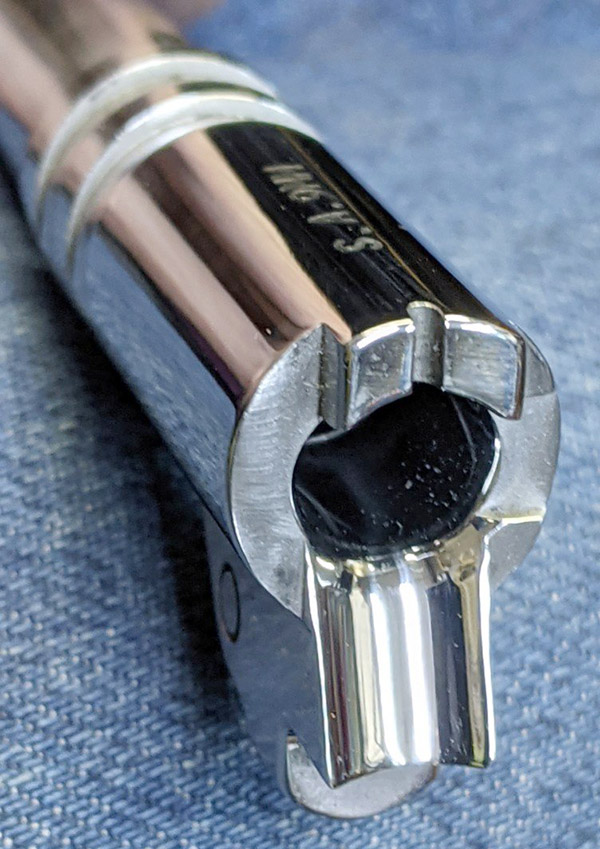
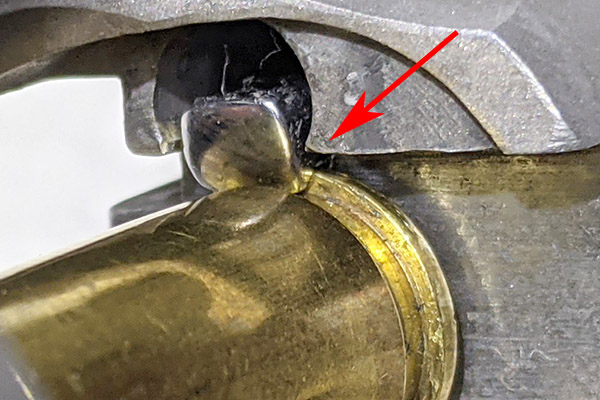
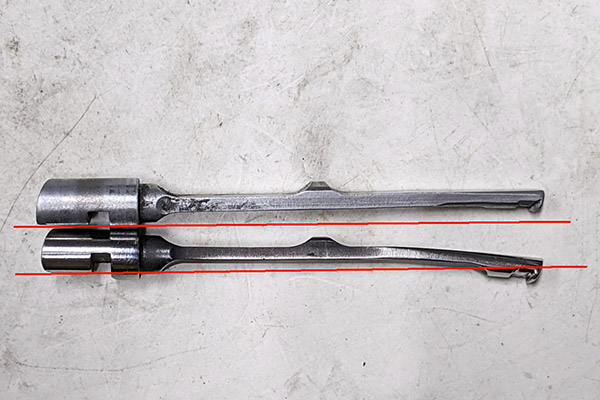
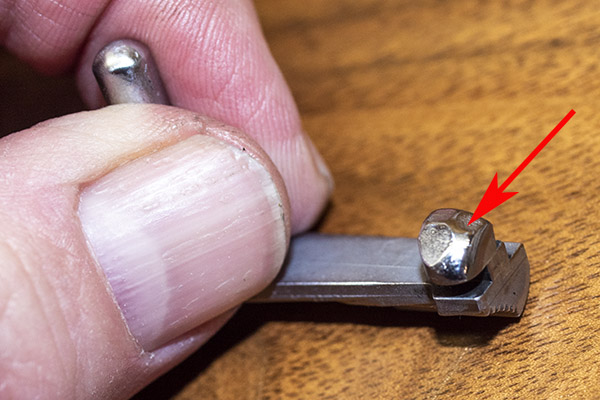
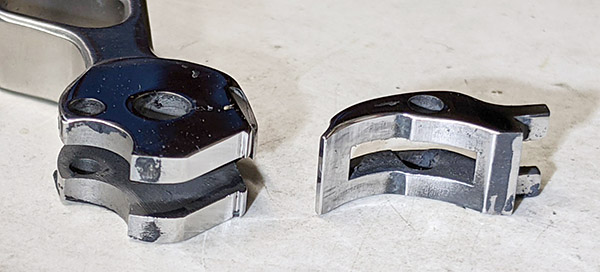
This photo shows the original extractor not touching the cartridge case at all. It appears that the claw is just too short.The new extractor TJ installed; note that it now has a firm grip on the case rim.Another shot of the extractor on the case rim. It’s amazing the cartridges were extracting and ejecting before this fix. They were flying everywhere.The old extractor is on top; the new one is on the bottom. Note that the old extractor was not reaching in to engage the case.
Ejection is way better now. The gun drops all the cases in the same spot just to my right (they don’t go flying all over creation like they used to). It makes scooping up my brass a lot easier.
Reinstalling the slide release on my Springfield was difficult. The slide release plunger was too long and the camming surfaces on the underside of the slide release were not cut at the correct angles. TJ reconfigured both. The slide release snaps into place in a very slick manner now. There’s no more worry about scratching the receiver (the so-called idiot scratch) when the gun is reassembled.
The slide release plunger, as delivered by Springfield Armory, was originally too long. It made installing the slide release problematic. TJ shortened and recontoured it.The slide release has a contoured bevel to push the slide release plunger in when the slide release is installed. As delivered by Springfield Armory, the angles were incorrect. TJ recontoured this area to make installing the slide release much easier.
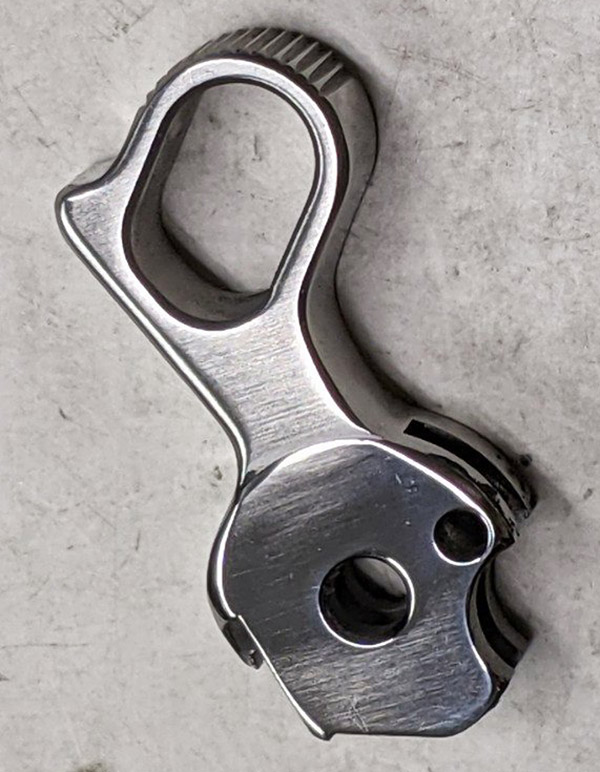
TJ polished and fit a new hammer, which looks better than the original. He also lightened the trigger pull. The new trigger is light and I like it.
A polished hammer and sear.The new hammer. It looks good.
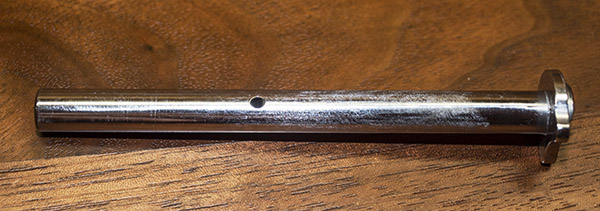
The Springfield Armory 9mm 1911 came from the factory with a two-piece guide rod, which I hated. It would constantly unscrew, even after applying blue Loctite after each cleaning. The stock Springfield guide rod needed an Allen wrench to unscrew and remove it (Springfield provided one with the gun). The gun required doing this to be able to rotate the barrel bushing after depressing the guide rod plug. In my opinion, two-piece guide rods are a solution to a problem that doesn’t exist. I don’t know why manufacturers fit them to new guns and I don’t why anybody would want one. I asked TJ to fit a polished one-piece guide rod to my 1911, and to make it short enough so that I could rotate the barrel bushing for disassembly without having to unscrew the guide rod. I like the new set up a lot better.
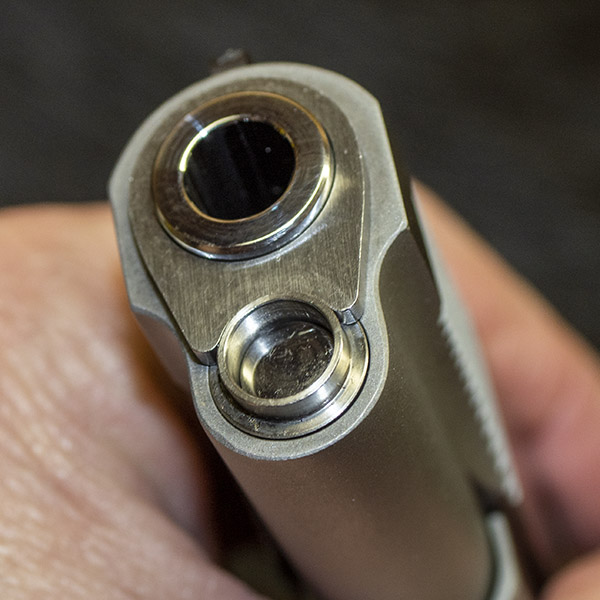
TJ installed a one-piece guide rod. I like it. The original two-piece guide rod was always unscrewing.The new guide rod in its bushing. TJ modified it so I could disassemble the 1911 without having to unscrew the guide rod. Not the polished end of the new guide rod, and the polished barrel end.
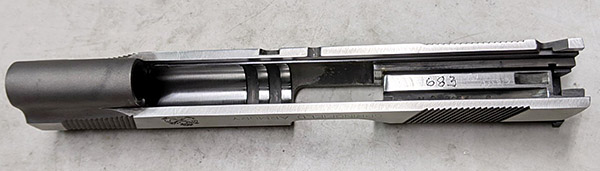
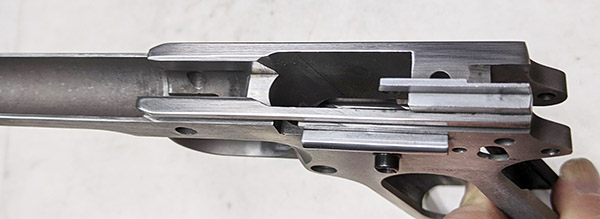
Finally, TJ polished the slide-to-receiver interface points. You can see this work in the photos below.
The 1911 slide underside.The 9mm 1911 receiver.
While TJ had the gun, I ordered new grips and a replacement magazine from the Springfield Armory website. The original crossed-cannon cocobolo Springfield grips were damaged when the cartridge burst, so I bought another set (they were reasonably priced at $32.95). The Springfield site also advertised a set of double-diamond checkered cocobolo grips (without the Springfield logo) for $15, so I checked that box, too (I like having an extra set of 1911 grips on hand). The grips and the new magazine arrived a few days after I ordered them.
I picked up the repaired and reinvigorated 1911 from TJ this week. I’ve already been to the range with it and it works well. Watch the blog; I’ll post a range report in the near term. I’ve also had a few more thoughts on what might have caused the burst round that started this adventure, and we’ll have another blog on that as well. Here are links to our prior blogs on this topic:
Help us bring more content to you…please click on the popup ads!
Seeing double? Nope. I liked my 9mm 1911 so much that when I saw the same gun in .45 ACP, I bought it, too. Watch for a report on it in an upcoming ExNotes blog.