A Favorite 1911

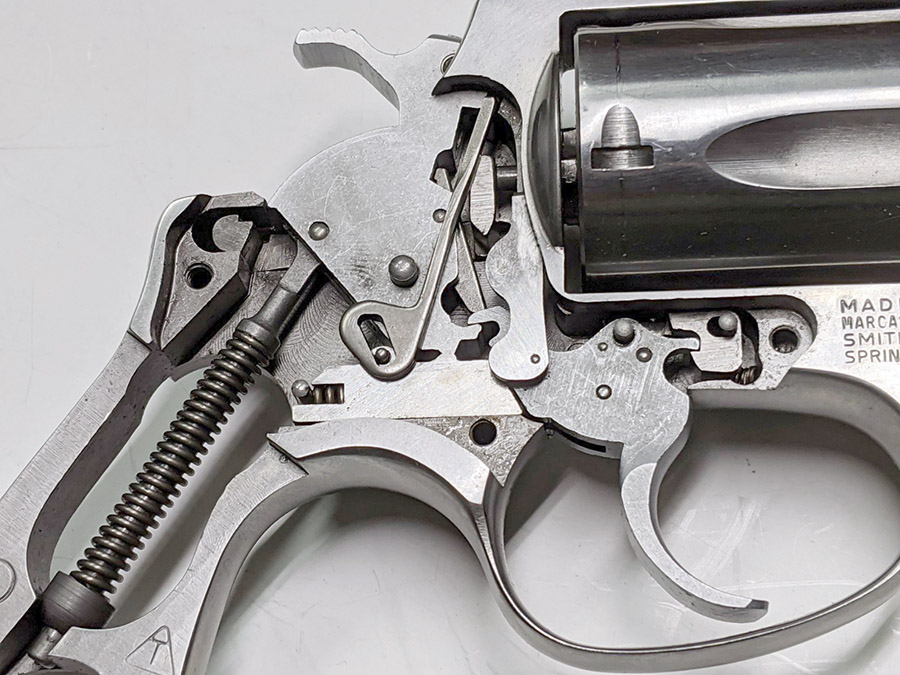
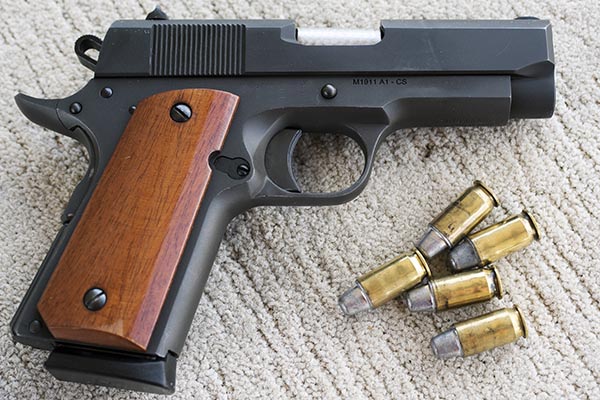
The 1911 is an all time favorite handgun for me (and a lot of other people, too).   I’ve owned several 1911s over the last few decades, I carried one in the Army, and I enjoy shooting them.  One of the best I’ve ever owned is a bright stainless steel Series 80 Government Model I bought new back in the mid-1980s.   Mine has been customized by good buddy TJ (of TJ’s Custom Gunworks) and it’s the one you see here.  I have no idea how many rounds I’ve sent downrange with this gun, but it’s been zillions.  Maybe even gazillions.

TJ’s Custom 1911 Touches

My bright stainless 1911 has had a number of TJ’s custom touches.  The fixed Millet sights are probably the most obvious.

Front and rear Millet sights on my 1911. You’re actually supposed to focus on the front sight and the rear should be blurred when shooting (just the opposite of what you see here). I’ll post more on that in a later blog.
The Millet red ramp front sight.

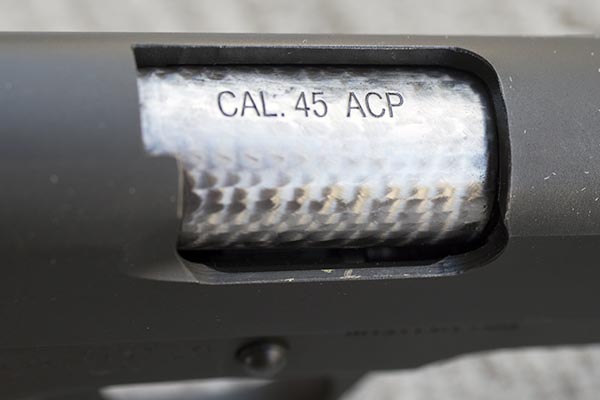
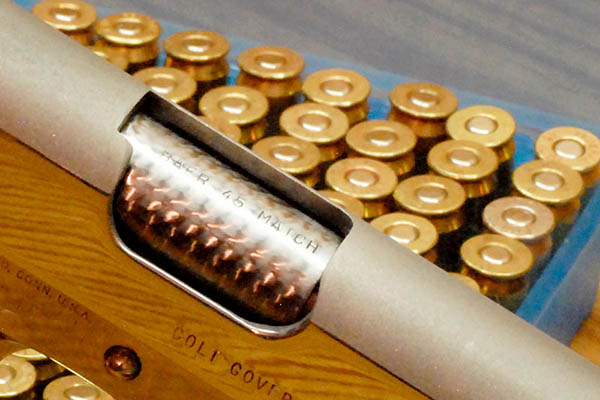
TJ polished and ramped the gun’s internals so it will feed anything, he added a Les Baer match grade barrel, and I had him engine turn the chamber (I love the look).

A Les Baer match barrel.
I like it so much I photographed it twice!

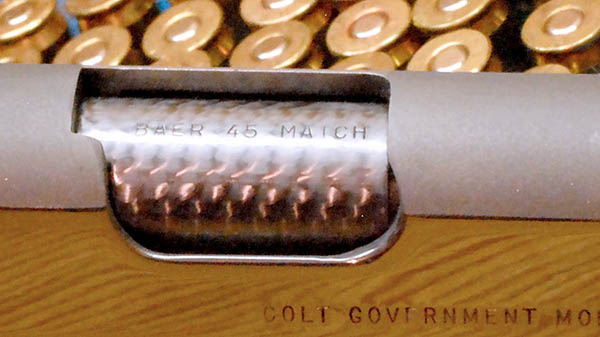
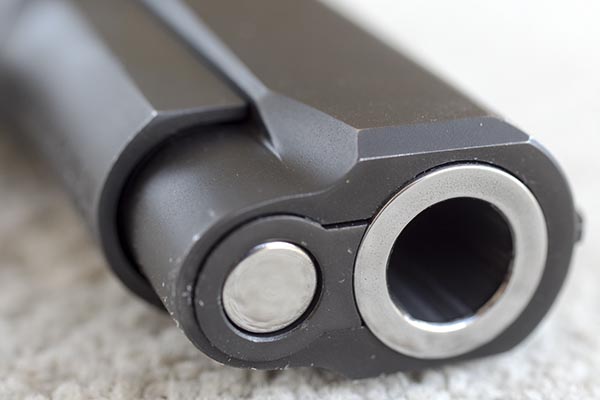
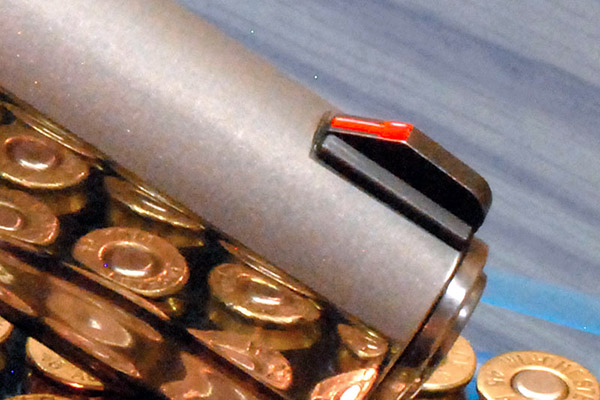
The original Colt front sight wouldn’t stay put on my 1911 (probably because of the number of rounds I was cycling through it), and after having the front sight restaked twice, I knew something more permanent was required.  The Millet red ramp from sight has two stakes, they are each larger than the single Colt front sight stake, and TJ JB-welded them from underneath after staking.  They are on there for the duration.  A lot of folks prefer a dovetailed front sight and that would have worked, too, but I’m partial to these no-longer-made Millets.  I just like the look.

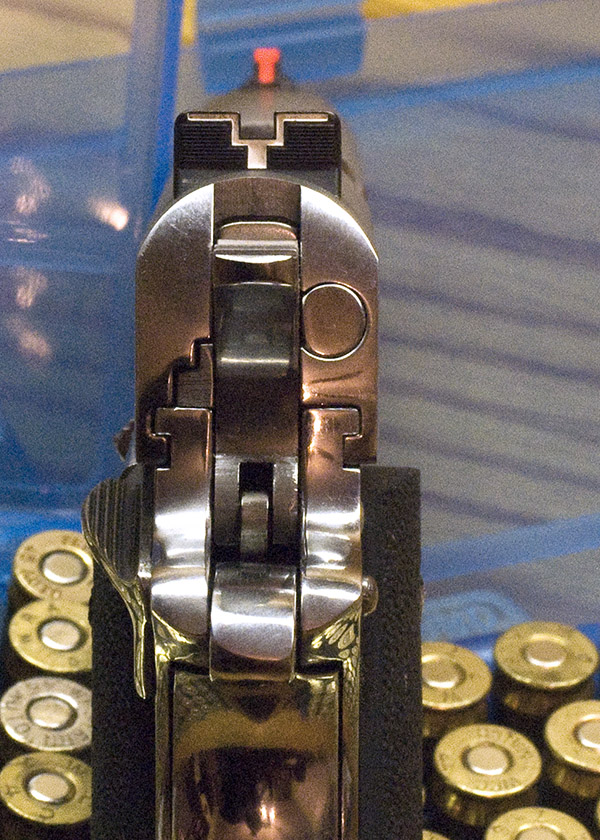
The rear sight is a fixed Millet dovetail and it has a bright white outline that works well with the red ramp front. I’m not normally a fan of gimmicky sight doodads like red ramps and white outlines, but these just flat work.  They’re quick to acquire and they put the bullets where I want them to go.  Millet sights are no longer in production, but they are some of the best ever made and TJ keeps a stash in stock for his customers.  I imagine he spends a lot of time on Ebay hunting for these things.

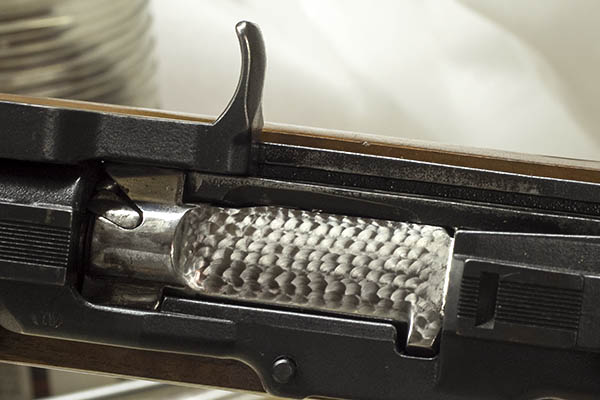
One other thing TJ did on my 1911:  He fitted the extractor.  It was very rough as delivered from Colt and difficult to remove for cleaning.  Now (after TJ’s magic touches) it inserts and removes easily, and extraction is flawless.

1911 Accuracy

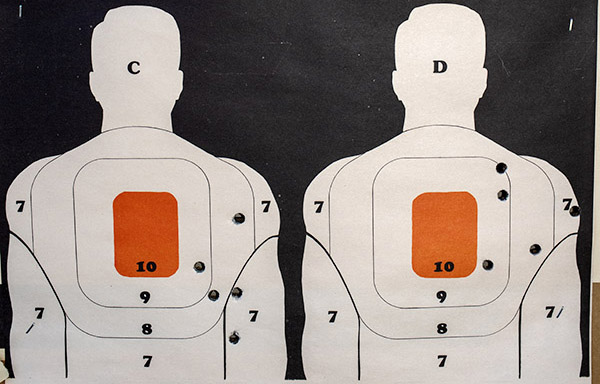
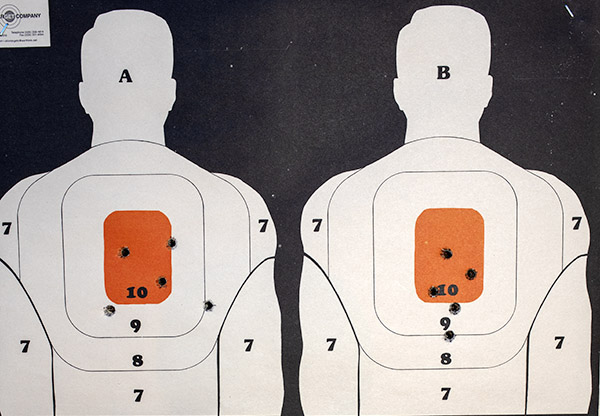
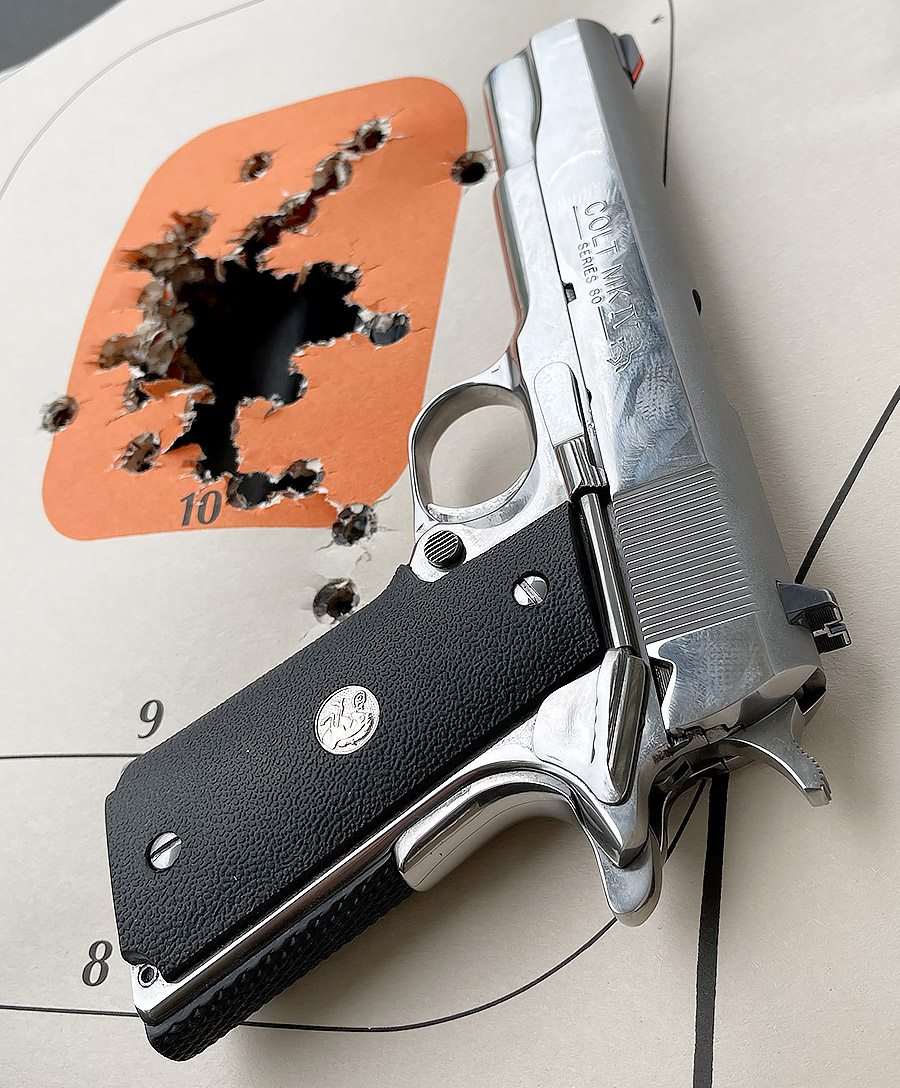
Close enough for government work, most folks would say, and maybe that’s so.  When I slow down and do my part, I can tear one ragged hole at 50 feet with my 1911, and that’s good enough.  If I’m shooting for fun with a bit of speed, it’s not problem to put an entire box of ammo through one big ragged hole with the odd flyer or five like you see up top.

The Millet sights print where I want them to, and I like the simplicity of fixed handgun sights.  It’s a good setup.

Getting a Grip

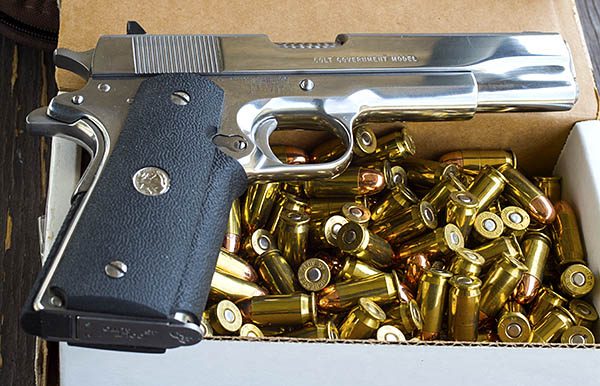
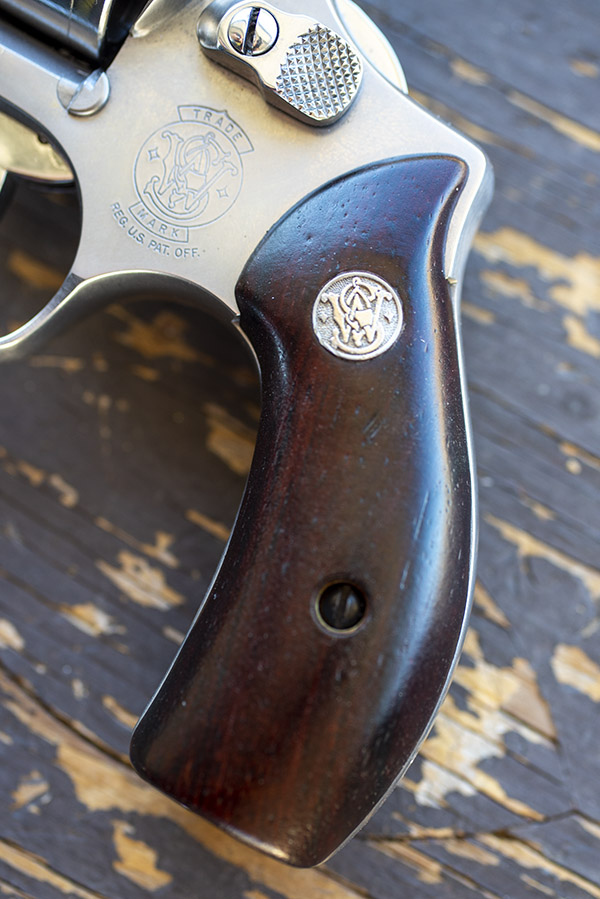
My 1911 didn’t need a trigger job, and TJ recommended not trying to improve the trigger after he felt it.  The gun came with the rubber Pachmayr-type wraparound grips from the Colt factory, and I added a Pachmayr rubberized rear grip housing.  Those two items (the rubber grips and rear grip housing) are, in my opinion, as good as it gets in the 1911 game.  I don’t think that rear grip housing is available any more.  I wish I had bought a few extra when Pachmayr was still making them.

Appearance Is Everything 

I’m not normally a shiny objects kind of guy, but when I first saw my bright stainless 1911 in that gun store 35 years ago, I knew I had to have it. The gun just looked cool and it’s a conversation starter.  It’s easy to pick up minor scratches that I can see before other folks do, but they come right out with a bit of Flitz (a superb stainless steel polish) and a little elbow grease.

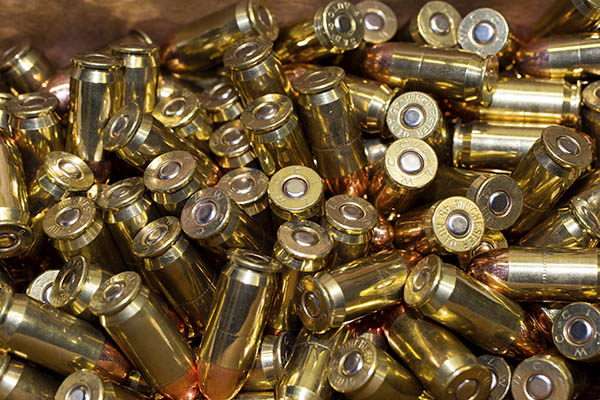
My Three Favorite .45 ACP Loads

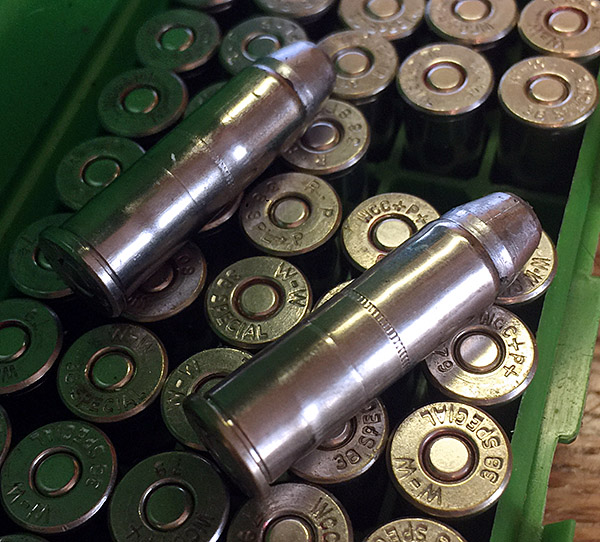
The target you see at the top of this blog?  That’s 50 rounds at 50 feet with one of my favorite loads for this and any other 1911 I’ve ever shot:  5.0 grains of Bullseye under a 185-grain cast semi-wadcutter bullet.  I’ve got a couple of other favorite loads, too.  One is the 230-grain cast roundnose over 5.6 grains of Unique (that load is 100% reliable in any 1911).   Another for target work is 4.2 grains of Bullseye and a 200-grain cast semi-wadcutter.  All three loads are as reliable as taxes going up under a Democrat, and they all work with the same recoil spring.  In my case, that’s the spring that came with my Colt 1911.

230 grains (in this case, bullets from Xtreme), 5.6 grains of Unique, and good times.

If you’re interested in learning how to reload .45 ammo, here you go:

Reloading Part I
Reloading Part II
Reloading Part III
Reloading Part IV


Sign up for free!


We have more good stuff on our Tales of the Gun page, and if you enjoyed this piece, you might take a look.


TJ’s Bulldog

What does a professional, world-class pistolsmith use for his personal weapon of choice?

I asked good buddy TJ (of TJ’s Custom Gunworks) that question, and the answer was surprising.  This is a man who knows handguns inside and out, and a guy who is one of the top men in the world for custom-crafted combat handguns.  SIGs, 1911s, Colt and Smith revolvers and autos, and more.  A guy who could have just about anything he wanted.  His guns are carried by law enforcement officers, special agents, and others the world over.  So what is TJ’s personal sidearm?

It’s a highly-customized Charter Arms Bulldog, chambered in the mighty .44 Special cartridge.  It’s the one you see here and in the photo above:

As you might imagine, TJ did not leave the gun stock.  These are the custom features TJ’s personal .44 carries:

      • Satin brushed hard chrome finish
      • 1.5-inch barrel (cutdown from stock barrel)
      • Radiused and polished trigger
      • “Melted” (rounded – sharp edges removed) contours throughout
      • Night sights with orange DayGlo highlighting
      • Custom-contoured front sight
      • Level 1 action work
      • Action modified to double action only
      • MagNaPorted barrel
      • Bobbed hammer
      • TJ custom prototype laser grips (modified from Crimson Trace S&W grips)

TJ explained that double action is the only way he uses revolvers.  You know, there’s a school of thought that a good man with a double action revolver can fire faster than can one with a semi-auto handgun.  You can read more about that in Ed McGivern’s Fast and Fancy Revolver Shooting, a good read for anyone interested in improving their handgun shooting with a double action revolver.

TJ’s Charter Arms custom Bulldog is a very impressive weapon.  You can see more photos of it, and a few of TJ’s other custom guns, on the TJ’s Custom Gunworks website.


Help us bring more content to you:  Please click on the popup ads!


More Tales of the Gun!


Never miss an ExNotes blog:  Sign up here for free!

An Urban Camo SIG 239 (and a quick Python update)

When I recently visited good buddy and custom gunsmith TJ of TJ’s Custom Gunworks to discuss a trigger job on my new Colt Python, I noticed a custom SIG P220 in .45 ACP in his shop.   The SIG had a very unusual finish.  The trigger work was incredible, with as crisp a single action trigger pull as any I have ever felt.  I’m hoping the Python’s will be as good after  TJ works his magic on it (jumping ahead, it is, and that will be in a future blog). I asked TJ about the SIG, and in particular, if I could share it with our blog readers.   Here’s what TJ told me:

I haven’t taken photos of my urban camo P220 yet; I’ll do that over the weekend.  Here are some photos of his little brother, the P239, in .40 S&W.

The camo finish is a 6-layer process. I did a full LEVEL 1 package on it, and since it was already DAO (Joe’s note:  That’s double action only) I did a full bob on the hammer, slightly lifted the slide catch, melted the edges and corners, satin polished the barrel and extractor, applied orange DayGlo on the front sight, installed camo Duracoat on the Hogue rubber grips, and I fitted my TJ hex head grip screws. I can email you more details of what I did if you need it over the weekend.

These are the photos TJ sent.   The first one is the 239 SIG as TJ acquired it, the next one is one of the steps in the camo application process, and the last two or three are the finished gun.

This TJ-customized SIG 239 sure is impressive.  It’s in a powerful chambering, it’s compact, all of TJ’s customs are super reliable, and the gun just has a cool look.  Whoever ends up owning it is going to have one hell of a handgun.   TJ tells me he’s going to be listing the gun you see here on Gunbroker in the near future (at a price that seemed to me to be way too low).

If you’ve ever thought about having a custom handgun built to your specifications, TJ is the guy you want to talk to.  One of the gun magazines described TJ’s work as “duty jewelry you can wear.”  That sounds accurate.  You don’t have to be here to use his services; most of TJ’s work is for folks in other states.  Take a few minutes and check out the photos of prior TJ custom handguns  on the TJ’s Custom Gunworks website.


Never miss an ExNotes blog!


A quick note:  The Python is back from TJ now and the trigger is superb.  The double action went from 9 1/2 to 9 lbs and it is much smoother.  The single action trigger went from 5 1/2 lbs (with a lot of creep) to a what I would call a breaking glass, creep-free 2 1/4 lbs.  It feels better and I am seeing an immediate improvement on target.  If you own a Colt Python, trust me on this:  You need a TJ trigger job on yours.  It completely changes the character of the revolver.  Watch for an upcoming blog on the new Python with its improved trigger.


Help us keep the lights on:   Please visit our popup ads and our sponsors!


A TJ Roscoe

Roscoe:  It’s slang for a snubnose revolver.  No one is really sure where the term originated.   There are others…heater, rod, piece, burner, gat (that last one is easy, with me knowing a little bit about The Gatling Gun and all), but the origins of most of these terms are lost in the haze of handgun history.  And on that Roscoe terminology, I recently tumbled onto a very cool website I’ll be talking about a bit more here on the ExNotes blog.  But that’s for later.  This blog is about my Roscoe.

It’s a Model 60 (no dash) stainless steel Smith and Wesson snubbie, to be specific.  I mentioned it and the work my good buddy TJ was doing to it not too long ago, and it’s back.   And it’s awesome.  I had TJ do an action job, a little cosmetics work, and fix a problem or two.

First, the action work.  TJ lightened both the double and single action trigger pull, and he did it the old-fashioned way…lots of hand work, polishing, and fitting.  Here’s what the guts of my Model 60 look like after a TJ Level 1 action job:

I initially thought I’d have TJ put a high polish on the entire revolver (it would have been something north of $300 just for that work), but TJ was looking out for my best interests.  “I can do the whole revolver,” TJ said, “but it will look a lot better if you just have me do the ejector rod, the cylinder, the trigger, the cylinder release, and the hammer.” He was right.  It looks awesome.

Here are a few more shots of the high polish TJ put on these components.

The work on the trigger is lot more than just cosmetic.  TJ recontoured the face of the trigger in addition to polishing it, and it really makes a difference in double action shooting.  It’s much easier to find and control that precise instant when the hammer drops during double action shooting with the new trigger contour.

As part of the Level I action job, TJ also applied orange Day Glo to the front sight. It’s a small touch that works wonders. Finding and putting the front sight on target is much faster with this Day Glo treatment.  It’s not just a cosmetic thing.

I mentioned in a previous blog that the revolver was hard to open, and TJ found and fixed the root causes of that problem.  The ejector rod threads had stripped, the ejector rod’s axis wasn’t concentric to the bore, and the barrel underlug catch was not properly configured.  My Model 60 opens and closes the way it should now.  It’s slick.

Here’s another small detail I like…polishing the cylinder release and its slotted nut (it’s not a screw, even though it looks like one).  This little bit adds a nice touch to the revolver.

The grips are smooth rosewood, and they work well with their S&W emblems against the stainless steel revolver.  I like the look.

So, on to the main question:  How did the TJ-customized Model 60 shoot?  Superbly well, thank you.  I tried two loads with the new-to-me Model 60.  The first was the 148-grain wadcutter with 2.7 grains of Bullseye; the second was a 158-grain cast truncated flat point bullet with the same 2.7 grains of Bullseye.  I loaded both on my new-to-me freebie Star progressive reloader.  Yep, the Star is up and running now, and how it works will be a story for a future blog (in the meantime, you can read about the Star resurrection here).

I fired four targets at 50 feet and the results are interesting.  The first two targets were with the 148-grain wadcutter load (I use an Alco silhouette that has four small silhouettes on a single target sheet).

I shot the target on the left with a 148-grain Missouri double-ended wadcutter bullet; the one on the right is with a Hornady swaged 148-grain hollow base wadcutter bullet.  I’ll tell you more about those in a bit.

Before TJ did any work on my Model 60, the gun printed wadcutter groups a good 12 inches to the right (good if you want to hit your bad guy in the elbow, I suppose).  After TJ fixed the ejector rod issue I described above, the wadcutter bullets still shot a little bit to the right, but much less than they had before.  That rightward bias is a function of the load, not the gun (as you’ll see in the next set of targets).

The really good news is how the Model 60 performed with the 158-grain truncated flat point bullets.  Those puppies shot exactly to point of aim, and after warming up with the first group on the left target below, I got serious about focusing on that beautiful Day Glo front sight and shot the group you see on the right target.  Point of aim was at 6:00, and for a 2-inch barrel Roscoe, that ain’t bad shooting.

If you’re not familiar with all this wadcutter and truncated flat point bullet business, here’s your lesson for the day.  Let’s call it Bulletology 101.

The brass cartridge on the left is loaded with a Missouri 148-grain DEWC (double ended wadcutter) cast bullet; the nickel-plated 38 Special cartridge to its right is loaded with a Hornady 148-grain swaged hollow base wadcutter (HBWC).  The Missouri DEWC bullets are symmetrical (they’re the same top and bottom); the Hornady HBWC bullets have (as the name implies) a hollow base (you can see those bullets in the center of the photo above, one inverted and the other right side up).  The idea behind a wadcutter bullet is that it punches a clean hole in the target (that makes it easier to score).  The two bullets on the right side of the photo above are 158-grain cast truncated flat points. I have a local caster make these for me.

I am enjoying my Model 60 and the custom work TJ did on it, but I’ll tell you what…this puppy bites.  The recoil is significant (even with the lighter 148-grain wadcutter loads), and I’m a guy used to shooting big bore handguns.  That little .38 Special cartridge is nothing to sneeze at (Elmer Keith, Dirty Harry, and all the rest of the bigger-is-better gunsels notwithstanding).

For a defense gun, I can live with Roscoe’s recoil (it’s not a handgun I would put 100 rounds through during a range session, though).  For all you keyboard commandos out there, I know, I know.  You can do that all day long.  I can, too, with a 1911.  But this little Chiefs Special is a handful, and after firing 5 or 6 groups, I’ve had enough.  Your mileage may vary.   I know, too, that if I put the Pachmayr-style oversize rubber grips on it, it would be more manageable (and I own a pair of those).  But then it wouldn’t look like it does now, and I love that look.


Hey, there’s more to this story…TJ also did a little work on my Compact 1911.  The latest improvements on the Compact 1911 are coming up in a future blog, so stay tuned!


More Tales of the Gun are here!

Want silhouette targets for your next trip to the range?    Don’t pay exorbitant range prices.  Get them here.

Custom grips for a snubbie Smith and Wesson?  Take a look here!
Never miss an ExNotes blog…get your own free subscription!


Want to turn your handgun into a one-of-a-kind combat companion?  You don’t need to live out here; TJ’s work is carried daily by law enforcement officers (and others whose lives depend on their sidearms) all over the world.  Here’s where you need to go to get started:

A TJ tune for my Model 60

I had trouble selecting a title for this blog.  The other contender was 50 Shades of Gray to go with the big photo you see above.  I wish I could say I took that photo, but the credit goes to good buddy and master gunsmith TJ.  TJ is the best pistolsmith there is, and one of the things that makes working with him so enjoyable is his photography.  When TJ works a custom gun project, he photodocuments it to keep you appraised of what’s going on, and a couple of the photos you see here are the ones he sent to me on my Model 60 project.   But I’m getting ahead of myself.  Let me back up a bit.

If you follow the blog (and you all do, right?), you’ve been watching the Star reloader resurrection project I’m working.  That’s coming along nicely, and I’m already making .38 Special ammo on my resurrected reloader.   This story started with my noticing an ad in my gun club newsletter for a Model 60 at a killer price.  I’m normally not a snubnose kind of guy, but hey, a deal’s a deal and I like the idea of a snubnose .38.  Maybe I watched too many cop shows in the ’50s and ’60s.  You know.  Cannon, Kojak, Hawaii 5-0, 77 Sunset Strip, Dragnet…you get the idea.  All those guys carried snubbies.

Anyway, the Model 60 was a good deal, but swinging the cylinder out to the side was a bit dicey…sometimes it wanted to stick.  The seller told me about that but I didn’t see it as a problem.  I saw it as an opportunity to do another project with good buddy TJ, and that’s what I’m doing.  TJ is doing his Level 1 action job for me (polishing all the internals and lightening both the double and single action trigger pulls), and I’m having him also put a mirror finish on the cylinder, the ejector rod, the cylinder release, the trigger, and the hammer.  It will make for a nice, subtle contrast with the brushed stainless finish on the rest of the gun.  That leaves only the grips, and I’m doing something about those, too.  TJ put into words what I was thinking, and that was that the stock grips (the ones you see above) are butt ugly (pardon the gun pun).

Back in the day Smith used to offer uncheckered rosewood grips, and that’s what I really wanted.  They don’t sell those any more, though, and I mentioned to TJ that I should have bought a set back in the ’70s.  You know,  just in case.  “Try E-Bay,” TJ said, and I did.  I hit paydirt almost immediately, and the grips you see below are on their way to me now.  Rosewood.  Smooth.  Just what I wanted.

The finish on my inbound grips may be a little funky, but that’s another opportunity, too.  It’s TruOil time, folks.  TruOil and a little patience will have these grips looking literally better than they did when they left the S&W factory in Springfield.

The Star reloader is operational now (I’ll show you more on the Star resurrection in upcoming blogs, and I’ll include a video that shows it making finished ammo).  I’ll have the Model 60 back in a few days, so I went ahead and loaded a box of ammo with the outstandingly accurate 158-grain cast bullets I get from my good buddy Roy.  It took only a few minutes on the Star (it would take closer to an hour on a single-stage press).  For a machine that’s probably older than I am, the Star sure does a good job.

When I take my custom snubbie .38 to the range, I’ll grab a few photos and share a range report with you here on the ExNotes blog.  Stay tuned, my friends, and keep your powder dry.


More Tales of the Gun!


Enter your email address for a free subscription to ExNotes!

TJ’s Custom Gunworks

My RIA Compact 1911. Ported, polished, and breathed on internally to feed any kind of ammo, it’s 100% reliable and superbly accurate. Its plain Parkerizing and simple walnut grips remind me of the 1911s I carried in the Army, and I like that. This 1911 is smaller, easier to carry, more accurate, and thanks to TJ, it works every time.

When you meet someone who is a master in their field, that’s a good thing. There’s an old saying that only 10% of the people in any profession are really good at what they do, and in my experience, I think that 10% figure is too high. It doesn’t seem to matter what the field is…motorcycles, medicine, and everything in between.  I commented on this one time to a really good medical doctor, and she asked if I knew what you call the medical student who graduates at the bottom of the class (the answer, of course, is “Doctor”).   It’s everywhere.  You don’t often find the truly greats in any profession, and when you do, you stick with them.

So, to the point of this blog, I know a gunsmith who is one of the greats. This is a story about my good buddy TJ.  TJ is gunsmith like no other.  He is more of a perfectionist than I am, and let me tell you, I am one picky guy.  I’ve been going to TJ for years and he’s worked his magic on several of my handguns.  He has never disappointed me.

I first met TJ more than 30 years ago when I hung out with the falling plate crowd at the Ontario indoor pistol range. Those were good times. A bunch of us would get together on Tuesday nights, I think, and try to knock down six steel plates as quickly as we could pull the trigger. I never won, but I didn’t care.  I had a lot of fun and I met some interesting people. The guns were usually highly customized race guns built specifically for the falling plate game. Custom 1911s and heavy-barreled S&W revolvers were the order of the day (I shot a revolver). The go to guy for these kinds of guns back then was TJ, and that’s were I first met him. TJ was just starting out back then, but word of his talent spread quickly, and it wasn’t long before TJ had a loyal following.   The big names, Special Forces guys, federal law enforcement officers, and others for whom handguns were critical to their profession and their survival started turning to TJ as word of his talent spread.  TJ’s guns were soon featured in several gun magazines. The guy is in the big leagues, and appropriately so. TJ’s work is both functional and gunsmithing art, and everything is focused on supreme reliability. It’s as good as it gets, in my opinion, and way better than you’d get from anyone else.

My first custom gun by TJ was my bright stainless .45 1911. TJ put in a Les Baer match barrel, polished and ported the receiver and the barrel to feed anything, and he installed custom fixed Millet sights.  That .45 became a 100% reliable, tack driving thing of great beauty. I don’t say that lightly; in the 10 years since TJ customized my Colt 1911, it has never failed to feed, fire, or eject, and it groups supremely well.  Usually, when you prioritize reliability in a handgun accuracy suffers, but that doesn’t happen with a handgun TJ has touched.

So when my Model 59 started acting up a month ago after 45 years of faithful service, I knew there’s only one guy I’d trust with it. I called TJ, and I asked him to fix the extraction issues.  While he had the gun, I also asked him to add the custom jeweling he does so well on the chamber and other bits and pieces. TJ went beyond that with a custom polish and porting job on the feed ramp and chamber, and my Model 59 is ready for the next 45 years.

A lightly customized S&W Model 59. Zebrawood grips, lots of engine turning, and this 9mm auto is good to go.

TJ also spun up my Rock Island Compact 1911. The drill there was similar: Custom engine turning on the chamber, and polishing the feed ramp, the chamber mouth, the barrel exterior, and the guide rod. TJ told me the gun’s extractor was junk and he fitted a new one (and now, the occasional extraction and ejection failures I experienced with that 1911 are gone). I love shooting that Compact .45, and I send a couple hundred rounds downrange with it every week. It feeds everything now, from 185 grain cast wadcutters to 230 grain hardball, and it does so flawlessly.  Every time.

Engine turning on the Compact 1911’s chamber. Engine turning has a pearlescent effect. As you turn the gun, the chamber appears to come alive. It’s very cool.
The barrel and guide rod are polished (along with the feed ramp and chamber entrance) to enhance the 1911’s reliability.  This pistol is one super reliable 1911.

And hey, I thought why not spin up my Mini 14 a bit, too? So I asked TJ to polish and jewel the bolt.  He did, and that rifle has never looked better.  It’s a little dirty in the photo below, but that’s okay.  I sent a whole bunch of full metal jacket 62 grain bullets downrange with it yesterday.

An unusual touch for a Mini 14: A jeweled bolt. It really adds to the rifle’s appearance.  Yeah, I like engine turning.

The bottom line: You won’t find another gunsmith as good as TJ. The guy does work that is superior in every aspect.   He communicates well, too.  While my guns were with TJ, I had a steady stream of photographs and emails from him clarifying the work and reporting progress.  Where else can you get that?  I’ve already sent several of my friends to TJ, and now I’m telling you about him. You can get to his site here, and you might want to do that even if you don’t have any immediate gunsmithing needs. You can spend hours just looking at TJ’s custom guns, and that would be time well spent.


Check out our other Tales of the Gun stories!


Never miss an ExhaustNotes blog by signing up here!