A month or so ago I wrote a blog about Lee’s .357 Magnum Deluxe 4-die set. I liked those dies so much I picked up a Lee 4-die set in .44 Magnum. I am similarly pleased with this latest set of dies. There’s too much info to fit into one blog post, so I’m presenting it in three blogs:
This first blog is about the four different dies, what each does, and the parts in each die. Lee’s engineering is superior, and this blog showcases it.
A second blog will focus on installing each die in my loading press, and how to adjust the dies to make world class .44 Magnum ammunition. Watch for this blog within the week.
A third (and concluding) blog reveals how ammunition loaded with the Lee dies performed. The ammo was stellar and I’m a believer. Lee’s Deluxe 4-die set is a magnificent product and it makes magnificent ammunition. But don’t take my word for it. You’ll see it in the groups I shot. The accuracy blog will post in about two weeks.
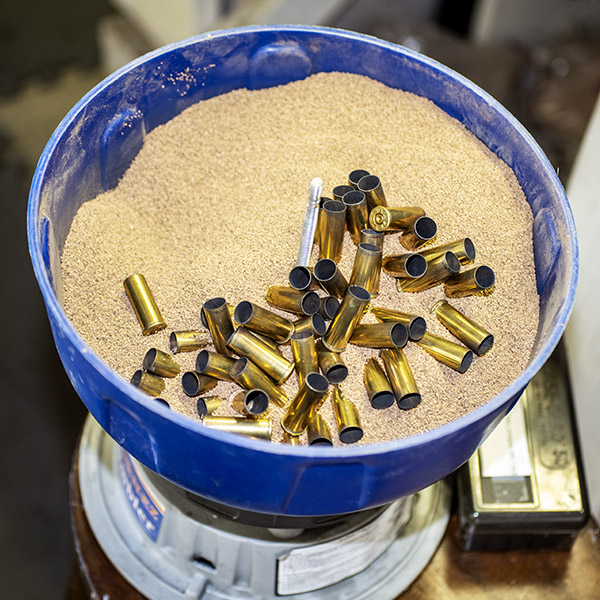
So, here we go. When I reload, I start with fired ammo brass cartridge cases, like you see below.
Fired .44 Magnum ammo brass cases, loaded into the vibratory cleaner. The vibratory cleaner polishes the brass cartridge cases. This makes the cases look good, but more importantly, it prevents them from slipping rearward against the cylinder walls when the reloaded ammo is fired.
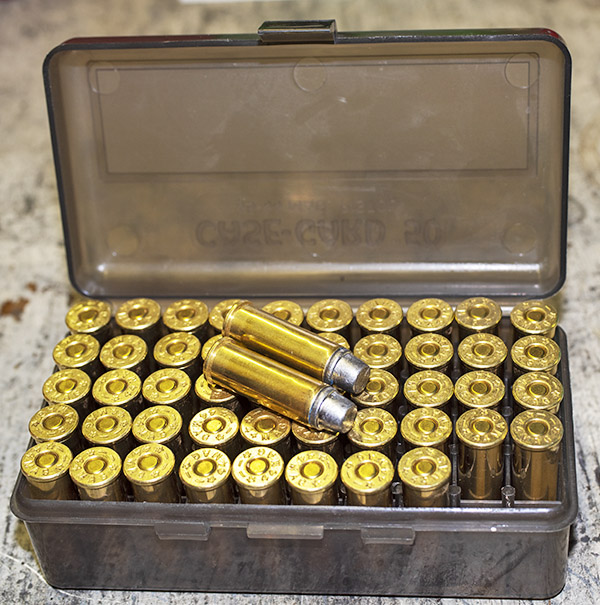
And when I finish, this is what I have…newly reloaded ammunition as good as or better than factory ammo, at a fraction of the cost of factory ammo. That “as good as or better than factory ammo” descriptor is misleading. My ammo is better.
A box of reloaded .44 Magnum ammo, custom tailored to my requirements, and capable of superior accuracy.
As most of you know, a gun chambered in .44 Magnum can also shoot .44 Special ammo (just like a .357 Magnum can shoot .38 Special). .44 Magnum dies can be used for reloading .44 Special ammo.
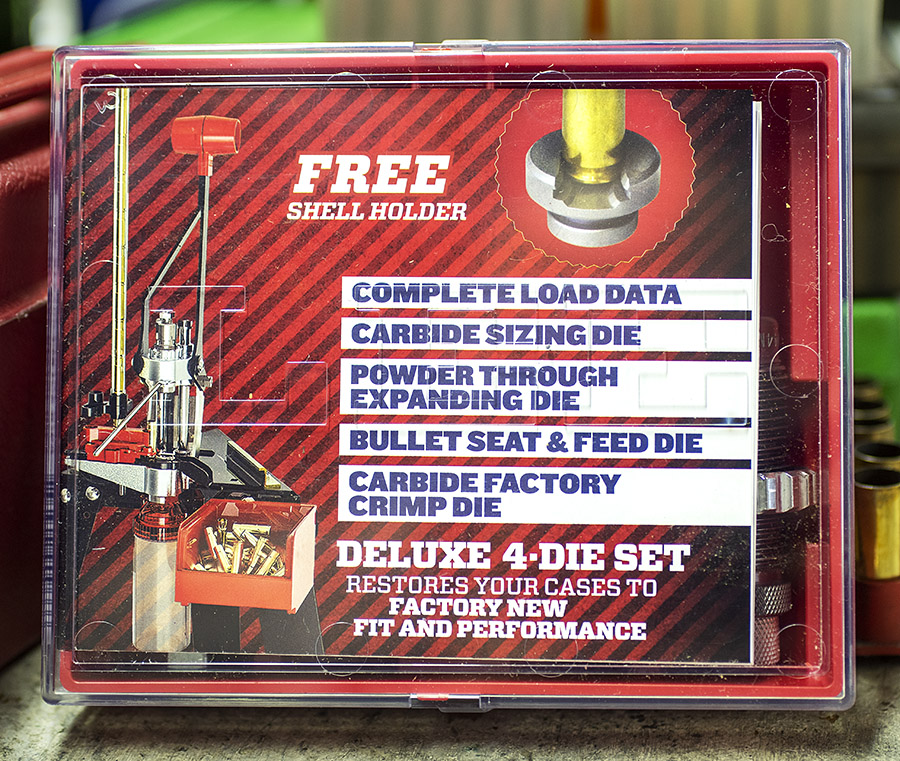
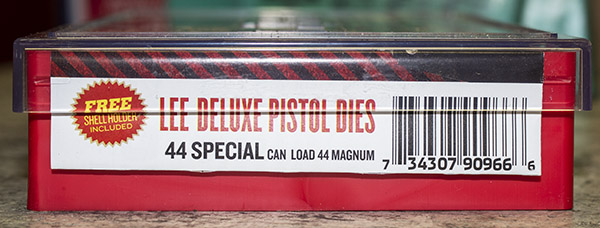
The label for each Lee die set is a printed instruction and load data sheet. The boxes are indexed and they stack nicely.
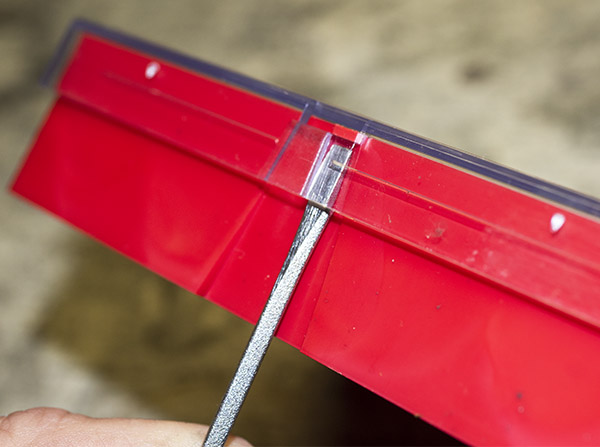
Lee dies come in a hard plastic case with a clear cover. The cover is removed by inserting a flat blade screwdriver on either side.
The plastic cover needs a little coaxing with a flat blade screwdriver to open. The cover includes a recess for screwdriver insertion.
The Lee label unfolds to reveal directions on using the dies along with a bunch of other information, including several suggested loads. Over the last five decades, I’ve found a few .44 Magnum loads I like, and in particular, I have a favorite load I shoot in the Ruger Super Blackhawk. I will share more of that with you in the next blog in this series.
The Lee instruction sheet includes load data and other information.
Lee’s Deluxe 4-die set consists of four dies, a shellholder, and a powder cup:
A carbide sizing die.
An expander die.
A bullet seating die.
A factory crimp die.
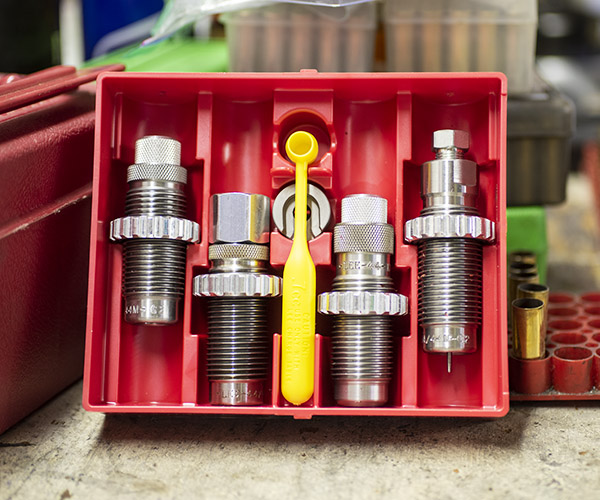
Here’s what the die set looks like after you remove the cover.
The Lee .44 Magnum/.44 Special Deluxe 4-die set. From left to right, it’s the factory crimp die, the expander die, the yellow powder cup, the shellholder, the bullet seating die, and the sizer die.
1. Sizing Die
The sizing die is a sizing and decapping die. When this die is installed in the reloading press and a fired brass case is inserted into it by raising the press ram, two things occur:
The cartridge case is resized to its original diameter (it expanded when the cartridge was fired, so it needs to be resized to specification dimensions). The Lee die is a carbide die, which means is has a very hard carbide steel tube inside the die body. Because it is a carbide die, there’s no need to lubricate the cartridge cases for the resizing operation (like you have to do with plain steel dies). Carbide dies are much preferred for this reason.
The used primer is pushed out of the cartridge case (this is the decapping operation).
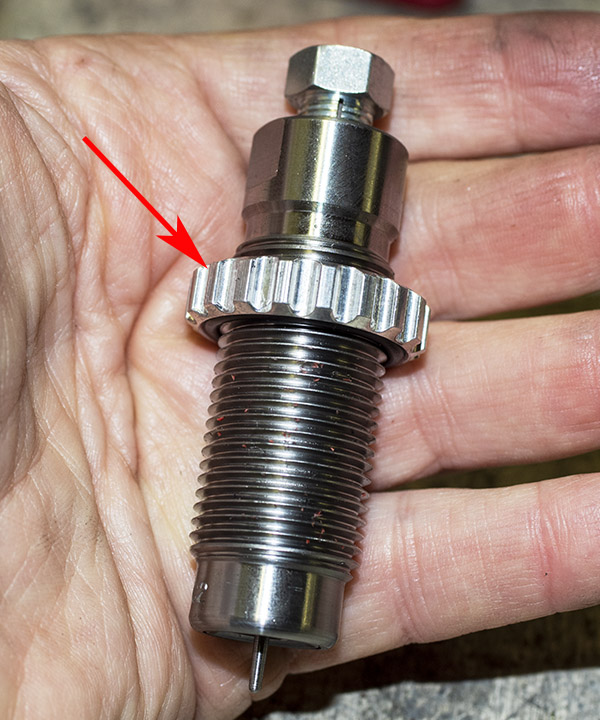
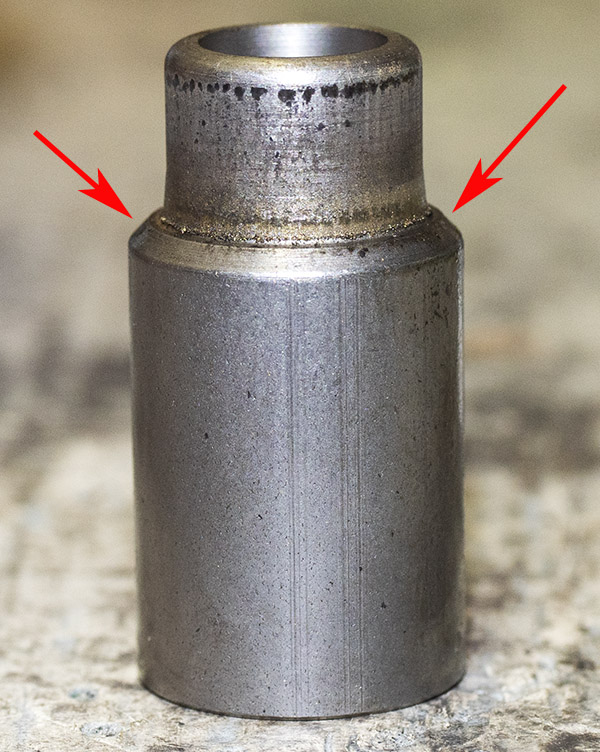
Here’s the sizing die.
The Lee sizing die. The red arrow points to the locking collar.
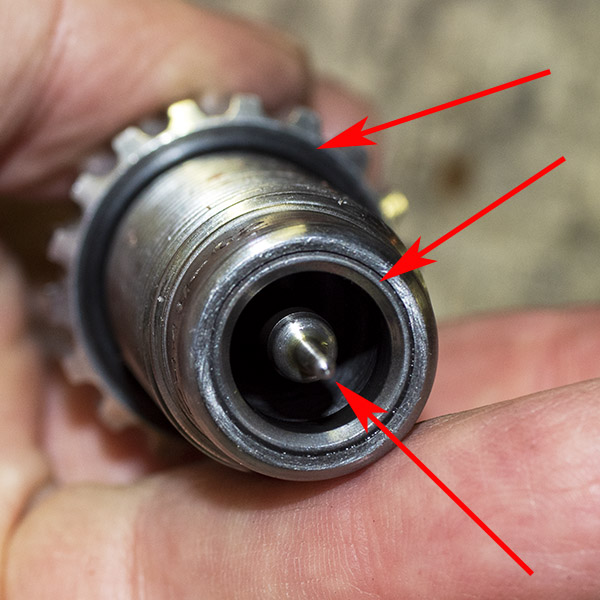
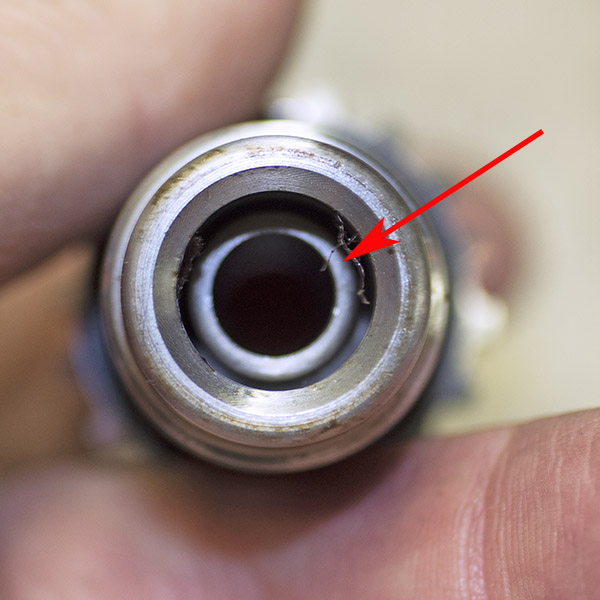
Here’s the sizing die from the bottom:
The top arrow points to the locking ring. It has an oring that holds the locking ring in place. The locking ring is screwed down on the threaded die body to lock the die body in place. The middle arrow points to the carbide sizing insert. The center ring points to the decapping pin, which pushes the spent primer out of the cartridge case.
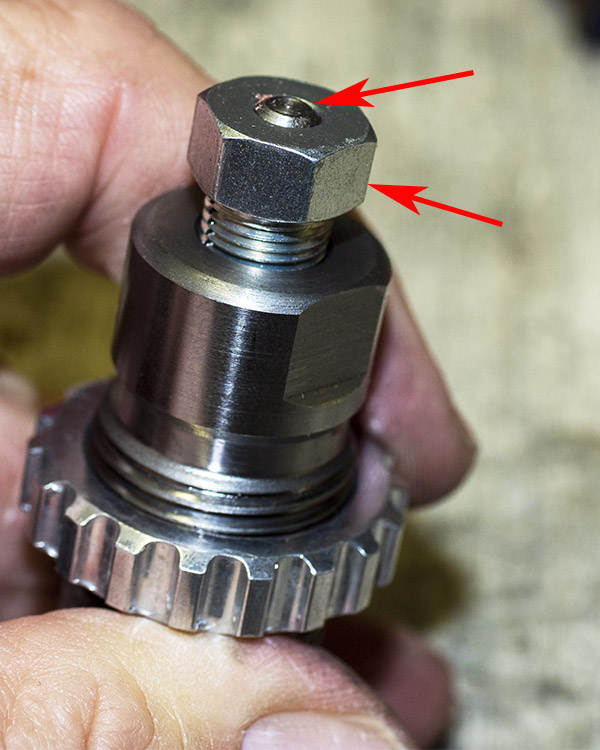
Viewed from above, the decapping pin is secured by a threaded collet that screws into the die body. It’s a good approach because if there is an obstruction (if the pin hits the case bottom rather than the primer through hole, or if the primer through hole is blocked), the decapping pin simply pushes up in the threaded collet nut. This prevents bending or breaking.
The upper arrow points to the top of the decapping pin. The lower arrow points to the threaded collet that secures the decapping pin in the die body.
2. Expander Die
Once the cartridge case has been resized in the sizer die, it needs to be opened up slightly and the case mouth needs to be flared to allow a new bullet to be started in the case. This is accomplished with the expander die. Like each die in the Lee Deluxe 4-die set, this die includes a locking ring to lock the die in the reloading press. Some reloaders charge the case (add powder to the case) during the expander die operation. I don’t reload this way, and I don’t know any reloaders who do.
The Lee expander die consists of six components. These are:
The die body.
The locking ring and its oring.
An oring between the die body and the through hole insert.
An expander.
The through hole insert.
These components are shown in the photo below.
Expander die parts. The die body, the locking ring, and the oring are shown as a subassembly on the left. The arrow points to the expander. The part on the right is the powder through hole insert.
The expander slides up in the die body when a cartridge case is inserted by the press ram. When it reaches the end of its travel, a ramp in the expander plug creates a flare on the case mouth. This is what will allow a new bullet to be inserted in the cartridge case. In the photo below, the expander plug is inverted from its installed orientation to allow a better view of this ramp
The arrows point to the ramped surface that creates a flare in the case mouth.
You might wonder why there is a powder through hole component at the top of the expander die, and why the ramped expander plug is allowed to move up and down as a cartridge case is inserted into the expander die. The through hole allows inserting powder into the case with the powder cup (which I don’t use). Other Lee reloading gear uses the expander plug up and down motion to activate automatic powder dispensing devices (this is the approach used on Lee’s progressive reloaders).
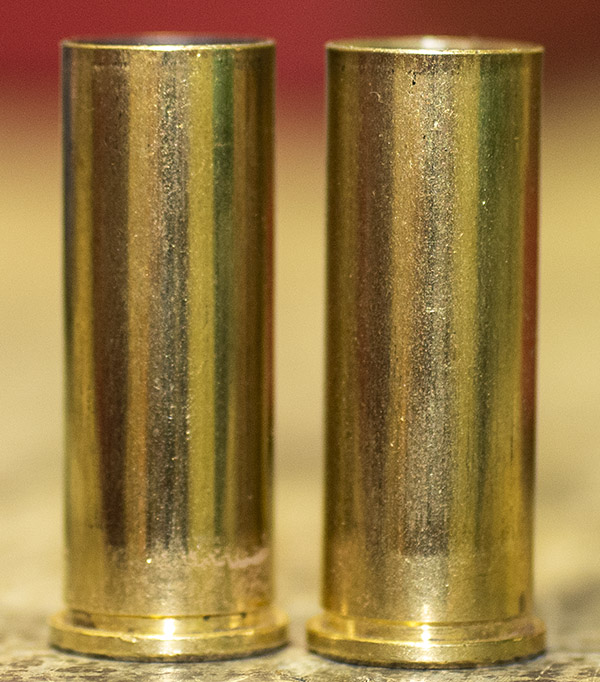
The business end of the Lee expander die. The red arrow points to the expander plug as the cartridge case sees it.The cartridge case on the left has not been through the expander; the cartridge case on the right has been through the expander. Notice the very slight flare on the right cartridge case mouth. This will allow starting a bullet into the case.
3. Bullet Seating Die
The bullet seating die is the third die in the Lee Deluxe 4-die set. This one is a bit more complicated than the first two because there are two adjustments, and this die can also be used as a crimping die. With the 4-die set, I am not going to use this die for crimping. I am only going to use it for seating the bullet to its required position in the cartridge case.
The bullet seating die is shown below.
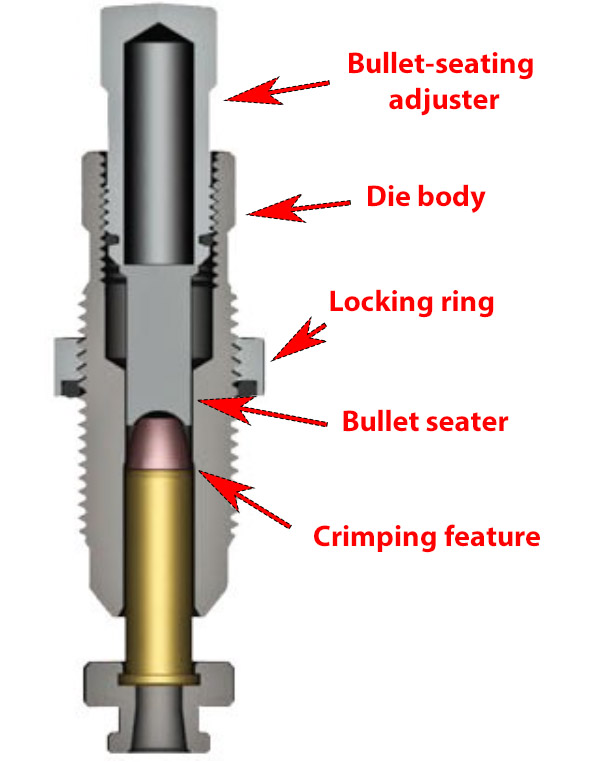
The bullet seating die. The upper arrow points to the bullet seating adjuster, the middle arrow points to the die body, and the lower arrow points to the locking ring.
Here’s Lee’s illustration of the bullet seating die.
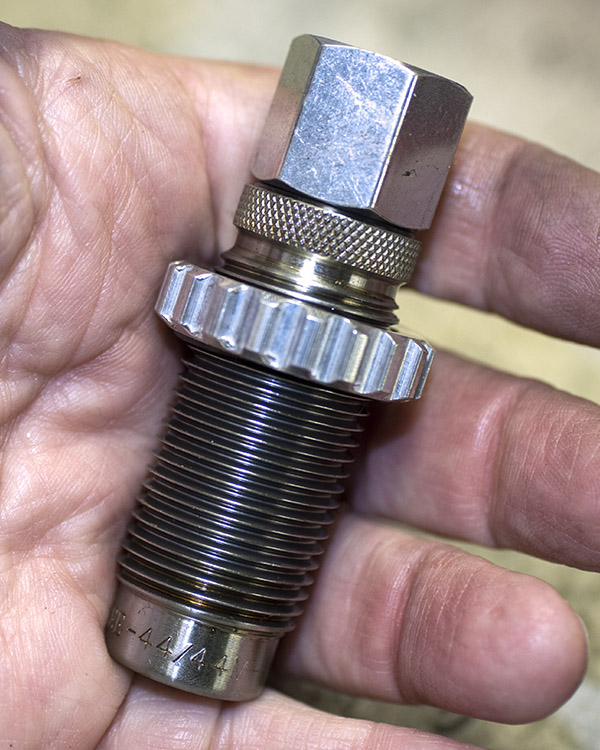
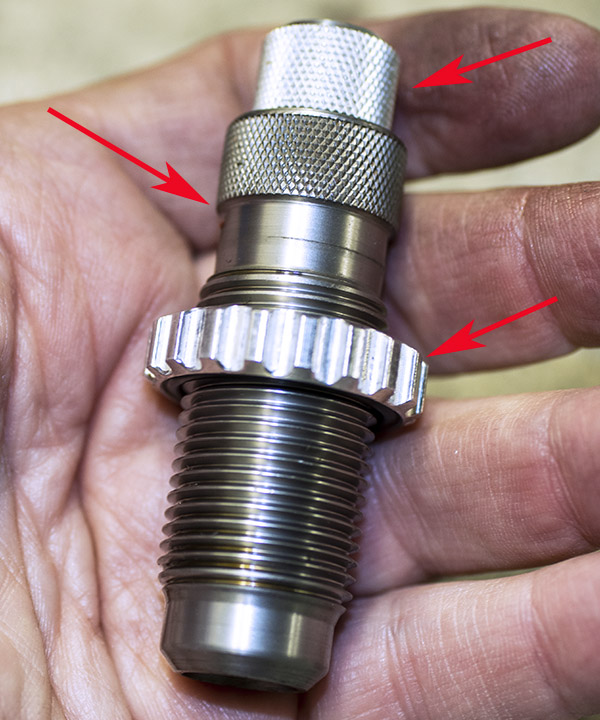
From the outside, the bullet seating die and the factory crimp die appear to be almost identical. The easiest way to distinguish them is by the size of the knurled segment on top and by the length of the die body.
The bullet seating die is on the left; the crimping die is on the right. The bullet seating die has a longer knurled section and the die body is longer.
The bullet seating die parts include:
The die body.
The bullet-seating adjuster and its locking oring.
The locking ring and its oring.
The bullet seater.
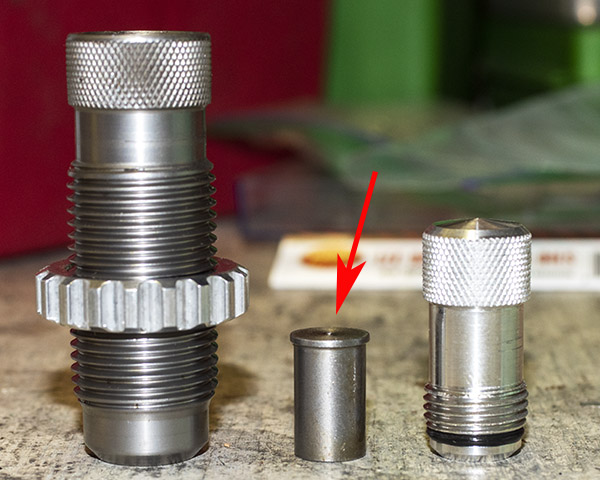
These parts are shown below.
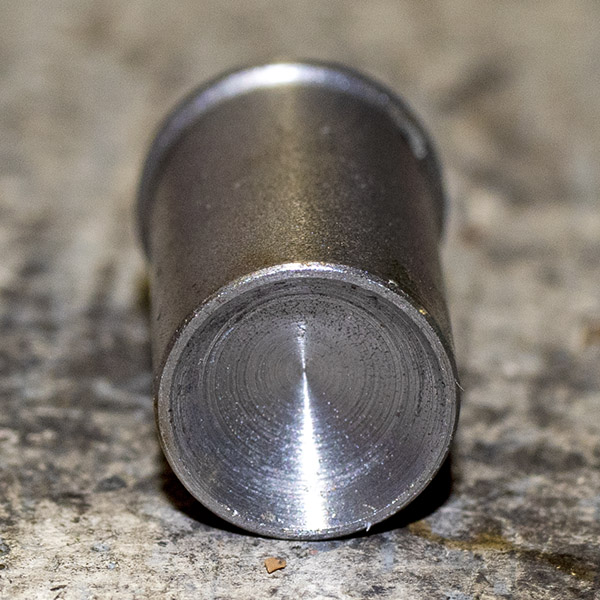
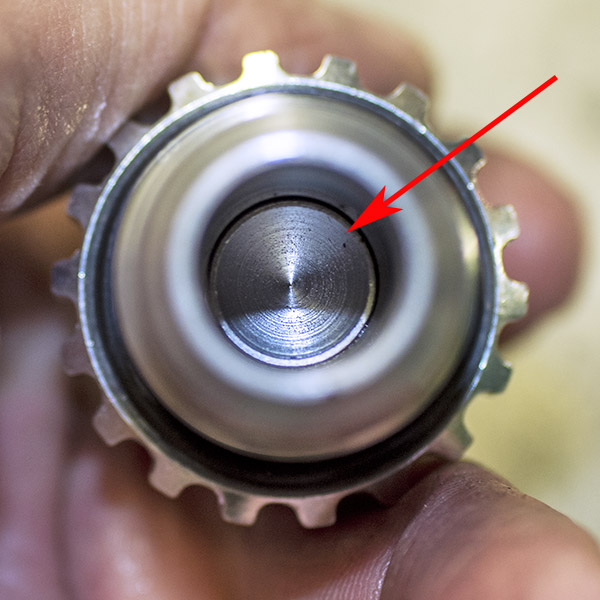
From left to right, this photo shows the bullet seating die body and locking ring, the bullet seater (denoted by the arrow), and the bullet-seating adjuster and its locking oring.The bullet seater.The bullet seater as seen by the bullet. The arrow points to the bullet seater.
I mentioned above that I use this third die in the Lee Deluxe 4-die seat only to seat the bullet. It can also be used to crimp the cartridge case around the bullet, but I don’t crimp with this die. I use the Lee factory crimp die for crimping.
The bullet seating die also includes a crimping ramp in the die body, as shown by the arrow.
To adjust the die to do this, I run the bullet-seating adjuster well into the die body so that it pushes the bullet to its desired seating depth before the crimping feature reaches the cartridge case. I’ll describe this adjustment in more detail in tomorrow’s blog.
You might wonder: Why not do both (bullet seating and crimping) with this one die? Some folks do, and if you have the Lee 3-die set (not the Deluxe 4-die set), that is your only option for crimping. But this approach has the bullet still being inserted into the case as the crimping operation occurs, which invites potential bullet misalignment. To get around that, I use the fourth die in the Lee Deluxe 4-die set (the factory crimp die).
4. Factory Crimp Die
The factory crimp die does three things:
It roll crimps the bullet in place.
It maintains bullet alignment in the cartridge case.
It removes any imperfections in the cartridge case to assure easy chambering.
Here’s the factory crimp die.
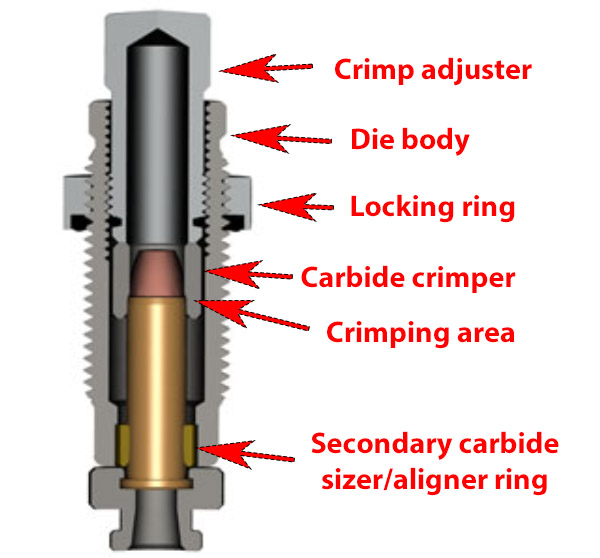
Here’s Lee’s illustration of the factory crimp die:
The factory crimp die has the following parts:
The die body.
The locking ring and its oring.
A carbide crimper sleeve.
The crimping adjuster and its locking oring.
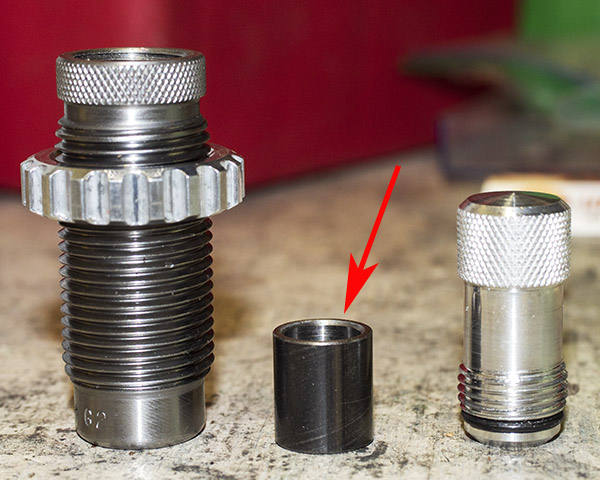
These parts are shown below.
The Lee factory crimp die disassembled. From left to right, this photo shows the die body and its locking ring, the carbide crimper sleeve (indicated by the red arrow), and the crimp adjuster and its locking oring.The carbide crimper. The red arrow points to the crimping ring inside the carbide crimper. Note that this feature must point down when the die is assembled; this piece is orientation sensitive.
The carbide crimper shown above requires the cartridge case to enter the carbide crimper sleeve before the crimp is executed. This is an important feature, as it maintains bullet alignment with the case as the crimp is achieved and prevents case deformation that could interfere with chambering. Also, the bullet is not moving further into the case as the crimp is achieved, which is what would occur if I used the bullet seating die to crimp the case.
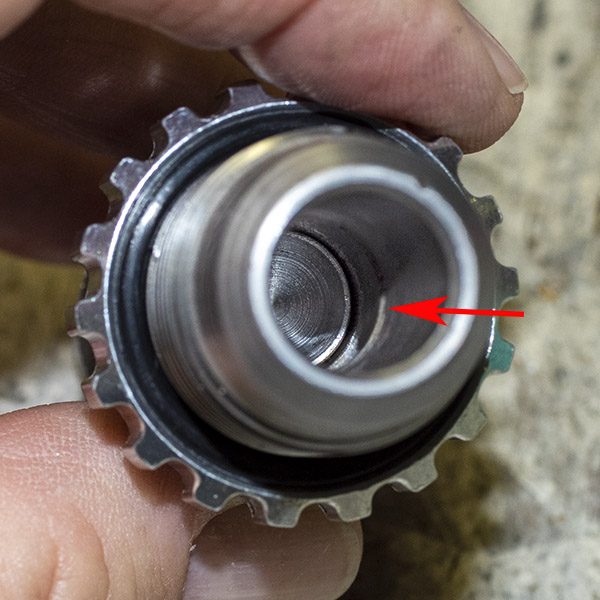
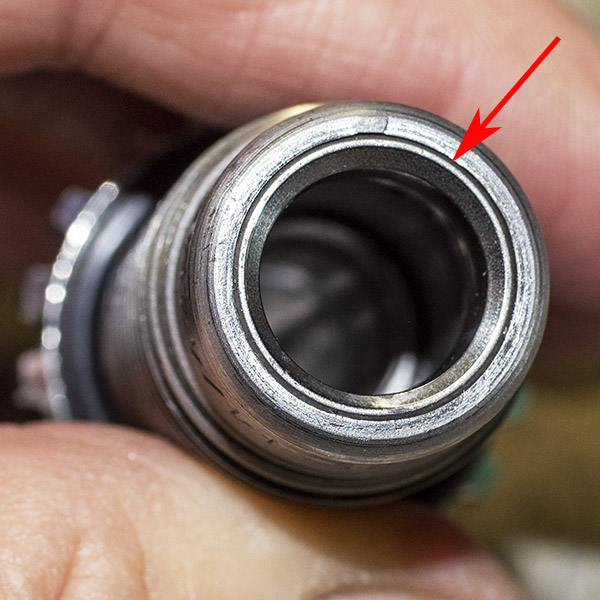
The factory crimp die as seen by the cartridge. The upper arrow points to the crimper sleeve; the lower arrow points to the crimping ring within the crimper sleeve.
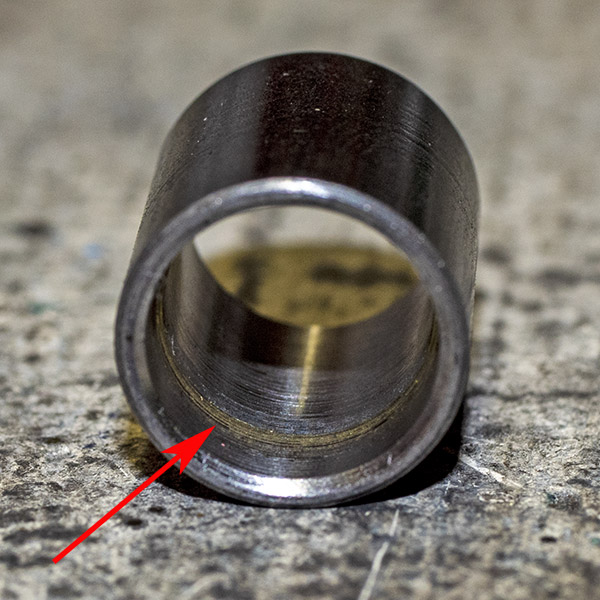
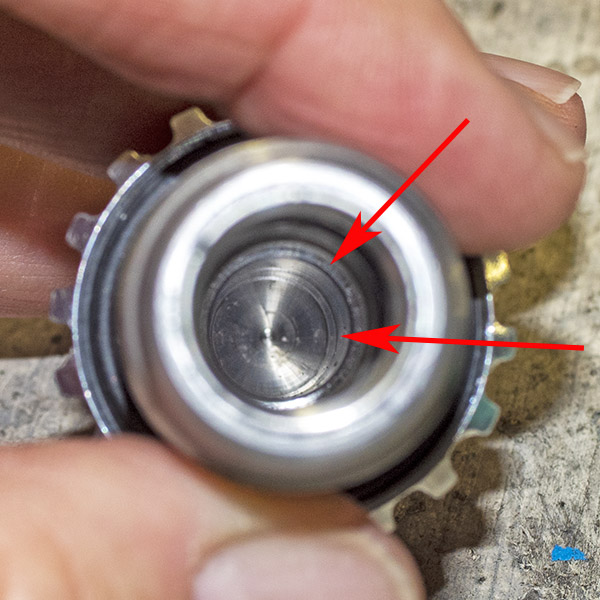
There’s another carbide ring at the base of the factory crimp die, shown by the photo below.
Lower carbide ring in the Lee factory crimp die.
The factory crimp die lower carbide ring both prevents and removes any deformation in the cartridge case when the case is crimped and the cartridge is inserted and withdrawn from the die. This assures easy chambering and bullet-to-case alignment.
So there you have it. In our next blog, which will post in about a week, I’ll explain how I set up each of the dies in my press.
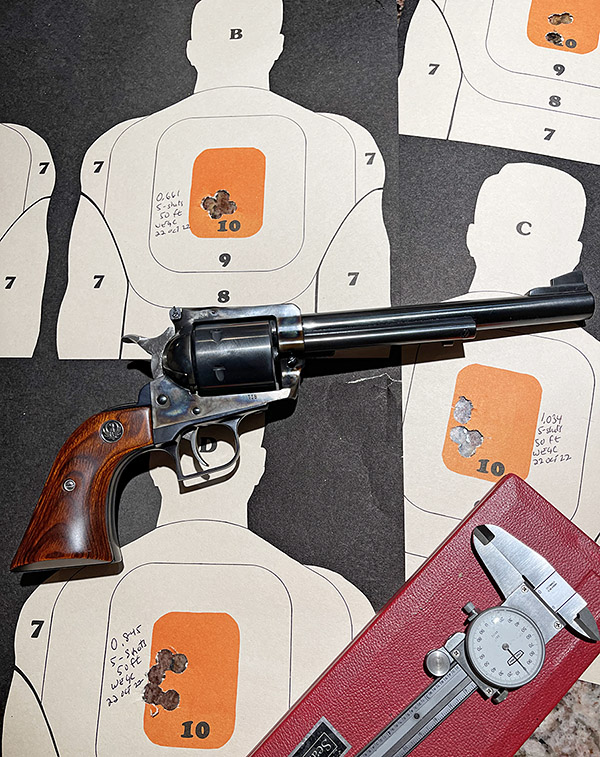
You might be wondering: Do these Lee dies really work? The short answer is an emphatic yes. I found when loading .357 Magnum ammo with the Lee Deluxe 4-die set that accuracy improved and bullet pull (bullets backing out under recoil) was eliminated. To jump ahead a bit, the .44 Magnum Deluxe 4-die set described in this blog resulted in stellar accuracy. I’ll cover that in a third blog, which will publish in about two weeks. Before I get there, though, here’s a teaser photo:
One of a limited run of Turnbull color case hardened Ruger Super Blackhawks, and targets shot with ammo reloaded using Lee’s Deluxe 4-die set.
If you want to make sure you don’t miss any of the upcoming .44 Magnum Lee Deluxe 4-die set blogs, grab your free ExNotes subscription here:
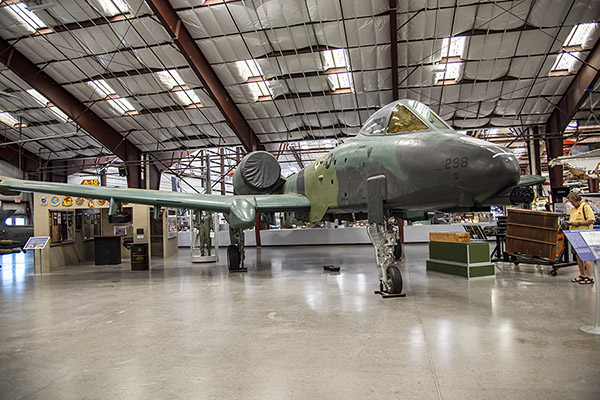
The Pima Air and Space Museum has an A-10 Warthog on display. That’s an impressive aircraft with impressive features. The most impressive, I think, is the Warthog’s GAU-8/A 30mm Gatling gun. “GAU” is the military abbreviation for modern Gatlings. It stands for Gun, Automatic, Utility, and it’s pronounced “Gow.”
Viewed from the front, the A-10’s Gatling gun seems like it is offset from the aircraft center line. The reason is only one barrel fires at a time as the barrel cluster rotates, and it does so when it is on the aircraft centerline. When firing at the gun’s maximum rate (4,000 shots per minute), the recoil equals the A-10’s 18,000-pound max thrust. If the firing barrel was not on the aircraft centerline, the gun would steer the aircraft when firing.
The Fairchild A-10 Warthog.
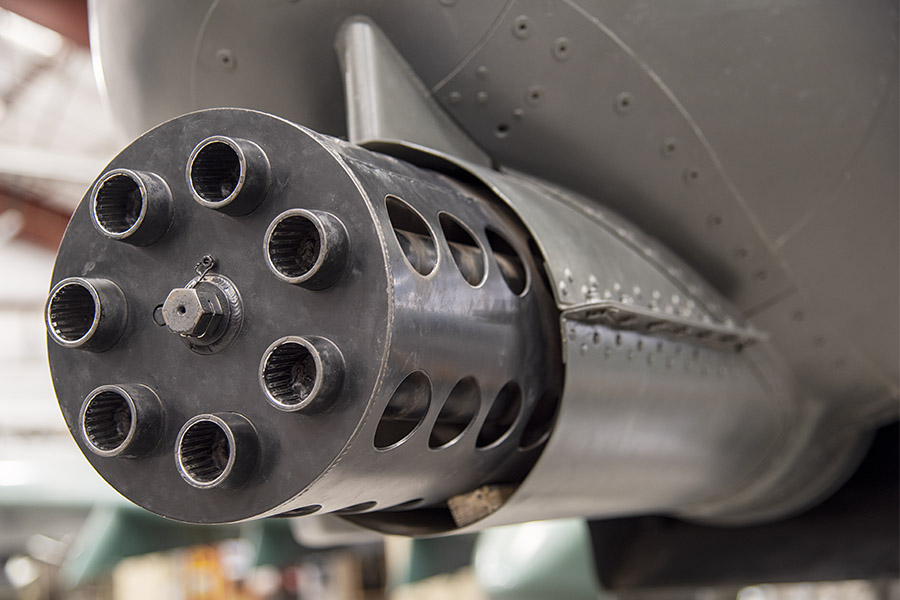
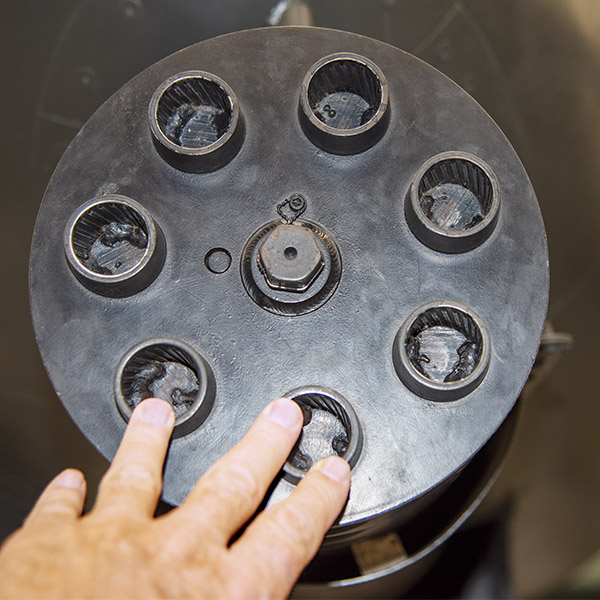
The photo below shows the A-10’s Gatling muzzle clamp, which is the device that holds the gun’s seven barrels together at the forward end. The barrels are welded shut on this display aircraft to prevent a bad guy from stealing and using the gun.
The A-10 muzzle clamp. The rifling in each barrel is visible here. 30mm is 4.6mm larger than 1 inch.
The muzzle clamp’s center bolt secures the muzzle clamp to the barrel cluster. Maintenance folks never stand in front of the gun when removing the muzzle clamp. Applying torque to the muzzle clamp bolt might rotate the barrel cluster, doing so could bring the firing barrel into position, and if the gun is loaded, it might fire. In the old days of the Civil War era Gatling guns, it was not uncommon for a soldier to inadvertently fire a round when attempting to remove the muzzle clamp.
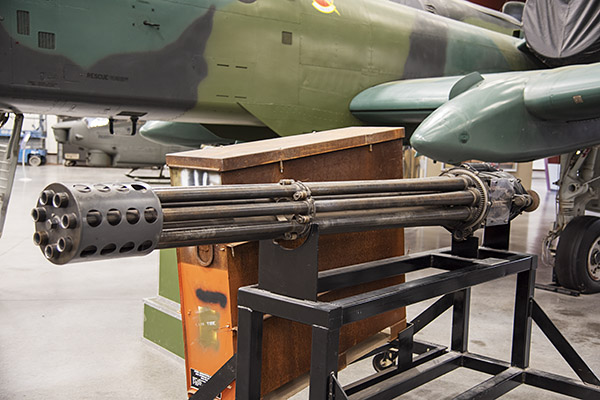
Here’s the A-10’s GAU-8/A Gatling removed from the aircraft (another Pima Air and Space Museum display item). It’s about the same length as a Volkswagen Beetle.
The A-10 GAU-8/A Gatling gun. These guns were manufactured by General Electric in Burlington, Vermont.
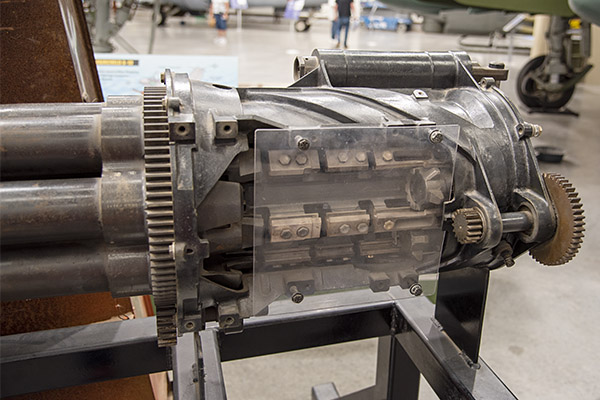
This next photo shows the gun’s bolts (there’s one for each barrel). It also shows the elliptical cam path in the gun’s rear housing. The elliptical cam path that drives the bolts back and forth as the barrel cluster rotates. That was Dr. Gatling’s original idea. All Gatling guns use this concept, from the first Gatling gun in 1862 to the modern Gatlings.
The Gating gun’s rear housing assembly.
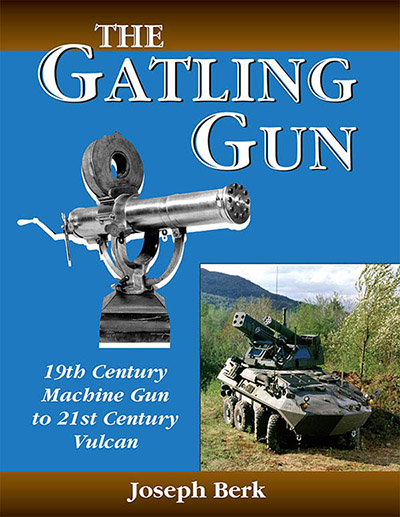
If you are interested in the Gatling gun, its history, and its current applications, you might want to pick up a copy of The Gatling Gun.
Never miss an ExNotes blog:
Please click on the popup ads…it’s how we pay the rent!
We awoke in Moto Camp, located in Sibiu, just before sunrise. Moto Camp is probably the best base camp we’ve ever had and the best one anybody could ask for when staying near the Transylvanian mountain passes. These mountains are home to several of the world’s most sought-after motorcycle roads.
We researched the weather while drinking a strong cup of Romanian coffee. The day looked promising and the weather gave us a green light for riding. The buzz from riding the Transfagarasan Highway the day before was still with us and we both were anxious to see how the Transalpina Highway would compare.
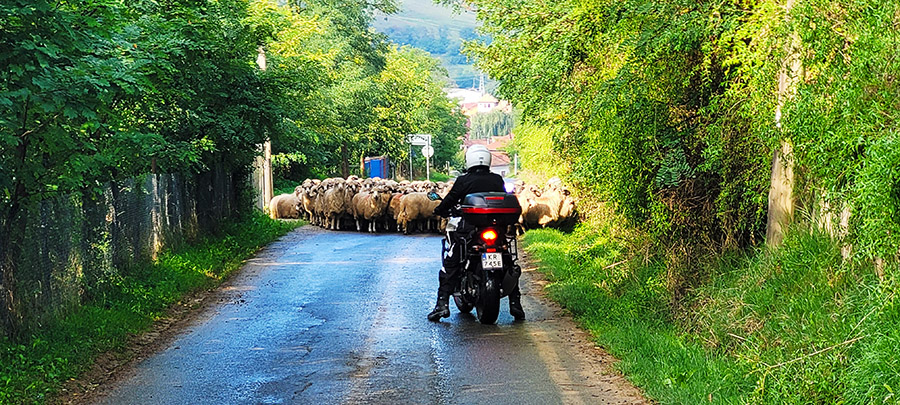
The Transalpina Highway was two hours away from our base camp. We searched the least traveled roads to ride, which provided entertainment as we passed through tiny villages untouched by time. Horse-pulled carts rolled next to us and the occasional sheep crossings reminded us we were in Romania. These sites are common to Romanians, but for us it was like stepping into the early 1900s. Between the scenery and our motorcycle engines humming it was a perfect mesh of culture and time that fit nicely.
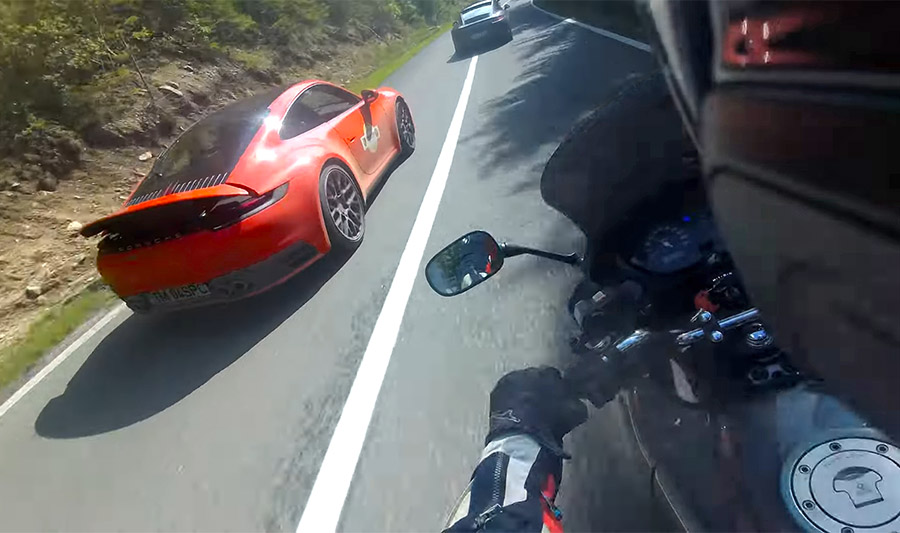
As we continued to ride, the small towns gave way to a remote pine forest speckled with beech trees shedding their leaves. As we sped by, we rustled the leaves to create mini sparkling whirlwinds in the morning sunlight while accelerating into the sweeping corners of this magical road. After 30 minutes we stopped along a dam with food and souvenir kiosks to grab a snack and drink. While sitting there we noticed about 40 Porsches stop and take the entire length of the dam. “Porsche Club of Romania” was stickered on their cars. Not wanting to be stuck behind any of the traffic we ate with a purpose and tackled the second portion of this road.
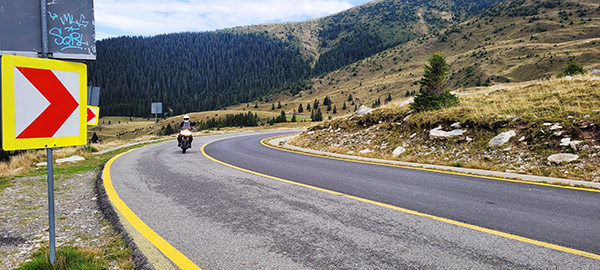
Once we left the dam, the sweeping corners continued with steeper gradients, angled such that we had to lean into them and keep our speed up while doing trig calcs on the fly to avoid falling. We continued gaining elevation when suddenly a bolt blew by me on the left, then another, and another. It was the Romanian Porsche Club; it seems they wrapped up their snacks at the same pace we had. As they roared past like orcas going for the kill (even on blind corners) I thought: “Hey, I still have Boston blood; I can be an apex predator, too!” We rode with them in formation as we roared past numerous cars on their Sunday drive.
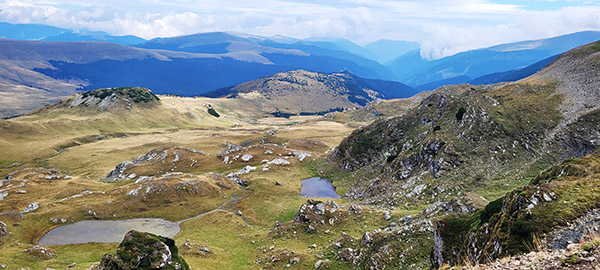
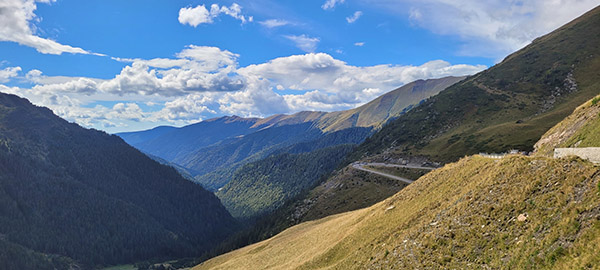
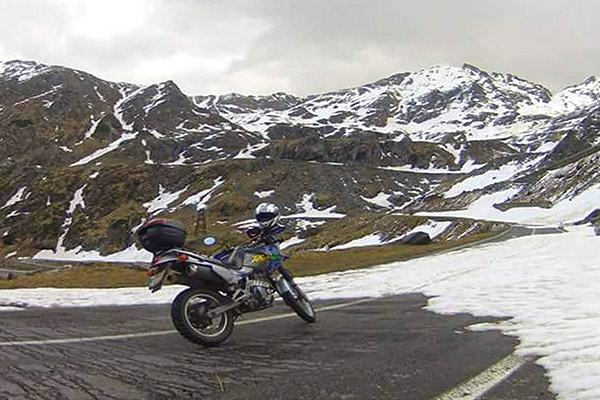
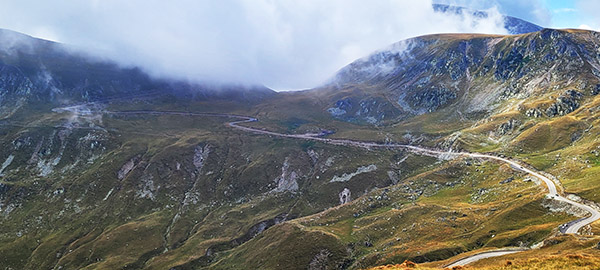
Having been engrossed with the Porsches and the road (and our minds working geometry problems in the corners), we hadn’t noticed how the terrain had changed yet again. It went from pine forests to open alpine meadows with volcanic lakes. We continued to ride along these alpine meadows as heavy fog moved in. We were at just over 5,200 feet, but we felt we were on top of the world. As we adjusted to the new terrain the fog banks closed upon us and our visibility dropped to almost zero. Then, just as quickly as the fog appeared, it retreated. When this happened, the veil lifted to give us a snapshot of the road ahead before it dropped again.
Once hitting Ranca, our turnaround point, the fog rolled in so heavily that even the Porsches turned around. As we sat along a wall to fully absorb the view, we could hear the Porsche engines roaring in the distance as they continued down the pass, popping in and out of the fog. With the fog in no hurry to leave, we thought it was time to return to Sibui and mark another wonderous day of riding one of the best motorcycle roads in the Romanian mountains: The Transalpina Highway.
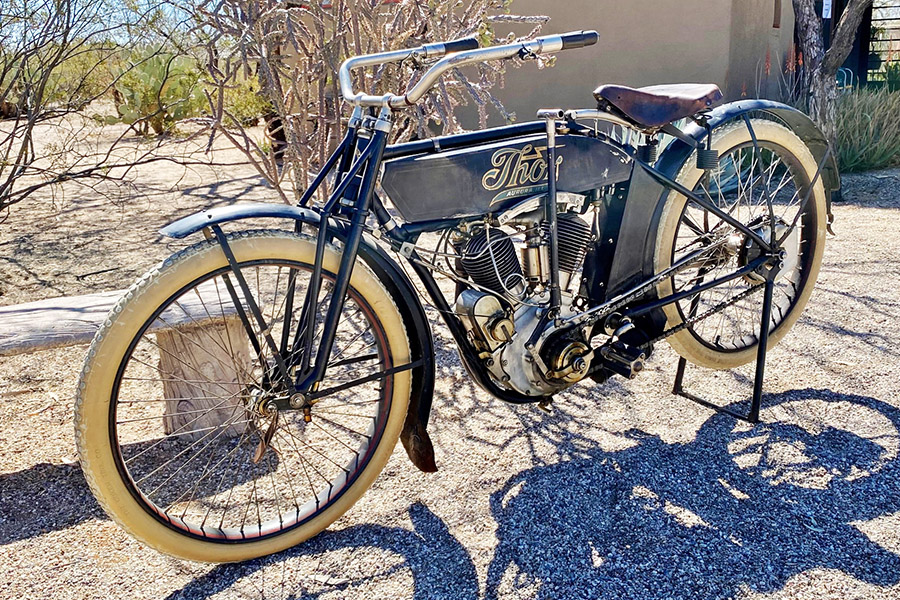
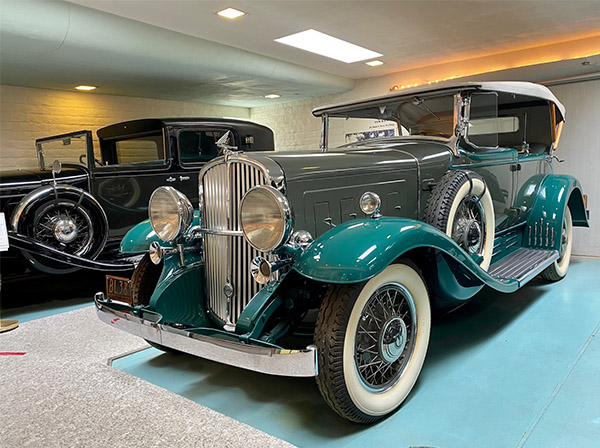
That motorcycle you see in the photo above is a 1913 Thor. It’s not been restored; the paint is original, as are the tires (and they still hold air). You don’t see something like that every day, and it’s something I didn’t even know was there. “There” being the Franklin Automobile Museum in Tucson, Arizona, a hidden gem in every sense of the word (more on that in a second).
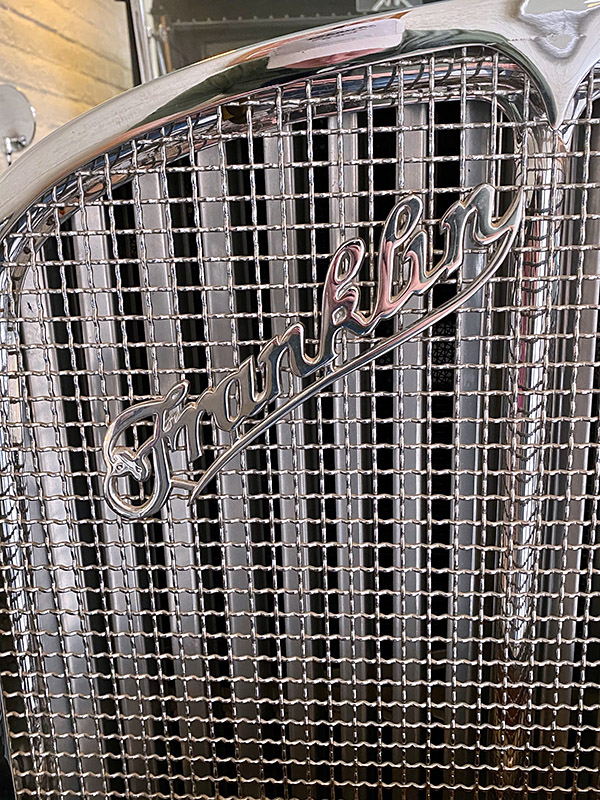
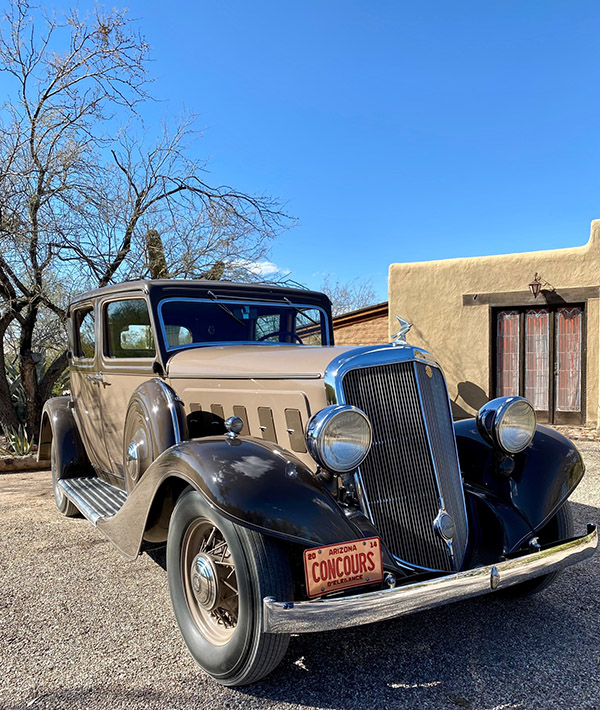
A Franklin grill. These are majestic automobiles.
Never heard of the Franklin automobile? Don’t feel bad; I hadn’t, either. In checking out what museums were in the Tucson area, we found the Franklin Automobile Museum with an Internet search. The Franklin Automobile Museum has been called Tucson’s best kept secret. I believe it. I’ve been to Tucson many times and, as I said above, I had never heard of it.
Franklins were luxury cars, competitors to Cadillacs and other high end automobiles before the Great Depression. A Ford Model A in those days might cost $600. Most Franklins cost about $3,000; some went as high as $6,500.
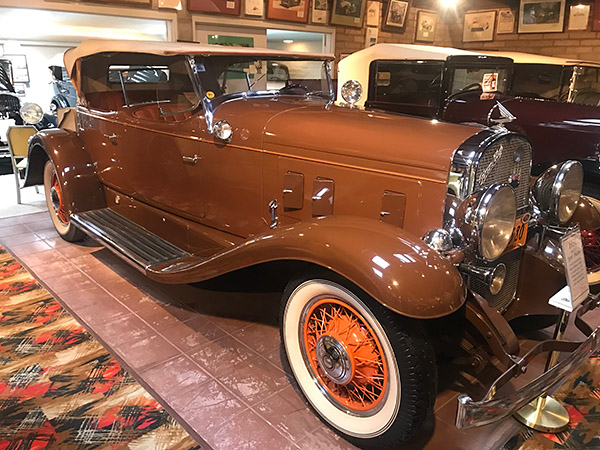
A 1934 Franklin 19-B Club Sedan. This automobile has a 274-cubic-inch factory supercharged air-cooled straight six engine.
The first Franklin was designed by John Wilkinson in 1900. An industrialist named Herbert H. Franklin manufactured the cars, and the car was named accordingly. Franklins featured air cooled engines (initially four cylinder engines, but as the company grew, so did the cars and their engines…all the way up to a V-12, and yes, even the V-12 engines were air cooled). The cars were manufactured in Syracuse, New York. Franklin built approximately 153,000 cars from 1902 to 1934, and then the firm closed its doors, a victim of the Great Depression.
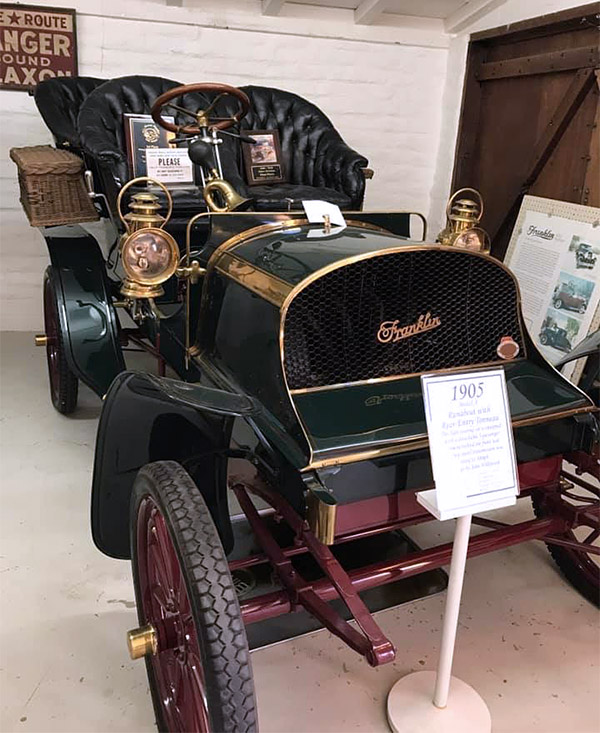
An early 1905 Franklin Model A Runabout. The car has a transversely mounted air cooled inline four cylinder engine.
The H.H. Franklin Club, founded in 1951, aimed to preserve the legacy of these automobiles. Approximately 3700 Franklins survive.
The Franklin Automobile Museum came to be as a result of the late Thomas Hubbard, a Tucson businessman. Hubbard was born in New York but raised by his aunt and in Tucson. Hubbard’s parents owned a Franklin. They visited Thomas in Tucson every year, driving the Franklin from New York to Arizona. Hubbard was impressed by his parent’s annual road trips, and he bought his first Franklin in 1953. It was the first of many. Hubbard opened the Franklin Automobile Museum in Tucson in 1962.
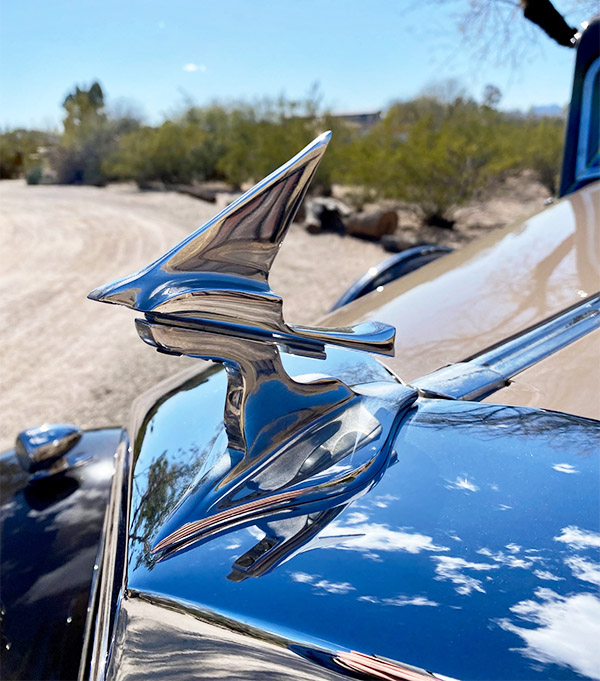
The distinctive Franklin hood ornament.A 1931 Franklin 153 DeLuxe Phaeton, with a custom body by the Merrimac Body Company. This Franklin has the 274 cubic inch air cooled straight six engine. This car’s original price was $6,500, a heady sum in 1931!A 1932 Franklin Series 16 Pursuit Phaeton, with the original factory body style and colors. This car has the same 274 cubic inch straight six air cooled engine. It was the first year of the synchronized transmission.
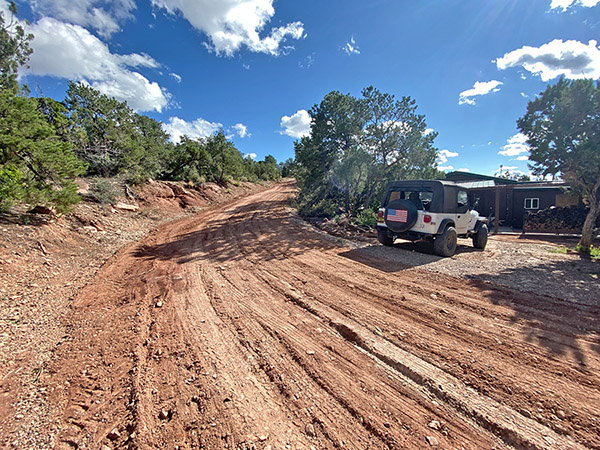
The Franklin Museum is tucked away in northeast Tucson’s Richland Heights area at 1405 East Kleindale Road. It’s not a place you would just stumble on to or notice from the street. If you use a nav system to find your way to the address (a highly recommended to get there), don’t be surprised when you enter the neighborhood: Even though the Museum is in a major American city, the roads in this area are dirt. And even though the address is on East Kleindale, the Museum entrance is on Vine (just around the corner).
The Franklin Automobile Museum is open mid-October to Memorial Day, Wednesday through Saturday, 10 a.m. to 4 p.m. Admission is $12, with discounts available for senior citizens and students. I’d give the place two thumbs up, and that’s only because I don’t have three thumbs. It’s well worth a visit.
A special thanks for Tony Warren of the Franklin Automobile Museum for the photos you see here.
Help keep us publishing: Click on those pop up ads!
It was a bad one as motorcycles accidents go, and my recovery was a lengthy one. A friend contacted me and asked if (while I was recovering) I’d like to write Internet responses to the keyboard commandos badmouthing a company making a new Mustang motorcycle. Would I ever…and that’s how I hooked up with CSC Motorcycles and the modern Mustang. The story is fascinating. Here’s a bit of it, which appeared as a sidebar to my Motorcycle Classics Mustang article.
Ed Seidner founded one of the largest motorcycle superstores in the country, Bert’s Mega Mall in Covina, California, which today sells new Hondas, Ducatis, Triumphs and more. Son Steve ran that operation until he branched out on his own, starting motorcycle accessory company Pro-One Performance Manufacturing.
Ed never had a Mustang, but his friend Billy Buster had one when they were kids and Ed always wanted one. Steve grew up hearing stories about Billy Buster and his Mustang, so he decided to do something about it. He bought an unrestored 1954 Mustang on eBay and took it home to the Pro-One production facility to restore it, a surprise gift for Ed. Steve quickly discovered three things: Customers walked right past ultra-sleek Pro-One V-twins for a better look at the unrestored Mustang, the Mustang was
a simple design, and the little bike was solid. In fact, after Steve drained the stale gas, cleaned the fuel lines and filled the bike’s peanut tank, the old Mustang started on the first kick.
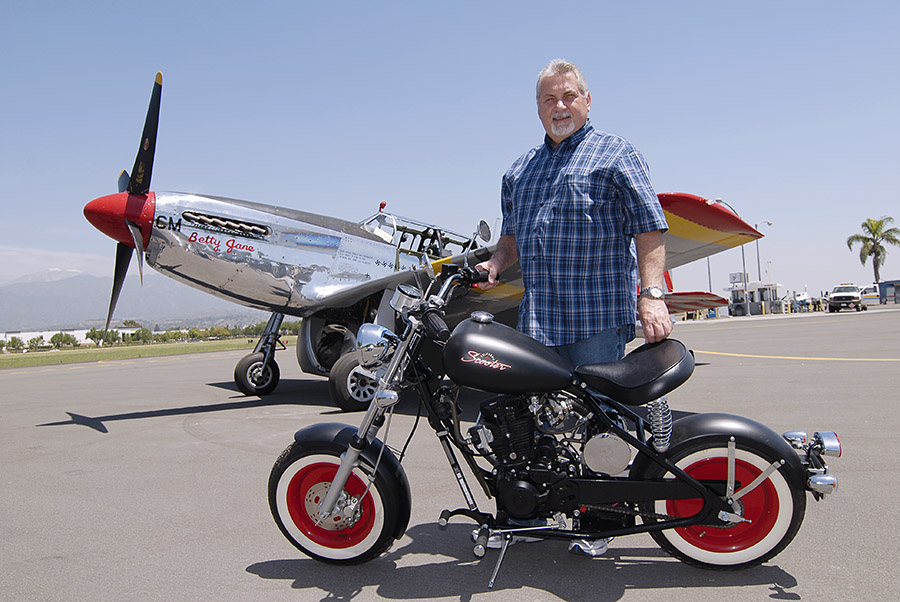
A 1954 unrestored Mustang with a new CSC-150 California Scooter.
Steve’s response was swift. With the 56-year-old Mustang as a template, he started California Scooter Company (www.californiascooterco.com), making the bikes he believes Mustang would build today. The new CSC motorcycles are EPA and CARB approved with modern amenities like electric start, turn signals, speedometer, hydraulic disc brakes, etc.
The bikes are built in La Verne, California, about 30 miles from the original Mustang factory, while the engines are sourced from Asia. Three years after introducing the 150cc CSC 150, CSC introduced the 250cc P51, taking the P51 designation from the World War II Mustang airplane. With its larger 250cc counterbalanced single overhead cam engine, the P51 absolutely rips. The Mustang formula — short wheelbase, light weight and 12-inch wheels — still works.
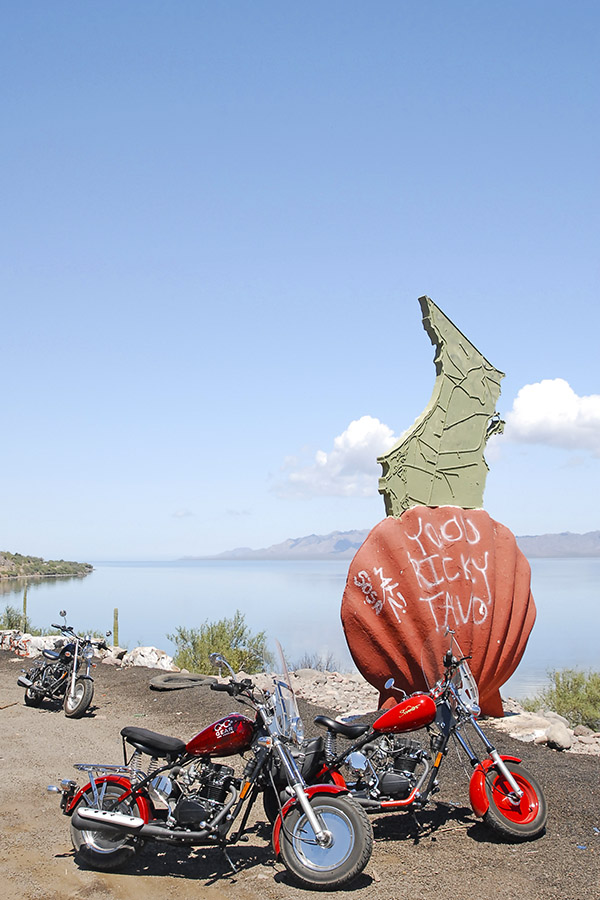
CSC-150 Mustang Replicas in Baja. That’s the Sea of Cortez in the background. We were at the Tropic of Cancer when I snapped this photo. We rode our CSC-150s all the way down to Cabo San Lucas and back without a single breakdown.
So how does the new compare to the old? Fully broken in, my 150cc red CSC Classic tops out at about 66mph. With their 320cc engines, the original Mustangs were crazy fast. My geezer buddies tell me a stock Mustang would do 70mph (how they knew that is beyond me, as Mustangs didn’t get speedometers until the late 1950s). I’ve touched 80mph on the new P51.
I’ve ridden vintage Mustangs, but because of their value I was afraid to push them too hard. The old Mustangs feel a little wobbly to me, but of course they have old forks and old tires. The new bikes benefit from more than 50 years of advancements in technology. When I take my CSC on Glendora Ridge Road, the bike is light, tight and an absolute delight through the twisties. Which bike is faster or better is moot. Both are awesome, and each offers a riding experience like no other. There’s one fact, though, that riders of vintage Mustangs and new California Scooters both have to accept:
You can’t go anywhere without drawing a smiling crowd. — Joe Berk
As I mentioned in the prelude to this blog, when I wrote the Mustang story for Motorcycle Classics magazine I was also a consultant to CSC Motorcycles. CSC Motorcycles stopped producing Mustang replicas a few years ago (around the same they started importing the advernture touring RX3), so there are no more new California Scooter Mustang replicas. But the modern Mustangs do come up for sale now and then, and the best way to find one is by contacting CSC directly. If you’d like to know more about CSC, their Mustang replicas, and how the company became the North American importer of Zongshen motorcycles, you should pick up a copy of 5000 Miles At 8000 RPM.
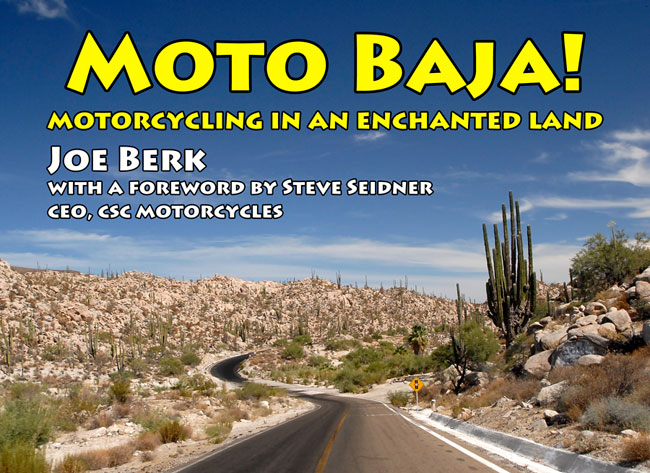
Would you like to know about our CSC Mustang ride through Baja, as well other forays into Baja? It’s all right here, in full color, in Moto Baja!
A recent road trip took us to New Mexico, and that meant a stop at Joe Gresh’s Tinfiny Ranch. The word “ranch” has a nice ring to it, but Joe’s ranch is more of a cool toys repository than a place where cattle range freely (the toys more than make up for the missing cattle…the stories they hold are better than any Bonanza episode).
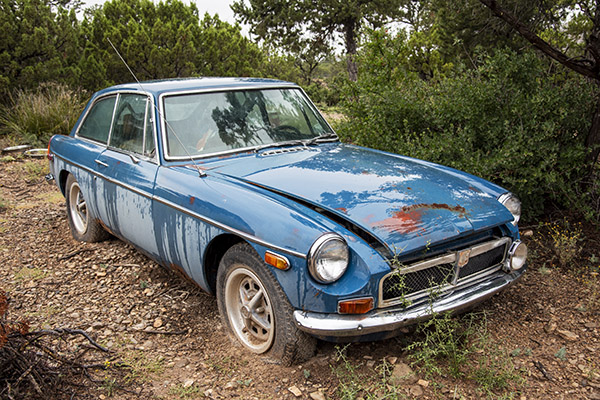
When walking up the hill from Joe’s home to his shop, you can’t miss his powder blue MGB GT. The MG came with the property. At one point Joe was going to get it running again and he started a resurrection blog series on it. He’s now thinking he may sell it. I’d like to see him finish this one for a lot of reasons, mostly centered around my belief that any British motor vehicle is inherently cool and there would be interesting blog content accompanying the effort. Time will tell. And so will we.
As you can see from the above photo, it was raining a bit when we visited. The rain gave the MGB a nice look, a hint of what it would be if it was running again with the original paint buffed out. The MG would be a cool resurrection project. If you agree, leave a comment here on the blog. I’m trying to start a “Keep the MG” movement.
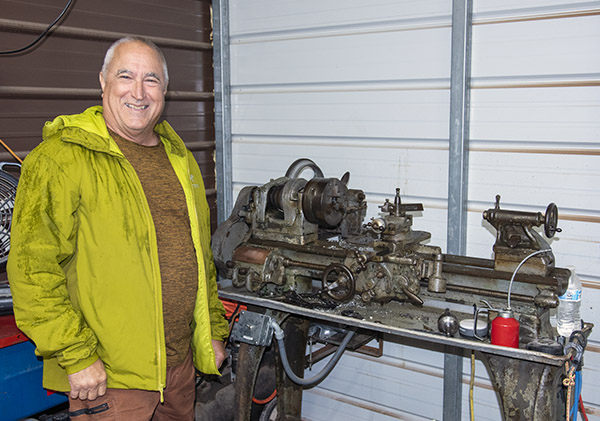
Joe has a bunch of equipment in his Tinfiny Ranch shop, including a sandblast cabinet, a drill press, all manner of hand and power tools, and a lathe. “You can make anything with a lathe…you can even make another lathe,” Joe once said. You can read more about that here.
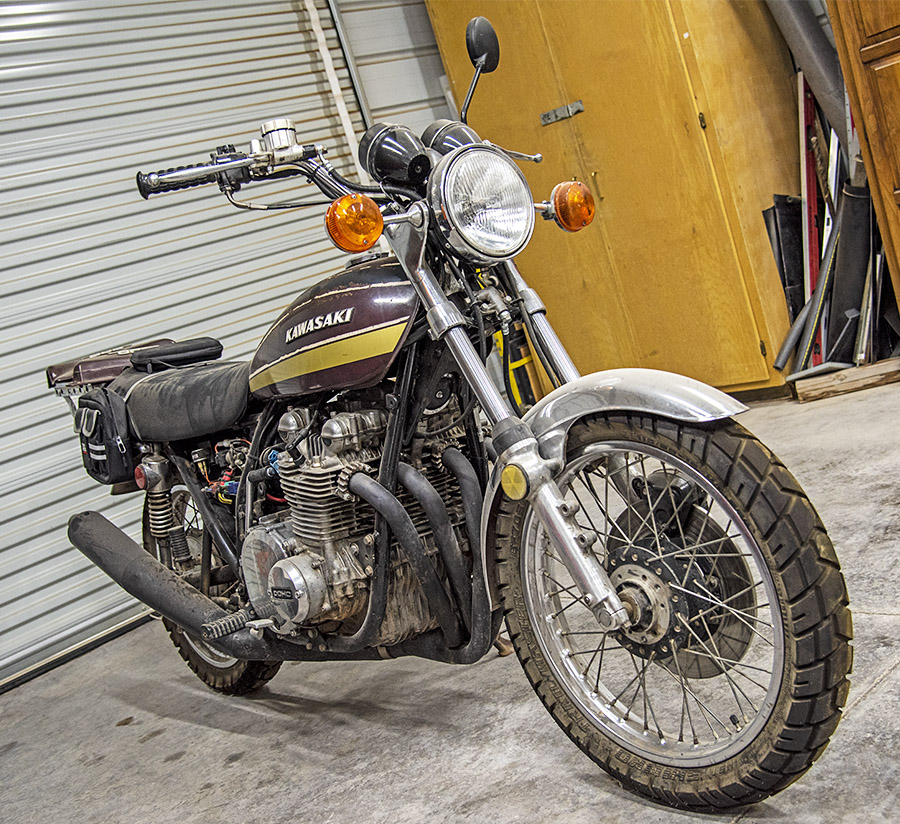
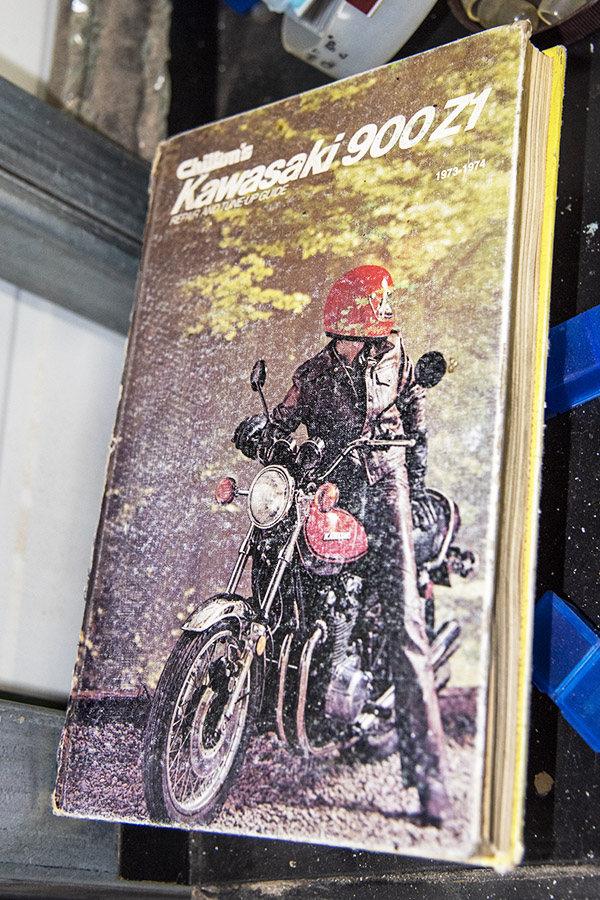
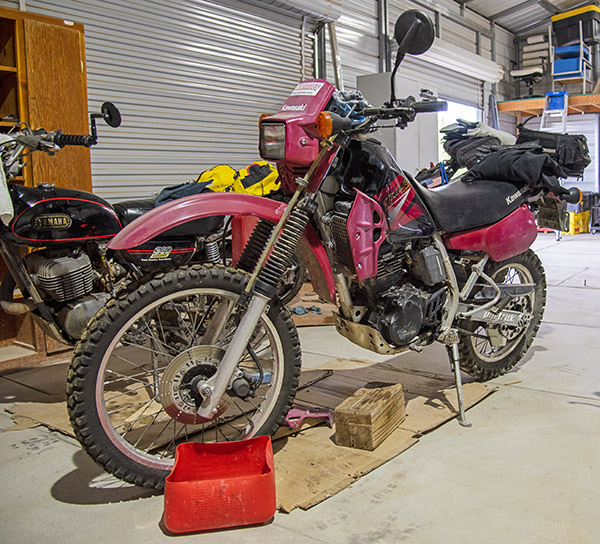
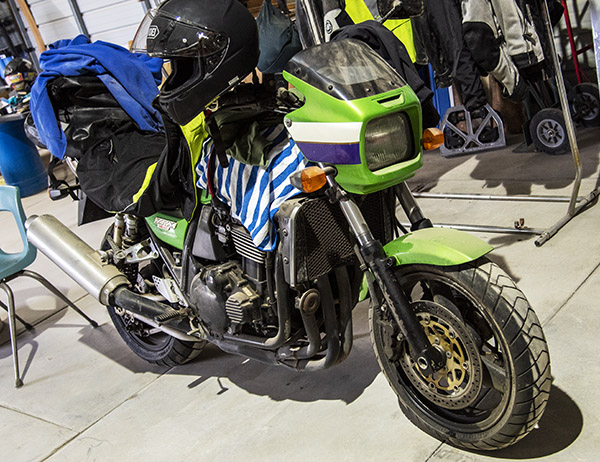
The photo at the top of this blog is Zed, Joe’s original 900cc Kawasaki, and it is the first resurrection story Joe wrote for ExNotes. In my opinion, this is the coolest bike on the planet. I especially like the original paint. The patina is priceless.
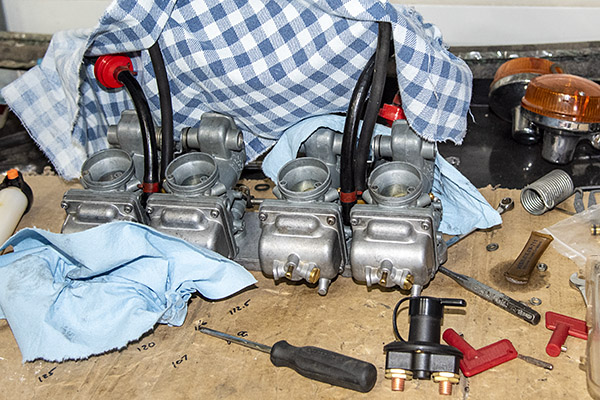
Joe had Zed’s carbs off the bike when we visited. Zed needs Joe, and I think Joe needs Zed. He’s talked about selling it; I hope he doesn’t. If you agree, leave a comment here on the blog. You know the drill.
Joe’s well worn Zed shop manual.
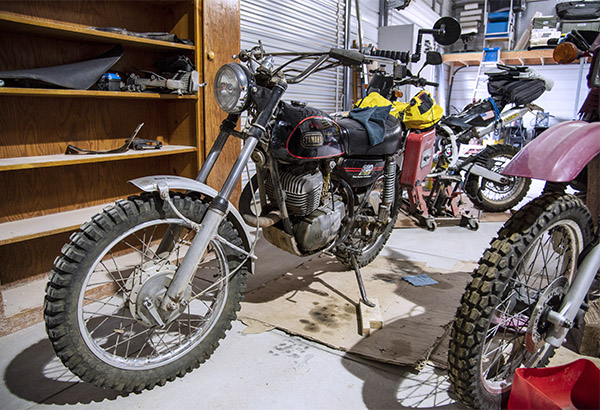
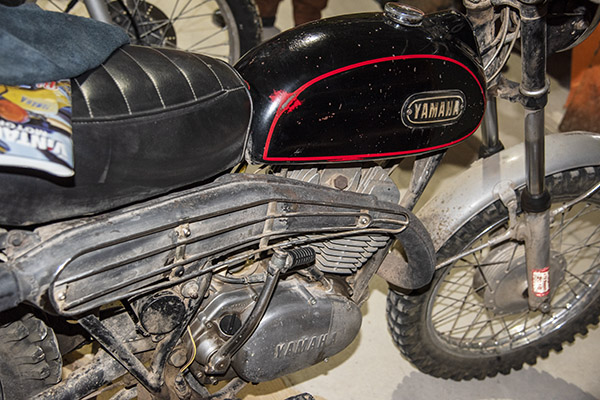
One of Joe’s more famous vintage bikes is Godzilla, a Yamaha 360 he rode on the Trans America Trail. It’s a delightfully original machine with a lot of stories, a few of which have appeared here on ExNotes.
I wish Yamaha still made these bikes. I always wanted one, but I’ve never ridden one. Someday.
Joe is one of two guys I know with a Kawasaki KLR 250 (the other guy is also named Joe, but it’s not me). Joe has a few stories about the KLR 250 here on ExNotes.
When I first met Joe on our CSC Motorcycles 5000-mile ride through the American Southwest (with our friends from China and Colombia), Joe told me he would really love to install the 250cc RX3 engine in his KLR 250. Joe is thinking about selling his KLR. I get it; I sold my KLR a few years ago. But I regretted it. KLRs are great bikes.
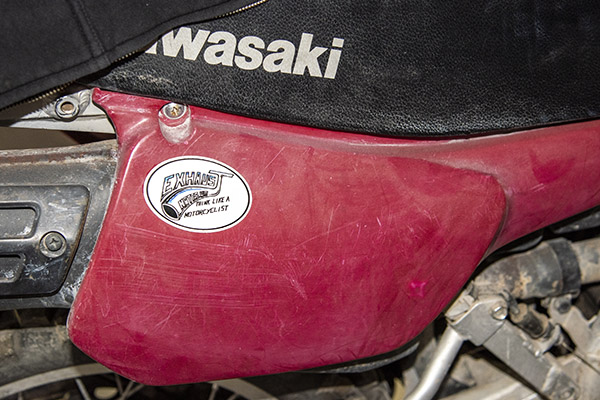
I have one of these decals on my motorcycle, too.
Incidentally, if you want to know more about the RX3 and our ride with the Chinese on it through the American Southwest, you might consider picking up a copy of 5000 Miles At 8000 RPM.
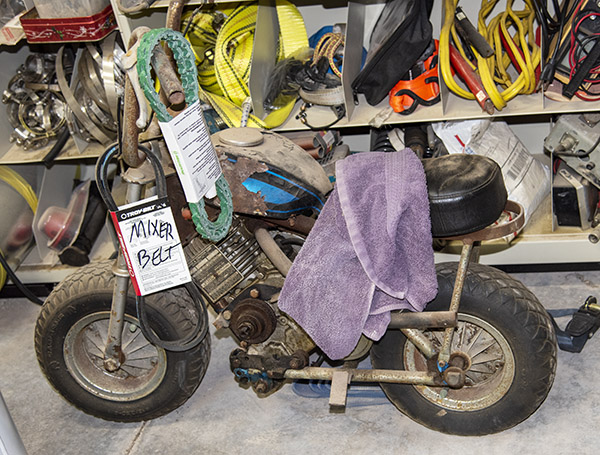
Here’s Joe’s mini-bike. He’s owned this one a long time.
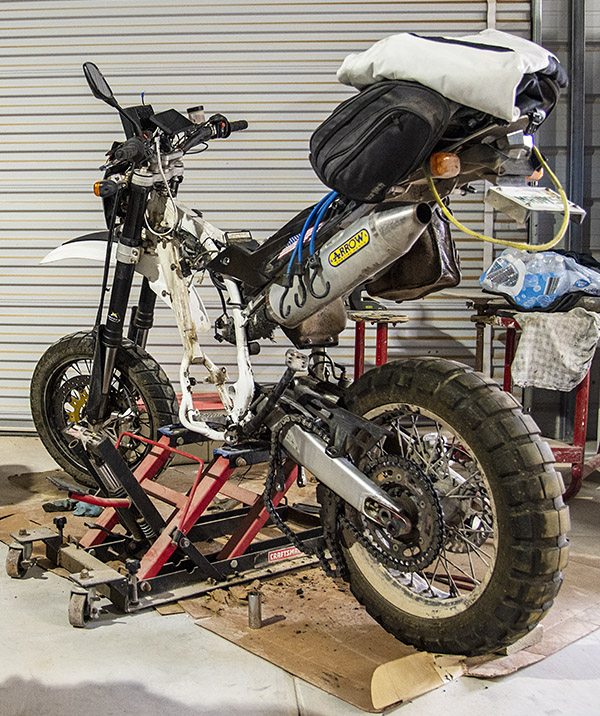
Joe’s famous Husky…with the engine out. Joe is rebuilding the transmission on this motorcycle. He’s blogged about it; watch ExNotes for future updates. I know Joe will have it on the road again.
Joe’s Kawi 1100 hasn’t been started in a decade or two. He’s thinking about getting it on the road again. That will make for a bunch of great blogs.
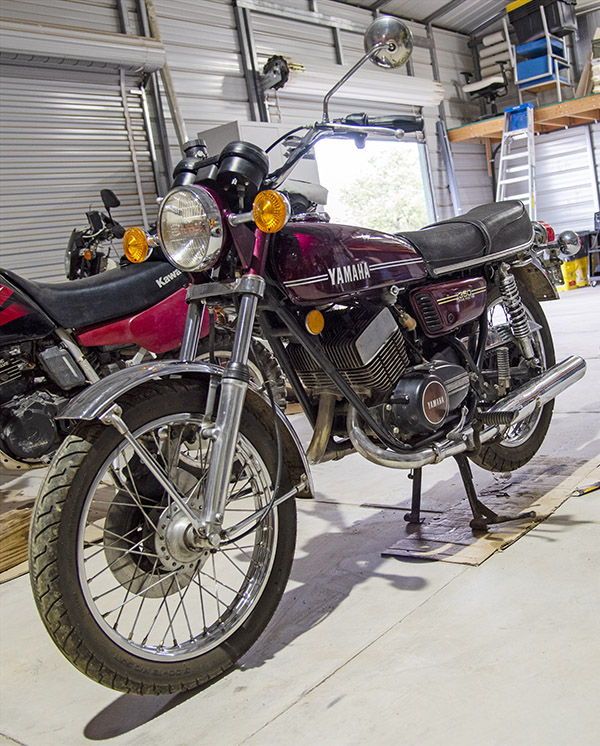
Joe’s most recent acquisition is this stellar Yamaha RD 350. Joe’s written about it here on ExNotes.
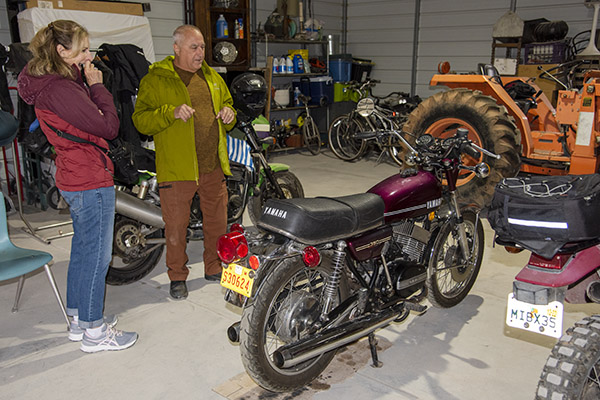
Joe explaining the RD’s merits to Susie.
Joe started the RD 350 for us. It sounded great.
It was a good visit. There’s a lot going on at Tinfiny Ranch (living off the grid stuff, concrete stories, tractors, implements, the water wars, vintage motorcycles, and more), and you can read about it here on ExNotes. Stay tuned, my friends.
Most people think of New Mexico as a barren, desert state. Much of it consists of broad expanses of high, scrabbly bush land. But that’s not nearly all there is here. New Mexico has two mountain ranges running north to south dividing the land into separate areas each with their own style of terrain, east of the Pecos River you’ll find the flat, oil-rich Permian Basin. This area is New Mexico’s Golden Goose that never seems to run out of eggs. The Permian Basin pays a huge amount of taxes to the state coffers. The odor of salt water mixed with oil is everywhere. It makes me a little homesick for the bilges of boats I used to build and repair in Florida.
Moving west from the Pecos River you come to my mountains, the Sacramento Mountains. Tinfiny Ranch lies on the western foothills of the Sacramento Mountains looking out over the Tularosa Valley. At 6000 feet Tinfiny Ranch is both wetter and cooler than the small towns down in the flat lands of the valley 1500 feet below.
Tinfiny Ranch has small trees, maybe 20 feet high and all of the plant life is larger and happier than the small shrubs you find at lower elevations. Within Tinfiny Ranch there are two different ecosystems: the relatively damper lower arroyo area where some idiot decided to put the shack we live in and the higher, just slightly more arid upper area where the off-grid trophy shed sits. The elevation change is only 50 feet but the trees are noticeably larger and the undergrowth denser down by the Arroyo. There’s even a little grassy lawn struggling to survive in the lower reaches.
The upper and lower areas are connected by a steep dirt road that is always in need of repair. Whenever it rains the water cuts deep ruts across and parallel to the road. Monsoon season makes the road 4-wheel drive only. UPS and FedX stop delivering when the road gets too bad. They leave packages by the entrance gate instead of at our door.
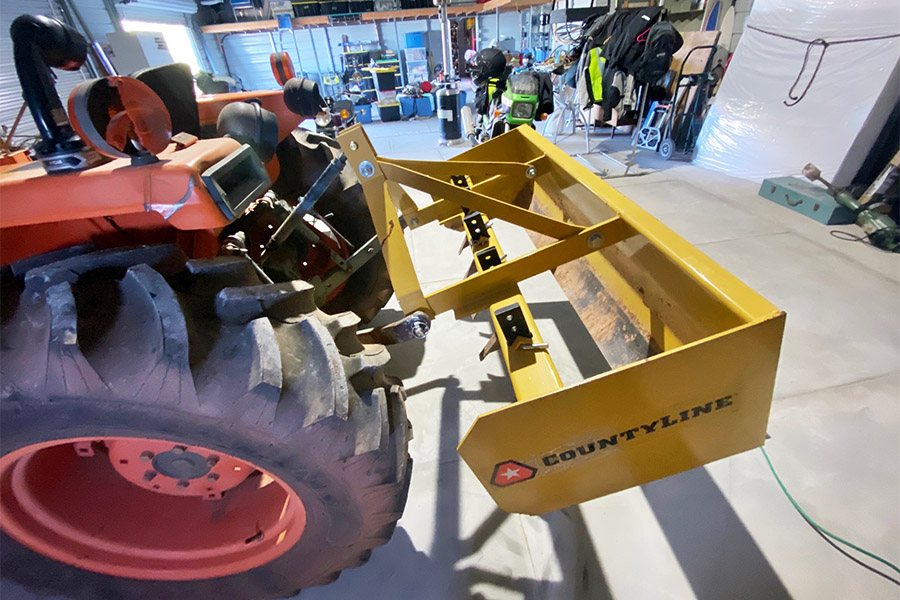
Tractor Supply’s County Line Box Blade is just the ticket for grading and smoothing out the ruts in our driveway. Five feet wide, the box blade connects to the 3-point hitch on the back of standard tractors and comes mostly assembled except for a few thick bars of steel that make up the top mount. It’s a heavy chunk of steel and I can only lift one side at a time to move it.
Five depth-adjustable scarifying teeth mounted ahead of the leveling blade allow the box blade to break up hard ground. These teeth will catch roots and rocks and rip them out of the ground making it easier for the following blade to level the area. If you didn’t have the scarifying teeth the blade would just bounce over some obstacles leaving behind an uneven grade.
Tinfiny Ranch has a lot of big rocks from softball size to larger than a shopping cart. Running over one of these big boys will kick the box blade into the air with a loud crash. Some rocks you’ll want to dig out of the ground with a pick and pry bar instead of beating up the box blade.
With the box blade it took just a few hours to straighten out the road leading to the upper level. I’ll need to do some more work on it to fill in some low spots and cut down some high spots but it’s still raining so I don’t get too excited about making it perfect. At some point we will either asphalt the road or pave it with concrete. I’m leaning towards asphalt since I won’t have to do it.
I give the Tractor Supply box blade high marks for its low-ish $1000 price tag and high quality. That seems like a lot of money but try to find a used one. If you manage to it will be a wreck and cost $500. This County Line unit is a well built, heavy tool that will last your lifetime and maybe more. Once you get a box blade you’ll start finding all sort of areas that need leveling. Soon there won’t be a plant standing and your yard will be a broad, featureless plain, like some areas of New Mexico.
Keep us in implements: Please click on the popup ads…we get paid every time you do!
The Colt Python versus the Ruger Blackhawk: Apples and oranges? Maybe, maybe not. This blog compares the two .357 Magnum revolvers from several perspectives, including price, actions and triggers, sights, barrels, fit and finish, durability, feel, panache, accuracy, bore leading, ammo sensitivity, and extraction.
Price
The Python is a premium revolver, selling for $1500 (if you can find one) compared to a Ruger Blackhawk’s typical sell price of just under $700. I believe Ruger stopped making Blackhawks for a while; they resumed production this year and I have one of the recently manufactured specimens. Colt stopped making the original Pythons in 1999; in 2020 they reintroduced an improved version. That’s the one I have now.
Actions and Triggers
The Python is a double action revolver; the Ruger is a single action. That means that on the Ruger, you have to cock it by pulling the hammer all the way to the rear to rotate the cylinder and bring the gun to a ready-to-fire condition. On a double action revolver like the Python, you can fire it single action as described immediately above, or you can pull the trigger a longer distance to rotate the cylinder, cock the gun, and drop the hammer.
Help us bring more content to you…please click on the popup ads!
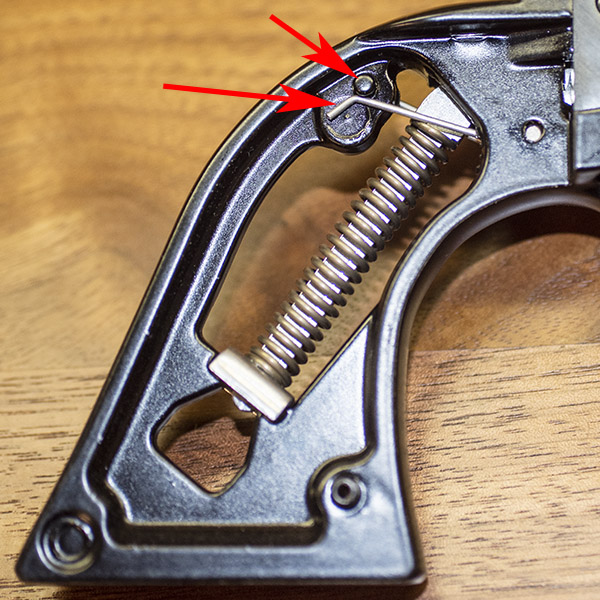
As delivered, the Blackhawk had a crisp but relatively heavy single action trigger pull. I gave mine the quick New York trigger job described in an earlier blog; now it is both lighter and crisp. It’s a good trigger, as good as you’d get with a custom trigger job. Ruger did a good job here.
A Blackhawk New York trigger job. Unhook one leg of the trigger spring, and you get a lighter trigger.
The Colt Python’s double action trigger pull is superb, far superior to the double action trigger of the earlier Pythons. It doesn’t stack; it’s a constant force trigger pull all the way to hammer drop. The Python trigger is serrated, which I don’t care for. I think it would be better as a smooth trigger, like the Ruger has. The serrations interfere with the double action trigger motion, in which I’d like my finger to be able to slide across the trigger laterally as I complete the pull. But it’s still a good double action trigger.
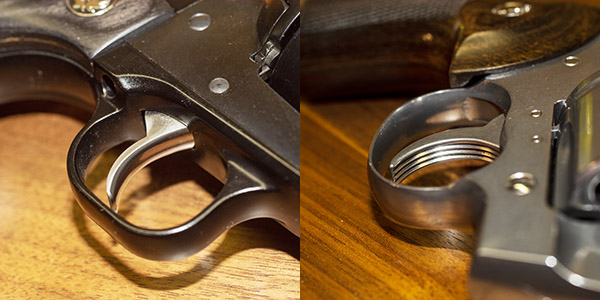
The Ruger and Colt triggers. A smooth trigger on the Python would make for better double action shooting.
The Colt Python’s single action trigger, as delivered by the factory, was not acceptable to me. It probably exceeded 6 pounds, it was gritty, and it actually cocked the hammer a bit more before it released. I called my contact at Colt to ask about it and he explained that it’s necessary to survive our California drop test. That requirement stipulates that a cocked gun has to not discharge when dropped repeatedly from a specified height on a concrete surface. I run with a pretty exclusive crowd (exclusive in the sense that we don’t drop our loaded and cocked guns repeatedly on concrete), so the requirement is beyond silly to me, but hey, it is what it is, and it’s why a new Python has a heavy, gritty single action trigger from the factory. It’s not Colt’s fault; it’s California.
I had TJ (of TJ’s Custom Gunworks) work his magic on the single action trigger and it’s now what it is supposed to be. Think zero creep, a breaking glass release, and 2.5 pounds, and you’ll have a good idea of my Python’s single action trigger.
Sights and Sight Radius
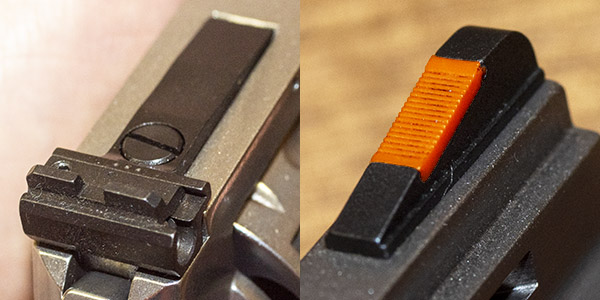
Both revolvers have adjustable sights. The Python has a red ramp front sight (but no white outline rear). The Blackhawk has plain black sights front and rear, which I actually prefer. The Blackhawk rear sight is click adjustable for windage and elevation (like most handguns with adjustable rear sights), the Python rear sight is click adjustable for elevation. The Python windage adjustment is a little different than most. It is infinitely adjustable for windage via a screw (with no clicks), and it can be locked in place with what has to be the world’s smallest Allen screw. Colt provides a tiny Allen wrench with the revolver for this purpose.
The Ruger Blackhawk’s front and rear sights. I prefer a plain black post and rear blade, like this Ruger has. The rear sight blade has an indented provision for adding paint to create a white outline, but I’m leaving it black.The Colt Python’s sights. The rear is click adjustable for elevation, and infinitely adjustable (i.e., there are no clicks) for windage. The front sight has a red ramp.
The Colt front sight is easily replaced with the same size tiny Allen screw that is used to lock the rear sight windage. I’ve not seen any different front sights offered to replace the red ramp front sight, but I guess they are (or will be) available.
I actually prefer the Ruger’s plain black sights to the Colt’s red ramp arrangement, but that’s a personal preference.
The Colt’s sight radius (the distance from the front to rear sight) is 7 3/4 inches. The Ruger’s sight radius is 8 1/2 inches, which should give a Ruger a slight accuracy edge.
Barrels
Both handguns have the longer version of the barrels offered by their respective manufacturers. The Ruger .357 Magnum New Model Blackhawk can be had with either a 4 5/8-inch barrel or a 6 1/2-inch barrel; I opted for the 6 1/2-inch barrel. The Colt Python is available with either a 4 1/4-inch barrel or a 6-inch barrel; I went with the 6-inch version. For me, these are target guns, and I wanted the longer sight radius.
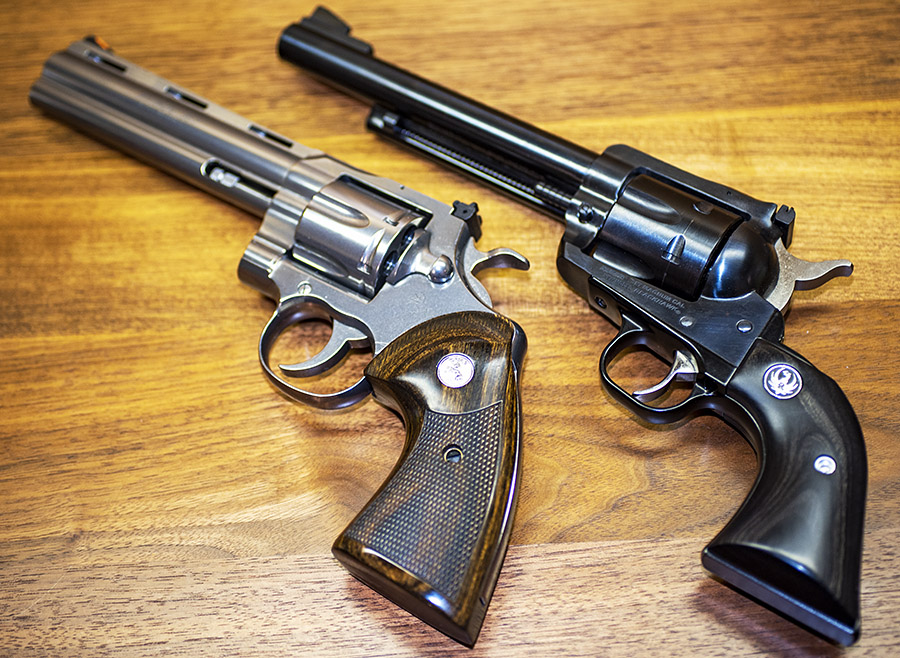
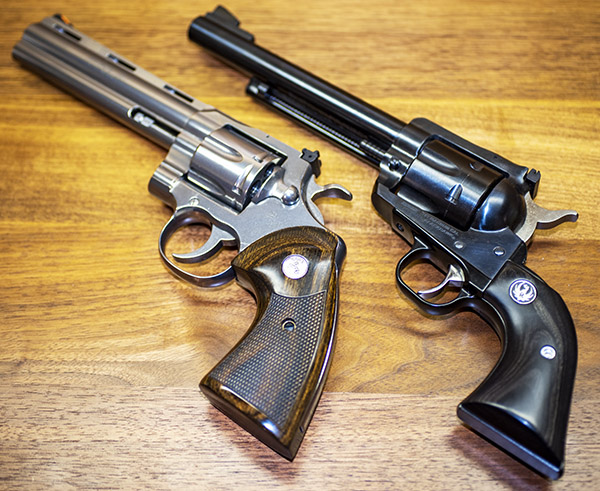
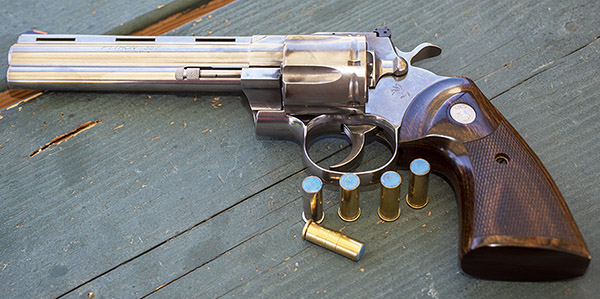
The Colt Python has a 6-inch barrel; the Ruger Blackhawk has a 6 1/2-inch barrel. Both are large, heavy revolvers.
Colt is recently introduced a 3-inch barrel on the Python. The Python (in my opinion) is too big for concealed carry even with the 3-inch barrel; the short barreled version holds no interest for me.
The Python has a 1 turn in 14 inches left twist rate barrel; the Ruger has a slightly slower 1 turn in 16 inches right twist rate. Both barrels have recessed crowns. The Python, of course, has its signature ventilated rib and full underlug barrel. It’s a classic and unique look and I love it.
Interestingly, in the 1970s I shot handgun metallic silhouette competition with a Smith and Wesson Model 27; it had a twist rate of 1 turn in 18 3/4 inches. It was accurate, but not any more than either of the two 357 Magnums being reviewed here.
Weight
The Colt Python weighs 46 ounces. The Ruger Blackhawk weighs 45 ounces. The grip frame on the Blackhawk is a painted alloy, which reduces the weight slightly. These are both big, heavy handguns. They are not meant to be concealed carry guns.
Fit and Finish
Ah, how to be delicate here. Colt hit a home run with the Python. Ruger, not so much, at least on my Blackhawk.
The Python has a high polish, mirror-like finish on its stainless steel surfaces. It’s actually not hand buffed like you might imagine; Colt uses a vibratory polishing media approach. It really works; the finish is superb.
Ruger’s Blackhawk has an industrial grade blued finish, and on my revolver, the factory missed several spots on the cylinder. Ruger offered to reblue the cylinder for me, but truth be told, the cylinder is a fitted part and I didn’t want to chance sending it to Ruger and having them return a different cylinder. I used cold blue on mine to touch it up, and after oiling it, you have to know where the bluing shortfalls were to find them. But you shouldn’t have to do that on a new gun.
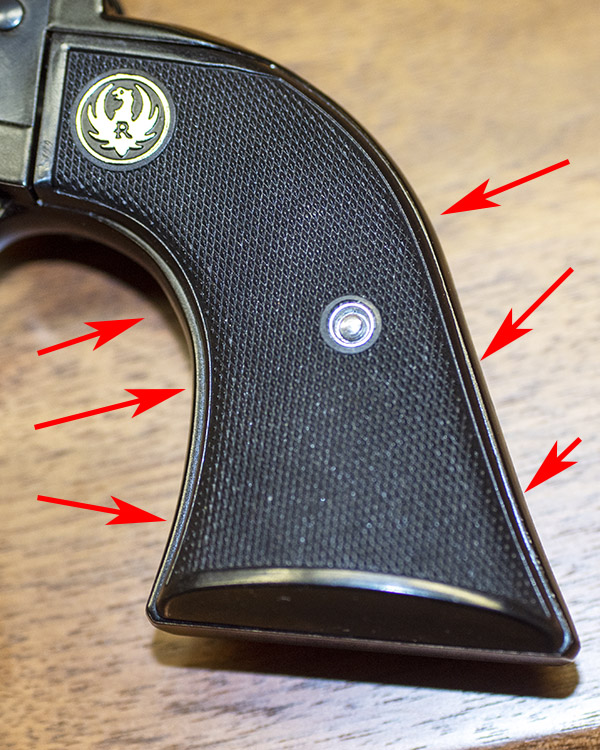
Lapses in bluing quality on the Ruger Blackhawk. This gun should have never left the factory.The fit of the grips to the grip frame was atrocious on my Blackhawk.
The grips on my Blackhawk had a very poor fit. I thought they were made of plastic, but they are hard rubber (like on the Colt Single Action Army). Ruger sent a new set of grips to me, but I couldn’t get them over the mounting posts in the grip frame and I didn’t want to screw around enlarging the holes. Instead, I installed a previous set of black laminate grips I had from Ruger (you can see them in the photo at the top of this blog). I like the look and the feel of the laminate grips, so they are staying on the gun. You shouldn’t have these kinds of issues on a new gun.
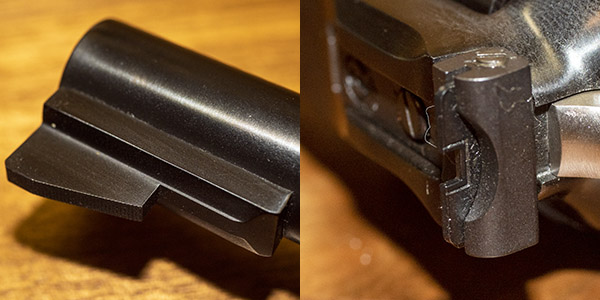
Both the Colt and Ruger rear sight elevation adjustment pivots on a pin through the revolver frame. After shooting the Colt for a couple of years, the pin is still in place. Colt uses a rolled steel pin; Ruger uses a solid pin. On the Ruger, by the end of the first range session its pin had backed out. Ruger sent me another pin with a recommendation that I bend it slightly before I install it. I’ll fix it in place with green Loctite when I get around to picking some up, but I shouldn’t have to do this.
I paid $659 for my Blackhawk, but factoring in the freight cost, the sales tax, the California DOJ fee, and the transfer fee, it was crowding a thousand dollars by the time I took it home. For that kind of money, I expect something to be perfect. That’s not what I received. On the plus side, I know if I shipped the revolver back to Ruger, they’d make it perfect. As I said in an earlier blog, Ruger’s customer service is the best in the business. But that’s a poor benchmark for a gun manufacturer (or any manufacturer, for that matter). If they got it right the first time, they wouldn’t need to be the best in the best in correcting quality escapes from the factory, and getting it right the first time is what most of us expect when we plunk down our hard-earned cash.
Durability
The older Pythons were delicate firearms, and it’s been said by people who know what they’re talking about they suffered from frame stretch and timing issues within the first 2,000 to 3,000 rounds. The new Python is a much beefier gun, and the guys I spoke with at Colt told me it no longer has these issues. I haven’t owned my Python long enough to say that’s the case, but I believe what Colt told me. I’ve shot mine a lot over the last two or three years; if anything, it’s becoming more accurate.
Ruger Blackhawks have always been built like anvils. I’m the only guy I know who wore one out, and I put many, many max loads through my old stainless steel Blackhawk. Blackhawks are tough. I think the new Pythons are, too. From a durability perspective, I’d call it a draw.
Feel
This is a subjective assessment that includes grip, balance, and ease in handling the revolver. It’s very much a matter of personal preference. I like the feel and balance of a single action better than a double action revolver, so for me, the Blackhawk takes the win here.
Panache
This is another subjective assessment. The dictionary defines panache as “flamboyant confidence of style or manner.” The Python is the easy winner here. Don’t get me wrong: Folks have approached me on the range to ask about what I’m shooting when I’ve been out there with both guns. But it happens more often with the the Python. It’s a prestige item. Pythons have been featured in movies going all the way back to the second Dirty Harry flick, Magnum Force, as well as others. I don’t know that I’ve ever seen a Ruger Blackhawk in a movie (if you have, let me know).
Accuracy
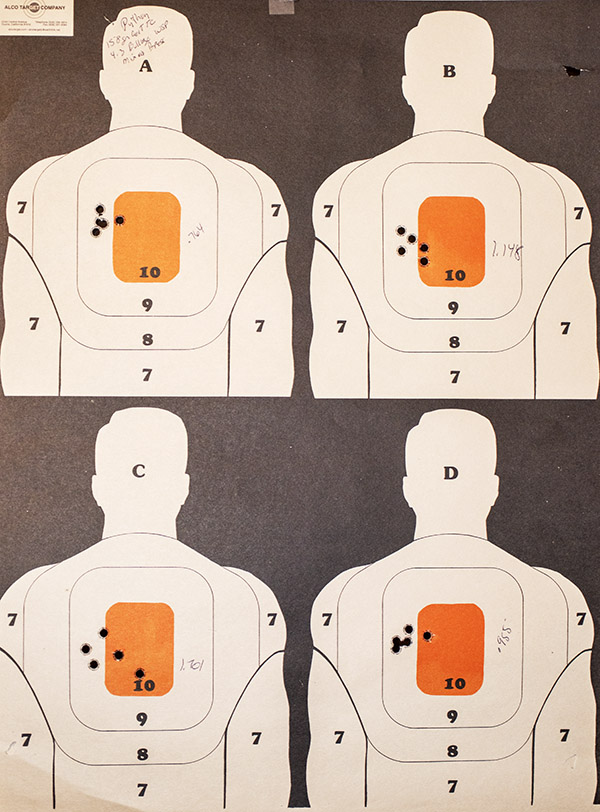
This is essentially a draw. Both revolvers are accurate, and both have their preferred loads. You may have read my recent blog on the Blackhawk’s accuracy; I shot the same loads with the Python to make a comparison.
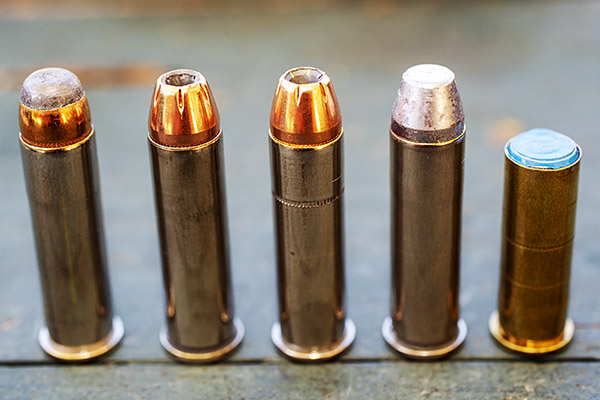
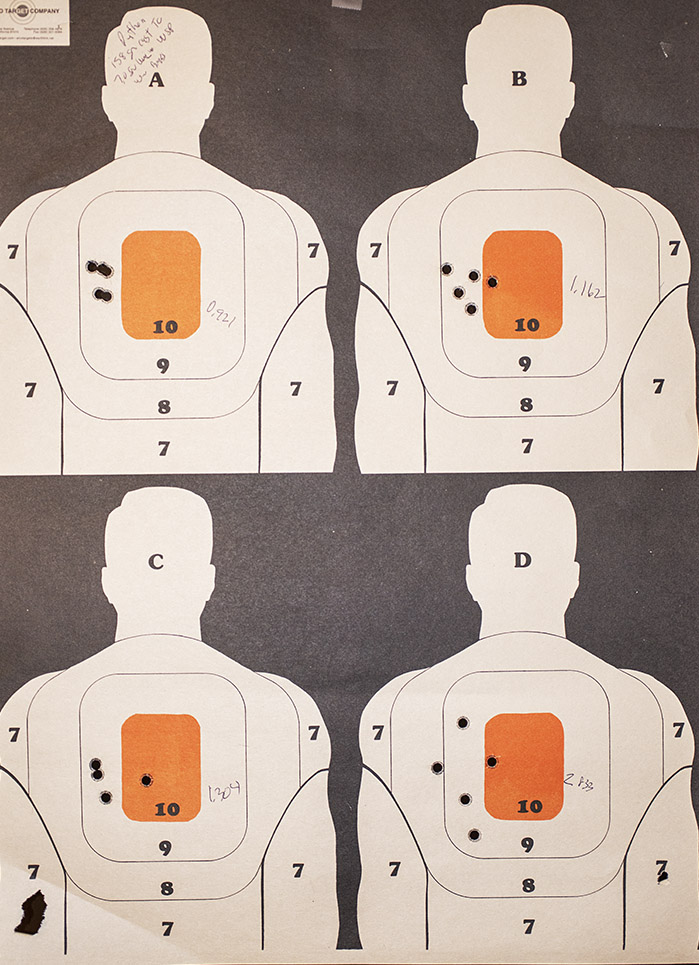
Bullets used for this test: From left to right, the Speer 158-grain jacketed soft point, the Hornady 158-grain jacketed hollow point (also called the XTP), the Hornady 110-grain jacketed hollow point, a cast 158-grain flat point, and the 148-grain Gardner cast and powder coated double ended wadcutter loaded in .38 Special cases. The different powder charges and primers used with these bullets are shown in the table below.
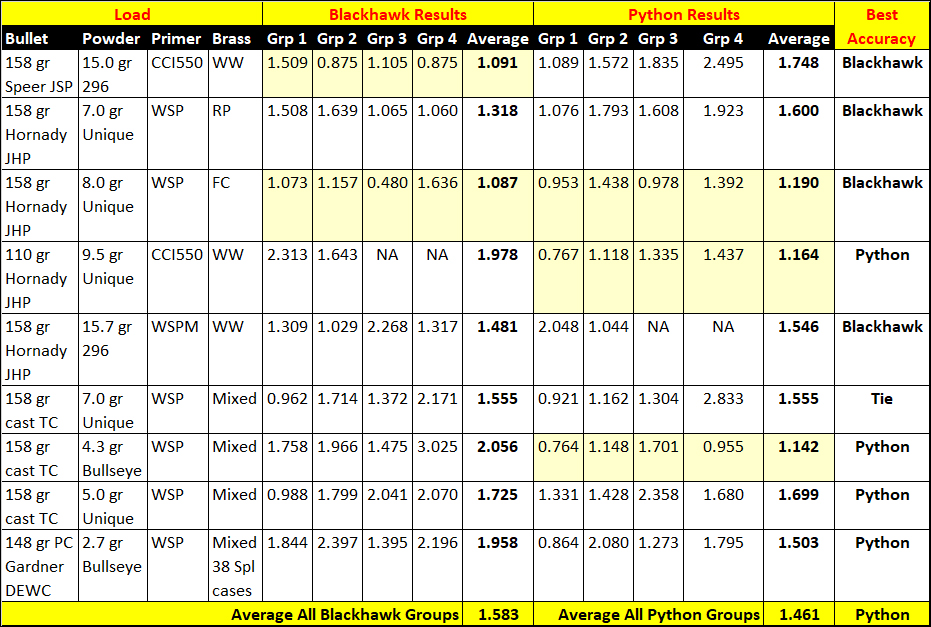
Take a look at the results:
I fired the above 5-shot groups at 50 feet, using a two hand hold resting my hands on the bench. I did not use a machine rest, nor did I chronograph any of my loads.
Both the Python and the Blackhawk shot very well with 8.0 grains of Unique and the Hornady 158-grain jacketed hollow point bullet (Hornady calls it their XTP bullet).The Python did very well with a light .357 Magnum cast load: 4.3 grains of Bullseye and the 158-grain cast flat point bullet. The Ruger didn’t shoot the lighter cast bullet loads nearly as well. I need to move my Python’s rear sight to the right a bit.
The clear winner for a full power load that works well in both guns is the 158-grain Hornady jacketed hollow point with 8.0 grains of Unique. That was the accuracy load for a 158-grain jacketed bullet in the old 45th edition (1970s vintage) Lyman manual (it’s not shown in the newer manuals). Loads using 158-grain jacketed bullets and Winchester’s 296 propellant did well in both guns, too, but they are high energy, high muzzle blast, and high recoil loads.
Another known favorite .357 Magnum load is the 110-grain Hornady jacketed hollow point with a max load of Unique. These performed superbly well in the Python, but they were terrible in the Blackhawk. The accuracy was poor and the brass would not extract (I had to remove the Blackhawk’s cylinder and drive the brass out with a rod). This load had previously worked well in a stainless steel Blackhawk, but this newer one did not digest this recipe well. Every gun is different.
I also tried a few lighter loads. The Python grouped very well with 4.3 grains of Bullseye and the 158-grain cast flat point bullet. That’s an easy load to shoot and I’ll be reloading a bunch of .357 Magnum cases with it later this week. It’s an easily recoiling load, it’s very accurate in the Python, and it doesn’t lead the bore. And a pound of Bullseye will go a long with this load (1627 cartridges, to be precise). I also tried my preferred .38 Special target load in both revolvers (2.7 grains of Bullseye and a 148-grain Gardner powder coated double ended wadcutter bullet loaded in .38 Special brass). The Python did well with these; the Blackhawk did not. In general, the Ruger didn’t do nearly as well with lighter loads.
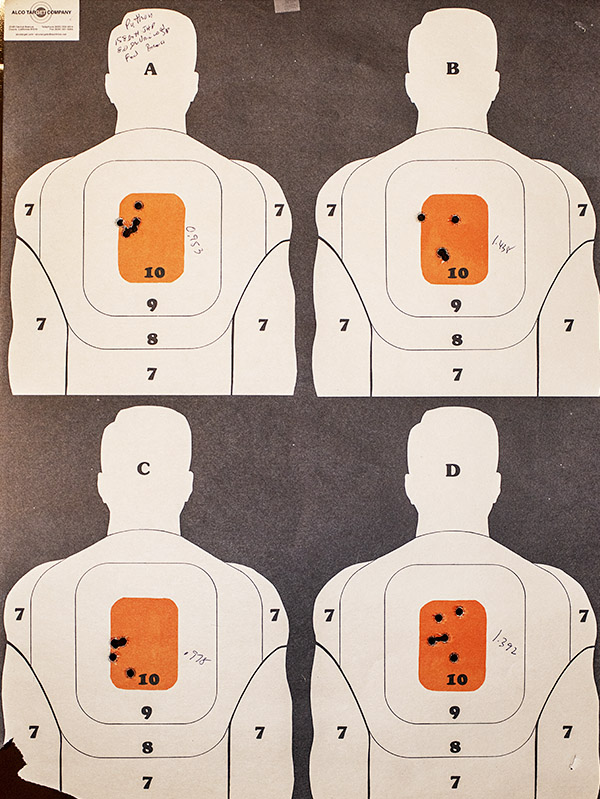
The Colt Python with 148-grain .38 Special target loads. Recoil was minimal; accuracy was good with this load in the Python but not the Blackhawk.
Overall, it’s hard to say one revolver is more accurate than the other. The table above shows amazing consistency for both guns. I averaged all the averages for each revolver, and from that statistic, one could conclude that the Python holds an accuracy edge. But you know what they say about statistics. From an accuracy perspective, both manufacturers (Colt and Ruger) got it right.
Extraction
The Python was flawless. The Ruger had extraction issues with the 110 grain bullet and a near-maximum load of Unique. Well, issues isn’t exactly the right word. Cases fired with those loads wouldn’t extract. I had to remove the cylinder and tap the cases out with a rod. All the other loads tested in the Ruger extracted normally.
The Python extracted the same load that gave the Ruger fits with no issues, and owing to the nature of a double action revolver’s extraction mechanism, it had to push out all the cases at the same time. The inside of the Python chambers have a mirror finish. The Ruger chambers do not.
With regard to extraction, the Python is the better revolver.
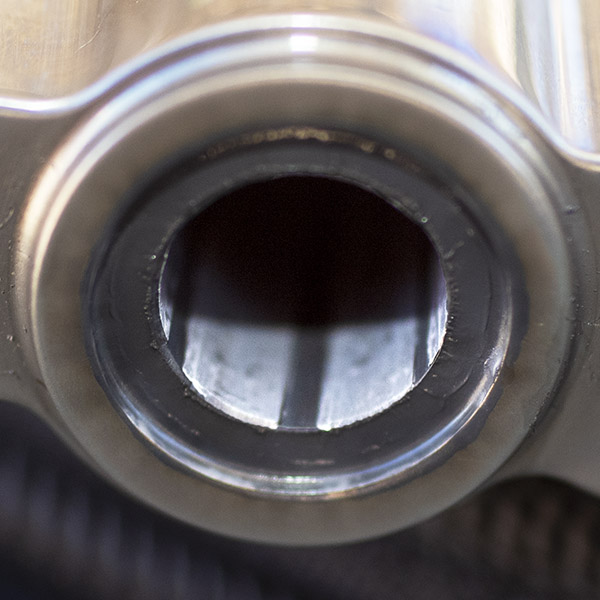
Leading
Neither revolver had an advantage over the other with regard to leading. When cast bullet velocities were high, both guns leaded the bore. If I loaded to get velocities below 1000 feet per second, neither revolver leaded the bore. But (and it’s an important but), the Python is more accurate than the Ruger with lower velocity cast bullet reloads.
The Python’s bore after firing 20 rounds of cast bullets with 7.0 grains of Unique.
As I mentioned in an earlier blog, my old standard .357 Magnum load turned out to not be such a good load. It leaded the bore of the Python and the Ruger significantly after 10 rounds. The first five shot group grouped well; each succeeding group grew larger. Interestingly, that group averaged exactly the same (1.555 inches) for both the Python and the Blackhawk.
When I was finished with the Python accuracy testing, I know I’d have to scrub the lead out of the barrel with a bronze bore brush. From time to time, people ask if they can just shoot jacketed bullets when the bore leads up to “push the lead out.” I knew the answer to that question is a solid no, but I fired a few jacketed bullets through the heavily-leaded Python bore to make the point.
Fire jacketed bullets through a leaded bore and you get copper fouling on top of bore leading. It still needs to be bore brushed. The copper bullets do not push the lead out.Both revolvers performed similarly with the 7.0-grains of Unique and the 158 grain cast flat point bullet. The first group was good, then as the bore leaded the groups progressively grew. This target is with the Python; the Ruger target looks the same (both revolvers averaged exactly 1.555 inches overall with this load).
Ammo Sensitivity
I’ve already mentioned issues associated with extraction, and how the Python did better than the Ruger Blackhawk.
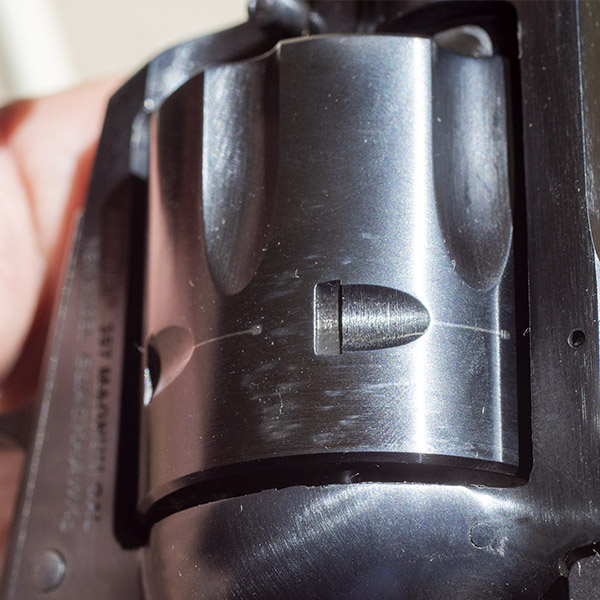
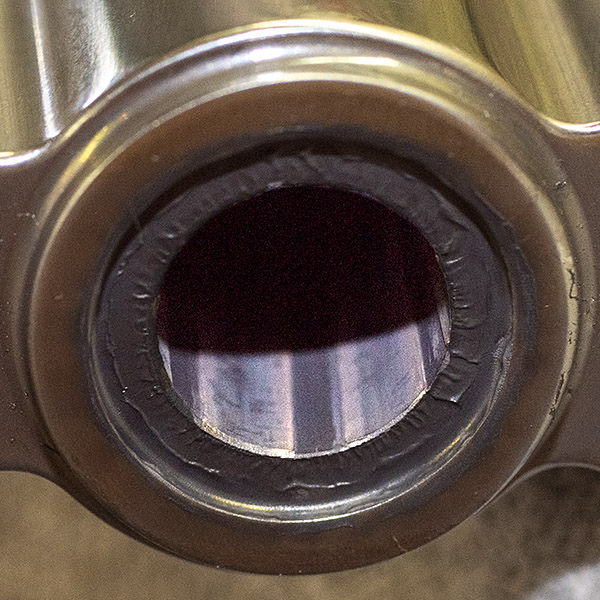
There’s another potential issue, and that’s bullet pull under recoil. The Ruger has a longer cylinder than the Python, and if bullet pull occurs, the Ruger is less susceptible to it preventing cylinder rotation.
You can see that the Blackhawk’s cylinder is longer than the Python’s.
The Ruger has a 1.640-inch long cylinder. The Python has a 1.553-inch long cylinder. The Ruger gives you another 0.087 inches of cylinder length to play with, which would probably allow any recoil-induced bullet pull to go unnoticed (unless the cartridges had no crimp at all, the bullets most likely wouldn’t back out far enough in six rounds to affect cylinder rotation). In this regard, the Blackhawk will be more forgiving than the Python. Did Colt make the Python cylinder too short? Nope, they did not. They made it as long as it needs to be with adequately-crimped .357 Magnum ammo meeting the max cartridge overall length spec. The reason for that is accuracy. Keeping the distance the bullet has to jump to the rifling as low as it can be enhances accuracy. Colt got it right, in my opinion. I like the idea that cylinder length is minimized.
Conclusions
The bottom line to me is that you won’t be making a mistake by purchasing either handgun. I’d think twice about ordering the Blackhawk through one of the online sites; the better approach would be to purchase the gun at a store where you can see it first. On the Colt, you may not be satisfied with the single action trigger pull as delivered from the factory (I wasn’t, but it was recoverable with a trigger job).
From an accuracy perspective, it’s a draw; both guns are very accurate.
You might be wondering which of the two I prefer, and I don’t have an answer for you. I enjoy reloading for and shooting both.
Subscribe to the ExNotes blog for free!
Help us out, folks! We depend on our popup ads to keep us in components and chain lube. Please click on the popup ads!
Berk and I were discussing the challenges of taking on additional writers here at ExhaustNotes. We print new stories about every two days and while we appreciate our loyal readers it wouldn’t hurt to drag a bunch more subscribers into the fold. We’d like ExhaustNotes’ popularity to reflect the quality of the content and to increase ad revenue to match our prodigious output. Plus, younger, less jaded motorcyclists who actually like all the electronic junk manufacturers strap onto motorcycles would be kind of cool.
So we’ve decided to try a thing: Berk says the best way to increase Internet hits and ad revenue is to publish interesting stories from insightful and entertaining writers on a regular basis. To do that, ExhaustNotes will need more than just two guys typing in their spare time. We may need three. Or four. Or more.
I don’t know about you but I’m ready for some fresh new perspectives on motorcycling and with Berk pushing 72 and me pushing a crusty 65 we tend to give fresh new perspectives a bit of the old stinkeye. You’ll notice we type a lot of dream bike segments and none of them are modern bikes. Do not stand on our lawns.
Perspectives don’t have to be young to be fresh, just different. Let’s hear how you love the way your motorcycle makes all the power and braking decisions for the rider. Hey, you still get to steer… for now. Tell us about the biker lifestyle and how it differs from the cosplay actors at comic-com. Exactly how do you use a 200 horsepower, full-race motorcycle on the street and stay alive? Tell us in an interesting way and you’ll get paid for doing it!
How much will you make?
Glad you asked: ExhaustNotes uses a simple formula to calculate how much we earn. We take the total site income from advertisers and Google ads and subtract the expense of running the site. That gives us a pool of money to pay the writers. You won’t get paid by the word. For example, if revenue after expenses is $100 and we publish 100 stories then each story is worth $1. Now, say Berk writes 70 stories and I write 30 stories then Berk makes $70 and I make $30. This is the part where you new writers will come in: If we publish 5 stories from you then the split will reflect your contribution. Berk divvies the money up twice a year, assuming there’s revenue.
On the surface this seems self-defeating, since you’ll be making the same amount per story as me and Berk then we must be losing money. Maybe not. The idea is to increase revenue, build the reader base and create a bigger pie. If it works we’ll all get filthy rich and go live with the prostitutes. Okay, maybe I can’t go live with the prostitutes but one of you guys might be able to.
We understand the unfairness of a 3000-word story earning the same as a 700-word story but life is full of unfair situations. Writing for ExhaustNotes is just one more. Try to picture this whole ExhaustNotes website thing as a grand experiment that we are opening up to a wider pool of participants. Who knows what will happen?
If you’ve already been a guest columnist for ExhaustNotes you won’t get any money from your past stories. That ship has sailed. This new deal is going forward from today. Mike Huber’s Romanian travel story is the very first one of our new system.
A few other things you should know: Berk is going to be the editor-in-chief and his word is final, meaning submitting is not the same as getting published. Punctuation and grammar matter. If Berk has to re-write your story to make it intelligible he probably won’t use it. ExhaustNotes only pays if we publish your story and we pay poorly at that. You retain all rights to your work and can do whatever you want with it. Remember: You are not going to make a ton of money doing this. If you feel our accounting methods are not strenuous enough don’t submit a story.
Having the proper mindset is critical. Berk and I write ExhaustNotes for the fun of it. If you factor in our time, we lose money doing it and I see no good reason why you shouldn’t lose money writing for us, too. Any beer money that happens to come our way is gravy that we use to buy mini bikes and reloading components. Topics are mostly motorcycle related with guns and construction materials thrown in, but any topic that is interesting will be considered. Everyone has to start somewhere; I started my writing career with a simple letter to the editor of The Key West Citizen. Let’s see what starts your writing career.
If you have a story you’d like to propose on motorcycles, guns, Baja, reloading, great rides, great roads, or any other topic you think would be of interest to our readers, email us with your story idea at info@exhaustnotes.us.
Never miss an ExNotes blog:
Help us help you: Please click on those pop-up ads!
Good buddy and fellow U.S. Army former paratrooper Mike Huber, whom I met a few years ago on one of the Baja rides, is joining the ExNotes team as a regular contributor.
You’ll be seeing more of Mike’s work here on the ExNotes blog. Mike, over to you and welcome aboard!
Joe
Throughout my adult life (although, many will argue I have yet to reach mature adulthood) one of my greatest passions is motorcycling. Like many of you, I seek out the most beautiful and exciting roads to experience on two wheels. Whenever possible I try to achieve this on a global level and not limit this quest to just my state, or even my country. This isn’t always the easiest objective to reach. Many roads that are the pinnacle of any rider’s dreams are usually quite far off the beaten path. This can seem like a deterrent to many, but my mindset is to use the distance to reach these places only adds more depth to the adventure and in doing so adds not only miles, but new friends and stories to each road.
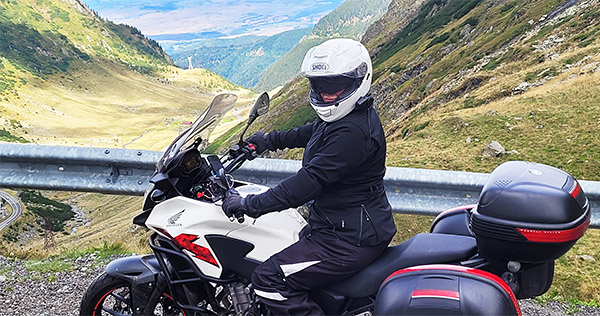
Transfagarasan Highway
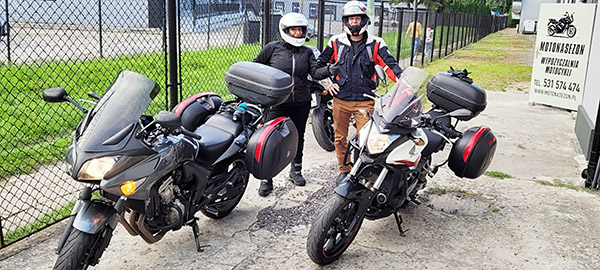
If you perform a Google search on “best motorcycle roads on Earth” or any similar phrase, what will appear before you in the top images will be a photo of the Transfagarasan Highway. This mind-blowing highway is nestled deep in the Transylvania Mountains of Romania, and for us it was a four-day ride from Krakow, Poland. This is where my girlfriend Bobbie and I rented our Honda motorcycles (she had a CBX500 and I had the CB600F).
We began the day waking up in a yurt at an amazing moto camp in Sibiu, Romania that is hosted by Doru Dobrota. Doru has been running this camp out of his family’s old mountain cabin for years and over that time has meticulously grown the camp to a perfect launching point to the many beautifully challenging roads of Romania. Once we finished breakfast, confirmed the weather would cooperate with us, performed routine maintenance checks on the bikes, and a had chat with some other riders staying at the camp, we were ready to set out for one of the greatest days possible on a motorcycle.
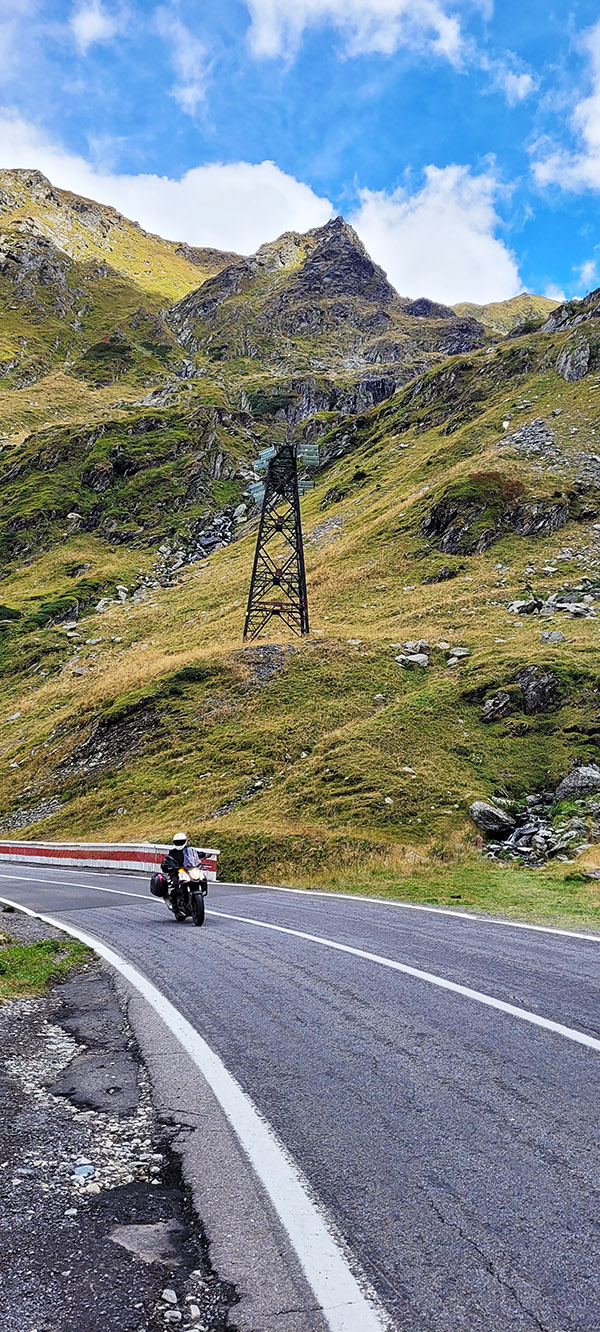
It was a two-hour ride through some remote Romanian villages that we had to remain alert for deer, cattle, horses, and the usual obstacles to dodge around as we traveled from Sibiu to the base of the mountain pass where the roads started really becoming fun. Once the switchbacks began in the lower parts of the pine forests, we quickly twisted the throttle and leaned into the perfectly paved corners as we begin to ascend the highway to where you eventually are at the bottom of what would be like in skiing terms a giant bowl. Looking up I am instantly in awe of what looks like a gigantic matchbox car racetrack thrown recklessly together by a 6-year-old.
After regaining our emotions of what lies before us, we jump on the Hondas and hit the throttles hard. The road has nonstop switchbacks but since its so open it allows you the ability to constantly overtake any vehicle in front of you easily. This enables us to really lean in deep to each corner pushing the red line of these little Hondas, as well as challenging our own riding abilities. We continue to traverse the switchbacks for what seemed like forever and just as we summit the pass, we stop for a quick breather at a waterfall to absorb what we have just completed and imagine what was ahead of us.
We now begin our decent down the south side of the pass. The southern side is less dramatic but nonetheless has spectacular views for miles until we are well below the tree line and back into another tight pine forest with switchbacks. This seemed less dramatic until out of the corner of my left eye I spotted something crawling onto the road. At this point the road has some sand on it, so we were only traveling at about 25 miles per hour. My first thought was a deer, but when I was able to decipher what it was, I had to stop and shake my head. It was a grizzly bear eating a bagel. Now THAT is worth stopping for a photo of. As I am taking the picture, I hear a loud shout through my headset “Go! Go! Go!”
I looked in front of me and there were three more grizzlies. What was so concerning at this point was they consisted of a mother bear and two cubs, fully blocking the road. So, I have one next to me eating a bagel and three in front of me. I hang my head down and reply over the headset with my usual response to when I am in a bad situation “So this is how it ends…” We sat extremely still on the bikes for a few minutes until the bears dispersed in front of us, retreating into the thick pine forest.
As the sunlight retreated into the dense forests, we still were admiring the beauty of the road and what Romania had shined upon us this day. After a fresh fish dinner and the semi comfort of a hostel bed we were able to fully absorb and appreciate the experience for having ridden one of the greatest roads on Earth: The Tranfagarasan Highway.


 Once we left the dam, the sweeping corners continued with steeper gradients, angled such that we had to lean into them and keep our speed up while doing trig calcs on the fly to avoid falling. We continued gaining elevation when suddenly a bolt blew by me on the left, then another, and another. It was the Romanian Porsche Club; it seems they wrapped up their snacks at the same pace we had. As they roared past like orcas going for the kill (even on blind corners) I thought: “Hey, I still have Boston blood; I can be an apex predator, too!” We rode with them in formation as we roared past numerous cars on their Sunday drive.