This is our third and final blog on the Lee .44 Magnum Deluxe 4-die set. We posted an initial blog on the four dies and their components, and then a second blog on how to setup each die in the reloading press. This last blog on the .44 Magnum Deluxe 4-die set shows how my reloaded ammo performed and wraps up my thoughts on the Lee 4-die set’s advantages.
Keep us afloat: Click on those popup ads!
Here’s the bottom line: The Lee Deluxe 4-die set is easy to set up, it makes accurate ammo, and it positively prevents bullet pull under recoil. Lee’s locking, crimping, and decapping pin retention approaches are superior and the Lee dies cost less. It’s a better product at a lower price.
That said, let’s take a look at the specifics.
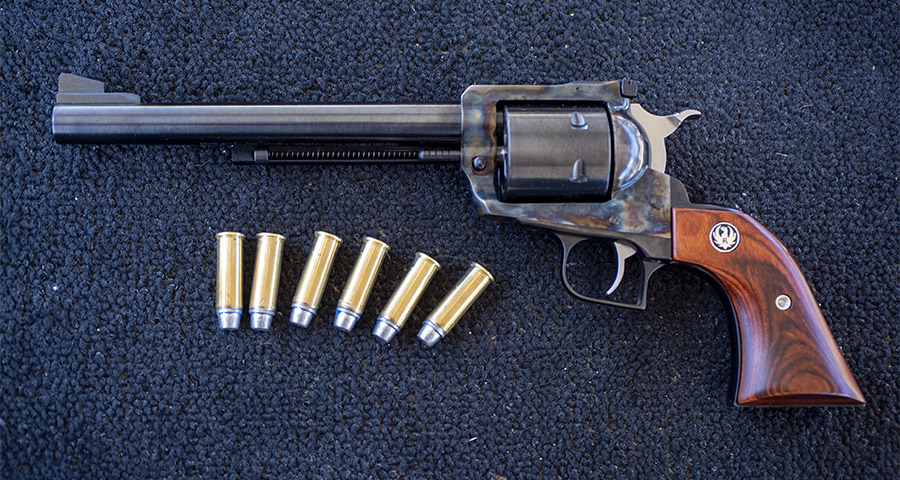
.44 Magnum ammo loaded with Lee’s Deluxe 4-die set. It’s good looking, consistent, and accurate ammo.
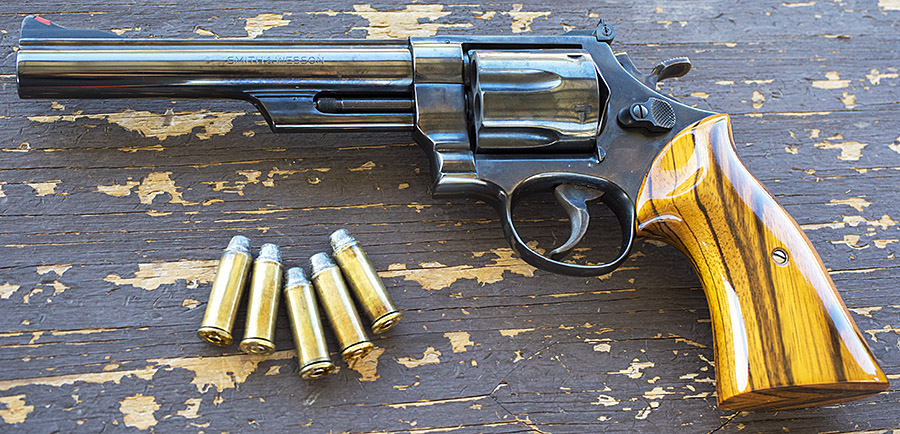
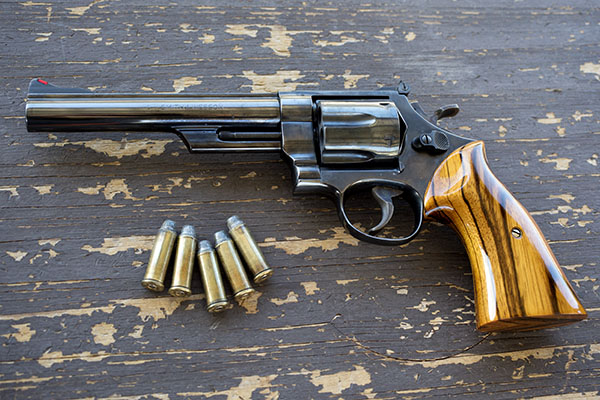
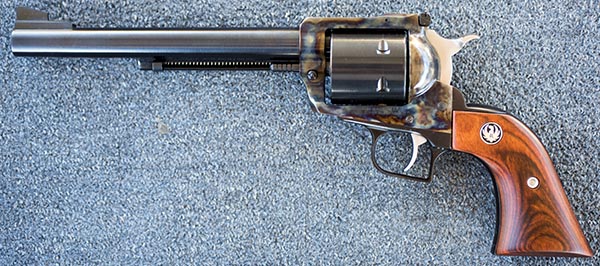
I used my Turnbull Ruger Super Blackhawk for this test series. It’s the gun you see in the big photo at the top of this blog. I fired 5-shot groups at 50 feet from a bench, using a two-hand hold and resting my hands on the bench. No other part of the revolver was supported and I did not use a machine rest. I held at 6:00 on the orange bullseye.
Superb Accuracy
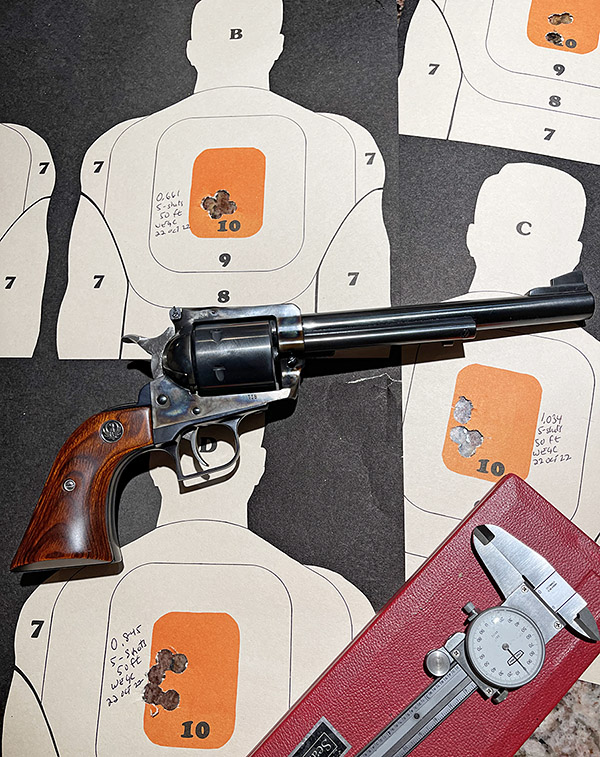
This, to me (and I imagine to most reloaders) is the most crucial aspect in evaluating any reloading equipment, and in my experience, Lee’s Deluxe 4-die set provides superior accuracy. I was more than pleased with the results. The targets below speak for themselves. My preferred .44 Magnum load of 6.0 grains of Bullseye with a 240-grain cast semiwadcutter bullet, reloaded with Lee’s Deluxed 4-dies set worked well. It was accurate, and barrel leading and recoil were minimal. I know you can load hotter .44 Magnum loads. Read that sentence again, and put the accent on you. A 240-grain projectile at just under 1000 feet per second (which is what my load provides) works fine for me.
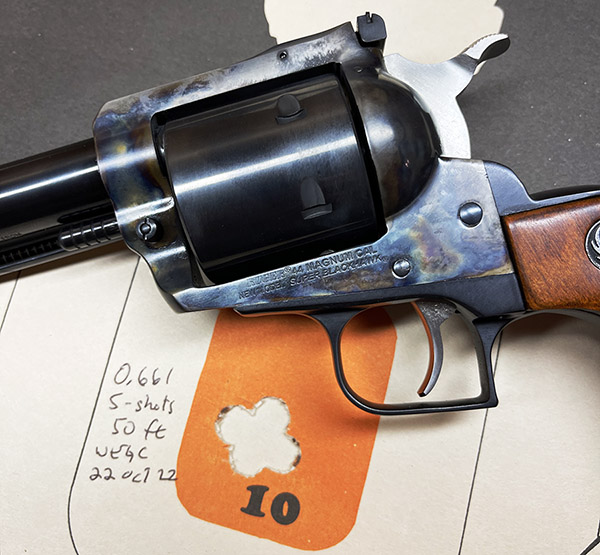
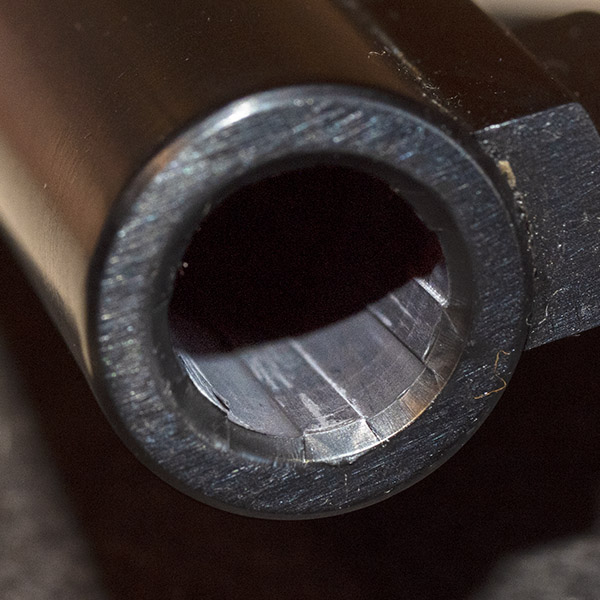
A one-hole, 5-shot group brought to you by Lee’s Deluxe 4-die set.Typical .44 Magnum groups at 50 feet with ammo loaded on Lee’s Deluxe 4-die set.Modest barrel leading after 50 rounds of .44 Magnum ammo with cast bullets.
Groups that tore one ragged hole were typical. That speaks highly of the Lee die set’s ability to produce consistent ammo.
Consistent Crimping
The Lee factory crimp die is just a better approach than any other die maker’s. It gives a better crimp, it assures cartridge chambering, and I believe it maintains better bullet alignment in the case. Yeah, you can crimp in a separate step with the bullet seating die, but then you wouldn’t have the carbide straightening and alignment features you get in the Lee factory crimp die. It’s a better approach that better aligns the bullet in the case and guarantees reliable chambering.
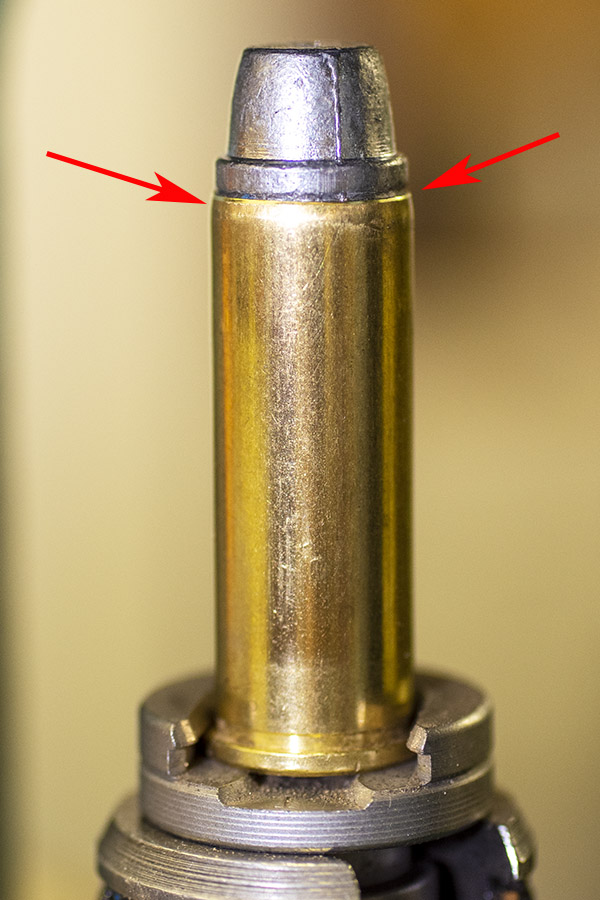
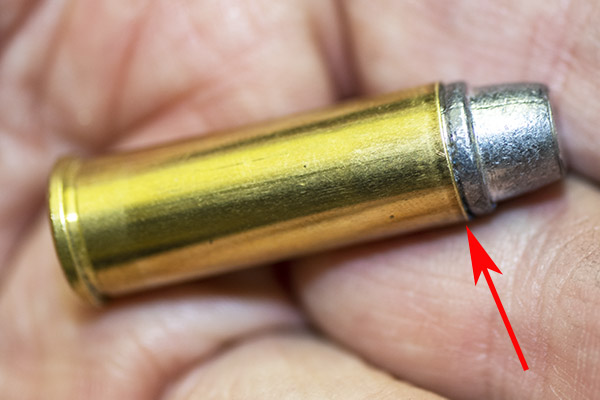
A beautiful and consistent crimp.
Simply put, with the Lee factory crimp die there is no bullet movement under recoil. None of the cartridges in this test series experienced bullet pull under recoil. The Lee crimp die does a great job in locking the bullets in place. In similar testing using a Lee Deluxe 4-die set in .357 Magnum, I found that regular crimping (i.e., not using the Lee factory crimp die) allowed bullet pull, but crimping with the Lee factory crimp die did not. This .44 Magnum reloaded ammo performed similarly.
Easy Die Adjustability
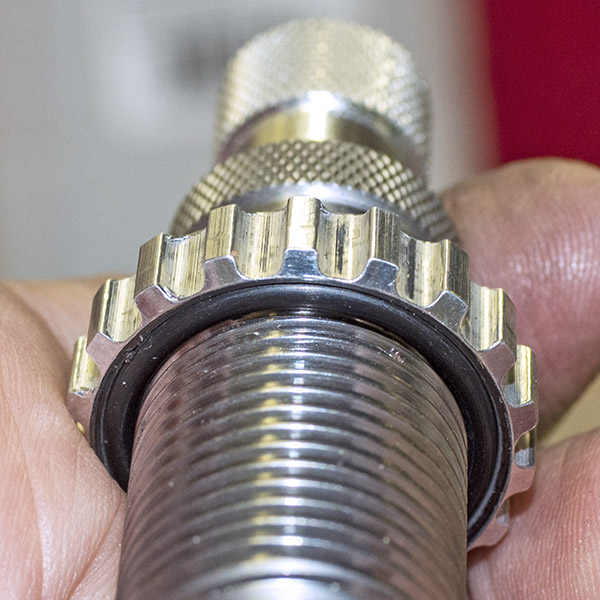
The Lee dies are easy to adjust and they stay in adjustment. I like Lee’s incorporation of orings for holding the locknut in place and for locking the die position in the press.
Lee uses orings extensively for lockrings and other adjustments. The approach works.
When I first encountered Lee’s oring approach 40+ years ago, I thought it was a bit sketchy, but I’ve come around. I believe this is better than using a standard locknut, even when the locknut uses a set screw to lock it in place on the die body. The Lee approach is easier to use. You can remove the die and preserve the adjustment without damaging the die body threads. I’ve never had a Lee die go out of adjustment, and to my surprise, none of the orings on any of my Lee dies ever deteriorated or otherwise failed (and some of my Lee dies are more than 30 years old). Even if an oring did fail, based on my prior experience with Lee Precision I’m pretty sure if I (or you) called Lee, they’d ship a replacement for free.
Free Shellholder
As mentioned previously in one of the blogs in this series, I like the fact that a Lee die set includes the shell holder.
Lee provides a free shellholder with their dies. It’s the right thing to do.
With most (maybe all) other die manufacturers, you have to buy the shellholder separately. That’s an inconvenience and an added expense. I like Lee’s approach better.
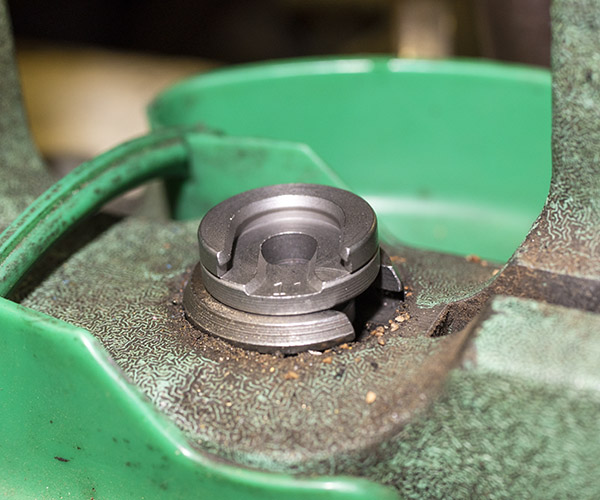
Better Decapping Pin Retention
I like Lee’s approach for securing the sizing die decapping pin better than the approach used by the other guys.
The Lee decapping pin retention approach is a superior engineeirng design.
With other manufacturers’ dies, if something obstructs the decapping pin, it’s easy to bend or break the decapping pin. When that happens, a reloading session is over until a new pin is installed. With Lee’s approach, an obstruction just backs the decapping pin out of the locking collet, and if that occurs, it only takes a minute to fix.
Lower Cost
Lee dies are less expensive than other dies. Simply put, you get more bang for your buck with Lee dies.
The Bottom Line
As I said above, the .44 Magnum Lee Deluxe 4-die set is easy to set up, it makes accurate ammo, and it positively prevents bullet pull under recoil. Lee’s locking, crimping, and decapping pin retention approaches are superior and the Lee dies cost less. It’s a better product at a lower price.
This is the second blog in our series of three articles on the Lee Deluxe 4-die set. The first blog focused on the dies and their components; this blog focuses on how to set up the dies in a press.
1. Shellholder
As a first step, I inserted the shell holder (No. 11 in Lee’s numbering system) into the press ram. It’s a no brainer, but I wanted to mention that Lee includes the shellholder with their dies, which is a nice touch.
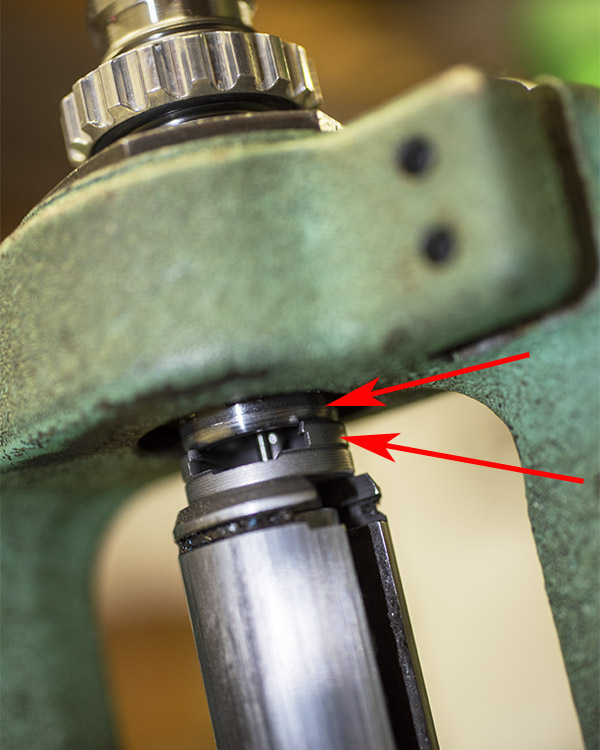
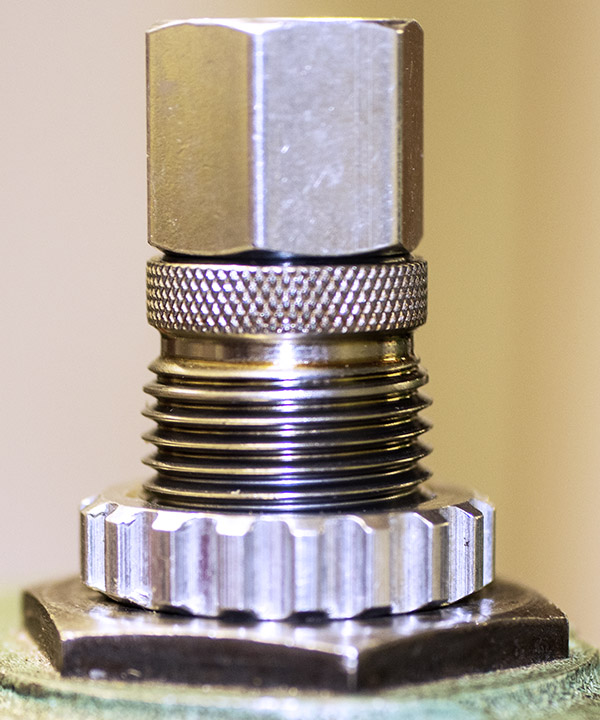
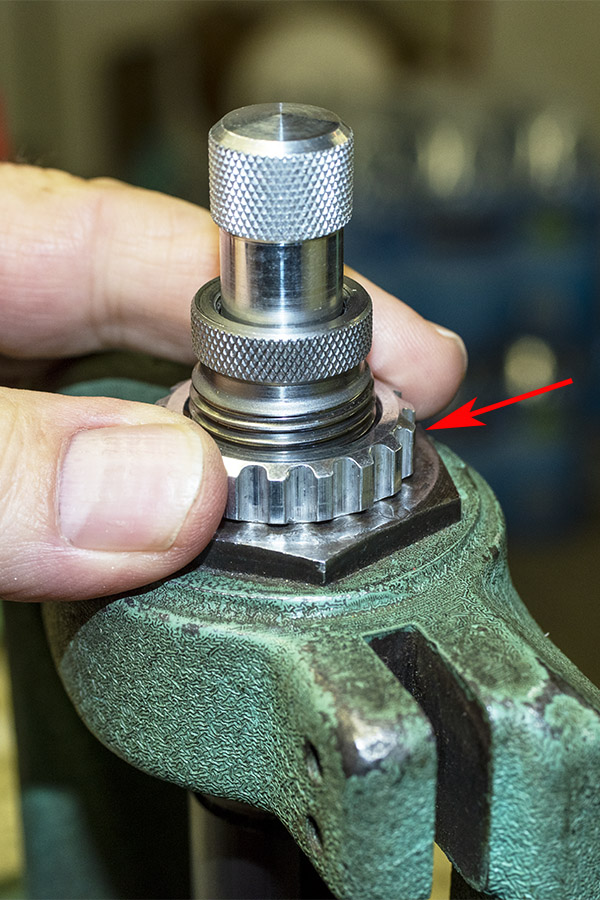
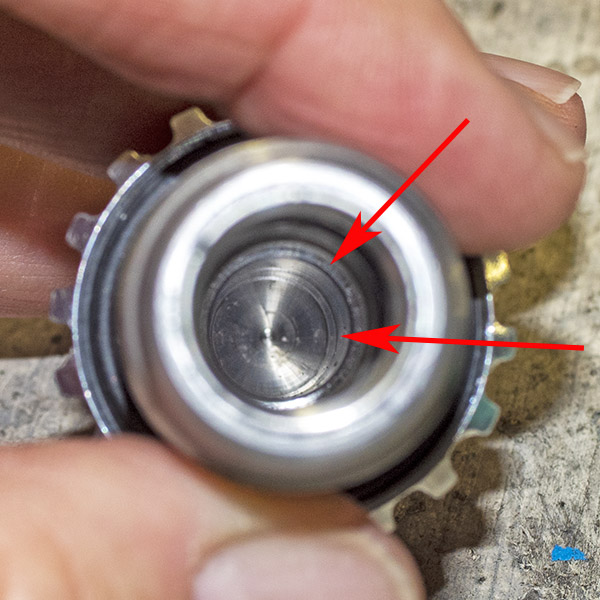
I then raised the reloading press ram, and threaded in the sizing die in until it made contact with the shell holder. After the bottom of the sizing die contacted the shell holder, I lowered the press a bit, turned the die into the press a bit more, and tested it by raising the ram again. I wanted to feel just a bit of pushback on the ram.
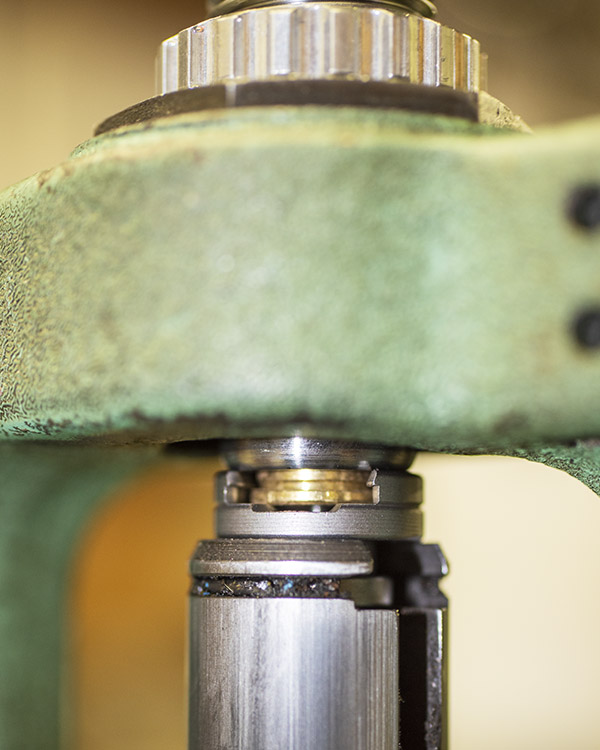
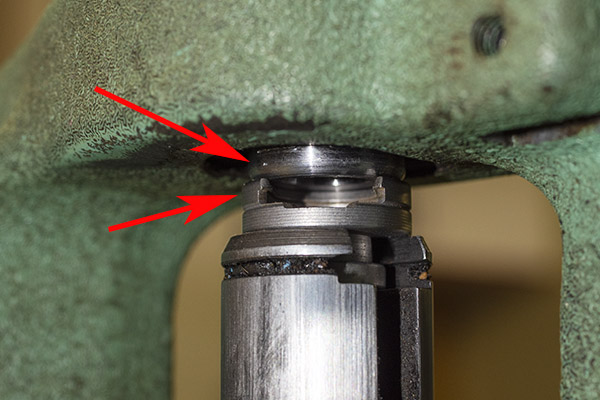
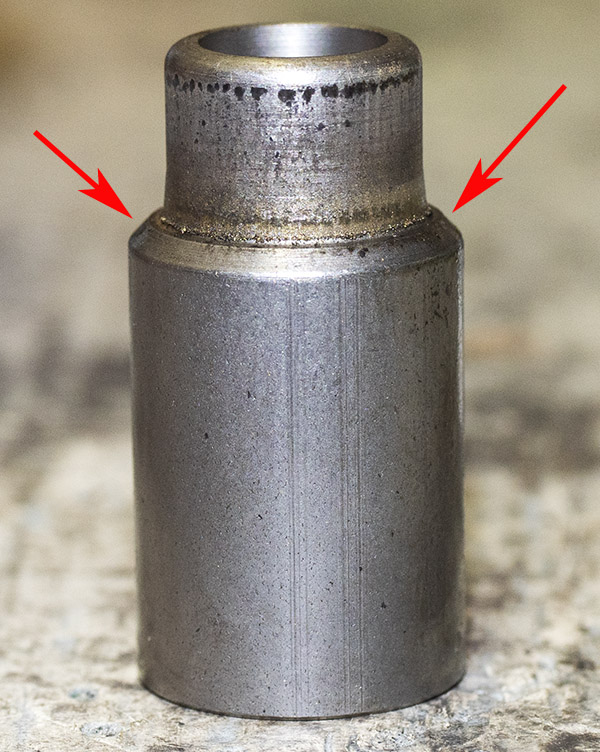
The shellholder (lower arrow) in intimate contact with thre sizing die (upper arrow).
Once I felt resistance in the ram lever with the ram fully raised, I screwed the sizing die’s locking ring all the way down to the press head.
Screwing down the sizing die locking ring.
Once that adjustment was made, I don’t have to adjust the sizing die again for future reloading sessions. I can unscrew it by grabbing the locking ring and unscrewing it from the press head. The locking ring’s oring prevents the locking ring from inadvertently moving on the die body. All I need to do is screw the sizing die into the press.
The sizing die locking ring screwed all the way down to the press head.
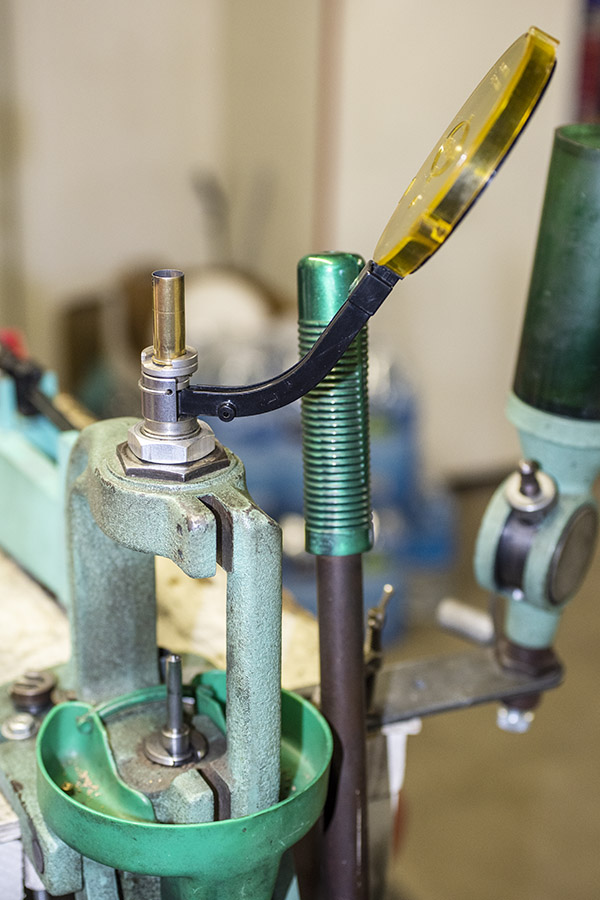
At this point, I proceeded to size 50 cases. I inserted each into the shell holder and raised the ram fully. This both knocked out the old primer and resized each case.
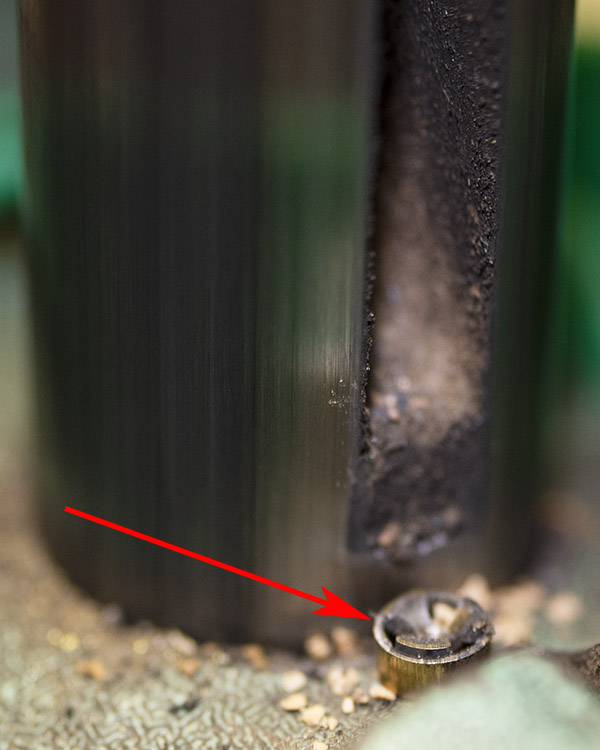
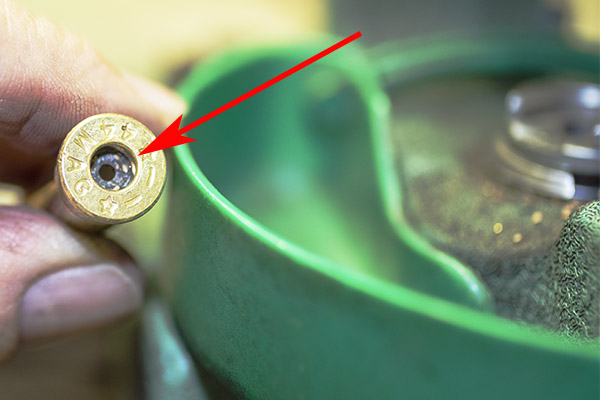
Sizing .44 Magnum cases and punching out the spent primers.An ejected, spent primer..44 Magnum case with primer removed.
3. Expanding
After completing the resizing operation, I unscrewed the sizing die from the press and partially screwed in the expander die (just a couple of turns at this point). I placed a resized cartridge case in the shell holder and raised the ram fully.
I then continued to screw in the expander die until I felt the cartridge case touching the expander die. I then lowered the ram slightly and screwed the expander die a little further into the press, raising the ram and then lowering it again. I repeated this in minor increments to get the desired amount of flare on the case mouth. I knew I only needed a little bit, just enough to allow a bullet to start in the case mouth. When I do this part of the expander die installation, I check for adequate case mouth flare by taking a bullet and checking to see if it can start in the case mouth.
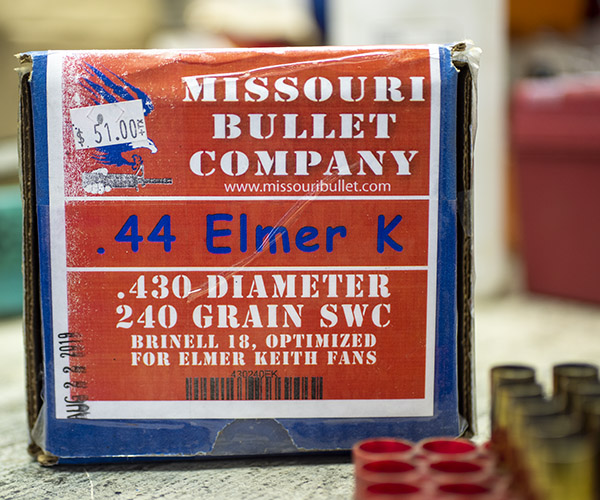
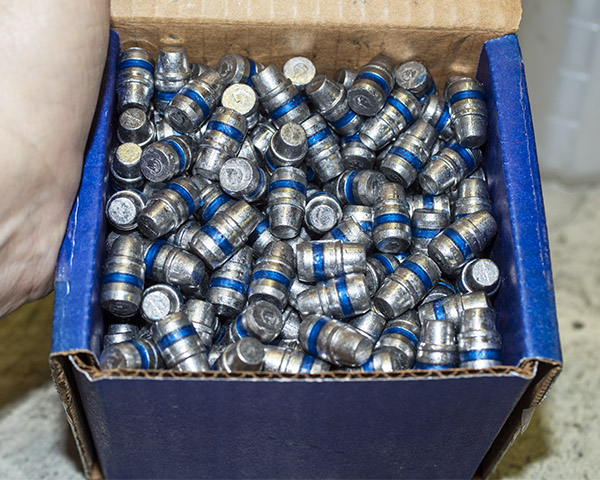
I used Missouri Bullet Company 240-grain cast bullets for these reloads.The 240-grain Missouri bullets.
I don’t put too much flare on the case mouth. All that’s necessary is enough to allow the bullet to start into the case mouth.
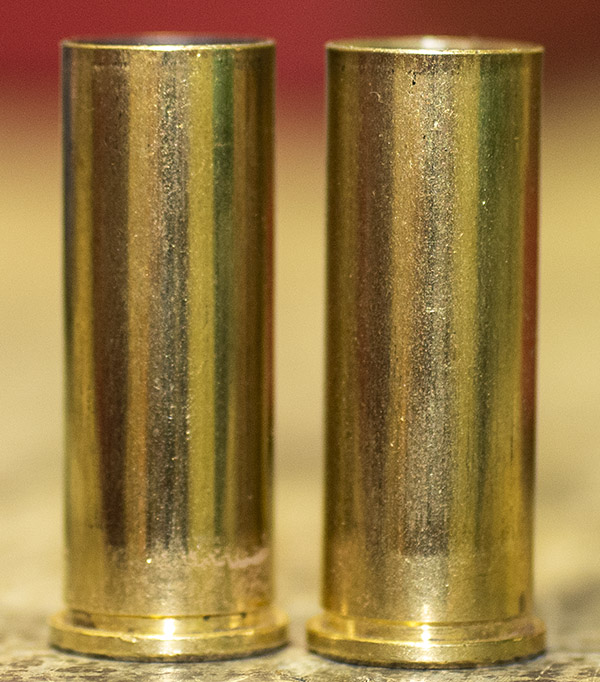
The case on the left has not had the case mount expanded; the case on the right has had the case mouth expanded. Only a small flare is necessary.
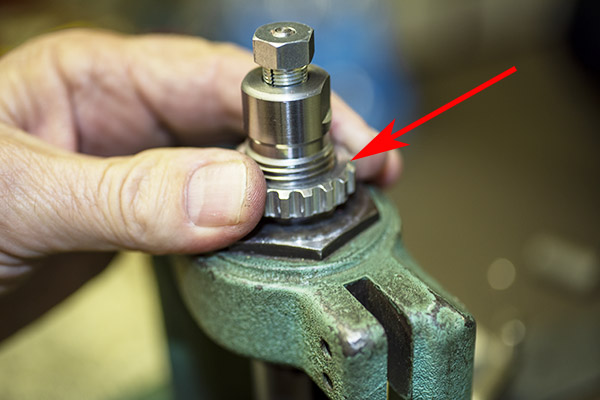
Once the bullet could start to enter the case mouth, I knew I had enough flare. At that point, I raised the ram with the case in the shellholder. The case is now in intimate contact with the expander, preventing any expander die rotation. I then threaded the locking ring all the way down on the expander die, locking it in place in the press.
Screwing down the locking ring after the expander die has been adjusted.The expander die lock ring locked in position.
Once I had locked the expander die in place, I proceeded to run all 50 cartridge cases through it.
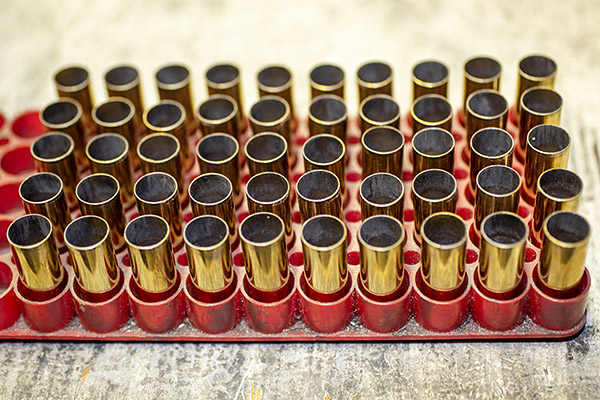
50 Starline cases that have been run through the expander die. I usually reload handgun cases in multiples of 50.
After completing that operation, I grabbed the expander die by its locking collar and unscrewed it. It, too (like the sizing die) now had the locking ring in the right place, and it would not require adjustment for future reloading sessions (for .44 Magnum ammo; if I wanted to load .44 Special ammo, the shorter .44 Special cases would require making the adjustment described above again).
4. Priming
At this point, I seated primers in all 50 cases. I use an older Lee priming tool that is no longer available from Lee. My Lee priming tool is close to 50 years old, which says a lot about the quality and durability of Lee reloading equipment. I’m not going to spend too much time today talking about seating the primers, as this blog is focused on the Lee Deluxe 4-die set. I may do a future blog on the latest Lee priming equipment.
My old Lee priming tool. It still does a great job.
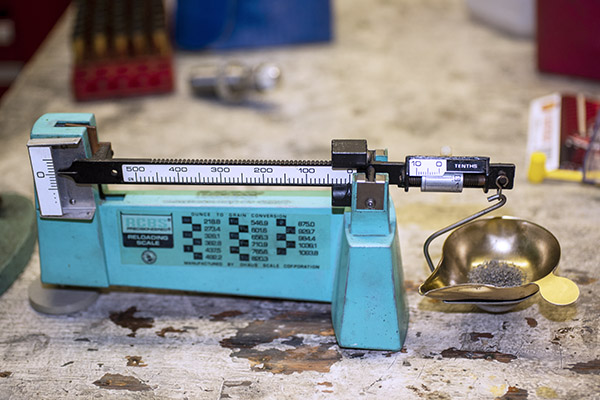
5. Charging
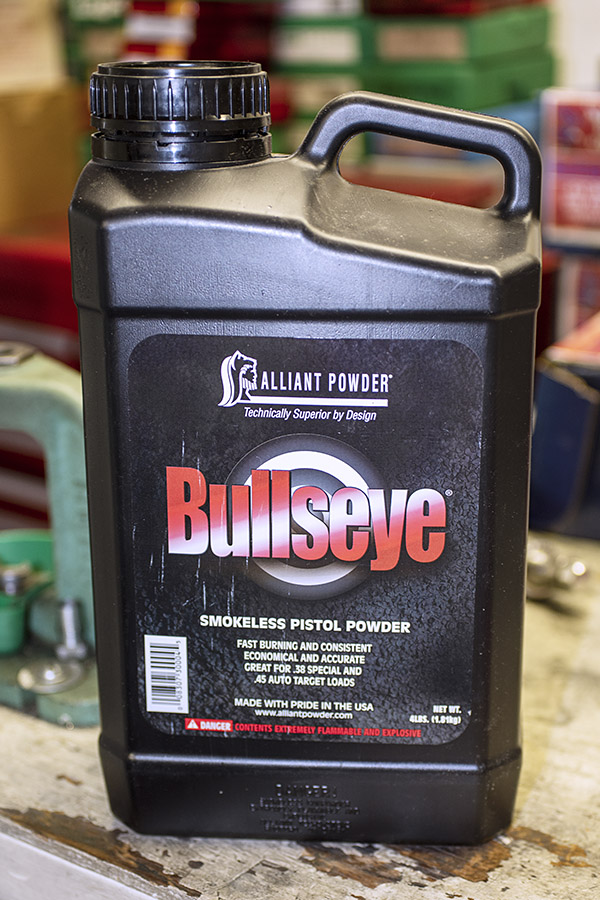
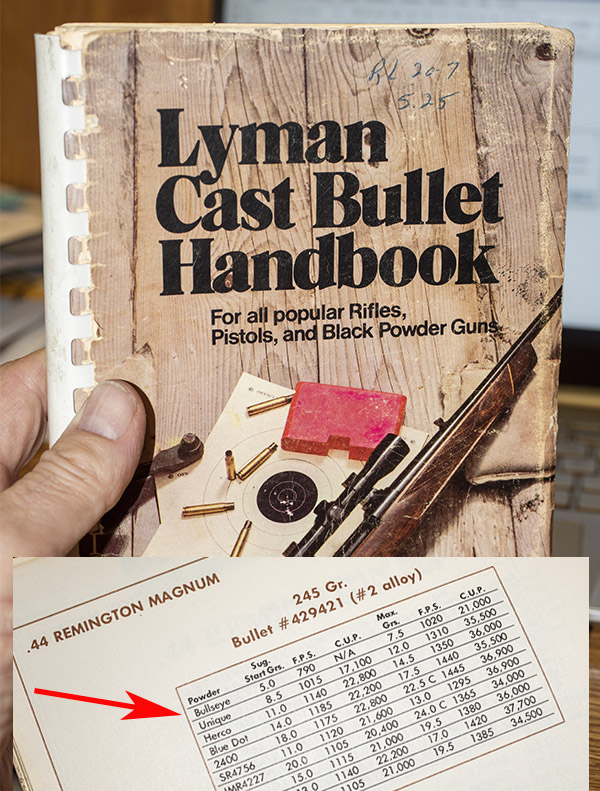
After priming, I charged the cases with propellant. My load is 6.0 grains of Bullseye powder with a 240-grain Missouri Bullet Company semiwadcutter bullet. You won’t find that load in modern reloading manuals. I have a library of old reloading manuals; this one is from an earlier Lyman cast bullet handbook.
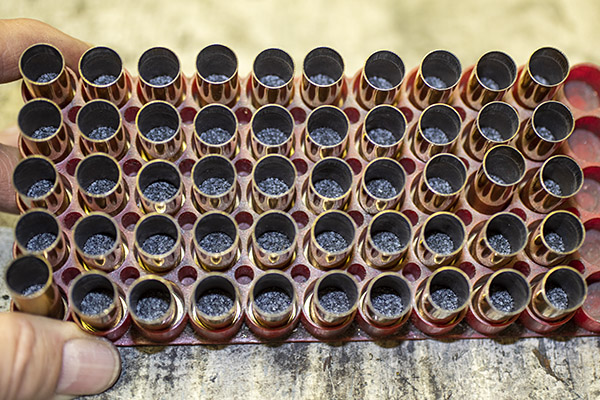
An oldie but still a goodie. I use Bullseye powder for several different handgun loads.An older Lyman Cast Bullet Handbook with a great load for the .44 Magnum.6.0 grains of Bullseye with a 240-grain cast bullet works well in the .44 Magnum.50 Starline cases primed and charged with Bullseye propellant.
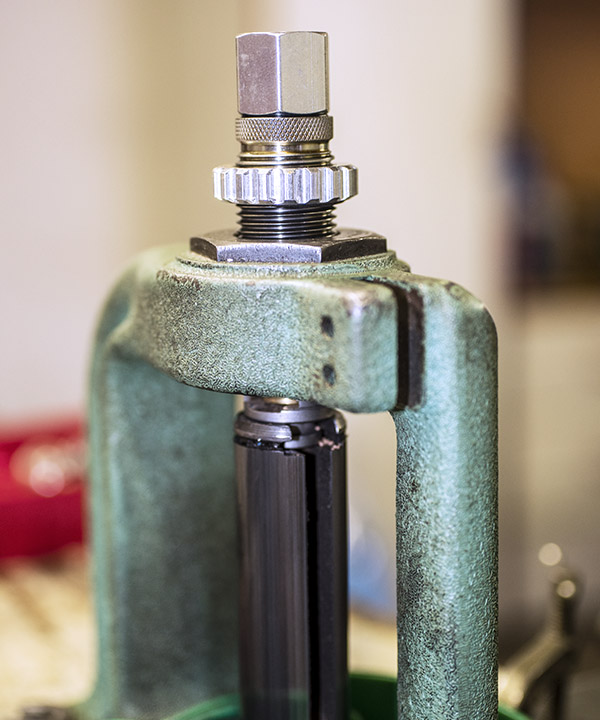
6. Bullet Seating
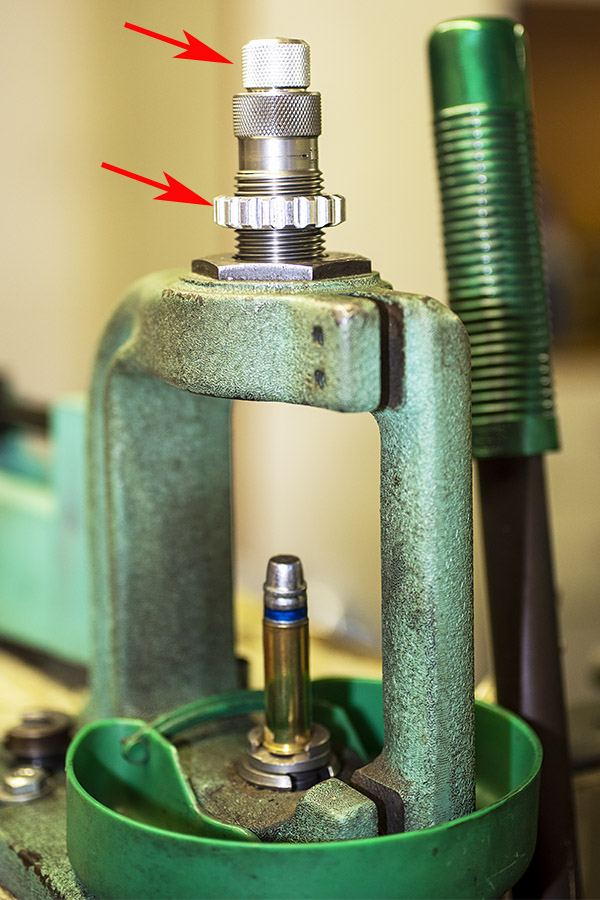
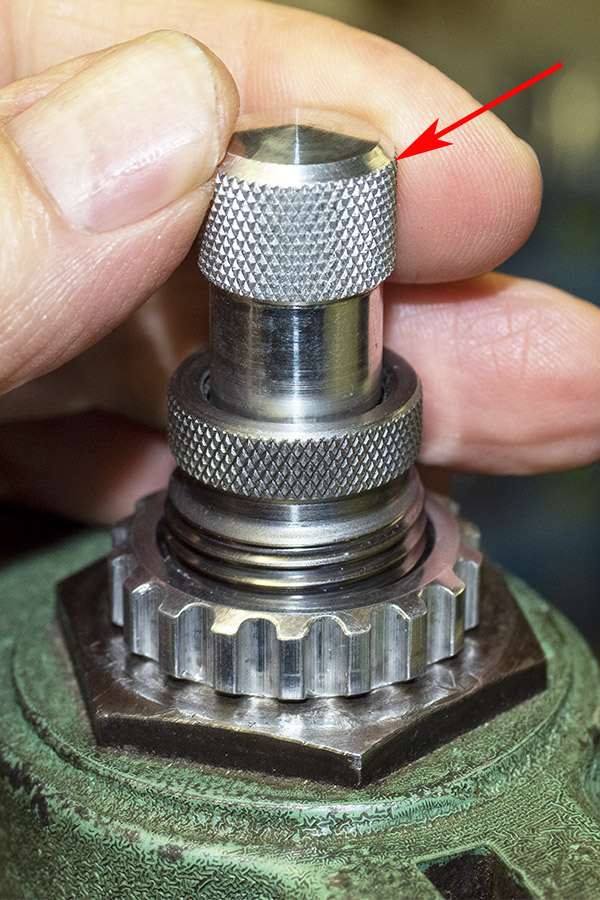
I next seated the bullets using the bullet seating die. The bullet seating die can also be used to crimp the bullet in place, but I don’t crimp with this die. To prevent the bullet seating die’s internal crimping ring from crimping the bullet, I screwed the bullet seater nearly all the way into the bullet seating die (I wanted the bullet seater to reach the bullet before the die’s crimping feature reaches the case mouth). I then adjusted the bullet seating depth by screwing the die body deeper into the press.
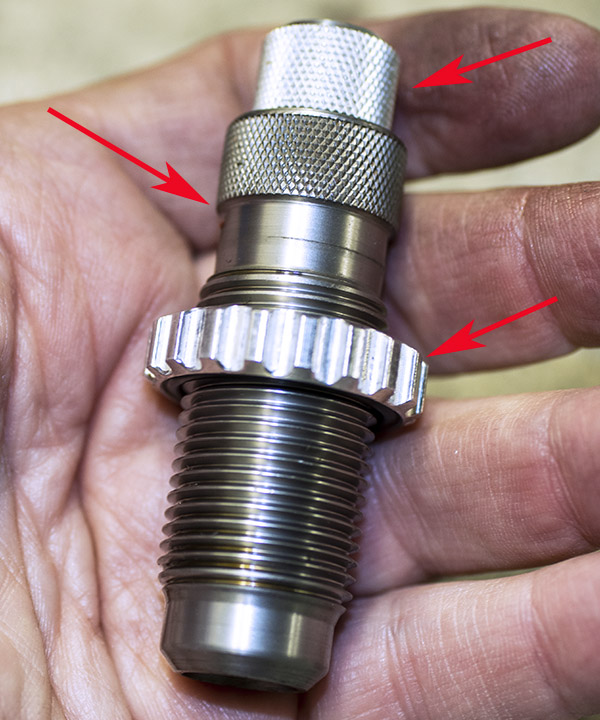
A .44 Magnum cartridge about to have its bullet seated to the correct depth. The upper arrow points to the bullet seater adjustment; the lower arrow points to the locking ring.
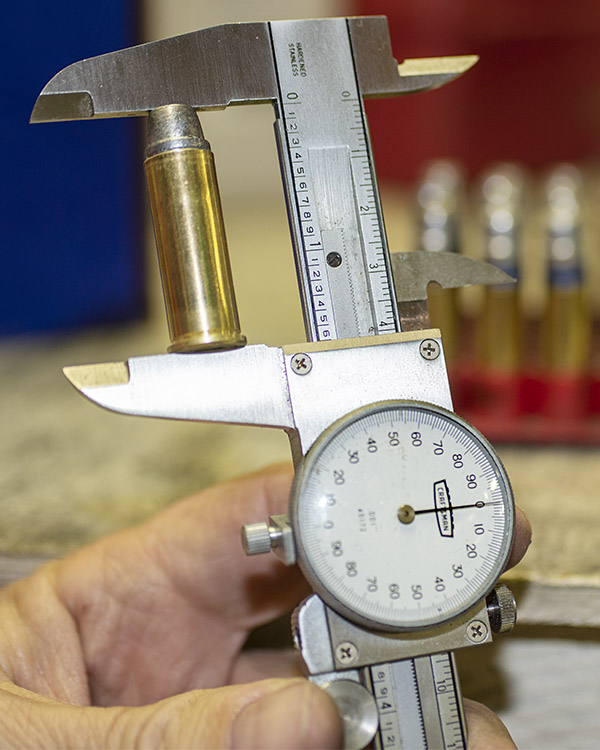
I adjusted the die deeper into the press until the bullet was seated to its crimping groove. This resulted in an overall cartridge length of 1.600 inches.
Having a good calipers helps reloading enormously.The 240-grain bullet seated at an overall cartridge length of 1.600 inches, but not yet crimped in place.
After I had achieved the desired bullet seating depth, with the ram raised and a cartridge with a seated bullet in the shell holder, I screwed down the die’s lock ring to lock the die in place. I then seated the bullets in all 50 cartridges.
7. Crimping
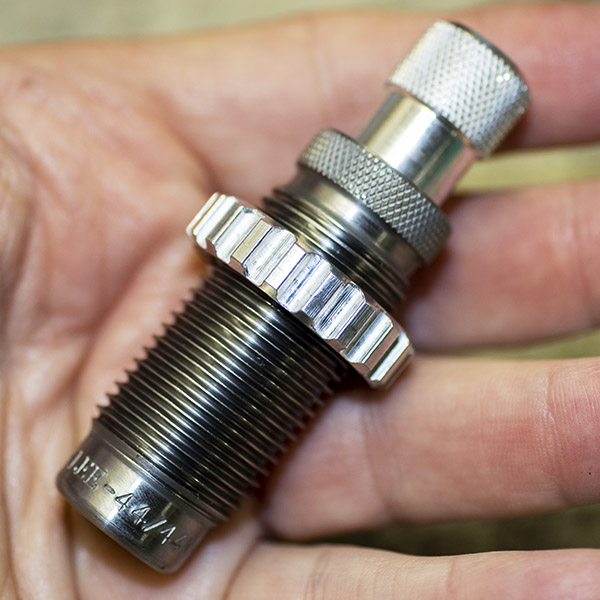
The last die is the crimping die. Here’s what it looks like.
The Lee Factory Crimp Die. This is a stellar bit of reloading equipment.
To install and adjust the crimping die, I raised the ram without a cartridge in the shellholder. I then screwed the die fully into the press head until the bottom of the crimping die firmly contacted the shellholder. At that point, I backed the crimp adjuster nearly fully out (until I knew it would not contact the cartridge case). I needed to do this step without a cartridge in the press because if I tried to do it with a cartridge in the press, I might have overcrimped the bullet in the case before I had the crimp adjustment correct.
The shellholder in intimate contact with the bottom of the Lee factory crimp die.The factory crimp die locking ring, fully screwed down on the die body.
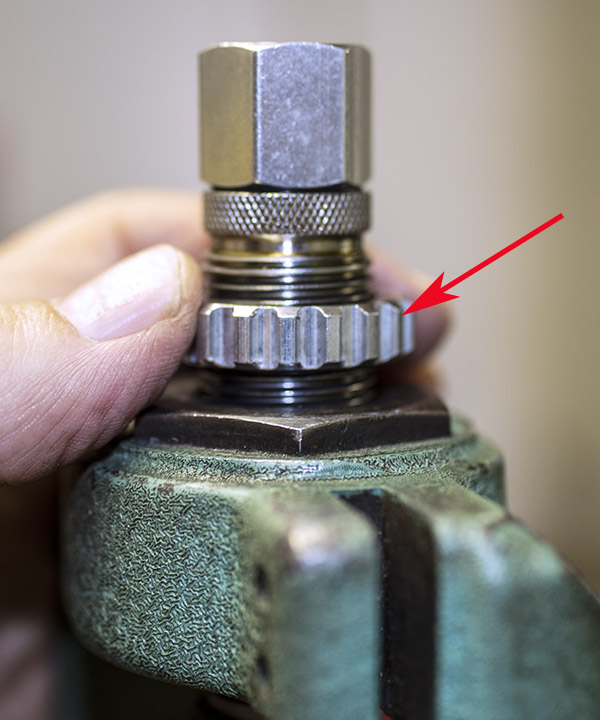
I lowered the ram, installed a cartridge that had not been crimped into the shellholder, and raised the ram fully. I lowered the crimp adjuster until it contacted the cartridge case (I could feel when it did do by increased resistance on the crimp adjuster as I screwed it into the die body).
The crimp adjuster.
I then withdrew the ram slighly and turned the crimp adjuster in a little bit more. I backed off the ram and examined the crimp. I repeated this process (backing off the ram, screwing the crimp adjuster in a bit more, and examining the crimp) until I was satisfied with the crimp.
A crimped .44 Magnum cartridge. The Lee factory crimp die does a great job.
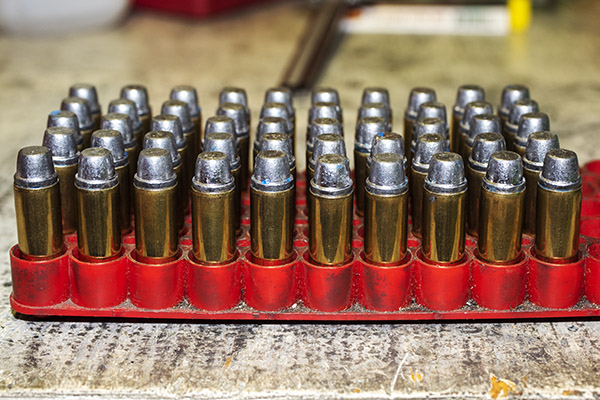
Once I was satisfied with crimp, I crimped all 50 cartridges.
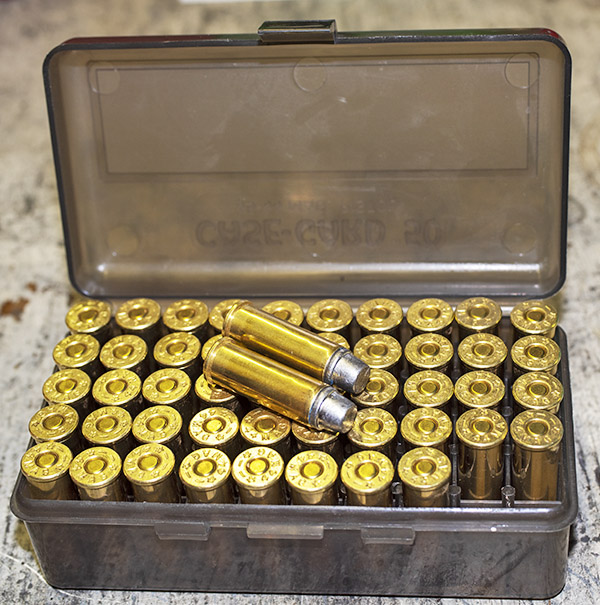
50 reloaded .44 Magnum cartridges.Reloaded ammo in the cartridge box.
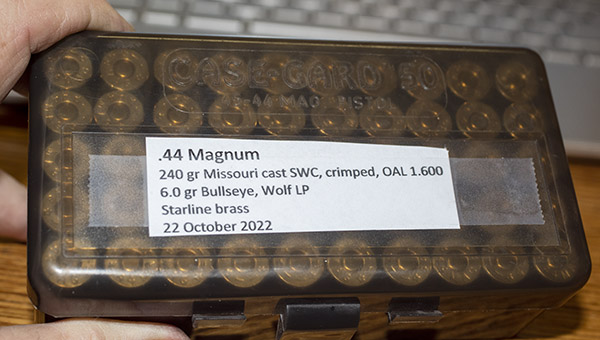
The last step for me was to label my newly reloaded box of .44 Magnum ammunition.
Labeling is critical. If I don’t do this immediately after loading the ammo, I might forget what the recipe was.
I had my 50 rounds of reloaded .44 Magnum ammo; the next step was a trip to the range to see how it shot. That blog will post in about a week. A spoiler alert…this ammo performed magnificently. Stay tuned, and you’ll see.
Keep hitting those popup ads! You’ve been helping us enormously and we appreciate it!
Never miss an ExNotes blog!
For more info on Lee Precision reloading equipment, click on the image below:
A month or so ago I wrote a blog about Lee’s .357 Magnum Deluxe 4-die set. I liked those dies so much I picked up a Lee 4-die set in .44 Magnum. I am similarly pleased with this latest set of dies. There’s too much info to fit into one blog post, so I’m presenting it in three blogs:
This first blog is about the four different dies, what each does, and the parts in each die. Lee’s engineering is superior, and this blog showcases it.
A second blog will focus on installing each die in my loading press, and how to adjust the dies to make world class .44 Magnum ammunition. Watch for this blog within the week.
A third (and concluding) blog reveals how ammunition loaded with the Lee dies performed. The ammo was stellar and I’m a believer. Lee’s Deluxe 4-die set is a magnificent product and it makes magnificent ammunition. But don’t take my word for it. You’ll see it in the groups I shot. The accuracy blog will post in about two weeks.
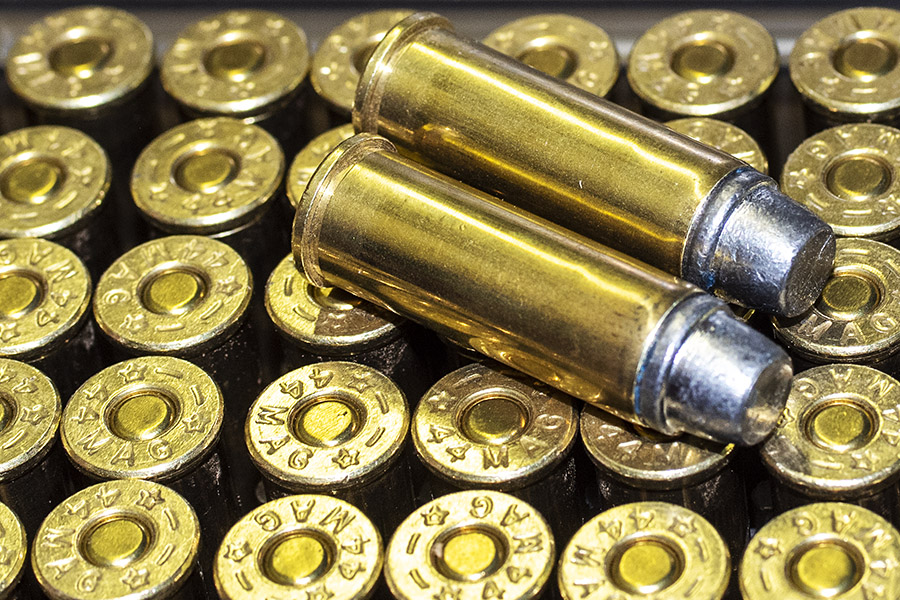
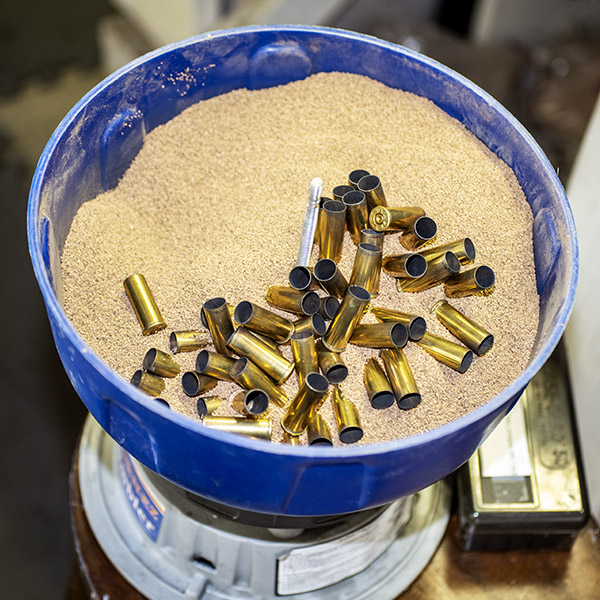
So, here we go. When I reload, I start with fired ammo brass cartridge cases, like you see below.
Fired .44 Magnum ammo brass cases, loaded into the vibratory cleaner. The vibratory cleaner polishes the brass cartridge cases. This makes the cases look good, but more importantly, it prevents them from slipping rearward against the cylinder walls when the reloaded ammo is fired.
And when I finish, this is what I have…newly reloaded ammunition as good as or better than factory ammo, at a fraction of the cost of factory ammo. That “as good as or better than factory ammo” descriptor is misleading. My ammo is better.
A box of reloaded .44 Magnum ammo, custom tailored to my requirements, and capable of superior accuracy.
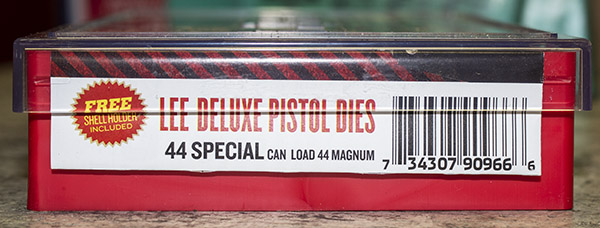
As most of you know, a gun chambered in .44 Magnum can also shoot .44 Special ammo (just like a .357 Magnum can shoot .38 Special). .44 Magnum dies can be used for reloading .44 Special ammo.
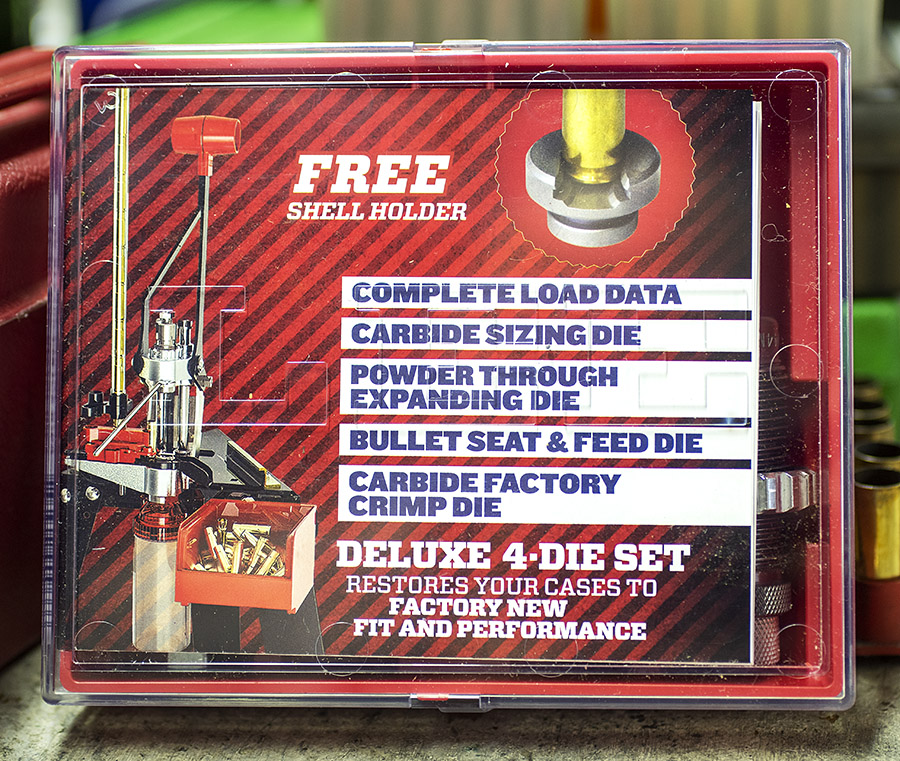
The label for each Lee die set is a printed instruction and load data sheet. The boxes are indexed and they stack nicely.
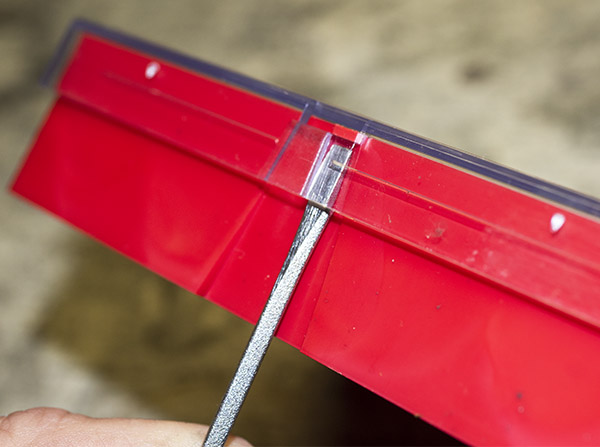
Lee dies come in a hard plastic case with a clear cover. The cover is removed by inserting a flat blade screwdriver on either side.
The plastic cover needs a little coaxing with a flat blade screwdriver to open. The cover includes a recess for screwdriver insertion.
The Lee label unfolds to reveal directions on using the dies along with a bunch of other information, including several suggested loads. Over the last five decades, I’ve found a few .44 Magnum loads I like, and in particular, I have a favorite load I shoot in the Ruger Super Blackhawk. I will share more of that with you in the next blog in this series.
The Lee instruction sheet includes load data and other information.
Lee’s Deluxe 4-die set consists of four dies, a shellholder, and a powder cup:
A carbide sizing die.
An expander die.
A bullet seating die.
A factory crimp die.
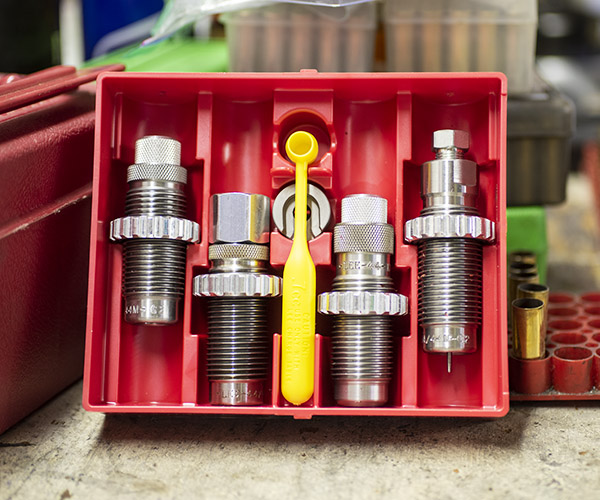
Here’s what the die set looks like after you remove the cover.
The Lee .44 Magnum/.44 Special Deluxe 4-die set. From left to right, it’s the factory crimp die, the expander die, the yellow powder cup, the shellholder, the bullet seating die, and the sizer die.
1. Sizing Die
The sizing die is a sizing and decapping die. When this die is installed in the reloading press and a fired brass case is inserted into it by raising the press ram, two things occur:
The cartridge case is resized to its original diameter (it expanded when the cartridge was fired, so it needs to be resized to specification dimensions). The Lee die is a carbide die, which means is has a very hard carbide steel tube inside the die body. Because it is a carbide die, there’s no need to lubricate the cartridge cases for the resizing operation (like you have to do with plain steel dies). Carbide dies are much preferred for this reason.
The used primer is pushed out of the cartridge case (this is the decapping operation).
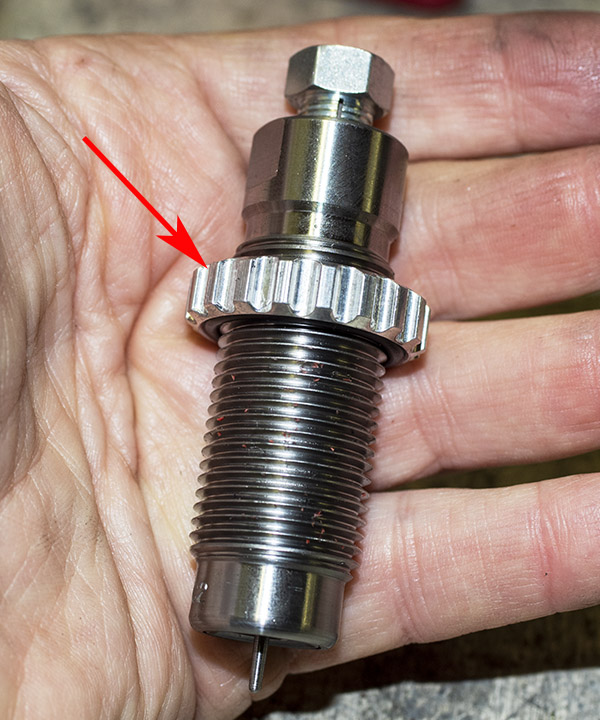
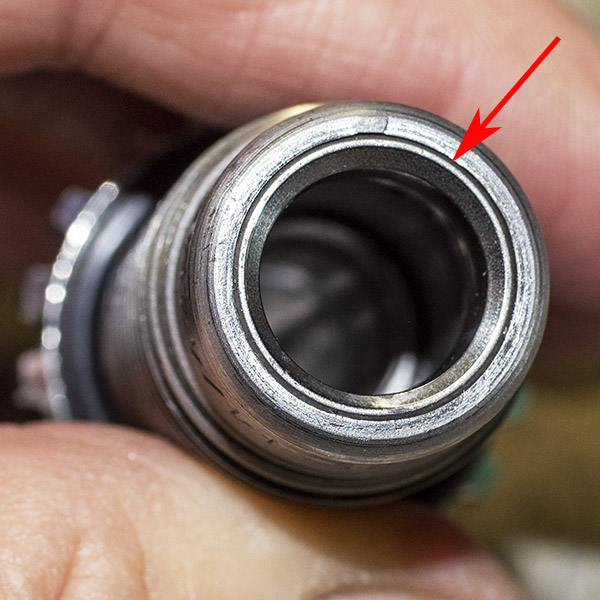
Here’s the sizing die.
The Lee sizing die. The red arrow points to the locking collar.
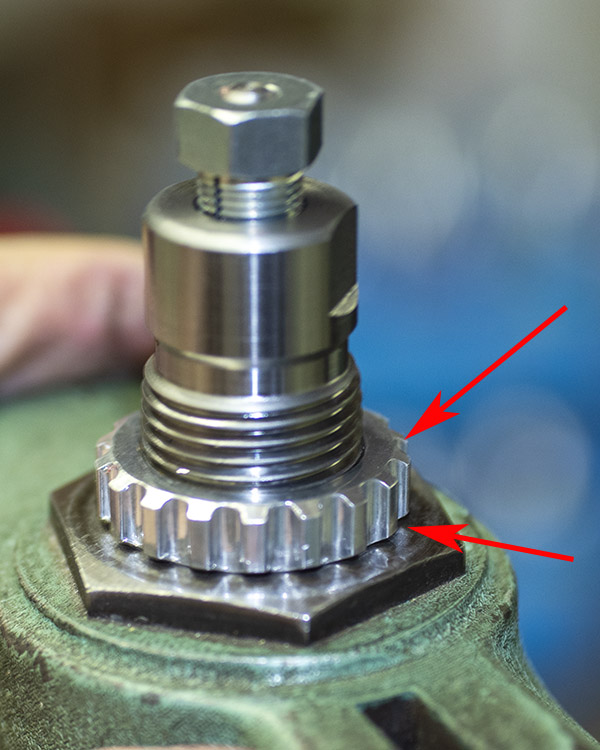
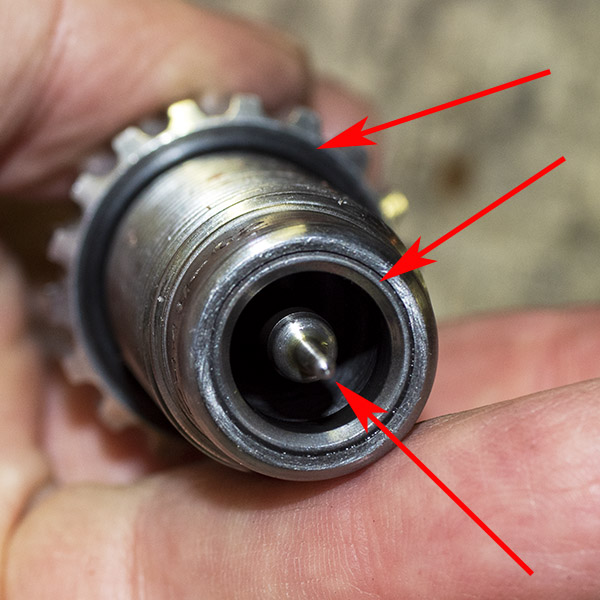
Here’s the sizing die from the bottom:
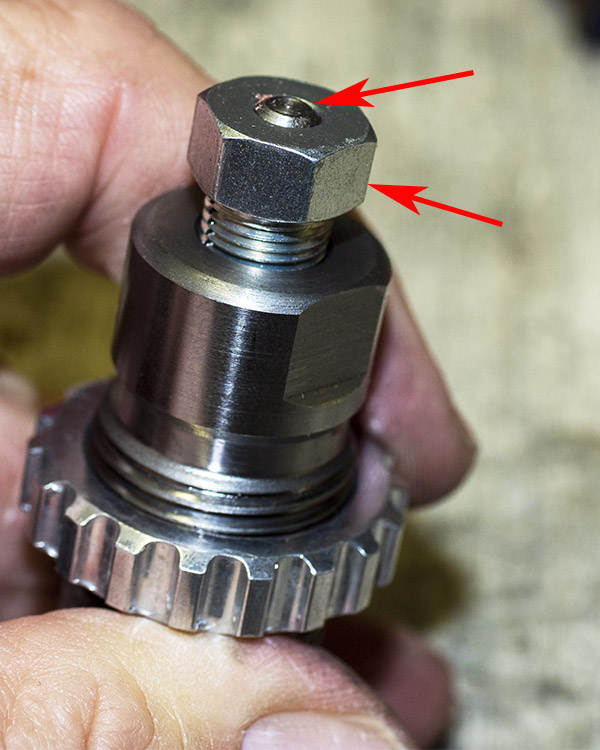
The top arrow points to the locking ring. It has an oring that holds the locking ring in place. The locking ring is screwed down on the threaded die body to lock the die body in place. The middle arrow points to the carbide sizing insert. The center ring points to the decapping pin, which pushes the spent primer out of the cartridge case.
Viewed from above, the decapping pin is secured by a threaded collet that screws into the die body. It’s a good approach because if there is an obstruction (if the pin hits the case bottom rather than the primer through hole, or if the primer through hole is blocked), the decapping pin simply pushes up in the threaded collet nut. This prevents bending or breaking.
The upper arrow points to the top of the decapping pin. The lower arrow points to the threaded collet that secures the decapping pin in the die body.
2. Expander Die
Once the cartridge case has been resized in the sizer die, it needs to be opened up slightly and the case mouth needs to be flared to allow a new bullet to be started in the case. This is accomplished with the expander die. Like each die in the Lee Deluxe 4-die set, this die includes a locking ring to lock the die in the reloading press. Some reloaders charge the case (add powder to the case) during the expander die operation. I don’t reload this way, and I don’t know any reloaders who do.
The Lee expander die consists of six components. These are:
The die body.
The locking ring and its oring.
An oring between the die body and the through hole insert.
An expander.
The through hole insert.
These components are shown in the photo below.
Expander die parts. The die body, the locking ring, and the oring are shown as a subassembly on the left. The arrow points to the expander. The part on the right is the powder through hole insert.
The expander slides up in the die body when a cartridge case is inserted by the press ram. When it reaches the end of its travel, a ramp in the expander plug creates a flare on the case mouth. This is what will allow a new bullet to be inserted in the cartridge case. In the photo below, the expander plug is inverted from its installed orientation to allow a better view of this ramp
The arrows point to the ramped surface that creates a flare in the case mouth.
You might wonder why there is a powder through hole component at the top of the expander die, and why the ramped expander plug is allowed to move up and down as a cartridge case is inserted into the expander die. The through hole allows inserting powder into the case with the powder cup (which I don’t use). Other Lee reloading gear uses the expander plug up and down motion to activate automatic powder dispensing devices (this is the approach used on Lee’s progressive reloaders).
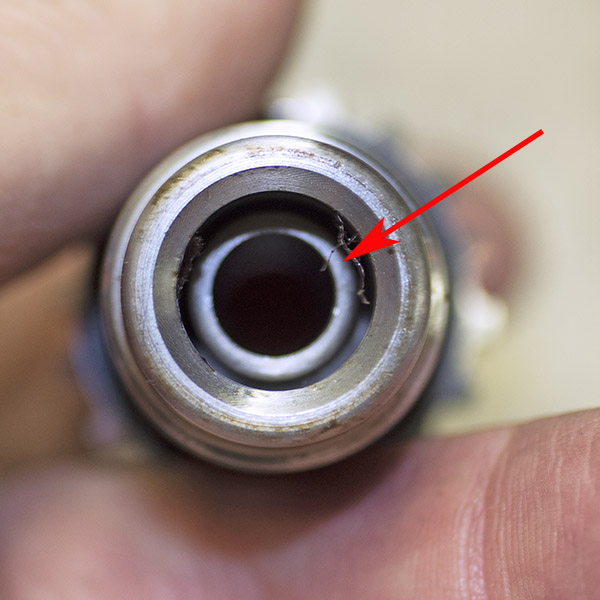
The business end of the Lee expander die. The red arrow points to the expander plug as the cartridge case sees it.The cartridge case on the left has not been through the expander; the cartridge case on the right has been through the expander. Notice the very slight flare on the right cartridge case mouth. This will allow starting a bullet into the case.
3. Bullet Seating Die
The bullet seating die is the third die in the Lee Deluxe 4-die set. This one is a bit more complicated than the first two because there are two adjustments, and this die can also be used as a crimping die. With the 4-die set, I am not going to use this die for crimping. I am only going to use it for seating the bullet to its required position in the cartridge case.
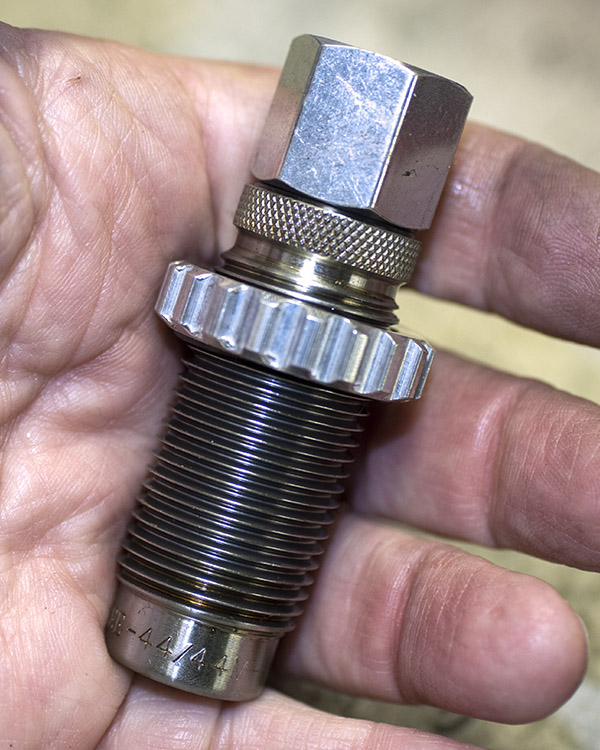
The bullet seating die is shown below.
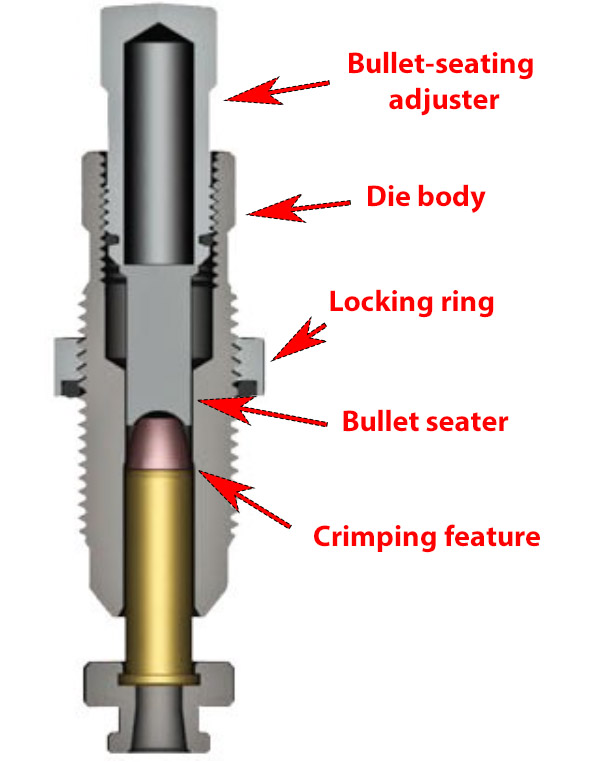
The bullet seating die. The upper arrow points to the bullet seating adjuster, the middle arrow points to the die body, and the lower arrow points to the locking ring.
Here’s Lee’s illustration of the bullet seating die.
From the outside, the bullet seating die and the factory crimp die appear to be almost identical. The easiest way to distinguish them is by the size of the knurled segment on top and by the length of the die body.
The bullet seating die is on the left; the crimping die is on the right. The bullet seating die has a longer knurled section and the die body is longer.
The bullet seating die parts include:
The die body.
The bullet-seating adjuster and its locking oring.
The locking ring and its oring.
The bullet seater.
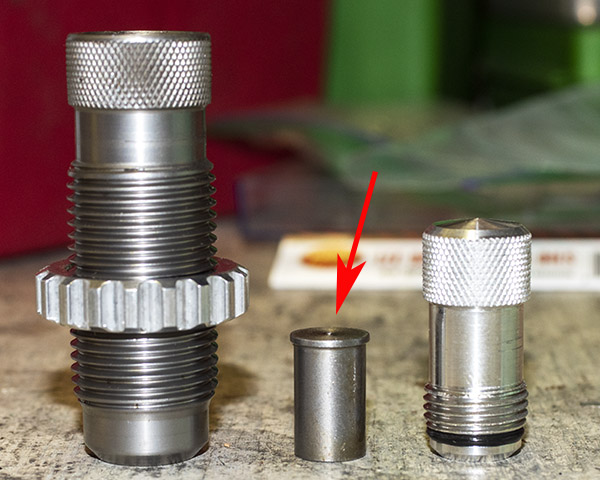
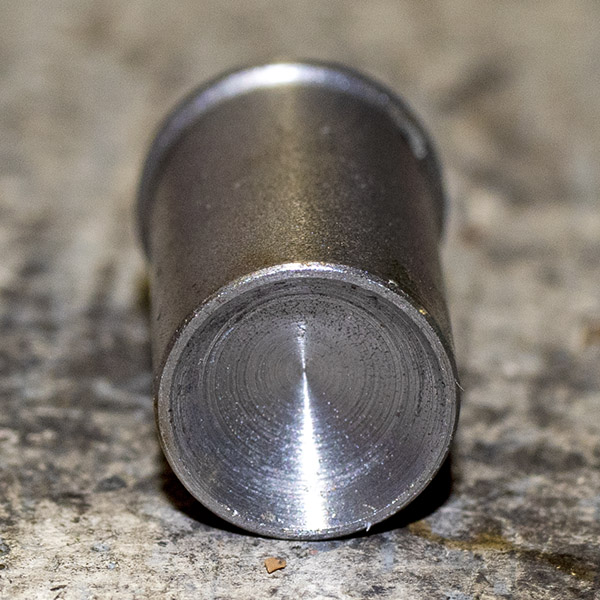
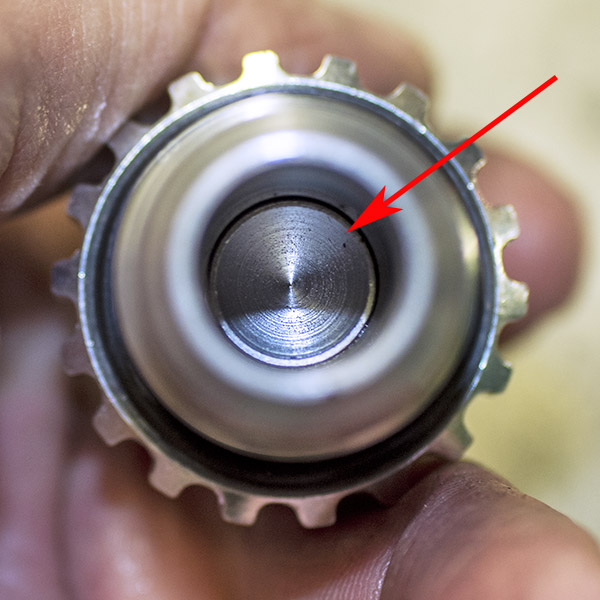
These parts are shown below.
From left to right, this photo shows the bullet seating die body and locking ring, the bullet seater (denoted by the arrow), and the bullet-seating adjuster and its locking oring.The bullet seater.The bullet seater as seen by the bullet. The arrow points to the bullet seater.
I mentioned above that I use this third die in the Lee Deluxe 4-die seat only to seat the bullet. It can also be used to crimp the cartridge case around the bullet, but I don’t crimp with this die. I use the Lee factory crimp die for crimping.
The bullet seating die also includes a crimping ramp in the die body, as shown by the arrow.
To adjust the die to do this, I run the bullet-seating adjuster well into the die body so that it pushes the bullet to its desired seating depth before the crimping feature reaches the cartridge case. I’ll describe this adjustment in more detail in tomorrow’s blog.
You might wonder: Why not do both (bullet seating and crimping) with this one die? Some folks do, and if you have the Lee 3-die set (not the Deluxe 4-die set), that is your only option for crimping. But this approach has the bullet still being inserted into the case as the crimping operation occurs, which invites potential bullet misalignment. To get around that, I use the fourth die in the Lee Deluxe 4-die set (the factory crimp die).
4. Factory Crimp Die
The factory crimp die does three things:
It roll crimps the bullet in place.
It maintains bullet alignment in the cartridge case.
It removes any imperfections in the cartridge case to assure easy chambering.
Here’s the factory crimp die.
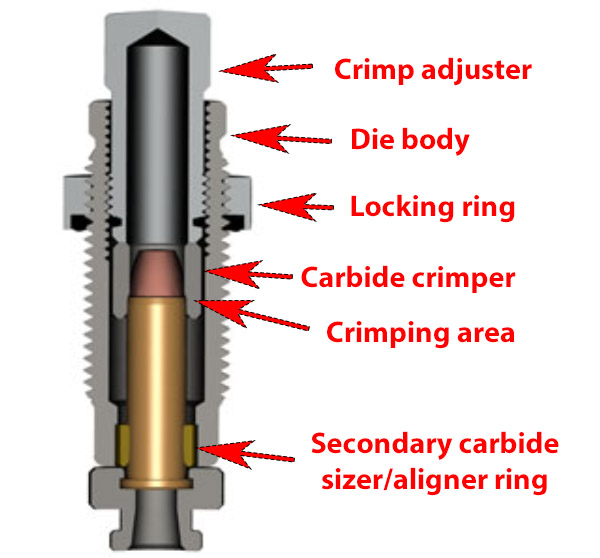
Here’s Lee’s illustration of the factory crimp die:
The factory crimp die has the following parts:
The die body.
The locking ring and its oring.
A carbide crimper sleeve.
The crimping adjuster and its locking oring.
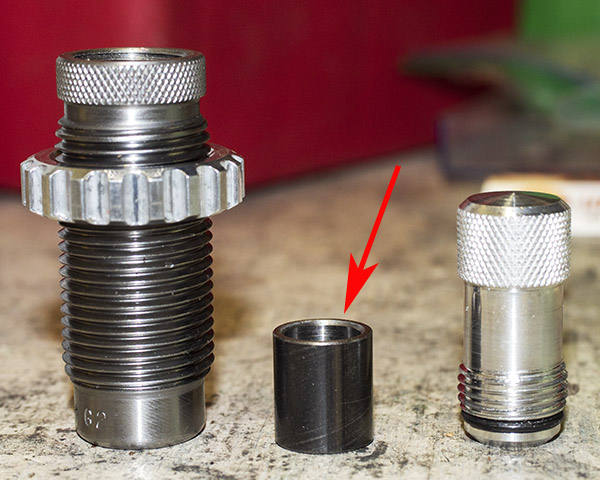
These parts are shown below.
The Lee factory crimp die disassembled. From left to right, this photo shows the die body and its locking ring, the carbide crimper sleeve (indicated by the red arrow), and the crimp adjuster and its locking oring.The carbide crimper. The red arrow points to the crimping ring inside the carbide crimper. Note that this feature must point down when the die is assembled; this piece is orientation sensitive.
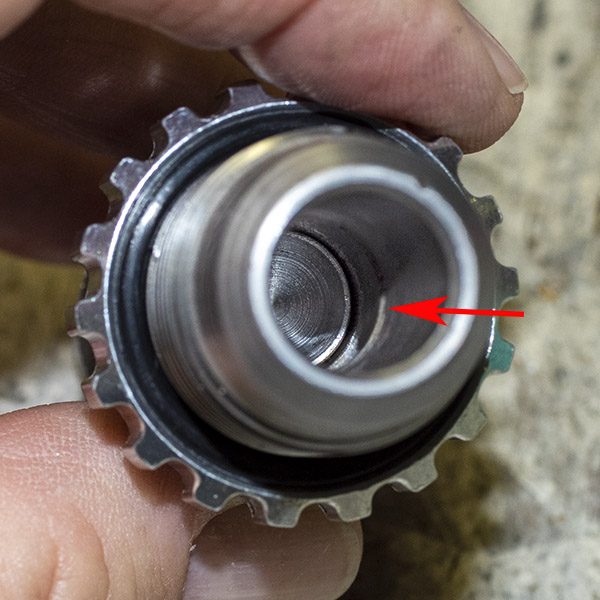
The carbide crimper shown above requires the cartridge case to enter the carbide crimper sleeve before the crimp is executed. This is an important feature, as it maintains bullet alignment with the case as the crimp is achieved and prevents case deformation that could interfere with chambering. Also, the bullet is not moving further into the case as the crimp is achieved, which is what would occur if I used the bullet seating die to crimp the case.
The factory crimp die as seen by the cartridge. The upper arrow points to the crimper sleeve; the lower arrow points to the crimping ring within the crimper sleeve.
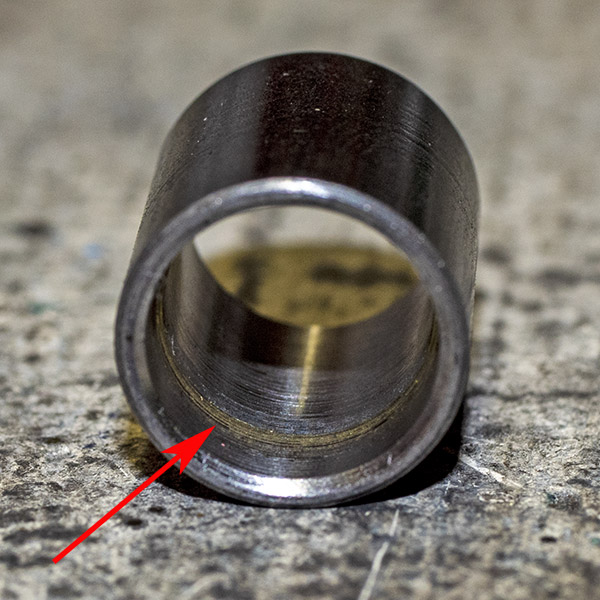
There’s another carbide ring at the base of the factory crimp die, shown by the photo below.
Lower carbide ring in the Lee factory crimp die.
The factory crimp die lower carbide ring both prevents and removes any deformation in the cartridge case when the case is crimped and the cartridge is inserted and withdrawn from the die. This assures easy chambering and bullet-to-case alignment.
So there you have it. In our next blog, which will post in about a week, I’ll explain how I set up each of the dies in my press.
You might be wondering: Do these Lee dies really work? The short answer is an emphatic yes. I found when loading .357 Magnum ammo with the Lee Deluxe 4-die set that accuracy improved and bullet pull (bullets backing out under recoil) was eliminated. To jump ahead a bit, the .44 Magnum Deluxe 4-die set described in this blog resulted in stellar accuracy. I’ll cover that in a third blog, which will publish in about two weeks. Before I get there, though, here’s a teaser photo:
One of a limited run of Turnbull color case hardened Ruger Super Blackhawks, and targets shot with ammo reloaded using Lee’s Deluxe 4-die set.
If you want to make sure you don’t miss any of the upcoming .44 Magnum Lee Deluxe 4-die set blogs, grab your free ExNotes subscription here:
The year was 1971 and I was 20 years old. Those were the good old days. Movies were wildly entertaining, it was real easy to tell the good guys from the bad guys, movie stars kept their political opinions to themselves, and being politically correct hadn’t been invented yet. And the movies were better for it. To me, there’s one movie in particular that stands out: Dirty Harry.
Dirty Harry was an exceptional movie for its time and it was an iconic role for Eastwood: Inspector Harry Callahan of the San Francisco Police Department. Eastwood went on to make several Dirty Harry movies. The Callahan role propelled Eastwood’s career enormously. But Callahan was only one of two stars in Dirty Harry. The other was Smith and Wesson’s Model 29 .44 Magnum revolver. Much as I like Clint Eastwood, I liked the Model 29 better, and yep, I bought a Model 29 after seeing Dirty Harry. I’ll get to that in a minute.
Susie and I were flipping through movies on Netflix a few nights ago and Dirty Harry was on the menu. “Put it on,” Sue said, with some resignation. “You know you want to watch it.” She was right. I did. Before I get into the Model 29 and all that, watch the video clip below. It’s a classic bit of tough guyism, and it’s a scene a lot of guys like me burned into our mental firmware.
So…back to the Model 29. Before Dirty Harry, Smith and Wesson didn’t quite know what to do with their Model 29. The police didn’t want it (the .44 Magnum is wildly overpowered as a police cartridge), nearly everyone who tried the cartridge back then took a pass, and the gun just kind of languished at the dealers. Oh, I know you read Elmer Keith and you’re a keyboard commando and all that, but let me tell you…in the ’50s (when the .44 Magnum was introduced) and on into the ’60s, nobody was buying them. The guns retailed in the mid-$150 range in those early years, but they just weren’t moving. Then Dirty Harry hit the big screen, and everything changed. Whaddaya know, everyone wanted a Model 29. I know. I was one of them. I was there.
You couldn’t find a Model 29 anywhere after Dirty Harry. It was product placement before anyone knew what product placement was, and all those N-frame Smiths gathering dust in dealer showcases vanished. In 1971 the MSRP for a new Model 29 was $183, but all that changed after Dirty Harry. They were going for $500 when you could find one on the used gun market, and that wasn’t very often. Everyone wanted to be Dirty Harry Callahan, including me. But I had an “in.” I had people. My father was an Olympic-class competitive trap shooter and he had contacts in the gun world. Dad put the word out and one of his buddies (a firearms wholesaler in south Jersey) had a brand new Model 29 (if I wanted it, he said) at the discounted price of $150. If I wanted it. Like I could say no. It’s good to know people, and I was in. Inspector Callahan, move over.
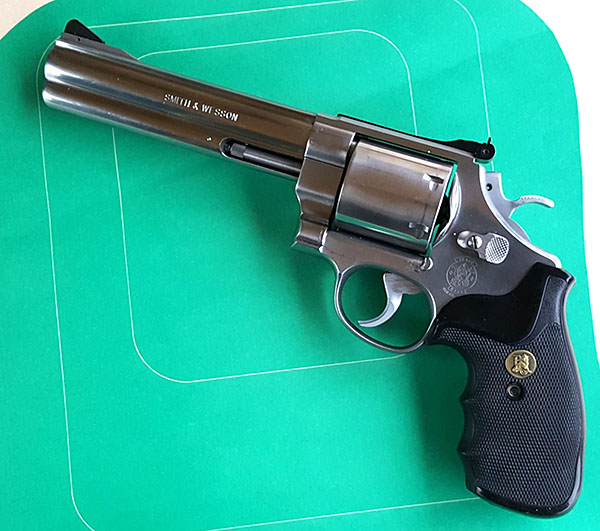
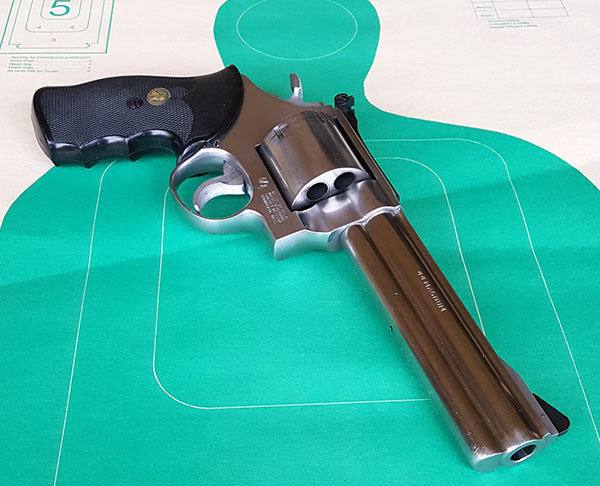
My Model 29. It’s a beautiful handgun and it’s a good shooter. I bought the custom grips at a gun show in Dallas back in the 1970s.
I shot the hell out of that Model 29 in New Jersey and then in Texas when I went in the Army, until it loosened up so much I didn’t want to shoot it any more. I put a notice up on a bulletin board at Fort Bliss and the next day an artillery captain bought it from me for, you guessed it, $500. I no longer owned a Model 29, but that was only a temporary situation. I reached out to my peeps back in New Jersey (it was my home of record and I was still a legal resident) and a week later I had another new Model 29. It’s the one I have today and the one you see in these photos.
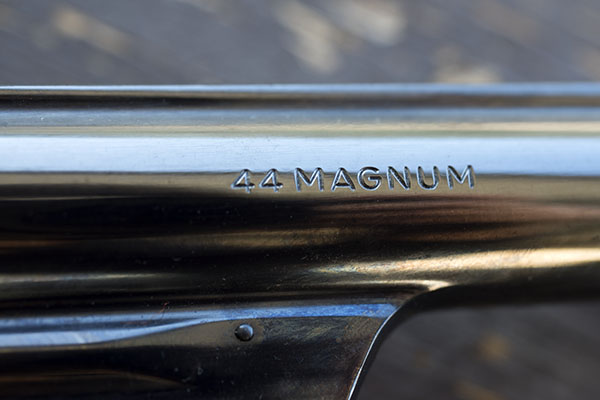
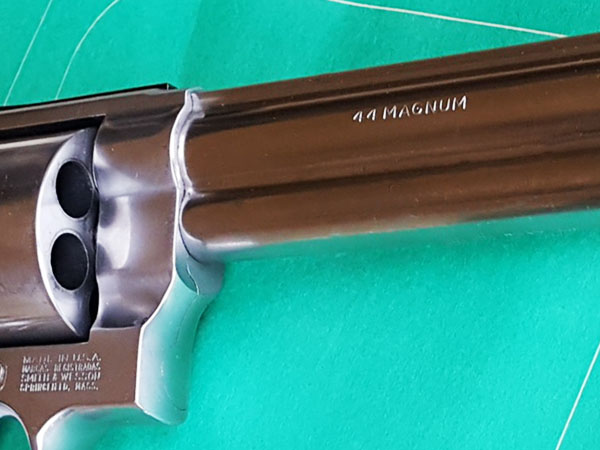
The early Model 29s were of impeccable quality. Note the rollmarking and how it is free of any distortion or metal upset around the letters. Check out the deep blue. These are amazing handguns.
So when Sue and I watched Dirty Harry the other night, I realized it had been more than a few years since I shot my Model 29. I checked the ammo locker and I had some .44 Magnum ammo I had reloaded back in 2012. I dug the Model 29 out of the safe that evening, and the next day I was on the range. You know what? I still do a pretty good Dirty Harry. Inspector Callahan has nothing on me.
Five-shot groups at 50 feet on an Alco target. I shot the upper left target first and scored a decent group that was high right. The rear sight was way to the right, so I centered it and shot a second group at the same target. I moved over to the target on the right, then down to the left target on the bottom row. Ah, one went high on that one, but I was getting familiar with the Model 29 again. My last group was the lower right target, and that’s how you do it. The load was the 240-grain Speer swaged semi-wadcutter over 5.6 grains of Bullseye (light for a .44 Magnum, but still enough to get your attention). Even Dirty Harry didn’t shoot full-bore .44 Magnum loads!
So back to that opening Dirty Harry scene…you know, the “Do you feel lucky, punk?” bit. It is classic Hollywood tough guy babble, but I had no idea of its reach until we had a bunch of Chinese guys come over from Zongshen to ride across the United States (you can and should read about that in 5000 Miles at 8000 RPM). We had a couple of days to kill before starting our epic journey, and when we asked the Chinese what they wanted to do, their answer was immediate: We want to shoot a gun. You know. ‘Murica, and all that. Hey, I was only too happy to oblige and we were off to the gun club. After sending a lot of lead downrange with a Ruger Mini 14, our Chinese guests then wanted to visit a gun store (the full American experience, you know), so we rolled over to Bass Pro.
I was a little nervous because the Chinese like to take pictures (and guys like me don’t like anyone, especially foreigners, taking our pictures in gun stores). Our Chinese guests were cool when I told them to put their cameras away, but I need not have worried. The Bass Pro folks were intrigued by all of this when we walked in. They invited our Chinese guests to take all the photos they wanted, and then they allowed them to handle the guns. That was really cool. One of the Bass Pro sales dudes gave Hugo, the young Zongshen rep, a monstrous .500 Smith and Wesson revolver. The Chinese guys had their cameras on Hugo in a heartbeat as he handled that massive hand cannon. Hugo knew what to do. With a slight Chinese accent (but otherwise perfect English) he was transformed. Hugo became Dirty Harry:
I know what you guys are thinking. Did I fire six shots, or only five? Tell the truth, in all this excitement, I kind of lost track myself. What you need to ask yourself is: Do I feel lucky?
Well, do ya, punk?
Hugo was amazing and we all (me, the Chinese guys, and the Bass Pro staff) had a good laugh. Hugo was born on the other side of the world a good 30 years afterDirty Harry hit the big screen, but he knew that line perfectly. And he knew it was part of the whole Smith and Wesson schtick. I guess it’s no small wonder. It was both the opening and closing scenes of Dirty Harry. Take a look:
Me? I still have my Model 29, and I can still hit the target with it. I still feel lucky, too.
I’m not the Joe in this story, nor is Joe Gresh. Nope, this is something altogether different…a guest blog by our good buddy Art, and it touches on a topic near and dear to my heart, the .44 Magnum Smith and Wesson Model 29. Let’s get right to it, and that would be Art’s blog on his friend, Joe, and their experiences with the mighty Model 29.
Joe Abbott was one of South London’s finest characters. Probably in his mid-fifties, this tough looking, gruff-talking individual of which at least one in three words was an expletive, was also a man of many diverse talents. He’d been in the fruit & vegetables and meat trade, blue movies, and had settled in the more lucrative scrap metal trade.
But what made Joe such so endearing was that he always came to the shooting club with a 6.5” barrel, lusciously-blued, S&W Model 29 tucked away in a suitable shoulder rig. This unloaded piece was also kept in fine company by a bullet belt with about 8 rounds.
Joe always graciously allowed people to handle his .44 Magnum. This experience was always accompanied by lurid stories about just how many engine blocks it could destroy and the unsavory whack the shooter would receive.
It was 1975, and I had not yet seen “Dirty Harry,” but the repeated references were made and after coming out of the cinema, I realized that I really needed one.
Getting a Firearms Certificate (FAC) in the UK is a drawn-out procedure and you must join a reputable shooting club. Once done, I obtained a ‘slot’ on my FAC for a 6”, Model 29-2 which I bought through “The Saddlery & Gunroom” in Biggin Hill, Kent – and which still exists today.
And so it came to be that on one fine October evening in 1981 I found myself on the “Stone Lodge” shooting range in Dartford, southeast of London – now long defunct due to the UK’s continuing anti-gun stance.
The dozen or so, pistol booths, divided by plywood walls had battered wooden counters which bore a few scattered marks of various NDs over the years.
With some trepidation, I partially loaded op the cylinder with 240-grain Federal JHPs, took my stance and gently bought the gun up one-handed as I had been taught for slow-fire. Joe Abbot’s biblical warnings returned to me when the next thing was a thunderous muzzle blast, a blinding flash that seemed to light up the skies and a mule’s kick to my right hand, which was still clutching my 44 in a near-vertical position.
“You OK, mate?” came a voice from the booth next to me. It seemed that the flimsy plywood had not been sufficient in dampening the 44’s roar.
When my fellow shooter peered into my booth, he found me gazing open mouthed at my new piece which I had placed on the counter, wondering what the hell I had just bought. That evening I only put five more rounds through it, the standard Goncalo Alves grips with its sharp checkering not giving any quarter.
The .44’s reputation preceded me, so every time I took it to any range, there was always a healthy line of people wanting to shoot it, and who offered their pieces in return to fire, which allowed for a good experience with a wide range of guns. One of the club’s members downloaded my brass into .44 Special loads, easing up the load on my gun and my wrist.
In 1997, the whole thing came to an end when the British government banned all handguns in private possession. Along with 40,000 law abiding sports men and women all over the UK, I was commanded to go to a local police station of their choice and hand in my 44 and Walther GSP .22 target pistol, never to be seen again.
As rumors persisted that the higher end guns would be stored for some years and then sold to lesser restrictive countries, I had written my full name and address inside the grips of both guns.
In 2015, I became a proud ‘Documented-American-In-Waiting’, my AZ residence allowing me to enjoy an unprecedented freedom that no other world country could dream of offering. I would continue to dream of owning another part of identical S&W history, despite the steep prices to which they had climbed over the years.
In the ever-increasing universe of polymer self-loaders, the appreciation of the traditional steel has begun a steady upwards trend. Revolvers with their near-clockwork mechanism are becoming increasingly in demand, especially from the younger shooters. Ex-police guns, predominantly the stainless autos, have found their way into the civilian market and are hungrily bought by discerning citizens who are swayed by historical interest and the very affordable prices.
One fine day, and at half the price of the blued ‘Dirty Harry’ model, a 6” stainless .44 Magnum Hunter Classic with unfluted cylinder followed me home from one of the Phoenix shows. The continued underlug, ventilated barrel rib, resembling the beautiful Colt Python, and Pachmayr grips sounded the bells of seduction. I was well and truly on the rocks.
Those 38 years must have dulled my initial reactions to Joe Abbott’s apocalyptic performance figures since I pointed my Model 29-2 downrange for the very first time. Perhaps it was the increased weight of my new piece that seemed to have tamed the ferocious recoil, or having fired a great many handguns of various calibers. Whatever, happy days are here again and I’m privileged to enjoy the 228-year-old rights and privileges that all Americans are born with. Long may it continue.
Art, I could not have said it better myself. Well done, and thanks for your guest blog. I enjoyed reading it and I’m sure our readers will, too. We’re glad you’re here in America with us, and it’s always good to hear from a fellow .44 aficionado (how’s that for alliteration?). Please shoot us a copy of your snail mail address, Art, and we’ll send to you a signed copy of 5000 Miles At 8000 RPM as a small thank you for helping us make the blog a success.
And to the rest of our readers: Do you have an idea for a guest blog? It can be any topic: Motorcycles, watches, guns, bicycles, travel, photography, and more. We’d love to hear from you. Write to us at info@exhaustnotes.us!
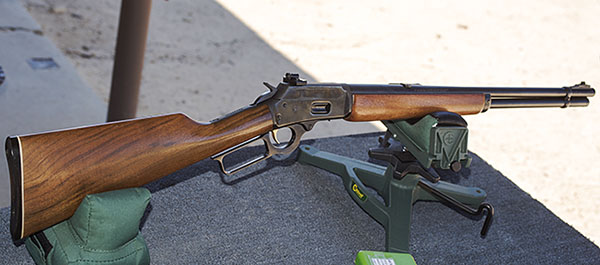
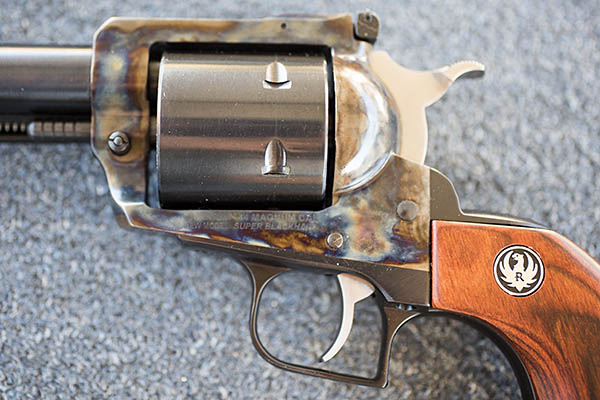
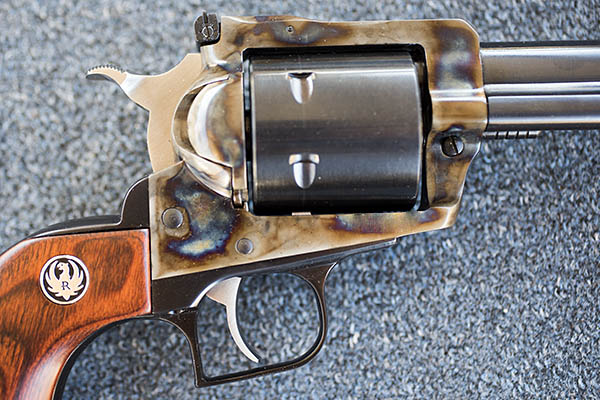
A stunning, Turnbull color case hardened Ruger Super Blackhawk in .44 Magnum.Another beautiful .44 Magnum…this one is a 1970s Marlin Model 1894 with a Williams aperture rear sight.
Friday was a good day, as is any day spent on the range, and for me, Friday last week meant a visit to the West End Gun Club. Hey, I’m retired. Ride the motorcycle, or head to the range? Life is good either way. This past Friday, the range got the nod.
I took two guns with me. One was a new Ruger Turnbull Super Blackhawk I recently picked up from a Gunbroker auction at a decent price. The other was Marlin 1894 lever action rifle that I’ve owned too long and shot too little. Both are chambered in .44 Magnum. The idea here is that you have two guns both chambered for the same cartridge, and it makes for a good combination to carry afield. Mind you, I’m not too sure where “afield” is actually located, but I kind of get the idea…it’s a place that frequently appears in gun ads and Western novels, a place where manly men hang out. The thought is that you only have to carry one cartridge, so you can save your manliness for other endeavors.
My take on the concept? I think it’s a solution to a problem that doesn’t exist. I had opportunities to carry both a rifle and a handgun at the same time when I was in the Army, but I thought doing so was just dumb. I didn’t want the added weight, so I always went for either an M-16 or a 1911 (but never both) depending on what I was doing that day. On a hunting trip, I think it’s an absolute bust. When I was a lot younger, one time chasing hogs I carried a 9mm handgun and a .300 H&H Mag custom Weatherby rifle (I know, .300 H&H was massive overkill for hogs). The first day of that adventure was enough to convince me that carrying both a handgun and a rifle was silly, and I left the handgun home after that (I spent that entire first day walking through the woods trying to not scratch the rifle on the handgun). And in case you were wondering, the only thing I came home with on that trip was the worst case of poison oak I ever had.
That said, the idea of a lever gun and a sixgun both chambered for the same cartridge maybe made sense when the .44-40 was winning the West. In those days, you could get a Colt six-shooter and a Winchester lever gun that both used the .44-40 cartridge. Or maybe I’ve just been reading too many Zane Grey novels. But the idea has had a following stimulated by rifle and handgun marketing types for years. Like I said, unless you are transported back in time and you get around on a horse, I think carrying a rifle and a handgun is wacky. But I own a rifle and a handgun that shoot the same cartridge (the two firearms you see in the above photos), and just for grins I wanted to see if I could find a load that is superbly accurate in both.
To cut to the chase, the answer so far is no. But I’m getting ahead of myself.
I’ve been shooting .44 Mag since shortly after Dirty Harry adorned the silver screen, and I’ve been reloading the round for about that long, too. I haven’t shot .44 Mag in a handgun much in the last few years (the recoil can only be described as brutal and Lord knows I’m no spring chicken), and I had not shot the .44 Mag Marlin rifle hardly at all. It was time to address both character deficiencies, I thought, and last Friday was as good a day as any to do so.
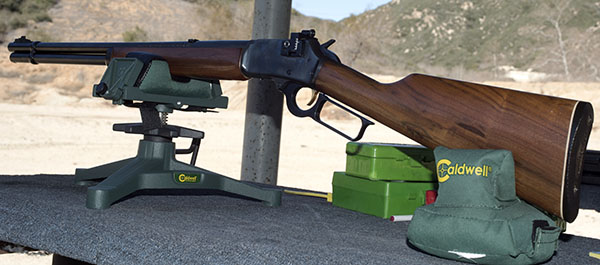
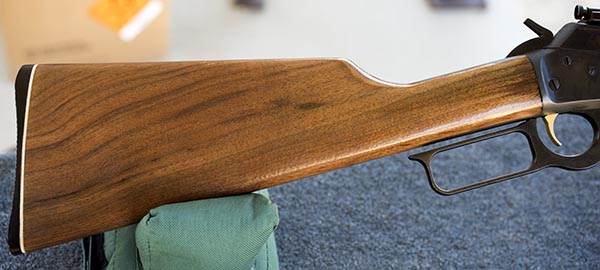
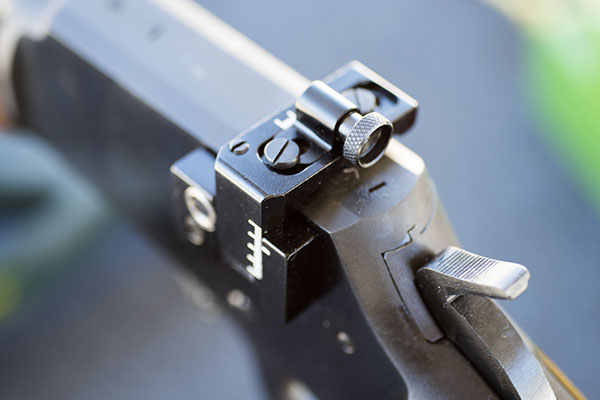
I’m a sucker for lever actions with pretty wood, and the Marlin checked all the boxes for me.See what I mean? It’s not bad. Not exceptional, but above average, and the price was right.The Williams aftermarket aperture sight on the 1894 Marlin. The theory is that an aperture sight is more accurate than a simple notch rear sight. I prefer the plain notch sight.
I bought the Marlin when Reagan was in the White House. I’m not sure why. It was one of those guns you buy and then just never shoot much. I felt guilty about that. And the Turnbull was one I wanted to use. Yeah, it’s almost too pretty to shoot. Almost. Like I said, I hit the Gunbroker “bid again” button a sufficient number of times to take it home. It’s beautiful, and like you’ve read on these pages before, I am a big fan of Turnbull-finished firearms.
Turnbull color case hardening. Gresh talked about what constitutes art in his most recent blog. To me, this is it.The starboard side of the Turnbull Ruger. Pretty, huh?
Even though I had not shot much .44 Magnum in recent years, I had a half-dozen different loads in .44 Mag squirreled away in my ammo locker: One box of factory ammo that’s been there for a decade or more (I can’t remember where I picked it up, one I reloaded with Hornady jacketed bullets, and the rest I had reloaded with various cast or swaged lead bullets. My intent was to find the magic load that shot well in both the Marlin 1894 rifle and the Ruger revolver. There was nothing scientific in any of this; I just had a bunch of different loads and I thought I would try them all.
So, back to the range. It was a beautiful day, but it was windy as hell out at the West End Gun Club last Friday and I’m sure that affected my results. But, sometimes it’s windy. What are you going to do? I shoot when I can. And I just wanted to get an idea what my six different loads would do in the rifle and the handgun.
So, here’s the bottom line…
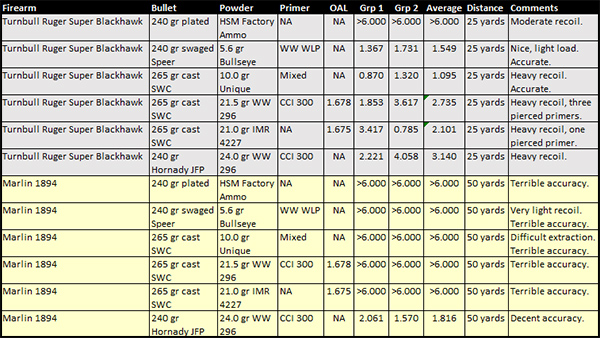
Revolver and rifle load testing results with the Ruger Super Blackhawk and the Marlin 1894. These are my loads only; you should start lower and develop your own to make sure any load is safe in your gun.
None of my cast or swaged loads had acceptable accuracy in the rifle. That’s probably because of the Marlin microgroove bore and the diameter to which my cast bullets had been sized. I don’t think Marlin uses microgroove rifling any more in their .44 Magnum lever guns. Microgroove rifling is a very shallow rifling technique; current Marlins use more conventional (and deeper) Ballard-type rifling. I’d read online that to get a .44 Magnum cast bullet to shoot in the Marlin microgroove barrel, you had to size the bullets to 0.433 inch. All of my cast stuff is sized smaller than that around the standard 0.429 or 0.430 inch (yep, that’s right, a .44 Mag is actually not 0.44 inch in diameter; it’s only 0.429 inch…not that it would matter to anything struck by one of these monstrous high velocity slugs). Oh, and that factory ammo? My box of old HSM factory .44 Magnum was terrible in the Marlin.
It wasn’t all bad news with the Marlin, though. The load with Hornady jacketed flatpoint bullets and Winchester’s 296 propellant shot well in the rifle, as you can see in the chart above. That’s good to know. Interestingly, those bullets are 0.429 inch in diameter. But they shot well. Go figure.
With the Turnbull revolver results varied, but they were generally way better than with the Marlin rifle. All of my cast loads shot reasonably well, although the recoil was horrendous with all of them (except for the one light Bullseye load). The Hornady jacketed bullet load with 296 powder shot well. I’ve always had good luck with 296 powder in both the .357 and .44 Magnum. The HSM factory load? It shot the same in the Ruger as it did in the Marlin, which is to say it was terrible.
Chasing a load that shoots well in both a rifle and a handgun may be a fool’s errand (like I said ealier, I may be reading too much Zane Grey), but it was something I wanted to play around with. The Marlin liked those Hornady jacketed bullets with 296 and they did well in the Ruger, too, so I think the next round of testing will involve using just those bullets with different levels of 296. It may be I need a different loads for the Marlin and the Ruger, but that’s okay. The next time I go “afield” I’ll only be carrying one gun, and you can bet I’ll be keeping a sharp eye out for pigs and poison oak.
Want to make sure you never miss an ExNotes blog post? Sign up for our email updates in the widget you see to the right (if you’re on a laptop) or at the bottom of this post (if you’re on a smartphone). We’ll never give your email to anyone else, and you’ll automatically be entered in our quarterly moto-adventure book giveaway!
Want to see our other Tales of the Gun stories? Just click here!