Time To Split: An Open Letter to Car Drivers

Jack Lewis and I platooned in Motorcyclist magazine for many years. How Jack managed to avoid writing about concrete in all that time I’ll never know. Here’s a bit on lane splitting for America.


Dear automobilists – you, in the shiny red pickup and that girl in the flashy BMW and yes, even you in the dented Subaru with the sticker-patched Yakima box up top and dog slobber lathering your windows – please don’t misunderstand us.

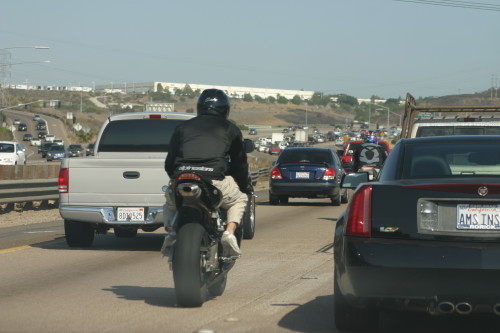
When we rip along the dotted lines, zipping between door handles in a manner that must look crazy-dangerous to you, we’re not actually trying to rub your noses in the hell of stop-and-go traffic. We’re not trying to cheat you out of your transportative birthright, nor play some weird Russian roulette with spit cups and trailer mirrors.

Motorcycle lane splitting is legal in California — and it works. © Eric Schmuttenmaer

We’re just trying to get out alive.

See, while you may perceive motorcyclists mostly through GoPro silliness and X-Games heroics, a lot of riders actually give real thought to which measures might bring us through our riding day intact, arrayed as we are with nothing but a bit of thick foam and thin plastic between our squishable bodies and your 3,500 lbs. of moving steel.

Still, I get what it’s like to be startled, whilst sitting in my car, by a motorcycle howling past in a sudden rush. It’s a little spooky, and I always feel like I should have been paying better attention.
That’s how you feel, right? Like you should have been paying better attention?

Sure ya do! Just before you wonder out loud why anyone let those irresponsible dingbats loose on their murdercycles in the first place. How dare they discompose you, let alone proceed at a pace slightly faster than the turgid sloth of gridlock?

Being stuck in traffic is ugly for everyone. On a motorcycle, it’s worse. Yes, your kids may be fighting in the back seat, but they were gonna do that, anyway. The biker is juggling variables that include overheating, keeping his bike upright, clutch wear, where to put his feet (Pegs? Ground? Pegs? Ground?), and the friction-free contact patches ensured by the overflowing coolant of pissed-off cars.

Motorcycles are built to go, and they’re built elementally light. While your car does its engineered best to trade off its BTUs to the surrounding atmosphere on a hot day, and swaddles you in a full metal jacket against winter rain and snow, that rider tap dancing along the Botts’ dots either needs continuous air flowing over her engine to keep both it and her body from overheating, or would very much like to get home and take Mom’s advice to get out of those wet things. Hypothermia is a risk they cover in basic riding classes.

Serves those fools right, you say? Fine, but remember: if the motorcycle breaks down and has to be pushed out between the choked lines of traffic to meet a tow truck, that ain’t exactly gonna speed you up.

If the driver behind a stuck rider gets distracted by the radio or her kids or a super-important tweet, she may roll up into the rider who obediently parks between cars, virtually disappearing in a long line of tail lights. Or some other driver may spot a “hole” in the next lane, yank over and park on our hapless moto-jockey. Aside from the bloody consequences for some poor dumb motorcyclist, that accident holds up traffic even longer while EMTs slowly wail their way up the breakdown lane.

But isn’t it dangerous for those guys to go between the cars, where nobody can see them coming? Well, if you actually use your mirrors, you can see bikes much better when they’re moving between the lanes. Our eyes are designed to notice movement and anomalies.

Moreover, in any accident occurring between your car and a motorcycle, it won’t matter one bit how the lawfully the rider was behaving, or how badly you screwed up. All you have to say is “I never saw him,” or, “He came out of nowhere!” Once you’ve articulated those magic words, your police report will reliably read “DRIVER NOT CITED” — even if you blew a red light, made a left against traffic, or ran him down from behind. Tuck that knowledge away for later use, because it. Is. Awesome.

It’s even kind of true. Even with decades of motorcycling under my (continuously expanding) belt, I’ve overlooked motorcycles from behind the wheel. No one can see bikes as well as cars. You can’t judge their distance effectively whether they’re coming (only one headlight) or going (only one taillight). At night, they’re practically invisible and during the day, they may as well be.

Cars and trucks grow logarithmically in your vision as they approach, while bikes are always just… small. Your brain doesn’t process them as a real vehicle, and the courts know that. Killing a motorcyclist is kinda like hitting someone’s beloved terrier: the family may be broken up about it, but everybody else understands that it wasn’t really your fault.

We implore you not to use this powerful knowledge to hit the next rider you see, though, as it will definitely slow down your commute. We’re talking efficiency here.

You can’t see them, but they can see you. Lane splitters keep an eye on your movement the way mice watch owls, and they won’t carelessly ding your car. Think about it: catching a handlebar end means they go face down on the freeway. Nobody volunteers for that.

Lane-splitting motorcyclists tend to be well-trained, fit, decently equipped riders, and they’re statistically safer than riders who never split lanes.
Kinda flies in the face of common sense, dunnit? But then, so does motorcycling. Not everyone wishes to be common, or sensible.
We know it seems like cheating for them to weave through the blocked ranks of Good Suburban Taxpaying Folk – and it is. If you ain’t cheatin’, you ain’t tryin’.

That’s why you get to do what bikers can’t: control your climate with dashboard switches, sip the beverages nesting in your cup holders, flip through the FM dial for Sigalerts, call your sweetie through the rear view mirror (that you never glance at) with a dinnertime update, and scroll GPS maps for the clearest route. If you’re unwilling to give up your car full of traffic hacks and blissful comforts, why should riders sacrifice their ability to proceed elegantly through smaller spaces?

As second-class traffic citizens, speed, wariness, and maneuverability are the only tactical advantages motorcyclists possess. Don’t think of them as a safety threat to your armored carapace. They’re more like furry little rodents, juking between the footfalls of mighty dinosaurs.

“Fair” is a utopian concept and you can’t get to Utopia from here. What you can get is home a little faster, every time a rider splits lanes. Think this through with me: when a rider lane-splits, he transcends the traffic jam, flowing through it with mercurial ease while you sit there, stymied and cursing your ugly luck. Advantage: rider. Kinda gets your goat, doesn’t it? They shouldn’t be able to do that!

But wait… she also removes one vehicle from the impacted sludge of traffic. Advantage: EVERYBODY. Will you receive a benefit equal to the rider’s? Nope. She assumes more risk, makes less ecological impact, trades comfort for freedom and burns less fuel. Seems only fair that she should get through the fastest. Let ‘er go, mate. Don’t swing that door out!

When two percent of vehicles slip out of the traffic stream and split lanes, that’s two percent fewer vehicles getting in your way, threatening your family’s safety, and farting their carbon monoxide straight through your cabin filter and into the soft, vulnerable fat of your cerebral cortex. Can you imagine if it were 15, 20, or as much as 50 percent of traffic that was bled off by those dynamic pressure relief valves? Lane splitting makes riding more attractive, increasing the number of people willing to deal with the disadvantages.

We all know what causes traffic jams: too many vehicles occupying the same road space at the same time. One social engineering tool to purge that clog is HOV lanes allowing more efficient transport – e.g. buses, motorcycles, and carpools – to move faster. Studies show that such lanes also speed up main lines of traffic. Still, it’s danged annoying to watch privileged eco-prudes whiz by in their Teslas, and we all know it costs tens of millions of your dollars to build those lanes that you usually can’t use.

When interstate flyers shine on the dotted line, though, three or four de facto diamond lanes spring up at no cost — but offer benefits to every vehicle’s progress, from buses to Jeeps to Peterbilts.

And in town, when scooters and motos slip between cars and filter up to the front of an intersection, they’re not ripping you off. When the light changes they’ll accelerate celeritously, maneuvering between late-walking pedestrians without risk. Then they’re gone and out of your way, cutting down both on your total sum of obstacles and on the safety variables you have to reconcile.

Filtering to the front helps everyone. © Roland Dobbins

Poof! They just vanish, right off your cloud. You won’t have to navigate cautiously around their wobbling butts the way you do with bicycles. Also (unlike those free-loading pedalers), motorcyclists pay disproportionately high license tag fees to help maintain your roads.

No one is harmed, and everybody wins. Ever wish a whole bunch of drivers would just get off your damn road? Yeah. It’s like that.

Traffic works better when we all work together. No man is an island, entire of itself. Therefore, ask not for whom the rider lane-splits; she splits for thee. Next time you’re asked, vote to allow lane-splitting in your state for the benefit of every driver… and the true safety of every rider.

If you still think all lane-splitting does is give a huge advantage to motorcycles, why not ride one yourself? Nothing prevents you from stepping out of your big, safe box, swinging your leg over a bike, and winging it through traffic in swift, sexy, highly maneuverable freedom.

Do it for yourself. Do it for society. All you have to fear is fear itself — plus, of course, the savage vindictiveness of unenlightened drivers (no, don’t be that guy; nobody likes that guy).

So come on over the dark side. We throw the best parties – and you’ll get there fast, looking fly on your bad motor scooter.

Everybody wins.


If you’d like to see more Jack Lewis, you can do so here on his blog.

The Henry Single Shot: A Tack-Driving Buffalo Gun!

It’s time to get out and do stuff.  Yeah, this CV19 thing is a disaster, but it looks like what the wizards recommended is starting to produce results, and that gave me an excuse to get to the range again.   Not that anyone ever needed an excuse to get to the range, but I felt like it was time, and that beautiful Henry Single Shot I’ve been writing about (but had not yet fired) was calling my name.

Exhibition-grade walnut, blue steel, polished brass, and a box of .45 70 ammo. Life is good!

I had my Nikon with me, too, so I was finally able to get some good D810 photos of this beauty from Henry’s Rice Lake, Wisconsin manufacturing operation.

A view from the right.
And the view from the left.

I wanted a couple of photos showing the entire rifle, and then I wanted to get a couple more showing the highly-figured walnut stock.   The folks at Henry sure did a great job.

Sweet, huh?  The polished brass buttplate works, too.  This is a stunning bit of American firearm artistry.  Like Mr. Imperato says, made in America, or not made at all.
What’s nice is the stock is highly-figured on both sides. It’s hard to find wood like this on a production rifle these days. Always has been. I believe it’s getting tougher, too.

The .45 70 cartridge is a big one, and I’ve written about it in earlier blogs.  There’s a list of links to our earlier blogs on the Henry single shot at the end of today’s post, along with a few other cool links.   Take a stroll through them to get a feel for how I came to acquire this magnificent rifle (after you’re read this blog and shared it on all your social media platforms, of course).

If you have one of these and someone says “bring enough gun,” you’ll have all the bases covered with the Henry Single Shot.

It was fun shooting the Henry, both literally (more on that in a second), and figuratively (with the Nikon).  The brass receiver on these guns photographs well, I think.

The rear sight is a standard folding leaf. You can flip it to the other side so that you don’t have the white diamond, and you can invert it to get a square notch instead of the U-notch. I’ve left mine as it was delivered from the factory.

On to the good stuff, and that’s an answer to the most basic question for any firearm: How does it shoot?  In a word or two, superbly well.  I had a big plan to test all kinds of different loads, but I don’t want to bore you with the details of what didn’t work well and get right to what did.

First, a word on my marksmanship.   It had been about 9 weeks since I’d been to the range, and the ability required to shoot a rifle well is not something you just pull out of drawer and pick up where you left off.  Nope, rifle marksmanship is an art, and I needed to put a few rounds downrange before the Henry started performing.  Well, actually, that’s not quite accurate: I had to send a few rounds downrange before I started performing.  There’s a skill set involved in shooting a rifle well.  You can read our treatise on rifle marksmanship later (I’ll include a link for that at the end of this article, too).

I started with four targets this morning at 50 yards and the results were not what I wanted, but I knew it was me and not the rifle.  So I put another four targets out, and I started to settle down.  It was a beautiful morning out at the West End Gun Club.   Bright skies, mild temperatures, no wind, and I had the range to myself.  It wasn’t too long before I was in the groove.  The first target (the top left) was a bit shaky (good enough for deer or hog, and especially good enough for buffalo), but not what I knew I should be able to do with this rifle.   The second target (top right) was a lot better, as I was kind of figuring out how to get the right sight picture.  Shooting with iron sights is much more challenging than simply laying a scope’s crosshairs on the bullseye.  Iron sights demand skill and practice.  With 9 weeks away from the firing line, I was coming up short on both, but I was getting my groove back.  I could feel it.  The third target (bottom left) was another good deal, and then the fourth target sealed the deal.   That one was a 0.740-inch group, with all the holes touching.  With open sights on a lightweight .45 70 at 50 yards, I’ll take three-quarter-inch groups all day long.

50 yards, with a 6:00 hold on each target. Top left, top right, bottom left, and bottom right. Not bad, if I do say so myself.

Here’s another photo of my last target of the day, showing that beautiful 0.740-inch group.  Bring on the buffalo.  I’m ready.  So is my Henry.

I think I’ll leave the Henry’s adjustable rear sight right where it is.

The secret sauce?   It goes like this:  A 300-grain Hornady jacketed hollow point bullet crimped in the cannelure, 16.2 grains of Trail Boss powder, a CCI 200 primer, and Federal brass.  I don’t think the brass makes much of a difference when shooting .45 70, as long as the brass is trimmed to a uniform length.  I used Federal brass because it’s what I had, and I’ve had it a long time.  My .45 70 brass is over 40 years old.  It’s been loaded a lot of times, but when you load at Springfield levels, brass lasts a long time.

So what’s it like to shoot the Henry .45 70 Single Shot?  It’s fun.  The Henry is more of carbine than a full-sized rifle, although the length of pull is the same as my other rifles and the barrel is a full 22 inches.  It’s that single shot design that allows the overall package to be shorter.  It’s a compact, hard-hitting package with recoil that is one thin red hair on the good side of tolerable.  The rifle’s brass buttplate adds substantially to the rifle’s overall rich appearance, but let me tell you, you feel it when the hammer drops.  I was glad the 300-grain bullets worked well; the 405-grain loads I had were just a hair over a tolerable recoil level for me.  My shooting was all in shirt sleeves shooting off the bench, though.  With a winter jacket or on a hunt, making friends with 405-grain bullets would be a lot easier.

It’s stunning just how elegant the Henry .45 70 Single Shot is, and what’s equally stunning is the amount of “cool” you get for the price.   The MSRP on this rifle is $628, and Henry tells you on their website that you should expect a discount from that price.  To me, the benchmark single shot rifle is Ruger’s No. 1, and that rifle is something like $1500 these days.  I believe the Henry’s fit and finish are actually superior to what you get on a Ruger No. 1.   The walnut on my Henry is exceptional.  I think Henry is undercharging for these rifles.   They’re that good.

So where am I on all of this?  The Henry likes 300-grain bullets better than the heavier 405-grain stuff, and that’s where I’ll focus future load development.  Several suppliers offer 300-grain .458 bullets, and there are other powders to try.   One more thing I want to make sure you know:  I love this rifle.  Life is good.  I’m having a lot of fun with my Henry.


Check out our earlier Henry Single Shot stories here:

Henry’s Home
Developing a Henry .45 70 Load:  Part 2
Developing A Henry .45 70 Load:  Part 1
The Henry Is In California
Henry Rifles:  Made in America Or Not Made At All


Want more gun stuff?  Hey, just click here!


Our rifle marksmanship blog is here!


Never miss an ExhaustNotes blog!  Sign up here:

A note from Bill…

Bill Murar, at speed, on a CSC 150 somewhere near Lake Erie.

That’s good buddy Bill Murar in the photo above, riding a CSC 150 Mustang replica a few years ago in the Lake Erie Loop (a one-day, 600-mile endurance event around the periphery of Lake Erie).   That’s impressive…600 miles in a single day on a 150cc motorcycle!  Bill and I have stayed in touch ever since, and a couple of weeks ago I received this note from him:

Joe, thought you might enjoy this photo of my grandmother (Estelle Dadney) standing next to my grandfather’s (William Dabney’s) early H-D motorcycle. I had his photo superimposed above the bike. He was a pilot in WWI and WWII. Somewhere, there is another photo with (I believe) the same motorcycle with a sidecar with both of them. 

Enjoy!

Bill

That’s a great photo, Bill.  Thanks for sharing it with us.  Ride safe and stay in touch.

New CSC RX3 Colors

I recently heard from good buddy Steve Seidner over at alma mater CSC Motorcycles that the new 2020 RX3 colors have arrived, and the colors are sharp!  Take a look:

Steve told me that the new 2020 RX3 includes substantial refinements and that the bike has steadily improved since its 2015 introduction.  I thought the 2015 version (the one I ride) was impressive; to hear that it has improved makes the RX3 even more desirable.  The 2020 RX3 motorcycles are in stock now, and the price has dropped to $3995.  That’s a hell of a deal.

The RX3 story makes for an interesting read and if you’d like to know more about these motorcycles, pick up a copy of 5000 Miles At 8000 RPM.

Janus Motorcycles’ Virtual Discovery Day

This Saturday at 10:00 a.m. EDT Janus Motorcycles is hosting a Virtual Discovery Day that you can sign up for here.  Hey, if you’re under house arrest (as most of us are these days) this is a much better alternative than watching Netflix or TV reruns.  The Janus bikes are beyond cool, and in the Virtual Discovery Day you’ll get to meet Devin Biek and Richard Worsham, the two guys who founded Janus.  I rode with Devin and Jordan (another key Janus guy) in Baja (you can read about that ride here) and it was a hoot.

So it’s this Saturday at 10 Eastern.  I’ll be there, and I hope to see you there, too!

Zed: Better Living Through Silicone

Every time I tinker with Zed it leaks a little less. This session I tackled the alternator wire oil leak. Zed’s alternator runs wet, a popular thing to do way back when motorcycles were made of steel and riders were flesh and blood. Where the wire harness exits the stator housing a rubber grommet is supposed to keep oil from seeping out. Someone had stuffed electrical tape down in there and Zed’s grommet wasn’t doing its job because the harness dripped oil.

The problem with replacing the grommet is that the stator harness plug needs to be dismantled to get the wire ends through the grommet. Dismantling the 45 year old stator plug is an iffy proposition. You’ll break the brittle plastic for sure. I guess you could eliminate the plug, cut the wire ends off and butt splice the mess back together. It would probably be better from an electrical standpoint.

The job also requires removing the stator housing to gain access to the grommet. That means a new cover gasket and more work. Instead, I took ExhaustNotes.us reader, Honda 919’s advice: After removing the tape and gunk in the grommet area I flushed the void with carb cleaner and mopped it out with a rag. Once I got the void nice and clean I packed in black, RTV silicone until it was flush with the stator housing. Then I let it dry over night. No more stator leak…at least for now.

The black rubber, half-circle cam end plugs were the next problem. Oil seeped out of these with the engine running and at high speeds the oil would blow back onto the plug wire and whatever pants you happened to be wearing that day. The plugs are more than just rubber though, they have an aluminum core to help hold their shape. Zed’s were dry and hard from years of service so I bought new ones.

The old cam plugs were glued in with silicone. I’m not sure it’s a factory process but I used a tiny bit of RTV black on the head semi-circle to help seal the plugs. All went well until I started tightening the valve cover and the rubber plugs started to squirt out the side of the head. Maybe the silicone was making the plugs slippery. I used a rubber mallet to tap the rubber plugs back into the head but when I did that the valve cover gasket pulled in towards the head.

I decided to let the silicone set up and walked away. The next day I loosened the valve cover, set the valve cover gasket back into position and buttoned the thing up. Hopefully for good.

Somewhere in all these road tests the high/low beam knob fell off leaving a broken bit of plastic stalk to control the lights. The parts to fix the high/low switch cost nearly as much as an entire new switch cluster! Having had about enough parts ordering I heated and curved a bit of black plastic, drilled a hole in the thing and RTV silicone glued it onto the protruding bit of the switch stalk. It looks horrible but at least it’s ugly.

I set an ambitious goal for Zed’s 4th test run: 200 miles across the Sacramento Mountains to eastern New Mexico and back. I was only 15 miles into the test run when I smelled oil. The damn valve cover was leaking. Still! The two forward cam ends had a light sheen of oil so I aborted the big ride and took a shorter route. After 36 miles of riding the oil leak seemed to be gone. After 60 miles of riding the cams were nice and dry and there was no oil smell. After 90 miles of riding, not a drop of oil anywhere: the engine was dry. Maybe the earlier oil leak was pre-existing oil blowing around the front of the engine? Back home I checked Zed and could not find any leaks.

I believe the test runs are over for Zed. It runs great and it doesn’t leak. There will be more repairs in Zed’s future but I feel pretty confident in the old motorcycle getting me where I need to go. That is, if the gas tank doesn’t leak.


More Zed’s Not Dead here!

A 1911 Pellet Gun

Same dimensions, same heft, and it says Colt on the slide. How cool is that?

The Colt .177 1911 Pellet Pistol

That 1911 you see above is the same size and the same weight as a real deal .45 ACP 1911, but this one is a CO2 pistol that fires .177-caliber pellets.  I saw it in a Big 5 sporting goods store a good 20 years ago, and for reasons I can’t easily explain, I bought it.  It was an impulse buy.  I thought it was a cool idea and I figured if I was ever stuck in the house and couldn’t go out, I could entertain myself by shooting my pellet pistol.  Little did I know the CV19 debacle would turn that eventuality into reality (I mean, I’ve been under house arrest for over a month…I have everything but the ankle monitor).  I paid $150 for my .177 1911, I put it on the shelf, and I forgot about it for the next two decades.

A cool case, too, and it also sports the Colt logo. How could I go wrong?

As you know from following our earlier pellet pistol blogs, I recently set up an indoor pellet pistol range in my garage in an effort to keep myself entertained (I don’t live on a big ranch in New Mexico and I don’t do concrete).   I previously wrote about two Crosman pellet pistols that wouldn’t hold pressure and my old Daisy 717 pellet pistol that worked like a champ.  A the end of the most-recent Daisy blog I mentioned that I had the 1911 pellet gun and I said I would break it out if I could find it.

Pellet Pistol Packaging Problems

Well, that’s what I did.  I found the gun pretty easily…it was in the bright blue case you see above.  But when I opened the case, things did not look good.

The road to Hell is paved with good intentions. In this case, those good intentions were a foam bed that attacked the gun chemically as the foam decomposed.

Hmmm, the foam padding inside the case that was supposed to protect the gun was doing just the opposite.  Instead of protecting the gun, the foam was decomposing and appeared that it might be damaging the 1911.  Ah, maybe not, I thought.   Given a spritz of that powerful spray that cures all evil (that would be WD 40, not YooHoo, Fred), the foam that was sticking to the 1911 would probably fall right off.  Or so I hoped.  Before you feel compelled to weigh in on this, let me say at this point I realize this is all my fault.  I was remiss in letting the gun sit in that case for 20 years without ever pulling it out, checking it, and keeping it wiped down.  Maybe.  It could be that if I wiped it down the oil I used would have accelerated the foam’s decomposition.  Who knows?

Messy. Whoever specified this foam did a lousy job. It was rotting away and sticking to the gun.
The appropriate engineering response to this condition is: Yeccchh!
The boys at Colt were thoughtful enough to include a tin of pellets. The foam had cruddily bonded to it, too.

Finish Degradation

So I was hoping all this rotting, rotten foam would wipe right off and the gun underneath would be fine.  Well, like the old saying goes, you can hope in one hand and poop in the other.  You know which one is going to fill up first.  A few shots of WD 40, a good scrub with an oily rag, and the verdict was in:  Things were not looking good.

That’s not dust. It’s pitting in the finish where the foam had attacked it.

I even tried lightly scuffing the gun with steel wool (that works on light rust on blued steel), but nothing helped.  The 1911 has what I’m guessing is a powder-coated finish, and that damned decomposing foam actually was eating into the finish.  It was like rust, but it was a different chemical reaction.  It actually etched its way into the powder coating.

Another shot of the surface finish damage. You live and you learn. Sometimes, anyway.  Interestingly, the Colt pellet 1911 rear sight has an Allen screw that can be loosened to slide the sight left or right to adjust zero.

So I learned a lesson again I learned a long time ago:  You can’t just put something away in a box and forget about it.  I should have taken that gun out of its case every year and wiped it down.  Eh, we live and we learn.

.177 1911 Operation

I cleaned up the 1911’s exterior as best I could, and then I had to figure out how to operate it.  I had the owner’s manual, but what would be the fun of simply reading it?  Nope, I had to play with my fuzzy friend and figure it out for myself.  The 1911 had two little cylinders for holding the pellets and the owner’s manual (what little I read) said it could be fired either single or double action.  Hmmm, that’s cool, I thought.

I looked at the gun and it had a lot of the same features as a regular 1911 (i.e., a .45 ACP 1911).  You know, the grip safety, the mag release, and the slide release.  I tried the grip safety (unlike the rest of this 1911, it’s plastic).  It was hinged at the top just like a real 1911.  Cool, I gotta check this out, I thought, so I pulled the hammer back, pointed the gun in a safe direction without depressing the grip safety, and pulled the trigger.  The hammer fell anyway.  Okay, so the grip safety is purely cosmetic.   The 1911 also has a thumb-actuated safety, but unlike the grip safety, it actually works (it prevented the hammer from falling when I pulled the trigger).  The pellet 1911 has a mag release just like a real .45 auto, and what that does is press against the right grip to flex it away from the frame.  That allows you to get a fingernail under the grip, and you can pop it off (more on that in a second).  And finally, there’s a slide release just like a real 1911.  I pressed it down and what do you know, the slide slid!  Forward, that is…about three quarters of an inch (more on that in a moment, too).

The thumb safety really works, just like it would on a real 1911. The plastic grip safety is hinged like it would be on a real 1911, but it is cosmetic only.

Like I said, when you press the mag release, it pushes the right grip away from the gun’s frame.  You can then pull it off and that exposes where the CO2 cylinder sits.  There’s a lever under the grip.  You can rotate that down and it releases upward pressure under the CO2 cylinder.  Then you rotate a knurled brass wheel to lower it and a brass cup underneath the cylinder, and then the spent cylinder can be removed.  To install a new cylinder (which you need to do a lot, as I’ll explain shortly), you just insert the new cylinder, rotate the brass wheel to take out all the clearance between it and the cylinder, and then rotate the 1911’s grip lever (underneath the grip) upward.  That pushes the CO2 into the probe that penetrates the cylinder cap and seals the cap against the probe.  It’s all very clever.

A CO2 cartridge in the 1911’s grip cavity. That little brass wheel beneath it snugs up against the bottom of the CO2 cartridge.
Snap the right grip back on the gun, rotate the lever beneath the grip (shown here in the lowered position), and the gun is charged.

I did all the above, locked a new CO2 cartridge in place, and the gun was charged.  And unlike the two Crosman handguns I tried a couple of weeks ago, it held pressure.  Next up was loading one of the little revolving cylinders with .177 pellets.

Colt provided two pellet cylinders with the .177 1911. They are like the cylinders in a revolver.  Those little protuberances on the face of the cylinder are supposed be engaged by a push from the gun’s internals to rotate the cylinder when it is fired double action or when the hammer is cocked.
Here’s another shot of the pellet cylinder with a few pellets inserted.  It holds eight pellets, matching the magazine capacity of a real 1911.

After you’ve loaded the cylinder with pellets, the idea is that you drop it into the 1911 between the rear of the slide and the frame, and then pull the slide to the rear to close it.  I did all that, and at that point, I was ready to start sending lead downrange.

A loaded cylinder, in place. Rack the slide rearward, and it should be ready to go.

Double Action It Ain’t

Downrange, in this case, was 20 feet away into my house-arrest, Rube Goldberg, cardboard-box-contrived bullet trap.  Like my pistol, I was pumped because it felt good to have a hefty 1911 in my hand again.  This 1911 pellet gun feels like a real one.  It weighs exactly the same, it’s got relatively decent sights, and lining it up on the target felt like the real deal.  Alvin York, step aside, ’cause this 1911 has the added advantage of double action.

Or so I thought.  With the safety off and the gun pointed at the target, I tried firing double action.  I felt the take up on the trigger and I felt it come all the way to the rear, but nothing happened.  I tried again, looking at the hammer, but the hammer just sat there.  Hmmm.   Well, so much for double action.

I manually cocked the hammer, lined up the sights, held my breath, focused on the front sight, and then I heard a satisfying PFFFT!  That delightful report was followed a nano-second later by the mighty .177 lead hourglass sharply smacking into my target.  I could see the hole it made, and it was in the black!  Yeah, baby!

Cool, I thought.  Okay, double action was a bust, but that’s no big deal…I’ll just cock the hammer for each shot.  So I pulled the hammer back, repeated the steps above, and it was PFFFT again, but this time without the thwack of the pellet hitting the target.  I looked downrange and that prior hole on the target was looking mighty lonely.  Hmmm again.  Shooting blanks with a pellet gun.  Whoever heard of such a thing?

I pressed the slide release, the slide slid forward, and I peeked in.  The cylinder holding the pellets had not advanced.  It was still sitting on the empty chamber I had fired previously.  I pulled the hammer back to see if the hand that is supposed to advance the cylinder was moving up to do so, but it wasn’t.  Rats.  It looks to me like the parts that form the mechanism to rotate the cylinder are plastic.  They may be broken, or age-degraded, or maybe stuck in place by agglomerated lube.  Who knows?  I need to take the thing apart to do a proper proctological exam, but that’s a project for another time.  A quick Google search showed that others complained of similar problems with these guns, and one of the comments noted that there are YouTube videos showing how to work on the thing.   Hey, Gresh has his Z1 and concrete, and I have my broken-down pellet guns!  Life is good.

Sending Lead Downrange

For right now, I have a single shot 1911 pellet gun.  I just have to open the breech, take the cylinder out, load a pellet, put the cylinder back in, close the slide, cock the hammer, and take a shot.   Which I did several times, and here are the results.

Eh, not bad. Not as good as the Daisy 717, but not bad, either.
Another five rounds. One went high.
I had a good group going, but this time two went high.
Running out of steam. After 25 or 30 shots, the CO2 cartridge was circling the drain. The pellets didn’t have enough poop to pop through the paper.

Cost per Shot (Pellets vs .45 ACP Ammo)

This is a good news/bad news story.  You’ve already read the bad news.  A little bit more bad news:  I only get about 30 shots (maybe less) out of a single C02 cartridge.  That surprised me.  So much so, that I looked it up on Google, and it seems like 30 shots is about what any CO2 pellet pistol gets.  I think I’ll probably get comments from our readers on that and I’m looking forward to reading your inputs.   Hey, if your mileage varies, leave a comment and tell me about it.

Just for giggles, and because I have the time while we’re all under house arrest, I thought it would be fun to compare the cost of shooting the pellet 1911 to the real thing.

I checked online (because it’s been a long time since I’ve bought C02 cartridges), and they seem to be going for around $8 for a box of 5.  That works out to $1.60 per cartridge, and at 30 shots per cartridge, that’s a little more than 5 cents per shot for the CO2.  The pellets seem to run around $7 for a tin of 150, and that’s a little less than 5 cents per pellet.   So, every time I pull the trigger on my 1911 pellet gun, I’m sending a dime downrange.

For my .45 ACP reloads, there are costs in the bullets, the powder, and the primer.  I don’t count the .45 brass, because I get mine for free and it seems to last forever.  My favorite Missouri 230-grain cast roundnose bullets are $50 for a box of 500, so that’s a dime per shot in lead.  Unique powder is about $30 a pound, there are 7,000 grains in pound, each cartridge takes 5.6 grains of Unique, and if you do the math, that works out to $0.024 per cartridge for propellant.  CCI 300 large pistol primers are $30 per thousand, s0 that’s $0.03 per round for primers.  The bottom line here is each time I pull the trigger on a real 1911, it costs me 15 cents.

What the above means is that I’m saving about a nickle per shot with the 1911 pellet gun.  I guess need to shoot a whole bunch more…you know, so I can make up for the hit my 401K is taking as a result of the corona virus.

Wrapping It Up

So where am I on all this?   The good news is I like my 1911 pellet gun.  It’s impressive how much it feels like a real 1911 (without the sound and fury of a real 1911’s bark, of course).   The pellet gun 1911’s accuracy isn’t stellar, but it isn’t terrible, either.  It doesn’t index when I cock the thing and it doesn’t work double action, but that’s almost an advantage given our current house arrest situation (fixing those problems is just another project to put in the hopper).  The bottom line?   I like my .177 Colt pellet gun and it’s one I’ll be using more.


See our other Tales of the Gun stories here!

Another Day, Another Leak

I don’t want to give you the wrong impression. It sounds like I’m having lots of trouble getting Zed back on the road but it’s really more a function of my resurrection approach. I tried to spend the minimum amount required to get the 1975 Kawasaki Z1 operational because I didn’t know if the engine was shot or if the transmission slipped out of gear under load. Having done that, and proven to myself that this 900cc mill is a sweet one I can invest more money into some age-related issues.

On my first 30-mile road test I had a two copious oil leaks and I resolved those in a previous story. Zed was ready for a more ambitious undertaking. I laid out an 80-mile round trip to the Three Rivers, Santa Nino De Atocha church. The Santa Nino is off the beaten path but is still in use. Next door to the church is an interesting graveyard that I planned to commune with the spirits in while I sipped my thermos of Batdorf & Bronson® coffee. Hanging out with dead people is a great way to avoid catching the corona virus.

Zed ran strong and we made it out to church in fine tune. I parked the bike, pulled out my thermos and prepared for the séance. Then I noticed the gas leak. A panic set in: how long has it been leaking? Will I have enough fuel to get home? Won’t I look pretty stupid after hating on tank sealer for so long?

I took a big slug of coffee in case the situation spun out of control and I had no time later. Popping the seat I could see a thin stream of fuel shooting from the left rear seam directly into the air box inlet screen. It was strong, pretty thin and 3-inches long…Ahem…

I never go anywhere on a motorcycle without tools so I had vise grips in my bag (that was strapped to the much-hated luggage rack) and managed to crimp the seam slowing the pinhole leak. Fuel was still seeping but at least it wasn’t spraying out. I took one more slug of coffee for the road and reloaded the bike. Since the leak was using fuel faster than I was burning it I cruised back at a brisk 80 miles per hour. I had less than a gallon left when I got home, a 20-mpg average.

This next part will require so many disclaimers that the blog would crash under the weight of them. Listen, if you don’t know how or are even slightly worried about welding a fuel tank then don’t do it. If you choose to weld on a fuel tank don’t come crying to me pointing at bits of sheet metal stuck in your eye.

After draining the tank I blew it out with a grass blower to dry out any residue. Next I shot a heat gun into the filler neck to warm up the tank, hoping to evaporate any remaining fuel. Then I blew it out again and gave it the heat gun treatment again. This all took about ½ hour.

My finely calibrated nose told me that the fuel/air ratio inside the tank had dropped to safe levels. You can’t teach this skill; it’s like wine tasting. You have to blow up a few gas tanks to get the knack. I took the tank outside where there was plenty of room to explode and stuck a lighted propane torch nozzle inside the tank. The tank did not kill me. I was ready to weld.

I knew where the pinhole leak was but I brazed a wide area on either side in case other leaks were concealed by the main leak. I use brazing rod instead of welding the tank because the metal was so thin I would burn through trying to cover the amount of tank I wanted to cover. Once I thought that I had piled on enough material I reinstalled the fuel tap, filled the tank and waited to see if it would leak.

The tank stayed nice and dry. It was time for another test run, this one 140 miles in duration. Zed passed with flying colors. This bike runs smooth at 4800 RPM and 70-ish miles per hour. Hills and headwinds don’t bother the thing and I had plenty of both on the third test run. I averaged 40 miles per gallon running 70 most of the trip.

The half-circle cam-end rubbers leaked oil but I knew they were leaking and I have new ones on order. The alternator wire harness leaks a few drops where it exits the stator housing. That will require a new grommet. The speedometer is jumpy above 60 miles per hour. I’ll try a new cable but I suspect the grease has dried out inside the gauge. Low beam blew out in the headlight. That may be due to the 14.8-volt charge rate or the old bulb that came in the headlight was ready to go. I’ll install another bulb and if it blows I’ll knock down the voltage to the headlight. Otherwise nothing really bad happened.

Zed has proven to be an excellent runner so there are a few more things I want to do to the carburetors. New needles and seats, enrichener plunger seals, bowl gaskets and free up the stuck bowl drain screws. Kind of tighten up the carbs as it were.

Now we come to the elephant in the room: the fuel tank. Zed’s tank was very rusty before I cleaned it out. That rust has eaten deep into the seams of the gas tank. I don’t believe my patch job is a permanent fix. Maybe not today, maybe not tomorrow, but someday another thin spot on the seam will give way and start spewing gasoline. Zed’s patina is cool and all but I plan on taking some long, lonely motorcycle rides and that gas tank worries me. I know I could pour that devil’s brew tank liner crap inside and buy a few years of service. A new Z1 aftermarket tank in grey primer is $300. Or I could use Trump’s stimulus check on a whole new set of Z1 Enterprise’s red bodywork (tank, fender, side covers) beautifully painted in the original Kawasaki style for $1300.

I’m cheap but that Z1E bodywork would make old Zed look like a new motorcycle. I have no bias against a nice looking motorcycle. I don’t need to ride a ratty bike, you know? Any suggestions?


Check out the compleat Z1 resurrection here!

It’s a Daisy!

A pellet gun that shoots as well today as it did nearly 40 years ago…the Daisy 717!

The pellet pistol you see in the above photo is a Daisy 717, one I’ve owned for nearly 40 years.  After learning that my Crosman C02 pellet pistols wouldn’t hold pressure a few days ago, I thought I’d try the Daisy, and whaddaya know, it worked like a champ (just like it did when I bought in the early 1980s).   The Daisy is a single-stroke pneumatic air pistol.  You pump it once with this long lever that swings out to the left, open the bolt (just like on a bolt-action rifle), put a single pellet in it, close the bolt, and then shoot.  No CO2 cartridges required.

Daisy first introduced these guns in 1981, and at the time, they sold for something well below $60.  I want to say I paid around $40 for mine at a department store called Gemco.  In those halcyon days, I thought I’d give competitive air pistol shooting a shake and I didn’t want to spend a thousand bucks or so on a serious handgun.  The range was short (I  think it was 10 meters, or 33 feet), and wow, were those targets ever tiny.  I only tried that game once…the club where the matches were held was a long drive for me, the competitors had uber-expensive guns, and I just wasn’t that into it.  But I didn’t embarrass myself, and I did better than some of the folks out there with their big bucks pellet pistols.   Then I put the Daisy away and more or less forgot about it for the last 40 years.

Well, sort of.   A friend in the bomb factory (where I was working at the time) told me about another use for air guns, and on occasion, I would put the Daisy to work when the need arose.   That story goes like this:  No matter how militant a feminist your better half might be, when there’s a spider on the ceiling or in the bathtub she’s going to get all sguiggly and require manly intervention.  That’s where yours truly and the mighty Daisy answer the call to arms.

Truth be told, there’s no way I went to get up close and personal with a big old hairy, funky spider.  I was always just as scared as Sue was, but I couldn’t let her see that.  I know, I used to be an Army officer, I’ve jumped out of airplanes, I’m pretty good with a 1911, and I rode a motorcycle across China.  But I’ll admit it, and only to you:  Spiders scare the hell out of me.  But we’re men, you see.  Real men.  And when it’s time to step up, that’s what we gotta do.

This guy might be a little much for the Daisy. I photographed him on Glendora Ridge Road in 2003. Maybe a .458 Win Mag would be more appropriate.

The good news?  The Daisy 717 makes it easy.   All you need to do when you hear that dreaded directive (There’s a spider in the bathroom…get it!) is dig out the Daisy.   Cock it without putting a pellet in the gun (that part is real important…make sure you don’t put a pellet in).  Stalk your prey carefully and slowly approach the offending arachnid.  Place the muzzle (the end the pellet comes out of) approximately two inches from the spider, taking care not to alarm it.  Take a deep breath, let it halfway out, and then slowly squeeze the trigger (without jerking it) while maintaining proper sight alignment.  When the pistol discharges, a high speed jet of compressed air will strike the spider, breaking it up into its major body parts, legs, and assorted arachnid appendages, which will then fall gently and harmlessly to the floor.  It’s likely said appendages will continue to twitch for several minutes after your demonstration of manly marksmanship.   More good news:  At this point, your job is done (you’ve done what your significant other requested).  You were asked to “get it” and you did.  If you are of a mind to, you can tell her to clean it up, but I wouldn’t advise doing so (don’t ask how I know this).

All that aside, after nearly four decades of faithful spider stalking and, most recently, trying to amuse myself during our self-imposed shelter-in-place house arrest, I thought I would try my Daisy in my cobbled-up indoor, garage-based pistol range.  I made a target stand out of a cardboard box and a phone book, and hey, the Daisy and I can still drive tacks!

Five shots at 20 feet with the Daisy. The 717 does nice work.

Product Test: British Motorcycle Gear Rapido Gloves

I have managed to use British Motorcycle Gear’s Rapido gloves in temperatures ranging from the low 40s to the mid-90s and they have worked well across that range. All in, I’ve done about 600 miles wearing these gloves. Despite the wide temperature variations the gloves were never uncomfortably hot on my rides around muggy, warm Daytona last month.

The Rapidos are fairly stiff when you first put them on. Normally stiff is an attribute men aspire to but getting the Rapidos on and off was a bit of a struggle the first day. By day 4 the gloves had loosened up quite a bit and I no longer thought about the process.

Another reason I had trouble getting in the Rapidos was because they come with triple hook and loop straps, two on the gauntlet and one on the wrist. I didn’t realize the wrist strap adjusted and so was forcing them on willy-nilly. Loosening all the straps made it easier.

One benefit to all those straps is security: once tightened down this glove is not going to fly off in a crash unless your hand is still inside it. More security is provided by the thick rubber finger guards on the leading edge of the glove. If you’ve done much off-roading with faster buddies you know how painful a rock tossed into your hand can be. I wish I had these on a few months ago when Mike kicked up a boulder into my finger. It felt like the thing was broken. Three of the finger guards have little vents built into them, kind of like little hood scoops. The vents don’t pass much air but if you hold your hand out fingers forward you can feel the air coming in.

Yet more security comes in the form of a carbon fiber looking knuckle plate attached to the glove. BMG calls it Carbon Leather, I think. I haven’t managed to test this bit because I don’t want to hurt myself but if your hand became pinned beneath the bike and the pavement (never let go of the bike!) I imagine it would buy a few hundred feet of abrasion before you started to lose any knuckle. Amazingly, all that armor does not restrict hand movement much and once the gloves are broken in you can make a fist easily.

The Rapidos have a fairly long gauntlet and with the straps disconnected the mouth opens wide to fit big jacket sleeves. There’s a decent range of adjustment on the gauntlet. I was able to snug them down while riding in just a T-shirt and a G-string. The Rapido’s palm area has a lot of activity going on what with extra pads and stitches but none of it seemed to cause blisters. The Rapidos are heavier duty gloves than I’m used to wearing. They feel like they might actually protect your hands in a wipeout. I usually wear long white opera gloves or Harbor freight Nitrile gloves when riding motorcycles.

My red Rapido glove’s appearance is not exactly conservative; in fact they’re downright flashy. When I put them on I get a strange urge to crash The Avengers from the Marvel movie series. If you’re an under-the-radar guy get the black Rapidos. At $79 list price the Rapidos are not cheap but my regular work gloves run 10 or 12 bucks a pair and they don’t have near as many nifty features as the Rapidos.

I’m going to use the Rapidos for the next few years and I’ll be sure to write an Exhaustnotes long term review if the world doesn’t end before the gloves do. Maybe we’ll get lucky and I’ll get to crash test the Rapidos.