Recently Berk wrote a story on his five best motorcycle books. I figure I’ll copy him since nothing else moto-related is going on. Berk’s choices were all good choices but naturally not the ones I would have picked. Berk and I differ on a lot of topics (ok, most) but we don’t let that stop us from getting along well. Maybe it’s my deep-seated conviction that I am always right or maybe it’s because I actually am always right that smooths troubled waters. It’s hard to tell, really. Whatever it is it works so I’m not going to over-analyze the thing.
The thing is, I don’t read many motorcycle books, and five will be a stretch. Sure, I’ve read Berk’s travel books but only the ones with me in them. I have nothing against travel/adventure books but as a rule, it’s a topic that I would rather do than read about. I’m going to take a stab at the five-list anyway.
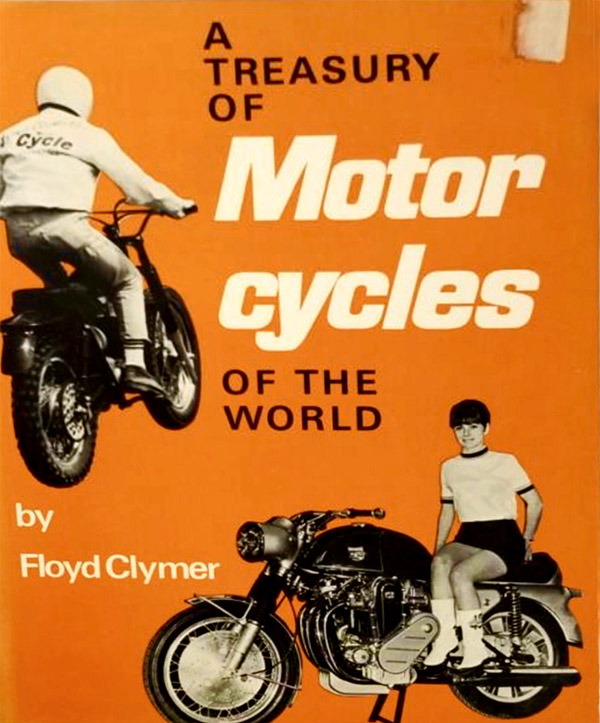
My top pick for all-time best motorcycle book is Floyd Clymer’s A Treasury of Motorcycles of the World. This huge hardcover was my bible growing up. I read and re-read the thing so many times I knew it by heart. The Treasury came out just slightly before the age of Japanese superbikes and reading it you get no sense of the dramatic changes that were about to sweep over motorcycling. The Treasury covered practically every brand that you could find in the USA: Harleys, Triumphs, Hondas and the rest. The more obscure brands were covered also. What seems obvious to us now was at that time still up in the air. The Japanese were making inroads but one look at the outsized 4-cylinder Munch and you suspected car-engined motorcycles were the future. In such a fast moving business, who knew which marques would be successful?
The Treasury covered more than just motorcycles. Included were descriptions of motorcycle culture and motorcycle events. A debate between Triumph and Suzuki on the merits of two-stroke vs. four-stroke stands out in my mind. I sided with Suzuki. If you were completely new to motorcycling this one book would bring you up to speed on the whole shebang.
Maybe I’m remembering theTreasury with rose-tinted neurons. I lost the book somewhere over the 53 years since I read it last and I can’t be bothered to buy another copy of The Best Motorcycle Book Ever. I’d rather keep the knowledge I gained from the book: the excitement and wonder from its pages and a life long infatuation with two-wheeled travel. I’ll not risk my entire life history to a few mis-firing neurons.
Next on my list of all-time greats is a book I’ve never read. Learn To Wheelie by Jack B. Watson was advertised in the back ads of the many, many motorcycle magazines I devoured as a youth. The book must have sold by the thousands because the ads ran at least 20 years. That alone should tell you how good Learn To Wheelie is. I wanted to buy a copy for all those 20 years but money was scarce and I ended up learning to wheelie by trial and error.
Trial and error was how most of us learned to wheelie and it was a hard won skill. One time I flipped over backwards on my Honda SL70 doing around 45 miles per hour. I landed on my back and the asphalt wore through at each of my vertebra leaving little, quarter-sized cherries to mark out each one in a zipper-like fashion.
The SL70 continued on for few yards longer and when the front wheel came down the bike started cartwheeling in the middle of the road. It bent the swing arm, the frame, the handlebars and broke any sticky-outtie parts clean off. It was like the SL70 had spent a few hours in a cement mixer. Things would have gone a whole lot different had I read Learn To Wheelie. A whole lot different.
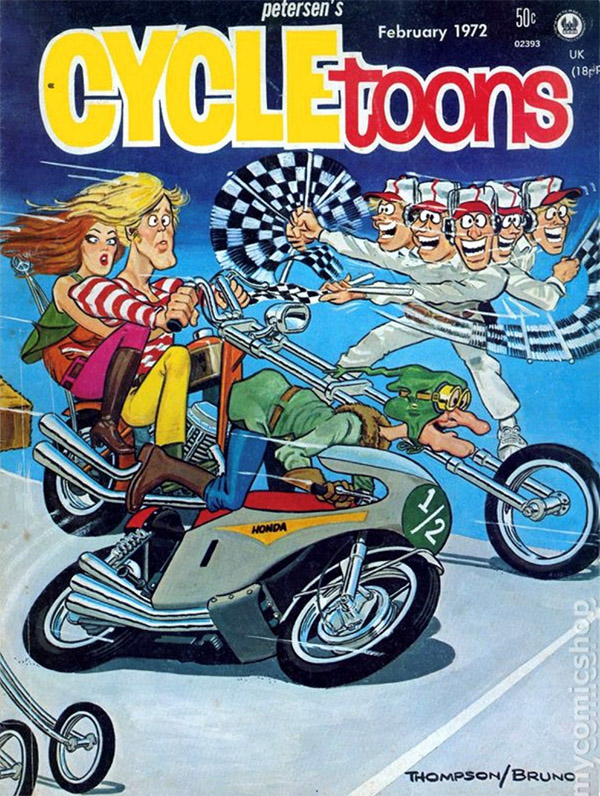
If you asked me, and you didn’t, I’d say the book that had the most influence on my feverish teenaged brain was Cycletoons. Not that Cycletoons is exactly a book. It’s a comic book and that has the word “book” in it so in my book it qualifies. Cycletoons came out once a month for a few years and in that short time did permanent damage to my personality. The artwork and stories were fantastic, running from hardcore nuts and bolts stuff to fantasy pieces that mimicked drug induced psychosis.
Unlike Clymer’s Treasury, Cycletoons came out in the early 1970s right when motorcycling in the USA was coming on the pipe. Up to date in every way with cultural references ripped from the headlines, Cycletoons put all the traditional, stodgy motorcycle magazines on the trailer. Some of the humor (and it was all humor) was pretty lame but when it was good it was the best. The artists and writers of Cycletoons were mostly young guys that knew what was happening and they used the language of the day to tell their stories. Something you rarely saw back then.
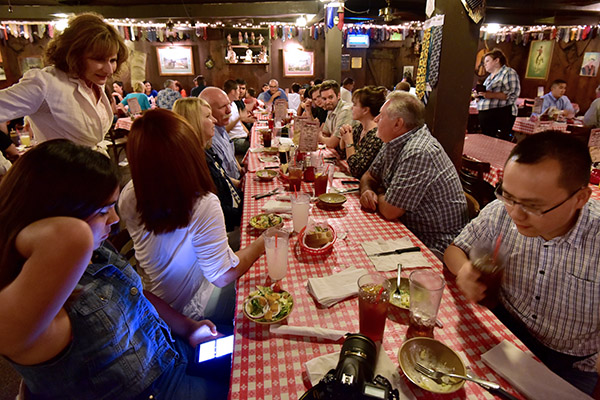
Webley-Vickers, The Ol’ Poop, Cycle Chicks, the lonely hearts mail page, Pillow Trot and Elbow Juice, I loved all of it and haunted the local 7-11 store eating Lemon Heads and waiting for the next issue to come out. Cycletoons magazines are fairly expensive now. They go for 30 to 50 bucks a copy on Amazon so I won’t be buying them. I think I still have one issue saved. It’s the one with the cover art of all the Cycletoons characters along with Skip Van Leeuwen, Nixon, Romero and a few other famous racers powering into turn one on everything from a broken down chopper to a Vespa scooter. If you find a stack of Cycletoons at a garage sale snap them up. I guarantee you’ll love them.
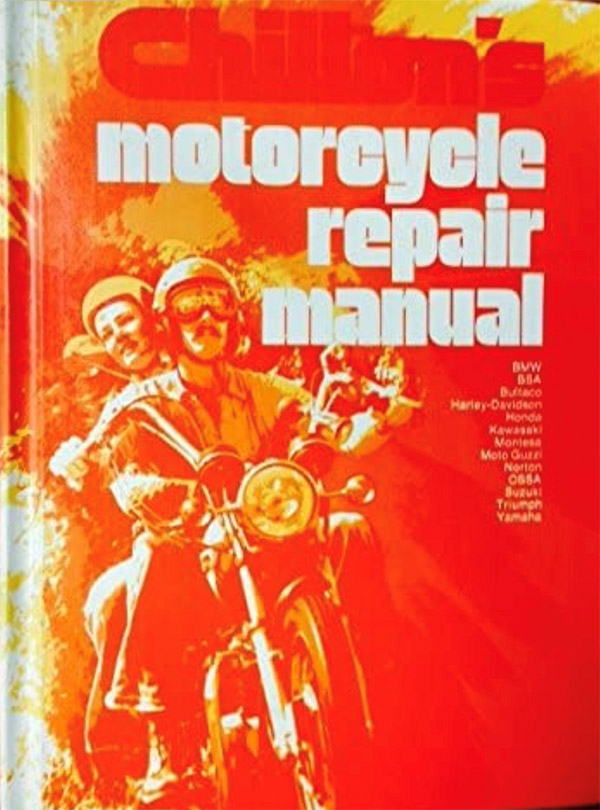
If you are into old clunkers like I am Chilton’s Motorcycle Repair Manual is the one book you’ll need for whatever crappy old motorcycle lands in your garage. The thing is massive, weighing over 6 pounds, and covers in detail most 1950-ish to pre-1973 motorcycles. This book has saved me so many times I refuse to count that high. While not the same as a one-make-and-model shop manual Chilton’s Motorcycle Repair Manual gives you enough information to fix most any old bike out there.
Beyond it’s practical applications, Chilton’s Motorcycle Repair Manual is enjoyable as pure entertainment. Looking over the repair procedures for a bike I will never own is a guilty pleasure. The book covers Z1s and H2s and has helped me make decisions about bikes on my wish list.
Structurally, Chilton’s Motorcycle Repair Manual is pretty flimsy. The hard covers are there to protect the super thin, magazine quality paper inside. I guess that was the only way fit in all the information and keep the beast to 6 pounds. Turn the pages carefully, my brothers. Oddly a used Chilton’s Motorcycle Repair Manual is not that expensive to buy. $35 is a cheap price to pay for the joyful information contained within.
Last but not least is another book I haven’t read but I do have it on order from Amazon. One Man Caravan by Robert Edison Fulton, Jr. One Man Caravan deserves it’s lofty spot simply because it’s The Mother of All Adventure Books. Nowadays everyone and their mother are riding motorcycles around the world and publishing a book about it. We’ve become complacent. Bored with the same old stories. Fulton did it way back, between the first horror of WW1 that was supposed to end all wars and the second, more complete horror of WW2. Fulton did it before it was a thing and he rode a (Douglas?) which makes him much, much cooler than anyone else. All the reviews I’ve read about the book are rave so I look forward to reading the thing when it shows up.
It’s a sad thing when your list of five best motorcycle books has two books you haven’t read but there is nothing I can do about it now. Let me know if I’ve missed any!
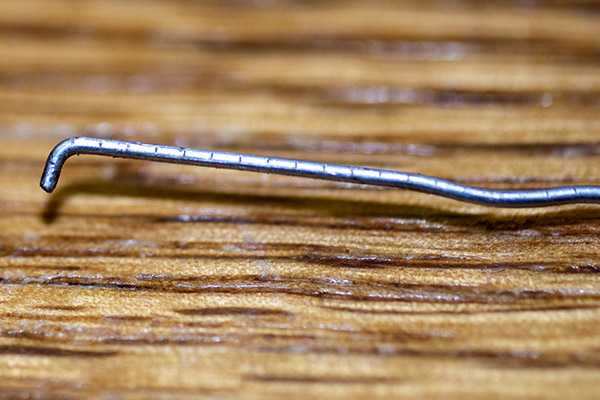
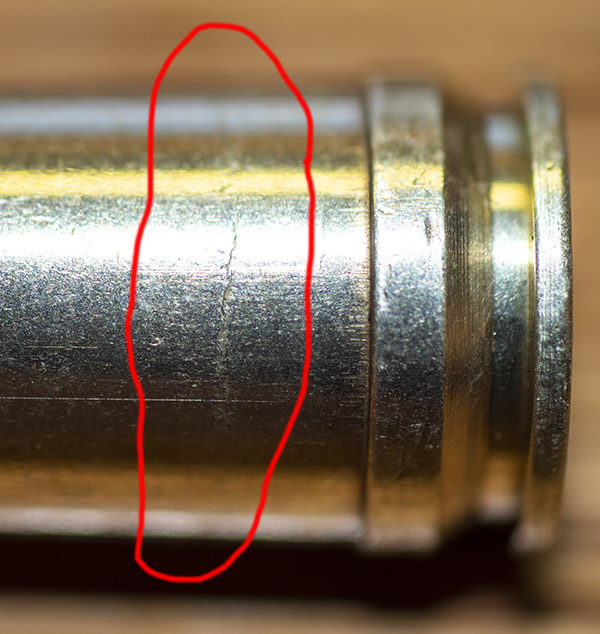
I had the 300 H&H Mags out last week, and when reloading the brass from that range session, I noticed a bright ring around some of them about a quarter inch above the belt. I did the inside-the-case check with a bent paper clip and sure enough, I could feel the sharp step of the brass thinning. Uh oh. Impending case separations. I had reloaded this brass once too often.
Case separations are caused by case stretching, which progresses each time you reload a cartridge. You can check for impending separations by examining the cases closely (you’ll see a bright ring, maybe evidence of gas escaping, or maybe even the beginnings of a crack above the case head). You can also make a tool from a paper clip to feel for a circumferential notch inside the case. That’s what I do, and I could feel the notch on these cases. They were at the end of their useful life.
I don’t know how many times I had reloaded these cases (maybe something like 3 to 5 times?), but rather than risk an impending case separation, I tossed the brass (all 50 pieces). It felt like a crime against nature, but it was necessary. I had two more boxes of 300 H&H brass (100 rounds) tucked away, so that will be the next lot that I load. I had tumbled the old brass for several hours, and maybe that was a good thing because it let me see the warning signs and the faint beginnings of circumferential cracks. Time to move on and start with fresh brass.
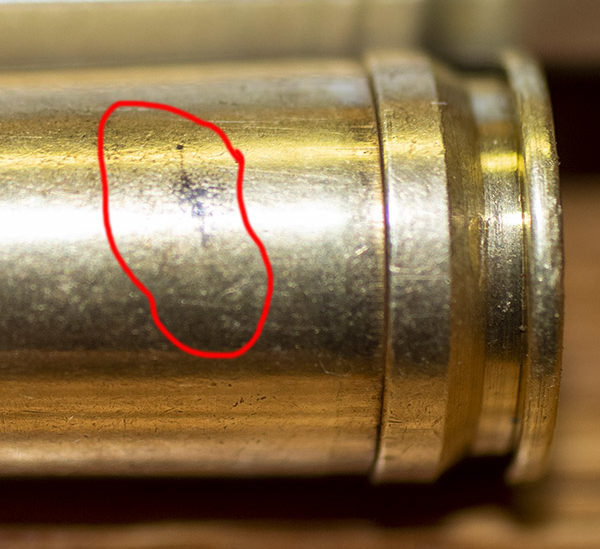
Evidence of a escaping gas on a fired 300 H&H Magnum case. The “belt” is the larger diameter just above the case base.A classic impending case separation. You can see that the case has already started to crack. This would separate if I loaded and fired it again.
When I started this blog, I didn’t intend for it to be another reloading tutorial, but here we are anyway. Let’s get back on the two 300 H&H Magnums. I guess to start, allow me to tell you a bit about the magnificent and classic 300 H&H cartridge. It goes back to shortly after World War I, when the venerable English firm of Holland and Holland introduced it as an African plains game cartridge. I know, I’m coming across as snooty, and to tell the truth, I’m not entirely certain what “venerable” means. But it sounds like it fits.
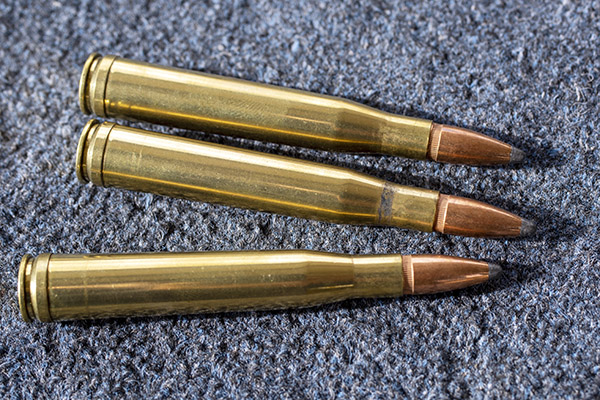
300 H&H reloads. I use 150 gr Winchester bullets I bought about 6 years ago. I got a good deal on those bullets and I bought about 700 or so. I should have bought more, as I can’t find them anywhere online. I think I have about 200 or 300 left. You can see a bright circumferential ring above the case base on the lower cartridge, warning that this brass was past its useful life.
The 300 H&H was the absolute hottest .30 caliber cartridge in those days, and the belted 300 H&H cartridge just looks cool. It became the basis for nearly every magnum round that followed, including nearly all the Weatherby chamberings, the 7mm Remington Magnum, and a bunch more. The 300 H&H round won the Wimbledon 1000 yard match in 1935, and in 1937 Winchester offered it as a factory chambering in their Model 70 (assuring it’s survivability well into the future). Did I mention it just looks cool, too?
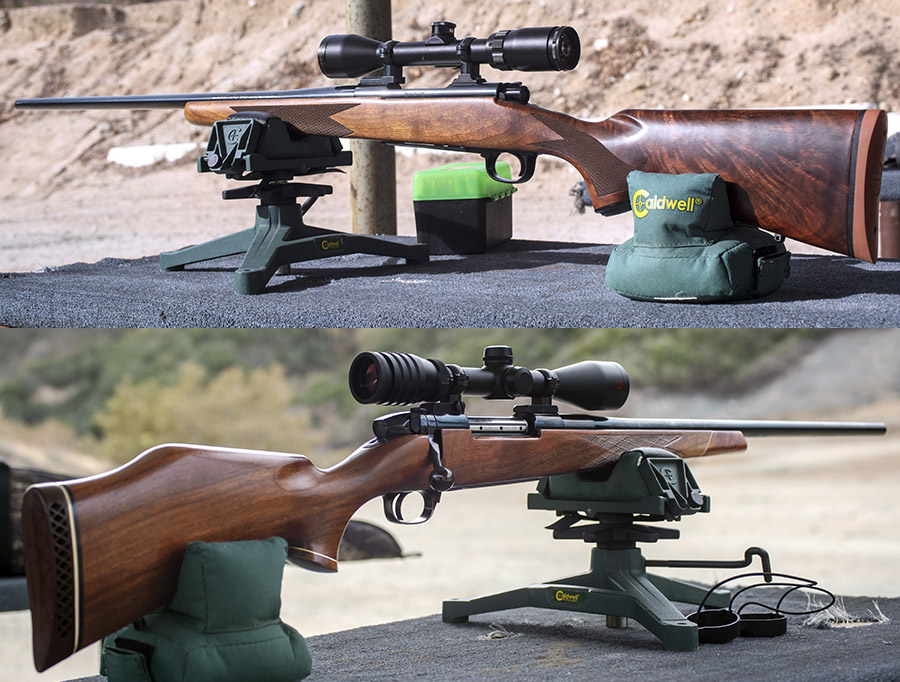
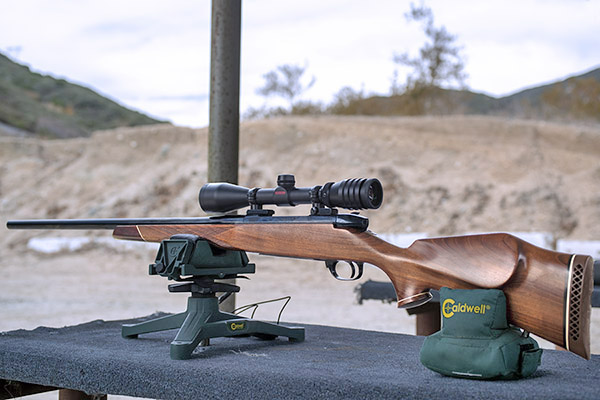
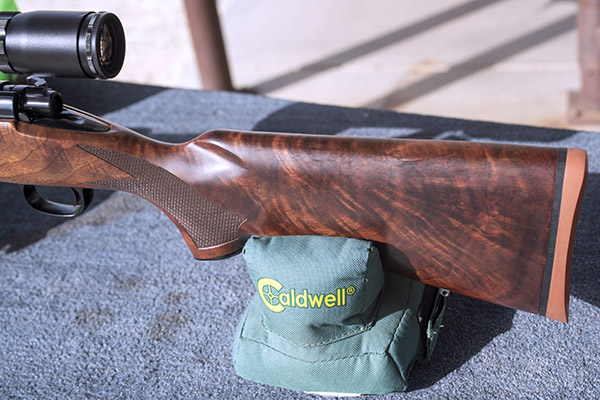
So to continue the story, I had to have a 300 H&H, and because I had a Weatherby 7mm Mag that I couldn’t get to group well no matter what I tried, to me the solution was obvious: Rebarrel it in 300 H&H. Which I did. 35 years ago. I’ve been shooting it ever since. It’s the one you see in the big photo at the top of this page, and if you don’t feel like scrolling up, here’s a view from the port side:
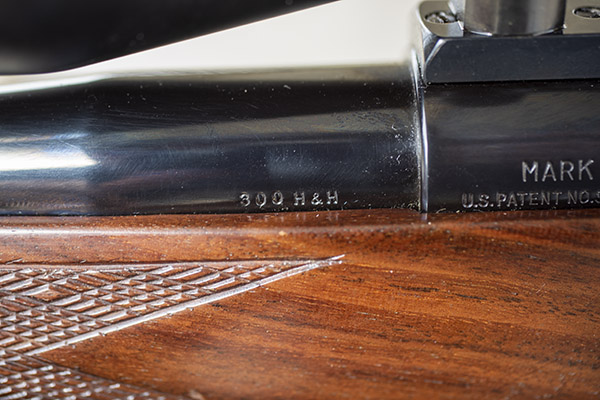
A custom 300 H&H Weatherby Mark V. This is a magnificent rifle.The cartridge stamp on my custom barrel.
The 300 H&H Weatherby is a fabulous rifle. It has a Timney trigger my Dad put in it while I was overseas, and it breaks like glass. I enjoy owning it, reloading for it, and shooting it.
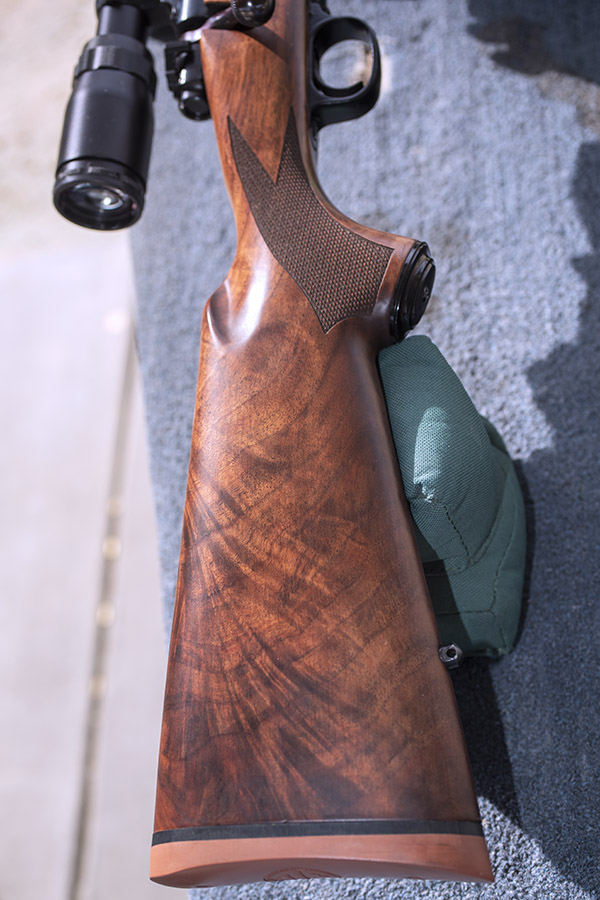
Then I picked up another 300 H&H rifle maybe 7 years ago: A Model 70 Winchester. The Model 70 in 300 H&H is not a commonly-encountered rifle, and I searched a while to find this one on Gunbroker with the fancy walnut I wanted. Trust me on this: It looks even better in person. And this one is a shooter. It deserves a better scope, but it’s still a beautiful rifle.
Sometimes people ask why I always find rifles with the nicest wood. It’s because I look for them!The Model 70 stock from the right side of the rifle. It’s unusual to see this kind of walnut on a production rifle. I recognized that when I saw the rifle on Gunbroker, and I pulled the trigger.
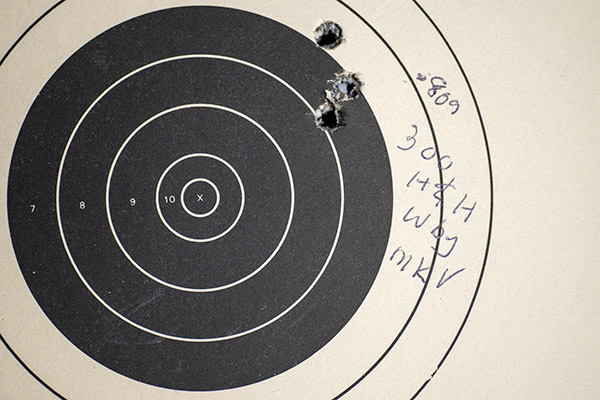
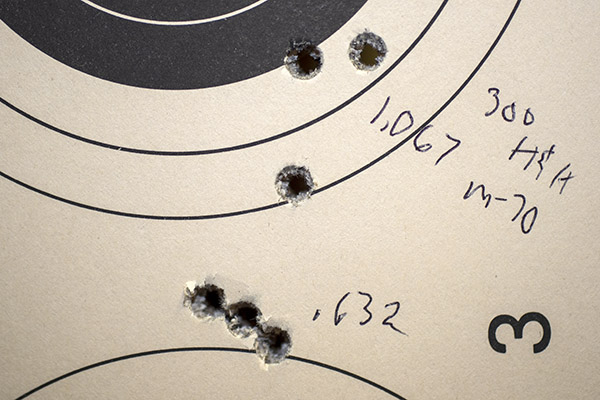
Anyway, one day last week was one of those days when I woke up and knew I needed to get out and shoot some 300 H&H Magnum. So I did. These are some photos from that range session. I think it was a Monday. It was cold and windy as hell with gusts up to 60 mph (that’s the bad news), but because of that I had the range to myself (that’s the good news).
I shot my standard 300 H&H load. It’s one that has done well for me in the Weatherby, and it does equally well in the Winchester. The load is 60 grains of IMR 4320, a CCI-250 large rifle magnum primer, the 150-grain Winchester jacketed soft point bullet I mentioned above, and an overall cartridge length of 3.600 inches. You won’t find this load in any of the newer reloading manuals, but I still have the manuals I used years ago, before all the latest and greatest gee-whiz propellants came out. That’s where I found this one. And wow, does it work! Check out the 100-yard groups on the targets below, and remember it was a cold and windy day when I shot these.
The inexpensive Bushnell on the Model 70 was at the end of its elevation adjustment range and the rifle still shot a little high at 100 yards. I shimmed the front of the scope up .010 inch, which should get me a foot lower on the target at 100 yards (if you do the math, each 0.005 gets you 6 inches at 100 yards). I should be in the scope’s adjustment range after shimming, but I haven’t fired it again to make sure. I’ll check it the next time I’m out there. Longer term, though, the Model 70 will get the scope it deserves (and that will be a Leupold).
Edit: I learned that the manufacturer has discontinued IMR 4320 propellant, so the bad news is that when I deplete the little bit of this wonderful powder I have left, I need to develop a new load (and I guess that’s also the good news, as it means I get to play around with developing a new accuracy load). I’ll probably start with IMR 4350, as my research indicates it’s the go to powder for .300 H&H. Nobody has 4350 in stock right now; hopefully, that will change soon.
One more update…on a subsequent trip to the range, the shims did the trick for the Model 70; the Bushnell scope can now be adjusted to put the shots right where I want them.
More fancy walnut: Check!
More accuracy loads: Check!
More gun stories: Check!
Riding in a group is a lot like sex: Most of us think we’re better at it than we really are.
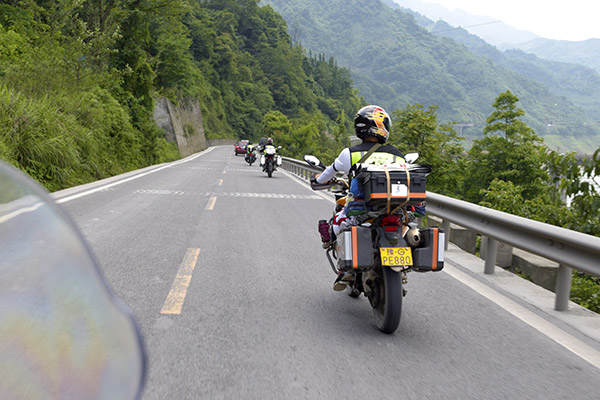
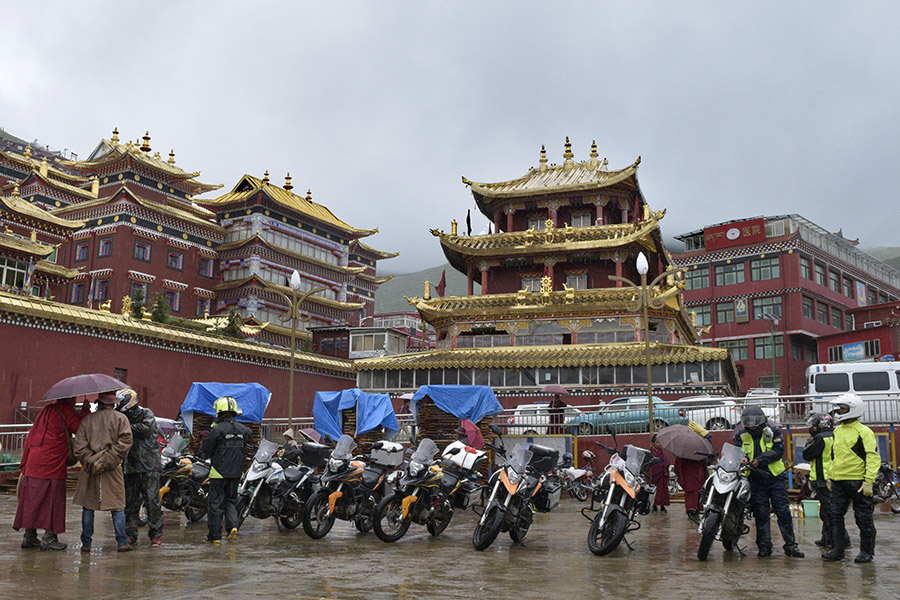
This blog focuses on how to play well with others on a group ride. It’s told from the perspective of a guy who has organized and led group rides (that would be me) and who has been a participant on group rides (that would also be me). You can have a lot of fun on a group ride and go places you might not otherwise go, like Seda in the photo above. Seda is a town that will take your breath away…it’s the largest Tibetan Buddhist school in the world, it took days to reach, and I would have never visited it had I not done so on a group ride. You can read all about that in Riding China.
Riding AKT Motos RS3 motorcycles in the Andes Mountains. This was a fabulous group ride organized by AKT Motos and my good buddies Juan and Carlos. The RS3 is a carbureted RX3. You can read that story in Moto Colombia.
I make a distinction between organized group rides and simply taking a ride with a buddy or two. This article is not about rides in that second category. In this blog, I’m describing organized rides with several riders, rides that are usually put together by a club, a dealership, and on occasion, by a manufacturer (like the ride I did with AKT Motos through the Andes Mountains in Colombia).
Tip 1: Don’t Be A “Maybe” Rider
If you’re not sure, don’t commit to the ride. Don’t be a guy who says he might go if he can get off work, or if his girlfriend says he can go, or if he feels like going that day, or any of the myriad of brainless “ifs” folks put on their potential participation. You know the drill…you start out with a whole platoon of guys who say they’re going, a week before the ride it’s down to five people, and the morning of the ride it’s you and one other guy. If you can go, put on your big girl panties and go. If you’re not sure, don’t say anything.
Tip 2: Don’t Invite Others Without Checking First
I’ve had this happen to me a few times when I’ve planned rides: Folks I invited invite others. Consider it from this perspective: I invited you because I think you’d add something to the ride and I think I know how you ride. I don’t know other folks you might want to invite, I don’t know how they would fit in the group, and I don’t know how they ride. My suggestion is this: Ask the ride organizer if you want to invite someone else. Don’t just invite others along.
If it’s a marque-specific ride, don’t invite others along who ride other motorcycles. The ride organizer is promoting a manufacturer’s motorcycle. It’s weird; folks would badmouth Chinese motorcycles but then get their shorts in a knot because we wouldn’t allow other brands on the CSC Baja rides (you can read about those in 5000 Miles at 8000 RPM and Moto Baja). Call Brand X and complain to them if they don’t have a ride for you; don’t bitch at me because I don’t want your bike sneaking into my marketing photos.
Tip 3: Don’t Ask To Join The Ride Along The Way
This seems to be a recurring request, and the only thing I can attribute it to is laziness and that all-too-common sense of “You don’t understand…I’m special.” It doesn’t seem to matter if we’re organizing a 300-mile ride or a 5000-mile ride. There’s always that guy who doesn’t want to ride an extra 15 miles to join the group at the starting point. He wants the group to pull off the highway to meet him somewhere along the way.
Don’t do this, folks. Either make it to the start of the ride or stay home. The ride organizer has enough going on without adding additional stops to save you 15 miles (and we don’t want to inconvenience everyone else who made it to the start point). Find those big girl panties. Pull ’em on.
Tip 4: Attend the Pre-Ride Briefing
If there’s a pre-ride briefing, go to it. Ride organizers do this to provide critical information and to emphasize safety. Don’t ask if you can skip the pre-ride briefing.
A combined dinner and pre-ride briefing before our Western America Adventure ride. It was an awesome ride: 15 guys, 5000 miles, and no mishaps.
Tip 5: Don’t Push Alternative Routes
Trust me on this: The ride organizer has put a lot of thought into the route. I know when I plan a ride I have a lot of things in mind (start times, how long the ride will take, getting in before dark, the group’s safety, things to see along the way, the route, fuel stops, etc.). If you have a better idea, do your own ride.
If the group isn’t going somewhere you want to go, you might ask the ride organizer privately if it would be okay to split off, see what you want to see, and then meet up with the group later that night (or just finish the ride on your own). I’ve had guys do this and I’m fine with it. What ride organizers don’t want is a debate during the pre-ride briefing.
Tip 6: Arrive Early
This is so obvious it almost seems silly to mention it. When I plan a ride and specify a departure time, that’s when we’re leaving. If you’re not ready to go at that time, we’re leaving anyway. I won’t delay the group because you can’t get there on time.
It was the morning we departed California for a 5000-mile ride through the western United States. Everyone was there on time except the chase truck driver. Always show up early for any group ride.
Tip 7: Arrive Fully Fueled
Stop for fuel someplace close to the departure point and fill up, and do so such that you can arrive for the start on time. There are few things more frustrating than a rider who announces he has to stop for fuel when the group is ready to leave.
This applies to breakfast, too: Eat your breakfast early, unless the group plans to stop for breakfast. I’ve had guys announce when the group was ready to leave that they needed to eat first. Seriously?
Tip 8: Make Sure You and Your Bike Are Ready
If you need to adjust your chain, check your oil, charge your cell phone, clean your faceshield, tweet, post on Instagram, adjust your jockstrap, or any of the other things I’ve seen guys do at the start of a group ride, do all that before you arrive. I used to ride with a guy named Dick who did that sort of thing constantly, and he always did it just as we were ready to leave. “Wait a second,” Dick would say, “I think my chain is loose.”
Yep, I needed to clean my faceshield. But I didn’t make anyone wait while I did so.
The advice here is simple: Don’t be a Dick. Do whatever you need to do so that you’re ready to roll at the designated departure time.
Tip 9: Keys, Gear, and Mount Up (in that order)
Put your key in the ignition before you suit up, suit up, and then get on your bike. Don’t get on your bike before you put on your gear, and don’t pull your gloves on when your key is still in your pocket. I know, this all sounds obvious. But people do these things. I’ve seen guys drop their bikes because they suddenly realize they need to put on their helmet, jacket, and gloves as the group is leaving. They’ll jump on their bike, try to balance an 800-pound motorcycle while pulling on their gear, realize the key is still in their pocket so they have to remove their gloves…and in the middle of it all: Bam, down goes the bike. Dick used to do that all the time.
Put the key in the ignition, suit up, and then get on your bike. And do it so when the group is ready to leave, you are, too.
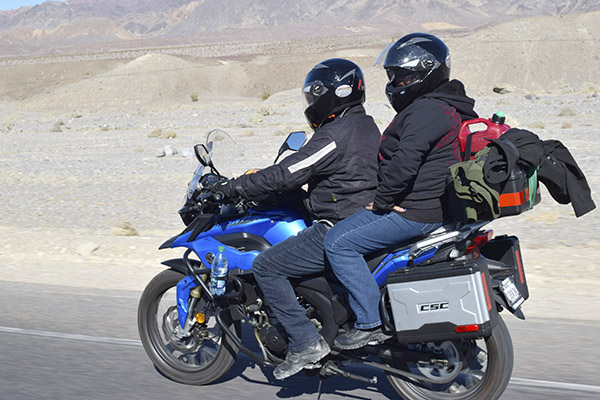
Velma and Orlando at speed in Death Valley. She was wonderful…always on time and always reminding Orlando that orange is the fastest color.
One more point on this: If you want to bring your significant other along and he or she is one of those people who takes a long time getting ready, explain that motorcycle rides are different. They just are. If your significant other can’t adapt, maybe you need another significant other.
Tip 10: Refuel When Everyone Else Does
Your ride organizer will have considered the bikes and their fuel ranges and selected stops accordingly. Don’t assume you can make it to the next fuel stop when everyone else is refueling. I’ve had guys do this and then run out of gas at inconvenient times and in inconvenient places. One guy did so coming home from a Baja ride. We spent the night in Tecate and fueled the bikes there, but for whatever reason, he decided he had enough gasolina and he didn’t top off. He ran out of gas on I-5 somewhere north of San Diego. For all I know, he’s still sitting by the side of the road.
Tip 11: Keep Your Helmet On At Gas Stops
A fuel stop can be 10 minutes if everyone pulls up to a pump, keeps their helmet on, and is efficient. Or it can be 45 minutes or more if folks take their helmets off, start kibitzing and posting on social media…you know. Listen to what the ride organizer says about this during the pre-ride briefing. I like to keep my helmet on and keep things moving.
Drink enough to stay hydrated. Use the restroom every chance you get, even if you don’t have to (so you won’t have to while underway).
Fuel stops are a good place to use the rest room, too, but be quick about it. Most ride organizers will make a pit stop every hour or so (hey, we’re mostly a bunch of full-figured mature prostate patients), so take advantage of every stop and hit the head.
Tip 12: Eat With The Group, and Be Nice
Don’t decide you don’t like the restaurant the ride leader selects for lunch and wander off looking for your idea of the perfect place, and don’t suggest different places to eat when the group stops at a restaurant. Give the ride leader credit for having thought about things like how long it takes to get served at a restaurant, cost, etc. On the wandering off thing, I’ve had guys do this and I left without them when we were finished eating. Sometimes they got back in time and sometimes they didn’t, but I wasn’t going to inconvenience everyone else waiting for my vagabundos to rejoin the group.
If you’ve ever worked in a restaurant, you know large groups are tough. The wait staff may be leery of your group for a couple of reasons…you’re a bunch of people dressed like Power Rangers (so you may be a little intimidating), and most groups tend to leave scanty tips (or no tip at all). Be nice and leave a good tip. The ride organizer probably has a relationship with the restaurant from prior visits, and he ‘ll probably want to bring other groups on subsequent rides. Don’t poison the well.
That ketchup bottle belongs where you see it. Gresh knows this now. We are not alone.
Don’t take up other tables by stacking your helmets, your jackets, and other stuff on them. Leave other tables free for the restaurant’s other customers.
Some folks take forever choosing from the menu, or they have special requests (you know, put this on the side, add this but subtract that, can I get goat cheese instead of American cheese, etc.). That makes things difficult for the restaurant and the other riders. Choose from the menu, be quick about it, and don’t delay the group.
Here’s another thing I want to mention: I’ve ridden with guys my age or older who mostly look like me, yet they somehow feel compelled to hit on the wait staff. For the record, I’m overweight, I’m bald, and I’m not tall, dark, or handsome. Read that sentence again, because whether you realize it or not, I may have just described you. Do you really think a young woman working in a restaurant is going to be impressed by a short, fat, and not-so-handsome guy three times her age hitting on her? Give it a break, guys.
Tip 13: Ride Safely
Safety trumps everything else on a group ride. Go to the safety briefing, ride in a staggered formation, don’t crowd the rider in front of you, and don’t try to carry on a conversation by riding alongside another rider.
Good spacing and a staggered formation make for a safe ride. If you’re wondering, I shot this photo in Baja.
Riding in a group also means keeping up…you don’t want to tailgate the rider in front of you, but you don’t want to ride so slowly that it opens up huge gaps in the group.
If a traffic light changes to red, don’t blow through it just to keep up with the group. The ride leader will most likely stop to wait for you. You should know the route so that if you do get separated, you can join the group down the road. And if a car needs to change lanes to exit in front of you, allow it to enter and cross your lane.
Finally, know your capabilities and consider the group. If you’re a loud-pipes-saves-lives kind of rider and the group is a bunch of loud-clutches-saves-lives canyon carvers, you may be praying at the wrong church. If the group is riding at a pace beyond your capabilities, drop out and ride your own ride. Don’t get in over your head, and don’t assume because the guy in front of you made it through that corner at 80 mph you will, too.
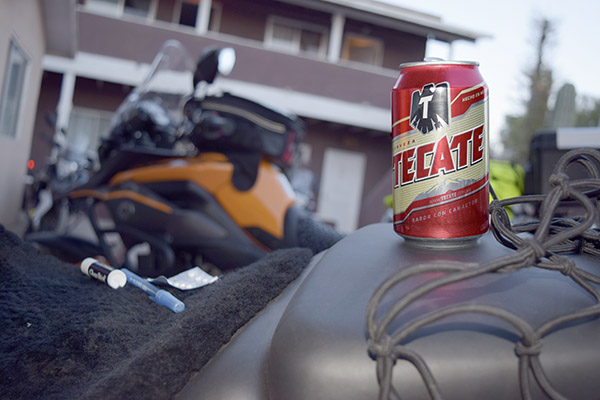
Tip 14: Avoid Alcohol During the Ride
I’ll only ride with folks who won’t drink at all on a ride. Once the bikes are parked for the evening, that’s another story, but during the day, it’s no booze. Period. I’ve played the game with guys who think they can have a beer during the day. Then it becomes two. Then three. Nope. Not gonna happen. Not with me.
Nothing is better than a Tecate with lime and rock salt around the rim once the bikes are put away for the evening.
There are liability issues here, and it’s likely that folks sponsoring a ride simply won’t risk the extra exposure that goes with allowing alcohol consumption on a ride.
Tip 15: Be An Extremely Careful Photog
You can have a great motorcycle ride or you can make a great video, but you can’t do both at the same time.
If you want to do a video on the road, get a mount (Ram makes good gear) to mount your Go Pro or cell phone to the bike so you don’t have to screw around holding it or looking through a viewfinder while you ride. If you’re using a wide angle lens, don’t try to make up for it by crowding the rider in front of you to get a better view of his bike. Safety first all the time is the rule here.
If you’re using a digital camera for still shots, never try to use the viewfinder or look at the LCD screen to compose the shot while you’re riding. Digital film is cheap: Take a bunch of photos without looking through or at the camera. One or more of your photos will be good. You can’t control your motorcycle trying to compose a photo, and you put yourself and the riders around you at risk if you attempt to do so.
Riding China. Buy the book (don’t wait for the movie). It was a glorious 6,000-mile group ride without a single incident.
Last point on this topic: Don’t delay the ride so you can get the perfect photo or an artistic video. There’s a lot more at stake here than the number of likes you’ll get on Facebook.
Tip 16: Pay Attention To Your Turn Signals
Keep an eye on your turn signals. Dick used to put his turn signal on, he’d make the turn, and then he’d ride the next 72 miles with his turn signal flashing. Again: Don’t be a Dick.
Tip 17: Pack Your Bike Safely
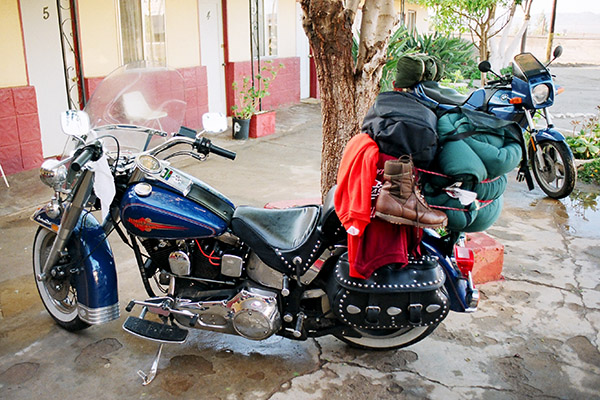
One time I rode with bunch of guys from the place I was working at the time, and the plan was for a 3-day trip to San Felipe. I had my KLR, there was another guy on an FJR, and there was another guy on a full dress Harley. We met up at a Denny’s and I was shocked, although I guess I shouldn’t have been. The Harley guy’s bike had saddlebags and a tailpack, and he still had a bunch of stuff strapped down on his rear seat and the top of the tailpack. “I brought everything I needed for the three days,” Mr. Harley announced (his name wasn’t Dick, but it could have been).
I had everything I needed, too, and it was all in the tankbag on my KLR (including a camera). I pointed that out to my portly V-twin buddy. Learning how to pack (and what to pack) comes with experience, I guess. New riders tend to overpack. I used to do that. I travel light now.
My Harley on one of my first Baja rides. Cue in the music from the Beverly Hillbillies.
The drill on a ride for me is this: If I can’t get it into the panniers and the tailpack, I don’t need it. And that includes tools, a laptop, my camera, and a couple of lenses. I mentioned this on one of the week-long CSC Baja rides, and one of my friends said, “I don’t know how you do it. I have the same bike with the same bags, and I still need to strap a bag down on the rear seat to hold everything. And I only brought enough underwear to change every other day.”
My response? “You brought underwear?”
Tip 18: Let Others Know If You Bail
If you’re going to leave the ride, let others know. It’s okay to do that; it’s not okay to do it without letting anybody know and just disappearing. That happened to me once in Baja and it scared the hell out of us. You don’t want to make people nervous (and maybe become the object of a search party, like we had to do in Baja) by simply changing your mind about the ride or the route. Be a nice guy and let someone know if you’re going to bail.
So there you have it. If I’ve offended anyone with the above list, my guess is you’re young and you’ll probably get over it. If not, mea culpa. And if you have more suggestions on how to ride well in a group, we sure would like to hear them. Please leave your comments here on the ExNotes blog (don’t post your comments on Facebook; be one of the cool kids and post them here).
Ride safe, folks. And ride extra safe if you ride with a group.
Help keep us going: Please click on the popup ads!
Never miss an ExNotes blog! Sign up for free here!
Some folks called it the Christmas Star, but it’s actually Jupiter and Saturn, two planets that came into alignment earlier this week. It won’t happen again for another 800 years, they tell us. I don’t really have the right lens for this sort of thing and I was fumbling around in the dark trying to find the right shutter speed and aperture. Yeah, I could have done better, I suppose…I would have liked to get the two planets a lot sharper. The one on the left is Jupiter, and it’s a cool 500 million miles out there (you can see all four of Jupiter’s moons). The planet on the right is Saturn; its oblong shape is due to the rings around Saturn. Saturn is 750 million miles away.
So here we are: Christmas 2020. Our best wishes to you and your families for the holidays. Christmas is different this year, and it has been a different year in many ways. The Covid 19 pandemic has dominated nearly everything in 2020, and like everyone else, we sure will be glad when this curse is in the rear view mirror. One of my daughters works in the healthcare field and she was one of the first to receive the vaccine earlier this week. We’re hoping to all get vaccinated in the next few months. Sue and I will get prioritized because we’re geezers (some of you are, too). 2021 will be a better year.
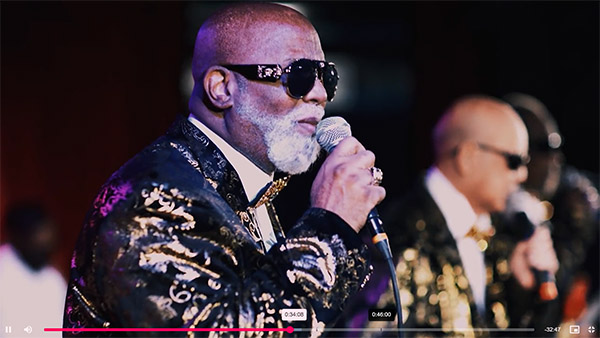
We’ve been staying home, which is what most folks here in the Peoples Republik of Kalifornia are doing these days. It’s tough being on lockdown, but there are still things worth doing. A couple of nights ago we watched a live Blind Boys of Alabama concert (that’s them above) on the computer and it was awesome. We’ve seen the Blind Boys in person a couple of times. If you ever have a chance to listen to this gospel group, don’t let it get away. Trust me on this; these guys are amazing.
I’ve been catching up with a lot of my friends the last few days…some on Facebook, some on Facetime, some on the phone, and one or two in person at the rifle range.
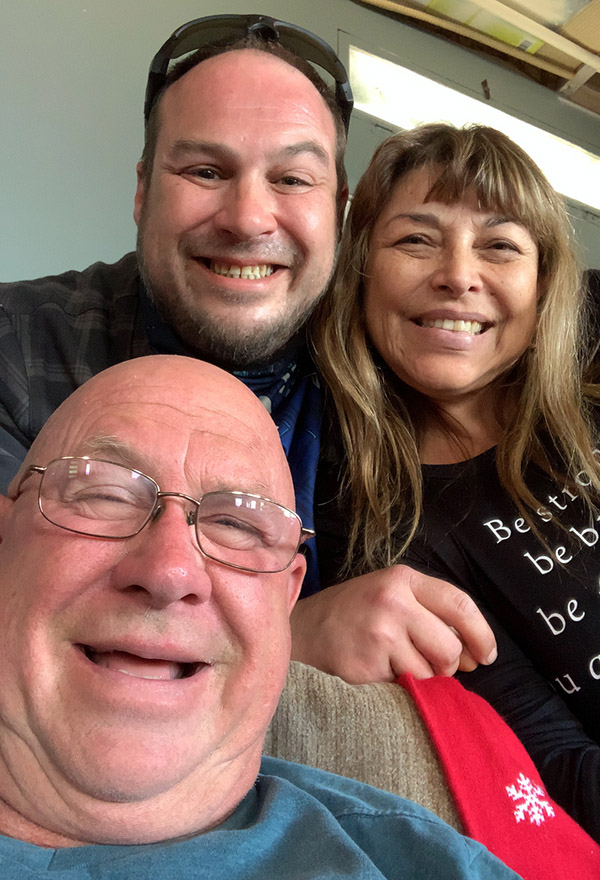
Baja John and I caught up via Facetime yesterday (that’s him above with his family at home in Mexico). I miss riding Baja with John; we’ve done some great rides down there.
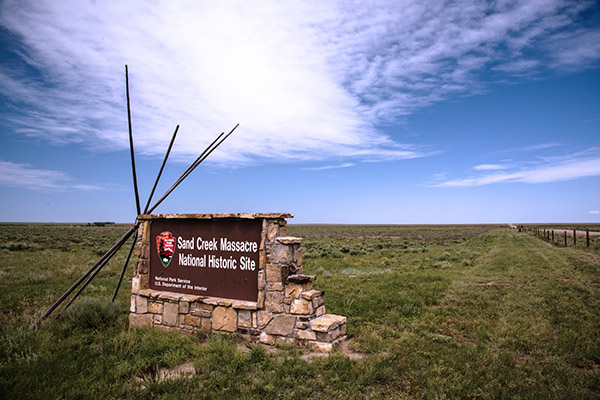
Other than that, we’ve been homebodies for the last several weeks. I’ve been doing a little writing, a little blogging, a little reloading, and a little shooting. The Sand Creek Massacre National Historic Site story just published in Motorcycle Classics (I was there in 2019); you can read it here but you would do better to subscribe to the magazine…it really is a first class publication with awesome stories and photography.
So that’s it for today. Here’s hoping Santa was good to you, and here’s another wish for a happy and healthy 2021. Merry Christmas, folks!
We want you! Sign up here for a free subscription to ExNotes!
We’re starting a new series here on ExNotes, and it’s one I think you’ll enjoy: A series on our favorite hotels in Baja. There are some great places to stay in Baja, and unlike hotels here in the US, they are not part of any big hotel chains. I love exploring Baja, and the hotels are part of the experience.
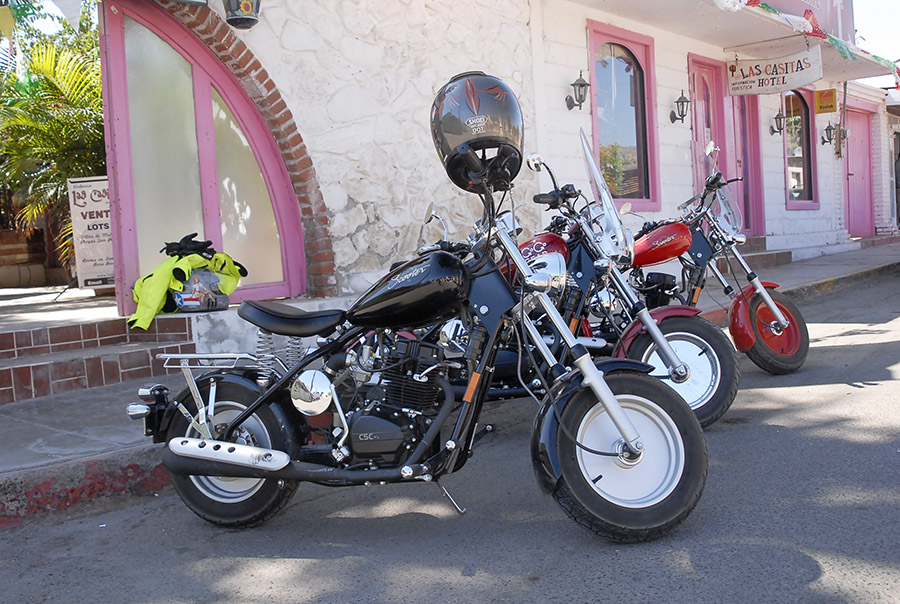
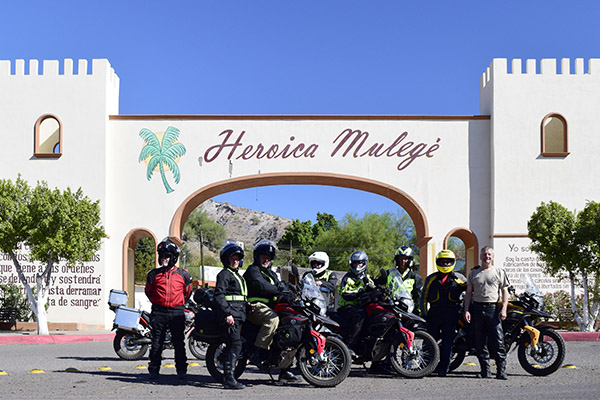
That’s enough introduction…let’s get to my all time favorite Baja hotel first: The Las Casitas Hotel in Mulegé. It’s the hotel you see those little CSC-150 Scooters parked in front of in the big photo above.
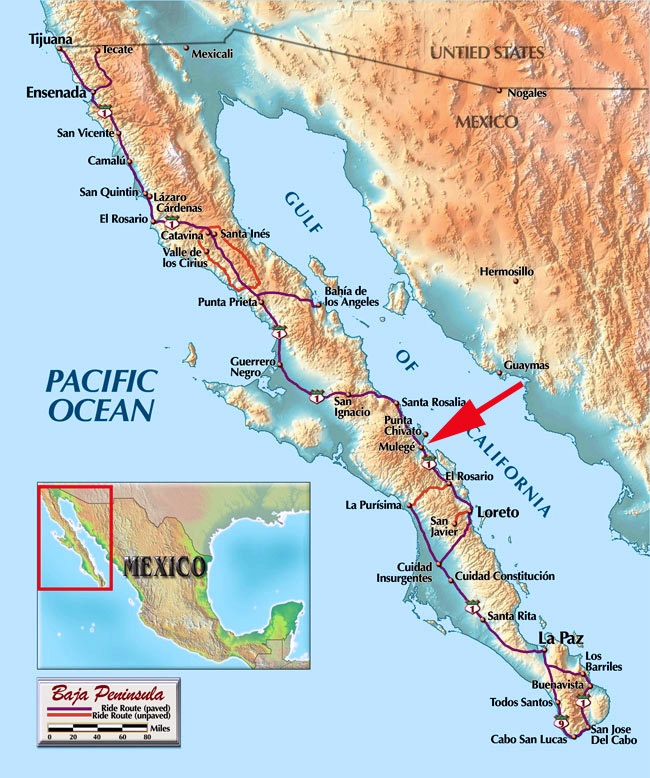
Mulegé is a special place. It’s about 630 miles south of San Diego, and you can get to it by either riding south from Tijuana on Mexico Highway 1, or you can take what is now a paved road all the way down from Mexicali on the Sea of Cortez side. Either ride is stunning.
Mulege is on the Sea of Cortez about 600 miles down the road from the border.
One note we always add on any Baja story is to make sure you have Mexican insurance before you enter Baja. Our recommendation is to go with BajaBound (the insurance we always use).
Mulegé is one of my favorite towns in Baja, and the Las Casitas just adds to the experience. It’s not hard to find. Just bear to the right at the first fork in the road as you enter Mulegé and you’ll be there (the official address is Valle Vadero 50 Colonia Centro 89518 Mulegé, Baja California Sur, Mexico). But like I said, it’s not that hard to find, and if don’t find it immediately, you’ll like riding around in Mulegé. If you want to make a reservation, you can reach the hotel at lascasitas1962@hotmail.com or you can call +52 615 153 0019.
The Las Casitas has two locations…the original one, and then one a block or two away. The original location includes a bar and a restaurant, and when I’m in Mulegé I put both to good use.
Good buddy Brian and yours truly at the Las Casitas Hotel, kicking back after a long day on the road.
Francisco Javier Aguiar Zuñiga is the proprietor (he has been for 40 years). Javier is an all around nice guy. If you’re going there with a group, let him know and he’ll prepare a special meal. I’ve done that on group tours I’ve led through Baja, and every meal at the Las Casitas has been a treat.
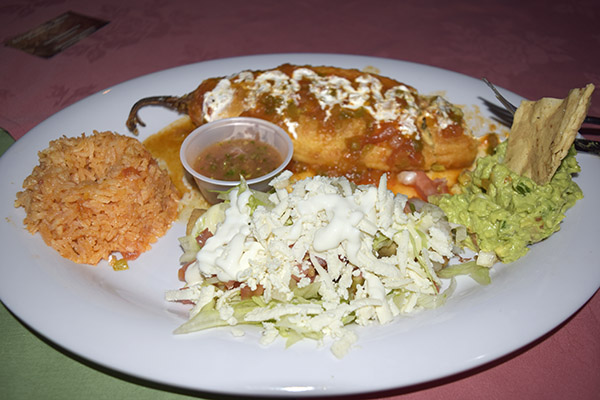
Dinner in the Las Casitas Hotel during one of the CSC Baja expeditions.Chile rellenos, as prepared and served by Javier and the staff at the Las Casitas Hotel. They were exquisite. Being right on the Sea of Cortez, the seafood is outstanding, too. Breakfasts are spectacular.
You know, I looked through my photos for the restaurant, and to my great surprise, I could only find a couple. I think that’s an indication of just how good things are there…the hospitality and the cuisine are so fabulous (and I enjoy both so much) that I only had my camera out a couple of times. The breakfasts are outstanding, too…Javier always has fresh orange juice ready to go, and trust me on this, you want to try it.
A great group of graybeards posing for photos in the Las Casitas Hotel courtyard. Javier is second from the left.
The Las Casitas has a central courtyard that is distinctly tropical in appearance and feel, and for good reason: Mulegé is only a few miles north of the Tropic of Cancer, where the tropics officially begin. Javier will let you park your motorcycle into the courtyard, although I don’t know that it’s necessary. On one of my trips, we overindulged in Negro Modelos and margaritas in the Las Casitas lounge and left our bikes parked on the street that night. They were just fine the next morning.
Entering Mulegé. The Mulegénos kicked our butts in the 1800s, but all has been forgiven and you’ll be treated like royalty today.
The town calls itself “Heroica Mulegé.” During a dinner at the Las Casitas one evening I was telling the story behind that name. The Heroica part has to do with the Mexicans holding off a much larger military force, except as I relayed the tale I couldn’t remember who they were fighting. “It was you,” Javier politely reminded me, and indeed it was. All this happened during the 1846-1848 Mexican-American War. As you might guess, relations have improved since then.
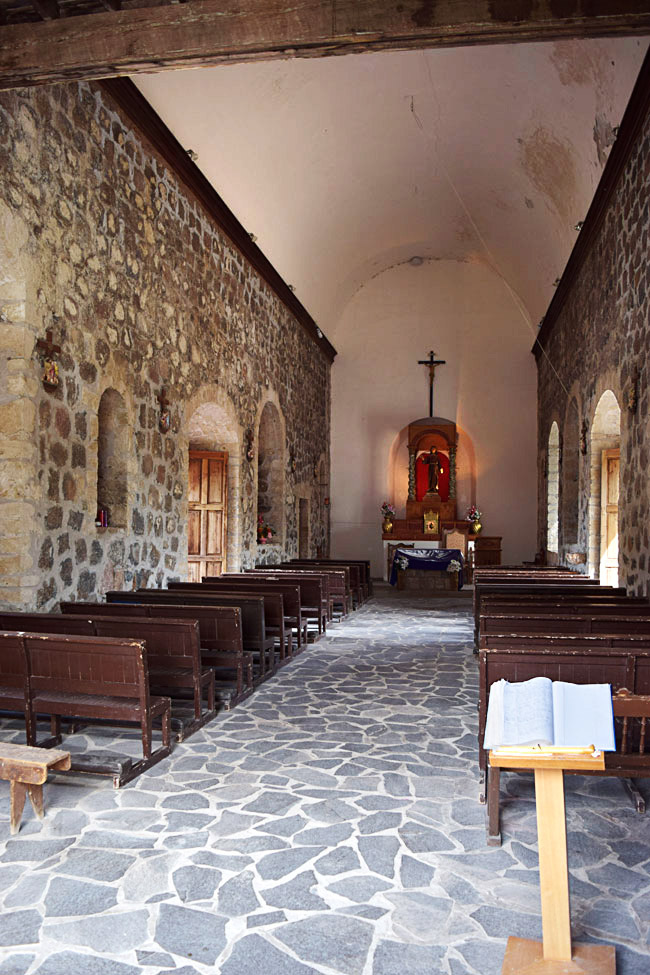
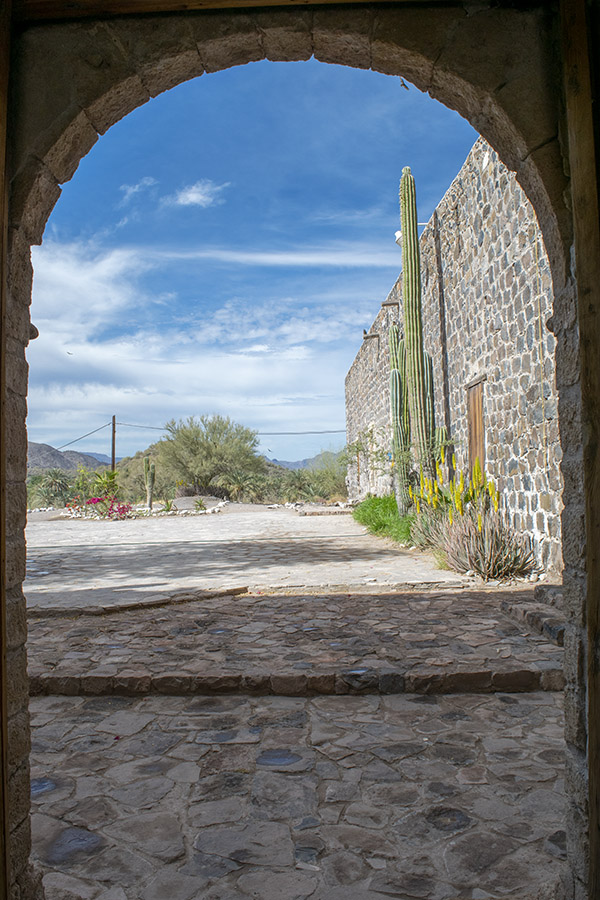
When you visit, be sure you make time to stop by the Misión Santa Rosalía de Mulegé (it’s one of the original Baja missions).
Inside the Misión Santa Rosalía de Mulegé.The view looking out from inside the Misión Santa Rosalía de Mulegé. There’s an observation deck up top, too, with a commanding view of Mulegé’s date orchards and the Rio Mulegé.
Mulegé also has an historic prison that is now a museum. Let me tell you how good life was (and is) in Mulegé: Back in the day, prisoners were allowed to leave during the day to work, and the prison had no bars. Things were so good in Mulegé that no one (including the prisoners) wanted to leave. I can understand why. You will, too, when you visit this magnificent little gem of a town and the Las Casitas Hotel. They are two of Baja’s best kept secrets.
If you’re planning a Baja trip, there are two books we’d like to suggest you consider to gain more insight into what Baja has to offer. The first is, of course, my book on motorcycling in Baja, Moto Baja. It’s good. The other is Jennifer Kramer’s Tijuana to Los Cabos, which is another excellent resource.
One more thing…if you’re making the trek into Baja, you’ll want to capture great photos, folks. You want a good single lens reflex digital camera for an adventure like Baja, and Nikon’s D3500 is one of the best. It’s what I shoot. Gresh works his magic with a comparable Canon digital camera, and they’re good, too.
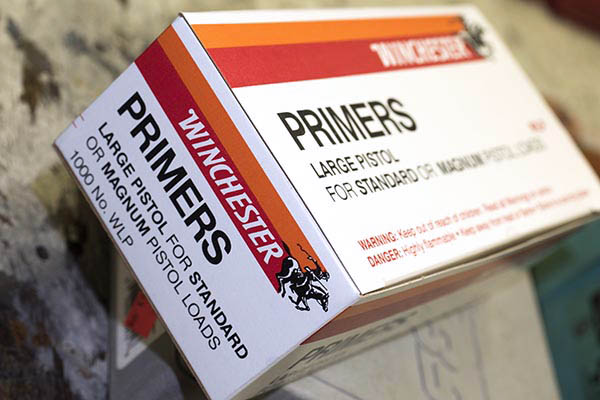
Gougers. People who overcharge simply because they can when supplies are low. Someone who takes advantage of a bad situation. There’s a lot of that going on in the ammo and reloading components business today. What’s driving it is extreme demand induced by the pandemic, the breakdown in law and order in some urban areas, a change of administrations, and the resulting ammunition and components shortages. People are buying guns and ammo in unprecedented numbers because they are afraid. It’s being fueled by uninformed and malicious folks on the Internet.
Me? I’m not worried. We’ve been through this before. The pendulum swings both ways, and it always returns to center. It may take a while, but common sense always prevails.
Before all this shortage business began, primers sold for about $34 or $35 per thousand. Gougers have kicked that up to around $100 per thousand, and even at that price, they are difficult to find. Thanks, but I’ll take a pass. I’ll wait it out. It’s that pendulum thing I mentioned above.
I imagine it’s tough being in the ammo business these days. For the most part, the folks who make ammo are the same folks who make reloading components, and with the unprecedented demand for ammo, their components are necessarily being consumed by their own factories. I get that, too.
This video from the CEO of an ammo and components company popped up in my feed yesterday, and I think it’s a good one. You might want to watch it.
I get it, Mr. Vanderbrink. The trolls who start rumors, spread rumors, and post stupid stuff on the Internet are as despicable as the gougers, and I give Vanderbrink a lot of credit for calling it like it is. I’d call the trolls morons, but that would be an insult to morons everywhere. You folks in the ammo business keep doing what you’re doing. We’ll be here as loyal customers when the shortages end, as they always do.
Guns, ammo, reloading, motorcycles, product reviews, trip reports, and more! Never miss an ExNotes blog:
At Tinfiny Ranch it’s been kind of cool this winter. I haven’t been riding motorcycles much at all lately. Zed, the Z1 Kawasaki, needs its float needles changed as it has developed an intermittent incontinence on the far right carburetor. I have to keep turning off the fuel petcock because I don’t trust the carbs to reliably do their carb thing.
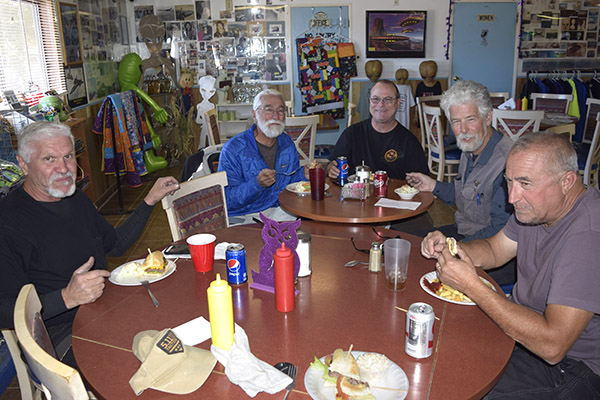
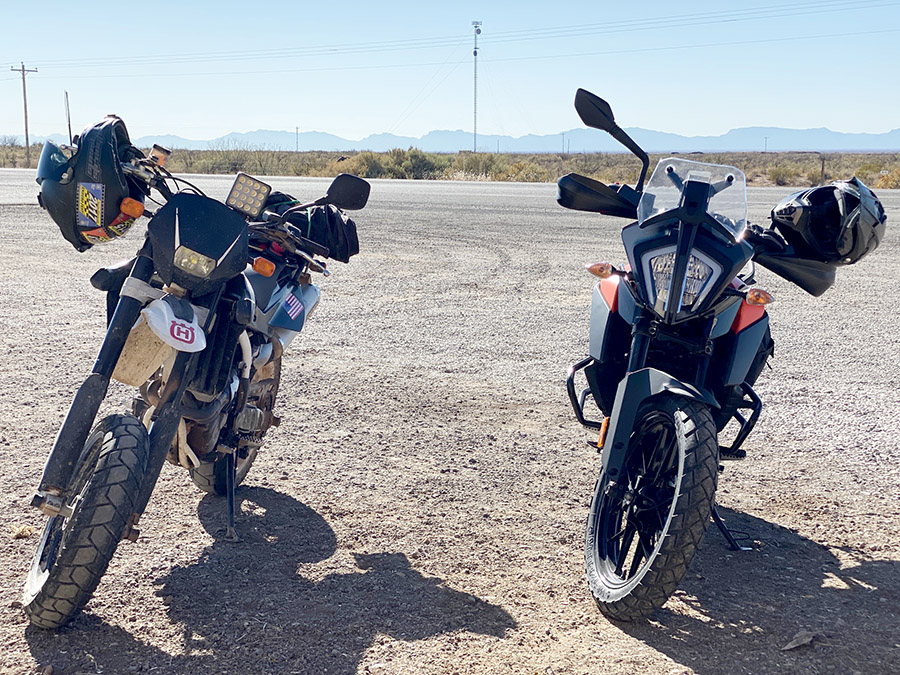
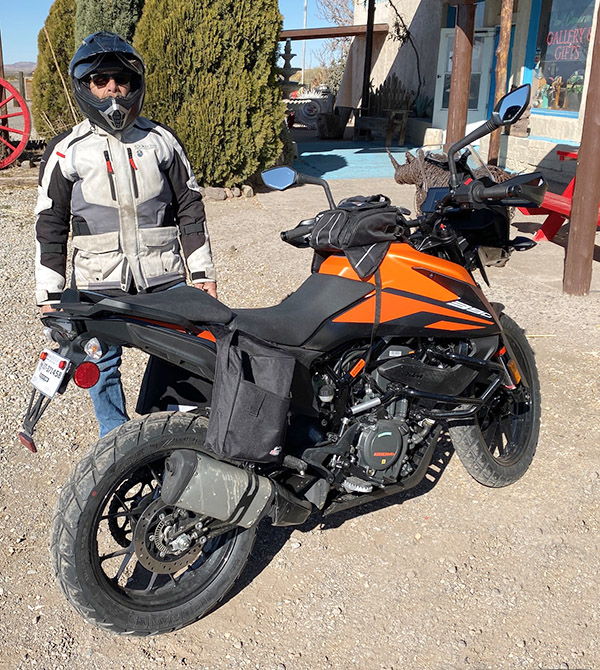
The Husky is way overdue for a valve adjustment but I have too many other projects apart and going on to hobble my Italian/Swedish mish-mash motorcycle at the moment. The Husky still runs fine so when Mike, my Eastern Assassin riding buddy texted me photos of his new KTM 390 Adventure bike and said, “The hell with this cold, lets do a little ride and you can check out my new bike,” I was all over it.
Mike rides more dirt than anyone I know. I’ve done thousands of miles of gravel roads with him and I’ve only seen a quarter of the trails he has. His normal trail bike was a 650 BMW single but that bike turned out not so great on rough trails. It’s a heavy, low-slung bike and it tended to fall over a lot. Mike, a reformed street rider, had a Harley Davidson Fat Boy that was gathering dust in his garage so he sold it off and used the proceeds to buy a new KTM 390 Adventure. I’m guessing not many people go from a Fat Boy to a KTM 390. The 390 weighs about 100 pounds less than the 650 BMW and straight-line performance is nearly the same although naturally the 390 spins faster to get the job done.
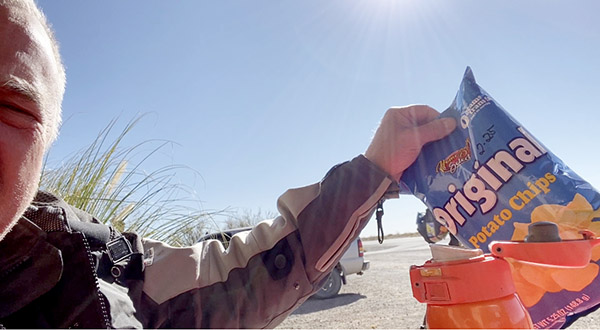
We met up for coffee and potato chips at a little tourist trap on the corner of Three Rivers and Highway 54. The 390 looks great. It’s very light feeling off the kickstand. The bike came with street tires similar to the crappy tires I run on the Husqvarna. The KTM is a bit high in the saddle but its wide seat is actually lower than the Husky seat. My short legs reach the ground about the same on both bikes.
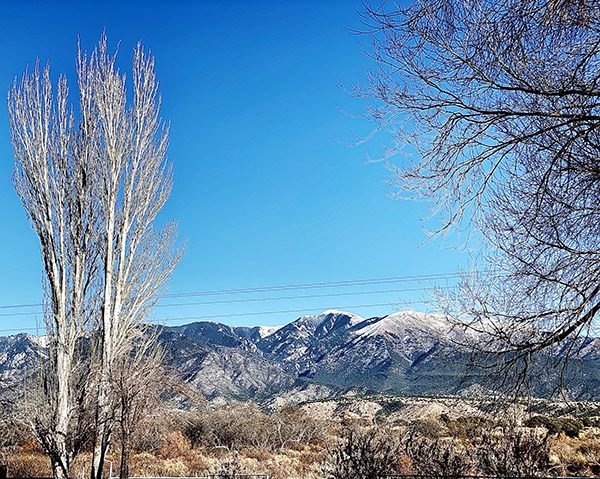
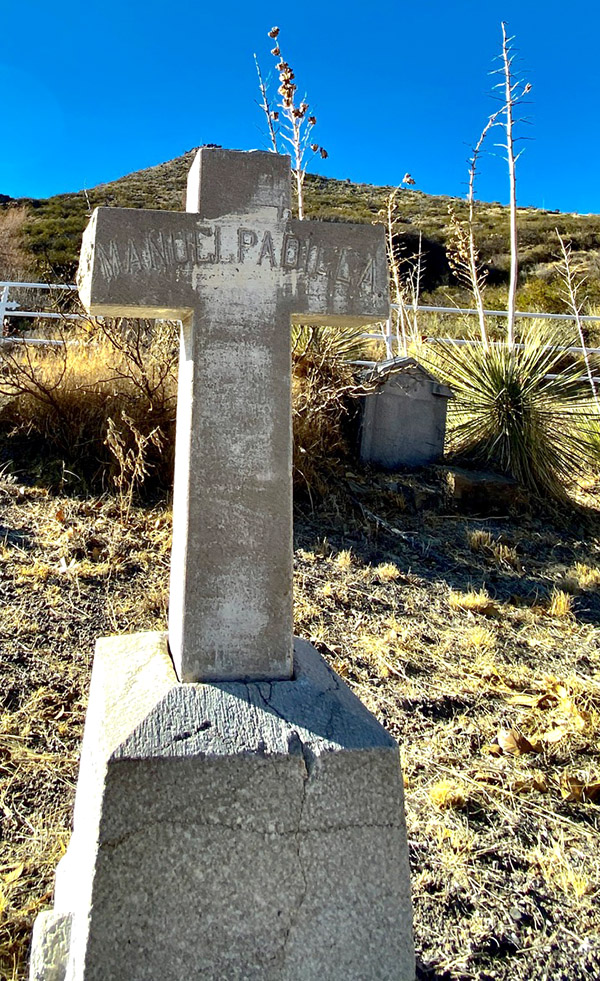
We rode towards the Sacramento Mountains ending up at the little Santa Nino de Atocha church. While not a religious man, I like earnest churches and old graveyards. Last time I was here my Kawasaki gas tank sprung a leak and I had to hurry home before I ran out of gas. I didn’t have time to check things out properly.
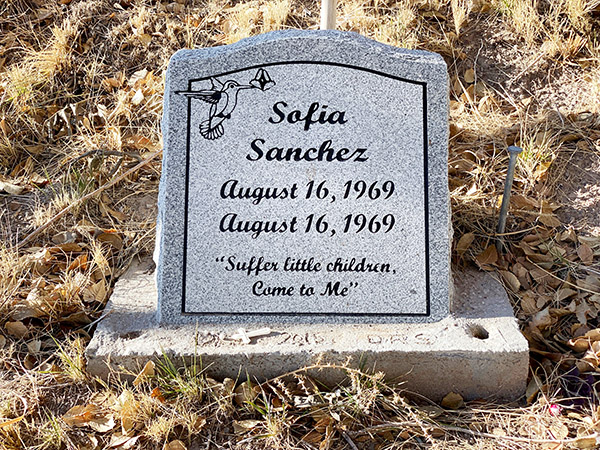
The graves at Santa Nino de Atocha are fairly well maintained. It’s a lonely spot but I believe the church still draws a few congregants from the huge ranches situated all the way to the mountains.
Poor little Sofia never had much of a chance. As I grow older I realize everyday is a gift.
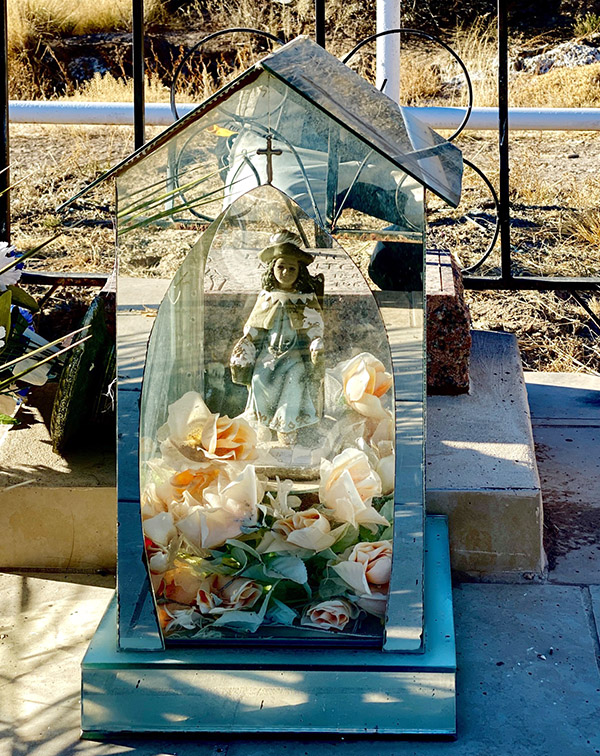
Fancy glass-enclosed Mary (I think, I don’t know my saints)
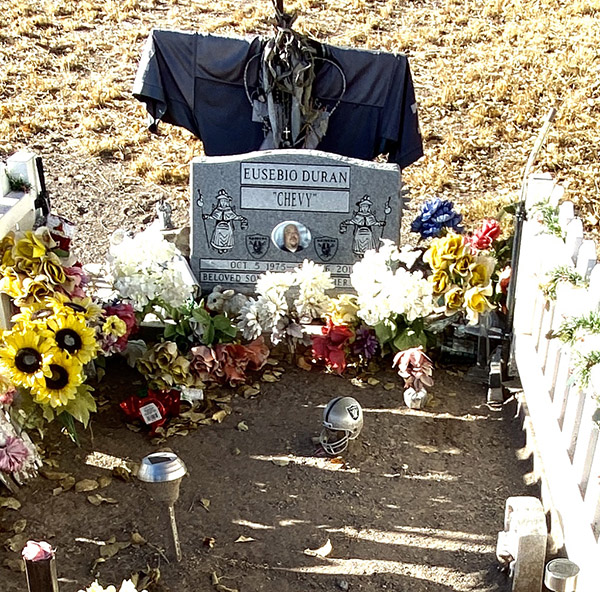
Raiders fan for all eternity.
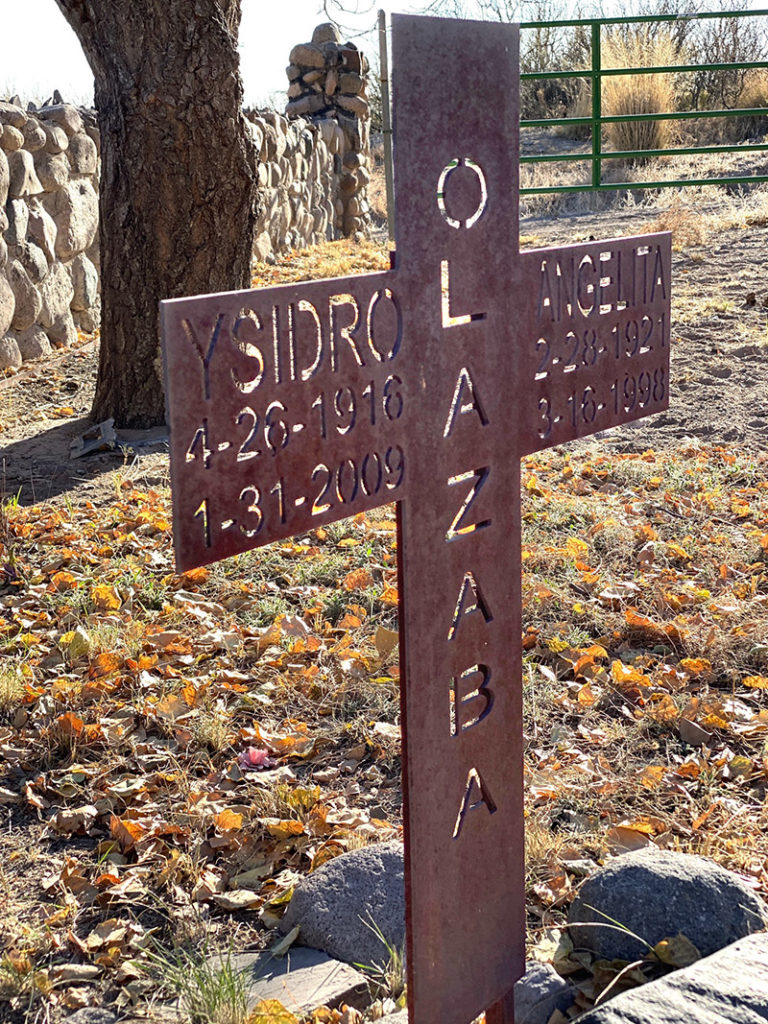
Laser-cut steel cross. Very nice metal work.
It gets a little nippy in New Mexico’s winter but the brilliant blue sky warms your soul.
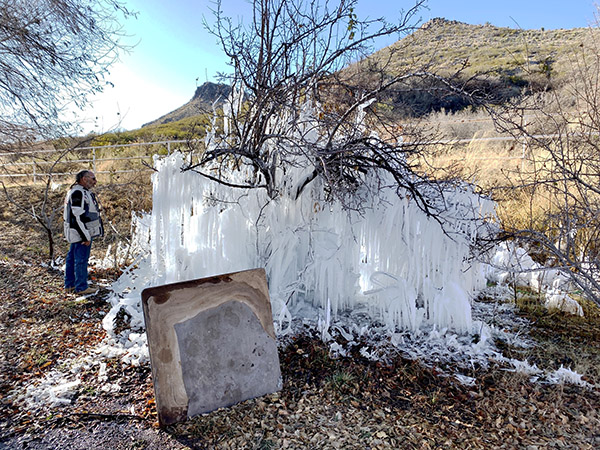
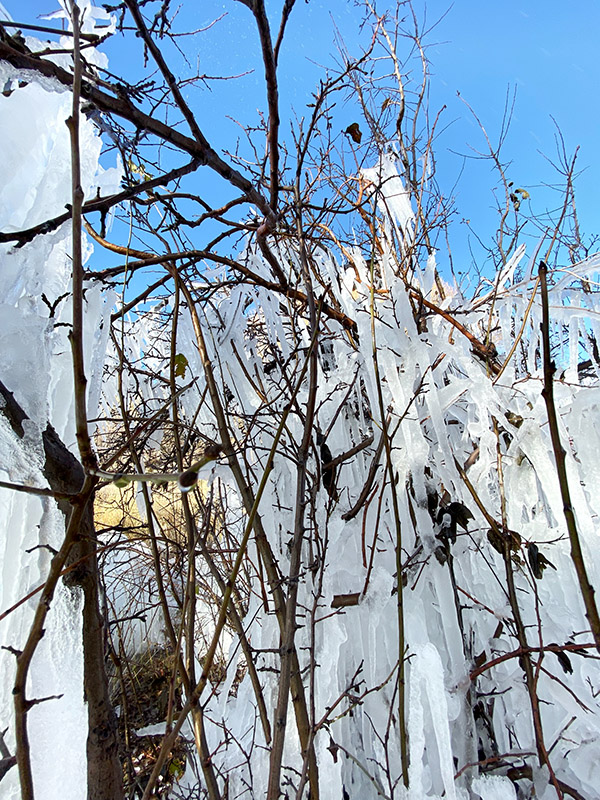
Somebody left the sprinkler on and created an ice fantasy over by the church’s RV camping area.
Mike and I shot the breeze for a while and made grand plans for the rides we will take his new motorcycle on until the temperature started dropping along with the sun. I don’t want to do much night riding anymore so we bundled up and headed back to our little towns on opposite ends of Highway 54 (La Luz and Carrizozo).
It was only a 100-mile ride but I felt recharged when I got home. Mike has managed to put a thousand miles on the KTM in only a few cold weeks. If I don’t hurry and get back to motorcycles he’ll have the thing worn out before I ride again.
Need more Gresh?
Joe Gresh’s published articles in Motorcyclist, Adventure Rider, and other pubs are here.
You can see all of Joe Gresh’s blogs by clicking on his name in the upper left corner by his avatar (as shown by the red arrow).
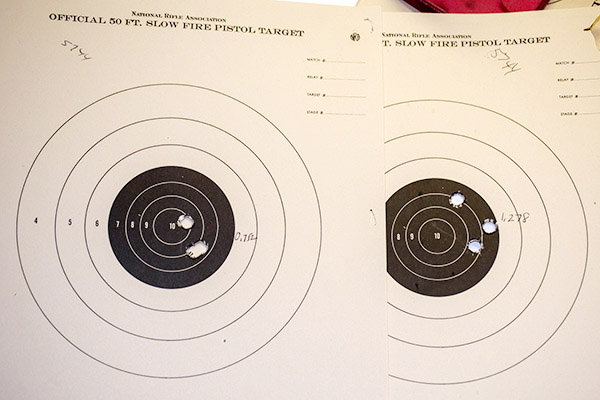
You’ll recall a recent blog where I waxed eloquent about Eleanor, my Ruger RSM .416 Rigby rifle. In that blog, I talked about reduced loads using 350-grain cast Montana bullets and 5744 and Trail Boss propellant. It was fun…the Trail Boss loads had milder recoil and “good enough” (but not stellar) accuracy. Take a look at these 50-yard targets:
The above target on the left was with 30.0 grains of Trail Boss; the one on the right was with 34.0 grains of Trail Boss. I could feel a tiny bit more recoil with the 34.0-grain load, but both were light loads with modest recoil. Weirdly, the point of impact shifted sharply to the right with the lighter load, but it moved back to the center with the 34.0-grain load (and it was slightly higher). The Trail Boss loads shot okay, but they weren’t running in the same league as the load I had shot the prior week with 5744 propellant and the same Montana Bullet Works 350-grain bullet, as you can see from the 50-yard targets below.
I could see what I was getting with the Trail Boss and I could see that it wasn’t grouping nearly as well as the 5744 loads at 50 yards, so that stopped my testing with Trail Boss (that, and the fact that I had used up all my Trail Boss cartridges).
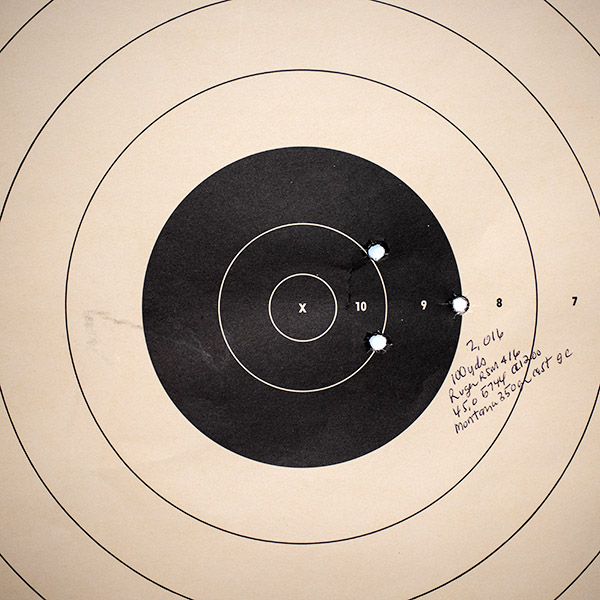
I was curious: How would Eleanor do at 100 yards? I still had some of the 5744 loads left, so I posted a couple of 100-yard targets and let Eleanor have her way. I first fired a 3-shot group and after looking through my spotting scope, I was surprised to see how well they grouped.
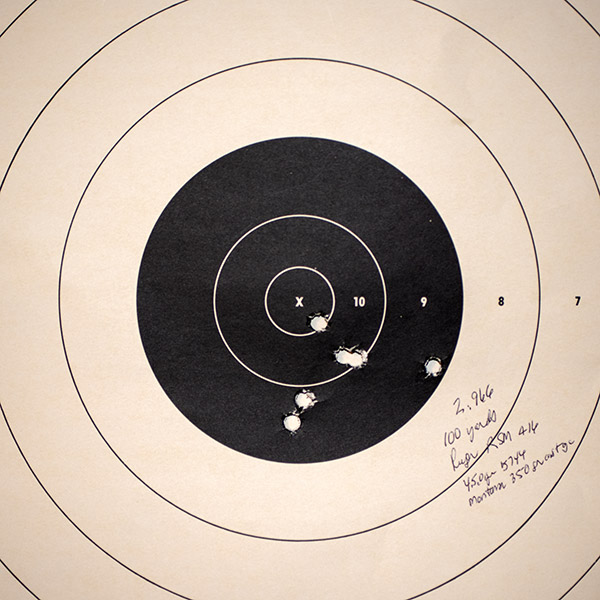
I thought maybe that target was a random success, and I didn’t want to ruin it by throwing more shots at it. So I fired another 3-shot group at the second target, and then another three at that same target. That’s the one you see below.
Before all you keyboard commandos start telling me that these results are nothing special, allow me to point out that these are 100-yard groups using open sights on an elephant rifle. I’m calling it good to go. Like I said earlier, when the elephants become an invasive species here in So Cal, I’m ready. The load is 45.0 grains of 5744 (it’s the load the Lyman Cast Bullet Handbook specified as the accuracy load, and they were right), the 350-grain Montana Bullet Works .416 bullet sized to .417 and crimped in the cannelure, Hornady brass, and a CCI-200 primer. I didn’t weigh each charge; I just adjusted my RCBS powder dispenser and cranked them out. If you were wondering, I use Lyman dies for this cartridge.
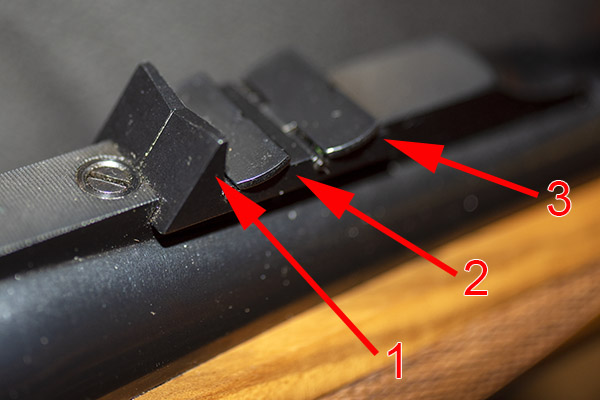
A bit more about Eleanor: The rifle is a Ruger 77 that the good folks from New Hampshire call an Express or RSM model (I think RSM stood for Ruger Safari Magnum). They made them in 375 H&H, 416 Rigby, and 458 Lott (kind of a magnum .458 Magnum). Ruger also made a similar one in a few of the standard calibers (7mm Mag, 30 06, and 300 Win Mag, and maybe one or two others). These rifles were a bit pricey when Ruger sold them in the late 1990s/early 2000s, but evidently not pricey enough. They were too expensive to manufacture, so Ruger stopped making them. When you see these rifles come up for sale today (which doesn’t happen very often), they command a premium. I wish I had bought one in 30 06 when they were first offered; to me, that would be the perfect rifle.
The rear sight on a Ruger RSM rifle is of the African “Express” style. The elevation adjustment consists of a fixed and two flip-up blades, and they all have a very shallow V. I guess the idea of that shallow V is that it lets you see more in case an elephant is charging. The sight has two flip up blades behind the fixed blade; as range increases, you flip up the second blade, and if it is an even longer shot, you go for the third blade. I got lucky, for me, the fixed rear sight blade is perfect with this load. I made a minor adjustment for windage, and the elevation is spot on with a 6:00 hold at both 50 yards and 100 yards.
Incidentally, that rib the rear sight sits on? It’s not a separate piece. It and the barrel were turned and milled from one solid piece of steel. It’s one of the reasons these rifles were too expensive to manufacture.
The front sight is the typical brass bead (you can sort of see it in the featured photo at the top of this blog), which I usually don’t like, but with these results I can’t complain. I’ve shot better groups with two or three other open sight rifles using jacketed bullets at 100 yards; this is the best any cast bullet has ever done for me.
Want to see the first installment of the Eleanor story? It’s right here.
Tough to get to a gunstore to buy targets? Range fees for targets too high? Do what I do and order them online. They’re delivered right to your door and they’re less expensive, too.
Need a calipers for measuring your group size? This is a great place to find great calipers at a great price.
Want to check out Montana Bullets? Here’s a link to their website. Tell them Joe sent you. Trust me on this: These are best cast bullets I’ve ever used.
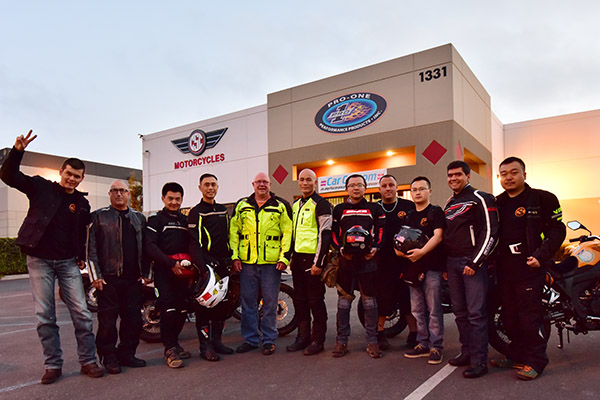
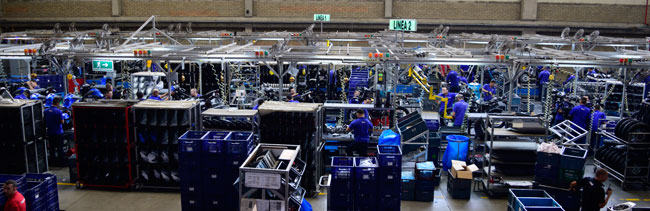
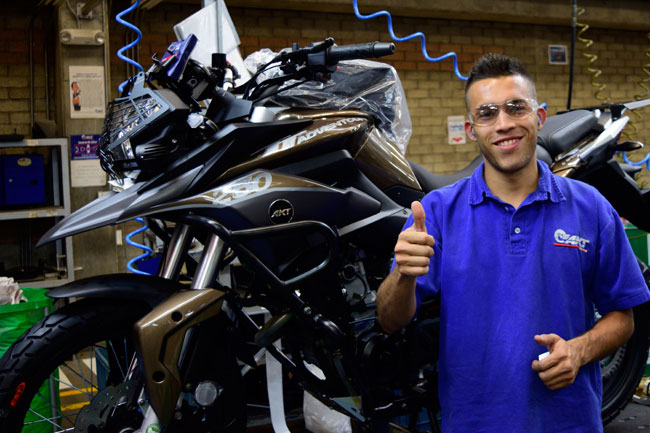
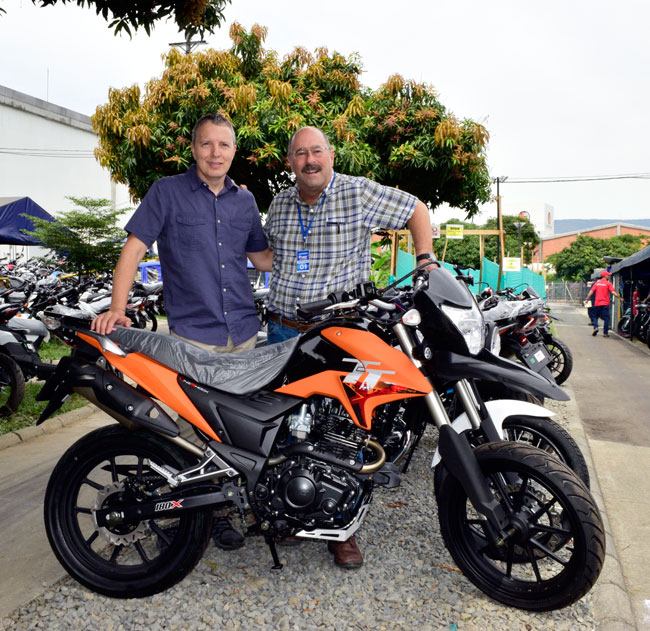
After zipping through the Andes Mountains in Colombia for a week on RS3 motorcycles with my good buddies Juan and Carlos (the RS3 is the carbureted version of the RX3), I spent a day in the AKT Motos plant. AKT Motos is the importer and assembler of Zongshen motorcycles in Colombia.
The AKT factory was impressive, and not just because of the fact that they make motorcycles there. I’ve been in and around factories for most of my life. There are good ones and there are bad ones. I can tell the difference as soon as I walk in just by looking at the people who work there and the condition of the facilities. The vibes were all good…AKT is a good place to work and the people there love what they do.
Here’s the AKT Moto assembly line:
Juan Carlos grabbed the photo below of yours truly with Enrique Vargas, AKT Moto’s General Manager.
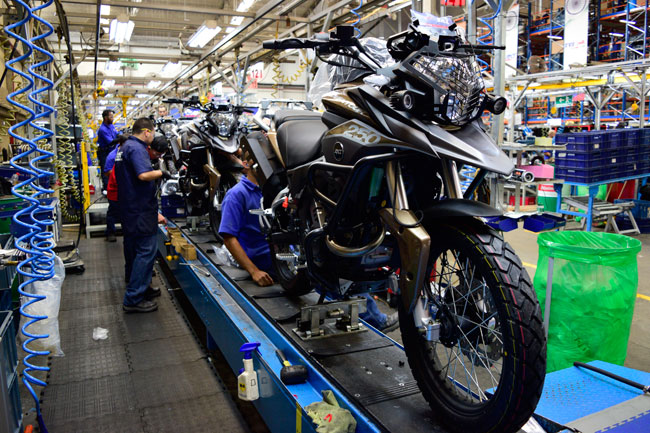
Here’s a video showing the AKT Motos plant in action:
Enrique is a genuine nice guy and he’s the real deal. He rides a different AKT Motos motorcycle to work every day (in Medellin traffic, that’s no small feat), and he races motocross on the weekends. Enrique is the guy who invited me on the Colombia trip, and I had a wonderful time on that ride. You can read about the adventure in Moto Colombia, our book about the ride through Colombia. It was the ride of a lifetime, and the book makes a great gift.
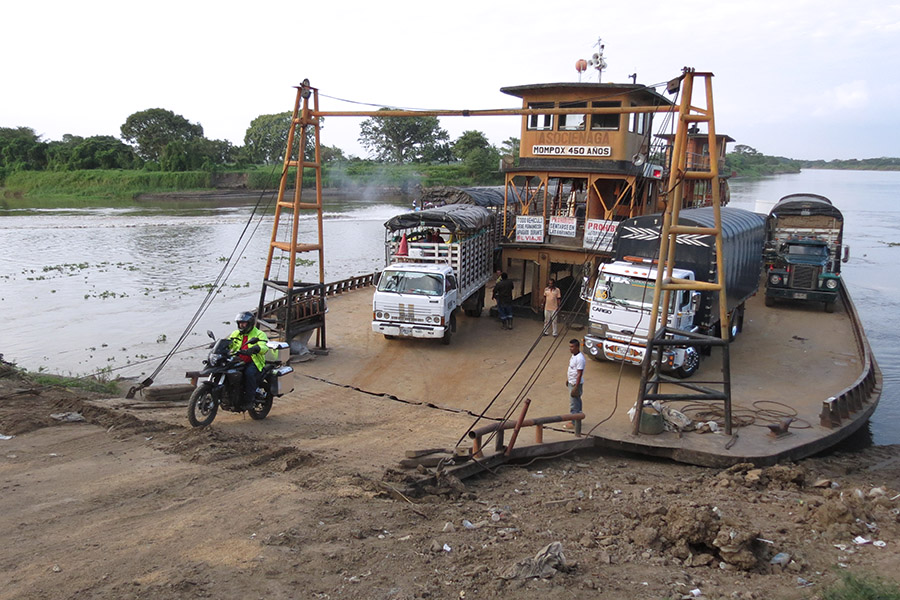
That photo at the top of this blog? It’s yours truly leaving the ferry that had carried us down the Magdalena River to Mompox, one of my favorite places in the world and unquestionably one of the more exotic spots I ever visited on a motorcycle. Here’s a video I did on that ferry ride with a few scenes in Mompox at night, and another riding through the Andes.
You’ve thought about reloading, you’ve read stuff from us and others about the benefits of reloading, and you want to do it. But how?
Hey, I was born into it. My Dad was a reloader and I had a pretty good idea what to do when I wanted to start, but the urge to do so didn’t hit until I was a young guy in the Army at Fort Bliss. I was lucky. The guy who ran the Fort Bliss Gun Club (Roy Johnson) had a room set up for just that purpose and he walked me through the process some 50 years ago. But Roy has gone on to his reward, you’re probably not stationed at Fort Bliss, and you want to get into the game. That’s what this blog focuses on, and in particular, the equipment you’ll need to get started.
Inside the Fort Bliss Gun Club. This is a fabulous place where I spent a lot of time as a young Army dude. Next time I’m in El Paso you can bet I’ll stop in again.
Reloading Advantages
There are three advantages to reloading: Cost, accuracy, and availability.
Generally, reloaded ammo costs less than factory ammo, and in some cases (especially for more exotic rifle ammunition), the savings are huge. For example, factory .416 Rigby ammo costs $170 for a box of 20 rounds; I can reload .416 Rigby ammo for well under a buck a round.
From an accuracy perspective, reloading is the only way to go. You can tailor a load to a particular firearm by varying bullet type, bullet seating depth, crimp, powder type, powder charge, brass, and primers to arrive at a combination that delivers superior accuracy (and it’s fun doing this). I have rifles that shoot 3-inch groups at 100 yards with factory ammo; with my custom reloads, I can get half-inch groups.
Today, if you reload and you’ve laid in a good stock of components, you can reload your way through any ammo shortages. Nobody has .45 ACP, 9mm, or .223 ammo in stock right now; I have enough components on hand to reload thousands of rounds. I’m on the range two or three times a week enjoying my shooting hobby while other folks are online whining about not being able to buy ammo.
What You Will Need
The things you will need to start reloading fall into two categories: The reloading equipment, and the reloading components. The reloading components are the things that combine to bring an empty brass cartridge case back to life (that includes the bullets, the propellant, and the primers). The reloading equipment includes the gear you need to take the components and turn them into a ready-to-fire cartridge.
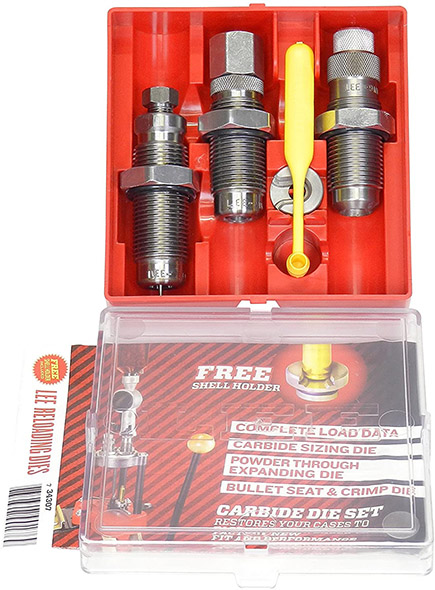
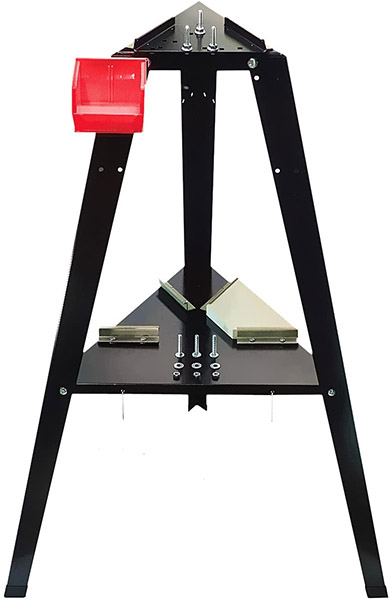
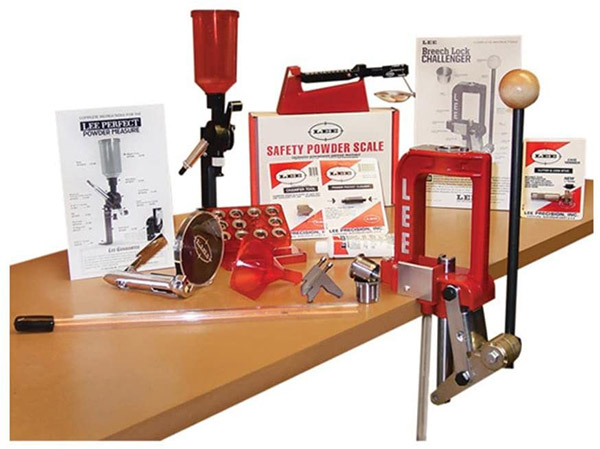
If you want to get into the reloading game, I believe the best way to do so is to buy a complete equipment reloading package from one of the suppliers like RCBS or Lee. That’s the RCBS kit shown in the big photo above. I’ll talk about it, the Lee kit, and a couple of others further down in this blog. First, let’s review each bit of gear.
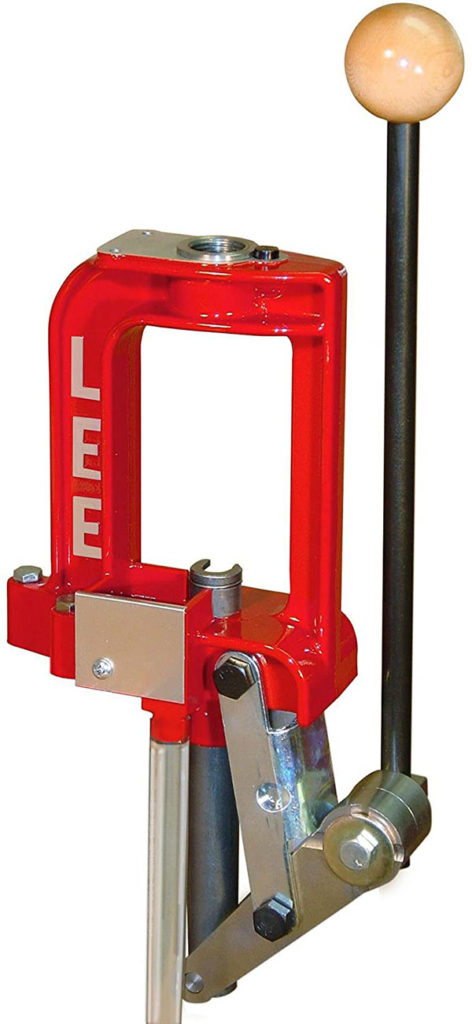
The Reloading Press
That’s the lever-operated press that accepts the dies (more on that in a second) for reloading your ammo, and sometimes the press includes a mechanism for seating primers in the cartridge case after the old primer has been removed. In other cases, a separate priming tool is used. Presses are offered by RCBS, Lee, Lyman, Hornady, and other companies.
The Lee Challenger press. It’s a decent unit at a decent price, and an ideal way to get started in reloading.
Dies
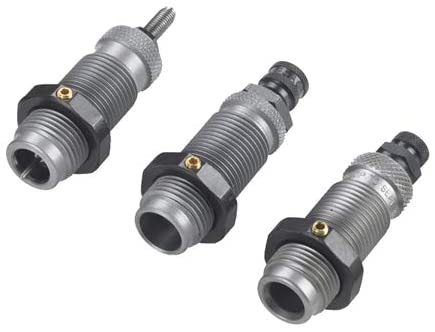
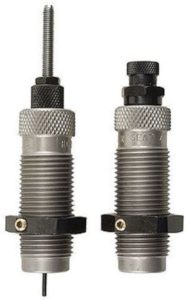
The dies are cartridge specific. For handgun cartridges, the die set usually includes three dies; for rifle cartridges, the die set usually includes two dies. The good news is that die threads are pretty much standardized, and every company’s dies will fit every company’s reloading press. In other words, if you buy Lee dies, they’ll work on an RCBS press. If you buy RCBS dies, they’ll work on a Lee press. Dies are offered by several companies, with the most popular brands being Lee and RCBS.
A three-die pistol set from RCBS. The first die knocks out the old primer and resizes the fired case. The second die flares the case mouth to accept a new bullet. The third die seats the new bullet and, if you want, crimps the bullet in place.An RCBS two-die rifle set. The first die knocks out the fired primer and returns the case to its original dimensions. The second die seats the bullet and, if desired, crimps it in place.A three-die pistol cartridge set from Lee Precision. Lee includes the shell holder with their die sets.
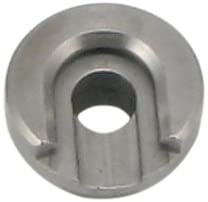
Shell Holder
You will need a shell holder for the cartridges you wish to reload. That’s the piece that holds the cartridge case in place so the press can push it up into the die and then extract it from the die. RCBS does not include the shell holder with their die sets (so you’ll need to buy RCBS shell holders separately); just about all other die makers do (when you buy their dies, the die set includes a shell holder for that cartridge).
A shell holder. You need to buy these separately if you buy RCBS dies.
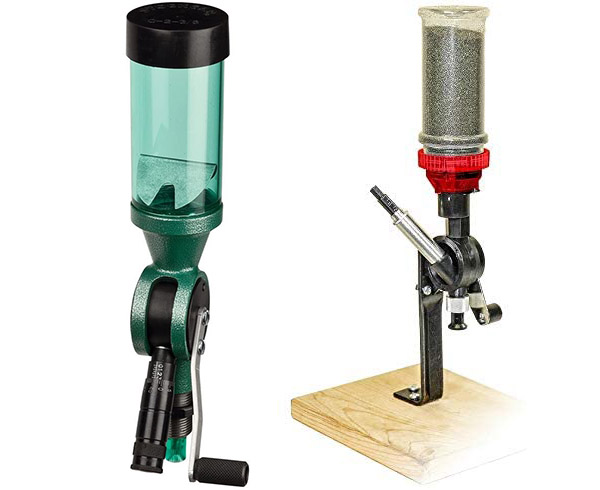
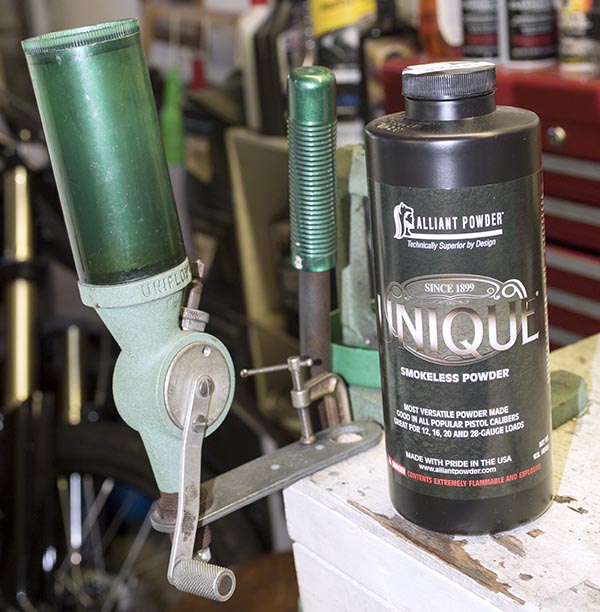
A Powder Dispenser
This is a device for dropping a precisely-metered powder charge into each cartridge case. There are fancy (read: expensive) electronic powder dispensers, but you don’t need those to get started and a lot of folks (myself included) don’t like them. A simple mechanical dispenser will work fine (as mine has been doing for 50 years). Both RCBS and Lee offer good powder dispensers; the Lee is substantially less expensive.
An RCBS powder dispenser on the left, the Lee powder dispenser on the right.
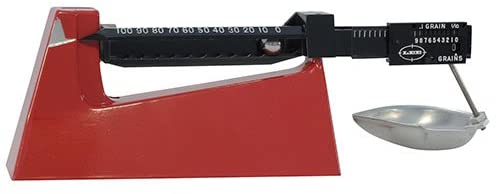
A Powder Scale
This is a simple balance beam scale to allow you to measure the weight of the propellant charge and adjust the powder dispenser to throw that charge. There are electronic scales, too, but they add complexity and considerable expense where none is required. Again, the dominant brands are Lee and RCBS.
A simple Lee balance beam reloading scale. These scales can measure to a tenth of a grain.
Cartridge Trays
When we reload, we use a cartridge tray (to hold the cartridges as we work through the process of reloading). A variety of manufacturers offer these.
An RCBS cartridge tray. These are available from several manufacturers. I’ve been using mine for nearly 50 years.
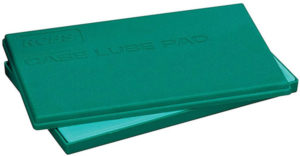
A Case Lube Pad
This is a simple foam pad. You put case lube on the pad and roll the brass cases on it to lubricate the exterior prior to running them through the resizing die (the first die used in the reloading process). If you have a straight wall pistol cartridge, you can buy tungsten carbide dies that don’t require lubing the cartridge cases. If you’re going to reload 9mm, .38 Special/.357 Magnum, .45 Auto, or .45 Colt, my advice is to spend the few extra bucks and get the carbide dies.
An RCBS case lube pad. You put a bit of case lube on the pad and roll the brass on it to lube the cases prior to running them through the resizing die.
Case Lube
This is the lube used as described above. To mention it again, if you’re going to reload straight wall pistol cartridges and you buy tungsten carbide dies, you won’t need case lube (or the case lube pad).
RCBS case lube.
Alternatively, you can buy spray-on case lubes, which eliminate the need for the case lube pad. I’ve tried spray-on case lubes and I prefer using the pad and case lube instead. Other reloaders like the spray-on approach better.
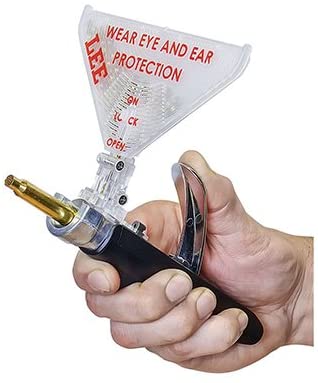
A Primer Seating Tool
Some reloading equipment companies incorporate a primer seating tool in their press; others offer separate primer seating tools. I have an RCBS press that came with the primer seating tool, but I like using a manual hand priming tool instead. Several manufacturers offer these; I use one from Lee.
The Lee hand priming tool. These work well. You can feel each primer seating and better control seating depth with these hand priming tools.
A Bench
You may already have a sturdy workbench where you can mount the reloading press; if not, there are reloading-specific benches available.
A Lee reloading bench. These work well if you don’t have a workbench for mounting your press.
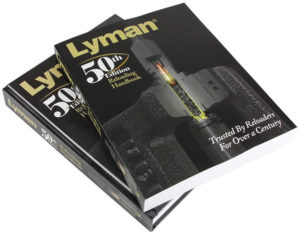
A Reloading Manual
There are several available, including the excellent offerings from Sierra, Speer, Hornady, and Lyman. Don’t think you can skip this; a good reloading manual is a must-have item for any reloader. They all explain the reloading process at the beginning, and they include safe recommended load levels for nearly all cartridges. I’ve acquired several reloading manuals over the years and they are all good; my favorites are the ones from Lyman. Others are published by bullet manufacturers (these include the manuals from Hornady, Speer, and Sierra) and those manuals include loads only for their bullets. The Lyman manual is more generic. But like I said, they’re all good.
I have reloading manuals going back 50 years. The Lyman manuals are probably the best.
That’s the reloading equipment. In addition to that, you’re going to need the ingredients for the cartridges you want to reload. That includes the brass cases, the bullets, the powder, and the primers.
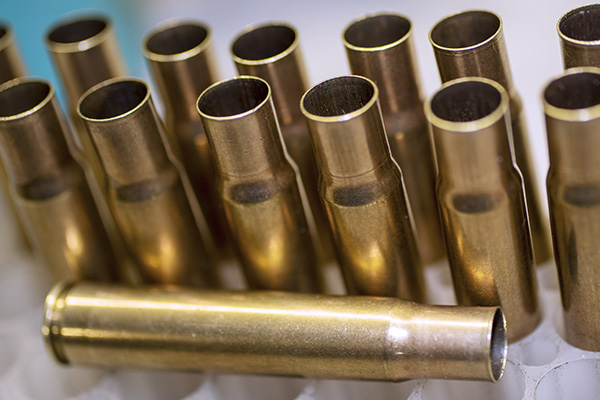
Brass Cartridge Cases
You can buy virgin brass online, you can buy once-fired brass at the range or at most gunstores, or you can do like most of us have done: Save your brass when you shoot factory ammo and reload it.
.35 Whelen brass waiting to be charged with propellant. This ammo costs $43 for a box of 20 factory rounds (and you can’t find anybody who has it in stock right now); I can reload it for under 50 cents a round.
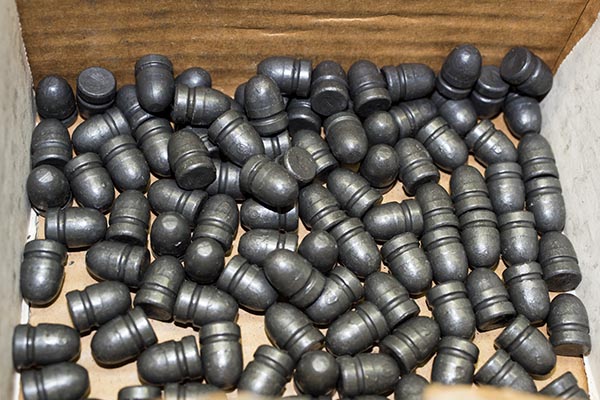
Bullets
You’ll need bullets to reload your ammo. There are lots of options here, and they basically break down into either cast or jacketed bullets. I’m a big fan of cast bullets for handgun and reduced velocity rifle reloads, and I use jacketed bullets for full-bore factory level (high velocity) rifle loads. Most folks these days order bullets online from reloading suppliers like MidwayUSA, Graf’s, MidSouth, Powder Valley, Natchez Shooting Supplies, and others. Smaller gun stores are disappearing, and you usually don’t find decent prices at the big chain stores.
Cast bullets waiting to be loaded into .45 ACP cases.
Propellant
For lack of a better term, we usually call propellants “powder,” and there are a wide variety of powders available. The reloading manuals show which powders work best for the cartridge you wish to reload.
Unique propellant and my RCBS powder dispenser. The reloading manuals will help you select the powder you need. Unique is a good general purpose propellant I’ve used for a variety of handgun cartridges and a few cast bullet rifle loads.
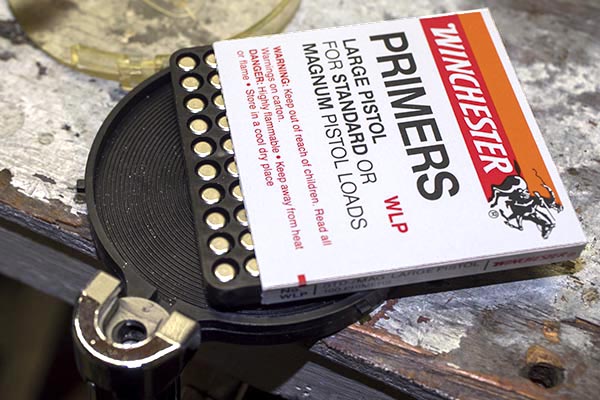
Primers
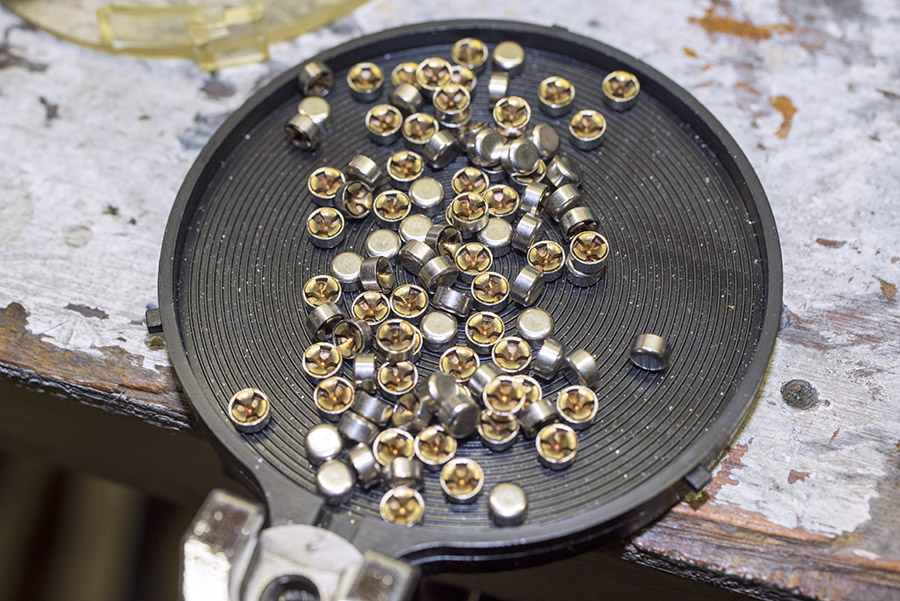
The primer is the component that lights the candle when you pull the trigger. There are several primer suppliers. The trick today is finding them, as there has been a run on primers since the pandemic began. If you can find primers in a local shop, buy them. The same suppliers listed above for bullets also sell primers (they are all out of stock now, but that will change as supply catches up with demand).
Winchester primers being loaded into my Lee hand priming tool. Other primer makes include Remington, CCI, Federal, and a few more.
The Best Equipment Approach: A Complete Kit
As I mentioned at the start of this blog, I believe the best way to get into the game is to buy a complete equipment reloading package from one of the reloading equipment suppliers. My advice if you are a new reloader is to go with the Lee package. It’s the least expensive and if you decide that reloading is not for you, you’ve minimized your cash outlay. I should add, however, that I don’t know anybody who ever tried reloading who didn’t get hooked on it. It is a marvelous hobby, and I believe it is as much fun as shooting.
I’ve used reloading equipment over the years from all the manufacturers. My personal setup is centered around an RCBS Rockchucker, but equipment from any of the suppliers is good. Basically, you can’t go wrong in this game from an equipment perspective. With that said, let’s take a look at what’s out there.
The Lee Challenger reloading kit. These were sold out on Amazon (and everywhere else) when this blog was published. Keep an eye on the Amazon site; it’s a good place to order the kit.
There’s only one problem with the Lee Challenger reloading kit: It’s such a good deal (well under $200 for the entire kit) that literally everyone is out of stock right now. As you know, we’re going through unprecedented times in the shooting world (guns, ammo, and reloading components are sold out due to the civil insurrection in many large cities, a new anti-gun administration on the horizon, and the global pandemic). That will change, but at this instant, no one I could find has the Lee kit in stock.
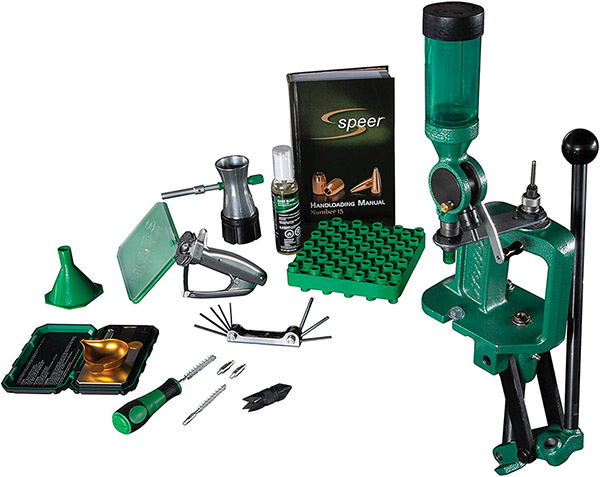
The RCBS reloading kit. RCBS makes high quality equipment that will last a lifetime. It costs more, but it’s worth it.
I’ve been using RCBS equipment for the last 50 years, and I believe it to be the best. It is built to last. If I couldn’t get the Lee package as a newbie, or if your budget will allow it, I’d go with RCBS equipment. At about $400, it’s just over twice the price of the Lee kit, but it’s still a great deal compared to buying all the different equipment items separately. The RCBS package shown above includes an electronic scale instead of a beam scale, a powder trickler (it allows you to finesse adding individual powder kernels to attain a precise charge weight), and a couple of case preparation tools that the Lee kit doesn’t include.
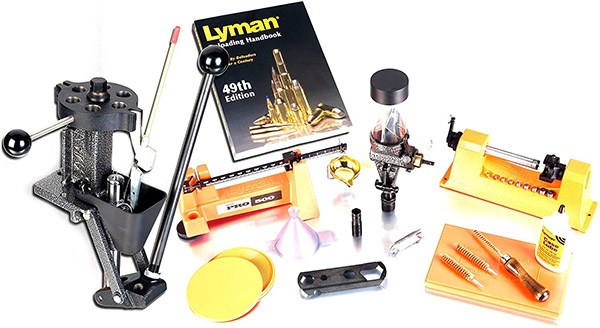
Lyman is another outfit offering a complete reloading kit:
Lyman’s reloading equipment package.
What’s a bit different about the Lyman kit is that it comes with a turret press, which allows you to mount all the dies in the press head and rotate them as you progress through the various reloading steps. I’m not a big fan of this approach; other folks are. The Lyman kit is just under $1000; the turret press and the inclusion of a case trimmer are what drive the price to that level.
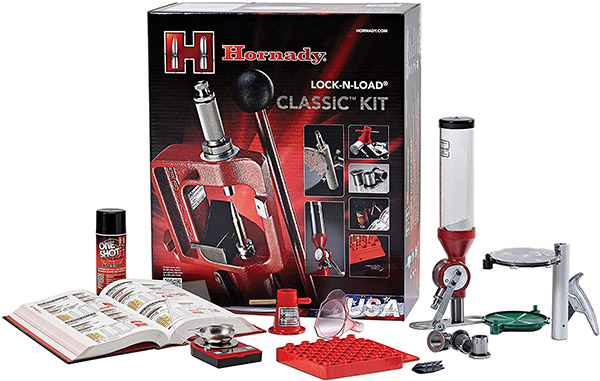
Hornady’s reloading package. I have the least experience with Hornady reloading gear, and I’m not wild about their dies. Hornady bullets are fantastic.
The Hornady kit is about $550. That’s substantially less than the Lyman kit, but more than either the Lee or the RCBS kits.
So there you have it. Remember that no matter which reloading kit you buy, you’ll still need dies and a shellholder specific to your cartridge. You’ll probably want to purchase more equipment as your reloading interest develops, including more dies (so you can reload more calibers), case cleaning and polishing accessories, a micrometer, and more. But what we’ve outlined here will get you started and keep you in the game for years.
In this blog we’ve covered the equipment you’ll need to get into reloading. If you would like to read about how to use this equipment, we have you covered there, too. We have a bunch of information on reloading various cartridges on our Tales of the Gun page, and a complete series on reloading handgun ammo that you can review here:


 .
.