As ExNotes blogs followers know, we visited Indiana this year. The trip combined three missions: We visited with good buddy Jeff and his wife Sally (who moved to Indianapolis shortly after we finished college in New Jersey), we visited and interviewed the key people at Janus Motorcycles in Goshen, Indiana, for a Motorcycle Classics article, and we hit as many points of interest as we could while we were in Indiana. We hit home runs in all three areas, I think. We enjoyed our time with Jeff and Sally, we had a great visit with Janus, and wow, did we ever see a lot in Indiana. One of the coolest places we visited was the Benjamin Harrison Presidential Site in Indianapolis.
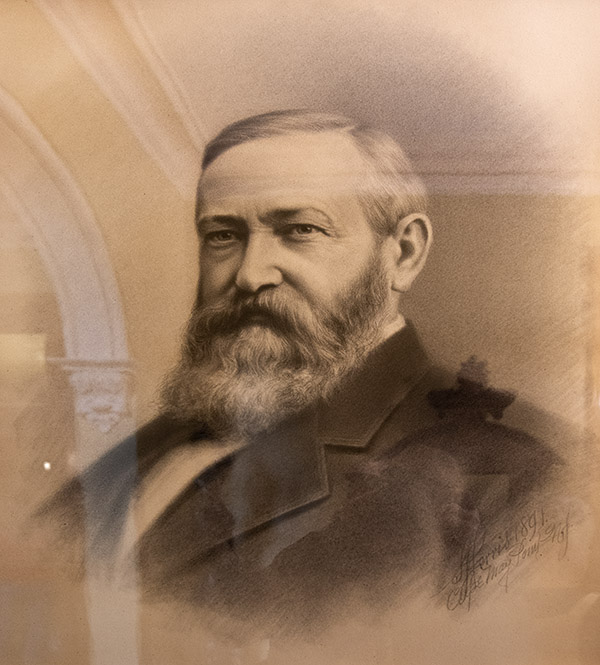
I didn’t really know anything about Benjamin Harrison when we visited the site, but I’ve learned quite a bit during and after our visit. Here a few of his accomplishments:
Graduated Miami University at Oxford, Ohio in 1851.
Elected Indianapolis City Attorney in 1857.
Elected Supreme Court Reporter in 1860.
Breveted Brigadier Civil War General in 1865.
Appointed by President Grant to defend U.S. Government in Milligan case in 1871.
Argued five cases before the U.S. Supreme Court (the most of any lawyer-President).
Elected U.S. Senator from 1881-1887.
Elected U.S. President from 1889-1893.
Set aside 13 million acres of public domain land for national forest reserves.
Initiated the Pan American Conference in 1889, later resulting in the Pan American Union.
Established the United States Coast Guard Academy.
Expanded the Navy from three steel war ships to 22 ships by 1893.
Added six states to the Union during his Presidency (this was the most of any President).
Firmly enforced the 15th Amendment to secure voting rights.
Instituted the practice of displaying the American Flag over public buildings and schools.
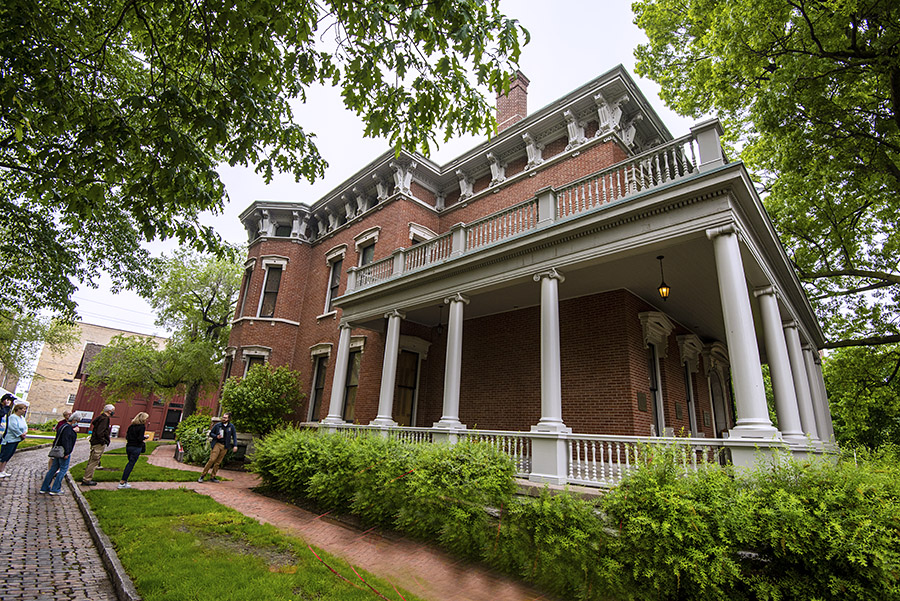
The Benjamin Harrison Presidential Site is in Benjamin Harrison’s actual home. Harrison built it on the outskirts of Indianapolis, but the city has expanded and it’s now in what I would consider the downtown area. The guided tour made for an interesting visit.
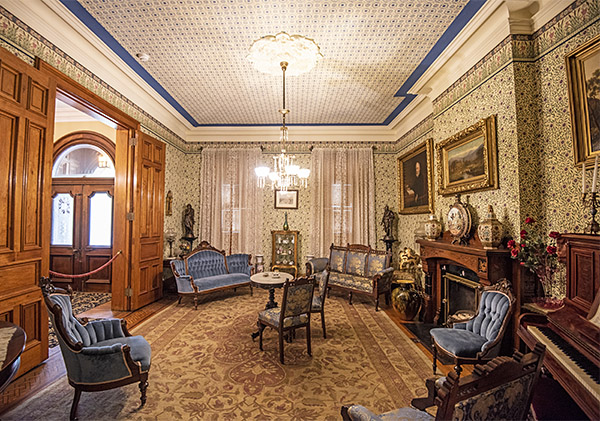
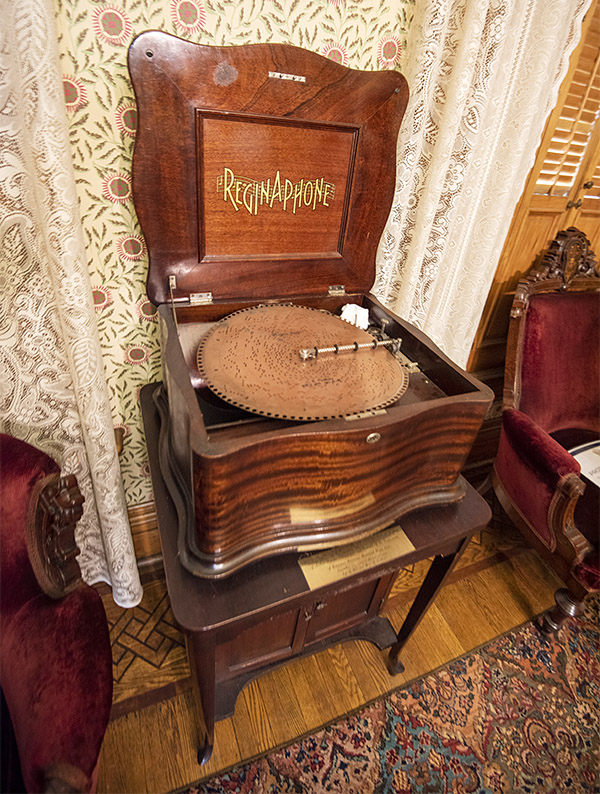
This room is a parlor just to the left of the front door. The tour guide explained to us that it was restored to its original condition, including the creation of custom wallpaper to match that which was originally in the house.
The Reginaphone was an early record player. It uses a disk with protrusions to create the music. This one works and we listened to it.
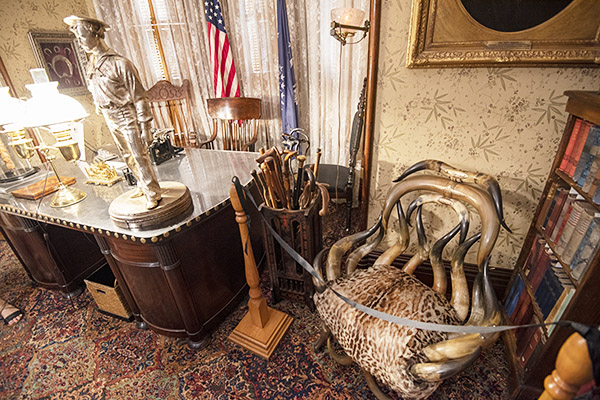
This is Benjamin Harrison’s home office. The horn chair is cool.
These are items on top of Benjamin Harrison’s desk.
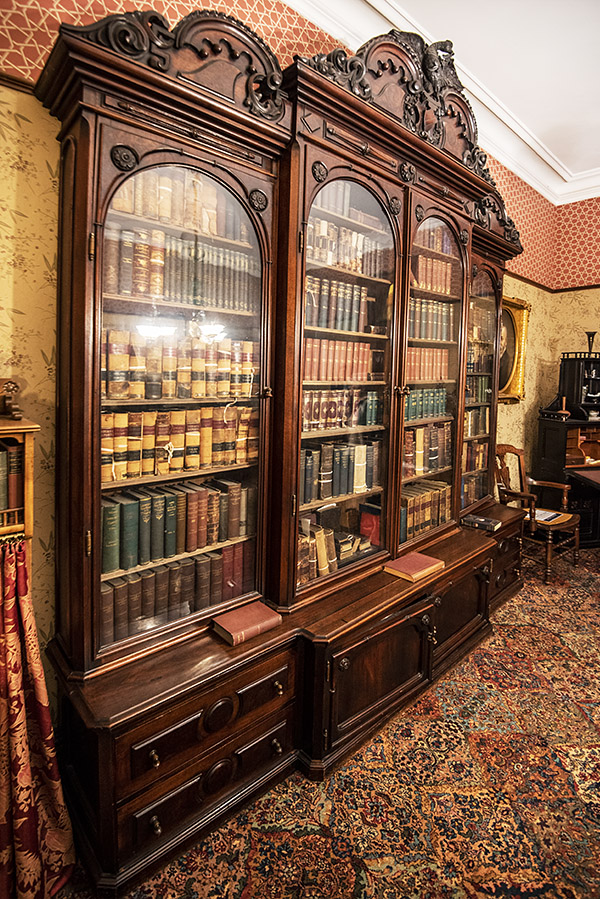
A very cool bookshelf dominated one of the walls in Harrison’s office.
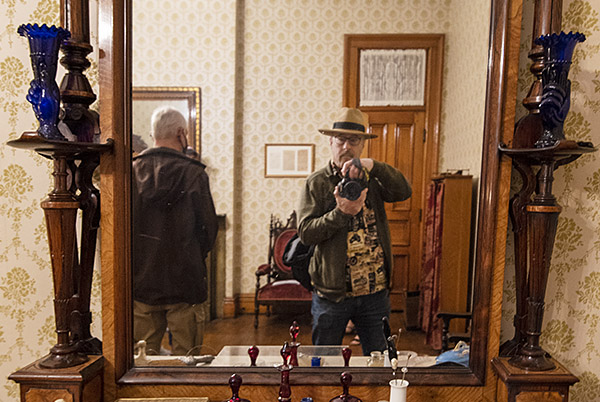
I can’t resist this shot whenever I see a mirror.
The tour continued with a trek through the dining room, the kitchen, some of the upstairs bedrooms, and a workout room.
I was surprised to see this when we left the Harrison Presidential Site. Steve is everywhere, I guess.
The tour takes about an hour and a half, and it costs $14 (there are modest discounts for military personnel and a big discount for children). You need to book your tickets in advance.
If you are in Indianapolis, I’ve got a good lunch suggestion. One of the best kept secrets in that fine city is Shapiro’s Delicatessen. It’s only 4 1/2 miles from the Harrison home and the food is stellar. Both spots are worth a visit.
Never miss an ExNotes blog:
Keep our admission fee kitty healthy. Hit those popup ads!
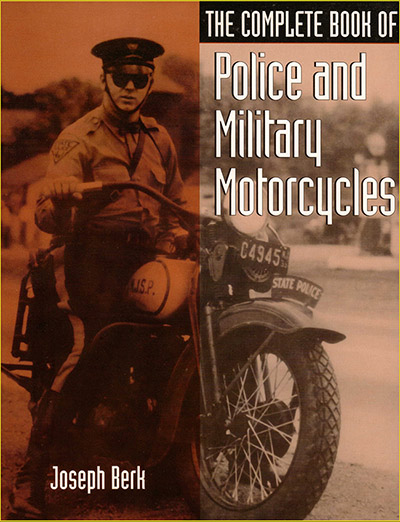
You’ve read about good buddy Jerry, his vintage Honda 305 Scrambler, and his Dad’s service as a New Jersey State Trooper motor officer. A photo of Gerry’s father, Ralph Dowgin, graces the cover of The Complete Book of Police and Military Motorcycles.
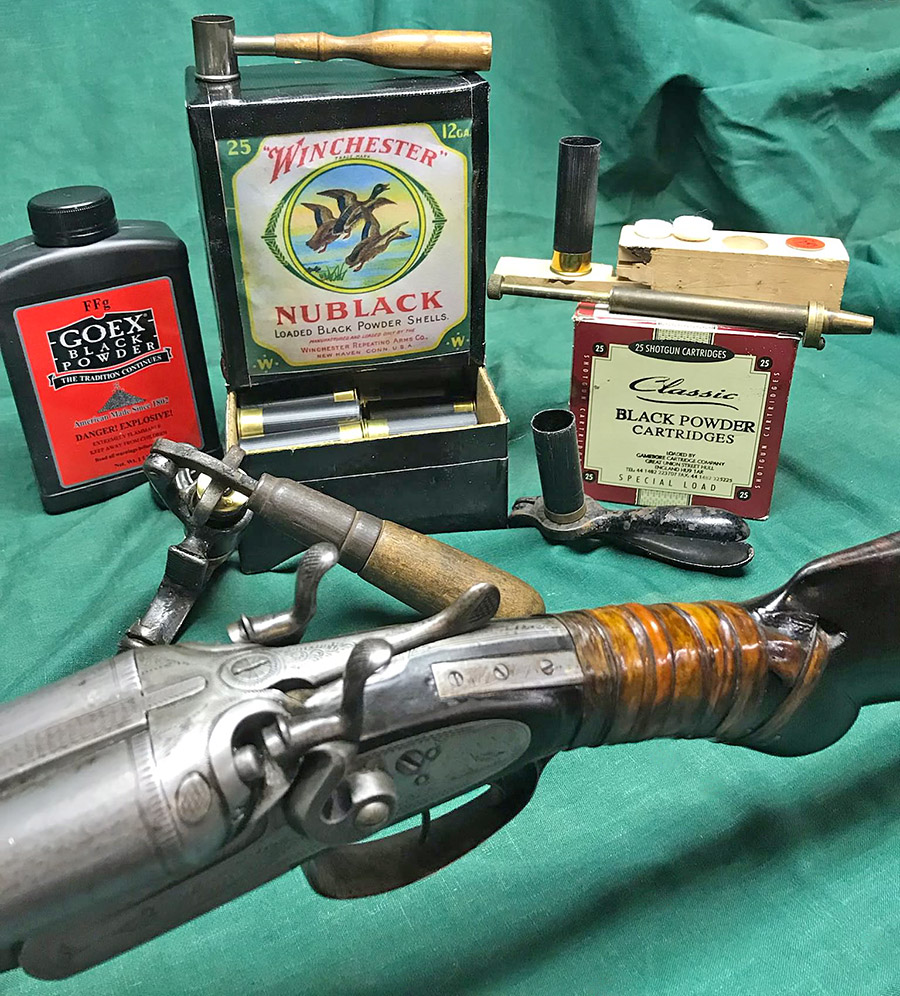
Not surprisingly, and in keeping with the ExhaustNotes’ theme (i.e., that folks who play with motorcycles are frequently interested in firearms, photography, watches, and other shared interests), Jerry sent a note to me recently about his restoration of a vintage shotgun. It’s the one you see at the top of this blog. Here’s Jerry’s description.
I restored my grandfather’s pre 1900 12 gauge Damascus double-trigger black powder shotgun. I researched how to load black powder shells for it, bought the loading equipment, made some of it myself and made the reproduction shotgun boxes from that period.
Using 70 grains of powder and No. 6 shot I hit 2/3 of the clay birds. Not bad for someone who only shoots clays every couple of years! I have since then loaded a box of buck shot.
Black powder fires at 10,000 fps vs modern powder that fires at 100,000 fps or so I read.
My grandfather fed 8 children on his 50-acre farm and I am sure his shotgun helped do it. The only things he bought in the store were sugar, salt, flour, and tobacco. Everything else he and Grandma made!
I did not find anyone else loading black powder shotgun shells in the literature.
Grandpop’s shotgun has silver inlays and rawhide wrapping on the pistol grip because grandpop’s oldest son John borrowed the gun and accidentally broke the pistol grip. Instead of just bringing it home broken and saying sorry, Pop, he brought it to a jeweler who inlaid the silver inlays to strengthen the pistol grip part of the stock and wrapped it in rawhide. That corrective remedy is how all future Dowgin children should behave when they break items of their parents. Thank you Uncle John for being a great role model.
Jerry, that’s awesome. The shotgun story is interesting; your efforts in recreating black powder shotgun ammo (including the box it came in) is downright fascinating. Good shooting, and I’m looking forward to seeing you next month!
I used to work in the recreational vehicle industry. I ran a plant for Johnnie Crean at Alfa Leisure a couple of decades ago making See Ya motor homes (I’ve written about that before), and I consulted with Thor Industries on their travel trailers and Zieman on their trailers. It’s a fun business, although it was quite a bit different than the mostly aerospace work I had done up to that time. In the aerospace business, tolerances are thousandths of an inch, and if something is nonconforming (even if off by only a thousandth), it is rejected. In the RV business, tolerances are huge (usually denoted in fractions like ±1/8 or ±1/4 inch), and if the tolerances aren’t met, corrective action involves finding a bigger hammer.
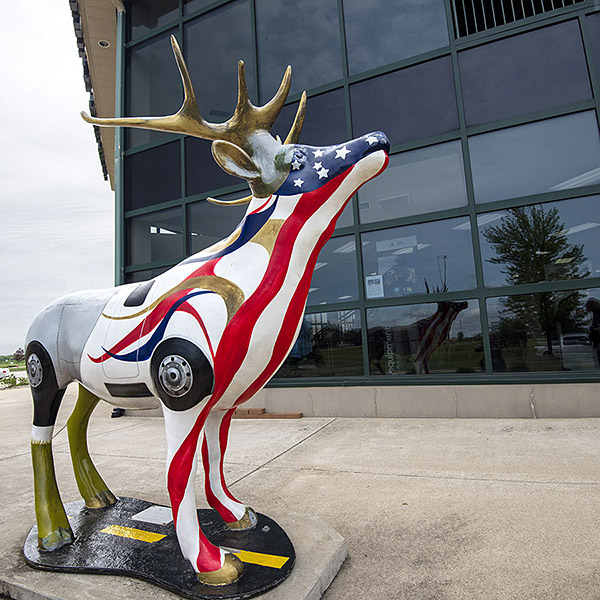
You see a lot of elk statues in Elkhart. The RV and Motor Home Museum and Hall of Fame has one.
I loved making RVs and I loved working for Johnnie Crean. The guy is the most creative person I’ve ever known, and his ability to find simple solutions to complicated problems always impressed me. Johnnie came from RV royalty: His father was John Crean, the self-made billionaire who founded Fleetwood. I met Johnnie’s father a couple of times. He was a cool and unassuming guy. When Johnnie finished college, he went to work for his dad at Fleetwood and realized after a couple of weeks he could start his own RV company, and that’s what he did. I worked for Johnnie at Alfa Leisure and I ran the motor home plant.
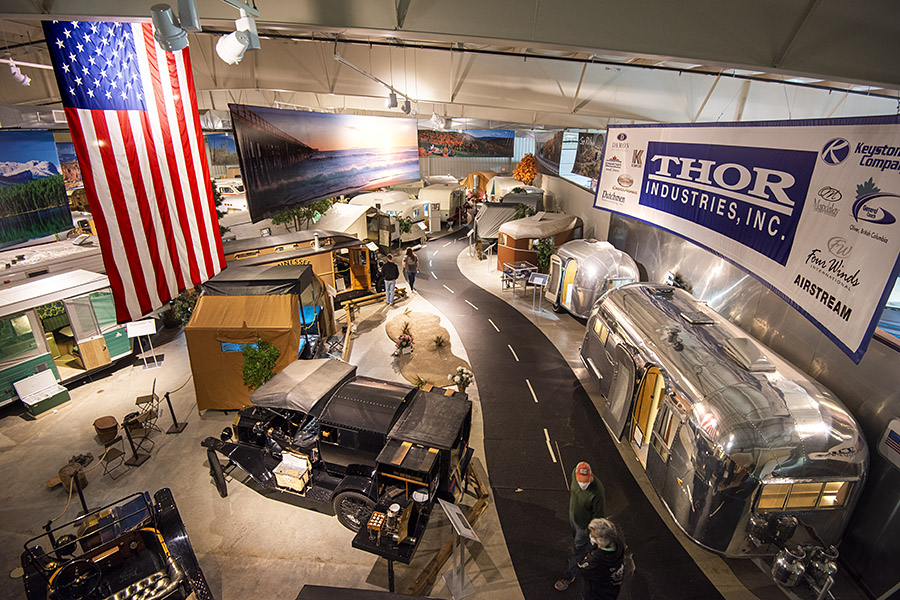
Anyway, I’m getting off topic, which is the RV and Motor Home Museum and Hall of Fame in Elkhart, Indiana. It was a fun visit and not surprisingly, John Crean’s name appeared more than a few times. Check out the little travel trailer in the photo below.
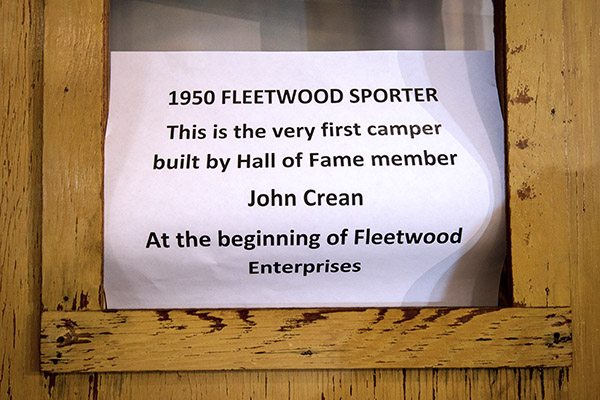
A 1950 Fleetwood travel trailer. This one has quite a pedigree.The very first. This is pretty cool.
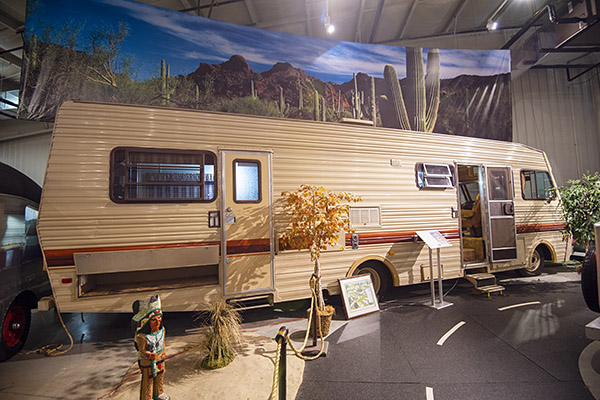
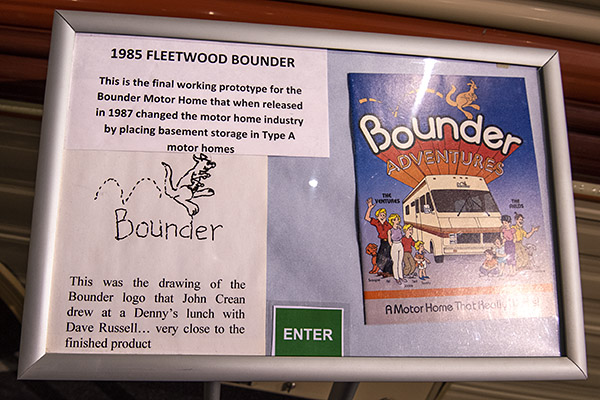
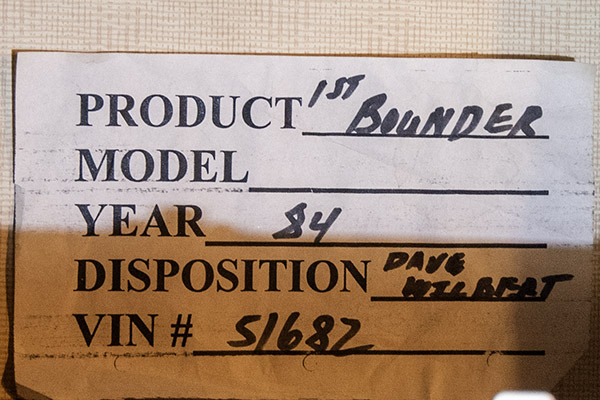
The RV/MH Hall of Fame also included the very first Bounder, another John Crean design that set a new standard in the RV business.
The first Fleetwood Bounder.John Crean drew the Bounder logo on a napkin in a Denny’s restaurant. It’s a cool story. It’s one of the concepts that made him a billionaire.The Bounder interior.The very first one.
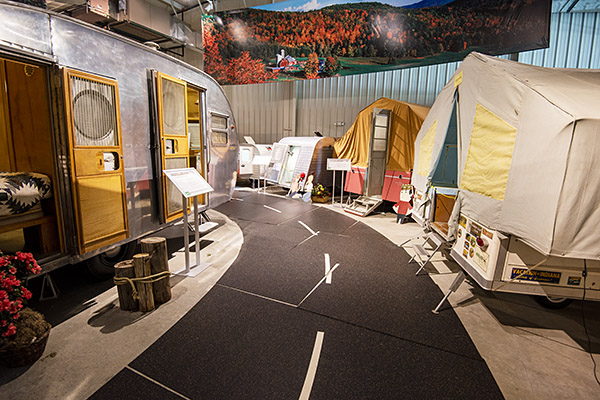
The main exhibit hall in the RV/MH Hall of Fame displays iconic recreational vehicles and early campers along a walkway painted to look like a two-lane road.
Some early RVs and campers.
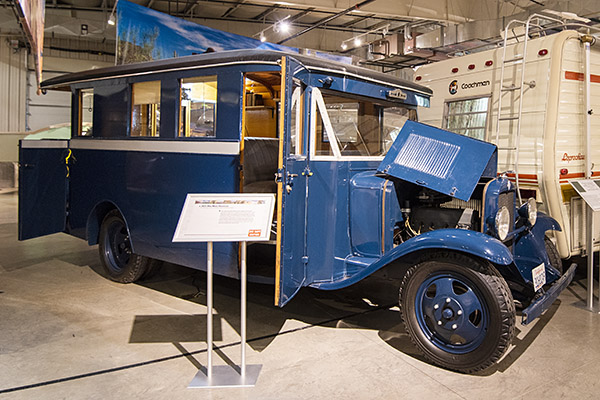
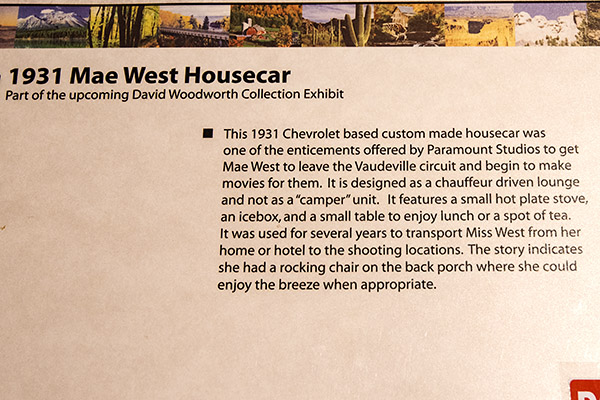
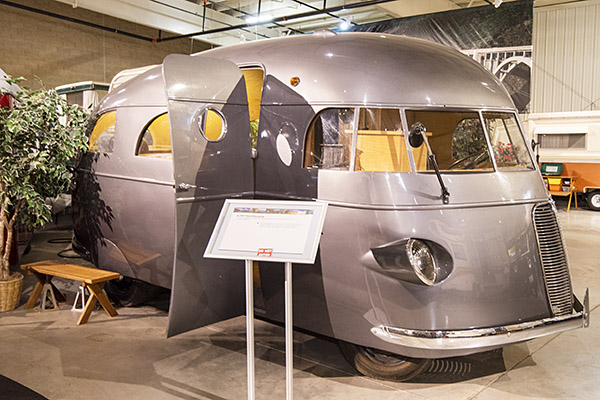
Mae West, the famous actress, was an RVer. Her RV was interesting.
Mae West’s housecar.A bit of info about the MaeWestMobile.The interior of the Mae West housecar.
This concept of movie stars having an RV is interesting. When I ran the Alfa Leisure plant, we also manufactured 5th-wheel trailers (they connect to a pintle inside a pickup bed instead of a trailer hitch). Alfa Leisure was the preferred 5th wheel in Hollywood, and big name movie stars’ contracts stipulated Alfa Leisure RVs.
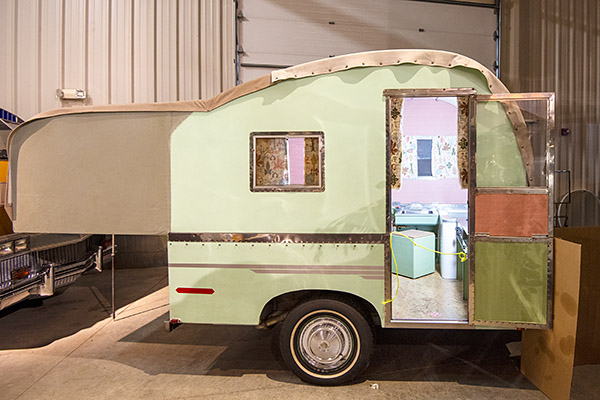
The Museum also displayed several examples of early travel trailers and motorhomes.
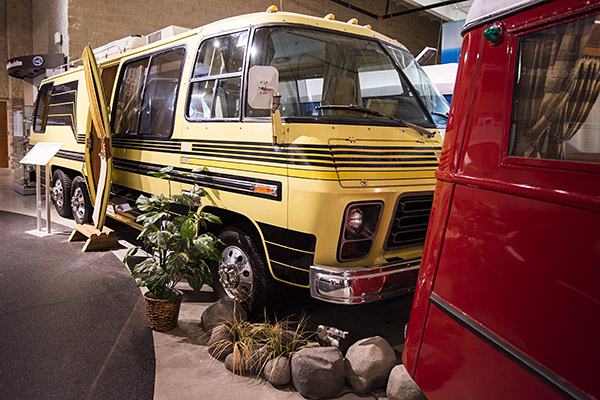
An early travel trailer.An early motor home.General Motors dabbled in the motor home business briefly. It looks interesting, but GM’s interest in RV’s was fleeting.
In the early days, motor homes did not include bathrooms, showers, or other amenities. Today, high end motor homes include all of those things and more. Some sell for more than a million dollars.
Walmart used to allow RVs to park in their lots for free (maybe they still do). We joked about folks who would spend a million bucks on an RV and then spend a half day looking for a Walmart where they could park overnight for free.
When I was in high school back in the early 1970s a new idea in educational teaching methods came about. This new method was called LAPS, for Learning Activity Package or maybe Learn At your own Pace. Whatever it stood for, LAPS was an attempt to uncouple individual students from a strict, class-wide learning schedule.
In the old style of everyone learns at once system if you were a smart kid you were held back by the slowest learners in your class. By the same token if you were a stupid kid you always felt pressured to learn as fast as the rest of the class. LAPS was a system designed to make learning either less boring or less stressful for the student, depending on which end of the intelligence spectrum you found yourself.
LAPS consisted of 20-page LAP printouts. A light blue cover sheet would be titled Algebra LAP-1 and inside were smelly, mimeographed pages of the 1st algebra lesson. This naming convention continued until Algebra LAP-20. After a student felt that they had mastered a particular LAP there was a final test. If you passed the final you went on to the next LAP. This process continued until you had successfully completed the Algebra course.
There was no set time to complete a LAPS course. A student didn’t have to complete all 20 LAPS to pass the course. They just had to do the best they could. Everyone received LAP-1 on the first day of school but from then on students progressed at their own pace. The teacher didn’t address or teach the class as a group. How it worked was you read LAP-1 and as you came to things you didn’t understand you went to the teacher’s desk and she would give you the personal, one-on-one help you needed to grasp the mathematical concept at hand. The program rapidly became known as “Laps for saps.” Failing a LAPS course was pretty hard to do because you were always right on the pace you needed to be.
For me school was misery. I hated sitting in class and watching the minute hand slowly rotate until the bell rang and you changed classes only to start the clock watching all over again. When school was over I could not sprint out of the damn place fast enough.
Another thing I hated was to ask for help. I still don’t like to ask for help. (See concrete.) A scrum of students was always at the teacher’s desk bugging her for information on how to do this or calculate that. No way was I going to wait around at her desk like a paparazzi hoping for a compromising shot.
I stared at the LAP-1 lessons and none of it made sense to me. It was like looking at Egyptian hieroglyphics: Look, there’s a scarab beetle. Over here is a bird with a human body with the number 7 hovering over its beak. I never approached the teacher for assistance because I was sure algebra was total BS and anyway I couldn’t fail the class. I will say this about the LAPS learning program: At least no one bothered me. I’m sure by now loyal ExhaustNotes readers can take a guess at how well the LAPS program worked.
The autumn months dragged by, the daydreaming days grew shorter and when Christmas season rolled around I was still on LAP-1, the only kid in class still on LAP-1. Apparently my most comfortable learning pace was a dead stop. Most kids were up around LAP-8 or LAP-10. Those kids were the jerks sucking up to the teacher.
Somehow the school notified my mom that I was an exceptional student in that I might be the only student to ever fail a LAPS class. I guess you had to do one LAP minimum to pass. Mom went ballistic. She was astounded that I had accomplished absolutely nothing in 4 months of schooling. Mom told my older sister Marlin to help me out (that’s not a typo, I’ve spelled my sister Marilyn’s name that same way since I could spell and I see no need to change it now).
So began my crash course in algebra. Marlin would sit with me at the dinner table for a couple hours a night and explain what the scarab beetles and the birdmen meant. It was pretty easy, even fun, when she showed me the ropes. We spent more time laughing than learning. I passed Lap 1 the very first week.
The pace quickened. Marlin had places to go and people to see so she rammed that algebra into my brain as fast as it would accept it. We were doing one, sometimes two LAPS a week. The teacher grew suspicious and thought I might be cheating so she actually sat with me to watch me take a couple of the LAP final tests.
By March I had caught and passed some of the smart kids and by mid-April my sister and I had completed all 20 LAPS of algebra. My brain was so jacked up it glowed in the dark. I had to wear a towel over my head to get any sleep at night. Unfortunately, I have since forgotten much of what I learned but I still use the concept of information that is missing to help figure things out.
Then came something the LAPS system didn’t plan for: What to do with kids that finished early? They couldn’t let us roam the halls so they put me with two brainiacs in a classroom and called it current events. In other words, we sat and watched TV. The TV club slowly grew as other students finished their LAPS. I watched TV or slept in that class for 2 months and learned nothing except that I didn’t like any of the kids I was with. It was a bizarre end to a bizarre way of teaching.
The following school year the LAPS program was discontinued, for me anyway. I went back to learning the old fashioned way without very impressive results. I muddled along, skipping school to ride motorcycles and flunking out my senior year from too many days playing hooky. Who knew there were a minimum number of days you had to attend to graduate? I finally managed to get a high school diploma but there was no pomp and ceremony to the thing. I simply went to the administration building after completing summer school and picked up the diploma from some clerk in an office I had never seen or been in before. It was like a janitor’s closet or a mechanical equipment room.
Those few months of intense learning with my sister were so much fun. I loved blowing past the smart kids with my secret weapon, Marlin. It was like having the fastest motorcycle on the block. What an advantage I had! Marlin taught me that learning stuff wasn’t such a bad thing and she taught me more than algebra: She taught me that while I may be slow, I’m not stupid.
I recently bid in a Rock Island auction for an Old Model Blackhawk once owned by Hank Williams, Jr. I wanted that gun, but not as badly as someone else. It sold for $4,993.37. I thought that was crazy, but in these days of 8.3% inflation (considered by some to be nothing), I’m not sure what constitutes crazy anymore.
The Hank Williams, Jr., Old Model Ruger Blackhawk.
As an aside, the New Model Blackhawk is not that new. Ruger introduced it in 1973. The New Model contains internal changes (a transfer bar mechanism) that prevents it from firing if it is dropped with a live round in the chamber. The previous Blackhawk (sometimes called the Old Model or the Three Screw) could discharge a round if it was dropped. The Hank Williams Ruger you see above is the Old Model.
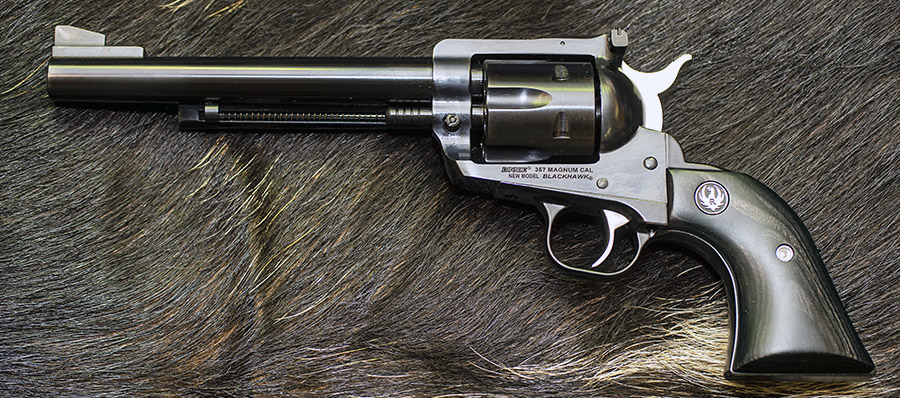
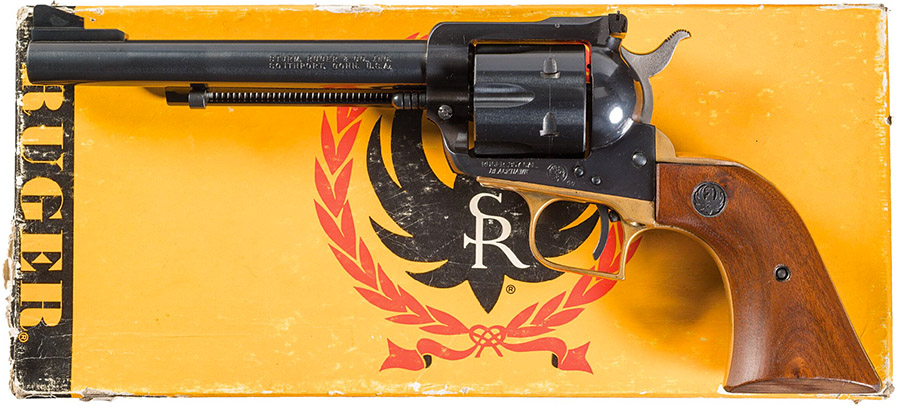
You know the story of my stainless steel .357 Magnum Blackhawk (it went down the road), and that left me without one. I felt naked without a .357 Magnum Blackhawk, so I bought a new one through Gunbroker.com from Reeds in Minnesota. I recently picked it up (after waiting the obligatory Peoples Republik of Kalifornia 10-day cooling off period). I’ve already started a couple of blogs on the new Blackhawk, including one on the best accuracy loads and another comparing it to the Colt Python (a .357 Magnum revolver costing twice as much as the Blackhawk). This blog focuses on my initial impressions.
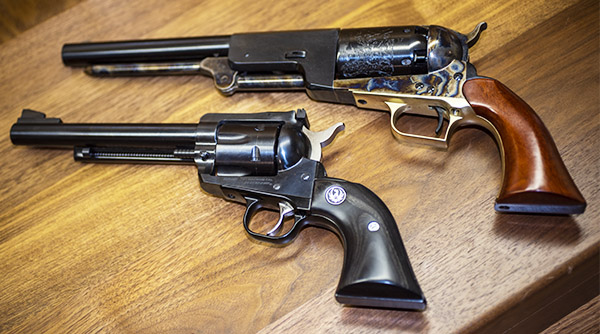
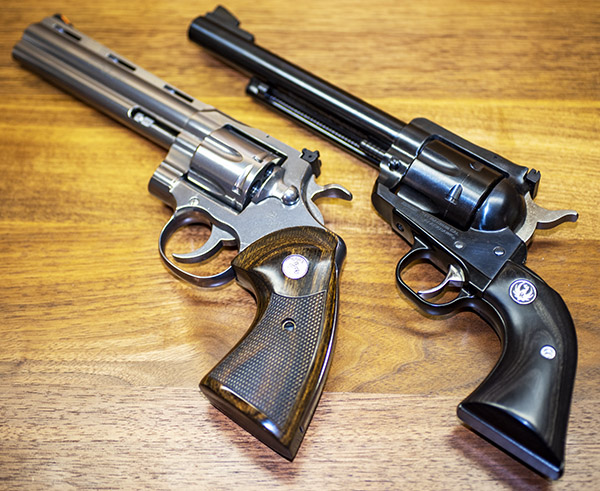
Two huge handguns: The Ruger New Model .357 Blackhawk and Uberti’s resurrection of the Colt Walker. The Blackhawk is wearing a set of Ruger black laminate grips in this photo.
My first impression is one I’ve always had: Ruger’s New Model Blackhawk is a massive handgun. I ordered mine with the 6 1/2-inch barrel (it’s primarily going to be a target gun, although if all the planets come into alignment I may hunt with it someday). My first thought when I picked it up was of the Colt Walker, another sixgun of huge proportions. The Ruger is a bit smaller than the Walker, but you have to put them side by side to see it. Heft the Ruger by itself and the feel is one of massiveness. It’s a big revolver. I like that.
The bluing is what I’d call an industrial grade gun finish. It’s certainly better looking to me than the black plastic stuff I see on the range. My cylinder had bright spots where the bluing was incomplete.
Spots where the bluing quality standard must have been “close enough for government work.” I’m surprised this escaped from the Ruger plant.
The pin securing the rear site to the revolver is another issue. After my first 140-round range session, it started to back out. Green Loctite is the answer here. In fairness to Ruger, I’ve experienced this on other handguns. But it shouldn’t happen.
The fit of the black plastic grips can only be described as poor. I had decided (before I saw the revolver) that I would leave the stock checkered black plastic grips on the gun because I have the same grips on a .30 Carbine Blackhawk and I like the fit, the feel, and the look. On the .30 Carbine Blackhawk, the grips fit well. On this new .357 Blackhawk, the grips didn’t match the grip frame.
The grip frame should align with the grips. It does not.
The grip frame sits a good 0.080-inch proud of the grips nearly all the way around. I’ve seen this sort of thing on other Blackhawks. I don ‘t know if the grip frames are varying from gun to gun, or if the grips are varying, or if both conditions exist. In any event, the lack of dimensional control is not good. If I had seen this gun in a gunstore, I would have asked to see another.
I have a few older Blackhawk grips I’ve picked up over the years. One is a set of black laminated grips. They fit the new .357 much better. The fit is not perfect, but it’s better and they’re staying on for now. The dark grips complement the Blackhawk’s look well. It’s what you see in the big photo at the top of this blog.
I checked the Ruger’s timing and it is perfect (as it should be). The way to check timing is to exert light drag on the cylinder while cocking the hammer, and the cylinder bolt should click in place when the hammer reaches full cock. Kudos to Ruger on that. You’d be surprised how many new guns are timed incorrectly from the factory. In the late 1970s in the Dirty Harry craze, Smith and Wesson revolvers were notorious for being out of time when brand new (I know because I bought a few; they quickly went to new owners).
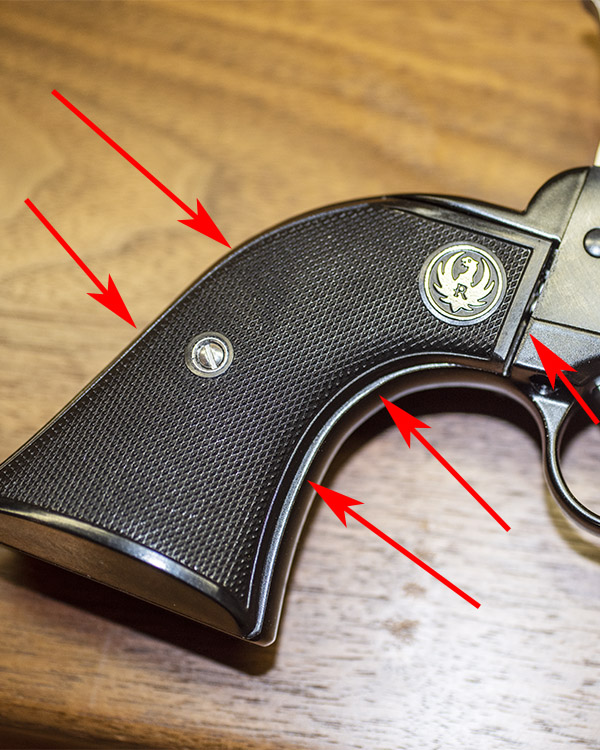
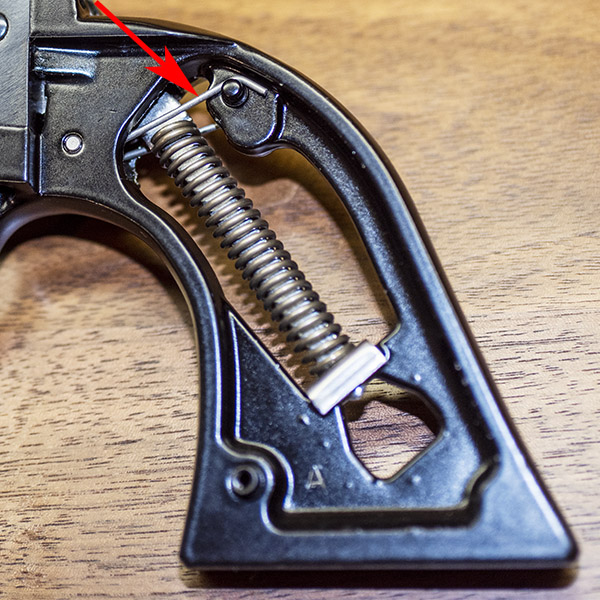
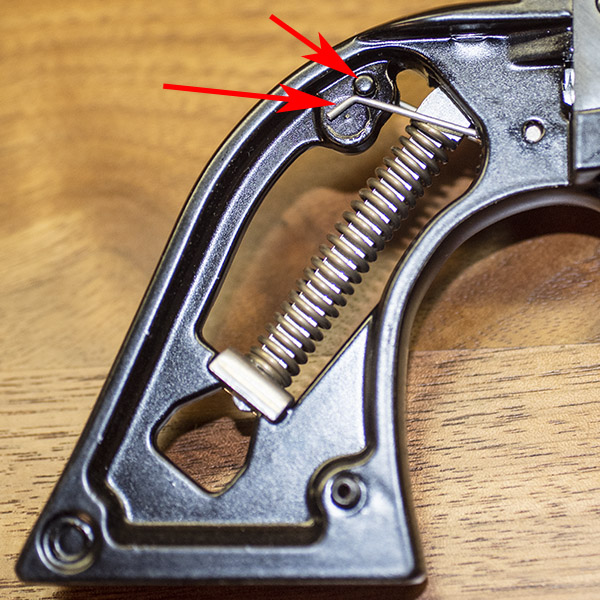
The Blackhawk’s trigger spring is a coil spring with two legs that extend into the grip frame area (one side of the spring is noted by the red arrow in this photo).To reduce the trigger pull, simply unhook one side of the trigger spring (denoted by the lower red arrow) from the post against which it rests (denoted by the upper red arrow). Voilà, a New York trigger job.
The Ruger’s trigger is crisp, with zero creep. Ruger got that right, too. I did a quick New York trigger job, and it now it is lighter and has that classic “breaking glass” release. It’s a wonderful trigger.
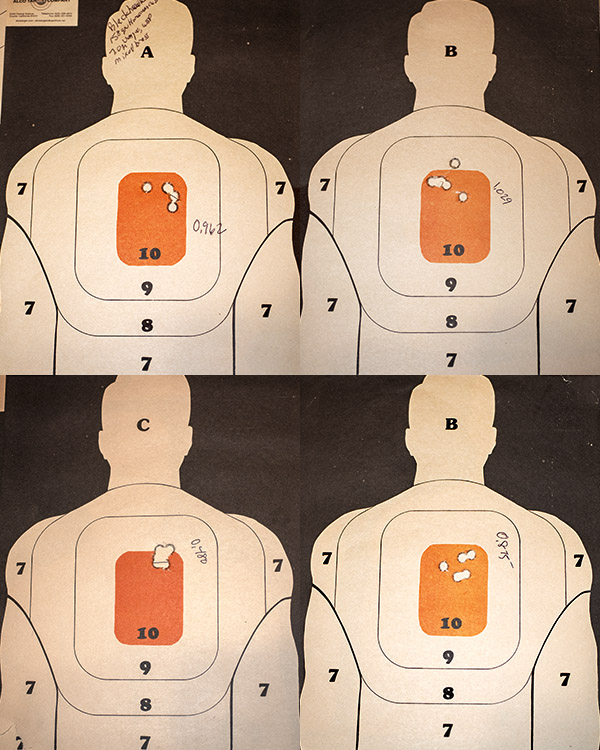
So how does it shoot? In a word, it’s wonderful. I’ve already been to the range to evaluate different loads (the subject of a future blog), and the results are impressive. Here’s a set of teaser photos showing a few 50-foot, 5-shot groups.
Cosmetic issues aside, my new Blackhawk is a shooter. These are phenonemal groups for a first range session. Watch for a near-term future blog on how different loads performed.
We’ll have a series of blogs on the Blackhawk in the coming days. One will be the preferred loads blog mentioned above. Another will be a detailed comparison of the Blackhawk and the Colt Python. Apples and oranges, you say? Maybe not.
A Colt Python and a Ruger Blackhawk, both chambered in .357 Magnum. One costs twice what the other costs. Is it worth it? Stay tuned and find out.
I contacted Ruger about the grips and the cylinder bluing; they are sending me a new set of grips and they will reblue the cylinder. That’s Ruger Customer Service; it’s the best in the business.
On the off chance that decisionmakers at Ruger read this blog, indulge me and allow a recommendation from one of your biggest fans. Bring out a premium version of the .357 Blackhawk with:
A brass grip, Super Blackhawk Dragoon frame (like that Hank Williams, Jr. revolver shown above). Yeah, I know it would cost more. There are people willing to pay more. Put me at the head of that line.
A high polish blue, like you used to do on the Super Blackhawk. The same comments apply; a price hike would be okay.
A 7 1/2-inch barrel. You already do so on the Super Blackhawk, and on the .30 Carbine and .45 Colt Blackhawks. That extra inch of sight radius makes a difference, and a 7 1/2-inch barrel just looks cool. Regarding cost, see above.
That’s it for now. Stay tuned; there’s more good stuff coming your way.
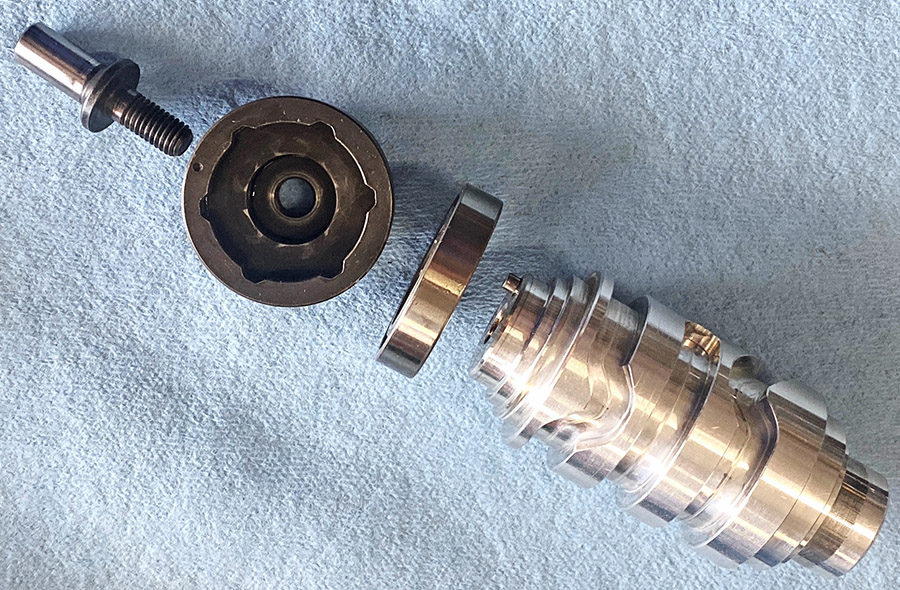
The Husqvarna is still in a million pieces but those pieces are improving. I received the new-used transmission from eBay and it looks to be in good condition. The seller included a few extra bits like a brace for the starter gears and a well-worn countershaft sprocket. The odd thing is, I bought the gears from a British eBay seller but the transmission was shipped from Latvia. Have I stumbled upon an international motorcycle theft ring that keeps a United Kingdom address for customer assurance but chops the stolen bikes in Latvia? Is it a way to get around the dreaded Value Added Tax?
The transmission fits into the crankcase well and looks exactly the same as the old gear cluster. I used the countershaft shim that came from Latvia but I don’t like the gear spacing so I might try the shim from the old countershaft shim. I’m using the Latvian shift forks and shift drum (the old ones don’t look bad but I suspect may be bent as the bike kept jumping from neutral into gear just pushing it around).
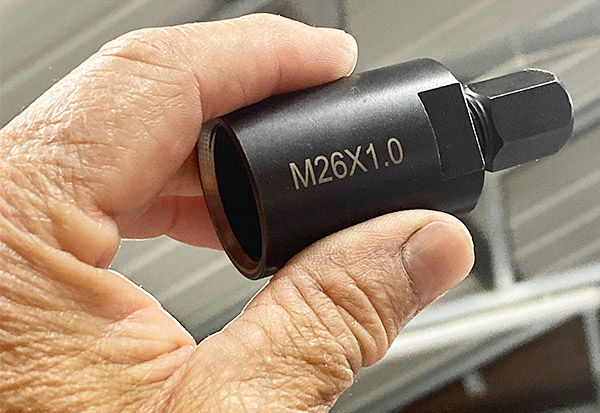
The flywheel puller I ordered that was supposed to fit my year Husqvarna missed it by a few millimeters. I was sent a 26mm but I measure the threaded puller boss at 28mm. Of course the puller would not thread on. I need to get the flywheel off to wash out the crank bearings and case. I have ordered a 28mm puller; hopefully it will fit.
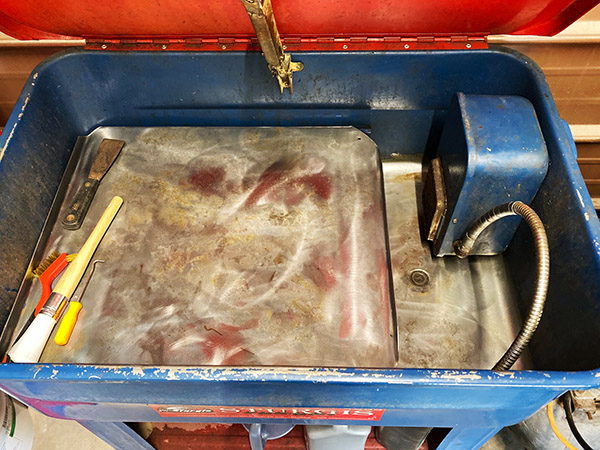
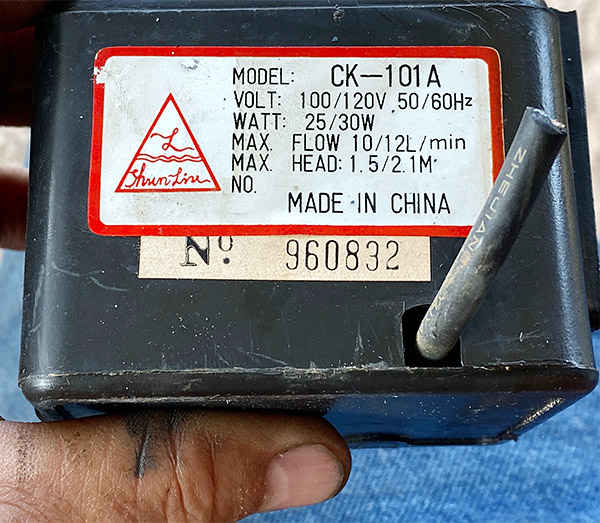
My Harbor Freight parts washer hasn’t been cleaned since 1999 and had a ½-inch layer of greasy muck in the bottom. The goal is to not make the parts less polluted, not more. I scraped the gunk out and cleaned the parts washer. It was time, really. The solvent pump was not working and the plastic pump’s hose bard had broken just from sitting. I have looked online for a replacement pump but can’t find an exact fit. I don’t feel like modifying a different pump right now so I decided to wash the bits the old fashioned way: a stiff brush and bucket of mineral spirits.
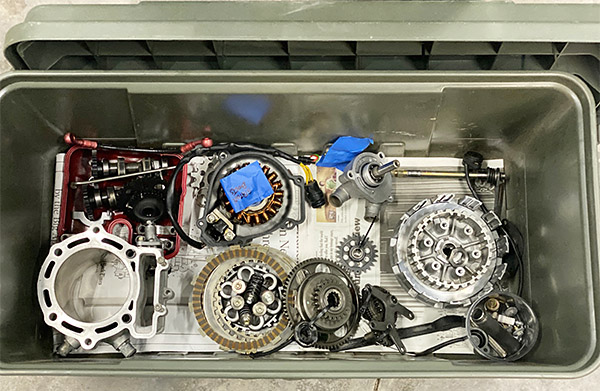
As I clean the parts I stack them in order inside a nice, lidded, plastic box to keep dust and cat hair off of them until ready to reinstall. I use blue masking tape to keep the bolts for each component together. This saves you from having to figure out which bolt went where later on. Lots of junk came off the parts and I had to refresh the mineral spirit bucket frequently.
My buddy Deet thinks the world of Yamabond sealant so I ordered a small tube of Number 4 to seal the crankcase halves. I would have used Huskybond 3 but couldn’t find any for sale. My plan is to dry fit the crankcase halves together and test the shifting of the transmission, You need both sides to test the transmission properly otherwise the gears bind and push the shift fork shafts around. After I’m sure the thing shifts ok I’ll pull it apart and apply the sealer for final assembly.
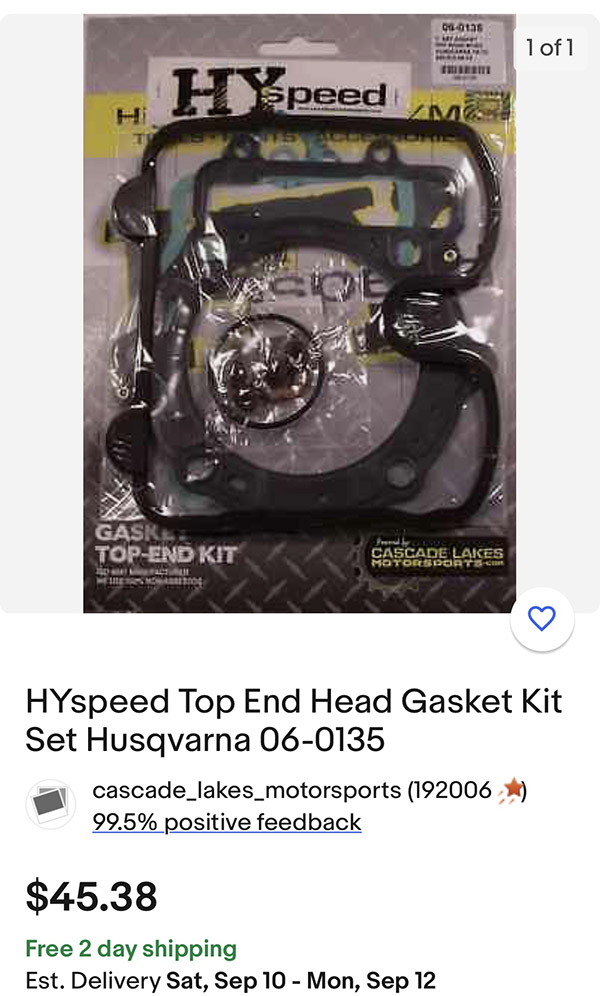
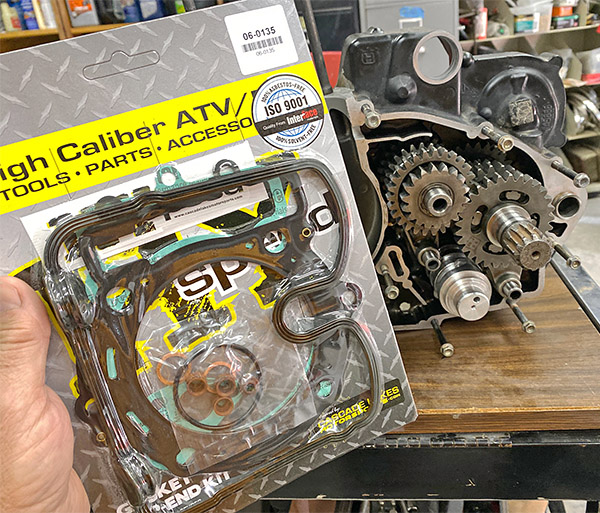
I received the top end gasket set from eBay. It only took two days! I haven’t checked to see if they are the right ones but they look ok in the package, what could go wrong? The gasket set was pricy at $45 but is very complete with all the o-rings and rubber parts along with valve stem seals and the gaskets.
I’m not making rapid progress on the Husqvarna. I spend a lot of my time wondering at a blade of grass or being amazed by the sky revolving around above my head. Still, I’m more confident than ever that the Husky will tear up the trails once again. Now I just need that 28mm puller.
Like what you get in ExhaustNotes? Help us out and hit those popup ads!
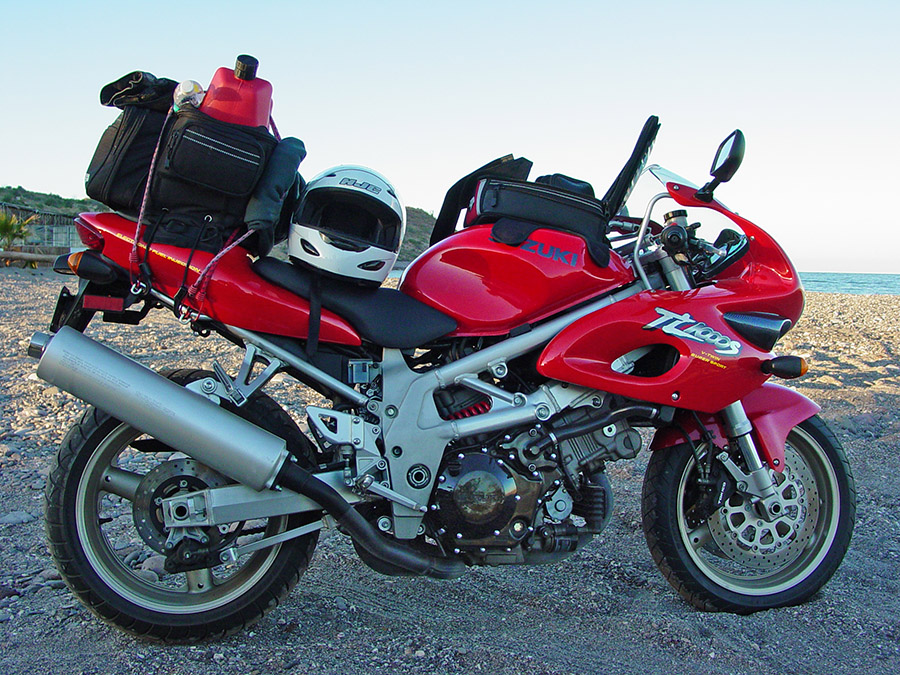
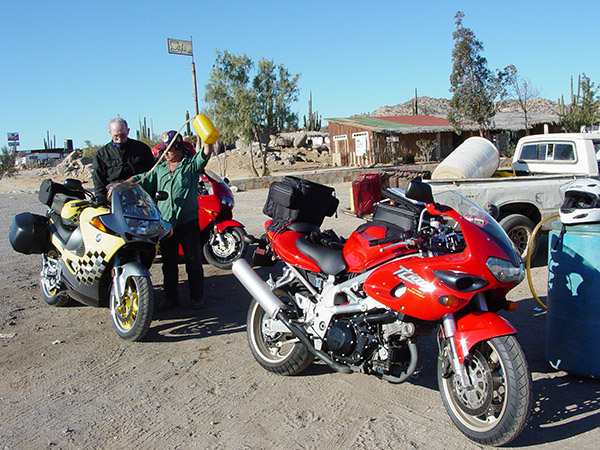
The year was 1997 and the Ducati V-twins had been dominating magazine covers for years. Not to be outdone, two Japanese manufacturers produced similarly-configured V-twins (actually, L-twins). Honda had the SuperHawk, and Suzuki the TL1000S. I’ve always liked Suzuki better, so I went with the TL1000s. Suzuki offered the TL in two colors….a forest green with red accents; and bright red with yellow accents. For me, it had to be red.
My ’97 TL1000S, somewhere in northern Baja.
I bought my TL at Bert’s in Azusa. If I recall correctly, I negotiated the guys down to $8700 out the door, and part of that was a Yamaha 650 twin I traded in. I had bought the Yamaha used from a guy in a course I taught at McDonnell Douglas, thinking the Yamaha would be like my old Triumph Bonnevilles but reliable. The Yamaha was a bust. It was too heavy, it had cheap fasteners, the Hopper/Fonda riding stance was awful, it didn’t handle, and it lacked the low-end grunt of my earlier Triumphs.
I remember riding the TL home from Bert’s. The riding was awkward with the bike’s low bars and high footpegs, but I got used to it and I made it less punishing with a set of Heli-Bars. The Heli-Bars were slighly taller and wider (you got about an inch more in each dimension, which made a difference).
A stop for fuel in Catavina. The guys sell gasolina from bottles along Mexico Highway 1.
The TL was the fastest and hardest accelerating motorcycle I ever owned. It would wheelie in third gear if you weren’t paying attention, and it went from zero to 100 in a heartbeat. The bottom end torque was ferocious. Fuel economy was atrocious, and it had a tendency to stall at low rpm. But wow, did it ever look good. Did I mention it was fast?
My friend Marty had an Aprilia V-twin (a Mille, I think, or something like that), another bit of Italian exotica, that cost even more than the Ducati. Marty’s spaghetti-bender was more than twice what I paid for my TL. We swapped bikes once on a day ride and I came away unimpressed. My TL was faster.
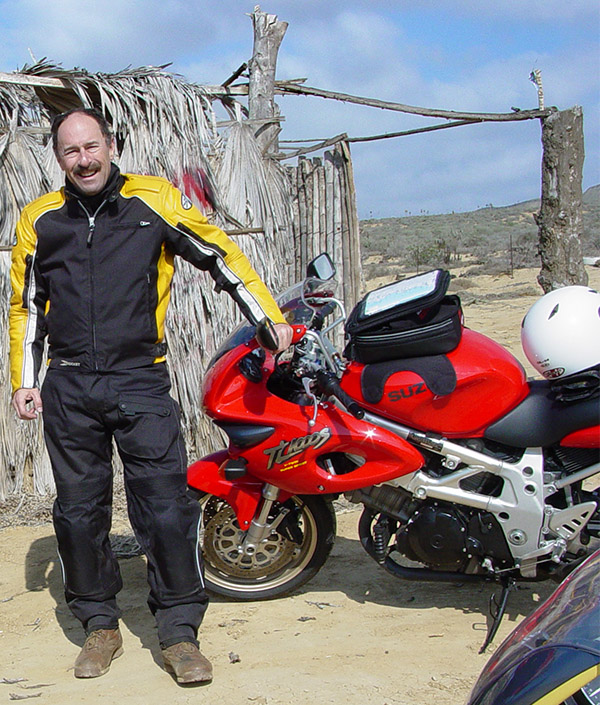
Baja a few years ago. Younger, thinner, and hair that hadn’t turned gray yet. That motorcycle made me look good.
I wanted the look of a sport bike, but I’m not a canyon racer and the exotic look didn’t do anything for me once I had ridden the TL a few times. Then something funny happened. My Harley died on a Baja ride. I nursed my Harley home, parked it, and took the TL. Surprisingly, it did a good job as a touring platform. And I could ride at speeds the Harley couldn’t dream about. In those days, if there were speed limits in Baja, I didn’t know about them.
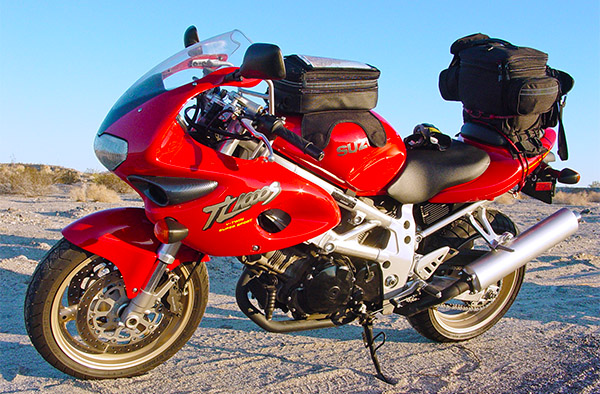
That first big trip on the TL instead of the Harley cinched it for me. I bought sportsbike soft luggage and used the TL on many rides after that. 700-mile days in Baja became the norm (I could make Mulegé in a day; the TL wouldn’t break a sweat). The only downside was the abominable fuel economy (the fuel light would come on after 105 miles), but a one-gallon red plastic fuel container and a bungie cord fixed that. It was Beverly hillbillies, but it worked. Not that there’s anything wrong with being a hillbilly (somebody’s got to shoot those road signs).
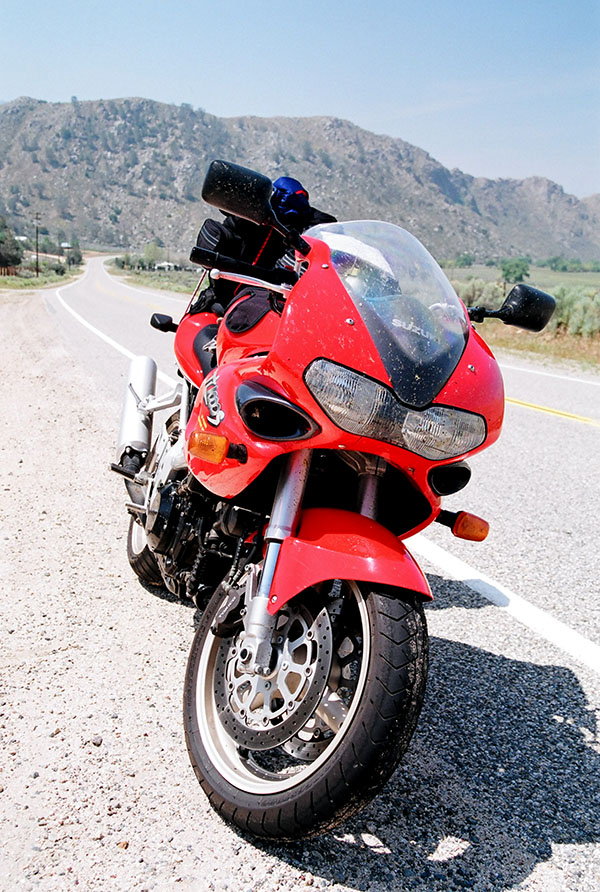
TL1000S touring. The bike was a surprisingly good touring machine.
Even with the TL’s mid-30-mpg fuel economy, I only ran out of fuel twice. Once was on the Bodfish-Caliente Road (one of California’s best kept secrets). I didn’t have my gas can with me; Marty rode ahead and returned with a gasoline-filled water bottle he hoped wouldn’t dissolve (it didn’t). The other time was on Baja’s long stretch headed south to Guerrero Negro. That road runs straight as an arrow, and I ran the TL at a surprisingly comfortable 145 mph (still well below the TL’s top speed). The TL was fuel injected and when it ran dry it was like someone shut the ignition. I poured my extra gallon in and made it to the next Pemex station. The guys I rode with were still far behind.
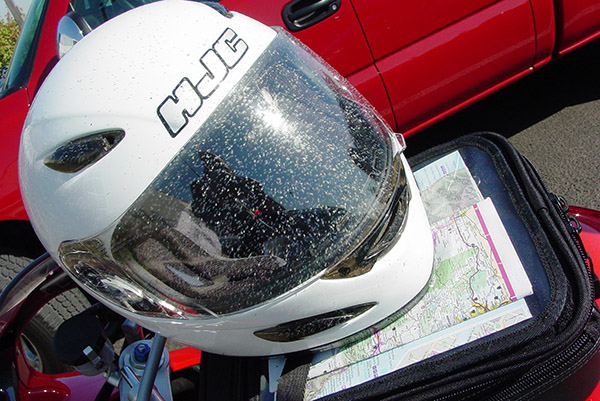
I had fun with the TL, but I dropped it a lot more than any other bike I had ever owned. All the drops were my fault. The low-mounted sport bars restricted steering, and once when pulling into my driveway, there wasn’t enough to keep the bike upright. Before I realized it, the bike and I were both on the ground (my first thought was to wonder if anyone had seen me). The next time the bike was in my driveway, facing slightly downhill. I started it to let it warm up, and the bike rolled off the sidestand. Again, my first thought was if anyone had seen me. The third time was more dramatic. The TL had a slipper clutch; you could downshift with reckless abandon. The clutch would slip and not skid the rear tire. It was cool, until I used it diving hard into a corner. The curb was coming up quickly and I wasn’t slowing fast enough. The slipper clutch was doing its thing, but when I touched the front brake, that was enough to unload the rear wheel. It broke loose and I fishtailed into the curb. I went over the bars, executed a very clean somersault, and came to rest in the sitting position looking straight ahead. I had been watching the Oympics on TV the day before and I remember thinking (as I completed my dismount) I could be a competitor. A woman in a station wagon saw the whole thing. She rolled down her window and I half expected to see a sign with a 10 on it (like they do at the Olympics). “Are you okay?” she asked.
“Yeah, I’m fine,” I answered. “I’m a gymnast and I’m practicing.” The window went up and she disappeared.
I loved the looks of the TL. Yeah, the carbon fiber was faux, but I didn’t care. In those days I was running a factory that made carbon fiber aircraft stuff and I never understood the attraction. Even with fake carbon fiber, the TL was a motorcycle that looked fast. And it was.
Serious miles were easy on the TL1000S.
Suzuki only made the TL for a few years. Some guy in the UK killed himself in a speed wobble, the bike got an Internet rep as a tank slapper, and that killed sales worldwide. Suzuki had a recall to add a steering damper, but the damage had been done. Bert’s installed the damper on my TL, I couldn’t feel any difference , and my bike never went into a wobble (either before or after the recall). My hypothesis is that the UK guy rolled on too much throttle exiting a corner, lifting the front wheel with the bike leaned over. That will induce a wobble, you know. There was another recall to fix the low speed stalling issue. I guess it worked; my bike never had a low speed stall after that.
Suzuki offered a more radical fully-faired version called the TL1000R (I didn’t like its looks), but the TL-R didn’t survive, either. The engine, however, proved to be a winner. Today, 25 years later, a detuned version is still soldiering on in the ADV-styled V-Strom. I never owned a V-Strom, but I should have. Everybody I ever talked to who owned one loved the V-Strom. Me, I loved my TL.
This blog is longer than I intended it to be. I thought I would just do a quick bit about a new set of Lee reloading dies I recently purchased, but as I got into it, I learned more about my Colt Python, crimping with a bullet seating die versus a dedicated factory crimp die, and well, the thing just grew. Mea culpa; you can leave early if you want to. Because this is a longer-than usual post, I thought I’d provide the bottom line up front: The Lee factory crimp die is a good thing. It works. It holds bullets in place better, it improves chambering, and it improves accuracy.
Now, the rest of the story.
For the last umpteen years when loading .38 Special or .357 Magnum ammo I have been using a kluged-up three die set (a carbide resizer/decapper from Dillon, an expander die from Lee, and a bullet seating and roll crimping die from Lee). You can use the same dies for both .38 Special and .357 Magnum; the only difference between the two cartridges is the length of the cartridge case. They use the same diameter bullets (even though it’s called a .38 Special, the bullet diameter of a .38 is actually .357 to .358 inches, just like the .357 Magnum).
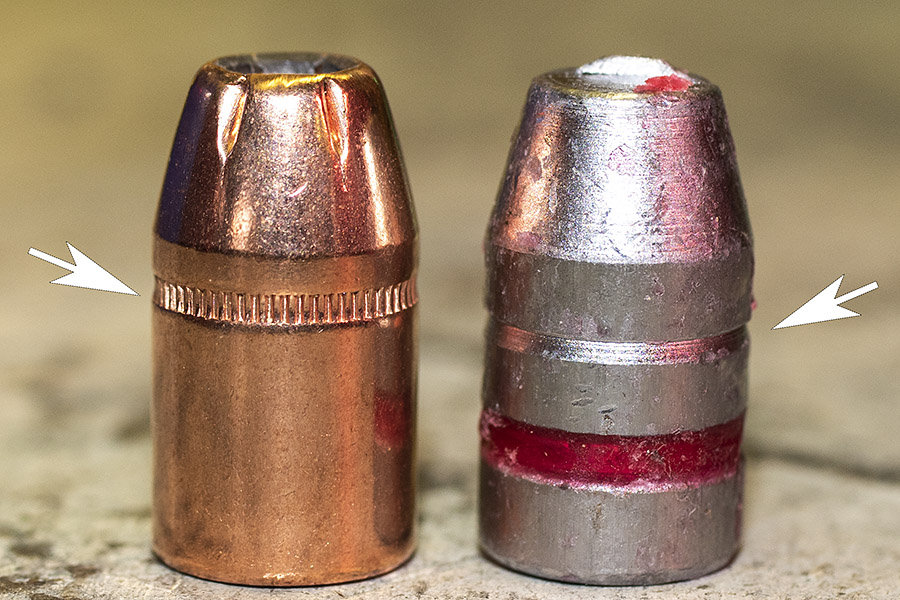
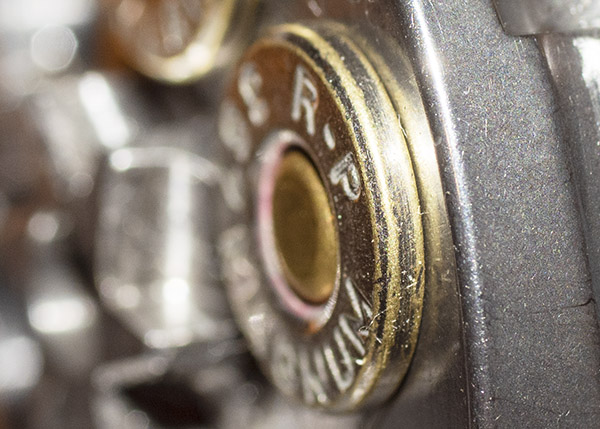
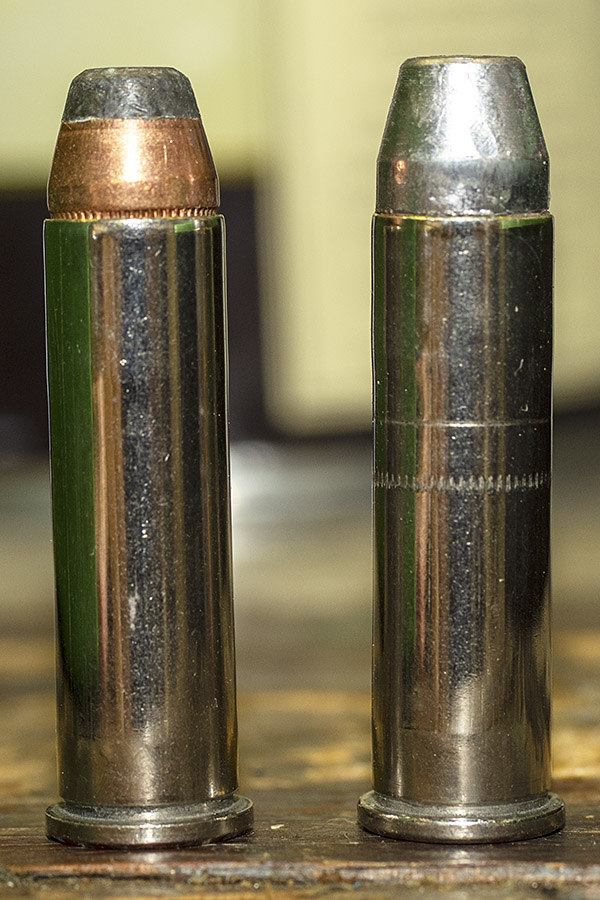
The two cartridges on the left are .357 Magnum; the one on the right is a .38 Special. The .357 cartridge case is longer so it cannot be inadvertently inserted into a handgun chambered for .38 Special. Note the slightly longer overall cartridge length on the .357 Magnum cartridge on the left (with the cast bullet) compared to the .357 Magnum cartridge in the middle (with the jacketed bullet).A mixed set of dies I’ve been using for years for reloading .357 Magnum and .38 Special. Note the Lee shellholder marked “1.” .38 Special used to be the most commonly reloaded cartridge in America. Today it’s 9mm. .38 Special was the first cartridge I ever reloaded. The die on the right is the bullet seating and crimping die.
Reloading Gear
I’ve had a few .38/.357 die sets over the years, selling them when convenient as I bought or inherited other equipment. As featured here on the ExNotes blog, I have a 50-year-old Star reloader I use for .38 Special wadcutter ammo (I’ll give you a link for the Star story at the end of this blog). The Star is set up to meter 2.7 grains of Bullseye propellant (that’s a 148-grain wadcutter target load) and it works fabulously well, so it’s a dedicated setup. For all other .38 Special and for .357 Magnum reloading, I load with my RCBS Rockchucker single-stage press. I’ve been using it for 50 years.
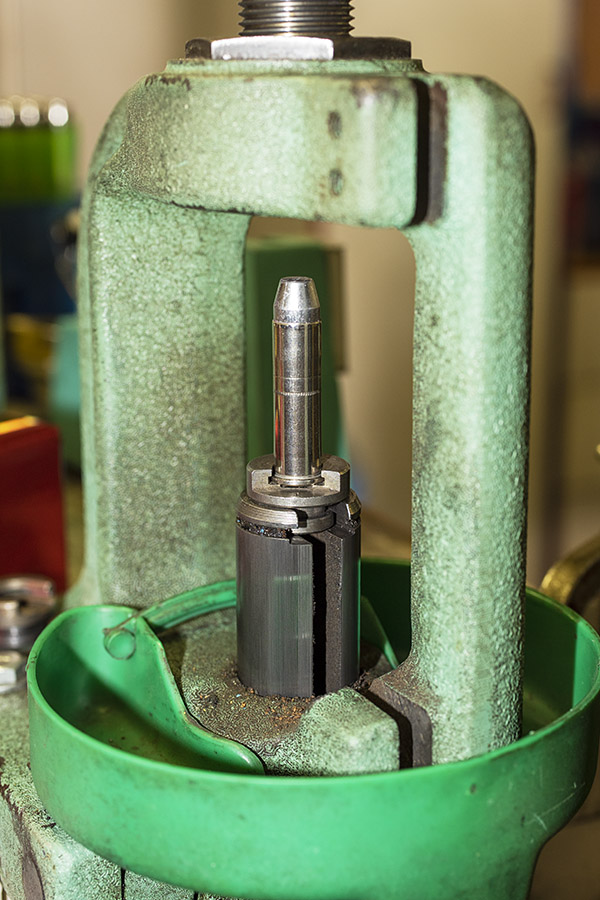
My Star progressive reloader. A good buddy gave this to me in rundown, funky, and long-neglected condition. I cleaned it, lubed it, and put in back in service. The Star does a fantastic job on .38 Special wadcutter ammo.Old Faithful, my RCBS Rockchucker single stage press. I load non-wadcutter .38 Special ammo and all .357 Magnum ammo on this press.
Bullet Seating and Crimping
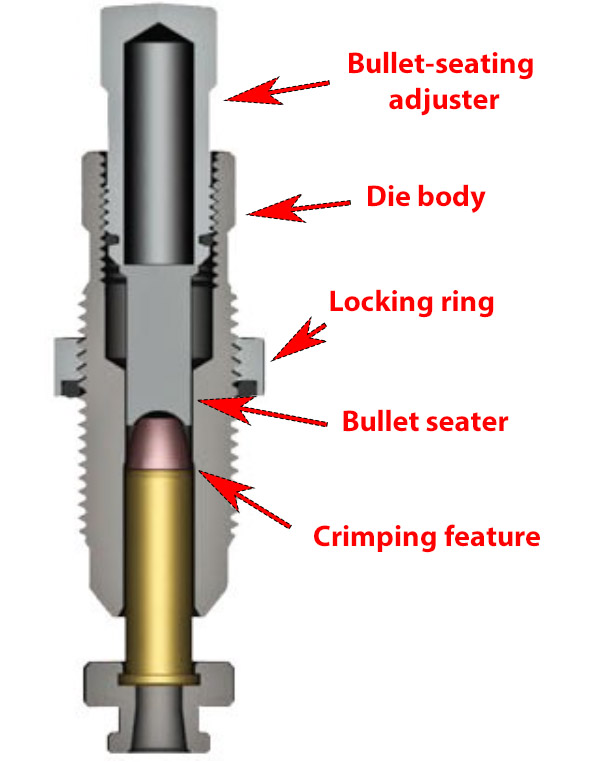
For many years, I seated and crimped my bullets with a simple seating and crimping die. It’s what you see in the illustration below.
I use this die in two steps. First, I screw the bullet seating adjuster deep into the die and seat the bullet to the correct cartridge overall length without crimping the bullet in place. After seating all the bullets, I then back off on the bullet seating adjuster so that it no longer contacts the bullet, and then I screw the die body deeper into the press. The die body has a roll crimping feature that then roll forms a crimp around the case mouth to lock the bullet to the cartridge case.
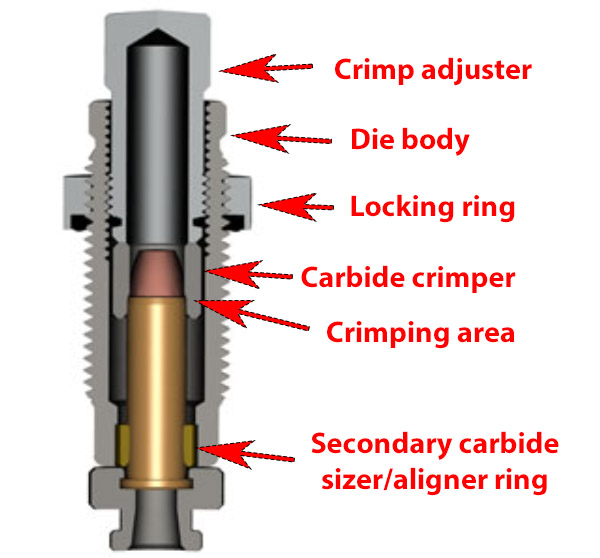
Lee has an alternative approach for bullet crimping they call the factory crimp die. As a first step, you seat the bullet to the desired depth in the case using the die shown above. After seating all the bullets, you then remove the bullet seating and crimping die from the press and then use the fourth die (the factory crimp die). Here’s what the factory crimp die looks like:
The fourth die, the factory crimp die, does not seat the bullet. Its only function is to apply the crimp, and it does this very well. The idea is that the die is screwed all the way into the press such that it contacts the shellhoder, and then the amount of crimp is set up with the crimp adjuster, which screws into the die body. This die applies a roll crimp on a revolver cartridge (the same kind of crimp as the bullet seating and crimping die described above), but it does so in a much better-controlled manner. The factory crimp die also has a secondary carbide sizer/aligning ring at its lower end, which aligns the cartridge as it enters the case, and holds the cartridge outside diameter to specification values as the cartridge enters and then exits the die. It works fabulously well, and Lee states that this die makes it impossible to buckle a case.
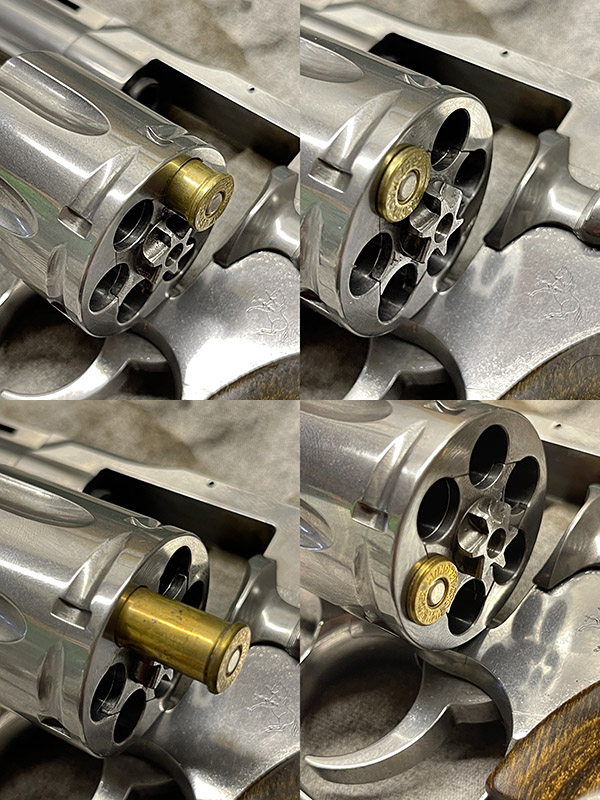
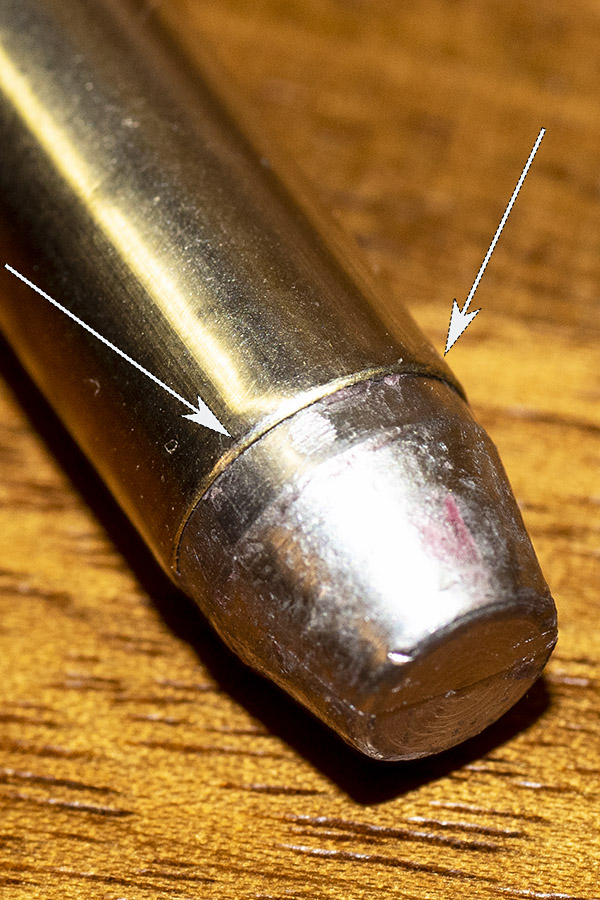
I had .357 Magnum ammo I had previously loaded using the bullet seating and crimping die only (not the Lee factory crimp die), and it chambered with no problem in my Ruger Blackhawk. The Colt Python has a tighter chamber, though, and several of these older reloads would not chamber in the Python. A quick trip through the Lee factory crimp die cleaned up the outside diameters and the rounds chambered easily.
Before and after shots of older .357 loads I reloaded using the bullet seating and crimping die. Some wouldn’t chamber in the tighter Python. The Lee factory crimp die fixed that.
Lee’s Deluxe 4-Die Set
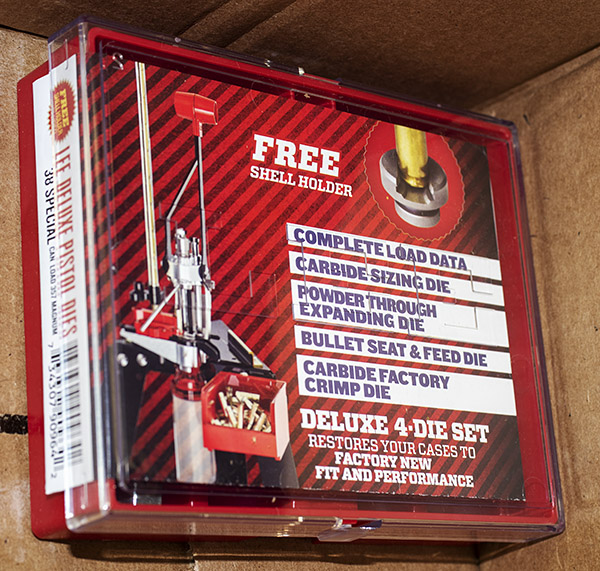
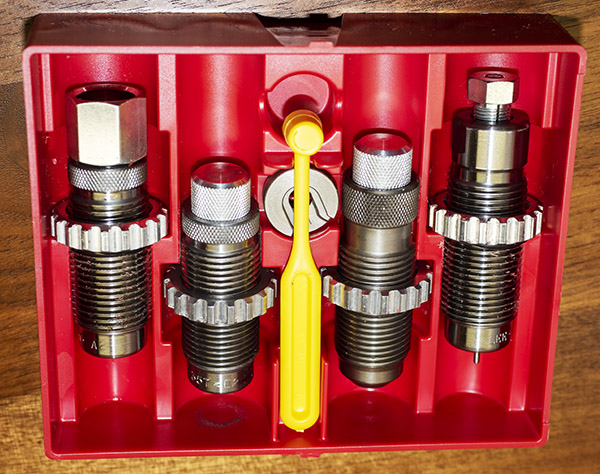
I recently ordered a new Ruger Blackhawk, and I’ve written many times about my Colt Python. With my new .357 Magnum Blackhawk in its 10-day cooling off period, I thought I would get a new set of dies. I like Lee (they give you a shellholder, they are inexpensive, and they do a good job). I had bent the decapping pin on the Dillon sizing die in my mixed set of dies shown above (a primer wouldn’t come out and I forced it). I was able to bend the pin straight, but I figured a man of my stature ought to have a set of grownup new dies. Then I got an email from MidwayUSA showing the Lee 4-die set on sale for $53 and they had free shipping on orders over $49. The Lee Deluxe set includes the factory crimp die. All the planets were in alignment (enter order, buy now…you know the drill). The dies were at my front door a few days later.
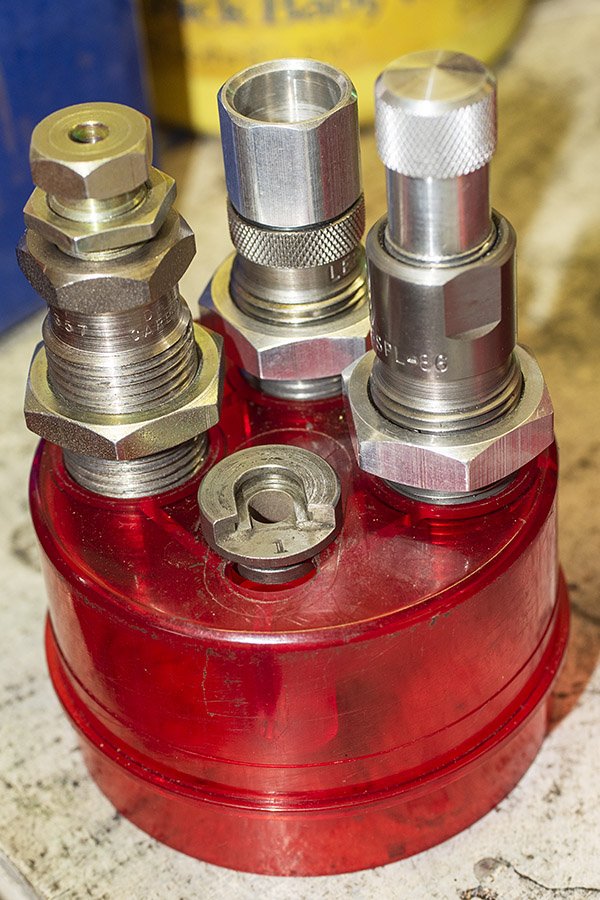
The new Lee 4-die Deluxe Set was well packaged by Midway.The Lee dies in my new die set.The Lee Deluxe 4-die set includes a carbidge sizing die and decapper (the die on the far right), a cartridge expander and case mouth flaring die (on the far left), a bullet seating and roll crimping die (second from the right), and the Lee factory crimp die (second from the left). Lee also provides a shell holder and power dispensing spoon. I’ve never used the powder dispensing spoon; I use an RCBS powder dispenser.
The new dies looked great, and I was eager to put them to work.
Bullet Pull and Cylinder Rotation
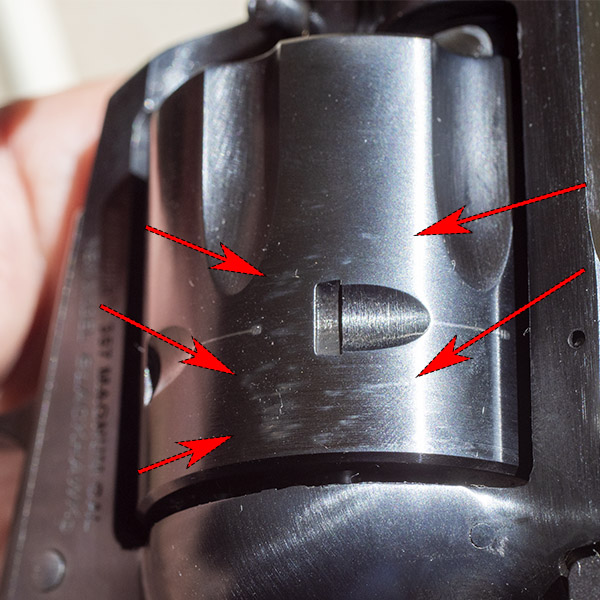
On revolvers with significant recoil, bullets can back out of the cartridge case when other rounds in the cylinder are fired. This can allow bullets on unfired cartridges to protrude beyond the cylinder face and interfere with cylinder rotation. We prevent this by controlling the reloaded cartridges’ overall length and by crimping. In firing my new Colt Python with ammo I had loaded for an earlier Ruger Blackhawk, even though the bullets were crimped I experienced bullet pull beyond the front of the cylinder. When this occurred, the cylinder would not rotate. These same rounds had worked in a Ruger Blackhawk.
In analyzing the cylinder rotation issue on my new Python, I found several things:
The bullets were not seated deep enough (the cartridge overall length exceeded the maximum spec of 1.590 inches), even though the bullets were crimped in their crimping groove.
The crimp wasn’t strong enough to hold the bullets in place. Under recoil from other cartridges, the bullets were backing out.
The Python cylinder is slightly shorter than the Ruger Blackhawk cylinder. I probably had the same bullet pull occurring on the Blackhawk, but the Blackhawk’s longer cylinder masked it. They might have been backing out on the Ruger and I didn’t know it.
Cartridge Overall Length
Let’s dive into the numbers. The reloading manuals show the .357 Magnum maximum cartridge overall length (COAL) to be 1.590 inches. With my cast bullets crimped in their crimping groove, the overall length was running from 1.607 to 1.615 inches. That put them about even with the front of the Python cylinder. If any bullet pull occurred under recoil, the front of the bullet would hit the rear of the forcing cone and the cylinder wouldn’t rotate. That’s what I experienced with my Python.
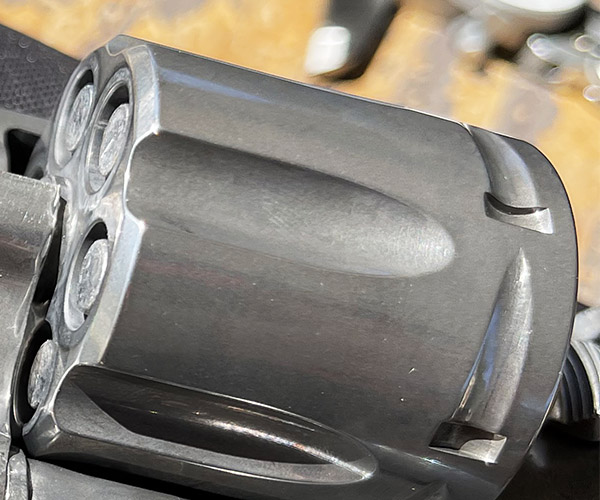
The Ruger New Model .357 Blackhawk has a longer cylinder than the Python. The Ruger cylinder is 1.640 inches long. The Internet says the Python cylinder length is 1.552 inches; mine measures 1.553 (which is close enough). Right away, the astute ExNotes blog reader will recognize that the Colt’s cylinder (at 1.552 inches) appears to be shorter than the specification .357 Magnum cartridge maximum overall length (1.590 inches), but it is not. When loaded in the cylinder the cartridge is held rearward by its rim, which sits flush against the back end of the cylinder.
The Python, like most revolvers, headspaces on the cartridge rim. The cartridge rim is 0.060 inches thick.
The .357 Magnum cartridge rim backs the cartridge up 0.060 inches (the rim thickness), which would put the leading edge of the bullet in a cartridge loaded to an overall length of 1.590 inches about 0.023 inches inside the front edge of the cylinder (if I’ve done the math correctly). And I think I have, because when you look at cartridges in the Python cylinder, they are pretty close to the edge of those big .357 cylinder holes. 0.023 inches. Twenty-three thousandths of an inch. That’s not much to play with.
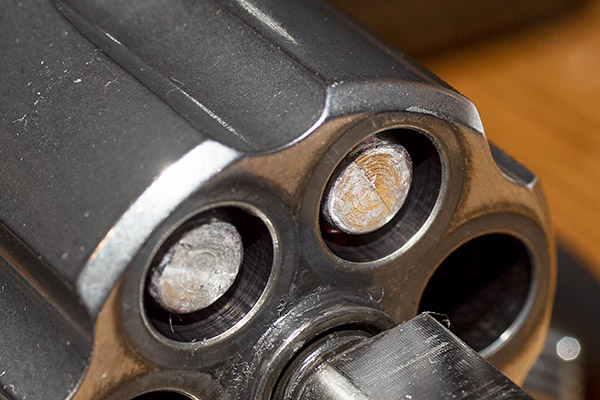
.357 Magnum cartridges loaded in the Python cylinder. At the cartridge’s specified max overall length of 1.590 inches, the front of the bullet is only 0.023 inches away from the forward cylinder face.
Bullet Design and Crimp Location
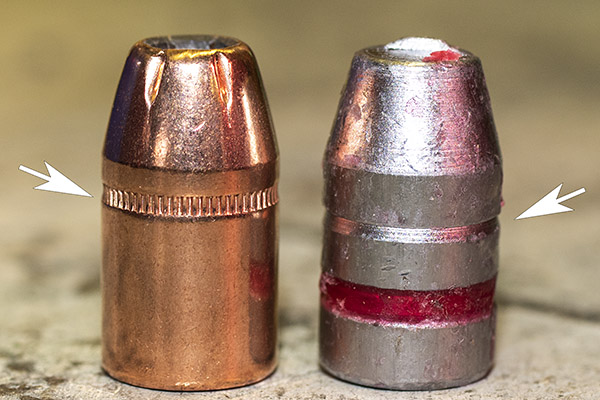
I examined the bullets I was using. I had crimped my cast bullets in the crimping groove, and I could see that the crimping groove put the bullet face very close to the forward end of the Python’s cylinder. I couldn’t seat the cast bullets any deeper and still crimp in their crimping groove. Hornady’s jacketed 158-grain bullets are no problem; their crimping groove is a lot higher on the bullet.
A 158-grain Hornady jacketed hollow point bullet on the left, and a cast 158-grain bullet on the right. Note how much higher the crimping groove is on the jacketed bullet. This lowers the bullet in the cartridge case when it is crimped, making the cartridge shorter.Two .357 Magnum cartridges with crimped bullets. The cast bullet cartridge on the right has the bullet seated as low as it can go while still allowing a crimp. You can see that the cast bullet cartridge is longer than the cartridge with the jacketed bullet.
Test Objectives
I wanted to test bullets seated and crimped using both approaches (i.e., the bullet seating and crimping die, versus seating with the bullet seating die and crimping separately with the Lee factory crimp die). My testing would evaluate the following:
Bullet movement under recoil.
Accuracy.
Ease of chambering.
The ability to get a good crimp in locations other than the crimping groove.
That last one is important, because as I learned with my Python, crimping some cast bullet configurations in the crimping groove makes the cartridge too long.
Test Ammo
I loaded three test lots. The first was with 15.7 grains of Winchester 296 powder, Winchester small pistol magnum primers, and Hornady’s 158-grain jacketed hollow point bullets. That was my accuracy load when shooting metallic silhouette a few decades ago, so I know it works well. I loaded half with the bullets crimped using the old Lee bullet seating and crimping die (not the factory crimp die), and the other half with the bullets crimped with my new Lee factory crimp die (after seating them with the bullet seating die).
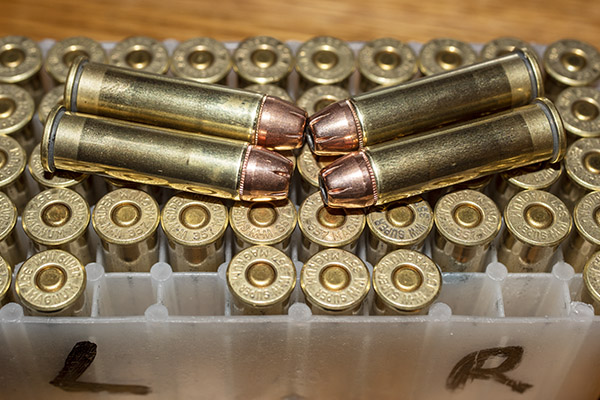
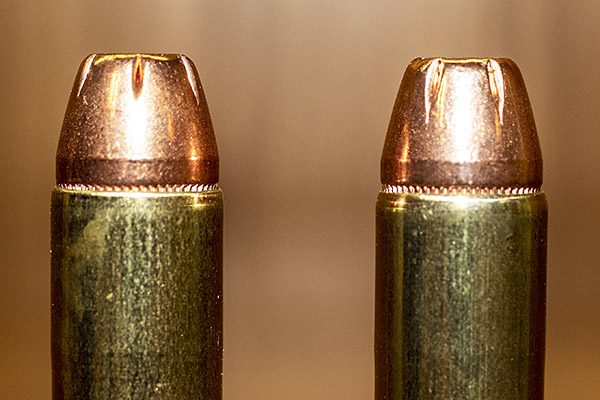
.357 Magnum ammo with 158-grain Hornady jacketed hollowpoint bullets. The 25 on the right were crimped with the bullet seating die; the 25 on the left were crimped with the Lee factory crimp die.A macro photograph of the ammo above. The Lee factory crimp due cartridge is on the left; the bullet crimped with the bullet seating die is on the right.
The second lot of ammo was a group I had loaded several years ago. This ammo had 158-grain cast semi-wadcutter bullets crimped in the crimping groove, 7.0 grains of Unique, and Winchester small pistol primers. That load (7.0 grains of Unique and a 158-grain cast bullet) has been accurate in every .357 revolver I’ve ever shot. I loaded this ammo with the bullet seating and crimping die (not the Lee factory crimp die). I’d shot tons of this load in an older Ruger Blackhawk, but I had not tried it yet in my Python.
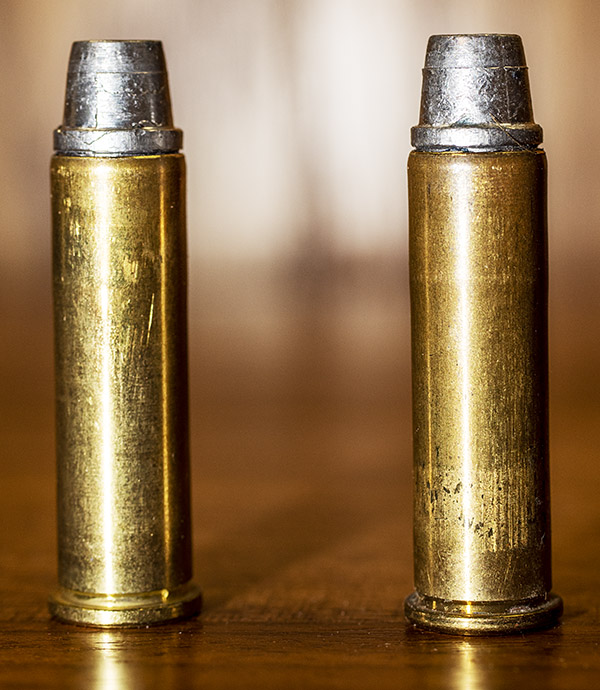
.357 Magnum ammo with cast 158-grain semi-wadcutter bullets crimped in their crimping groove. This ammo worked fine in the Ruger Blackhawk, but it had issues in the Colt Python. Although crimped in the crimping groove, this ammo was longer than the .357 Magnum’s 1.590-inch maximum cartridge overall length.
The third ammo lot was similar to the one above (same bullet weight and powder), but I used the cast truncated flat point bullet and I crimped above the bullet’s crimping groove using the Lee factory crimp die. I wanted to get the bullet further back from the cylinder face to prevent cylinder rotation inteference if the bullets pulled under recoil. My concern was that I would be crimping above the crimping groove, on the bullet’s main diameter, and I didn’t know if the crimp would hold the bullet in place.
The cast 158-grain truncated flat point bullet crimped above the crimping groove. This shortens the cartridge overall length. I seated these to 1.565 inches overall length. After crimping, that figure came back up back up to 1.568 inches, still well below the 1.590-inch maximum length spec.The above .357 cartridges in the Python cylinder crimped with the Lee factory crimp die above the crimping groove. These rounds were loaded to an overall cartridge length of 1.568 inches (as shown above), which positions the front of the bullets further back from the cylinder face.
When loading with my new Lee Deluxe 4-die set, I noticed immediately that the resizing operation was much easier. The same was true for the expander die step. Maybe the older dies I had been using were just dirty, but I sure like do the feel of these Lee Deluxe dies.
Some of you may wonder: Why not just trim the brass shorter to a below-spec length? That would move the bullet back, and if I trimmed it short enough it would allow me to crimp these cast bullets in their crimping groove and not risk any cylinder rotation interference. Yeah, I could have done that, but when I trim brass I like to trim it to specification, not something below spec. And I don’t want to have to segregate brass based on trimmed length tied to specific firearms.
Test Results: Bullet Movement
The first test objective was to determine how much bullet movement occurs during recoil using the two different crimping approaches. Here’s how I tested:
I loaded 5 rounds in the revolver.
I took a 6th round and recorded its cartridge overall length, and then I loaded it.
I fired the first five cartridges.
I removed the unfired 6th round and measured the overall length again.
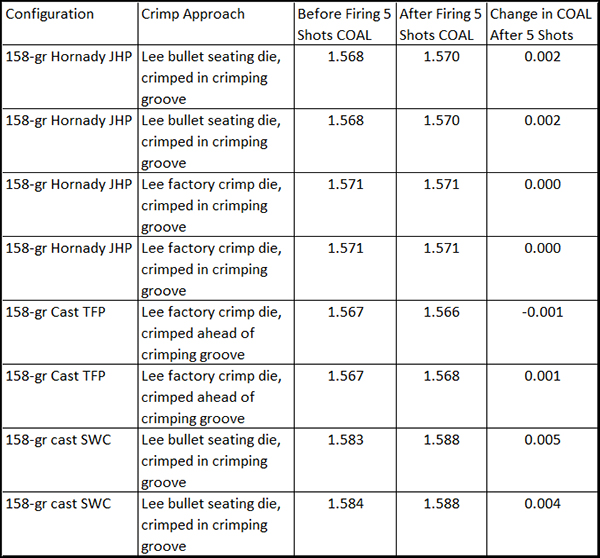
Here’s what I found in assessing the two crimping approaches’ ability to prevent bullet pull:
The results surprised me. The Lee factory crimp die, even when done on the main diameter of the bullet (not in the crimping groove) does a better job holding the bullet in place than does crimping with the bullet seating die. In each test in which the bullets were crimped with the bullet seating die, they experienced recoil-induced bullet movement. That one entry where the overall length decreased by 0.001 inch is probably measurement error on my part.
Test Results: Accuracy
This testing was straightforward. I fired a series of 5-round groups at 50 feet to assess any differences in accuracy.
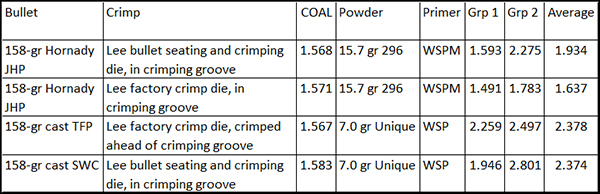
Here’s what I see in the above results:
With the Hornady jacketed hollow point points, using the Lee factory crimp die resulted in an improvement in accuracy (the group average was 1.637 inches compared to 1.934 inches).
The Hornady jacketed hollow point bullets were more accurate than the cast bullets. That was an expected result.
With the cast bullets, there isn’t much of an accuracy difference between using the bullet seating and crimping die versus using the bullet seating die and then the Lee factory crimp die.
With the cast bullets, there wasn’t much of an accuracy difference between the truncated flat point bullets and the semi-wadcutter bullets.
I wasn’t having my best range day ever (I had a bad cold when I fired these groups). But I think I did well enough to support the above conclusions.
Test Results: Ease of Chambering
I already mentioned this. Lee claims that the factory crimp die will not buckle or distort the case during crimping. My results confirm this. A few rounds that had been crimped with the bullet seating die would not chamber in the Python; after running these through the Lee factory crimp die, they chambered easily. The Lee factory crimp die does a better job for ease of chambering.
Test Results: Crimping Without a Crimp Groove
This is really a subset of the first test objective, in which we evaluated the ability of the Lee factory crimp die to hold bullets in place under recoil. Here, the focus is more specific: I crimped on the bullet’s main diameter, not in the crimping groove, and I wanted to determine if the Lee factory crimp die would secure the bullet in place. As you can see from the data above, it did. When I crimped the cast truncated flat point bullets forward of the crimping groove, they did not move under recoil. The Lee factory crimp die did this well, and it did so without buckling the cartridge case.
The Bottom Line
The Lee factory crimp die is a good thing. It holds bullets in place better, it improves chambering, and with jacketed bullets, it improves accuracy.
If you want to buy a set a Lee dies, or the Lee factory crimp die, or any Lee reloading equipment, Amazon is a good place to shop. Midway is, too. But I usually go to Amazon first.
If you have comments, be sure to let us know in the comments section below. We enjoy hearing from you.
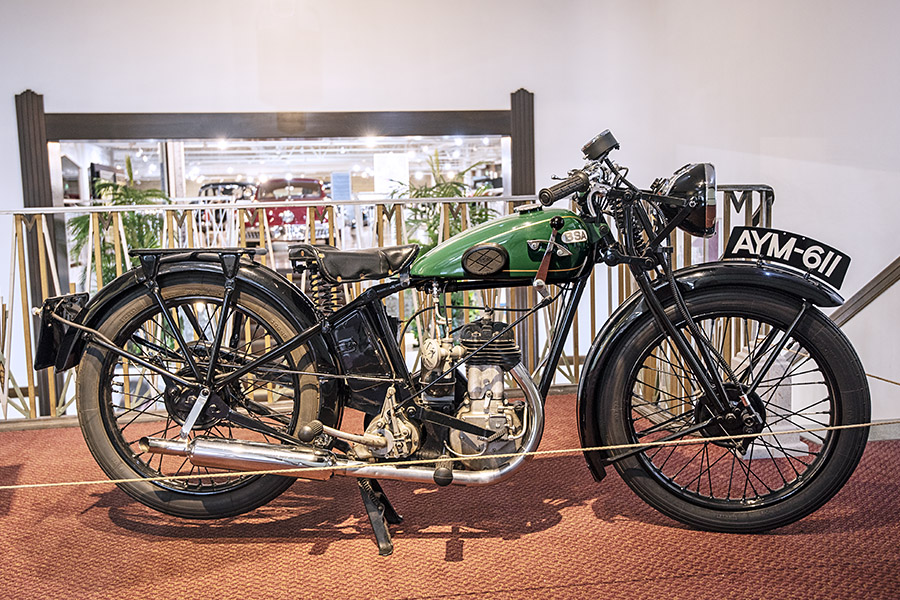
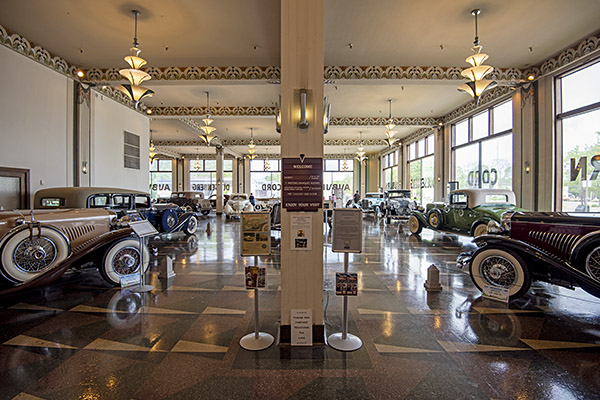
The Auburn, Cord, and Duesenberg Museum is somewhat misleadingly named. Yes, they have a stunning and visually arresting collection of Auburns, Cords, and Duesenbergs (one of the best I’ve ever seen), but the collection of more than 120 vintage automobiles includes more than just these three marques. There’s even a vintage BSA motorcycle (I’ll get to that in a bit).
The Museum is housed in what used to be the Auburn factory. It’s in Auburn, Indiana, where they used to make Auburn automobiles. Auburn is north of Indianapolis (the quick way in is on Interstate 69); we stopped there on our way to Goshen to visit the Janus factory. Janus was fun and I grabbed a ton of awesome photos there, too. Grab the September/October issue of Motorcycle Classics magazine and you’ll see it. But that’s not what this blog is about. Let’s get back to Auburn and the Museum.
The Museum is magnificent and the automobiles are stunning. The Duesenbergs are beyond stunning but don’t take my word for it. You might consider seeing this magnificent collection yourself. I took enough photos to fill a book and I had a hard time picking just a few to show here. I probably went a little overboard, but the cars are so nice it was hard not to.
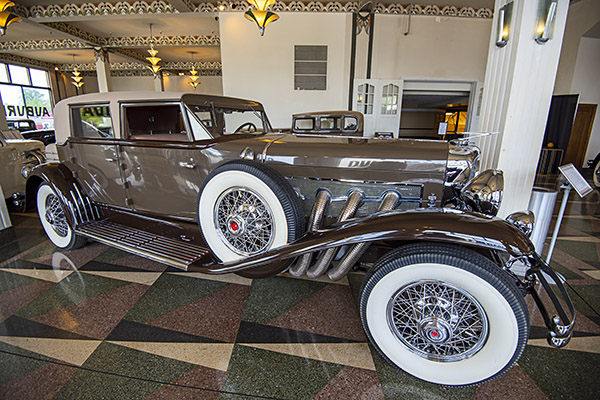
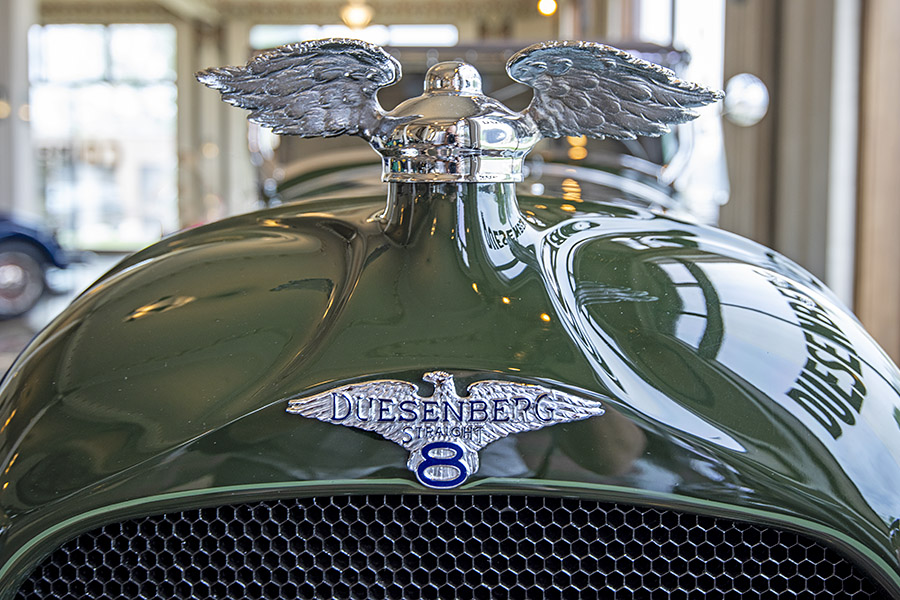
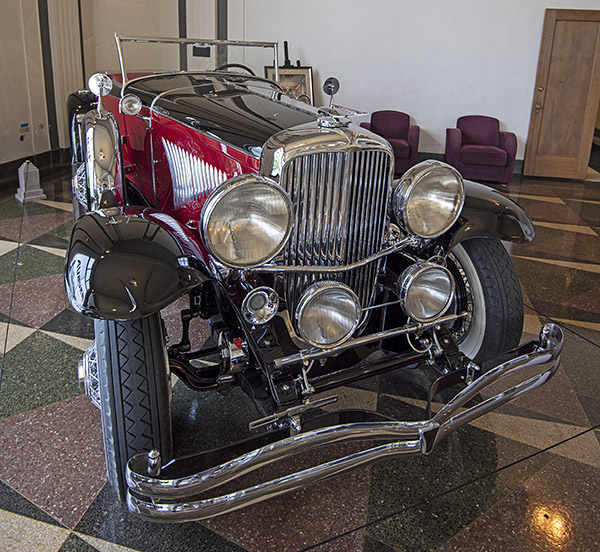
Here’s a 1931 Duesenberg Model J. The body was built by the Murphy company of Pasadena, who made more Duesenberg bodies than any other company. The car has a straight 8 engine.
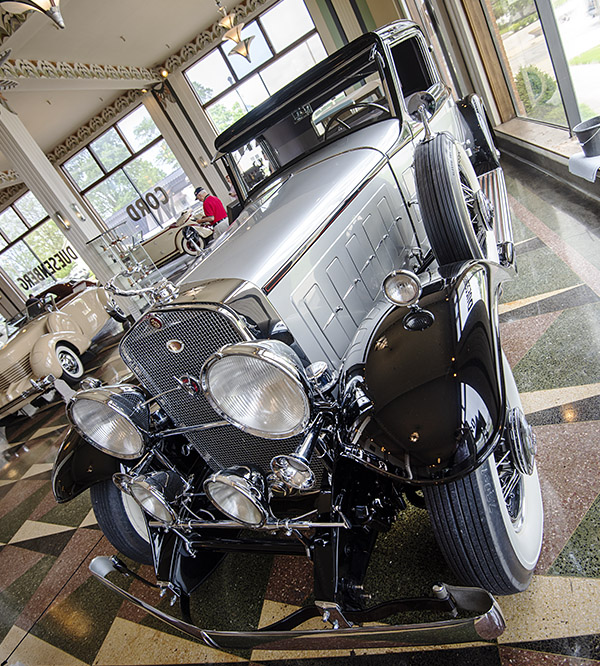
This is a V-16 Cadillac, another truly magnificent automobile.
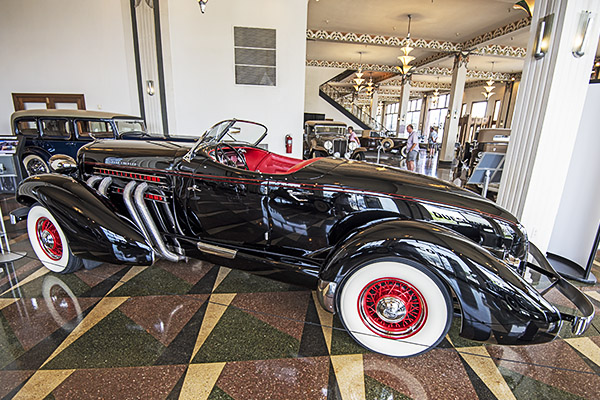
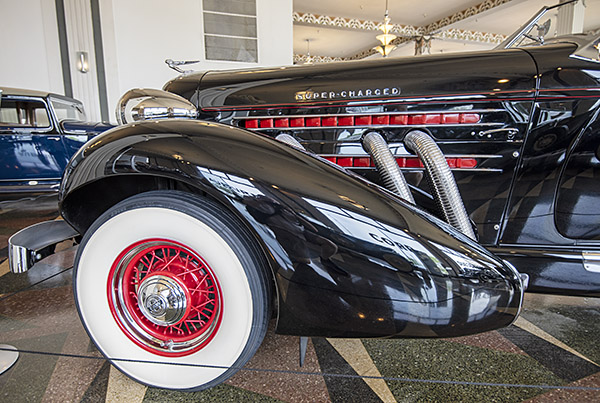
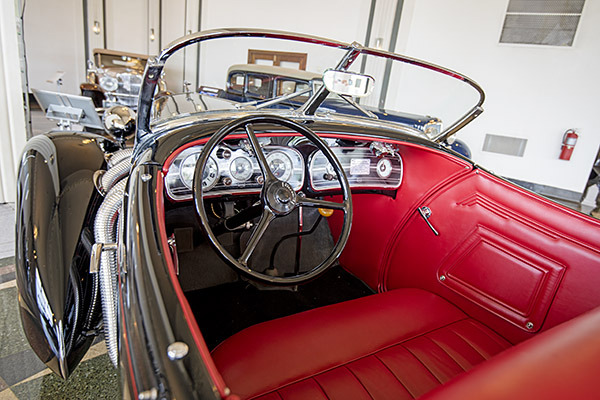
Next up is a supercharged 1935 Auburn. It is an 851 Speedster, with a Lycoming straight 8 engine. It cost $2,245 when it was new (less than a used Sportster, if you’re using that as a benchmark). The lines on this car are beautiful, and the colors work, too.
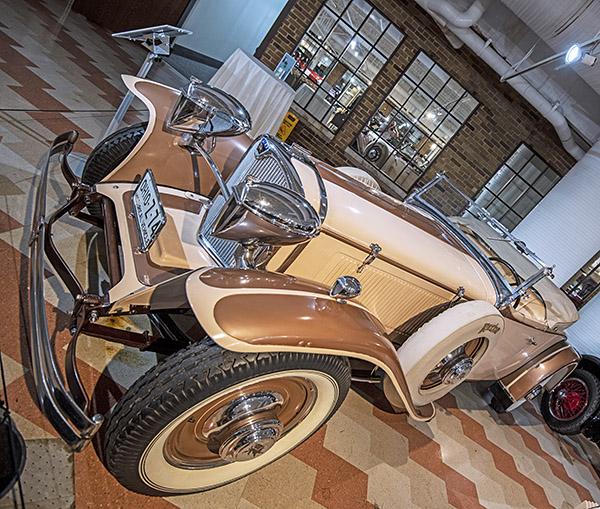
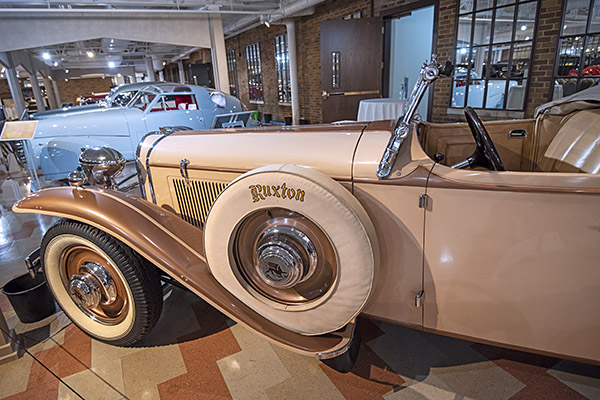
This next car is a 1929 Ruxton, a car I had never heard of before visting the Auburn Cord Duesenberg Museum. It’s a front-wheel-drive car, a competitor to the Cord in its day. According to what I found online, the Ruxton was lower, lighter, and handled better than the Cord. The looks and the colors work for me.
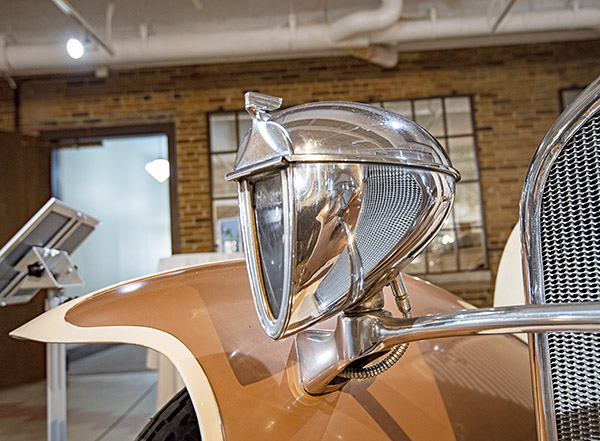
Check out the Ruxton’s headlights. These are Woodlite headlights, which are very art deco. They look like helmets.
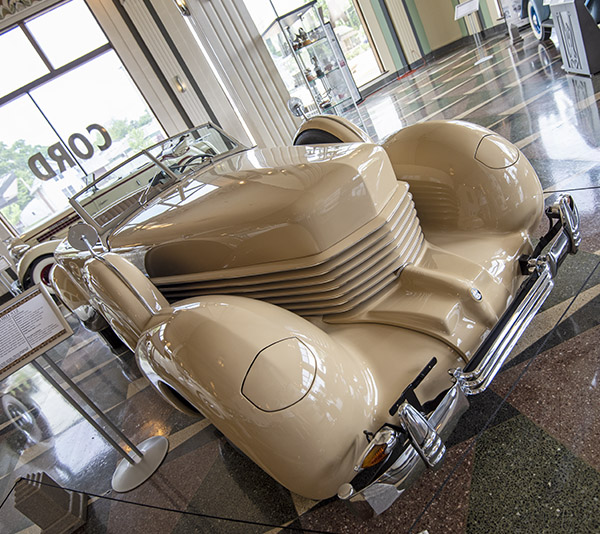
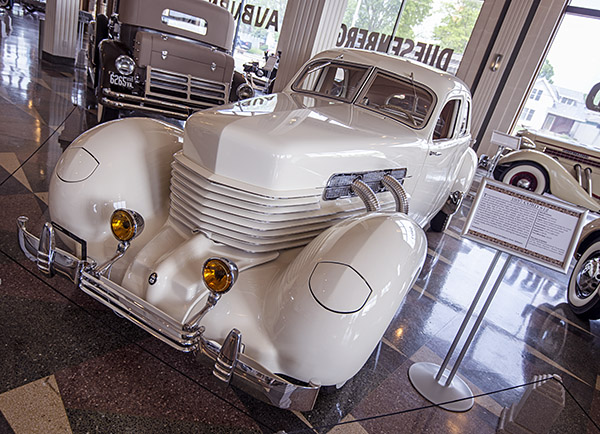
Here are two 1937 Cord 812 automobiles: A convertible and a coupe. The colors and the style are impressive. When I was a kid, I built a Monogram plastic model of a Cord that I think was based on the convertible I saw in Indiana.
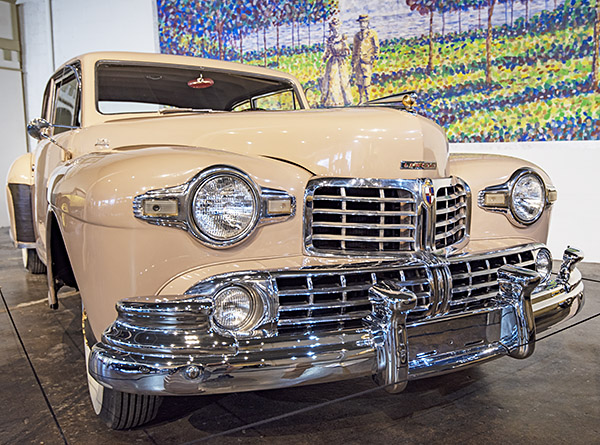
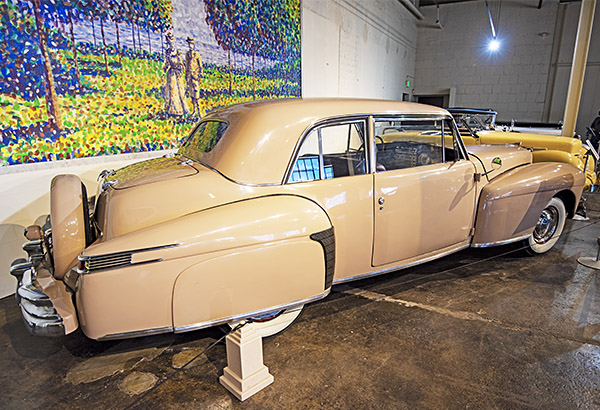
Here’s a 1948 Lincoln Continental Coupe with a V-12 engine. 1948 was the last year any US automobile manufacturer made a V-12. This one had 305 cubic inches and it produced 130 horsepower. The car you see here cost $4,145 in 1948.
This 1933 250cc single-cylinder BSA is the lone motorcycle in the Cord Auburn Duesenberg Museum. This one was E.L. Cord’s personal motorcycle, which he kept on his yacht and at his Nevada ranch.
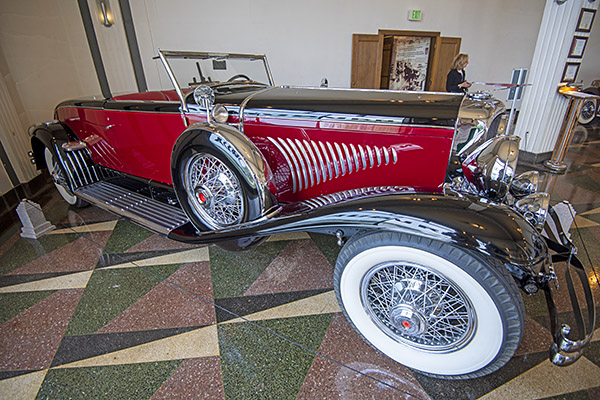
Another magnificent Duesenberg. This one is a 1931 Beverly sedan, with a 420 cubic inch, straight 8, 265-horsepower engine It went for $16,500 when it was new.
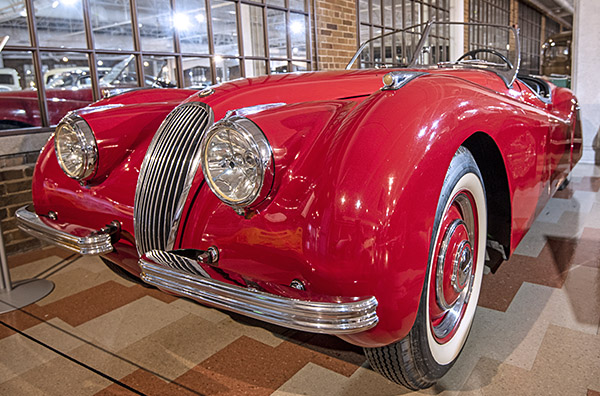
This is an XK 120 Jaguar. I think this is one of the most beautiful cars ever made. It’s my dream car, in exactly these colors.
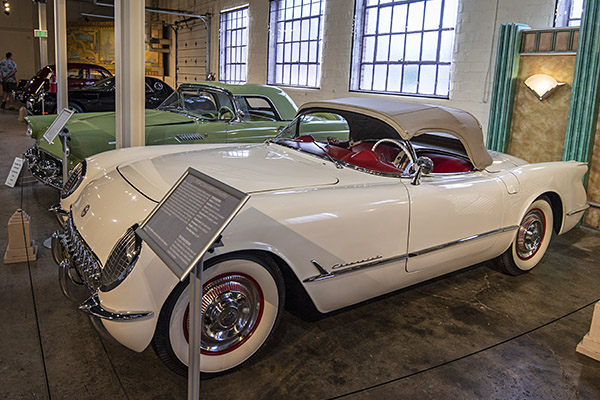
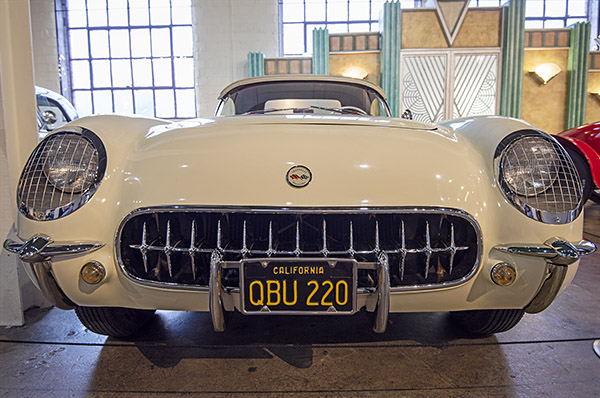
Here’s a first-year-of-production, 1953 Corvette. Chevy introduced the Corvette in the middle of the 1953 model year, so there were only a few made. The 1954 Corvette was essentially the same car.
Chevy was going to discontinue the Corvette due to its low sales, but the dealers convinced them otherwise. The dealers didn’t sell a lot of Corvettes, but they sold a lot of other Chevys to people who visited the showrooms to see the Corvette.
Another view of the first year Corvette. Note the mesh headlight protectors.
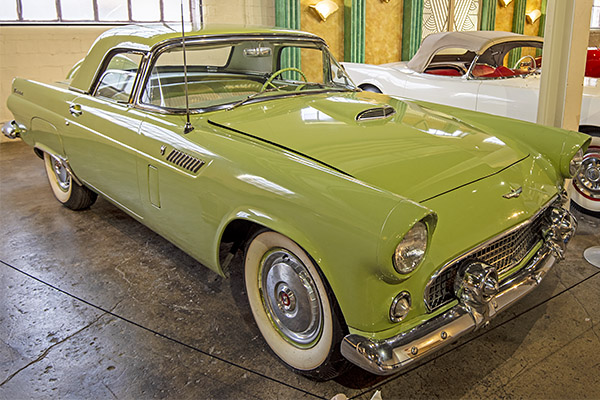
Ford’s answer to the Corvette…the two-seat Thunderbird. The little T-Bird never matched the Corvette’s performance. After three years of production (1955 to 1957), Ford redesigned the Thunderbird as a larger four-seater.
The Thunderbird soldiered on as a four-seater for years, then it was discontinued, then it briefly emerged again as a two-seater in 2002 (that’s the car you see below). The new Thunderbird only lasted through 2005, and like the classic ’55/’56/’57 two-seat T-Birds, Ford dropped this one, too. My buddy Paul drives one that looks exactly like this.
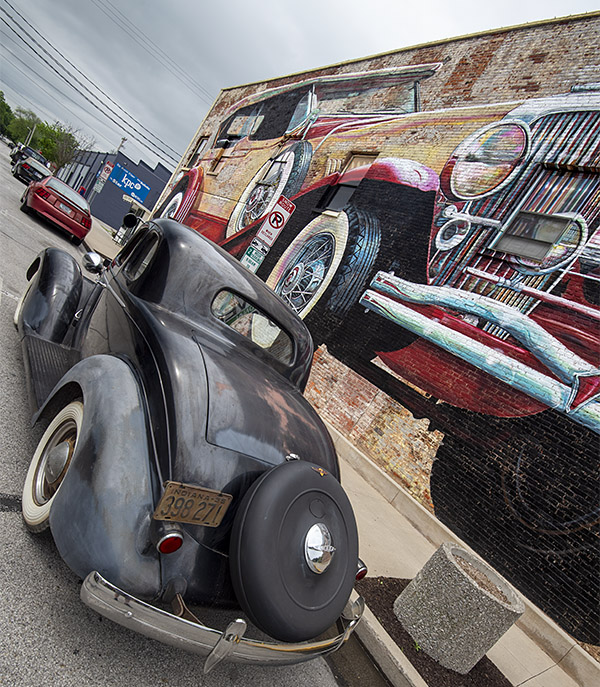
Auburn is a cool little town. Its population is about 14,000 and the town is about 145 miles north of Indianapolis (it’s a straight shot up on Interstate 69). The town is rooted in automotive history, and other history as well. In 1933, John Dillinger and his gang raided the local police station and they stole several firearms and ammunition. But it’s the automobiles and their history that make this town a worthy destination. Auburn, Indiana, loves its automobiles and automotive history. We saw several vintage cars being used as daily drivers. The murals were cool, too.
You can easily spend three or four hours in the Auburn Cord Duesenberg Museum, and spending the entire day there wouldn’t be out of the question. One of Auburn’s best kept dining secrets is Sandra D’s, a reasonably-priced Italian restaurant with an exquisite menu. Try the eggplant parmesan; you won’t be disappointed.
In the first episode of Grind Me A Pound Of Reverse I contemplated buying a Suzuki DR650 and leaning the broken down Husqvarna SMR510 on the side of the shed to bleach in the harsh New Mexico sunlight. Suzuki DR650s are as stone axe simple as you can make a motorcycle today. They are air-cooled, carbureted, have zero electronic widgets (except for ignition) and cost around $6000 for a 2022 model. I’d have to sell a few of my clunkers to fund the DR but it’s the sensible thing to do.
The thing is, the Husky is such a fun bike to ride I thought I’d take a poke at fixing its transmission woes. The Husqvarna crankcase is a vertically split unit which is easier to manufacture but means the entire engine must be dismantled to access the gearbox. In my case this is not a big deal because when a gearbox explodes you have to clean out all the microscopic and not so microscopic bits of metal.
The SMR510 frame is wrapped tightly around its engine and a lot of stuff has to be dismantled to get the lump out into the open. With long-travel suspension causing wide variations in chain tension its best to keep the swing arm pivot as close to the countershaft sprocket as possible. On the SMR the pivot bolt goes through the back of the engine and that means the swing arm has to come off. In addition, the radiators, fuel injection body, EMS and other body parts must be removed also. It took me about 4 hours to finally free the Husky’s engine but I don’t work fast.
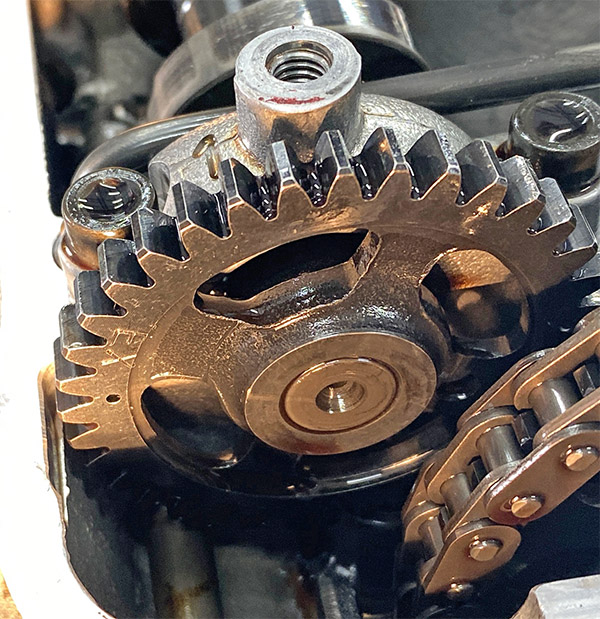
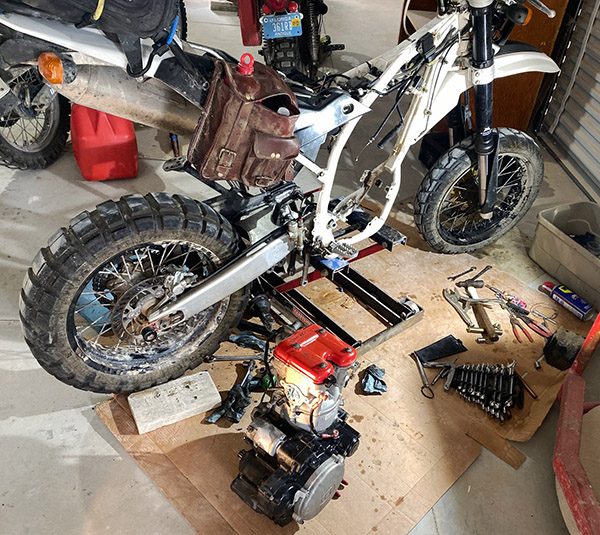
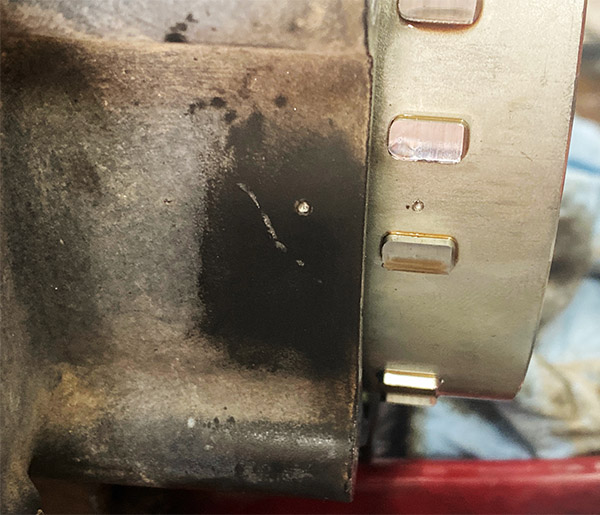
I have no shop manual for this bike so with the engine on the bench the first thing I did was rotate the engine to top dead center-compression stroke in order to find the cam timing marks. The Husky has a cam chain that spins an idler gear; the idler gear then spins the two overhead cams. Each cam has a small dot that lines up with the outside gasket surface of the head. The idler gear has three markings, the center mark is two dots and these dots line up with a mark on the cylinder head.
I also put an additional punch mark on the crankcase and alternator rotor to make finding top dead center less subjective. The Husky’s timing looks pretty easy to do so I’m sure I’ve got it all wrong and the valves will bend the first time I try to start the engine.
Next I removed the cam caps. The cam caps were secured by these allen-head bolts and they were so tight the heads rounded out on three of them. I had to use a flat chisel to knock the bolts loose so I’ll need to get replacements from the hardware store. The head bolts are 10mm allen-type and deeply recessed so once the cams were out of the way I had to cut a 10mm allen wrench to make a long reach socket. The head bolts didn’t round out.
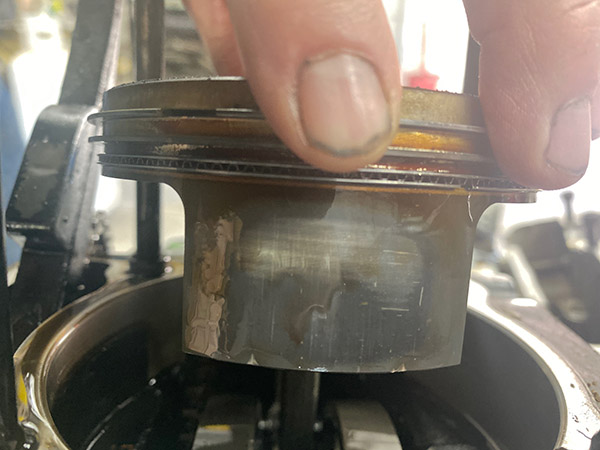
One of the reasons the Husqvarna 510 engine doesn’t last long is the slipper piston. This type of piston is pretty much a racing piston and has so much cut away there is only a narrow skirt to take side loading and a limited surface area for an oil film. The valve train is state of the coil-spring art: long, skinny valves at a narrow angle to give an almost flat-top combustion chamber.
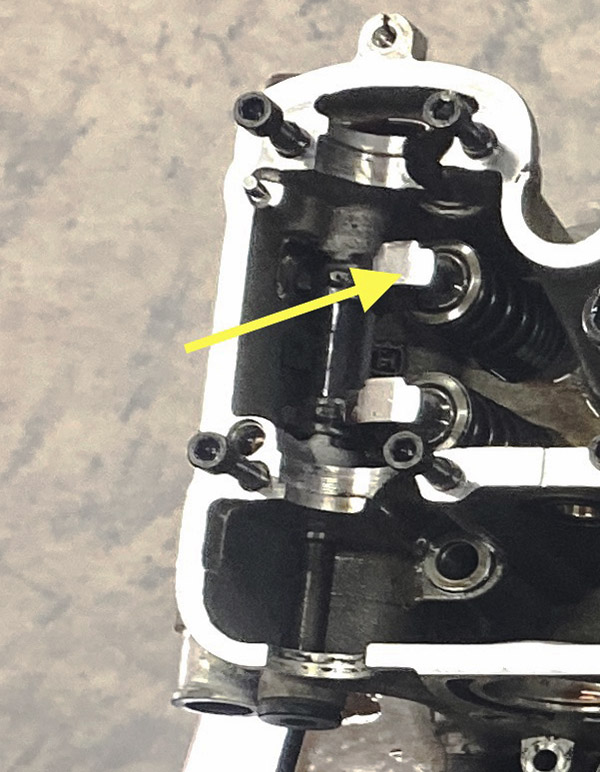
The Husky incorporates small finger-rocker followers to remove valve-stem side loading. The cam lobes swipe across the followers, not directly on the valves. This set up adds a bit of weight to the valve train but the Husky revs to 10,000 rpm without valve float so I’m not going to worry about weight. A nifty feature is the spring-metal separator clip that can be removed from the rocker arm shafts, which will allow the finger rocker to slide over giving access to the valve shims. This means you don’t have to remove the cams to adjust valve clearance.
Splitting the cases was a fairly straightforward operation except for the shift drum. I managed to get the thing apart but still haven’t figured out how the shift drum is held into the right crankcase half. I got pretty frustrated and gave it a few whacks but it didn’t budge. I’ll study the situation after I calm down.
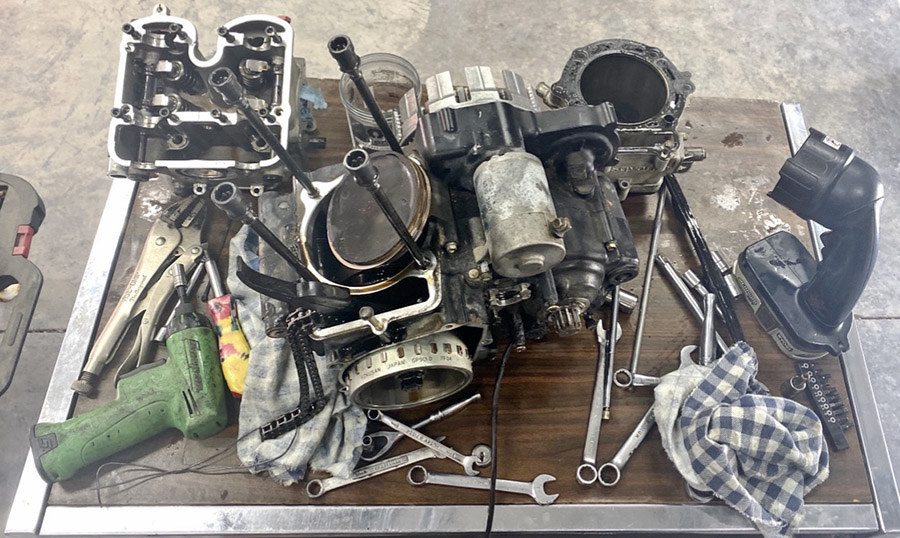
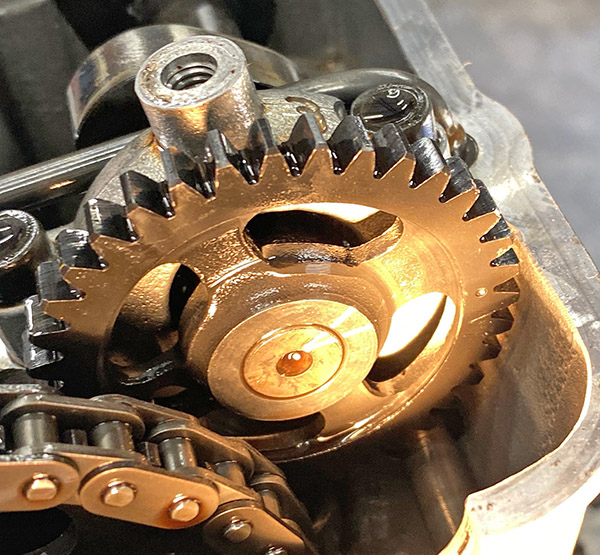
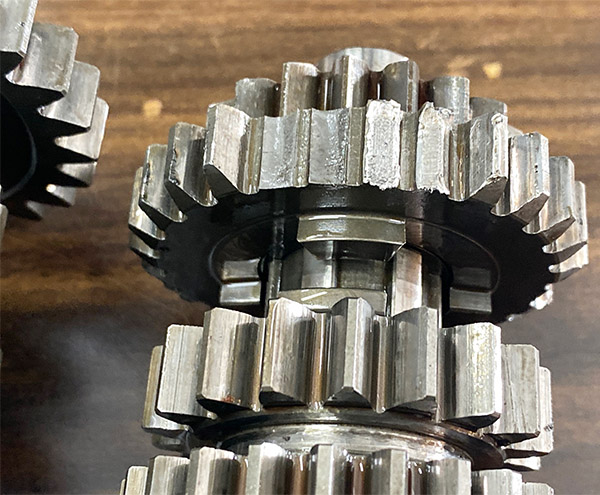
This is what was causing the racket. A couple gears are missing teeth and who knows what other unseen damage to the cluster was done as the bits of hard metal flew around inside? The shift forks may be bent because the bike wouldn’t stay in neutral and kept going into gear when i pushed it around the shop. I decided to get a used gearbox and replace the entire transmission.
The 2008 Husky SMR510 is one of the last Husqvarna’s with a tangible connection to the original Swedish manufacturer. Employees from old Husqvarna operated the company that built my bike. They purchased the name and relocated manufacturing to Italy. Cold, icy Sweden or warm, sunny Italy, who wouldn’t move? Shortly after my bike was built Husqvarna was sold to BMW and the bikes became re-badged BMWs. This only lasted a few years until KTM bought Husqvarna from BMW and the bikes became re-badged KTMs.
So parts are sort of hard to find. I located this complete TE510 (the enduro version of my bike) transmission in England for $285. Shipping was expensive but it’s a long way to Old Blighty and probably one gear would cost $100 if I bought it new. Hopefully it will fit.
EBay also had a top end gasket set for fairly cheap so I have that kit on the way. The case halves are sealed with goop, no gasket needed. The side cover gasket and alternator gasket came away without tearing so being ever thrifty I can reuse those gaskets.
I’ll have to do a thorough job of cleaning out the transmission debris inside the engine and whenever this stuff arrives I’ll try to reassemble the mess. ExhaustNotes will have up to date information as this project moves forward. Even if the Husky manages to run again I still might buy that DR650.
You know what to do. Share this post and please, do a friend a favor: Hit those pop up ads!


 Here are two 1937 Cord 812 automobiles: A convertible and a coupe. The colors and the style are impressive. When I was a kid, I built a Monogram plastic model of a Cord that I think was based on the convertible I saw in Indiana.