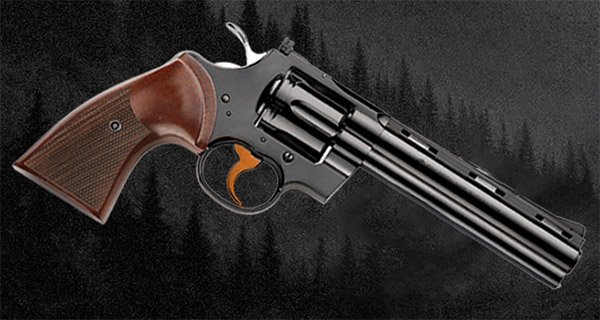
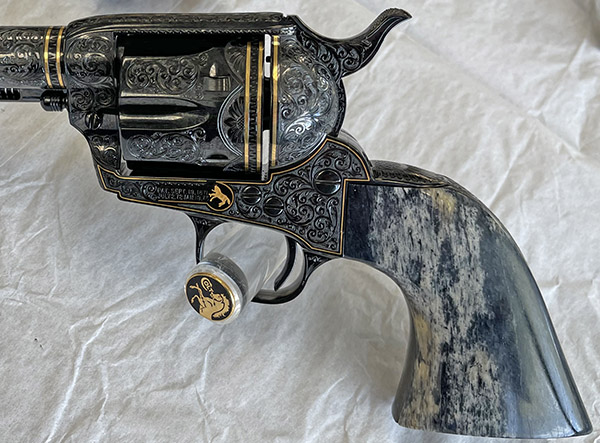
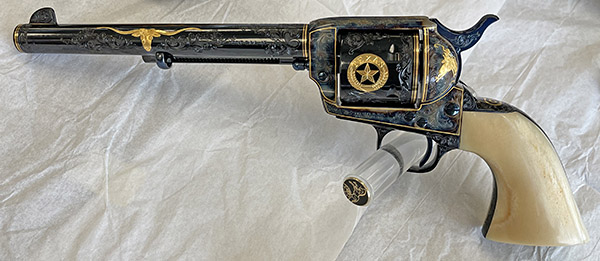
This is really cool: Pietta is coming out with a reproduction of the original Colt Python, and rumor has it that it will sell for about half what a new Python costs. That puts the pre-tariff price at $750. Pietta plans to call it the Blacktooth. I don’t know about that name, but I don’t make thousands of guns like Pietta does. I’m thinking something like Copperhead would be a good name for this handgun. Copperhead would make an obvious connection with Python and Colt’s serpent-themed sixguns, and it sort of ties in with copper-jacketed bullets. Maybe put a touch of copper plating on the gun, too, to complete the copper connection (the trigger or the hammer, the grip medallions, or maybe the screws). Maybe even offer a tuned version with an action job, and call it the Competition Copperhead? Eh, what do I know?
A Pietta Copperhead?
The Python story goes like this: Colt originally produced the Python in 1955 as a premium double action revolver, and then it was discontinued in 1999. The original Pythons had hand-fitted components, and it just got too expensive to make. I’ve heard it said that they went out of time quickly, and the frames tended to stretch with full bore .357 Mag loads. I owned a couple of these original Pythons, and they were beautiful guns, but they both went down the road when in my youthful ignorance I decided I needed something else more. Colt reintroduced the new Python with redesigned internals and frames in 2020, and I quickly snapped up one. It’s a beautiful handgun, and I’ve written about it a lot on these pages (I’ll provide links at the end of this blog).
How is it that Pietta, an Italian gunmaker known for producing copies of Old West sixguns, is able to copy the original Colt Python? Well, Partner, I don’t know, but I’m guessing Colt’s patent on the original Python expired and Pietta picked it up. That’s what happened on the Colt 1911 (the .45 Auto) and why so many companies are now producing the 1911.
I’m guessing that the Pietta Python won’t be available in California (at least initially) for a while (or maybe ever) due to our nutty gun laws, but who knows…maybe Pietta will succeed in getting the thing California approved. I sure hope so. Or maybe I’ll buy a house and live part time in a state that respects the U.S. Constitution so I can have access to the guns California prohibits. Texas or Tennessee come to mind.
More Python? You bet. Here are our earlier Python related posts:
I’m thinking of doing another book on guns. It would be a two-volume series. What I have in mind is a compendium of expanded articles based on our firearms-related blogs, with a working title of Tales of a Gun Collector. Volume 1 would be rifles; Volume II would be handguns. What do you think? Let us know by leaving a comment below, and thanks in advance for your inputs.
Speaking of Colt…did you know that the original Gatling guns were manufactured by Colt in Hartford, Connecticut? All that and more is in The Gatling Gun.
It was to be a busy day in Thailand starting with a long ride south out of Bangkok to the famous floating market, an awesome shrimp lunch after that visit, then back to Bangkok, and then dinner at a fabulous Italian restaurant with a couple of good friends (I know people everywhere). Imagine that: Italian food in Bangkok (and it was good, too).
About the floating market near Bangkok: I’d first sort of heard of it way back in the early 1970s when I saw a James Bond movie and its chase scenes with those narrow Thai boats. The Bond flick was The Man With The Golden Gun (if you’re reading this blog, my guess is you’ve seen all the Bond movies). The movie showed the boats in Bangkok, not the floating market, but it planted a seed 50 years ago and I when I heard about the floating market on this visit, I wanted to see it. Here’s that scene I remembered showing James Bond doing his secret agent stuff (with an appearance by Sheriff J.W. Pepper, ably played by the late Clifton James) on Bangkok’s waterways:
The floating market is about 100 miles south of Bangkok. The concept is that there are shops on the canals in the delta where the Chao Phraya River meets the sea. The idea is you are on these long narrow boats and you float along, visiting shops. In some places the vendors paddle out to visit you. Every turn in the floating market was a photo op, and for me, the photo ops were the best part of our visit. I took close to 400 photos in the space of a couple of hours. All were with my D3300 Nikon and its 18-55mm kit lens. That combo is a stellar travel photography approach. The 18-55mm lens is not as sharp as a good prime lens, but it does a good job and it is versatile.
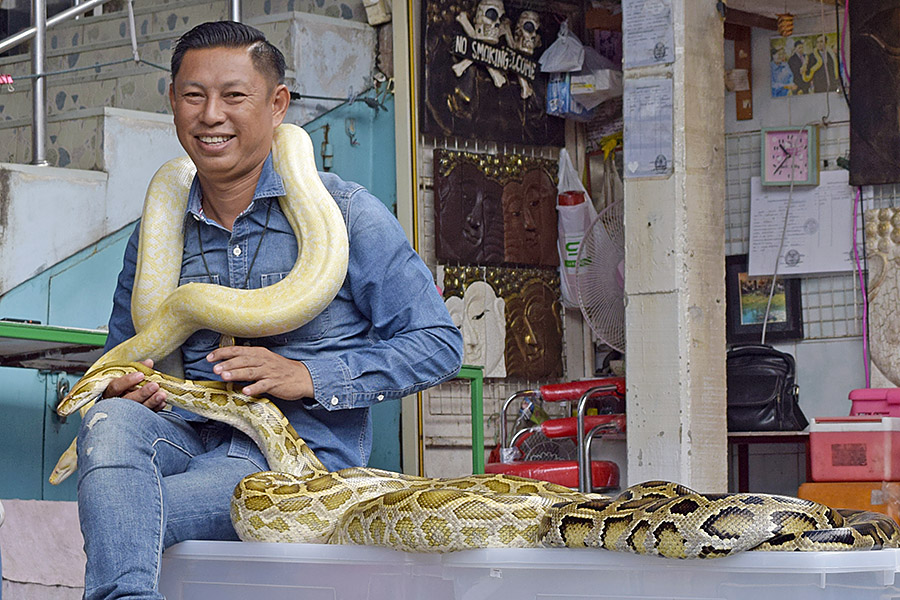
A typical scene in the floating market. It was very tranquil. In some places, it was also very crowded.A happy coconut vendor.Need a python? I have one. You can read about it here.One of the long boat captains.Imitation, the sincerest form of flattery. Here, this young lady is imitating me photographing her.Mango. It looked good.Some folks make amazing photo subjects.Some animals do, too. If you’re wondering what this guy is…it’s a pygmy slow loris, rare primates that live in bamboo forests in Southeast Asia. They look friendly.
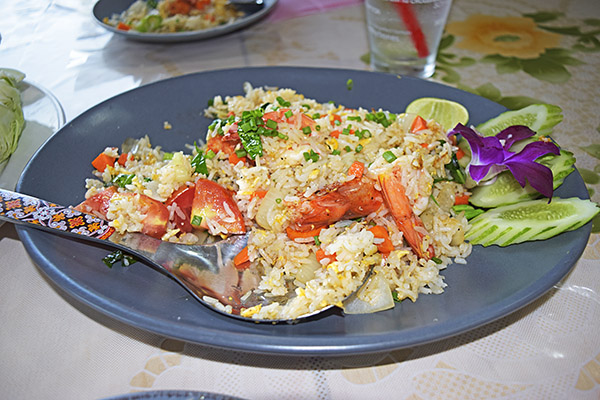
On the way back to Bangkok, our driver took us to a nondescript restaurant that didn’t look like much from the outside, but our driver knew where the good spots were. We had shrimp fried rice for lunch, and it was delicious. The freshness, the aroma, the taste…it was marvelous. It was easily the best shrimp plate I’d ever had, and I’ve had some good ones. I’m not supposed to eat rice and I’m not supposed to eat shrimp, but I’m glad I broke the rules for this meal.
A hidden gem…a Thai shrimp plate. I knew when I was enjoying it I’d probably never find this restaurant again. Maybe that added to the experience.
We returned to downtown Bangkok and I wandered around grabbing a few more photos. I promised something related to motorcycles in every Bangkok blog. Promises made; promises kept:
The Bangkok Moto GP. It’s at the head of every traffic line at every traffic stop.
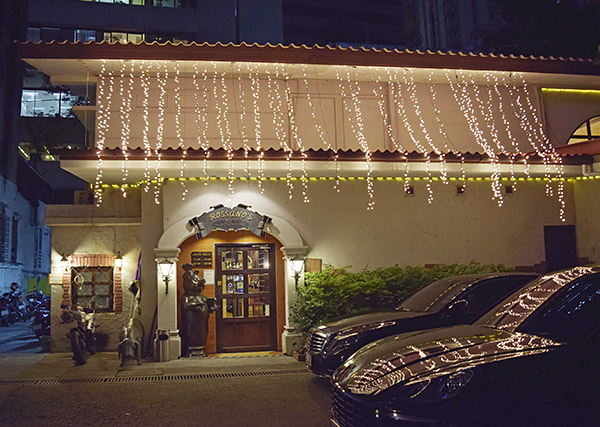
Our plans for that evening included having dinner with our good friends Kevin and Nan at Rosseno’s Italian Cucina. It was another five-star dining experience, a world-class Italian restaurant in the middle of downtown Bangkok. It was only a couple of blocks from our hotel, so Sue and I walked there.
Rosseno’s Italian Cucina. It was superb. I had lasagna.From left to right, it’s Nan, Kevin, Susie, and me.
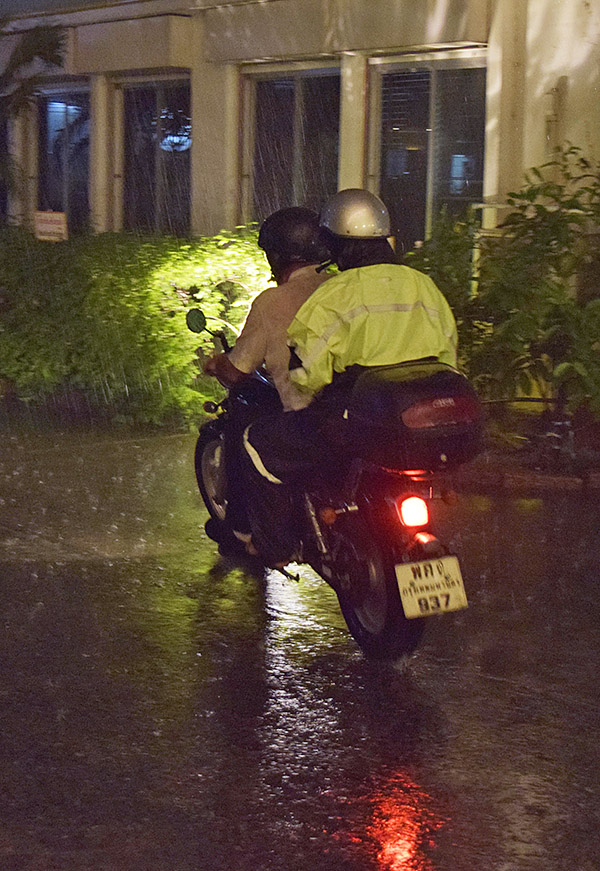
During dinner, it started raining. After dinner it was pouring. It does that a lot in Bangkok. Kevin and Nan had arrived on one of Kevin’s motorcycles. I would have been concerned about the rain, but as folks who live in Bangkok, Kevin and Nan were not. To them it was no big deal.
Nan put on her rain gear (Kevin did not) and they rode off into Bangkok traffic.
Bangkok is one of the world’s great cities. It’s about the size of New York, and like most major cities in the world, it pretty much has everything you can imagine (including great Italian food).
Tomorrow’s adventure is going to be another Bangkok hidden treasure: The Jim Thompson house. Stay tuned. You’ll enjoy it.
Never miss an ExNotes blog:
Help us bring more to you: Please click on the popup ads!
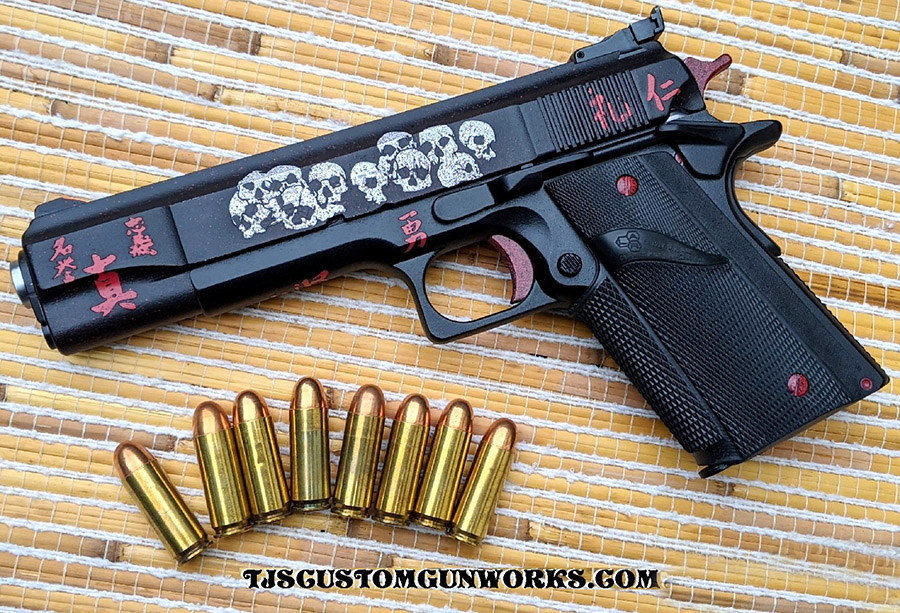
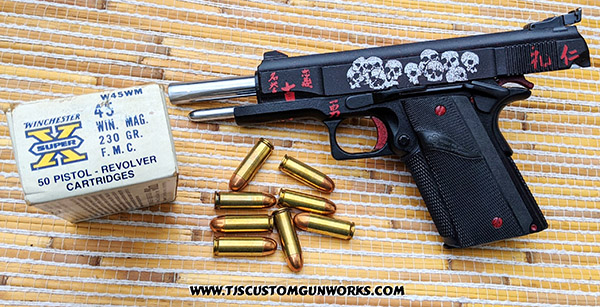
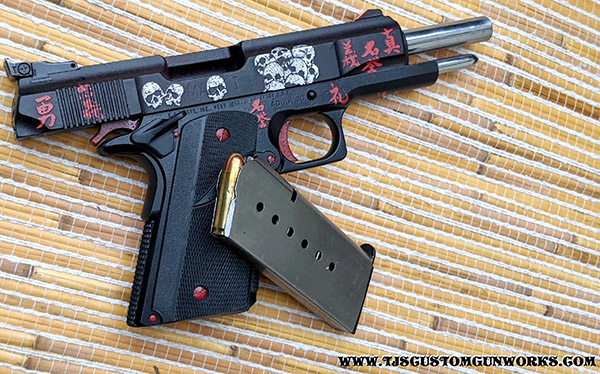
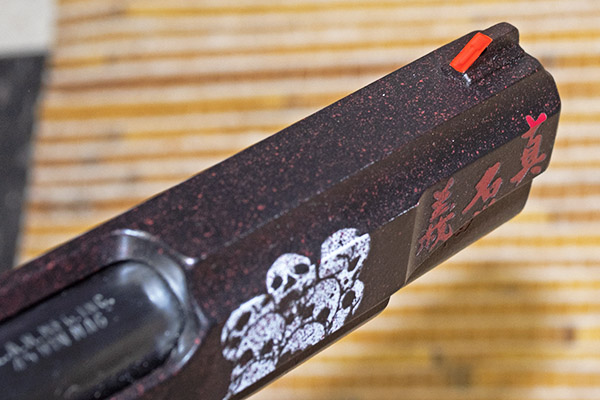
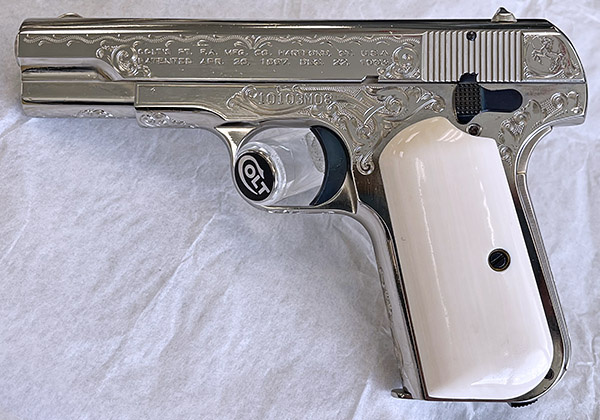
I had lunch with good buddy TJ (of TJ’s Custom Gunworks) recently and he showed me an LAR Grizzly .45 Winchester Magnum handgun he recently completed. It’s wild. It’s the one you see in the photo above and in the additional photos below. Here’s TJ’s description:
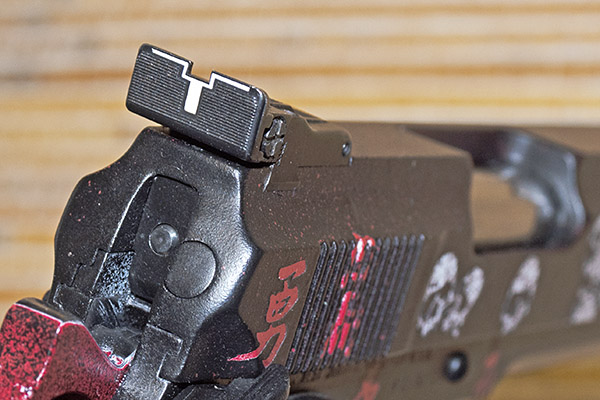
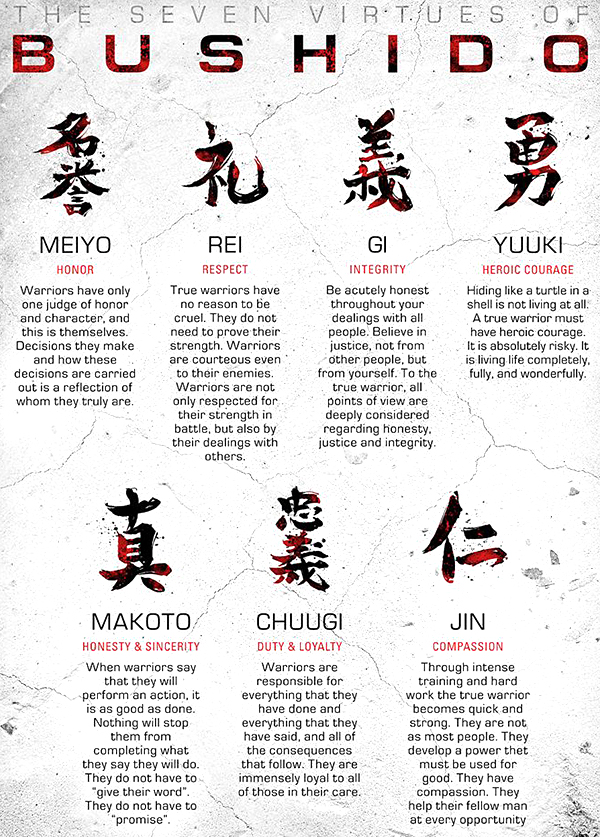
The Path of Bushido, a custom L.A.R. Grizzly .45 Winchester Magnum (it’s a supersized 1911). This handgun is Duracoated with Skulls of Death and Kanji characters depicting the seven Samurai virtues of the Bushido. This magnum features the typical 1911 match action, trigger, and reliability work, as well as barrel and bushing clearance reduction. The gun also has melted edges, a speckled Duracoat finish, a Bullet-guide rod, and Millett target sights with orange DayGlo on the front.
The photos can only begin to the do justice to this stunning handgun (trust me, I’ve seen it in person). And that .45 Win Mag cartridge…think of it as the illegitimate offspring of the already-powerful .45 ACP cartridge (my favorite, by the way) and the .44 Magnum. It’s a very impressive hand cannon.
One of the things I like best about TJ’s latest creation is the Millett sights. In my opinion, there are none better. I have these on both my Rock Island Compact 1911 and my bright stainless Colt 1911, and TJ is the pistolsmith who installed them on both guns.
If you were wondering about the Bushido emblems on the Grizzly, here’s an explanation:
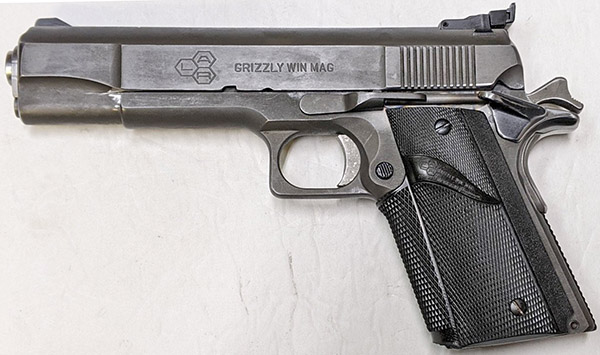
I asked TJ what the Grizzly looked like before he worked his magic, and TJ shared this photo with me:
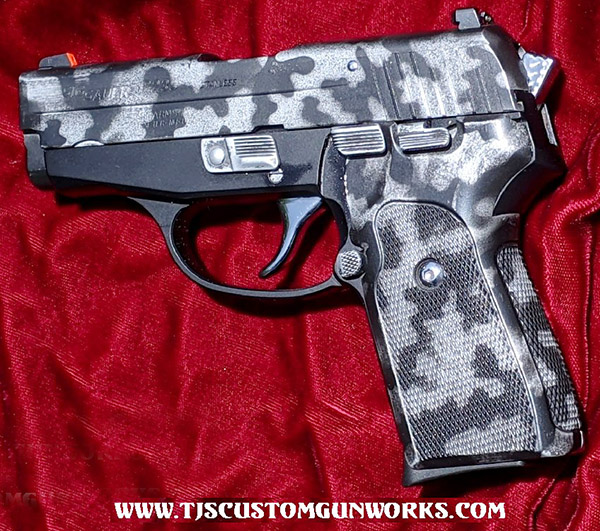
At the end of our visit, I asked TJ what else he’s been up to lately. Take a look. These are magnificent. This first one is a SIG P239 with black camo treatment, a jeweled hammer, a rounded trigger, and lots of internal smoothing and reliability enhancement.
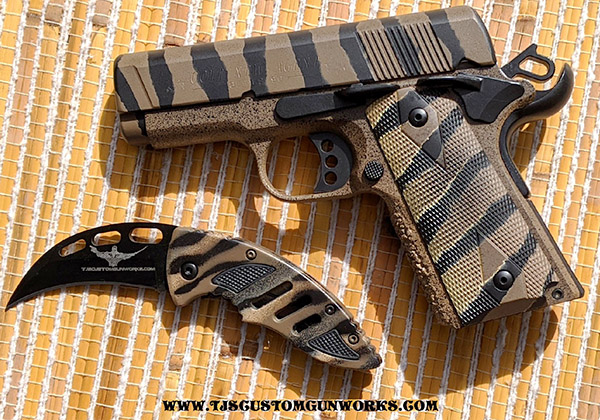
This next one is compact Colt Agent 1911 with Tiger Duracoat and a matching a matching TJ’s knife.
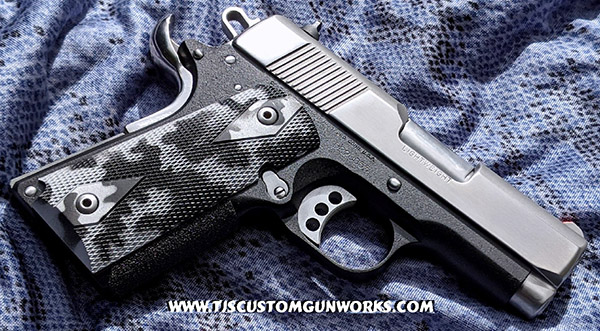
This is another compact 1911 (a Colt Defender) with a camo surface treatment and all the internal reliability action work. It’s not easy to get a compact 1911 to perform, but TJ sure did it on mine. I’ve put thousands of rounds through my TJ-customized Rock Island Compact. TJ took what was a relatively unreliable gun and turned it into a masterpiece.
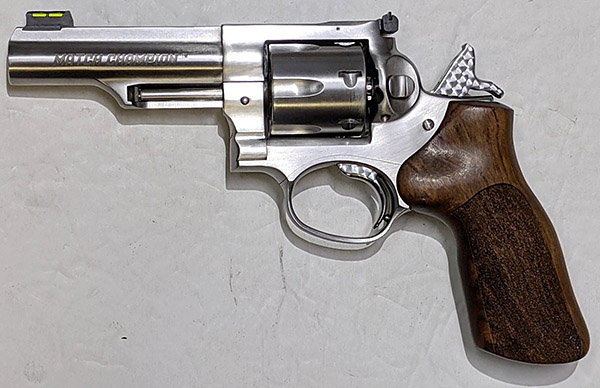
Here’s a TJ-modded Ruger Match Champion revolver, with jeweled bits, recontoured trigger, and an action job.
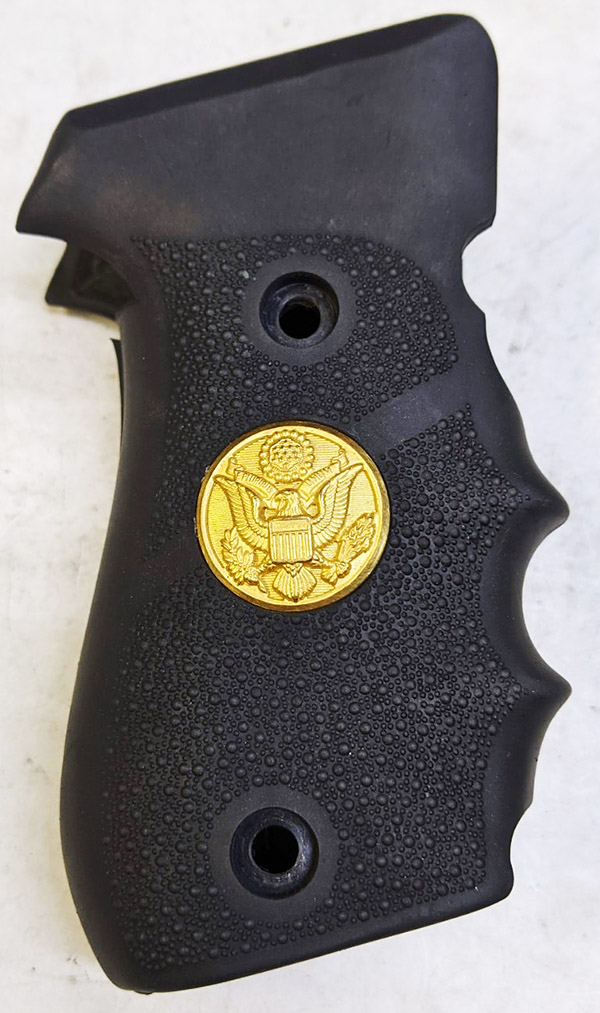
One last photo…this is a SIG P220 grip in which TJ custom inlayed the US government insignia. TJ does a lot of work for senior government folks here and abroad. It’s cool stuff.
I’ve had six handguns and a rifle customized by TJ, and every one of them is a stellar example of his craftsmanship. These include my Model 59, a bright stainless Colt 1911, my MacManus Colt 1911, the Rock Island Compact, a Model 60 Smith and Wesson snubbie, a Ruger Mini 14, and my new Colt Python. In addition to my guns, folks who follow the ExNotes blog took my advice and had TJ work on their guns, like Marty with his custom Colt Combat Commander, Bob with his Beretta 92, and others who are not listed here. You might have noticed that TJ advertises here on ExNotes. If you want to reach the folks who follow the blog, you might consider doing so, too. You can contact us at info@ExhaustNotes.us and you can reach TJ by clicking on the link below.
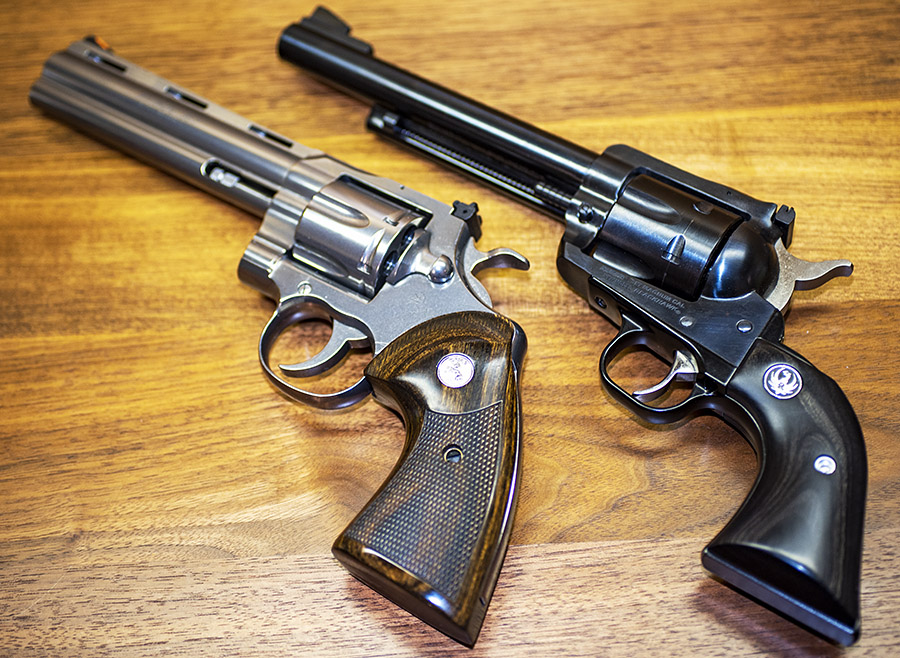
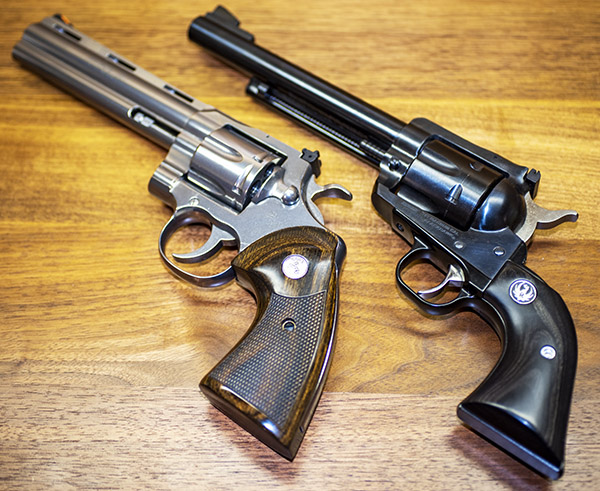
The Colt Python versus the Ruger Blackhawk: Apples and oranges? Maybe, maybe not. This blog compares the two .357 Magnum revolvers from several perspectives, including price, actions and triggers, sights, barrels, fit and finish, durability, feel, panache, accuracy, bore leading, ammo sensitivity, and extraction.
Price
The Python is a premium revolver, selling for $1500 (if you can find one) compared to a Ruger Blackhawk’s typical sell price of just under $700. I believe Ruger stopped making Blackhawks for a while; they resumed production this year and I have one of the recently manufactured specimens. Colt stopped making the original Pythons in 1999; in 2020 they reintroduced an improved version. That’s the one I have now.
Actions and Triggers
The Python is a double action revolver; the Ruger is a single action. That means that on the Ruger, you have to cock it by pulling the hammer all the way to the rear to rotate the cylinder and bring the gun to a ready-to-fire condition. On a double action revolver like the Python, you can fire it single action as described immediately above, or you can pull the trigger a longer distance to rotate the cylinder, cock the gun, and drop the hammer.
Help us bring more content to you…please click on the popup ads!
As delivered, the Blackhawk had a crisp but relatively heavy single action trigger pull. I gave mine the quick New York trigger job described in an earlier blog; now it is both lighter and crisp. It’s a good trigger, as good as you’d get with a custom trigger job. Ruger did a good job here.
A Blackhawk New York trigger job. Unhook one leg of the trigger spring, and you get a lighter trigger.
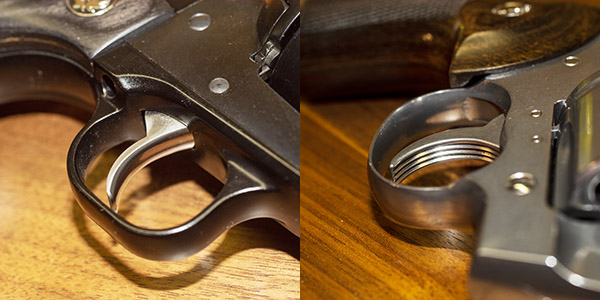
The Colt Python’s double action trigger pull is superb, far superior to the double action trigger of the earlier Pythons. It doesn’t stack; it’s a constant force trigger pull all the way to hammer drop. The Python trigger is serrated, which I don’t care for. I think it would be better as a smooth trigger, like the Ruger has. The serrations interfere with the double action trigger motion, in which I’d like my finger to be able to slide across the trigger laterally as I complete the pull. But it’s still a good double action trigger.
The Ruger and Colt triggers. A smooth trigger on the Python would make for better double action shooting.
The Colt Python’s single action trigger, as delivered by the factory, was not acceptable to me. It probably exceeded 6 pounds, it was gritty, and it actually cocked the hammer a bit more before it released. I called my contact at Colt to ask about it and he explained that it’s necessary to survive our California drop test. That requirement stipulates that a cocked gun has to not discharge when dropped repeatedly from a specified height on a concrete surface. I run with a pretty exclusive crowd (exclusive in the sense that we don’t drop our loaded and cocked guns repeatedly on concrete), so the requirement is beyond silly to me, but hey, it is what it is, and it’s why a new Python has a heavy, gritty single action trigger from the factory. It’s not Colt’s fault; it’s California.
I had TJ (of TJ’s Custom Gunworks) work his magic on the single action trigger and it’s now what it is supposed to be. Think zero creep, a breaking glass release, and 2.5 pounds, and you’ll have a good idea of my Python’s single action trigger.
Sights and Sight Radius
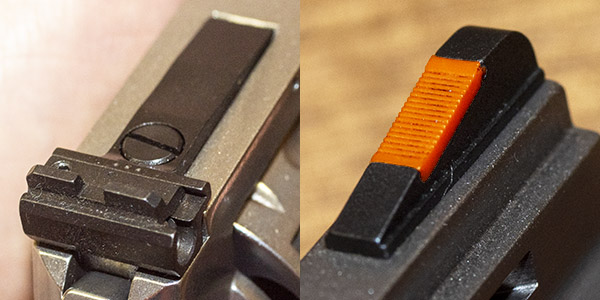
Both revolvers have adjustable sights. The Python has a red ramp front sight (but no white outline rear). The Blackhawk has plain black sights front and rear, which I actually prefer. The Blackhawk rear sight is click adjustable for windage and elevation (like most handguns with adjustable rear sights), the Python rear sight is click adjustable for elevation. The Python windage adjustment is a little different than most. It is infinitely adjustable for windage via a screw (with no clicks), and it can be locked in place with what has to be the world’s smallest Allen screw. Colt provides a tiny Allen wrench with the revolver for this purpose.
The Ruger Blackhawk’s front and rear sights. I prefer a plain black post and rear blade, like this Ruger has. The rear sight blade has an indented provision for adding paint to create a white outline, but I’m leaving it black.The Colt Python’s sights. The rear is click adjustable for elevation, and infinitely adjustable (i.e., there are no clicks) for windage. The front sight has a red ramp.
The Colt front sight is easily replaced with the same size tiny Allen screw that is used to lock the rear sight windage. I’ve not seen any different front sights offered to replace the red ramp front sight, but I guess they are (or will be) available.
I actually prefer the Ruger’s plain black sights to the Colt’s red ramp arrangement, but that’s a personal preference.
The Colt’s sight radius (the distance from the front to rear sight) is 7 3/4 inches. The Ruger’s sight radius is 8 1/2 inches, which should give a Ruger a slight accuracy edge.
Barrels
Both handguns have the longer version of the barrels offered by their respective manufacturers. The Ruger .357 Magnum New Model Blackhawk can be had with either a 4 5/8-inch barrel or a 6 1/2-inch barrel; I opted for the 6 1/2-inch barrel. The Colt Python is available with either a 4 1/4-inch barrel or a 6-inch barrel; I went with the 6-inch version. For me, these are target guns, and I wanted the longer sight radius.
The Colt Python has a 6-inch barrel; the Ruger Blackhawk has a 6 1/2-inch barrel. Both are large, heavy revolvers.
Colt is recently introduced a 3-inch barrel on the Python. The Python (in my opinion) is too big for concealed carry even with the 3-inch barrel; the short barreled version holds no interest for me.
The Python has a 1 turn in 14 inches left twist rate barrel; the Ruger has a slightly slower 1 turn in 16 inches right twist rate. Both barrels have recessed crowns. The Python, of course, has its signature ventilated rib and full underlug barrel. It’s a classic and unique look and I love it.
Interestingly, in the 1970s I shot handgun metallic silhouette competition with a Smith and Wesson Model 27; it had a twist rate of 1 turn in 18 3/4 inches. It was accurate, but not any more than either of the two 357 Magnums being reviewed here.
Weight
The Colt Python weighs 46 ounces. The Ruger Blackhawk weighs 45 ounces. The grip frame on the Blackhawk is a painted alloy, which reduces the weight slightly. These are both big, heavy handguns. They are not meant to be concealed carry guns.
Fit and Finish
Ah, how to be delicate here. Colt hit a home run with the Python. Ruger, not so much, at least on my Blackhawk.
The Python has a high polish, mirror-like finish on its stainless steel surfaces. It’s actually not hand buffed like you might imagine; Colt uses a vibratory polishing media approach. It really works; the finish is superb.
Ruger’s Blackhawk has an industrial grade blued finish, and on my revolver, the factory missed several spots on the cylinder. Ruger offered to reblue the cylinder for me, but truth be told, the cylinder is a fitted part and I didn’t want to chance sending it to Ruger and having them return a different cylinder. I used cold blue on mine to touch it up, and after oiling it, you have to know where the bluing shortfalls were to find them. But you shouldn’t have to do that on a new gun.
Lapses in bluing quality on the Ruger Blackhawk. This gun should have never left the factory.The fit of the grips to the grip frame was atrocious on my Blackhawk.
The grips on my Blackhawk had a very poor fit. I thought they were made of plastic, but they are hard rubber (like on the Colt Single Action Army). Ruger sent a new set of grips to me, but I couldn’t get them over the mounting posts in the grip frame and I didn’t want to screw around enlarging the holes. Instead, I installed a previous set of black laminate grips I had from Ruger (you can see them in the photo at the top of this blog). I like the look and the feel of the laminate grips, so they are staying on the gun. You shouldn’t have these kinds of issues on a new gun.
Both the Colt and Ruger rear sight elevation adjustment pivots on a pin through the revolver frame. After shooting the Colt for a couple of years, the pin is still in place. Colt uses a rolled steel pin; Ruger uses a solid pin. On the Ruger, by the end of the first range session its pin had backed out. Ruger sent me another pin with a recommendation that I bend it slightly before I install it. I’ll fix it in place with green Loctite when I get around to picking some up, but I shouldn’t have to do this.
I paid $659 for my Blackhawk, but factoring in the freight cost, the sales tax, the California DOJ fee, and the transfer fee, it was crowding a thousand dollars by the time I took it home. For that kind of money, I expect something to be perfect. That’s not what I received. On the plus side, I know if I shipped the revolver back to Ruger, they’d make it perfect. As I said in an earlier blog, Ruger’s customer service is the best in the business. But that’s a poor benchmark for a gun manufacturer (or any manufacturer, for that matter). If they got it right the first time, they wouldn’t need to be the best in the best in correcting quality escapes from the factory, and getting it right the first time is what most of us expect when we plunk down our hard-earned cash.
Durability
The older Pythons were delicate firearms, and it’s been said by people who know what they’re talking about they suffered from frame stretch and timing issues within the first 2,000 to 3,000 rounds. The new Python is a much beefier gun, and the guys I spoke with at Colt told me it no longer has these issues. I haven’t owned my Python long enough to say that’s the case, but I believe what Colt told me. I’ve shot mine a lot over the last two or three years; if anything, it’s becoming more accurate.
Ruger Blackhawks have always been built like anvils. I’m the only guy I know who wore one out, and I put many, many max loads through my old stainless steel Blackhawk. Blackhawks are tough. I think the new Pythons are, too. From a durability perspective, I’d call it a draw.
Feel
This is a subjective assessment that includes grip, balance, and ease in handling the revolver. It’s very much a matter of personal preference. I like the feel and balance of a single action better than a double action revolver, so for me, the Blackhawk takes the win here.
Panache
This is another subjective assessment. The dictionary defines panache as “flamboyant confidence of style or manner.” The Python is the easy winner here. Don’t get me wrong: Folks have approached me on the range to ask about what I’m shooting when I’ve been out there with both guns. But it happens more often with the the Python. It’s a prestige item. Pythons have been featured in movies going all the way back to the second Dirty Harry flick, Magnum Force, as well as others. I don’t know that I’ve ever seen a Ruger Blackhawk in a movie (if you have, let me know).
Accuracy
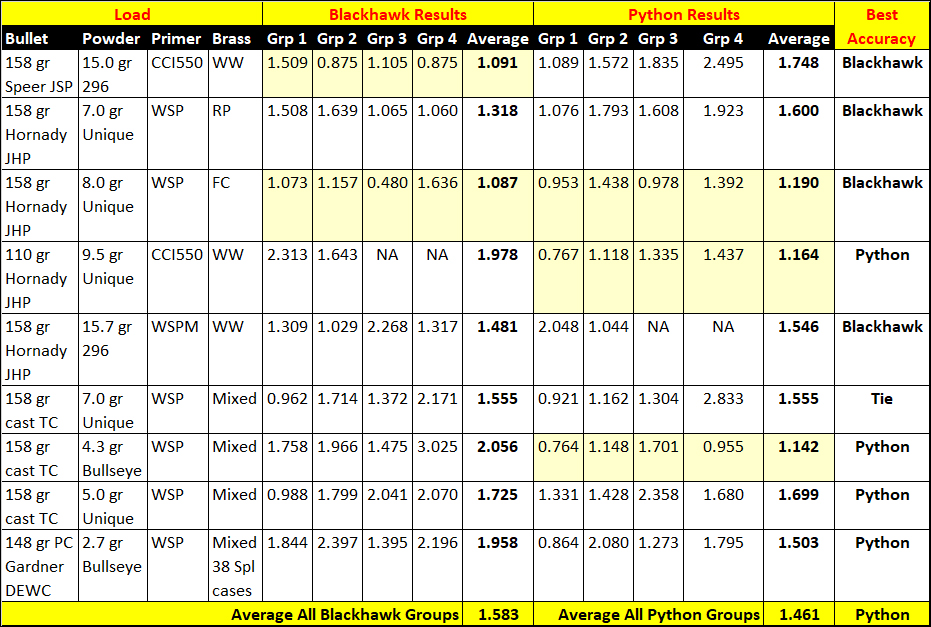
This is essentially a draw. Both revolvers are accurate, and both have their preferred loads. You may have read my recent blog on the Blackhawk’s accuracy; I shot the same loads with the Python to make a comparison.
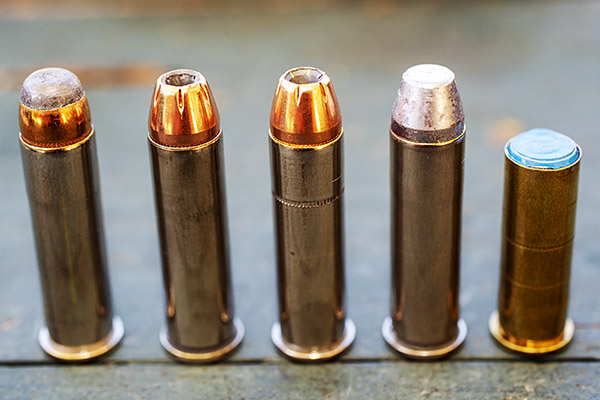
Bullets used for this test: From left to right, the Speer 158-grain jacketed soft point, the Hornady 158-grain jacketed hollow point (also called the XTP), the Hornady 110-grain jacketed hollow point, a cast 158-grain flat point, and the 148-grain Gardner cast and powder coated double ended wadcutter loaded in .38 Special cases. The different powder charges and primers used with these bullets are shown in the table below.
Take a look at the results:
I fired the above 5-shot groups at 50 feet, using a two hand hold resting my hands on the bench. I did not use a machine rest, nor did I chronograph any of my loads.
Both the Python and the Blackhawk shot very well with 8.0 grains of Unique and the Hornady 158-grain jacketed hollow point bullet (Hornady calls it their XTP bullet).The Python did very well with a light .357 Magnum cast load: 4.3 grains of Bullseye and the 158-grain cast flat point bullet. The Ruger didn’t shoot the lighter cast bullet loads nearly as well. I need to move my Python’s rear sight to the right a bit.
The clear winner for a full power load that works well in both guns is the 158-grain Hornady jacketed hollow point with 8.0 grains of Unique. That was the accuracy load for a 158-grain jacketed bullet in the old 45th edition (1970s vintage) Lyman manual (it’s not shown in the newer manuals). Loads using 158-grain jacketed bullets and Winchester’s 296 propellant did well in both guns, too, but they are high energy, high muzzle blast, and high recoil loads.
Another known favorite .357 Magnum load is the 110-grain Hornady jacketed hollow point with a max load of Unique. These performed superbly well in the Python, but they were terrible in the Blackhawk. The accuracy was poor and the brass would not extract (I had to remove the Blackhawk’s cylinder and drive the brass out with a rod). This load had previously worked well in a stainless steel Blackhawk, but this newer one did not digest this recipe well. Every gun is different.
I also tried a few lighter loads. The Python grouped very well with 4.3 grains of Bullseye and the 158-grain cast flat point bullet. That’s an easy load to shoot and I’ll be reloading a bunch of .357 Magnum cases with it later this week. It’s an easily recoiling load, it’s very accurate in the Python, and it doesn’t lead the bore. And a pound of Bullseye will go a long with this load (1627 cartridges, to be precise). I also tried my preferred .38 Special target load in both revolvers (2.7 grains of Bullseye and a 148-grain Gardner powder coated double ended wadcutter bullet loaded in .38 Special brass). The Python did well with these; the Blackhawk did not. In general, the Ruger didn’t do nearly as well with lighter loads.
The Colt Python with 148-grain .38 Special target loads. Recoil was minimal; accuracy was good with this load in the Python but not the Blackhawk.
Overall, it’s hard to say one revolver is more accurate than the other. The table above shows amazing consistency for both guns. I averaged all the averages for each revolver, and from that statistic, one could conclude that the Python holds an accuracy edge. But you know what they say about statistics. From an accuracy perspective, both manufacturers (Colt and Ruger) got it right.
Extraction
The Python was flawless. The Ruger had extraction issues with the 110 grain bullet and a near-maximum load of Unique. Well, issues isn’t exactly the right word. Cases fired with those loads wouldn’t extract. I had to remove the cylinder and tap the cases out with a rod. All the other loads tested in the Ruger extracted normally.
The Python extracted the same load that gave the Ruger fits with no issues, and owing to the nature of a double action revolver’s extraction mechanism, it had to push out all the cases at the same time. The inside of the Python chambers have a mirror finish. The Ruger chambers do not.
With regard to extraction, the Python is the better revolver.
Leading
Neither revolver had an advantage over the other with regard to leading. When cast bullet velocities were high, both guns leaded the bore. If I loaded to get velocities below 1000 feet per second, neither revolver leaded the bore. But (and it’s an important but), the Python is more accurate than the Ruger with lower velocity cast bullet reloads.
The Python’s bore after firing 20 rounds of cast bullets with 7.0 grains of Unique.
As I mentioned in an earlier blog, my old standard .357 Magnum load turned out to not be such a good load. It leaded the bore of the Python and the Ruger significantly after 10 rounds. The first five shot group grouped well; each succeeding group grew larger. Interestingly, that group averaged exactly the same (1.555 inches) for both the Python and the Blackhawk.
When I was finished with the Python accuracy testing, I know I’d have to scrub the lead out of the barrel with a bronze bore brush. From time to time, people ask if they can just shoot jacketed bullets when the bore leads up to “push the lead out.” I knew the answer to that question is a solid no, but I fired a few jacketed bullets through the heavily-leaded Python bore to make the point.
Fire jacketed bullets through a leaded bore and you get copper fouling on top of bore leading. It still needs to be bore brushed. The copper bullets do not push the lead out.Both revolvers performed similarly with the 7.0-grains of Unique and the 158 grain cast flat point bullet. The first group was good, then as the bore leaded the groups progressively grew. This target is with the Python; the Ruger target looks the same (both revolvers averaged exactly 1.555 inches overall with this load).
Ammo Sensitivity
I’ve already mentioned issues associated with extraction, and how the Python did better than the Ruger Blackhawk.
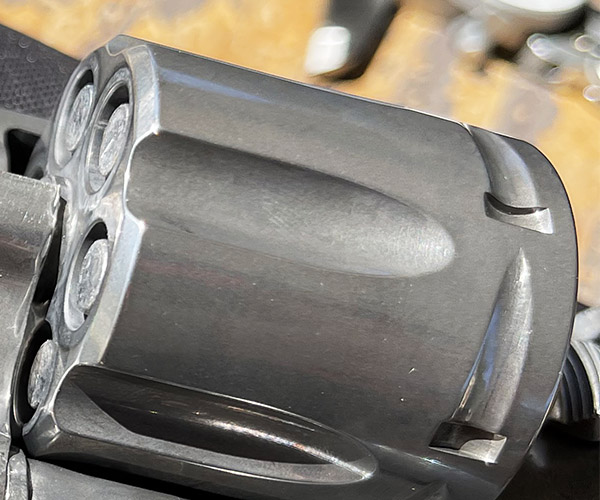
There’s another potential issue, and that’s bullet pull under recoil. The Ruger has a longer cylinder than the Python, and if bullet pull occurs, the Ruger is less susceptible to it preventing cylinder rotation.
You can see that the Blackhawk’s cylinder is longer than the Python’s.
The Ruger has a 1.640-inch long cylinder. The Python has a 1.553-inch long cylinder. The Ruger gives you another 0.087 inches of cylinder length to play with, which would probably allow any recoil-induced bullet pull to go unnoticed (unless the cartridges had no crimp at all, the bullets most likely wouldn’t back out far enough in six rounds to affect cylinder rotation). In this regard, the Blackhawk will be more forgiving than the Python. Did Colt make the Python cylinder too short? Nope, they did not. They made it as long as it needs to be with adequately-crimped .357 Magnum ammo meeting the max cartridge overall length spec. The reason for that is accuracy. Keeping the distance the bullet has to jump to the rifling as low as it can be enhances accuracy. Colt got it right, in my opinion. I like the idea that cylinder length is minimized.
Conclusions
The bottom line to me is that you won’t be making a mistake by purchasing either handgun. I’d think twice about ordering the Blackhawk through one of the online sites; the better approach would be to purchase the gun at a store where you can see it first. On the Colt, you may not be satisfied with the single action trigger pull as delivered from the factory (I wasn’t, but it was recoverable with a trigger job).
From an accuracy perspective, it’s a draw; both guns are very accurate.
You might be wondering which of the two I prefer, and I don’t have an answer for you. I enjoy reloading for and shooting both.
Subscribe to the ExNotes blog for free!
Help us out, folks! We depend on our popup ads to keep us in components and chain lube. Please click on the popup ads!
Wowee, do we ever have some good stuff coming up right here on the ExNotes blog. Guns, motorcycles, adventure touring in Transylvania, and the results of a content safari through Arizona all the way to Albuquerque. Here’s an inkling of just a few of the topics coming your way.
What’s the real difference between a $1500 Colt Python and a $650 Ruger Blackhawk? Watch for our side-by-side, target-by-target comparo. It’s coming up.
Into resurrections? Hey, how about CSC’s replica of the original Mustang motorcycle! You read our recent story about the Al Simmons Mustang motorcycle collection and the origins of the Mustang. CSC’s Steve Seidner went a step further, and we’ll tell you all about it.
Ever have your well dry? I mean literally, not figuratively. Uncle Joe Gresh has, and he’ll tell you all about it. Gresh is a guy who makes MacGuyver look like an amateur. You’ll love this story.
We’re going to bring in a new writer or two (or maybe more). We have a blog loaded and ready to publish from good buddy Airborne Mike on a motorcycle ride through (get this!) Transylvania! I kid you not. Transylvania and the Transfagarasan Highway!
On that topic of new writers…Joe Gresh will tell you all about what you need to do to be considered for the ExNotes editorial staff. Watch for a blog on this topic in the near future.
The Pima Air Museum in Tucson is another treasure. Wow, that was a fun visit. There’s so much there we couldn’t take it all in during a single visit, and it’s a place that screams for more than a single blog. I need to return. The photo ops were incredible.
More good Joe Gresh stuff straight from Tinfiny Ranch, including the Gresh moto stable and the world famous Gresh project bank. Motorcycles, the MGB-GT, and more!
How about the Franklin Automobile Museum in Tucson, Arizona? Never heard of it? We hadn’t, either, but (trust me on this) it’s Tucson’s best kept secret!
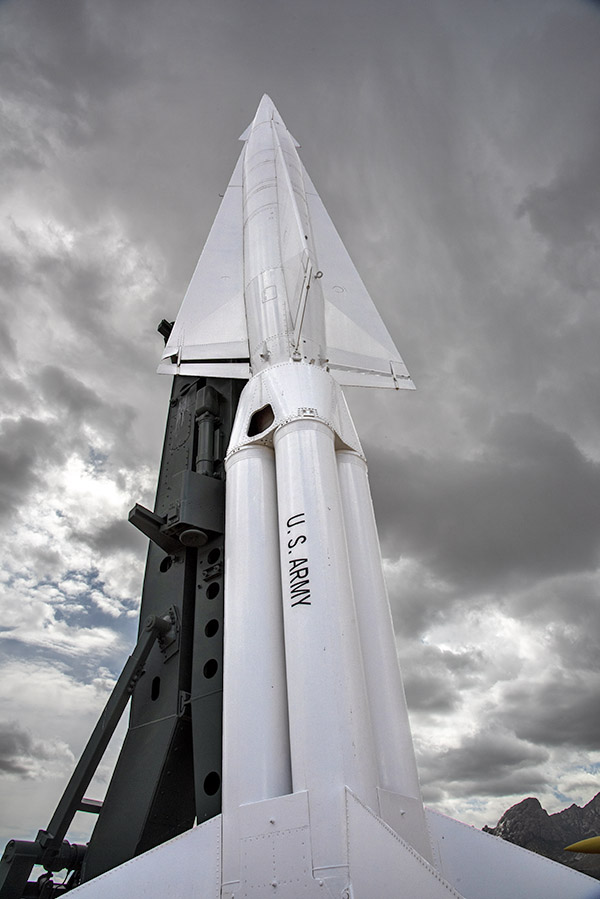
White Sands Missile Range? Yep, that, too. Everything from a Nazi V-2 to current US weaponry, and we’ll have the story right here.
How about White Sands National Park? Think Sahara Desert, and you’ll have a good idea about what these rolling snow white gypsum hills look like. It was awesome!
The New Mexico Museum of Space History, with a guided tour by none other than Joe Gresh? That was a really fun visit with lots of cool exhibits. It’s coming your way.
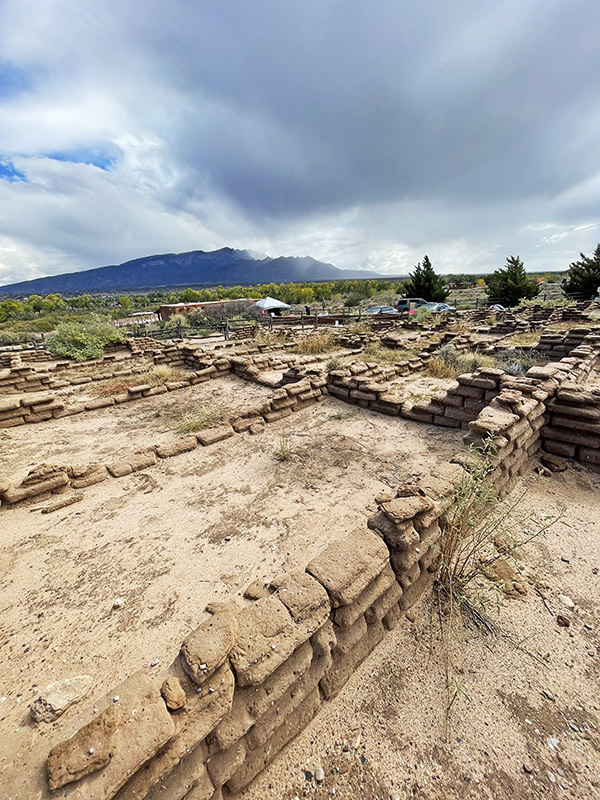
How about sacred Native American ruins in New Mexico? We saw several and they were impressive, including the Kuaua Native American site along the Rio Grande River.
Albuquerque is quite a town, and Old Town Albuquerque is quite the place. We had a lot of fun wandering around and taking photos. It’s in the mix for a future blog.
And the Albuquerque 50th Anniversary Balloon Fiesta…wow, was that ever spectacular. The excitement and wonder of that event is one of the most impressive things I’ve ever experienced.
Stay tuned, folks. It’s quite an adventure, and it’s onging!
Click on those popup ads…we get paid everytime you do!
This blog is longer than I intended it to be. I thought I would just do a quick bit about a new set of Lee reloading dies I recently purchased, but as I got into it, I learned more about my Colt Python, crimping with a bullet seating die versus a dedicated factory crimp die, and well, the thing just grew. Mea culpa; you can leave early if you want to. Because this is a longer-than usual post, I thought I’d provide the bottom line up front: The Lee factory crimp die is a good thing. It works. It holds bullets in place better, it improves chambering, and it improves accuracy.
Now, the rest of the story.
For the last umpteen years when loading .38 Special or .357 Magnum ammo I have been using a kluged-up three die set (a carbide resizer/decapper from Dillon, an expander die from Lee, and a bullet seating and roll crimping die from Lee). You can use the same dies for both .38 Special and .357 Magnum; the only difference between the two cartridges is the length of the cartridge case. They use the same diameter bullets (even though it’s called a .38 Special, the bullet diameter of a .38 is actually .357 to .358 inches, just like the .357 Magnum).
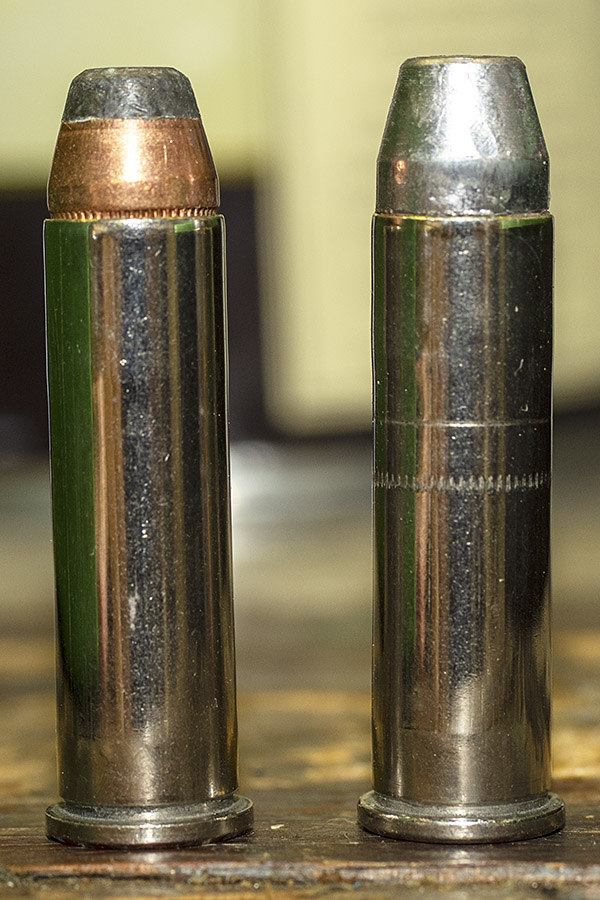
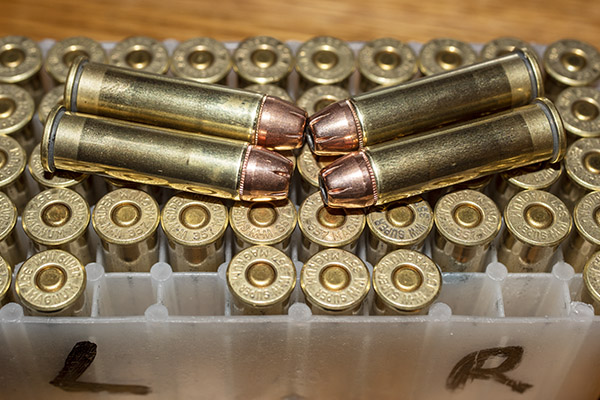
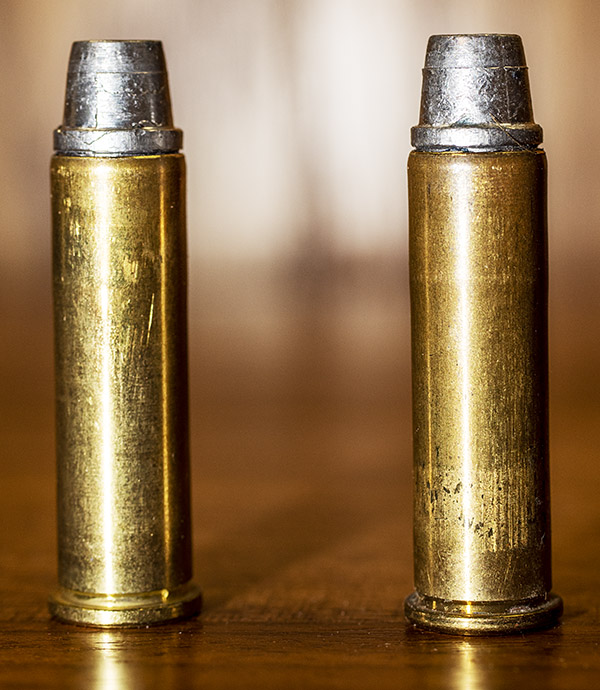
The two cartridges on the left are .357 Magnum; the one on the right is a .38 Special. The .357 cartridge case is longer so it cannot be inadvertently inserted into a handgun chambered for .38 Special. Note the slightly longer overall cartridge length on the .357 Magnum cartridge on the left (with the cast bullet) compared to the .357 Magnum cartridge in the middle (with the jacketed bullet).A mixed set of dies I’ve been using for years for reloading .357 Magnum and .38 Special. Note the Lee shellholder marked “1.” .38 Special used to be the most commonly reloaded cartridge in America. Today it’s 9mm. .38 Special was the first cartridge I ever reloaded. The die on the right is the bullet seating and crimping die.
Reloading Gear
I’ve had a few .38/.357 die sets over the years, selling them when convenient as I bought or inherited other equipment. As featured here on the ExNotes blog, I have a 50-year-old Star reloader I use for .38 Special wadcutter ammo (I’ll give you a link for the Star story at the end of this blog). The Star is set up to meter 2.7 grains of Bullseye propellant (that’s a 148-grain wadcutter target load) and it works fabulously well, so it’s a dedicated setup. For all other .38 Special and for .357 Magnum reloading, I load with my RCBS Rockchucker single-stage press. I’ve been using it for 50 years.
My Star progressive reloader. A good buddy gave this to me in rundown, funky, and long-neglected condition. I cleaned it, lubed it, and put in back in service. The Star does a fantastic job on .38 Special wadcutter ammo.Old Faithful, my RCBS Rockchucker single stage press. I load non-wadcutter .38 Special ammo and all .357 Magnum ammo on this press.
Bullet Seating and Crimping
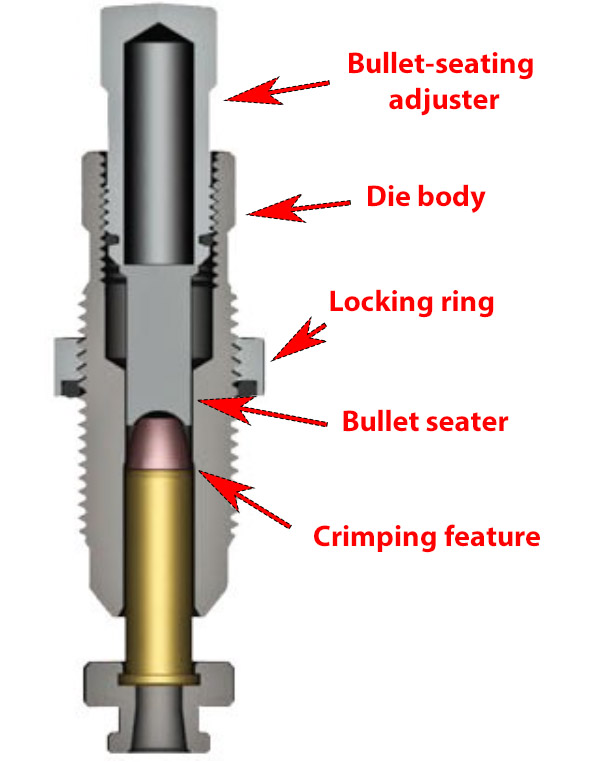
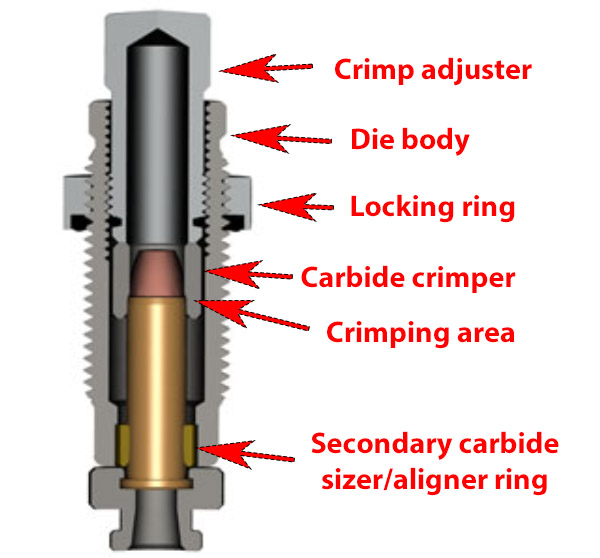
For many years, I seated and crimped my bullets with a simple seating and crimping die. It’s what you see in the illustration below.
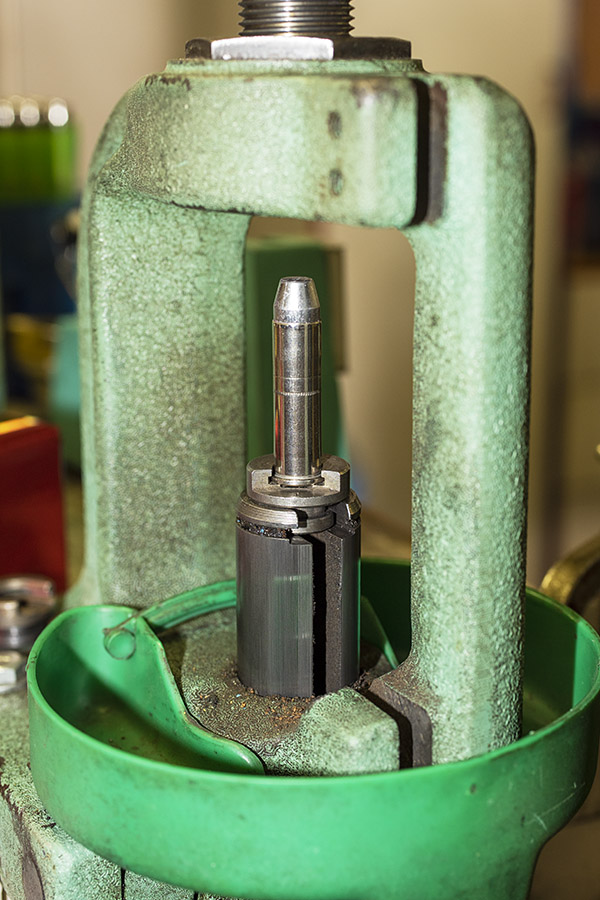
I use this die in two steps. First, I screw the bullet seating adjuster deep into the die and seat the bullet to the correct cartridge overall length without crimping the bullet in place. After seating all the bullets, I then back off on the bullet seating adjuster so that it no longer contacts the bullet, and then I screw the die body deeper into the press. The die body has a roll crimping feature that then roll forms a crimp around the case mouth to lock the bullet to the cartridge case.
Lee has an alternative approach for bullet crimping they call the factory crimp die. As a first step, you seat the bullet to the desired depth in the case using the die shown above. After seating all the bullets, you then remove the bullet seating and crimping die from the press and then use the fourth die (the factory crimp die). Here’s what the factory crimp die looks like:
The fourth die, the factory crimp die, does not seat the bullet. Its only function is to apply the crimp, and it does this very well. The idea is that the die is screwed all the way into the press such that it contacts the shellhoder, and then the amount of crimp is set up with the crimp adjuster, which screws into the die body. This die applies a roll crimp on a revolver cartridge (the same kind of crimp as the bullet seating and crimping die described above), but it does so in a much better-controlled manner. The factory crimp die also has a secondary carbide sizer/aligning ring at its lower end, which aligns the cartridge as it enters the case, and holds the cartridge outside diameter to specification values as the cartridge enters and then exits the die. It works fabulously well, and Lee states that this die makes it impossible to buckle a case.
I had .357 Magnum ammo I had previously loaded using the bullet seating and crimping die only (not the Lee factory crimp die), and it chambered with no problem in my Ruger Blackhawk. The Colt Python has a tighter chamber, though, and several of these older reloads would not chamber in the Python. A quick trip through the Lee factory crimp die cleaned up the outside diameters and the rounds chambered easily.
Before and after shots of older .357 loads I reloaded using the bullet seating and crimping die. Some wouldn’t chamber in the tighter Python. The Lee factory crimp die fixed that.
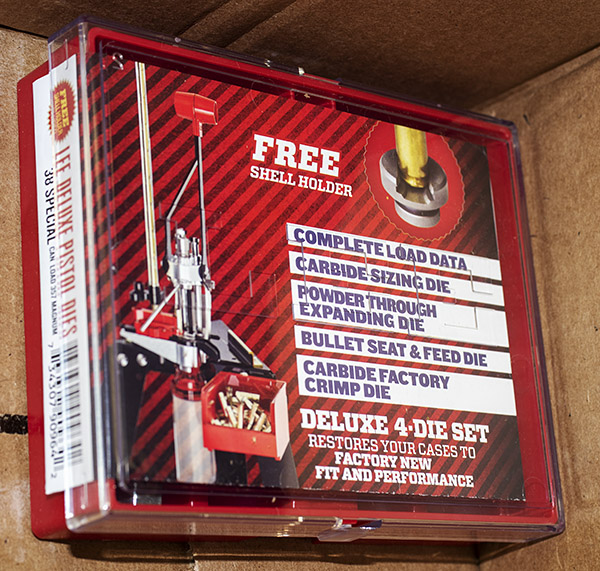
Lee’s Deluxe 4-Die Set
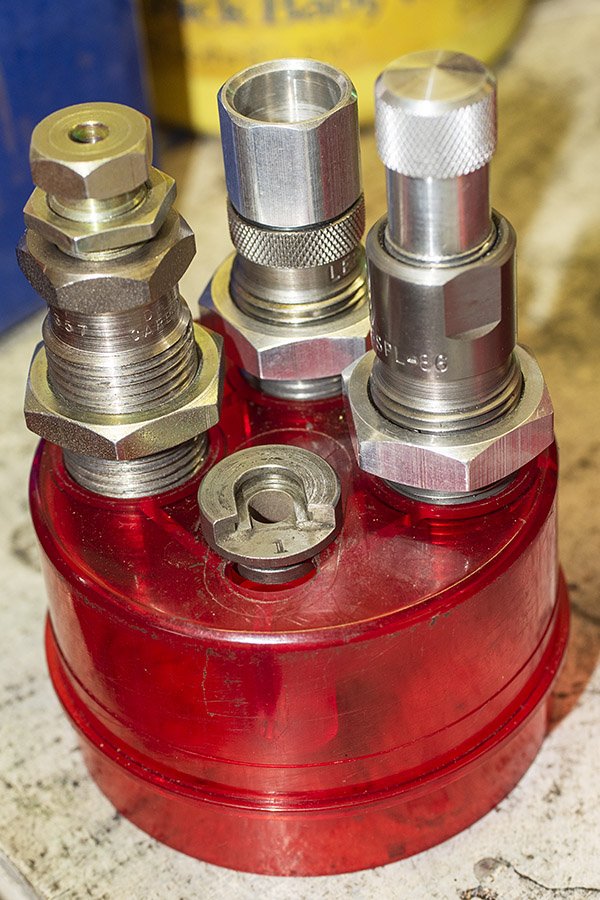
I recently ordered a new Ruger Blackhawk, and I’ve written many times about my Colt Python. With my new .357 Magnum Blackhawk in its 10-day cooling off period, I thought I would get a new set of dies. I like Lee (they give you a shellholder, they are inexpensive, and they do a good job). I had bent the decapping pin on the Dillon sizing die in my mixed set of dies shown above (a primer wouldn’t come out and I forced it). I was able to bend the pin straight, but I figured a man of my stature ought to have a set of grownup new dies. Then I got an email from MidwayUSA showing the Lee 4-die set on sale for $53 and they had free shipping on orders over $49. The Lee Deluxe set includes the factory crimp die. All the planets were in alignment (enter order, buy now…you know the drill). The dies were at my front door a few days later.
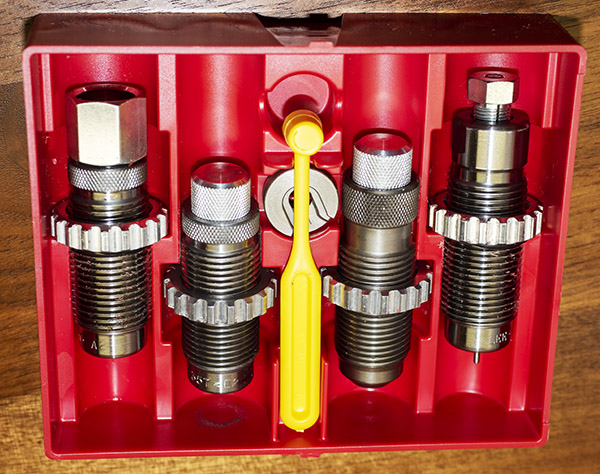
The new Lee 4-die Deluxe Set was well packaged by Midway.The Lee dies in my new die set.The Lee Deluxe 4-die set includes a carbidge sizing die and decapper (the die on the far right), a cartridge expander and case mouth flaring die (on the far left), a bullet seating and roll crimping die (second from the right), and the Lee factory crimp die (second from the left). Lee also provides a shell holder and power dispensing spoon. I’ve never used the powder dispensing spoon; I use an RCBS powder dispenser.
The new dies looked great, and I was eager to put them to work.
Bullet Pull and Cylinder Rotation
On revolvers with significant recoil, bullets can back out of the cartridge case when other rounds in the cylinder are fired. This can allow bullets on unfired cartridges to protrude beyond the cylinder face and interfere with cylinder rotation. We prevent this by controlling the reloaded cartridges’ overall length and by crimping. In firing my new Colt Python with ammo I had loaded for an earlier Ruger Blackhawk, even though the bullets were crimped I experienced bullet pull beyond the front of the cylinder. When this occurred, the cylinder would not rotate. These same rounds had worked in a Ruger Blackhawk.
In analyzing the cylinder rotation issue on my new Python, I found several things:
The bullets were not seated deep enough (the cartridge overall length exceeded the maximum spec of 1.590 inches), even though the bullets were crimped in their crimping groove.
The crimp wasn’t strong enough to hold the bullets in place. Under recoil from other cartridges, the bullets were backing out.
The Python cylinder is slightly shorter than the Ruger Blackhawk cylinder. I probably had the same bullet pull occurring on the Blackhawk, but the Blackhawk’s longer cylinder masked it. They might have been backing out on the Ruger and I didn’t know it.
Cartridge Overall Length
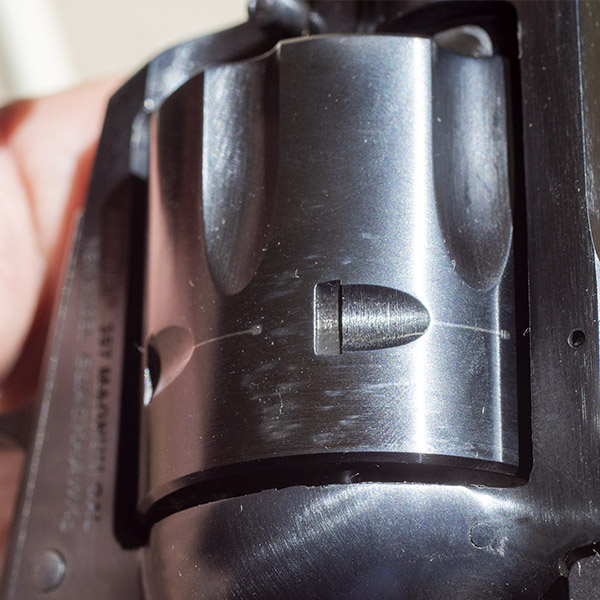
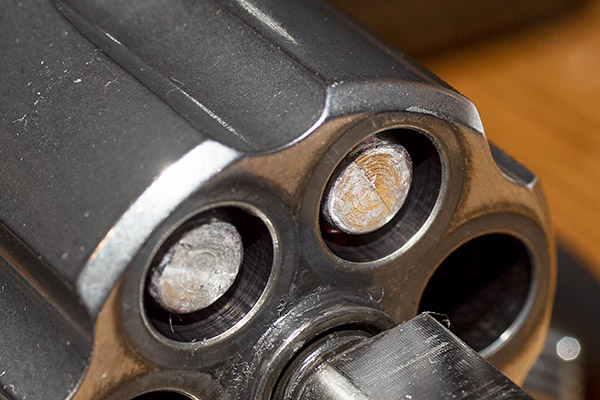
Let’s dive into the numbers. The reloading manuals show the .357 Magnum maximum cartridge overall length (COAL) to be 1.590 inches. With my cast bullets crimped in their crimping groove, the overall length was running from 1.607 to 1.615 inches. That put them about even with the front of the Python cylinder. If any bullet pull occurred under recoil, the front of the bullet would hit the rear of the forcing cone and the cylinder wouldn’t rotate. That’s what I experienced with my Python.
The Ruger New Model .357 Blackhawk has a longer cylinder than the Python. The Ruger cylinder is 1.640 inches long. The Internet says the Python cylinder length is 1.552 inches; mine measures 1.553 (which is close enough). Right away, the astute ExNotes blog reader will recognize that the Colt’s cylinder (at 1.552 inches) appears to be shorter than the specification .357 Magnum cartridge maximum overall length (1.590 inches), but it is not. When loaded in the cylinder the cartridge is held rearward by its rim, which sits flush against the back end of the cylinder.
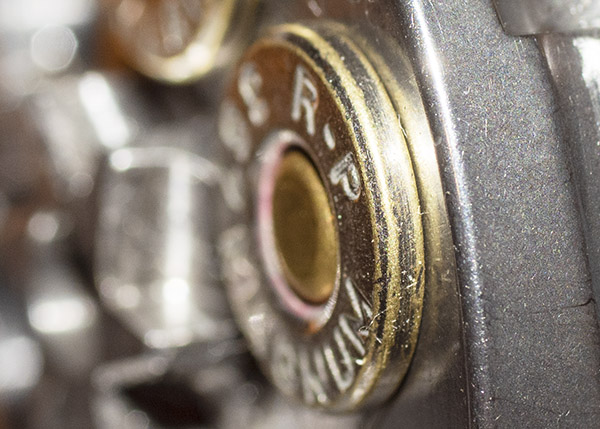
The Python, like most revolvers, headspaces on the cartridge rim. The cartridge rim is 0.060 inches thick.
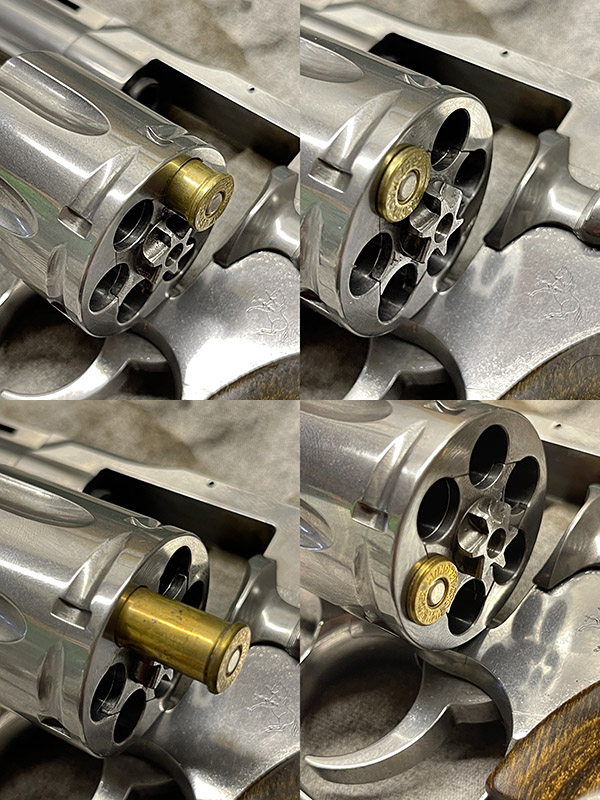
The .357 Magnum cartridge rim backs the cartridge up 0.060 inches (the rim thickness), which would put the leading edge of the bullet in a cartridge loaded to an overall length of 1.590 inches about 0.023 inches inside the front edge of the cylinder (if I’ve done the math correctly). And I think I have, because when you look at cartridges in the Python cylinder, they are pretty close to the edge of those big .357 cylinder holes. 0.023 inches. Twenty-three thousandths of an inch. That’s not much to play with.
.357 Magnum cartridges loaded in the Python cylinder. At the cartridge’s specified max overall length of 1.590 inches, the front of the bullet is only 0.023 inches away from the forward cylinder face.
Bullet Design and Crimp Location
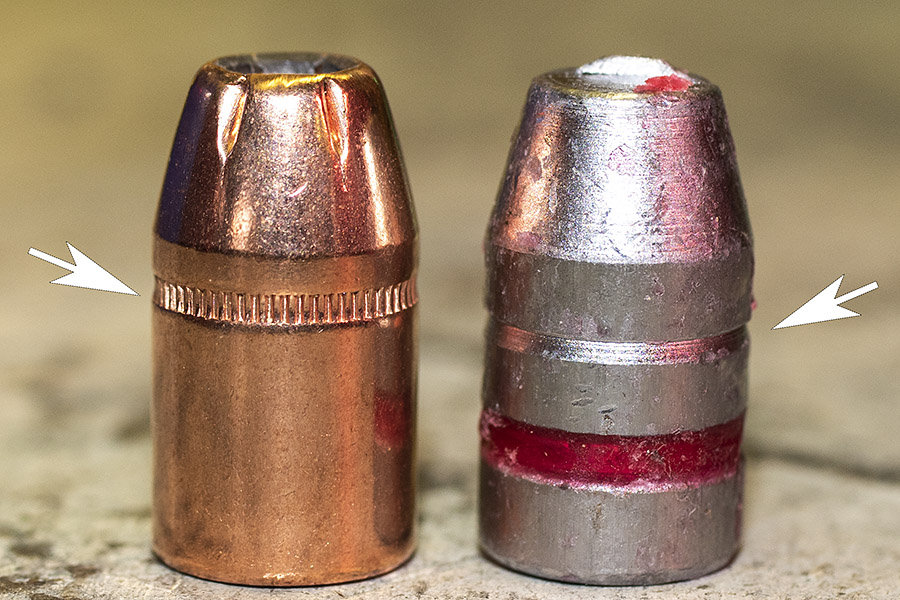
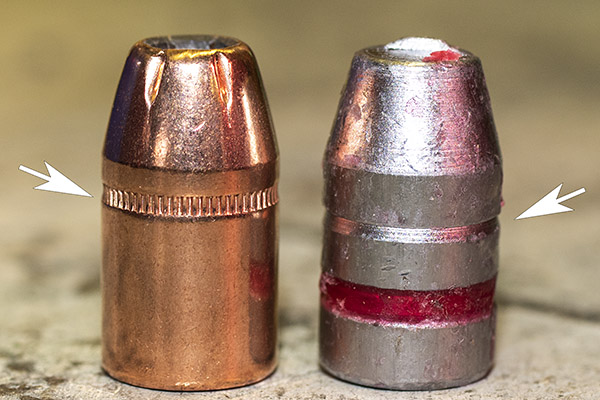
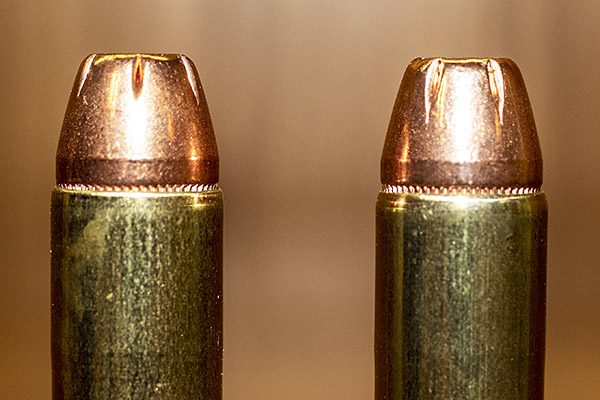
I examined the bullets I was using. I had crimped my cast bullets in the crimping groove, and I could see that the crimping groove put the bullet face very close to the forward end of the Python’s cylinder. I couldn’t seat the cast bullets any deeper and still crimp in their crimping groove. Hornady’s jacketed 158-grain bullets are no problem; their crimping groove is a lot higher on the bullet.
A 158-grain Hornady jacketed hollow point bullet on the left, and a cast 158-grain bullet on the right. Note how much higher the crimping groove is on the jacketed bullet. This lowers the bullet in the cartridge case when it is crimped, making the cartridge shorter.Two .357 Magnum cartridges with crimped bullets. The cast bullet cartridge on the right has the bullet seated as low as it can go while still allowing a crimp. You can see that the cast bullet cartridge is longer than the cartridge with the jacketed bullet.
Test Objectives
I wanted to test bullets seated and crimped using both approaches (i.e., the bullet seating and crimping die, versus seating with the bullet seating die and crimping separately with the Lee factory crimp die). My testing would evaluate the following:
Bullet movement under recoil.
Accuracy.
Ease of chambering.
The ability to get a good crimp in locations other than the crimping groove.
That last one is important, because as I learned with my Python, crimping some cast bullet configurations in the crimping groove makes the cartridge too long.
Test Ammo
I loaded three test lots. The first was with 15.7 grains of Winchester 296 powder, Winchester small pistol magnum primers, and Hornady’s 158-grain jacketed hollow point bullets. That was my accuracy load when shooting metallic silhouette a few decades ago, so I know it works well. I loaded half with the bullets crimped using the old Lee bullet seating and crimping die (not the factory crimp die), and the other half with the bullets crimped with my new Lee factory crimp die (after seating them with the bullet seating die).
.357 Magnum ammo with 158-grain Hornady jacketed hollowpoint bullets. The 25 on the right were crimped with the bullet seating die; the 25 on the left were crimped with the Lee factory crimp die.A macro photograph of the ammo above. The Lee factory crimp due cartridge is on the left; the bullet crimped with the bullet seating die is on the right.
The second lot of ammo was a group I had loaded several years ago. This ammo had 158-grain cast semi-wadcutter bullets crimped in the crimping groove, 7.0 grains of Unique, and Winchester small pistol primers. That load (7.0 grains of Unique and a 158-grain cast bullet) has been accurate in every .357 revolver I’ve ever shot. I loaded this ammo with the bullet seating and crimping die (not the Lee factory crimp die). I’d shot tons of this load in an older Ruger Blackhawk, but I had not tried it yet in my Python.
.357 Magnum ammo with cast 158-grain semi-wadcutter bullets crimped in their crimping groove. This ammo worked fine in the Ruger Blackhawk, but it had issues in the Colt Python. Although crimped in the crimping groove, this ammo was longer than the .357 Magnum’s 1.590-inch maximum cartridge overall length.
The third ammo lot was similar to the one above (same bullet weight and powder), but I used the cast truncated flat point bullet and I crimped above the bullet’s crimping groove using the Lee factory crimp die. I wanted to get the bullet further back from the cylinder face to prevent cylinder rotation inteference if the bullets pulled under recoil. My concern was that I would be crimping above the crimping groove, on the bullet’s main diameter, and I didn’t know if the crimp would hold the bullet in place.
The cast 158-grain truncated flat point bullet crimped above the crimping groove. This shortens the cartridge overall length. I seated these to 1.565 inches overall length. After crimping, that figure came back up back up to 1.568 inches, still well below the 1.590-inch maximum length spec.The above .357 cartridges in the Python cylinder crimped with the Lee factory crimp die above the crimping groove. These rounds were loaded to an overall cartridge length of 1.568 inches (as shown above), which positions the front of the bullets further back from the cylinder face.
When loading with my new Lee Deluxe 4-die set, I noticed immediately that the resizing operation was much easier. The same was true for the expander die step. Maybe the older dies I had been using were just dirty, but I sure like do the feel of these Lee Deluxe dies.
Some of you may wonder: Why not just trim the brass shorter to a below-spec length? That would move the bullet back, and if I trimmed it short enough it would allow me to crimp these cast bullets in their crimping groove and not risk any cylinder rotation interference. Yeah, I could have done that, but when I trim brass I like to trim it to specification, not something below spec. And I don’t want to have to segregate brass based on trimmed length tied to specific firearms.
Test Results: Bullet Movement
The first test objective was to determine how much bullet movement occurs during recoil using the two different crimping approaches. Here’s how I tested:
I loaded 5 rounds in the revolver.
I took a 6th round and recorded its cartridge overall length, and then I loaded it.
I fired the first five cartridges.
I removed the unfired 6th round and measured the overall length again.
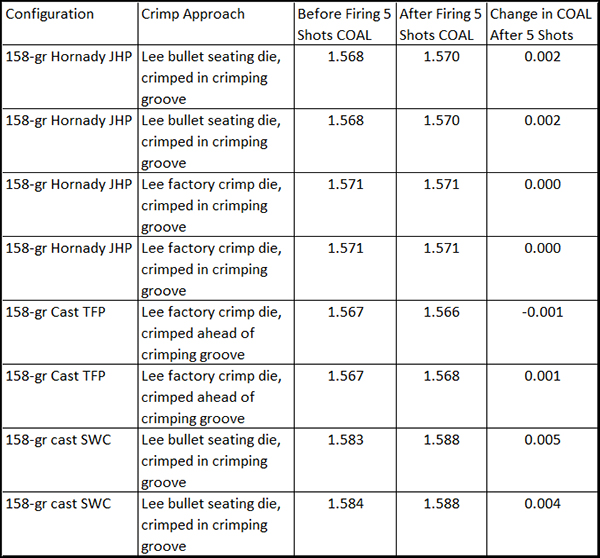
Here’s what I found in assessing the two crimping approaches’ ability to prevent bullet pull:
The results surprised me. The Lee factory crimp die, even when done on the main diameter of the bullet (not in the crimping groove) does a better job holding the bullet in place than does crimping with the bullet seating die. In each test in which the bullets were crimped with the bullet seating die, they experienced recoil-induced bullet movement. That one entry where the overall length decreased by 0.001 inch is probably measurement error on my part.
Test Results: Accuracy
This testing was straightforward. I fired a series of 5-round groups at 50 feet to assess any differences in accuracy.
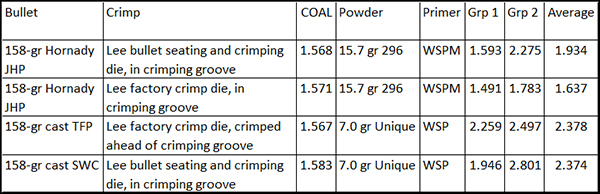
Here’s what I see in the above results:
With the Hornady jacketed hollow point points, using the Lee factory crimp die resulted in an improvement in accuracy (the group average was 1.637 inches compared to 1.934 inches).
The Hornady jacketed hollow point bullets were more accurate than the cast bullets. That was an expected result.
With the cast bullets, there isn’t much of an accuracy difference between using the bullet seating and crimping die versus using the bullet seating die and then the Lee factory crimp die.
With the cast bullets, there wasn’t much of an accuracy difference between the truncated flat point bullets and the semi-wadcutter bullets.
I wasn’t having my best range day ever (I had a bad cold when I fired these groups). But I think I did well enough to support the above conclusions.
Test Results: Ease of Chambering
I already mentioned this. Lee claims that the factory crimp die will not buckle or distort the case during crimping. My results confirm this. A few rounds that had been crimped with the bullet seating die would not chamber in the Python; after running these through the Lee factory crimp die, they chambered easily. The Lee factory crimp die does a better job for ease of chambering.
Test Results: Crimping Without a Crimp Groove
This is really a subset of the first test objective, in which we evaluated the ability of the Lee factory crimp die to hold bullets in place under recoil. Here, the focus is more specific: I crimped on the bullet’s main diameter, not in the crimping groove, and I wanted to determine if the Lee factory crimp die would secure the bullet in place. As you can see from the data above, it did. When I crimped the cast truncated flat point bullets forward of the crimping groove, they did not move under recoil. The Lee factory crimp die did this well, and it did so without buckling the cartridge case.
The Bottom Line
The Lee factory crimp die is a good thing. It holds bullets in place better, it improves chambering, and with jacketed bullets, it improves accuracy.
If you want to buy a set a Lee dies, or the Lee factory crimp die, or any Lee reloading equipment, Amazon is a good place to shop. Midway is, too. But I usually go to Amazon first.
If you have comments, be sure to let us know in the comments section below. We enjoy hearing from you.
The city of Hartford in Connecticut is Mecca if you are a Colt fan (as in Colt firearms), and I sure am a Colt fan. I grew up seeing Colt .45 sixguns in western movies when I was a kid and I got my first Colt (a .45 ACP 1911 Government Model) when I finished college (and I’ve never not owned at least one Colt since then). I have no tattoos, but if I were going to get one it would be the Colt logo.
My Colt 1911 has been sending lead downrange for 50 years.
I made a friend in the Colt company when reviving the MacManus award. I had to be in Hartford recently for a symposium and I told my Colt buddy I’d buy him a beer. He suggested a tour of the Colt factory. That was an opportunity I could not let pass.
Popup ads…click on them and we’ll keep the lights on!
The original Colt plant (the one built by Sam Colt) is a National Historic Site. Time did not permit visiting it, but I could see the blue dome above the old plant from my hotel window.
The original Colt manufacturing facility on the banks of the Connecticut River. I didn’t get to it, but the next time I’m in Hartford I will.
The modern Colt factory is a few miles from downtown Hartford. It’s what you see in the big photo up top, and it’s where I had the plant tour described in this blog. The bad news is that photography is prohibited inside the plant (as a manufacturer of military rifles for the US and other countries, Colt can’t have photos of their production processes finding their way to the bad guys). The good news is that I entered the inner sanctum. I saw how the M4s, the M16s , the 1911s, the Single Action Armys, the Pythons, and all the other cool stuff are made. As a manufacturing guy and gun guy with a defense industry background, it was one of the best days of my life.
More good news is that I could take pictures inside the famed Colt Custom Shop. The Custom Shop is a small group of world class artists who assemble what are arguably the most desirable guns in the world. Think engraved, gold inlaid, extremely expensive works of the gunmaker’s art. Guns that are delivered to US presidents, wealthy collectors, and…well, you get the idea. There’s a two-year waiting list for a Custom Shop Colt firearm, and when delivered, the ticket can exceed the cost of a new car. On the secondary market, some have been known to exceed the cost of a new home.
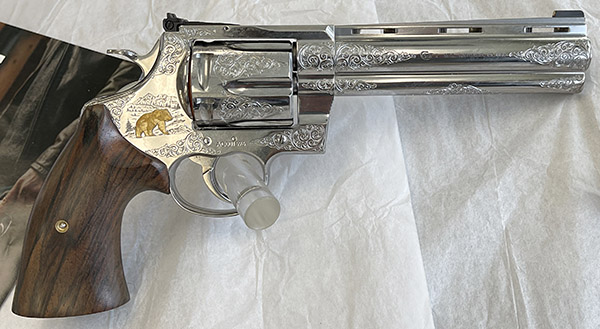
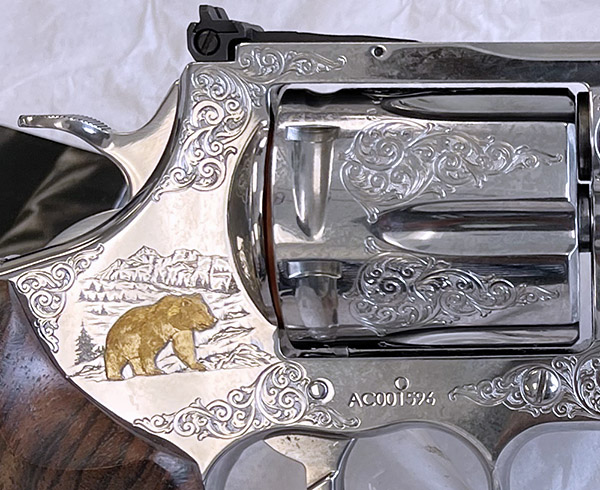
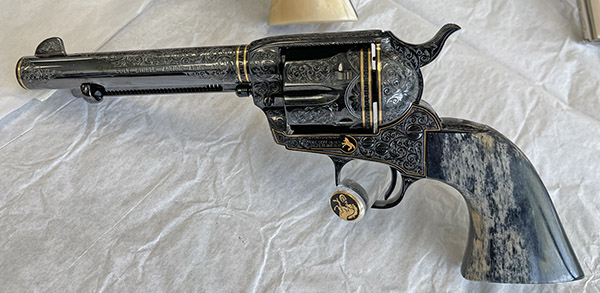
Colt Custom Shop handguns, the stuff of dreams.You can still purchase a brand new Colt 1903 through the Custom Shop. This one is exquisite. I owned one in the 1970s I bought it for $75 and sold for $200 a few months later, thinking I had done well. Ah, the mistakes we make.A Custom Shop Anaconda with an inlaid gold bear and extensive engraving.A closeup of the above Anaconda’s engraving and gold inlay. It’s all done by hand with small hammers and tiny chisels.An exquisite Single Action Army. The grips are giraffe bone.A closer look.Colt’s Custom Shop is producing a series of Single Action Army revolvers for the legendary Texas Rangers. The Texas Rangers are the oldest law enforcement organization in America.Colt has a process for making a new gun look aged. It’s been applied to this Custom Shop Single Action Army.
This was my second visit to Hartford. When I wrote The Gatling Gun nearly 30 years ago, I contacted Colt to ask if I could visit their archives (the original Gatling guns were built by Colt). Colt referred me to the Connecticut State Library and Museum. I went there and I was met by a Connecticut State Trooper who asked me a few questions, took my fingerprints, and ran a background check. Satisfied I wasn’t a terrorist or a KGB agent, he issued a laminated permit designating me an official Connecticut state historian. That gave me access to the archives in a secure area of the Museum. Poking around in there made for a fun day, and I used materials from those archives when I wrote The Gatling Gun.
My visit to the Colt archives three decades ago was impressive. I handled hand-written documents signed by Dr. Gatling and Samuel Colt. It was a great day and a lifelong memory. My recent visit to Colt factory and the Custom Shop (as described in this blog) made for an even better day. A Colt tattoo….maybe that’s not a bad idea.
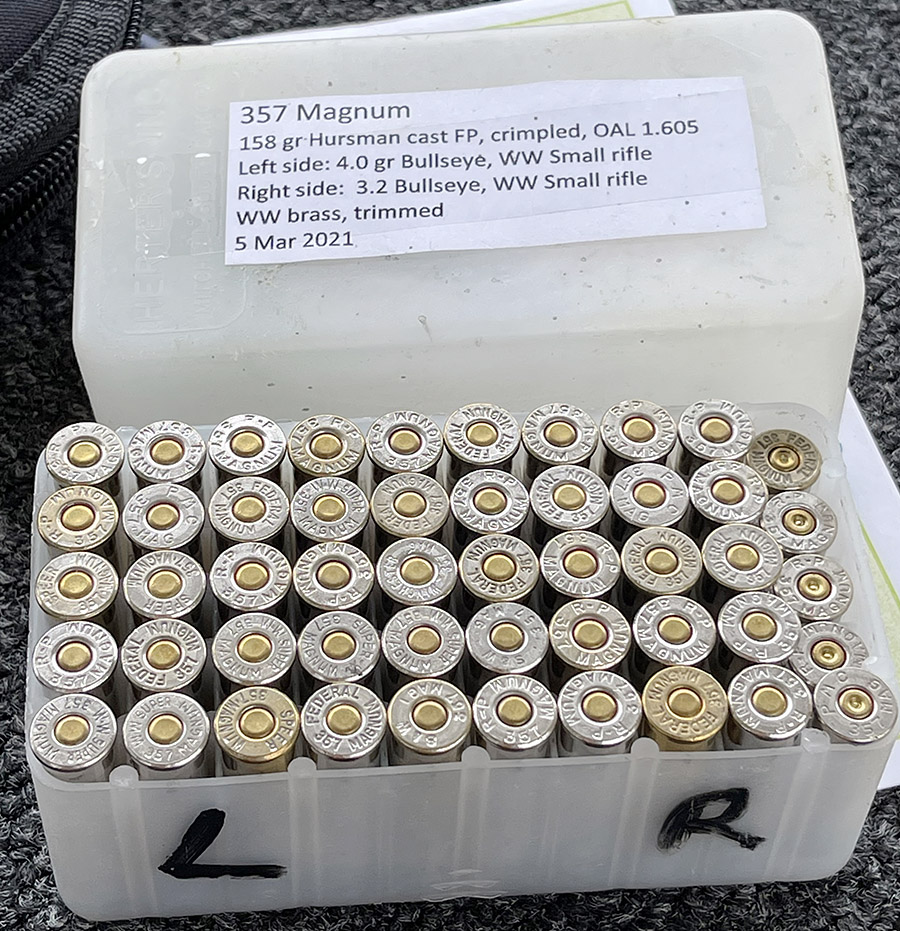
With reloading components still hard to find, the question emerges: Can you use rifle primers in handgun cartridges? If you’re flush with rifle primers but hurting for pistol primers (as I am), it’s a logical question. To evaluate this, loaded a box of .357 Magnum ammo for my Colt Python. I tried to different loads of Bullseye (not an ideal .357 Magnum propellant, but it’s what I had available) and Winchester small rifle primers.
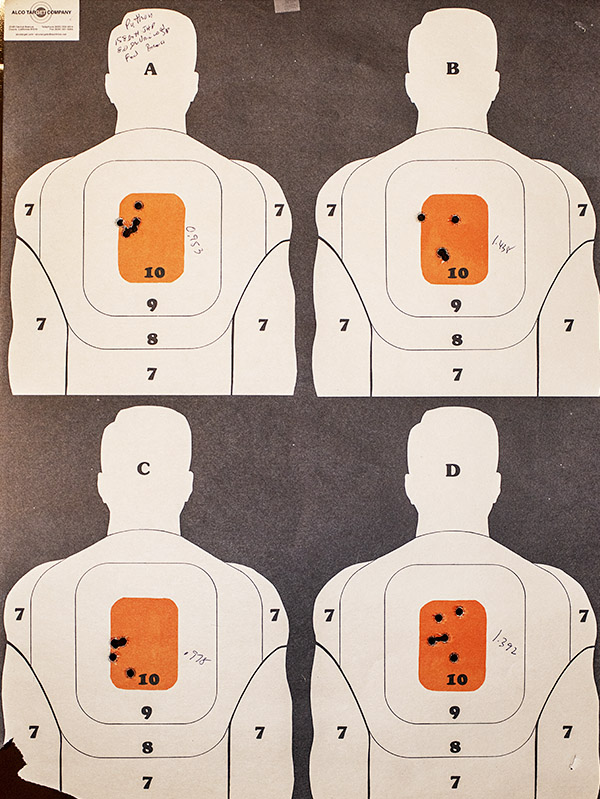
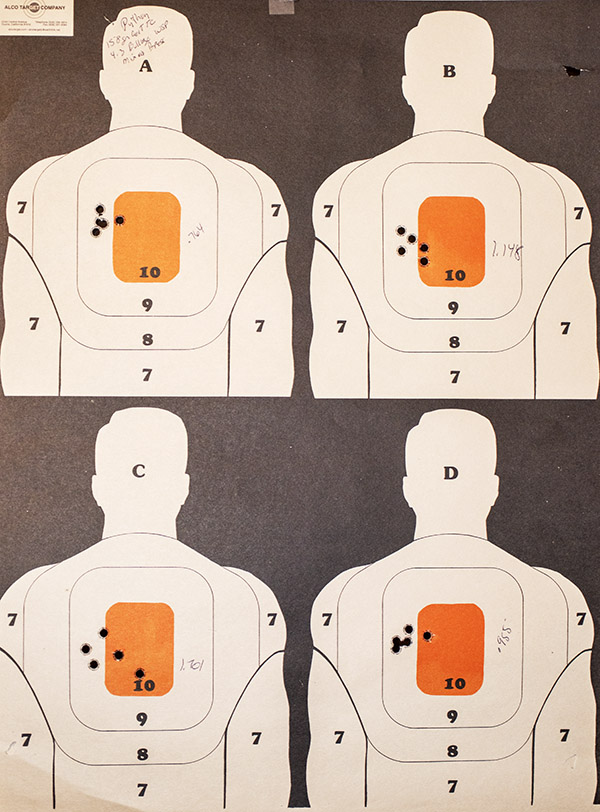
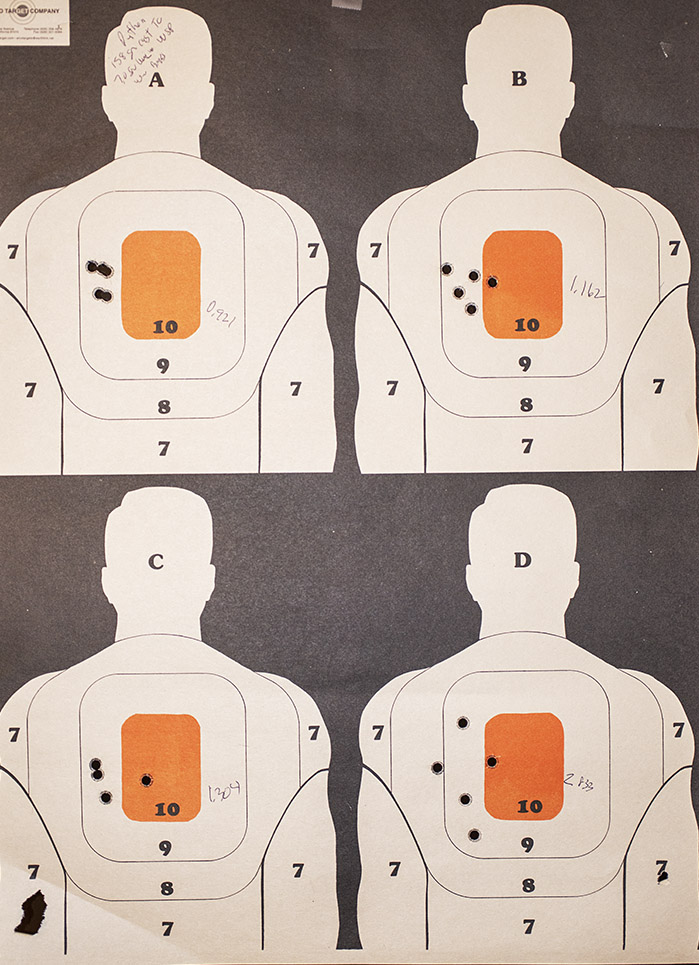
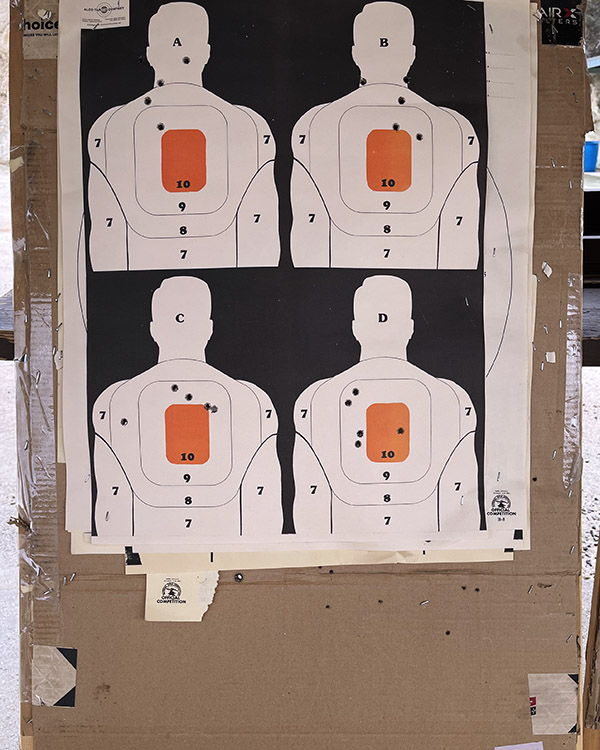
I thought I would simultaneously test for accuracy and reliability on Alco 4-silhouette targets at 25 yards, firing single action at the top two targets and double action on the bottom two targets. The first load was 3.2 grains of Bullseye, a 158 grain cast flatpoint bullet, and Winchester small rifle primers.
Accuracy was mediocre (if you’re ever assaulted by four little men with orange bullseyes painted on their chest, you’d be good enough for government work, but you won’t be taking home any accuracy trophies). The upper two little orange guys were fired single action, and every round discharged. The bottom two little orange guys were fired double action, and on those two targets, I had two misfires. That’s two misfires in 10 rounds, and that’s not good. When I fired the two misfired rounds a second time, they discharged normally.
The next target was a repeat of the first, except the ammo I shot at it had 4.0 grains of Bullseye. Everything else was the same. The top two targets were fired single action and the bottom two were fired double action. All rounds fired normally.
You can ignore the shots below the bottom two targets. I was just shooting up some ammo I had left loaded with different combos. The lower left group on the zombie’s green hand were .38 Special 148 grain wadcutter loads (with 2.7 grains of Bullseye); the ones between the two targets were .38 Special loads with the 158 grain flat point bullets and 4.5 grains of Bullseye (a very hot .38 Special load).
The propellant’s name notwithstanding, none of the above were not particularly accurate loads.
As to the primary question: Will rifle primers work in handgun cartridges, my take on this is yes, if fired single action. In double action, ignition is unreliable. On handguns with heavy hammers, you’re probably okay if firing single action. That’s true on the Colt Python, and it’s definitely true on single action Ruger Blackhawks (I have a .30 Carbine Ruger Blackhawk and I always load .30 Carbine ammo with rifle primers).
I suppose it’s possible that the two rounds that misfired double action in the Python may have been suffering from primers that were not completely seated, but I don’t see a need to continue testing. I learned enough from this quick look.
As I mentioned in a recent blog, good buddy TJ (of TJ’s Custom Gunworks) reworked the trigger on my Colt Python. The original single action trigger had a lot of creep, it was heavy, and what surprised me most of all was that it actually cocked the hammer another few degrees before it released. I was getting a little double action when firing single action.
That bothered me enough to call my contact at Colt Manufacturing, and I think he was surprised when heard about it, too. He checked with his engineering department, and the word came back: They had to do that to meet the California and Massachusetts drop test requirements. I checked the California regulation and it requires dropping a loaded, cocked revolver from a height of 1 meter six times on a concrete surface without the gun firing inadvertently. Think about that. Dropping a loaded and cocked revolver, a .357 Magnum, onto a concrete floor. Six times.
Me? I’m going with an alternative approach. I’m not going to drop my loaded, cocked, .357 Magnum revolver on a concrete surface even once. It’s kind of a common sense approach, one that the politicians in California and Massachusetts apparently think we can’t be trusted to take.
A loaded revolver. Cocked. Dropped. Six times. Onto a concrete floor. What were they thinking?
I’m not one to to argue Darwinism versus Divine Creation (we don’t do politics or religion here on ExNotes), but here’s a thought. Maybe someone who drops a cocked, loaded, .357 Magnum revolver on a concrete surface six times, well, maybe Darwin was on to something. Maybe that person needs to be culled from the gene pool. Before you get your shorts in a knot, though, remember my preface: It’s just a thought.
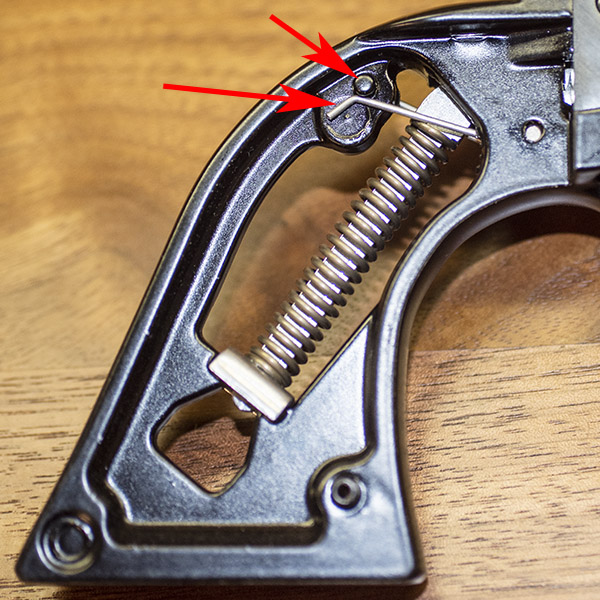
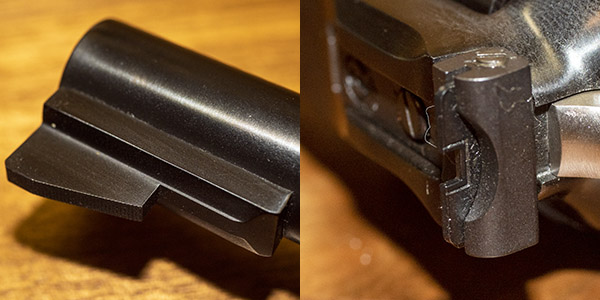
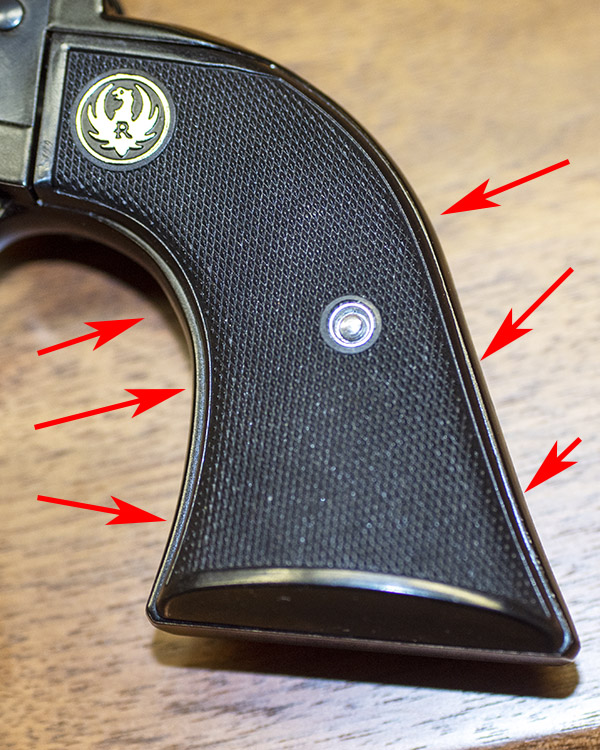
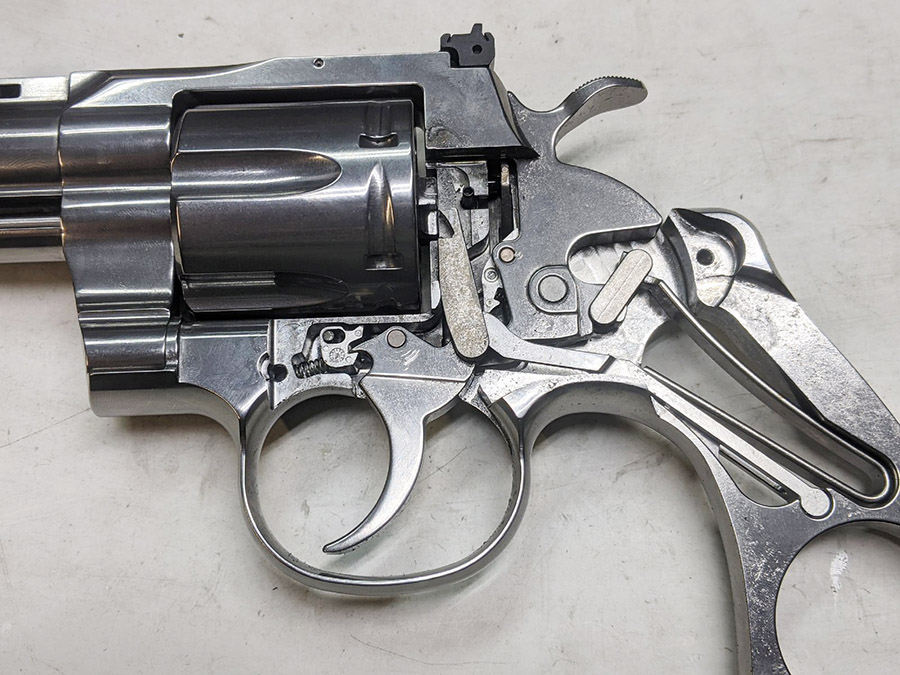
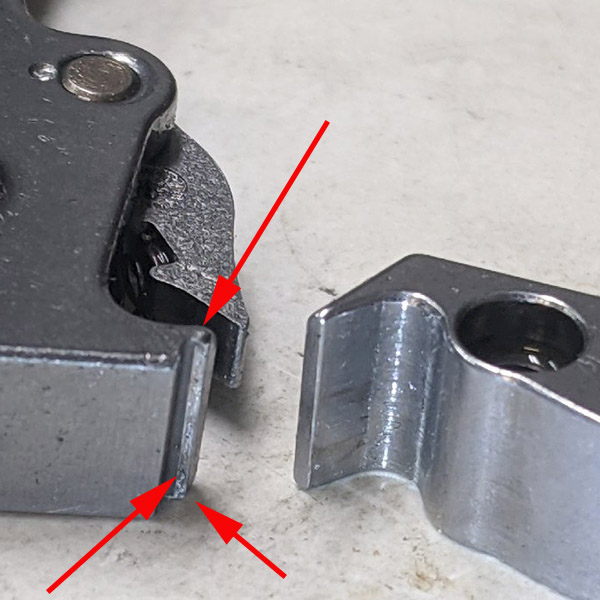
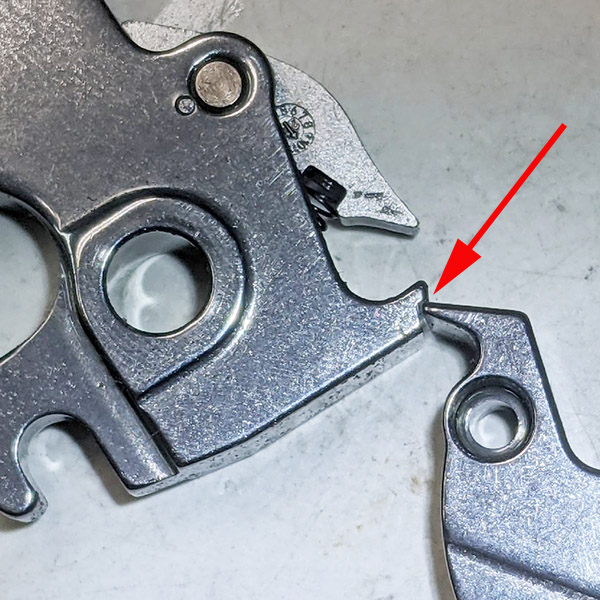
Anyway, back to the main attraction, and that’s the trigger job TJ did on the new Python. TJ took photos of the Python’s internals (the complete parts interface is shown above in the large photo). The photo below shows what was causing the trigger creep and the hammer movement during a single action trigger pull:
That’s the hammer on the left, and the trigger on the right. You’ll notice that the hammer’s sear area (denoted by the red arrows) is kind of rough and it contains a hooked ledge of sorts. That’s what was rotating the hammer back a few more degrees when the trigger was actuated in the single action mode.
TJ modified the sear to eliminate the hooked ledge and create the angles and surface finish the Python trigger-to-hammer interface deserves. That’s what you see below.
Before he improved the sear interface, the Python’s double action trigger pull was 9 1/2 lbs; it is now 9 lbs. The single action trigger pull was a very creepy 5 1/2 lbs; now there is no perceptible trigger or hammer movement before the hammer is released and the trigger breaks at a very clean 2 1/4 lbs. The upgrade completely changes the character of the new Python. I can’t imaging anyone buying a Python and not wanting to have the trigger cleaned up in this manner. TJ is the guy to do it.
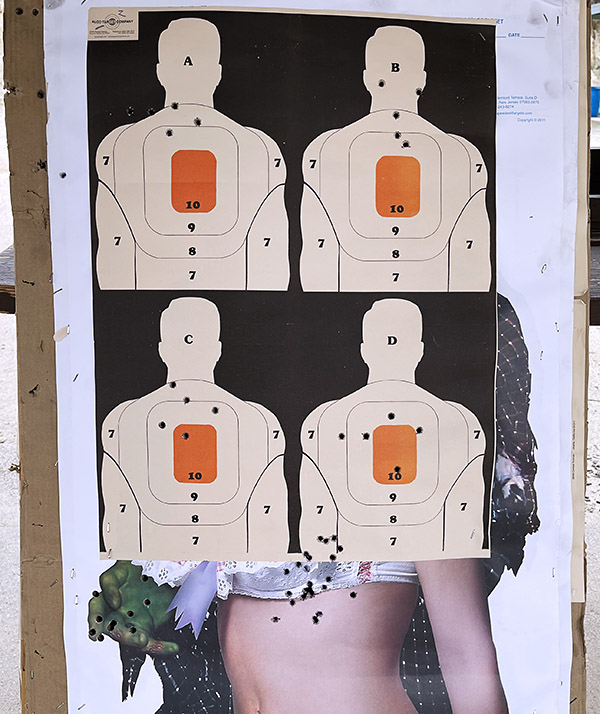
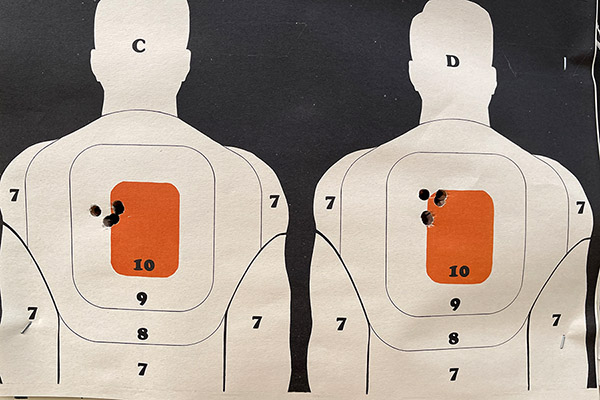
The next big question is: Did the new trigger a make a difference in how the Python performed? Hey, you tell me. Here are two 5-shot groups shot at 50 feet with the improved trigger:
Those two groups were shot with my go-to .38 Special target load (a 148-grain wadcutter and 2.7 grains of Bullseye prepared on my Star reloader). The group on the left measures 0.680 inches; the one on the right measures 0.830 inches. Some of the .357 Magnum loads performed just as well. I’ll share all my Python load testing results in a near-term future blog. I didn’t adjust the sights during my load testing because I’d be moving them with each new load; I’ll zero the gun when I’ve selected the load I want for the Python. I am a happy camper; these are phenomenally good results.
You might be wondering about now why you’d need a trigger job on a $1500 handgun. Folks, this isn’t Colt’s fault. They’re doing what they have to in order to meet a requirement imposed by people who don’t understand what they are doing. Don’t get upset with Colt. Do the right thing and vote.
If you have a Python and you’re not happy with the trigger, take a look at TJ’s Custom Gunworks and drop TJ a note. Trust me on this: You’ll be glad you did.