Last year I started a Facebook group focused on Uberti firearms (and that’s the name I gave it). I saw a note on Facebook that if you didn’t see a group you wanted, you could create your own group, and I did. I created the group because I’ll sometimes post firearms-related blogs there. It was trivially easy to do, and within weeks, membership had grown to 13,500 members. I like Uberti guns, I’ve written about them before here on ExNotes, and it just sort of seemed like a good thing to do.
Last week, a fellow named Aldo Venturini posted some intriguing pictures of cap and ball revolvers he had engraved, along with a few knives he had made. One thing led to another, and with the help from Translate.Google.com we had an interesting conversation. Here’s what Aldo told me:
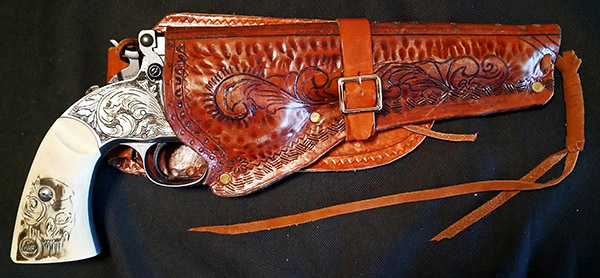
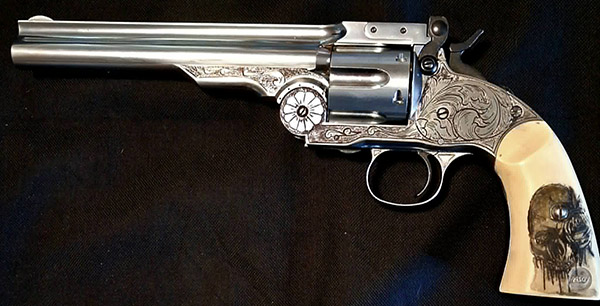
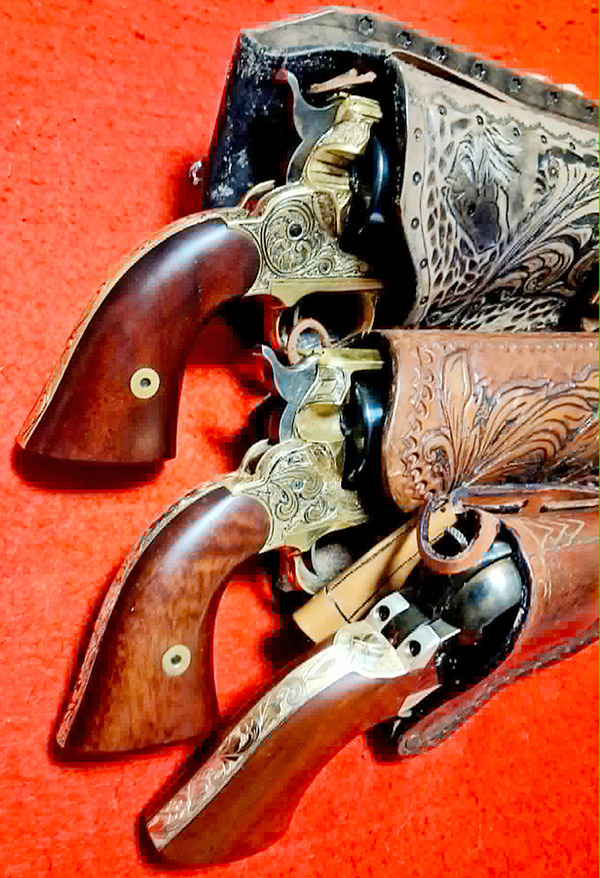
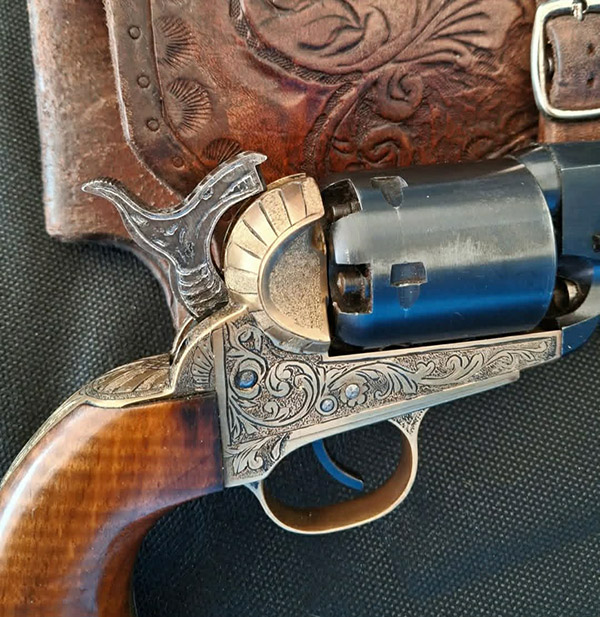
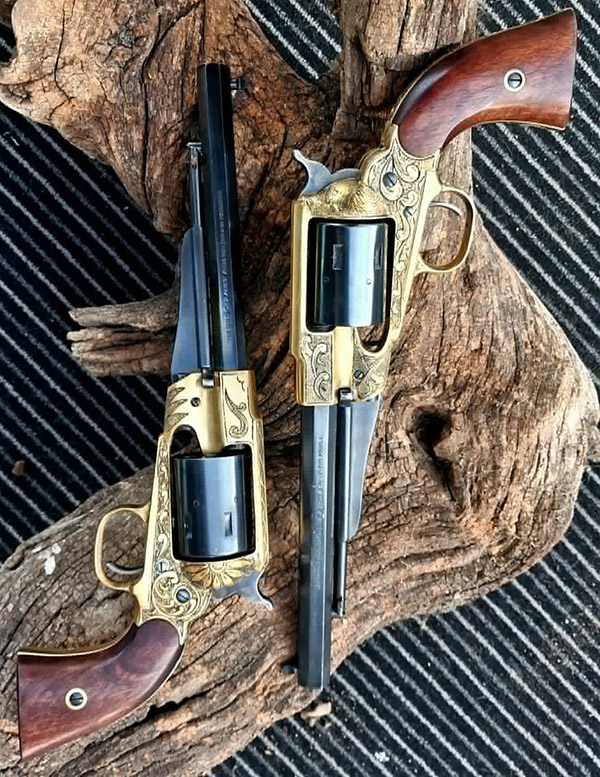
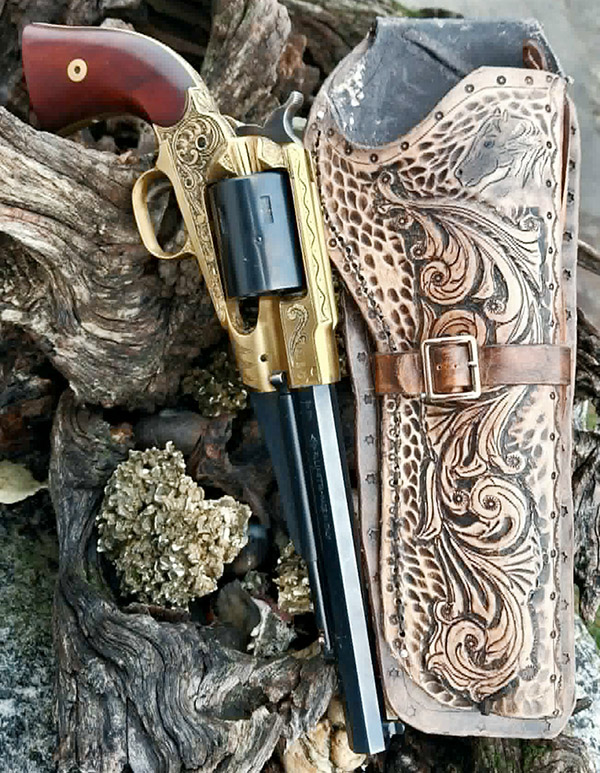
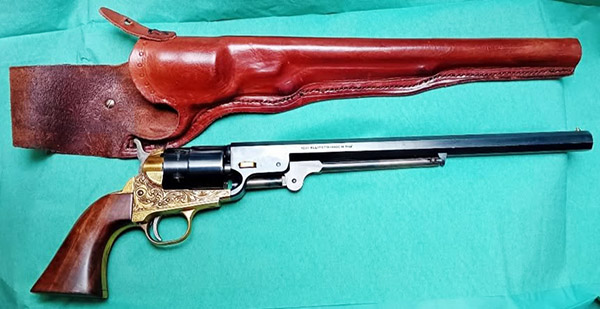
I’m a passionate engraver. I’ve been engraving for 15 years. I’m experienced in various engraving techniques. I also work with leather, which allows me to make sheaths for both the guns I engrave and the knives. With engraving, I do what inspires me…I don’t have any established subjects.
I’m a lover of weapons as objects and believe that weapons are the best canvas for engraving.
For variety, I make knives, mainly Bowie knives. I own a fair number of my own.
All work is done in-house by hand. The knives are made entirely, complete with sheaths. The Colt sheaths are also handmade. For my personal satisfaction…I do engravings upon request, after agreeing on the work and cost. I don’t do it for the money.
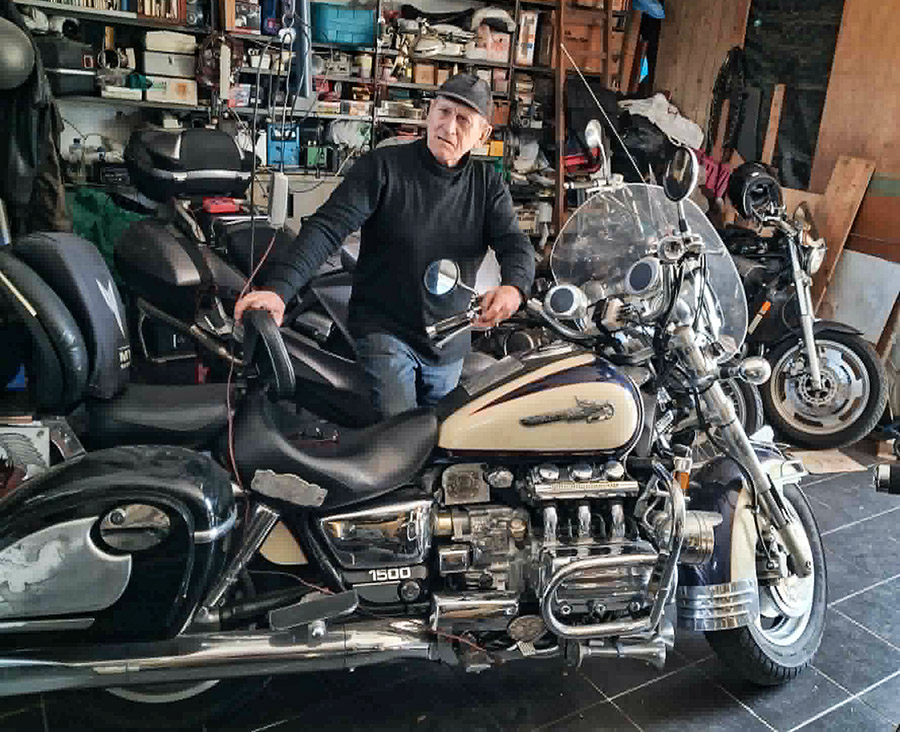
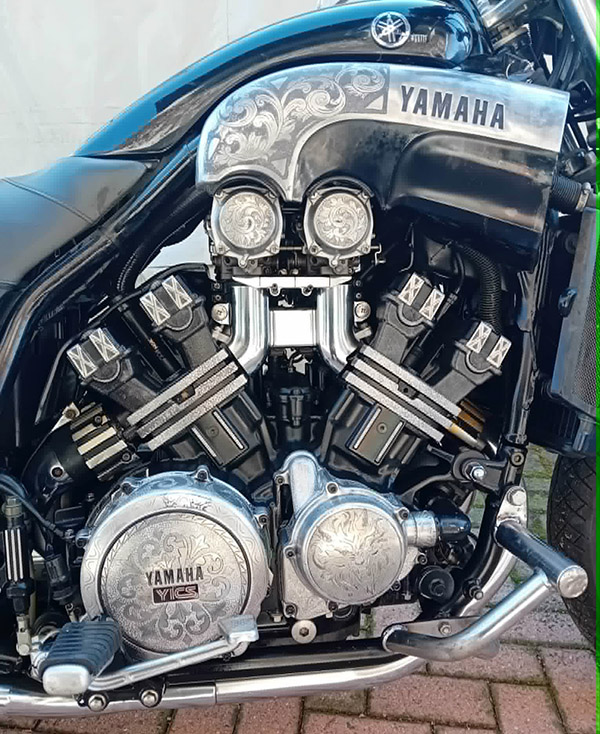
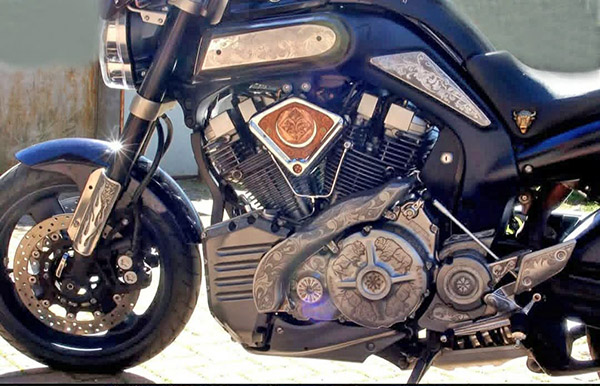
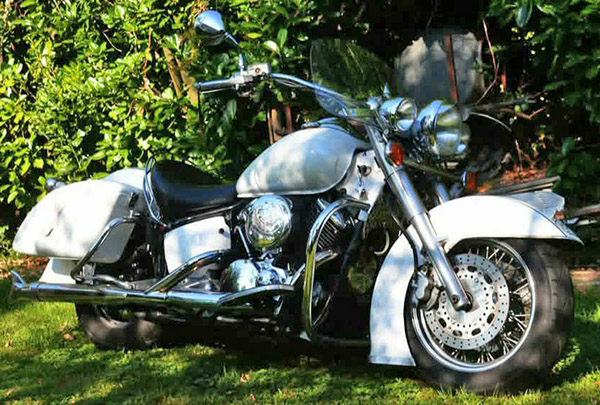
I’m self-taught, and I learned because I wanted to engrave my motorcycle the way I liked it. Then, once I finished, I continued with other engravings. I have 10 motorcycles….😄I’ll give you one that’s a bison…1700 cc twin-cylinder.
I’ll be 80 this year. I have no problems and can still afford to ride my 10 motorcycles (all large-displacement bikes). I’m also an inventor…with several patents filed, including one in the United States in the medical field. Check my name. Others are filed in the European Patent Office in Munich.
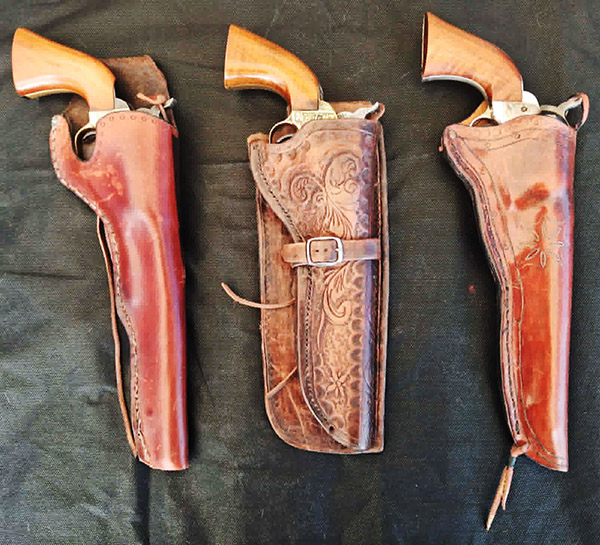
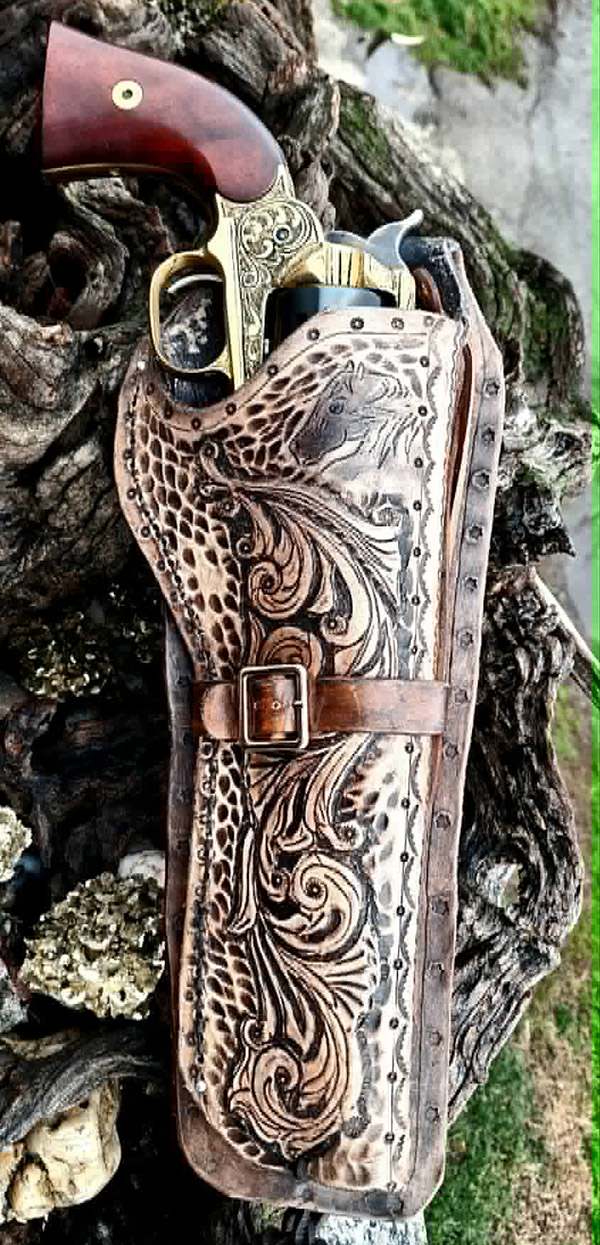
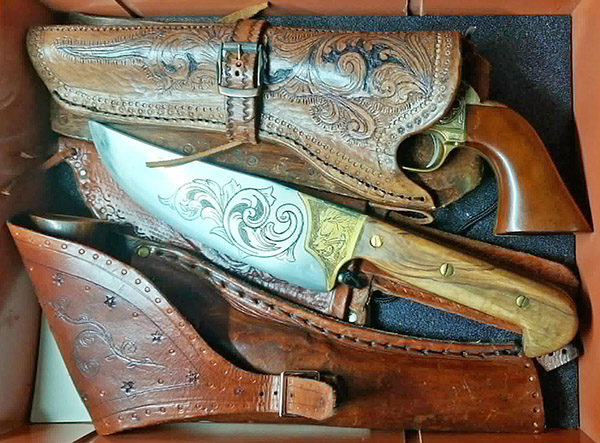
I asked Aldo if I could post some of his photos here on the ExNotes blog and he said okay. This is beautiful work and I’m happy to share it with you. First, a few of the guns and their holsters…
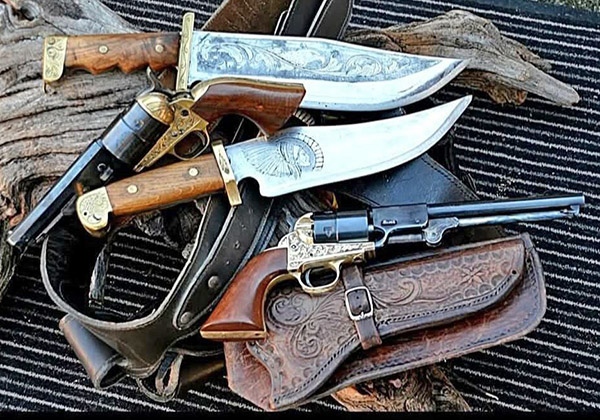
Next are a few of Aldo’s knives…
And here are photos of some of Aldo’s motorcycles…
Aldo is an interesting man. I wish he lived closer than Torino (in Italy). He’d fit right in with the ExhaustNotes crowd.
Aldo, grazie mille per aver condiviso la tua arte con noi. Guida con prudenza e restiamo in contatto, amico mio!
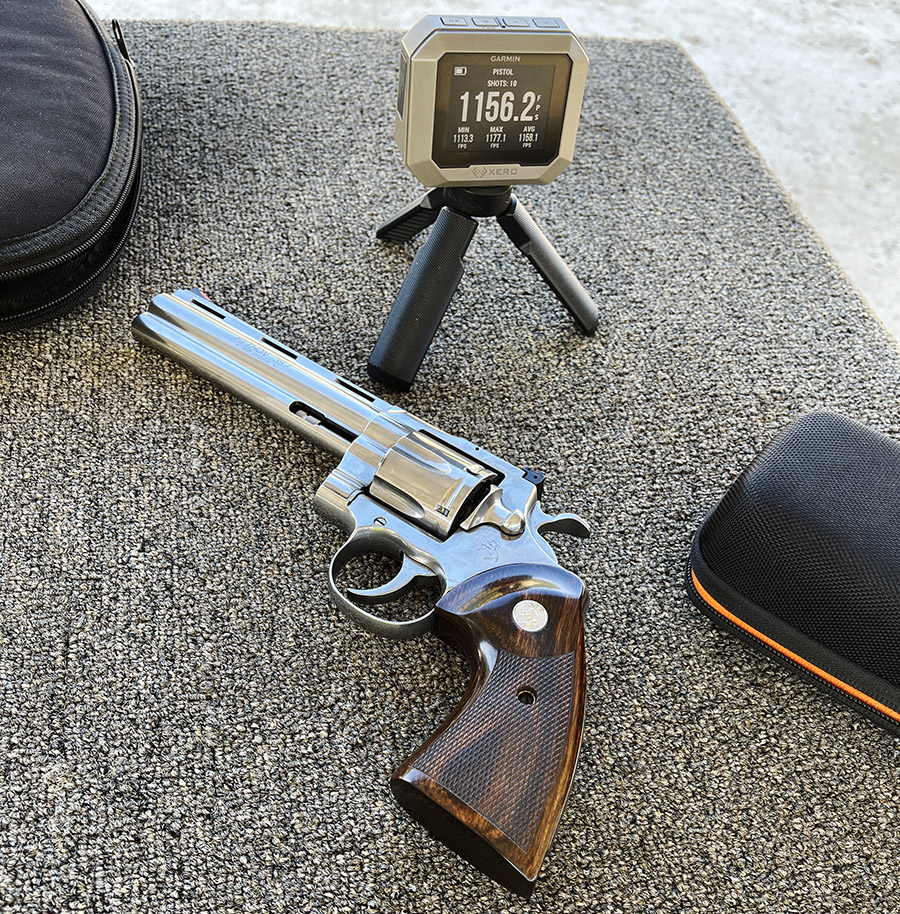
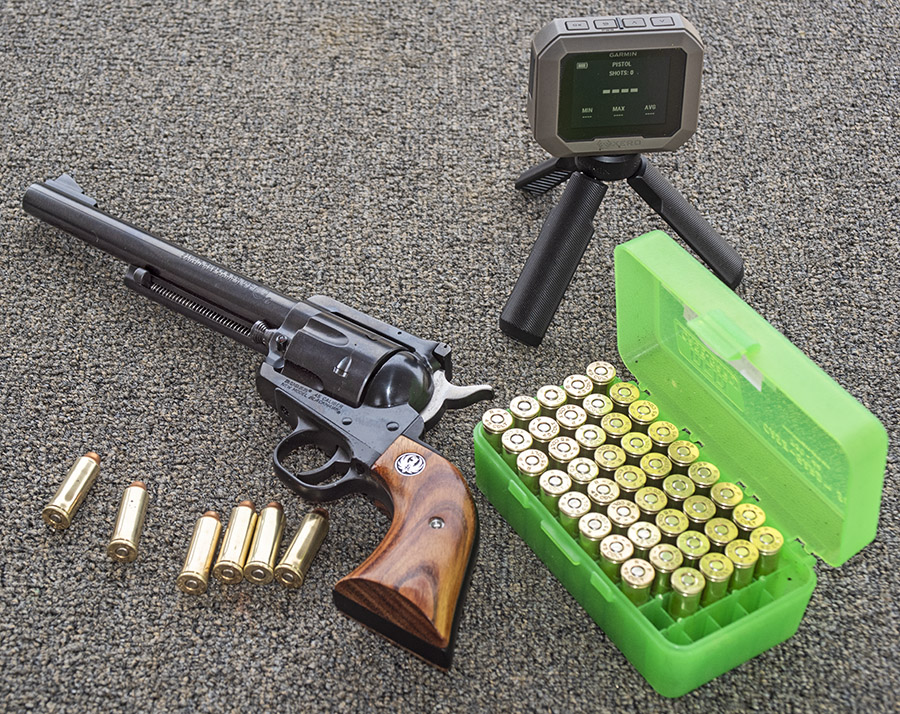
Man, I love my Colt Python. I thought I’d get that out of the way first in case anyone had any doubts. The Python is one of those things that just feels right. I’m glad I bought it and every time I take it to the range I feel good because I know I made a good decision.
I’ve been on a kick lately developing different loads for the Python with a focus on 158-grain and 180-grain jacketed bullets, and different propellants (including Winchester 296, Bullseye, IMR 4227, and Unique). Not to be combative and before you get your inner keyboard commando up, let me state at the outset that I can hear the comments already: What about 2400, or Power Pistol, or (fill in with your favorite powder). You go to war with the Army you have and I had to put a cap on the development work (and the above listed powders are what I had). If you want to see more development work with other powders, hit the donate button below and send me a note. Or start your own website.
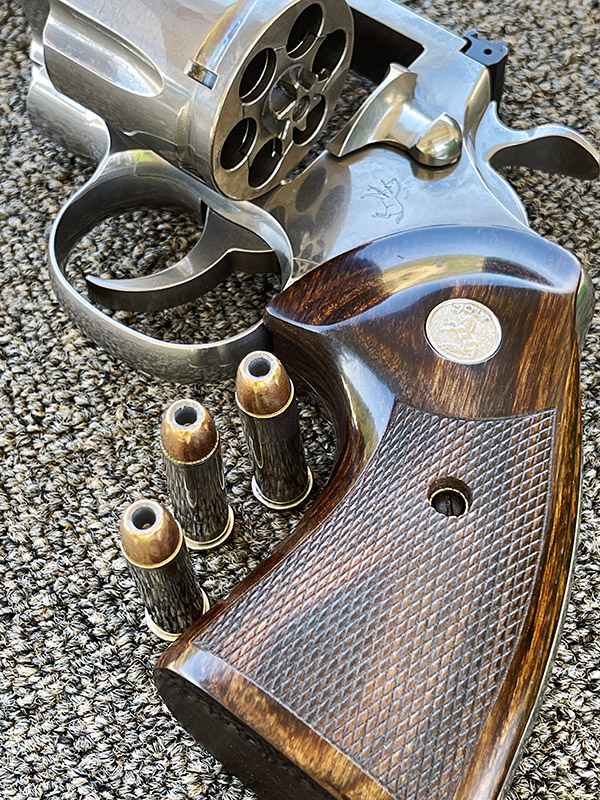
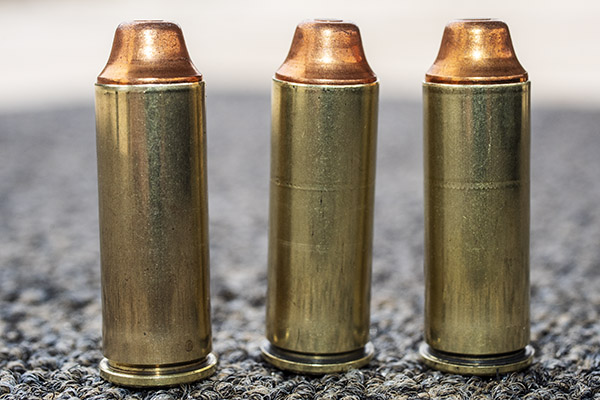
158-grain DKC bullets, .357 Magnum reloads, and the Colt Python: A marriage made in Heaven.
I keep a stash of Hornady jacketed bullets as my preferred projectiles in the .357 Magnum, mostly because of their consistent quality and accuracy. Recently, I received an email from Raven Rocks for DKC 158-grain jacketed hollowpoint bullets, so I thought I’d try those. DKC is a Turkish bullet maker, and I know from prior defense industry experience that the Turks usually do a good job on armament components. You may recall that I recently tested some of DKC’s 147-grain 9mm bullets in three different handguns and I wasn’t too impressed with them (that blog is here). I wanted to see if the DKC .357 bullets were any better than the 9mm bullets (spoiler alert: they are).
For this testing, I fired all loads at 50 feet, I used my Garmin chronograph to measure the velocities, and I used my Lee classic four turret press and Lee’s .38/.357 four-die set for loading the ammo. I believe in Lee reloading gear, and when it comes to getting a good crimp on hot revolver cartridges, the Lee dies work best (you can read about that here). That’s especially critical on the Colt Python, which has a very short cylinder compared to some other sixguns). Making sure the other bullets in the cylinder don’t jump forward under recoil is critical with the Python (see our earlier testing).
So what’s the bottom line?
It’s 15.0 grains of IMR 4227, CCI 550 primers, and the DKC 158-grain jacketed hollowpoint bullet. Here’s how I got there:
I know the table’s font is too small to read as presented here. If you click on the table, a larger table will appear. You can thank me by clicking on the Donate button.
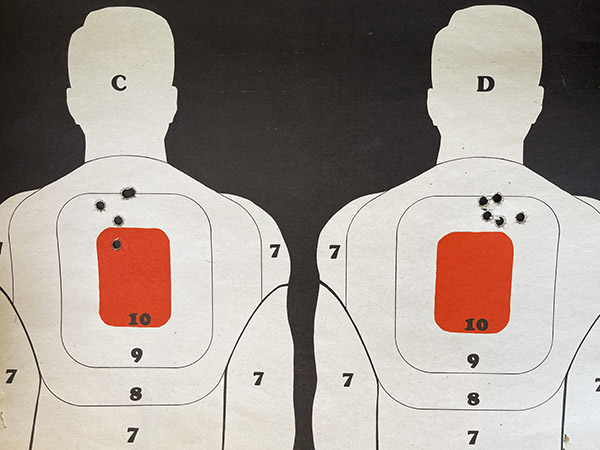
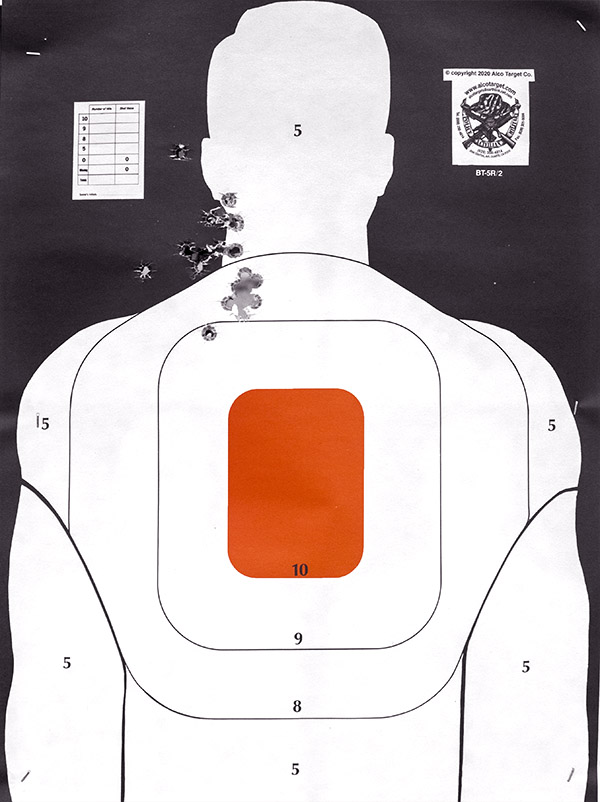
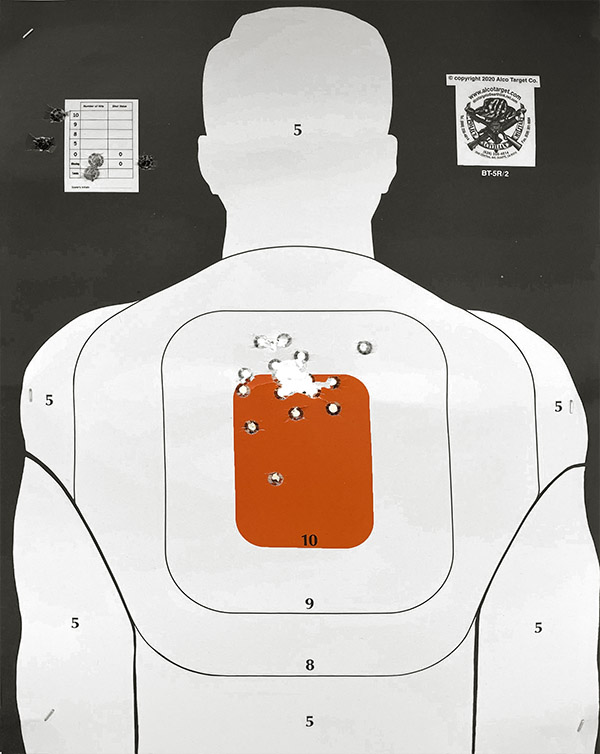
Oh yeah! A 50-foot target shot with the 15.0-grain IMR 4227 load. Point of aim was 6:00 on the orange bullseyes.
As stated above, I found that 15.0 grains of IMR 4227, a magnum primer (I used CCI 550 primers), and the DKC 158-grain bullet gave the smallest groups, but several of the other recipes were not too far behind. Just about any load combo worked well. But that 15.0-grain load…wow, it was a honey. The velocity (which averaged 1140 fps) was what I would consider moderate for a .357 Magnum. The recoil was correspondingly moderate.
Every gun is different, and it’s interesting to see what works best in different guns chambered for the same cartridge. The Unique load at the top of the table above was the accuracy load for my 6 1/2-inch blue steel Ruger Blackhawk. The 158-grain Hornady jacketed hollowpoint load with 16.7 grains of Winchester’s 296 worked best in my 6 1/2-inch Ruger stainless Blackhawk and it was stunningly accurate in my 8 3/8-inch Model 27 Smith and Wesson 40 years ago. But 16.7 grains of 296 makes for a religious experience type of load. Recoil is impressive and steady servings of those cartridges beat both the stainless Ruger Blackhawk and the Smith Model 27 to death. I only tried a few of those monster loads in the Python, and I’m glad they weren’t the accuracy winner.
I keep a stash of the .38 Special standard target load (2.7 grains of Bullseye with a 148-grain Hornady hollowbase wadcutter bullet) on hand. It is a one-hole load in my Model 52 Smith, and it’s been accurate in other .357 and .38 Special handguns. I wanted to use it in the Python as a standard of comparison, and it surprised me. It was the least accurate of any of the loads tested in my Python. Like I said above: Every gun is different.
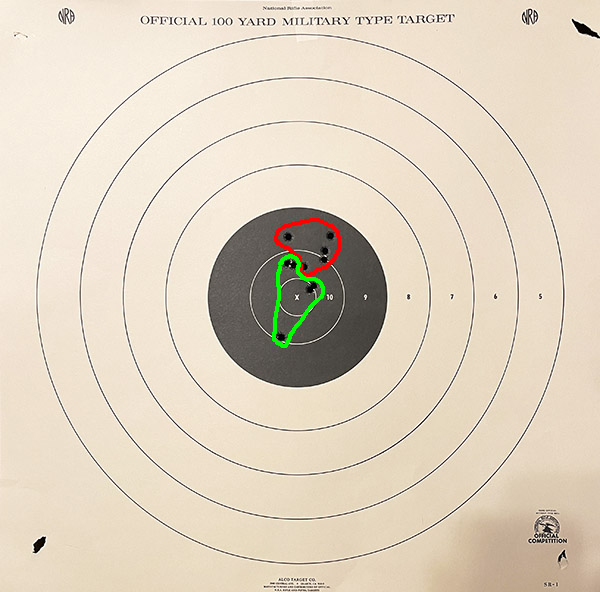
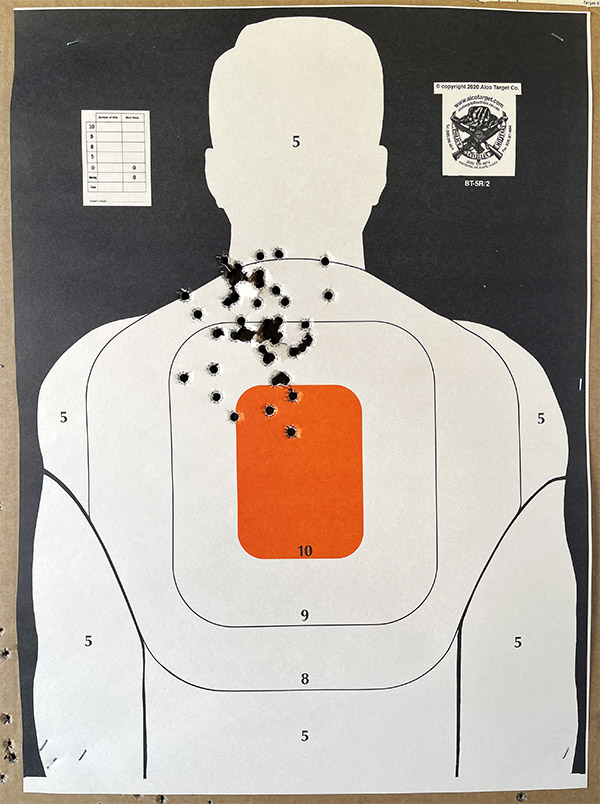
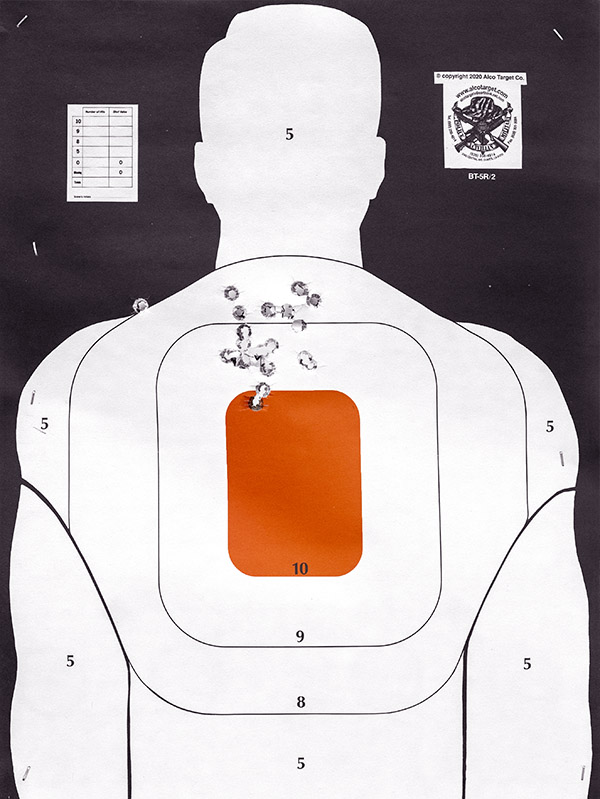
After settling on the 15.0-grain IMR 4227 load, I wanted to see how it would do at 25 and 50 yards. I went to the West End Gun Club on a beautiful Sunday morning and set up targets at both distances.
I first shot at the 25-yard target and shot a great group, but it was high (it’s the group circled in red in the target below). The rear sight only had four more clicks left in the down direction, so I dialed those in and fired another five rounds. That produced the group circled in green in the target below. I used a 6:00 hold on the black bullseye for both groups.
A 25-yard target with my 15.0-grain IMR 4227 load. Two groups…one in red before lowering the rear sight, and one in green after lowering the green sight.
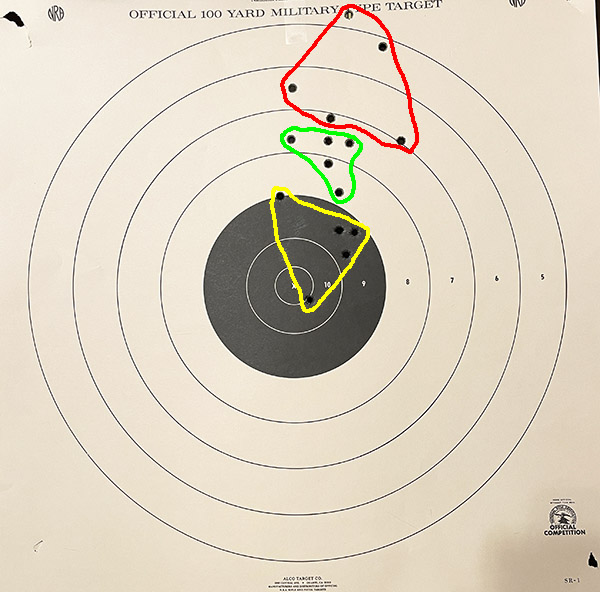
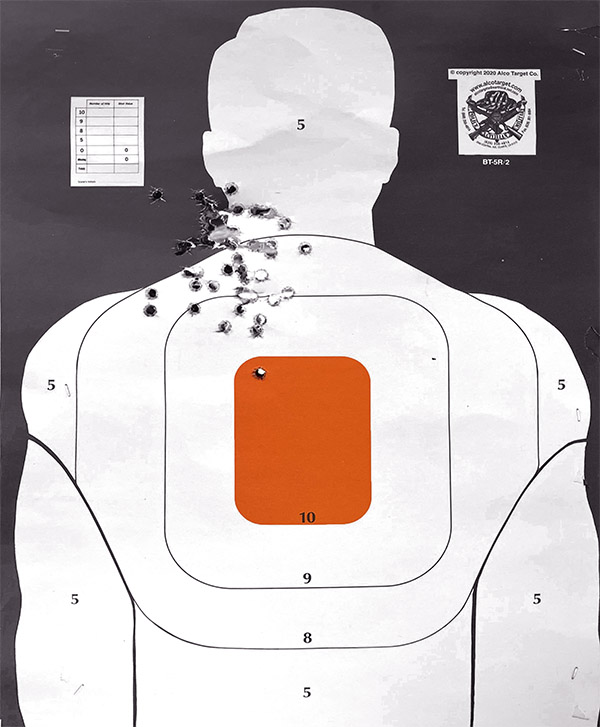
After firing the first 25-yard group, I shifted to the 50-yard target before adjusting the rear sight. That produced the group outlined in red in the target below. After lowering the rear sight, I shot the group outlined in green in the target below. It was a good group at 50 yards, but still too high (I was using the same 6:00 bullseye hold mentioned above). Because I was out of adjustment on the rear sight, I tried to hold about 4 inches below the bottom of the bullseye, and I shot the group outlined in yellow.
I couldn’t get the rear sight low enough at 50 yards, so I dialed in a little Kentucky droppage to get the group in yellow.
I’m pleased with these results. I might need to move the rear sight a scosh to the left, but I want to shoot a few more groups to confirm that. That will happen in the near term. I am also thinking about a taller front sight. The rear sight is already in its lowest position; a taller front sight would bring the point of impact in line with the point of aim. We’ll see.
What’s next? I’m thinking a trip to Arizona for some more pork. I’d like to see how this combo works on a pig, and I think there’s enough energy and accuracy to humanely take next year’s stash of bacon. Well, okay, you got me: I’m just kidding about the bacon part. There’s no belly fat on a wild pig. There’s plenty of other meat on one of those Arizona hogs, though, and I’m already thinking about a cookbook featuring recipes for the same.
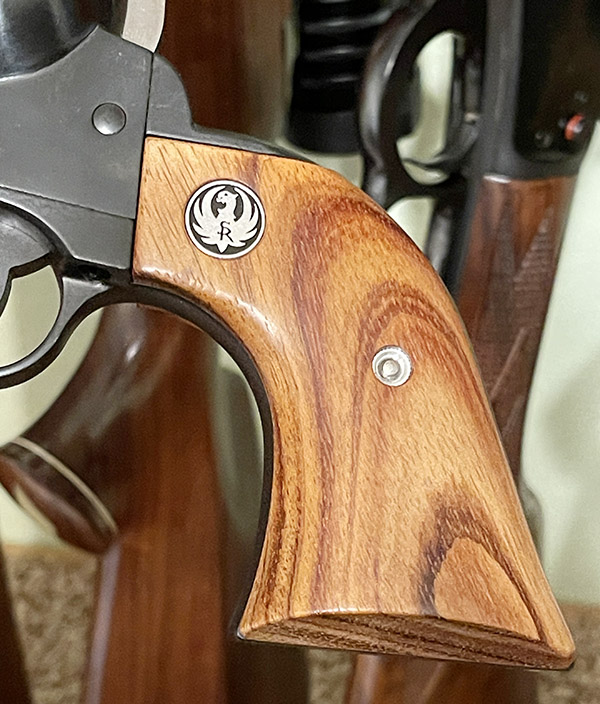
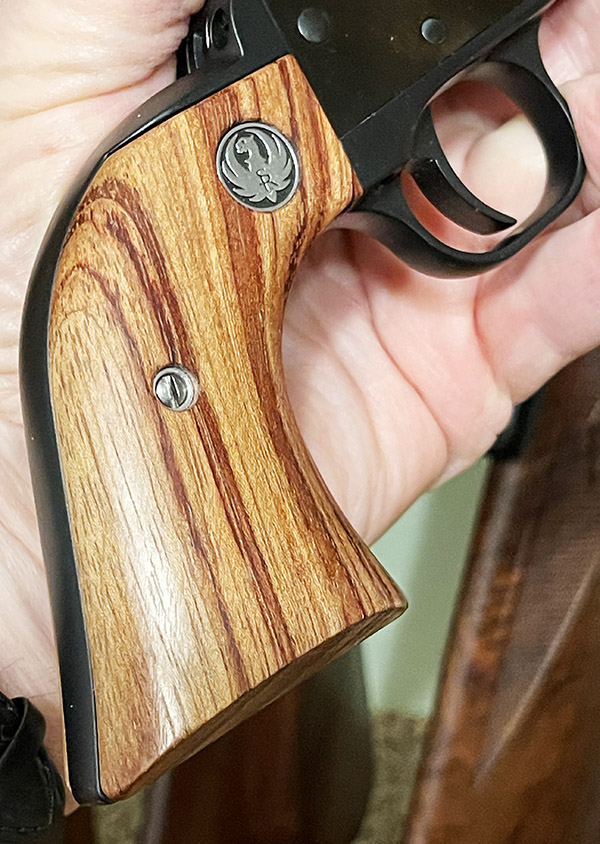
I saw the Ruger Blackhawk you see above in a forum post several years ago and wrote to ask if the owner if he would sell it. The answer was yes, and after navigating all the California hurdles, the revolver found a home in my gun safe. Several things attracted me to it. It is a 200th Year Ruger, it is in as new condition, the cylinder throats had already been reamed to their correct dimensions (several .45 Colt Blackhawks left the factory in 1976 with undersized throats), and the grips are nice (much nicer than normally seen on a Ruger Blackhawk). The grips have great figure and the wood-to-metal fit is superb (something rarely seen on a new Blackhawk these days).
Fancy wood. I’m guessing this is Gonçalo Alves wood. The wood-to-metal fit is way better on this 50-year-old revolver than it is on current production Rugers.The right grip is just as pretty as the left. Ruger used to get it right.
You saw my previous post 0n fitting the Power Custom base pin to this revolver, and another in which I compared this handgun to two other .45 Colt handguns (a 4 5/8-inch stainless Blackhawk and a tuned Taylor Uberti Single Action Army replica). I had not really done any load development for the Blackhawk you see in this blog, and I wanted to start doing so this week. I grabbed some ammo and headed to the range.
Getting out to the West End Gun Club has been a bit dicey over the last month or so. With our heavy rains, Lytle Creek has been running high. My Subie came through, though, like it almost always does.
I say “almost” because a couple of years ago under similar circumstances, I almost became a U-boat commander. You may have read that blog before.
My first target at 25 yards with the 5.9-grain Red Dot load I had previously evaluated at 10 yards was mediocre. The group was high and big. Ordinarily (and with an accurate revolver), I can put a box of ammo into a 25-yard group you could cover with a silver dollar. That wasn’t happening with this load.
Meh. I’ve done better.
When my buddy Kevin saw the above target, he asked if I was using a shotgun. I understood his point. So I set up another target, again at 25 yards and with the same load, figuring I’d do better the next time. The results were the same.
Another group with the 5.9-grain, 200-gr truncated roundnose cast bullet. Just like the group above. High left, and too damn big.
Must be the load, I thought. I switched to the last box of .45 Colt loaded with Trail Boss powder (it was 6.4 grains of Trail Boss under the same 200-grain roundnose, flatpoint, cast bullet used above). That’s a load that’s done well in other guns chambered for this cartridge. The results were almost identical to the Red Dot load.
Same bullet, but with 6.4 grains of Trail Boss. Maybe the group was a little tighter. Maybe not.
So far, the .45 Blackhawk results with Red Dot were disappointing. The groups were too big and too high. My Blackhawk’s rear sight is all the way down, so it I knew it was time to try something different. I had some 230-grain roundnose Missouri bullets hiding somewhere under the reloading bench, along with another box of 200-grain Speer swaged bullets, but I didn’t think either of those would be the answer here. A heavier bullet (like the 230-grain cast roundnose bullet) would shoot higher. That’s what heavier handgun bullets do because they generate more recoil and have a slower muzzle velocity (and that causes the bullet to spend more time in the barrel as it rises), giving a higher point of impact. I also had some 185-grain full metal jacket bullets (a little lighter than the ones I shot here), so I tried them. Maybe they would be the answer. I went home and loaded some of those to try the next time I visited the range.
An unusual appearance cartridge: The .45 Colt with 185-grain Winchester jacketed semi-wadcutter bullets.
I prepared 20 .45 Colt reloaded rounds with the 185-grain Winchester jacketed semi-wadcutters with the same Red Dot propellant charge as previously used (5.9 grains), and then I reloaded another 20 rounds with that Winchester bullets and a heavier charge (6.7 grains of Red Dot).
The first group (loaded with 5.9 grains of Red Dot and the 185-grain Winchesters) printed high and to the left. The group was a little tighter, at least with respect to lateral dispersion.
Way high, a little left, and a few flyers. The rear sight was already in its lowest setting. It was pretty windy that day.
I next shot a group with a higher Red Dot charge (6.7 grains). It moved the group down substantially (a hoped-for result) and the group was tighter. Ah, progress. It comes in many forms.
With a higher Red Dot charge (6.7 grains here), the group moved a little right and a little lower. That one flyer on the left? Who knows?
A quick check of the fired cartridges confirmed what I was experiencing when extracting the above rounds. There were no pressure signs, and extraction was easy.
No primer flattening, and easy extraction. These loads showed no signs of high pressure.
I went home and reloaded more .45 Colt cartridges, this time with even higher charges. The recipes this time were the same 185-grain Winchester jacketed semi-wadcutters, but with 7.0 grains and 7.3 grains of Red Dot.
While all this was going on, I continued to cruise the Internet, looking for more information on Red Dot and its reloading peculiarities. A found a few places where folks mentioned that the powder didn’t meter well. Usually, my Lee powder dispenser has a consistent drop, so I thought I would weigh a few after I had the dispenser adjuster. Wow. Those guys were right. I was seeing variation of as much as 0.5-grain from charge to charge. Hmmm. I was experimenting with charge weight differences as small as 0.3 grains, while the dispenser was throwing in variability of 0.5 grains. That’s not good. I filled the powder dispenser, rapped it a few times to settle the Red Dot, and I managed to get the variability down to not more than 0.2 grains. It was 0.0 grains, which is what I had experienced with other powders, but it was better than the 0.5 grains I first encountered. Like Donald Rumsfeld used to say, you go to war with the Army you have. My Army had 0.2 grains powder-drop-to-powder-drop variability, and that’s what I was going to war with.
The next day at the range, I fired 20 rounds at a 25-yard target using a my 7.0-grains-of-Red-Dot load. It shot a little bit better group, and it had a little bit lower point of impact. More progress.
Ever wonder why a head shot is only worth 5 points, while a center of mass shot is worth 10? These things sometimes keep me up at night. The point of impact was getting lower with higher charges.
Then I tried the last group I had loaded, this time with 7.3 grains of Red Dot. I had a few stray shots, but I also had the makings of a better group, and it was lower yet on the target.
A better group. Still too high, but getting better. Those stray shots: Were they the result of shot-to-shot powder charge weight variability, or were they due to pilot error?
At that point, I decided to call it a day with this test series and with this revolver. Here’s what I concluded from the above:
Red Dot is not the best propellant for the .45 Colt cartridge, which is probably why you almost never see it listed in any of today’s reloading manuals. The above notwithstanding, Red Dot can work for .45 Colt cartridges, as this test series found.
Higher charge weights are better, probably because they occupy more of the case volume (the .45 Colt is a big handgun cartridge). My tests showed that the average velocity, the extreme spread, and the standard deviation all improved with higher Red Dot charge weights.
With my 7.3-grain Red Dot load, the average velocity is 980.0 feet per second, the extreme spread is 76.5 feet per second, and the standard deviation is 21.1 feet per second. These are not the best numbers I’ve ever seen in a handgun, but they are not the worst, either, and a 185-grain, .45 caliber bullet smoking along at nearly 1000 feet per second is nothing to sneeze at. Other powders would do better in this cartridge (IMR 4227 comes to mind), and future efforts will focus on that.
Regarding my .45 Colt Blackhawk shooting high at 25 yards, I don’t know if it’s the load or the gun. I have another Ruger Blackhawk that shoots high at 25 yards (my .357 Blackhawk). I have a lower rear sight blade from Ruger laying around here somewhere. I will try to find it and, after confirming it is lower than the blade currently in the gun, I’ll see how much that helps.
So there you have it: Red Dot propellant reloads in a Ruger .45 Colt Blackhawk. If you have a comment, we’d love to hear it.
More gun stories? You bet! There’s good stuff on our Guns page on the three Rs (Rugers, revolvers, and rel0ading)!
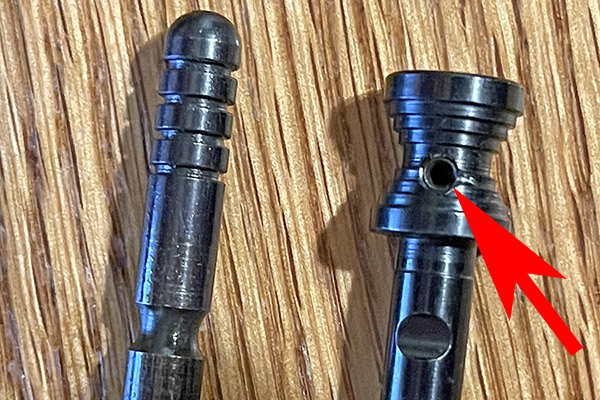
One of the very few areas in which the Ruger Blackhawk design can be improved is cylinder shaft retention. I experienced this problem many decades ago on a Ruger .357 Blackhawk, and back in those days, the easiest thing to do with a problematic firearm was to sell it (that’s not so easy these days). I don’t want to sell any of my guns, especially my 200th Year Ruger .45 Colt Blackhawk. It’s the one you see in the photos above and below.
Before I go too much further, let’s address terminology. The Blackhawk cylinder rotates around a shaft that Ruger identifies as a base pin assembly. That’s okay, I guess; Ruger makes a lot of guns and they can call their parts whatever they want. I tend to use more precise and descriptive terminology. I call the part the cylinder rotates around the cylinder shaft, and that’s what I’ll refer to it as in this blog.
To get the point of this blog, I had a problem the last time I had the Blackhawk on the range (which was only the second I had fired the gun). I shot my 850 fps, 5.9 grains of Red Dot, and 200-grain cast bullet loads (which is a mild load), and suddenly, the gun would not cock. On closer examination, I found that the cylinder shaft had jumped forward. It was the return of a condition I had experienced on another Ruger Blackhawk back in the 1970s and then had completely forgotten about.
The cylinder revolves around a shaft that is held in place by a spring-loaded, frame-mounted lock. Under heavy recoil, the cylinder shaft wants to stay where it is due to inertia as the gun recoils. The spring-loaded lock engages a notch in the cylinder shaft, and it’s supposed to prevent that from happening. Sometimes, though, the recoil is too much. The spring-loaded lock is cammed out of place by the cylinder shaft inertia, and the cylinder shaft slides forward in the frame.
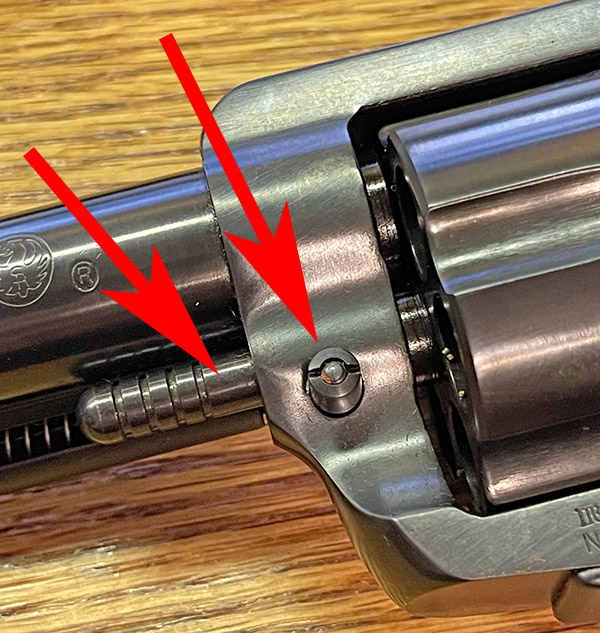
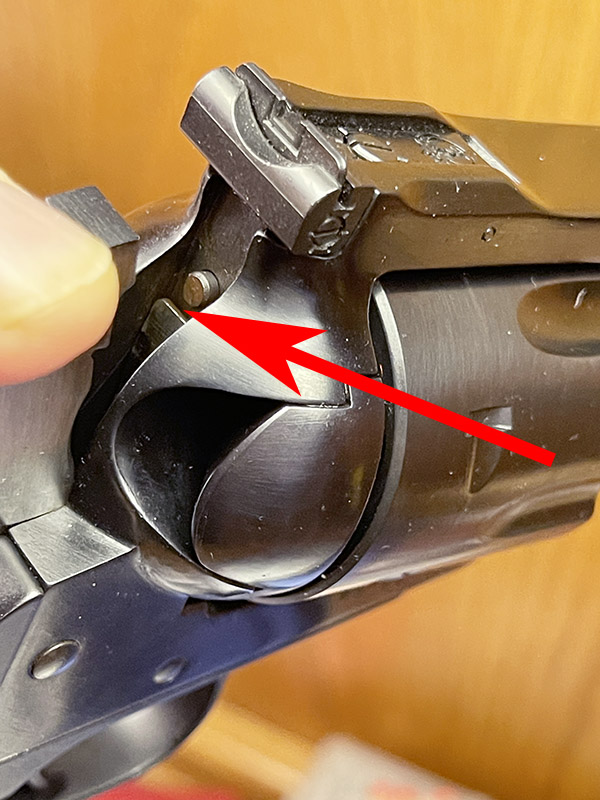
The left arrow points to the cylinder shaft. The right arrow points to the spring-loaded cylinder shaft retention pin. To remove the cylinder, push the retention pin to the gun’s right, and the cylinder shaft can be pulled forward. This allows removal of the cylinder for cleaning.Under recoil, the cylinder shaft’s inertia can cause it to displace the cylinder shaft retention pin, and that allows the cylinder shaft to slide forward in the revolver frame (as you see here). When that occurs, the revolver hammer cannot be pulled all the way to the rear to cock the gun.
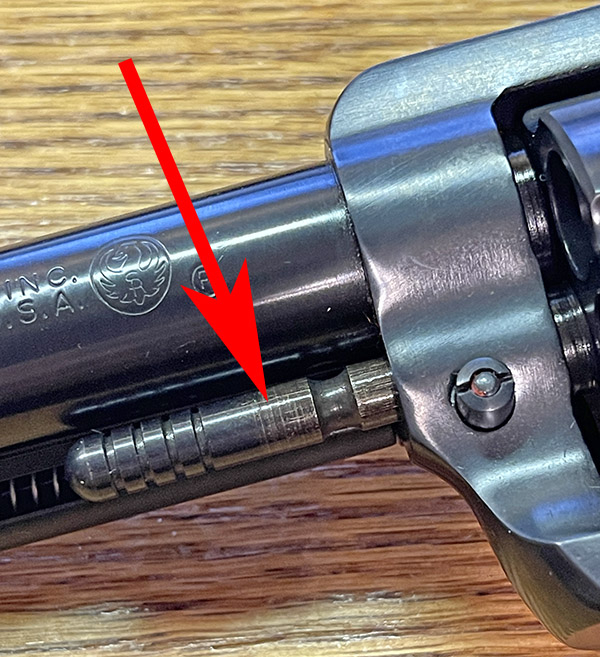
When the cylinder shaft slides forward in the frame, the spring-loaded pin at the other end of the cylinder shaft moves forward, too. It shifts to a position that interferes with upward motion of the revolver’s transfer bar when attempting to cock the gun. You can see the area of interference in the photo below.
When the cylinder shaft slides forward in the revolver frame, a spring-loaded pin on the end of the cylinder shaft moves with it. When that occurs, the cylinder shaft’s aft end pin no longer pushes on the transfer bar (indicated by the red arrow). The result is that the transfer bar is no longer held to the rear. When attempting to cock the gun, the transfer bar’s upward motion is blocked by the firing pin.
The transfer bar is designed to prevent the hammer from contacting the firing pin if the trigger is not pulled. This feature prevents an unintended discharge is the gun is dropped. The transfer bar is normally pushed to the rear by a spring-loaded pin in the back of the cylinder shaft, but when the cylinder shaft slides forward, that no longer occurs. The result is that the transfer bar (no long held to the rear) catches on the firing pin, and the gun will not cock.
The Fix: The Power Custom Base Pin
So what’s the fix to the cylinder shaft moving forward in the revolver when it recoils? That would be a product called the Power Custom replacement base pin (note that Power Custom uses Ruger’s terminology for the cylinder shaft). I bought one and this blog focuses on the good, the bad, and the ugly (and which, with a nod to Clint Eastwood, somehow seems fitting for a blog on a part that goes into a Western-styled six shooter).
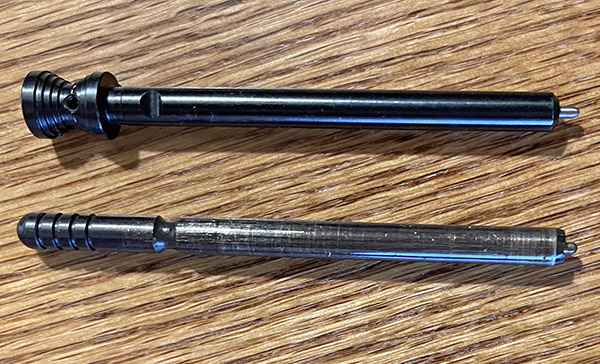
The Power Custom replacement base pin (upper component) and the stock Ruger cylinder shaft. The little pin on the right end of each is what pushes the transfer bar to the rear, preventing interference with the firing pin when the revolver is cocked. Note the Power Custom’s larger grip on the left.
Installation
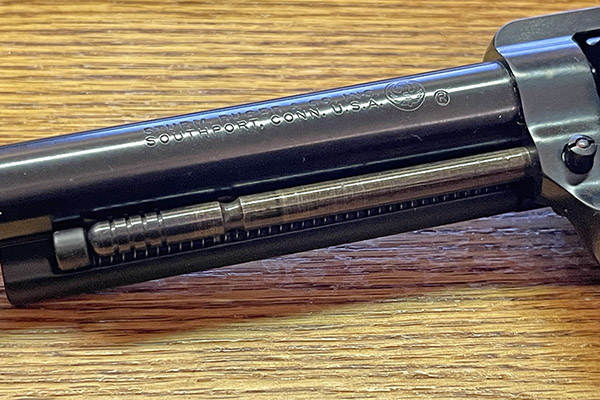
When I started to remove the Ruger’s cylinder shaft so I could install the Power Custom part, I discovered something I had forgotten. The ejector rod subassembly has to come off to allow cylinder shaft removal. Without doing so, the cylinder shaft cannot move far enough forward for removal.
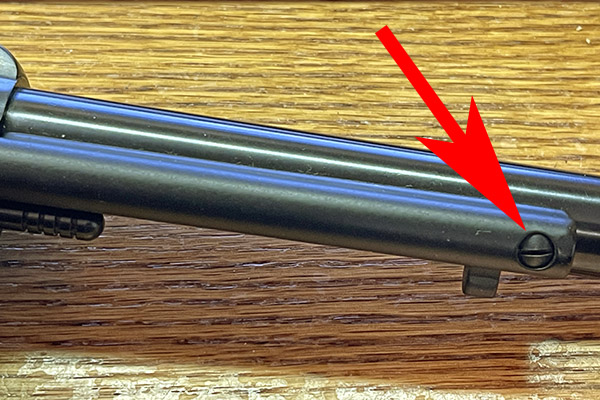
A fully-extended cylinder shaft. The ejector rod and its housing had to be removed to remove the cylinder shaft.The screw that allows removing the ejector rod housing.
Removing the ejector rod subassembly was easy enough to do, and after doing so, I pulled the original Ruger cylinder shaft and replaced it with the Power Custom part.
The Good
The Power Custom replacement base pin (which replaces the original cylinder shaft) has a tighter fit in the revolver frame and the cylinder. The Power Custom part has a diameter of 0.2492 inches; the stock Ruger cylinder shaft has a diameter of 2.480 inches. I could feel the decreased cylinder wobble as soon as I installed the Power Custom part. Theoretically, this should translate into improved accuracy.
The Power Custom replacement has a different, larger-diameter, stepped grip. There’s more to grab onto when you want to slide the cylinder shaft forward to cylinder removal.
The Power Custom grip contains a set screw that can be tightened against the revolver barrel (which I did not use). The idea is the tighter fit and the set screw act to prevent the cylinder shaft from being inertially driven forward under recoil. Power Custom recommends using a drill bit through the set screw hole to spot face the barrel, which would give the set screw a better place to seat. I didn’t like that idea, and I didn’t tighten the set screw on my gun.
A set screw on the Power Custom base pin assembly. I opted not to use the set screw. Note the slot in the Power Custom part for the cylinder shaft release, and note that it is unmarred.
Finally, although the Power Custom base pin has a larger grip, the overall part is shorter in length than the stock Ruger part. This allows greater ejector rod travel, which is better for case ejection. Sometimes with the stock Ruger cylinder shaft, the cases aren’t fully ejected due to carbon fouling in the cylinder, and spent cases have to be pulled manually from the cylinder after they are partially ejected. This shorter overall length is a good idea, I think.
The Bad
I already mentioned the set screw business above, and Power Custom’s barrel spotfacing recommendation. I didn’t like the idea of having to use a set screw.
Power Custom provides a tiny Allen wrench for use in tightening the set screw. With the stock Ruger cylinder shaft, the cylinder shaft can be moved into the cylinder removal position with no tools, and should the need arise, the cylinder can be removed in the field. With the Power Custom part, an Allen wrench is needed. I don’t want to carry around a tiny Allen wrench. Is this a real concern? Maybe. In the last 50+ years, I have had to remove Blackhawk cylinders a time or two while wandering around in the boonies. To me, this is a disadvantage.
This brings us to the principal bad, and it’s my fault (for reasons I’ll explain momentarily): The Power Custom base pin did not reliably stay in place under recoil in my Blackhawk. Note my comment above: I did not tighten the set screw in the Power Custom base pin. If I had, it probably would have stayed put. And on the plus side, it doesn’t jump out of position nearly as often as the Ruger cylinder shaft does.
The Ugly
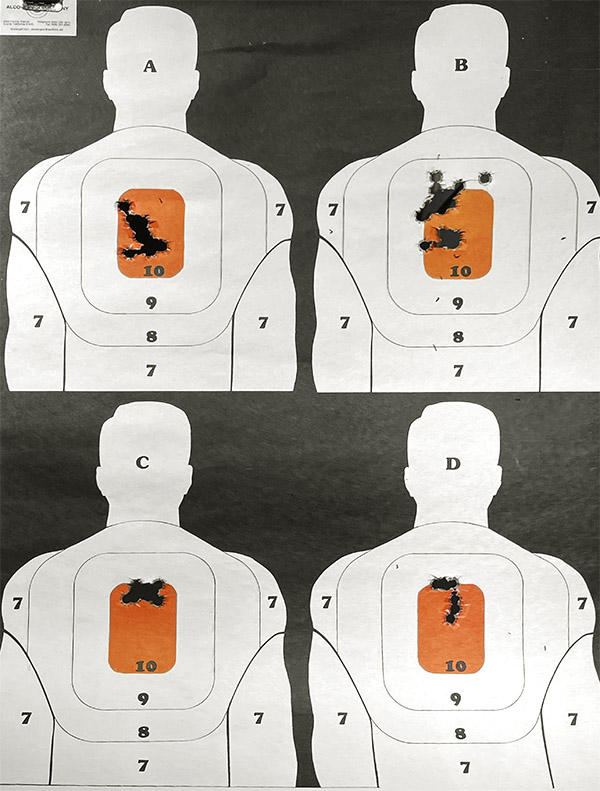
Once the new Power Custom cylinder shaft was installed, I grabbed some ammo and headed to my local indoor range. How did the Blackhawk shoot with its new cylinder shaft? From an accuracy perspective, I could not tell the difference. This is a 10-yard target, depleting a box of my reloaded .45 Colt ammo in the process.
Thanks again, Command Sergeant Major Hickman! My point of aim was at 6:00 on the orange bullseye. At 30 feet, the revolver was shooting high, and the rear sight was all the way down.
During my indoor session on three different targets (using up a couple of boxes of the 5.9-grain Red Dot reloads), the new Power Custom cylinder shaft jumped over the retainer twice. If I had tightened the set screw against the barrel, that probably would not have happened, but to mention it one more time, I don’t like the idea of having to rely on a set screw to hold the cylinder shaft in place.
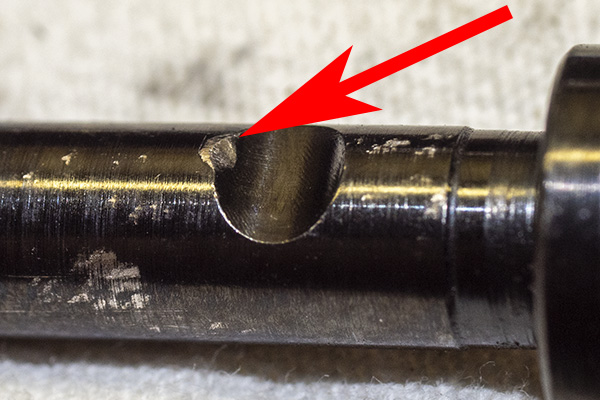
When I returned home, I pulled the Power Custom base pin. I could see that it had deformed slightly in the groove that engages the mating retention feature in the revolver frame. I then pulled the extractor subassembly to get a better photo.
A gouge on the new Power Custom cylinder shaft. It wasn’t there when new (see earlier photo of the new part). I believe the Power Custom base pin steel should be heat treated to a higher hardness. The part’s softness and not using the set screw is what allowed this to occur.
My conclusion is that the Power Custom base pin should be heat treated to a higher hardness. If it had been, it would not have deformed when forced against the revolver’s cylinder shaft retention feature. But that may be irrelevant. The Power Custom base pin’s principal locking feature is the set screw, and I didn’t use it. And as I mentioned above, while it did shift forward a couple of times, it doesn’t exhibit this behavior nearly as often as the stock Ruger component does.
I emailed Power Custom about the deformation I noted in their cylinder shaft, and to the company’s great credit, they put a replacement base pin in the mail to me the next day. That’s great customer service.
Here’s the bottom line upfront: Don’t expect stunning accuracy from DKC’s 9mm bullets.
I bought 1000 of them from Raven Rocks after watching a YouTube video about FBI handguns and ammunition, in which an FBI ballistics expert explained why the FBI uses 147-grain bullets in their 9mm Glocks. The YouTube fellow didn’t specify which 147-grain bullet the FBI uses, although a friend later told me it’s the Speer Gold Dot. The DKC bullets I bought were cheap at $98 per 1000, and my testing showed why. You get what you pay for. Sometimes.
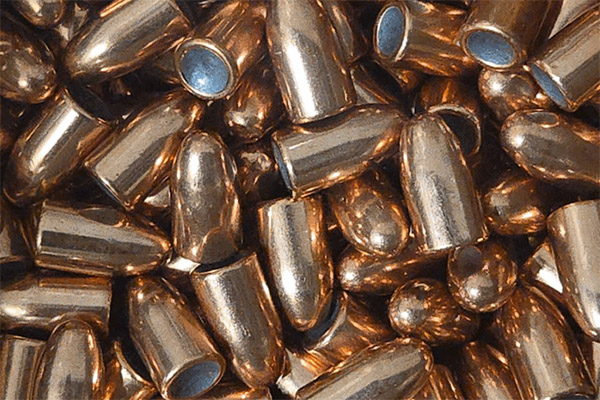
Full metal jacket, 147-grain, 9mm DKC bullets.
DKC is relatively young Turkish ammunition and reloading components manufacturer. One of their importers is Raven Rocks here in the US. I’ve ordered components from Raven Rocks before (in particular, their composite 9mm and .45 bullets) and I’ve been pleased with the results. I was hoping the same thing would happen with these 9mm full metal jacket bullets, but it was not to be. Win some, lose some.
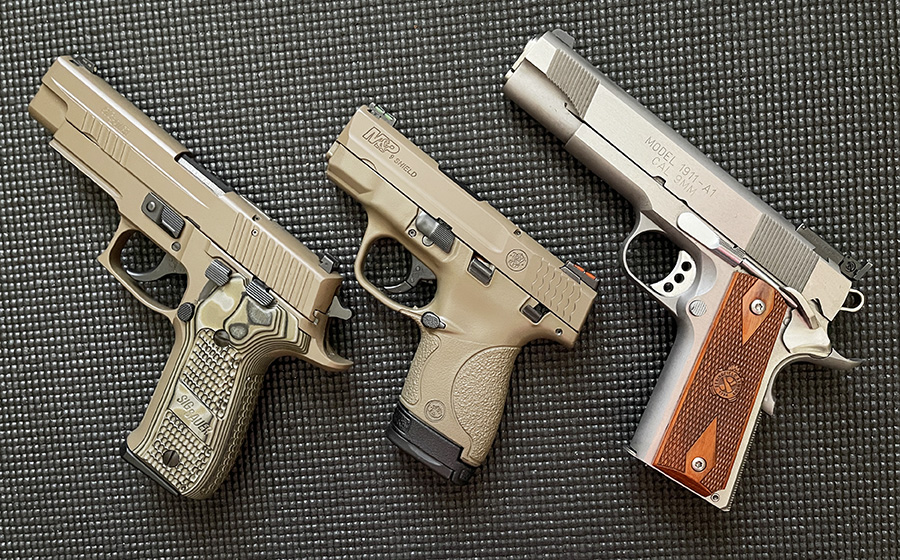
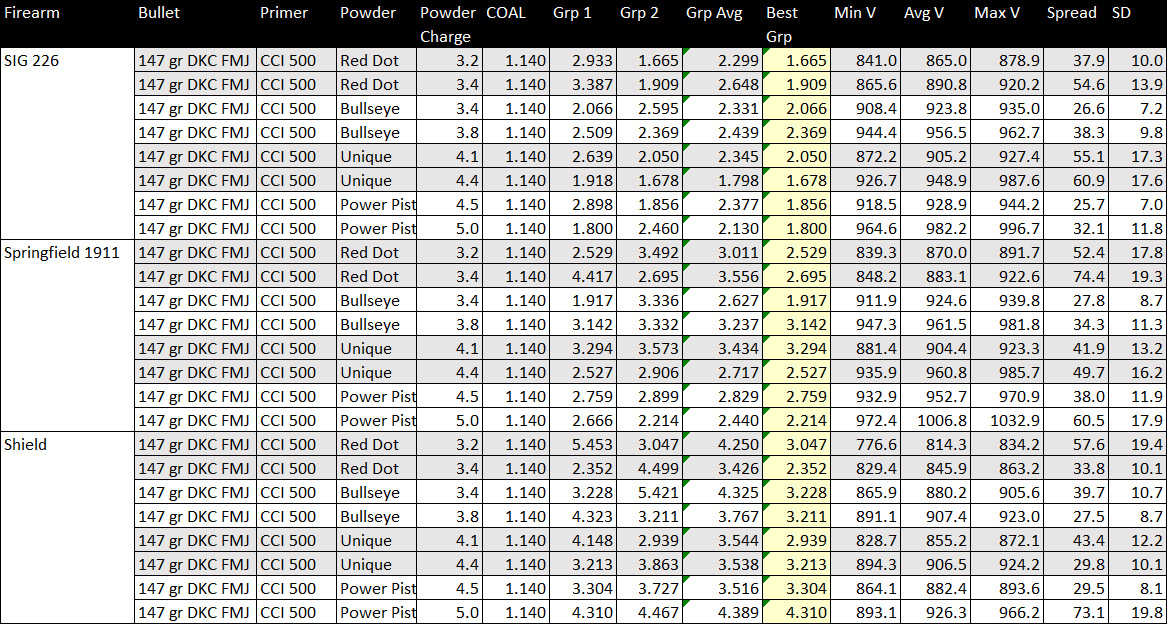
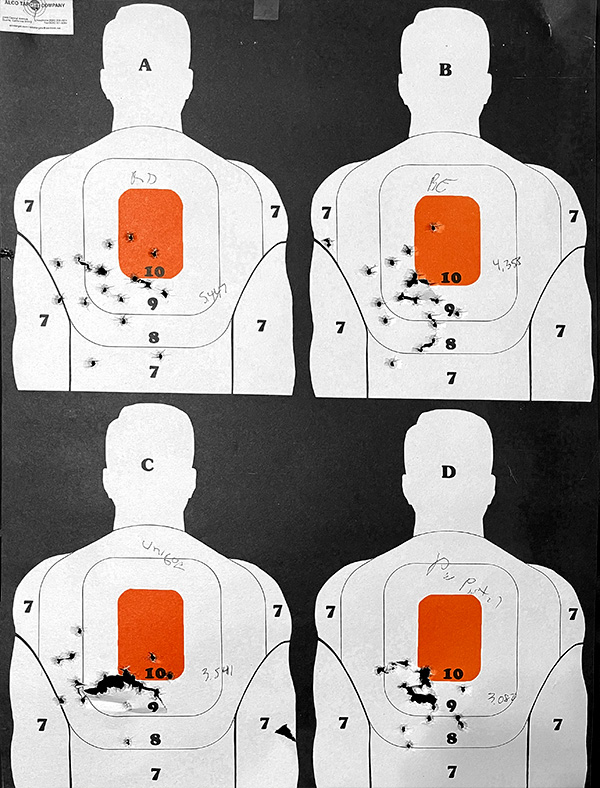
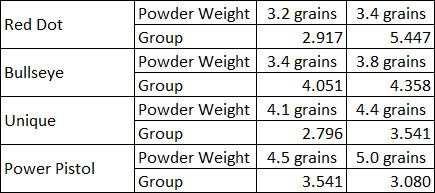
I fired my 9mm DKC bullet handloads at the West End Gun Club using the 147-grain full metal jacket bullets. I tested the bullets in three different handguns (a Springfield 1911, a SIG P226, and a S&W Shield), with a light load and a heavier load for each of four different propellants (Red Dot, Bullseye, Unique, and Power Pistol). For the initial accuracy testing, I shot two 5-shot groups at 50 feet for each configuration.
How did the new bullets do? All the 50-foot groups were disappointing from an accuracy perspective. A few of the groups dipped below 2 inches, but most were above (and some well above), and at 50 feet, that’s not the kind of accuracy I’m used to. Here’s how it shook out:
The results. I fired 400 shots in total for this blog’s test series. I used my Garmin Xero to chronograph the velocities. Click on the table to make it bigger.
The above table is data intensive and correspondingly small (ah, if only my groups were the same). If you click on the table, it will open in a new window and be a little easier to read.
You can see from the above that the group sizes generally were mediocre to poor. As a point of reference, what I consider good is a group of an inch or less from a 9mm at that distance. None of the loads I tested met that threshold.
I added a column to show the best of the two groups fired for each load in each pistol (this is highlighted in yellow), thinking that maybe it was my shooting that returned the mediocre groups and this might give a better feel for what worked best. None of the groups met my 1-inch threshold. I had been h0ped that a few of them would, as had occurred when testing previous 9mm loads (see, for example, A Tale of Two Nines, A 9mm Comparo: Cast Bullets, and A 9mm Comparo: Jacketed Bullets). On the plus side, all the loads functioned all three handguns reliably. There were no failures to feed and no failures to extract. I guess that’s something.
Surprisingly (especially when considered in light of the mediocre accuracy), the velocity standard deviations were all relatively low, and in some combinations, surprisingly low. Bullseye was generally the winner from a standard deviation perspective, although its low standard deviation did not translate into superior accuracy.
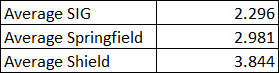
I averaged all groups for each handgun (both high and low loads and the different propellant loads). Predictably, the SIG returned the best groups overall, and the short-barreled Shield was the worst. The SIG has always been a stellar performer.
Average group sizes for all loads in each pistol.
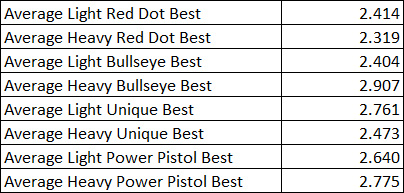
I then considered the results across the three pistols to try to select a powder that I could use for all three handguns. To do this, I averaged the three pistol’s performance with the light Red Dot load, the average performance with the heavy Red Dot load, etc. Nothing emerged as a significantly better accuracy load, as you can see below.
Average group size for different loads across all three handguns.
By this time, the data were confusing me. I was also feeling my age a bit, thinking maybe my old eyes just aren’t what they used to be.
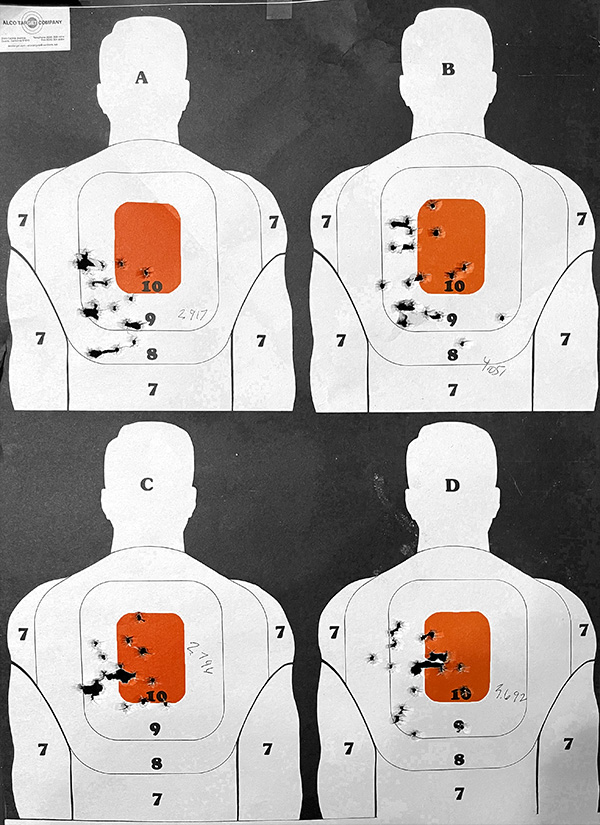
At the end of the session, I had 20 rounds left in each load combination. I fired the heavy loads (for each powder) into each of four targets at 50 feet using the SIG only. By this measure, the heavy Power Pistol load had maybe the best group. I didn’t do the same for the other two handguns. The Power Pistol load had perceptibly heavier recoil, and it averaged over 1000 fps (a lot, I think, in a 9mm 147-grain load). I don’t know if I want to subject an aluminum-framed handgun to a steady diet of this load (see my blog on the Smith and Wesson Model 59).
The targets you see above are (clockwise from top left), the heavier Red Dot load, the heavier Bullseye load, the heavier Unique load, and the heavier Power Pistol load. If you eliminate the one or two flyers in each group, there’s not a lot of difference between any of the heavier loads.
I also had 20 rounds left for each of the four loads at the lower end of the propellant charges. I took these 80 rounds and one of the Alco mini-4 silhouette targets to my indoor range. I again fired all rounds through the SIG, shooting the groups you see below at 10 yards. Here’s what that target looked like:
These are targets shot at 30 feet with 20 rounds each of the lighter loads. Clockwise from top left, these were shot with the lighter Red Dot load, the lighter Bullseye load, the lighter Unique load, and the lighter Power Pistol load.
The experimental design for the lower and higher load comparisons with the SIG you see above would probably earn a failing grade from a competent statistics professor. The sample size is too small, I shot at different distances for the higher-level loads versus the lower-level loads, and I probably broke one or two other statistics rules. That notwithstanding, here’s a summary of what the group size data looks like:
Data from the above two targets summarized in tabular form.
Where’s all this going? The bottom line is none of the results were anything to write home about. Why, I wondered? Other 9mm loads had done significantly better.
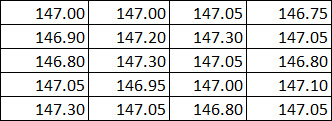
To further assess why my results were as mediocre as they were (and recognizing but not fully accepting that 100% of the mediocrity could have been due to me, the shooter), I next evaluated the bullets themselves. The first parameter I measured was bullet weight. In a random weight sample of 20 DKC 147-grain 9mm bullets, here are the weights I recorded (all weights are in grains):
Weights for 20 of the DKC 147-grain 9mm bullets.
That first bullet was right on the money at 147.0 grains, so I thought these would prove to be good bullets from a weight variability perspective. But I was wrong, as the remaining measurements above showed. Here are the particulars on weight variability:
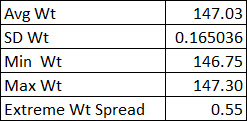
Bullet weight variability parameters.
I think that half a grain weight variability (0.55 grain, to be exact) is a lot for a jacketed pistol bullet. I would have expected the weight to be within ±0.1 grain, so an extreme spread of 0.55-grain is not good. It’s also not likely that the weight variability is symmetric to the bullets’ axes, which further aggravates the problem. As the bullet spins, any weight asymmetry will induce larger group sizes.
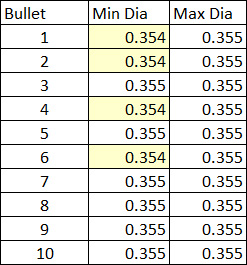
That had me wondering about bullet diameter. After zeroing my calipers, I measured the diameter of 10 bullets. Note that these are stated by the supplier to be 0.355 inches, which is what I would expect on a 9mm jacketed bullet. Here’s what I found:
0.355 inches in diameter? Guess again, Bullet Boy!
Damn! Four of the ten bullets I measured were out-of-round by 0.001 inch (these are Bullets 1, 2, 4, and 6), and where this occurs, they are undersized. Small wonder the group sizes were not that good. The undersized bullets would have rattled down the bore, with perhaps some propellant gas sneaking around their periphery. I think the reason the hotter Power Pistol loads did a little better is the higher chamber pressure probably deformed the bullet to fill the bore better.
Here’s the bottom line from an old ordnance engineer: These bullets are (ah, what’s that ordnance technical term again…oh yeah, I remember): MAB (or mediocre, at best). They are cheap at $98/1000, but in retrospect, they are at best plinkers, nothing more. Maybe I’m expecting too much. Maybe a 9mm handgun just won’t group that well with a 147-grain bullet. I don’t think that’s it, though. I’ve done better with other 9mm 147-grain bullets.
I relayed the above results to a few of my buddies and one of them asked me if he could have some of the DKC bullets because, as he put it, he is more of a plinker than a wannabe ballistics engineer (like yours truly). Done and done, I immediately answered. Then the question becomes: How should I load the rest of these bullets? I still have several hundred left.
I realized this would not be a decision based on accuracy, as none of the different recipes I tried resulted in impressive accuracy. I don’t need big time penetration and I don’t need high velocity, as I’m not an FBI agent preparing for a rerun of the Miami gunfight. I decided I would go with a load that offered:
A low velocity standard deviation (which held at least a promise of better accuracy).
Reliable performance.
Lower recoil.
A load that was adequate (if not stellar) across all three 9mm handguns.
Any of the loads I tested with the 147-grain DKC bullets meet the above criteria, so the choice came down to which powder I had the most of on hand. That made it easy. I’m going with the lower Red Dot load of 3.2 grains. That will give me just under 900 feet per second from the 1911 and the 226, and just over 800 feet per second in the Shield. That’s as good as or better than a .38 Special with a comparable weight bullet, and the .38 Special is a great cartridge. I’ll be flush with these 9mm handloads for a while, and then I won’t buy any more of the 147-grain DKC bullets.
This is really cool: Pietta is coming out with a reproduction of the original Colt Python, and rumor has it that it will sell for about half what a new Python costs. That puts the pre-tariff price at $750. Pietta plans to call it the Blacktooth. I don’t know about that name, but I don’t make thousands of guns like Pietta does. I’m thinking something like Copperhead would be a good name for this handgun. Copperhead would make an obvious connection with Python and Colt’s serpent-themed sixguns, and it sort of ties in with copper-jacketed bullets. Maybe put a touch of copper plating on the gun, too, to complete the copper connection (the trigger or the hammer, the grip medallions, or maybe the screws). Maybe even offer a tuned version with an action job, and call it the Competition Copperhead? Eh, what do I know?
A Pietta Copperhead?
The Python story goes like this: Colt originally produced the Python in 1955 as a premium double action revolver, and then it was discontinued in 1999. The original Pythons had hand-fitted components, and it just got too expensive to make. I’ve heard it said that they went out of time quickly, and the frames tended to stretch with full bore .357 Mag loads. I owned a couple of these original Pythons, and they were beautiful guns, but they both went down the road when in my youthful ignorance I decided I needed something else more. Colt reintroduced the new Python with redesigned internals and frames in 2020, and I quickly snapped up one. It’s a beautiful handgun, and I’ve written about it a lot on these pages (I’ll provide links at the end of this blog).
How is it that Pietta, an Italian gunmaker known for producing copies of Old West sixguns, is able to copy the original Colt Python? Well, Partner, I don’t know, but I’m guessing Colt’s patent on the original Python expired and Pietta picked it up. That’s what happened on the Colt 1911 (the .45 Auto) and why so many companies are now producing the 1911.
I’m guessing that the Pietta Python won’t be available in California (at least initially) for a while (or maybe ever) due to our nutty gun laws, but who knows…maybe Pietta will succeed in getting the thing California approved. I sure hope so. Or maybe I’ll buy a house and live part time in a state that respects the U.S. Constitution so I can have access to the guns California prohibits. Texas or Tennessee come to mind.
More Python? You bet. Here are our earlier Python related posts:
I’m thinking of doing another book on guns. It would be a two-volume series. What I have in mind is a compendium of expanded articles based on our firearms-related blogs, with a working title of Tales of a Gun Collector. Volume 1 would be rifles; Volume II would be handguns. What do you think? Let us know by leaving a comment below, and thanks in advance for your inputs.
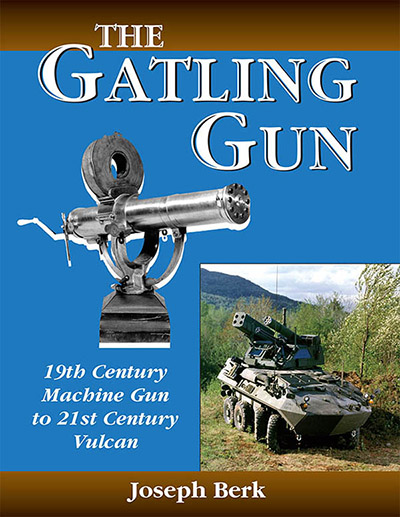
Speaking of Colt…did you know that the original Gatling guns were manufactured by Colt in Hartford, Connecticut? All that and more is in The Gatling Gun.
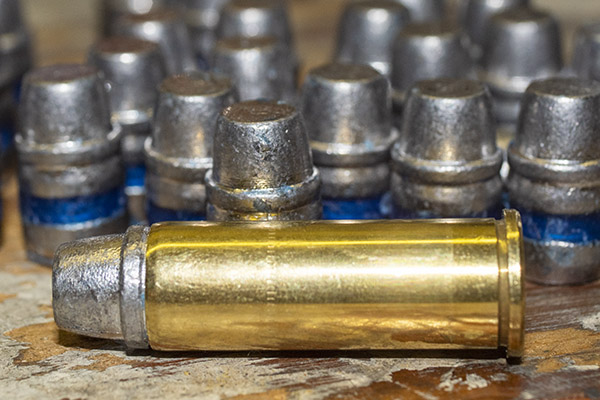
In the early days of the COVID pandemic, I bought a box of 500 240-grain cast lead .44 bullets from a reputable bullet supplier.
A reloaded .44 Magnum cartridge. This is one of my favorite cartridges to reload and shoot. Dirty Harry made me a believer.
When I opened the box to start loading these bullets, I was dismayed to see that the bullet bases were not clean. Most were plagued by excess lead that had flowed beyond the bullet’s beveled base. The conventional wisdom has always been that any deformations to a bullet’s base will degrade accuracy, so I was disappointed when I saw these.
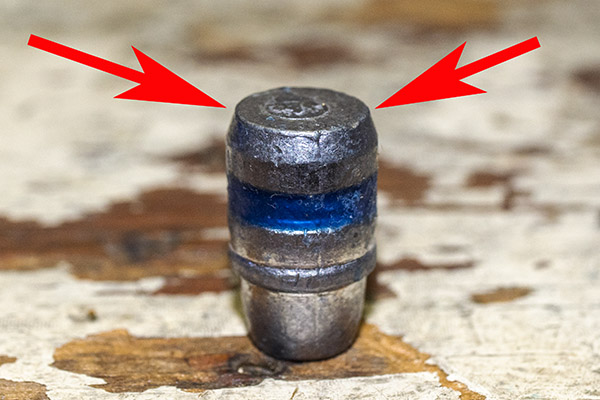
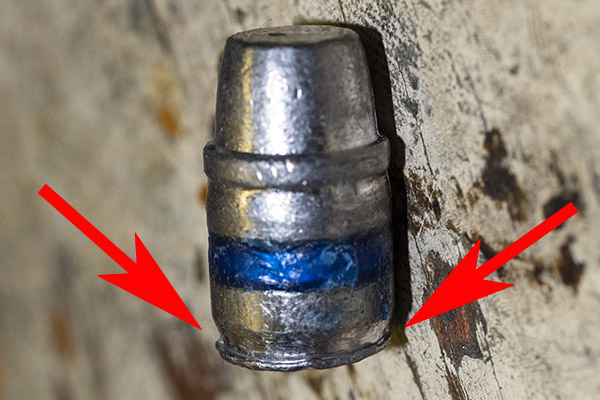
A relatively good cast bullet, with no excess lead around the bullet skirt. This bullet is shown upside down.A defective cast .44 Magnum bullet. Excess molten lead flowed around the base of the bullet. This occurs when the lead has not solidified when the bullet is dropped from the mold, or if the slider above the mold is loose. The theory is that an imperfect base will cause the propellant gases to deflect the bullet as it leaves the barrel.
I contacted the manufacturer (whose bullets I had been using for many years) by email and asked if such bullets met their quality requirements. I included a picture of one of the deformed bullets. The manufacturer’s response was immediate: No, those bullets were not acceptable. They do not meet our quality requirements.
The manufacturer then went on to say they had previously been aware of this lot escaping, they had traced it to a particular inspector, and he was no longer with the company. I probably would have jacked up the inspector a bit, and I would have seriously jacked up the operator instead. After all, it was the operator who made the bad product. The manufacturer also promised to send me a new box of bullets, and shortly thereafter, they arrived.
I put the box of defective bullets on a shelf under my reloading bench and forgot about them for the next several years. Recently, while poking around under the bench, I came across them again. It’s always exciting to find forgotten stuff down there, and I half expect to come across Jimmy Hoffa someday hiding behind a coffee can full of .45 ACP brass. As I looked at the box of bullets, I wondered: Are they really defective? Would they shoot well enough for my purposes?
You can guess where this story is going. I decided to test good versus bad bullets. While I was at it, I decided to also test the effects of powder position within the cartridge case on velocity and accuracy (more about this a bit further down).
Deformed Bullet Base Accuracy and Velocity Testing
The first step involved sorting good bullets from bad. Most of the 500 bullets had deformed bases, but I was able to find 20 bullets with relatively clean (i.e., no excess lead flow) bases. I then selected the worst of the deformed bullets. I loaded 40 cartridges with 5.9 grains of Alliant’s Red Dot propellant (it was what I found to be a good load for the .45 Colt, it was in the range of propellant weight my manuals suggested for Red Dot in the .44 magnum, and I already had the powder dispenser adjusted to drop 5.9 grain from a batch of .45 Colt I had just finished loading). This would allow for firing four groups of five shots each with the deformed bullets, and another four groups of five shots each with the good bullets. It was a large enough sample size to allow making a quantified comparison of good versus bad bullets’ effects on accuracy.
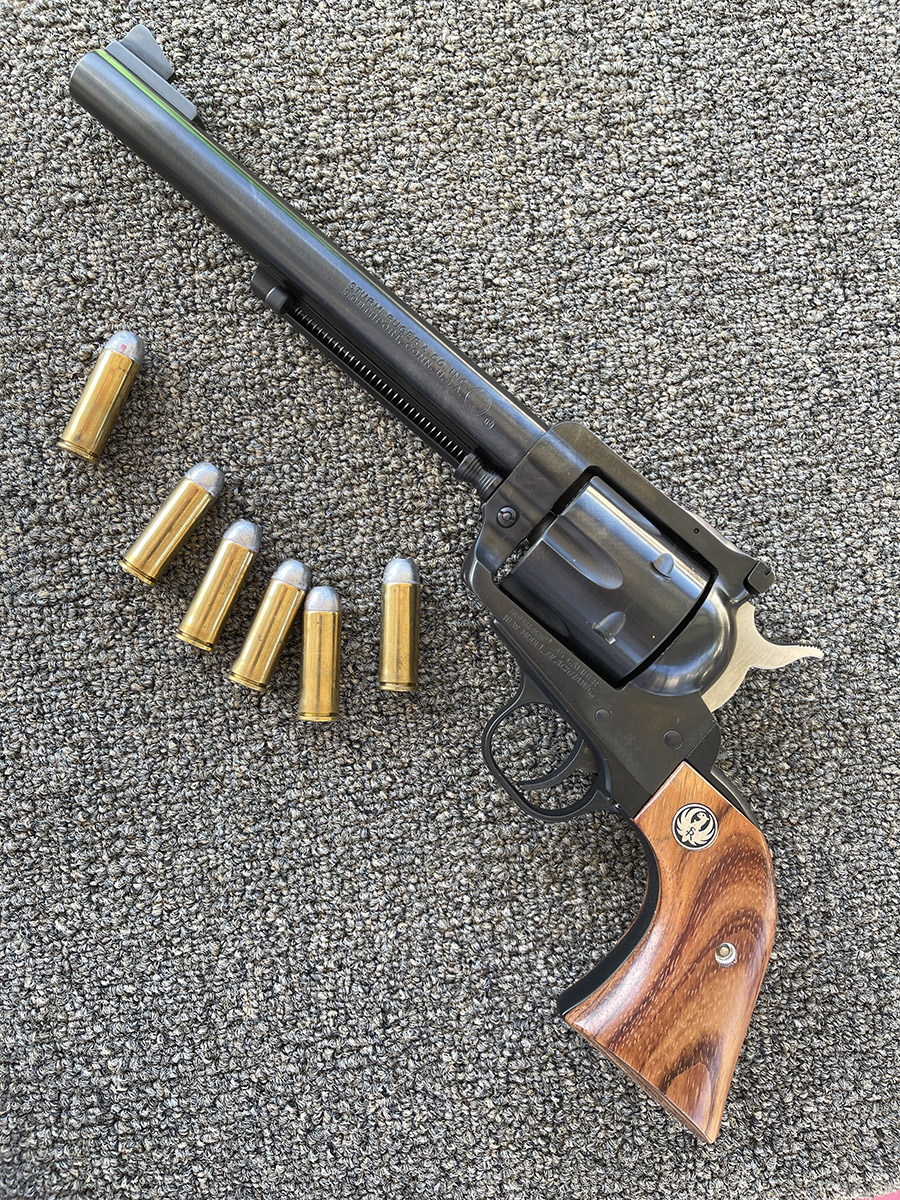
For this testing, I used mini-silhouette Alco targets at distance of 50 feet (you’ve seen me use these targets for other handgun accuracy testing). I shot my Turnbull Super Blackhawk, a superb and elegant .44 Magnum revolver (it’s the handgun you see at the top of this blog). I captured velocity information with my Garmin chronograph. All loads used once-fired Remington brass and the CCI 300 primer, and all were loading using Lee’s superb Classic Turret Press and Lee dies.
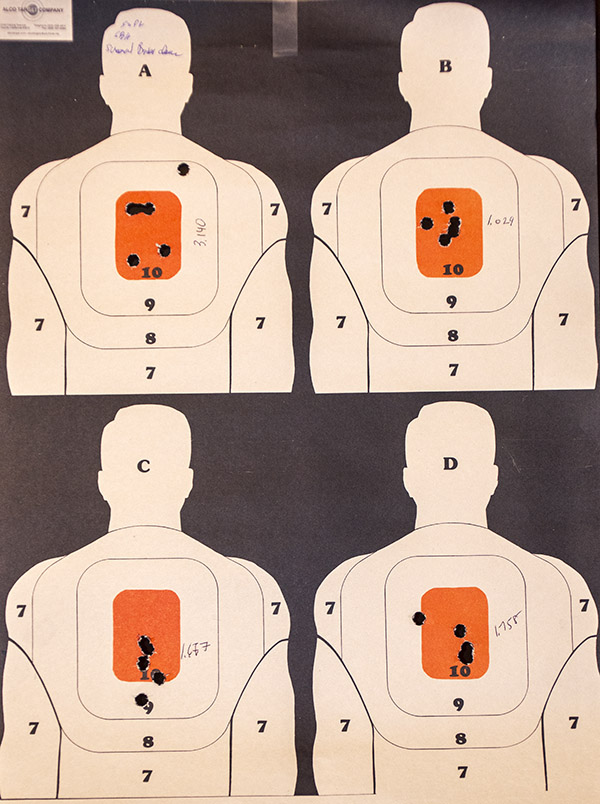
Here’s a typical target:
Alco’s target with four mini-silhouettes.
So what were the results? Here’s what I found assessing the bullets with defective bases versus those with relatively clean bases:
Based on the average group size comparison between the good bullets versus the defective base bullets, the good ones group better than the bad ones (even at the short test distance of 50 feet). The good bullets grouped, on average, 1.901 inches; the ones with defective bases had an average group size of 2.432 inches. That’s a 28% accuracy degradation for the bullets with defective bases.
The muzzle velocity difference between the two groups of bullets is not very significant, with an average velocity in the 970 feet per second range and a relatively small standard deviation of only around 19 feet per second. This is a good load.
Powder Position Accuracy and Velocity Test
There’s a concern that powder position within the case will affect both accuracy and velocity. The conventional wisdom holds that if the powder is close to the bullet (instead of the primer), the cartridge will behave differently than if the powder is close to the primer (or so the theory goes). It is thought this affects both accuracy and velocity. I tested this parameter, too.
I had another 40 rounds to do the same kind of testing as described above for the bullet base testing. I did not sort the bullets this time. For the first 20 rounds, I pointed the muzzle down (to position the powder more near the bullet) prior to firing. For the second 20 rounds, I pointed the muzzle up (to position the powder more near the primer) prior to firing. I did this to assess both accuracy and velocity.
5.9 grains of Red Dot does not fill a .44 magnum case; it instead occupies about 70% of the case volume. When the bullet is seated in the case, that 5.9 grains fills even more of the available case volume because the bullet occupies a portion of the case above the powder.
It’s tough to get a photo like this. This is 5.9 grains of Red Dot in a .44 Magnum case. When the bullet is seated, most of that case volume is taken up.
There is a little space available (5.9 grains is not a compressed load), and the powder in the case can be biased toward the bullet or toward the primer. Would this make a difference in either accuracy or velocity? The test results here show positioning doesn’t make much of a difference:
As you can see from examining the above data, the group size difference between the two approaches is not very large, and can probably be accounted for by variability in my shooting. There is a small difference in average velocities, but it’s probably insignificant.
I think what’s going on is that because Red Dot is a somewhat fluffy powder, it occupies enough of the case volume that it doesn’t make any difference which way the powder is situation in the case when it fires. It might make more sense to repeat this experiment with a denser powder like Bullseye, which occupies much less of the case volume. I may get around to that one of these days. What this test says to me is that 5.9 grains of Red Dot behind a 240-grain cast semi-wadcutter bullet is a good load in the .44 Magnum. It’s even better when the bullet bases are not deformed.
More gun stuff? You bet. Buy yourself (or a friend) a copy of The Gatling Gun.
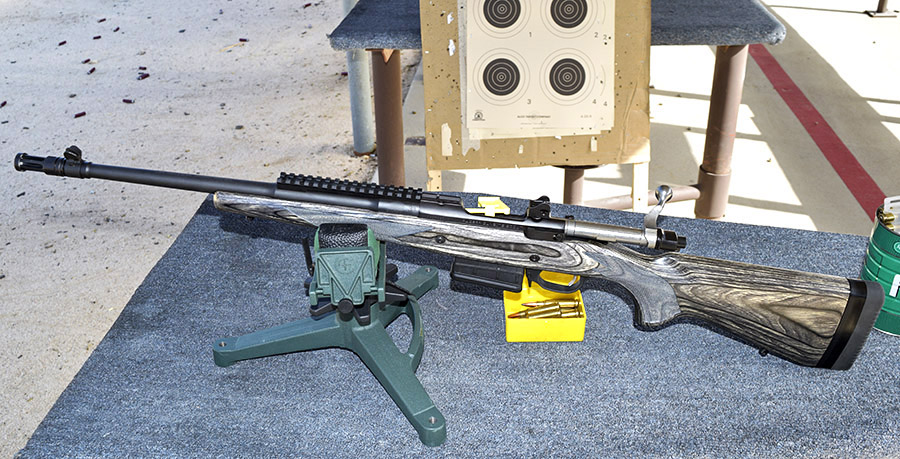
One of my favorite rifles (and one that is a lot of fun to shoot) is my Ruger GSR. I bought one when they first came out; my late buddy Jim Wile did the same. That was 14 years ago. Man, the years are flying by. It seems like it was just a few months ago.
The marketplace is the ultimate authority on what stays in production and what does not, and I guess the market has spoken. My GSR cost about $800 14 years ago, and even though I thought that was a bit pricey at the time, I felt it was still a good deal. I love shooting .308 and I especially love shooting the GSR with its open sights. It is accurate. With certain loads, it can keep five shots in an inch. It fits me like a glove. That was a over decade ago, though, when I was steadier and my eyes were better.
Nothing in this world stands still, however. The price of the GSR climbed to nearly $1500, and Ruger came out with lower cost alternatives on different rifle platforms with the black plastic furniture that’s so in vogue today with shooters who think they know everything (file under: there’s no accounting for some peoples’ tastes).
As one of the world’s largest and most successful firearms manufacturers, Ruger knows what it is doing. But that doesn’t change my feelings. I wish the GSR was still in production.
I’ve posted a number of stories on the GSR. Here are the links:
Boy oh boy, do we have cool stuff coming up on the ExNotes blog! Here are just a few of the things coming your way…
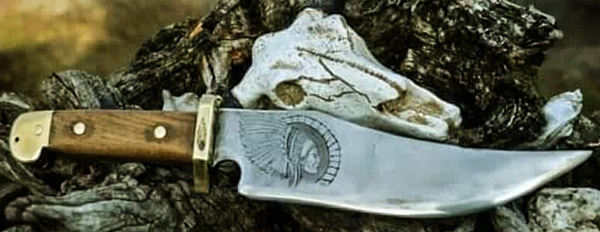
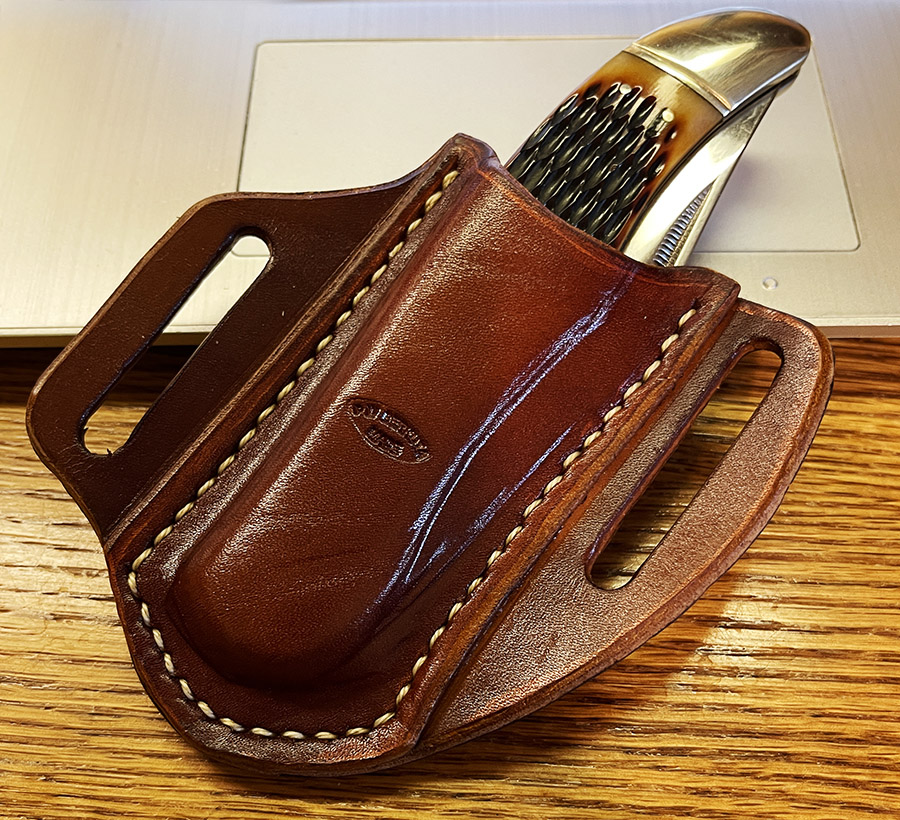
The Rough Rider Knife and Custom Holster
Wow, a super cool Rough Rider large folding knife, so big it actually makes a Buck 110 look small, along with something that makes it even better: A custom-made holster, stitched together by good buddy Paulie B! It’s the one you see at the top of this blog, and it sure is sweet!
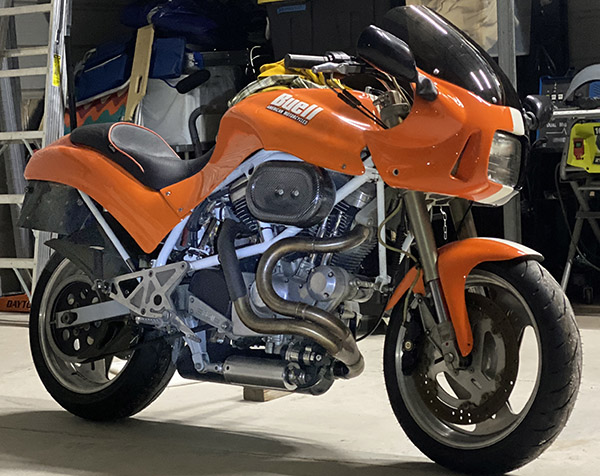
More Buell
Joe Gresh is going great guns with his new Buell. I am so jealous. You can expect more on Joe’s bringing the Buell up to Tinfiny moto standards, and maybe even get a chance to listen to the awesome potato potato potato aural splendor that is the essence of all things Harley.
Good times and good stories coming up on this one, boys and girls, including more on the Iconic Motorbikes auction process. Gresh greatness inbound, folks!
Good Morning, Vietnam!
We are digging Mike Huber’s Tales of the Open Road from Vietnam, and his stories have spiked a significant uptick in donations to the ExNotes site. Being the inveterate veteran that he is, there’s more TOTOR (Tales of The Open Road) revelry from Mike in work.
After Vietnam, it’s going to be Japan TOTOR, and then Colombia. I’ve been to both spots, and like you, I’m looking forward to Mike’s keyboard kraziness. Bring it on!
An Update on the How To Series
I’m doing a lot of How To articles for my favorite moto mag (one that should be yours, too), and that, of course, is Motorcycle Classics. I’m back in the saddle as you read this headed toward Indio and Cycle Garden, home to all that is classic Guzzi.
In addition to the Guzzi goodness, good buddy and ace tech Steve roasts his own coffee beans, and I am already jonesing for that first cup of Joe. The How To articles are running in Motorcycle Classics magazine, and if you don’t have a subscription to Motorcycle Classics…well, you should. Stay tuned!
Dirty Harry Rides On!
We haven’t forgotten our gun stuff. Want to read about a great .44 Magnum load in a superior sixgun? It’s on the way, my friends.
This is good stuff. So much so that Baja John and yours truly are talking about using the .44 Mag sixguns on our next Arizona pig soiree! Sooey! Clint Eastwood, eat your heart out!
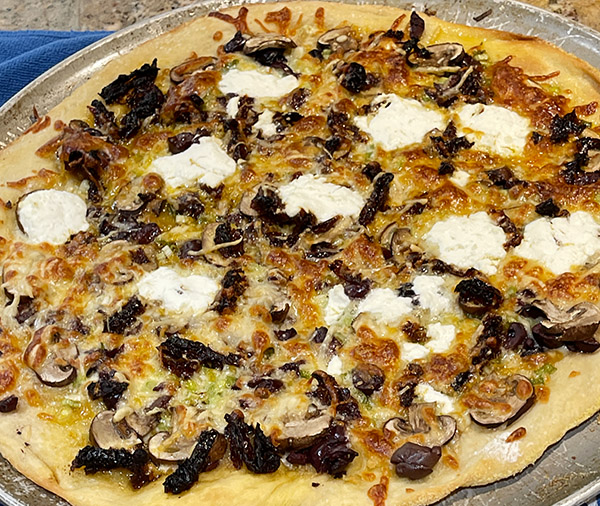
Pizza Pizza Pizza!
It’s no secret…I like to cook. We’ve done a few recipes here on ExNotes before, and we’re going to be adding a lot more. If you can cook, oh, how can I say this? I learned from good buddy Texas John that the easiest way to meet beautiful women was to invite them over for a home-cooked meal. I’m an old married guy now, but prior to that, I put John’s advice to good use!
That’s a story for another blog, and I’ll get to it, but in the meantime, I’ll share my favorite pizza recipe with you in a near term blog. And yeah, that pizza above was as good as it looks!
Stay tuned, folks, keep clicking on those pop-up ads, and work that Donate button you see here and at the bottom of every blog. It’s what keeps us going!
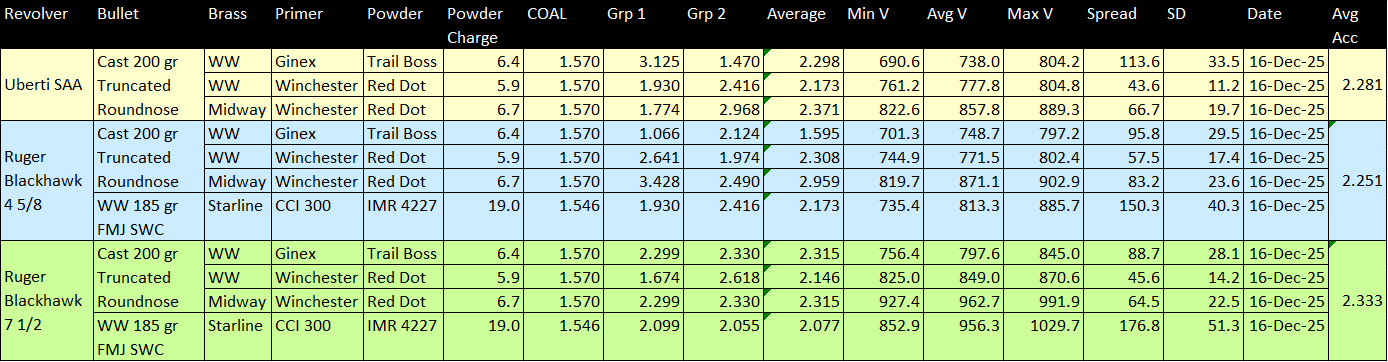
I tested four different .45 Colt loads in three different six shooters yesterday. The revolvers were an 1873 Taylor-tuned Uberti SAA with a 5½ inch barrel, a stainless steel Ruger 4 5/8 inch Blackhawk, and a 200th Year Ruger 7½ inch Blackhawk. Conditions were way less than ideal: It was windy and I was there in the afternoon, which meant I was shooting into the sun on the West End Gun Club’s 50-foot handgun range.
My Uberti with a Schrade stag-handled large folding knife. Both are elegant.
Every time I shoot the Uberti, I’m reminded how elegant the 1873 design is. The Ruger Blackhawks look good and shoot well, but they are a bit “clunky” compared to the old Colt design. The 1873 SAA just feels graceful. It’s a delight to hold and to shoot.
Ruger’s stainless steel, 4 5/8 inch barreled Blackhawk chambered in .45 Colt. It’s a slick sixgun.A 200th Year 7 1/2 inch Ruger Blackhawk, also chambered in .45 Colt. I bought it about 15 years ago; I fired it for the first time in this load evaluation.
As I was unlocking the gate to get into the range, a low-rent-gangbanger-looking, dirty, tattooed guy pulled up behind me in a beat up old white Honda. He obviously had been waiting to follow me in. Even though I’m armed, I’m always a little nervous when I get out of the car to unlock the gate because it’s desolate out there and it’s a good ambush spot. The guy sure didn’t look like a Republican to me. I asked him to show his membership card and he went into his “no habla” routine. I told him I wouldn’t leave the gate open without seeing his membership card, and he suddenly had enough “habla” to understand that. He turned around and left. A recent WEGC email explained that these guys steal brass and other stuff from the range, so I’m guessing that’s what this dirtball wanted.
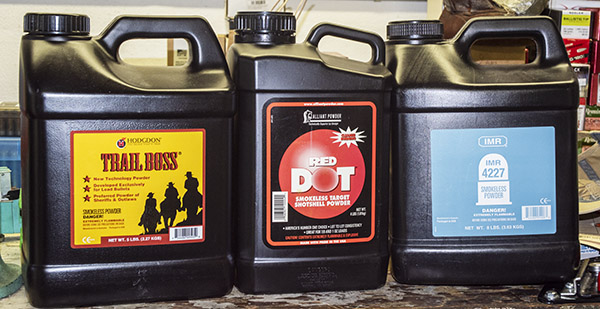
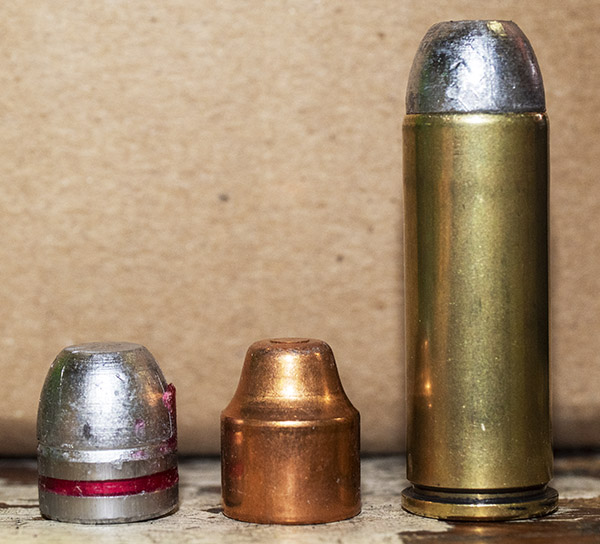
The three propellants used for this test series: Hodgdon Trail Boss, Hercules Red Dot, and IMR 4227.The 200-grain cast bullet, the 185-grain Winchester jacketed semiwadcutter, and a loaded .45 Colt cartridge.
The loads used Trail Boss, IMR 4227, and Red Dot powder. I had been loading .45 Colt with Trail Boss because it is what the Cowboy Action Shooters use and it was presumably a low velocity load. To my surprise, the Trail Boss velocities were only very slightly below the other powders’ velocities. I loaded with two different bullets (Winchester’s 185-grain jacketed semiwadcutter and a 200-grain cast roundness bullet with a truncated ogive).
The results of my testing are in the table below. The table’s font (as it appears in the blog) is tiny, but if you click on it, the table will open with a larger and more readable display.
Here are the inferences I make from the above data:
There are some large groups sprinkled in the above data (above 3 inches); that’s probably due to the poor shooting conditions and me. My first group was one of the worst; I attribute that to me settling down for subsequent groups.
I used Alco’s target with four mini-silhouettes. Shooting conditions were less than ideal.
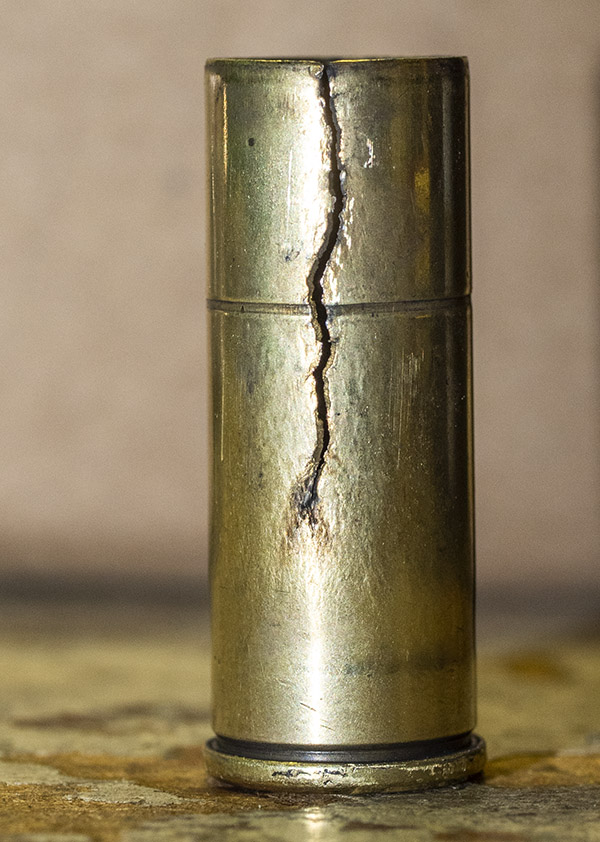
I also noticed that one of the cases had split, and the bullet from that case would have been a flyer. With the exception of the one case that split, none of the cartridges exhibited any pressure signs. All cases extracted easily (other than the one that split) and none had flattened primers.
It happens. This cartridge case had been loaded one too many times. When this occurs, it results in a flyer.
The Lee cast bullet reloading manual shows the 200-grain truncated roundnose bullet accuracy load to be 5.6 grains of Red Dot, which is at the very bottom end of the range. I went with 5.9 grains because the Red Dot loads don’t occupy much of the case volume and I felt uncomfortable with that. I might try the lower load of Red Dot (i.e., 5.6 grains) next time I’m reloading, but I think I’m going to just stick with 5.9 grains. It works well enough in all three revolvers.
The Trail Boss spreads and standard deviations were large, which surprised me. I’ve had good accuracy at 50 feet with this powder, but the large standard deviations mean that at longer ranges the accuracy will be poor. I could feel the difference in recoil with the Trail Boss load; one round would give a sharp crack back, and the next might be much lighter. The Trail Boss chronograph data supports that subjective assessment.
I have a lot of Red Dot propellant, so I wanted to evaluate it in the .45 Colt. It did well. In general, the Red Dot velocity spreads and standard deviations were lower than those with Trail Boss or IMR 4227. That was a surprise, too.
Overall average group size (all guns, all loads) with the cast 200-grain bullets was 2.275 inches. Overall average group size (all guns, all loads) with the full metal jacket semi-wadcutter Winchester bullets was 2.125 inches. That’s not much of a difference.
You might be wondering why I didn’t try the IMR 4227 loads in the Uberti SAA. I thought these would be a lot hotter loads because the load data was for Ruger revolvers. Turns out the velocities were in line with the Trail Boss and Red Dot loads. I could have shot the IMR 4227 in the Uberti, but I didn’t realize that when I was on the range. I was very surprised at the huge velocity spreads and standard deviations with IMR 4227.
Recoil for all the loads listed in the table above was not oppressive. But I wouldn’t characterize the recoil as light, either. The .45 Colt is a big cartridge.
As expected, the 7 ½ inch Blackhawk velocities were slightly higher than were those for the other two shorter-barreled revolvers. The longer sight radius on the 7 ½ Ruger didn’t make much difference in accuracy. That’s counterintuitive. It may just be that the wind and shooting into the sun masked any advantage the longer sight radius offered.
Overall accuracy for the revolvers with all loads was essentially the same (see the last column in the above table). I could repeat this evaluation under better range conditions, but I think I have enough information to select a good load. While the groups were not stellar (they were in the 2-inch+ range), the above convinces me that Red Dot is a good powder in .45 Colt. I’ll probably standardize at 5.9 grains of Red Dot with the 200-grain cast bullet. The velocity is high enough for my purposes and I love that low standard deviation.
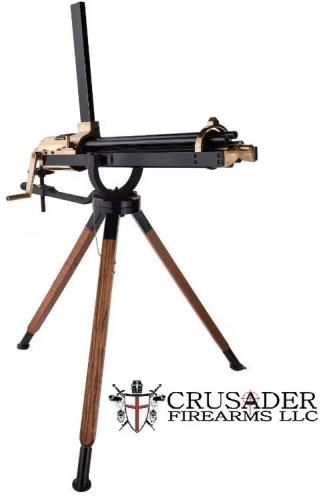
I’m a student of the Gatling gun and as you tell from reading this piece, I’m a big fan of the .45 Colt cartridge. After finishing this blog, I briefly wondered: Were any of the original Gatlings chambered in .45 Colt? The short answer is no. Even though the .45 Colt was a prevalent cartridge during the era of the original Gatlings, none were built for this cartridge (they instead used the much more powerful .45 70 rifle cartridge). That was then, though, and this is now. You can buy a current reproduction of the Gatling chambered in .45 Colt. That would be cool, but it would be expensive to keep such a beast fed.
Crusader’s .45 Colt Gatling Gun. It’s only $8149.99.
If you want to know more about Gatling guns (including their early history, the transition to modern weapon systems, and their current applications), pick up your copy of The Gatling Gun.