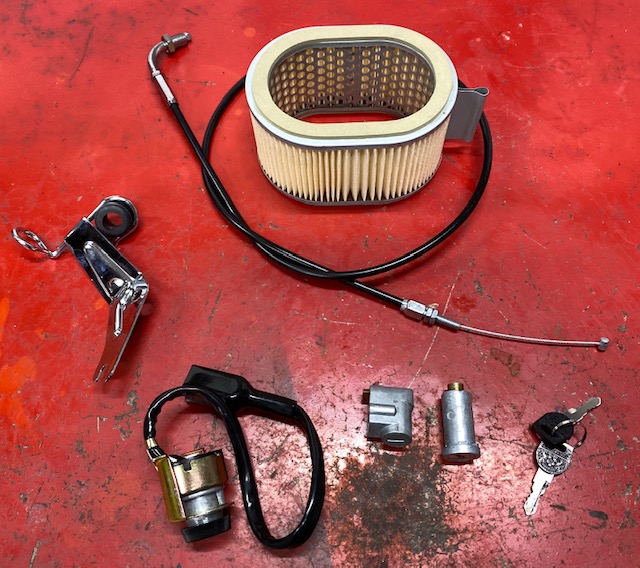
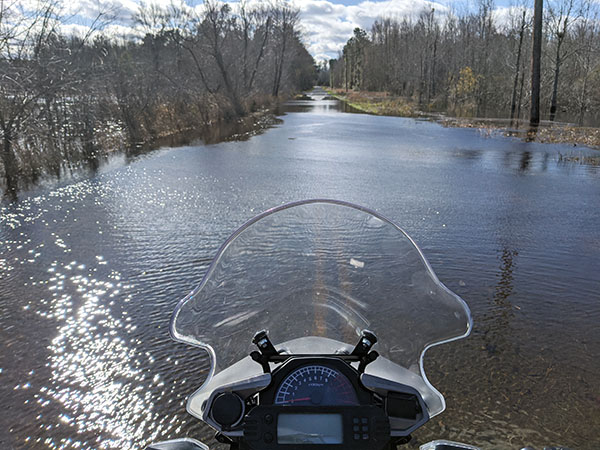
The pace has quickened here at Tinfiny Ranch. Lots of new parts from Z1 Enterprises arrived and lots of new ground was covered on Zed’s resurrection. We are going to ride like the wind soon. In Part 17 the ignition switch was giving me trouble but that’s been resolved with all new locks from Z1E. I had to dismantle the headlight area to replace the ignition and the under-seat area to install the new seat lock. The fork lock was easy. I should have gone with new parts in the first place. Ah well, if I didn’t do stupid things no one would understand me.
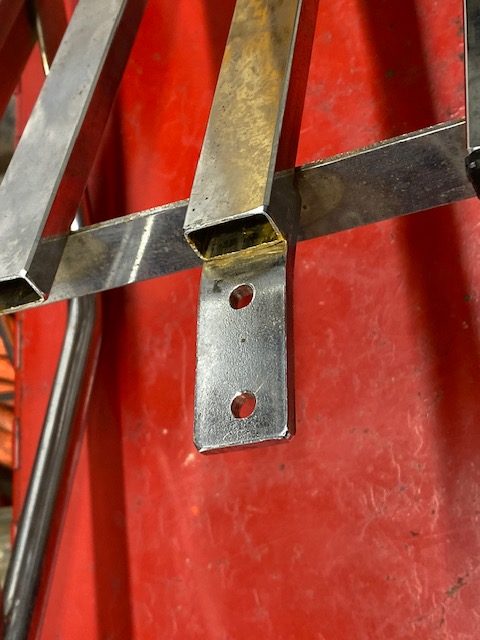
The luggage rack I bought from ebay fit Zed only in the broadest sense of the word. It was made to connect to the original grab bar on this tab but I don’t have the grab bar. That’s ok because it sat way too far back on the bike for me. Like 6 inches past the taillight. I lopped that tab off and shortened the rack where it mounts to the top shock bolt.
Without the tab or grab rail there was nothing to hold the rack from flopping down onto the rear fender. Using a New Mexico hammer-and-14mm deep socket-roll forming machine I knocked up two brackets that fit into the old grab rail mounting holes. I made a 1-inch spacer out of some solid steel round stock that had lain in Tinfiny’s driveway for several years.
The rack looks much better tucked in tight but cantilevered as it is, I’m not sure the tubing will be strong enough to hold much gear. I may redesign the rack with a long gusset running on the bottom of the tube that will incorporate the mounting tabs for a rearward set of blinker tabs. Moving the blinkers aft will allow me to use those toss-over, Pony Express style saddlebags.
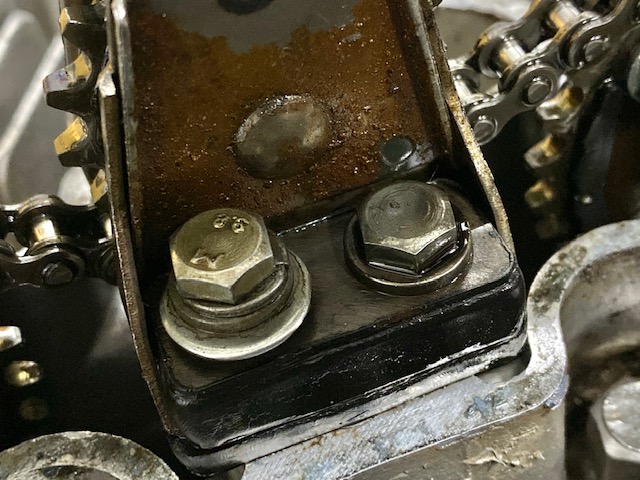
Zed’s lower, right-side engine mount was missing and I’m getting tired of buying parts for this bike so I made a paper template and cut a chunk out of an old motorhome bumper that had also laid in Tinfiny’s driveway for years. I hate to disturb the junk buried around Tinfiny because it stabilizes the soil. You never know which part you pull out of the ground will cause a landslide. It’s like living atop a Jenga stack.
The mount is not as nice as a stock mount but it’s way on the bottom. No one will ever know.
I also bought a new seat! Replacement foam and a new seat cover added up to nearly the same as a whole new seat so I bit the bullet. It tasted like brass with a hint of lead. The seat came complete with brackets, rubber supports and seat latch. It was missing only the pivot pins that hold the seat on. Using my New Mexico hand-lathe, I spun down a ¼-20 stainless bolt to fit through the frame brackets. A hole for a cotter pin & washer keeps the seat pins from falling out.
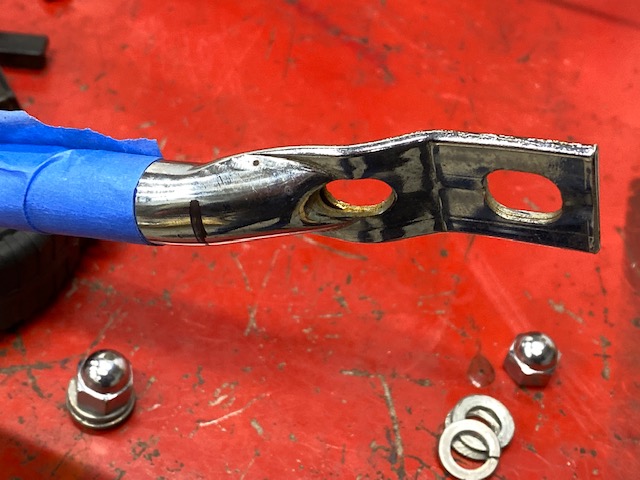
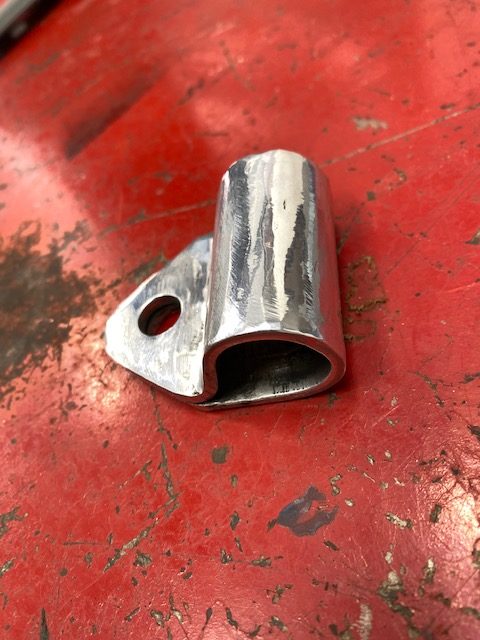
Besides rebuilding the caliper and master cylinder in a previous Zed installment I replaced the rubber hoses and the missing hose support down by the fender. I also had to replace the solid pipe from the caliper to the lower brake hose.
Bleeding the brakes was fairly straightforward. So far nothing has leaked out of the rebuilt parts. The lever feels a bit mushy; I’ll let it sit a bit to let the air bubbles coalesce then try a little more bleeding.
I rigged the bike with a spare battery and tested all the electrical circuits. Amazingly, everything works. The alternator works a little too well putting out 17 volts to the battery! Not to worry, another $100 has a new Z1 Enterprises regulator/rectifier on the way. The new unit is not an exact replacement. The regulator/rectifier is all in one finned casting unlike the stock Kawasaki set up where the two functions are separate parts.
The last time I ran Zed way back in Zed’s Not Dead 10 it ran and idled great. Now the bike is popping and won’t run off choke. The poor quality of gas sold today turned dark red in a very short time so I have removed the float bowls and will blast the carbs with aerosol carb cleaner. Hopefully this will get the bike running normally as I don’t want to take those damn carbs apart again.
Read our earlier Zed’s Not Dead installments for the rest of the resurrection!
So you’ve probably noticed I haven’t been riding too much lately. You know how it goes…it gets cold, you have other things going on in your life, you want to send some lead downrange, and on and on it goes.
I needed to break that pattern, and there’s no better way to do that than to buy a motorcycle. Yeah, I know…I already have two motorcycles (what has to be the world’s most well-traveled RX3, and a pristine, low miles TT 250). I like CSC motorcycles. But you may recall that Uncle Joe Gresh and I road tested two Enfields last year and I fell in love with the 650 Interceptor.
Down Mexico way…dinner at the San Remedio in Guerrero Negro. Life is good, folks.
I was primed to buy a Royal Enfield when I returned from Mexico, but the Enfield dealer in Glendale had done a God-awful job prepping the Bullet (I wouldn’t buy squat from those guys now), and the Enfield dealer in Brea was doing the normal bend-you-over-a-barrel, here-comes-the-setup-and-freight-charges routine. Folks, I’ve worked in the industry, and I know what setup and freight costs actually are. Trust me on this…they ain’t $1500. So I didn’t buy an Enfield.
Then an amazing thing happened. One of the few dealerships I trust picked up the Enfield line last week. It’s Art Guilfoil’s Douglas Motorcycles in San Bernardino. I asked Art what he could do for me on a new Enfield, I was shocked at how low the number was (don’t ask, because I won’t tell), and, well…
I think this is No. 42 or No. 43 or something. I’ve owned a lot of motorcycles. This is the latest. Sue is cool with it, too!
I’m picking up my new 650 Royal Enfield on Thursday, and to say I’m excited would be an understatement of immense proportions. It was a tough call for me between the Enfield and the new CSC RX4, but truth be told, I love my RX3 and it checks all the boxes for what I want in an adventure touring motorcycle. Arguably, the RX3 is the finest adventure touring motorcycle in the world if you’re going places other than the corner burger joint (for all the reasons I explained in my piece titled Why a 250?). I know. I’ve been to places other than the corner burger joint, and I’ve made most of those trips on an RX3.
So with my new Royal Enfield coming in, it begged the question: What should I do with my RX3 and TT 250? My first thought was that I’d sell them. Then I got to thinking about the RX3. I’ve done some miles on that thing, folks, and we’ve bonded. Nope, I’m going to hang on to it. Baja beckons, and all that. The RX3 is perfect for poking around the peninsula. And next, month, that’s where I’m headed. Susie’s going with me, and we’ll share a Tequila or two with Baja John. You can read about it here.
That leaves the TT 250. Hey, I was involved in bringing the TT 250 to America, and it all started when I eyeballed the 150cc version on display in Zongshen headquarters. It was a bit of an uphill struggle…you know, getting Zongshen to make a 250cc version, and then selling the idea in Azusa. I got the powers that be to go along and then I was out of town when the prototypes arrived in California. A couple of the CSC underlings didn’t like the bike, and I had to sell it in Azusa all over again. But it worked out, and the TT 250 is one of CSC’s best selling motorcycles ever. It should be…it is a hell of a bike for a stunningly low price.
My TT 250 on the road at La Rumarosa in Baja.
With the Enfield coming in, I thought I would sell my TT 250. Hell, it’s pristine, but because I don’t ride it too much, the carb gummed up on me. I thought maybe I’d bring it to CSC and have them make it perfect again, and then another serendipitous thing occurred. A few days ago, a post popped up on Facebook (why do I spend so much time on that moronic site?) from Revzilla, and what do you know, it was about doing your own maintenance on a CSC motorcycle. In this case, it was the San Gabriel (a wonderful name for a motorcycle if ever there was one), and the guys from Revzilla said the CSC shop manuals were wonderful. I thought that was great for a lot of different reasons, including the fact that, along with help from Gerry Edwards and the guys in the shop, I wrote many of the CSC manuals. Then I realized…hey, I wrote the TT 250 manual. I can fix my own carburetor. I looked up the carb stuff and this afternoon I took mine apart, I cleaned the low and high speed jets, and now my TT 250 is running great. There’s something uniquely satisfying about fixing your own motorcycle, and the Revzilla boys were right: Those CSC manuals are amazing. So are the motorcycles. And so is the 650 Enfield. I know, because I took one on what had to be the longest demo ride ever…all the way to Baja and back!
More good times coming up, folks, on the Royal Enfield 650 Interceptor!
I noticed my good buddy and Facebook friend John’s post about his decision to purchase the RX3 instead of the new RX4 on the Facebook CSC page and I thought it was well done. Both the RX3 and the RX4 are great motorcycles and I enjoyed reading John’s analysis, so I wrote to John and asked if I could post it here on ExNotes. John said yes (thanks much, Amigo), so here it is.
RX3 versus RX4
By John Franklin
I recently bought a new RX3, and yes the RX4 was available at the time. I have gotten more than one pm asking me why I didn’t go with the RX4. It’s a very valid question. My last ride was a 2016 KLR650, so the RX4 is much closer in power. While that is true, it’s only part of the picture. I paid $5700 for my KLR, the close to another $3500 for givi luggage, panniers, crash bars, skid plate, tires, USB power, heated grips, progressive front suspension, better seat, folding gearshift, handguards, GPS and on and on. Yes I rode it; I spent more time off road than on road. I did several two week long adventures. Then I had back surgery.
There’s good riding in John’s neck of the woods (photo by John Franklin).
In considering a new bike, post back surgery, I was really looking at what I could do without hurting myself, and what I really needed, as well as what I could spend. I was out of work for a year, and kinda tight on funds. My list was fairly firm on what I had to have. I wanted a lighter bike to start with. I needed luggage, hard panniers and a top box big enough for my helmet. Crash bars, skid plate, and real hand guards were also a non-negotiable must. Heated grips were also high up there.
A shot of John’s RX3 in it’s natural surroundings (photo by John Franklin).
With that firmly established, I started looking. I found used bikes and older bikes. A random link in a article I was reading led me to the RX3. I ignored it; then I began to see more and more mentions of the RX3. So I really dug in. The chinariders forum was a great resource. I have ridden bikes all over the world and ridden all kinds of makes, so I was not initially put off by the non USA mainstream brand.
Once I decided that it was a valid option and I started looking, here is how it broke down.
The 2019 RX3 with heated grips, handguards, taller top box, Wolfman tank bag, USB power outlet, led headlight upgrade and extra oil filters was $4602.95. That’s what I paid CSC. I had to pay SC sales tax, SC property tax and the registration fee. Grand total was $5100.63. That is what it cost me for everything. All fees, taxes and bribes.
A RX4 starts at $4995, add the $400 shipping fee, handguards $109, luggage $490, tank bag $90, heated grips $109, skid plate $160, crash bars not available for RX4 and oil filters $50 we are at $6403. SC sales tax, property tax and tag fee would put it right at $7200. A difference of $2100. And at the $7000 range I could find a good used BMW 650GS, on which I could get out of the sales tax and not being new, the property tax would be a joke. Plus I would have to create a set of crash bars (which was actually a plus, because I love fun stuff like that).
Go ahead…what’s the worst that could happen? (Photo by John Franklin.)
I admit, I have put more than a little into the RX3 after deciding I like it. Bar risers, better tires, better chain, 13T front sprocket, folding shift lever, GPS mount… You get the idea. But I would have done the same to anything I decided to keep and ride. It honestly came down to two things for me. Value of the purchase (not price in and of itself), and weight.
CSC has been great, and it is a wonderful company, even if the service guy hates replying to emails, but he reads them and will talk for hours on the phone. I don’t regret it. Hopefully in a couple of years I will be able to ride a larger, taller bike again, but this thing was a good purchase.
If you’d like to see more on the RX4, and comparisons of the RX4 to the RX3 and the KLR 650, please check out our ExNotes RX4 page! And if you’d like to know more about the RX3 and the RX4, mosey on over to the CSC Motorcycles page. Hey, one more thing…if you’d like to read about real world adventures on the RX3 (I’m talking good stuff here, folks, like riding across China, Colombia, the US, and Mexico), you should buy any or all of the books listed below!
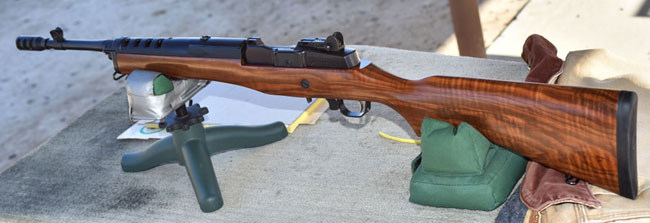
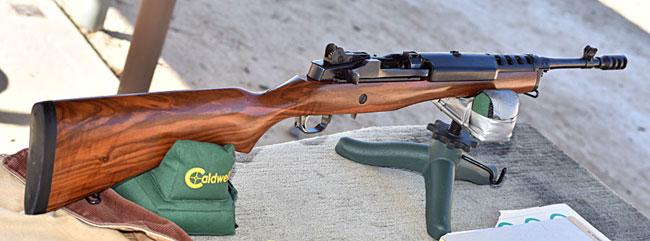
The Davidson’s Circassian walnut Ruger Mini 14. It was a limited production item offered for sale about 10 years ago.
My Mini 14 quest for accuracy is over. I have the answer and an honest-to-God 1.5 MOA Mini 14. With open sights. At 100 yards. Yippeeee!
It’s been an interesting journey.
Davidson’s Circassian Mini 14
I like rifles with fine walnut, and about a decade ago when Davidson’s (a large Ruger distributor) offered a limited quantity of Mini 14 rifles with Circasssian walnut stocks, I had to have one. Most of the Circassian Mini 14 rifles had very plain wood, but when I saw the one you see here, I pulled the Buy Now trigger. That’s a light trigger, I’ve learned. If it’s for a rifle with highly-figured walnut, in my case you might even say it’s a hair trigger.
Another shot of the Circassian walnut on the Davidson’s Mini 14. That’s a Springfield Armory M1A in the background. I like fancy walnut.
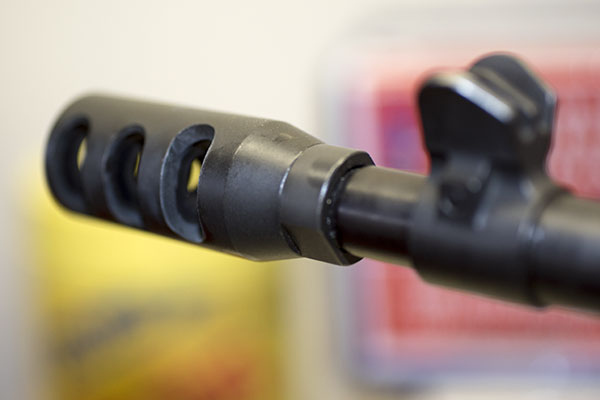
The problem I had is that Davidson’s Circassian Mini 14 wasn’t legal in California because of its two 30-round magazines and flash suppressor. Here in the Peoples Republik of Kalifornia (Gavinland, if you will), we can’t have mags that hold more than 10 rounds, and semi-auto rifles with flash suppressors are verboten. So I had the rifle shipped with no magazines to an outfit with a Class III license, and they replaced the flash suppressor with a muzzle brake. Then I had to wait my state-mandated 10-day cooling off period. After I had chilled sufficiently, the rifle was mine.
The muzzle brake on my Mini 14. It may seem silly to have a muzzle brake on a .223 rifle, but if you fire this rifle and then a Mini 14 without a muzzle brake, there is a perceptible difference in recoil.
I think the muzzle brake looks better than the flash suppressor, and I don’t need a 30-round magazine. I hated the idea of leaving those 30-round mags with the guy I bought the rifle from (they were worth about $80), but hey, our mush-minded legislators think they made the Golden State safer and that’s what matters.
My rifle has a 16-inch barrel (most Mini 14 rifles have 18-inch barrels), which looks cool but it is not conducive to great accuracy. There’s nothing inherent to the shorter barrel in and of itself that hurts accuracy, but what that shorter barrel does is reduce the sight radius. A longer sight radius offers an accuracy advantage, a shorter one can work against accuracy.
The bottom line? The rifle is beautiful. I shoot it a lot, and whenever I’m on the range with it, folks are taken with it. It draws a crowd. You just don’t see Mini 14 rifles with wood like mine. But it wasn’t terribly accurate. I was going to change that. And I did.
The First Accuracy Mod: Tech-Sights
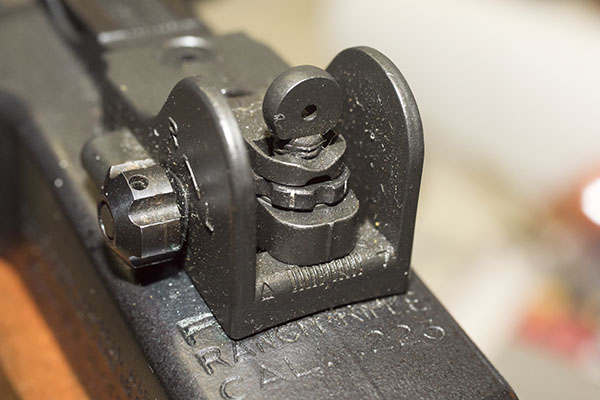
I did not like the standard rear sight on my Mini 14. To adjust elevation, you had to loosen the windage adjustment and then rotate the entire rear aperture, and to adjust windage you had to loosen both Allen screws at the base of the sight and move it. There was not indexing for windage, so where you ended up was only repeatable with a repeated fire, check the point of impact, loosen the sight, adjust, tighten the sight, fire again, and repeat until you were happy. I also didn’t like the range of elevation adjustment on the stock sight; it seemed liked the aperture had to be way too high to bring my shots to the point of aim.
The Tech-Sights rear sight on a Mini 14. It’s a first class product, and it is much better than the stock Mini 14 rear sight.
The hot setup is a replacement rear sight from Tech-Sights. It was about $70, but it was well worth it. The Tech-Sights rear sight is click adjustable for both windage and elevation, and it is repeatable when I make adjustments. It’s a much better mousetrap.
Mini 14 Accuracy Loads
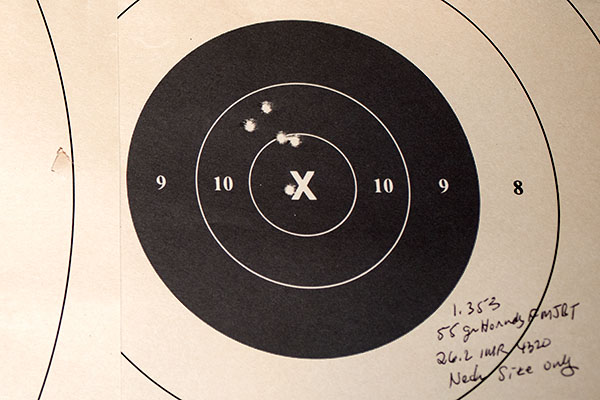
I tried different reloading recipes until the cows come home, and over the last decade, I’ve converged on two that gave the best results in my Mini 14. Both use inexpensive Hornady full metal jacket boat tail bullets. The first is the 55-grain Hornady FMJBT with 26.2 grains of IMR 4320 propellant, a Winchester small rifle primer, and a cartridge overall length of 2.255 inches. That’s a near max load, and the only reason I don’t run it up to the max load is the 26.2 grains damn near fill the .223 case. The second favored load is the Hornady 62-grain FMJBT bullet with 23.2 grains of ARComp propellant. I use the same primer and overall cartridge length as the first load.
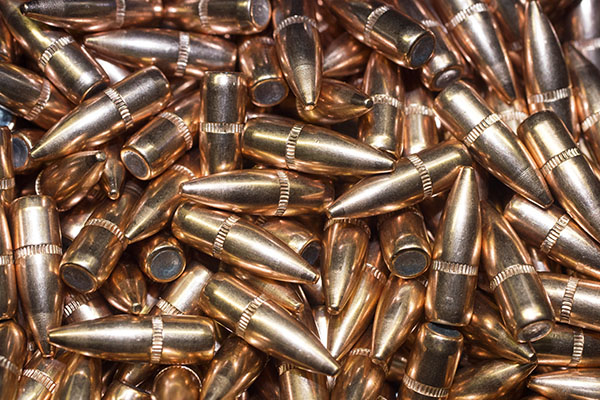
Hornady 55-grain full metal jacket boat tail bullets. The boat tail reduces aerodynamic drag and allows a flatter trajectory, or so the theory goes. These are accurate bullets with the right load.
Either bullet (Hornady’s 55-grain or 62-grain FMJBT) can usually be purchased for something between $7.50 and $8.00 per hundred when they are on sale. I probably get 10 emails a day from the different reloading houses advertising their sales, and when they throw free shipping into the mix, I’m in. You usually have to order above $100 in stuff to get the free shipping, and that’s why I have 1400 of the 62-grain Hornady bullets inbound. I’ll burn through those in 6 months or so. Yeah, I shoot my Mini 14 a lot.
I don’t crimp the bullets in either of the above loads, and I’ve found that what kind of brass I use doesn’t make a difference in group size. Using brass from different manufacturers does move the group around, though, so when I load, I do so using only one kind of brass for each lot of ammo. For me, that is usually either Remington or military brass. I have a good supply of both.
Factory versus Reloaded Ammo in the Mini 14
There may be good factory ammo out there that groups well in the Mini 14, but I haven’t found it. I buy bulk factory only to get the brass (believe it or not, when loaded bulk ammo goes on sale, I can actually buy it for less than what unprimed brass costs). When I shoot the bulk factory ammo, the accuracy is truly abysmal. At 100 yards from a bench rest, a 20-shot Remington bulk ammo group spans about 12 inches. For all you keyboard commandos out there…I know, you can do better. One guy keeps commenting that he can shoot the lock off a Cadillac with his Mini 14. Whatever. I’m reporting my results, and with factory ammo, they’re terrible.
With either of the two reloading recipes described above, I can get the group size down to about the size of the 9-ring on a 100-yard target. That’s a big improvement from factory ammo and the other loads I’ve tried. The problem, though, was the rifle wasn’t consistent. I could get a good group, but then the next one would open up. Then I’d get another good group, but it would shift on the target from the last group.
Bedding the Mini 14 Action
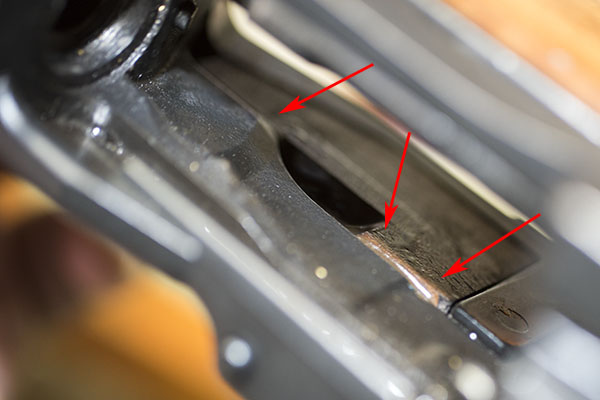
Past accuracy quests with bolt action rifle always included bedding the action. What that means is creating a glass-fiber-impregnated epoxy bed for the barreled action in the stock. It’s a lot trickier on a Garand-style rifle (which the Mini 14 is) than a bolt action, because the Garand-type action doesn’t have a conventional recoil lug or action screws. On the Mini 14, two tabs on the receiver fit into sheet metal inserts in the stock, and the trigger group’s trigger guard pivots to lock the whole mess (barreled action, stock, and trigger group) together. On my rifle, I could detect a minor amount of play between the stock and the barreled action, both fore-and-aft and left-to-right.
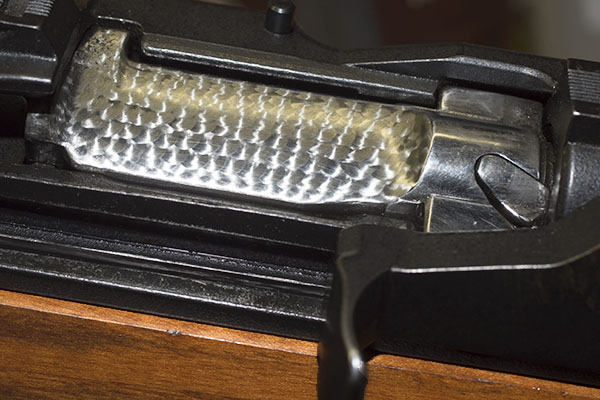
The jeweled bolt on my Mini 14. This photo doesn’t really add to the story and the bolt jeweling does nothing to improve accuracy, but I love the look. The jeweling was done by my good buddy TJ at TJ’s Custom Gunworks. I locked the bolt to the rear for the next photo so you could see the glass bedding.That brown stuff is the glass bedding below the action, between the receiver and the stock. Bedding a Mini 14 is a bit tricky, but it worked out well for me.You can just barely see that there is Acraglas bedding beneath the receiver, between it and the stock. The reason you can barely see it is because I did it well.
I used Brownell’s Acraglas as the bedding compound, and after reading and watching everything I could on the Internet about glass bedding a Mini 14, I did so with mine. It turned out well, I think. There is zero play between the barreled action and the stock now.
ASI’s Mini 14 Gas Port Kit
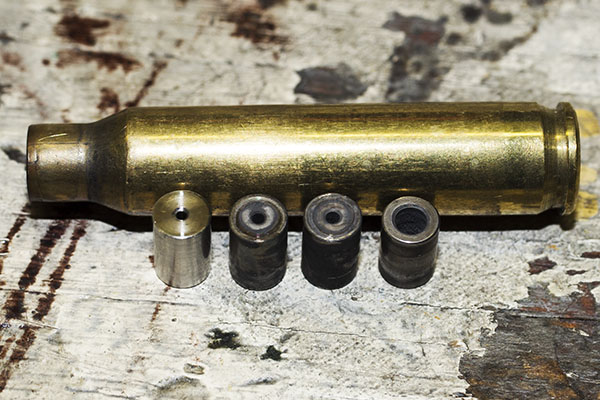
I wrote about this before in a previous blog. The Mini 14 throws brass into the next county, and that’s a real pain in the ass. I’ve actually dented cars behind the firing line with brass ejected from my Mini 14. The reason the Mini’s ejection is so violent is that Ruger overdesigned the ejection approach to make the rifle reliable. Ruger uses a gas port with an approximate 0.085-inch-diameter opening to port propellant gas to the op rod, and that pretty much guarantees that no matter what type of ammo you’re shooting, the rifle will function. It’s way more gas pressure than the op rod needs, though, and the ejection is so energetic that the barreled action doesn’t stay in the same place after each round. That hurts accuracy.
Mini 14 gas ports. The three on the left are ASI’s 0.035, 0.040, and 0.045-inch diameter ports. The fourth port in the kit (a 0.050-inch diameter port) is currently in my rifle. The port on the right is the stock Mini 14 gas port. You can see its ID is huge.There are four Allen bolts securing the upper and lower Mini 14 gas blocks. You have to remove the barreled action from the stock and unscrew these four bolts to replace the gas port.As delivered by Ruger, the gas block Allen bolts are staked in place. Getting them out (and back in again) takes some muscle.
As an aside, the Mini 14 is kind of like the AK 47 with regard to its ejection energy. Both rifles have excess margin in the extraction and ejection gas porting design to make sure they always work.
The ASI gas port kit includes four bushings with different diameter ports, and the idea is you try each one to find the bushing that gives you reliable function. You want to use the smallest one possible consistent with reliable operation. I’ve tried all four and I’m now at the 0.050-inch port (the largest one in the ASI kit), and it is usually reliable, but not always. I still get an occasional failure to extract. I may take the smallest one (with its 0.035-inch bore) and have it opened up to 0.060 inch, but that will come later. I’m not going into combat with my Mini 14, so I can tolerate the occasional failure to extract. I like to think of my Mini 14 as a SHTF rifle, but truth be told, I’m more concerned about shooting tiny groups than I am about doomsday scenarios. Your mileage may vary.
I think the reason the largest of the ASI ports still sometimes fails to extract is because my rifle has that short 16-inch barrel, which imparts a little less of a gun gas pressure pulse to the op rod than would a rifle with an 18-inch barrel. It may be another disadvantage of the shorter barrel.
ASI Gas Ports and Glass Bedding
My last Mini 14 blog was on the effects of both the glass bedding and the ASI gas port. Both of these upgrades made a difference, but the rifle still wasn’t where I wanted it to be from an accuracy perspective. Interestingly, the dispersion got smaller top to bottom, but it was still about the same left to right as it had been with my preferred 62-grain bullet load.
Better, but still no cigar on a 100-yard target. Glass bedding and the 0.050-inch ASI gas port reduced vertical dispersion to about 3 inches and brought the lateral dispersion down to about the size of the bullseye, but I still wasn’t where I wanted to be.
5.56 NATO versus .223 Ammunition
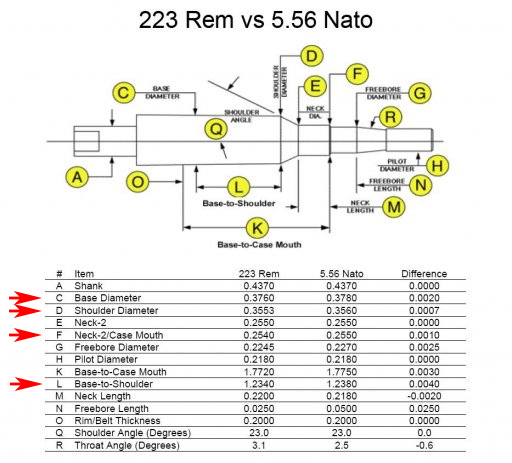
Ah, here’s where things start to get both technical, and to ballistics geeks like me and you, extremely interesting. You might be wondering why this blog is suddenly going tangential into a discussion of 5.56 NATO ammunition and the .223 Remington commercial cartridge. Bear with me and it will all come together.
As we proceed, keep this in mind: Even though the Ruger Mini 14 is marked as a caliber .223 rifle, it has a 5.56mm NATO chamber.
For starters, there is a difference between the two cartridges (they are loaded to different pressure levels, with the 5.56mm NATO cartridge loaded to higher pressure than the .223 Remington cartridge), but the 5.56mm NATO and commercial .223 Remington share identical exterior dimensions. Military (i.e., NATO) ammo has thicker case walls, which means the interior volume decreases slightly, but on the outside, the dimensions are the same.
Okay, the above addresses the two cartridges. Now, let’s consider the two chambers (the part of the rifle that surrounds the cartridge). There are lots of differences between the chambers in a 5.56 NATO rifle versus a rifle chambered for the .223 Remington cartridge. The first is the leade (the distance between the case mouth and where the rifling begins in the barrel). Rifles chambered for the 5.56 NATO round have approximately twice the leade as do rifles chambered for the .223 Remington cartridge. That’s what allows the 5.56 NATO round to be loaded hotter than .223 Remington cartridge (it’s exactly the same thing you see in a Weatherby rifle; they are cut with longer leades to allow loading the cartridges hotter for more velocity). Because longer leades allow loading a cartridge hotter (the bullet is free to move a little more before the rifling resists it), the longer leade allows higher muzzle velocities. But longer leades may allow the bullet to tilt a bit before it hits the rifling, so rifles with longer leades tend to be less accurate. In a bolt action or single shot rifle, you could account for this by seating the bullet out further in the cartridge case to get it closer to the rifling, but you can’t do that in the Mini 14. If you seat the bullet out further, the cartridges won’t fit in the magazine.
All that business above about the 5.56mm NATO chamber’s longer leade is interesting, but it’s not the primary concern here. The bigger concern as it pertains to the Mini 14 (and its 5.56mm NATO chamber) is that the 5.56 NATO chamber is slightly larger than is a chamber for the .223 Remington cartridge. That’s to meet the military’s combat reliability requirements (a rifle with more clearance between the chamber and the cartridge is less likely to jam). The difference in the two cartridges’ chamber dimensi0ns is shown in the chart below.
In particular, note Dimensions C, D, F, and L, which govern the length, neck location, and diameter of the chamber. As you can see above, they are all larger for the 5.56mm NATO chambered rifle, and like I said above, the Mini 14 has a 5.56mm NATO chamber. The cartridge has a lot more clearance between the case and chamber walls in the Mini 14 than it would in a rifle with a .223 Remington chamber. The cartridge can move around in the Mini 14’s chamber, and that hurts accuracy. Big time, as it turns out.
With one exception in the Mini 14 family (that was the Mini 14 Target, which was kind of a commercial flop), the Mini 14 has a 5.56mm NATO chamber, because Ruger designed the rifle to work with either 5.56mm NATO ammunition or .223 Remington commercial ammunition. What that means to us is that the rifle is not optimized for accuracy. There’s a greater bullet jump from the cartridge case to the rifling, and there’s more clearance around the cartridge due to the slightly larger chamber. Both work against optimal accuracy.
Neck Sizing Mini 14 Brass
Well, that chamber issue sure had my attention as a potential significant contributor to the Mini 14’s accuracy woes. It made me wonder: Would neck sizing the brass (rather than full length resizing) make a difference? Maybe the Ruger’s chamber is just too loose to be accurate, I thought.
So what is neck sizing? There are two approaches to resizing brass during the reloading process. The first is that you full length resize the brass, which brings it back to factory specification. The entire case is resized, including its diameter along the full length of the cartridge case, the case neck diameter, and the location and angle of the case shoulder (you know, where it necks down to the part of the case that holds the bullet). The other approach is to neck size only, and the idea here is you leave most of the case (in its post-fired condition) alone and only resize the part of the case that holds the bullet. The concept is that the case has formed (we call it fireforming) to the exact dimensions of the chamber in which it was fired, and resizing only the neck assures a near perfect fit of the reloaded cartridge in the rifle that previously fired it. It should be a near perfect fit around the case diameter and from the case shoulder to the bolt face. It should theoretically improve accuracy because the cartridge and its bullet are in exactly the same position for each shot.
I know you usually would not ordinarily neck size brass for ammo to be fired in a semi-auto rifle, as it could degrade reliability. But my thinking was maybe the Ruger’s chamber is so big it would work. As a first step, I tried an empty case that had been fired in the Mini to see if it chambered and extracted easily. It did.
.223 cartridge cases that have been neck sized only. Only the area between the arrows has been resized. The rest of the case is left in its fireformed condition. It will more closely match the dimensions of the Mini 14 chamber in which it was fired.
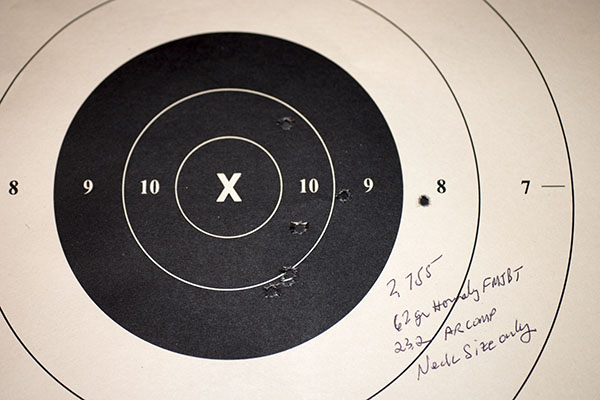
There are two approaches to neck sizing brass. One is that you can use the full length resizing die, but you don’t screw it into the press all the way. The intent is that it resizes the case neck but not the case body. The problem with this approach is that it is hard to get most of the case neck without the full length resizing die contacting the cartridge case body. I tried this as a first approach, though, and the results on the target were dramatic. Using the last of my 62-grain Hornady FMJBT bullets and 23.2 grains of ARComp propellant, I was now reliably getting groups I could mostly keep in the black at 100 yards. Yowzers!
Progress at 100 yards! Neck sizing the .223 cases using a full length resizing die got the group sizes down to the size of the bullseye. Things were moving in the right direction.
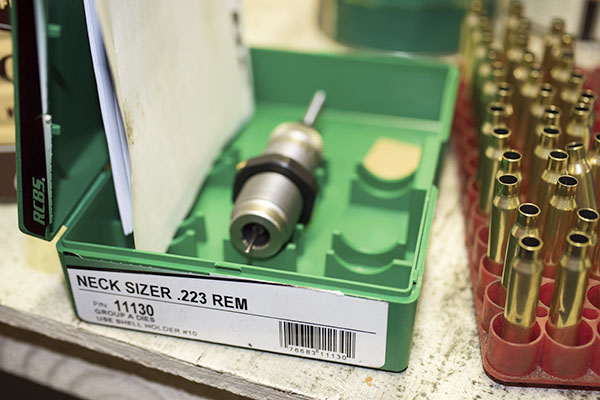
I ordered the RCBS neck size only .223 die on Amazon and when it arrived the next day, I loaded ammo with what had been my best load with the 55-grain Hornady FMJBT bullet (and that was 26.2 grains of IMR 4320 propellant). How did it work? Read on, my friends.
My new RCBS .223 neck size die. It cost just over $30.
The Sweet Feel of an Accurate Mini 14
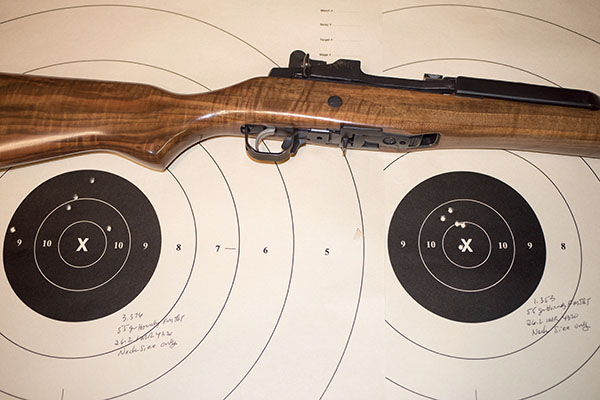
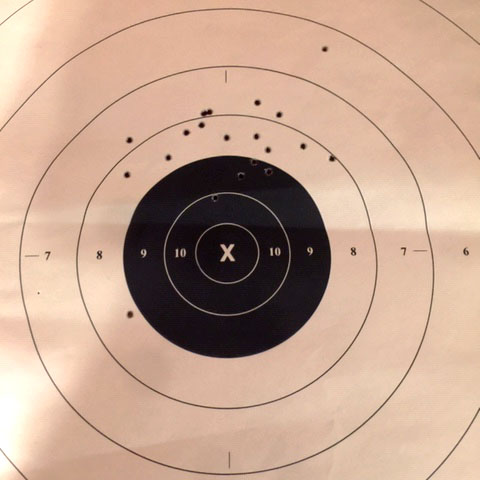
Ah, the sweet feel of success. I was out of my 62-grain Hornady bullets (more are on the way as I write this blog), so like I said above I used my other favorite load with Hornady’s 55-grain bullets. That load worked even better, and surprisingly, it required no sight adjustment from the 62-grain bullet load.
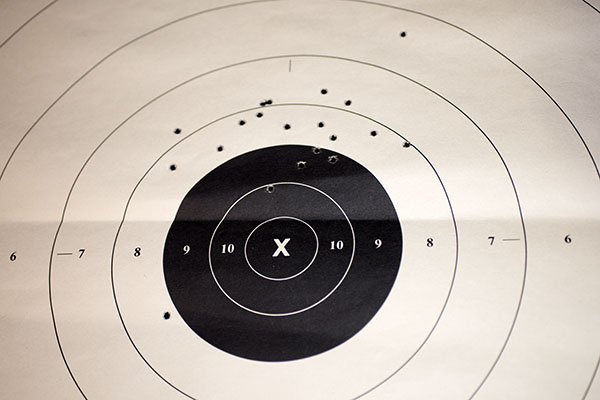
Good times with an iron-sighted Mini 14 at 100 yards. That group on the right looks like it could have been fired with a scoped rifle, but it wasn’t.
I had two targets set up at the 100-yard line (the two you see above), and I first shot the target on the left. I could see the holes with my 20X spotting scope, and it felt mighty good to see them all plunk right into the bullseye. Then I fired on the target on the right, and when I checked it in the spotting scope, I thought I had done well, but I wasn’t sure. The way the light was hitting the target I couldn’t count five holes through the spotting scope. At the next line break, my buddy Greg and I walked down to the targets and at first, I was disappointed. I could see only four holes in the target on the right, and I thought I had missed altogether with my fifth shot. I mentioned that to Greg, and then he pointed to the fifth hole. It was hiding right alongside the X.
100 yards, iron sights, and a Ruger Mini 14. I have this rifle dialed in now.
As I said at the beginning of this admittedly long blog, this has been an interesting journey. I think everything I did to this rifle helped to improve its accuracy, but the major contributors have been finding the right load, glass bedding, and neck sizing. Your mileage may vary (every rifle is different). I’ve found what works for me.
See Our Other Mini 14 Blogs
I mentioned several earlier Mini 14 blogs. Here are links to our Mini 14 posts:
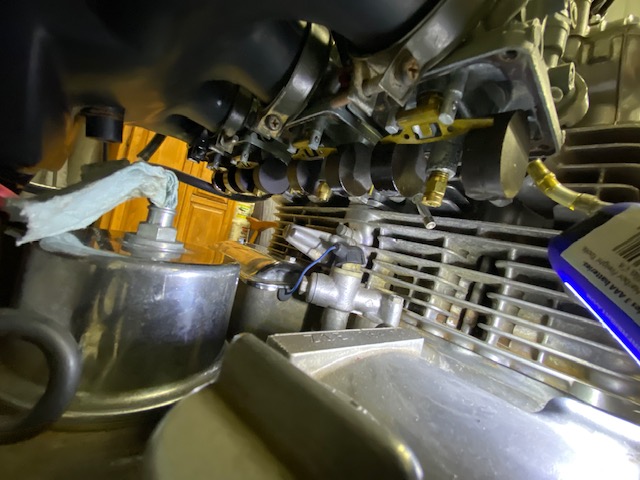
Repairing old motorcycles is both fun and unnerving. After a couple weeks waiting on shims I finally finished the valve adjustment on Zed. While I was poking around under the valve cover I noticed that one of the four cam idler sprocket bolts was a non-standard bolt.
Zed’s previous mechanic must have lost a bolt or stripped the threads and the replacement bolt was too long. Stacking washers took up the clearance for the errant bolt but it looked like hell. I wanted to install the correct length bolt. The damn thing was tight. Like break-the-bolt-off tight. As I gave it a semi-gentle tug it had that springy feel. I fear that if I put any more torque on the fastener it will twist off leaving me with a mess.
It worries me that in the 45 years since the Kawasaki left the factory someone probably removed the cams in Zed. There were a lot of performance part catalogs in the same shed Zed came from. I hope the guy didn’t screw up the engine. I decided to leave the offending bolt for a later day and after checking the clearances one more time I used a new gasket and buttoned up Zed’s top cover.
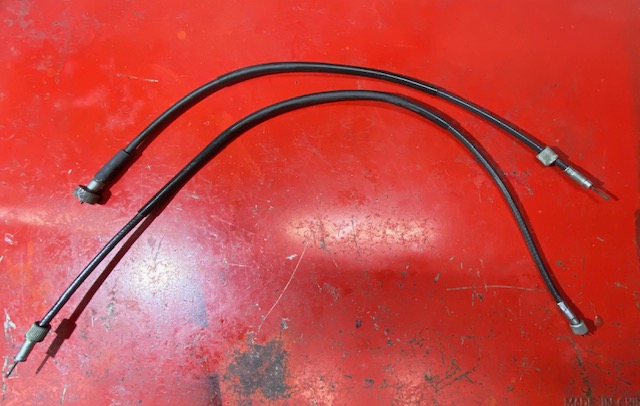
I’m bumping into my self-imposed 3000-dollar budget limiter so I’ve been making some hard choices. Tach and Speedo cables aren’t very expensive but after flushing out the cable housings and cleaning the cables I couldn’t see any fraying or signs of stress. I coated the cables with grease and will be reusing them so that’s another 25 bucks saved.
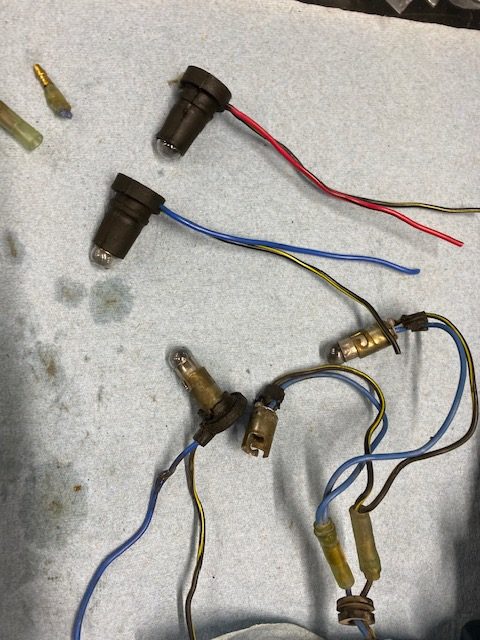
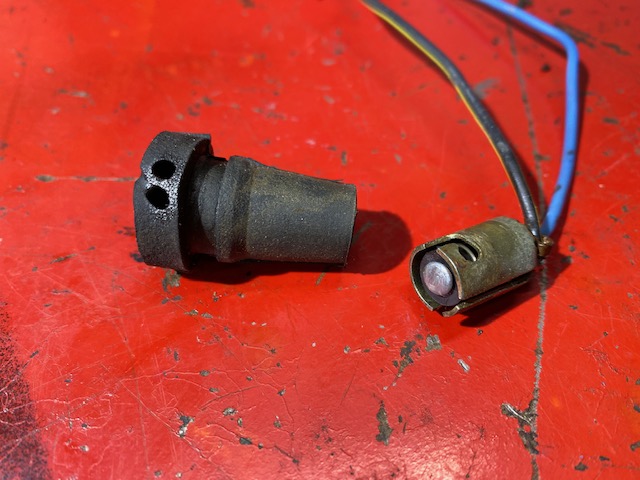
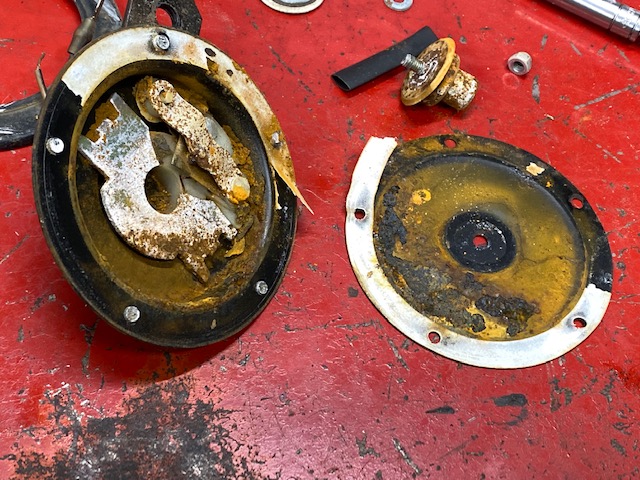
The Z1 Enterprises wiring harness was very complete, all except for the instrument light harnesses. Zed’s tach and speedo have two instrument lights per side. These bulbs are illuminated whenever the headlight is on so the rubber bulb holders were sort of crystalized from heat. They fell apart when I removed them. Half the rubber fell inside the gage and half stayed stuck on the instrument light socket. Luckily for me the Z1E harness came with a new warning light harness and I was able to steal the old warning light rubbers and repurpose them for gauge illumination.
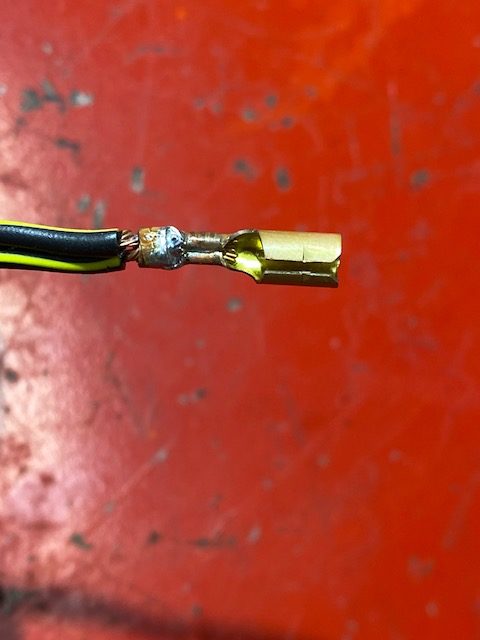
Changing the sockets and rubbers was less trouble than I thought it would be. I had to cut off the bullet connectors to pull the trick off. After threading the wire through the rubbers I uncrimped the old bullet connectors and recrimped the wires with a bit of solder to make up for any weakness inherent in a reused crimp connector. I wanted to keep the original instrument light sockets & wires so the color code would be correct but one of the sockets had chafed wiring and corrosion inside. I borrowed a warning light socket from the old harness and hopefully no one will ever see.
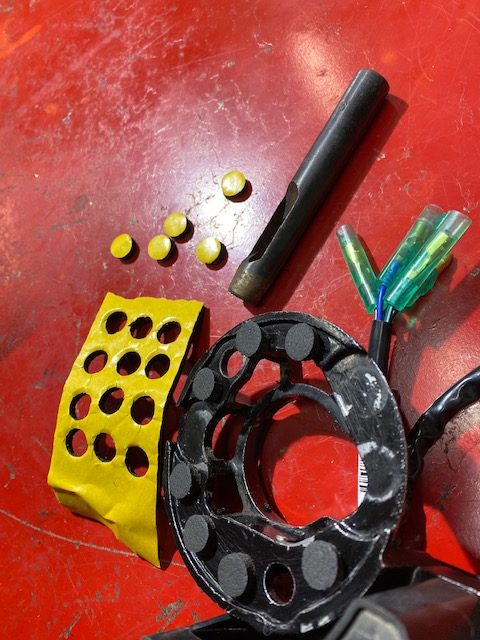
On a Z1 the gauges foam padding is sandwiched between the gauge and the cast aluminum bracket. This padding had deteriorated and crumbled easily. I knocked out a few round pads from some sticky refrigeration insulation and applied them wherever it seemed like the right place to apply such a thing. Next I tested all the bulbs and assembled the gauge cluster.
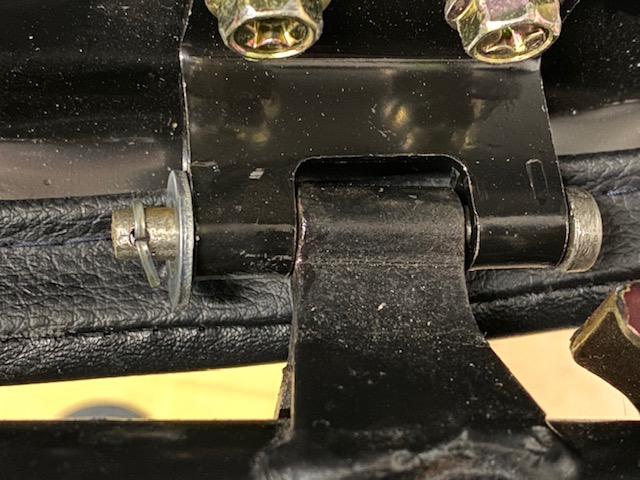
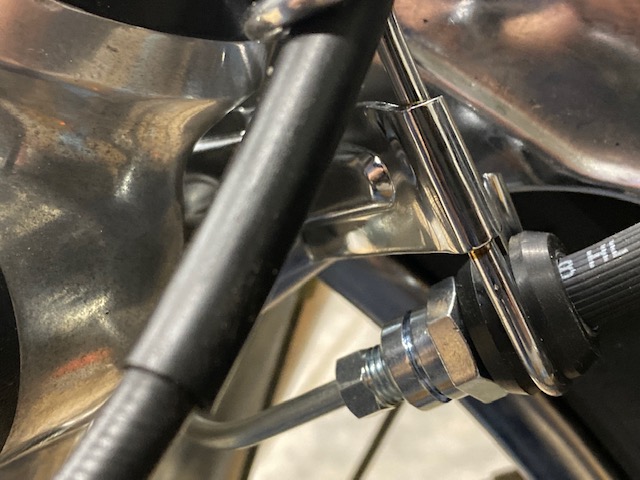
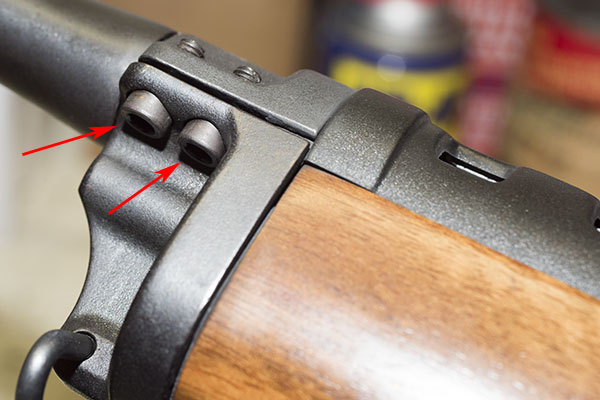
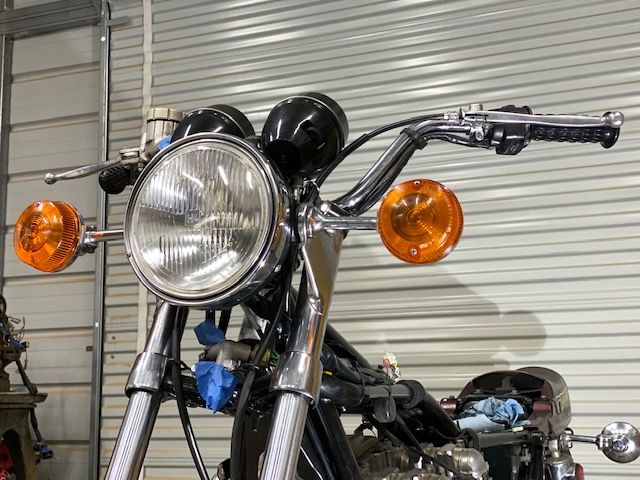
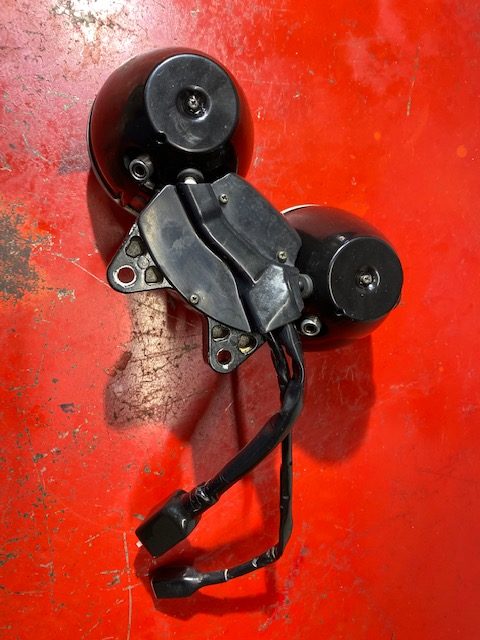
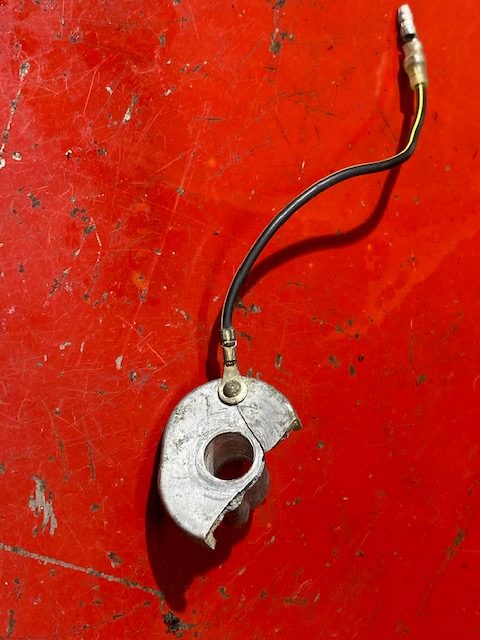
I had a hard time figuring out the headlight shell/blinker stalk sequence but my Internet buddies helped me get the various parts in the correct order. The blinkers ground through this ground washer/spacer type deal but mine were both broken.
Ever thrifty, I used a couple of thick washers and made an aluminum spacer to replicate the broken ground washer’s function, if not their aesthetics. The headlight ears on Zed appear to be slightly bent, giving a wall-eyed look to the blinkers. Or, if you like, swept back for speed. I don’t think I’ll try to straighten the ears because chrome does not stretch well and I don’t want hairline cracks in the lustrous finish. Sometimes effective motorcycle repair requires knowing when to quit.
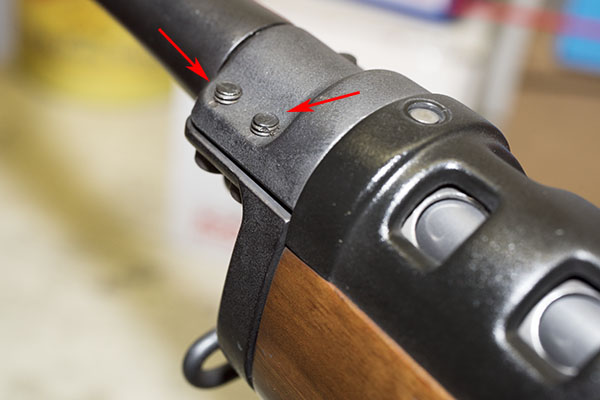
At times my thriftiness ends up costing me more in the long run but not often. I never had a key for Zed so I took the seat lock, fork lock and ignition switch to our local locksmith. He made a couple keys that fit and only charged $40 for the work. Now that the instrument cluster and headlight was back together it was time to throw a battery on Zed and see if anything worked. I used a car battery and a couple jumper cables, turned the key…and nothing. Flipping the key back and forth brought flashes of light from the neutral and oil pressure warning lights. By turning the key just so, and shaking it like a Polaroid picture I could get the lights to come on steady. I’ve ordered a new ignition switch at $75.
Amazingly most everything worked. The left rear blinker bulb wasn’t making good contact so I cleaned the socket and it worked. The horn was badly rusted inside so I’ve ordered a new one but other than those two things all other circuits are fine. The starter works but I didn’t run the engine. That crappy ignition switch will just make it cut out.
Zed is getting very close. Very close, my brothers. Except now I have to take the headlight and gauge cluster back apart when my new switch shows up. And then the seat lock. And then the fork lock. It’s two steps forward, one step back kind of action. One other cost saving measure that didn’t pan out was the used front tire. It looked fine when I first installed the thing but the tire has developed deep cracks in the rubber between the treads. Yet more stuff on order.
My latest Zed parts order is around $600 but this should be the last big pile of parts. It looks like it’s time to clean out Zed’s rusty gas tank and start thinking about all the cool places I’ll ride to on this beast.
I received a cool press release from our good buddies at Janus Motorcycles this morning and I want to share it with you.
FOR IMMEDIATE RELEASE
February 17, 2020
Janus Motorcycles featured on Jay Leno’s Garage
Goshen, Indiana – On Sunday, February 16th, 2020, an extended feature on Janus Motorcycles was published on Jay Leno’s popular YouTube channel, “Jay Leno’s Garage.”
Janus co-founders Richard Worsham and Devin Biek were invited to visit Mr. Leno’s garage and film studio in Burbank, California in December 2019. Mr. Leno interviewed Biek and Worsham, filmed each of their three motorcycle models, and took an extended ride on their most popular model, the Halcyon 250.
Beyond his fame as a late-night TV show host, Mr. Leno is known for his extensive classic car and motorcycle collection and his knowledge of automobiles. His YouTube channel, “Jay Leno’s Garage”, has nearly 3 million subscribers and his show airs weekly on CNBC.
“Jay is an authority on classic motorcycles, so being featured by Jay Leno’s Garage has long been a dream of ours at Janus,” said Worsham.
Co-founder Biek was very pleased: “Jay’s collection was amazing to visit, and Mr. Leno asked great questions and seemed genuinely interested in our story and motorcycles. The entire experience was incredible.”
The segment is titled “Janus Motorcycles – Jay Leno’s Garage” and may be viewed on Jay Leno’s YouTube channel.
ABOUT JANUS MOTORCYCLES: Founded by Devin Biek and Richard Worsham in 2011, Janus Motorcycles builds made-to-order production motorcycles out of their Goshen, Indiana headquarters. Their classic designs have been featured in the Wall Street Journal, New York Times, Fox News, the Discovery Channel, and in multiple industry publications. Their motorcycles are designed to be enjoyed by riders of all experience levels.
Drawing on the rich pool of manufacturing and fabrication shops in northern Indiana, their three models of lightweight 229cc motorcycles feature hand-formed tanks, locally welded components such as frames, hand-bent stainless handlebars, hand-painted trim, and a proprietary anti-dive suspension developed by the Janus team.
They are fully registrable in all fifty states with EPA and California ARB certification. All three models start at $6995. They plan to produce 250 units out of their Goshen facility this year.
Janus makes cool motorcycles. I know because I’ve ridden and written about their bikes, and I rode a Janus (along with good buddies Devin and Jordan) through Baja. That’s the topic of another YouTube video that the Janus guys put together.
One more thing, and that’s the Jay Leno video referenced above.
My idea of a good restoration and your idea of a good restoration may differ, but you know deep down inside that I’m always right. I am the arbiter of cool. I am the final word, I am…Omni Joe. Here are 5 common restoration mistakes that drive me crazy:
Sin #1: Gas tank liners.
That sealer crap people pour into their motorcycle gas tanks is the worse invention of all time. Guys swear by this junk but don’t listen to those lazy bastards. When I read the words, gas tank liner and/or Caswell sealer in a motorcycle description I know an amateur’s hands have been fiddling the motorcycle. Who would pour that devil’s goop into a nice motorcycle gas tank? It makes me wonder what else they screwed up. The way to fix a leaking, rusty gas tank is to get rid of the rust and weld/braze any holes. Any other method is destined to fail. There’s no excuse for using devil’s goop, YouTube is lousy with videos explaining how to clean out a rusty gas tank and how to stop it from re-rusting.
Sin #2: Repainting serviceable original finishes.
Nothing annoys me like a guy posting up a 90% perfect, original-paint motorcycle and asking where he can get it repainted. Stop! If the paint has a few chips or is faded a tiny bit leave the damn thing alone. One of the most underused old-sayings is, “It’s only original once.” No matter how shiny and beautiful you think your topcoat turned out its still vandalism. There are many phony re-pop’s running around, don’t make your motorcycle one. By painting over your once desirable survivor you lower its historic value. Listen, I’m not against repainting really bad original body parts, lord knows my Z1 needs it but I know anything I do that covers over the factory work erases a story, and vintage motorcycles are commodities without a story.
Sin #3: Over restoration.
When the Japanese bikes that are considered classic today were first sold they had acceptable build quality. For some strange reason many motorcycle restoration experts go way overboard making the motorcycle a show bike that bears little resemblance to real motorcycles. Chrome back in the day was thin and yours should be too. Nothing depresses me as much as these tarted-up travesties. The nerve of some Johnny-Come-Lately with a fat wallet and no soul thinking he can render a better motorcycle than the factory. Keep it simple and try to match the level of finish that you remember. Otherwise, what’s the point? It’s already worth less because you damaged the original build by trying to improve the bike. Why pour money into the thing making it something it never was?
Sin #4: Giving a damn about numbers.
As people get deeper into the vintage bike hobby they grow ever more insane. It’s not enough to have the correct parts anymore: Now you must have the exact build date on the part to suit your motorcycle’s VIN number. This is madness. Nobody except lunatics and bike show judges will care that your sprocket cover was made a year or two after your bike left the factory. The only part number that matters is the one that can get your bike registered for the road. I’ve seen people on vintage groups debating a slight casting change or a vestigial nub as if it were the most important thing in the world. People like that have no business owning a motorcycle; they should go into accounting or better yet, prison.
Sin #5: Parking it.
The final and biggest sin of all is to restore a motorcycle and then park it. I can over look all the other sins, even tank sealer, if the owner rides his vintage motorcycle. Get the thing muddy. Do a burn out. Ride it to shows in the rain. Honor the motorcycle by using it. A show motorcycle that is too valuable or too clean to ride is nothing, less than worthless. The machine was built for you. It has a seat and controls for you. The engine wants to pull. Do the right thing by your motorcycle and your sins will be washed away, my brothers.
As many of you know, good buddy and motojournalist extraordinaire Kevin Duke is now a Brand Manager with CSC Motorcycles, which is good for CSC and good for Kevin. Kevin and CSC recently released this video on the new 450cc RX4 motorcycle, and it’s the best one to ever come out of CSC (the video and the motorcycle). But don’t take my word for it…check it out yourself!
If you’d like to see more about how the RX4 compares to the RX3 (and to the KLR 650) please check out our RX4 pages.
If you follow the ExNotes blog, you know I’m still chasing accuracy improvements for my Mini 14. The latest upgrades include glass bedding the receiver and installing a smaller gas port. They helped, as will be described here. What’s next? Read on.
The Accuracy Systems International Gas Port Kit
I bought a new set of Mini 14 gas ports from Accuracy Systems International, an outfit that specializes in Mini 14 accuracy upgrades. The gas port is essentially an orifice that restricts the flow of combustion gas to the rifle’s op rod. The stock Ruger gas port orifice is huge (it’s probably something like 0.090 inches in diameter). That is because Ruger wants the rifle to function with any kind of ammo, but the huge stock gas port throws spent brass into the next county and it slams the barreled action around in the stock (that hurts accuracy, as the receiver may not be sitting in the same spot after each round). The ASI gas port kit costs $30, but it’s more like $40 after including the shipping and handling charge. That’s a rip because the thing fits in a business envelope, but hey, it is what it is.
Glass Bedding the Mini 14
I bought an Acraglas bedding kit from Brownells and glass bedded the receiver in the stock. I’ve glass bedded bolt action rifles before, but I had never done a Garand-type action. There’s no recoil lug like a bolt action rifle has, so the glass bedding involved delicately laying in the epoxy on the interior sides of the stock and the area above the stock that mates with the receiver. This was something new for me, and I don’t mind telling you that I was plenty nervous about getting the barreled action out of the stock after the epoxy cured. I need not have worried; the release agent worked like it was supposed to and the bedding job turned out well. There is zero movement between the receiver and the Mini 14’s Circassian walnut stock now, and that’s what I wanted.
Tuning The Mini 14 Gas Port
After the bedding job, it was time to start playing with the different gas port orifices. The Accuracy Systems International kit includes four gas ports (0.035, 0.040, 0.045, and 0.050 inches), and the drill is to find the smallest one that works. The stock Ruger gas plug orifice is huge (as mentioned above), and ejection from a stock Mini 14 can only be described as violent. I tried the 0.040 and then the 0.045, but both would occasionally fail to fully cycle. With the 0.050 orifice, the rifle didn’t have any failures. I noticed that sometimes the last round out of a magazine just lays the brass on top of the follower after being extracted. That’s no big deal. My Mini 14 now throws the brass about 20 feet to the right (maybe less, because the brass was landing on concrete and rolling around a bit). It’s a substantial improvement.
100 Yards From The Bench
I first fired at a 100 yard target from a bench rest. Surprisingly, the bedding and the new orifice only shifted the group a little. The rifle now shoots a bit high, but the group size (absent a couple of flyers, one high and one low, most likely due to me) is about the size of the 9-ring on a 100-yard target (and that’s an improvement). Most of the dispersion is lateral, and that’s a change from what the rifle used to do. If I practiced a bit more, I’d do better. If I drop the rear sight a couple of clicks I should be right on the money. This was my 100-yard target from the bench:
The accuracy wasn’t the greatest I’ve ever achieved with an iron-sight rifle (my 80-year-old Mosin-Nagant will consistently keep its hits in the 10-ring), but it was an improvement over what the Mini 14 had done prior to the bedding job and the smaller gas port orifice. Things are moving in the right direction.
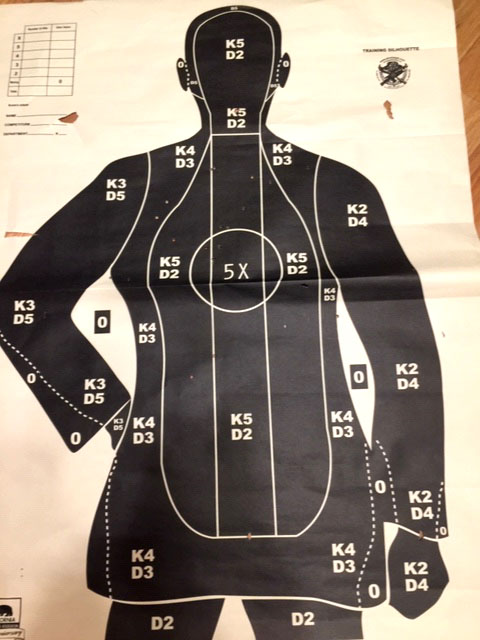
The B-21 Department of Corrections Target
Next up was the California Department of Corrections B-21 target my CDC buddy told me about. The California CDC uses the Mini 14 as an issue weapon, and the B-21 is their periodic qualification target. I bought some of these targets at Alco last week and I wanted to see how I would to. My CDC friend told me that CDC officers qualify with their Mini 14 rifles at 50 and 100 yards, from both the standing and kneeling position.
I put my target out at 100 yards and tried shooting from the kneeling position. It felt very awkward to me and I was terrible. Oh, I put rounds on the target, but this kneeling position is not my cup of tea. I used to be able to do it when I was in the Army, but I weighed 50 lbs less and I bent a lot easier in those days. I’m not even sure what knee is supposed to be on the ground. Maybe I need Colin Kaepernick to tutor me.
Then I went to the standing position, shooting offhand, and I found I could keep my shots in the bottle (as my CDC buddy described the target). I might be able to qualify as a CDC officer if I could get on top of this kneeling position business. The little .223 holes on the target below are a hard to see (my apologies for the cell phone photography), but trust me, they’re on there. All the ones that are outside the bottle were from the kneeling position.
You know, when I first saw that B-21 target, I was amused at how big it is (it’s literally life-sized). Try shooting it offhand from the standing position with iron sights, though, and the old B-21 suddenly gets a lot smaller. At 100 yards, I couldn’t see any of the lines on the target. It was just a big black mass, and I tried to hold in the center of it as I fired. It was swimming in the sights, but I was able to connect. Mind you, I had not shot offhand like this in years. The rifle seems to be grouping a little high shooting offhand (as it did from the bench). But it is, as the saying goes, close enough for government work.
What do you think? Would I be able to run with the big dogs in the CDC? My CDC buddy told me I’d qualify expert. Maybe he was just being nice.
Future Mini 14 Accuracy Improvement Thoughts
I am thinking about what else might make a difference in accuracy on the Mini 14. The action is bedded and I’ve experimented with different loads until the cows came home (for your information, my best load is with a max ARComp charge and the Hornady 162 grain full metal jacket bullet). I sort and trim the brass I reload (and that makes a difference). I’ve found the gas port that works best (it’s the 0.050-inch orifice). So what’s left?
I’m wondering about the fit of the .223 cartridge in the chamber. The Mini 14 has a loose chamber to make sure everything feeds reliably, so I’m wondering if it’s too loose for optimal accuracy. My thought is to try neck sizing only. That’s when you only size the cartridge neck down (to hold the bullet in place) but leave the rest of the brass case enlarged, as it came from the rifle after the last firing. I know you usually would not do that in a semi-auto rifle, but I’m guessing there’s plenty of room in that chamber. I’m thinking I’ll load 20 rounds with neck sizing only and see how that goes. I guess I could try chambering an empty case previously fired in the Mini 14 and see if it chambers and extracts easily. If it does, neck-sized-only loaded rounds probably will, too.
Sometimes you can seat the bullets out further in the case to improve accuracy. You can’t mess around with bullet eating depth on a Mini 14, though. If you seat the bullets out any further, the cartridges won’t fit in the magazine, so that’s out as a potential accuracy improvement.
Next up is the muzzle brake. This thing has a gigondo muzzle brake (see the photo above) that I had installed to replace the stock flash suppressor. I had to do that to bring the rifle into the People’s Republik of Kalifornia (a flash suppressor on a semi auto rifle is illegal in California, a stupid law if ever there was one). The muzzle brake does not make contact with the bullet on the way out of the barrel, but I’m wondering if it somehow disturbs the bullet’s flight as it exits the muzzle. I think I’ll Google “muzzle brake impact on accuracy” and see if there is anything out there on this. (Note: I did, and there’s evidence that this can happen.)
The other thing I’m wondering is if the guy who installed the brake damaged the muzzle when he installed it. I can’t see the muzzle in there. It’s not going to be easy to get it (the muzzle brake) off the barrel, but that may be the next step. The muzzle brake has to be affecting the barrel’s harmonics, too, because it is so massive. Maybe I’ll just take it off and see what that does.
The Mini 14’s bolt feels loose when the rifle is in battery, but my Garand is like that, too, as well as many of the bolt guns I have. I don’t know if that is playing an accuracy role. There’s nothing I can do about it, though, so that’s something that will remain a mystery.
I’m wondering about the front sight, too. It’s wide. At 100 yards, the width of the front sight blade is three or four times the diameter of the bullseye. My M1A has a much thinner blade for the front sight, and it seems to be a lot easier to shoot small groups with it. Looking at the 100-yard bullseye target shown above, most of the Mini 14’s dispersion is left and right; I’m thinking a thinner front sight might cut down on that lateral dispersion.
I’ve put a lot of lead downrange with my Mini 14, probably something well north of 10,000 rounds. Maybe the barrel is just worn out. Eyeballing it, though, it looks good, and accuracy keeps getting better with incorporation of some of the things I’ve done. But that’s a lot of shooting. It could be that a new barrel would make a difference.
Any other ideas? Hey, let’s hear your comments. I’ve shared what I know, and I could use your help.
See our other Tales of the Gun reports (including more on the mighty Mini 14) here.
West of downtown Santa Fe, New Mexico towards the strip malls, chain stores, and old neon-lit motels, is a thing called Meow Wolf. I call it a thing because I’m not quite sure what it is and that’s after crawling through refrigerators, blue time tunnels, and playing musical mastodons. The amount of ingenuity per square foot is astounding.
There’s a detective story loosely connected to Meow Wolf. Immerse-ants will find private correspondence referring to all kinds of mysterious events. Feel free to open drawers or snoop in cabinets, cues are scattered everywhere but with so many people wandering around gaping at the strangeness it’s hard to get a look at them all. I sort of tried to follow the story but it will take several visits to figure it out. If you want to solve the story go to Meow Wolf when nobody is blocking your progress.
Besides the back story, Meow Wolf can stand alone if you don’t want to tax your brain trying to slot Lex’s school reprimand letter into the narrative. Nothing is what it seems to be so just wander around opening portals and being amazed at the way normal life can be altered by slight shifts in reality. It reminds me of that Monkees movie, Head.
Be prepared to crawl around on your hands and knees and push or pull on everything. At least half the stuff leads to somewhere else. One second you’re in a traditional living room, the next a spacecraft. If you can fit inside it goes somewhere cool. I loved the place and it’s given me many ideas on how to make our house forever un-sellable with a few modifications.
The closest things to Meow Wolf in the real world are those McDonald land playhouses found at suburban McDonald’s restaurants, except that Meow Wolf is not as sticky. They must have a crack janitorial crew. After two and a half hours I had use one of the many exits to make sure I wasn’t stuck in there. It’s artwork that you enter and sign in please, then try to imagine why it exists.
Next time you visit Santa Fe, New Mexico, visit Meow Wolf. There is talk of replicating Meow Wolf in Las Vegas, Nevada. I’m sure the Vegas one will be overdone and flashy but I like the little mom and pop alternate realities better.