When you’re a reloader you get a bunch of odds and ends components and you go on a jag to load them all just to get the stuff off the bench. Oddball bullet dribs and drabs, brass you don’t want to bother cleaning, trimming, or sorting, that sort of thing. I had a bunch of the above laying around crying out to become .223 ammo, I hadn’t been to the range with my Mini 14, and it was time to shoot up the leftovers.
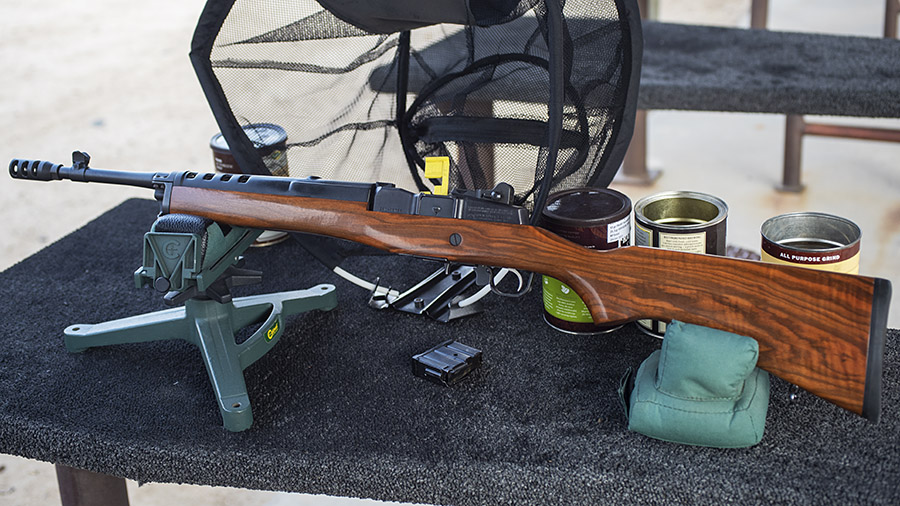
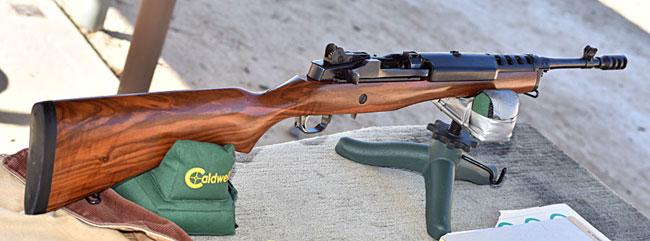
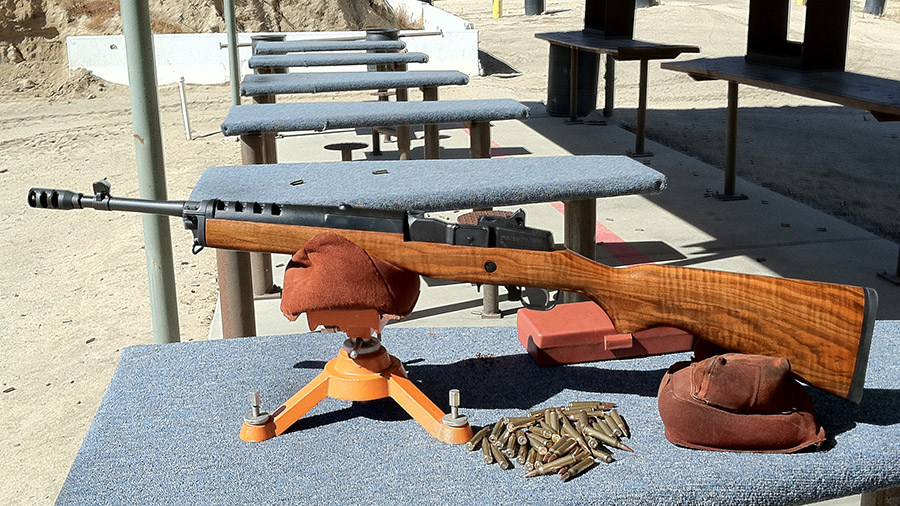
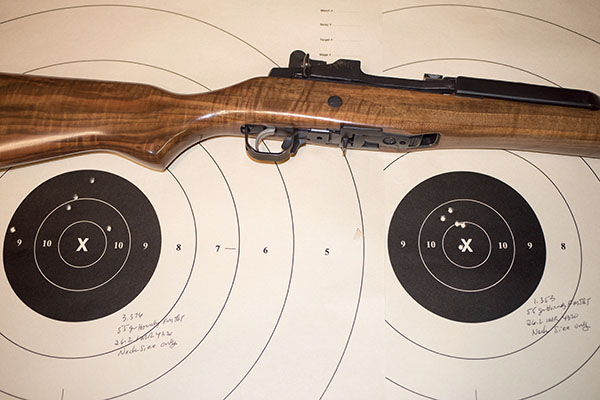
First, a bit about the rifle. It’s what Davidson’s called the Mini 14 Tactical, and it was a limited run they had Ruger make with Circassian walnut stocks. I looked at a bunch of them on Gunbroker before I spotted the one you see here and I pounced (most had very plain walnut).
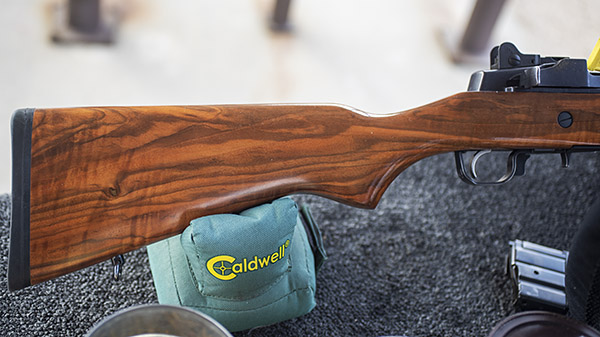
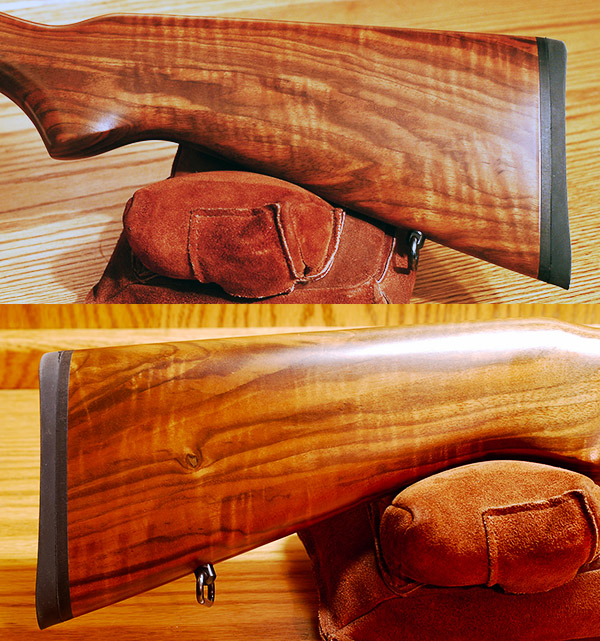
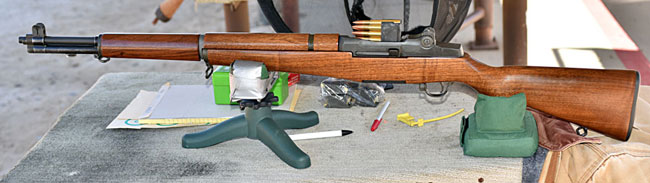
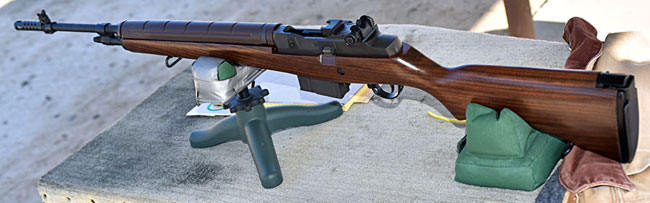
An unusual Mini 14 with a Circassian stock. I get a lot of compliments on this rifle. It’s not for sale.
This is a rifle that gets compliments every time I bring it to the range. I’ve written about my Mini 14 before here on the ExNotes blog and I know what it takes to make this puppy group. This wasn’t going to be one of those days; like I said, I was just using up remnants from reloading sessions for other rifles.
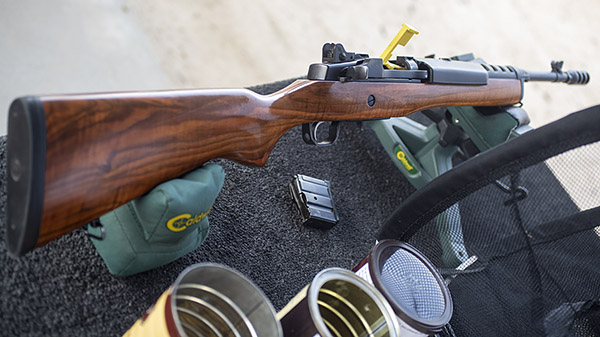
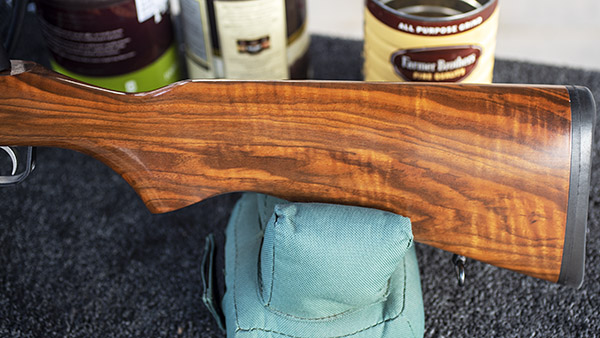
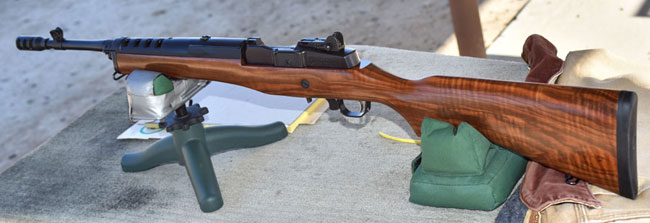
The left side of the Mini 14’s Circassian walnut stock.The right side. This sure is a nice-looking Mini 14.
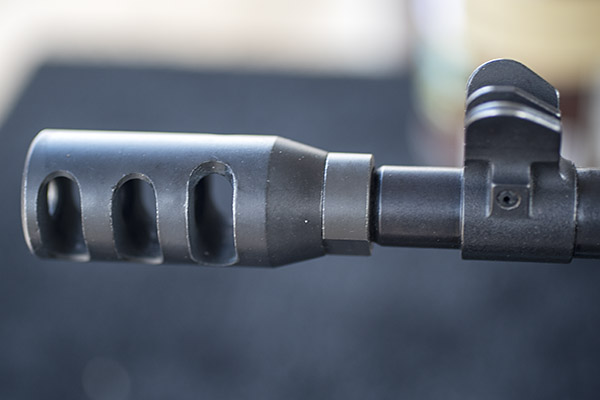
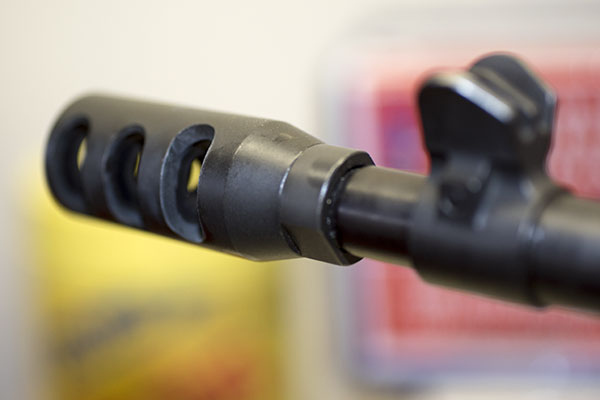
The Davidson’s Mini 14s came with 30-round mags and a flush suppressor, both of which are apparently favored by folks who rob gas stations and convenience stores (our legislators have their heads so far up their fourth points of contact they haven’t seen daylight in decades). I replaced the flash suppressor with a muzzle brake to make the rifle much less intimidating.
You might laugh at a muzzle brake on a Mini 14. It works, though. Fire a Mini 14 with a muzzle brake and then fire one without and you’ll feel the difference.
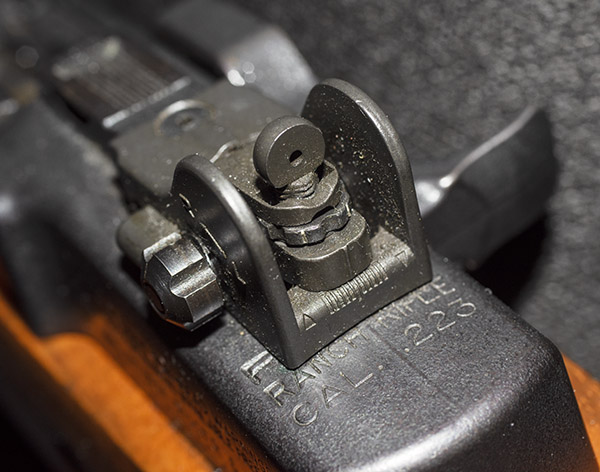
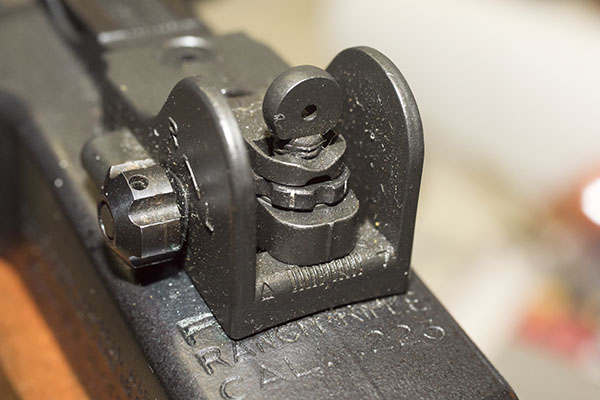
I also installed the Tech Sights Mini 14 rear aperture sight, which I like a lot better than the standard Mini 14 rear sight.
The Tech Sights rear aperture sight. If you have a Mini 14 and you don’t have one of these, you’re missing the boat.
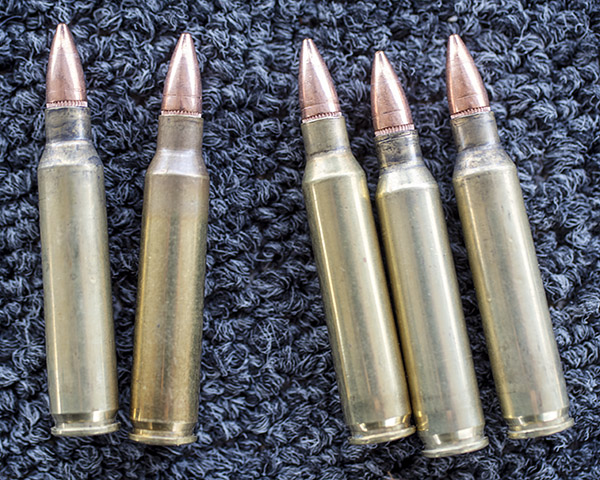
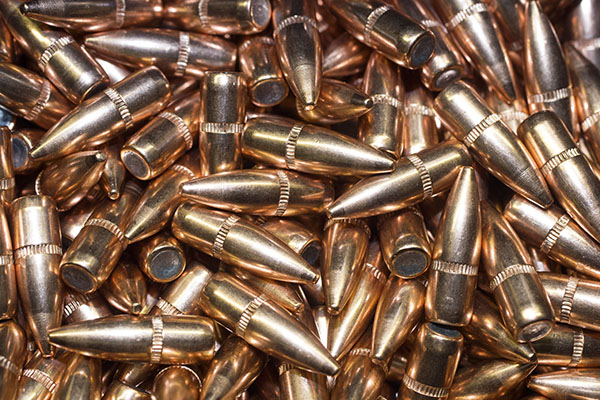
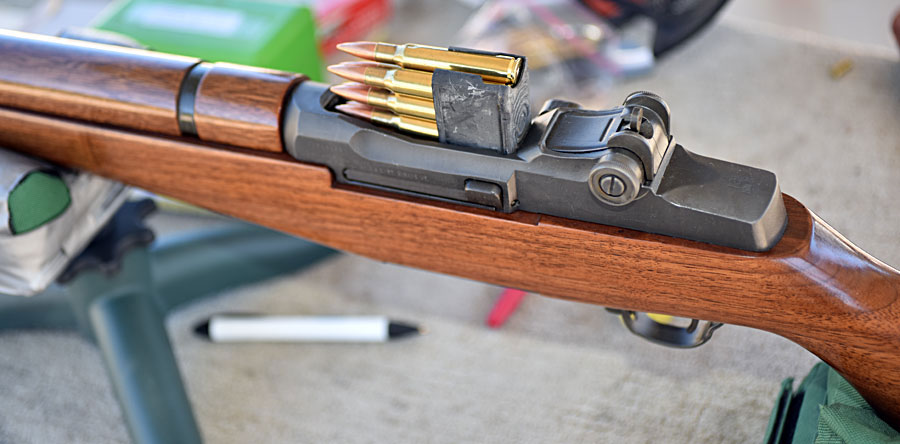
I loaded three configurations of ammo. The first was a new load I had developed using XBR 8208 propellant. For reasons I can’t remember, I had a bunch of Hornady 55-grain full metal jacket bullets I had pulled from another load. If you look closely at the photo below, you’ll see the circumferential ring where the collet puller grabbed the bullets. My thought was that pulled bullets would degrade accuracy, which is why they were tucked away and ignored for a long time. The load was 25.3 grains of XBR 8208, mixed brass previously fired in the Mini 14 (neck sized only for this load), and Winchester small rifle primers. I seated the bullets about midway in the cannelure, but I didn’t crimp. For this load, I didn’t tumble or trim the brass, either.
55-grain bullets loaded in .223 Remington brass for the Mini 14. Note the circumferential bullet puller collet marks just above the cannelure.
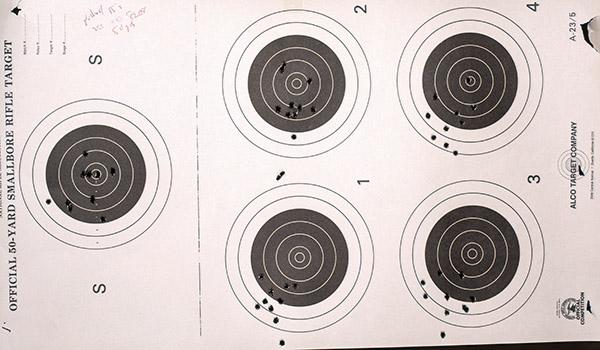
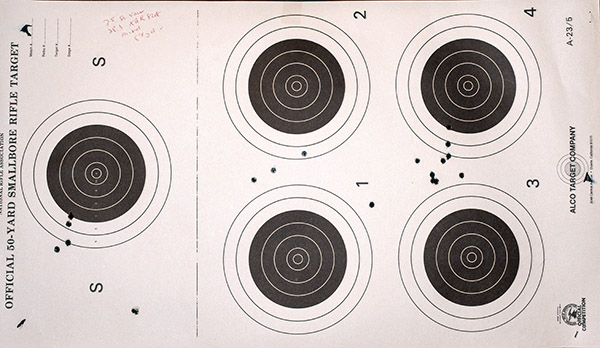
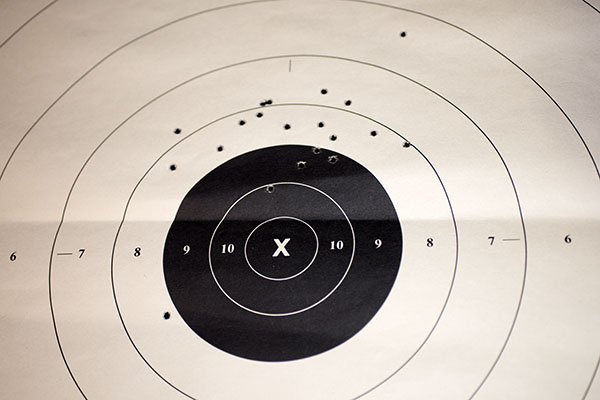
Surprisingly, the above load shot relatively well. If the marks on the bullets affected accuracy I couldn’t see it. I shot a few 10-shot groups at 50 yards just to get into the swing of things, and then I fired a 10-shot group at 100 yards (which I’ll get to at the end of this blog). The 10-shot group at 100 yards wasn’t too shabby. The rifle shot low left (my aim point was at 6:00), but I hadn’t adjusted the sights for this load.
50-yard groups with the above load. The flyers are do to operator error. The groups showed promise at 50 yards, and I knew I would test them at 100 yards.
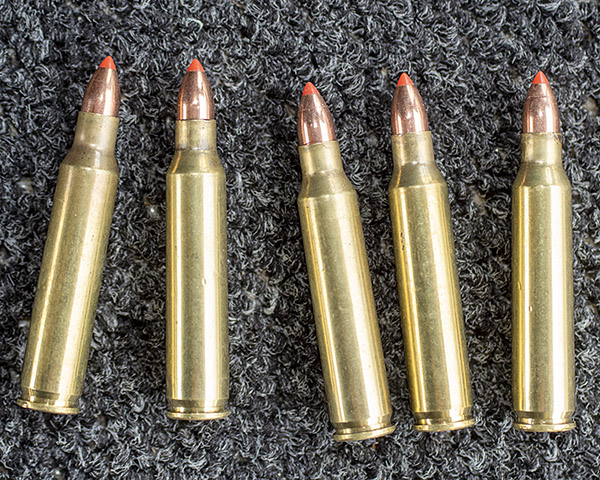
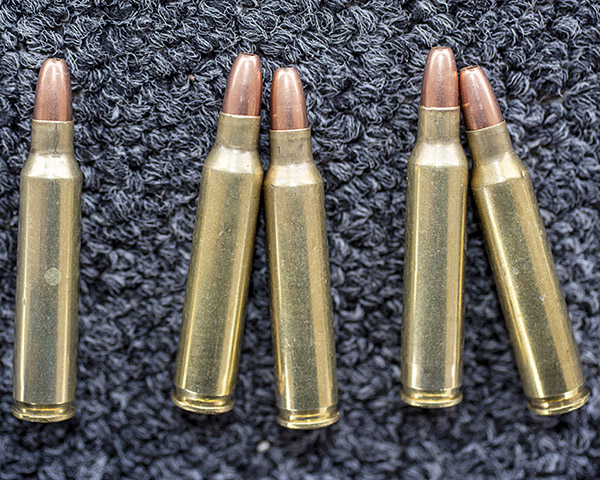
For the next load, I had a few 35-grain Hornady V-Max bullets I normally use for my .22 Hornet. This is a bullet I guessed would not do well in the much-higher-velocity .223 Remington cartridge, and I was right. Some of them grouped okay at 50 yards, but they were right on the edge of instability. A few tumbled and went wide. I didn’t bother firing these at 100 yards; if they were flaky at 50 yards, they would be positively flaky at 100.
.223 Remington cartrdiges loaded with 35-grain Hornady VMax Hornet bullets. The ammo looks good, but it was not a good load for the Mini 14.The 35-grain VMax loads at 50 yards. The bullets were right on the stability threshold.
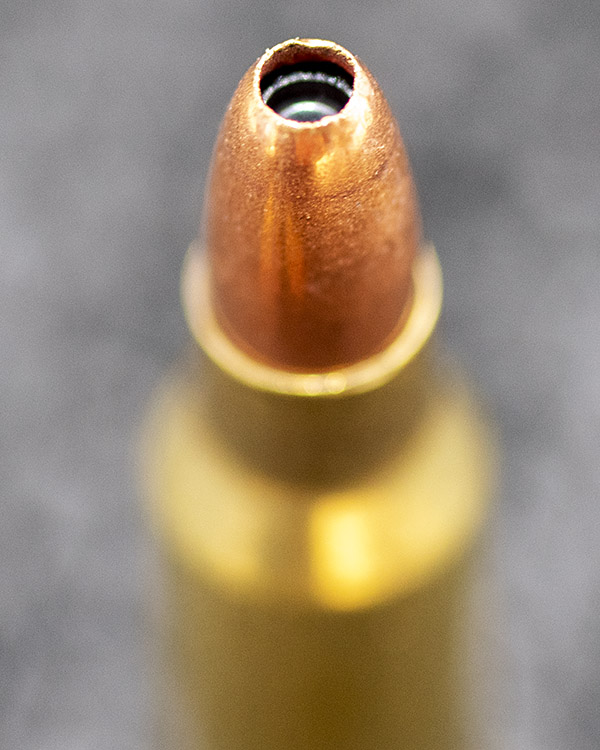
The last group was one I put together using another set of leftover Hornet bullets, the 46-grain Winchester jacketed hollow point bullet. They shot poorly when I tested them in my Ruger No. 3 Hornet, and they were really terrible in the .223 Mini 14. I suspect they were breaking up in flight. Several went wide or through the target sideways.
46-grain Winchester hollowpoint jacketed bullets loaded in .223 brass. This didn’t work out at all.A huge hollowpoint. It might work well on prairie dogs in the .22 Hornet, but these bullets weren’t stable and didn’t group well in the .223 Remington cartridge.
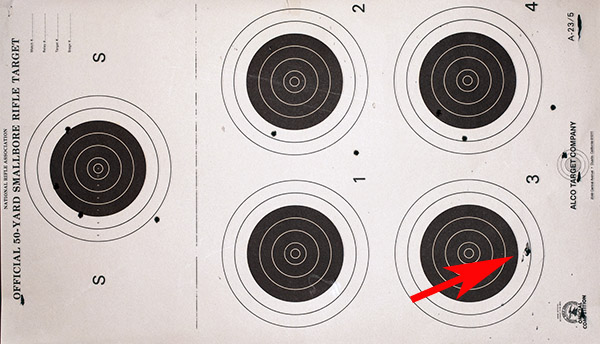
The 46-grain Winchester groups were huge at 50 yards and I could see on the target that they were unstable. At least one tumbled. Some never even made it to the target.
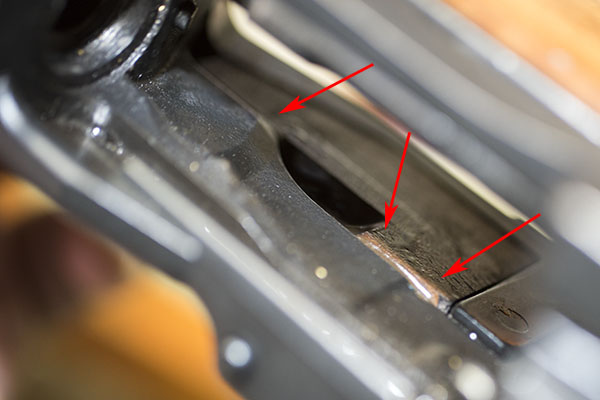
The above load’s poor performance was predictable, but I’m one of those guys who has to pee on the electric fence. You know, just to make sure. The arrow points to a spot where a bullet went through the target sideways.
After testing the above bullets at 50 yards, I knew that the Hornet bullets were a no go. Actually, I kind of knew that before I tested the load. But I had the bullets and I thought I would give it a try.
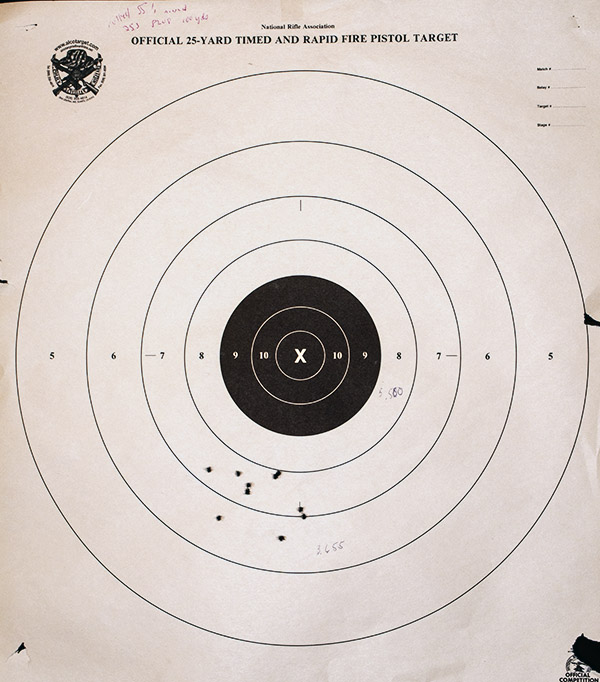
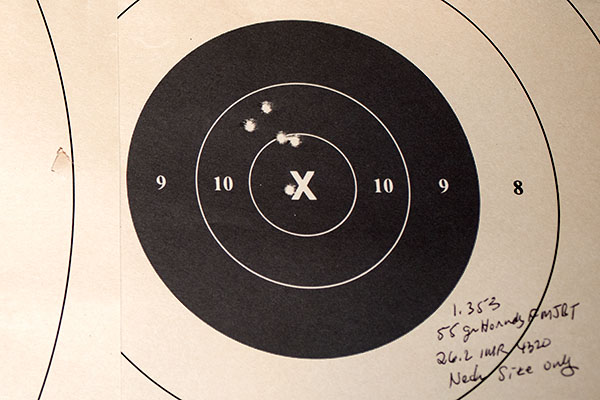
I wanted to see how the pulled 55-grain Hornady bullets would do at 100 yards, so I moved a target out to 100 yards they did relatively. The group centroid shifted from my usual Mini 14 load, but it was fairly tight for iron sights with junk/untrimmed mixed brass.
55-grain full metal jacket boattail pulled Hornady bullets, 25.3 grains of XBR 8208 propellant, Winchester small rifle primers, and mixed brass provided a 3.65-inch 10-shot group at 100 yards. The black bullseye is 5.50 inches in diameter. I was pleased with these results.
Well, you live and you learn. I cleaned off the reloading bench, I had a little fun, and I now know from personal experience that 35-grain and 46-grain Hornet bullets won’t do very well in the .223. Sometimes it’s good to learn what doesn’t work as well as what does.
More guns and reloading content? Like fancy walnut? Hey, it’s all right here!
You can’t beat free…sign up here and never miss an ExNotes blog.
I love shooting and writing about the Mini 14. Having said that, let’s get to today’s main attraction, and that’s how to get the best accuracy out of a Ruger Mini 14.
Tip 1: Refine Your Shooting Techique
There’s a lot to say here. I won’t spell it all out, as we’ve covered this topic before. Focus on the basics and refer to our earlier post on Mini 14 Marksmanship.
Tip 2: Reload Your Own Ammo
Ah, this statement will light up the trolls: There is no great factory ammo for the Mini 14 and bulk ammo is generally inaccurate. That said, mark my words: Some troll will post that he shoots 200-yard half-inch 10-shot groups offhand using iron sights with (fill in the blank) bulk ammo. Why such individuals aren’t competing at the international level instead of wasting their time posting comments on Facebook I can’t say. Trust me when I delicately suggest they are not honest information brokers.
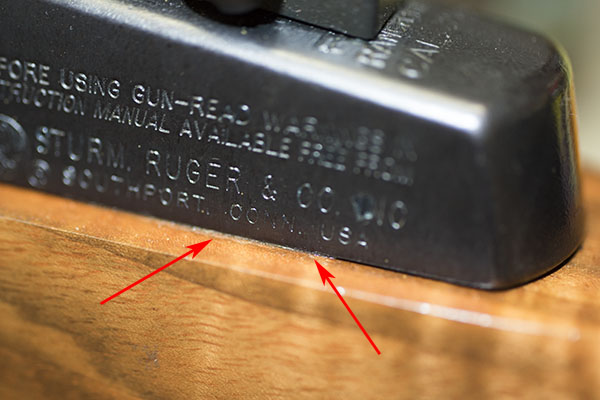
You might consider my experience and that of many others when I state that you really need to reload your own ammo to attain optimal accuracy. For starters, there’s the issue of the chamber size. With the exception of the short-lived Mini 14 Target Model, all .223 Mini 14 rifles are actually chambered for the 5.56 mm NATO round, and that chamber is actually slightly larger than .223 Remington ammo. For this reason, neck sizing brass that has been fired in your Mini 14 will assure a much better chamber fit and accuracy will improve significantly. You can read more about that here.
Regarding the specifics, I’ve had great luck with Hornady boattail full metal jacket bullets of either the 55-grain or 62-grain persuasion crimped in the cannelure with the Lee factory crimp die. I’ve also found that the more expensive Hornady V-Max bullets are quite accurate. As for powders, my best results are with IMR 4320 (no longer available unless you have a stash), ARComp (a superb powder), IMR 4198, and Winchester’s 748. Other folks report good results with Varget (I have that powder, but I haven’t tested it in my Mini 14). My most accurate Mini 14 loads are with charges near the upper end of the charge spectrum. As always, start low and work your way up watching carefully for pressure signs as you increase the charge. I never go above the max charges listed in my load manuals (and neither should you).
To get the best reloading results, you might also consider:
Sorting your brass by manufacturer.
Trimming the brass.
Cleaning the primer pockets.
Cleaning the brass.
As you read this part of today’s blog you might be thinking “but I don’t reload.” If that’s the case, I have but one word: Start. You can get a good handle on the reloading process and the equipment you’ll need in our prior posts on this topic.
This might have been listed under Tip 1 (Refine Your Techniques), but I see so many Rambo wannabees on the range I want to include it as a separate point. You know the kind of inbred I’m talking about: The guy (it’s always a guy, and typically a younger guy) who wears camo gear (but has never been in the military). He’s the guy who loads 20 or 30-round magazines and rapid fires all of them as if the ability to shoot 30 rounds in under 3 seconds somehow equates to shooting skill.
I think that guy’s name is most likely Richard Rambo, and you don’t want to be like him. Don’t be a Dick.
I only shoot 5-round magazines, and I let the barrel cool between shots and between magazines. The Mini 14 has an assymetrically-contacted, relatively thin barrel. Heat that barrel up via rapid fire and your rifle will string its shots. If you’re shooting for accuracy, let the barrel cool.
There’s an after market rear sight manufacturer, Tech-Sights, who offers a dramatically better rear aperture sight than the stock Mini 14 setup. Get a set. They are more easily adjusted and they will make your rifle easier to shoot accurately. Make sure you LocTite them in place during the installation; if you don’t, they will shoot loose.
You could put a scope on your Mini 14, but I’ve never had good luck with a scope on a Mini. Even with LocTite, the scope mounts always loosened after surprisingly few rounds, and before they did so, the group sizes really weren’t any smaller. Tech-Sights is the way to go.
Tip 5: Clean the Rifle
The good news about the Mini 14 is that it seems to run forever without cleaning, and the bad news about the Mini 14 is that it seems to run forever without cleaning. I say that because accuracy will degrade long before reliability does, and if you’re fundamentally lazy like me, you’ll shoot hundreds (and sometimes a thousand or more) rounds before you clean your rifle. Yeah, it will keep shooting, but the accuracy won’t be there. Clean your rifle (including the bolt’s innards, the action, and the bore) after every range session.
Some folks will tell you the bore needs to be fouled before the rifle will attain its best accuracy. They suggest you shoot a couple of magazines through a clean bore before testing for accuracy. I haven’t found that to be the case; my Mini 14 is accurate with a freshly-cleaned bore. In fact, my rifle doesn’t even display the typical first-shot-through-a-clean-bore flyer that other rifles exhibit.
When you clean your Mini 14, take care not to let the cleaning rod drag at the muzzle’s edges while doing so. Give it a good soaking with Hoppes No 9 using a cleaning patch, let it soak for an hour, and repeat that until all the black powder residue is out. Then let it soak for a few hours with Hoppes No 9, run a patch through the bore, and repeat that over the next two days to get the copper traces out. I know I’m done when there’s no green or turquoise on the patch.
For the bolt, I spray the hell out of it with carb cleaner. Taking the bolt apart is a nonstarter for me (you need special tools to do so), so I just spray it well (outdoors, of course). Then I go to work on the other action components, using a brass brush on the piston and its surrounding areas to get all the carbon residue gone. When everything is squeaky clean, I’ll lightly oil it all as I’m reassembling the rifle, except for the firing pin in the bolt. I leave that dry.
Tip 6: Glass Bed the Action
After seeing the positive accuracy impact on my M1A from a glass bedding job, I did the same on my Mini 14. I use AcraGlas from Brownell’s when I bed a rifle. Other folks have had good luck with Marine-Tex.
Bedding a Mini 14 is different than bedding a bolt action rifle. The Mini 14 action beds along inside edges of the stock, and along the top edge of the stock where it contacts the bottom edge of the upper receiver. It doesn’t take a lot of bedding material, and you don’t want to slop it all over. You just want capture some at the rear of the receiver where it interfaces with the top of the stop, and under the receiver interior rails where they interface with the stock’s interior near the magazine well.
You’ll feel movement between the receiver and the stock of a Mini 14 that hasn’t been glass bedded; once you glass bed the action that movement disappears (if you’ve done the bedding job well). That’s what you want. This is one of the more significant tips in this article; a good bedding job will improve accuracy significantly.
Tip 7: Practice (A Lot!)
You want realize your rifle’s accuracy if you are an occasional shooter. I find if I don’t shoot my Mini 14 for a few weeks, my edge disappears and I need a couple of range sessions to get back in the groove. When I take my Mini 14 out every week, the groups get smaller and they stay small. It’s funny how that works.
Parting Shots
Some folks like to use a barrel brace under the Mini 14 barrel just forward of the stock. It’s the thing that resembles an M1A gas chamber and makes the Mini look like an M14. I’ve never tried those, so I can’t say if they work or not. It seems gimmicky to me. Folks (including yours truly) have tried shimming the receiver where it mates with the stock, with the idea that this will remove any play between the stock and the barreled action. I’ve tried that (before I went with glass bedding) and I found that the shimming approach made no difference in accuracy. If you want to get rid of the play between the barreled action and the stock, glass bedding is the way to go. I’ve also played around with smaller gas plugs. More testing showed that while these did reduce how far the Mini 14 tosses spent brass, accuracy stayed the same while reliability decreased, so I went back to the stock Ruger gas port.
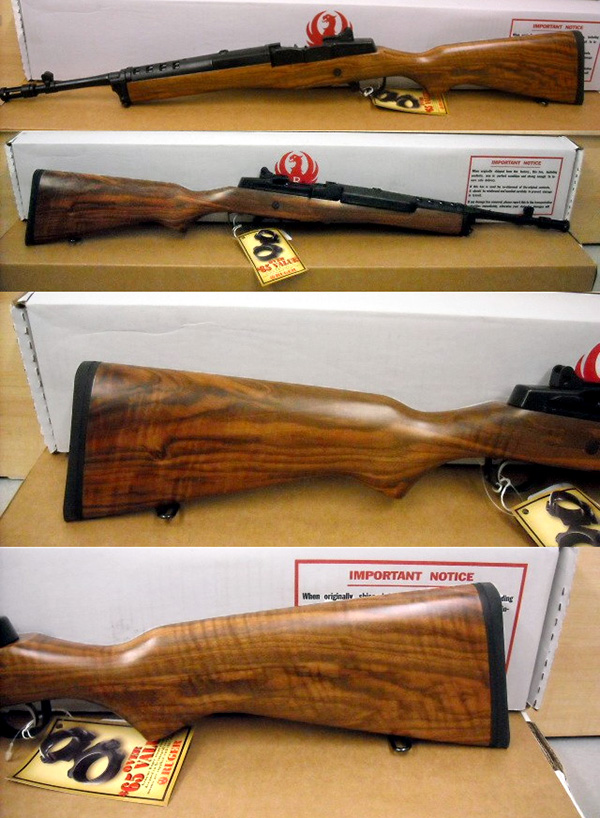
A lot of folks ask about my Mini 14 and its Circassian stock. A dozen years ago Davidson’s (a large Ruger distributor) commissioned a run of Mini 14s with Circassian walnut. Most had plain, straight-grained lumber, but a very small number were superbly figured. I watched Gunbroker.com for several months and when the one you see here appeared, I pounced. I bought it new for $699. My attitude has always been you can’t pay too much for a gun; you can only buy it too early. And no, this one is not for sale.
I love the Ruger Mini 14 and I’ve written several blogs on it (I’ll give you a link at the end of this blog). The Mini 14 is not the most accurate rifle I’ve ever shot, but there’s something about it that just makes it fun. I think if Ruger had introduced the Mini 14 a few years earlier it might have been the next US service rifle instead of Mattel’s M-16. That statement might get a few trolls’ shorts in a knot, but hey, they’re young. They’ll get over it.
Photos from the original GunBroker.com ad for my Mini 14. It was a limited production item with a Circassian walnut stock. Very few had wood this highly figured.
I took my Mini to the West End Gun Club a couple of weeks ago to see what impact (if any) a new Lee factory crimp die had on accuracy. Usually when I reload rifle cartridges with jacketed bullets I don’t crimp. Part of this is because it’s a bit difficult to get a consistent crimp if the brass is not trimmed to exactly the same length, and part of it is I often find I don’t need to trim my brass to get good accuracy. That’s not to say case neck tension isn’t critical (it is; lube a couple of bullets before seating them and see how far out of the group they print). But it you don’t crimp, you rely on friction between the case neck and the bullet to control the case’s grip, and friction is a tough thing to control. Crimping should make the grip on the bullet more consistent (or so the theory goes). Crimping is also thought to provide more complete combustion, reducing pressure variability and the inaccuracies associated with it.
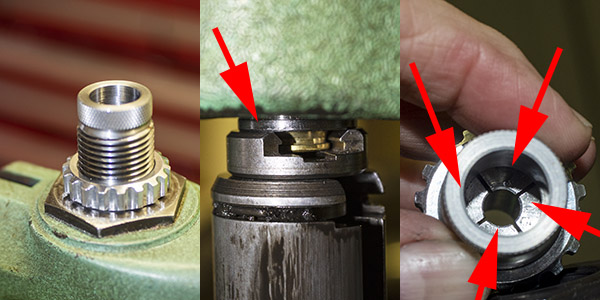
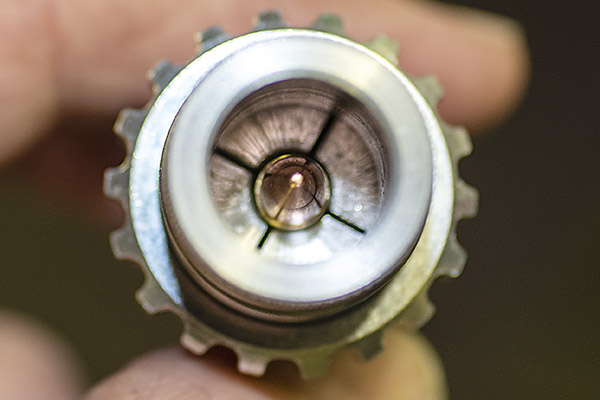
Conventional reloading dies rely on a reduced diameter in the bullet seating die, which rolls the case mouth into the bullet to achieve a crimp (such a crimp is called a roll crimp). Lee’s factory crimp die uses a different approach. It has four collets (each forms a quadrant) that work at 90 degrees to the case to crimp the brass. The collets are activated by the die’s base during the reloading press upstroke.
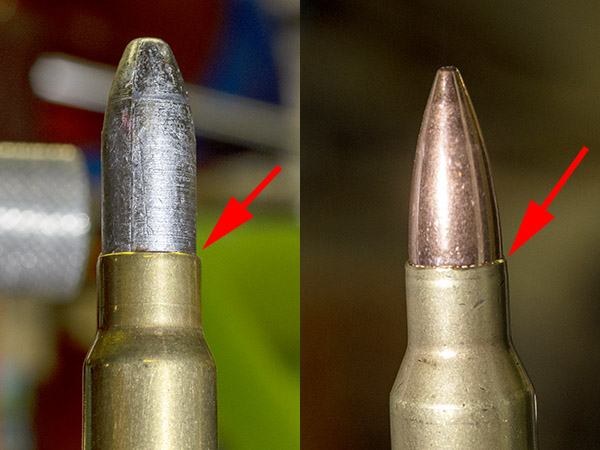
A .223 Lee factory crimp die. This is the last step in the reloading process. The die is screwed into the press after the bullet has been seated to the desired depth (left photo); the amount the die is screwed into the press controls the interface between the shell holder and the die (center photo). When the ram is fully raised, the die has collets that compress the brass horizontally around the case mouth (right photo), thereby crimping the bullet in place in the same manner as factory ammunition.The view from above. The collets squeeze the brass around the bullet to crimp it in the case.A 7.65x53mm Belgian Mauser round with a cast bullet roll crimped in place (left), and a .223 Remington/5.56mm NATO cartridge crimped with the Lee factory crimp die. The difference is subtle, but you can see it if you look closely.
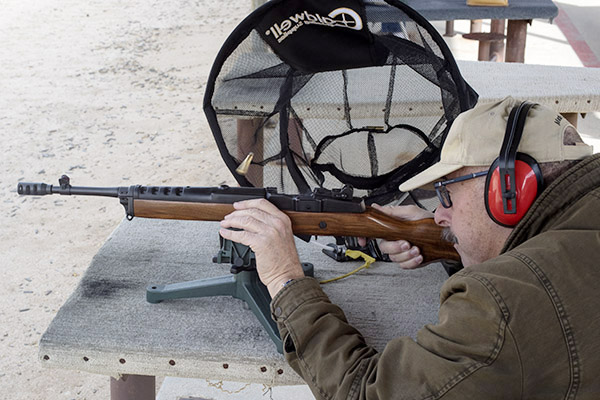
I loaded 15 rounds crimped in the Lee factory crimp die, and I used another 15 rounds without the crimp. I shot two targets at 100 yards from a rest using iron sights, with 15 rounds for each target. The target on the left is with no crimp, the one on the right is with the Lee factory crimp die (and I used a heavy crimp). The brass was fireformed in this rifle and neck sized only to get a good fit in the Mini 14’s 5.56 NATO chamber, which (as you know) is slightly larger than the .223 Remington cartridge. In prior load development work, I found that neck sized only brass is much more accurate in the Mini 14.
15 uncrimped .223 rounds at 100 yards (left target) and 15 rounds crimped with the Lee factory crimp die (right target).
The first five shots using uncrimped reloads all went into the left target’s 10-ring, so I thought I was doing pretty well. Then I switched to the Lee factory crimp die ammo on the right target. The first shot felt weird, and it did not fully extract. I think it was the one that went way low. The next four all went into the 10 ring. On the next five rounds (again, using the Lee die ammo on the right target), the first one did the same thing (it failed to extract and it went low). I fired one more magazine of Lee crimped ammo and all five worked okay.
Somewhere in those first two magazines of the Lee crimped ammo, I had two light primer strikes that did not fire. I extracted and chambered them again and they fired on the second attempt. I didn’t know why those two rounds had light primer strikes. Maybe the round had not fully chambered? Maybe because the Lee factory crimp die distorted the case mouth or something and it didn’t fully chamber? Or maybe something was interfering with the firing pin’s travel? I didn’t know and I wouldn’t find out until I disassembled rifle.
Then I fired 10 more uncrimped rounds at the target on the left and I had one failure to eject. My Mini 14 sometimes acts funny like that with the neck sized brass. It’s not a duty gun, so I thought I could live with an occasional failure to eject. But I don’t like it.
So back to those misfires. In the past, I’ve had to clean debris from around the firing pin, and it looked to me like it might be time to do that again. That could account for the two light firing pin strikes I had.
One other thing…I had painted the front sight with red nail polish, and that actually made the front sight’s top edge harder to see. I want to go back to the plain blued front sight.
I also want to adjust the Lee factory crimp for less of a crimp. These first rounds used a max crimp. I didn’t trim the brass for this test because it was only fired once, but I don’t know how even (in length) it was. I used bulk Remington loaded ammo to get the brass (having fired it previously in the Mini 14) because a couple of years ago that stuff actually cost less than unprimed brass. But inexpensive bulk ammo is not precision made and I suspect the case length had some variation (my suspicions were later confirmed, as you’ll read below).
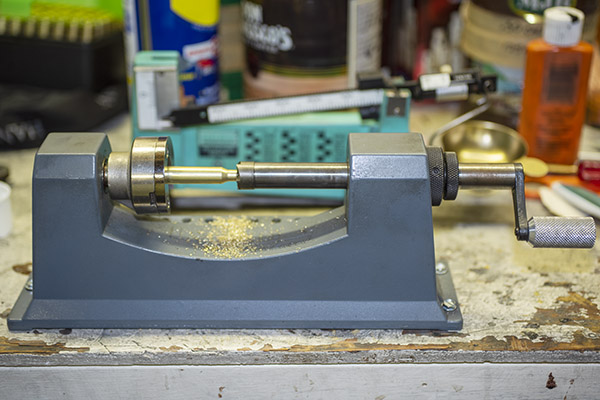
A Lyman case trimmer I’ve been using for nearly 50 years. The Lee factory crimp die does not require case trimming, but the cases had enough length variability that I decided to trim them anyway. Cases that are too long can interfere with the bolt fully closing and raise chamber pressures.
When I reloaded the rounds fired in this test, I checked a few case lengths after neck sizing. The “trim to” length (per the Hornady manual) is supposed to be 1.750 inches, with a max case length of 1.760 inches. These cases (after two firings and neck sizing) were all over the map. They ranged from 1.752 to 1.780. That alone could account for some of the anomalies described above. I ran them all through the trimmer and reloaded a hundred for the next range visit. I backed off a bit on the Lee factory crimp die, too, as my good buddy Robby suggested.
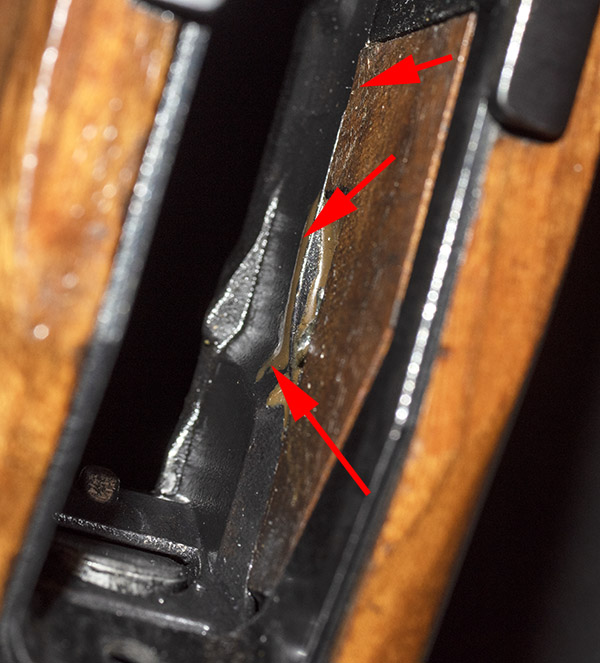
I gave the Mini 14 a good cleaning and I was surprised at how filthy it was. This is not a rifle that I clean religiously…I’ll shoot it on several outings before cleaning (heresy, I know, but hey…it is what it is). I wanted to grab a few photos of what a funky Mini 14 can look like, but my hands were so dirty and greasy I didn’t want to handle my Nikon camera. After the most recent range visit, I Hoppes No 9’ed the Mini 14 bore for a couple days to get all the copper out (you know, until the patches came out with no green).
There were bits of what appeared to be very thin sheet brass in the bolt around the firing pin as well as a whole bunch of greasy carbon residue in the bolt. That could account for the couple of misfires. Removing the firing pin is not an easy job (it takes a special tool I don’t have or want); the drill here was to shpritz the hell out of the bolt with carb cleaner and work the firing pin back and forth to push the nasty stuff out. The thin brass bits might have been primer cup material. Or they might have been chips from the extraction operation that found their way into the bolt and were peened flat. There’s no way of telling, as some of that ejected brass ends up in the next county (a trait Mini 14s are famous for). By the way, when you’re working with that carb cleaner, you need to do it outdoors where there’s plenty of fresh air. It’s highly flammable and if I use that stuff indoors, I get lightheaded and nauseated pretty quickly.
There was a lot of carbon gunk in the stock channel clear back into the action. There was also a lot of carbon in and on the guide rod, as well as around the extractor. This could account for the occasional failures to eject. I blew it all out with WD 40 (in the stock) and carb cleaner (for the metal pieces). There was so much carbon residue in the stock’s barrel channel that I thought I might have a leak around the gas port, but I didn’t see any carbon residue around the gas port and I’ve got the Allen bolts around that part tightened as tight as I dare go. I tried the smaller diameter aftermarket gas ports last year, but every one of them gave me unreliable function, so I went back to the stock port.
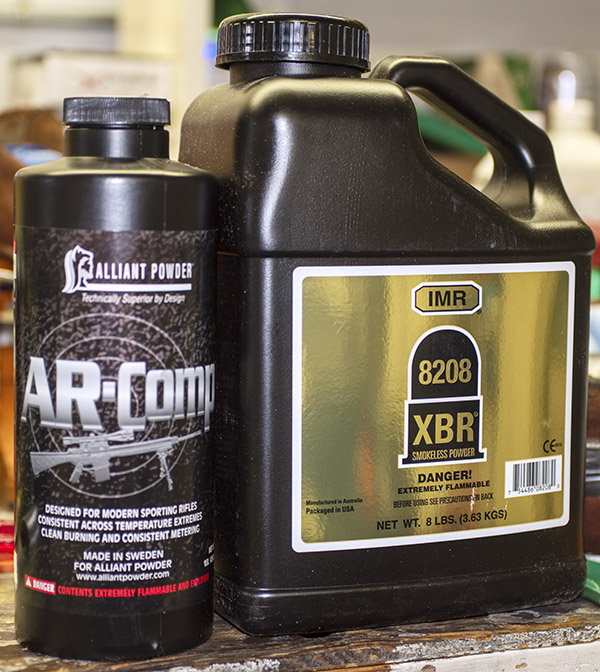
I’ve got a little more than a pound of ARComp, and that has been my “go to” Mini 14 powder for several years. When things started to get tight last year, my reloading outlet had an 8-pound bottle of XBR 8208 (it was the last bottle of anything he had). I had never heard of that powder before but I figured it would work in something, and in poking around on the Internet I found that 8208 gets the nod as a great powder for the .223 cartridge. The hundred rounds I just loaded are with ARComp, but I think I will do another 100 or so with different 8208 charges to see how they do. I’ve still got several hundred 62-grain Hornady full metal jacket bullets and I have another 500 55-grain bullets that just arrived from Midway. And I have small rifle primers and a potful of .223 brass. Unlike a lot of folks, I’m in good shape for .223 for a while (and no, I don’t want to sell or trade any components).
What’s the bottom line to all this? Did the Lee factory crimp die improve accuracy? The short answer is: I don’t know yet. I think it does, but I had too many other things going on with the rifle and the brass to be sure. If you ignore the first two rounds that went low, I think the accuracy edge goes to the Lee crimped ammo. Bear in mind that I was shooting with iron sights at 100 yards, so the differences may be more due to me than anything else. There were only four rounds outside the 10 ring with the Lee ammo; the uncrimped ammo had six rounds outside the 10-ring. But again, it’s iron sights at 100 yards, so who knows?
I’m going to share this post on Facebook, and you can bet some yahoo will tell me that he shoots 1/2-inch groups at 200 yards with open sights on his Mini 14 all day long. Hey, it’s the Internet. You have to ignore those buttheads. As far as the Lee factory crimp die’s accuracy edge goes, I think it’s real. I’ll find out for sure (maybe) the next time I go to the range. Everything in the Mini is clean, lightly oiled, and ready for action. We’ll see what happens on the next outing, and you’ll read about here on the ExNotes blog.
The Davidson’s Circassian walnut Ruger Mini 14. It was a limited production item offered for sale about 10 years ago.
My Mini 14 quest for accuracy is over. I have the answer and an honest-to-God 1.5 MOA Mini 14. With open sights. At 100 yards. Yippeeee!
It’s been an interesting journey.
Davidson’s Circassian Mini 14
I like rifles with fine walnut, and about a decade ago when Davidson’s (a large Ruger distributor) offered a limited quantity of Mini 14 rifles with Circasssian walnut stocks, I had to have one. Most of the Circassian Mini 14 rifles had very plain wood, but when I saw the one you see here, I pulled the Buy Now trigger. That’s a light trigger, I’ve learned. If it’s for a rifle with highly-figured walnut, in my case you might even say it’s a hair trigger.
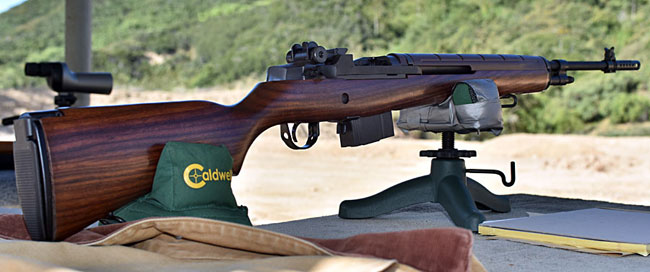
Another shot of the Circassian walnut on the Davidson’s Mini 14. That’s a Springfield Armory M1A in the background. I like fancy walnut.
The problem I had is that Davidson’s Circassian Mini 14 wasn’t legal in California because of its two 30-round magazines and flash suppressor. Here in the Peoples Republik of Kalifornia (Gavinland, if you will), we can’t have mags that hold more than 10 rounds, and semi-auto rifles with flash suppressors are verboten. So I had the rifle shipped with no magazines to an outfit with a Class III license, and they replaced the flash suppressor with a muzzle brake. Then I had to wait my state-mandated 10-day cooling off period. After I had chilled sufficiently, the rifle was mine.
The muzzle brake on my Mini 14. It may seem silly to have a muzzle brake on a .223 rifle, but if you fire this rifle and then a Mini 14 without a muzzle brake, there is a perceptible difference in recoil.
I think the muzzle brake looks better than the flash suppressor, and I don’t need a 30-round magazine. I hated the idea of leaving those 30-round mags with the guy I bought the rifle from (they were worth about $80), but hey, our mush-minded legislators think they made the Golden State safer and that’s what matters.
My rifle has a 16-inch barrel (most Mini 14 rifles have 18-inch barrels), which looks cool but it is not conducive to great accuracy. There’s nothing inherent to the shorter barrel in and of itself that hurts accuracy, but what that shorter barrel does is reduce the sight radius. A longer sight radius offers an accuracy advantage, a shorter one can work against accuracy.
The bottom line? The rifle is beautiful. I shoot it a lot, and whenever I’m on the range with it, folks are taken with it. It draws a crowd. You just don’t see Mini 14 rifles with wood like mine. But it wasn’t terribly accurate. I was going to change that. And I did.
The First Accuracy Mod: Tech-Sights
I did not like the standard rear sight on my Mini 14. To adjust elevation, you had to loosen the windage adjustment and then rotate the entire rear aperture, and to adjust windage you had to loosen both Allen screws at the base of the sight and move it. There was not indexing for windage, so where you ended up was only repeatable with a repeated fire, check the point of impact, loosen the sight, adjust, tighten the sight, fire again, and repeat until you were happy. I also didn’t like the range of elevation adjustment on the stock sight; it seemed liked the aperture had to be way too high to bring my shots to the point of aim.
The Tech-Sights rear sight on a Mini 14. It’s a first class product, and it is much better than the stock Mini 14 rear sight.
The hot setup is a replacement rear sight from Tech-Sights. It was about $70, but it was well worth it. The Tech-Sights rear sight is click adjustable for both windage and elevation, and it is repeatable when I make adjustments. It’s a much better mousetrap.
Mini 14 Accuracy Loads
I tried different reloading recipes until the cows come home, and over the last decade, I’ve converged on two that gave the best results in my Mini 14. Both use inexpensive Hornady full metal jacket boat tail bullets. The first is the 55-grain Hornady FMJBT with 26.2 grains of IMR 4320 propellant, a Winchester small rifle primer, and a cartridge overall length of 2.255 inches. That’s a near max load, and the only reason I don’t run it up to the max load is the 26.2 grains damn near fill the .223 case. The second favored load is the Hornady 62-grain FMJBT bullet with 23.2 grains of ARComp propellant. I use the same primer and overall cartridge length as the first load.
Hornady 55-grain full metal jacket boat tail bullets. The boat tail reduces aerodynamic drag and allows a flatter trajectory, or so the theory goes. These are accurate bullets with the right load.
Either bullet (Hornady’s 55-grain or 62-grain FMJBT) can usually be purchased for something between $7.50 and $8.00 per hundred when they are on sale. I probably get 10 emails a day from the different reloading houses advertising their sales, and when they throw free shipping into the mix, I’m in. You usually have to order above $100 in stuff to get the free shipping, and that’s why I have 1400 of the 62-grain Hornady bullets inbound. I’ll burn through those in 6 months or so. Yeah, I shoot my Mini 14 a lot.
I don’t crimp the bullets in either of the above loads, and I’ve found that what kind of brass I use doesn’t make a difference in group size. Using brass from different manufacturers does move the group around, though, so when I load, I do so using only one kind of brass for each lot of ammo. For me, that is usually either Remington or military brass. I have a good supply of both.
Factory versus Reloaded Ammo in the Mini 14
There may be good factory ammo out there that groups well in the Mini 14, but I haven’t found it. I buy bulk factory only to get the brass (believe it or not, when loaded bulk ammo goes on sale, I can actually buy it for less than what unprimed brass costs). When I shoot the bulk factory ammo, the accuracy is truly abysmal. At 100 yards from a bench rest, a 20-shot Remington bulk ammo group spans about 12 inches. For all you keyboard commandos out there…I know, you can do better. One guy keeps commenting that he can shoot the lock off a Cadillac with his Mini 14. Whatever. I’m reporting my results, and with factory ammo, they’re terrible.
With either of the two reloading recipes described above, I can get the group size down to about the size of the 9-ring on a 100-yard target. That’s a big improvement from factory ammo and the other loads I’ve tried. The problem, though, was the rifle wasn’t consistent. I could get a good group, but then the next one would open up. Then I’d get another good group, but it would shift on the target from the last group.
Bedding the Mini 14 Action
Past accuracy quests with bolt action rifle always included bedding the action. What that means is creating a glass-fiber-impregnated epoxy bed for the barreled action in the stock. It’s a lot trickier on a Garand-style rifle (which the Mini 14 is) than a bolt action, because the Garand-type action doesn’t have a conventional recoil lug or action screws. On the Mini 14, two tabs on the receiver fit into sheet metal inserts in the stock, and the trigger group’s trigger guard pivots to lock the whole mess (barreled action, stock, and trigger group) together. On my rifle, I could detect a minor amount of play between the stock and the barreled action, both fore-and-aft and left-to-right.
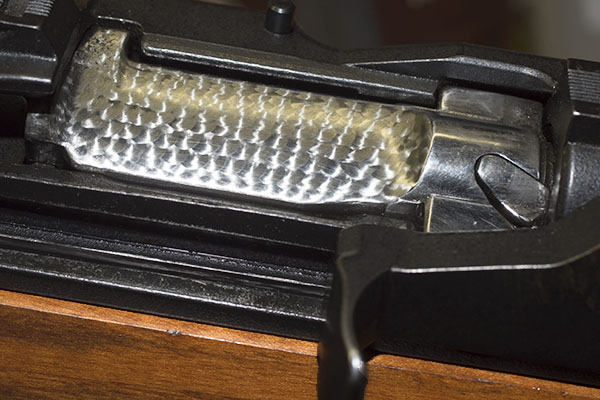
The jeweled bolt on my Mini 14. This photo doesn’t really add to the story and the bolt jeweling does nothing to improve accuracy, but I love the look. The jeweling was done by my good buddy TJ at TJ’s Custom Gunworks. I locked the bolt to the rear for the next photo so you could see the glass bedding.That brown stuff is the glass bedding below the action, between the receiver and the stock. Bedding a Mini 14 is a bit tricky, but it worked out well for me.You can just barely see that there is Acraglas bedding beneath the receiver, between it and the stock. The reason you can barely see it is because I did it well.
I used Brownell’s Acraglas as the bedding compound, and after reading and watching everything I could on the Internet about glass bedding a Mini 14, I did so with mine. It turned out well, I think. There is zero play between the barreled action and the stock now.
ASI’s Mini 14 Gas Port Kit
I wrote about this before in a previous blog. The Mini 14 throws brass into the next county, and that’s a real pain in the ass. I’ve actually dented cars behind the firing line with brass ejected from my Mini 14. The reason the Mini’s ejection is so violent is that Ruger overdesigned the ejection approach to make the rifle reliable. Ruger uses a gas port with an approximate 0.085-inch-diameter opening to port propellant gas to the op rod, and that pretty much guarantees that no matter what type of ammo you’re shooting, the rifle will function. It’s way more gas pressure than the op rod needs, though, and the ejection is so energetic that the barreled action doesn’t stay in the same place after each round. That hurts accuracy.
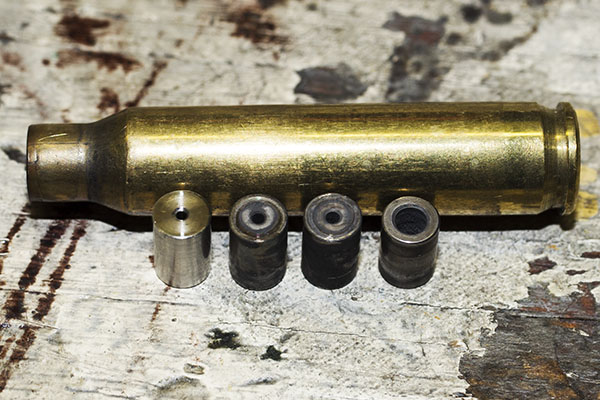
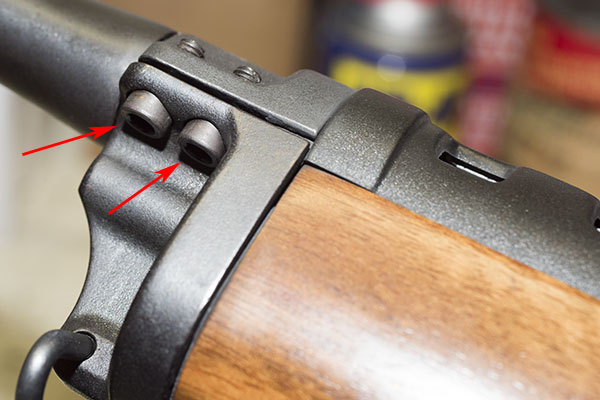
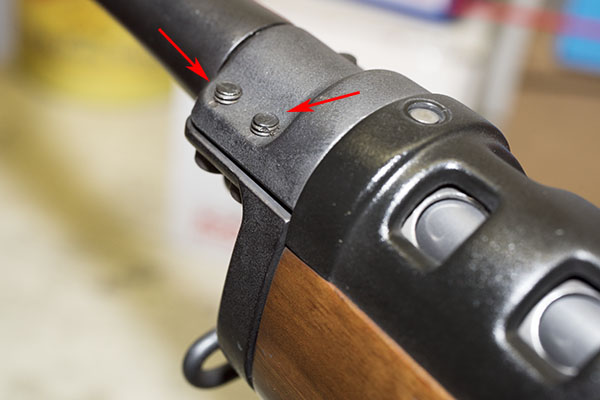
Mini 14 gas ports. The three on the left are ASI’s 0.035, 0.040, and 0.045-inch diameter ports. The fourth port in the kit (a 0.050-inch diameter port) is currently in my rifle. The port on the right is the stock Mini 14 gas port. You can see its ID is huge.There are four Allen bolts securing the upper and lower Mini 14 gas blocks. You have to remove the barreled action from the stock and unscrew these four bolts to replace the gas port.As delivered by Ruger, the gas block Allen bolts are staked in place. Getting them out (and back in again) takes some muscle.
As an aside, the Mini 14 is kind of like the AK 47 with regard to its ejection energy. Both rifles have excess margin in the extraction and ejection gas porting design to make sure they always work.
The ASI gas port kit includes four bushings with different diameter ports, and the idea is you try each one to find the bushing that gives you reliable function. You want to use the smallest one possible consistent with reliable operation. I’ve tried all four and I’m now at the 0.050-inch port (the largest one in the ASI kit), and it is usually reliable, but not always. I still get an occasional failure to extract. I may take the smallest one (with its 0.035-inch bore) and have it opened up to 0.060 inch, but that will come later. I’m not going into combat with my Mini 14, so I can tolerate the occasional failure to extract. I like to think of my Mini 14 as a SHTF rifle, but truth be told, I’m more concerned about shooting tiny groups than I am about doomsday scenarios. Your mileage may vary.
I think the reason the largest of the ASI ports still sometimes fails to extract is because my rifle has that short 16-inch barrel, which imparts a little less of a gun gas pressure pulse to the op rod than would a rifle with an 18-inch barrel. It may be another disadvantage of the shorter barrel.
ASI Gas Ports and Glass Bedding
My last Mini 14 blog was on the effects of both the glass bedding and the ASI gas port. Both of these upgrades made a difference, but the rifle still wasn’t where I wanted it to be from an accuracy perspective. Interestingly, the dispersion got smaller top to bottom, but it was still about the same left to right as it had been with my preferred 62-grain bullet load.
Better, but still no cigar on a 100-yard target. Glass bedding and the 0.050-inch ASI gas port reduced vertical dispersion to about 3 inches and brought the lateral dispersion down to about the size of the bullseye, but I still wasn’t where I wanted to be.
5.56 NATO versus .223 Ammunition
Ah, here’s where things start to get both technical, and to ballistics geeks like me and you, extremely interesting. You might be wondering why this blog is suddenly going tangential into a discussion of 5.56 NATO ammunition and the .223 Remington commercial cartridge. Bear with me and it will all come together.
As we proceed, keep this in mind: Even though the Ruger Mini 14 is marked as a caliber .223 rifle, it has a 5.56mm NATO chamber.
For starters, there is a difference between the two cartridges (they are loaded to different pressure levels, with the 5.56mm NATO cartridge loaded to higher pressure than the .223 Remington cartridge), but the 5.56mm NATO and commercial .223 Remington share identical exterior dimensions. Military (i.e., NATO) ammo has thicker case walls, which means the interior volume decreases slightly, but on the outside, the dimensions are the same.
Okay, the above addresses the two cartridges. Now, let’s consider the two chambers (the part of the rifle that surrounds the cartridge). There are lots of differences between the chambers in a 5.56 NATO rifle versus a rifle chambered for the .223 Remington cartridge. The first is the leade (the distance between the case mouth and where the rifling begins in the barrel). Rifles chambered for the 5.56 NATO round have approximately twice the leade as do rifles chambered for the .223 Remington cartridge. That’s what allows the 5.56 NATO round to be loaded hotter than .223 Remington cartridge (it’s exactly the same thing you see in a Weatherby rifle; they are cut with longer leades to allow loading the cartridges hotter for more velocity). Because longer leades allow loading a cartridge hotter (the bullet is free to move a little more before the rifling resists it), the longer leade allows higher muzzle velocities. But longer leades may allow the bullet to tilt a bit before it hits the rifling, so rifles with longer leades tend to be less accurate. In a bolt action or single shot rifle, you could account for this by seating the bullet out further in the cartridge case to get it closer to the rifling, but you can’t do that in the Mini 14. If you seat the bullet out further, the cartridges won’t fit in the magazine.
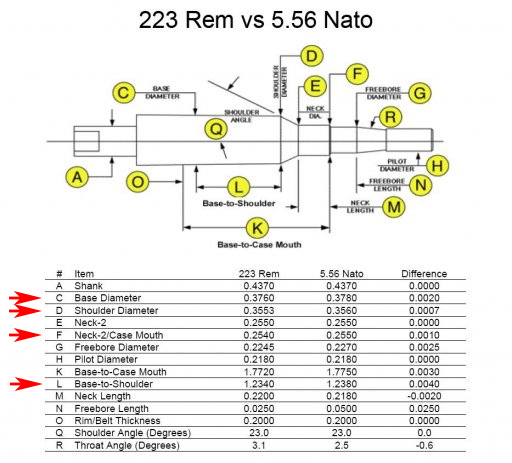
All that business above about the 5.56mm NATO chamber’s longer leade is interesting, but it’s not the primary concern here. The bigger concern as it pertains to the Mini 14 (and its 5.56mm NATO chamber) is that the 5.56 NATO chamber is slightly larger than is a chamber for the .223 Remington cartridge. That’s to meet the military’s combat reliability requirements (a rifle with more clearance between the chamber and the cartridge is less likely to jam). The difference in the two cartridges’ chamber dimensi0ns is shown in the chart below.
In particular, note Dimensions C, D, F, and L, which govern the length, neck location, and diameter of the chamber. As you can see above, they are all larger for the 5.56mm NATO chambered rifle, and like I said above, the Mini 14 has a 5.56mm NATO chamber. The cartridge has a lot more clearance between the case and chamber walls in the Mini 14 than it would in a rifle with a .223 Remington chamber. The cartridge can move around in the Mini 14’s chamber, and that hurts accuracy. Big time, as it turns out.
With one exception in the Mini 14 family (that was the Mini 14 Target, which was kind of a commercial flop), the Mini 14 has a 5.56mm NATO chamber, because Ruger designed the rifle to work with either 5.56mm NATO ammunition or .223 Remington commercial ammunition. What that means to us is that the rifle is not optimized for accuracy. There’s a greater bullet jump from the cartridge case to the rifling, and there’s more clearance around the cartridge due to the slightly larger chamber. Both work against optimal accuracy.
Neck Sizing Mini 14 Brass
Well, that chamber issue sure had my attention as a potential significant contributor to the Mini 14’s accuracy woes. It made me wonder: Would neck sizing the brass (rather than full length resizing) make a difference? Maybe the Ruger’s chamber is just too loose to be accurate, I thought.
So what is neck sizing? There are two approaches to resizing brass during the reloading process. The first is that you full length resize the brass, which brings it back to factory specification. The entire case is resized, including its diameter along the full length of the cartridge case, the case neck diameter, and the location and angle of the case shoulder (you know, where it necks down to the part of the case that holds the bullet). The other approach is to neck size only, and the idea here is you leave most of the case (in its post-fired condition) alone and only resize the part of the case that holds the bullet. The concept is that the case has formed (we call it fireforming) to the exact dimensions of the chamber in which it was fired, and resizing only the neck assures a near perfect fit of the reloaded cartridge in the rifle that previously fired it. It should be a near perfect fit around the case diameter and from the case shoulder to the bolt face. It should theoretically improve accuracy because the cartridge and its bullet are in exactly the same position for each shot.
I know you usually would not ordinarily neck size brass for ammo to be fired in a semi-auto rifle, as it could degrade reliability. But my thinking was maybe the Ruger’s chamber is so big it would work. As a first step, I tried an empty case that had been fired in the Mini to see if it chambered and extracted easily. It did.
.223 cartridge cases that have been neck sized only. Only the area between the arrows has been resized. The rest of the case is left in its fireformed condition. It will more closely match the dimensions of the Mini 14 chamber in which it was fired.
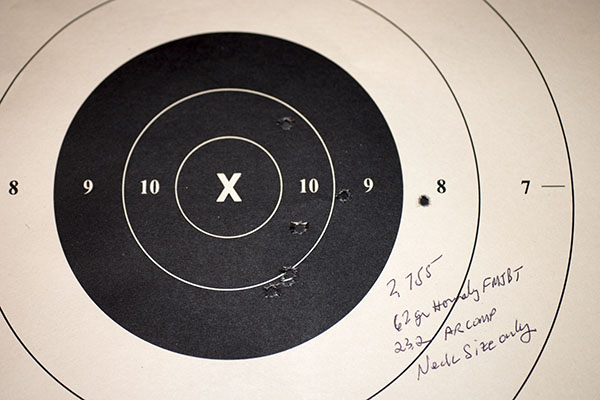
There are two approaches to neck sizing brass. One is that you can use the full length resizing die, but you don’t screw it into the press all the way. The intent is that it resizes the case neck but not the case body. The problem with this approach is that it is hard to get most of the case neck without the full length resizing die contacting the cartridge case body. I tried this as a first approach, though, and the results on the target were dramatic. Using the last of my 62-grain Hornady FMJBT bullets and 23.2 grains of ARComp propellant, I was now reliably getting groups I could mostly keep in the black at 100 yards. Yowzers!
Progress at 100 yards! Neck sizing the .223 cases using a full length resizing die got the group sizes down to the size of the bullseye. Things were moving in the right direction.
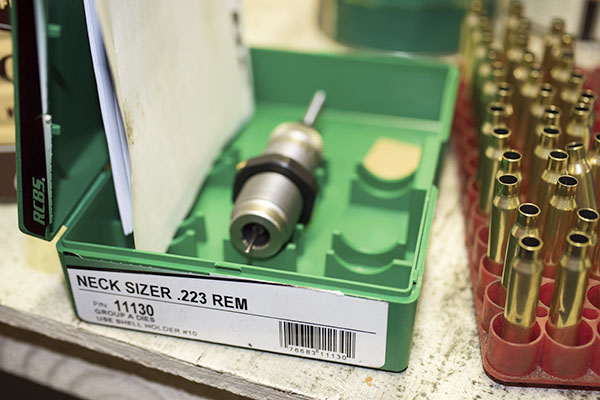
I ordered the RCBS neck size only .223 die on Amazon and when it arrived the next day, I loaded ammo with what had been my best load with the 55-grain Hornady FMJBT bullet (and that was 26.2 grains of IMR 4320 propellant). How did it work? Read on, my friends.
My new RCBS .223 neck size die. It cost just over $30.
The Sweet Feel of an Accurate Mini 14
Ah, the sweet feel of success. I was out of my 62-grain Hornady bullets (more are on the way as I write this blog), so like I said above I used my other favorite load with Hornady’s 55-grain bullets. That load worked even better, and surprisingly, it required no sight adjustment from the 62-grain bullet load.
Good times with an iron-sighted Mini 14 at 100 yards. That group on the right looks like it could have been fired with a scoped rifle, but it wasn’t.
I had two targets set up at the 100-yard line (the two you see above), and I first shot the target on the left. I could see the holes with my 20X spotting scope, and it felt mighty good to see them all plunk right into the bullseye. Then I fired on the target on the right, and when I checked it in the spotting scope, I thought I had done well, but I wasn’t sure. The way the light was hitting the target I couldn’t count five holes through the spotting scope. At the next line break, my buddy Greg and I walked down to the targets and at first, I was disappointed. I could see only four holes in the target on the right, and I thought I had missed altogether with my fifth shot. I mentioned that to Greg, and then he pointed to the fifth hole. It was hiding right alongside the X.
100 yards, iron sights, and a Ruger Mini 14. I have this rifle dialed in now.
As I said at the beginning of this admittedly long blog, this has been an interesting journey. I think everything I did to this rifle helped to improve its accuracy, but the major contributors have been finding the right load, glass bedding, and neck sizing. Your mileage may vary (every rifle is different). I’ve found what works for me.
See Our Other Mini 14 Blogs
I mentioned several earlier Mini 14 blogs. Here are links to our Mini 14 posts:
If you follow the ExNotes blog, you know I’m still chasing accuracy improvements for my Mini 14. The latest upgrades include glass bedding the receiver and installing a smaller gas port. They helped, as will be described here. What’s next? Read on.
The Accuracy Systems International Gas Port Kit
I bought a new set of Mini 14 gas ports from Accuracy Systems International, an outfit that specializes in Mini 14 accuracy upgrades. The gas port is essentially an orifice that restricts the flow of combustion gas to the rifle’s op rod. The stock Ruger gas port orifice is huge (it’s probably something like 0.090 inches in diameter). That is because Ruger wants the rifle to function with any kind of ammo, but the huge stock gas port throws spent brass into the next county and it slams the barreled action around in the stock (that hurts accuracy, as the receiver may not be sitting in the same spot after each round). The ASI gas port kit costs $30, but it’s more like $40 after including the shipping and handling charge. That’s a rip because the thing fits in a business envelope, but hey, it is what it is.
Glass Bedding the Mini 14
I bought an Acraglas bedding kit from Brownells and glass bedded the receiver in the stock. I’ve glass bedded bolt action rifles before, but I had never done a Garand-type action. There’s no recoil lug like a bolt action rifle has, so the glass bedding involved delicately laying in the epoxy on the interior sides of the stock and the area above the stock that mates with the receiver. This was something new for me, and I don’t mind telling you that I was plenty nervous about getting the barreled action out of the stock after the epoxy cured. I need not have worried; the release agent worked like it was supposed to and the bedding job turned out well. There is zero movement between the receiver and the Mini 14’s Circassian walnut stock now, and that’s what I wanted.
Tuning The Mini 14 Gas Port
After the bedding job, it was time to start playing with the different gas port orifices. The Accuracy Systems International kit includes four gas ports (0.035, 0.040, 0.045, and 0.050 inches), and the drill is to find the smallest one that works. The stock Ruger gas plug orifice is huge (as mentioned above), and ejection from a stock Mini 14 can only be described as violent. I tried the 0.040 and then the 0.045, but both would occasionally fail to fully cycle. With the 0.050 orifice, the rifle didn’t have any failures. I noticed that sometimes the last round out of a magazine just lays the brass on top of the follower after being extracted. That’s no big deal. My Mini 14 now throws the brass about 20 feet to the right (maybe less, because the brass was landing on concrete and rolling around a bit). It’s a substantial improvement.
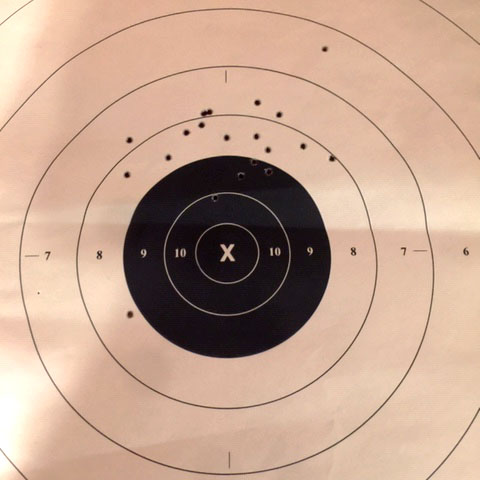
100 Yards From The Bench
I first fired at a 100 yard target from a bench rest. Surprisingly, the bedding and the new orifice only shifted the group a little. The rifle now shoots a bit high, but the group size (absent a couple of flyers, one high and one low, most likely due to me) is about the size of the 9-ring on a 100-yard target (and that’s an improvement). Most of the dispersion is lateral, and that’s a change from what the rifle used to do. If I practiced a bit more, I’d do better. If I drop the rear sight a couple of clicks I should be right on the money. This was my 100-yard target from the bench:
The accuracy wasn’t the greatest I’ve ever achieved with an iron-sight rifle (my 80-year-old Mosin-Nagant will consistently keep its hits in the 10-ring), but it was an improvement over what the Mini 14 had done prior to the bedding job and the smaller gas port orifice. Things are moving in the right direction.
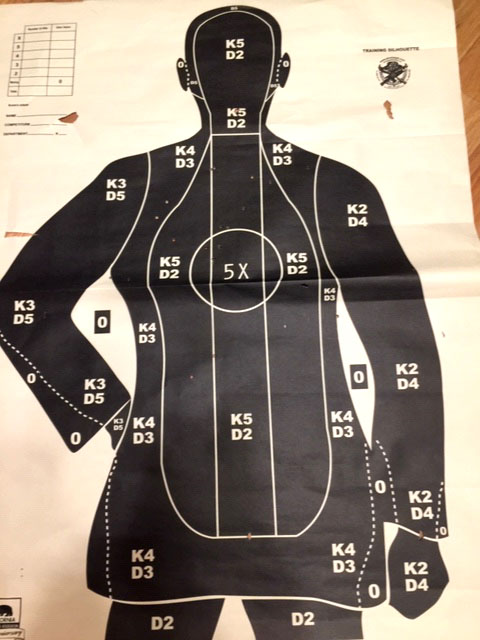
The B-21 Department of Corrections Target
Next up was the California Department of Corrections B-21 target my CDC buddy told me about. The California CDC uses the Mini 14 as an issue weapon, and the B-21 is their periodic qualification target. I bought some of these targets at Alco last week and I wanted to see how I would to. My CDC friend told me that CDC officers qualify with their Mini 14 rifles at 50 and 100 yards, from both the standing and kneeling position.
I put my target out at 100 yards and tried shooting from the kneeling position. It felt very awkward to me and I was terrible. Oh, I put rounds on the target, but this kneeling position is not my cup of tea. I used to be able to do it when I was in the Army, but I weighed 50 lbs less and I bent a lot easier in those days. I’m not even sure what knee is supposed to be on the ground. Maybe I need Colin Kaepernick to tutor me.
Then I went to the standing position, shooting offhand, and I found I could keep my shots in the bottle (as my CDC buddy described the target). I might be able to qualify as a CDC officer if I could get on top of this kneeling position business. The little .223 holes on the target below are a hard to see (my apologies for the cell phone photography), but trust me, they’re on there. All the ones that are outside the bottle were from the kneeling position.
You know, when I first saw that B-21 target, I was amused at how big it is (it’s literally life-sized). Try shooting it offhand from the standing position with iron sights, though, and the old B-21 suddenly gets a lot smaller. At 100 yards, I couldn’t see any of the lines on the target. It was just a big black mass, and I tried to hold in the center of it as I fired. It was swimming in the sights, but I was able to connect. Mind you, I had not shot offhand like this in years. The rifle seems to be grouping a little high shooting offhand (as it did from the bench). But it is, as the saying goes, close enough for government work.
What do you think? Would I be able to run with the big dogs in the CDC? My CDC buddy told me I’d qualify expert. Maybe he was just being nice.
Future Mini 14 Accuracy Improvement Thoughts
I am thinking about what else might make a difference in accuracy on the Mini 14. The action is bedded and I’ve experimented with different loads until the cows came home (for your information, my best load is with a max ARComp charge and the Hornady 162 grain full metal jacket bullet). I sort and trim the brass I reload (and that makes a difference). I’ve found the gas port that works best (it’s the 0.050-inch orifice). So what’s left?
I’m wondering about the fit of the .223 cartridge in the chamber. The Mini 14 has a loose chamber to make sure everything feeds reliably, so I’m wondering if it’s too loose for optimal accuracy. My thought is to try neck sizing only. That’s when you only size the cartridge neck down (to hold the bullet in place) but leave the rest of the brass case enlarged, as it came from the rifle after the last firing. I know you usually would not do that in a semi-auto rifle, but I’m guessing there’s plenty of room in that chamber. I’m thinking I’ll load 20 rounds with neck sizing only and see how that goes. I guess I could try chambering an empty case previously fired in the Mini 14 and see if it chambers and extracts easily. If it does, neck-sized-only loaded rounds probably will, too.
Sometimes you can seat the bullets out further in the case to improve accuracy. You can’t mess around with bullet eating depth on a Mini 14, though. If you seat the bullets out any further, the cartridges won’t fit in the magazine, so that’s out as a potential accuracy improvement.
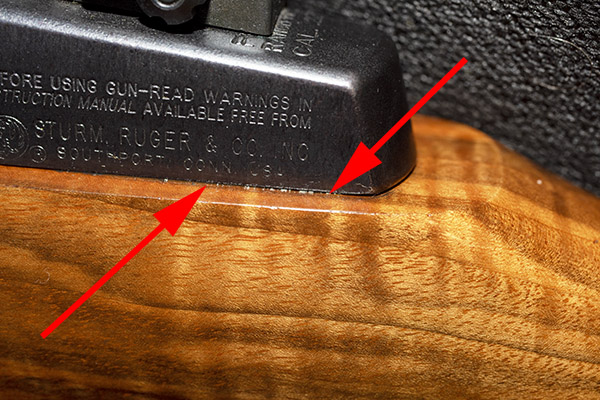
Next up is the muzzle brake. This thing has a gigondo muzzle brake (see the photo above) that I had installed to replace the stock flash suppressor. I had to do that to bring the rifle into the People’s Republik of Kalifornia (a flash suppressor on a semi auto rifle is illegal in California, a stupid law if ever there was one). The muzzle brake does not make contact with the bullet on the way out of the barrel, but I’m wondering if it somehow disturbs the bullet’s flight as it exits the muzzle. I think I’ll Google “muzzle brake impact on accuracy” and see if there is anything out there on this. (Note: I did, and there’s evidence that this can happen.)
The other thing I’m wondering is if the guy who installed the brake damaged the muzzle when he installed it. I can’t see the muzzle in there. It’s not going to be easy to get it (the muzzle brake) off the barrel, but that may be the next step. The muzzle brake has to be affecting the barrel’s harmonics, too, because it is so massive. Maybe I’ll just take it off and see what that does.
The Mini 14’s bolt feels loose when the rifle is in battery, but my Garand is like that, too, as well as many of the bolt guns I have. I don’t know if that is playing an accuracy role. There’s nothing I can do about it, though, so that’s something that will remain a mystery.
I’m wondering about the front sight, too. It’s wide. At 100 yards, the width of the front sight blade is three or four times the diameter of the bullseye. My M1A has a much thinner blade for the front sight, and it seems to be a lot easier to shoot small groups with it. Looking at the 100-yard bullseye target shown above, most of the Mini 14’s dispersion is left and right; I’m thinking a thinner front sight might cut down on that lateral dispersion.
I’ve put a lot of lead downrange with my Mini 14, probably something well north of 10,000 rounds. Maybe the barrel is just worn out. Eyeballing it, though, it looks good, and accuracy keeps getting better with incorporation of some of the things I’ve done. But that’s a lot of shooting. It could be that a new barrel would make a difference.
Any other ideas? Hey, let’s hear your comments. I’ve shared what I know, and I could use your help.
See our other Tales of the Gun reports (including more on the mighty Mini 14) here.
This is a tale of three Garand-style rifles, told from my laptop while waiting to make a connection in Taipei. Yep, I have time on my hands (5 ½ hours, to be precise). I had this Garand tale from an earlier writeup, so I thought I would polish it up a bit and post a gun story on the ExhaustNotes blog.
The M1, the M1A, and the Mini 14
The three Garand rifles? They’re all based on John C. Garand’s brilliant rifle known as the M1, so I guess I’ll start with a description of that firearm first. The M1 Garand is a gas-operated, semi-automatic rifle, described by General George S. Patton as the greatest battlefield implement ever invented. In a period when all other armies were using bolt-action rifles, our ability to deliver serious semi-automatic firepower without having to turn a bolt was a major advantage.
My M1 mutt.
The Garand design operates by porting a bit of the combustion gas to a cylinder that drives an operating rod, and then the operating rod unlocks and cycles the bolt. Garand’s genius is evident in the mechanical interactions between the bolt, the operating rod, and the rifle’s receiver. The angles and camming surfaces are such that when the operating rod pushes the bolt rearward, the bolt first rotates and unlocks before it extracts and ejects the spent cartridge case. After it has done that, the rifle’s main spring drives the operating rod forward again, the bolt picks up and chambers a new round, and everything locks into place. It’s very clever. There is no software and there are no electrons carrying any signals. It’s all driven by good old-fashioned, straightforward mechanical stuff.
Several armories and companies manufactured Garands, and serious collectors look for Garand rifles based on their manufacturing pedigree. My M1 Garand is nothing fancy or collectible. It’s a mutt, a hodgepodge of components with an Israeli-manufactured receiver, an Italian Beretta trigger group, and other parts of mixed origin. But it shoots well and I love shooting it, and the Garand is a rifle with a soul. It’s like taming a living beast when you shoot it. It roars, it kicks, it makes mechanical noise, and it sends things flying.
Check out the spent cartridge case just ejected…it’s in the lower center of this photo! My daughter took this photo with her cell phone.
M1 Rifles Standing Guard
I was surprised to see Garands still on guard duty a few years ago when I was on a secret mission in Turkey. I grabbed some cool photos of Turkish sailors and soldiers (young Turks, you could call them) guarding Ataturk’s tomb in Ankara…
Standing guard in Ankara, Turkey, with an M1 Garand.An M1 Garand in Ankara.
Garand originally designed the M1 to fire a cartridge with a 0.27-inch diameter projectile, but when it was fielded, the Army opted to chamber it in .30 06. We already had machine guns and the Springfield 03A3 chambered in .30 06, and sticking with the same round made sense. The M1 Garand soldiered on during World War II and the Korean War for us, and it’s still soldiering on in ceremonial units (like those Young Turks you see above).
The M14 and M1A
After the Korean War, the US Army developed the M14 rifle to replace the Garand. The M14 is essentially a shortened M1 Garand with a magazine (you insert the ammo into the bottom of the rifle). The basic Garand operating concept is the same. The M14 switched from the mighty .30 06 round to the 7.62 NATO round (the .308 Winchester cartridge). The M14 shoots the same bullet, but the 7.62 brass cartridge case is a little bit shorter and the bullet is about 100 feet per second slower than it would be if it was fired from a .30 06. The shorter cartridge case allows the 7.62 NATO round to operate in a machine gun with a higher cyclic rate of fire, and that was one of the reasons we went with it.
The M14 started development in the 1950s and it officially replaced the Garand as the US Army infantry rifle in 1961. I first trained with the M14 when I joined the Army, and I loved it. It was a full-sized rifle with real sights and a real walnut stock (no black plastic silliness in those days), and it fired a serious cartridge. Unlike the Garand, the M14 had a selector switch that allowed it to fire full auto. With those features, what’s not to like?
In addition to being a great service rifle, the M14 was one hell of a target rifle. The M14’s .308 Winchester cartridge is inherently more accurate than the M1 Garand’s .30 06 round (heresy to some, I know, but I’ll stand by that statement). Civilian competitive shooters wanted the M14, but it wasn’t going to happen. So private industry did what America does best: It engineered a solution. The company was the Springfield Armory (not to be confused with the U.S. government’s Springfield Arsenal), and they created and sold semi-auto-only versions of the M14 to the public. Springfield Armory called the new rifle the M1A (not to be confused with the M1 Garand). I know, there’s a lot of “not to be confused” stuff here. It’s complicated.
I always wanted an M1A, and when I spotted one in our local gun shop with nice horizontal figure in the walnut stock, I pulled the trigger (pardon the pun). The finish on a standard Springfield Armory M1A is crude (it’s a single coat of boiled linseed oil on a not-very-smoothly-finished stock). The figure in my rifle’s stock indicated the wood had potential, so I went to work applying multiple coats of TruOil (one hand-rubbed coat each night, just like we used to do in the Army). It turned out well and it shot well, but I reasoned it could do better, so I sent it back to Springfield to have it glass-bedded and I added National Match sights. The glass-bedding stabilizes the action in the stock (it’s a technique for making a rifle more accurate), and the National Match sights have a smaller aperture at the rear and a thinner front sight (that makes it easier to shoot tighter groups). It worked for me; those two changes dropped my M1A’s 50-yard groups from 1.5 inches to 0.5 inches.
A modern Springfield Armory M1A, the civilian version of the M14, which was the successor to the M1 Garand.10 coats of hand-rubbed TruOil and the M1A’s horizontal stripes stand out.
The thing about both of the above rifles is they shoot big cartridges. The Garand’s .30 06 and the M14’s 7.62 NATO rounds have serious recoil and muzzle blast. Again, American inventiveness to the rescue: Enter another mechanical genius and business leader extraordinaire, Bill Ruger. Ruger developed what is essentially a scaled-down version of the M14 chambered for the 5.56 NATO cartridge (which is essentially the .223 Remington round). That’s the same cartridge used in the M16. It fires a much smaller bullet than either the M14 or the M1, and the recoil and muzzle blast are substantially lower.
A Favorite: The Mini 14
Ruger called his Garand-based rifle the Mini 14 (it was a smaller version of the M14). It came on the market in the early 1970s and it was an instant hit. I’ve owned several Mini 14s (and fired several more) over the last 5 decades, and I love the things. They are not known for their accuracy, but they are accurate enough and they are a lot fun to shoot.
A Ruger Mini 14 with a muzzle brake and a Circassian walnut stock. This one is from a limited run Ruger made with Circassian walnut about 10 years ago. It’s very collectible and it always gets compliments at the range.Not the world’s most accurate rifle, but accurate enough.
The Mini 14 never made it into the US military in a major way (it’s rumored that some special forces units were armed with Mini 14s), but it is used by many US police agencies (including the San Bernardino County Sheriff’s Department, one of the best there is), the French military, and the militaries of a few other countries. I believe that if Ruger had come to market with the Mini 14 a few years earlier, it might have become the US Army’s standard rifle instead of the M16 (and that would have been fine by me). That last statement is bound to raise a few eyebrows, but hey, this is the Internet. If you disagree, that’s why we have a Comments section.
I’ve fired thousands and thousands of rounds through my Mini 14, and it is the cartridge I reload the most frequently. The small .223 bullets are inexpensive and reloading is as much fun as shooting. My Mini 14 is the rifle I shoot most and one of these days I suppose I’ll wear out the barrel, but I’m not worried. I’ll just have a new one fitted and shoot another zillion rounds.