The Rustoration of Zed, my 1975 Kawasaki Z1 900, has once again hove into view. After several months of pouring concrete in Bay 2 of the big metal shed then building a retaining wall to level the back yard and pouring a side patio to slow erosion, the time has come to push Zed a little further down the road.
I left Zed somewhat assembled as far as the running gear was concerned. Today we will tackle adjusting the eight valves. You really can’t get an easier engine to work on than the Z1. After measuring the valve gaps and determining which valves need attention (four in my case), the first things you’ll need are a few old 29mm shims to stand in for the shims you are about to remove. These placeholders keep the cam from contacting the valves in an unfriendly way when the engine is rotated to access other valves. I don’t have any extra 29mm shims so I cut some out of a 1/16 bit of aluminum flat stock. These temporary shims can be a much looser fit (thus easier to remove), as you will not be running the engine with them installed.
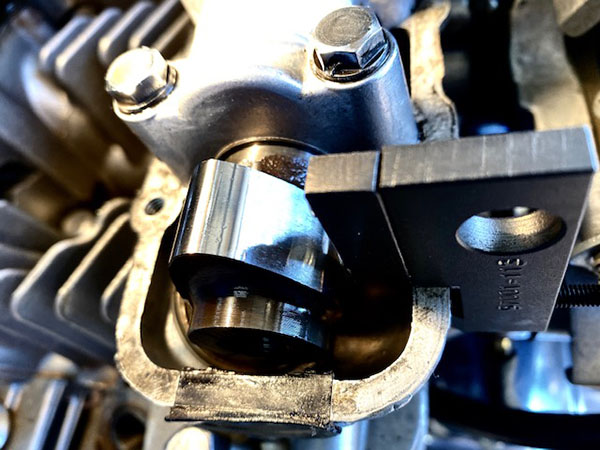
I bought the correct Kawasaki brand valve shim remover tool online for around $40. There are other style shim tools but this one works well enough and leaves both hands free for the fiddly task of extracting the shim from its holder. I had to grind a little clearance into the tool where it straddles the cast-in tool boss on the Kawasaki’s cylinder head. The tool boss castings were slightly different thicknesses so after grinding it to fit the largest one I had to shim it with a plastic tie-wrap on the smaller castings.
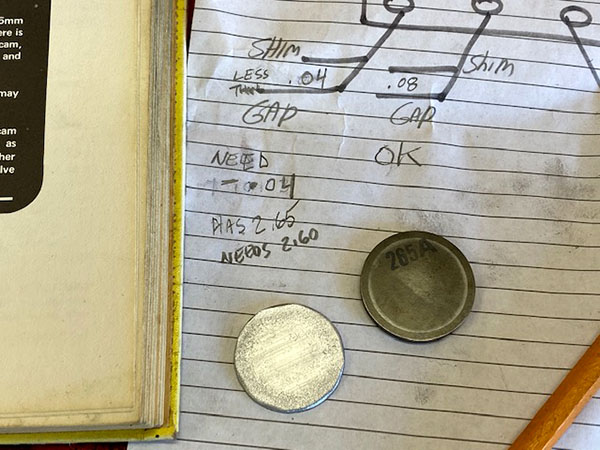
Now that you have measured all the valve clearances and removed the shims on the out-of-spec valves it’s time to play shuffle-shim. The shims are marked in millimeters and if the last guy who set the valves was not an asshole the markings will be readable on the side facing away from the cam. It’s a good idea to measure the shims with a micrometer but I don’t have a metric micrometer and it’s too much math to convert from inches. With my clearances I was able to relocate two shims leaving only two valves to go.
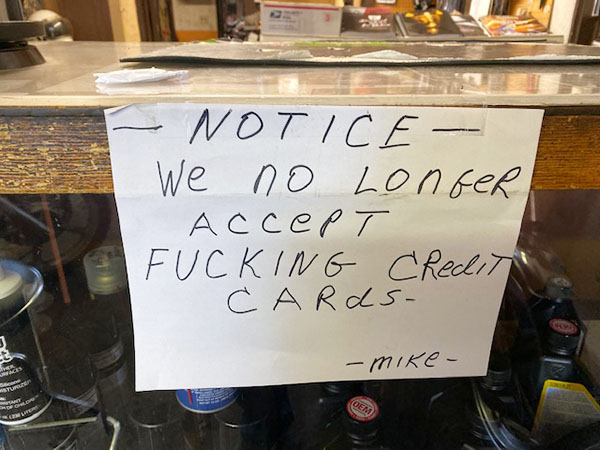
Holiday Cycles is our local Old School cycle shop. There are no dealerships; Holiday is an independent, pan-brand shop. The place looks like its been in business since 1939. I love it. You can see by the credit card sign that these guys don’t put up with bullshit. Holiday Cycles had one of the shims I needed and swapped me for mine. I’m not sure how they are going to make any money like that but I’m cheap so it really tugged at my heartstrings.
Next I went to Dave at the local Kawasaki dealership. Dave had shims but the Z1 is so old the shims were in his storage shed. I had to wait a day to pick up the next shim. I installed the new shims but the 3.00 mm one was too tight. That valve had a 2.95 shim and the gap was at .013 so I couldn’t understand why the 3.00 didn’t bring it down to .008. This is where measuring the shims comes into play. Dave told me that shims can vary a couple thousandths. Add in a bit of wear and it’s a crapshoot as to which replacement shim to get.
Trial and error has been my normal MO since forever so I ordered another 2.95 from Dave except he doesn’t want to go back to the storage unit right now so I am waiting on a call back. Once I get the valves set I’ll run the engine again to flush the carbs with fresh gasoline. Then I can get to work on the gauges and headlight area and try out the new electrical system. I really want to ride this bike before I die.
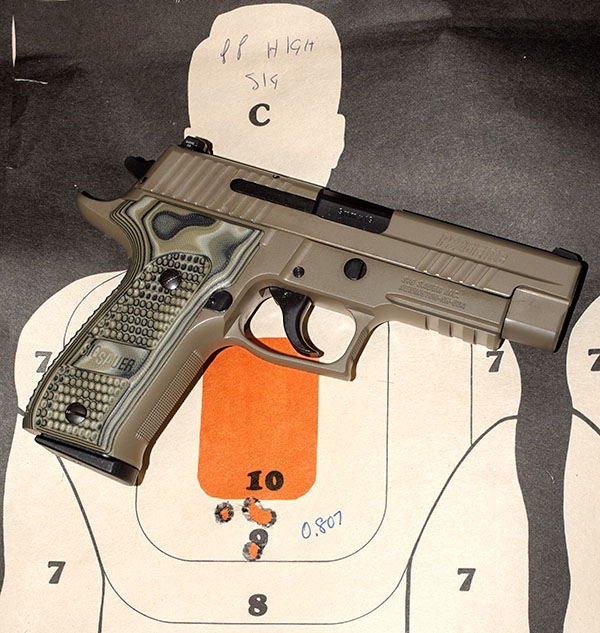
Bottom line first: The SIG P226 Scorpion can get ‘er done! This is a phenomenal handgun, one of the best I’ve ever shot.
This is Part I of the promised 9mm comparo, and after thinking about it for a bit, I thought I would focus on the cast bullet loads in the first installment, and then move on to the jacketed bullet loads in the next one (that will come a little later). There are a lot of ways I could have organized the comparo; this one made the most sense to me. There’s a lot of information here and I didn’t want it to be overwhelming. It also involves a lot of shooting (about a half day’s worth with just the cast bullets), and I wanted to clean the pistols after shooting the cast bullet loads before moving on to the jacketed loads.
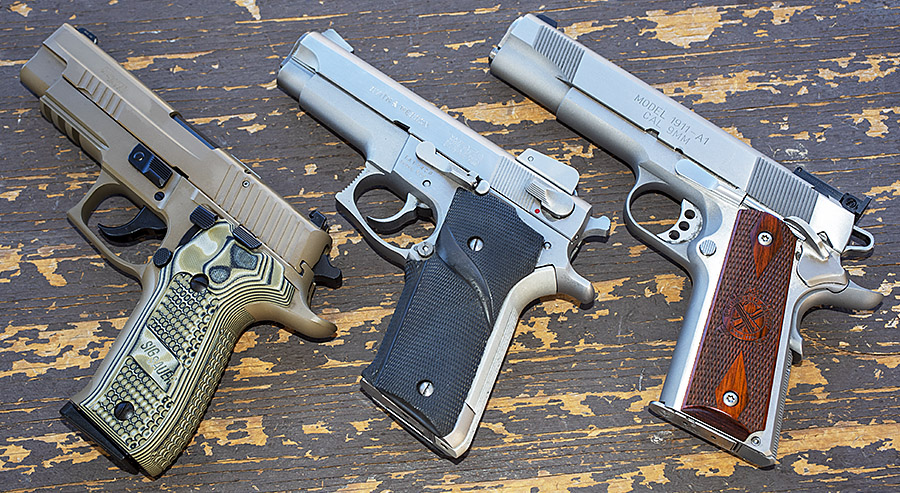
I used three 9mm handguns for this test: A former police-issue Model 659 Smith and Wesson, a Springfield Armory 1911 Target, and a SIG P226 Scorpion. Let’s start with a few words about each.
Keep us in clover…please click on the popup ads!
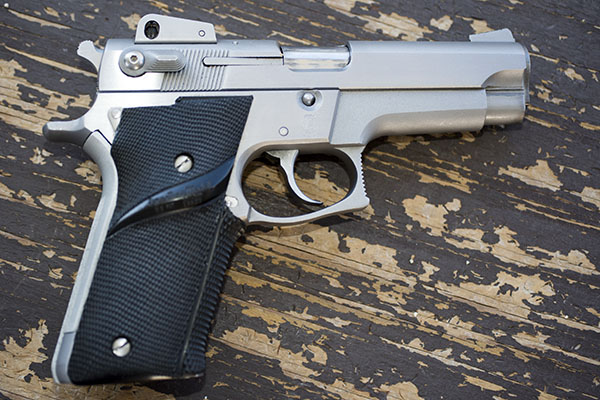
The 659 S&W is a gun that’s been featured on the ExNotes blog before. It’s a police department trade-in that was manufactured in the 1980s. My good buddy Tom gave me a great deal on it, I refinished the brushed stainless steel slide and frame, I fixed the decocker (it wasn’t dropping the hammer when the safety was actuated), and I’ve been shooting it a lot in the last few months. My gun has Pachmayr checkered rubber grips (which I like a lot). It is a heavy gun at 40 ounces, mostly because it has a steel frame (many 9mm handguns have a polymer or aluminum frame).
The 659 Smith and Wesson. It’s a solid service pistol, one that was used widely when police agencies in the US switched from revolvers to autos 40 years ago.
I like the 659. Like I said above, it’s heavy (but that means it’s steady) and it seems to shoot everything well. What do I not like about it? It needs to be kept clean behind the extractor, or it will sometimes fail to fully extract and eject a fired cartridge. That’s due to the nature of the extractor, which is a hinged arm. When grit or powder reside gets behind the aft portion of the extractor, it can’t pivot and it doesn’t pull the cartridge all the way out so that it can be ejected. I think the squared-off trigger guard is goofy. I never wrap my left hand around the front of the trigger guard and I prefer the look of a rounded trigger guard. Like most double-action/single-action semi-auto handguns, this 659 has the Joe Biden trigger (it’s kind of creepy). The front sight is unfinished stainless steel, so it is hard to see on the target (I paint the front sight on my 659 flat black so I can get a good sight picture). The Pachmayr grips add to the 659’s bulky grip design, but they also allow a secure hold.
That’s a lot of bitching, I suppose, especially when it’s directed at a handgun I enjoy shooting enormously. None of the above would keep me from buying a 659 (and none of the above kept me from buying this one). I like my 659. If you get an opportunity to buy one and the price is right for you, take it from a guy who knows: You won’t regret pulling the trigger (literally and figuratively) on a used Model 659. That’s if you can even find one. The police departments have all traded them in, Smith and Wesson stopped making these guns decades ago, and the supply is drying up.
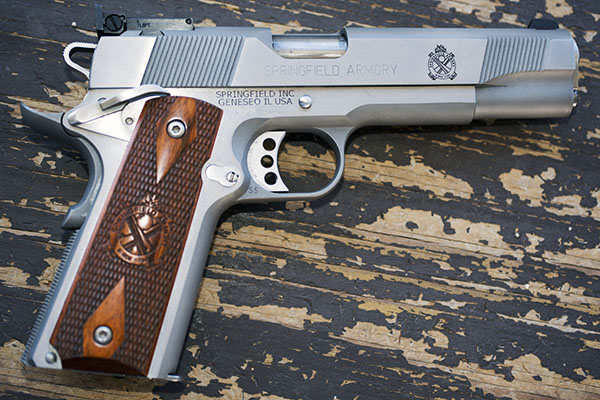
The next one up is a Springfield Armory Target model 9mm 1911. As handguns go, it doesn’t get any better than the 1911 (or so I thought up until this test, but more on that later), and having a 1911 chambered in 9mm seems to me to be a good idea.
Springfield Armory changed the name on this gun. It used to be called the “Loaded” model (as in loaded with all the options, including target sights and hand fitting here in the US), but they later changed the name to the Target model. That’s good. “Loaded” makes it sound like the gun is a stoner (i.e., a doper, not the weapons designer).
I’ve had my 9mm 1911 for about 5 years (I bought it new from my good buddy Brian at Bullet Barn Guns). I knew it was accurate, but I had not really played with it that much to find out what loads it liked best.
The Springfield Armory 1911 Target Model, with adjustable sights, a 5-inch barrel, and all stainless steel construction.
There’s not too much to dislike about the Springfield Armory 1911. Springfield makes a quality gun. The fit and finish on mine are superb. One thing I’ve noticed is that it has a tight chamber, and ammo loaded on a progressive reloader is prone to sometimes jam if the cartridge isn’t perfect (unlike the 659, which feeds anything). That doesn’t bother me because I load everything on a single-stage RCBS Rockchucker these days. I don’t need the speed of a progressive reloader, and my ammo quality and accuracy are better when I load on a single-stage press. The trigger on my 1911 is superb, as is the case on nearly every 1911 I’ve ever shot. I think that as 1911s go, Springfield Armory is one of the best. I’ve owned and shot several of them. They are accurate and they hold up well. Fit and finish are top drawer, too, on every Springfield Armory 1911 I’ve ever seen. It’s just a beautiful 1911.
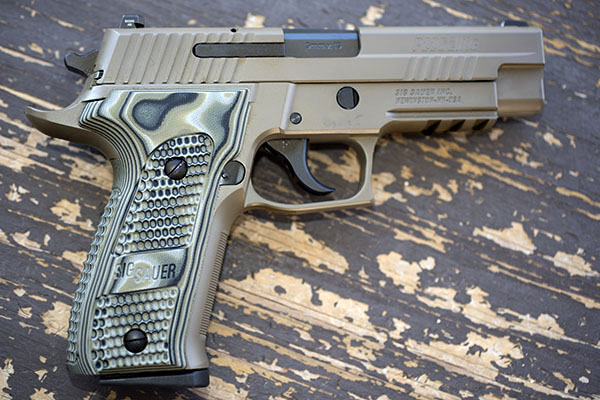
The third handgun for this test series is my recently-acquired SIG P226 Scorpion. This is the first SIG I’ve ever owned. I’d heard so many good things about SIG handguns (and in particular, their accuracy) that I thought I would take the plunge and buy one. I bought mine at Turner’s here in southern California.
So how do I like the SIG? In a word, it’s awesome. I like the look of the Cerakote finish and the SIG grips, and gun just feels right in my hand. The grips fit like a glove, and the grip texture works. It is one seriously good-looking and good-handling handgun.
SIG’s P226 Scorpion. It has a Cerakote finish and an aluminum frame. This is a good-looking handgun, I think.
The SIG is the only pistol used in this test that does not have adjustable sights. The SIG literature told me they offer sights of different heights, and the rear sight can be drifted left or right in its dovetail, but none of that was necessary on my gun. My SIG shoots exactly to its point of aim at 50 feet (take a look at that target at the top of this blog again).
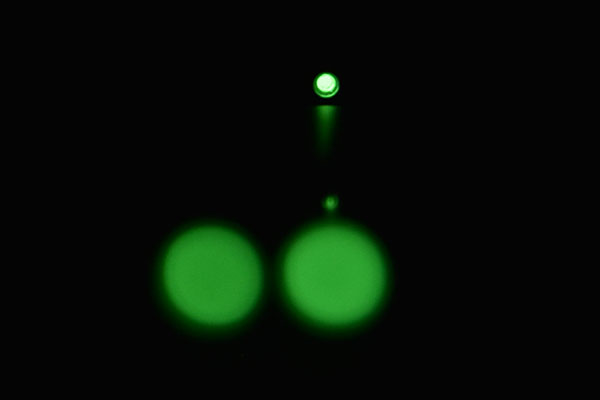
Speaking of sights, the SIG has what is evidently a fairly expensive set of Tritium sights that glow in the dark (I think they are about a hundred bucks if you buy them separately). The glow is not like the lume of a watch dial; instead, they have something else going on that makes them light up at night. You can see that in this photo I took in the dark:
There’s the sights. Where’s the target? Normally, you’d get the front and rear sights aligned; that is not the case in this photo. The only point of this photo is that the SIG glows in the dark.
I think the Tritium sights are kind of a Gee-Whiz deal, and I don’t think I need them. I’m an old guy and I shoot targets when I can see what I’m shooting at. If I was a lot younger and I was running around in a white Ferrari with Miami Vice music playing while chasing bad guys at night, maybe Tritium sights would do it for me. But even under those conditions, it would still be dark and I wouldn’t be able to see my target. I think the Tritium sights are gimmicky, and the little lenses (or whatever they are) for the Tritium inserts are distracting. Plain black sights work best for me. Your mileage may vary.
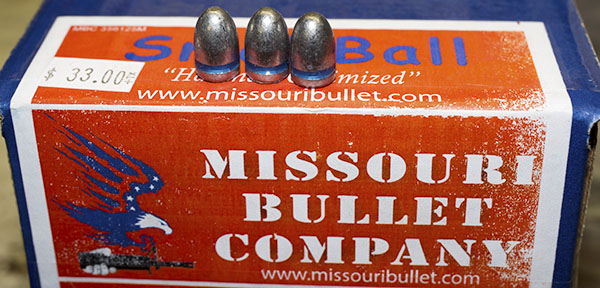
So, on to the main attraction: The 9mm loads and how they performed in each of the three handguns. I loaded everything for this first 9mm test series with a bullet I’ve known and loved for 50 years, and that’s the 124-grain cast roundnose. My particular flavor these days are the pills from Missouri Bullets. At $33 for a box of 500, they are inexpensive and the quality is good. A roundnose configuration bullet feeds well in just about any gun. Yeah, I know there are other cast bullet configurations and other cast bullet weights. I’ve always had my best results with the 124-grain bullets, though, and that’s what I used for this test.
124-grain cast roundnose bullets from the Missouri Bullet Company. They are relatively inexpensive and they shoot well.
I tested with four different propellants: Bullseye, Unique, 231, and Power Pistol. For the 231 and Power Pistol loads, I loaded near the lower end of the recommended charge range for one test set, and I loaded another test set near the upper end of the recommended charge range. With Unique, they were all loaded with 5.0 grains, which is a max charge in most reloading manuals. I had a bunch of these already loaded, and I knew from a past life that this was an accurate load. I tried one load with Bullseye, too. I had a box of 50 loaded and I grabbed those as I headed to the range a few days ago. I used Remington small pistol primers for everything, and I used several different brands of brass, but I used the same kind of brass for each load. Cartridge overall length was 1.112 inches for all loads.
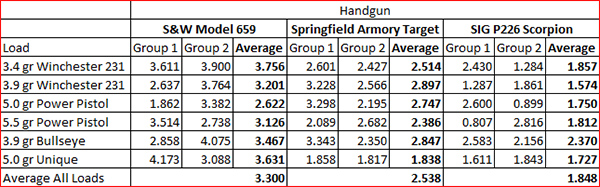
All loads were handheld at a distance of 50 feet. I shot two 5-shot groups with each load. I didn’t use a machine rest or a chronograph because I have neither. I shot from the bench, resting my arms (but not the gun) on the bench. Yes, a lot of the variability you see in the chart below is due to me. Hey, I’m what you get. My intent was to get an idea what worked best in each of these guns, and I think I succeeded.
That’s the background. Here are the results:
Clearly, the SIG is the most accurate of the three handguns. What I’d read and heard about SIG’s performance is true. Some of the SIG groups were amazing, putting 5-shots into under an inch at 50 feet. That’s about as good as I’ve ever done.
While the SIG was accurate with Winchester’s 231 propellant, the gun didn’t like it. On both of the 3.4 grain loads, the slide went forward after the last round (it didn’t lock open), and it did it again on one of the 3.9 grain magazines. While the 231 loads had enough poop to cycle the action, it wasn’t running the slide far enough back to lock open on the last round. This powder also did that on one of the Springfield Armory 1911 tests. Interestingly, the Smith and Wesson 659 worked okay with both the upper and lower 231 loads. These were light loads (I could see the slide moving back and forth with each shot, and it popped the brass out right next to the gun). My testing got me far enough along to decide Winchester 231 is not for me as a 9mm propellant.
The SIG really liked Power Pistol propellant, and from an accuracy perspective it performed similarly at both the low (5.0 grain) and high (5.5 grain) levels. There was perceptibly more recoil (but no pressure signs) with 5.5 grains of Power Pistol, so my load for the SIG with this bullet will be 5.0 grains. The SIG also did well with 5.0 grains of Unique. That’s a good thing, as I have a bunch of ammo loaded with this recipe. As I mentioned above, I found 5.0 grains of Unique did well in accuracy testing a long time ago, and it’s good to see this test supports those earlier findings. The 5.0 grains of Unique load also did very well in the Springfield 1911 (it was the Springfield’s most accurate load). With this load, the Springfield is as accurate as the SIG. But the SIG did well with all loads; the Springfield was pickier.
The 659 is a great gun, but from an accuracy perspective it can’t run with the big dogs. That’s okay; it’s still fun to shoot and I plan to continue shooting it a lot. And it only cost about a third what the others cost. Like I said earlier, if you get a chance to pick up a 659, don’t let it get away.
But that SIG. Wow!
So there you have it. Next up? I want to see how these same three pistols shoot jacketed bullets. Stay tuned.
One last comment…it’s time for the warnings and disclaimers. These are my loads in my guns. You should always consult a reloading manual published by one of the major sources (Hornady, Speer, Sierra, Lyman, Winchester, Alliant, you get the idea) and rely on the load data published there. Start low and work your way up, watching for any pressure signs along the way.
Help us keep the lights on: Please click on the popup ads!
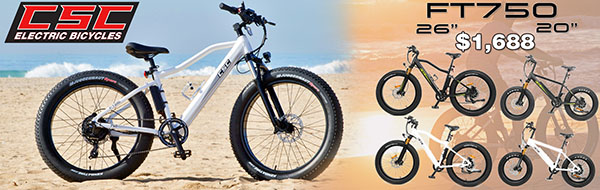
CSC recently announced that it is bringing a new line of electric bicycles to America, and as they have done with their motorcycles, their dealerless path-to-market is allowing them to do so at prices well below any of their competitors. I’ve seen and ridden the CSC ebikes, and they are a lot of fun. Here’s the CSC press release that came out yesterday.
CSC Motorcycles, renowned for its exceptional customer service, brings its smart sourcing and innovative delivery model to electric bicycles with the new FT750-26 and FT750-20. Both fat-tire bikes are specced out with quality components and desirable features that deliver unmatched value in the e-bike marketplace. Delivered to your door for only $1,688.
“I became frustrated when I was shopping for an electric-assist bicycle, trying to sort through the cheap junk and the expensive stuff that costs more than our motorcycles,” explained Steve Seidner, CSC’s president. “After doing extensive research, I was able to source the exact componentry to build an e-bike that is the perfect balance of quality and value.”
The FT750 is built around a lightweight aluminum chassis rather than heavier steel frames, and it uses a battery pack that fits integrally into the frame’s downtube for an ultra-clean appearance compared to the tacked-on battery of lesser competitors. The battery uses high-quality Samsung lithium cells to deliver 653 watt-hours of energy, enough to help power the bike for 25 to 40+ miles, depending on the amount of pedal assistance provided by its rider.
The lockable battery pack sends its energy to an intelligent brushless controller and then to a first-rate Bafang motor mounted in the rear-wheel hub that delivers a healthy 750 watts of power. Pedal-assist rates can be adjusted to five levels, while a thumb-operated throttle can power the FT750 to 20 mph (max speed for Class 2 electric bikes) without even pedaling. Adding pedal power can boost maximum speed above 25 mph.
Like the Samsung battery, Bafang motor, and 6061 aluminum frame, the rest of the FT750’s components are also premium quality. Some bicycle brands use primitive cable-actuated brakes, while CSC chooses Shimano hydraulic brakes biting on huge 180mm stainless steel discs for superb control.
The esteemed Shimano brand is also found on the 7-speed Freewheel gear set and Tourney derailleur that provides adaptable gear ratios to tackle everything from steep hills to urban road speeds. The Shimano index shifter clearly displays which gear is selected. A dual-sided front sprocket guard ensures the chain remains on track even when ridden over rough terrain.
Rider comfort is aided by a front suspension with 3.94 inches (100mm) of bump-absorbing travel, able to be fine-tuned with 8 levels of damping adjustment plus a lockout setting, as well as spring-preload adjustability. Fat Kenda Juggernaut tires look brawny and provide additional bump absorption.
Lightweight aluminum is also used for key components such as the pedals and crank, wheel rims, and tapered handlebar. Instrumentation is via a 2.6 x 3.8-inch LCD display that monitors speed, pedal-assist rate, battery charge, trip information and even ambient temperature.
Thoughtful convenience and safety items are part of the FT750 package. LED headlights and taillights enhance rider conspicuity, as does a handlebar-mounted bell. A handy USB port is provided to power electronic devices, and a water bottle holder enables riders to stay hydrated. A protective cage is fitted over the derailleur to prevent drivetrain damage, and frame tabs are ready to mount rear fenders or racks.
In addition to the FT750-26, CSC offers a version with 20-inch wheels (FT750-20) that reduces the step-over and seat heights but retains all of the features of its bigger brother. CSC’s electric bicycle lineup will be growing in the coming months, and a range of convenience and comfort accessories will soon follow.
The FT750’s modest $1,688 price is due to CSC’s innovative business model of selling direct to consumers, and the price includes free shipping anywhere in the contiguous 48 U.S. states. CSC’s bikes include a 12-month warranty backed by a company dedicated to outstanding customer service.
The FT750s are available in Gloss White or Matte Black and are simply ordered via CSC-ebike.com.
Like I said above, I’ve ridden these bikes and they are pretty cool. You can set up the drive system so that the bike acts just like a regular bicycle with no power assist, or you can dial in a pedal assist system at up to five different levels. What that means is that when you pedal, you get an extra boost from the electric motor. I really like it.
Jim Lehrer passed away yesterday. He had a good run, I guess. At 85, he got his money’s worth and he lived a full life. But I still mourn his passing. He came from a time when people served their country, and he was a real reporter…the kind that provided news, not propaganda. There aren’t too many of those around any more. Maybe none.
I heard Jim Lehrer speak at Harvard once. He was the commencement speaker and his message struck a nerve with me. There might have been 2000 people in the crowd. At a time when we were fully committed in both Afghanistan and Iraq, he asked the crowd how many people knew someone who was actually serving in the military. Maybe 100 hands went up. Then Mr. Lehrer asked another question: How many people had been personally affected by the war? Not a single hand went up. This was a rarified crowd. Knowing more than a few of the folks in this group, I knew many of them perceived themselves to be foreign policy, military strategy, and political experts (you know, like everyone on Facebook these days). But not a single one had any skin in the game. Mr. Lehrer had just demonstrated that (very politely, of course).
Lehrer went on to speak about his service as a second lieutenant in the US Marine Corps. This was a man with opinions I wanted to hear. He had served, and he had my respect. His recommendation? That we all do some kind of national public service in our early years. It need not be in the military. It could be the Peace Corps, or maybe teaching in the public school system. Or maybe public health. But it should be something, some form of national service. I could not agree more.
Lehrer said in the commencement address that he was a better man as a result of his Marine Corps service, and that some form of shared public service would make all of us better. Jim Lehrer, we are a better people as a result of your presence among us. Rest in peace, Sir.
If you haven’t already joined the Facebook page, Fans of Motorcyclist Magazine’s Washed Up Writers, I encourage you to do so. FOMMWUW is a place for former Motorcyclist mag writers to post their new stuff and for fans to see that their old favorites did not die just because Bonnier killed the motorcycle magazine business in America. One of the washed up writers posted a helmet review from his site. The review was ok. It covered fit and finish, noise and weight. Conclusions were drawn but that’s not what I took away from the review: It was the inspiration for this blog.
Way back when moto-magazines still held thrall over the motorcycle advertising landscape writers were professional and paid fairly well. One of those writers, Dexter Ford, wrote the most important motorcycle magazine article since…since I don’t know when. The story was called Blowing The Lid Off and the amount of time and money spent researching this one story dwarfs what we Internet bloggers can devote to a hundred topics.
Blowing The Lid Off combined applied scientific research, traffic accident studies and logical thinking to destroy the long held belief among motorcycle riders that a more expensive helmet was a better helmet. Ford didn’t mince around with fit and finish. He cut right to the chase: How well does the helmet protect your head in a motorcycle crash. New ways of testing helmets were devised. Whole new parameters were used instead of the old metrics. Ford’s story changed the way helmets were rated by proving that stronger helmets weren’t always better in a motorcycle accident. One of the cheapest helmets tested (Shark brand, if I remember correctly) protected a simulated human brain better than the most expensive brands available.
Rotational forces, multiple impacts, using statistical areas of contact instead of a fixed point on top, the story was complete and completely unheard of: A masterwork. Ford had so perfectly executed his Mona Lisa that Motorcyclist Magazine lost a huge amount of advertising money from (expensive) helmet manufacturers. The toxic corporate fallout from Blowing The Lid Off contaminated friendships, leaked emails and ultimately cost Ford his job at Motorcyclist. It was a real mess but that story is best told by those who were actually involved.
I met Dexter Ford on the Best Western Motel-Arkansas-Harley Ride boondoggle. (Even though I wrote about wheel spokes coming loose, that was not the story that soured The Motor Company on my writing). We had drinks and dinner at the schmoozefest portions of the ride. Shooting the breeze with Ford was so damn funny I actually had to beg him to stop as my uncontrollable laughing was making me look like a drunken idiot. The other moto-journos at the table must have thought I’d lost my mind.
Ford and I got along famously on that ride but we had a little falling out towards the end of the Best Western tour. He was a proponent of the sanctity of the writer’s craft. He believed it was a calling and the worthiest of all pursuits. I’ve always approached writing from the rear entrance and with not much respect for the act-of so I told him that digging a perfect ditch was just as valuable as anything I could ever type. I can be a jerk when I want to be.
After that, Ford was not exactly dead to me but the fun times and hilarious asides dried up. I probably should not have said the thing about the ditch but I’m a laborer at heart and will always take the side of the man in the hole.
I tried to find Blowing The Lid Off online but after 10 minutes of searching I could not find a link that worked. Maybe one of you guys can post up a link or it’s saved in an archive somewhere. Failing that, screen shots of the story could be uploaded somewhere safe. It would be a shame if the greatest investigative motorcycle writing ever disappeared from the moto-world.
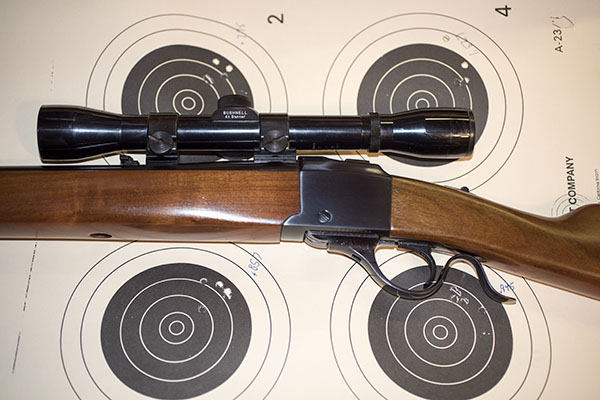
I’ve written about the Hornet before (and I’ll give you a link to that past blog at the end of this one). The point of today’s writeup? It’s about accuracy and a few different loads for the Hornet in my single-shot No. 3 Ruger. I like the idea of a single-shot rifle and I love the .22 Hornet cartridge. The .22 Hornet was the world’s first centerfire .22 cartridge, and in its day, it was a real hot rod. Velocities range between 2400 and 2900 feet per second (sometimes a little more, depending on the load). Recoil and muzzle blast are nearly nonexistent compared to other centerfire cartridges, and it’s a fun cartridge to shoot.
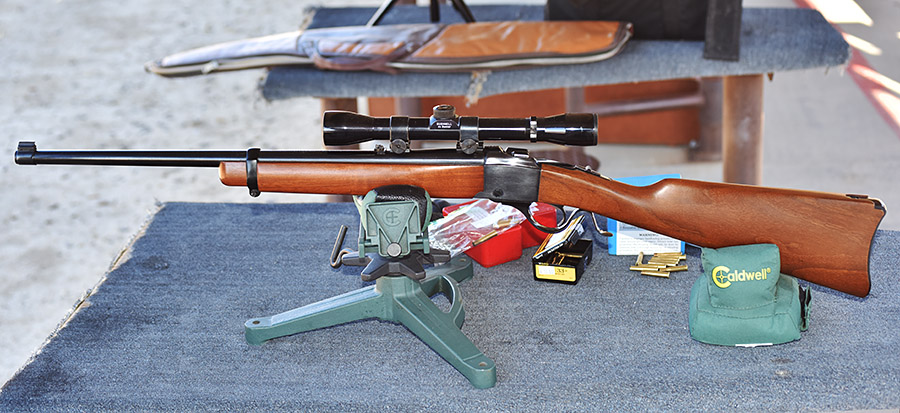
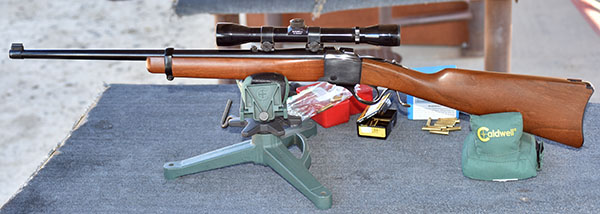
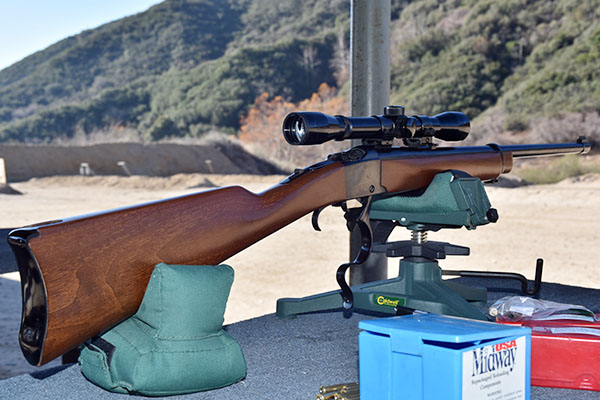
A Ruger No. 3 in .22 Hornet. It has a period-correct inexpensive Bushnell 4X scope, which is good enough for me. My rifle is in near-new condition.
The idea for this blog started when I saw three boxes of Speer 33-grain hollow point bullets a couple a few weeks ago at my reloading supply depot. They were inexpensive (just $10 a box), so I bought all three. I hadn’t tried the light Speer bullets and I wanted to see how they compared to an old favorite, the 45-grain Sierra Hornet bullet. I also wanted to try a propellant that I had purchased previously (Lil Gun) and compare it to my favorite Hornet propellant (Winchester 296). And my good buddy Tom recently gave me a bunch of old .22 Hornet ammo that I shot up on a prior outing, so I had a good supply of Hornet brass. It all came together a week or two ago, and the result was a hundred rounds of reloaded .22 Hornet ammo in various load configurations.
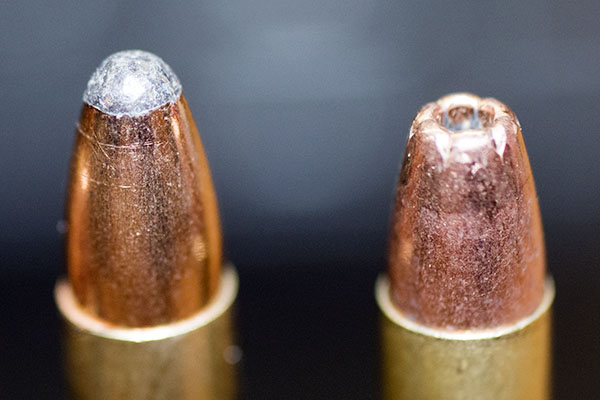
The Sierra 45-grain jacketed soft point bullet on the left, and the Speer 33-grain jacketed hollow point bullet on the right.
The Ruger No. 3 was the low-alternative to the fancier Ruger No. 1 back in the day. The No. 1 had more figured walnut (in the 1970s, and maybe today, too), the No. 1 rifles with iron sights had fancier sights and a cool quarter rib, the No. 1 stock had a pistol grip and a rubber recoil pad, and the No. 1 had hand-cut checkering. The No. 3 was a simpler gun, with plain walnut, an aluminum (later plastic) buttplate, no checkering, and a less-fancy iron sight setup. In the 1970s, the No. 3 suggested retail price was $165, and you could buy them brand new all day long for $139. The No. 1 retail price was $265, and those could similarly be had for $239. Oh, how times have changed. New No. 1 Rugers sell for something like $1500 today, and Ruger stopped making the No. 3 altogether. It’s likely (in my opinion) that at some point in the not too distant future, Ruger will drop the No. 1, too. That’s okay; it will make mine more valuable. Not that I’m planning to sell anything. It just feels better knowing the value is going up.
Ruger manufactured the No .3 from 1973 to 1986. The very first one was chambered in .45 70 (a classic cartridge, to be sure), and then Ruger added two more classics: The .22 Hornet and the .30-40 Krag. Ruger built the rifle you see in this blog in 1978. Ruger No. 3 rifles can still be found on the used gun market, but these days they go for about the same price as a used No. 1, which is usually somewhere between $800 and $1000. Supply and demand, you know…they aren’t making any more No. 3 Rugers.
The Ruger No. 3 falling block action, with the lever open and the block in the retracted (or lowered) position.
The Ruger’s action is called a falling block because, well, it is. When you open the trigger guard/lever, the breechblock drops (it’s the silver thing you see in front of the trigger in the photo above), and that allows inserting a round in the chamber.
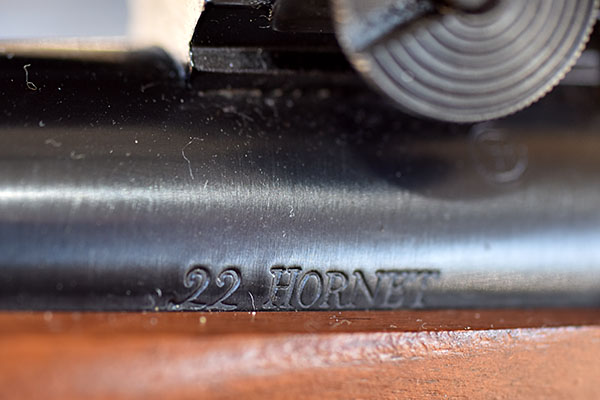
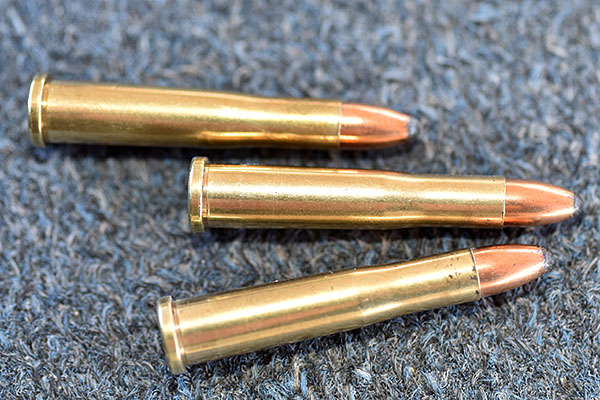
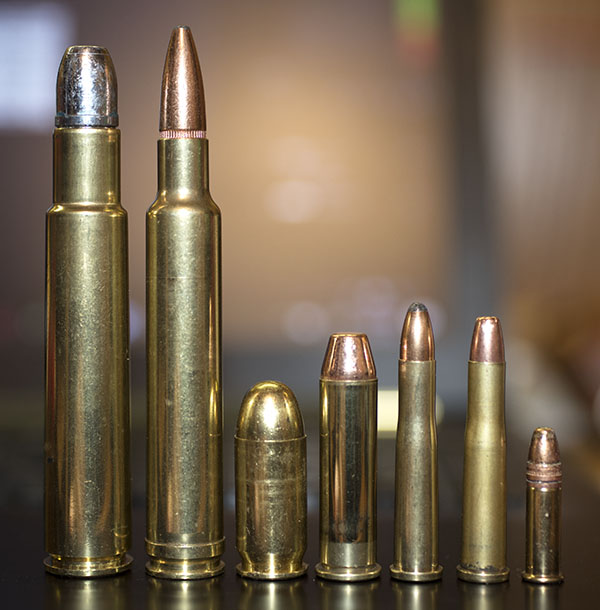
Ruger uses a distinctive font on its No. 1 and No. 3 rollmarks. This one is cool.The .22 Hornet is a cute round. These are loaded with 45-grain Sierra jacketed softpoint bullets.A sense of scale: .22 Hornet rounds next to a couple of .30 30 cartridges.Another sense-of-scale photo. From left to right, that’s a .416 Rigby cartridge with a 350-grain cast Montana bullet, a .300 Weatherby Magnum with a 180-grain jacketed softpoint bullet, a .45 ACP with a 230-grain jacketed roundnose bullet, a .357 Magnum with a 158-grain plated bullet, a .22 Hornet with a 45-grain jacketed softpoint bullet, another .22 Hornet with a 33-grain jacketed hollowpoint bullet, and a .22 Long Rifle with a 40-grain plated bullet.
The Hornet is fun to shoot, but it’s one of those cartridges that is tricky to reload (a couple of others are .30 Carbine and 9mm; they are challenging to reload for other reasons). Hornet brass is very thin (so you can’t reload it too many times and it’s easy to deform it when seating the bullet). It’s hard to get the bullets started straight during the seating operation, and the whole reloading process just takes a lot more finesse than does reloading most other cartridges. Everything is tiny. That being said, though, I like reloading Hornet ammo, especially when good groups are the result.
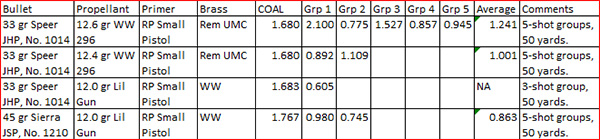
So how did it go? Not bad, I think. Here are the results:
The 33-grain loads show promise.
My testing wasn’t exhaustive, and I only shot at 50 yards on this outing. I tried a few new things with these tests. As mentioned above, the Lil Gun propellant and 33-grain Speer bullets were two of the variables, and both did well. I’d previously read that some shooters had better results using small pistol primers instead of small rifle primers, so tried that and it seems to be the case for me, too. The theory is that small rifle primers, combined with the Hornet’s small case capacity, may blow the bullet out of the case before the powder can get a good burn going. I don’t know if that’s the case or not, but the small pistol primers worked well for me.
The next steps for me will be to shoot these loads at 100 yards to see how the rifle does at that range. The scope on my rifle is an inexpensive Bushnell straight 4X and it’s quite a bit more clear at 100 yards (it’s just a little bit out of focus at 50 yards). We’ll see how that goes, and I’ll publish the results here. Stay tuned, my friends.
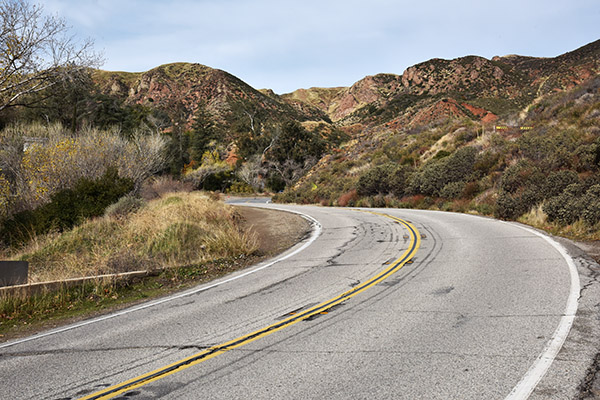
Susie and I were up in the Santa Clarita area last week and we thought we would attempt to find the St. Francis Dam site. A quick Google search brought us to a map, we took a right off I-5 at the 126, and we soon found ourselves on San Francisquito Canyon Road. Wow, after a bit of the burbs it grew rural real fast. I know great roads, and folks, this is one. San Francisquito Canyon Road is an awesome set of twisties, one I plan to return to soon on my motorcycle.
An amazing road, San Francisquito Canyon Road was, and there was a lot more of it. I’ll be back, and I’ll be back on two wheels.
We were only traveled a few miles when we came upon a large art deco building (an LA Department of Water and Power plant). We had arrived.
LA DWP’s Plant 2, an art deco hydroelectric generation facility on San Francisquito Road. The three huge pipes behind it carry water from the California aqueduct system.
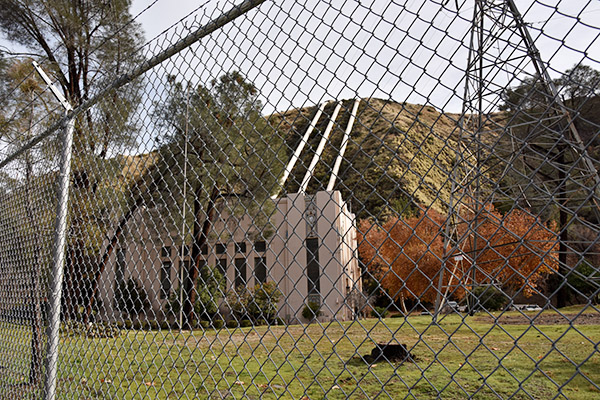
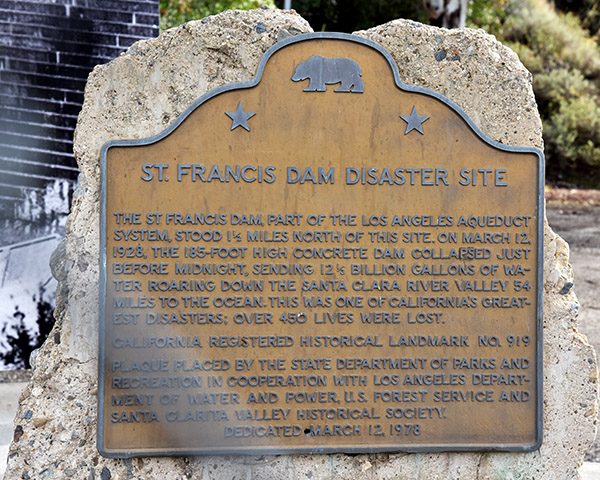
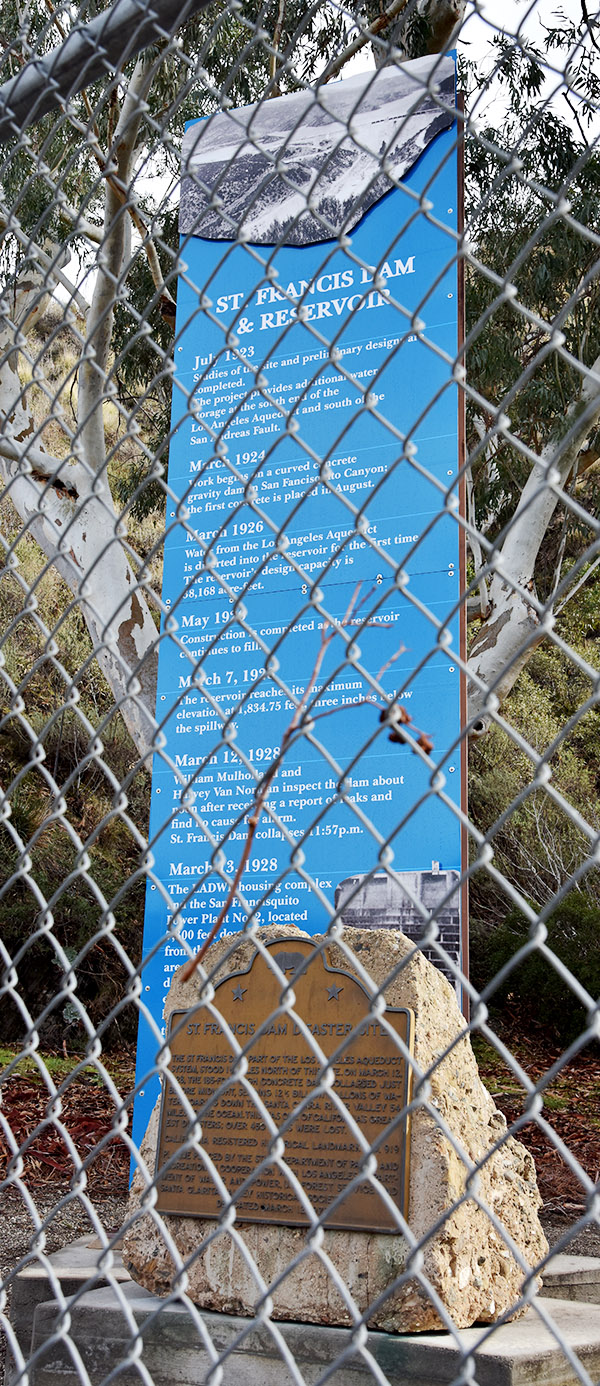
The DWP building was magnificent, and when we parked, we found this plaque:
There you have it: The story, the plaque, and the location. We had arrived. Everything was behind a chain link fence, but it was still very cool. I’m going to guess the concrete behind the plaque is from the St. Francis dam. We were standing where the wall of water released by the dam had passed.A timeline of events leading up to the St. Francis Dam disaster of 1928.
As the plaque said, we were a mile and a half from where the actual dam had stood, so we continued north on San Francisquito Canyon Road. The building (the one in the photo above) is a replacement…the original power plant was swept away when the dam collapsed. I would think so; when the dam collapsed it released a 10-story tall 12 1/2 billion gallons of water.
We didn’t see the actual dam; the Internet told us it was a 5-minute hike east of the road (you can’t drive to it), and according to what we read, there’s not much of the dam left. We drove north a little further and saw the dirt road leading to the site, but there was a gate and it was closed. Maybe next time.
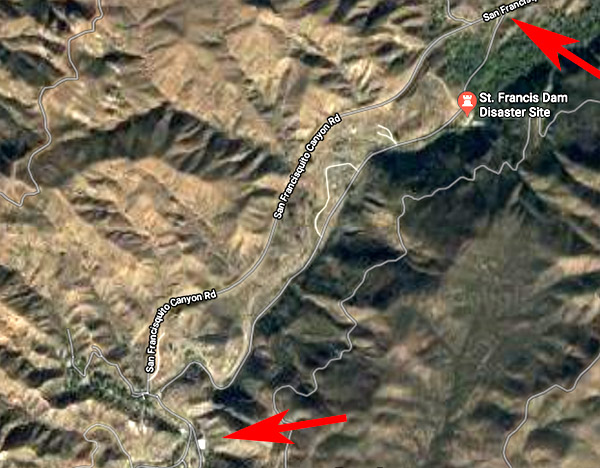
I was very intrigued by San Francisquito Canyon Road, and I wanted to know where it went. I found this satellite photo map on Google:
The bottom arrow points to LA DWP Plant 2, the building you see in the photo at the top of this blog. The upper arrow points to our turnaround point. The site I found on the Internet said you can park there and hike to the actual dam site. The distance from one arrow to the other is about a mile and a half. The other roads shown in this photo are all dirt.
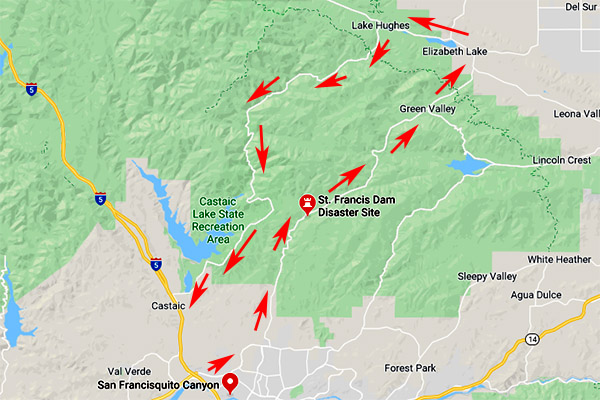
From the map, I could see that continuing north on San Francisquito Canyon Road would brings us to Elizabeth Lake Road, and from there it’s Lake Hughes Road south to get back to Interstate 5 near Castaic. The little bit we did on San Francisquito Canyon Road showed it to be a great road. I had ridden Elizabeth Lake Road on previous motorcycle rides (without realizing how close I was to the St. Francis Dam disaster site). On the map, Lake Hughes Road appears to be even twistier than San Francisquito Canyon Road, and it looks like it would be a great ride.
My planned motorcycle ride: East at CA 126 off I-5, northeast on San Francisquito road to Elizabeth Lake Road, and then south on Lake Hughes Road. It’s going to be a good one.
I’m going to return to this area on my motorcycle and do the ride you see above. It’s going to be great, and you’ll read about it right here.
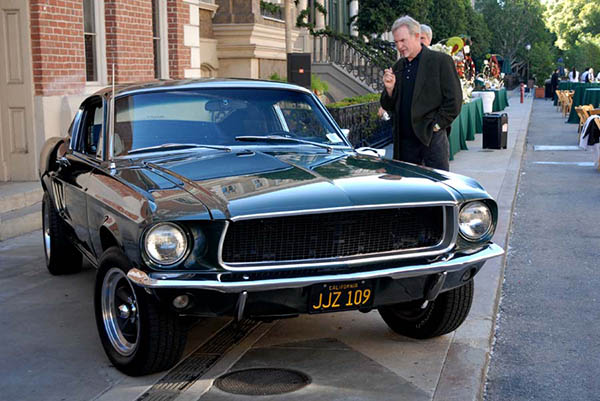
Well, it’s over…the auction for the Mustang used in the Steve McQueen movie Bullitt, the very car used in what is unquestionably the greatest chase scene ever filmed. It set a new record for American muscle car sales. I saw both Mustangs used in Bullitt at a Warner Brothers event celebrating the life of Bud Ekins (that story is here), and they were undeniably cool.
The Bullitt Mustang. Yeah, it was cool. I shot this photo in 2007.
My good buddy and friend-since-grade-school Ralph predicted the Bullitt Mustang would go for over three million dollars, and he was right. Surprisingly, that’s not the highest price ever paid at auction for an American car. A Duesenberg sold for something around $22 million a while back. That’s a bit more than what Gresh and I make on the ExNotes blog. Quite a bit more, actually.
I saw Bullitt when it first played back in the day (it was released in 1968), and I’ve probably watched it a dozen times since. My good buddy Richie and I drove into New Brunswick to see it at the RKO State movie theatre and it was electrifying. The closest thing I’d ever seen to a chase scene that dramatic was the motorcycle chase in The Great Escape, and what do you know, Bud Ekins and Steve McQueen did the honors in that one, too.
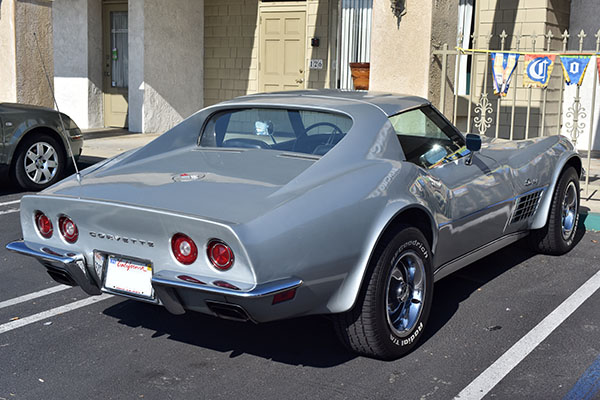
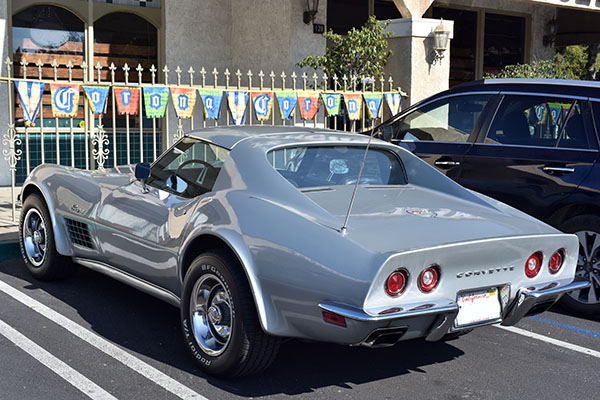
Good buddy Kirk was at our favorite Mexican restaurant a few days ago and he graciously consented to a photo or two of his 1970 Corvette. It’s an awesome car.
I love old Vettes, and I think the C3 body style is one of the best. I also like the C1, the C2, the C4, the C5, and well, you get the idea. I like Corvettes.
Kirk’s Vette is from one of the lowest production years ever for the Corvette. Chevy went to the C3 body style in 1968, and Kirk told me that the ’68 and ’69 model years had so many problems that the car hit a sales trough in 1970. Today, that translates into increased rarity for the ’70 model and increased demand. Kirk’s car has the 350-cubic-inch motor and a three-speed Turbo Hydramatic transmission. It’s incredibly cool and I love the look of a silver Corvette.
The Corvette you see above is 50 years old this year. At that age, it could have its own midlife crisis, which is kind of funny as buying a Corvette is usually the result of guys having a midlife crisis. I had a silver Corvette that I kept for 14 years (I sold it a couple of years ago). It was a great car and I sometimes think about getting another one. Folks would always ask me if it was my midlife crisis car, and I always told them I sure hoped so. I bought it when I was 53 years old and I would like going for another 53 years.
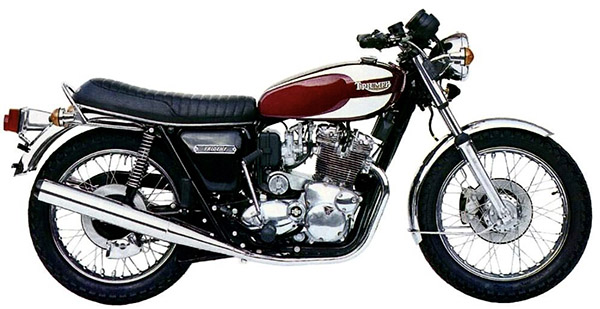
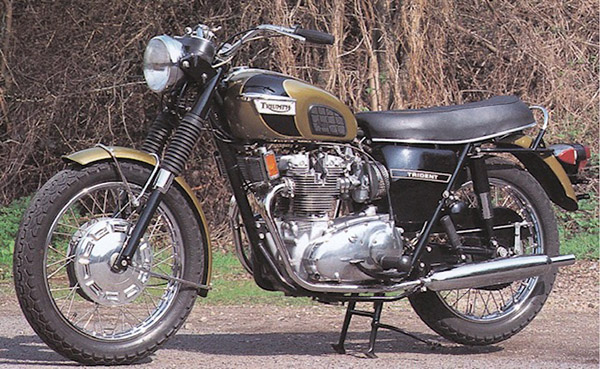
The mid-1970’s Triumph T160 is one of the best looking motorcycles ever. The swoopy tank, the perfect stance, the soft-edged thrum of its exhaust. I’ve wanted a T160 since I first saw one. They weren’t popular where I grew up so I didn’t get to see a real live 750 until they were already out of production.
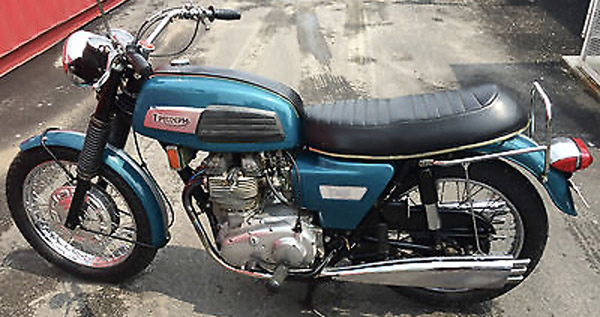
The T160’s engine is actually a BSA engine. But then again the BSA engine was a 500cc Triumph engine with an extra cylinder grafted on so who stole what? Not that it matters because the only real difference between BSA and Triumph’s versions of the 750cc three-banger was a slight forward slope to the BSA cylinder bank.
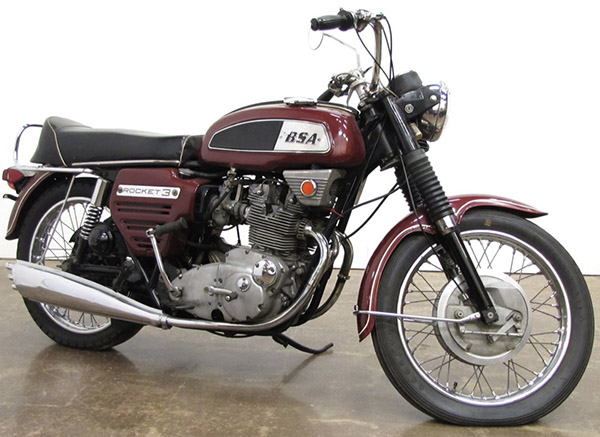
The older BSA triples are cool in a Jetsons kind of way. The square tank and the ray gun silencers didn’t sell well in the USA so BSA chromed the heck out of the thing and made it into a fire breathing hot rod. I’ve never seen one on the road, only in museums.
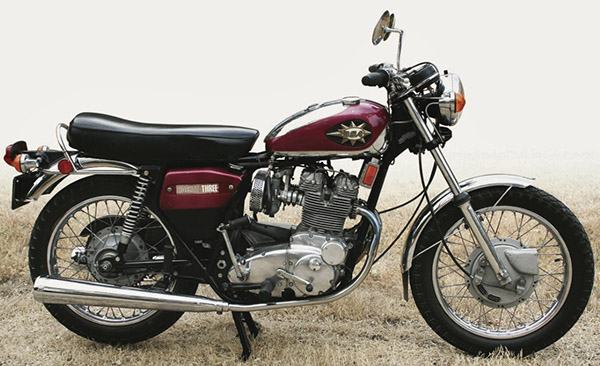
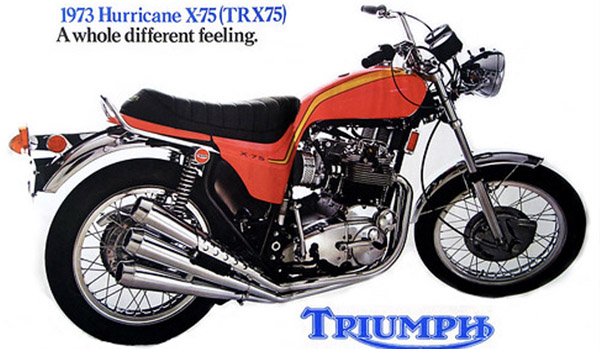
Triumph had the same problem with its modern-looking but slow selling triple. If I understand history correctly Triumph sent bodywork beauty kits to the USA to fix slow sales. These kits made the Triumph Trident look pretty much like any other Triumph made in the last 60 years.
The triple engine design consisted of typical British engineering: Why use one part when 32 parts will do the job just as well? The top deck of the crankcase had a gaping opening that the cylinder spigots fitted into. It looks weak to me. I’m surprised the crankcase doesn’t oil can at high compression levels. The center main bearing bolted in from the top, which is pretty strange. The sum of the triple’s complicated, ancient collection of parts worked amazingly well together, winning many road races against more advanced designs.
I would take any of the triples if you gave me one but the only one I would buy is the final Triumph T160 version. The T160 has an electric starter and the thing actually works on the few I’ve seen. Disc brakes front and rear means you don’t have to sacrifice stopping power to revel in the past. The styling of the T160 looks fresh 45 years after it rolled off of the assembly line. I like it better than the Vetter version.
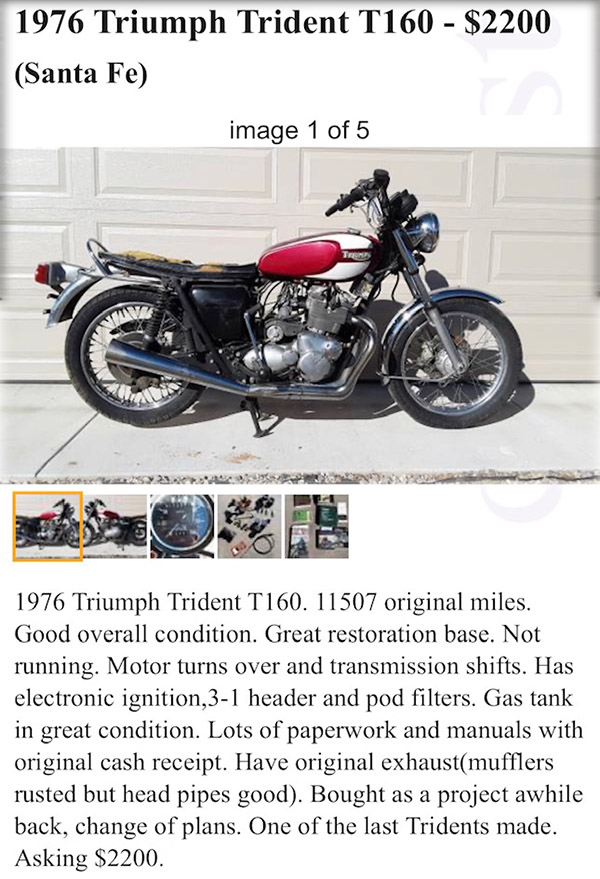
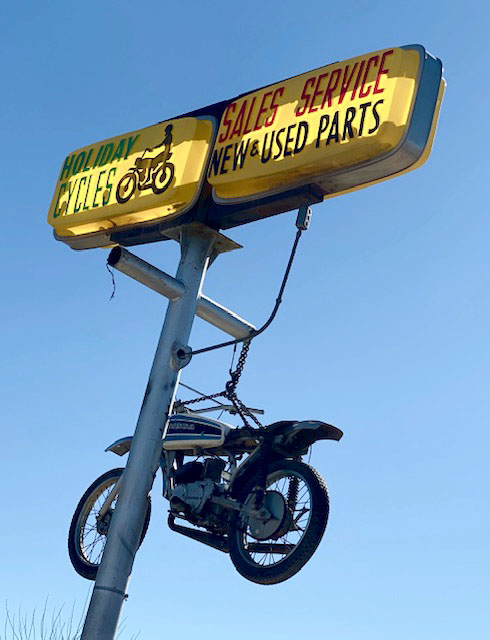
Beginning with the 1970’s Japanese Superbikes steamrolled everything in their path. When it comes to big bike, high horsepower nostalgia most American motorcyclists of a certain age go for a Kawasaki or Honda. Today, the relatively cheap price of a T160 reflects the lower esteem British bikes were held in at the time. If you want one like I do, Triumph/BSA triples are within reach of the average person. $5000 should get one in ridable condition with not-embarrassing cosmetics. $10,000 will buy a show bike. The T160 pushes all the right buttons for me and if I didn’t already have 47 projects lined up I would have grabbed this recent listing. Let me know if you need me to go pick it up for you.


 I love old Vettes, and I think the C3 body style is one of the best. I also like the C1, the C2, the C4, the C5, and well, you get the idea. I like Corvettes.