KLR250 Reflash: Part 4

I know what you’re thinking. You’re thinking I’ve been working on the KLR250 for forever. It seems that way to me also. Since the last KLR blog 325 years ago we have sold The Love Shack in Astor, Florida and the Widowmaker 250 no longer has a purpose in my life. I’m not one to store a good motorcycle and the KLR250 will make some newbie rider (or older experienced motorcyclist) a fine machine to learn the dark art of dirt riding.

It’s time for the KLR to go. I can’t keep all these bikes registered and insured, much less in operating condition. But before I let a new owner crash about on the KLR there are a few more things I need to fix.

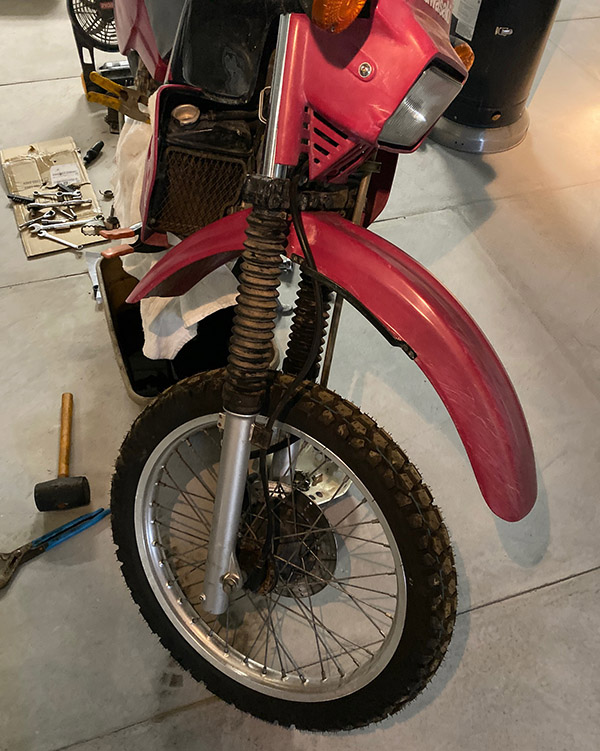
Equipped with a worn out 21” front tire, a very popular size, I blew a few bucks on a new Dunlop semi-dirt tire and a new tube. These skinny 21” wheels are super easy to change tires on, it took like 20 minutes.

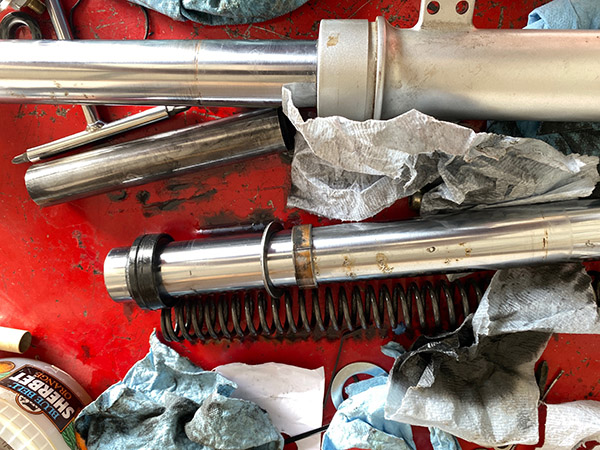
The Widowmaker’s fork seals were dribbling a decent flow of oil; in fact one tube only had a few ounces left inside. One fork leg came apart easily: Impact wrench on the bottom bolt and zing-zing it was apart. The other leg was more trouble. The recessed allen bolt just spun when I hit it with the impact.

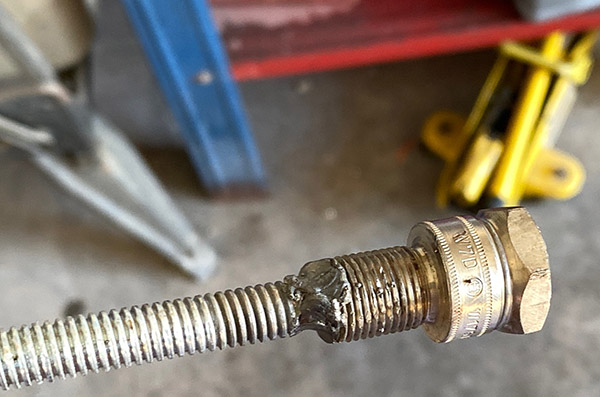
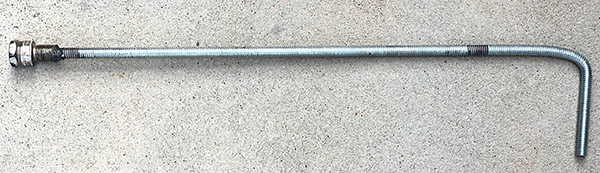
I needed something to stop the inner damper rod from spinning the fork spring, which wasn’t offering enough resistance. Looking through my nut and bolt bins was futile. I found a spark plug was the closest to fitting the damper. I cut down the plug and removed the ceramic, then welded a length of all thread to the plug. With my new eye I could just make out the puddle. It was great, before I saw nothing but glare.

The damper rod retaining tool worked excellent and I was able to dismantle the other fork leg. After cleaning assembly was straightforward. A length of PVC pipe was used to press the new seals into the sliders. I didn’t have enough fork oil in one viscosity so I mixed 10 weight and 15 weight together. I figure I’m running 12.5 weight in the forks now.

I reassembled the front forks and all seemed done at the front. Next I installed a new battery just for the KLR250, no more sharing with the Husky and Z1. The battery has been sitting around a year or so but still had juice. I popped it into the KLR250, lowered the bike off the motorcycle jack and the thing started in about 7 kicks. These KLRs are tough cookies.

Thinking I was pretty much done, I took the bike on a road test. The carb might be a little clogged up as it’s either idling at 3000 RPM or dying. Once up to speed the bike ran as good as it ever has. Parking the bike on the brand new shed floor it was easy to notice coolant dripping from that small hole in the water pump housing. Rats, this is what I mean when I say I can’t keep them all running.

I ordered a new water pump seal and when it arrived I drained the Widowmaker’s coolant and removed the water pump cover and impeller. The seal is a spring-loaded ceramic type of deal and the spring part pulled off with little effort. That left the steel part still stuck in the engine.

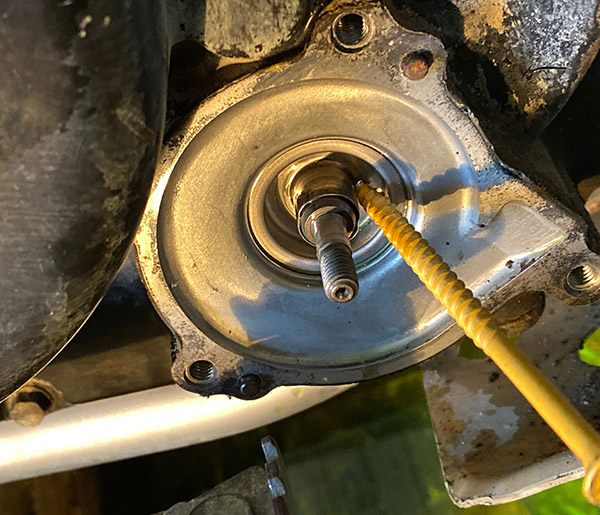
If you’re lucky, sometimes you can thread a deck screw into the thin metal seal and pull the thing out with no problem. I wasn’t lucky and the seal kept looking worse the more I tried to remove it.

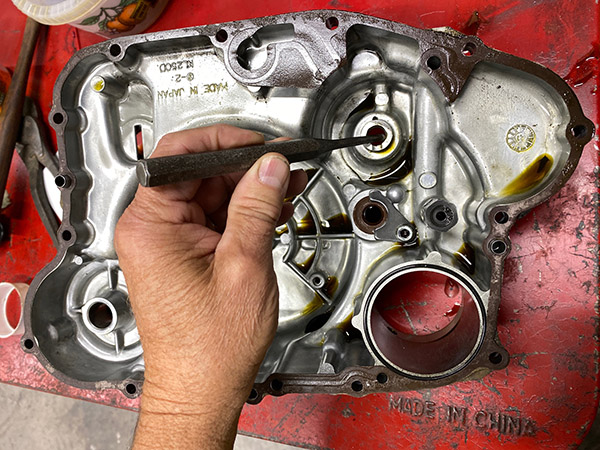
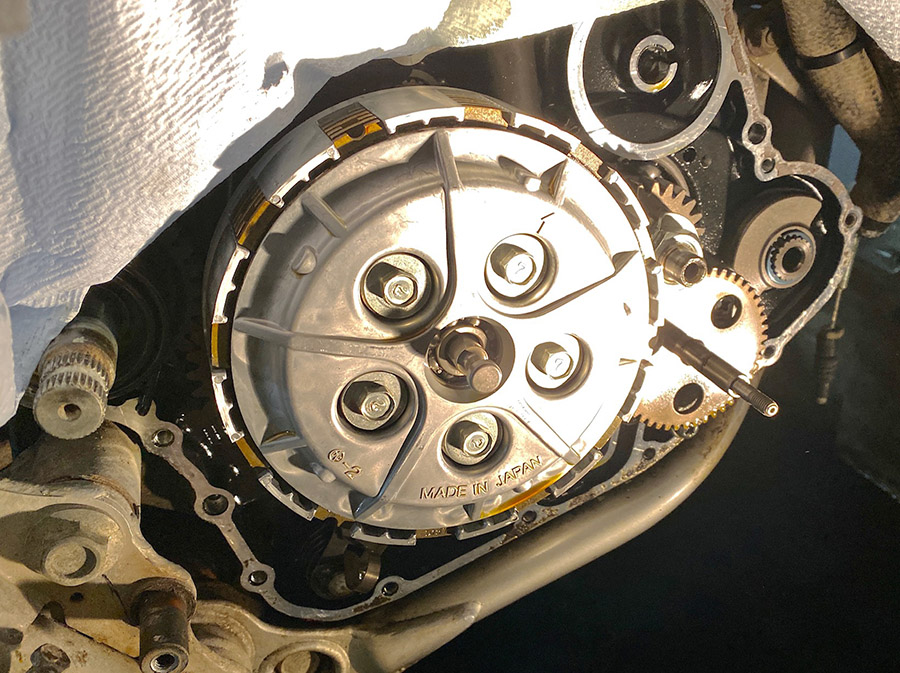
Finally I gave up and removed the right side engine cover to gain access to the seal from the other side. Removing the cover meant I had to remove the rear brake lever, foot peg and clutch cable. With the engine cover off it was a piece of cake to poke the seal out from the inside with a ¼” punch.

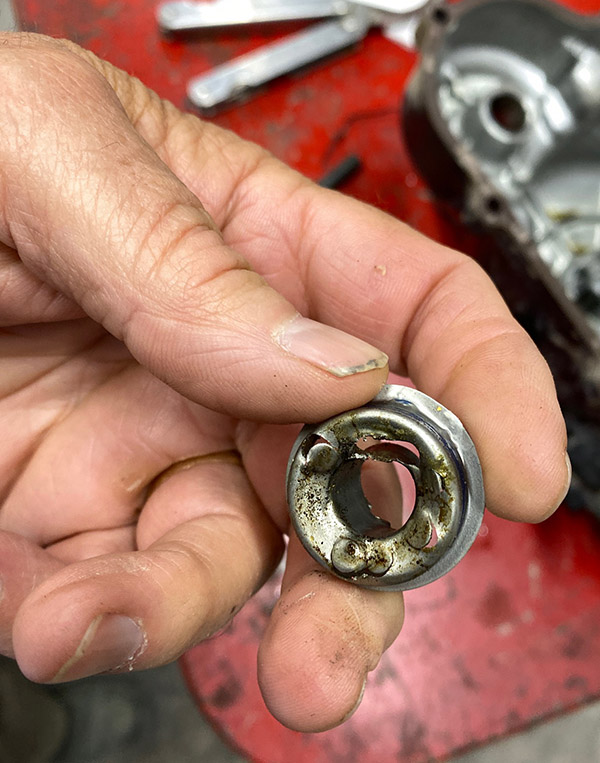
As you can see, I pretty much mangled the seal trying to save taking the engine cover off. For good measure I also destroyed the pump shaft oil seal in the process. I guess it needed changing also. Now I’ve got to look up a pump oil seal and a cover gasket for the Widowmaker. I think I’m going to clean the carburetor and see if I can’t make it run better low speed. Since I have to take the tank of to clean the carb I may as well adjust the valves. It’s super easy on the KLR250. And then it will be ready to sell.


More on the KLR and other Resurrections!


Never miss an ExNotes update…get your free subscription here.

Squeeze Me: KLR250 Refresh, Reflash and Rehash Part 3

The KLR250 refurbishment has been going slowly but in addition to that I’m not getting much done otherwise. It’s the heat. Temperatures at Tinfiny Ranch have been hovering around 100 degrees or more and under these conditions it’s all I can do to press paper firebricks.

I did manage to order a brake caliper kit from England. The Widow Maker’s front brake gave me lots of problems at Daytona this year. The caliper was mightily stuck and the master cylinder was odd feeling. I managed to get the brake working well enough for Bike Week and replaced the master cylinder in a previous R, R & R episode but I didn’t trust my half-assed Florida Man repairs on the caliper.

The Brakemasters rebuild kit was very complete and was inexpensive to boot. The Widowmaker’s original rubber parts lasted through 20 years of neglect so the new stuff has a steep hill to climb. The only part I didn’t care for was the new bleeder nipple. The replacement nipple did not want to thread in easily. I could have forced it and remolded the aluminum caliper threads but instead used the old nipple, which threaded in by hand.

As expected, the caliper job went well. Old motorcycles with single-piston calipers are a breeze to repair. The hardest part was fitting the dust seal into the caliper body and then fitting the piston. I didn’t remember how I did the trick last March and was getting frustrated. Thank goodness for YouTube; I pulled up a quick search on caliper dust boot installation and there was a guy showing me how to do the deal.

I think in March I used a beer can to make an expander sleeve for the piston and then slid the piston into the (already installed in the caliper) boot. It just wasn’t working this time. Maybe fresh rubber is stronger than 20-year-old rubber. YouTube man fitted the boot to the piston first (the opposite of what I was doing) and let a short length of rubber hang off the back. That hanging bit was then pushed and prodded into its groove on the caliper. Once the dust boot is in the groove the piston can be slid into the caliper all the way until the piston groove catches the other end of the boot. With all the talk of grooves this sounds confusing but that’s why YouTube videos are so nice. YouTube Man’s method worked great and the caliper is now ready for reinstallation.

If it cools off a little I’ll tackle the fork seals and re-grease the steering head bearings next. And keep making firebricks, of course.


More on the KLR250 and other moto-resurrection stuff is on the ExNotes Resurrections page!

The 5 Deadly Sins Of Motorcycle Restoration

My idea of a good restoration and your idea of a good restoration may differ, but you know deep down inside that I’m always right. I am the arbiter of cool. I am the final word, I am…Omni Joe. Here are 5 common restoration mistakes that drive me crazy:

Sin #1: Gas tank liners.

That sealer crap people pour into their motorcycle gas tanks is the worse invention of all time. Guys swear by this junk but don’t listen to those lazy bastards. When I read the words, gas tank liner and/or Caswell sealer in a motorcycle description I know an amateur’s hands have been fiddling the motorcycle. Who would pour that devil’s goop into a nice motorcycle gas tank? It makes me wonder what else they screwed up. The way to fix a leaking, rusty gas tank is to get rid of the rust and weld/braze any holes. Any other method is destined to fail. There’s no excuse for using devil’s goop, YouTube is lousy with videos explaining how to clean out a rusty gas tank and how to stop it from re-rusting.

Sin #2: Repainting serviceable original finishes.

Nothing annoys me like a guy posting up a 90% perfect, original-paint motorcycle and asking where he can get it repainted. Stop! If the paint has a few chips or is faded a tiny bit leave the damn thing alone. One of the most underused old-sayings is, “It’s only original once.” No matter how shiny and beautiful you think your topcoat turned out its still vandalism. There are many phony re-pop’s running around, don’t make your motorcycle one. By painting over your once desirable survivor you lower its historic value. Listen, I’m not against repainting really bad original body parts, lord knows my Z1 needs it but I know anything I do that covers over the factory work erases a story, and vintage motorcycles are commodities without a story.

Sin #3: Over restoration.

When the Japanese bikes that are considered classic today were first sold they had acceptable build quality. For some strange reason many motorcycle restoration experts go way overboard making the motorcycle a show bike that bears little resemblance to real motorcycles. Chrome back in the day was thin and yours should be too. Nothing depresses me as much as these tarted-up travesties. The nerve of some Johnny-Come-Lately with a fat wallet and no soul thinking he can render a better motorcycle than the factory. Keep it simple and try to match the level of finish that you remember. Otherwise, what’s the point? It’s already worth less because you damaged the original build by trying to improve the bike. Why pour money into the thing making it something it never was?

Sin #4: Giving a damn about numbers.

As people get deeper into the vintage bike hobby they grow ever more insane. It’s not enough to have the correct parts anymore: Now you must have the exact build date on the part to suit your motorcycle’s VIN number. This is madness. Nobody except lunatics and bike show judges will care that your sprocket cover was made a year or two after your bike left the factory. The only part number that matters is the one that can get your bike registered for the road. I’ve seen people on vintage groups debating a slight casting change or a vestigial nub as if it were the most important thing in the world. People like that have no business owning a motorcycle; they should go into accounting or better yet, prison.

Sin #5: Parking it.

The final and biggest sin of all is to restore a motorcycle and then park it. I can over look all the other sins, even tank sealer, if the owner rides his vintage motorcycle. Get the thing muddy. Do a burn out. Ride it to shows in the rain. Honor the motorcycle by using it. A show motorcycle that is too valuable or too clean to ride is nothing, less than worthless. The machine was built for you. It has a seat and controls for you. The engine wants to pull. Do the right thing by your motorcycle and your sins will be washed away, my brothers.


Keep up with the Zed restoration!