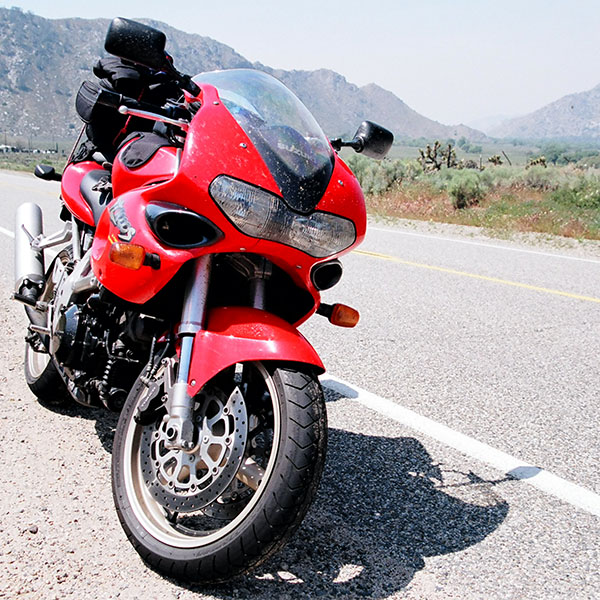
Cheap is good. In a world of $20K, $30K, $40K, and $50K motorcycles, it’s especially good.
The idea of flying to another continent, buying a cheap motorcycle, riding cross country, and then selling the bike and flying home is an appealing one. That’s why when good buddy Marty sent a link to this video, I knew I would watch it. I enjoyed it and I think you will, too.
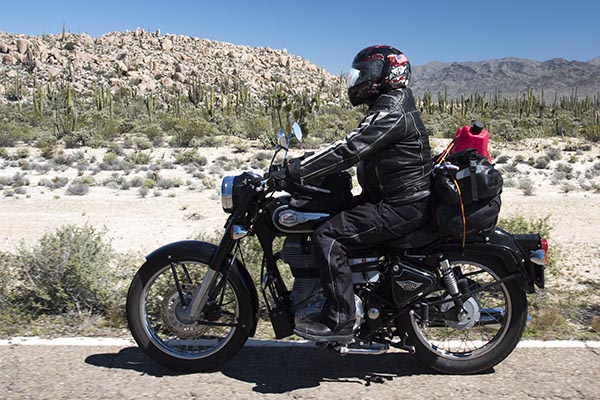
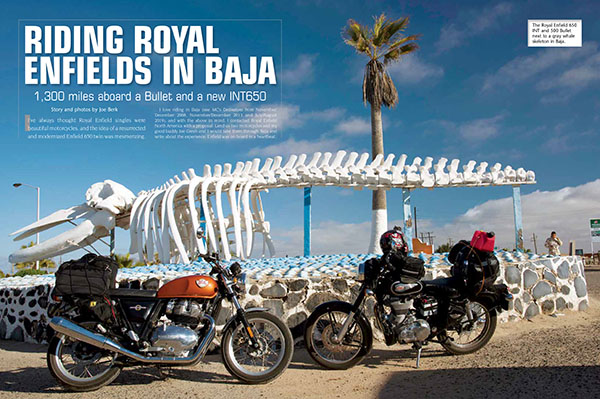
I like single-cylinder inexpensive motorcycles, having toured the Americas and China on RX3/RS3 motorcycles (which are Zongshen 250cc singles). I like Enfields, too, and I wanted to learn more about the Himalayan. When Gresh and I tested Enfields down in Baja, I liked the Enfield Interceptor so much I bought one when we returned. We also had an Enfield Bullet on that Baja ride (it was their 500cc Bullet). Both Gresh and I really wanted to like the Bullet, but it was a bust. The Bullet had experienced several breakdowns (read my take on the Bullet here and here, and Gresh’s take on the same bike) and because we didn’t trust the bike, we turned around at Guerrero Negro instead of riding further south to Mulegé.
Gresh on a Bullet in Baja.
The Bullet was considerate, though. Its last breakdown occurred just as we arrived home (it was a stripped rear sprocket at just a few thousand miles; something I had never previously encountered on any motorcycle). In the above video, the single-cylinder Enfield Himalayans didn’t suffer that fate, so my assumption is the breed has improved.
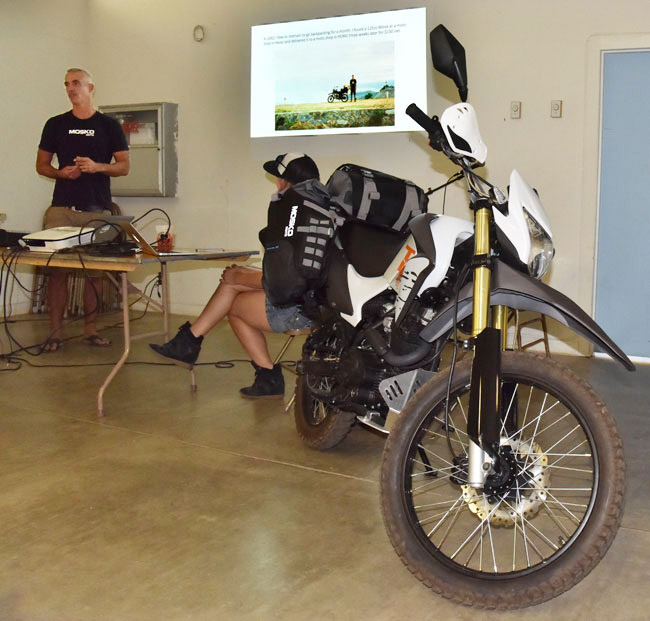
Peter Day of Mosko Moto presenting at an ADV event, with a CSC TT 250 as a prop.
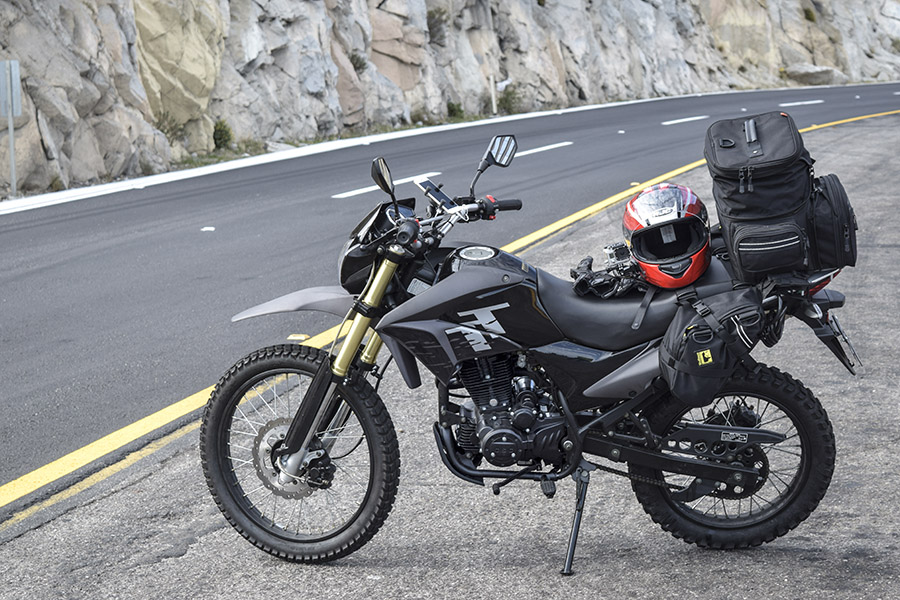
I met another guy who used the same approach for his touring. That guy is Peter Day, CEO of Mosko Moto luggage. I met Peter at an adventure touring event in Mariposa, California, several years ago. Peter flies into whatever third-world country he wants to tour with no motorcycle and no firm plans, he finds and buys a used Chinese motorcycle for a couple of hundred bucks or so wherever he goes (central America, Africa, you name it), he rides for a month or two or three, and then he sells the bike before getting on an airplane home. Peter especially likes Chinese bikes based on the Honda CG engine, like the CSC TT 250 I enjoyed owning and riding so much (the photo atop this blog is my TT 250 in Mexico). The bikes that copy the Honda CG engine are simple, reliable, inexpensive, and designed to survive. Flying someplace off the beaten path, buying a cheap bike, riding the wheels off it, selling it, and then flying home is a good approach.
Subscribe to ExNotes for free!
We need your support! Do what you can to help ExNotes stay in the black!
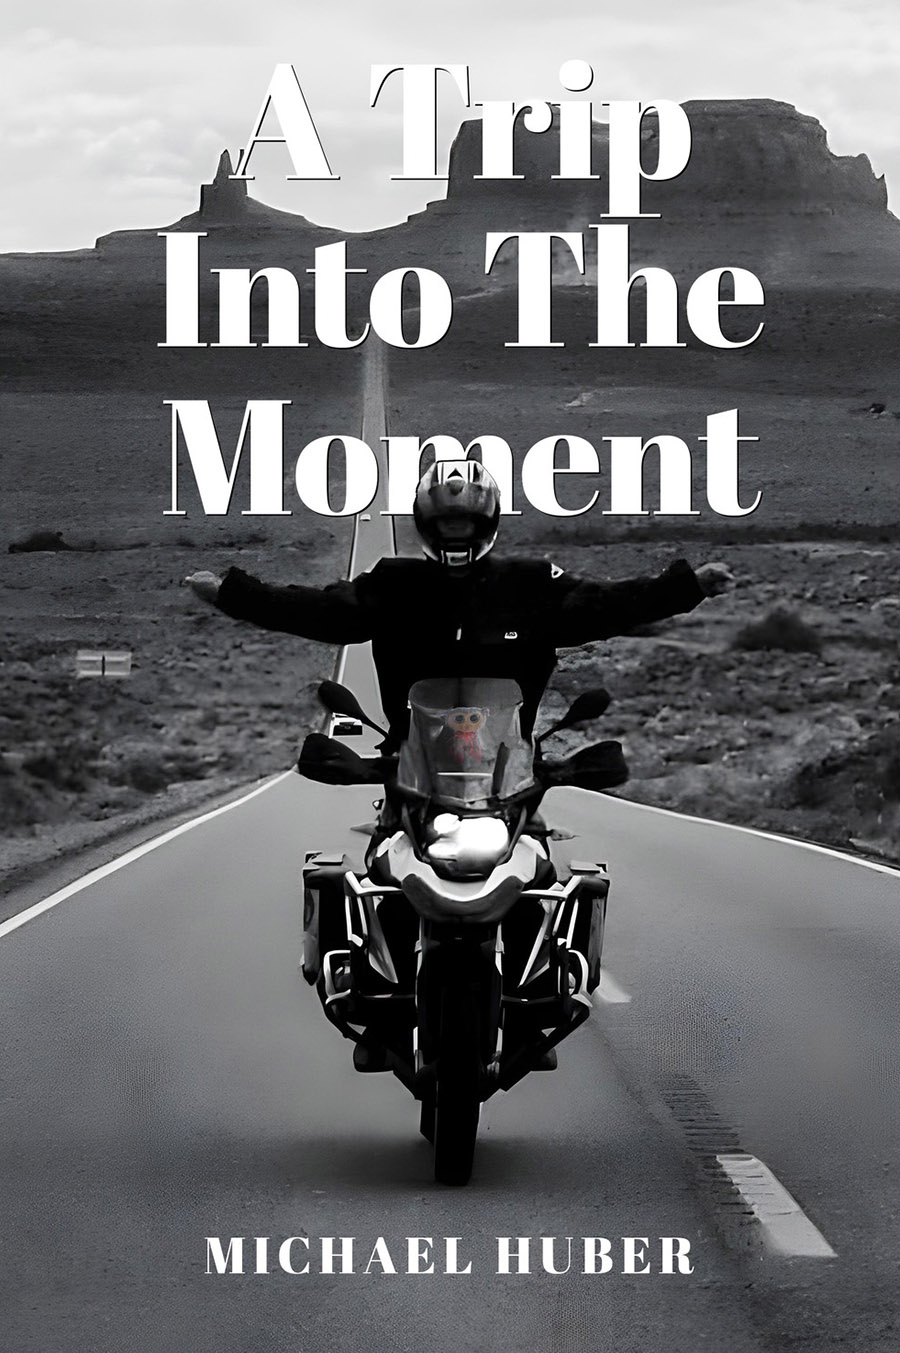
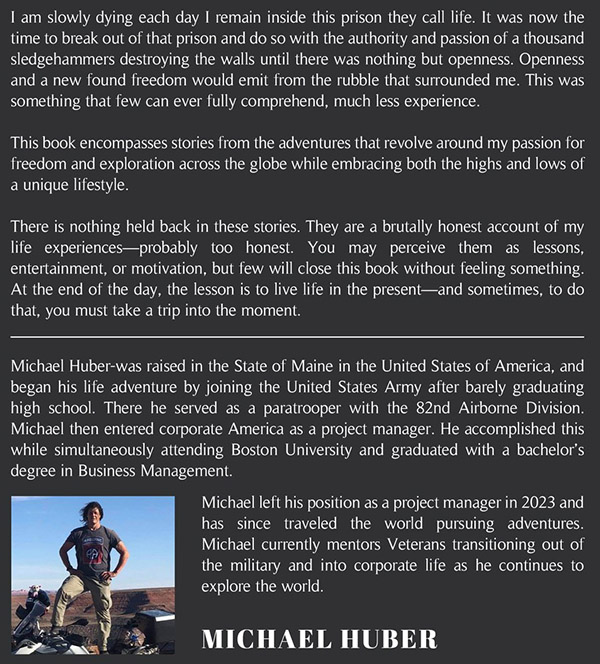
It had to happen: Good buddy and frequent ExNotes blogger Mike Huber wrote a book! Mike’s book is A Trip Into The Moment, published by Native Book Publishing. You should buy it now from Amazon. Here’s the back cover blurb:
We are a literary bunch, us ExNotes writers. Joe Gresh and I published a collection of our favorite stories not too long ago, and I’ve penned (or keyboarded) a few myself. Here’s a link to the Gresh and yours truly book, A Cup O’ Joes:
Want to lose weight, ride faster, and impress your friends? Add our books to your library and drop a Huber, Gresh, or Berk quote from time to time. Better yet, buy a copy of each of our books and post this blog’s link on your social media (it will help with sales)!
This was an interesting blog to write (and it was interesting on many levels). As you know, I’m writing a series of blogs on motorcycles I’ve owned with the machines organized by cylinder count. The idea is to consider all of them from my ownership perspective, rack up a bunch of (hopefully) fun-to-read blogs, and then wrap up with my opinion on which engine configuration is the best. I’ve already done the first one on the singles I’ve owned.
A word on the photos: I was surprised I had photographs of every bike I’ve ever owned. In recent decades, after I had become a half-assed amateur photographer, the photo quality is generally good. In earlier years, I was not a very good photographer, nor was my equipment very good. Some of the photos are in black and white, and most of the earlier ones were taken with a dinky little Minolta C-110 camera. Hey, you go to war with the army you have.
Between that first ¿Quantos Pistones? post and this one, something self-updated on my computer and my laptop went from simply taking my orders to predicting what words I’m going to type next and then filling them in, which I found to be wildly annoying. I thought it was in the WordPress software, but it wasn’t. It was in my Edge browser. Google helped me; I found the offending “feature” in the Edge settings and switched it off. I think these software weenies are changing things just to give themselves something to do. I wish they would stop. The folks who keep doing this sort of thing are going to have a hard time explaining themselves when they’re standing in front of the pearly gates. I’ll be there, too, as a witness for the prosecution.
Rant over; let’s get back to the main attraction.
As was the case in the blog on singles, I am again discovering this: Just when I think I’ve listed all of the twins I’ve owned, I remember another one. That sure has been the case here. I suppose I had better hit the Publish button before I remember another one.
Alrighty then: With the above as a backdrop, here we go.
1965 Honda CB 160
Okay, I’m cheating a little. This wasn’t my bike at all. It was my Dad’s. But I rode it in the fields behind our house quite a bit and I sort of considered it to be mine, and that’s why it’s on this list.
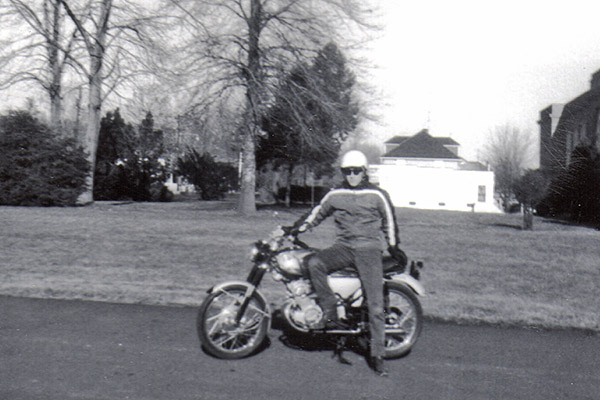
The 1964 Honda CB 160, That’s me on the bike in New Jersey, during the winter months, when I was 14 years old.
The little 160 was nice. It was the first motorcycle I ever rode and I had a lot of fun on it. Honda was making big inroads in the United States in the mid-1960s and they changed nearly everything in the motorcycle world. It was a fun time for a 14-year-old kid.
The CB 160 only stayed with us for a couple of months. Dad had been bitten by the bug. He wanted something bigger.
1965 Honda Super Hawk
As was the case with the CB 160, the Super Hawk was Dad’s motorcycle. But the same modifier applied: I used to ride it in the fields behind our house in New Jersey, so I’m including it here.
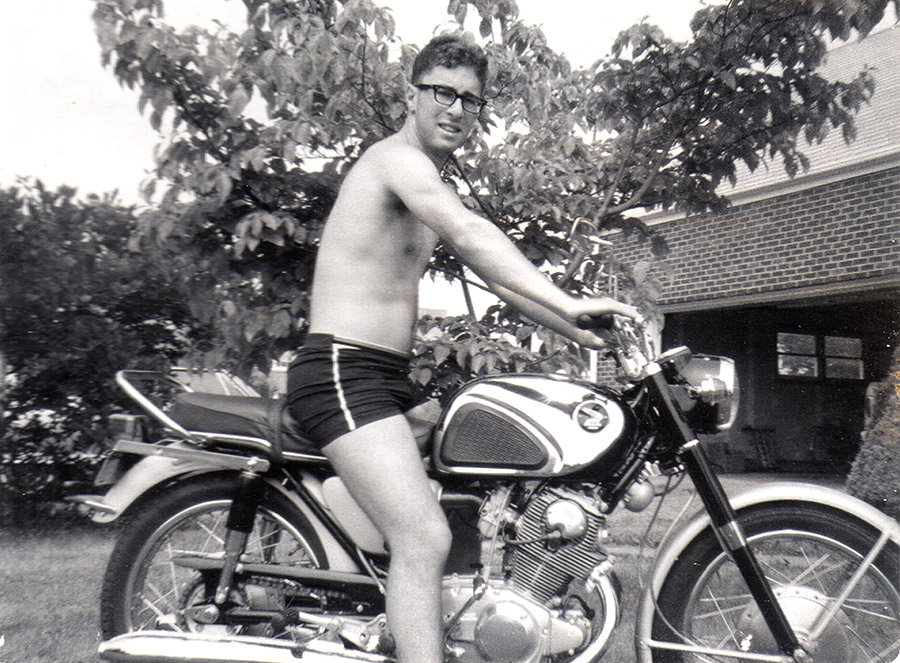
Fast forward a bit, and it’s me again during the summer months on a 1965 Honda Super Hawk. We had a swimming pool, so I spent my summers in a bathing suit.
The Super Hawk, with its 305 cubic centimeters, seemed infinitely more powerful than the CB 160 (especially riding it in the fields behind our house). Dad had the bug, though. The Super Hawk would only last for a couple of months, too.
1966 Triumph Bonneville
Ah, this was a motorcycle. A Triumph Bonneville. I couldn’t believe it. It had been my dream machine for at least a couple of years, and now there was one in the garage. And you know what? Dad let me ride it in those same fields behind our house. I can’t imagine what he was thinking or why he let me do that. I never dropped it, though. God Almighty, it was powerful. And the sound….it was awesome.
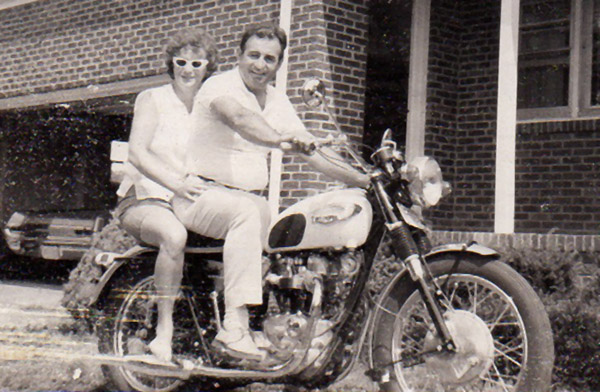
Mom and Dad on the 1966 Triumph Bonneville. You can see their other Bonneville (a 1965 Pontiac) in the garage. You could say we liked Bonnevilles. No one in my family has ever been to the Bonneville Salt Flats. I probably should go there one of these days.
The Bonneville was an amazing motorcycle. Dad and I had a lot of good rides on it. I wish we had kept it. On that sound comment above: Nothing, and I mean nothing, has a a more soul-satisfying exhaust note than a Triumph.
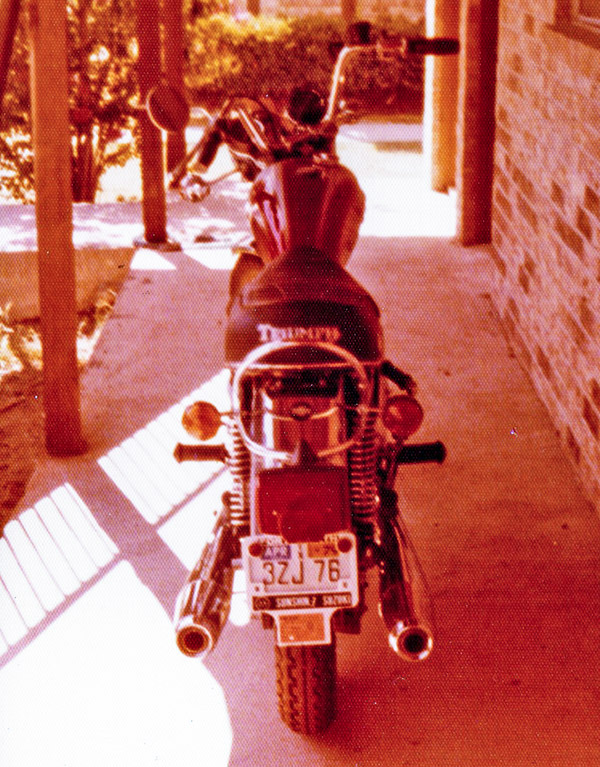
1978 Triumph Bonneville
I was living in Fort Worth, Texas, I was single, and I was an engineer at General Dynamics on the F-16 program. When I passed by the Triumph dealer I realized I hadn’t ridden a Triumph Bonneville since I was 16 years old, so I thought I’d stop by. An hour later I signed on the dotted line, and I owned a Bonneville again.
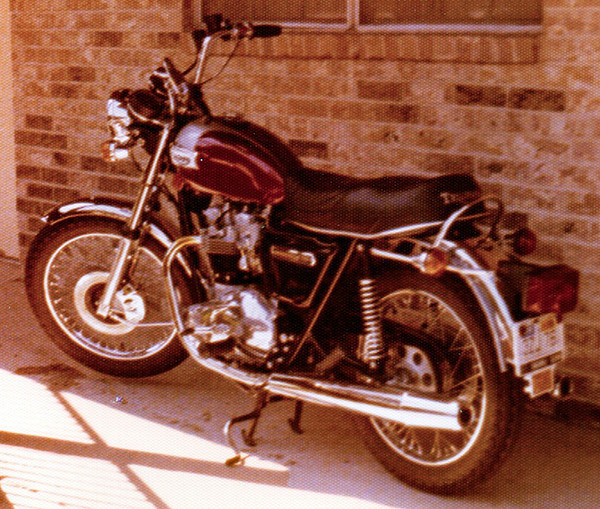
My 1978 Triumph Bonneville, parked outside my apartment in Fort Worth, Texas. The colors have mostly drained from these two photos. The bike was a deep candy apple red.Another shot of my 1978 Triumph Bonneville.
It was a great motorcycle. There was an older guy who owned a Yamaha TT 500 at General Dynamics (his name was Sam), and we road all the farm roads in the areas around Fort Worth. We both had hay fever and Texas had terrible pollen, but the riding was great. My Bonneville would top out at exactly 109mph (the earlier T120 and then T140 designations notwithstanding), and that was enough. The bike was kick start only (which made it an anachronism in 1978), but I was okay with that, too. For awhile, anyway.
I sold the Bonneville. I’m can’t remember why; I did a lot of dumb things when I was young. Shortly after I sold the Bonneville, I realized I needed a motorcycle again. You know, to be a complete person. That led to my next acquisition. But to this day, I wish I had kept the Bonneville.
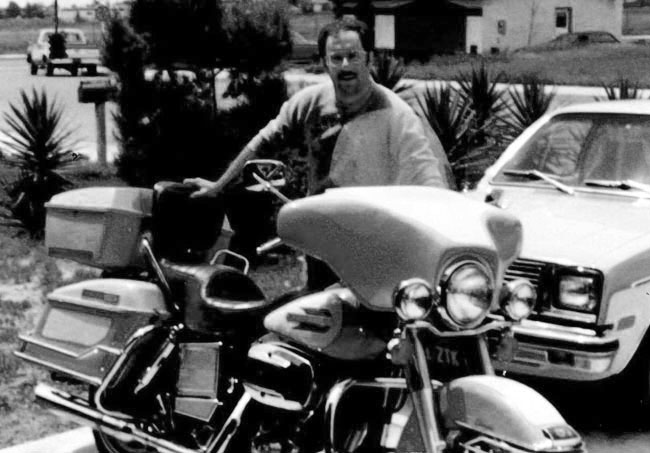
1979 Harley Electra-Glide Classic
I used to spend a lot of time at the Fort Worth Harley dealer drooling over their new bikes. The late ’70s were, in my opinion, the height of the Willie G styling years at Harley. It was also the absolute bottom for them from a quality perspectives, as I would soon find out when I finally bit the bullet and bought the bike I thought was the most beautiful motorcycle I’d ever seen: The 1979 Electra-Glide Classic.
Yours truly, with a full head of hair and a 1979 Electra-Glide Classic. I called it my optical illusion. It looked like a motorcycle.
The Electra-Glide was beautiful, but to call it a piece of crap would be insult to turds the world over. The bike couldn’t go a hundred miles without something breaking on it. It needed three top end jobs in the 12,000 miles I owned it (the first two were on the warranty, the last one was on me). I’d finally had it with that bike and what some folks like to call “The Motor Company.” Hell, the motor was the worst thing on that bike. And the brakes. And the clutch. And the starter. And the handling. And the….well, you get the idea. It was one of the last years Harley was owned by AMF, and when a Harley mechanic told me what that stood for, I finally got it. I smiled inwardly when I sold the bike, thinking to myself, “Adios, MF.”
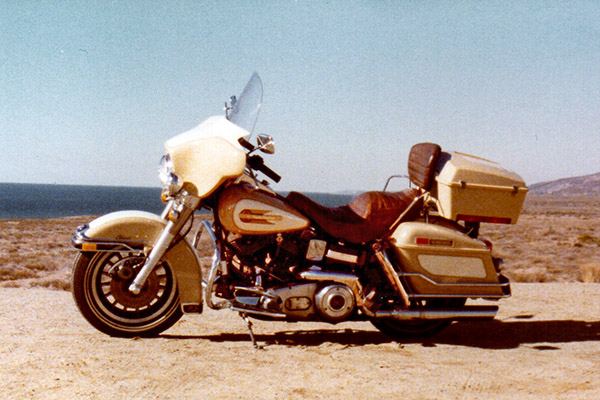
On the way down to San Diego, with the Pacific Ocean in the background. I explored a lot of southern California on the Harley. It was the most unreliable motor vehicle of any type I ever owned.
After that awkward ownership experience, I swore I’d never buy another Harley. I didn’t keep that promise, though.
Even considering all the above, I wish I still had that ’79 Electra-Glide. It would be worth a small fortune today. It sure was a pretty motorcycle.
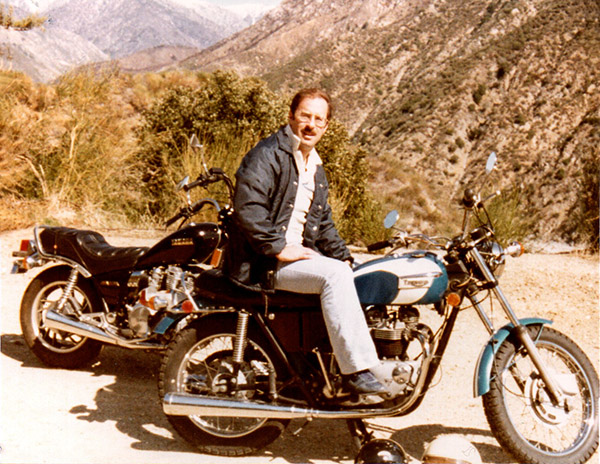
1976 Triumph TR6
Somewhere in the succession of events described above, I moved from Fort Worth to southern California. General Dynamics transferred me to the Pomona facility. I loved southern California and I hated GD/Pomona. Actually, that’s not entirely accurate. The company was okay, but my boss was a dickhead. So I did what I normally do in that situation: I quit and went to work for another defense contractor. While there, I worked with yet another defense company, and one of the guys there had a 1976 Triumph TR6 he offered to sell to me for $500. It was running, it was registered, and minutes later it was mine.
On Glendora Ridge Road on the 1972 Triumph Tiger. It was a great motorcycle.
The TR6 was a wonderful motorcycle. If there was a performance difference between it and a Bonneville, I didn’t have the asspitude to feel it. The single-carb TR6 actually felt stronger at low rpm than the Bonneville did. I loved that bike, too.
Another Glendora Ridge Road portrait. The Tiger had character, and I mean that in a good way.
The paint on the TR6 had oxidized pretty badly (the former owner kept it outside). I had this idea I would restore it (see above regarding my propensity to do dumb things when I was younger). I did a pretty good job turning the great-running TR6 into a basket case (again, see the preceding comments regarding my youthful decisions). The paint job I paid for on the fuel tank was a disaster, and then I lost interest in resurrecting the bike. I sold the basket of bits and pieces for what I had paid for the bike. I wish I still had that one.
1972 Triumph Daytona
The first motorcycle I ever went gaga over was a 1964 Triumph Tiger that a kid named Walt Skok rode to high school. In those days, the Tiger was a 500cc twin that looked a lot like a Bonneville. God, that thing was beautiful.
One of the neighbor kids on my 1972 Triumph Daytona, also known as the Baby Bonneville. This was another great motorcycle.
Triumph kept that 500cc twin in their line for years, ultimately adding a second carb and rechristening the bike as the Daytona. When the 650 line went to the oil-frame-configuration in the early 1970s, the Daytona (also known as the Baby Bonneville) did not; it kept the classic Triumph separate oil tank and peashooter mufflers.
I can’t remember who I bought the Daytona from (I bought it used), but I sure remember its looks. It was a deep candy metallic green with silver accents. It was bone stock and it was a wonderful ride. The handing was almost thought-directed…I could just think what I wanted the motorcycle to do and it would do it. One day, for no particular reason, I took it to the top of one of our streets that ran up into the mountains, turned it around, turned off the ignition, and started coasting downhill. I wanted to see how fast it would go with zero power (see my previous decision-making comments); the answer was exactly 70mph.
I never registered the Daytona over the three years I owned it; I just rode the snot out of it. I never got stopped or and I never had a citation for the expired plates. I can’t remember why I sold it, or who I sold it to. The Daytona was a wonderful motorcycle. I wish I still had it.
1992 Harley Heritage Softail
I didn’t keep my promise to never buy another Harley. A fried let me ride his ’89 Electra-Glide. It was a big, fat porker (the bike, not my friend), but Harley was getting a lot of press about their improved quality. I saw a blue Heritage Softail on the road one day, and I decided I need one. It was that simple.
I covered a lot of territory on my 1992 Harley Softail. This shot was in the mud flats near Guerrero Negro in Baja, a trip I made with good buddy Baja John.
I put a lot of miles on my ’92 Softail, and while it lasted, it was a great motorcycle. Good buddy Baja John and I rode our bikes to Cabo, we took the ferry across the Sea of Cortez, and we rode down to Guadalajara and then back up through mainland Mexico to Nogales (you can read about that adventure here).
The Harley died on me down in Mexico on another trip, and although I had regained a tiny bit of trust in Milwaukee, the dealers were still (in my opinion) basically incompetent. When my ’92 went belly up, the dealer wouldn’t touch it because it was more than 10 years old (I can’t make this stuff up, folks), so I took it to an unencumbered independent repair shop and had it rebuilt as a real motorcycle (you can read that story here).
What kind of killed the Harley dream was me forgetting to pick up milk one day when coming home from a ride on the Harley. My wife asked about the milk. I realized I had forgot it, so I went back out to run to the store. For whatever reason, I took my KLR, and it was as if I had been set free. The KLR was just so much better, I put an ad in the local Cycle Trader the next day and sold the Harley the day after that.
While I am on this subject of Harley twins, I will tell you that I always wanted a Sportster. One day the Harley dealer had to keep my bike overnight and he lent a Sportster to me. That changed my mind in a hurry. It was gutless. I know some of my readers ride Sportsters and others ride Big Twins. Mea culpa in advance. If you’d like to tell me how great your bikes are and how I have my head up my fourth point of contact, please leave a comment, or send in a draft blog (info@exhaustnotes.us) with pics and I’ll publish your rebuttal.
1982 Yamaha XS 650
This was a lucky find, or rather, it sort of found me. I was teaching a failure analysis class at McDonnell Douglas about thirty years ago, and the first evening when I connected my laptop to the projector, a photo of the Triumph Daytona (the one described above) briefly appeared in front of the class.
“Hey, I have one of those,” one of the older engineers in the class said. I asked if he was a Triumph fanboy (as I was). He told me that he didn’t have a Triumph; he had the Yamaha that was based on it. He offered to sell it to me in front of the entire class. I hadn’t even introduced myself yet.
“Let’s talk after class,” I said.
I turns out this guy had purchased the XS 650 new, rode it very little, and it had sat in his garage for several years. I bought it for $900. I think it was a 1982 model, but I can’t say that for sure. Being a Triumph rider, I always thought it would be cool to own one of the Japanese 650 twins. You know…better reliability, no oil leaks, smoother running engines, better fit and finish, and all that.
I found had a good shot (at least I think it is good) of my 1982 Yamaha XS 650 Heritage Special. To this day, I don’t know how Yamaha managed to make the bars so uncomfortable.
I didn’t keep the XS 650 long enough to assess its reliability. I did keep it and ride it long enough to find out that it had absolutely no personality, it didn’t have the bottom end torque that a Triumph did, it sounded more like George Jetson’s car than a real motorcycle (let’s see how many of you know who he was), its Phillips head screws reacted to a screw driver the same way butter reacted to a hot butterknife, and the “cruiser style” handlebars were the most uncomfortable I’d ever experienced. As you can guess, the XS 650 didn’t hang around long. I traded it in to lower the cash outlay on my TL1000S Suzuki.
1997 Suzuki TL1000S
Ducati was setting the world on fire with its L-twin performance bikes, and predictably, it was only a matter of time before the Japanese attempted to do the same. Two L-Twin Japanese motorcycles emerged in 1997: Suzuki’s TL1000S and Honda’s Super Hawk (not to be confused with their Super Hawk of the mid-1960s, as shown above in this Twins story). I opted for the Suzuki variant in red. I just liked the looks of it; I felt it was a prettier motorcycle than the Honda.
The Roadmaster. This thing ate miles and speed limits voraciously. I toured a lot of Baja on it. This photo was taken somewhere in northern Baja.
The Suzuki was the fastest and hardest accelerating motorcycle I ever owned. It would lift the front wheel when shifting from second to third at over 100 mph. I dropped it twice getting in over my head, but I never really damaged the bike or myself. I used the TL as a touring bike, and I covered large parts of Baja with it. It was a fabulous machine and I wish I still had it.
2020 Royal Enfield INT
My most recent twin is the Royal Enfield 650 INT. Enfield called it the Interceptor initially (which is a much better name), but they quickly changed it to the INT (my guess is because Honda threatened to sue them, as they already had a model called the Interceptor).
The Motorcycle Classics magazine centerfield showing the two Enfields Gresh and I used for touring Baja. It was a fun trip.
Gresh and I conned Enfield North America into loaning us two bikes (a 500cc Bullet and the new twin INT) for a comparo ride in Baja. We had a great trip, trading bikes off each day and blogging extensively about our impressions. I liked the INT so much I bought one shortly after we returned. It’s a great bike at a great price and it has all the performance I’ll ever need, both as a street bike and as a touring bike.
So there you go. I’ve owned a lot of twins. To me, a well-engineered twin makes a great street bike.
You know what? In searching for photos of my old twins, I found another single I’d forgotten all about. It was my Triumph Cub.
I never put the Cub on the street. I just rode it a bit in the fields behind my apartment building and then sold it. It was crude compared to other bikes of the era, but it was nice. It would be worth way more today than what I paid for it or what I got when I sold it.
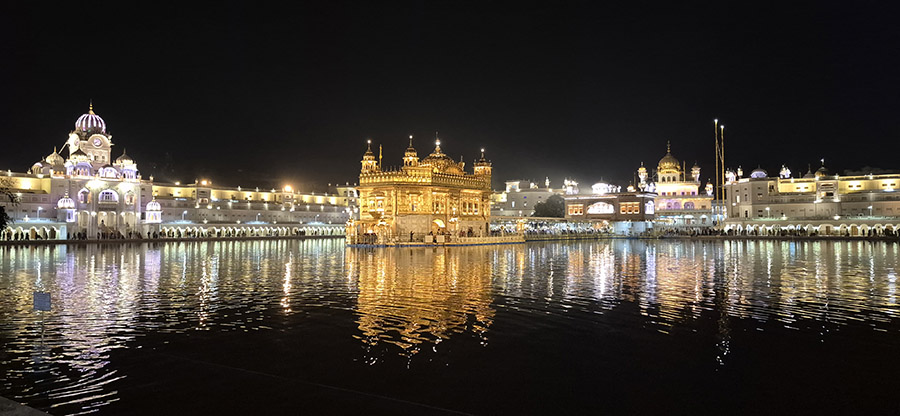
Loading the bikes the following morning, we were still basking in the Golden Temple’s magical glow. We were amped up for our next leg. This portion would be a relaxing two-day journey via Shimla to Rishikesh and would give us a glimpse of the lower Himalayan Mountain ranges. The roads would mostly be mountain twisties. This was what we wanted for riding (or so we thought).
The roads, although having great twisties, were extremely narrow. So narrow, in fact, that on more than one occasion oncoming busses would find themselves in stalemates as to who would back down and reverse to allow the other to pass. When this happened, we usually could squeeze through while they were conferring on who would back up. There also were the usual obstructions: Monkeys, cows, goats, and an occasional camel. This made for very slow going and by the end of this portion of the trip we were starting to miss the major roads we had previously ridden.
A sure way to tell you are off the beaten path is when you have to refuel your bike by purchasing fuel that is brought to you in plastic water bottles. Along these roads this refueling process became the norm, which I always find cool.
All in all it was part of the journey and we had a blast on this portion of our ride. Upon arriving in Rishikesh and seeing the Ganges River, we were exhausted and looking forward to a few down days to explore the city and have a couple of cold Kingfisher beers. I think my friend may have had another Bhang pastry as well.
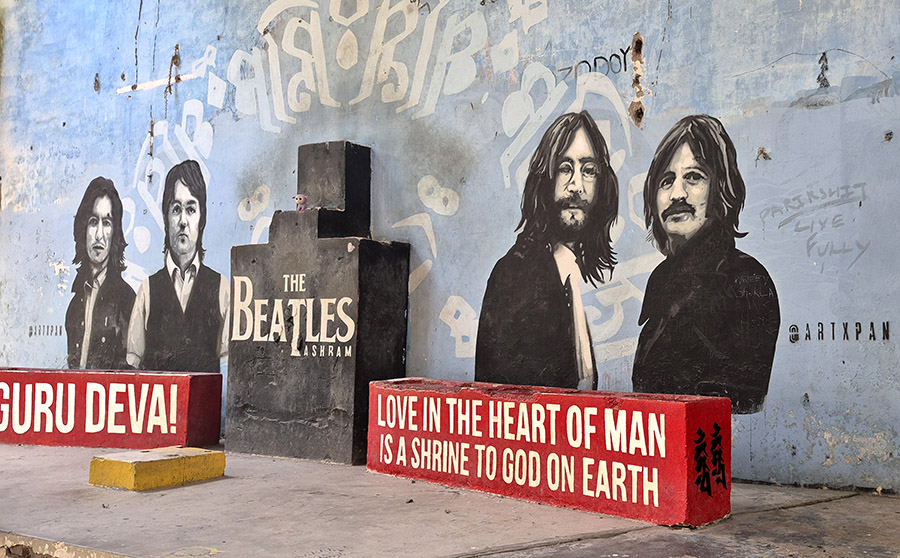
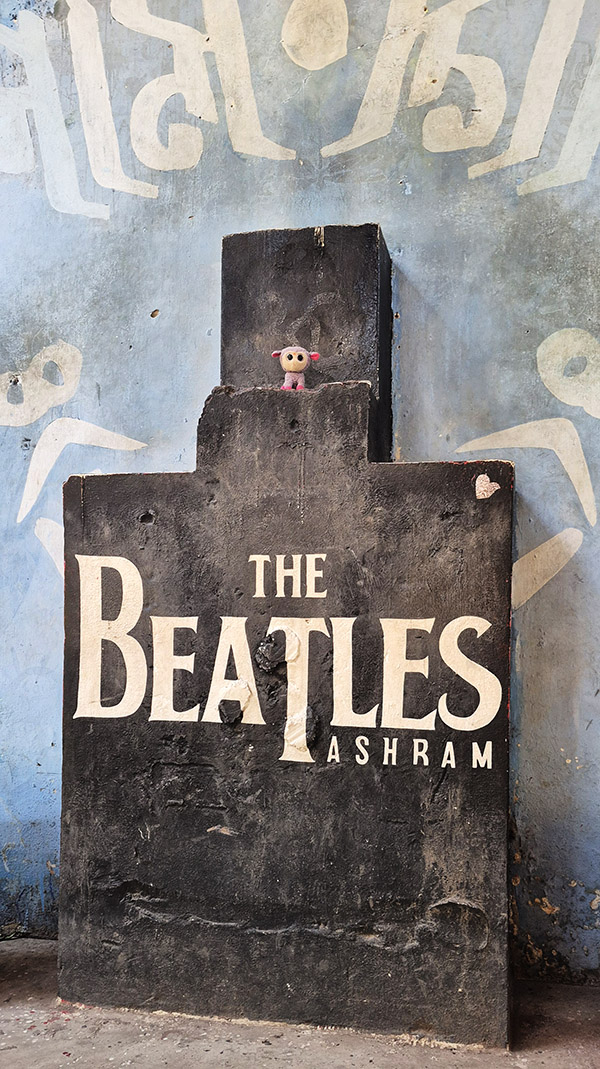
The only thing I knew of Rishikesh was that the Beatles wrote most of their White Album there. We did the tourist thing and visited the Beatles’ Ashram (where they during that period). The Ashram was mostly overrun by jungle, but it was a decent side quest, and a reason to listen to the White Album that evening.
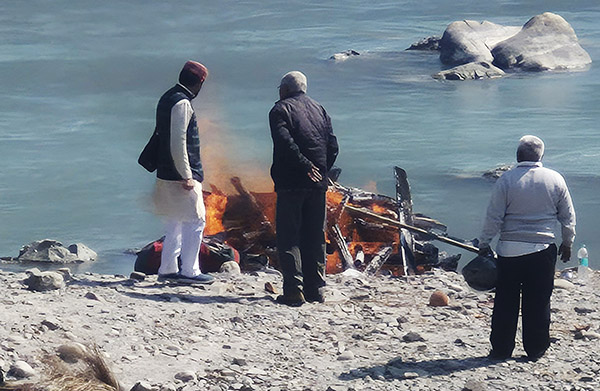
We took a different way back to our hotel from the Beatles’ Ashram. It allowed us to cross a narrow (mostly pedestrian) suspension bridge over the Ganges. We were about 100 feet above the river on this narrow bouncy bridge, moving very slowly due to the immense pedestrian traffic. It allowed us to observe Rishikesh from our high location, including the ceremonial burning of bodies along the Ganges’ banks. The crossing took about five minutes, but there was so much to take in during that five minutes that it felt as though we were on the bridge for hours. It was other-worldly, to say the least.
After reaching the other side of the bridge, we parked the motos. We sat along the Ganges and took everything in. Rishikesh was where we would begin to part ways on this journey, as my friends needed to return to Canada, their jobs, their wives, their children, and their world.
It was a crossroads for me. I didn’t have a next location or activity planned, as the trip through India during the past month had consumed every waking hour. I wasn’t concerned; this was the norm for me and I knew I would figure it out. I just didn’t expect to learn of my next destination by my phone exploding with calls in the middle of the night.
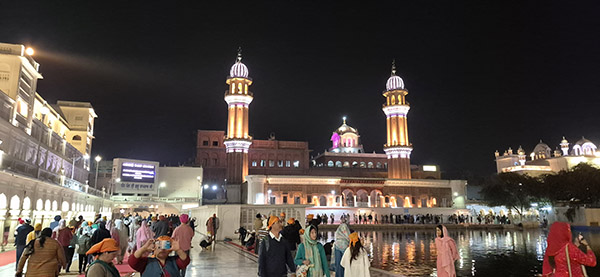
As we arrived back in Amritsar my friend’s eyes were returning to almost normal from his Bhang border journey that had still left him speechless. We all were still in awe from the entire border scene but we would have time to reflect on it later. Now we had to walk about two kilometers from our hotel to the Golden Palace and experience having dinner there. It wasn’t quite like anything we expected.
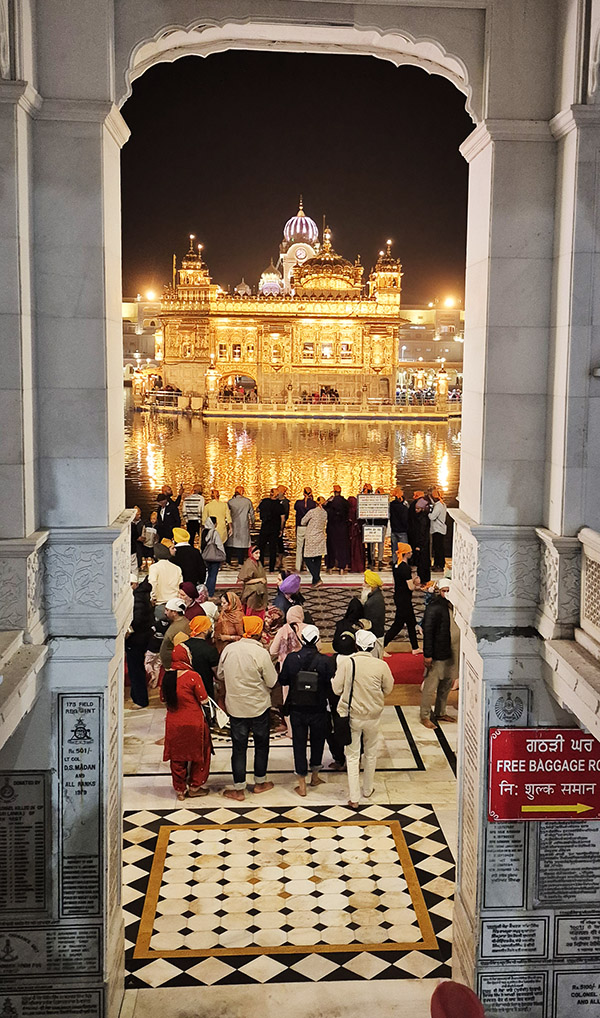
As we entered the grounds of the Golden Temple we had to check our shoes at the gate and place a hat on our heads to adhere to the Temple’s dress code. The temple and surrounding buildings were so lit up (not as lit up as my friend at the Pakistani Border, but lit up nonetheless). We walked around the inner walls of this magnificent building and eventually made our way to what seemed to be a huge dining hall. We learned this temple provides free food to 100,000 people every day! It is the single largest free kitchen in the world.
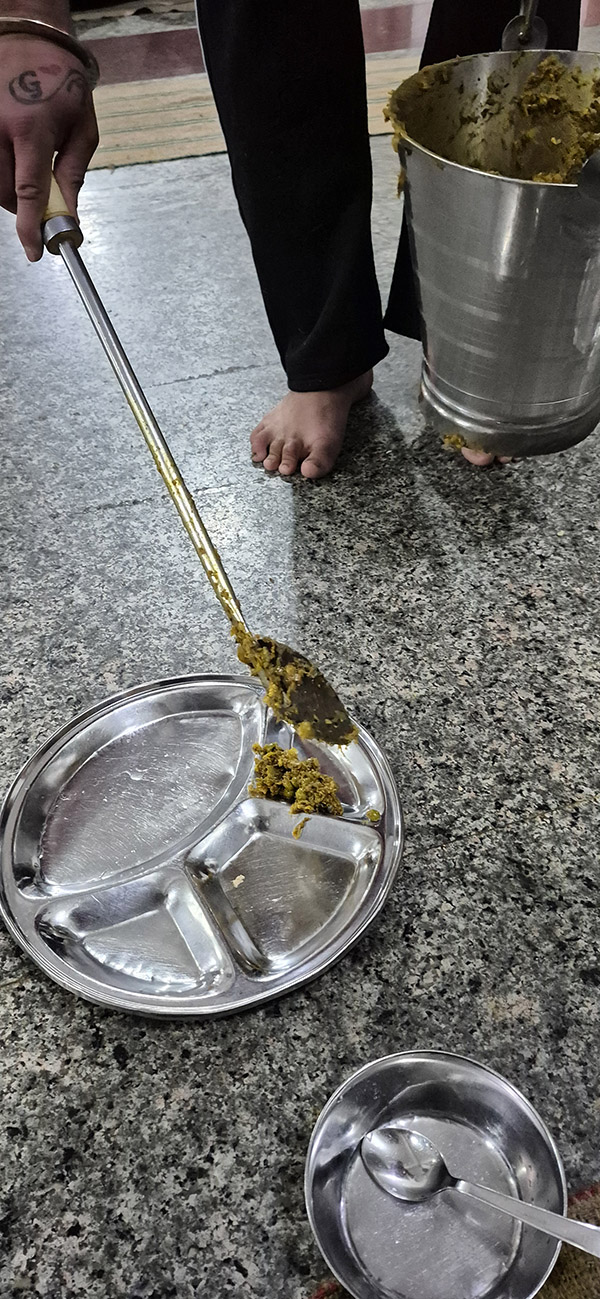
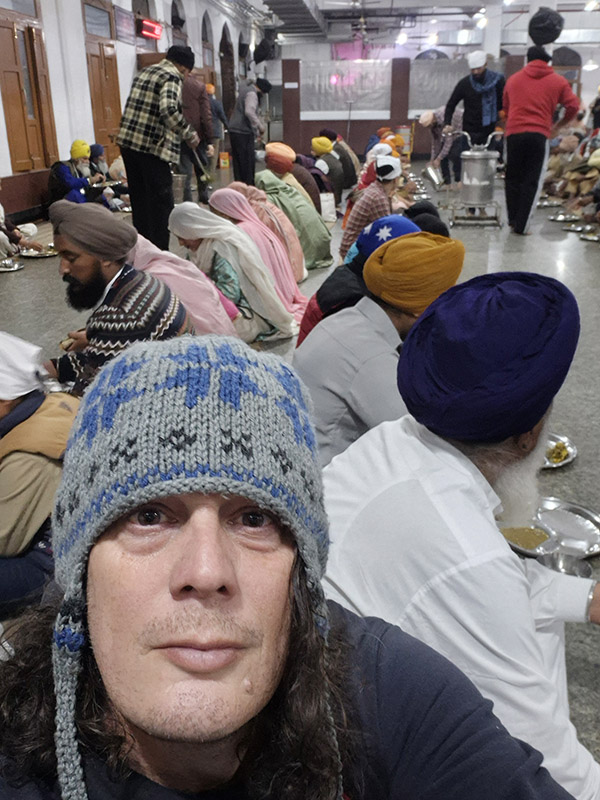
Once in the dining hall we were given a metal tray, some utensils, and a cup. We simply followed the people in front of us into an even larger room where there were just rows and rows of people sitting down on the floor, eating and drinking. After we sat down it was only a few moments before a server came by with a giant ladle and plopped some food onto our tray. There were a few servers dishing out rice, water, bread, and a sauce. For the amount of people there this setup was extremely efficient, to the point that once we were finished with our first portion, seconds were just a few moments away. The food was very satisfying and by the time we each had consumed two or three servings, we were set to get up and drop our trays and utensils off at the dishwasher counter.
After dinner we spent about an hour or so just admiring the beauty of this massive architectural structure. It was quite a sight and it was one of those places that really had its own pulse. The temple had a presence you could feel.
It was quite an eventful day in Amritsar. We retired to our rooms to get some sleep and prepare for the next day’s adventure.
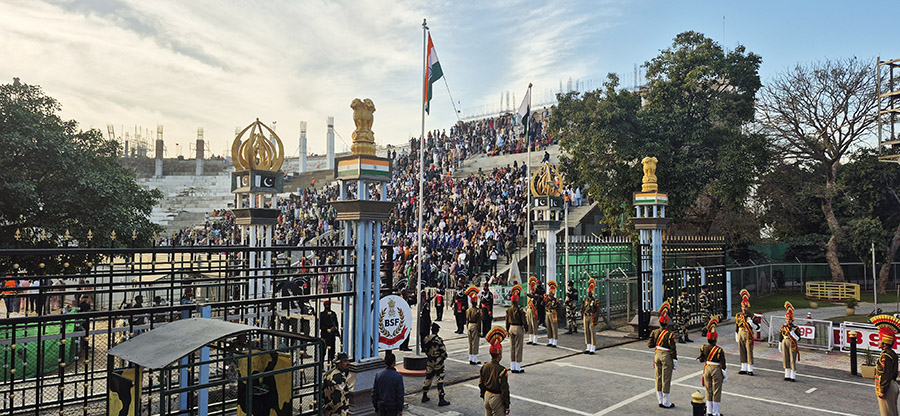
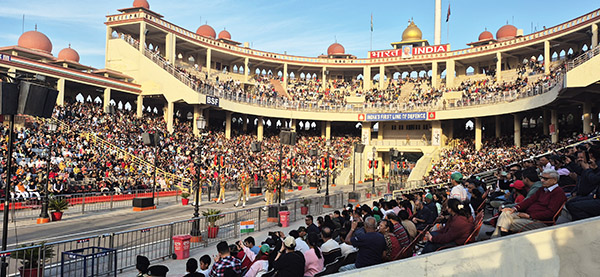
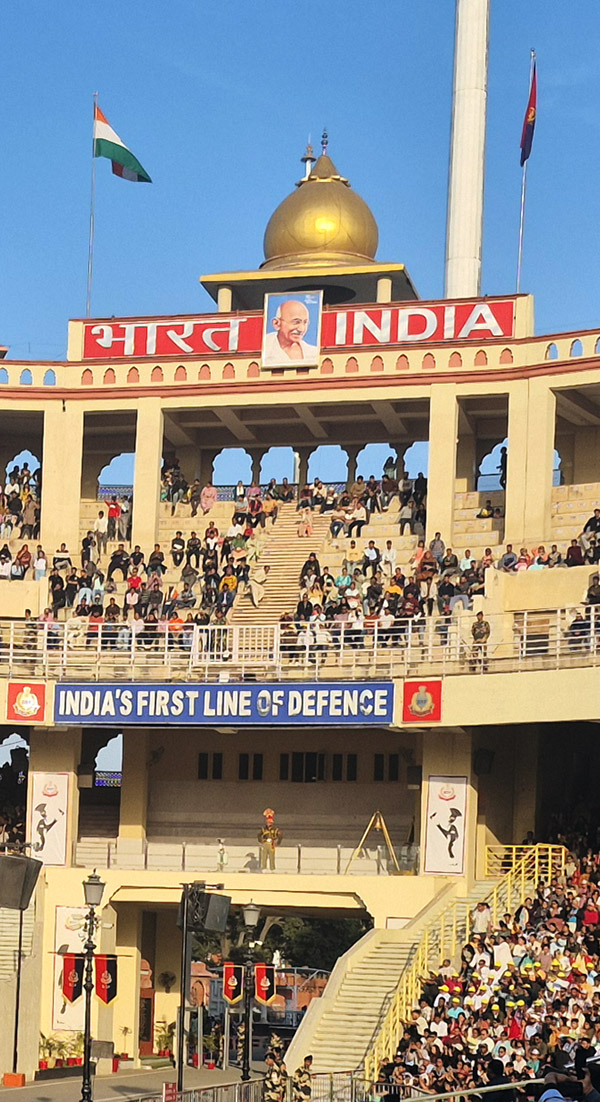
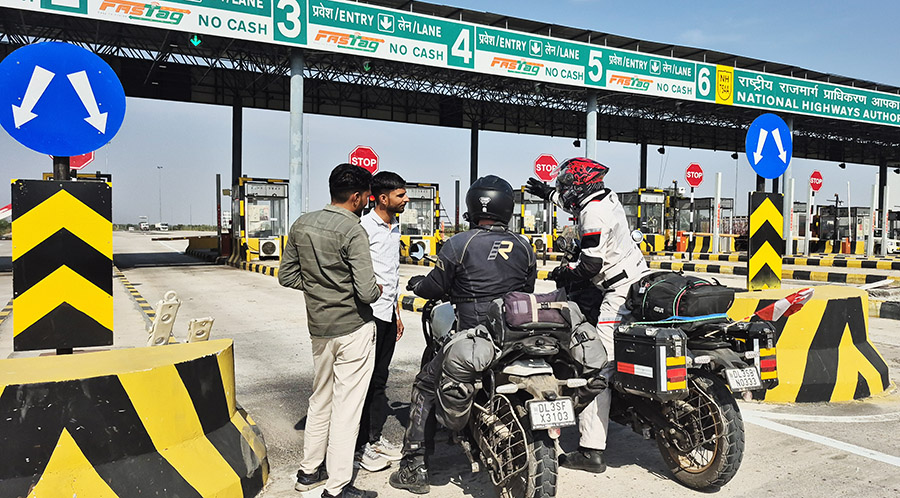
Shaking off the continual feeling of being around rats, we began a 4-hour drive to Amritsar. It was crucial we get there early, as our plan was to Uber 45 minutes to the Pakistani Indian border for the closing ceremony. From what I had heard, it was just an insane spectacle to witness. Our ride was almost uneventful this day. Almost.
Around 10:00 a.m., we were still within the state of Rajasthan and we pulled over in a bustling city for a coffee break. It didn’t take too long before we were surrounded by locals wanting selfies of us and asking a lot of questions. This was mostly normal for us although it did seem at this particular stop there was an alarming amount of people surrounding us (not just the usual five or so). Within a few minutes, three serious looking men sat at our table and began asking some deeper questions than the normal chit chat. They asked to see our passports and stated they were Indian Federal Police. I am not sure why but I replied with “Show me yours first.” Which they did. Okay. It seems we were in a tourist forbidden zone as we were just a few kilometers from the Pakistani Border, which in Rajasthan was not a good thing (in Amritsar this was a non-issue).
Not wanting to lose physical control of our passports we chatted them up and in unison began to de-escalate the situation. This took about 10 minutes of back and forth as two more Federal Authorities joined in the questioning. There had been no signs or warnings stating this was a non-tourist area. I guess it was just common knowledge to most (the common knowledge we sort of lacked). Eventually the situation worked itself. They offered to buy us another coffee, but we thought it best to continue to Amritsar and not test our luck any further. We mounted our Royal Enfields and were on our way.
Shortly after we arrived in Amritsar without any further issues, we parked the bikes and paged an Uber to go to the Pakistani Border. Along the ride my riding friend in the front seat ate what seemed to be his baked goods from the Bhang shop (he bought these two days ago). He was talking to the Uber driver about pretty much everything under the sun as he wolfed down his pastry or whatever it was. I found it odd yet entertaining and his banter helped pass the drive until we pulled into the parking garage and began our short walk to what looked like a giant stadium.
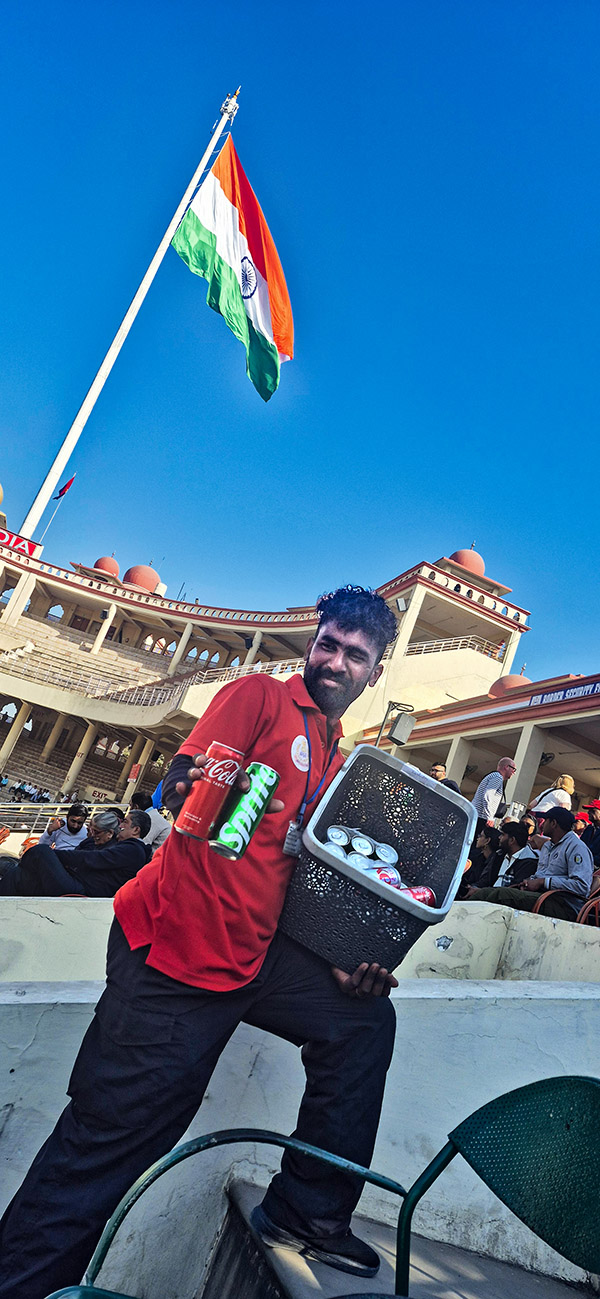
There were thousands of Indians entering the long tunnel to the stadium interior. The really cool thing about this experience is that as foreigners we were treated as VIPs and given the best seats in the house. We were only 10 meters from the Pakistan border. This was after three different security and passport checks. Once we were seated we noticed it would be more than an hour before the ceremony started, but that made no difference to those on the India side as music was thumping through the speakers, and people were selling popcorn, sodas, Indian Flags, and all kinds of souvenirs. It was like being at Fenway Park but with much more going on in every direction.
As the time drew near for the ceremony, we could see through the fence that the Pakistani side was filling up. They had their own music thumping. Meanwhile, on the India side, there was a “ring announcer” riling up all those on the India side to include hundreds in a massive mosh pit on the stadium floor.
While these pre-ceremony festivities were occurring, I kept looking to my friend on my left. His eyes seemed a bit…well, off, and he was acting a bit freaked out. I nudged him to ask what he thought of the show. He could barely reply. He finally said, “There sure is a lot going on here.”
It took me a bit to finally pull out of him what was going on. The Bhang shop pastries were a type of legal edible marijuana, and he had consumed a rather large portion during the Uber ride in. My friend was higher than a cat on acid, at the India/Pakistan border, while all these activities occurred. Oh, man, it must have been a hell of a show for him. For me, even without the pastry, it was probably the craziest thing I have ever witnessed. Each stadium grew louder and louder. The only analogy I have is this: Picture Giants Stadium cut in half with two football games going on simultaneously, and being on the 50-yard line.
Fortunately for loaded friend, once the actual border ceremony began the ambiance began to tame down somewhat as the soldiers each performed their border closing duties (to include a halftime moment of them shaking hands with a short bow to one another). The flags of each country were lowered, carefully folded, and the ceremony came to a close. My friend’s eyes were about as wide as you can imagine throughout it all. We made our way back to the Uber for a relaxing 45-minute ride back to our hotel.
The day was far from over as we were to have dinner at the Golden Palace that evening.
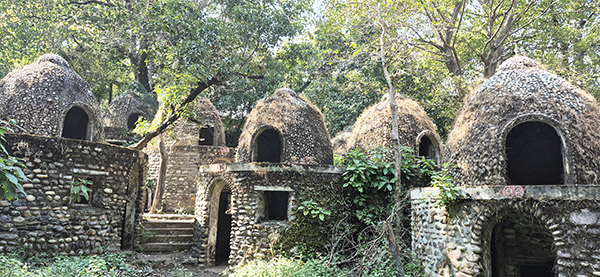
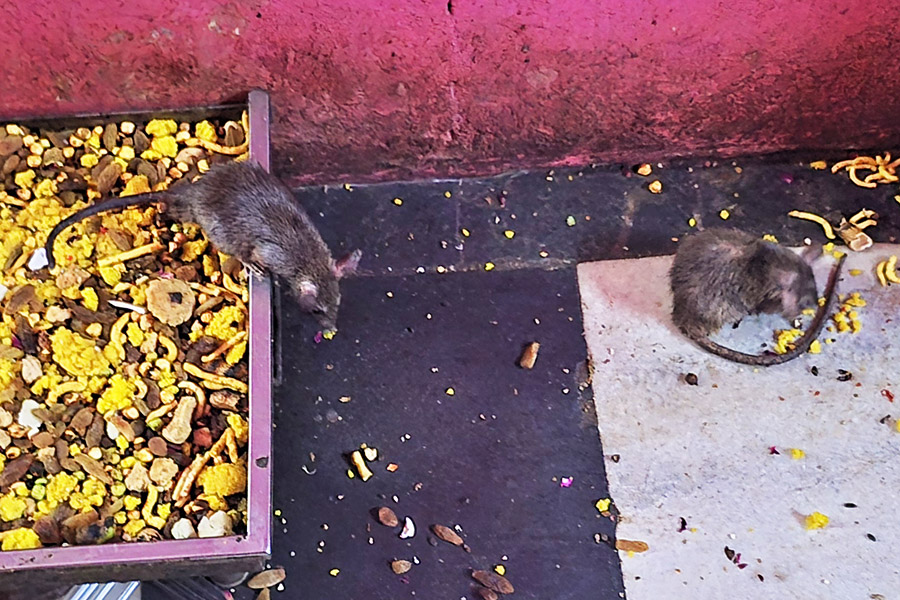
After ensuring we didn’t have any tails on us from our highway escapades, it was a short turnaround at the hotel before a visit to a temple in Deshnoke. I had heard much about this temple over the years and really wasn’t sure what to expect. What was urban legend and what was actually the truth surrounding this strange place? This temple was named the Karni Mata Temple, or as it is better known, the Rat Temple.
Well, it turns out this temple is everything I imagined it would be, but actually experiencing it was something for which none of us were prepared. Karni Mata is a Hindu Temple that believes rats are the reincarnated souls of a local story teller family that died during a famine. The rats are everywhere. There are just thousands all over and they are fed quite well. There are even several troughs for them to eat out from, and donations of grains and milk are frequently left to appease these local deities.
To add to the cringe factor, you must remove your shoes to enter the temple. As we removed our shoes and began our walk down the long hallways, out of the corner of my eye I would see things scurrying from left to right, and then right to left, and then just everywhere. After entering the temple, there are several long hallways with raised troughs that the rats climb up to eat grains and seeds. Every corner we cautiously walked around we would just see more and more rats. Surreal doesn’t begin to describe the place. The rats are so well fed, however, that when walking around the other parts of the city there wasn’t a rat to be seen. It seems they all stay in the temple. With such an abundance of food, why not? This didn’t help us get to sleep any easier, though, as our hotel was across the street from the temple.
We weren’t getting nearly as much sleep as we wanted (due to the temple’s close proximity) and we were anxious to get out of town and put as many kilometers between us and the rats as possible. Nonetheless, the temple was an experience to be had that few people get the opportunity to embrace.
Our next stop would be Amritsar, including a special trip to the Pakistan/India Border Closing Ceremony and the famous Golden Palace. This would prove to be one of our more adventurous days in India, in more ways than one.
Awakening the following morning (still with some uneasiness from our close encounter the previous day), it took more than one coffee to jar us back into the present and rid yesterday’s cobwebs. We had a full day planned and although weren’t rushed, we wanted to get moving to ensure we could fit everything in.
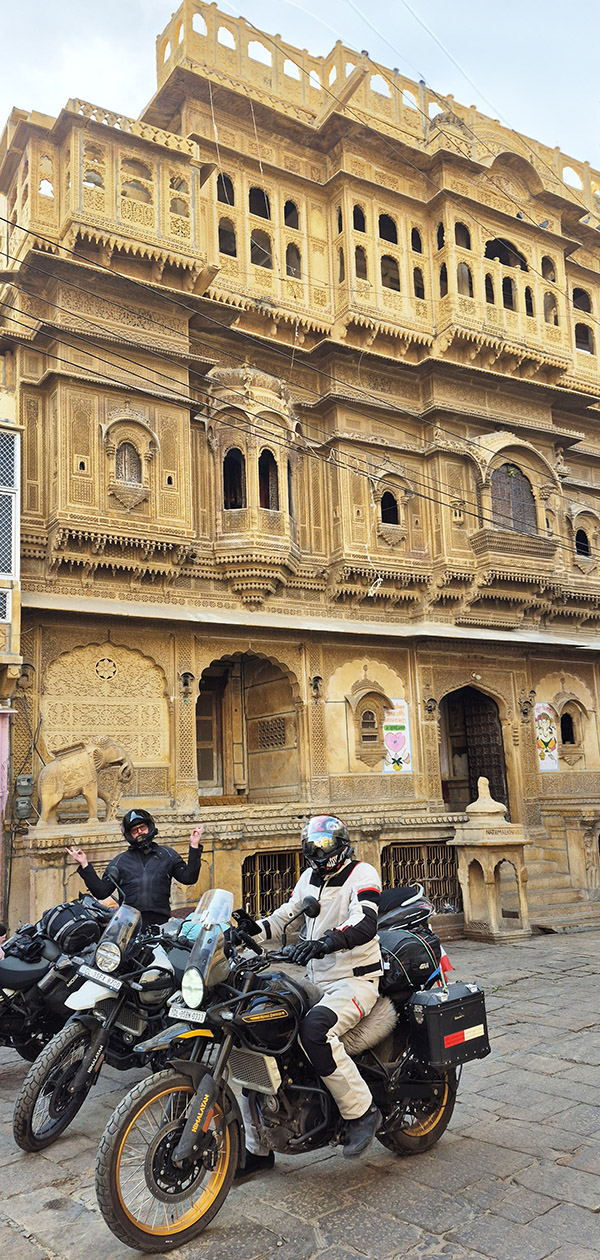
Our first stop was a beautiful fort in Jaisalmer. This was an incredible structure from every angle. Forts in Rajasthan all dominate each city’s backdrop. While this was an incredible location and area, I couldn’t help but notice when we parked one of the guys slyly snuck off and went into a small store. The sign said “Govt. Authorized Bhang Shop.” He returned with what looked like a pile of cookies so I assumed it was just some Indian bakery and didn’t give it any more thought. We took a few photos and then it wasn’t too much longer until we were on our way further north.
As we continued north we encountered a nasty patch of construction. The construction dragged on for over an hour. There was nothing but breathing in dust, and loose gravel challenging our ability to remain upright. Upon nearing the end we stopped for a quick bottle of water, and we were relieved to see the highway ramp that would take us about 50 kilometers to our destination to wrap up the day. The entertainment at this stop was a guy who was beyond hammered. He could barely stand, much less form any sort of sentence (in English or Hindi). We did our best to ignore him prior to saddling up and making our way toward the highway.
As we approached the entry gate to the highway the person controlling the gate wasn’t going to let us on and I knew right away this was one of those highways where motos were not allowed. Instantly, the thought of having to return for another hour of riding through construction popped into my head, and I could see the same wash over my friends’ faces as well. Just as we were about to concede, who comes stumbling up but the drunk from the rest stop, more animated than ever. He nudged the toll worker aside and raised the gate himself for us to pass under. Just like that, we were on our way.
We were each pretty happy to not be revisiting that construction mess and the highway conditions were pristine. There was minimal traffic with new pavement. Life was good, obviously too good, and I knew that somewhere between our current location and the 50 kilometers we had remaining that we would be paying for this one way or another. I noticed the other vehicles looking intently at us and of course there were no other motos on the highway.
The 50 kilometers went by fast and as we took our exit we saw another gate which was closed and a couple people coming out to “greet” us. They spoke no English but it was clear they wanted us to turn around. Turning around made no sense to any of us. It was like doing the same violation, but twice. After we took turns with our failed attempts to get them to raise the gate (and with turning around a hard no for a solution) we spotted a sidewalk with no gate. This would be our new exit. We quickly took the initiative to exit the highway using the sidewalk. The workers were chasing us with pens and paper in a failed attempt to write our license tag numbers down. What we did sounds a bit dodgy, but I solely blame it on the drunk guy who originally raised the gate. Either way, we made great time, had a story, and to the best of my knowledge, none of us got in any trouble for it. We needed that extra time, too, as it was late in the day and we still had one more Temple to visit: The Rat Temple.
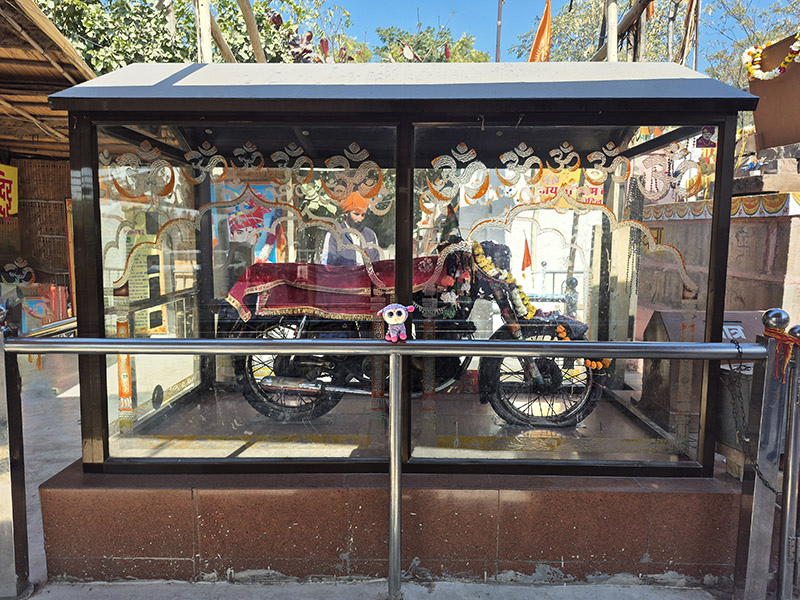
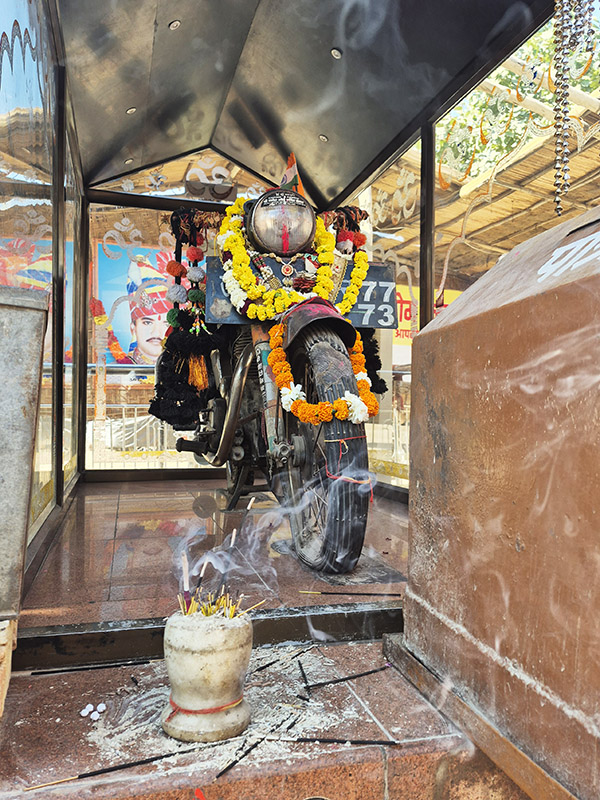
The number of temples and shrines we visited throughout Rajasthan in India had become mind boggling. They each had their appeal and draw for one crowd or another. It seems as though there was a temple for everyone, and as soon as I began wondering just how far apart and diverse the temples were we pulled into one that finally fully resonated with all of us. It was the Temple of Om Banna.
This wasn’t just any temple. Temple Om Banna is a temple dedicated to fallen motorcycle riders and to provide a safe journey blessing for all travelers. As legend has it in 1988, a motorcyclist lost control of his Royal Enfield here and hit a tree and was instantly killed. His motorcycle ended up in a nearby ditch. The police recovered it and brought it to their station. The following day the motorcycle was missing from the police station and rediscovered back where it had originally crashed. This happened several times until the locals declared this a miracle and the Om Banna Shrine was created.
The Shrine is located right off the highway and is hard to miss with all the food carts, people, and yes, motorcyclists. It is said that travelers who do not stop at this Temple will have bad luck for the continuation of their journey. Not wanting to have any bad luck (and more importantly, to check out this cool temple) we quickly pulled in on our Royal Enfields.
There were probably a couple hundred people there as we entered the open air temple. There was incense burning and just a few meters past that we could see the Royal Enfield encased in glass with offerings surrounding it. These offerings included food, money, and small liquor bottles (makes sense right?). The entire scene was surreal. The motorcycle did seem to have a life of its own. I am not sure if it was just from the ambience surrounding it or if it was indeed a miracle we were gazing upon. Either way, the temple was something that we each connected with in our own way and in our own space.
Upon packing up to leave one of my friends decided he would go ahead of us and get some kilometers in as he was a faster rider and would find a hotel for us for that evening. The rest of us were in no rush and decided to get off the highway to just go slower and take in the countryside. We were all pretty relaxed as another busy day was winding down. It seems that anytime riding in India, as soon as you lower your guard India feels it, and will throw something at you as a reminder to respect your surroundings.
The two of us were on a long straight. My friend was leading as I was gazing outward I saw something dart under my friend’s moto. Whatever it as it was for a moment was consumed underneath the bike and seemed to have disappeared. By the time this all processed (split seconds) I realized it was a small child that was being called by her sibling on the other side of the road. The child was underneath the bike from my perspective. My mind quickly raced through about 100 different reactions and emotions. It seems I blinked and then the child reappeared on the other side of the motorcycle still running, seemingly oblivious to what had almost happened. Neither of us could fully process how the child wasn’t killed or injured in anyway. It was just that close.
We both pulled over instantly. My friend needed about 10 minutes and a call to his family back in Canada to calm down and process what had happened, or almost happened. Once having regained our composure we began the short and very quiet ride to our hotel where we met up with our friend. He instantly could tell something was up as we pulled into the hotel. When he asked what as up the only reply I could say was “Om Banna.”


 We are a literary bunch, us ExNotes writers. Joe Gresh and I published a collection of our favorite stories not too long ago, and I’ve penned (or keyboarded) a few myself. Here’s a link to the Gresh and yours truly book,
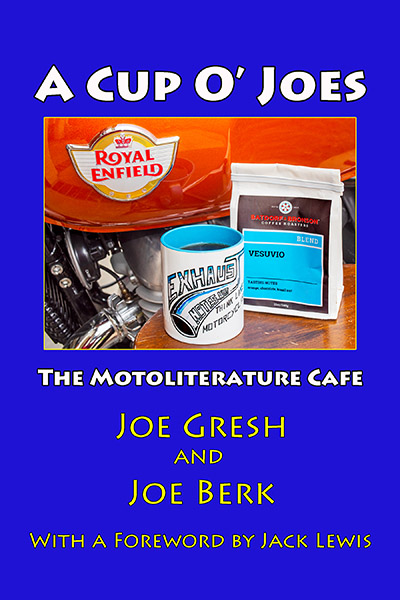


 The roads, although having great twisties, were extremely narrow. So narrow, in fact, that on more than one occasion oncoming busses would find themselves in stalemates as to who would back down and reverse to allow the other to pass. When this happened, we usually could squeeze through while they were conferring on who would back up. There also were the usual obstructions: Monkeys, cows, goats, and an occasional camel. This made for very slow going and by the end of this portion of the trip we were starting to miss the major roads we had previously ridden.
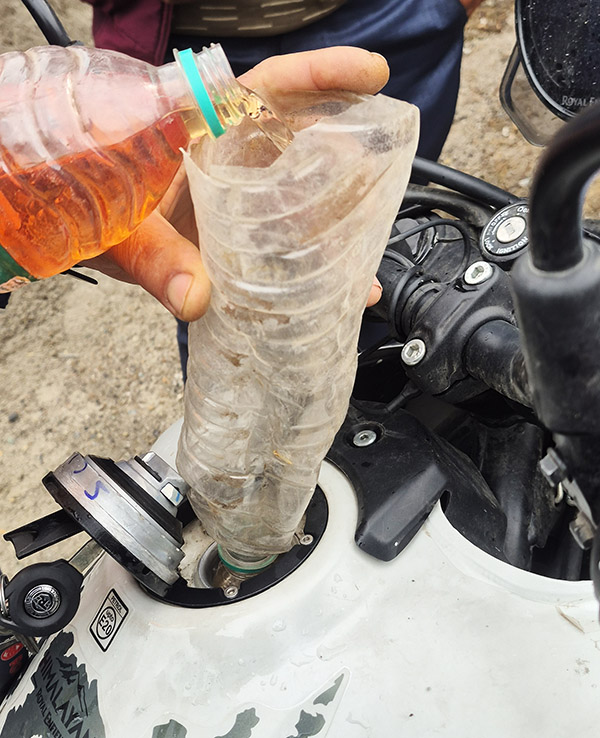

 Well, it turns out this temple is everything I imagined it would be, but actually experiencing it was something for which none of us were prepared. Karni Mata is a Hindu Temple that believes rats are the reincarnated souls of a local story teller family that died during a famine. The rats are everywhere. There are just thousands all over and they are fed quite well. There are even several troughs for them to eat out from, and donations of grains and milk are frequently left to appease these local deities.
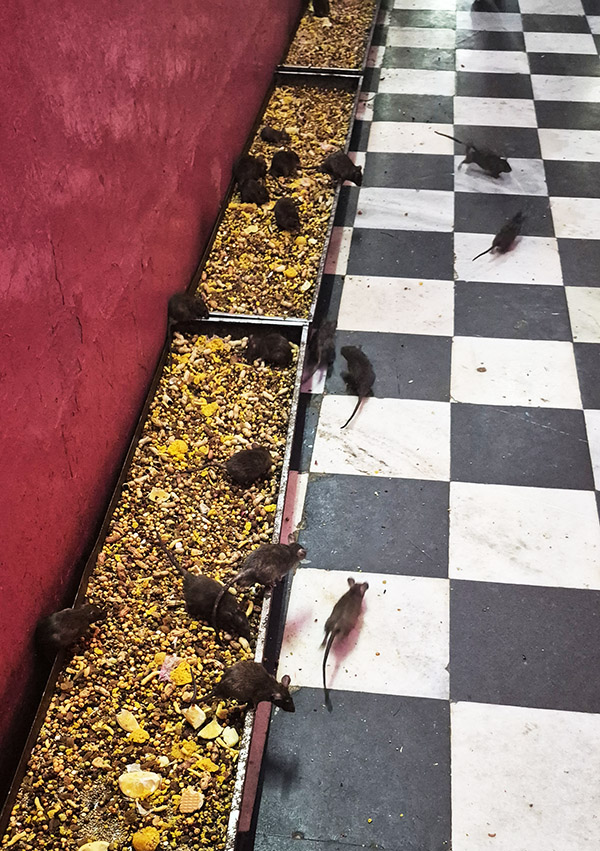
 As we continued north we encountered a nasty patch of construction. The construction dragged on for over an hour. There was nothing but breathing in dust, and loose gravel challenging our ability to remain upright. Upon nearing the end we stopped for a quick bottle of water, and we were relieved to see the highway ramp that would take us about 50 kilometers to our destination to wrap up the day. The entertainment at this stop was a guy who was beyond hammered. He could barely stand, much less form any sort of sentence (in English or Hindi). We did our best to ignore him prior to saddling up and making our way toward the highway.