A Distant Memory: Memphis Bike Night

By Joe Berk

This is a sort of a Wayback Machine post, one that goes way back.  It’s from June of 2012, which is way before Gresh and I started the ExhaustNotes blog.  I used to write the CSC Motorcycles blog (it’s where I started as a blogger).   I was thinking about Tennessee the other day and I remembered that I had written a blog about the Memphis bike nights, but I couldn’t find it in the ExNotes archives.  Then I realized: It predated ExNotes.  It was a CSC blog.


I have got to be the luckiest guy on the planet. I’m taking this great tour through the South, and yesterday we found ourselves in Memphis.  Memphis is a great city for many reasons, not the least of which is Graceland.  As I mentioned in the CSC blog yesterday, Susie and I took the Graceland tour and we loved it.   It was beyond awesome.  I’m a great Elvis Presley fan, and the opportunity to visit his home was not one to be missed.  Folks, if you ever get to Memphis, Graceland is a must!

Well, our good fortune did not end there.   We had an awesome dinner at the Rendezvous, a super barbeque joint my good buddy Georgia Robby recommended.  Folks, trust me on this…barbeque just doesn’t get any better than this!

The Rendezvous in Memphis…the best of the best!

After our great dinner, we moseyed on over to Beale Street.   That’s kind of like the Memphis version of New Orlean’s Bourbon Street…it’s the place to be in Memphis.  We noticed a lot of motorcycles heading that way, and then, hey, we saw that the street was shutdown…and it was nothing but motorcycles!  Turns out that Wednesday night is Motorcycle Night on Beale Street!  Check this out…

Midweek Memphis Moto Madness on Beale Street!

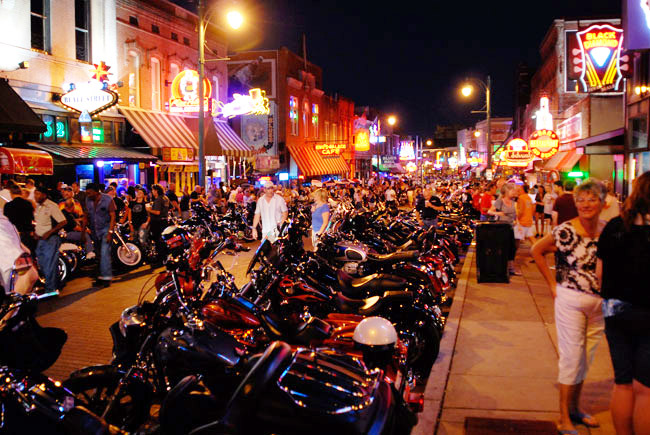
The Memphis moto night is one big street party, folks!  We were having a blast talking to the riders there.   They saw my California Scooter shirt and everyone wanted to know about the CSC bikes.   It was awesome.  We met a lot of people and made a lot of friends.

The photo below shows Carl and Ryan, a father and son team.  These are cool guys.  Carl was on his Gold Wing, and Ryan was on a CX500 he and Carl rebuilt.  Ryan just graduated from technical school, and when his father asked him what he’d like for a graduation present, Ryan just asked to go with Carl on his next motorcycle trip.  That’s pretty cool stuff, folks.

Wisconsin Carl and his son Ryan…riders extraordinaire!

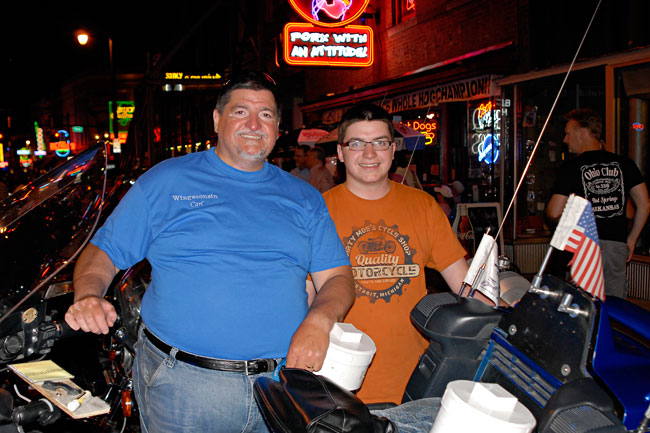
We actually rode alongside these guys about 100 miles east of Memphis without meeting them.  Susie recognized the Gold Wing when we saw them again at the Memphis moto night.   Talk about a small world!

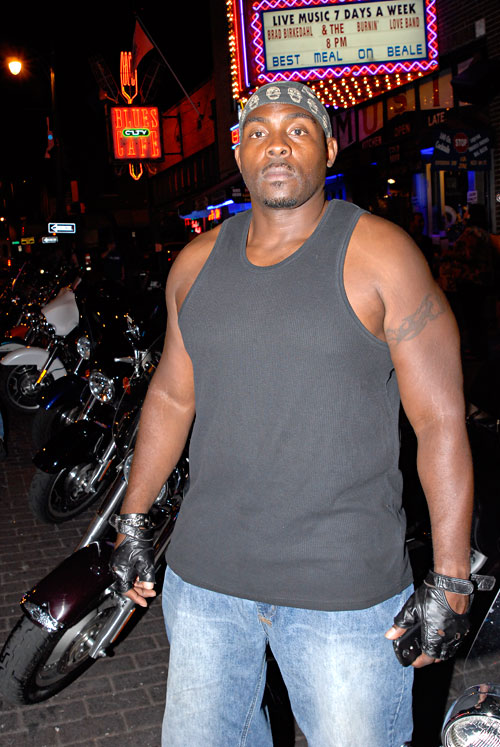
I grabbed a lot of photos on Beale Street.   Every body was having a good time.   I asked the fellow below if I could grab a shot, but he kept smiling for every shot and looking like too nice of a guy.  I asked him to strike a tougher pose, and wow, did he ever!

He’s really a nice guy!

We were having a lot of fun.  We noticed police officers at each intersection making sure that Beale Street allowed no one other than motorcyclists, and I asked a couple of them if I could grab their photo.   They said sure, but only if Susie was in the picture…

Susie with two of Memphis’ finest!

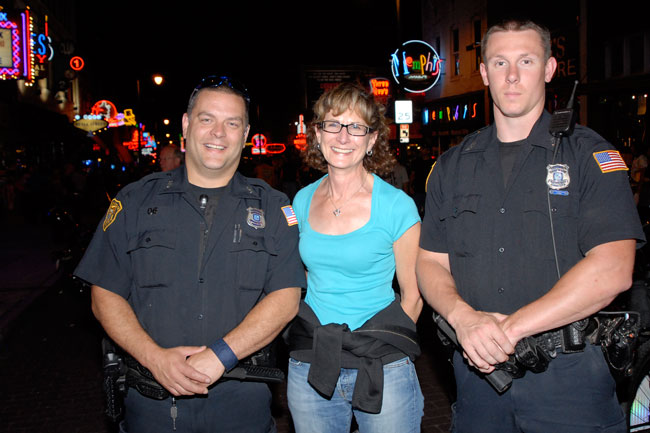
The police officer on the left looks like he’s having a good time…but the guy on the right looks like he wanted me to explain that traffic ticket I never paid…

Well, hey, the next day we had an absolutely awesome Memphis breakfast.  I had a French toast fluffer-nutter with whipped cream and blueberries, and hash brown sweet potatoes with marshmallow.

There’s peanut butter and bananas sandwiched between those slices of French toast!
Hash brown sweet potatoes with marshmallows!

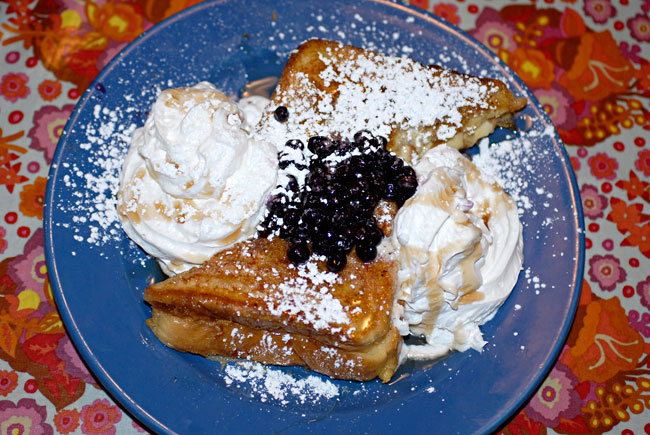
Steve saw the above photos and told me I might need to lower the gearing on my CSC motorcycle when I returned to California.

The next night we made it to Mobile, another great southern US city.   In the morning, we toured the USS Alabama, a floating museum just outside of Mobile.  It was beyond awesome.   The ship bristled with guns.   I was amazed, and I have to tell you, it’s worth a trip to this part of the country just to see this magnificent battleship.  After seeing the USS Alabama, we followed the Alabama Scenic Byway to the Emerald Coast in Florida’s panhandle, and we had a great grilled amberjack dinner in Fort Walton Beach.  Imagine bone white sand and emerald green water, and you’ll have a pretty good handle on Florida’s Emerald Coast.


That trip was 14 years ago, and I remember it like it was yesterday.  Good times brought to life once again through the miracles of the Wayback Machine!  The blog you read above evolved into a Destinations piece for Motorcycle Classics magazine.  You can find it and more here.


Subscribe to ExNotes for free!


We need your support!  Do what you can to help ExNotes stay in the black!


More Huber? Check out A Trip Into The Moment.

More Gresh and Berk?  You bet!  Check out A Cup O’ Joes!


Join our Facebook ExNotes page!

Buell Fever Part 10: Failure is an Option

By Joe Gresh

I’ve kind of lost count on which Buell installment dealt with the muffler falling off. The story was about how the muffler was held on by a T-bolt clamp on the header pipe (basically a heavy-duty hose clamp) and two vertical brackets that located the rear of the muffler. Those vertical brackets would come loose letting the muffler slide back into the wheel. In that previous story I welded the rear bracket so the muffler couldn’t slide back unless the bolt was removed. This setup no longer relied on the clamping force of fasteners alone.

I thought I had it fixed, a common misconception that I have frequently,  and both the muffler bolts of my belt-and-suspenders repair vibrated out. The muffler fell off again. Most riders would write this off as a bad design on Buell’s part, but I look at it as a challenge. Just like Lucy always pulled the football away from Charlie Brown the Buell keeps snatching success away from me.

The Buell lives and dies in real time. No waiting around for Honda-like reliability to finally fail. Each individual Buell-ride has a beginning, a middle and an end. The end being something to fix. And sometimes fix it again.

There were two of these. One is on the road a few miles ahead of the bolts that fell out.

When the muffler bolts fell out one of the two rubber bushings fell out also. These bushings fit into two holes cast into the Buell’s engine crankcases. It was a good system and I should have used Loctite or safety-wired the bolts the first time.

I wasn’t in the mood to hunt online for another bushing and the thin, molded-in tube preventing the rubber from crushing made me wary of really cranking down on the muffler bolts. I decided to take things into hand and make two new bushings since it’s as easy to make two as it is one.

I’ll need a better cut-off tool but you can see, two is as easy as one.

I have plenty of aluminum round stock and the crude bushings I spun out would shock a real toolmaker. I added a couple of grooves for o-rings to cushion the aluminum. Regardless, I now had something I could tighten a bolt against as much as I wanted. Putting the hangers back together I used nylon locknuts on fresh bolts hoping to slow down the rate of failure.

The finished bushings.
Harley cast in a couple of sturdy mounting holes on the Sportster crankcase.
The bushings are slightly longer than the mounting holes allowing for tight bolts with a bit of give for the shaky Sportster engine.

On yet another long test rides the bolts stayed tight and the muffler did not fall off. Lucy-1, Joe-1. I’m adding checking the muffler bolts to my pre-flight inspection list until this fix proves permanent.

After years of Kawasaki perfection, knowing every ride will be successful, I’m loving the Buell’s humanity. The Buell needs a steady handful of wrenches and ingenuity. Riding and tinkering with the thing brings me back to my youth of edger-powered minibikes roaring through the hot, humid Florida nights. Riding those old minibikes was a crash engineering course. You learned fast or you pushed the thing. So far, I haven’t needed to push the Buell.


Buell Parts 1 through 9 are here!


Subscribe to ExNotes for free!


We need your support! Do what you can to help ExNotes stay in the black!


More Huber? Check out A Trip Into The Moment.

More Gresh and Berk? You bet! Check out A Cup O’ Joes!


Join our Facebook ExNotes page!

Buell Fever Part 9: It’s a Bagger!

By Joe Gresh

I’ve said it before and I’ll say it again because it gets the word count up: when you leave town in New Mexico you are more out-of-town than other places.  Traffic here is light, cell phone coverage is spotty, gas stations are fewer and far between-er.  If you break down 10 miles from home, you might as well be 100 miles from home. It could be a few hours before a car comes along and are there any ax murderers out there?

Even though it annoys my internet buddy, Hacksaw, or maybe because it annoys him, I like to have a few tools, a patch kit, a rain suit, a tire inflator, some water and a few snacks. I even carry a tiny emergency tent and bivouac in case I need to spend the night doing a bit of unplanned camping.

Arrow points to the small tail compartment. Who let the cat out of the bag?

The Buell has a small compartment in the tail section that will hold a few items, but that’s about it. Normally a tank bag holds most of my on-the-road junk and I may rig one on the Buell. I’d hate to mess up the cool paint job (which is what sold me on the Buell in the first place).

A rear rack is another option, I looked around the World Wide Web and didn’t see much for an S2. I didn’t feel like making one either. Which left saddle bags.

Erik did a neater job of it.

Buell made a touring version of the S2 called the S2T; that bike had nice looking bags that blended into the subsonic styling of the Thunderbolt. I didn’t see any of those for sale. I’m guessing people keep them if they have a set.  After I started this project, I found a set for $1000, one-third the cost of the entire Buell.

Who knew Harbor Freight sold motorcycle gear?

My favorite store, Harbor Freight, had a sale on pelican-style plastic cases. Branded Apache, they are fairly sturdy, weather tight boxes that even have a pressure relief valve for those high altitude runs. Normally these cases are used for cameras, test equipment or anything that needs protection from the bumps and bruises of life in these United States.  The HF cases look like most of the bags attached to popular Adventure Barges except a bit smaller. I bought two of the 3800 series for $50 total. Attaching them to the Buell was a challenge.  Being an underslung monoshock frame there’s not a lot of bolts on the back section to attach things to. One obvious spot is the passenger peg. It’s a big, strong bolt that you could lift the bike from. The first step was to make a bit of plastic (brand name: Starboard) to connect the bag to the footpeg. This gave me a starting point to work out the rest of the mounting system.

Mount slides over passenger peg and is secured with a pinch bolt in front.

To keep the back part of the saddle out of the rear tire I made a U-shaped bracket that attaches under the seat with rubber covered Adel clamps. The right-hand side is tight due to the Buell’s wide belt drive pulley. After a few tries, I had an ugly brace welded up.

Not a thing of beauty. Hopefully it will keep the bad away from the tire.

For a mid-mount I bent a piece of aluminum to fit around the rear subframe tube. I probably didn’t need this, but more support is always more support.

I may not need this mount but I like it.

Anything mounted solidly to a Sportster-engined motorcycle usually has a short lifespan. Because of this, the bag-to-rear-bracket connections are those rubber isolator type deals (four on each side for a total of eight). If these isolators don’t survive, it will be easy to replace them with progressively larger isolators until the entire bag is all isolator, leaving little room for storage.

A total of four isolators and the flexible plastic peg mount should keep the bag on the Buell.

The HF bags have two snap-type latches that seem to hold ok but there are also two holes for a padlock or carabiner to ensure they don’t pop open. I’m going to add a small padlock for extra security. Not for theft, but instead for unplanned bag opening.

I seem to do a lot of test rides on the Buell. I’ve put 1500 miles of testing on the bike, and the bagger test ride took me on a 280-mile mountain loop out to Roswell then back on Highway 70 through Ruidoso and tacos at Los Agaves-east (the other Los Agaves is in Artesia).  After eating delicious tacos, I noticed oil on the right saddle bag. It wasn’t coming from the tacos. In fact,  there was oil all over the place.

I checked the rear cylinder, the source of a previous leak, but it was nice and dry. The Buell had been getting kind of bouncy, and the rear shock was dripping oil. By the time I got home there was no rebound damping at all. The Buell was wallowing like an overloaded Chevy station wagon complete with sticky brats in the way-back.

Do these bags make my butt look big?

I need to do a little work on the shock absorber (two steps back), but the bags turned out well. (One step forward) at speed I reached back to touch them, and they were mostly vibration-free. The rear bracket is not my finest hour and if these bags hold up, I may take a stab at a better-looking rear bracket.

Under side view of rear bracket. I may re-do this part later. Tubing would look better.

On the lonely western roads between Mayhill and Roswell it was comforting to have a few tools and water in case of breakdown. I like a more practical motorcycle, and the Bagger Buell is practical. I may add a refrigerator and a microwave to make my rides even more practical.


Read earlier dispatches from the Buell resurrection project!


Subscribe to ExNotes for free!


We need your support!  Do what you can to help ExNotes stay in the black!


More Huber? Check out A Trip Into The Moment.

More Gresh and Berk?  You bet!  Check out A Cup O’ Joes!


Join our Facebook ExNotes page!

Buell Fever Part 8: Slippery Business

By Joe Gresh

The stereotypical image of a Harley-Davidson motorcycle leaking oil has become a cultural icon. Dirty, unshaven and drunk riders astride seeping, smoking, rattling, home-built murdercycles were made popular in biker movies from the 1970’s and the image persists today.

How real is that image? I can’t say because my Buell was manufactured in 1995 but I hear new Harleys mostly don’t leak…much, if at all. My 30 year-old Buell leaked oil. Before we dive into the engine oil leak we have to get a few other leaks out of the way. .

You’ll remember all the trouble I had with the original Mikuni carburetor, the float needle leaked through various repair attempts and I thought I had the problem licked. The Buell ran good and got 50 miles to a gallon of gas. I took it out for a few rides and no carburetor leaks. Then I walked into the shed one day, straddled the Buell, hoisted it up straight and gas poured out the air cleaner. Like a lot of gas.

China, China, China.

That was the final straw for the original Mikuni carburetor. I replaced the entire unit with a Chinese clone carb from Amazon and the bike has never run better and it doesn’t leak out of the carburetor or the air cleaner. Thanks, Global Trade!

But here’s my question: why did the old carburetor overflow at all? I had the fuel petcock off, where did the gas running out of the carb come from, you may well ask?  Turns out the petcock was not completely shutting off as a steady drip of gasoline wormed its way past the 4-hole rubber seal in the petcock. Thus, the fuel shut-off was never really shut-off.

This isn’t the actual petcock gasket but you get the idea.

I took the petcock apart and flipped the 4-hole rubber seal around. That cured the fuel leaking to the carburetor in the off position but it created a bigger problem in that gas leaked out of the body of the petcock in all positions.

Finding a replacement rubber, 4-hole o-ring was uneventful as none were to be found. Instead, I bought a new petcock on Amazon and the new valve fixed the bypassing problem. But there was another gas leak.

The Buell has a roto-cast plastic gas tank under that pretty, race-bike inspired, but heavy, fiberglass bodywork. An aluminum gas cap flange screws onto the tank with a rubber gasket. This joint weeped gas when riding the bike. Not a lot, but annoying and enough to leave streaks of fuel mungus down the side of the gas tank.

Not so many parts to the Buell tank but the few that are there may leak.

Dismantling the flange, I discovered a check valve under the tank vent that needed to be removed before the flange would come off.

I got rid of this check valve. I expect the bike to burst into flames any minute.

The valve must have something to do with emissions control as it only let air into the tank. I’m sure this added to the float needle issue as the tank was under slight pressure just sitting in the warm New Mexico sun.

Fixing the flange leak was as easy as cleaning off the gasket. Blasting it with a little Permatex high-tack and reassembling the mess. I omitted the check valve to equalize the pressure between the tank and the Earth’s atmosphere. Of course now when the bike falls over it will leak gas like every other old motorcycle I own.

You can’t see it well in this photo but the rear cylinder is an oily mess.

With the gas leaks sorted I turned my attention to the oil leaks. The rear rocker cover was dribbling oil down the cylinder where turbulent air whisked it onto the battery and all points south. It wasn’t a huge leak but let’s just say the back of the Buell is not likely to rust anytime soon.

Luckily Erik built the S2 so that the rocker covers are removable without dropping the engine. I did have to cut an Allen wrench short to clear the frame tube, but it was an easy job all things considered.

It’s a snug fit but as long as you’re willing to chop your tools it’s do-able.

With the new rocker cover gaskets, I took the bike out for a spin and the rear cylinder puked oil as badly as ever. I figured the oil must be leaking from under the rocker box. I’m nothing if not persistent so I took the rocker covers back off and then the rocker boxes. (This year Sportster engine has 3-piece rocker assemblies)

The gaskets crumbled upon removal of the rocker boxes.

The paper gasket is under the rear rocker box was brittle and broken. I replaced both front and rear gaskets with a metal version of the paper gasket. I knew for sure I had the leak fixed.

On the test run the reassembled rear rocker leaked as bad as ever. Back to the shed and everything came apart again for the third time. I was pretty much out of ideas.

Studying the situation over the course of several days I observed the rear umbrella valve (a nickel-sized, round flapper-type deal in the rocker cover) was much harder than the front umbrella valve. Like hard plastic instead of soft rubber. I swapped both umbrella valves with new ones. Then assembled the mess thinking no way it could be those little valves.

This little valve caused the rear cylinder rocker cover leak.

I test rode the Buell 200 miles and no oil leaked out the rear cylinder. The battery area and aft sections were dry. Look, I’m not complaining. I can’t pin this on Harley’s image. 30-year old motorcycles are going to leak oil. Seals harden, gaskets dry up and split, 0-rings lose their O-ness and umbrella valves aren’t going to bounce.  Besides, I enjoy working on the Buell. It’s a weird, wonderful machine that fits no known stereotype.


Subscribe to ExNotes for free!


We need your support!  Do what you can to help ExNotes stay in the black!


More Huber? Check out A Trip Into The Moment.

More Gresh and Berk?  You bet!  Check out A Cup O’ Joes!


Join our Facebook ExNotes page!

My Vintage Bike Wish List

By Joe Berk

Like most of you, I spend a lot of time thinking about what I’d park in my garage if I had the money and the space for a motorcycle collection.  At various times in my life I’ve owned several motorcycles at the same time and I’ve sort of realized the dream I describe here (at least in terms of how many motorcycles I owned), but this blog describes something different.  The bikes I owned in the past came about as the result of having the time and the money when something cool caught my fancy.  This time, I’d start from scratch and define what would go into my ideal collection.  Gresh and I have theorized and fantasized and written about this in the past (see our Dream Bikes page).   Here, I’m starting from scratch and I’m limiting myself to six motorcycles (just because I think that should be the right number of bikes).  You might be surprised at some of my choices.

1965 Triumph Bonneville

When I was a kid in high school, one of the seniors (a fellow named Walt Skok) bought a new Triumph Bonneville.  I thought it was the most beautiful thing I’d ever seen, and I wanted one.  Later in life, I bought, rode, and sold several Triumph Bonnevilles, but I never scratched that itch for a ’65 model.  Someday…

To me, everything about the 1965 Triumph Bonneville was perfect:  The colors, the exhaust system, the exhaust notes, the tank parcel grid, the design symmetry, the little decal recognizing Triumph’s world speed record, and more.  I always wanted one and I still do.

1965 Harley-Davidson Electra-Glide

I’ve owned a couple of Harley full dressers, but the one I always wanted was the 1965 Electra-Glide.  That year was the first year Harley offered electric starting and it was the last year of the panhead engine (which I think is the best-looking big twin engine Harley ever made).

The ’65 Electra-Glide is another bike that, in my opinion, was styled perfectly.  I like the tank contours, the 1965 paint design, the panhead engine’s look, the fishtail mufflers, the saddlebag contours, the potato-potato-potato exhaust note, and more.  Apparently, my thoughts about this motorcycle’s intrinsic beauty are also shared by the U.S. Post Office (see the above postage stamp).  The ’65 Electra-Glide is the bike I used to think about as a teenager when I rode around on my Schwinn bicycle, imagining that my Schwin was a Harley.

Cycle Garden 1974 Moto Guzzi El Dorado

Ah, a Cycle Garden Guzzi.  This is one I tumbled to only recently.  I’ve been writing a series of articles for Motorcycle Classics magazine, and one of the shops that’s been helping me is Moe Moore’s Cycle Garden in Indio, California.  I always thought the mid-1970s Moto Guzzi were stunning in their stock and restored configurations.  Then, during one Cycle Garden visit, I saw a custom bike that Moe and his crew had assembled for a client.

The bike was a 1974 police motorcycle, but it painted in a breathtaking battleship gray and metallic blue paint theme.  I could see myself riding it, rumbling through the open roads and magnificent landscapes of Baja.  It is a motorcycle that is firmly on my list.

1983 Harley XR-1000

I wrote a Dream Bike piece about this during the first year of  the ExhaustNotes.us blog’s existence, and the thing that struck me about it was that Joe Gresh told me I’d beat him to it…he was thinking about doing a Dream Bike piece on the same motorcycle.

I’ve never owned or ridden an XR-1000.  Come to think of it, I never heard one run.  I could have bought an XR-1000 new for around $8K when they were new, but I didn’t have a spare $8K laying around in those days.  It’s another one of those motorcycles bikes for which I think the visual and visceral appeal is perfect.  Maybe someday I’ll get to scratch that itch.

2006 Kawasaki KLR 650

To me, this is an interesting choice with which some might take issue.  I don’t care.   I loved my KLR 650.   Lifelong good buddy Baja John had one, too.  That’s Baja John and yours truly somewhere in Baja in the photo below.

The KLR 650 is one of my all time favorite motorcycles.  Mine was a first-gen KLR, and I think those are more desirable than the second gen bikes.  My KLR was perfect for exploring Baja, and I did a lot of that on it.  It had just the right amount of power, it was simple (except for the shim-and-bucket valve adjustments), it was a very comfortable motorcycle (the ergos were perfect), and it was inexpensive.  I bought it new in 2006.  It was one of the best motor vehicles (of any kind) I ever owned.   If you’re wondering why I sold it, so am I.

2015 CSC RX3

The CSC RX3 motorcycle is another bike that I thought was just perfect for me.   I covered a lot of miles in Baja and elsewhere in the world on it.

I think a 250 is the perfect size for a motorcycle (you can read why here).  I traveled through a lot of the world on one:  Through the American West, Mexico, the Andes Mountains in Colombia, and China (with Joe Gresh; Joe and I are in the photo above auditioning for a Chinese gladiator movie).  All those trips and all those miles were awesome, and the RX3 didn’t miss a beat on any of them.  I almost cried when I learned Zongshen discontinued the RX3, and if they were to bring it back (which they should), I would no doubt be riding the world and blogging the RX3’s virtues again.


There you have it.  It was fun thinking about this, writing this blog, imagining the above six motorcycles parked in my garage, and riding them in different parts of the world.  A quick mental tally tells me I could make the above wish list a reality for something around $120K in today’s dollars.  Hmmmm…I don’t have a spare $120K laying around, but maybe if a few of you hit that donate below…


What about you?  What would be the ideal collection you’d like to see in your garage?  Let us know in the comments below.


You know you want it.   Go ahead.


Why Are All My Friends Buying Harleys?

By Joe Berk

Don’t get excited; I don’t have that many friends.  But lately two of them (Baja John and Uncle Joe Gresh) both bought Harleys.  I guess I started thinking about it when I went to the gym yesterday morning.  There was an early Harley V-Rod parked in front.  It looked brand new.  It’s too bad that bike didn’t make it with the beer bellies and tattoos bunch.  Harley is on the skids now, struggling through a huge sales downturn and significant layoffs.  I guess they don’t know what to do.  I do (small bikes and even smaller prices; it ain’t rocket science, Milwaukee).  Eh, what do I know?

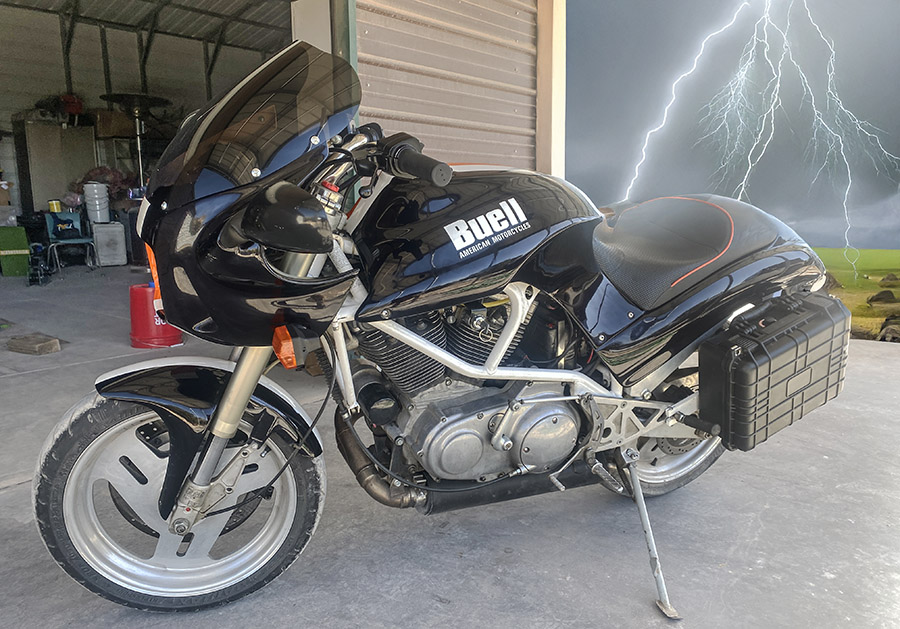
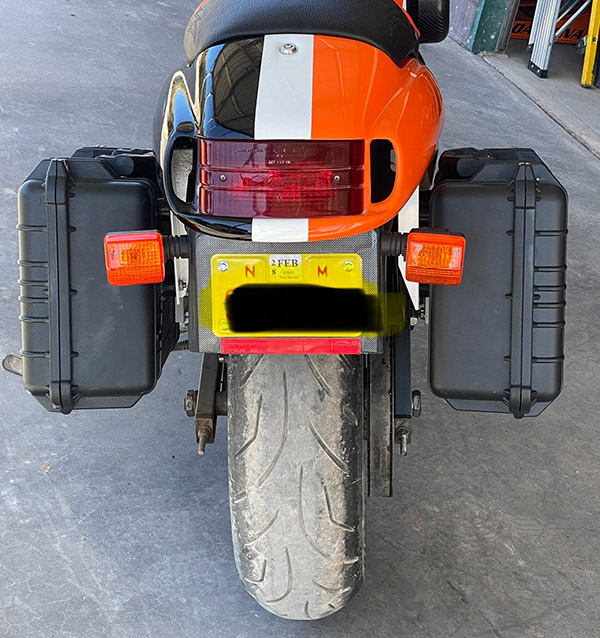
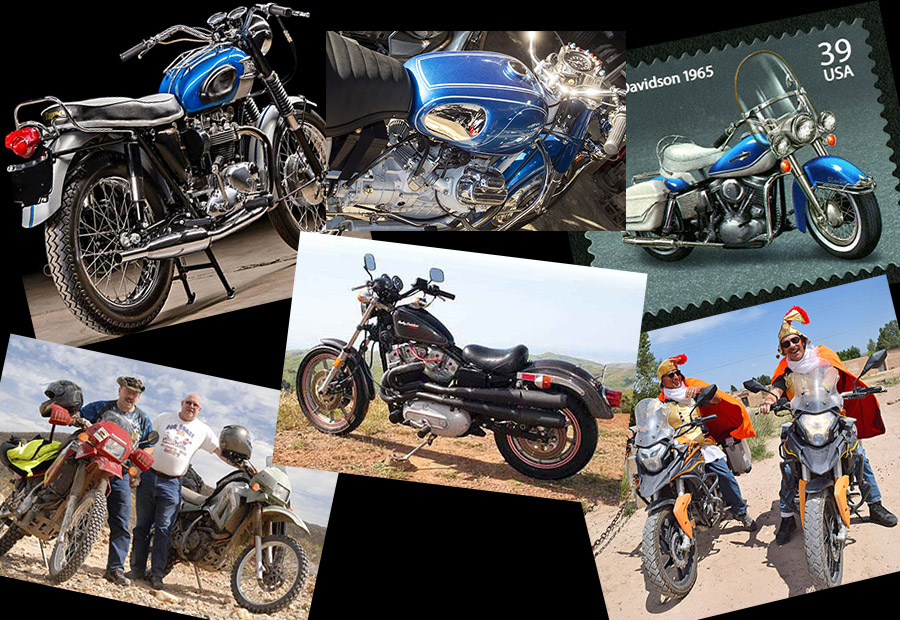
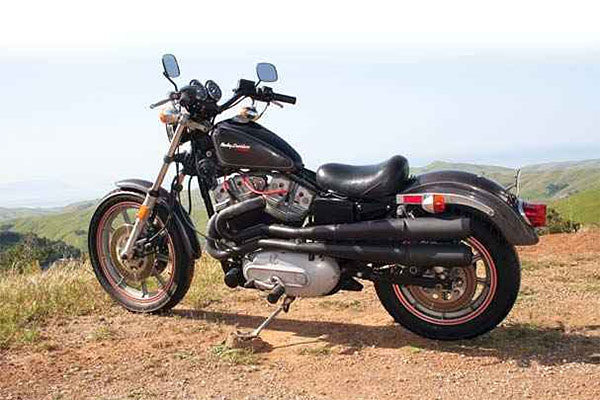
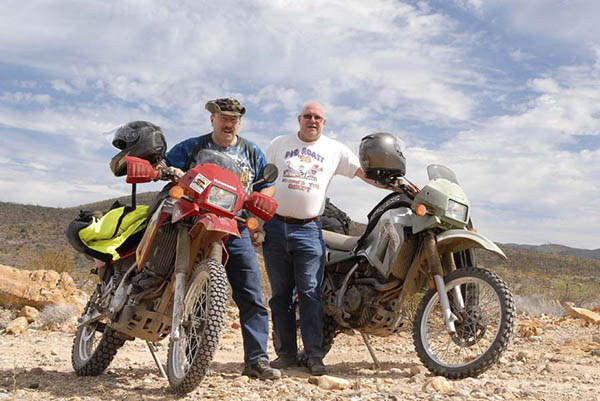
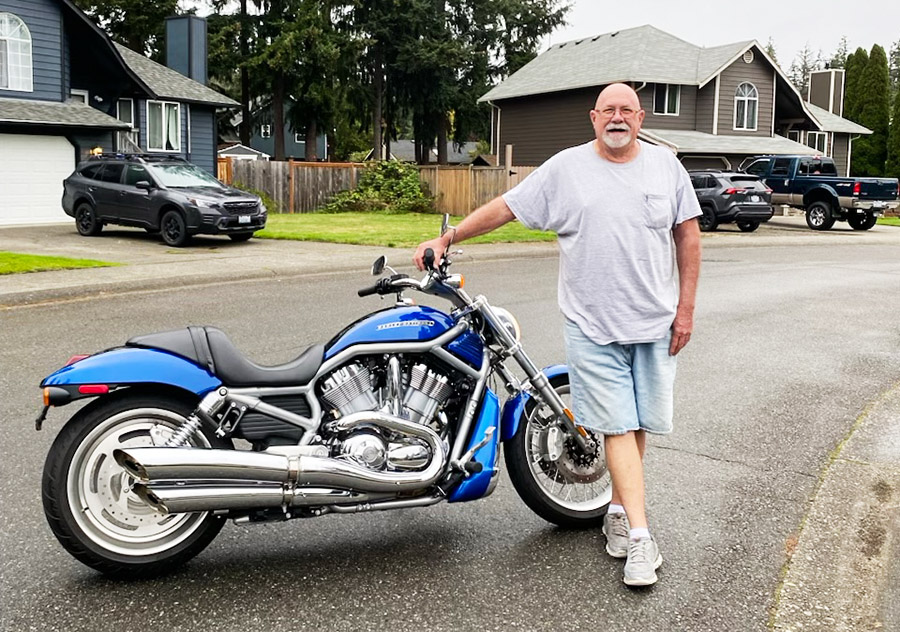
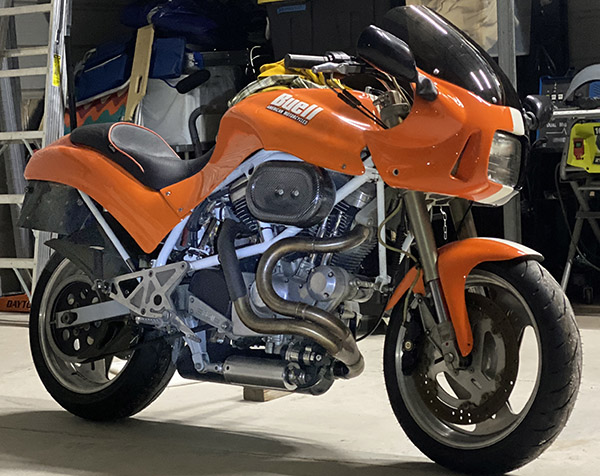
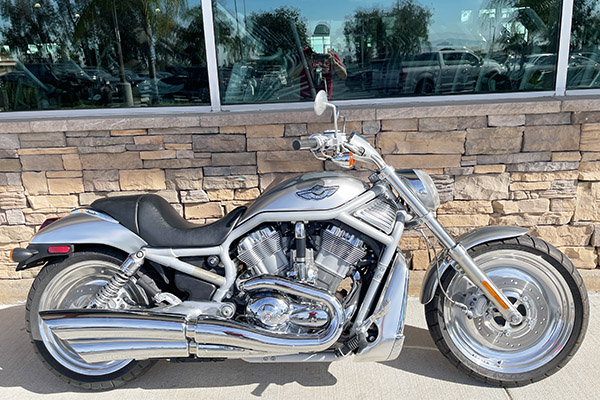
The V-Rod had me thinking about Baja John.  He bought a V-Rod last year.  I haven’t seen it yet, so I called John and asked him to send a photo.  It’s the one you see at the top of this blog.  I need to get out there to Arizona and visit with John again.  Maybe on the next pig hunt.  Maybe sooner.

And then there’s Gresh and his Buell.  I knew more about that motorcycle, as Sue and I hosted Gresh out here in La La Land when he came out to pick it up.   It’s a beautiful motorcycle, and it’s been fun watching Joe resurrect it.  He’s having fun.  It’s too bad Buell didn’t work out for Harley, either.  I thought those bikes might have been the answer.  Joe’s adventures have had me thinking maybe I need to find an older Buell to play with.  It would be fun.  But there aren’t too many Harley dealers around here anymore; they’ve been dropping like left wing loonies (sorry for the redundancy) at a MAGA rally.  Seriously.  Harley dealers are falling fast.  It’s a shame, really.

The upshot of the above, of course, is that if you are in the market for a Harley, this is probably a good time to buy.  I’ve owned two Harleys; one was a turd and the other was awesome.  They sure were beautiful, though.  Even the ’79 Electra-Glide (the turd) that treated me worse than Kamala Harris at a Toastmasters meeting was drop dead gorgeous.

I think if I was going to buy another motorcycle, it would be a Moto Guzzi.  The work I’ve been doing for Motorcycle Classics magazine with Cycle Garden in Indio cemented what I already felt:  Guzzis are the world’s most beautiful motorcycles.  I like the Ambassadors and El Dorados from the 1970s, and I also like the Griso.  I’m keeping my eyes peeled.  And there’s another plus on the Guzzis:  They sure are easy to maintain.

How easy?  Hey, buy a recent issue of Motorcycle Classics, turn to the “How To” section, and you’ll see.  The upcoming issue has a feature on how to de-rust a gas tank, and it’s pretty interesting.  I think you’ll like it.


Subscribe to ExNotes for free!


We need your support!  Do what you can to help ExNotes stay in the black!


More Huber? Check out A Trip Into The Moment.

More Gresh and Berk?  You bet!  Check out A Cup O’ Joes!


Join our Facebook ExNotes page!


Help us keep the lights on:

Buell Fever Part 7: Lean On Me

By Joe Gresh

Tidying up where we left off in Part 6, the new front brake pads arrived and everything wheel-wise went together. Bleeding the front caliper was uneventful and the brake stopped the wheel which is all you can ask in today’s crazy world.

Stoppage by PM.

It was time to tackle the Buell’s kickstand issue. If you’re keeping count, that’s three motorcycles I have had to modify the kickstand on.

Kickstand things are precarious and resulted in a crash.

The Buell’s kick stand was an odd duck. It had the typical Harley locking style but where Harley used heavy, hard-wearing steel the Buell used soft, easy to consume aluminum.

The material change is important because with only 13,000 miles my Buell kickstand locking groove was completely worn out. The notch the kickstand flopped into was gone and with the poor angles involved the bike was ready to fall over any minute. And it did.

The notch area, eaten away in the pursuit of light weight.

I was going to take a stab at welding a notch in place but I couldn’t get the TIG torch in the narrow kickstand mounting boss. This was a job better left to the pros at Roy’s Welding. I took the aluminum side plate down to Roy’s and dropped it off.

Access is limited, so I gave up and took the kickstand plate to a welder.

A few days later I called Roy’s to see how things were going and I guess they couldn’t get their torch in between the kickstand mount either. Back I went to retrieve the still-boogered kickstand mount. I searched online for a few days but a left-side mounting plate was not available when I needed it.

Left with no option I tried some of Harbor Freight’s ersatz aluminum welding rod. This material is kind of an aluminum solder. To weld with it you use an Oxy-acetylene torch and it kind of works.

A nice flood of ersatz aluminum filled the void.

You’ll need to clean the aluminum well and then using the torch to heat the work you sort of rub the rod into the metal. Take care not to overheat the work. It’s an easy process that you can stop anytime by removing the heat source.

I welded (if you can call it that) the original pivot holes closed then filled the worn spot inside the kickstand mount. It worked ok and I managed to get the filler pretty level inside the mount.

The original pivot holes stopped the stand at a 90-degree angle. This was fine and dandy when the stand had a notch to fall into. My new plan was to make the kickstand more like every other kickstand in the world instead of Harley style.

The relocated pivot hole allowed more stand arc.

I re-redrilled the holes and a position that allowed the stand to swing forward and over center the return spring. This set up is pretty normal even in later Buells. I ground the stand a bit thinner to make room for a steel washer in the hope of protecting the soft aluminum filler material.

It looks much worse than it is

To allow movement for the old stand design the hole in the kickstand was oval shaped. This made for quite a bit of lean when deployed. My new design didn’t need the oval hole so I drilled it out and fitted a steel bushing. Now things were snug.

Steel bushing to fill the wongo-wongo, pivoting angle.

With the relocated pivot holes the end of the kickstand hit the swing arm in the up position. I used a piece of Starboard (plastic used in boat building) to make a new stop for the stand.

New stops keep the kickstand from hitting the swing arm.

It all worked. The Buell stand is still in an odd, dirt-bike like location but it operates normally and the bike doesn’t fall over. So that’s a good thing.

No more rolling off the stand and hitting the ground for me.

More Gresh Buellishness!

Buell 1:  More Cowbell
Buell 2:  The Reckoning
Buell 3:  An Own Goal
Buell 4:  Striking Oil
Buell 5:  Carb Blues
Buell 6:  Oingo-Boingo


More gun stuff? You bet!


We need your support! Do what you can to help ExNotes stay in the black!


More Huber? Check out A Trip Into The Moment.


More Gresh and Berk? You bet! Check out A Cup O’ Joes!


Join our Facebook ExNotes page!


Help us keep the lights on:

Buell Fever Part 6: Oingo-Boingo

By Joe Gresh

I have two motorcycles with upside down forks. Both of these motorcycles have leaking fork seals. Coincidence? I think not. I have no love for USD forks and one of the reasons I wanted a Buell Cyclone was the conventional forks those bikes came with.

I don’t care for upside down forks. They seem to leak more than conventional forks.

Alas, I ended up with a Thunderstorm, which is mostly the same as a Cyclone except for the forks. Mine were leaking, which is not unexpected for a 30-year-old motorcycle.

I try to lay out the parts in the order they are removed. Until I kick the cardboard and the bits scatter. This is the fork cap-retainer-plastic spacer-metal washer top of the tube parts.

New fork seals were kind of hard to find. I tried contacting the OEM manufacturer, White Power (that name didn’t age well), but I got no response. Through the wonder of the internet, I found a company in England that had the seals.

Always tape over ridges so the seal doesn’t get cut or damaged when sliding it into the tube.
The seal installer in action. Sliding the fork tube presses in the fork bushing, a spacer and the seal in one motion.
After pressing the two halves are removed. Next is the seal retaining clip (which is all that holds the forks together).

The seals were reasonably priced at $14 per set, but the shipping was expensive. I bought three sets since the shipping was the same. Now I have enough Buell S2 fork seals for the rest of my life. On a side note: a week after the seals were delivered FedEx sent me a $20 invoice for “fees.” I haven’t paid the fee yet; I’m not sure, it may be a scam. The fees may be re-named tariffs.

Without this relief cut the seal installer would smash the seal lip.
Buell seal installer. PVC tube machined to fit seal lip then cut in half.

The Buell has a large front disc.  To remove the wheel, you have to remove the brake caliper. To remove the brake caliper, you have to remove the brake pads and then retract all six of the caliper pistons back inside their respective bores.

The old Performance Machine brake caliper pistons were pretty crusty, and I didn’t want to push all that mess across the bore seals into the caliper. Removing the brake disc from the wheel allowed enough wiggle room to get things apart.

The WP forks were super tight in the triple clamps. I used a wedge to expand the fork tube bores and still it was a struggle to slide the forks out. Once out, disassembly was fairly straightforward (although oily) experience.

These triple clamps really grip the fork tubes. You almost don’t need pinch bolts.

You’ll need to make a seal installer to press the new seals into the forks. I made mine from PVC tubing in the hope of avoiding scratching the sliders. The new seals fit well, and the hardest part was compressing the fork spring while holding the damper rod up with a bent wire and using a third hand fitting the damper rod spring keepers. My Buell shop manual describes this process as a two-man job. And it really is.

It took a couple days to figure out how to one-man a two-man job. I ended up employing an oxy-acetylene welding cart as a prop to hold the fork.  The T-handle on the cart was in a convenient location and height to loop the damper-rod holding wire over and I still had two hands free to compress the spring and slip in the keepers.

After the seals are in place the fork spring retainer goes on. Note the wire holding the damper rod and the welding cart holding the fork. This setup leaves both hands free to compress the fork spring and fit the retainers.
More Buell specialty tools. Wire to hold damper rod, wedges to spread triple clamps.

The Buell manual called for 7-1/2 weight fork oil. I should have ordered fork oil online, but I didn’t, so I called around and the local Honda shop had some. It’s a 20-mile drive to the Honda shop. The Honda fork oil bottles are confusingly labeled. What looks like 7 weight ended up being 5 weight, but I wanted to get the front end put back together.  So I poured a pint of 5 weight into each fork leg. Stay tuned for a follow up report if I can feel any difference between 5 and 7 weight fork oil.

While the forks were off, I re-greased the steering head bearings. They still had a little grease remaining but thinly applied. I walked out the old stuff and smooshed in fresh grease. That left just the front caliper to clean up.

Re -greased steering head bearings. I don’t like the design of the cup under the bottom bearing. It seems like it would hold water. I might bend a drain channel into the low side.

The caliper came apart easily, but the pistons did not. I used to have a big pair of reverse pliers (the jaws expand rather than close when the handles are squeezed).  I would use these pliers to grab inside the hollow pistons and pull them out of the caliper. I would, that is, if I could find them.  I spent a few hours looking for the pliers and finally gave up.

A snap ring Oliver was pressed into service and I managed to get all six pistons out. Performance Machine uses chromed steel pistons and the bit of piston that was exposed to the elements had corroded. Finding new pistons would be an impossible task and a new caliper would cost $600, so I polished the corroded pistons on the buffing wheel.

Except for the chromed pistons, the PM caliper is a nice looking unit. Note the piston diameter change to apply evenly distributed wear.
Performance Machine caliper back together and waiting on brake pads

I’ve had good luck piston polishing.  Yes, they re-corrode, but the section of piston covered with brake fluid doesn’t corrode. I look at it as an ongoing maintenance item rather than a bad part. You’ll have to wait for new brake pads to arrive to see if the caliper leaks in Buell Fever Part 7.


Join our Facebook ExNotes page!


More Joe Gresh?   It’s right here:


Help us keep the lights on:

Buell Fever Part 5: Carburetor Blues

By Joe Gresh

After years and years of tinkering with engines, my whole life really, I’ve come to the conclusion that I am not very good at fixing carburetors. The Buell’s multiple personality disorder carburetor has really illuminated my carb inadequacies.

Considering it sat for who knows how long the Buell carburetor was fairly clean inside. I blasted it out with spray carb cleaner and installed a few new parts just because it was apart. The bike started up easy and seemed to run ok. And then the oil tank blew all over the place. I got sidetracked cleaning up oil and it was a few days before I got around to starting the Buell again.

The aftermarket needles have slightly longer springs. I’m not sure this matters.

After a few moments of running, the bike started getting richer and richer. Black smoke poured out the muffler along with popping and farting sounds. I shut the engine off and fuel began leaking out the carburetor intake mouth. This was unfortunate because I installed a new needle and float earlier.

Off the carb came for the second time. I re-checked the float level, installed another new needle and bench tested the carb. No leaks. Plugging the carb back into the motorcycle and reconnecting all the bits, I turned on the fuel valve from the remote tank and gas poured out the carb. It was like there was no needle at all.

The seat didn’t look too bad to me but I could not get the thing to stop leaking.

Third time: I pulled the carb and put the old float and needle back into the carb, maybe the aftermarket stuff is junk, right? I re-installed the carb. No leaks. Good. Started the engine. Bike ran rich and the longer it ran the richer it got. Lots of backfiring and flames. Fuel started running out the carb.

At this point I gave up and ordered a new carb from Amazon. It was on sale for $38. I pulled the carb again and it sat on the bench for two days. You have to understand, there is no simpler carb than the one on this Buell. Despite appearances my pride can be hurt. If I can’t fix the Buell carb, then I can’t fix any carb. I decided to take one last shot.

For some reason, the float bowl o-ring enlarged from my ham-fisted ministrations. Stuffing the ring into the bowl groove became a Sisyphean task: push one side in and the other side popped out. I didn’t want to wait for an internet gasket, so I drove down to our friendly neighborhood Harley shop, Liberty Cycles on Highway 70.

Liberty is a real old school Harley shop. Independent, scruffy, populated by guys that might beat you up for mistaking the year Panheads were first manufactured. 99% of the bikes in the shop were big twins. Sportster riders are suspect. I asked Father Time, a grizzled, white-bearded mechanic for a bowl of-ring.

Father Time dug around in various drawers and came up with the o-ring, handed it to me and said “Just take it.”   Maybe these guys aren’t so scary.

Harley needle-seat burnishing tool. A center punch on a Ryobi cordless.

On the bench, the needle seat looked okay to me but I wanted a more polished look. Using a center punch on a drill motor I burnished the seat to make it smoother. Back go all the pieces after checking float level. No leaks. Start the bike and it runs good for a few moments then starts loading up on fuel again. It’s maddening but at least fuel is not leaking out of the carb. Progress.

After a steel-to-brass burnishing session the seat looked smoother. Most importantly the carb stopped flooding.

After a steel-to-brass burnishing session the seat looked smoother. Most importantly the carb stopped flooding.

The enrichener plunger was dingy but not terribly dingy. It was enough to cause problems.
After cleaning the plunger sealed off the enrichener circuit, greatly reducing black smoke.

Fourth time pulling the carb. I removed the enrichment plunger; it looked a little dingy. Maybe the plunger is not seating? I used 800-grit wet-or-dry sandpaper to remove any deposits and cleaned the enrichener bore. Reassembled again and installed on the Buell. Bike starts up and runs well for a few minutes. Install the air cleaner, fire up the bike and after a minute or so the bike starts running rich, black smoke pours out the muffler.

Arrow points to the float bowl vent. This is the only vent as there is no bowl overflow tube.

Fifth time pulling the carb, thank goodness it’s easy to do on the Buell. I examine everything. My repair manual shows a float bowl overflow tube in the bowl. My float bowl has no overflow hose. My bowl has no tube. This is why fuel runs out of the carb throat when it floods. A normal carb would piss the fuel into the ground. Which got me thinking: How does the float chamber vent to atmospheric pressure?

The air cleaner back plate blocked the bowl vent. I didn’t grasp this until much later in the process.

Facing the intake side of the carb there is a hole at the 10-o’clock position. This is how the float chamber vents and this is the hole that is covered up when the air cleaner is installed. It sounds easy and logical reading this now, but it took hours of confused staring at the Buell to figure out what was happening.

Drilling a vent hole in the air cleaner back plate allows for atmospheric pressure in the float bowl.

I drilled a hole in the air cleaner where the vent exits the carb. Reassembled the entire mess yet again and started the bike. It ran better but was missing on one cylinder. With a single carb if you have one cylinder missing it pretty much has to be ignition, so I removed the spark plugs. They were covered in fluffy black soot. Chunks of soot nearly bridged the electrode gap on the front cylinder sparkplug.

A quick session with a wire wheel and douching the plugs with carb cleaner had them looking like new. I reinstalled the plugs and the bike started up easily, ran smooth, both cylinders ticking off nicely. It idled well, as well as any Harley idles. Maybe I have finally fixed the thing.

To recap, the carb had three issues:

      1. The first was the needle seat. It must have had some microscopic flaws that prevented the rubber needle tip from sealing. The leaking needle caused a rich condition.
      2. The next issue was the enrichener plunger. It was not seating completely. This allowed extra fuel into the intake, causing a rich condition.
      3. The final issue, extra confusing because sometimes I had the air cleaner installed and sometimes I had it removed, was the blocked float bowl vent. Without a vent to atmospheric pressure the float chamber is under a vacuum. I’m not sure but I think the bike runs rich as extra fuel is sucked in. The vent on the fuel tank becomes the atmospheric pressure inlet.

The Buell seems to be running fine now but after pulling the carb so many times, I’m a bit gun shy. I’ll call it fixed with reservations.

I haven’t received the Amazon carb yet but if the thing has a bowl overflow and the parts interchange I’ll be swapping the bowl. The Buell leans left on the kickstand, the carb towards the (downhill) intake manifold. Without a float bowl overflow, a sticking needle could run gas into the engine. Not good.

A smarter man could have figured out the Buell carb in less steps. He would have analyzed the symptoms and made a logical plan to address them. I am not that man. I threw everything at that damn carburetor until something stuck. I had to grind through obvious processes until the correct answers were all the answers that remained.


In the trades we call this Buell Hand. It comes from adjusting the idle mixture screw between the hot exhaust headers.


Join our Facebook ExNotes page!


More Joe Gresh?   It’s right here:


Help us keep the lights on:

Buell Fever Part 4: I’ve Struck Oil!

By Joe Gresh

Part of the reason I bought a Buell was because my life has become too predictable. Except for the Husqvarna, you stand a good chance of getting where you’re going on my old bikes. And the Buell is not disappointing. Lots of fun stuff is happening as I work on getting the bike back on the road.

It’s such a joy to tinker on a single-carb motorcycle. There are no racks and synchronizing to deal with, you only have to do a thing once instead of four times, but watch out for those aftermarket parts. The kit I bought was okay, but the emulsion tube was not drilled properly. And then I managed to pinch the bowl o-ring.  It was cheaper to buy another kit than a single bowl gasket, so I did that. Unfortunately, that kit’s bowl o-ring was too small. No matter how I stretched it, it kept popping out of the bowl groove. I ended up reinstalling the pinched o-ring. It was a futile effort to keep my mechanical standards up.

It wouldn’t be a Harley without baling wire. The choke tube is plastic and was fragile after all these years. The choke knob was falling out of its slot. I broke the tube finger tightening the thing. Wire to the rescue!
The accelerator pump plumbing was clogged. I fished a small bit of wire through the passage to clear it.
The carb kit emulsion tube (right side) was not drilled correctly. I try to use all the old stuff if possible. So this was no great loss.
This brass nozzle sprays fuel from the accelerator pump. Supposedly the tube is removable for cleaning but it seems well stuck and I started to chew it up a bit so I stopped.

I’m a big fan of lithium batteries, so I bought a Vevor brand close in size to the original lead-acid battery. The Vevor was a bit small and the factory battery location is not far from the rear cylinder exhaust header. To help with the heat I wrapped the sides and front with foam, then wrapped gorilla tape around the mess to hold the foam insulation.

It looks a little rough but an insulated battery is a happy battery.

A neat feature on the Vevor is the dual posts (four total). There are positive and negative posts on both sides of the battery; if your cables are in the wrong place, just flip the battery around. I added a spacer on the hook side of the battery strap to keep it tight and a small tube spacer in the bolt side (less threading to do on the hold down bolt), which makes installation 12 seconds faster. When you ride a Buell every second counts. The battery seems secure; hopefully, it will stay put.  With the Vevor battery (supposedly 400 cranking amps) in place and the carb back on, I needed to hear the Buell run. The oil tank level was between the high and low marks. The oil looked clean, like it had just been changed.

I removed the spark plugs, put the coke machine key in the ignition, and spun the engine over to clear any excess oil from my previous cylinder lubing. With the sparkplugs back in the cylinder heads I pulled the choke, hit the right turn indicator button, and nothing happened.

Harley handlebar switches are so weird. Pushing the starter button on the inside of the blinker switch worked better, and the Buell fired up in a couple revolutions. The engine popped and farted a few times. Lots of smoke came out the tail pipe but all things considered, it was running good.  Then came a loud pop followed by a geyser of oil spewing from the oil tank. The oil broadcast in a 15-foot fan covering the general area with great dollops of thick oil. The spots were viscous, so they stood proud of my clean concrete floor. Except for the spot I was standing. I received a blast of spraying oil that covered my sweater and left a clean, Joe-shaped silhouette on the concrete floor.

My nice, clean floor got its first baptism-by-Harley.
My sweater took the brunt of the oil explosion.

What a mess. How long the Buell had been sitting was unknown, but the oil tank must have slowly drained into the crankcase.  Some helpful person topped off the tank with fresh oil and I squirted the stuff all over the place. I drained the tank.  There must have been a gallon in there if you include the oil on the ground.  Once the oil level was correct, I fired the Buell and it settled down to the hit and miss syncopation Harley likes to call idle.

Back to other issues. I didn’t like the way the muffler was held into the bike. The setup relied on the front clamp combined with two rear brackets that bolted up in a parallelogram-like deal. The only thing that held the muffler in place was fastener tension.  To achieve a more secure mounting I made a thicker bracket out of mild steel and welded it to the Muffler. Now in order for the muffler to slide back my crappy weld would have to break. Which it just might.

Since I don’t have the equipment to weld stainless steel I made a mild steel bracket for the muffler.
The bracket welded to the muffler. Now the muffler can’t work loose and rub the tire.

The rear brake on the Buell was stuck. There were several issues contributing to this problem. The first was the brake pedal. It was bent where the master cylinder pushrod attached in a way that made the rod move dramatically sideways when the brake was applied. I used Harley tool 0-U812 (a big crescent wrench) to adjust the brake pedal. Now the push rod moved in a straight line concentric with the master cylinder.

This replacement rear brake assembly was close but off in meaningful ways. The seller refunded my money and didn’t want me to ship it back.
This part of the brake left was bent causing the master cylinder pushrod to go off course.
It’s still a little bent but the pushrod articulates correctly now.

The clone master/slave kit I bought on Amazon that was supposed to fit was just off enough to be completely useless, so I decided to rebuild the original stuff.

All the original brake parts cleaned up well. So far no leaks.

The piston inside the master cylinder was stuck but a few raps with a hammer had the piston moving and I dismantled the master/slave. I was having trouble finding seals for the Brembo components, so I cleaned everything and reassembled the brakes.

Bleeding the brakes wasn’t going well. I could get pressure at the banjo bolt on the master cylinder but nothing at the slave. Shooting brake cleaner into the brake line did nothing. The hose was clogged.  Out came the battery to access a hose clamp bolt, and I removed the brake line. Removing the brake light switch gave me a mid-point spot to shoot cleaner. The metal brake line was clear, the clog was in the rubber line.  I soaked the line in an ultrasonic parts cleaner then worked a 0.30 flux core welding wire through the rubber line. It took a bit of finagling but the wire made it through. Then it was just a matter of soaking with brake cleaner and shuttling the 0.30 wire back and forth until the line was clear. Blowing the lines with compressed air got rid of any stragglers inside the hose.  A quick reassembly and I had pressure to the slave. Bleeding the system was a straightforward proposition. The rear brake works.

Next on the list is fixing the kickstand and broken clutch lever.


Join our Facebook ExNotes page!


More Joe Gresh?   It’s right here:


Help us keep the lights on: