Lee .357 Magnum Dies, Cast vs Jacketed Bullets, and Crimping

This blog is longer than I intended it to be.  I thought I would just do a quick bit about a new set of Lee reloading dies I recently purchased, but as I got into it, I learned more about my  Colt Python, crimping with a bullet seating die versus a dedicated factory crimp die, and well, the thing just grew.  Mea culpa; you can leave early if you want to.  Because this is a longer-than usual post, I thought I’d provide the bottom line up front:   The Lee factory crimp die is a good thing.  It works.  It holds bullets in place better, it improves chambering, and it improves accuracy.  

Now, the rest of the story.


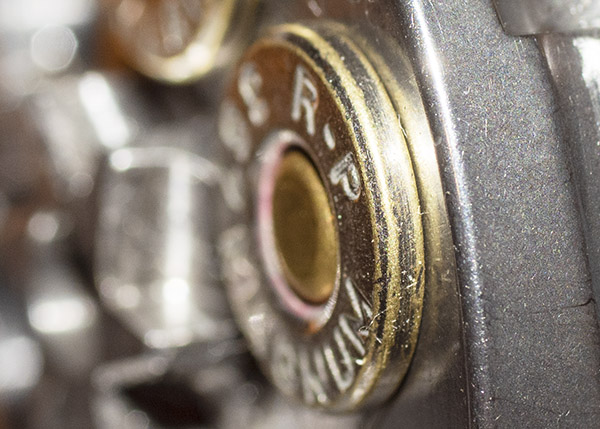
For the last umpteen years when loading .38 Special or .357 Magnum ammo I have been using a kluged-up three die set (a carbide resizer/decapper from Dillon, an expander die from Lee, and a bullet seating and roll crimping die from Lee).   You  can use the same dies for both .38 Special and .357 Magnum; the only difference between the two cartridges is the length of the cartridge case.  They use the same diameter bullets (even though it’s called a .38 Special, the bullet diameter of a .38 is actually .357 to .358 inches, just like the .357 Magnum).
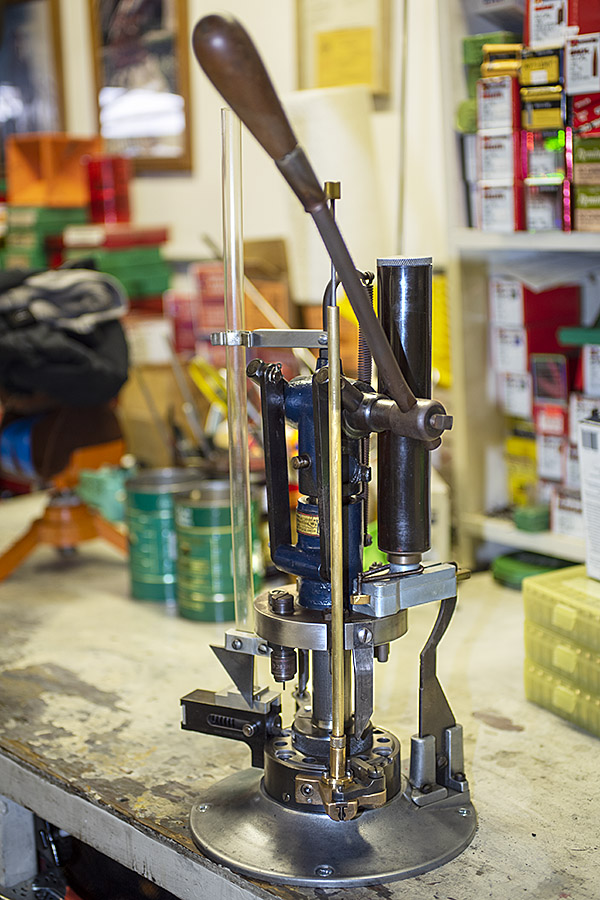
The two cartridges on the left are .357 Magnum; the one on the right is a .38 Special. The .357 cartridge case is longer so it cannot be inadvertently inserted into a handgun chambered for .38 Special. Note the slightly longer overall cartridge length on the .357 Magnum cartridge on the left (with the cast bullet) compared to the .357 Magnum cartridge in the middle (with the jacketed bullet).
A mixed set of dies I’ve been using for years for reloading .357 Magnum and .38 Special. Note the Lee shellholder marked “1.”  .38 Special used to be the most commonly reloaded cartridge in America.  Today it’s 9mm.  .38 Special was the first cartridge I ever reloaded.  The die on the right is the bullet seating and crimping die.

Reloading Gear

I’ve had a few .38/.357 die sets over the years, selling them when convenient as I bought or inherited other equipment. As featured here on the ExNotes blog, I have a 50-year-old Star reloader I use for .38 Special wadcutter ammo (I’ll give you a link for the Star story at the end of this blog). The Star is set up to meter 2.7 grains of Bullseye propellant (that’s a 148-grain wadcutter target load) and it works fabulously well, so it’s a dedicated setup. For all other .38 Special and for .357 Magnum reloading, I load with my RCBS Rockchucker single-stage press. I’ve been using it for 50 years.

My Star progressive reloader. A good buddy gave this to me in rundown, funky, and long-neglected condition. I cleaned it, lubed it, and put in back in service. The Star does a fantastic job on .38 Special wadcutter ammo.
Old Faithful, my RCBS Rockchucker single stage press. I load non-wadcutter .38 Special ammo and all .357 Magnum ammo on this press.

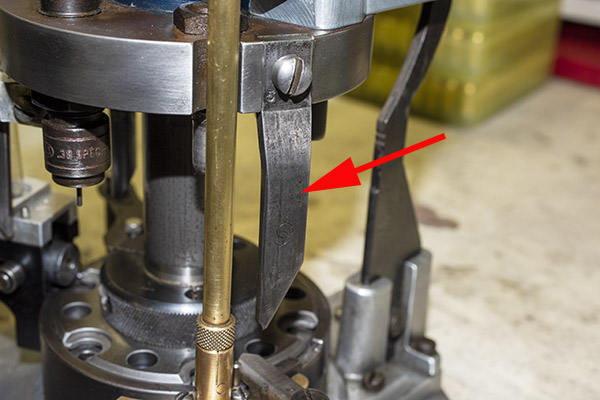
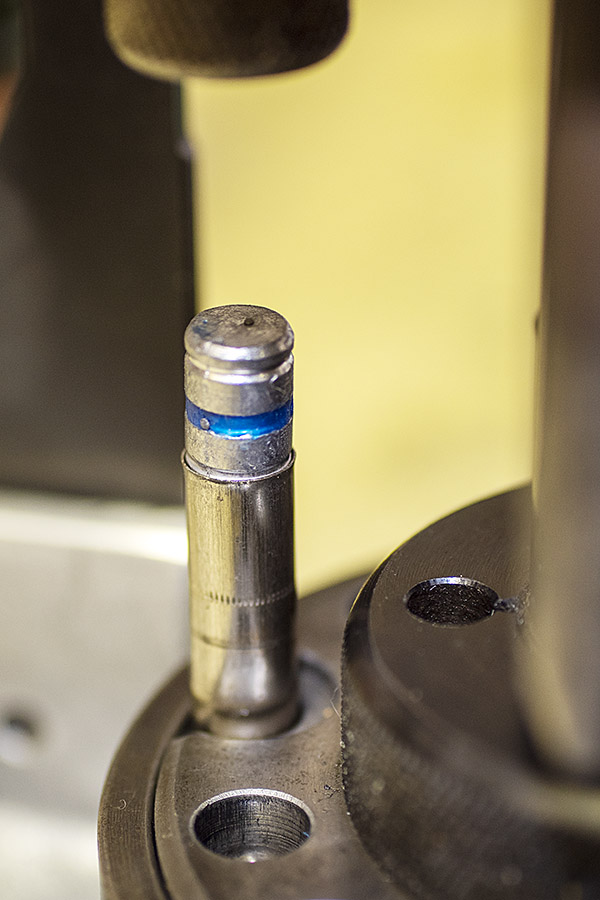
Bullet Seating and Crimping

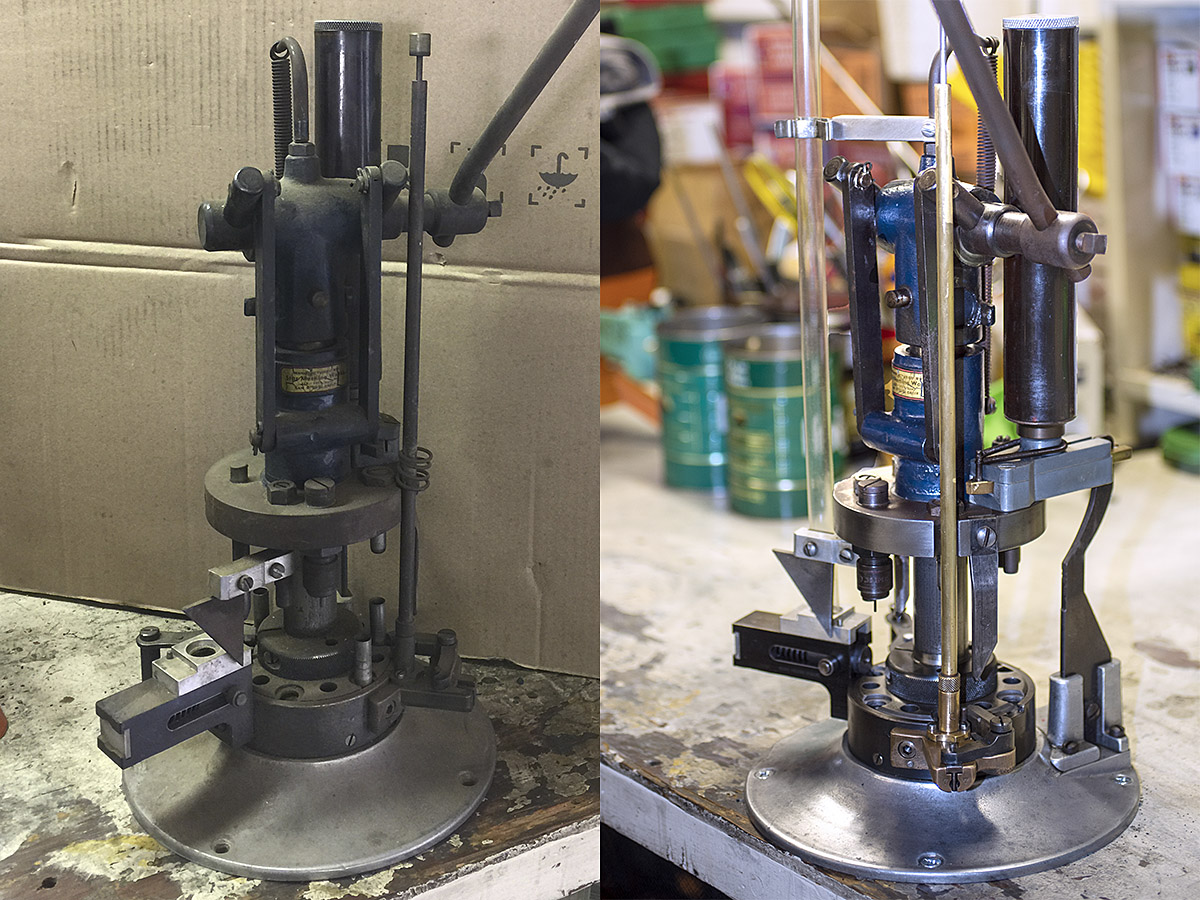
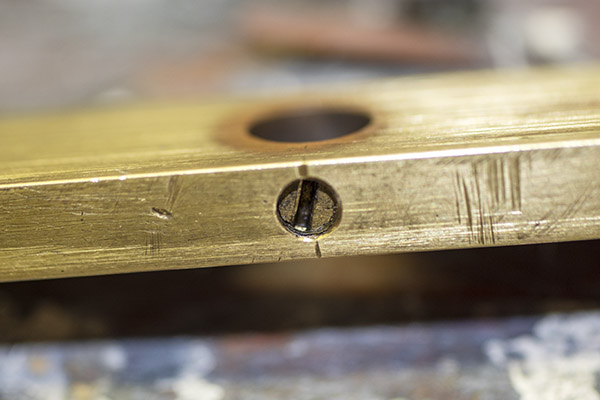
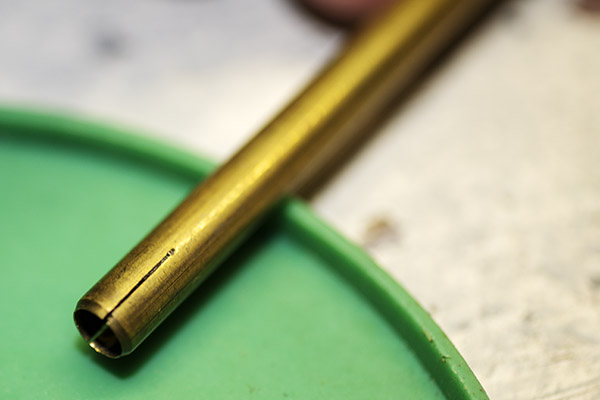
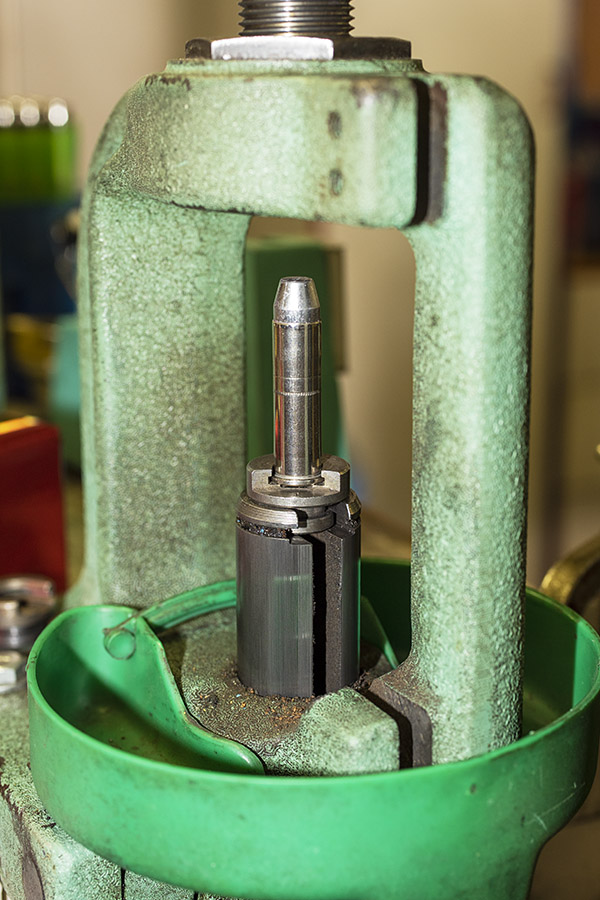
For many years, I seated and crimped my bullets with a simple seating and crimping die.  It’s what you see in the illustration below.

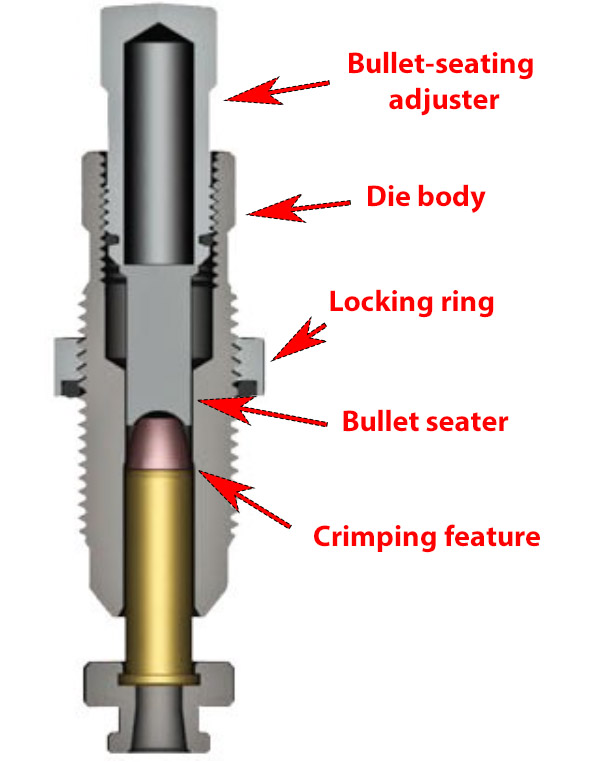
I use this die in two steps.  First, I screw the bullet seating adjuster deep into the die and seat the bullet to the correct cartridge overall length without crimping the bullet in place.  After seating all the bullets, I then back off on the bullet seating adjuster so that it no longer contacts the bullet, and then I screw the die body deeper into the press.  The die body has a roll crimping feature that then roll forms a crimp around the case mouth to lock the bullet to the cartridge case.

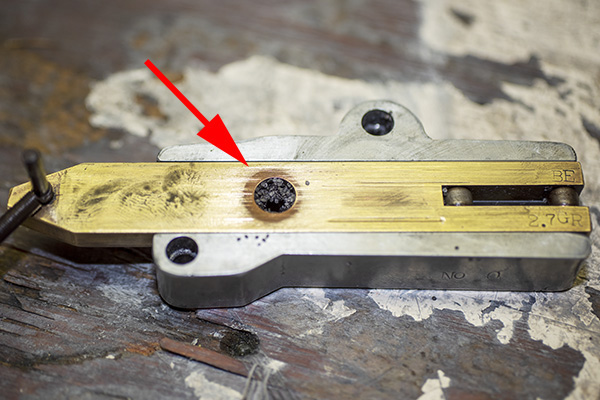
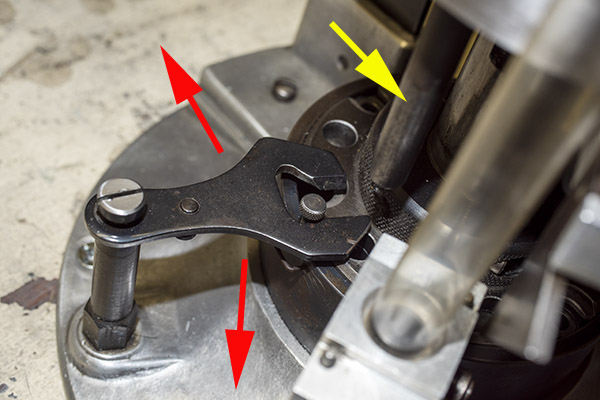
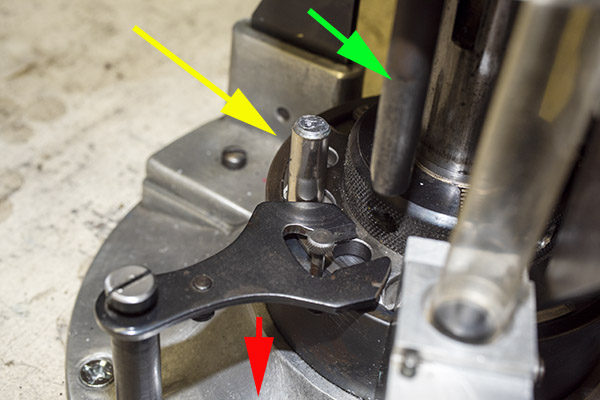
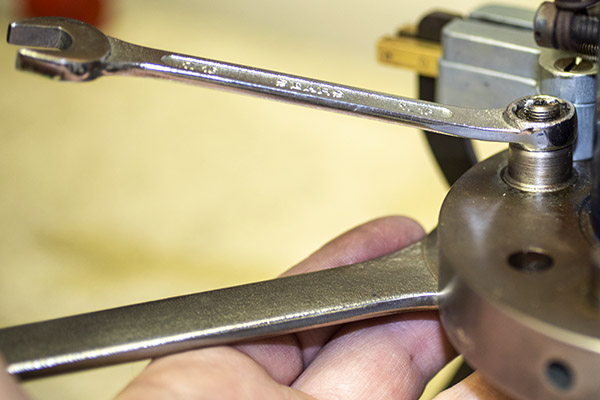
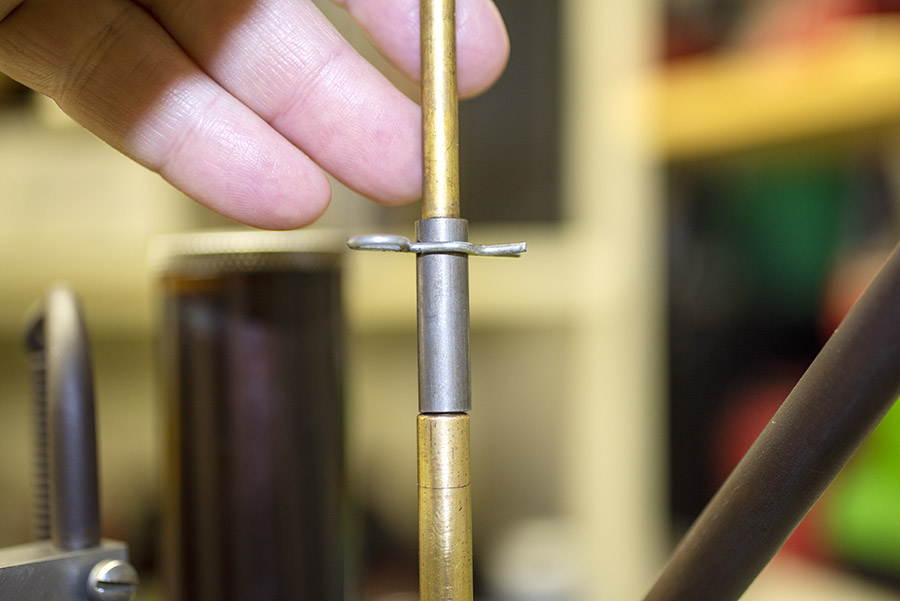
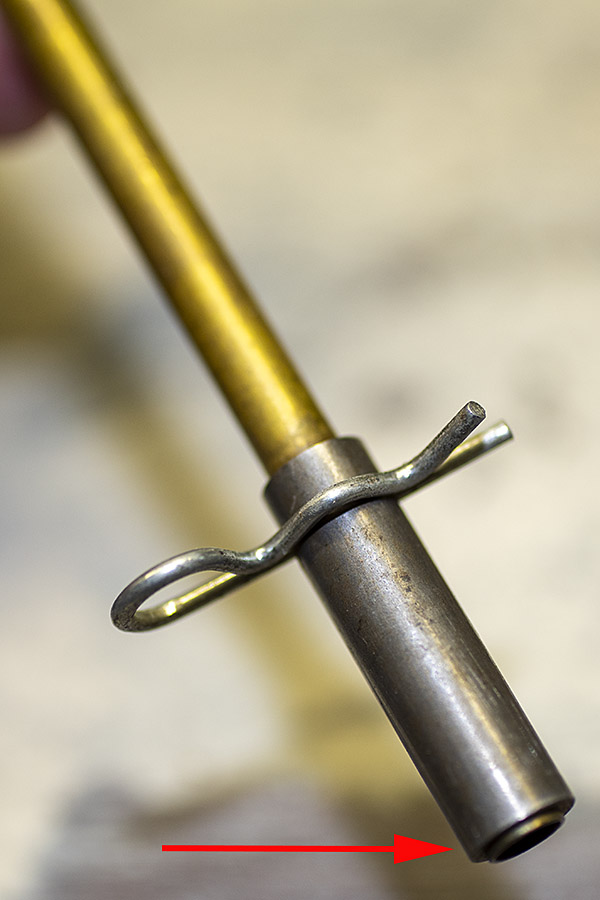
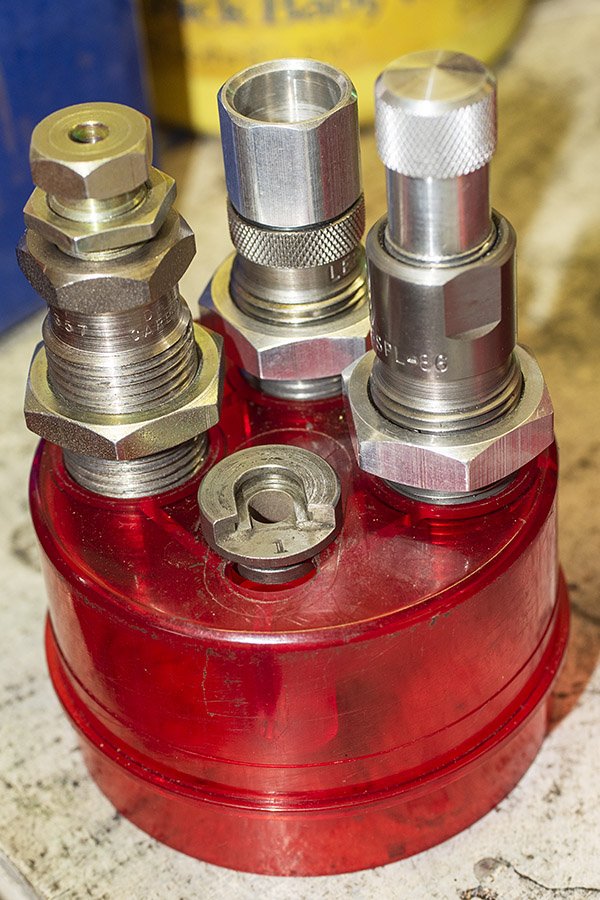
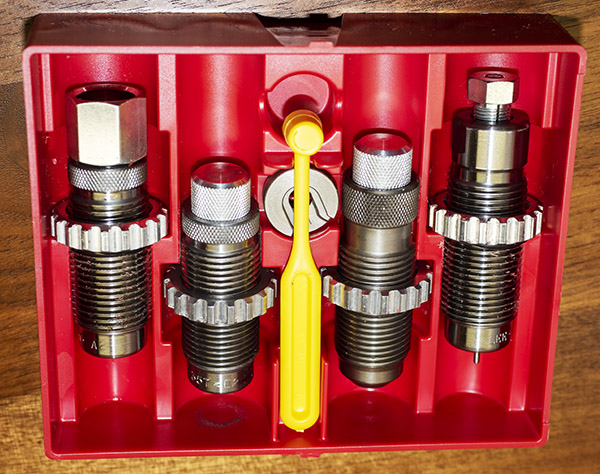
Lee has an alternative approach for bullet crimping they call the factory crimp die.  As a first step, you seat the bullet to the desired depth in the case using the die shown above.  After seating all the bullets, you then remove the bullet seating and crimping die from the press and then use the fourth die (the factory crimp die).  Here’s what the factory crimp die looks like:

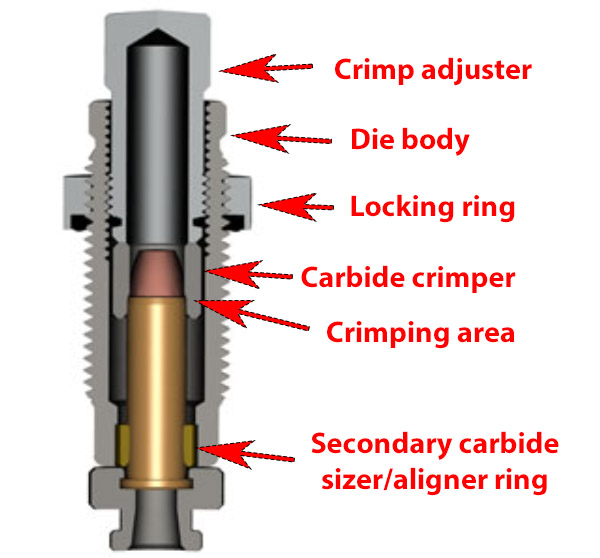
The fourth die, the factory crimp die, does not seat the bullet.  Its only function is to apply the crimp, and it does this very well.   The idea is that the die is screwed all the way into the press such that it contacts the shellhoder, and then the amount of crimp is set up with the crimp adjuster, which screws into the die body.  This die applies a roll crimp on a revolver cartridge (the same kind of crimp as the bullet seating and crimping die described above), but it does so in a much better-controlled manner.   The factory crimp die also has a secondary carbide sizer/aligning ring at its lower end, which aligns the cartridge as it enters the case, and holds the cartridge outside diameter to specification values as the cartridge enters and then exits the die.  It works fabulously well, and Lee states that this die makes it impossible to buckle a case.

I had .357 Magnum ammo I had previously loaded using the bullet seating and crimping die only (not the Lee factory crimp die), and it chambered with no problem in my Ruger Blackhawk.  The Colt Python has a tighter chamber, though, and several of these older reloads would not chamber in the Python.  A quick trip through the Lee factory crimp die cleaned up the outside diameters and the rounds chambered easily.

Before and after shots of older .357 loads I reloaded using the bullet seating and crimping die. Some wouldn’t chamber in the tighter Python. The Lee factory crimp die fixed that.

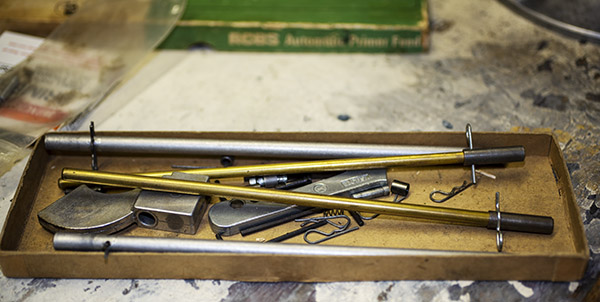
Lee’s Deluxe 4-Die Set

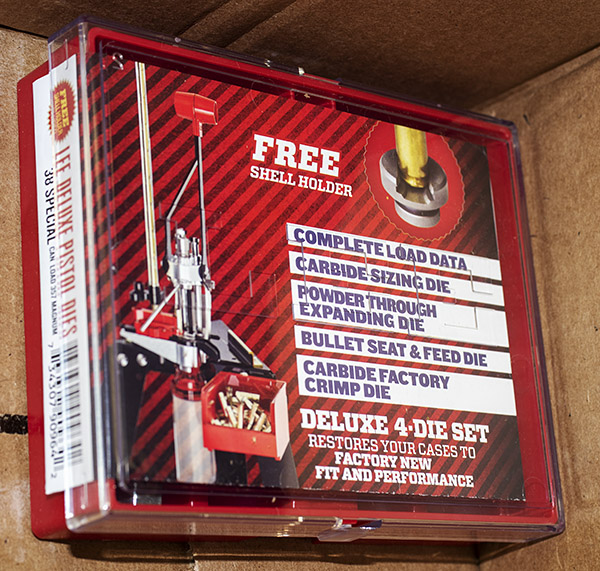
I recently ordered a new Ruger Blackhawk, and I’ve written many times about my Colt Python.  With my new .357 Magnum Blackhawk in its 10-day cooling off period, I thought I would get a new set of dies.  I like Lee (they give you a shellholder, they are inexpensive, and they do a good job). I had bent the decapping pin on the Dillon sizing die in my mixed set of dies shown above (a primer wouldn’t come out and I forced it). I was able to bend the pin straight, but I figured a man of my stature ought to have a set of grownup new dies. Then I got an email from MidwayUSA showing the Lee 4-die set on sale for $53 and they had free shipping on orders over $49.  The Lee Deluxe set includes the factory crimp die.  All the planets were in alignment (enter order, buy now…you know the drill).  The dies were at my front door a few days later.

The new Lee 4-die Deluxe Set was well packaged by Midway.
The Lee dies in my new die set.
The Lee Deluxe 4-die set includes a carbidge sizing die and decapper (the die on the far right), a cartridge expander and case mouth flaring die (on the far left), a bullet seating and roll crimping die (second from the right), and the Lee factory crimp die (second from the left). Lee also provides a shell holder and power dispensing spoon. I’ve never used the powder dispensing spoon; I use an RCBS powder dispenser.

The new dies looked great, and I was eager to put them to work.

Bullet Pull and Cylinder Rotation

On revolvers with significant recoil, bullets can back out of the cartridge case when other rounds in the cylinder are fired.  This can allow bullets on unfired cartridges to protrude beyond the cylinder face and interfere with cylinder rotation.  We prevent this by controlling the reloaded cartridges’ overall length and by crimping.  In firing my new Colt Python with ammo I had loaded for an earlier Ruger Blackhawk, even though the bullets were crimped I experienced bullet pull beyond the front of the cylinder.  When this occurred, the cylinder would not rotate.  These same rounds had worked in a Ruger Blackhawk.

In analyzing the cylinder rotation issue on my new Python, I found several things:

      • The bullets were not seated deep enough (the cartridge overall length exceeded the maximum spec of 1.590 inches), even though the bullets were crimped in their crimping groove.
      • The crimp wasn’t strong enough to hold the bullets in place.  Under recoil from other cartridges, the bullets were backing out.
      • The Python cylinder is slightly shorter than the Ruger Blackhawk cylinder.  I probably had the same bullet pull occurring on the Blackhawk, but the Blackhawk’s longer cylinder masked it.  They might have been backing out on the Ruger and I didn’t know it.

Cartridge Overall Length

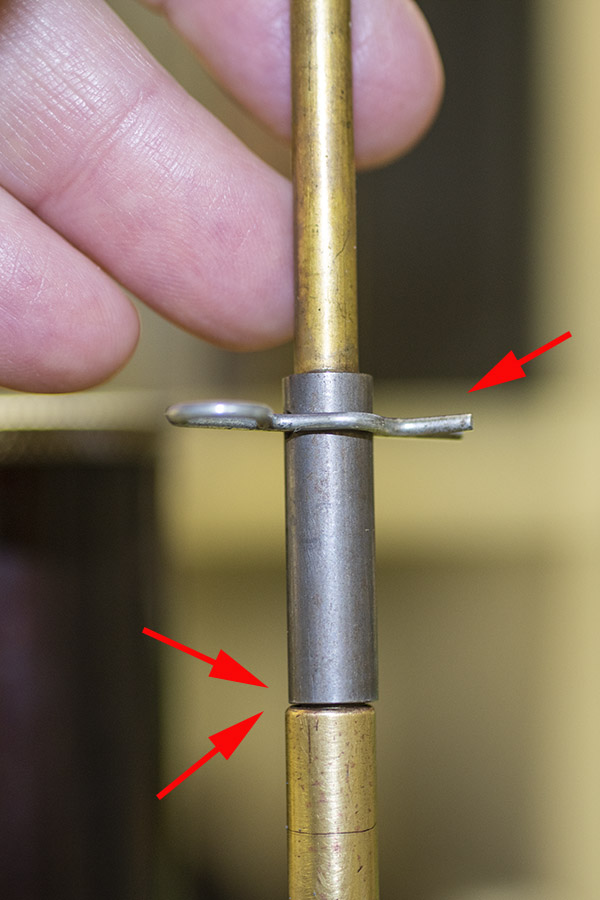
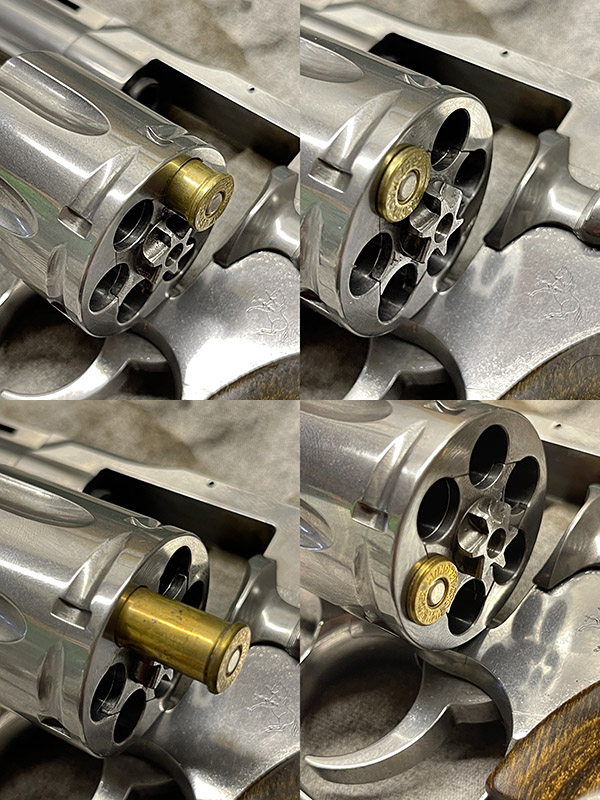
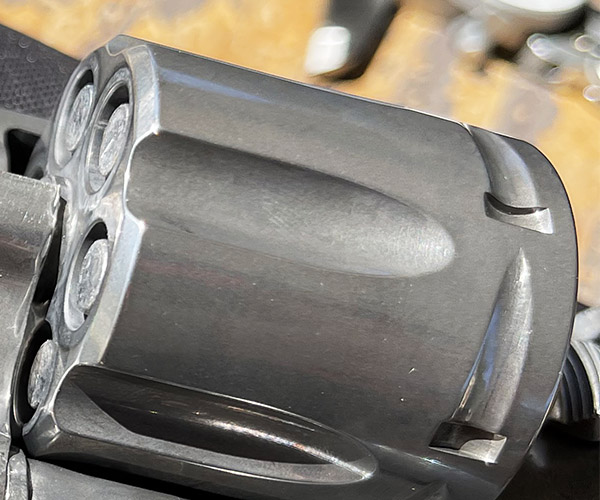
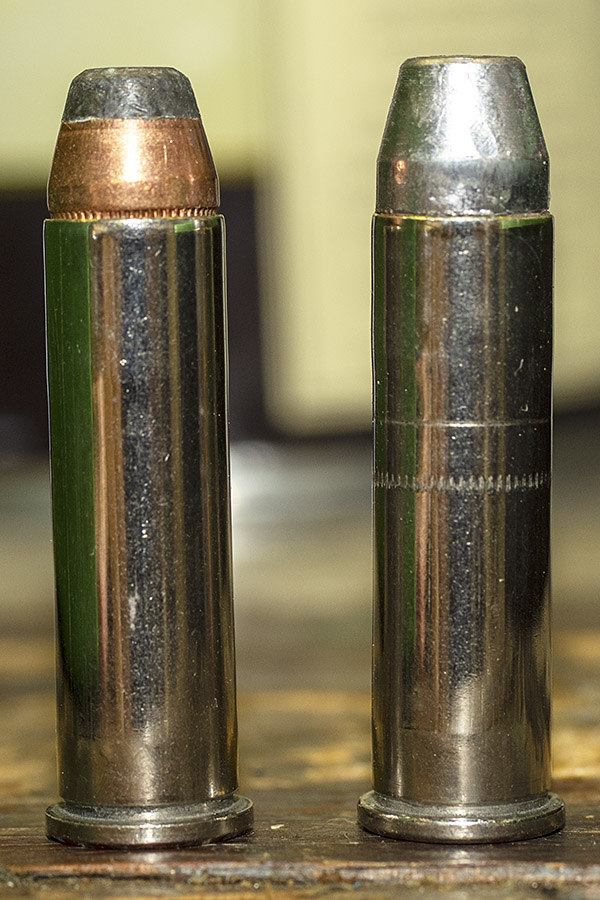
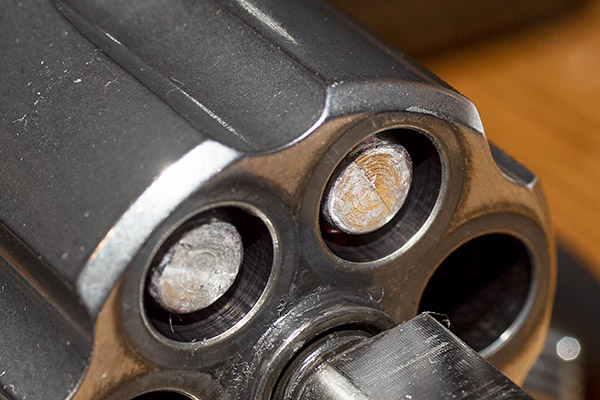
Let’s dive into the numbers.  The reloading manuals show the .357 Magnum maximum cartridge overall length (COAL) to be 1.590 inches.  With my cast bullets crimped in their crimping groove, the overall length was running from 1.607 to 1.615 inches.  That put them about even with the front of the Python cylinder.  If any bullet pull occurred under recoil, the front of the bullet would hit the rear of the forcing cone and the cylinder wouldn’t rotate.  That’s what I experienced with my Python.

The Ruger New Model .357 Blackhawk has a longer cylinder than the Python.  The Ruger cylinder is 1.640 inches long.  The Internet says the Python cylinder length is 1.552 inches; mine measures 1.553 (which is close enough).   Right away, the astute ExNotes blog reader will recognize that the Colt’s cylinder (at 1.552 inches) appears to be shorter than the specification .357 Magnum cartridge maximum overall length (1.590 inches), but it is not.  When loaded in the cylinder the cartridge is held rearward by its rim, which sits flush against the back end of the cylinder.

The Python, like most revolvers, headspaces on the cartridge rim. The cartridge rim is 0.060 inches thick.

The .357 Magnum cartridge rim backs the cartridge up 0.060 inches (the rim thickness), which would put the leading edge of the bullet in a cartridge loaded to an overall length of 1.590 inches about 0.023 inches inside the front edge of the cylinder (if I’ve done the math correctly).  And I think I have, because when you look at cartridges in the Python cylinder, they are pretty close to the edge of those big .357 cylinder holes.  0.023 inches.  Twenty-three thousandths of an inch.  That’s not much to play with.

.357 Magnum cartridges loaded in the Python cylinder. At the cartridge’s specified max overall length of 1.590 inches, the front of the bullet is only 0.023 inches away from the forward cylinder face.

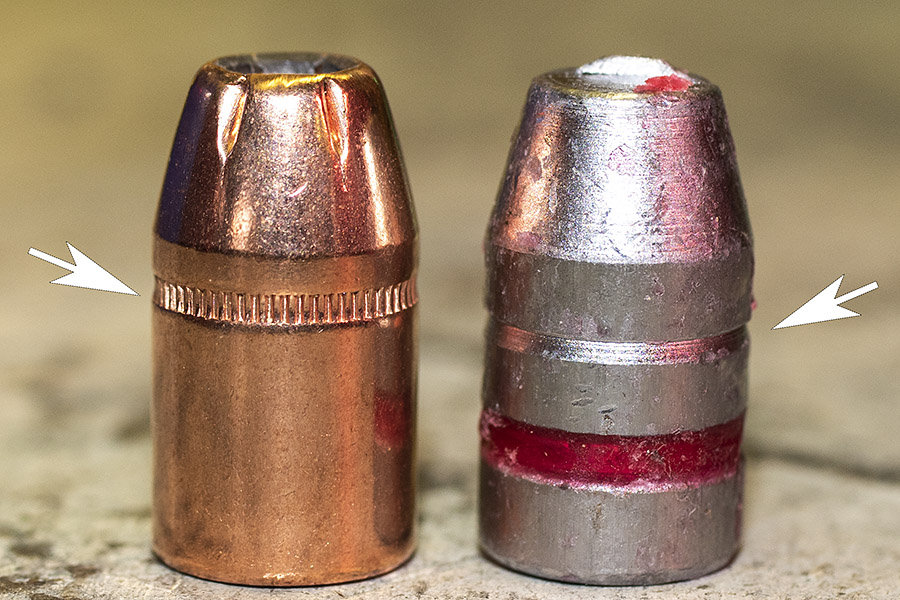
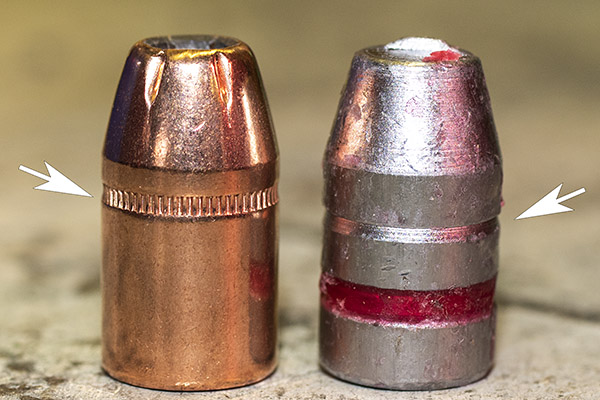
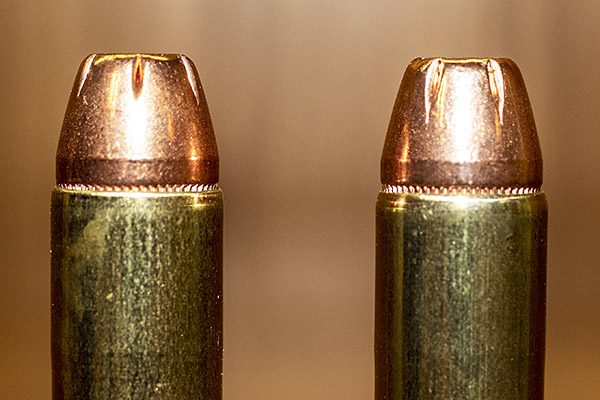
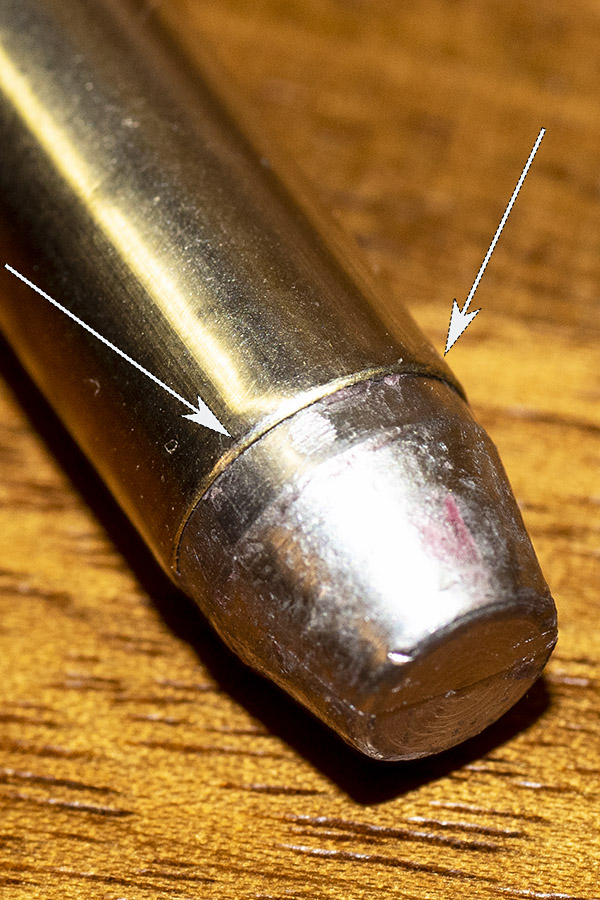
Bullet Design and Crimp Location

I examined the bullets I was using.  I had crimped my cast bullets in the crimping groove, and I could see that the  crimping groove put the bullet face very close to the forward end of the Python’s cylinder.  I couldn’t seat the cast bullets any deeper and still crimp in their crimping groove. Hornady’s jacketed 158-grain bullets are no problem; their crimping groove is a lot higher on the bullet.

A 158-grain Hornady jacketed hollow point bullet on the left, and a cast 158-grain bullet on the right. Note how much higher the crimping groove is on the jacketed bullet. This lowers the bullet in the cartridge case when it is crimped, making the cartridge shorter.
Two .357 Magnum cartridges with crimped bullets. The cast bullet cartridge on the right has the bullet seated as low as it can go while still allowing a crimp. You can see that the cast bullet cartridge is longer than the cartridge with the jacketed bullet.

Test Objectives

I wanted to test bullets seated and crimped using both approaches (i.e., the bullet seating and crimping die, versus seating with the bullet seating die and crimping separately with the Lee factory crimp die).  My testing would evaluate the following:

      • Bullet movement under recoil.
      • Accuracy.
      • Ease of chambering.
      • The ability to get a good crimp in locations other than the crimping groove.

That last one is important, because as I learned with my Python, crimping some cast bullet configurations in the crimping groove makes the cartridge too long.

Test Ammo

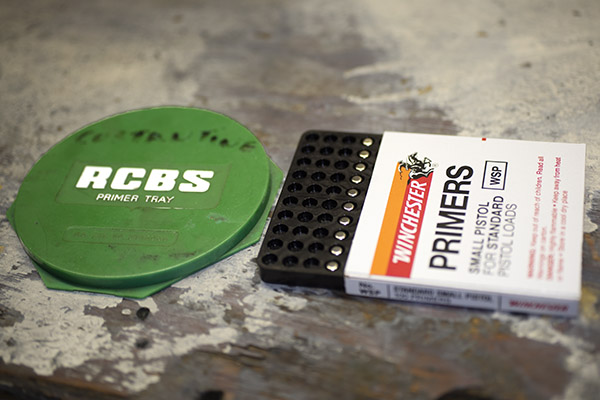
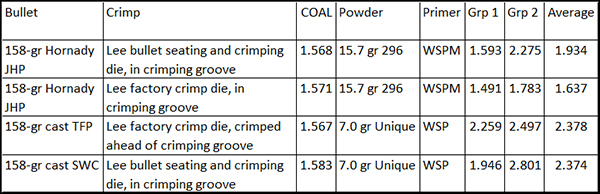
I loaded three test lots.  The first was with 15.7 grains of Winchester 296 powder, Winchester small pistol magnum primers, and Hornady’s 158-grain jacketed hollow point bullets. That was my accuracy load when shooting metallic silhouette a few decades ago, so I know it works well. I loaded half with the bullets crimped using the old Lee bullet seating and crimping die (not the factory crimp die), and the other half with the bullets crimped with my new Lee factory crimp die (after seating them with the bullet seating die).

.357 Magnum ammo with 158-grain Hornady jacketed hollowpoint bullets. The 25 on the right were crimped with the bullet seating die; the 25 on the left were crimped with the Lee factory crimp die.
A macro photograph of the ammo above. The Lee factory crimp due cartridge is on the left; the bullet crimped with the bullet seating die is on the right.

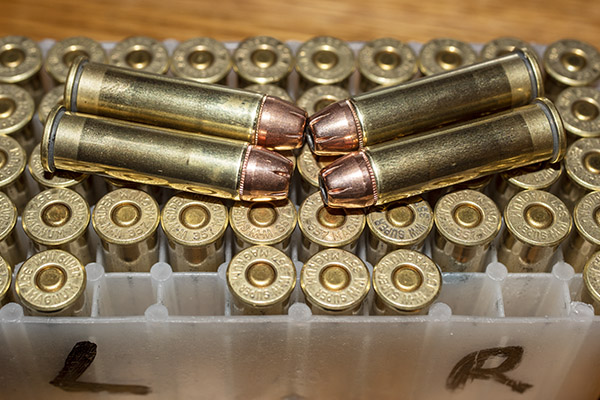
The second lot of ammo was a group I had loaded several years ago.  This ammo had 158-grain cast semi-wadcutter bullets crimped in the crimping groove, 7.0 grains of Unique, and Winchester small pistol primers.  That load (7.0 grains of Unique and a 158-grain cast bullet) has been accurate in every .357 revolver I’ve ever shot.   I loaded this ammo with the bullet seating and crimping die (not the Lee factory crimp die).  I’d shot tons of this load in an older Ruger Blackhawk, but I had not tried it yet in my Python.

.357 Magnum ammo with cast 158-grain semi-wadcutter bullets crimped in their crimping groove. This ammo worked fine in the Ruger Blackhawk, but it had issues in the Colt Python.  Although crimped in the crimping groove, this ammo was longer than the .357 Magnum’s 1.590-inch maximum cartridge overall length.

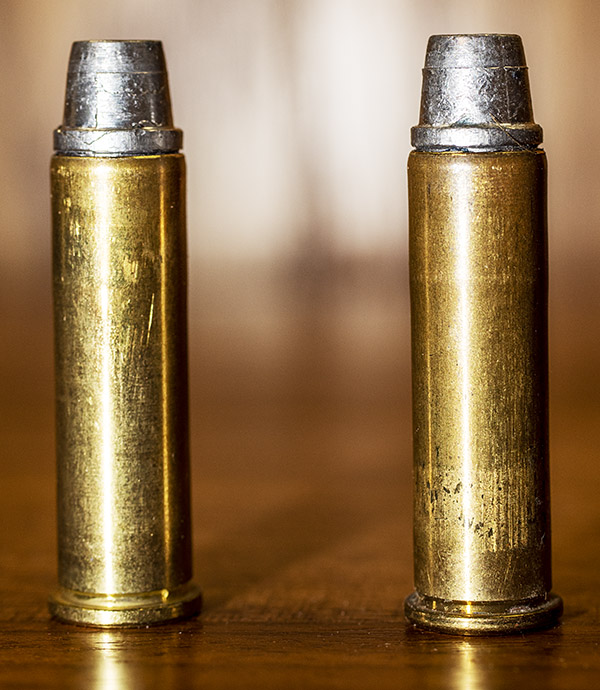
The third ammo lot was similar to the one above (same bullet weight and powder), but I used the cast truncated flat point bullet and I crimped above the bullet’s crimping groove using the Lee factory crimp die.  I wanted to get the bullet further back from the cylinder face to prevent cylinder rotation inteference if the bullets pulled under recoil.  My concern was that I would be crimping above the crimping groove, on the bullet’s main diameter, and I didn’t know if the crimp would hold the bullet in place.

The cast 158-grain truncated flat point bullet crimped above the crimping groove.   This shortens the cartridge overall length. I seated these to 1.565 inches overall length. After crimping, that figure came back up back up to 1.568 inches, still well below the 1.590-inch maximum length spec.
The above .357 cartridges in the Python cylinder crimped with the Lee factory crimp die above the crimping groove.  These rounds were loaded to an overall cartridge length of 1.568 inches (as shown above), which positions the front of the bullets further back from the cylinder face.

When loading with my new Lee Deluxe 4-die set, I noticed immediately that the resizing operation was much easier.  The same was true for the expander die step.  Maybe the older dies I had been using were just dirty, but I sure like do the feel of these Lee Deluxe dies.

Some of you may wonder:  Why not just trim the brass shorter to a below-spec length?  That would move the bullet back, and if I trimmed it short enough it would allow me to crimp these cast bullets in their crimping groove and not risk any cylinder rotation interference.  Yeah, I could have done that, but when I trim brass I like to trim it to specification, not something below spec.  And I don’t want to have to segregate brass based on trimmed length tied to specific firearms.

Test Results:  Bullet Movement

The first test objective was to determine how much bullet movement occurs during recoil using the two different crimping approaches.  Here’s how I tested:

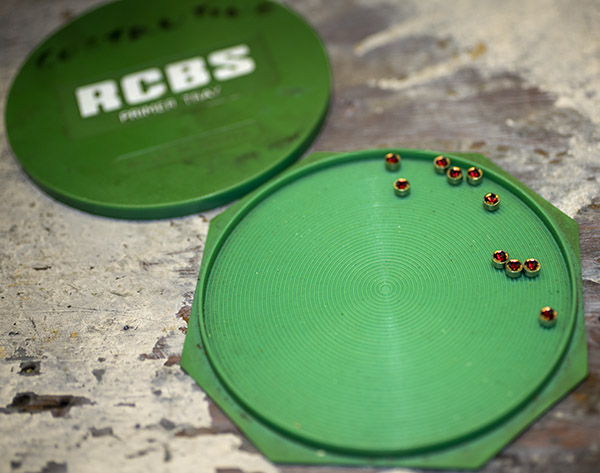
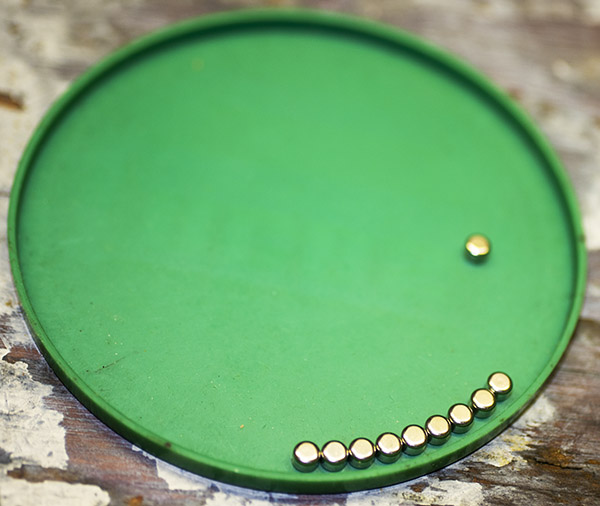
      • I loaded 5 rounds in the revolver.
      • I took a 6th round and recorded its cartridge overall length, and then I loaded it.
      • I fired the first five cartridges.
      • I removed the unfired 6th round and measured the overall length again.

Here’s what I found in assessing the two crimping approaches’ ability to prevent bullet pull:

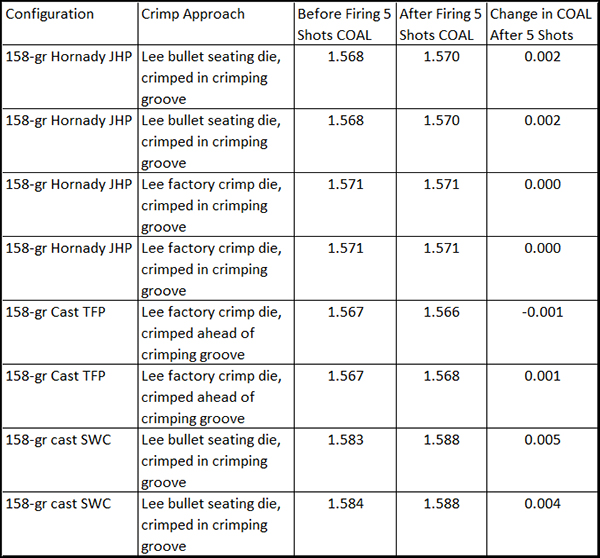
The results surprised me.  The Lee factory crimp die, even when done on the main diameter of the bullet (not in the crimping groove) does a better job holding the bullet in place than does crimping with the bullet seating die.  In each test in which the bullets were crimped with the bullet seating die, they experienced recoil-induced bullet movement.  That one entry where the overall length decreased by 0.001 inch is probably measurement error on my part.

Test Results:  Accuracy

This testing was straightforward.  I fired a series of 5-round groups at 50 feet to assess any differences in accuracy.

Here’s what I see in the above results:

      • With the Hornady jacketed hollow point points, using the Lee factory crimp die resulted in an improvement in accuracy (the group average was 1.637 inches compared to 1.934 inches).
      • The Hornady jacketed hollow point bullets were more accurate than the cast bullets.  That was an expected result.
      • With the cast bullets, there isn’t much of an accuracy difference between using the bullet seating and crimping die versus using the bullet seating die and then the Lee factory crimp die.
      • With the cast bullets, there wasn’t much of an accuracy difference between the truncated flat point bullets and the semi-wadcutter bullets.

I wasn’t having my best range day ever (I had a bad cold when I fired these groups).   But I think I did well enough to support the above conclusions.

Test Results:  Ease of Chambering

I already mentioned this.  Lee claims that the factory crimp die will not buckle or distort the case during crimping.   My results confirm this.  A few rounds that had been crimped with the bullet seating die would not chamber in the Python; after running these through the Lee factory crimp die, they chambered easily.  The Lee factory crimp die does a better job for ease of chambering.

Test Results:  Crimping Without a Crimp Groove

This is really a subset of the first test objective, in which we evaluated the ability of the Lee factory crimp die to hold bullets in place under recoil.  Here, the focus is more specific:  I crimped on the bullet’s main diameter, not in the crimping groove, and I wanted to determine if the Lee factory crimp die would secure the bullet in place.  As you can see from the data above, it did.  When I crimped the cast truncated flat point bullets forward of the crimping groove, they did not move under recoil.  The Lee factory crimp die did this well, and it did so without buckling the cartridge case.

The Bottom Line

The Lee factory crimp die is a good thing.  It holds bullets in place better, it improves chambering, and with jacketed bullets, it improves accuracy.

If you want to buy a set a Lee dies, or the Lee factory crimp die, or any Lee reloading equipment, Amazon is a good place to shop.  Midway is,  too.  But I usually go to Amazon first.

If you have comments, be sure to let us know in the comments section below.  We enjoy hearing from you.


The Star reloader resurrection story is here.


Hit those popup ads!


Want to read our handgun ammo reloading tutorial?  It’s right here.


Never miss an ExNotes blog:


More reloading and gun articles are on our Tales of the Gun page.


For more info on Lee Precision reloading equipment, click on the image below:

Star Reloader: The Final Tweaks

You’ve been following the Star resurrection, and if you haven’t, you can get the earlier Star stories here.  This blog wraps up the last few bits and pieces on the Star.  The resurrected Star is fully operational now and I’ve been making ammo on it.  In a future blog, I’ll do a video showing the machine in action.  I would have done it for today’s blog, but I’m out of empty cartridge cases.  That’s a good problem…I’ve got to  get to the West End Gun Club to shoot up some ammunition so I can reload again!

This blog covers the last few details, the last few bits and pieces I cleaned up, a part or two here and there, a few adjustments, and mounting the Star on my reloading bench…so here we go.

Mounting the Star

I needed to secure my Star reloader to my reloading bench.  That necessitated drilling four pilot holes for the mounting screws, and two holes beneath the reloader (one for the finished rounds to drop through, and the other for the old primers to drop through).   Here’s what the holes in the bench look like (the upper hole is for the finished rounds and the smaller hole is for the old primers).

When the Star reloader operates, finished rounds drop from the bottom of the machine, which is why I needed that bigger hole you see above.  When used primers are punched out of the fired case (we call this decapping), they, too, drop from the bottom of the machine.  That’s what the little hole in the photo above is for.

The finished Star mounts to the bench with four countersunk wood screws.  It looks really good.

Tool Head

The tool head is the piece that holds the dies, the powder dispenser, and a few other things.  It was basically rusted all over.  I went to work on the sides with Scotchbrite and Kroil, and the tool head cleaned up nicely.

The arrows in the above photo point to key components that mount on the tool head.  From left to right, we have the double charge safety (more on that in a bit), the priming lever actuator (which also mounts the came for the Hulse case feed mechanism), the decapping and resizing die (this brings the case back to its specification dimensions), and the case flaring die (this puts a bell on the case mouth to allow the new bullet to enter the case).

Primer Feed Cam

The primer feed cam is a knife-like looking thing that mounts to the tool head.  As explained in the blog on the case feed mechanism, this cam moves up and down with the tool head and actuates a lever, which in turns pushes a slider with a primer underneath the decapped case.  The primer feed cam was rusty so I cleaned it with Scotchbrite.  The part was originally blued, so I applied cold blue to the part to bring it back to near-original condition.  It looks good.

Powder Dispenser Corrections

When you reload, one of the things you have to pay attention to is the powder charge.  Too little, and you can get a bullet stuck in the barrel; too much, you risk blowing the gun up.  With propellants like Bullseye (which occupy very little of the available cartridge case volume), that’s a real serious concern.  One of things I wanted to do was make sure that the Star’s powder dispenser was dropping the right amount of propellant.  You may remember from our blog on the powder dispenser that my Star has a powder bar marked 2.7 GR BE, which is the bar for 2.7 grains of Bullseye.  That’s exactly what I wanted, so it was time to make sure that’s what the dispenser was serving.

I added Bullseye powder to the powder hopper, cycled the powder slide a few times to throw a charge, and then I cycled it once more to capture a charge in my RCBS powder scale pan to weigh it.  To my surprise, I found that the powder dispenser dropped about 2.2 grains of Bullseye instead of the 2.7 grains it was supposed to dispense.

I had an idea about what might be causing the problem, but before I tore into the powder dispenser, I thought I’d check with good buddy Bruce at Star Machine Works.   Bruce knows more about these machines than any man alive.  Bruce told me that in his experience, the Star 2.7 GR BE slides throw over the specified weight to give 2.9 to 3.0 grains, not under as I was experiencing.

I thought this for a bit and realized I probably had residual oil in the dispenser from when I cleaned it, causing the Bullseye powder to clump up, and I was right.  Take a look:

I cleaned the dispenser with alcohol to get all the oil out, let it dry, reassembled it, and tried it again.  Yep, Bruce was right…it was throwing right at 2.9-3.0 grains of Bullseye.  I thought that would probably be okay (0.3 grains of powder is probably about what a fly poops), but I knew that 2.7 grains was the secret sauce for good accuracy in 38 Special in my Model 52 Smith and Wesson, and that’s what I wanted.  I was thinking about when I looked at the powder slide again, and what do you know, I was once again blown away by how clever these Star folks were.  There was an adjustment in the powder slide.  It’s a little set screw in the powder slide, and by screwing it in or out you can adjust the volume of the powder slide cavity (and therefore the charge weight).  Very clever, indeed.

I screwed the set screw in to reduce the cavity volume by what I guesstimated would be 0.3 grains, and I got it right on the first try.  The dispenser drops exactly 2.7 grains of Bullseye now.

On that issue of overcharging a case:  The real concern is that you inadvertently double charge a case.  That could be disastrous.  The risk could be heightened, I think, by the fact that you have to manually advance the Star’s shell plate after each pull of the lever.   The mechanism does not automatically advance each time, and if someone wasn’t paying careful attention, an inadvertent double charge could occur.   Well, the Star folks thought of that, too.  The Star reloader incorporates a gizmo called the safety cam.

The Star Reloader Safety Cam

This thing is very clever, which seems to be a hallmark of everything on the Star.  It’s a toggling guard sort-of-deal on the left side of the reloader that I cleaned with Scotchbrite and Kroil.  You can see it in the photo below.

Take a look at the red and yellow arrows in the photo above.  That blued-steel Y-shaped toggle guard translates back and forth on its pedestal.  There’s a wire spring underneath the guard that makes it naturally flip to the position you see the photo above.  Now, look at the post beneath the tool head (the yellow arrow points to it).  If you attempt to operate the lever and lower the tool head (which would also operate the powder dispenser and drop 2.7 grains of Bullseye into the cartridge case beneath the powder dispenser), that post will hit the toggle and stop further tool head downward motion.  When that happens, no powder will drop.   We want that, because the case sitting below the powder dispenser has already been charged with propellant.

Okay, this is going to get a little complicated, so bear with me.  The Star reloader’s shell plate does not automatically advance.  You have to manually advance the shell plate as a separate action (it isn’t slaved to pulling the reloader’s lever).  Now, imagine you’ve pulled the lever in the previous step, doing all the things that makes happen (knocking out the old primer, resizing the case, inserting a primer in the next case, flaring a case mouth, dropping 2.7 grains of Bullseye into the primed and sized case, and seating a bullet and crimping the case).  Wow, that’s a lot.  Now it’s time to manually rotate the shell plate to the next position.   When we do that, the finished cartridge (new primer, new powder, new bullet, crimped bullet) advances into the safety cam toggle, rotating the toggle toward us.

You can see all this in the photo above.  The safety cam toggle rotates toward us (indicated by the red arrow), pushed there by the completed cartridge case just before that case drops through the reloader (the case is indicated by the yellow arrow).  When the safety cam toggle moves toward us, the post mounted on the tool head (indicated by the green arrow) now has a clear shot at a hole in the shell holder (it’s no longer obstructed by the safety cam toggle), and the tool head can be fully lowered.  The new cartridge drops through the reloader, through the hole in the reloading bench shown at the top of this blog, and into a box waiting below the bench.  When the completed cartridge drops through the reloader and the lever is raised, the safety cam toggle’s spring pushes it back to the natural position, and the lever cannot be fully lowered again until the next cartridge case pushes the safety cam toggle to the safe position.  It’s clever and it’s complicated, but it’s simple and it prevents dropping the tool head twice on the same cartridge (thereby preventing a double charge).

Seating and Crimping Die Adjustment

The final die in the tool head is the seating and crimping die.  It does two things.  It seats the new bullet in the cartridge case (it pushes the bullet in to the correct depth), and it roll crimps the cartridge case around the new bullet.

Seating depth and crimp are made through two adjustments.  There’s a locknut on the seating die beneath the tool head to lock the die in place, and there’s another locknut on the seating post to lock it into position.   Crimp is adjusted by positioning and locking the entire die in the tool head, and bullet seating depth is adjusted by how far the seating post is threaded into the die body and then locked in place with its locknut (see the red arrows in the photo below).

Case Feed Tube Support

The last item I needed to add was the case feed tube support.   You may remember that I jury-rigged an external support from a coat hangar.  It was definitely a bit of Bubba engineering, but hey, it worked.  Good buddy Mike saw that, felt a wave of pity and a willingness to help, and asked me if I wanted a part that he had.   I said yep, Mike shipped it to me, and here it is installed on my machine.

This project has come together very nicely.  I just loaded another 50 rounds of .38 Special with the Star. I used a different bullet (the Hursman 158-grain cast flat point, which is what necessitated the bullet seating depth change described above).  The Star sure did a nice (and fast) job.  I loaded 50 rounds in less than 10 minutes. This thing is really cool and I am getting used to the tempo and the hand-eye-coordination/feel of the thing.  At first, I felt like I almost needed another hand to operate the Star because there’s so much going on, but I got the hang of it very quickly.  You only have to do three things each cycle:

    • Advance the shell plate one position (you do that manually on these machines; the mechanism doesn’t advance the cases).
    • Put a bullet in the charged shell at the back of the press.
    • Pull the lever down and then bring it back up.

While doing the above, you need to pay attention to the powder magazine, the primer magazine, and the case feed tube to make sure each has not run out of the components it feeds.  The Star reloader really is a slick device, and it works great.

As I mentioned in one of the earlier blogs on the Star, these machines ruled the roost for high-volume reloading for a cool half century.   At one point back in the day, a Star reloader sold for north of a thousand dollars, and there was a 2-year wait to get one.  It’s easy to see why.  This is a nice piece of equipment.  If you’re a gearhead, a gadget guy, a shooter, and a reloader (and I check all four boxes), you can’t help but love a Star reloader.


Do you enjoy reading about bringing old stuff back to life?  You’ll love the Resurrections page!

See all the Tales of the Gun here!

Never miss an ExNotes blog!

Star Primer Pickup Tubes: A Story Within A Story!

Like the title says, this is a story within a story.  It’s about using primer pickup tubes with my resurrected Star reloader, and how Lady Luck smiled on me yet again.

First, a bit of background.  There are a few approaches in the reloading world for transferring primers from the primer box into the reloader.  In our general series on reloading, I showed how to use the Lee primer tool, which is what I generally use when I’m loading on a single stage press like my RCBS Rockchucker.  Another approach is to use a primer pickup tube and a primer tray.   See, the deal is that you don’t want to touch the primers with your bare fingers.  You might get skin oils on the primer, and that could make the primer inert.  As explained earlier, in this game, you want all the primers to be “ert.”

The first step is to transfer primers from the box they come in into a primer tray, like you see below.

That green circular deal on the left in the photo above is the primer tray.  It consists of a base and a lid.  You take the lid off and drop the primers into the base, like you see below.

When you do that, though, invariably some of the primers will face up and some will face down.  We want them all facing down in the tray’s base, and we get that by jiggling the base.  There are little circumferential ridges molded into the base, and when you jiggle the tray, it makes all the primers face down (see below).

Get ready for more cleverness here, folks.  What we do next is put the lid back on the primer tray, invert it, and then remove the base from the lid.  That leaves us with the lid, and all the primers in it are facing up (see below).

At this point, we pick up the primers from the tray using a primer pickup tube like you see in the photo below.

The tube you see in the photo above is an RCBS primer pickup tube.  It’s a hollow tube with a spring catch on one end and a spring clip on the other.  What you do is take that tube and push it down (spring end down) on top of each primer.  That stacks the primers, one on top of the other, in the tube.  Then you invert it over the primer magazine on the Star reloader, remove the spring clip, and all the primers in the pickup tube drop into the Star’s primer magazine.

Star reloaders originally had a brass primer pickup tube, but that didn’t come with the one I have.  I’m not complaining; my Star reloader was free.  And I figured I’d just use an RCBS primer pickup tube, because I knew had three or four of those stashed away somewhere.  But I couldn’t find the things.  Then I remembered I had put a bunch of reloading odds and ends in a 50 cal ammo can somewhere, and I went through maybe 10 ammo cans before I found it. I used the RCBS primer pickup tube and I had to hold it carefully in alignment with the Star’s primer magazine when transferring the primers from the inverted tube, pulling the pin, and letting the primers fall into the Star brass primer magazine. It worked just fine. It wasn’t the original Star gear, but hey, you go to war with the Army you have.

After I did that, I went on to other things.  I thought I was doing pretty good, you know, finding those RCBS primer pickup tubes, but the box they were in kept playing over and over again in my mind.  Something was tickling the neurons, but I didn’t know what it was.  Then it hit me.  I remembered earlier in the day when I took the RCBS primer pickup tube out of the box.  I could see it clearly in my mind:

There were two other brass primer pickup tubes in that box.  In my eagerness to get the RCBS primer pickup tubes (the ones I was looking for), I reached right over the brass tubes.  Could it be?  I put that stuff away a decade ago, way before I ever had the Star.

I went back to that box immediately, and son of a gun, there were not one, but two Star original brass primer pickup tubes. Two! I think they came from Sue’s Dad before he passed away more than 10 years ago (he was a reloader, too), and I got a lot of his old bits and pieces. He never had a Star reloader that I ever saw, but he must have latched onto these two primer pickup tubes somewhere along his journey through life. How about that?

So, back to the story du jour…and more of the Star folks’ cleverness.  Star used a slightly different approach than did RCBS.  For starters, they made a cross cut in the pickup end of their primer pickup tubes to give the spring tension needed to hold the primers in the tube.

I started picking up a batch of primers from the primer tray lid with my newly-discovered Star primer pickup tube.

When you get that last one, you push it the rest of the way in with a probe (not your finger).  With apologies in advance for the inadequate photo depth-of-field, here’s what the last primer looks like in the Star tube.

Then you invert the tube, so all the primers are at the other end.  The spring clip keeps them from falling out.  There’s a flange on the end of the Star primer pickup tube.  It interfaces with the Star reloader’s primer magazine to keep the primer pickup tube aligned with the primer magazine tube.

Here’s the top end of the Star reloader’s primer magazine, with the primer follower in place.  I removed it and placed the primer pickup tube on top.

At this point, I then removed the spring clip, and all the primers that were in the primer pickup tube transferred (gravity feed!) into the primer magazine.

So there you have it. The Star is up and running, and I’ll post about cleaning up a few more details on this magnificent old machine in the next Star blog. Stay tuned!


More cool reloading stuff is here!

Read the rest of the Star reloader resurrection here!

Sign up for email notifications when we post future blogs here: