I took my Model 60 S&W apart to clean it and somewhere along the way I lost the shims I put in to reduce cylinder end shake. A quick email to good buddy Lance Shively and a set of shims later, and I’m back in business. That got me to thinking: I had written a blog on installing the shims several years ago and I thought it would be a good idea to run it again.
I love my S&W Model 60 and I shoot it a lot. It’s particularly cool after I had TJ (of TJ’s Custom Gunworks) do an action job on it. Not content to leave well enough alone, I convinced myself that (after tracing the occasional double action misfire to not-fully-seated primers) that what I really needed was a lighter hammer spring (in addition to the lighter trigger spring I had already installed). Wolff Springs sells a lighter hammer spring kit, and I went for the lightest hammer spring I could get.
The Wolff Springs hammer spring kit. I went with the lightest spring.
The lighter trigger spring affects single action trigger pull after you have already cocked the gun and it has nothing to do with the occasional double action misfiring I had experienced in the past. Double action trigger pull is affected by both the trigger spring and the hammer spring, but the hammer spring is a much beefier spring and it drives most of the resistance when firing double action. The hammer spring, if too light, can induce misfires.
The Wolff hammer spring kit includes a standard strength spring (an 8 1/2-pound spring), a heavier spring (a 9-pound spring), and a lighter spring (an 8-pound spring). I wanted a lighter double action pull, so I used the 8-pound spring. The tradeoff is this puts less force on the hammer, which means it has lower velocity when it hits home, and that ups the likelihood of a misfire.
The hammer spring is easy to change, and if necessary, I can go for either of the two heavier springs at the range. All it takes is a small screwdriver to remove the grips, and the same exotic custom tool used for disassembling the Rock Island Compact 1911 (a bent paper clip). The photos below show how this is done.
The Model 60’s hammer spring, with the hammer in the uncocked position.The Model 60’s hammer spring, with the hammer cocked. Note that the hammer yoke (the rod running through the center of the hammer spring) has been pushed back, exposing a hole in the rod.A high tech, German tool steel special assembly/disassembly aid? Nah, it’s a bent paper clip and it works gang busters.To remove the hammer spring yoke and the hammer spring, insert the paper clip into the yoke and gently release the hammer by pulling the trigger and lowering the hammer.With the hammer dropped, the spring is captured in a compressed mode and the hammer spring and the yoke can be removed from the gun. Once this subassembly is removed, you can manually push the spring cap to further compress the spring, remove the paper clip, remove the spring cap and spring, and install the lighter hammer spring. Assembly is the reverse of disassembly.
While installing the new hammer spring, I noticed that my normal gun cleaning routine just wasn’t cutting it on the Model 60. There was still a bit of lead in the barrel, and the powder residue was building up around the yoke. I selected a bronze bristled toothbrush and went to work on the cylinder, the yoke, and the frame, and a bronze bore bush for the bore. When the remnants of gunfights past were gone (you know, my encounters with zombies, as previously described), I spritzed the gun with the universal cleaner (WD40) and then I wiped it down before applying gun oil.
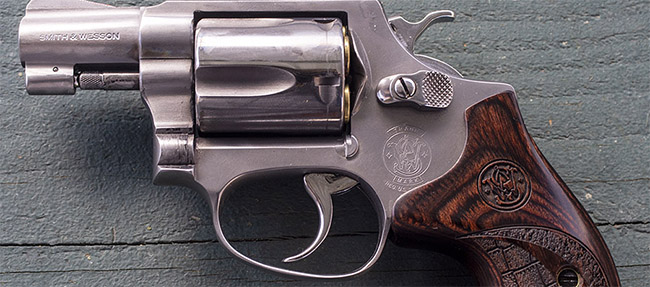
That’s when I noticed that the barrel-to-cylinder gap was nonexistent. Zip. Nada. Zero. The front of the cylinder was touching the rear of the barrel. Uh oh. That’s no good. There’s supposed to be a gap there (like you see in the photo below), because if there’s no gap the cylinder will drag on the barrel. That will degrade the double action trigger pull and, in a worst-case scenario, it can drive the revolver out of time (the chamber won’t be aligned with the barrel). The technical term for the fore-and-aft cylinder movement that assures a minimum clearance when the cylinder is fully forward is called end shake. There needs to be some, and there needs to be a gap. Ideally, that should be 0.004 to 0.008 inches. Any less, and powder and lead residue will bind the cylinder, any more and too much gas escapes (and velocity suffers).
The barrel-to-cylinder gap. This is about .004-inch with the cylinder pushed forward, and that’s the gap I want. This was after I installed the TriggerShims.com cylinder shim.
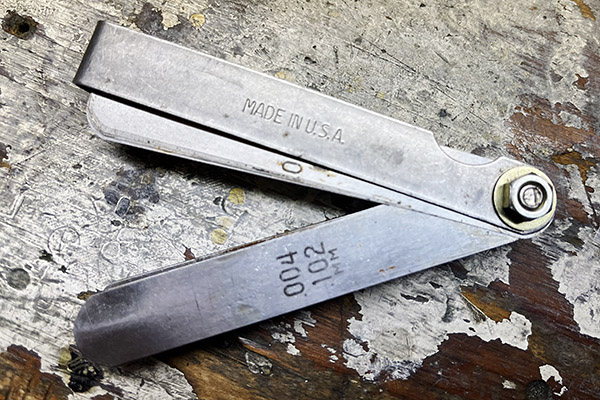
You measure the barrel-to-cylinder gap with a feeler gage, just like you would when setting the valves on a motorcycle. I’ve done that (as you know from reading this blog and any of the CSC shop manuals), and I already had the feeler gages I needed.
My feeler gage. I’ve probably owned this tool for 40 years. It still works. I use it for adjusting valves on my Royal Enfield, too.
After a bit of internet research, I learned that the way to address inadequate gap is by shimming the cylinder and its fit on the yoke. That’s when I first learned there’s a business that specializes in making shims for this exact purpose. In short order I was communicating with Lance Shively, who heads TriggerShims.com.
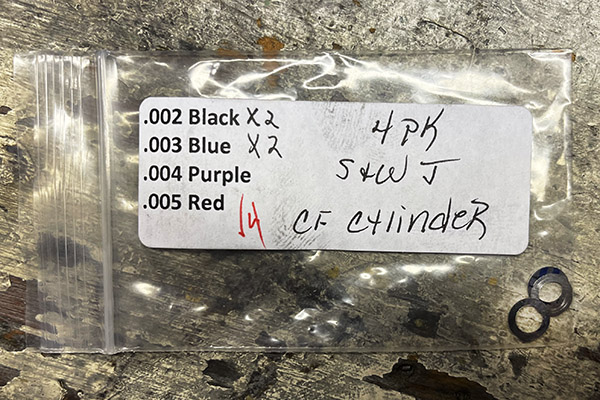
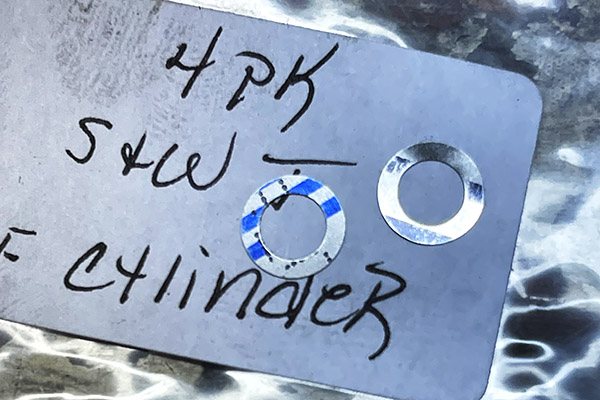
The cylinder shims from TriggerShims.com. They were well packaged and sent in a standard business envelope.The cylinder shims out of the pack. I ordered the four-piece set because I had not worked with these before, I didn’t know what I would need, and they were inexpensive. They are color coded by size.
Lance and his wife, Tammy, run a real Mom and Pop operation that manufactures gun specific shims for a living. Lance has an extensive background in small engine repair and tool and die making, and he and Tammy parlayed that into TriggerShims, which has been doing well for more than 14 years now. Lance told me his primary concern is customer satisfaction, and I can tell you my perception in working with TriggerShims is they have mastered it. I had the Model 60 custom end shake shims in three days, there was no postage charge, and the price was more than reasonable for custom gun parts. Lance runs a Christian business, he believes in God and country, and he’s not bashful about letting people know that. He and Tammy also sell select items from other vendors when he finds a company he likes and believes in, but that is a very select group. The two biggest ones are Wolff and Volquartsen.
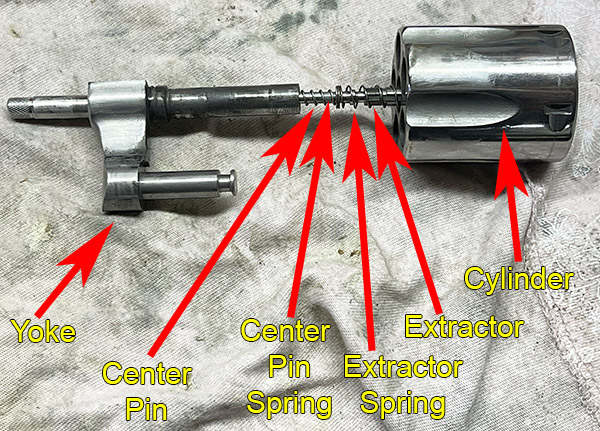
I received the shims I ordered from Lance in just a few days, and installation was trivially easy. I had to remove the yoke, disassemble the ejector rod from the extractor, install the shim I wanted to use (I went with a single .003-inch shim to give the clearance I wanted), and then reassemble everything. It only took a few minutes, and the only tricky part was remembering that the ejector rod had a left-hand thread.
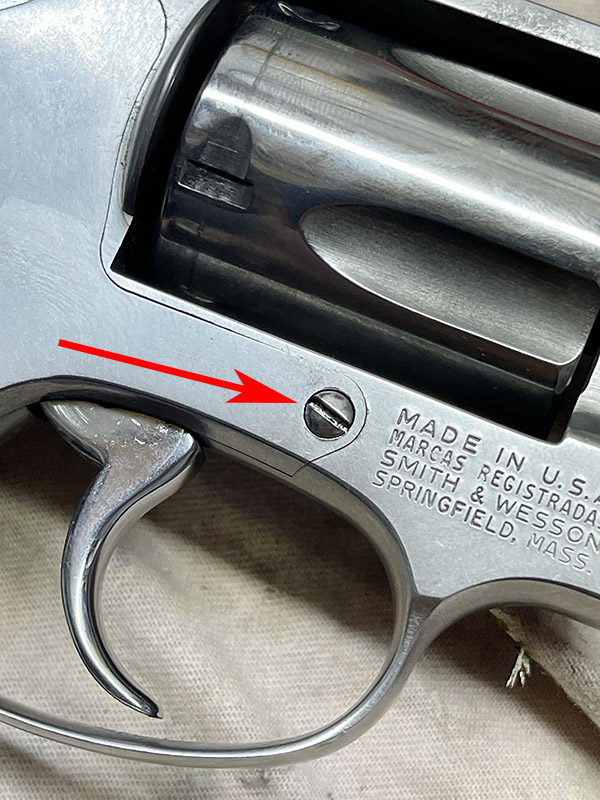
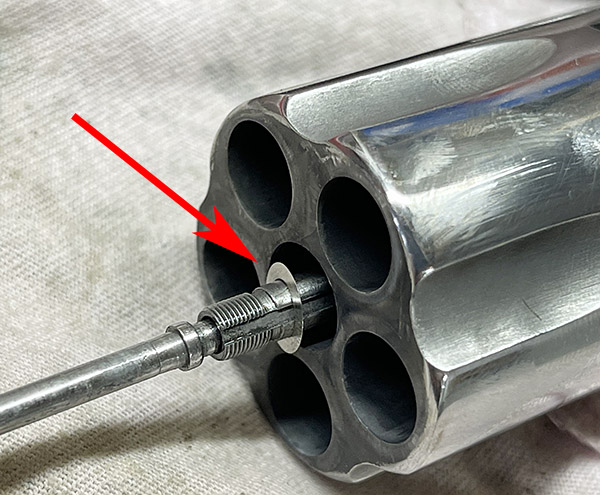
This screw has to be removed to allow removal of the yoke and cylinder from the revolver. You don’t need to remove the revolver’s side plate.With the yoke removed, you unscrew the ejector rod (the knurled piece you push on to eject empty brass from the cylinder) and everything comes apart. Hold on to the ejector rod as you unscrew it so parts won’t fly away, and remember that it is a left-hand thread.The cylinder shim(s) fit beneath the extractor spring. They are pushed into the cylinder by the extractor spring as the cylinder and yoke subassembly are reassembled. The shim(s) position the cylinder further to the rear, increasing the barrel-to-cylinder gap.
TriggerShims.com manufactures over 100 firearm-specific shims with thicknesses from .002-inch to .007-inch, with some specialty items as thick as .010-inch and as thin as .0015-inch. Lance sends shims worldwide, with Australia and Canada being the biggest international customers (he also ships to more than 100 other countries).
Lance and I had a good conversation, during which he told me he enjoyed exploring the ExhaustNotes site and our blog. One thing led to another, and TriggerShims.com is our newest advertiser. You’ll see the TriggerShims.com logo on the ExNotes blog and all ExNotes pages, and Lance asked if he could post links to some of our Tales of the Gun stories on the TriggerShims.com site. Hey, you bet, Lance, and welcome aboard.
I had the Model 60 on the range yesterday morning, and it is a much smoother running revolver.
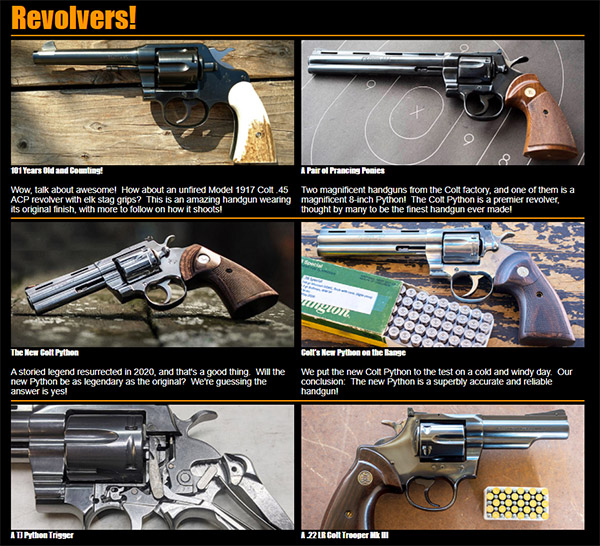
Good buddy Paul sent this very recently released video from Lipsey’s to me last night:
The video is just under 10 minutes long and it’s worth watching. To me, this new J-frame Smith addresses most of the shortcomings I’ve noticed with my concealed carry J-frame revolver. Here are my thoughts:
I like it.
The ideal of a .30 caliber 6-shot is intriguing (in addition to the 5-shot .38 Special version Lipsey’s is also offering). I know most concealed carry handgun encounters are settled in less than two shots, but having an extra round (one over the standard 5 shots) makes sense to me.
I notice the grips don’t go below the bottom of the grip frame, which would be a problem for me. Getting my little finger caught under the grip frame is what makes shooting a J-frame revolver uncomfortable (in fact, it’s downright painful after a shot or two). I do like the G10 material grips, though. I have those on my Sig Scorpion 226 and it is the best grip material ever, in my opinion. I would like a set of G10 grips that extend lower than the bottom of the grip frame, like the Altamont grips I put on my J-frame. These would be very comfortable.
The sights are a much-needed upgrade. The stock Model 60 and other J-frame sights are a joke.
The aluminum frame means light weight, which I guess is good for carrying the gun all day, but those little J-frames can have fierce recoil. My stainless steel Model 60 packs a punch; the aluminum version recoil will be worse. I suppose the assumption for most is that the gun will be carried more than it is shot, and that makes sense. But, still, that’s going to be a lot of recoil.
The J-frame endurance package is sorely needed. I shot the hell out of my Model 60 doing rapid fire at 7 yards and it quickly went seriously out of time. That was an expensive fix. Mine also had excessive headshake. I was able to address it with a shim kit, but it should not have been necessary.
It will be interesting to see what this new Lipsey’s/Smith and Wesson J-frame revolver costs and if it gets approved in California. My prediction is that Lipsey’s will later release a .357 Magnum version (not that anyone would need it, but it would probably sell well). I also predict a 9mm version. 9mm is the most popular centerfire handgun cartridge in the world, and I believe a 9mm version would sell well, too.
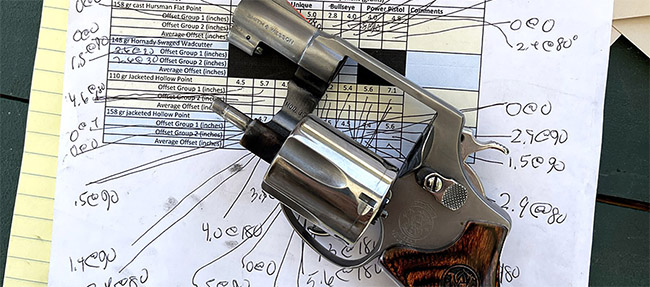
Today I took the Model 60 to the range. All shooting was at the standard full size B21 police target and the distance 7 yards. I shot double action as fast as I could to see if I could keep them on the target. I did, as you’ll see below.
Please click on the popup ads…it’s what keeps the blog alive!
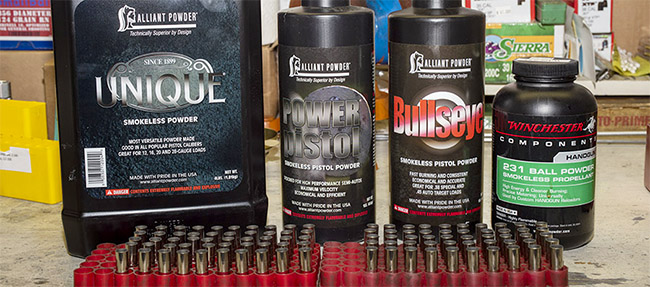
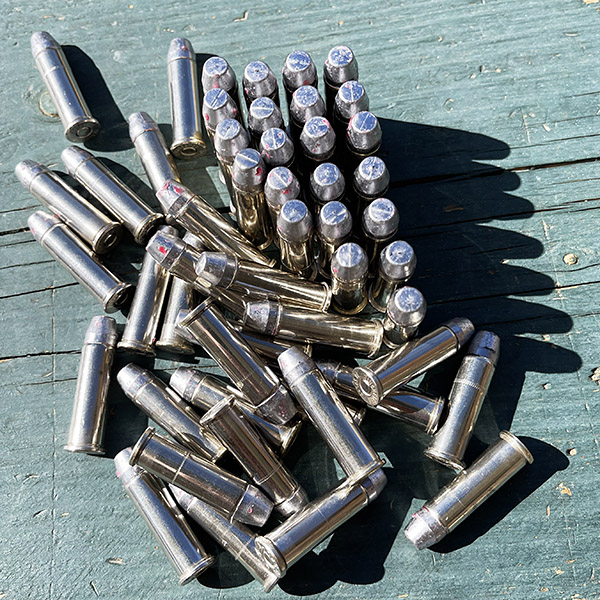
The first load was with the 158 grain Hursman cast bullet (a truncated conical bullet with a flat point) and 2.7 grains of Bullseye. I loaded this ammo on my Star reloader with the bullet seater backed out to account for the longer 158 grain bullet. The Star did a nice job on these cartridges.
Here’s 50 rounds, shooting double action rapid fire (really rapid fire, as fast as I could while still hanging on to the front sight).
I was pleased with that target and the load. The load was light and easy to shoot. The Star can’t easily be adjusted for powder charge and I have it set up for wadcutter ammo, so all I changed was the bullet seating die. I didn’t even adjust the crimp; I just backed out the seater.
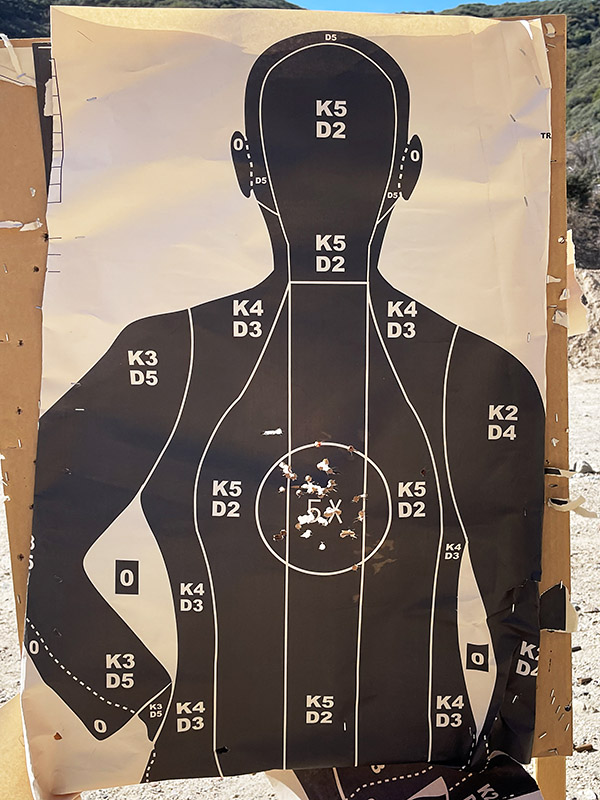
Next up was the same bullet (the 158 grain Hursman cast bullet), loaded with 5.4 grains of Accurate No. 5. I loaded this with the single stage RCBS Rockchucker.
The load was noticeably hotter than the first load, but not so much that it became unmanageable. Here’s 50 rounds of the above ammo on the B21. The brown areas that appear to be bullet holes are not holes on this target; that’s the sun shining through previous holes behind the target.
One shot went out of the 5X ring at 11:00. Eh, you can’t win them all. The guy in that target wouldn’t know the difference.
Then I shot another 50 rounds, this time wadcutter ammo. This was with the Gardner 148 grain powder coated double ended wadcutter bullet and 2.7 grains of Bullseye. I loaded this ammo on the Star.
These had three shots out of the x-ring, but I was really flying, doing my best to imitiate Ed McGivern. You know, you can make a double action revolver cycle faster than a semi-auto pistol. Ed McGivern could, anyway.
I had a good day at the West End Gun Club, but that’s stating the obvious. I don’t think I’ve ever had a bad day at the West End Gun Club, and I’ve been going there for close to 40 years. Here are the take-aways from today’s range session:
I found it was easy to shoot really, really fast with the Model 60 and still keep all shots on the target.
At this distance, all of the loads grouped about the same. I’d have to go out to 50 feet, I think, to see an accuracy difference.
The one most pleasant to shoot was the 158 grain Hursman bullet with 2.7 grains of Bullseye, and at this distance, it was accurate. It’s a nice load. That load had less recoil than the same load with the 148 grain wadcutter bullet. I think that’s because the 148 grain wadcutter bullet has more bearing area so the pressure is probably higher. After returning from the range, I loaded the remainder of my Hursman cast bullets with this load.
The gun shoots to point of aim with all three loads.
The Model 60 is a wonderful handgun and shooting a snubnose .38 is fun. The keyboard commandos can wax eloquent about the need for 20-round magazines in the latest Wunder 9; five shots from a Model 60 does it for me.
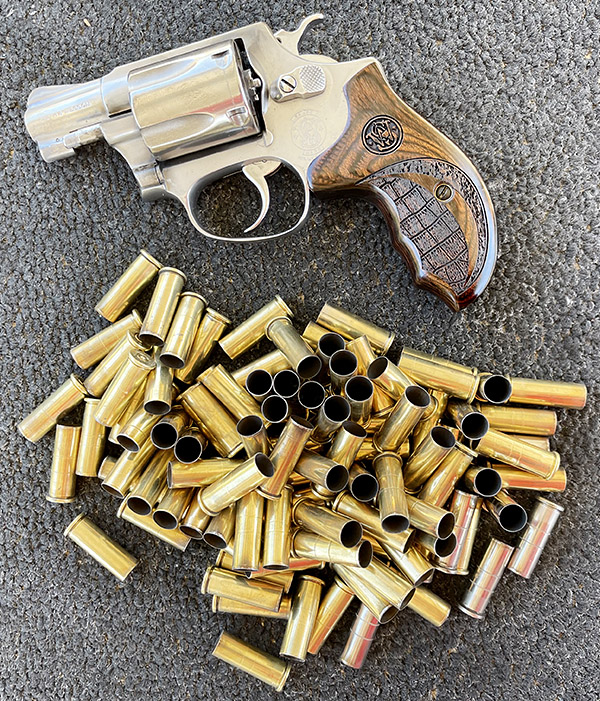
As if the day weren’t perfect enough, someone left 250+ pieces of once-fired 9mm brass on the range. I ordinarily would not use range brass and Lord knows I have plenty of 9mm cases, but this was pristine stuff and I could see that it had never been reloaded. It’s in my blood, I guess; I can’t leave good brass laying on the ground (it was in my tumbler 10 minutes after I got home).
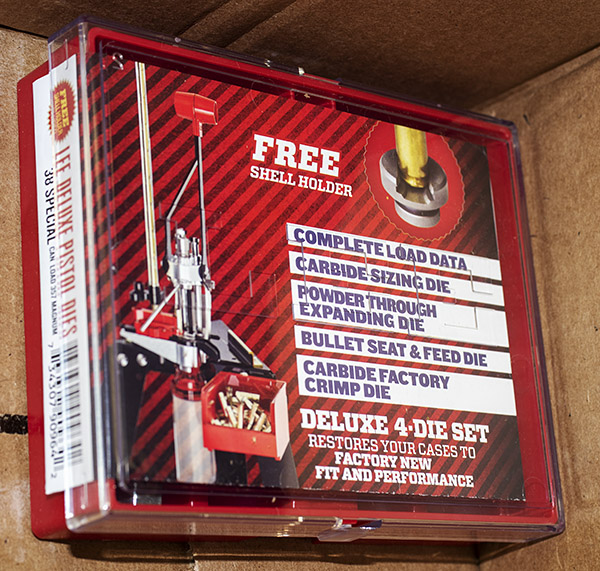
There are three outfits that I recommend you consider if you’re reloading .38 ammo and if you want your handgun to perform well. The first is TJ’s Custom Gunworks. TJ did the action job and polishing on my Model 60, and his work is beyond stellar. The next is Lance Shively’s TriggerShims.com. If you want to assure your cylinder gap is what it’s supposed to be to assure smooth cycling and minimize misfires, Lance’s shims will do the trick and they are inexpensive. The next is Lee Precision reloading gear. I am migrating to near-complete use of Lee equipment, and I used a Lee Deluxe 4-die set when loading the .38 ammo on a single stage press. I recently acquired a Lee four turret press as part of a Lee Precision package deal. I’ve always been completely satisfied with the gear I’m using from Lee. Watch for a near-term blog on the four turret press kit. I’m eager to get it into service, and when I do, you’ll read about it here.
Two more things: Here’s a link for the B21 targets you see above (they’re different and they’re fun to shoot). And, I frequently get compliments on the Altamont grips my Model 60 wears. They make the gun much more comfortable to shoot and they don’t print if you’re carrying concealed. If you want a set of Altamont grips, a good place to get them is on Amazon.
This blog is longer than I intended it to be. I thought I would just do a quick bit about a new set of Lee reloading dies I recently purchased, but as I got into it, I learned more about my Colt Python, crimping with a bullet seating die versus a dedicated factory crimp die, and well, the thing just grew. Mea culpa; you can leave early if you want to. Because this is a longer-than usual post, I thought I’d provide the bottom line up front: The Lee factory crimp die is a good thing. It works. It holds bullets in place better, it improves chambering, and it improves accuracy.
Now, the rest of the story.
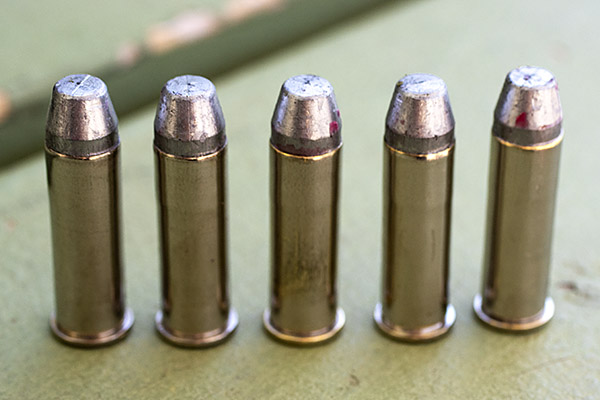
For the last umpteen years when loading .38 Special or .357 Magnum ammo I have been using a kluged-up three die set (a carbide resizer/decapper from Dillon, an expander die from Lee, and a bullet seating and roll crimping die from Lee). You can use the same dies for both .38 Special and .357 Magnum; the only difference between the two cartridges is the length of the cartridge case. They use the same diameter bullets (even though it’s called a .38 Special, the bullet diameter of a .38 is actually .357 to .358 inches, just like the .357 Magnum).
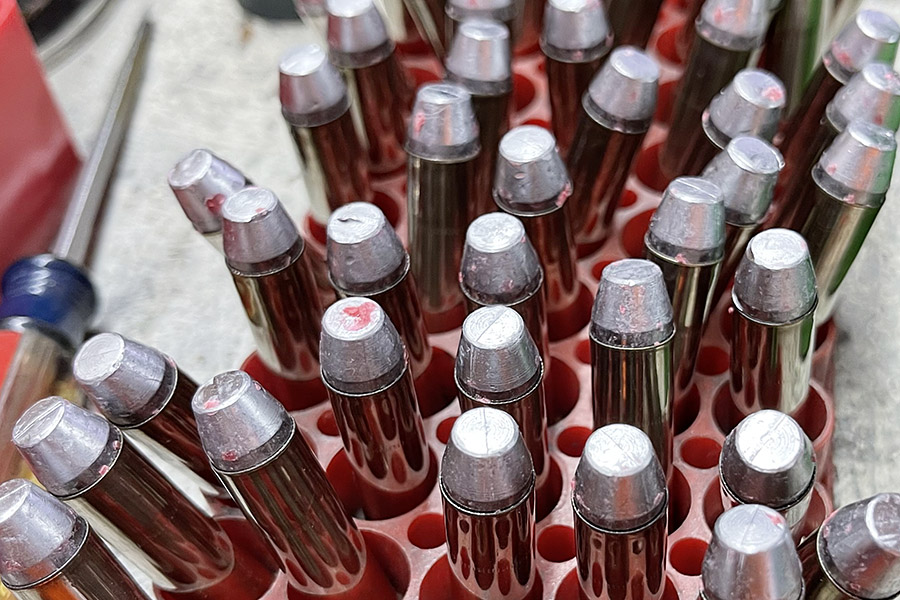
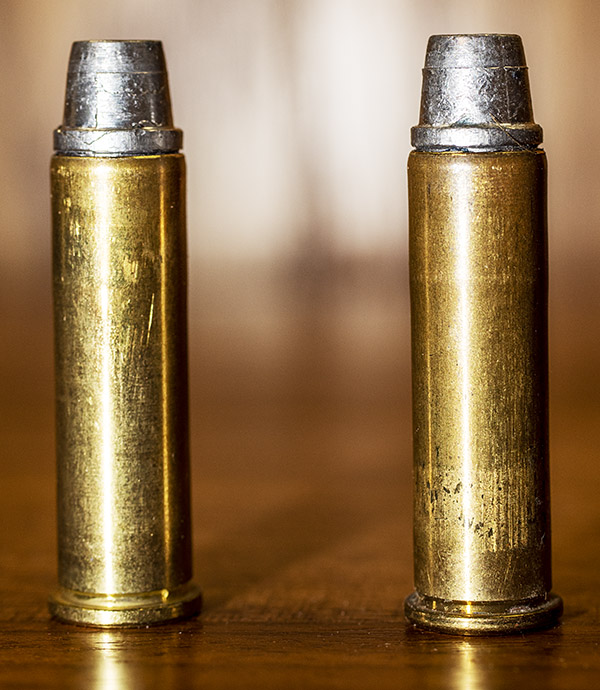
The two cartridges on the left are .357 Magnum; the one on the right is a .38 Special. The .357 cartridge case is longer so it cannot be inadvertently inserted into a handgun chambered for .38 Special. Note the slightly longer overall cartridge length on the .357 Magnum cartridge on the left (with the cast bullet) compared to the .357 Magnum cartridge in the middle (with the jacketed bullet).A mixed set of dies I’ve been using for years for reloading .357 Magnum and .38 Special. Note the Lee shellholder marked “1.” .38 Special used to be the most commonly reloaded cartridge in America. Today it’s 9mm. .38 Special was the first cartridge I ever reloaded. The die on the right is the bullet seating and crimping die.
Reloading Gear
I’ve had a few .38/.357 die sets over the years, selling them when convenient as I bought or inherited other equipment. As featured here on the ExNotes blog, I have a 50-year-old Star reloader I use for .38 Special wadcutter ammo (I’ll give you a link for the Star story at the end of this blog). The Star is set up to meter 2.7 grains of Bullseye propellant (that’s a 148-grain wadcutter target load) and it works fabulously well, so it’s a dedicated setup. For all other .38 Special and for .357 Magnum reloading, I load with my RCBS Rockchucker single-stage press. I’ve been using it for 50 years.
My Star progressive reloader. A good buddy gave this to me in rundown, funky, and long-neglected condition. I cleaned it, lubed it, and put in back in service. The Star does a fantastic job on .38 Special wadcutter ammo.Old Faithful, my RCBS Rockchucker single stage press. I load non-wadcutter .38 Special ammo and all .357 Magnum ammo on this press.
Bullet Seating and Crimping
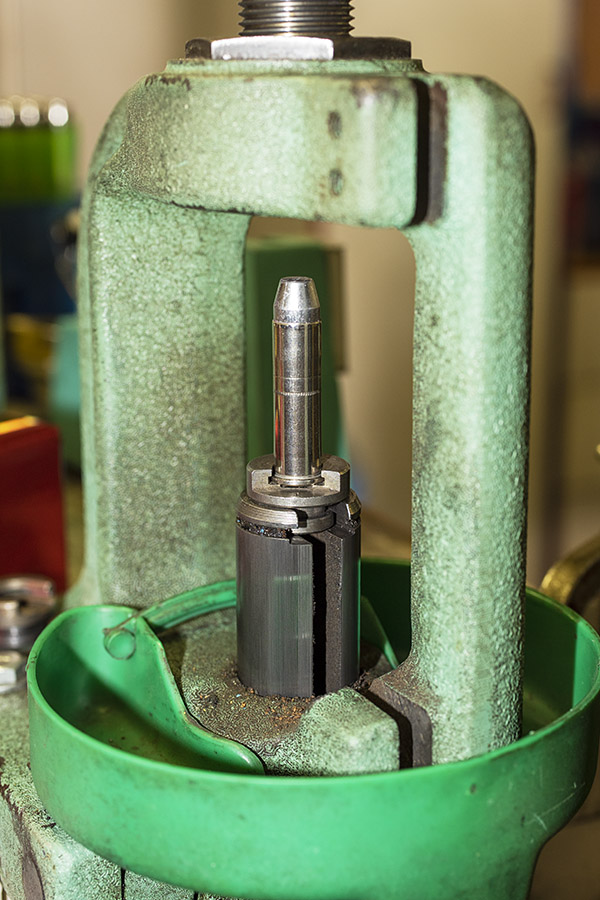
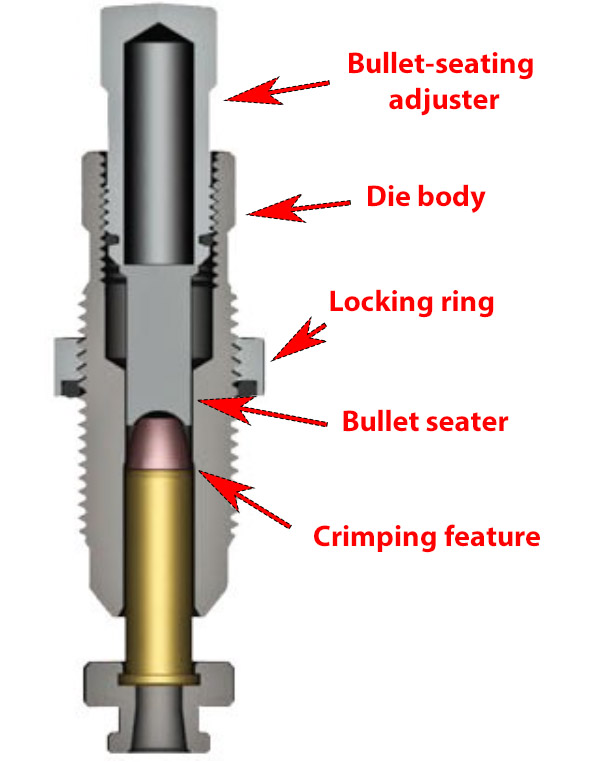
For many years, I seated and crimped my bullets with a simple seating and crimping die. It’s what you see in the illustration below.
I use this die in two steps. First, I screw the bullet seating adjuster deep into the die and seat the bullet to the correct cartridge overall length without crimping the bullet in place. After seating all the bullets, I then back off on the bullet seating adjuster so that it no longer contacts the bullet, and then I screw the die body deeper into the press. The die body has a roll crimping feature that then roll forms a crimp around the case mouth to lock the bullet to the cartridge case.
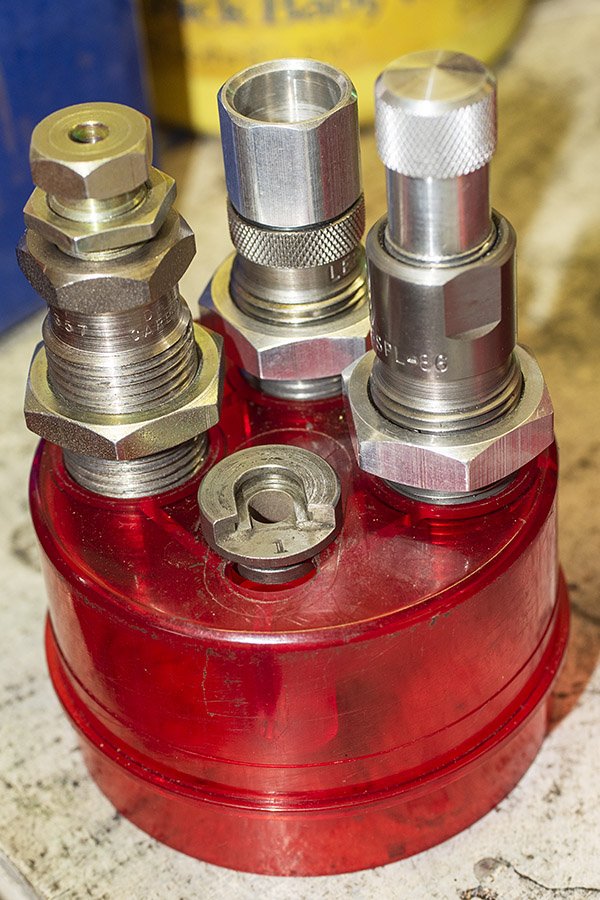
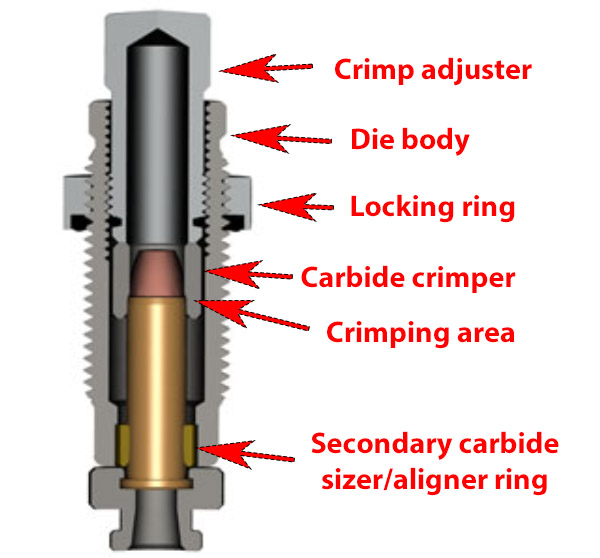
Lee has an alternative approach for bullet crimping they call the factory crimp die. As a first step, you seat the bullet to the desired depth in the case using the die shown above. After seating all the bullets, you then remove the bullet seating and crimping die from the press and then use the fourth die (the factory crimp die). Here’s what the factory crimp die looks like:
The fourth die, the factory crimp die, does not seat the bullet. Its only function is to apply the crimp, and it does this very well. The idea is that the die is screwed all the way into the press such that it contacts the shellhoder, and then the amount of crimp is set up with the crimp adjuster, which screws into the die body. This die applies a roll crimp on a revolver cartridge (the same kind of crimp as the bullet seating and crimping die described above), but it does so in a much better-controlled manner. The factory crimp die also has a secondary carbide sizer/aligning ring at its lower end, which aligns the cartridge as it enters the case, and holds the cartridge outside diameter to specification values as the cartridge enters and then exits the die. It works fabulously well, and Lee states that this die makes it impossible to buckle a case.
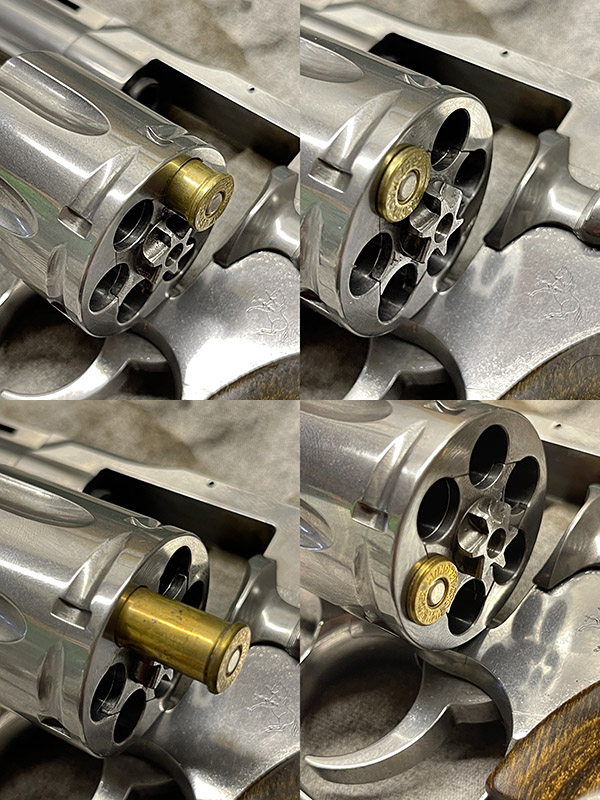
I had .357 Magnum ammo I had previously loaded using the bullet seating and crimping die only (not the Lee factory crimp die), and it chambered with no problem in my Ruger Blackhawk. The Colt Python has a tighter chamber, though, and several of these older reloads would not chamber in the Python. A quick trip through the Lee factory crimp die cleaned up the outside diameters and the rounds chambered easily.
Before and after shots of older .357 loads I reloaded using the bullet seating and crimping die. Some wouldn’t chamber in the tighter Python. The Lee factory crimp die fixed that.
Lee’s Deluxe 4-Die Set
I recently ordered a new Ruger Blackhawk, and I’ve written many times about my Colt Python. With my new .357 Magnum Blackhawk in its 10-day cooling off period, I thought I would get a new set of dies. I like Lee (they give you a shellholder, they are inexpensive, and they do a good job). I had bent the decapping pin on the Dillon sizing die in my mixed set of dies shown above (a primer wouldn’t come out and I forced it). I was able to bend the pin straight, but I figured a man of my stature ought to have a set of grownup new dies. Then I got an email from MidwayUSA showing the Lee 4-die set on sale for $53 and they had free shipping on orders over $49. The Lee Deluxe set includes the factory crimp die. All the planets were in alignment (enter order, buy now…you know the drill). The dies were at my front door a few days later.
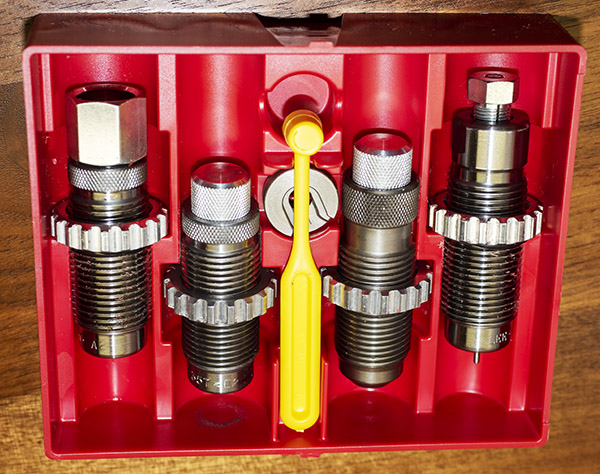
The new Lee 4-die Deluxe Set was well packaged by Midway.The Lee dies in my new die set.The Lee Deluxe 4-die set includes a carbidge sizing die and decapper (the die on the far right), a cartridge expander and case mouth flaring die (on the far left), a bullet seating and roll crimping die (second from the right), and the Lee factory crimp die (second from the left). Lee also provides a shell holder and power dispensing spoon. I’ve never used the powder dispensing spoon; I use an RCBS powder dispenser.
The new dies looked great, and I was eager to put them to work.
Bullet Pull and Cylinder Rotation
On revolvers with significant recoil, bullets can back out of the cartridge case when other rounds in the cylinder are fired. This can allow bullets on unfired cartridges to protrude beyond the cylinder face and interfere with cylinder rotation. We prevent this by controlling the reloaded cartridges’ overall length and by crimping. In firing my new Colt Python with ammo I had loaded for an earlier Ruger Blackhawk, even though the bullets were crimped I experienced bullet pull beyond the front of the cylinder. When this occurred, the cylinder would not rotate. These same rounds had worked in a Ruger Blackhawk.
In analyzing the cylinder rotation issue on my new Python, I found several things:
The bullets were not seated deep enough (the cartridge overall length exceeded the maximum spec of 1.590 inches), even though the bullets were crimped in their crimping groove.
The crimp wasn’t strong enough to hold the bullets in place. Under recoil from other cartridges, the bullets were backing out.
The Python cylinder is slightly shorter than the Ruger Blackhawk cylinder. I probably had the same bullet pull occurring on the Blackhawk, but the Blackhawk’s longer cylinder masked it. They might have been backing out on the Ruger and I didn’t know it.
Cartridge Overall Length
Let’s dive into the numbers. The reloading manuals show the .357 Magnum maximum cartridge overall length (COAL) to be 1.590 inches. With my cast bullets crimped in their crimping groove, the overall length was running from 1.607 to 1.615 inches. That put them about even with the front of the Python cylinder. If any bullet pull occurred under recoil, the front of the bullet would hit the rear of the forcing cone and the cylinder wouldn’t rotate. That’s what I experienced with my Python.
The Ruger New Model .357 Blackhawk has a longer cylinder than the Python. The Ruger cylinder is 1.640 inches long. The Internet says the Python cylinder length is 1.552 inches; mine measures 1.553 (which is close enough). Right away, the astute ExNotes blog reader will recognize that the Colt’s cylinder (at 1.552 inches) appears to be shorter than the specification .357 Magnum cartridge maximum overall length (1.590 inches), but it is not. When loaded in the cylinder the cartridge is held rearward by its rim, which sits flush against the back end of the cylinder.
The Python, like most revolvers, headspaces on the cartridge rim. The cartridge rim is 0.060 inches thick.
The .357 Magnum cartridge rim backs the cartridge up 0.060 inches (the rim thickness), which would put the leading edge of the bullet in a cartridge loaded to an overall length of 1.590 inches about 0.023 inches inside the front edge of the cylinder (if I’ve done the math correctly). And I think I have, because when you look at cartridges in the Python cylinder, they are pretty close to the edge of those big .357 cylinder holes. 0.023 inches. Twenty-three thousandths of an inch. That’s not much to play with.
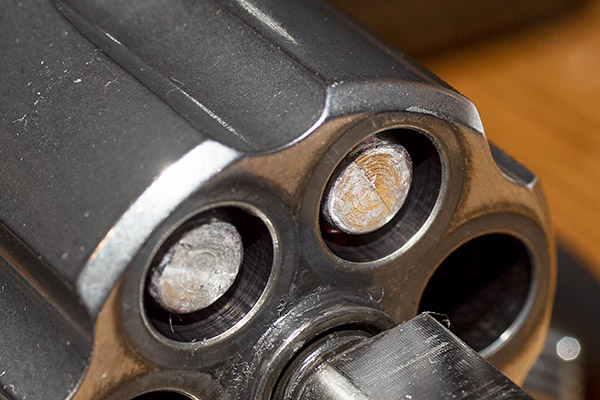
.357 Magnum cartridges loaded in the Python cylinder. At the cartridge’s specified max overall length of 1.590 inches, the front of the bullet is only 0.023 inches away from the forward cylinder face.
Bullet Design and Crimp Location
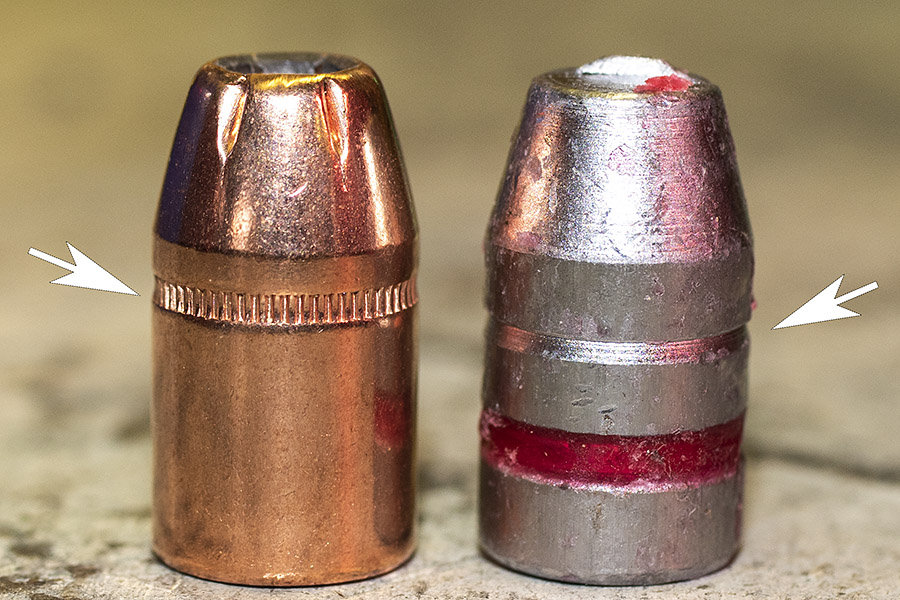
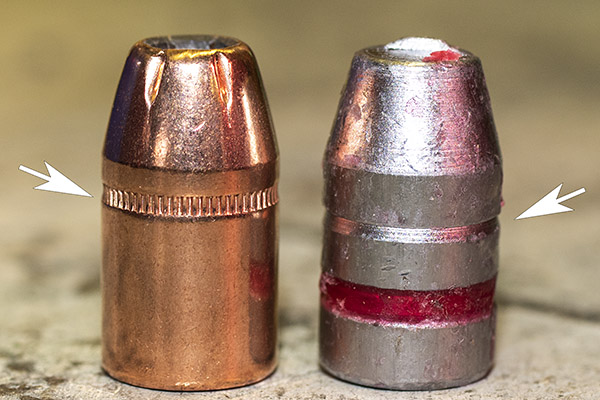
I examined the bullets I was using. I had crimped my cast bullets in the crimping groove, and I could see that the crimping groove put the bullet face very close to the forward end of the Python’s cylinder. I couldn’t seat the cast bullets any deeper and still crimp in their crimping groove. Hornady’s jacketed 158-grain bullets are no problem; their crimping groove is a lot higher on the bullet.
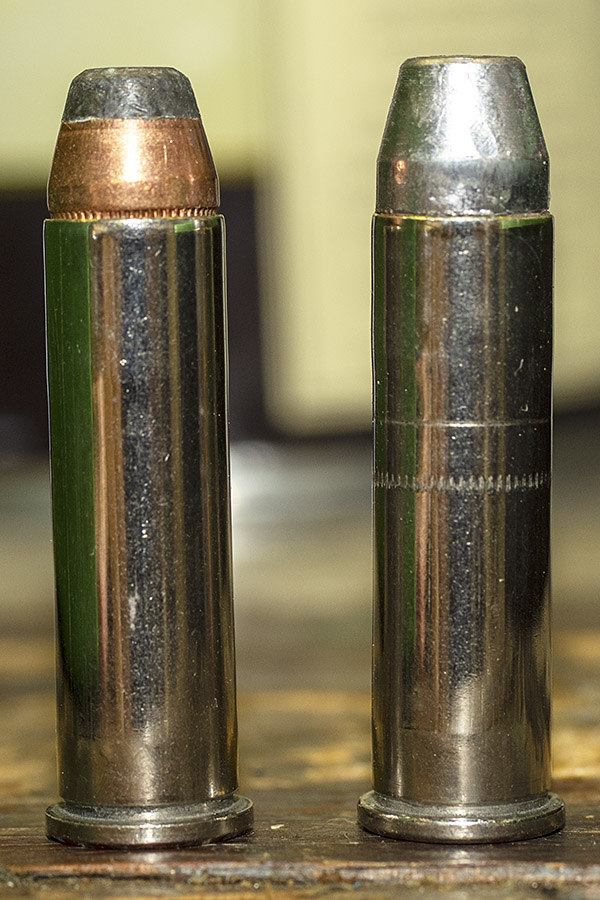
A 158-grain Hornady jacketed hollow point bullet on the left, and a cast 158-grain bullet on the right. Note how much higher the crimping groove is on the jacketed bullet. This lowers the bullet in the cartridge case when it is crimped, making the cartridge shorter.Two .357 Magnum cartridges with crimped bullets. The cast bullet cartridge on the right has the bullet seated as low as it can go while still allowing a crimp. You can see that the cast bullet cartridge is longer than the cartridge with the jacketed bullet.
Test Objectives
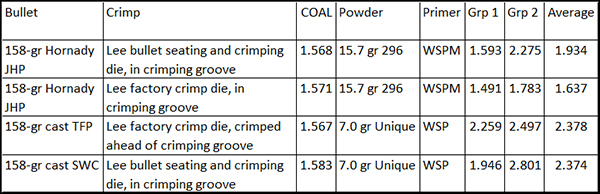
I wanted to test bullets seated and crimped using both approaches (i.e., the bullet seating and crimping die, versus seating with the bullet seating die and crimping separately with the Lee factory crimp die). My testing would evaluate the following:
Bullet movement under recoil.
Accuracy.
Ease of chambering.
The ability to get a good crimp in locations other than the crimping groove.
That last one is important, because as I learned with my Python, crimping some cast bullet configurations in the crimping groove makes the cartridge too long.
Test Ammo
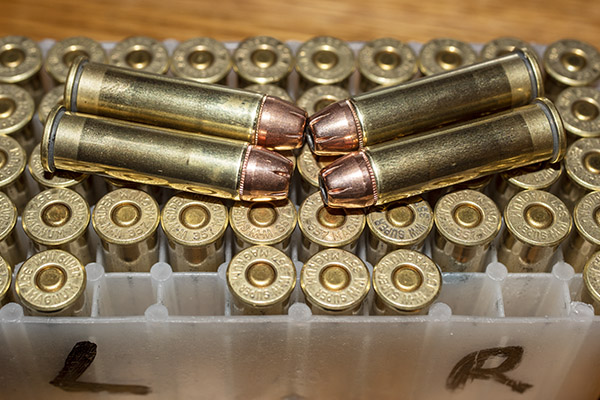
I loaded three test lots. The first was with 15.7 grains of Winchester 296 powder, Winchester small pistol magnum primers, and Hornady’s 158-grain jacketed hollow point bullets. That was my accuracy load when shooting metallic silhouette a few decades ago, so I know it works well. I loaded half with the bullets crimped using the old Lee bullet seating and crimping die (not the factory crimp die), and the other half with the bullets crimped with my new Lee factory crimp die (after seating them with the bullet seating die).
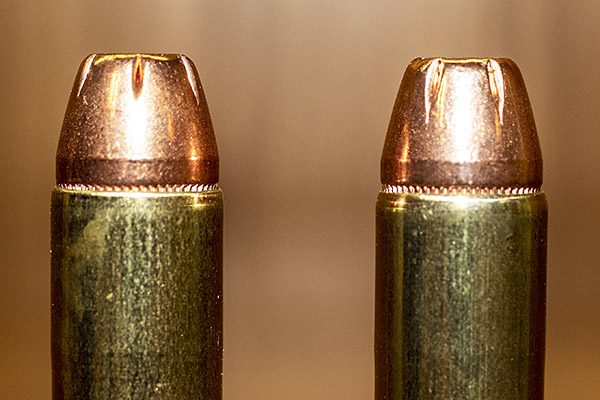
.357 Magnum ammo with 158-grain Hornady jacketed hollowpoint bullets. The 25 on the right were crimped with the bullet seating die; the 25 on the left were crimped with the Lee factory crimp die.A macro photograph of the ammo above. The Lee factory crimp due cartridge is on the left; the bullet crimped with the bullet seating die is on the right.
The second lot of ammo was a group I had loaded several years ago. This ammo had 158-grain cast semi-wadcutter bullets crimped in the crimping groove, 7.0 grains of Unique, and Winchester small pistol primers. That load (7.0 grains of Unique and a 158-grain cast bullet) has been accurate in every .357 revolver I’ve ever shot. I loaded this ammo with the bullet seating and crimping die (not the Lee factory crimp die). I’d shot tons of this load in an older Ruger Blackhawk, but I had not tried it yet in my Python.
.357 Magnum ammo with cast 158-grain semi-wadcutter bullets crimped in their crimping groove. This ammo worked fine in the Ruger Blackhawk, but it had issues in the Colt Python. Although crimped in the crimping groove, this ammo was longer than the .357 Magnum’s 1.590-inch maximum cartridge overall length.
The third ammo lot was similar to the one above (same bullet weight and powder), but I used the cast truncated flat point bullet and I crimped above the bullet’s crimping groove using the Lee factory crimp die. I wanted to get the bullet further back from the cylinder face to prevent cylinder rotation inteference if the bullets pulled under recoil. My concern was that I would be crimping above the crimping groove, on the bullet’s main diameter, and I didn’t know if the crimp would hold the bullet in place.
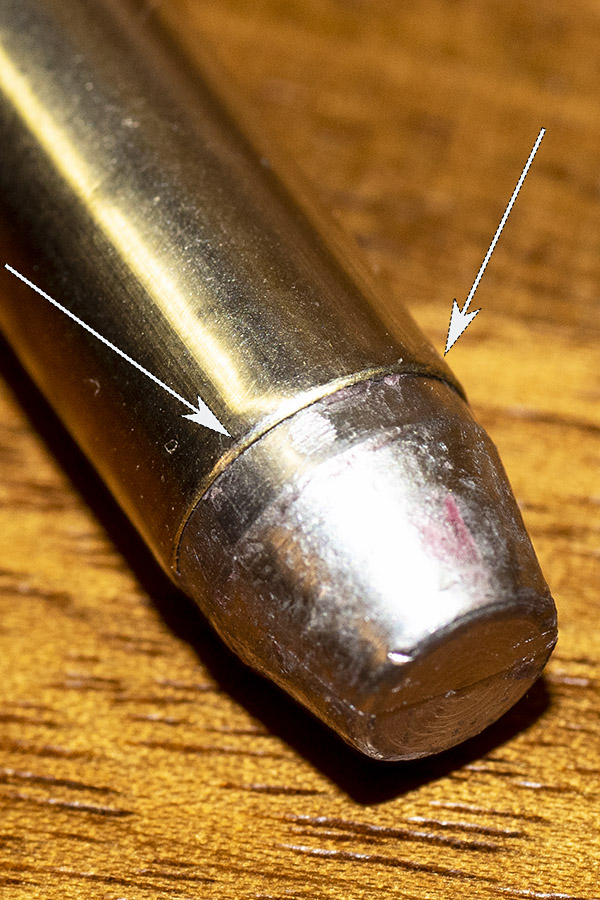
The cast 158-grain truncated flat point bullet crimped above the crimping groove. This shortens the cartridge overall length. I seated these to 1.565 inches overall length. After crimping, that figure came back up back up to 1.568 inches, still well below the 1.590-inch maximum length spec.The above .357 cartridges in the Python cylinder crimped with the Lee factory crimp die above the crimping groove. These rounds were loaded to an overall cartridge length of 1.568 inches (as shown above), which positions the front of the bullets further back from the cylinder face.
When loading with my new Lee Deluxe 4-die set, I noticed immediately that the resizing operation was much easier. The same was true for the expander die step. Maybe the older dies I had been using were just dirty, but I sure like do the feel of these Lee Deluxe dies.
Some of you may wonder: Why not just trim the brass shorter to a below-spec length? That would move the bullet back, and if I trimmed it short enough it would allow me to crimp these cast bullets in their crimping groove and not risk any cylinder rotation interference. Yeah, I could have done that, but when I trim brass I like to trim it to specification, not something below spec. And I don’t want to have to segregate brass based on trimmed length tied to specific firearms.
Test Results: Bullet Movement
The first test objective was to determine how much bullet movement occurs during recoil using the two different crimping approaches. Here’s how I tested:
I loaded 5 rounds in the revolver.
I took a 6th round and recorded its cartridge overall length, and then I loaded it.
I fired the first five cartridges.
I removed the unfired 6th round and measured the overall length again.
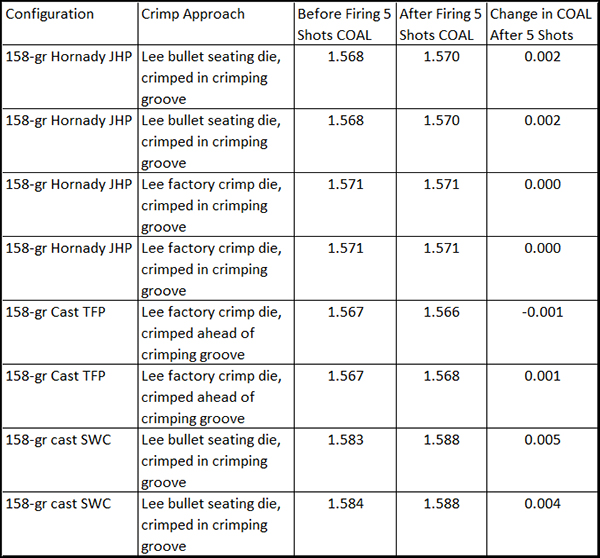
Here’s what I found in assessing the two crimping approaches’ ability to prevent bullet pull:
The results surprised me. The Lee factory crimp die, even when done on the main diameter of the bullet (not in the crimping groove) does a better job holding the bullet in place than does crimping with the bullet seating die. In each test in which the bullets were crimped with the bullet seating die, they experienced recoil-induced bullet movement. That one entry where the overall length decreased by 0.001 inch is probably measurement error on my part.
Test Results: Accuracy
This testing was straightforward. I fired a series of 5-round groups at 50 feet to assess any differences in accuracy.
Here’s what I see in the above results:
With the Hornady jacketed hollow point points, using the Lee factory crimp die resulted in an improvement in accuracy (the group average was 1.637 inches compared to 1.934 inches).
The Hornady jacketed hollow point bullets were more accurate than the cast bullets. That was an expected result.
With the cast bullets, there isn’t much of an accuracy difference between using the bullet seating and crimping die versus using the bullet seating die and then the Lee factory crimp die.
With the cast bullets, there wasn’t much of an accuracy difference between the truncated flat point bullets and the semi-wadcutter bullets.
I wasn’t having my best range day ever (I had a bad cold when I fired these groups). But I think I did well enough to support the above conclusions.
Test Results: Ease of Chambering
I already mentioned this. Lee claims that the factory crimp die will not buckle or distort the case during crimping. My results confirm this. A few rounds that had been crimped with the bullet seating die would not chamber in the Python; after running these through the Lee factory crimp die, they chambered easily. The Lee factory crimp die does a better job for ease of chambering.
Test Results: Crimping Without a Crimp Groove
This is really a subset of the first test objective, in which we evaluated the ability of the Lee factory crimp die to hold bullets in place under recoil. Here, the focus is more specific: I crimped on the bullet’s main diameter, not in the crimping groove, and I wanted to determine if the Lee factory crimp die would secure the bullet in place. As you can see from the data above, it did. When I crimped the cast truncated flat point bullets forward of the crimping groove, they did not move under recoil. The Lee factory crimp die did this well, and it did so without buckling the cartridge case.
The Bottom Line
The Lee factory crimp die is a good thing. It holds bullets in place better, it improves chambering, and with jacketed bullets, it improves accuracy.
If you want to buy a set a Lee dies, or the Lee factory crimp die, or any Lee reloading equipment, Amazon is a good place to shop. Midway is, too. But I usually go to Amazon first.
If you have comments, be sure to let us know in the comments section below. We enjoy hearing from you.
Some days at the range I don’t feel like punishing myself with heavy recoil or trying to shoot the tightest possible groups with loads that have been tuned to perfection. Nope, shooting is fun, and sometimes blasting through a box of ammo is just what the doctor ordered.
A few years ago when we were organizing military surplus rifle fun matches, good buddy Paul showed up with a bunch of zombie targets. Paul called the zombie Boris and the hostage Betty, and the names stuck. We had targets left after the match, and yesterday I shot the very last one.
I had my trusty Model 60 Smith and Wesson and a box of 100 .38 Specials I had loaded on my Star progressive reloader. They were Gardner Cache powder-coated 148-grain wadcutters with 2.7 grains of Bullseye (the go to accuracy load in .38 Special). I set ol’ Boris and Betty up on the 7-yard line and proceeded to double-action my way through 20 cylinders’ worth of ammo (the cylinder in a Model 60 holds 5 rounds). There was not a single misfire in the entire 100 rounds, and more importantly, not a single one of them hit Betty. Boris…he didn’t fare so well.
You know, you can have a lot of fun dreaming up titles for blogs. When I told good buddy Mike about this one, he’s the guy who suggested the above. Yeah, it’s racy, but it’s not what you think. This blog is about timing. Life, success, good comedy, and a host of other things are all about timing.
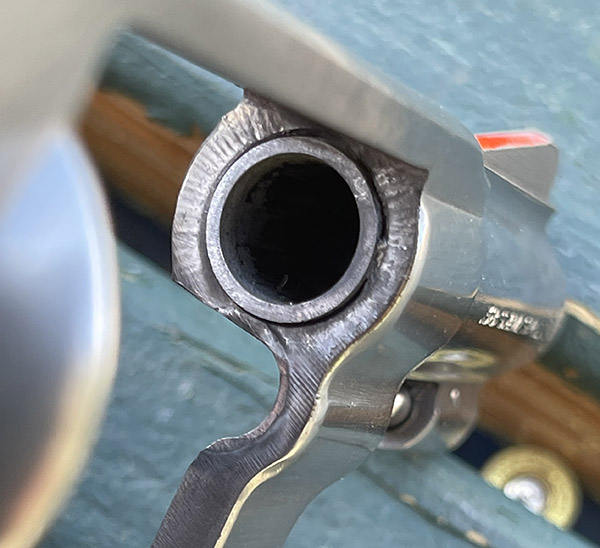
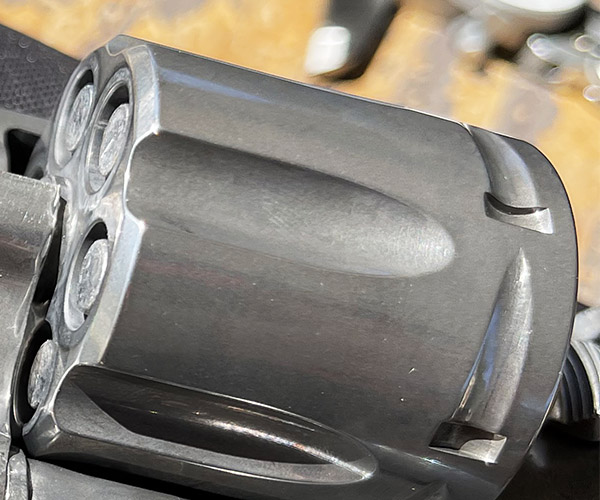
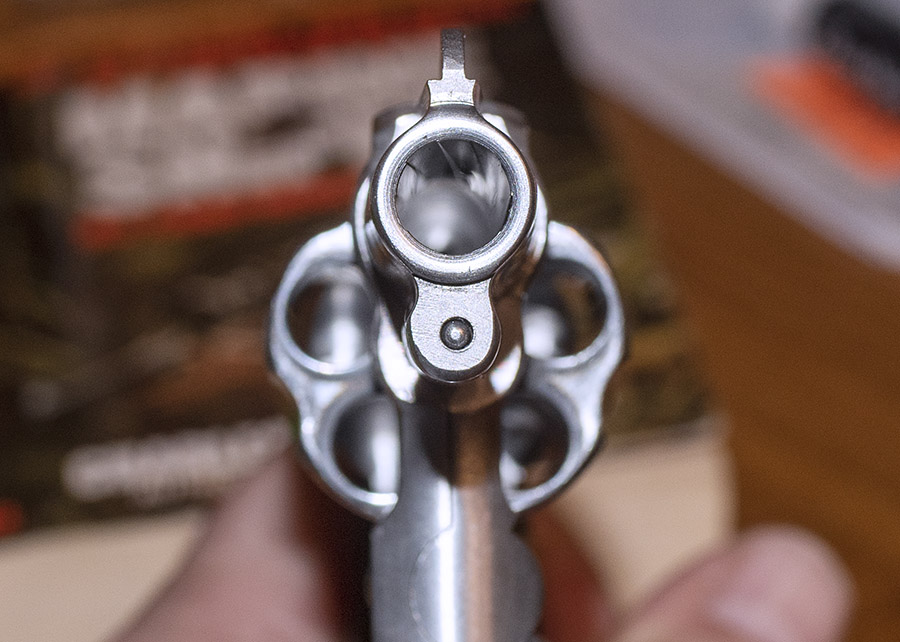
Take revolvers, for instance. Timing is critically important. For a revolver, timing refers to having the chamber precisely aligned with the barrel when the hammer drops. If it’s not, the barrel becomes a salami slicer, which is good if you’re a mohel but bad if you’re a shooter (or another shooter on the firing line).
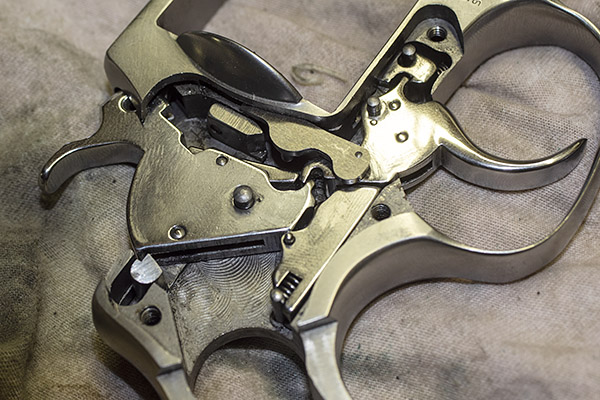
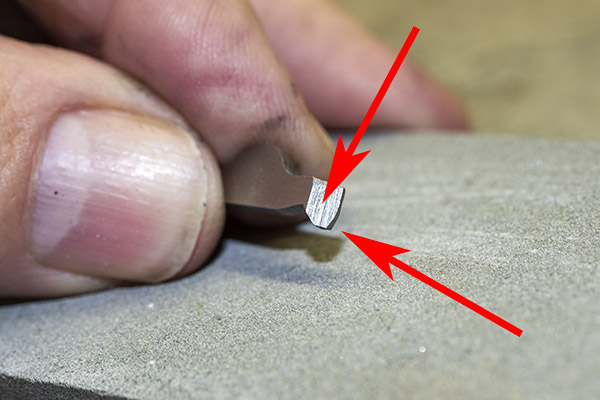
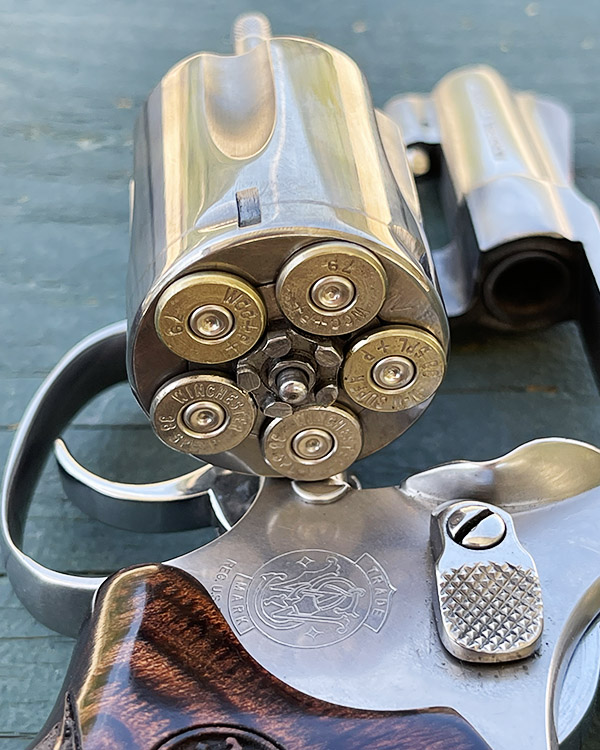
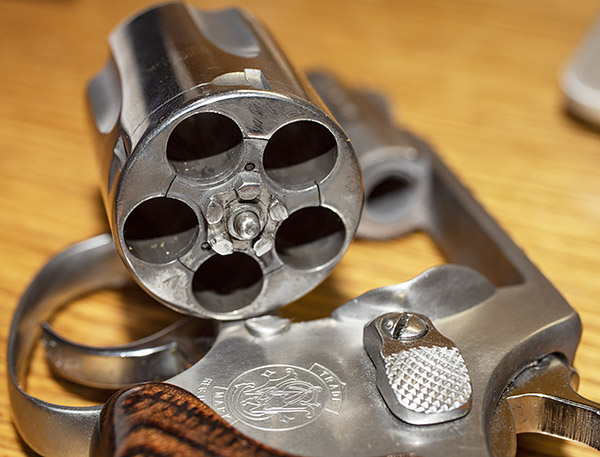
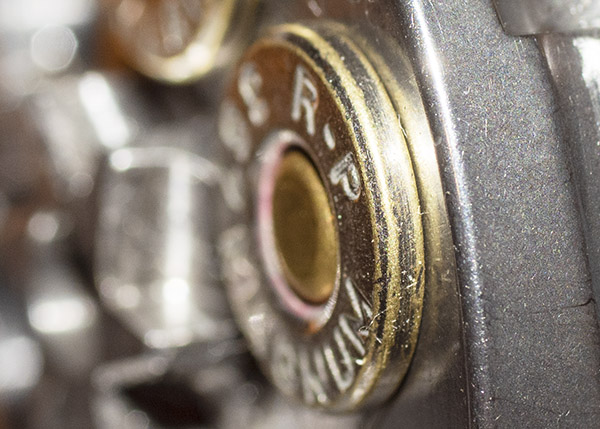
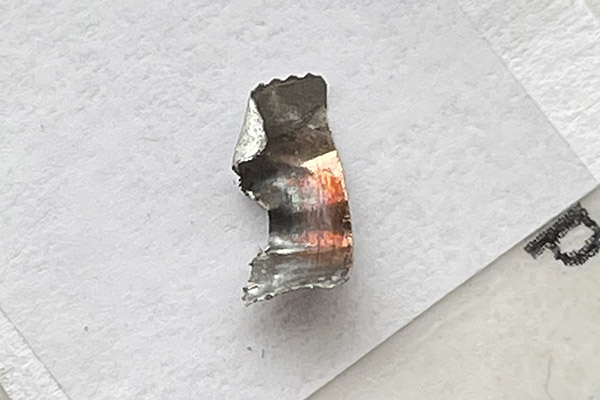
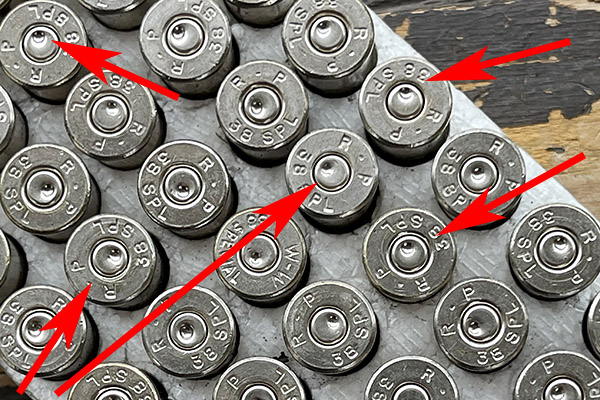
Take a look at that lead shaving in the photo above. It’s what squeaked out of my Model 60 and went sideways at high velocity between the cylinder and the barrel. It did that because the revolver went out of time. Primers can be another indication of incorrect revolver timing, as shown in the photo below. When the firing pin’s primer indentations are offset like you see here it means you’ve got trouble in River City (or anyplace else you’re firing the revolver).
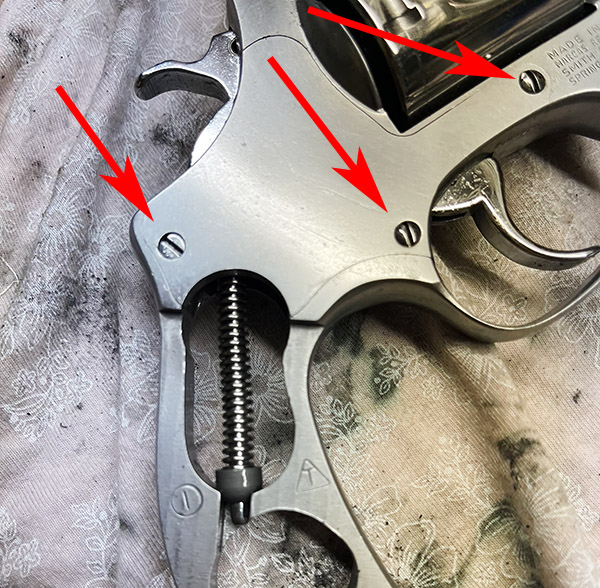
This blog explains how to correct an incorrectly timed revolver. We’ll start, as always, by making damn sure the gun is unloaded. Once we’re satisfied it is unloaded, the next steps are to remove the revolver’s grips and sideplate. The grips detach with a single screw. Three screws secure the sideplate, and each of them is different. The one at the rear of the sideplate is easy to distinguish because it has a flathead to fit under grips. The other two have domed heads, but they are not identical. The screw at the front of the sideplate is dimensioned such that it locks the yoke in position fore and aft, but it allows it to rotate. If you switch the two domed screws when you reassemble the revolver, the cylinder will not swing out of the frame freely.
Once the grips and sideplate screws are out, don’t try to pry the sideplate off the revolver frame. Hold the revolver over your workbench with the sideplate facing down, and give the left side of the grip frame a few sharp whacks with a plastic mallet or a screwdriver handle. The sideplate will drop out, and the transfer bar will drop with it.
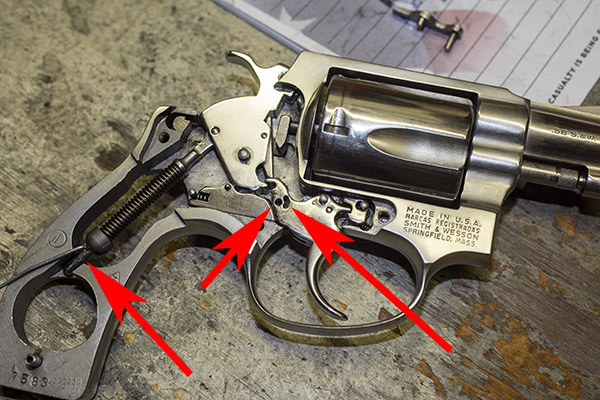
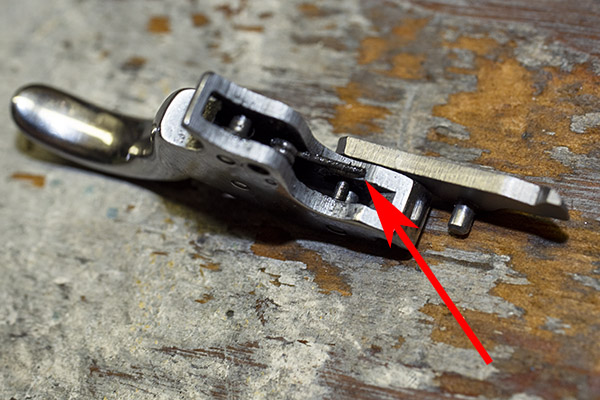
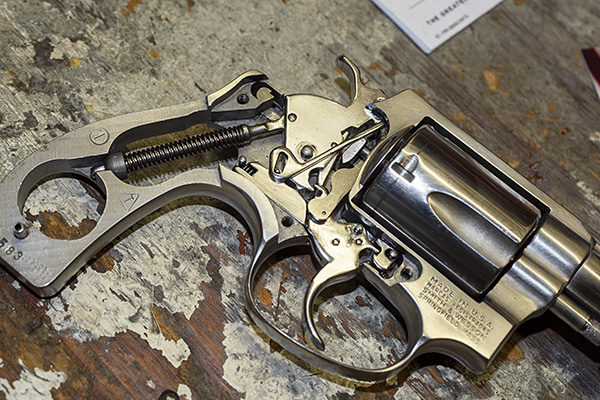
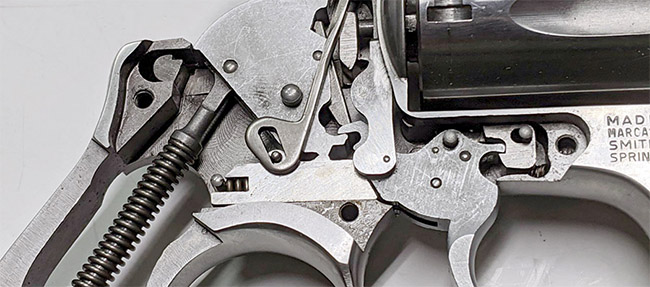
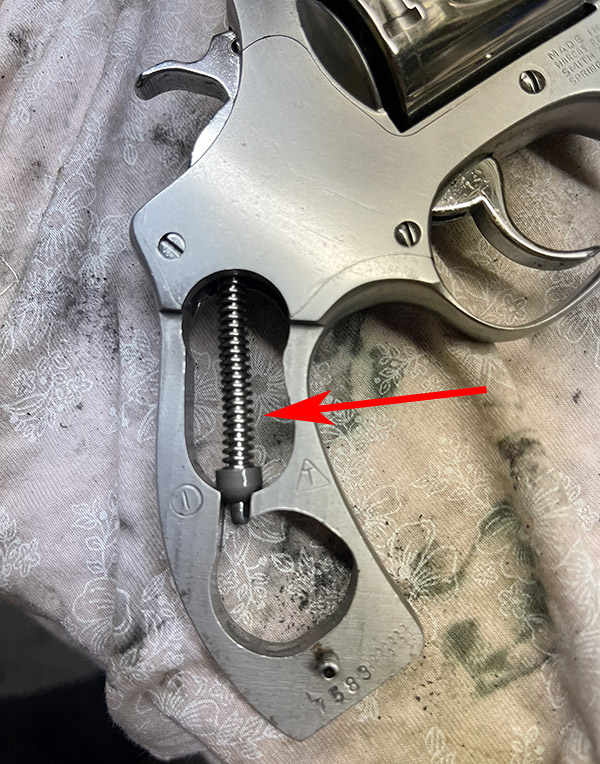
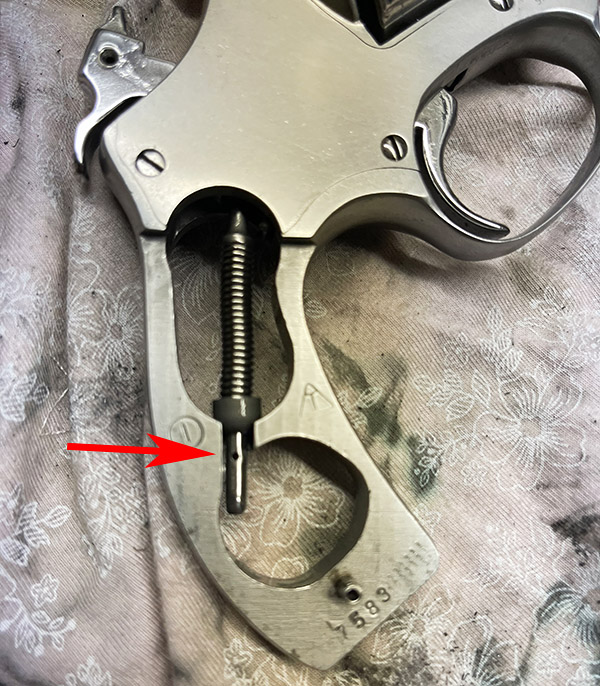
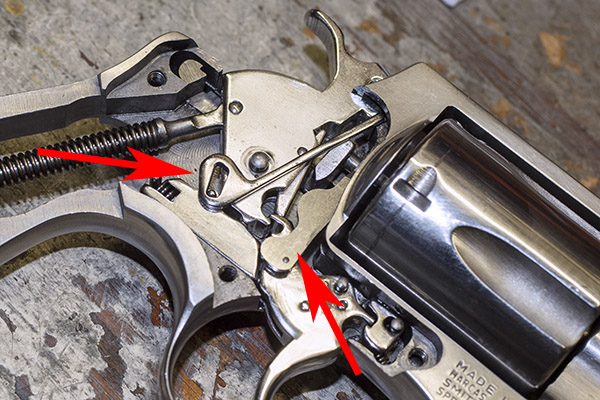
After the grips and the sideplate are off, here’s what the guts of a Model 60 look like. The transfer bar is the piece denoted by the left arrow. It will probably have already fallen off the gun when you removed the sideplate. Our focus in this blog will be on the hand, which is the piece noted by the red arrow on the right in the photo below. The hand will pivot counterclockwise in the photo below. Rotate the hand counterclockwise and you can lift it out.
The hand is what moves upward as you pull the trigger or cock the hammer. It fits through a slot in the revolver’s frame to engage the little nubs on the cylinder’s ejector.
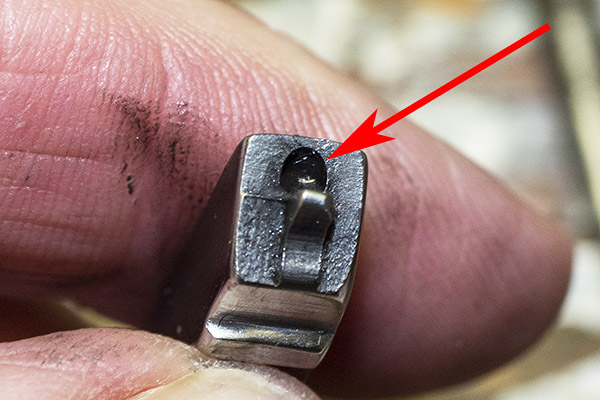
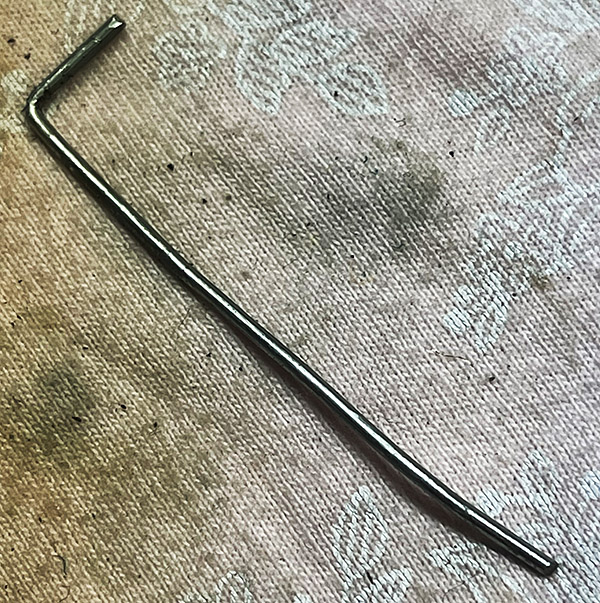
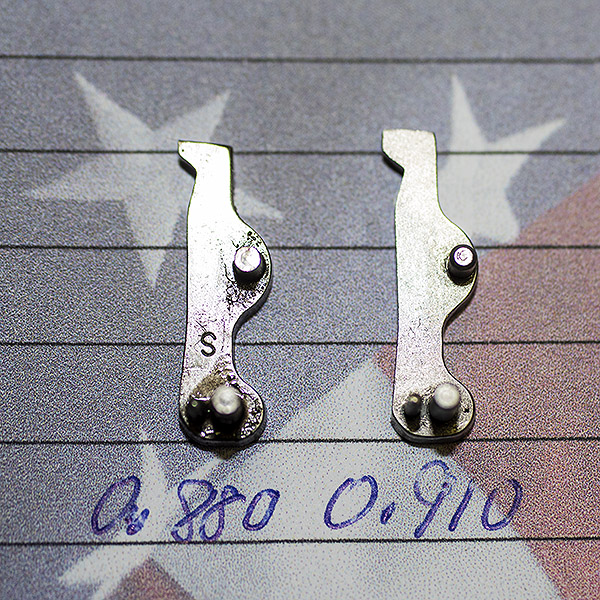
Here’s what the hand looks like after you have taken it out of the revolver. The hand on the left (in the photo below) is the one that was in the revolver and Model 60 to go out of time; the one on the right is a brand new one.
You can see there’s a big difference in length between the old and the new hands. I bought my new hand from MidwayUSA.com. It was about $25.
The next steps involve removing most of the revolver’s internal pieces. You don’t have to do this to get the hand out of the gun, but you will have to remove and reinstall several internal components several times to properly fit the hand. This involves checking both single and double action function testing, disassembling, removing very small amounts of material from the upper part of the hand, reassembling, and repeating the process several times until the revolver is functioning satisfactorily.
We’re going to remove the hammer spring and yoke using the same paper clip custom tool we used for installing the lighter hammer spring (denoted by the left arrow). Those other two arrows denote where the hand’s two bottom pins fit into the trigger. We’ll come back to that later.
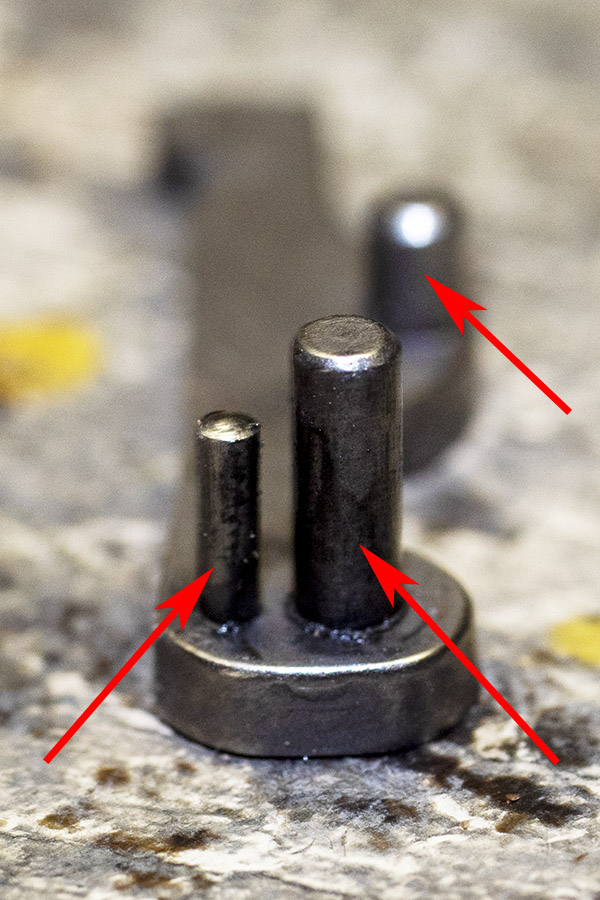
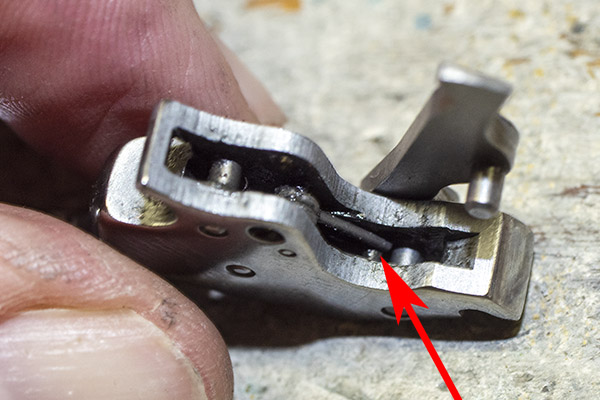
This next two photos show the hand’s bottom pins. The third pin is a stop. We’ll come back to that later, too.
At this point, push the revolver’s cylinder release forward, lower the cylinder out of the frame, and slide the yoke and the cylinder off the revolver.
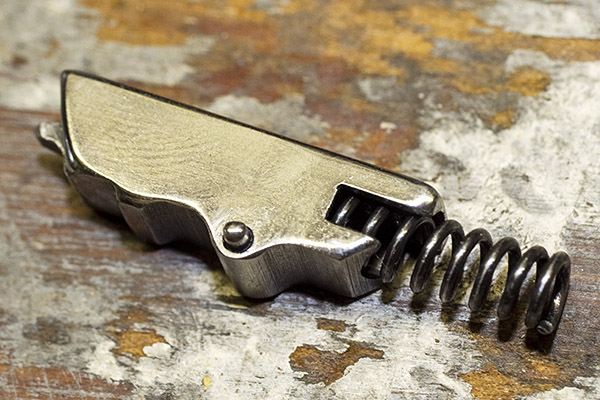
We’ll next remove the revolver’s hammer. It lifts out to the right. Then we get to the trigger spring and rebound slide. It’s tricky. It’s the piece just below the hammer in the photo below. Note that it has a spring acting against a post at the rear. After you have removed the hand and the hammer, you can pry the rebound slide away from the revolver’s frame, but make sure you cover that spring. If you don’t, it will go flying. Don’t ask me how I know.
Here’s the trigger spring and rebound slide after removal from the revolver.
At this point, you can lift the trigger out of the revolver.
This is where things get even more tricky. We’ll fit the new hand to the revolver. Doing so will require installing it as delivered to get a rough feel for how much material we need to remove from the hand, reassembling the revolver to check functionality, disassembling again to remove the hand, stoning the upper surface down a little, reassembling, and repeating the process. It took me three assembly/disassembly/reassembly cycles to get it where it needed to be. Slow and gentle is the approach here. You can take material off the hand; you can’t put it back on. Take too much off, and you’ll ruin the new hand.
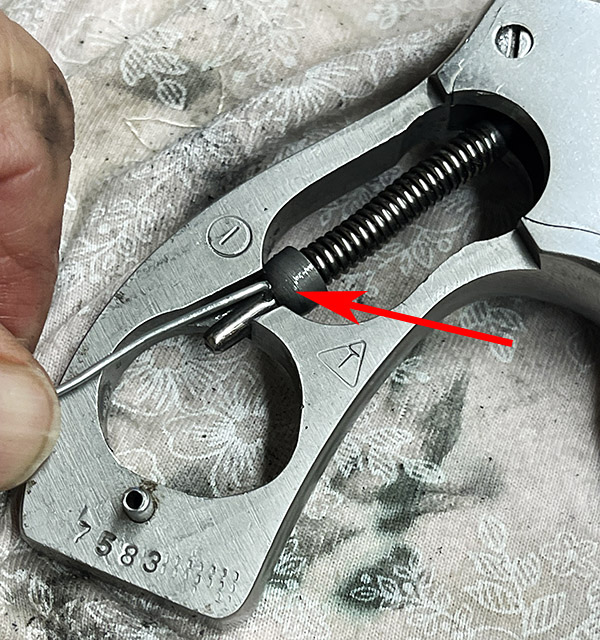
The first thing we need to do during the reassembly step is install the new hand in the trigger, and that’s tricky, too. There’s a tiny torsion spring in the trigger, and its purpose is to keep the hand pressed forward against the extractor. You can see the red arrows pointing to the spring in the photo below.
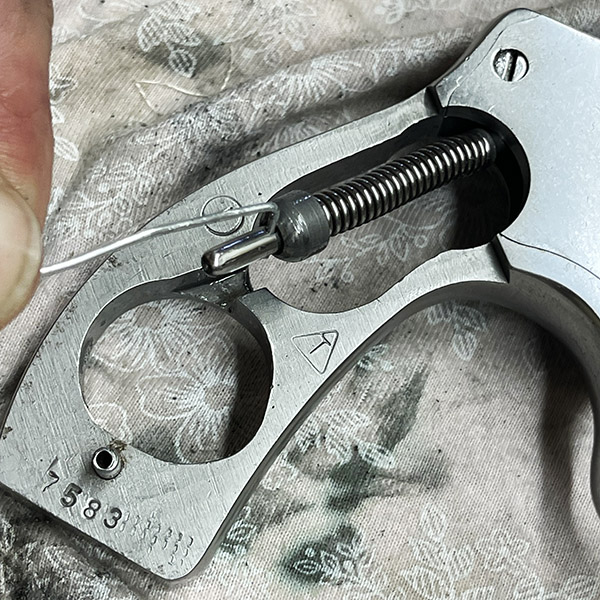
That little spring needs to be on top of the hand’s smaller lower post, and in order to get it there, the easiest way is to push it up from beneath the trigger before you attempt to install the hand, rest the spring on the side of the trigger, install the hand, and then push the spring back into the trigger. Here’s what it looks like with the spring pushed on the side of the trigger.
After you have inserted the hand into the trigger (as you see above), you can then push the spring back into the trigger’s slot.
We are now ready to start the fitting process. Put everything back together again except the transfer bar, the sideplate, and the grips. When you reinstall the rebound bar, make sure the little shaft that extends from the rear of the trigger engages the cavity in the front of the rebound bar. You can see that cavity in the photo below.
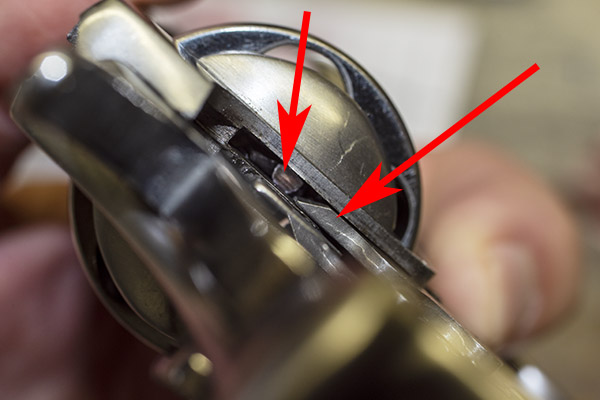
When you look at the revolver from the rear, you’ll see the hand inside the revolver frame slot, and how it moves up and down when the hammer is cocked (if you are firing single action) or when the trigger is pulled all the way to the rear (if you are firing double action). The hand acts against the little nubs on the extractor to rotate the cylinder. You can see one of the extractor nubs in the photo below.
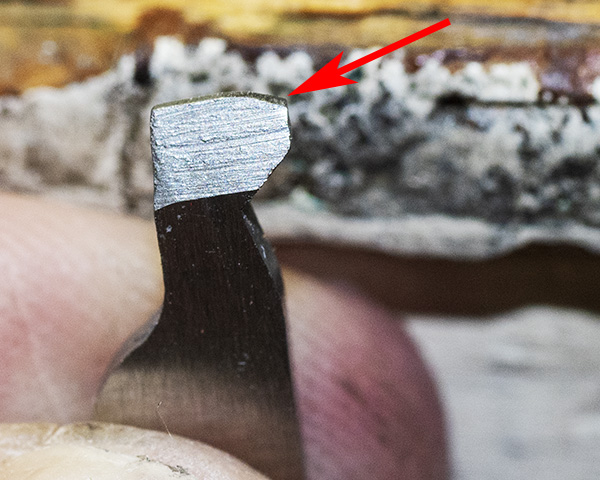
On a new hand, the hand will most likely be too long. The revolver may or may not rotate the cylinder when you actuate the trigger in a double action mode, and the hand probably will not actuate the cylinder when you cock the hammer as if you were firing in the single action mode. That is because the hand is so long it slides along the rear of the extractor nubs without dropping in between them, which it needs to do to ratchet the cylinder so the next round comes into battery. In the photo above, you can see a little bright witness mark at the bottom of the upper red arrowhead where this occurred.
We next disassemble the revolver’s guts as described above to fit the hand to the revolver. We’ll remove a bit of hand material from its top portion using a stone. I angled the top edge of the hand. Here’s what that looks like.
The lower arrow in the photo immediately above shows where I removed hand material. The upper arrow shows the hand’s angled surface that completes the cylinder’s advance. Leave this area alone.
The photo above presents another look at the same angled portion of the hand as it is delivered. The red arrow points to the area where I removed material to fit the hand to the revolver. The larger angled area is how the hand came from the factory. It looks rough as hell, like it is begging to be polished, but I left that part alone and my revolver is silky smooth.
After we’ve done the above assemble/check/disassemble/remove hand material a few times, you’ll get to where the revolver looks the cylinder in place right where it is supposed to be (you’ll need to reinstall the cylinder and yoke to do this). What we want to do is put your finger on the cylinder so that it has a little drag while cocking the hammer. When the hammer is fully to the rear, the bolt at the bottom of the cylinder should click into place. Then we want to do the same thing (put your finger on the cylinder to impart a little drag) and pull the trigger to the rear double action style. The bolt should snick into the cylinder just before the hammer falls.
When you think you’re there based on the above checks, it’s time to fully reassemble the revolver. Lay the revolver on its left side and place the transfer bar on top of the hammer as you see in the photo below. You have to have the transfer bar all the way up so the pin in engages is at the bottom of the transfer bar slot. If you don’t have it positioned as you see below, the sideplate will not fit back on the revolver.
After doing the above, good buddy Paul suggests loading dummy rounds in your Model 60 to make sure it cycles correctly. Before you go to the range after doing this kind of work, it’s a good idea to take some fired cases and cycle them through the gun in both single action and double action modes. If you have some with the primer indentations off center (as shown in the photo at the start of this blog), check to make sure that the new indentations are now more centered (they were on my Model 60). DO NOT put live primers in an otherwise empty case for this test; they can back out of the cartridge case and lock the gun. You also want to make sure that there’s no interference between the new hand and the case rims. I haven’t encountered this on a Smith and Wesson revolver; Paul has on a Taurus revolver.
I used the fired empty cases you see in the photo near the top of this blog (the ones with the off-center primer strikes) and cycled five through single action, and another five through double action. The gun cycled flawlessly, and the previously fired cases now had primer indentations in the center of the primers. Things were looking good, but the real test would be on the range.
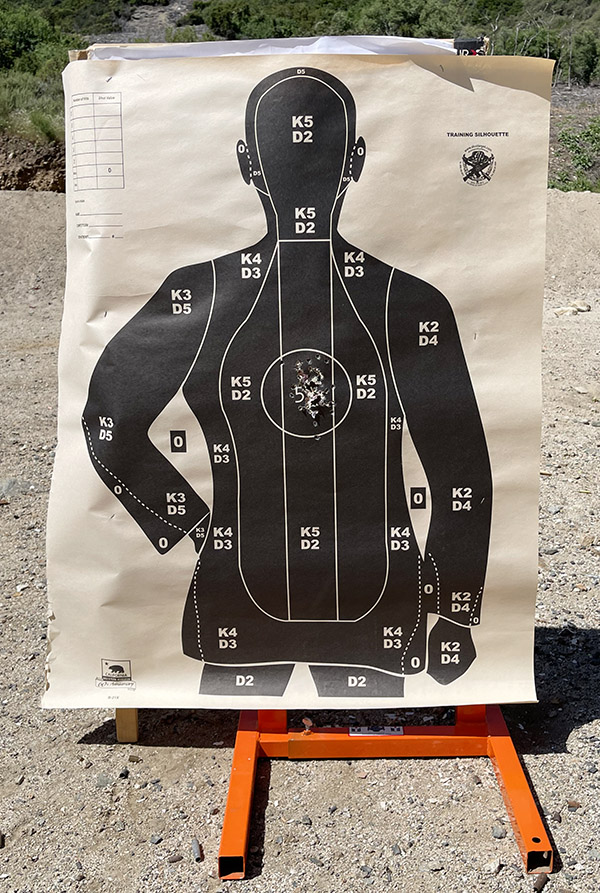
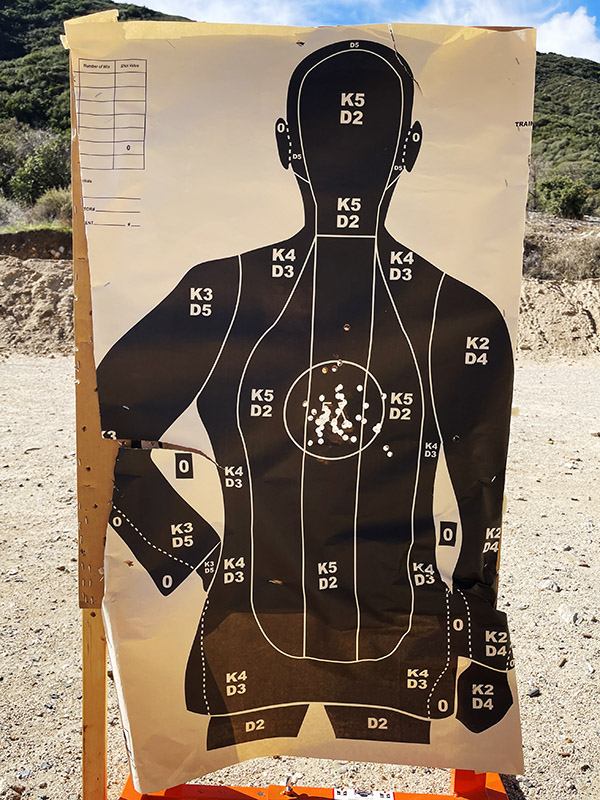
I set up a police qualification target at 7 yards and pumped a box of ammo (5o rounds) through the Model 60 shooting double action rapid fire. Wow, was I pleased with the on-target results.
After the first few cylinders of ammo, I looked at the forcing cone around the frame. Unlike earlier, when there was a heavy lead spatter pattern on the right side of the frame only, the spatter was now evenly distributed around the forcing cone. That’s another indication that the cylinder was centered in the forcing cone (i.e., aligned with the barrel). Things were looking good.
I then examined the primer indentations in fired cases. They were smack dab in the center of the primer, right where they should be.
And folks, that’s it. This revolver is between 50 and 60 years old, and it’s now as good as new. It’s a favored handgun and it does good work, as that target above attests.
Watch the blog, as the Model 60 will continue to appear here. It’s just too good and too much fun to relegate to the safe.
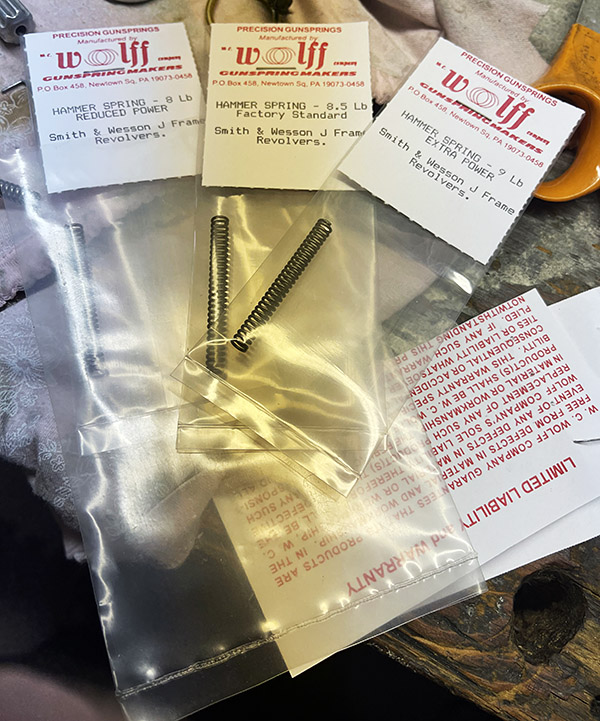
I love my S&W Model 60 and I shoot it a lot. It’s particularly cool after I had TJ (of TJ’s Custom Gunworks) do an action job on it. Not content to leave well enough alone, I convinced myself that (after tracing the occasional double action misfire to not-fully-seated primers) that what I really needed was a lighter hammer spring (in addition to the lighter trigger spring I had already installed). Wolff Springs sells a lighter hammer spring kit, and I went for the lightest hammer spring I could get.
The Wolff Springs hammer spring kit. I went with the lightest spring.
The lighter trigger spring affects single action trigger pull after you have already cocked the gun and it has nothing to do with the occasional double action misfiring I had experienced in the past. Double action trigger pull is affected by both the trigger spring and the hammer spring, but the hammer spring is a much beefier spring and it drives most of the resistance when firing double action. The hammer spring, if too light, can induce misfires.
The Wolff hammer spring kit includes a standard strength spring (an 8 1/2-pound spring), a heavier spring (a 9-pound spring), and a lighter spring (an 8-pound spring). I wanted a lighter double action pull, so I used the 8-pound spring. The tradeoff is this puts less force on the hammer, which means it has lower velocity when it hits home, and that ups the likelihood of a misfire.
The hammer spring is easy to change, and if necessary, I can go for either of the two heavier springs at the range. All it takes is a small screwdriver to remove the grips, and the same exotic custom tool used for disassembling the Rock Island Compact 1911 (a bent paper clip). The photos below show how this is done.
The Model 60’s hammer spring, with the hammer in the uncocked position.The Model 60’s hammer spring, with the hammer cocked. Note that the hammer yoke (the rod running through the center of the hammer spring) has been pushed back, exposing a hole in the rod.A high tech, German tool steel special assembly/disassembly aid? Nah, it’s a bent paper clip and it works gang busters.To remove the hammer spring yoke and the hammer spring, insert the paper clip into the yoke and gently release the hammer by pulling the trigger and lowering the hammer.With the hammer dropped, the spring is captured in a compressed mode and the hammer spring and the yoke can be removed from the gun. Once this subassembly is removed, you can manually push the spring cap to further compress the spring, remove the paper clip, remove the spring cap and spring, and install the lighter hammer spring. Assembly is the reverse of disassembly.
While installing the new hammer spring, I noticed that my normal gun cleaning routine just wasn’t cutting it on the Model 60. There was still a bit of lead in the barrel, and the powder residue was building up around the yoke. I selected a bronze bristled toothbrush and went to work on the cylinder, the yoke, and the frame, and a bronze bore bush for the bore. When the remnants of gunfights past were gone (you know, my encounters with zombies, as previously described), I spritzed the gun with the universal cleaner (WD40) and then I wiped it down before applying gun oil.
That’s when I noticed that the barrel-to-cylinder gap was nonexistent. Zip. Nada. Zero. The front of the cylinder was touching the rear of the barrel. Uh oh. That’s no good. There’s supposed to be a gap there (like you see in the photo below), because if there’s no gap the cylinder will drag on the barrel. That will degrade the double action trigger pull and, in a worst-case scenario, it can drive the revolver out of time (the chamber won’t be aligned with the barrel). The technical term for the fore-and-aft cylinder movement that assures a minimum clearance when the cylinder is fully forward is called end shake. There needs to be some, and there needs to be a gap. Ideally, that should be 0.004 to 0.008 inches. Any less, and powder and lead residue will bind the cylinder, any more and too much gas escapes (and velocity suffers).
The barrel-to-cylinder gap. This is about .004-inch with the cylinder pushed forward, and that’s the gap I want. This was after I installed the TriggerShims.com cylinder shim.
You measure the barrel-to-cylinder gap with a feeler gage, just like you would when setting the valves on a motorcycle. I’ve done that (as you know from reading this blog and any of the CSC shop manuals), and I already had the feeler gages I needed.
My feeler gage. I’ve probably owned this tool for 40 years. It still works. I use it for adjusting valves on my Royal Enfield, too.
After a bit of internet research, I learned that the way to address inadequate gap is by shimming the cylinder and its fit on the yoke. That’s when I first learned there’s a business that specializes in making shims for this exact purpose. In short order I was communicating with Lance Shively, who heads TriggerShims.com.
The cylinder shims from TriggerShims.com. They were well packaged and sent in a standard business envelope.The cylinder shims out of the pack. I ordered the four-piece set because I had not worked with these before, I didn’t know what I would need, and they were inexpensive. They are color coded by size.
Lance and his wife, Tammy, run a real Mom and Pop operation that manufactures gun specific shims for a living. Lance has an extensive background in small engine repair and tool and die making, and he and Tammy parlayed that into TriggerShims, which has been doing well for more than 14 years now. Lance told me his primary concern is customer satisfaction, and I can tell you my perception in working with TriggerShims is they have mastered it. I had the Model 60 custom end shake shims in three days, there was no postage charge, and the price was more than reasonable for custom gun parts. Lance runs a Christian business, he believes in God and country, and he’s not bashful about letting people know that. He and Tammy also sell select items from other vendors when he finds a company he likes and believes in, but that is a very select group. The two biggest ones are Wolff and Volquartsen.
I received the shims I ordered from Lance in just a few days, and installation was trivially easy. I had to remove the yoke, disassemble the ejector rod from the extractor, install the shim I wanted to use (I went with a single .003-inch shim to give the clearance I wanted), and then reassemble everything. It only took a few minutes, and the only tricky part was remembering that the ejector rod had a left-hand thread.
This screw has to be removed to allow removal of the yoke and cylinder from the revolver. You don’t need to remove the revolver’s side plate.With the yoke removed, you unscrew the ejector rod (the knurled piece you push on to eject empty brass from the cylinder) and everything comes apart. Hold on to the ejector rod as you unscrew it so parts won’t fly away, and remember that it is a left-hand thread.The cylinder shim(s) fit beneath the extractor spring. They are pushed into the cylinder by the extractor spring as the cylinder and yoke subassembly are reassembled. The shim(s) position the cylinder further to the rear, increasing the barrel-to-cylinder gap.
TriggerShims.com manufactures over 100 firearm-specific shims with thicknesses from .002-inch to .007-inch, with some specialty items as thick as .010-inch and as thin as .0015-inch. Lance sends shims worldwide, with Australia and Canada being the biggest international customers (he also ships to more than 100 other countries).
Lance and I had a good conversation, during which he told me he enjoyed exploring the ExhaustNotes site and our blog. One thing led to another, and TriggerShims.com is our newest advertiser. You’ll see the TriggerShims.com logo on the ExNotes blog and all ExNotes pages, and Lance asked if he could post links to some of our Tales of the Gun stories on the TriggerShims.com site. Hey, you bet, Lance, and welcome aboard.
I had the Model 60 on the range yesterday morning, and it is a much smoother running revolver. I confirmed another issue I’ve experienced on this revolver before, and that’s a slightly out-of-time situation when firing double action (probably induced by the cylinder drag described above). That’s going to take a new hand to correct (“hand” is the nomenclature used for the part that advances the cylinder). The replacement hand is on order, and there will be another Model 60 blog coming up in a couple of weeks on it. As always, stay tuned.
There’s a Facebook group called Snub Noir and I enjoy it. They have a lot of good info there about concealable revolvers, and it projects kind of a ’40s/’50s/’60s vibe having to do with private investigators and police officers (and movies, TV shows, and novels from that era). It’s centered on the Colt and Smith snubbies of the day, and on today’s snubbies, too. If you’re into snub nosed revolvers, you’ll like this place. If you visit it, you’ll understand the Gats and Hats thing.
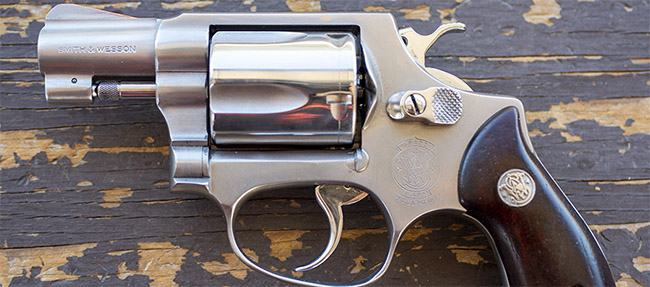
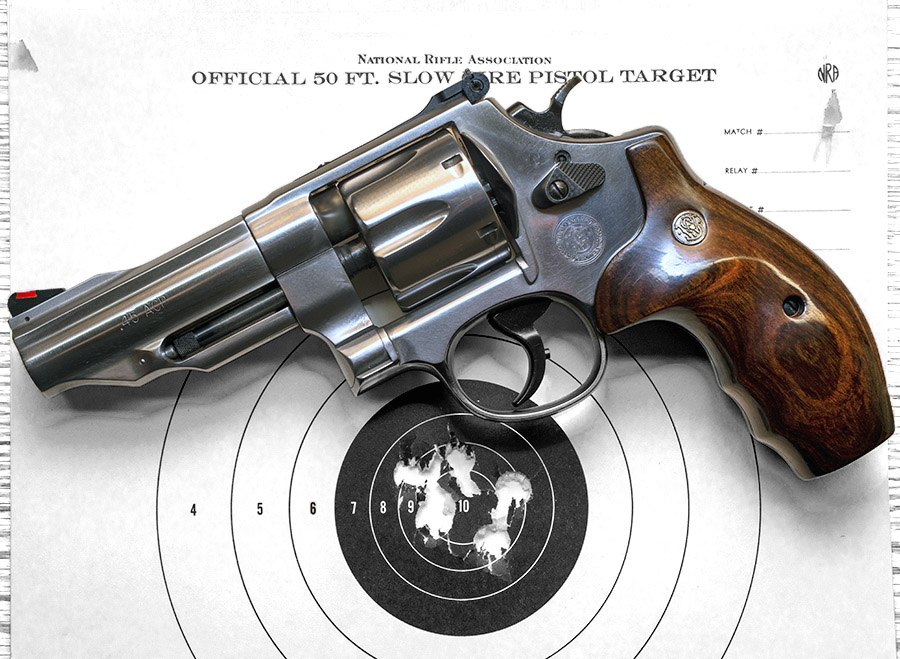
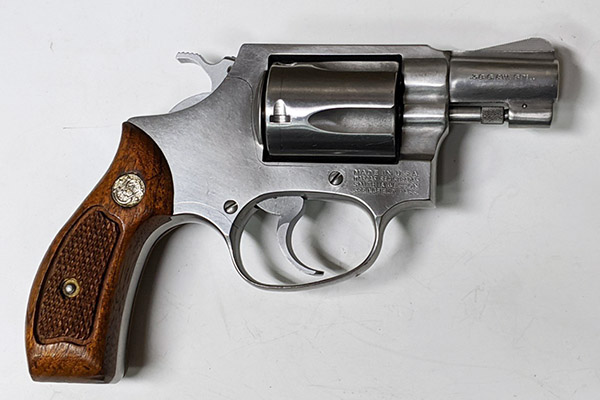
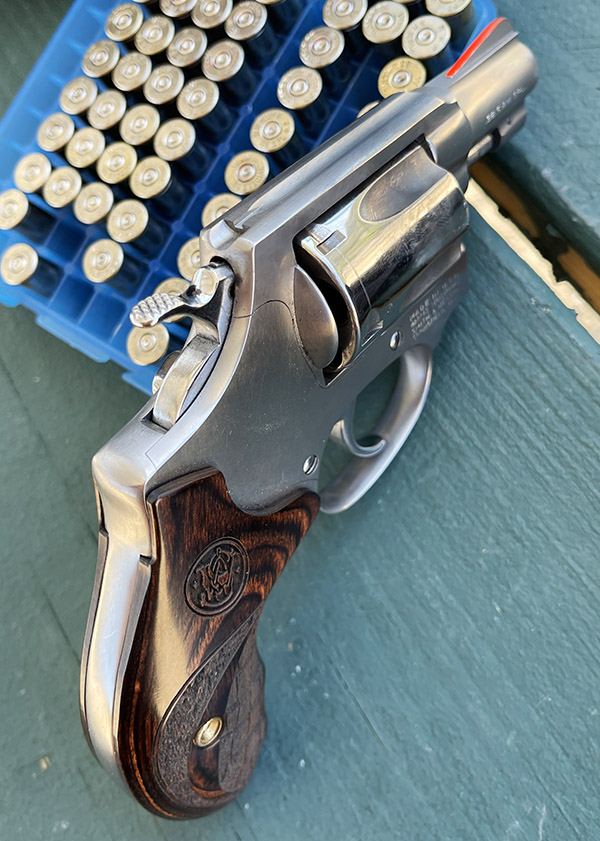
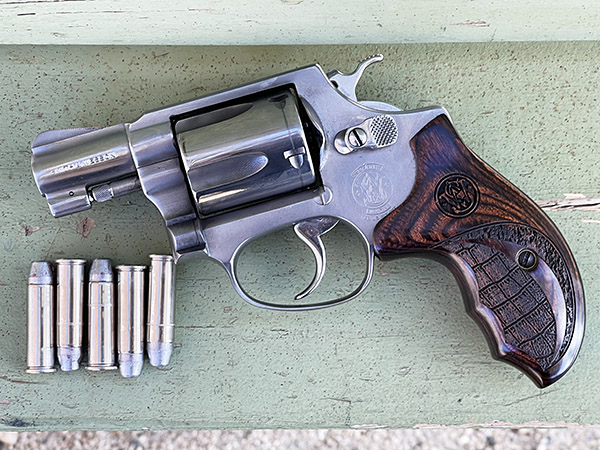
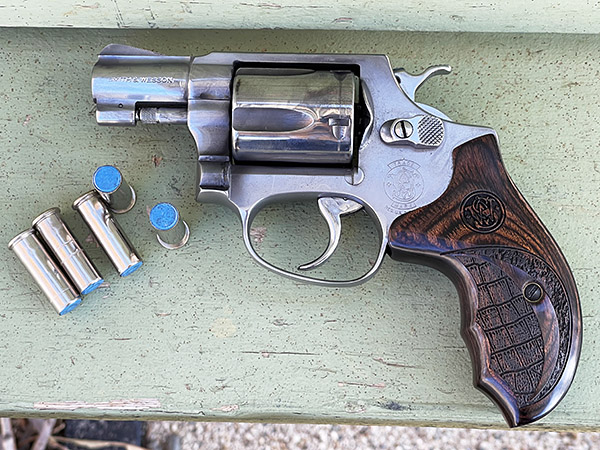
That beautiful S&W Model 60 you see in the big photo above is my personal carry gun and it’s a sweet piece. It’s been selectively polished, it has Altamont grips, and it has a TJ action job (you can read more about TJ’s work on his website and I’ll give you a few more links on my Model 60 at the end of this blog). I’ve done a fair amount of load testing with the Model 60 and I know the loads it likes from accuracy and shoot-to-point-of-aim perspectives. The best load is the FBI load, which is a 158-grain bullet over 3.5 grains of Winchester 231 propellant.
Five rounds of .38 Special, with a 158-grain flatpoint cast bullet and 3.5 grains of Winchester 231. It’s a great load. You can read about it in the links provided at the end of this blog.
I wanted to try something different, though. I’ve shot the Model 60 at 50 feet, 25 yards, 50 yards, and 100 yards. I know, I know: Those latter two distances are not really what the snub nose revolver designers had in mind when they designed these guns. But I was curious when I did those tests. I know a retired police officer who can hit a clay target at 50 yards (the kind you dust in trap or skeet shooting).
The police sometimes qualify at 7 yards, and I think that’s more in line with what a snubbie is intended to do. And, you know, there’s this zombie apocalypse thing that’s coming down the road. I’ve done my homework, and I know that most zombie hostage incidents (i.e., where a zombie is holding a damsel in distress) occur at 7 yards. I wondered: How would I do firing my Gat double-action as quickly as I could at 7 yards? I want to be prepared, you know.
Five rounds is all the Model 60 holds. It sure is slender and it conceals well.
Fortunately for me, zombie-holding-hostages targets are readily available on Amazon, so I grabbed a couple and headed to the range to test my hostage rescue skills with two different loads. The first was the old bullseye target competition .38 Special standard: A 148-grain wadcutter (in this case, copper-plated wadcutters from Xtreme Bullets) over 2.7 grains of Bullseye propellant. It’s the load I’m set up to produce in large quantities on my Star reloader, and it’s the load you see in the top photo (the Dr. Seussian Gat in the Hat pic). The other is the FBI load mentioned above: A 158-grain bullet and 3.5 grains of Winchester 231 secret sauce.
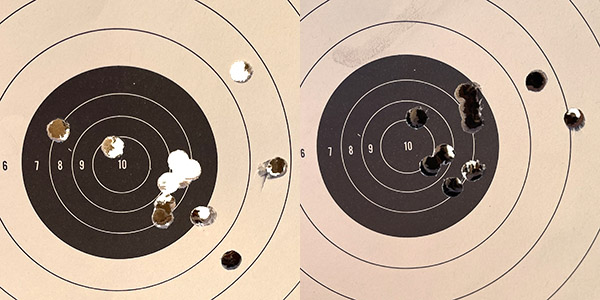
So how’d I’d do? The short answer is not too bad. Not as good as I thought I would, but good enough and certainly close enough for government zombie work. The first target (the one immediately below) shows the results of six full cylinders (30 rounds, as the Model 60 holds five rounds). The good news is 29 of those shots went directly into the zombie’s noggin and none hit Betty (the hostage).
Betty and her zombie captor. He’s toast. Note the one round that tumbled just above Betty’s head. These were low-velocity wadcutter loads.
The bad news? One of the wadcutter bullets tumbled. Fortunately for Betty it went right over her head. You can see the bullet’s outline in the target above. It might have been that the Star threw a light load on that round, or maybe a case split and let too much pressure escape, or maybe these light target loads are marginal in the Model 60’s short 2-inch barrel. Win some, lose some. Betty’s okay, though…that’s the important thing.
Not surprisingly, the FBI load did much better (old J. Edgar know what he was doing against both zombies and commies, I think). The 30 holes you see in Mr. Zombie below went into a tighter group, none of the bullets tumbled, and most importantly, none of them went into Betty.
Betty liked the FBI load better. So did I. The zombie offered no opinion.
I feel better now. I know if I can keep my wits about me and I have my Model 60, and if I can get the zombie to pose with Betty like you see above at 7 yards, he’s toast and Betty’s going to be just fine. For any zombies who follow the ExNotes blog: You’ve been warned.
Never miss an ExNotes blog…sign up for free:
As this blog’s title states, this blog is Gats and Hats I. Will there be a Gats and Hats II? Stay tuned, my friends. Two more days, and we’re calling in the heavy artillery.
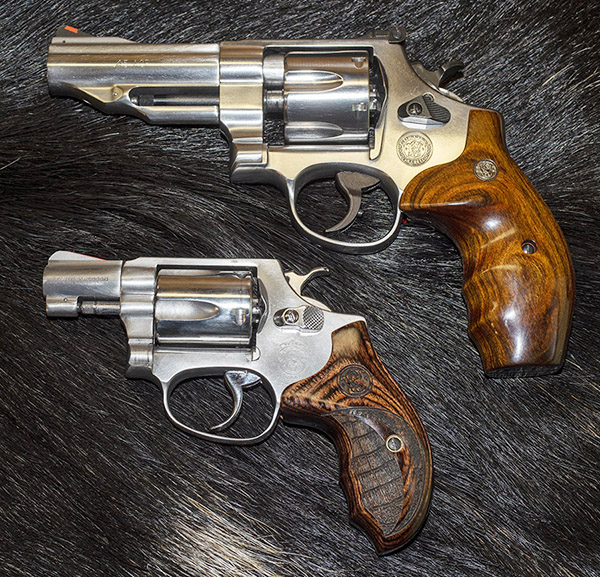
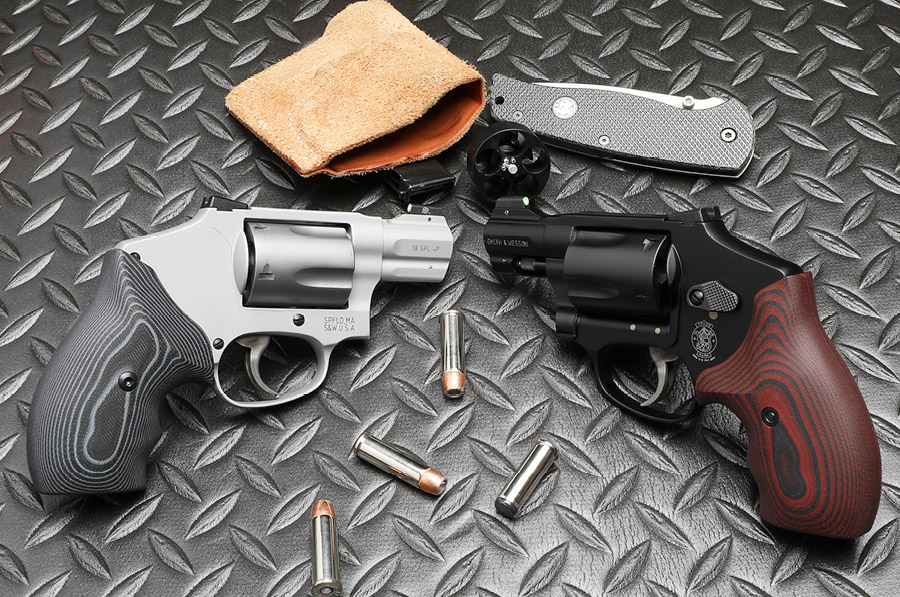
When I first posted about the Model 60 load development plan and the Altamont grips I bought from good buddy Paul, the cover photo showed my recently-acquired Model 60 snubbie and a Smith and Wesson Performance Center Model 625 I’ve owned for years.
The Model 625 and the Model 60.
I like that photo because the two stainless steel Smiths look great on the wild boar skin. That skin is from a pig hunt Paul and I did in Arizona a few years ago.
The earlier blog was about finding an accuracy load for the Model 60, but a few people wrote to ask if I had a favorite load for the Model 625. I do: My usual accuracy load for the 625 is a cast 200-grain cast semiwadcutter bullet (sized to .452 inches) over 4.2 grains of Bullseye.
When I went to the range to run a few rounds through the 625 I picked a box of ammo I had reloaded in 2014. It was different than my usual accuracy load. I used the same bullet (a 200-grain cast semi-wadcutter), but instead of Bullseye I had loaded these over 6.0 grains of Unique. And instead of .45 ACP brass in star clips, I used AutoRim brass. This is the load I fired that 6-shot group you see in the cover photo above for this blog, and it’s a honey. The group, that is…not the photo (it’s hard to get true colors when using an iPhone in the shade). I shot at 50 feet while standing…there’s no rest for the Model 625 or the weary.
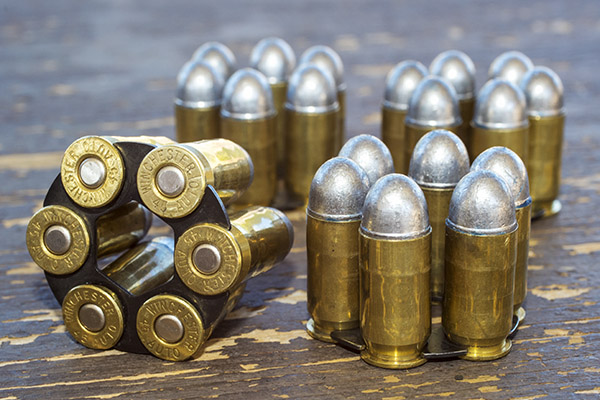
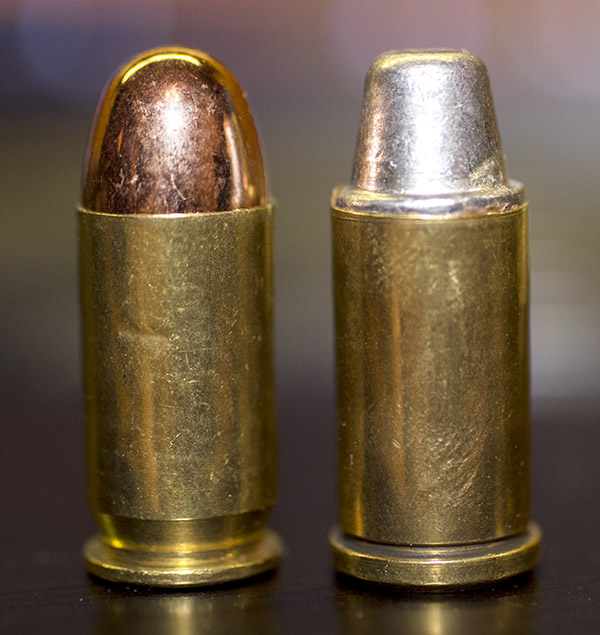
.45 ACP cartridges in star clips for the Model 625. These are loaded with 230-grain cast roundnose Missouri bullets.The .45 ACP cartridge (left) and the .45 AutoRim cartridge (right). The AutoRim cartridge is designed for use in the Model 625 without star clips. The ACP cartridge has a 230-grain roundnose Xtreme bullet; the AutoRim cartridge has Missouri’s 200-grain semi-wadcutter.
The AutoRim brass is in the tumbler as I write this and when I reload it I’m going to go with the same load: The 200-grain cast semi-wadcutter over 6.0 grains of Unique. It seems to be working for me.
Help keep us afloat: Please click on the popup ads!
Never miss an ExNotes blog: Sign up here for free!
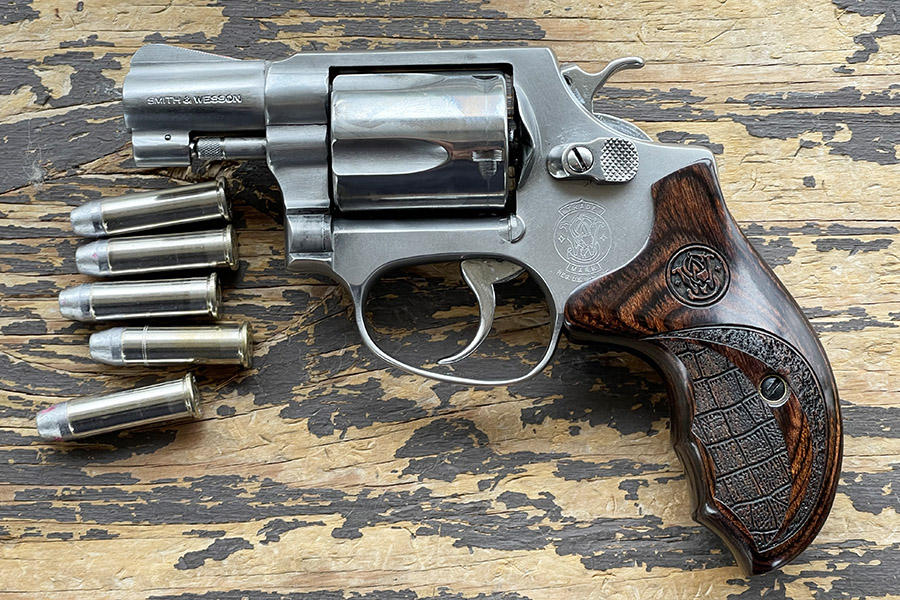
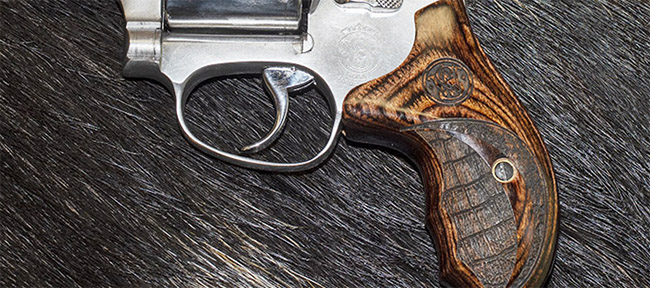
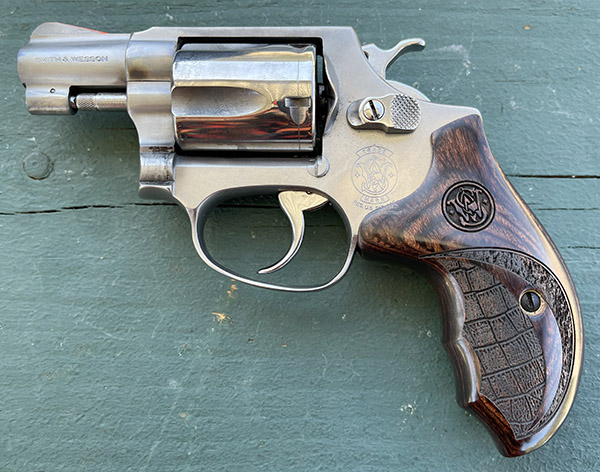
I visited with good buddy Paul up north last week, and while I was there he showed me a set of Altamont grips he had for his Smith and Wesson snubnose handgun. When I saw the grips it was love at first sight, and I had to have them for my TJ-customized Model 60. Paul was happy to oblige (thanks, Paul!), I came home with a new set of Altamont‘s finest, and they promptly went on the Model 60. The Model 60 now looks like a scaled-down version of the big .45 ACP Smith & Wesson Performance Center Model 625, and I had to grab the shot you see above. The 625 wears custom grips, too, but that’s a story for another blog.
There’s no question I’ve gone overboard in getting grips for the Model 60. It came with the stock checkered walnut grips (the original equipment on this handgun), as well as a set of Pachmayr rubber grips. The Pachmayrs would have been better for shooting, but I wanted a set of smooth rosewood grips and I found them on Ebay. They looked great, but they were painful to shoot.
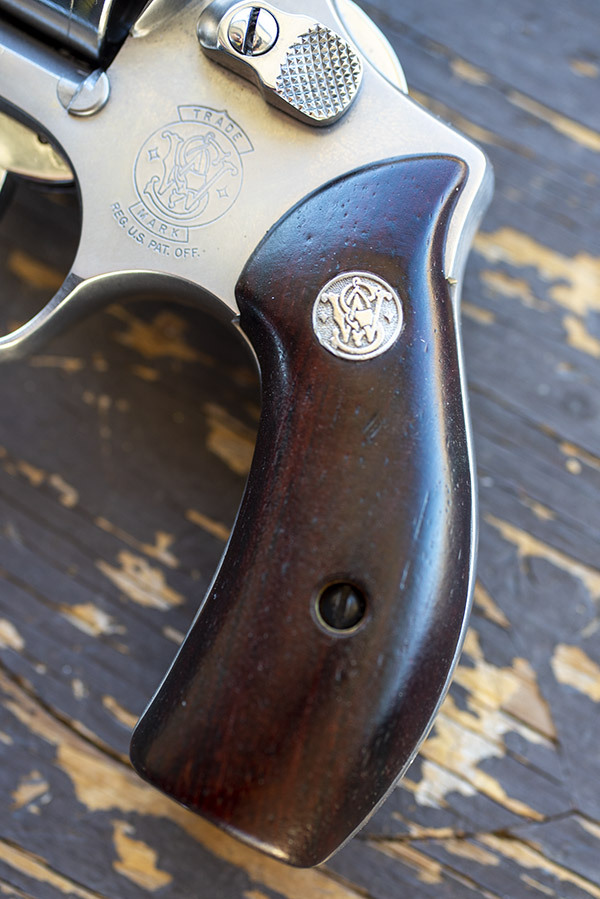
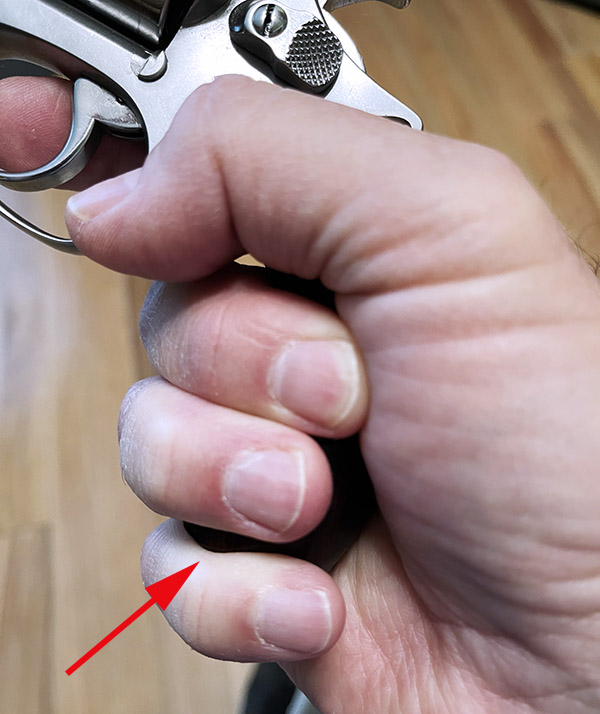
The Model 60’s OEM checkered walnut grips. Photo by TJ of TJ’s Custom Gunworks.Smith and Wesson J-frame uncheckered rosewood grips. These are the same size as the walnut grips shown above.The problem with both the OEM walnut grips and the replacement rosewood grips is that they are too small. My pinkie wraps around beneath the frame and takes a pounding with each shot.
The problem with the stock walnut grips and the Ebay rosewood grips is that my little finger gets under the grip. The recoil from the little Model 60 is significant (as we engineers like to say, f = ma), and it would pound my pinkie every time I fired it. Think about putting your pinkie sideways on a table and having someone whack it with a hammer, and you’ll have a pretty good idea what shooting this little snubbie was like.
All that’s changed with the Altamont grips Paul provided. Take a look. They’re beautiful.
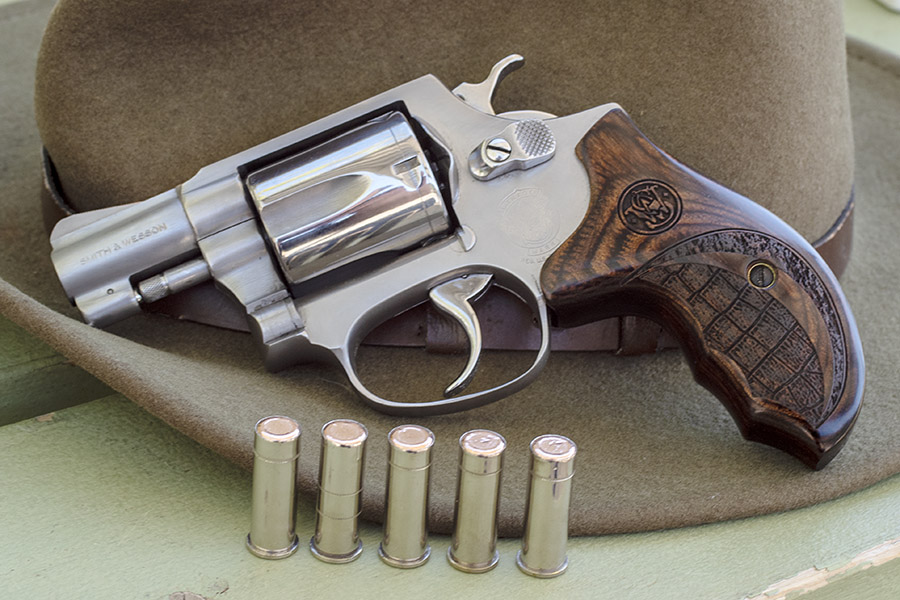
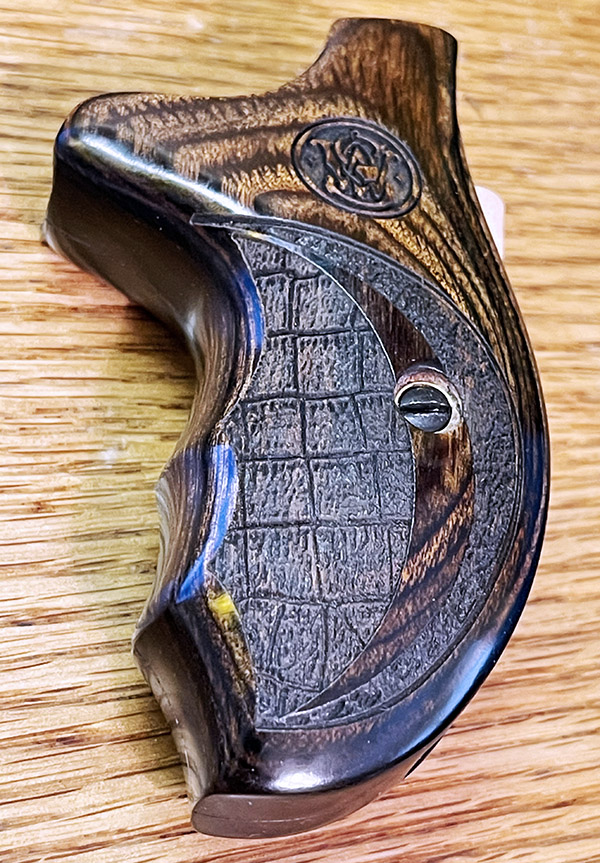
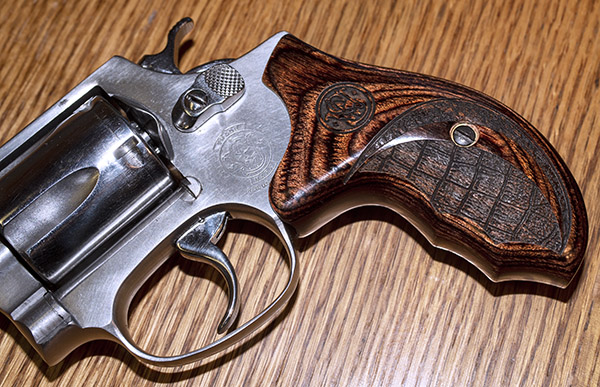
Custom Altamont grips for the Model 60. Note the stippling (a crocodile pattern!) and the laser-engraved S&W logo.The Altamont grips installed on the Model 60.
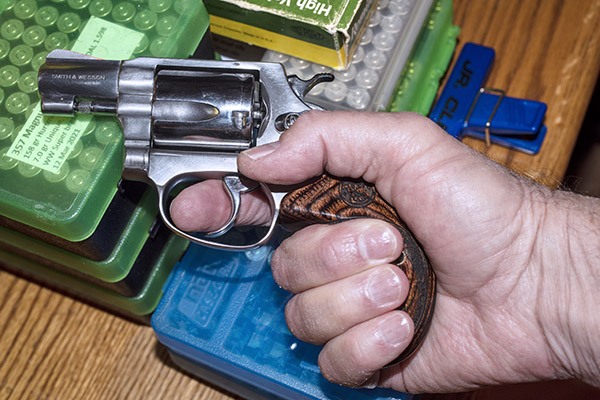
The new Altamont grips are extended just a bit below the frame and they have finger grooves. It keeps my pinkie from getting underneath the frame, and with the new grips the Model 60 just feels right in my hand.
The Altamont grips provide a much better ergonomic hold. I like them a lot.
These new Altamont grips have a much better feel to them. The wood-to-metal fit is way better than with the stock grips (the grips exactly contour to the Model 60’s frame, unlike the OEM grips). The next obvious question, and the one that really matters is this: How did the Model 60 shoot with the new grips?
In a word, it was amazing. The new Altamont grips completely changed the character of the Model 60. First, a couple of shots of the Model 60 on the range:
The Model 60 became an entirely different animal with the Altamont grips. It’s much easier to shoot now.Good buddy TJ reworked my Model 60 extensively. It has an action job, selective polishing (ejector rod, cylinder, trigger, hammer, and cylinder release), and a red ramp front sight. TJ’s Custom Gunworks is the place to go if you want a bespoke handgun.
And here are two targets I shot at 15 yards (45 feet). One has 10 shots on it; the other has 12 (each had two cylinders of 5 cartridges, and I had a couple left over to finish the box).
Two targets on the 15-yard line. That little Model 60 has near-target grade accuracy with the Altamont grips. If you have a snubbie, you need these grips!
Several things are amazing about the above targets. The first is that it was windy as hell out on the range this morning, and even though I was shooting with both hands from a bench, I could see the sights swimming around as the wind gusted. The second is that the groups are dramatically tighter than they had ever been before with this handgun. And the third is that the revolver shot almost exactly to point of aim. I was holding at 6:00 on the 50-foot slow-fire NRA targets you see above. My load was the tried and true .38 Special target load: 2.7 grains of Bullseye propellant with the 148-grain Hornady hollow base wadcutter. Before, with the OEM and rosewood grips shown above, this same load shot a good 12 inches to the right of the point of aim, and the groups were huge. Evidently, as the revolver discharged, it was rotating to the right in my hands with those much smaller grips (and beating the hell out of me in the process). The Altamont grips brought the point of impact essentially in line with the point of aim and just a bit high, which is what I want in a handgun.
You may recall from a recent blog that I have a load development test planned for the Model 60, and I’ll be firing the cartridges I loaded for it within the week. I was up north on a secret mission last week and I didn’t get to shoot during that time. I recently read that if you go 72 hours without firing a handgun your skills deteriorate. I believe that, and I wanted to get in a little shooting before I shoot for group size. Hopefully, the Santa Ana winds through the Cajon Pass will die down, conditions will be right, and I’ll get to do some real accuracy testing in the next few days. You’ll get the full report right here. Stay tuned, my friends.


 Here’s 50 rounds, shooting double action rapid fire (really rapid fire, as fast as I could while still hanging on to the front sight).
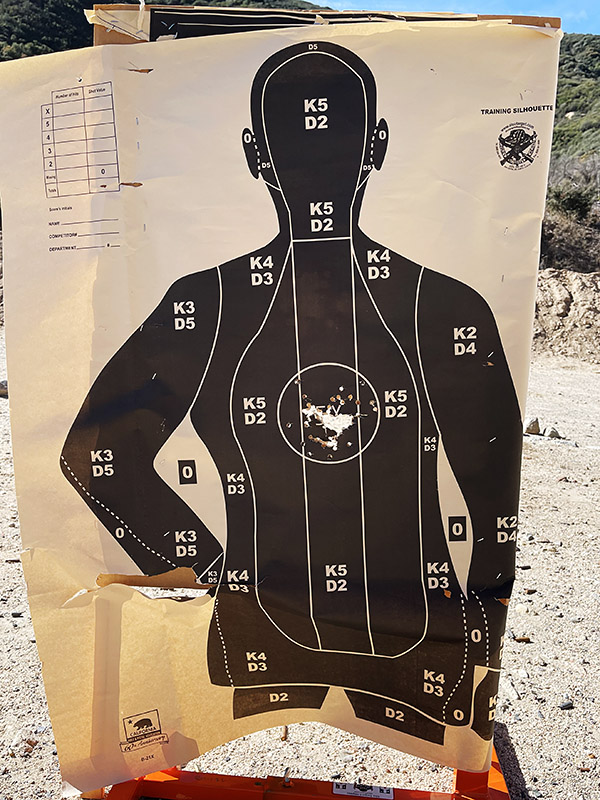


 You can see there’s a big difference in length between the old and the new hands. I bought my new hand from MidwayUSA.com. It was about $25.