Four .45 ACP Revolvers

By Joe Berk

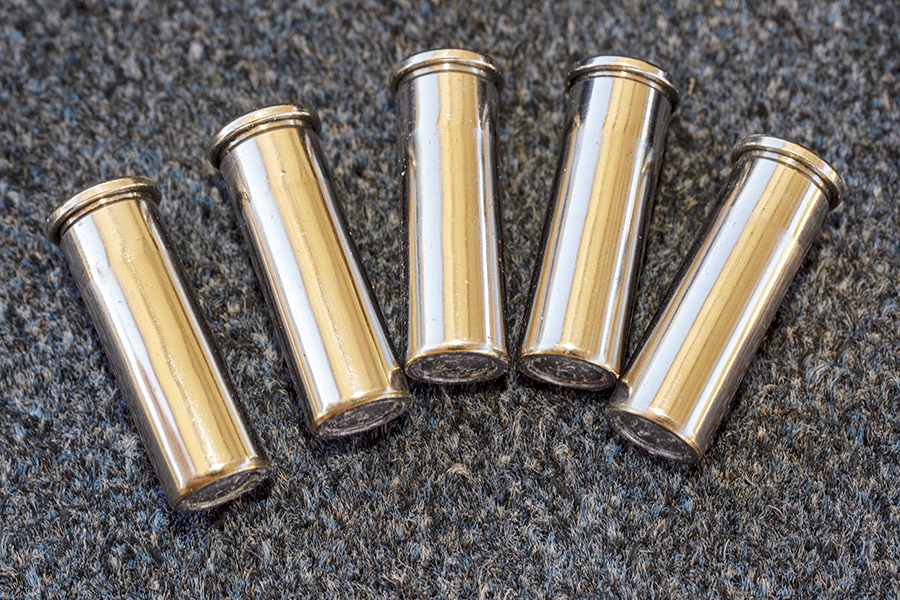
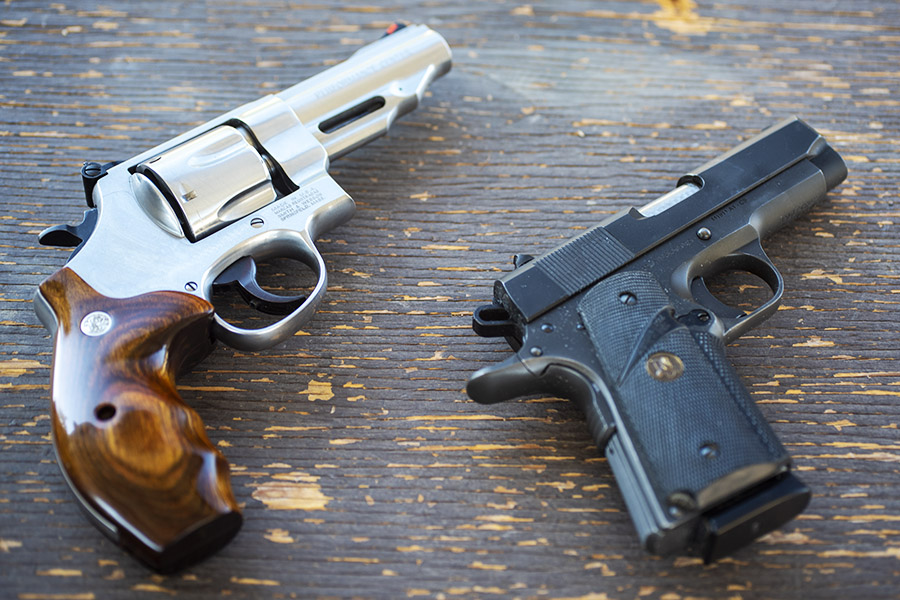
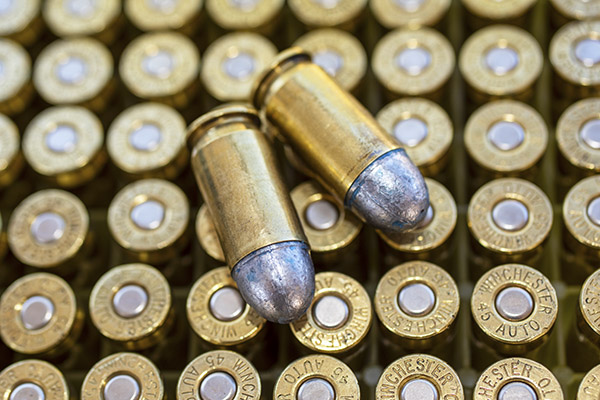
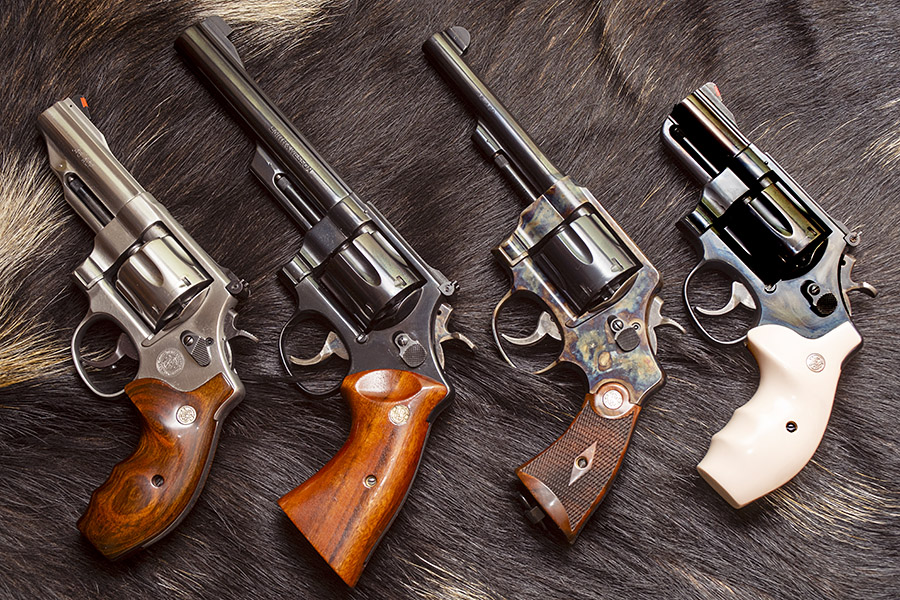
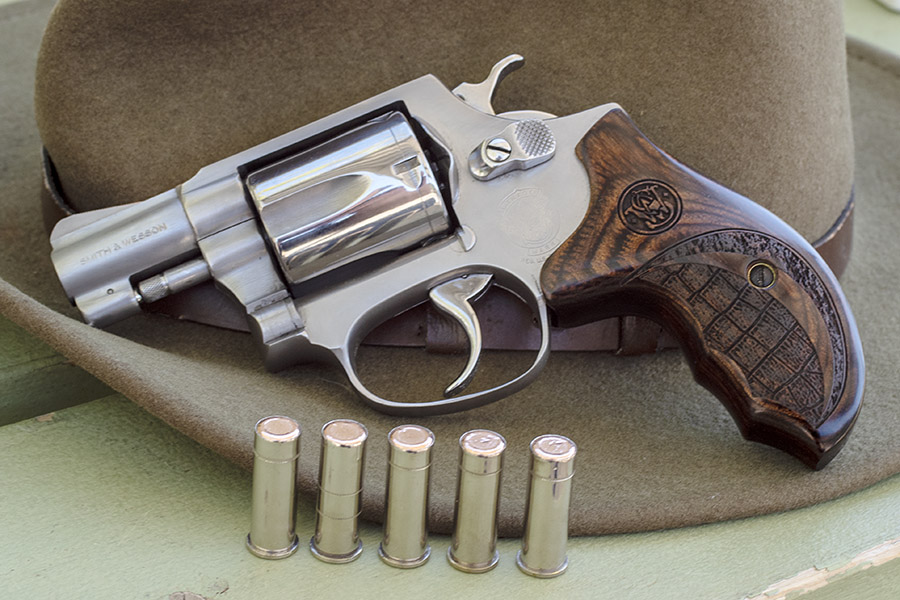
When most folks think of the .45 ACP cartridge, they think of the 1911 and other semi-auto handguns.  The big .45 also makes an ideal wheelgun cartridge, especially in N-frame Smith and Wessons.  I own four (the ones you see above) and I shoot them all.

The .45 ACP Revolver Story

Smith and Wesson forayed into the .45 ACP revolver business when Colt couldn’t keep up with the demand for its 1911 semi-auto in World War I.  The Army asked both Smith and Colt to make .45 ACP versions of their large-frame double action handguns, both manufacturers did, and the Army designated both revolvers as the Model 1917.

After the World War I, the 1917 revolvers became available to civilians.  Colt left the .45 ACP revolver business, but Smith and Wesson soldiered on, and to this day Smith still offers several different models.

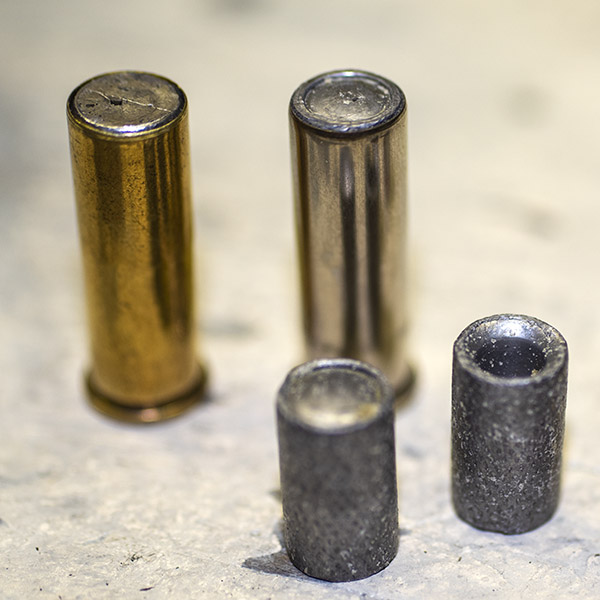
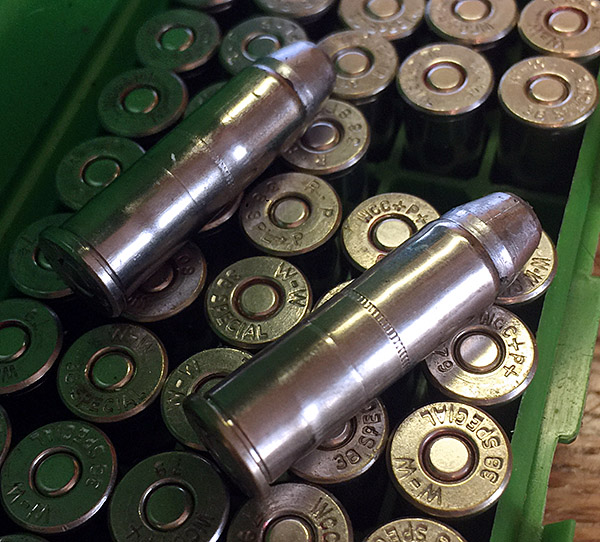
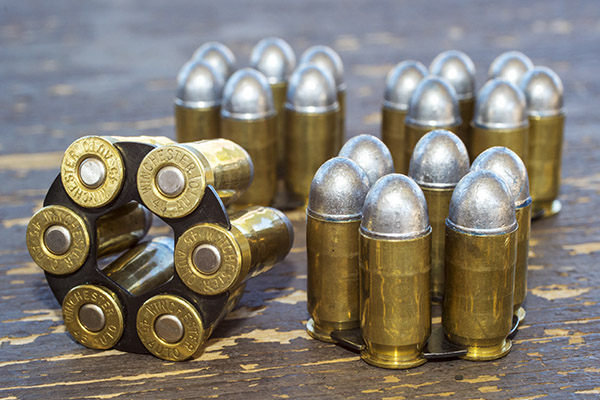
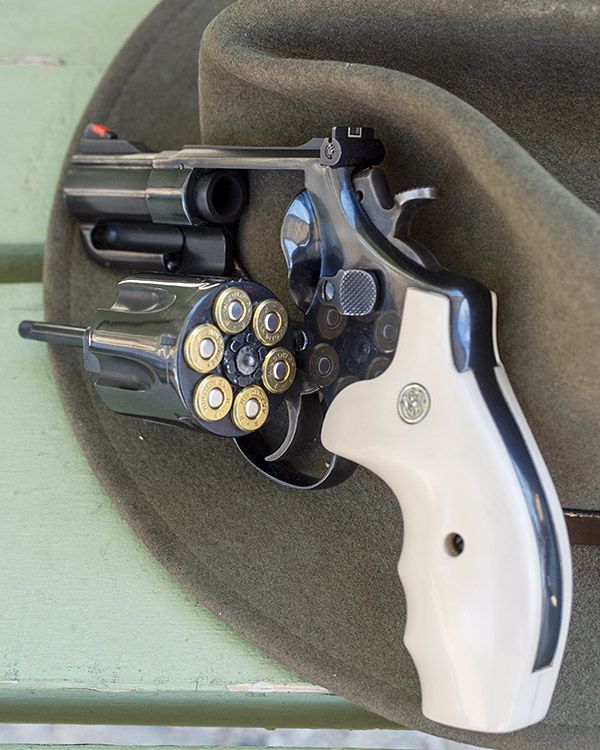
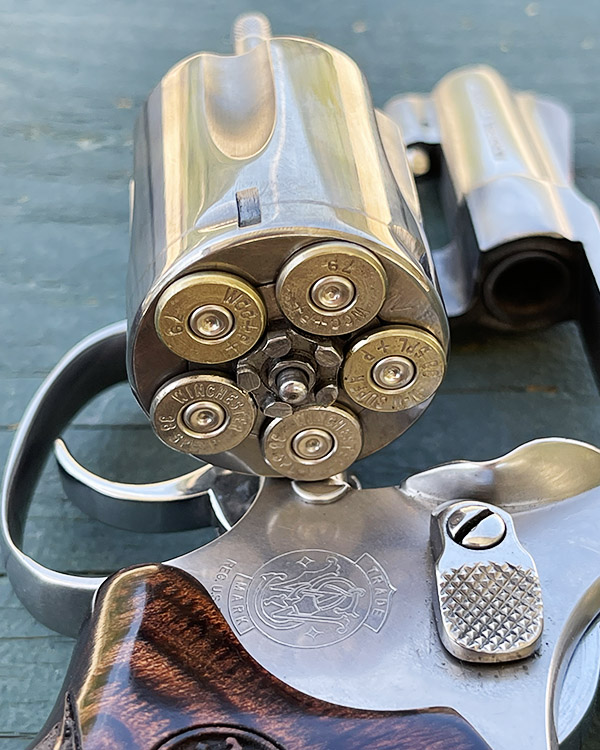
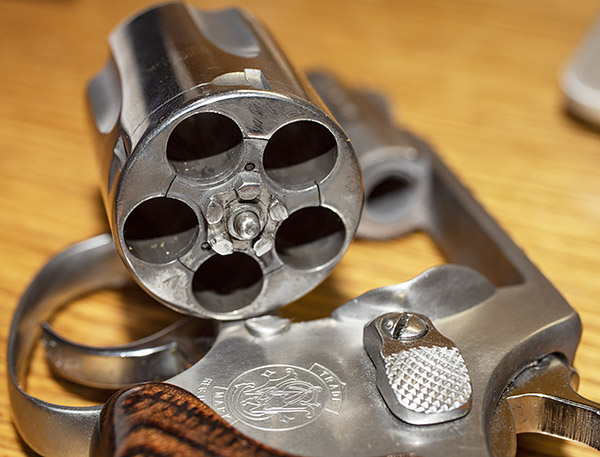
Shooting .45 ACP ammo in a revolver requires a clip.  You have to snap the rounds into the clip so they will fire and extract in a revolver.  At one point, the 1917 revolvers were popular enough that Remington introduced the .45 AutoRim cartridge, which is a rimmed version of the .45 ACP that allows use of the cartridge in a revolver without the clip.

.45 ACP rounds in a star clip. I have a tool that makes it easy to insert cartridges in the clips and remove the empty cases after shooting. In World War I, clips held only three rounds (you needed two to load six rounds in a 1917 revolver).
A .45 ACP round (left) and a .45 AutoRim cartridge (right). Note the difference in rim configuration at the base of each cartridge.  I’ve experimented with both ACP and AutoRim brass in my .45 ACP revolvers; both deliver comparable accuracy.

Over the years Smith and Wesson has manufactured several .45 ACP revolver models.  I’d like to own them all, but there’s only so much room in the safe and Susie’s willingness to indulge my gun collecting.  The four this blog addresses are:

      • The Model of 1955
      • A Jovino snubnose
      • Smith’s reincarnated and Turnbull-finished Model 1917
      • The Performance Center Model 625.

Info on each follows.
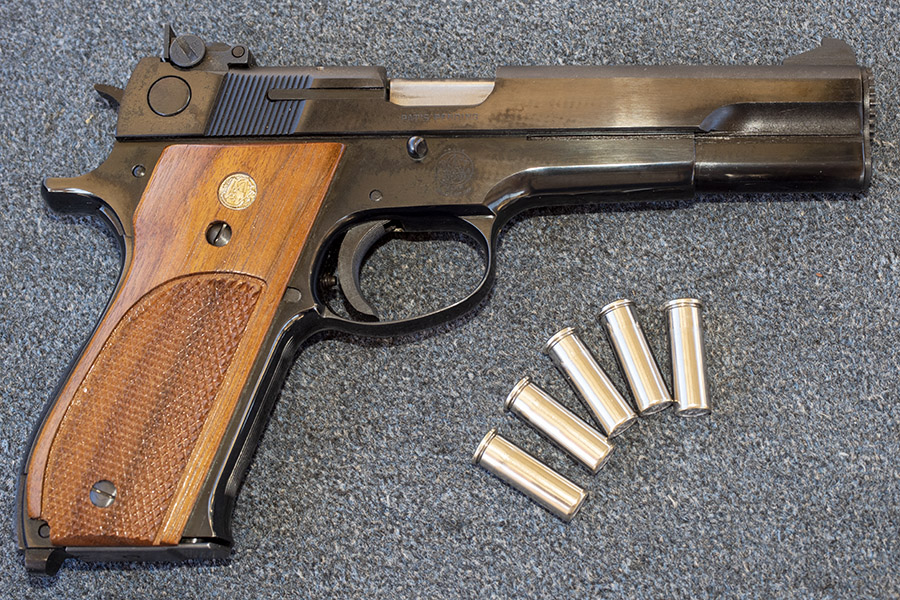
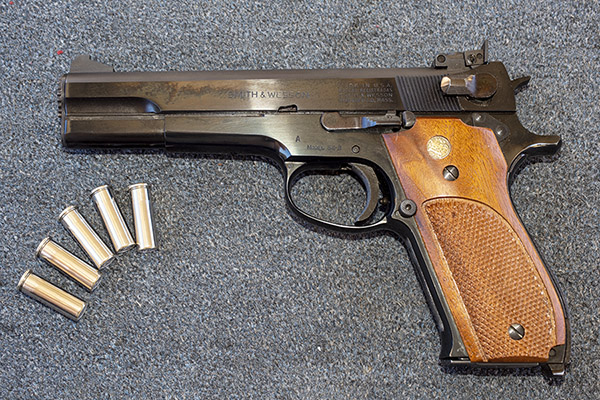
The Model of 1955

Smith introduced the Model of 1955 as an alternative to the 1911 semi-auto for bullseye target competition.  Mine was made in the 1970s.   I bought it from Rutgers Guns in Highland Park, New Jersey shortly after I left the Army (Rutgers Guns had no connection to Rutgers University other than geography).  I paid around $200 for it new.

A typical Model of 1955 three-shot 50-foot group. This gun shoots everything well.

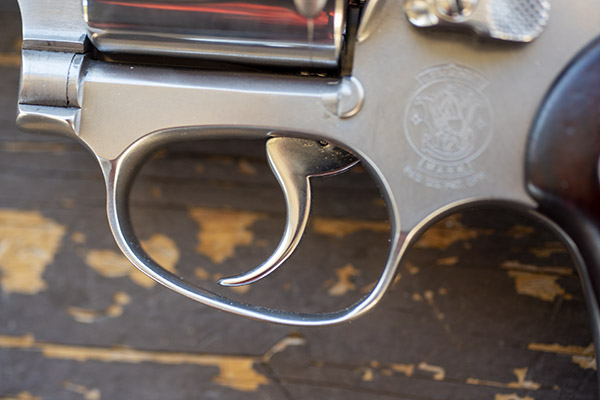
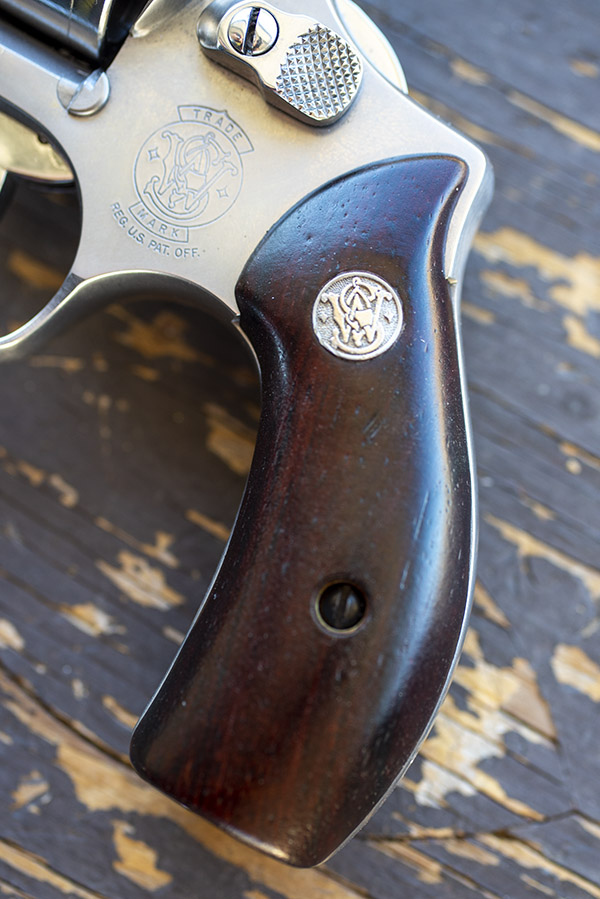
The Model of 1955 has Smith and Wesson’s target trigger and target hammer, and it has target sights (with a Patridge style sight in front).  It originally had checkered grips, but shortly after I bought it I put a set of smooth grips on it.  I think the smooth grips both look and feel better.  Back in the day, you could purchase those grips new for around $25.  Today, a set from that era (like the ones you see above) would fetch $300 to $400.  The Model of 1955 has the highly polished and deep blue finish that is the hallmark of earlier Smith and Wesson revolvers.  It is a beautiful handgun.

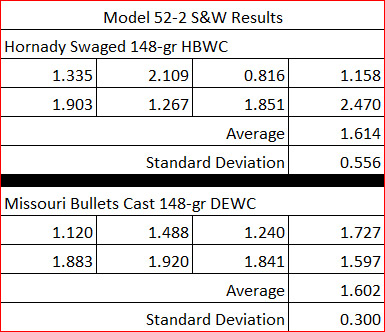
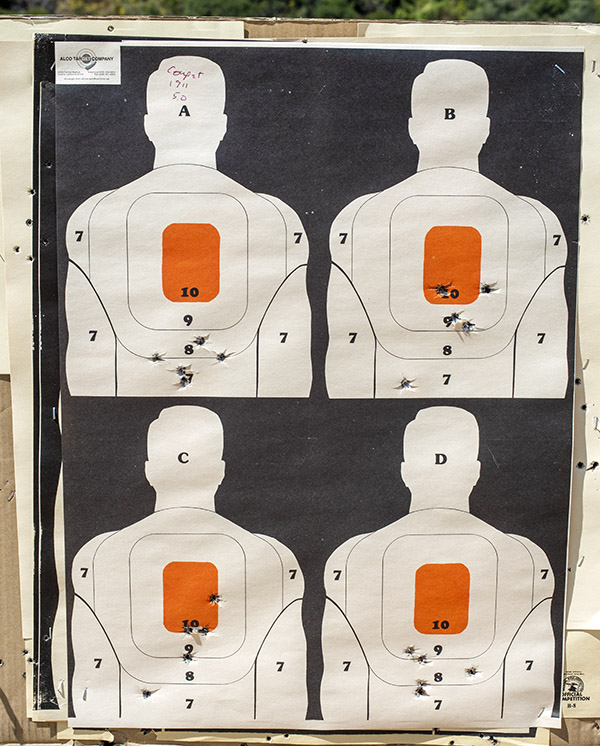
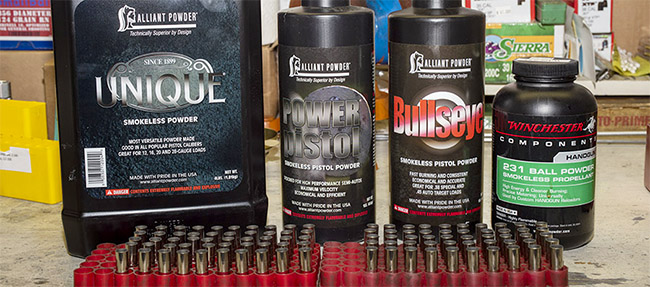
I never tried a load in the Model of 1955 that didn’t do well; every powder and every bullet combination I loaded grouped well.  In the nearly 50-years that I’ve owned this revolver, I’ve only seen one other guy on the range with the same gun.  I asked him what load he used and he told me the gun likes everything; every load he ever tried shot well, too.  That said, the load I use is typically 4.2 grains of Bullseye and a 200-grain semi-wadcutter bullet.  I use Lee’s Deluxe 4-die set and I crimp the bullets with their factory taper crimp die to assure easy chambering and to prevent bullet pull under recoil (although recoil with this load is light).
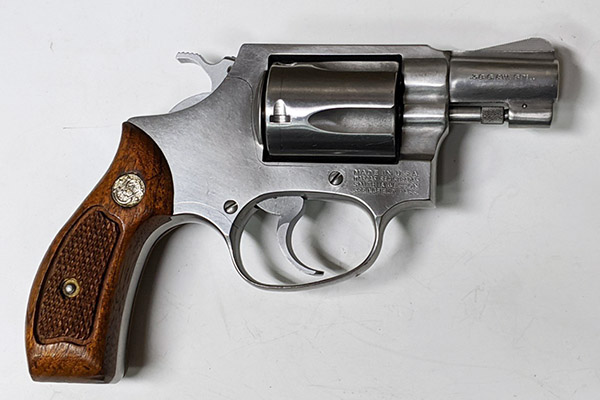
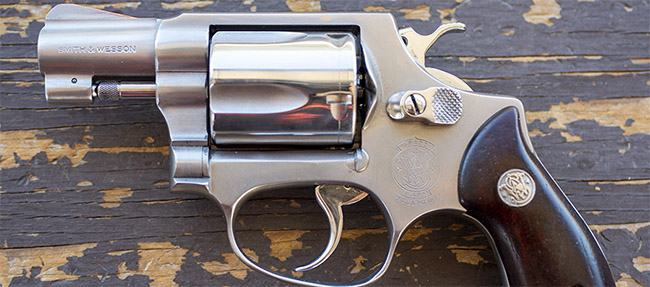
The Jovino Snubbie

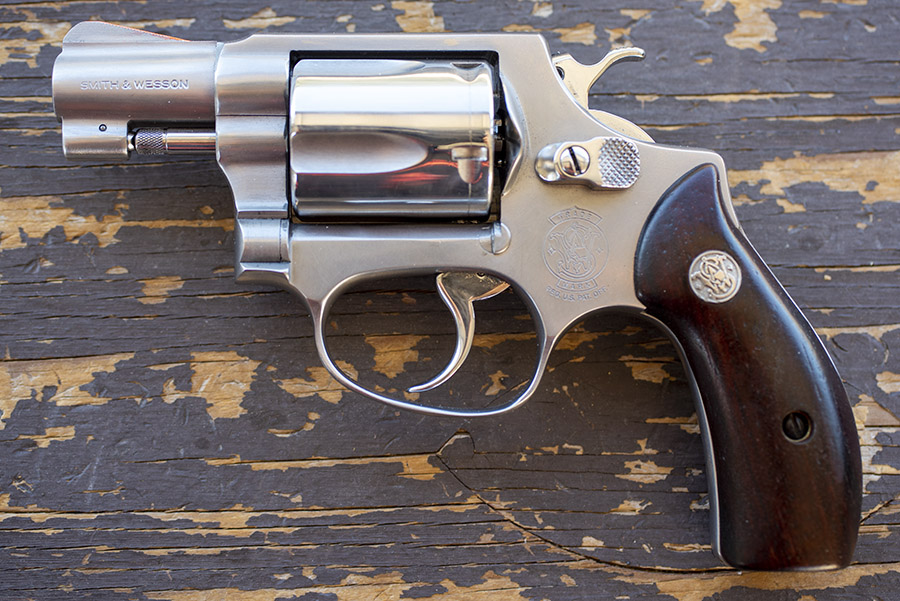
The Jovino snubnose revolver is a rare animal, one of 650 customized by New York City’s John Jovino Gun Shop (which no longer exists; when it closed, Jovino was the oldest gun shop in the country).

The Jovino snubnose .45 ACP revolver. It’s a real rarity.

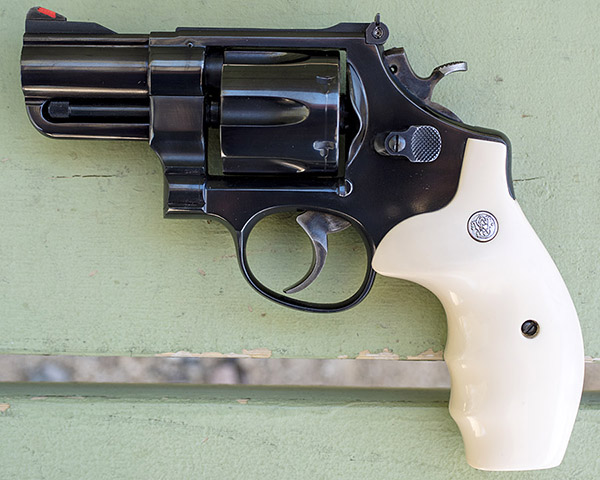
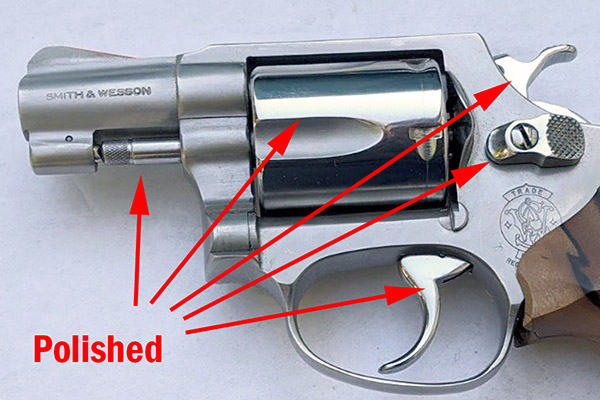
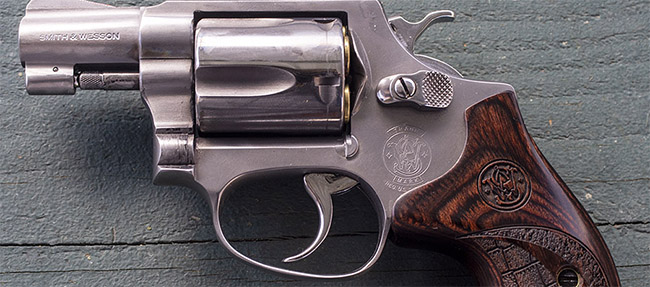
Back in the 1980s, Jovino’s built custom guns.  Their main clients were the NYPD and other police departments, so many of the Jovino customs tended to be duty-oriented carry weapons.  Jovino bought 6 1/2-inch barreled Smiths like the one you see above and turned them into 2 1/2-inch snubnose revolvers. The conversion was not just a simple chop job, though.  Here’s what Jovino did to these guns:

      • Shortened the factory barrel to 2 1/2 inches.
      • Installed a crane lock to replace the ejector rod lock.
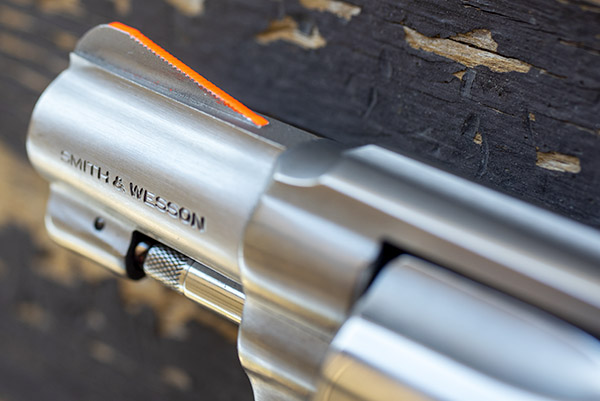
      • Relocated the red ramp front sight.
      • Rounded the butt to the S&W K frame round butt configuration.
      • Tuned the double and single action trigger.
      • Radiused the hammer spur.
      • Polished the trigger face.
      • Fitted Pachmayr rubber grips.
      • Reblued the cut barrel (the new bluing is actually a bit darker and more polished than the stock bluing).

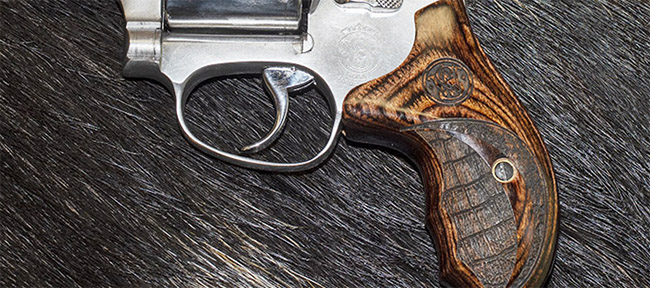
The original grips that came with the Jovino snubbie were rubber Pachmayrs, but I wanted the look of ivory grips. That’s when I found out that the Jovino guns did not have a standard N-frame rounded grip profile.  It took a lot of patient sanding and polishing to get the fake ivory grips to fit.  I like the look.

The grips look good. So does the revolver. One of the Jovino custom touches was to round the hammer spur profile. I like what they did.

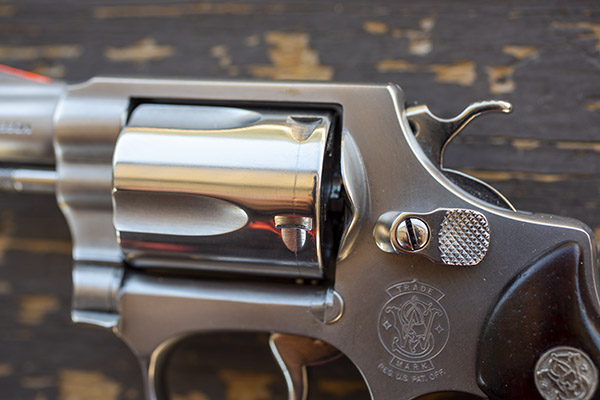
The double action trigger on the Jovino is incredibly smooth.  The slick trigger and the red ramp and white outline sights work together well, and the gun is very accurate. I’ve never seen another one of these guns on the range, so the exclusivity factor is there, too.

Smith and Wesson’s Reincarnated 1917

Smith’s resurrected Model 1917 .45 ACP revolver, shown here with AutoRim ammo.

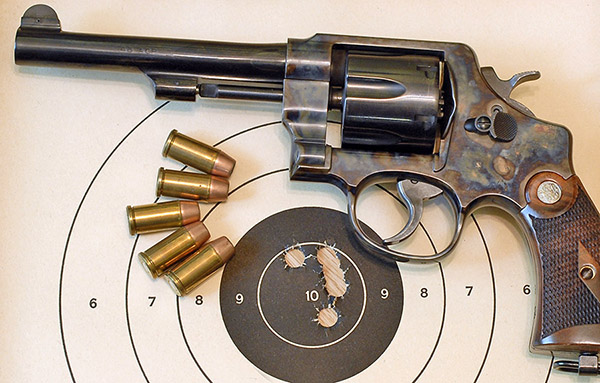
About 20 years ago Smith and Wesson introduced a reissue of its World War I Model 1917 for a very short time, and as part of that deal, the new Smith included Turnbull color case hardening.  I saw one of the Turnbull 1917 revolvers at a local Bass Pro and it sat in the display case for months.  Bass Pro had it marked down to $695 and it still hadn’t moved.  I asked the kid behind the counter what they would take for it; he read the price tag and told me $695.  Would you consider less, I asked.  I’d have to ask the manager, he said, looking at me and not moving.  Why don’t you do that, I answered.  He finally realized his job was to sell stuff and I was a real live customer, so he took off in search of the boss.

“We’ll take 30 off,” Junior said when he returned.

“Is that percent, or dollars?” I asked.

He smiled.  “Dollars.”  It was still a hell of a deal, so I pulled the trigger.  Today if I wanted to sell this gun I could probably get $1500 for it.  But I don’t want to sell it, and I never will.

Another view of the 1917, its glorious Turnbull color case hardening, and .45 ACP ammo loaded in clips.

I don’t shoot my Turnbull 1917 all that often; my preference is the Model 625 described below.  The 1917 groups well, but its small checkered grips are punishing.  This is another cool gun.  I’ve never seen another one on the range.

Smith’s Performance Center Model 625

The Performance Center is Smith’s marketing shtick for guns that have been slicked up a bit, which is Smith and Wesson’s way of saying they build Performance Center guns with the attention to detail that used to be standard on all Smith and Wessons.  This one has a good trigger, a different barrel contour, blended edges on the front of the cylinder, and probably a few other niceties I can’t remember right now.

This revolver originally had clown-like, awkward, red-white-and-blue grips.  I quickly swapped the goofy factory grips for what were advertised as rosewood grips from a third-party vendor (they weren’t rosewood at all; they were instead fabricated of cheap laminated and dyed wood, as I found out when I refinished them).   But my custom grips fit my hands much better, and this is an extremely accurate revolver.  I also installed a red ramp front sight and a white outline rear site.  The white outline rear sight Smith sells today has barely-visible gray lines and the red is not as bright as it used to be, but they are better than the gold dot front sight and plain black rear sight that came on the gun (I don’t like gold dot front sights).

Six rounds at 50 feet, standing, from the Performance Center .45 ACP Model 625.  This revolver has grips I refinished and a red ramp and white outline set of sights.  The target shown here was shot with the 200-grain semi-wadcutter bullet and 6.0 grains of Unique.

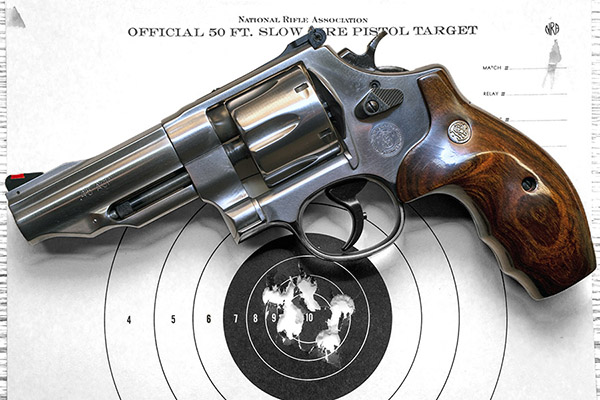
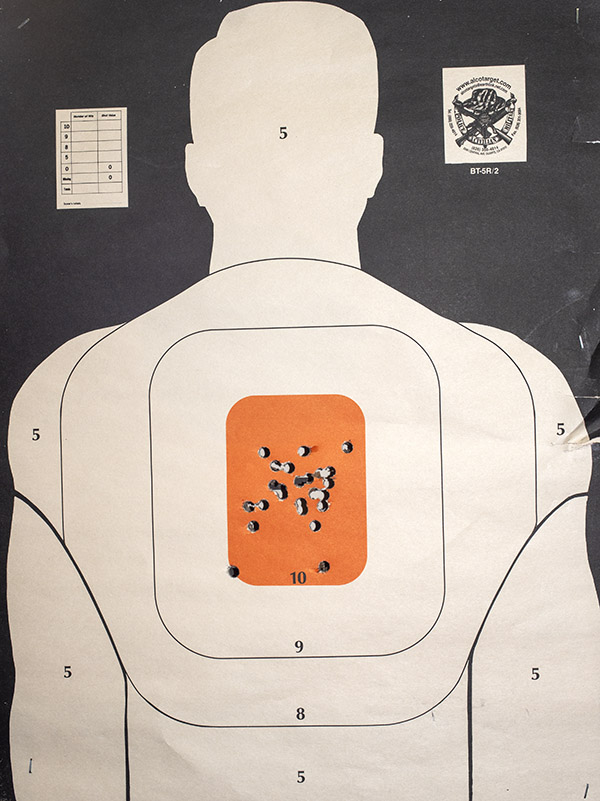
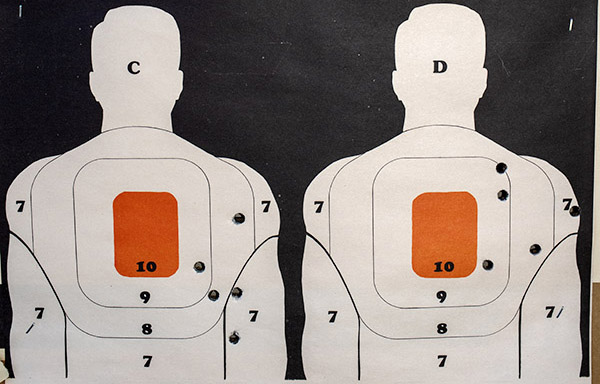
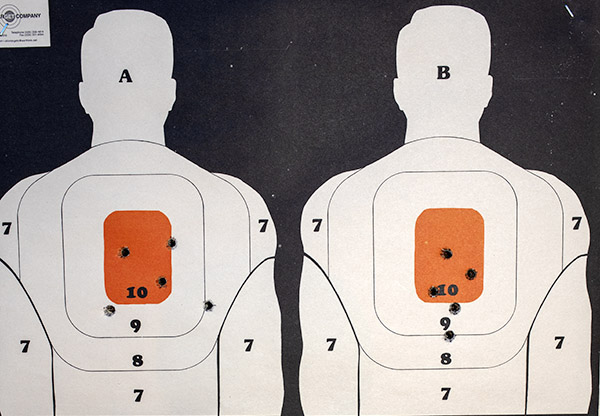
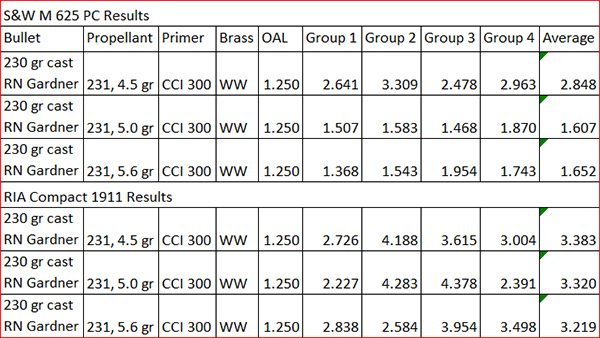
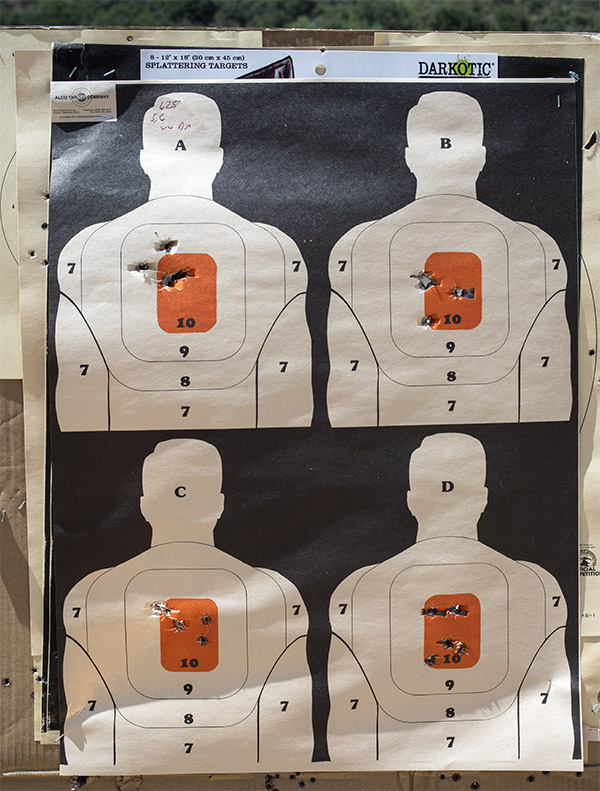
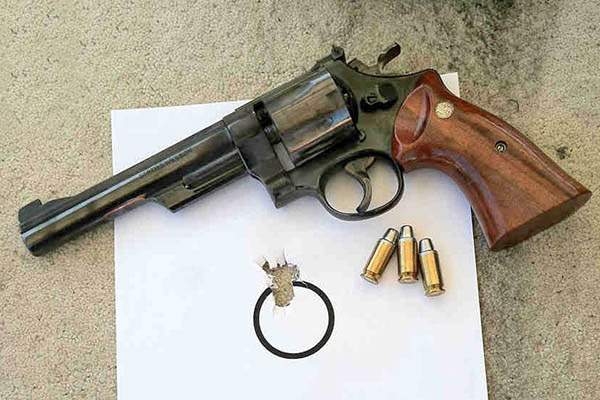
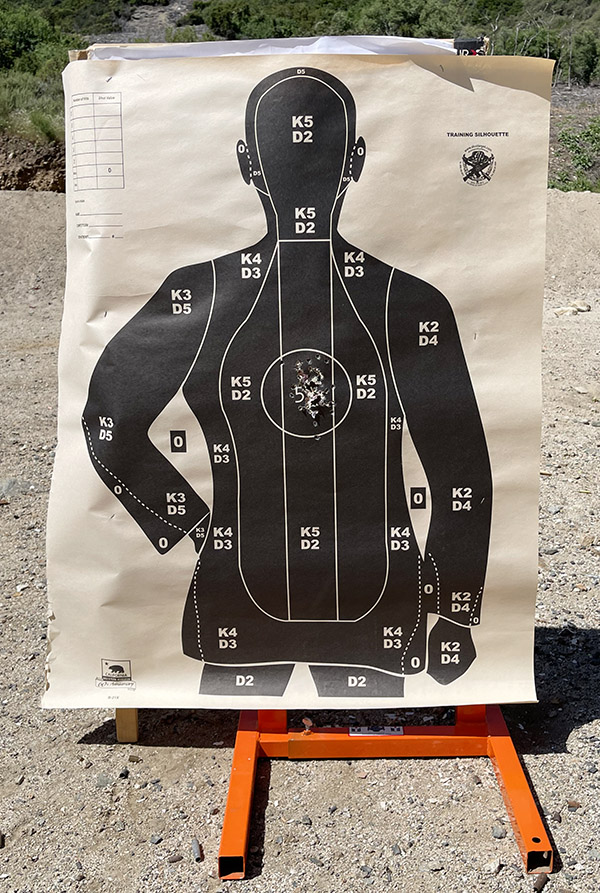
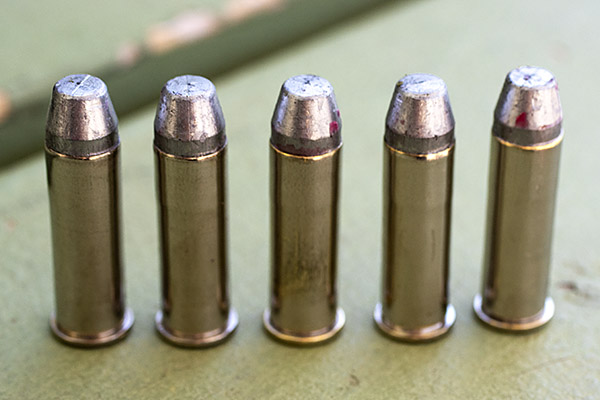
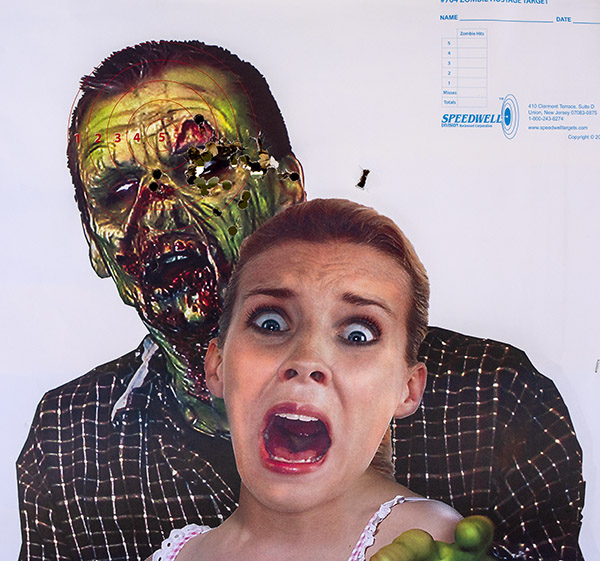
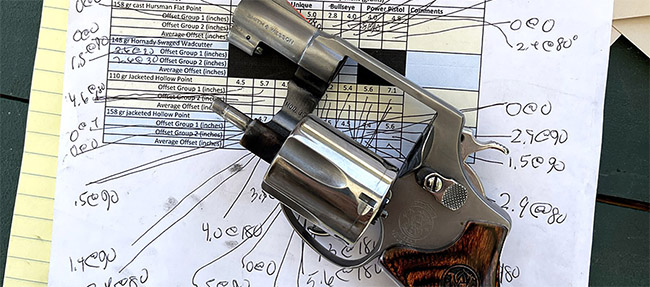
My usual accuracy load for the 625 is a cast 200-grain semiwadcutter bullet (sized to .452 inches) over 4.2 grains of Bullseye.   Another load that works well is the same bullet with 6.0 grains of Unique (it’s the load I used on the target above).


After reading about the above Smith and Wesson .45 ACP revolvers, you might have two questions:

      • Which is my favorite?
      • Which do I prefer:  A .45 ACP revolver or a 1911?

The answer to both questions is:  Yes.


Never miss an ExNotes blog:


Don’t forget: Visit our advertisers!


A Model 60 Hand Job

You know, you can have a lot of fun dreaming up titles for blogs.  When I told good buddy Mike about this one, he’s the guy who suggested the above.  Yeah, it’s racy, but it’s not what you think.  This blog is about timing.  Life, success, good comedy, and a host of other things are all about timing.

Take revolvers, for instance.  Timing is critically important.  For a revolver, timing refers to having the chamber precisely aligned with the barrel when the hammer drops.  If it’s not, the barrel becomes a salami slicer, which is good if you’re a mohel but bad if you’re a shooter (or another shooter on the firing line).

Take a look at that lead shaving in the photo above.  It’s what squeaked out of my Model 60 and went sideways at high velocity between the cylinder and the barrel.  It did that because the revolver went out of time.  Primers can be another indication of incorrect revolver timing, as shown in the photo below.  When the firing pin’s primer indentations are offset like you see here it means you’ve got trouble in River City (or anyplace else you’re firing the revolver).

This blog explains how to correct an incorrectly timed revolver.  We’ll start, as always, by making damn sure the gun is unloaded.  Once we’re satisfied it is unloaded, the next steps are to remove the revolver’s grips and sideplate.  The grips detach with a single screw.  Three screws secure the sideplate, and each of them is different.  The one at the rear of the sideplate is easy to distinguish because it has a flathead to fit under grips.  The other two have domed heads, but they are not identical.  The screw at the front of the sideplate is dimensioned such that it locks the yoke in position fore and aft, but it allows it to rotate.  If you switch the two domed screws when you reassemble the revolver, the cylinder will not swing out of the frame freely.

Once the grips and sideplate screws are out, don’t try to pry the sideplate off the revolver frame.  Hold the revolver over your workbench with the sideplate facing down, and give the left side of the grip frame a few sharp whacks with a plastic mallet or a screwdriver handle.   The sideplate will drop out, and the transfer bar will drop with it.

After the grips and the sideplate are off, here’s what the guts of a Model 60 look like.   The transfer bar is the piece denoted by the left arrow.  It will probably have already fallen off the gun when you removed the sideplate.  Our focus in this blog will be on the hand, which is the piece noted by the red arrow on the right in the photo below.  The hand will pivot counterclockwise in the photo below. Rotate the hand counterclockwise and you can lift it out.

The hand is what moves upward as you pull the trigger or cock the hammer.  It fits through a slot in the revolver’s frame to engage the little nubs on the cylinder’s ejector.

Here’s what the hand looks like after you have taken it out of the revolver.  The hand on the left (in the photo below) is the one that was in the revolver and Model 60 to go out of time; the one on the right is a brand new one.

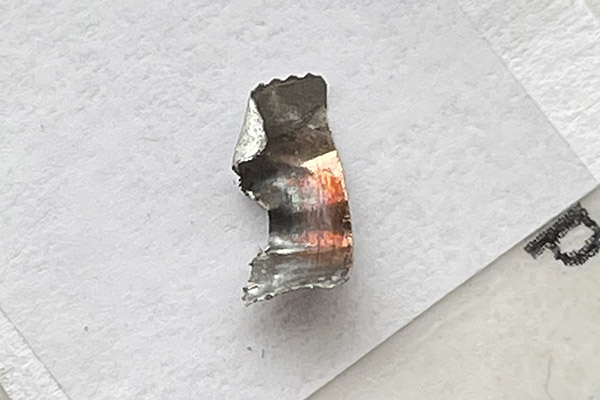
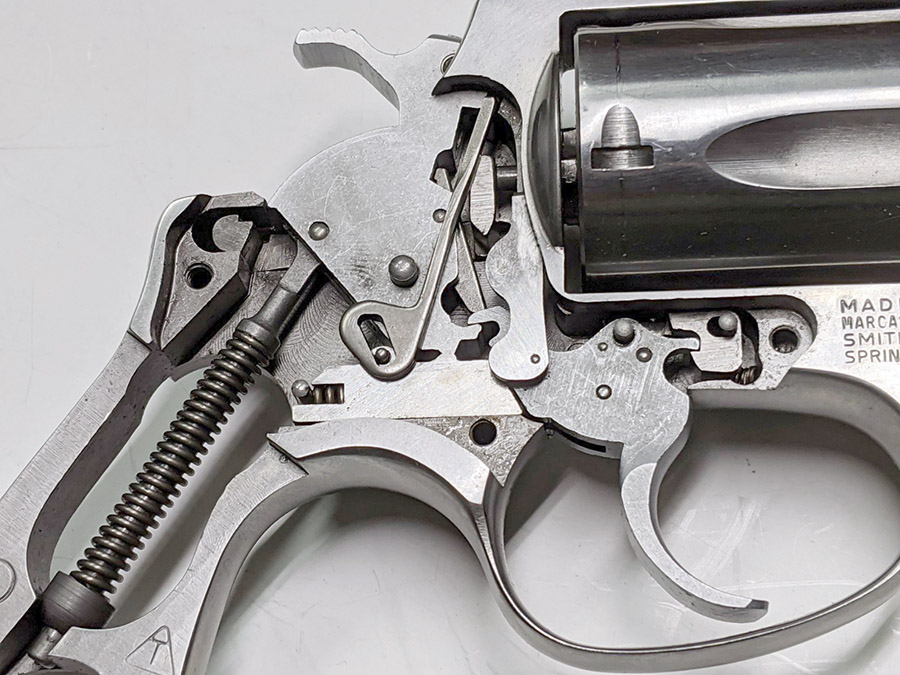
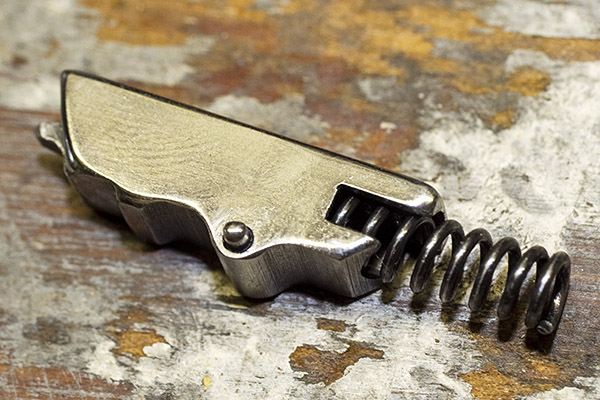
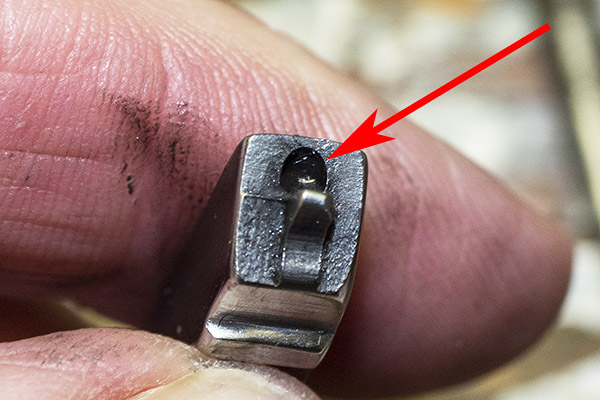
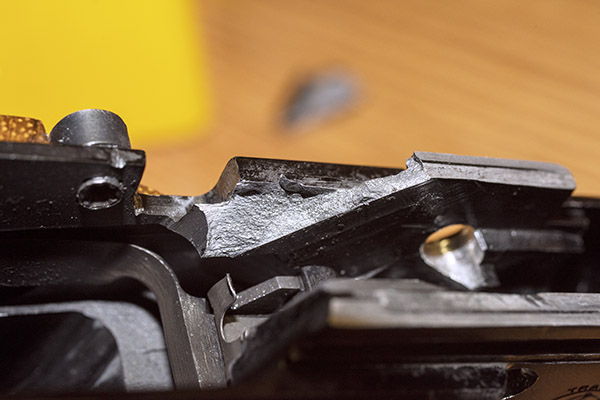
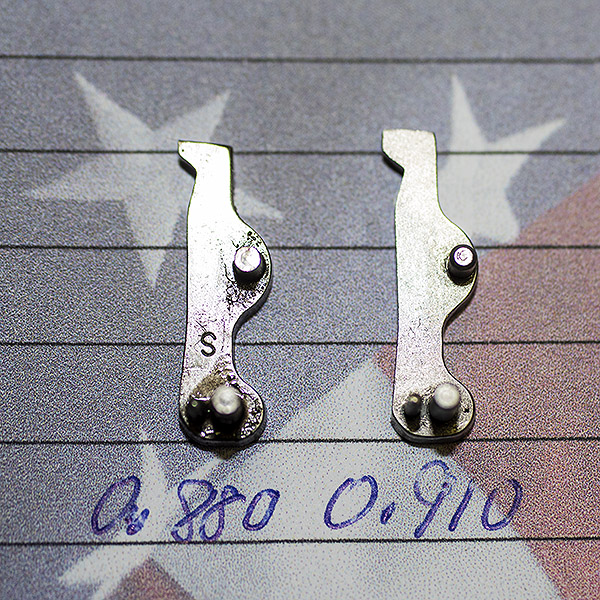
You can see there’s a big difference in length between the old and the new hands.  I bought my new hand from MidwayUSA.com.  It was about $25.

The next steps involve removing most of the revolver’s internal pieces.  You don’t have to do this to get the hand out of the gun, but you will have to remove and reinstall several internal components several times to properly fit the hand.  This involves checking both single and double action function testing, disassembling, removing very small amounts of material from the upper part of the hand, reassembling, and repeating the process several times until the revolver is functioning satisfactorily.

We’re going to remove the hammer spring and yoke using the same paper clip custom tool we used for installing the lighter hammer spring (denoted by the left arrow).  Those other two arrows denote where the hand’s two  bottom pins fit into the trigger.  We’ll come back to that later.

This next two photos show the hand’s bottom pins.  The third pin is a stop. We’ll come back to that later, too.

At this point, push the revolver’s cylinder release forward, lower the cylinder out of the frame, and slide the yoke and the cylinder off the revolver.

We’ll next remove the revolver’s hammer.  It lifts out to the right.   Then we get to the trigger spring and rebound slide.   It’s tricky.  It’s the piece just below the hammer in the photo below.  Note that it has a spring acting against a post at the rear.  After you have removed the hand and the hammer, you can pry the rebound slide away from the revolver’s frame, but make sure you cover that spring.  If you don’t, it will go flying.  Don’t ask me how I know.

Here’s the trigger spring and rebound slide after removal from the revolver.

At this point, you can lift the trigger out of the revolver.

This is where things get even more tricky.  We’ll fit the new hand to the revolver.  Doing so will require installing it as delivered to get a rough feel for how much material we need to remove from the hand, reassembling the revolver to check functionality, disassembling again to remove the hand, stoning the upper surface down a little, reassembling, and repeating the process.  It took me three assembly/disassembly/reassembly cycles to get it where it needed to be.  Slow and gentle is the approach here.  You can take material off the hand; you can’t put it back on.  Take too much off, and you’ll ruin the new hand.

The first thing we need to do during the reassembly step is install the new hand in the trigger, and that’s tricky, too.  There’s a tiny torsion spring in the trigger, and its purpose is to keep the hand pressed forward against the extractor.  You can see the red arrows pointing to the spring in the photo below.

That little spring needs to be on top of the hand’s smaller lower post, and in order to get it there, the easiest way is to push it up from beneath the trigger before you attempt to install the hand, rest the spring on the side of the trigger, install the hand, and then push the spring back into the trigger.  Here’s what it looks like with the spring pushed on the side of the trigger.

After you have inserted the hand into the trigger (as you see above), you can then push the spring back into the trigger’s slot.

We are now ready to start the fitting process.  Put everything back together again except the transfer bar, the sideplate, and the grips.  When you reinstall the rebound bar, make sure the little shaft that extends from the rear of the trigger engages the cavity in the front of the rebound bar.  You can see that cavity in the photo below.

When you look at the revolver from the rear, you’ll see the hand inside the revolver frame slot, and how it moves up and down when the hammer is cocked (if you are firing single action) or when the trigger is pulled all the way to the rear (if you are firing double action).  The hand acts against the little nubs on the extractor to rotate the cylinder.  You can see one of the extractor nubs in the photo below.

On a new hand, the hand will most likely be too long.  The revolver may or may not rotate the cylinder when you actuate the trigger in a double action mode, and the hand probably will not actuate the cylinder when you cock the hammer as if you were firing in the single action mode.  That is because the hand is so long it slides along the rear of the extractor nubs without dropping in between them, which it needs to do to ratchet the cylinder so the next round comes into battery.  In the photo above, you can see a little bright witness mark at the bottom of the upper red arrowhead where this occurred.

We next disassemble the revolver’s guts as described above to fit the hand to the revolver.  We’ll remove a bit of hand material from its top portion using a stone.  I angled the top edge of the hand.  Here’s what that looks like.

The lower arrow in the photo immediately above shows where I removed hand material.  The upper arrow shows the hand’s angled surface that completes the cylinder’s advance.  Leave this area alone.

The photo above presents another look at the same angled portion of the hand as it is delivered.  The red arrow points to the area where I removed material to fit the hand to the revolver.  The larger angled area is how the hand came from the factory.  It looks rough as hell, like it is begging to be polished, but I left that part alone and my revolver is silky smooth.

After we’ve done the above assemble/check/disassemble/remove hand material a few times, you’ll get to where the revolver looks the cylinder in place right where it is supposed to be (you’ll need to reinstall the cylinder and yoke to do this).   What we want to do is put your finger on the cylinder so that it has a little drag while cocking the hammer.  When the hammer is fully to the rear, the bolt at the bottom of the cylinder should click into place.  Then we want to do the same thing (put your finger on the cylinder to impart a little drag) and pull the trigger to the rear double action style.  The bolt should snick into the cylinder just before the hammer falls.

When you think you’re there based on the above checks, it’s time to fully reassemble the revolver.  Lay the revolver on its left side and place the transfer bar on top of the hammer as you see in the photo below.  You have to have the transfer bar all the way up so the pin in engages is at the bottom of the transfer bar slot.  If you don’t have it positioned as you see below, the sideplate will not fit back on the revolver.

After doing the above, good buddy Paul suggests loading dummy rounds in your Model 60 to make sure it cycles correctly.   Before you go to the range after doing this kind of work, it’s a good idea to take some fired cases and cycle them through the gun in both single action and double action modes.  If you have some with the primer indentations off center (as shown in the photo at the start of this blog), check to make sure that the new indentations are now more centered (they were on my Model 60).  DO NOT put live primers in an otherwise empty case for this test; they can back out of the cartridge case and lock the gun.  You also want to make sure that there’s no interference between the new hand and the case rims.  I haven’t encountered this on a Smith and Wesson revolver; Paul has on a Taurus revolver.

I used the fired empty cases you see in the photo near the top of this blog (the ones with the off-center primer strikes) and cycled five through single action, and another five through double action.  The gun cycled flawlessly, and the previously fired cases now had primer indentations in the center of the primers.  Things were looking good, but the real test would be on the range.

I set up a police qualification target at 7 yards and pumped a box of ammo (5o rounds) through the Model 60 shooting double action rapid fire.  Wow, was I pleased with the on-target results.

After the first few cylinders of ammo, I looked at the forcing cone around the frame.  Unlike earlier, when there was a heavy lead spatter pattern on the right side of the frame only, the spatter was now evenly distributed around the forcing cone.  That’s another indication that the cylinder was centered in the forcing cone (i.e., aligned with the barrel).  Things were looking good.

I then examined the primer indentations in fired cases.  They were smack dab in the center of the primer, right where they should be.

And folks, that’s it.  This revolver is between 50 and 60 years old, and it’s now as good as new.  It’s a favored handgun and it does good work, as that target above attests.

Watch the blog, as the Model 60 will continue to appear here.  It’s just too good and too much fun to relegate to the safe.


More Tales of the Gun!


Never miss an ExNotes blog…sign up here for free!

Gats and Hats I: The Model 60 S&W

There’s a Facebook group called Snub Noir and I enjoy it.  They have a lot of good info there about concealable revolvers, and it projects kind of a ’40s/’50s/’60s vibe having to do with private investigators and police officers (and movies, TV shows, and novels from that era).  It’s centered on the Colt and Smith snubbies of the day, and on today’s snubbies, too.  If you’re into snub nosed revolvers, you’ll like this place.  If you visit it, you’ll understand the Gats and Hats thing.

That beautiful S&W Model 60 you see in the big photo above is my personal carry gun and it’s a sweet piece.  It’s been selectively polished, it has Altamont grips, and it has a TJ action job (you can read more about TJ’s work on his website and I’ll give you a few more links on my Model 60 at the end of this blog).  I’ve done a fair amount of load testing with the Model 60 and I know the loads it likes from accuracy and shoot-to-point-of-aim  perspectives.  The best load is the FBI load, which is a 158-grain bullet over 3.5 grains of Winchester 231 propellant.

Five rounds of .38 Special, with a 158-grain flatpoint cast bullet and 3.5 grains of Winchester 231. It’s a great load. You can read about it in the links provided at the end of this blog.

I wanted to try something different, though.  I’ve shot the Model 60 at 50 feet, 25 yards, 50 yards, and 100 yards.  I know, I know: Those latter two distances are not really what the snub nose revolver designers had in mind when they designed these guns.  But I was curious when I did those tests.  I know a retired police officer who can hit a clay target at 50 yards (the kind you dust in trap or skeet shooting).

The police sometimes qualify at 7 yards, and I think that’s more in line with what a snubbie is intended to do.   And, you know, there’s this zombie apocalypse thing that’s coming down the road.  I’ve done my homework, and I know that most zombie hostage incidents (i.e., where a zombie is holding a damsel in distress) occur at 7 yards.  I wondered:  How would I do firing my Gat double-action as quickly as I could at 7 yards?  I want to be prepared, you know.

Five rounds is all the Model 60 holds. It sure is slender and it conceals well.

Fortunately for me, zombie-holding-hostages targets are readily available on Amazon, so I grabbed a couple and headed to the range to test my hostage rescue skills with two different loads.  The first was the old bullseye target competition .38 Special standard:   A 148-grain wadcutter (in this case, copper-plated wadcutters from Xtreme Bullets) over 2.7 grains of Bullseye propellant.  It’s the load I’m set up to produce in large quantities on my Star reloader, and it’s the load you see in the top photo (the Dr. Seussian Gat in the Hat pic).  The other is the FBI load mentioned above: A 158-grain bullet and 3.5 grains of Winchester 231 secret sauce.

So how’d I’d do?   The short answer is not too bad.  Not as good as I thought I would, but good enough and certainly close enough for government zombie work.  The first target (the one immediately below) shows the results of six full cylinders (30 rounds, as the Model 60 holds five rounds).  The good news is 29 of those shots went directly into the zombie’s noggin and none hit Betty (the hostage).

Betty and her zombie captor. He’s toast. Note the one round that tumbled just above Betty’s head. These were low-velocity wadcutter loads.

The bad news?  One of the wadcutter bullets tumbled.  Fortunately for Betty it went right over her head.  You can see the bullet’s outline in the target above.  It might have been that the Star threw a light load on that round, or maybe a case split and let too much pressure escape, or maybe these light target loads are marginal in the Model 60’s short 2-inch barrel.  Win some, lose some.  Betty’s okay, though…that’s the important thing.

Not surprisingly, the FBI load did much better (old J. Edgar know what he was doing against both zombies and commies, I think).  The 30 holes you see in Mr. Zombie below went into a tighter group, none of the bullets tumbled, and most importantly, none of them went into Betty.

Betty liked the FBI load better. So did I. The zombie offered no opinion.

I feel better now.  I know if I can keep my wits about me and I have my Model 60, and if I can get the zombie to pose with Betty like you see above at 7 yards, he’s toast and Betty’s going to be just fine.  For any zombies who follow the ExNotes blog:  You’ve been warned.


Never miss an ExNotes blog…sign up for free:


As this blog’s title states, this blog is Gats and Hats I.  Will there be a Gats and Hats II?  Stay tuned, my friends.  Two more days, and we’re calling in the heavy artillery.


More gun stories?  Hey, it’s what we live for!


Want to know more about the Model 60 featured in this blog?   It’s all in the links below:

The Model 60 heads to TJ.
A TJ Roscoe.
New shoes for the Model 60.
A Model 60 load development plan.
Model 60 load testing results.
Getting hammered, and the effects of incomplete primer seating.

Adios, Mi Amigo!

Well, I had a good day on the range until my Model 59 broke.  It’s the gun my father bought for me before I went overseas and I’ve had it for 50 years.  I was having fun and I’d just fired 80 rounds at a 25 yard target.  I went to put the next magazine in and it wouldn’t seat.  Uh oh.  When I pulled it out, the piece you see above fell from the magazine well.  I pulled the slide release, dropped the slide, and wowee.  This wasn’t good.  Or maybe it was (more on that in a second).


Please click on the popup ads…it’s what keeps the blog going!


Ugly, ain’t it?  Surprisingly, the surface fractography doesn’t look like a fatigue failure (there are no characteristic beach marks).  I make it to be a brittle failure.

The photo below is my beautiful jeweled Model 59 barrel, all dressed up with no place to go.  The arrows point to the ramps on either side of the chamber (the photo below shows the ramps on the left side).  Those ramps are what smack into the aluminum frame with each shot.

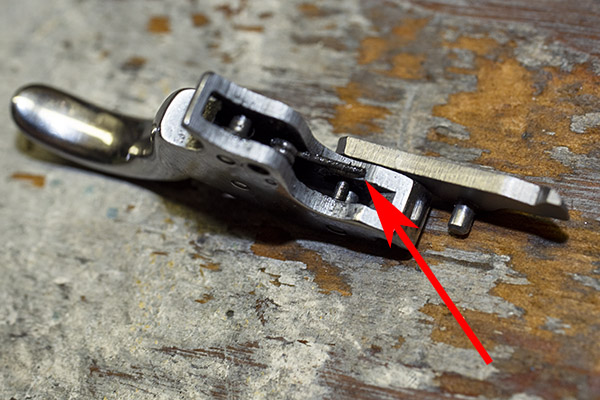
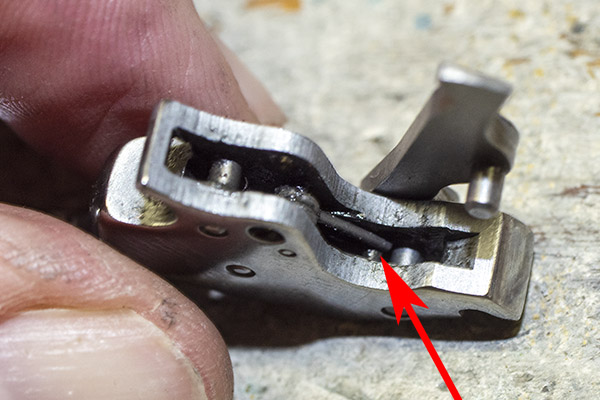
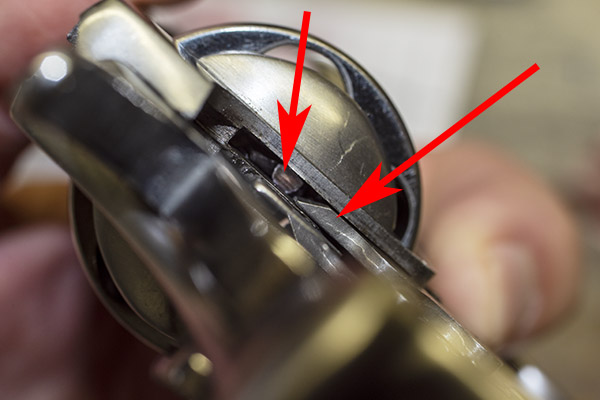
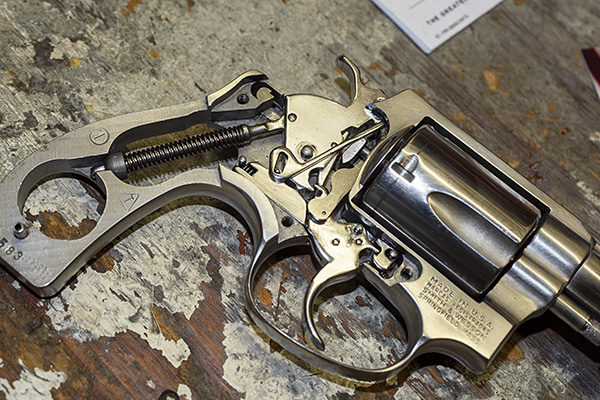
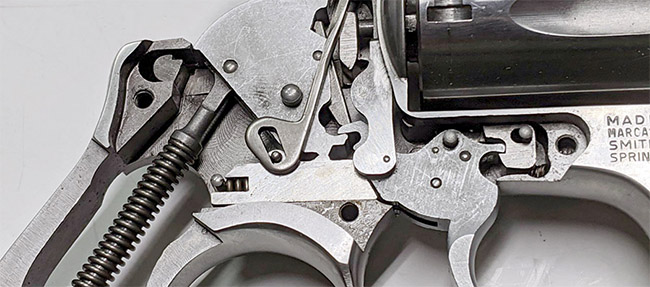
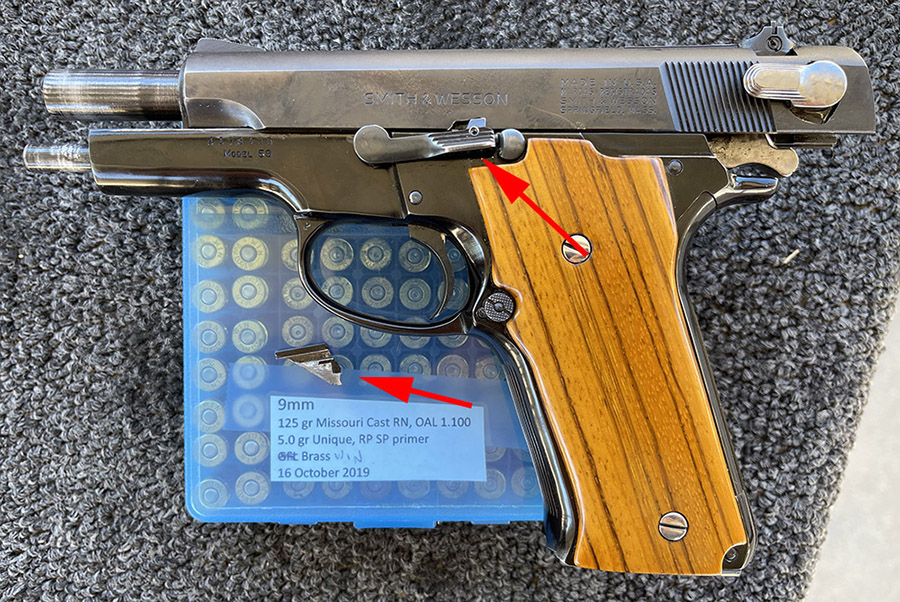
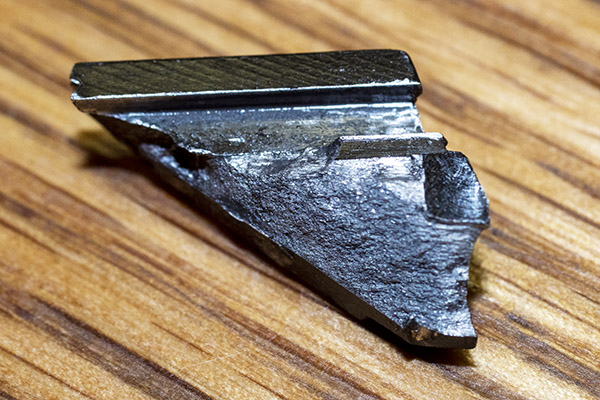
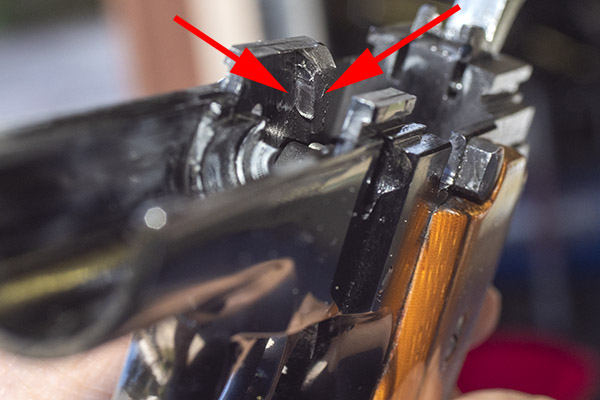
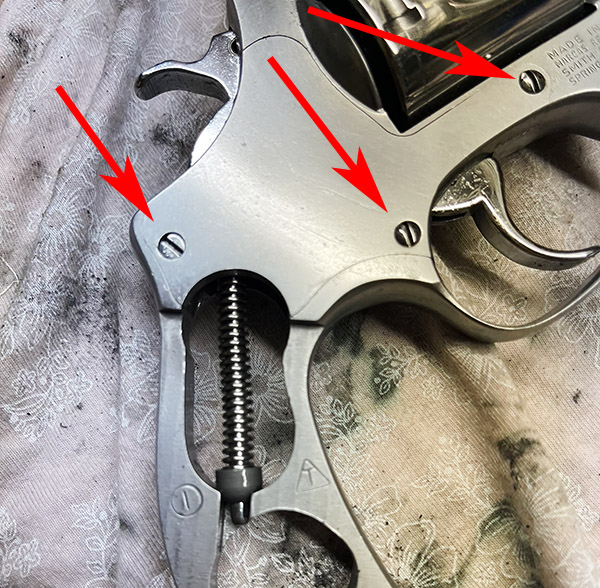
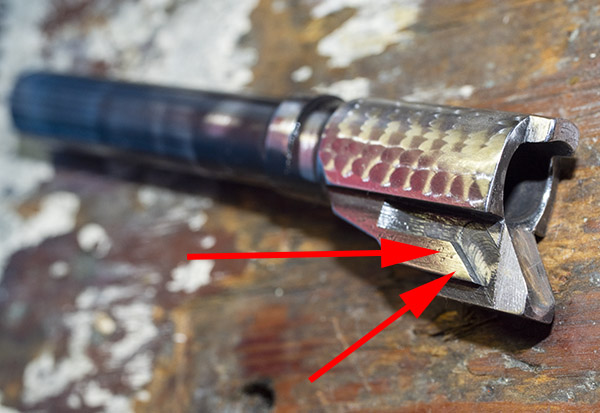
The arrows in the next pic point to the matching right side of the Model 59 frame.  Note the worn area.  It’s where the barrel ramp contacts the frame ramp when the gun recoils.  That ramp (along with the mating ramp on the barrel) drops the barrel slightly to disengage it from the slide when the slide moves to the rear.  You can see this area took a beating over the last 50 years.  The photo shows the opposite side of the frame, where it didn’t break.

You might think I’m mad at the gun, but I’m not.  I have a good dose of mechanical empathy.  Imagine you are that aluminum ramp on the Model 59 when a 9mm cartridge lights off and the barrel is recoiling toward you at speed.  WHAM!  Do that 20,000 or 30,000 times in a row and think about how you would feel.  Nope, the Model 59 did its job for 50 years.  I can’t be mad at it.

You read that right.  I had 50 years of fun with my Model 59 on the range, carrying it on hunting trips, keeping it handy when I felt I needed to, and on one occasion, threatening a late night marsupial Sue thought was a burglar (the ‘possum was not impressed).  I’ve fired between 20,000 and 30,000 rounds through my Model 59 (a guess based on how many boxes of 9mm I’ve reloaded). Very few of these (maybe none) were light loads, as the best 9mm accuracy is at the top of the spectrum. From what I’ve found in the endless stream of what passes for information on the Internet, semi-auto aluminum handgun frame life expectancy estimates are around 10,000-20,000 rounds, so I’m in the zone.  Maybe I’m even ahead of the game.

I figure the cost of my reloaded 9mm ammo is about $.15 per round, so if I fired 20,000 rounds through this gun, that’s $3K in ammo.  Dad paid something like $135 for the Model 59 back in 1972. Ignoring inflation, the ammo costs make the gun the least expensive part of the deal. Somehow that makes the fact that my Model 59 is toast slightly less bothersome. I probably could part it out (grips, slide, barrel, jeweled parts, etc.), but I don’t think I will. My buddies suggested putting it in a wooden frame and hanging it on the wall.  That sounds like a good idea. I guess I can’t bitch too much.  50 years of service ain’t too shabby.

Some of you might be wondering why I don’t just get the gun repaired.  It can’t be fixed; even Smith and Wesson told me it’s a goner.  They didn’t offer to buy it back like Ruger did when I wore out a .357 Mag Blackhawk, but hey, Ruger is Ruger and Smith is Smith.  One of my friends said I should buy a new 9, and I’m ahead of the curve on that, too.  I bought a SIG P226 Scorpion a year or two ago.  The SIG is the finest 9mm handgun I’ve ever owned, a worthy successor to the Model 59.   If it lasts 50 years like the Model 59 did, I’ll be 120 years old and I’ll feel like I got my money’s worth with it, too.


More Tales of the Gun are here!


Never miss an ExNotes blog!

The Model 52 Smith and Wesson

I’m a lucky guy.  One of the Holy Grail pieces in my collection is a Model 52 Smith and Wesson.   These guns were discontinued nearly 30 years ago and a lot of folks (myself included) consider them to be the finest handguns ever manufactured.  I had always wanted one, and finally, after pestering a good friend relentlessly, he agreed to sell me his.

An impressive target handgun: The Smith and Wesson Model 52-2. It has one of the best triggers I’ve ever experienced.

The Model 52 was built as a no-compromise bullseye target handgun chambered for mid-range .38 Special wadcutter ammunition.  What that means is that it’s not a duty weapon or a concealed carry weapon.  It’s a full-sized, 5-inch-barreled, adjustable sights, tightly-clearanced handgun with but one objective in mind:  Shooting tiny groups with wadcutter ammo.

The .38 Special cartridge has been around forever, and the target variant uses a wadcutter bullet.  One of my friends saw these and commented that it was odd-looking ammo, and I guess if you’re not a gun nut it probably is.  The bullets fit flush with the case mouth, and because of the sharp shoulder at the front of the bullet, they cut a clean hole in the target (hence the “wadcutter” designation).

.38 Special wadcutter ammo, reloaded on a Star reloading machine. The secret sauce (not so secret, actually) is a 148 grain wadcutter bullet seated flush and 2.7 grains of Bullseye propellant.

I love reloading .38 Special wadcutter ammo, especially now that I am doing so on my resurrected Star reloader.  You can read about that here.

You can see the clean holes cut by the wadcutter bullets in the target below, and that’s a typical target for me when I’m on the range with the Model 52.  What you see below is a target with 25 shots at 25 yards shot from the standing position.

25 rounds at 25 yards from the Model 52, all in the bullseye. I’m a ham-and-eggs pistolero; guys who are good can shoot much tighter groups.

Yeah, I know, 2 of the 25 shots were a bit low in the orange bullseye.  A gnat landed on my front sight twice during the string of 25.  (That’s my story and I’m sticking to it.)

That’s a Hornady hollow-base wadcutter on the left, and the Missouri Bullets cast double-ended wadcutter on the right. The HBWC is orientation sensitive; the DEWC is not.
Reloaded HBWC and DEWC cartridges, with two of the double-ended wadcutter bullets that show the wadcutter end (which faces forward in the cartridge) and the hollow base end. These HBWC projectiles are Hornady bullets.

Next question:  Which is more accurate in the Model 52, the hollow-base wadcutters or the double-ended wadcutters?   The two I tried are the Missouri cast double-ended wadcutter, and the Hornady swaged hollow-base wadcutter.   Here’s what they look liked (with me behind the gun) on a set of 50-ft targets:

50-ft targets used for comparing DEWC bullets versus HBWC bullets. These targets are about one-fourth the size of the silhouette target shown above.

And here’s the group size data from the 16 five-shot groups I fired a couple of days ago (all dimensions are in inches).  It was all focused on answering the question:  Which is more accurate?  Hollow-base wadcutters, or double-ended wadcutters?

The load was 2.7 grains of Bullseye, a CCI 500 primer, and mixed brass for all of the above groups.  They were all shot at 50 feet.  So, to answer the accuracy question, to me the difference is trivial (it’s less than a 1% difference when comparing hollow-base to double-ended wadcutter average groups).   The standard deviation (a measure of the variability in the group size) was a little bigger for the hollow-base wadcutters, but the difference was probably a statistcal anomaly and it was more due to me, I think, than anything else.

Folks often wonder how the Smith and Wesson wizards managed to get a semi-auto to feed wadcutter ammo.  It’s partly in the magazine design and partly in the ramping (but mostly in the magazine).  The Model 52 magazine is designed to only hold 5 rounds, and if the bullet protrudes beyond the case mouth, it won’t fit into the magazine.  The magazine holds the the top cartridge nearly perfectly in alignment with the chamber, and when the slide pushes the round forward, it glides right in.    It will even do so with an empty case, as the video below shows.

The Model 52 was first introduced by Smith and Wesson in 1961.  It was based on Smith’s 9mm Model 39, but it had a steel frame (instead of an aluminum frame, although Smith also made a small number of Model 39s with steel frames), a 5-inch barrel (instead of the 39’s 4-inch barrel), and target-grade sights adjustable for windage and elevation (instead of the 39’s windage-adjustable-only sights).  The original Model 52 had the Model 39’s double action first shot capability, although I’ve never seen a no-dash Model 52.   In 1963 Smith incorporated a better single-action-only trigger and the 52 became the 52-1, and then in 1970 it became the 52-2 when Smith incorporated a better extractor.  Mine is the 52-2.

I was lucky…when my friend sold the Model 52 to me, he had the complete package:  The original blue Smith and Wesson box, the paperwork that came with the new gun, and all of the tools and accessories (including the barrel bushing wrench).

You might be wondering:  Which is more accurate?  The Model 52 Smith and Wesson, or the new Colt Python?  They are both fine and accurate handguns, but in my hands and after coming back from good buddy TJ and TJ’s Custom Gunworks with a crisp single-action trigger, the Python gets top billing in the accuracy department.  You can read about the Python’s accuracy with wadcutter .38 Special ammo here.


Never miss any of our ExNotes blogs on guns, bicycles, motorcycles, construction equipment, product reviews, and all the rest.  Subscribe for free here!


More Tales of the Gun?  You bet!


Click on those popup ads!

A TJ Roscoe

Roscoe:  It’s slang for a snubnose revolver.  No one is really sure where the term originated.   There are others…heater, rod, piece, burner, gat (that last one is easy, with me knowing a little bit about The Gatling Gun and all), but the origins of most of these terms are lost in the haze of handgun history.  And on that Roscoe terminology, I recently tumbled onto a very cool website I’ll be talking about a bit more here on the ExNotes blog.  But that’s for later.  This blog is about my Roscoe.

It’s a Model 60 (no dash) stainless steel Smith and Wesson snubbie, to be specific.  I mentioned it and the work my good buddy TJ was doing to it not too long ago, and it’s back.   And it’s awesome.  I had TJ do an action job, a little cosmetics work, and fix a problem or two.

First, the action work.  TJ lightened both the double and single action trigger pull, and he did it the old-fashioned way…lots of hand work, polishing, and fitting.  Here’s what the guts of my Model 60 look like after a TJ Level 1 action job:

I initially thought I’d have TJ put a high polish on the entire revolver (it would have been something north of $300 just for that work), but TJ was looking out for my best interests.  “I can do the whole revolver,” TJ said, “but it will look a lot better if you just have me do the ejector rod, the cylinder, the trigger, the cylinder release, and the hammer.” He was right.  It looks awesome.

Here are a few more shots of the high polish TJ put on these components.

The work on the trigger is lot more than just cosmetic.  TJ recontoured the face of the trigger in addition to polishing it, and it really makes a difference in double action shooting.  It’s much easier to find and control that precise instant when the hammer drops during double action shooting with the new trigger contour.

As part of the Level I action job, TJ also applied orange Day Glo to the front sight. It’s a small touch that works wonders. Finding and putting the front sight on target is much faster with this Day Glo treatment.  It’s not just a cosmetic thing.

I mentioned in a previous blog that the revolver was hard to open, and TJ found and fixed the root causes of that problem.  The ejector rod threads had stripped, the ejector rod’s axis wasn’t concentric to the bore, and the barrel underlug catch was not properly configured.  My Model 60 opens and closes the way it should now.  It’s slick.

Here’s another small detail I like…polishing the cylinder release and its slotted nut (it’s not a screw, even though it looks like one).  This little bit adds a nice touch to the revolver.

The grips are smooth rosewood, and they work well with their S&W emblems against the stainless steel revolver.  I like the look.

So, on to the main question:  How did the TJ-customized Model 60 shoot?  Superbly well, thank you.  I tried two loads with the new-to-me Model 60.  The first was the 148-grain wadcutter with 2.7 grains of Bullseye; the second was a 158-grain cast truncated flat point bullet with the same 2.7 grains of Bullseye.  I loaded both on my new-to-me freebie Star progressive reloader.  Yep, the Star is up and running now, and how it works will be a story for a future blog (in the meantime, you can read about the Star resurrection here).

I fired four targets at 50 feet and the results are interesting.  The first two targets were with the 148-grain wadcutter load (I use an Alco silhouette that has four small silhouettes on a single target sheet).

I shot the target on the left with a 148-grain Missouri double-ended wadcutter bullet; the one on the right is with a Hornady swaged 148-grain hollow base wadcutter bullet.  I’ll tell you more about those in a bit.

Before TJ did any work on my Model 60, the gun printed wadcutter groups a good 12 inches to the right (good if you want to hit your bad guy in the elbow, I suppose).  After TJ fixed the ejector rod issue I described above, the wadcutter bullets still shot a little bit to the right, but much less than they had before.  That rightward bias is a function of the load, not the gun (as you’ll see in the next set of targets).

The really good news is how the Model 60 performed with the 158-grain truncated flat point bullets.  Those puppies shot exactly to point of aim, and after warming up with the first group on the left target below, I got serious about focusing on that beautiful Day Glo front sight and shot the group you see on the right target.  Point of aim was at 6:00, and for a 2-inch barrel Roscoe, that ain’t bad shooting.

If you’re not familiar with all this wadcutter and truncated flat point bullet business, here’s your lesson for the day.  Let’s call it Bulletology 101.

The brass cartridge on the left is loaded with a Missouri 148-grain DEWC (double ended wadcutter) cast bullet; the nickel-plated 38 Special cartridge to its right is loaded with a Hornady 148-grain swaged hollow base wadcutter (HBWC).  The Missouri DEWC bullets are symmetrical (they’re the same top and bottom); the Hornady HBWC bullets have (as the name implies) a hollow base (you can see those bullets in the center of the photo above, one inverted and the other right side up).  The idea behind a wadcutter bullet is that it punches a clean hole in the target (that makes it easier to score).  The two bullets on the right side of the photo above are 158-grain cast truncated flat points. I have a local caster make these for me.

I am enjoying my Model 60 and the custom work TJ did on it, but I’ll tell you what…this puppy bites.  The recoil is significant (even with the lighter 148-grain wadcutter loads), and I’m a guy used to shooting big bore handguns.  That little .38 Special cartridge is nothing to sneeze at (Elmer Keith, Dirty Harry, and all the rest of the bigger-is-better gunsels notwithstanding).

For a defense gun, I can live with Roscoe’s recoil (it’s not a handgun I would put 100 rounds through during a range session, though).  For all you keyboard commandos out there, I know, I know.  You can do that all day long.  I can, too, with a 1911.  But this little Chiefs Special is a handful, and after firing 5 or 6 groups, I’ve had enough.  Your mileage may vary.   I know, too, that if I put the Pachmayr-style oversize rubber grips on it, it would be more manageable (and I own a pair of those).  But then it wouldn’t look like it does now, and I love that look.


Hey, there’s more to this story…TJ also did a little work on my Compact 1911.  The latest improvements on the Compact 1911 are coming up in a future blog, so stay tuned!


More Tales of the Gun are here!

Want silhouette targets for your next trip to the range?    Don’t pay exorbitant range prices.  Get them here.

Custom grips for a snubbie Smith and Wesson?  Take a look here!
Never miss an ExNotes blog…get your own free subscription!


Want to turn your handgun into a one-of-a-kind combat companion?  You don’t need to live out here; TJ’s work is carried daily by law enforcement officers (and others whose lives depend on their sidearms) all over the world.  Here’s where you need to go to get started:

A TJ tune for my Model 60

I had trouble selecting a title for this blog.  The other contender was 50 Shades of Gray to go with the big photo you see above.  I wish I could say I took that photo, but the credit goes to good buddy and master gunsmith TJ.  TJ is the best pistolsmith there is, and one of the things that makes working with him so enjoyable is his photography.  When TJ works a custom gun project, he photodocuments it to keep you appraised of what’s going on, and a couple of the photos you see here are the ones he sent to me on my Model 60 project.   But I’m getting ahead of myself.  Let me back up a bit.

If you follow the blog (and you all do, right?), you’ve been watching the Star reloader resurrection project I’m working.  That’s coming along nicely, and I’m already making .38 Special ammo on my resurrected reloader.   This story started with my noticing an ad in my gun club newsletter for a Model 60 at a killer price.  I’m normally not a snubnose kind of guy, but hey, a deal’s a deal and I like the idea of a snubnose .38.  Maybe I watched too many cop shows in the ’50s and ’60s.  You know.  Cannon, Kojak, Hawaii 5-0, 77 Sunset Strip, Dragnet…you get the idea.  All those guys carried snubbies.

Anyway, the Model 60 was a good deal, but swinging the cylinder out to the side was a bit dicey…sometimes it wanted to stick.  The seller told me about that but I didn’t see it as a problem.  I saw it as an opportunity to do another project with good buddy TJ, and that’s what I’m doing.  TJ is doing his Level 1 action job for me (polishing all the internals and lightening both the double and single action trigger pulls), and I’m having him also put a mirror finish on the cylinder, the ejector rod, the cylinder release, the trigger, and the hammer.  It will make for a nice, subtle contrast with the brushed stainless finish on the rest of the gun.  That leaves only the grips, and I’m doing something about those, too.  TJ put into words what I was thinking, and that was that the stock grips (the ones you see above) are butt ugly (pardon the gun pun).

Back in the day Smith used to offer uncheckered rosewood grips, and that’s what I really wanted.  They don’t sell those any more, though, and I mentioned to TJ that I should have bought a set back in the ’70s.  You know,  just in case.  “Try E-Bay,” TJ said, and I did.  I hit paydirt almost immediately, and the grips you see below are on their way to me now.  Rosewood.  Smooth.  Just what I wanted.

The finish on my inbound grips may be a little funky, but that’s another opportunity, too.  It’s TruOil time, folks.  TruOil and a little patience will have these grips looking literally better than they did when they left the S&W factory in Springfield.

The Star reloader is operational now (I’ll show you more on the Star resurrection in upcoming blogs, and I’ll include a video that shows it making finished ammo).  I’ll have the Model 60 back in a few days, so I went ahead and loaded a box of ammo with the outstandingly accurate 158-grain cast bullets I get from my good buddy Roy.  It took only a few minutes on the Star (it would take closer to an hour on a single-stage press).  For a machine that’s probably older than I am, the Star sure does a good job.

When I take my custom snubbie .38 to the range, I’ll grab a few photos and share a range report with you here on the ExNotes blog.  Stay tuned, my friends, and keep your powder dry.


More Tales of the Gun!


Enter your email address for a free subscription to ExNotes!

A Tale of Two More .45s

A couple of weeks ago I tested three .45 ACP loads in a Model 625 Smith and Wesson and my Rock Island Armory Compact 1911 using Winchester’s 231 powder and Jim Gardner’s 230-grain cast roundnose bullets.  We’ve done a bunch of accuracy testing in both .45 ACP revolvers and autos with other loads (and you can find those stories here).  This blog focuses specifically on Jim’s 230-grain roundnose bullets with Winchester 231 propellant.

Reloaded .45 ACP ammo with Gardner 230-grain cast roundnose bullets.  The 230 cast roundnose bullets replicate GI hardball ammo and this bullet feeds in just about any .45 auto.

To get to the point quickly, the Gardner 230-grain cast roundnose bullets did well (as you’ll see below).  My testing consisted of three .45 loads with 4.5, 5.0, and 5.6 grains of WW 231 powder:

I was checking for accuracy and functionality in both guns.  Here’s what I found:

    • The Compact 1911 likes 5.0 grains of 231, and that load functioned best with this powder in the automatic.  The slide locked back after the last round the way it is supposed to; it would not do so with 5.6 grains of 231.  Getting a short-barreled 1911 to function well is a bit tougher than a full-sized 1911.  With 5.0 grains of 231 and the 230-grain cast bullets, my Compact 1911 functions reliably.  Your mileage may vary.
    • 4.5 grains of 231 functioned okay in the 1911, too, but it is the least accurate load in both the 1911 and the Model 625 (of the three loads that I tested).
    • The Model 625 likes both 5.0 and 5.6 grains of 231, with a slight accuracy edge going to the 5.0-grain load (although what you see here is probably more a result of my skills than anything else).  The 625 is not as accurate with the lighter 4.5-grain 231 load.

Lyman’s reloading manual has 5.8 grains of 231 as the accuracy load with this bullet, but I didn’t go that high (it was a max load).  Like I said, it doesn’t function reliably in the Compact 1911, and my testing showed 5.0 grains to be the Model 625’s sweet spot from an accuracy perspective.

All shots were at 50 feet, and all loads used the Lee factory crimp die (which assures easy chambering in 1917-style revolvers).  The loads would do better from a machine rest or a steadier shooter.  It was hot out on the range the morning I fired these targets and that probably adversely affected accuracy, too.

Here are the Compact 1911 targets that I shot using the 5.0-grain 231 load:

Compact 1911 results: Close enough for government work.  I use Alco targets for this kind of testing; these have four silhouettes per sheet.

The Compact 1911 is not a target gun, but it is accurate enough for its intended purpose.  The Rock Compact 1911 is very concealable and it’s the handgun I carry most often.  They are surprisingly inexpensive and surprisingly accurate with the right loads.

These are the targets with the Model 625 and 5.6 grains of 231:

The big Smith and Wesson Model 625 worked well with 231 and Jim’s 230-grain roundnose bullets.  This is the 5.6-grain target; 5.0 grains of 231 were even more accurate for me.

The Model 625 Smith and Wesson is more accurate than the Compact 1911 (hey, no surprises there).  They are both fun guns to shoot.

I usually load .45 ACP ammo with either Unique or Bullseye powder, but I thought I would try 231 just because I had some on hand and I wanted to see how it would do.  I have an accuracy load for the Compact 1911 with Bullseye and a 185-grain bullet that we wrote about earlier.  Other guys tell me 231 is their preferred .45 ACP propellant and I still had a can of it that I had purchased for the 9mm cast bullet comparo some time ago, so I thought I would give it a try in the two guns featured here.  With the sketchy availability of reloading components during these uncertain times, it’s good to know that this powder works well in .45 ACP.  But after this test, I’m going to stick with the other two propellants (Unique and Bullseye), assuming I can get them.  What I didn’t like about 231 is that it is a sooty powder…I found it to be significantly worse in that regard than Unique.

WW 231 propellant is accurate, but it sure is a dirty powder.  My left hand was covered in powder soot after just a few rounds.

I’ve been real happy with Gardner’s bullets.  They are less expensive than other cast bullets, the accuracy is good, and I observed no leading in either handgun. I’ll be purchasing Gardner bullets again.  If you haven’t tried Jim’s bullets, you might give them a try.


More Tales of the Gun, 1911, 1917, bolt action sporter, milsurp, load data, and other good shooting and reloading posts are here!


Join our Facebook ExNotes group!


Never miss an ExNotes blog…get a free subscription here:

Aging like a fine wine: My Model 59

The Smith and Wesson Model 59. Mine is a very early one, with a serial number that puts it in the first year of production. These old guns can shoot!

Dial back the clock a cool 46 years (which would put us in 1972), and Smith and Wesson had only recently introduced its Model 59 9mm, double-stack, semi-auto handgun. The 59 was the latest and the greatest in ‘72…a high capacity 9mm with a double stack magazine (like the Browning Hi-Power, the only other gun of its day with this feature) and a double-action first shot (pulling the trigger both cocked and fired the weapon).  It was cool.  Nah, scratch that.  It was super cool.

I first became acquainted with S&W semi-autos with their Model 39, the predecessor to the Model 59.  Dick Larsen, a family friend, had a Model 39.  Sergeant Larsen was on our local PD and to me he defined cool.  I really looked up to Larsen and I loved talking guns with him.  In one such discussion the conversation turned to the topic of the day: 9mm handguns versus the venerable .357 magnum revolver.   I thought Larsen was a dyed-in-the-wool revolver man, until he showed me his off-duty Model 39.  He had it on his belt under a Hawaiian print shirt.  It was a cool thing…small and light. I wanted one. “The one to get today is the Model 59,” the good Sergeant said, “if you can find one.”

The Model 59 was a new limited-production item from Smith and Wesson in 1972, and they were tough to get.  Rumor has it that S&W developed the 59 for the Navy SEALS (nobody outside S&W and the Navy knew this back then). That’s probably why they were so hard to get initially; nearly all the production was headed to Coronado Island.  I was going in the Army and after that conversation with Sergeant Larsen, I wanted a Model 59.  In those days, if you wanted to find a hard-to-get gun you either made a lot of phone calls or you visited a lot of gun shops (the Internet and Gunbroker.com did not yet exist).   My Dad did both (plus, as a world-class trapshooter, he knew people). I got lucky.  Dad found a distributer who could get a Model 59, and I had one before I shipped out for Korea.

I’ve had my Model 59 since 1973, and I’m guessing I’ve probably put something north of 30,000 rounds downrange with it. In my early days, I replaced the black plastic grips with cool tiger-striped exotic wood grips I bought at a Fort Worth gun show (who would want a gun with black plastic parts?), and I had to replace the safety once back in the ‘80s. Other than that, all I’ve done with my Model 59 is shoot the hell out of it and occasionally clean it. It’s surprisingly accurate, it feeds anything, and it’s just plain fun to shoot. It’s a gun I’ll never sell.

Zombies don’t stand a chance against the Model 59. My favorite 9mm load in the 59 is a 125 gr cast roundnose bullet over a max load of Unique propellant.

The good news is the Model 59 ultimately went into high rate production.   More than a few police departments chose the 59 when the migration from revolvers to autos occurred in the 1980s.  All of those PDs moved on to newer guns, and today you can still find used Model 59s for cheap.

Most folks today have either never heard of the Model 59, or they would smile quaintly at its mention and then tell you how great their plastic Glocks are. But don’t dismiss the Model 59.  The 59 is a grand old handgun and I’ll bet you a dollar to a donut you’d love it.  Mine just gets better with age (like a fine wine, I guess), and I love shooting it.


Want to see more of our Tales of the Gun?   Just click here!