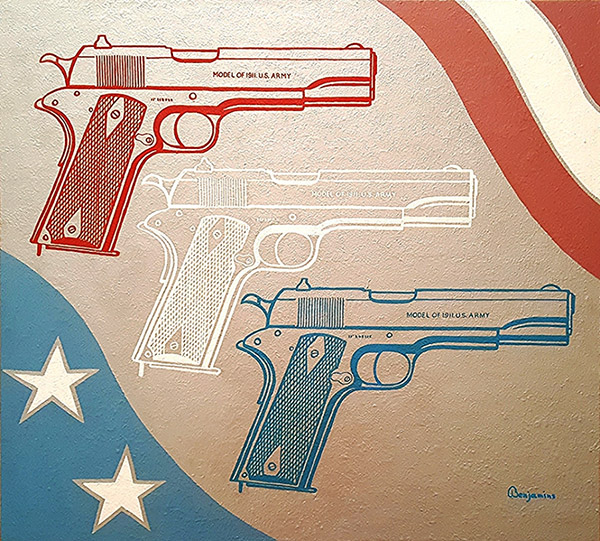
You probably remember good buddy Arthur Benjamins’ guest post on the Smith and Wesson Model 29. Arthur is an artist who recently created a beautiful painting highlighting the iconic 1911 .45 auto (a frequent topic here on ExNotes). He volunteered to do a guest column for the blog and we were quick to say yes. Enjoy, my friends.
Looks That Could Kill
The lady’s expression was thoughtful and disapproving. She stood arms crossed with a stance that parents would adopt with their young child who hadn’t properly screwed back the top on the peanut butter jar. If my junior school teacher had given me that same glare, I would have been guilty of shouting out the correct answer before raising my hand.
The subject of the lady’s gaze was my latest painting on show at the Arizona Fine Art Expo – my image graphically depicted of one of the USA’s legendary man made objects. 2.5 lbs of steel which could fit inside a coat pocket – The famous Colt .45 Automatic Pistol.
When Colt started production in 1911, no one would have guessed the impact it would have on the USA and the industrial world. It would be further immortalized in films, songs, books – and like the AR15, it would find its way into history and folklore. This was no ephemeral object. From an engineering point of view, the venerable Colt .45 pistol is a true work of art, and of the 2.7 million produced from 1911 onwards, all wartime specimens now command premium prices.
A Legend Comes to Life Again
One of the other artists offered to bring in his own for reference details, and the following morning he thrust a mint condition 1911 in a small cardboard box into my thirsty hands.
Thanking the good Lord for the USA’s freedom and Second Amendment, the mere possession of this object would have automatically produced a 5-year custodial sentence in the UK – a once-proud country in which I had lived for four decades and where I had sadly experienced firsthand the contrived and rapid deterioration of the firearms law and the victimization of the British shooting sports members.
However, I wanted to depict this highly developed, three-dimensional jigsaw puzzle and convey its iconic status. The voice of action imagery contributes highly towards a visual impact, but that was not what I was looking for. I chose a harmonious and nestling triumvirate in red, white and blue along with similarly hued starred and swirling banners on a field of noble silver.
The great Andy Warhol would have smiled enigmatically at my painting, and have said something cryptic to me. He would have used three individual images himself and have colored them similarly but my own selective abstraction had steered me away from his own repetitious trademark productions.
However, I gladly accepted his spiritual input which he would have welcomed as it was not widely known that as his own portfolio grew, he was forever running out of ideas, turning to others for renewed inspiration.
Beautiful Memories
At the Expo, it was amazing just how many viewers lamented having gotten rid of their beloved Colt .45 many years ago or wished they had owned one in a time when were considered as surplus and you could barely give them away. I encountered several moist eyes and stories of proud ownership. I was one of those myself years ago, but the UK handgun legislation in 1997 ended all that.
One of the Vietnam vets at the Expo’s American Healing Arts Foundation openly carried a customized 1911 on his hip. It remains one of the ‘carry’ favorites for a great many Americans who refuse to accept anything else.
Feeling I really needed to give the lady more input, I gently approached and said that the last ten years had seen a great upswing of women who had taken up the shooting sport to become proud and responsible gun owners.
“Mm-mm,” she mused, giving me a difficult look. Her brow had furrowed when she returned to the painting. She looked back at me, “We have friends,” she spat, “And THEY have a gun!” With that, she turned on her heels and disappeared from view.
“Only ONE?” I smiled, and with that I straightened Nineteen Eleven on my easel, adjusted the label and awaited further memories from discerning visitors.
You just can’t win ‘m all.
Title: “NINETEEN ELEVEN”
Size: 29” x 32” x 2”
Medium: Acrylic paint on wood.
Value: $5950
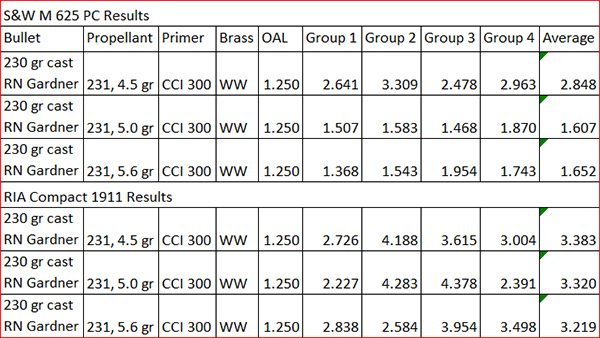
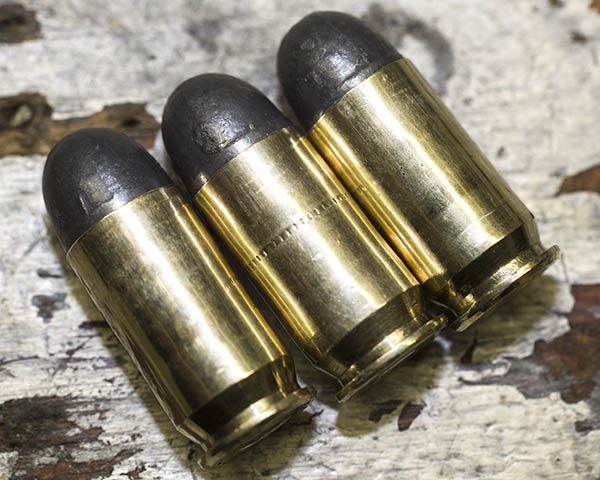
A couple of weeks ago I tested three .45 ACP loads in a Model 625 Smith and Wesson and my Rock Island Armory Compact 1911 using Winchester’s 231 powder and Jim Gardner’s 230-grain cast roundnose bullets. We’ve done a bunch of accuracy testing in both .45 ACP revolvers and autos with other loads (and you can find those stories here). This blog focuses specifically on Jim’s 230-grain roundnose bullets with Winchester 231 propellant.
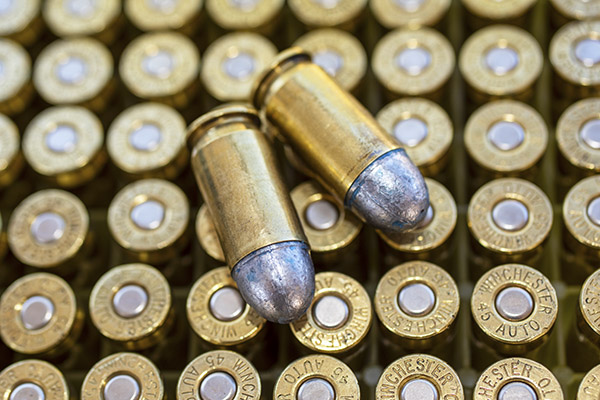
Reloaded .45 ACP ammo with Gardner 230-grain cast roundnose bullets. The 230 cast roundnose bullets replicate GI hardball ammo and this bullet feeds in just about any .45 auto.
To get to the point quickly, the Gardner 230-grain cast roundnose bullets did well (as you’ll see below). My testing consisted of three .45 loads with 4.5, 5.0, and 5.6 grains of WW 231 powder:
I was checking for accuracy and functionality in both guns. Here’s what I found:
The Compact 1911 likes 5.0 grains of 231, and that load functioned best with this powder in the automatic. The slide locked back after the last round the way it is supposed to; it would not do so with 5.6 grains of 231. Getting a short-barreled 1911 to function well is a bit tougher than a full-sized 1911. With 5.0 grains of 231 and the 230-grain cast bullets, my Compact 1911 functions reliably. Your mileage may vary.
4.5 grains of 231 functioned okay in the 1911, too, but it is the least accurate load in both the 1911 and the Model 625 (of the three loads that I tested).
The Model 625 likes both 5.0 and 5.6 grains of 231, with a slight accuracy edge going to the 5.0-grain load (although what you see here is probably more a result of my skills than anything else). The 625 is not as accurate with the lighter 4.5-grain 231 load.
Lyman’s reloading manual has 5.8 grains of 231 as the accuracy load with this bullet, but I didn’t go that high (it was a max load). Like I said, it doesn’t function reliably in the Compact 1911, and my testing showed 5.0 grains to be the Model 625’s sweet spot from an accuracy perspective.
All shots were at 50 feet, and all loads used the Lee factory crimp die (which assures easy chambering in 1917-style revolvers). The loads would do better from a machine rest or a steadier shooter. It was hot out on the range the morning I fired these targets and that probably adversely affected accuracy, too.
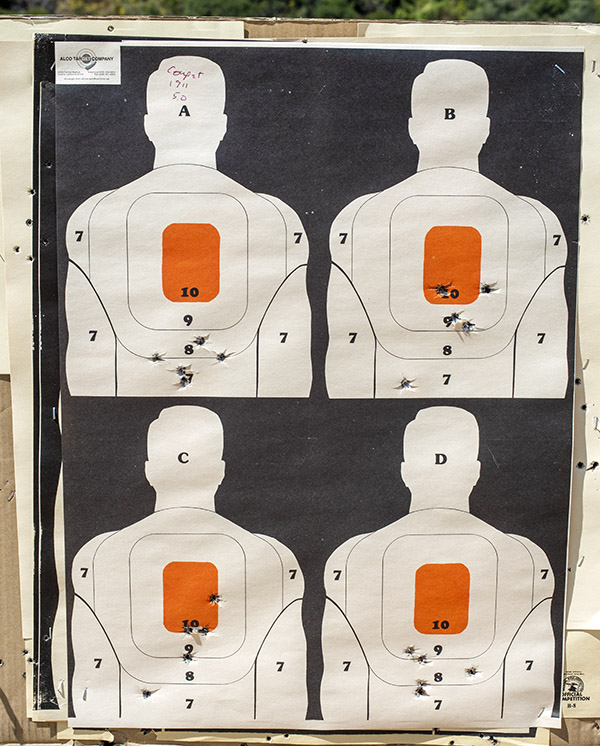
Here are the Compact 1911 targets that I shot using the 5.0-grain 231 load:
Compact 1911 results: Close enough for government work. I use Alco targets for this kind of testing; these have four silhouettes per sheet.
The Compact 1911 is not a target gun, but it is accurate enough for its intended purpose. The Rock Compact 1911 is very concealable and it’s the handgun I carry most often. They are surprisingly inexpensive and surprisingly accurate with the right loads.
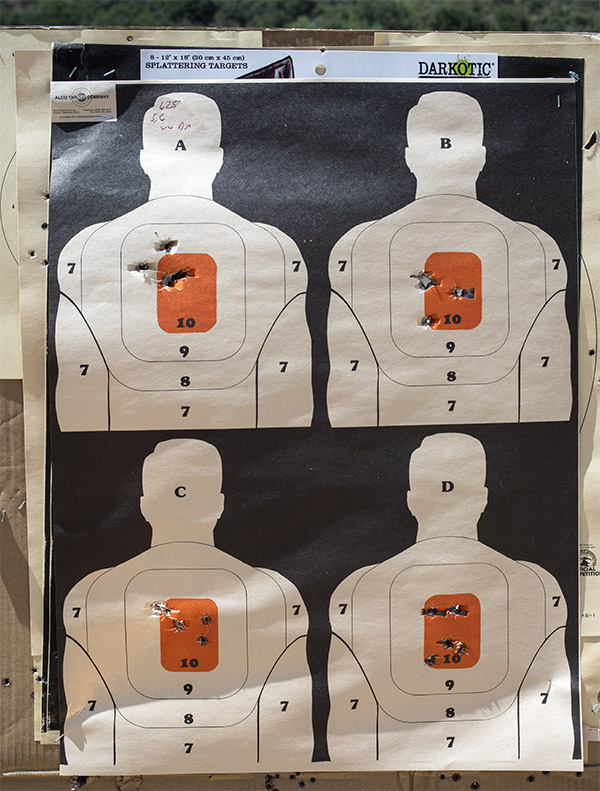
These are the targets with the Model 625 and 5.6 grains of 231:
The big Smith and Wesson Model 625 worked well with 231 and Jim’s 230-grain roundnose bullets. This is the 5.6-grain target; 5.0 grains of 231 were even more accurate for me.
The Model 625 Smith and Wesson is more accurate than the Compact 1911 (hey, no surprises there). They are both fun guns to shoot.
I usually load .45 ACP ammo with either Unique or Bullseye powder, but I thought I would try 231 just because I had some on hand and I wanted to see how it would do. I have an accuracy load for the Compact 1911 with Bullseye and a 185-grain bullet that we wrote about earlier. Other guys tell me 231 is their preferred .45 ACP propellant and I still had a can of it that I had purchased for the 9mm cast bullet comparo some time ago, so I thought I would give it a try in the two guns featured here. With the sketchy availability of reloading components during these uncertain times, it’s good to know that this powder works well in .45 ACP. But after this test, I’m going to stick with the other two propellants (Unique and Bullseye), assuming I can get them. What I didn’t like about 231 is that it is a sooty powder…I found it to be significantly worse in that regard than Unique.
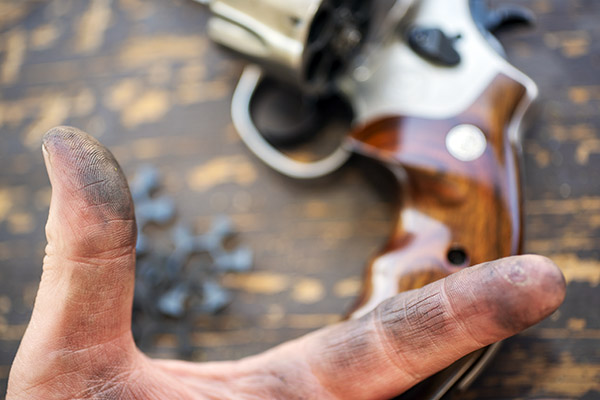
WW 231 propellant is accurate, but it sure is a dirty powder. My left hand was covered in powder soot after just a few rounds.
I’ve been real happy with Gardner’s bullets. They are less expensive than other cast bullets, the accuracy is good, and I observed no leading in either handgun. I’ll be purchasing Gardner bullets again. If you haven’t tried Jim’s bullets, you might give them a try.
More Tales of the Gun, 1911, 1917, bolt action sporter, milsurp, load data, and other good shooting and reloading posts are here!
I’ve done a few blogs on the 1911 handgun and, in particular, on a Rock Island Armory Compact I bought a couple of years ago. I love the Compact, it’s accurate enough, and it carries well. But I’ve had several issues with this handgun and because I’ve written about it before, I feel like I owe you an update.
Quick offhand shots with the Rock Island Compact 1911 at 50 feet. The load was a 185-grain wadcutter with a stiff charge of Bullseye propellant. It’s accurate enough for its intended purpose, and every shot was on the target. My 230-grain hardball loads are more accurate.
I’m going to share my experiences with you, but I want to make this point early on: I love my Rock Island Compact, and I would buy one again in a heartbeat. Yeah, it’s had problems, but let me make my point again: I’d buy another one in a heartbeat. I thought long and hard about doing a blog focused on the Compact’s failures, mostly because I’ve used the gun longer and harder than most. I’ve put several thousand rounds through the Compact, and nearly all have been full-power, hardball equivalent loads. Having said that, let’s get into it.
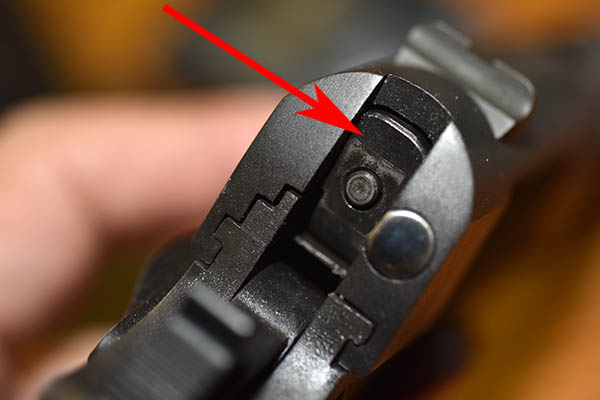
Firing Pin Stop Release
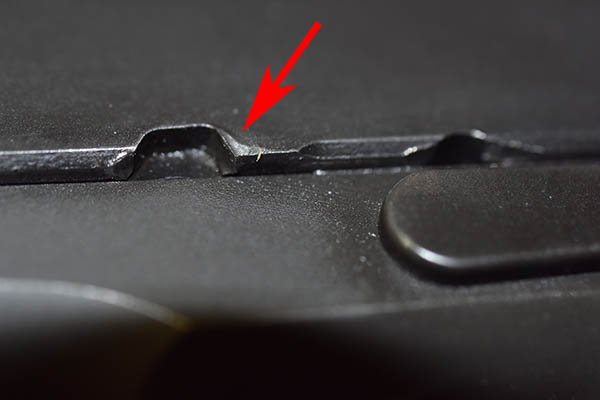
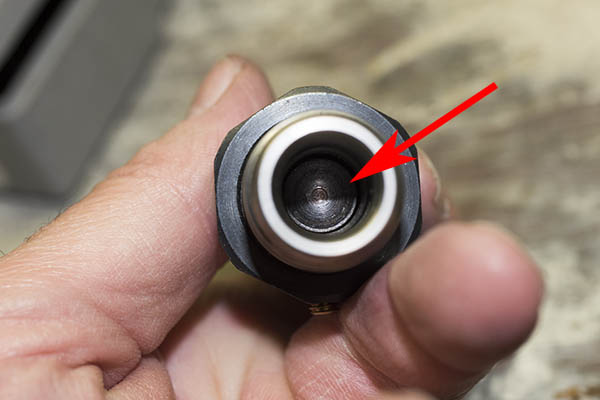
The first time I had the Compact on the range, it locked up a couple of times. The culprit? It was a weird one, something I had never encountered on a 1911 before. The firing pin stop was sliding off the firing pin.
The red arrow points to the firing pin stop. It is held in place by the firing pin (shown in the center of the firing pin stop) during recoil, but the firing pin has to be pushed back by its spring to do so.
This fix for this one was easy. After removing the slide from the frame, I depressed the firing pin, pulled the firing pin stop, and then I pulled the firing pin and its spring from the slide. I stretched the firing pin spring just a bit, figuring it needed a little more oomph to push the firing pin back to hold the firing pin stop in place. After that, this failure never recurred.
Staked Front Sight Failure
The Rock Island Compact front sight. It loosened within the first thousand rounds through the gun.
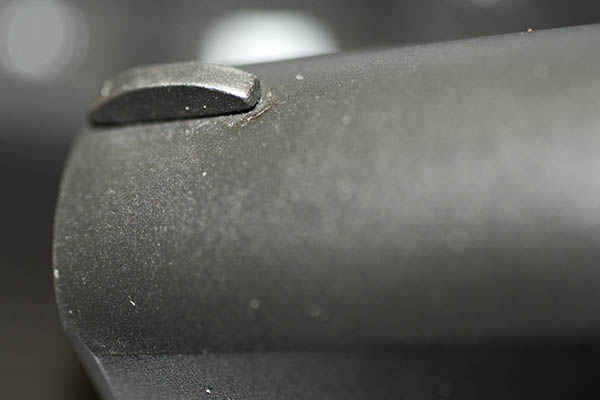
The front sight on my Compact came loose very quickly. That’s common enough on 1911s for staked sights (I’ve had it happen on a Colt 1911 and I’ve seen it happen on a couple of Springfield Armory 1911s, so it’s not a problem unique to the Rock Island handgun). If I was running Engineering at Rock Island, I’d specify a dovetailed front sight. The Compact replicates the look of the original Army 1911 (and I love that about the gun), but I think most purists like me would be willing to give up a tiny bit of the original GI look for a dovetailed front sight. Staked front sights on a 1911 (especially a Compact, which really gets knocked around by hardball-level recoil) are not a formula for long term reliability.
Rock Island made good on the front sight failure with their lifetime warranty. I sent the gun back and they fixed it, and the front sight is staying put.
Extraction and Ejection Failures
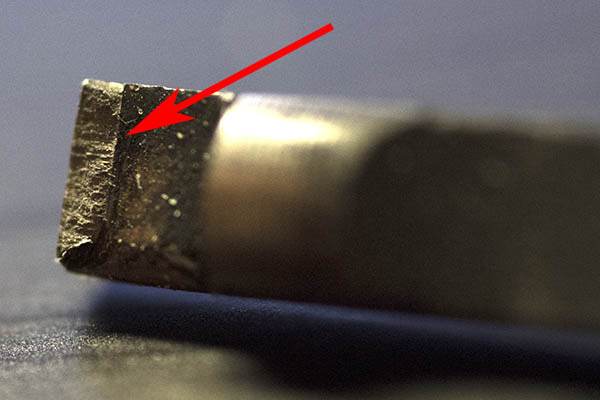
I had a ton of extraction and ejection issues. I sent the Compact back to Rock Island on the warranty and they fooled around with the extractor, but it still had extraction problems (at a lower frequency, but they still occurred). After the gun came back and I fired maybe another thousand rounds through it, the extractor broke so I replaced it with an aftermarket extractor (at my expense, because I didn’t want to send it back to Rock Island again). The nature of the failure indicated the extractor steel was too brittle.
The fracture surface of the Rock Island extractor. The surface fractography indicates the material was too brittle (perhaps a consequence of an inadequately-controlled heat treat process).
Ejection was flaky, too, and the gun frequently failed to eject the last round fired. It would stovepipe the brass as the slide went forward, and that brings me to another problem: The slide frequently would not lock to the rear after firing the last round. I mentioned that when I sent the gun back to Rock Island for the extraction issues, but they didn’t completely solve this problem, either. It got better, but it still occurred.
I then took the gun to a real gunsmith (good buddy TJ, about whom I’ve written before). TJ looked at the ejector and immediately recognized it was cut at the wrong angle. He recut it and the gun now ejects flawlessly. To state the obvious, you shouldn’t have to do this on a new gun.
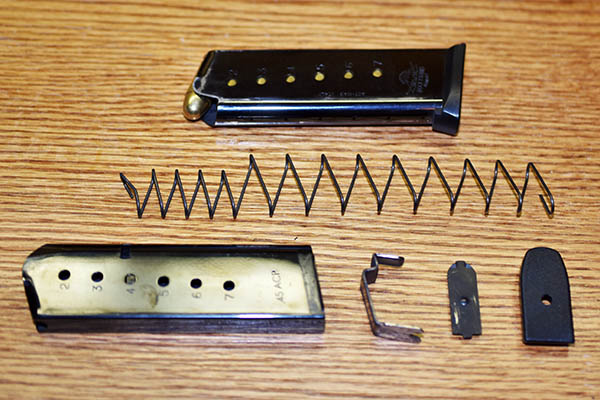
Magazine Issues
Regarding the slide not locking back after firing the last shot in the magazine, that problem required a couple of fixes. One issue was the relationship between the magazine follower and the slide release. I bought two extra mags from Rock Island thinking (and hoping) that maybe I just had a bad magazine, but all three mags had the same problem. The magazine follower is supposed to push the slide release up after the last round is fired with enough force to lock the slide to the rear, but on my gun it wasn’t doing this reliably. I believe it was because one of the magazine follower bends is in the wrong place.
The magazine follower. The arrow on the right points to the follower bend I believe positions the flat portion of the follower (denoted by the other arrow) too low to effectively engage the slide release. I think that bend needs to be about 0.030 or 0.040 inches higher.
TJ addressed the magazine follower issue by welding a bead on the bottom of the slide release where it engages the magazine follower. That made sure the magazine exerted positive upward pressure on the slide release after the last shot, and that made a significant improvement. I think what Rock Island needs to do is modify the design of the follower bend, or better control the manufacturing process to make sure the follower bend is in the right place (it might be that the engineering drawing for the follower places the bend at the wrong location, or it might just be the magazine follower doesn’t meet the Rock Island drawing).
A fully assembled loaded magazine, and a disassembled magazine. One of the magazine issues is a weak magazine spring. The fix was simple enough: I elongated it and that fixed the slide not staying back after the last round.
The other issue is that the magazine springs were wimpy. I pulled the springs and stretched them, reinstalled them in the magazines, and the problem disappeared. The slide now stays back after firing the last round every time.
Slide Deformation
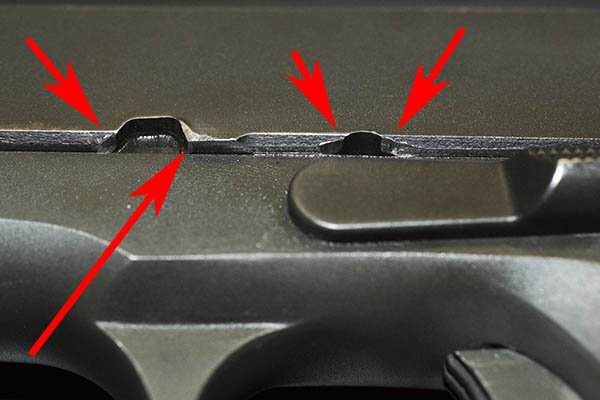
I believe the slide material is too soft. This resulted in a big burr on the slide at the rear of the machined cutout for the slide release, which I ground off because it was scarring the inside of my leather holster and it just looked ugly. You can see the deformation in the photos below.
Metal deformation on the Compact 1911’s slide. A small amount of this is to be expected, but this is excessive.Deformation in the slide’s release slot.
To some extent, a modest amount of slide material deformation is to be expected, and the problem is somewhat self-correcting. As metal deforms, it work hardens, and this natural work hardening tends to prevent further deformation. I’ve seen this occur on other 1911s I’ve owned (including one manufactured by Colt). I just saw way more of it than I expected on the Rock Island 1911.
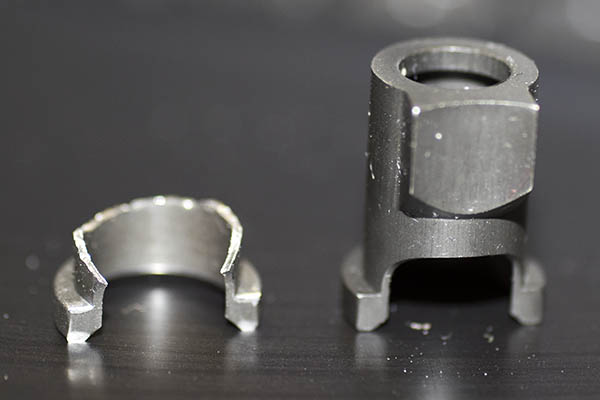
Guide Rod Plug Failure
My most recent failure involved the guide rod reverse plug (I call it a bushing). I think this part failed because it was too hard (the fracture surface indicates a brittle failure); I’m guessing the heat treat made it too brittle. This part needs to be more ductile. I also think it is too thin in the area in which the failure occurred.
Rock Island calls this part a plug; I call it a guide rod bushing. The plug fractured and Rock Island shipped a replacement part to me at no cost.The new plug installed on the guide rod. The paper clip is holding the plug in position while the 1911 is being reassembled.The guide rod, recoil spring, and replacement plug installed in the slide.The guide rod plug, viewed from the business end. My barrel and the guide rod have been polished; the stock parts have a Parkerized finish.
Poor Heat Treating Suspected
With the exception of the guide rod plug (which I think is a weak design) and the magazine follower, the issues described above are not faults in the basic design. I think they are being caused by inadequate heat treating process control. Heat treating was always a challenge in the defense plants I managed. To heat treat properly, you have to pull a partial vacuum to prevent hydrogen embrittlement, and it’s difficult (but not impossible) to get accurate temp readings in a partial vacuum. You think it’s one temperature, but actually it’s different temperatures at different locations in the heat treat oven. The result? You get parts harder or softer than specified on their respective drawings, which makes them more brittle or more ductile than they’re supposed to be. This issue of parts being too hard or too soft could be a contributor to the slide deformation issue, the front sight failure, the guide rod reverse plug failure, the extractor fracture, and the magazine and firing pin springs being too weak.
RIA Compact 1911: The Bottom Line
Yeah, I am putting more rounds through my Compact than most folks, who might get to the range once a month or more likely a couple of times a year. But the gun ought to be able to handle it. And yeah, the Compact has a lifetime warranty and the folks at Rock Island have been good about honoring it. I just wish I didn’t have to use it as often.
Having said the above, though, I’ll also tell you that new gun issues are not unique to Rock Island Armory. I’ve had to send three Rugers back for warranty service, my very expensive Smith and Wesson Performance Center revolver went back to Smith for repeated failures to fire (they took what I considered to be an inordinate amount of time to fix it), and my Springfield Armory M1A went back to Springfield for ejection issues (those guys took a long time, too). Two of my friends have Springfield Armory 1911s, and they both had to go back to Springfield for front sight failures (one of them had to go back twice because Springfield screwed up the repair). All of this has been in just the last few years. It’s unfortunate, but quality issues abound in the gun industry, and it seems like things are getting worse. When folks say they don’t make them like they used to, I can tell you from a lifetime of playing with things that go bang that’s true.
Help us keep the content coming: Please click on the popup ads!
I should also tell you that one of my good buddies tried my Compact, liked it, and he bought one. He hasn’t had any issues with his. None. Zip. Nada. So I can’t say my experience is representative of what you might expect. I’m only telling you what I experienced.
All the above notwithstanding, I’m happy with my Rock Island Armory Compact 1911 and like I said above, I love the gun. I’ve fixed the thing so many times that the Rock and I have what you might call an intimate relationship. We know each other. Like Gresh said about his relationship with the Royal Enfield Bullet, my Rock Island 1911 needs me.
You might wonder: Why not just buy a compact 1911 from a higher-end supplier, like Springfield, Kimber, Sig, or one of the custom builders like Les Baer or Wilson? Well, in a word, price. These other compacts start at roughly twice what the Rock costs (and go up sharply from there), and there’s no certainty they wouldn’t have problems, too. You could argue that you get what you pay for, and my response to that would be: Sometimes.
You can buy Rock Island 1911s for $499 all day long, and I’ve seen them on sale for as little as $429. That’s a great deal on a new 1911. I’ve had to work my way through the issues outlined above, but my Rock Compact is extremely reliable now and it’s a constant companion. Someday I may wear it out completely and if that ever happens, I’d just buy another one. If something goes wrong, odds are I’ll know how to fix it.
This post wraps up our tutorial on reloading .45 ACP ammunition, although from time to time we’ll be posting favored .45 loads as we continue to add Tales of the Gun blog posts featuring this fine old cartridge. If you’d like to catch up by reading the first three parts of this series, here they are:
We’re in the home stretch now, folks, with the last steps in creating our custom-crafted .45 ACP ammunition. The tools and components we’ll use in these remaining reloading steps are the propellant, the powder dispenser, our previously prepped-and-primed .45 ACP brass cases, bullets, the third reloading die, a reloading scale, a caliper to measure cartridge overall length, and boxes and labels to hold and identify the ammo we’ve created.
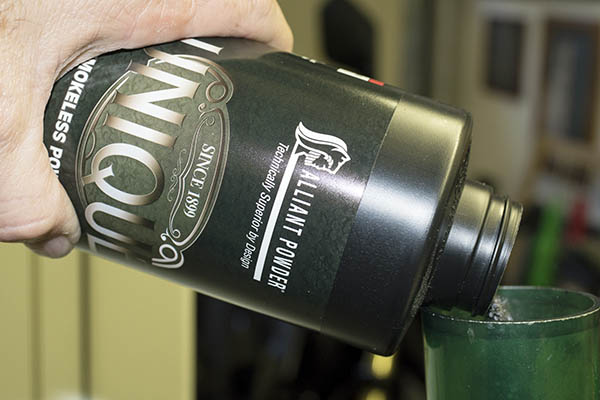
That’s the powder dispenser on the left, and Unique propellant on the right. I use an RCBS dispenser. Several reloading equipment companies offer these.
My preferred propellants for .45 ACP ammo are Unique or Bullseye, and of the two, I prefer Unique. Some folks prefer Bullseye. Others may use different propellants. One of the more enjoyable aspects of the reloading process is you can try different recommended propellants (and different charges of these propellants) to find the secret sauce that works best for you.
Help us bring more articles to you…please click on the popup ads!
What does that mean? For a revolver, it usually means the load that is the most accurate. For a semi-automatic handgun (like the 1911), accuracy is not the only requirement. You also need to have a load with enough energy to cycle the action. Usually, the loads shown in a reloading manual are powerful enough to cycle the action. You should never go above the maximum propellant charge listed in any reloading manual, and you should only approach that by testing loads at the lower end first, and then working up to a higher level if you feel a need to for accuracy or functionality reasons (but never go above the max load).
Adding Unique propellant to the powder dispenser.
Here’s another important point: Whichever powder you choose to use, never have any propellant other than the one you are using on your reloading bench. You don’t want to get the propellants mixed up, or mistake one for another.
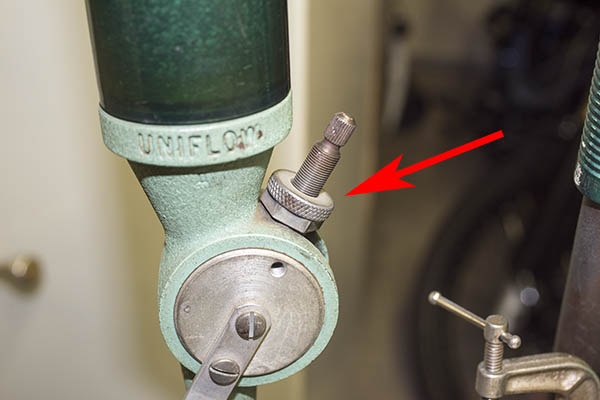
After you’ve added propellant to the powder dispenser, tap the dispensing handle against the lower stop several times to settle the powder. What we’re going to do next is to adjust the throw weight (the weight of powder dispensed) by adjusting the dispenser with the threaded adjustor shown in the photo below.
The dispenser’s adjustor. You can screw it in to dispense less powder, or out to dispense more powder. Once it dispenses the correct amount, lock it in place with the locknut.
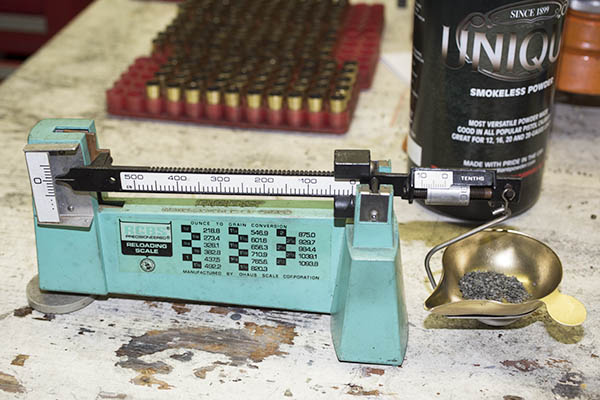
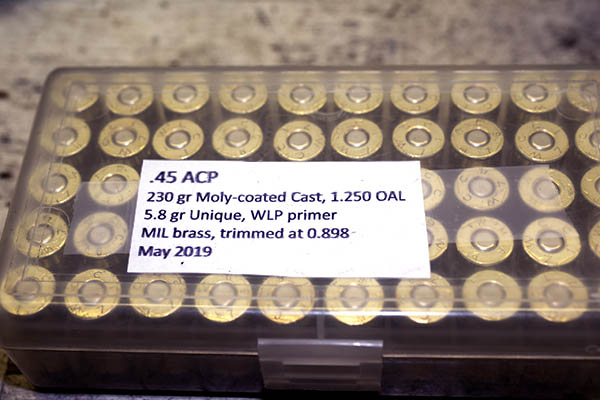
What we do at this point is get our reloading scale, set it to zero grains, and make sure the indicator (the balance arm) is in a neutral position (as indicated on the left side of the balance arm against the graduations on the scale markings on the left of the scale. Once the scale is zeroed, use the sliding and turning adjustors for the weight of propellant you wish to use. After years of accuracy testing and shooting, I’ve settled on 5.8 grains of Unique as the load I use with a 230-grain cast roundnose bullet.
My RCBS reloading scale set to 5.8 grains.
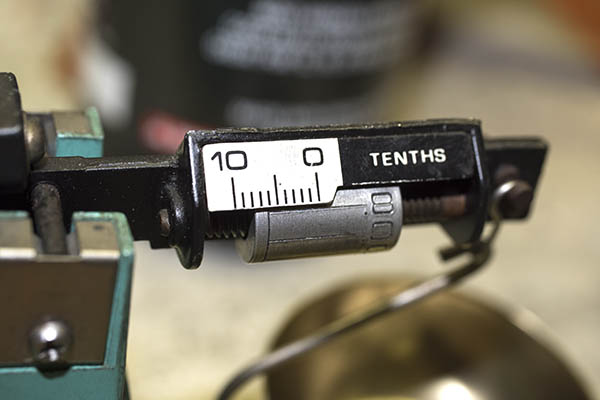
Note in the photo above that the sliding weight is at zero grains, and further note in the photo below that the rotating adjustor wheel is set to 5.8 grains. For anything under 10 grains, you leave the sliding weight at zero and set the weight with the rotating barrel as shown below. For most .45 ACP loads, we use the rotating barrel only.
The rotating barrel adjusting wheel is set to 5.8 grains.
After adjusting the powder dispenser’s adjustor and checking the weight with the scale, we now have the dispenser releasing 5.8 grains of Unique propellant every time the dispenser is actuated. I’ll throw several charges to make sure the dispenser is dispensing consistently, and once I’m satisfied it is, we’re now ready to dispense 5.8 grains of propellant in each of the prepped and primed cases we prepared in Part III of of our .45 ACP reloading series.
There are 5.8 grains of Unique in each primed case. Note that the propellant levels are approximately equal in all cases, and no cases have been missed.
When you dispense powder, it’s important to be consistent. I don’t like to stop until I’ve done the entire tray of prepped and primed cases, and I don’t like to be interrupted while I’m doing this. After you’ve dispensed the propellant in each cartridge case, visually inspect the tray to make sure every case is charged with propellant, and all propellant heights are approximately equal. We’re looking for missed cases here (if that happens, the primer will push the bullet into the barrel just a bit, which requires disassembling the firearm to hammer the bullet back out with a rod, and that’s basically the end of your shooting session that day). We’re also looking for any cases that are double-charged (i.e., cases that have two charges of powder in a single case). A double charge is real serious and dangerous business, as it will most likely blow up the gun, injure you, or worse. You have to pay attention to what you’re doing here. Like I just said, this is serious business.
So, after we’ve charged the cases with propellant, we now ready to move on to the next step, which is seating the bullets.
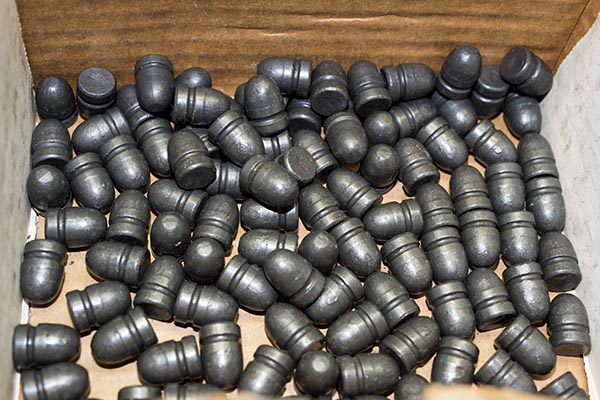
.45 ACP 230-grain cast roundnose bullets. I like this bullet design and weight. It’s accurate, and it feeds reliably in just about any .45 auto.
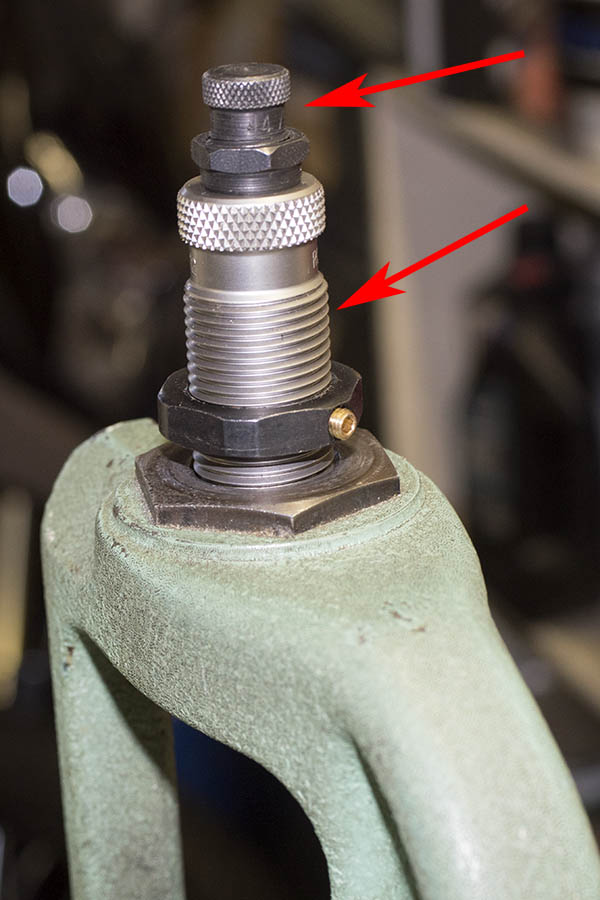
We’ll now use the seating die, the last of the three dies in our die set. This part of the operation requires a bit of adjusting and a bit of finessing on our part. We’re actually doing two things with this third and final die. We’re seating the bullet to the correct depth in the cartridge case (to meet the cartridge overall length requirement, which is found in your reloading manual), and we’re removing the cartridge case bellmouth that allowed the bullet to enter the case.
The business end of the seating die. The red arrow points to the part of the die that interfaces with and pushes the bullet into the case.
In order to make both adjustments, we’ll work with how far we thread the entire die into the reloading press (this affects both bullet seating depth and crimp), and we’ll also work with the bullet seating adjustor. These two parts of the die are shown by the red arrows in the photo below.
The bullet seating die in the reloading press. The upper threaded adjustor (denoted by the upper red arrow) adjusts bullet seating depth. The crimp or bellmouth removal adjustment is made by how far the entire die is threaded into the press (denoted by the lower red arrow), Once the crimp (or bellmouth removal for the .45 ACP cartridge) is set and the cartridge meets the desired overall length, lock both the die and the bullet seating adjustor in place with the two locknuts.
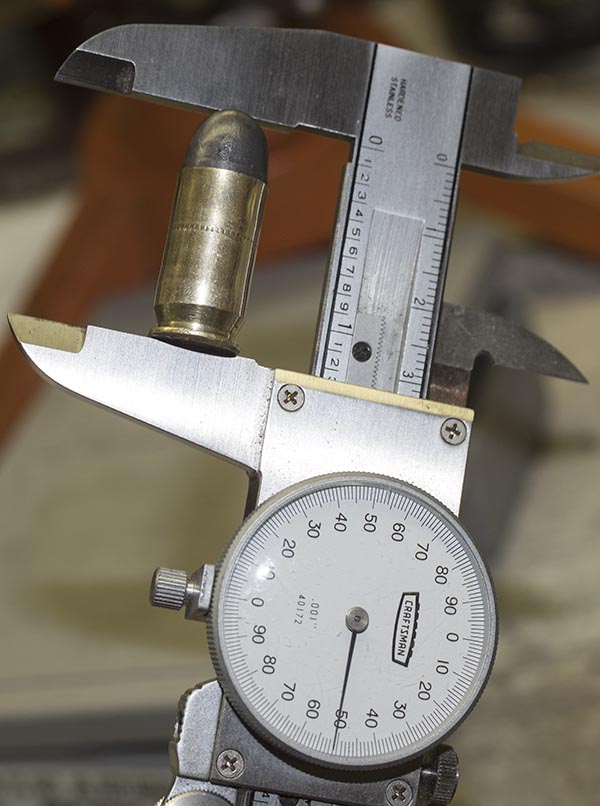
Here’s how I do this. I first screw the bullet seating adjustment all the way into the die, and then I’ll use this to seat the bullet to the right depth by threading the entire die into the reloading press, a little at a time. With each adjustment, I’ll run the charged case (with a bullet on top) into the die with the press. I keep doing this until the cartridge overall length is where I want it to be. For a 230-grain roundnose bullet, I adjust the seating depth such that the cartridge overall length is 1.250 inches, as specified by my reloading manual. That cartridge overall length is good, as it allows the cartridge to feed into the chamber, and it allows the cartridge to fit into the magazine.
Once I have the bullet seated to a depth that provides the correct cartridge overall length, I then back the bullet seating adjustor all the way out. Then I’ll start the crimping adjustment process by threading the entire die deeper into the press, a little bit at a time, running the cartridge into the press with each incremental downward die adjustment. The reason I ran the bullet seating adjust all the way out is that I don’t want it to push the bullet in any further while I adjust the crimp.
Here’s what going on here. Remember that I said the seating die does two things: It seats the bullet to the correct depth, and it crimps the cartridge. In the case of the .45 ACP, we’re not really crimping the bullet into the case. We just want to remove the brass case bellmouth that we previously added to allow the bullet to start into the case. The inside of the seating die has a reduced circumference step. Our purpose in making this adjustment is to thread the die into the press just enough to have the case make contact with the inner die step. That will remove the bellmouth. We’re not crimping here; we’re just removing the bellmouth so that the brass case becomes a straightwall case around the bullet.
Once I have adjusted the die body by screwing it into the press enough to remove the case bellmouth (and with the press ram raised to position the cartridge all the way up in the die), I then run the bullet seating adjustor all the way down, such that it contacts the top of the bullet. This will position the die such that it removes the case bellmouth, and simultaneously seat the bullet to the correct cartridge overall length. At this point, I can lock everything in position with the two locknuts (one for the die body in the press, the other for the bullet seating adjustor in the die) while the ram is in the raised position with a cartridge in the die. At this point, I’m ready to finish the rest of the cartridges.
A case with the bellmouth removed, and the bullet seated to the correct depth. The cartridge overall length is 1.250 inches. Life is good. I can hit a gnat in the ass at 25 meters with this cartridge.
At this point, what I do is put a bullet on each charged case, and then I start running each cartridge, with a bullet on top, thr0ugh the reloading press.
Charged cases topped with bullets, ready for the bullet seating operation.
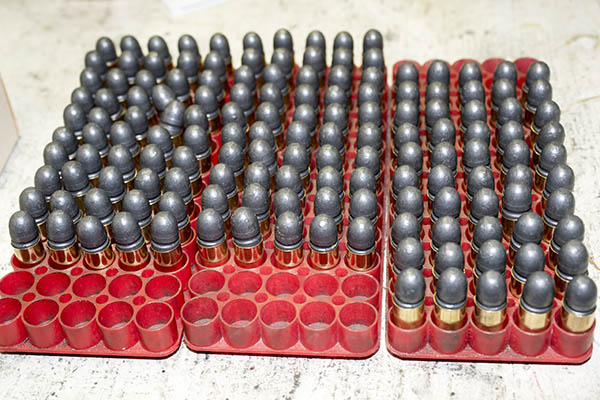
With each run up the press, I’ll create a reloaded cartridge. Here are three reloaded rounds…
Reloaded .45 ACP ammo. It’s good looking ammo, and I know it will provide superior accuracy and reliability in my 1911. It will perform way better than factory ammo, and that’s what this reloading game is all about.
As I produce each round, I place it in one of the plastic boxes I use for my ammo.
Once the above steps are done, I then take the propellent remaining in the powder dispenser and return it to the propellant container (in this case, the Unique bottle). That’s one of the reasons it’s important to only have one bottle of propellant on the reloading bench. You don’t want to dump the leftover powder into the wrong propellant container. If that happens, you can’t use the container of propellant you just emptied the leftover powder into because now it contains a mix of two different propellants. The only thing you can do is throw it away. It’s just to risky to use it. And yeah, I’ve had to do that before.
Reloaded .45 ACP ammo, ready for the range. It looks good, doesn’t it?
There’s one more step, and that’s labeling each box of reloaded ammo with cartridge, bullet weight and type, cartridge overall length, propellant type and charge, primer type, brass type, brass trim length, and the date I manufactured the ammo.
At this point, I’m good to go. It’s off to the range…
So there you have it. Reloaded .45 ACP ammo, as good as or better than what you can buy anywhere. I just returned from the range a few minutes ago, where I shot some of the ammo you see in the photo above, and yeah, it functioned flawlessly and hit the target every time.
If you enjoyed this post, let your friends know about us. Leave a comment if you’d like to add to or join the discussion. We love hearing from you. And if you never want to miss an ExhaustNotes blog, please sign up for our automatic email notifications!
Want to read more gun stuff? Check out our Tales of the Gun page!
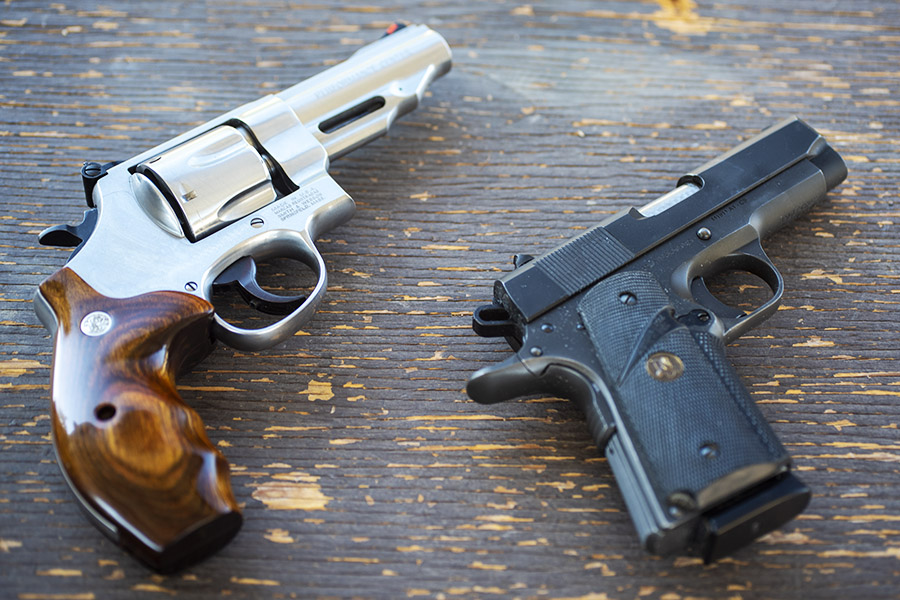
We’ve done “A Tale of Two Guns” pieces before here on the ExNotes blog, and we’ve specifically done a “Tale of Two .45s.” That earlier piece was on the Rock Island Compact 1911 and a Smith and Wesson Model 625. The Rock Island Compact has become my favorite handgun and it’s the one I shoot most often. I wondered: How much accuracy am I giving up by shooting a snubbie 1911?
When I call the Compact a snubbie, I’m referring to the fact that it has a shorter barrel. You know, a standard Government Model 1911 has a 5-inch barrel, and the Rock Island Compact has a 3.5-inch barrel. There’s nothing inherently more or less accurate about a shorter versus longer barrel. What could make an accuracy difference, though, is the sight radius (the distance between the front and rear sights). The longer barrel 1911 has a longer sight radius, and that theoretically should make it more accurate.
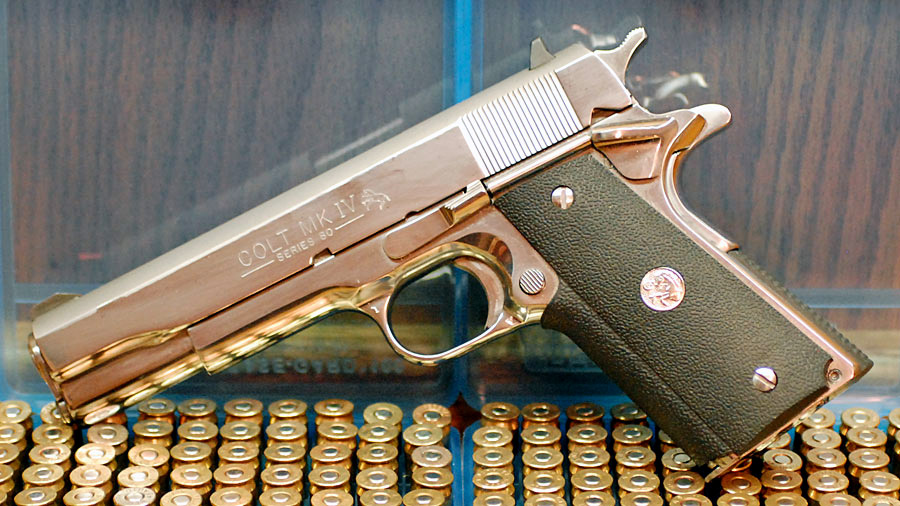
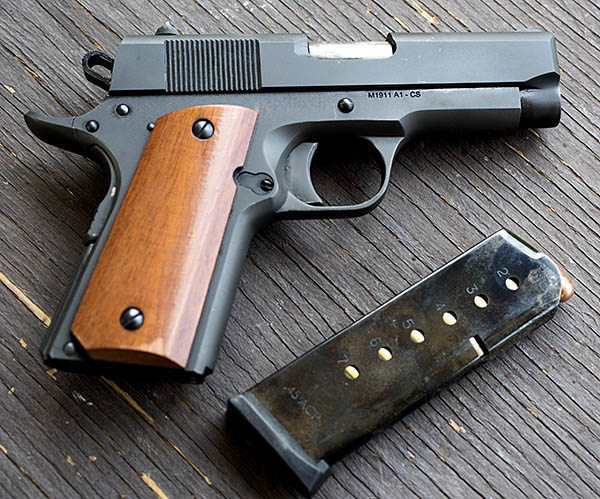
A Colt bright stainless steel full-sized 1911 Government Model, along with a box of reloaded .45 ACP ammo. The standard 1911 barrel length is 5 inches, and that’s what this handgun has. This particular 1911 has been extensively customized, with a view toward extreme reliability.The Rock Island Compact 1911. This inexpensive .45 auto has a 3.5-inch barrel. It’s become my favorite handgun.
I was taught to shoot the 1911 by one of the best. Command Sergeant Major Emory L. Hickman, a US Army Marksmanship Training Unit NCO, taught me the basics (you can read about that here). I’ve been shooting the .45 since 1973, and I’ve been reloading ammo for it about that long, too. I used to be pretty good, but I’ve slowed down a bit. Hey, speaking of that…here’s a video of me playing around at the range with the Colt bright stainless .45 auto…
The video above is real time…it’s not been modified from the video that came straight out of the camera. But I couldn’t leave it alone. My choices were to spend about a zillion hours on the range and maybe shoot up another zillion dollars of ammo to get really good, or to just use my video editing software to have a little fun. I went for Door No. 2…
Okay, enough goofing around. Let’s get serious, and get to the real topic of this blog. I went to the range with the two 1911s shown above with two objectives in mind. I wanted to test different loads to see which was the most accurate in each gun, and I wanted to see if there really was a difference in accuracy between a standard size 1911 and the Compact.
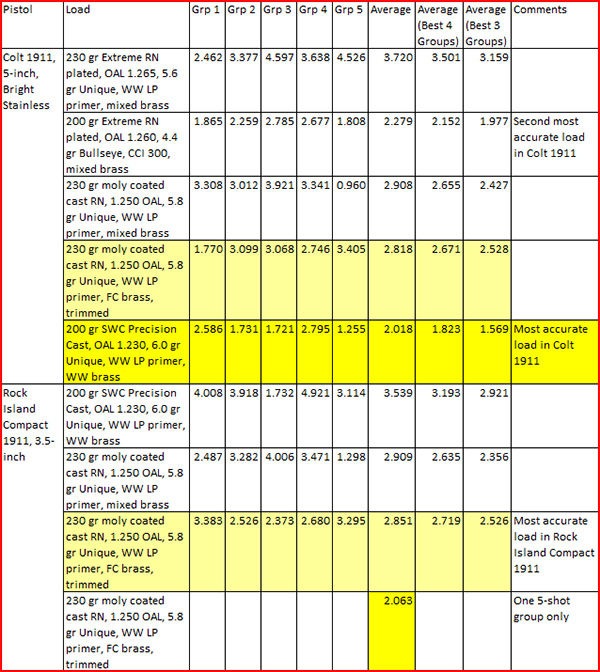
I brought along different loads with two different propellants (Unique and Bullseye) and several different bullets (a 230-grain moly-coated roundnose, a 230-grain plated roundnose, a 200-grain plated roundnose, and a 200-grain cast semi-wadcutter). I fired all groups at 50 feet from a two-hand-hold, bench-rest position. All groups were 5-shot groups. I then measured the groups and took the average group size for each load.
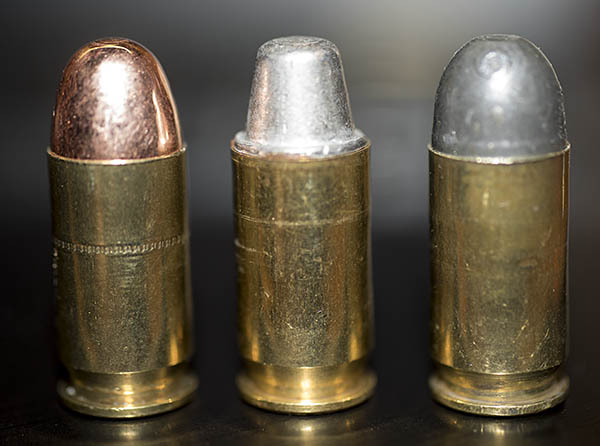
Different .45 ACP bullet configurations. From left to right: A 200-grain roundnose plated bullet, a 200-grain cast lead semi-wadcutter bullet, and a 230-grain moly coated cast bullet.
I know that using a hand-held approach as I did is not the way to eliminate all variability except that due to the gun and the load, and my inability to hold the gun completely steady was a significant contributor to the size of the groups I shot. A better approach would have been to use a machine rest (you know, the deal where you bolt the gun into a rigidly mounted support), but like my good buddy Rummy used to say, you go to war with the Army you have. I don’t have a machine rest, so all you get is me.
Because I introduced so much variability into this accuracy assessment, I thought I would throw out the largest group for each combination of load and gun, and take the average of the four best groups. I did that, and then I did it again by throwing out the two largest groups for each combination of load and gun. Doing so predictably made the averages smaller, but the relative ranking of the different loads from an accuracy perspective pretty much stayed the same. That’s good to know.
Before I get into the results, let me tell you a bit about the two handguns. The Compact 1911 is a stock handgun, as delivered from the factory, with the exception of a Klonimus extractor (which I installed because the factory extractor failed after about 1000 rounds). The Colt has been extensively customized by my gunsmith (TJ’s Custom Gunworks in Redondo Beach), with a view toward 100% reliability with any ammo. That handgun is probably worth $2500 as it sits now. The Compact 1911 can be had for a little over $400.
Okay, that’s enough background. Let’s get to the bottom line…
Interesting stuff, to be sure. Most of the variability you see in the above table (and you can see that there’s a lot) was me. A machine rest would have provided for better groups, but you get what you get, and what you get here is me.
As I expected, the 5-inch 1911 is a bit more accurate than the Compact. The best average group with the full size Colt 1911 was 2.018 inches. The best average group with the Compact was 2.851 inches. Okay, so at 50 feet that’s 8/10 of an inch difference, and as they say, that’s close enough for government work. What was surprising was how accurate the Compact is. You really don’t give up much in accuracy between the two guns. And, look at the last row of the above table. I fired one group with the Compact (and what is now my preferred load) that hung right in there with the Government Model. More on that in a second.
In the Rock Island 1911, the 230-grain moly bullet was the most accurate load I tested. After I did the five groups to get an average group size, I fired one more group with this load in the Compact and it was a scant 2.083 inches. Yeah, this gun is accurate enough.
In the Colt, the most accurate load was with the 200-grain semi-wadcutter bullets over 6.0 grains of Unique. This load fed flawlessly in both the Rock Island Compact and the Colt. My Colt has been throated to feed semi-wadcutter bullets; the Rock Island has not been (usually, a 1911 requires that the feed ramp be opened up and polished, or throated as we say, to feed semi-wadcutter bullets). But the 200-grain semi-wadcutter load failed to eject twice in the Compact. The Compact is fussy about ejection, and the two failures convinced me that this load won’t work reliably in the Rock Island without additional work. For now, I’m sticking with the 230-grain roundnose load. It’s completely reliable for both feeding and ejection.
You’ll notice that one of the Government Model five-shot groups with the 230-grain moly coated bullet and 5.8 grains of Unique was a tight 0.960 inches. The bottom line is that this load is a good one. Yeah, the other groups with that load were larger: It’s that shooter variability thing again. Both the Compact and the Colt are capable of greater accuracy than what I could do.
The moly-coated 230-grain bullets shot tighter groups in the Colt than did the plated 230-grain Extreme plated bullets. That’s consistent with my observations over the years. Cast bullets seem to be more accurate than plated bullets in any of the .45 autos I’ve shot. But, the 200-grain roundnose plated bullet did pretty well in the Government Model, too. I didn’t test that load in the Compact.
The bottom line to all of the above: My standard .45 Auto load is going to be 5.8 gr of Unique with the 230-grain moly coated cast roundnose bullet. It fired the best overall group (at 0.960 inches) in the Colt, and it was the best load for the Compact. This load functions well in both guns, with no anomalies in feed or ejection, and it’s accurate. The only problem I may have is that moly coating fell out of favor some time ago, and I don’t know if any one is still offering moly-coated bullets. I have a stash of the 230-grain moly bullets, so I’m good for a little while. After that, it’s back to the loading bench and the range to find the next favorite load.
Regarding the two handguns, I love them both. That bright stainless Colt Government Model has had a lot of work done to it (a Les Baer barrel, custom fitting, porting and polishing, engine turning, and Millet Hi-Viz sights). The Rock Island Compact can be had new for something a little north of $400. It’s a phenomenal value. The Compact is a lot more concealable, and surprisingly the recoil is only very slightly more than the bigger Colt. And, as I showed above, it’s accurate. The Rock Island is a hell of a 1911 at any price, but at it’s current price, the Rock Island is an absolute steal. I like the look of the Compact, too. The Parkerized finish, simple wood grips, and low profile fixed GI sights remind me a lot of the 1911s I carried when I was in the Army, and I like that.
Check out our other Tales of the Gun stories here!
Or so sayeth Joe Gresh, soothsayer, philosopher, and observer of the human condition extraordinaire. Say what you wish, every time we post a gun blog here on ExNotes, the hits (no gun puns intended) go through the roof. We’re primarily a motorcycle site, with an emphasis on vintage bikes, restorations, destinations, Baja, and adventure riding. But our readers love gun stories. What to do?
I guess we’ve got to find a way to merge the two topics: Guns and motorcycles. Somebody did it with roses. We’ve got to be smart enough to find a way to do it with motorcycles. Here are my thoughts…
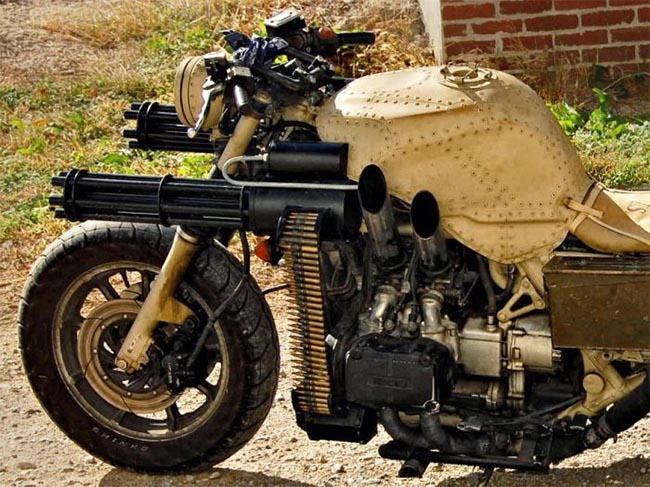
Maybe armed motorcycles. Hmmm, that might work. I’m thinking a .45 ACP Gatling mounted centerline on a big V-twin, maybe with the bike being designated the FLH-GG. Centerline mounting would prevent recoil-induced torque steer (just as was done on the A-10 Warthog), and the .45 ACP chambering would allow for increased ammo storage and shorter barrel length (plus, the .45 ACP is an incalculably cool cartridge). I’m thinking a firing rate of 1000 rounds per minute would do nicely.
I’d go with a single Gatling mounted in the headlight, chambered in .45 ACP. You get the idea. If you need to know more about Gatling guns, take a look here.
That Gatling thing could work. When I was in the Army, we called our 20mm Gatlings Vulcans, and Kawasaki made a motorcycle called the Vulcan. There are branding possibilities here, folks.
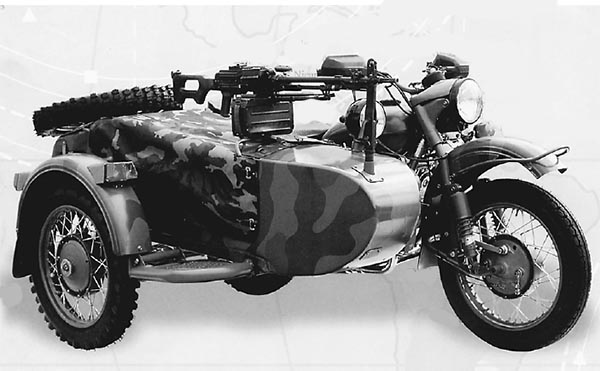
Or maybe we look for bikes that have already been built. Ural had a sidecar model with a machine gun mount a few years ago. Yeah, that could work.
We could focus on police and military motorcycles. Hmmm, I know a pretty good book on that topic, and Lord knows there’s enough models of police and military bikes to support a string of blog features. But hey, we’re already planning to do that. And it will be cool. I guarantee it.
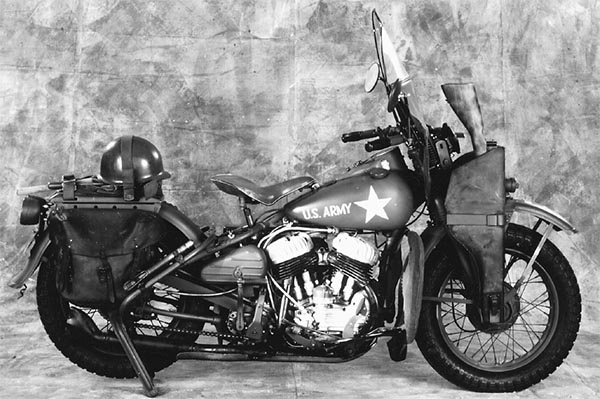
A Harley WLA, complete with a Thompson submachine gun scabbard. Thompson submachine gun sold separately. This is another photo from Police and Military Motorcycles.
Maybe a feature or two on how to carry a gun on a motorcycle, both out in the open and maybe a concealed carry feature. The Army had some cool ideas on open carry back in the 1940s (see the above photo). For concealed carry, I’m thinking maybe something that’s integrated into the clutch lever, or a tankbag holster that looks like a map case. Or maybe a cell phone mount with a Derringer designed to look like a cell phone. Yeah, we could have a lot of fun with this one.
When I was at CSC, we sometimes ran a postal match. You know, where folks shoot at a target, send the target to us, and we’d score them to find a winner. That was a lot of fun.
While we were running the postal match, somebody actually wrote to me suggesting we have a match in which you have to shoot from a rolling motorcycle (no kidding, folks…I can’t make up stuff this good). It would be kind of like polo, I suppose, but with bikes and bullets instead of horses and mallets (or whatever they call those things they whack the ball with). Liability coverage might be tough, but it could be made to work.
We could design a gun that transforms itself into a motorcycle. You know, you carry the thing in a holster, say a few well-chosen words, and it converts itself into a motorcycle to allow for a convenient and quick exit. We could maybe call it something catchy, like the Transformer. We ‘d probably sell a few just because it sounds like an electric thingamabog (you know, it would sell to folks wanting to show they’re green). Nah, I don’t think he technology has caught up to the EPA challenges yet. But it’s fun to think about.
The Transformer, a motorcycle that changes into a gun. We’d sell a lot of T-shirts.
I’ve done a blog or two on motorcycle companies that started as firearms manufacturers. You know, BSA (which actually stands for Birmingham Small Arms), Royal Enfield (of Lee Enfield rifle fame), and well, you get the idea. That would involve a lot of research, so it may not fit in with our ExNotes labor minimization strategies. But it might be worth considering.
All of the above is food for thought, but I’m rapidly approaching a state in which I’ve been thinking so hard I may not be able to think for the next several days. Help me out here, folks. What are your ideas?
Like our wit? If so, don’t take a chance on missing future ExNotes blogs. Sign up for our automatic email notifications, and you’ll automatically be entered in our quarterly drawing for the next moto adventure book giveway!
My good buddy Paul, whom you’ve already read about on the ExNotes blog, is a retired aerospace engineer who has way more talent than me in the gun-tinkering arena. During one of our shooting expeditions, Paul brought along an interesting 1911…a .45 that he had re-barreled to shoot 9mm. There’s not a simple proposition, but hey, Paul’s good at this stuff and his 9mm conversion shot well. Then, a few months ago, we had a discussion about the merits of the .38 Super cartridge. That’s a round similar to the 9mm, but the case is longer, allowing for more propellant. The result? The .38 Super’s velocity is substantially higher than a 9mm (the .38 Super is roughly equivalent to a .357 Magnum).
Well, one thing led to another, I guess, and I received an interesting photo and email from Paul a few days ago…
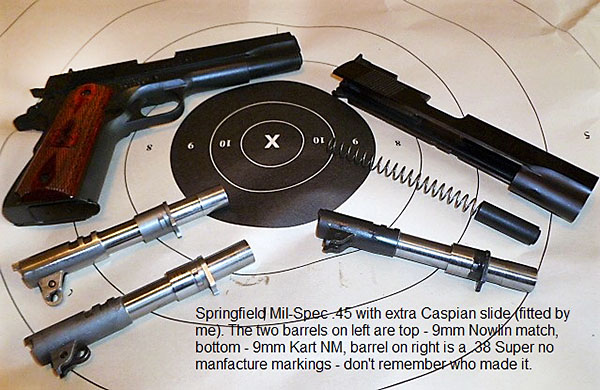
A four-fer, so to speak….a 1911 that can shoot .45 ACP, .38 Super, 9mm, and .22 Long Rifle.
Joe:
I started this project about 5 or 6 years ago. My intent originally was to buy a stainless steel Springfield 1911 9mm target pistol. At the time they were very scarce and wait time was close to a year at an inflated price. I then decided to purchase a mil spec .45 and buy a Caspian 9mm slide, barrel and slide components to convert the .45 to 9mm. I said to myself that if I was going this far with the project that I would buy a .38 Super barrel and have a pistol that will convert into a .45, 9mm, and .38 Super. I did the Caspian slide and 9mm Nowlin barrel fitting first, a few months after I originally purchased the pistol.
I shot the pistol in 9mm conversion at Joe’s range a few years back and it performed very well. The .38 Super conversion was put on hold until now. I purchased a new oversized bushing and three different barrel links to get the correct lockup, which arrived from Brownell’s a few days ago. I recontoured the barrel and fit the bushing to barrel, and then to the slide. This took 3+ hours to do with a 0.0005″ to 0.001″ tolerance fit on all surfaces. Link and lockup fitting were next.
When I fit the link to the barrel, a job that I thought would take 10 minutes, it actually took 1.5 hours. That barrel must have been a budget-manufactured barrel because the workmanship was poor in the link recess and not deep enough to allow the link to fully seat. I’m glad I have a milling machine. The lockup is now solid and everything cycles as it should.
I think it’s ready to test fire but first I have to reload some ammo for it. I’m going to do a Cerrosafe casting of the bore to see what the diameter is. The spec for the bullet diameter for the .38 Super is 0.356-inch and the 9mm it is 0.355-inch. I have some Berry’s plated bullets that are 0.356 but I’m not sure if they are 115 or 124 grains. I want to use 124 to 130 grain bullets. I do have a fair amount of 124 gr semi-wadcutter cast bullets that I did many years ago for my Colt 9mm target bullet experiment but I never sized or lubed them (looks like I’ll be bringing out the bullet sizer/luber). Not too sure that this style of bullet will cycle, but it’s worth a try.
I also purchased a .22 LR conversion kit for this pistol about four years ago, which I have also previously shot. So, now this 1911 Springfield Mil Spec will shoot .45 ACP, 9mm Luger, .38 Super, and .22 LR when it’s finally finished…how neat is that!
Paul
That’s awesome, Paul…and thanks for taking the time to explain your approach and for the photo. It’s a cool handgun and having that kind of versatility is a slick concept. I think it has to be especially satisfying knowing that you built it yourself.
We’ve found that folks who ride are frequently into guns, and vice versa (like good buddy Paul). It’s why we include interesting Tales of the Gun stories on the ExNotes blog. Want to see more?
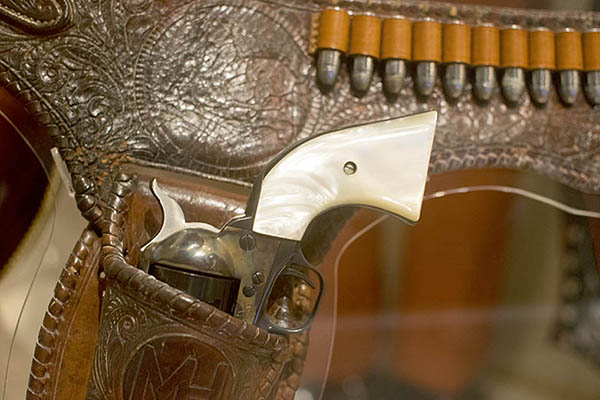
This is an interesting story about the development of the .45 ACP 1911 and a sister military sidearm, the 1917 revolver, and maybe a little more. To really appreciate the history of these two guns, we need to consider three cartridges (the .45 Colt, the .45 ACP, and the .45 AutoRim), and four handguns (the 1873 Colt Single Action Army, the Model 1911 Colt, the Model 1909 Colt revolver, and the Model 1917 revolvers). Wow, that’s a mouthful. But it’s a fascinating story.
So what is this story about? A tale of two .45s, or of four?
The Two .45 Handguns
Well, it started out as a tale of two…the 1911 Rock Island and my Model 625 Smith and Wesson. But I’m getting ahead of myself. Read on..
The 1873 Colt Single Action Army, chambered in .45 Colt (the cartridges you see on the gunbelt). If you grew up watching cowboy movies (like I did), you know this gun well.
.45 ACP Historical Perspective
To best understand this, we need to go back to 1899, and maybe as far back as 1873. Yep, this tale goes back a century and a half.
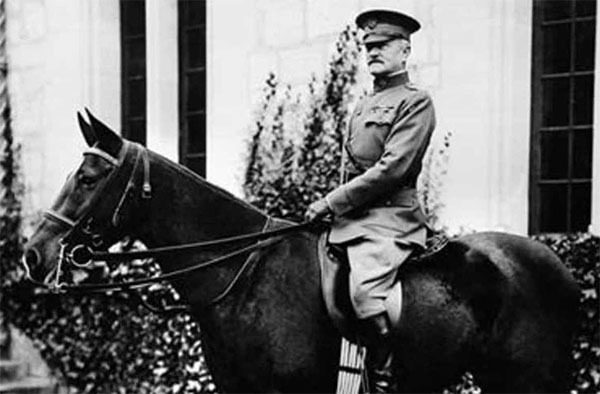
In 1899, the Philippine-American War started (it’s also known as the Philippine Insurrection). We sent US Army troops armed with .38-caliber revolvers, Krag rifles, and 12-gauge shotguns to put down the insurrectionists (the Moros), and we found out the hard way that the .38 just wouldn’t cut it as a military sidearm.
General John J. “Black Jack” Pershing, who was a captain during the Philippine Insurrection. He had direct experience using the .45 Colt Single Action Army during the American Indian wars. Pershing was America’s only 6-star general, a rank never attained by anyone else. He fought Indians, he chased Pancho Villa in Mexico, and he commanded American troops during the first World War.
In response to this, or so the story goes, the Army tried all kinds of handgun ideas, including the then-new 9mm Luger. There was a lot more to the story than just the concept that the .38 wasn’t enough gun, but it’s the version that is most frequently bandied about and we’ll stick with it to keep things simple. You hear about drug-crazed Moro insurgents, you hear about religious fanatics, and more. I don’t know which parts are true and which parts are, to use a current term, fake news. But I do know that as a result of that war, the Army wanted a handgun with more power.
The idea of a semi-automatic handgun was cool, but the Army thought the Luger was too complicated and the 9mm cartridge wasn’t much better than the .38. The .38 and 9mm bullets are essentially the same diameter (one is 0.356 inches, the other is 0.358 inches), and neither had enough knockdown power.
Our Army went back to an earlier cartridge, the .45 Colt, a rimmed cartridge used in the old 1873 Single Action Army Colt. It’s the six shooter that you see in the old cowboy movies (the one holstered in the photo at the top of this blog). The old 1873 was a single action sixgun (you had to pull the hammer back for each shot). By the time the Moro Wars rolled around, both Colt and Smith and Wesson had double action revolvers. On those, all you had to do was pull the trigger (that cocked the action and fired the weapon). To meet the new need in the Philippines, Colt manufactured double action revolvers (their Model 1909) chambered in the .45 Colt round. The Army was all for it, and they felt it met their needs (at least on an interim basis).
An interim solution to the unstoppable, presumably drug-crazed Moro insurrectionists…Colt’s Model 1909 revolver in .45 Colt, the same cartridge used by the Colt 1873 Single Action Army.
Having played with the Luger, though, the Army liked the idea of a semi-automatic handgun. But that puny 9mm round wasn’t enough back in those days, so the Army invited firearm manufacturers to submit larger caliber automatic pistol designs.
The 1911
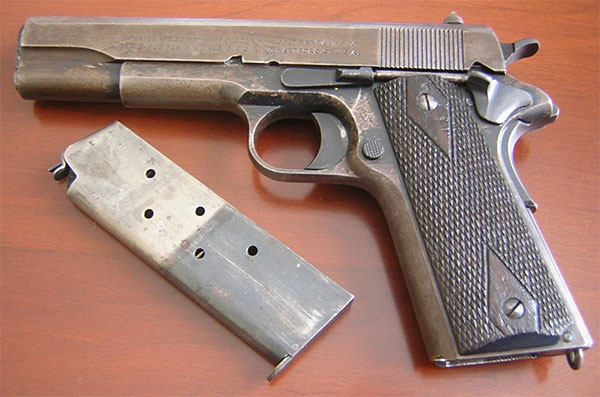
The winner, of course, was John Browning’s 1911 design, and the .45 auto came into being as the US Army Model of 1911. It was a new gun and a new cartridge. The 1911 couldn’t shoot the rimmed .45 Colt cartridge used in the 1873 Peacemaker and Colt’s double action Model 1909 handguns. Instead, it used a new .45 ACP round (“ACP” stands for Automatic Colt Pistol), which fired the same big .45-inch-diameter bullet in a rimless cartridge case (actually, the cartridge has a rim, but the rim is the same diameter as the rest of the cartridge case, and that allowed it to work in the new semi-auto).
The 1911 Colt Auto. The new automatics used the rimless .45 ACP cartridge. The .45’s claim to fame is its tremendous stopping power.
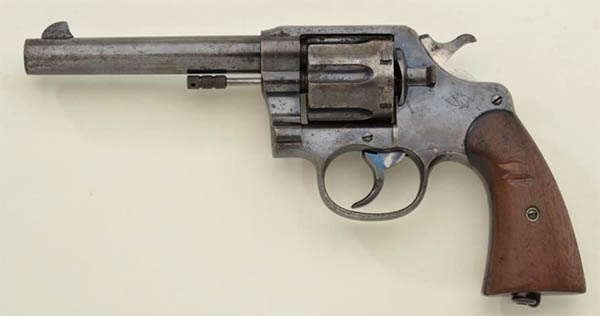
The 1917 Colt and Smith and Wesson Revolvers
Fast forward a few more years and World War I started. The Army’s preferred handgun was the 1911, but there weren’t enough of the new semi-autos. Colt, and Smith and Wesson came to the rescue by modifying their earlier big bore revolver designs to shoot the .45 ACP cartridge, and the Army issued these as the Model 1917 revolver.
A US Army 1917 Smith and Wesson. These are beautiful revolvers. The gizmo beneath the grips is a lanyard attach point, which tied the gun to the soldier who carried it.
The 1917 double action .45s were phased out of the Army a few years after World War I ended, and they were sold as surplus to the public (things were different back then). Model 1917 revolvers are highly collectible today. I owned an original GI issue Colt Model 1917 back in the 1970s, when you could pick them up for about a hundred bucks. I loved that revolver, but I stupidly sold it 40 years ago. (When discussing firearms, the phrase “stupidly sold” is inherently redundant. Like nearly all of the guns I’ve sold, I wish I still had it.)
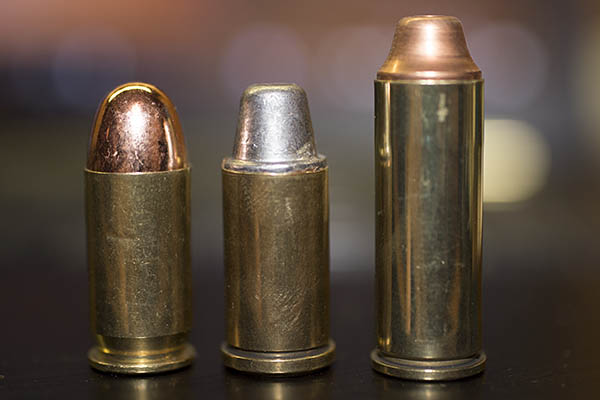
The three cartridges, all in .45 caliber. The one on the left is the .45 ACP, as used in the Model 1911 automatic and the Model 1917 revolver (and my Model 625 revolver). The one in the middle is the .45 AutoRim, which is essentially the .45 ACP but with a rim (that allows it to be used in the Model 1917 revolver and its descendants without a star clip). The one on the right is the old .45 Colt, which has been around since 1873 and is still a popular revolver round.
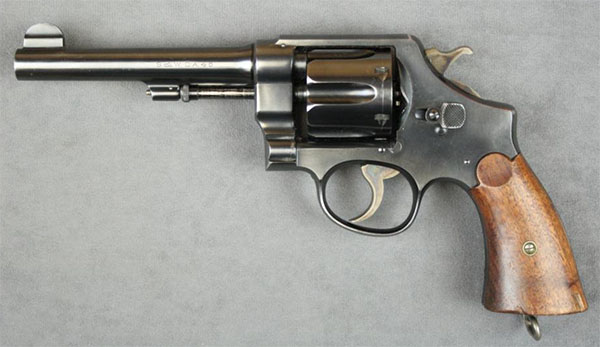
The 1911 .45 auto? It continued as the official US Army sidearm for the next seven decades. I carried one when I was in the Army. Like a lot of shooters, I think it is the best handgun ever.
In 1985, the Army replaced the 1911 with the 9mm Beretta. That (in my opinion) was a dumb move, and apparently the Army ultimately came to its senses with regard to the Beretta, but they stuck to the 9mm Luger round (now the NATO standard pistol cartridge) when they went to a Beretta replacement. The Beretta is being replaced by yet another 9mm (the SIG).
The Model 625 Smith and Wesson
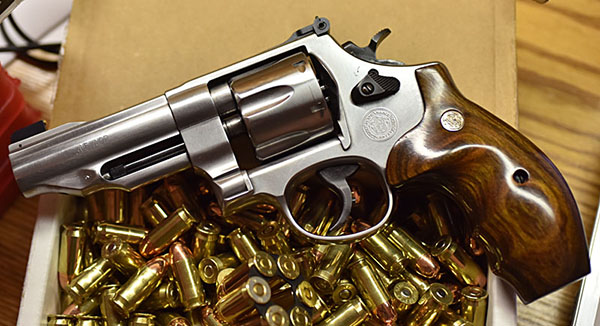
No matter; there are still many of us who consider the 1911 in .45 ACP the ultimate sidearm. I’m one of those guys, but I’m also a huge fan of the double-action revolver in .45 ACP. The good news for me (and you, too, if you’re a .45 auto fan) is that Smith and Wesson still makes a modern version of their double-action revolver in this cartridge. It’s the Model 25 Smith (or, in stainless steel, the Model 625), and it’s a direct descendent of the old 1917 revolver.
A Model 625 Performance Center Smith and Wesson, and my reloaded .45 ACP ammo.
The Rock Island 1911 Compact
I am a lucky guy. I own both the .45 ACP Model 1911 and the .45 ACP Smith Model 625. You’ve read the earlier ExNotes blog about my Rock Island Compact 1911. It’s a sweet shooter and, at just under $500, it’s a hell of deal. And that Model 625? Wow. The Performance Center is Smith’s custom shop, and that revolver is accurate. It should be; it costs twice what the Rock Island 1911 goes for. But both guns are great, and I love shooting both.
A Rock Island Arsenal Compact 1911, the subject of an earlier ExNotes blog.
I had both of my .45s out at the range yesterday, and I had a blast (pun intended). Yeah, the revolver is a more accurate handgun than the 1911, but like we used to say in the Army, both are close enough for government work.
.45 ACP Accuracy
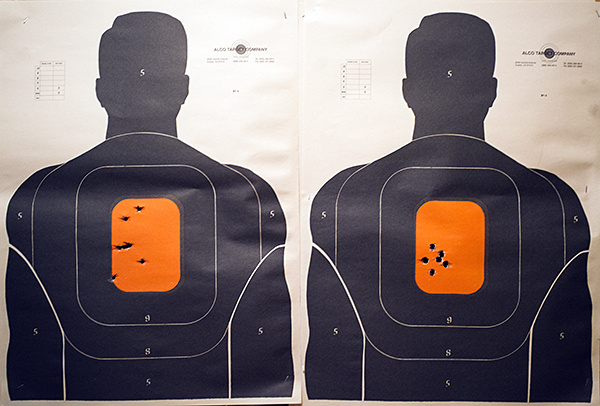
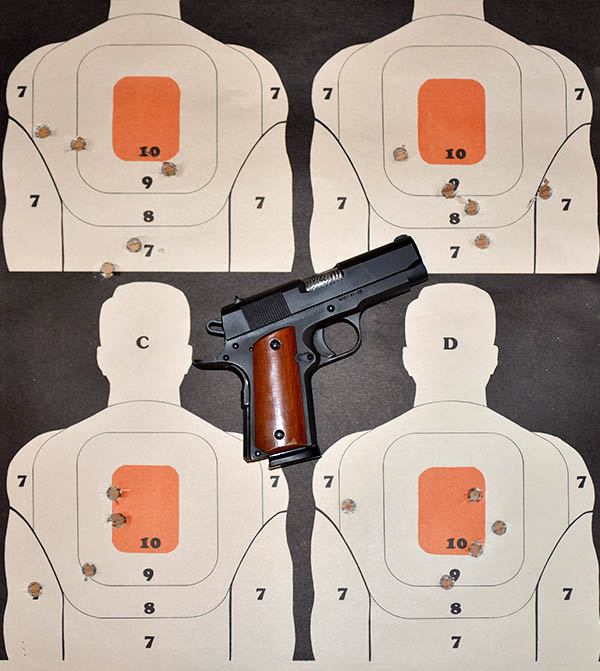
So just how well do these guns shoot? The short answer is very, very well. After running through a couple of hundred rounds, I thought it might be a good idea to set up two targets, side by side, and fire six rounds at each (the first six with the 1911, and the second six with my revolver). That’s exactly what I did, and it’s the final photo for this story…
Two targets at 50 feet, with six rounds each. The one on the left was with the Compact 1911, and the one on the right was with the big Smith and Wesson Model 625. Are both guns accurate? You bet! They’re close enough, as they say, for government work…
Hit those pop up ads! It’s what keeps the lights on!
Incidentally, if you like reading about guns and their history, you might want to pick up a copy of The Gatling Gun. I wrote that book, and it covers the early days of the Gatling (the Civil War), the transition to a modern weapon system after World War II, and modern Gatling applications on high-tech weapon systems. I worked on many of these systems, and I worked for the company that manufactured 30mm ammo for the A-10 Warthog. You can read all about that in The Gatling Gun, available from Amazon.
Help us keep the lights on:
Want more gun stories? You can see all of our gun articles here on Tales of the Gun!
Like what you see here? Hey, sign up for a free subscription to the ExNotes blog!
I’m a huge fan of the 1911, going all the way back to 1973. That’s when I graduated college and headed off to the Army. I went to college on an ROTC scholarship, and I had the same spot in the Corps of Cadets as Colin D. MacManus did when he graduated a few years before me in 1965. Captain MacManus was killed in action in Vietnam, and every year after that, his family awarded a Colt 1911 to the graduating senior who held his position. I was that guy in 1973, and that was my first .45 auto.
Back then, times were different. I had to get a permit to own the .45, but it was more a formality than anything else. We could shoot in our backyard, we often did, and my father and I couldn’t wait to put the .45 through its paces. Like I said, we couldn’t wait, but that was only one thing we couldn’t do. The other was hit the target. We set up a target 30 feet away (a soda can), and trying as best we could, the only thing we hit was the ground halfway between us and that soda can. A lot of dirt flew. There’s a lot of lead buried in what used to be our backyard. Don’t tell the EPA.
Fast forward a few weeks, and I got lucky. The Army sent me to graduate school, and the ROTC detachment got a new Sergeant Major, one Emory L. Hickman. Sergeant Major Hickman had spent most of his career in Vietnam and the Army Marksmanship Training Unit, where the finest pistoleros in the world live. He was the real deal: A warrior and an expert pistol shot. I told him of my plight (the evasive can of pop) and he laughed. The Sergeant Major schooled me on the fundamentals of handling the 1911, he coached me on the pistol range, and he taught me how to put those big old 230-grain FMJ bullets pretty much exactly where I wanted them to go. Thank you, Sergeant Major Hickman.
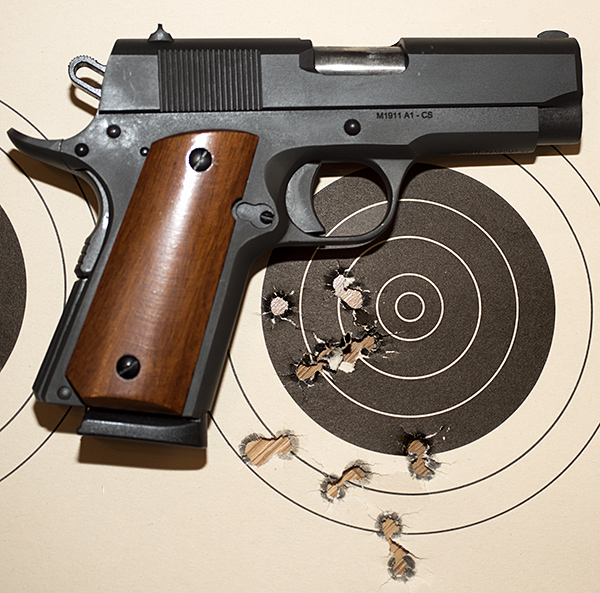
Fast forward several decades and dozens of 1911s later, and that brings us to this morning at the West End Gun Club, where I and my Rock Island Compact 1911 did, once again, what the old Sergeant Major taught me to do.
And about that Rock Island 1911…it’s a short little thing, and it’s a blast to shoot. Around here in the People’s Republic of Kalifornia, Rock Island 1911s go for $500 brand new (that’s a tremendous value). They are inexpensive, but they are not cheap. The Rock Island 1911 is a real handgun with its Parkerized finish, all steel construction, wood grips, and GI sights (none of that black plastic silliness here). It reminds me a lot of the 1911s I carried in the Army. I love shooting my Rock Island Compact, it hits well, and I can still put my shots where I want to. Sergeant Major Hickman would be 92 years old today if he was still around (I’m guessing he’s not); wherever he is, he’d be proud. He taught me well.


 Interesting stuff, to be sure. Most of the variability you see in the above table (and you can see that there’s a lot) was me. A machine rest would have provided for better groups, but you get what you get, and what you get here is me.