I recently purchased a copy of Field and Stream, a magazine I had not read in decades. I was traveling, the selection of good reading material at airport newsstands is limited, and it was the only thing that looked even remotely capable of occupying my interest on a 3-hour flight. In scanning the cover, I saw that the magazine included an article on long-distance shooting, so Field and Stream it was for that flight.
The Ruger Mini 14
Back on topic, the Ruger Mini 14 is a rifle not known for its accuracy, and I was frustrated with mine. It was (I thought) barely okay as far as accuracy goes. I like shooting it, but the Mini 14 wasn’t great in the accuracy department and great was what I wanted.
The Field and Stream piece on long-distance shooting was partly focused on hunting at extreme distances (something in which I have zero interest), and partly focused on rifle marksmanship (something in which I have a keen interest). There was nothing new in the article (I’d been exposed to all the topics it covered at one time or another), but seeing them all in one place was a good refresher that made me realize I was getting sloppy in my old age. As I read the article, I realized that I wasn’t doing a lot of the things that are important for shooting tiny groups and I had been relying too much on the rifle and the load to make it all happen. This somehow seemed particularly relevant to the Mini 14 and it made me want to get to the range with it and focus on the techniques mentioned in the story. I realized there was more to this accuracy business than just the gear and the ammo. The nut behind the trigger plays a significant role, and this particular nut had not been focused on the basics.
I resolved to concentrate on the fundamentals mentioned in the Field and Stream article (things I learned 50 years ago in the Army) during my next trip to the range. As soon as I returned to California, that’s exactly what I did. And you know what? I shot better. A lot better.
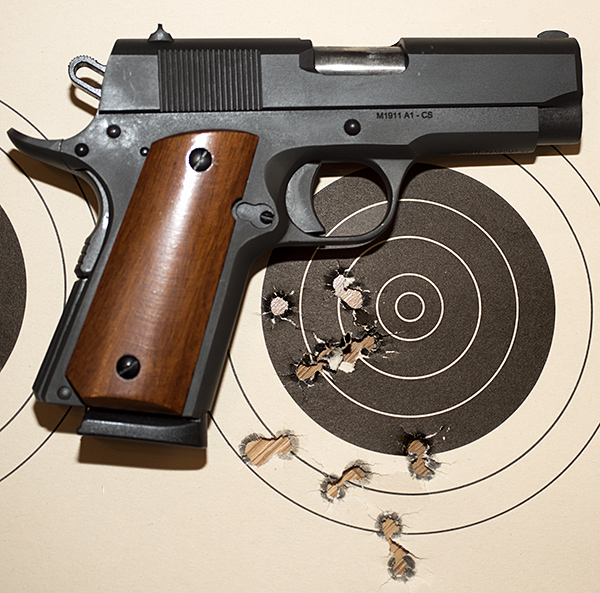
The load (a 62-grain bullet over 23.2 grains of ARComp) is one I had previously found to be a decent one in my Mini 14, but it had never given me groups like I shot that morning. That morning my groups were consistently tight and significantly smaller than what I had seen in the past. It was extremely satisfying, and I proved to myself once again that it’s the fundamentals that make a difference. Bear with me; I’ll get to those in a moment.
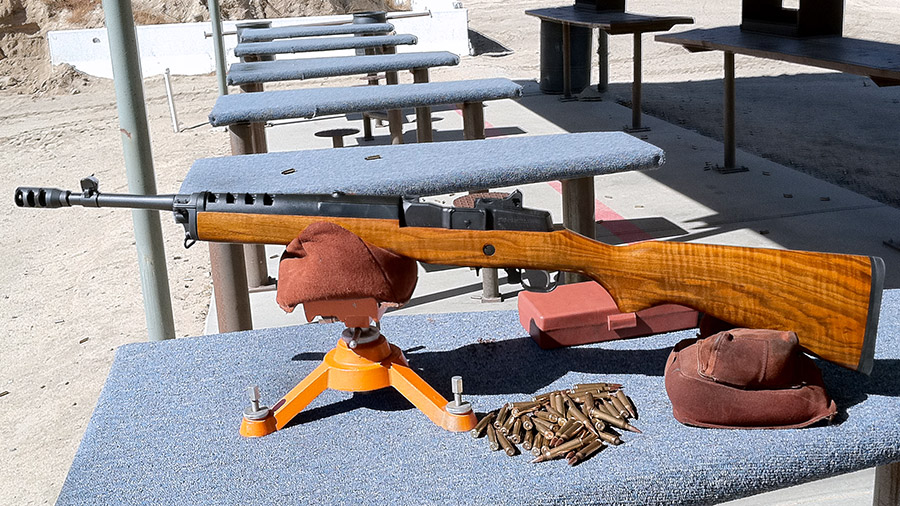
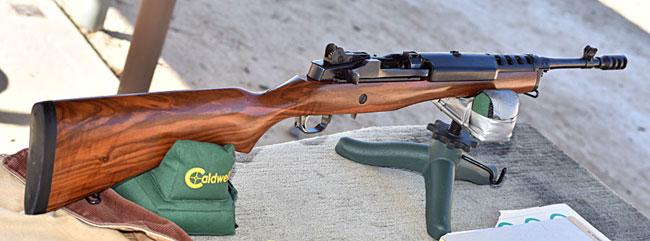
First, a comment or two on my Mini 14. Whenever I show a photo of it or take it to the range, folks ask about the stock. My rifle is a special run 580-series Mini 14 offered by Davidson’s (a Ruger distributor) about 10 years ago. It has a Circassian walnut stock (folks often ask if it’s a custom stock, but it’s not). I looked at a lot of Mini 14s online from that special run before I bought the one you see above. I wanted exceptional walnut and I think I found it in this rifle.
As configured from the factory, my Mini 14 didn’t meet the laws here in the Peoples Republik of Kalifornia. I had to remove the flash suppressor and replace it with a muzzle brake to bring it into the Golden State. I also replaced the Ruger rear aperture sight with one from Tech Sites (it’s a better design, in my opinion). Other than that, the rifle is completely original. I’ve put tens of thousands of rounds through my Mini 14, it’s my favorite rifle, and it’s absolutely reliable. But it’s never been terribly accurate (or so I thought) until I read that Field and Stream article and got back to the basics.
Marksmanship Fundamentals
You might be wondering about what the fundamentals of sound rifle marksmanship are. Or maybe you already know what they are, but you would like a few reminders. That’s kind of where I was. Here’s what I took away from that Field and Stream article.
1. The first fundamental is to get into a good position. I shoot from the bench, and most folks might think that the rest, the rifle, and the bench make everything work. There’s a lot more to it than that. You need to get square to the rifle and sit directly behind the stock, and you need to adjust your position to achieve a natural aim. What that means is that after you think you are in the right position, you sit up away from the rifle, close your eyes, and then position yourself behind the rifle again. Open your eyes, and when you look through the sights, the sights should naturally align on the target. If they are not on the target, you’re not there yet. Move around and try it again. Keep doing this until you can shut your eyes, get in position, look through the sights, and find the target right where you want it to be. Trust me on this: It makes a difference.
2. The next fundamental is to focus on the front sight only. The Field and Stream article was about a rifle with a telescopic sight, but it mentioned front sight focus for iron sights and I knew I had a hard time doing it right when shooting the Mini 14. I guess I needed to be reminded. This is a tough thing to do for most people. I do it superbly well with a handgun, but I have a tough time doing it when shooting a rifle equipped with a rear aperture sight. I find myself wanting to look at the target, wanting to get the front sight post perfectly aligned in the rear aperture, and generally not doing this the way it’s supposed to happen. Focusing on the front sight only is almost zen-like in the concentration it demands. When I do it right, though, I actually don’t see the rear sight or the target and that’s tough for me to accept mentally. When I do it right, the only thing I see is the front sight and the muzzle flash when the hammer drops. Seeing that flash outlining the front sight lets me know I’m in the zone and I’m doing it the way it should be done. It’s a weirdly satisfying feeling. When it happens, I know the bullet will go where I want it to go.
3. The third important factor is breath control. None of us can hold a rifle steady while breathing, so I had to find a natural point to hold my breath. According to the Field and Stream article (and my old drill instructors) we can only do that for a couple of seconds before the sight starts to blur. In the Army, we were taught to take a breath and let it half out. The Field and Stream article pointed out that the “let it half out” thing may not be the best approach. The article said to find your natural point for holding your breath, so I tried that and sure enough, I seem to have a spot about two-thirds of the way down that feels like a natural stopping point. The article also mentioned that if the front sight starts to blur, don’t try to force the shot. Take another breath and start over. Not doing all of these things, I realized, were bad habits I had picked up.
4. The fourth important factor is trigger squeeze. Easy, steady, straight back, using the tip of my finger only. I have a tendency to get my finger too far around the trigger. On this outing, I forced myself to use only my finger tip, and wow, it really worked.
5. The last thing the Field and Stream article mentioned was holding the rifle properly with your trigger hand. Some of this stuff I knew, and some of it I didn’t. Shooting from the bench involves barely touching the rifle. That part I knew, and I think I did okay there. What I do is to just barely have my cheek on the stock without bearing down on it (you can impart torque into the rifle if you hold it too securely, and that works against accuracy). The other thing was how to hold the rifle with your trigger hand. This was something I hadn’t been doing correctly. The correct technique is to use my lower three fingers to lightly pull the rifle straight back into my shoulder, use my trigger finger tip to squeeze straight back on the trigger, and position my thumb off the rifle above my other fingers (I had to relearn not to wrap my thumb around the stock). That last part felt unnatural to me, but boy oh boy, it sure worked. I could see the difference on the target.
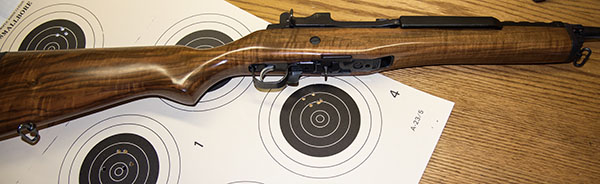
So there you have it. I focused on the fundamentals described above, and what do you know, I shot my Mini 14 better than I ever did before. My Mini 14 is suddenly far more interesting and way more fun to shoot, and I have a new respect for it. And the group sizes show it. Back to the basics. Good times.
More Tales of the Gun stories are waiting for you!
I use RCBS equipment for my reloads.
Tired of paying a buck a target or more at the range? Get targets delivered to your door for less. Click here!
Never miss an ExhaustNotes blog…sign up here for automatic email updates!