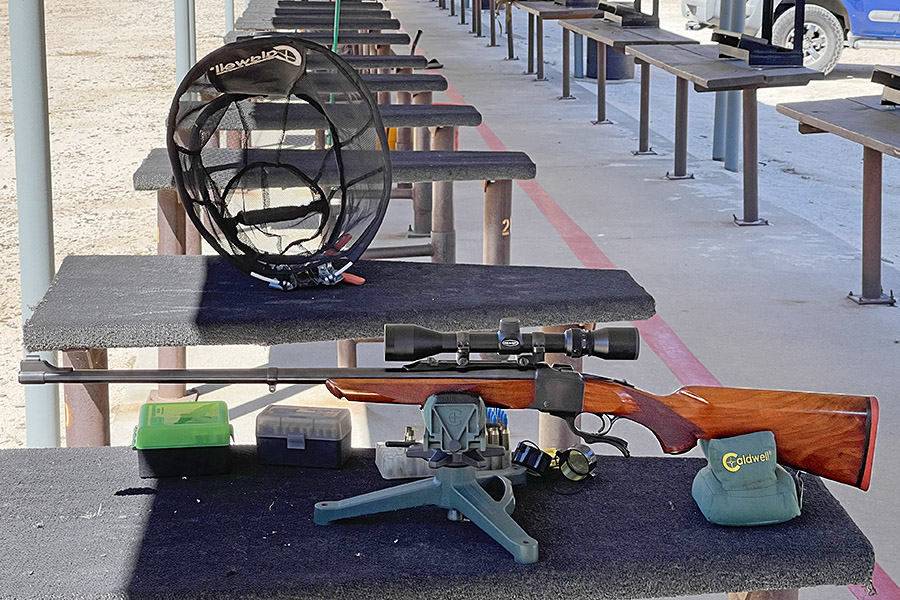
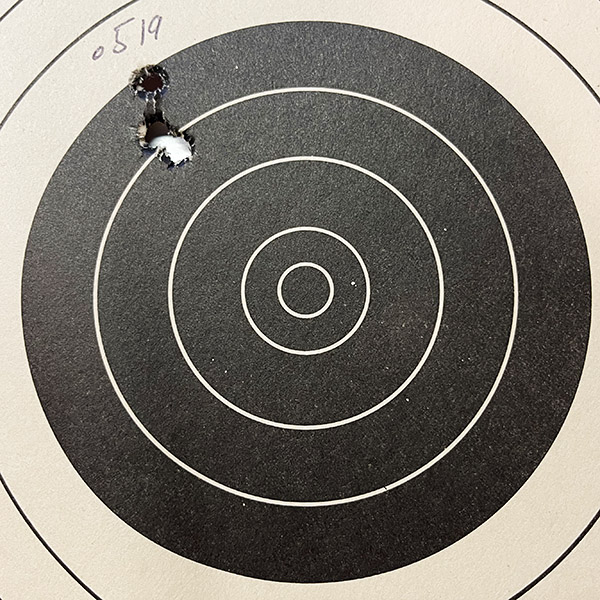
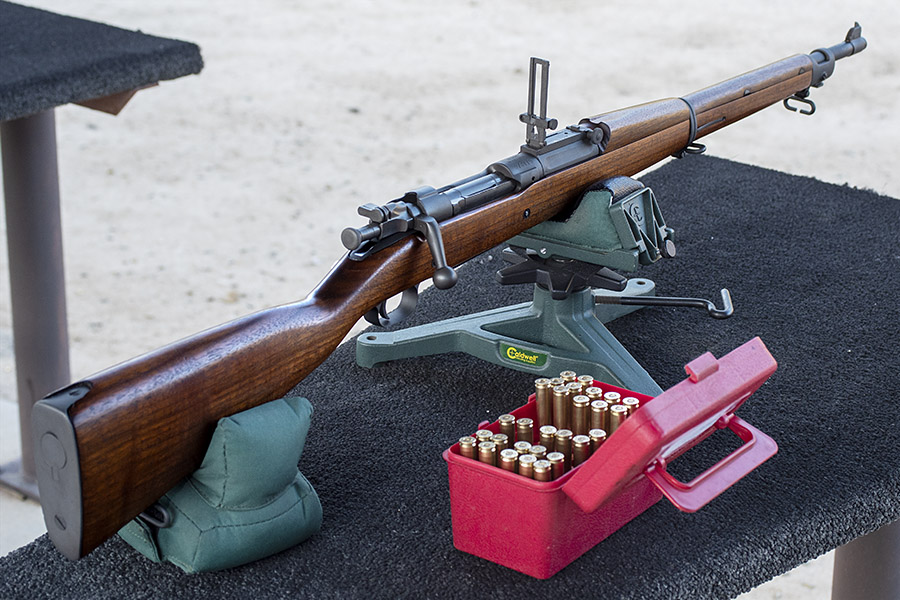
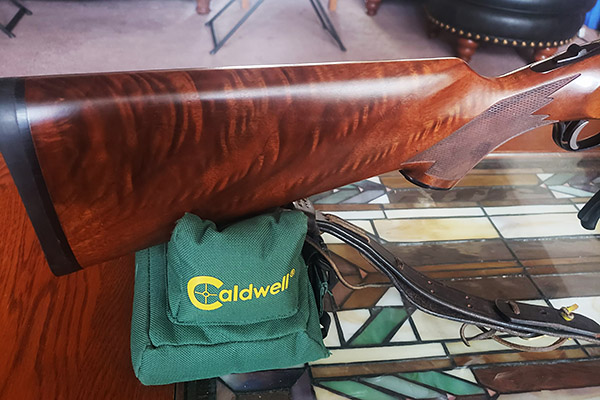
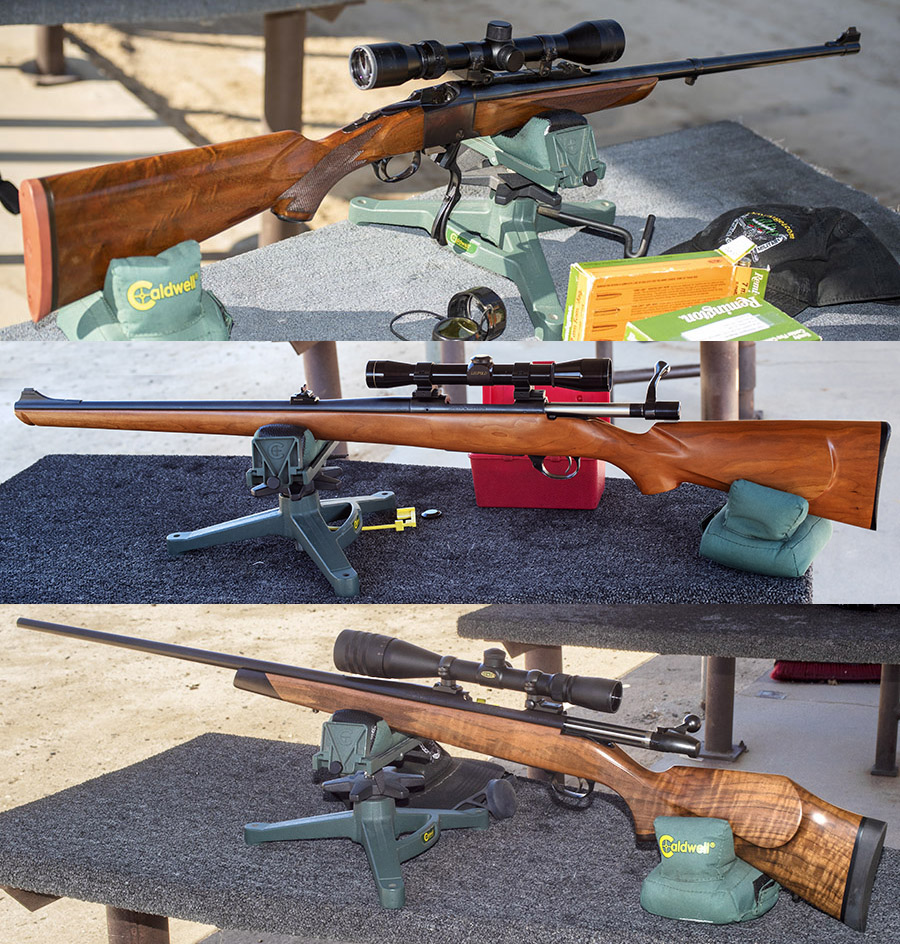
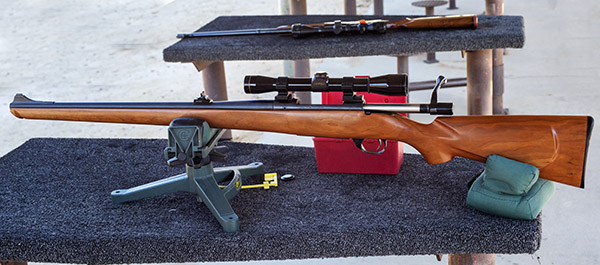
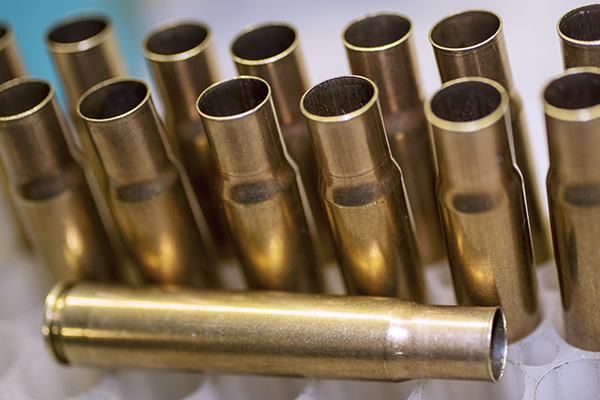
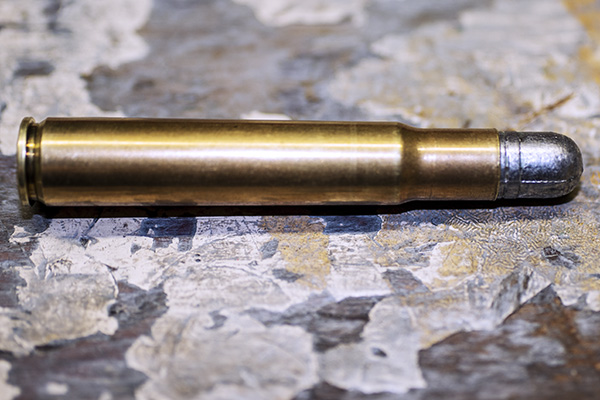
I had a good morning at the West End Gun Club recently. I shot the 6.5 Creedmoor rifles, a .223 Browning Micro Medallion, and Jim Gardner’s powder-coated cast bullets in a 7mm Remington Magnum Ruger No. 1. I might get around to writing about the other rifles, but for today, the focus is on the 7mm Magnum No. 1 and powder-coated cast bullets. I’ve written about shooting 7mm cast bullets in the No. 1 before; those results were mediocre and the barrel leaded enough after five rounds that accuracy went to hell (I had to clean the bore with a bristle brush after ever group). The powder coating Jim applies makes a difference. The Gardner powder-coated bullets did not lead the barrel (at all) and the results were good. I think I’ve finally found a decent cast bullet load for this rifle.
I have had a lot of difficulty making this rifle perform with the powder-coated cast bullets. It was apparent they weren’t leading like my other cast bullets had, but they weren’t very accurate. Neck sizing only, which often improves accuracy, compounded the felony. It didn’t work well at all, mostly because I couldn’t chamber most of the rounds (even though they had been fired in the same 7mm Magnum Ruger No. 1 rifle). I also tried seating the bullets further out, but one got stuck when I chambered a round and when I removed it, the bullet came out of the case and Trail Boss propellant spilled all over the guts of the rifle. That led to it not extracting, so I had to disassemble the action and clean everything. I also tried crimping, but those rounds weren’t any better.
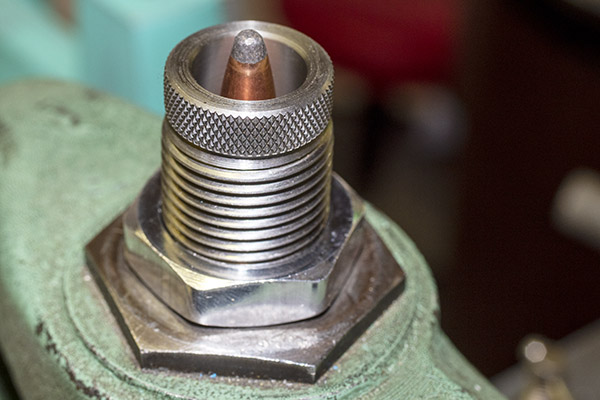
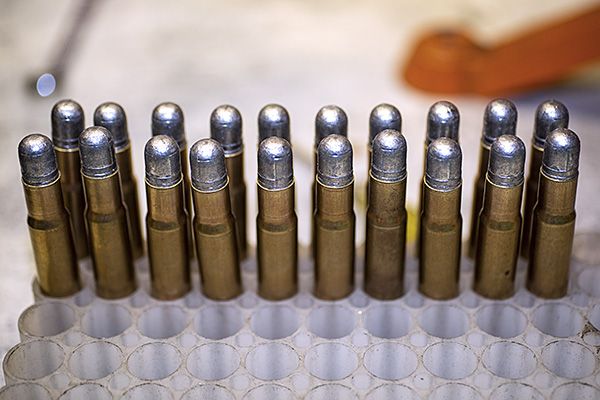
This morning’s batch were full length resized, not trimmed, and not crimped. I flared the case mouth just a tiny bit to let the Gardner powder -coated bullets enter without shaving any of the powder coating or the lead, and I seated them a little deeper so that they did not contact the rifling. When I seated the bullets this time, they expanded the case mouth just enough to eliminate the flare. This batch chambered easily.
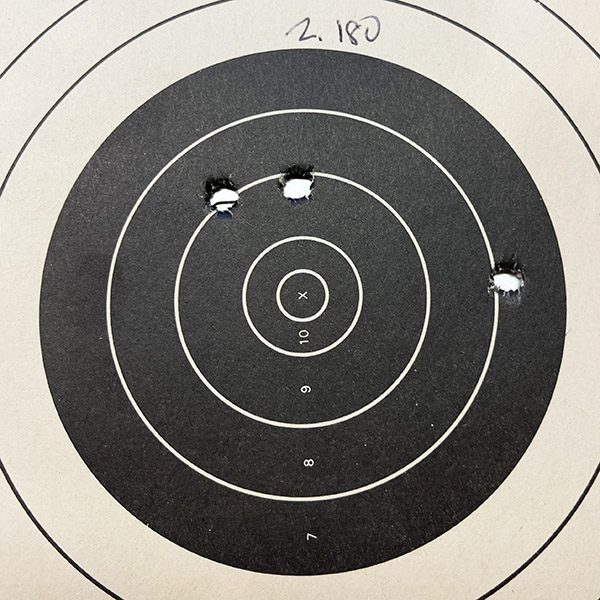
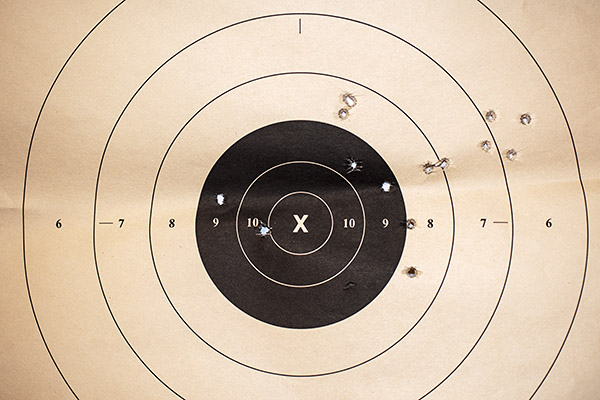
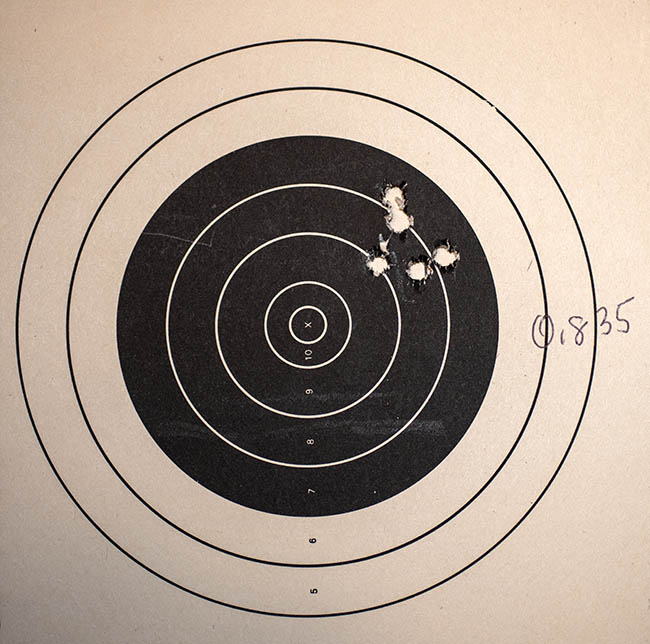
I had one round left over from a previous batch, and I fired it first (all shots are and groups discussed here were 50 yards from a rest). That one round was left over because it wouldn’t chamber the previous time I had the rifle out because the case had deformed slightly when I overcrimped it. I had to run that round through the full length resizer (bullet and all, with the decapping pin removed) so it would chamber. It was my first shot of the day and it shot a little to the right (as you can see above). That first group was the biggest group of the morning.
I then shot four more groups, and all the rest grouped nicely.
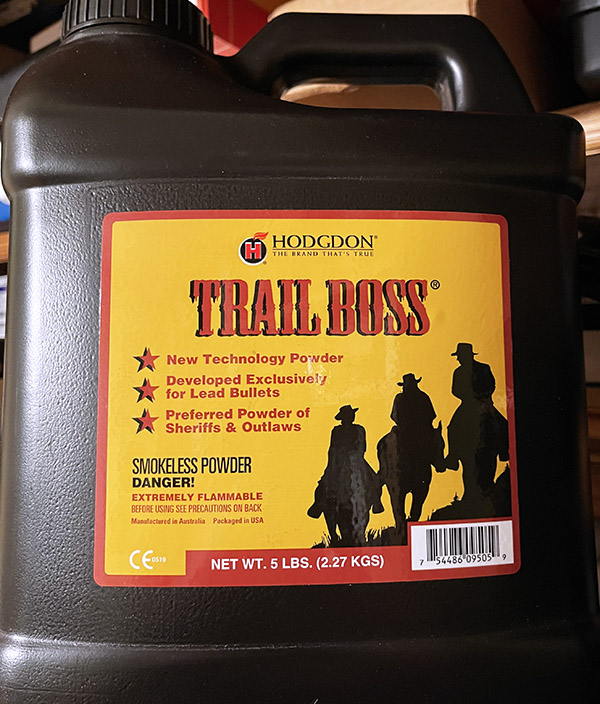
At 50 yards, these aren’t what I would call amazing groups, but they are getting better and that one half-inch group shows promise. I bought a thousand of the Gardner powder coated bullets, so it’s nice to know I can get then to work. The powder charge was 18 grains of Trail Boss, dispensed (not individually measured). I may go out to a hundred yards on the next outing to see how they perform. But where they are, I’d feel comfortable chasing rabbits with them.
The tricks to this load were full length resizing, no crimp, very slight case mouth flare, 18.0 grains of Trail Boss, Winchester large rifle primers, Remington brass, and a cartridge overall length of 3.127 inches. I’m going to try this load again. The brass is in the tumbler now.
This is an update on my latest 1903 Springfield load development work.
I purchased this rifle about three years ago assuming the headspace was correct, but it wasn’t. That’s a risk associated with old military rifles. Rifle parts are often mixed through the years, and when doing so with the bolt and the barreled action, it’s easy to induce an excess headspace condition. That’s what I encountered on my rifle, so I had the Civilian Marksmanship Program (CMP) in Anniston, Alabama install a new 1903 barrel and rechamber the rifle. Live and learn, I guess. Always check the headspace when purchasing a milsurp rifle.
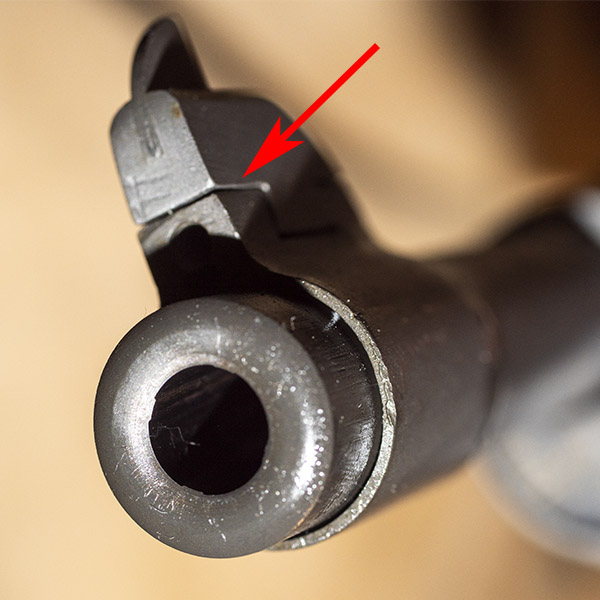
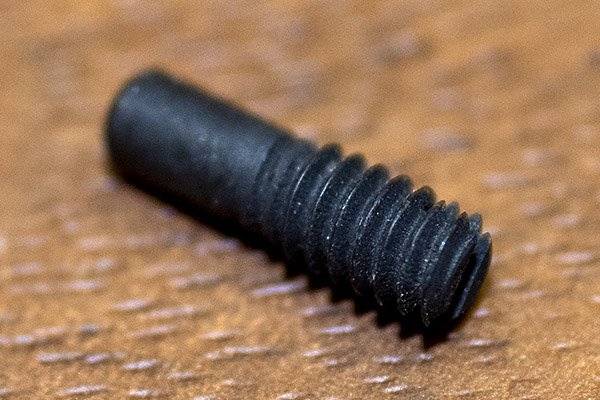
As it was returned to me from the CMP the rifle shot to the right and jacketed bullets shot way too high (at least I thought it shot way too high, but I was wrong…more on that in a bit). I noticed that the front sight was biased to the left (which made the rifle shoot to the right). I drifted the front sight in its base (it’s a dovetail fitting). The front sight takes a retaining screw that secures it to the barrel mount, and on my rifle that screw was missing. It might have shipped that way from the CMP or it might have fallen out.
When the Springfield was returned to me from the CMP, the front sight was biased to the left, as you see here. I didn’t notice it at first.A replacement front sight screw.
I wrote to the CMP regarding the missing front sight screw, but I haven’t heard from them and I found a replacement front sight screw on the Sarco website. I haven’t installed it yet (that will come later). I drifted the front sight in its dovetail to the right, and that brought the point of impact closer to the point of aim.
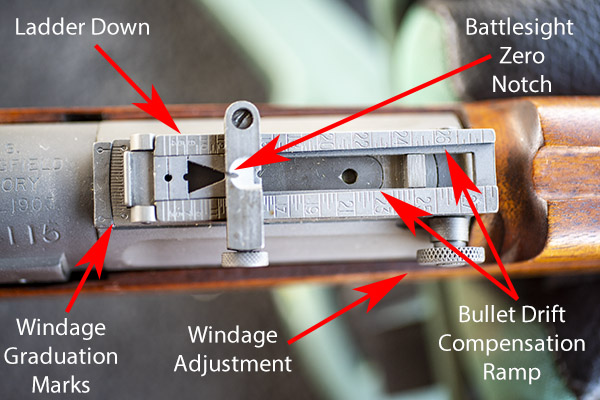
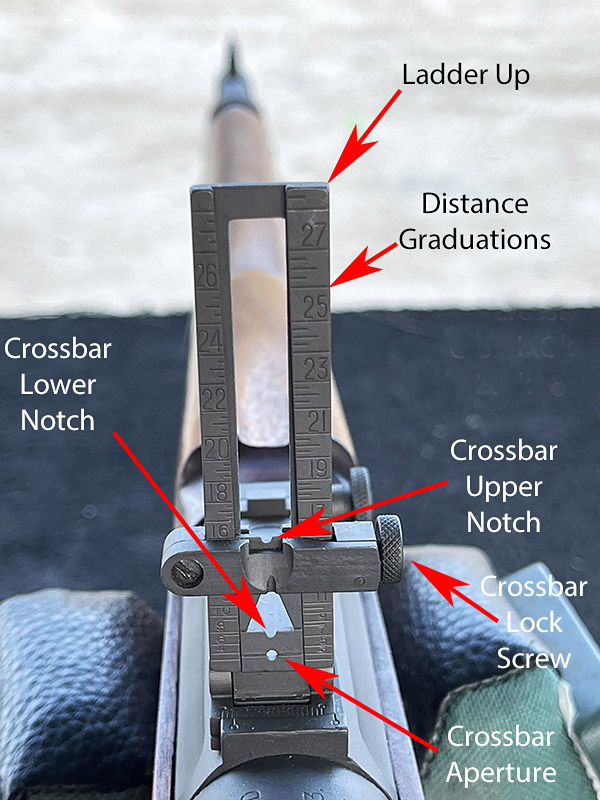
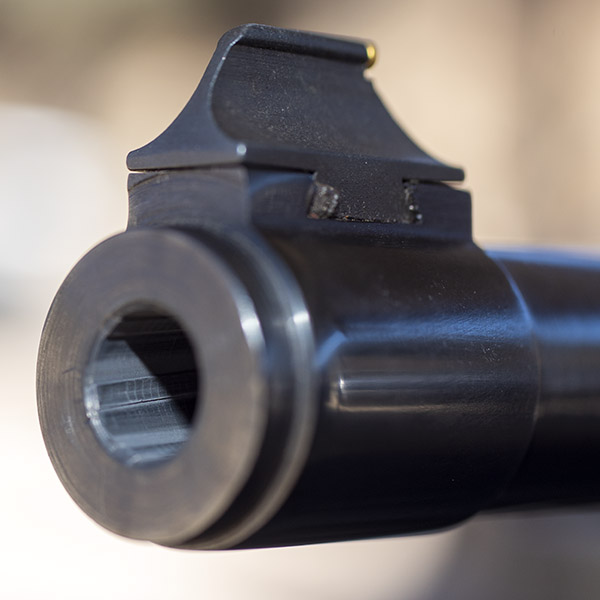
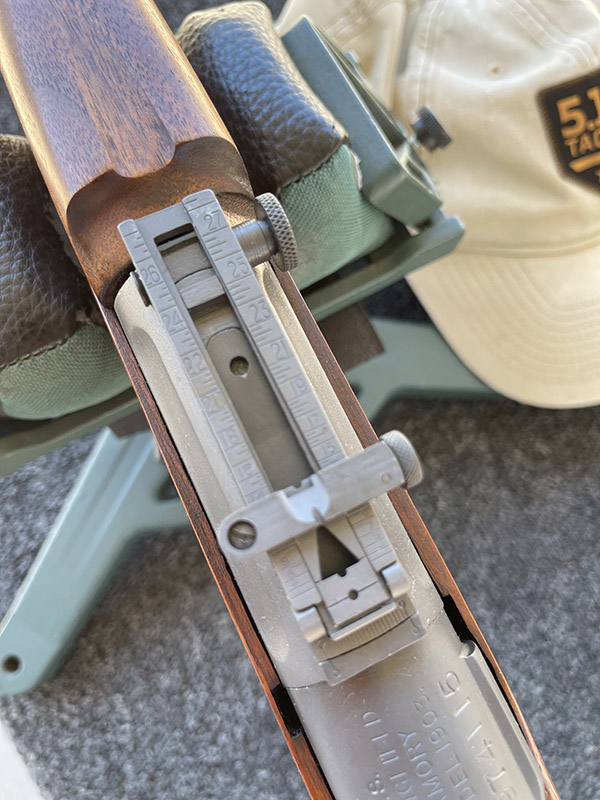
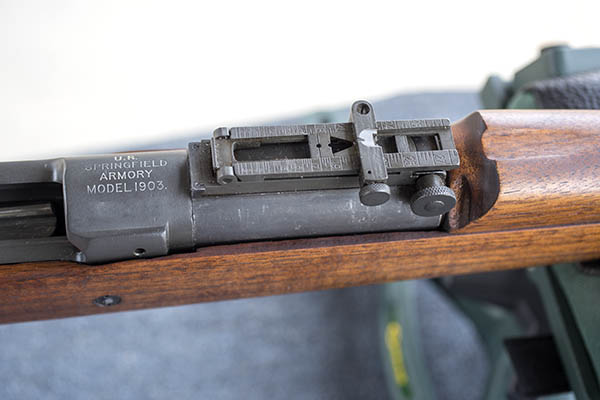
Before I get into the reloading specifics, I should explain a bit about the rear sight. The rear sight on the 1903 Springfield rifle is a complicated device. It’s called the M1905 rear sight, and it is designed and calibrated for standard military ball ammo (back in the day when the Army used .30 06 ball ammo). The sight is a ladder type rear sight and it has four aiming methods. One is the battlesight zero (it’s with the ladder down); the other three are with the ladder up which allows adjusting for various distances. In the big photo at the top of this blog, you see the rear sight with the ladder up. In the photo below, you see the rear sight with the ladder down.
The M1905 rear sight assembly on the 1903 Springfield rifle. The sight ladder is in the down, or battlesight zero position. Wow, there’s a lot going on there.
This first aiming method is through the battlesight zero notch with the ladder down. Battlesight zero means the bullet will coincide with the point of aim at 547 yards. The thought is that if you hold center of mass on a man-sized target at any distance up to 547 yards, you’ll hit the target. At 100 yards the rifle will shoot way high with the ladder down using the battlesight zero, which is what I experienced. I did not understand this was a normal occurrence when using the battlesight zero rear sight notch.
The 1903 Springfield’s rear sight in the raised position. Note that the sides of the rear sight force the crossbar to the left as distance to the target increases. That’s a built-in feature to compensate for bullet drift to the right at longer distances. Clever people, those Army engineers were. This rifle is over 100 years old.
The other three aiming methods all involve shooting with the ladder up (as you see in the above photo). You can adjust for various ranges from 100 yards out to 2800 yards (which is roughly a mile and a half) by loosening the crossbar lock screw and sliding the crossbar up or down to various indicated ranges on the ladder. One sighing method uses the crossbar upper notch. You simply slide the crossbar up or down so that the top of the notch aligns with the estimated distance to the target (in yards) on the ladder’s distance graduations. Another sighting method uses the crossbar lower notch. In this case, you slide the crossbar up or down so that the top of this lower notch aligns with the estimated distance to the target. The last sighting method involves using the crossbar aperture. There’s a horizonal scribe line across the plate containing this aperture, and when using the aperture, you align that scribe line with the estimated distance to the target. The aperture allows zeroing the rifle for ranges as close at 100 yards, which is where I do most of my shooting.
All the above is calibrated for standard military .30 06 ball ammo. If you’re shooting cast bullet ammo, or jacketed ammo with bullet weights or velocities other than standard ball ammo, you have to zero your rifle for your specific load.
There’s one other bit of coolness incorporated into the design of this rear sight. The sight ladder is designed so that as you raise the crossbar, the sighting notches and aperture move to the left. That’s to compensate for the bullet’s natural drift to the right as distances increase.
It’s all very clever, but in my opinion the Army made it too complicated. The rear sight was probably designed by an engineer who never had to carry or use a rifle in the field or train recruits to do so. I think most of the guys I served with in the Army would have a hard time remembering all this (I’m an engineer and I struggled to understand it). Apparently the Army agreed: They simplified the rear sight on the later 1903A3 rifle. The 1903A3 rear sight is much better for an infantry rifle.
That’s enough background on the 1903 Springfield sights. Let’s get to the reloading variables and which loads the Springfield likes. I prepped several, and I also grabbed some of the ammo I had previously loaded for the M1 Garand.
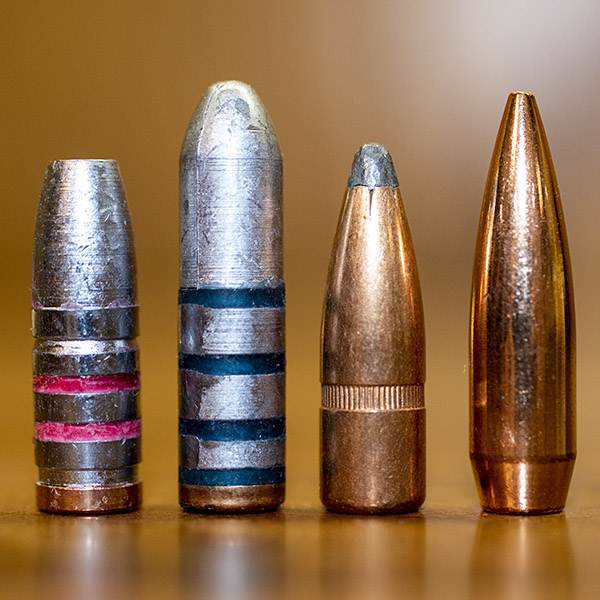
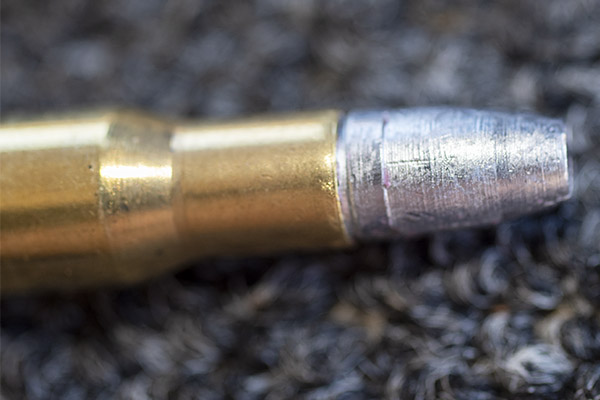
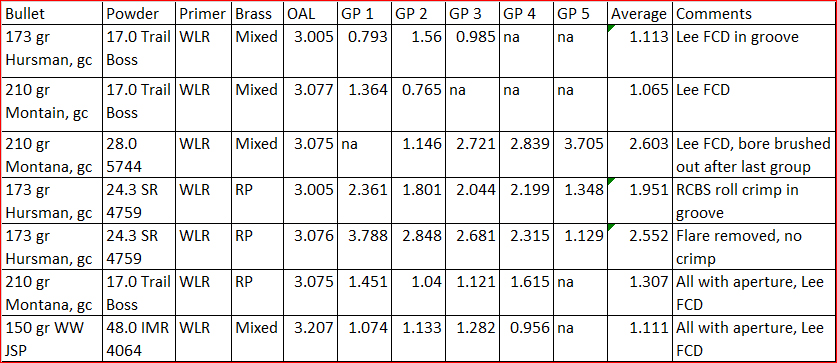
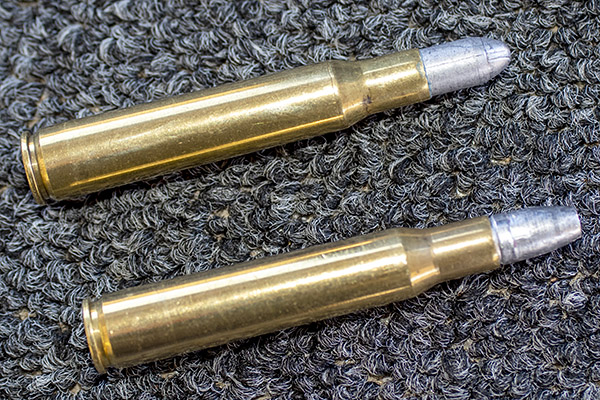
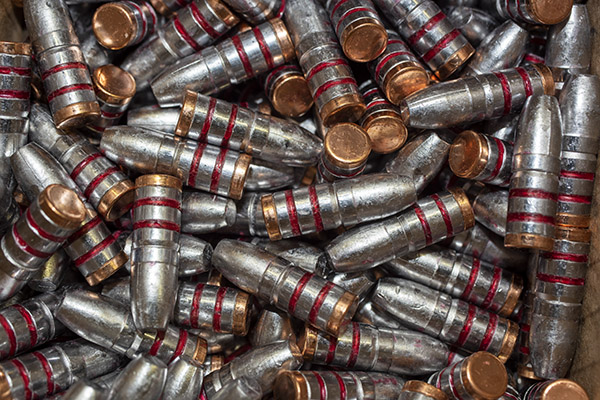
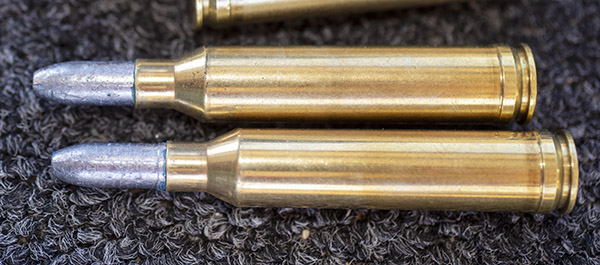
Four bullets used in this testing. From left to right: The Hursman 173-grain cast bullet, the Montana 210-grain cast bullet, the Winchester 150 grain jacketed soft point bullet, and the jacketed Speer 168-grain Match bullet.The Hursman cast bullet loaded in a .30 06 cartridge.
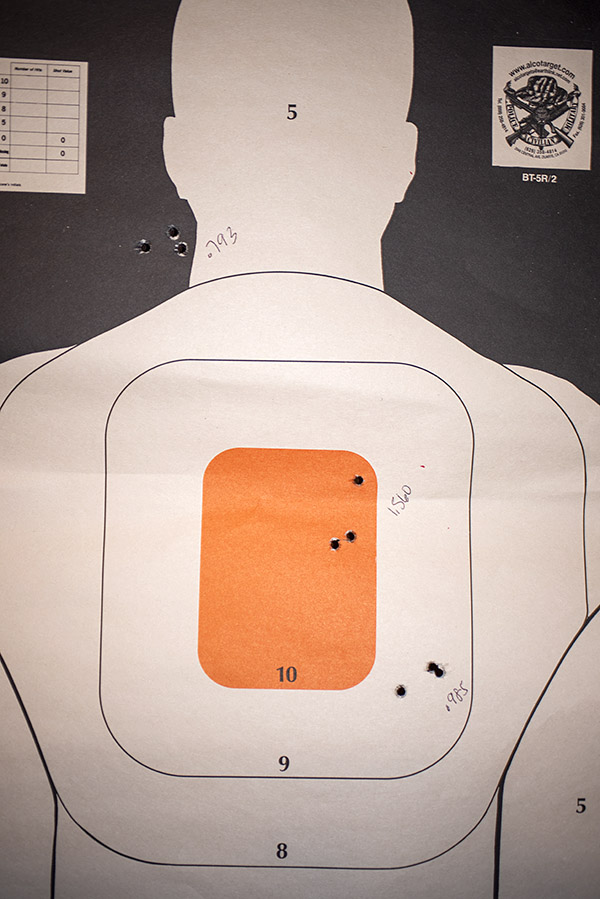
I first fired at a 5o-yard silhouette target to see where the bullets were hitting (there’s lots of real estate on that target). With the ladder down, the point of impact was to the right and low using the 17.0-grain Trail Boss and 173-grain Hursman bullet load. With the ladder up, it moved left a little and printed higher using the higher rear sight notch. For that 0.793 group up top, I used the bottom edge of the upper left box as the aimpoint. For the other two groups, it was the bottom of the orange bullseye.
An initial target shot with cast bullets and Trail Boss powder. There’s a lot of real estate on this target, so I could see where the rifle was shooting.
I shot groups at 50 yards with several different loads using combinations of the bullets shown above and SR 4759, Trail Boss, 5744, and IMR 4064 propellants, all at 50 yards, and all with neck-sized-only .30 06 brass. Then I returned a week later and fired groups with the 150-grain jacketed Winchester bullets (again at 50 yards).
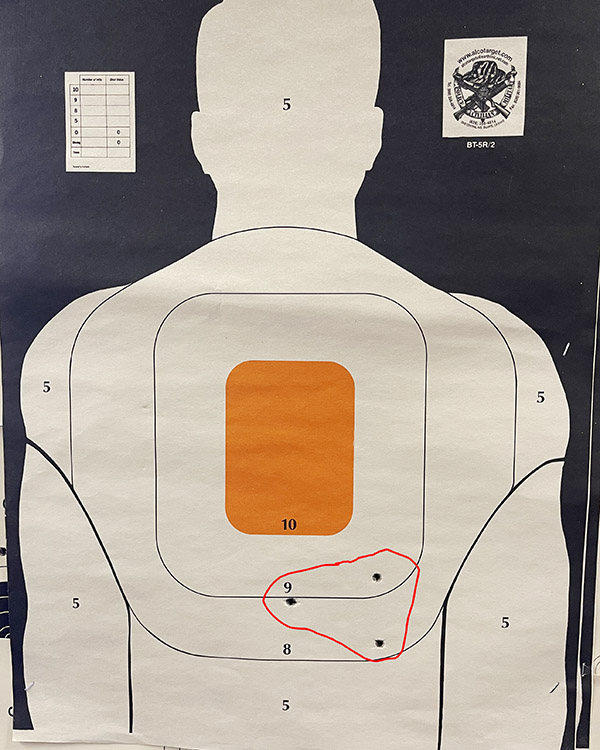
After shooting the above groups, I had 20 rounds left with the Trail Boss, Hursman bullet, and SR 4759 load. I shot two of them at a clump of dirt at about 80 yards and hit it (I think) both times. Then I put a 100-yard small bore rifle target up at 100 yards and shot at it with the 173-grain cast bullet SR 4759 load (8 rounds were crimped, and 10 rounds were not). To my surprise, all 18 rounds were on the paper and 14 of the 18 were in the black. It’s not that great a 100-yard group, but it shows potential. All this was with the ladder down using the battlesight zero sighting approach, so with cast bullets this rifle (at least with the SR 4759 load) is pretty much in the ballpark.
Cast bullets at 100 yards using the battlesight zero rear sight.
For the jacketed loads, I used the 150-grain Winchester jacketed soft point bullet (I bought a bunch of these a few years ago when somebody had them on sale) and 48.0 grains of IMR 4064. This is the accuracy load in the Lyman reloading manual with a 150-grain jacketed bullet, and I know from prior development work it is superbly accurate in my Model 70. It is also a minimum load, which is nice given the 1903’s steel buttplate. The 1903 did well at 50 yards with the Winchester bullets, so I posted another silhouette target at 100 yards. I fired three rounds and it was rough shooting at that target. Using the aperture, I literally could not see the orange bullseye at 100 yards when I focused on the front sight. The orange bullseye disappeared until I shifted my focus to the target. I’d acquire the bullseye, then rapidly shift my focus to the front sight and squeeze the trigger. I did that three times, literally firing blind, and managed to get a 3.050-inch 3-shot group.
The 150-grain jacketed Winchester bullet load at 100 yards. I couldn’t keep the orange bullseye visible using the aperture at 100 yards.
I figured it was time to quit while I was ahead. I didn’t have any more black bullseye targets with me. I knew I would be able to see those focusing on the 1903’s front post while sighting with the aperture. But with the orange bullseyes (like you see in the target above), I might as well have been shooting at night. I returned to the range a few days later and shot at 100 yards with the jacketed 150-grain Winchester bullets (with the 48.0-grain IMR 4064 load), the 210-grain cast Montana bullets (with the 17.0-grain Trail Boss load), and the 168-grain Speer match bullets (with a 48.0 grain IMR 4064 load).
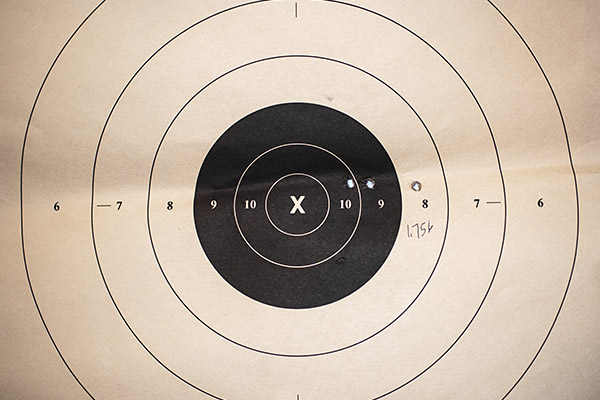
Using the rear sight aperture, I shot the target below at 100 yards with the 150-grain Winchester jacketed bullet and 48.0 grains of IMR 4064. I was pleased with the results and I quit after 3 shots (I didn’t want to screw up the group).
Three shots into an inch and three quarters at 100 yards. The load was 48.0 grains of IMR 4064 and the Winchester 150-grain jacketed soft point bullet. Old eyes and an even older rifle sometimes do great things. My rifle was manufactured in 1918; I was born in 1951.
I then shot at another 100-yard target with the 210-grain Montana cast bullet (these were loaded with 17.0 grains of Trail Boss). I used the rear sight’s lower notch for this target. Hmm, what do you know…the elevation was about perfect without moving anything on the rear sight.
Another 100 yard target, this time with the Montana 210-grain cast bullet and 17.0 grains of Trail Boss. I used the rear sight notch immediately above the aperture without making any adjustments. This is a real sweetheart load with minimal muzzle blast, almost no recoil, and no leading. The cast bullets are not as accurate at 100 yards as are the jacketed bullets, but they are still pretty good.
Finally, I fired eight rounds originally loaded for the Garand (I reload for the Garand in multiples of eight, as that’s what a clip holds), returning again to the rear sight aperture. This load used the 168-grain Speer jacketed boattail hollowpoint bullet and 48.0 grains of IMR 4064 propellant. The Speer bullets are almost identical to the Sierra match bullet, but the Speer’s ogive is slighly different and it has less bearing area in the barrel. I called the wizards at Speer about that and they recommended going to a heavier charge than would be used with the comparable Sierra bullet (they specifically recommended 48.0 grains of IMR 4064 for the Garand). That load was a little warm in the 1903 (the recoil was significantly more than the 150-grain Winchester bullet and the primers had slight flattening). But it was reasonably accurate.
Eight rounds of .30 06 ammo loaded for the Garand, using the 1903 rear sight aperture, at 100 yards. The astute blogophile will note there appears to be only seven holes; the hole just outside the 10-ring had two bullets pass through it.
My observations and conclusions from the above are:
The 1903 Springfield rear sight is needlessly complex for an infantry rifle. You may feel differently. Hey, go start your own blog.
With my cast bullet loads, there was no leading. My cast bullets had gas checks (the little copper cup on the bullet base), which helps to prevent leading.
The Lyman cast bullet book showed a minimal 5744 load to be the accuracy load for the 210-grain Montana cast bullet. I did not find that to be the case.
Both the Hursman 173-grain and the Montana 210-grain cast bullets were extremely accurate with 17.0 grains of Trail Boss, at least at 50 yards.
The Winchester 150-grain jacketed bullet accuracy load, per the Lyman manual, was with 48.0 grains of IMR 4064. I found this to be a very accurate load. I didn’t do a lot of work developing a jacketed bullet load. I’m going to stick with this one for this rifle.
Orange bullseyes and aperture rear sights don’t work with my old eyes at 100 yards. They are okay at 50 yards, but not 100 yards.
Both of the jacketed bullet loads I tried (the Speer Garand load and the Lyman 150-grain accuracy load) are accurate. Without adjusting the rear sight from the 150-grain jacketed bullet setting, the Garand load shoots a little high and to the right, but the group size would fit into the bullseye if the sights were adjusted.
The cast bullets are not as accurate as the jacketed bullets at 100 yards. The cast bullets are comparabily accurate to jacketed bullets at 50 yards, but not at 100.
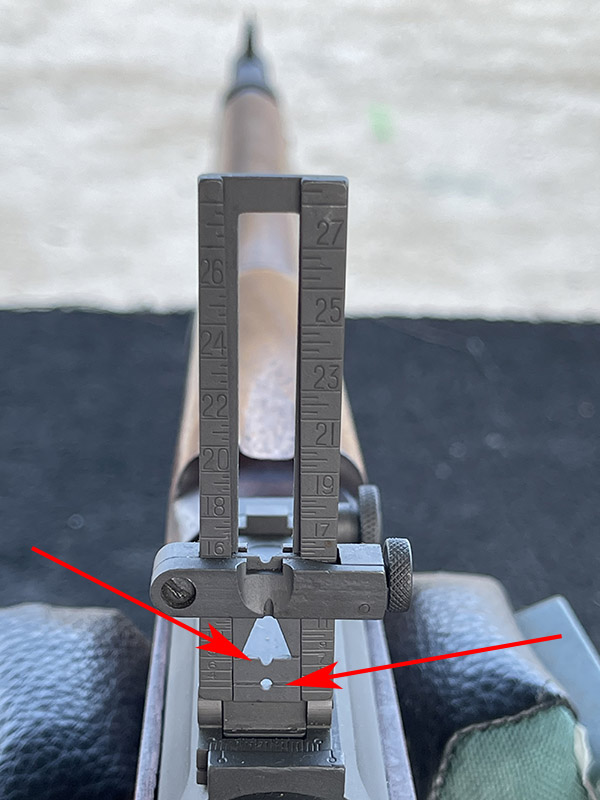
With regard to shooting both cast and jacketed bullets in the same rifle, I got lucky: As complicated as that 1903 Springfield rear sight is, I found that one rear sight position shoots to the same point of impact at 100 yards for both my cast bullet accuracy load and my jacketed bullet accuracy load. Yep, you read that right. With the rear sight crossbar secured as you see in the photo below, I can use the aperture (denoted by the right arrow) with the 150-grain jacketed bullet load. Or, I can use the lower crossbar notch (denoted by the left arrow) with the 210-grain cast bullet, 17.0 grains of Trail Boss load. Both will shoot to the same point of impact at 100 yards. A friend asked if I tuned the loads to do this. I wish I could say I had that kind of load development expertise. Nope, I just got lucky.
One size fits all (sort of). With the 1903’s rear sight in the raised position, I use the notch denoted by the arrow on the left for my cast bullet accuracy load at 100 yards. I use the aperature denoted by the arrow on the right for the 150-grain jacketed bullet load at 100 yards. I don’t need to move the rear sight cross bar up or down. Sometimes you just get lucky.
One final note that’s sure to set the Internet on fire: I know this is heresy. As much as I like my 1903, I think the 91/30 Mosin Nagant is a better rifle. My Mosin groups better at 1oo yards. But that’s a story for another blog.
Never miss an ExNotes blog:
Tales of the Gun: 1911s, revolvers, 9mm semi-autos, bolt action sporters, milsurps, reloading, big bore rifles, and more. It’s all right here!
Click on those popups, folks! It’s what pays the rent!
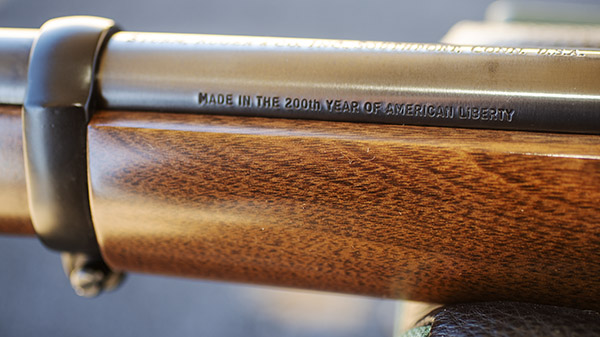
I am a fan of both the No. 1 and the No. 3 Ruger single shot rifles. The No. 1 is the more elegant rifle with a fancier lever, a pistol grip stock, checkering, a rubber shoulder pad, a slick quarter rib, fancier walnut, and more. The No.3 was the economy version without checkering, plain walnut, an aluminum (and later plastic) shoulder pad, and a no frills look. When I started collecting these rifles in 1976, the No. 1 was chambered in contemporary cartridges and priced at $265. The No. 3 came in classic chamberings; in 1976 that included .22 Hornet, .30-40 Krag, and .45-70. Ruger listed the No. 3 at $165, and you could buy them all day long for $139. Which I did. In 1976, I bought No. 3 rifles in all three chamberings. All had the “Made in the 200th Year of American Liberty” inscription.
Take a look at the finish on this Ruger No. 3. It’s better than how they came from the factory.
I was younger and dumber in those days, and I stupidly sold all three rifles within a year of purchasing them. The Hornet went to Army buddy Jim, the .45-70 went to another Army buddy also named Jim, and the .30-40 was traded for something else I can’t remember. If you’re reading this blog, you realize the phrase “stupidly sold” is redundant. We have all sold guns we wish we kept.
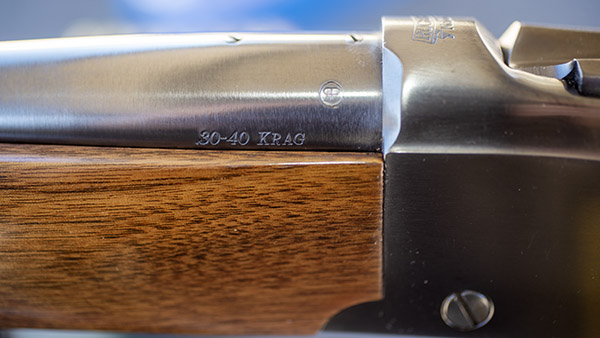
Ruger has to have one of the best fonts ever for chambering designation.
I wanted to undo the wrong I did, and about 15 years ago I started a search to replace my No. 3 rifles. The .45-70 was the easiest to find and the .22 Hornet followed shortly thereafter. The prices had gone up (used, they were going for about $650-$700 back then). The .30-40 Krag was tougher to find. I’m assuming it was because Ruger made fewer of them. Then I spotted something I had to have: An unfired .30-40 No. 3 advertised on Gunbroker, and it had significantly nicer wood then No. 3 rifles typically have. I had to own it and I paid top dollar. When I called the shop, I used my American Express card instead of a certified check because I was eager to get it. I had to pay a 4% premium, but that turned out to be a good thing (more on that in a second).
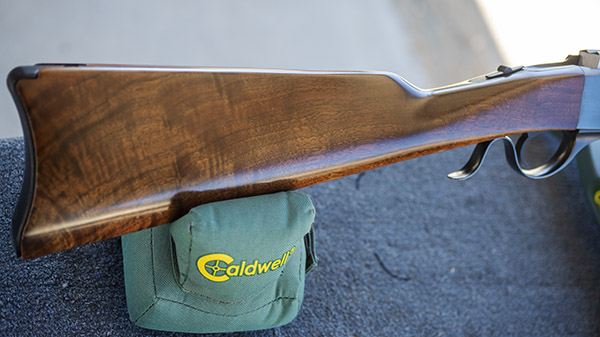
Unusually highly-figured walnut on a No. 3 Ruger.
The shop that sold it to me did something stupid. They shipped the rifle in the original box with no additional padding and they didn’t insure it. You could get away with shipping a No. 1 Ruger in the original box, as they were stout and contained big pieces of foam padding. The No. 3 had a flimsy cardboard box in keeping with the No. 3’s lower price. You can guess where this story is going.
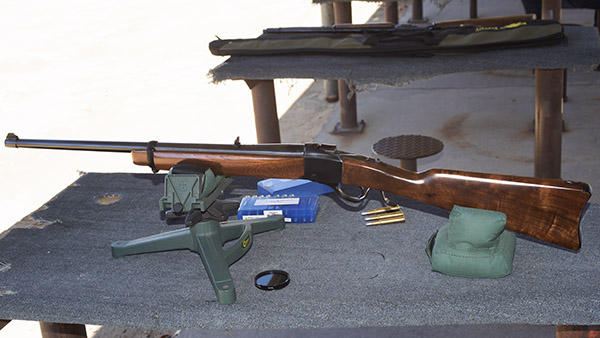
A view of the No. 3’s port side at the West End Gun Club.
Yep, the rifle arrived with the stock broken at the wrist. Wow. The wood was as beautiful as it looked in the Gurnbroker.com ad, but it was busted. I had a brand new, unfired 200th year No. 3 in .30-40 Krag with nice wood and its collector value was ruined. Like the box, I was crushed.
I called the shop owner, who turned out to be a real prick. “It’s your problem, and it’s between you and the US Post Office,” he told me. “You didn’t tell me to insure it, so I didn’t. Once it leaves here, it’s yours.” I told him I was going to have the stock repaired and I offered to split the cost with him, but he kept repeating his mantra: Once it leaves here, it’s yours.
Keep us publishing: Please click on the popup ads!
I told this sad story the next day during our usual geezer gathering at Brown’s BMW in Pomona, and good buddy Dave asked if the gun shop had asked me about insurance. “Nope, he never asked and I didn’t mention having it insured. I guess I just assumed it would be.” Dave explained that I was right to make that assumption, so I called the shop owner again, I explained to him I had learned about insurance responsibilities, and I again offered to split the repair cost. He said no again.
Then I remembered I had used my credit card. I called American Express, I explained the situation, and I told them it would cost about $275 to have the stock repaired and refinished. Not a problem, the guy on the other end of the line said, and just like that, he took $275 off the charge and said that the shop owner had 30 days to appeal. He didn’t, and that was that.
I sent the rifle off and when it came back I was both pleased and disappointed. I had asked the place I use for such work to match the original Ruger finish, but they did not. Instead, it was a much deeper and more glorious oil finish. It was nicer than the original finish, but it wasn’t original. That was good news and bad news. I had planned to keep the gun in its unfired condition, but now that it was busted, repaired, and refinished, it would be a shooter (that was the good news).
You can just barely see where the crack was in the stock wrist, but that’s because I used flash for this photo. In normal light, you really can’t see it.
I didn’t shoot the No. 3 immediately. This all happened 15 years ago before I retired and before COVID hit. I recently decided I needed to shoot the .30-40, so I ordered unprimed brass and Lee’s Ultimate four die set. Both were initially unavailable, but they came in and I was in business. I already had large rifle primers, a stash of what has to be one of the best powders ever for cast bullets (SR 4759), and a bunch of 173-grain gas checked bullets.
.30-40 Krag ammo in new brass, loaded by yours truly.Ready for the range.
I seated the cast bullets to the crimping groove and used the Lee factory crimp die, and the cartridges looked great. I tried a number of different SR 4759 powder charge levels in the Lyman cast bullet manual. When I fired on the 50-yard line at the West End Gun Club using the rifle’s open sights, I found that 20.0 grains of SR 4759 is my accuracy load.
I held at 6:00, and the rounds shot very close to point of aim at 50 yards. The target was mounted on its side, as you see it here.Very modest bore leading in the No. 3. That SR 4759 load with the 173-grain bullet is accurate even with the Ruger’s factory iron sights.
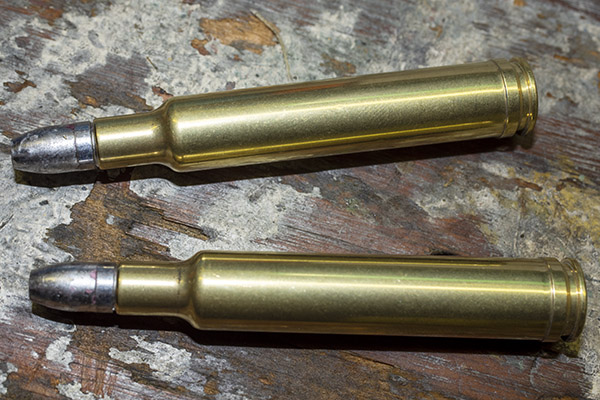
The .30-40 Krag is an interesting cartridge. It was the US Army’s standard chambering after they phased out the .45-70 Springfield. The new rifle was the 1892 Krag-Jorgensen rifle made at the Springfield Arsenal. It was the first military cartridge designed for smokeless (as opposed to black) powder, and it originally fired a 230-grain jacketed bullet. The .30-40 is a rimmed cartridge that looks a lot like the 7.62x54R Russian cartridge (which came out just one year earlier). The ballistics of both are fairly close to the .308 Winchester (which is the 7.62 NATO round we currently use).
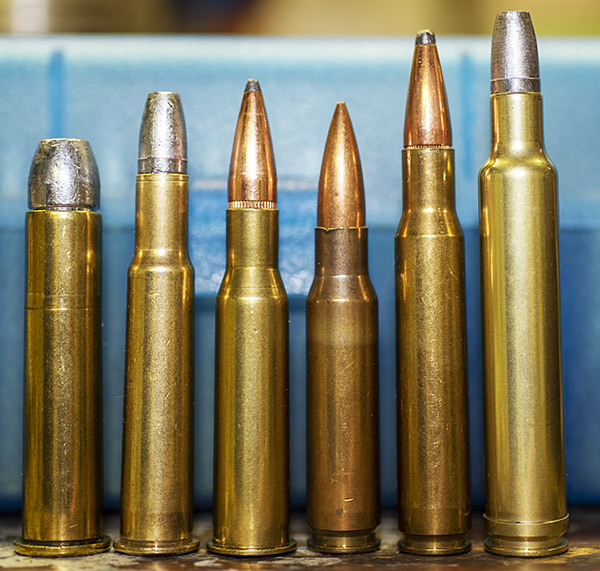
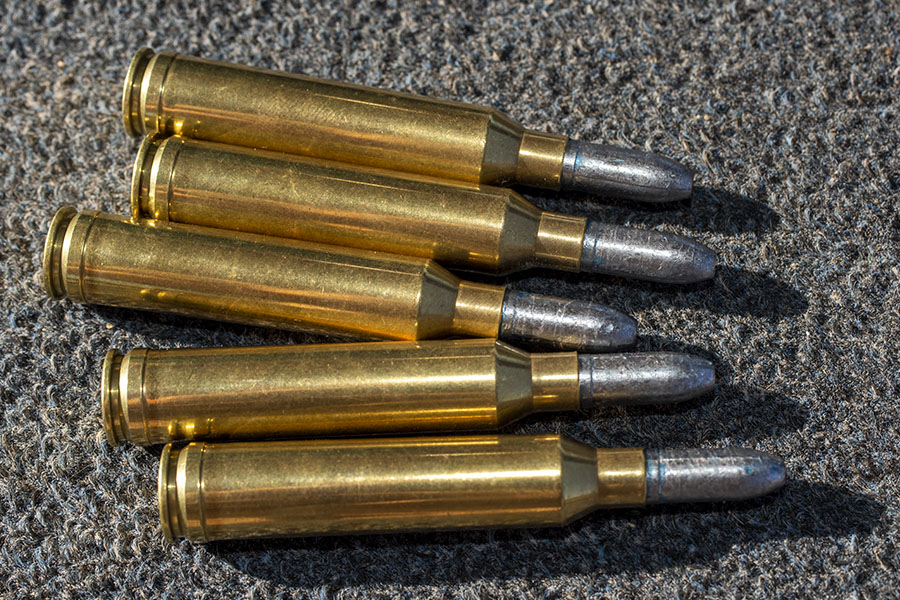
.45-70, .30-40 Krag, 7.62x54R Russian, .308 Winchester (7.62 NATO), .30 06, and .300 Weatherby cartridges. The .300 Weatherby is the fiercest recoiling cartridge in the group when loaded with jacketed bullets at factory velocities (the cartridge shown here is loaded with a cast bullet). With the exception of the .300 Weatherby, Gatling guns have been chambered in each of these cartridges. Modern mini-guns are electrically-powered Gatlings chambered in 7.62 NATO (.308 Winchester).
After our experiences in the Spanish-American War, our government load plant created and issued a hotter version of the .30-40 Krag in an attempt to match the speed and ballistics of the Spanish 7mm Mauser round, but the Krag rifles started cracking bolts. All the .30-40 Krag ammo was recalled and reconfigured with the original, lower pressure load. The .30-40 Krag was also used in the Gatling gun. You can read about that here:
The .30-40 Krag only lasted about a decade in US government service. It was replaced with the .30-03 in 1903 (which was soon replaced with the .30-06, which became one of the most popular hunting cartridges ever). The history of this fine old cartridge is interesting; shooting it with cast bullets in a sleek Ruger No. 3 is good old fun. I might never have known that if the stock had not broken.
Good buddy and fellow Inland Empire shooter Jose recently posted on Facebook about what has to be one of the best deals ever for a highly collectible Ruger No. 1 in .405 Winchester. Ruger produced only a small number of these rifles (I’ve only seen one in person at a gun show a few years ago). This one has exceptional walnut, which makes it even more desirable.
Here’s Jose’s story. Enjoy, my friends.
I’ve never had any desire to hunt African game and I probably never will. But I’ve enjoyed reading about the African plains rifles since I was a kid in junior high school. Bringing a copy of Guns & Ammo magazine to school would probably get you a quick trip to the principal’s office these days…but I digress.
Exquisite walnut is often found on the older Ruger No. 1 rifles.
Quite a few years ago I saw an old Ruger No.1 Tropical in the consignment rack of a small gun shop that is now long gone. The owner said, “just pick it up and feel the heft.” And of course, I did and the next thing you know we were talking price, knowing I would never pay $2,000 for a collectible Ruger No. 1. Shaun confided in me that the rifle’s owner couldn’t find the obsolete 405 ammo for it anywhere and he wasn’t a handloader, so he wanted to sell the rifle. Another problem with the rifle was that a previous owner had cut down the front sight, probably because he had been shooting handloads with .41 caliber pistol bullets. So we settled on $500 and I became the owner of my first “unobtainable” Ruger No. 1!
In the gun shop years ago eyeing the Ruger No. 1. Salesman Shaun said, “hand me your phone and let me take a photo of you so you can see how good you look with that rifle!” Shaun passed away a couple of years ago, but I know he smiled down from Heaven yesterday as I fired the Ruger No. 1H Tropical for the first time. And he was right, this gun was meant for me!
It took me a lot of searching over the past few years, but I finally located a set of 405 Win reloading dies, the shell holder, and all the components to bring this rifle back to life.
Hornady had made a run of new 405 Winchester brass and I was lucky enough to find a New Old Stock box of 50 shells. I also located some new Barnes .412, 300 grain TSX bullets.
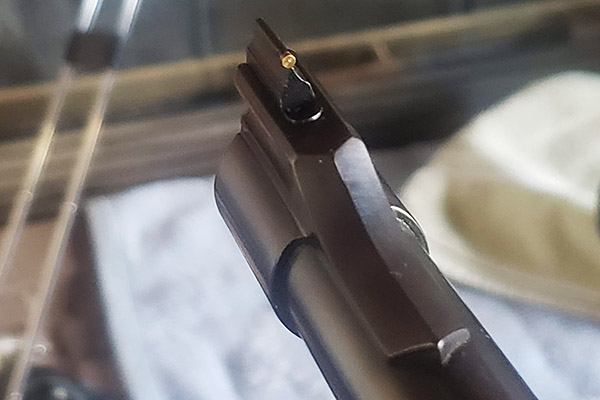
The first step in restoring the old 1H Tropical was to contact Ruger and purchase a new gold bead front sight. That was a simple install as the blade is held in place by a small detent spring.
New Ruger NOS gold bead front sight blade installed.
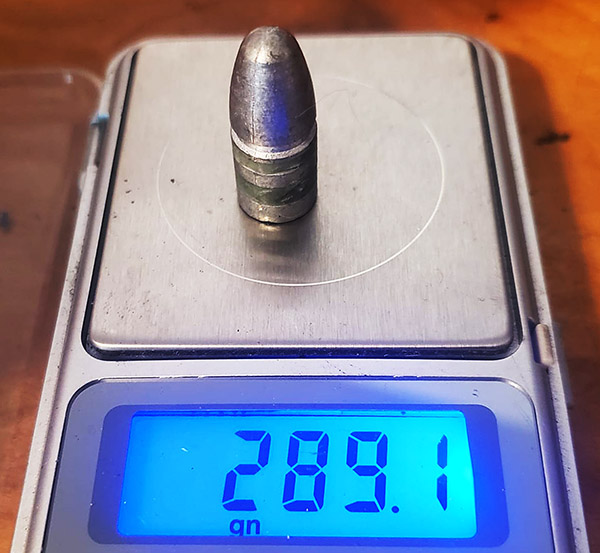
Not wanting to use the expensive Barnes TSX bullets quite yet, lead bullets were cast from lead wheel weights with a bit of tin added using a Lyman 412263 plain base mold to cast 288 grain bullets. These were sized to 0.413 inch and lubed with Alox. Lyman has since discontinued this fine old bullet mold.
A Lyman 412263 bullet, lubed and sized.
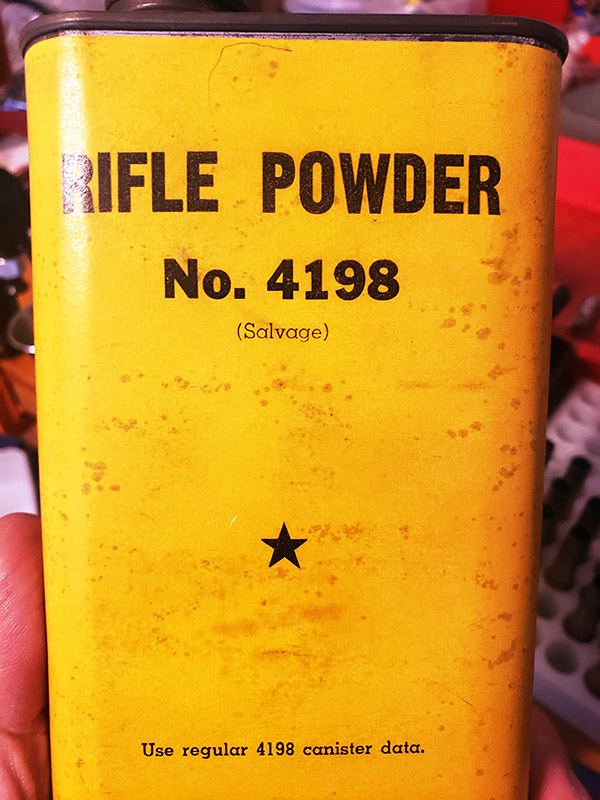
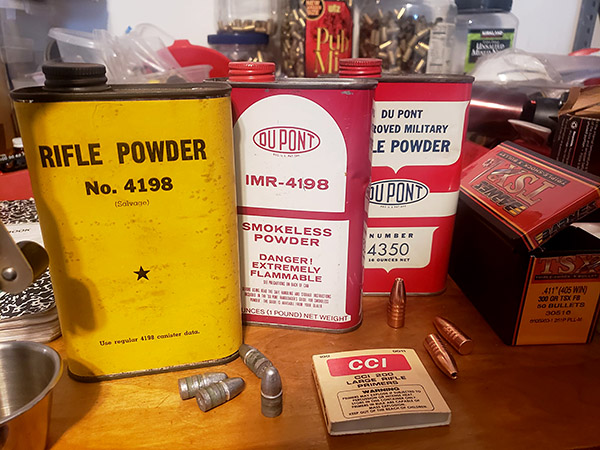
Finally, yesterday morning I decided it was time to resurrect this old rifle! Besides, the project would give me the opportunity to test some old “salvage” Hodgdon 4198 powder I’ve had sitting on the shelf for nearly two decades. The powder is probably from the 1950s or early 1960s. I also had some ancient CCI 200 large rifle primers on hand.
Hodgdon “salvage” 4198 smokeless powder. The powder is probably WW II US Military surplus powder that Hogdon bought in bulk and repackaged in the late 1950s or early 1960s.Vintage components for a vintage cartridge.
I loaded 20 rounds of 405 Winchester ammo using the cast lead bullets and a starting load of 38.5 grains of 4198 and headed down the hill with good friend Yvon to an informal shooting range on BLM land.
The obsolete 405 Winchester cartridge (left) and the popular 45-70 Government cartridge (right) used by 1880s plains buffalo hunters of the American west. I don’t shoot buffalo and never will. But I enjoy reviving and firing old guns!
Let me say that this Ruger No. 1H Tropical in 405 Winchester lives again. It shoots incredibly tight groups with the cast bullets and gold bead open sights.
My next project will be to develop a non-lead hunting load using the 300 grain Barnes TSX bullets.
Bringing life back into old obsolete rifles can be tons of fun.
That’s an awesome story, Jose, and thanks for allowing us to share it here on the ExNotes blog. Your No. 1 has to be one of the best deals ever. The dealer’s original asking price is probably what that rifle is worth if you could find one for sale. Well done, my friend.
This is an interesting story and it’s one of the very few times in my life I was hosed on a firearm purchase. The rifle is a 1903 Springfield I bought a few years ago and didn’t shoot much. The times I shot it previously I had experimented with cast bullets and it shot okay, but not great. Then I tried it with jacketed bullets (loads at much higher pressures), and what do you know, I had a headspace issue. I could see it in the primers that had partially backed out of the brass after firing, and on one round, I split a case circumferentially just ahead of the base (indicating with near certainty an excess head space issue). I borrowed good buddy Greg’s 30 06 head space gages, and the bolt closed on both the no go and the field service gages. That’s a no no.
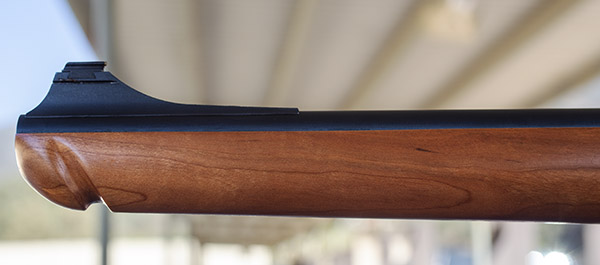
The 1903 Springfield rear sight. The 1903A3 went to a much less expensive stamped steel rear aperture sight.
My first thought was to have the existing barrel set back and rechambered, but that didn’t work. The 1903 Springfield has a barrel collar that holds a very sophisticated rear sight and positions the upper handguard. When we set the barrel back, the rear sight integrity was greatly weakened and the front handguard had excess play. Nope, I needed a new barrel.
I checked around and came to the conclusion that the best place to get this kind of work done is the Civilian Marksmanship Program (CMP) Custom Gunshop. This is a quasi-government arsenal and these folks are the experts. I priced having a new barrel and rear sight collar installed on my 1903, cutting a new 30 06 chamber with the correct headspace, and having the entire gun re-Parkerized. The work was surprisingly reasonable. I had to wait my turn in line, but that’s okay. I had other guns I could shoot.
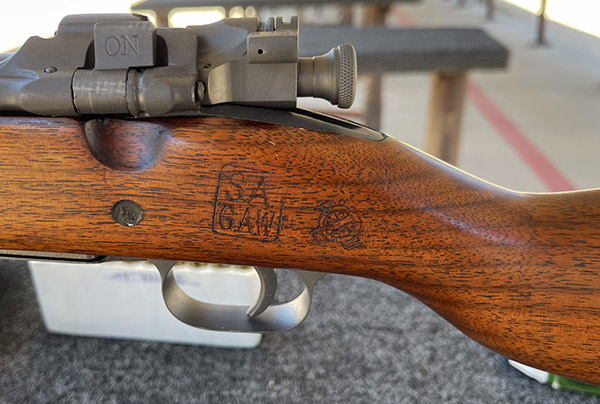
With a re-Parkerized finish and a new barrel, my 1903 looks great.Very cool. The 1903 “scant” stock, complete with cartouche.
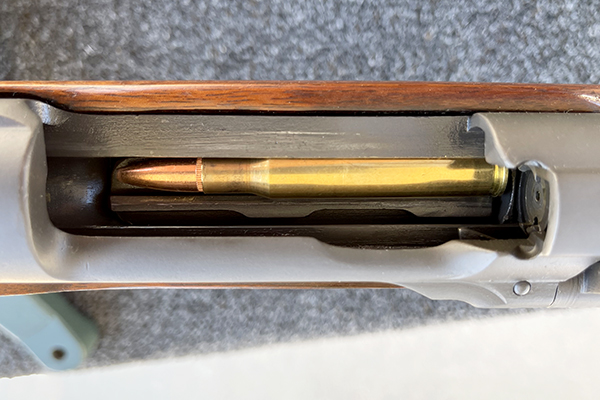
When the rifle was returned to me, it was stunning. It literally looked like a brand new 1903. A quick trip to the range followed, and I tried some jacketed bullet factory level reloads. I loaded and fed from the magazine, as the 1903 is a controlled round feed and it’s best in these guns to let the cartridge rim ride up and find its position behind the extractor.
A 30 06 cartridge in the 1903’s magazine.
I shot a few targets with copper jacketed bullets and found that the rifle shot about a 8 inches high and slightly to the right. The rear sight would take care of the right bias, and I figured the high impacts were okay. Some military rifles of this era are designed with a 300-yard battlesight zero, which means they shoot to point of aim at 300 yards at the lowest sight setting (everything in between is high, with the idea being that if you hold center-of-mass on a human size target, you’ll have a hit out to 400 or 500 yards).
High and slightly to the right with factory-level reloads. My point of aim was 6:00 on the orange bullseye.
I could buy a taller front sight blade to lower the point of impact, but that wasn’t the way I wanted to go. Nope, my plan was to shoot cast bullets in this rifle. My guess was that if the rifle shot 8 inches high at 50 yards with jacketed bullets, cast bullets would be right where I wanted them to be.
Loading my first batch of 1903 cast bullet test ammo was easy. Years ago I was on a reloading tear, and I had loaded a bunch of plated 110-grain round nose bullets with 14.0 grains of Unique. I knew those loads were terrible in other 30 06 rifles (the lead under the copper plating is dead soft and it tears off, resulting in terrible accuracy). Hey, no problem. I pulled the plated bullets, left the 14.0 grains of Unique in the cartridges, flared the case mouths, and seated different cast bullets. One was the 180-grain cast Hursman bullets with gas checks (these worked well in the .300 Weatherby), the other was the 210-grain Montana bullets I picked up from good buddy Paul (these are also gas checked bullets). After seating the cast bullets, I crimped the brass with my Lee factory crimp die.
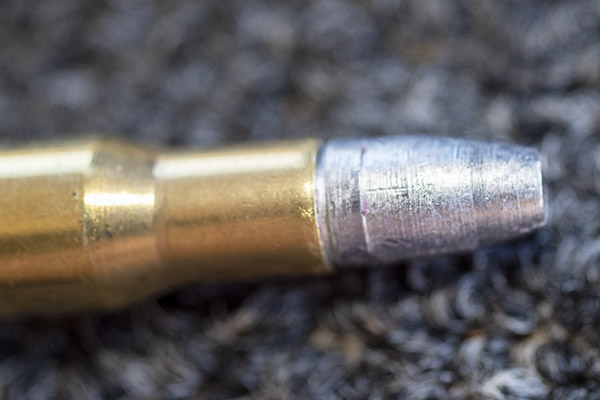
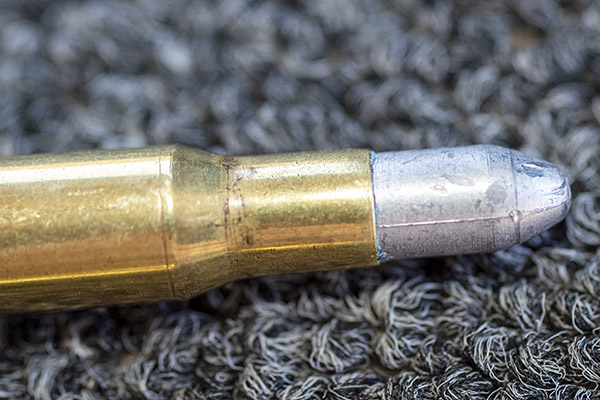
The Lee factory crimp die. It’s shown here with a jacketed bullet. It has collets that circumferentially crimp the case mouth to the bullet.30 06 reloads with cast bullets. That’s the Montana bullet on the upper cartridge, and the Hursman bullet in the lower cartridge. If you look closely, you can see that the case mouth has been crimped by the Lee factory crimp die.A macro shot of the Hursman 180 grain bullet. The case was crimped with a Lee factory crimp die.A similar photo of the Montana bullet. It’s cast with a Lyman mold. The Montana bullet’s rounded nose fed better from the 1903 magazine.
I only loaded 20 rounds (10 each with the two different cast bullets), as this was to be a “quick look” evaluation.
A morning at the range on an overcast day, a beautiful 1903 Springfield rifle, and .30 06 ammo loaded with cast bullets. Life doesn’t get much better.
Both loads shot reasonably well. I’m not going into the upholstery business with either of these loads (they are not tack drivers), but they are good enough. I was particularly pleased with the 210-grain Montana bullets. The Hursman bullets had proved to be the preferred load in the .300 Weatherby; the Springfield showed a decided preference for the Montana bullets.
I shot at 50 yards with both loads; future testing will be with the Montana bullet at 100 yards.
The Hursman bullet load at 50 yards. The load was 14.0 grains of Unique; it may be that the Hursman bullets will group better with other propellants.The Montana bullet at 50 yards on the left-most bullseye (the other bullseyes were shot with a Mosin-Nagnt rifle, covered in another blog). I found a sweet spot with that 14.0-grain Unique load and the Montana bullet.
Unique is not the best powder out there for loading cast bullets in rifle cartridges. In the past, I’ve shot much better groups in other rifles with IMR 4227, 5744, SR 4759, and Trail Boss. Those evaluations in the 1903 are coming up. For now, I know I’ve got a good load with Unique and the Montana bullets.
One of the big takeaways for me in this adventure is that when you buy a milsurp rifle, always check the headspace to make sure that it is within specification. It’s pretty common for these rifles to have gone through arsenal rebuilds and to have been cobbled together from parts bins, and when that occurs, if the chamber isn’t matched to the bolt you can have an excess headspace problem. That’s a bad situation, as it can be dangerous to the shooter and anyone nearby.
You can find headspace gages on Amazon and elsewhere. If you’re going to buy a military surplus rifle, checking the headspace should be part of the drill.
I always liked that “kinder, gentler” line from George Bush. We don’t do politics here at ExNotes (we’d lose half our readers no matter which way we leaned), but every once in a while I’ll borrow a phrase if it fits. So, you’re looking at the big photo above showing a 300 Weatherby Magnum, a 7mm Remington Magnum Ruger No. 1, and a custom Howa 30 06, and you’re probably wondering: What is kinder and gentler about shooting those T-Rex cannons?
Cast bullets, that’s what. I started shooting cast bullets back in the 1970s in El Paso and I’ve been hooked on them ever since. I don’t cast my own these days (it’s easier to buy them), but I still enjoy the benefits. Lower cost, exclusivity (far fewer folks shoot cast bullet rifle loads), long brass life, easier cleaning, and the big one: Lower recoil.
That last one, reduced recoil, figures prominently in my mind. I’ve been beating myself up lately shooting full bore .300 Weatherby cartridges and it’s been tough. I have a box of 180-grain cast .308 bullets and I have a bottle of Trail Boss propellant and that got me to thinking: Would cast bullets work in the .300 Weatherby?
Help us keep the lights on…click on those popup ads!
I checked the Lyman manuals and there are cast loads listed for .300 Weatherby. I checked the Trail Boss site and it lists .300 Weatherby cast loads, too. Hmmm. I wondered how good it could be. After all, you could fit the Hollywood Bowl inside a .300 Weatherby cartridge case. There’s a lot of space in there, and not occupying it usually hurts accuracy. With jacketed bullets, the .300 Weatherby usually delivers its best accuracy at max or near-max loads. Would all that volume and the much lighter charges associated with cast bullets make an accurate load?
Trail Boss propellant. It’s shaped like flattened Cheerios and it’s a light, fluffy powder. It’s good stuff.
There’s one powder designed for cast bullet shooting that hits the cartridge case volume issue head on, and that’s Trail Boss. The Trail Boss people tell you to fill the case to the base of the bullet and that’s your max load, and if you take 70% of that, you’ll have your minimum load. My Weatherby brass took 31.3 grains of Trail Boss, but that was in a fired, unresized case, so I figured 30.0 grains would make for a good max load. 70% of that is 21.0 grains. Then I checked the Hodgdon site (they’re the folks who make Trail Boss) and it showed a range of 19.0 to 27.5 grains. That’s close enough for government work…my lower end load would be 21.5 grains, and then I’d try a warmer load with 24.5 grains. You know, to get a feel for what the Weatherby Mark V preferred. So I loaded a few rounds early one morning and I was ready to test the Mark V with cast bullets.
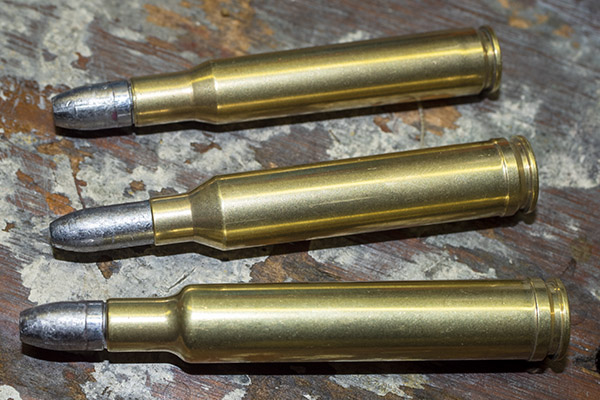
The .308 180-grain cast bullets I used in both the .30 06 and the .300 Weatherby. They were sized to .309..300 Weatherby ammo loaded with the above 180-grain cast bullets.
I already had a bunch of 7mm Remington Magnum reloads with Gardner’s 145-grain cast bullets. I had three boxes: One with 18.0 grains of Trail Boss, one with 20.0 grains, and a third with 21.4 grains. My prior reloading adventures with the 7mm Remington Magnum in my Ruger No. 1 indicated that it liked Trail Boss, but I didn’t know what the right dose would be.
Gardner’s 145-grain 7mm cast bullets.7mm Remington Mag ammo with cast bullets seated to different depths, with and without crimping.
I also had a box of .30 06 ammo loaded with cast bullets. I loaded these with SR 4759 powder, a stellar cast bullet propellant. I grabbed that box and my custom Howa.
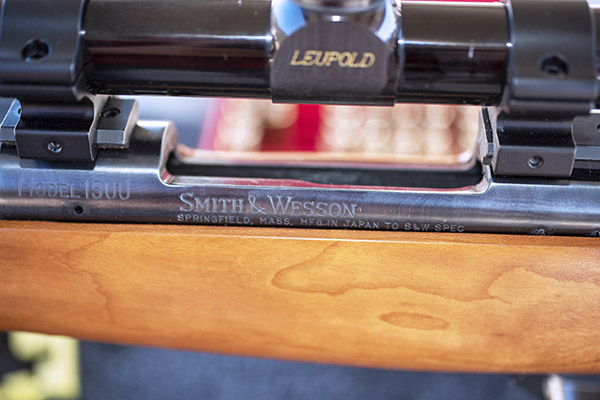
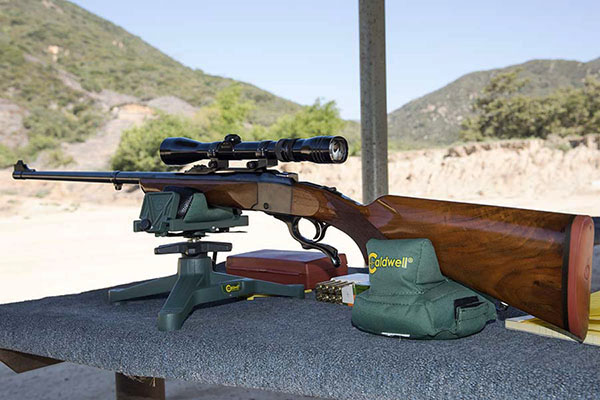
I stocked this rifle with a Bishop cherry stock about 35 years ago. It’s one of my favorite rifles. There’s a blog on it here.I wanted to try my hand at a Mannlicher style, full length stock. I carved it to match the Alex Henry fore end tip on a Ruger No. 1. It’s a unique rifle that always gets noticed on the range.Howa sold barreled actions to Smith and Wesson when Smith wanted to play in the rifle business maybe 40 years ago. They no longer are..30 06 ammo loaded with 180-grain cast bullets and SR 4759 propellant.A comparison: .30 06, 7mm Remington Magnum, and .300 Weatherby ammunition, all loaded with cast bullets. It’s cool-looking ammo.
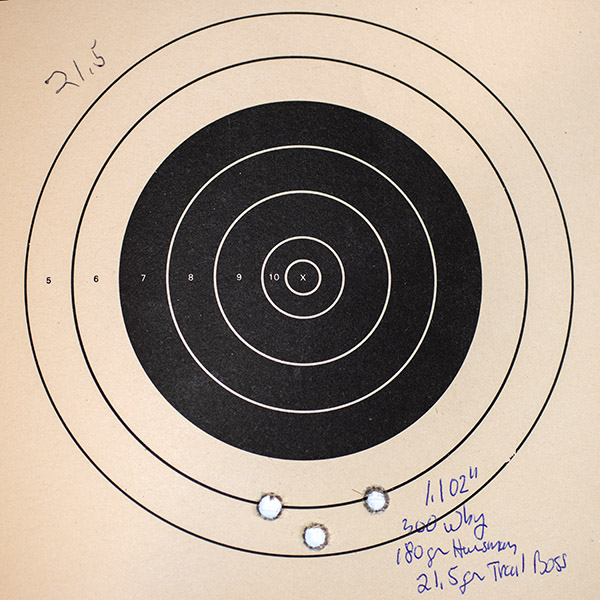
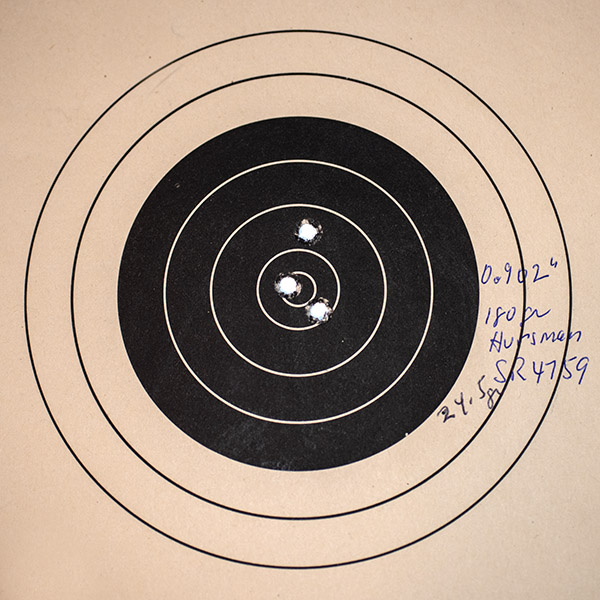
So how did the cast bullet rifle session go? Surprisingly well. I shot the Weatherby first, as it was the rifle that had prompted the cast bullet theme. The recoil level was low, almost like shooting a .38 Special. That was a welcome relief from the factory-level loads I had been shooting. The .300 Weatherby Mark V printed its best 50-yard group at 1.102 inches (a three-shot group), and that was with 21.5 grains of Trail Boss.
Shooting cast bullets in the .300 Weatherby was a pleasant experience. I could do this all day.
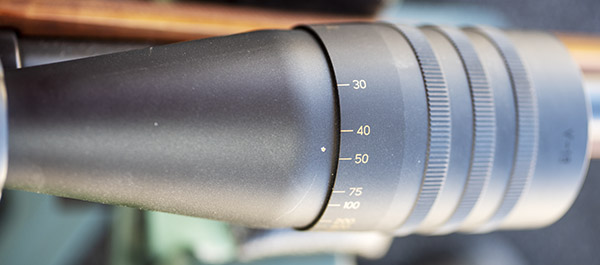
Because I was shooting at 50 yards, I needed to readjust the parallax on the Mark V’s 4-16 Weaver scope. When I did this at 100 yards, the parallax adjustment was right where Weaver had marked it for 100 yards. At 50 yards, the Weaver marking on the scope’s objective was a bit off, but that’s okay. I could move my eye around behind the scope and the crosshair movement had been appropriately minimized.
At 50 yards, the parallax adjustment was at about the 46-yard mark. I took this photo so I could return to this spot on subsequent 50-yard shooting sessions.
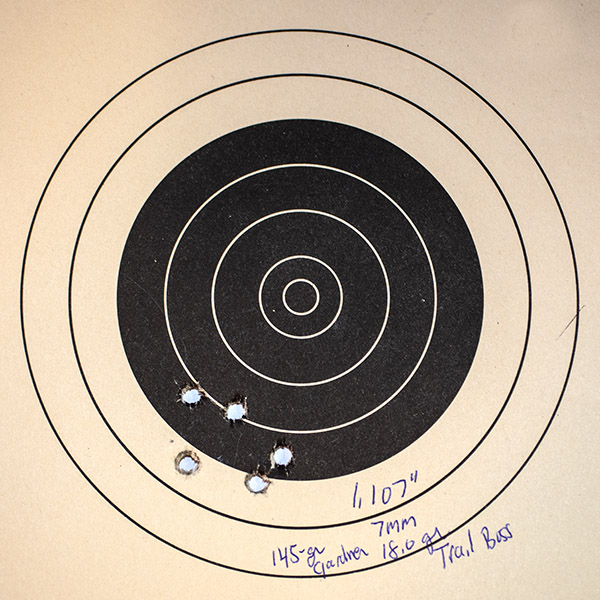
The Ruger No. 1 in 7mm Remington Magnum printed a 1.107-inch five-shot group at 50 yards with 18.0 grains of Trail Boss.
The Ruger No. 1 shot well with Trail Boss and cast bullets. I have more loaded with a slightly lighter load (not because of recoil, but because it appears the gun will do better with a lighter load).
And my .30 06 Howa did the best of the three, with a 0.902-inch three-shot group at 50 yards. I loaded that ammo with 24.5 grains of SR 4759. I’ve always had good accuracy with SR 4759 when shooting cast bullets.
The .30 06 group. These were with SR 4759 powder; I’ll next test with Trail Boss.
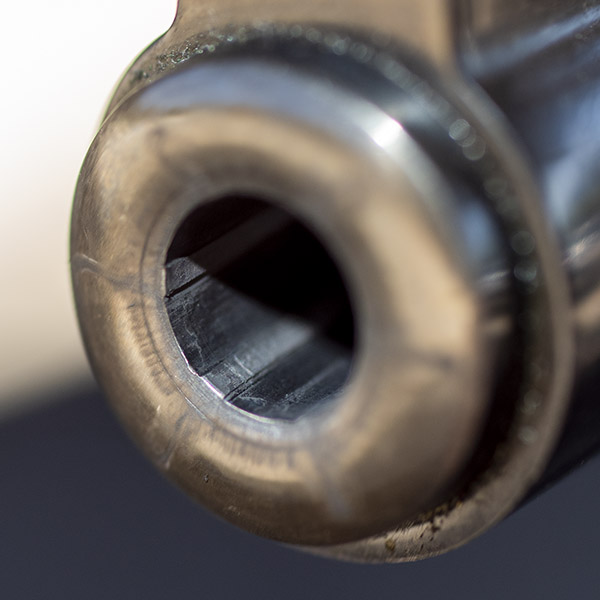
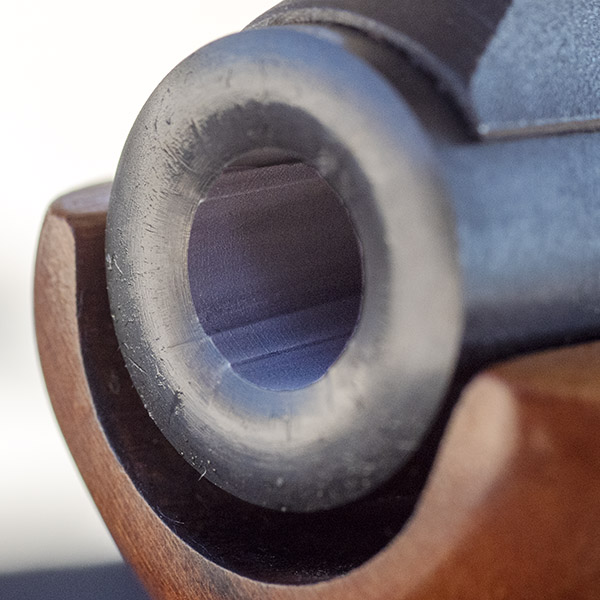
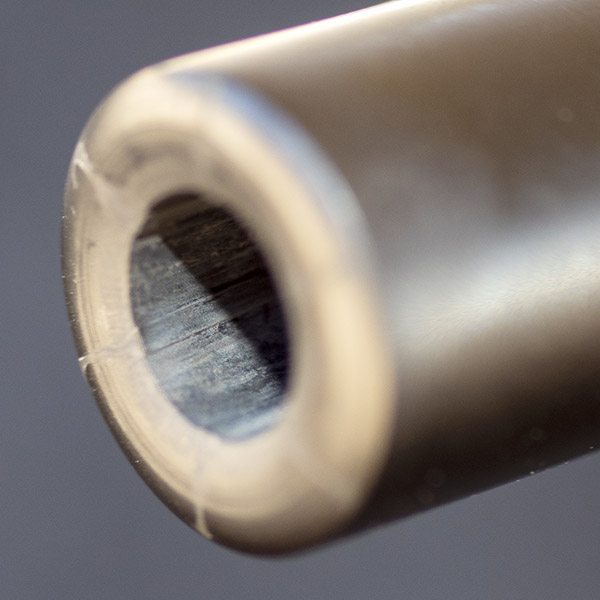
None of the cast bullet loads leaded the barrels, and that’s a good thing. Take a look (all of these photos were after shooting, but before cleaning):
The 7mm Ruger No. 1 bore after firing cast bullet loads. The bore was surprisingly clean with almost no leading.The Howa’s bore after firing a box of cast bullets. This bore was immaculate. It appears the machining on it was better than the Weatherby and the Ruger rifles.The Weatherby Mark V’s bore after firing cast bullets. There’s a very tiny bit of leading, but nothing significant. It cleaned up easily.
Cleaning a rifle after shooting cast bullets is much easier than cleaning after shooting jacketed bullets. I run a patch soaked with Hoppes through the bore and let it set for maybe 15 minutes to soften any lead remnants and combustion residue. After that I run a bronze bore brush through the barrel three or four times, and then I push two or three patches through the bore. That’s all it takes to get an immaculate bore. It’s much easier than removing copper fouling after firing jacketed bullets.
On the next set of cast bullet loads, I think the direction is clear. The .300 Weatherby shot better with 21.5 grains of Trail Boss than it did with 24.5; the Hodgdon online data shows the charge going as low as 19.0 grains. My next .300 Weatherby load will be with 20.0 grains of Trail Boss. The 7mm Remington Mag shot better with 18.0 grains of Trail Boss than it did with 20.0 and 21.4 grains; I think I’ll try 17.0 grains in a few to see if accuracy improves. I haven’t tried any 30 06 loads with Trail Boss yet (the loads I shot for this blog were loaded with SR 4759), so I’ll do some .30 06 Trail Boss loads for the next outing.
I was just about out of Trail Boss powder after loading more cast bullet ammo for the next session with the above three rifles, and with component availability today being what it is, that concerned me. I got lucky, though. I found a source with a 5-pound bottle of Trail Boss at a decent price and I jumped on it. I’m set for a while.
Trail Boss propellant. Good stuff and a good find.Ready for the next range session: 7mm Remington Magnum, .300 Weatherby, and .30 06 ammo, all loaded with cast bullets and Trail Boss propellant.
I’ll move the targets to 100 yards the next time I’m out. Good buddy Paul set me up with a box of Montana Bullet Company’s 200-grain .308 cast bullets, and I’ll load a few of them to see how they do in the .30 06 and the .300 Weatherby. Montana Bullet Company’s cast bullets have done superbly well in my .35 Whelen and .416 Rigby rifles; I’m eager to see how these do in the .30 06 and .300 Weatherby.
Montana Bullet Company cast 200-grain rifle bullets. These are great bullets.
That’s it for now. I intend to be on the range sometime this week to continue the cast bullet testing, and when I do, you’ll read about it here.
When I first posted about the Model 60 load development plan and the Altamont grips I bought from good buddy Paul, the cover photo showed my recently-acquired Model 60 snubbie and a Smith and Wesson Performance Center Model 625 I’ve owned for years.
The Model 625 and the Model 60.
I like that photo because the two stainless steel Smiths look great on the wild boar skin. That skin is from a pig hunt Paul and I did in Arizona a few years ago.
The earlier blog was about finding an accuracy load for the Model 60, but a few people wrote to ask if I had a favorite load for the Model 625. I do: My usual accuracy load for the 625 is a cast 200-grain cast semiwadcutter bullet (sized to .452 inches) over 4.2 grains of Bullseye.
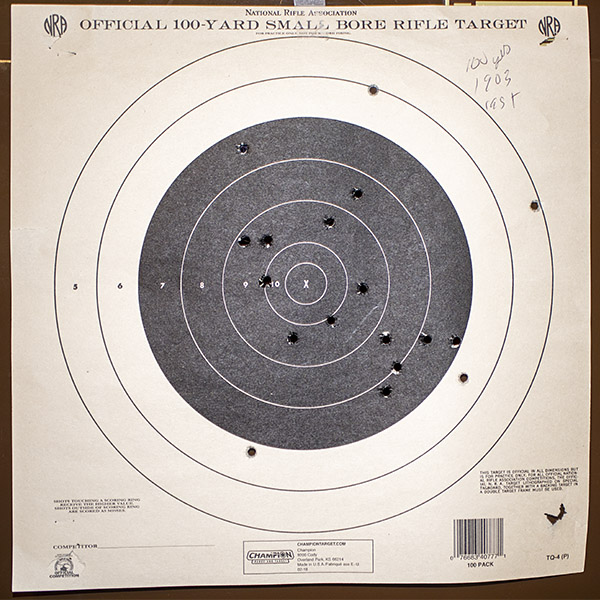
When I went to the range to run a few rounds through the 625 I picked a box of ammo I had reloaded in 2014. It was different than my usual accuracy load. I used the same bullet (a 200-grain cast semi-wadcutter), but instead of Bullseye I had loaded these over 6.0 grains of Unique. And instead of .45 ACP brass in star clips, I used AutoRim brass. This is the load I fired that 6-shot group you see in the cover photo above for this blog, and it’s a honey. The group, that is…not the photo (it’s hard to get true colors when using an iPhone in the shade). I shot at 50 feet while standing…there’s no rest for the Model 625 or the weary.
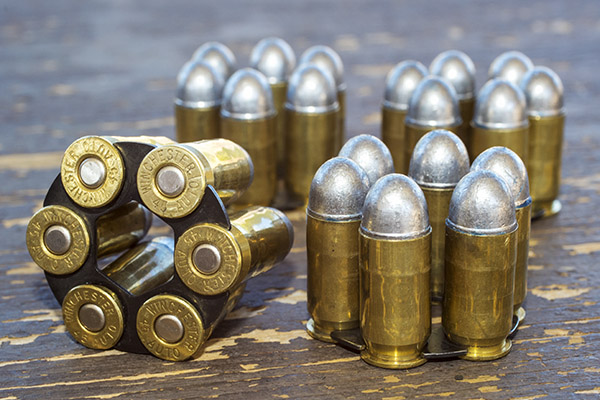
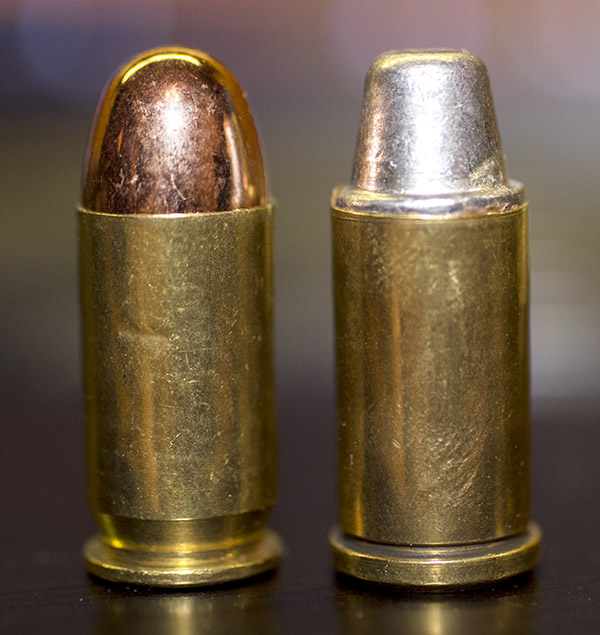
.45 ACP cartridges in star clips for the Model 625. These are loaded with 230-grain cast roundnose Missouri bullets.The .45 ACP cartridge (left) and the .45 AutoRim cartridge (right). The AutoRim cartridge is designed for use in the Model 625 without star clips. The ACP cartridge has a 230-grain roundnose Xtreme bullet; the AutoRim cartridge has Missouri’s 200-grain semi-wadcutter.
The AutoRim brass is in the tumbler as I write this and when I reload it I’m going to go with the same load: The 200-grain cast semi-wadcutter over 6.0 grains of Unique. It seems to be working for me.
Help keep us afloat: Please click on the popup ads!
Never miss an ExNotes blog: Sign up here for free!
It’s the .35 Whelen (not “wailin'”), but with a name like that, I had to have a little fun. I also considered “Win Some, Lose Some” for the title of this blog, but I’ll get to that in a minute. What this blog is all about is the beginning work in finding a reduced velocity load for my .35 Whelen Ruger No. 1.
Photos from the Gunbroker auction for my rifle (yeah, I saved them). The big featured photo above shows the wood with an orange tint, but that’s because I used flash for that photo. The rifle’s colors are closer to what you see here. It’s a beautiful rifle.
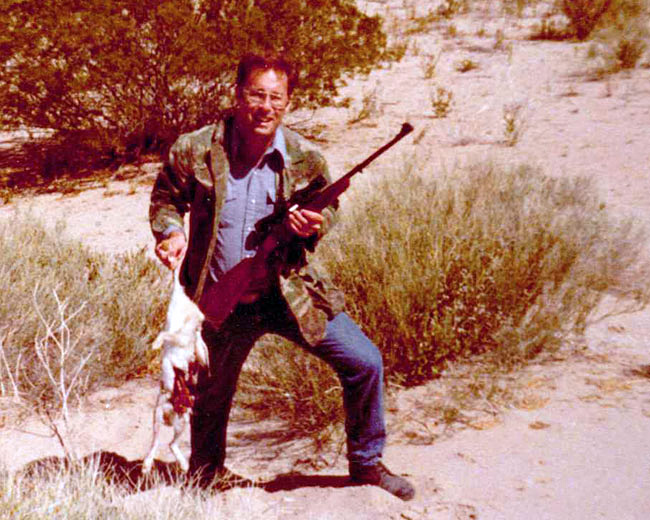
My .35 Whelen is the one you see in the photos above. I have a thing, you see, for Ruger No. 1 rifles. The first rifle I ever bought was a Ruger No. 1 in .30 06 when I was in the Army back in the ‘70s. I initially thought I’d wear out the barrel on my .30 06 and have it recut to .35 Whelen, but that ain’t gonna happen (I’ll never shoot that rifle enough). I have shot it a lot, though. An infantry division of jackrabbits in west Texas met their maker on account of me and my .30 06 No. 1.
Me, half a century ago with a 30 06 Ruger No. 1 and a very dead jackrabbit (one of many) in the west Texas desert. That was a 400-yard offhand shot. The older I get, the better I was.
Okay, back to the .35 Whelen: The concept of a big bore .30 06 stuck in my mind. I’d wanted a Whelen ever since I read about the cartridge. It was created by Townsend Whelen in 1922 (there’s some disagreement about whether it was Whelen or a guy he worked with, but there’s disagreement about everything on the Internet, and Townsend Whelen is the story I’m going with). Old Colonel Whelen ran a .30 06 cartridge case over a .358 expander, plunked in a .358-caliber bullet, and voila, he had created the .35 Whelen.
The .35 Whelen was strictly a wildcat from 1922 to 1988; in 1988 Remington chambered their 700 Classic rifle for it (my good buddy Jason has one and he recently took a nice buck with it). Then Ruger manufactured a limited run of No. 1 rifles in .35 Whelen maybe 5 or 6 years ago (I got mine from that run). Most of these rifles had very plain wood (both the Remingtons and the Rugers); when I saw the one featured in this blog on GunBroker, I jumped on it. The gun looks even better in person that it does in the photos (and it looks great in the photos). My mantra for many years has been that you just can’t go wrong with a Ruger No. 1 and fancy walnut. I believe these to be some of the classiest rifles ever made.
Why a reduced load? Hey, why not? I’ve got other thumpers, and if I ever hunt dinosaur, I can take my .458 Win Mag. I thought finding a way to make the Whelen work with less energetic loads would be fun. Factory-level loads are tough at both ends, and I want to have fun with this rifle. Folks say the .35 Whelen is as good a game-dropper as a .375 H&H. That may be, but it’s irrelevant to me, and besides, those kinds of energy levels come with big recoil. Finding a load that makes a thumper less of a thumper is my idea of fun. I just think the cartridge looks cool, too.
So I’ve had the Whelen a few years now, but until recently, I had never fired it. Then, for reasons I won’t go into, I no longer have a .357 Magnum handgun but I have a couple thousand 200-grain cast .357 Mag bullets. Hey, I thought…let’s see if they’ll work in the .35 Whelen. I looked online and found that other guys are doing it, my 200-grain bullets are sized at .358, and I thought it ought to work.
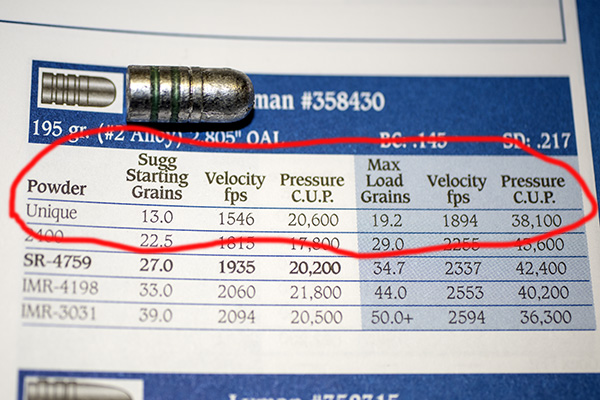
The Lyman cast bullet data for this bullet in the .35 Whelen.
I looked in the Lyman cast bullet book and I think the bullets I bought are the very same 200-grain Lyman bullet their cast bullet manual shows for the .35 Whelen (the profile is exactly the same). Whoa, this just might work, and it would give me something to use those big pills in.
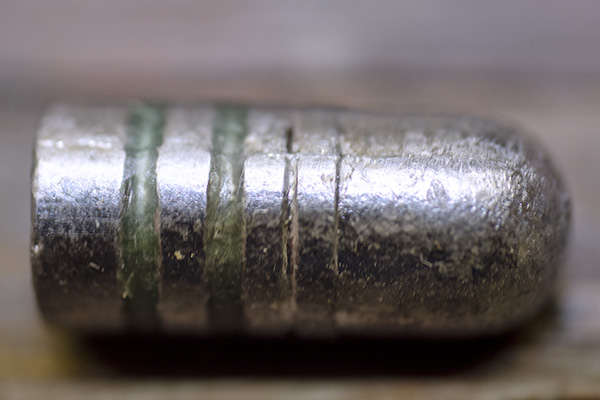
A big heavy 357 Mag/38 Special bullet. It does well in the .357 Magnum revolver (I’ve shot 3-inch groups with this bullet in my Ruger Blackhawk at 100 yards).
I actually have .35 Whelen brass, but I wanted to make some the old-fashioned way like Townsend Whelen did. I ran 20 new .30 06 cases through the .35 Whelen sizing die to open the case mouths to .35 (from .308), I flared the mouths slightly with the Lee case mouth flaring tool (that’s so the cast bullets will start into the case mouth without shaving lead), and then the brass cases went into the tumbler. They came out looking good.
.35 Whelen brass crafted from .30 06 cases.A .30 06 case on the right, which is what the .35 Whelen cases are formed from.
I selected Unique as the propellant for this first load because I have some on hand, and because it shows the lowest velocities in the Lyman manual. I went with 15.0 grains as a starting point. My 200-grain .357 magnum cast bullets leaded the bore a little bit in my .357 Magnum Blackhawk revolver, so I was mildly concerned that they would lead the bore in my Ruger No. 1. Hold that thought, because we’re going to return to it in a second.
15.0 grains of Unique.Seating the bullets in my RCBS Rockchucker press.
My .35 Whelen cartridges looked good, and they chambered with no issues in the No. 1. I was eager to get to the range to see how they would group.
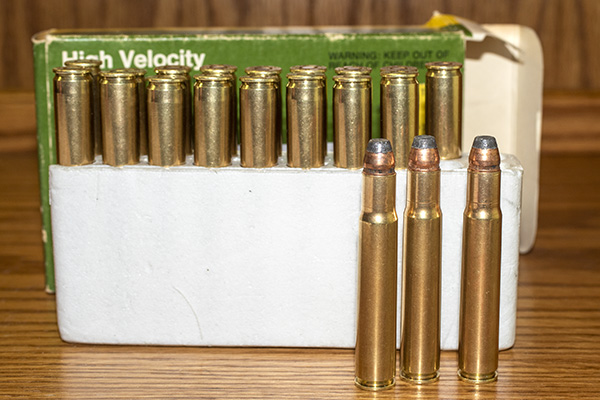
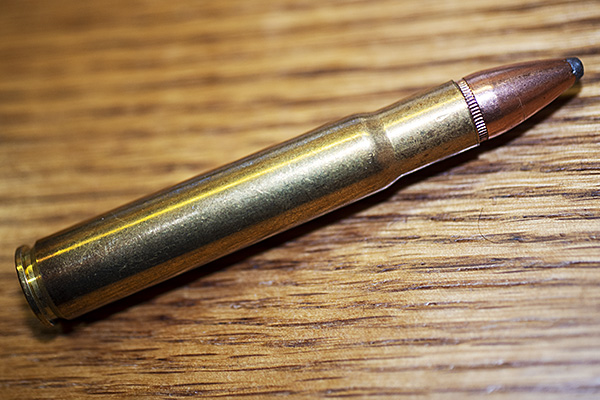
A finished .35 Whelen cartridge. It’s a handsome cartridge, I think.I loaded 20 rounds for a trial run. This is good-looking ammunition.
So how did it work? Well, that brings us to the “lose some” portion of the tentative title I mentioned at the start of this blog. You know, as in “Win Some, Lose Some,” although I don’t think any No. 1 with wood like the one you see here could be filed in the “lose some” column.
Bottom line? The cast bullet load didn’t perform well at all. The bullets didn’t tumble in flight (as would have been evidenced by their keyholing through the target), but they didn’t group worth a damn, either. I’m talking 12-inch groups at 50 yards. Hell, on a mediocre day I can shooter smaller groups at a hundred yards with a handgun. A quick look at the bore revealed the culprit: Leading. Lots and lots of leading.
A severely-leaded Ruger No. 1 barrel. The bullets I used are intended for handgun velocities. I was hoping for a miracle. It didn’t happen. Not surprisingly, accuracy was nonexistent. Good buddy Greg commented that there was probably enough lead in that barrel to cast another bullet or two.
Okay, it’s knowledge gained, and that’s not a bad thing. These handgun bullets won’t work in my No. 1. But there are cast bullets out there made specifically for rifles, and I knew where to go to get some. I like the cast bullets made by Montana Bullet Works. I called them when I got home, I had a nice conversation with Bruce (the owner), and a hundred of his bullets are on their way to me now. Bruce’s bullets are from an RCBS mold, they have a gas check, they’re hardened to 22 BHN, and they’re heat treated (to prevent breakup when hunting). Everything I’ve read about these bullets on the Internet indicates they are great, and I’ve had good experiences with Montana Bullet Works when using their bullets in a different big bore rifle. I’ll update you with a range report when I try them.
Montana Bullet Works 200-grain flatnose gas check bullets. It will be interesting to see how these perform in the .35 Whelen.
In the meantime (while I’m waiting for the Montana Bullet Works bullets), I explored the Internet and my loading manuals for more information on a reduced .35 Whelen load. I didn’t do well with the 200-grain cast .357 Mag bullets but in researching this more, I found that others have had decent results using jacketed .357 Mag bullets, and there are loads published for this in the Lyman manual. The .35 Whelen rifle bullet diameter is listed at .358 and the jacketed pistol bullets are listed at .357 (we’re talking inches here, folks), but guys on the Internet are saying they get good results with the pistol bullets. So I loaded 20 and made a quick run to the range.
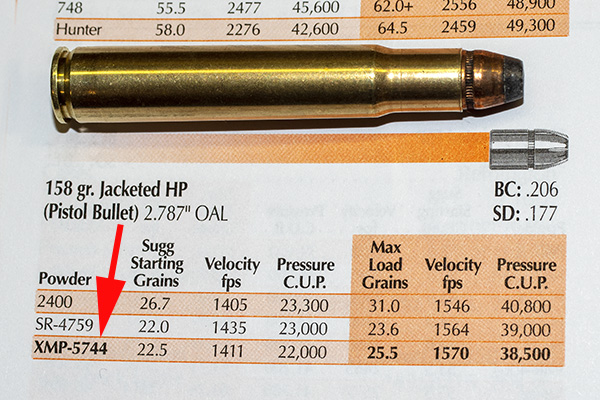
Hornady 158-grain .357 Magnum jacketed flatnose pistol bullets. These grouped well in the Whelen.The Lyman manual’s data for using 158-grain .357 Magnum pistol bullets in the .35 Whelen.20 rounds of custom-made, good-looking .35 Whelen ammo.
I loaded at 24.0 grains of 5744 because I have that powder on hand and I didn’t want to dip into my stash of discontinued 4759. While I was loading these, I was a little leery about shooting .357-inch diameter bullets in a .358-inch bore. About 45 years ago in another life I tried loading .45 ACP bullets in a .458 Win Mag (I know, I was young and dumb). The difference there was too much (the pistol bullets were .451 inch and the bore diameter for a .458 Win Mag is .458). Those rounds fired okay, but accuracy was horrible. The bullet was a whopping 0.007 smaller than the bore. Here, with the .35 Whelen, I’m 0.001 smaller. Maybe it would work, I thought.
I arrived at the range in the late afternoon and set up a target at 50 yards. At the West End Gun Club, the rifle range points about 20-degrees north of due west, and what that means is that late afternoon shooting involves shooting into the sun (the sun is off to the left about 20 degrees). Everything I’ve read about the effects of lighting on bullet point of impact says that the point of impact moves in the opposite direction that light emanates from, but my experience has always been exactly the opposite. If the light is coming from the left, my point of impact is to the left, and that’s what I experienced with the Whelen.
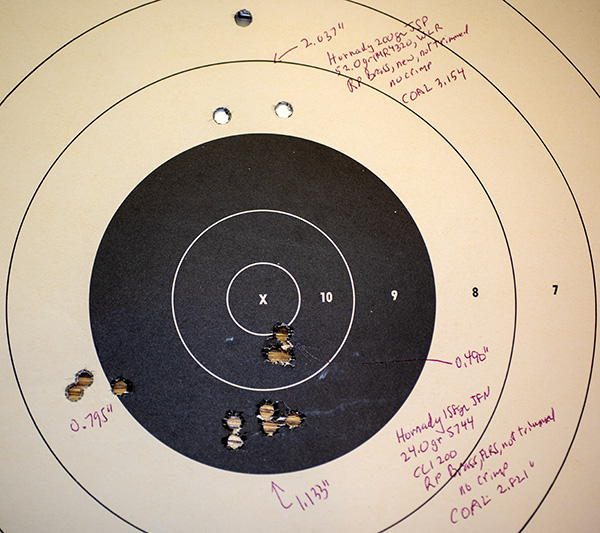
My Ruger has a brass bead front sight (which I think is the worst kind of front sight), and it had a decided flare on the left side from the sinking sun. Sure enough, my first group was sharply offset to the left. Tight, but to the left. I shifted the sight over to the right, and my guesstimate put the point of impact dead even with the centerline of the target. I fired a 3-shot group, moved the front down a hair, and then fired a 5-shot group. All were gratifying small, given that I was shooting almost into the sun by then and using iron sights (well, brass and iron, but you know what I mean).
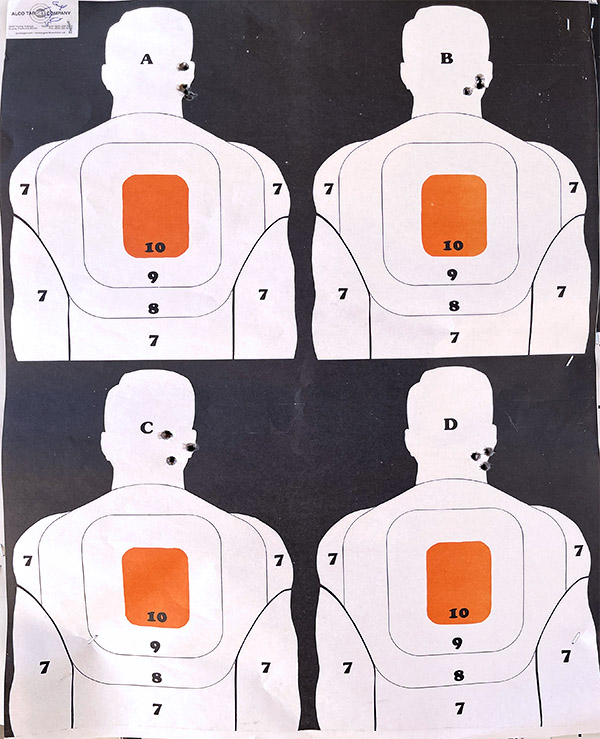
My 50-yard .35 Whelen target. The first group (a 0.795-inch group) was off to the left. I drifted the rear sight to the right and shot the 0.490-inch, 3-shot group. Then I moved the rear sight down a hair (or was it a hare?) and shot a 5-shot, 1.133-inch group. The top 3-shot, 2.037-inch group was with full power, 200-grain Hornady jacketed bullets.
This is looking good. I am very satisfied with the accuracy I’m getting with the reduced velocity jacketed pistol bullet groups. They’re maybe about 1500 feet per second, and that just feels right.
Then, just for giggles, I fired another 3-shot group with “real” .35 Whelen ammo, loaded with the 200-grain Hornady jacketed softpoint bullet and 52.0 grains of IMR 4320 ammo. That’s at the low end of the big bore loads in the Hornady manual, recoil was substantially higher, and as expected, the group was quite a bit higher (I had the rear sight all the way up for the reduced velocity loads). It wasn’t as tight as the pistol bullet reduced loads, but it’s the first load I tried in the big boy .35 Whelen load region. It was late in the afternoon and the sun was, by now, nearly directly even with my line of sight. I have a million excuses, folks.
The real deal…a big boy .35 Whelen load with a 200-grain Hornady bullet designed for big game rifle shooting. Recoil was more than with the reduced loads, but it was not overwhelming. I’d say it was about the same as a 30 06, but this was at the low end of the .35 Whelen propellant range. The reduced loads discussed above are more fun.
Overall, this is good stuff. At least it is to me. I’m sure there’s a clown or two on Facebook who shoots quarter-inch groups offhand in the rain at 500 yards with his .35 Whelen (it’s always a guy, never a gal, making those insane claims), but for a geezer like me shooting iron sights, this ain’t bad for the second time I’ve had this rifle on the range. You can bet there will be more.
You might be wondering: Why not just go with a full-bore, factory-equivalent load? I’m way ahead of you there. I’ve got a hundred rounds of factory-level .35 Whelen loads ready to go with 200-grain and 250-grain jacketed Hornady bullets (well, now it’s 97, as three of them went through that target you see above). Me? I’m on a quest to develop a decent reduced load for this rifle and I am making good progress. I can shoot the full bore stuff later; for now, the reduced load quest continues. I’ve got good results with the jacketed 158-grain Hornady pistol bullets; when the Montana 200-grain cast bullets arrive, I’ll let you know how they work.
Help us keep these stories coming: Please click on the popup ads!
More Tales of the Gun and good reloading info are here!
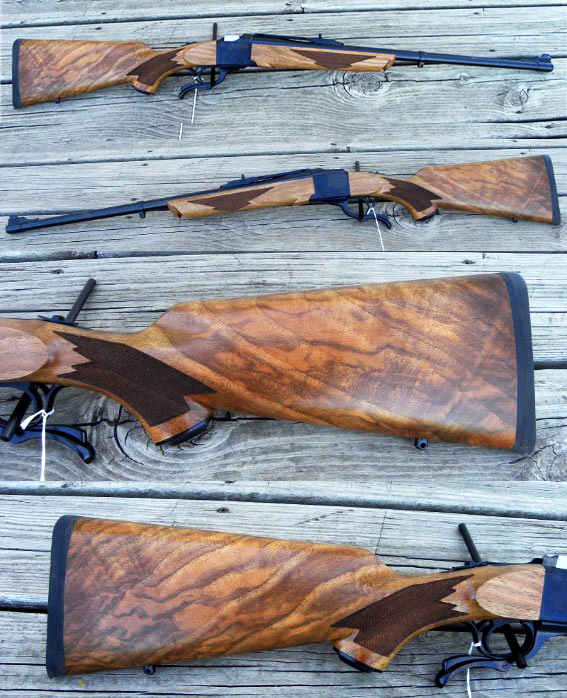
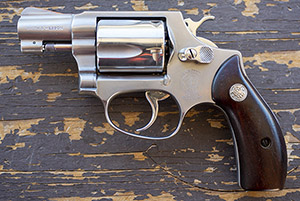
A 200th Year Ruger No. 1S in 7mm Remington Magnum. With factory-level jacketed bullet loads, recoil is attention-getting. With cast bullets, this magnum is a lot easier to shoot. I shot cast bullets for the first time in this rifle this week.
When I was younger, I made my own bullets by casting them out of molten lead. I cast bullets until I decided there wasn’t enough time to do everything I want to do. Shooting can be a full time hobby, reloading can be a full time hobby, and casting can be a full time hobby. There’s a little motorcycle riding and some writing thrown in there, too. Something had to give, so a few years ago I sold all my bullet casting gear.
I still enjoy reloading and shooting cast bullets, though, for a lot of reasons. Lighter recoil, cheaper bullets (usually), less barrel wear, and the big factor: It’s fun and it’s challenging. This fascination with cast bullets, for me, started when I ran with a bunch of gunsels in El Paso and one of the guys decided it would be fun if we had a cast bullet rifle bullseye competition. Being mostly engineers, we reckoned that big bore rifles would be the way to go, as the larger bullet diameters and weights would tend to make bullet weight differences and imperfections negligible. The first rifle I ever shot a cast bullet in was a .458 Win Mag. I was hooked after the first shot, mostly because there was far less recoil than shooting jacketed factory ammo and the experience was much more enjoyable. Then I fired four more shots and when I saw the 1-inch group at 100 yards (from a .458 Win Mag!) I was hooked. We all shot big bores in those days: .458s, .45 70s, .375 H&H Magnums, and such. Cast bullets in these big calibers can be amazingly accurate.
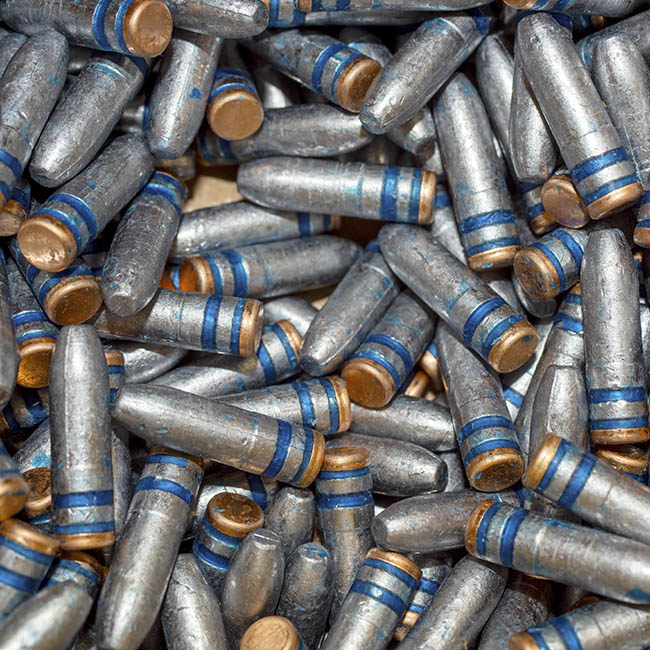
Anyway, I fell in love with cast bullets and I’ve been shooting them ever since, but these days I buy my cast bullets. I have a local source for cast bullets, and I have a few I like that I order online or pick up at my dealer (that’s Phillips Wholesale in Covina, California). I also poke around a bit on the Internet and a few weeks ago I found Gardner’s Cache, another commercial bullet casting operation. What had my attention immediately is that Jim Gardner’s prices are relatively low, he’s a veteran, and he had something I had not been able to find elsewhere at a decent price: 7mm cast rifle bullets. I wanted to try cast bullets in a couple of 7mm rifles (one being the Ruger No. 1 that you see at the top of this blog), so I ordered a box of 250. Then USPS lost the shipment. I filled out an online lost shipment report, the boys in blue located my bullets, and a few days later they arrived. The Gardner bullets look great.
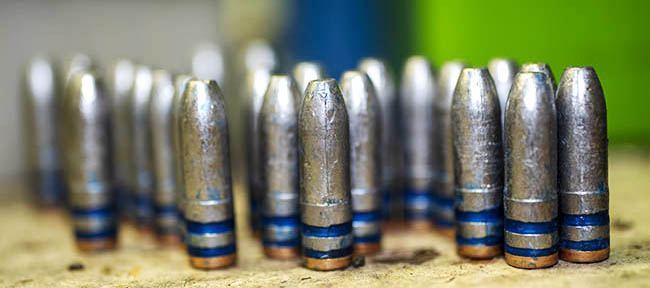
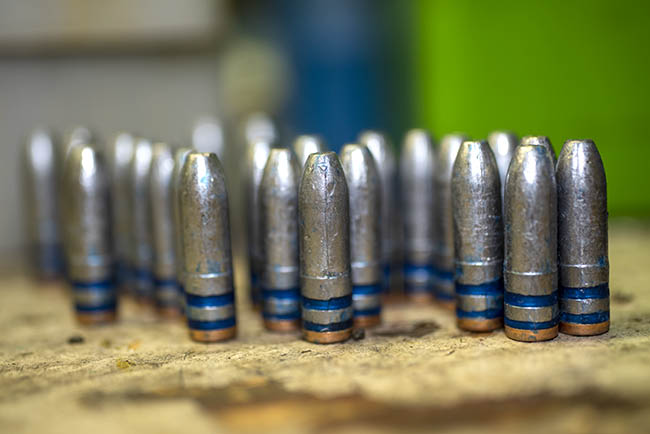
Beautiful cast Gardner 7mm bullets. Casting quality is high, and I was hoping accuracy would match. It did. I’m a happy camper.
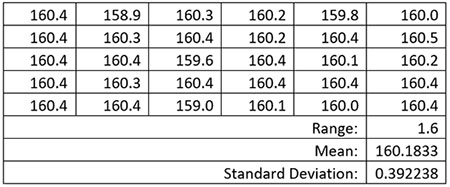
I could see that the casting quality was high, so just for grins I measured 30 projectiles to get a feel for the variability.
In 30 bullets, the range of weights did not exceed 1.6 grains. The mean is the average weight, and the standard deviation is a measure of the variability around the average value.
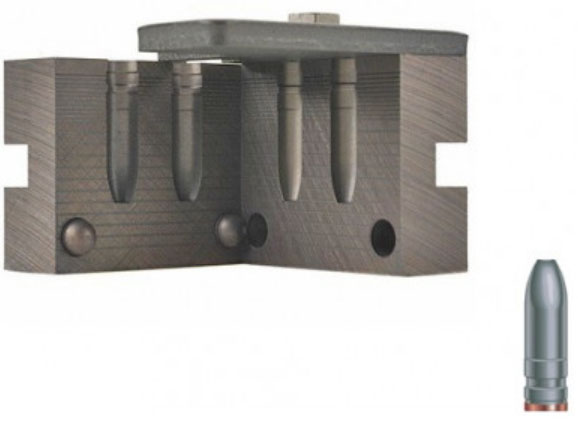
It was good. You ordinarily get a lot more variability with cast bullets then you do with jacketed bullets, but the Gardner bullets were more consistent than other cast bullets I’ve used. As I reviewed the data, it suddenly hit me that these were supposed to be 145-grain bullets. I could see from the bullets’ configuration that they matched the RCBS No. 82150 bullet mold, but what the mold maker tells you the bullet is supposed to weigh and what they actually weigh seldom line up. I had seen this before with other cast bullets.
The RCBS No. 82150 bullet mold. It’s not uncommon for the specified bullet weight to be different than what the mold actually throws, and that was the case here.I like these bullets so much I had to grab another photo of them. The copper cap at the bullet’s base is called a gas check. It protects the back of the bullet from hot propellant gases and reduces barrel leading. The blue stuff is bullet lubricant, which eases the bullet’s passage through the bore and also helps to reduce leading.
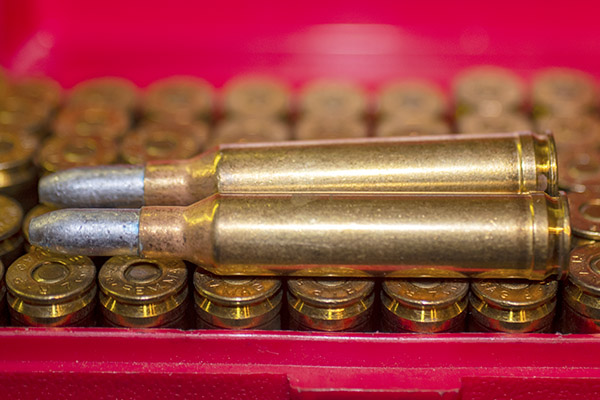
I loaded several configurations with my new Gardner cast bullets in virgin Remington brass I had on the shelf, and the cartridges looked good.
Loaded 7mm Remington Magnum ammo, waiting to be range tested. You can’t buy this kind of ammunition; you have to reload your own.
I went to the range the next day with the 7mm Remington Magnum Ruger No. 1 and my new cast bullet load, and after getting set up I fired the first load (with Unique propellant) at a single pistol target at 50 yards. The rifle had been zeroed for a factory equivalent jacketed load, and the results were very predictable. Whenever I’ve taken a centerfire rifle zeroed for factory ammo and shot cast bullets in it, the load is always about 10 inches low at 50 yards.
Two good groups (both around 1.5 inches) at 50 yards. The low group was fired with the scope still adjusted for jacketed ammo, and it was predictably 10 inches low. 80 clicks up on the Weaver and we’re in the money.
The required telescopic sight adjustment in going from jacketed to cast is something I know by heart: 80 clicks up. You can see the first five-shot group at 6:00 in the 5-ring on the above target. Windage looked about right, so I went 80 clicks up on the Ruger’s Weaver 3×9 scope. Each click is 1/4-inch at a hundred yards so that means a click is 1/8-inch at 50 yards, and I had to go up 10 inches. 10 inches is 80 clicks. I made that adjustment and oila, the second group was right where I wanted it. It was exactly the same as the amount of elevation I had to crank into my .30 06 Browning B78 when going from jacketed to cast bullets.
Then I moved over to the other targets I had set up at 50 yards. I’d like to tell you that all groups were tight, but hey, you do this to find out what works and what doesn’t. My best group of the day was with 18.0 grains of Trail Boss propellant, but it wasn’t as consistent as the Unique load was.
Not bad, but not consistent. The next group with this same load was 3.140 inches. Was it me, was it the rifle, was it the bullet, or was it the load? We’ll find out on the next outing. This might have been a 1.6-inch group at 100 yards, and that ain’t bad.
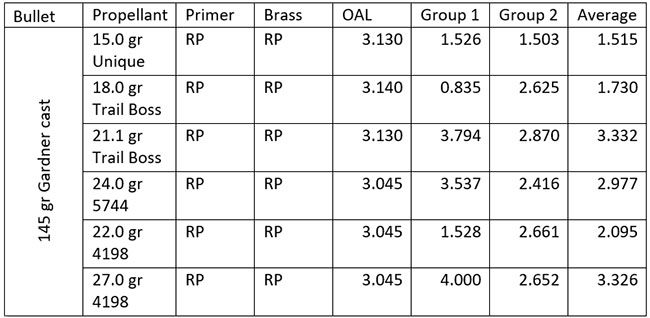
Here’s what I experienced with the first six loads I’ve tried with these bullets. Yep, there’s a lot of variability on some, but I’m encouraged.
Accuracy results from the first six loads I tried with my 7mm Remington Magnum cast loads. I’ll focus primarily on Unique and Trail Boss, and seat the bullets out a little further for a longer overall cartridge length on the next set of loads.
I’ve already loaded more 7mm ammo with the Unique and Trail Boss loads, and I’m also going to try IMR 4227. I don’t think that 4227 will do as well as the first two loads, though. We’ll see. After that, I’m moving the targets out to 100 yards. That will be interesting, and when I do, you’ll see the results here on the ExNotes blog.
I already used about half of the 250 Gardner bullets that came in the first box. The results in my Ruger No. 1 made me a happy camper and I ordered another 1000 7mm rifle bullets a few days ago. If you want good cast bullets at a great price, you might take a look at Jim’s website.
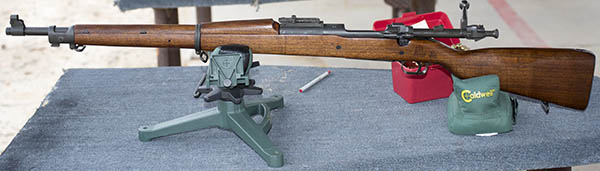
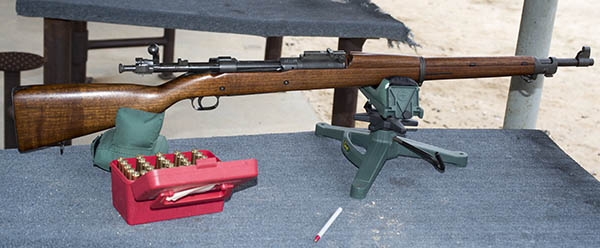
Yep, by popular demand, it’s another Tales of the Gun piece, this time focused on shooting cast bullets in my 1903A1 Springfield. I like shooting cast bullets in a rifle, and my intent is to use the Springfield with cast bullets only. I have two good buddies who also own ’03 Springfields, and we’ve all been playing with different loads to see what works best. I think I’m out in front here. I’ve been sharing my results with ’03 buddies, and I thought I’d share what I’ve found with you, too.
My Springfield is one that was built up from parts as an ’03, but with the scant stock, so it is sort of a wannabe 1903A1 in essentially as new condition. I bought it from a guy who had it built up but hadn’t fired it. I’ve written about the Springfield before here on the ExNotes blog, but I had not gone into any detail on the loads I am developing for it. The intent today is to talk a bit about some of the cast loads I’m playing with for this rifle.
But first, here’s a look at my rifle. It’s a magnificent old warhorse…
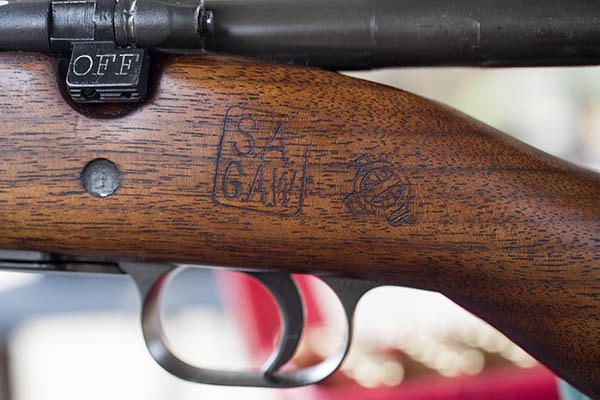
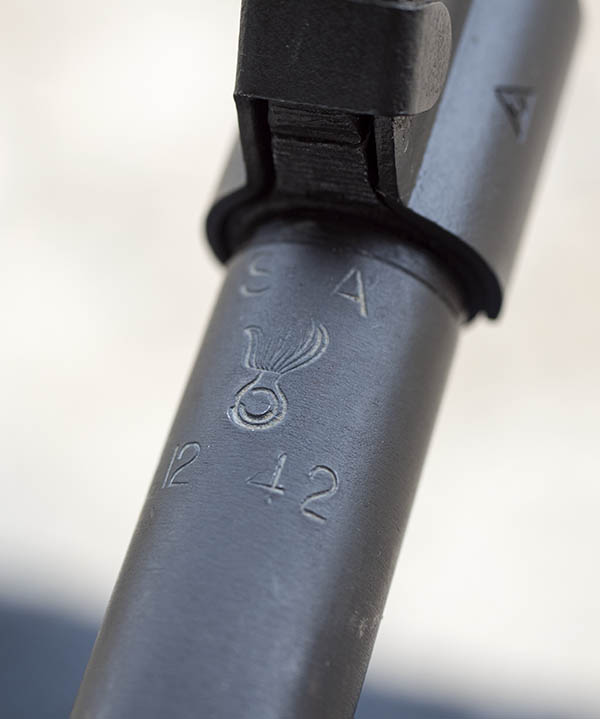
Sweet, huh?The right side of my Springfield. Folks who know what they’re seeing have stopped to admire this rifle each time I’ve been to the range with it.The 1903A1’s rear sight. It is a complicated little arrangement, which the government simplified dramatically on the 1903A3 version.The man who built this rifle from parts knew what he was doing. Check out the cartouche.The barrel on this rifle was a new old stock 1942 Springfield barrel.
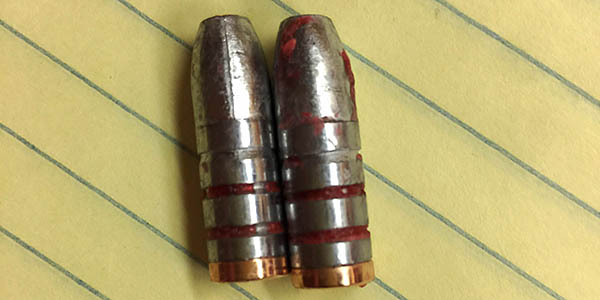
I had reasonably good results in an initial range session with this rifle using 190-grain gas-checked bullets sized to 0.309. I have a local guy who casts these bullets for me. The idea behind using a gas check is to prevent leading the bore.
190-grain cast bullets. I like shooting cast bullets. There’s a story behind that, but it’s one for another blog. The copper thingamabobber on the aft end of these bullets is the gas check. The red stuff is bullet lube, designed to ease the passage of the bullet down the bore. Both the bullet lube and the gas checks serve to prevent leaving deposits of lead in the rifle’s bore.
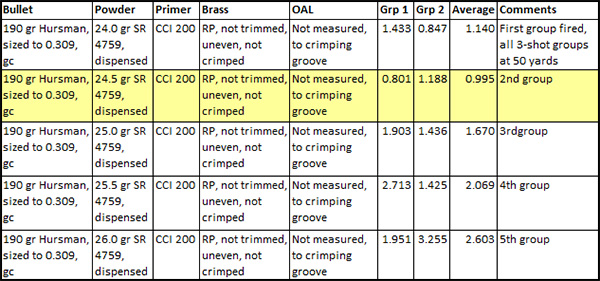
For the initial range session mentioned above, I had prepared loads ranging from 21.0 grains to 24.0 grains of SR 4759 propellant, and I had the best results (just eyeballing the results) at 24.0 grains. In the first outing with the Springfield I wasn’t being too rigorous in my accuracy and test protocols; I just wanted to get an idea of what worked and what didn’t.
For my next set of accuracy tests, I went from 24.0 grains to 26.0 grains of SR 4759 in half-grain increments. Here are the results…
Test results for SR 4759 propellant and 190-grain cast bullets in the Springfield 1903A1. The yellow-shaded row highlights the best accuracy. 24.5 grains of SR 4759 is the secret sauce here.
The risk in assessing accuracy from any of these tests is that a lot of the variation is my aiming error, and the resulting group sizes may not truly represent how the different loads perform in the rifle. Based on the above data, though, it looks like my Springfield wants to be at 24.5 grains of SR 4759. My Lyman manual says the muzzle velocity at that charge is somewhere around 1750-1800 fps. That’s hotter than I normally would want to be with cast bullets, but the above loads didn’t lead the barrel too badly. Recoil was moderate. For these loads, I did not trim the brass cartridge cases and they were uneven, and because of that, I did not crimp the bullets. I’m pretty sure I can get better accuracy if I trim the brass to a uniform length, weigh each charge, and crimp (I’ve always found cast bullets do better when crimped).
The above results were encouraging. The accuracy with cast bullets was good, but not quite as good as my Mosin or my 1909 Argentine Mauser. The Springfield shot just under an inch at 50 yards, which would be just under two inches at 100 yards, and with cast bullets and iron sights, that ain’t half bad. My Mosin and my Argentine Mauser will sometimes shoot into a half-inch at 50 yards. The Springfield might do that, too, if I trimmed the brass and employed all of the other accuracy tricks mentioned above. The good news is that I’m getting there. It took a while to get everything right for the Mosin and the Mauser. Rome wasn’t built in a day, as they say.
Encouraged by the above results, I reloaded more ammo with the 190-grain cast bullets to confirm the SR 4759 propellant results and to evaluate a few additional powders, including IMR 3031, IMR 4227, IMR 4198, 5744, Trail Boss, and Unique. The reason I wanted to explore using other propellants is that SR 4759 is a discontinued powder. I have a stash of it, but my two Springfield buddies do not, and someday I’ll run out of 4759.
I was able to repeat the 4759 results (it’s a good propellant for cast bullets), and I found the other propellants show potential for great accuracy, too. Here are the results (all at 50 yards) with the other powders…
IMR 3031 and IMR 4198 are looking good. IMR 4227 is good, too.
It was raining when I shot the above loads and I got my targets and loads mixed up a bit (eh, it happens). I got enough out of the range session, though, to form some general impressions. The loads generally seem to fall into two categories:
Hotter loads. These loads were roughly 70%-80% of what jacketed loads would be (with recoil nearly like a jacketed load). Surprisingly, these had very little leading with the cast bullets. In particular, IMR 3031 worked well and it nearly had the recoil of a regular 30 06 jacketed load.
Milder loads. These were in the 1500 fps range. These have lighter recoil and were moderately accurate, but they drop significantly at 50 yards compared to the hotter loads. These are easy on the shoulder, but the drop put them off the target and they would require flipping the elevated ladder sight up on the ’03 to get back on target. For that reason, I’m not doing any more work with these. In this group, though, 13.0 gr of Unique gave decent (not great, but decent) groups. Trail Boss did okay, too. The Trail Boss loads were super light. Recoil was about like a .22.
The good news is that IMR 4227 works well in the 30 06 Springfield with the 190 grain bullets. (The reason it’s good news is that one of my Springfield buddies has a lot of 4227 on hand.) The bad news is that 4227 is not in the current Lyman reloading manual. I have older manuals from the 1970s that list 4227, and that’s where the load data came from.
In cleaning the Springfield after the above range sessions, I checked the action screws (the two that secure the barreled action in the stock) and while they were snug, they were not fully tightened. I tightened them and it’s likely accuracy will improve. Next time, folks. A properly-secured action, trimmed brass, crimped bullets, and good weather with no wind at the range…those half-inch Springfield groups are out there. I just need to find them.
Like what you’re reading here? Check out our other Tales of the Gun stories, and please sign up for our automatic email blog updates!