Shield Savvy

By Joe Berk

I promised an update on my Smith and Wesson 9mm Shield, and this is it.  I’ve put 2,500+ rounds through the Shield (all reloads with different bullets and powders).  Until I recently took my Shield to good buddy TJ, I was growing increasingly dissatisfied with the pistol’s frequent failures to extract, and I wasn’t alone.  If you Google “failure to extract” and “Smith and Wesson Shield” you’ll find a lot of people are having this issue.  My problem is in the rearview mirror, though, and my Shield is 100% reliable now.  That’s because of TJ.  I’ll get to that in a minute.

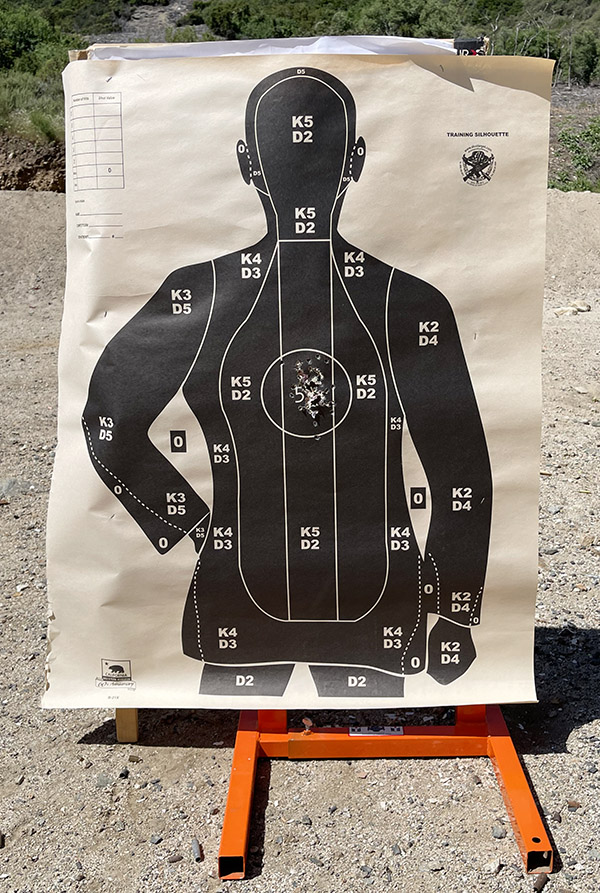
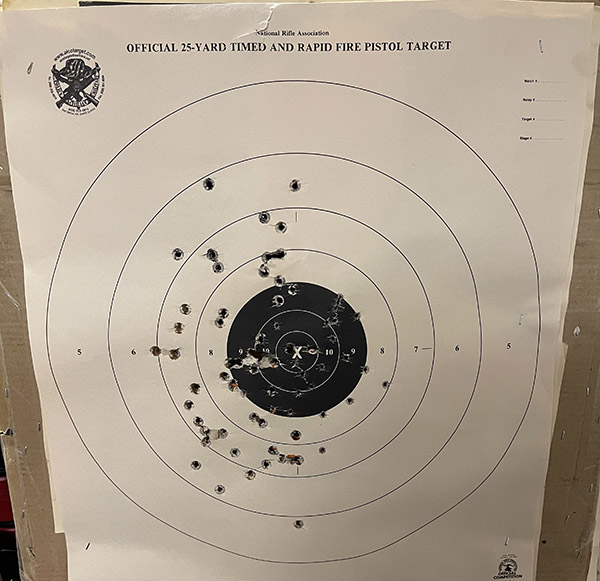
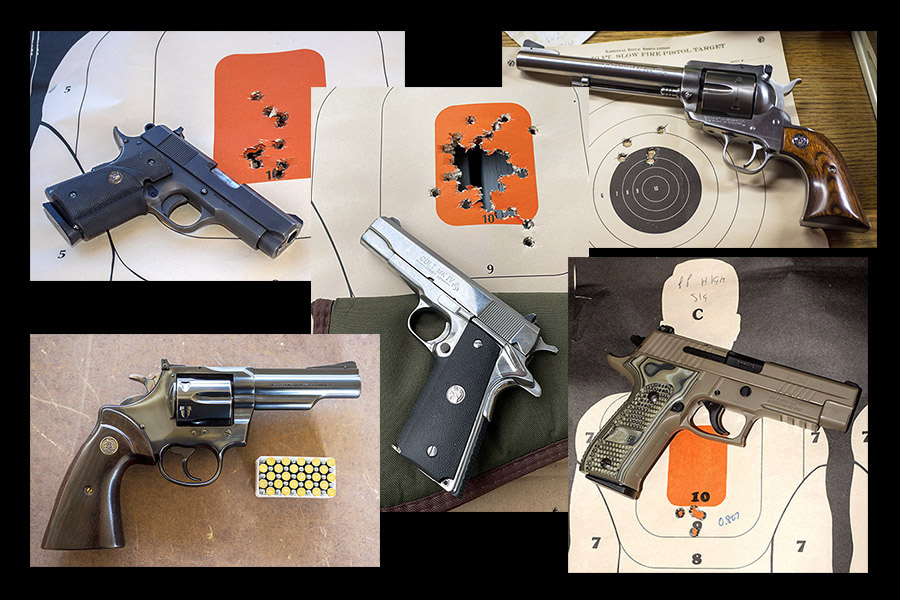
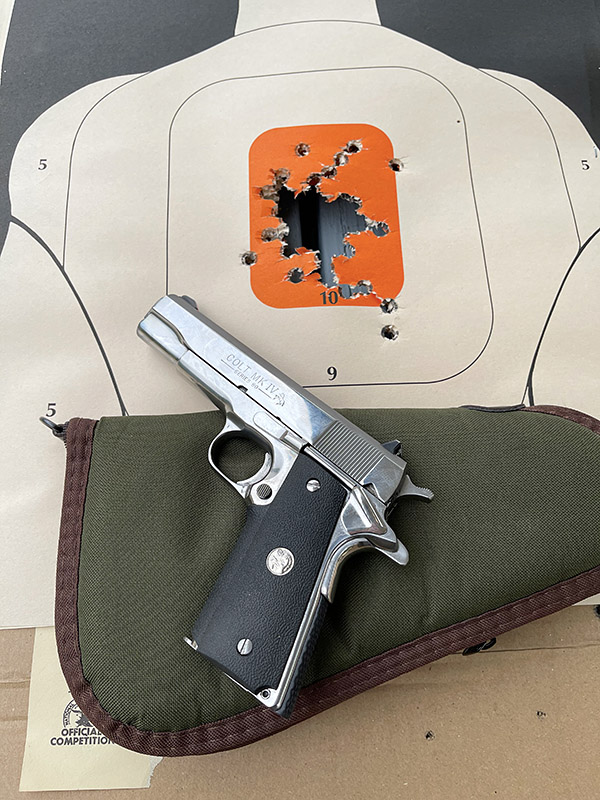
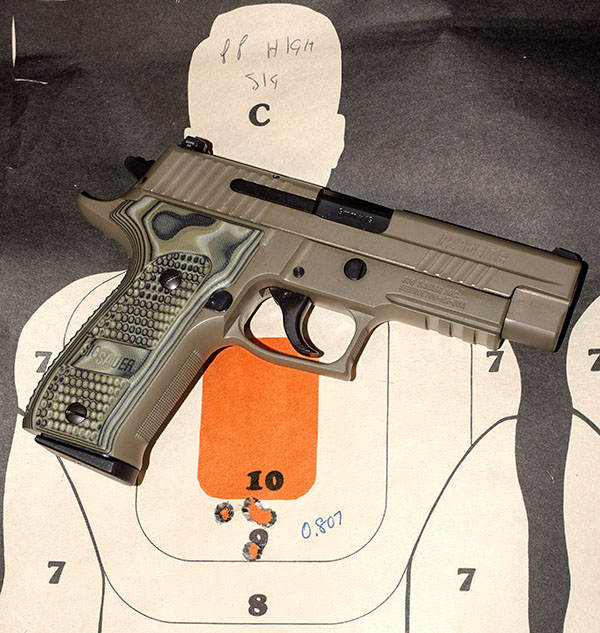
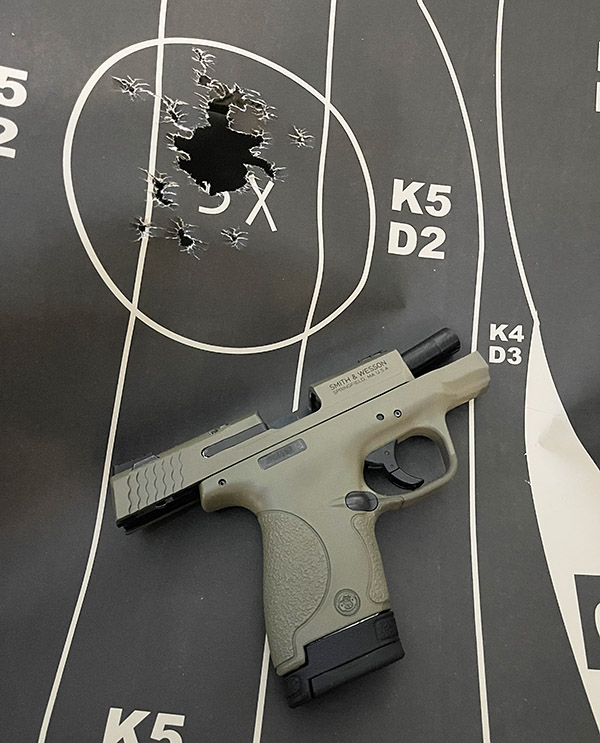
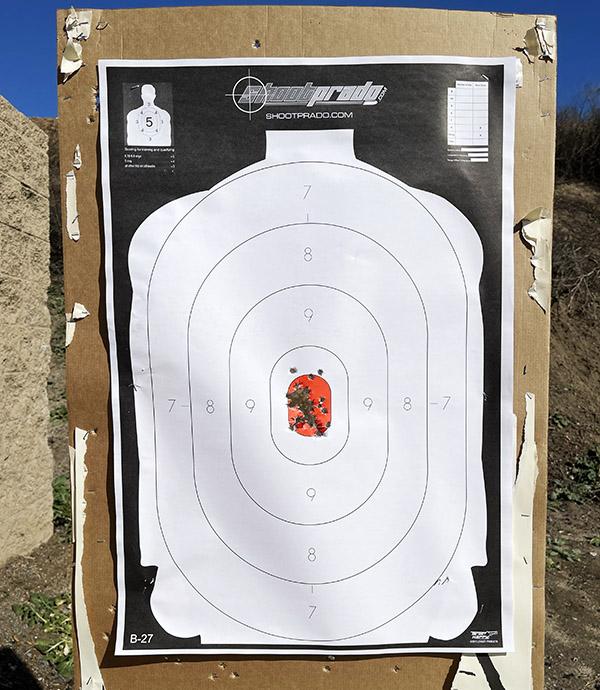
That target above?  It’s 50 rounds at 30 feet through my Shield, shooting offhand.  If you’re a reloader, here are the load specifics:

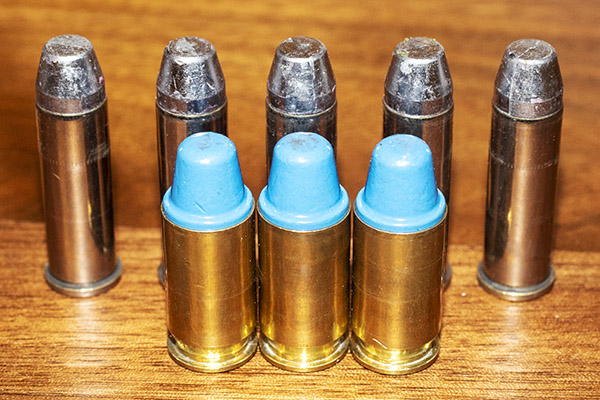
      • Jim Gardner 125 grain powder coated roundnose bullets (Jim sized these to 0.356 inch, which is his standard bullet).
      • Cartridge overall length 1.145 inches.
      • 5.4 grains of Accurate No. 5 propellant.
      • Lee factory taper crimp (light crimp; see below).
      • Ammo loaded on Lee Classic 4-Turret press.
      • Mixed brass.

Ordinarily, I tailor a load to the handgun, and I thought I would be able to do that relatively easily with the Shield.  I found that not to be the case.  The Shield seemed accurate enough with nearly every load I tried, but nearly all had reliability issues.  On the low end, the lighter loads didn’t have enough energy to cycle the action (a common enough problem on compact semi-autos).  Light, mid range, and hot loads all gave the Shield extraction issues.  The Shield experienced a failure to extract about every other magazine.   It was very frustrating.  I scoured the Internet forums for this issue and the opinions were all over the map.  Here’s a smattering of the drivel I found:

      • Don’t use Winchester ammo because the rims are smaller (I measured them; that was baloney).
      • Don’t use cast bullets because they hang up (I knew that was baloney).
      • Don’t shoot aluminum ammo (which I never do, anyway).
      • Don’t shoot 115-grain bullets.
      • Don’t shoot 125-grain bullets.
      • Don’t shoot 147-grain bullets.
      • Clean your gun after every round (seriously?).
      • Don’t limp wrist your gun (again, seriously?).
      • Don’t do this, don’t do that, don’t do this other thing…
      • Do this, do that, do this other thing…

It was all written by people who apparently love the sound of their keyboards clacking.  None of it was useful information.  I felt stupid for wasting my time reading it.


Help us keep the content coming:  Please click on the popup ads!


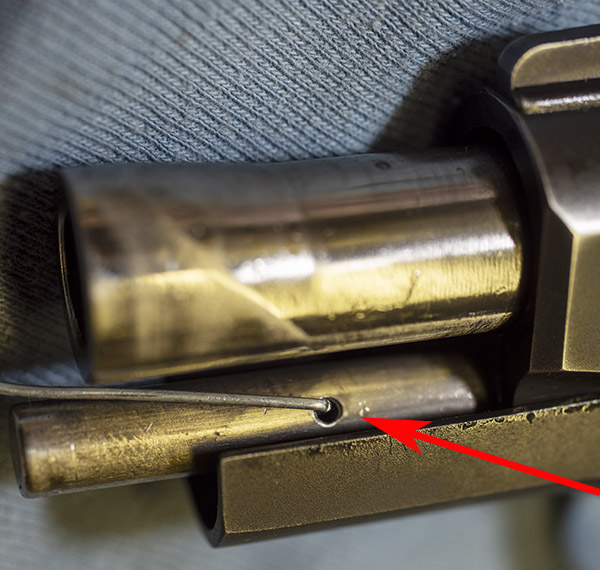
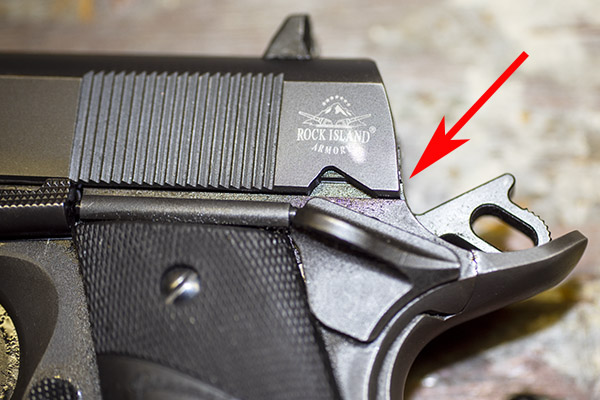
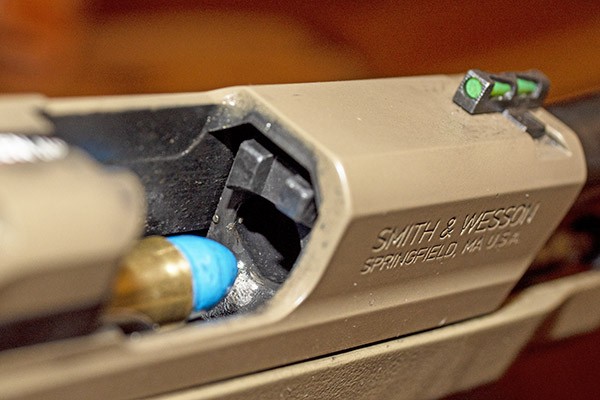
What I found was that the extraction problem occurred more with powder coated bullets than either plated or jacketed bullets.  Other than that, there wasn’t a lot of correlation between any of the load variables I could play with and the gun’s failure to extract propensity.  Then, during one range visit when I had a failure to extract, I fell back on my failure analysis background.  I put the loaded gun down on the bench (being careful to keep it pointed downrange) and took a photo with my iPhone.

A cartridge case caught during extraction on the mouth of the case immediately below it.

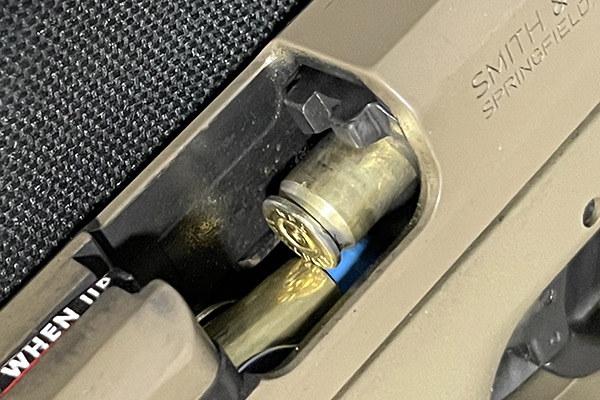
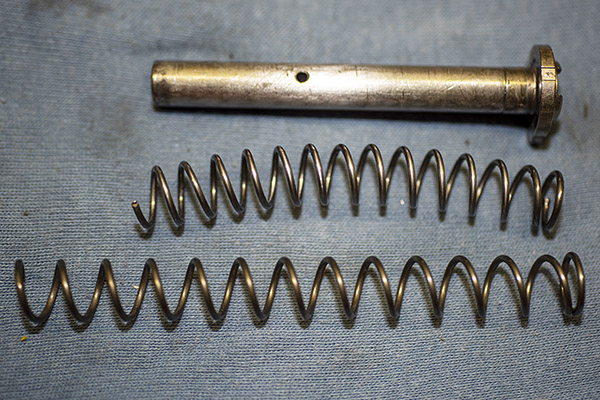
Wow.  How about that?  It was apparent that the case being extracted was hanging up on the case mouth of the round still in the magazine, and it was a strong enough obstacle to pull the extractor off the rim.  This brought up a lot of questions in my mind centered on the crimp and the bullet.  The Gardner bullets have a slight ramped step just north of the crimp.   And when I crimp a bullet for a semi-auto, I put a slight taper crimp on it with the Lee taper crimp die.  I want enough of a crimp to remove the case mouth flare (part of the reloading process to assure the bullet will enter the case mouth without shaving lead or copper), and enough to assure the cartridge will chamber easily.  Maybe I didn’t have enough crimp, I thought, and that was causing the case being extracted to hang up.

One of my reloaded 9mm rounds with a taper crimp and a Gardner powder-coated bullet.

I examined my ammo and I thought it looked good (actually, I thought it looked great; like most reloaders, I enjoy looking at my finished ammo).  But, to make sure, I loaded another box with as much taper crimp as I could get out of the Lee die.  Lee is right when they say their taper crimp die makes it impossible to deform a case: I put a very pronounced crimp on all the cartridges in the next box of ammo.  But that wasn’t the answer, and it created a new problem.  With a semi-auto like the 9mm or the .45 Auto, the cartridge headspaces on the case mouth.  When I used a more pronounced crimp, I started getting misfires.  The rounds were going too far into the chamber, and the firing pin wasn’t igniting the primers reliably.  Nope, more crimp wasn’t the answer.

At this point, I was getting a little frustrated.  All these problems aside, I wanted to like my Shield.   I wanted to use it as my concealed carry weapon, so I needed the thing to be reliable.  Faced with this issue, I knew it was time for what works every time:  A visit to TJ’s Custom Gunworks.

TJ examined the Shield.  He observed that the magazine positions the first cartridge in the magazine unusually high in the gun, and that was probably aggravating the failures to extract.  But there’s not really anything you can do about that.  It’s the gun’s design.  It is what it is.

The Shield’s magazine sits relatively high.
A loaded round waiting to chamber when the Shield’s slide returns to battery.

TJ then took a look at the extractor.  It was pretty dirty with combustion residue, but he felt it should work.   TJ, honest as always, told me he could polish the ramp and the chamber (they come from the factory pretty rough), but he didn’t know if that would fix the failures to extract.  I asked TJ to proceed.

A photo from TJ showing how dirty my extractor was. Even though it was funky (shame on me), TJ felt it would not have caused the extractor to slip off the case rim.

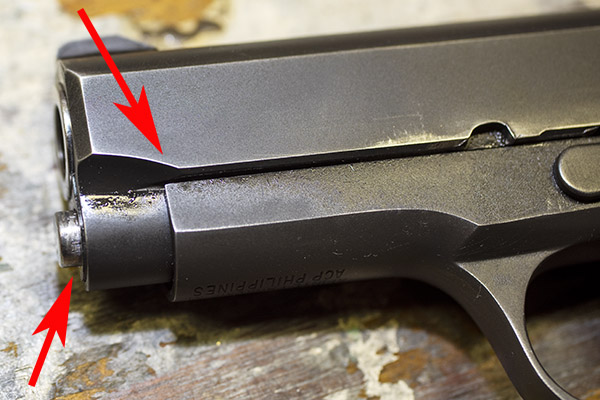
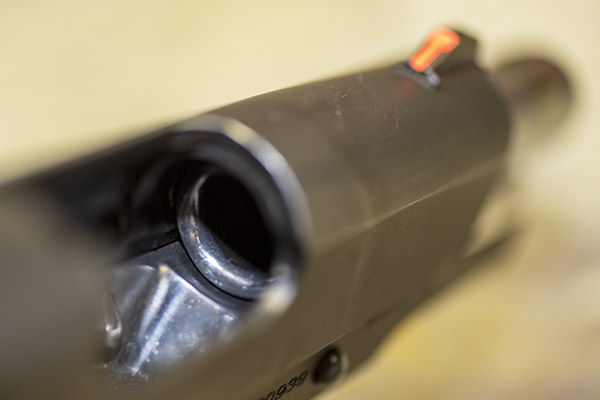
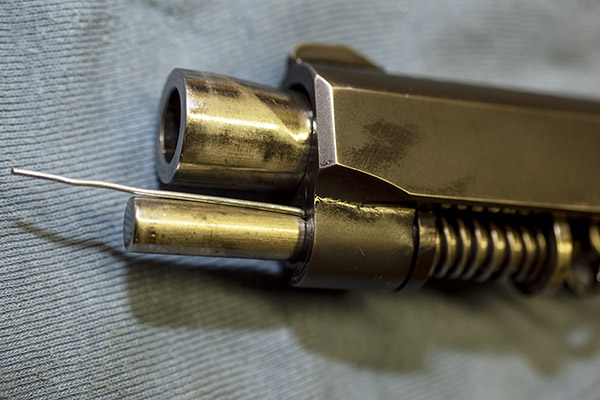
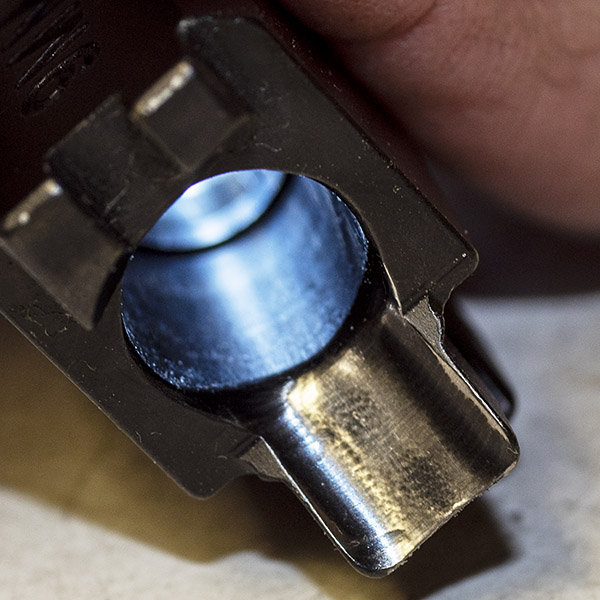
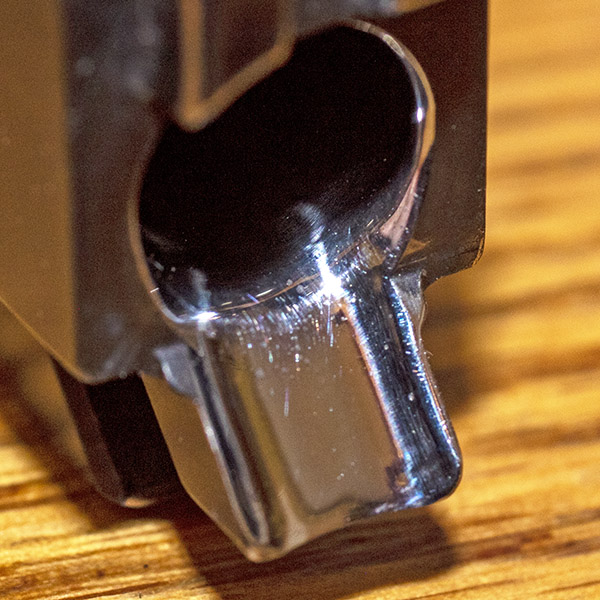
Here are a couple of photos of the chamber and the ramp as they come from the Smith and Wesson factory.   The Shield always fed and chambered reliably; it was only the extraction that was an issue.  TJ explained that if the chamber is rough, it can hang on to the fired case as it is being extracted.  I’ve experienced that on other guns.  The Shield’s chamber and its ramp looked about like I’d expect them to look on a mass-produced pistol, which is to say not very good.  I asked TJ to work his magic on both the ramp and the chamber.

The Shield’s feed ramp and chamber as delivered from the factory. Rough, but not ready.
Another view of the factory Shield feed ramp. It looks like it might have been cut by hand with a dull chisel.

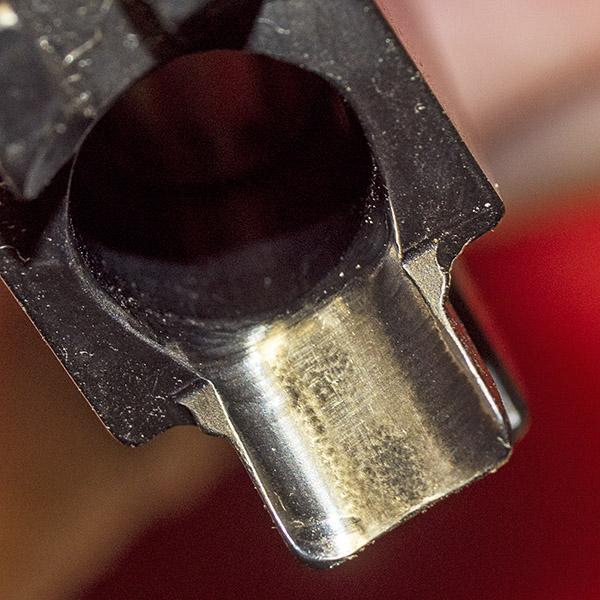
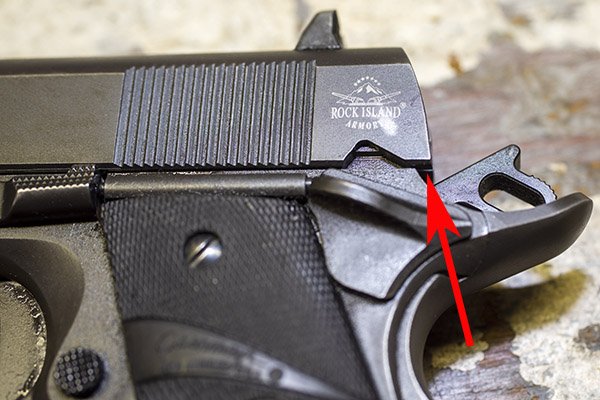
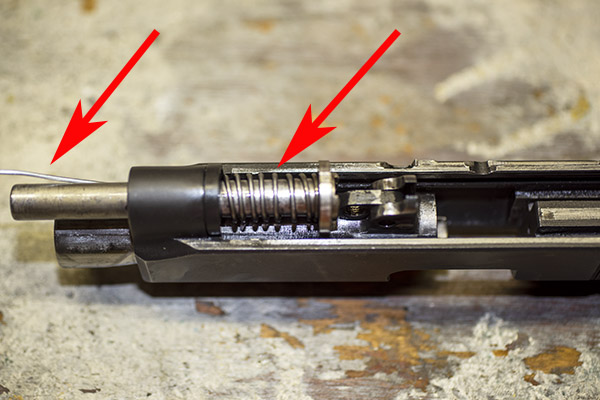
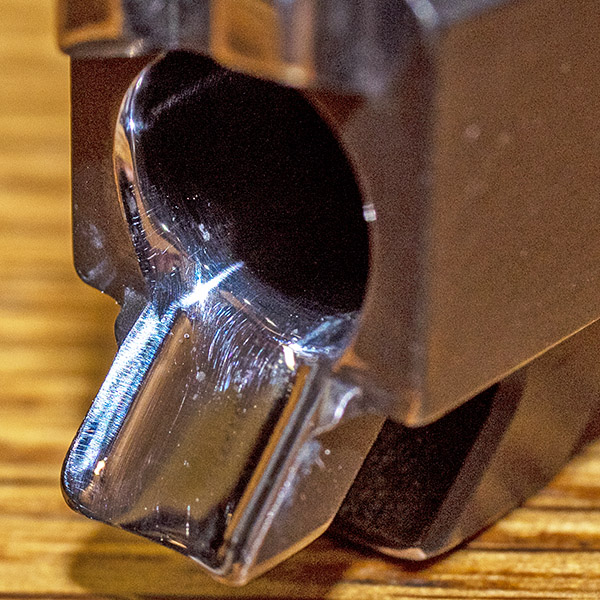
TJ did his usual excellent job, and here’s what things look like now.

Pure TJ magic.
What a good ramp looks like.  Slick.  Smooth.  Shiny.

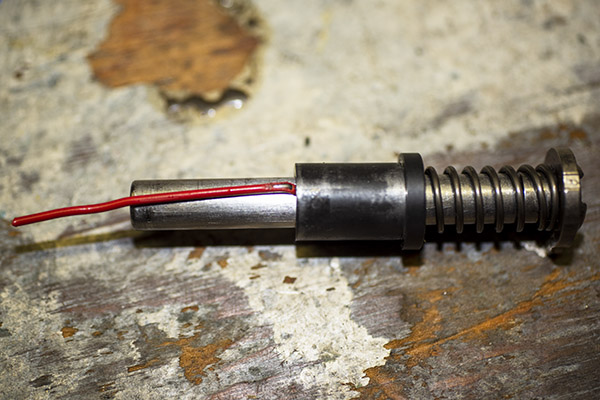
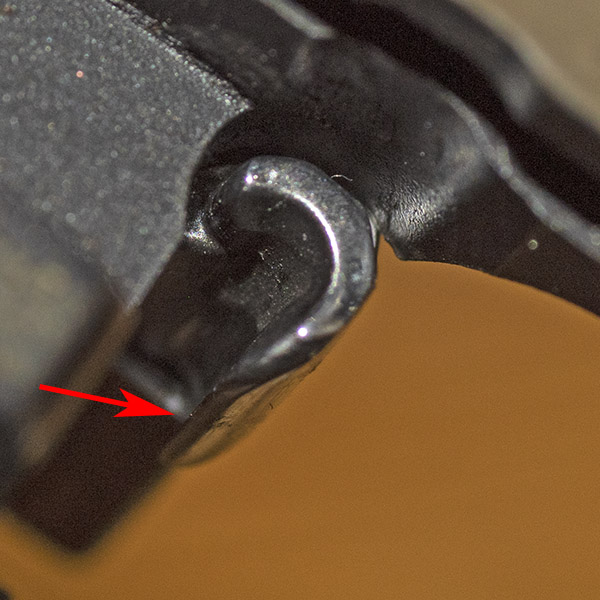
TJ told me he also put a slight undercut on the extractor to allow it to get a better grasp on the case rim.

The Shield’s extractor, as seen from the bottom. This is the piece that pulls the fired case out of the chamber. TJ undercut the area indicated by the arrow to give the extractor a better grip on the case.

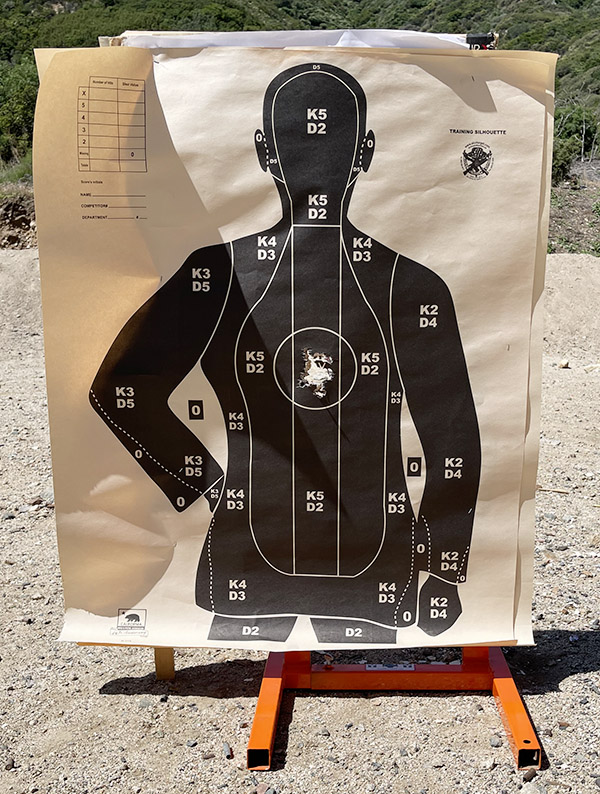
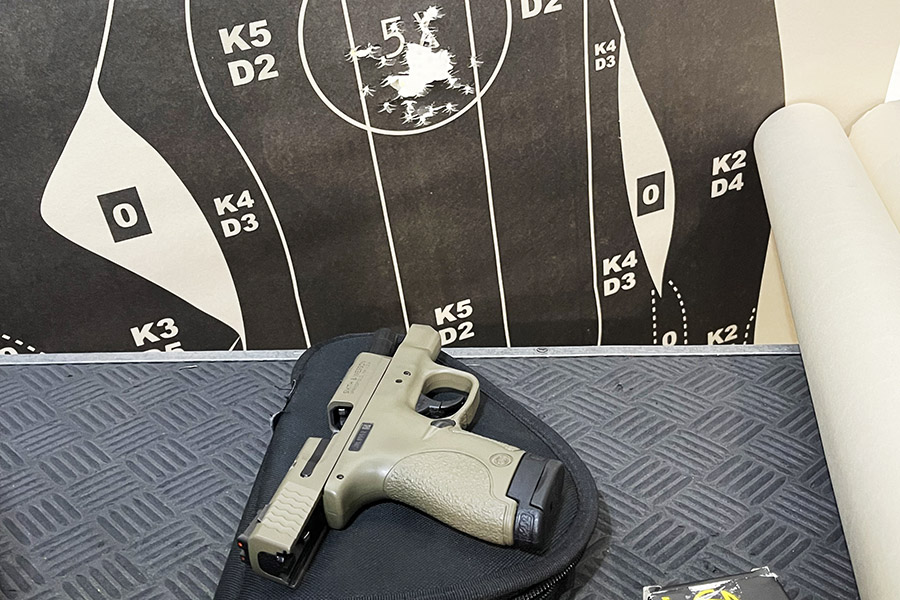
I picked up my Shield a few days later and went to the range that afternoon. The Shield is now what it is supposed to be.  You saw the target at the top of this blog.  I fired 50 rounds without a single failure to extract and eject.  The gun just feels a lot smoother and slicker now.  My Gardner bullet and Accurate No. 5 load is perfect.  And the recut extractor drops the cartridges in one nice small pile on the floor behind me.  Wow.  I’m impressed.  Then, just to make sure (and because I was having so much fun) I fired another box of 50 rounds (again, with ammo loaded on the Lee Classic Turret press using the load at the top of this page).

Another target, another 50 rounds. Reliable as death and taxes, and accurate. Now, the Shield is as it should have been from the factory (thanks to TJ).

The Lee Classic Turret press does a magnificent job, and now, so does my Smith and Wesson Shield.  It’s the way the pistol should have come from the factory.

It’s bothersome that most of my recent gun purchases have required additional work to get them to perform the way they should.  In my former life as an aerospace manufacturing guy, I used to manage organizations with machine shops.  I know it would cost a little more for the gun companies to do the kind of things TJ did to my Shield (and several other guns, for that matter).  I wish the gun companies would do that; they ought to just hire TJ as a consultant (he knows what they need to do).  The bottom line here? If you have a Smith and Wesson Shield and you want it to be what it is supposed to be, get in touch with TJ.

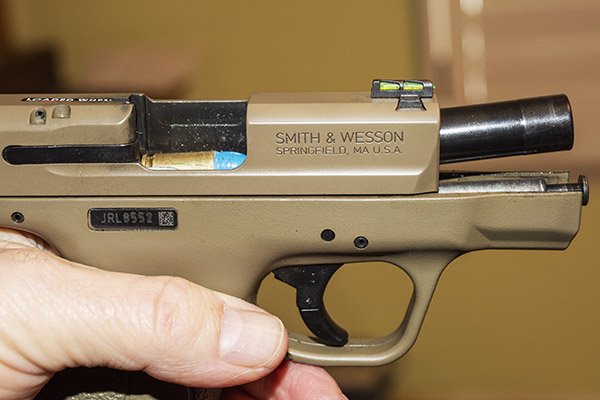
There are a lot of things I like about the Shield.  Accuracy and illuminated sights are at the top of the list.  You can get a feel for its accuracy from the targets shown here.  None of this was bench rested; it was all shooting offhand on an indoor range with banging and clanging and brass flying all around me.

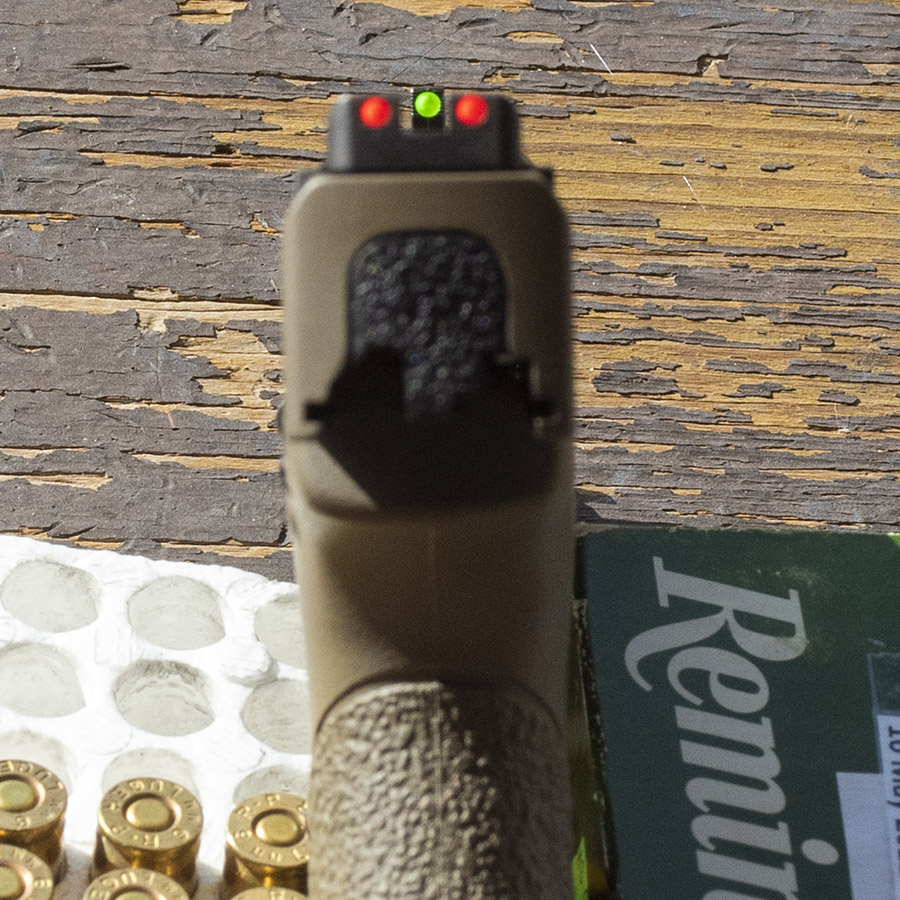
I found that after firing a a box of ammo, gunshot residue tends to occlude the sides, front, and rear of the front sight, and that causes the red to glow a lot less.  But that’s a minor point.  The Shield’s high visibility sights are great.

Holstered, the S&W Shield is about the same size as the Rock Island Compact 1911.
Another Shield-to-Compact-1911 comparison: The holstered Shield on top of the holstered 1911. Length and height are about the same.
The Shield is narrower than the 1911, and much lighter. It should be easier to carry concealed.

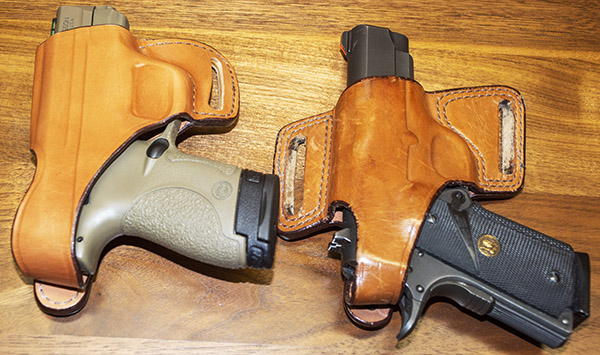
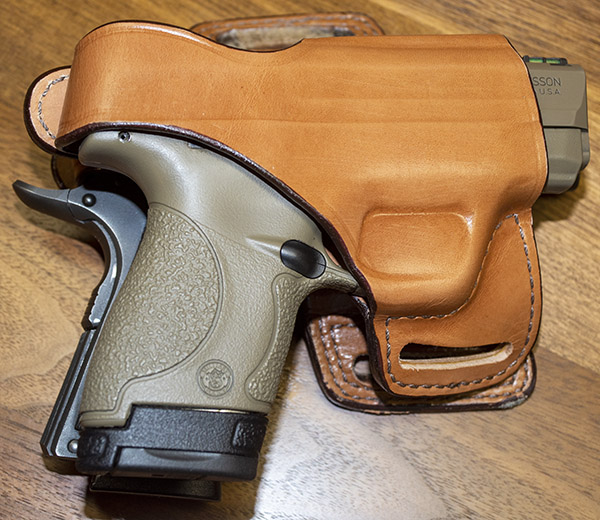
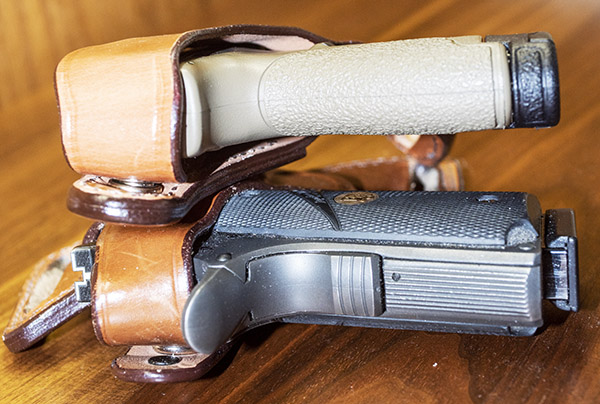
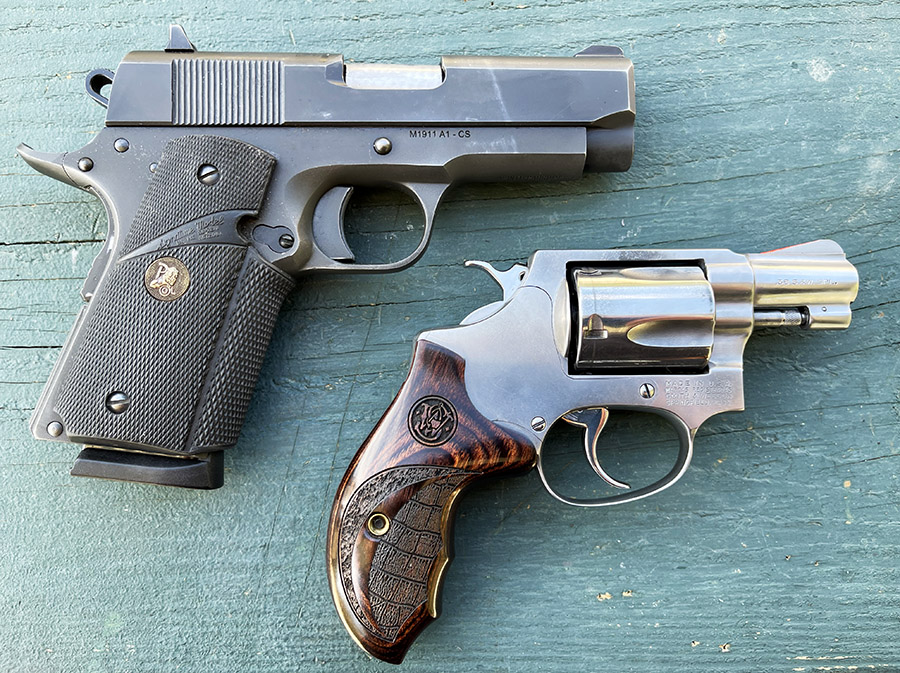
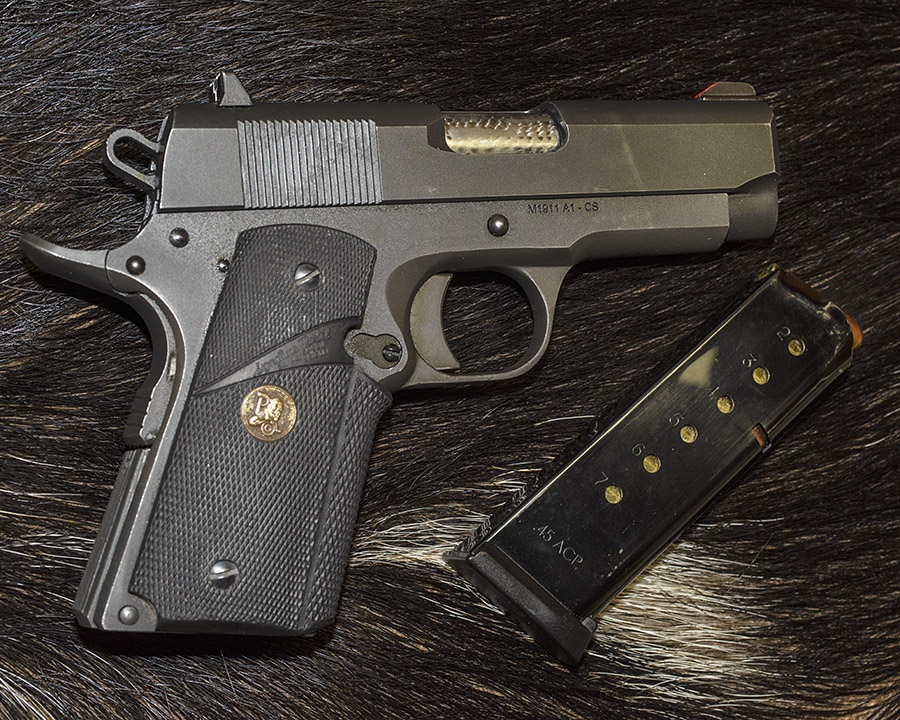
I bought a Bianchi leather holster for the Shield.  It’s similar to the Bianchi I use with my Compact 1911.  When I put the Shield in its holster I was surprised:  It’s really not any smaller than my Compact 1911.  It’s a bit narrower, but by the time both guns are holstered, the overall width is about the same.  Where the Shield has a clear advantage, though, is weight.  And even though the Shield with its polymer frame is much lighter than the Compact 1911, the recoil is quite a bit less than the .45.  Now that the Shield has been made more reliable by TJ, it will make a good concealed carry gun.  Incidentally, TJ worked his magic on my 1911, too.  It’s one of the most reliable handguns I’ve ever owned.

Ten rounds from the Compact 1911, ten from the Model 60, and ten from the Shield. All are in the 10 ring, 28 of the 30 are in the X-ring.

Never miss an ExNotes blog:

Two Bodacious Belly Guns

Not too long ago, I posted the Model 60 handjob blog, which was a story about fitting a new hand to the revolver to correct an out-of-time situation.  When I took the reworked Model 60 to the West End Gun Club to check its performance, I brought along my Rock Island Compact 1911.  Both guns are on my concealed carry permit and I thought it might be cool to rapid fire on the police qualification target at 7 yards.

As you can see from the photo above, the guns appear to be comparably sized, but that photo is a bit misleading.  I don’t feel like I’m printing with the Compact 1911 (you know, allowing the gun’s outline to standout against my shirt), but the 1911 does hang heavier and it presents a bigger shape under an untucked shirt.   I’ll get to the specs of both guns in a minute, but first let’s take a look at how they compare on target.  The first target is the Model 60; the second is the Rock Island Compact 1911.

50 rounds, rapid fire, at 7 yards from the Smith and Wesson Model 60 (all fired double action).
50 rounds, rapid fire, at 7 yards from the .45 ACP Rock Island Compact 1911.

I shot both targets using a two-hand hold from the standing position.  Both are accurate and close enough, as they say, for government work.

The loads were fairly stiff.  I used a cast 158-grain truncated cone bullet with 4.4 grains of Unique propellant for my .38 Special ammo, and a 185-grain cast semiwadcutter bullet with 5.0 grains of Bullseye for the .45 ACP.  Given the choice, I wouldn’t want to be hit by either one.  But I’m betting that the 1911 hits harder.

.38 Special and .45 ACP reloads. Both were fairly stout. The 158-grain truncated conical bullet .38 Special loads are potent.  The .45 ACP semiwadcutters come from Jim Gardner’s casting operation, and they are accurate and hard hitting.

The Model 60 Smith and Wesson weighs 19 ounces empty and it carries 5 rounds (which adds another 1.8 ounces, for a total of just under 21 ounces).  The 1911 weighs 34.6 ounces empty and it carries 7 rounds in its 7-round mags (that adds another 3 ounces, for a total of 37.6 ounces).   The loaded 1911 weighs almost twice as much as the loaded Smith and Wesson revolver.  Anything you measure in ounces may not seem like a lot, but trust me, when you carry it all day, it is.  From a weight perspective, the Model 60 has an advantage.

I know all you keyboard commandos want to tell me I could carry 8 rounds in the 1911, but I won’t carry with a loaded chamber in a semi-auto.  Save your breath if you think I should.  The Israelis don’t carry with a round chambered and they seem to know what they’re doing, we didn’t carry with a round chambered when I was in the Army, and I’ve seen more than a few accidental discharges from folks who carried with a round chambered in a semi-auto handgun.  Nope, it’s an empty chamber for me.  Your mileage may vary.

From an accuracy perspective, you can see from the targets above that I shoot the 1911 better.  I don’t think the 1911 is inherently more accurate than the Model 60.  But in my hands, and with my old eyes, I can hold a tighter group with a 1911.  Most of that has to do with my 1911’s sights.  I have a red ramp/white outline set of Millet sights that good buddy TJ (of TJ’s Custom Guns) installed on my 1911, and those things are the best handgun sights I’ve ever used.  The Model 60’s sights…well, let’s just say it’s a game of hide and seek with them.  The 1911 gets the nod from an accuracy perspective.

You might think 7 versus 5 rounds is a tremendous advantage.  On paper, maybe.  In real life, the average number of rounds fired by a concealed carry permit holder in a confrontation is less than 2 rounds.  It’s kind of a draw from a capacity perspective, at least from my perspective.  If you’re a keyboard commando, you may feel differently.  Go post your opinions on Facebook; they need folks like you.

So what’s my preference?  Most of the time, it’s the 1911, but I love both of these handguns.


More Tales of the Gun!


Never miss an ExNotes blog:  Sign up here for free!

Compact 1911 Spring Fatigue

The last time I had the Compact 1911 on the range, I shot worse than usual.  At 25 yards (with me resting my arms on the bench), I can typically keep my shots in the black with the Rock Compact.  This is how I shot last week:

Maybe adequate for defense purposes and probably close enough for government work, but terrible shooting.

That’s pitiful (there’s a few 9mm holes on that target above; ignore those). Then I noticed the slide was not going fully back into battery, which was something new to me.  It wasn’t jammed, it just needed a slight nudge to finish the trip home.

The slide sitting about a tenth of an inch from returning to battery.

Another view of the slide not returning to battery. “Battery” means fully forward, ready to fire the next round.I knew that Compact 1911 recoil springs fatigue earlier than the springs in full-sized 1911s, but this one snuck up on me.  Armscor (the Rock Island Armory folks who manufactured my Compact 1911) were out of stock, so I ordered a new spring from Wilson Combat.  Wilson Combat is a recognized “go to” shop in the 1911 world.  I received my new recoil spring a few days later.

A brand-new Wilson Combat 24-pound recoil spring.

Online research said the life of these springs in a Compact 1911 is only about 2000 rounds, tops.  That surprised me.  The literature from Wilson surprised me even more:

The Wildon Combat bubble-pack literature.

1000 rounds.  That’s 10 boxes of ammo.  Wow.  I probably had several times that many rounds through my Rock.  Small wonder the slide wasn’t returning to battery.

When the spring arrived, I was eager to put it in my 1911.  I dropped the magazine and cleared the weapon:

The TJ-customized and polished feed ramp and chamber entrance on the Rock Island Armory Compact 1911. Yep, it’s empty.

Then it was time to turn to my custom, German tool steel, carefully configured to exacting tolerances, Rock Island Armory Compact 1911 disassembly tool.  It’s a bent paper clip:

A bent paper clip 1911 disassembly aid.

The drill is to lock the slide back, put the paper clip in the guide rod hole, and ease the slide gently forward to engage the paper clip.

The 1911 guide rod hole that accepts the paper clip disassembly aid.
With the slide forward on the guide rod, held in place by the paper clip You bend the paper clip so that the guide rod, recoil plug, and recoil spring can be pushed rearward in the slide to remove these three components as a subassembly).

Once I had the slide forward, with the paper clip disassembly aid in place like you see above, I withdrew the slide release from the left side of the pistol.  At that point, the entire slide assembly can slide forward off the receiver.

Another view from underneath the slide.

The next step was to extract the recoil spring, the guide rod, and the recoil plug out of the slide.  It’s best to leave the paper clip in the guide rod (i.e., with the recoil spring still compressed), and then slide the entire recoil plug/recoil spring/guide rod rearward as a unit out of the slide.  After that, I pushed down on the recoil plug, withdrew the paper clip from the guide rod, and released the compression on the spring.  I was careful when I did this; parts could go flying if I just let them go.  Don’t ask me how I know this.

The recoil plug, the guide rod, and the recoil spring removed from the slide with the paper clip removed.

Here’s what the guide rod, the original recoil spring, and the new Wilson Combat recoil spring look like.  The new spring is on the bottom:

Quite a difference, huh?  In case you were wondering, both springs have 14 coils.

I think the new spring wire diameter is larger than the original spring wire diameter.  I didn’t think to measure it before I installed it; I will do so the next time I have the gun apart.  And there’s a huge difference in free length, as you can see in the above photo.

Installing the new spring on the guide rod with its recoil plug was a challenge.  I had make to a tool to compress the spring and the recoil plug enough to get a paper clip on the guide rod to hold everything together so I could install it in the slide.  Again, I was super careful.  I didn’t want to release these parts, and I always wear eye protection when I do this sort of thing.  A lot of people get hurt by being careless with springs.

The reassembled recoil plug, recoil spring, and guide rod, ready for insertion in the slide.

At this point, I reinstalled the subassembly in the slide, I slid the slide onto the receiver, and then I reinstalled the slide stop.

Once the gun was back together, the first time I tried to rack the slide I was shocked.  I couldn’t pull the slide all the way back.  I muscled it and then did so several times, and it seems to be okay now, but wow, it is stiff.   The 24-pound recoil spring is way stronger than what the Compact 1911 had in it.  That’s the bad news.  The good news is that the problem with the slide not returning to battery is gone.

The Compact with the slide in battery.

You know, I was playing around with the Compact 45 when I was cleaning it before the above spring replacement and I noticed that because the slide only went limply into battery there was a lot more play between the receiver and the slide.  I thought maybe it was me, but I noticed the accuracy was really falling off the last couple of times I shot it.  I’ll bet when the recoil spring holds the slide firmly in battery keeps the slide in the same spot each time.  With a weak spring, it stands to reason that the slide would swim around a bit more and accuracy would suffer.  I shook the gun in my hand with the old spring in it, and it rattled just like the 1911s I carried in the Army. I’ll bet they all had worn recoil springs, too.

When testing a recoil spring to see if it’s the right one, the drill is to load one round in the magazine, fire it, and if the slide locks back after that round (as it is supposed to do), the spring is good.  I tried that with seven rounds of factory hardball and the new Wilson Combat 24-pound recoil spring, and it worked each time.  Then I tried my 230-grain cast hardball load with 5.6 grains of Unique (my reloads are less potent but way more accurate than factory ammo), and it worked great.  Then I tried my 185-grain cast semi-wadcutter load (with 5.0 grains of Bullseye; my Compact 1911 accuracy load), and it worked great.  It’s a little easier to rack the slide now, but it’s still way stiffer than it was before.


Like 1911 stories?  Or maybe other handgun stories?  Or good reloading info?  Hey, it’s all available on Tales of the Gun!


Help us keep the content coming:  Please click on the popup ads!


More stories on the Rock Island Armory Compact?  Yes, indeed!

The 1911
A Tale of Two 45s
An Accurate Compact 1911 Load
A Gripping 1911 Story
A Tale of Two More 45s
RIA Compact:  Load versus Point of Impact
TJ’s Custom Gunworks
RIA Compact Update


Never miss an ExNotes blog:


We love it when you click on those pop up ads!  It’s what keeps the lights on!

Five Favorite Handguns

I’ve owned quite a few handguns and I’ve shot quite a few more.  These are my five all-time favorites.

Colt 1911 Government Model

What can I say?  I waxed eloquent about the 1911 in several ExNotes blogs.  I’ve owned several 1911s, and I still own my first, the MacManus Award Colt 1911.  My mid-1980s bright stainless steel 1911 is a real honey.  It’s hard to go wrong with any 1911.

1911 Government Models can be phenomenally accurate handguns, I love the .45 ACP cartridge, and the 1911 is part of America.  I carried a 1911 in the Army and I carry one today (see below).

Rock Island Compact 1911

The Rock Island Compact checks all the boxes for me.  It’s under $500 (I picked  up mine new for an incredibly low $425).  While not quite as accurate as a full-size Government Model, it’s accurate enough and it’s easy to carry.   Like the bright stainless Colt 1911 above, my Compact has been lightly customized by TJ’s Custom Gunworks, with a polished barrel and chamber, engine-turned chamber exterior, Millet sights, and other mods to improve reliability (new extractor, recut ejector, etc.).  It feeds anything.  I like the Parkerized finish; it’s all business and it reminds me of the 1911s I carried in the Army.  I call it my American Express gun (I never leave home without it).

My favored Compact 1911 loads are a 230-grain cast roundnose with 5.6 grains of Unique, and a 185-grain semi-wadcutter with 5.0 grains of Bullseye.  The 185-grain SWC load is crazy accurate for a snubbie .45.

Colt .22 Trooper 

This is an unusual one.  I bought it in the 1980s.  The Trooper is the same .357 Magnum that Colt manufactured for police duty, except it’s chambered in .22 Long Rifle.  The barrel and the cylinder have the same external dimensions as the .357 Mag, which makes it heavy and that translates into stellar accuracy.  It is the most accurate .22 handgun I own.  Mine has custom rosewood grips.  I love shooting the Trooper, and it does well with every brand of ammo I’ve put through it.

I paid $200 for the Trooper back in the ’80s.  If you check what they go for today on Gunbroker.com, I think you’ll agree it was a good investment.  But like all the other guns in this blog, it is not for sale.

Ruger .357 Magnum Blackhawk 

Ruger Blackhawks are exceptionally accurate revolvers, they are easy to shoot, and they are just plain cool.  I’ve shot loads in mine that run the gamut:  148-grain wadcutter target loads, 110-grain max hollow point loads, 158-grain max loads, and metallic silhouette 200-grain cast roundnose loads.   The Blackhawks don’t care; they handle all of them with target-grade accuracy.

I used to say Blackhawks last forever, but I have to tell you I can’t say that anymore.  My stainless steel Blackhawk finally wore out.  When I sent it in to Ruger for repair, they were surprised, too, and they backed up their surprise with an even-more-surprising offer to buy the gun back (an offer I accepted).  I’ve got my antenna up for another .357 Blackhawk, and when things calm down a bit in the gun world, another one will find a home with me.

SIG P226 Scorpion

The SIG P226 is an amazing handgun. At $1200 (and that’s a pre-pandemic price), they are not cheap, but I feel like I spent my money wisely on this piece.  I love the SIG’s finish and grips, and I love its accuracy (it is the most accurate 9mm handgun I’ve ever owned).

I first learned just how good the SIG is when I fired good buddy Python Pete’s, and it wasn’t too long after that I bought the one you see here.  It did better than any of the other 9mm handguns in the load development comparos (for both cast and jacketed loads).  Trust me on this…if you want a fine handgun, you won’t go wrong with a SIG P226.


Lots more gun stuff on our Tales of the Gun page!


Keep us afloat:  Please click on those popup ads!


Never miss an ExNotes blog…sign up here for a free subscription: