
I told you a bit about my 222 Savage 340 in an earlier blog, and I described removing the barreled action from the stock for a refinishing project. This is the second installment of that project, in which I remove the old finish and prep the stock for refinishing.
Stripping
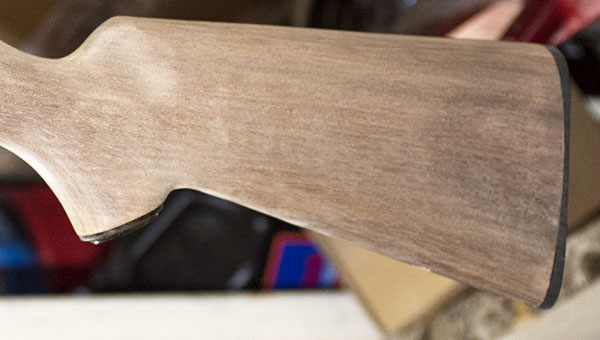
At this point, all that’s left is the walnut stock, and that means it’s time to remove the old finish. The last time I did this I used an spray that took the finish off almost immediately, and it required only one application. This new stuff is supposed to be better for the environment, and the spray can said it might take a couple of applications to get all of the old finish off. The instructions also said to wait 3 hours after applying it. It did take three applications to get all of the old finish off. Somewhere a tree hugger is thankful, I guess, but it meant that with the wait times after each application this task was spread over 2 days. The way I used it was I sprayed the stuff on, I waited the three hours, and then I wiped the gooey finish remnants off with a towel. I wore disposable rubber gloves and wiped the stock down with an old terry cloth towel.

Oil Extraction
After that, I went to work with a heat gun on the stock. That sweated out the whatever oils were left in the wood, and then it was time to start the stock repairs and the sanding.
Undinging
There were a couple of depressions in the stock (not chips, but slight depressions where the wood had been compressed). That called for the old wet washcloth and iron trick. The drill here is to lay a wet washcloth over the dings in the stock, and then apply the hot iron to the washcloth directly over the dings. The resulting steam is forced into the wood and it lifts the dents. It works well because the wood wants to return to its uncompressed state and the steam helps it do so.
Butt and Cap Alignment
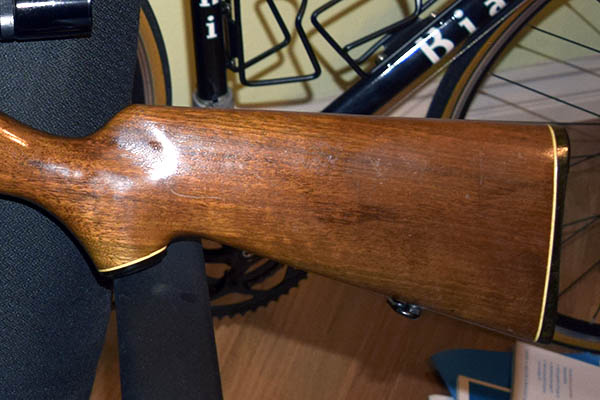
After that, I reinstalled the butt plate and the pistol grip cap, but without the white line spacers. The white line spacer thing was a popular look in the ‘50s and 60’s, but I don’t care for it. I like the look of a black buttplate and pistol grip cap directly against the walnut. There was a bit of mismatch between these plastic parts and the stock, but that’s okay, too. It will be addressed in the next step.
Sanding
You might think the walnut would be smooth because it was already smooth before the original finish was applied several decades ago, but that’s usually not the case in a project like this. Stripping the finish raises the grain a bit, and truth be told, original finishes from the factory are usually not so good, anyway. And, as hinted at in the preceding paragraph, sanding will assure a perfect match between the walnut stock and the butt plate and pistol grip cap. I start with 220 grit sand paper, then 320 grit, then 400 grit, and finally, 600 grit. Again, patience is a friend here. I worked to get the match I wanted between the stock and the black plastic parts, and I wanted a smooth surface all over the stock. I always sand with a block to support the sandpaper, and I’m careful not to round any edges where crisp edges are desired (like along the top of fore end).
All of the above took a little more than 3 days, and at the end of this phase of the project, I had a pristine stock with a perfectly matched buttplate and pistol grip cap. It was ready for the next step, and that’s the start of the TruOil applications for a rich, subdued, and elegant oil finish. That’s coming up in the next blog on this project.
Read more of our Tales of the Gun stories here, and don’t forget to sign up for our automatic email blog notifications!
Did you miss the earlier blogs on this Savagely inexpensive, tack-driving Savage 340? You can see them here and here!
Joe I’ve never been very good at refinishing so this blog I find a Godsend and the way you write makes it easy even for me to understand like your books it’s easy reading I can’t wait to look through my old military treasures and pick one to start my project thanks Joe for sharing your knowledge on this project
I’ll help… “The Stripper”…