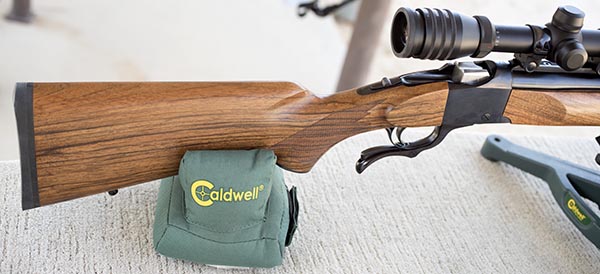
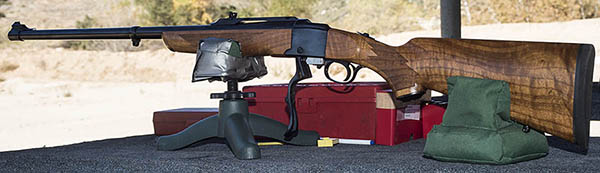
The Ruger No. 1 in .257 Weatherby Magnum. It was a glorious weekend.
I have good news and I have bad news, like my old platoon sergeant used to say. The good news is that the .257 Weatherby chambering issue that I wrote about in the last blog is in the rear view mirror. I learned the secret handshake from RCBS tech support, as I wrote in a previous blog. More good news is that I loaded several more combinations of propellant and charge weights (all with the Sierra 100-grain jacketed soft point bullet) and I saw a few loads that show promise. Nothing really great yet, but better than I’d seen before I solved the chambering issue problem. I’ll show you the results in a second or two.
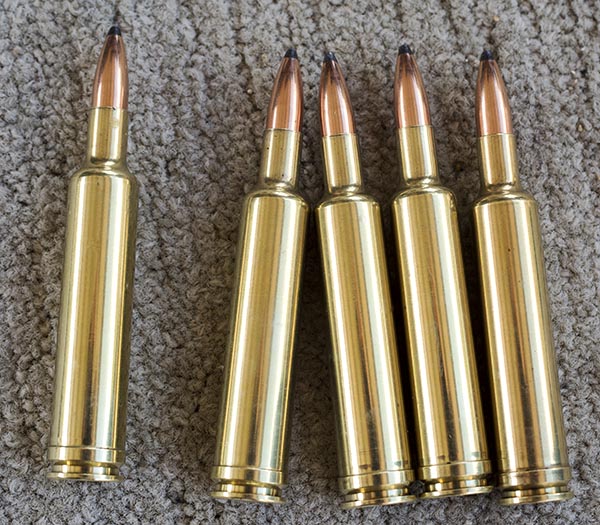
Reloading .257 Weatherby Magnum Ammo
Beautiful ammo, but getting it to perform in the Ruger No. 1 has been a challenge. I’m not there yet. These are 100-grain Sierra bullets. Phil at Sierra told me they have driven these up to 3500 fps without bullet failure. That’s smoking, folks!
The bad news? Well, it goes like this. Some of the bullets broke up in flight, and I’ve got the evidence on target that proves it. You may recall that I wrote about that in the first blog on the .257 Weatherby Ruger No. 1, and at that time, I attributed it to the varmint 87-grain bullets I used for those loads. My thought then is that they were thin-skinned varmint bullets designed to explode on impact, and pushing them at .257 Weatherby velocities (with the consequent aero heating and centrifugal forces) induced the failures. It’s what made me step up to the 100-grain Sierra bullets, as I thought the heavier bullets might drop the muzzle velocity enough that this would not occur again.
Like I said, beautiful. But will she shoot?
.257 Weatherby Accuracy Testing
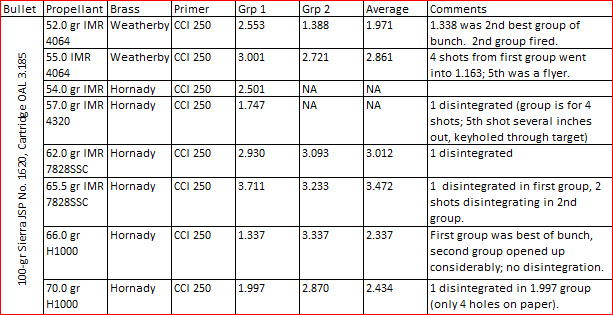
My results on the range with my new loads were a bit disappointing. The rounds chambered okay, but the groups were nothing special and in most cases, downright discouraging. And like I said, I could see that some of the bullets were tumbling and disintegrating in flight. Here are my results from the latest accuracy tests:
So far, IMR 4064 and H1000 propellants show promise at the lower end of the charge range. Several of these combos had bullets break up in flight. I’m searching for cause and corrective action now.
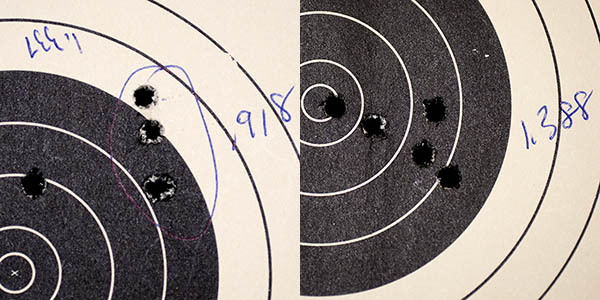
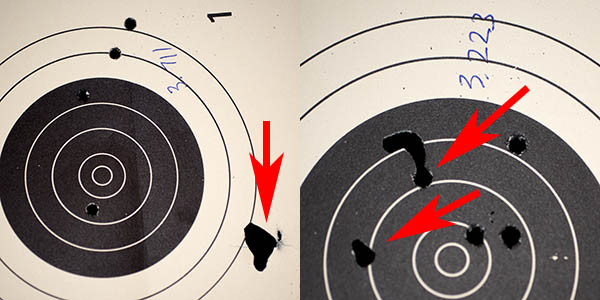
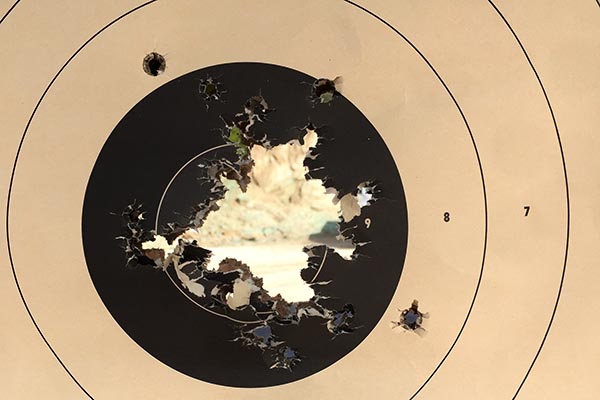
This is what it looked like on target for the best groups that experienced no inflight disintegration:
The load on the left was with 66.0 grains of H1000 propellant; the load on the right was with 52.0 grains of IMR 4064. Both these combinations grouped about the same and experienced no bullet inflight anomalies. That’s the good news, although tighter groups would have made it better news.
And here’s what bullet breakup/disintegration looks like on target:
Whoa, check out what’s going on here! The bullet in the photo on the left came apart in flight just as it was passing through the target. You can see a gray misting at the lower right edge of that jagged hole; that’s lead being sprayed out due to centrifugal action. Two of the five bullets in the target on the right similarly broke up as they passed through the target.
Sierra’s Inputs on Bullet Disintegration
I had such good luck calling RCBS tech support on the chambering issue that I thought I would call Sierra and talk to their engineer, and that’s what I did. I found their number easily on the Sierra website, and a minute later I was chatting with Phil, the Sierra tech guru. Phil listened patiently as I explained what I was seeing on my targets and then he gave me his take on the situation. He agreed that what I was seeing was clear evidence that the bullets were failing in flight. My first concern was that the extra long Ruger barrel might be causing the breakups (it’s 28 inches, as opposed to other .257 Weatherby Magnum rifles that have 24 or 26 inch barrels). Phil said the Ruger’s extra 2 inches would make the muzzle velocity higher, but it wasn’t enough to cause this problem.
Phil pointed me in two or three directions. His first thought was that the barrel might have an imperfection induced either by a machining anomaly or being too dirty. He advised me to thoroughly scrub out the barrel and then inspect it carefully. I felt a bit uneasy (maybe guilty is a better word). I clean my guns after every range session, but I’m not a fanatic about it. Another thing that made this hit home for me is that in both recent range visits, I shot some of my best groups early in the sessions (while the barrel was cleaner). That made me wonder: Maybe there’s enough crud left in there from the prior session that after the first or second group it attracts more copper and combustion fouling and that’s what is killing accuracy. I poked around a bit on the Internet and other folks have commented that these rifles require cleaning every 15 or 20 rounds. Hmmm. I typically test 50 in a single range session. I have the barrel soaking with Butch’s bore shine as I write this blog, and there is a lot of copper fouling coming out. I hope that’s enough to solve the problem. If it’s an errant machining artifact, that means the rifle has to go back to Ruger, and I really don’t want to go that way.
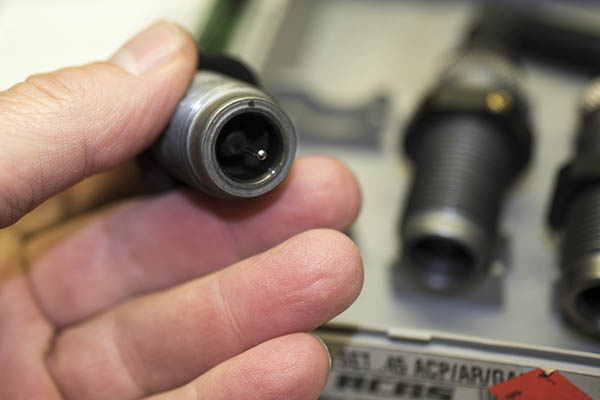
Phil also advised me to take a look at my resizing die. He directed me to carefully check the expander button. It’s the part that opens the case mouth just enough to assure an interference fit with the bullet. If the expander has a scratch or burr on it, Phil said, that will transfer to the case mouth inner diameter, and that could damage the base of the bullet. That, too, could account for the bullets breaking up in flight. Along these same lines, Phil recommended lightly deburring the case mouth’s inner edge. I had done that on these loads, so I’m thinking that may not be the issue. But I’ll do it again on the next reload.
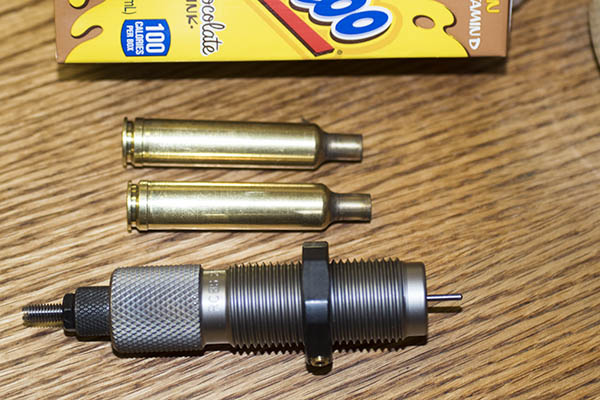
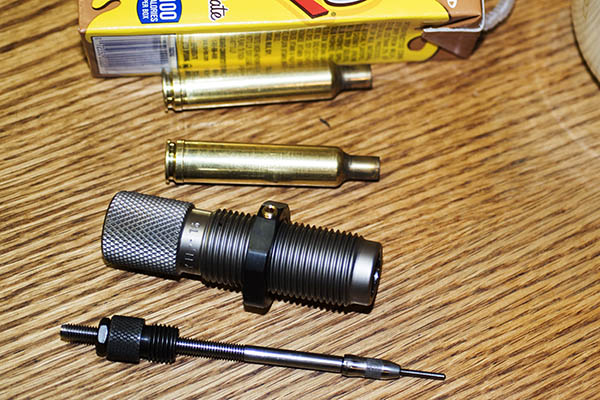
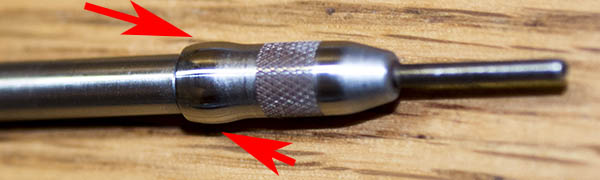
The .257 Weatherby Mag resizing die. That thing sticking out of the bottom (on the right) is the decapper, which knocks the old primer out of the fired case.The expander and decapping pin subassembly removed from the resizing die.This is the expander button. It passes into the brass case on the up stroke (as the case is being returned to spec dimensions), and then expands the inside of the case mouth on the press retraction stroke. If this part had any burrs on it, it could be inducing a scratch on the inside of the case mouth. That, in turn, could damage the bullet when it is seated into the case. I didn’t see any burrs, but who knows? I figured I’d polish it, anyway. There’s a lot going on in the reloading process. I used to be an engineer in the munitions industry, and I love working these kinds of challenges.The expander button after polishing. I chucked this piece in a drill and polished it first with 600-grit sandpaper, and then with polishing compound. I could comb my hair (if I had any) in the now-mirrored surface.
So I’ve got the bore soaking with bore solvent and I’ve been working on it for about a day now. There was a lot of copper in there, and it’s still coming out a few atoms at a time (I figure the bore will be copper free by Christmas at the rate I’ve been able to remove it). I’ve polished the expander button as you can see above. And, I’ve resized 20 cases that I’ll reload this afternoon at the lower end of the spectrum to see if I can get tighter groups out of my .257 (those cases are in the tumbler/polisher now). If all goes well, I’ll be back on the range in another day or two, and I’ll let you know what happens right here on the ExhaustNotes blog. I’ve been drinking my Yoo-Hoo, so things should go better.
This post wraps up our tutorial on reloading .45 ACP ammunition, although from time to time we’ll be posting favored .45 loads as we continue to add Tales of the Gun blog posts featuring this fine old cartridge. If you’d like to catch up by reading the first three parts of this series, here they are:
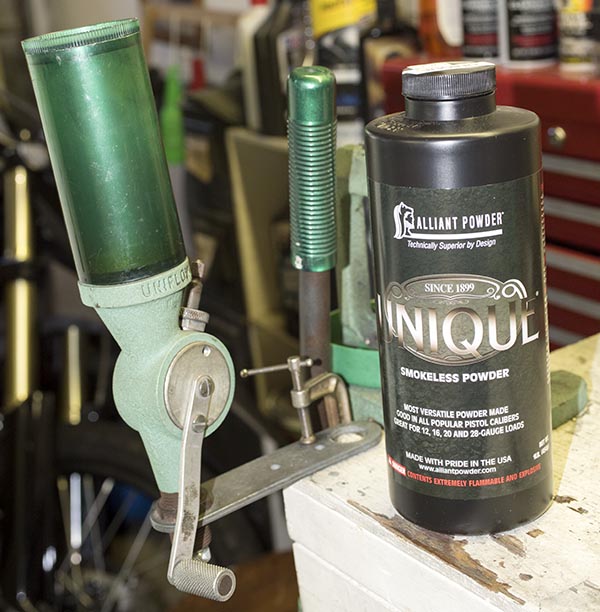
We’re in the home stretch now, folks, with the last steps in creating our custom-crafted .45 ACP ammunition. The tools and components we’ll use in these remaining reloading steps are the propellant, the powder dispenser, our previously prepped-and-primed .45 ACP brass cases, bullets, the third reloading die, a reloading scale, a caliper to measure cartridge overall length, and boxes and labels to hold and identify the ammo we’ve created.
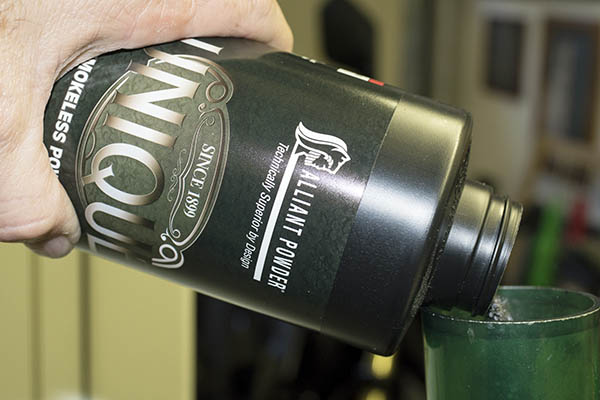
That’s the powder dispenser on the left, and Unique propellant on the right. I use an RCBS dispenser. Several reloading equipment companies offer these.
My preferred propellants for .45 ACP ammo are Unique or Bullseye, and of the two, I prefer Unique. Some folks prefer Bullseye. Others may use different propellants. One of the more enjoyable aspects of the reloading process is you can try different recommended propellants (and different charges of these propellants) to find the secret sauce that works best for you.
Help us bring more articles to you…please click on the popup ads!
What does that mean? For a revolver, it usually means the load that is the most accurate. For a semi-automatic handgun (like the 1911), accuracy is not the only requirement. You also need to have a load with enough energy to cycle the action. Usually, the loads shown in a reloading manual are powerful enough to cycle the action. You should never go above the maximum propellant charge listed in any reloading manual, and you should only approach that by testing loads at the lower end first, and then working up to a higher level if you feel a need to for accuracy or functionality reasons (but never go above the max load).
Adding Unique propellant to the powder dispenser.
Here’s another important point: Whichever powder you choose to use, never have any propellant other than the one you are using on your reloading bench. You don’t want to get the propellants mixed up, or mistake one for another.
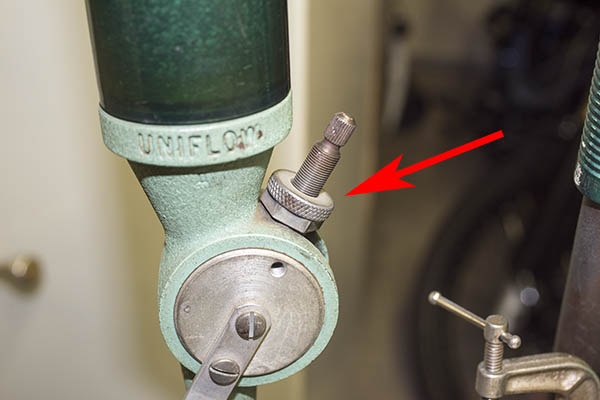
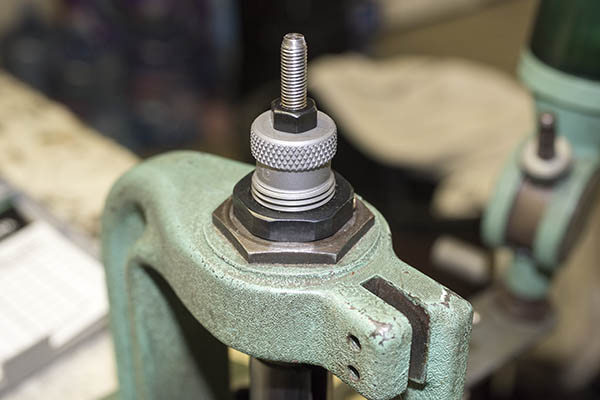
After you’ve added propellant to the powder dispenser, tap the dispensing handle against the lower stop several times to settle the powder. What we’re going to do next is to adjust the throw weight (the weight of powder dispensed) by adjusting the dispenser with the threaded adjustor shown in the photo below.
The dispenser’s adjustor. You can screw it in to dispense less powder, or out to dispense more powder. Once it dispenses the correct amount, lock it in place with the locknut.
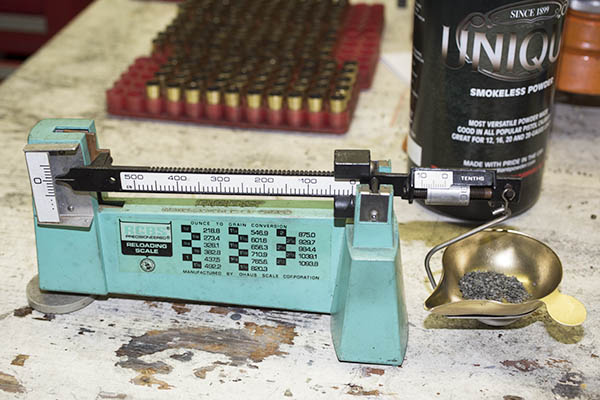
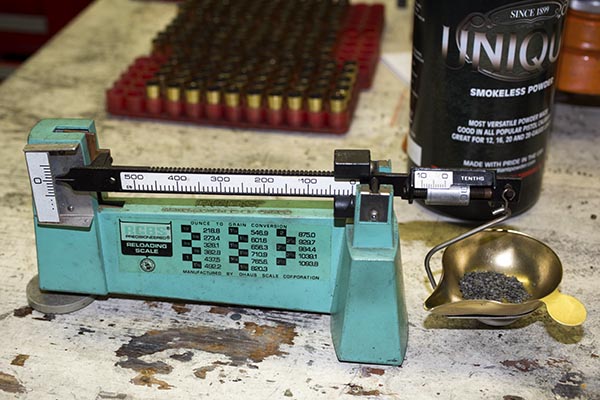
What we do at this point is get our reloading scale, set it to zero grains, and make sure the indicator (the balance arm) is in a neutral position (as indicated on the left side of the balance arm against the graduations on the scale markings on the left of the scale. Once the scale is zeroed, use the sliding and turning adjustors for the weight of propellant you wish to use. After years of accuracy testing and shooting, I’ve settled on 5.8 grains of Unique as the load I use with a 230-grain cast roundnose bullet.
My RCBS reloading scale set to 5.8 grains.
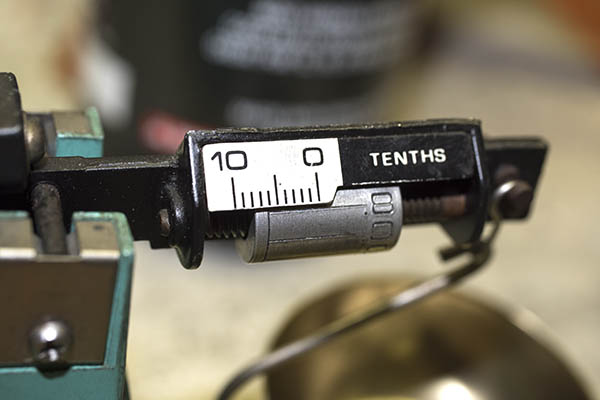
Note in the photo above that the sliding weight is at zero grains, and further note in the photo below that the rotating adjustor wheel is set to 5.8 grains. For anything under 10 grains, you leave the sliding weight at zero and set the weight with the rotating barrel as shown below. For most .45 ACP loads, we use the rotating barrel only.
The rotating barrel adjusting wheel is set to 5.8 grains.
After adjusting the powder dispenser’s adjustor and checking the weight with the scale, we now have the dispenser releasing 5.8 grains of Unique propellant every time the dispenser is actuated. I’ll throw several charges to make sure the dispenser is dispensing consistently, and once I’m satisfied it is, we’re now ready to dispense 5.8 grains of propellant in each of the prepped and primed cases we prepared in Part III of of our .45 ACP reloading series.
There are 5.8 grains of Unique in each primed case. Note that the propellant levels are approximately equal in all cases, and no cases have been missed.
When you dispense powder, it’s important to be consistent. I don’t like to stop until I’ve done the entire tray of prepped and primed cases, and I don’t like to be interrupted while I’m doing this. After you’ve dispensed the propellant in each cartridge case, visually inspect the tray to make sure every case is charged with propellant, and all propellant heights are approximately equal. We’re looking for missed cases here (if that happens, the primer will push the bullet into the barrel just a bit, which requires disassembling the firearm to hammer the bullet back out with a rod, and that’s basically the end of your shooting session that day). We’re also looking for any cases that are double-charged (i.e., cases that have two charges of powder in a single case). A double charge is real serious and dangerous business, as it will most likely blow up the gun, injure you, or worse. You have to pay attention to what you’re doing here. Like I just said, this is serious business.
So, after we’ve charged the cases with propellant, we now ready to move on to the next step, which is seating the bullets.
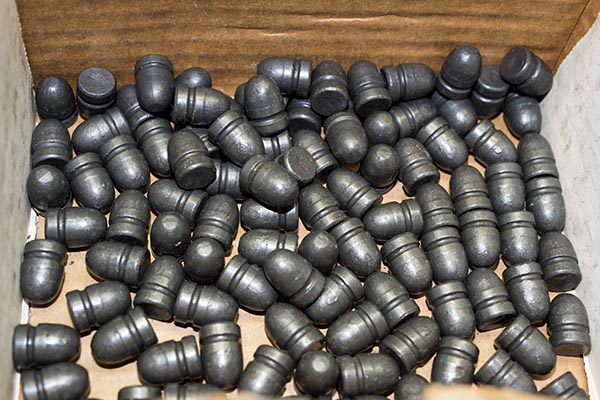
.45 ACP 230-grain cast roundnose bullets. I like this bullet design and weight. It’s accurate, and it feeds reliably in just about any .45 auto.
We’ll now use the seating die, the last of the three dies in our die set. This part of the operation requires a bit of adjusting and a bit of finessing on our part. We’re actually doing two things with this third and final die. We’re seating the bullet to the correct depth in the cartridge case (to meet the cartridge overall length requirement, which is found in your reloading manual), and we’re removing the cartridge case bellmouth that allowed the bullet to enter the case.
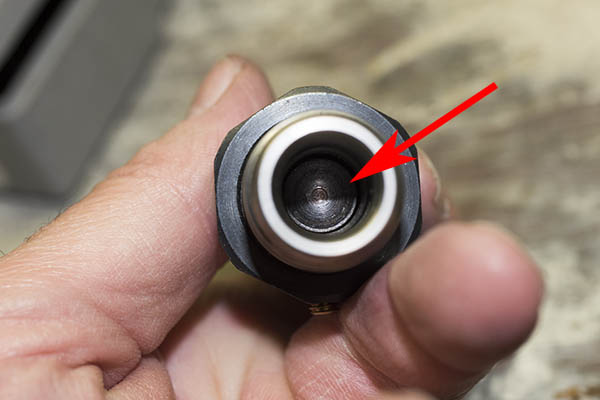
The business end of the seating die. The red arrow points to the part of the die that interfaces with and pushes the bullet into the case.
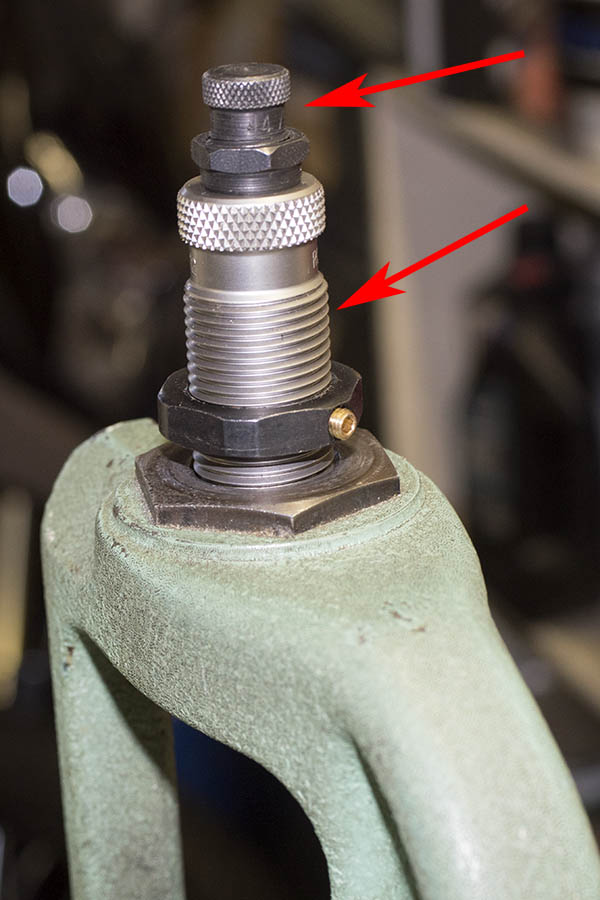
In order to make both adjustments, we’ll work with how far we thread the entire die into the reloading press (this affects both bullet seating depth and crimp), and we’ll also work with the bullet seating adjustor. These two parts of the die are shown by the red arrows in the photo below.
The bullet seating die in the reloading press. The upper threaded adjustor (denoted by the upper red arrow) adjusts bullet seating depth. The crimp or bellmouth removal adjustment is made by how far the entire die is threaded into the press (denoted by the lower red arrow), Once the crimp (or bellmouth removal for the .45 ACP cartridge) is set and the cartridge meets the desired overall length, lock both the die and the bullet seating adjustor in place with the two locknuts.
Here’s how I do this. I first screw the bullet seating adjustment all the way into the die, and then I’ll use this to seat the bullet to the right depth by threading the entire die into the reloading press, a little at a time. With each adjustment, I’ll run the charged case (with a bullet on top) into the die with the press. I keep doing this until the cartridge overall length is where I want it to be. For a 230-grain roundnose bullet, I adjust the seating depth such that the cartridge overall length is 1.250 inches, as specified by my reloading manual. That cartridge overall length is good, as it allows the cartridge to feed into the chamber, and it allows the cartridge to fit into the magazine.
Once I have the bullet seated to a depth that provides the correct cartridge overall length, I then back the bullet seating adjustor all the way out. Then I’ll start the crimping adjustment process by threading the entire die deeper into the press, a little bit at a time, running the cartridge into the press with each incremental downward die adjustment. The reason I ran the bullet seating adjust all the way out is that I don’t want it to push the bullet in any further while I adjust the crimp.
Here’s what going on here. Remember that I said the seating die does two things: It seats the bullet to the correct depth, and it crimps the cartridge. In the case of the .45 ACP, we’re not really crimping the bullet into the case. We just want to remove the brass case bellmouth that we previously added to allow the bullet to start into the case. The inside of the seating die has a reduced circumference step. Our purpose in making this adjustment is to thread the die into the press just enough to have the case make contact with the inner die step. That will remove the bellmouth. We’re not crimping here; we’re just removing the bellmouth so that the brass case becomes a straightwall case around the bullet.
Once I have adjusted the die body by screwing it into the press enough to remove the case bellmouth (and with the press ram raised to position the cartridge all the way up in the die), I then run the bullet seating adjustor all the way down, such that it contacts the top of the bullet. This will position the die such that it removes the case bellmouth, and simultaneously seat the bullet to the correct cartridge overall length. At this point, I can lock everything in position with the two locknuts (one for the die body in the press, the other for the bullet seating adjustor in the die) while the ram is in the raised position with a cartridge in the die. At this point, I’m ready to finish the rest of the cartridges.
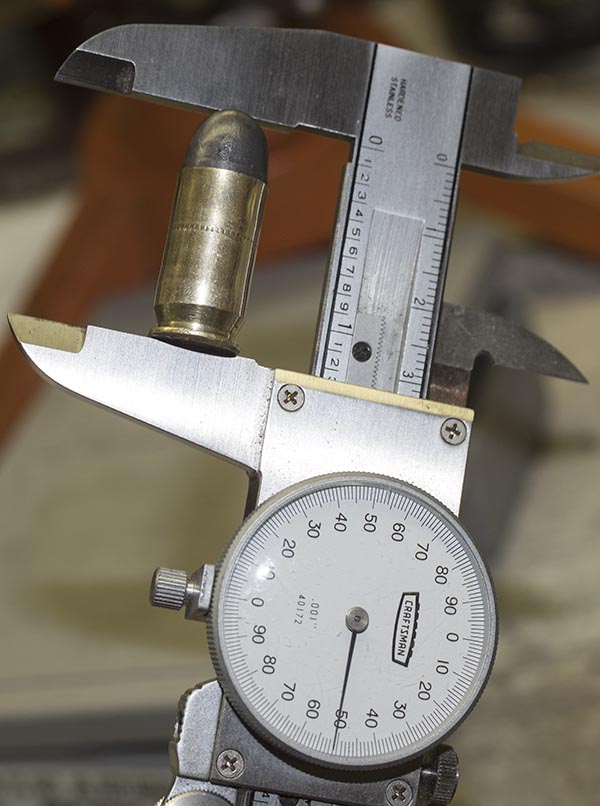
A case with the bellmouth removed, and the bullet seated to the correct depth. The cartridge overall length is 1.250 inches. Life is good. I can hit a gnat in the ass at 25 meters with this cartridge.
At this point, what I do is put a bullet on each charged case, and then I start running each cartridge, with a bullet on top, thr0ugh the reloading press.
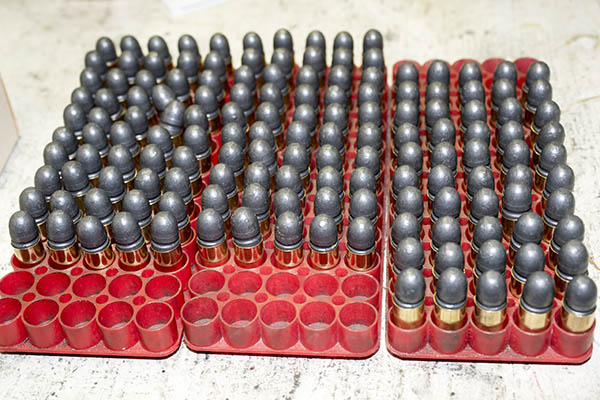
Charged cases topped with bullets, ready for the bullet seating operation.
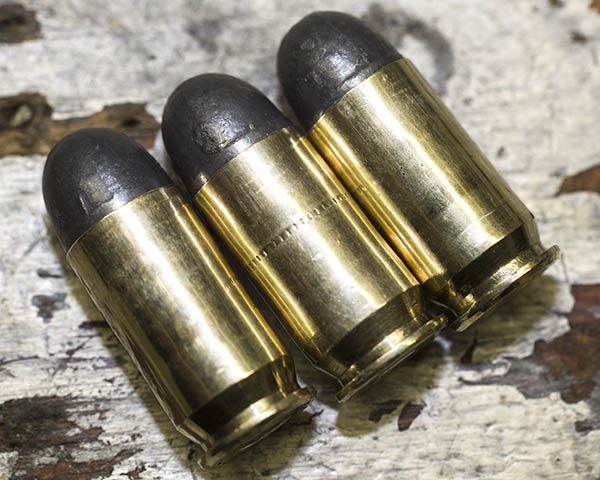
With each run up the press, I’ll create a reloaded cartridge. Here are three reloaded rounds…
Reloaded .45 ACP ammo. It’s good looking ammo, and I know it will provide superior accuracy and reliability in my 1911. It will perform way better than factory ammo, and that’s what this reloading game is all about.
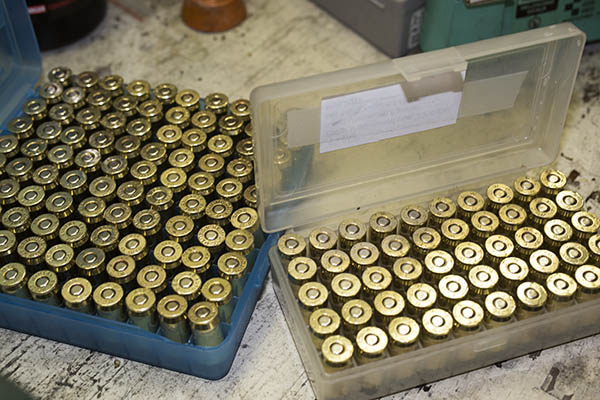
As I produce each round, I place it in one of the plastic boxes I use for my ammo.
Once the above steps are done, I then take the propellent remaining in the powder dispenser and return it to the propellant container (in this case, the Unique bottle). That’s one of the reasons it’s important to only have one bottle of propellant on the reloading bench. You don’t want to dump the leftover powder into the wrong propellant container. If that happens, you can’t use the container of propellant you just emptied the leftover powder into because now it contains a mix of two different propellants. The only thing you can do is throw it away. It’s just to risky to use it. And yeah, I’ve had to do that before.
Reloaded .45 ACP ammo, ready for the range. It looks good, doesn’t it?
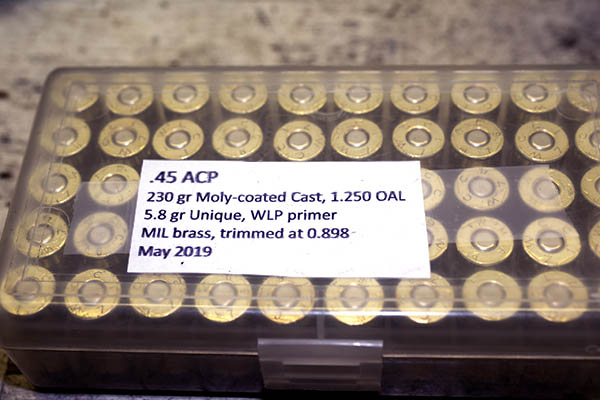
There’s one more step, and that’s labeling each box of reloaded ammo with cartridge, bullet weight and type, cartridge overall length, propellant type and charge, primer type, brass type, brass trim length, and the date I manufactured the ammo.
At this point, I’m good to go. It’s off to the range…
So there you have it. Reloaded .45 ACP ammo, as good as or better than what you can buy anywhere. I just returned from the range a few minutes ago, where I shot some of the ammo you see in the photo above, and yeah, it functioned flawlessly and hit the target every time.
If you enjoyed this post, let your friends know about us. Leave a comment if you’d like to add to or join the discussion. We love hearing from you. And if you never want to miss an ExhaustNotes blog, please sign up for our automatic email notifications!
Want to read more gun stuff? Check out our Tales of the Gun page!
Reloaded .45 ACP ammunition. Bright, shiny, and far more accurate than factory ammunition in my Colt and Rock Island 1911 pistols. I’ve got the targets to prove it.
In our first post on this topic, we talked about the equipment and components needed for reloading the .45 ACP cartridge. In this blog, we talk about the reloading process. We won’t cover all of it here (we’ll get about halfway through), and we’ll cover the rest of the process in a subsequent blog or two. In our first blog, we discussed the basic equipment. In this blog, we’ll talk about a few more bits of equipment that I use, but they are not essential. You can get by without them.
If you want to catch up with the first blog on this topic, you can do so here.
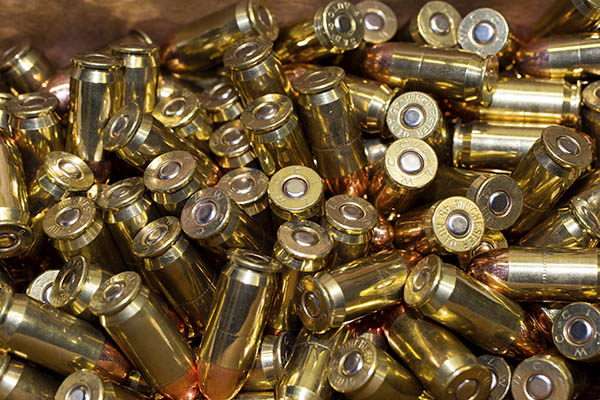
Let’s say you’ve been to the range, you’ve made .45-caliber holes in your targets, and you’ve collected your spent brass. That’s the only part of the reloading process I don’t like…at my age, bending over and picking up all that brass is a pain-in-the-you-know-what. But I still do it. In fact, if I see somebody leaving brass on the ground, I’ll collect it. I grew up collecting brass to reload, and leaving brass at the range feels to me like a crime against nature.
So we’re home, and you’ve got your fired brass…
Fired .45 ACP brass. I just can’t leave brass at the range. To me, it’s like leaving cash on the ground.
This next step I’m going to show you is an optional one, and that’s cleaning the brass. You don’t need to do this, and I reloaded .45 ammo for a lot of years without ever cleaning my brass. I always do it now, though, and I do it for two reasons: Cosmetics and accuracy
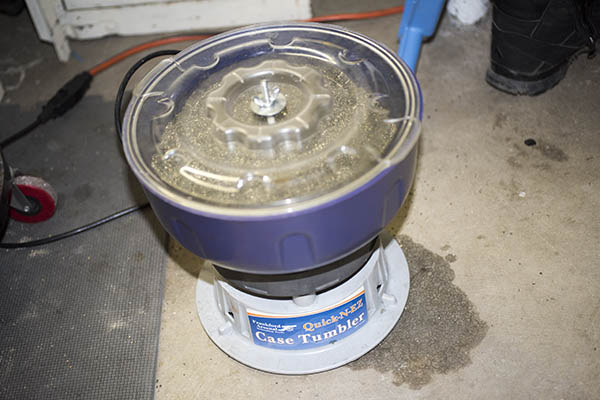
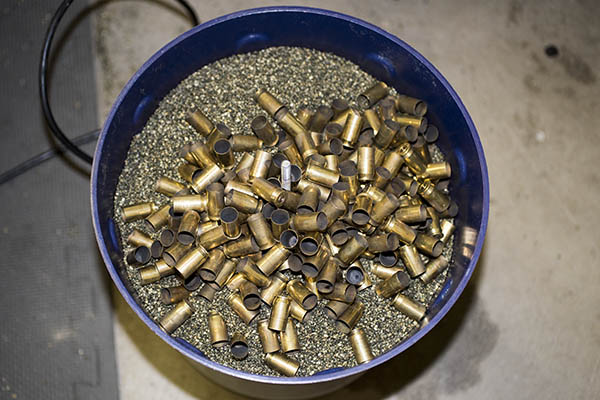
Here’s how I go about doing it. I dump the brass into my vibratory tumbler and let it rock for a couple of hours.
My Frankford Arsenal vibratory cleaner. I call it a tumbler. It has corn cob media. You unscrew the butterfly nut on top, remove the cover, and dump the fired brass into the media.Here’s the tumbler with the cover removed and the brass placed on the media. The cover goes back on and I let the thing vibrate for a couple of hours.
Like I said above, I tumble my brass. One of the reasons is that I like bright, shiny ammo (it just looks cool). But a far more important reason is that it makes the ammo more accurate. When you tumble the brass, you’re cleaning it on the inside and the outside. The outside is cosmetic. The inside affects the grip the brass case has on the bullet. We’re not interested in making it shiny on the inside; we’re interested in making that grip consistent. I’ve found over the years that a consistent inside case surface (where the case interfaces with the bullet) makes for a more accurate cartridge. It’s extremely significant in a rifle (I’ve seen 100-yard groups shrink from 3 inches to a quarter of an inch in my .30 06 Model 70 Winchester just by tumbling the brass). The accuracy improvement in a handgun is not that significant, but it’s still there. You don’t have to do this (you can reload the brass without tumbling it), but it’s something I do.
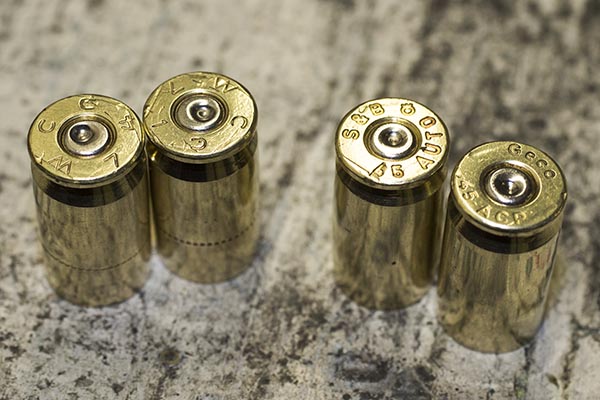
Here’s what the brass looks like after it’s been tumbled….
Squeaky clean and shiny. Fired, cleaned brass.
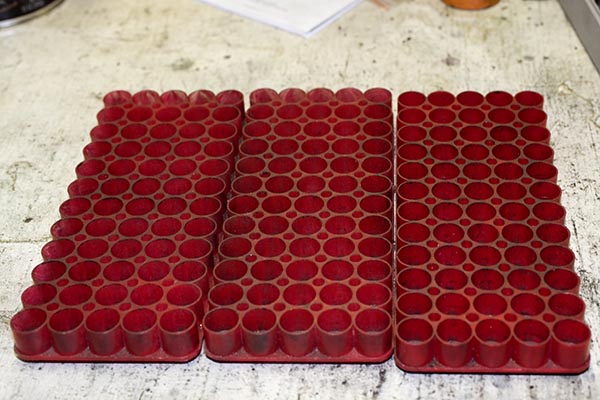
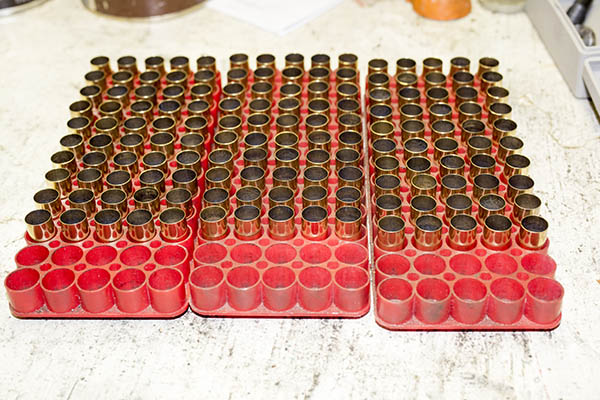
Now we’re ready to start the resizing operations. We’ll want to get our ammo trays ready…
Reloading trays. Each tray holds 60 rounds, but I only load 50 in each one.
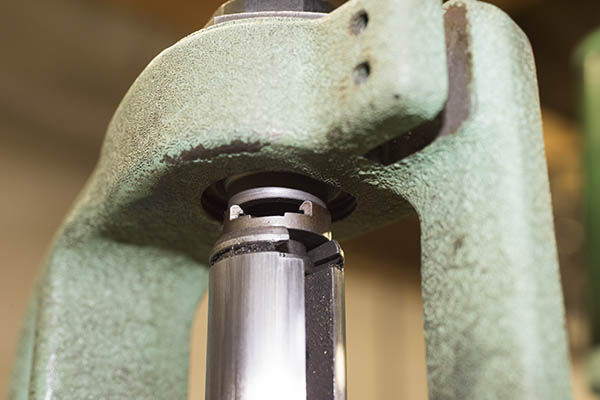
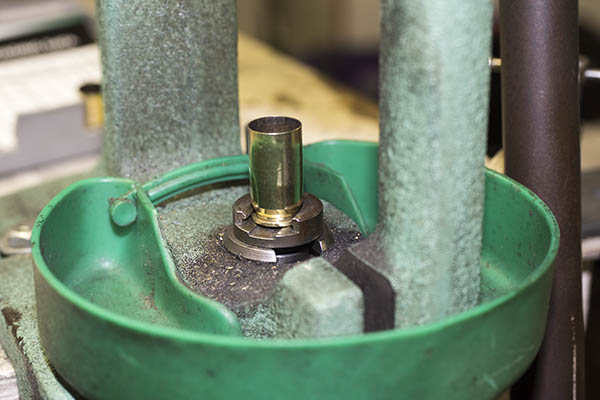
The next step is to install the first of our reloading dies (the resizing die) in the press. We’re going to use this die to squeeze the cartridge case back to its unfired case diameter and simultaneously knock out the fired primer.
The resizing die. Note the protruding pin; it’s what pushes the old primer out of the brass case.The resizing die, threaded into the reloading press. Note the large locknut at the base.With the shell holder installed on the press ram, we fully elevate the ram, thread the resizing die down to contact the shellholder, withdraw the ram slightly, turn the die in just a bit more, run the ram up, and then lock the die in place with its locknut. What we want is to feel a slight “knuckle over” when the ram is fully elevated.
At this point, we’re ready to start resizing and depriming cases. Here’s what that looks like.
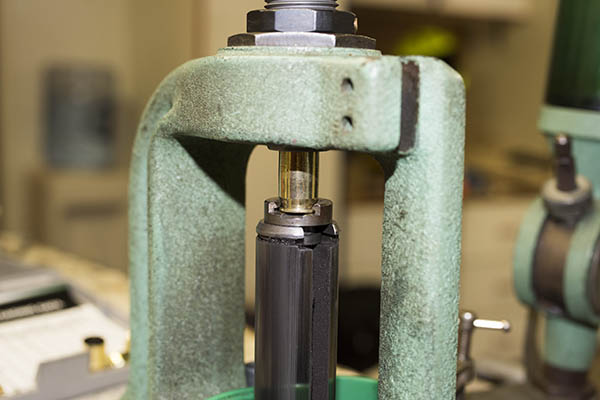
A case in the shellholder. When we raise the ram, it will be resized and the old primer will be pushed out.The ram is raised all the way to the top of its stroke. Here we see the case just starting to enter the resizing die. You don’t want to get your finger caught between the die and the fired case (don’t ask me how I know). The ram will go up until the shellholder contacts the bottom of the sizing die. As that occurs, the case is resized to its original diameter, and the primer is pushed out of the case.
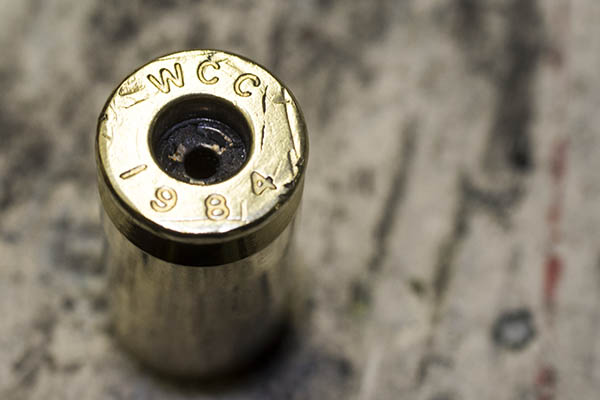
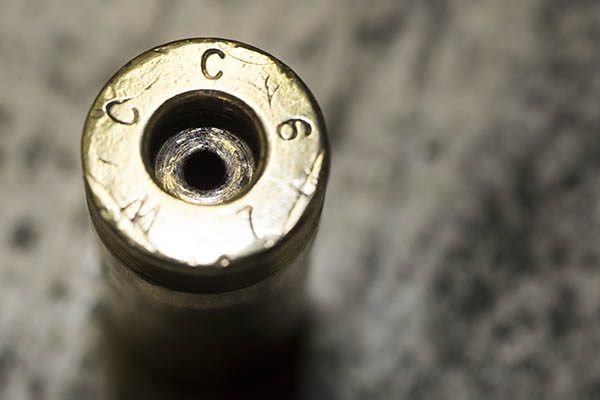
This is what the case looks like after it has been resized. Note that the primer is no longer in the case. Also, note how funky the primer pocket is. It’s gunked up with combustion residue.
A resized, deprimed case. Note the combustion reside remaining in the case’s primer pocket. And yes, I’ve been reloading this case since 1984. I’ve got some that are even older. .45 ACP brass lasts a long time.
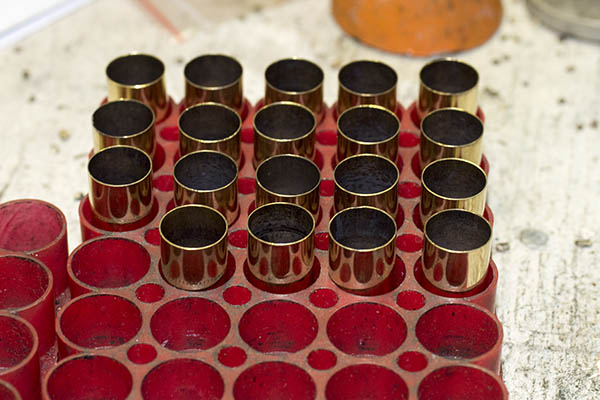
As each case comes out, I’ll place it in the reloading tray, like you see below.
Resized and deprimed cases in the reloading tray.
When I reload, I’ll generally do between 20 and 200 rounds in a batch. I reloaded 150 rounds in this batch.
150 resized and deprimed cases. Note that there are 10 empty spaces in each tray.
I use reloading trays that hold 60 rounds, and the reason I like these is that for a group of 50 cases I can track which case I’ve performed an operation on and which ones remain. Each time a case undergoes a reloading step, I move it over such that I always have 1o open spots between the cases that have undergone a reloading step and those that have yet to undergo the step.
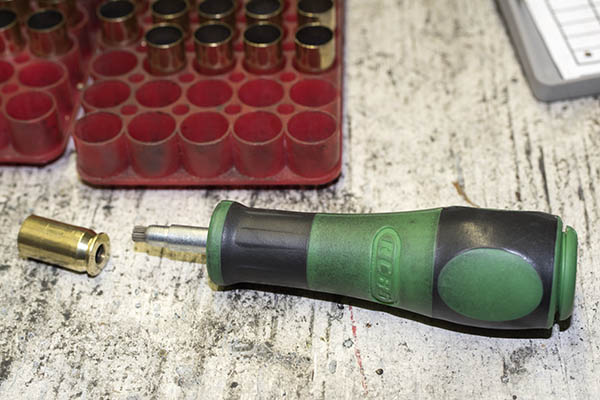
Ah, but those primer pockets. Remember how dirty they were after we pushed the primers out? Well, this is another optional step. I clean the primer pockets. I do each case manually, one at a time, using a primer pocket cleaning tool.
The primer pocket cleaning tool. It’s a primer-pocket-sized wire brush, and it removes the primer pocket combustion residue.A cleaned primer pocket. It doesn’t need to be bright and shiny; we just want to remove the clumps of combustion residue so the new primer can fully seat.
Like I said, primer pocket cleaning is optional. I reloaded for a lot of years and won more than a few matches without primer pocket cleaning, but these days I do it on every case. The reason we want the residue gone is that the residue can interfere with the new primer seating fully in the case (we’ll talk more about that in the next .45 ACP reloading blog). Having the primers all seated to the same depth will theoretically make for more accurate ammunition (less variability always equals more accuracy). It won’t effect functioning if the primers are at slightly different depths in a 1911, but if you’re reloading ammo for a revolver, a primer that is seated above flush (one that sticks out beyond the cartridge case base) can interfere with the cylinder turning.
At this point, we’ve got cleaned, resized, and deprimed cases. We’re ready to bellmouth the cases, install the primers, charge the cases with propellant, and seat the new bullets.
So that’s it for now. Stay tuned; this series will continue right here on the ExNotes blog!
The finished product: Reloaded .45 ACP ammunition. This handcrafted ammo is tailored for my 1911, and it is much more accurate than factory ammunition. Our blogs on reloading will cover the equipment and components needed, and the steps involved, in reloading ammo for the .45 Automatic.
I’ve had a few requests for a blog on reloading. You know, not just favored loads for different cartridges, but how to go about reloading. I know it can be a bit intimidating if you’ve never done it, but (trust me on this), learning how to reload adds an entirely new dimension to shooting, and many of us view reloading as being as much fun as shooting. In fact, one of my friends often jokes about shooting…he says it’s what we do so we get to reload ammo again.
A very cool guy named Roy Johnson taught me how to reload when I was in the Army. I was assigned to Fort Bliss, Texas, and Roy ran the Rod and Gun club there. Roy was a colorful El Paso fixture, and they named the road to the Rod and Gun club Roy Johnson Lane when he died. I was 22 years old when Roy taught me how to reload, and I’ve been reloading ever since.
I thought I would approach this topic in two or three parts, with the first blog focused on the equipment and components you’ll need to reload, and a subsequent blog or two on the actual reloading process. I had to pick a cartridge, so I thought I would start with the first one I learned to reload: The .45 ACP.
With that as a backdrop, here we go…
Reloading reverses the process of firing a bullet, and reversing that process requires several pieces of equipment.
One part of the equipment list is the dies that force the fired brass case back into shape (the brass expanded during firing) and knock the used primer out of the case.
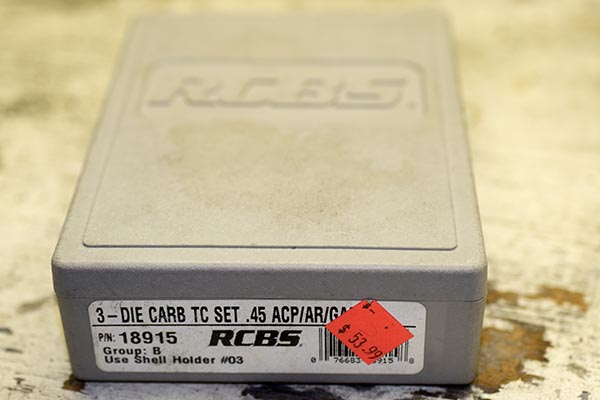
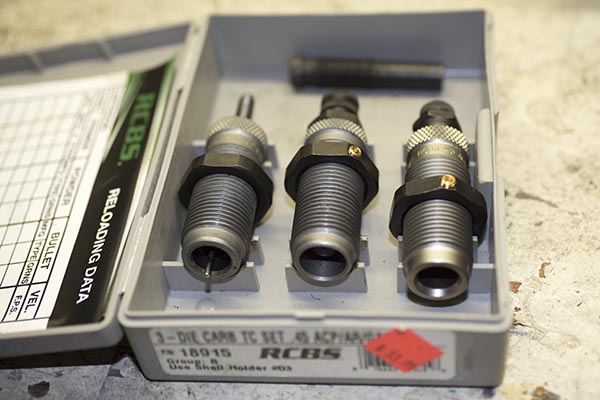
A set of RCBS carbide dies for the .45 ACP cartridge.A die set consists for a pistol cartridge typically includes three dies. From left to right, they are the resizing die (it sizes the brass case back to original dimensions and punches the primer out of the case), the expander die (it opens and flares the case mouth to accept the new bullet), and the seating die (it seats the new bullet in the case and removes the case mouth flare).
I stick with RCBS dies, as I’ve learned over the years they work best, but there are other manufacturers out there. I also use Lee dies for a few of the cartridges I reload (they are typically less expensive than RCBS dies, and they are as good). An added advantage of the Lee dies is that they include the shellholder with the die set, so you don’t have to buy a separate shellholder and pay extra for it. I don’t care for Hornady dies, but as they say, your mileage may vary. I’m the guy doing the writing here, so I’ll share my experiences and preferences, and I like RCBS and Lee. A new set of RCBS carbide dies are a little north of $50; Lee dies are typically $10 to $15 less than the RCBS dies (and like I said earlier, the Lee dies come with a shellholder).
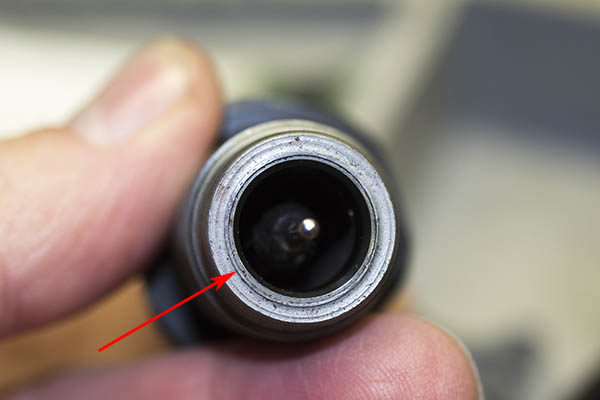
The business end of the carbide resizing die. The red arrow points to the carbide insert.
I use carbide dies for pistol cartridges. A carbide die has a super-hard carbide insert that interfaces with the brass case, and it allows you to squeeze the case back to its unfired configuration without having to lubricate the case first. The downside is that carbide dies are slightly more expensive than non-carbide dies. For straight-walled pistol cartridges, there are three dies in a set. We’ll discuss in more detail what each does in Part II of this series.
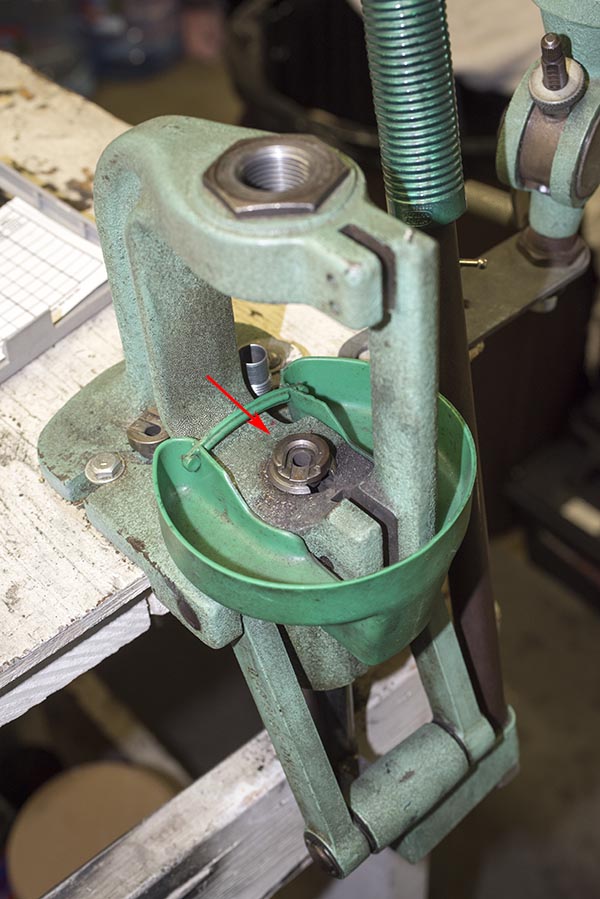
You will also need a reloading press and a shellholder for the brass cartridge case. I use an RCBS Rockchucker press I bought new nearly 50 years ago when Roy Johnson taught me how to reload. A good press lasts forever.
The RCBS Rockchucker reloading press. A good one lasts forever. The red arrow points to the shell holder. Different cartridges take different shell holders. We’ll see how all this stuff is used in Part II of our reloading series.
A scale is necessary for measuring propellant charges (also referred to as powder). Several companies offer scales specifically designed for reloading.
My RCBS reloading scale. Like the Rockchucker press shown above, I’ve been using this for a half century.
It’s a good idea to have reloading trays for the cartridges. These are relatively inexpensive, and they seem to last forever, too.
Reloading trays. These hold the brass cases we are going to reload, and allow for easy tracking and inspection of each reloading process step.
A powder dispenser allows you to dispense the correct amount of propellant in each cartridge case.
A powder dispenser, and the propellant I like to use for loading .45 ACP ammunition. I bought that dispenser back in the day, along with the scale and the press. My preferred propellant is Unique.
At this point, we’ve covered the equipment necessary; let’s now turn to the components. One is the propellant you see in the photo above. As seen in the photo below, for the .45 ACP cartridge, I prefer Unique.
You’ll need previously-fired cartridge cases. You can also buy new brass that has never been loaded if you don’t have any, or you can buy factory ammo, shoot it, and save the brass. I don’t think I’ve ever purchased new brass for the .45 ACP, mostly I had plenty available from my days in the Army. The .45 ACP cartridge is a relatively low-pressure cartridge, and the brass seems to last forever. I’ve been reloading the brass you see here for a long time.
Fired .45 ACP brass. It’s dirty. I usually polish mine, but it’s not necessary that you do so. We’ll talk more about that in the next blog.Polished .45 ACP brass. It cleans up well and it seems to last forever (look at the stamps on the two cases on the left).
You’ll need primers. The primer is the little cap that the firing pin strikes when you pull the trigger. There are two or three companies making primers these days. I usually buy whatever the shop has in stock. I haven’t found that primers make a difference in accuracy or reliability for handgun shooting.
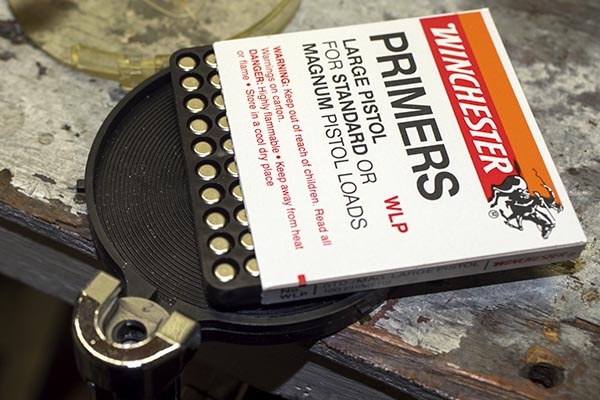
Winchester primers. We’ll talk about the tool you see below the primers, and how to install the primers, in the next blog.
And finally, you will need bullets. I’m using moly-coated 230-grain roundnose lead bullets these days, like you see in the photo below, mostly because I have a bunch of them in my reloading locker. Many other bullet configurations are available.
Bullets. I usually buy them in boxes of 500 because I do a lot of shooting. There are different kinds of bullets available, but that’s a discussion for another time, too. If you’re just starting out and you’re reloading .45 ACP ammo, my advice is to get a 230-grain roundnose bullet in either cast or jacketed flavors. It will feed reliability in nearly any 1911. We’ll talk more about this in the next blog, too.
There’s one other item I strongly recommend you purchase, and that’s a reloading manual. These manuals list different loads for different cartridges and different bullets and propellants. The whole idea here is to experiment with these combinations (within the parameters provided by the manuals) to find the recipe that produces the best accuracy and reliability in your gun. My preference is the Lyman manual, as it lists different bullet manufacturers and cast bullets, too. You can buy manuals from the bullet manufacturers, but the downside there is they only show data for their bullets.
You can buy all of the equipment separately (as I did a long time ago) or you can buy a complete kit that has everything you need to get started. RCBS has a kit that goes for about $350. Lee has a similar kit for a lot less (about $150), and it will get you into the reloading game. I have a friend who bought the Lee kit a few years ago, he uses it to reload .308 Winchester ammo for his Model 700 Remington, and the ammo he makes routinely delivers 1/2-inch groups at 100 yards. With either kit, you’ll need to buy the dies required for the cartridge you wish to reload, and the components as described above.
You might be wondering: Where do you buy this stuff? Most gun stores sell reloading equipment and components. Cabela’s and Bass Pro are two that come to mind. You can also buy components and equipment online from places like Amazon, Midway, Natchez Shooter’s Supply, Grafs, and other places. Buying the energetic components online gets a bit more complicated (propellants and primers), but the stores can fill you in on that. In most areas, there’s usually a shop that is known for being the best in your neck of the woods for reloading stuff, and you can find these places with a quick Google search or by asking around.
So there you have it. I’ve described the equipment and the dies you’ll need to reload the .45 ACP, but the procedures I’ll describe in subsequent blogs will be the same for nearly any handgun cartridge (.38 Special, .537 Magnum, .380, 9mm, .40 S&W, .44 Magnum, and .45 Colt). All you need will be different dies and shellholders, and of course, different types of bullets.
Our next reloading blog will cover the first steps of the reloading process. Stay tuned; it’s coming up!
Read our other Tales of the Gun stories for the loads we prefer. Disagree with anything above or want to toss your $0.02 into the discussion? Hey, there’s a comments section below and we’d love to hear from you.
One last thing…ever wonder what the “ACP” stands for in .45 ACP? Well, here you go…wonder no more.
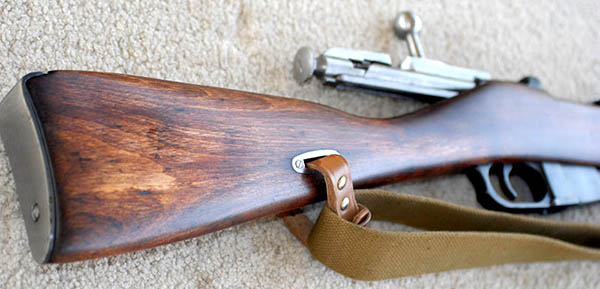
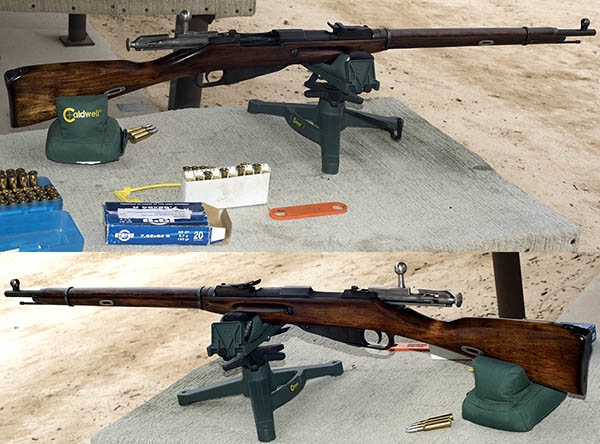
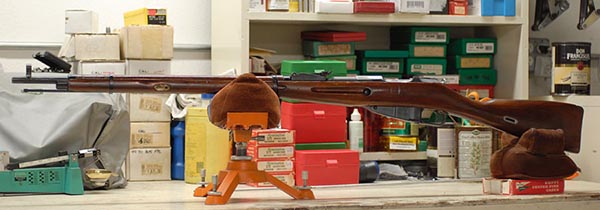
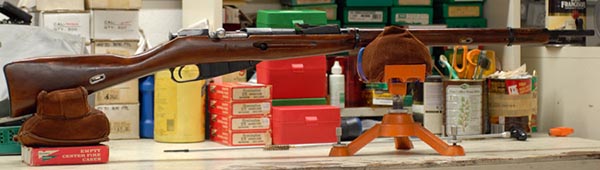
The Mosin-Nagant 91/30. These rifles are extremely accurate. This one is 84 years old.
I’m a Mosin-Nagant fan, as you know from reading our prior posts on these fine old Russian warhorses. I’ve got two, one I use with jacketed bullets and one I use exclusively with cast bullets. Today’s blog focuses on reloading and using cast bullets in a Mosin.
So what’s the deal on cast bullets? If you reload, you can use either factory-produced, copper-jacketed bullets, or you can use cast bullets. Cast bullets are cast of lead, lubricated with an appropriate grease, and sometimes fitted with a gas check (a small copper cap on the back of the bullet).
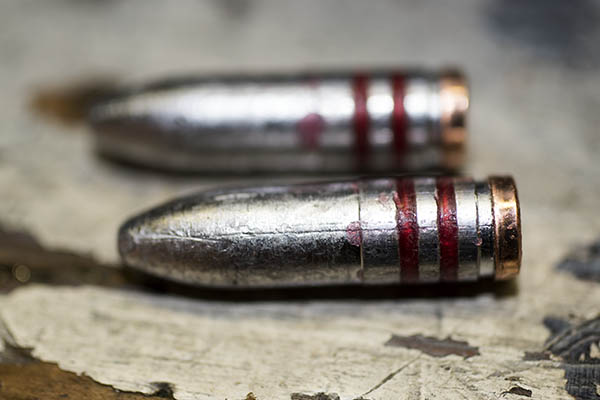
The cast bullets I’ve settled on as best for my Mosin. These are 200-grain, gas-checked bullets made by a local caster. The gas check is the little copper cap at the base of the bullet. It prevents the propellant gases from melting the bullet’s base and minimizes barrel leading.
Folks who shoot cast bullets either buy the bullets or they cast them themselves. I used to cast bullets 40 years ago, but I found it easier just to buy them from folks who know what they are doing and avoid the hassles of melting lead, breathing the fumes, etc.
Cast bullets are a lot easier on both the rifle and the shooter. The softer metal (lead versus a copper jacket) is easier on the rifling and the lower velocities reduce recoil. The downsides are that the trajectory is more pronounced due to the lower velocities associated with cast bullets, and generally speaking, cast bullets are not as accurate as jacketed bullets. But that last bit sure isn’t the case here. My cast loads in the Mosin are every bit as accurate as jacketed loads, and the Mosin I use for cast bullets is another one of my all-time favorite rifles. It’s the rifle you see in the first photo of this blog, and in the photos below.
My Mosin-Nagant has been worked on a bit. I stripped and refinished the stock, I glass bedded the action, and I did a trigger job to lighten the pull and eliminate trigger creep. It’s a great shooter.The desirable hex receiver Mosin. The Mosin-Nagant is an extremely accurate milsurp rifle.
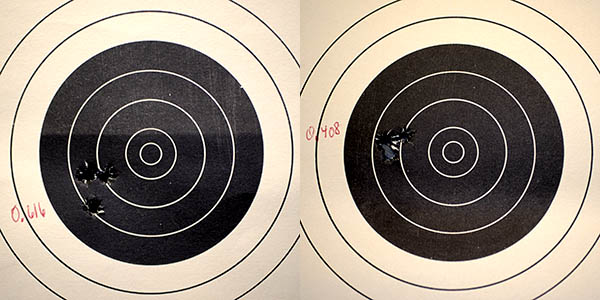
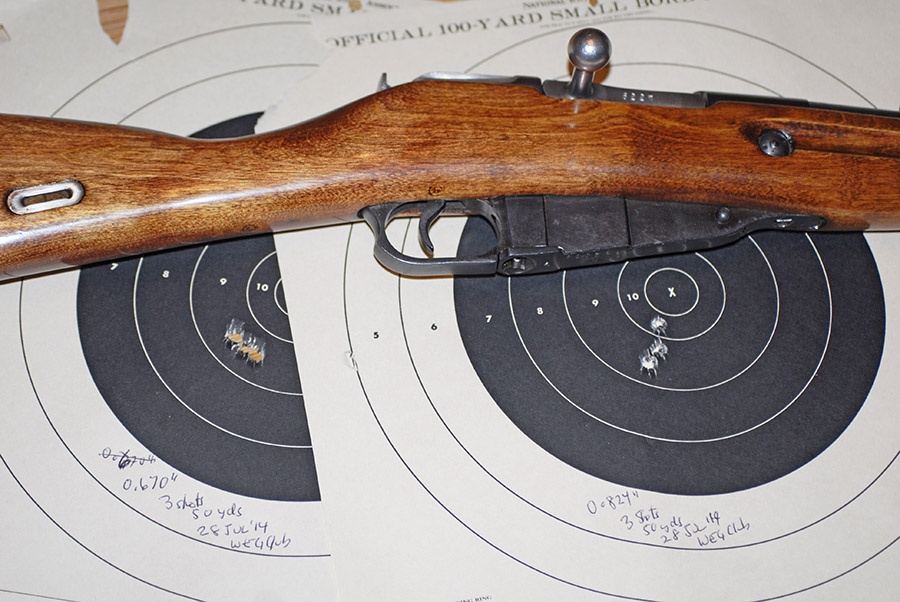
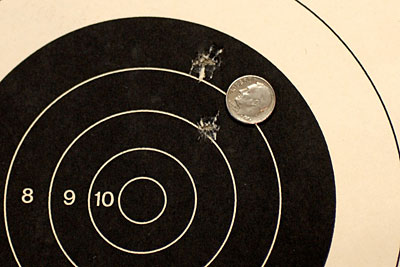
My cast bullet Mosin is just flat amazing. It regularly cloverleafs at 50 yards, and when I do my part, I’ll get groups under 2 inches at 100 yards. Yeah, I know, other folks talk about sub-minute-of-angle shooting at that distance, but we’re talking about iron sights and cast bullets here, folks, and it’s all being done with a rifle manufactured in 1935. And wow, can that 84-year-old puppy shoot…
Open sights, 50 yards, shooting from a benchrest at the West End Gun Club.
This kind of accuracy doesn’t just happen and it’s usually not attainable with factory ammunition. This is what you can get when you tailor the load to a particular rifle, and you can only do that if you reload. I developed the load used to shoot the targets you see above trying different propellants and propellant charges, different cartridge cases, and different cast bullets. The secret sauce? It’s this recipe right here…
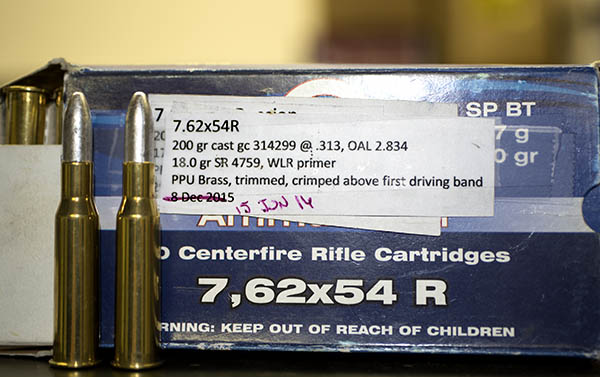
My Mosin load. SR4759 is a powder that works well for reduced velocity and cast bullet loads. It’s no longer in production, but I have a stash. When I run out of SR4759, I’ll turn to a current production powder and start the development process all over again.
Good buddy Gresh suggested I do a piece on reloading, and I actually had done that already in the form of a video some time ago. What you’ll see in the video below is the reloading process. When you reload a cartridge, you lube the brass, resize it to its original dimensions, prime it, flare the case mouth (to accept the cast bullet), add the propellant, and seat the bullet. With a little bit of music taken directly from Enemy at the Gates (a movie in which the Mosin-Nagant rifle was the real star), take a look at what’s involved in reloading 7.62x54R ammo with cast bullets…
Shooting cast bullets in a rifle is a lot of fun. A good reference if you want to try loading with cast bullets is the Lyman Cast Bullet Handbook (it’s the one I use). If you never tried reloading you might think about getting into it, and if you’re already reloading, you might think about giving cast bullets a go.
Check out our other Tales of the Gun stories! And, don’t forget to sign up for our automatic email updates. You might win our next quarterly adventure book giveaway!
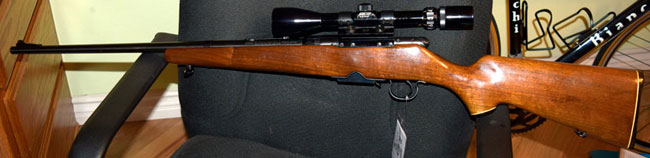
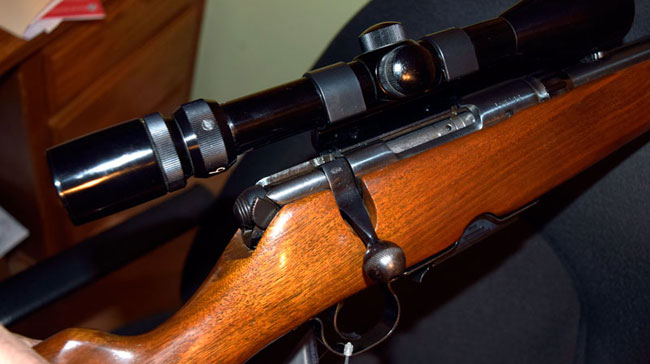
My new-to-me Savage 340 in .222. It’s got a scope and the whole shebang set me back $180. Such a deal!
I’m a rifle enthusiast, I can’t pass on an interesting experience, and I’m cheap. So when I was in a local gunshop a year or so ago, I was surprised and intrigued to see a consignment rifle go on the rack at a ridiculously low price. It was a 50-year-old Savage 340 bolt action rifle in .222 Remington (complete with a period-correct 3×9 telescopic sight) for only $180.
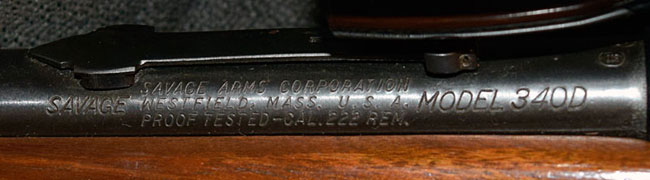
A Bushnell 3×9 scope was included with the deal!Rollmarks on the Savage.
This is a rifle that probably sold new for around $35 or $40, but like I said, that was 50 years ago. These days, any kind of a shooter for $180 is a steal. I was immediately attracted to the Savage by the price and the thought that it might make for a nice gunstock refinishing project. What really got my attention, though, was the cartridge for which it was chambered: The .222 Remington.
I’ve never owned a gun chambered in .222 Remington. The Triple Deuce is a cartridge that has a cult following because it is one of those special numbers known to be inherently accurate. It’s very similar to the .223 Remington (the 5.56 NATO round), but the .222 is a little bit shorter with a longer case neck. It’s proportions are said to be ideal for phenomenal accuracy. Like I said, I’ve never had a .222, but for $180, I could afford to find out if the stories were true.
Okay, on to Step 2 of this saga, and that’s the reloading aspect. Accuracy can be greatly enhanced by reloading. You know, that’s the deal where you save the fired brass, resize it in a reloading press, punch out the old primer, insert a new primer, load a precisely-controlled amount of new gunpowder, and seat a new bullet. Oilà…you have a reloaded round ready for firing. The deal with reloading is that you can experiment with different powders, different powder weights, different primers, different brass manufacturers, different bullet makers, different bullet weights, different bullet seating depths, and more. The concept is that you can tune the ammunition to precisely match a rifle’s preferences and achieve improved accuracy. I’ve been reloading ammo for close to 50 years and I’m here to tell you it works.
Now, back to that Savage rifle. I waited my obligatory 10 days (the Peoples Republik of Kalifornia’s “kooling off” period) and in Governor Gavin’s eyes I guess had cooled off sufficiently. I picked up my new-to-me, 50-year-old Savage and loaded several different combos to see how the old 340 would work. In a word, it was awesome…
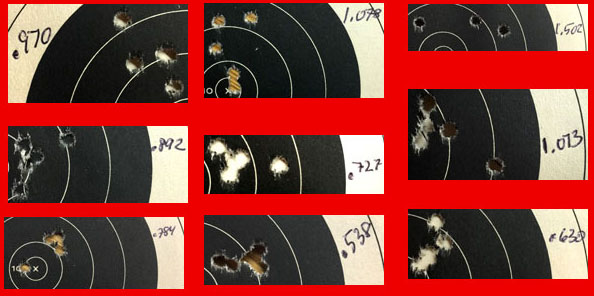
Impressive results for the first time out with a 50-year-old rifle. These groups were fired at 50 yards; the next steps will involve experimenting around the best load and testing for accuracy at 100 yards. The recipe for the tiniest loads was a 55-grain Hornady full metal jacket boat tail bullet, a cartridge overall length of 2.176 inches, and 22.6 grains of IMR 4064 propellant.
You can see that different loads do indeed result in different accuracy levels. This is encouraging stuff, and what makes it even more promising is it shows the results of just one reloading session. The load that printed a 0.538-inch group is clearly pointing toward what the Savage likes, and my next set of loads will refine that combination. Good stuff and great fun, and all with a rifle that only cost $180!
The rain has been nonstop here for the last several days, and for the last couple of nights it’s rained so hard that it woke me up a few times. I guess nearly all of California is getting drenched. It’s too wet to ride and it’s too wet to shoot, so I’ve been catching up on other stuff.
On that shooting bit…to get to my gun club you have to drive down a dirt road for a couple of miles, and at one point the road actually crosses a stream. Usually it’s only a couple of inches deep and sometimes it’s even dry, but that sure isn’t the case right now. The gun club sent out an email yesterday afternoon with a video warning folks not to try to drive across the stream (which is now a little river)…
So, with all this rain (and some hail) I’ve been attending to other things…catching up on writing a couple of articles, doing a bit of reloading, and I even put a new battery in my TT250.
Reloading is a good thing to do on a rainy day, and the menu today included .44 Magnum and .45 AutoRim, two of my all-time favorite cartridges.
.44 Mag loads for more accuracy testing in the new Ruger Turnbull Super Blackhawk. These loads have a 240 grain cast bullet with Unique loaded at 9.0 grains, 10.0 grains, and 11.0 grains. We’ll see which load the Turnbull prefers..45 AutoRim ammo. This cartridge is just like the .45 ACP, except the rim allows shooting it in revolvers chambered for the .45 ACP without the use of metal clips. This is a 200 grain moly-coated cast bullet with 6.0 grains of Unique, and it is a shooter!Shooting the .45 AutoRim cartridge in a Model 625 Smith and Wesson last week before the rains started. That’s 100 rounds at 25 yards. The two outside the black happened when a fly landed on my front sight. Or maybe it was a sudden gust of wind. Or maybe I sneezed. Yeah, that was it.
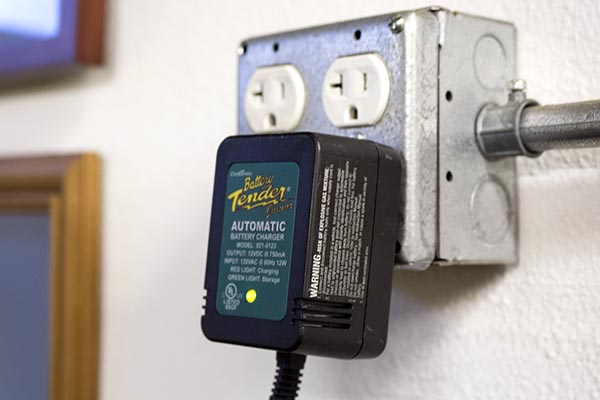
Back to the battery for my TT250…I’ve owned my TT250 for close to three years now and the battery finally gave up the ghost. I stopped in at CSC and told Steve I wanted a new one on the warranty, and we both had a good laugh about that. Steve told me I was the only guy he knew who could get that kind of life out of a Chinese battery. I thought that was kind of funny because all the batteries are Chinese now.
Seriously, though, I think the reason my batteries last so long is that I usually keep them on a Battery Tender. Those things work gangbusters for me, the bikes run better when the batteries are kept fully charged, and the batteries seem to last a good long time. You can buy a Battery Tender most anywhere; my advice would be to get one (or more) from CSC. They come with a little pigtail you can permanently install on your battery, which makes connecting the Battery Tender a snap. I have one on both my RX3 and my TT250.
I rotate the battery between my RX3 and my TT250, and the batteries seem to last a lot longer. I don’t know why anyone who owns any motorcycle wouldn’t have one of these.The Battery Tender pigtail on my RX3. You can’t get the polarity wrong on these if you’ve connected the pigtail to the battery correctly. You get a pigtail for free when you buy a Battery Tender.
Another bit of a commercial for CSC…the mailman dropped off a box on Saturday, and it was one of the new CSC hats. I’m a hat guy. I like wearing a hat. My favorite kind of hat is a free one. The CSC hat I received was free (thanks, Steve), but unless you wrote a blog for CSC for 10 years, it’s not likely you’d get yours for free. I think they sell for $19.95, which is a bit above what hats normally go for, but this one is more than worth it. It’s got cool embossed stitching and it looks good. I like it and I think it will make me a better man. Like I said, $19.95 ain’t bad, but maybe you could get one for free as part of the deal when you buy a new CSC motorcycle. I’d at least ask the question. The worst that could happen is Steve will say no. But if he does that, ask for a free copy of 5000 Miles At 8000 RPM when you buy your new motorcycle. You never know.
I got a free hat from CSC. Gresh didn’t. At least not yet, he didn’t. Seriously, these are nice hats.
Hey, here’s one more cool photo. I’ve been spending a bit of time up in northern California. I have a new grandson up there who I think is going to be a rider, a shooter, and a blog writer. On that blog writing thing, I told him it’s a great foundation for any “get rich slow” scheme, and I think he gets it. Anyway, my wife Sue is still up there, and she saw the neighborhood brood of wild turkeys this morning walking around like they own the place…
Genuine Screaming Turkey performance parts? It could work…
You know, there was some talk of making the turkey our national bird instead of the bald eagle when our country first formed (Ben Franklin was pushing for the turkey, but I guess the rest of the founding fathers told him to go fly a kite). As an aside, when I ride up to northern California, I take Highway 152 across from Interstate 5 to the 101, and there’s a tree where I always see one or two bald eagles. Bald eagles are majestic raptors. I can see the logic behind the turkey, though. But wow, would it ever take a rethink of a lot of marketing stuff, and in particular, it would make for a major revamp of one particular Motor Company’s marketing and branding efforts (you know, the guys from Milwaukee). Seriously, their performance parts would all have to be marketed under a new Screaming Turkey brand. You could bask in the assumed glory of your motorcycle’s heritage as you rode like, well, a real turkey. Perhaps the Company could get a patent on a new exhaust note….one that would have to change from “potato potato” to “gobble gobble.” There would have to be new logos, tattoos, T-shirts…the list just doesn’t end. But I guess I had better. You know, before I offend anyone.
Stay tuned, folks. Like always, there’s more good ExNotes stuff coming your way. Gobble gobble.
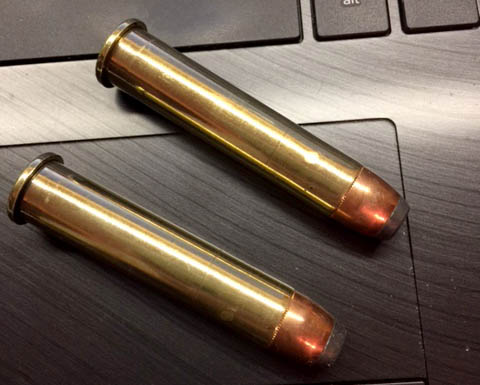
The 45 70 is a cartridge that’s been around since 1873, and it’s a whopper. Its designation was originally the 45 70 500 (a .45 caliber, 500 grain bullet, packed with 70 grains of powder). It was an Army cartridge used in the 1873 Springfield rifle, and the recoil was fierce enough that Uncle Sam soon cut the bullet weight to 405 grains. The cartridge was also used in Sharps and other rifles, and the early Gatling guns.
Reloaded 45 70 cartridges, with the 300-grain Hornady bullet. This is a big cartridge. It’s what buffalo hunters and Gatling guns used.
After the Army went to the 30 06 cartridge (in, of course, 1906), the 45 70 just about went belly up. But then Ruger re-introduced the 45 70 in their No. 1 single shot rifle in the early 1970s, and Marlin reintroduced their 1895 rifle shortly after that. The fun started all over again. That’s when I got in the game (back in the 1970s), and I’ve been happily sending those big .45 slugs downrange ever since.
I’m a big fan of the 45 70 and I’ve been told I’m a bad influence, as I’ve had several friends buy 45 70 rifles after hanging around me. It’s been fun, especially reloading the 45 70 and comparing recipes (more on that in a second).
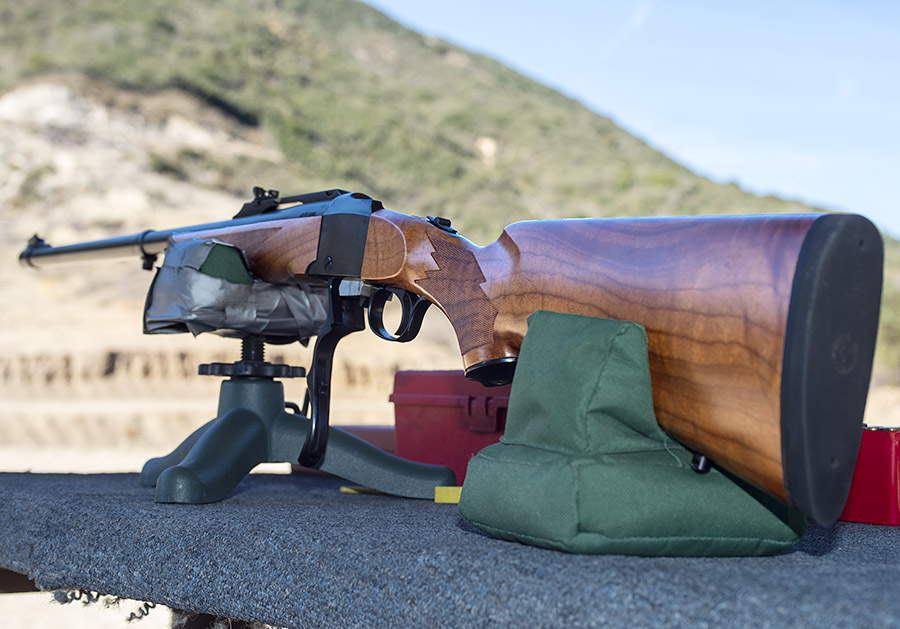
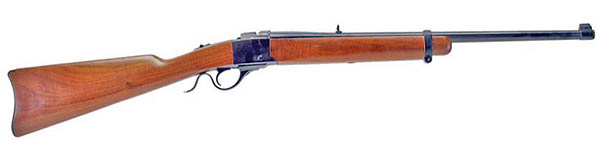
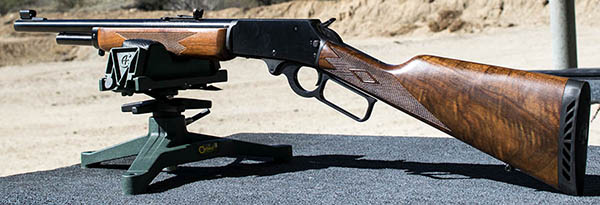
As mentioned above, the Ruger No. 1 was the first of the modern rifles chambered in 45 70, and it’s a beautiful firearm. The Ruger No. 3 was an economy version of the No. 1 that Ruger only made for a few years. The No. 3 rifles were substantially less than a No. 1 when new, but because they’ve been discontinued, No. 3 rifles often sell for as much as a No. 1 (and sometimes more). The Marlin is less than either Ruger, but don’t confuse price with quality (or fun). The Marlin is a hoot to shoot, too.
A 45 70 Ruger No. 1, with Circassian walnut furniture and a 26-inch barrel.The Ruger No. 3, also in 45 70. These rifles sold for about $139 when new. Today they can sell for as much as $1000 in pristine condition.A Marlin 1895 45 70 Guide Gun. I bought this rifle because of its wood. It’s a good shooter, too.
I mentioned that my several of my friends now have 45 70 rifles, and we all reload 45 70 ammo. The idea is that we want to find the most accurate load for our rifles, and every rifle (even the same model) has its preferences. No two guns shoot the same.
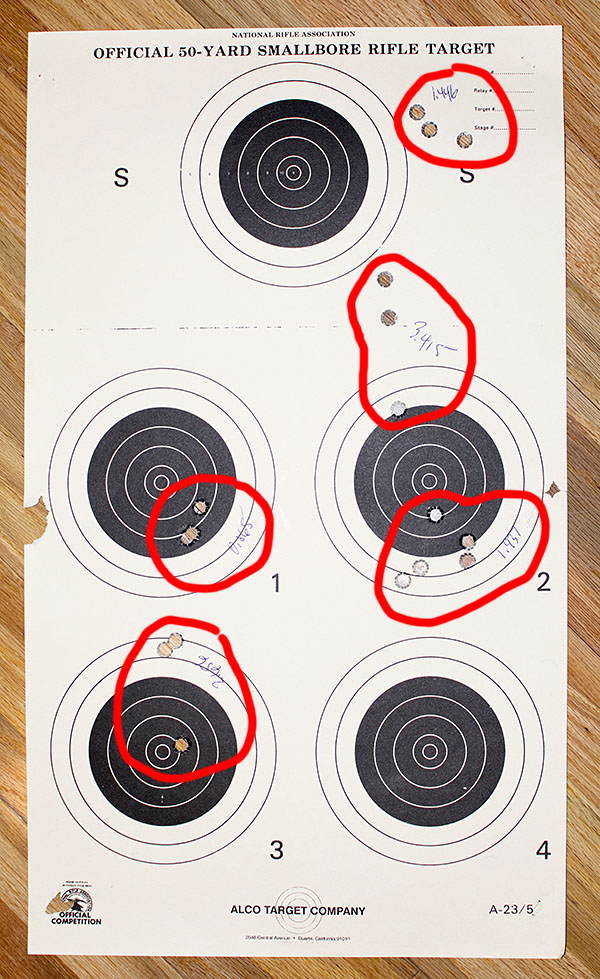
Here’s where all this going. One of my buddies tested a load that looked promising in his 45 70 (a load using Trail Boss gunpowder with a 300 grain jacketed hollow point bullet), so I tried his load along with one other, all in the above three rifles, to see how they would do.
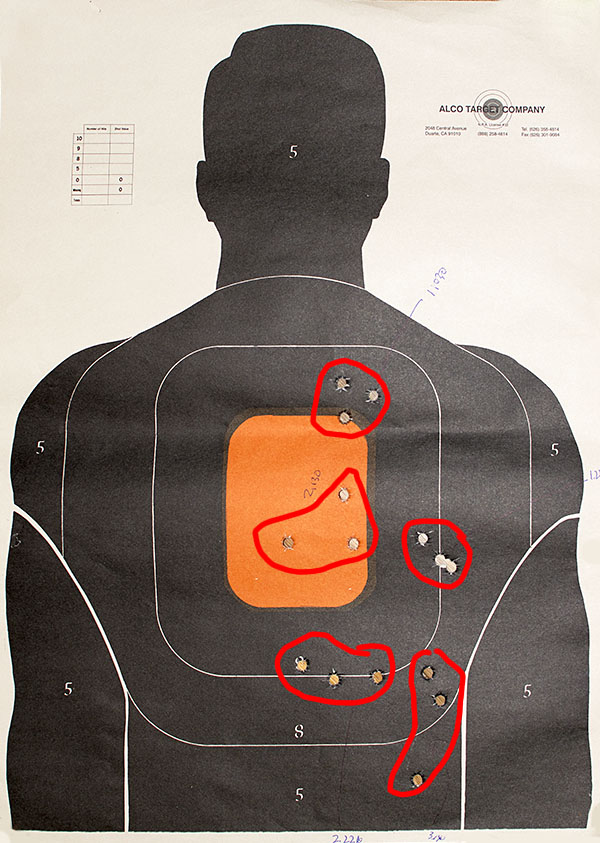
I shot at two targets for this test (a standard silhouette target and a 5-bullseye target). I shot each rifle at the silhouette’s orange center first (my aim point) because I didn’t know where the rounds would hit and I wanted to make sure I was on paper. Then I shot a second group from each rifle at the bullseye targets. I shot 3-shot groups except for one, as noted in my results in the table below. Note that all targets were fired at a distance of 50 yards.
First, the targets…
There are five different groups on this target. My point of aim was the bottom of the orange rectangle.The bullseye targets. I wasn’t worried about each group’s location; at this point, only group size was of interest. After picking the best load, I’ll adjust the rifle’s sights.
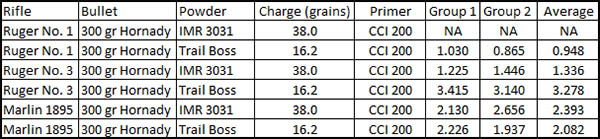
And finally, my tabulated results….
The first load tested would not chamber in the Ruger No. 1 because the bullets were seated too far forward in the brass cartridge case; better to find this out at the range than on a hunting trip!
The Ruger No. 1 really liked that 16.2 grain Trail Boss load (it was my buddie’s favored load). It delivered a 1-inch group. This load was also good in the Marlin, but not nearly as good as others I have shot in that rifle (the Marlin shoots into 0.6-inch with the right load). The No. 3 Ruger seemed to like the 3031 powder load with the 300 grain jacketed hollow point bullets.
As I mentioned above, every rifle responds differently to a given load, and that’s what we try to find…the best load for the best rifle.
My initial exposure to the Mosin-Nagant rifle occurred when I saw the movie Enemy at the Gates a few years ago. At that time, I didn’t know anything about Mosin-Nagants other than I had seen them for sale at ridiculously low prices in Big 5 sporting goods stores. I never took Big 5 as a serious gun store (I went there when I needed jogging shoes), nor did I think of Mosins as interesting rifles. But Enemy at the Gates got my attention. It was very well done, starting with the opening scene when Vasily Zaitsev nailed a wolf with a Mosin, and progressing to the now famous “Can you shoot?” scene near the beginning of the movie.
Enemy at the Gates was set in Stalingrad. I studied that battle. Stalingrad was one of the world’s epic struggles. Hitler sent two million men into Russia; fewer than 3,000 returned to Germany. Incredible and awesome stuff, and snipers played a key role in turning the tide for the Russians.
Please click on the popup ads…it’s what keeps us going!
I didn’t run out and buy a Mosin-Nagant after watching Enemy at the Gates, but the seed had been planted. I also knew a bit about the history of modern sniping in the US military. I read a book a few years ago about Carlos Hathcock, our famous sniper of the Vietnam War (that book, incidentally, is awesome).
Available on Amazon, Marine Sniper is a great read.
So, fast forward, and my interest in rifles ultimately extended to the Mosin-Nagant. I purchased my first Mosin-Nagant (a round receiver Tula; more on that in a moment) and I was impressed with it. For $179, it was cheap fun. I started reloading 7.62x54R ammo for the Mosin after I bought a couple of boxes of factory PRVI Partizan ammo. The PRVI ammo was stupid hot, not very accurate, and I knew I could develop a better load than the factory stuff. And I did, but that’s a story for another blog.
I told my shooting and riding buddies about my Mosin and how much fun I was having with it. After listening to me babble on, my friends started buying Mosins, too. One of those guys was my good buddy Paul up in Hollister. Paul picked up a real nice hex-receivered Izzy (Ivhevsk was one of the two Russian arsenals that produced Mosin-Nagant rifles; my first Mosin was made by Tula, the Russian other arsenal). Then, like most of us, Paul convinced himself one Mosin was not enough. Paul wanted a round receiver (the other Mosin receiver configuration).
After picking up his second Mosin-Nagant, Paul shot an email to me explaining that he found a couple of holes on the left side of the receiver filled in with threaded plugs, and that the outside of the receiver over these holes had been welded and filed smooth. He had researched it and, to his great surprise, Paul learned that his Mosin had been a former sniper rifle. It seems that after World War II, the Russians refurbed these guns (including their sniper weapons), and they returned the snipers to a non-sniper configuration by welding in the receiver’s scope mounting holes.
Let me go tangential for a minute and explain how the Russians made sniper rifles during World War II. Unlike us, the Russians did not build a sniper rifle from the ground up to be super accurate. They built more than 17 million Mosins, and they test fired every one. If a particular rifle was found to exceptionally accurate during their routine post-production test firing, it was marked to be a sniper rifle. And my good buddy Paul scored one.
I thought that was beyond cool. An actual Mosin-Nagant sniper rifle. It was Enemy at the Gates come home to roost. I was happy for Paul finding such a great rifle, and I was jealous. I thought that the entire Mosin thing was great…my getting into Mosins, Paul buying two Mosins based on my enthusiasm, and then finding out that one of his was a sniper rifle.
My interest was pumped, and remembering the scenes from Enemy at the Gates, I started looking for stuff on Vasily Zaitsev. That’s when I came upon this video…
Enemy at the Gates certainly played up the Zaitsev-Koenig sniper duel, and so did The History Channel special. To hear it straight from the man himself (Vasily Zaitsev) it was just a chance encounter. Ah,Hollywood.
All the while this was going on, my interest in Mosins continued to develop. Just like Paul was convinced he needed a round receiver Mosin, I convinced myself I needed a hex receiver. Hey, at these prices, Mosin-Nagant rifles were like potato chips. You couldn’t have just one. So I found a 1935 hex receiver Izzy at Big 5 (Ivhevsk was the other Russian arsenal that built Mosins), I pulled out my credit card, I waited my obligatory People’s Republik of Kalifornia 10 days, and it was mine. The bore on the new-to-me ’35 Izzy was about in the same condition as the 1940 rifle, which is to say it looked like it had been rode hard and put away wet. Maybe I’m being too kind. It looked like a sewer pipe.
Then, on a motorcycle ride through Big Bear, California, I stopped at their Big 5. Like most Big 5 stores, the kids that worked there didn’t know much about these rifles, and the one rifle they had on display looked pretty decrepit. I asked the same question I always did when seeing a rifle on the sales rack, and they dutifully pulled out the other Mosins they had in their safe. To make a long story short, I found another 1935 hex receiver rifle with all matching numbers and I pulled the trigger (figuratively speaking) on that one, too. Another 10 days went by and I made the trek back up to Big Bear to pick up my latest Pringle.
The next day I went to the range with all three of my Mosins – the first 1940 Tula, the second 1935 Izzy with a hex receiver, and my latest 1935 hex receiver Tula (the Big Bear rifle). Of the three, I had previously only fired the 1940 Tula.
The Big Bear Mosin, waiting to surprise me.Same rifle, different side…
I shot the first two Mosins, and they were good shooters. Then I tried the Big Bear Tula, and at first, I thought the accuracy was terrible. My first shot was on the paper at 50 yards, but my second shot had missed the paper completely (that’s how it looked through the spotting scope). I fired a third round and that one was satisfyingly only about 3/8 of an inch away from the first. I walked downrange to inspect the target, and wowee!
My first three sniper rifle shots…two went through one hole!
That second shot wasn’t off the paper…it went through the same hole as the first shot! Thinking that this was just a fluke, I fired another group of three shots, with similar results! Wowee again! With open sights, this was iron sight accuracy I just wasn’t used to. It was stellar. Bear in mind these were the first shots I had put through this rifle. I was elated.
Knowing that this Tula was a shooter, I took the rifle apart later that day to give it a good cleaning. I noticed the little nicks and dings you see when you do this sort of thing, including what looked like painted over weld spatter on the left exterior of the receiver. Even though Paul had explained the findings on his sniper rifle to me, it never occurred to me what I was working with. I didn’t think about sniper rifles; I just thought that due to this particular rifle’s condition it probably saw action in World War II and the Russian refurb arsenal did the best they could to clean it up. And I knew it was a shooter. The thing was just flat accurate. Amazingly so.
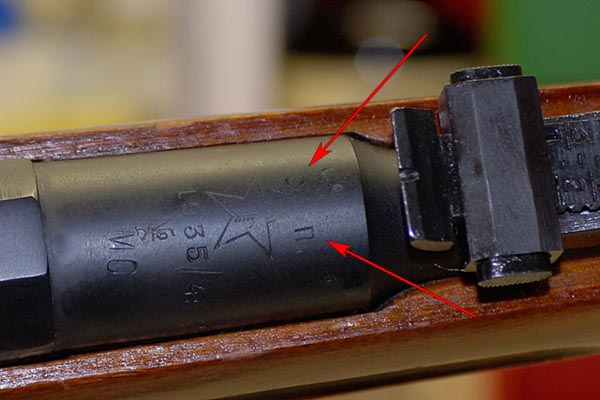
I snapped a bunch of photos when I reassembled the Tula, and here’s the money shot…
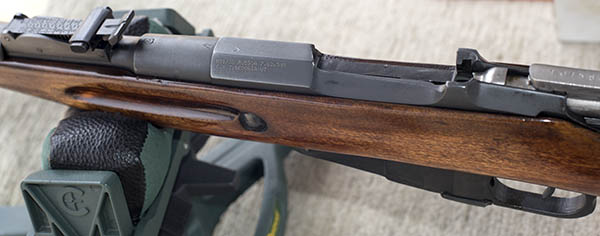
Lots of markings. The red arrows point to the sniper designation. The star means the rifle was manufactured at the Tula arsenal.
I didn’t know what all the markings on it meant; I simply liked the photo and I posted it on one of the Mosin Internet forums.
Well, the Mosin forum lit up, and the comments started pouring in. The first one was a simple one-word comment:
Sniper.
Hmmm. How do you know that, I posted, watching more comments pour in about my Mosin being a sniper.
It’s the markings that look like a C and an N, the forum dudes told me. One guy wrote “Look inside the receiver and you’ll see the two plugs on the left side…I know they’ll be there.”
Wow, before I even looked, it all came together for me. The weld spatter on the outside of the receiver. The overall condition of the rifle (rode hard, put away wet, definitely not pristine). I pulled the bolt back, looked inside, and there they were…the plugged holes where the sniper scope used to be. Awesome! I had hit the jackpot, just like Paul did!
So this whole Mosin Sniper thing really had my attention. I poked around on the Internet a bit more and these photos showed up…
Roza Shanina
That’s Roza Shanina, “the unseen terror of East Prussia,” holding a Mosin-Nagant sniper rifle. She’s credited with 59 kills during World War II. Her story is fascinating and would make for a great book. It all sounds like a hell of a story.
You’ll notice there’s a scope on Roza Shanina’s rifle, which is what the sniper rifles had. The mount for it required two threaded holes on the receiver, the two holes the Russians plugged when they refurbed the rifles. The sniper rifles also had a longer, downturned bolt handle that allowed the shooter to work the bolt with the scope mounted. All very cool stuff. The Stephen Hunter novel references to a fictionalized Shanina are oblique and like most novels, some of the technical stuff is wrong. But it’s a great read.
You can still buy Mosin-Nagant rifles, but the prices are climbing sharply and these rifles are not as readily available as they were just two or three years ago That’s probably a good thing, because my credit card can stay hidden away in my wallet. But I still like to look, and if I see a Mosin on the rack in any gun store, I’ll check the receiver for the sniper markings and the two weld plugs where the scope used to be. I haven’t seen a single one since I scored mine, and that’s a satisfying feeling.