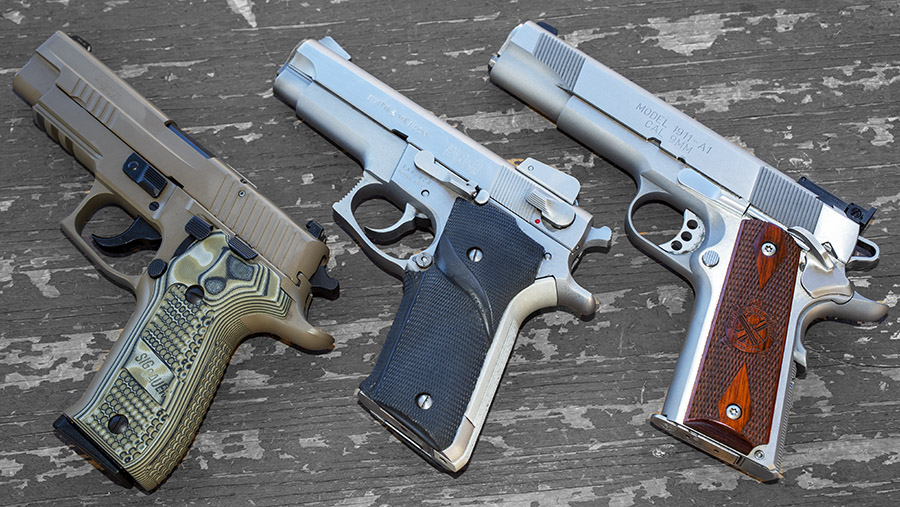
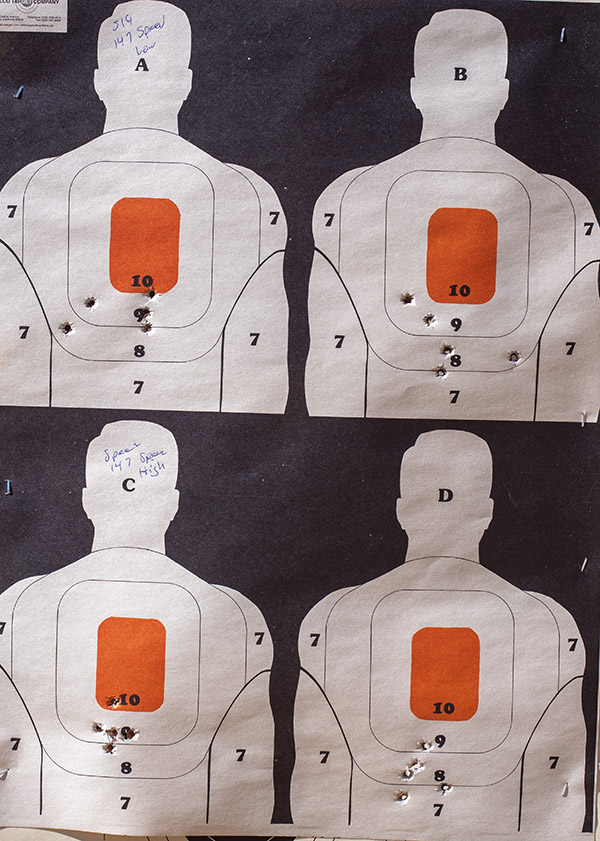
Back in January I tested a bunch of 9mm cast bullet loads in the three handguns you see above: A SIG P226 Scorpion, a Smith and Wesson Model 659, and the Springfield Armory 1911 Target. For that test series (you can read it here), all the loads used the Missouri 125-grain cast roundnose bullet with different powders and different charge weights. My cast bullet testing showed the SIG to be the most accurate, followed by the Springfield and then the Smith and Wesson Model 659.
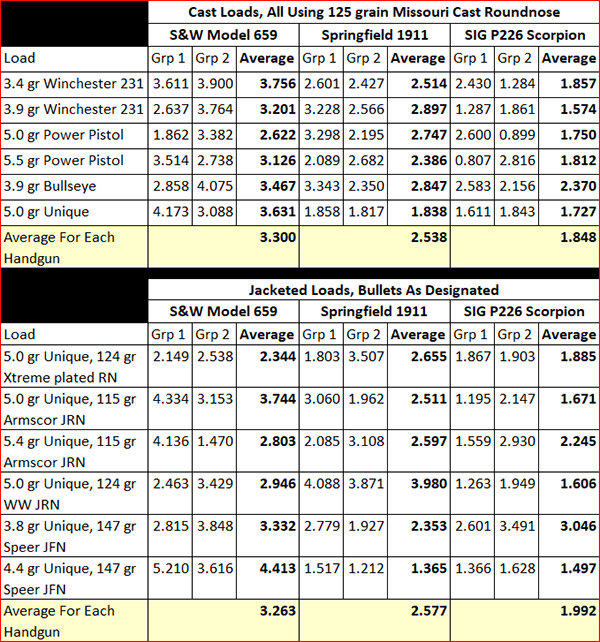
I promised an update with jacketed bullets to assess accuracy and functionality of all three handguns (and to find favored accuracy loads for each). It took a while, but I finally got around to making good on that promise this past week. The six different loads I tested for the jacketed 9mm test series are summarized below:
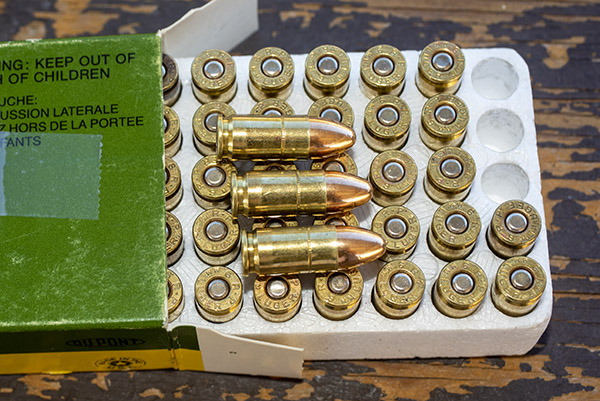
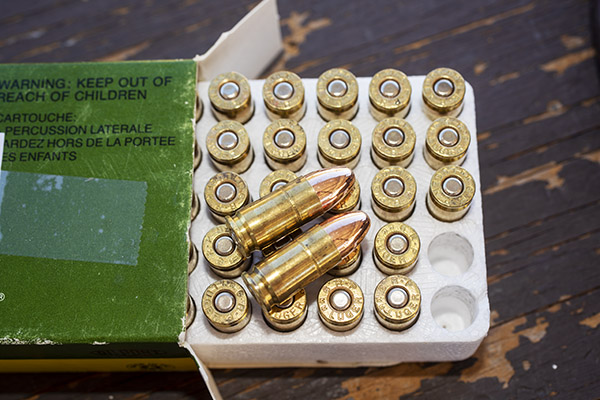
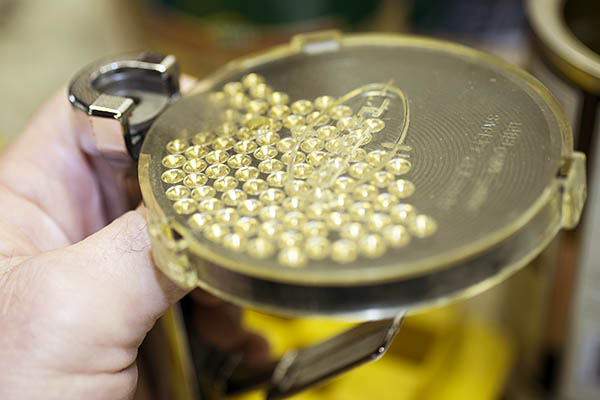
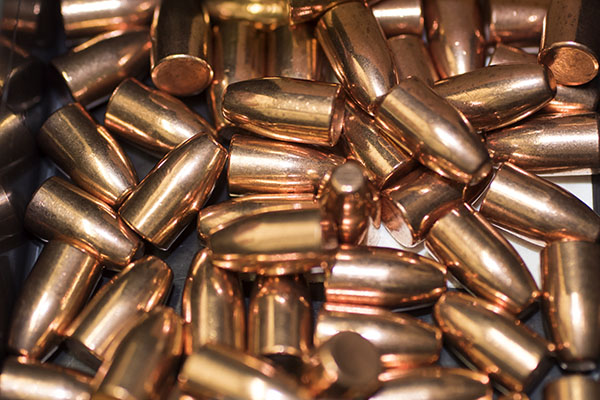
Actually, the term “jacketed” doesn’t really apply to the Xtreme bullets (they are copper plated, not copper jacketed). The Armscor bullets are brass jacketed. Both the Winchester and Speer bullets are copper jacketed bullets. As you can see from the table above and the photos below, the Xtreme, Armscor, and Winchester bullets were of the roundnose configuration. The Speer 147-grain bullets were jacketed flatnosed bullets. I didn’t try any hollow points in this test series; I prefer roundnose bullets in my 9mm handguns. They are reliable.
All groups were 5 shot groups. I shot a total of 360 rounds in the two test series (both the jacketed and cast bullet accuracy tests).
While I was shooting last week, I was a little disappointed. I thought I had done a lot better with the cast bullets back in January. I thought my jacketed groups were larger when I eyeballed the targets, but you never really know until you measure the groups.
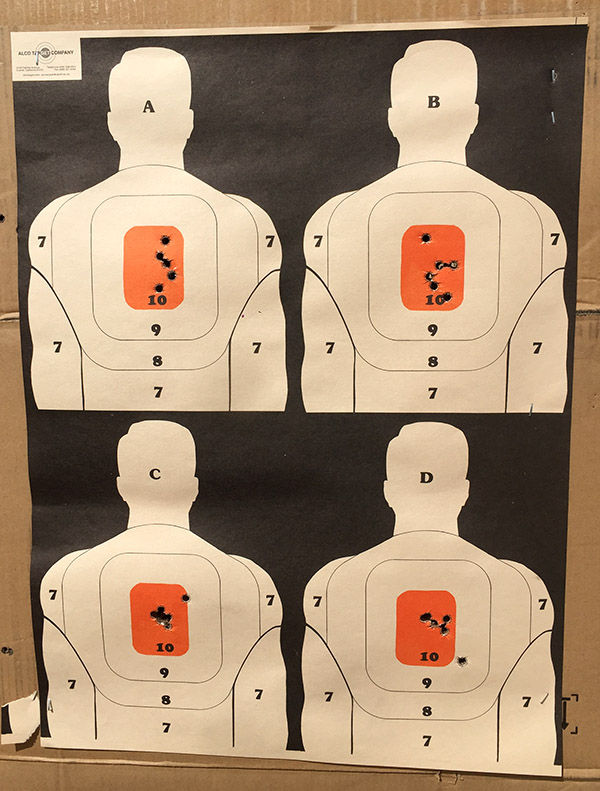
9mm jacketed bullets on an Alco target. I like using the Alco target that has four mini-silhouettes on a single target. All testing was at 50 feet.
When I returned home, measured the group sizes, and tabulated the results, I was surprised. The results of the jacketed and plated bullets were not too different from what I had achieved with the cast bullets almost a year ago. Take a look:
The most surprising finding, for me, was that the average results with the jacketed bullets (versus the cast bullets) were almost identical. Here’s that data extracted from the above, shown in a table that makes it a little easier to make the comparison:
My testing showed essentially the same results for the three handguns I tested whether I used cast bullets or jacketed bullets: The SIG P226 Scorpion is the most accurate (it is a magnificent handgun), followed by the Springfield Armory 1911, followed by the Smith and Wesson 659. It doesn’t matter whether it’s with cast or jacketed bullets: The averages are eerily similar for each gun, with a very slight accuracy advantage going to the cast bullets for the SIG and the 1911, and a very slight accuracy advantage going to the jacketed bullets for the Smith 659. But the differences between jacketed and cast bullets are so small they can be ignored. Cast bullets are usually a lot less expensive than jacketed bullets, so this is good knowledge.
Help us continue to bring stories to you: Please click on the popup ads!
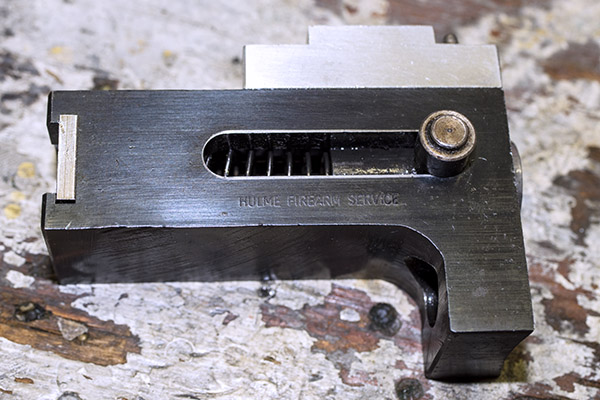
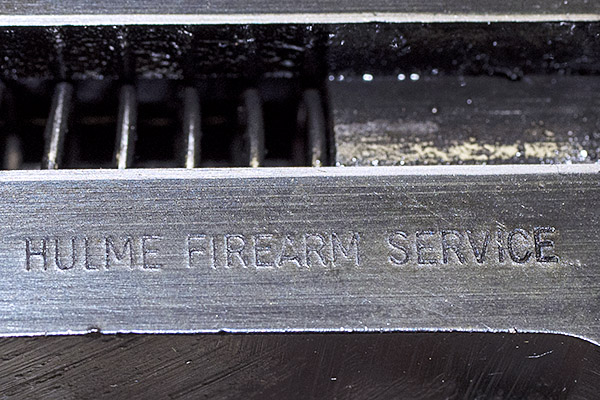
The Star story just keeps getting better. I not only picked up the reloader for free…I also got a free Hulme case feed mechanism. I didn’t realize what I had until I started learning more about these marvelous old machines.
You may remember that we posted a blog a month or so ago about the Los Angeles Sheriffs Department Pistol Team. It was a cool old video (it was from the 1930s), but I didn’t realize just how cool it was until I spoke with my buddy Paul about the Star reloader I’m resurrecting. Paul mentioned that the LASD video had a segment about reloading .38 Special ammo, and as soon as he said it, I remembered the scene. You’re certainly welcome to watch the entire video again, but my advice would be to jump to the 13:57 mark to see the Star reloader in action:
Man, those guys are busy, I thought as I watched them reloading .38 Special ammo in the video above. It’s almost as if you need three hands (or two people) to operate the Star. For every cycle, you need to:
Insert a case in the shell plate.
Insert a bullet in the case that’s just been charged with powder.
Pull the main lever down.
Pull the main lever up.
Index the shell plate one position counterclockwise.
Then I realized: The guys in that video above were placing the empty .38 Special cases directly into the shell plate. My Star doesn’t work that way. It has a case feed mechanism. Instead of inserting the empty case directly into the shell plate, you insert the case into the case feed mechanism. Why do that, I wondered, when you can insert the case directly into the shell plate?
Then it hit me: My Star had the optional Hulme case feeder. It was missing a couple of parts (the empty case magazine and the support for that magazine), but those parts would be easy to replace or make myself. That way, I wouldn’t have to insert an empty case into the Star every time I pulled the lever. I could just load up 25 or 30 cases at a time, and the Hulme case feed mechanism would take care of the rest. That would simplify the number of actions I’d have to do each cycle. Woo hoo!
Here’s another YouTube I found that explains how the Hulme case feed mechanism works.
It’s all very clever. I started this part of the Star resurrection by cleaning up the Hulme case feed mechanism on my press.
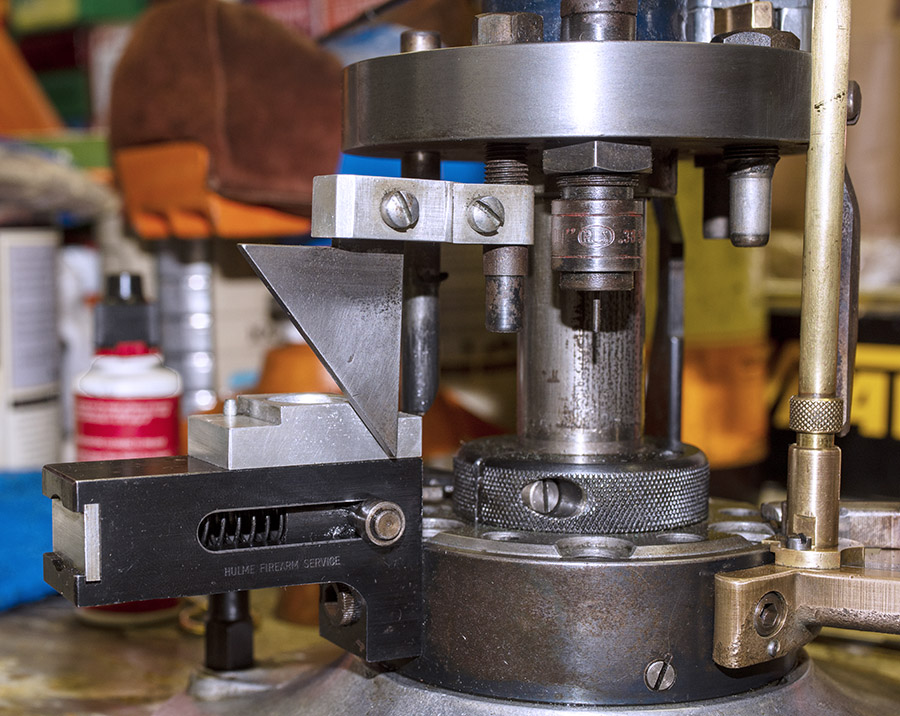
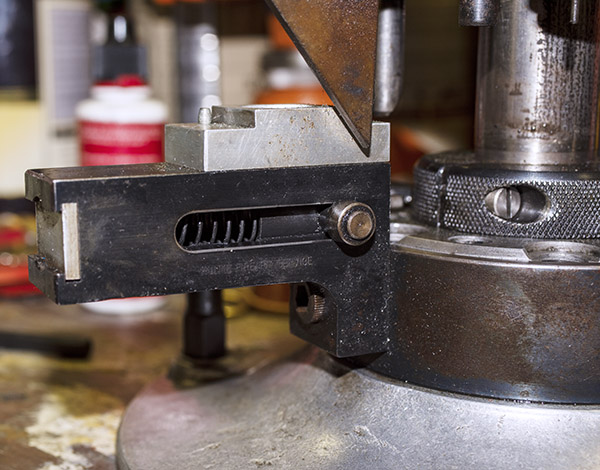
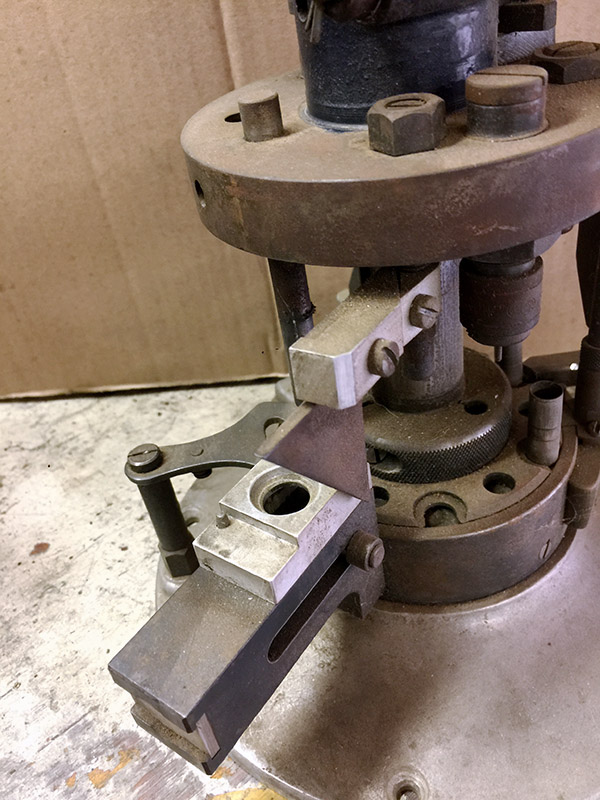
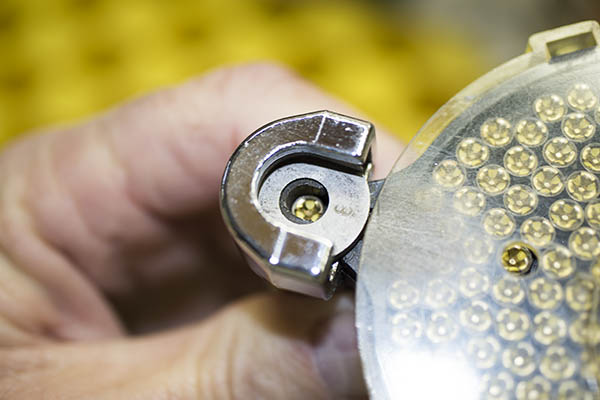
Here’s what it looked like before I disassembled it for a more thorough cleaning. Notice the rusty cam angle at the top of the photo below.
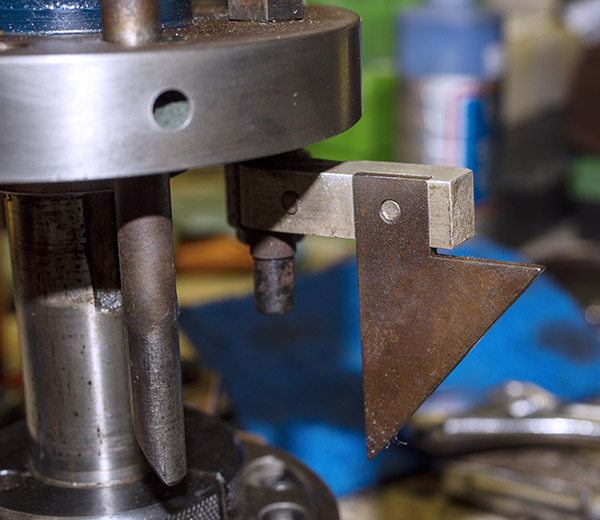
Here’s another photo of the rusty cam. It’s the piece that drives the Hulme case feeder to the rear when the tool head is lowered (which occurs when the main lever is pulled down).
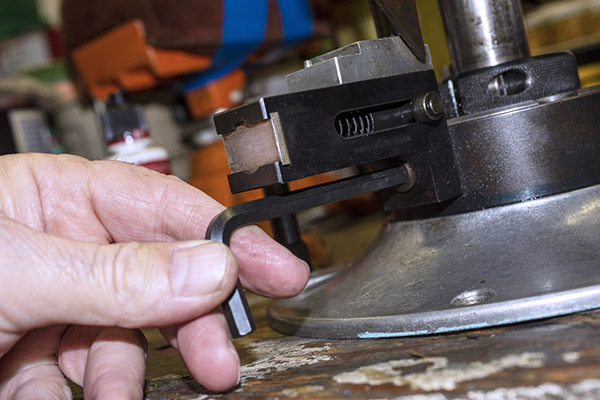
The Hulme case feed mechanism attaches to the Star base with a single Allen bolt. Stars originally did not have that hole in the base, but the Hulme case feed mechanism was such a popular option that Star included a drilled and tapped hole (for the Hulme device) on all their presses sometime around 1959. I learned this from good buddy Bruce at Star Machine Works in New Jersey.
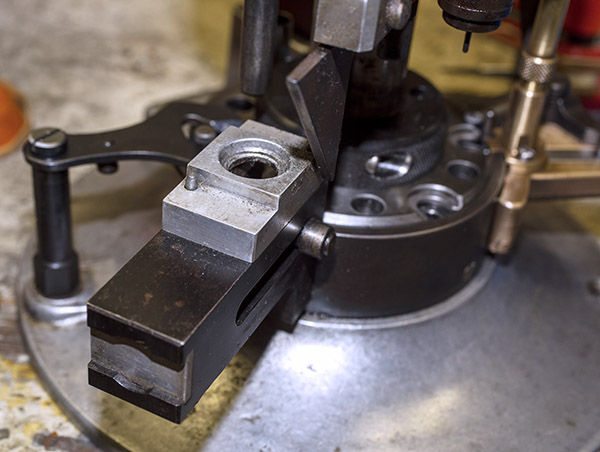
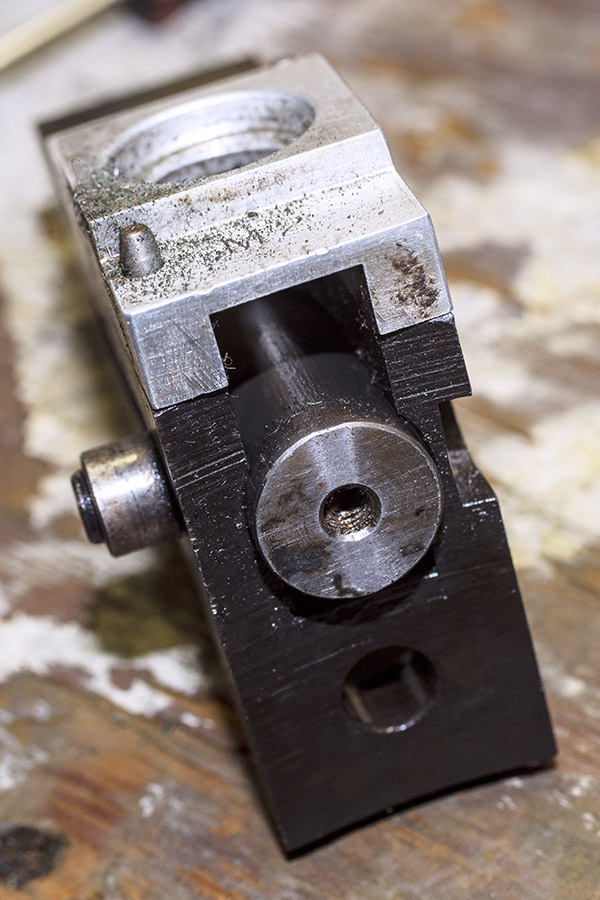
I removed it and then cleaned the case feed mechanism with Kroil, WD 40, and Scotchbrite.
Then I went to work on the cam and its mounting bracket with Kroil and Scotchbrite. After that, I remounted the Hulme case feed mechanism. Here’s what the case feed mechanism looks like in operation:
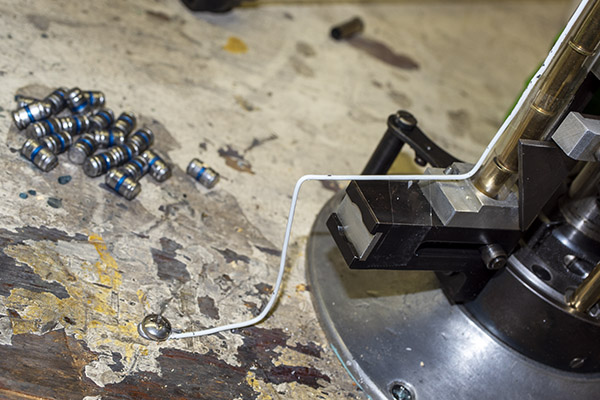
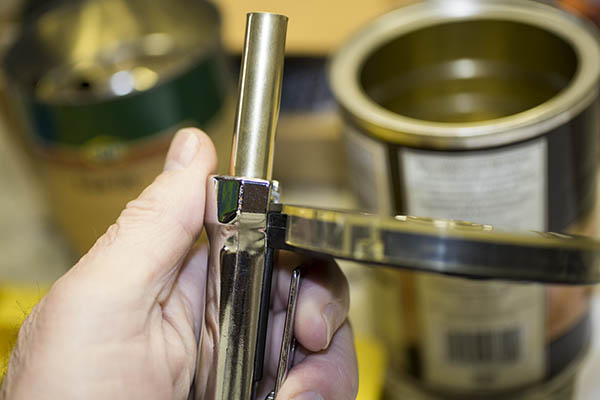
So, I had the case feed mechanism cleaned and it was operational. But I still needed to feed in a single case every cycle. I didn’t want that; I wanted the cases to feed automatically. It was time to channel my inner Bubba. All I needed was a tube in which to stack empty .38 Special cases above the case feeder, and a means to secure that tube. Hulme originally offered the componentry to do that, and my good buddy Bruce at Star Machine Works (the company that restores these magnificent old reloaders) offers the parts, but I hadn’t spent anything on my Star, and I wanted to keep it that way just for the sake of living up to my cheap SOB reputation. I wondered: WWJGD (what would Joe Gresh do)? I noodled a few ideas around, and then went to the closet for a coat hanger. I already had a clear plastic tube from one of my Lee reloading presses.
Like we say in French: Voilà!
The Star and its Hulme case feed mechanism works, and it works well. Take a look!
We’re getting pretty close to being done with the Star resurrection project, but there are still a few more things I want to show you. Stay tuned; you’ll see them right here on the ExNotes blog!
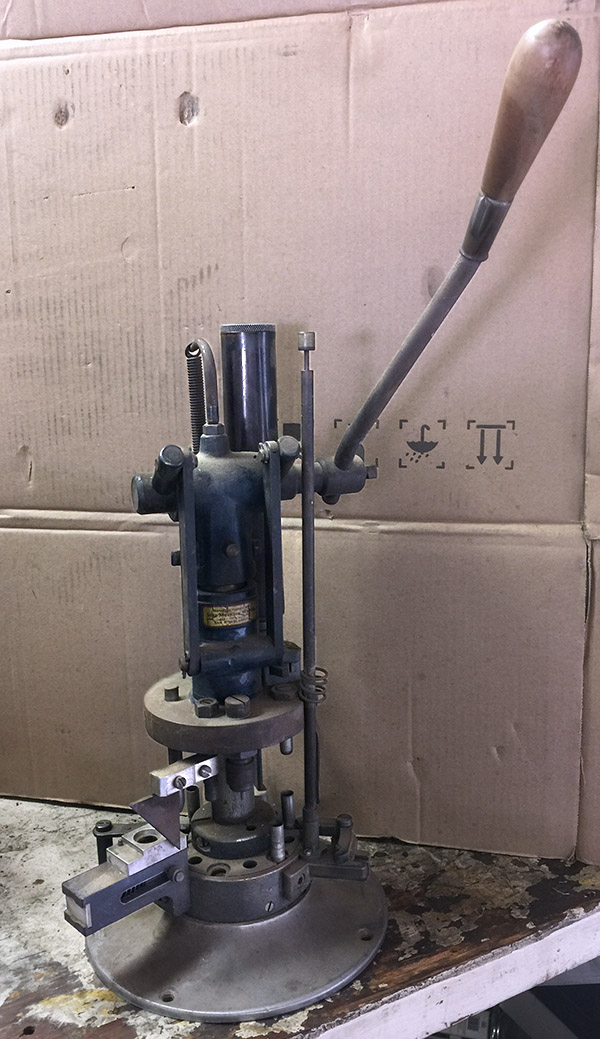
Sometimes you just get lucky. That’s what happened to me. I’m buying a used snubnosed .38 Special (there will be a blog on it in a few weeks), and I used a different federal firearms license dealer for the transfer (I always buy through an FFL dealer to keep things legal). The seller had an FFL dealer he wanted to use, and much to my surprise it happened to be one of the rangemasters at the West End Gun Club (a guy I already knew). We all had a nice visit, and while I was there, I was looking around the shop and my eye turned to an old progressive reloader. I love old stuff, and if you’re reading this, you probably do, too.
Now when I say progressive, I don’t mean the reloader leans left or votes democrat. Nope, progressive in the reloading world means each pull of the lever results in a finished round coming off the machine. With each stroke, a cartridge case is resized and deprimed, another is flared, another is charged with powder, another has a bullet seated in the brass case and crimped, and a new one is spit out. Then, on the lever upstroke, the base plate rotates (it progresses, hence the name), and the sequence continues. The output on a progressive is impressive. You can reload north of 500 rounds an hour on these things.
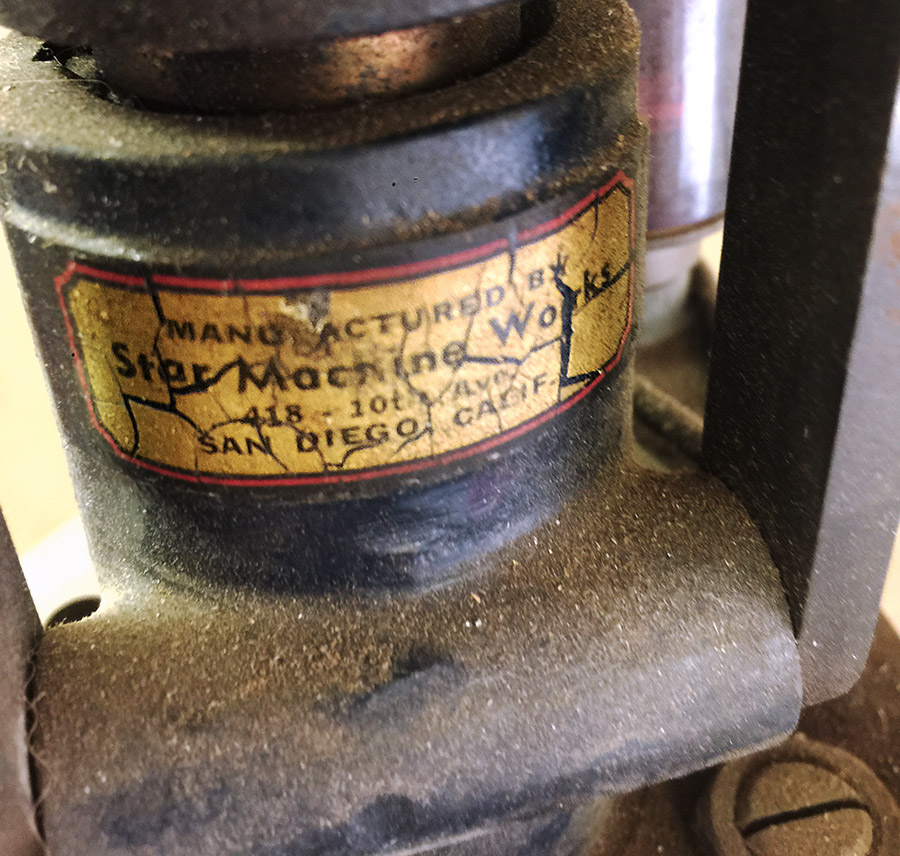
This particular progressive is one of the first ones and it was made by a company called the Star Machine Works. They first came out in the 1930s. I don’t know exactly when mine was made, but it had my attention this morning and I guess that was obvious. My rangemaster buddy told I could take it home with me if I wanted.
“How much?” I asked. I think he could see that the hook was already set. I wanted it. And I guess it showed.
“You could take it home with you.”
“I think I will,” I said, “but tell me how much.”
“No,” he said, “you can take it home. It’s yours.”
You can’t beat a deal like that. The pictures you see here are of my new-to-me (but probably older than me) Star progressive reloader on my reloading bench. It’s going to go through a Joe Gresh-style resurrection, and we’ll tell the story here on ExNotes. There won’t be any cosmetics (I love the patina on this thing), and I want to keep the look as you see it here. The Star will only undergo the stuff that’s needed to make it functional. And you’ll be able to follow the Star’s resurrection here on the blog.
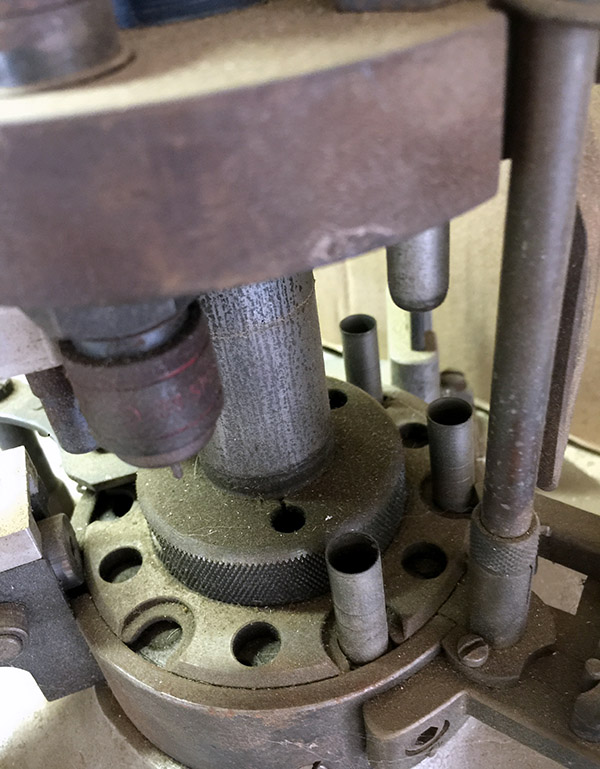
This Star is set up for .38 Special and .357 Magnum (both cartridges take the same dies), and there are still a few cases in the machine from who knows when. You can see how they index into the plate, and it’s that plate that advances with each stroke of the lever.
The photo above shows the case feeding mechanism. I haven’t attempted to clean it up or actuate the press yet. What you see is exactly how it came home with me.
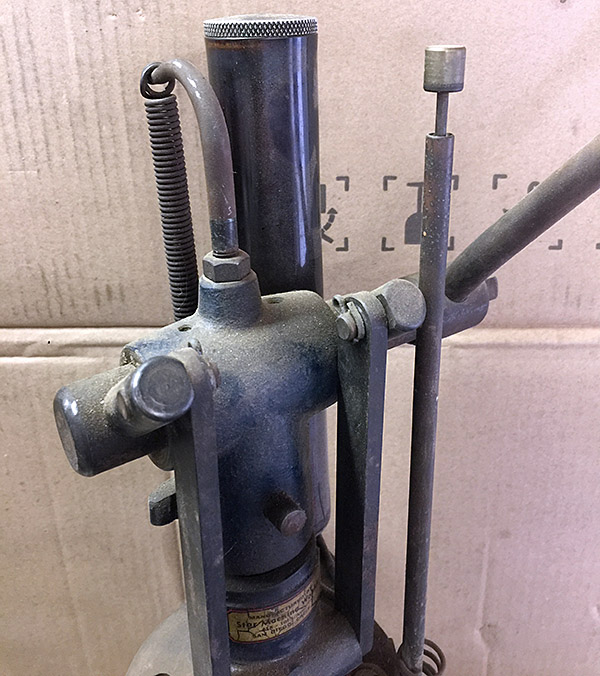
The big tube behind the lever and head is the powder container, and the narrow tube to the right is (I think) the primer dispenser.
I’ll start cleaning the Star this week, and once I’ve got it cleaned and lubed I’ll do my best to understand how it operates. I’m not nearly as mechanically talented as Joe Gresh, so this resurrection will probably take a while. But I’m going to enjoy the ride, and I think you will, too. Like we always say: Stay tuned.
Boy oh boy, we’ve got cool stuff to link to, like our Resurrections page and our Tales of the Gun page. And hey, if you don’t want to miss any of it, be sure to subscribe to the ExNotes blog. We’re running a special this month, and if you sign up now, it’s free!
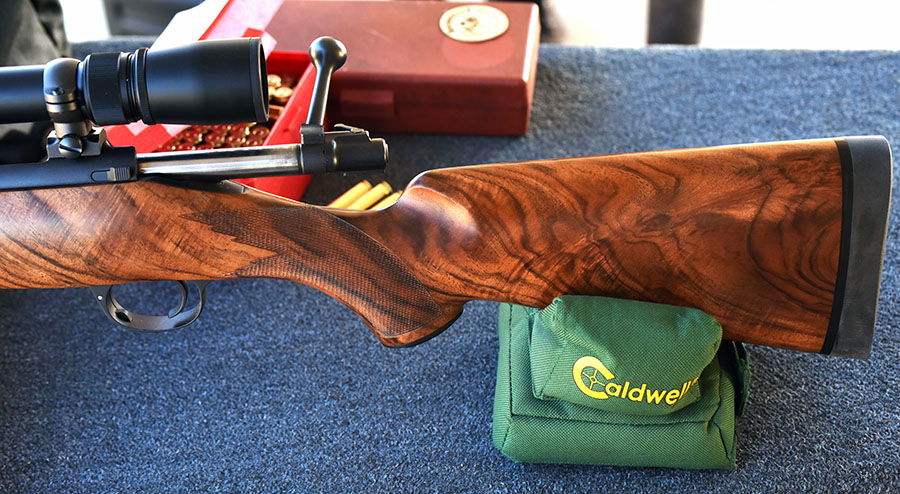
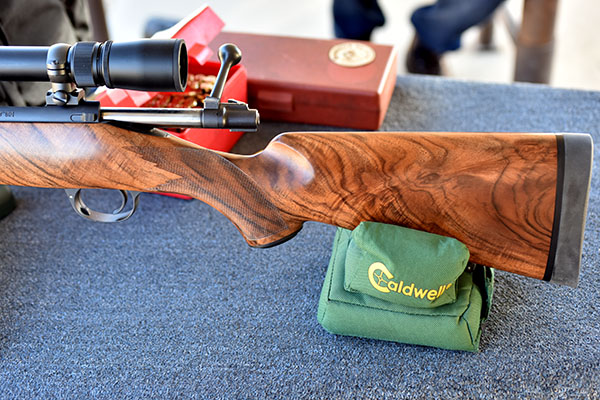
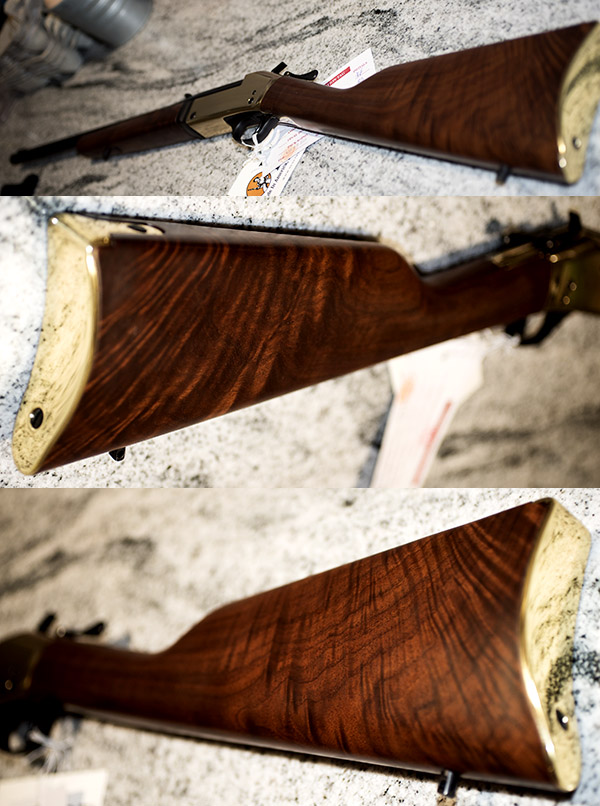
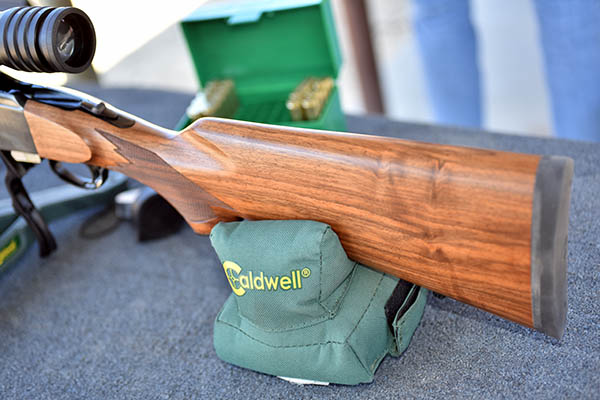
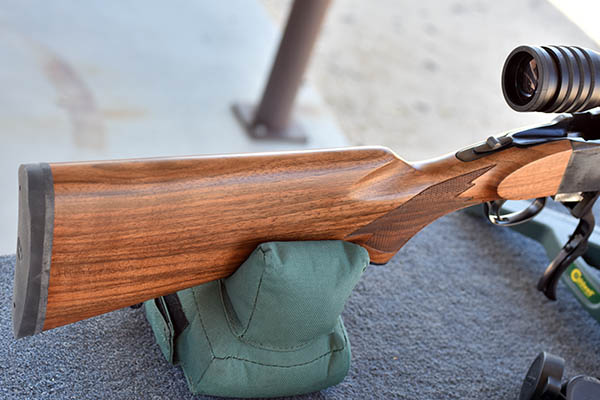
I like fancy walnut. I won’t buy a gun unless it has exceptional wood and it’s in chambered in a round I already shoot (I don’t want to buy new dies and components, and with the exception of .22 Long Rifle, I only shoot what I reload). On rare occasions I’ll come across a rifle with wood so exceptional, though, that I’ll set aside my caliber rule. This is a story of one such rifle: A Kimber 84 Classic Select chambered in .257 Roberts.
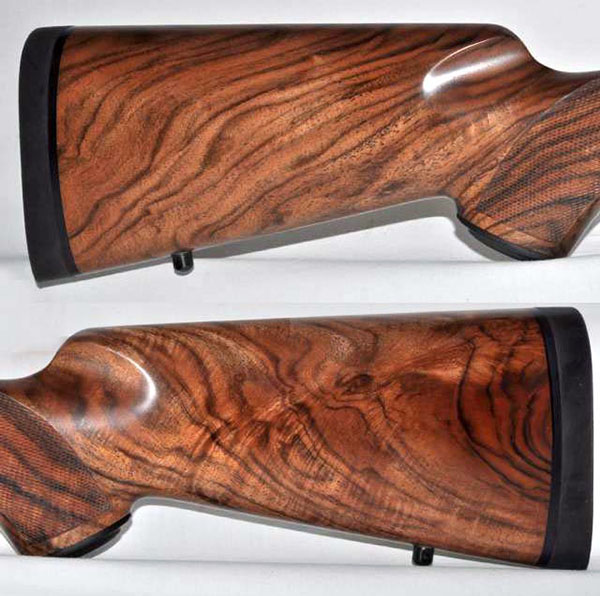
The Kimber “Select” designation means the rifle has been selected for the figure in its stock, but I’d seen any number of Select Kimbers with mediocre wood. That’s not the case here, though. The two photos directly below were straight from the Gunbroker.com ad, and I’d never seen one as beautiful as the auction photos indicated.
I knew I wanted the rifle, but I was a bit skeptical because I’d talked to a guy at the range with a .257 Roberts Kimber. When I asked him how it shot, he just looked down and shook his head. “With that pencil weight barrel, it’s hard to hold 3 inches,” he said. “Good enough for deer, I guess.”
But still, that wood. When I saw those photos above online, I called the store behind the Gunbroker ad. “Is it really as nice as the pictures?” I asked.
“We were stunned when we opened the box,” the guy at the other end said, “so the answer is yes. We’ve never seen one like it.”
That cut it for me. The rifle had a “buy now” price posted on Gunbroker, and that’s what I did. The time to buy something exceptional is when you see it. I suspect if I had let the auction for the Kimber run its course, the bidding would have taken the price well north of the buy now number.
I was a little leery of the .257 Roberts cartridge having had zero experience with it, but everything I read about it was good. Ned Roberts (a gun writer and wildcat cartridge developer in the 1920s) necked down the 7mm Mauser round to .25 caliber (the actual bullet diameter is 0.257 inch). Remington added legitimacy to the cartridge by offering it in 1934. Folks say it’s perfect for hunting everything from groundhogs to deer. All that sounded great, but I remembered that guy with his .257 Bob at the gun club. I need not have worried, though. You’ll see why in a minute.
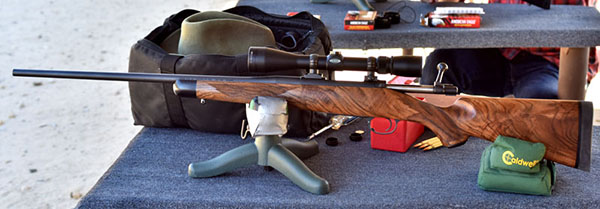
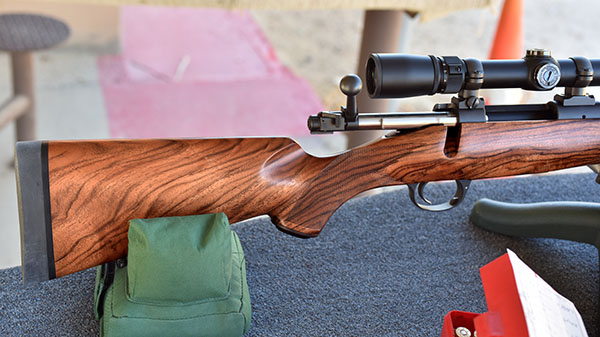
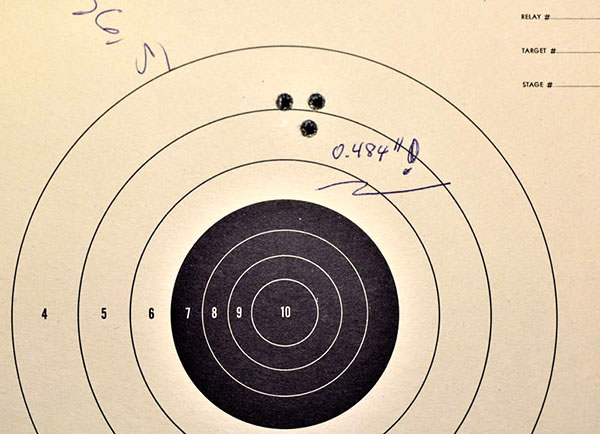
So how did the Kimber shoot? In a word, it was fantastic. How about sub-half-minute groups the first time out?
The secret sauce for the Kimber is 36.5 grains of IMR 4320 propellant under the 100-grain Sierra jacketed softpoint bullet (their No. 1620 bullet). My Lyman manual lists a propellant range for that bullet of 36.0 to 40.0 grains. I had three loads prepared that went up to 38.0 grains, but I found the 38.0-grain load too hot (the bolt was difficult to open). You should always start low and work up, and I had just proven that. Every rifle is different (even when they are identical), and 38.0 grains was too hot in my rifle. The 36.5-grain load was the Goldilocks load: It was just right.
More beautiful wood and secret sauce reloading recipes? You can read them right here!
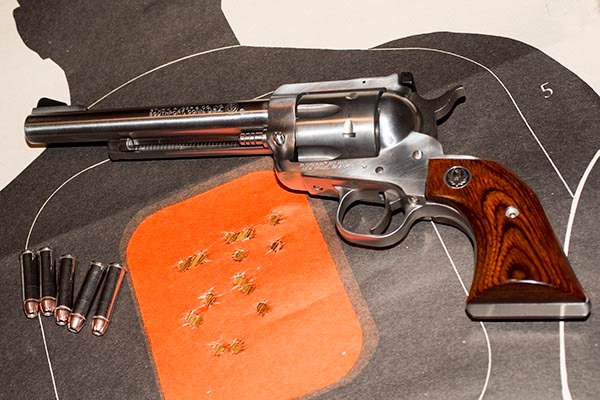
A favorite load that seems to work well in any .357 Magnum revolver, including my stainless steel Ruger Blackhawk, is 15.7 grains of Winchester’s 296 propellant and the Hornady 158-grain jacketed hollow point bullet. I use standard rather than magnum primers. This was a 25-yard target.
The .357 Ruger Blackhawk
Ruger’s Blackhawk is an iconic firearm, one that’s been in production since the 1950s in one form or another. I bought my first one in a department store in Texas for under a hundred bucks back in the mid-1970s, and I’ve bought and sold several since. I wish I had not sold any of the Blackhawks.
I’ve owned a few .357 Magnums over the years…Rugers, a couple of Model 27 Smiths, a Model 28 Smith (remember that one?), a Model 19 Smith, and a Model 65 Smith. I’ve owned a couple of Colt Pythons, too. The Pythons were nice, but not nice enough to command the premium prices they pulled in the 1970s, and certainly not nice enough to pull the exorbitant amounts they sell for today. The Smiths were accurate, but they didn’t hold up under constant use with magnum loads. I had a new Model 27 that I wore out in a couple of seasons in the metallic silhouette game; it suffered from extreme gas cutting under the top strap and a cylinder that sashayed around like an exotic dancer in a room full of big tippers. The Ruger Blackhawks seem to last forever.
Every Ruger firearm manufactured in 1976 carries the 200th year bicentennial stamp, just like the one on my 200th year Blackhawk. On my gun, the liberty scrollmark is on top of the barrel.
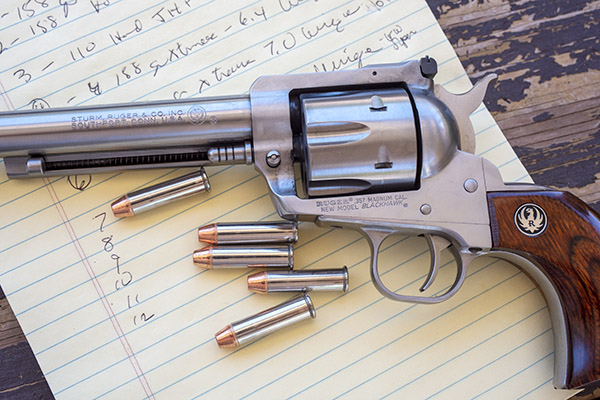
I’m down to one .357 Magnum now and it’s a 200th year stainless steel Blackhawk with a 6 1/2-inch barrel. It’s one of my favorite revolvers and it’s not for sale (it never will be; I learned my lesson about letting good guns get away). I have a few favorite .357 Magnum loads I’ve used over the last 50 years. I thought it might be a good idea to document how they did in the Blackhawk, try a few more to see how they do, and share it all with you here on the ExNotes blog. I guess this is the appropriate place for the disclaimer: These are loads that work well in my Blackhawk. You should never just take these loads (or any others from the Internet) and simply run with them. Always consult a reputable reloading manual (I like the Hornady and Lyman manuals best). Always start with lower charges and work your way up, looking for any signs of excess pressure, and go no higher if you see signs of excess pressure. Okay, so that’s out of the way. Let’s get to the good stuff.
Last week’s .357 Magnum testing at the West End Gun Club.
.357 Magnum Accuracy Loads
I’ve played with a lot of different .357 Magnum loads over the years. I have a few favorite .357 Mag loads that have been superbly accurate in any of the .357 sixguns I’ve owned. That’s a bit unusual because frequently a load that is accurate in one gun won’t be accurate in another, but that rule doesn’t seem to apply here. The loads I like have worked well for me in any .357 I’ve ever shot. I verified these loads in my Blackhawk with this latest round of testing, and like I said above, I explored a few more loads.
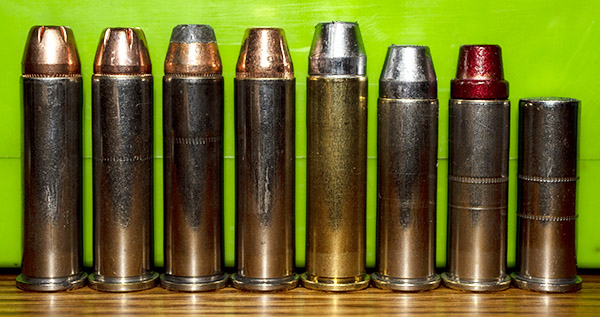
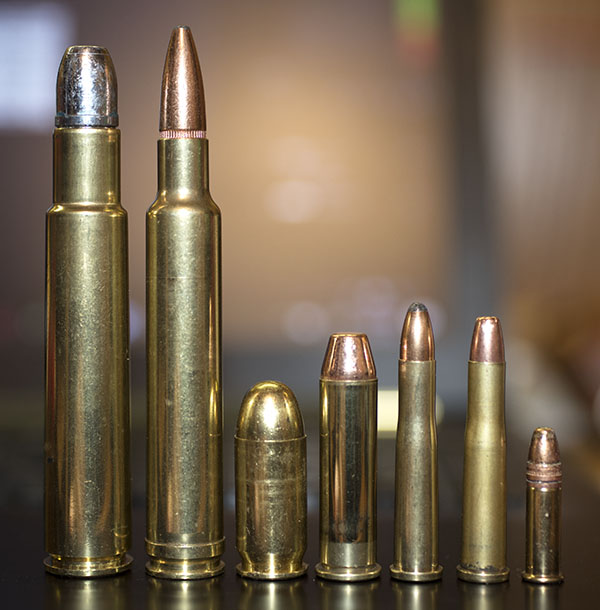
A few of the loads tested for this blog. From left to right, the first five are .357 Magnum cartridges and the last three are .38 Special cartridges (you can fire .38 Special rounds in a .357 Magnum handgun). The bullets (from left to right) are the 110-grain Hornady jacketed hollow point, the 158-grain Hornady jacketed hollow point, the 158-grain Hornady jacketed flat point, the Xtreme 158-grain plated flatpoint, a cast 158-grain flatpoint, a cast 158-grain flatpoint in a .38 Special case, a powder-coated 158-grain semi-wadcutter in a .38 Special case, and the Missouri 148-grain double-ended wadcutter in a .38 Special case.
So, with the above as background info, let’s get into the loads. I’ll start with one of the standard “go to” .357 Magnum loads. That’s the 158-grain cast semi-wadcutter bullet (the Keith-style) over 7.0 grains of Unique. This is not the hottest .357 load (it’s a mild-recoiling .357 Magnum load), but it’s hot enough, it’s very accurate, and it’s relatively flat shooting. I have a guy who casts 158-grain flatpoint bullets for me and I like those with 7.0 grains of Unique even better than the semi-wadcutter bullets. The load is very consistent, and with the same zero and six o’clock hold I use at 50 feet (seen in the target below), I pretty much hit right on target at 25 yards, 50 yards, and yep, even at 100 yards. I was hitting a steel gonger last week at 100 yards consistently with this load. My shooting buddies were impressed, and after all, that’s what a lot of this is all about. This is a good load.
A 50-ft target with the .357 Blackhawk using 158-grain cast flatpoints with 7.0 grains of Unique. Like they say, this is close enough for government work.
For hotter .357 Magnum loads, any of the Hornady 158-grain jacketed bullets (hollow points, flat points, and full metal jacket flat points) work superbly well with 15.7 grains of Winchester’s 296 propellant. These loads have a distinctive bark, high velocities, snappy recoil, and they are superbly accurate.
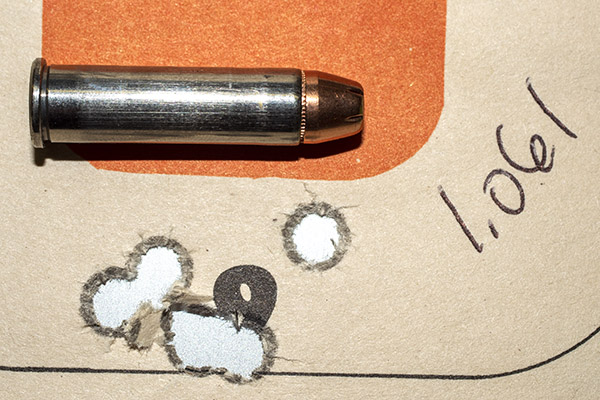
15.7 grains of WW 296 and the 158-grain Hornady jacketed flat point resulted in the best group fired in this test series. Two shots went through the hole in the lower right.
Another long time favorite load is a bit unusual but it’s accurate as hell. That’s the 110-grain Hornady jacketed hollow point and a max Unique load (10.0 grains of Unique, as listed in a Hornady reloading manual from the 1970s). I first tried this one 40 years ago when I had a Colt Python and I was impressed with its accuracy. I tried it again in this test series and the results were similarly impressive. It’s probably the fastest load I tested because of the max load and the light bullets. My old Hornady manual indicates the 110 grain Hornady bullet with 10.0 grains of Unique exits the muzzle at 1450 feet per second. That’s fast.
If light bullets and high velocity float your boat, try this one (but work your way up to it): 10.0 grains of Unique with Hornady’s 110-grain jacketed hollow point.
Plated Bullets: Are They Any Good?
Surprisingly, the 158-grain plated flatpoint bullets I tested didn’t do well with any charge of Unique, and in the past, they have performed very poorly with 296 (the bullets frequently shed their plating in the bore). These plated bullets are offered by Berry and Xtreme. These are not jacketed bullets; the copper plating is chemically applied and the coating is very thin. I did get one decent showing with a lower-end charge of IMR 4227 propellant, but given the choice, I’d go for a plain cast bullet rather than plated bullets. You may feel differently. Please leave a comment here on the blog if your experience is different than mine.
Powder Coating and Paint Fumes
I tried powder-coated bullets last week, too, to see how they would perform. Powder coating is a concept that’s been around for a few years as an alternative to lubing cast bullets. I found that accuracy was more or less on par with lubed bullets, but not really any better. The powder-coated bullets look cool (the cartridges kind of look like lipstick). When I fired several powder-coated bullets fairly quickly, I could smell the paint. Some folks swear by these bullets and love them for IDPA and similar competitive pistol events. For me, performance was the same as conventional cast bullets. Your mileage may vary. Leave us a comment if you feel differently.
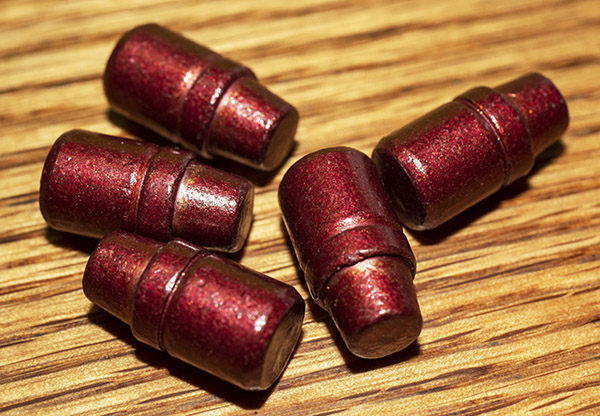
Powder-coated 158-grain semi-wadcutter bullets. I found their accuracy to be comparable to conventional cast and lubed bullets.
A Metallic Silhouette Load
When I shot metallic silhouette competition I used a 200-grain cast roundnose bullet in my .357 Magnum Model 27 Smith and Wesson. That bullet worked extremely well, and because of its heavy-for-caliber nature and high length/diameter ratio, it carried a lot of energy downrange. It was superbly accurate with 12.4 grains of 296. But finding those bullets is next-to-impossible today. It used to be a standard .38 Special bullet for police duty, but very few (if any) departments carry .38s today, and nobody seems to stock the 200-grain bullets. Maybe I need to get back into casting. I sure loved that 200-grain bullet in the .357 Magnum. They actually made the .357 Magnum work better on the 200-meter rams than a 240-grain .44 Magnum. The .44 Magnum wouldn’t consistently take down the rams; the 200-grain .357 Magnum did so every time.
.38 Special Loads
One of the great things about a .357 Magnum handgun is you can also shoot .38 Special loads in it. I guess that’s a good thing, as the .38 Special cartridges have lighter recoil. I tried three .38 Special loads with three different bullets. The accuracy load in .38 Special is a 148-grain wadcutter bullet seated flush with the cartridge mouth over 2.7 grains of Bullseye propellant. That load is super accurate in my Model 52 Smith and Wesson target pistol, and it did okay in the Ruger, too. I’ve always believed that a .38 Special cartridge would never be quite as accurate in a .357 Magnum handgun because the bullet has to make a longer jump to reach the rifling, and my testing last week did nothing to change my mind on that count. The .38 Special does okay in a .357 Magnum handgun, but I believe the best accuracy resides in a .357 case.
.357 and .38 Accuracy Testing Results
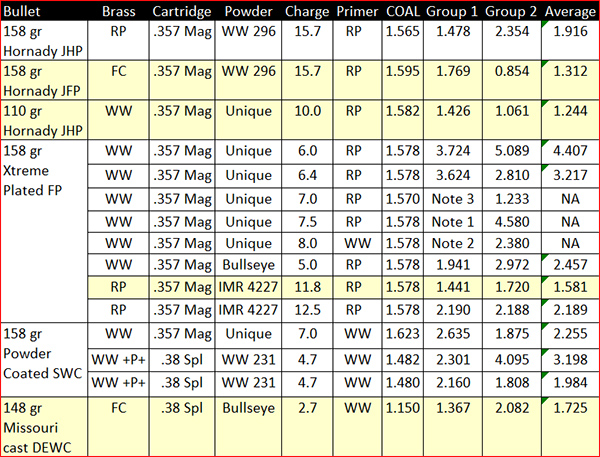
Here’s a chart summarizing my accuracy results:
Ruger Blackhawk accuracy testing results. All testing was with a two-hand hold at 50 feet. All groups are five shots. All loads (except the plated bullet loads) were crimped. All cast bullets were sized to 0.358. Note 1: Two shots went off paper. Notes 2 and 3: One shot went off paper.
There you have it. If you have a load that works well, please leave a comment. We’d love to hear from you.
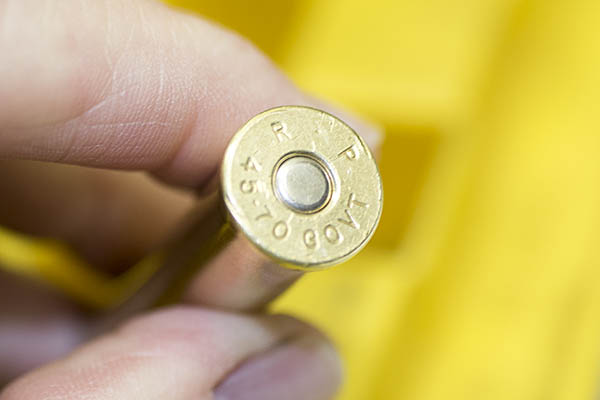
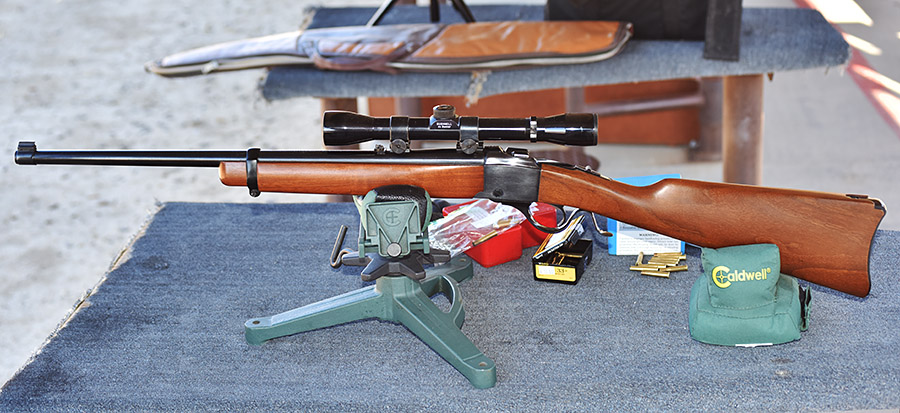
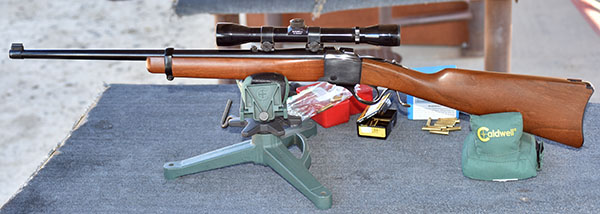
The new Henry Single Shot, brass frame .45 70 rifle. Henry makes a beautiful rifle.
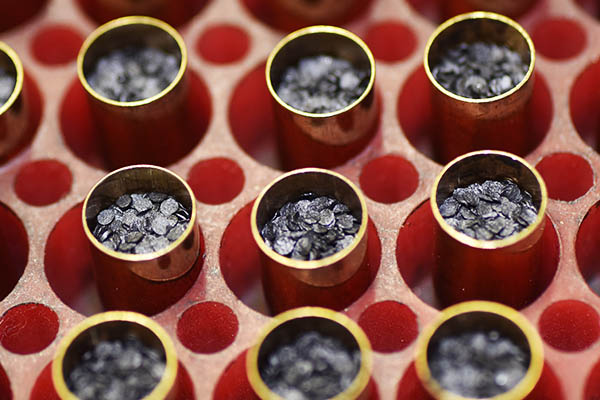
I’m using the time before I pick up my new Henry rifle to prepare the reloaded ammunition I want to test for accuracy. You will recall that in an earlier blog we discussed the three .45 70 load levels shown in modern reloading manuals. As I mentioned in that earlier blog, I use the loads intended for the 1873 Trapdoor Springfield. Those loads were powerful enough to take down all kinds of critters back in the 1800s, and in developing loads for other .45 70 rifles, I’ve found these to be fun to shoot and accurate.
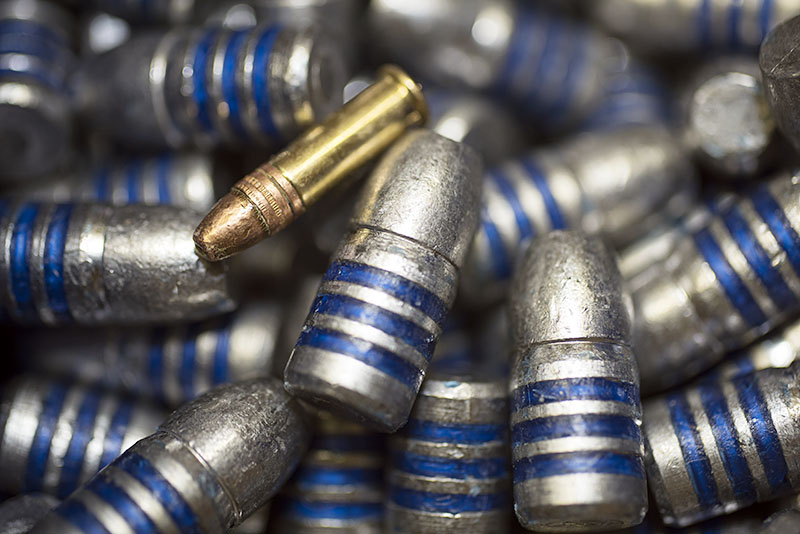
Missouri 405-grain cast .45 70 bullets. These have proven to be very accurate in other .45 70 rifles. I’m trying these and two other bullets in the Henry. The .22 Long Rifle cartridge you see here didn’t come with the Missouri bullets; I added it to give you an idea of just what a monster the .45 70 cartridge is.
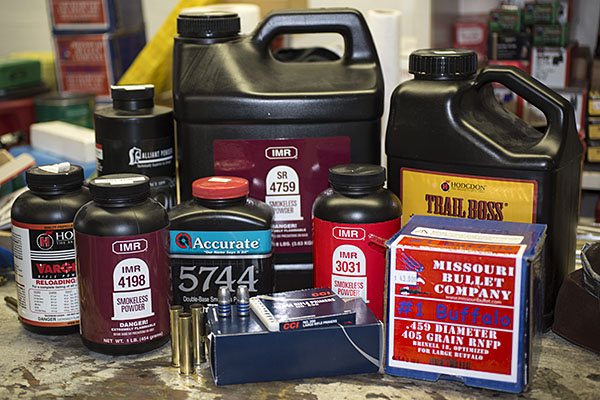
My loads are based primarily on the components I have on hand and loads I’ve known to work well in the past. Powders include SR 4759, IMR 4198, IMR 3031, 5744, Varget, and Trail Boss. Bullets include the Remington 405-grain jacketed soft point, the Hornady 300-grain jacketed hollow point, and the Missouri 405-grain cast roundnose.
A photo showing some of the components to be used in this test. When loading, I would never have all of this stuff on the reloading bench, and in particular, I would never have more than one powder on the bench at the same time. The risk of mixing powders is too great. If you have more than one powder container on the bench, it’s very easy to pour the remaining powder in the dispenser into the wrong container (don’t ask me how I know this). When that happens, the only prudent thing to do is throw the mixed powder on the front lawn (it makes good fertilizer).
I like all of the bullets I listed above, but I particularly like the Missouri bullets. The Missouri cast bullets seem to always be available, they are relatively inexpensive, and they are accurate. I’m expecting to see great accuracy from these in the Henry, as they shoot well in the Ruger and the Marlin. The 405-grain Missouri bullets are accurate in the Chiappa 1886, too, but that rifle’s stock design and buttplate make the recoil painful when shooting the heavier Missouri bullets.
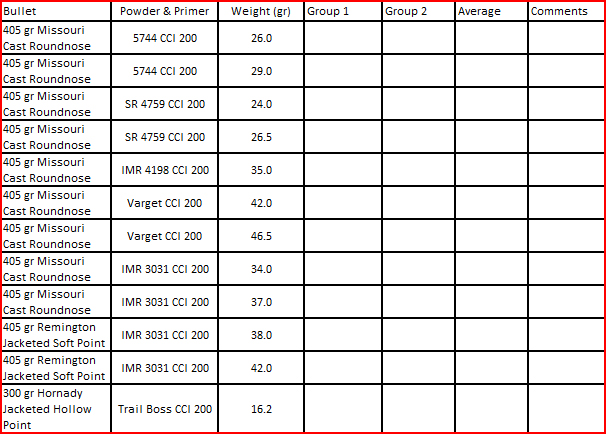
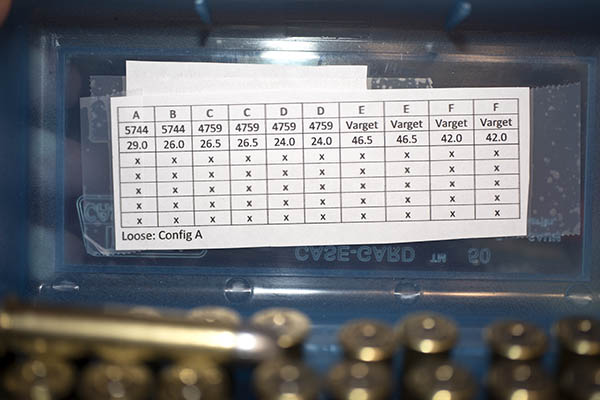
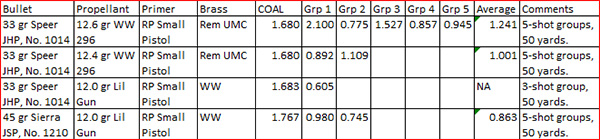
Here are the .45 70 loads I will test in the Henry:
When testing for accuracy, it helps to keep things organized. I’ll bring this table to the range with me and record my results as soon I retrieve the targets. All loads will be fired using open sights at 50 yards.
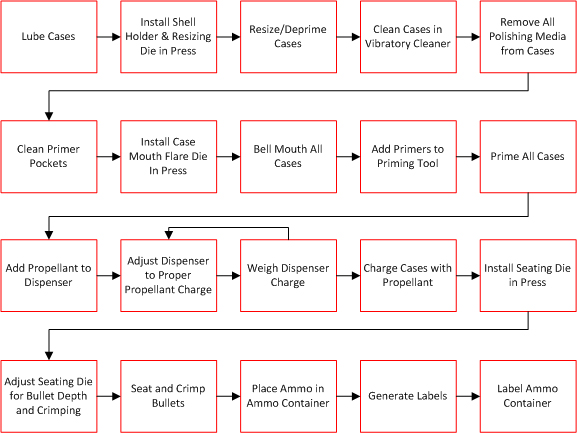
For a more in-depth reloading process overview, I invite you to review our earlier series on loading .45 ACP ammunition. The .45 70 reloading process is very similar to loading handgun ammo. That’s because the .45 70 is nearly a straight-walled cartridge, so the steps are the same. This is what is involved in reloading .45 70 ammo:
The reloading process. It looks complicated, but it’s very intuitive. Most folks who reload find it as enjoyable as shooting.
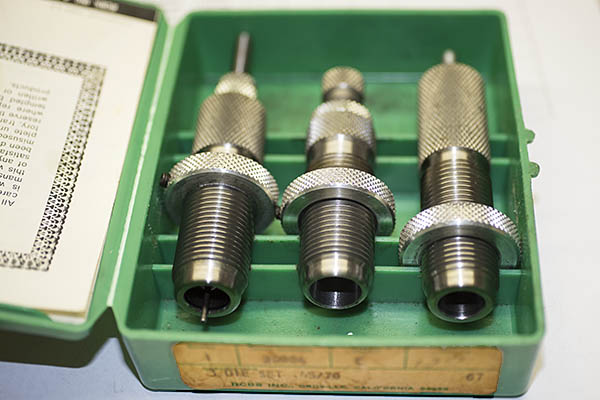
I use mostly RCBS or Lee reloading dies for all of the cartridges I load. Both are good companies, and both offer superior customer service (if you ever need it, which has only occurred a couple of times for me). I’ve been reloading .45 70 ammo for close to 50 years now, and I’ve been using the same set of RCBS dies the entire time.
A three-die RCBS set. The first die (on the left) deprimes and resizes the fired case to its original diameter. The case has to be lubricated for this step, or else it will stick in the die. The second die is called the expander die. It expands the upper portion of the cartridge case and, if adjusted to do so, adds a flare to the case mouth. The third die (on the right) is the bullet seating and crimping die. It can be adjusted to change the depth to which the bullet is seated, and to add a crimp if you wish to do so.
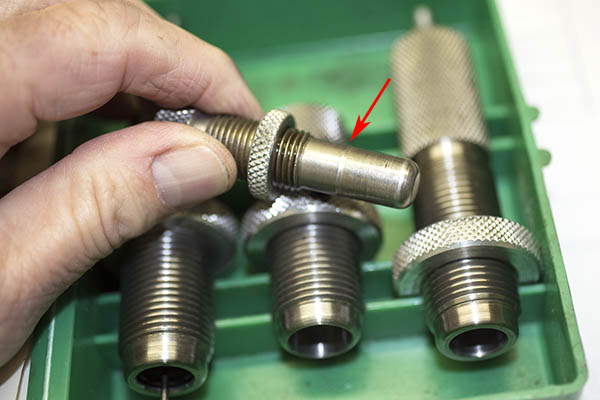
The expander die (the one in the center of the above three dies) is the one that flares the case mouth. It contains a threaded insert with a step in it to apply the bell mouth to the case.
In this photo, the case expander has been removed from the die to show the diametral step. It is this step that adds a flare to the case mouth.
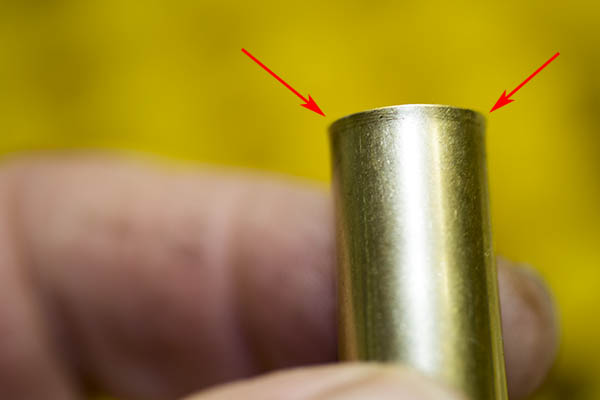
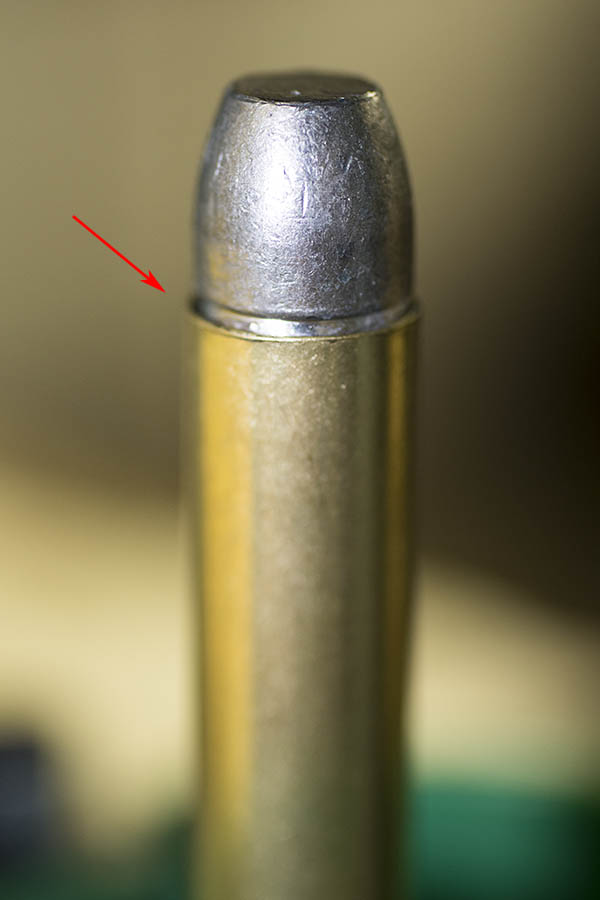
This is what the case mouth should look like after it has been flared. You don’t want to overdo this step. You just want to get enough of a flare to allow the bullet to get started in the case.
A .45 70 case with a flared mouth. We add the flare to allow the bullet to enter the case with no shaving of the bullet.
After the case has the flare applied, it’s time to clean the primer pockets and then prime each case. I use another RCBS tool to clean any combustion residue from the primer pocket (see our earlier tutorial on loading .45 ACP ammo), and then I use a Lee priming tool to seat the primers.
The Lee priming tool. This is another tool I’ve been using for five decades. It’s a much better way to prime cartridge cases.A CCI 200 large rifle primer in place, ready to be seated in a cartridge case. The .45 70 cartridge requires a Lee No. 8 shellholder, shown in place in this photo.A .45 70 case in the Lee priming tool. Compressing the handle (shown to the right of the priming tool barrel) forces the primer into the case. You do this one at a time for each case.A freshly primed .45 70 cartridge case.
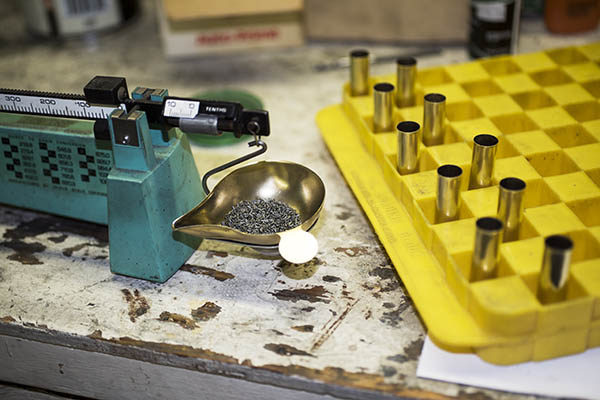
After all the cases have been cleaned, flared, and primed, it’s time to add propellant. I use my RCBS scale along with a powder dispenser to add the right amount of powder to each case. To get the correct amount of powder, I always consult a load manual. I’m showing you different charge weights in this blog, but DO NOT rely on what I’m telling you (or what you read on the Internet from other people) for this information. Always consult a reloading manual. Several reloading manuals are available; I prefer the Lyman manual and it’s the one I use most often. Most of the other manuals are either from bullet manufacturers or propellant manufacturers, so they list only their components. The Lyman manuals are not restricted to a single brand of bullets or powders, as Lyman does not manufacture bullets or powders. Lyman does a good job, I think.
My RCBS powder scale, the reloading tray, and ten .45 70 cases waiting for their propellant charges.
When I load different test loads as I’m describing in this blog, I’ll charge and complete each group separately. Typically, that’s ten cartridges in a group.
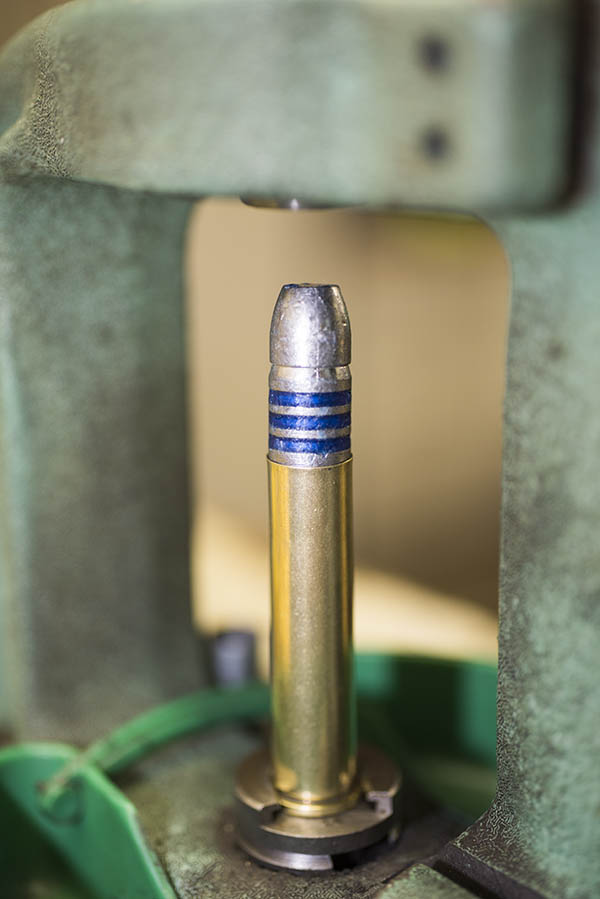
Once the cases have been charged with propellant, it’s time to seat and crimp the bullet. I typically use a light crimp for the .45 70. Crimping involves bending the flared case mouth into a crimping groove (sometimes called a cannelure) on the bullet. You crimp a cartridge for three reasons: To prevent the bullet from being forced further into the cartridge case if it is fed into the chamber automatically (as occurs with, say, a 9mm or .45 ACP cartridge), to prevent the bullet from backing out of the case due to the recoil of other cartridges (as might occur in a revolver or a rifle magazine), and to hold the bullet in place when the primer first fires (this allows the flame front to build to a consistent pressure in cartridge prior to driving the bullet down the bore). It’s that last reason that I’m most interested in here. It should make for a more accurate cartridge. Theoretically, neither of the first two reasons is a consideration for a single shot rifle.
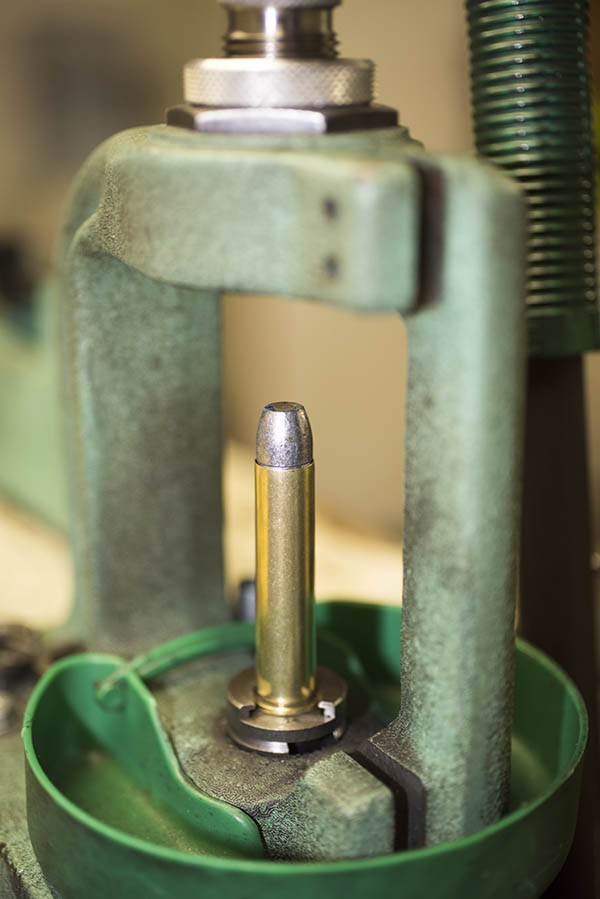
A Missouri bullet on top of a charged .45 70 case, ready to be run into the bullet seating die in the RCBS Rockchucker press.
Seating the bullet and crimping it is a bit of a dance. You have to get the bullet seated to the right depth, and then you have to apply the crimp. We use the third and final die in a three-die set to accomplish both. I screw the bullet seating portion of the die fairly far into die initially and then I screw the die into the press to get the bullet seating depth where I want it. In this case, I want the top of the brass case to be nearly even with the top of the bullet’s crimp groove. Then I back the bullet seat all the way up in the die, and screw the die body into the press such that it forms the crimp (there’s a tapered decreased diameter in the die insider diameter that forms crimp). Once I have the crimp where I want it (and the amount of crimp I want), I then screw the bullet seater all the way such that it contacts the bullet. I then make sure everything is jake on the next round (you know, the same crimp and the same cartridge overall length), I make any required small adjustments, and then I lock everything down with the die’s two locknuts and load the remaining cases.
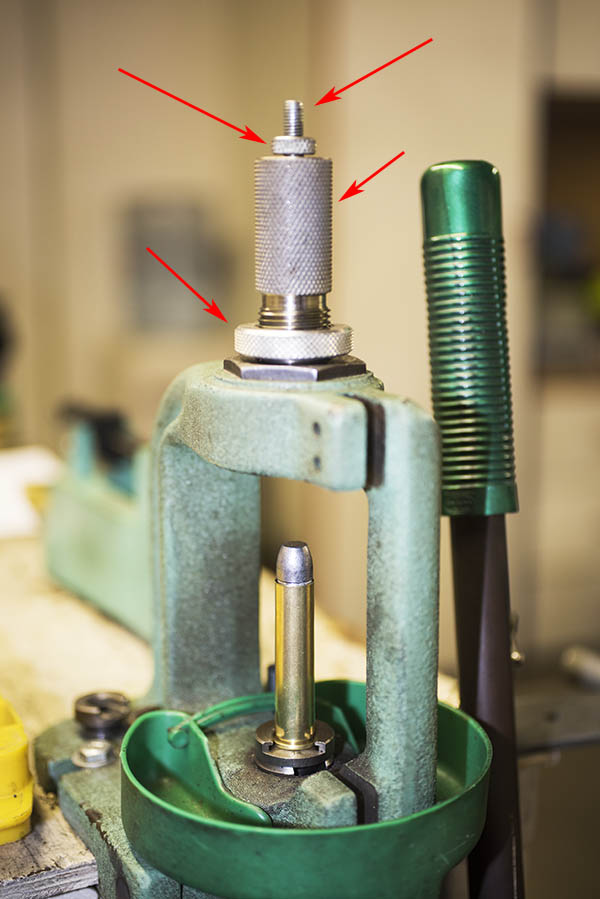
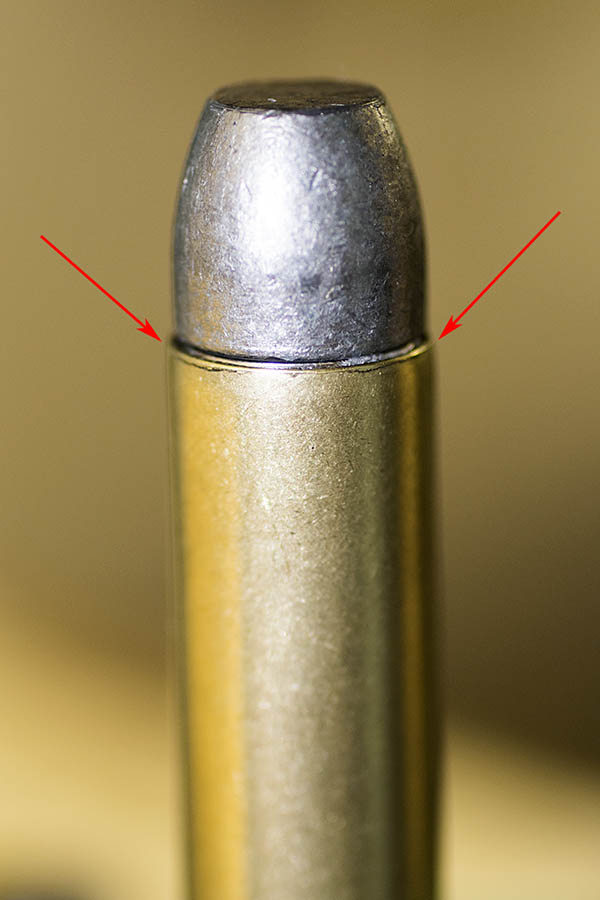
Adjustments on the seating and crimping die. The small-diameter threaded shaft controls fine adjustment of the bullet seating depth. Turning the main die body into or out of the press controls coarse bullet seating depth and crimp. The two locknuts (denoted by the arrows on the left) lock the bullet seating shaft and the die body in place.The Missouri bullet nearly fully seated in the case, but not yet crimped. I’ll seat the bullet just a bit deeper, and in the last few thousandths of an inch on the press stroke, the upper edge of the cartridge case will be crimped by the die around the bullet.A seated and crimped Missouri bullet in a .45 70 brass case. When I bellmouth the cases, I only open them up just enough to allow the bullet to start into the case. When I crimp, I only crimp a little bit. This minimizes working of the brass around the case mouth. Loading at the Trapdoor Springfield levels as I do, and using this minimal amount of opening and then crimping the brass, results in long case life. These cases were purchased in the 1970s and I’m still using them.A completed round. This .45 70 cartridge is ready chamber and fire. It’s a big cartridge.
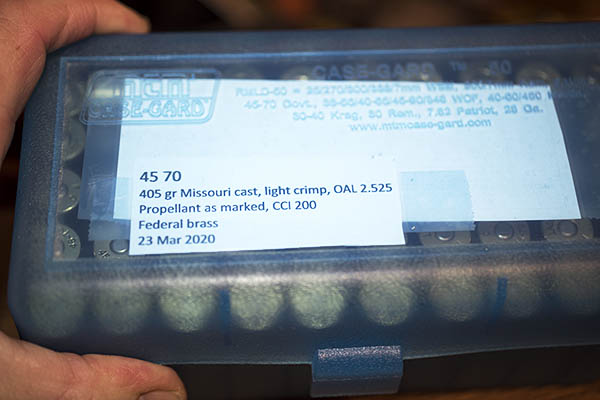
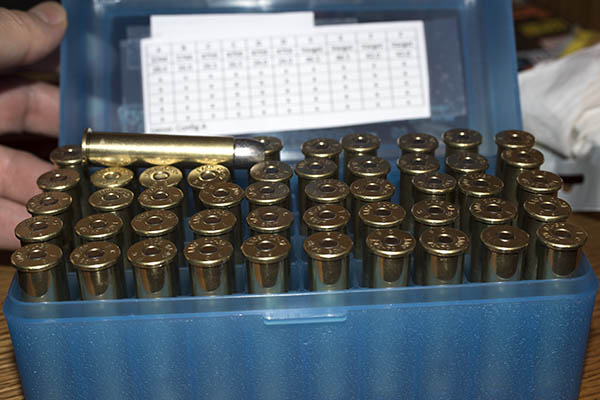
After I’ve done all of the above, I immediately label the packaged, reloaded ammo so that I know what I have. I can’t rely on my memory and do this later; I always perform the labeling operation as soon as the reloading operations are complete.
A box of 50 .45 70 cartridges labeled and ready to take to the range. I always label my loads as soon as I finish them.Because these are cartridges loaded differently for accuracy testing in the new Henry rifle, I included a map inside the cartridge container to identify how each group has been loaded.Ready to go to the range. Reloaded cartridges are less expensive than factory ammunition, and I will be able to find which combination of components performs with the greatest accuracy in my new Henry rifle. With factory ammo, you pay more and you get what you get in terms of accuracy.
There you have it. I have all the .45 70 ammunition I want to test loaded, boxed, labeled, and ready to go to the range. Now all I have to do is take possession of my new Henry, head out to the West End Gun Club, and see what works best. You’ll get to see it, too, right here on the ExNotes blog.
Check out our earlier Henry Single Shot stories here:
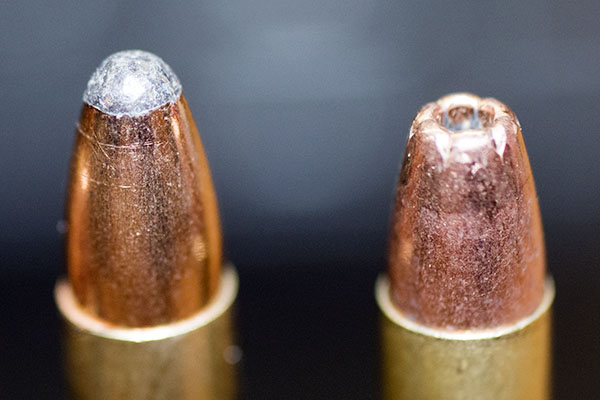
I’ve written about the Hornet before (and I’ll give you a link to that past blog at the end of this one). The point of today’s writeup? It’s about accuracy and a few different loads for the Hornet in my single-shot No. 3 Ruger. I like the idea of a single-shot rifle and I love the .22 Hornet cartridge. The .22 Hornet was the world’s first centerfire .22 cartridge, and in its day, it was a real hot rod. Velocities range between 2400 and 2900 feet per second (sometimes a little more, depending on the load). Recoil and muzzle blast are nearly nonexistent compared to other centerfire cartridges, and it’s a fun cartridge to shoot.
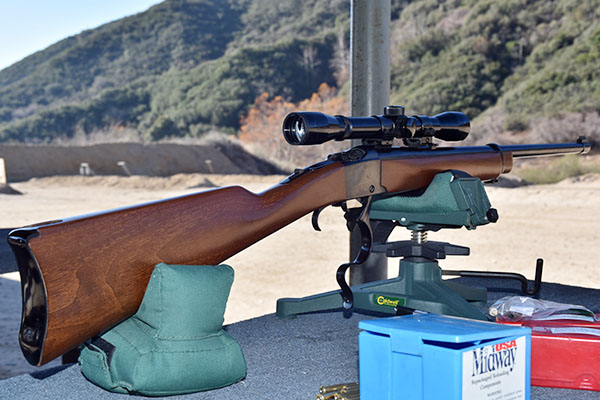
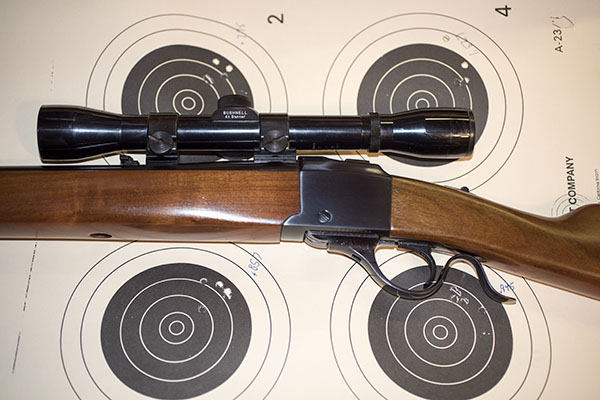
A Ruger No. 3 in .22 Hornet. It has a period-correct inexpensive Bushnell 4X scope, which is good enough for me. My rifle is in near-new condition.
The idea for this blog started when I saw three boxes of Speer 33-grain hollow point bullets a couple a few weeks ago at my reloading supply depot. They were inexpensive (just $10 a box), so I bought all three. I hadn’t tried the light Speer bullets and I wanted to see how they compared to an old favorite, the 45-grain Sierra Hornet bullet. I also wanted to try a propellant that I had purchased previously (Lil Gun) and compare it to my favorite Hornet propellant (Winchester 296). And my good buddy Tom recently gave me a bunch of old .22 Hornet ammo that I shot up on a prior outing, so I had a good supply of Hornet brass. It all came together a week or two ago, and the result was a hundred rounds of reloaded .22 Hornet ammo in various load configurations.
The Sierra 45-grain jacketed soft point bullet on the left, and the Speer 33-grain jacketed hollow point bullet on the right.
The Ruger No. 3 was the low-alternative to the fancier Ruger No. 1 back in the day. The No. 1 had more figured walnut (in the 1970s, and maybe today, too), the No. 1 rifles with iron sights had fancier sights and a cool quarter rib, the No. 1 stock had a pistol grip and a rubber recoil pad, and the No. 1 had hand-cut checkering. The No. 3 was a simpler gun, with plain walnut, an aluminum (later plastic) buttplate, no checkering, and a less-fancy iron sight setup. In the 1970s, the No. 3 suggested retail price was $165, and you could buy them brand new all day long for $139. The No. 1 retail price was $265, and those could similarly be had for $239. Oh, how times have changed. New No. 1 Rugers sell for something like $1500 today, and Ruger stopped making the No. 3 altogether. It’s likely (in my opinion) that at some point in the not too distant future, Ruger will drop the No. 1, too. That’s okay; it will make mine more valuable. Not that I’m planning to sell anything. It just feels better knowing the value is going up.
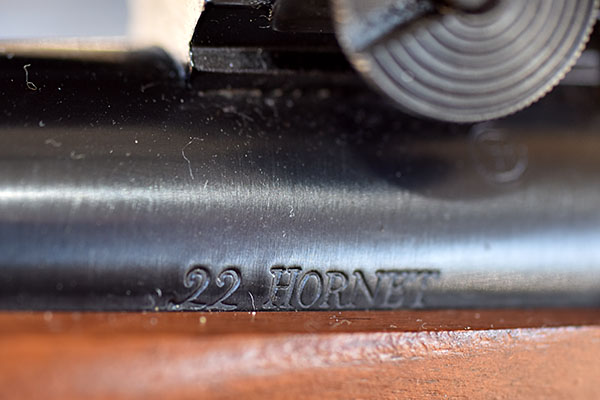
Ruger manufactured the No .3 from 1973 to 1986. The very first one was chambered in .45 70 (a classic cartridge, to be sure), and then Ruger added two more classics: The .22 Hornet and the .30-40 Krag. Ruger built the rifle you see in this blog in 1978. Ruger No. 3 rifles can still be found on the used gun market, but these days they go for about the same price as a used No. 1, which is usually somewhere between $800 and $1000. Supply and demand, you know…they aren’t making any more No. 3 Rugers.
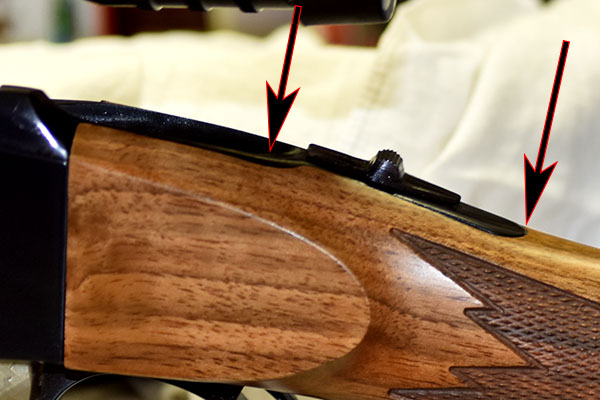
The Ruger No. 3 falling block action, with the lever open and the block in the retracted (or lowered) position.
The Ruger’s action is called a falling block because, well, it is. When you open the trigger guard/lever, the breechblock drops (it’s the silver thing you see in front of the trigger in the photo above), and that allows inserting a round in the chamber.
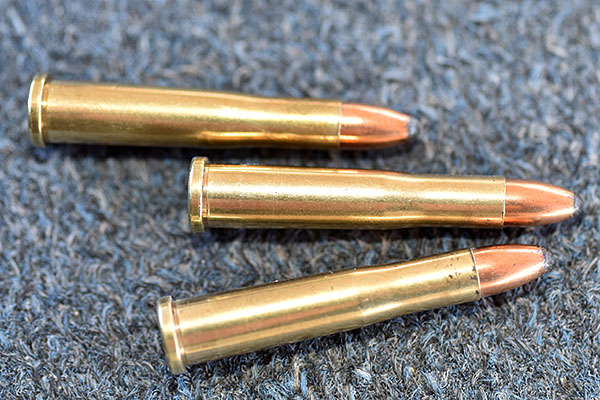
Ruger uses a distinctive font on its No. 1 and No. 3 rollmarks. This one is cool.The .22 Hornet is a cute round. These are loaded with 45-grain Sierra jacketed softpoint bullets.A sense of scale: .22 Hornet rounds next to a couple of .30 30 cartridges.Another sense-of-scale photo. From left to right, that’s a .416 Rigby cartridge with a 350-grain cast Montana bullet, a .300 Weatherby Magnum with a 180-grain jacketed softpoint bullet, a .45 ACP with a 230-grain jacketed roundnose bullet, a .357 Magnum with a 158-grain plated bullet, a .22 Hornet with a 45-grain jacketed softpoint bullet, another .22 Hornet with a 33-grain jacketed hollowpoint bullet, and a .22 Long Rifle with a 40-grain plated bullet.
The Hornet is fun to shoot, but it’s one of those cartridges that is tricky to reload (a couple of others are .30 Carbine and 9mm; they are challenging to reload for other reasons). Hornet brass is very thin (so you can’t reload it too many times and it’s easy to deform it when seating the bullet). It’s hard to get the bullets started straight during the seating operation, and the whole reloading process just takes a lot more finesse than does reloading most other cartridges. Everything is tiny. That being said, though, I like reloading Hornet ammo, especially when good groups are the result.
So how did it go? Not bad, I think. Here are the results:
The 33-grain loads show promise.
My testing wasn’t exhaustive, and I only shot at 50 yards on this outing. I tried a few new things with these tests. As mentioned above, the Lil Gun propellant and 33-grain Speer bullets were two of the variables, and both did well. I’d previously read that some shooters had better results using small pistol primers instead of small rifle primers, so tried that and it seems to be the case for me, too. The theory is that small rifle primers, combined with the Hornet’s small case capacity, may blow the bullet out of the case before the powder can get a good burn going. I don’t know if that’s the case or not, but the small pistol primers worked well for me.
The next steps for me will be to shoot these loads at 100 yards to see how the rifle does at that range. The scope on my rifle is an inexpensive Bushnell straight 4X and it’s quite a bit more clear at 100 yards (it’s just a little bit out of focus at 50 yards). We’ll see how that goes, and I’ll publish the results here. Stay tuned, my friends.
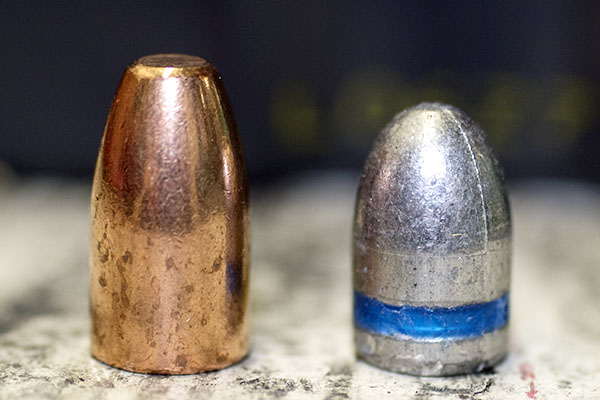
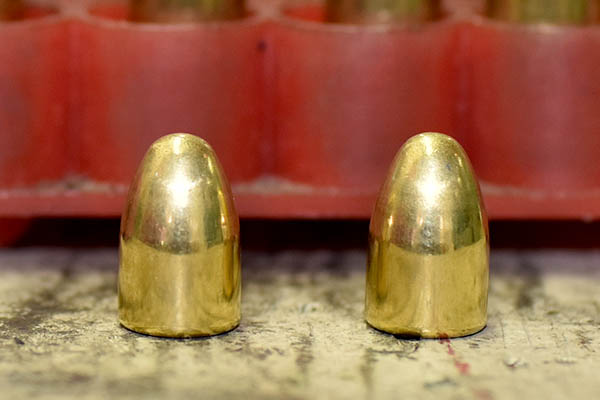
The 147-grain 9mm Speer bullet next to a 124-grain cast roundnose bullet. Cool, huh?
Well, ol’ Gresh sure stirred up a hornet’s nest with that flat track blog yesterday. We nearly ran out of bandwidth!
On to a more metric subject: 9mm ammo.
I started the PRK 10-day cooling off period (you know, the People’s Republik of Kalifornia) for my new SIG P226 a couple of days ago. Let me tell you, if anybody thinks they are going to outlaw guns in California, they need to think again. I had to wait an hour and a half at our local Turner’s Sporting Goods store just to start the process. There were five guys working the gun counter and customers were lined up five deep. There were a ton of folks buying and picking up guns. Trying to outlaw guns in America is a nonstarter, even here in looney leftwing California.
This man had some of the best comments ever. “They know so much that just isn’t so” ranks high on my list.
Okay, enough of the rant about my friends who know so much that just isn’t so, to borrow a phrase from one of the greats, and on to the subject of this blog: Getting ready for the 9mm accuracy load development program I spoke about a few days ago. Like I said earlier, my standard 9mm accuracy load for years has been 5.0 grains of Unique behind a 125-grain cast bullet, but as part of my New Year’s resolutions I am moving in two directions simultaneously: I’m expanding my horizons in the 9mm world and I’m reducing my waistline. The waistline story can wait for another day; today’s topic is the loads I’m crafting for inclusion in the 9mm Comparo.
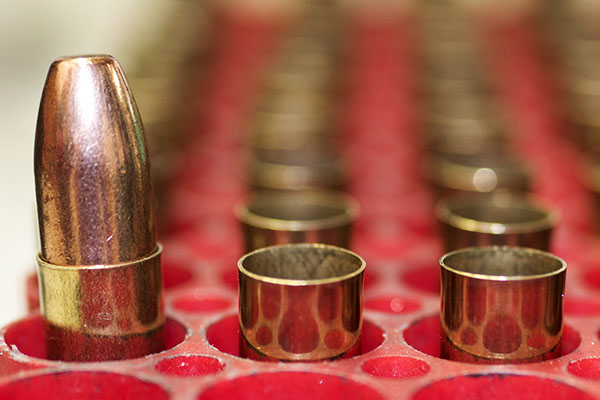
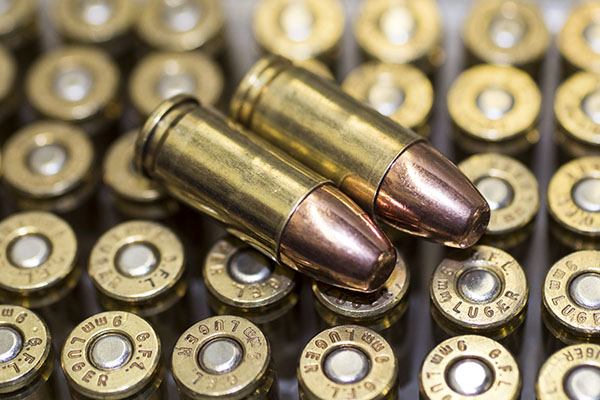
I’m going to evaluate three or four different 9mm handguns and several different loads, and I’ve started reloading the ammo for that. The first four loads I’ve already crafted are with two different bullets I haven’t tried before: The 147-grain Speer truncated metal jacket bullet, and the 115-grain Armscor FMJ bullet. The 147-grain Speer bullets are really cool looking. If they shoot half as good as they look I’ll be driving tacks with my new SIG!
A box of Speer 147-grain TMJ bullets. These are long bullets compared to what I normally shoot. They do look good.One of the 147-grain Speers ready for seating in a charged 9mm case.Another angle. Some of you folks get it. Stuff like this is beautiful. I mean, look at it: Polished brass, Unique propellant, and full metal jacket, heavy-for-caliber bullets. Life is good, folks. These loads are at 3.9 grains and 4.4 grains.
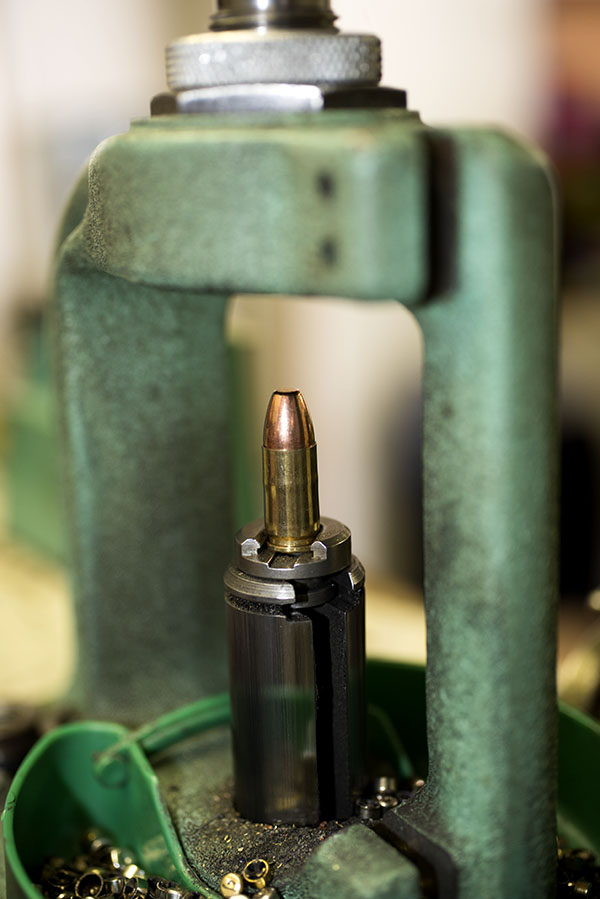
Seating the bullets is always cool, too. It’s where it all comes together.
On the way up, Rockchucker style……and on the way down. A new cartridge is born!
The finished rounds look great. Now the question is: Are they accurate? We’ll see. This is the first time I’ve tried a bullet this heavy in a 9mm.
You can’t think about the time you spend reloading ammo compared to the cost of factory 9mm ammo. It would be too depressing. We do it for the sheer enjoyment of making something. We’re recyclers. Maybe that’s why RCBS reloading gear is green. Al Gore and Ms. Thunberg have nothing on us!
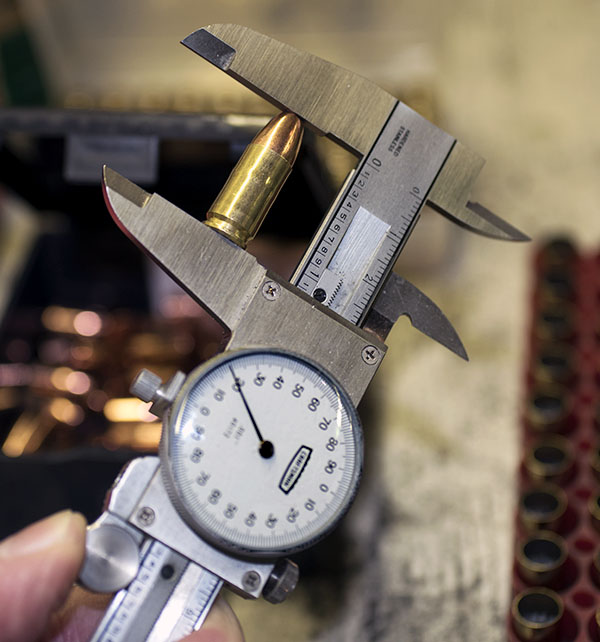
I seated the Speer bullets to the recommended depth for an overall cartridge length of 1.120 inches. I’m trying a couple of different propellant charges. I can experiment with seating depth to find the best accuracy later if this combo shows promise.
I know. It’s an obsession. But it’s fun.
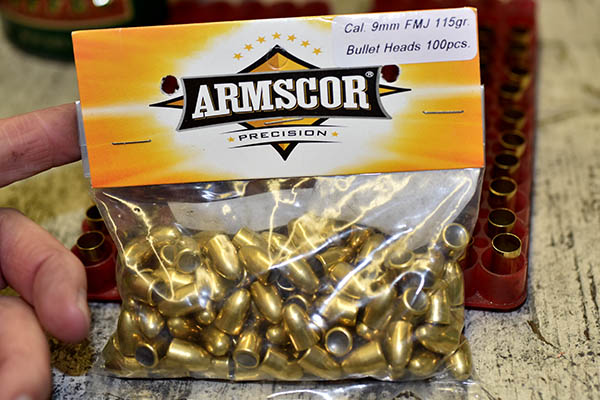
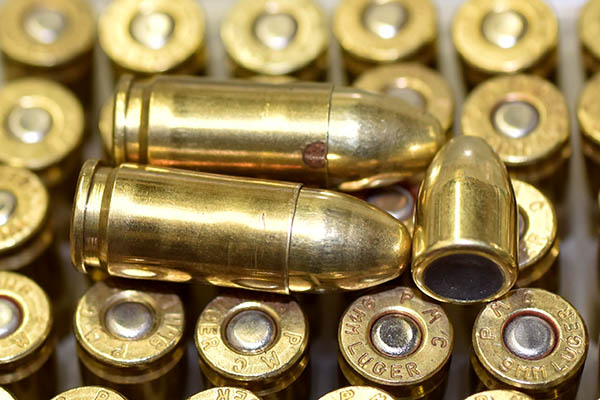
But wait: There’s more! I also picked up another bullet I had not tried yet, the Armscor 115 FMJ (full metal jacket) roundnose bullets. They are cool, too, and they were only $10 for a bag of 100 pills.
Armscor is the same company that makes Rock Island Armory guns, like my Compact 1911.
I’ve shot brass-jacketed FMJ bullets before, but that was in my .45 when I bought bulk Remington ammo just to get the brass cases (you know, so I could shoot them up and reload them later). These are good looking bullets, too.
Brass jacketed Armscor 9mm bullets. We’ll see how these do. I like the look..
The charges listed in my loading manuals for a 115-grain jacketed bullet with Unique propellant seemed to hover around a max of 5.5 grains with a minimum of 4.8 grains, so I prepped two loads, one at 5.4 grains and one at 5.0 grains.
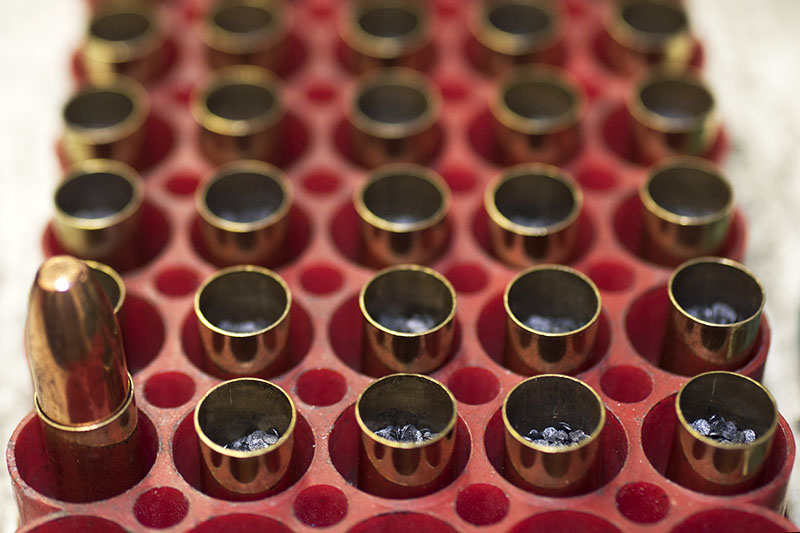
5.4 grains of Unique in primed 9mm cases. You can’t load too much more; this charge nearly takes up the entire case volume. With the bullets seated, this will become what we call a compressed load. Unique is what is known as a flake powder…the individual grains are tiny flakes of propellant.
Here’s a cool shot of the finished Armscor load. I like the way these look. It’s like being the Lone Ranger, but with gold instead of silver bullets. Hi Yo SIG, away! (Cue in the William Tell Overture.)
Ready for accuracy testing. This, too, is nice looking ammunition.
If you are not a reloader yet, you might want to think about getting into it. To me, reloading is as much fun as shooting. And if you want to learn how to do it, take a look at our series on reloading .45 ACP ammo on the Tales of the Gun page!
I posted a series of blogs on my Ruger No. 1 in .257 Weatherby and the loads I was developing for it a few months ago, and I told you about the stock cracking on my rifle. That held things up for a while.
The original stock on my .257 Weatherby Ruger No. 1 cracked on the top and the bottom, just aft of the tang. I can repair this stock and use it, but Ruger provided a new stock on the warranty. Ruger customer service is top notch.
Ruger Customer Service
I was disappointed about the stock fracture, but the wizards at Ruger did a good job in selecting a piece of wood of comparable quality, figure, and tone. I also asked Ruger to return the defective stock to me after they installed the new one, and they did. And they didn’t charge me anything to put a new stock on the rifle (it was a warranty repair). Ruger sent photos of three stocks they had selected that were a good match for the forearm, and they allowed me to pick the one I wanted. More good news is that I believe the stocked crack can be repaired. I’m going to do that and maybe put it back on this rifle. Or maybe I’ll just have it as a spare.
Tang Relief
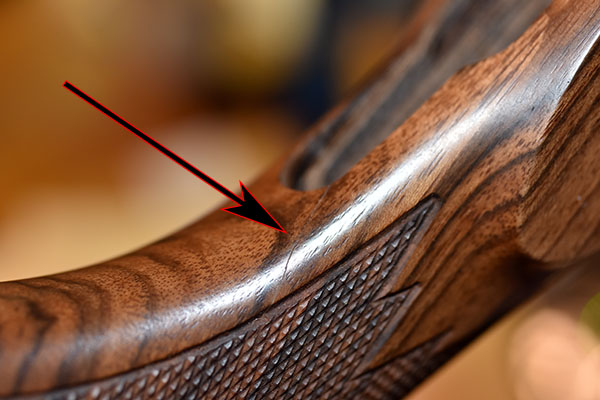
I believe the reason the original stock cracked is that the wood around the receiver tang had not been properly fitted (there should be a little clearance to prevent the tang from acting like a wedge to split the wood). I asked Ruger to make sure the new stock had some clearance behind the tang, and they did. They actually went a little overboard in my opinion, but that’s preferable to having no relief.
At my request, Ruger relieved the new stock to provide clearance between the receiver’s tang and the wood.
More good news is that I now have a load that reaches into the upper stratosphere of what the .257 Weatherby cartridge can do, and it does so with high velocity and great accuracy.
The New Ruger No. 1 Stock
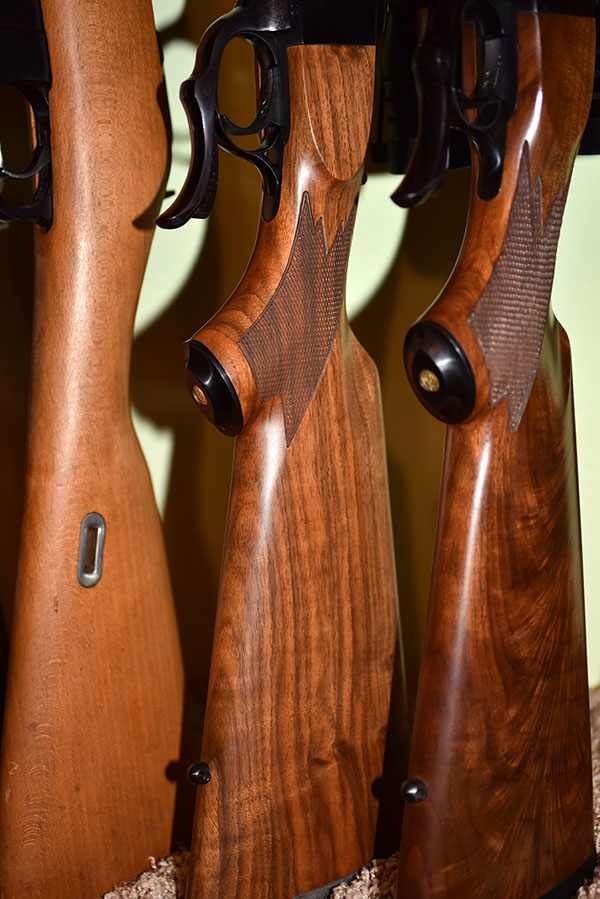
First, allow me to show you the new lumber on the Ruger No. 1:
The new stock on my Ruger No. 1. Notice how well the stock matches the forearm.The left side of my new stock. It’s Circassian walnut.And the right side. The original stock had horizontal stripes, which I wanted Ruger to duplicate. They did a good job. They showed photographs of three stocks to me; this is the one I selected.
Here are a couple more shots to show the new stock, one in the gun rack and another on my workbench when I was cleaning the rifle:
Another view of the new stock. I love pretty wood. I selected this No. 1 because of the wood, and when the stock cracked, I was afraid that the replacement would not be as nice. But it was.And one more view. The rifle on the left is an unissued, unfired 1956 M44 Polish Mosin-Nagant. The one on the right is another Ruger No. 1, this one chambered in .300 Weatherby. Ruger has in the past offered the Ruger No. 1 in .257 Weatherby, .270 Weatherby, and .300 Weatherby, along with many other non-Weatherby chamberings. There are still a few new .257 Weatherby Rugers out there. They are destined to be collectibles.
A Mississippi Dave .257 Weatherby Load
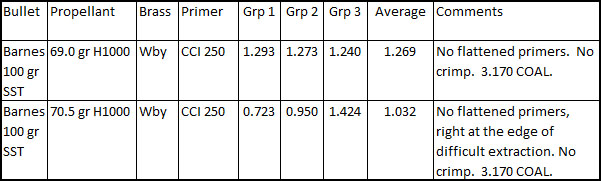
I’d like to take credit for discovering the load on my own, but I can’t do that. My good buddy Mississippi Dave, who knows more about the .257 Weatherby cartridge than anybody I know, turned me on to Barnes solid bullets and H1000 propellant powder as the keys to success with this cartridge, and he was spot on in his guidance. Here are my results, all at 100 yards:
Those are great results, and 70.5 grains of H1000 is the load I am going to use with the Barnes bullets. I think I could have done even better, but conditions were less than ideal when I was shooting that day. There were a lot of guys on the range the day I was out there, including a couple of Rambo wannabees on either side of me with assault rifles and muzzle brakes shooting rapid fire. I know that’s what caused that third group with 70.5 grains of H1000 to open up to over an inch. I think the No. 1 could be a half-minute-of-angle rifle with this load. And this load in my rifle (the Ruger has a 28-inch barrel, 2 inches longer than normal) is probably attaining velocities well over 3700 feet per second. That’s smoking.
One quick additional comment on the above loads: These are loads that work in my rifle. Your mileage may vary. Always consult a reloading manual when you develop a load, and always start at the bottom of the propellant range and slowly work up. Barnes publishes their recommended reloading data, and you can go to their website to download that information.
Barnes Bullets
The high velocities mentioned above are only possible with Barnes’ solid copper bullets. Jacketed bullets (lead core bullets shrouded in a copper jacket, which is normally how bullets are constructed) would break up in flight at these higher velocities, and for me, they did (see the earlier .257 Weatherby blogs).
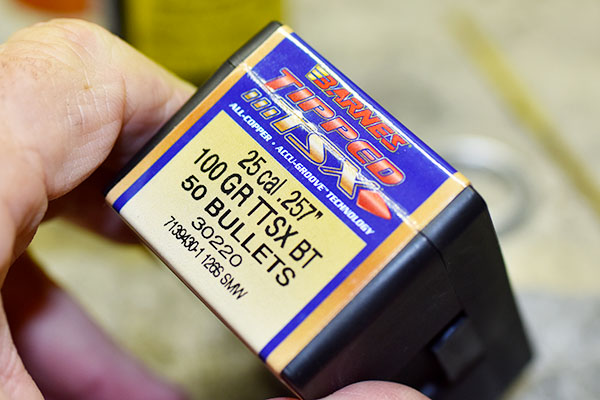
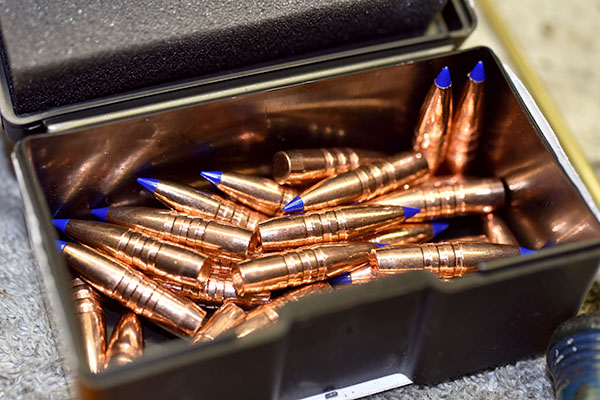
The bullets Mississippi Dave recommended. And wow, they worked superbly well.The Barnes bullets are solid copper. That’s all you can use if you hunt in California. The concern is that if you wound an animal and it later dies, it might be subsequently consumed by a California Condor, and if it had a lead bullet in it, the Condor might die of lead poisoning. I can’t make this stuff up, folks. Our politicians really believe this could happen.
.257 Weatherby Lessons Learned
I’ve learned a lot, with help from Mississippi Dave, about reloading the .257 Weatherby cartridge. You have to use solids (the monolithic Barnes bullets) to realize the full velocity potential of the .257 Weatherby. The .257 Roy can be extremely accurate, and at its upper-range velocities, higher velocities means more accuracy. Cup and core (conventional jacketed) bullets will work in the .257 Weatherby, but only at lower velocities, and if you’re going to do that, you’re not really using the .257 Roy the way it is intended to be used. Bore cleanliness is critical on these rifles, and because of the huge powder charges and high projectile velocities, the bore fouls quickly. When you reload for this cartridge, you not only need to full-length resize the cartridge case, you need to go in another 90 degrees on the resizing die after it contacts the shell holder in order to get the round to chamber. The best powders for this cartridge are the slow burning ones. H1000, in particular, works well in my rifle.
Earlier .257 Weatherby Blog Posts
The .257 Weatherby sage has been a long one but it is a story with a happy ending. If you’d like to read our earlier blogs on this magnificent cartridge, here they are:
If you enjoyed this blog and you want to see more, you can read our other Tales of the Gun stories here. And if you don’t want to miss anything from us, sign up for our automatic email blog notifications here:
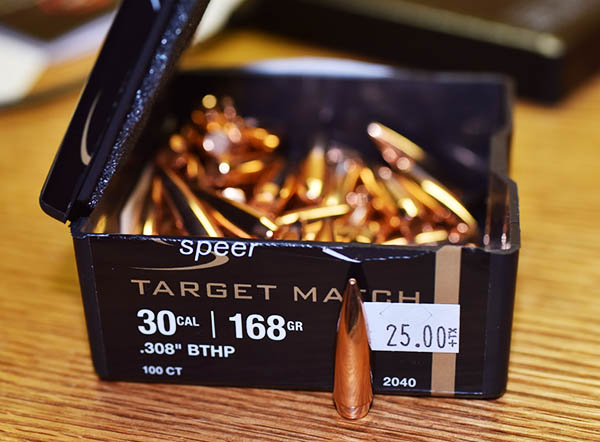
I mentioned last week that Speer offers 168 grain jacketed hollow point boat tail bullets, and that I was going to load a few rounds for the Garand to see how they performed. My initial results with the Speer bullets were not as good as with Sierra bullets, but I’m just getting started. The Speer Competition Target bullets are much less expensive than the Sierra MatchKings, and I want to make the Speers work. I’m basically a cheap SOB.
Speer’s 168 grain target bullets are just $25 for a box of 100; the comparable Sierra bullets are $37.
My accuracy load with the Sierra bullets was 47.0 grains, which did well in my Garand. That’s the load I used with the Speer bullets. Here’s what I did at 100 yards:
Two clips of 8 rounds each. There’s potential here.
I shot two clips of 8 rounds each at the above target. The promising part was that the second 8 shots grouped better than the first. Not quite as good as the Sierras, but the Speer bullets are hinting there’s more accuracy hiding in those shiny copper jackets. I didn’t exercise the care and consistency I normally would when I loaded these; I guess I was in a hurry. I used brass I had fired four times in the Garand, the brass is getting longer, and I didn’t trim it. I didn’t clean the primer pockets, either. For the next load I’ll trim the cases to a consistent length, I’ll clean the primer pockets, and I’ll use all the other little tricks I’ve learned over the years.
I called the Speer folks yesterday to see if they had any further insights on accuracy with their bullets in the Garand. Reaching the Speer guy was not easy; they don’t list a number on their website and I hate those website “ask us your question” pages. I finally got through to a guy who knew what he was talking about. The Speer rep said he couldn’t tell me the Garand accuracy load because they use a different barrel in their rifle and the harmonics would be different. After asking about the load I was using with the Sierra bullets, he told me their IMR 4064 propellant range with this bullet goes from 45.0 grains up to 49.0 grains (higher than the max load with the Sierra bullets). He also said that the Speer bullets do better with higher charges. He recommended I start at 47.0 grains of IMR 4064 and go up from there. The Speer bullets have ogive and boat tail profiles that are longer than the Sierra bullet, so the Speers have less bearing area in the barrel (that’s why they can be loaded hotter). The Speer dude told me they also load to a longer cartridge overall length of 3.295 inches (which basically defines how deep the bullets are seated in the cartridge case). For someone who couldn’t give me their accuracy load, he sure had a bunch of good information.
So, that’s my plan for the next load. I’ll pick up another box of the Speer bullets and I’ll shoot them later this week, assuming my component dealer still has the Speers in stock. It would be good if I can get them to shoot as well as the Sierras. They are way less expensive. Did I mention I am a cheap SOB?
On to that motorcycle commercial thing mentioned in the title of this blog. Good buddy TK sent this YouTube to me last week, and it’s a hoot. It looks like the Harley and Kawi commercials overseas are a lot better than the silly stuff we see here (although I don’t think I’ve seen any motorcycle commercials for at least a couple of years now).