I’m in the money with the Mark V .300 Weatherby now, but it took some doing to get there and the journey isn’t over yet. My recent reloads with this rifle were all over the place at 100 yards. I suspected it was more me than the rifle (or the loads) and I was probably right about that. This rifle has serious recoil, way more than I am used to. I was developing a flinch in anticipation of getting whacked by the Mark V.
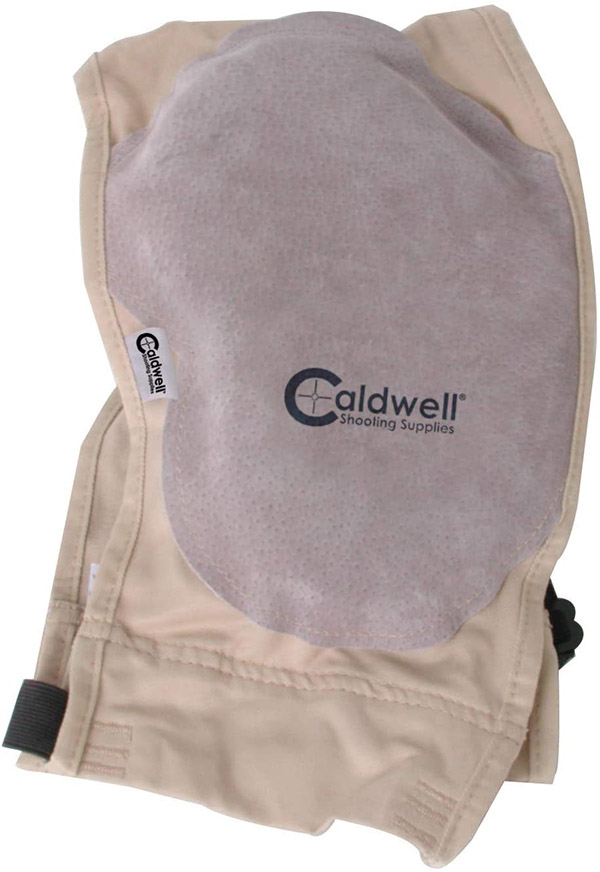
I have a friend who shoots the .300 Weatherby a lot, and he’s about the same size as me. I thought about him a bit, mentally picturing him on the range, and then I realized: He uses a shoulder pad. It was a click or two on Amazon until I found the Caldwell recoil shield.
I had the Caldwell recoil shield the next day, and I had to play with it a bit to find how to wear the thing. I bought the thickest version, figuring that if some is good, more would be better.
I next researched the Internet to find ways to improve my bench rest technique and I immediately found two improvement opportunities: Parallax, and how I positioned the rear rest.
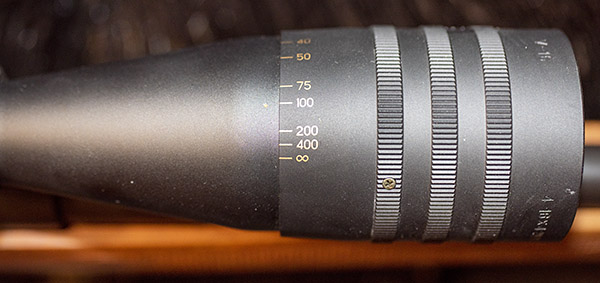
With regard to parallax, it’s a real thing and a real issue. Most scopes don’t have any adjustment for parallax, but the 4×16 scope I have on the Mark V does. To adjust for parallax, you set the rifle in the rest and put the cross hairs on the target. Then, without touching the rifle, you move your head around and see if the reticle moves around on the target. On a scope with parallax adjustment, what I read is that you ignore the markings on the parallax adjustment and move your head around, adjusting the parallax adjustor until the parallax is minimized. I couldn’t completely eliminate the parallax on my 100 yard target, but I was able to greatly reduce it. After making the adjustment I looked at the scope objective (the parallax adjustment feature), and what do you know, it was right on the 100-yard mark. I guess those Weaver boys knew what they were doing.
I had a rifle with me that has a non-parallax-adjustable scope and checked it for parallax at 100 yards, and wow, when I moved my head around the reticle was moving around a good 3 inches on the target (left to right, and up and down). To control parallax with a non-parallax-adustable scope, the trick is to get your eye in exactly the same spot every time. In fact, that’s good technique with any scope.
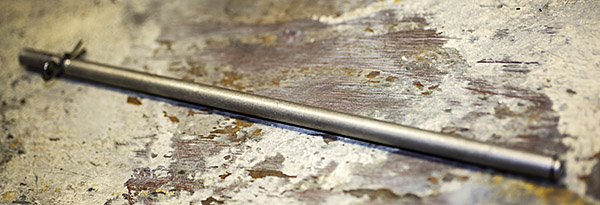
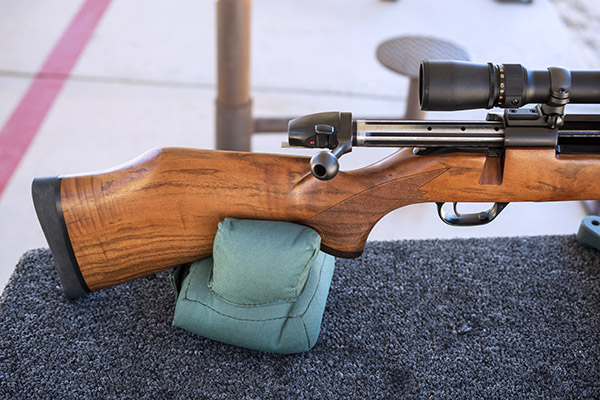
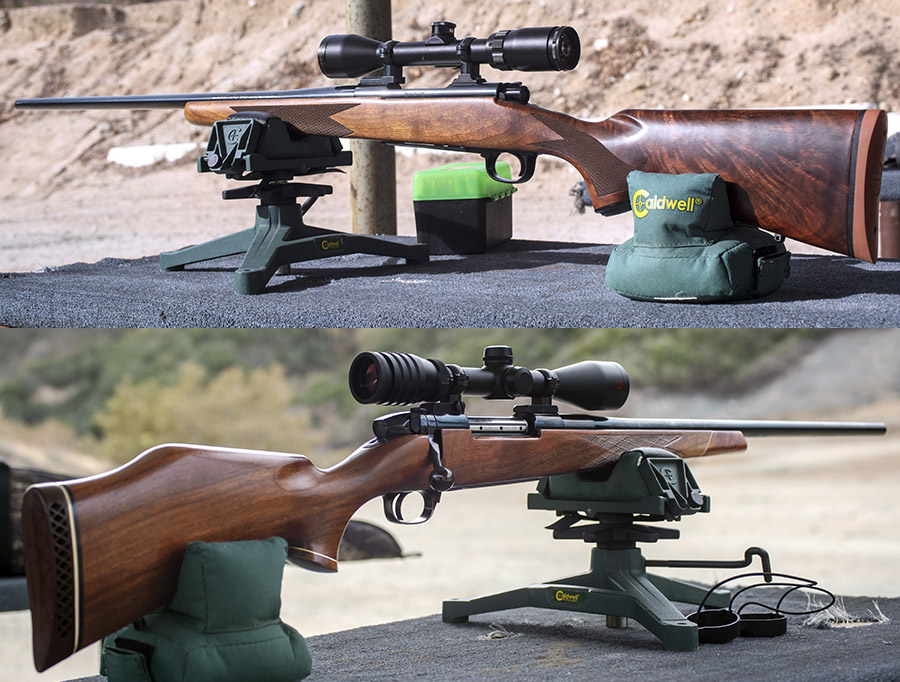
The next thing for me was to get the rear rifle rest directly under where my face rested on the stock. You can see the front and rear rest in the large photo at the top of this blog (I use Caldwell equipment). The idea behind getting the rear rest directly under where your cheek contacts the stock is that the downward force from your cheek is transmitted directly through the stock into the rear rest without flexing the stock. It may not seem possible (or even detectable), but if your face is ahead of the rear rest or behind it, you will impart a torque into the rifle and it can be enough to shift the point of impact at 100 yards.
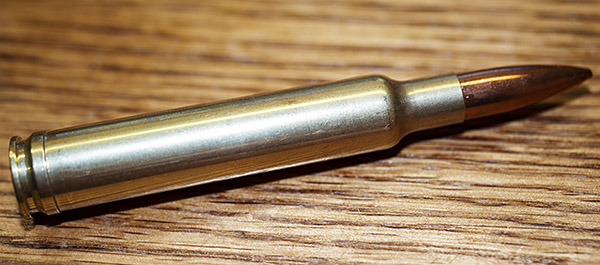
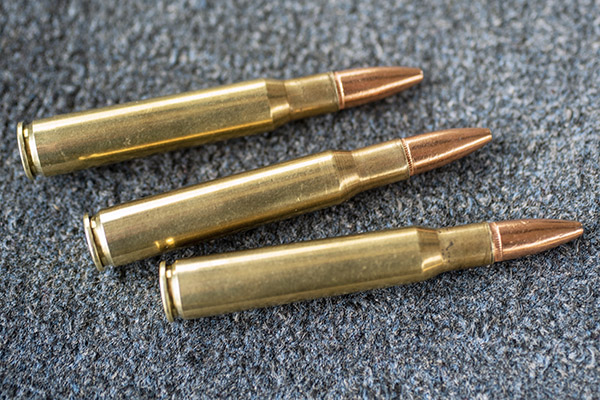
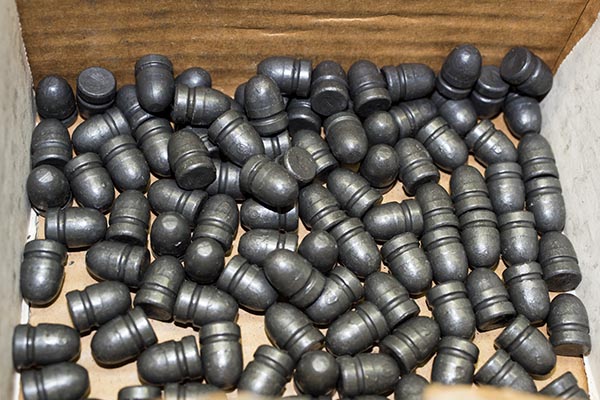
On to my loads: I reloaded the next set of .300 Weatherby cartridges, going with 73.0 grains of IMR 7828, the CCI 250 magnum primer, 200-grain Sierra MatchKing bullets, and every trick I knew of to improve accuracy. This is a relatively light load. I neck sized three different sets of brass (fireformed .300 Remington cases made from .300 H&H brass, Remington .300 Weatherby brass, and Weatherby brand .300 Weatherby brass). I have a Lee .300 Weatherby collet die that squeezes the neck down to size, and I used brass I had previously fired in the Mark V rifle. I also seated the bullets out much further (the reloading manuals all show the cartridge overall length to be 3.560 inches, but I seated the Sierras out for an overall length of 3.718 inches). The Weatherby Mark V rifles have a lot of freebore. The cartridges still fit in the magazine and the bullets did not contact the rifling, so I was good to go.
It was a quick trip to the West End Gun Club and I had the range to myself. I got everything set up, pulled on the Caldwell shoulder pad, and went to work. The Caldwell shoulder pad was awkward at first (as you might imagine), but it was wonderful. The .300 Weatherby Magnum is still a beast, but the Caldwell pad did its job. It greatly alleviated my fear of getting clobbered every time I squeezed the trigger and my groups tightened up immediately.
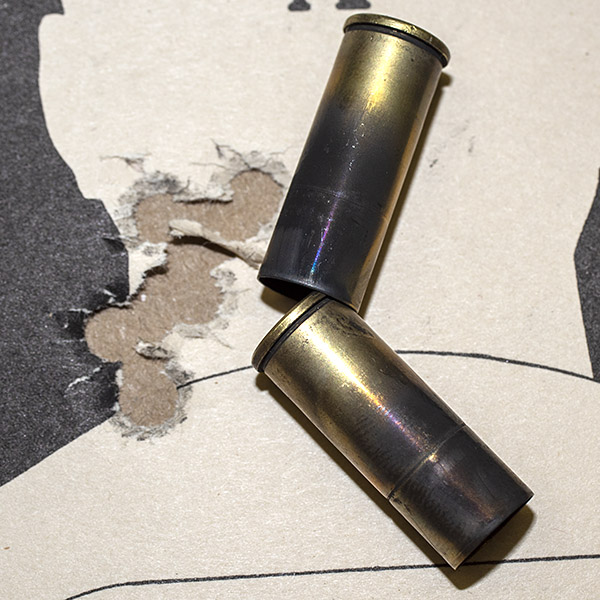
So my groups were way better, but I had a new problem. Many of the cases were sticking in the chamber after firing. The bolt would rotate freely, but the cases didn’t want to come out. When I pulled harder on the bolt, the extractor popped over the rim and the case stayed in the chamber. I had to tap the cases out with a cleaning rod. Other than the cases sticking, there were zero indications of excess pressure. No flattened primers or anything. The Remington cases were sticking almost 100% of the time (both the fireformed .300 H&H cases and the .300 Weatherby Remington cases). The Weatherby brass did not stick in the chamber, although a couple felt like they wanted to.
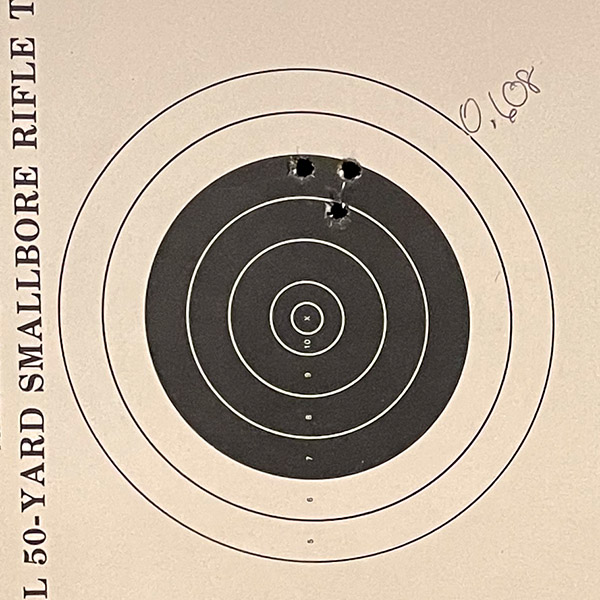
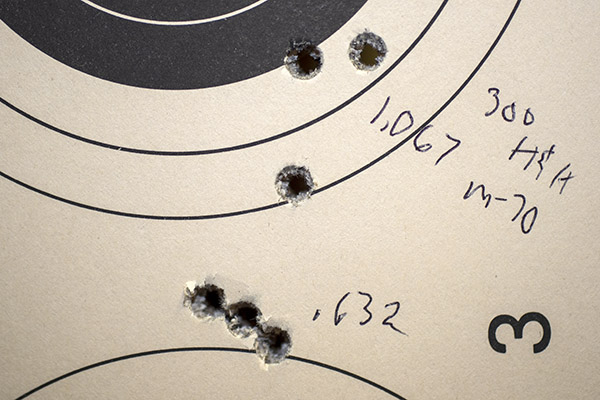
On to the good news: My best group was a .608-inch 3-shot group at 100 yards, which ain’t half bad on a fire-breathing monster like the .300 Weatherby. Before you trolls tell me I should shoot 5-shot groups, I will share with you that in my experience it’s pretty difficult to get animals to sit still for five shots. If your dead set on being critical, let’s get your butt out here. I want to watch you shoot 5-shot groups with your .300 Weatherby.
The next morning, after cleaning the rifle, I rechambered a couple of the fired Remington cases, and then when I withdrew the bolt the cases stuck in the chamber again. And again, I had to tap them out with a rod. The Weatherby brass did not, but it was tight. I measured each of the cases that stuck, and they all met the SAAMI .300 Weatherby specification. My conclusions are:
I don’t have an excess pressure situation. I loaded at the bottom of the propellant range, the bolt rotated freely, there were no pressure signs on the case base, and the primers were not flattened.
Neck sizing on my .300 Weatherby Mark V is not a good way to go (notice I said mine; your mileage may vary). I full length resized one of the cases that stuck (a Remington case) and it chambered and extracted easily. Weatherby brass is better (but it is hard to get).
I need to full length resize when reloading for this rifle.
The Weatherby Mk V extractor is weak. For a dangerous game rifle, that’s not a good thing. Maybe the extractor spring is weak.
I think the real issue was the neck sizing approach. I’m out of IMR 7828 propellant (powder goes fast with the 300 Weatherby) and no one seems to have any in stock, so I’ll try either H1000 or IMR 4831 next. Like we always say, stay tuned.
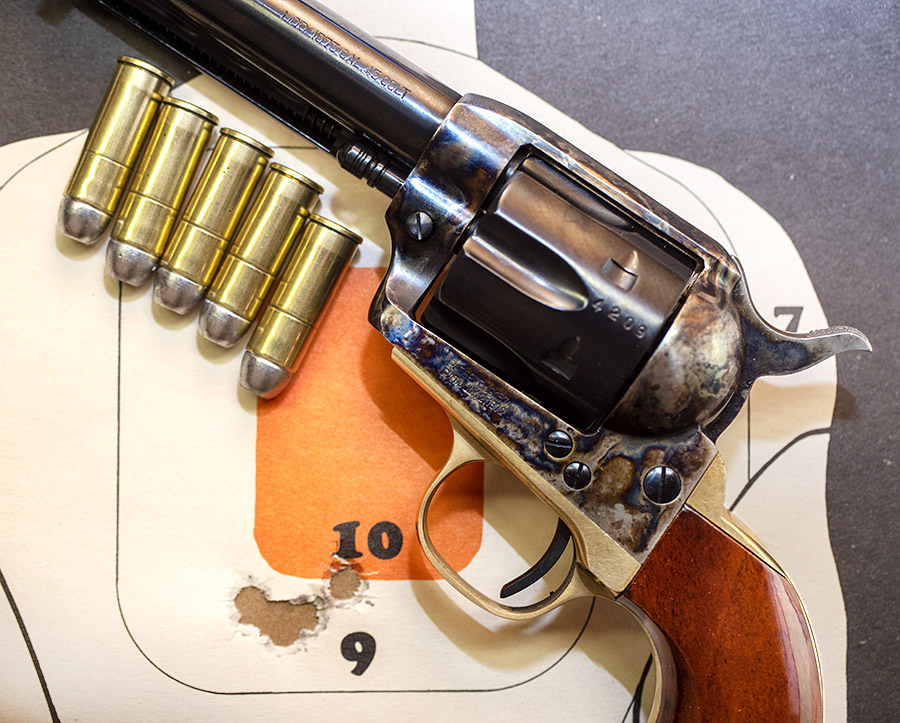
That would be my tuned Taylor Uberti in .45 Colt, the Italian Stallion Single Action Army revolver that has graced these pages in a few earlier blogs. It was a good day…a couple of my good buddies stopped by with brass they didn’t want (including the ultra-tough-to-get-these-days .45 Colt), and I was hard at it on the reloading bench shortly thereafter. My go to fun load in .45 Colt is 6.4 grains of Trail Boss, a 200-grain cast bullet (in this case the truncated roundnose thrown by the Lee mold, although just about any 200-grain semi-wadcutter works equally as well), and a crimp for an overall cartridge length of 1.595 inches. It was 5 shots at 50 feet, and I was putting them pretty much into one ragged hole just about exactly at my point of aim. You just gotta love a good Single Action Army revolver…I sure do!
Keep us in components…please click on the popup ads!
About the only thing I don’t like about Trail Boss powder is that it doesn’t obturate well, although you wouldn’t know it from the accuracy this load delivers. Trail Boss soils the cases and they take longer to come clean in the tumbler, but it’s a small price to pay for this kind of accuracy.
The nice thing about the Trail Boss load mentioned here is that it shoots just about to point of aim for me at 50 feet. Another nice thing is there’s almost no recoil…this load in a Single Action Army is a real powder puff. Yeah, I could go hotter, but what would be the point?
I love the Ruger Mini 14 and I’ve written several blogs on it (I’ll give you a link at the end of this blog). The Mini 14 is not the most accurate rifle I’ve ever shot, but there’s something about it that just makes it fun. I think if Ruger had introduced the Mini 14 a few years earlier it might have been the next US service rifle instead of Mattel’s M-16. That statement might get a few trolls’ shorts in a knot, but hey, they’re young. They’ll get over it.
Photos from the original GunBroker.com ad for my Mini 14. It was a limited production item with a Circassian walnut stock. Very few had wood this highly figured.
I took my Mini to the West End Gun Club a couple of weeks ago to see what impact (if any) a new Lee factory crimp die had on accuracy. Usually when I reload rifle cartridges with jacketed bullets I don’t crimp. Part of this is because it’s a bit difficult to get a consistent crimp if the brass is not trimmed to exactly the same length, and part of it is I often find I don’t need to trim my brass to get good accuracy. That’s not to say case neck tension isn’t critical (it is; lube a couple of bullets before seating them and see how far out of the group they print). But it you don’t crimp, you rely on friction between the case neck and the bullet to control the case’s grip, and friction is a tough thing to control. Crimping should make the grip on the bullet more consistent (or so the theory goes). Crimping is also thought to provide more complete combustion, reducing pressure variability and the inaccuracies associated with it.
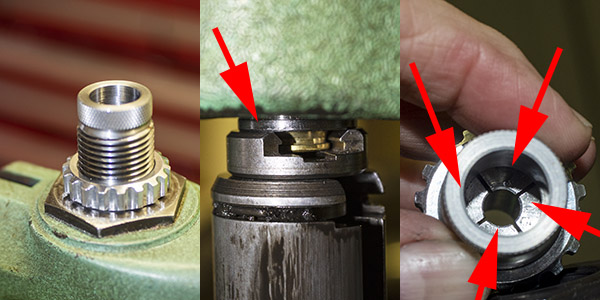
Conventional reloading dies rely on a reduced diameter in the bullet seating die, which rolls the case mouth into the bullet to achieve a crimp (such a crimp is called a roll crimp). Lee’s factory crimp die uses a different approach. It has four collets (each forms a quadrant) that work at 90 degrees to the case to crimp the brass. The collets are activated by the die’s base during the reloading press upstroke.
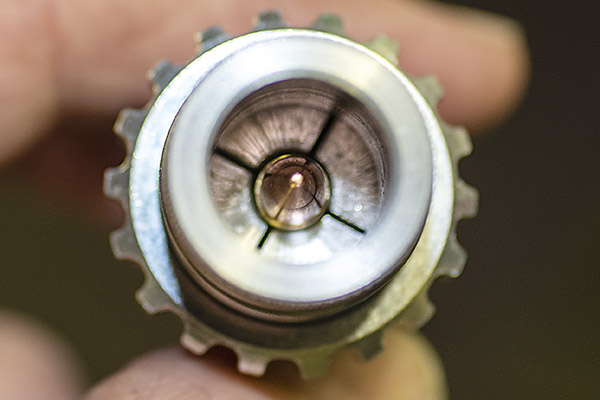
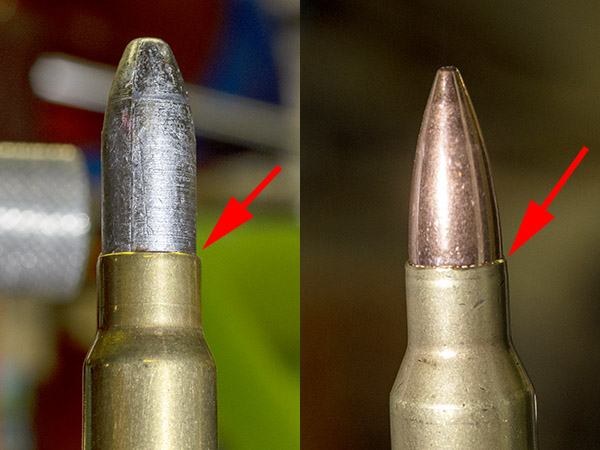
A .223 Lee factory crimp die. This is the last step in the reloading process. The die is screwed into the press after the bullet has been seated to the desired depth (left photo); the amount the die is screwed into the press controls the interface between the shell holder and the die (center photo). When the ram is fully raised, the die has collets that compress the brass horizontally around the case mouth (right photo), thereby crimping the bullet in place in the same manner as factory ammunition.The view from above. The collets squeeze the brass around the bullet to crimp it in the case.A 7.65x53mm Belgian Mauser round with a cast bullet roll crimped in place (left), and a .223 Remington/5.56mm NATO cartridge crimped with the Lee factory crimp die. The difference is subtle, but you can see it if you look closely.
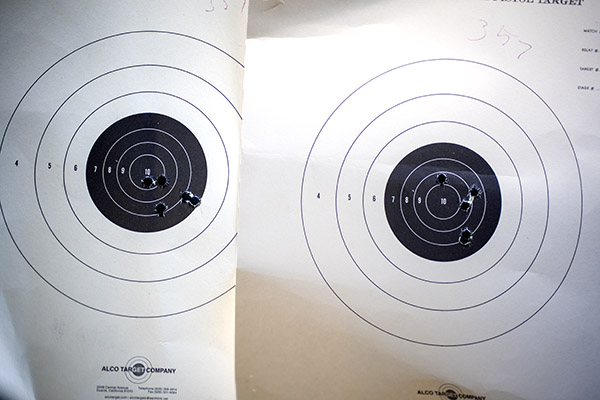
I loaded 15 rounds crimped in the Lee factory crimp die, and I used another 15 rounds without the crimp. I shot two targets at 100 yards from a rest using iron sights, with 15 rounds for each target. The target on the left is with no crimp, the one on the right is with the Lee factory crimp die (and I used a heavy crimp). The brass was fireformed in this rifle and neck sized only to get a good fit in the Mini 14’s 5.56 NATO chamber, which (as you know) is slightly larger than the .223 Remington cartridge. In prior load development work, I found that neck sized only brass is much more accurate in the Mini 14.
15 uncrimped .223 rounds at 100 yards (left target) and 15 rounds crimped with the Lee factory crimp die (right target).
The first five shots using uncrimped reloads all went into the left target’s 10-ring, so I thought I was doing pretty well. Then I switched to the Lee factory crimp die ammo on the right target. The first shot felt weird, and it did not fully extract. I think it was the one that went way low. The next four all went into the 10 ring. On the next five rounds (again, using the Lee die ammo on the right target), the first one did the same thing (it failed to extract and it went low). I fired one more magazine of Lee crimped ammo and all five worked okay.
Somewhere in those first two magazines of the Lee crimped ammo, I had two light primer strikes that did not fire. I extracted and chambered them again and they fired on the second attempt. I didn’t know why those two rounds had light primer strikes. Maybe the round had not fully chambered? Maybe because the Lee factory crimp die distorted the case mouth or something and it didn’t fully chamber? Or maybe something was interfering with the firing pin’s travel? I didn’t know and I wouldn’t find out until I disassembled rifle.
Then I fired 10 more uncrimped rounds at the target on the left and I had one failure to eject. My Mini 14 sometimes acts funny like that with the neck sized brass. It’s not a duty gun, so I thought I could live with an occasional failure to eject. But I don’t like it.
So back to those misfires. In the past, I’ve had to clean debris from around the firing pin, and it looked to me like it might be time to do that again. That could account for the two light firing pin strikes I had.
One other thing…I had painted the front sight with red nail polish, and that actually made the front sight’s top edge harder to see. I want to go back to the plain blued front sight.
I also want to adjust the Lee factory crimp for less of a crimp. These first rounds used a max crimp. I didn’t trim the brass for this test because it was only fired once, but I don’t know how even (in length) it was. I used bulk Remington loaded ammo to get the brass (having fired it previously in the Mini 14) because a couple of years ago that stuff actually cost less than unprimed brass. But inexpensive bulk ammo is not precision made and I suspect the case length had some variation (my suspicions were later confirmed, as you’ll read below).
A Lyman case trimmer I’ve been using for nearly 50 years. The Lee factory crimp die does not require case trimming, but the cases had enough length variability that I decided to trim them anyway. Cases that are too long can interfere with the bolt fully closing and raise chamber pressures.
When I reloaded the rounds fired in this test, I checked a few case lengths after neck sizing. The “trim to” length (per the Hornady manual) is supposed to be 1.750 inches, with a max case length of 1.760 inches. These cases (after two firings and neck sizing) were all over the map. They ranged from 1.752 to 1.780. That alone could account for some of the anomalies described above. I ran them all through the trimmer and reloaded a hundred for the next range visit. I backed off a bit on the Lee factory crimp die, too, as my good buddy Robby suggested.
I gave the Mini 14 a good cleaning and I was surprised at how filthy it was. This is not a rifle that I clean religiously…I’ll shoot it on several outings before cleaning (heresy, I know, but hey…it is what it is). I wanted to grab a few photos of what a funky Mini 14 can look like, but my hands were so dirty and greasy I didn’t want to handle my Nikon camera. After the most recent range visit, I Hoppes No 9’ed the Mini 14 bore for a couple days to get all the copper out (you know, until the patches came out with no green).
There were bits of what appeared to be very thin sheet brass in the bolt around the firing pin as well as a whole bunch of greasy carbon residue in the bolt. That could account for the couple of misfires. Removing the firing pin is not an easy job (it takes a special tool I don’t have or want); the drill here was to shpritz the hell out of the bolt with carb cleaner and work the firing pin back and forth to push the nasty stuff out. The thin brass bits might have been primer cup material. Or they might have been chips from the extraction operation that found their way into the bolt and were peened flat. There’s no way of telling, as some of that ejected brass ends up in the next county (a trait Mini 14s are famous for). By the way, when you’re working with that carb cleaner, you need to do it outdoors where there’s plenty of fresh air. It’s highly flammable and if I use that stuff indoors, I get lightheaded and nauseated pretty quickly.
There was a lot of carbon gunk in the stock channel clear back into the action. There was also a lot of carbon in and on the guide rod, as well as around the extractor. This could account for the occasional failures to eject. I blew it all out with WD 40 (in the stock) and carb cleaner (for the metal pieces). There was so much carbon residue in the stock’s barrel channel that I thought I might have a leak around the gas port, but I didn’t see any carbon residue around the gas port and I’ve got the Allen bolts around that part tightened as tight as I dare go. I tried the smaller diameter aftermarket gas ports last year, but every one of them gave me unreliable function, so I went back to the stock port.
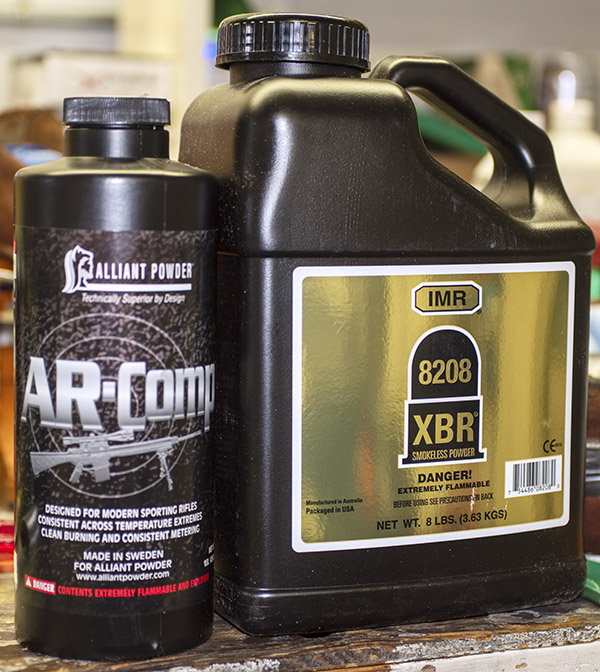
I’ve got a little more than a pound of ARComp, and that has been my “go to” Mini 14 powder for several years. When things started to get tight last year, my reloading outlet had an 8-pound bottle of XBR 8208 (it was the last bottle of anything he had). I had never heard of that powder before but I figured it would work in something, and in poking around on the Internet I found that 8208 gets the nod as a great powder for the .223 cartridge. The hundred rounds I just loaded are with ARComp, but I think I will do another 100 or so with different 8208 charges to see how they do. I’ve still got several hundred 62-grain Hornady full metal jacket bullets and I have another 500 55-grain bullets that just arrived from Midway. And I have small rifle primers and a potful of .223 brass. Unlike a lot of folks, I’m in good shape for .223 for a while (and no, I don’t want to sell or trade any components).
What’s the bottom line to all this? Did the Lee factory crimp die improve accuracy? The short answer is: I don’t know yet. I think it does, but I had too many other things going on with the rifle and the brass to be sure. If you ignore the first two rounds that went low, I think the accuracy edge goes to the Lee crimped ammo. Bear in mind that I was shooting with iron sights at 100 yards, so the differences may be more due to me than anything else. There were only four rounds outside the 10 ring with the Lee ammo; the uncrimped ammo had six rounds outside the 10-ring. But again, it’s iron sights at 100 yards, so who knows?
I’m going to share this post on Facebook, and you can bet some yahoo will tell me that he shoots 1/2-inch groups at 200 yards with open sights on his Mini 14 all day long. Hey, it’s the Internet. You have to ignore those buttheads. As far as the Lee factory crimp die’s accuracy edge goes, I think it’s real. I’ll find out for sure (maybe) the next time I go to the range. Everything in the Mini is clean, lightly oiled, and ready for action. We’ll see what happens on the next outing, and you’ll read about here on the ExNotes blog.
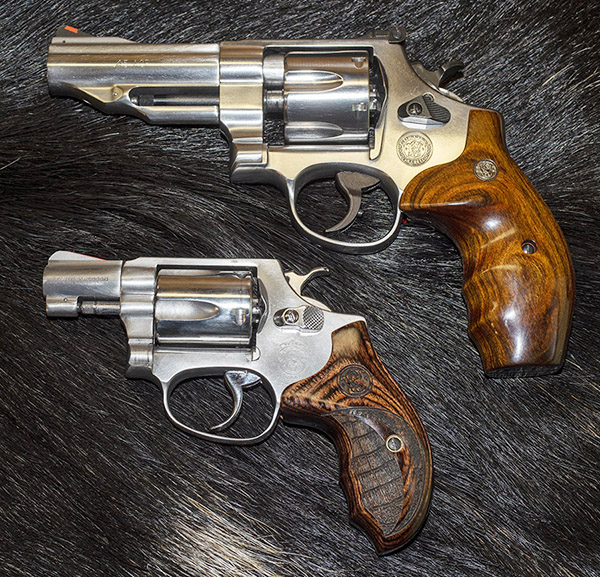
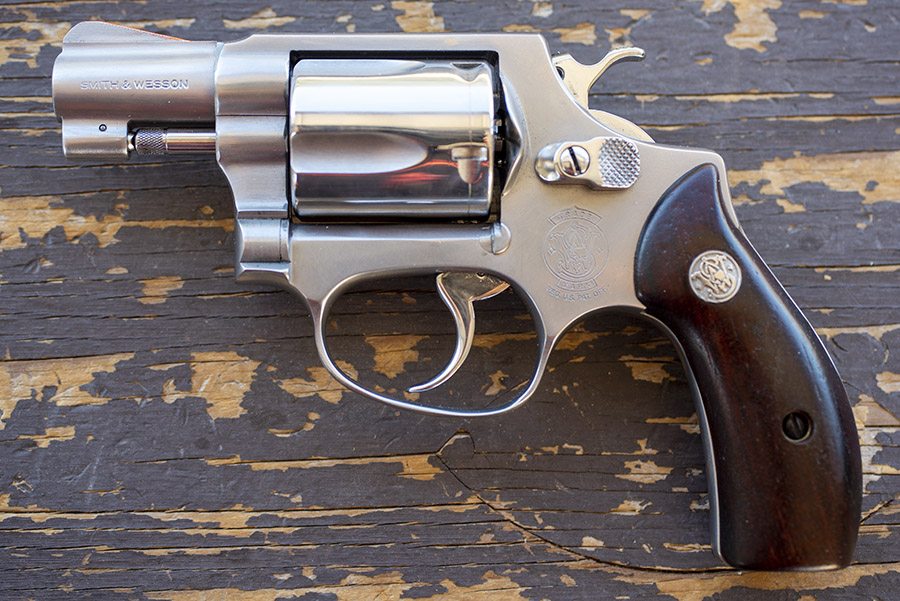
When I first posted about the Model 60 load development plan and the Altamont grips I bought from good buddy Paul, the cover photo showed my recently-acquired Model 60 snubbie and a Smith and Wesson Performance Center Model 625 I’ve owned for years.
The Model 625 and the Model 60.
I like that photo because the two stainless steel Smiths look great on the wild boar skin. That skin is from a pig hunt Paul and I did in Arizona a few years ago.
The earlier blog was about finding an accuracy load for the Model 60, but a few people wrote to ask if I had a favorite load for the Model 625. I do: My usual accuracy load for the 625 is a cast 200-grain cast semiwadcutter bullet (sized to .452 inches) over 4.2 grains of Bullseye.
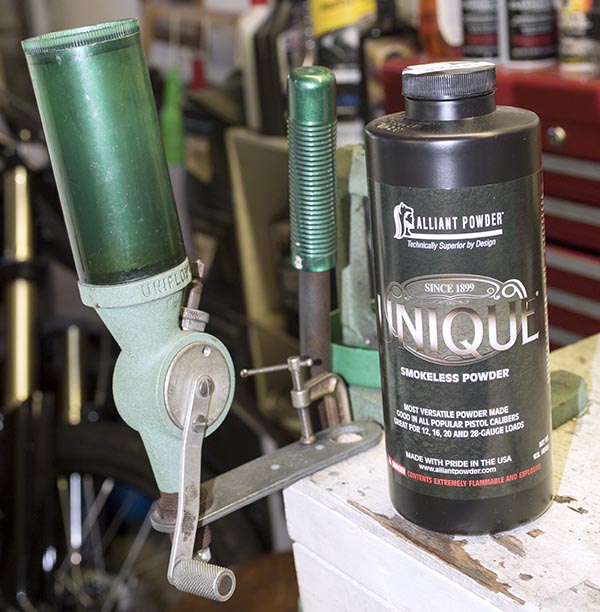
When I went to the range to run a few rounds through the 625 I picked a box of ammo I had reloaded in 2014. It was different than my usual accuracy load. I used the same bullet (a 200-grain cast semi-wadcutter), but instead of Bullseye I had loaded these over 6.0 grains of Unique. And instead of .45 ACP brass in star clips, I used AutoRim brass. This is the load I fired that 6-shot group you see in the cover photo above for this blog, and it’s a honey. The group, that is…not the photo (it’s hard to get true colors when using an iPhone in the shade). I shot at 50 feet while standing…there’s no rest for the Model 625 or the weary.
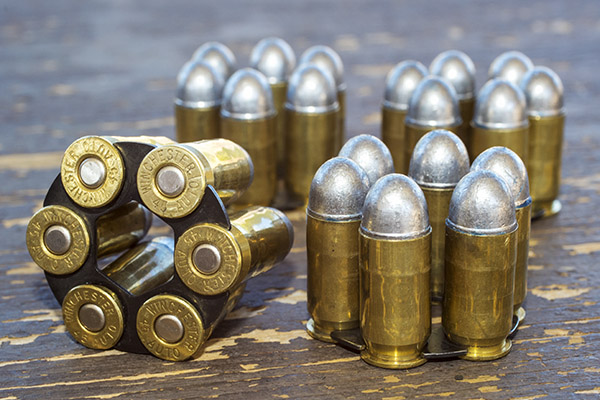
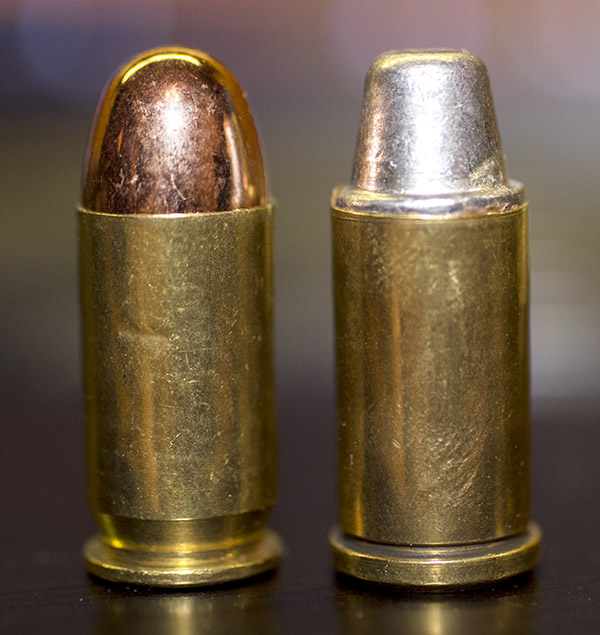
.45 ACP cartridges in star clips for the Model 625. These are loaded with 230-grain cast roundnose Missouri bullets.The .45 ACP cartridge (left) and the .45 AutoRim cartridge (right). The AutoRim cartridge is designed for use in the Model 625 without star clips. The ACP cartridge has a 230-grain roundnose Xtreme bullet; the AutoRim cartridge has Missouri’s 200-grain semi-wadcutter.
The AutoRim brass is in the tumbler as I write this and when I reload it I’m going to go with the same load: The 200-grain cast semi-wadcutter over 6.0 grains of Unique. It seems to be working for me.
Help keep us afloat: Please click on the popup ads!
Never miss an ExNotes blog: Sign up here for free!
This blog outlines the development plan I’m using for my new-to-me Model 60 Smith and Wesson revolver. You might recall that I bought this revolver not too long ago and I had my good buddy and master pistolsmith TJ (of TJ’s Custom Gunworks) go through the gun, get everything perfect, do the trigger, and add a bit of tasteful polishing.
My custom Smith and Wesson Model 60. Note the polished ejector rod, cylinder, trigger, cylinder release, and hammer, and the smooth rosewood grips.
TJ did a hell of a job, I recently qualified with the Model 60 for my concealed carry permit, and now I want to find the most accurate load for this handgun. To me this means two things: The smallest group size and where the revolver hits with respect to the point of aim. I’m not concerned with velocity. All the velocity in the world doesn’t mean a thing if you can’t hit your target.
When I develop a load, I generally do a bit of research on the Internet to see what others have found to be an accurate load, I see what components I have on hand (bullets and powders), and I consult my reloading manuals. I never take loads off Internet forums as gospel unless I confirm their safety in my load manuals or they come directly from the manufacturer’s websites (there is just so much inaccurate information on the Internet), and I never load at the manual’s max without working up to that level. My approach is to load a few rounds at the minimum level and a few a bit below the max level with each bullet and powder combination to get a quick feel for further load development. Or, I might find a combination in the initial tests that is so good I don’t need to do any further testing.
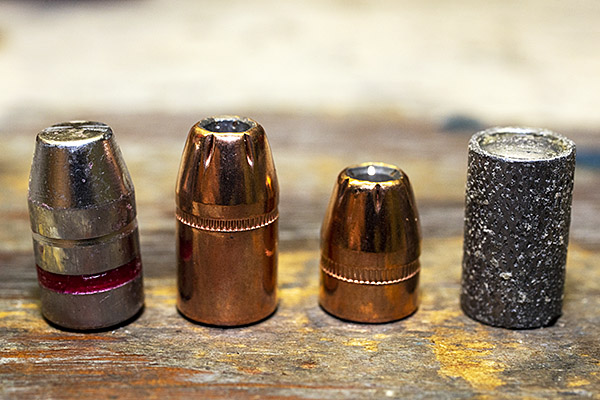
From left to right: 158-grain cast flatpoint, Hornady 158-grain jacketed hollow point, Hornady 110-grain jacketed hollow point, and Hornady 148-grain swaged wadcutter.
These days, I’m governed by what I have on hand, as the component suppliers are out of nearly everything. For me and this test series, that means four bullets:
A 158-grain cast flatpoint bullet from a local caster
Hornady’s 158-grain jacketed hollowpoint
Hornady’s 110-grain jacketed hollowpoint
Hornady’s 148-grain swaged wadcutter
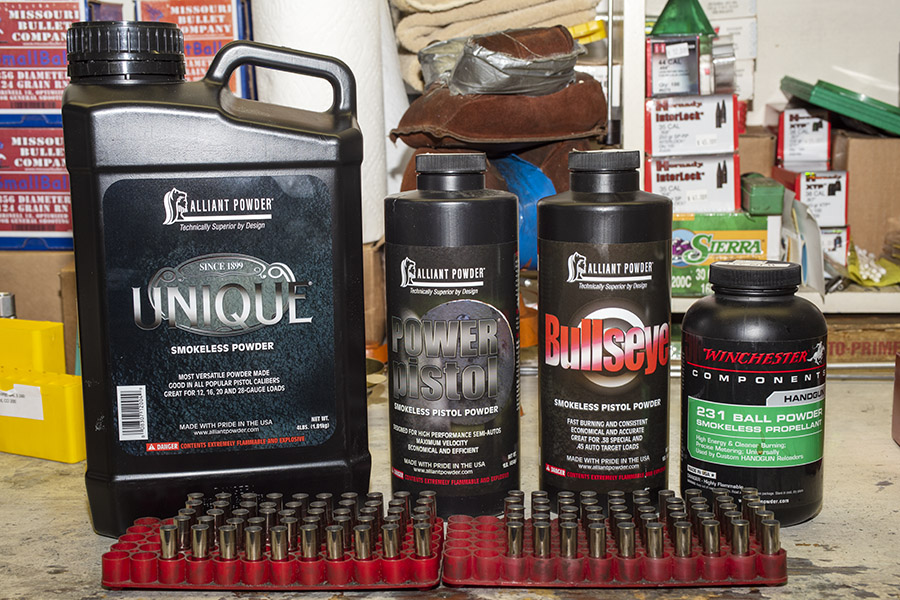
All are shown in the photo above. My powders include Winchester 231, Unique, Bullseye, and Power Pistol (as seen in the featured photo at the top of this blog).
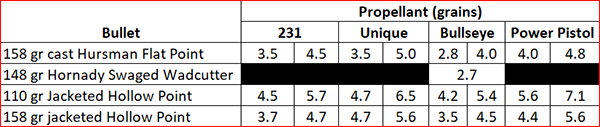
Here’s what the test plan looks like:
I’m going to test at 50 feet and fire two groups of three shots each for each combination. That will keep the total number of rounds fired to a manageable 150 rounds. It’s a quick look at what works and what doesn’t.
You might notice that I’m only going to test one load with the 148-grain wadcutter bullet. That’s because it’s been the known accuracy load for years, and it’s also because it’s what I have my Star progressive reloading press set up to make. Stated differently, I’m not going to change this load because it’s my standard wadcutter load, and the Model 60 will either do okay with it or it won’t. I already know this load shoots significantly to the right of my point of aim in the Model 60, but I’m including it here because I have the ammo and it’s easy to include in this test series.
That’s the plan. I’m reloading the ammo as you read this, and I’ll have it tested most likely next week. Watch the ExNotes blog for results in the near future.
Necessity is the mother of invention, or something like that. When I heard that IMR 4320 was discontinued (on top of the ammo and components shortage), I was not a happy camper. IMR 4320 was my go to powder for several cartridges, and now what I have left is all there is (and it’s almost gone). But it really doesn’t matter, because we can’t hardly find propellants of any flavor. That notwithstanding, I made the trek to my local components supplier a couple of weeks ago, and he had only three propellants left: IMR 4166, 8208, and BLC2. I’ve never used any of these, although I had heard of Ballsy 2. The 4166 seemed interesting…it matched my motorcycle jacket, but none of my reloading manuals had any data for it (it’s that new). I bought all three.
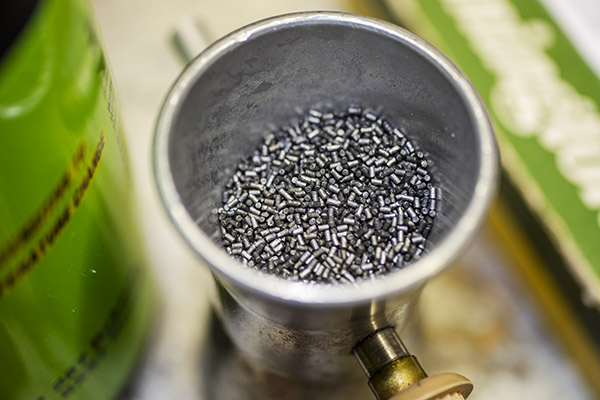
I went online and found data published by the manufacturer, so I worked with that for my 30 06. IMR 4166 is an extruded stick powder. It will flow through a dispenser, but the dispenser throw variability was about 0.2 grain, and that’s enough when loading for rifle accuracy that I’ll weigh every charge with my scale and trickle it in with my RCBS powder trickler.N Would 0.2 grains make an accuracy difference? I don’t know (and someday I’ll test to find out). I suspect not, but weighing every charge only takes a few seconds more, and it seems like the right thing to do.
IMR 4166 is a stick powder that looks like any other stick powder. It’s in a powder trickler in this photo. Yeah, I weigh the powder for every cartridge.
On the IMR website, it said that Enduron IMR 4166 is one of a new class of propellant that offers four adventages:
Copper fouling reduction. These powders contain an additive that drastically reduces copper fouling in the gun barrel. Copper fouling should be minimal, allowing shooters to spend more time shooting and less time cleaning a rifle to retain accuracy. Hmm, that might be interesting. We’ll see how it does, I thought to myself as I read this.
Temperature change stability. The Enduron line is insensitive to temperature changes. Whether a rifle is sighted in during the heat of summer, hunted in a November snowstorm or hunting multiple locations with drastic temperature swings, point of impact with ammunition loaded with Enduron technology will be very consistent. In the old days, I might have dismissed this as a solution looking for a problem, but I’ve experienced what can happen in a temperature sensitive powder. I had a max load for my 7mm Weatherby that was fairly accurate that I took out to the range one day when it was 107 degreees. I fired one shot and had great difficulty getting the bolt open. It’s a real issue if you develop a load at one temperature and then shoot it at an elevated temperature. If IMR 4166 is free from that characteristic, that’s a good thing.
Optimal load density. Enduron powders provide optimal load density, assisting in maintaining low standard deviations in velocity and pressure, a key feature for top accuracy. Eh, we’ll see how it does on paper. I have some loads that are low density (i.e., they occupy well under 100% of the case volume) and they shoot superbly well. I’m interested in how the load groups. The target doesn’t give extra credit if an inaccurate load has a low standard deviation.
Environmentally friendly. Enduron technology is environmentally friendly, crafted using raw materials that are not harmful to the environment. Okay, Al Gore. Gotcha. Now go back to inventing the Internet.
My test bed for the new powder would be a Model 700 Euro in 30 06, a 27-year-old rifle I bought new about 10 years ago. I had just refinished it with TruOil and glass bedded the action (a story a future blog, to be sure), and I hung a cheapie straight 4X Bushnell scope just to get a feel for how everything might perform.
The Model 700 Euro had a tung oil finish. The rifle was only offered in 1993 and 1994. The tung finish didn’t do it for me, so I did my usual TruOil finish. That’s an old Bushnell 4X economy scope up top.
My load was to be a 180-grain Remington Core-Lokt jacketed soft point bullet and 47 grains of the IMR 4166, all lit off by a CCI 200 primer. If you’re interested, I was using Remington brass, too. The cartridges were not crimped.
Loaded 30 06 ammo with the Remington 180-grain jacketed soft point bullet.
Wow, those 180-grain bullets pack a punch. Recoil was fierce, and I probably felt it more because the Model 700 doesn’t have a recoil pad.
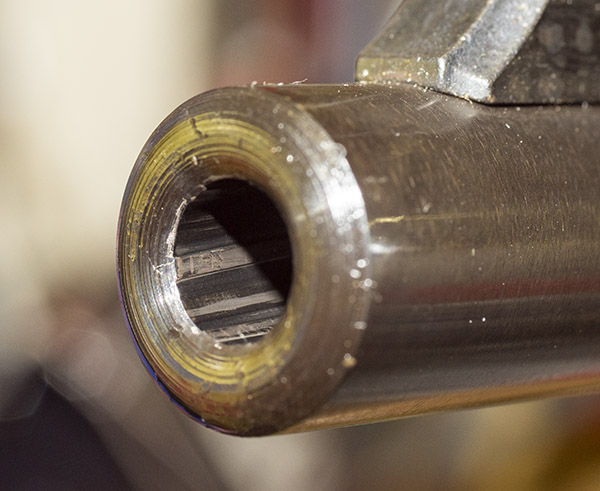
Okay, that’s enough about my heroics. Let’s take a quick look at how the propellant performed. With regard to the reduction in copper fouling claim, I’d have to say that’s an accurate claim. After 20 rounds (the very first through this rifle), I ran a single patch with Hoppes No. 9 though the bore, followed by a clean patch, just to remove the powder fouling. There was a very modest amount of copper fouling, way less than I would have seen with any other propellant. Ordinarily, at this point in the cleaning process (i.e., removing the soot) I would normally see a bright copper accent on top of each land. With 4166, there was only a minimal amount of copper present (as you can see below). After a second patch with Hoppes No. 9, the copper was gone. I guess this copper fouling eliminator business is the real deal.
This is a brand new rifle even though it’s nearly 30 years old. Check out the machinings inside the bore. Remington, for shame!
With regard to accuracy, 4166 has potential. I shot five targets that afternoon, and this was the best. It’s a 0.590-inch group at 100 yards, and that ain’t too shabby.
Sometimes you just get lucky. Other times you rely on careful load development, glass bedding, and a steady trigger squeeze.
The bottom line for me is that IMR 4166 is a viable powder. Now, like everyone else, I need to find more. That’s going to be a challenge. But at least I know that my IMR 4320 has a decent replacement.
The Colt Python is an iconic handgun that stands out as the pinnacle of the gunmaker’s art. They were originally offered by Colt as their premier .357 Magnum revolver in a run that spanned decades and offered several variants: Blue steel, nickel-plated steel, brushed stainless steel, bright stainless steel, and barrel lengths of 2 1/2, 4, 6, and 8 inches. For a brief period, they even offered one chambered in .38 Special only. That all ended a few years ago when the revolver market subsided and black plastic, semi-auto 9mm gangbanger guns held sideways took over the silver screen (there’s absolutely no accounting for some folks’ taste, I guess). Then, in a surprise move, Colt introduced a re-engineered Python last year, in stainless steel only, with either a 4 1/4-inch or 6-inch barrel. I had to have one, and about a month ago, I scratched that itch.
The new Python carries a hefty $1499 price tag and they are just about impossible to find. And when you do see one, it is always substantially above MSRP. I don’t see the prices coming down on these guns, either. The original Pythons sell for $3K or more (mostly more), and with guns in high demand now and for the forseeable future, I think you’ll always always be able to get your money out of a Python if you ever wanted to sell it. I don’t see the prices going anywhere but up, and like I said, it is near-impossible to find a new Colt Python. But I know people in high places, I got a hell of a deal on my Python, and I am enjoying it enormously. Just looking at it is fun.
I went to my gun club a few days ago to shoot the new Python for the first time, and in a word, it was spectacular. I’ll get to that in a second.
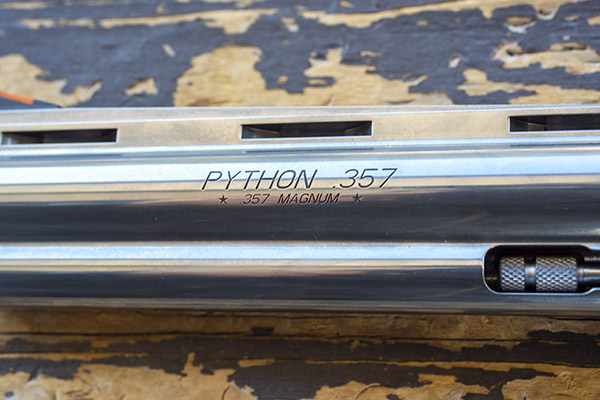
My Python has a 6-inch ventilated rib barrel. The revolver is polished stainless steel and it looks great. The roll marks on the new Python are very similar to the original Pythons. Very classy, in my opinion.
One of the reasons Colt stopped making the original Pythons a few years ago is they were too expensive to manufacture, as they required too much hand fitting of the revolver’s internal components. Colt’s re-engineering effort made all but one internal part capable of being CNC-machined to final dimensions, and in the modern Python hand-fitting is required for only one component. What that did was dramatically improve the double action trigger pull, and somewhat degrade the single action trigger pull. The double action trigger is short and sweet, and the hammer travel is only about half what it used to be. The single action trigger pull is, well, different. Read on, my friends.
Help us keep the content coming: Please click on the popup ads!
Single action, by design on the new Python, has a some take-up and you can actually see the hammer move a little further to the rear when you squeeze the trigger shooting single action. Think of it as a single action trigger that adds a little bit of double action to the dance before it releases the hammer.
I thought there was something wrong with the revolver, but my contact at Colt told me the new Pythons were designed that way to meet the California and Massachusetts drop test requirements. It is definitely not a “breaking glass” single action trigger; it’s closer to pulling the trigger on a Glock (that’s not intended to be a compliment). Double action, though, is absolutely outstanding. It’s a shorter pull than any other double action revolver I’ve ever fired and I like it. I suppose some people might think it’s a good thing that the gun meets the drop test requirements of left-leaning governments. Me? I’d go with Door No. 1 and refrain from dropping my loaded $1499 revolver.
Anyway, the single-action trigger threw me for a loop, but I adjusted to it quickly during a dry firing session. I don’t notice it anymore, and as you’ll see below, it sure hasn’t hurt accuracy.
Fit and finish on the new Python are top notch. You can see that in the photos on this blog, which I shot during and after an extended range session. I probably should have taken pictures before I fired the new Python (when the gun was factory immaculate), but hey, it is what it is.
The new Python has a red ramp front sight, which I like. There is no white outline rear sight (it’s plain black). The combination works well, as the targets you see here show. The Python also has a recessed crown, unlike the original one, which was flush. The recessed crown better protects the bore.
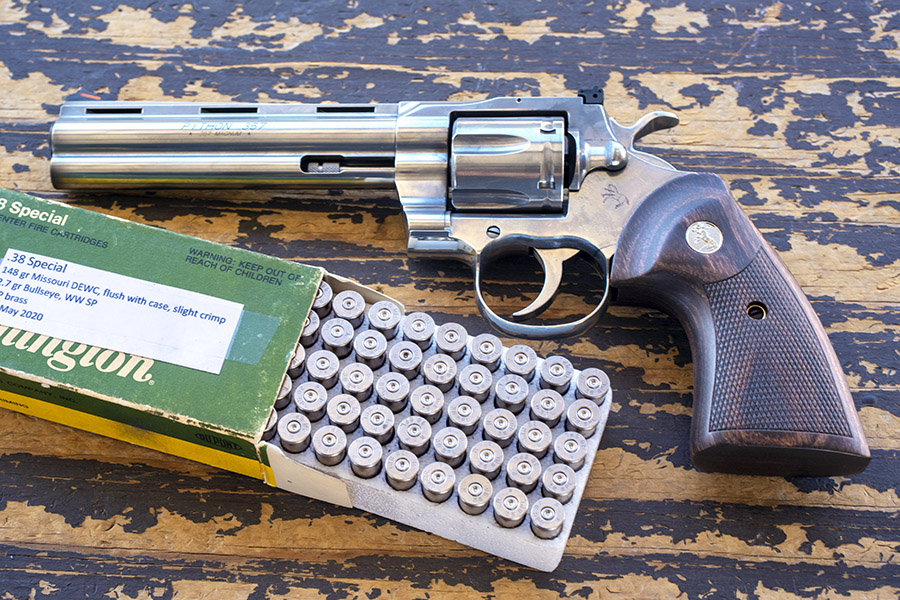
My first shots were 50 rounds I put through the gun using my standard .38 Special target load (2.7 grains of Bullseye and a 148 gr wadcutter, loaded on my Star reloader), all fired single action. I shot from the 50-foot line and it was windy as hell. I had to stop a few times to walk downrange and add more staples to the target because it was starting to come loose, and the target stand was swaying toward and away from me as the wind rocked it. I was shooting, literally, at a moving target.
A complete box of .38 Special wadcutter ammo…50 rounds fired at 50 feet firing single action. All those extra staples were needed to keep the wind from tearing the target off the stand.
I was surprised (and pleased) at how stunningly accurate the new Python is. I hadn’t touched the sights, and it was punching holes right where I wanted right out of the box. It put an entire box of ammo into the bullseye with a standard 6:00 hold and the sights left as they came from the factory. That’s a first for me, and I’ve been doing this a long time. The bottom line: The new Python is accurate.
.38 Special ammo loaded with 148-grain wadcutter bullets. The bullet’s “wadcutter” nose profile cuts a clean hole in the target. I used mixed brass shooting the new Python for the first time.
Then I shot another box of 50 cartridges (using the same .38 Special target load I used for the target above), but this time shooting double action. Let me make the point again: These two boxes were the first time I ever fired the new Python. Here’s my second 50 rounds on the target, fired double action.
Another 50 rounds at 50 feet, this time shooting double action. Not too shabby, if I do say so myself. The new Python’s double action trigger is superb.
Eh, one shot went out of the bullseye (it’s that one in the 9-ring, just outside the 10-ring, on the right). Like I said, it was windy out there. But still, for me, this was phenomenal double action shooting. It’s the best I’ve ever done shooting double action, actually.
Then I thought I’d try two 5-shot groups on the 50 foot standard pistol target with .357 ammo (all targets shown here were shot at 50 feet). As you know, a .357 Magnum handgun can shoot either .357 Mag ammo or .38 Special ammo. I brought along some of my standard 357 Magnum reloads (15.7 grains of Winchester 296 powder and a 158 grain Hornady jacketed hollow point bullet). This is a load I’ve been using since my Army days and it does well in any .357 Magnum revolver I’ve ever owned. It came from the pamphlet Winchester published in the 1970s for their powders. It performed superbly well in the new Python.
.357 Magnum shots at 50-foot targets. Point of aim was 6:00 for all shots. Bring it on…fire and brimstone…the new Python handles full power .357 Magnum loads well.
It’s easy to forget how powerful the .357 Magnum cartridge is unless you fire it back-to-back with the .38 Special. The .38 Special is a very manageable cartridge with moderate recoil, especially in a big, heavy, 6-inch handgun like the new Python. When I shot the .357 Magnum loads, I was instantly reminded that the .357 is a real barn burner. Think big recoil and lots of muzzle flash and blast. It was cool, and the big Python handled full power magnum loads well.
As I already mentioned, it was very windy and gusty on the range (two tractor trailers were on their side on I-15 when I drove out to the club). I was the only guy out there (I’m probably the first guy to visit our range with the new Python, too). On a calm day, I’m sure I could do better than the targets you see above.
I finished up another box of .38 Specials shooting 158 gr cast flatpoint Hursman bullets (also loaded with 2.7 gr of Bullseye), shooting at one of those green star target things you throw on the ground (my daughter bought it for me a few years ago and I think the thing is going to last forever). I walked it out to 50 yards with repeated hits, and I’ll bet I didn’t miss but two or three times out of 40 or so rounds.
There were no malfunctions of any kind in the approximately 150 rounds I fired through the new Python. No light strikes, no misfires, and no jams. And like I’ve been saying, accuracy was stellar. It’s almost like the new Python is laser guided.
A prancing pony…the rampant Colt logo that has adorned Colt firearms for more than a century and a half. Long may it live!
You know, there’s an old saying: You get what you pay for. To that, I would add the qualifier: Sometimes. In the case of the new Colt Python, this is one of those times. I love the new Python. It’s an iconic firearm and if you are thinking about getting one, my advice is this: Do so. You won’t be disappointed.
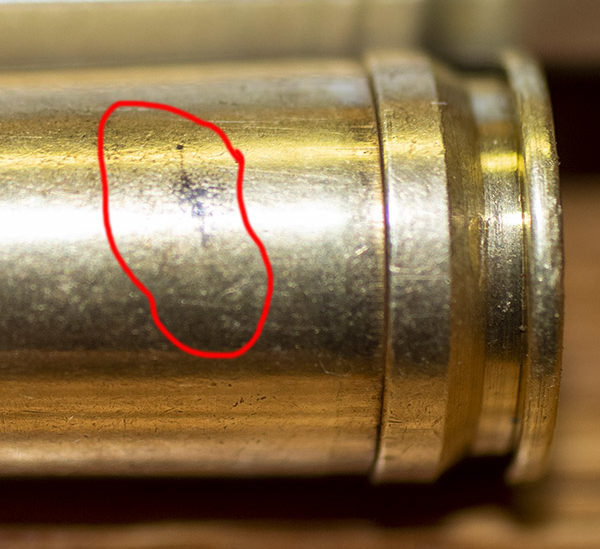
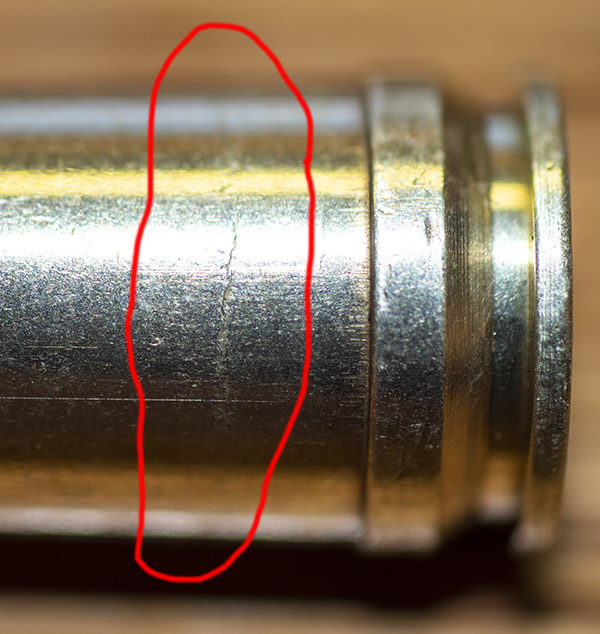
I had the 300 H&H Mags out last week, and when reloading the brass from that range session, I noticed a bright ring around some of them about a quarter inch above the belt. I did the inside-the-case check with a bent paper clip and sure enough, I could feel the sharp step of the brass thinning. Uh oh. Impending case separations. I had reloaded this brass once too often.
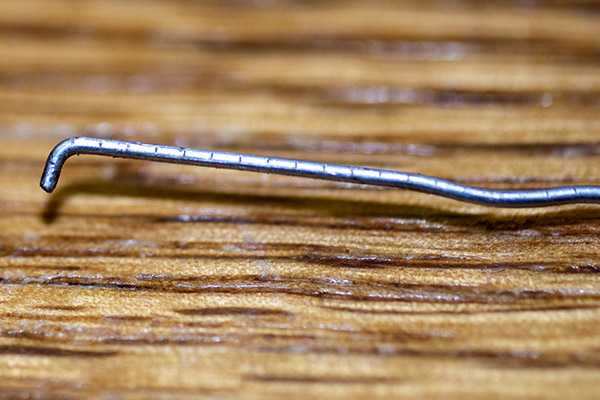
Case separations are caused by case stretching, which progresses each time you reload a cartridge. You can check for impending separations by examining the cases closely (you’ll see a bright ring, maybe evidence of gas escaping, or maybe even the beginnings of a crack above the case head). You can also make a tool from a paper clip to feel for a circumferential notch inside the case. That’s what I do, and I could feel the notch on these cases. They were at the end of their useful life.
I don’t know how many times I had reloaded these cases (maybe something like 3 to 5 times?), but rather than risk an impending case separation, I tossed the brass (all 50 pieces). It felt like a crime against nature, but it was necessary. I had two more boxes of 300 H&H brass (100 rounds) tucked away, so that will be the next lot that I load. I had tumbled the old brass for several hours, and maybe that was a good thing because it let me see the warning signs and the faint beginnings of circumferential cracks. Time to move on and start with fresh brass.
Evidence of a escaping gas on a fired 300 H&H Magnum case. The “belt” is the larger diameter just above the case base.A classic impending case separation. You can see that the case has already started to crack. This would separate if I loaded and fired it again.
When I started this blog, I didn’t intend for it to be another reloading tutorial, but here we are anyway. Let’s get back on the two 300 H&H Magnums. I guess to start, allow me to tell you a bit about the magnificent and classic 300 H&H cartridge. It goes back to shortly after World War I, when the venerable English firm of Holland and Holland introduced it as an African plains game cartridge. I know, I’m coming across as snooty, and to tell the truth, I’m not entirely certain what “venerable” means. But it sounds like it fits.
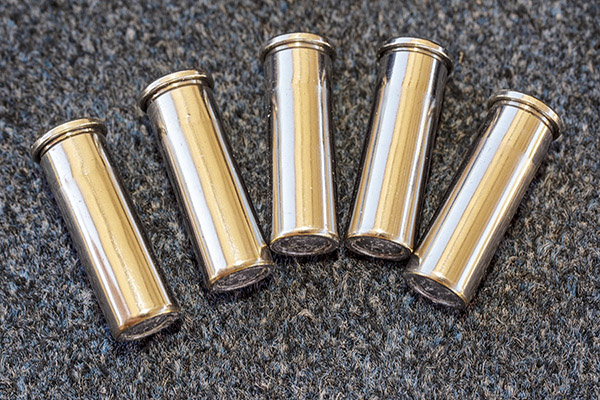
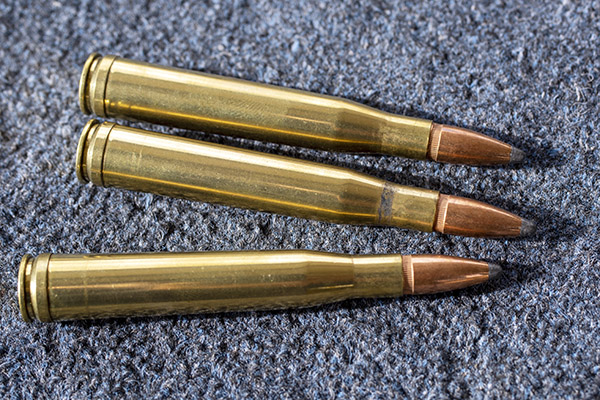
300 H&H reloads. I use 150 gr Winchester bullets I bought about 6 years ago. I got a good deal on those bullets and I bought about 700 or so. I should have bought more, as I can’t find them anywhere online. I think I have about 200 or 300 left. You can see a bright circumferential ring above the case base on the lower cartridge, warning that this brass was past its useful life.
The 300 H&H was the absolute hottest .30 caliber cartridge in those days, and the belted 300 H&H cartridge just looks cool. It became the basis for nearly every magnum round that followed, including nearly all the Weatherby chamberings, the 7mm Remington Magnum, and a bunch more. The 300 H&H round won the Wimbledon 1000 yard match in 1935, and in 1937 Winchester offered it as a factory chambering in their Model 70 (assuring it’s survivability well into the future). Did I mention it just looks cool, too?
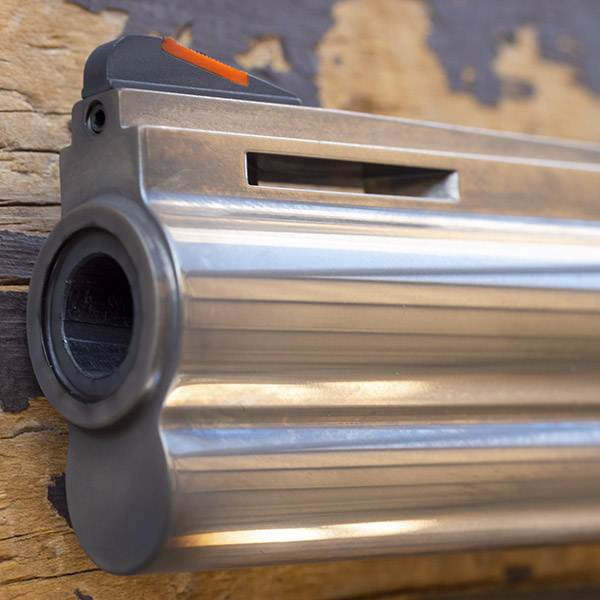
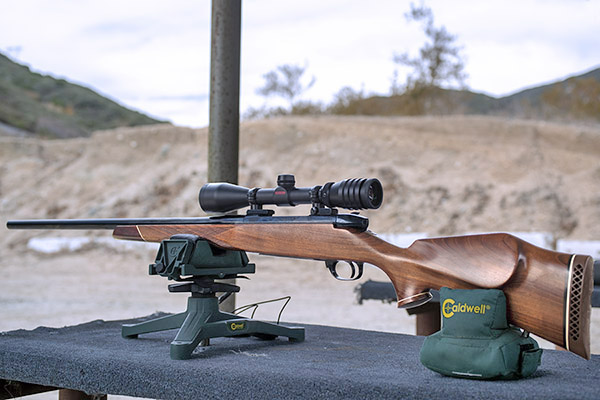
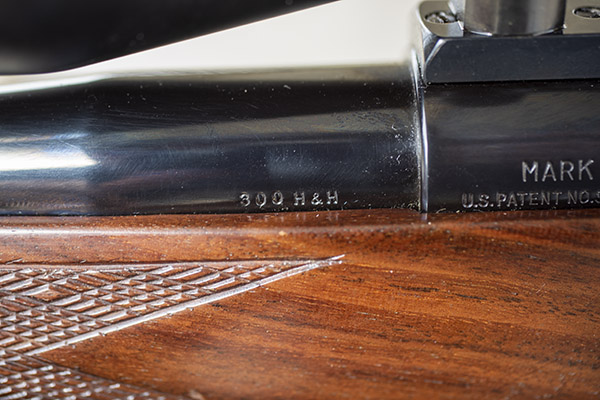
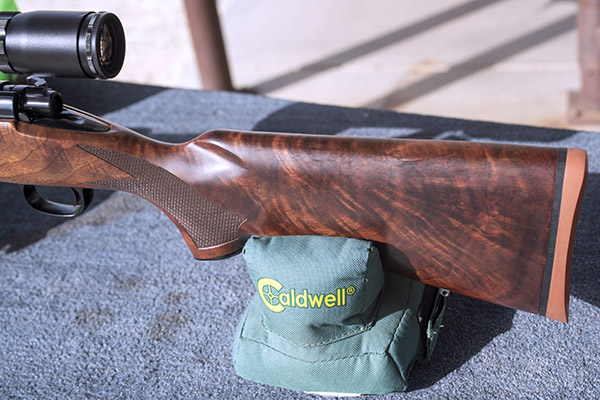
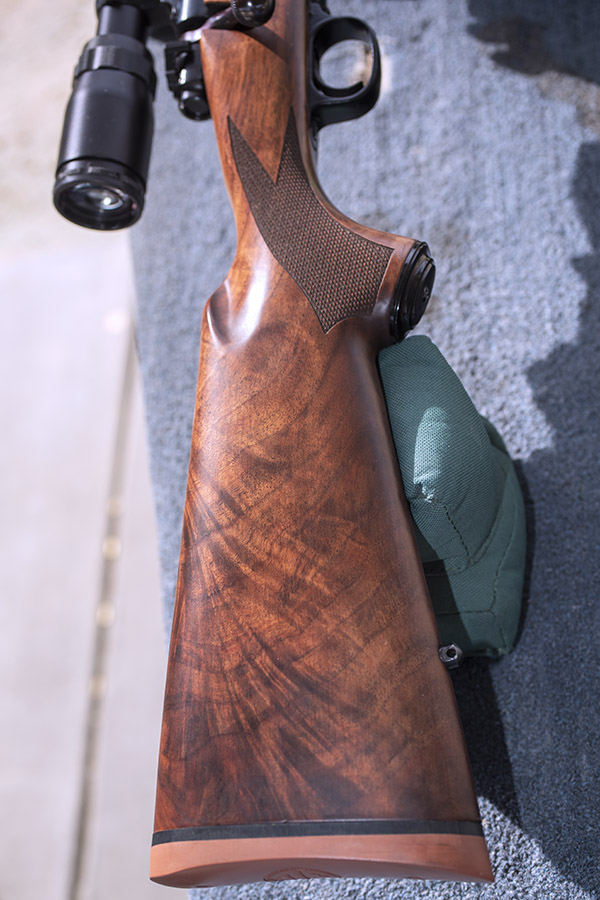
So to continue the story, I had to have a 300 H&H, and because I had a Weatherby 7mm Mag that I couldn’t get to group well no matter what I tried, to me the solution was obvious: Rebarrel it in 300 H&H. Which I did. 35 years ago. I’ve been shooting it ever since. It’s the one you see in the big photo at the top of this page, and if you don’t feel like scrolling up, here’s a view from the port side:
A custom 300 H&H Weatherby Mark V. This is a magnificent rifle.The cartridge stamp on my custom barrel.
The 300 H&H Weatherby is a fabulous rifle. It has a Timney trigger my Dad put in it while I was overseas, and it breaks like glass. I enjoy owning it, reloading for it, and shooting it.
Then I picked up another 300 H&H rifle maybe 7 years ago: A Model 70 Winchester. The Model 70 in 300 H&H is not a commonly-encountered rifle, and I searched a while to find this one on Gunbroker with the fancy walnut I wanted. Trust me on this: It looks even better in person. And this one is a shooter. It deserves a better scope, but it’s still a beautiful rifle.
Sometimes people ask why I always find rifles with the nicest wood. It’s because I look for them!The Model 70 stock from the right side of the rifle. It’s unusual to see this kind of walnut on a production rifle. I recognized that when I saw the rifle on Gunbroker, and I pulled the trigger.
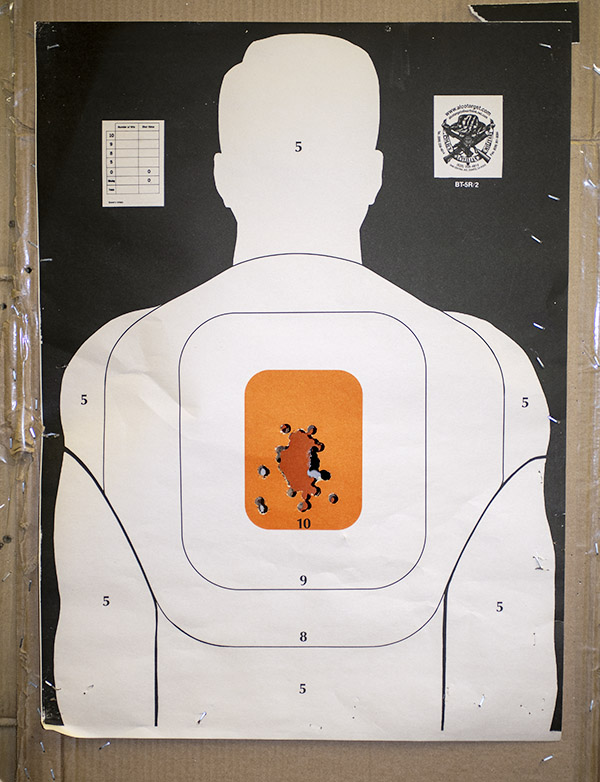
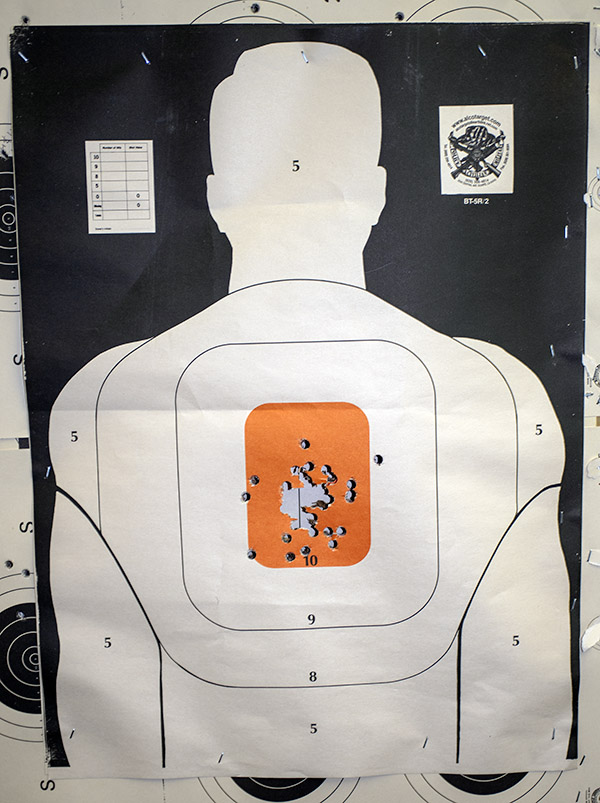
Anyway, one day last week was one of those days when I woke up and knew I needed to get out and shoot some 300 H&H Magnum. So I did. These are some photos from that range session. I think it was a Monday. It was cold and windy as hell with gusts up to 60 mph (that’s the bad news), but because of that I had the range to myself (that’s the good news).
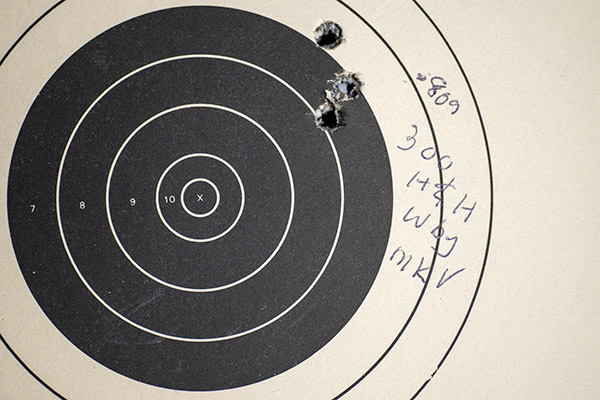
I shot my standard 300 H&H load. It’s one that has done well for me in the Weatherby, and it does equally well in the Winchester. The load is 60 grains of IMR 4320, a CCI-250 large rifle magnum primer, the 150-grain Winchester jacketed soft point bullet I mentioned above, and an overall cartridge length of 3.600 inches. You won’t find this load in any of the newer reloading manuals, but I still have the manuals I used years ago, before all the latest and greatest gee-whiz propellants came out. That’s where I found this one. And wow, does it work! Check out the 100-yard groups on the targets below, and remember it was a cold and windy day when I shot these.
The inexpensive Bushnell on the Model 70 was at the end of its elevation adjustment range and the rifle still shot a little high at 100 yards. I shimmed the front of the scope up .010 inch, which should get me a foot lower on the target at 100 yards (if you do the math, each 0.005 gets you 6 inches at 100 yards). I should be in the scope’s adjustment range after shimming, but I haven’t fired it again to make sure. I’ll check it the next time I’m out there. Longer term, though, the Model 70 will get the scope it deserves (and that will be a Leupold).
Edit: I learned that the manufacturer has discontinued IMR 4320 propellant, so the bad news is that when I deplete the little bit of this wonderful powder I have left, I need to develop a new load (and I guess that’s also the good news, as it means I get to play around with developing a new accuracy load). I’ll probably start with IMR 4350, as my research indicates it’s the go to powder for .300 H&H. Nobody has 4350 in stock right now; hopefully, that will change soon.
One more update…on a subsequent trip to the range, the shims did the trick for the Model 70; the Bushnell scope can now be adjusted to put the shots right where I want them.
More fancy walnut: Check!
More accuracy loads: Check!
More gun stories: Check!
You’ve thought about reloading, you’ve read stuff from us and others about the benefits of reloading, and you want to do it. But how?
Hey, I was born into it. My Dad was a reloader and I had a pretty good idea what to do when I wanted to start, but the urge to do so didn’t hit until I was a young guy in the Army at Fort Bliss. I was lucky. The guy who ran the Fort Bliss Gun Club (Roy Johnson) had a room set up for just that purpose and he walked me through the process some 50 years ago. But Roy has gone on to his reward, you’re probably not stationed at Fort Bliss, and you want to get into the game. That’s what this blog focuses on, and in particular, the equipment you’ll need to get started.
Inside the Fort Bliss Gun Club. This is a fabulous place where I spent a lot of time as a young Army dude. Next time I’m in El Paso you can bet I’ll stop in again.
Reloading Advantages
There are three advantages to reloading: Cost, accuracy, and availability.
Generally, reloaded ammo costs less than factory ammo, and in some cases (especially for more exotic rifle ammunition), the savings are huge. For example, factory .416 Rigby ammo costs $170 for a box of 20 rounds; I can reload .416 Rigby ammo for well under a buck a round.
From an accuracy perspective, reloading is the only way to go. You can tailor a load to a particular firearm by varying bullet type, bullet seating depth, crimp, powder type, powder charge, brass, and primers to arrive at a combination that delivers superior accuracy (and it’s fun doing this). I have rifles that shoot 3-inch groups at 100 yards with factory ammo; with my custom reloads, I can get half-inch groups.
Today, if you reload and you’ve laid in a good stock of components, you can reload your way through any ammo shortages. Nobody has .45 ACP, 9mm, or .223 ammo in stock right now; I have enough components on hand to reload thousands of rounds. I’m on the range two or three times a week enjoying my shooting hobby while other folks are online whining about not being able to buy ammo.
What You Will Need
The things you will need to start reloading fall into two categories: The reloading equipment, and the reloading components. The reloading components are the things that combine to bring an empty brass cartridge case back to life (that includes the bullets, the propellant, and the primers). The reloading equipment includes the gear you need to take the components and turn them into a ready-to-fire cartridge.
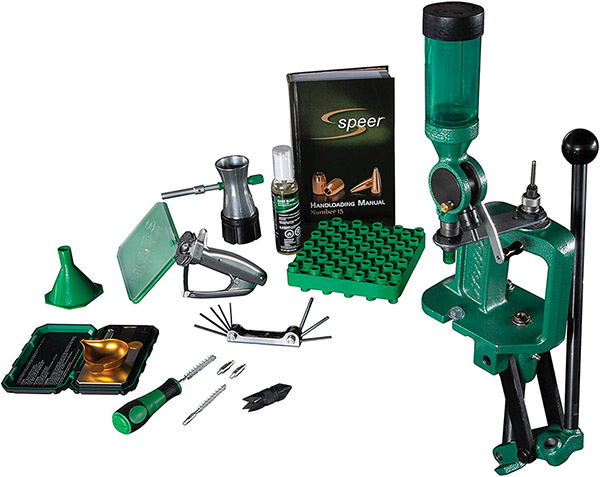
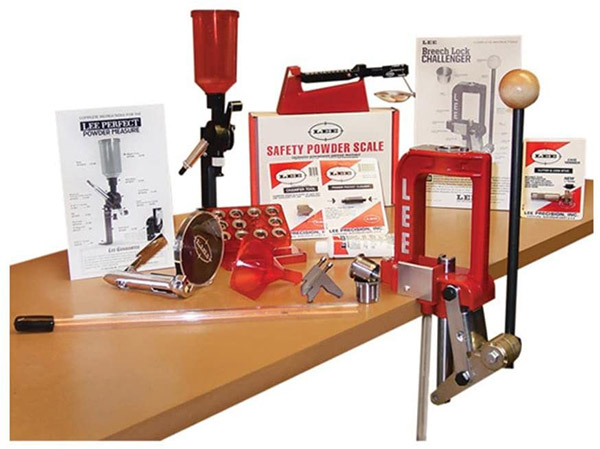
If you want to get into the reloading game, I believe the best way to do so is to buy a complete equipment reloading package from one of the suppliers like RCBS or Lee. That’s the RCBS kit shown in the big photo above. I’ll talk about it, the Lee kit, and a couple of others further down in this blog. First, let’s review each bit of gear.
The Reloading Press
That’s the lever-operated press that accepts the dies (more on that in a second) for reloading your ammo, and sometimes the press includes a mechanism for seating primers in the cartridge case after the old primer has been removed. In other cases, a separate priming tool is used. Presses are offered by RCBS, Lee, Lyman, Hornady, and other companies.
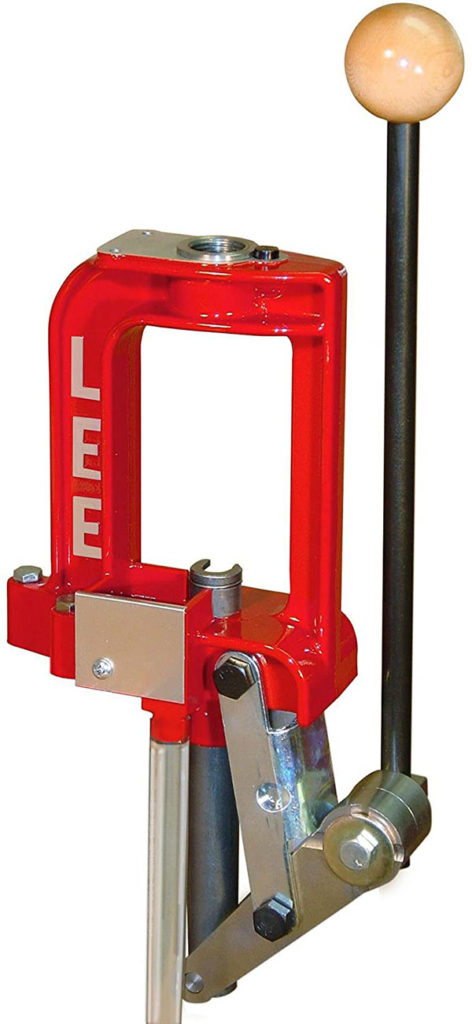
The Lee Challenger press. It’s a decent unit at a decent price, and an ideal way to get started in reloading.
Dies
The dies are cartridge specific. For handgun cartridges, the die set usually includes three dies; for rifle cartridges, the die set usually includes two dies. The good news is that die threads are pretty much standardized, and every company’s dies will fit every company’s reloading press. In other words, if you buy Lee dies, they’ll work on an RCBS press. If you buy RCBS dies, they’ll work on a Lee press. Dies are offered by several companies, with the most popular brands being Lee and RCBS.
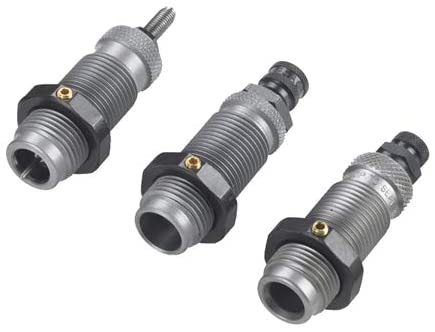
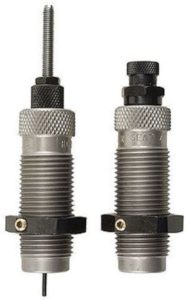
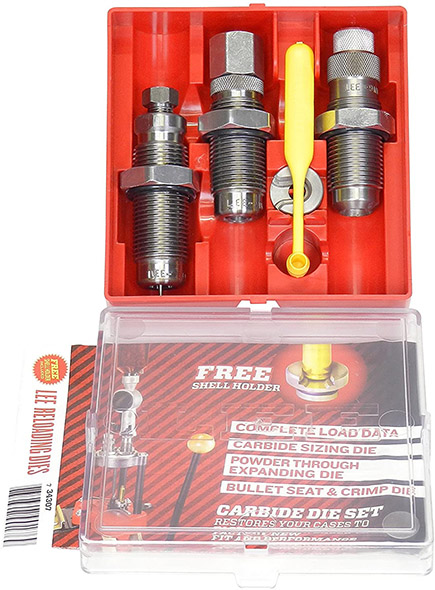
A three-die pistol set from RCBS. The first die knocks out the old primer and resizes the fired case. The second die flares the case mouth to accept a new bullet. The third die seats the new bullet and, if you want, crimps the bullet in place.An RCBS two-die rifle set. The first die knocks out the fired primer and returns the case to its original dimensions. The second die seats the bullet and, if desired, crimps it in place.A three-die pistol cartridge set from Lee Precision. Lee includes the shell holder with their die sets.
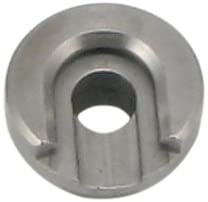
Shell Holder
You will need a shell holder for the cartridges you wish to reload. That’s the piece that holds the cartridge case in place so the press can push it up into the die and then extract it from the die. RCBS does not include the shell holder with their die sets (so you’ll need to buy RCBS shell holders separately); just about all other die makers do (when you buy their dies, the die set includes a shell holder for that cartridge).
A shell holder. You need to buy these separately if you buy RCBS dies.
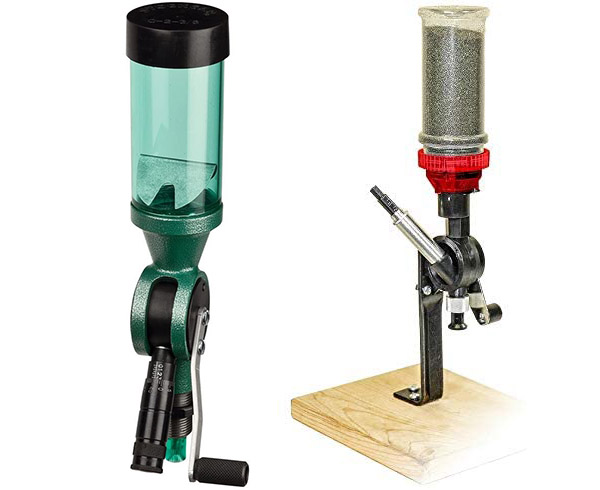
A Powder Dispenser
This is a device for dropping a precisely-metered powder charge into each cartridge case. There are fancy (read: expensive) electronic powder dispensers, but you don’t need those to get started and a lot of folks (myself included) don’t like them. A simple mechanical dispenser will work fine (as mine has been doing for 50 years). Both RCBS and Lee offer good powder dispensers; the Lee is substantially less expensive.
An RCBS powder dispenser on the left, the Lee powder dispenser on the right.
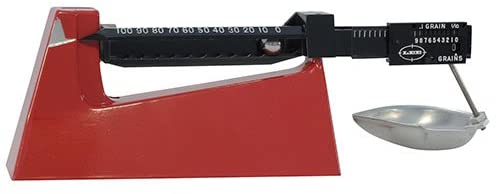
A Powder Scale
This is a simple balance beam scale to allow you to measure the weight of the propellant charge and adjust the powder dispenser to throw that charge. There are electronic scales, too, but they add complexity and considerable expense where none is required. Again, the dominant brands are Lee and RCBS.
A simple Lee balance beam reloading scale. These scales can measure to a tenth of a grain.
Cartridge Trays
When we reload, we use a cartridge tray (to hold the cartridges as we work through the process of reloading). A variety of manufacturers offer these.
An RCBS cartridge tray. These are available from several manufacturers. I’ve been using mine for nearly 50 years.
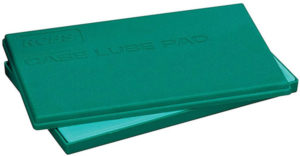
A Case Lube Pad
This is a simple foam pad. You put case lube on the pad and roll the brass cases on it to lubricate the exterior prior to running them through the resizing die (the first die used in the reloading process). If you have a straight wall pistol cartridge, you can buy tungsten carbide dies that don’t require lubing the cartridge cases. If you’re going to reload 9mm, .38 Special/.357 Magnum, .45 Auto, or .45 Colt, my advice is to spend the few extra bucks and get the carbide dies.
An RCBS case lube pad. You put a bit of case lube on the pad and roll the brass on it to lube the cases prior to running them through the resizing die.
Case Lube
This is the lube used as described above. To mention it again, if you’re going to reload straight wall pistol cartridges and you buy tungsten carbide dies, you won’t need case lube (or the case lube pad).
RCBS case lube.
Alternatively, you can buy spray-on case lubes, which eliminate the need for the case lube pad. I’ve tried spray-on case lubes and I prefer using the pad and case lube instead. Other reloaders like the spray-on approach better.
A Primer Seating Tool
Some reloading equipment companies incorporate a primer seating tool in their press; others offer separate primer seating tools. I have an RCBS press that came with the primer seating tool, but I like using a manual hand priming tool instead. Several manufacturers offer these; I use one from Lee.
The Lee hand priming tool. These work well. You can feel each primer seating and better control seating depth with these hand priming tools.
A Bench
You may already have a sturdy workbench where you can mount the reloading press; if not, there are reloading-specific benches available.
A Lee reloading bench. These work well if you don’t have a workbench for mounting your press.
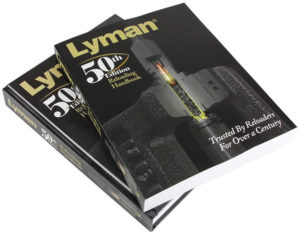
A Reloading Manual
There are several available, including the excellent offerings from Sierra, Speer, Hornady, and Lyman. Don’t think you can skip this; a good reloading manual is a must-have item for any reloader. They all explain the reloading process at the beginning, and they include safe recommended load levels for nearly all cartridges. I’ve acquired several reloading manuals over the years and they are all good; my favorites are the ones from Lyman. Others are published by bullet manufacturers (these include the manuals from Hornady, Speer, and Sierra) and those manuals include loads only for their bullets. The Lyman manual is more generic. But like I said, they’re all good.
I have reloading manuals going back 50 years. The Lyman manuals are probably the best.
That’s the reloading equipment. In addition to that, you’re going to need the ingredients for the cartridges you want to reload. That includes the brass cases, the bullets, the powder, and the primers.
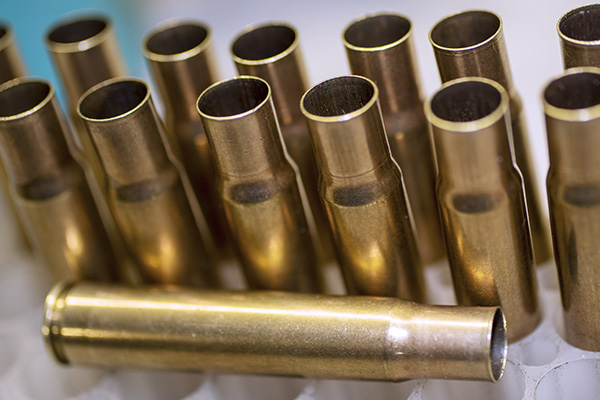
Brass Cartridge Cases
You can buy virgin brass online, you can buy once-fired brass at the range or at most gunstores, or you can do like most of us have done: Save your brass when you shoot factory ammo and reload it.
.35 Whelen brass waiting to be charged with propellant. This ammo costs $43 for a box of 20 factory rounds (and you can’t find anybody who has it in stock right now); I can reload it for under 50 cents a round.
Bullets
You’ll need bullets to reload your ammo. There are lots of options here, and they basically break down into either cast or jacketed bullets. I’m a big fan of cast bullets for handgun and reduced velocity rifle reloads, and I use jacketed bullets for full-bore factory level (high velocity) rifle loads. Most folks these days order bullets online from reloading suppliers like MidwayUSA, Graf’s, MidSouth, Powder Valley, Natchez Shooting Supplies, and others. Smaller gun stores are disappearing, and you usually don’t find decent prices at the big chain stores.
Cast bullets waiting to be loaded into .45 ACP cases.
Propellant
For lack of a better term, we usually call propellants “powder,” and there are a wide variety of powders available. The reloading manuals show which powders work best for the cartridge you wish to reload.
Unique propellant and my RCBS powder dispenser. The reloading manuals will help you select the powder you need. Unique is a good general purpose propellant I’ve used for a variety of handgun cartridges and a few cast bullet rifle loads.
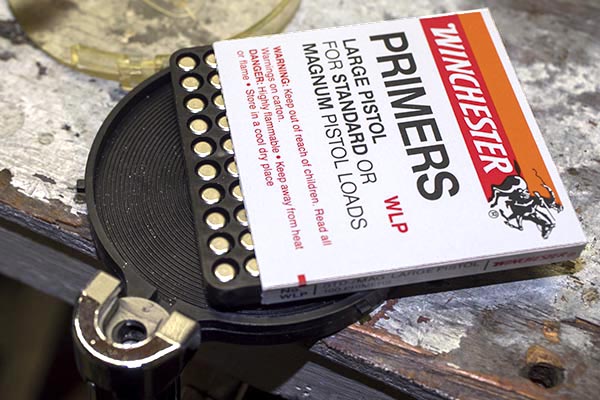
Primers
The primer is the component that lights the candle when you pull the trigger. There are several primer suppliers. The trick today is finding them, as there has been a run on primers since the pandemic began. If you can find primers in a local shop, buy them. The same suppliers listed above for bullets also sell primers (they are all out of stock now, but that will change as supply catches up with demand).
Winchester primers being loaded into my Lee hand priming tool. Other primer makes include Remington, CCI, Federal, and a few more.
The Best Equipment Approach: A Complete Kit
As I mentioned at the start of this blog, I believe the best way to get into the game is to buy a complete equipment reloading package from one of the reloading equipment suppliers. My advice if you are a new reloader is to go with the Lee package. It’s the least expensive and if you decide that reloading is not for you, you’ve minimized your cash outlay. I should add, however, that I don’t know anybody who ever tried reloading who didn’t get hooked on it. It is a marvelous hobby, and I believe it is as much fun as shooting.
I’ve used reloading equipment over the years from all the manufacturers. My personal setup is centered around an RCBS Rockchucker, but equipment from any of the suppliers is good. Basically, you can’t go wrong in this game from an equipment perspective. With that said, let’s take a look at what’s out there.
The Lee Challenger reloading kit. These were sold out on Amazon (and everywhere else) when this blog was published. Keep an eye on the Amazon site; it’s a good place to order the kit.
There’s only one problem with the Lee Challenger reloading kit: It’s such a good deal (well under $200 for the entire kit) that literally everyone is out of stock right now. As you know, we’re going through unprecedented times in the shooting world (guns, ammo, and reloading components are sold out due to the civil insurrection in many large cities, a new anti-gun administration on the horizon, and the global pandemic). That will change, but at this instant, no one I could find has the Lee kit in stock.
The RCBS reloading kit. RCBS makes high quality equipment that will last a lifetime. It costs more, but it’s worth it.
I’ve been using RCBS equipment for the last 50 years, and I believe it to be the best. It is built to last. If I couldn’t get the Lee package as a newbie, or if your budget will allow it, I’d go with RCBS equipment. At about $400, it’s just over twice the price of the Lee kit, but it’s still a great deal compared to buying all the different equipment items separately. The RCBS package shown above includes an electronic scale instead of a beam scale, a powder trickler (it allows you to finesse adding individual powder kernels to attain a precise charge weight), and a couple of case preparation tools that the Lee kit doesn’t include.
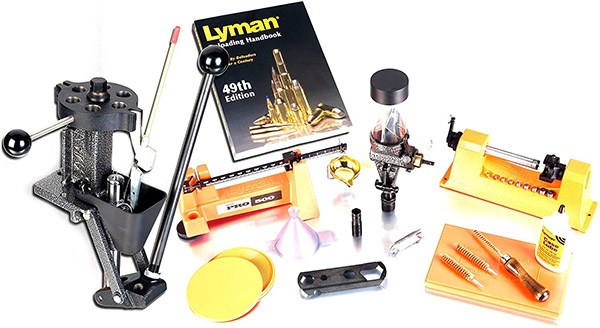
Lyman is another outfit offering a complete reloading kit:
Lyman’s reloading equipment package.
What’s a bit different about the Lyman kit is that it comes with a turret press, which allows you to mount all the dies in the press head and rotate them as you progress through the various reloading steps. I’m not a big fan of this approach; other folks are. The Lyman kit is just under $1000; the turret press and the inclusion of a case trimmer are what drive the price to that level.
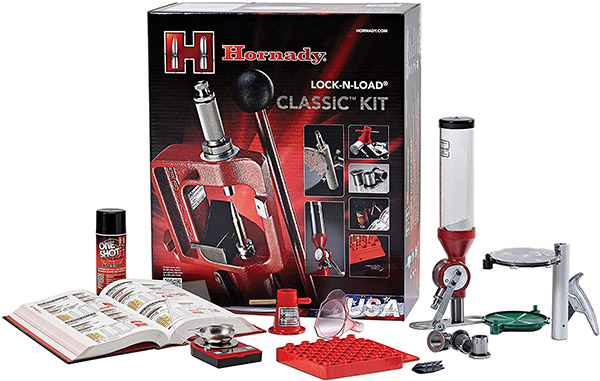
Hornady’s reloading package. I have the least experience with Hornady reloading gear, and I’m not wild about their dies. Hornady bullets are fantastic.
The Hornady kit is about $550. That’s substantially less than the Lyman kit, but more than either the Lee or the RCBS kits.
So there you have it. Remember that no matter which reloading kit you buy, you’ll still need dies and a shellholder specific to your cartridge. You’ll probably want to purchase more equipment as your reloading interest develops, including more dies (so you can reload more calibers), case cleaning and polishing accessories, a micrometer, and more. But what we’ve outlined here will get you started and keep you in the game for years.
In this blog we’ve covered the equipment you’ll need to get into reloading. If you would like to read about how to use this equipment, we have you covered there, too. We have a bunch of information on reloading various cartridges on our Tales of the Gun page, and a complete series on reloading handgun ammo that you can review here:
Like the title says, this is a story within a story. It’s about using primer pickup tubes with my resurrected Star reloader, and how Lady Luck smiled on me yet again.
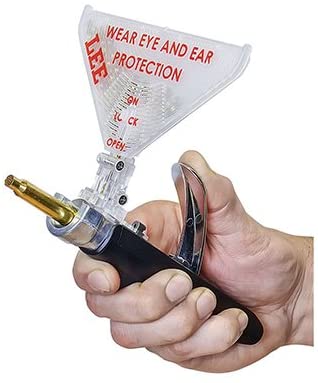
First, a bit of background. There are a few approaches in the reloading world for transferring primers from the primer box into the reloader. In our general series on reloading, I showed how to use the Lee primer tool, which is what I generally use when I’m loading on a single stage press like my RCBS Rockchucker. Another approach is to use a primer pickup tube and a primer tray. See, the deal is that you don’t want to touch the primers with your bare fingers. You might get skin oils on the primer, and that could make the primer inert. As explained earlier, in this game, you want all the primers to be “ert.”
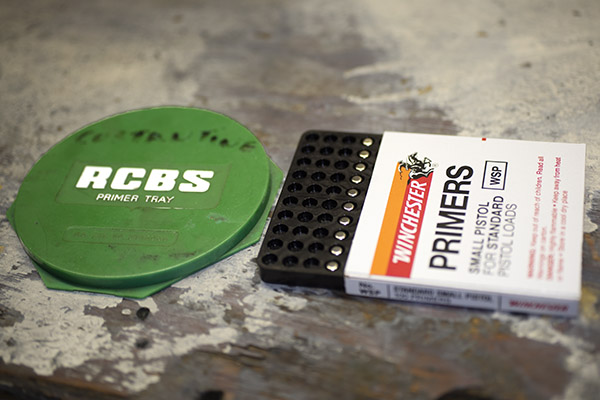
The first step is to transfer primers from the box they come in into a primer tray, like you see below.
That green circular deal on the left in the photo above is the primer tray. It consists of a base and a lid. You take the lid off and drop the primers into the base, like you see below.
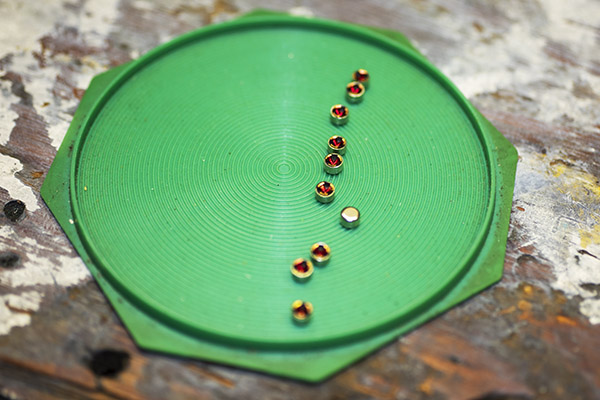
When you do that, though, invariably some of the primers will face up and some will face down. We want them all facing down in the tray’s base, and we get that by jiggling the base. There are little circumferential ridges molded into the base, and when you jiggle the tray, it makes all the primers face down (see below).
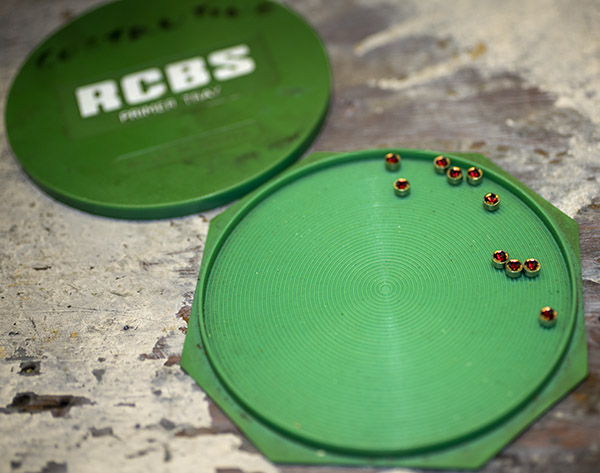
Get ready for more cleverness here, folks. What we do next is put the lid back on the primer tray, invert it, and then remove the base from the lid. That leaves us with the lid, and all the primers in it are facing up (see below).
At this point, we pick up the primers from the tray using a primer pickup tube like you see in the photo below.
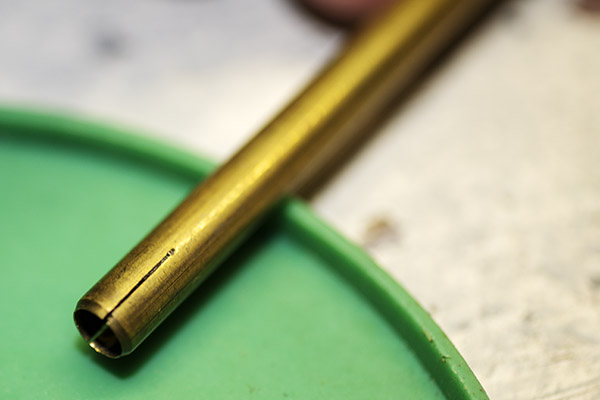
The tube you see in the photo above is an RCBS primer pickup tube. It’s a hollow tube with a spring catch on one end and a spring clip on the other. What you do is take that tube and push it down (spring end down) on top of each primer. That stacks the primers, one on top of the other, in the tube. Then you invert it over the primer magazine on the Star reloader, remove the spring clip, and all the primers in the pickup tube drop into the Star’s primer magazine.
Star reloaders originally had a brass primer pickup tube, but that didn’t come with the one I have. I’m not complaining; my Star reloader was free. And I figured I’d just use an RCBS primer pickup tube, because I knew had three or four of those stashed away somewhere. But I couldn’t find the things. Then I remembered I had put a bunch of reloading odds and ends in a 50 cal ammo can somewhere, and I went through maybe 10 ammo cans before I found it. I used the RCBS primer pickup tube and I had to hold it carefully in alignment with the Star’s primer magazine when transferring the primers from the inverted tube, pulling the pin, and letting the primers fall into the Star brass primer magazine. It worked just fine. It wasn’t the original Star gear, but hey, you go to war with the Army you have.
After I did that, I went on to other things. I thought I was doing pretty good, you know, finding those RCBS primer pickup tubes, but the box they were in kept playing over and over again in my mind. Something was tickling the neurons, but I didn’t know what it was. Then it hit me. I remembered earlier in the day when I took the RCBS primer pickup tube out of the box. I could see it clearly in my mind:
There were two other brass primer pickup tubes in that box. In my eagerness to get the RCBS primer pickup tubes (the ones I was looking for), I reached right over the brass tubes. Could it be? I put that stuff away a decade ago, way before I ever had the Star.
I went back to that box immediately, and son of a gun, there were not one, but two Star original brass primer pickup tubes. Two! I think they came from Sue’s Dad before he passed away more than 10 years ago (he was a reloader, too), and I got a lot of his old bits and pieces. He never had a Star reloader that I ever saw, but he must have latched onto these two primer pickup tubes somewhere along his journey through life. How about that?
So, back to the story du jour…and more of the Star folks’ cleverness. Star used a slightly different approach than did RCBS. For starters, they made a cross cut in the pickup end of their primer pickup tubes to give the spring tension needed to hold the primers in the tube.
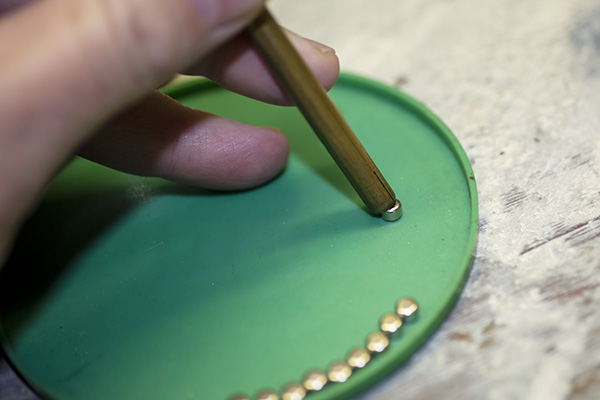
I started picking up a batch of primers from the primer tray lid with my newly-discovered Star primer pickup tube.
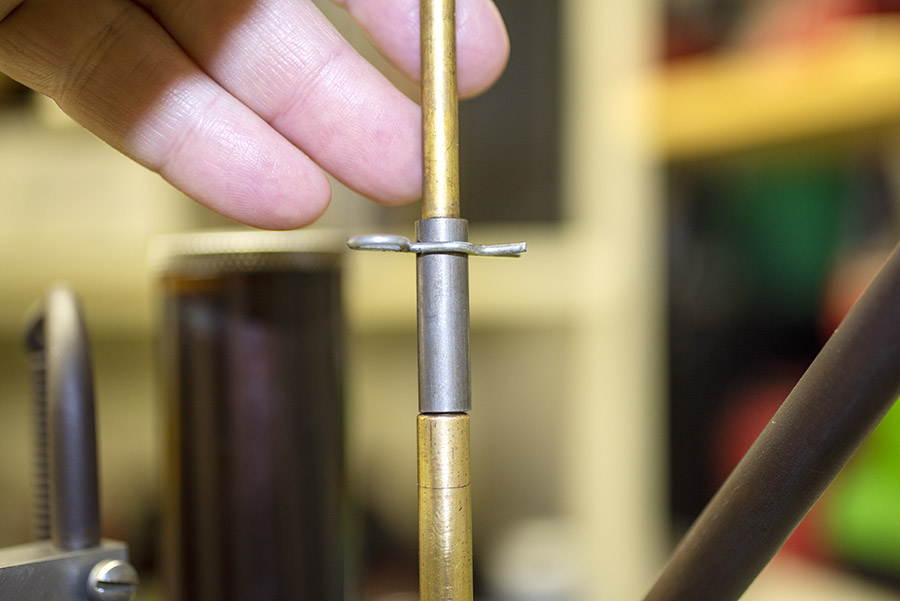
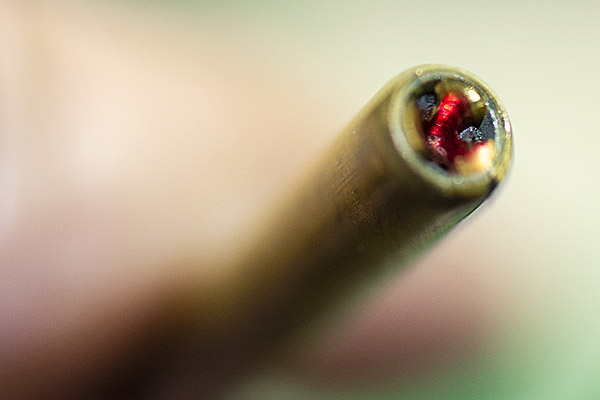
When you get that last one, you push it the rest of the way in with a probe (not your finger). With apologies in advance for the inadequate photo depth-of-field, here’s what the last primer looks like in the Star tube.
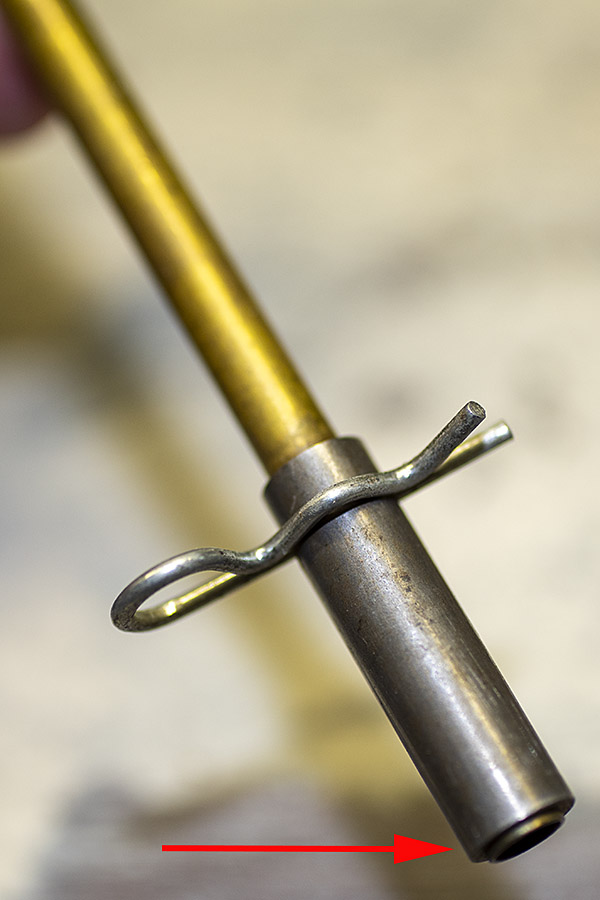
Then you invert the tube, so all the primers are at the other end. The spring clip keeps them from falling out. There’s a flange on the end of the Star primer pickup tube. It interfaces with the Star reloader’s primer magazine to keep the primer pickup tube aligned with the primer magazine tube.
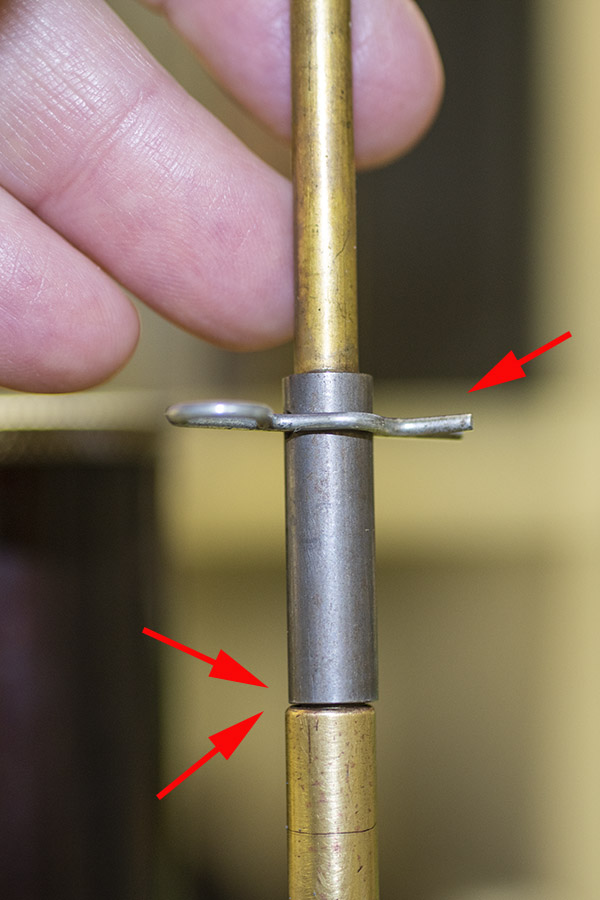
Here’s the top end of the Star reloader’s primer magazine, with the primer follower in place. I removed it and placed the primer pickup tube on top.
At this point, I then removed the spring clip, and all the primers that were in the primer pickup tube transferred (gravity feed!) into the primer magazine.
So there you have it. The Star is up and running, and I’ll post about cleaning up a few more details on this magnificent old machine in the next Star blog. Stay tuned!


 Challenger reloading kit. These were sold out on Amazon (and everywhere else) when this blog was published. Keep an eye on the Amazon site; it’s a good place to order the kit.