Every once in a while we do a blog that covers a bunch of topics, and this is one of those times.
Good buddy Mike Huber and his friend Bobbie motorcycled Mexico (Baja, to be specific, almost another country all by itself), and he most recently published an excellent story about being stranded down there by the Covid 19 pandemic. It’s not often that we recommend another blog, but hey, Mike’s writing is outstanding and it’s a great story. Take a look; it’s very good.
My favorite motorcycle magazine (that would be Motorcycle Classics) sends out marketing emails on a regular basis, and in those emails they include links to past (and sometimes recent) articles. I write for MC, and the most recent email that slipped into my inbox included a link to my Destinations piece on Hearst Castle. You might want to read that story; I love Hearst Castle. It’s closed for the pandemic, but the pandemic won’t last forever. Hearst Castle will be there when it’s over.
We’re having a heat wave (both here in the Peoples Republik of Kalifornia and at Tinfiny Ranch). That prompted us to start a piece on riding in extreme heat. My first recommendation would be: Don’t. But things don’t always work out the way you want them to. I once rode the length of Baja on a Mustang replicas with several friends, and due to a lack of research on my part we did the ride in Baja’s hottest month (and that’s September). You can read about the 150cc Baja ride through Hell here. Do you have any advice for riding in high temperatures? Please share them with us (info@exhaustnotes.us) and we’ll include your recommendations here on the blog.
We have more motorcycle, gun and other stuff coming up, including info on Ruger’s new Custom Shop and their Super GP100 .357 Mag revolver, favored loads in the Henry .45 70 Single Shot, a piece on Turnbull’s iconic color case hardening and restoration services, a stunning (and tack-driving) Kimber with exhibition grade French walnut, the wrap-up of our ride through the Andes Mountains in Colombia, the Canton Fair, and for you fans of The Ten Commandments, making bricks without hay and mortar. And a whole lot more.
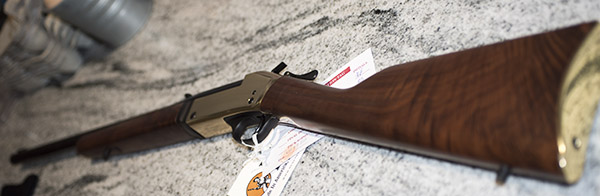
The new Henry Single Shot, brass frame .45 70 rifle. Henry makes a beautiful rifle.
I’m using the time before I pick up my new Henry rifle to prepare the reloaded ammunition I want to test for accuracy. You will recall that in an earlier blog we discussed the three .45 70 load levels shown in modern reloading manuals. As I mentioned in that earlier blog, I use the loads intended for the 1873 Trapdoor Springfield. Those loads were powerful enough to take down all kinds of critters back in the 1800s, and in developing loads for other .45 70 rifles, I’ve found these to be fun to shoot and accurate.
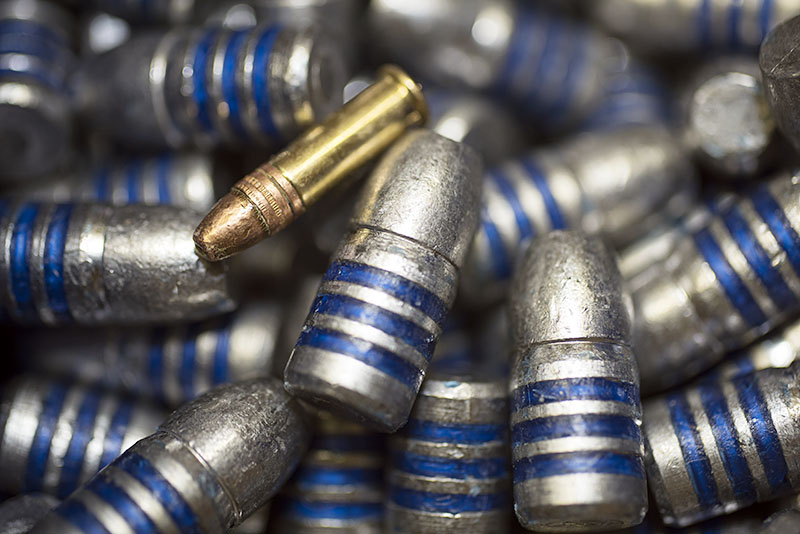
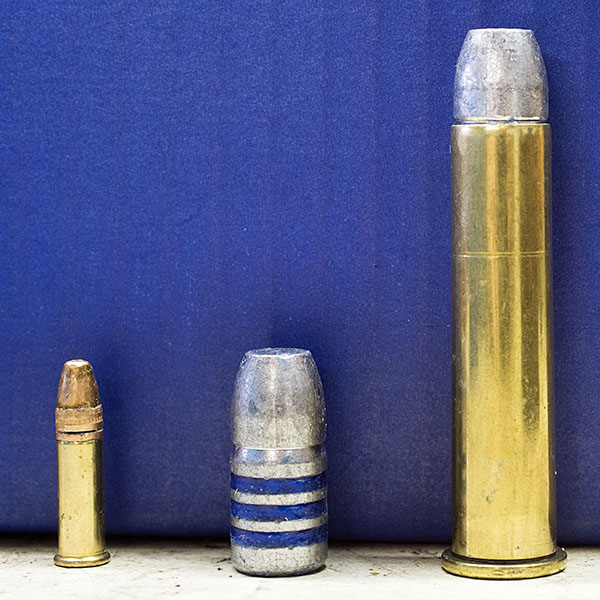
Missouri 405-grain cast .45 70 bullets. These have proven to be very accurate in other .45 70 rifles. I’m trying these and two other bullets in the Henry. The .22 Long Rifle cartridge you see here didn’t come with the Missouri bullets; I added it to give you an idea of just what a monster the .45 70 cartridge is.
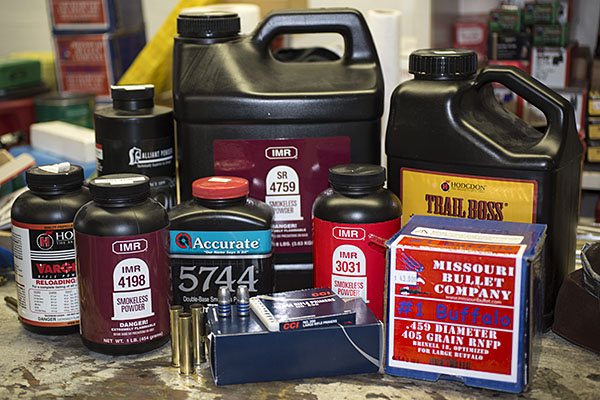
My loads are based primarily on the components I have on hand and loads I’ve known to work well in the past. Powders include SR 4759, IMR 4198, IMR 3031, 5744, Varget, and Trail Boss. Bullets include the Remington 405-grain jacketed soft point, the Hornady 300-grain jacketed hollow point, and the Missouri 405-grain cast roundnose.
A photo showing some of the components to be used in this test. When loading, I would never have all of this stuff on the reloading bench, and in particular, I would never have more than one powder on the bench at the same time. The risk of mixing powders is too great. If you have more than one powder container on the bench, it’s very easy to pour the remaining powder in the dispenser into the wrong container (don’t ask me how I know this). When that happens, the only prudent thing to do is throw the mixed powder on the front lawn (it makes good fertilizer).
I like all of the bullets I listed above, but I particularly like the Missouri bullets. The Missouri cast bullets seem to always be available, they are relatively inexpensive, and they are accurate. I’m expecting to see great accuracy from these in the Henry, as they shoot well in the Ruger and the Marlin. The 405-grain Missouri bullets are accurate in the Chiappa 1886, too, but that rifle’s stock design and buttplate make the recoil painful when shooting the heavier Missouri bullets.
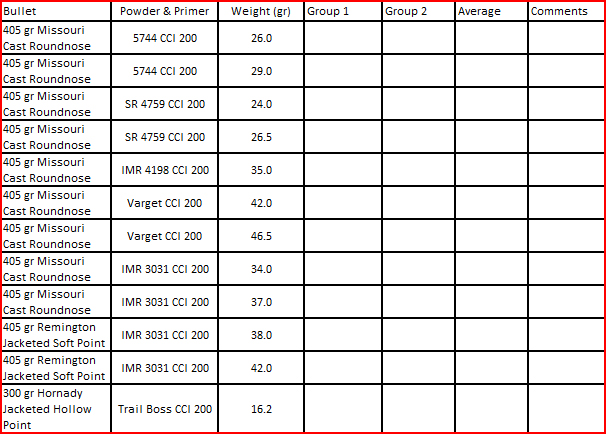
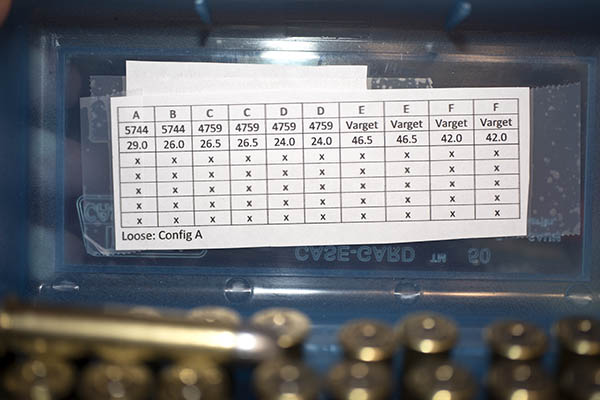
Here are the .45 70 loads I will test in the Henry:
When testing for accuracy, it helps to keep things organized. I’ll bring this table to the range with me and record my results as soon I retrieve the targets. All loads will be fired using open sights at 50 yards.
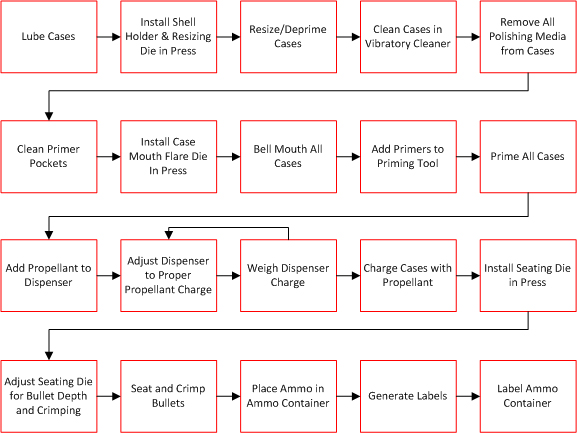
For a more in-depth reloading process overview, I invite you to review our earlier series on loading .45 ACP ammunition. The .45 70 reloading process is very similar to loading handgun ammo. That’s because the .45 70 is nearly a straight-walled cartridge, so the steps are the same. This is what is involved in reloading .45 70 ammo:
The reloading process. It looks complicated, but it’s very intuitive. Most folks who reload find it as enjoyable as shooting.
I use mostly RCBS or Lee reloading dies for all of the cartridges I load. Both are good companies, and both offer superior customer service (if you ever need it, which has only occurred a couple of times for me). I’ve been reloading .45 70 ammo for close to 50 years now, and I’ve been using the same set of RCBS dies the entire time.
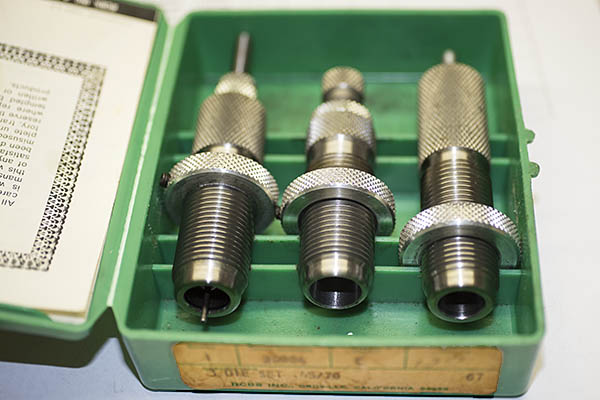
A three-die RCBS set. The first die (on the left) deprimes and resizes the fired case to its original diameter. The case has to be lubricated for this step, or else it will stick in the die. The second die is called the expander die. It expands the upper portion of the cartridge case and, if adjusted to do so, adds a flare to the case mouth. The third die (on the right) is the bullet seating and crimping die. It can be adjusted to change the depth to which the bullet is seated, and to add a crimp if you wish to do so.
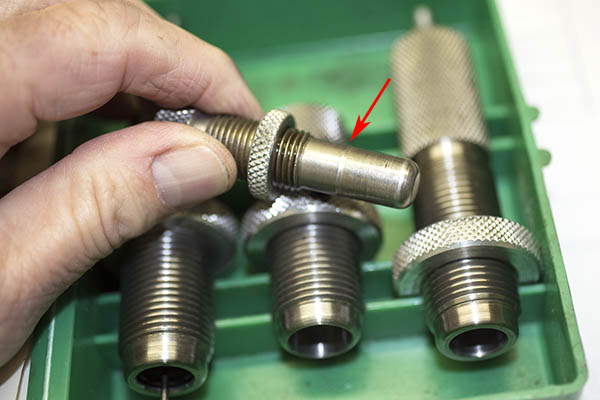
The expander die (the one in the center of the above three dies) is the one that flares the case mouth. It contains a threaded insert with a step in it to apply the bell mouth to the case.
In this photo, the case expander has been removed from the die to show the diametral step. It is this step that adds a flare to the case mouth.
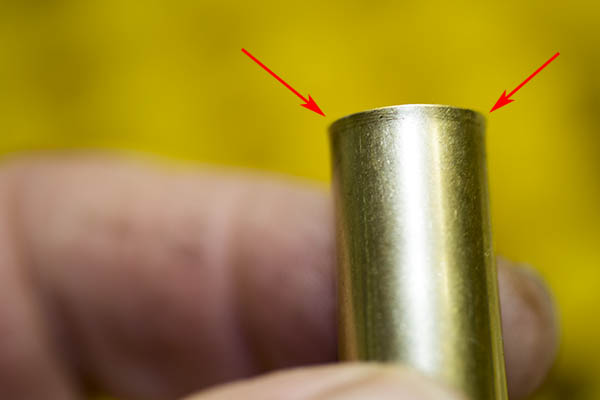
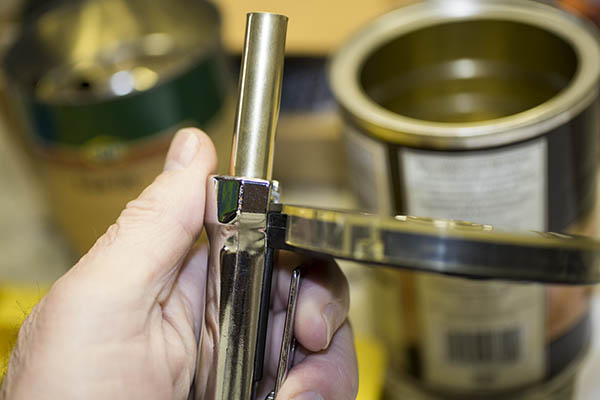
This is what the case mouth should look like after it has been flared. You don’t want to overdo this step. You just want to get enough of a flare to allow the bullet to get started in the case.
A .45 70 case with a flared mouth. We add the flare to allow the bullet to enter the case with no shaving of the bullet.
After the case has the flare applied, it’s time to clean the primer pockets and then prime each case. I use another RCBS tool to clean any combustion residue from the primer pocket (see our earlier tutorial on loading .45 ACP ammo), and then I use a Lee priming tool to seat the primers.
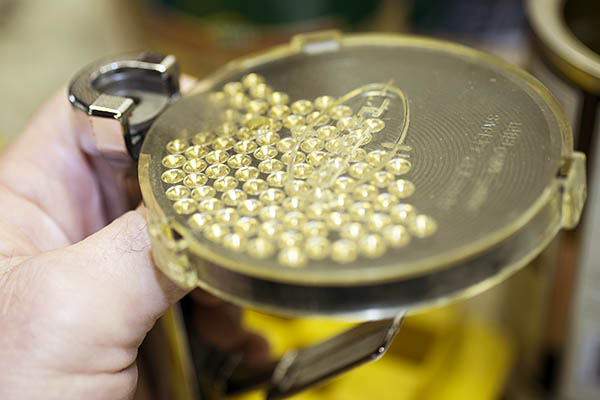
The Lee priming tool. This is another tool I’ve been using for five decades. It’s a much better way to prime cartridge cases.A CCI 200 large rifle primer in place, ready to be seated in a cartridge case. The .45 70 cartridge requires a Lee No. 8 shellholder, shown in place in this photo.A .45 70 case in the Lee priming tool. Compressing the handle (shown to the right of the priming tool barrel) forces the primer into the case. You do this one at a time for each case.A freshly primed .45 70 cartridge case.
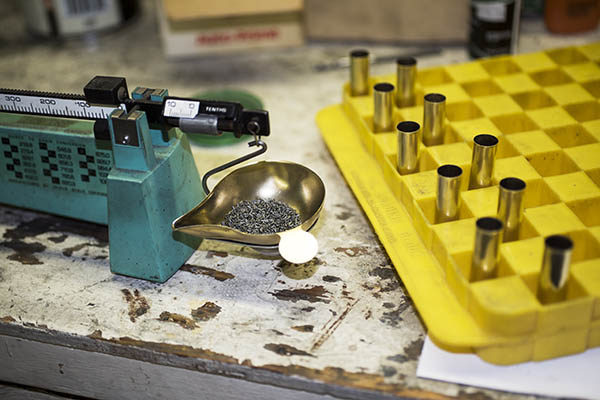
After all the cases have been cleaned, flared, and primed, it’s time to add propellant. I use my RCBS scale along with a powder dispenser to add the right amount of powder to each case. To get the correct amount of powder, I always consult a load manual. I’m showing you different charge weights in this blog, but DO NOT rely on what I’m telling you (or what you read on the Internet from other people) for this information. Always consult a reloading manual. Several reloading manuals are available; I prefer the Lyman manual and it’s the one I use most often. Most of the other manuals are either from bullet manufacturers or propellant manufacturers, so they list only their components. The Lyman manuals are not restricted to a single brand of bullets or powders, as Lyman does not manufacture bullets or powders. Lyman does a good job, I think.
My RCBS powder scale, the reloading tray, and ten .45 70 cases waiting for their propellant charges.
When I load different test loads as I’m describing in this blog, I’ll charge and complete each group separately. Typically, that’s ten cartridges in a group.
Once the cases have been charged with propellant, it’s time to seat and crimp the bullet. I typically use a light crimp for the .45 70. Crimping involves bending the flared case mouth into a crimping groove (sometimes called a cannelure) on the bullet. You crimp a cartridge for three reasons: To prevent the bullet from being forced further into the cartridge case if it is fed into the chamber automatically (as occurs with, say, a 9mm or .45 ACP cartridge), to prevent the bullet from backing out of the case due to the recoil of other cartridges (as might occur in a revolver or a rifle magazine), and to hold the bullet in place when the primer first fires (this allows the flame front to build to a consistent pressure in cartridge prior to driving the bullet down the bore). It’s that last reason that I’m most interested in here. It should make for a more accurate cartridge. Theoretically, neither of the first two reasons is a consideration for a single shot rifle.
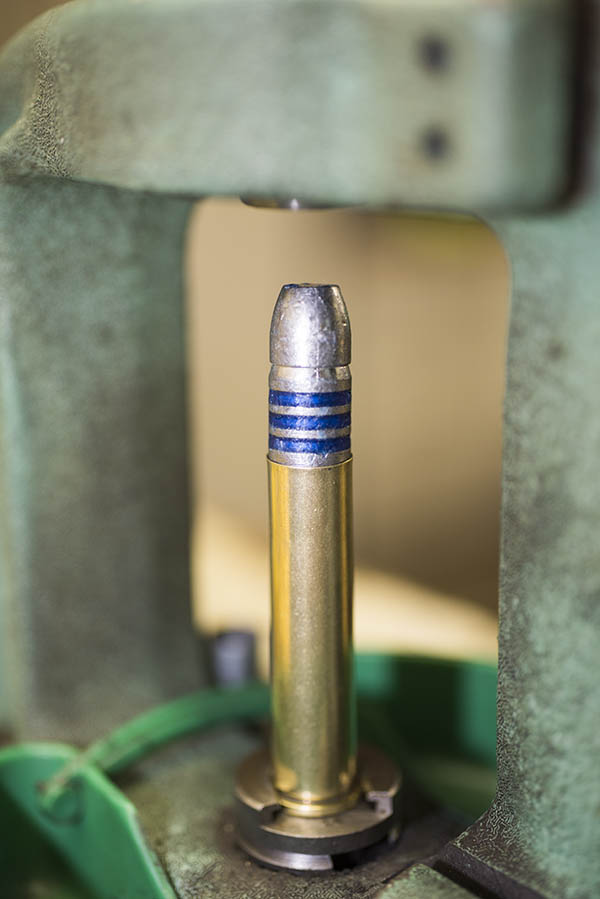
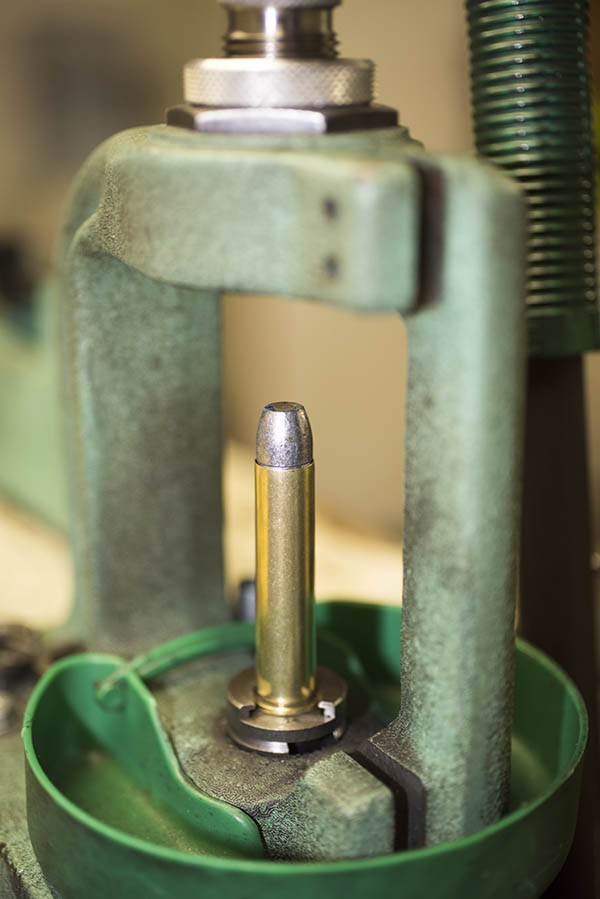
A Missouri bullet on top of a charged .45 70 case, ready to be run into the bullet seating die in the RCBS Rockchucker press.
Seating the bullet and crimping it is a bit of a dance. You have to get the bullet seated to the right depth, and then you have to apply the crimp. We use the third and final die in a three-die set to accomplish both. I screw the bullet seating portion of the die fairly far into die initially and then I screw the die into the press to get the bullet seating depth where I want it. In this case, I want the top of the brass case to be nearly even with the top of the bullet’s crimp groove. Then I back the bullet seat all the way up in the die, and screw the die body into the press such that it forms the crimp (there’s a tapered decreased diameter in the die insider diameter that forms crimp). Once I have the crimp where I want it (and the amount of crimp I want), I then screw the bullet seater all the way such that it contacts the bullet. I then make sure everything is jake on the next round (you know, the same crimp and the same cartridge overall length), I make any required small adjustments, and then I lock everything down with the die’s two locknuts and load the remaining cases.
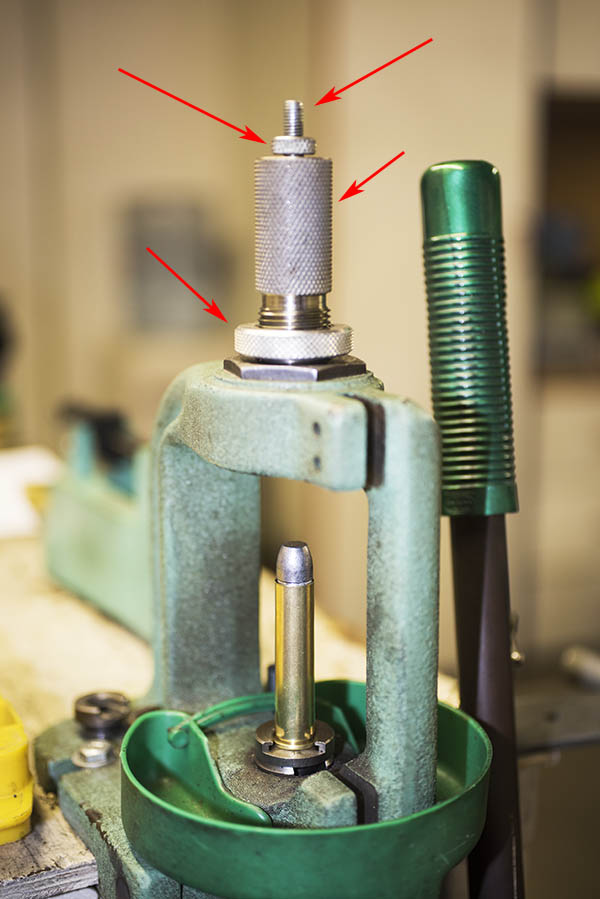
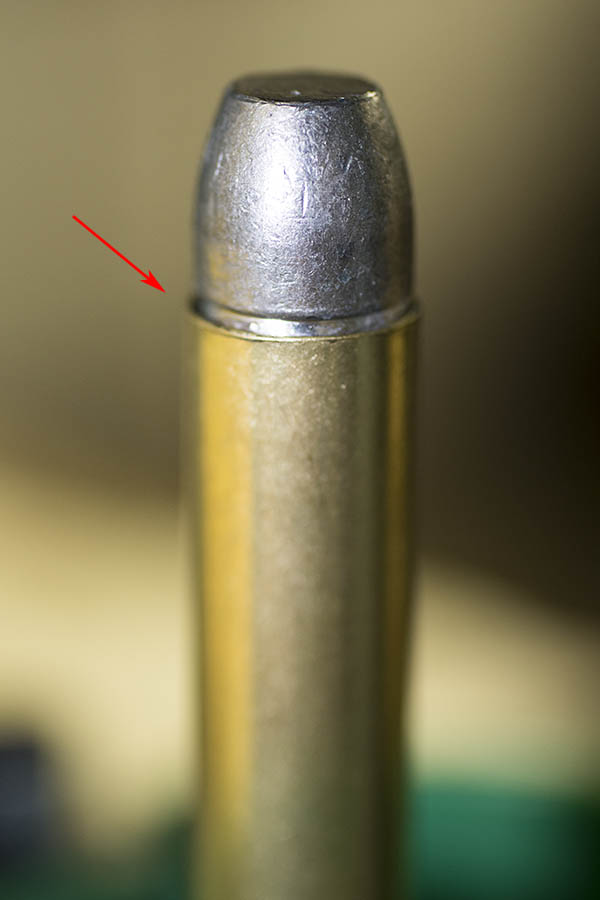
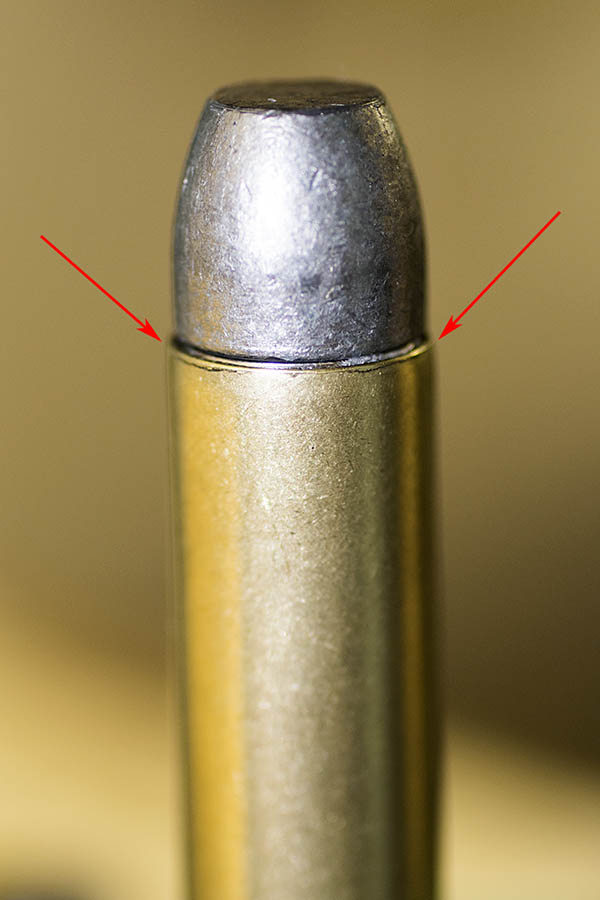
Adjustments on the seating and crimping die. The small-diameter threaded shaft controls fine adjustment of the bullet seating depth. Turning the main die body into or out of the press controls coarse bullet seating depth and crimp. The two locknuts (denoted by the arrows on the left) lock the bullet seating shaft and the die body in place.The Missouri bullet nearly fully seated in the case, but not yet crimped. I’ll seat the bullet just a bit deeper, and in the last few thousandths of an inch on the press stroke, the upper edge of the cartridge case will be crimped by the die around the bullet.A seated and crimped Missouri bullet in a .45 70 brass case. When I bellmouth the cases, I only open them up just enough to allow the bullet to start into the case. When I crimp, I only crimp a little bit. This minimizes working of the brass around the case mouth. Loading at the Trapdoor Springfield levels as I do, and using this minimal amount of opening and then crimping the brass, results in long case life. These cases were purchased in the 1970s and I’m still using them.A completed round. This .45 70 cartridge is ready chamber and fire. It’s a big cartridge.
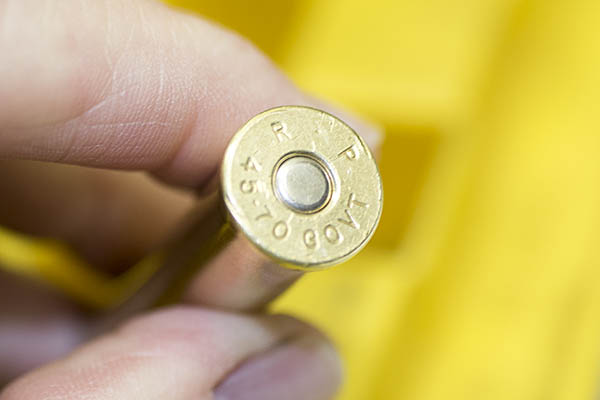
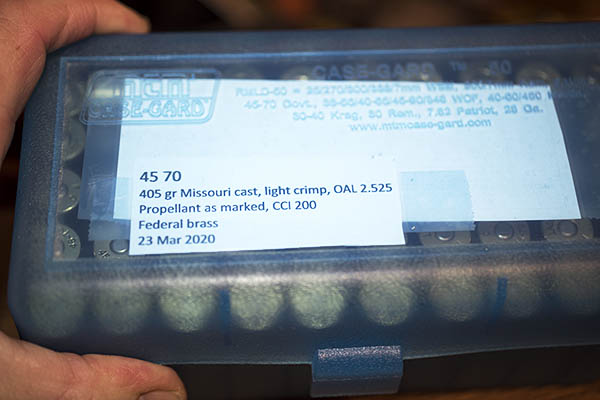
After I’ve done all of the above, I immediately label the packaged, reloaded ammo so that I know what I have. I can’t rely on my memory and do this later; I always perform the labeling operation as soon as the reloading operations are complete.
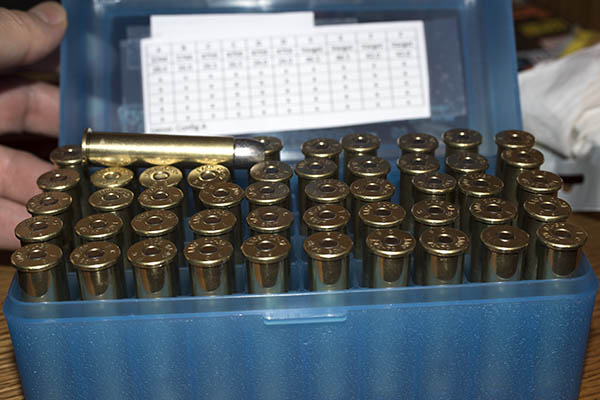
A box of 50 .45 70 cartridges labeled and ready to take to the range. I always label my loads as soon as I finish them.Because these are cartridges loaded differently for accuracy testing in the new Henry rifle, I included a map inside the cartridge container to identify how each group has been loaded.Ready to go to the range. Reloaded cartridges are less expensive than factory ammunition, and I will be able to find which combination of components performs with the greatest accuracy in my new Henry rifle. With factory ammo, you pay more and you get what you get in terms of accuracy.
There you have it. I have all the .45 70 ammunition I want to test loaded, boxed, labeled, and ready to go to the range. Now all I have to do is take possession of my new Henry, head out to the West End Gun Club, and see what works best. You’ll get to see it, too, right here on the ExNotes blog.
Check out our earlier Henry Single Shot stories here:
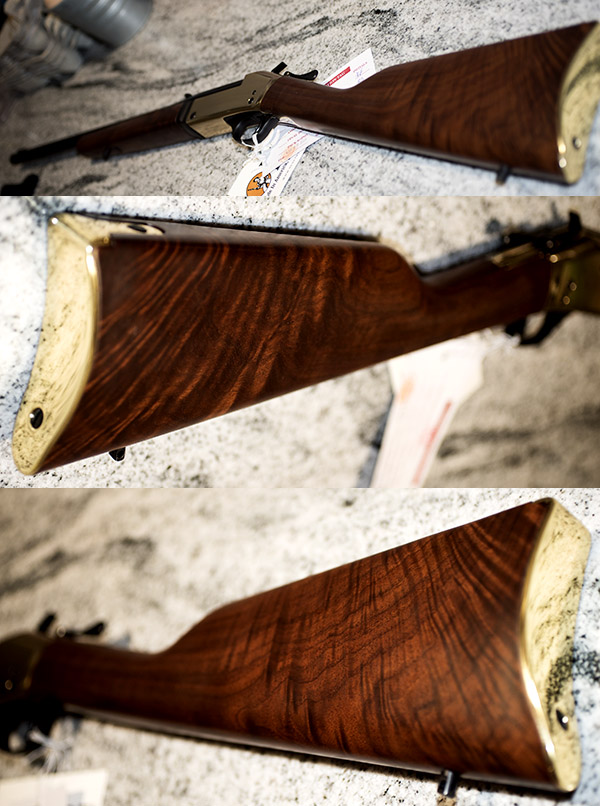
The new Henry Single Shot. Mine has exceptionally fancy walnut. I am a soft touch when fancy walnut is involved.
I’m about a week away from having sufficiently cooled (at least in the Peoples Republik of Kalifornia’s eyes), which is another way of saying I have 7 days left until my 10-day waiting period is over, and then I’ll be able to pick up my new Henry .45 70 Single Shot. (“Single Shot” is capitalized because it’s a proper noun; it’s Henry’s official name for this rifle.)
Another view showing the entire Henry Single Shot rifle. I’ll get better photos when I get to the range; I shot these photos at the dealer.
I am loading a series of cartridges to test for accuracy in the new Henry and I’m going to tell you about the loads, but before I get into that I want to tell you about the three levels of reloads you find in the .45 70 reloading manuals. I’ll post about the different loads (and reloading those rounds) in the next blog.
A Sense of Scale: A .22 Long Rifle cartridge, a 405-grain Missouri cast .45 70 bullet (just the bullet is bigger in both length and diameter than an entire .22 cartridge), and a reloaded .45 70 cartridge.
.45 70 History
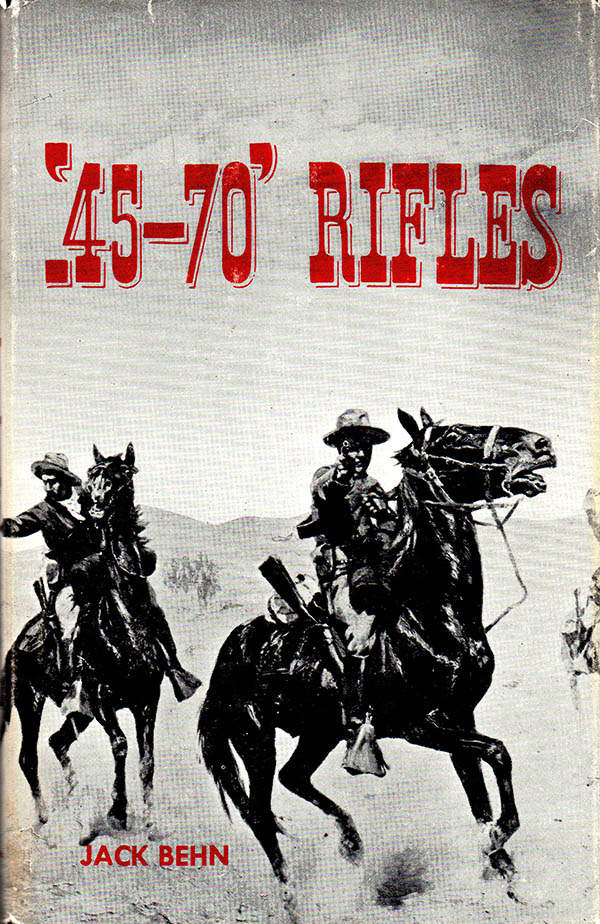
I’ve been a student of the .45 70 for close to 50 years, and the cartridge is nearly 150 years old. One of the best sources of information on the early .45 70 rifles is Jack Behn’s touchstone reference shown below.
One of the best references on early .45 70 rifles is Jack Behn’s excellent 1956 book. It was published by the Gun Room Press, an imprint owned by the now defunct Rutgers Gun Store. When I picked up my 1973 Colin D. MacManus 1911 .45 auto, it was from the Rutgers Gun Store in Highland Park, New Jersey.
At the end of the Civil War, the Army knew it needed a breechloading rifle (one that loaded from the rear with metallic cartridges). This resulted in development of the 1873 Springfield rifle and the .45 70 500 cartridge, so designated because it fired a 500-grain, .458-inch diameter lead cartridge propelled by 70 grains of black powder. That was later changed to a 405-grain lead cartridge because soldiers complained that recoil with the 500-grain projectile was excessive.
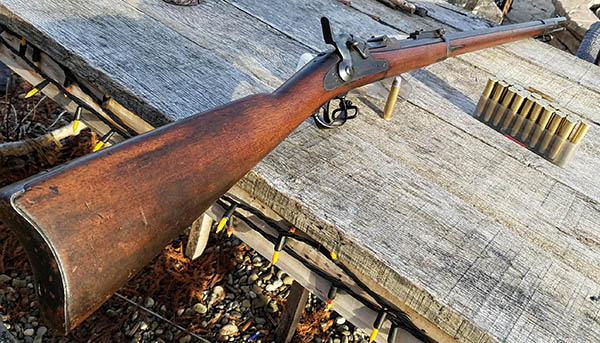
An 1873 Trapdoor Springfield rifle.
That .45 70 Trapdoor Springfield remained in service from 1873 through the Spanish American War and our wars against the Plains Indians. It was also the rifle most frequently used by buffalo hunters to nearly exterminate the American bison, which was really little more than an extension of the war against the Indians (it’s not widely known, but the dominant reason the U.S. Government encouraged eradication of the American bison was because it was the principal source of food, shelter, and clothing for the Indians).
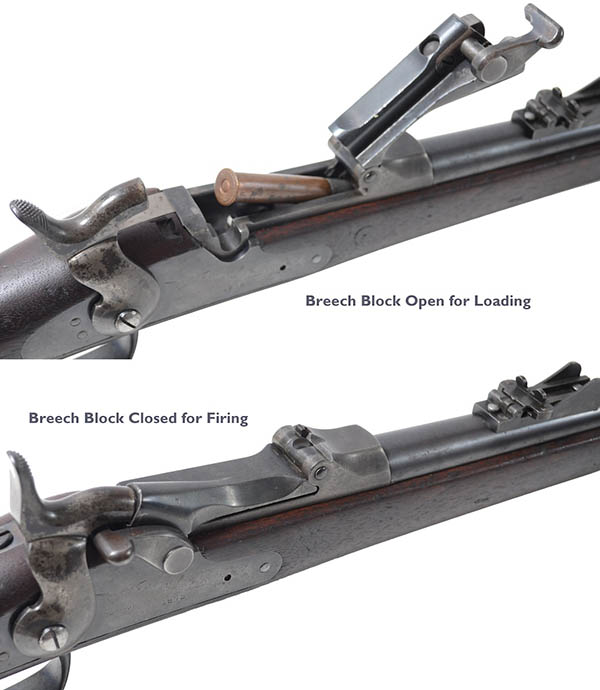
The Trapdoor action. New in its day, it is antiquated today. It is a weaker action than are those used in modern single shot and lever action rifles, and it therefore is loaded to lower chamber pressures.
Trapdoor Springfield .45 70 Loads
The “Trapdoor” designation for the 1873 Springfield refers to the action design. The Springfield’s action had a hinged element that rotated forward to allow loading a cartridge, which was then closed and locked in place prior to firing a round. It was state of the art in 1873, but it was inherently weak and limited the pressures to which ammunition could be loaded. But it was enough. The Springfield action could withstand pressures up to around 17,000 psi, sufficient to launch a 405-grain projectile at velocities a little north of 1400 feet per second. It was more than enough to kill a man, and in fact, it was enough to kill a buffalo.
Winchester and Marlin .45 70 Loads
The .45 70 cartridge had a lot going for it, and in 1886, Winchester introduced a .45 70 lever action repeater (their Model 1886). Marlin had previously introduced a .45 70 lever action repeater in 1881. The Winchester and Marlin rifles had two advantages: They could fire repeatedly by operating the lever action and squeezing the trigger, and the lever gun actions were stronger (so they could be loaded to higher pressures with resulting higher velocities). I don’t know that any of the ammo companies loaded the cartridge to the higher pressures the Winchester and Marlin rifles could handle back in those days (probably out of a fear that the ammo might be used in the weaker Springfield action), but folks who reload today and who have either a Marlin or a Winchester can load their ammunition to the higher levels allowed by the lever gun receivers.
The reloading manuals show that the Model 1895 Marlin and Model 1886 Winchester lever actions can handle chamber pressures in the 27,000 psi range. That’s enough to drive a 405-grain bullet out at about 1700 feet per second. That’s a smoking hot load.
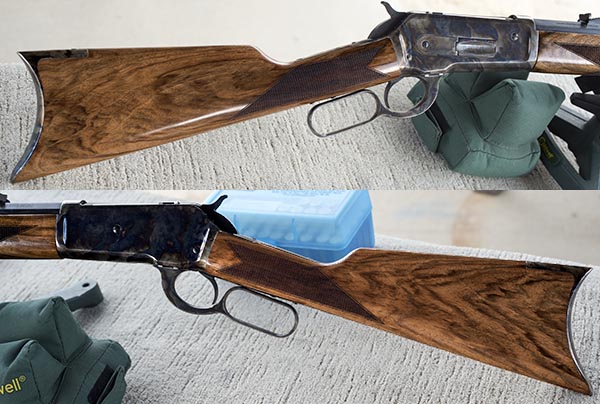
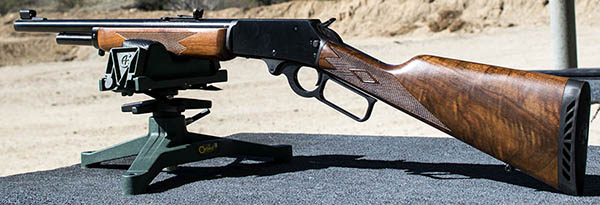
This is a Chiappa reproduction of the 1886 Winchester rifle, chambered in .45 70. This is a lever action rifle.The 1886 Chiappa reproduction. The curved metal buttplate is a faithful reproduction of the original Winchester design, and it is punishing when the hammer drops. Nice wood, huh?A modern Marlin 1895. When I saw this one on the rack, I knew I had to have it. I’ve owned the rifle about 25 years now. It’s very accurate, and it regularly shoots into an inch with open sights at 50 yards.
Ruger No. 1 and No. 3 .45 70 Loads
The next step in the .45 70 evolutionary chain? That would be the single shot rifles offered by Ruger starting in the 1970s. Ruger had two: Their No. 1 rifle and the No. 3. Both use the same action, and it’s strong. In the Ruger rifles, you can load .45 70 ammunition to nearly the same velocities and the same pressures as a .458 Winchester Magnum, which is to say, crazy levels (at least in terms of recoil). Ruger rifles chambered in .45 70 can handle pressures approaching 40,000 psi, with 405-grain bullet velocities north of 2,000 feet per second. I’ve done this. It’s no fun.
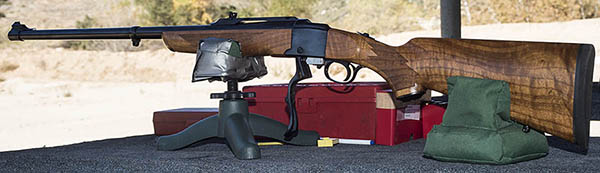
A Ruger No. 1 falling block rifle. This is the rare 26-inch barreled version with figured Circassian walnut. Ruger only made a limited number of these variants and most of them have very plain wood. It’s pretty, but the Marlin shown above is more accurate.
.45 70 Loads: The Bottom Line
The upshot of all this? There are three levels to which you can reload .45 70 ammunition: The Trapdoor Springfield level, the 1886 Winchester/Marlin level, and the Ruger level. When you see this in a reloading manual, you’ll see three sets of reloading data, designated separately as explained in this blog.
What does all this mean in the real world? Your mileage may vary, but for me, I never venture into the Marlin/Winchester and Ruger .45 70 reloading levels. There’s just too much recoil, and you don’t need to go there for accuracy. I would argue further that you don’t need to go there for lethality (the .45 70 in 1873 Trapdoor Springfields killed a lot of buffalo). I stick to the Springfield levels for all of my rifles (even though I could go higher), and that’s how I’m going to load for the new Henry rifle, too.
More Tales of the Gun here, including detailed info on each of the rifles shown above!
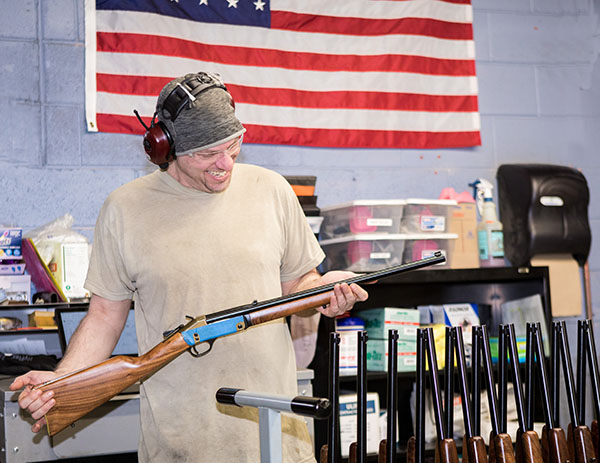
I sure was surprised a couple of days ago. While sheltered in place, or locked down, or in self-isolation, or whatever the nom du jour is, I received an email from my local FFL telling me that my Henry Rifle had arrived. Wow, I didn’t even know it had been shipped yet! You know the deal…I’m here in California and I have to wait 10 days so that I can cool sufficiently before taking possession of the new rifle, but I wanted to get the process started. I made an appointment so as not to be around too many other people and off I went. Truth be told, it felt great just getting out of the house, and I felt even better when I saw the Henry .45 70. It’s beautiful.
You can refer to our earlier blog for the first part of the Henry story. In it, I told about asking their marketing director (good buddy Dan) to try to get me one with a nice piece of walnut, and wow, did they ever! When I arrived at the FFL, the lighting at the store was not conducive to great photography, but I did my best:
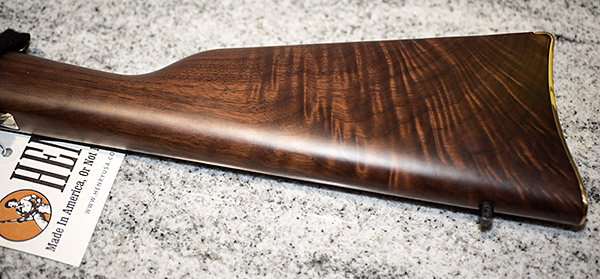
What’s really nice about this rifle is that the stock is highly figured on both sides, and it is what I would call exhibition grade walnut. I’m guessing it’s American walnut, as Henry prides itself on being made in America. I’ve been collecting rifles for a good half century now, and I have some with really nice wood. The new Henry jumped to the head of the pack. It’s stunning.
I had hoped to have a more in depth chat with Dan this week, but like all companies, Henry has its hands full right now. That’s okay; we’ll get to chat later. What Dan told me earlier is that all these rifles are nice, and they are a cut above what one would normally see in a rifle in this price range. I think he’s being too modest. I’ve seen and I own rifles that cost two to four times as much as this Henry, and the fit and finish on those is not as nice as this. It truly is a beautiful rifle. My compliments to Henry USA!
I’ve already started loading .45 70 for the Henry ammo development effort, and I think the next blog will be on that topic. This is going to be fun, folks. I can’t wait to talk possession of the rifle and I can’t wait to start shooting it. I’m eager to see how the rifle performs, and I’m equally eager to get the Henry on the bench and out in the sunlight so I can get better photos for you…this rifle deserves it!
We’re going through a rough patch right now, and when I say we, I mean that literally. We, as in the whole world, are working through a terrible situation. But it will pass, and when it does, we’ll be better people. I’ve cut back substantially on the time I spend on social media for a lot of reasons, not the least of which is my deep disappointment in people who are using the current world health situation to post stupid stuff. But every once in a while you see something good, and this meme from Southern Pride and Dixie Proud was one of those rare occasions:
Henry Single Shot rifles. The steel-framed ones have a conventional pistol grip stock. The brass-framed rifles have a straight grip. They are available in chamberings ranging from .223 to .45 70.
About four years ago I went to the range with my good buddy TK. TK is a cool guy and he had a rifle I didn’t know much about. It was a new .44 Magnum Henry lever action rifle with a brass receiver and, in a word, it was stunning. The brass and the bluing were highly polished, the walnut stock was highly figured, and wow, was it ever accurate. I’d seen Henry rifles before but I had never handled or fired one, and when TK let me shoot his…well, let me put it this way: Wow! TK was impressed with my marksmanship and so was I. I put five .44 slugs through a hole you could cover with a quarter, and folks, with open sights, that’s good shooting. The rifle looked, felt, handled, and shot the way a rifle should.
Just a couple of weeks ago, good buddy Greg and I were on the range again and Greg had a new toy. He had recently purchased an older Harrington and Richardson break open rifle in .223, and it was nice. Harrington and Richardson stopped making their rifles some time ago, and I always thought having one in .45 70 would be the right thing to do. But I had never gotten around to scratching that itch. Maybe it was time to do something about that, I thought.
I like the concept of break open rifle, and I love the concept of a single shot. They are just cool. You have to make every shot count, and that’s appealing to me. A Ruger No. 1 or a Ruger No. 3 single shot rifle has always been my first choice. There’s something about a single shot rifle that floats my boat.
Seeing Greg’s H&R single shot .223 got me to thinking about Henry rifles again, probably because I’d seen something on the web about Henry having introduced a new single shot. I remembered the quality of TK’s Henry, and I love the break open configuration I was seeing on Greg’s H&R. It reminded me of my very first rifle…a .177 caliber pellet gun I’ve had since I was a kid wandering the woods in New Jersey. What I had in mind was a Henry single shot rifle with a brass frame chambered in .45 70 (one of the world’s all-time great cartridges). Throw in some fancy walnut, and it would be perfect. It would be just what the doctor ordered.
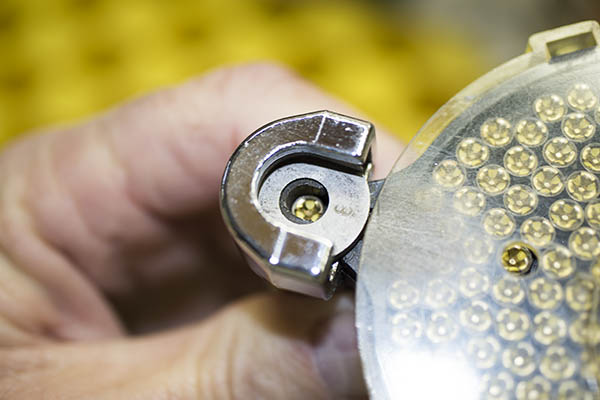
One of the artisan’s at the Henry plant handling a .45 70 single shot rifle. Check out the walnut!
Hmmmm. Brass. Walnut. .45 70. The wheels were turning, and that prompted a visit to Henry’s website. What’s this? A contact form? Hmmmm again. Would it be possible to get a Henry Single Shot in .45 70, brass framed, with hand-selected walnut? Well, it seems the Henry folks had checked out our ExNotes gun page, and the answer was swift: Yep, they could help me on this.
So, to make a long story a little less long, I’ve been corresponding with Henry USA and I bought one of their brass frame single shot rifles. The good folks at Henry assured me it will have nice walnut. I’m talking to the Henry marketing director to learn a little more about the company tomorrow and I’ll be posting a blog about that in the near future. I’ll soon have a new Henry rifle in the ExNotes armory, and you can bet I’m going to have lots to say about it.
Stay tuned, folks. You’ll read all about it right here.