Reloading Part II: The first steps

Reloaded .45 ACP ammunition. Bright, shiny, and far more accurate than factory ammunition in my Colt and Rock Island 1911 pistols.  I’ve got the targets to prove it.

In our first post on this topic, we talked about the equipment and components needed for reloading the .45 ACP cartridge.   In this blog, we talk about the reloading process.  We won’t cover all of it here (we’ll get about halfway through), and we’ll cover the rest of the process in a subsequent blog or two.  In our first blog, we discussed the basic equipment.  In this blog, we’ll talk about a few more bits of equipment that I use, but they are not essential.  You can get by without them.

If you want to catch up with the first blog on this topic, you can do so here.

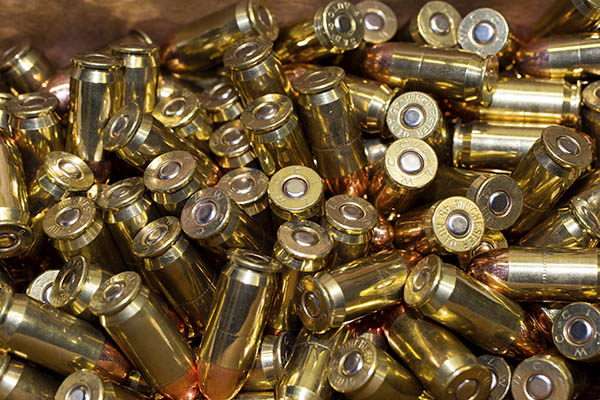
Let’s say you’ve been to the range, you’ve made .45-caliber holes in your targets, and you’ve collected your spent brass.   That’s the only part of the reloading process I don’t like…at my age, bending over and picking up all that brass is a pain-in-the-you-know-what.   But I still do it.  In fact, if I see somebody leaving brass on the ground, I’ll collect it.  I grew up collecting brass to reload, and leaving brass at the range feels to me like a crime against nature.

So we’re home, and you’ve got your fired brass…

Fired .45 ACP brass.  I just can’t leave brass at the range.  To me, it’s like leaving cash on the ground.

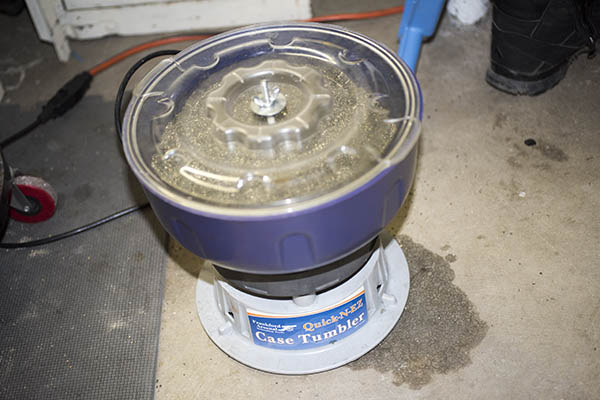
This next step I’m going to show you is an optional one, and that’s cleaning the brass.   You don’t need to do this, and I reloaded .45 ammo for a lot of years without ever cleaning my brass.  I always do it now, though, and I do it for two reasons:  Cosmetics and accuracy

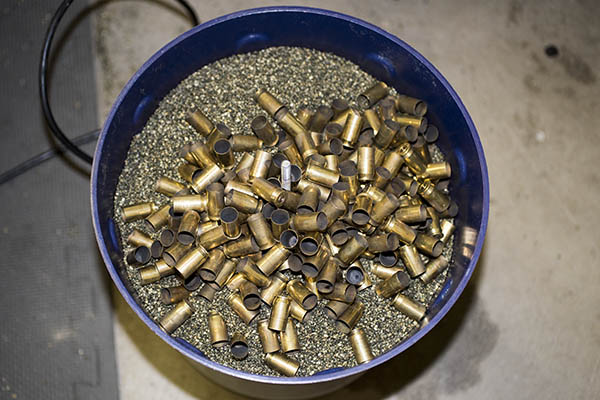
Here’s how I go about doing it.   I dump the brass into my vibratory tumbler and let it rock for a couple of hours.

My Frankford Arsenal vibratory cleaner. I call it a tumbler. It has corn cob media. You unscrew the butterfly nut on top, remove the cover, and dump the fired brass into the media.
Here’s the tumbler with the cover removed and the brass placed on the media. The cover goes back on and I let the thing vibrate for a couple of hours.

Like I said above, I tumble my brass.  One of the reasons is that I like bright, shiny ammo (it just looks cool).  But a far more important reason is that it makes the ammo more accurate.   When you tumble the brass, you’re cleaning it on the inside and the outside.  The outside is cosmetic.  The inside affects the grip the brass case has on the bullet.  We’re not interested in making it shiny on the inside; we’re interested in making that grip consistent.   I’ve found over the years that a consistent inside case surface (where the case interfaces with the bullet) makes for a more accurate cartridge.   It’s extremely significant in a rifle (I’ve seen 100-yard groups shrink from 3 inches to a quarter of an inch in my .30 06 Model 70 Winchester just by tumbling the brass).  The accuracy improvement in a handgun is not that significant, but it’s still there.   You don’t have to do this (you can reload the brass without tumbling it), but it’s something I do.

Here’s what the brass looks like after it’s been tumbled….

Squeaky clean and shiny. Fired, cleaned brass.

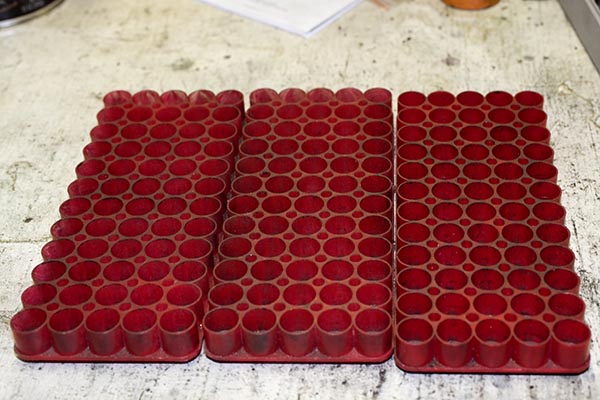
Now we’re ready to start the resizing operations.   We’ll want to get our ammo trays ready…

Reloading trays. Each tray holds 60 rounds, but I only load 50 in each one.

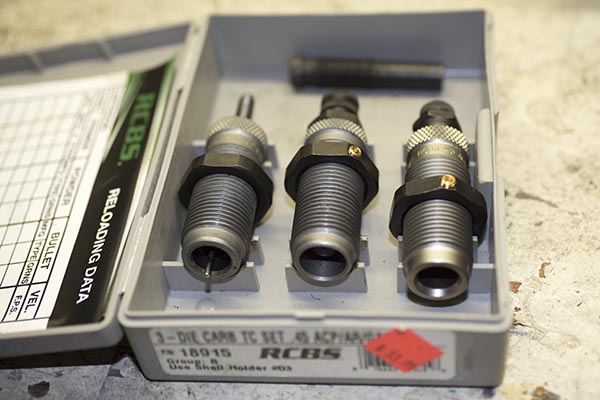
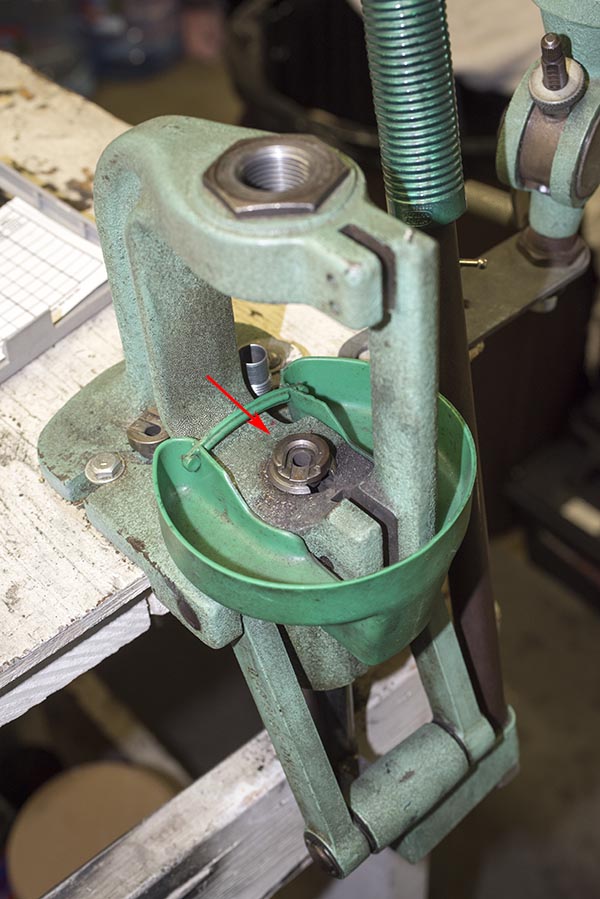
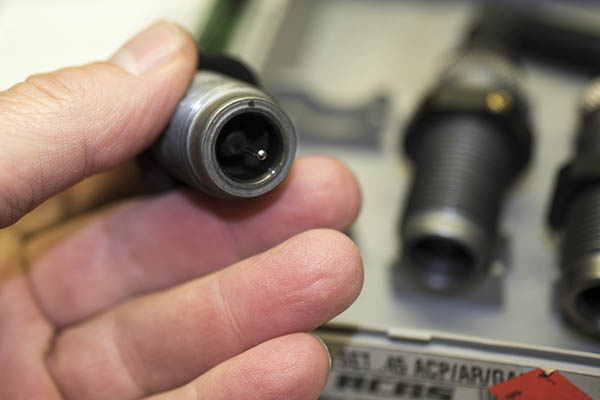
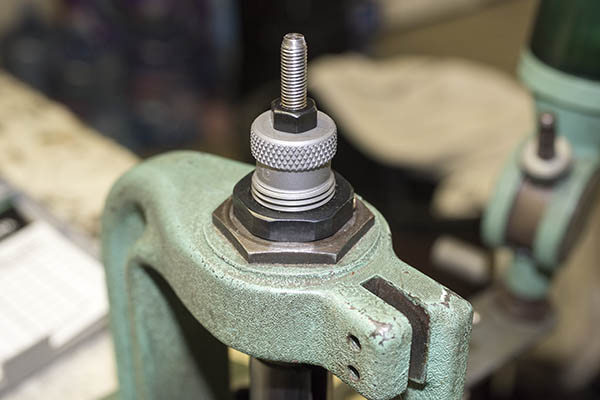
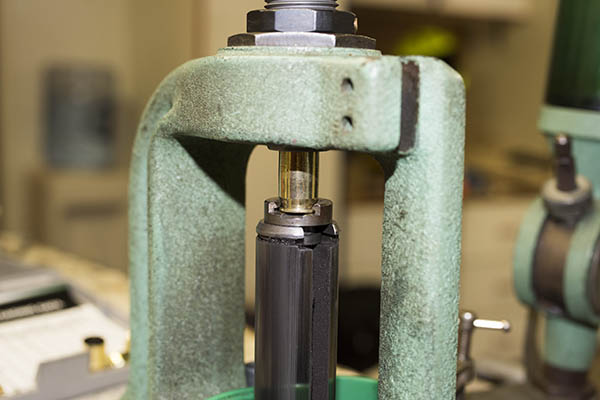
The next step is to install the first of our reloading dies (the resizing die) in the press.  We’re going to use this die to squeeze the cartridge case back to its unfired case diameter and simultaneously knock out the fired primer.

The resizing die. Note the protruding pin; it’s what pushes the old primer out of the brass case.
The resizing die, threaded into the reloading press.  Note the large locknut at the base.
With the shell holder installed on the press ram, we fully elevate the ram, thread the resizing die down to contact the shellholder, withdraw the ram slightly, turn the die in just a bit more, run the ram up, and then lock the die in place with its locknut.  What we want is to feel a slight “knuckle over” when the ram is fully elevated.

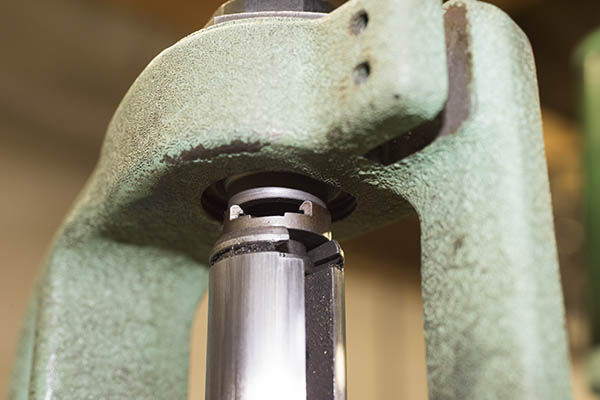
At this point, we’re ready to start resizing and depriming cases.  Here’s what that looks like.

A case in the shellholder.  When we raise the ram, it will be resized and the old primer will be pushed out.
The ram is raised all the way to the top of its stroke. Here we see the case just starting to enter the resizing die. You don’t want to get your finger caught between the die and the fired case (don’t ask me how I know). The ram will go up until the shellholder contacts the bottom of the sizing die.  As that occurs, the case is resized to its original diameter, and the primer is pushed out of the case.

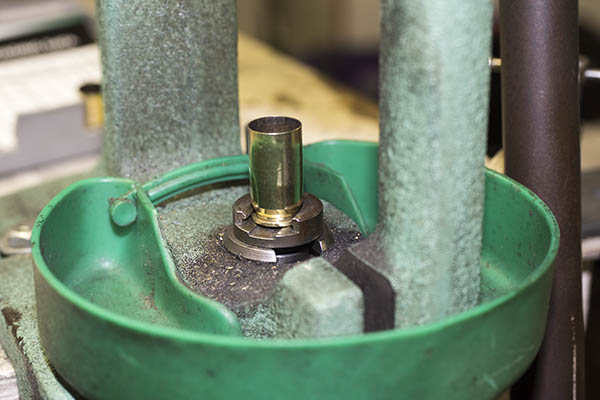
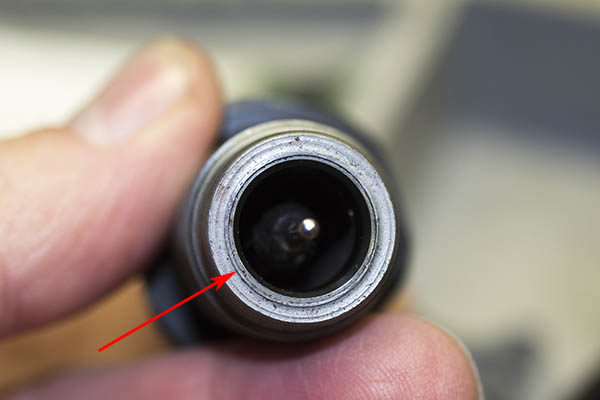
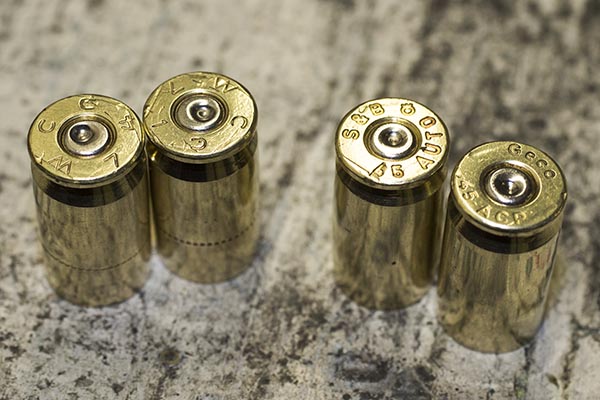
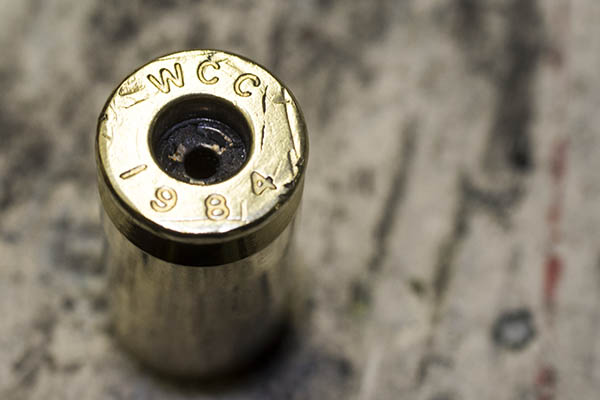
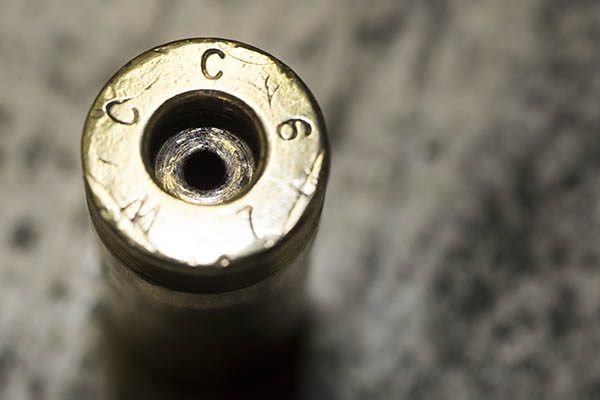
This is what the case looks like after it has been resized.   Note that the primer is no longer in the case.  Also, note how funky the primer pocket is.  It’s gunked up with combustion residue.

A resized, deprimed case. Note the combustion reside remaining in the case’s primer pocket.  And yes, I’ve been reloading this case since 1984.  I’ve got some that are even older.  .45 ACP brass lasts a long time.

As each case comes out, I’ll place it in the reloading tray, like you see below.

Resized and deprimed cases in the reloading tray.

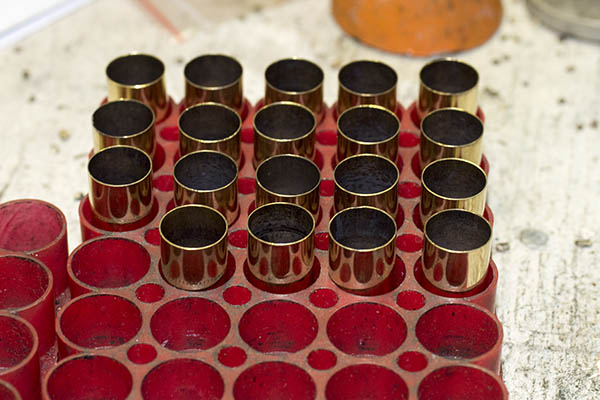
When I reload, I’ll generally do between 20 and 200 rounds in a batch.   I reloaded 150 rounds in this batch.

150 resized and deprimed cases.  Note that there are 10 empty spaces in each tray.

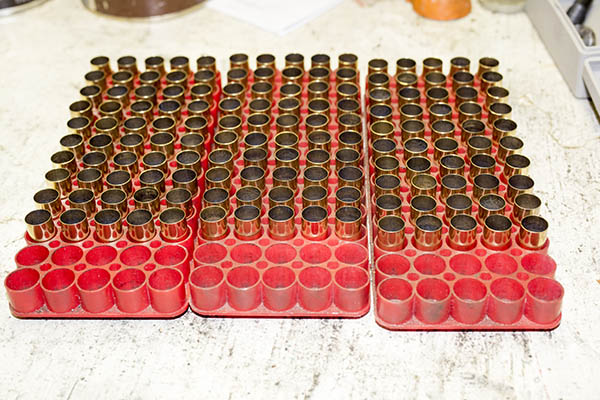
I use reloading trays that hold 60 rounds, and the reason I like these is that for a group of 50 cases I can track which case I’ve performed an operation on and which ones remain.   Each time a case undergoes a reloading step, I move it over such that I always have 1o open spots between the cases that have undergone a reloading step and those that have yet to undergo the step.

Ah, but those primer pockets.  Remember how dirty they were after we pushed the primers out?  Well, this is another optional step.  I clean the primer pockets.  I do each case manually, one at a time, using a primer pocket cleaning tool.

The primer pocket cleaning tool. It’s a primer-pocket-sized wire brush, and it removes the primer pocket combustion residue.
A cleaned primer pocket.  It doesn’t need to be bright and shiny; we just want to remove the clumps of combustion residue so the new primer can fully seat.

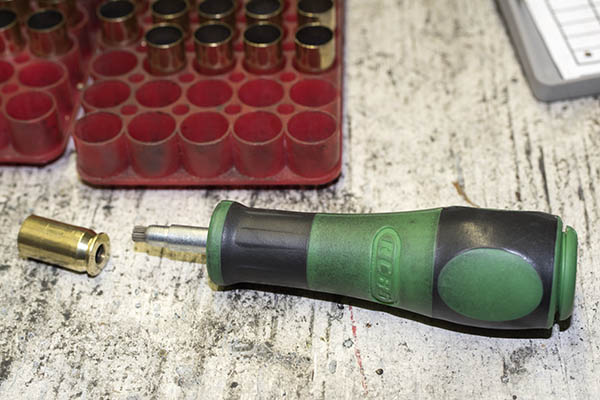
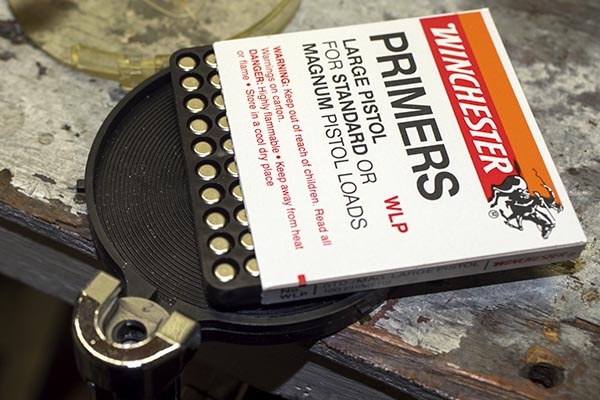
Like I said, primer pocket cleaning is optional.  I reloaded for a lot of years and won more than a few matches without primer pocket cleaning, but these days I do it on every case.  The reason we want the residue gone is that the residue can interfere with the new primer seating fully in the case (we’ll talk more about that in the next .45 ACP reloading blog).   Having the primers all seated to the same depth will theoretically make for more accurate ammunition (less variability always equals more accuracy).  It won’t effect functioning if the primers are at slightly different depths in a 1911, but if you’re reloading ammo for a revolver, a primer that is seated above flush (one that sticks out beyond the cartridge case base) can interfere with the cylinder turning.

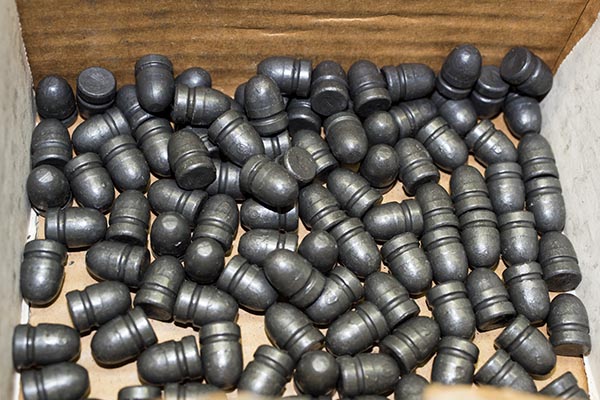
At this point, we’ve got cleaned, resized, and deprimed cases.  We’re ready to bellmouth the cases, install the primers, charge the cases with propellant, and seat the new bullets.

So that’s it for now.  Stay tuned; this series will continue right here on the ExNotes blog!

Reloading Part I: Equipment and Components

The finished product:  Reloaded .45 ACP ammunition. This handcrafted ammo is tailored for my 1911, and it is much more accurate than factory ammunition.  Our blogs on reloading will cover the equipment and components needed, and the steps involved, in reloading ammo for the .45 Automatic.

I’ve had a few requests for a blog on reloading.   You know, not just favored loads for different cartridges, but how to go about reloading.  I know it can be a bit intimidating if you’ve never done it, but (trust me on this), learning how to reload adds an entirely new dimension to shooting, and many of us view reloading as being as much fun as shooting.  In fact, one of my friends often jokes about shooting…he says it’s what we do so we get to reload ammo again.

A very cool guy named Roy Johnson taught me how to reload when I was in the Army.   I was assigned to Fort Bliss, Texas, and Roy ran the Rod and Gun club there.  Roy was a colorful El Paso fixture, and they named the road to the Rod and Gun club Roy Johnson Lane when he died.  I was 22 years old when Roy taught me how to reload, and I’ve been reloading ever since.

I thought I would approach this topic in two or three parts, with the first blog focused on the equipment and components you’ll need to reload, and a subsequent blog or two on the actual reloading process.  I had to pick a cartridge, so I thought I would start with the first one I learned to reload:  The .45 ACP.

With that as a backdrop, here we go…


Reloading reverses the process of firing a bullet, and reversing that process requires several pieces of equipment.

One part of the equipment list is the dies that force the fired brass case back into shape (the brass expanded during firing) and knock the used primer out of the case.

A set of RCBS carbide dies for the .45 ACP cartridge.
A die set consists for a pistol cartridge typically includes three dies. From left to right, they are the resizing die (it sizes the brass case back to original dimensions and punches the primer out of the case), the expander die (it opens and flares the case mouth to accept the new bullet), and the seating die (it seats the new bullet in the case and removes the case mouth flare).

I stick with RCBS dies, as I’ve learned over the years they work best, but there are other manufacturers out there.  I also use Lee dies for a few of the cartridges I reload (they are typically less expensive than RCBS dies, and they are as good).  An added advantage of the Lee dies is that they include the shellholder with the die set, so you don’t have to buy a separate shellholder and pay extra for it.  I don’t care for Hornady dies, but as they say, your mileage may vary.  I’m the guy doing the writing here, so I’ll share my experiences and preferences, and I like RCBS and Lee.  A new set of RCBS carbide dies are a little north of $50; Lee dies are typically $10 to $15 less than the RCBS dies (and like I said earlier, the Lee dies come with a shellholder).

The business end of the carbide resizing die. The red arrow points to the carbide insert.

I use carbide dies for pistol cartridges.  A carbide die has a super-hard carbide insert that interfaces with the brass case, and it allows you to squeeze the case back to its unfired configuration without having to lubricate the case first.  The downside is that carbide dies are slightly more expensive than non-carbide dies.  For straight-walled pistol cartridges, there are three dies in a set.  We’ll discuss in more detail what each does in Part II of this series.

You will also need a reloading press and a shellholder for the brass cartridge case.   I use an RCBS Rockchucker press I bought new nearly 50 years ago when Roy Johnson taught me how to reload.  A good press lasts forever.

The RCBS Rockchucker reloading press. A good one lasts forever. The red arrow points to the shell holder. Different cartridges take different shell holders. We’ll see how all this stuff is used in Part II of our reloading series.

A scale is necessary for measuring propellant charges (also referred to as powder).   Several companies offer scales specifically designed for reloading.

My RCBS reloading scale. Like the Rockchucker press shown above, I’ve been using this for a half century.

It’s a good idea to have reloading trays for the cartridges.   These are relatively inexpensive, and they seem to last forever, too.

Reloading trays. These hold the brass cases we are going to reload, and allow for easy tracking and inspection of each reloading process step.

A powder dispenser allows you to dispense the correct amount of propellant in each cartridge case.

A powder dispenser, and the propellant I like to use for loading .45 ACP ammunition. I bought that dispenser back in the day, along with the scale and the press. My preferred propellant is Unique.

At this point, we’ve covered the equipment necessary; let’s now turn to the components.  One is the propellant you see in the photo above.  As seen in the photo below, for the .45 ACP cartridge, I prefer Unique.

You’ll need previously-fired cartridge cases.  You can also buy new brass that has never been loaded if you don’t have any, or you can buy factory ammo, shoot it, and save the brass.  I don’t think I’ve ever purchased new brass for the .45 ACP, mostly I had plenty available from my days in the Army.  The .45 ACP cartridge is a relatively low-pressure cartridge, and the brass seems to last forever.  I’ve been reloading the brass you see here for a long time.

Fired .45 ACP brass. It’s dirty. I usually polish mine, but it’s not necessary that you do so. We’ll talk more about that in the next blog.
Polished .45 ACP brass. It cleans up well and it seems to last forever (look at the stamps on the two cases on the left).

You’ll need primers.  The primer is the little cap that the firing pin strikes when you pull the trigger.   There are two or three companies making primers these days.  I usually buy whatever the shop has in stock.  I haven’t found that primers make a difference in accuracy or reliability for handgun shooting.

Winchester primers. We’ll talk about the tool you see below the primers, and how to install the primers, in the next blog.

And finally, you will need bullets.  I’m using moly-coated 230-grain roundnose lead bullets these days, like you see in the photo below, mostly because I have a bunch of them in my reloading locker.  Many other bullet configurations are available.

Bullets. I usually buy them in boxes of 500 because I do a lot of shooting. There are different kinds of bullets available, but that’s a discussion for another time, too. If you’re just starting out and you’re reloading .45 ACP ammo, my advice is to get a 230-grain roundnose bullet in either cast or jacketed flavors. It will feed reliability in nearly any 1911. We’ll talk more about this in the next blog, too.

There’s one other item I strongly recommend you purchase, and that’s a reloading manual.  These manuals list different loads for different cartridges and different bullets and propellants.  The whole idea here is to experiment with these combinations (within the parameters provided by the manuals) to find the recipe that produces the best accuracy and reliability in your gun.  My preference is the Lyman manual, as it lists different bullet manufacturers and cast bullets, too.  You can buy manuals from the bullet manufacturers, but the downside there is they only show data for their bullets.

You can buy all of the equipment separately (as I did a long time ago) or you can buy a complete kit that has everything you need to get started.   RCBS has a kit that goes for about $350.  Lee has a similar kit for a lot less (about $150), and it will get you into the reloading game.  I have a friend who bought the Lee kit a few years ago, he uses it to reload .308 Winchester ammo for his Model 700 Remington, and the ammo he makes routinely delivers 1/2-inch groups at 100 yards.  With either kit, you’ll need to buy the dies required for the cartridge you wish to reload, and the components as described above.

You might be wondering:  Where do you buy this stuff?  Most gun stores sell reloading equipment and components.  Cabela’s and Bass Pro are two that come to mind.  You can also buy components and equipment online from places like Amazon, Midway, Natchez Shooter’s Supply, Grafs, and other places.  Buying the energetic components online gets a bit more complicated (propellants and primers), but the stores can fill you in on that.  In most areas, there’s usually a shop that is known for being the best in your neck of the woods for reloading stuff, and you can find these places with a quick Google search or by asking around.

So there you have it.  I’ve described the equipment and the dies you’ll need to reload the .45 ACP, but the procedures I’ll describe in subsequent blogs will be the same for nearly any handgun cartridge (.38 Special, .537 Magnum, .380, 9mm, .40 S&W, .44 Magnum, and .45 Colt).  All you need will be different dies and shellholders, and of course, different types of bullets.

Our next reloading blog will cover the first steps of the reloading process.  Stay tuned; it’s coming up!


Read our other Tales of the Gun stories for the loads we prefer.  Disagree with anything above or want to toss your $0.02 into the discussion?  Hey, there’s a comments section below and we’d love to hear from you.

One last thing…ever wonder what the “ACP” stands for in .45 ACP?  Well, here you go…wonder no more.