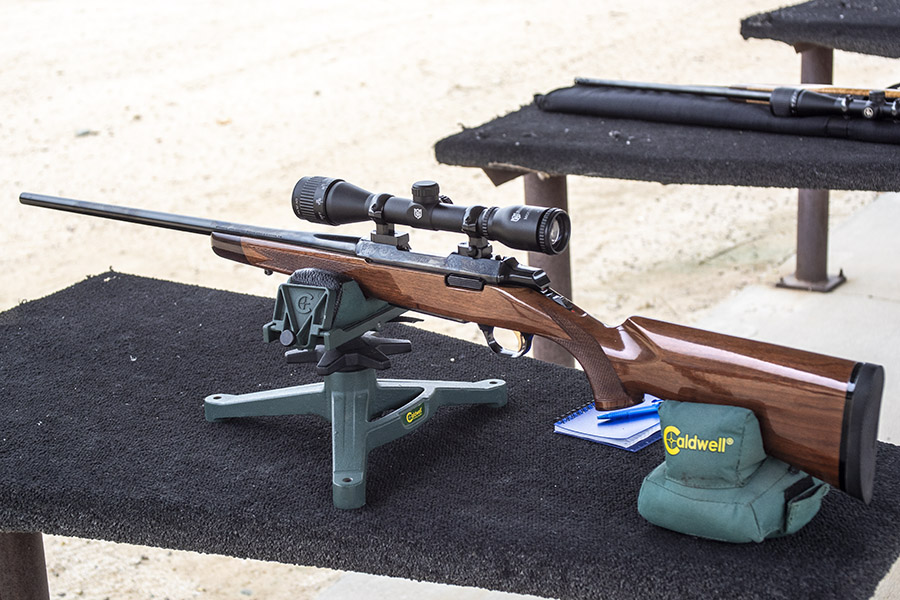
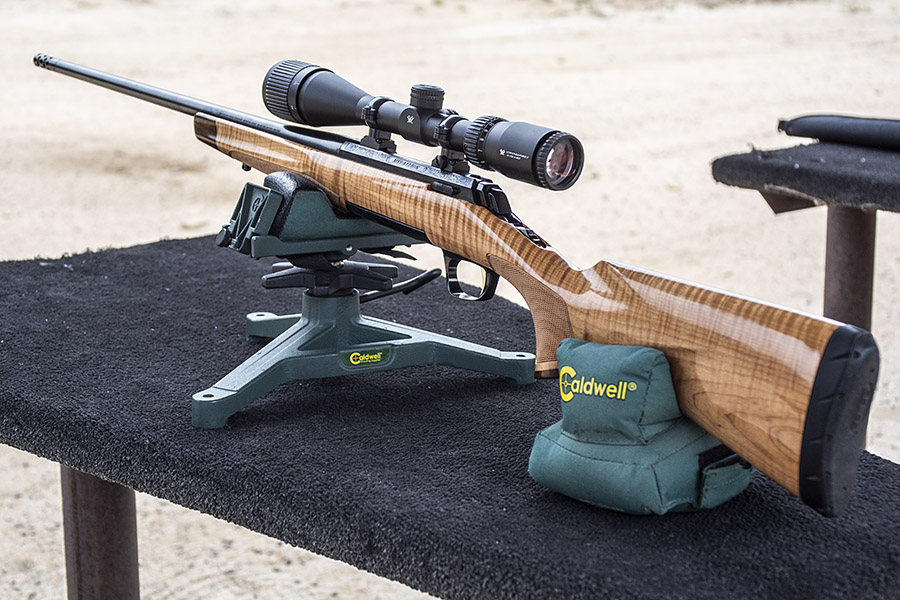
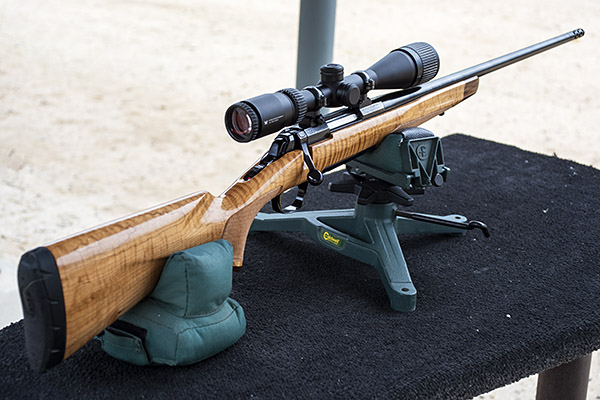
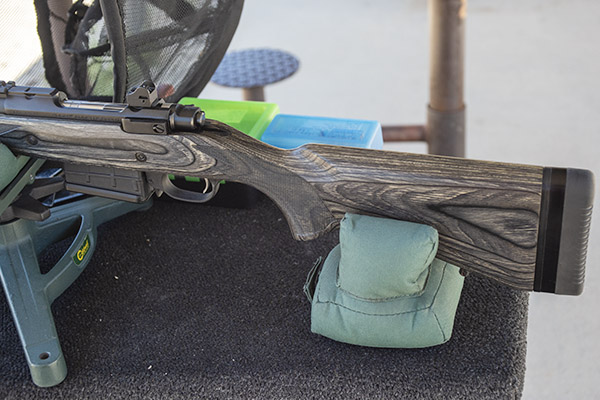
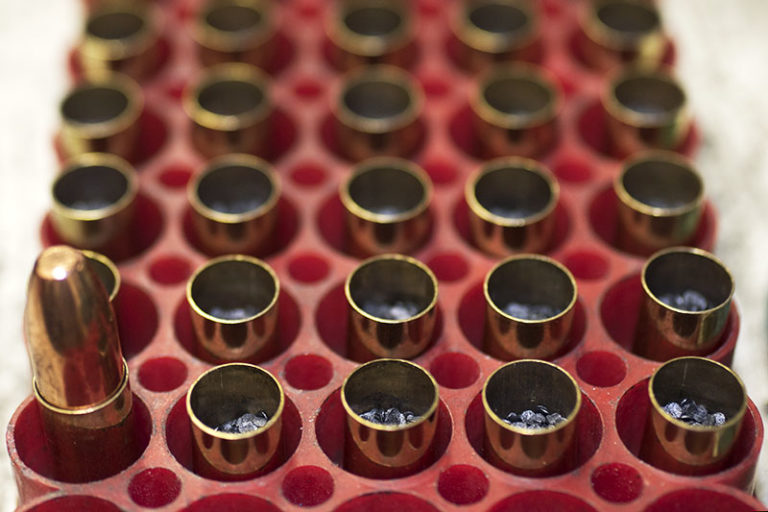
I recently posted a blog about a couple of accuracy loads for the 6.5 Creedmoor Browning X-Bolt. This blog focuses on a different Browning: A .223 Browning Micro Medallion A-Bolt. It’s the rifle you see here.
I bought the A-Bolt new from a local gun shop in southern California about 35 years ago. I paid $339 for it. It doesn’t have fancy walnut but when I saw it on the rack I asked to see it. I soon as I held it I wanted it. It just felt right. I fancied it as a walking around varmint rifle suitable for rabbits and coyotes, although I’ve never taken this rifle anywhere but the West End Gun Club 100-yard rifle range. I still make gun purchase decisions based on the kind of hunting and shooting I did 50 years ago in Texas. Someday I may get out and chase jack rabbits and coyotes with this rifle again. I can dream.
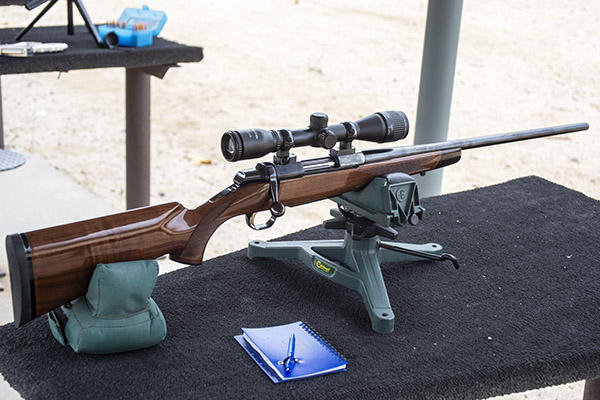
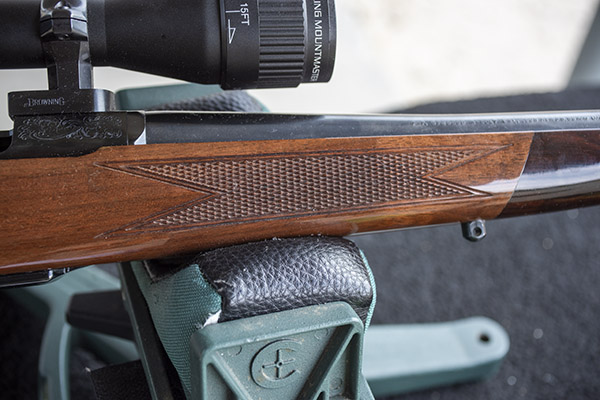
The right side of the Micro Medallion.
Browning offered their A-Bolt Medallion series, which were full-sized rifles, and their A-Bolt Micro Medallions, which have a shorter barrel and a shorter stock. The Browning Medallions and Micro Medallions were discontinued a few years ago when Browning shifted to the X-Bolt rifle, but you can still find the Micro Medallion A-Bolt rifle on the used gun racks and on the gun auction boards. A recent check showed that they go for around $650.
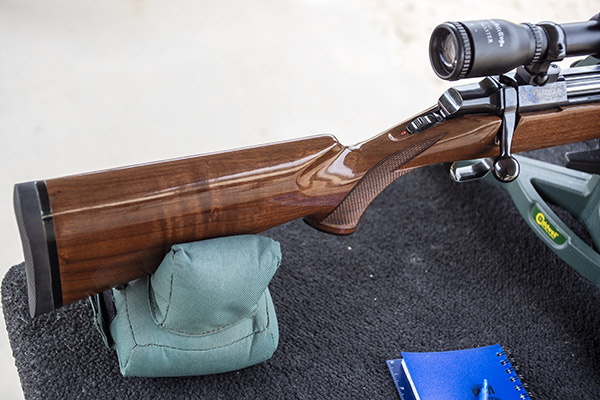
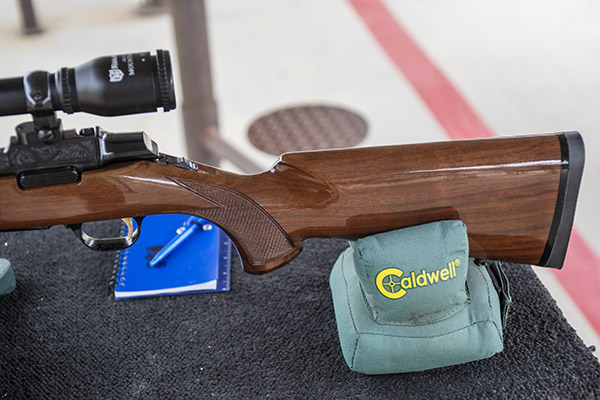
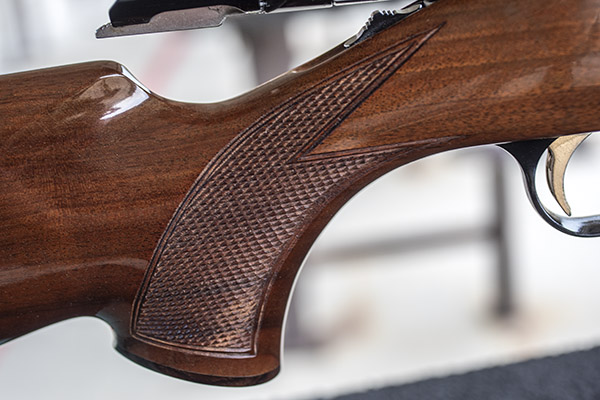
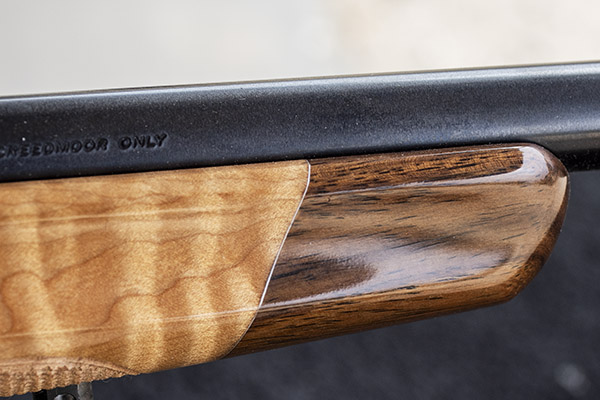
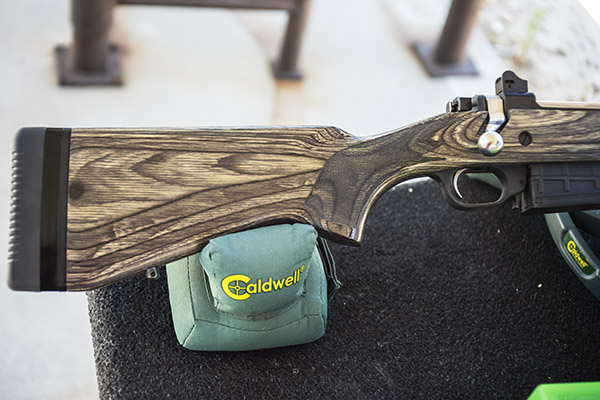
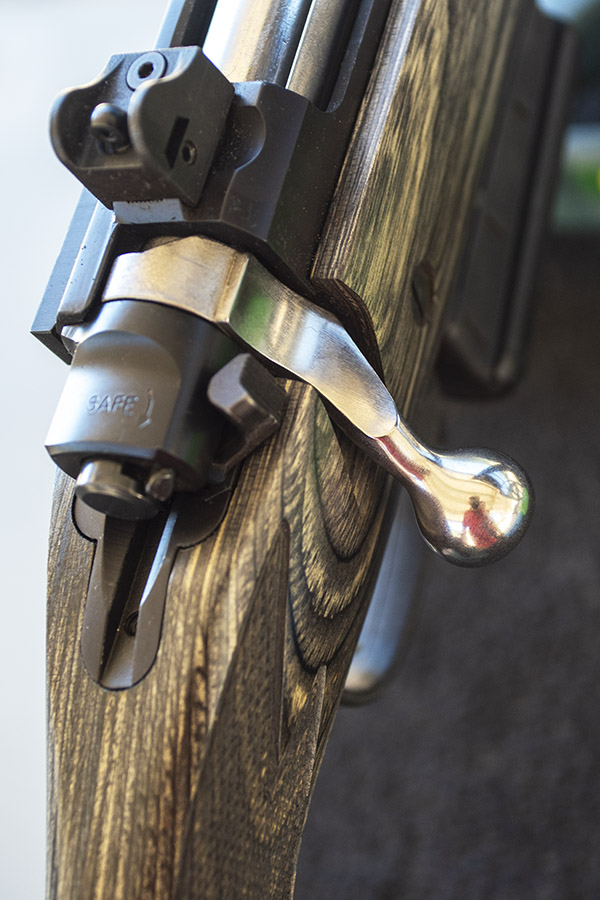
The rifle you see here is Browning’s Micro Medallion. I like the smaller size. It’s a lighter rifle and the shorter stock fits me well. I don’t like the gloss finish, but at the time it was all Browning offered (they later offered a satin finished rifle). What’s nice about the gloss finish, though, is that it has held up well. It and the deep bluing make this firearm look brand new. I like the rifle’s cut checkering and the darker fore end pistol grip tips, too. Browning made a big deal about their rifle’s short bolt angle in their advertising back in the 1980s and 1990s (bolt angle is the angle the bolt turns through to allow extraction, ejection, and loading). I like it, but if the rifle had a c0nventional bolt throw it wouldn’t have bothered me. It’s something different, but it’s not necessary. It is cool.
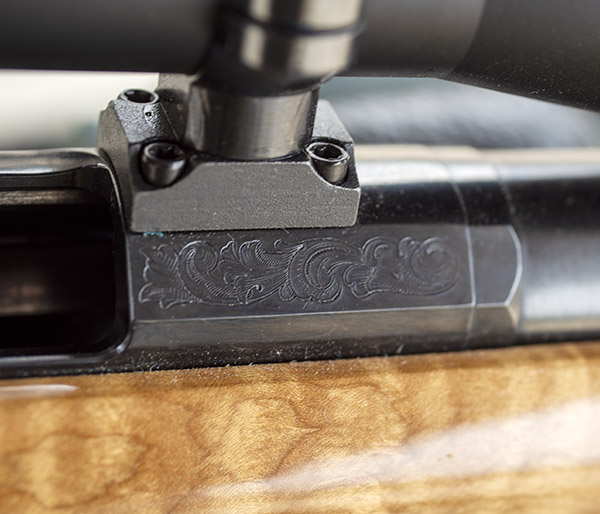
Fairly plain, gloss finished walnut. The Browning’s bolt throw is a short 60 degrees, much less than a conventional bolt action rifle’s 90 degrees. The rifle’s bluing is amazing.A nice rifle. I use the notepad to keep track of which load I fire at which target.Cut checkering on the Browning. These rifles were manufactured in Japan. They did a nice job.The fore end tip and the pistol grip have rosewood caps. They look good.
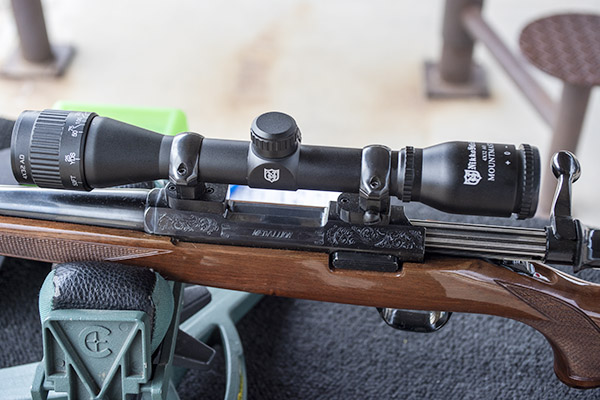
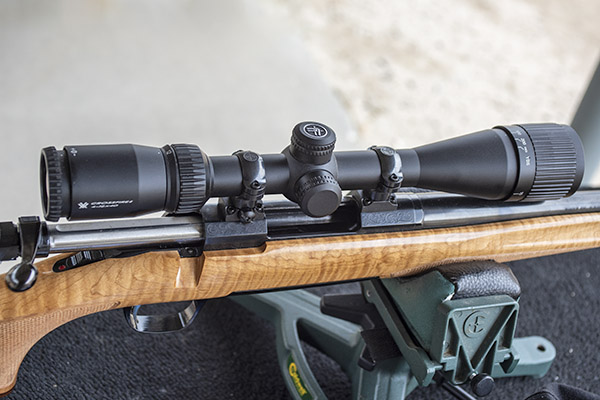
Shortly after I bought the rifle, I mounted an inexpensive 4X Tasco scope on it. That worked okay for a couple of years and then the scope called it quits, so I bought another inexpensive 4X scope (a Nikko this time). The Nikko has held up well.
You might wonder: Why a nonvariable 4X scope? Why not the more popular 3-9X you see on most rifles? In my opinion, the 4X is a lot more useable in the field. I don’t get dramatically better groups with higher magnification scopes, and I like the lightness and the much larger field of view a 4X offers. Unfortunately, not too many companies offer fixed power 4X scopes these days. The scope companies’ marketing has convinced everyone they need variable scopes with high magnification.
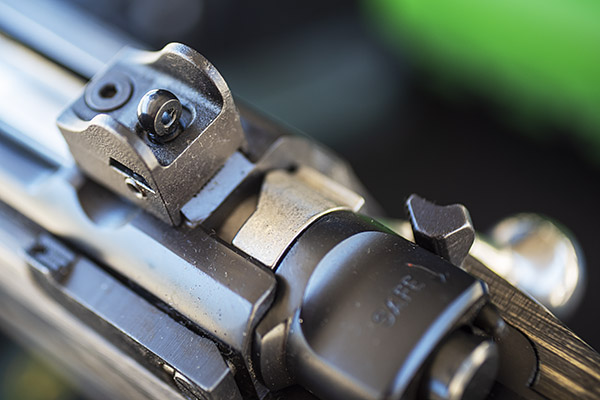
The Nikko 4X scope was inexpensive. It has parallax and focus adjustments. Not the roll engraving on the receiver.
In my recent blog about the Browning maple Medallion 6.5 Creedmoor X-Bolt, I described a couple of accuracy loads I developed for that rifle. This time, my objectives were different. I wasn’t shooting the .223 Micro Medallion for accuracy. I was harvesting brass.
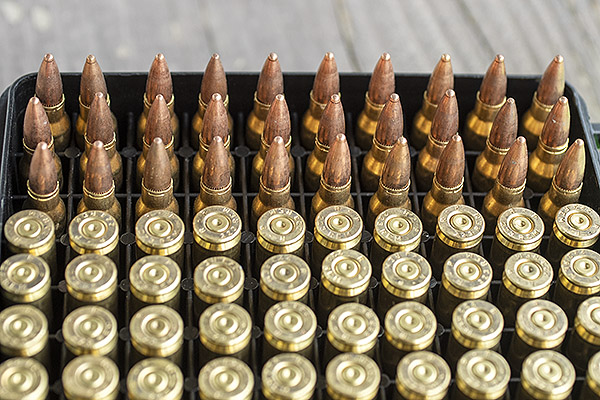
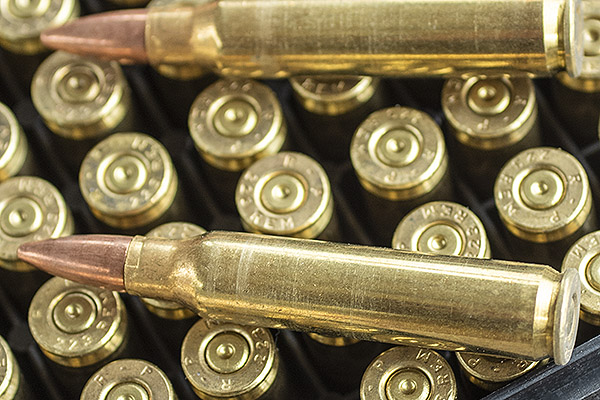
Bulk Remington .223 ammunition. It comes in a big plastic bag. I counted out 100 rounds for this range session.A macro shot of the bulk Remington .223 ammo. Note the crimp applied to each round. I generally find that uncrimped ammo is more accurate with this cartridge. I think the crimping induces a bit of tilt in the bullet.
Several years ago I scoured the Internet looking for Remington brass. I’ve always had good luck with Remington brass (it lasts longer and it provides better accuracy, in my opinion). At that time and to my surprise, loaded Remington bulk ammo was cheaper than unprimed brass. For me it was a no brainer: I ordered a thousand rounds of loaded .223 Remington bulk ammo. When I need .223 brass, I’ll shoot up a bunch of the bulk ammo to get the brass.
The bulk Remington ammo was notoriously inaccurate in my Ruger Mini 14, which is the only rifle I had previously used with this ammunition. I wanted to see how the ammo would shoot in the Browning. I knew the Browning was accurate based on previous range testing at 100 yards (some of my reloads would shoot into a quarter of an inch in the Browning; I’ll give you those loads at the end of this blog).
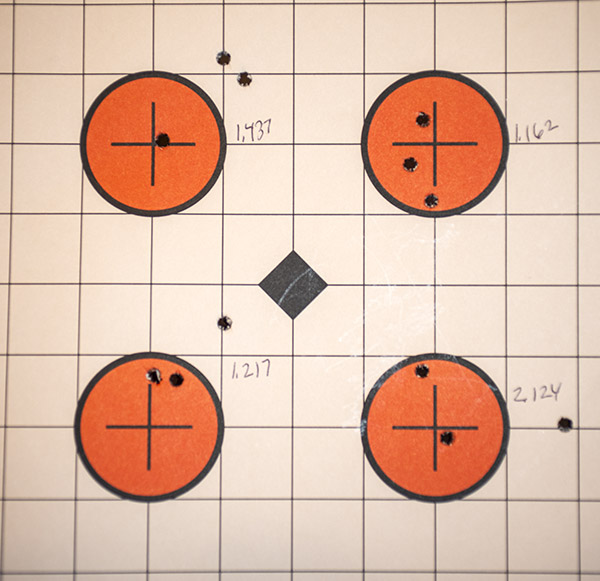
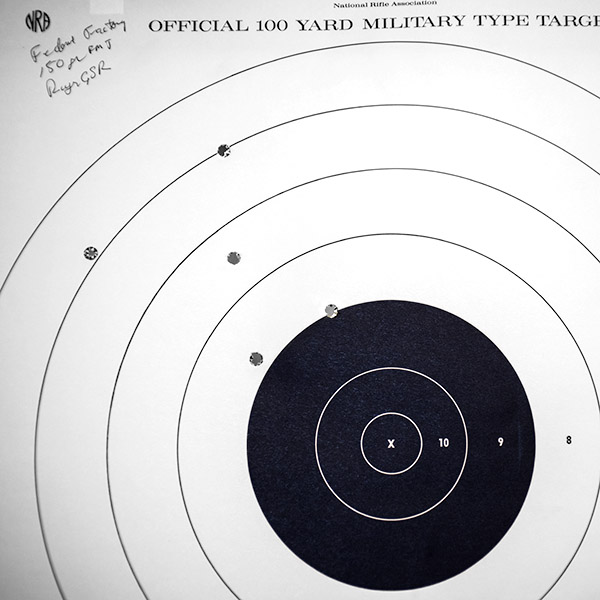
The Remington ammo did well enough in the Browning. It held loads right around a minute and a half of angle at 100 yards, and it printed about where the scope was zeroed. Take a look:
Cheap ammo, but results that weren’t too shabby. I could hunt with this load.
This accuracy is good enough for minute of jackrabbit or coyote. The Browning Micro Medallion rifle is fun to shoot, too. It has negligible recoil, the shorter Micro Medallion barrel helps to keep the weight down, and it connects well at 100 yards.
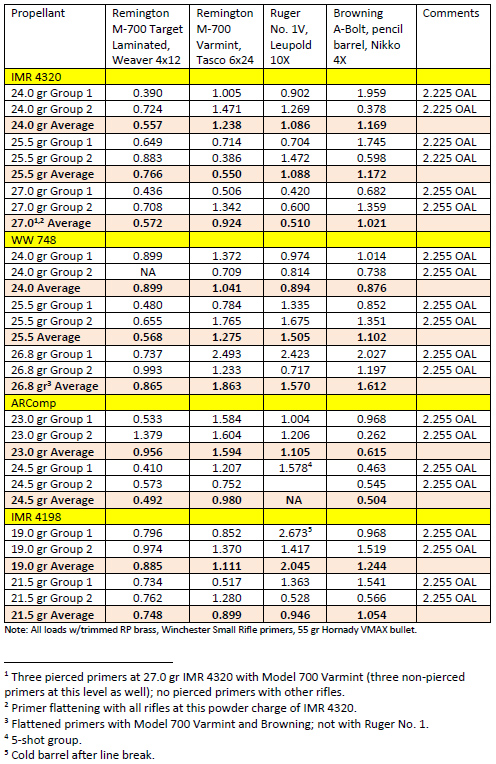
About the accuracy loads I mentioned above: In a previous load development effort I tested .223 loads in several rifles, including two Remington 700 varmint guns with bull barrels and big scopes. To my surprise, the Micro Medallion and its 4X scope had no problem running with the big guns and their much heavier barrels and much higher magnifications. Here’s how the Micro Medallion and three other .223 rifles grouped a few years ago at 100 yards:
The Browning Micro Medallion shot half-inch groups with ARComp propellant (and it was basically a minute-of-angle rifle with nearly all other loads). I’ll reload the brass harvested from this range session with the Hornady V-Max bullet and ARComp propellant. This is great performance, especially considering the lightweight barrel and the 4X scope. It’s a great rifle.
Never miss an ExNotes blog:
Please click on the popup ads and visit the folks who advertise with us.
The creek is dry and getting to the West End Gun Club is a lot easier these days, so I reloaded some 6.5 Creedmoor ammo in the brass good buddy Johnnie G sent to me. I wanted to try a couple of new loads in my maple-stocked X-Bolt.
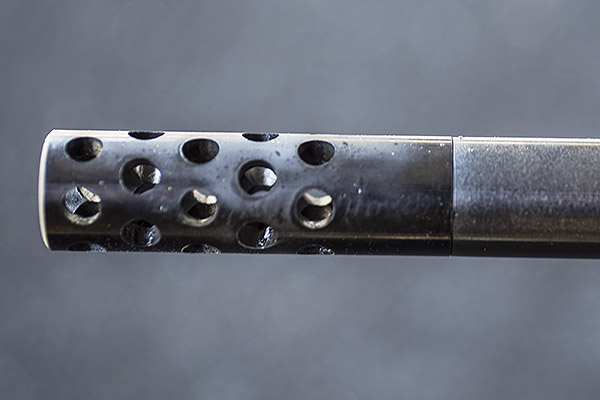
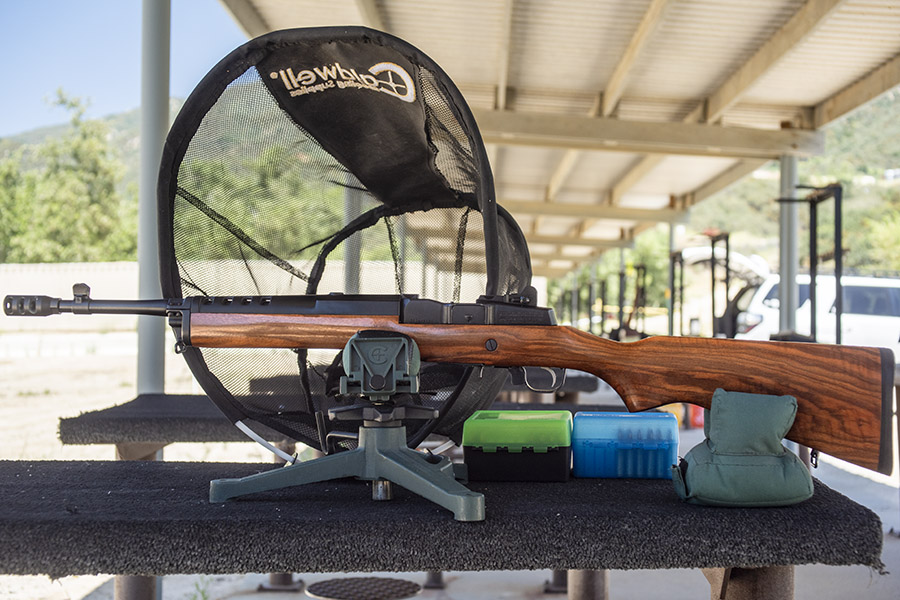
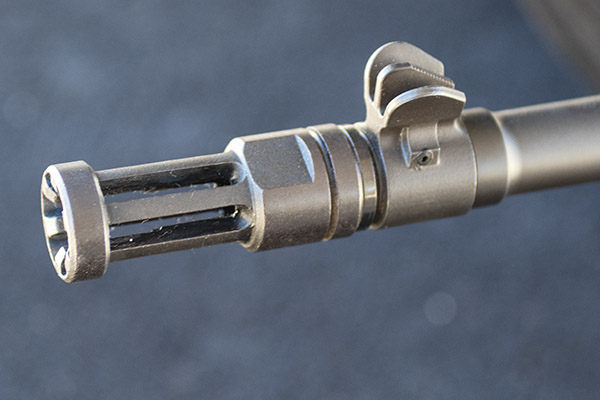
A right side view of the Browning 6.5 Creedmoor rifle. Note the muzzle brake on the end of the barrel.
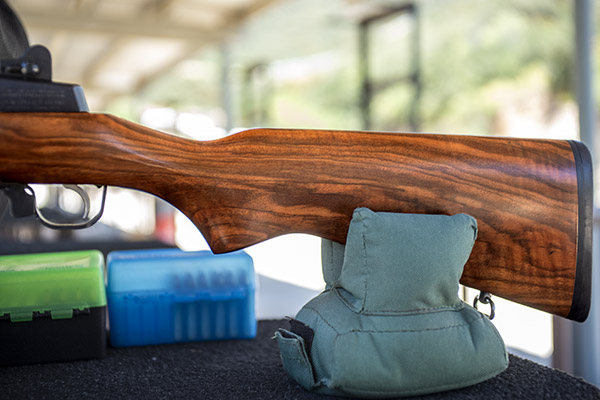
I bought the X-bolt when I saw the wood, and it had a cross-country ride and a half to get to me. I saw it in a shop in Lamar, Colorado, and I knew I had to own the Browning as soon as I saw it. You don’t see many rifles with wood of this caliber.
There was a problem, though. The Colorado shop owner wouldn’t ship it to California. There’s an extra hoop or two a dealer has to jump through to ship a gun to California and I guess folks in Colorado aren’t basketball players. Here’s where capitalism came to the rescue. There’s a guy in Virginia who makes a living off of these kinds of situations, so I had the Colorado dealer ship it to the Virginia dealer, who then shipped it to my dealer in California. None of these dealers did so for free (going to Colorado-to-Virginia-to-California route wrapped the Browning in another $100 bill, and you can guess who had to pay up). But that’s okay. I wanted the rifle and now I have it. It really is an exquisite firearm. And it is exquisitely accurate. I’ll get to that in a minute.
I mounted a 4×12 Vortex scope on the Browning 6.5 Creedmoor. Check out the roll engraving on the receiver.Another view of the 6.5 Creedmoor Vortex scope. The scope includes a parallax adjustment on the objective lens.A macro shot of the receiver’s roll engraving. It’s a nice touch.The stock has a darker wood fore end tip. It’s a classy rifle. The action is glass bedded from the factory.The X-Bolt has a muzzle brake. The bluing is fine; that’s powder residue you see on it. I can feel a light puff a fraction of a second after the bullet leaves the barrel.
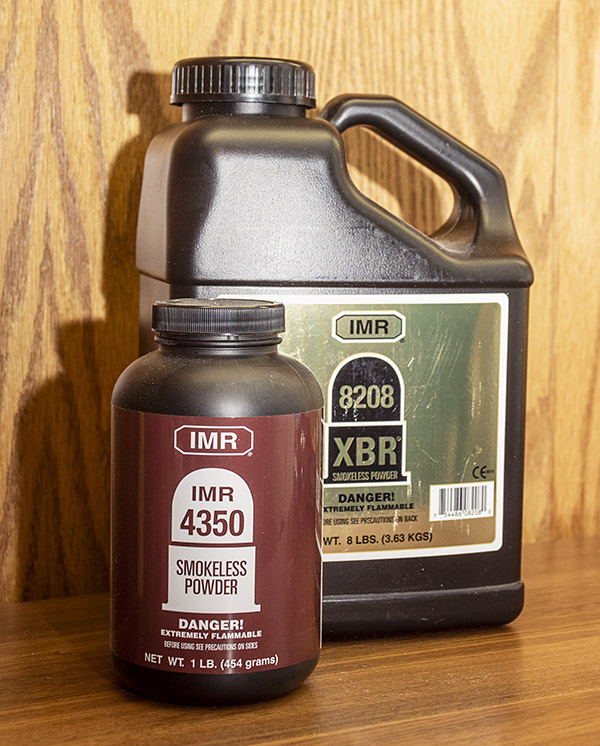
I used the Hornady 140-grain full metal jacket boat tail bullet for two loads I wanted to test; one with IMR 4350 propellant and the other with XBR 8208 propellant.
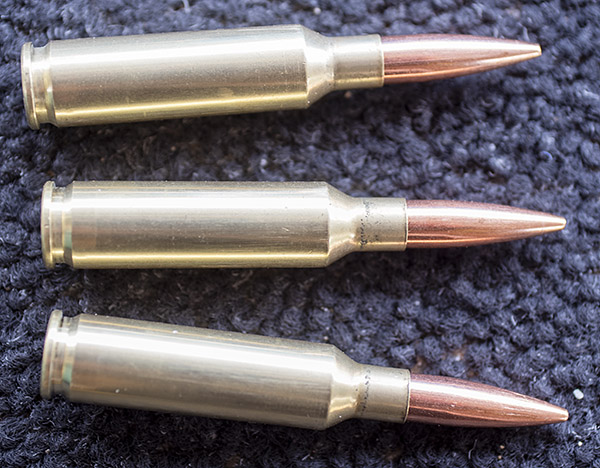
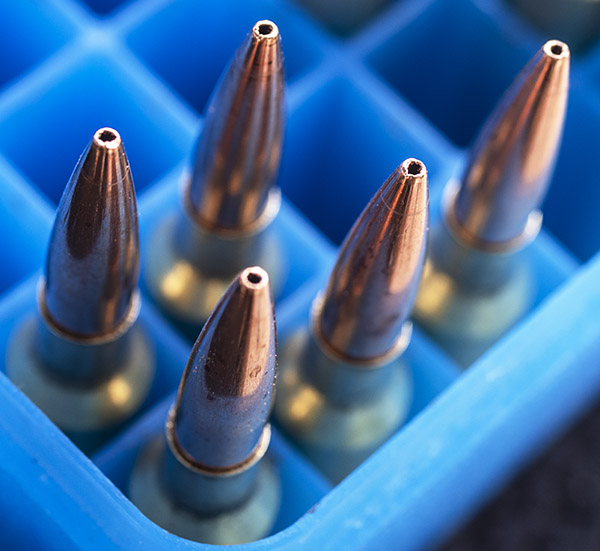
Reloaded 6.5 Creedmoor ammo with Winchester brass and the 140-grain jacketed hollow point boat tail bullet. It’s good looking ammo.The business end of the 140-grain Hornady bullets.
The loads showed no signs of excess pressure after firing. The bolt opened easily and the primers were not flattened.
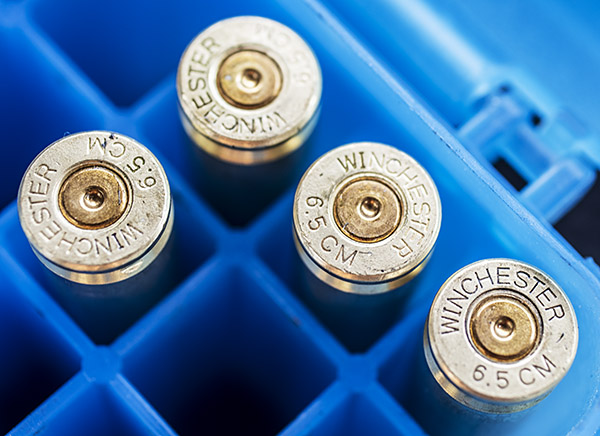
Winchester brass, and unflattened Winchester large rifle primers.
I full length resized the 6.5 Creedmoor brass because I have two rifles chambered in 6.5 Creedmoor (see our earlier story, A Tale of Two Creedmoors). The alternative approach is to neck size the brass only (which can theoretically offer improved accuracy), but when you neck size the brass the reloaded ammo will only fit into the rifle in which the brass was previously fired. I didn’t want to try to keep my ammo segregated by rifle, and as it turns out, I don’t need to. The full length resized 6.5 Creedmoor brass provided great 100-yard results in the Browning X-Bolt rifle with both the XBR 8208 and IMR 4350 loads.
The first shot of the day at the upper left target was low and to the left, which is a common occurrence when shooting from a clean and lightly oiled barrel. The next three grouped tightly into the orange target (I could see the bullet holes with the rifle’s 12X scope). I let the barrel cool for a few minutes, and then I fired another three rounds at the upper right target. I was pleased; the load returned an even tighter three shot group in about the same spot as the first group. Both groups, when measured later, were a satisfyingly tight half minute of angle.
I let the barrel cool again, and then I moved on to the IMR 4350 loads. Wow, talk about consistent. Both shot to the same part of the target, and both were exactly the same group size: 0.829 inches.
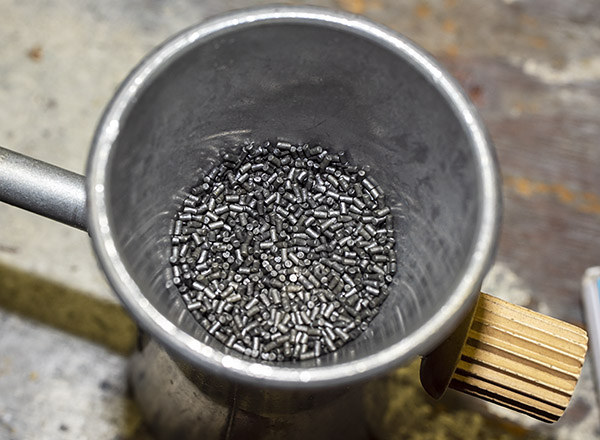
Two great 6.5 Creedmoor powders: IMR 4350 and XBR 8208.My old RCBS powder trickler still works well.
I had read that IMR 4350 was a “go to” powder for 6.5 Creedmoor accuracy, and my results confirmed that. I had not found much information about XBR 8208 accuracy in this chambering, but it sure seemed to get the job done for me. As the above target shows, the XBR 8208 performed even better than the IMR 4350 loads. Here’s a bit more on info on these two loads:
Both had the Hornady 140-grain bullets seated to an overall cartridge length of 2.800 inches.
I did not crimp the bullets in place.
I did not trim the brass for either load.
The powder charges for both loads were weighed for every cartridge. I used my powder dispenser to drop a little bit lower charge, and then trickled in the last few grains.
I used 31.5 grains of XBR 8208.
I used 39.0 grains of IMR 4350.
I used Winchester brass with Winchester large rifle primers.
So there you have it: Two great 6.5 Creedmoor loads for the Browning maple Medallion.
Rifles, that is…two Ruger rifles. I’ve written about them before, but it’s been a while since I shot either one and with the stream crossing to the West End Gun Club almost manageable these days (more on that later), I thought I would take them out to the 100-yard range. I shoot handguns regularly (at least a couple of times a week) on the indoor 50-foot pistol range closer to home, but there are times when the high-powered-rifle-on-a-football-field-length-range itch needs to be scratched.
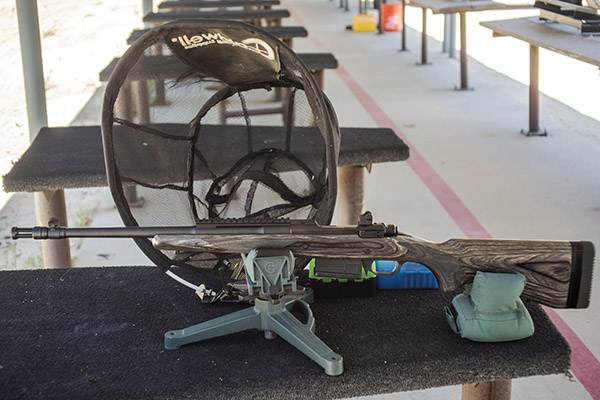
The two Ruger rifles in this article are two of my favorites: A Davidson’s Circassian-stocked Mini 14 (the one in the photo above) and the Ruger GSR (GSR stands for Gunsite Scout Rifle). The Davidson’s Mini 14 1was a 2009 offering with (as the name implies) a Circassian walnut stock. Back then the Circassian Mini’s $700 price seemed high, but I’ve been at this for a while and I know that when a gun’s price seems high it only means I’m buying too soon. The price will always catch up with the calendar, and that’s certainly been the case with this rifle. It originally came with two 30-round mags and a flash suppressor. California being what it is meant I couldn’t own the rifle as Ruger built it. I had to leave the 30-round mags with the out-of-state dealer, and because of the flash suppressor, it had to ship to the Class III dealer here in La La Land.
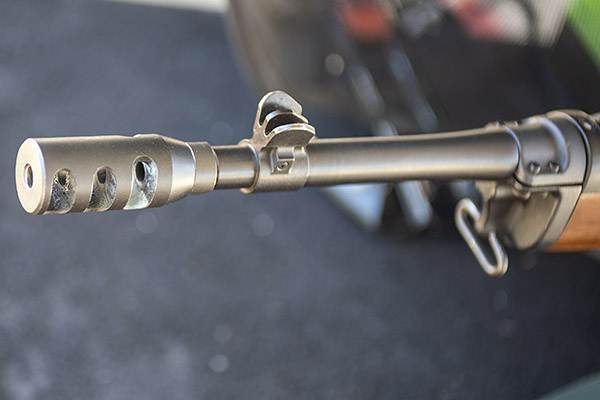
Circassian walnut from the port side. It sure looks good.The California-legal muzzle brake. I wonder what the California legislators were smoking when they passed that law.
The California Class III dealer replaced the flash suppressor with a muzzle brake (which I think looks even more intimidating and I had to buy a 10-round La-La-Land-legal magazine for my Mini.
Circassian walnut from starboard side. This is the fanciest Mini 14 I’ve ever seen.
You might be wondering: Where can I get a Mini with a stock like this one?
The short answer is: You can’t. I watched the gun sale websites for months looking for a Davidson’s Circassian Mini 14 until I found one with nice wood (most had straight-grained, broomstick grade wood). When I saw the one you see here, I pounded (and I’m glad I did). You just don’t see Mini 14 rifles with wood like this one. It’s all mostly black plastic stuff on the range these days, which is almost a crime against nature.
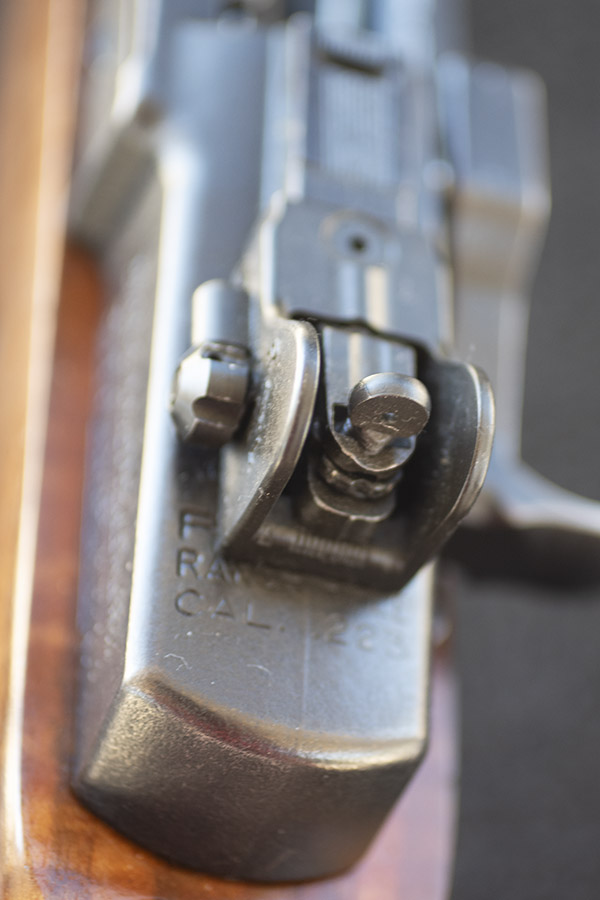
The Techsites rear sight on my Mini 14. It has a slightly smaller aperture and better adjustability than the stock Mini 14 rear site.
I’ve done a few mods to my Mini 14 to improve its accuracy, and I’ve detailed this in prior blogs (I’ve provide a link at the end of this article). The Reader’s Digest version is I’ve added a Techsites rear aperture sight to replace the Ruger sight, I’ve glass-bedded the action, and I’ve done a fair amount of experimentation to find the right load.
So how does the Circassian Mini 14 shoot? It does very well. I grabbed two loads: A full metal jacketed load with Hornady’s 62-grain bullet, and another with Hornady’s 55-grain V-Max bullets. You can see the results below.
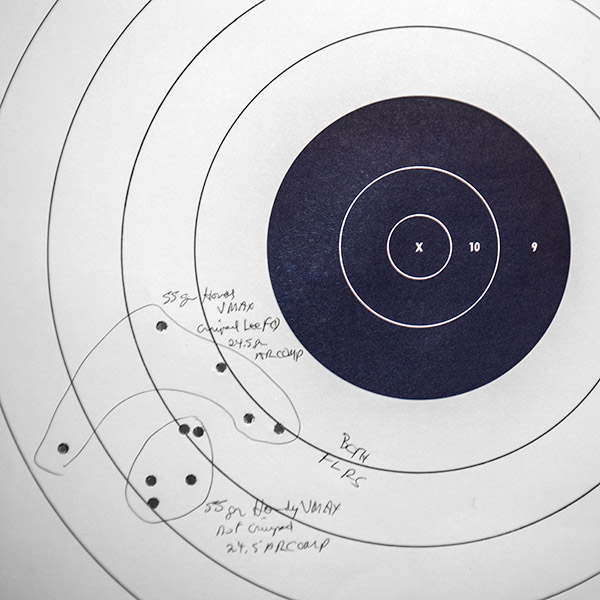
A bunch of shots at 100 yards with one of my favorite loads: The 62-grain Hornady full metal jacket boattail bullet and 25.0 grains of XBR 8208 propellant. This ammo was necked sized only, which usually is more accurate in my Mini 14. I held at 6:00 on all targets shown here.Another 100-yard Mini 14 target with two different loads, both using the 55-grain Hornady VMax bullet and 24.5 grains of ARComp propellant. The very tight 5-shot group was shot with bullets that were not crimped. The larger group was the same load, but the bullets were crimped. Surprisingly, both loads were full length resized. As mentioned in the photo above, neck-sizing usually provides better accuracy in this rifle.
The second rifle in this Tale of Two Rugers story is the Ruger GSR in .308 Winchester. This is an amazing (and amazingly accurate) rifle, but it didn’t start out that way.
How I purchased this rifle is kind of a funny story. I had oral surgery to start the process of installing two fake teeth, and the doc knocked me out with anesthetics. They warned me I would be in no shape to drive home, so good buddy Jim Wile volunteered to do the driving. Jim’s gone on to his reward (RIP, Jim). On the ride home, in a drugged but conscious state, I told Jim about this new GSR rifle Ruger had introduced, and we somehow managed to convince ourselves we each needed one. They say you should not buy guns when you’re under the influence. Like Hunter Biden, though, I didn’t heed that advice and Jim followed my lead.
The Ruger GSR on the range at the West End Gun Club.
The GSR is Ruger’s interpretation of the Scout rifle concept first put forth by a gun writer named Jeff Cooper. Cooper’s concept was a short-barreled rifle that would hold a scope in a forward location and make for a sort of do-anything long gun. Steyr built the first commercially available Cooper-inspired Scout rifle, and then about a decade later Ruger followed suit. Mossberg has one now, too (good buddy Johnny G has one). The Steyr is crazy expensive, the Ruger started out at a reasonable price but has since gone kind of crazy (along with everything else), and (in my opinion) the Mossberg is the best value (it’s a fine rifle and one I’ll probably own some day).
The left side of the Ruger GSR. Note the laminated stock, which provides a very stable bed for the barreled action.The GSR as seen from the right.A Ruger .308 selfie.The Ruger’s aperture rear sight. It’s similar to the original Mini 14 site. Techsites doesn’t offer a replacement rear site for the GSR; if they did, I would have a Techsites rear sight on this rifle.The Ruger GSR flash suppressor. It’s the same type that originally came on the Mini 14. On a bolt action rifle, it’s legal in Calilornia; on a semi-auto, it is not.
When I first took delivery of the GSR, it was a real disappointment. As had been the case with half the guns I bought in the last couple of decades, it had to go back to the manufacturer. The problem was that the rifle printed way to the right, and there wasn’t enough adjustment in the rear aperture to get it back to the point of aim. I returned it to Ruger, they greatly relieved the stock around the barrel, and I had it back in about a week. When I took it out to the range the same week it was returned, I was astonished by its accuracy.
A target I shot a few years ago. The GSR can be amazingly accurate. The difference between the two groups is probably due to how I held the rifle. The upper group is one of the best I’ve ever shot with open sights.
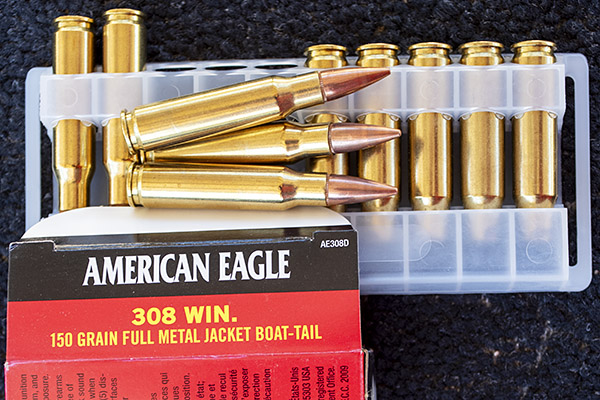
But that group above was then and this is now. I had not fired the GSR in a few years. I grabbed two loads for this rifle (a load I had developed for my M1A Springfield, and a box of Federal factory ammo with full metal jacket 150-grain bullets).
Federal American Eagle .308 ammo. I bought a bunch of this a few years ago for the brass; this ammo was about the same price as .308 brass.My reloaded ammo. This load shoots extremely well in my Springfield Armory M1A.
I only fired a couple of 5-shot groups at 100 yards with the GSR. It was getting late in the day, I was getting tired, I had not fired the rifle in a long time (shooting is a perishable skill), and I realized I wasn’t giving the rifle a fair shake.
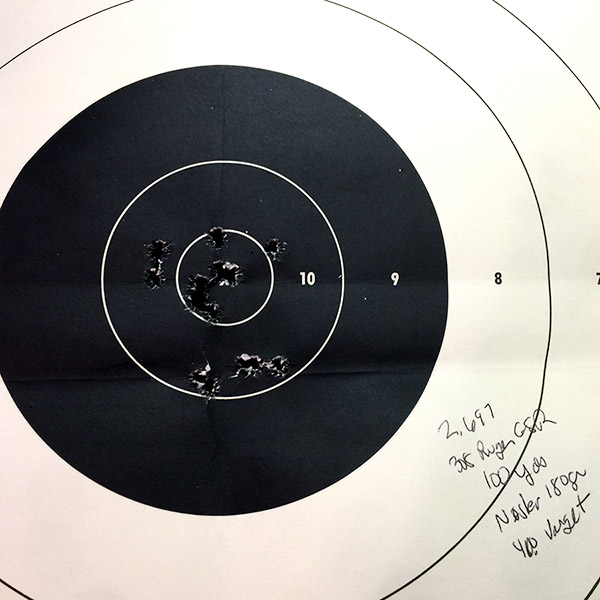
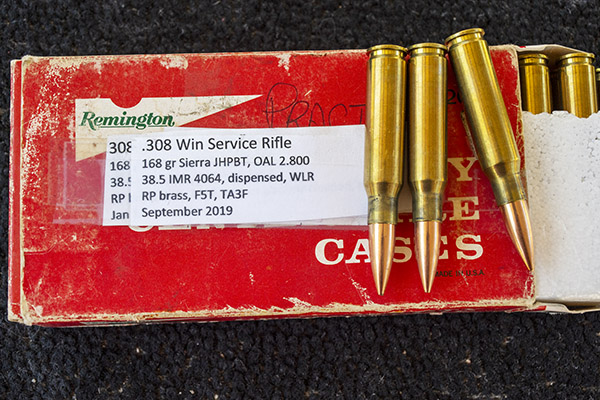
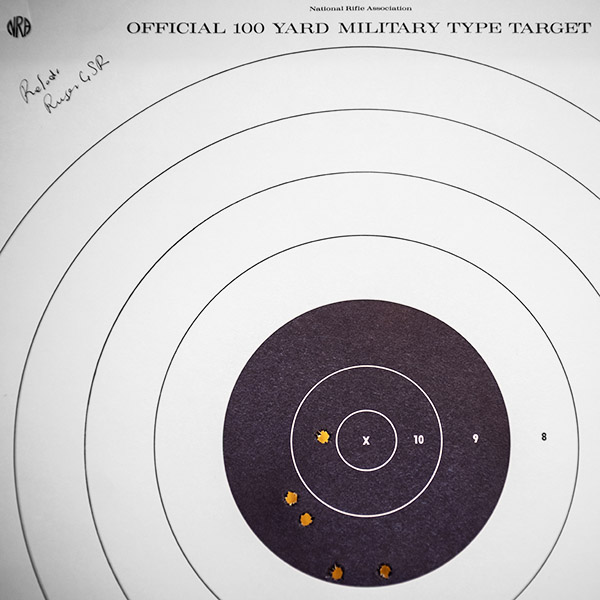
With the same rear sight adjustment used for the previous GSR target shown a couple of paragraphs above, the Federal factory 150 grain load shot high and to the left. The group is considerably larger than the load with 180-grain Noslers and Varget propellant.Another 5-shot group, this time with 168-grain Sierra hollowpoint bullets and IMR 4064 propellant (the accuracy load for my Springfield M1A). The load doesn’t perform as well in my GSR as it does in the M1A, but it’s still substantially better than the Federal factory ammo. It’s why I reload.
That stream crossing I mentioned at the start of this blog? Lytle Creek flows across the dirt road going into Meyers Canyon, and it can be a real challenge at times. With all the rain and snow we’ve had this past winter, the reservoirs are full and the snow up in the San Gabriels is still melting. You may remember the blog I wrote about the time I high sided my Subie attempting a crossing. The stream is down a scosh since then, but it’s still not an easy crossing. Here’s a video I made on the way out on this trip after visiting the range with the Mini 14 and the Ruger GSR.
I’ll be shooting the GSR more in the coming weeks now that I’m back into the swing of shooting a .308 off the bench, so watch for more stories on it. I think I can do better than the groups you see above.
This is an update on my 9mm 1911 sudden unintended disassembly saga. I will address four topics:
Zeroing in on the cause.
Rework of the ammo I had loaded on my Lee turret press.
My reconstituted 9mm 1911.
Preventing a recurrence.
Let’s get into it.
Zeroing In On The Cause
I’m down to thinking the 1911 event was due to either of two causes: A double propellant charge, or bullet setback (i.e., the bullet slid deeply into the case as the round was being chambered, thereby raising the chamber pressure).
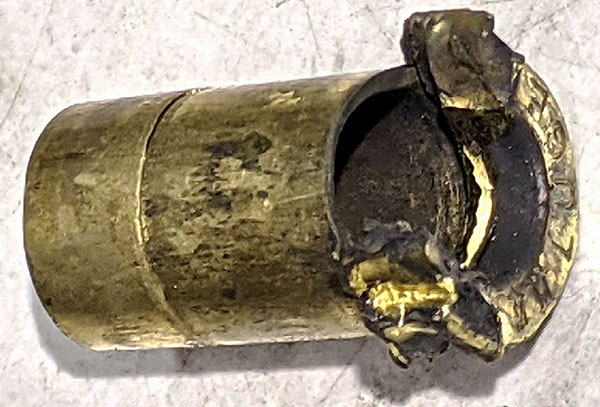
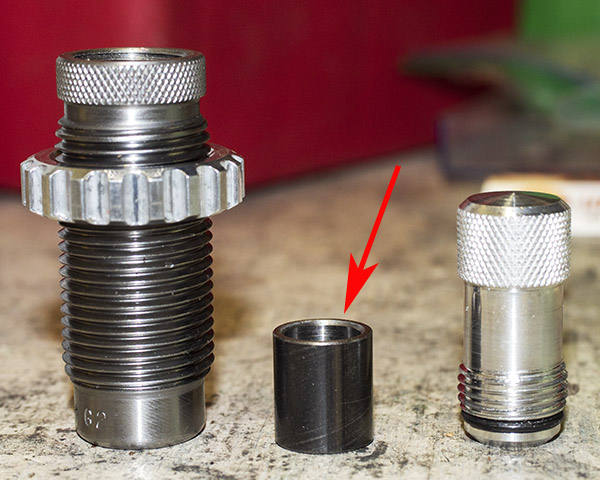
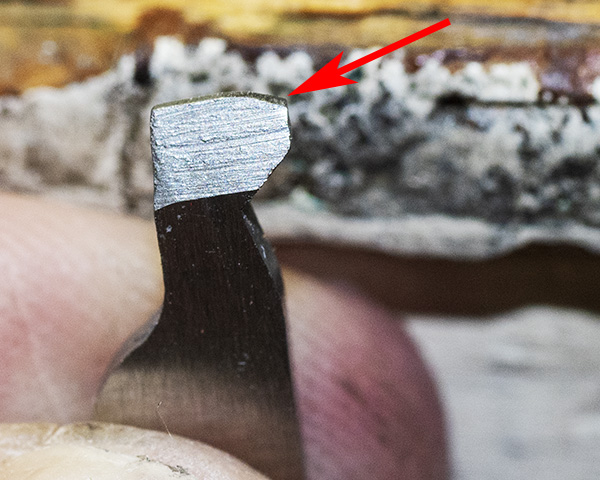
My burst 9mm cartridge case. It was a Remington case, not that it makes any difference. Any case would likely have burst. Photo by TJ of TJ’s Custom Gunworks. Compare this to the photo of the double-charged case at the end of the video below.
A Double Charge
I did a Google search on double-charged cartridges, and what do you know, there’s actually someone out there who did the same thing I did. He caught it on video and posted it with a photo of the case. His burst cartridge case sure looks a lot like mine.
If you compare the photo at the end of the above video to the case stuck in my chamber, they are identical. I’ve convinced myself that this is the most likely of the two scenarios, but I’ll describe the other scenario (bullet setback) as well.
Bullet Setback
What has me thinking deep thoughts about the second failure mode (pushing the bullet deeper into the case during chambering) is that I think it is relatively easy to screw up while reloading and induce this failure, and from what I’ve read, 1911s are more prone to do this than are other semi-autos.
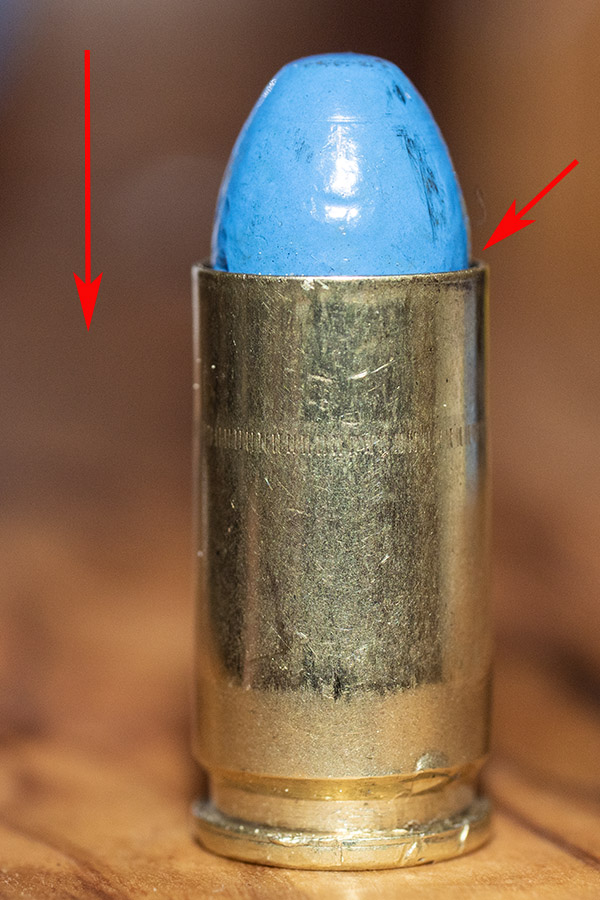
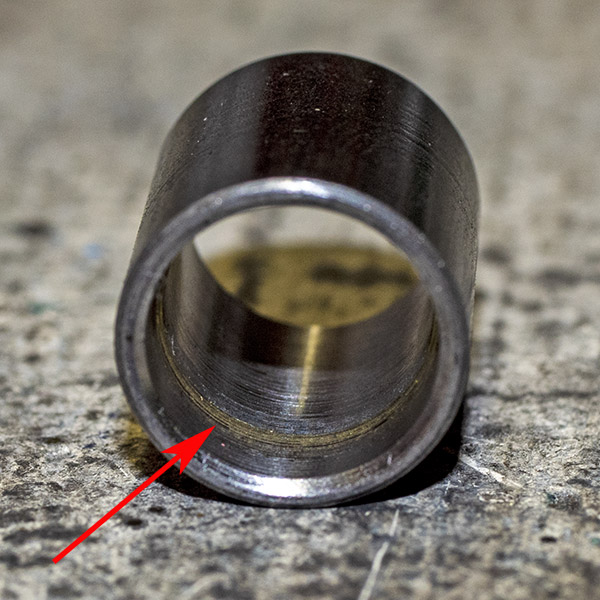
This is what bullet setback would look like. The bullet is seated much deeper in the case than it is supposed to be, which would raise chamber pressure. This example did not occur in the gun; I loaded dummy case and pushed the bullet in much deeper using my reloading press. Theoretically, it can be induced by the gun if the bullet is not crimped sufficiently.
Let’s discuss screwing up the reloading process in a manner that could induce bullet setback. On my Lee Classic turret press, bullet seating and crimping occur in two separate operations (seating refers to pushing the bullet into the case; crimping refers to locking the bullet in place by crimping the cartridge case mouth). The third (of the four) dies seats (but does not crimp) the bullet; the fourth die applies a taper crimp to the bullet. Here’s the screwup: I’ve had at least a couple of instances where I took the cartridge out of the press after seating the bullet (but before crimping it). I know; you’re thinking that’s stupid, and I can’t argue with that conclusion. I don’t know why I did it (too eager to see the completed round, maybe?). I caught myself, returned the cartridge the press, and crimped it. But it’s possible I missed the crimping step on a cartridge.
I think setback is the less likely of the two failure modes discussed here. I tested the crimp by tapping on the bullet with a rubber mallet and it didn’t move. Failure to crimp or a weak crimp may have caused setback, but on properly crimped bullet, I don’t think setback will occur. Also, when I made the cartridge shown in the photo above on my RCBS Rockchucker press, it took more effort than I thought it would to seat the bullet as deeply as you see in the photo (and the case had not been crimped). I doubt that simply chambering the round would drive the bullet in that deeply (even without a crimp). If you think otherwise, please leave a comment below.
Gun Design and Bullet Setback
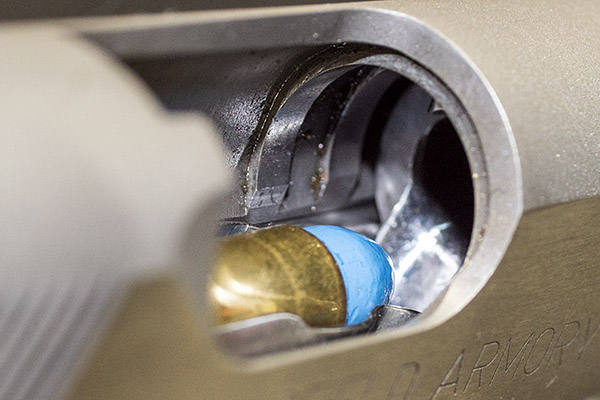
As mentioned above, bullet setback is more likely to occur on a 1911 than it is on other semi-auto handguns. It has to do with cartridge location in the magazine, and how it feeds into the chamber. On more modern handguns, the top round in the magazine sits higher in the gun than it does on older design guns. When the slide shoves the round forward, cartridges in more modern handguns have a straighter path into the chamber. On a 1911, the top round in the magazine sits lower in the gun. When the slide pushed it forward, the bullet impacts the ramp, it has to stay situated in the cartridge case without experiencing setback, and the cartridge has to rotate up and then into the chamber. Because of this, a 1911 is more likely to experience bullet setback than is, say, a gun like the S&W Shield.
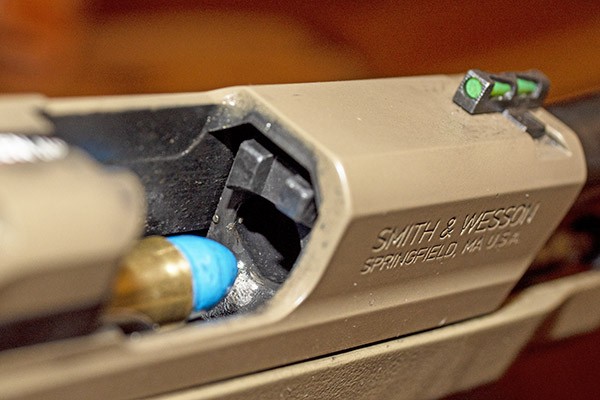
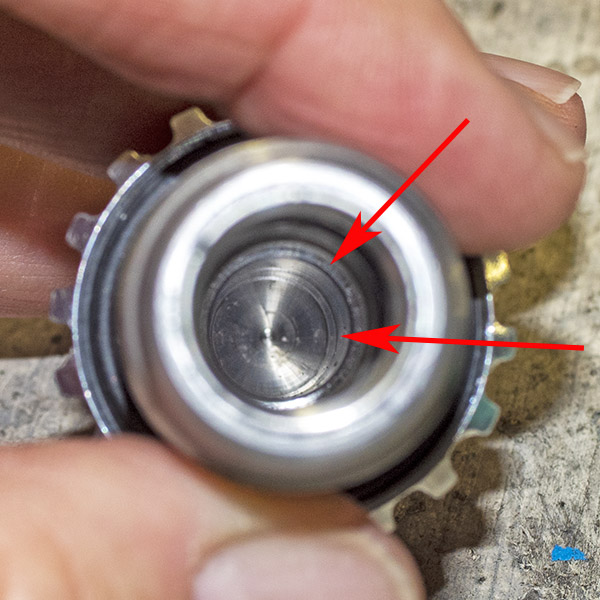
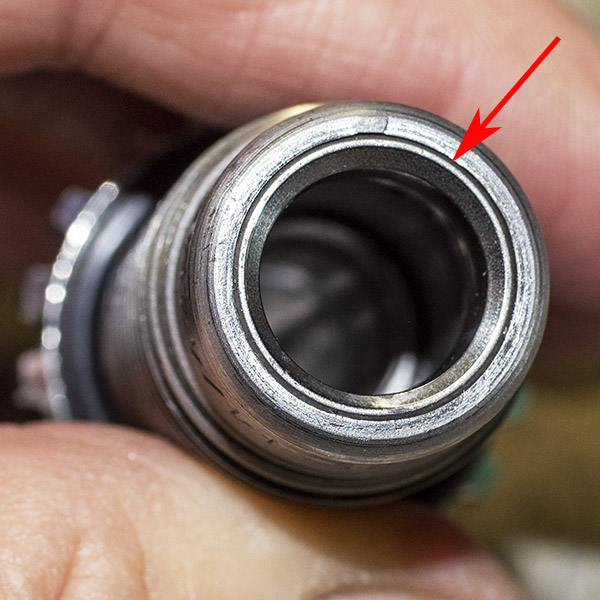
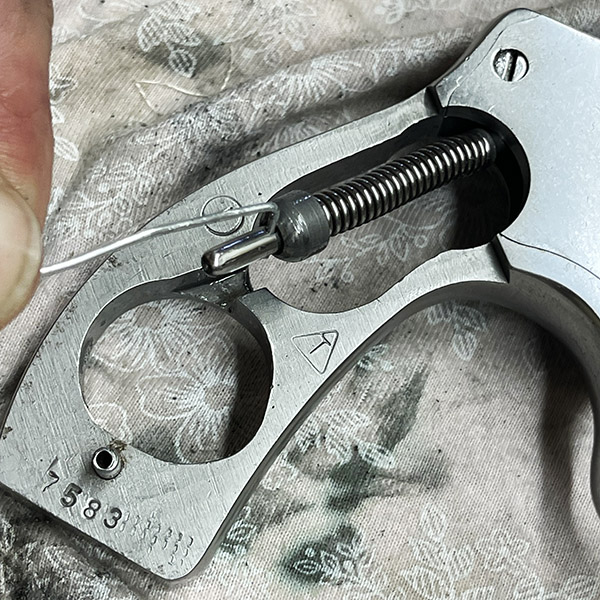
A 9mm cartridge waiting to be chambered in a 1911. It’s a little hard to see in this photo (I did the best I could), but the bullet nose will hit the ramp head on and then slide up the ramp and into the chamber. The potential for bullet setback is a little higher here than on most other modern 9mm semi-auto handguns.A 9mm cartridge waiting to be chambered in the S&W Shield. Notice how the round is nearly aligned with the chamber as it sits in the magazine.
That’s not to say the Smith and Wesson Shield is a better design or that it’s all sunshine and rainbows. There’s a tradeoff the engineers made on the Shield. Yep, the Shield’s higher cartridge position makes for a straighter path into the chamber. It also allows for higher capacity in a smaller gun (my little Shield holds 8 in the magazine and one in the chamber). But the higher cartridge position can induce another issue: Failure to extract and eject.
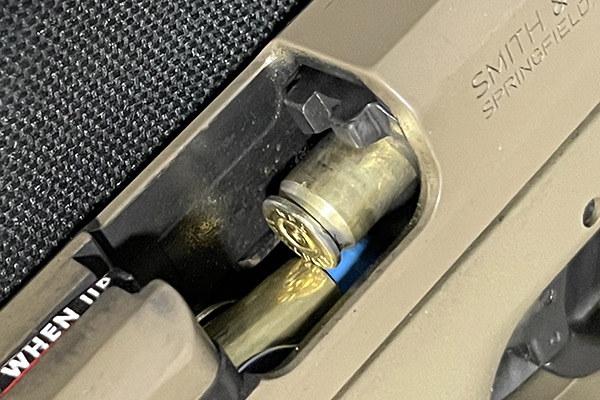
A cartridge case in the S&W Shield caught during extraction on the mouth of the case immediately below it.
During extraction, the round being extracted has to drive the magazine’s top cartridge down into the magazine as it is being extracted. it does so by using the next cartridge’s bullet as a cam surface. The rear edge of the cartridge being extracted bumps into the mag’s top cartridge, and then it has to drive it down so the case can exit the gun after firing. As it uses the bullet of the mag’s top round for that cam surface, the rear of the cartridge case rim encounters the case mouth of the mag’s top cartridge, and that can cause a failure to extract and eject. It’s happened to me. I’ve found the Shield is sensitive to ammo brand, bullet configuration, and crimp. Too much crimp, and the cartridge goes too deep into the Shield’s chamber and the firing pin won’t light the round off. Too little crimp and it jams in the manner described above. Too little crimp and it might experience bullet setback. Like most things in life, the design is a tradeoff.
Again, I don’t think bullet setback is what happened in my 9mm 1911. I’m including it here simply because it is interesting and relevant to this discussion.
Ammo Rework
One of the personally dismaying and embarrassing things about blowing up my 9mm 1911 is that it immediately threw into question the approximately 1500 rounds of 9mm and .45 ACP ammo I had reloaded on the Lee turret press.
I thought I could use weighing the rounds as a way to screen for double loads, but on both the 9mm and the .45 cartridges, the weight variation exceeds the weight of the powder charge. That means I could have a double charge and if it was in a lighter round, it would be within the variability for the loaded cartridge. So weight was not a way to screen. I know there will be keyboard commandos with advice to stick to one case manufacturer (or to segregate cases by brand), but the same variability problem exists even when cases are segregated (I’ve checked). I wish the self-styled “experts” on Facebook would slither back under their rocks (or at least refrain from commenting when they just don’t know what they are talking about, which is most of the time).
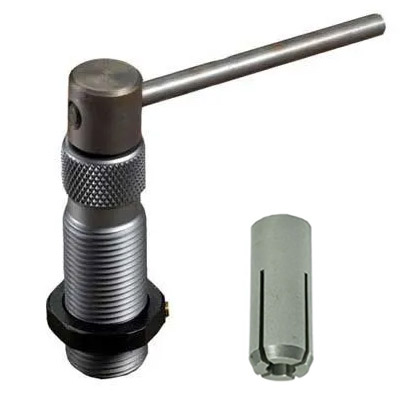
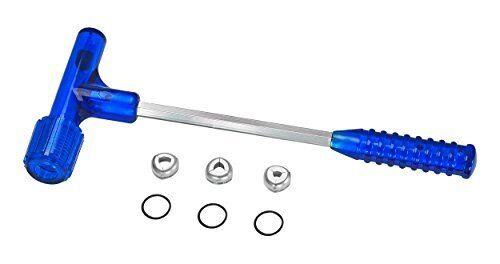
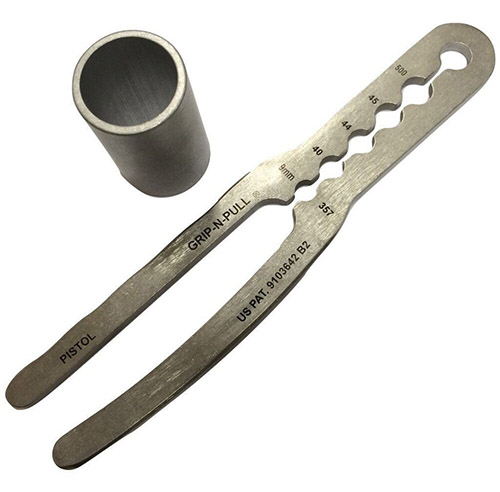
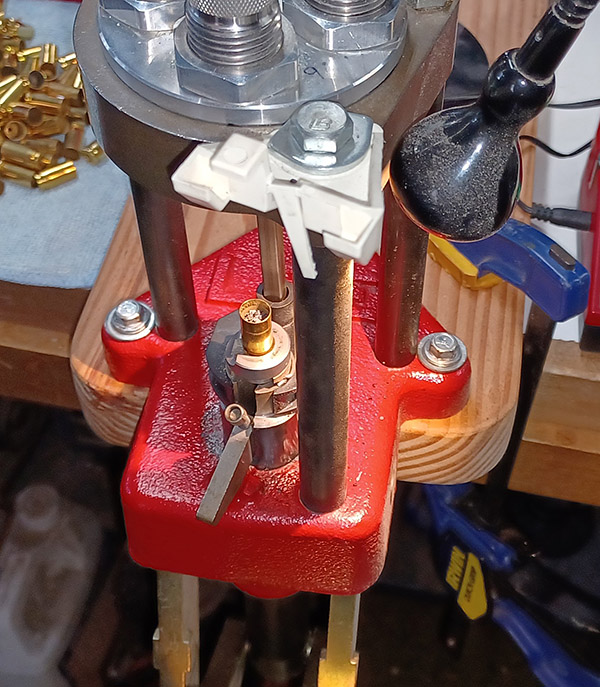
The RCBS collet bullet puller. You put your cartridge into the press shell holder, raise it into the collet (the gizmo on the right, which fits inside the gizmo on the left), tighten the crank, and lower the press ram. Voila, the bullet is pulled. Most of the time. Sometimes it doesn’t work.An impact bullet pullerr. You put a loaded cartridge into the cap on the hammer head, whack the opposite end against a hard surface a few times, and inertia drives the bullet out of the case. It is a lot of work.The Grip-N-Pull. It works occasionally. I tried a few cartridges and gave up on it.
I’ve disassembled and reassembled the 800 9mm rounds I loaded on the Lee turret press. I did not find a single one with a double charge. I used my buddy Greg’s RCBS collet bullet puller for this on my 9mm ammo and it worked like a champ with minimal or no bullet damage. Surprisingly, with all brands of brass, after pulling the 9mm bullets from crimped cartridges I did not have to expand the case mouths again to reseat the bullets. They slid right in. I just seated them to the right depth and crimped them again. Reusing the bullets didn’t seem to affect accuracy, either.
The RCBS collet bullet puller did not work on my .45 ACP ammo. The .45 collet couldn’t get a good enough grip on powder coated 230-grain roundnose bullets or on my 185-grain cast semi wadcutters. I tried one of those Grip-N-Pull devices and that didn’t work, either. The bullets slid right out of it. To disassemble the .45 cartridges, I had to use an impact bullet puller, and that was tough sledding. It takes forever. I don’t like impact bullet pullers, but hey, it is what it is. And what it is, well, is a lot of labor. I’m working it a little at time, at a rate of about a box per week. Three or four months and the rework will be in the rearview mirror.
That double charge sure turned out be one expensive mistake, both in terms of damage to the 1911 and the need to rework a lot of ammo. Live and learn, I guess.
The Reconstituted 1911
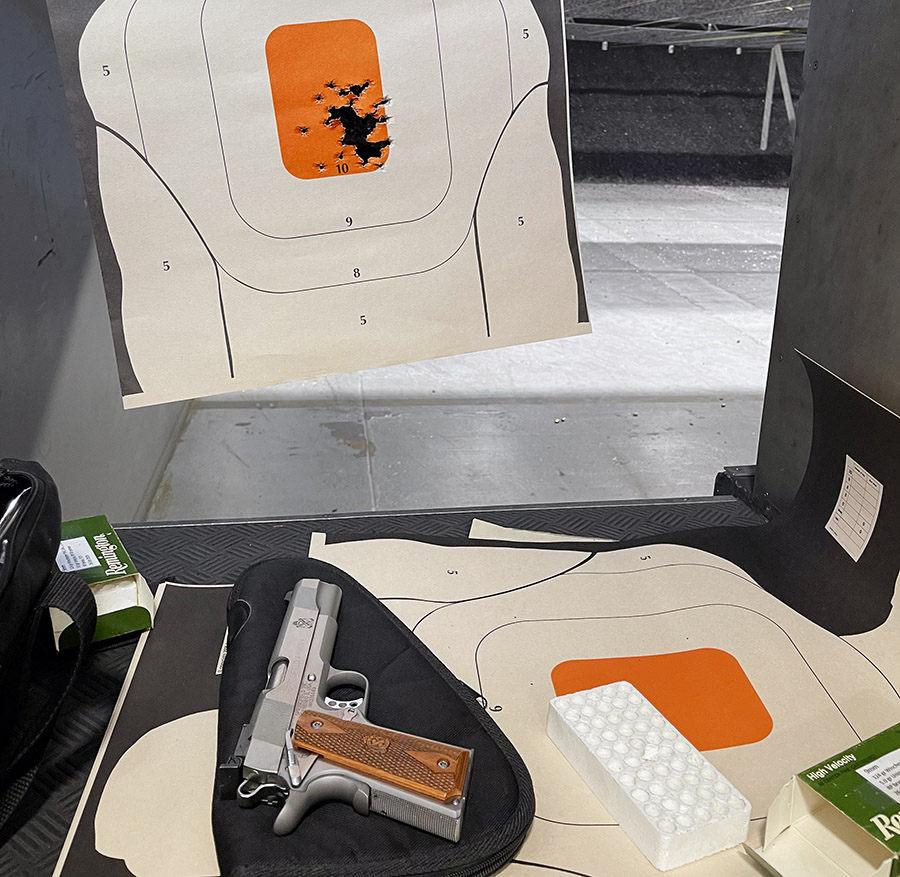
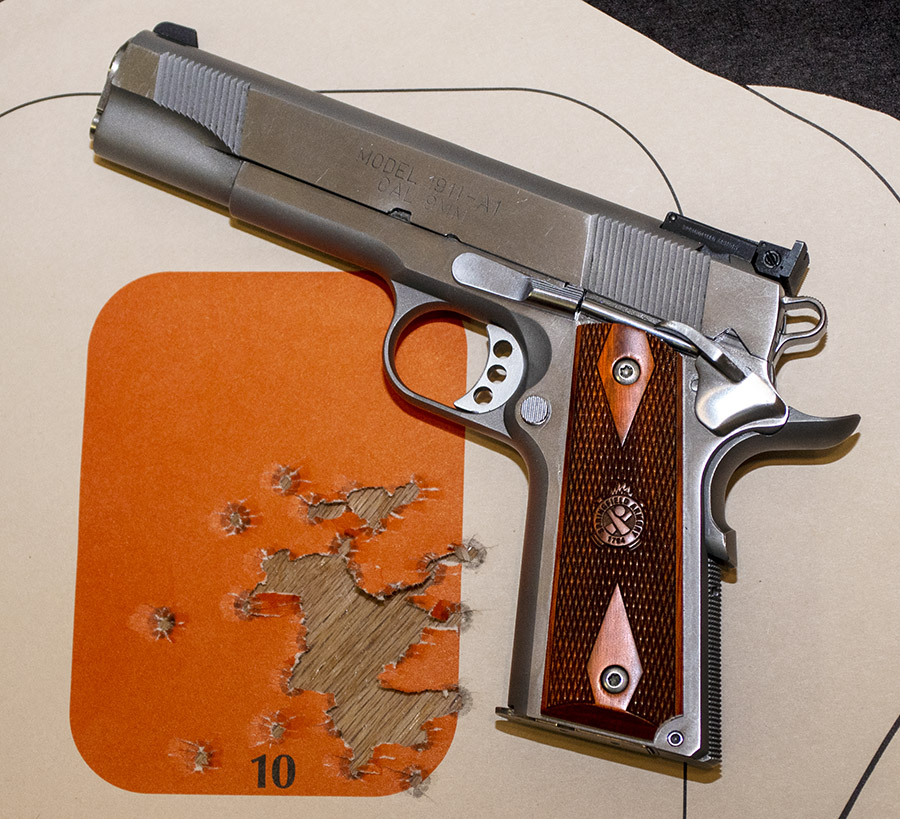
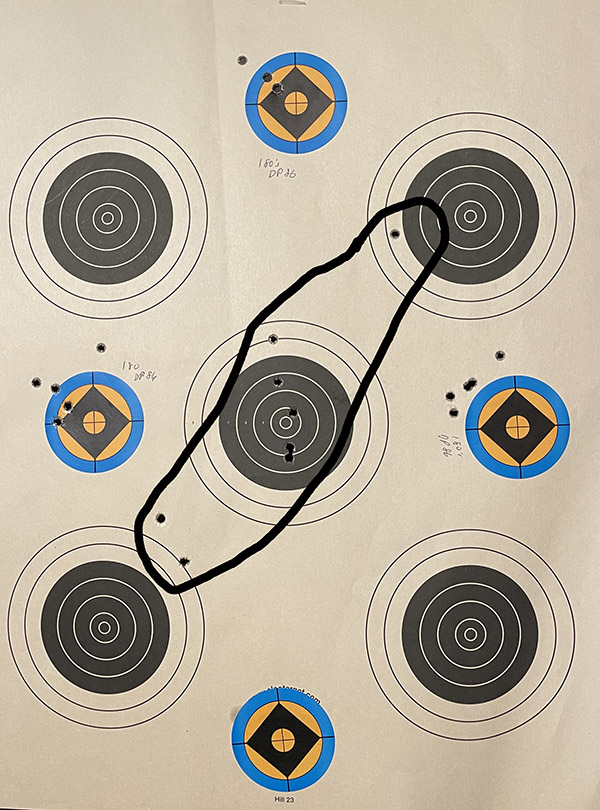
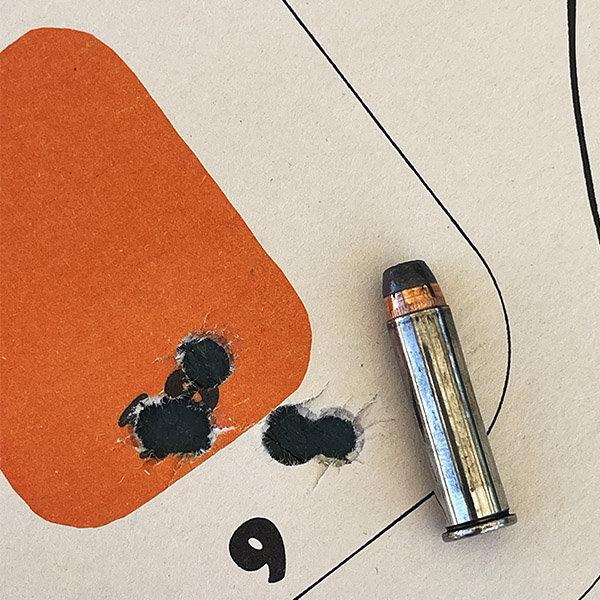
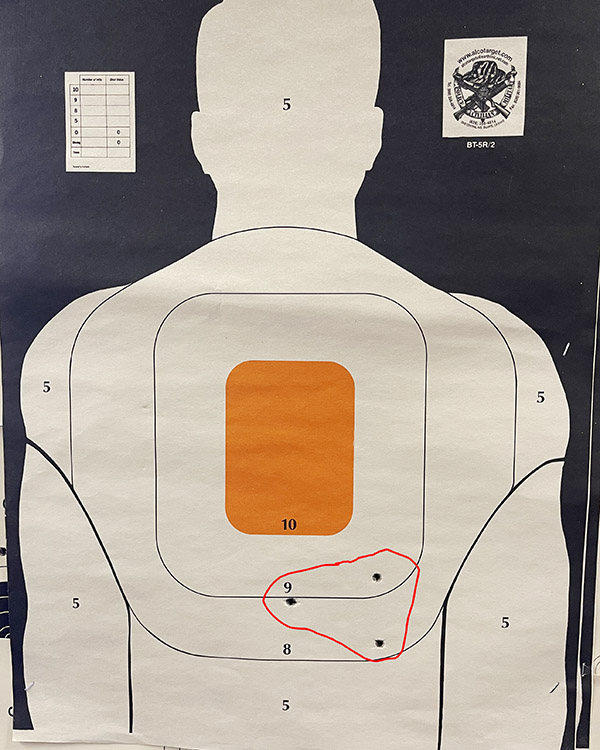
TJ (of TJ’s Custom Gunworks) worked his magic on my 9mm 1911. As mentioned in a previous blog, in addition to addressing the damage from the burst cartridge, he polished the barrel and ramp, refit an extractor that actually works (shame on you, Springfield Armory, for letting this one get out of the factory with an extractor that didn’t even contact the cartridge case), he recontoured the slide release and the slide release pin (shame on you again, Springfield Armory, for a slide release that was extremely difficult to install), he fit a one-piece guide rod (which is what I asked him to do), and he did one of his magnificent trigger jobs (this 1911 has a “breaking glass” 2 1/2 pound trigger now, with zero creep and no discernible takeup). This 1911 is a pure joy to shoot. I loved it before and I love it even more now. That target at the top of this blog? It’s a full box of my reloaded 9mm ammo (50 rounds) fired without resting the gun on anything. No failures to feed, no failures to eject, no misfires, and every bullet hit in the 10 ring.
50 rounds shooting offhand with the 9mm Springfield Armory 1911. Custom work by TJ’s Custom Gunworks.
Preventing a Recurrence
Wow. Where to begin.
I am implementing a number of changes in my reloading to prevent this from occurring again:
I’m slowing down and paying more attention. Duh. I’m no longer complacent. Duh again.
I’m installing better lighting on my press.
I’m standing up so I can see into the cartridge case.
I’m switching to a bulkier powder so that a double charge, if it ever occurs again, will spill over the case mouth and make a big, impossible-to-ignore mess.
I don’t mind sharing with you that when this first occurred, my thought was to abandon the Lee Classic turret press and return to loading on my single stage RCBS Rockchucker press. Double charging a case using a single stage press is (in my opinion) a much less likely thing to happen, and in 50 years of reloading on the Rockchucker, I’ve never had it happen.
When you load on a single stage press, it’s easier to view all of the charged cartridge cases. If any have been double charged, they will stand out.
I have a friend who works for Colt in their customer service department, and he tells me that when he sees a blown up gun sent in, there’s usually a progressive or a turret press somewhere in the story. But good buddy Paul told me to think about it a while longer and I did. I’m back to using the Lee turret press, but I’m a little older and a lot wiser now. The older part wasn’t really necessary, but the wiser part is and hopefully, readers can benefit from my screwup.
Slowing Down and Paying Attention
You know, when I worked in the munitions industry I participated in two fatality investigations where inadvertent detonations were involved. Multiple human errors caused those inadvertent detonations, and one of the key human errors was complacency. That’s what I had become using the Lee Classic turret press: Complacent. I’d been reloading for so long I became entranced with the turret press’s speed, and I started reveling in the thousands of rounds I was cranking out (and it was, literally, thousands of rounds). I always knew that double charges or skipped steps (like crimping) were really, really bad, but I just never thought I’d be the guy making either mistake. I wasn’t taking the time I needed to and I became complacent. That’s changed. I’ve slowed the pace, and you can bet I’m looking into every case immediately before I place a bullet on top to make sure I haven’t double charged it. You can also bet that I’m making sure I hit the crimping step on every round. I’ve actually posted a sign on my reloading bench with the best advice I’ve ever given myself: Slow down.
Better Lighting
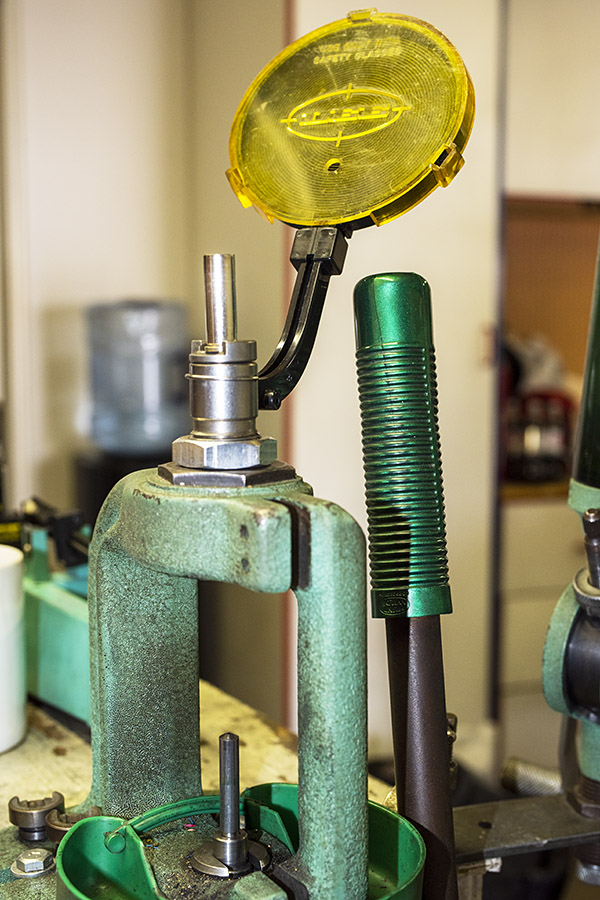
Good buddy Duane (who is both smarter and better looking than me) also reloads with the Lee Classic turret press. Duane mounted a light above his press to allow better visibility into the charged case. I’m going to do the same.
Standing Up
I used to sit at the reloading station. My bench, though, is higher than a standard work table (it’s how I had it built 50+ years ago). When I’m seated, it’s not as easy to see into the case. I reload standing up now, and that allows seeing directy into the case.
Bulkier Propellant
My last change concerns the propellant. One of the things I investigated shortly after my 9mm hand grenade episode was if it was possible to get a double charge into a 9mm case. With the load I was using (5.4 grains of Accurate No. 5), the answer was yeah, you could. It even had a little room left over. My thinking at the time was that I needed to go to a propellant that would overflow the case if I double charged it. In the past, I’ve found 4.8 to 5.0 grains of Unique with the 125 grain bullet is a marvelous 9mm load. Doubling that (i.e., 9.6 grains of Unique will overflow a 9mm case) and if that happens when loading, that’s a good visual indicator that something’s wrong. So, from here on out when using the Lee turret press, my load will be 4.8 grains of Unique. That only works for 9mm, though. Other cartridges (the .45 ACP, for example) will handily swallow a double charge. There, it’s back to paying serious attention (which we need to do on everything when we reload; it’s just using a propellant that will spill over with a double charge adds an additional indicator if things aren’t done correctly).
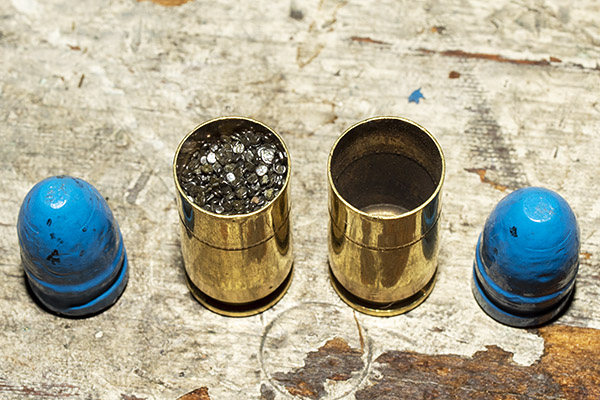
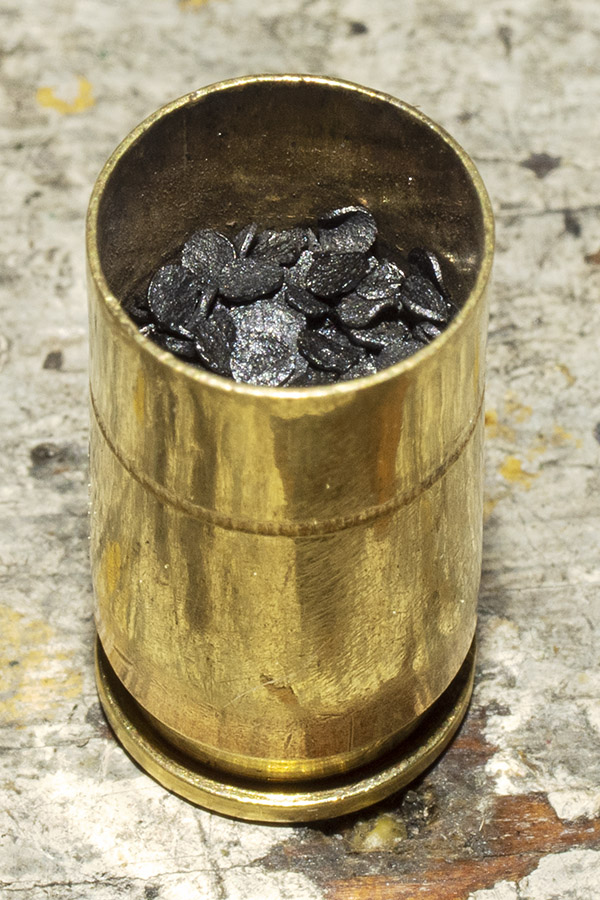
A double charge in the case on the left. My load was 5.4 grains of Accurate No. 5. I loaded both cases with this charge, and then took the propellant from the case on the right and poured it into the case on the left. A 9mm can easily swallow a double charge of Accurate No. 5.A single (correct) charge: 5.0 grains of Unique in a 9mm case.The most Unique I could load into a 9mm case was 7.9 grains. A double charge would spill over the top of the case and be immediately noticeable (at least in 9mm; the .45 ACP case will take a double charge of Unique without a spillover).
Incidentally, when this happened, I wrote to Lee and asked them if they offered any accessories to prevent a double charge (my Star reloader has a mechanical feature that prevents this from occurring). The answer was no, but Lee advised using a propellant that, well, read the above again and you’ll know. I checked the literature that came with the Lee Classic turret press kit, and sure enough, Lee has a recommendation in there to do exactly what I describe here.
Hornady’s Powder Cop
When I posted earlier blogs on Facebook, a few people mentioned a reloading cop. In 50 years of reloading, I’d never heard of such a thing, but I found it on Amazon. Hornady’s Powder Cop die is a die with a pushrod indicator. You add it to a vacant station on the reloading turret after the propellant charging station and when the charged round goes into it, if the case is double charged the rod will go higher than it normally does.
Hornady’s Powder Cop. The idea is that a double-charged case will lift the rod another 3/16 of an inch or so.
I don’t think the Powder Cop is the answer for several reasons. The Lee Classic turret press doesn’t have an empty station in its turret (all four stations are taken by the Lee 4-die set), you would have to notice that the pushrod indicator rose marginally higher than it was supposed to, and I believe that if a double charge was present, the pushrod might just push into the powder and not rise enough to indicate the double-charge condition. The Powder Cop might be right for some people, but my equipment can’t use it and I don’t think it’s an effective check. If you missed the double charge, you would probably miss the rod extending upward a bit further, too.
The RCBS Lockout Die
RCBS offers their lockout die which is, in my opinion, the best option for preventing a double charge on a reloading press, if the press that has an open station. If the case has an overcharge or an undercharge (or no charge), the lockout die locks the press, which positively lets you know that something isn’t right. It’s a clever mechanical device that detects either and overcharge or an undercharge and then stops the process.
The RCBS lockout die. If the case has an undercharge or an overcharge, this device stops the reloading process.
Unlike Hornady’s powder cop die, the RCBS lockout die isn’t just a rod moving up and down. The lockout die stops the show and forces you to check the cartridge that has locked up press movement. I think it’s a much better approach. The problem, though, is that you need that extra station on either a turret or a progressive press, and I don’t have that on the Lee Classic turret press (so for me it’s a nonstarter). What it says to me is that if I were to buy a new press, I would want one that has an extra station. I think the lockout die is a stellar idea; I just don’t have the real estate for it on my press.
The Bottom Line
I’m convinced that I had a double charge in the round that burst in my 1911. I’m also convinced that it’s on my to prevent it from happening again. As explained above, here’s what I’m doing:
I’m slowing down and paying attention to what I do. There is no place for complacency in the reloading world.
I will continue to use my Lee Classic turret press, but I’m installing better lighting and standing up so I can see into the cartridge case.
I’m switching to a bulkier powder so that a double charge, if it ever occurs again, will spill over the case mouth and make a big, impossible-to-ignore mess.
So there you have it. If you have any thoughts on any of the above, I’d sure like to hear them.
Never miss an ExNotes blog:
Check out our Tales of the Gun page for more firearms and reloading articles.
If you reload, you know that one of the toughest things to find over the last two or three years has been primers. I was one of the lucky guys…I laid in a stock of primers and I came through the shortage in fairly good shape. Primers are available again, but good Lord, the prices are obscene.
Before the pandemic, primers typically cost about $35 per thousand. That seemed to generally be in line with the last few decades of inflation (when I started reloading about 50 years ago, a brick of 1000 primers cost about $7). Then the pandemic came along, and BAM!, primers are now selling for $80 to $125 per thousand. As a former manufacturing guy, I can tell you that is outright gouging by the manufacturers and distributors. There’s nothing that changed in the materials that go into primers or their manufacturing processes that could possibly justify the 300% to 400% price increase. The manufacturers and distributors are gouging their customers.
The price increase has attracted at least one new player to the US market (the Argentinean firm Aventuras). But even those are $79.95 to $95 per thousand. The manufacturers, distributors, and resellers know that we’re willing to pay those prices so that we can continue to reload, but it’s an outrage. My message to the primer supply chain is simple:
Shame on you.
Want to know how primers are used in the reloading process? Check out our series on reloading .45 ACP ammunition.
A month or so ago I wrote a blog about Lee’s .357 Magnum Deluxe 4-die set. I liked those dies so much I picked up a Lee 4-die set in .44 Magnum. I am similarly pleased with this latest set of dies. There’s too much info to fit into one blog post, so I’m presenting it in three blogs:
This first blog is about the four different dies, what each does, and the parts in each die. Lee’s engineering is superior, and this blog showcases it.
A second blog will focus on installing each die in my loading press, and how to adjust the dies to make world class .44 Magnum ammunition. Watch for this blog within the week.
A third (and concluding) blog reveals how ammunition loaded with the Lee dies performed. The ammo was stellar and I’m a believer. Lee’s Deluxe 4-die set is a magnificent product and it makes magnificent ammunition. But don’t take my word for it. You’ll see it in the groups I shot. The accuracy blog will post in about two weeks.
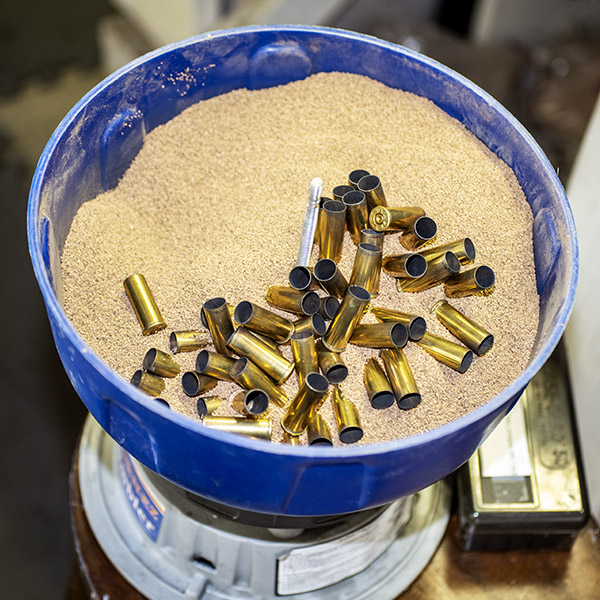
So, here we go. When I reload, I start with fired ammo brass cartridge cases, like you see below.
Fired .44 Magnum ammo brass cases, loaded into the vibratory cleaner. The vibratory cleaner polishes the brass cartridge cases. This makes the cases look good, but more importantly, it prevents them from slipping rearward against the cylinder walls when the reloaded ammo is fired.
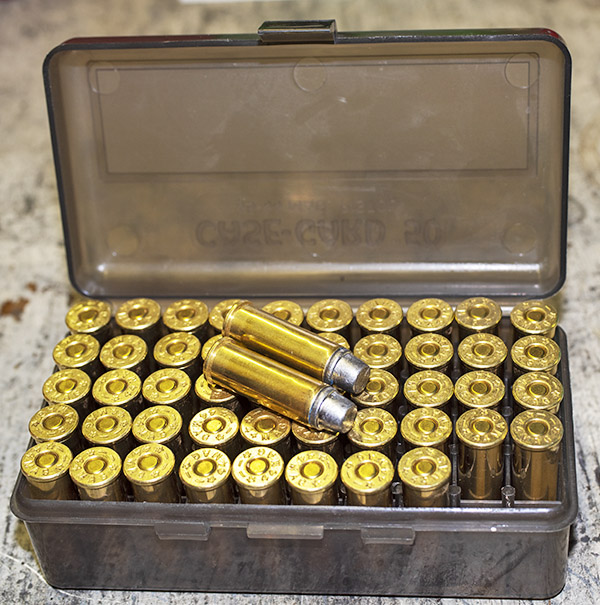
And when I finish, this is what I have…newly reloaded ammunition as good as or better than factory ammo, at a fraction of the cost of factory ammo. That “as good as or better than factory ammo” descriptor is misleading. My ammo is better.
A box of reloaded .44 Magnum ammo, custom tailored to my requirements, and capable of superior accuracy.
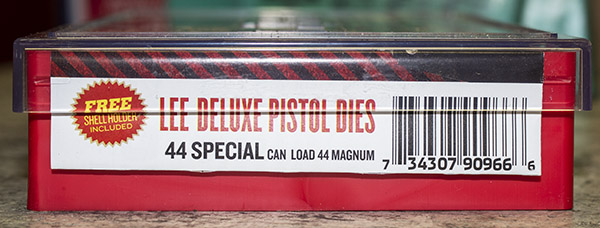
As most of you know, a gun chambered in .44 Magnum can also shoot .44 Special ammo (just like a .357 Magnum can shoot .38 Special). .44 Magnum dies can be used for reloading .44 Special ammo.
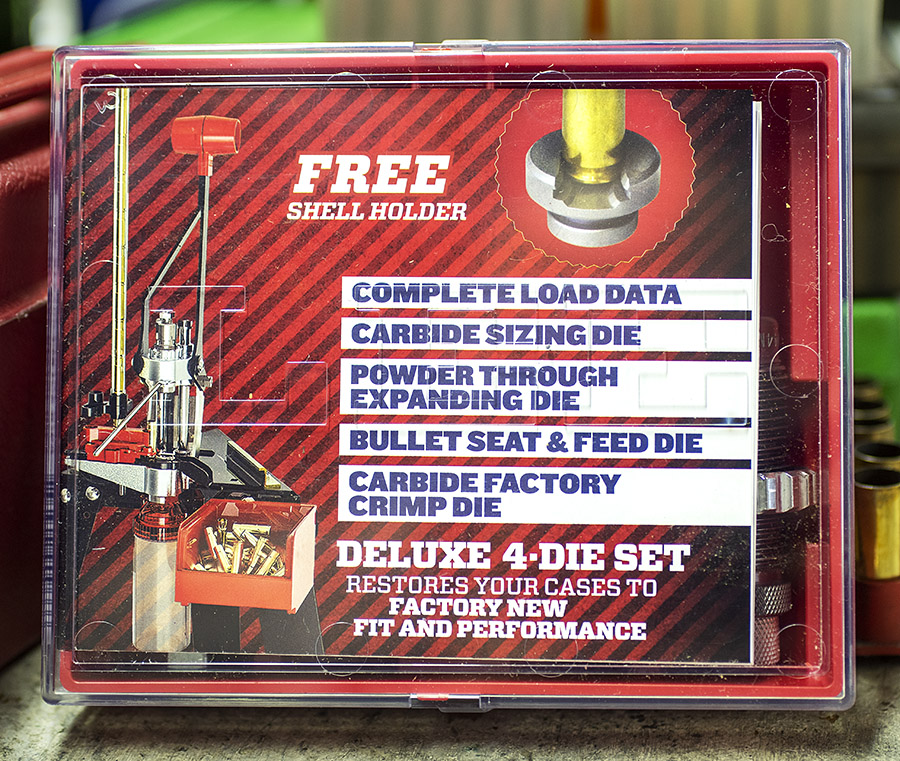
The label for each Lee die set is a printed instruction and load data sheet. The boxes are indexed and they stack nicely.
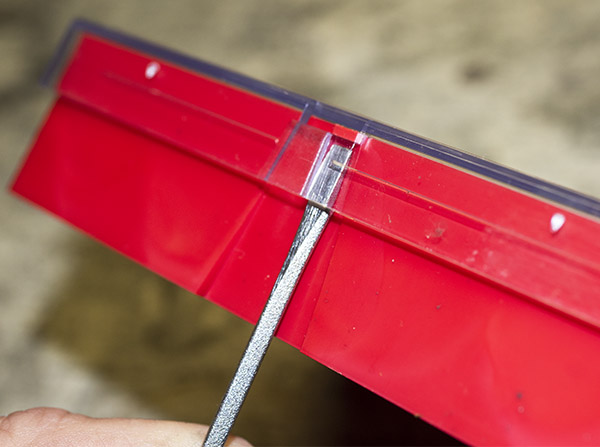
Lee dies come in a hard plastic case with a clear cover. The cover is removed by inserting a flat blade screwdriver on either side.
The plastic cover needs a little coaxing with a flat blade screwdriver to open. The cover includes a recess for screwdriver insertion.
The Lee label unfolds to reveal directions on using the dies along with a bunch of other information, including several suggested loads. Over the last five decades, I’ve found a few .44 Magnum loads I like, and in particular, I have a favorite load I shoot in the Ruger Super Blackhawk. I will share more of that with you in the next blog in this series.
The Lee instruction sheet includes load data and other information.
Lee’s Deluxe 4-die set consists of four dies, a shellholder, and a powder cup:
A carbide sizing die.
An expander die.
A bullet seating die.
A factory crimp die.
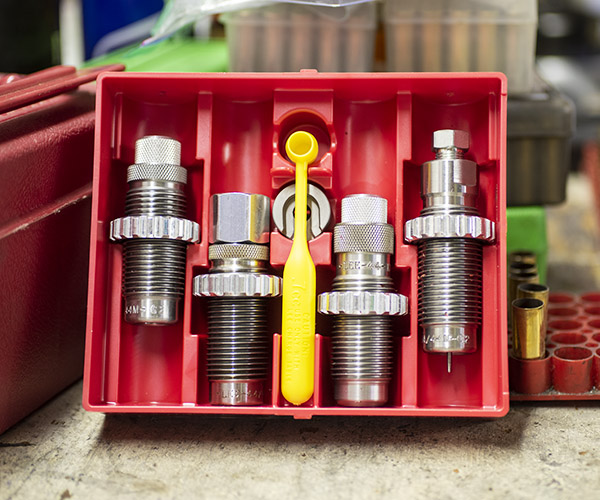
Here’s what the die set looks like after you remove the cover.
The Lee .44 Magnum/.44 Special Deluxe 4-die set. From left to right, it’s the factory crimp die, the expander die, the yellow powder cup, the shellholder, the bullet seating die, and the sizer die.
1. Sizing Die
The sizing die is a sizing and decapping die. When this die is installed in the reloading press and a fired brass case is inserted into it by raising the press ram, two things occur:
The cartridge case is resized to its original diameter (it expanded when the cartridge was fired, so it needs to be resized to specification dimensions). The Lee die is a carbide die, which means is has a very hard carbide steel tube inside the die body. Because it is a carbide die, there’s no need to lubricate the cartridge cases for the resizing operation (like you have to do with plain steel dies). Carbide dies are much preferred for this reason.
The used primer is pushed out of the cartridge case (this is the decapping operation).
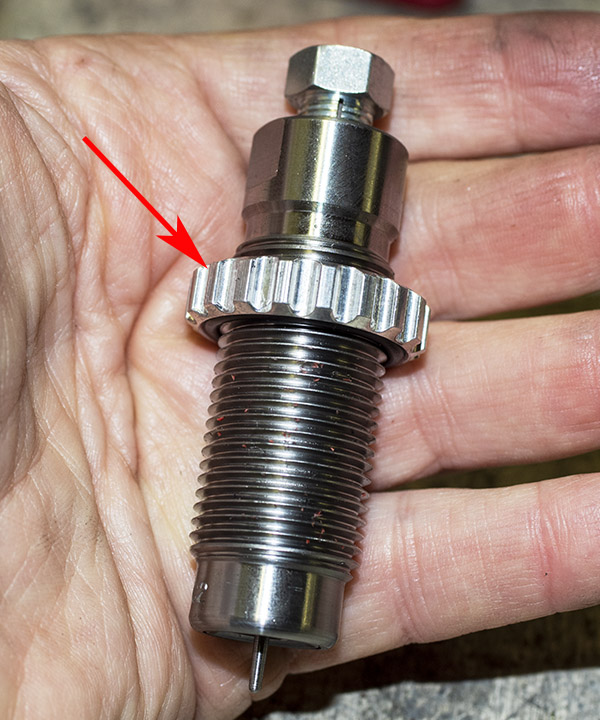
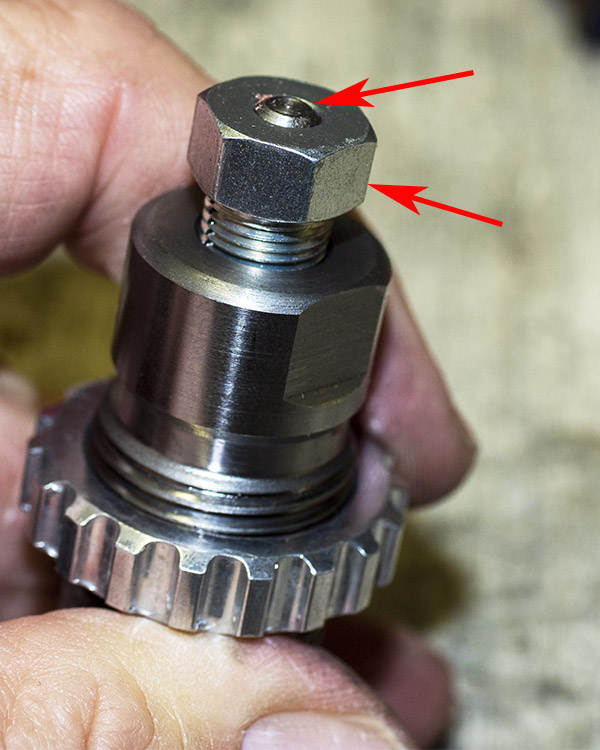
Here’s the sizing die.
The Lee sizing die. The red arrow points to the locking collar.
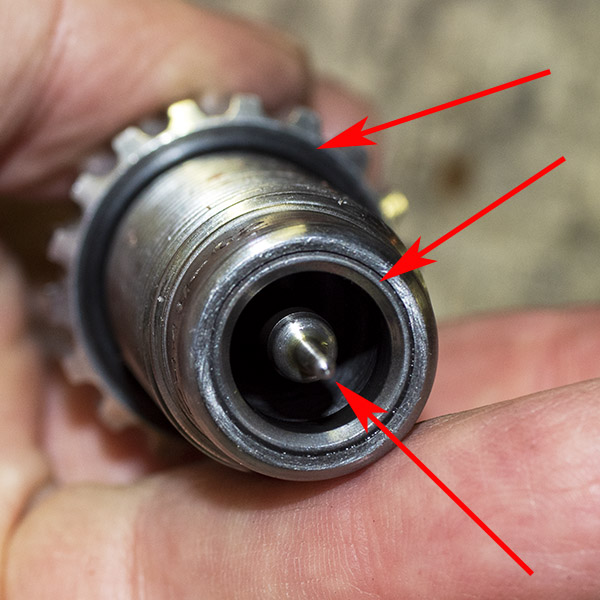
Here’s the sizing die from the bottom:
The top arrow points to the locking ring. It has an oring that holds the locking ring in place. The locking ring is screwed down on the threaded die body to lock the die body in place. The middle arrow points to the carbide sizing insert. The center ring points to the decapping pin, which pushes the spent primer out of the cartridge case.
Viewed from above, the decapping pin is secured by a threaded collet that screws into the die body. It’s a good approach because if there is an obstruction (if the pin hits the case bottom rather than the primer through hole, or if the primer through hole is blocked), the decapping pin simply pushes up in the threaded collet nut. This prevents bending or breaking.
The upper arrow points to the top of the decapping pin. The lower arrow points to the threaded collet that secures the decapping pin in the die body.
2. Expander Die
Once the cartridge case has been resized in the sizer die, it needs to be opened up slightly and the case mouth needs to be flared to allow a new bullet to be started in the case. This is accomplished with the expander die. Like each die in the Lee Deluxe 4-die set, this die includes a locking ring to lock the die in the reloading press. Some reloaders charge the case (add powder to the case) during the expander die operation. I don’t reload this way, and I don’t know any reloaders who do.
The Lee expander die consists of six components. These are:
The die body.
The locking ring and its oring.
An oring between the die body and the through hole insert.
An expander.
The through hole insert.
These components are shown in the photo below.
Expander die parts. The die body, the locking ring, and the oring are shown as a subassembly on the left. The arrow points to the expander. The part on the right is the powder through hole insert.
The expander slides up in the die body when a cartridge case is inserted by the press ram. When it reaches the end of its travel, a ramp in the expander plug creates a flare on the case mouth. This is what will allow a new bullet to be inserted in the cartridge case. In the photo below, the expander plug is inverted from its installed orientation to allow a better view of this ramp
The arrows point to the ramped surface that creates a flare in the case mouth.
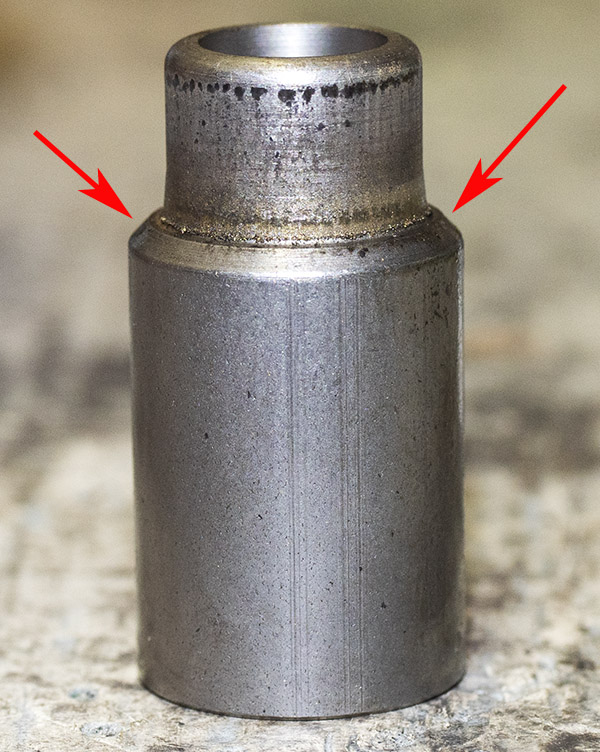
You might wonder why there is a powder through hole component at the top of the expander die, and why the ramped expander plug is allowed to move up and down as a cartridge case is inserted into the expander die. The through hole allows inserting powder into the case with the powder cup (which I don’t use). Other Lee reloading gear uses the expander plug up and down motion to activate automatic powder dispensing devices (this is the approach used on Lee’s progressive reloaders).
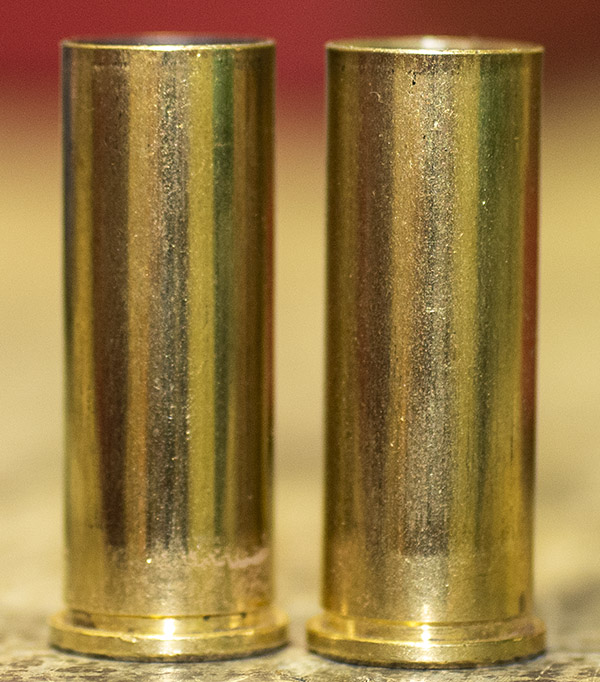
The business end of the Lee expander die. The red arrow points to the expander plug as the cartridge case sees it.The cartridge case on the left has not been through the expander; the cartridge case on the right has been through the expander. Notice the very slight flare on the right cartridge case mouth. This will allow starting a bullet into the case.
3. Bullet Seating Die
The bullet seating die is the third die in the Lee Deluxe 4-die set. This one is a bit more complicated than the first two because there are two adjustments, and this die can also be used as a crimping die. With the 4-die set, I am not going to use this die for crimping. I am only going to use it for seating the bullet to its required position in the cartridge case.
The bullet seating die is shown below.
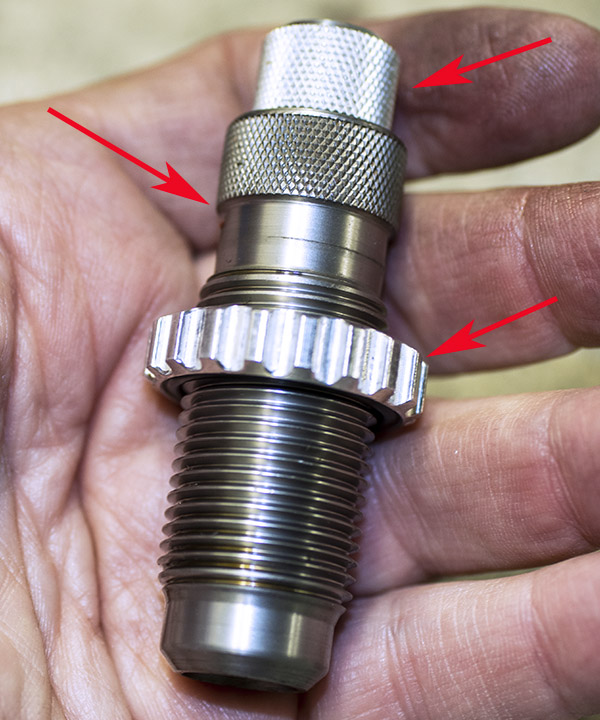
The bullet seating die. The upper arrow points to the bullet seating adjuster, the middle arrow points to the die body, and the lower arrow points to the locking ring.
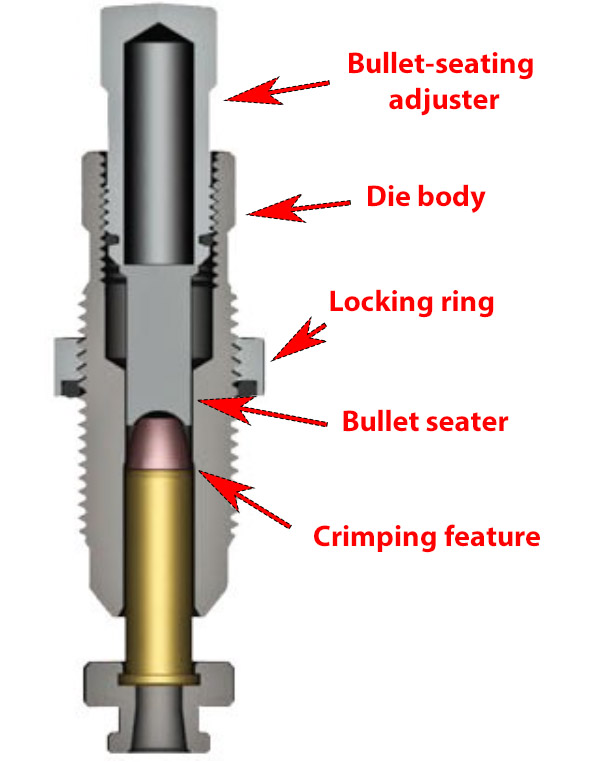
Here’s Lee’s illustration of the bullet seating die.
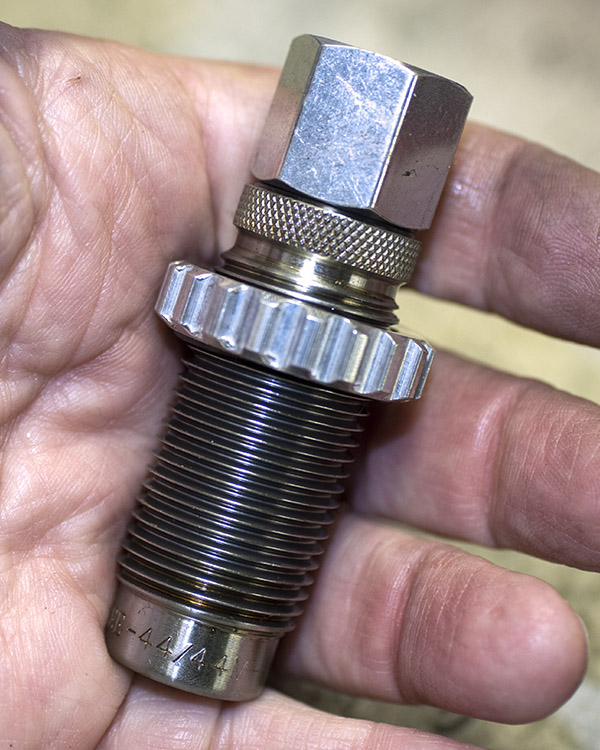
From the outside, the bullet seating die and the factory crimp die appear to be almost identical. The easiest way to distinguish them is by the size of the knurled segment on top and by the length of the die body.
The bullet seating die is on the left; the crimping die is on the right. The bullet seating die has a longer knurled section and the die body is longer.
The bullet seating die parts include:
The die body.
The bullet-seating adjuster and its locking oring.
The locking ring and its oring.
The bullet seater.
These parts are shown below.
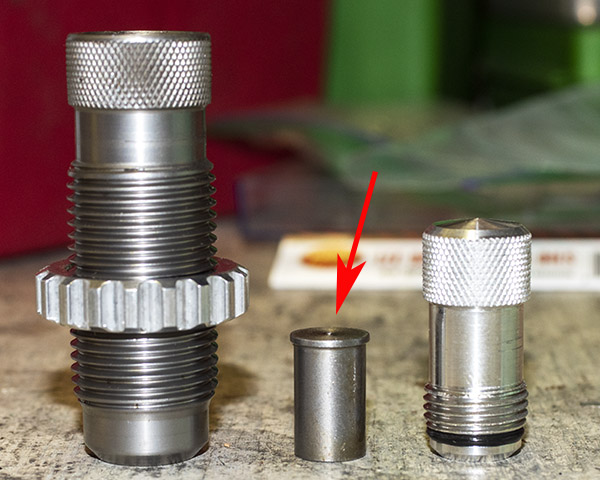
From left to right, this photo shows the bullet seating die body and locking ring, the bullet seater (denoted by the arrow), and the bullet-seating adjuster and its locking oring.The bullet seater.The bullet seater as seen by the bullet. The arrow points to the bullet seater.
I mentioned above that I use this third die in the Lee Deluxe 4-die seat only to seat the bullet. It can also be used to crimp the cartridge case around the bullet, but I don’t crimp with this die. I use the Lee factory crimp die for crimping.
The bullet seating die also includes a crimping ramp in the die body, as shown by the arrow.
To adjust the die to do this, I run the bullet-seating adjuster well into the die body so that it pushes the bullet to its desired seating depth before the crimping feature reaches the cartridge case. I’ll describe this adjustment in more detail in tomorrow’s blog.
You might wonder: Why not do both (bullet seating and crimping) with this one die? Some folks do, and if you have the Lee 3-die set (not the Deluxe 4-die set), that is your only option for crimping. But this approach has the bullet still being inserted into the case as the crimping operation occurs, which invites potential bullet misalignment. To get around that, I use the fourth die in the Lee Deluxe 4-die set (the factory crimp die).
4. Factory Crimp Die
The factory crimp die does three things:
It roll crimps the bullet in place.
It maintains bullet alignment in the cartridge case.
It removes any imperfections in the cartridge case to assure easy chambering.
Here’s the factory crimp die.
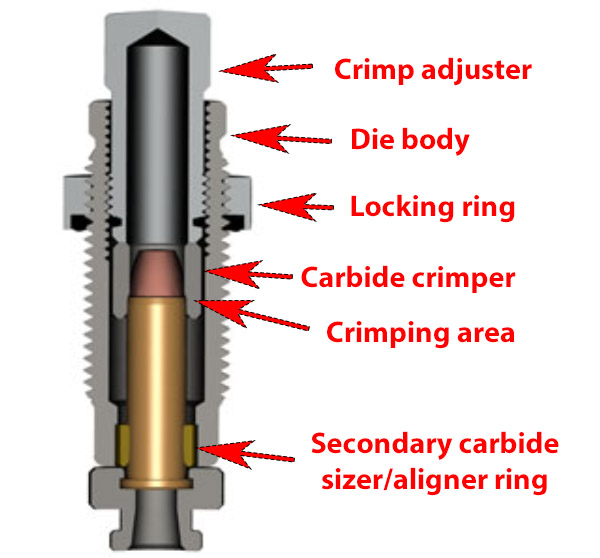
Here’s Lee’s illustration of the factory crimp die:
The factory crimp die has the following parts:
The die body.
The locking ring and its oring.
A carbide crimper sleeve.
The crimping adjuster and its locking oring.
These parts are shown below.
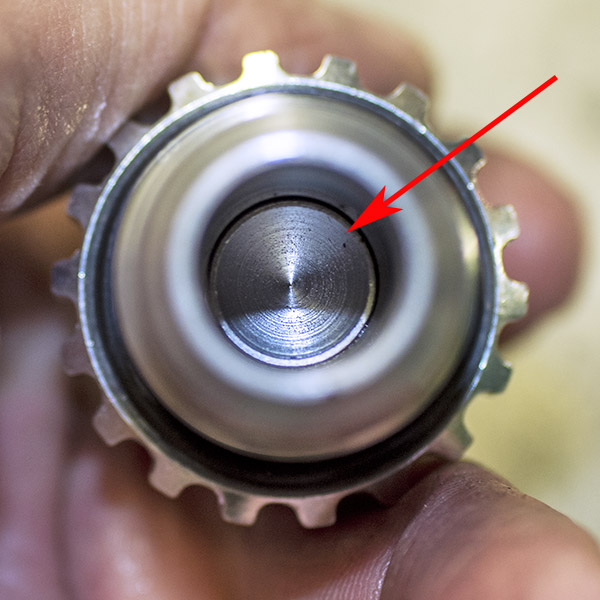
The Lee factory crimp die disassembled. From left to right, this photo shows the die body and its locking ring, the carbide crimper sleeve (indicated by the red arrow), and the crimp adjuster and its locking oring.The carbide crimper. The red arrow points to the crimping ring inside the carbide crimper. Note that this feature must point down when the die is assembled; this piece is orientation sensitive.
The carbide crimper shown above requires the cartridge case to enter the carbide crimper sleeve before the crimp is executed. This is an important feature, as it maintains bullet alignment with the case as the crimp is achieved and prevents case deformation that could interfere with chambering. Also, the bullet is not moving further into the case as the crimp is achieved, which is what would occur if I used the bullet seating die to crimp the case.
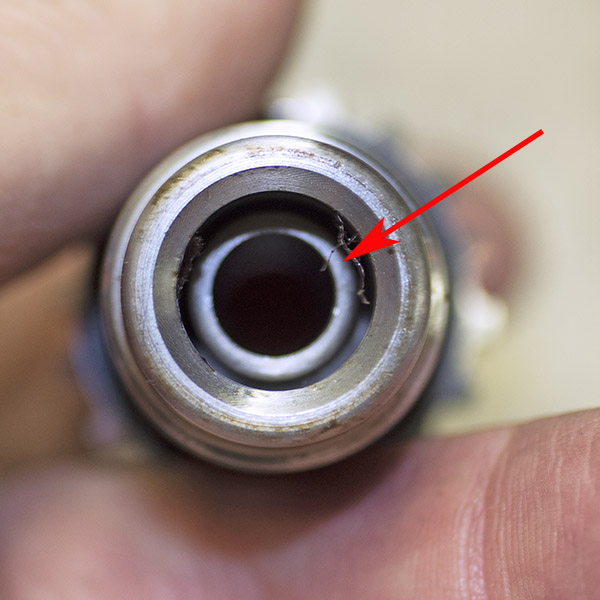
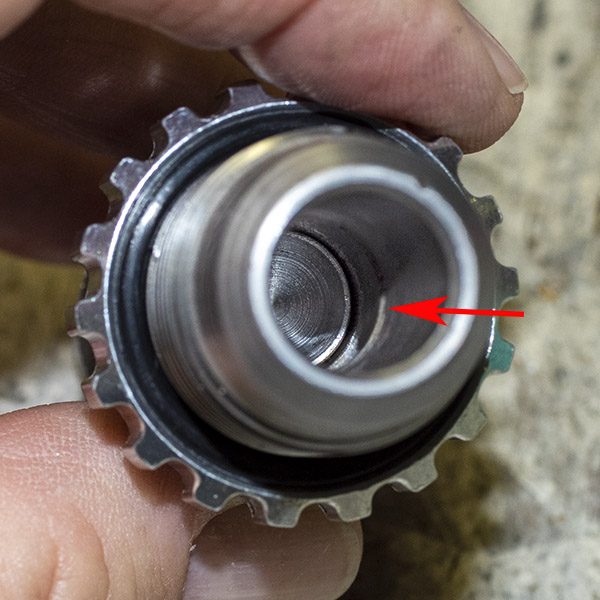
The factory crimp die as seen by the cartridge. The upper arrow points to the crimper sleeve; the lower arrow points to the crimping ring within the crimper sleeve.
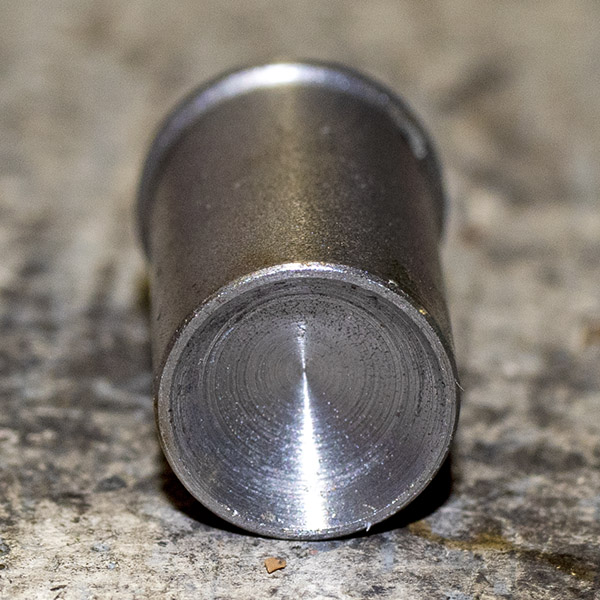
There’s another carbide ring at the base of the factory crimp die, shown by the photo below.
Lower carbide ring in the Lee factory crimp die.
The factory crimp die lower carbide ring both prevents and removes any deformation in the cartridge case when the case is crimped and the cartridge is inserted and withdrawn from the die. This assures easy chambering and bullet-to-case alignment.
So there you have it. In our next blog, which will post in about a week, I’ll explain how I set up each of the dies in my press.
You might be wondering: Do these Lee dies really work? The short answer is an emphatic yes. I found when loading .357 Magnum ammo with the Lee Deluxe 4-die set that accuracy improved and bullet pull (bullets backing out under recoil) was eliminated. To jump ahead a bit, the .44 Magnum Deluxe 4-die set described in this blog resulted in stellar accuracy. I’ll cover that in a third blog, which will publish in about two weeks. Before I get there, though, here’s a teaser photo:
One of a limited run of Turnbull color case hardened Ruger Super Blackhawks, and targets shot with ammo reloaded using Lee’s Deluxe 4-die set.
If you want to make sure you don’t miss any of the upcoming .44 Magnum Lee Deluxe 4-die set blogs, grab your free ExNotes subscription here:
Finding reloading components of any kind these days (brass, bullets, powders, or primers) is a tough thing to do. Finding brass for more exotic cartridges is near impossible. One of my favorite cartridges is the famed .300 Holland and Holland. It’s a specialty item. I’ve not seen loaded .300 H&H ammo or brass in gun stores for years. I searched for two years for brass and found nothing. Prices for both ammo and brass have climbed through the roof (Nosler brass, just the empty brass, is now about $6 per round), but it’s all moot. It could be free or it could be $100 per round. Nobody has any. I know moot, and this is it.
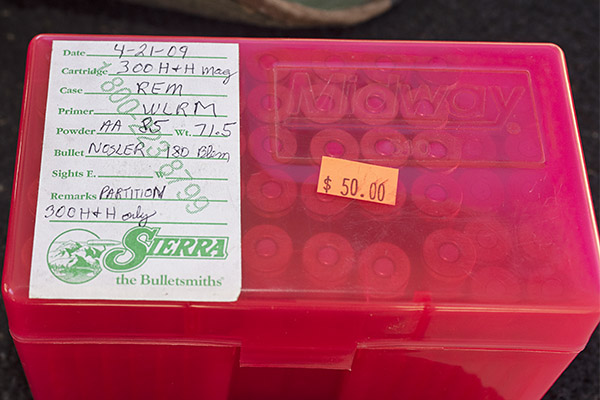
I was recently in my local reloading shop (Phillips Wholesale, in Covina, California). I stop by there periodically just to see what Rick has in stock, and if it’s anything I might be able to use, I buy it because there’s no telling when it will be available again. While there, I was lamenting with Rick about the sad state of affairs in component availability, and I mentioned not being able to find .300 H&H brass. Rick perked up. “.300 H&H?” he said. “I might have something.”
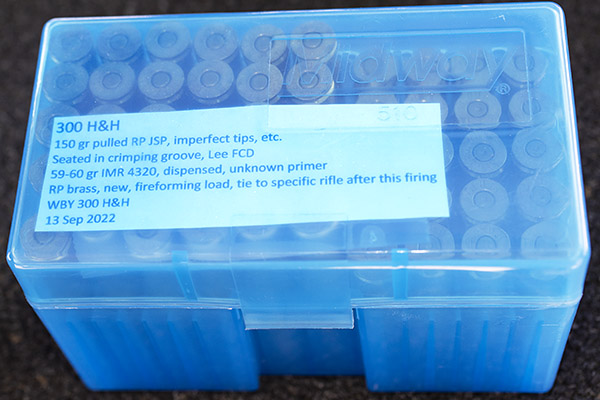
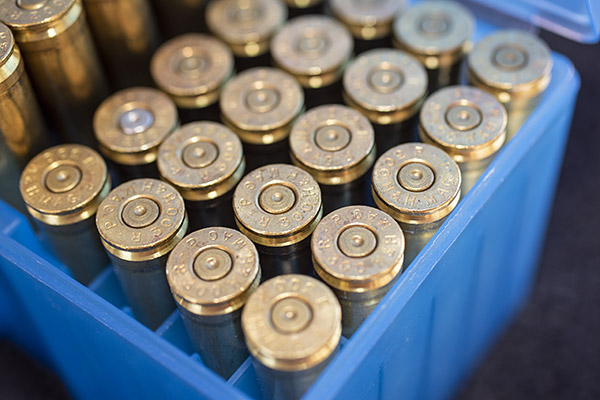
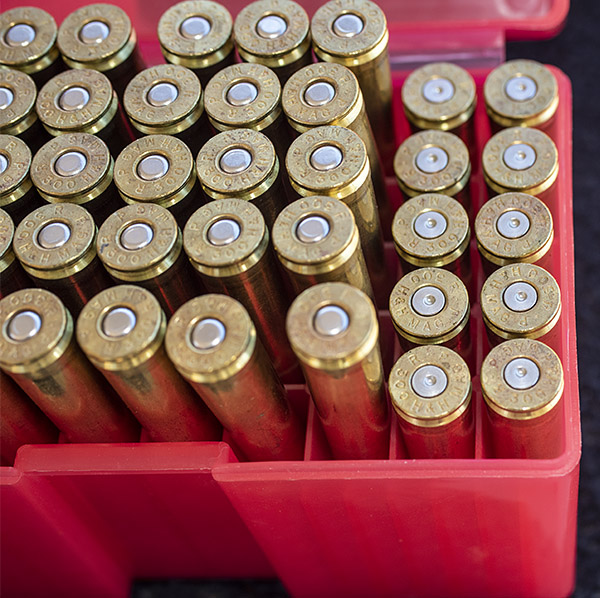
Rick pulled a plastic box of 50 cartridges from under the counter. It contained .300 H&H handloaded ammo in virgin (previously unfired) brass.
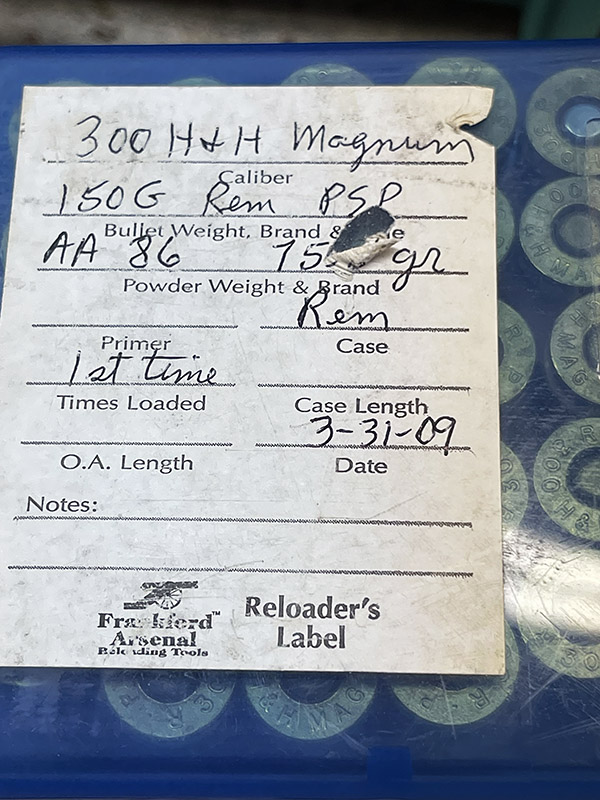
.300 H&H ammo. It;s beautiful, isn’t it?The data label on the ammo Rick showed to me. It was loaded 12 1/2 years ago.
Rick helps folks settle estates when the estate includes reloading goodies. This was a box of ammo with that provenance. I normally wouldn’t fire someone else’s handloads. I’m a careful reloader; I don’t know that the someone else who loaded other ammo was. But I had, in my hot little hands, 50 rounds of fresh .300 H&H brass. I didn’t recognize the propellant (AA 86?), but I didn’t care. I figured I could pull the bullets, dump the powder, and load the new brass with my preferred .300 H&H load, which is 60.0 grains of IMR 4320 and a Winchester 150-grain jacketed softpoint bullet. My rifle (I’ll tell you more about it in a minute) has shot 0.25-inch groups with this load.
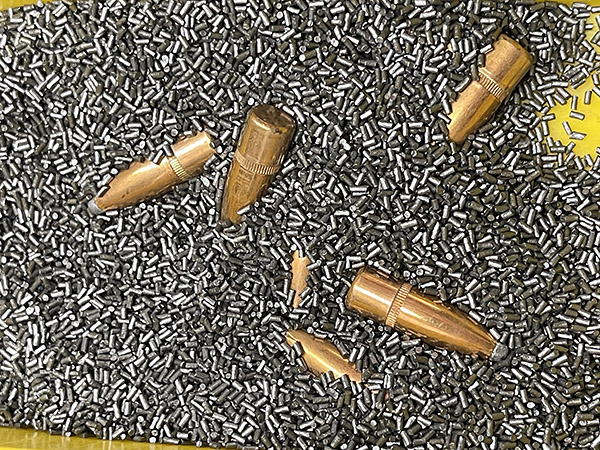
So I bought the ammo and proceeded to pull it apart. I removed the bullets (which mashed a few tips and scraped a few ogives), dumped the powder, and reloaded the brass cases with my IMR 4320 load. I reused the pulled bullets. The bullets weren’t perfect after the extraction operation, but I wanted to fireform the brass to my rifle and I didn’t care about their condition. Once the brass has been fireformed (fired so it conforms to that particular rifle), I will neck size only to maximize case life. The .300 H&H cartridge is known for short case life when it is full length resized.
AA 86 propellant and Remington 150-grain jacketed soft poin bullets pulled from the first box of ammo. I’m going to use that powder in .243 ammo now that I know what it is.
I weighed a few of the powder charges as I was pulling the bullets and they were exactly as labeled on the box Rick sold to me: 75.0 grains. Whoever loaded this (a fellow from Riverside who passed away) was obviously a careful reloader. The propellant was a stick powder, so I figured it was a rifle propellant, but I had never heard of AA 86. I recognized AA as most likely belonging to Accurate Arms, but there’s nothing I could initially find on the Accurate website called AA 86.
I called Accurate Arms’ customer service to see if they could shed any light on the AA 86 mystery. The kid I spoke with told me Accurate Arms had gone through an acquisition, and he didn’t know anything about their propellants before the acquisition. He specificially had never heard of AA 86. I poked around a bit more on the Internet and learned that Accurate Arms had occasionally sold surplus powders identified as Data Powder (or DP) powders, followed by a two-digit number. There was a DP 86 powder. I went back to the Accurate Arms site and found a reference to it, which said that DP 86 was essentially the same as their AS 3100 powder. The Accurate Arms customer service guy didn’t know this (he sounded like a young guy).
When I bought the box of .300 H&H ammo from Rick, he told me he might have some more. I gave him my phone number and Rick called a couple of days later. He found three more boxes. I was in the middle of doing something important (writing an ExNotes blog, actually), but Rick’s message took priority. I stopped writing and left for Rick’s shop immediately.
I told Rick about the phone call to Accurate Arms. Rick knew all about DP 86, and he told me that this ammo had indeed been loaded with DP 86. He also had canisters of the powder from the gentleman who passed away. It sold quickly, Rick told me.
After pulling the bullets, I reloaded the first box with my pet load. If I was loading for accuracy, I would measure each charge, but I just wanted to fireform so I charged each case with my RCBS powder dispenser. IMR 4320 is an extruded rod powder, but the individual rods are small and it meters well.
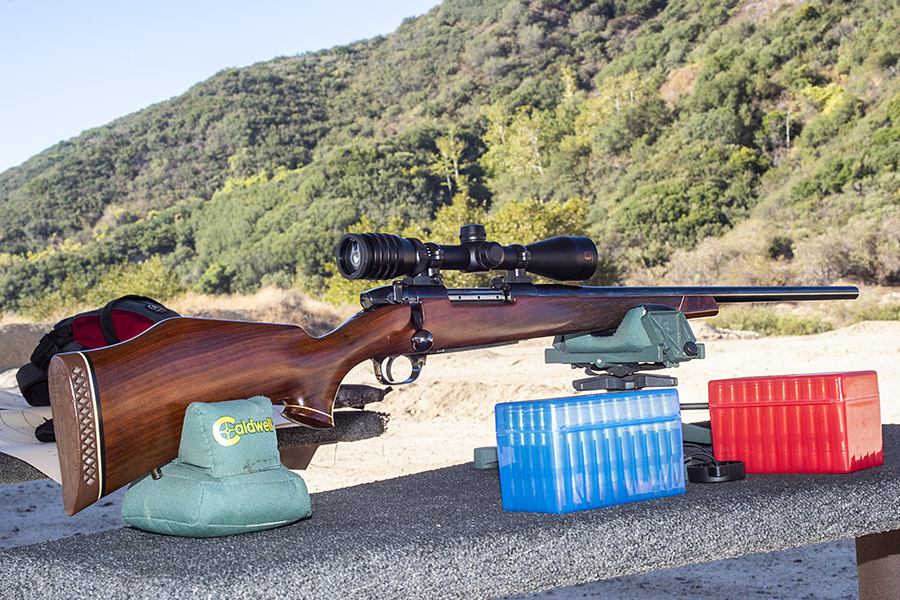
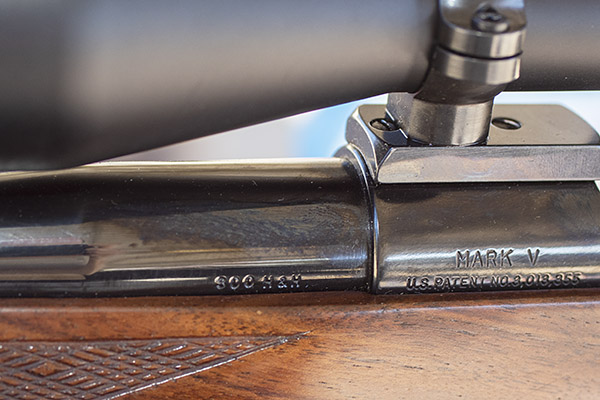
I mentioned above that I would tell you a bit about my .300 H&H rifle. My Dad bought it for me in the early 1970s before my US Army tour in Korea. The rifle began life as a 7mm Weatherby Magnum, but I never could get the rifle to group well with that cartridge. I had it rebarreled in .300 H&H, a cartridge I had read a lot about and learned to love in a pre-’64 Model 70 Winchester (don’t ask, it’s sold, and yeah, selling it was a dumb move on my part). I glass bedded the Weatherby action, and I stripped the rifle’s original epoxy finish and refinished it with TruOil.
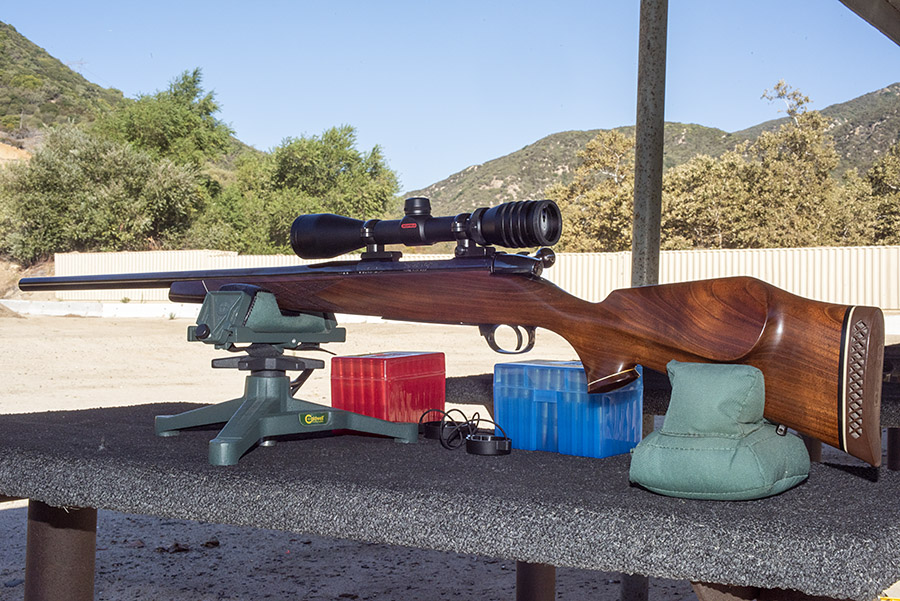
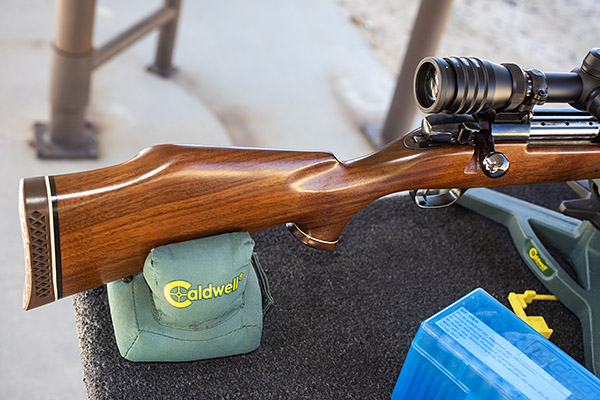
A Douglas barrel chambered in .300 H&H. It has a 1 turn in 10 inches twist rate and it is accurate. The rebarreled Weatherby feeds the .300 H&H cartridges flawlessly.Rich, warm, and beautiful. There’s something about oil-finished walnut that is just right.The flip side looks just as good. About 10 years after I refinished this rifle, Weatherby introduced their Euromark line, which was the Mark V with an oil finished walnut stock. I own a couple. Both have highly figured walnut, but to me this custom .300 H&H looks better. It groups better, too. Weatherby has since discontinued making walnut Mark V rifles. They are all composite rifles now, which seems like a crime against nature.
I’ve been shooting and hunting with this custom .300 H&H Weatherby for close to 50 years now, and I’ve owned and shot quite a few other rifles during that time. This one remains my favorite. I am a big Weatherby fan and I love the .300 H&H cartridge. It is the perfect combination of power, accuracy, and manageable recoil. I greatly prefer the .300 H&H Magnum over the .300 Weatherby Magnum. The .300 Weatherby Magnum’s recoil is vicious and unpleasant. The .300 Weatherby’s recoil is aggravated by a need to load at or near maximum for accuracy. The .300 H&H is a more useable and enjoyable chambering.
I bought four boxes (200 rounds!) of this handloaded virgin brass, and I recently took two boxes to the range. One contained my reconstituted ammo with the IMR 4320 powder and 150-grain pulled Remington bullets; the other was loaded with 180-grain Nosler blemished bullets and AA 85 powder. On this blemished bullet business: Sometimes bullet manufacturers sell factory seconds at reduced prices. This was the only time I’ve heard of blems from Nosler. I’m a guy who loads for accuracy (I could care less about muzzle velocity or killing power), so the idea of using a rejected factory bullet seems silly. I’m firing this ammo only to fireform the cases, so I was okay with reusing the pulled bullets. And I felt more comfortable about firing the ammo as provided by Rick once I learned more about AA 86 and AA 85 propellants.
How did it shoot? Both the boxes I tried (my IMR 4320 load and the 180-grain Nosler load) shot very well. The 180-grain load predictably had a bit more recoil, but it wasn’t bad. The 150-grain bullet and IMR 4320 load showed no primer flattening; the 180-grain Nosler load showed just a hint of primer flattening (but not enough to be of concern).
My favorite 300 H&H load showed no pressure signs. The guy who loaded it snuck in a different primer on one cartridge.The ammo loaded with 180-grain Noslers and a near-max DP 86 load flattened the primers just a bit, but not enough to indicate excessive pressure. This load had more recoil, but it was still way below .300 Weatherby levels.
Accuracy was surprisingly good with both loads, especially considering that I dinged up the 150-grain Winchester bullets during the removal operation and the 180-grain Noslers were factory blems.
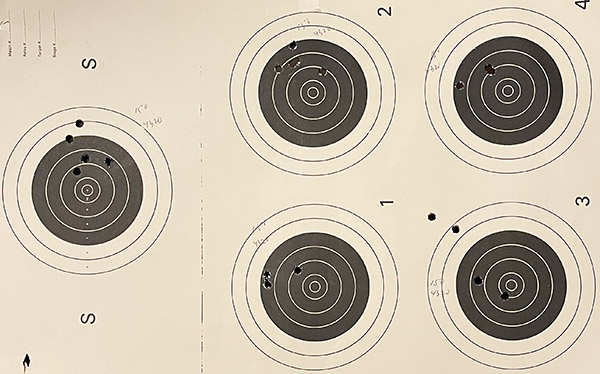
Here’s the target I shot at 100 yards with my IMR 4320 loads:
This is way below minute-of-wild-boar and more than accurate enough for ammo loaded with pulled bullets and brass that had not yet been fireformed. Next tme will be better. It’s a load that has produced quarter-inch groups in the past. I didn’t expect that kind of accuracy with this ammo due to the bullets’ condition.
And here’s one I shot with the 180-grain Noslers as loaded by the original reloader 12 1/2 years ago. You can ignore the group(s) circled in black. When good buddy Chuck gave me a target board at the range, it had a target stapled on it with usable real estate. I’m cheap so I reused the target (somebody had previously fired at the bullseyes circled in black; I only shot at the orange and blue targets).
Groups shot with the 180-grain blemished Nosler bullets and DP 86 surplus powder. It’s not bad for a dragon slayer at 100 yards. The shots circled in black were already on the target when I used it.
I’m quite pleased with this .300 H&H ammo. I picked up 200 rounds at about one-sixth what factory ammo would have cost at a time when neither ammo nor brass is available. It pays to maintain a relationship with local businesses.
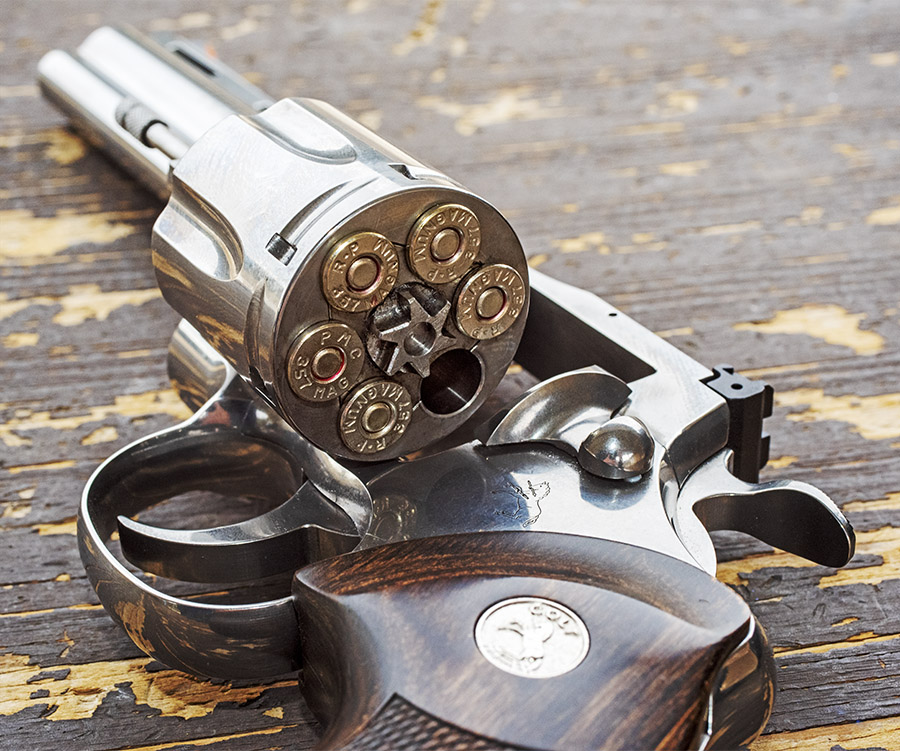
I’ve owned three Colt Pythons. Back in the ‘70s I had a blue 6-inch Colt Python and another 6-inch nickel-plated one (they were only about $250 back then, and I could buy them for even less through the Post Exchange). Both those Pythons went down the road, and yeah, I’m sorry I sold them. Who wouldn’t be?
Please click on the popup ads…it keeps us going!
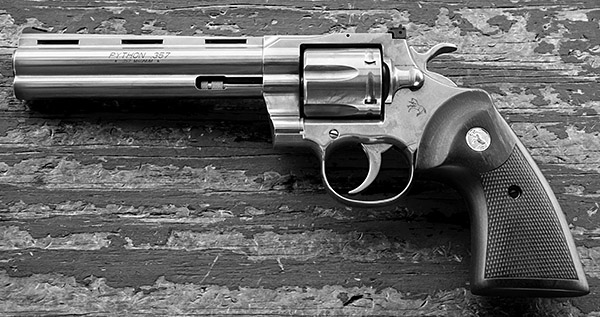
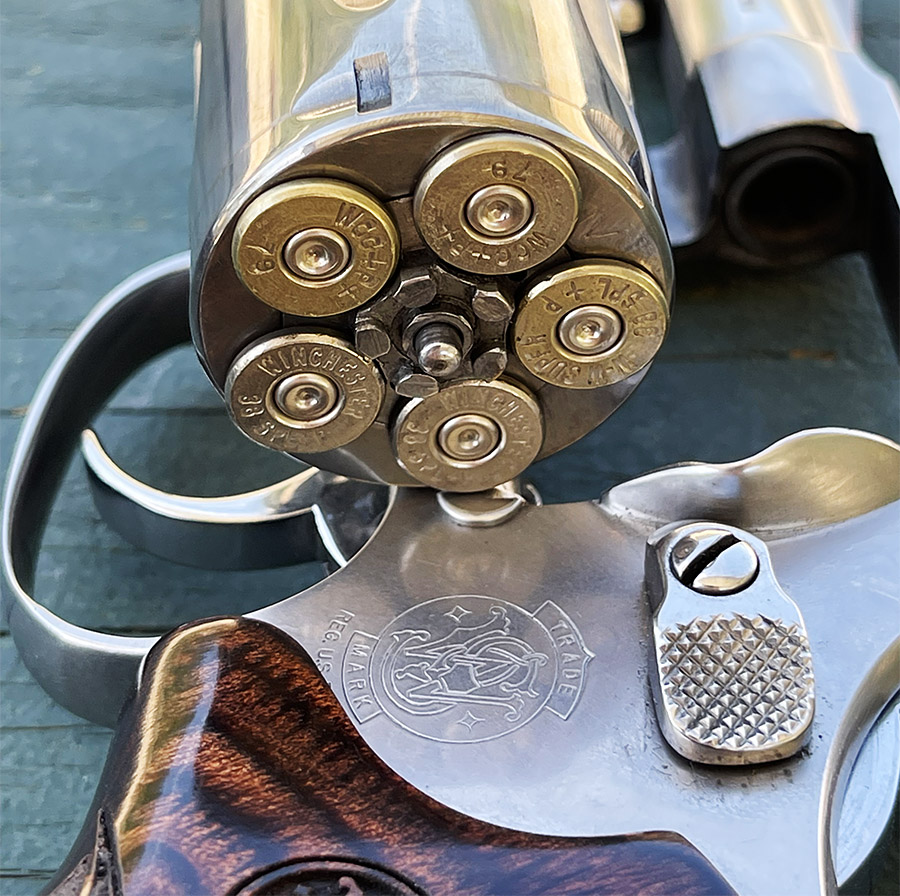
These days, I have a 6-inch bright stainless Colt Python, the new model, and I love it. It’s the one you see in the photo above. I’ve been to the Colt factory to see how they are made, and both the Python’s design and its production are impressive. I’ll let you in on a secret: The new Pythons are better guns. I shoot my Python a lot. In the last few months I’ve been hitting the range with it at least a couple of times every week. I’m old school, I guess: I prefer a revolver to a semi-auto, and I prefer .38 Special and .357 Magnum over 9mm. Your mileage may vary. I know what I like.
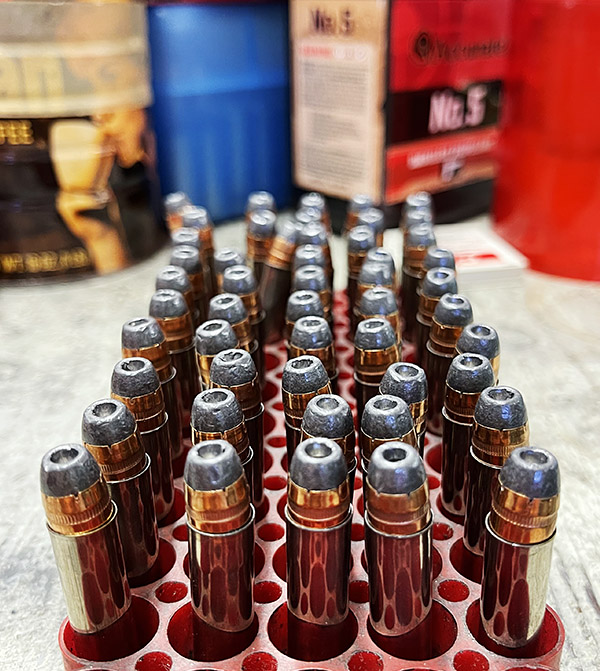
Winchster 110-grain jacketed hollow point bullets waiting to be seated and crimped.
I remembered that back in the day I found a 110-gr jacketed hollow point bullet with 10.0 grains of Unique (the max load in the Hornady manual in the 1970s) and it was extremely accurate in my blue steel Python. I mean, like one-hole accurate. Accurate enough to keep that load in my memory for five decades.
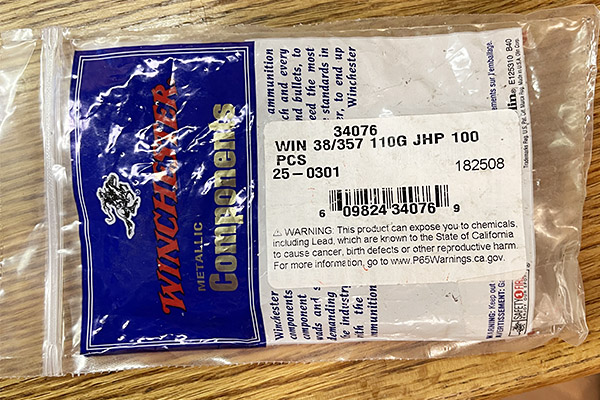
Fast forward 50 years and you’ll find me scrounging for reloading components on a fairly regular basis. On one of those scrounging expeditions Rick Phillips (of Phillips Wholesale) had Accurate No. 5 propellant in stock. It’s a handgun powder, and Rick told me that Accurate No. 5 has a burn rate about like Unique. Hmmm. Unique, huh? That stuck in my mind, mostly because I had some 110-grain .357 pistol bullets in my components stash: I had Winchester jacketed hollow points, and Hornady jacketed hollow points. I bought a bunch of the Winchester bullets during the Obama years when everything was scarce, and I was down to one unopened bag of 100. I had an unopened box of the Hornady 110-grain bullets, too.
Winchester, if you’re paying attention, this bag was 15 bullets light.
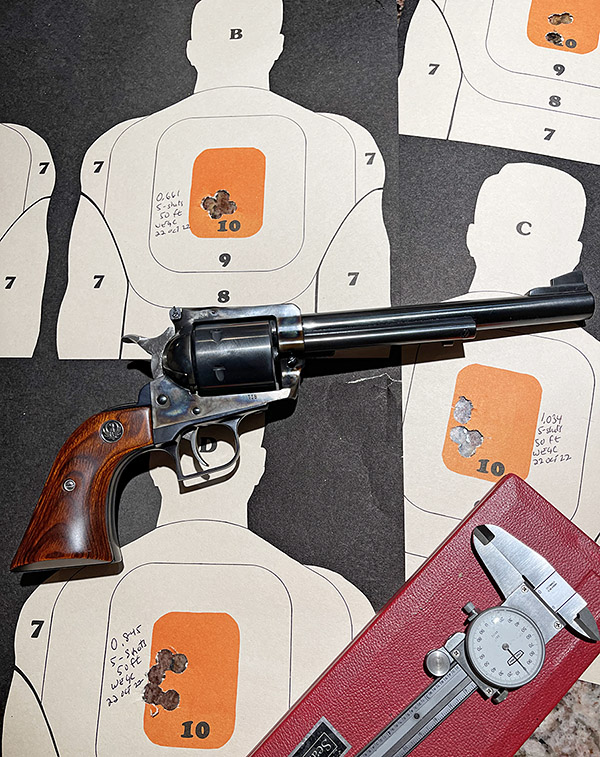
I loaded the last of the Winchester bullets recently using some junk 357 brass. I have Unique, but I wanted to see if I could get good results with Accurate No. 5. Rick’s comment about Accurate No. 5 being about like Unique stuck in my mind. The max load on the Accurate site for 110 grain bullets is 11 grains, so I loaded some at 10.1 grains and some at 10.5 grains, both with magnum CCI primers.
Winchester shorted me on that last bag of 100 grain bullets. The last bag I had was unopened, but it had only 85 bullets in it. I wrote to Winchester customer support, and they responded with an answer that was left blank. I wrote to Winchester again after receiving the above non-answer for an answer, but I’m not holding my breath.
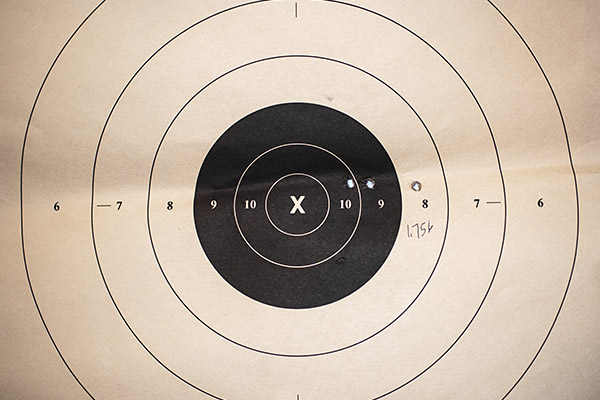
The results with both the Hornady and Winchester bullets were great. Here’s a 5-shot group at 50 feet with 10.1 grains of Accurate No. 5 and the Winchester bullets. This was the best group this morning, but they were all good.
That’s how we like to do it. I know the brass is dirty. This was a quick and dirty test. The laod was 10.1 grains of Accurate No. 5, a CCI 550 primer, and Winchester’s 110-grain jacketed hollowpoint bullet. The distance was 50 feet.
The 10.1 and the 10.5 grains of Accurate No. 5 loads shot about the same from an accuracy perspective, but the 10.5 grain loads made the primers flatter, so I’ll load the 10.1 grain load the next time I reload this ammo. No sense burning up more powder and stressing the gun and the brass if there’s no accuracy improvement. It’s already excellent at 10.1 grains.
Rugged, reliable, regal, and rewarding: Today’s Colt Python.
The Winchester bullets looked cruder than the Hornady bullets but I think they maybe had a slight accuracy edge. I went online to buy more, but I learned Winchester discontinued them. One of my buddies had two bags and he gave them to me, but the odds of me ever getting any more are slim. Hornady, Speer, and Sierra all make JHP 110-grain bullets, but nobody has any in stock. I have 85 left of the Hornady bullets (I used 15 of the Hornady bullets to make up for the ones Winchester shorted me) and now, an additional 200 Winchester bullets. You still owe me 15 bullets, Oliver.
This is an update on my latest 1903 Springfield load development work.
I purchased this rifle about three years ago assuming the headspace was correct, but it wasn’t. That’s a risk associated with old military rifles. Rifle parts are often mixed through the years, and when doing so with the bolt and the barreled action, it’s easy to induce an excess headspace condition. That’s what I encountered on my rifle, so I had the Civilian Marksmanship Program (CMP) in Anniston, Alabama install a new 1903 barrel and rechamber the rifle. Live and learn, I guess. Always check the headspace when purchasing a milsurp rifle.
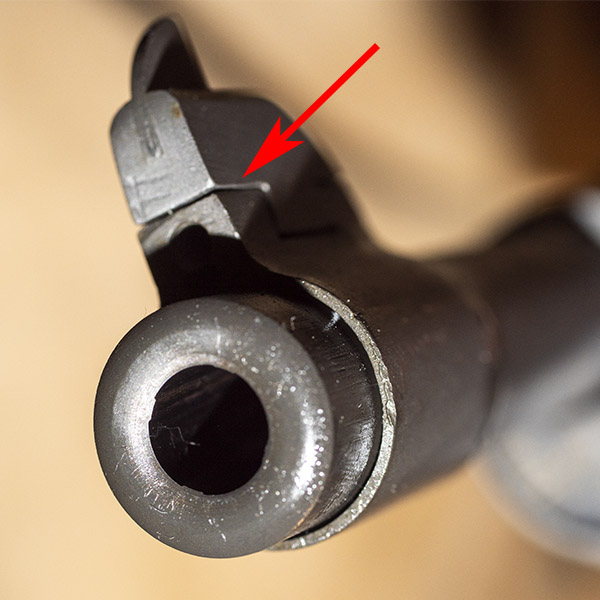
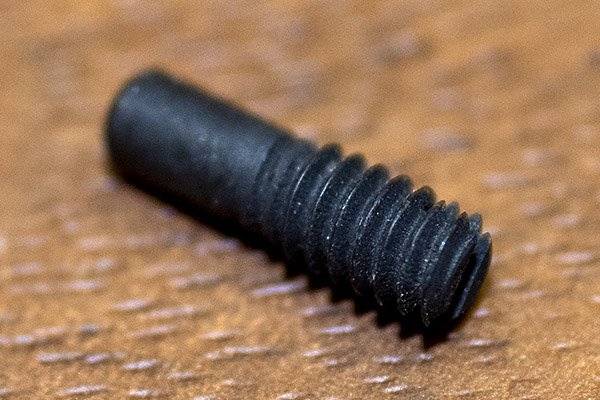
As it was returned to me from the CMP the rifle shot to the right and jacketed bullets shot way too high (at least I thought it shot way too high, but I was wrong…more on that in a bit). I noticed that the front sight was biased to the left (which made the rifle shoot to the right). I drifted the front sight in its base (it’s a dovetail fitting). The front sight takes a retaining screw that secures it to the barrel mount, and on my rifle that screw was missing. It might have shipped that way from the CMP or it might have fallen out.
When the Springfield was returned to me from the CMP, the front sight was biased to the left, as you see here. I didn’t notice it at first.A replacement front sight screw.
I wrote to the CMP regarding the missing front sight screw, but I haven’t heard from them and I found a replacement front sight screw on the Sarco website. I haven’t installed it yet (that will come later). I drifted the front sight in its dovetail to the right, and that brought the point of impact closer to the point of aim.
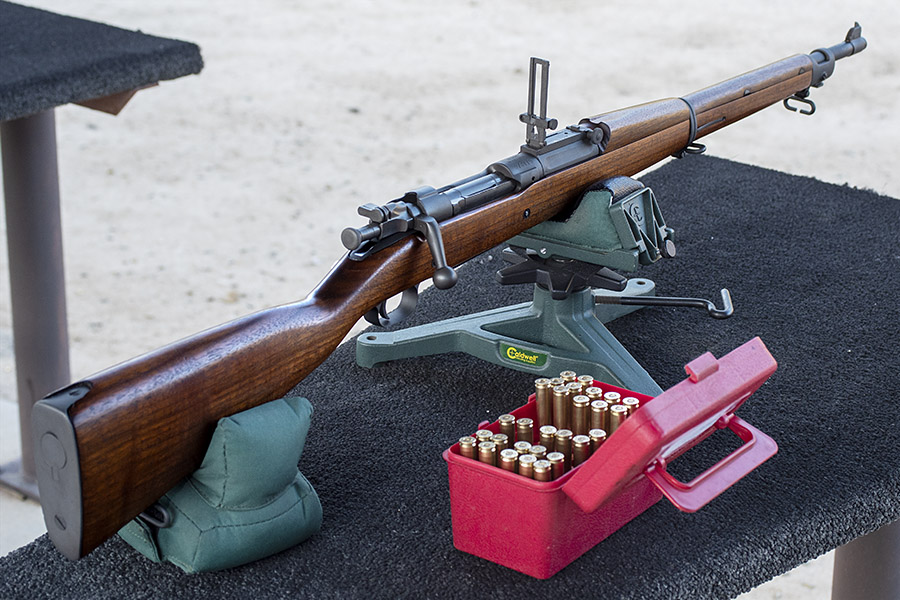
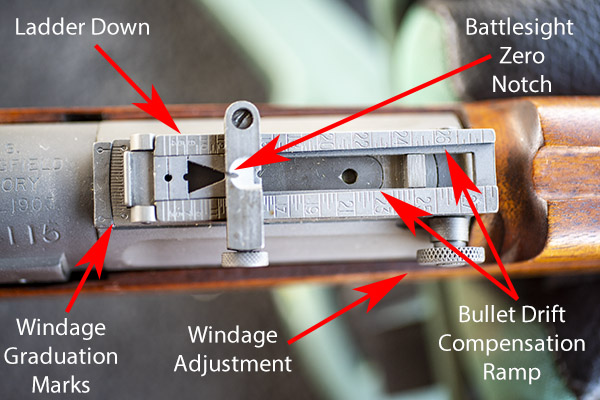
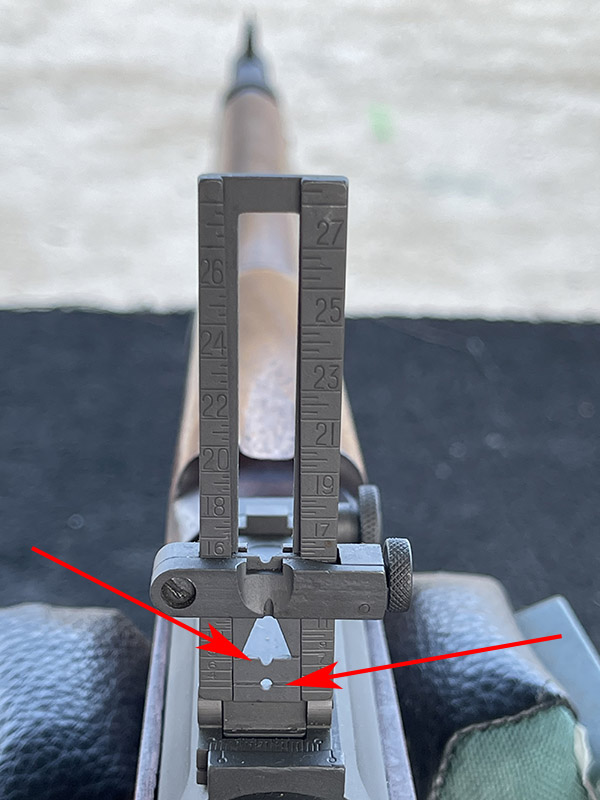
Before I get into the reloading specifics, I should explain a bit about the rear sight. The rear sight on the 1903 Springfield rifle is a complicated device. It’s called the M1905 rear sight, and it is designed and calibrated for standard military ball ammo (back in the day when the Army used .30 06 ball ammo). The sight is a ladder type rear sight and it has four aiming methods. One is the battlesight zero (it’s with the ladder down); the other three are with the ladder up which allows adjusting for various distances. In the big photo at the top of this blog, you see the rear sight with the ladder up. In the photo below, you see the rear sight with the ladder down.
The M1905 rear sight assembly on the 1903 Springfield rifle. The sight ladder is in the down, or battlesight zero position. Wow, there’s a lot going on there.
This first aiming method is through the battlesight zero notch with the ladder down. Battlesight zero means the bullet will coincide with the point of aim at 547 yards. The thought is that if you hold center of mass on a man-sized target at any distance up to 547 yards, you’ll hit the target. At 100 yards the rifle will shoot way high with the ladder down using the battlesight zero, which is what I experienced. I did not understand this was a normal occurrence when using the battlesight zero rear sight notch.
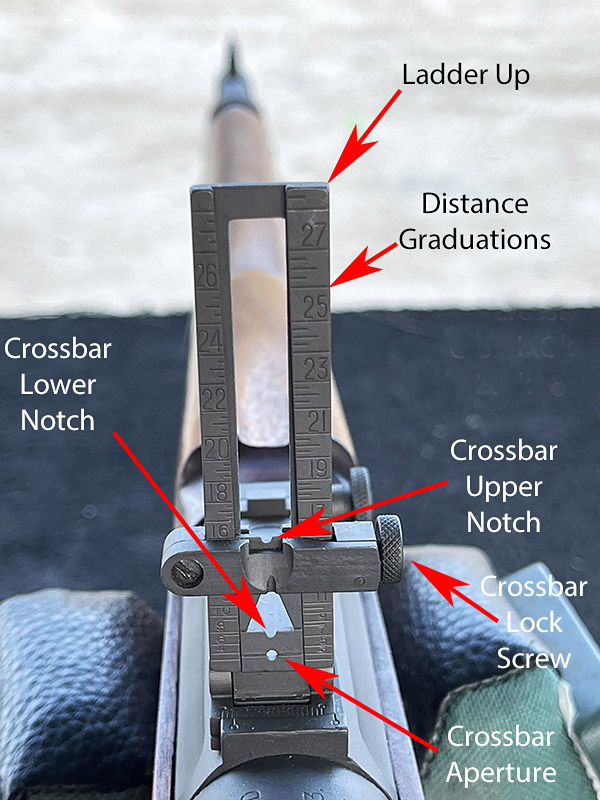
The 1903 Springfield’s rear sight in the raised position. Note that the sides of the rear sight force the crossbar to the left as distance to the target increases. That’s a built-in feature to compensate for bullet drift to the right at longer distances. Clever people, those Army engineers were. This rifle is over 100 years old.
The other three aiming methods all involve shooting with the ladder up (as you see in the above photo). You can adjust for various ranges from 100 yards out to 2800 yards (which is roughly a mile and a half) by loosening the crossbar lock screw and sliding the crossbar up or down to various indicated ranges on the ladder. One sighing method uses the crossbar upper notch. You simply slide the crossbar up or down so that the top of the notch aligns with the estimated distance to the target (in yards) on the ladder’s distance graduations. Another sighting method uses the crossbar lower notch. In this case, you slide the crossbar up or down so that the top of this lower notch aligns with the estimated distance to the target. The last sighting method involves using the crossbar aperture. There’s a horizonal scribe line across the plate containing this aperture, and when using the aperture, you align that scribe line with the estimated distance to the target. The aperture allows zeroing the rifle for ranges as close at 100 yards, which is where I do most of my shooting.
All the above is calibrated for standard military .30 06 ball ammo. If you’re shooting cast bullet ammo, or jacketed ammo with bullet weights or velocities other than standard ball ammo, you have to zero your rifle for your specific load.
There’s one other bit of coolness incorporated into the design of this rear sight. The sight ladder is designed so that as you raise the crossbar, the sighting notches and aperture move to the left. That’s to compensate for the bullet’s natural drift to the right as distances increase.
It’s all very clever, but in my opinion the Army made it too complicated. The rear sight was probably designed by an engineer who never had to carry or use a rifle in the field or train recruits to do so. I think most of the guys I served with in the Army would have a hard time remembering all this (I’m an engineer and I struggled to understand it). Apparently the Army agreed: They simplified the rear sight on the later 1903A3 rifle. The 1903A3 rear sight is much better for an infantry rifle.
That’s enough background on the 1903 Springfield sights. Let’s get to the reloading variables and which loads the Springfield likes. I prepped several, and I also grabbed some of the ammo I had previously loaded for the M1 Garand.
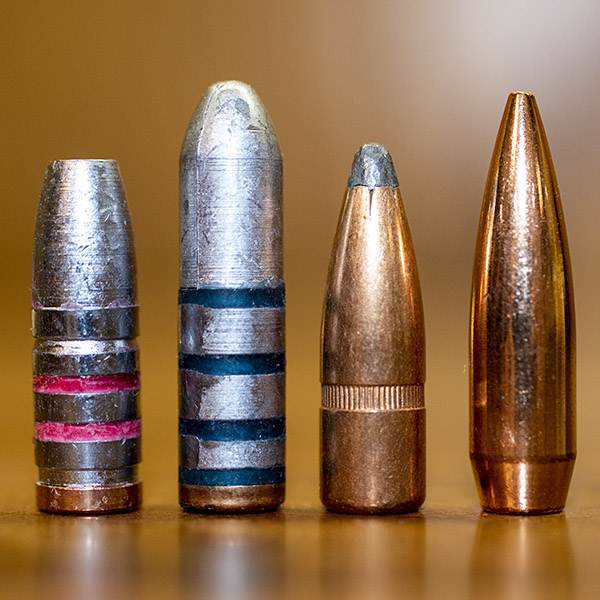
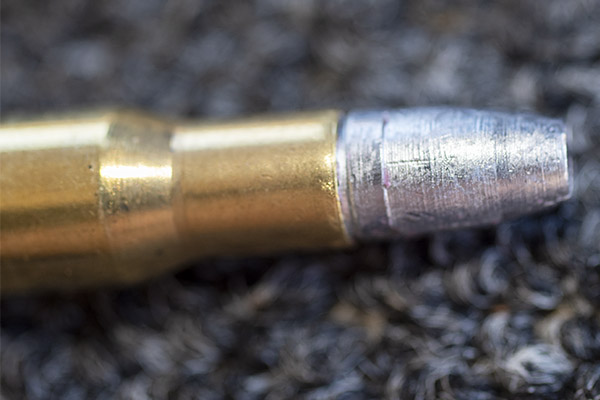
Four bullets used in this testing. From left to right: The Hursman 173-grain cast bullet, the Montana 210-grain cast bullet, the Winchester 150 grain jacketed soft point bullet, and the jacketed Speer 168-grain Match bullet.The Hursman cast bullet loaded in a .30 06 cartridge.
I first fired at a 5o-yard silhouette target to see where the bullets were hitting (there’s lots of real estate on that target). With the ladder down, the point of impact was to the right and low using the 17.0-grain Trail Boss and 173-grain Hursman bullet load. With the ladder up, it moved left a little and printed higher using the higher rear sight notch. For that 0.793 group up top, I used the bottom edge of the upper left box as the aimpoint. For the other two groups, it was the bottom of the orange bullseye.
An initial target shot with cast bullets and Trail Boss powder. There’s a lot of real estate on this target, so I could see where the rifle was shooting.
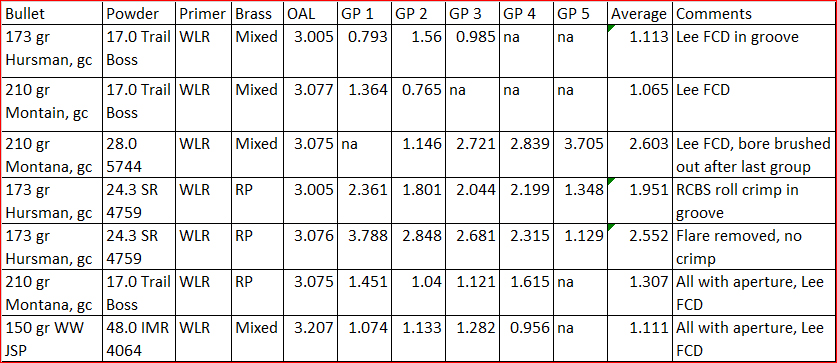
I shot groups at 50 yards with several different loads using combinations of the bullets shown above and SR 4759, Trail Boss, 5744, and IMR 4064 propellants, all at 50 yards, and all with neck-sized-only .30 06 brass. Then I returned a week later and fired groups with the 150-grain jacketed Winchester bullets (again at 50 yards).
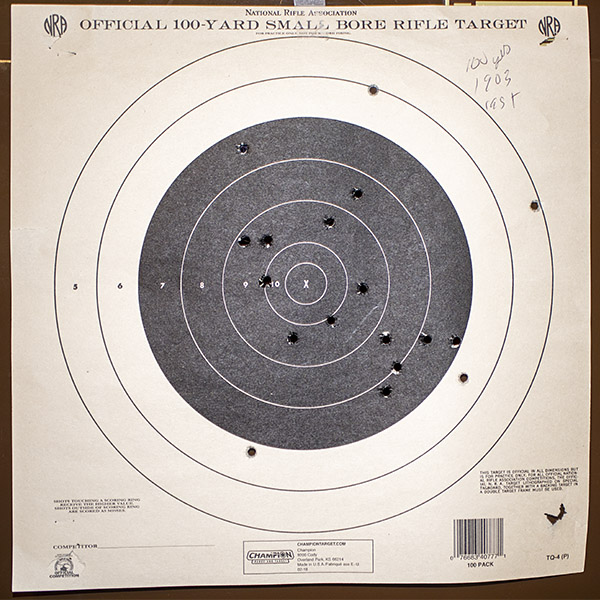
After shooting the above groups, I had 20 rounds left with the Trail Boss, Hursman bullet, and SR 4759 load. I shot two of them at a clump of dirt at about 80 yards and hit it (I think) both times. Then I put a 100-yard small bore rifle target up at 100 yards and shot at it with the 173-grain cast bullet SR 4759 load (8 rounds were crimped, and 10 rounds were not). To my surprise, all 18 rounds were on the paper and 14 of the 18 were in the black. It’s not that great a 100-yard group, but it shows potential. All this was with the ladder down using the battlesight zero sighting approach, so with cast bullets this rifle (at least with the SR 4759 load) is pretty much in the ballpark.
Cast bullets at 100 yards using the battlesight zero rear sight.
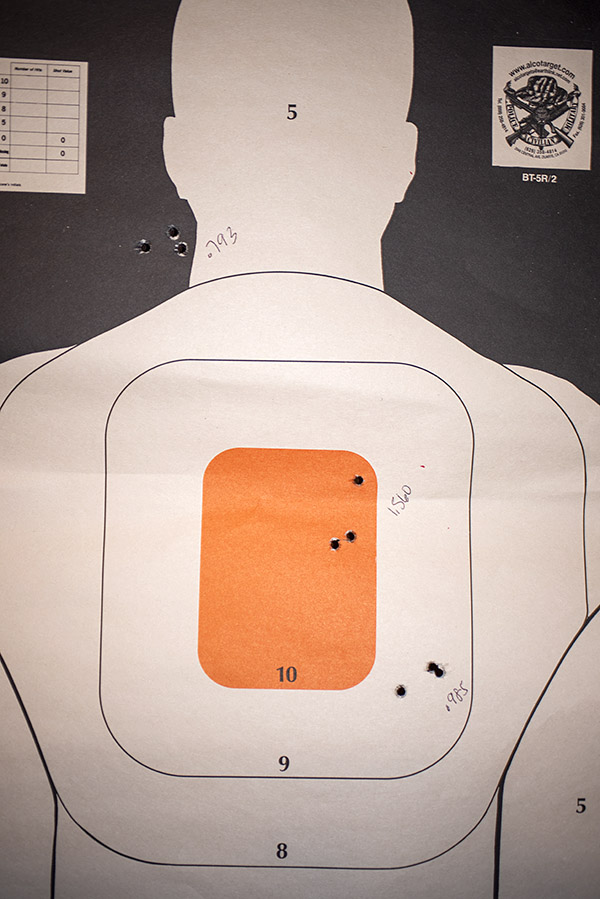
For the jacketed loads, I used the 150-grain Winchester jacketed soft point bullet (I bought a bunch of these a few years ago when somebody had them on sale) and 48.0 grains of IMR 4064. This is the accuracy load in the Lyman reloading manual with a 150-grain jacketed bullet, and I know from prior development work it is superbly accurate in my Model 70. It is also a minimum load, which is nice given the 1903’s steel buttplate. The 1903 did well at 50 yards with the Winchester bullets, so I posted another silhouette target at 100 yards. I fired three rounds and it was rough shooting at that target. Using the aperture, I literally could not see the orange bullseye at 100 yards when I focused on the front sight. The orange bullseye disappeared until I shifted my focus to the target. I’d acquire the bullseye, then rapidly shift my focus to the front sight and squeeze the trigger. I did that three times, literally firing blind, and managed to get a 3.050-inch 3-shot group.
The 150-grain jacketed Winchester bullet load at 100 yards. I couldn’t keep the orange bullseye visible using the aperture at 100 yards.
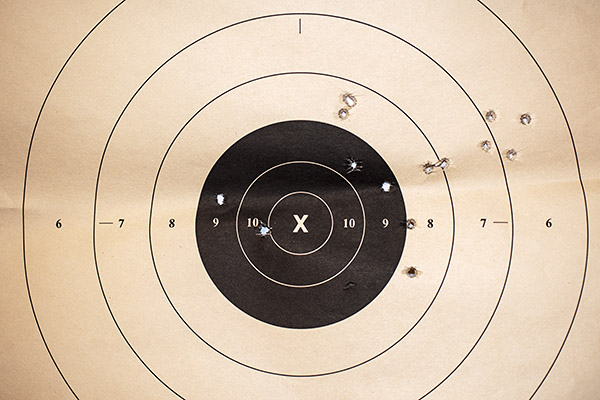
I figured it was time to quit while I was ahead. I didn’t have any more black bullseye targets with me. I knew I would be able to see those focusing on the 1903’s front post while sighting with the aperture. But with the orange bullseyes (like you see in the target above), I might as well have been shooting at night. I returned to the range a few days later and shot at 100 yards with the jacketed 150-grain Winchester bullets (with the 48.0-grain IMR 4064 load), the 210-grain cast Montana bullets (with the 17.0-grain Trail Boss load), and the 168-grain Speer match bullets (with a 48.0 grain IMR 4064 load).
Using the rear sight aperture, I shot the target below at 100 yards with the 150-grain Winchester jacketed bullet and 48.0 grains of IMR 4064. I was pleased with the results and I quit after 3 shots (I didn’t want to screw up the group).
Three shots into an inch and three quarters at 100 yards. The load was 48.0 grains of IMR 4064 and the Winchester 150-grain jacketed soft point bullet. Old eyes and an even older rifle sometimes do great things. My rifle was manufactured in 1918; I was born in 1951.
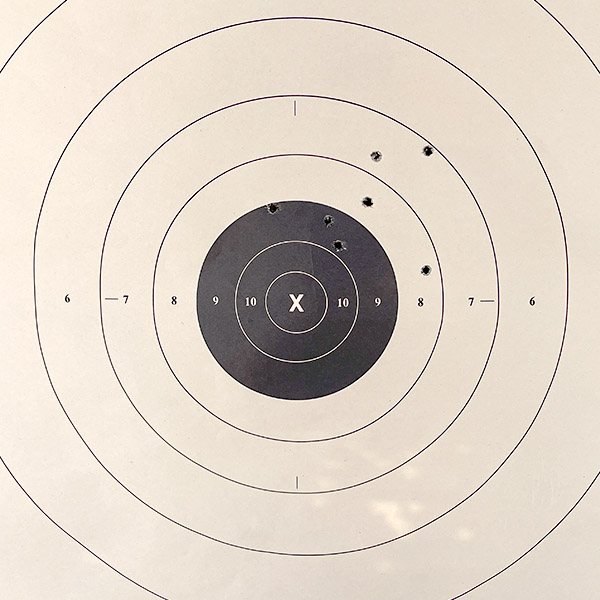
I then shot at another 100-yard target with the 210-grain Montana cast bullet (these were loaded with 17.0 grains of Trail Boss). I used the rear sight’s lower notch for this target. Hmm, what do you know…the elevation was about perfect without moving anything on the rear sight.
Another 100 yard target, this time with the Montana 210-grain cast bullet and 17.0 grains of Trail Boss. I used the rear sight notch immediately above the aperture without making any adjustments. This is a real sweetheart load with minimal muzzle blast, almost no recoil, and no leading. The cast bullets are not as accurate at 100 yards as are the jacketed bullets, but they are still pretty good.
Finally, I fired eight rounds originally loaded for the Garand (I reload for the Garand in multiples of eight, as that’s what a clip holds), returning again to the rear sight aperture. This load used the 168-grain Speer jacketed boattail hollowpoint bullet and 48.0 grains of IMR 4064 propellant. The Speer bullets are almost identical to the Sierra match bullet, but the Speer’s ogive is slighly different and it has less bearing area in the barrel. I called the wizards at Speer about that and they recommended going to a heavier charge than would be used with the comparable Sierra bullet (they specifically recommended 48.0 grains of IMR 4064 for the Garand). That load was a little warm in the 1903 (the recoil was significantly more than the 150-grain Winchester bullet and the primers had slight flattening). But it was reasonably accurate.
Eight rounds of .30 06 ammo loaded for the Garand, using the 1903 rear sight aperture, at 100 yards. The astute blogophile will note there appears to be only seven holes; the hole just outside the 10-ring had two bullets pass through it.
My observations and conclusions from the above are:
The 1903 Springfield rear sight is needlessly complex for an infantry rifle. You may feel differently. Hey, go start your own blog.
With my cast bullet loads, there was no leading. My cast bullets had gas checks (the little copper cup on the bullet base), which helps to prevent leading.
The Lyman cast bullet book showed a minimal 5744 load to be the accuracy load for the 210-grain Montana cast bullet. I did not find that to be the case.
Both the Hursman 173-grain and the Montana 210-grain cast bullets were extremely accurate with 17.0 grains of Trail Boss, at least at 50 yards.
The Winchester 150-grain jacketed bullet accuracy load, per the Lyman manual, was with 48.0 grains of IMR 4064. I found this to be a very accurate load. I didn’t do a lot of work developing a jacketed bullet load. I’m going to stick with this one for this rifle.
Orange bullseyes and aperture rear sights don’t work with my old eyes at 100 yards. They are okay at 50 yards, but not 100 yards.
Both of the jacketed bullet loads I tried (the Speer Garand load and the Lyman 150-grain accuracy load) are accurate. Without adjusting the rear sight from the 150-grain jacketed bullet setting, the Garand load shoots a little high and to the right, but the group size would fit into the bullseye if the sights were adjusted.
The cast bullets are not as accurate as the jacketed bullets at 100 yards. The cast bullets are comparabily accurate to jacketed bullets at 50 yards, but not at 100.
With regard to shooting both cast and jacketed bullets in the same rifle, I got lucky: As complicated as that 1903 Springfield rear sight is, I found that one rear sight position shoots to the same point of impact at 100 yards for both my cast bullet accuracy load and my jacketed bullet accuracy load. Yep, you read that right. With the rear sight crossbar secured as you see in the photo below, I can use the aperture (denoted by the right arrow) with the 150-grain jacketed bullet load. Or, I can use the lower crossbar notch (denoted by the left arrow) with the 210-grain cast bullet, 17.0 grains of Trail Boss load. Both will shoot to the same point of impact at 100 yards. A friend asked if I tuned the loads to do this. I wish I could say I had that kind of load development expertise. Nope, I just got lucky.
One size fits all (sort of). With the 1903’s rear sight in the raised position, I use the notch denoted by the arrow on the left for my cast bullet accuracy load at 100 yards. I use the aperature denoted by the arrow on the right for the 150-grain jacketed bullet load at 100 yards. I don’t need to move the rear sight cross bar up or down. Sometimes you just get lucky.
One final note that’s sure to set the Internet on fire: I know this is heresy. As much as I like my 1903, I think the 91/30 Mosin Nagant is a better rifle. My Mosin groups better at 1oo yards. But that’s a story for another blog.
Never miss an ExNotes blog:
Tales of the Gun: 1911s, revolvers, 9mm semi-autos, bolt action sporters, milsurps, reloading, big bore rifles, and more. It’s all right here!
Click on those popups, folks! It’s what pays the rent!
It’s been a long haul correcting double action misfires on my snubnose Smith and Wesson revolver, but the magnificent Model 60 is where I want it to be now. Here’s how I went about it.
My Model 60 had too much end shake (the cylinder had a lot of back and forth play). Shimming the cylinder with TriggerShim’s excellent shims quickly corrected that problem. Shimming the cylinder keeps it closer to the firing pin and that permits more energy from the hammer’s fall transferring directly into the primer. You can read our blog about correcting cylinder end shake here.
My reloaded ammo’s primers were not completely seated. When that occurs, some of the hammer and firing pin’s energy goes into fully seating the primer rather than firing it. You want ammo reloaded for use in double action revolvers to have very slightly flattened primers after the primer seating operation, and that can be achieved with Lee’s excellent primer seating tool. You can read about that here.
If a revolver is out of time the firing pin will hit the primer off-center resulting in unreliable ignition. If you shoot enough your revolver will go out of time. Correcting revolver timing typically involves fitting a new hand and you can read about that here.
If your revolver’s hammer spring has weakened over the years or as a result of use you can easily install a new Wolff hammer spring. We wrote a blog about that you can read here.
If you’re having problems with misfires in a double action revolver, the above areas are where I would look first.