Nose Job: 1971 Yamaha RT1-B Front End Refresh

By Joe Gresh

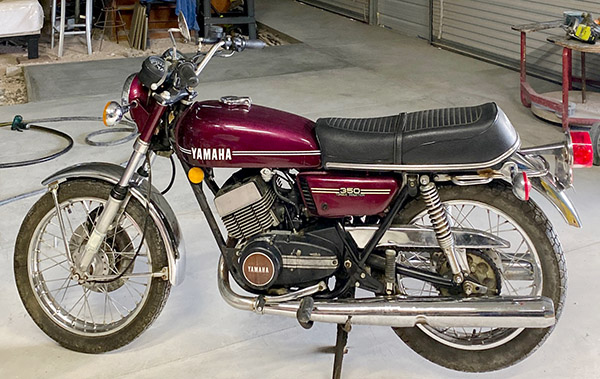
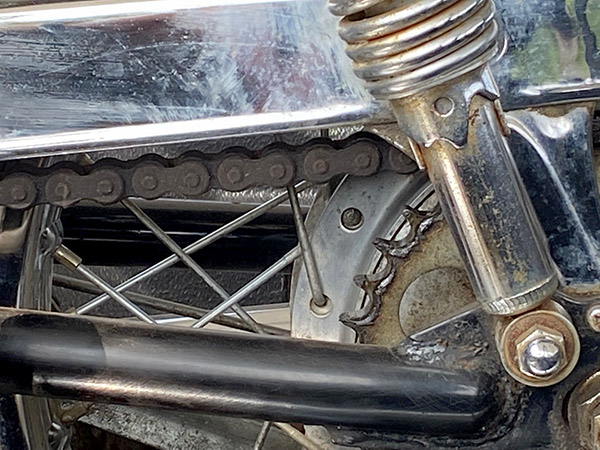
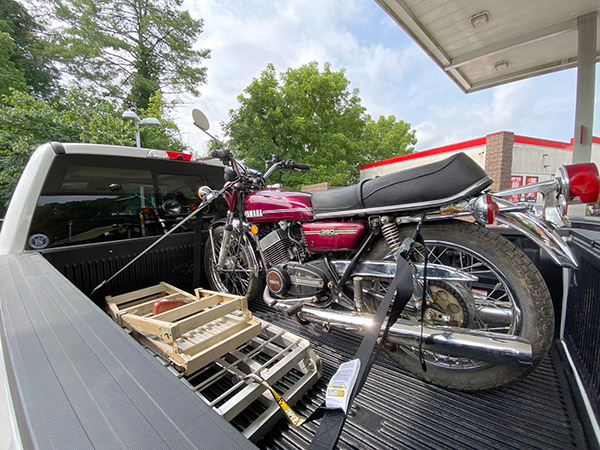
The Yamaha RT1-B 360cc that I call Godzilla has been my long haul dirt bike choice for years. The old Yamaha has criss-crossed the country on dirt and on pavement and I had it set up to carry a lot of gasoline and a lot of gear. Up front, I removed the non-functional speedometer/tachometer cluster and replaced it with a luggage rack. The rack worked great, it redistributed the weight of my travel gear and made the bike handle less worse than if everything was strapped to the back rack.

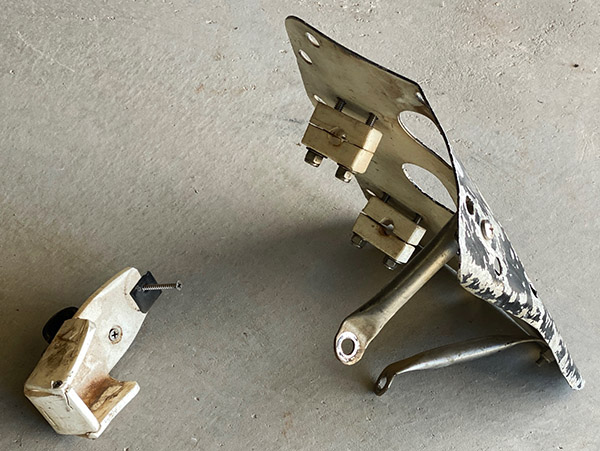
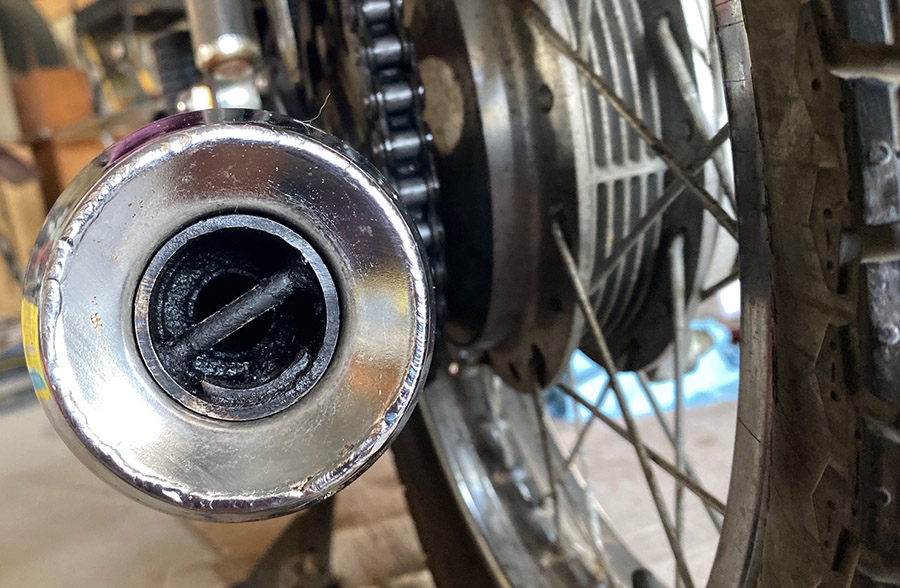
I crashed in Beaver, Utah a few years ago and mangled the front rack so I removed it for future repairs. While I was at it I got rid of the cheesy GPS mount that fit a GPS I no longer owned. Truthfully, I don’t need that stuff because haven’t been doing any long distance dirt rides lately. It seems like all my rowdy friends have settled down. Anyway, with that junk out of the way the view from the saddle was kind of sparse. I decided to freshen up Godzilla’s front end.

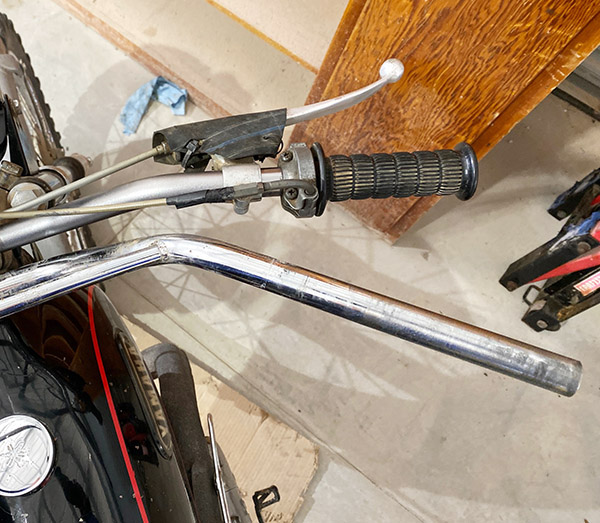
I rode Godzilla for many years with the stock handlebars (bottom bars) and they were fine. The last couple rides my wrists started hurting a bit and I think the sweep back angle was causing too much stress on my decrepit body. The bars on the Husky are almost flat across and very comfortable so I bought a new, lower, flatter bar (top bar). The new bar has no cross brace and is made of powder-coated aluminum; I’m hoping they flex a bit more to smooth out the really rough trails where I tend to crash.

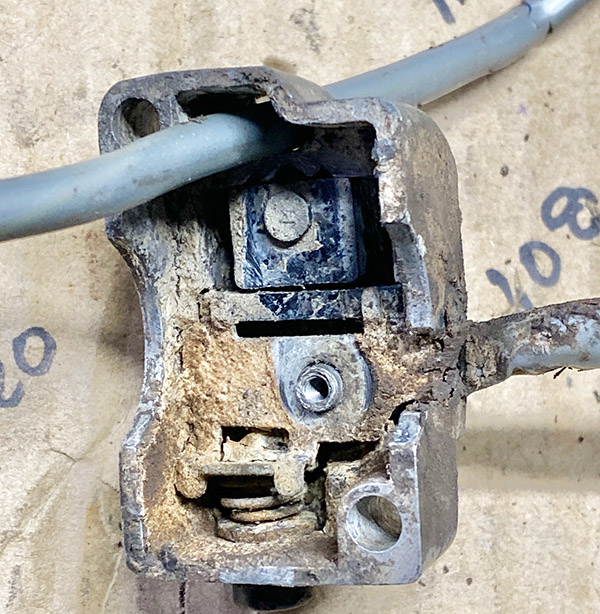
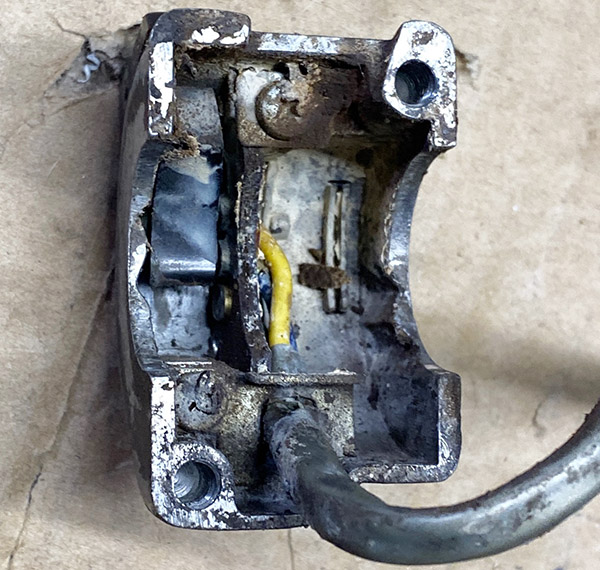
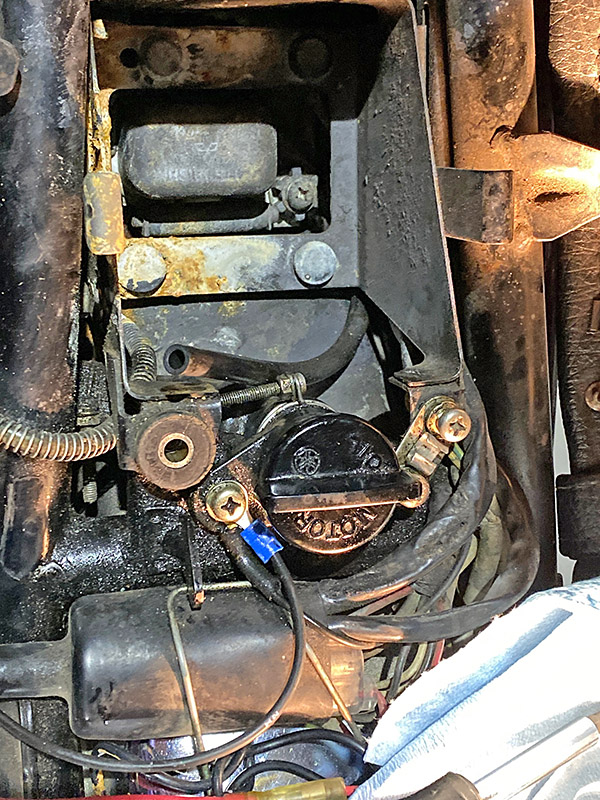
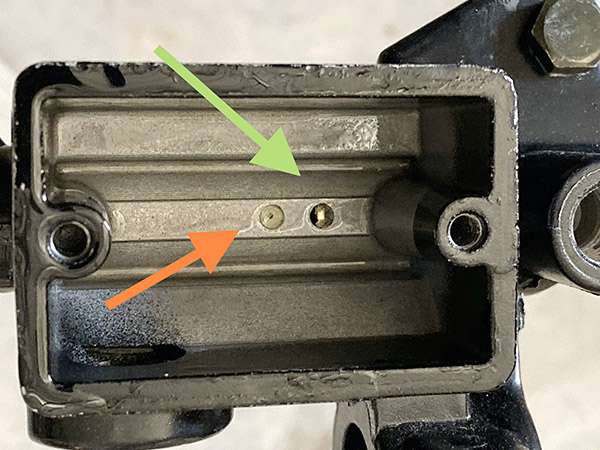
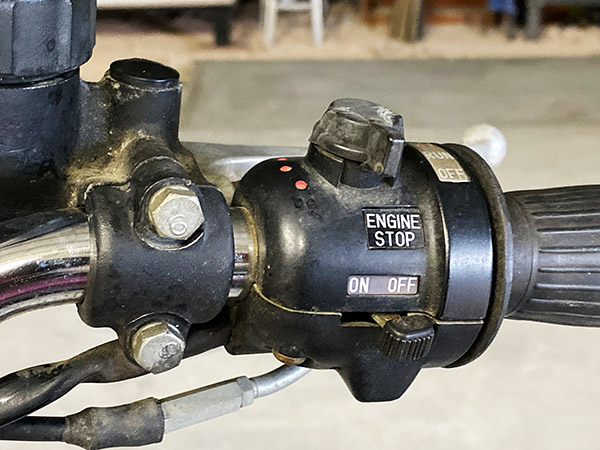
After replacing the handlebars my horn quit working. I figured that the process of removing and replacing the switch must have disturbed the rust inside so I dismantled and cleaned out the three switches in the control module. The horn button was really rusty and the other switches looked none too good, either.

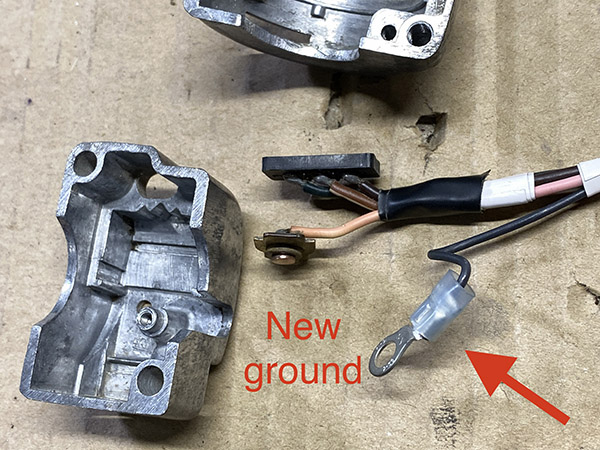
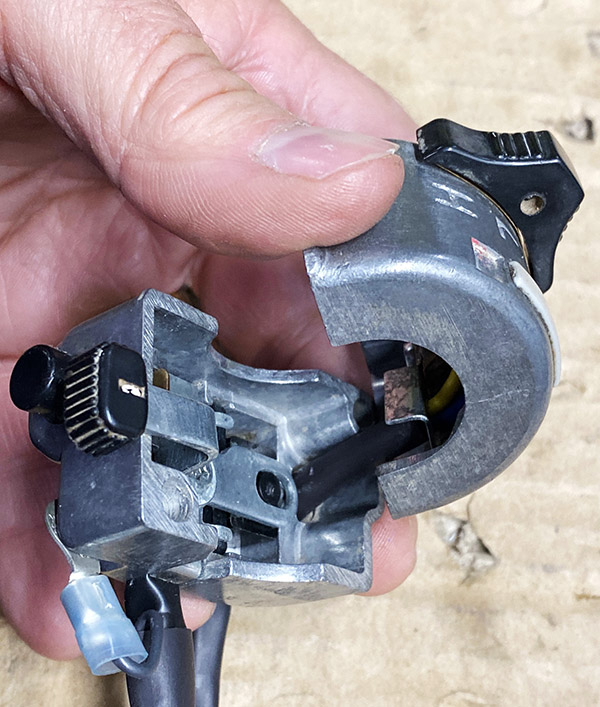
After all that work on the switches the horn still didn’t beep. The Yamaha wiring supplies the horn with power and the horn button grounds the circuit through the handlebars, triple clamps, and steering head bearings then on to the frame, which is grounded. This convoluted electrical path makes the horn go beep. I took the headlight apart and grounded the horn wire inside the headlight housing. It worked. Then I grounded the horn to the new handlebars: nothing. Turns out, powder coat is an effective electrical isolator. Instead of scraping the powder coat off to make a connection I ran an extra ground wire to the switch pod. Now I had a horn.

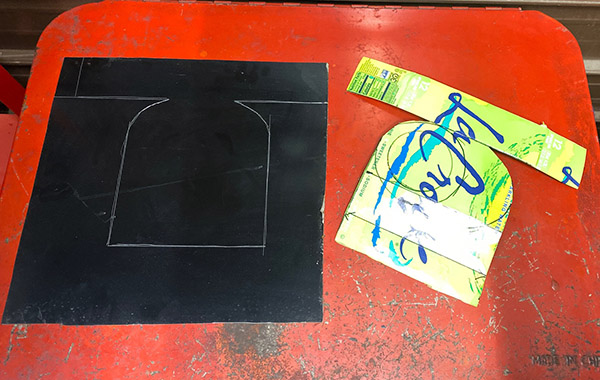
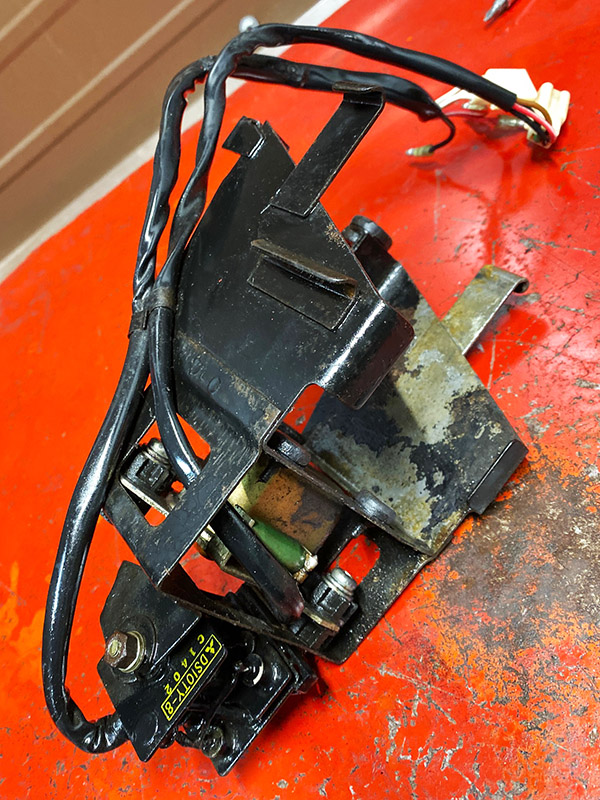
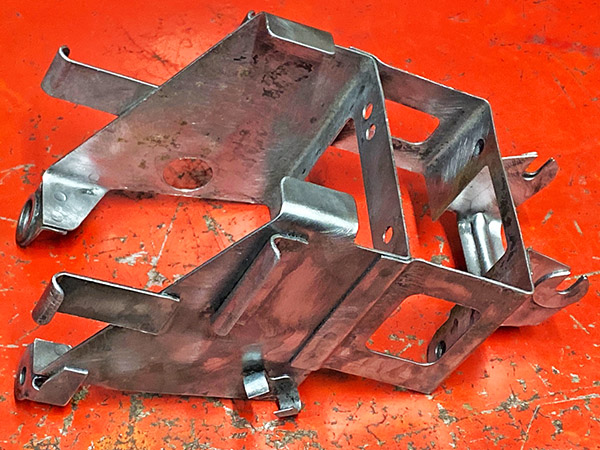
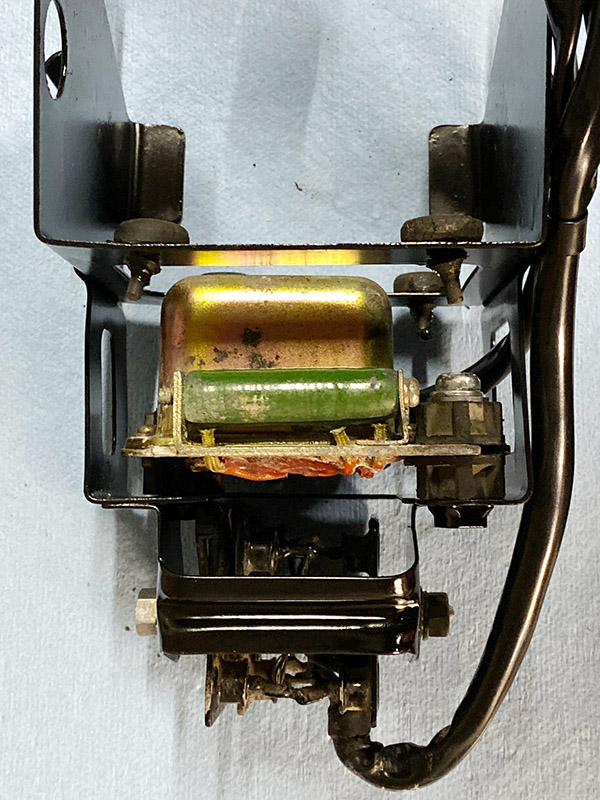
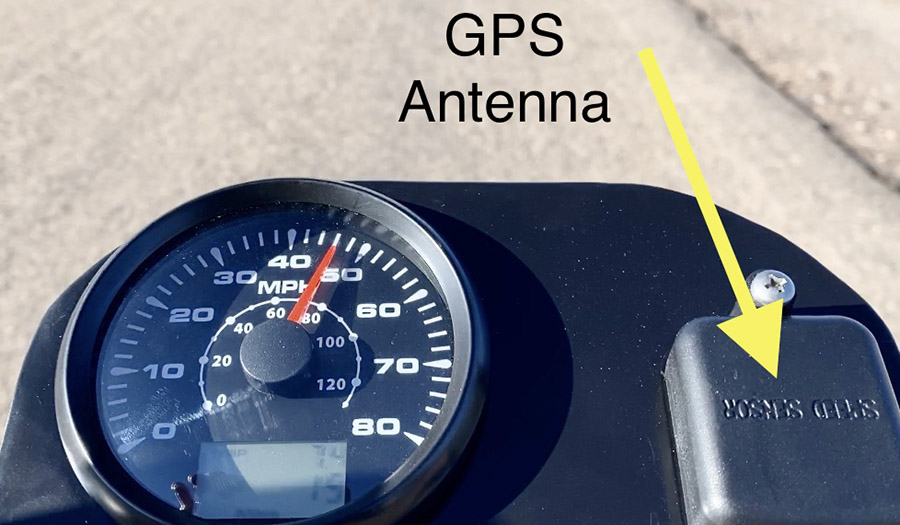
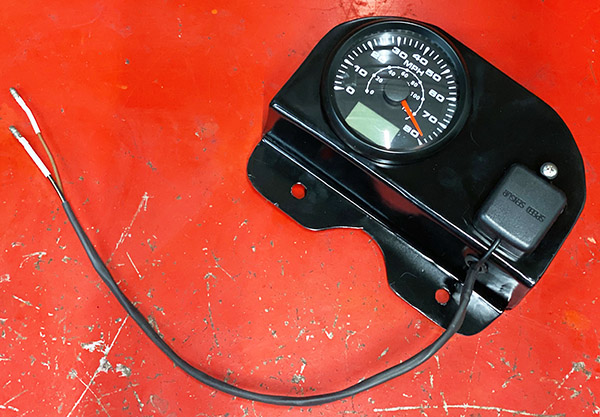
For a speedometer I decided to try one of those cableless, GPS, analog types from Amazon. The voltage input on the speedo is 9 to 32 volts and the thing powered up fine on Godzilla’s 6-volt battery. Since this fancy electronic wizardry was all new to me I also bought a 6-volt to 12-volt converter to make sure the speedo had plenty of voltage. All this junk needed to go somewhere so I made a LeCrox template and chopped the side out of a storage cabinet for sheet metal.

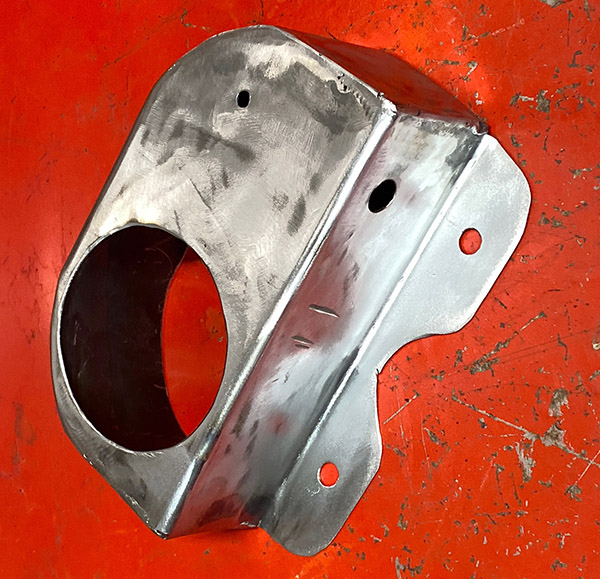
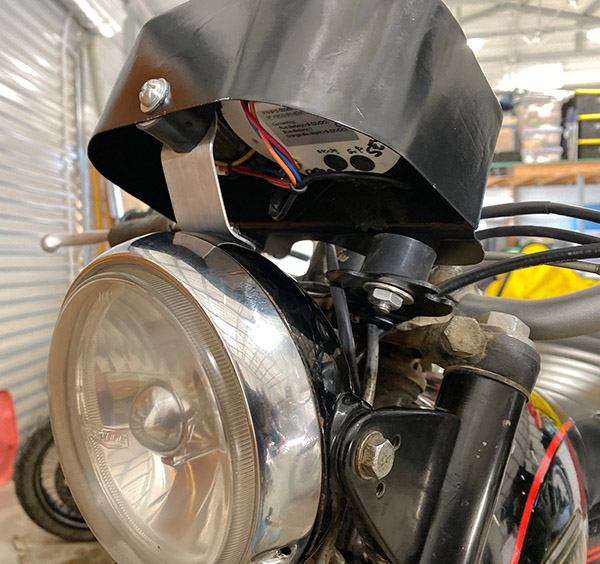
After bending and welding the gauge console I gave it a lick of spot putty and some black paint to hide the sins of my welding. Next all the pieces went into the housing and I pre-wired the speedometer so that it would plug into an unused, key-switched, 6-volt power wire inside the headlight.

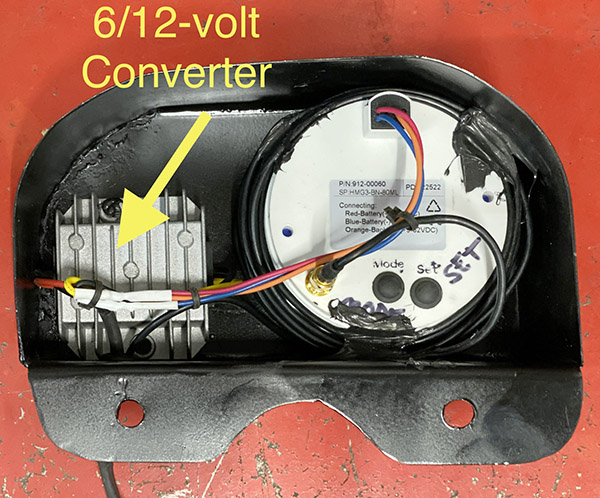
I used the existing Yamaha speedo/tach mounting base by adding a couple rubber lord mounts and assembled the whole mess onto the motorcycle. It powered up fine and was ready for a test ride.

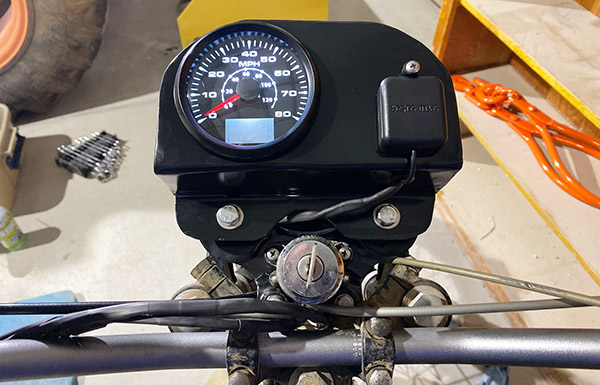
The test ride was a failure. Not because of the speedo (it worked great), but the cantilevered gauge console flexed the rubber mounts so much the gauge was dancing up and down like a set of those humorous, wind up chattering teeth. It was back to the shop for a quick brace on the front of the console.

I used the high beam indicator hole on the headlight shell and ran a short brace to another lord mount that steadied the gauge nicely. Now I can bang around in the dirt without the speedometer trying to slap me upside the head. Hopefully it won’t push the headlight aim down.

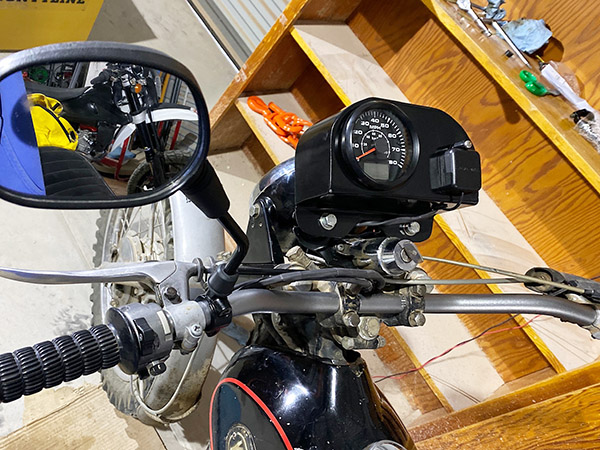
To finish off the front-end facelift I bought a new mirror to replace the crappy bar-end mirror. The old bar-end mirror was a bicycle part and never worked very well. It was there for legal, not visual reasons. The new mirror gives me a fairly clear view of what is going on behind me.

The GPS speedometer is smooth. You have to wait a few seconds while it acquires a satellite fix but from then on it seems just like a regular speedometer except it is accurate and the needle is steady. With no reception it won’t work indoors but I don’t ride far indoors. I zipped the RT1-B up to 75 miles per hour and all was well.

There are several functions you can access like different color backlights, Trip 1, Trip 2, odometer and compass. Trip 1 is sort of useless because it resets each time you turn the key off. Trip 2 supposedly saves the data and you have to hold a button for 3 seconds to clear it. The compass is a 360-degree type so you get a numerical reading instead of north, south, east and west. I’ll have to mess with the thing a little more to see how all this flimflammery works.

One thing I don’t like is that the mode and set buttons are on the back of the speedo. This is not a problem for a motorcycle because you can reach behind and push them. If the speedo was mounted in a car or boat dash this would be a deal killer. If I had it to do over I would try to find a unit with the buttons on the face. Also, it would be nice if the antenna could be incorporated into the gauge, eliminating the external antenna but that probably wouldn’t work in a car.

For a prototype my dash console works good enough. If the speedo holds up I may re-work the design a bit. If I flipped the mounting flange 180 degrees the mounting bolts would be hidden inside the console and it would move the speedo back a bit which I think would look better. As it is the gauge console has a clunky, AMF-era, Harley-Davidson look to the thing. I may remake the console using aluminum as the sheet metal one, while thin, is not very light. Godzilla is a high society motorcycle now with its modern, space age speedometer; I guess there’s nothing more for me to do but to join my peers down at the local Starbucks.


Help us continue to bring exciting content to you:  Please click on the popup ads!

Never miss an ExNotes blog:

Acid Reflux: Yamaha RD350 Battery Box

I’ve been putting miles on the 1974 RD350 in the last few months, almost doubling the 4100 miles that showed on the bike’s odometer when I first got it. As my confidence in the bike increases so do the miles racked up in a single ride. This increase in running time has led to a problem with the battery that was installed in the RD350.

The battery seemed to work okay; it held a charge and didn’t use too much electrolyte but the fill plugs located on top were seeping a bit of acid. The caps felt snug and the battery vent was not clogged yet after a long ride the acid-damp lay heavy on the battery and even started dripping down the sides. I sort of let it slide for a while. Riding the RD is too much fun and stopping the bike for maintenance seemed like a waste of good weather.

Now that it’s a bit cooler I tackled the battery situation. The acid had dripped down onto the swing arm and corroded the battery box along with the small coil spring that keeps the oil tank vent from kinking. My laziness always comes back to haunt me.

I took the battery box, along with the attached rectifier and voltage regulator out of the frame and washed everything down with a mix of baking soda and water. The affected paint fell off in large chunks. I dismantled the electrical components and soaked the battery box in Evap-Rust then wire brushed any loose paint.

It was a nippy week at The Ranch so painting the box in 50-degree weather was a challenge. I heated the rattle can and the battery box to within 2.8 degrees of each other (measured via a recently calibrated fingertip) then shot the box with primer and two coats of Krylon satin black. I used a brush to apply paint to the bare spots on the swing arm.

It all came out good enough and anyway, I’m riding this bike, not showing it.  The electrical bits, being directly under the battery did not suffer any acid corrosion. I cleaned them up and reassembled the mess into the motorcycle.

Many older motorcycles do not regulate their voltage as precisely as you would like and my Yamaha RD350 is one of the many. With the headlights on and engine revving I measured 14/14.1 volts at the battery. This is ideal. With the headlights off 15 volts were going into the battery. 15 volts is a little too high for comfort but I decided that since I leave the headlights on all the time the original regulator would be okay.

My good buddy Deet told me about using sealed, AGM type, alarm-system/UPS batteries in old bikes. I have had one of them in Godzilla, the 1971 RT1-B for a couple years and it has been working great. These type batteries hold a charge much longer than flooded lead acid batteries. The new one I bought on Amazon has a high tolerance for high voltage; it can handle up to 15-volts charging. These AGM standby batteries can withstand constant trickle charging and long periods of inactivity, which describes vintage motorcycle riding to a tee. The small spade terminals on these batteries are not made for large current loads like an electric starter or lighting up the strip in Las Vegas but they can handle motorcycle lighting and ignition circuits without complaint.

At 4AH the new battery has a bit less capacity than the leaky old 5.5AH unit I took out but I think it will work okay. Close enough counts in hand grenades, horseshoes and motorcycle batteries.

The new battery is a skosh smaller than the old battery so I used some closed-cell packing foam to keep the thing from rattling around inside the battery box. The RD350 is once again ready to rumble. From my experience with the RT1-B, I’m not anticipating any problems with the RD350 but I’ll be sure to let ExhaustNotes readers know if I have any issues with the new AGM set up.


Do a friend a favor or ten:  Click on those popup ads!


Never miss an ExNotes blog:

ExNotes Rally Review: 2022 VJMC 45th Annual Meet In Eureka Springs, Arkansas

I have a hard time in Eureka Springs, Arkansas. The place is cursed, man. I either drink too much and get sick or don’t drink enough and make semi-lucid promises to people I only recognize by their colored lights, shouted conversations and loud music. By one o’clock in the morning Eureka Springs feels like I am wearing those flippers skin-divers wear on their feet. I look back fondly to my post Eureka Springs restroom sessions over a white porcelain toilet. It’s a refuge from the tourist anarchy. As long as I stay hunched over watching the better part of my gastrointestinal system swing lazily before my eyes I can’t possibly get into any more trouble.

Eureka Springs is situated in a steep, narrow gully filled with hippies, old buildings, artists, bars, restaurants, and music. Known for its healing mineral springs the town has always been a tourist spot that gives an buttoned down guy like me the impression he can hang out with the cool cats, if only for a day. It was a false impression.

Regardless of how it happens, I end up with my comically large feet awkwardly slapping the ground unsteadily and in a dead run. It’s my traditional way to leave Eureka Springs. So when Hunter sent me a link about the Vintage Japanese Motorcycle Club holding their 45th annual rally in Eureka Springs the first thought that popped into my head was “Oh no, not again.”

Hunter and I don’t have a lot of time to ride motorcycles lately, you know? Life is speeding by and eventually only one of us can end up owning Godzilla. There’s this whole, cats-in-the-cradle vibe going on. Losing a few years to the pandemic and chasing the American Dream doesn’t help much. What the hell, I’m old and expendable; I’ll try Eureka Springs one more time.

The plan was to meet at Hunter’s place in Oklahoma and ride our vintage Yamaha enduros to Eureka Springs, A distance of 200 miles or so. I tossed Godzilla into the truck and headed east. When I got to Oklahoma Hunter’s bike needed work and it was about 150 degrees outside. We decided to keep on going in my truck as Hunter stores another old Yamaha at his beat up shack in Eureka Springs.

The VJMC event was held in a gigantic Best Western located just outside of downtown Eureka Springs. It was the biggest Best Western I’ve ever seen, the place had three or four buildings, one of which was taken up by the VJMC. We came in on the Saturday and the greater part of the vintage bikes were not there yet. I asked some official-looking VJMC dudes, “Can we wander around and look at the bikes?”

“No, the show is only for VJMC members, if it was outdoors the public could see the bikes but for insurance reasons we can’t let you. You have to sign up for the rally.” There were maybe 20 bikes in the show, mostly Hondas. Hunter tried to explain to them I was a famous moto-journalist but none of the crew at the sign-in desk had heard of Motorcyclist magazine. It’s amazing how fast a star can burn out. The entry fee for the rally was pretty steep. The wizened old codger behind the desk decided to cut us a break. “Now, if you were VJMC members we can let you look around but you can’t participate in rally events.”

I bit, “How much to join the VJMC?” Turns out $35 for a year’s membership and with that you get a subscription to the VJMC magazine, an actual paper magazine. In this manner Hunter and I became part of the VJMC people. It was getting late and the taco truck across from the Best Western was calling our name so we beat it of of there vowing to return the next day when the vintage bike show would be at full strength.

Oark, Arkansas is a gas stop on the Trans America Trail. Oark also sells really good hamburgers. Hunter and me rode bikes down there on Sunday morning before it got too hot. Oark has changed a little since I was there so many years ago. The waitresses were younger and not so abusive. The interior had more tables and it was cleaner. It took some of the edge off the place.

By the time we finished our burgers it was getting late and the vintage bike show was waiting. Eureka Springs gets a lot of Harley-type bikers day tripping on the weekend and we managed to get stuck behind a slow moving train of the stuttering, popping, fart-bikes. They were weaving back and forth in the lane like they saw actor-bikers do in those 1970s Hell’s Angels movies. Hunter peeled off the main road and we blitzed through a small state park. At the other end of the park/short cut we came out just ahead of the fart-bikes. Hunter made it into the lead and I followed up on Godzilla passing the first farter in the train. One of the tattooed ladies riding pillion flipped us the bird as we pulled out in front of them. Just like in the movies. Godzilla laid down a fine blue fog for the fart-people to ride through.

The bike show had around 60 bikes; the majority were Hondas but there were enough Yamahas and Kawasakis to keep the big, red H honest. I didn’t see many Suzukis. The Best Western had two rooms with bikes and they spilled out into the parking lot. I parked Godzilla a discrete distance away so as to not shock the VJMC attendees. The bike show was a judged affair and as such we didn’t stick around to see who won. It doesn’t matter really. They’re all winners in my book. You know, the one I wrote called, “They’re All Winners.”

We missed the VJMC dinners, meetings and group rides because we didn’t sign up for the rally. That kind of geeky fellowship doesn’t appeal to me as much as it used to, and my old Yamaha is so ratty it wouldn’t do well in a show against new-looking bikes. If you like that sort of rally stuff there was plenty of it to do at the 45th VJMC rally.

It was a special day for me on Monday. You see, I’d made it out of Eureka Springs without any cellular level damage. Our old bikes ran fine; we rode about 180 miles over the weekend. I regulated my alcohol consumption and promised nothing to anybody. Staying away from downtown helped, although there was a hippy-dippy gathering at the big, natural amphitheater on the main drag. There was live music. People were dressed funny in purples and pinks. It started to get to me.  I wanted to take my clothes off and run around naked but that would be old Eureka Springs behavior.

There are a couple things I would do differently if I was in charge of the VJMC. Of course it’s easy for me to critique because no one will ever put me in charge. The first thing I’d do is get the word out better. I have several vintage Japanese bikes and frequent many vintage sites and social media pages, even the VJMC’s own page on Facebook. I didn’t hear about the 45th until Hunter ran across it somewhere and told me about it.

I’d make event information clearer on the VJMC website. I could never figure out if I had to join the rally to attend the bike show. As a struggling writer, the rally was out of my price range and only when I was at the registration desk did we sort out a work around that allowed me entry to the show. And that was because one of the guys working the desk came up with a nifty plan B.

Next, why not invite the general public? It could increase membership if you charged a $35 entry fee to the bike show that included a year’s membership and a subscription to the magazine. Toss in a T-shirt! Finally, get someone at the VJMC to answer emails. I sent emails to the VJMC president and the person in charge of membership asking about the 45th event: crickets. Maybe the website has outdated contact information. No one has ever got back to me yet. I’m both old and into vintage Japanese bikes so I imagine I’m the target market. Not getting back to old guys makes them cranky.

We made it safely to Hunter’s ranch in Oklahoma and I only got one speeding ticket right as I crossed from Oklahoma’s No Man’s Land into the Texas panhandle. Even that wasn’t so bad as the cop chatted me up about Godzilla. His grandpa had an old RT1-B just like it. When I told Hunter about the ticket he knew the cop. Apparently it’s a popular speed trap. It was good to see Hunter again. It was good to ride a little dirt on the RT1-B. Life is short: go to the vintage bike show, any vintage bike show, if you get a chance.


Never miss an ExNotes blog:


You know the drill.  Do us a favor and help keep the lights on:

Hit those popup ads!

Yamaha RD350 Part 5: Stop Me If You’ve Heard This…

I have a bunch of projects stacked up here at Tinfiny Ranch but I really wanted to take the RD for a spin. One little problem: the front brake was not working on the motorcycle. I can ride with a lot of stuff out of commission on a motorcycle, like no air in the tires or a spark plug fouled but I can’t ride without a front brake. So I played hooky from my responsibilities and dug into the brake system.

Installing the aftermarket brake caliper was a doddle, it fit perfectly. The same was true of the aftermarket master cylinder on the right handlebar. The issue came when I filled the brake reservoir with DOT3 and started bleeding the air. I got nothing, zip, nada. Not amount of pumping and bleeding would produce a drop of brake fluid at the caliper.

I thought maybe the new master cylinder was bad so I loosened the master cylinder banjo nut and gave the lever a squeeze. Brake fluid shot out all over my RD’s beautiful purple paint. I was fast with the water hose rinse so no damage was done; at least now I knew something was plugged.

Taking the entire system apart revealed both upper and lower rubber hoses were plugged solid with dried up brake fluid. It took a length of bailing wire worked back and forth to clear the hoses. Then I squirted brake cleaner aerosol through the lines until they ran clear. I also blew out the brake switch manifold, as it was easy to get to with the rest of the brake system dismantled. Before you get all Internet Outraged, I have new rubber brake lines on order. The cleared hoses are temporary just to see if the bike runs ok.

Putting everything back together I could bleed the system and got fluid out of the caliper but the lever didn’t want to build much pressure. I read somewhere that if you pull the lever back to the handlebar and tie it off leaving it that way will get air out of the system. I don’t see how it can but I tried it. It didn’t work.

The next day I tried bleeding the brake again. I was getting good fluid without any air but the lever needed rapid pumping to get pressure on the disc. In short it sucked. I started thinking that there must be something wrong with the new master cylinder and took it apart. Everything looked good inside the bore. The piston and seals looked new.

Reassembling the master cylinder I noticed the lever didn’t completely release from the piston. There was no free play. No play at the master usually makes the brakes pump up not the other way around but I was open for ideas. The after market unit did not have a free play adjusting screw like the stock Yamaha master. I had two ways of adjusting the free play: Grind the lever where it contacted the piston or cut a sliver off the lever stop so that it could travel farther from the handgrip.

I cut a thin sliver from the stop and gained a bit of play. Putting the master back on the bike and bleeding the system again yielded the same results. There was no pressure until the last bit of lever travel.

This led me to examine the inner workings of the reservoir. It seemed like the return hole, the orifice that allows the fluid to return to the reservoir at rest, was bypassing a lot of fluid for the first 75% of lever travel. Plugging the return with my finger (the red arrow) immediately made good pressure at the lever.

You and I both know you can’t very well ride a motorcycle with your finger in the reservoir. It’s not conducive to proper control. I debated plugging the return hole and drilling another further up the bore to make the piston build pressure sooner and was nearly ready to attempt it when a tiny little voice in my head said, “You’re screwing up, Gresh.” I’ve never heard that voice. Must be old age.

At that point I gave up and ordered an Ebay rebuild kit for the stock Yamaha master cylinder. It irked me to no end that the kit cost more than an entire new, non-working master cylinder. The kit showed up and of course it was not at all like the original. The piston differed where the spring connected. The original had a plastic bobbin to seat the spring where the new kit simply lets the spring push directly onto the seal. I suspect the spring will eventually cut through the seal. When that happens tag my tombstone with “He rebuilt master cylinders.”

Until that day I’ll have brakes because the rebuilt master cylinder bled as normal. The RD350 has a killer front brake now. I’m serious: the RD350’s braking is only a step or two behind most modern bikes. It’s amazingly good and will stand the bike on its nose.

Finding a stock air filter was impossible so I sprung for a foam-type Uni filter from Dennis Kirk. It was on sale but still pricy and it fit the RD air box well; if anything it’s a bit too snug. Along the same air-flow lines I pulled the baffles out of the mufflers for cleaning. They were not very dirty leading me to believe the mileage on the bike is lower than the 20,000 the title states.

With a clear exhaust pipe, fresh new air cleaner and working brakes I took the RD for a 15-mile, unregistered spin and the thing ran like a dreidel. I ran through the gears and got to 80 miles per hour in short order. Everything seems to work and the next step will be to repack the steering bearings, replace the fork seals and install new brake hoses. The carbs might need a little synchronizing and I’ll work on that once I get around to lubing all the cables.


More Joe Gresh Resurrections!


Never miss an ExNotes story…subscribe here for free!

Yamaha RD350 Part 3: Possession is Nine-Tenths of The Law

The RD350 made a convoluted journey but at last it has arrived at Tinfiny Ranch. Originally I was going to fly out to my buddy Deet’s house in North Carolina and spend time there getting the bike in top shape for the ride back to New Mexico. That was a good plan but I’ve been stretched pretty thin around the ranch and the incomplete projects have been outnumbering the completed ones by a wide margin. Did I really want to take another motorcycle apart? Now? Not to mention that my New Mexico tag lady cannot issue temporary tags since some kind of rule change in August. That meant I would have to ride across most of the southern states with a license plate borrowed from one of the other bikes. Scenes from the movie Deliverance played in the theater of my mind.

Hunter (left) and Deet (right).

Plan B was for me to drive out to North Carolina and retrieve the RD350, pile Deet into the truck and have a grand adventure on the way to New Mexico. This seemed like a solid plan until Deet started thinking about being stuck in a truck with me for three days and then sleeping on the concrete shed floor until I took him to El Paso for a flight home. He’s kinda funny in a George Thorogood way.

Plan C was for Deet to load the bike into his truck and drive it out to Tinfiny Ranch. “I’ve got to have my own wheels.” Deet told me over the phone, “I want to go when I feel like going.” Plan C-1 came about because it had been a while since we Messed With Hunter in real life. Videos are fine but nothing beats hand-to-hand smack talk.  Plan C-1 had Deet driving to Hunter’s new house in Oklahoma with the RD350 in his truck and me driving to Hunter’s. There, the two of us would mercilessly tag-team harass the old sodturner.

And that’s how it went. We unloaded the RD at Hunter’s and loaded it into my truck. Deet took back Hunter’s 1968 DT-1 for a full restoration job back at Enduro Central and I dragged the RD back to Tinfiny Ranch.

It’s tempting to put off the concrete floor project and mess with the RD350 but long time readers will remember that I also have the Z1 carbs apart on the work bench. It’s time I finished something. I can’t just keep taking things apart.

The RD is in beautiful condition considering its age. At $4,250 this is the most expensive motorcycle I’ve ever bought. The paintwork has a few small scratches and some fading but I’ll be leaving it as is. From 10 feet away it looks practically new. Everything looks stock, if not original. The gas tank is clean inside and may have been replaced some years ago. The paint matches well but the decals look a bit newer than the decals on the side covers.

There is a bit of confusion on the mileage. The title says 20,000 but the odometer says 4,000. I imagine the speedometer was replaced at some point in the distant past. The seller, a Flipper, was not sure how many miles were on the thing. The RD350 certainly looks low mileage.

The Flipper put a new battery in the RD350 and the lights and switches seem to work ok. I think there may be a bulb out in the speedometer backlighting. The battery seems to charge, even the blinkers work! This bike still has a headlamp switch unlike modern bikes that have the lights on all the time. I have a key, too!

Being original is less important to me than having all the stock parts. Over 47 years it would not be unusual for repairs to be made on a motorcycle. Normal wear items like foot pegs and the seat cover look in good condition. This bike has not been beat up. The engine starts first kick, revs and idles well with no unusual rattles or knocks. The chrome is in very good condition and will polish up like nobodies’ business. In a first for me, the stock tool kit is still under the seat in its original, thin, black plastic pouch.

A few things I’ll be doing on the RD350 when I get tucked in are a new air filter as they tend to crumble and clog the carbs, new tires and tubes, fix the front hydraulic brake, grease the wheel bearings, adjust the clutch, change all the fluids, replace the outer crank seals, clean the carbs, clean the exhaust baffles, re-grease the steering head bearings, lube all the cables, add inline fuel filters and whatever else I come up with. It sounds like a lot but this is typical for old bikes needing to be made street worthy after sitting. Really, you can hop on the bike and ride it right now.

Most of the vintage bikes I’ve had in my life were in terrible condition when I got them. This Rd350 breaks that mold. I paid more at the onset but I have much more to work with than usual. I’m amazed at how little I have to do to get it running and cosmetically the thing just needs a bath and a polish.

The concrete floor and the Z1 carbs come first but that doesn’t mean I won’t be ordering parts for the RD350. Watch this space for Hasty Conclusion reviews and further updates on the RD’s progress.


Never miss an ExhaustNotes blog!


More Joe Gresh Resurrections?  They’re right here!

Two For The Road Part 1: 350 Yamaha RDreaming

One of my long-time dream bikes has been Yamaha’s RD350 twin built back in the mid-1970’s. My old buddy from childhood, Billy Mac, had a new 1973 RD350 and every time I rode it back then I was amazed at the power and agility of the 350cc two-stroke twin. The bike could do it all from off road to flat tracking sideways in asphalt parking lots. With power, braking, handling and style, a RD350 had it all over the other bikes built in that era. I never forgot the thrill of riding such an utterly competent motorcycle.

The 1974 RD350 was my favorite year. The deep purple paint and tasteful graphics were made for royalty such as I. Prices for RD350’s keep slowly climbing and seem to always stay just out of reach on my personal value/desirability scale for vintage motorcycles. Stock bikes are getting harder to find as every Teen-Spirit RD350 owner butchers the bike trying to improve on perfection.

Last week, on a routine Craigslist scouting mission I came upon this RD350, my RD350. The thing is bone stock and I paid too much for it but I really don’t have that many years left to spend looking for the ultimate barn find deal. I sent a link to my wife, CT, and she said “If you don’t buy the thing I’m going to buy it for you.” She knew the bike was The One as I have been telling her about how great RD350’s are for many years.

My next step was to get a set of trustworthy eyes on the machine as it was 1700 miles away. A call to Deet, AKA Dr. Enduro, was made and he agreed to enable my addiction by driving 3 hours each way to look at the bike. And, oh yeah, buy the bike for me. The bike price was at the top-end for RD350’s but was in much better condition compared to other top-price bikes I have checked out online.

“The bike started first kick and sounds fine.” Deet told me. I left the purchasing decision up to Deet, as I could add nothing to the mix from my lair in New Mexico. The seller was a flipper and knew his values well. Thankfully he had only replaced the battery and left the bike as he found it, which was fine by me. Deet managed to beat the seller down $350, understandable as it was Deet’s money funding my dream. So we ended up at $4250. I know, I know, it’s a lot of money for an old bike.

The bike is now safely ensconced inside Deet’s top-secret Enduro hospital and after I get a few things done around here I’ll be heading to North Carolina to retrieve my prize. I guess the only question left is do I ride it back to New Mexico or bring it home in the truck?


(All photos by Deet.)


More Gresh!


Never miss an ExNotes blog!