
With only two full-time writers here at ExhaustNotes.us, it’s a real challenge to churn out the quantity of content a website demands. Luckily we have Joe Berk on staff. One Berk equals like seven normal writers. Coming up with topics is easy but some of the ideas don’t rise to the level of an actual ExhaustNotes.us story. I’ve swept the floor at the luxurious ExhaustNotes.us office plaza and tossed all the bits into this blog post.
Reaching in through the bottom of the chicken we find that the 1975 Kawasaki Zed has been having a few problems as of late. The far right-side carburetor was spewing gasoline sporadically so I purchased 4, generic carb repair kits online. I really only needed the float needle and seat but at $14 a kit it was cheaper to buy the whole shebang rather than just the seats.
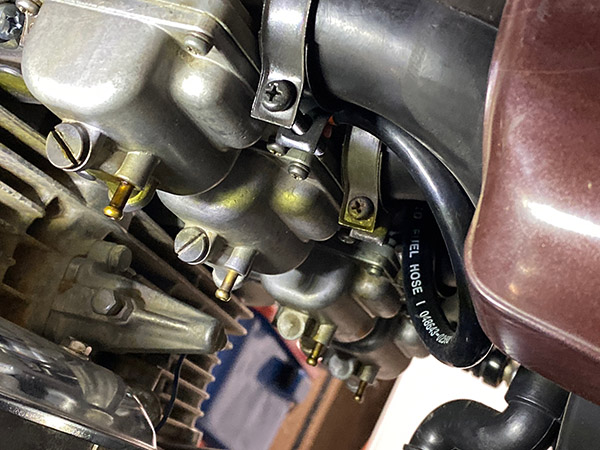
The carburetors sit relatively high off the crankcase on a Kawasaki Z1 so most carb circuits can be accessed from the bottom or top without removing the whole bank of 4 carbs. You can get to the idle jet, the main jet, the needle and seat and even the slide needle and emulsion tube if you’re willing to struggle a bit. When I say access theses parts I don’t mean to imply that it’s easy to do. I have the cuts on my hands to show for it.
After 3000 miles of running I was surprised by the lack of debris in the Kawasaki’s float bowls. If you followed Zed’s resurrection you’ll know how rusty Zed’s tank was. I expected the main-jet sump to be full of fine red dust. Installing the new needles and seats was a fiddly job but I managed to get them in and replaced the pilot jets just because I had them. I left the original main jets in place.
Before turning on the fuel I checked the fuel filter on the petcock and found it clean. I bought new inline filters but seeing how clean everything was I left the old inline filters alone. Don’t fix it if it isn’t broken is a good motto to live by with aging motorcycles.
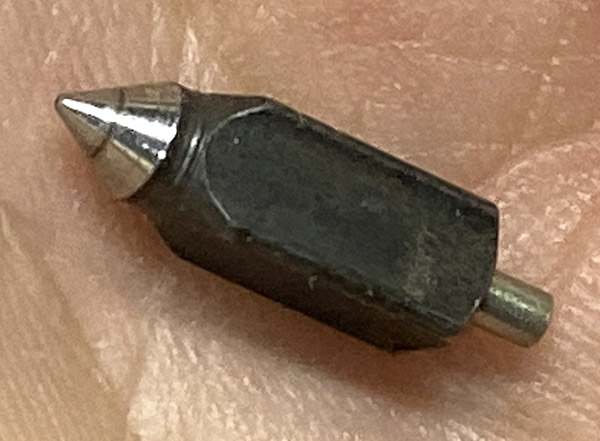
As soon as I turned the petcock on fuel started pouring out of Carb Number 3 (from the ignition side). Of course this is the hardest one to work on. I pulled the float bowl back off and removed the float and the needle. Everything looked ok. Figuring a piece of dirt must be in there I blew carb cleaner into the seat and reassembled the carb. Back together with the petcock on, the fuel leaked as bad as it ever did.
I took the float bowl back off and removed the float. Holding the needle in place with my finger I turned on the petcock and gas poured down my hand, onto my wrist and up the sleeve of my shirt. This led me to believe there was a problem with Number 3’s new needle/seat.
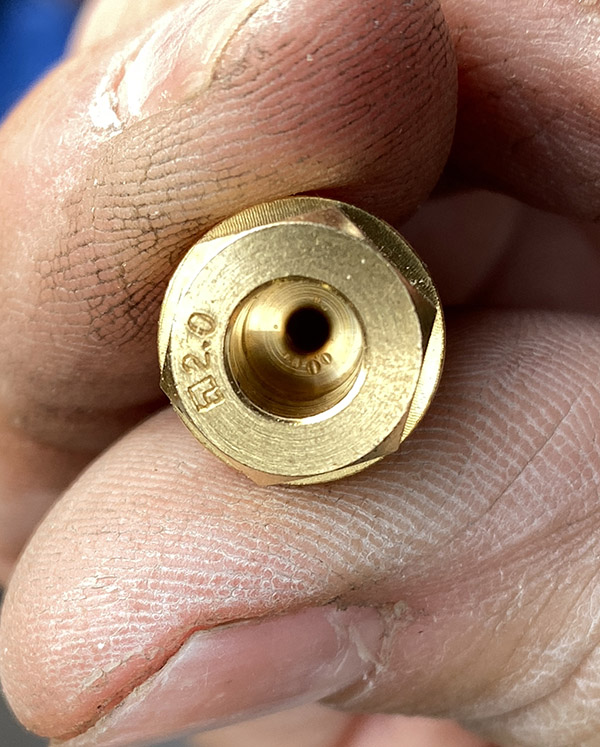
Upon further examination I found some unexplainable marking on the inside of the seat where the needle valve would normally seal. I’m not sure what is going on. Are the stampings some kind of size identifier? Did the punch that marks the seat miss and stamp the inside of the seat?
It became obvious to me that this particular needle/seat combination was never going to seal so I picked the best looking needle/seat from the old parts and installed them into Carb Number 3. No more leaking.
For the real mechanics: I know I should reset the floats but the bowl drain screws are very tight; removing them may break something I don’t want broken. My rationale is that the replacement needles/seats are the same overall length so the float levels wouldn’t have changed much, if at all. One day I’ll get the drain screws out and set the float levels using the clear tube system.
The upshot is that Zed is running much better. I took a quick, 140-mile, 60-degree-January-day jaunt and stopped several times leaving the fuel petcock on: no leaks. Spinning 5000-5500 RPM in top gear the Zed returned 41 miles per gallon not including the amount of fuel that I spilled while working on the carbs. In addition, I had to turn the airscrews in almost one whole turn after installing the new needles/seats and pilot jets.

Moving on from the carburetor woes, there are a few disappointing rubber-issues with some parts on Zed. The rubber fork wipers have split in just a little over a year. I really expected them to last a bit longer than that. The rubber vacuum plugs that cover the ports used for balancing the carbs have also rotted and split. These were new about the same time as the fork wipers. Not only are the vacuum plugs rotted, but one of the brass nozzles cast into the new rubber intake manifolds came adrift when I tried to push the vacuum plug into position. Luckily it didn’t go all the way into the intake port and I managed to pull it out and get the plug onto the thing.
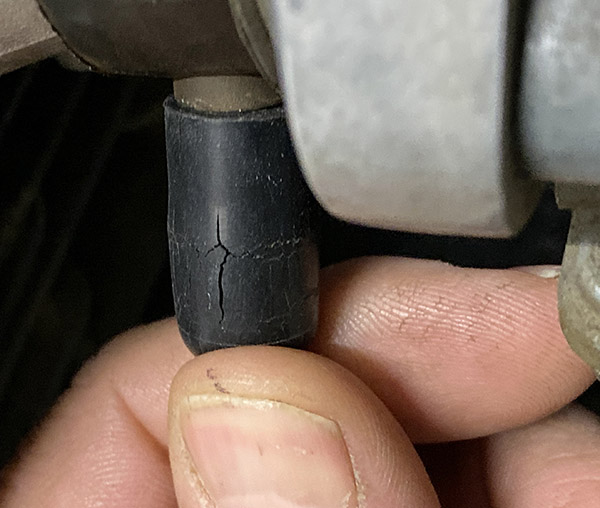
When I was resurrecting Zed I sourced parts from all over. I’m going to try and dig around to see if I have any receipts that will tell me where I got the various rubber bits. If they are EBay sellers I won’t bother but I’m sure the more reputable companies will work on making it right. One factor that may have caused the rubber failure is the fact that Tinfiny’s shed gets very hot in the summertime. With the doors closed it’s not unusual to hit 130 degrees inside. 130 degrees isn’t that hot for an air-cooled motorcycle engine but New Mexico’s dry air combined with long term exposure might affect the rubber. None of my other bikes stored in the same conditions have had rubber failures.
Well, what do you know, I had more ground to cover but this carb story ended up running on for so long it’ll make a standalone ExhaustNotes.us blog! I’ll post up Giblets 2 soon.
Read all about Zed’s resurrection here!
Whoa! You’ve won a free subscription to ExhaustNotes!
A lot of the rubber components that are cheap and readily available have come out of Taiwan or China are are largely very poor quality. I have had the same issues with some of my Yamaha XS 650’s. The original rubber component lasted almost 40 years but the cheap replacements go about a year or two and are cracked and leaking. See if you can buy better rubber parts. I heard of a guy who was restoring an older Japanese bike that no one had rubber parts for and he developed a technique of taking hardened rubber parts and boiling them in water for about 10 minutes and then soaking them in synthetic gun oil and they resumed being soft and pliable. Never tried it and don’t know if it works but in the article he wrote he swore by it. Maybe someone else has some techniques for restoring hardened rubber. Anyone?
Wintergreen oil is helpful for softening hardened rubber (:7 ) but cracked stuff is just junk. Wintergreen ain’t cheap and a blowdrier works in a pinch. Also a floor heater left pointing at 27 year old carb boots for an hour or more. It’s amazing what heat will do.