Tidying up where we left off in Part 6, the new front brake pads arrived and everything wheel-wise went together. Bleeding the front caliper was uneventful and the brake stopped the wheel which is all you can ask in today’s crazy world.
Stoppage by PM.
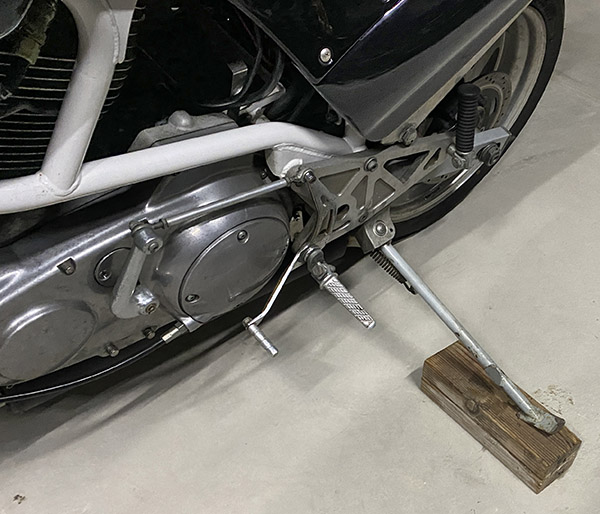
It was time to tackle the Buell’s kickstand issue. If you’re keeping count, that’s three motorcycles I have had to modify the kickstand on.
Kickstand things are precarious and resulted in a crash.
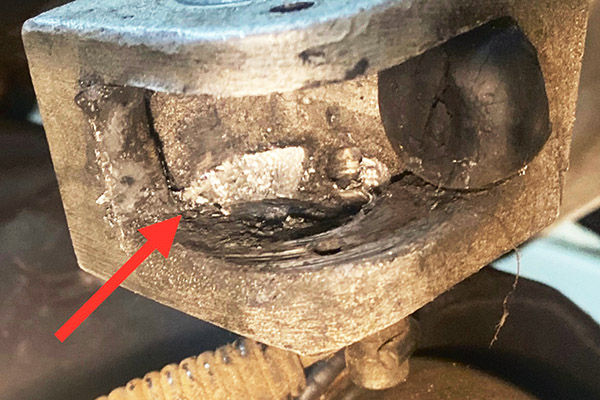
The Buell’s kick stand was an odd duck. It had the typical Harley locking style but where Harley used heavy, hard-wearing steel the Buell used soft, easy to consume aluminum.
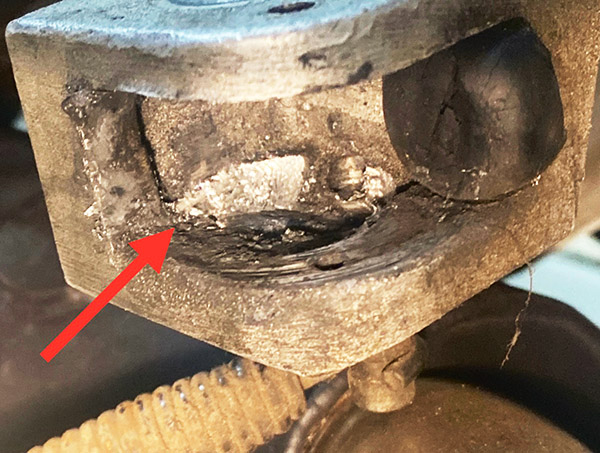
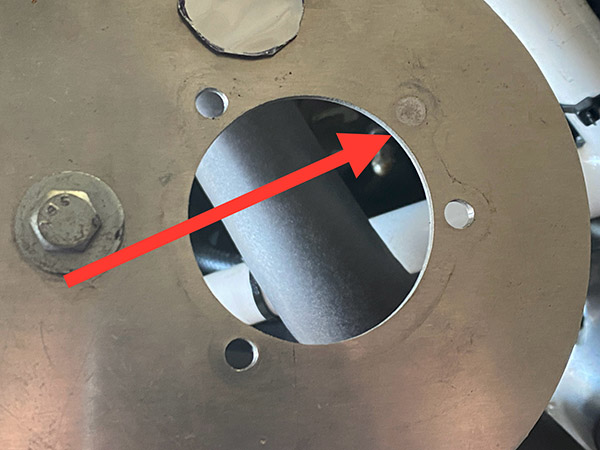
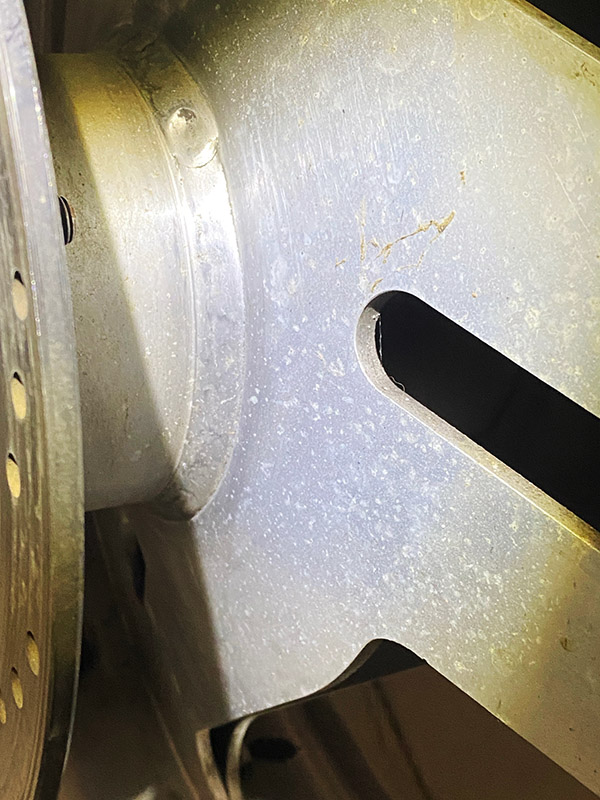
The material change is important because with only 13,000 miles my Buell kickstand locking groove was completely worn out. The notch the kickstand flopped into was gone and with the poor angles involved the bike was ready to fall over any minute. And it did.
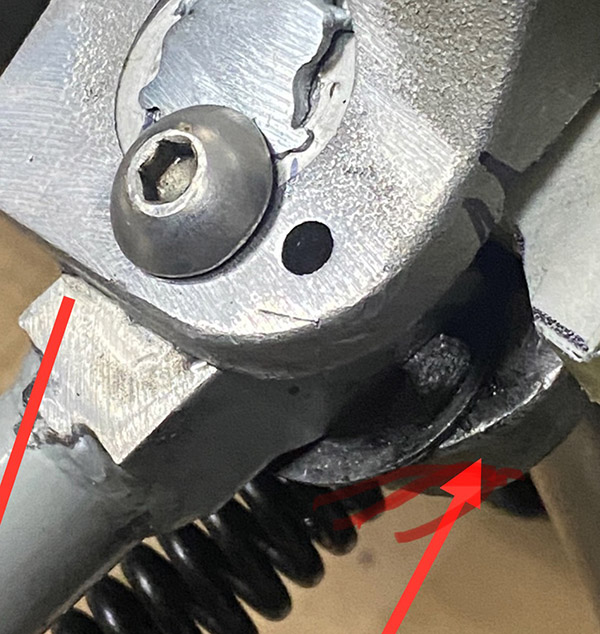
The notch area, eaten away in the pursuit of light weight.
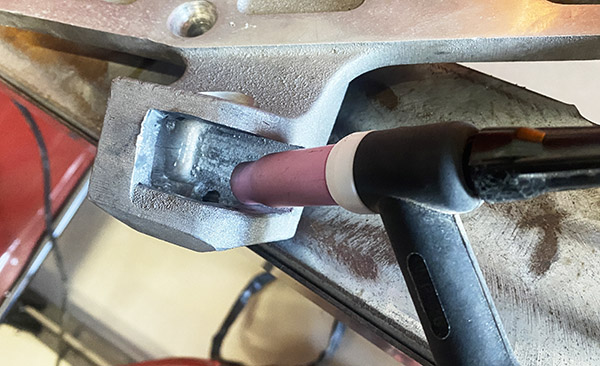
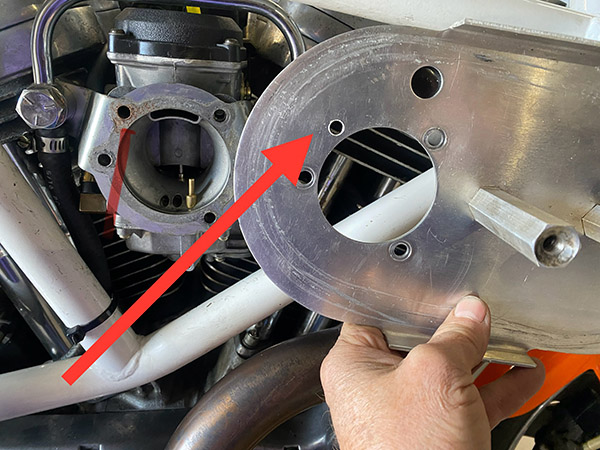
I was going to take a stab at welding a notch in place but I couldn’t get the TIG torch in the narrow kickstand mounting boss. This was a job better left to the pros at Roy’s Welding. I took the aluminum side plate down to Roy’s and dropped it off.
Access is limited, so I gave up and took the kickstand plate to a welder.
A few days later I called Roy’s to see how things were going and I guess they couldn’t get their torch in between the kickstand mount either. Back I went to retrieve the still-boogered kickstand mount. I searched online for a few days but a left-side mounting plate was not available when I needed it.
Left with no option I tried some of Harbor Freight’s ersatz aluminum welding rod. This material is kind of an aluminum solder. To weld with it you use an Oxy-acetylene torch and it kind of works.
A nice flood of ersatz aluminum filled the void.
You’ll need to clean the aluminum well and then using the torch to heat the work you sort of rub the rod into the metal. Take care not to overheat the work. It’s an easy process that you can stop anytime by removing the heat source.
I welded (if you can call it that) the original pivot holes closed then filled the worn spot inside the kickstand mount. It worked ok and I managed to get the filler pretty level inside the mount.
The original pivot holes stopped the stand at a 90-degree angle. This was fine and dandy when the stand had a notch to fall into. My new plan was to make the kickstand more like every other kickstand in the world instead of Harley style.
The relocated pivot hole allowed more stand arc.
I re-redrilled the holes and a position that allowed the stand to swing forward and over center the return spring. This set up is pretty normal even in later Buells. I ground the stand a bit thinner to make room for a steel washer in the hope of protecting the soft aluminum filler material.
It looks much worse than it is
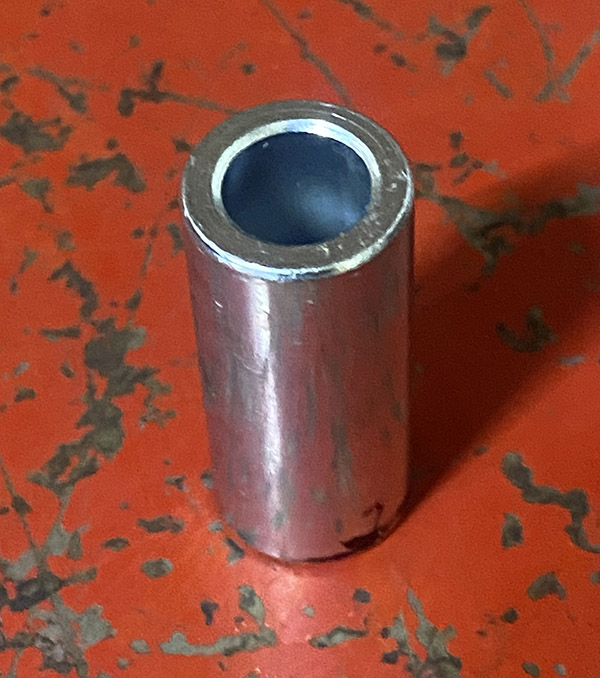
To allow movement for the old stand design the hole in the kickstand was oval shaped. This made for quite a bit of lean when deployed. My new design didn’t need the oval hole so I drilled it out and fitted a steel bushing. Now things were snug.
Steel bushing to fill the wongo-wongo, pivoting angle.
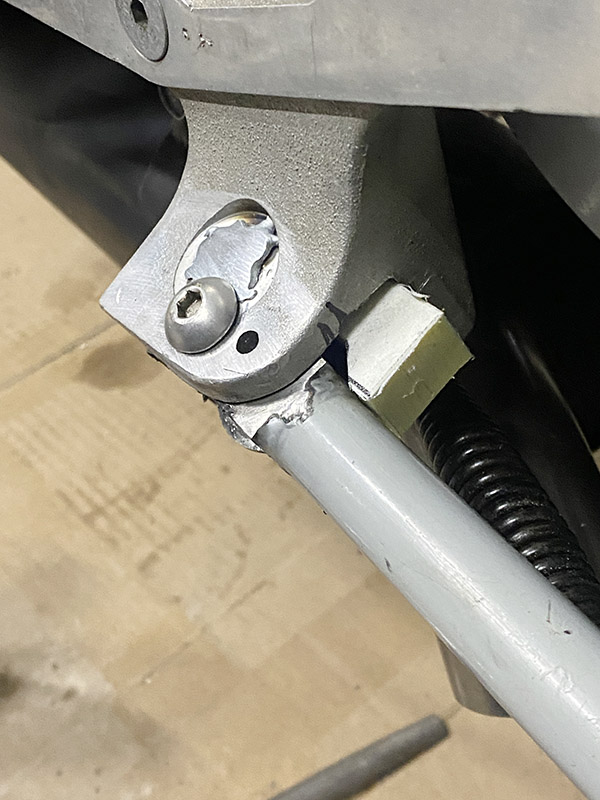
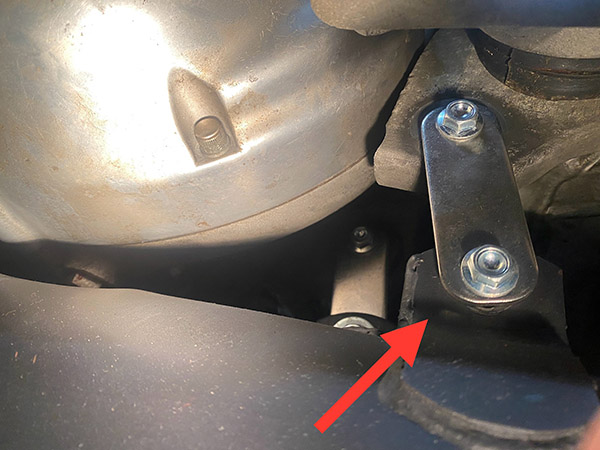
With the relocated pivot holes the end of the kickstand hit the swing arm in the up position. I used a piece of Starboard (plastic used in boat building) to make a new stop for the stand.
New stops keep the kickstand from hitting the swing arm.
It all worked. The Buell stand is still in an odd, dirt-bike like location but it operates normally and the bike doesn’t fall over. So that’s a good thing.
No more rolling off the stand and hitting the ground for me.
I have two motorcycles with upside down forks. Both of these motorcycles have leaking fork seals. Coincidence? I think not. I have no love for USD forks and one of the reasons I wanted a Buell Cyclone was the conventional forks those bikes came with.
I don’t care for upside down forks. They seem to leak more than conventional forks.
Alas, I ended up with a Thunderstorm, which is mostly the same as a Cyclone except for the forks. Mine were leaking, which is not unexpected for a 30-year-old motorcycle.
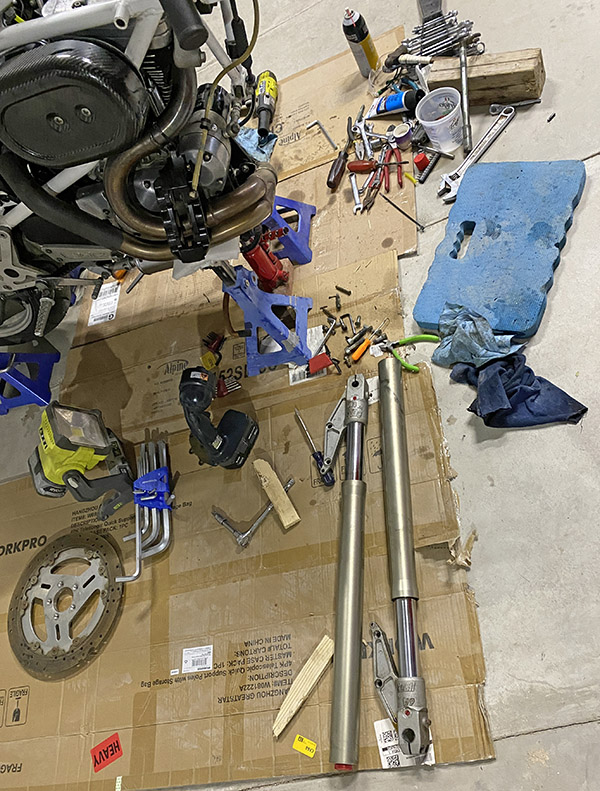
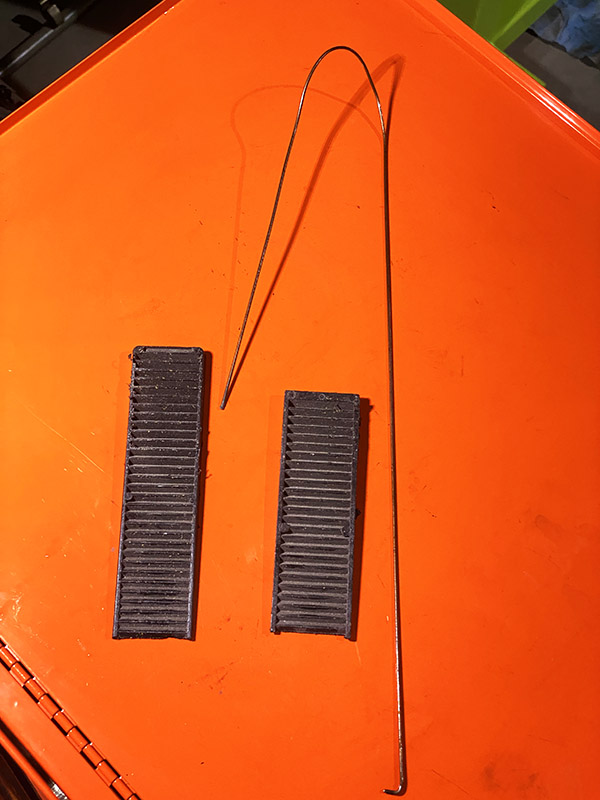
I try to lay out the parts in the order they are removed. Until I kick the cardboard and the bits scatter. This is the fork cap-retainer-plastic spacer-metal washer top of the tube parts.
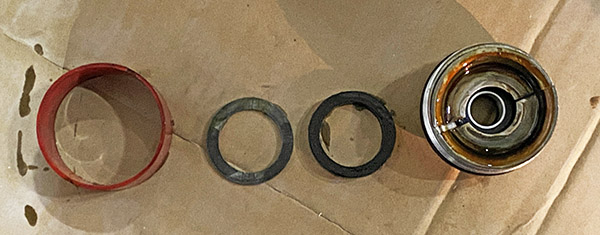
New fork seals were kind of hard to find. I tried contacting the OEM manufacturer, White Power (that name didn’t age well), but I got no response. Through the wonder of the internet, I found a company in England that had the seals.
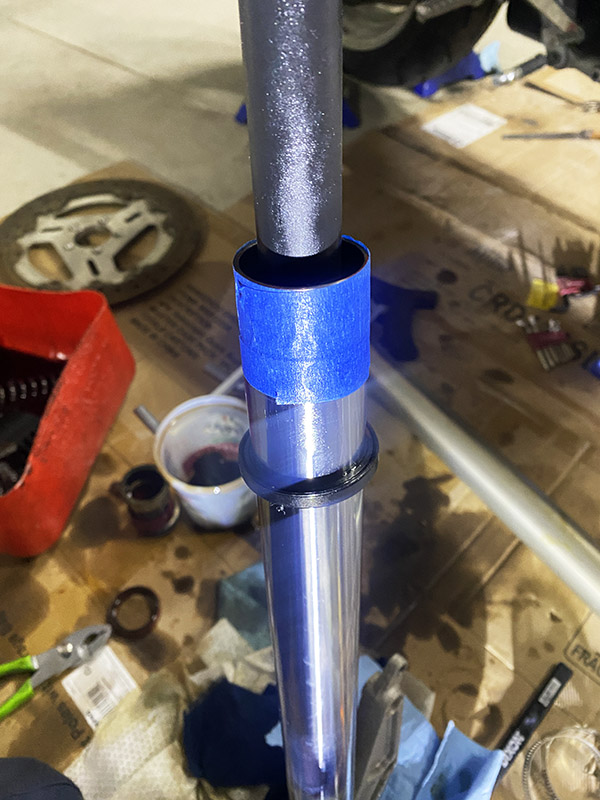
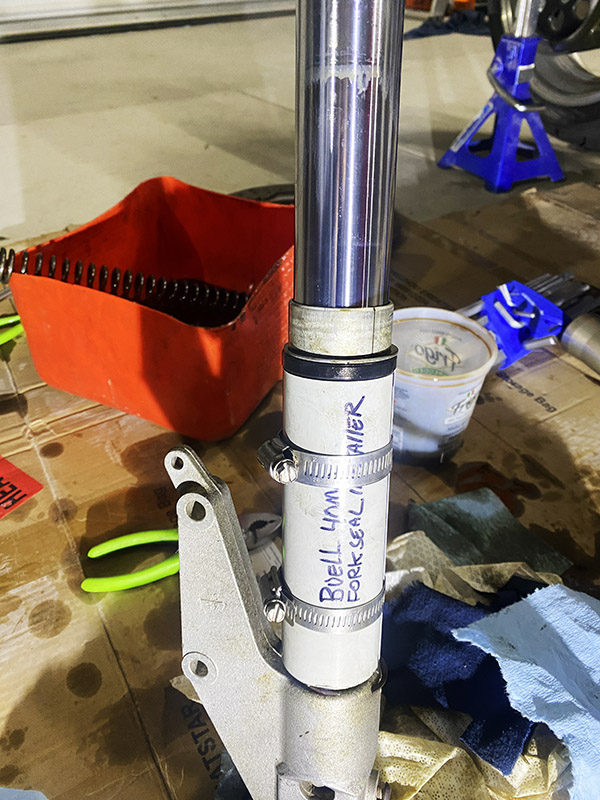
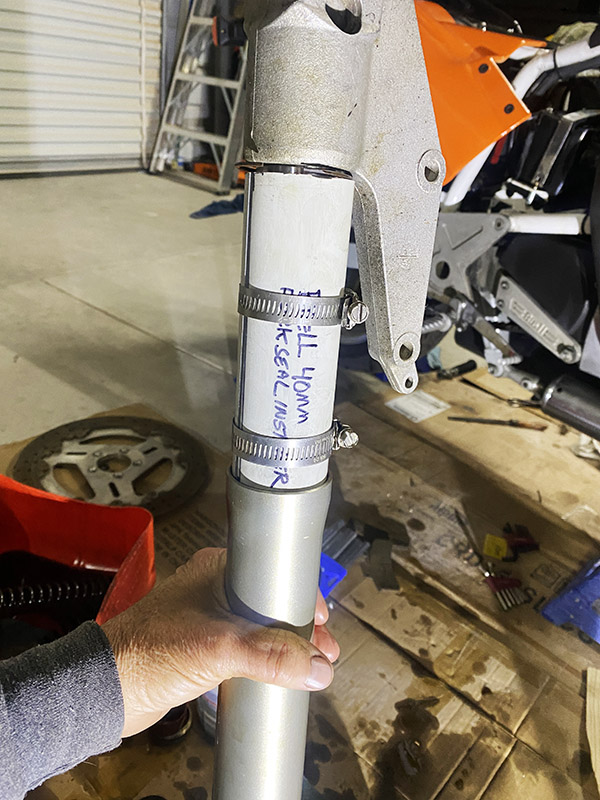
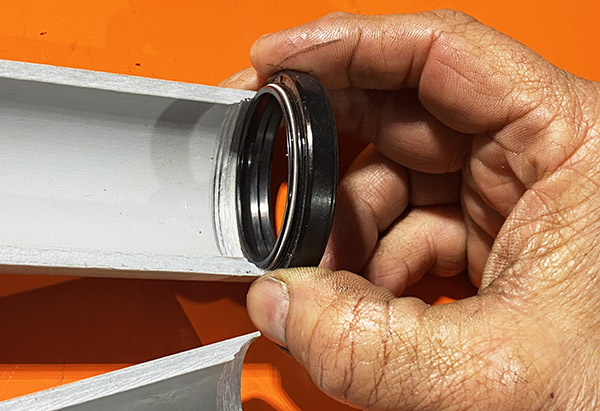
Always tape over ridges so the seal doesn’t get cut or damaged when sliding it into the tube.The seal installer in action. Sliding the fork tube presses in the fork bushing, a spacer and the seal in one motion.After pressing the two halves are removed. Next is the seal retaining clip (which is all that holds the forks together).
The seals were reasonably priced at $14 per set, but the shipping was expensive. I bought three sets since the shipping was the same. Now I have enough Buell S2 fork seals for the rest of my life. On a side note: a week after the seals were delivered FedEx sent me a $20 invoice for “fees.” I haven’t paid the fee yet; I’m not sure, it may be a scam. The fees may be re-named tariffs.
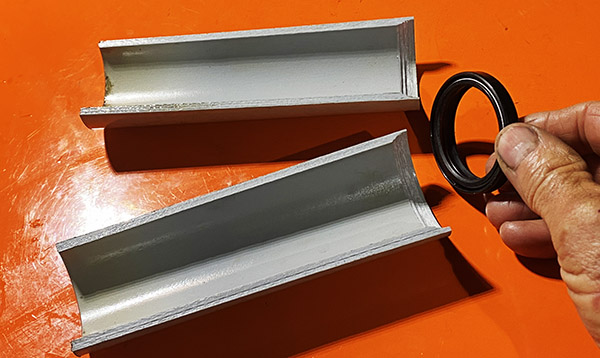
Without this relief cut the seal installer would smash the seal lip.Buell seal installer. PVC tube machined to fit seal lip then cut in half.
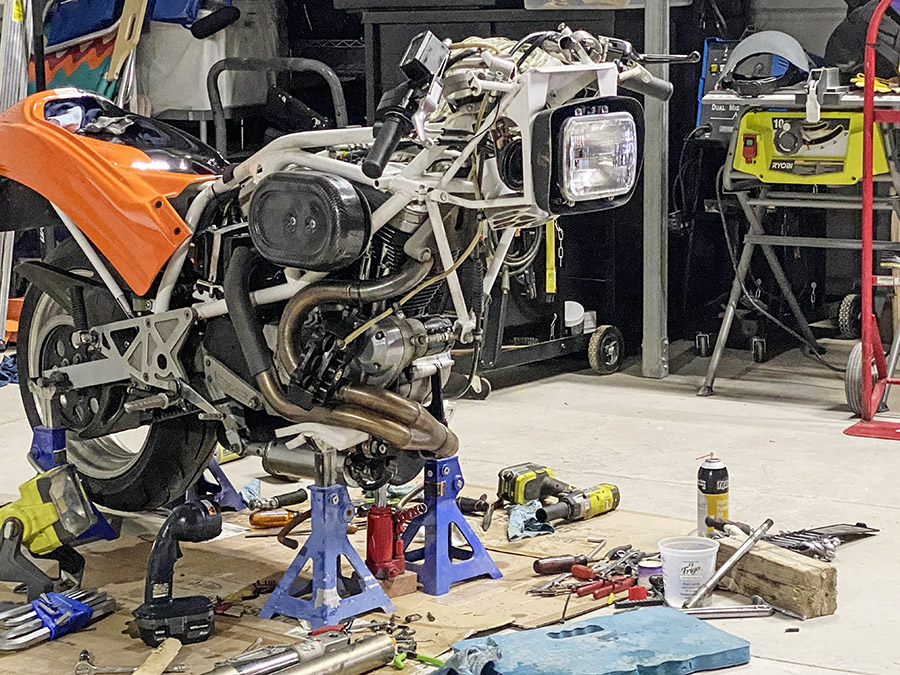
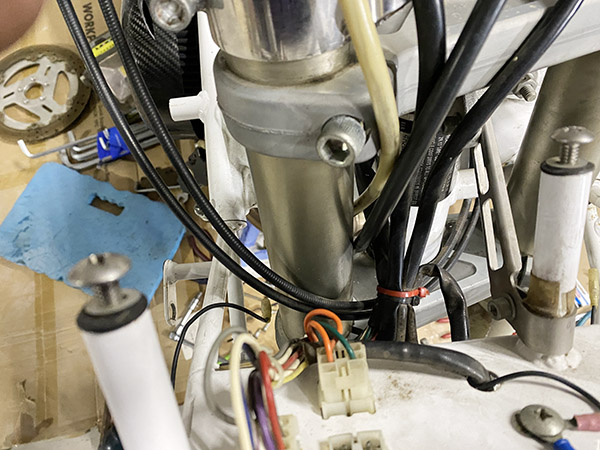
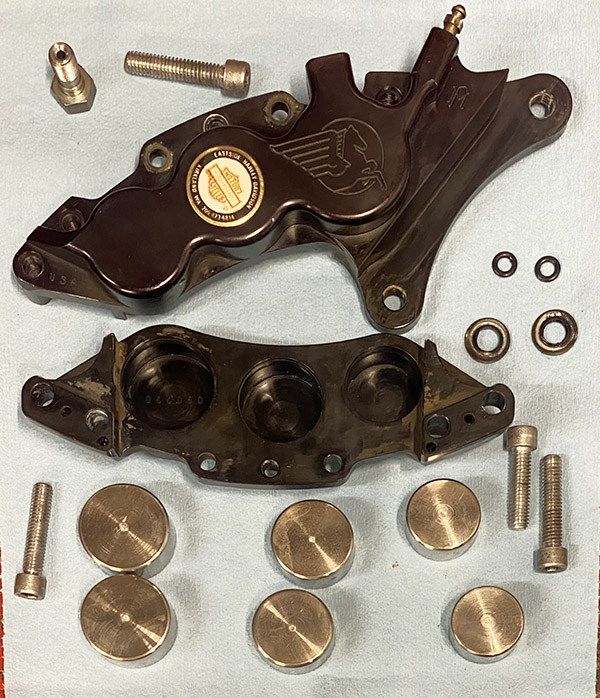
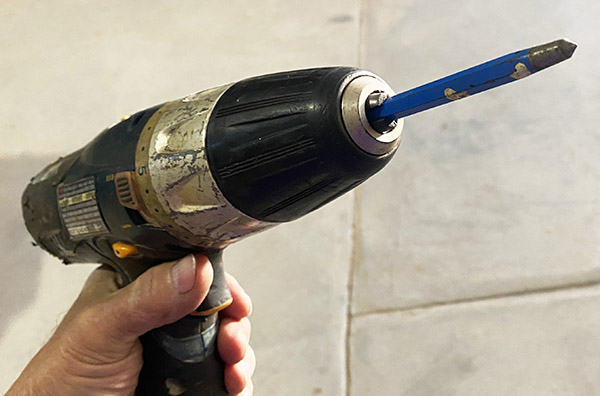
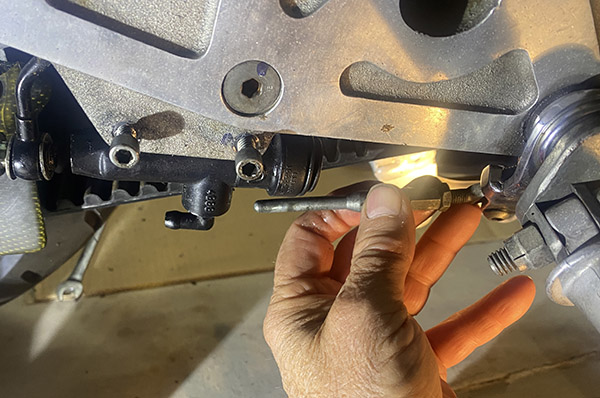
The Buell has a large front disc. To remove the wheel, you have to remove the brake caliper. To remove the brake caliper, you have to remove the brake pads and then retract all six of the caliper pistons back inside their respective bores.
The old Performance Machine brake caliper pistons were pretty crusty, and I didn’t want to push all that mess across the bore seals into the caliper. Removing the brake disc from the wheel allowed enough wiggle room to get things apart.
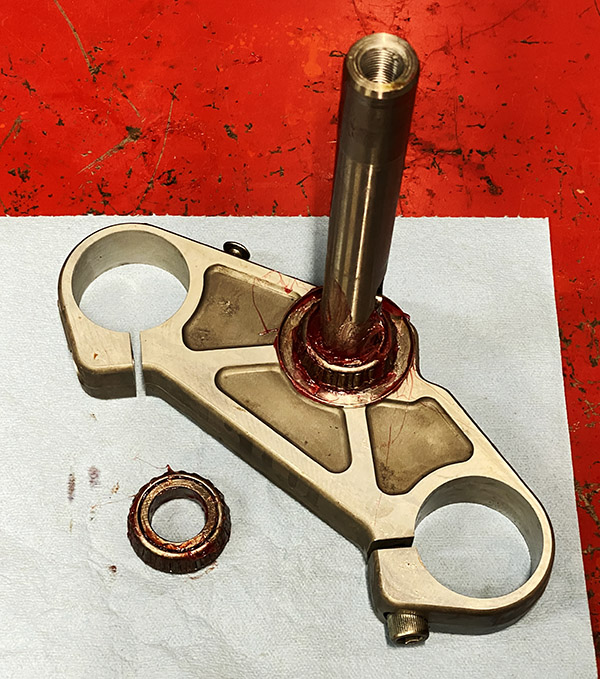
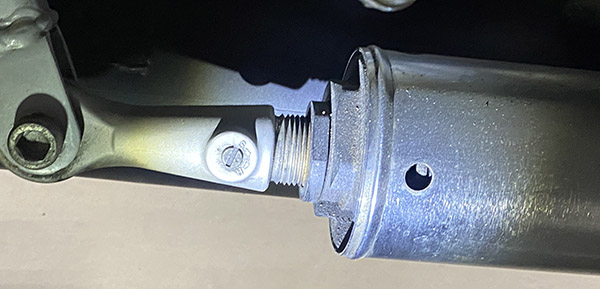
The WP forks were super tight in the triple clamps. I used a wedge to expand the fork tube bores and still it was a struggle to slide the forks out. Once out, disassembly was fairly straightforward (although oily) experience.
These triple clamps really grip the fork tubes. You almost don’t need pinch bolts.
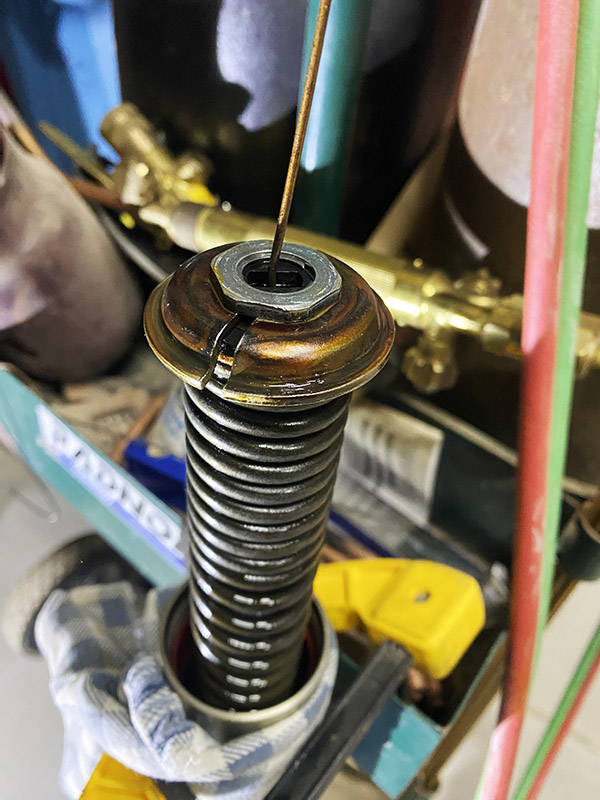
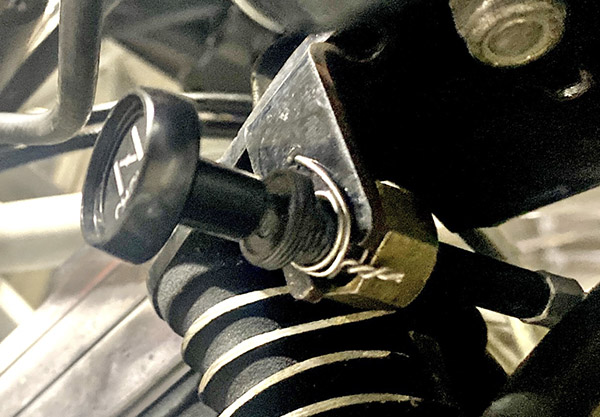
You’ll need to make a seal installer to press the new seals into the forks. I made mine from PVC tubing in the hope of avoiding scratching the sliders. The new seals fit well, and the hardest part was compressing the fork spring while holding the damper rod up with a bent wire and using a third hand fitting the damper rod spring keepers. My Buell shop manual describes this process as a two-man job. And it really is.
It took a couple days to figure out how to one-man a two-man job. I ended up employing an oxy-acetylene welding cart as a prop to hold the fork. The T-handle on the cart was in a convenient location and height to loop the damper-rod holding wire over and I still had two hands free to compress the spring and slip in the keepers.
After the seals are in place the fork spring retainer goes on. Note the wire holding the damper rod and the welding cart holding the fork. This setup leaves both hands free to compress the fork spring and fit the retainers.More Buell specialty tools. Wire to hold damper rod, wedges to spread triple clamps.
The Buell manual called for 7-1/2 weight fork oil. I should have ordered fork oil online, but I didn’t, so I called around and the local Honda shop had some. It’s a 20-mile drive to the Honda shop. The Honda fork oil bottles are confusingly labeled. What looks like 7 weight ended up being 5 weight, but I wanted to get the front end put back together. So I poured a pint of 5 weight into each fork leg. Stay tuned for a follow up report if I can feel any difference between 5 and 7 weight fork oil.
While the forks were off, I re-greased the steering head bearings. They still had a little grease remaining but thinly applied. I walked out the old stuff and smooshed in fresh grease. That left just the front caliper to clean up.
Re -greased steering head bearings. I don’t like the design of the cup under the bottom bearing. It seems like it would hold water. I might bend a drain channel into the low side.
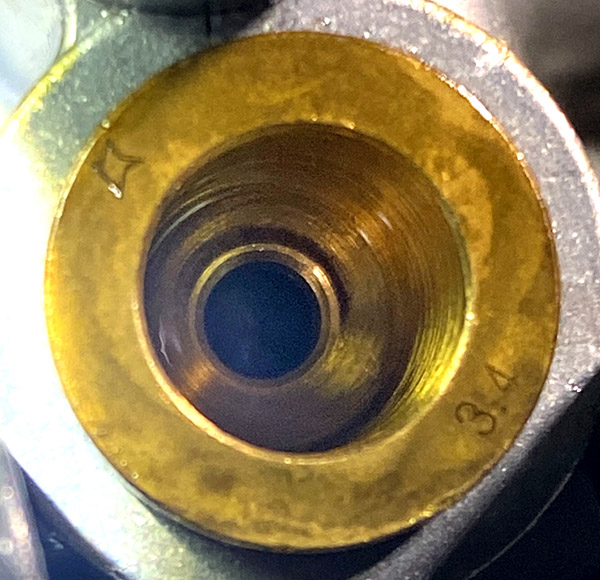
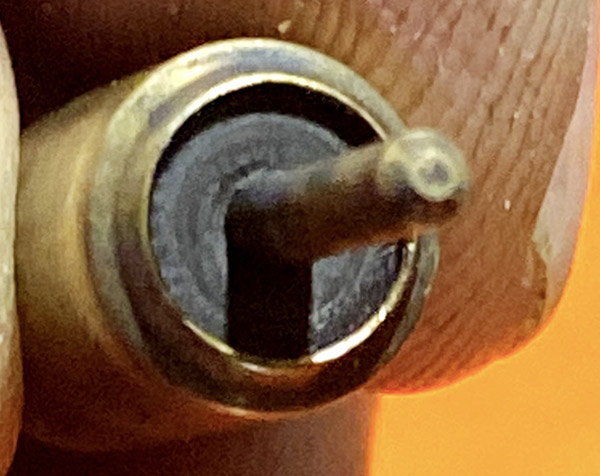
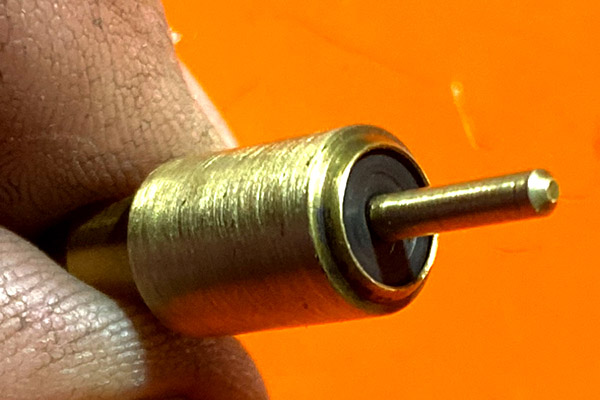
The caliper came apart easily, but the pistons did not. I used to have a big pair of reverse pliers (the jaws expand rather than close when the handles are squeezed). I would use these pliers to grab inside the hollow pistons and pull them out of the caliper. I would, that is, if I could find them. I spent a few hours looking for the pliers and finally gave up.
A snap ring Oliver was pressed into service and I managed to get all six pistons out. Performance Machine uses chromed steel pistons and the bit of piston that was exposed to the elements had corroded. Finding new pistons would be an impossible task and a new caliper would cost $600, so I polished the corroded pistons on the buffing wheel.
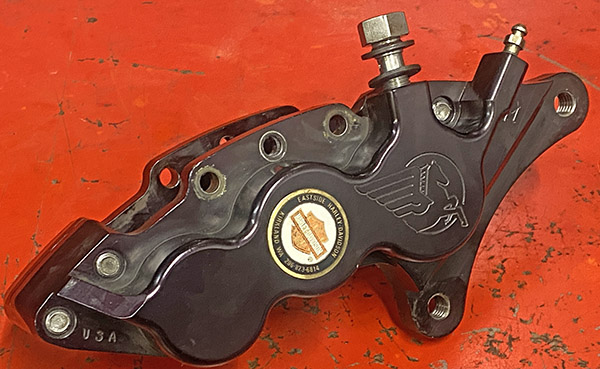
Except for the chromed pistons, the PM caliper is a nice looking unit. Note the piston diameter change to apply evenly distributed wear.Performance Machine caliper back together and waiting on brake pads
I’ve had good luck piston polishing. Yes, they re-corrode, but the section of piston covered with brake fluid doesn’t corrode. I look at it as an ongoing maintenance item rather than a bad part. You’ll have to wait for new brake pads to arrive to see if the caliper leaks in Buell Fever Part 7.
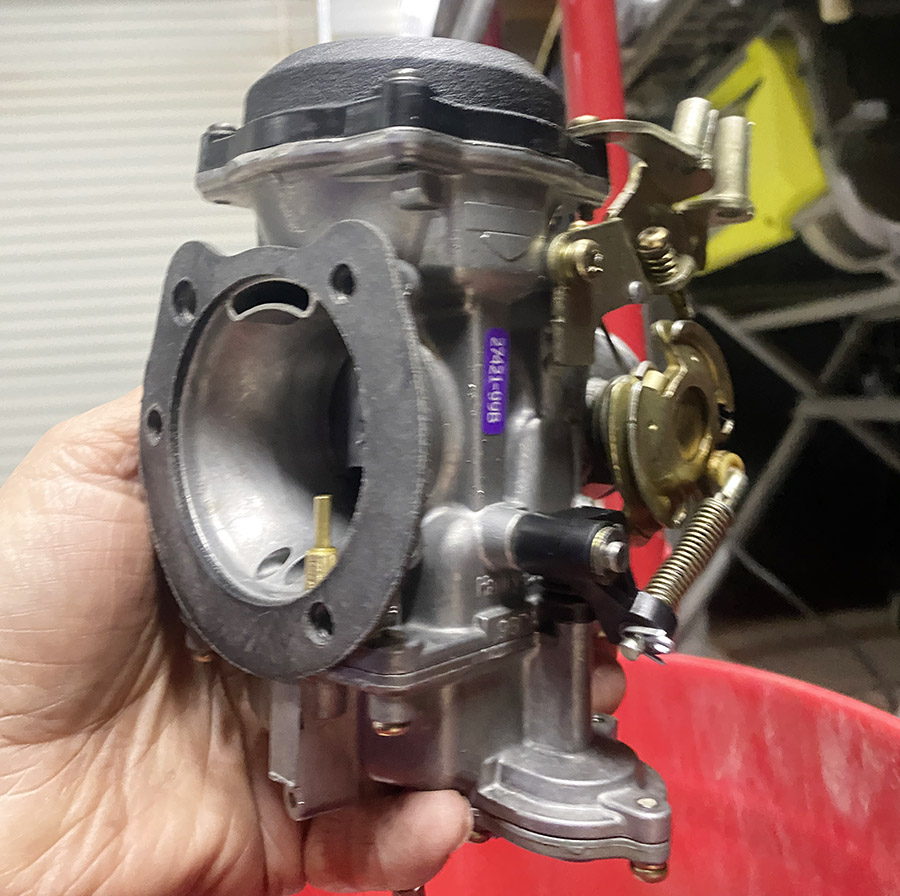
After years and years of tinkering with engines, my whole life really, I’ve come to the conclusion that I am not very good at fixing carburetors. The Buell’s multiple personality disorder carburetor has really illuminated my carb inadequacies.
Considering it sat for who knows how long the Buell carburetor was fairly clean inside. I blasted it out with spray carb cleaner and installed a few new parts just because it was apart. The bike started up easy and seemed to run ok. And then the oil tank blew all over the place. I got sidetracked cleaning up oil and it was a few days before I got around to starting the Buell again.
The aftermarket needles have slightly longer springs. I’m not sure this matters.
After a few moments of running, the bike started getting richer and richer. Black smoke poured out the muffler along with popping and farting sounds. I shut the engine off and fuel began leaking out the carburetor intake mouth. This was unfortunate because I installed a new needle and float earlier.
Off the carb came for the second time. I re-checked the float level, installed another new needle and bench tested the carb. No leaks. Plugging the carb back into the motorcycle and reconnecting all the bits, I turned on the fuel valve from the remote tank and gas poured out the carb. It was like there was no needle at all.
The seat didn’t look too bad to me but I could not get the thing to stop leaking.
Third time: I pulled the carb and put the old float and needle back into the carb, maybe the aftermarket stuff is junk, right? I re-installed the carb. No leaks. Good. Started the engine. Bike ran rich and the longer it ran the richer it got. Lots of backfiring and flames. Fuel started running out the carb.
At this point I gave up and ordered a new carb from Amazon. It was on sale for $38. I pulled the carb again and it sat on the bench for two days. You have to understand, there is no simpler carb than the one on this Buell. Despite appearances my pride can be hurt. If I can’t fix the Buell carb, then I can’t fix any carb. I decided to take one last shot.
For some reason, the float bowl o-ring enlarged from my ham-fisted ministrations. Stuffing the ring into the bowl groove became a Sisyphean task: push one side in and the other side popped out. I didn’t want to wait for an internet gasket, so I drove down to our friendly neighborhood Harley shop, Liberty Cycles on Highway 70.
Liberty is a real old school Harley shop. Independent, scruffy, populated by guys that might beat you up for mistaking the year Panheads were first manufactured. 99% of the bikes in the shop were big twins. Sportster riders are suspect. I asked Father Time, a grizzled, white-bearded mechanic for a bowl of-ring.
Father Time dug around in various drawers and came up with the o-ring, handed it to me and said “Just take it.” Maybe these guys aren’t so scary.
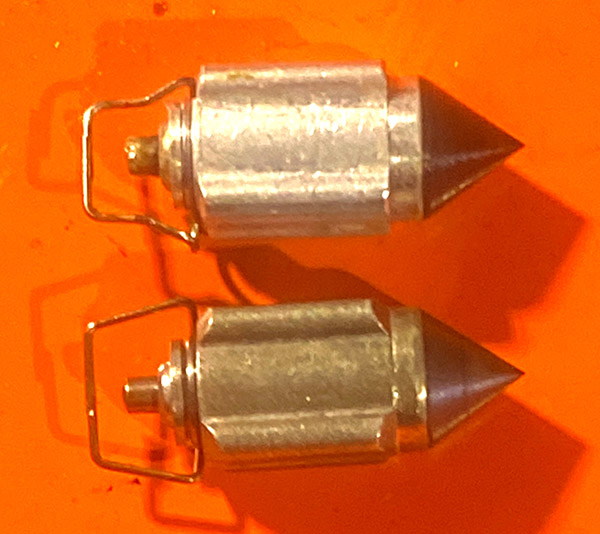
Harley needle-seat burnishing tool. A center punch on a Ryobi cordless.
On the bench, the needle seat looked okay to me but I wanted a more polished look. Using a center punch on a drill motor I burnished the seat to make it smoother. Back go all the pieces after checking float level. No leaks. Start the bike and it runs good for a few moments then starts loading up on fuel again. It’s maddening but at least fuel is not leaking out of the carb. Progress.
After a steel-to-brass burnishing session the seat looked smoother. Most importantly the carb stopped flooding.
After a steel-to-brass burnishing session the seat looked smoother. Most importantly the carb stopped flooding.
The enrichener plunger was dingy but not terribly dingy. It was enough to cause problems.After cleaning the plunger sealed off the enrichener circuit, greatly reducing black smoke.
Fourth time pulling the carb. I removed the enrichment plunger; it looked a little dingy. Maybe the plunger is not seating? I used 800-grit wet-or-dry sandpaper to remove any deposits and cleaned the enrichener bore. Reassembled again and installed on the Buell. Bike starts up and runs well for a few minutes. Install the air cleaner, fire up the bike and after a minute or so the bike starts running rich, black smoke pours out the muffler.
Arrow points to the float bowl vent. This is the only vent as there is no bowl overflow tube.
Fifth time pulling the carb, thank goodness it’s easy to do on the Buell. I examine everything. My repair manual shows a float bowl overflow tube in the bowl. My float bowl has no overflow hose. My bowl has no tube. This is why fuel runs out of the carb throat when it floods. A normal carb would piss the fuel into the ground. Which got me thinking: How does the float chamber vent to atmospheric pressure?
The air cleaner back plate blocked the bowl vent. I didn’t grasp this until much later in the process.
Facing the intake side of the carb there is a hole at the 10-o’clock position. This is how the float chamber vents and this is the hole that is covered up when the air cleaner is installed. It sounds easy and logical reading this now, but it took hours of confused staring at the Buell to figure out what was happening.
Drilling a vent hole in the air cleaner back plate allows for atmospheric pressure in the float bowl.
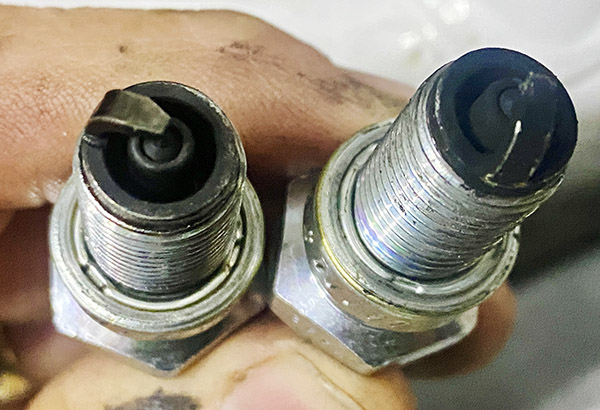
I drilled a hole in the air cleaner where the vent exits the carb. Reassembled the entire mess yet again and started the bike. It ran better but was missing on one cylinder. With a single carb if you have one cylinder missing it pretty much has to be ignition, so I removed the spark plugs. They were covered in fluffy black soot. Chunks of soot nearly bridged the electrode gap on the front cylinder sparkplug.
A quick session with a wire wheel and douching the plugs with carb cleaner had them looking like new. I reinstalled the plugs and the bike started up easily, ran smooth, both cylinders ticking off nicely. It idled well, as well as any Harley idles. Maybe I have finally fixed the thing.
To recap, the carb had three issues:
The first was the needle seat. It must have had some microscopic flaws that prevented the rubber needle tip from sealing. The leaking needle caused a rich condition.
The next issue was the enrichener plunger. It was not seating completely. This allowed extra fuel into the intake, causing a rich condition.
The final issue, extra confusing because sometimes I had the air cleaner installed and sometimes I had it removed, was the blocked float bowl vent. Without a vent to atmospheric pressure the float chamber is under a vacuum. I’m not sure but I think the bike runs rich as extra fuel is sucked in. The vent on the fuel tank becomes the atmospheric pressure inlet.
The Buell seems to be running fine now but after pulling the carb so many times, I’m a bit gun shy. I’ll call it fixed with reservations.
I haven’t received the Amazon carb yet but if the thing has a bowl overflow and the parts interchange I’ll be swapping the bowl. The Buell leans left on the kickstand, the carb towards the (downhill) intake manifold. Without a float bowl overflow, a sticking needle could run gas into the engine. Not good.
A smarter man could have figured out the Buell carb in less steps. He would have analyzed the symptoms and made a logical plan to address them. I am not that man. I threw everything at that damn carburetor until something stuck. I had to grind through obvious processes until the correct answers were all the answers that remained.
In the trades we call this Buell Hand. It comes from adjusting the idle mixture screw between the hot exhaust headers.
Part of the reason I bought a Buell was because my life has become too predictable. Except for the Husqvarna, you stand a good chance of getting where you’re going on my old bikes. And the Buell is not disappointing. Lots of fun stuff is happening as I work on getting the bike back on the road.
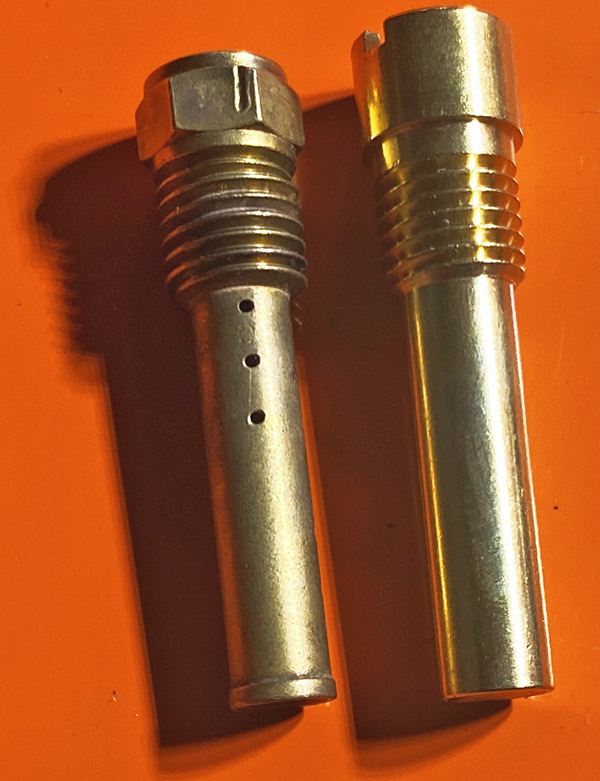
It’s such a joy to tinker on a single-carb motorcycle. There are no racks and synchronizing to deal with, you only have to do a thing once instead of four times, but watch out for those aftermarket parts. The kit I bought was okay, but the emulsion tube was not drilled properly. And then I managed to pinch the bowl o-ring. It was cheaper to buy another kit than a single bowl gasket, so I did that. Unfortunately, that kit’s bowl o-ring was too small. No matter how I stretched it, it kept popping out of the bowl groove. I ended up reinstalling the pinched o-ring. It was a futile effort to keep my mechanical standards up.
It wouldn’t be a Harley without baling wire. The choke tube is plastic and was fragile after all these years. The choke knob was falling out of its slot. I broke the tube finger tightening the thing. Wire to the rescue!The accelerator pump plumbing was clogged. I fished a small bit of wire through the passage to clear it.The carb kit emulsion tube (right side) was not drilled correctly. I try to use all the old stuff if possible. So this was no great loss.This brass nozzle sprays fuel from the accelerator pump. Supposedly the tube is removable for cleaning but it seems well stuck and I started to chew it up a bit so I stopped.
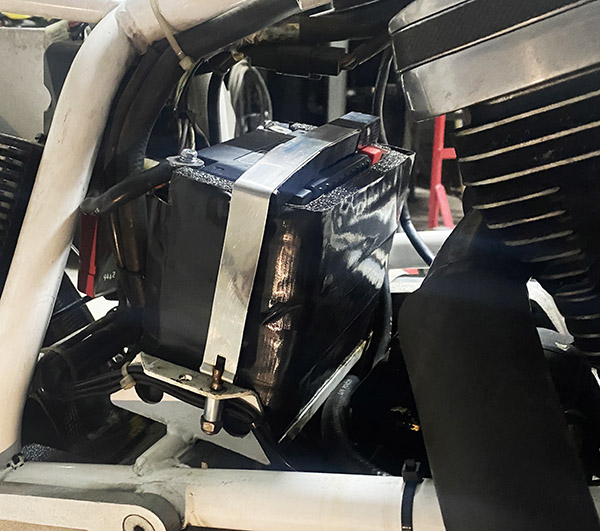
I’m a big fan of lithium batteries, so I bought a Vevor brand close in size to the original lead-acid battery. The Vevor was a bit small and the factory battery location is not far from the rear cylinder exhaust header. To help with the heat I wrapped the sides and front with foam, then wrapped gorilla tape around the mess to hold the foam insulation.
It looks a little rough but an insulated battery is a happy battery.
A neat feature on the Vevor is the dual posts (four total). There are positive and negative posts on both sides of the battery; if your cables are in the wrong place, just flip the battery around. I added a spacer on the hook side of the battery strap to keep it tight and a small tube spacer in the bolt side (less threading to do on the hold down bolt), which makes installation 12 seconds faster. When you ride a Buell every second counts. The battery seems secure; hopefully, it will stay put. With the Vevor battery (supposedly 400 cranking amps) in place and the carb back on, I needed to hear the Buell run. The oil tank level was between the high and low marks. The oil looked clean, like it had just been changed.
I removed the spark plugs, put the coke machine key in the ignition, and spun the engine over to clear any excess oil from my previous cylinder lubing. With the sparkplugs back in the cylinder heads I pulled the choke, hit the right turn indicator button, and nothing happened.
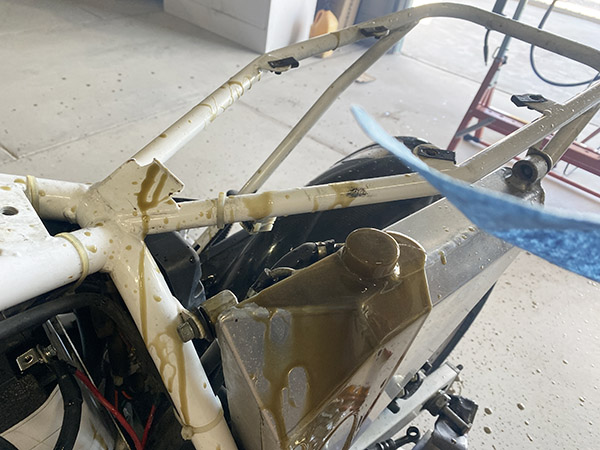
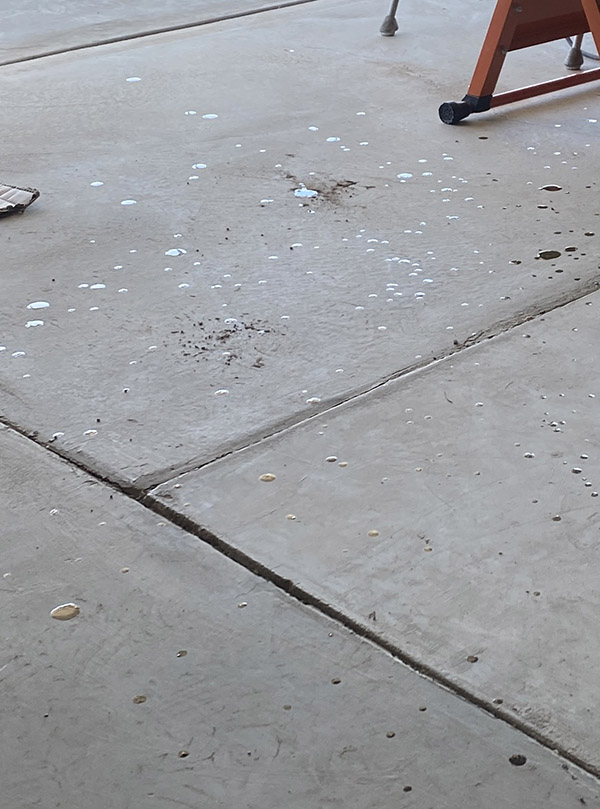
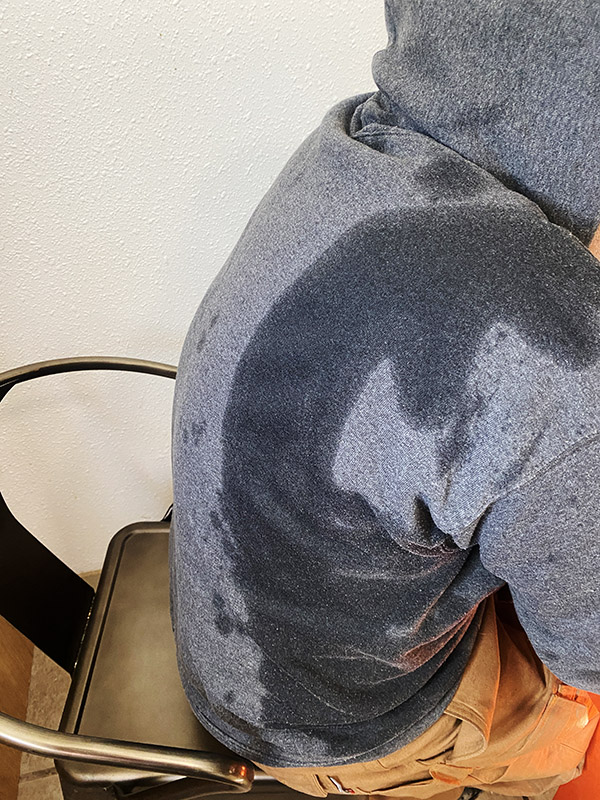
Harley handlebar switches are so weird. Pushing the starter button on the inside of the blinker switch worked better, and the Buell fired up in a couple revolutions. The engine popped and farted a few times. Lots of smoke came out the tail pipe but all things considered, it was running good. Then came a loud pop followed by a geyser of oil spewing from the oil tank. The oil broadcast in a 15-foot fan covering the general area with great dollops of thick oil. The spots were viscous, so they stood proud of my clean concrete floor. Except for the spot I was standing. I received a blast of spraying oil that covered my sweater and left a clean, Joe-shaped silhouette on the concrete floor.
My nice, clean floor got its first baptism-by-Harley.My nice, clean floor got its first baptism-by-Harley.My sweater took the brunt of the oil explosion.
What a mess. How long the Buell had been sitting was unknown, but the oil tank must have slowly drained into the crankcase. Some helpful person topped off the tank with fresh oil and I squirted the stuff all over the place. I drained the tank. There must have been a gallon in there if you include the oil on the ground. Once the oil level was correct, I fired the Buell and it settled down to the hit and miss syncopation Harley likes to call idle.
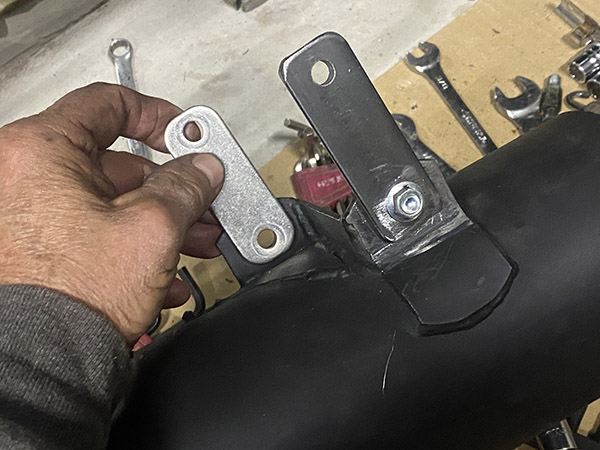
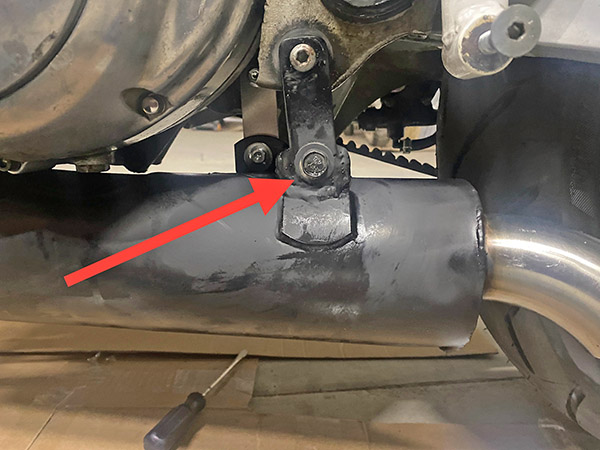
Back to other issues. I didn’t like the way the muffler was held into the bike. The setup relied on the front clamp combined with two rear brackets that bolted up in a parallelogram-like deal. The only thing that held the muffler in place was fastener tension. To achieve a more secure mounting I made a thicker bracket out of mild steel and welded it to the Muffler. Now in order for the muffler to slide back my crappy weld would have to break. Which it just might.
Since I don’t have the equipment to weld stainless steel I made a mild steel bracket for the muffler.The bracket welded to the muffler. Now the muffler can’t work loose and rub the tire.
The rear brake on the Buell was stuck. There were several issues contributing to this problem. The first was the brake pedal. It was bent where the master cylinder pushrod attached in a way that made the rod move dramatically sideways when the brake was applied. I used Harley tool 0-U812 (a big crescent wrench) to adjust the brake pedal. Now the push rod moved in a straight line concentric with the master cylinder.
This replacement rear brake assembly was close but off in meaningful ways. The seller refunded my money and didn’t want me to ship it back.This part of the brake left was bent causing the master cylinder pushrod to go off course.It’s still a little bent but the pushrod articulates correctly now.
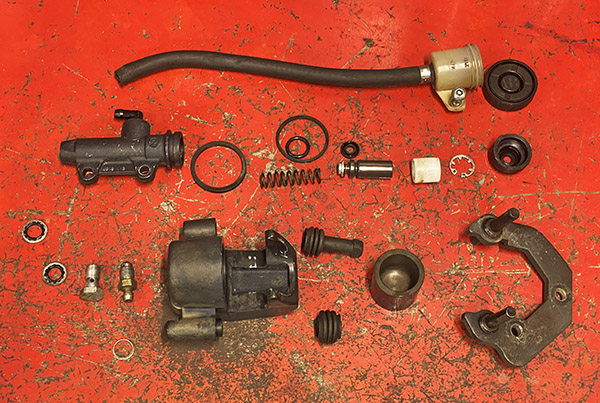
The clone master/slave kit I bought on Amazon that was supposed to fit was just off enough to be completely useless, so I decided to rebuild the original stuff.
All the original brake parts cleaned up well. So far no leaks.
The piston inside the master cylinder was stuck but a few raps with a hammer had the piston moving and I dismantled the master/slave. I was having trouble finding seals for the Brembo components, so I cleaned everything and reassembled the brakes.
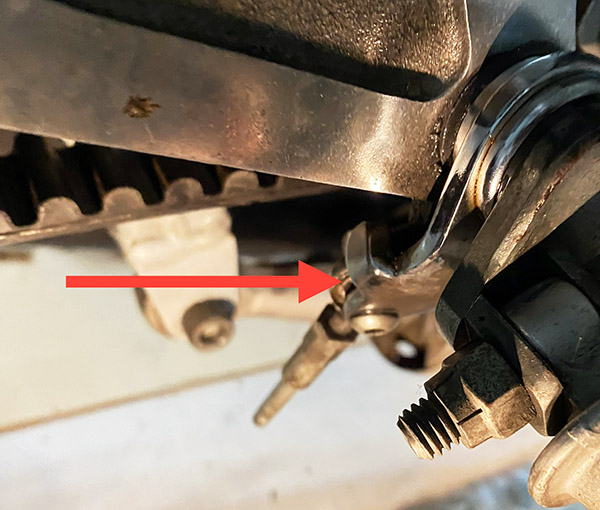
Bleeding the brakes wasn’t going well. I could get pressure at the banjo bolt on the master cylinder but nothing at the slave. Shooting brake cleaner into the brake line did nothing. The hose was clogged. Out came the battery to access a hose clamp bolt, and I removed the brake line. Removing the brake light switch gave me a mid-point spot to shoot cleaner. The metal brake line was clear, the clog was in the rubber line. I soaked the line in an ultrasonic parts cleaner then worked a 0.30 flux core welding wire through the rubber line. It took a bit of finagling but the wire made it through. Then it was just a matter of soaking with brake cleaner and shuttling the 0.30 wire back and forth until the line was clear. Blowing the lines with compressed air got rid of any stragglers inside the hose. A quick reassembly and I had pressure to the slave. Bleeding the system was a straightforward proposition. The rear brake works.
Next on the list is fixing the kickstand and broken clutch lever.
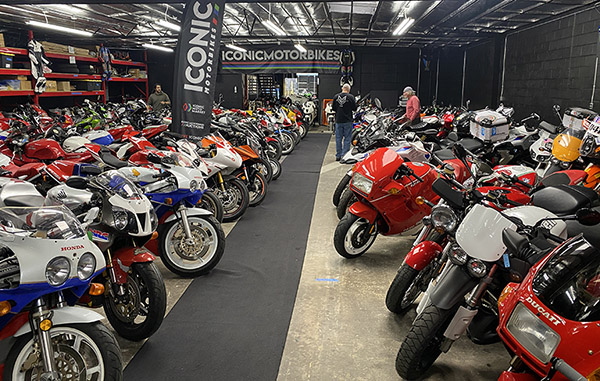
I have an interest in old or unusual motorcycles, to put it mildly. So it was strange that I never heard of Iconic Motorbikes out of Panorama City, California. My recent Buell Fever led me from online search to online search to Iconic’s website.
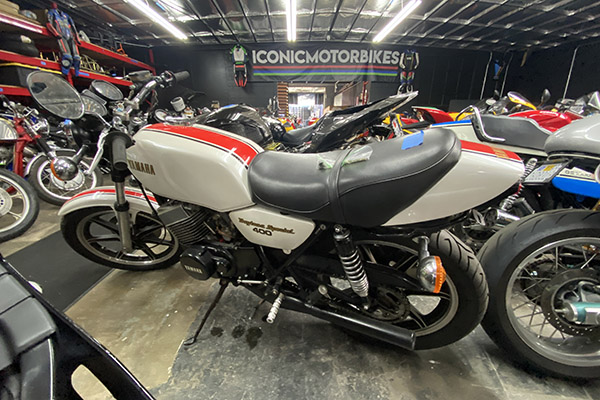
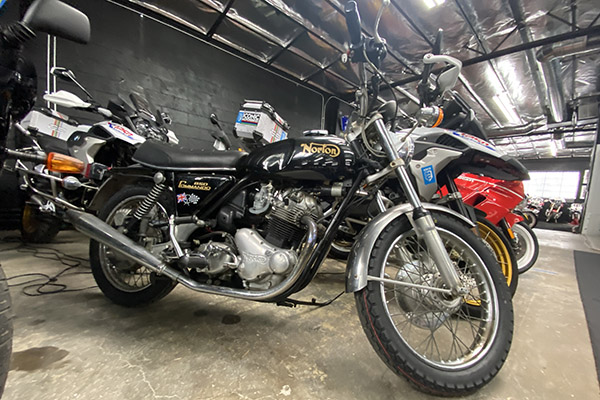
Rare, updated Norton still using the old bottom end. Norton has gone through some owners.An un-wrecked, oil-air cooled slabby GSXR.Yamaha Daytona 400. The last of the air-cooled RDs.Super condition Norton. The real deal before the owner shuffle began.MV grocery getters!A cannibalized CBX. Probably with a fortune as is.
It’s a good thing I didn’t find their site earlier or I’d be homeless, living in the streets surrounded by my collection of fantastic motorcycles. Iconic has a lot of cool bikes.
And for Buell’s, they got ’em. Plenty to choose from, and all at reasonable prices. The process works like this: you register to bid on the Iconic website and in no time you’re blowing money on cool motorcycles.
Even MV’s crates are beautiful. I wonder what swag is inside?
The site is set up for auto-bid: you put in your highest offer and Iconic bids for you as your chosen motorcycle’s price rises. This releases you from having to watch the bidding and gives you more time to pour concrete.
In my case all the Buells I bid on went over my budget. Don’t despair if you don’t get your dream bike: Iconic’s website has a section just for you called Buy It Now.
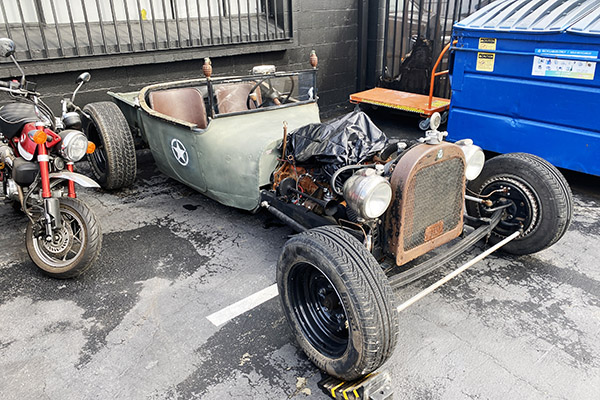
The odd rat-rod at Iconic’s Panorama City location.
Iconic’s Buy It Now section is full of bikes that didn’t make their reserve price on the auction side of the site. That’s where I found my VR1000-esque Buell. You can still make offers in Buy It Now, Iconic will contact the seller with your offer. Or, like me, you pay the asking price and the bike is yours. Most of the bikes in Buy It Now are not outrageously over-valued. There are a few kite-flyers, but you never know. Not all the motorcycles for sale are in Panorama City; some bikes are at other locations around the US.
Once the deal is made you pay Iconic for the bike and go pick it up (at Iconic or the owner’s location), and you’re done. It’s a pretty easy process. Iconic will also ship the motorcycle to wherever you want for an additional cost.
Wall to wall and two stories high. If you can’t find your dream bike in this lot you’re having a nightmare.
I liked Iconic for the huge selection and their extremely detailed reports on the condition of the motorcycles on auction. It’s like having a trusted friend go check on a bike for you like my buddy Deet did when I bought the RD350.
I wasn’t buying a piglet in a poke when I bought the Buell and I am using their list of recommended repairs as a check list while working on getting the ’95 Buell Thunderbolt back on the road.
Iconic’s huge location in a warehouse district of Panorama City, California, is a candyland of motorcycles. There are at least 300 motorcycles stuffed cheek-by-jowl and two floors up, all of them cool. Leave your wallet at home if you visit Iconic or you’ll leave with a bike you didn’t know you wanted.
I give the buying process at Iconic high marks. It’s almost too easy to blow money on motorcycles there, so use their site wisely, my brothers.
I’ve been ordering parts for the Buell as I dismantle the beast for service. I really like the way Erik Buell wrapped his tube frame around the 1200cc V-twin Harley lump. The bike is all engine and actually looks even better with the bodywork removed.
A new carb for $44! Tariffs? Never heard of her.
I’ve got the carb off and apart. It looks pretty clean inside, and the bike probably would have run fine, except for the rubber tip on the float needle. It has a pronounced ridge that may or may not have caused a flooding issue.
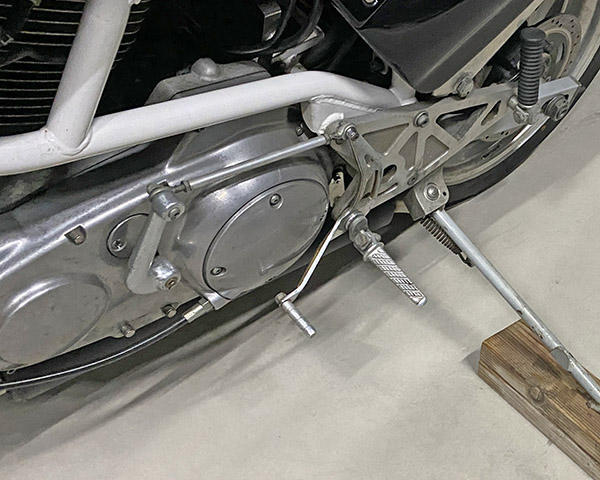
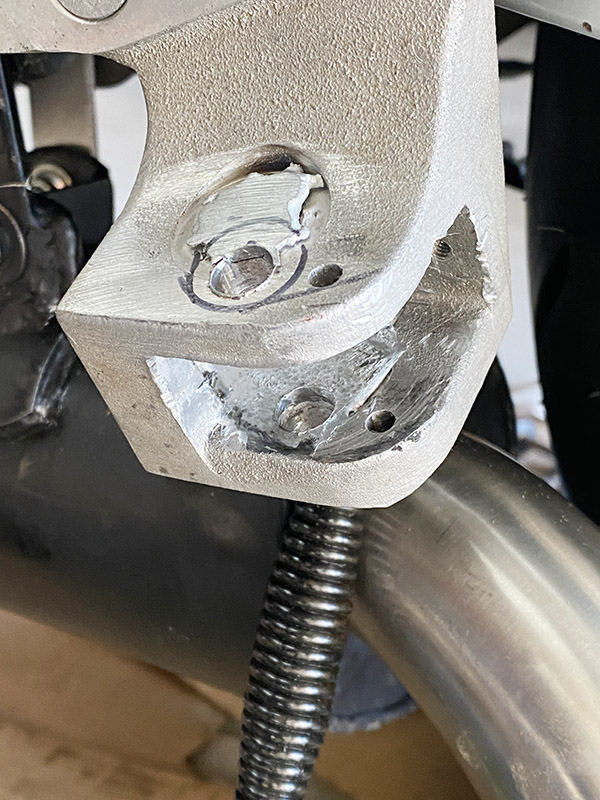
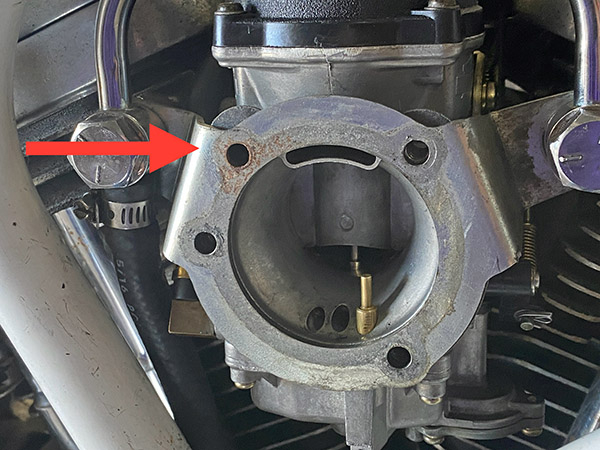
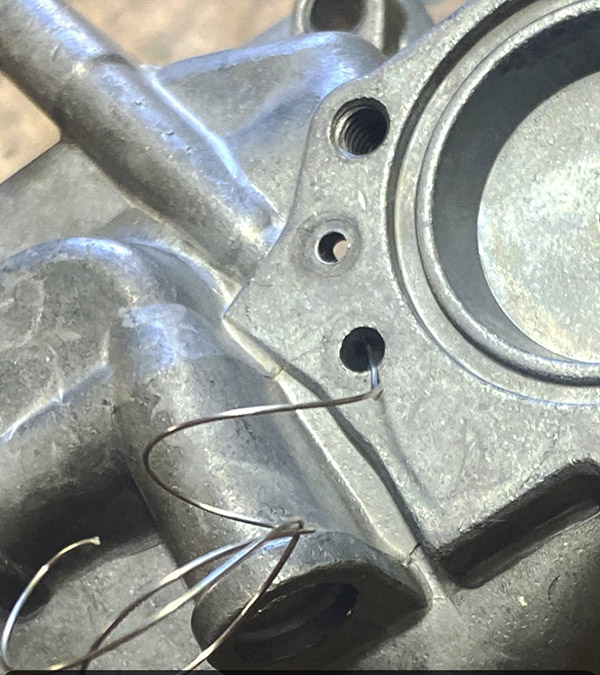
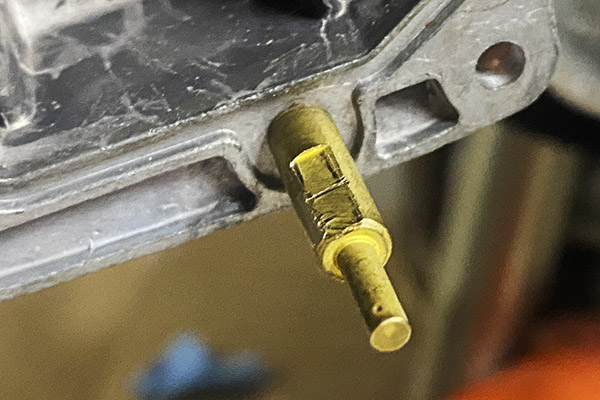
The kickstand culprit. This worn area was the locking boss. It’s wiped out so no locking. I may weld it up and relocate the pivot to allow for over-centering (eliminating the lock system).
The Buell has a strange kickstand (another bike with a goofy kick stand; see the Husqvarna kickstand story here on ExhaustNotes). The stand has an elongated mounting hole that allows the stand arm to pivot up and down in addition to the normal fore-aft motion. This extra motion was designed to allow the square pivot end of the stand to drop into a notch cast in the frame mounted, aluminum foot peg/kickstand boss. That’s a mouthful but when you see it it’s easy to grasp the concept. When new this setup made for a locking stand when deployed with the bike’s weight bearing on the stand.
The operative words here are “when new.” On my Buell the notch area inside the kickstand boss is worn out and the stand no longer locks. As built the stand doesn’t over-center and naturally stay in place like normal kickstands. You know where this is going. Fixing the kickstand was on my Buell to-do list. I should have made it job one.
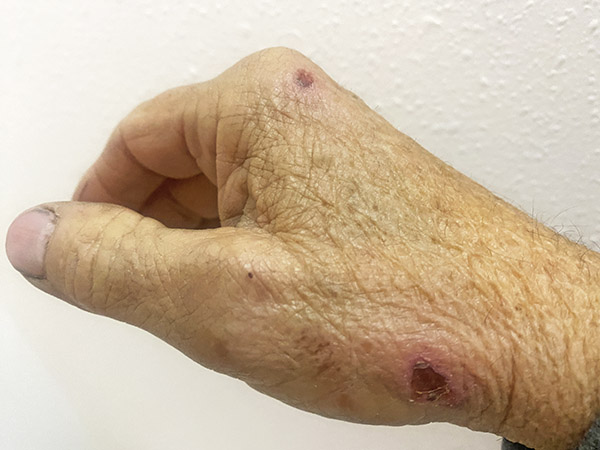
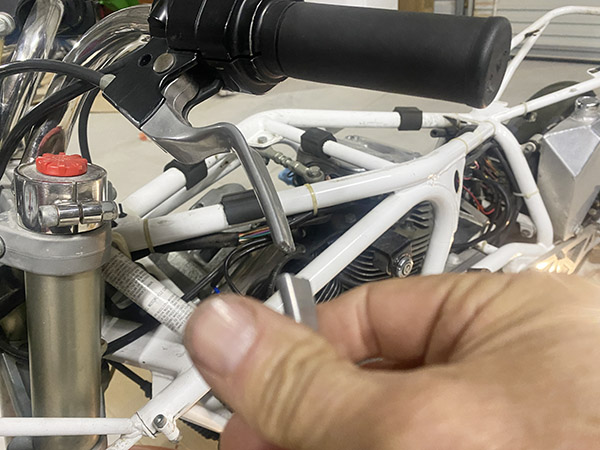
Kickstands break levers. Ask me how I know.
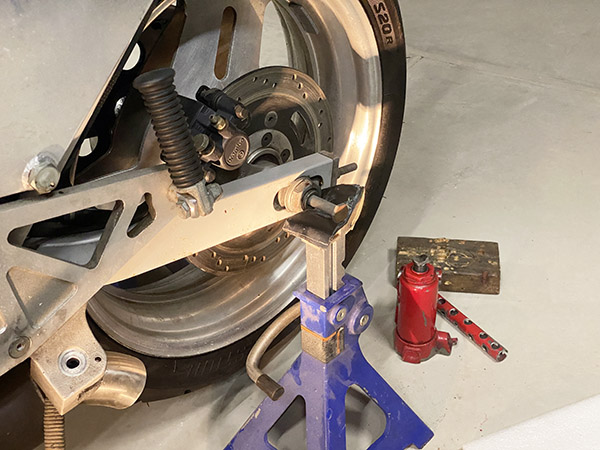
As I was removing the carb (standing on the right side of the bike) the Buell started rolling forward. As it fell left I held onto the frame as best I could but the bike hit the ground hard breaking the clutch lever. The right mirror, which is also a faring mount, took a hard hit and things look a bit off from the cockpit. I have the bike on jackstands now and it’s stabilized.
Jack stands after the horse has left the barn. At least I stopped dropping the bike.
Luckily, I had most of the bodywork removed and the only bits left, the front fender and fairing, are unscathed. $20 will get me two new levers (Harley parts are cheap!) but I think I’ll just weld the broken tip back on. You know, to keep it original.
Back to the carb. The Buell motor is a stock 1995 Sportster mill and there is a huge parts aftermarket serving the Sportster. The carb kit was $13! I can get a complete, clone carburetor with new spark plugs, fuel filter and jet cleaning tool for $44! I know, I know, it’s Chinese but who’s to say the original isn’t Chinese? The Amazon clone carb reviews are positive: just bolt it up and the bike runs great. I bought the kit but that new carb was tempting.
This 1995 Sportster is quite a bit different than my old 1968 Sportster. The bottom end looks similar but everything else is different. What I thought was a pressure feed for oiling the top end seems to be a vent as the hose ends under the battery with the hose end left open to the breeze.
There’s also a rubber grommet with an open hole in the filtered side of the air cleaner. I suspect a crankcase vent hose went there but I’m not sure. As is, the hole allows unfiltered air into the carburetor so that’s not good. I’ll plug the hole or figure out what goes in it.
Plugs look a little sooty. I’ll clean them up and flog the bike to blow out the soot.
I don’t know how long the Buell sat so I pulled the iridium spark plugs (sooty) and squirted some motor oil in the cylinders so the rings don’t have to scrape on dry bores. When I get a battery, I’ll give the motor a spin with the plugs removed to blow out any excess lube.
Apparently, the White Power front forks on the 1995 S2 are different from the following years. I’m having trouble finding fork seals and have emailed White Power directly. No response yet. If I had a 1996 S3 fork seals are everywhere for the damn things.
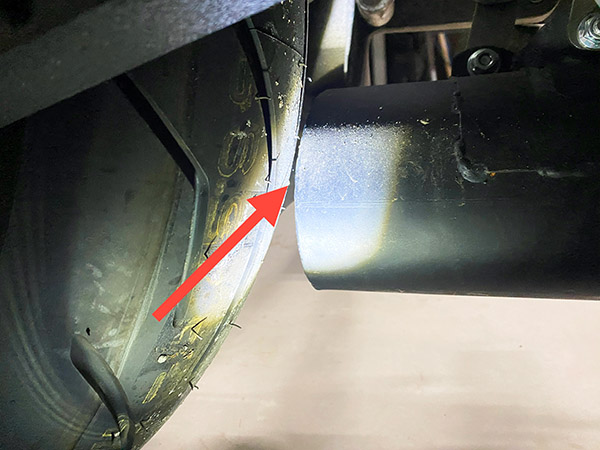
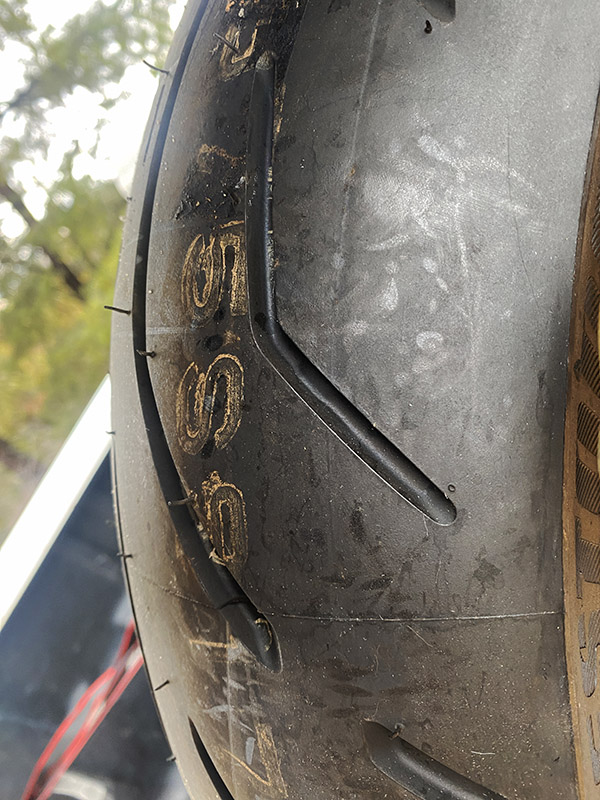
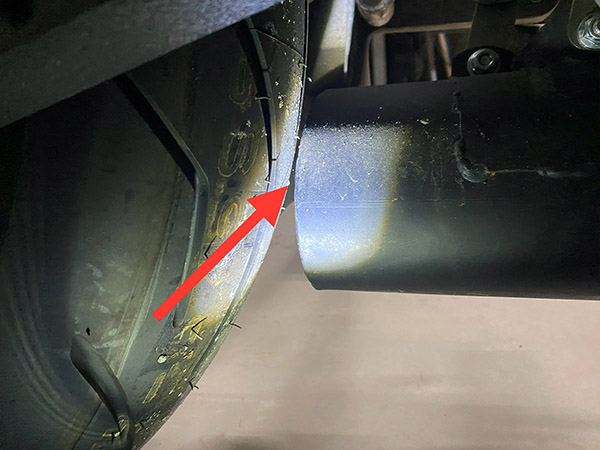
For me, the rear tire was a little too close to the Buell’s underslung muffler. Like a 1/8″ gap. It looks like the muffler slid back a bit from the header pipe. I loosened the pipe clamp and mounting bolts then beat the muffler forward with a rubber mallet.
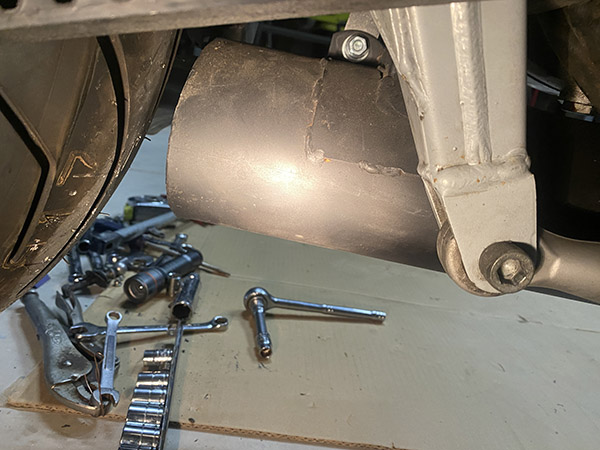
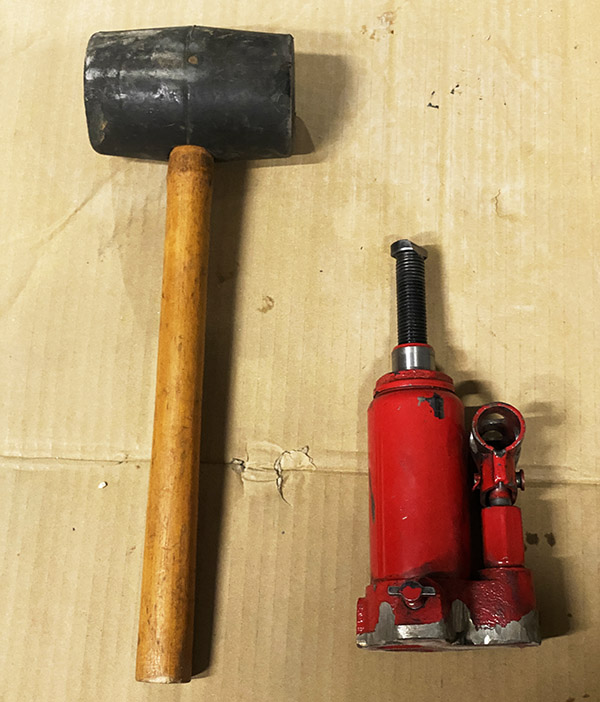
Does this tire gap make me look crashed? Not much clearance, Clarence.Hammers and jacks gained quite a bit of clearance. I have no faith in this fix.Buell tools. Anvil and forge not shown.I think the permanent fix is to make these brackets a bit longer so the muffler fits the header better. Then weld the brackets on the muffler side to prevent the parallelogram effect when the bolt clamping inevitably loosens.
A jack under the header pipes pushed the header into a more agreeable position and I tightened the bolts. This beating gained about 3/4″ but I’m sure it won’t hold. The muffler looks like a new one or freshly painted. The angle of the header pipe isn’t quite right. The tail of the muffler needs to drop about 1/4″ which means slightly longer muffler brackets. Once the bike is operational, I may do some exhaust re-engineering.
$30 seems cheap but then I’m approaching the end so I’m risking less.
The rear brake Brembo master cylinder is stuck and will need to come apart along with the rear caliper. Seals for the rear brake components are another hard to find item. I did find a Brembo clone master cylinder/caliper/brake line set up that may fit for $30 so I bought that. Watch for the ExNotes Brembo-clone brake system review.
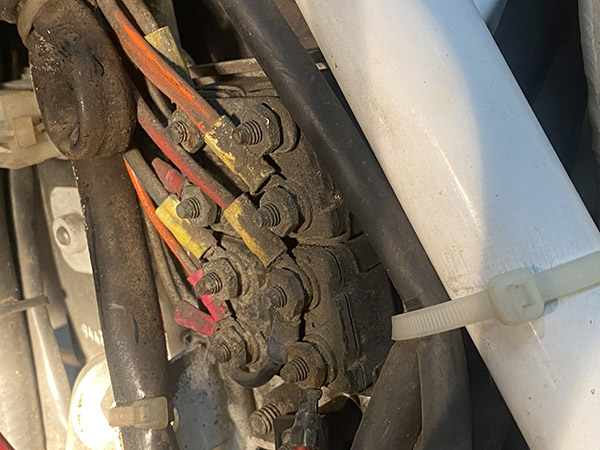
Wiring straight out of 1960. I love it.
Except for the damage I’m causing by dropping the Buell, it looks to be in good shape. I probably could have poured gas in the thing, popped a battery in and gone for a ride. Who needs a rear brake anyway? I’ll be dismantling the front end soon to measure the fork seals and to give the steering head bearings a shot of grease.
That 6-mile Cyclone (the one I didn’t win) is looking more and more like a steal!
After ten years of ownership I am passing the 1975 Z1 baton off to another owner. I’ve enjoyed fixing and riding the bike for 6000 miles but there’s not much else I need to do to the bike. I’ve moved on to Honda Dreams and Buells.
Don’t worry about my loss of the Z1. The money I get from selling the Z1 will be reinvested into other, unprofitable motorcycle ventures.
The complete story on Zed is here on ExhaustNotes under the Resurrections section. Read it all and you will know just about everything about this bike since I bought it.
Feel free to click on the link to Iconic Motorbike’s auction site to bid on the Z1. In fact, bid on it even if you don’t want it. Share it to your friends who aren’t interested in motorcycles!
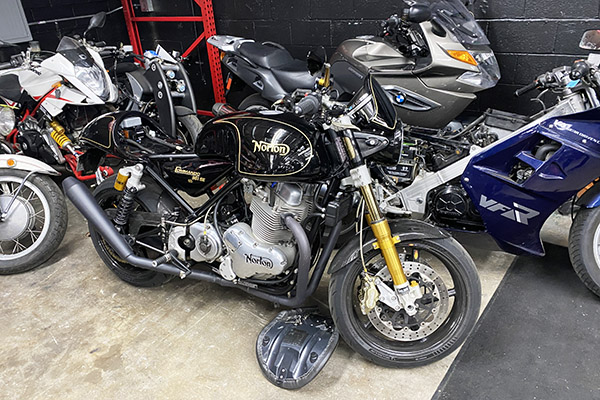
The 1995 Buell Thunderbolt is home safe and dry. It was good to meet up with Berk out in California. He really pulled out the stops: I had my own room, he bought me a bunch of food, took me on a tour of the San Gabriel mountains and helped pick up the Buell from Iconic Motorbikes. I really don’t deserve this much kindness. But I’m not turning it down.
The trip back to New Mexico was uneventful except for a steady rain that fell from Phoenix all the way to Las Cruces, New Mexico. It was nice to be snug and warm in the Toyota. I see why people drive cars.
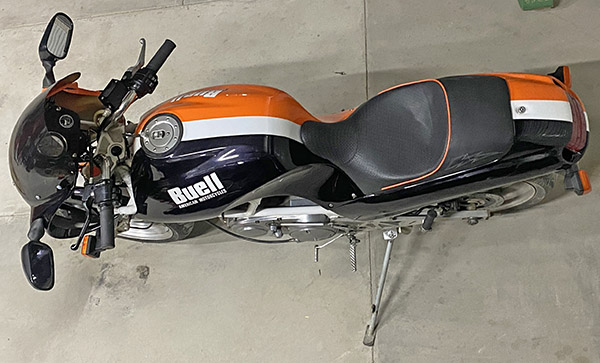
The Buell in Bay 2 of the shed. CT recently cleaned this area so I’ll have room to work on the bike.
Driving in the rain gives you time to think and I thought about how much longer I’ll be strong enough to suffer the elements on a motorcycle. It was a grey, melancholy ride. The bright orange and black Buell cheered me up whenever I looked in the rear view mirror. I got back home at dark. It started to rain. I left the Buell in the truck.
The rain was drizzling the next day when we unloaded the Buell. It was a slick, wet plastic Toyota bed liner that the front tire slid out of and down the ramp. Luckily CT was there to back me up if the Buell started to tumble. We managed to park the bike in the shed, I dried off the Buell and started examining my prize.
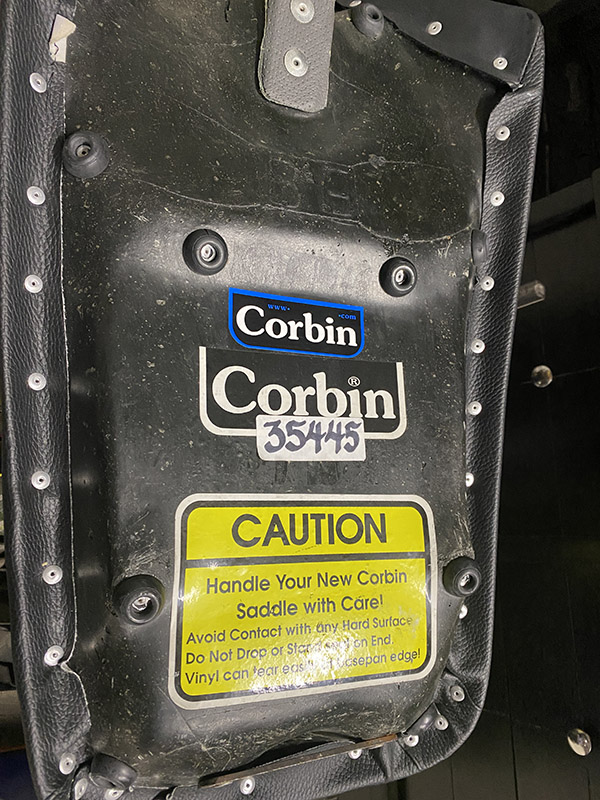
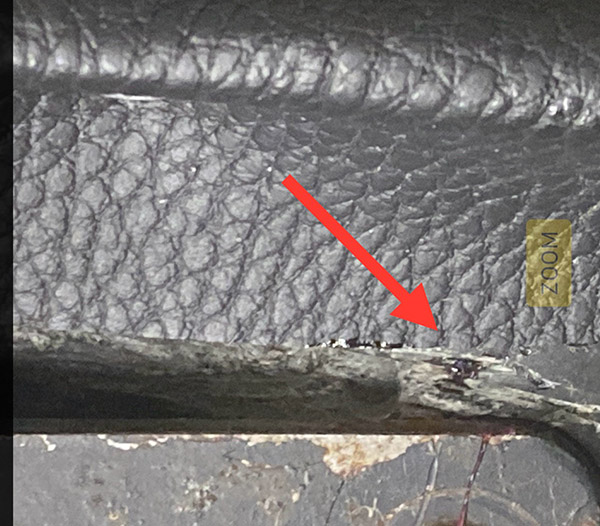
Both Bridgestone Battleaxe tires are unused and still have printing on the tread surface. The date code is from 2015 so 10 years old and never been warmed up. Before you tell me they are dangerous let me cut you off and say I’m running them. There are no cracks or check marks, they have been out of the sunlight, the rubber feels soft. I’m going to risk it.I’ll need to do a little adjusting as the handlebars hit the frame-mount faring. The faring has cut outs for low bars but these higher bars don’t align with the openings.The kickstand leans the bike way over. The stand is worn in the aluminum holder. I’ll need to shim this a bit or possibly put a slight bend in the stand to make the bike sit more upright.Performance Machine spun aluminum wheels are two halves joined at the hub and (I’m guessing) welded inside. A lick of polish should have them looking new.The under-slung muffler is uncomfortably close to the rear tire. Maybe the new drive belt will move the wheel back a bit. If not, I’ll have to make a bit of clearance.The Buell came with a Corbin seat. I don’t understand why this seat is so heavy. It’s like it’s made of lead. My brief time in the saddle seemed ok. Longer road tests to come.The Corbin seat fits the Buell well but the rear, locking latch doesn’t line up. The lever hits the seat too soon. It looks like someone tried to grind a bit of clearance but didn’t do enough. I’ll see what I can do, I’m just glad the seat didn’t blow off on the way home.The rear suspension is pretty stiff. I’m going to take out a bit of preload assuming this is where you adjust preload. With a Buell you can’t be too sure.
Now to start buying stuff for the Buell starting with a battery, seals for the stuck rear brake, fork seals and a fresh drive belt followed by a carb cleaning and a gas tank flush. Hopefully I’ll have a video of the bike running for Buell Fever Part 3.
As my age keeps creeping up and I slowly fall apart like Jeff Goldblum in the movie, The Fly, there is an urgency, a panic lying just below my normally placid exterior. Time is running short for all of us and if you have unfulfilled dreams, it’s best to get a move on.
The ill -fated VR1000, inspiration for my Buell’s paint.
Owning a tube frame Buell has been on my wish list since the S2 model came out in the mid 90’s. The combination of modern sport bike and 1957 lawnmower engine had a strange appeal to me and let’s face it: everyone should own a Sportster.
The dawn of 2026 found me frantically searching the internet for a 2000+ Buell Cyclone and I found a few. Several were pretty beat up all were reasonably priced but far away.
The deal I missed due to my inherent thriftiness.
I happened upon Iconic Motorbike Auctions and they had a pile of Buells from a private collection. The crown jewel was a Cyclone with only 6 total miles. It was a brand new, 25-year-old motorcycle. I bid on the bike and it made reserve at $4,000. What a deal! $4K was out of my self-imposed Buell budget so I stopped bidding. Someone got a hell of a deal.
Next up at Iconic was a clean, Buell Ulysses complete with Buell saddle bags. It was a gas-in-frame model. I prefer a tube-framed Buell but bid on the Ulysses anyway. It sold for $3,250! I didn’t bid anymore on it because it just wasn’t the bike I wanted. Although if I got it for $2K I would have learned to love it. After that, Iconic had an S3 with saddlebags that went for over $5,000. Now I was starting to freak out. I had Buell Fever bad-like. What if I was witnessing a Buell market correction in real time?
It’s like getting two bikes in one! Orange on the right.And black on the left.
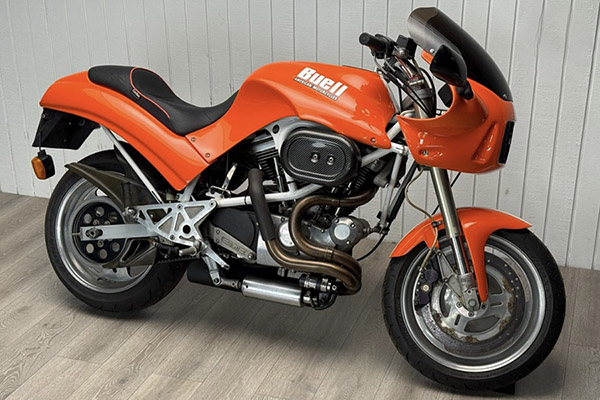
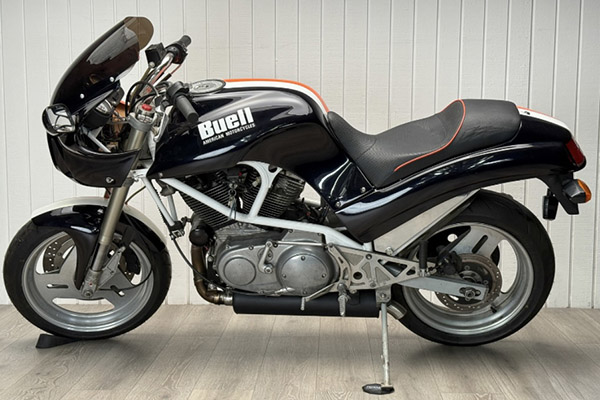
Iconic has a buy-it-now section for motorcycles that don’t make their auction reserve. I plundered around in buy-it-now and found a beautiful 1995 Thunderbolt with only 13,000 miles for $3,000. It has a few minor issues to sort out like any 30-year-old motorcycle but what really got to me was the Harley VR1000-tribute paint scheme . It looked cool as hell. I loved the paint job. I pushed the button.
It’s not an actual Cyclone, but it mostly is a Cyclone. The main cosmetic difference is the front forks and faring. Also the 1995 Thunderbolt used a bone-stock Sportster engine that Cycle World dynoed at 65-ish horsepower. Later Buell’s were pumped up a lot with Buell-specific heads and other parts churning out 100 horsepower.
While I wouldn’t mind another 35 horsepower, the truth is I just putt around on bikes. My go-fast days are behind me much like the strange growth I had cut out of my back a few months ago (see The Fly with Jeff Goldblum).
One advantage to the Sportster engine is that parts availability should be excellent for the remainder of my life and beyond. If I truly need more oomph there are tons of Sportster hop-up parts and 60 years of institutional knowledge on the Internet. 75 horsepower is a pipe and cams away.
But I probably won’t do anything to the Thunderbolt except ride it and look at it. I’ll be fixing the minor issues right here on ExhaustNotes so you’ll be able to follow along with this Buellishness.
Got to go. Driving out to Panorama City in California to pick up my dream bike from Iconic motorbikes.
Old Man Winter is taking his sweet time here in New Mexico. It is late December, 70 degrees and the frozen old git still hasn’t made much of a dent. But he will arrive and I’ll be ready with my new Kemimoto heated grips.
I’ve set up the Kawasaki ZRX as my cold weather bike with a 12-volt receptacle for an Aerostitch heated vest and these grips will complete my preparations for the cold. If it ever gets here.
Installation would normally be simple as the wiring connects directly to the host bike’s battery. The main problem with this setup is if you accidentally leave the grips on and drain your battery. In the cold.
I couldn’t find an unused, switched power connection on the factory harness so I rigged a cube-type relay under the headlight faring that energizes from the instrument light circuit. This ensures the grips are off when the key is off. Power for the grips comes from the Areostitch vest power lead and runs up to the relay.
The heating elements just wrap around your existing grips and a 3-power level switch needs to go somewhere. I used a fairing mount bolt to secure the included switch bracket on the right side of the gauge cluster. It’s not a great location but it was easy.
Heat-wise these grips crank it out. On high you can feel the burn. This setting would be good for freezing weather. Low was still too hot during my 60-degree test ride so it should be good for average New Mexico winter conditions.
That wrap around heating element never really gets very tight on the grips so you’ll need to reset its position as it slowly creeps around the throttle. Or squeeze tighter.
The on-off switch is dimly lit so in sunlight it’s hard to tell what power level the thing is set at (red=high, blue=medium, green=low) I had to stop and cup my hand over the switch to see the illumination.
While I haven’t tested the grips in truly cold weather I’m sure they will help. It’s nice to pop the switch on when the elevation climbs over 7000 feet. Cuddly and warm best describes the feeling.
How long the grips will last is anyone’s guess but they’re easily unwrapped, unplugged and stored for the 10 months a year they are unnecessary in sunny, warm New Mexico. The harness, relay and switch remain on the bike full time.
I’m satisfied with the Kemimoto heated grips and give them a solid 3-star rating, a rating that could be improved if they fit the grips tighter and the switch was brighter. Maybe a section of elastic would help hold the grips better but what do I know. Now if Old Man Winter would get off his butt I could try them out in proper conditions.


 I’ve set up the Kawasaki ZRX as my cold weather bike with a 12-volt receptacle for an Aerostitch heated vest and these grips will complete my preparations for the cold. If it ever gets here.