I deleted my Facebook account this morning. It feels good. These are the reasons why:
Facebook told me one my recent posts about a handgun violated their community standards (it’s the blog immediately below this one). What a patronizing, insulting, idiotic thing to do. Folks, “Facebook community standards” is an oxymoronic expression.
I didn’t like the constant stream of moronic comments and arguments.
I’d post a link to one of our blog articles and I’d get questions on Facebook that were answered in the blog. Facebook members were too lazy or too stupid to realize the link would provide the information.
Too many people add comments to Facebook that are just plain wrong.
There are persistent Facebook comments that are racist. I realize there are a lot of racists out there. I don’t need to see it.
Facebook’s so-called “fact checkers” routinely post “This statement is partially false” when it wasn’t. In fact, that ridiculous comment essentially agreed that it was true. Who are these “fact checkers,” anyway? My inference is that they are 22-year-old Bernie-Sanders-supporting Silicon-Valley software types making $200K/year who routinely confuse their income with their intelligence.
I grew tired of the anti-gun crowd on Facebook. If you don’t like guns, don’t own one. Do you really think your views are going to alter mine? Do you really think your insipid comments on Facebook are going to change my views?
What is Facebook, really? It’s not a product. It adds nothing of value to the human experience. It’s nothing, really.
I don’t like Mark Zuckerberg. I know someone who knows him, and the feedback isn’t good.
I was spending too much time on Facebook. Life is short. I’m not wasting another second of it glued to my laptop or my cell phone reading stupid stuff on Facebook.
Old Zuckerhead doesn’t make quitting Facebook easy. It took me about half an hour to finally find a way to do it. I’m pretty sure that’s not accidental. If it was such a good thing, you’d think they’d make it difficult to join, not difficult to quit.
It’s Sunday. I think I’m either going to the gym, or a motorcycle ride, or the range. Maybe I’ll do all three. I feel good.
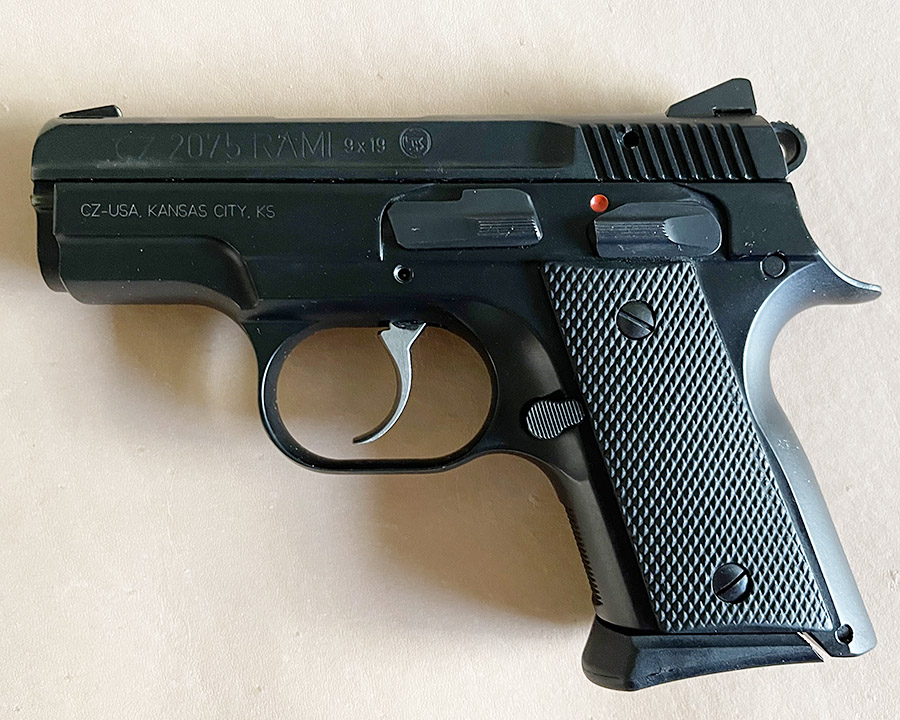
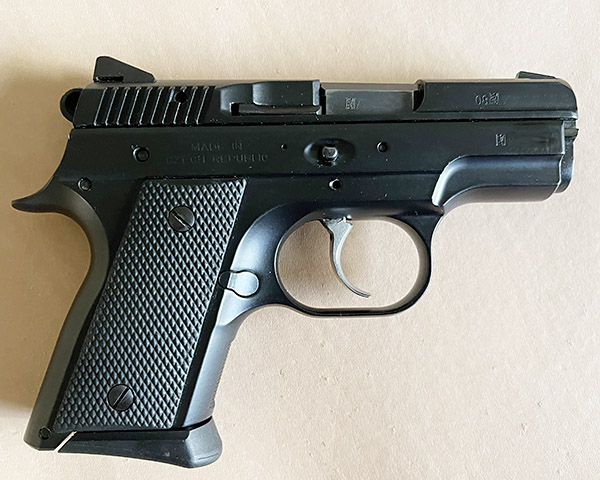
As concealed carry powerhouses go, it doesn’t get much better than the CZ 25 Rami. One of my good buddies owns one and I had an opportunity to play with it. I was impressed. On the plus side, it is an all-metal gun with a flat black finish, a hammer (greatly preferred by yours truly over a striker-fired pistol), great sights, and a marvelous trigger. My bud had a trigger job on his, and it was awesome (light and crisp, with zero creep, just like it should be).
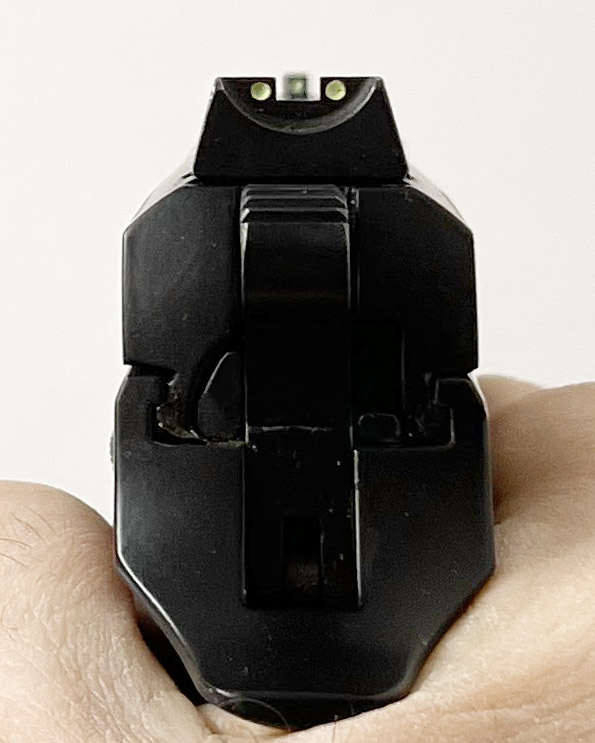
The three-dot sights on the CZ are crisp and non-gimmicky. There’s no glow-in-the-dark nonsense and they stand out. In the photo below, the sight picture is just the opposite of what it’s supposed to be (you want the front sight to be in sharp focus, and the rear sight to be a bit fuzzy, but I couldn’t get my iPhone camera to cooperate when I shot these photos).
I liked the feel of the CZ. I didn’t get to fire it, but I think I might have an opportunity at some point. The one you see here is chambered in 9mm. The Rami was also available in .40 S&W, which I think might be a bit much for a gun this small.
The Rami was discontinued in 202o with the introduction of newer CZ models. I haven’t seen the new handguns, but I can’t see how they can be any better than the CZ 2075. This pistol just feels right.
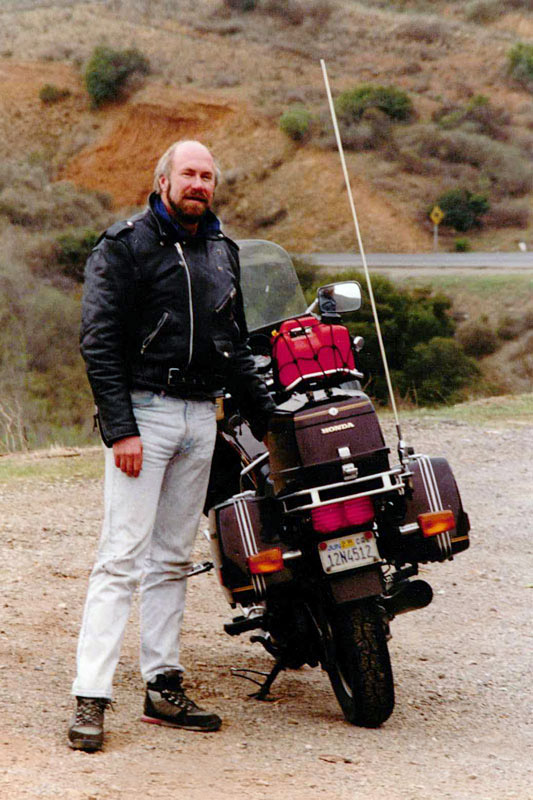
I’ve ridden motorcycles through Baja probably 30 times or more over the last 30 years, and it’s unquestionably the best place to ride a motorcycle I’ve ever experienced. Many people are afraid to venture into the peninsula for fear of a breakdown. Hey, it happens, but it’s not the end of the world and it doesn’t happen often. They don’t call it adventure riding because it’s like calling for an Uber.
Not all “breakdowns” result in your motorcycle being nonoperational. Some are just mere annoyances and you truck on. A few breakdowns result in the bike not running, but there are usually ways to get around that. When it happens, you improvise, adapt, and overcome. Here are a few of mine.
Heritage Indeed
The first time I had a motorcycle act up was on my beloved ’92 Harley Softail. It started clanging and banging and bucking and snorting somewhere around Ensenada. I was headed south with my good buddy Paul from New Jersey. It was obvious something wasn’t right and we turned around to head back to the US. The Harley got me home, but I could tell: Something major had happened. The bike was making quite a bit of noise. I had put about 300 miles on it by the time I rode it back from Mexico.
A roller lifter that converted to a solid lifter.
One of the Harley’s roller lifters stopped rolling, and that turned it into a solid lifter. And when that happened, the little wheel that was supposed to rotate along the cam profile started wearing a path through the cam. And when that happened, the metal filings migrated their way to the oil pump. And when that happened….well, you get the idea. My 80-cubic-inch V-Twin Evo motor decided to call it quits after roughly 53,000 miles. It happens I guess. Nothing lasts forever.
Potato, potato, potato.
Here’s where it started to get really interesting. My local Harley dealer wouldn’t touch the bike. See, this was around 2005 or so, and it seems my Harley was over 10 years old. Bet you didn’t know this: Many Harley dealers (maybe most of them) won’t work on a bike over 10 years old. The service manager at my dealer explained this to me and I was dumbfounded. “What about all the history and heritage and nostalgia baloney you guys peddle?” I asked. The answer was a weak smile. “I remember an ad with a baby in Harley T-shirt and the caption When did it start for you?” I said. Another weak smile.
An S&S engine in my ’92 Softail. It let me ride a slow bike fast.
I was getting nowhere fast. I tried calling a couple of other Harley dealers and it was the same story. Over 10 years old, dealers won’t touch it. I was flabbergasted. I tried as hard as I could, but there was no getting around it…the Harley dealer would not work on my engine. It was over 10 years old. That’s that; rules is rules. For a company that based their entire advertising program on longevity and heritage, I thought it was outrageous. A friend suggested I go to an independent shop. “It’s why they exist,” he said. So I did.
So, I went with Plan B. I took the Harley to a local independent shop, and they were more than happy to work on my bike. I could have the Harley engine completely rebuilt (which it needed, because those metal bits had migrated everywhere), or I could have it rebuilt with an S&S motor. I went with the S&S motor (the cost was the same as rebuilding the Harley engine), doubling the horsepower, halving the rear tire life, and cutting my fuel economy from 42 to 33 mpg.
Justin’s Countershaft Sprocket
On the very first CSC Baja trip, I was nervous as hell. The CSC bikes had received a lot of press and the word was out: CSC was importing the real deal, a genuine adventure touring motorcycle for about one sixth of what a GS 1200 BMW sold for in those days. The naysayers and keyboard commandos were out in force, badmouthing the Chinese RX3 in ways that demonstrated unbridled ignorance and no small amount of bias. And here we were, taking 14 or 15 guys (and one gal) who had bought new RX3 motorcycles that had literally arrived in the US just a few days before our departure. There was one thought in my mind as we headed south from Azusa that morning: What was I thinking? If the bikes started falling out on this first trip, it would probably kill the RX3 in America.
Hey, it worked. Adapt, overcome, improvise. The adventure doesn’t start until something goes wrong.
I need not have worried. None of the engines failed. We had a few headlights go out, but that’s not really a breakdown. And then, when we were about halfway down the Baja peninsula, I took a smaller group of riders to see the cave paintings at Sierra San Francisco. That trip involved a 140-mile round trip from Guerrero Negro into the boonies, with maybe 20 miles of that on a very gnarly dirt road. As we were returning, good buddy Justin’s RX3 lost its countershaft sprocket. We found it and Justin did a good enough MacGuyver job securing it to the transmission output shaft to get us back to Guerrero Negro, but finding a replacement was a challenge. We finally paid a machinist at the Mitsubishi salt mining company to make a custom nut, and that got us home.
On every Baja trip after that, I took a spare countershaft sprocket nut, but I never needed any of them after that one incident on Justin’s bike. Good buddy Duane had a similar failure, but that was on a local ride and it was easily rectified.
Jim’s Gearbox
Four or five Baja trips later, after we had ridden all the way down to Mulege and back up to the border, good buddy Jim’s transmission wouldn’t shift.
Good buddy Jim in the Mulege mission.
That’s the only breakdown I ever experienced anywhere on an RX3 that wouldn’t get us home, and that includes multiple multi-bike Baja trips, the multi-bike 5000-mile Western America adventure ride, the multi-bike 6000-mile ride across China, the 3000-mile circumnavigation around the Andes Mountains in Colombia, and quite a few CSC local company rides. One of the guys on that Baja ride lived in the San Diego area and he owned a pickup truck, so he took the bike back up to Azusa for us.
Biting the Bullet
A couple of years ago Joe Gresh and I did a Baja road test with Royal Enfield press bikes. One was the new 650 Interceptor twin (a bike I liked so much I bought one when I got home); the other was a 500 Bullet. The Bullet was a disaster, but it really wasn’t the bike’s fault. The dealer who maintained the press fleet for Royal Enfield (I won’t mention them by name, but they’re in Glendale and they’re known for their Italian bikes) did a half-assed job maintaining the bike. Actually, that’s not fair to people who do half-assed work (and Lord knows there a lot of them). No, the maintenance on this bike was about one-tenth-assed. It was very low on oil, it had almost no gas in it, the chain was loose and rusty, and on and on the writeup could go. The bike kept stalling and missing, and it finally gave up the ghost for good at the Pemex station just north of Guerrero Negro.
Joe Gresh, inflight missile mechanic extraordinaire, getting intimate with the Bullet in Baja. “The Bullet needs me,” he said.
Fortunately for me, Gresh had one of those portable battery thingamabobbers (you know, the deals that are good for about 10 battery jumps) and it allowed us to start the bike. We bought a new battery that didn’t quite fit the bike in Guerrero Negro (big hammers solve a lot of problems), but the entire episode left a bad taste in my mouth for the Bullet and for the Glendale Ducatimeister.
Big hammers fix all kinds of problems.
That bike had other problems as well. The kickstand run switch failed on the ride home, and Gresh did an inflight missile mechanic bypass on it. Then, just before we made it back to my house in So Cal, the rear sprocket stripped. Literally. All the teeth were gone. That was another one I had never experienced before. The Bullet was sort of a fun bike, but this particular one was a disaster. We joked about it. The Bullet needs me, Gresh said.
John’s Silver Wing Leak
Ah this is another motofailure that tried but didn’t stop the show. On one of my earlier Baja forays, Baja John had a Honda Silver Wing. That’s a bike that was also known as the baby Gold Wing (it had all the touring goodies the Gold Wing had). It was only a 500 or a 650 (I can’t remember which) and it had no problem keeping up with the Harleys (but then, it doesn’t take much to keep up with a Harley).
Baja John and the mighty Silver Wing, somewhere well south of the border.
The Silver Wing was a pretty slick motorcycle…it had a transversely-aligned v-twin like a Moto Guzzi and it had plenty of power. Unlike the Guzzi, the Silver Wing was water cooled and that’s where our problem occurred. John’s bike developed a coolant leak. I was a little nervous about that. We were more than halfway down the peninsula and headed further south when the bike started drooling, but John had the right attitude (which was not to worry and simply ignore the problem). The little Silver Wing was like a Timex…it took the licking and kept on ticking, and to my great surprise, it simply stopped leaking after another hundred miles or so. I guess it doesn’t really count as a breakdown.
John’s KLR 650 OPEC Bike
Baja John had another bike, a KLR 650, that developed a fuel petcock leak on another one of our Baja trips. As I recall, it started leaking on the return run somewhere around El Rosario. I get nervous around fuel leaks for the obvious reasons, but John stuck to his policy: Don’t worry, be happy.
Baja John: The man, the legend.
We stayed in a hotel in Ensenada that night. The hotel had an attached enclosed parking structure, which immediately started to smell like the inside of a gas tank. Not that I’ve ever been inside a gas tank, but that parking garage pretty much had the aroma I imagine exists in such places.
John’s luck continued to hold, and we made it home without John becoming a human torch.
The Bottom Line
The bottom line is you basically need four things when headed into Baja:
A tool kit.
A good attitude that includes a sense of adventure.
A well maintained motorcycle.
Maybe some spare parts.
So there you have it. If you’d like to know more about riding in Baja, please visit our Baja page and maybe pickup a copy of Moto Baja.
If you’re headed into Baja, don’t leave home without BajaBound Insurance. They are the best there is. If you are nice, they might even fix you up with a cool BajaBound coffee mug!
Never miss an ExNotes adventure! Sign up here for free:
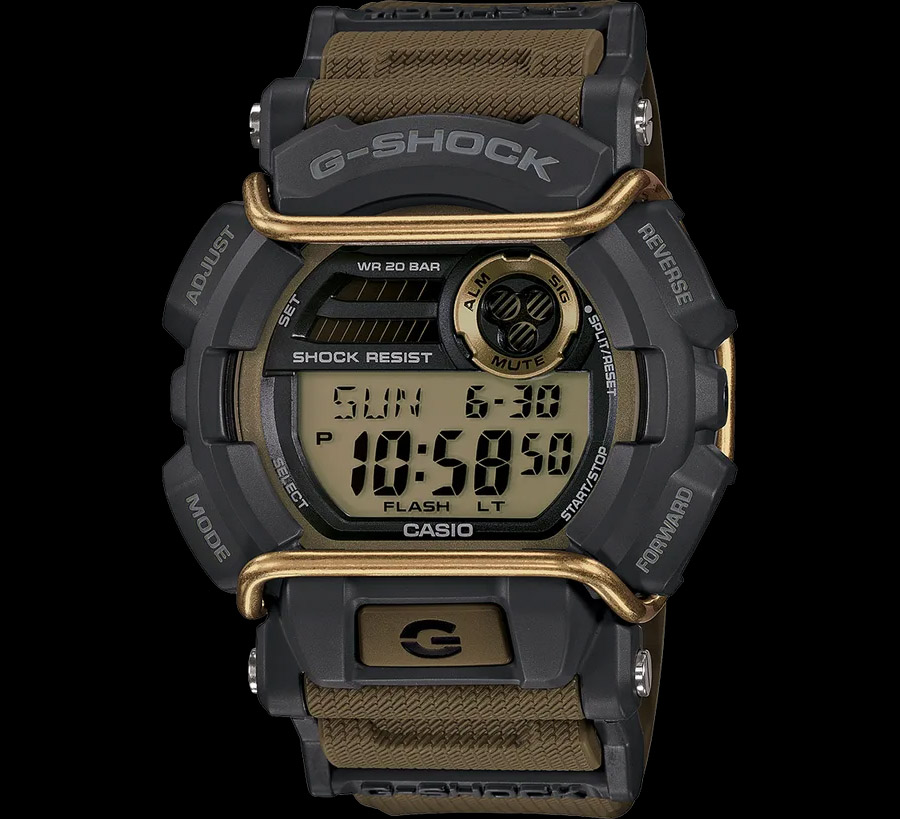
I own a bunch of watches. They’re not rich man watches; they are the indulgence of a guy with practical tastes and a flair for useful and inexpensive tools. My all-time favorite watch, hands down, is the Casio G-Shock GD400 series, with a personal preference for the olive green one. I’ll get to that in a second (hahahaha…a time pun).
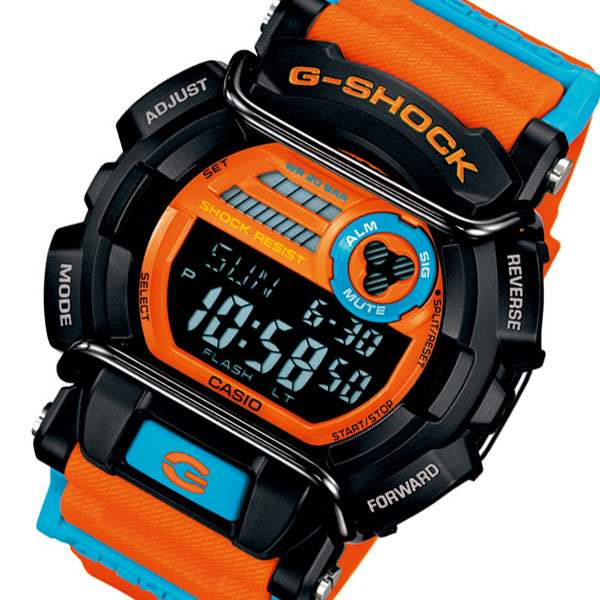
I first bought a similar Casio in turquoise and orange, almost as an impulse buy. I had purchased a set of shoes from Nike or Adidas or somebody in turquoise and orange, and then (probably because I had searched for them online) I started seeing pop up ads for the Casio.
I know it’s weird. I mean, what kind of a motorcycle guy buys a watch to match his shoes? (You don’t need to answer that.) The watch arrived a few days later and I liked it. I was in and out of CSC a lot when I bought the watch and the shoes (we were getting ready for a CSC Baja ride), and I caught a bit of flack for being a fashion plate. That’s how it goes sometimes when you’re a famous and well-dressed blogger.
I liked the watch, and I loved its phenomenal accuracy. I went to www.Time.gov (that’s the official US government time), and the Casio was running exactly even with the government website over the span of a month. That’s really good.
The Casio has a bunch of features I never really use and some I use a lot. It’s got a stopwatch, a timer, and an alarm. It’s got a calendar and it shows the day of the week. You can have it show regular time or military time. You can set it so that if you flick your wrist, the backlight comes on. And you can press the G button and the thing lights up. I use the Casio as a flashlight three or four times every night…you older guys will know what that’s all about. And by pressing the buttons mounted on the case side you can find the time in just about any time zone in the world. That comes in handy on many of my overseas secret missions.
I wore the watch for several years, and then on another CSC Baja trip the battery went south on me. The battery had the good manners to do this in Guerrero Negro, where there are a few stores. I asked the guy who took us to see the whales on that trip which store would have a battery and he pointed one out on our way to the docks. After seeing the whales and having a couple of fish tacos at Tony’s, I rode my RX3 to the place the guide had mentioned. Nope, they didn’t sell watch batteries, but the farmacia two doors down did. Okay, so I went to the farmacia two doors down. Nope, they didn’t have watch batteries, but another farmacia two doors on the other side of the first store did.
Then things got interesting. They had the battery, but the lady behind the counter told me I had to open the watch and change the battery myself. The watch has these tiny little screws and I was wearing my contact lenses, which gives me great far field vision but lousy near field vision. She gave me a little box of tiny screwdrivers, but I couldn’t see the screws very well and I tried to explain my predicament to the very nice lady, but she didn’t speak English. So, I took my right contact out (they’re one-day disposables, so it wasn’t a big deal) and I basically did a roadside repair.
The watch lit up as soon as the battery went in, but the rear cover is orientation sensitive and I got it wrong. The watch crystal fogged within an hour, and by the end of the day, the watch called time out (hahahaha …another time pun). The time out, unfortunately, was permanent. When I returned to So Cal, I took it to the guy who normally sells (and installs) watch batteries for me, but it was too late. The watch was toast.
I missed having that watch on my wrist, and I tried to buy it again. But it turns out that Casio changes the colors frequently on this particular model. Not only had the turquoise and orange version been discontinued, but now it was collectible. I had paid $72 for mine, but by this time used ones were going for close to $400 on Ebay.
A week or two later, another secret mission, and I found myself killing time (wow, a third time pun!) in a mall in New Jersey, and I saw the OD green version of the GD400 Casio. The sales guy and I went back and forth a little, and $92 later (tax included), the watch you see in the big photo at the top of this blog left with me. Like I said, it’s just about the perfect watch and I wear it nearly all the time.
More good news? I liked that turquoise and orange G-Shock watch, too, so I called Casio’s US importer and asked them if they could repair it. I had to spend another $60, but that’s okay. There’s only one thing that’s better than one Casio GD-400 G-Shock, and that’s two of them. The GD400 model comes in a variety of other colors, too, and they typically go for around $100 on the Internet. Trust me on this…if you want a good watch for every day bouncing around, you can’t go wrong with a G-Shock Casio.
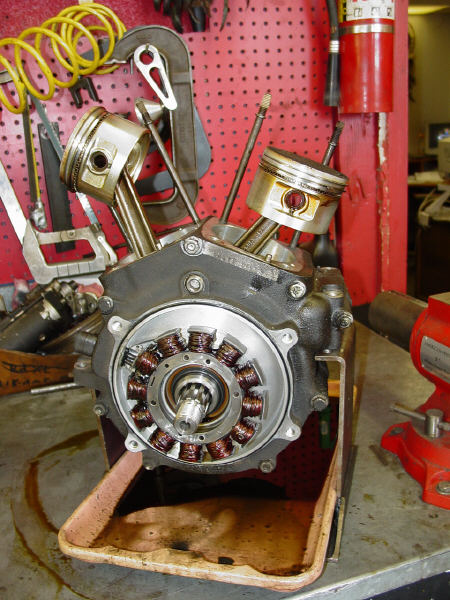
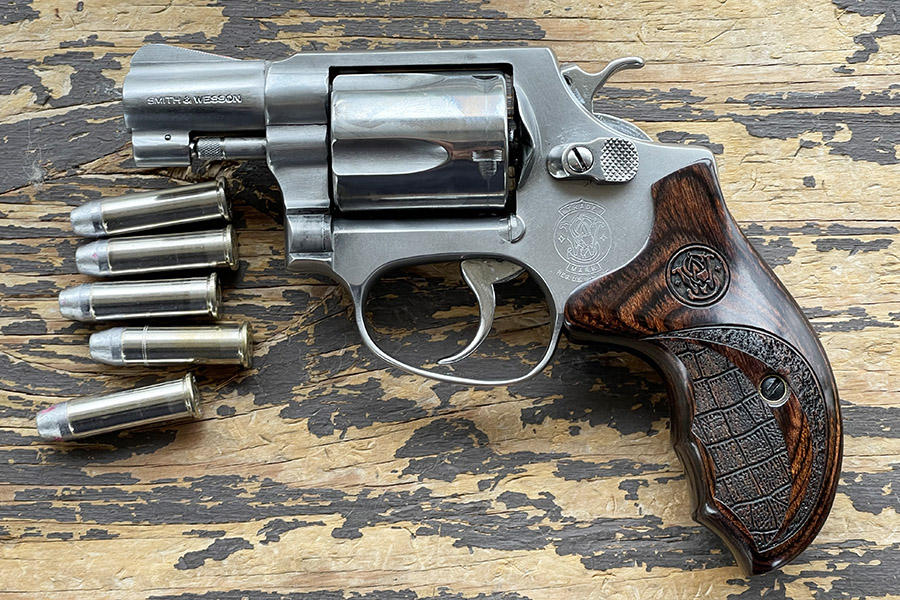
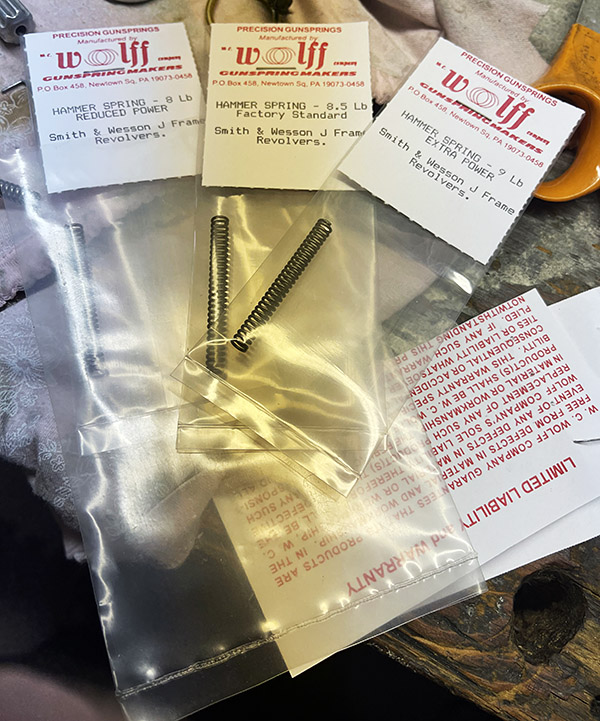
I love my S&W Model 60 and I shoot it a lot. It’s particularly cool after I had TJ (of TJ’s Custom Gunworks) do an action job on it. Not content to leave well enough alone, I convinced myself that (after tracing the occasional double action misfire to not-fully-seated primers) that what I really needed was a lighter hammer spring (in addition to the lighter trigger spring I had already installed). Wolff Springs sells a lighter hammer spring kit, and I went for the lightest hammer spring I could get.
The Wolff Springs hammer spring kit. I went with the lightest spring.
The lighter trigger spring affects single action trigger pull after you have already cocked the gun and it has nothing to do with the occasional double action misfiring I had experienced in the past. Double action trigger pull is affected by both the trigger spring and the hammer spring, but the hammer spring is a much beefier spring and it drives most of the resistance when firing double action. The hammer spring, if too light, can induce misfires.
The Wolff hammer spring kit includes a standard strength spring (an 8 1/2-pound spring), a heavier spring (a 9-pound spring), and a lighter spring (an 8-pound spring). I wanted a lighter double action pull, so I used the 8-pound spring. The tradeoff is this puts less force on the hammer, which means it has lower velocity when it hits home, and that ups the likelihood of a misfire.
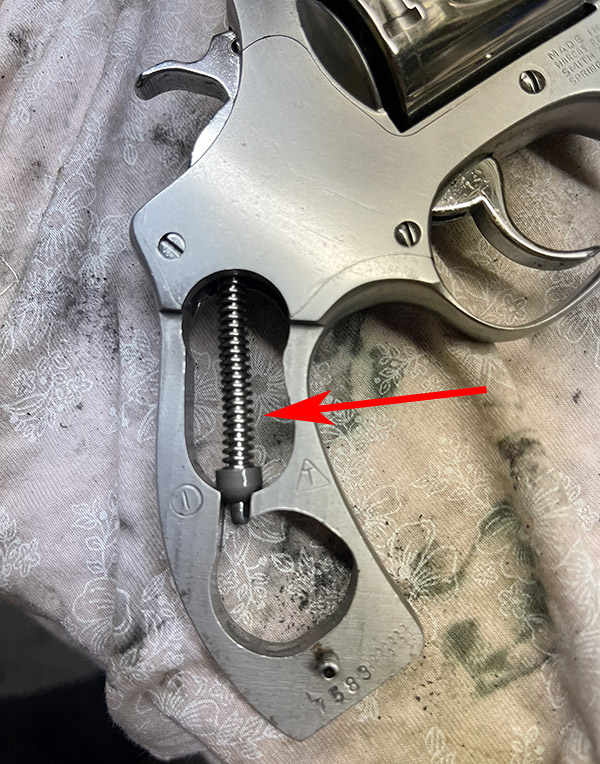
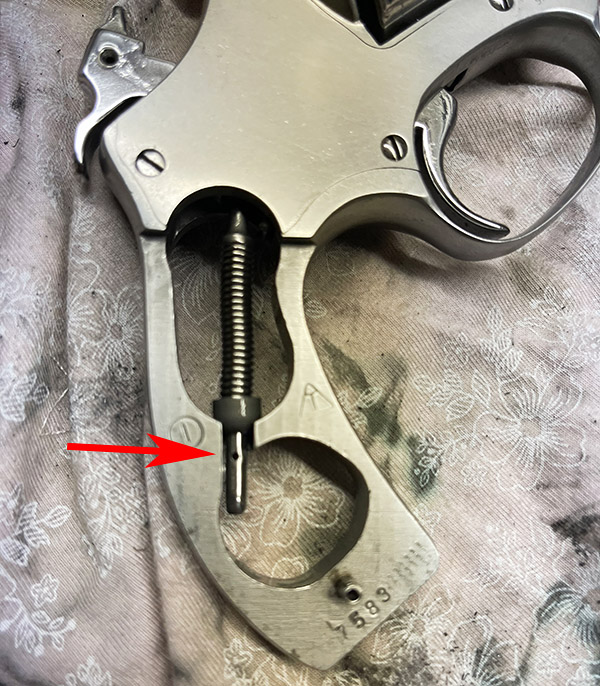
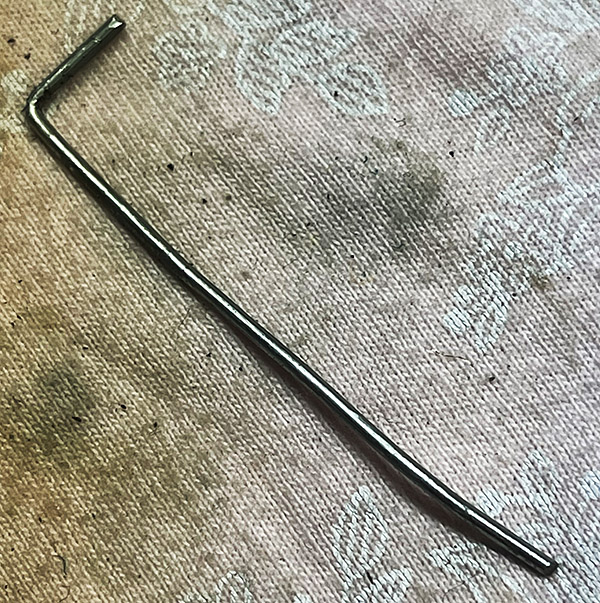
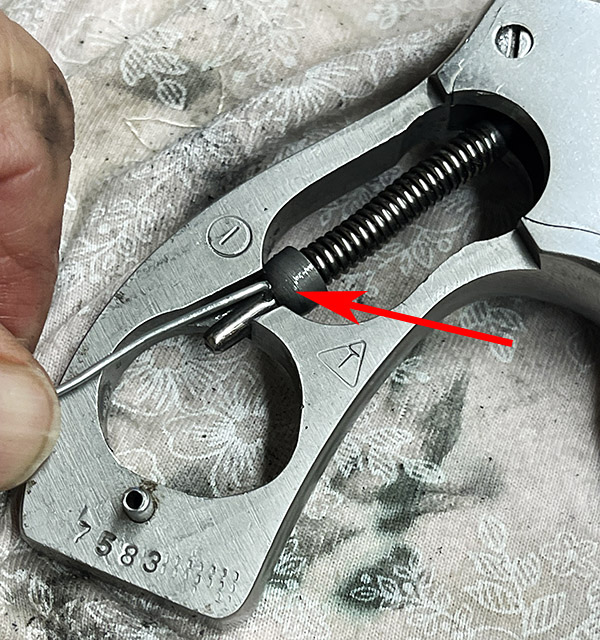
The hammer spring is easy to change, and if necessary, I can go for either of the two heavier springs at the range. All it takes is a small screwdriver to remove the grips, and the same exotic custom tool used for disassembling the Rock Island Compact 1911 (a bent paper clip). The photos below show how this is done.
The Model 60’s hammer spring, with the hammer in the uncocked position.The Model 60’s hammer spring, with the hammer cocked. Note that the hammer yoke (the rod running through the center of the hammer spring) has been pushed back, exposing a hole in the rod.A high tech, German tool steel special assembly/disassembly aid? Nah, it’s a bent paper clip and it works gang busters.To remove the hammer spring yoke and the hammer spring, insert the paper clip into the yoke and gently release the hammer by pulling the trigger and lowering the hammer.With the hammer dropped, the spring is captured in a compressed mode and the hammer spring and the yoke can be removed from the gun. Once this subassembly is removed, you can manually push the spring cap to further compress the spring, remove the paper clip, remove the spring cap and spring, and install the lighter hammer spring. Assembly is the reverse of disassembly.
While installing the new hammer spring, I noticed that my normal gun cleaning routine just wasn’t cutting it on the Model 60. There was still a bit of lead in the barrel, and the powder residue was building up around the yoke. I selected a bronze bristled toothbrush and went to work on the cylinder, the yoke, and the frame, and a bronze bore bush for the bore. When the remnants of gunfights past were gone (you know, my encounters with zombies, as previously described), I spritzed the gun with the universal cleaner (WD40) and then I wiped it down before applying gun oil.
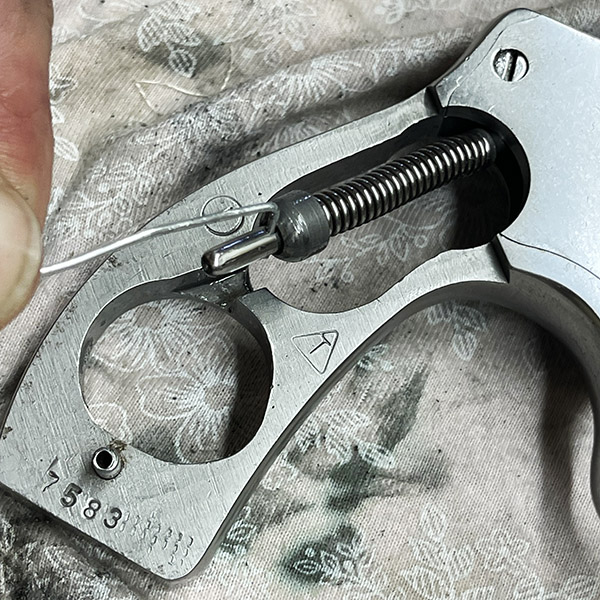
That’s when I noticed that the barrel-to-cylinder gap was nonexistent. Zip. Nada. Zero. The front of the cylinder was touching the rear of the barrel. Uh oh. That’s no good. There’s supposed to be a gap there (like you see in the photo below), because if there’s no gap the cylinder will drag on the barrel. That will degrade the double action trigger pull and, in a worst-case scenario, it can drive the revolver out of time (the chamber won’t be aligned with the barrel). The technical term for the fore-and-aft cylinder movement that assures a minimum clearance when the cylinder is fully forward is called end shake. There needs to be some, and there needs to be a gap. Ideally, that should be 0.004 to 0.008 inches. Any less, and powder and lead residue will bind the cylinder, any more and too much gas escapes (and velocity suffers).
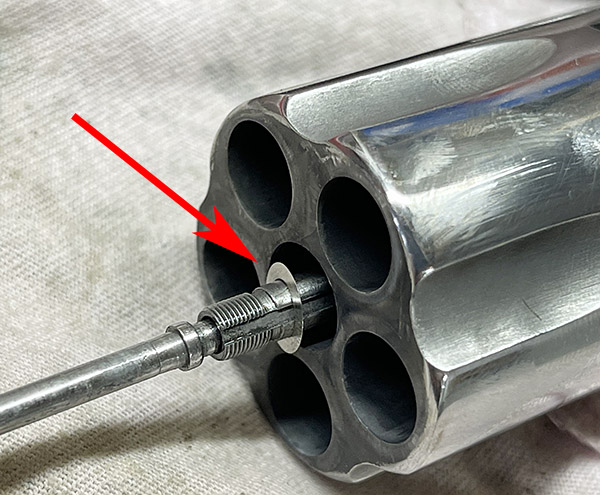
The barrel-to-cylinder gap. This is about .004-inch with the cylinder pushed forward, and that’s the gap I want. This was after I installed the TriggerShims.com cylinder shim.
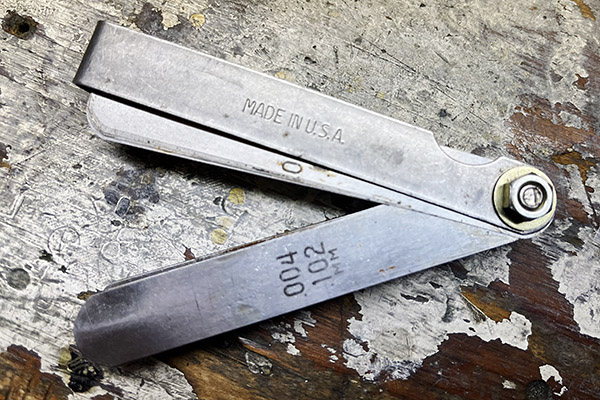
You measure the barrel-to-cylinder gap with a feeler gage, just like you would when setting the valves on a motorcycle. I’ve done that (as you know from reading this blog and any of the CSC shop manuals), and I already had the feeler gages I needed.
My feeler gage. I’ve probably owned this tool for 40 years. It still works. I use it for adjusting valves on my Royal Enfield, too.
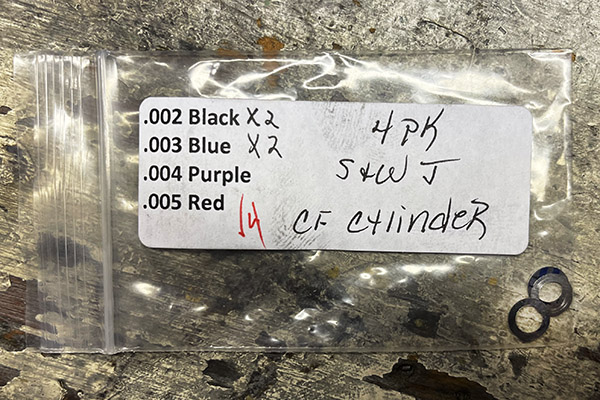
After a bit of internet research, I learned that the way to address inadequate gap is by shimming the cylinder and its fit on the yoke. That’s when I first learned there’s a business that specializes in making shims for this exact purpose. In short order I was communicating with Lance Shively, who heads TriggerShims.com.
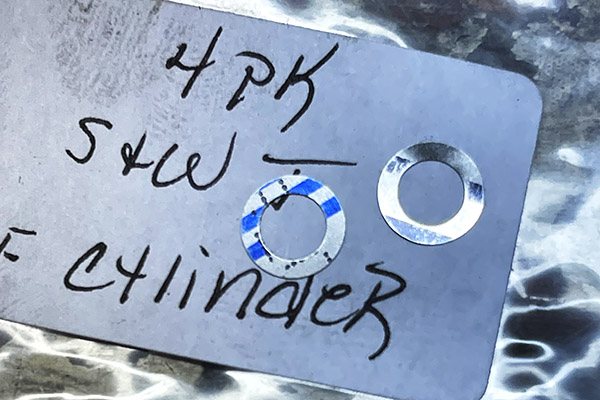
The cylinder shims from TriggerShims.com. They were well packaged and sent in a standard business envelope.The cylinder shims out of the pack. I ordered the four-piece set because I had not worked with these before, I didn’t know what I would need, and they were inexpensive. They are color coded by size.
Lance and his wife, Tammy, run a real Mom and Pop operation that manufactures gun specific shims for a living. Lance has an extensive background in small engine repair and tool and die making, and he and Tammy parlayed that into TriggerShims, which has been doing well for more than 14 years now. Lance told me his primary concern is customer satisfaction, and I can tell you my perception in working with TriggerShims is they have mastered it. I had the Model 60 custom end shake shims in three days, there was no postage charge, and the price was more than reasonable for custom gun parts. Lance runs a Christian business, he believes in God and country, and he’s not bashful about letting people know that. He and Tammy also sell select items from other vendors when he finds a company he likes and believes in, but that is a very select group. The two biggest ones are Wolff and Volquartsen.
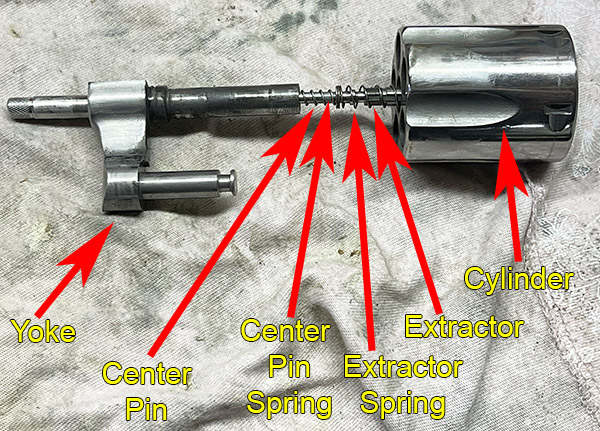
I received the shims I ordered from Lance in just a few days, and installation was trivially easy. I had to remove the yoke, disassemble the ejector rod from the extractor, install the shim I wanted to use (I went with a single .003-inch shim to give the clearance I wanted), and then reassemble everything. It only took a few minutes, and the only tricky part was remembering that the ejector rod had a left-hand thread.
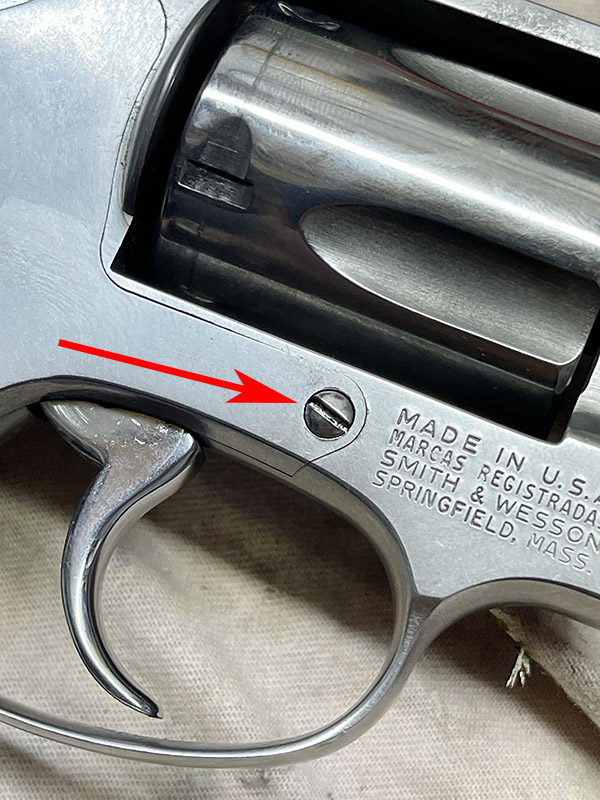
This screw has to be removed to allow removal of the yoke and cylinder from the revolver. You don’t need to remove the revolver’s side plate.With the yoke removed, you unscrew the ejector rod (the knurled piece you push on to eject empty brass from the cylinder) and everything comes apart. Hold on to the ejector rod as you unscrew it so parts won’t fly away, and remember that it is a left-hand thread.The cylinder shim(s) fit beneath the extractor spring. They are pushed into the cylinder by the extractor spring as the cylinder and yoke subassembly are reassembled. The shim(s) position the cylinder further to the rear, increasing the barrel-to-cylinder gap.
TriggerShims.com manufactures over 100 firearm-specific shims with thicknesses from .002-inch to .007-inch, with some specialty items as thick as .010-inch and as thin as .0015-inch. Lance sends shims worldwide, with Australia and Canada being the biggest international customers (he also ships to more than 100 other countries).
Lance and I had a good conversation, during which he told me he enjoyed exploring the ExhaustNotes site and our blog. One thing led to another, and TriggerShims.com is our newest advertiser. You’ll see the TriggerShims.com logo on the ExNotes blog and all ExNotes pages, and Lance asked if he could post links to some of our Tales of the Gun stories on the TriggerShims.com site. Hey, you bet, Lance, and welcome aboard.
I had the Model 60 on the range yesterday morning, and it is a much smoother running revolver. I confirmed another issue I’ve experienced on this revolver before, and that’s a slightly out-of-time situation when firing double action (probably induced by the cylinder drag described above). That’s going to take a new hand to correct (“hand” is the nomenclature used for the part that advances the cylinder). The replacement hand is on order, and there will be another Model 60 blog coming up in a couple of weeks on it. As always, stay tuned.
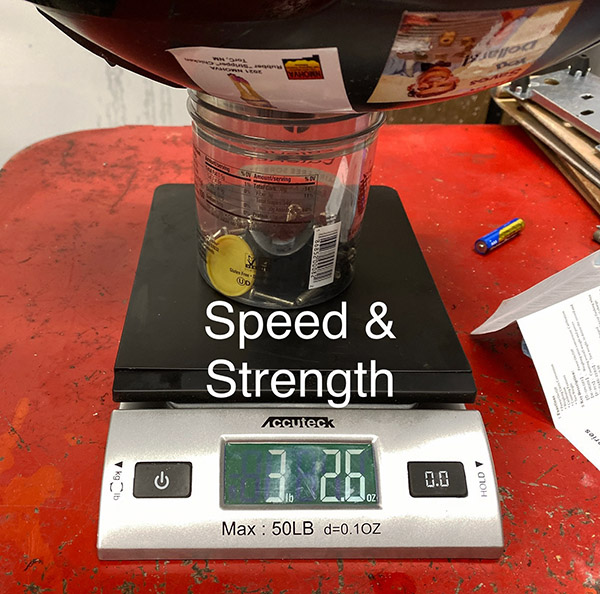
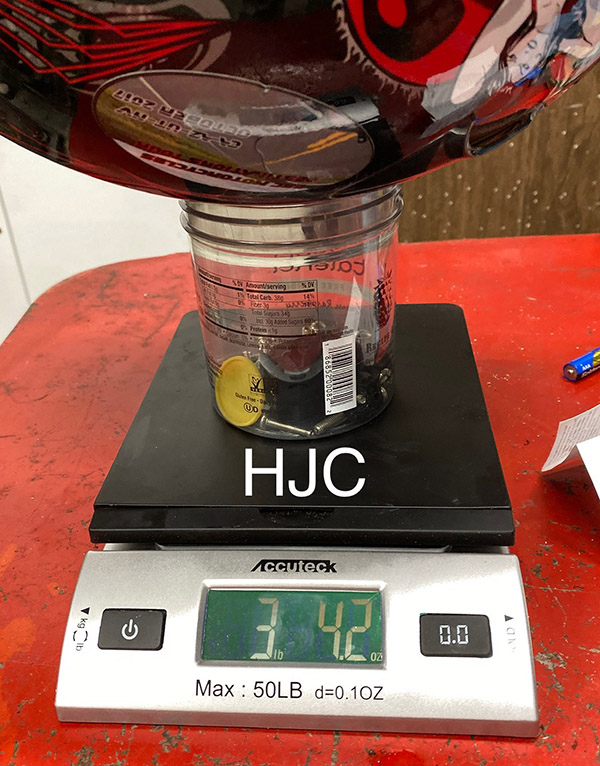
My nephew Anthony has been bugging me for years to buy a new motorcycle helmet. He was in the business as manager at Cycle Gear in Albuquerque, so he knew his helmets. Even I had to admit my tattered lids were getting old. I have a HJC from New Zealand bought in 2014 and a Speed and Strength from The Helmet House that dates all the way back to Motorcyclist magazine’s paper era.
Most brand name helmets have gotten pretty expensive. Since I’m so cheap I don’t like to give up old helmets until they kill me, or ideally, give them up a week before they kill me. But from a fiscal standpoint who can say which day that will be? Over the years I’ve bobbed and weaved around the topic so much that Anthony offered to send me a new helmet, any helmet I wanted. I mean, the guy is tying to support a family; I can’t have him buying helmets for me. That’s what wives are for.
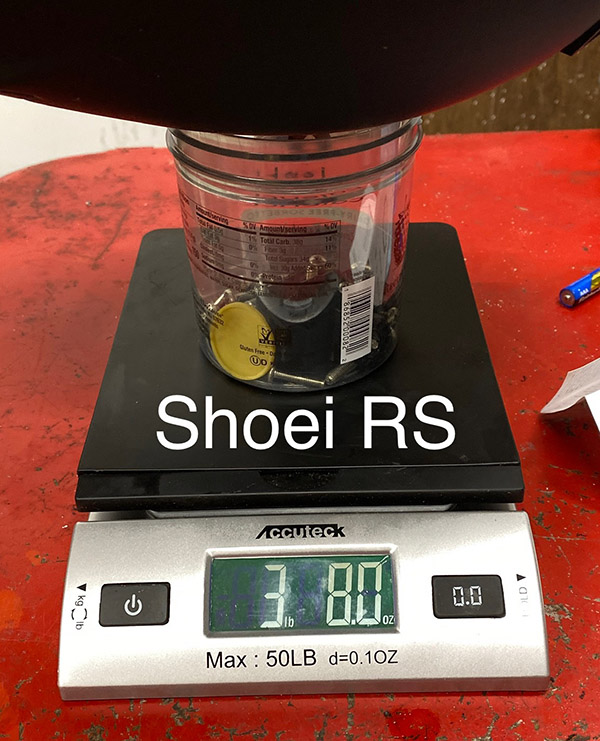
My A-number-one, favorite helmet of all time is the Speed and Strength. That helmet fit my head better than any other and it felt lightweight. The aerodynamics are great on the thing also: no buffeting in the wind and fairly quiet to boot. Naturally, the same model is no longer made. CT and Anthony got together and always keeping a weather eye on my thrifty nature, decided a Shoei RF-SR would be a quality helmet without costing much more than the motorcycles I habituate.
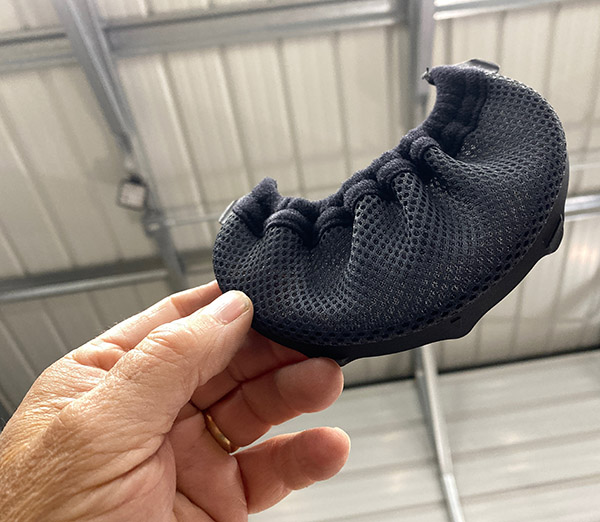
The Shoei RF-SR model must be on its way out because finding one was not an easy task. CT ordered one from Dennis Kirk and after a few weeks she checked on the order status. The helmet was out of stock and on back order. It would have been a polite thing for DK to mention this at the checkout page. As usual Amazon had the helmet but only in silly teen-age Moto GP colors, white or flat black. I chose flat black to make myself less conspicuous. Kind of a, if-they-can’t-see-you-they-can’t-hit-you, loud pipes save lives type of reasoning.
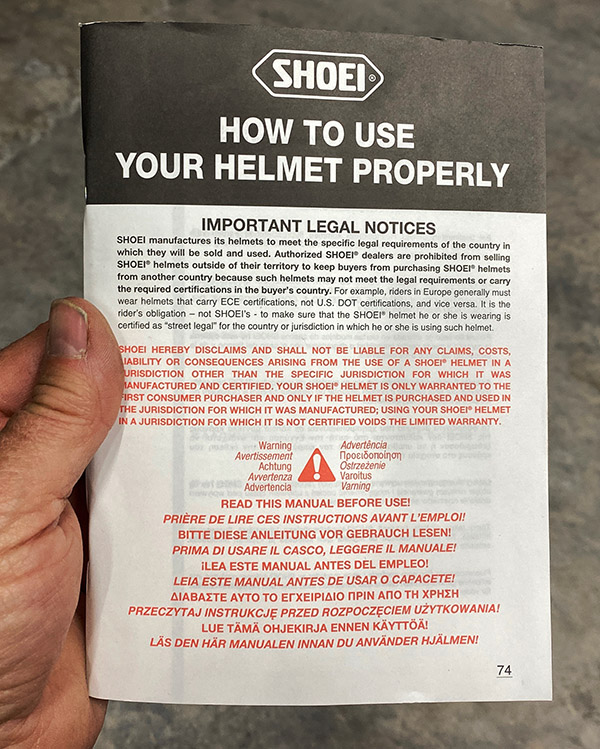
The Shoei came with a fat owner’s manual that consisted of page after page of responsibility disclaimers, warnings not to use anything but mild soap and water to clean the helmet and descriptions of all the ways the helmet could be made unsafe. I flipped through the manual and didn’t find much useful information but then I’m not a tort lawyer.
I was mostly concerned with fit, as the best helmet in the world won’t protect you if it is bouncing down the road without your head inside. Helmet brands are sized differently and with Internet purchases you can never be size-sure. Amazon’s easy return policy made the proposition a little less risky. My pea brain suits a medium helmet and the Shoei medium is a snug fit. Not painfully tight but you won’t forget you’re wearing a helmet. I think a large would be too loose.
I like a snug helmet. There’s nothing more annoying than a helmet wiggling around on your head causing double vision. I haven’t worn the helmet much but I think it will conform to my head shape after a few long rides. Or as they say on the British situation comedy Are You Being Served “It will ride up with wear.”
The Amazon shipping box felt very light and when I took the helmet out I commented how light it felt. I felt the urge to get all Cycle Magazine-y and put the thing on the scales. I was surprised to see the Shoei was heavier than both the HJC and my battered Speed And Strength.
The Shoei weighed 6 ounces more than the Speed And Strength, which seemed like a lot to me. The HJC, which always felt sort of heavy to me, split the difference. Oddly, the Shoei feels lighter when you pick it up and wear the thing. Maybe the hole it knocks in your wallet makes it seem lighter. This goes to show you I cannot be trusted when describing weights or measures.
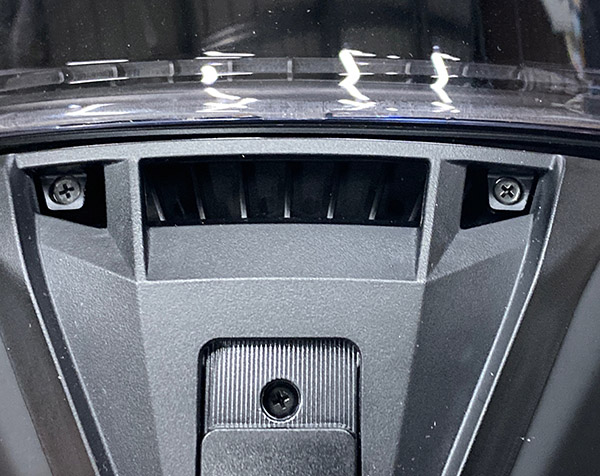
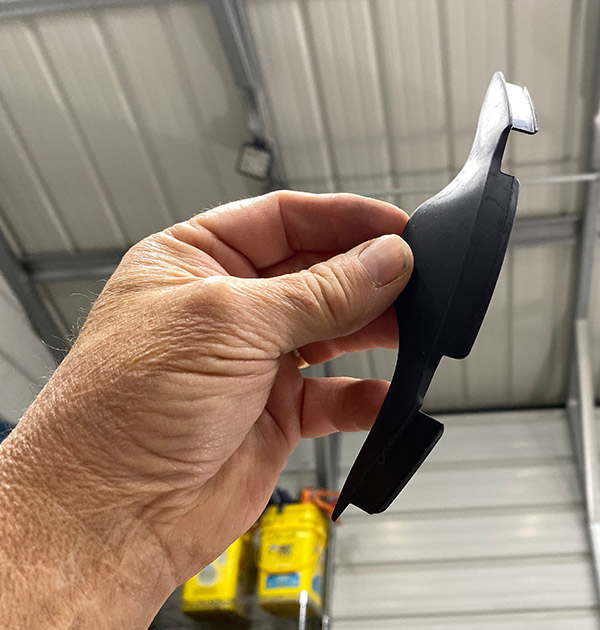
There is a large, closeable front vent on the chin bar of the Shoei. I hit the opening with my Ryobi grass blower and the vent passed a decent quantity of air. The plastic latching bits seem fairly secure.
On the forehead area there are two small vents that also open and close. The Ryobi grass blower passed less air through these small vents but really the only way to see how all these holes work is to ride the bike.
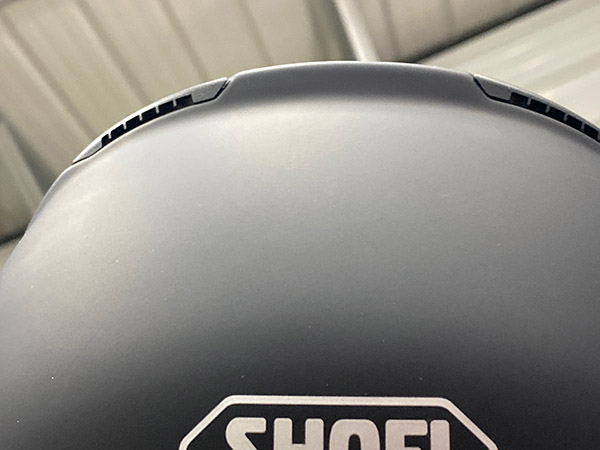
Two back vents take advantage of a low-pressure area directly behind the helmet’s spoiler thingy to help draw cool air through the Shoei. These are fixed and cannot be closed but you really need some air exchange inside the lid to keep from falling asleep and crashing. Okay, I made that last part up. No one has fallen asleep from motorcycle helmet oxygen starvation. That I know of.
Also included inside the Shoei box was a nose guard and a chin cover. The nose guard helps direct your hot, steamy exhalations downward away from the face shield. This might help with fogging but I can’t say for sure as it rubs on my awesome beak so I leave it out. The chin cover fits along the front-bottom of the chin bar and seals that area off for cold weather riding. I don’t like the feel of the chin cover chafing against my waddle so I left that bit out also.
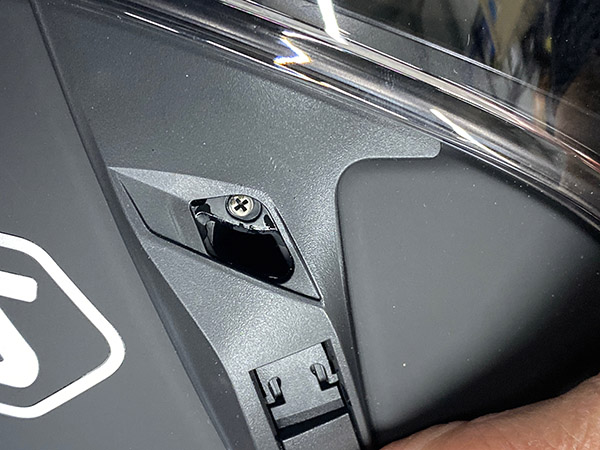
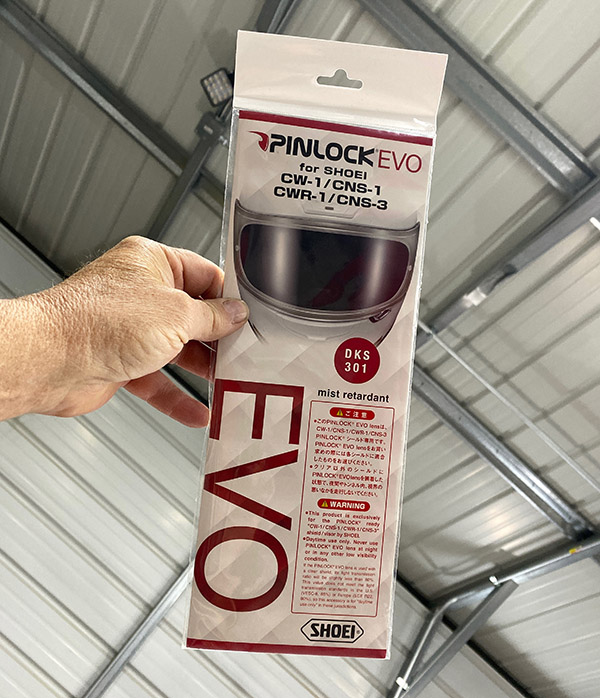
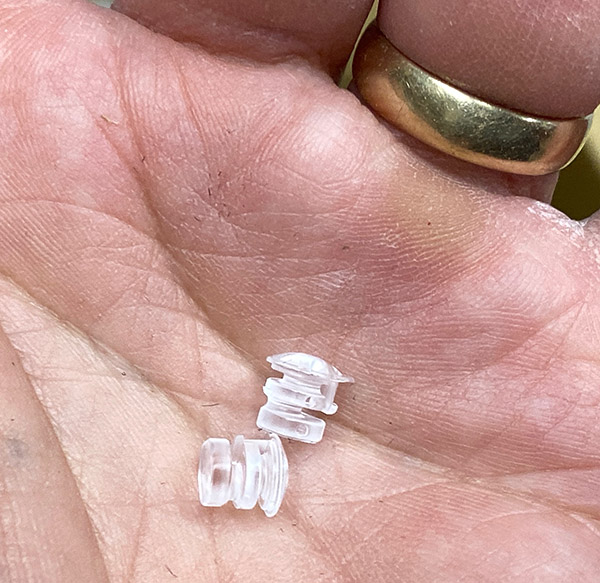
A pinlock anti-fog insert came in the Shoei box too, you get a lot of extras with a Shoei helmet. The pinlock fits inside your face shield creating a double pane window effect that is supposed to stop condensation and related fogging. It might do this but I’ll have to wait for conditions to worsen here in sunny, dry, New Mexico to test it out. Shoei included a couple of easily lost, pinlock posts in case your shield isn’t Pinlock ready. You’ll have to drill your shield and insert the little posts in the correct location. Right, that’s not gonna happen. Luckily for me the RF came with the posts already fitted.
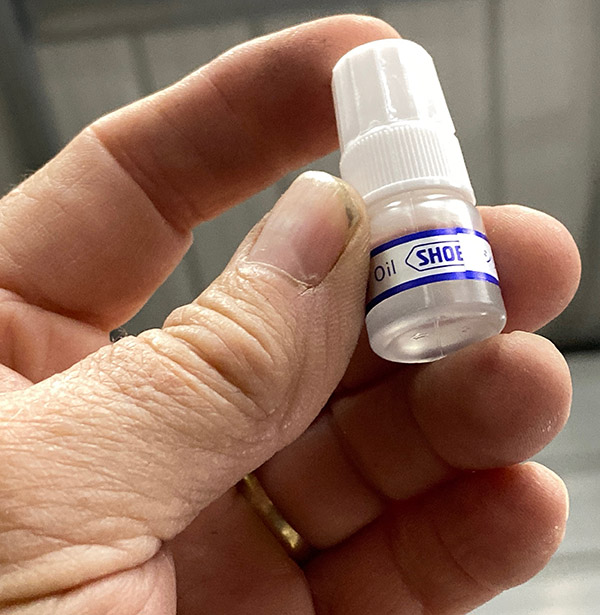
Lastly, a helmet bag and a tiny jar of Shoei oil were included in the box. I’m guessing the oil is for the face shield ratchet mechanism. I should put a little oil on there because the shield is kind of hard to open. I’m hoping it will ride up with wear.
Construction projects at Tinfiny ranch have been keeping me busy so I haven’t had a chance to test the Shoei beyond wearing it to bed for a couple Star Wars nights: “I’m your father, Luke!” I’ll try to get out in the next day or so with an ExhaustNotes follow up report with an additional surprise helmet widget review.
Never miss a single one of our blogs…sign up here for free: