I have been following this column ever since it hit the blogosphere, and I noticed that nearly all of our ExNotes writers have written about motorcycles they previously owned. This story is about some of the motorcycles and scooters I’ve had. It’s good to look back and cherish the things that have made life fun, and for me, motorcycles and motor scooters have certainly been a big part of that. Since I was a wee lad out on the farm, motorcycles have been my comfort, sanity and spare time hobby. They kept me out of the drinking and drugs my friends were getting into during high school. I opted instead for racing motocross in the mid 1970s when I was in high school. I was a Suzuki mechanic during high school and I loved it (despite all the teenage hormones interfering with my mind).
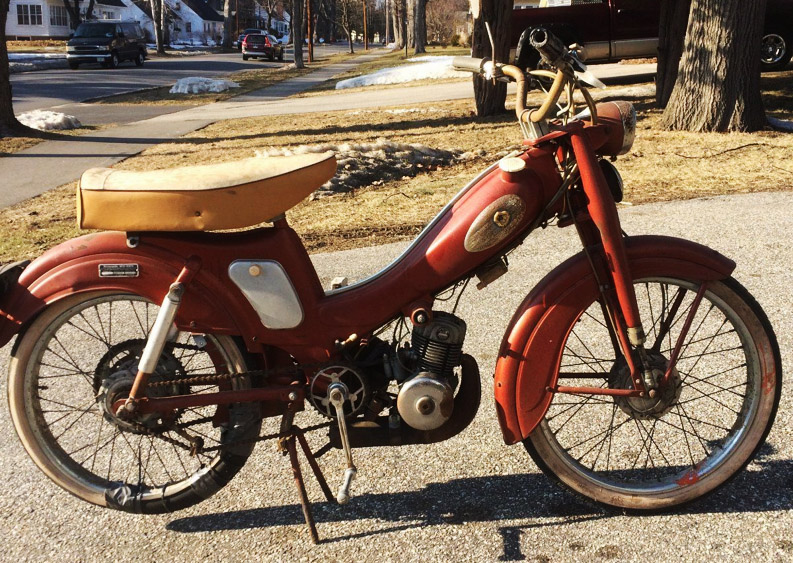
My very first bike was a Motobecane moped, which was also known as our barnyard speedway bike. With a little rain on the manure we could slide that baby around like Mert and the boys at the San Jose mile.
My next bike was a 1969 Hodaka Ace 100, and it was my first love. I spent many hours riding this motorcycle around the farm. I learned how to work on bikes on this motorcycle. They were great bikes.
This next one is a 1969 Maico MC125 motocrosser. I never got to ride or race it. A personal shortcoming is that I like to take things apart to see how they work. I took the rotary carb the off the engine to see how it worked. I then put it back together not realizing the rotary valve needed to go on in a certain way to time it with the piston going up and down. It never ran after that and burned up in the chicken house fire. Now, 50 years later, I know how to fix it. They say we get smart too late. This bike, for me, is one of many things that proves it.
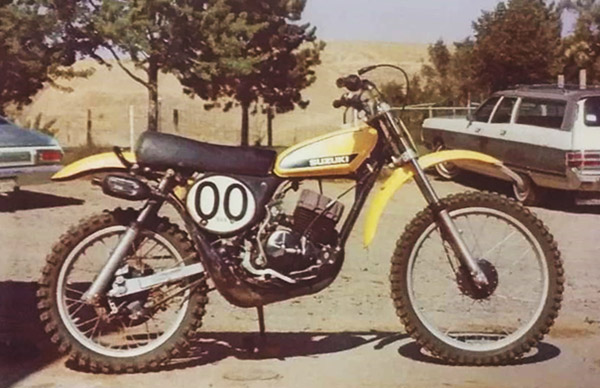
This 1974 Suzuki TM125 was my elixir through high school. I raced it at Puyallup International Raceway’s high school challenge.
The 1974 Suzuki TM250 was my other elixir through puberty. In my first race I looped it over backwards and they wouldn’t let me race again at the Starbuck track in Washington.
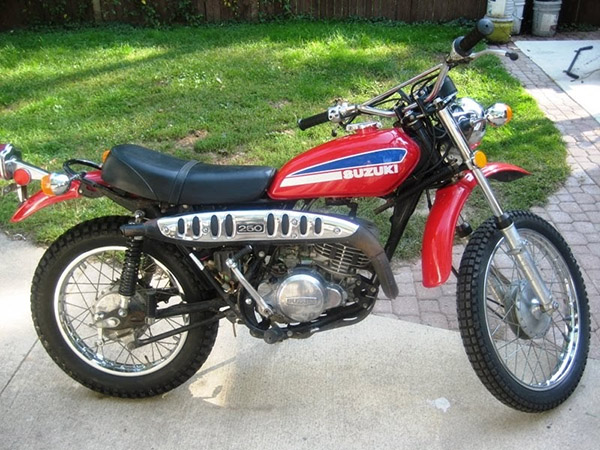
Here’s my 1976 Suzuki TS250. It was my first adventure travel bike and I loved it. I remember its two-stroke motor smoking down Interstate 5. Yeah, baby!
Then it was a series of bikes for which I have the memories but no photos. I had a Honda MT250 enduro that I traded for a Skidoo snowmobile. I should have kept the bike. Then it was a Suzuki GN400 thumper road bike. It was old school cool. Next up was a 1978 Husqvarna OR250 enduro. I broke a rib on crashing that bike going less than 10 miles an hour and I suppose that makes me lucky (that rib was the only bone I ever broke, and I’ve been riding a lot of years). I next had a GY200 Chinese enduro with a Honda-based engine. That was followed by a 1998 DR650 Suzuki, a nice big thumper. I had a Kinlon 150 road bike prototype that I later donated to the Barbour Museum. They resold it at a Mecum auction a few years ago.
Here’s my 1974 Honda MT125 Elsinore project bike. I rode to the Badrock Reunion at Hodaka Days with it a few years back.
My 1986 Husqvarna WR400 was a wonderful bike, but it was too tall and too hard for me to kick start with a bad hip. I think I was over-compensating for something. But the price was good so I bought it.
I had a 1988 Honda NX250, another one that left me fond memories but no photos. It was a nice little enduro with a water-cooled engine and a 6-speed transmission. It was kind of like a CSC RX3.
This was my 2006 Suzuki DR650. If it’s a yellow motorcycle, I’m a goner.
I had a 2008 Kawasaki Versys 650 (another one with no photos). That was my first long distance traveling big boy bike and I rode it to the Grand Canyon, Bryce, Zion, and Yellowstone. It’s the only bike I’ve ever crashed on the road. I spun out going about 35 mph in Yellowstone on the geyser snot on the road. Who would have thought that was even possible? I smelled like rotten eggs the rest of that day after landing in a ditch filled with geyser water. (Editor’s Note: Better that than crashing the manure-drifting moped you mentioned at the start of this blog!)
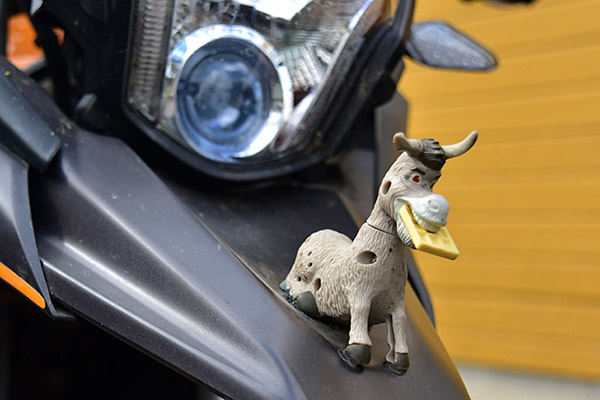
I was one of the first to buy the new 2015 CSC RX3 250 and it was a fabulous motorcycle. It’s the motorcycle you I covered 17,500 miles with it and had tons of camping fun on rides to Baja, Hells Canyon, the Grand Canyon, Canada, Death Valley, the ExtraTerrestrial Highway, the Columbia River Gorge, and Moab. I rode an Iron Butt (baby butt) ride on the RX3, and I rode on the original CSC Western America Adventure Ride and the Destinations Deal ride. I called it Donkey Hotey, and mounted a hood ornament on it.
Those RX3s were fabulous motorcycles. It’s hard to believe that they came out 8 years ago.
Other bikes I’ve owned that I don’t have photos of that I owned around this time included a 2008 Yamaha XT250, a 2009 Yamaha XT250, a 2006 GY200 Chinese enduro project R&R motor that I worked on with my son.
Here’s a photo of my 2002 MZ 125SM. It was a cool little water-cooled motard bike. I had a lot of fun on it.
I bought a 1982 Kawasaki KZ440 basket case bike and put a Harbor Freight 312cc motor in it. It had a constant velocity belt drive. I really wanted a Rokon RT340. I got one of those later, and I’ll cover it below. I then had a 1999 Suzuki DS80. That was one I fixed to resell for a neighbor’s kid. I had a 1982 Suzuki PE175Z. I got it running and sold it. It was a very nice enduro motorcycle.
I owned a 2009 BMW F650GS twin. The BMW was a very nice bike for traveling across America. I rode it from Oregon to Alabama and back.
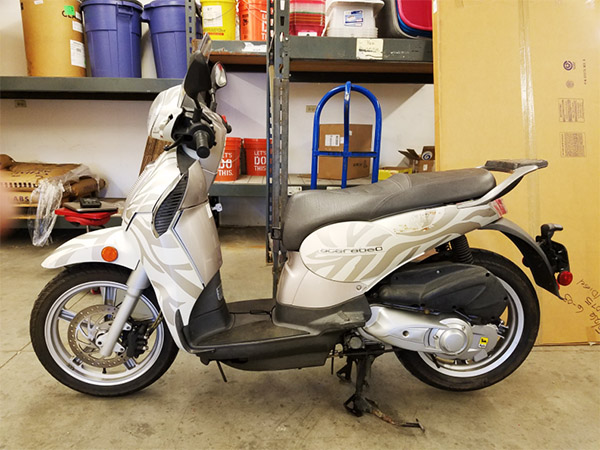
This was my 2009 Aprilia Scarabeo 200 scooter. I bought it to run in the 2020 Scooter Cannonball ride, but Covid canceled that run and I sold it.
Here’s a 1975 Rokon RT340. I had one just like the one in the photo below. It had a Sachs 340 snowmobile motor with a CVT belt drive. I was a twist and go setup that could reach 90 mph. Well, not with me on it, but it could.
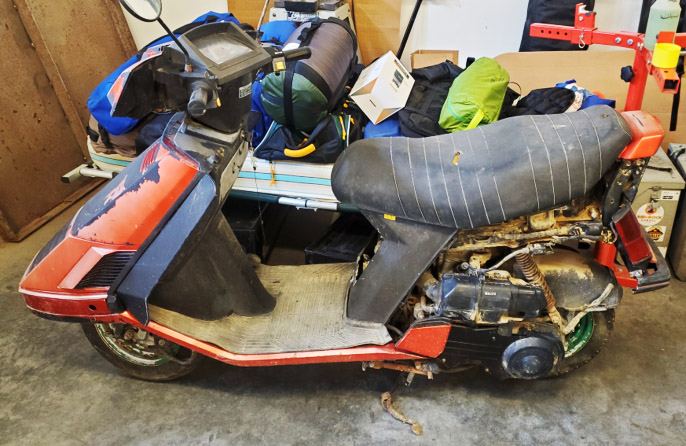
I had a 1985 Honda Elite CH150 scooter that had been stolen, recovered, and then sat for years out in the weather. I got it running and it became my daily driver. I affectionately called it “Tetanus Shot,” because I felt like I needed a tetanus shot just by looking at it.
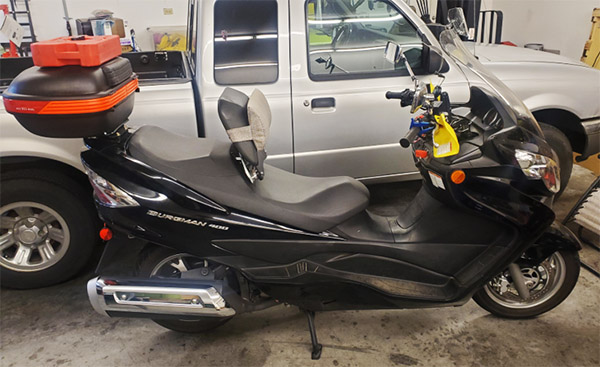
This is my 2008 Suzuki Burgman 400 Maxi scooter that has become my traveling bike now. I guess that makes me a Burg Man, too.
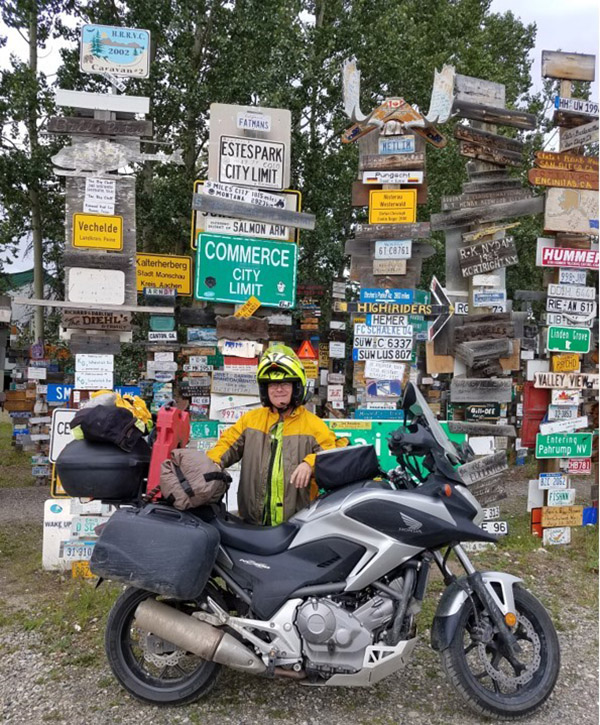
Here’s my 2012 Honda NC700X. I did a 7000-mile Alaska trip on it. It ran like a sewing machine all the way up and all the way back.
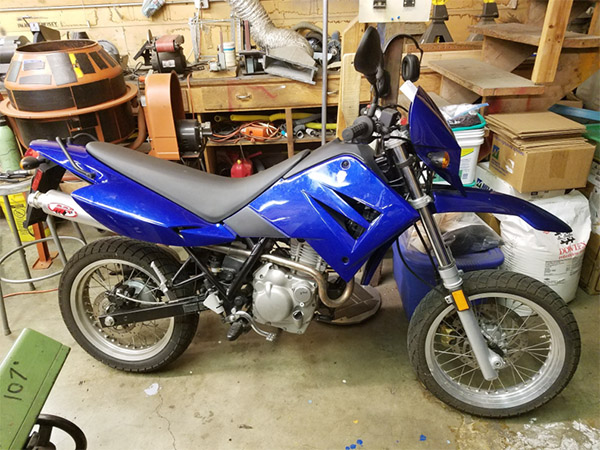
Here’s a 2019 Genuine G400c Chinese thumper road bike. I bought it used for a good price. It’s a fun little nostalgic bike that has a 1970s look. The same company that imports Genuine scooters imports this bike from China. It’s made by Shineray (they pronounce it Shin You Way in China). The engine is based on an old Honda design that Shineray picked up, and that engine is used as the basis for the Janus 450cc. Joe Berk rode one of the Genuine motorcycles out of Barry Gwin’s San Francisco Scooter Company about three years ago and he liked it, too.
This blog may be getting too long with all my old bikes and photos, so I will stop for now. Thinking about my former bikes has been fun, though, and if you have a bike you have fond memories of, please leave a comment below and tell us about it. And watch for a future blog about me going over to the dark side and becoming primarily a scooter rider.
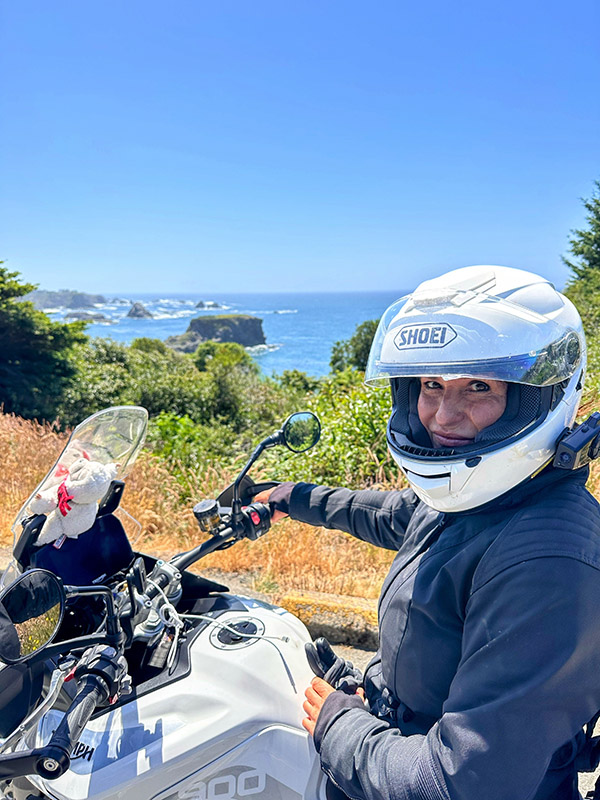
My solo motorcycle journey of joy from Sedona, Arizona, to Canada continues. This is an epic journey and it holds a special place in my heart. I can revisit fleeting moments of pure joy, rekindle the emotions, and extract lessons learned along the way. As a woman riding solo, I am part of a remarkable and tight-knit sisterhood that inspires me, challenges me, and provides me with extraordinary kinship. With their spirit in mind, I’m excited to dive into the next chapter of my unforgettable summer ride.
In Part I, I embarked on my trusty Triumph Tiger 900 GT Pro, affectionately named Tippi, leaving Sedona behind. Our journey took us through landscapes of the Colorado River, Lees Ferry, Marble Canyon, Jacobs Lake, North Grand Canyon National Park, and Zion National Park. It was a breathtaking start to an indelible adventure.
Part II chronicled our exploration of Bryce Canyon, Capitol Reef, and Great Basin as well as Highway 50 (the Loneliest Highway in America) and our arrival in Lake Tahoe. Each destination brought its own magic and challenges, enriching the tapestry of this incredible journey. Leaving Lake Tahoe after a full week of exploration was bittersweet. I savored every moment but the open road called, promising new horizons and cherished old favorites. This part of my journey led me to Roseville, California, where I had to part ways with Tippi temporarily for a well-deserved tune-up and a new chain. Joining forces with a fellow rider and friend Mike (whose BMW was waiting for a harness from Germany), we hatched a plan over drinks and a shared meal. Our first destination: Majestic Yosemite National Park.
We took a brief detour to pick up another adventurous soul, Dan, who would follow us as we made our way to a campsite outside the park. While the campsite may not have been the most scenic, the camaraderie more than compensated for it. We enjoyed a hearty campfire dinner, and Dan and Mike one-upped each other with travel tales of daring escapades. It was a night filled with laughter.
The following morning marked our entry into Yosemite National Park. For me, it held a special significance. It was here that I had embarked on my solo hike along the John Muir Trail, starting from this very valley floor. The memories flooded back, stirring emotions and a sense of longing that I can’t put into words.
We secured a campsite within the park and spent two days immersing ourselves in Yosemite. We hiked amidst the awe-inspiring vistas, capturing the record-breaking snow melt that transformed the waterfalls into powerful cascades painted by breathtaking sunsets. As if retracing my steps, I followed a small section of the John Muir Trail, a nostalgic journey that filled me with joy. Those two magical days, spent with my riding buddies, nourished my soul and dispelled the occasional loneliness that accompanies solo motorcycle adventures. The camaraderie and shared experiences reminded me of the beauty of both solitary and shared journeys.
With a fond farewell to our friend Dan, we resumed our journey, eager to immerse ourselves in the natural wonders of Kings Canyon and Sequoia National Parks. Nestled within the Sierra Nevada, this region is a testament to Mother Nature’s diversity—flaunting thickly forested mountains in the north and the awe-inspiring austerity of the south, adorned with numerous 12-thousand-plus-foot granite passes. Each pass unveiled mesmerizing views of ancient tarns and the vast valley floor, a breathtaking vista to behold.
Walking among the giant Sequoias shrouded in mist left an indelible mark on our souls. It was a humbling and awe-inspiring, a stark reminder of the profound importance of our National Parks. They are not merely places of natural beauty; they are sacred sanctuaries that merit steadfast dedication and protection.
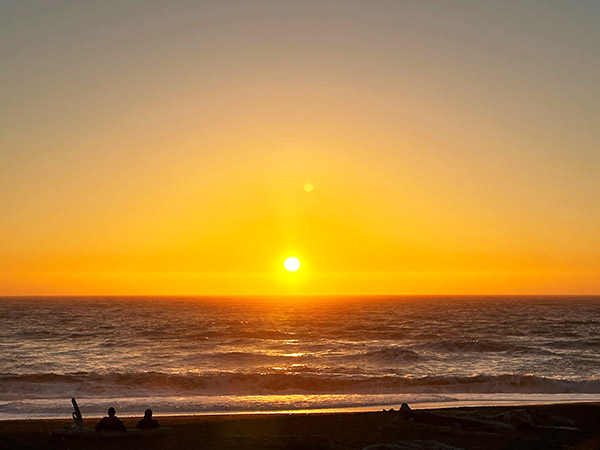
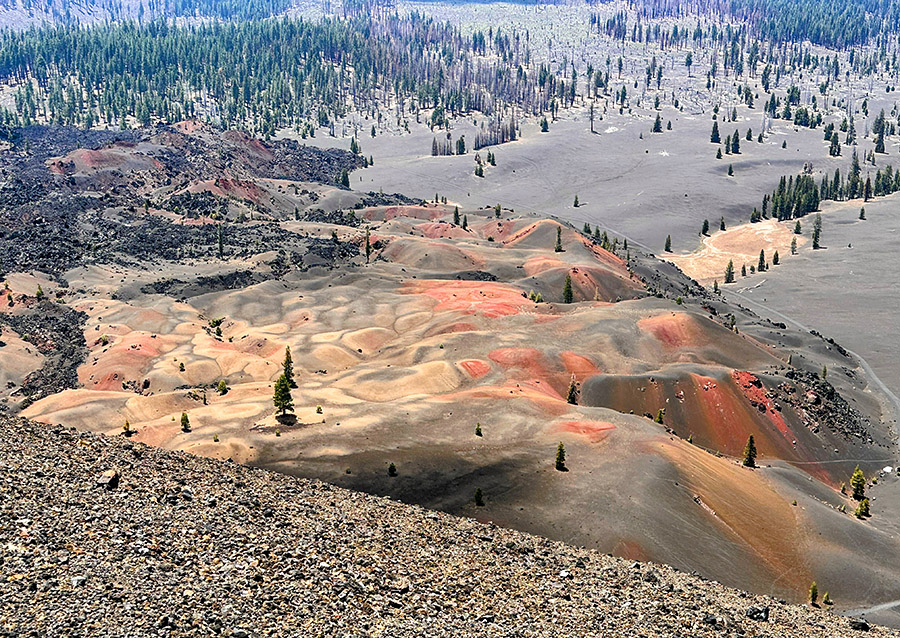
Leaving the majestic Sierras behind, we set our course for Roseville, where I was joyfully reunited with my beloved Tippi. After proper cleaning and the installation of a new chain, I mounted Tippi and instantly felt the familiar embrace of returning home as we navigated through the city. Our next destination was my ninth National Park on this epic journey: Lassen Volcanic National Park, a place I had never explored before. It’s the photo you see at the top of this blog.
Battling the sweltering heat, I was eager to escape the valley floor and ascend once more into the cool embrace of the mountains. Not even the looming threat of rain could diminish my excitement. Mike, still patiently traveling by car and awaiting his parts from Germany, made the most of vehicle camping. We embarked on an exploration of this new park, from leisurely walks around the serene lakes to gazing upon the painted desert from the viewpoint of an 800-foot-high cinder mountain. Two days sped by, leaving us reluctantly parting ways as we set our course for Bigfoot Country!
After a long day’s ride, we arrived in Redding, California, and were greeted by the majestic sight of Shasta Lake, with Mount Shasta occasionally revealing her beauty through the clouds. Continuing our journey, we soon reached our night’s destination, Willow Creek. This quaint town is adorned with numerous signs and wood carvings of Bigfoot, famously known for a rare sighting of the mythical creature. Adding to the allure, Highway 299 proved to be an underrated gem, offering exhilarating stretches of mountains and tight, winding roads, although the return of record-breaking temperatures reminded us of the heat.
Despite a warm night of camping, the anticipation of exploration tugged at our hearts, leading us to visit our friend Greg in McKinleyville, California. Leaving the majestic mountains behind for the refreshing embrace of the Pacific Ocean, I was up early and invigorated, eager to hit the beach!
Our long-awaited visit to the Lost Coast was the next thrilling chapter in our journey. Traveling through the towering giants of the redwoods and then navigating the winding, narrow roads flanked by quaint ranches and farms we finally arrived at our destination. Securing one of the thirteen coveted camp spots nestled against the picturesque sand dunes felt like a small victory. The beach, with its wild and rugged beauty, was a sight to behold. Our joy was multiplied when we invited an adventure rider from Croatia who had no place to camp to join us. We met two hikers planning to embark on the famous Lost Coast Trail the following day. With our newfound temporary traveling family, we combined our meager food supplies, beer, and the last of my Irish whiskey to set the mood for another unforgettable night of sharing grand tales beneath the starlit sky.
The following morning, we returned to visit Greg and his girlfriend K, soaking in his warm hospitality and exploring a delightful local wine-tasting room. The lazy Sunday was bathed in the glow of friendship as I leisurely embraced the day. That evening, I bid a heartfelt farewell to Mike for the last time. Our 4.5 years of shared adventures had gifted us with countless stories and unforgettable moments. With a heavy heart I knew I would miss our adventures together. The next morning found me back on Tippi’s saddle; after a fond goodbye to a casual friend who I knew would become a lifelong friend, I pulled out of Greg’s driveway and embarked on the northern coast journey along the famous Hwy 101.
I knew the days ahead would be filled with breathtaking views of the Pacific Ocean as I ventured into Oregon easing the bittersweetness of a wounded heart, but also an opportunity for reflection, healing, and embracing the boundless possibilities that lie ahead. I was on my bike heading wherever my heart desired and I planned on embracing each moment of my onward solo journey north.
Solo traveling is where my heart finds its purest joy, and venturing forth with my steadfast companion Tippi elevates this experience to unparalleled heights. While the presence of a cherished companion adds a unique dimension to our journey, the profound beauty of solo exploration lies in its ability to unveil the depths of our own capabilities. It’s about embracing the allure of the unknown and relishing the boundless possibilities of tomorrow.
As I eagerly dive into the upcoming chapters of my journey in Part IV, I promise to infuse these tales with the rich tapestry of emotions that solo travel and the open road have given me. I’ll unveil more stories of Oregon and Washington, and who knows, I might even tantalize your sense of adventure with a glimpse of enchanting Canada. The adventure continues, the road beckons, and the world awaits with open arms, ready to share its secrets and wonders with a wandering soul.
The Benelli B76 is a relatively rare and delightfully different handgun designed and manufactured more than four decades ago. In the 1980s, police departments were making a wholesale switch from .38 Special and .357 Magnum revolvers to 9mm semi-automatic sidearms. Benelli wanted in on this action and they introduced their B76 in an attempt to get on that bandwagon. Commercially, the B76 was a resounding flop. But from quality, technical complexity, and cool factor perspectives, Benelli out-Ducati’d Ducati, and that’s no mean feat. As an engineer, I find my Benelli to be an intriguing firearm. It’s not red and it doesn’t have a clutch that rattles, but it’s still a pretty exciting bit of Italian engineering.
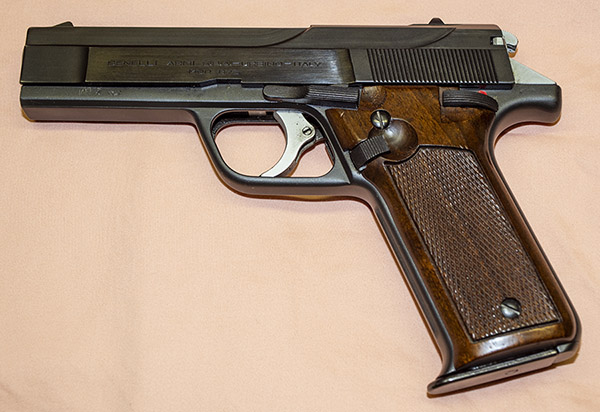
Benelli B76 9mm handgun, viewed from the port side. It is an attractive weapon.
From a collector’s perspective, the B76 was a cool deal. I picked this one up in the 1980s when they were going for cheap and tucked it away in the safe, which is where it sat for the next 40 years. A few weeks ago, I had the urge to shoot it. Benelli only made around 10,000 of the things, and you almost never see them come up for sale anymore (while writing this article, I searched GunBroker.com and GunsAmerica.com and I didn’t find a single one). In the last couple of years, when they came up on the auction sites, well worn examples would sell for around $2K. Three or four years ago, one that was new in the box with all the papers (which is what mine was until a couple of weeks ago) sold for $4K.
The high market value kept me from shooting my unfired B76, and then I realized: I’m not going to sell my Benelli. All I was doing by not shooting it was acting as a warehouse for some guy who would buy it after I’m gone. So I made the only two decisions any responsible gun owner could make: I decided I’m going to live forever, and I’m going to shoot the thing.
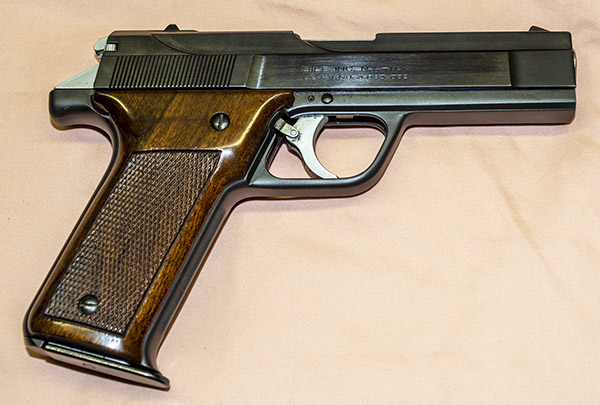
Starboard view of the B76. It is an attractive pistol.
The B76 is a very high quality European handgun built like a lot of European weapons were back in the day. It is of all steel construction (except for the walnut grips). The polishing and bluing is deep and exceptional. Like pre-war Mauser rifles, it has matching serial numbers everywhere: The frame, the slide, the barrel, and the receiver (I’m making a distinction between the frame and the receiver, with the receiver being the part into which the fixed barrel is attached). You read the above right: The barrel is fixed (more on that in a second). Because all these parts are serialized, I’m guessing that there was a fair amount of hand fitting at the Benelli factory.
The B76 is both a double action and single action semi-auto, and the innards are complex. The expense associated with the design and the single stack magazine (the B76 holds only 8 rounds; the WonderNines of the 1980s could hold 14 or more cartridges) probably doomed the B76 in the police market.
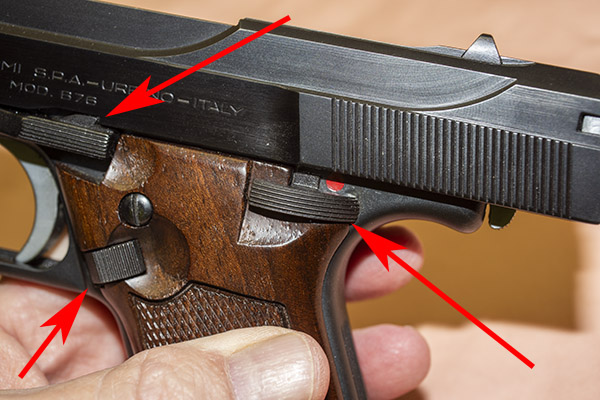
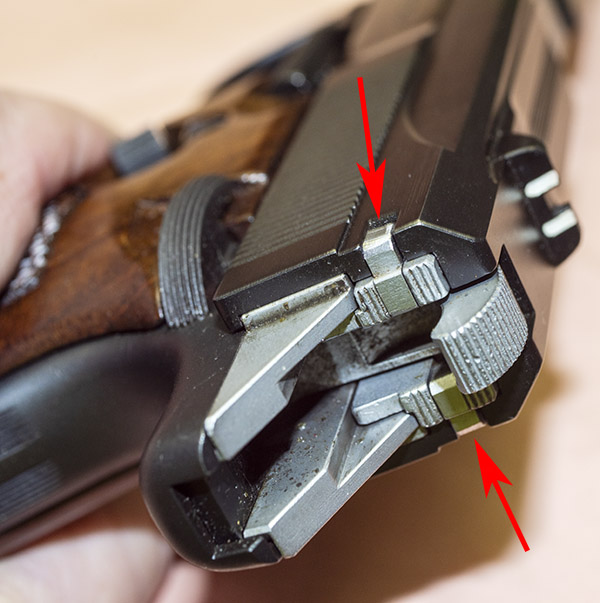
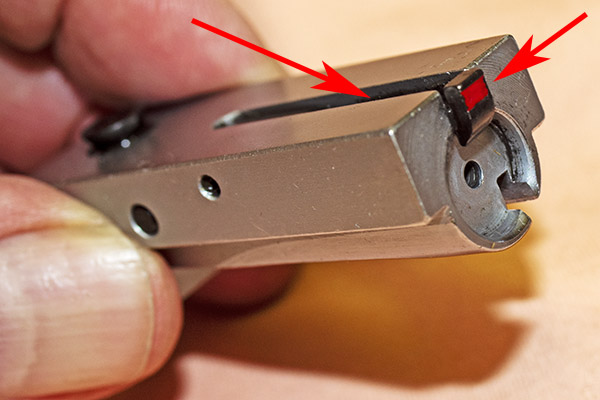
B76 controls. The top arrow points to the slide release, the lower left arrow points to the magazine release, and the lower rear arrow points to the manual thumb safety (a combined safety/slide lock).Disassembly requires pulling the slide all the way to the rear, and raising the manual thumb safety (right arrow). Note that in this position, the slide is further to the rear than it would be when locked open by the slide release.
The B76’s controls are all in the right places, as you can see above. There’s a trigger (as noted above, both single and double action), a slide release, a combined safety and slide lock (more on this in a second), and a magazine release. Unlike the 1911 and most semi-autos, the magazine release is not pushed into the frame to release the magazine. You have to push it forward. When you do so, the magazine flies out of the frame.
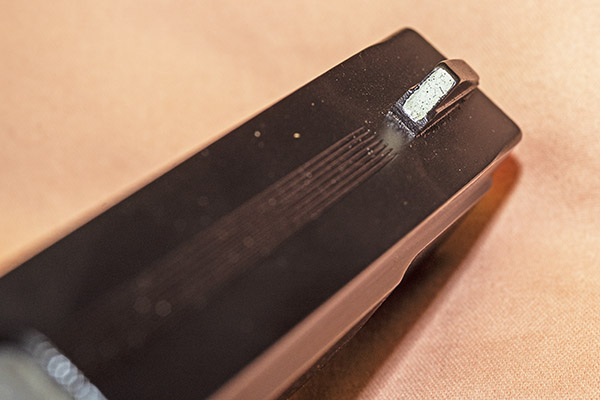
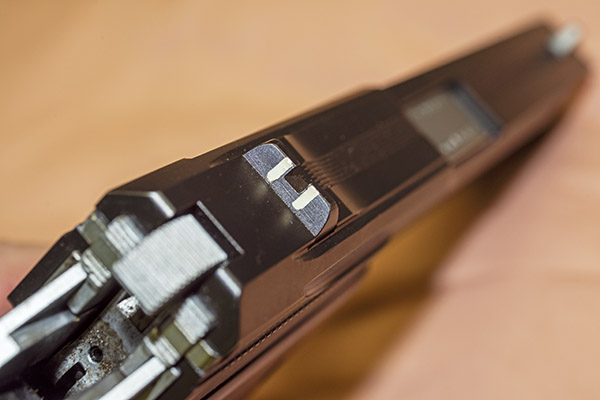
The B76 front sight.The B76 rear sight.
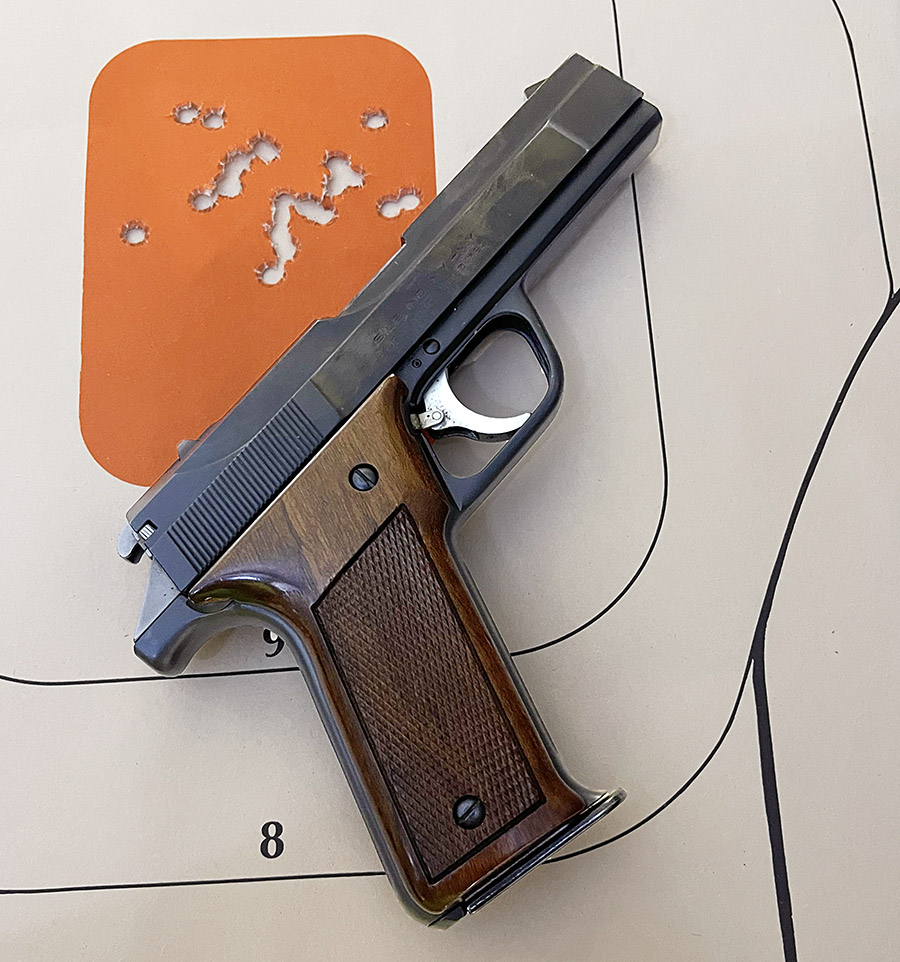
The B76’s fixed sights are a three white posts with no elevation adjustment. The rear sight can be drifted in its dovetail mount to move point of impact left or right. I didn’t need to move the sights on my B76; the windage is perfect (40 years ago, some dude in Italy at the Benelli factory got it right). I held at 6:00 on the orange bullseye on the target at the top of this blog. The B76 shoots a little bit high at 50 feet, but on a man-sized target, it’s close enough for government work.
I don’t really care for the three white posts on the sights, as they make aiming more difficult than it should be. There are two white posts on the rear sight. When aiming, there are gaps between the rear sight’s slot and the front sight (so that’s two more white posts). And then there’s the white post on the front sight. What this means to the shooter is that you have to align five white posts. To my old eyes, that’s way too complicated. I like a simple black post front sight and a simple black slot rear sight on a target gun. On a carry gun, the green and red dots on my Smith and Wesson Shield are about perfect, but in my opinion, that’s about the only thing Smith got right on the Shield.
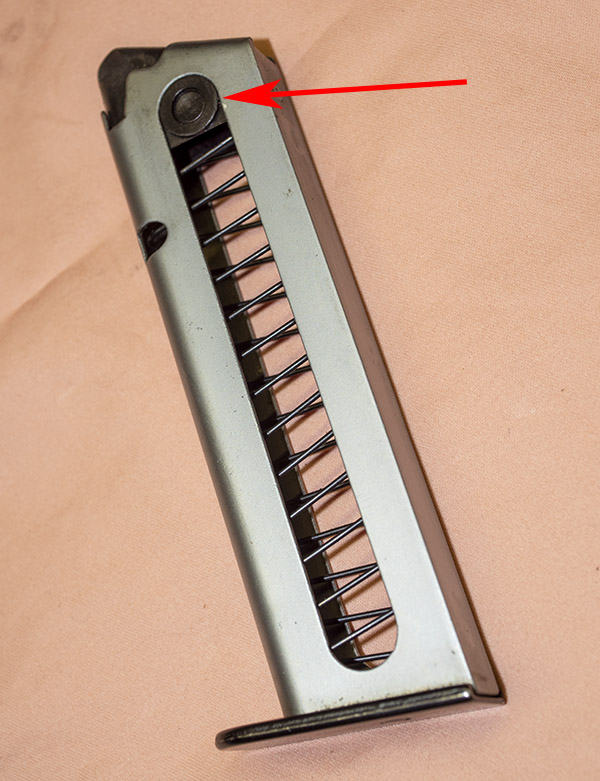
The B76 magazine. The red arrow points to the magazine follower.
As mentioned earlier, the B76 magazine “only” holds 8 rounds. That’s not an issue for me, as I’m a target shooter and I never load more than 5 rounds at a time. An interesting tidbit: The average number of shots fired in a gun fight is less than 2. I’m okay with a magazine holding 8 rounds.
Front to rear, there’s not a lot of real estate there. Overall cartridge length in this photo is 1.065 inches. Those are my reloads.
I found that I had to reload 9mm ammo to a shorter overall cartridge length for the Benelli. My other 9mm autos like the ammo to be loaded to an overall cartridge length of 1.105 inches (or more) for best accuracy. Loaded at that length, the cartridges won’t fit in the B76 magazines. To load ammo from the top by pushing one round in on top of the other, I have to hold overall cartridge length to 1.065 inches. I can go up to 1.080 inches, but to load cartridges of this length I have to pull the follower down and then slide the cartridges into the magazine. I fired cartridges of both lengths and I could see no difference in accuracy.
One last word on the Benelli B76 magazines: They are scarce. When you see them on Gunbroker.com, they go for $250 or more, and even at that price they don’t sit around long.
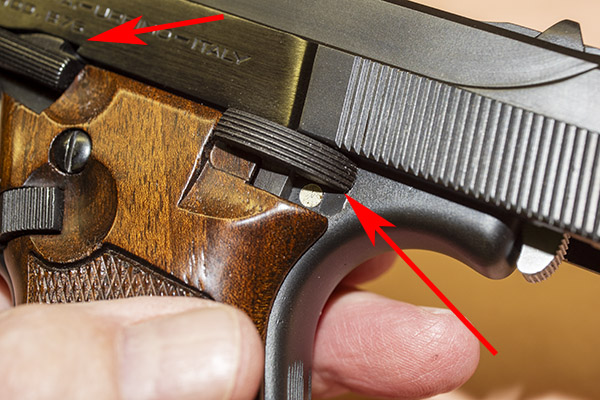
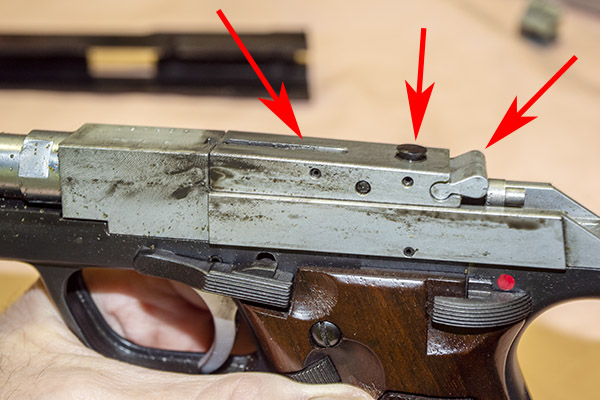
B76 disassembly for cleaning is different than a 1911, but still relatively simple. It starts by dropping the magazine from the weapon, pulling the slide all the way to the rear (beyond where it normally is restrained by the slide release lever), and then pushing the safety all the way up to hold the slide in this beyond-fully-retracted position.
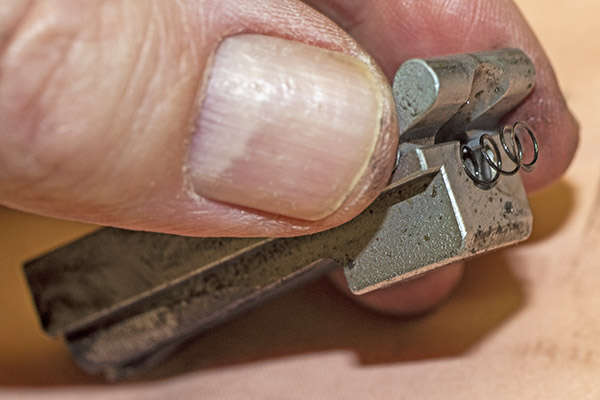
Locking pawls in the firing pin retainer and bolt locking support. The locking pawls are in the closed position.
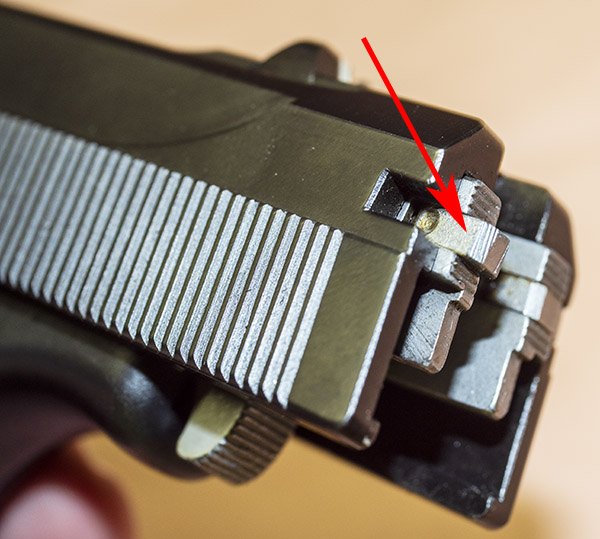
Disassembly continues with the locking pawls on either side of the hammer. In the photo above, with the slide in battery (all the way forward), the locking pawls are shown in the locked position. In the photo below, the slide has been pulled all the way back and locked, and the left pawl has been unlocked. The pawls unlock by rotating them to the rear.
Locking pawl in the open position. The little levers rotate outward.
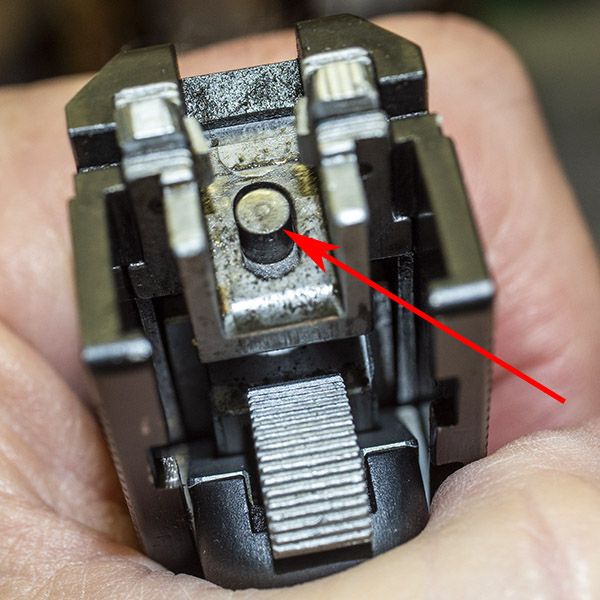
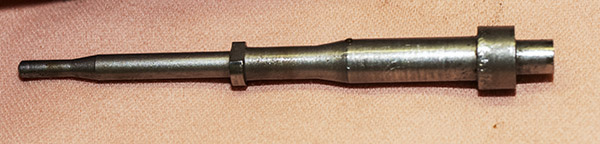
The next step requires pushing the firing pin in (I used a brass pin so as to not scratch any surfaces) and pulling the firing pin retainer and bolt locking support downward. It will drop out of the slide.
The firing pin in the firing pin retainer and bolt locking support. When the firing pin is pressed in, the firing pin retainer and bolt locking support can be slid down and out of the slide.
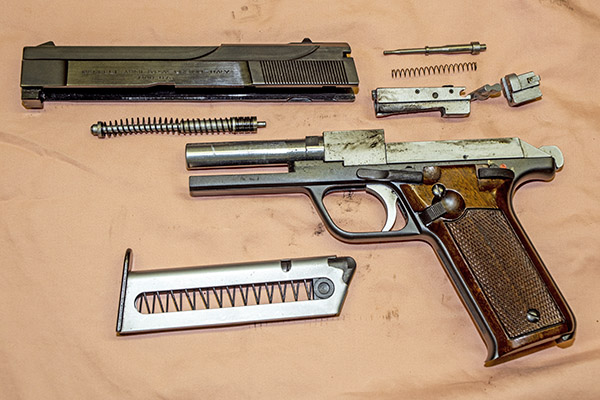
Once the firing pin retainer and bolt locking support has been removed from the slide, the slide can be slid forward off the frame (you have to lower the safety to release the slide). At this point, all of the major components are accessible and easily removed from the gun. I took my B76 apart for cleaning after putting several hundred rounds through it, so in the photos below the gun is kind of funky. Mea culpa.
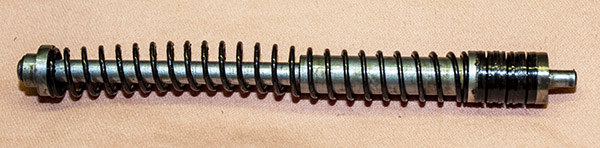
A very dirty B76 taken apart for cleaning. In this photo, you can see the slide, the firing pin, the firing pin spring, the blot, the firing pin retainer and bolt locking support, the bolt, the recoil spring assembly, the receiver, and the magazine. Note that the barrel is fixed to the frame. Theoretically, this should make the B76 more accurate, but I found its accuracy to be about the same as other 9mm handguns.The bolt, with the firing pin removed. The firing pin spring and the toggle lever lock are still in place. The spring is very light and it wants to stay in the bolt; exercise caution when removing it so as to not cause the spring to stretch too far and yield.The firing pin. It has a flat on the forward collar, which has to face up for assembly,The recoil spring assembly. It’s lighter than other semi-auto springs. That’s because the B76 slide is lighter than other slides.The bolt and its extractor. The extractor is also supposed to serve as a loaded chamber indicator, but in that regard it’s useless. It doesn’t protrude very much above the chamber, the red is covered with soot after the first shot, and the red is only visible when in front of the weapon.
So how does the B76 work? It’s complicated. There are a few YouTube videos that attempt to explain the B76 theory of operation and a few other explanations sprinkled around the Internet, and they are all either so superficial as to be useless or just flat wrong.
Larger caliber semi-auto handguns (9mm and up), other than the B76, rely on a design called locked breech recoil. Locked breech recoil systems keep the breech (the rear end of the chamber) locked against the slide until the bullet exits the muzzle, which allows pressure to drop to a safe level before the cartridge case is extracted and ejected. Larger caliber semi-auto pistols like the 1911 (and others) do this by keeping the barrel and the slide locked together initially. One thing to note at this point is that on these other guns, there is no separate bolt (the piece that fits up against the rear of the chamber). On these other guns the entire slide, in effect, is the bolt. It contains the firing pin and butts up against the chamber when the gun is in battery. When these guns fire, the barrel and the slide initially move together. As they move rearward from recoil and after the bullet has exited the barrel (by which time the pressure has dropped to a safe level), the slide keeps moving to the rear and the barrel is pulled downward. The barrel then unlocks from the slide, the slide continues to the rear, and the cartridge case is ejected as the slide’s extractor pulls the case from the chamber.
Going tangential for a second, you might wonder: Why not just let the recoil push the slide back to pull and eject the case from the chamber? Smaller handguns (e.g., 380 autos, .22 autos, etc.) work this way. But simply allowing the fired cartridge to push the slide rearward and eject (also known as blowback operation) is not feasible on the big dogs. There’s too much energy involved with the larger caliber guns, and too much gas pressure would be released near the shooter.
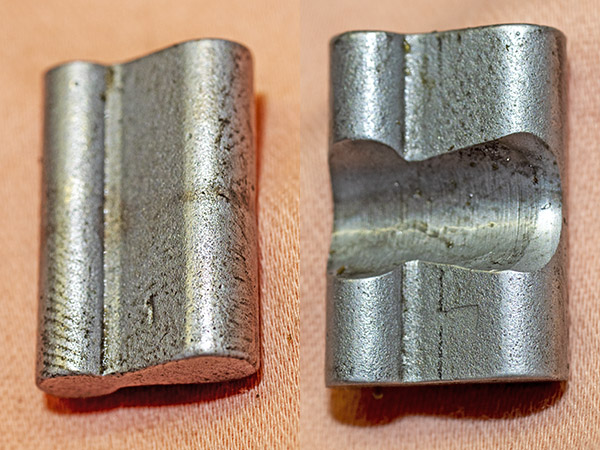
Benelli took a different approach. It’s quite clever and a bit abstract. In the Benelli literature, Benelli calls their system a delayed blowback locking system, but that term can also be applied to the 1911 approach. I’ll call the Benelli approach a lever-locked inertial system. The Benelli, unlike a 1911 or other larger caliber semi-auto handguns, has a separate bolt with a toggle lever lock and a bolt control stud. You can see these parts in the photo below.
The bolt in place in the B76 receiver. The arrow on the left points to the bolt, the center arrow points to the bolt control stud, and the arrow on the right points to the toggle lever lock. It’s dirty, I know. I shot these photos while disassembling the Benelli to clean it.
When the B76 slide is in battery (all the way forward), the firing pin retainer and bolt locking support (that’s a complicated name, but it’s all one part) at the rear of the slide push forward on the toggle lever lock. In this position, the top of the toggle lever lock butts up against the inside of the slide top, which holds the bolt down against the frame. In this position, the chamber is closed and the gun is in battery. When the bolt is in this position, a ramped surface at its rear engages a similar ramp in the frame. Until the hammer drops (and for a brief instant after), everything is locked closed.
Top and bottom views of the toggle lever lock. I’m guessing this is a hardened machined forging. I sure hope this piece never breaks.
When the B76 fires, the entire gun (the slide, the receiver, the whole gun) recoils and starts moving backward. The toggle lever lock is held down by the slide, and the toggle lever lock pushes down on the rear of the bolt, keeping it locked, too. But then a funny thing happens. The shooter’s hand, holding the receiver, slows the gun’s rearward motion (the motion that was induced by recoil). The slide, however, continues moving to the rear due to its inertia (the inertia it picked up when the gun was in recoil and everything was moving to the rear). As soon as the slide starts moving further to the rear than the receiver, the toggle lever lock drops and it no longer forces the bolt down. The bolt is now driven up by the ramp on its bottom that mates to a corresponding ramp in the receiver, and that drives the bolt control stud on top of the bolt into a slot in the underside of the slide. By this time, chamber pressure has been reduced significantly. And by this time, the bullet has cleared the muzzle and is headed downrange. The bolt and slide continue rearward. The bolt extracts and ejects the spent cartridge case.
After all the stuff I describe above occurs, the slide slows to a stop as it reaches the end of its rearward travel. The recoil spring force drives the slide forward again. The slide is still hanging on to the bolt control stud at this point, so the bolt is driven forward, too. As the bolt moves forward, the bolt picks up the next cartridge in the magazine and drives it into the chamber. And as the slide continues its forward motion it pushes the toggle lever link up, the toggle lever link pushes down against the bolt’s rear, the bolt control stud drops out of its slot inside the slide, and the bolt goes back into battery. Clever people, these Italians are (well, except for that desmo valve thing on their Ducatis). But they sure nailed it with this handgun design. Nobody else does it like this.
I love my B76. It is accurate enough, it is a fine handgun, it is extremely reliable, it is made of blue steel and walnut as God intended guns to be, and it is certainly something different. I have never seen another one on the range or in a gun shop, and that means something to me. It’s unique and it’s cool.
Here at ExNotes, we cover a lot of topics: Motorcycles, motorcycle touring, product reviews, concrete, guns, reloading, and more. And coffee. The thought occurs to me we’ve written a lot about coffee, from the primo Batdorf and Bronson beans provided by good buddy Ren to just about everything else. About now, you might be wondering: Where is this blog going?
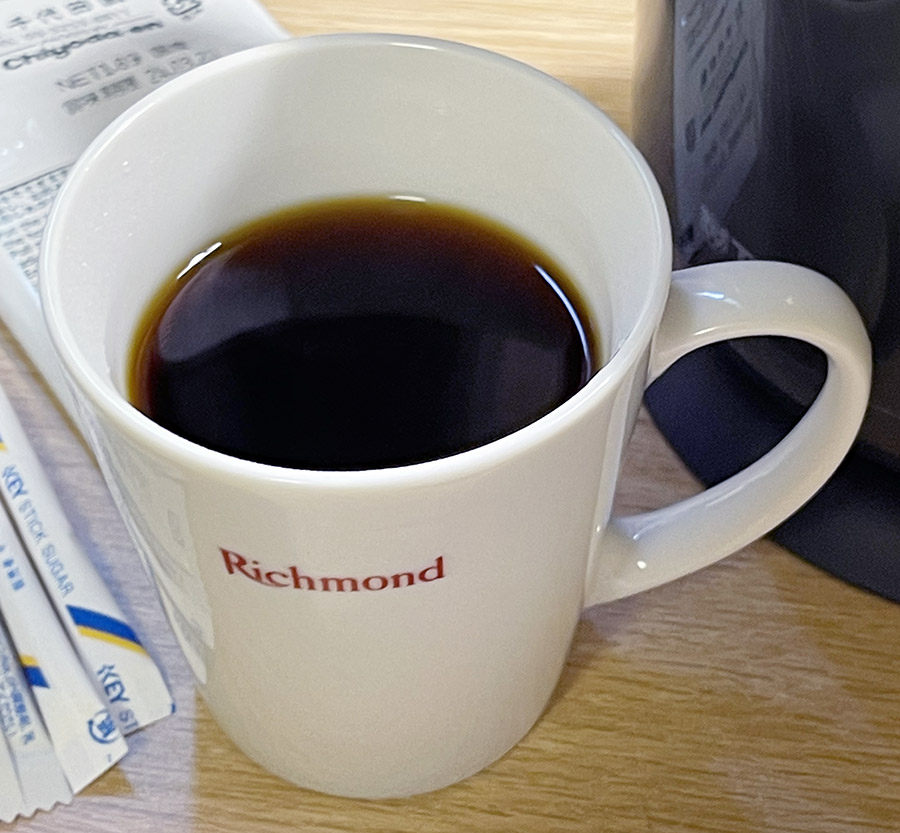
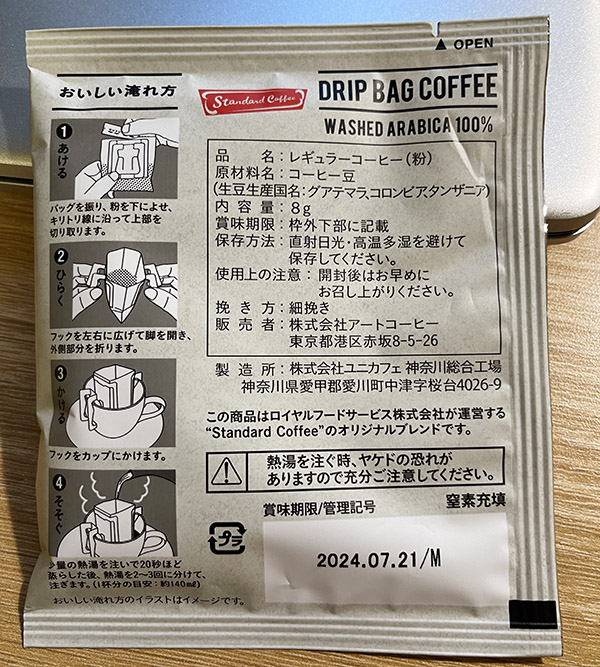
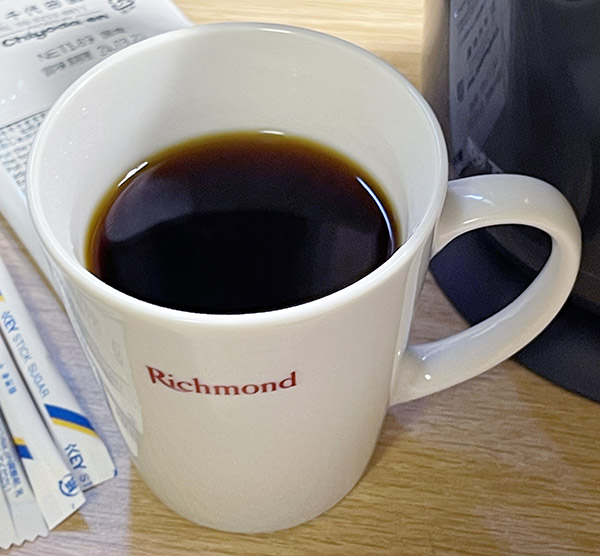
Well, I was recently in Tokyo. I gave a class in Singapore and Sue and I thought as long as we had invested the 20+ hours to get there, we might as well stop in Japan on the way home (neither of us had ever visited Japan before). I’ll post a blog or two about the land of the rising sun in the coming days, but for now I wanted to talk about making coffee in our Tokyo hotel room. On these Asian trips, I’m usually up by 2:00 or 3:00 a.m. (there’s a 16 hour time difference between Japan and LA, and my biological clock doesn’t handle it well). They don’t serve coffee in the hotel lobbies over here, so you either make coffee in your hotel room or you don’t have coffee. For me, not having coffee has never been an option.
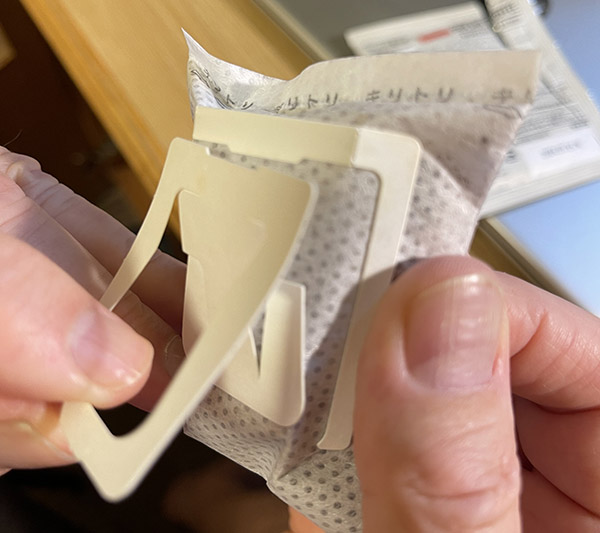
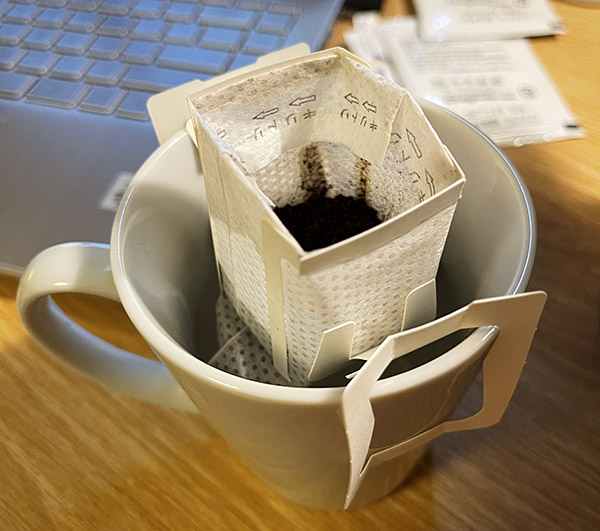
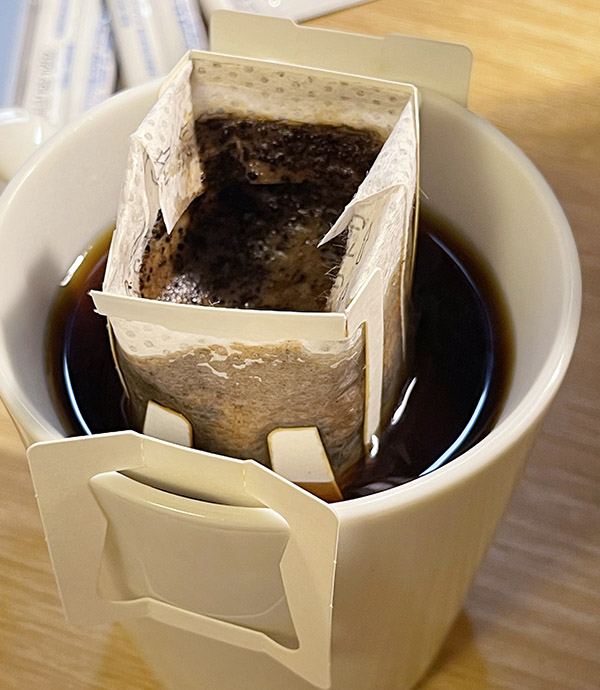
If you’ve read Riding China, you know that Gresh and I became experts at making coffee at places in China so remote they had to pipe in water and air. Our coffee was always prepared using instant Nescafe, which is almost a crime against nature for folks who enjoy a good cuppa Joe. Nescafe reminds me of that old engineering saying: Halitosis is better than no breath at all. But when it comes to making coffee in a hotel room, the Japanese had a better idea. It took me a while to dope it out and I finally had to read the instructions to do so. When I did, I realized: Clever people, these Japanese are. Take a look.
The water heater for making coffee. I thought the coffee bag would to into the white gizmo below the lid. I was trying to find a way to open it up. When I spotted the Phillips head screws securing it to the lid and I thought I needed a screwdriver, I realized I was on the wrong track. There are no English instructions anywhere on this pot.The bag of coffee. How the hell does it fit into the coffee pot?Ah, the flip side. No instructions in English, but there are pictures. I panicked initially when I couldn’t find the holding fixture the pictures show.Could it be? A cardboard fixture built into the coffee bag?Ah, these people are very, very clever. You heat the water in the pot, mount the coffee bag with its included cardboard mounting fixture in your cup, and pour the hot water over the coffee.It’s genius. Pure genius.And it was a damn fine cup of coffee, too!
Gresh and I sure could have used this when we rode across China. Next time, I guess, if I can find a place to buy these coffee bags. And you know what? As soon as I wrote that last line, I remembered: Amazon is your friend. I did a search on drip bag coffee, and wow, here they are!
I couldn’t let a story about coffee get by without a commercial or two…the first one being for our book, A Cup O’ Joes. Have you picked up a copy yet?
And the second commercial…how about Riding China, from which you can learn all about how two die-hard coffee drinkers struggled across the Gobi Desert, the Tibetan Plateau, and more in China, the land where people don’t drink coffee?
Until this summer, if anyone had mentioned Cordoba to me my first thoughts would have been of Fernando Llamas and fine Corinthian leather. Men and women of a certain age will remember the Chrysler commercials of the ’70s and ’80s:
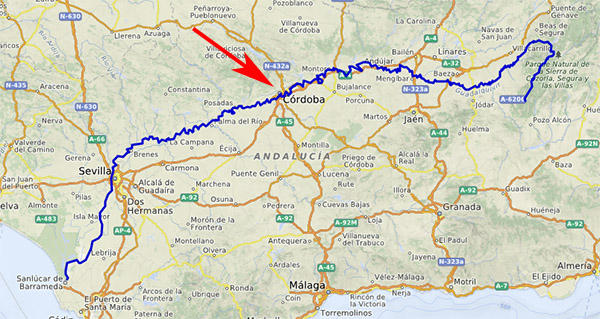
But I digress. This blog is about the real Córdoba. The one in Spain. I haven’t finished telling the story about our visit to Spain (I still have three or four blogs to go). This blog continues the journey, and our enfoque del día (focus of the day) is Córdoba. We traveled to Córdoba after our visit to Portugal.
Córdoba lies along the Guadalquivir, Spain’s second longest river. The Guadalquivir used to be navigable along most of its length; that is no longer the case.
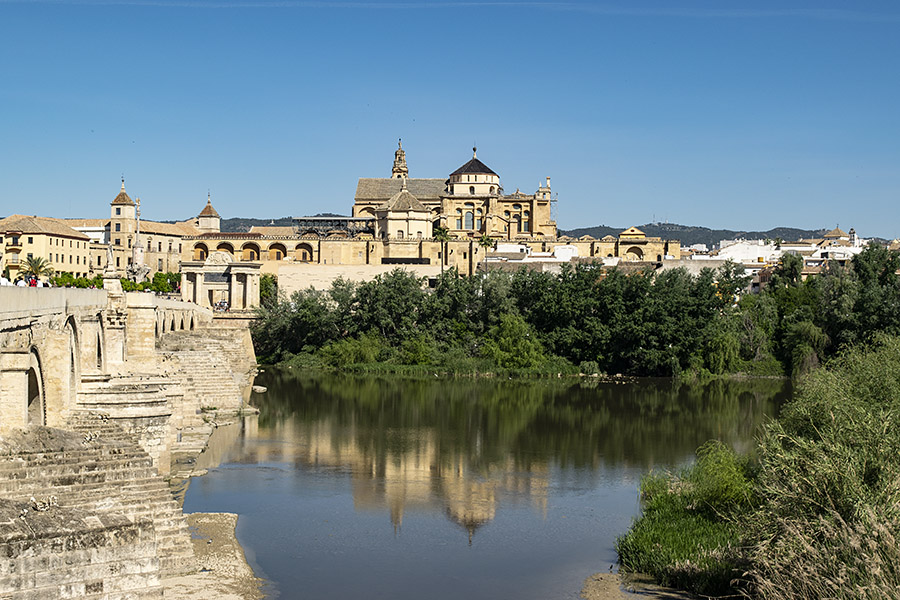
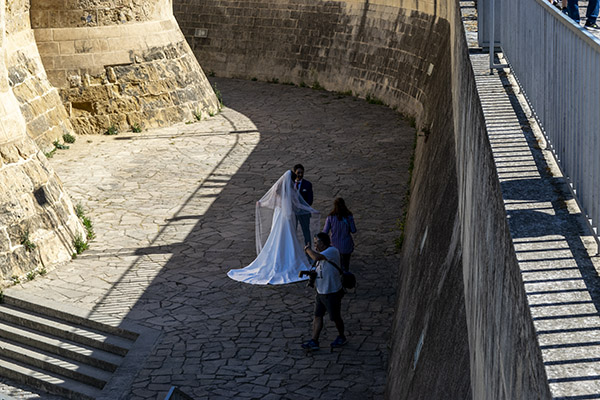
Córdoba is in southern Spain (in the Andalucia Province) along the Guadalquivir River. The photo at the top of this blog is where we walked across the Guadalquivir River into the center of the old city. The bridge across the Guadalquivir was built by the Romans and for 2000 years it was the only bridge into the city. As we walked across the bridge and entered Córdoba, I noticed a couple posing for wedding photos in the now dry moat.
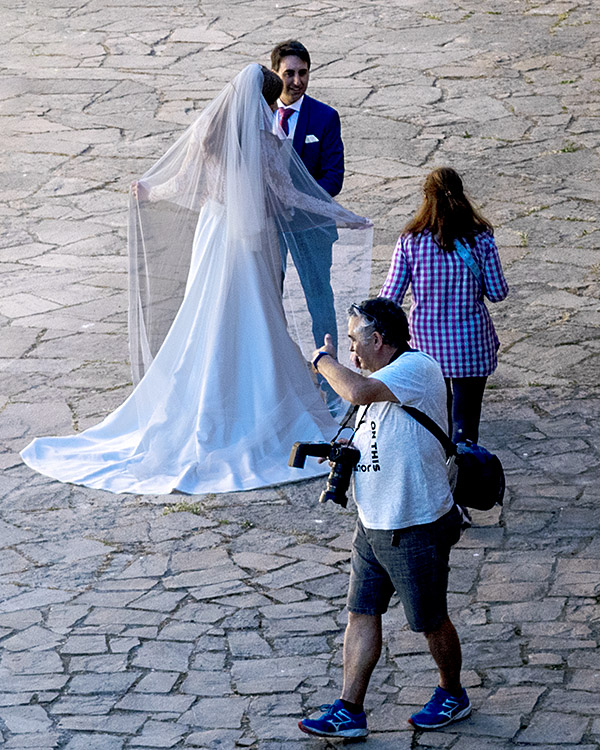
Ah, the wonders of a decent camera (my Nikon D3300), an inexpensive lens (the Nikon 18-55 that came with the camera), and PhotoShop. I cropped this photo and adjusted its curves and levels to get the image below.Ah, that’s better.
Córdoba is a World Heritage site with an impressive history and stunning architecture. The city was part of the Roman Empire, then it was conquered by the Visigoths, then the Muslims (when it became part of the Caliphate of Córdoba), and finally, the Christians when they conquered it in 1236. When the Muslims were the landlords, Córdoba became one of the world’s centers of knowledge and education.
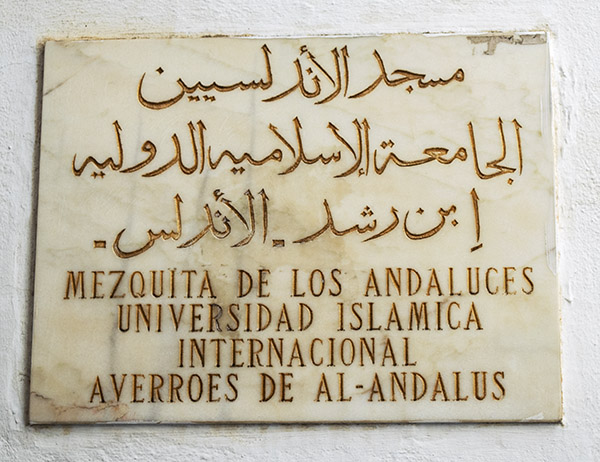
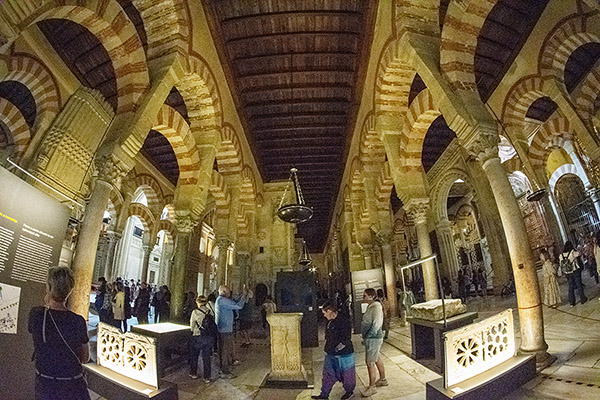
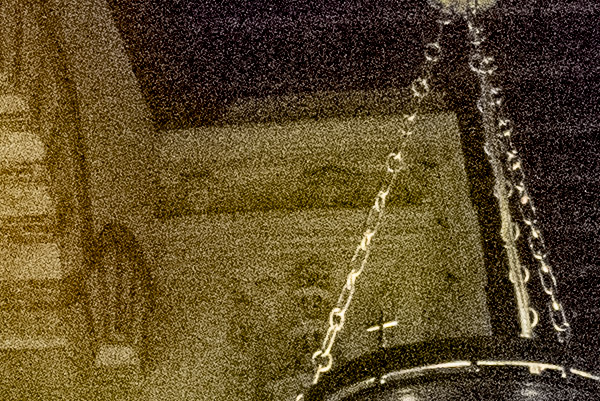
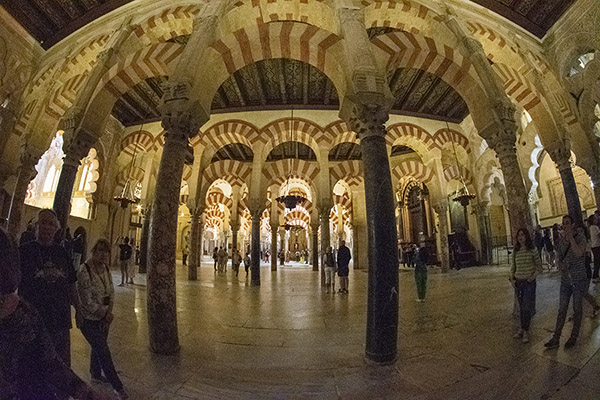
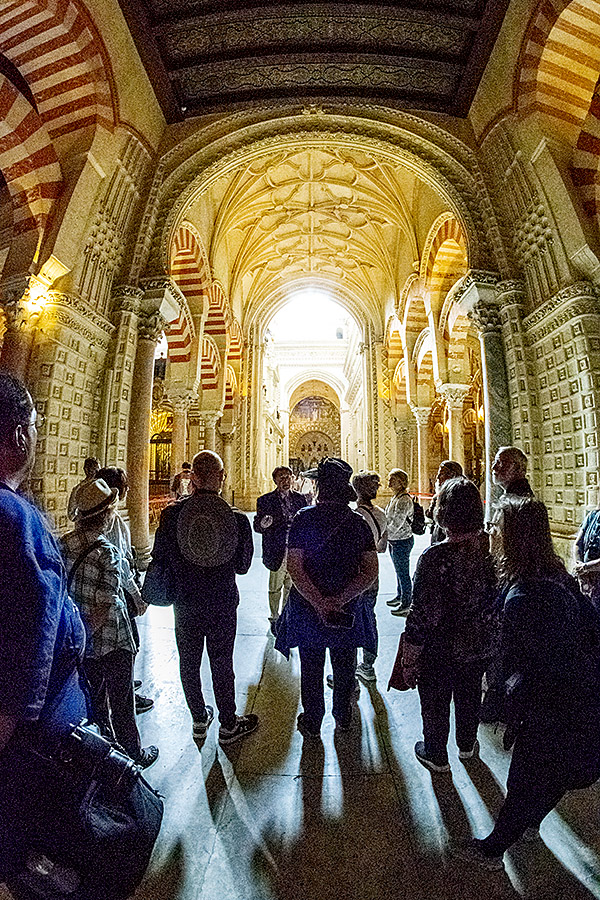
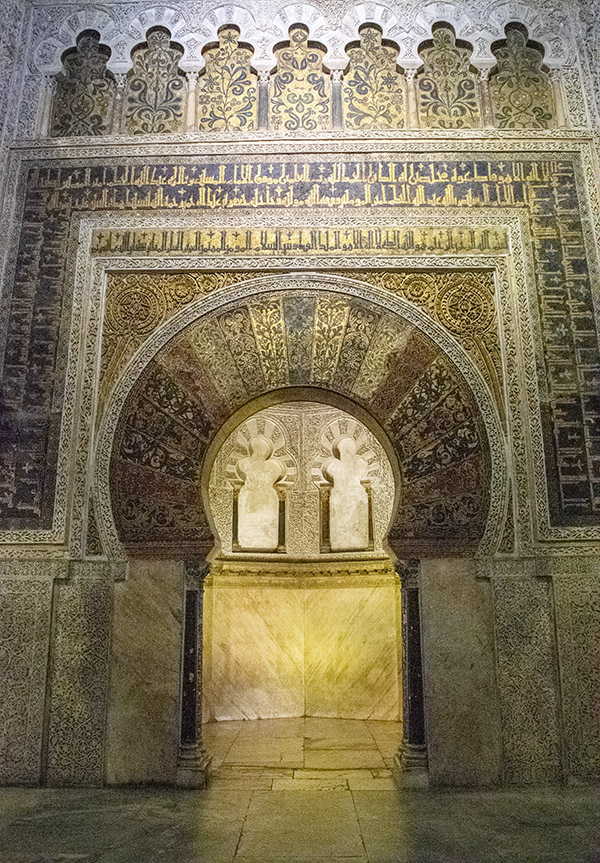
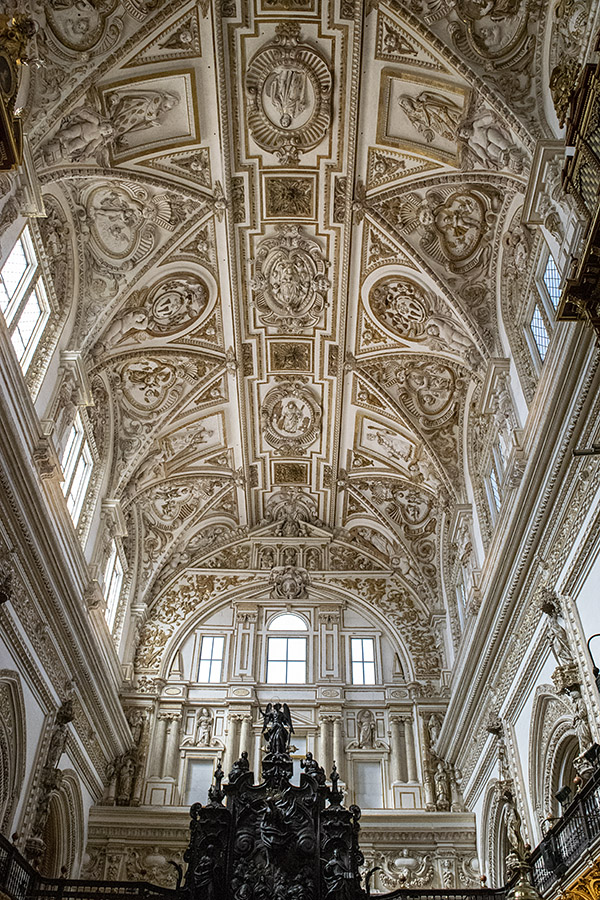
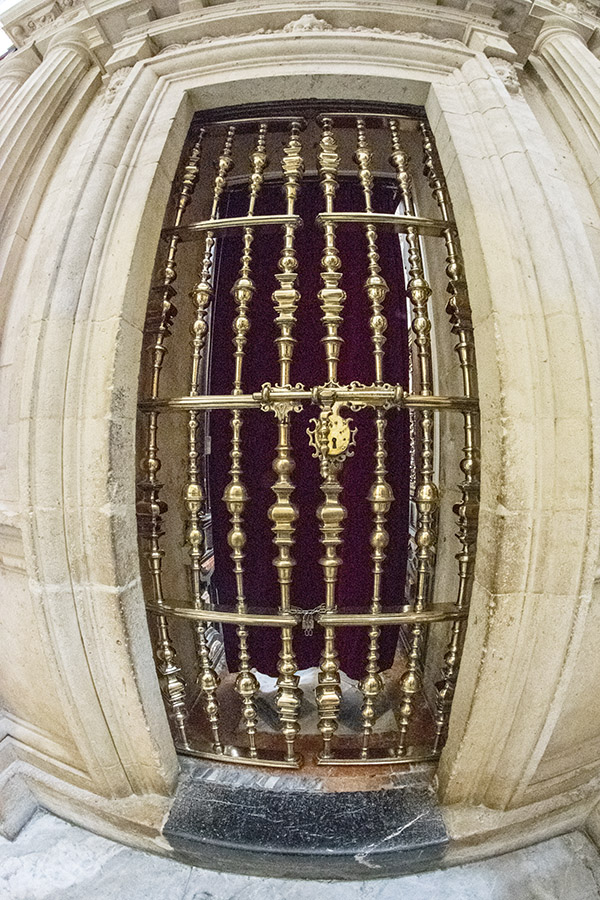
One of Córdoba’s principal attractions is the Mezquita-Catedral. It began life as a mosque in 784 – 786 AD when Abd al-Rahman I built it. I took the following photos using the fisheye 8mm Rokinon lens I’ve written about before. Using that lens requires doing everything manually (focus, shutter speed, ISO, and f/stop). I’ll usually have to take a few shots to get the camera dialed in using the onboard histogram. I set the ISO high (12,800) to get the speed (i.e., the camera’s light sensitivity) high enough for the dimly-lit mosque interior. That induces a lot of noise into the photo, but the noise mostly disappears when the photos are resized from their native 6000 x 4000 pixel size (at 300 dots per inch, or dpi) down to a 600 x 400 pixel, 72 dpi size for the blog.
Inside the mosque interior with the 8mm Rokinon lens. These interior photos were shot at a very high ISO, which adds a lot of noise to the photos that is not too visible in these reduced size images.A cropped portion of the original photo above. The high ISO noise mentioned above is quite visible in this “actual pixels” viewing size.
Another option for these kinds of shots would be to shoot at a much lower ISO speed (say, 200 or 400 ISO) with the camera on a stable tripod. That would get rid of the noise, but exposure times would have gone up dramatically. I didn’t want to carry a tripod for a lot of reasons, so that approach was out. You might be wondering about using flash, but that’s a nonstarter, too. Most of these places don’t allow flash photography, and even if they did, the flash is only good for a few feet. Available light, no tripod, and high ISO is the way to go here.
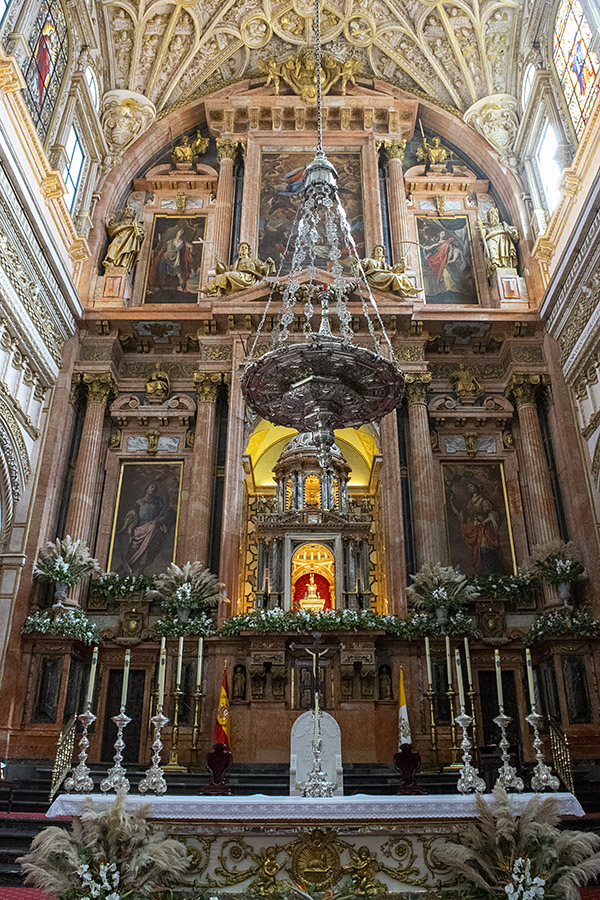
This area goes back about 1200 years. The Muslims built it when ruled Cordoba.Our local tour guide explaining more about the mosque.Another indoor photo where the lighting was a bit better.Islamic art and architecture inside the mosque.
When the Christians conquered Córdoba in 1236 the mosque became a church. There are a lot of churches in Spain that started life as mosques. Sometimes several such switches in ownership and religious affiliations occurred in other parts of Europe that had been ruled by the Moors. We’ve been in one that started as a mosque, became a church, and then reverted to a mosque as different factions occupied conquered lands (the one I’m thinking of is San Sofia in Istanbul, which I may get around to writing about one of these days).
So the mosque became a church as the Christians “converted” or executed all who were not Christians. While the artwork and architecture are beautiful, the history is not. During the Spanish Inquisition, the Jews of Córdoba had a choice: Convert to Christianity or die (with death preceded by horrific torture). The church is now referred to as the Mezquita-Catedral, the Great Mosque of Córdoba. The photos below show more of the Mezquita-Catedral.
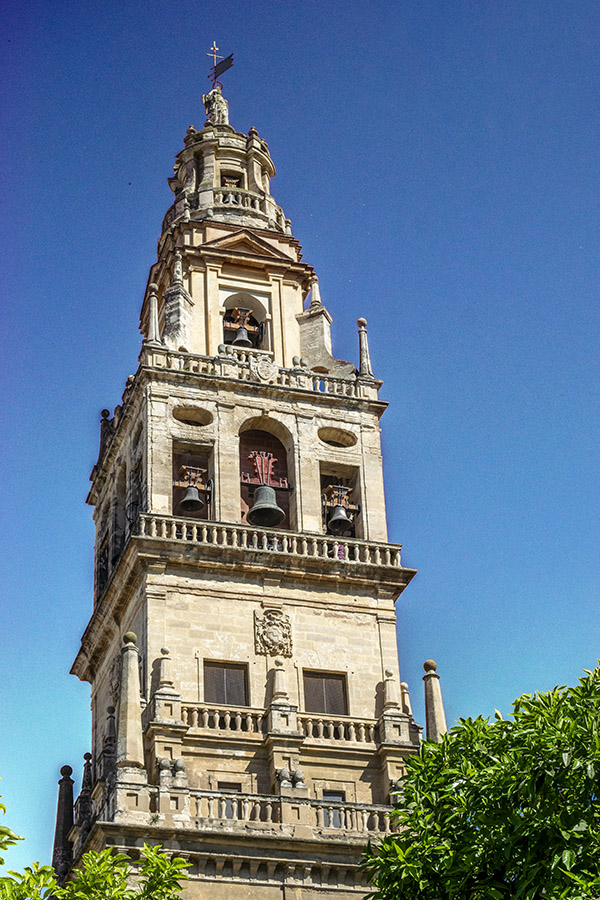
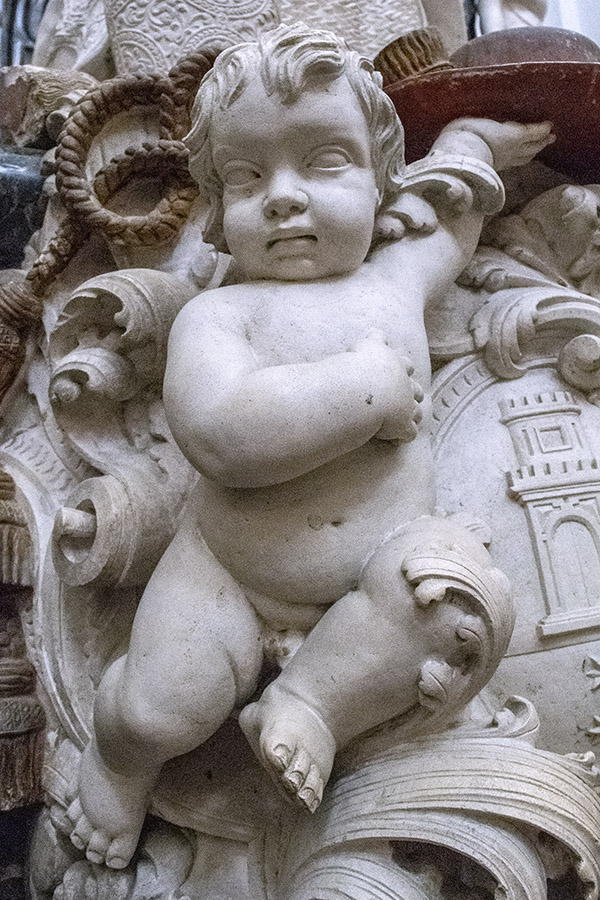
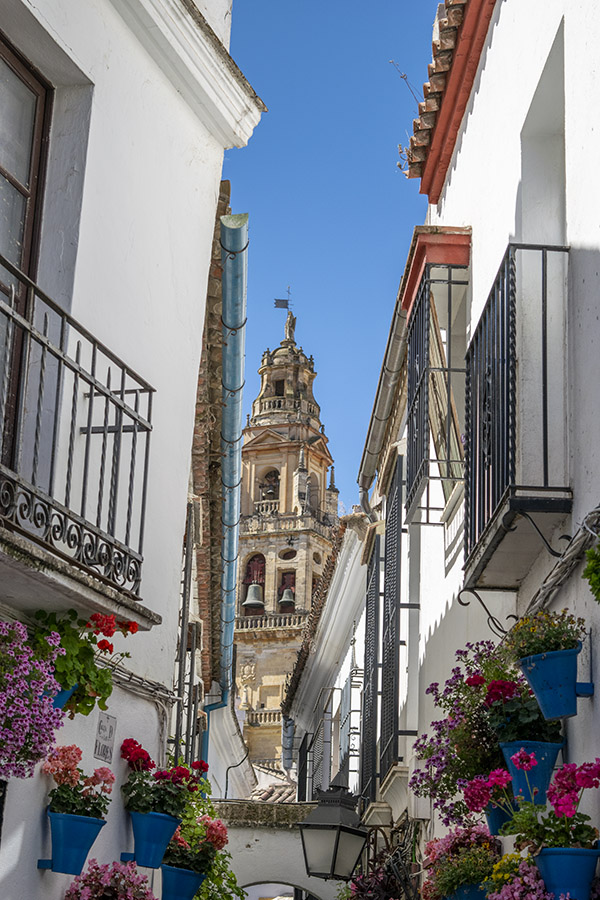
The f bell tower dominates Córdoba. It was built over the mosque’s dome.An interior photo of the Mezquita-Catedral.A photograph of the church ceiling.A sculpture inside the Mezquita-Catedral.
Ferdinand and Isabella lived in Córdoba for a while when they used it as a base of operations to drive the Moors from Spain. It’s also where the Spanish Inquisition took root. Prior to The Inquisition, Cordoba had three synagogues and a sizable Jewish population. Today, only one synagogue remains and it is essentially a tourist attraction. My research indicates no Jews live in Córdoba today.
A doorway to the Mezquita-Catedral, as seen by the 8mm Rokinon lens.
What used to be the Jewish quarter retains the streets of medieval Córdoba outside the Mezquita-Catedral, and today the area is largely a tourist center. Although the streets are not laid out in a grid pattern, the Mezquita-Catedral tower dominates the town and is visible from all directions. It would be difficult to get lost in Córdoba.
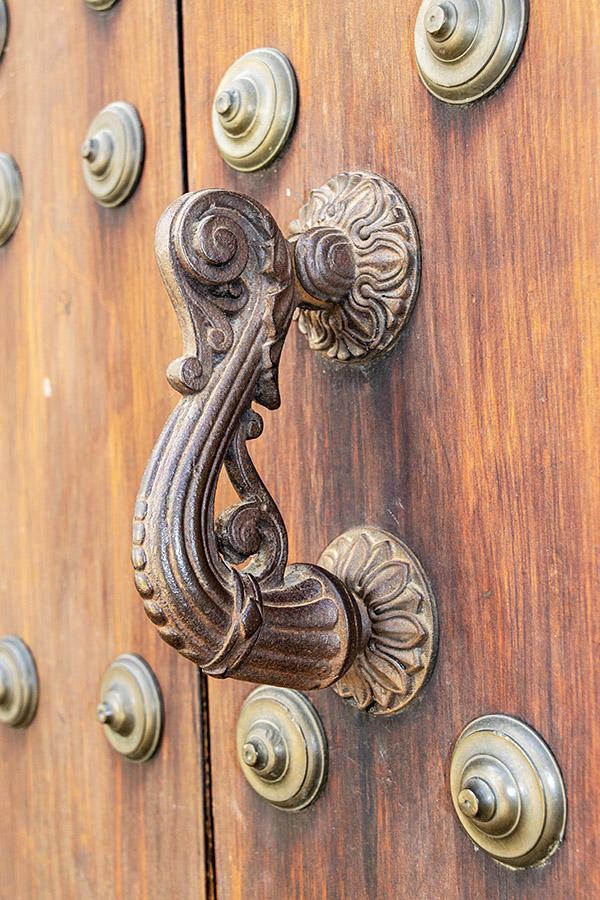
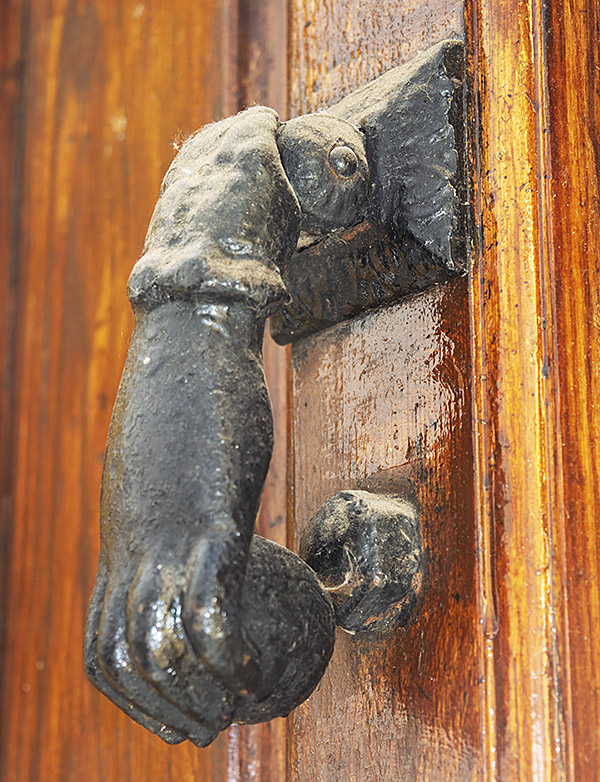
The Mezquita-Catedral bell tower dominates the tourist area.A door handle in Córdoba’s tourist area.A knocker. If you look through our other posts from Spain and Portugal (I’ll provide a set of links below) you’ll see quite a few similar photos.
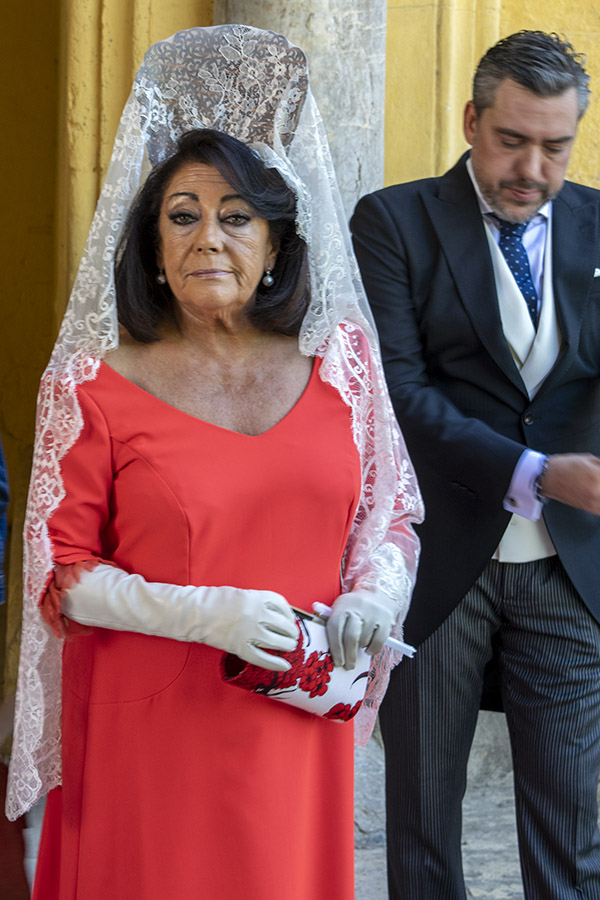
There are many restaurants in Córdoba, and we enjoyed lunch at one. Most of the restaurants have tables in front on the narrow cobblestone streets, and virtually all meals are preceded by complimentary tapas. After having lunch, we wandered around a bit more. There are about a dozen churches in Córdoba, and most go back to medieval times. I watched a family entering one for a wedding.
This woman was outside a church prior to a wedding. I’m guessing she’s either the bride or groom’s mother. I caught a pretty dour expression when I snapped this photo, but immediately after she broke into a huge smile. I don’t know why I didn’t hit the shutter again.
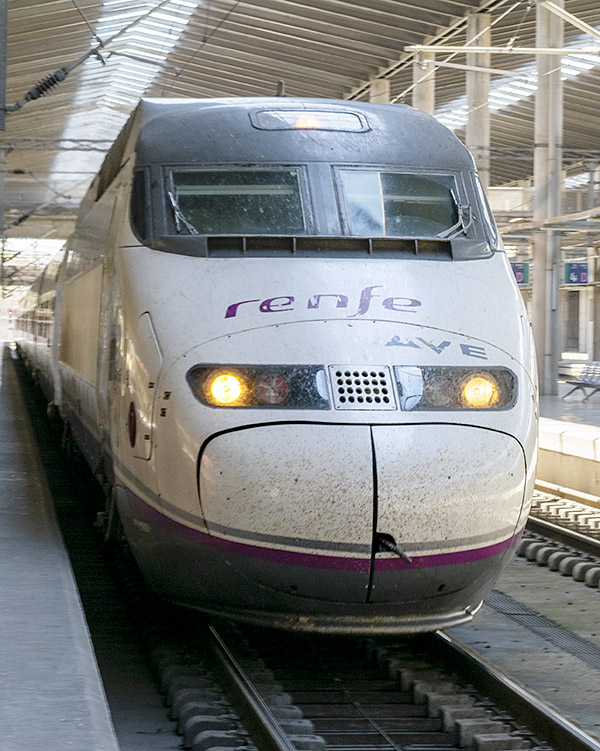
After Córdoba, it was on to Madrid. We traveled on Spain’s high-speed rail, running at speeds of around 220 mph. That was really cool.
A high-speed Spanish train. Their rail network is impressive.
So there you have it: Córdoba. I didn’t see Fernando Llamas nor did I encounter any fine Corinthian leather. But it was still fun, the city’s dark and inhumane history notwithstanding.
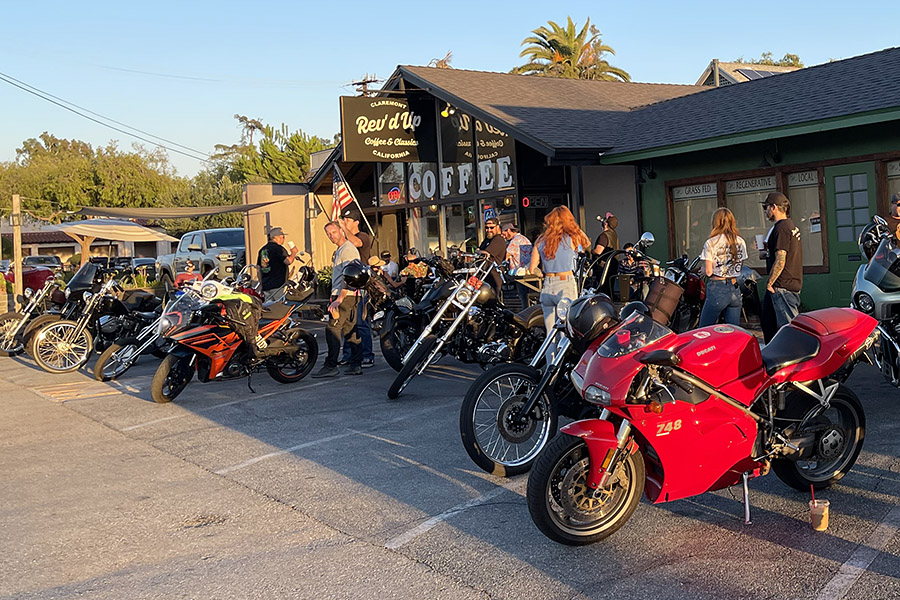
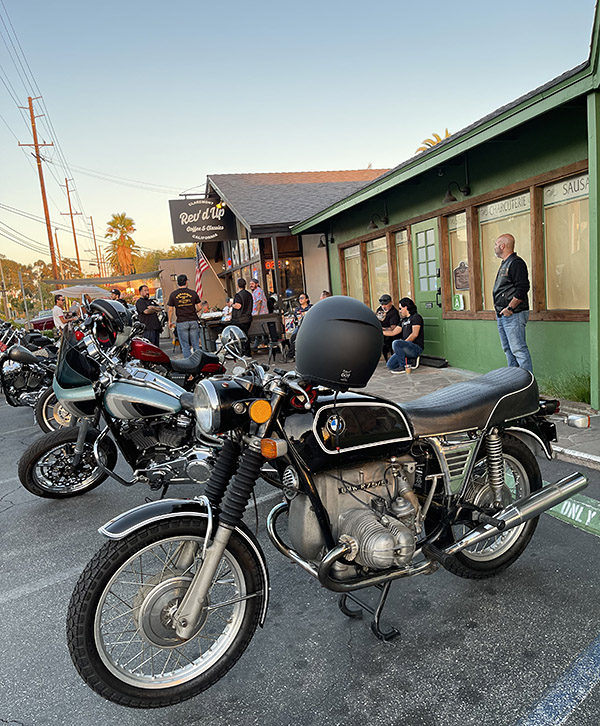
Wow, did I get lucky with this…a coffee and motorcycle spot just a few miles from home. It used to be that I had to ride all the way up Angeles Crest Highway to Newcomb’s so I could hang out at a motorcycle destination where like-minded people stopped for something to eat and to admire other motorcycles. Then Newcomb’s closed, a victim of the down economy and the pandemic. There was another cool spot Gresh and I spent an evening at in Chongqing, but the chances of me riding the Enfield across the Pacific to get there are slim. And then, I noticed Rev’d Up Coffee and Classics in Claremont. Claremont is the next town over from where I live. I’d seen Rev’d Up before, but I figured it was just another Gen X or Millennial (or whatever they’re calling themselves these day) Starbucks refugee trying to cash in on the coffee craze with a little moto mystique thrown in as sort of an artificial sweetener. Boy, was I ever wrong; there’s nothing artificial about Rev’d Up or its owner.
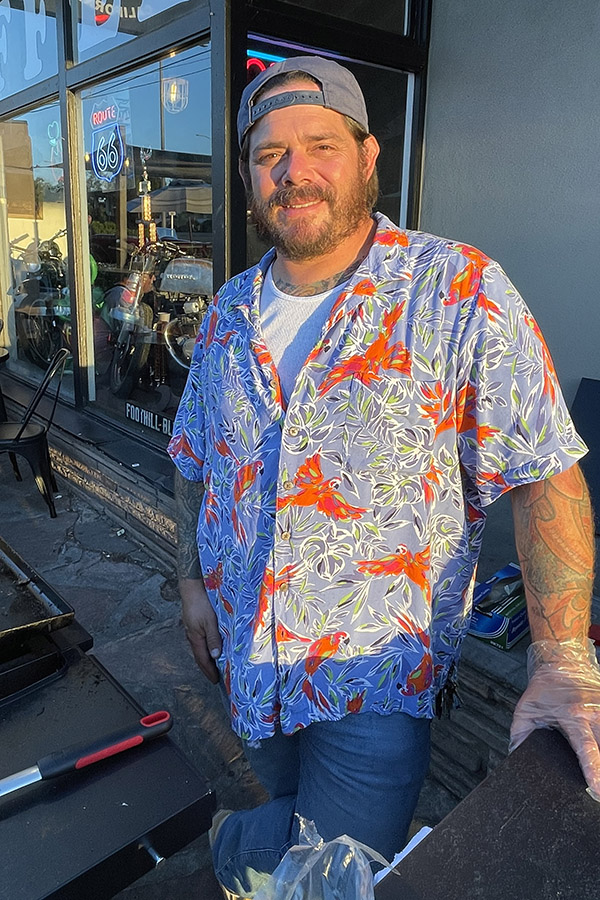
Steve Solis, motorcyclist and Rev’d Up proprietor, taking a break from Bike Night cooking duties.
Steve Solis is the guy who owns and runs Rev’d Up. He’s a good guy, a lifelong area resident, and a rider. Steve’s personal ride, a Sportster, is usually parked inside the restaurant seating area during normal business hours, but he brings it outside during bike night.
Steve’s personal ride – a Harley Sportster with an extended front end and apehangers.
The theme of Rev’d Up is bikes, classic cars, and hot rods. Steve has a couple of vintage bikes on display in the restaurant windows, and there are cool moto things throughout the dining and coffee sipping area.
A Honda Dream on display in one of the Rev’d Up windows.Another vintage Honda on display at Rev’d Up.Older motorcycle helmets. I wore one of the Peter Fonda Captain America helmets in the ’70s.
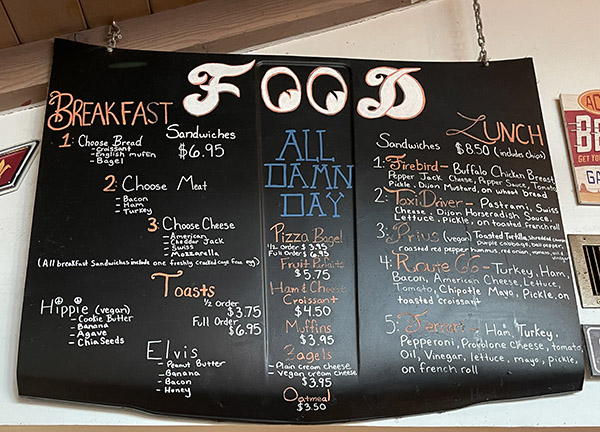
In keeping with the Rev’d Up theme, the menus are displayed on car hoods suspended from the ceiling. One is from a Camaro, the other is from a Datsun.
The breakfast and lunch menu. On Bike Nights, Steve is out front making Philadelphia cheesesteak sandwiches. They sure smelled good.The coffee and other specialty drink menu. I have to try the Easy Rider.
I asked Steve what the best kept secret was. His answer? The Easy Rider espresso. He said it was his favorite drink. Next time I’ll try it.
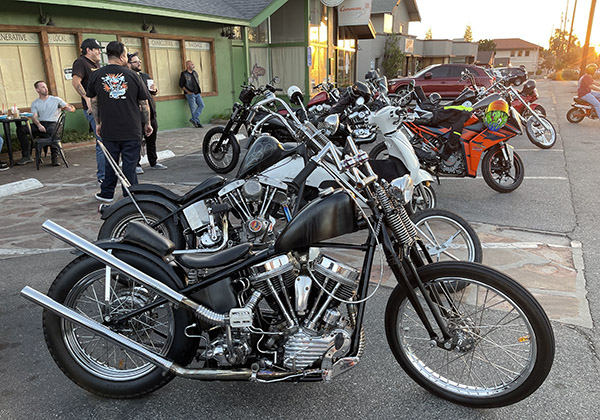
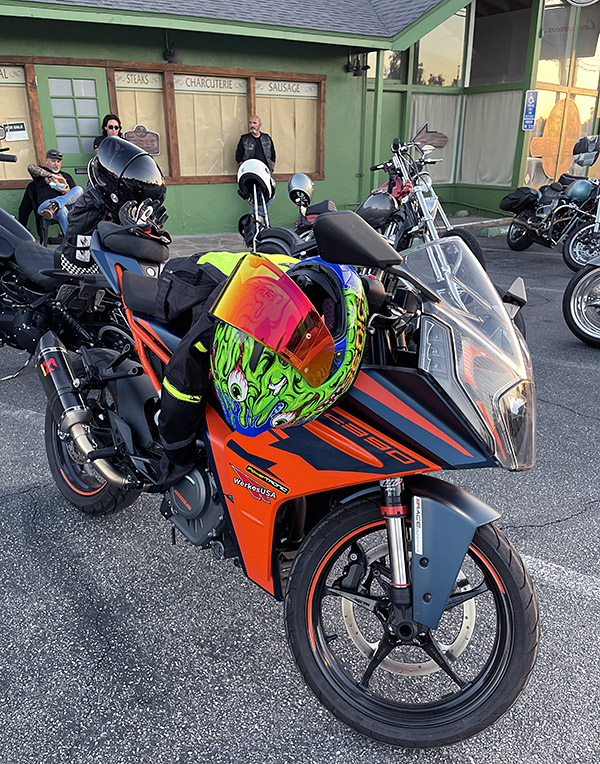
The best part of any of these gatherings is always wandering around in the parking lot, taking in the bikes, and talking to the riders. There’s no set theme regarding the bikes. Harleys, choppers, Ducatis, KTMs, BMWs, Triumphs, and more. They were all there.
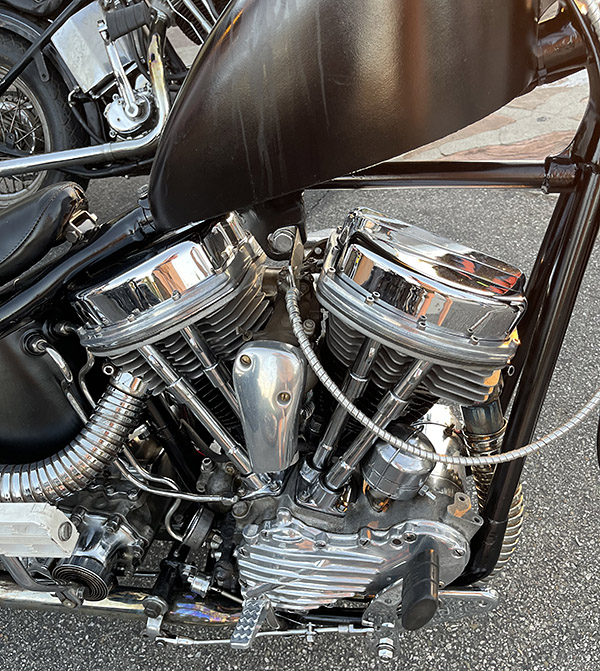
Check out the SU carb and the velocity stack on this Shovelhead chopper. Where does the rider’s leg go?The Harley Panhead engine, one of the two best-looking Harley engines ever made. The other one is the EVO motor. Those Panhead valve covers are impressive.A full view of the Panhead chopper.Bike night is not all about choppers. The colors on this helmet and motorcycle stood out.Another classic and beautiful motorcycle. The 748 was a later version of Ducati’s 916. They look good.There are no better colors for a classic BMW boxer twin than gloss black with white pinstripes.As we were leaving, this Triumph pulled into the parking lot. All marques are welcome at Rev’d Up. It’s a cool place.
Rev’d Up Coffee and Classics is located at 212 West Foothill Boulevard (that’s Route 66) in Claremont, California. It’s definitely worth a stop, and I’d say it’s a worthwhile place to take a ride. Maybe I’ll see you there. Look for the orange Enfield in the parking lot; if it’s there, I will be, too.


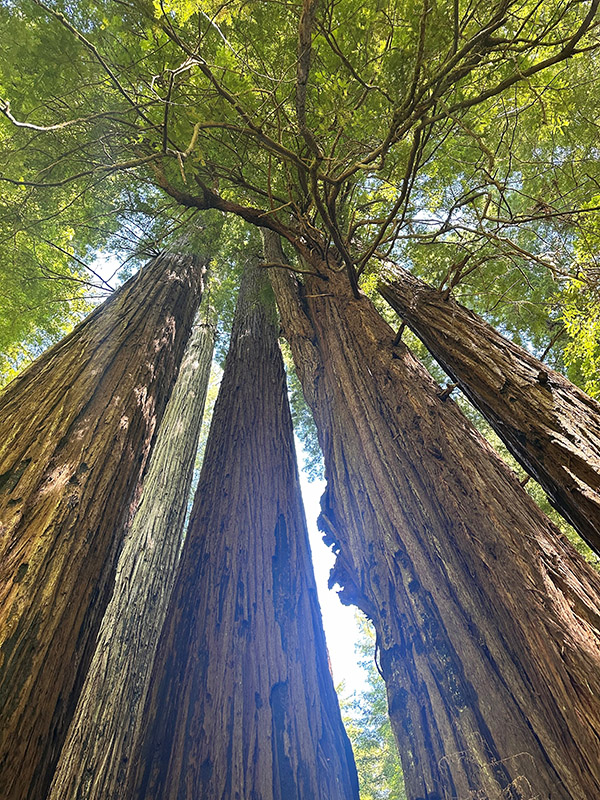

 Our long-awaited visit to the Lost Coast was the next thrilling chapter in our journey. Traveling through the towering giants of the redwoods and then navigating the winding, narrow roads flanked by quaint ranches and farms we finally arrived at our destination. Securing one of the thirteen coveted camp spots nestled against the picturesque sand dunes felt like a small victory. The beach, with its wild and rugged beauty, was a sight to behold. Our joy was multiplied when we invited an adventure rider from Croatia who had no place to camp to join us. We met two hikers planning to embark on the famous Lost Coast Trail the following day. With our newfound temporary traveling family, we combined our meager food supplies, beer, and the last of my Irish whiskey to set the mood for another unforgettable night of sharing grand tales beneath the starlit sky.