Wow, it’s March already. It seems like just a couple of days ago it was February. Seriously, though, the years are flying by. I had a bunch of things I wanted to mention, so this blog may meander a bit. Bear with me.
Baja John on the road to San Felipe back in 2005.
I got a note from Baja John yesterday. He’s down in San Felipe, which is not that big a stretch for him as he leaves down in Baja now. San Felipe celebrated their 100th anniversary this weekend and John wrote to tell me about it. Baja John, good buddy Marty, and I rode down there for San Felipe’s 80th anniversary, and if your Ph.D is in math, you know that means our ride was 20 years ago this past weekend. Those 20 years sure went by in a blur. It feels like that ride was maybe a couple of months ago.
John and yours truly two decades ago. I rode a Harley in those days. John rode a Virago. The BMW belonged to our friend Marty.
Man, I miss those Baja trips.
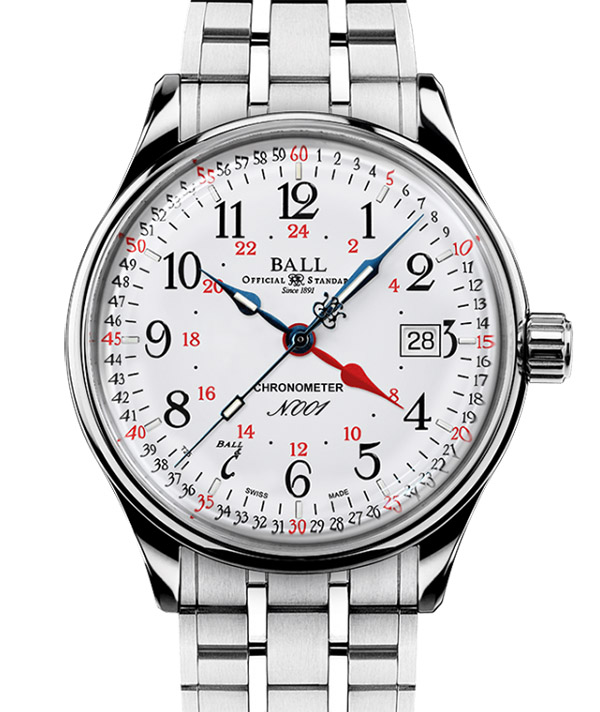
Speaking of time, I somehow made the Ball Watch email list. Their watches have a unique way of making the hands glow in the dark, which is kind of cool. I usually don’t find their style appealing, but Ball introduced a watch they call the Trainmaster a couple of years ago, and that one is beautiful. But at $2995 it’s not appealing enough (at least to me). I don’t need another watch. It sure is elegant, though.
The Ball Trainmaster. I would love to own one of these. It’s a GMT, too, one of my favorite watch types.
You may recall that several months ago we explained the origins of the expression, “Balls out.” That one means running flat out, and it is nontesticular in nature (it refers instead to a mechanical governor’s centrifugal balls being fully extended). It doesn’t have anything to do with Ball watches, either. But another expression, “on the Ball,” does. The official watch for railroads back in the 1800s was a Ball pocket watch (the same company that now makes the watch you see above), and if a train was running on schedule, it was said to be “on the Ball.”
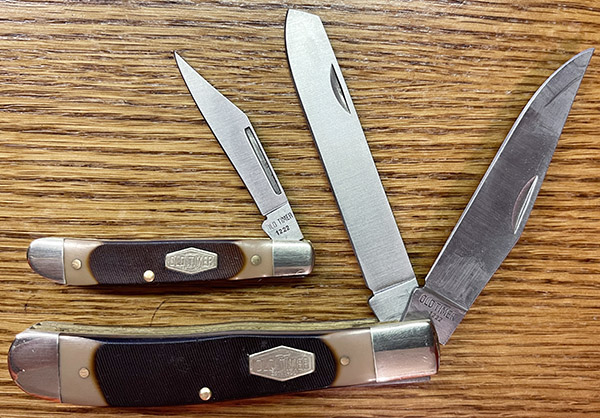
Two Old Timers for $26 at Walmart! I already accidentally cut myself with the big one.
The pocketknife thing is in full swing. I thought I had just a few laying around in various spots in the house, so I decided to gather them up and put them all in one spot. I was a little bit embarrassed when I finished. I don’t need any more pocketknives. But that may not stop me. I have one more inbound, and I’ll probably stop after that. Or not. We’ll see.
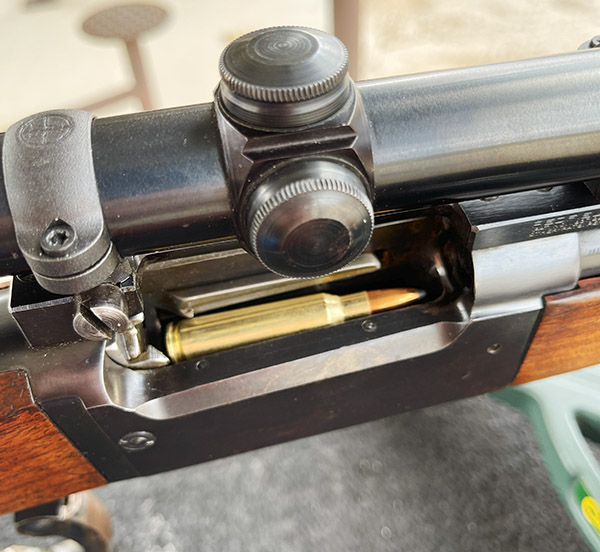
More good stuff: I’ve had an old Savage 99 lever gun (chambered in 250 Savage) stashed away and neglected for several decades. Well, I finally dug it out a couple of months ago, and the neglect was obvious. It was rusty when I got it, but I let it get worse. Most of the rust is now off and it looks good. I bought some new 250-3000 brass cases and a set of Lee dies. I’m surprised I took this long to get around to the Savage, and I’m even more surprised at just how nice a cartridge the .250 Savage is.
A .250 Savage round in a Savage 99 rifle that is one year younger than me.I haven’t finished the dialing in the load or the rifle, and I am already getting these kinds of results at 100 yards. The .250 Savage cartridge is a winner!
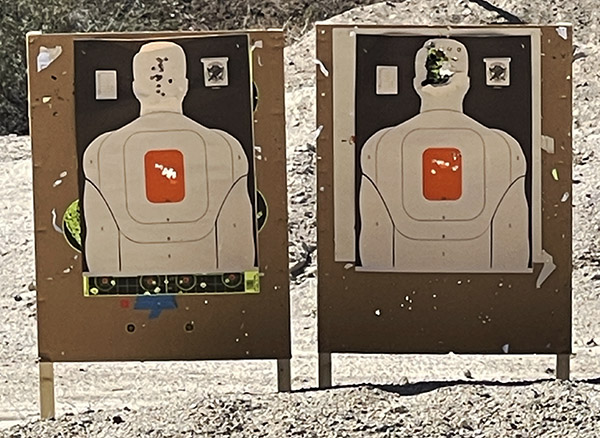
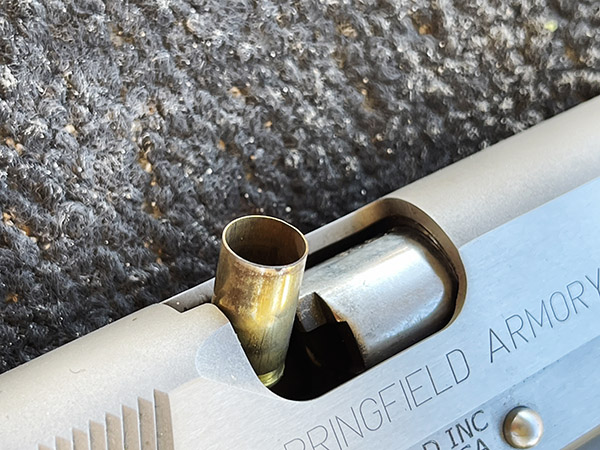
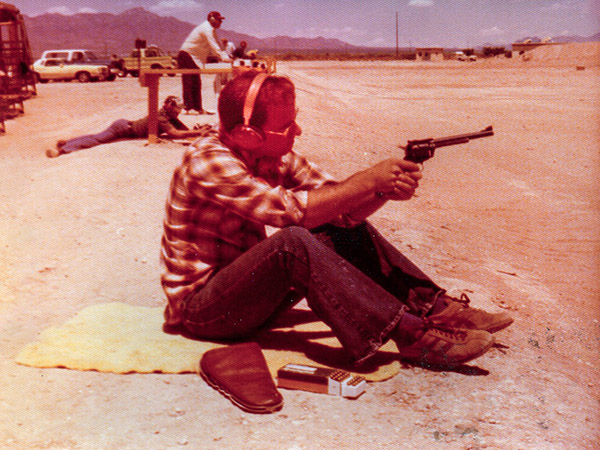
Another bit of misadventuring: I had a couple of old laptops that weren’t working and I’ve held off on tossing them for fear there might still be data on the hard drives. How do you wipe a hard drive so that whatever was there can’t be recovered? After a few minutes Googling the topic, it seems that the best way is to pull the hard drive and drill a few holes through the disk. Simply deleting the files or even using programs designed to eliminate whatever’s on there really doesn’t get the job done. I have a power drill, but I had a better idea. How about putting the hard drives behind a target and having at them with a .45?
Two guys getting blown away at the West End Gun Club. There was a laptop hard drive behind the head on each target.ARX .45 ACP bullets meet hard drive. Yep, that worked.Hard drives rendered unusable: Mission accomplished.
One more last item: You remember I told you about good buddy Lance and how well his end shake shims worked in my Model 60 snubbie. His company, TriggerShims.com, also makes bolt shims for .22 rifles I have two sets coming in for two of my .22 rifles, and I’m going to see how well they work.
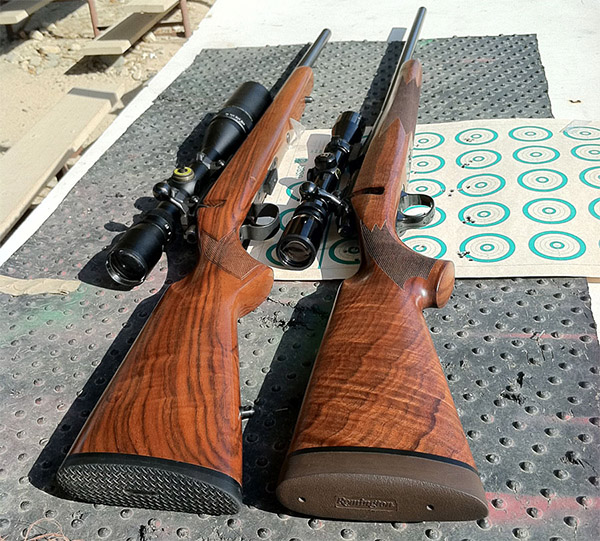
CZ 452 Varmint and Remington Custom Shop Model 504 22 rifles. I’m going to try Trigger Shims bolt shims in both.
Stay tuned, and you’ll get the full report right here.
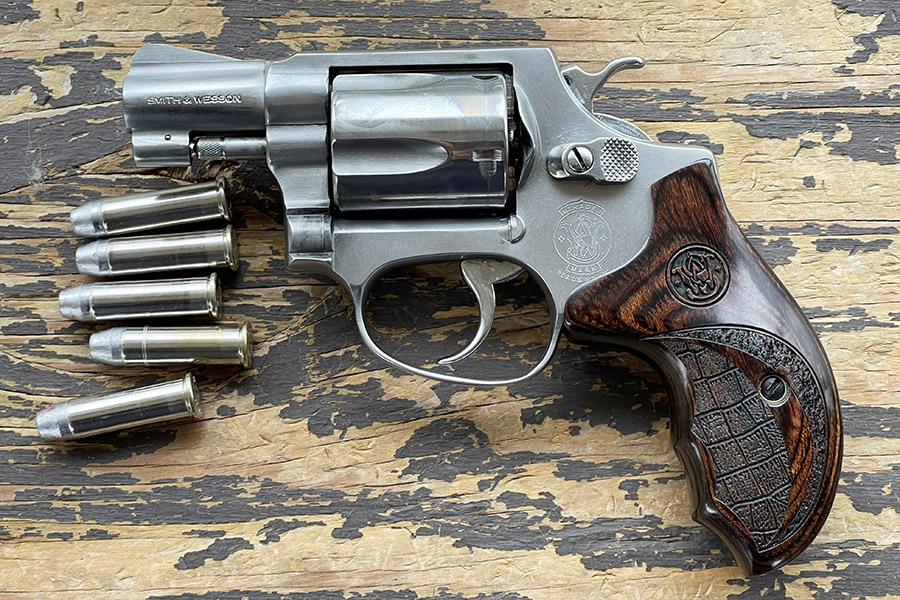
I took my Model 60 S&W apart to clean it and somewhere along the way I lost the shims I put in to reduce cylinder end shake. A quick email to good buddy Lance Shively and a set of shims later, and I’m back in business. That got me to thinking: I had written a blog on installing the shims several years ago and I thought it would be a good idea to run it again.
I love my S&W Model 60 and I shoot it a lot. It’s particularly cool after I had TJ (of TJ’s Custom Gunworks) do an action job on it. Not content to leave well enough alone, I convinced myself that (after tracing the occasional double action misfire to not-fully-seated primers) that what I really needed was a lighter hammer spring (in addition to the lighter trigger spring I had already installed). Wolff Springs sells a lighter hammer spring kit, and I went for the lightest hammer spring I could get.
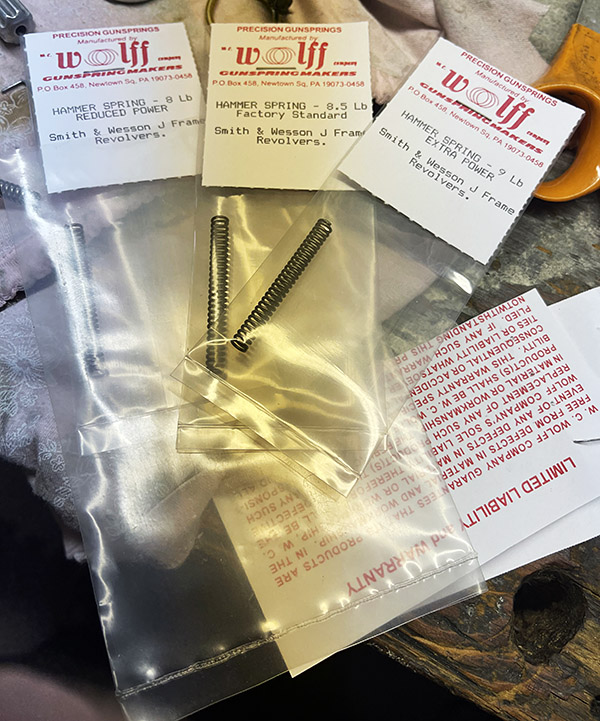
The Wolff Springs hammer spring kit. I went with the lightest spring.
The lighter trigger spring affects single action trigger pull after you have already cocked the gun and it has nothing to do with the occasional double action misfiring I had experienced in the past. Double action trigger pull is affected by both the trigger spring and the hammer spring, but the hammer spring is a much beefier spring and it drives most of the resistance when firing double action. The hammer spring, if too light, can induce misfires.
The Wolff hammer spring kit includes a standard strength spring (an 8 1/2-pound spring), a heavier spring (a 9-pound spring), and a lighter spring (an 8-pound spring). I wanted a lighter double action pull, so I used the 8-pound spring. The tradeoff is this puts less force on the hammer, which means it has lower velocity when it hits home, and that ups the likelihood of a misfire.
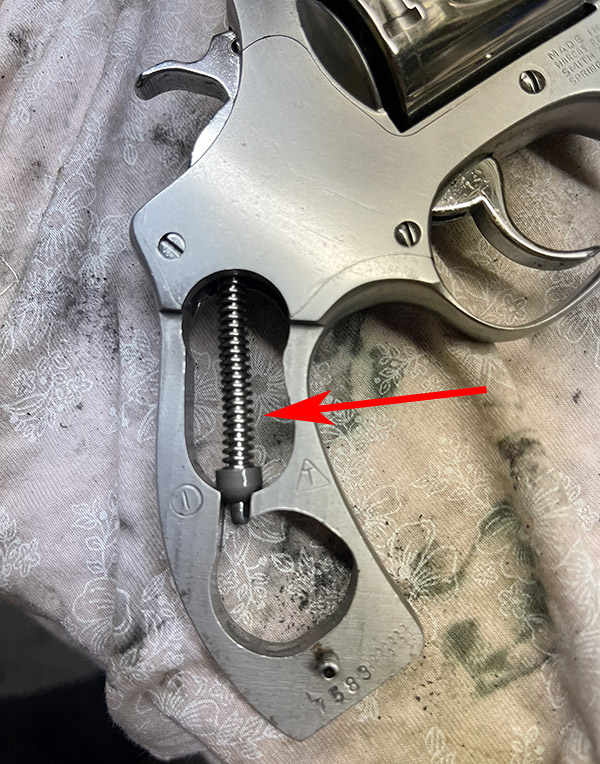
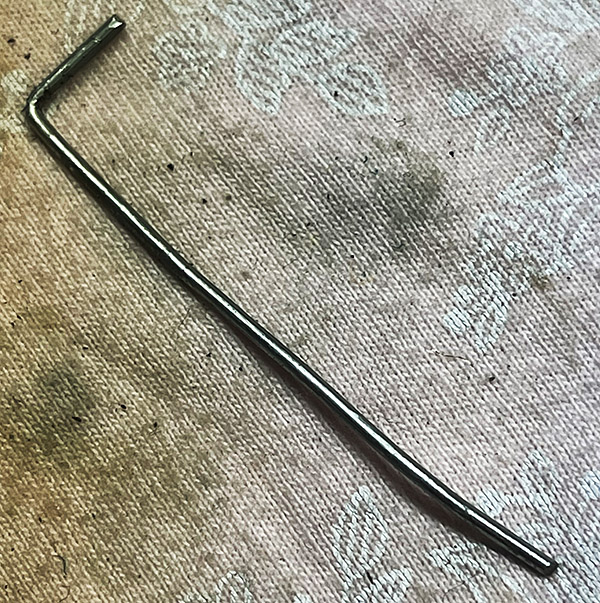
The hammer spring is easy to change, and if necessary, I can go for either of the two heavier springs at the range. All it takes is a small screwdriver to remove the grips, and the same exotic custom tool used for disassembling the Rock Island Compact 1911 (a bent paper clip). The photos below show how this is done.
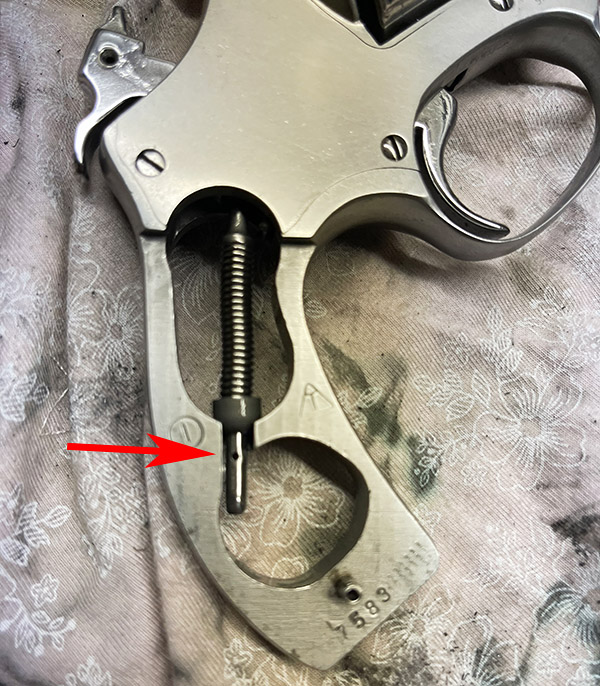
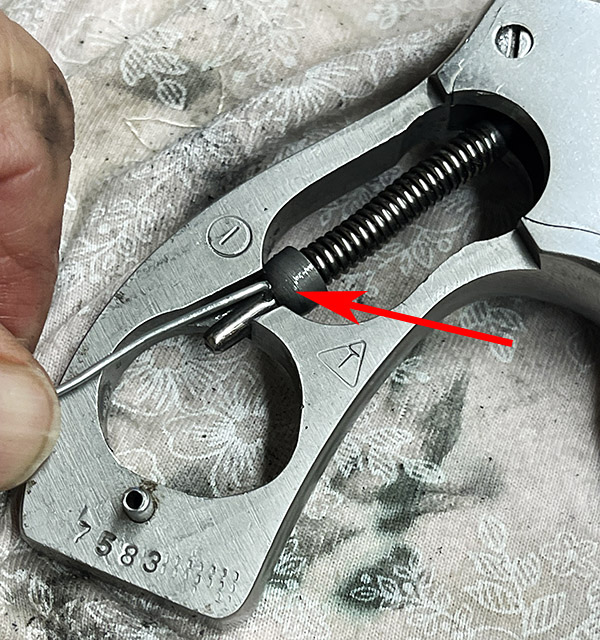
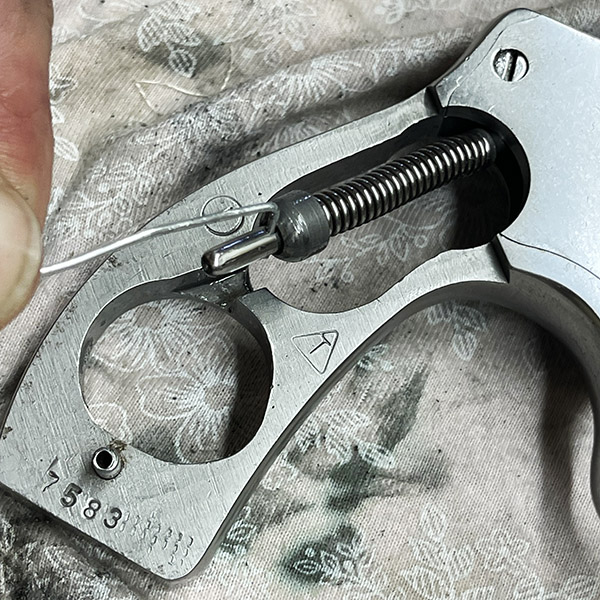
The Model 60’s hammer spring, with the hammer in the uncocked position.The Model 60’s hammer spring, with the hammer cocked. Note that the hammer yoke (the rod running through the center of the hammer spring) has been pushed back, exposing a hole in the rod.A high tech, German tool steel special assembly/disassembly aid? Nah, it’s a bent paper clip and it works gang busters.To remove the hammer spring yoke and the hammer spring, insert the paper clip into the yoke and gently release the hammer by pulling the trigger and lowering the hammer.With the hammer dropped, the spring is captured in a compressed mode and the hammer spring and the yoke can be removed from the gun. Once this subassembly is removed, you can manually push the spring cap to further compress the spring, remove the paper clip, remove the spring cap and spring, and install the lighter hammer spring. Assembly is the reverse of disassembly.
While installing the new hammer spring, I noticed that my normal gun cleaning routine just wasn’t cutting it on the Model 60. There was still a bit of lead in the barrel, and the powder residue was building up around the yoke. I selected a bronze bristled toothbrush and went to work on the cylinder, the yoke, and the frame, and a bronze bore bush for the bore. When the remnants of gunfights past were gone (you know, my encounters with zombies, as previously described), I spritzed the gun with the universal cleaner (WD40) and then I wiped it down before applying gun oil.
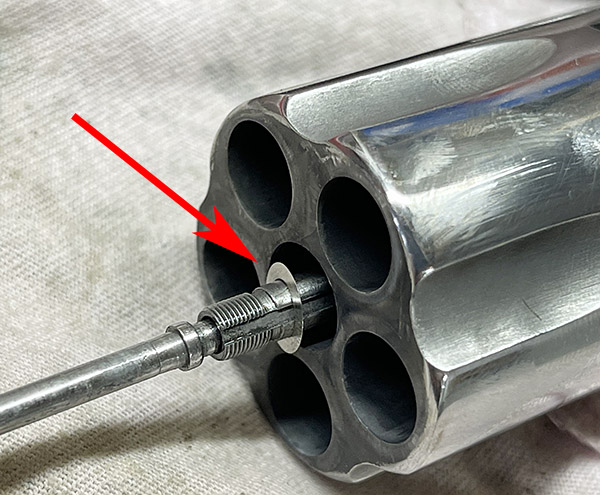
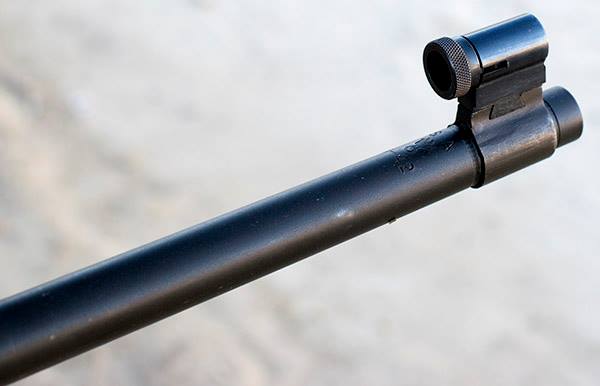
That’s when I noticed that the barrel-to-cylinder gap was nonexistent. Zip. Nada. Zero. The front of the cylinder was touching the rear of the barrel. Uh oh. That’s no good. There’s supposed to be a gap there (like you see in the photo below), because if there’s no gap the cylinder will drag on the barrel. That will degrade the double action trigger pull and, in a worst-case scenario, it can drive the revolver out of time (the chamber won’t be aligned with the barrel). The technical term for the fore-and-aft cylinder movement that assures a minimum clearance when the cylinder is fully forward is called end shake. There needs to be some, and there needs to be a gap. Ideally, that should be 0.004 to 0.008 inches. Any less, and powder and lead residue will bind the cylinder, any more and too much gas escapes (and velocity suffers).
The barrel-to-cylinder gap. This is about .004-inch with the cylinder pushed forward, and that’s the gap I want. This was after I installed the TriggerShims.com cylinder shim.
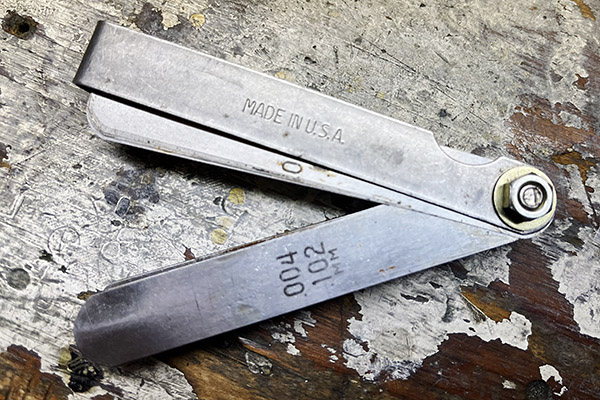
You measure the barrel-to-cylinder gap with a feeler gage, just like you would when setting the valves on a motorcycle. I’ve done that (as you know from reading this blog and any of the CSC shop manuals), and I already had the feeler gages I needed.
My feeler gage. I’ve probably owned this tool for 40 years. It still works. I use it for adjusting valves on my Royal Enfield, too.
After a bit of internet research, I learned that the way to address inadequate gap is by shimming the cylinder and its fit on the yoke. That’s when I first learned there’s a business that specializes in making shims for this exact purpose. In short order I was communicating with Lance Shively, who heads TriggerShims.com.
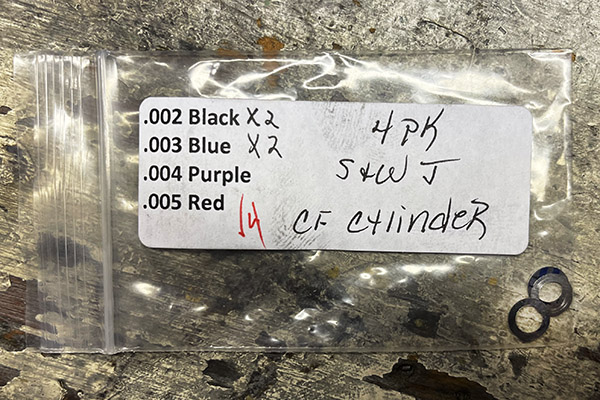
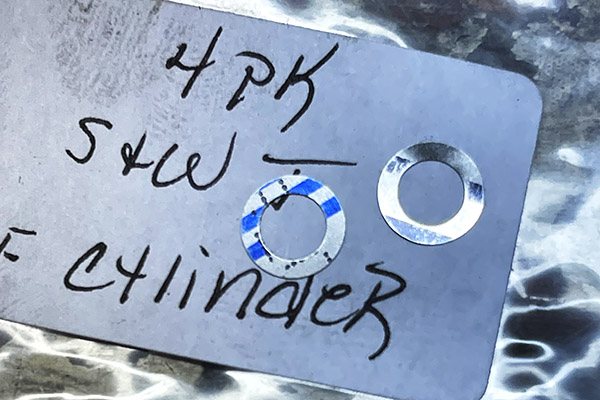
The cylinder shims from TriggerShims.com. They were well packaged and sent in a standard business envelope.The cylinder shims out of the pack. I ordered the four-piece set because I had not worked with these before, I didn’t know what I would need, and they were inexpensive. They are color coded by size.
Lance and his wife, Tammy, run a real Mom and Pop operation that manufactures gun specific shims for a living. Lance has an extensive background in small engine repair and tool and die making, and he and Tammy parlayed that into TriggerShims, which has been doing well for more than 14 years now. Lance told me his primary concern is customer satisfaction, and I can tell you my perception in working with TriggerShims is they have mastered it. I had the Model 60 custom end shake shims in three days, there was no postage charge, and the price was more than reasonable for custom gun parts. Lance runs a Christian business, he believes in God and country, and he’s not bashful about letting people know that. He and Tammy also sell select items from other vendors when he finds a company he likes and believes in, but that is a very select group. The two biggest ones are Wolff and Volquartsen.
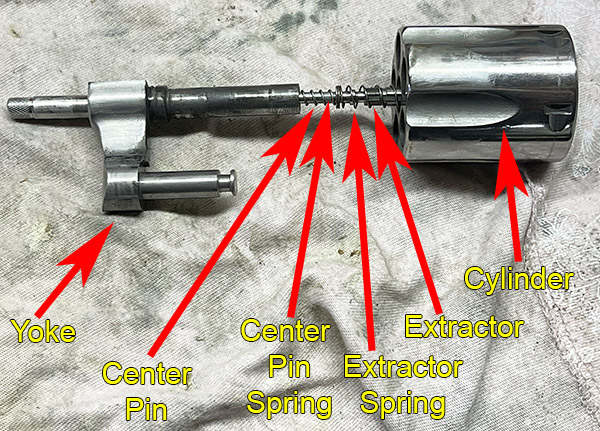
I received the shims I ordered from Lance in just a few days, and installation was trivially easy. I had to remove the yoke, disassemble the ejector rod from the extractor, install the shim I wanted to use (I went with a single .003-inch shim to give the clearance I wanted), and then reassemble everything. It only took a few minutes, and the only tricky part was remembering that the ejector rod had a left-hand thread.
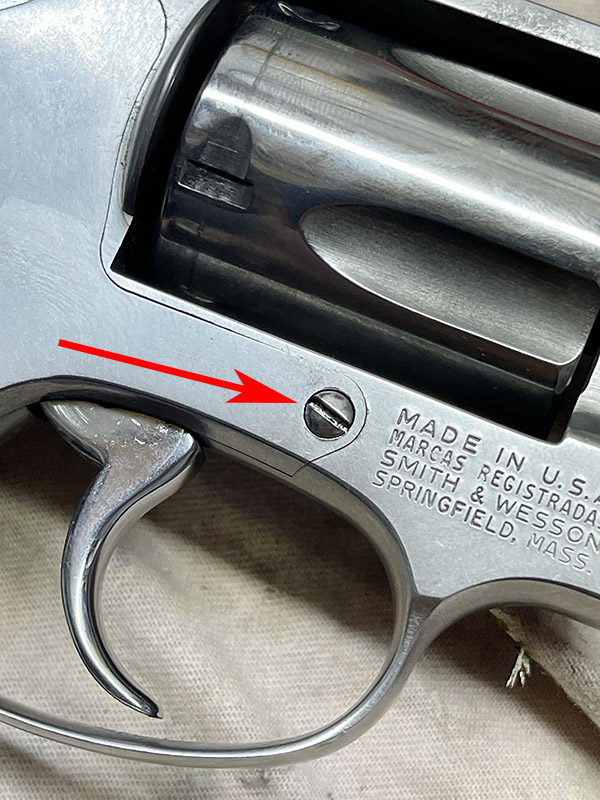
This screw has to be removed to allow removal of the yoke and cylinder from the revolver. You don’t need to remove the revolver’s side plate.With the yoke removed, you unscrew the ejector rod (the knurled piece you push on to eject empty brass from the cylinder) and everything comes apart. Hold on to the ejector rod as you unscrew it so parts won’t fly away, and remember that it is a left-hand thread.The cylinder shim(s) fit beneath the extractor spring. They are pushed into the cylinder by the extractor spring as the cylinder and yoke subassembly are reassembled. The shim(s) position the cylinder further to the rear, increasing the barrel-to-cylinder gap.
TriggerShims.com manufactures over 100 firearm-specific shims with thicknesses from .002-inch to .007-inch, with some specialty items as thick as .010-inch and as thin as .0015-inch. Lance sends shims worldwide, with Australia and Canada being the biggest international customers (he also ships to more than 100 other countries).
Lance and I had a good conversation, during which he told me he enjoyed exploring the ExhaustNotes site and our blog. One thing led to another, and TriggerShims.com is our newest advertiser. You’ll see the TriggerShims.com logo on the ExNotes blog and all ExNotes pages, and Lance asked if he could post links to some of our Tales of the Gun stories on the TriggerShims.com site. Hey, you bet, Lance, and welcome aboard.
I had the Model 60 on the range yesterday morning, and it is a much smoother running revolver.
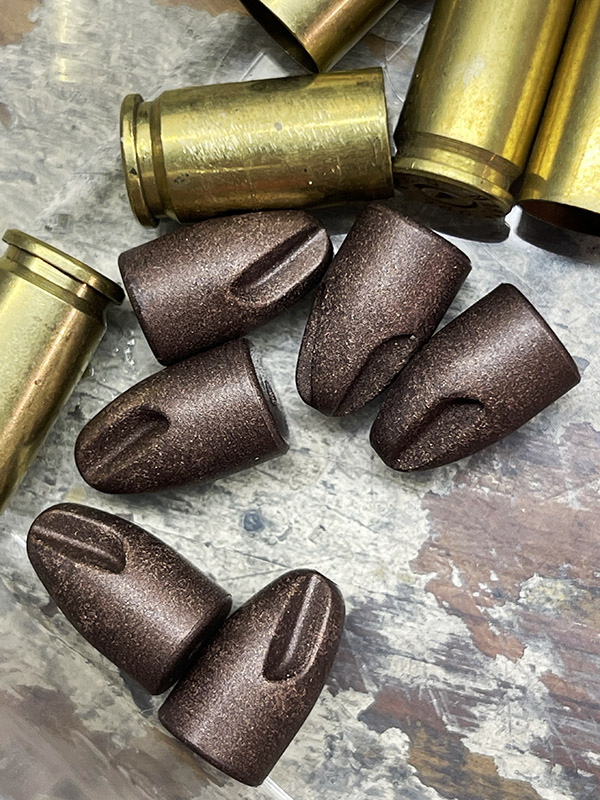
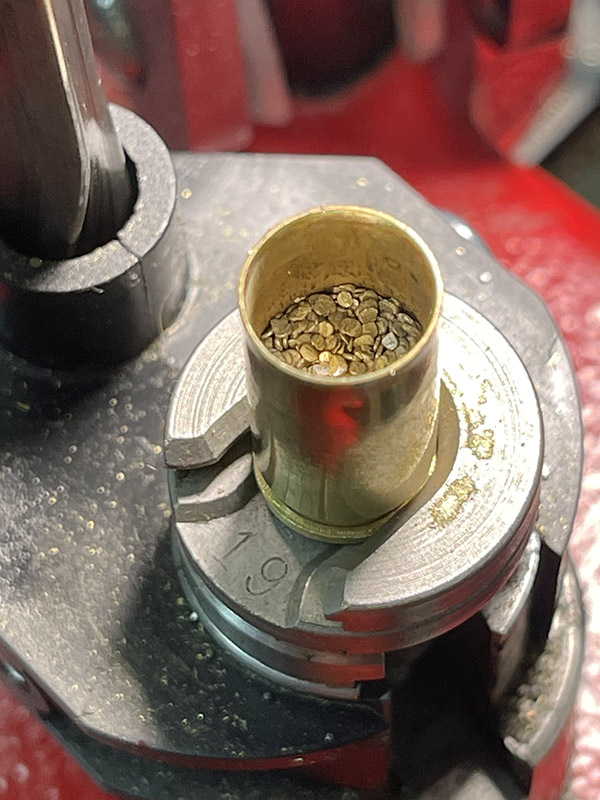
About three years ago I had dinner with good buddy Robby at a Mexican restaurant outside of Atlanta. Robby bought some sample bullets for me and one of the flavors was a 65-grain 9mm ARX bullet. It was something I had not seen or heard of before.
These are frangible lightweight bullets designed to inflict a lot of damage without penetrating walls. The bullets are called a fluted design, and they are a composite copper/polymer material. They are a very high velocity bullet. There are a number of reloading admonitions with these, including not to overcrimp because doing so will break up the bullet. I’m talking like I’m an expert on these; I am not. This is the first time I’ve played with them.
I loaded these with 5.2 grains of Winchester 231. That powder is the same as HP 38, and I found a load for HP 38. I’m thought I would get something like 1400 fps with this load based on what I saw on the Hodgdon site. Other powders provide more velocity, but I loaded with what I had on hand (and that was Winchester 231).
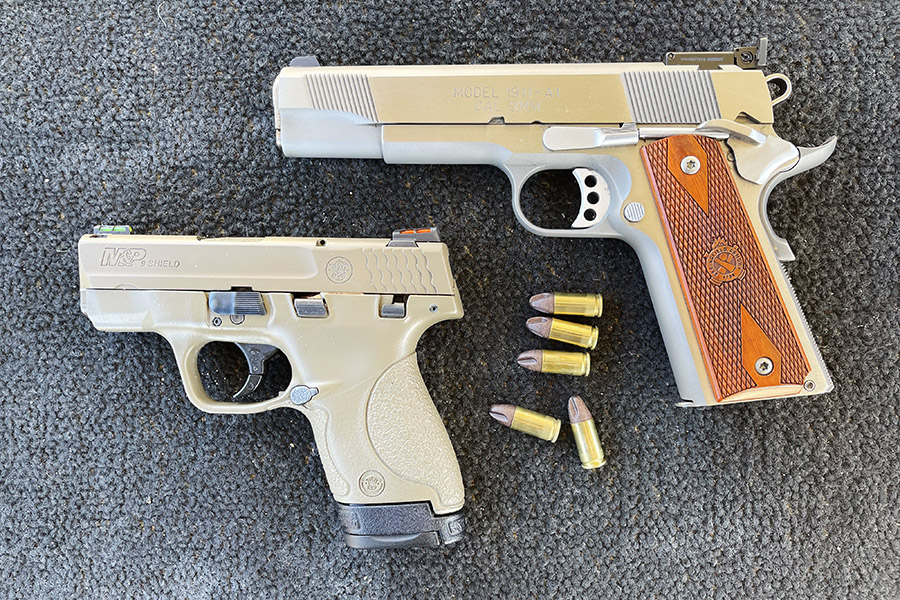
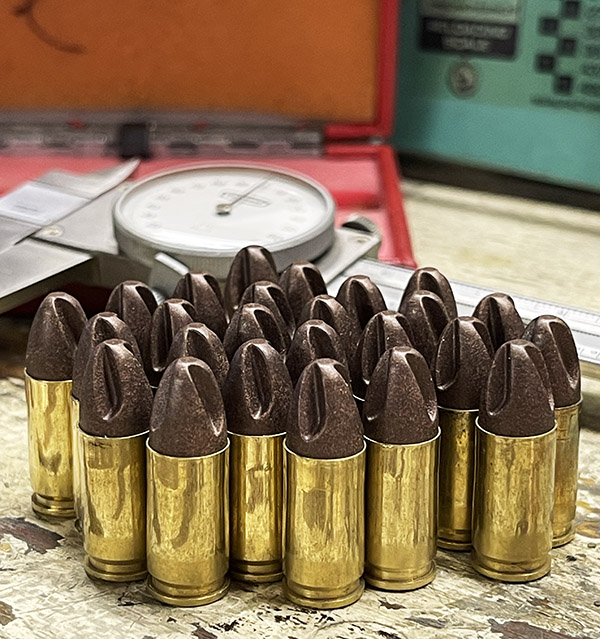
I loaded on Thursday and fired these the next day, testing for velocity, reliability, and accuracy in two 9mm handguns. Those were a 1911 (with a 5-inch barrel) and a Smith and Wesson Shield (with a 3.1-inch barrel). From what I had read in online reviews, the ARX bullets are supposed to be relatively accurate. I expected them to shoot way low (as lighter bullets in handguns generally do). The loaded ammo looks cool, and the ARX bullets are relatively inexpensive at $39/500.
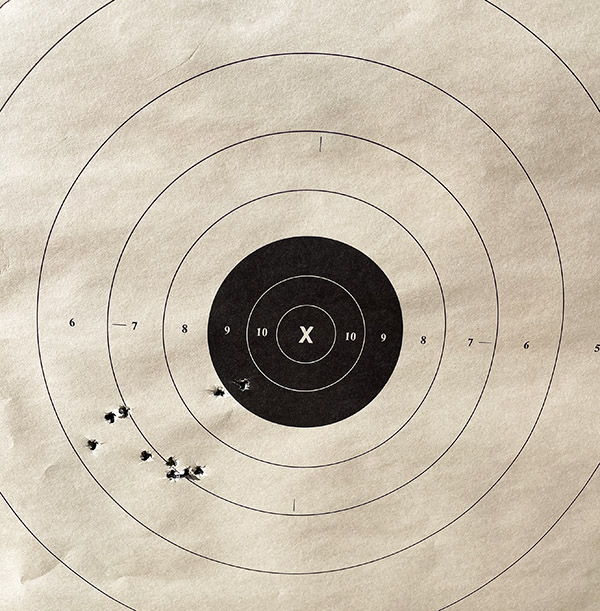
At the range, I set up a couple of targets at 25 yards. I had only loaded 25 rounds, so I shot the first 10 in the Shield. The Shield functioned perfectly with all 10 rounds (I shot two magazines with 5 rounds each). There were no failures to feed or eject. As I had read, the load was accurate (in fact, it was more accurate than anything else I’ve shot before in the Shield). Recoil was very light. I held at 6:00 on a standard 25-yard pistol target; the rounds hit low left (but not as low as I expected). This ain’t half bad with a little belly gun like the Shield. If I needed to, I could slide the Shield’s rear sight to the right to correct for the bias you see below.
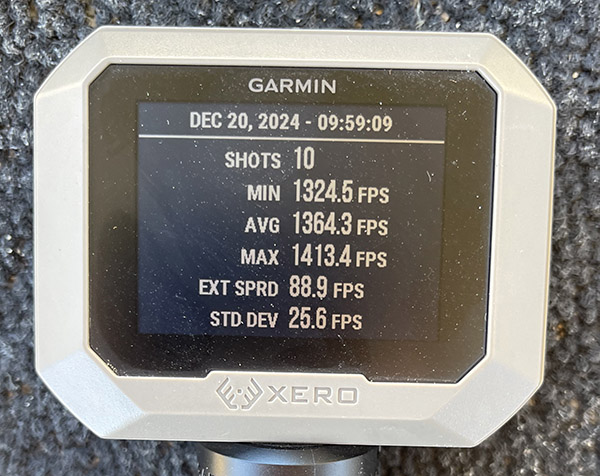
The Shield’s velocities were high, and the standard deviation was low. I am impressed. There are better results than I had previously seen in the Shield.
I next fired my remaining 15 rounds in the Springfield 1911. The load was at the top end of what Hodgdon lists for these bullets using HP38 powder (which is the same propellant as Winchester 231).
In the 1911, I had one failure to eject. You can see that below.
Also, on the last round for each of the three mags I fired in the Springfield 1911, the pistol did not hold the slide back (it functioned okay for the first four shots). This load apparently has just enough energy to cycle the 1911 slide, but not enough to drive it all the way back. I could probably address this with a lighter recoil spring. Subsequent testing proved to me that the above-described failures were related to how I was holding the 1911 during this test. I used a two-hand hold and I bench rested the pistol on a rest. When I fired with a two-hand hold without bench resting the pistol, it functioned flawlessly.
Here are the chrono results in the 1911. As expected, velocities were higher due to the 1911’s 5-inch barrel. There are other powders will give more velocity with the ARX bullets, but I loaded with what I had on hand. Like Donald Rumsfeld used to say, you go to war with the Army you have.
Like I found with the Shield, the 1911’s accuracy was similarly good at 25 yards (again, with a 6:00 hold on the target). I could probably do better. I didn’t make any sight adjustments, so I was surprised that the gun was pretty much on target.
Another pleasant finding was that the both the Shield and the 1911 dropped the brass right next to the gun. With the 1911, the brass just plopped out and came to rest on the table next to the gun. The Shield dropped most of the brass on the table; three pieces fell off the bench. Where you see the brass in the photo below is where it landed; I didn’t scoop it up and put it there.
The ARX bullets are a little trickier to reload than regular 9mm bullets. Inceptor, the manufacturer, advises against a heavy crimp as it will crush the bullet. The one time I blew up a gun two or three years ago I’m now convinced was the result of bullet setback when feeding due to a light crimp and a slippery powder coated bullet. Setback would be more of a concern here with the light crimp.
I could probably load these bullets a bit hotter to get them to hold the slide back after the last round in the 1911 (or, as mentioned above, go to a lighter spring). I don’t think I want to go above the 5.2 grains of Winchester 231. Also, as noted above, the issue disappeared when I fired normally without bench resting the pistol. This was intended to be a quick look. I learned what I wanted to. The ARX bullets are very good. I ordered a thousand of them, which should last for a while.
Fifty years ago I used to be a pretty good metallic silhouette shooter. I would like to return to that game. It would be nice to be 25 years old again, too, but that’s not in the cards. Metallic silhouette shooting, though…I think I can turn the clock back on that one.
Participating in a Fort Bliss metallic silhouette competition in 1976. One of the revolvers I shot in those days was a .44 Magnum Ruger Super Blackhawk (shown above); the other was a .357 Magnum Model 27 Smith and Wesson.
If you haven’t figured it out yet, that’s where this story is going. Ponce de León went looking for his fountain of youth. Me? I just want to knock over a few metal chickens, pigs, turkeys, and rams. Like I did 50 years ago.
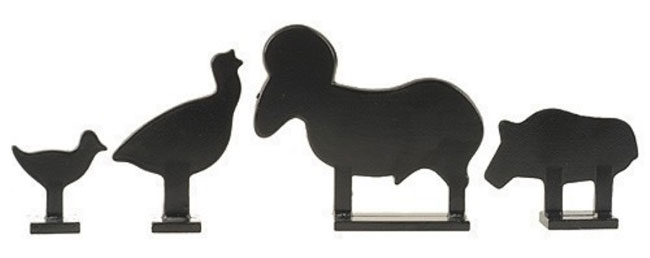
My friends at the range are surprised when I shoot at 100 yards with a revolver. That’s because they’ve never shot a handgun metallic silhouette course. In that game, there are four courses of fire:
Chickens at 50 yards (10 shots)
Pigs at 100 yards (10 shots)
Turkeys at 150 yards (10 shots)
Rams at 200 yards (10 shots)
The targets are sized so that each subtends about the same angle. That means the pigs (actually, they are supposed to be javelinas) are bigger than the chickens, the turkeys are bigger than the pigs, and the rams are bigger than the turkeys.
Chicken, turkey, ram, and pig targets.
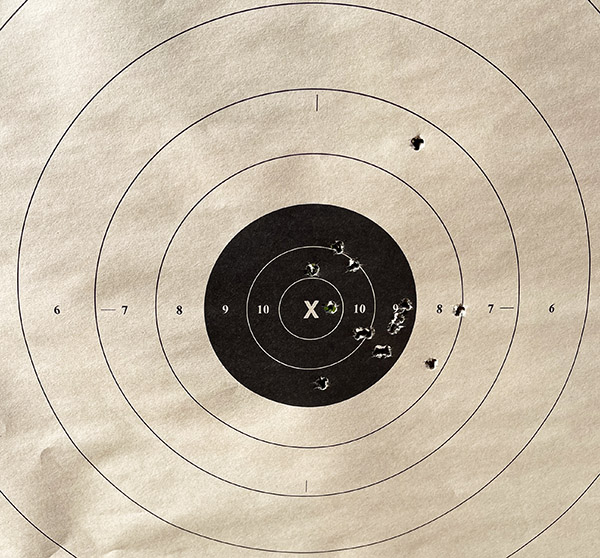
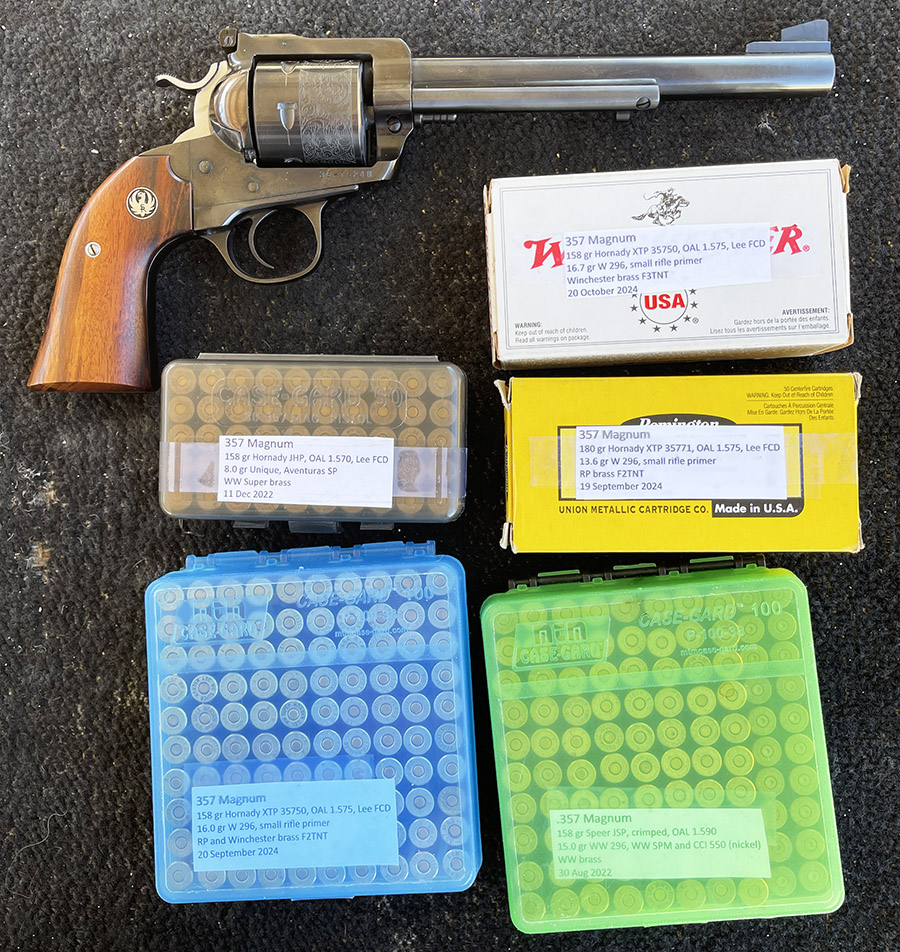
The hardest target to hit is the turkey (it is narrower than the other targets); the hardest target to knock over is the ram (it is big and heavy). Simply hitting doesn’t count; you have to knock the targets over. The 200-yard ram weighs about 55 pounds. Back in the day, I used to be able to knock them over with a .357 Magnum. My load was a 200-grain cast bullet and 13.0 grains of Winchester 296. It was more reliable than a 240-grain 44 Magnum load because the .357 bullet is more aerodynamic and it retained more energy downrange.
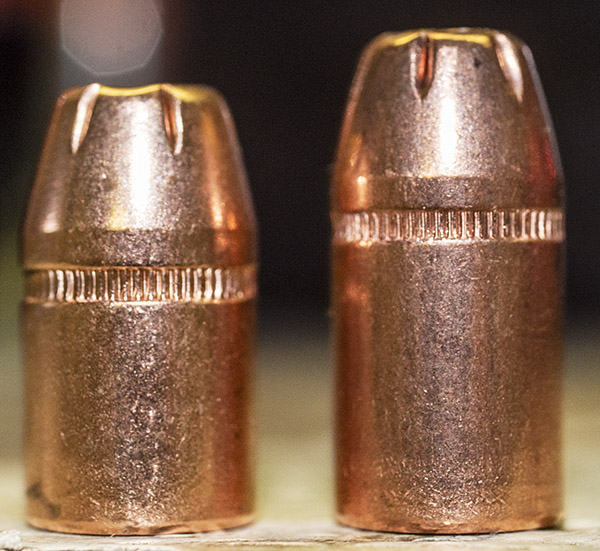
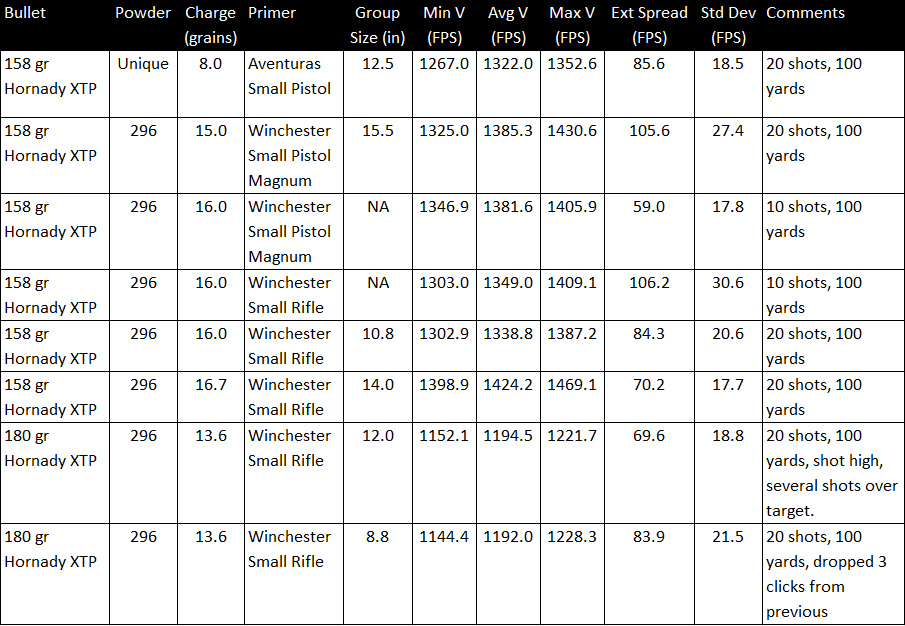
I’ve been evaluating loads for the .357 Ruger Bisley for metallic silhouette competition, and load development is progressing. I’ve mostly been playing with Hornady’s 158-grain jacketed hollowpoint XTP bullet, but I’ve also tried their 180-grain XTP. In my Bisley the 180-grain Hornady is a very accurate load.
Hornady’s 158-grain XTP bullet (left) and 180-grain XTP bullet (right).
The two bullets are identical above the cannelure. The difference is bullet length behind the cannelure.
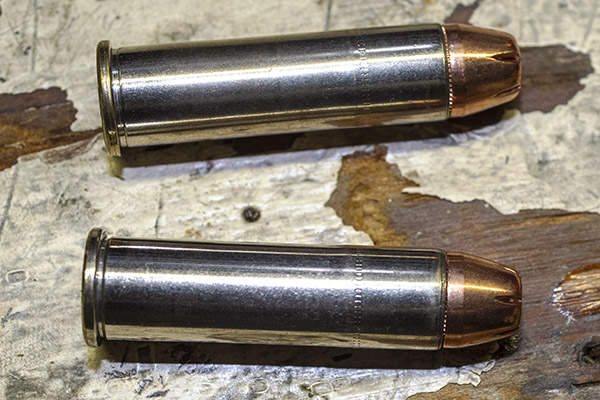
Two .357 Magnum cartridges loaded with the 158-grain XTP bullet (top) and 180-grain bullet (bottom). After loading, the cartridges appear to be identical.
I’ve been keeping track of the loads, the velocities, and the accuracy on 100-yard targets. The Bisley shoots best with the 180-grain Hornady XTP bullets and 13.6 grains of 296 powder. I used small rifle primers. I’ll try the same load with small pistol magnum primers to see if I get a velocity gain and if the groups get better. In prior tests with the 158-grain Hornady bullets, there didn’t seem to be a velocity increase in going from small rifle to small pistol magnum primers. We’ll see if the same holds true for the 180-grain bullets.
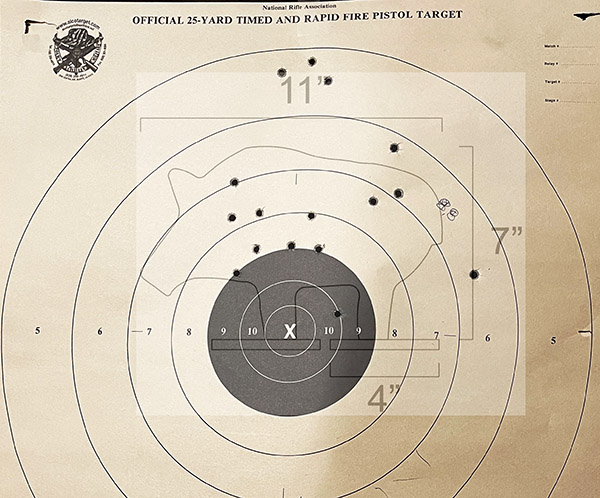
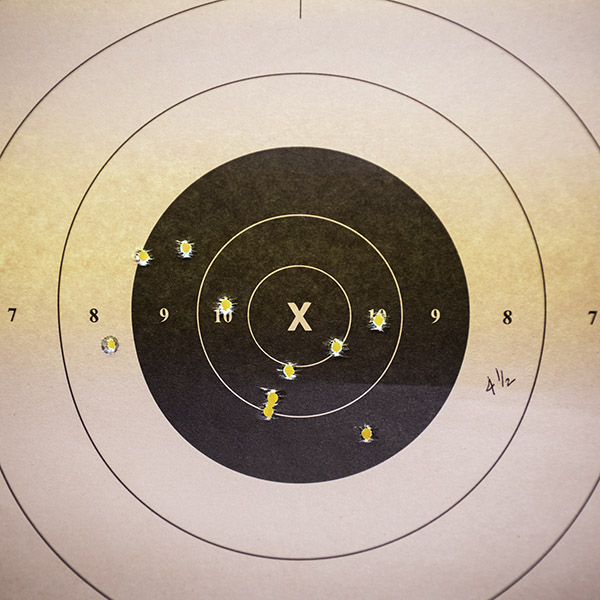
Here’s a 100-yard target with the actual size of the 100-yard pig overlayed on it. That silhouette is one I grabbed off the Internet. It is smaller than what I remember (and certainly smaller than any javelina I’ve ever seen, other than babies). But it’s useful for assessing my progress in getting a useable Bisley load. I used the 180-grain bullets for the group you see below.
A target shot at 100 yards, with a pig imposed on it. I think the actual target is a little larger. This isn’t a bad 100-yard revolver group, but I want to tighten it up.
Real javelinas are not quite that small, and they’re mean as hell. You don’t want to tangle with a javelina.
The real deal: Mamá Javelina con su bebé. Folks tell me I was in a bad spot when I took this photo. It was dark and I couldn’t see the javelina except when the flash fired. I didn’t know where to focus, so I just kept twisting the lens and firing successive shots. Only one was in focus. I didn’t know this lady was with her baby until I saw the photo later.
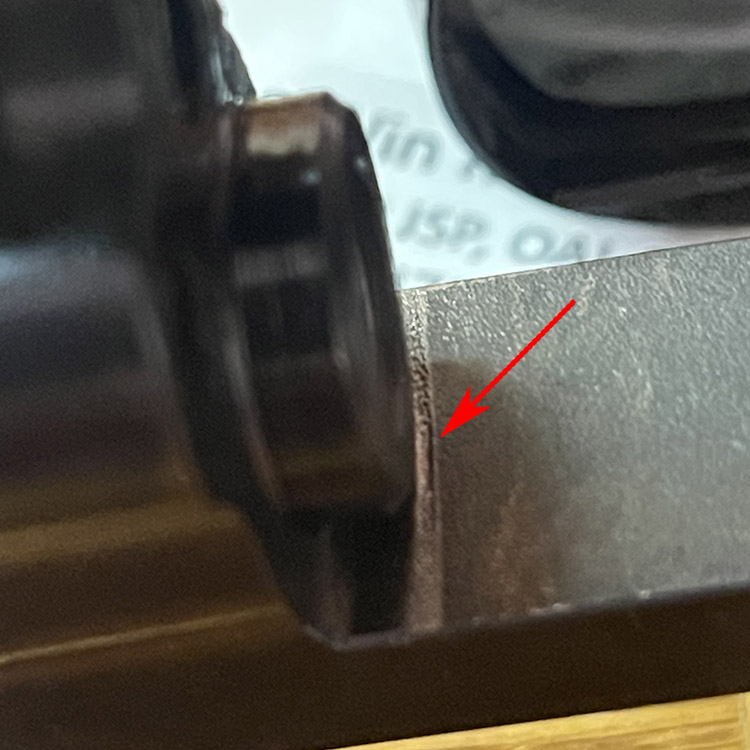
Winchester’s 296 powder is my preferred propellant as it usually gives great velocity and accuracy. Winchester 296 is prone to gas cutting, though. That’s what occurs on the underside of the revolver’s top strap (the part of the frame that goes over the cylinder). Hot gases and powder escape between the barrel and cylinder gap and cut into the frame. From what I’ve read, it tends to cut as you see in the photo below, and then it doesn’t get any worse. I think that’s because as the cutting gets deeper, the distance to the bottom of the cut increases.
Flame cutting on the Bisley top strap induced by hot 296 loads.
I’ve seen gas cutting in handguns after putting lots of 296-powered rounds through them (and that’s what I intend to continue to do with the Bisley). We’ll find out if it is self-limiting.
The plan is to continue to practice (a lot) and continue the load development effort. So far, 13.6 grains of 296 and the 180-grain Hornady bullet get the nod. Then I have to zero the revolver at 50, 100, 150, and 200 yards. Fortunately, my club (the West End Gun Club) has a range that goes out that far. Then I’m going to find someplace that has handgun metallic silhouette shooting and knock down a few targets. It’s going to be fun.
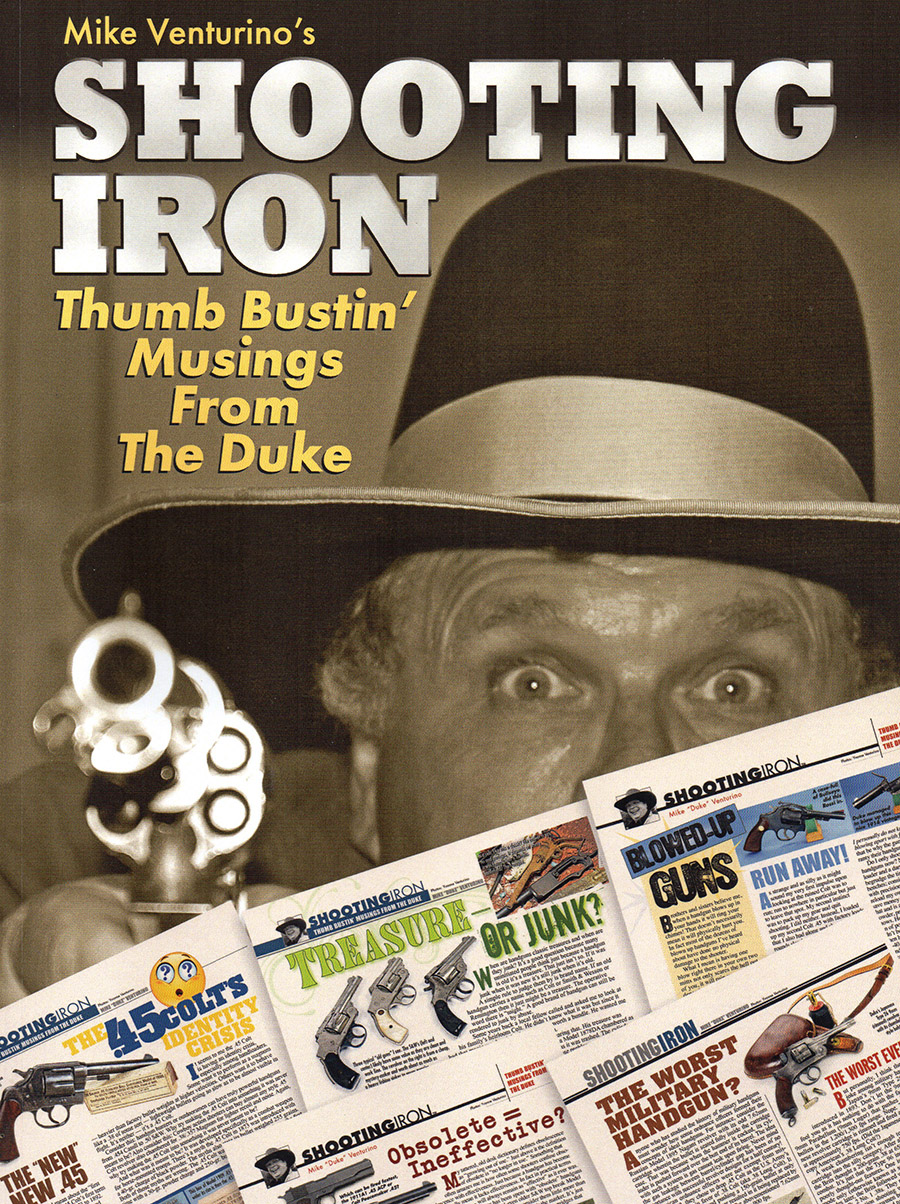
Mike Venturino was one of the greatest gun writers who ever lived. Whenever I’d see his byline in a gun magazine, I would carefully read every word in the accompanying article. He was a guy who wrote about things that exactly matched my interests: Handguns, rifles, military surplus weaponry, reloading, reloading for accuracy, and more. His style was relaxed and friendly, and his writing was easy to follow and understand. I felt like I knew the guy, even though we had never met. His writing style, I’m sure, influenced mine.
Mike Venturino passed away recently, and FMG Publications assembled a collection of his articles originally published in American Handgunner magazine. As soon as I heard about Shooting Iron, I ordered a couple of copies on Amazon (one for me, and one for a good friend). If you like good writing, good storytelling, and all things firearms related, I think you should pick up a copy, too. You can order Shooting Iron here.
As I read through Shooting Iron, I came across two descriptions in which Venturino described blowing up a 9mm handgun. You may recall that I did the same, and I shared that experience with you here and here. Based on what Venturino wrote and what I experienced, I am rethinking my 9mm 1911 Springfield blow up. I previously concluded that I must have had a double charge in one of the cartridges (particularly because I was using a new turret press). Now I am thinking that wasn’t it at all, but it was instead the bullet being pushed back into the case. This is based on the following:
I was using powder coated Gardner bullets, which are very slippery. It’s would have been easy to push one of them back into the case if the crimp was not strong. I don’t know if I had a really tight crimp when I loaded the round that burst. I use a very strong crimp now. Back then, I don’t know if I did.
I checked about 1500 cartridges after that event (ones I had previously loaded but not fired) by pulling them apart and examining the charge. None were double charged. That doesn’t prove I didn’t double charge one, but it suggests it was unlikely.
In reading the articles in Shooting Iron, I found where Venturino describes the 9mm bullet pushback phenomenon in two places (when you buy your copy, take a look at Pages 32 and 63). On Page 32, he describes this having occurred with a 9mm round, and he shows a burst case that looks just like mine. He further describes this episode with “…the escaping gas spitting (he probably meant splitting) the two grip panels and stinging my hand.” That’s precisely what I experienced. On Page 63, Venturino shows a burst case that looks like my case. I don’t know if the two instances described in the book are the same event. They both sound like what I experienced.
The bottom line is I don’t know exactly what happened when I blew up my 9mm 1911 and I never will. But after reading Mike Venturino’s Shooting Iron experiences, I am more convinced it was a bullet being pushed back into the case. In either event (bullet pushback or a double charge), I’m guilty of careless reloading, but somehow messing up on the crimp makes me feel less dumb than double charging a case. And I especially feel less dumb knowing that one of my literary heroes (Mike Venturino) did the same thing.
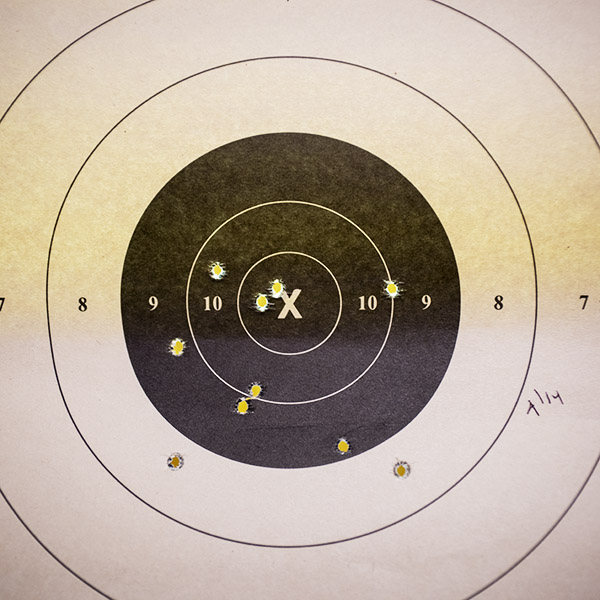
Here’s a quick look at what I’ve found to be three Mosin-Nagant accuracy loads shot off the bench at 100 yards using the rifles’ standard open sights. I didn’t try to get too sophisticated for this quick comparison; I simply shot a 10-shot group with each load. All were at 100 yards. I used the NRA 25-yard handgun target because it’s what I had on hand (the bullseye on that target is slightly smaller than the 100-yard NRA rifle bullseye target, and it gave a decent aiming point). You’ll see the targets below.
My jacketed bullet Mosin. It’s one of my favorite rifles.
My first two loads were with a rifle I use strictly for jacketed bullets. It’s my Tula 1940 round-top receiver. All you purists and keyboard commandos look away; this rifle is not for you. I refinished the stock with TruOil, I glass-bedded the action, and I reworked the trigger. As I’ve explained in earlier blogs, this rifle has a very rough bore, but the rifle remains blissfully ignorant of that fact and it shoots well.
My Mosin reserved exclusively for cast bullets. It’s another favorite.
I shot the cast bullet load in a Mosin-Nagant rifle I use for cast bullets. It’s a 1928 Ivshevsk hex receiver with a relatively clean (i.e., unpitted) bore. When I first shot this rifle with jacketed bullets, I found that it shot a foot or more above the point of aim at 100 yards with the rear sight in its lowest setting. I could have compensated for that by finding a taller front sight, but I decided instead to use the rifle with cast bullets. It shoots cast bullets within the rear sight’s adjustment range.
The Ammo
I shot 7.62x54R Russian reloaded ammo for this article. Two of the loads used jacketed bullets; the third used cast bullets.
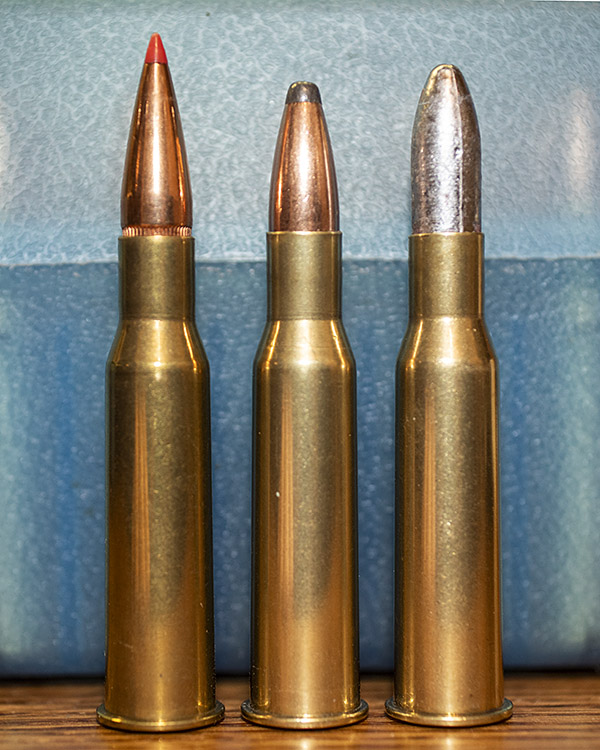
Three Mosin loads. From left to right, it’s the Hornady 150-grain polymer tipped bullet, the PPU 150-grain jacketed softpoint boat tail bullet, and the 200-grain cast bullet. The cast bullet is Lyman’s 314299 bullet sized to .313.
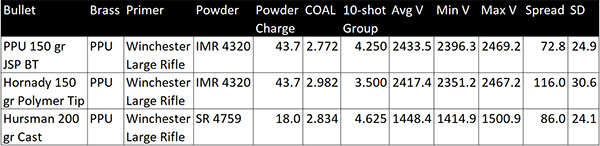
The jacketed loads were identical other than the bullet and cartridge length: For one load, I used Hornady’s 150-grain polymer-tipped jacketed bullet; in the other, I used Privi Partizan’s 150-grain jacketed softpoint boattail bullet. I didn’t crimp either load, and I didn’t attempt to find the best seating depth. The seating depths I used, though, worked well. Both loads used a charge of 43.7 grains of IMR 4320 propellant.
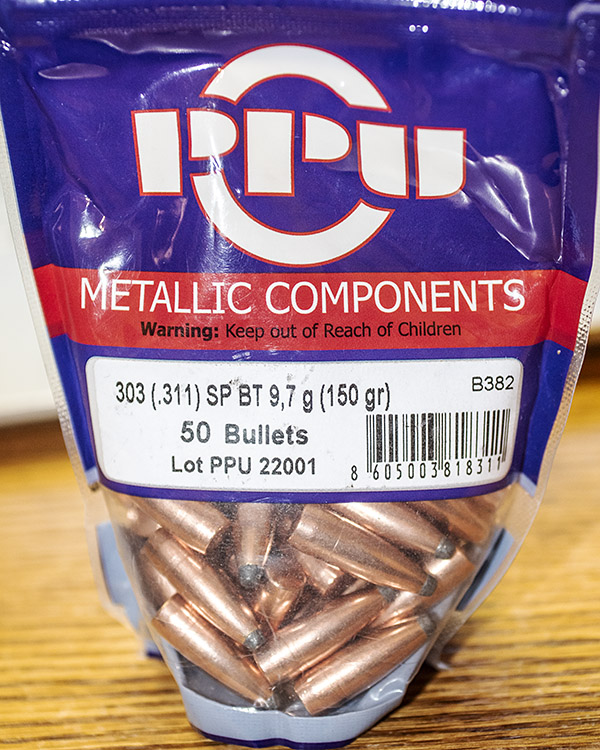
A bag of PPU 150-grain bullets. When these go on sale, I tend to stock up.
The cast load used a 200-grain cast lead bullet with a gas check. I didn’t crimp the cast bullets, either, although I did use the Lee factory crimp die to remove the case mouth flare that prevented bullet shaving when the bullet was seated. This load used 18.0 grains of SR 4759 propellant.
The astute reader and reloader will notice that several of the components I used for these loads are no longer available. The Hornady polymer-tipped 150-grain .312 bullets went out of production some time ago, as did the IMR 4320 and SR 4859 powders. It’s annoying, because when I get a load that works, I’d like to be able to load it again. I’ve got a good stash of IMR 4320 and that will probably last me the rest of my life (it’s a powder that works well for .30 06 and several other cartridges). I’ve also got a good stash of SR 4759. That’s been a favored “go to” powder for cast bullet loads and reduced .458 Win Mag loads, and I’m working through it at a pretty good clip. Trail Boss and 5744 are two powders frequently mentioned as also being good for reduced loads and cast bullets, so at some point I’ll have to start developing loads with those powders. I’m probably good for the next two or three years with my SR 4759 stash.
The Results
To cut to the chase, here are the loads and the results:
The Hornady polymer-tipped bullet was the clear winner:
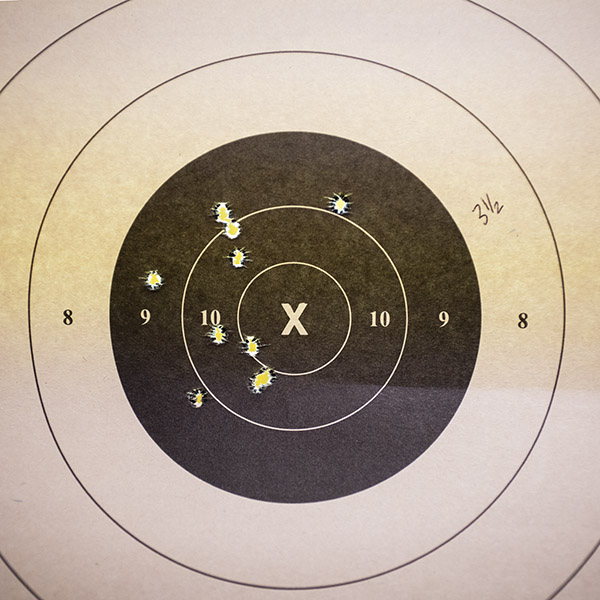
Not too bad, I think. 10 shots with the Hornady bullets at 100 yards. I’ve shot tighter groups. I’ve shot worse groups, too.
The Hornady polymer-tipped bullet put all 10 shots into a 3 1/2-inch group at 100 yards, which is not too bad with iron sights and geezer eyes. That’s almost a 10-ring-sized group (the 10 ring on these targets is 3 1/4 inches in diameter). I’ll call it close enough for government work.
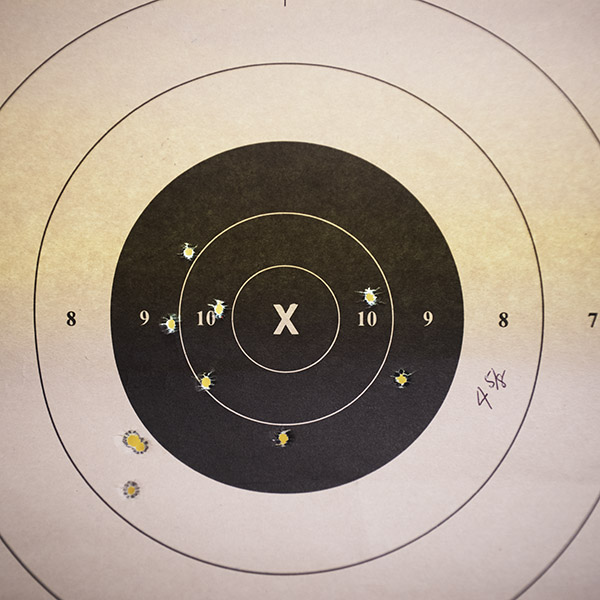
The PPU bullets are still available, although you don’t come across them very often. Sometimes the big online reloading shops (MidwayUSA, Midsouth, Natchez Shooting Supply, Powder Valley, etc.) have them on sale, and when that happens, I’ll stock up. Here are two PPU-bullet, 10-shot, 100-yard targets:
A 10-shot, 100-yard group with the PPU bullets.I shot another 10-shot group with the PPU bullets because I forgot to chronograph the first 10 shots. Nobody’s perfect.
Interestingly, the velocities of the two jacketed bullets (Hornady and PPU) were about the same. The Hornady bullet had a much larger velocity spread, but it turned in the tighter group.
And finally, here’s the 10-shot, 100-yard target I shot with cast bullets:
A 10-shot, 100-yard group with cast bullets. These are much easier to shoot. Less noise, less recoil, and lots of fun.
I was pleased with the cast bullet target, too. I wouldn’t ordinarily expect a cast bullet to group as well as a jacketed bullet, but these hung right in there.
So there you have it: Three loads that return acceptable accuracy in a Mosin-Nagant.
We have several articles on Mosin-Nagant rifles and on different loads for these rifles:
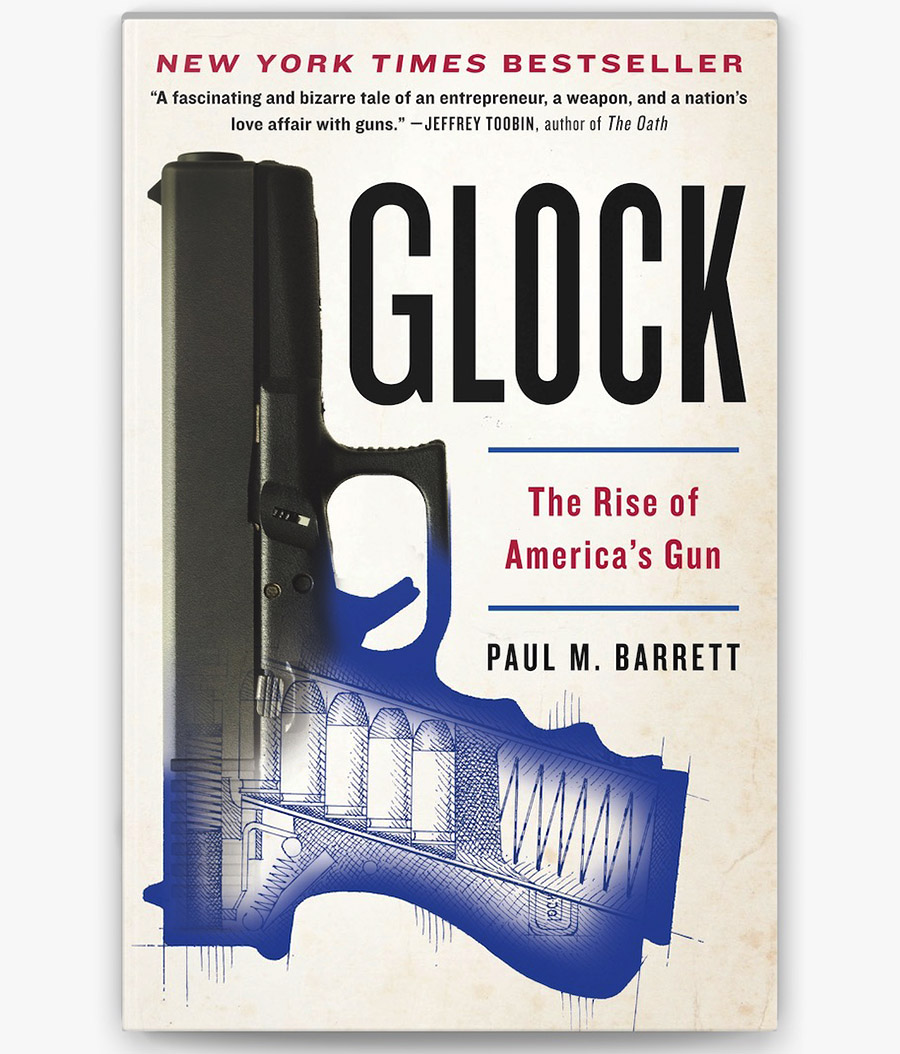
I’m not a Glock guy and it’s not likely I’ll ever own one, but Glock (a book by Paul M. Barrett about Gaston Glock and the pistols that carry his name) sure is an interesting read.
Gaston Glock surprised everyone when he submitted a bid with a new design for a military handgun. He surprised people even more when he won the competition, and then he (and the company that bears his name) were on their way. Glock ran a small-potatoes company in Austria that made automobile radiators. He knew nothing about firearms and military contracts. Maybe that was his advantage. Glock started with a clean sheet of paper, both for the gun’s design and his approach to market.
Barrett tells an interesting story about how Glock employed unorthodox marketing practices (practices involving a former porn princess and lots of company freebies) to become one of the most successful arms manufacturers on the planet. It really is a fascinating story. Corporate shenanigans, arms deals, palace intrigue, an attempt on Gaston Glock’s life, police shootouts, and more: Glock has it all.
I’ve shot Glocks (I have friends who own them). I get that they are inexpensive and reliable. I don’t like striker-fired (i.e., hammerless) trigger pulls and I’m not a big fan of Tupperware guns (even though my primary carry gun is a Tupperware Smith and Wesson), but I understand the reasons behind Glock’s success, and I understand those reasons even better now that I’ve read Barrett’s book. Trust me on this: If you’re interested in firearms and you want a good read, look no further than Glock. You can thank me later.
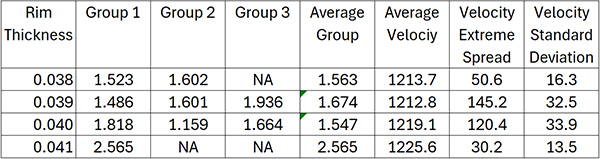
Here’s the latest accuracy rabbit hole I’ve gone down: Rim thickness as an accuracy factor for .22 Long Rifle ammo.
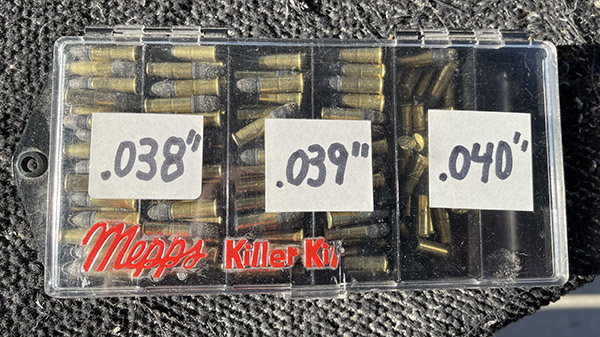
Kevin’s .22 Long Rifle ammo sorted by rim thickness.
My friend Kevin told me about a hypothesis that holds you can get even cheap .22 ammo to shoot well if you sort by rim thickness. I researched this online, and like most things online, opinions are all over the map (Abraham Lincoln once famously said not everything you read on the internet is true). Kevin told me about this and suggested it might make for an interesting blog. I felt it was worth investigating, and I’d never considered .22 Long Rifle rim thickness as a variable until Kevin mentioned it.
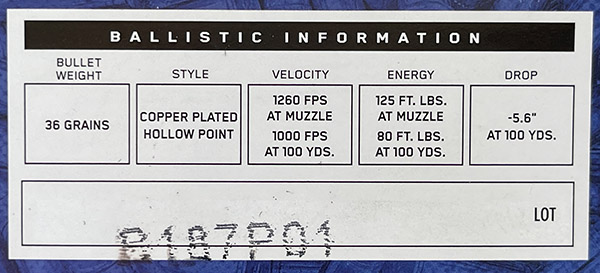
Federal Value Pack .22 Long Rifle ammo.Velocity data on the Federal Value Pack ammo. A bit optimistic, as it turns out.
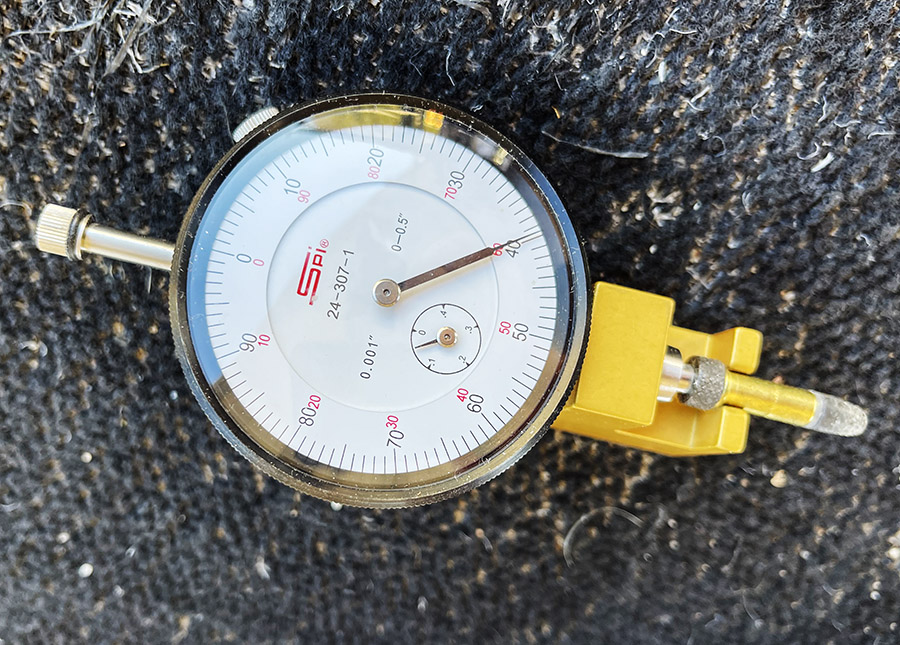
Kevin had a specially fixtured dial indicator for measuring rim thickness (see the photo on top of this blog) and he lent it to me for this blog. I sorted a bunch of Federal Value Pack 36 grain .22 ammo. It’s cheap ammo. I’ll get to the results in a second.
First, take a look at the SAAMI specs for sporting .22 Long Rifle ammo:
…and for match grade .22 LR ammo:
Yeah, I couldn’t see any difference between the two, either. You’d think match grade specs would be tighter, but they’re not. But check out that tolerance on rim thickness for both grades of .22 Long Rifle ammo…it varies from 0.036 to 0.043 inches. That seems like a huge tolerance to me.
If you read the SAAMI .22 Long Rifle chamber specs, the dimensioning there is the same for the chamber’s rim cavity on a sporting versus a match chamber. The chamber rim cavity can range from 0.043 to 0.051 inches. It would seem that a max thickness rim in a minimum length chamber would have line-to-line contact between the bolt face and the back of the cartridge. Any cartridge case that is less than 0.043 inches thick, or any chamber with the rim cavity longer than 0.043 inches, would allow clearance between the bolt face and the rear of the cartridge. Thicker rimmed cartridges would have minimal room to move around in the chamber, and should be more accurate.
The rim thickness versus accuracy hypothesis sounds like it could make sense. Differing rim thicknesses will influence headspace (.22 Long Rifle ammo headspaces on the rim), and that could influence accuracy. Also, as Kevin pointed out, rim thickness will affect firing pin strike on the cartridge case, so if the thicknesses are identical, the firing pin strike should be the same (and that should result in improved accuracy). It all sounds good, anyway.
I used Kevin’s dial indicator and measured rim thickness until I got tired of doing so (it took 62 cartridges for me to get there). I found four different rim thicknesses: 0.038, 0.039, 0.040, and 0.041 inches. I could see that the rim thicknesses were normally distributed with the cartridges sorted on my desk, but I thought it would be cool to prepare a bar chart and make that finding a bit more clear.
A rim thickness histogram. The rim thicknesses are normally distributed.
All the cartridge rim thicknesses I measured were within the SAAMI specification, but the SAAMI specification is liberal.
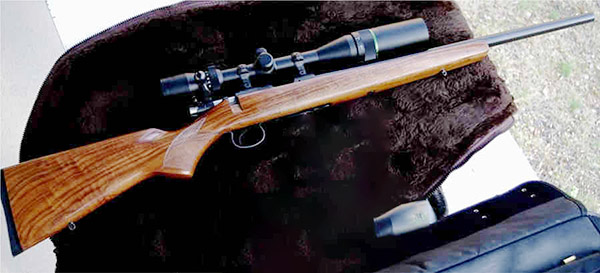
I headed to the West End Gun Club the next day with my most accurate .22 rifle, a beautiful CZ 452 Varmint model with a 14X Mueller scope.
My CZ 452. I saw this photo on a forum and wrote to the owner asking if he’d consider selling the rifle. The answer was no. But a year later he contacted me to ask if I still wanted to buy it. With wood like that, my answer was “Hell, yeah…”
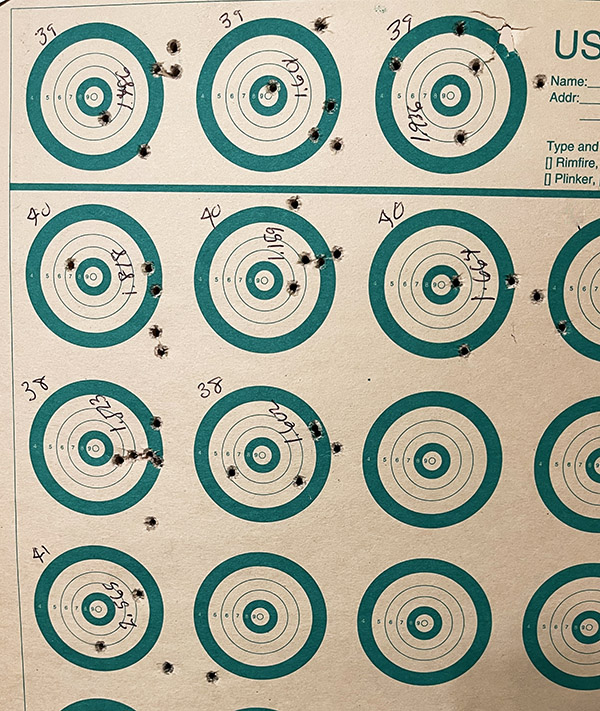
The plan was to shoot five-shot groups at 50 yards off the bench using the rim-thickness sorted Federal El Cheapo ammo. Here’s how that turned out:
50-yard groups with ammo sorted by rim thickness.
All my shots felt right when the firing pin dropped, so I’m pretty sure that I wasn’t throwing the shots around due to poor technique. This rifle normally shoots much tighter groups at 50 yards with standard velocity ammo. The intent here was to see if I could get it to shoot better with cheap ammunition sorted by rim thickness.
Here’s how it all shook out:
Results show that for Federal Value Pack ammo, sorting by rim thickness does not improve accuracy. Note the average velocity figures; they are all well below Federal’s claimed 1260 feet per second value. All group size data in inches; all velocity data in feet per second.
My take on the above data is:
All the rim thicknesses I measured were well within the liberal SAAMI specification tolerance band.
Not surprisingly, rim thickness is normally distributed (something I’ve found to be true for most manufacturing processes).
Rim thickness, at least with my inexpensive Federal Value Pack ammo, has no effect on accuracy. Well, almost no effect; that last group with 0.041-inch rims jumped in size. But it was only one group. I looked for more 0.041-inch-thick rounds to test this again and I couldn’t find any.
Rim thickness, at least with my inexpensive Federal Value Pack ammo, has no effect on average velocity.
Rim thickness, at least with my inexpensive Federal Value Pack ammo, probably has no effect on velocity variation. Although the table above shows differences, it’s likely those differences would disappear if the sample sizes were larger.
Sorting by rim thickness is an interesting hypothesis, but my limited testing to assess the hypothesis shows it’s not worth the effort (at least with Federal Value Pack ammo). I have Remington and Aquila target ammo, and I’m going to measure rim thickness on those two brands in the next day or so to see if the rim thickness variability is lower. I’ll fire that sorted ammo through the CZ to see if the rim thickness hypothesis holds up with better ammo. It’s another good excuse to get out to the range (not that I ever need an excuse).
Another one of the stops on my New Jersey Sopranos tour was Paterson Falls. Although only about 40 miles or so from where I grew up, I’d never been there.
I knew of the town, though. It’s an old industrial village with waterfalls, which meant that in the early days of our country it was perfect for industrial development. The falls provided hydraulic power, and that could be used to drive machinery. Indeed, it’s where Samuel Colt built his first run of revolvers, which are known (not surprisingly) as Paterson Colts. Paterson was established as the nation’s first planned industrial city in 1792, with its readily-available hydraulic power and close proximity to New York City and the Atlantic Ocean. Paterson manufactured silk cloth, steam locomotives, textiles, paper, firearms, and aircraft engines. It is centered on the Passaic River, which flows into Newark Bay and from there to the Atlantic Ocean.
The Passaic Falls are contained within the Paterson Great Falls National Historic Park, which is (as the name implies) part of the U.S. National Park system. All this was news to me, which is kind of amazing when you consider that I grew up a short 40 miles to the south. I’d never known any of this, and to learn about it at my age was surprising. I’ll give the credit for that to David Chase (the guy who created The Sopranos). Had that show not sparked my interest, I’d still be ignorant.
So, let’s move on to the scene in The Sopranos that caught my attention. It’s the episode in which Mikey Palmici (Uncle Junior’s driver and bodyguard) throws a drug dealer off the bridge over the Passaic Falls:
That episode you see above occurred later in The Sopranos. There was another scene in the very first Sopranos episode on the same bridge shown above in which Hesh Rabkin and Big Pussy Bompensiero (two of The Sopranos characters) threaten to throw a health insurance company executive (a guy named Alex Mahaffey, played by Michael Gaston) off the same bridge if he didn’t cooperate with a Sopranos scam to defraud the insurance company.
When threatened with a swan dive off the bridge, Mahaffey gave in to the Soprano family’s demands, but alas, his Sopranos career was over; Michael Gaston never appeared in another episode. But that didn’t mean Sue and I wouldn’t see him again. In one of our trips to New Jersey, we rode the Air Trans shuttle between the airport and the rental car facility. Just before we boarded the shuttle, Michael Gaston was leaving the car we entered. We didn’t bug him, but we made eye contact and he knew we knew who he was.
Michael Gaston, an actor we bumped into on the Newark Airport Air Trans.
There’s a lot more to Paterson, though, then simply having been a location for a couple of The Sopranos scenes. Here’s another video that describes Paterson’s history:
Today, Paterson is undergoing a renaissance, as the old factory buildings are being converted to loft apartments. Yup, Paterson is being yuppified. It looks like an interesting place to spend more time, but my schedule didn’t permit doing so on this visit. For us it was roll into town, grab a few photos, and bail.
A view of Passaic Falls. This is a beautiful area.The wood-surfaced foot bridge featured in two different Sopranos episodes.Another view of the bridge. It’s closed to the public. On the Internet, it says it’s for safety reasons. One of my police buddies told me it’s because there were too many suicides from this bridge.Another view of the Passaic River and its Falls in Paterson.While we were visiting the Paterson Great Falls National Historic Park, this rather plump groundhog was doing the same. My Dad used to hunt these in New Jersey with his .243 Model 70 Winchester and the farmers loved having him do so. These woodchucks may look cute, but they destroy a lot of crops.
One thing I know for sure: I’ll return to Paterson. I’d like to explore the city, its museums, and more in greater detail.
Want to see our other visits to The Sopranos locations? Here they are:
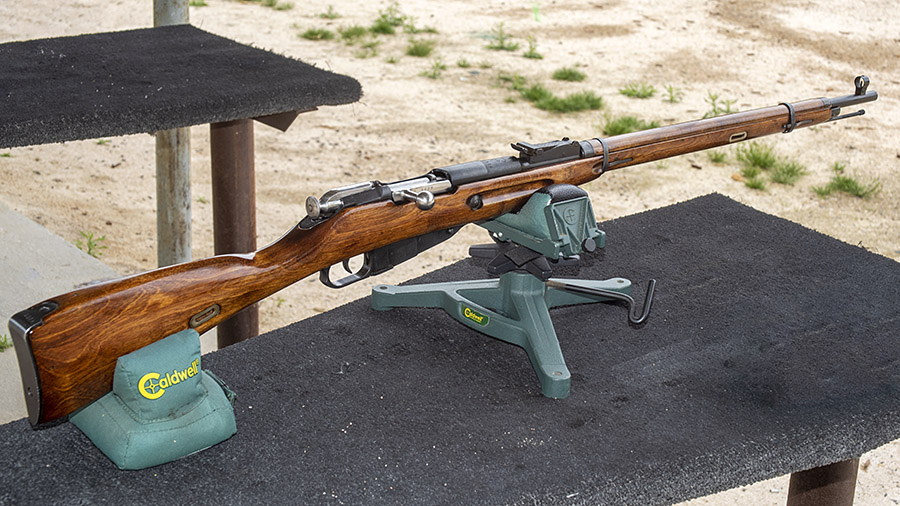
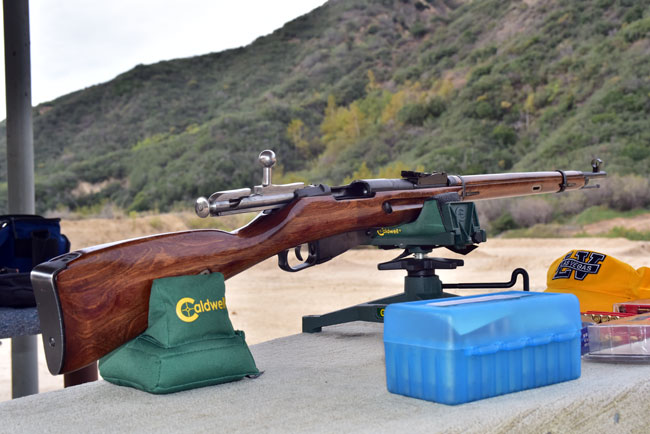
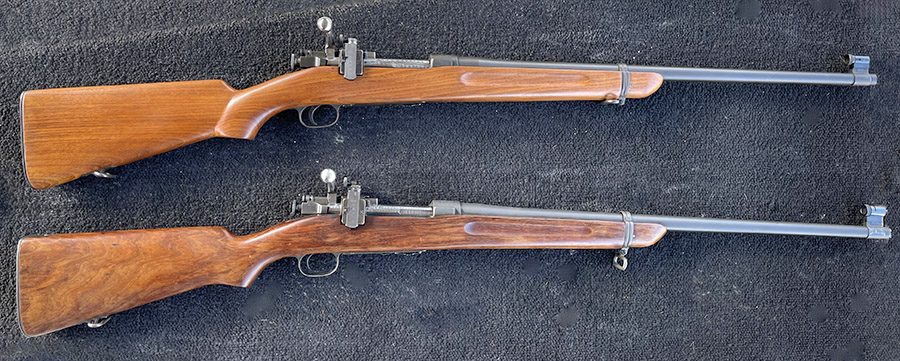
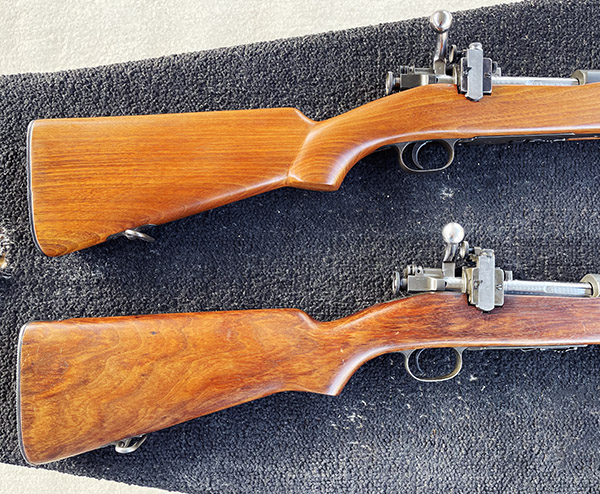
Many years ago, I inherited an M1922 Springfield rifle from my Dad. I’ve only ever seen one other M1922 (that’s how rare they are), and it was at the West End Gun Club range earlier this month. Good buddy Kevin owns one, and we both agreed to bring (and shoot) our rifles. Like mine, Kevin’s rifle is beautiful. It has nicer wood than mine. Just seeing any M1922 is a treat (let alone one with figured walnut), so I really enjoyed seeing Kevin’s.
Two ultra-rare M1922 Springfields. The top one is mine, the lower one is Kevin’s. These are the only two I’ve ever seen.
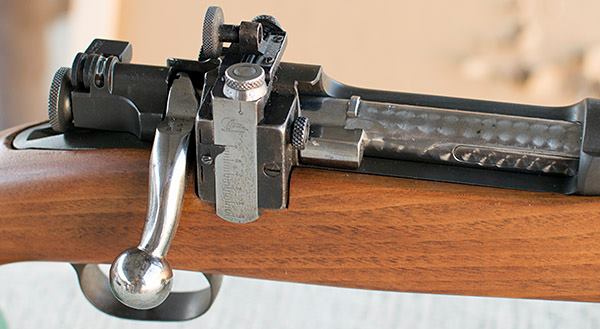
As the name implies, the Springfield Model 1922 was developed in 1922. It was built as a training rifle, intended to offer a lower cost, lower recoil approach to learning how to shoot the Army’s main battle rifle, the 1903 Springfield. The M1922 has the same general dimensions as the 1903, including the large bolt and the long action, but the bolt only retracts just enough to extract and eject a .22 Long Rifle cartridge. It’s really cool.
The M1922 has target grade Lyman adjustable sights, with interchangeable front sight inserts. My rifle is configured as a “peep to peep” sight set; instead of seeing a front post in the rear aperture, the front sight has another aperture ring instead of a post. The idea is that you focus on the target, and the two apertures (in the front sight and the rear sight) appear out of focus. It’s counterintuitive to all the shooting I’ve ever done with iron sights, but it seems to work. My issue is age; these days when looking through those tiny apertures it’s difficult to make sure I’m on the right bullseye on a multi-bullseye target. Ah, to be 70 again…
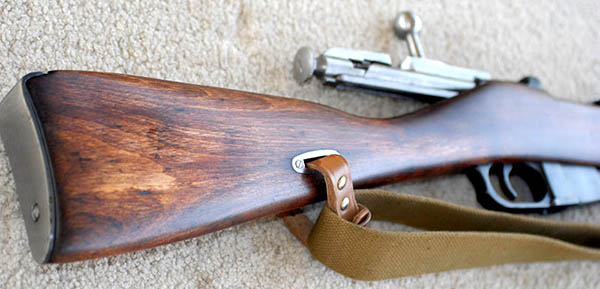
The adjustable rear Lyman peep sight on my M1922. Note the rifle’s jeweled bolt and long action.The M1922’s front peep sight. There are different front sight inserts available. Mine had the aperture (or “peep”) insert installed when the rifle came into my possession, and I left it that way.
The M1922 was produced in four different variants from 1922 until the advent of World War II. At that time, material shortages precluded further production, and the US Army had already moved on to the M1 Garand. Springfield Arsenal produced 2,020 M1922 rifles.
Both Kevin’s rifle and mine have jeweled bolts and the jeweling is identical. During all the years I owned my M1922, I always assumed that Dad did the jeweling on my rifle’s bolt (he did that on a lot of his shotguns and rifles). When Kevin showed me his, he told me that the jeweling on his was the only thing on the rifle that wasn’t original. I think we were both wrong. The jeweling on both bolts (Kevin’s and mine) is absolutely identical. I suspect the rifles left the Springfield Arsenal with jeweled bolts, although I did manage to find an internet M1922 photo with a non-jeweled bolt.
Kevin’s rifle had more figure in its walnut stock than mine, and that made me want it immediately (a reaction I have any time I see a rifle with fancy walnut). But I know Kevin is not selling his, and I’m not selling mine, either. These rifles are just too rare (they are irreplaceable, in my opinion), and mine came to me from my Dad (another reason I’ll never sell it). Springfield M1922 rifles don’t come up for sale very often, and when they do, they go for big bucks. I searched Gunbroker.com and found two that were listed at $2,499 and $2,099, and neither of those was in nearly as good a condition as mine or Kevin’s. I’d expect our rifles to be in the $3,000+ range if they were for sale, but like I said above, they most definitely are not. The magazines for these rifles are extremely rare, too. I’ve never seen one for sale; I imagine if one did appear on the market, the ask would be several hundred dollars.
I’d previously written about my M1922 here on ExNotes and that story is here. There’s more info about these fine rifles online. Rock Island Auction has a good M1922 video. Rock Island does a good job with their videos when they have interesting firearms for sale, and the M1922 Springfield is squarely in that category.
Never miss an ExNotes blog:
Folks, if you like what you read here, please consider helping us keep the lights on and the content flowing. We need your help!