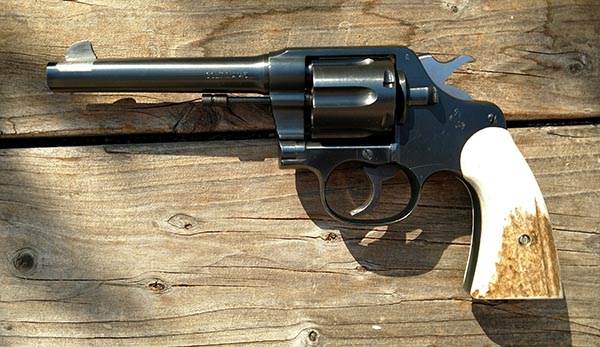
You may recall that I posted a blog last year about a handgun I bought that is over over a century old. It’s a pristine Model 1917 Colt, a U.S. Army handgun issued in World War I. Mine was a real find…it appears to be unfired, it has the original blue (not Parkerized) finish, and it is just awesome.
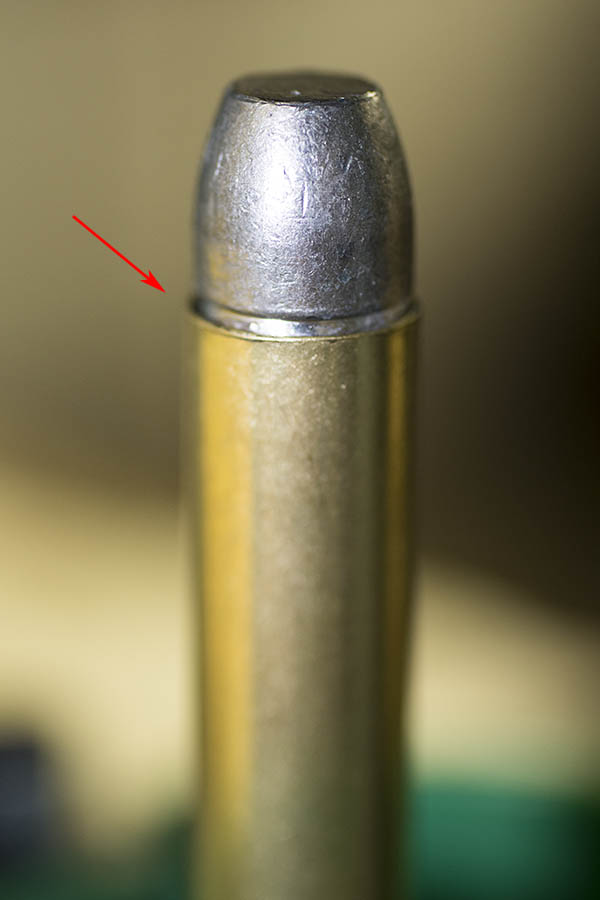
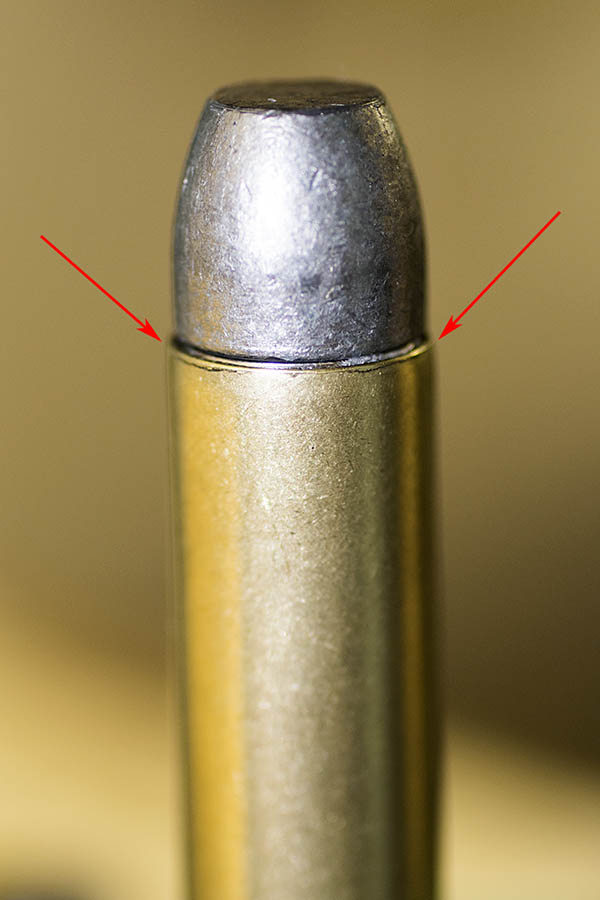
My Colt 1917, chambered in .45 ACP. Read our earlier blog; this is a great story.
As you know from reading that blog, the Army had two versions of the Model 1917, one manufactured by Colt and the other manufactured by Smith and Wesson. One of the Smith and Wessons (in comparable condition to my Colt 1917) closed on a Gunbroker.com auction yesterday for the astonishing price of $2,525.
The Smith and Wesson Model 1917 that closed on Gunbroker.com yesterday for $2,525. When the Army purchased these for World War I, they cost about 1/100 of that amount.
I spotted the Smith 1917 when it first appeared on Gunbroker and I thought it would be nice to own both an original Colt and a Smith, but the price shot up to over $1,000 very quickly (many days before the auction closed). I knew I wasn’t a player at those prices. And then it kept going up, and up, and up, all the way to $2,525. Wow! I’m feeling even better about my Colt, and I didn’t think that was possible.
It’s time to get out and do stuff. Yeah, this CV19 thing is a disaster, but it looks like what the wizards recommended is starting to produce results, and that gave me an excuse to get to the range again. Not that anyone ever needed an excuse to get to the range, but I felt like it was time, and that beautiful Henry Single Shot I’ve been writing about (but had not yet fired) was calling my name.
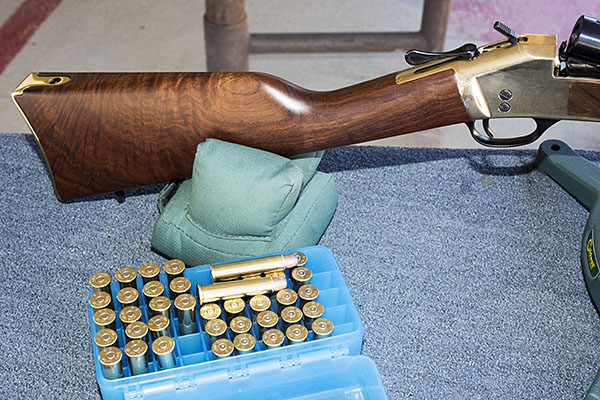
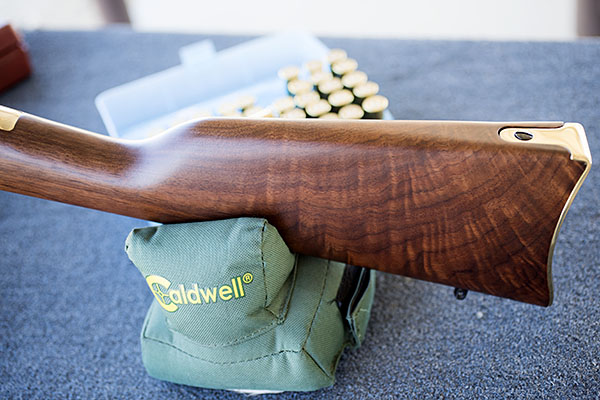
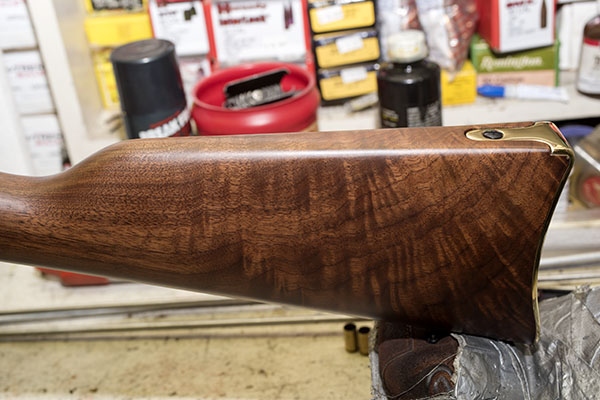
Exhibition-grade walnut, blue steel, polished brass, and a box of .45 70 ammo. Life is good!
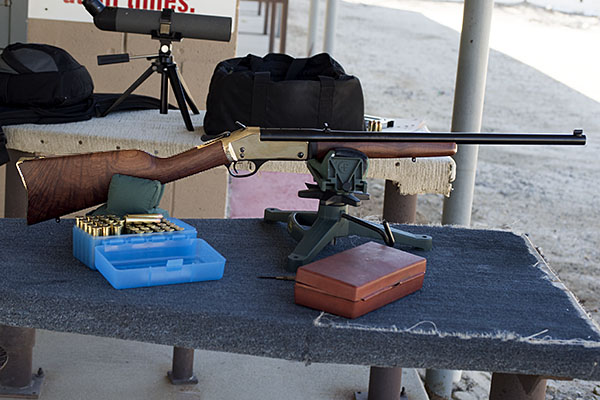
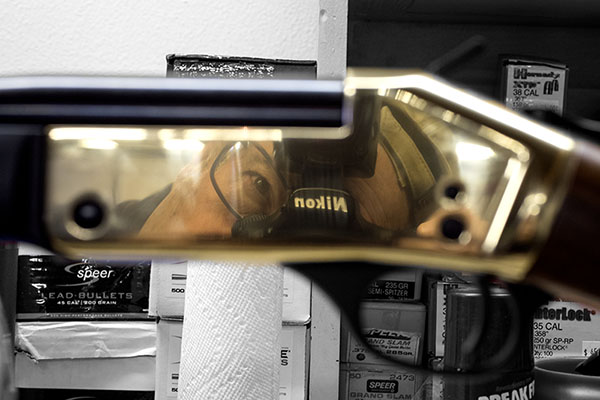
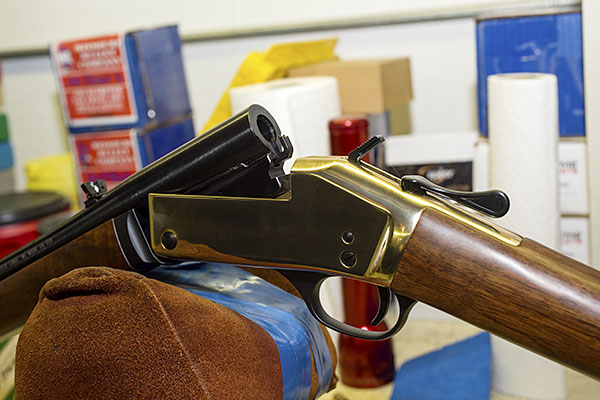
I had my Nikon with me, too, so I was finally able to get some good D810 photos of this beauty from Henry’s Rice Lake, Wisconsin manufacturing operation.
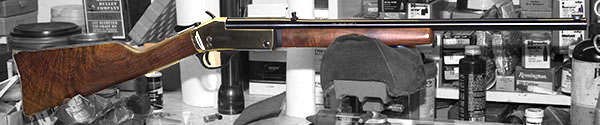
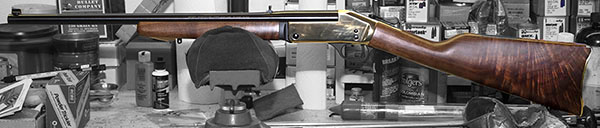
A view from the right.And the view from the left.
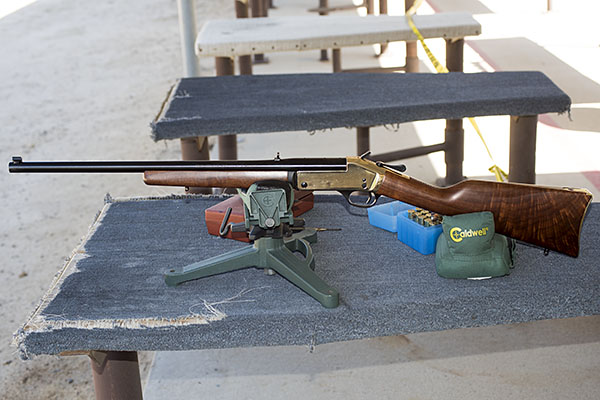
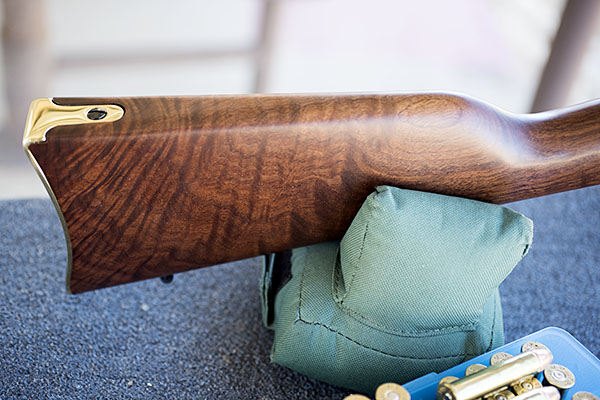
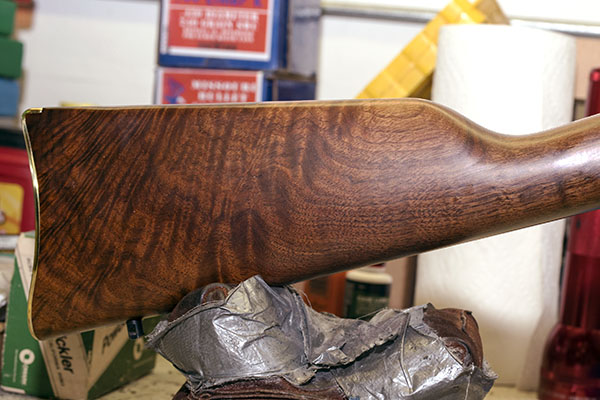
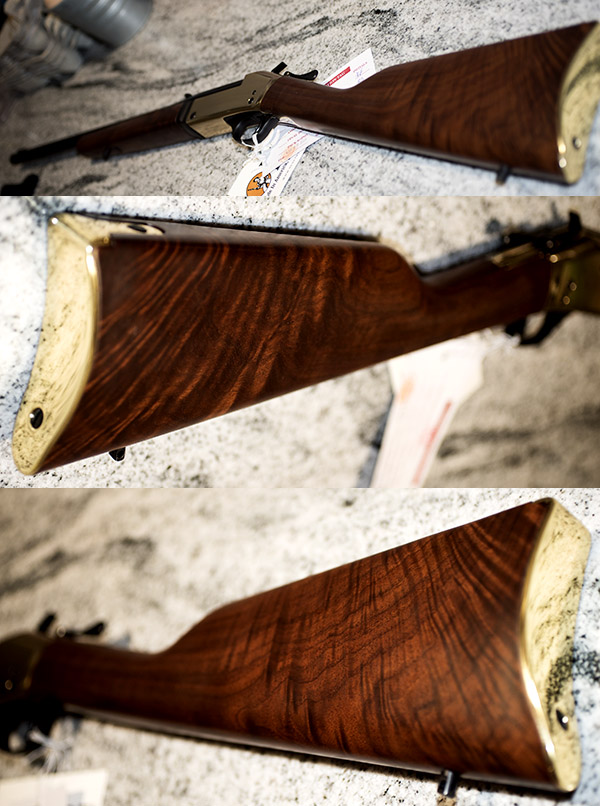
I wanted a couple of photos showing the entire rifle, and then I wanted to get a couple more showing the highly-figured walnut stock. The folks at Henry sure did a great job.
Sweet, huh? The polished brass buttplate works, too. This is a stunning bit of American firearm artistry. Like Mr. Imperato says, made in America, or not made at all.What’s nice is the stock is highly-figured on both sides. It’s hard to find wood like this on a production rifle these days. Always has been. I believe it’s getting tougher, too.
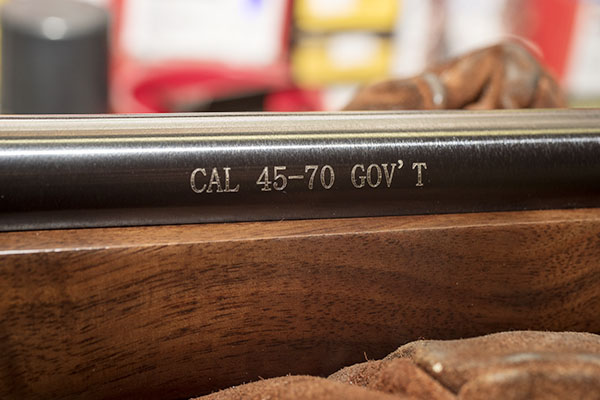
The .45 70 cartridge is a big one, and I’ve written about it in earlier blogs. There’s a list of links to our earlier blogs on the Henry single shot at the end of today’s post, along with a few other cool links. Take a stroll through them to get a feel for how I came to acquire this magnificent rifle (after you’re read this blog and shared it on all your social media platforms, of course).
If you have one of these and someone says “bring enough gun,” you’ll have all the bases covered with the Henry Single Shot.
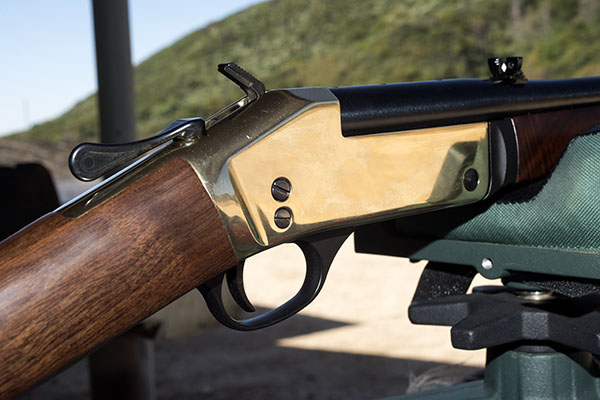
It was fun shooting the Henry, both literally (more on that in a second), and figuratively (with the Nikon). The brass receiver on these guns photographs well, I think.
The rear sight is a standard folding leaf. You can flip it to the other side so that you don’t have the white diamond, and you can invert it to get a square notch instead of the U-notch. I’ve left mine as it was delivered from the factory.
On to the good stuff, and that’s an answer to the most basic question for any firearm: How does it shoot? In a word or two, superbly well. I had a big plan to test all kinds of different loads, but I don’t want to bore you with the details of what didn’t work well and get right to what did.
First, a word on my marksmanship. It had been about 9 weeks since I’d been to the range, and the ability required to shoot a rifle well is not something you just pull out of drawer and pick up where you left off. Nope, rifle marksmanship is an art, and I needed to put a few rounds downrange before the Henry started performing. Well, actually, that’s not quite accurate: I had to send a few rounds downrange before I started performing. There’s a skill set involved in shooting a rifle well. You can read our treatise on rifle marksmanship later (I’ll include a link for that at the end of this article, too).
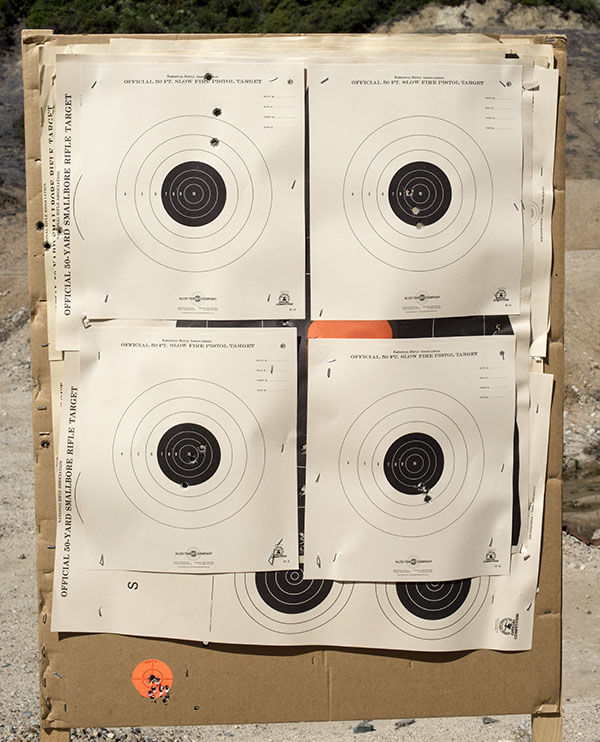
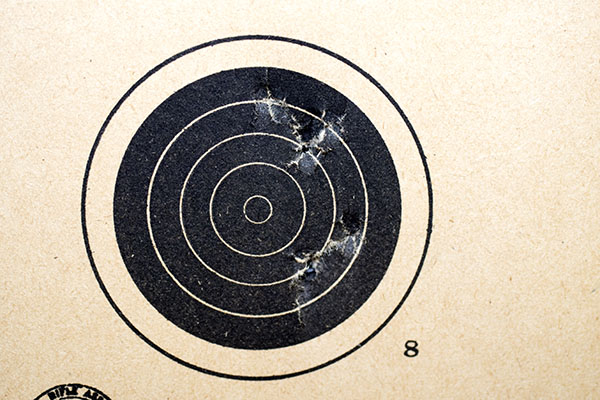
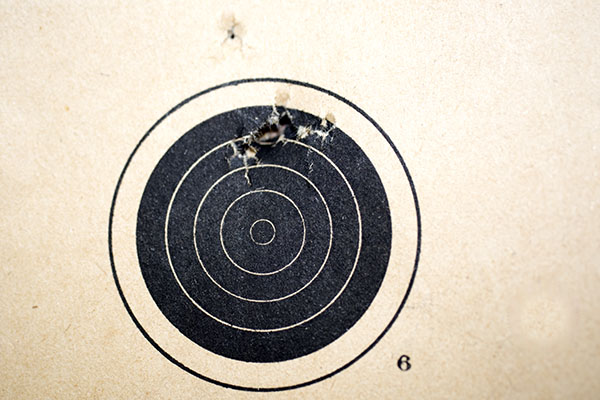
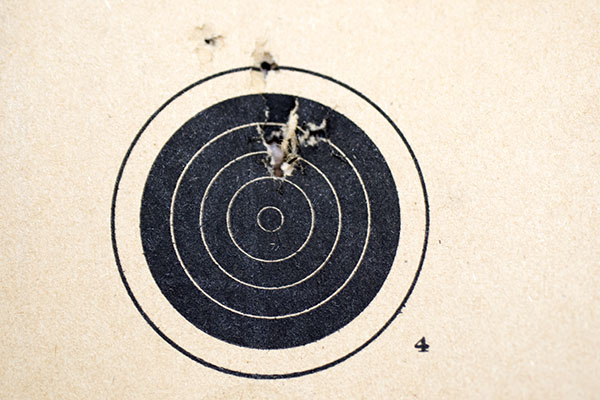
I started with four targets this morning at 50 yards and the results were not what I wanted, but I knew it was me and not the rifle. So I put another four targets out, and I started to settle down. It was a beautiful morning out at the West End Gun Club. Bright skies, mild temperatures, no wind, and I had the range to myself. It wasn’t too long before I was in the groove. The first target (the top left) was a bit shaky (good enough for deer or hog, and especially good enough for buffalo), but not what I knew I should be able to do with this rifle. The second target (top right) was a lot better, as I was kind of figuring out how to get the right sight picture. Shooting with iron sights is much more challenging than simply laying a scope’s crosshairs on the bullseye. Iron sights demand skill and practice. With 9 weeks away from the firing line, I was coming up short on both, but I was getting my groove back. I could feel it. The third target (bottom left) was another good deal, and then the fourth target sealed the deal. That one was a 0.740-inch group, with all the holes touching. With open sights on a lightweight .45 70 at 50 yards, I’ll take three-quarter-inch groups all day long.
50 yards, with a 6:00 hold on each target. Top left, top right, bottom left, and bottom right. Not bad, if I do say so myself.
Here’s another photo of my last target of the day, showing that beautiful 0.740-inch group. Bring on the buffalo. I’m ready. So is my Henry.
I think I’ll leave the Henry’s adjustable rear sight right where it is.
The secret sauce? It goes like this: A 300-grain Hornady jacketed hollow point bullet crimped in the cannelure, 16.2 grains of Trail Boss powder, a CCI 200 primer, and Federal brass. I don’t think the brass makes much of a difference when shooting .45 70, as long as the brass is trimmed to a uniform length. I used Federal brass because it’s what I had, and I’ve had it a long time. My .45 70 brass is over 40 years old. It’s been loaded a lot of times, but when you load at Springfield levels, brass lasts a long time.
So what’s it like to shoot the Henry .45 70 Single Shot? It’s fun. The Henry is more of carbine than a full-sized rifle, although the length of pull is the same as my other rifles and the barrel is a full 22 inches. It’s that single shot design that allows the overall package to be shorter. It’s a compact, hard-hitting package with recoil that is one thin red hair on the good side of tolerable. The rifle’s brass buttplate adds substantially to the rifle’s overall rich appearance, but let me tell you, you feel it when the hammer drops. I was glad the 300-grain bullets worked well; the 405-grain loads I had were just a hair over a tolerable recoil level for me. My shooting was all in shirt sleeves shooting off the bench, though. With a winter jacket or on a hunt, making friends with 405-grain bullets would be a lot easier.
It’s stunning just how elegant the Henry .45 70 Single Shot is, and what’s equally stunning is the amount of “cool” you get for the price. The MSRP on this rifle is $628, and Henry tells you on their website that you should expect a discount from that price. To me, the benchmark single shot rifle is Ruger’s No. 1, and that rifle is something like $1500 these days. I believe the Henry’s fit and finish are actually superior to what you get on a Ruger No. 1. The walnut on my Henry is exceptional. I think Henry is undercharging for these rifles. They’re that good.
So where am I on all of this? The Henry likes 300-grain bullets better than the heavier 405-grain stuff, and that’s where I’ll focus future load development. Several suppliers offer 300-grain .458 bullets, and there are other powders to try. One more thing I want to make sure you know: I love this rifle. Life is good. I’m having a lot of fun with my Henry.
Check out our earlier Henry Single Shot stories here:
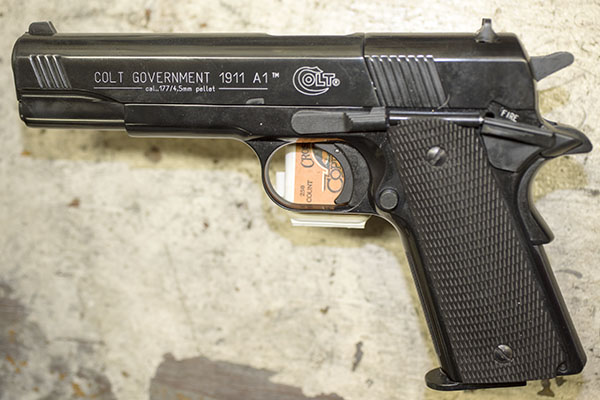
Same dimensions, same heft, and it says Colt on the slide. How cool is that?
The Colt .177 1911 Pellet Pistol
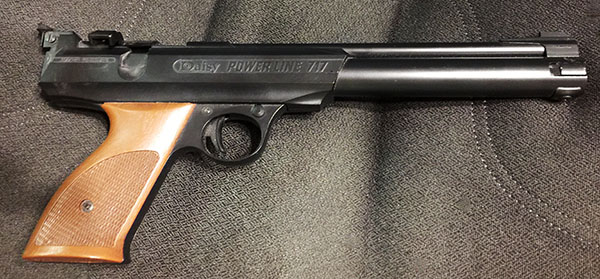
That 1911 you see above is the same size and the same weight as a real deal .45 ACP 1911, but this one is a CO2 pistol that fires .177-caliber pellets. I saw it in a Big 5 sporting goods store a good 20 years ago, and for reasons I can’t easily explain, I bought it. It was an impulse buy. I thought it was a cool idea and I figured if I was ever stuck in the house and couldn’t go out, I could entertain myself by shooting my pellet pistol. Little did I know the CV19 debacle would turn that eventuality into reality (I mean, I’ve been under house arrest for over a month…I have everything but the ankle monitor). I paid $150 for my .177 1911, I put it on the shelf, and I forgot about it for the next two decades.
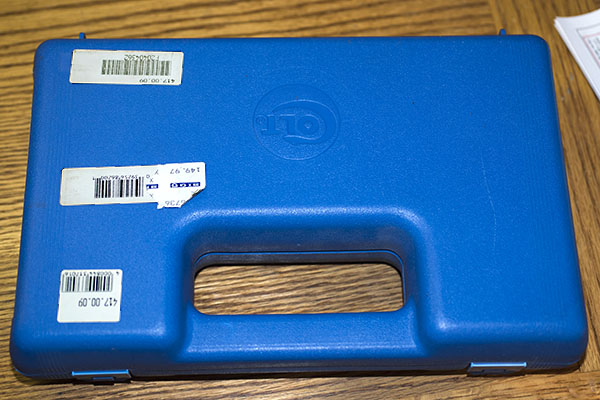
A cool case, too, and it also sports the Colt logo. How could I go wrong?
As you know from following our earlier pellet pistol blogs, I recently set up an indoor pellet pistol range in my garage in an effort to keep myself entertained (I don’t live on a big ranch in New Mexico and I don’t do concrete). I previously wrote about two Crosman pellet pistols that wouldn’t hold pressure and my old Daisy 717 pellet pistol that worked like a champ. A the end of the most-recent Daisy blog I mentioned that I had the 1911 pellet gun and I said I would break it out if I could find it.
Pellet Pistol Packaging Problems
Well, that’s what I did. I found the gun pretty easily…it was in the bright blue case you see above. But when I opened the case, things did not look good.
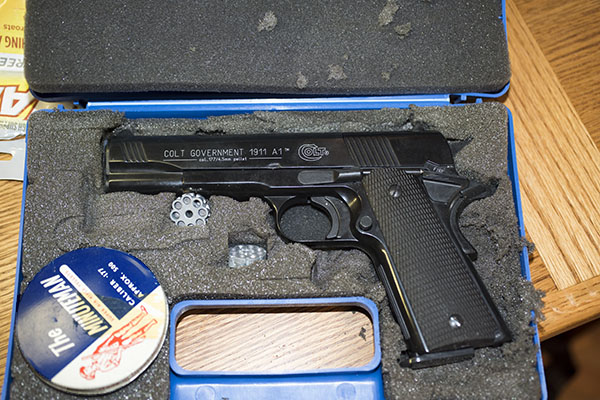
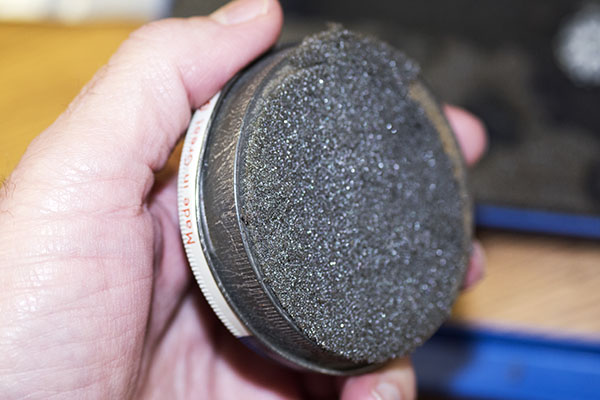
The road to Hell is paved with good intentions. In this case, those good intentions were a foam bed that attacked the gun chemically as the foam decomposed.
Hmmm, the foam padding inside the case that was supposed to protect the gun was doing just the opposite. Instead of protecting the gun, the foam was decomposing and appeared that it might be damaging the 1911. Ah, maybe not, I thought. Given a spritz of that powerful spray that cures all evil (that would be WD 40, not YooHoo, Fred), the foam that was sticking to the 1911 would probably fall right off. Or so I hoped. Before you feel compelled to weigh in on this, let me say at this point I realize this is all my fault. I was remiss in letting the gun sit in that case for 20 years without ever pulling it out, checking it, and keeping it wiped down. Maybe. It could be that if I wiped it down the oil I used would have accelerated the foam’s decomposition. Who knows?
Messy. Whoever specified this foam did a lousy job. It was rotting away and sticking to the gun.The appropriate engineering response to this condition is: Yeccchh!The boys at Colt were thoughtful enough to include a tin of pellets. The foam had cruddily bonded to it, too.
Finish Degradation
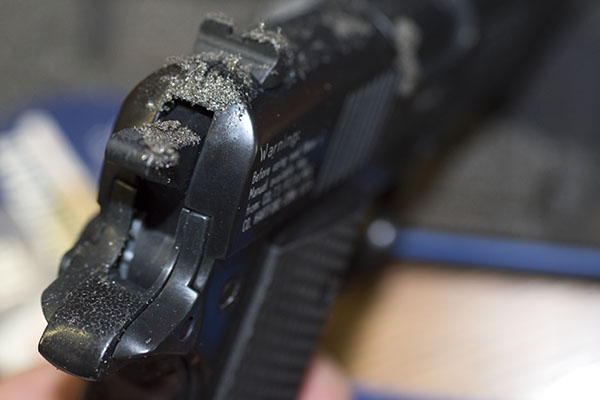
So I was hoping all this rotting, rotten foam would wipe right off and the gun underneath would be fine. Well, like the old saying goes, you can hope in one hand and poop in the other. You know which one is going to fill up first. A few shots of WD 40, a good scrub with an oily rag, and the verdict was in: Things were not looking good.
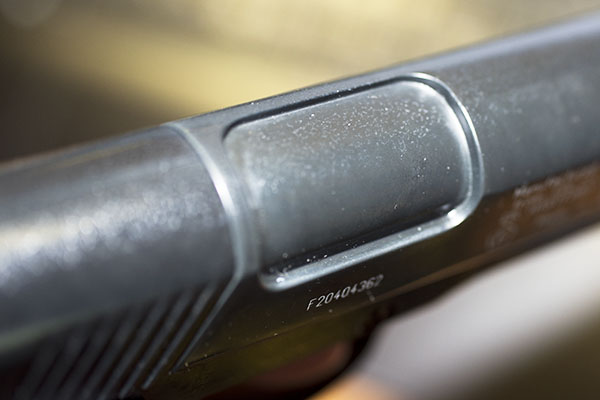
That’s not dust. It’s pitting in the finish where the foam had attacked it.
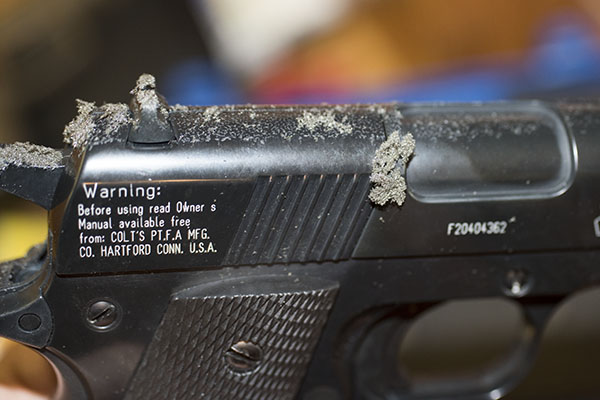
I even tried lightly scuffing the gun with steel wool (that works on light rust on blued steel), but nothing helped. The 1911 has what I’m guessing is a powder-coated finish, and that damned decomposing foam actually was eating into the finish. It was like rust, but it was a different chemical reaction. It actually etched its way into the powder coating.
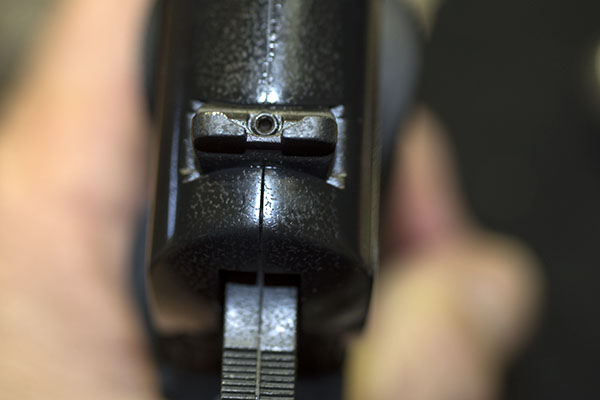
Another shot of the surface finish damage. You live and you learn. Sometimes, anyway. Interestingly, the Colt pellet 1911 rear sight has an Allen screw that can be loosened to slide the sight left or right to adjust zero.
So I learned a lesson again I learned a long time ago: You can’t just put something away in a box and forget about it. I should have taken that gun out of its case every year and wiped it down. Eh, we live and we learn.
.177 1911 Operation
I cleaned up the 1911’s exterior as best I could, and then I had to figure out how to operate it. I had the owner’s manual, but what would be the fun of simply reading it? Nope, I had to play with my fuzzy friend and figure it out for myself. The 1911 had two little cylinders for holding the pellets and the owner’s manual (what little I read) said it could be fired either single or double action. Hmmm, that’s cool, I thought.
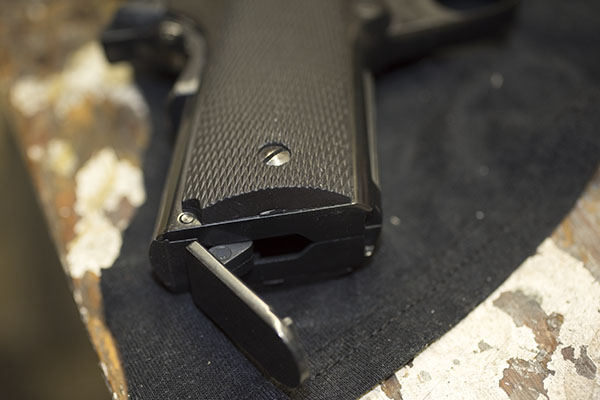
I looked at the gun and it had a lot of the same features as a regular 1911 (i.e., a .45 ACP 1911). You know, the grip safety, the mag release, and the slide release. I tried the grip safety (unlike the rest of this 1911, it’s plastic). It was hinged at the top just like a real 1911. Cool, I gotta check this out, I thought, so I pulled the hammer back, pointed the gun in a safe direction without depressing the grip safety, and pulled the trigger. The hammer fell anyway. Okay, so the grip safety is purely cosmetic. The 1911 also has a thumb-actuated safety, but unlike the grip safety, it actually works (it prevented the hammer from falling when I pulled the trigger). The pellet 1911 has a mag release just like a real .45 auto, and what that does is press against the right grip to flex it away from the frame. That allows you to get a fingernail under the grip, and you can pop it off (more on that in a second). And finally, there’s a slide release just like a real 1911. I pressed it down and what do you know, the slide slid! Forward, that is…about three quarters of an inch (more on that in a moment, too).
The thumb safety really works, just like it would on a real 1911. The plastic grip safety is hinged like it would be on a real 1911, but it is cosmetic only.
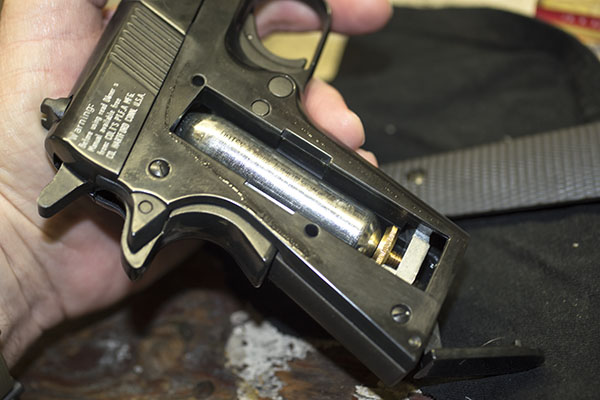
Like I said, when you press the mag release, it pushes the right grip away from the gun’s frame. You can then pull it off and that exposes where the CO2 cylinder sits. There’s a lever under the grip. You can rotate that down and it releases upward pressure under the CO2 cylinder. Then you rotate a knurled brass wheel to lower it and a brass cup underneath the cylinder, and then the spent cylinder can be removed. To install a new cylinder (which you need to do a lot, as I’ll explain shortly), you just insert the new cylinder, rotate the brass wheel to take out all the clearance between it and the cylinder, and then rotate the 1911’s grip lever (underneath the grip) upward. That pushes the CO2 into the probe that penetrates the cylinder cap and seals the cap against the probe. It’s all very clever.
A CO2 cartridge in the 1911’s grip cavity. That little brass wheel beneath it snugs up against the bottom of the CO2 cartridge.Snap the right grip back on the gun, rotate the lever beneath the grip (shown here in the lowered position), and the gun is charged.
I did all the above, locked a new CO2 cartridge in place, and the gun was charged. And unlike the two Crosman handguns I tried a couple of weeks ago, it held pressure. Next up was loading one of the little revolving cylinders with .177 pellets.
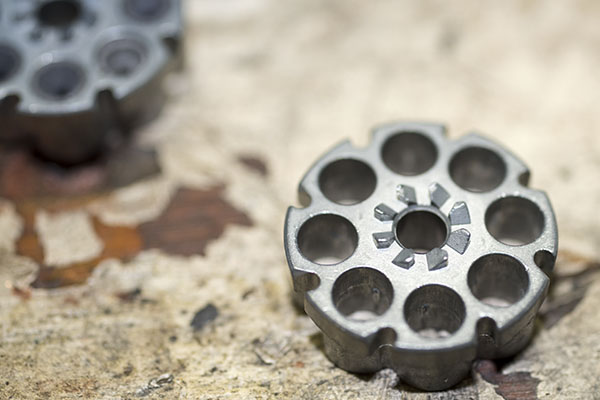
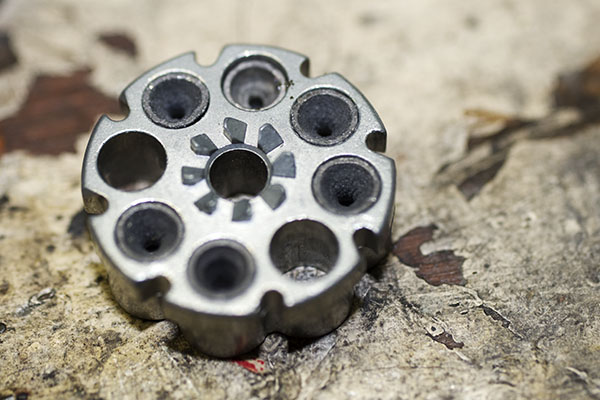
Colt provided two pellet cylinders with the .177 1911. They are like the cylinders in a revolver. Those little protuberances on the face of the cylinder are supposed be engaged by a push from the gun’s internals to rotate the cylinder when it is fired double action or when the hammer is cocked.Here’s another shot of the pellet cylinder with a few pellets inserted. It holds eight pellets, matching the magazine capacity of a real 1911.
After you’ve loaded the cylinder with pellets, the idea is that you drop it into the 1911 between the rear of the slide and the frame, and then pull the slide to the rear to close it. I did all that, and at that point, I was ready to start sending lead downrange.
A loaded cylinder, in place. Rack the slide rearward, and it should be ready to go.
Double Action It Ain’t
Downrange, in this case, was 20 feet away into my house-arrest, Rube Goldberg, cardboard-box-contrived bullet trap. Like my pistol, I was pumped because it felt good to have a hefty 1911 in my hand again. This 1911 pellet gun feels like a real one. It weighs exactly the same, it’s got relatively decent sights, and lining it up on the target felt like the real deal. Alvin York, step aside, ’cause this 1911 has the added advantage of double action.
Or so I thought. With the safety off and the gun pointed at the target, I tried firing double action. I felt the take up on the trigger and I felt it come all the way to the rear, but nothing happened. I tried again, looking at the hammer, but the hammer just sat there. Hmmm. Well, so much for double action.
I manually cocked the hammer, lined up the sights, held my breath, focused on the front sight, and then I heard a satisfying PFFFT! That delightful report was followed a nano-second later by the mighty .177 lead hourglass sharply smacking into my target. I could see the hole it made, and it was in the black! Yeah, baby!
Cool, I thought. Okay, double action was a bust, but that’s no big deal…I’ll just cock the hammer for each shot. So I pulled the hammer back, repeated the steps above, and it was PFFFT again, but this time without the thwack of the pellet hitting the target. I looked downrange and that prior hole on the target was looking mighty lonely. Hmmm again. Shooting blanks with a pellet gun. Whoever heard of such a thing?
I pressed the slide release, the slide slid forward, and I peeked in. The cylinder holding the pellets had not advanced. It was still sitting on the empty chamber I had fired previously. I pulled the hammer back to see if the hand that is supposed to advance the cylinder was moving up to do so, but it wasn’t. Rats. It looks to me like the parts that form the mechanism to rotate the cylinder are plastic. They may be broken, or age-degraded, or maybe stuck in place by agglomerated lube. Who knows? I need to take the thing apart to do a proper proctological exam, but that’s a project for another time. A quick Google search showed that others complained of similar problems with these guns, and one of the comments noted that there are YouTube videos showing how to work on the thing. Hey, Gresh has his Z1 and concrete, and I have my broken-down pellet guns! Life is good.
Sending Lead Downrange
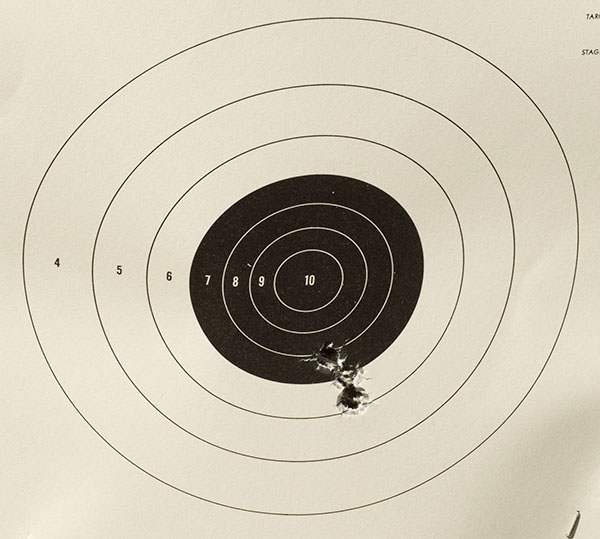
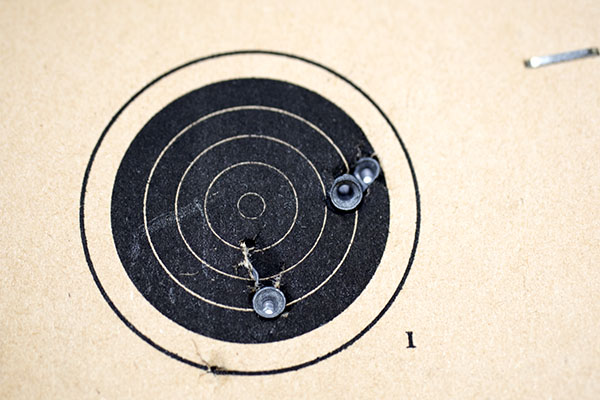
For right now, I have a single shot 1911 pellet gun. I just have to open the breech, take the cylinder out, load a pellet, put the cylinder back in, close the slide, cock the hammer, and take a shot. Which I did several times, and here are the results.
Eh, not bad. Not as good as the Daisy 717, but not bad, either.Another five rounds. One went high.I had a good group going, but this time two went high.Running out of steam. After 25 or 30 shots, the CO2 cartridge was circling the drain. The pellets didn’t have enough poop to pop through the paper.
Cost per Shot (Pellets vs .45 ACP Ammo)
This is a good news/bad news story. You’ve already read the bad news. A little bit more bad news: I only get about 30 shots (maybe less) out of a single C02 cartridge. That surprised me. So much so, that I looked it up on Google, and it seems like 30 shots is about what any CO2 pellet pistol gets. I think I’ll probably get comments from our readers on that and I’m looking forward to reading your inputs. Hey, if your mileage varies, leave a comment and tell me about it.
Just for giggles, and because I have the time while we’re all under house arrest, I thought it would be fun to compare the cost of shooting the pellet 1911 to the real thing.
I checked online (because it’s been a long time since I’ve bought C02 cartridges), and they seem to be going for around $8 for a box of 5. That works out to $1.60 per cartridge, and at 30 shots per cartridge, that’s a little more than 5 cents per shot for the CO2. The pellets seem to run around $7 for a tin of 150, and that’s a little less than 5 cents per pellet. So, every time I pull the trigger on my 1911 pellet gun, I’m sending a dime downrange.
For my .45 ACP reloads, there are costs in the bullets, the powder, and the primer. I don’t count the .45 brass, because I get mine for free and it seems to last forever. My favorite Missouri 230-grain cast roundnose bullets are $50 for a box of 500, so that’s a dime per shot in lead. Unique powder is about $30 a pound, there are 7,000 grains in pound, each cartridge takes 5.6 grains of Unique, and if you do the math, that works out to $0.024 per cartridge for propellant. CCI 300 large pistol primers are $30 per thousand, s0 that’s $0.03 per round for primers. The bottom line here is each time I pull the trigger on a real 1911, it costs me 15 cents.
What the above means is that I’m saving about a nickle per shot with the 1911 pellet gun. I guess need to shoot a whole bunch more…you know, so I can make up for the hit my 401K is taking as a result of the corona virus.
Wrapping It Up
So where am I on all this? The good news is I like my 1911 pellet gun. It’s impressive how much it feels like a real 1911 (without the sound and fury of a real 1911’s bark, of course). The pellet gun 1911’s accuracy isn’t stellar, but it isn’t terrible, either. It doesn’t index when I cock the thing and it doesn’t work double action, but that’s almost an advantage given our current house arrest situation (fixing those problems is just another project to put in the hopper). The bottom line? I like my .177 Colt pellet gun and it’s one I’ll be using more.
A pellet gun that shoots as well today as it did nearly 40 years ago…the Daisy 717!
The pellet pistol you see in the above photo is a Daisy 717, one I’ve owned for nearly 40 years. After learning that my Crosman C02 pellet pistols wouldn’t hold pressure a few days ago, I thought I’d try the Daisy, and whaddaya know, it worked like a champ (just like it did when I bought in the early 1980s). The Daisy is a single-stroke pneumatic air pistol. You pump it once with this long lever that swings out to the left, open the bolt (just like on a bolt-action rifle), put a single pellet in it, close the bolt, and then shoot. No CO2 cartridges required.
Daisy first introduced these guns in 1981, and at the time, they sold for something well below $60. I want to say I paid around $40 for mine at a department store called Gemco. In those halcyon days, I thought I’d give competitive air pistol shooting a shake and I didn’t want to spend a thousand bucks or so on a serious handgun. The range was short (I think it was 10 meters, or 33 feet), and wow, were those targets ever tiny. I only tried that game once…the club where the matches were held was a long drive for me, the competitors had uber-expensive guns, and I just wasn’t that into it. But I didn’t embarrass myself, and I did better than some of the folks out there with their big bucks pellet pistols. Then I put the Daisy away and more or less forgot about it for the last 40 years.
Well, sort of. A friend in the bomb factory (where I was working at the time) told me about another use for air guns, and on occasion, I would put the Daisy to work when the need arose. That story goes like this: No matter how militant a feminist your better half might be, when there’s a spider on the ceiling or in the bathtub she’s going to get all sguiggly and require manly intervention. That’s where yours truly and the mighty Daisy answer the call to arms.
Truth be told, there’s no way I went to get up close and personal with a big old hairy, funky spider. I was always just as scared as Sue was, but I couldn’t let her see that. I know, I used to be an Army officer, I’ve jumped out of airplanes, I’m pretty good with a 1911, and I rode a motorcycle across China. But I’ll admit it, and only to you: Spiders scare the hell out of me. But we’re men, you see. Real men. And when it’s time to step up, that’s what we gotta do.
This guy might be a little much for the Daisy. I photographed him on Glendora Ridge Road in 2003. Maybe a .458 Win Mag would be more appropriate.
The good news? The Daisy 717 makes it easy. All you need to do when you hear that dreaded directive (There’s a spider in the bathroom…get it!) is dig out the Daisy. Cock it without putting a pellet in the gun (that part is real important…make sure you don’t put a pellet in). Stalk your prey carefully and slowly approach the offending arachnid. Place the muzzle (the end the pellet comes out of) approximately two inches from the spider, taking care not to alarm it. Take a deep breath, let it halfway out, and then slowly squeeze the trigger (without jerking it) while maintaining proper sight alignment. When the pistol discharges, a high speed jet of compressed air will strike the spider, breaking it up into its major body parts, legs, and assorted arachnid appendages, which will then fall gently and harmlessly to the floor. It’s likely said appendages will continue to twitch for several minutes after your demonstration of manly marksmanship. More good news: At this point, your job is done (you’ve done what your significant other requested). You were asked to “get it” and you did. If you are of a mind to, you can tell her to clean it up, but I wouldn’t advise doing so (don’t ask how I know this).
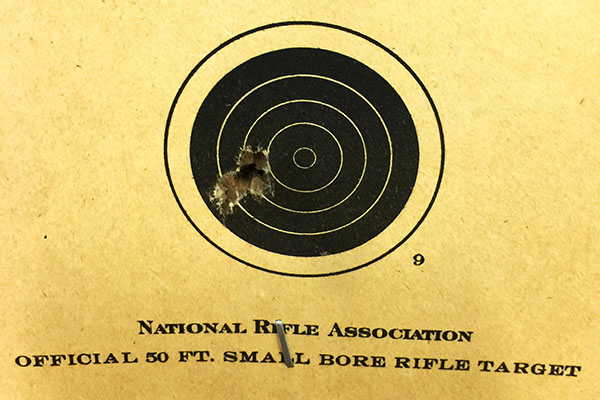
All that aside, after nearly four decades of faithful spider stalking and, most recently, trying to amuse myself during our self-imposed shelter-in-place house arrest, I thought I would try my Daisy in my cobbled-up indoor, garage-based pistol range. I made a target stand out of a cardboard box and a phone book, and hey, the Daisy and I can still drive tacks!
Five shots at 20 feet with the Daisy. The 717 does nice work.
Hmmmm….an indoor range with pellet guns during the shelter-in-place. What say you?
Sitting in my home office surfing the net, I’m sheltered in place which basically means staying home. It’s like detention in high school, or maybe house arrest, except if you sneak out you could die. I don’t know what it’s been now. Two weeks? Maybe more? Anyway, I was thinking about how much I missed getting to the range. I’m dry firing my SIG Scorpion a lot and assessing my performance by how stable the sight alignment is when the hammer drops, but it’s not the same thing as seeing the results on target. Then I saw two handguns I hadn’t fired in maybe 30 years. They’re the two you see above…Crosman CO2-powered replicas of a Smith and Wesson Combat Magnum (the Model 19) and the Colt Python. Hmmmm.
So I grabbed the Python and headed out to the garage. You load a CO2 cartridge in these things by popping the left handgrip off, inserting a fresh CO2 cartridge, and then tightening the screw at the bottom of the grip to tap the keg and form a seal. Except it didn’t. Form a seal, that is. Pfffttttt! That’s the sound of a CO2 cartridge emptying. That sound, and a bit of frost on the backstrap due to the rapidly expanding CO2 escaping around what used to be an effective seal.
No problem, I’ll just try the Combat Magnum. It’s good to have spares, you know? Except the results were the same. Pfffffttttt again!
Eternally optimistic, I went back to the Python and took it apart. Cheaply made guts, to be sure, but to my great surprise the internals are more complex than a real Python. Hmmmm. Man, there are a lot of seals inside that thing! I took it all apart and sprayed the hell out of everything with WD40, thinking the seals would be refreshed and, you know, seal. It took a lot longer putting it back together, and then it was another CO2 cartridge. And another frosty Pfffffttttt! Times that by two, and you’ll have a good idea of how I spent Saturday afternoon. Except after the last attempt, I guess I forgot how it all went together again and I reverted to a YouTube video on this specific subject. You can find everything on YouTube. God forbid I ever have a brain tumor, but if I did, I’m pretty sure somebody’s done a YouTube on how to surgically extract it yourself at home using readily-available kitchen utensils.
Sunday morning started with me watching the video again. With the help of a good Mariachi sound track (watch the video) and an artfully-edited YouTube video, I finally got the Crosman back together with no parts left over.
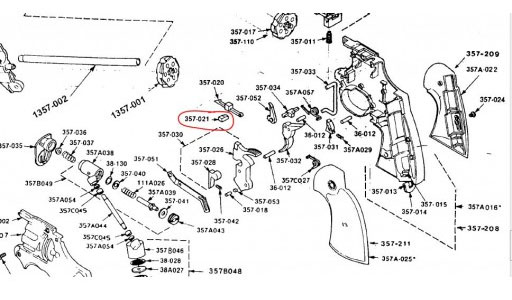
My Crosman .357 had two problems. The first was its Pfffftttt! problem; the other was the “elastomeric spring” that holds the barrel latch up. That part was sort of a rubber chingadera that had degraded and hardened. The spring aspect of its existence didn’t really work because the part no longer had any spring to it. Holding and examining it in my fingers, it fell apart like a cheap politician’s promise (sorry for the redundancy). I thought maybe I could order a new elastomeric spring (which really is an exotic term for a little piece of rubber), but when I went online I saw right away I would have problem. I found parts lists for my pellet pistol, but most of the parts were out of stock, and the few parts that were still in stock were way expensive. I only paid something like $37 when I bought the pellet gun maybe 35 years ago. There’s no way I’m going to pay half that for a little piece of rubber.
Like most exploded drawings, though, it was visually arresting. I was already in mental handcuffs studying it when I noticed the elastomeric spring circled in red. Whoever loaded that drawing evidently needed the same part.
The way the Crosman 357 loads is you depress a button in the top of the frame and it acts against the elastomeric spring you see in the drawing above. That lowers a lever to unlock a tab (the lever is the part immediately above the elastomeric spring in the drawing). That allows you to unlock and rotate the barrel down and the gun opens like an old British Webley. Then you can remove the cylinder and put the pellets in it.
I couldn’t fix the seal problem, but I felt like I wanted to fix something. So I cut up a wide rubber band, superglued the pieces together, and made my own elastomeric spring. It works well. But that’s not the main problem. That honor goes to the seals being (pardon the pun) shot. They are suffering (like me) from age-induced degradation. To make a long story longer, I went through six CO2 cartridges trying to find a fix. You can buy new seals, but they cost nearly as much as what I paid for the whole gun originally. And that’s before you put the larcenous shipping and handling charges on top of it all. Truth be told, I just don’t want to mess with the Crosman anymore. Even if I got those new seals, there’s no guarantee the thing is going to work.
The good news? I know a hell of a lot more about how a Crosman pellet revolver is supposed to work. More good news? The story I’m telling here was an interesting way to spend eight hours of my shelter in place time. The bad news? My two Crosman pellet guns are now nothing more than display pieces. I could probably find a way to make new seals, but I’m just not that committed to it.
I’ve got another CO2 pellet gun (a 1911) laying around somewhere that I’ve had about 10 years and never fired. I might dig it out later and screw around with it. I’ve also got an old Daisy pneumatic pellet pistol, and I think I’ll try to find it to see if it still works. As always, stay tuned.
Ogden’s Finest. It was a good morning to be a Harley, I think. A little wet, maybe, but still a good day to be out and about.
You know, you could do a pretty cool adventure ride lasting a couple of weeks without ever leaving Utah. I know we’re stuck at home, self-isolating and all that, so it’s a good time to share past adventures and photos of great trips. I’ve traveled a lot, and I think Utah is one of the best destinations on the planet. It is probably the most scenic and interesting state in the country.
About that photo you see above…Susie and I rolled into Odgen one day back in 2015 to visit their museums, and these Ogden motor officers were parked out front. It was a great photo op, so I asked, they said okay, and the photo you see above is the result. It was raining that morning, but that never stopped me from riding and it didn’t stop these motor officers, either!
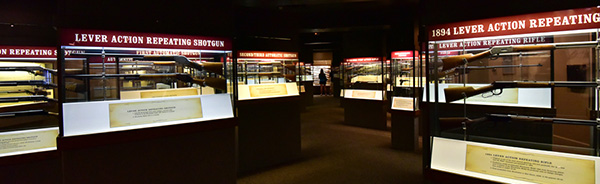
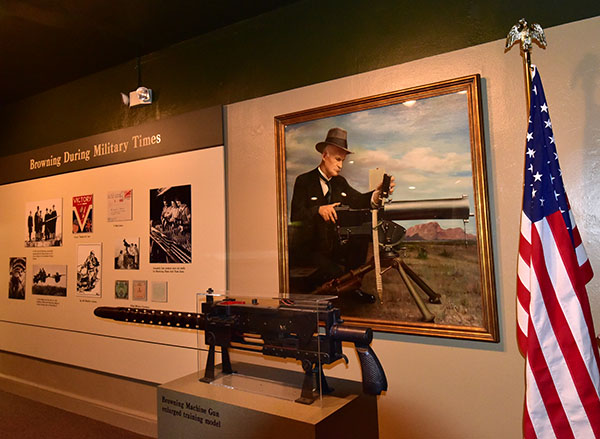
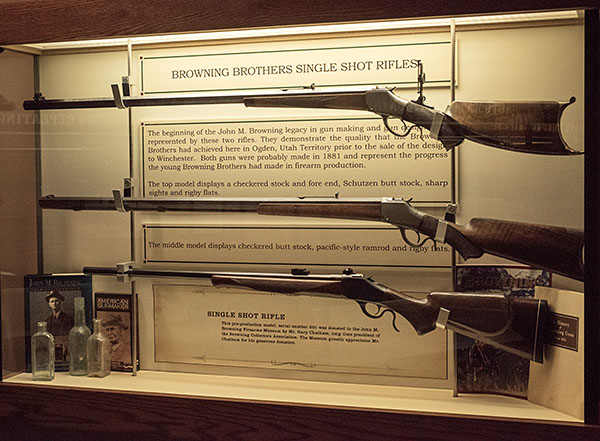
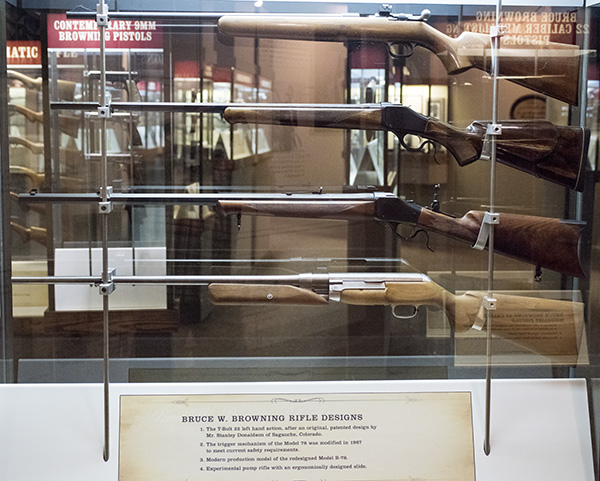
Ogden has four museums and an art gallery in their old railroad station, and it’s one heck of a deal. For a very minimal entrance fee, you get to see the Browning antique car collection, the Browning firearms museum, the railroad museum, the cowboy museum, and an art gallery. If you don’t have Ogden on your destinations list, maybe you need a new list!
Entering the Browning Firearms Museum. This museum alone makes Ogden a must-see destination.
Our focus in this blog is the Browning firearms museum. John Moses Browning, who did much of his work in Ogden, was perhaps the world’s most prolific arms inventor. This museum highlights his creations as well as many other interesting guns. I was in my element here!
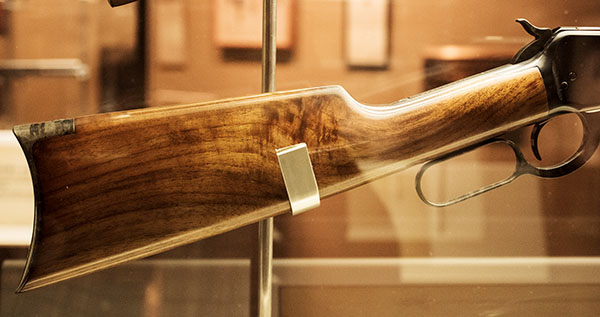
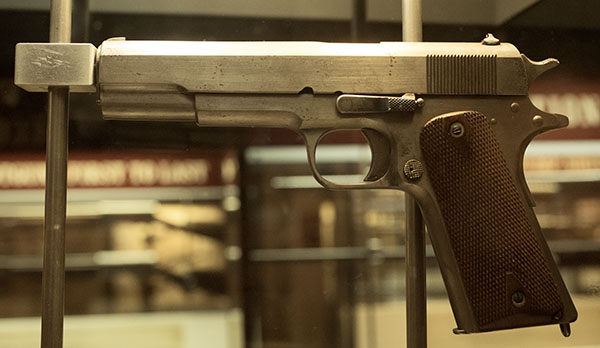
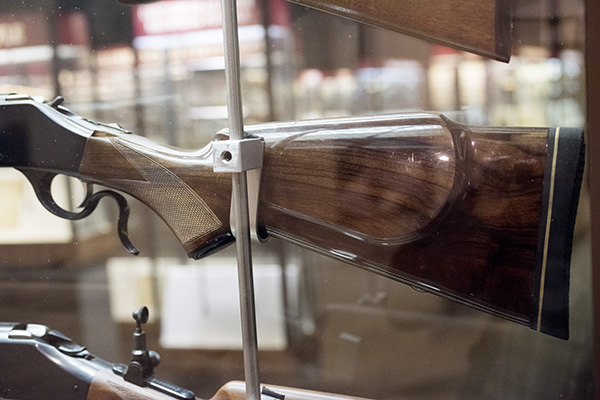
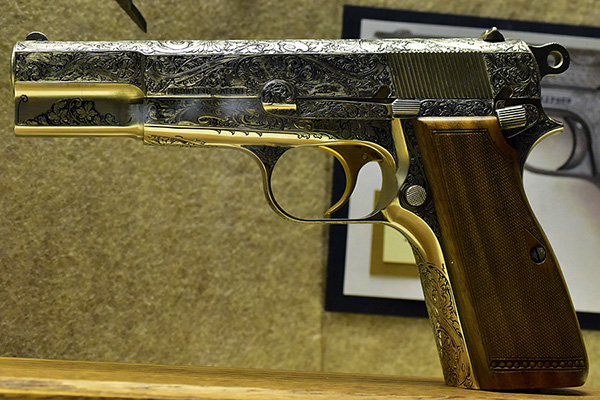
Handguns, rifles, machine guns…Browning’s creations cover it all.An 1886 Winchester. That buttplate is punishing with the 1886’s .45 70 cartridge.The 1911 .45 ACP semi-auto handgun, one of Browning’s best-known inventions.A few of Browning’s single-shot rifles.More cool Browning single-shot rifles. The second one from the top is a Browning B78. I have one of those rifles.A close up of the Browning 1878 stock.A display of Winchester rifles.An ornately-engraved Browning 9mm Hi-Power handgun. It was a later design than the 1911.
The lighting in the Browning museum was dim, and that’s why the photos you see in this blog are perhaps a bit below what I try to present on the blog. I was shooting at a very high ISO without flash, as most of the displays were behind glass. The photos are not great, but they are pretty good considering the lighting.
There were a lot of interesting firearms on display, and then we migrated over to the car collection and the railroad museum. Those will be the subjects of subsequent blogs. Trust me on this…if you’re ever in Ogden, you don’t want to miss this place.
After a great lunch in downtown Ogden, we talked about where we’d go next, and Susie suggested Promontory Summit. We had learned a bit about it in the railroad museum, and we were only about 45 miles away. It’s where the railroad construction crews completed the railroad that reached across the United States. That’s coming up, so stay tuned!
California’s 10 days are up, and Henry is in the house!
Henry, of course, is my new brass-framed .45 70 Single Shot from the rifle manufacturer of the same name. I haven’t shot it yet, but I’m ready. Eager, too. This is going to be fun.
To continue the story and as promised, a few days ago I interviewed Daniel Clayton-Luce, Henry’s Director of Communications. As you know from reading our earlier blogs, I am impressed with Henry and I purchased one of their new Single Shot rifles. I picked up my Single Shot yesterday (practicing all the required social distancing rules, of course), and wow, it is one fine firearm. Take a look.
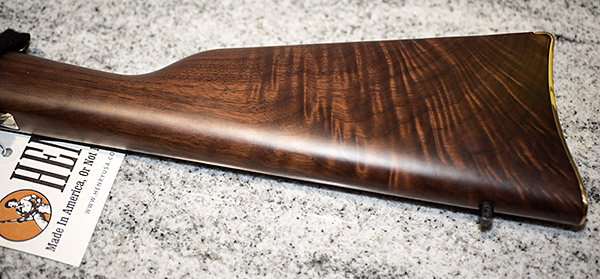
With me, it’s always been about the wood. I’ll get better photos when I’m basking in the grand and glorious sunshine at the West End Gun Club (and I’m not sure just yet when that will be), but here are a few teaser shots.
Like I said above, I haven’t shot the Henry yet. But my first impressions are very, very good. The wood is stellar (both the stock and the fore end), the wood-to-metal fit is way better than what I’m used to seeing on production guns, the action feels crisp and tight, and the brass frame and buttplate are classy. The trigger is a little heavy, but it is breaking-glass crisp, and the rifle shoulders well. The quality is off the charts. It’s that good.
So, about that interview with good buddy Dan from Henry USA…let’s get to it. My first questions were these: What prompted Henry to enter the single shot rifle market, and did Henry do so by purchasing the old Harrington and Richardson design and production equipment?
Dan explained to me that the new Henry Single Shot is a Henry through and through, it has no relation to the H&R design, and I would absolutely notice a difference in quality between it and the H&R guns. He sure was right. I am a collector and admirer of fine rifles (I’ve focused primarily on Ruger No. 1 and Ruger No. 3 rifles), and I think I know a bit about what goes into a good rifle. For me, the Ruger No. 1 has been the gold standard, especially the earlier ones made in the late 1960s and 1970s. I’m here to tell you that the new Henry is equal to those rifles, and perhaps even better. The fit, the finish, the wood, the bluing, and the overall feel of my Henry is absolutely top notch. Surprisingly, the new Henry brass-framed .45 70 (at an MSRP of a little over $600) is less than half the cost of a new Ruger No. 1. I am impressed. Dan told me that Henry decided to enter the single shot market with a premium offering, and after examining my new rifle, I can tell you that “premium” is the right adjective. My Henry Single Shot is stunning.
I told Dan that I thought entering the single shot rifle market had to be a risky venture (H&R went out of business, Ruger’s No. 1 sales have declined significantly, and the rage today seems to be black plastic Rambo wannabee guns). Dan told me that bringing the Henry Single Shot to market wasn’t as dicey a proposition as it might appear. Henry USA felt there was a strong desire in many shooters to get back to the basics, and shooting doesn’t get more basic than only having one shot. You need to make that one shot count, Dan said, and there’s an inherent challenge that makes a successful hunt with a single shot rifle more rewarding. It forces you to slow down, take your time with each shot, and think about the fundamentals. Dan didn’t have to convince me. I knew exactly what he was talking about. My first rifle was a single shot and I’ve been addicted to them ever since.
Dan told me the Henry Single Shot is doing well. Sales are good, and the rifle is a flexible platform (it is easy to introduce new calibers). In viewing the Henry USA website, I saw that the Single Shot is offered in .223, .243, .30 30, .308 Winchester, .357 Magnum, .44 Magnum, and .45 70. They have shotgun versions, too, in .410, 20 gauge, and 12 gauge. I suggested that Henry consider adding .22 Hornet to the mix (the .22 Hornet is a classic cartridge and it is one of my favorites, as you know from our earlier blogs on the Ruger No. 3 and my vintage Winchester Model 43). Dan said they would take a look at that and I immediately put my oar in the water…I told Dan when they bring out a .22 Hornet I want the first one off the production line (with fancy walnut, of course).
I asked Dan if they were going to offer replacement barrels to allow changing from one caliber to another. There are no plans to do so, he told me, and I can see the logic in that. Henry offers two models of the Single Shot rifle, one with a brass frame and one with a steel frame. The brass frame models are offered in chamberings that operate at lower pressure (.45 70, .357 Magnum, and .44 Magnum). If the barrels were interchangeable, there’s a risk someone might mount the barrel for a higher-pressure cartridge (e.g., .308 Winchester) on a brass frame. I get it.
I asked about folks using Henry rifles in competition, and Dan told me they are popular in both SASS (Single Action Shooting Society) and cowboy silhouette. There are no kits on the market for slicking the actions on a Henry lever gun (as exist for Marlin rifles), but the Henry rifles still have a good presence in these events.
Henry’s website says that Henry is the leading lever action manufacturer. Dan said that’s true, both from the perspective of quantity of rifles and sales revenue. That’s impressive. Marlin and Winchester have been around for more than 150 years, and Henry has already surpassed them,
My next question was on takedown and cleaning. I’ve owned Marlin and Winchester lever guns, and the difference in disassembling the two for cleaning is significant. On the Marlin, you only have to remove one screw (the lever pivot screw), and then the lever, the bolt, and the ejector are easily removed to provide access to the breech. Disassembling a Winchester is much more complex. Dan told me the Henry lever guns are like Marlins in that regard. That’s a good thing. On that same topic, I spent some time looking at Henry’s web-based maintenance videos. As a guy who’s done a few of those for CSC Motorcycles (I know what it takes to make a good video), I was impressed. The Henry videos are excellent. They cover disassembly, reassembly, sight adjustment, cleaning, and more. This is good stuff.
Anthony Imperato is Henry’s President and CEO (that’s Mr. Imperato you see in the photo above). In the video on the Henry website he comes across as a cool guy, so I asked the question: What’s he really like? Dan told me that Anthony is a personable, good-natured, hands-on leader and a genuine nice guy. He’s a shooter, too. That was good to hear. When I work with the best motorcycle companies (like CSC or Janus), it’s always good to see that the top people are riders as well as business leaders. Dan told me that the overwhelming majority of the nearly 500 employees at Henry are shooters and hunters. It sounds like a team I would like to join. If I was younger and looking for a place to make a difference, I’d send a resume to Henry.
Henry USA started as a small manufacturing operation in Brooklyn, New York. Henry outgrew the Brooklyn facility and moved manufacturing to Bayonne, New Jersey. In 2016, Henry opened a second plant in Rice Lake, Wisconsin to manufacture the Single Shot. Henry has grown to nearly 500 employees and they now offer a wide range of rifles, shotguns, and accessories. Take it from me, folks: Henry is the real deal, a genuine Made-In-America success story.
I asked Dan about the make/buy mix on their guns, and he told me 100% of the parts in a Henry are made in the U.S. The walnut comes from Missouri and is finished in North Carolina. There must be something about the soil and the water in Missouri; all the best wood from custom riflesmiths comes from Missouri. And North Carolina has a long heritage of making high end furniture, so it’s a natural fit for those good Southerners to craft the Missouri walnut for Henry. Henry uses a spray varnish on all but their modern version of the original Henry rifle (those rifles have an oil finish). I examined my Henry carefully, and the finish is flawless. I’m pretty picky about that sort of thing, having finished a few rifles myself. These folks have it wired. Henry does its own machining, too, including the barrels.
Dan and I spoke about their different models for a bit, and I asked which one is the most popular. The best-selling of all the Henry rifles is their H001, the .22 lever action rifle. In the Single Shot series, it’s the .45 70 (I guess great minds work alike). Dan told me every Henry has a lifetime warranty that follows the gun. New, used, or inherited, Henry stands behind the rifle for life. That says a lot. Henry tests every rifle for safety and functionality. They don’t test for accuracy, but they don’t need to. I know from firing good buddy TK’s beautiful brass-framed .44 Mag Henry lever gun that they are very accurate. When TK let me shoot his .44, I put five slugs through a hole you could cover with a quarter. In fact, it was that morning on the range a few years ago with TK that first planted the Henry seed in my mind.
I was going to ask Dan why someone would buy a Henry instead of a Marlin, a Winchester, or a Ruger, but I already knew the answer. It’s for all the reasons you see above. Good walnut, classy looks, a good trigger, real craftsmanship, a great price, accuracy, a lifetime warranty, and it’s all made right here in the USA. It just doesn’t get any better than this. The Henry .45 70 Single Shot is a beautiful and handy carbine that looks and feels the way a gun should. It’s 7 pounds and .45 70 chambering will make for a bit of kick on the bench with the 405-grain Missouri bullets, but that’s okay. On a hunt, I’ve never felt the recoil or even heard the gun fire when the hammer drops. That’s what intense concentration does; you folks who have experienced it already know that. The look? Henry nailed it. There’s something about polished brass, blue steel, and fancy walnut that simply feels right on a fine firearm, and Henry has made this a fine firearm indeed.
Stay tuned to the ExhaustNotes blog for the .45 70 Henry range test. Sign up here and never miss an ExhaustNotes blog!
Check out our earlier Henry Single Shot stories here:
The new Henry Single Shot, brass frame .45 70 rifle. Henry makes a beautiful rifle.
I’m using the time before I pick up my new Henry rifle to prepare the reloaded ammunition I want to test for accuracy. You will recall that in an earlier blog we discussed the three .45 70 load levels shown in modern reloading manuals. As I mentioned in that earlier blog, I use the loads intended for the 1873 Trapdoor Springfield. Those loads were powerful enough to take down all kinds of critters back in the 1800s, and in developing loads for other .45 70 rifles, I’ve found these to be fun to shoot and accurate.
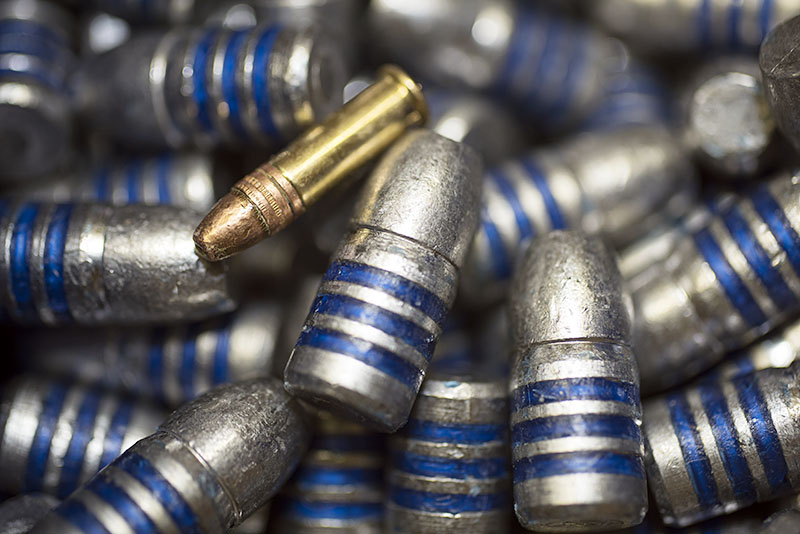
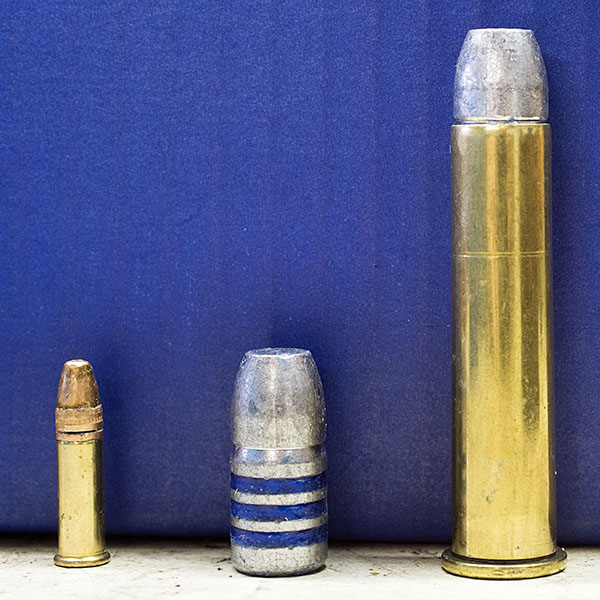
Missouri 405-grain cast .45 70 bullets. These have proven to be very accurate in other .45 70 rifles. I’m trying these and two other bullets in the Henry. The .22 Long Rifle cartridge you see here didn’t come with the Missouri bullets; I added it to give you an idea of just what a monster the .45 70 cartridge is.
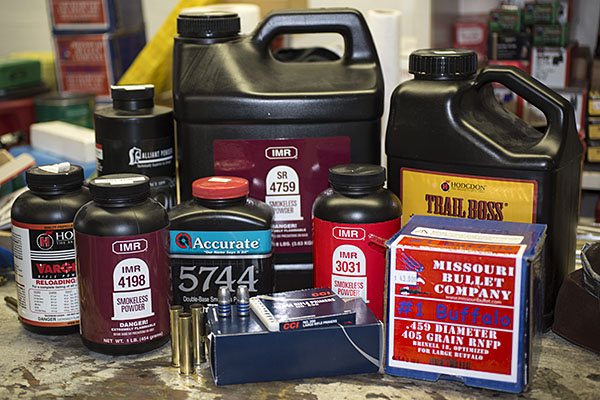
My loads are based primarily on the components I have on hand and loads I’ve known to work well in the past. Powders include SR 4759, IMR 4198, IMR 3031, 5744, Varget, and Trail Boss. Bullets include the Remington 405-grain jacketed soft point, the Hornady 300-grain jacketed hollow point, and the Missouri 405-grain cast roundnose.
A photo showing some of the components to be used in this test. When loading, I would never have all of this stuff on the reloading bench, and in particular, I would never have more than one powder on the bench at the same time. The risk of mixing powders is too great. If you have more than one powder container on the bench, it’s very easy to pour the remaining powder in the dispenser into the wrong container (don’t ask me how I know this). When that happens, the only prudent thing to do is throw the mixed powder on the front lawn (it makes good fertilizer).
I like all of the bullets I listed above, but I particularly like the Missouri bullets. The Missouri cast bullets seem to always be available, they are relatively inexpensive, and they are accurate. I’m expecting to see great accuracy from these in the Henry, as they shoot well in the Ruger and the Marlin. The 405-grain Missouri bullets are accurate in the Chiappa 1886, too, but that rifle’s stock design and buttplate make the recoil painful when shooting the heavier Missouri bullets.
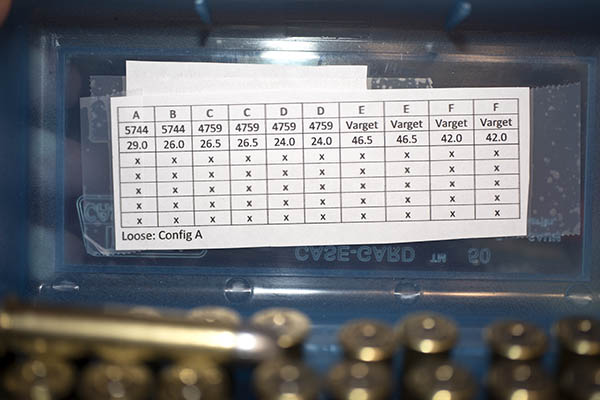
Here are the .45 70 loads I will test in the Henry:
When testing for accuracy, it helps to keep things organized. I’ll bring this table to the range with me and record my results as soon I retrieve the targets. All loads will be fired using open sights at 50 yards.
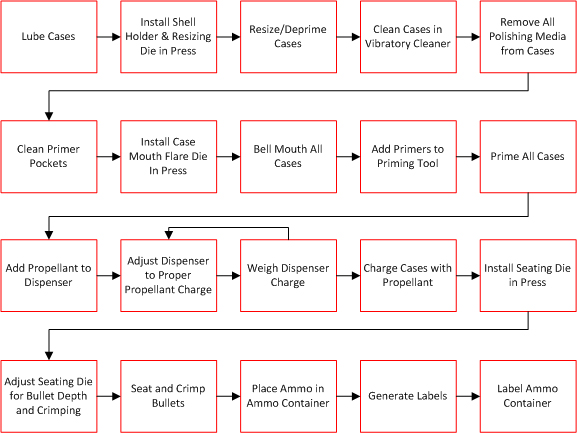
For a more in-depth reloading process overview, I invite you to review our earlier series on loading .45 ACP ammunition. The .45 70 reloading process is very similar to loading handgun ammo. That’s because the .45 70 is nearly a straight-walled cartridge, so the steps are the same. This is what is involved in reloading .45 70 ammo:
The reloading process. It looks complicated, but it’s very intuitive. Most folks who reload find it as enjoyable as shooting.
I use mostly RCBS or Lee reloading dies for all of the cartridges I load. Both are good companies, and both offer superior customer service (if you ever need it, which has only occurred a couple of times for me). I’ve been reloading .45 70 ammo for close to 50 years now, and I’ve been using the same set of RCBS dies the entire time.
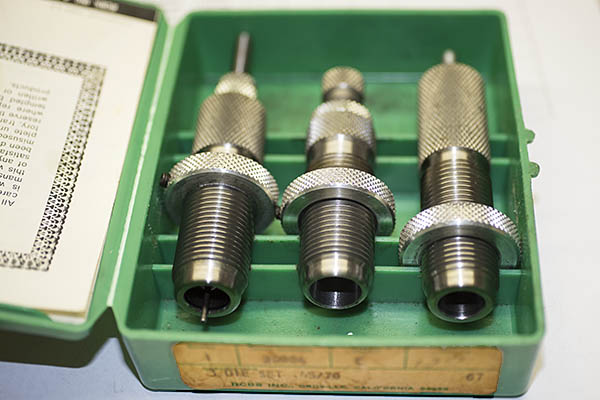
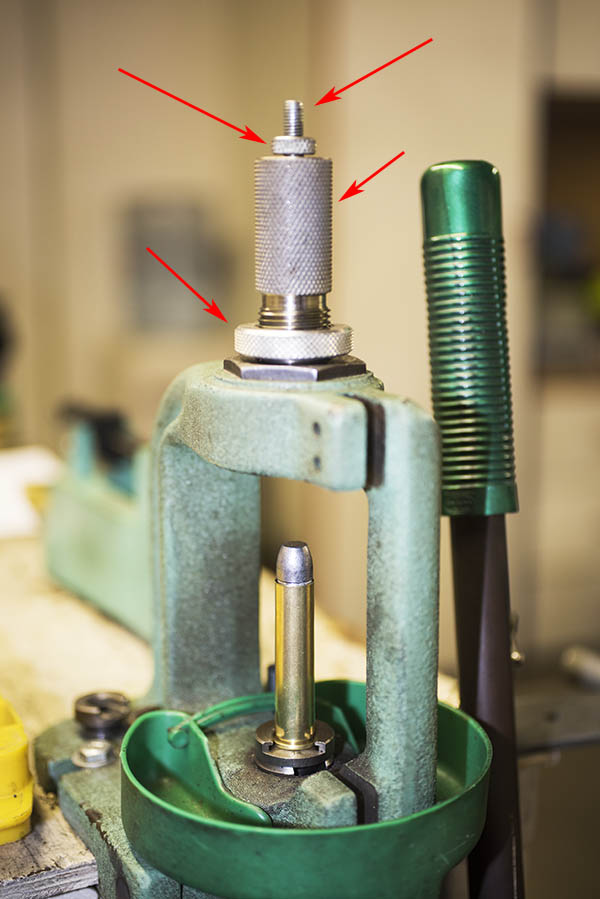
A three-die RCBS set. The first die (on the left) deprimes and resizes the fired case to its original diameter. The case has to be lubricated for this step, or else it will stick in the die. The second die is called the expander die. It expands the upper portion of the cartridge case and, if adjusted to do so, adds a flare to the case mouth. The third die (on the right) is the bullet seating and crimping die. It can be adjusted to change the depth to which the bullet is seated, and to add a crimp if you wish to do so.
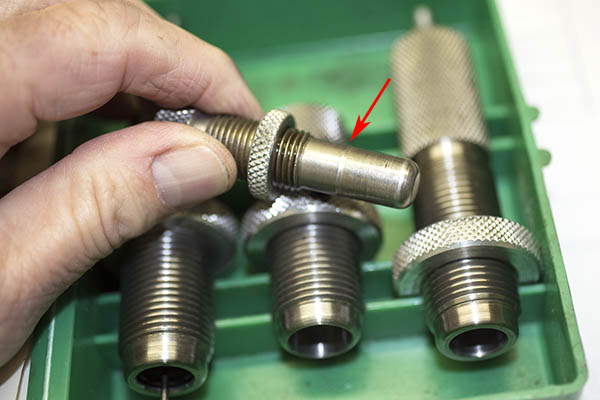
The expander die (the one in the center of the above three dies) is the one that flares the case mouth. It contains a threaded insert with a step in it to apply the bell mouth to the case.
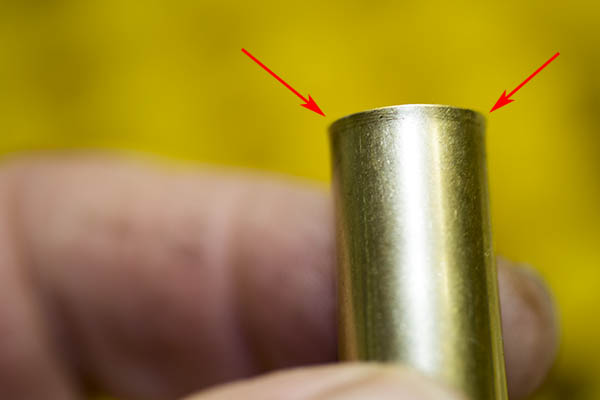
In this photo, the case expander has been removed from the die to show the diametral step. It is this step that adds a flare to the case mouth.
This is what the case mouth should look like after it has been flared. You don’t want to overdo this step. You just want to get enough of a flare to allow the bullet to get started in the case.
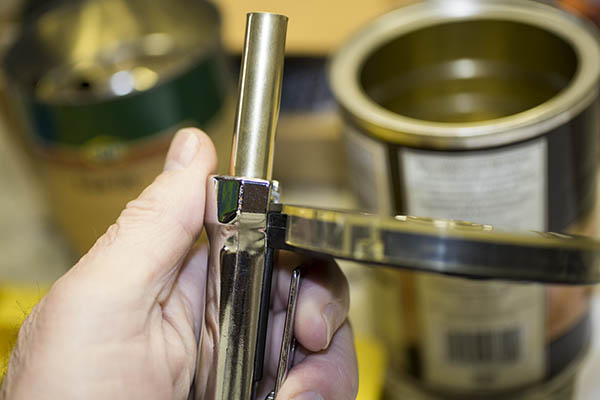
A .45 70 case with a flared mouth. We add the flare to allow the bullet to enter the case with no shaving of the bullet.
After the case has the flare applied, it’s time to clean the primer pockets and then prime each case. I use another RCBS tool to clean any combustion residue from the primer pocket (see our earlier tutorial on loading .45 ACP ammo), and then I use a Lee priming tool to seat the primers.
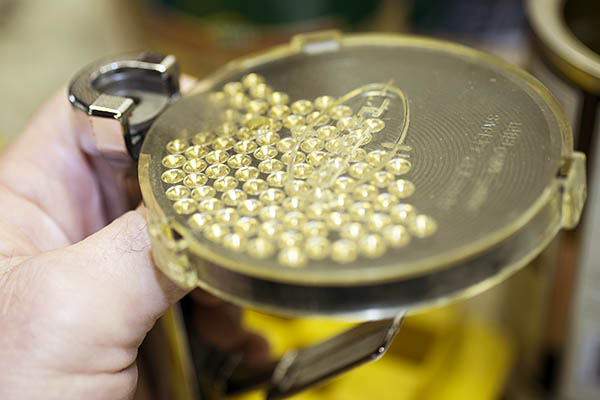
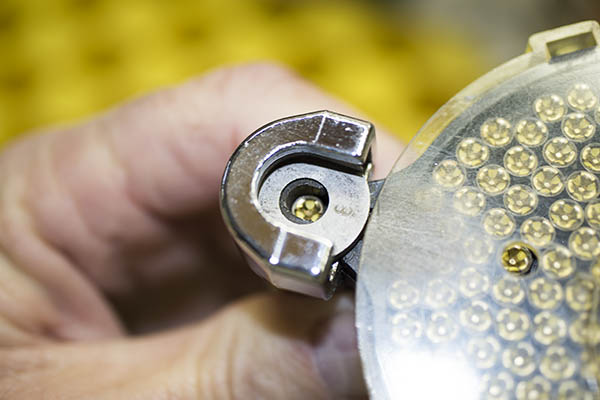
The Lee priming tool. This is another tool I’ve been using for five decades. It’s a much better way to prime cartridge cases.A CCI 200 large rifle primer in place, ready to be seated in a cartridge case. The .45 70 cartridge requires a Lee No. 8 shellholder, shown in place in this photo.A .45 70 case in the Lee priming tool. Compressing the handle (shown to the right of the priming tool barrel) forces the primer into the case. You do this one at a time for each case.A freshly primed .45 70 cartridge case.
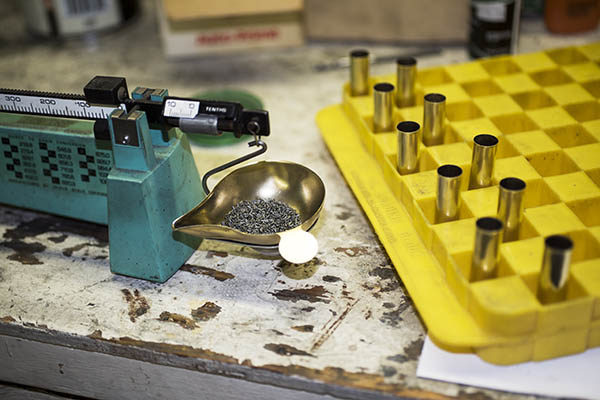
After all the cases have been cleaned, flared, and primed, it’s time to add propellant. I use my RCBS scale along with a powder dispenser to add the right amount of powder to each case. To get the correct amount of powder, I always consult a load manual. I’m showing you different charge weights in this blog, but DO NOT rely on what I’m telling you (or what you read on the Internet from other people) for this information. Always consult a reloading manual. Several reloading manuals are available; I prefer the Lyman manual and it’s the one I use most often. Most of the other manuals are either from bullet manufacturers or propellant manufacturers, so they list only their components. The Lyman manuals are not restricted to a single brand of bullets or powders, as Lyman does not manufacture bullets or powders. Lyman does a good job, I think.
My RCBS powder scale, the reloading tray, and ten .45 70 cases waiting for their propellant charges.
When I load different test loads as I’m describing in this blog, I’ll charge and complete each group separately. Typically, that’s ten cartridges in a group.
Once the cases have been charged with propellant, it’s time to seat and crimp the bullet. I typically use a light crimp for the .45 70. Crimping involves bending the flared case mouth into a crimping groove (sometimes called a cannelure) on the bullet. You crimp a cartridge for three reasons: To prevent the bullet from being forced further into the cartridge case if it is fed into the chamber automatically (as occurs with, say, a 9mm or .45 ACP cartridge), to prevent the bullet from backing out of the case due to the recoil of other cartridges (as might occur in a revolver or a rifle magazine), and to hold the bullet in place when the primer first fires (this allows the flame front to build to a consistent pressure in cartridge prior to driving the bullet down the bore). It’s that last reason that I’m most interested in here. It should make for a more accurate cartridge. Theoretically, neither of the first two reasons is a consideration for a single shot rifle.
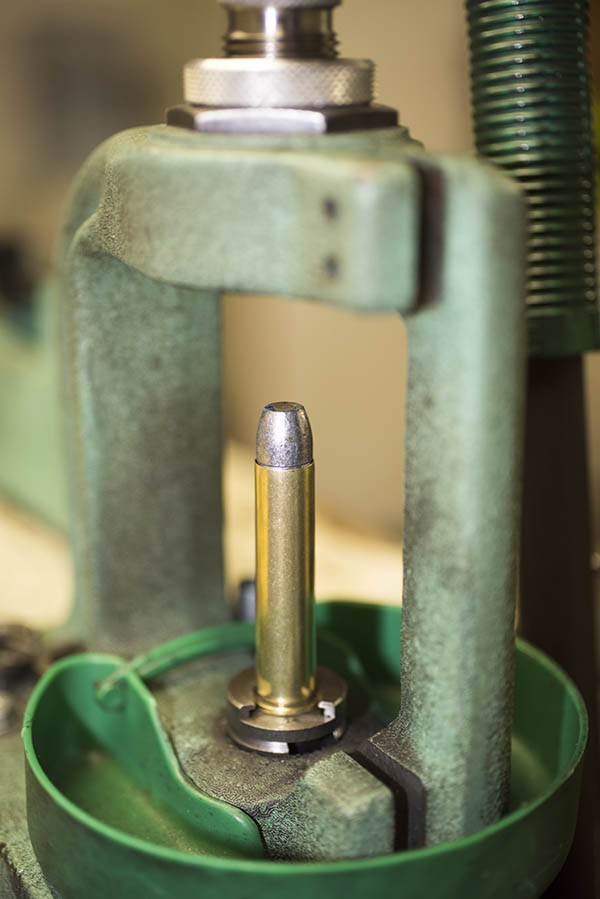
A Missouri bullet on top of a charged .45 70 case, ready to be run into the bullet seating die in the RCBS Rockchucker press.
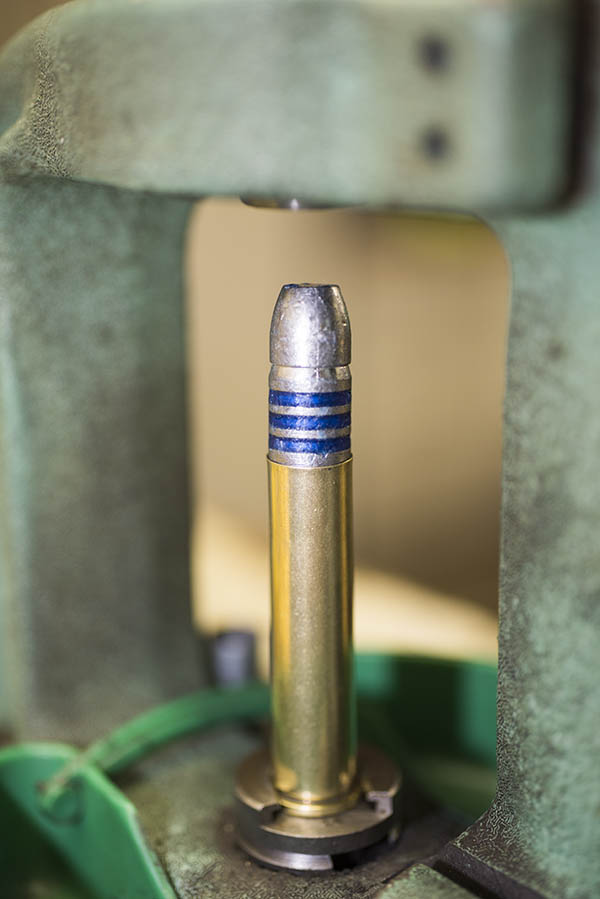
Seating the bullet and crimping it is a bit of a dance. You have to get the bullet seated to the right depth, and then you have to apply the crimp. We use the third and final die in a three-die set to accomplish both. I screw the bullet seating portion of the die fairly far into die initially and then I screw the die into the press to get the bullet seating depth where I want it. In this case, I want the top of the brass case to be nearly even with the top of the bullet’s crimp groove. Then I back the bullet seat all the way up in the die, and screw the die body into the press such that it forms the crimp (there’s a tapered decreased diameter in the die insider diameter that forms crimp). Once I have the crimp where I want it (and the amount of crimp I want), I then screw the bullet seater all the way such that it contacts the bullet. I then make sure everything is jake on the next round (you know, the same crimp and the same cartridge overall length), I make any required small adjustments, and then I lock everything down with the die’s two locknuts and load the remaining cases.
Adjustments on the seating and crimping die. The small-diameter threaded shaft controls fine adjustment of the bullet seating depth. Turning the main die body into or out of the press controls coarse bullet seating depth and crimp. The two locknuts (denoted by the arrows on the left) lock the bullet seating shaft and the die body in place.The Missouri bullet nearly fully seated in the case, but not yet crimped. I’ll seat the bullet just a bit deeper, and in the last few thousandths of an inch on the press stroke, the upper edge of the cartridge case will be crimped by the die around the bullet.A seated and crimped Missouri bullet in a .45 70 brass case. When I bellmouth the cases, I only open them up just enough to allow the bullet to start into the case. When I crimp, I only crimp a little bit. This minimizes working of the brass around the case mouth. Loading at the Trapdoor Springfield levels as I do, and using this minimal amount of opening and then crimping the brass, results in long case life. These cases were purchased in the 1970s and I’m still using them.A completed round. This .45 70 cartridge is ready chamber and fire. It’s a big cartridge.
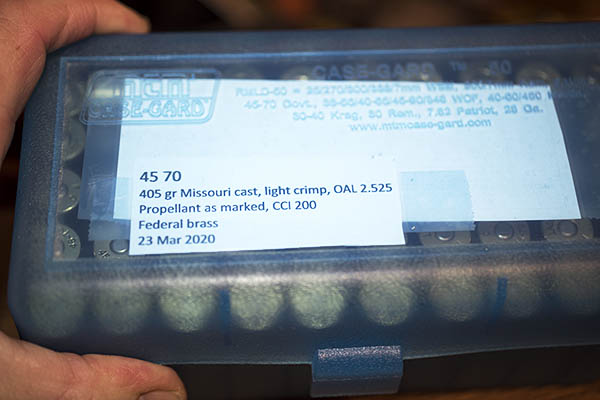
After I’ve done all of the above, I immediately label the packaged, reloaded ammo so that I know what I have. I can’t rely on my memory and do this later; I always perform the labeling operation as soon as the reloading operations are complete.
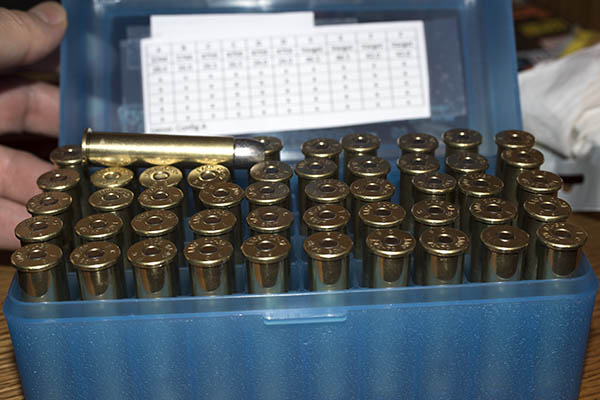
A box of 50 .45 70 cartridges labeled and ready to take to the range. I always label my loads as soon as I finish them.Because these are cartridges loaded differently for accuracy testing in the new Henry rifle, I included a map inside the cartridge container to identify how each group has been loaded.Ready to go to the range. Reloaded cartridges are less expensive than factory ammunition, and I will be able to find which combination of components performs with the greatest accuracy in my new Henry rifle. With factory ammo, you pay more and you get what you get in terms of accuracy.
There you have it. I have all the .45 70 ammunition I want to test loaded, boxed, labeled, and ready to go to the range. Now all I have to do is take possession of my new Henry, head out to the West End Gun Club, and see what works best. You’ll get to see it, too, right here on the ExNotes blog.
Check out our earlier Henry Single Shot stories here:
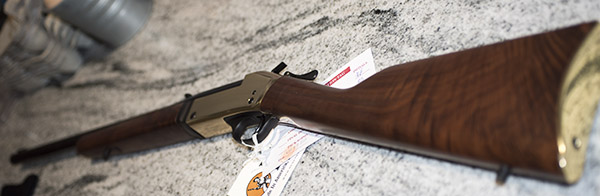
The new Henry Single Shot. Mine has exceptionally fancy walnut. I am a soft touch when fancy walnut is involved.
I’m about a week away from having sufficiently cooled (at least in the Peoples Republik of Kalifornia’s eyes), which is another way of saying I have 7 days left until my 10-day waiting period is over, and then I’ll be able to pick up my new Henry .45 70 Single Shot. (“Single Shot” is capitalized because it’s a proper noun; it’s Henry’s official name for this rifle.)
Another view showing the entire Henry Single Shot rifle. I’ll get better photos when I get to the range; I shot these photos at the dealer.
I am loading a series of cartridges to test for accuracy in the new Henry and I’m going to tell you about the loads, but before I get into that I want to tell you about the three levels of reloads you find in the .45 70 reloading manuals. I’ll post about the different loads (and reloading those rounds) in the next blog.
A Sense of Scale: A .22 Long Rifle cartridge, a 405-grain Missouri cast .45 70 bullet (just the bullet is bigger in both length and diameter than an entire .22 cartridge), and a reloaded .45 70 cartridge.
.45 70 History
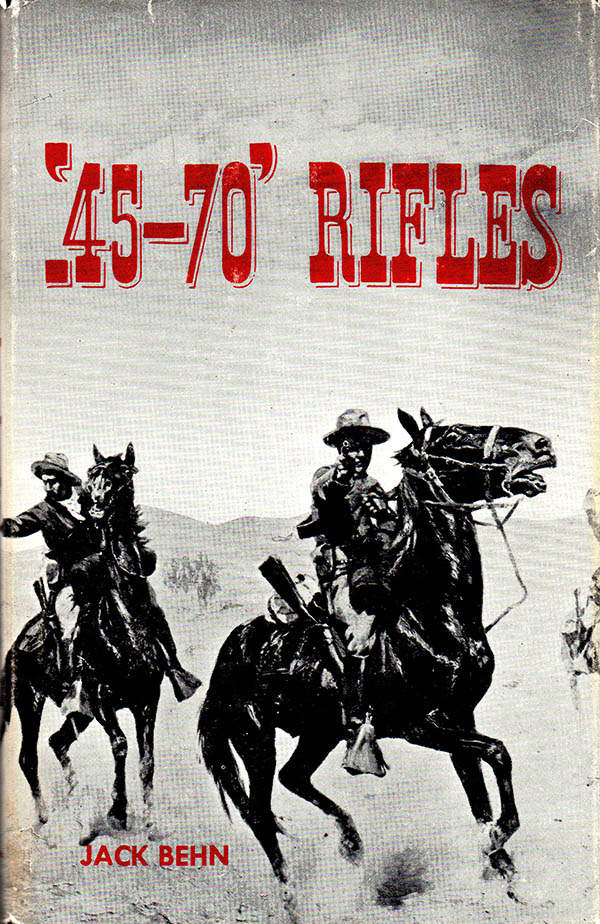
I’ve been a student of the .45 70 for close to 50 years, and the cartridge is nearly 150 years old. One of the best sources of information on the early .45 70 rifles is Jack Behn’s touchstone reference shown below.
One of the best references on early .45 70 rifles is Jack Behn’s excellent 1956 book. It was published by the Gun Room Press, an imprint owned by the now defunct Rutgers Gun Store. When I picked up my 1973 Colin D. MacManus 1911 .45 auto, it was from the Rutgers Gun Store in Highland Park, New Jersey.
At the end of the Civil War, the Army knew it needed a breechloading rifle (one that loaded from the rear with metallic cartridges). This resulted in development of the 1873 Springfield rifle and the .45 70 500 cartridge, so designated because it fired a 500-grain, .458-inch diameter lead cartridge propelled by 70 grains of black powder. That was later changed to a 405-grain lead cartridge because soldiers complained that recoil with the 500-grain projectile was excessive.
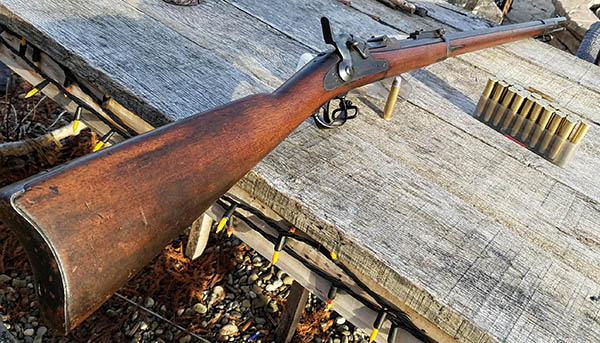
An 1873 Trapdoor Springfield rifle.
That .45 70 Trapdoor Springfield remained in service from 1873 through the Spanish American War and our wars against the Plains Indians. It was also the rifle most frequently used by buffalo hunters to nearly exterminate the American bison, which was really little more than an extension of the war against the Indians (it’s not widely known, but the dominant reason the U.S. Government encouraged eradication of the American bison was because it was the principal source of food, shelter, and clothing for the Indians).
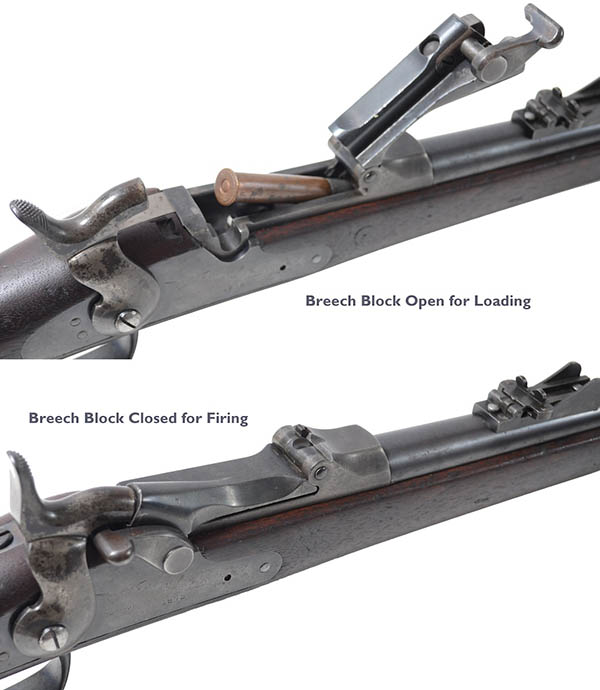
The Trapdoor action. New in its day, it is antiquated today. It is a weaker action than are those used in modern single shot and lever action rifles, and it therefore is loaded to lower chamber pressures.
Trapdoor Springfield .45 70 Loads
The “Trapdoor” designation for the 1873 Springfield refers to the action design. The Springfield’s action had a hinged element that rotated forward to allow loading a cartridge, which was then closed and locked in place prior to firing a round. It was state of the art in 1873, but it was inherently weak and limited the pressures to which ammunition could be loaded. But it was enough. The Springfield action could withstand pressures up to around 17,000 psi, sufficient to launch a 405-grain projectile at velocities a little north of 1400 feet per second. It was more than enough to kill a man, and in fact, it was enough to kill a buffalo.
Winchester and Marlin .45 70 Loads
The .45 70 cartridge had a lot going for it, and in 1886, Winchester introduced a .45 70 lever action repeater (their Model 1886). Marlin had previously introduced a .45 70 lever action repeater in 1881. The Winchester and Marlin rifles had two advantages: They could fire repeatedly by operating the lever action and squeezing the trigger, and the lever gun actions were stronger (so they could be loaded to higher pressures with resulting higher velocities). I don’t know that any of the ammo companies loaded the cartridge to the higher pressures the Winchester and Marlin rifles could handle back in those days (probably out of a fear that the ammo might be used in the weaker Springfield action), but folks who reload today and who have either a Marlin or a Winchester can load their ammunition to the higher levels allowed by the lever gun receivers.
The reloading manuals show that the Model 1895 Marlin and Model 1886 Winchester lever actions can handle chamber pressures in the 27,000 psi range. That’s enough to drive a 405-grain bullet out at about 1700 feet per second. That’s a smoking hot load.
This is a Chiappa reproduction of the 1886 Winchester rifle, chambered in .45 70. This is a lever action rifle.The 1886 Chiappa reproduction. The curved metal buttplate is a faithful reproduction of the original Winchester design, and it is punishing when the hammer drops. Nice wood, huh?A modern Marlin 1895. When I saw this one on the rack, I knew I had to have it. I’ve owned the rifle about 25 years now. It’s very accurate, and it regularly shoots into an inch with open sights at 50 yards.
Ruger No. 1 and No. 3 .45 70 Loads
The next step in the .45 70 evolutionary chain? That would be the single shot rifles offered by Ruger starting in the 1970s. Ruger had two: Their No. 1 rifle and the No. 3. Both use the same action, and it’s strong. In the Ruger rifles, you can load .45 70 ammunition to nearly the same velocities and the same pressures as a .458 Winchester Magnum, which is to say, crazy levels (at least in terms of recoil). Ruger rifles chambered in .45 70 can handle pressures approaching 40,000 psi, with 405-grain bullet velocities north of 2,000 feet per second. I’ve done this. It’s no fun.
A Ruger No. 1 falling block rifle. This is the rare 26-inch barreled version with figured Circassian walnut. Ruger only made a limited number of these variants and most of them have very plain wood. It’s pretty, but the Marlin shown above is more accurate.
.45 70 Loads: The Bottom Line
The upshot of all this? There are three levels to which you can reload .45 70 ammunition: The Trapdoor Springfield level, the 1886 Winchester/Marlin level, and the Ruger level. When you see this in a reloading manual, you’ll see three sets of reloading data, designated separately as explained in this blog.
What does all this mean in the real world? Your mileage may vary, but for me, I never venture into the Marlin/Winchester and Ruger .45 70 reloading levels. There’s just too much recoil, and you don’t need to go there for accuracy. I would argue further that you don’t need to go there for lethality (the .45 70 in 1873 Trapdoor Springfields killed a lot of buffalo). I stick to the Springfield levels for all of my rifles (even though I could go higher), and that’s how I’m going to load for the new Henry rifle, too.
More Tales of the Gun here, including detailed info on each of the rifles shown above!
I sure was surprised a couple of days ago. While sheltered in place, or locked down, or in self-isolation, or whatever the nom du jour is, I received an email from my local FFL telling me that my Henry Rifle had arrived. Wow, I didn’t even know it had been shipped yet! You know the deal…I’m here in California and I have to wait 10 days so that I can cool sufficiently before taking possession of the new rifle, but I wanted to get the process started. I made an appointment so as not to be around too many other people and off I went. Truth be told, it felt great just getting out of the house, and I felt even better when I saw the Henry .45 70. It’s beautiful.
You can refer to our earlier blog for the first part of the Henry story. In it, I told about asking their marketing director (good buddy Dan) to try to get me one with a nice piece of walnut, and wow, did they ever! When I arrived at the FFL, the lighting at the store was not conducive to great photography, but I did my best:
What’s really nice about this rifle is that the stock is highly figured on both sides, and it is what I would call exhibition grade walnut. I’m guessing it’s American walnut, as Henry prides itself on being made in America. I’ve been collecting rifles for a good half century now, and I have some with really nice wood. The new Henry jumped to the head of the pack. It’s stunning.
I had hoped to have a more in depth chat with Dan this week, but like all companies, Henry has its hands full right now. That’s okay; we’ll get to chat later. What Dan told me earlier is that all these rifles are nice, and they are a cut above what one would normally see in a rifle in this price range. I think he’s being too modest. I’ve seen and I own rifles that cost two to four times as much as this Henry, and the fit and finish on those is not as nice as this. It truly is a beautiful rifle. My compliments to Henry USA!
I’ve already started loading .45 70 for the Henry ammo development effort, and I think the next blog will be on that topic. This is going to be fun, folks. I can’t wait to talk possession of the rifle and I can’t wait to start shooting it. I’m eager to see how the rifle performs, and I’m equally eager to get the Henry on the bench and out in the sunlight so I can get better photos for you…this rifle deserves it!
We’re going through a rough patch right now, and when I say we, I mean that literally. We, as in the whole world, are working through a terrible situation. But it will pass, and when it does, we’ll be better people. I’ve cut back substantially on the time I spend on social media for a lot of reasons, not the least of which is my deep disappointment in people who are using the current world health situation to post stupid stuff. But every once in a while you see something good, and this meme from Southern Pride and Dixie Proud was one of those rare occasions: