Wowee, it’s been nonstop travel for Gresh and me these last few weeks. As you know from reading the ExhaustNotes blog, Gresh rode his Husqvarna to the Bonneville Speed Week in Utah from his home in New Mexico. He’s a better man than I am. I don’t think I could handle riding a Naugahyde-covered 2×4 all that distance. Joe is back on the Tinfiny Ranch in New Mexico now, no doubt thinking about concrete, motorized bicycles, getting his vintage Z1 back on the road, and more.
I’ve been on the road, too. It was a scouting expedition for an upcoming hunting trip with my good buddy J, back to Soprano-land for my 50th high school reunion, and then up to Seattle for a friend’s wedding. We’re racking up the miles, but I’m home now, and let me tell you, it’s good to be home! I was supposed to be on the road this past week for the Three Flags Classic (I would have been on the way home from Canada by now), but it was getting to be too much and I bailed out on that one. Like my good buddy Dirty Harry likes to say, a man’s got to know his limits, and I hit mine.
Scouting for Deer

Good buddy J and I snuck away to an undisclosed location to scout deer. Where we were and where we’re going is a closely-held military secret, but we saw lots of game, we’re going back heavy, and we’re looking forward to bringing home the bacon (or, I guess I should say, the venison). We camped on this trip, which is something I hadn’t done in quite a few years. J makes camping seem like staying at a 5-star hotel. It was fun. Except for the mosquitos. Those little bastards were brutal. I probably won’t be able to make it up there the same time as J (I’ve got another secret mission to Asia coming up real soon), but if I don’t make it on the trip with J, I’ll be there a few days later. Venison beckons and all that. I’ve got a .300 Weatherby load with a deer’s initials on it.
Bonneville Speed Week
Joe’s trek to Wendover for Bonneville’s Speed Week was awesome, and you can get to his posts here…
Salt 1
Salt 2
Salt 3
Salt 4
Salt 5
Salt 6
Salt 7
Salt 8
Reading Joe’s blogs was a real treat; I felt like I was riding along with Uncle Joe. You will, too…click on the above links if you haven’t seen these great stories and enjoy some of the best motorcycle story telling in the world!

Joe has another trip planned in the near term for the Yamaha Endurofest. I’m looking forward to the photos and the stories on that one. I love reading Joe’s stories!
The Big 50
Hey, what can I say? My classmates from our Class of ’69 did one hell of a job putting together an absolutely amazing 50th high school reunion. Surprisingly, I didn’t get a lot of photos…I was having way too much fun. I did get a few, though, and here they be!


At one point, we started grabbing photos of folks from the different elementary schools in our area. Here’s one of the crew who went to Deans School…my elementary school alma mater.

We then thought it would be a good idea to take a group photo of everyone who had detention in high school…you know, where they make you stay late to wash blackboards, clean erasers, and stuff like that for cutting up in class. I’m guessing they can’t do that anymore.
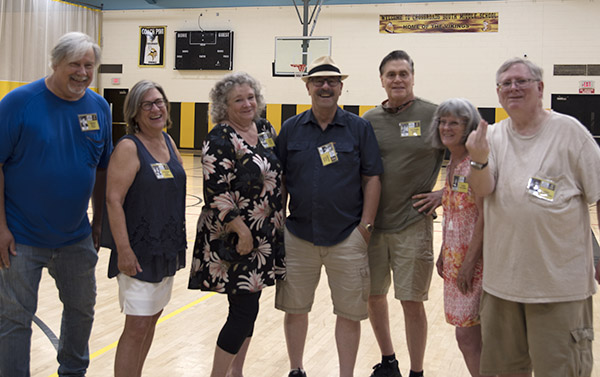
I can’t remember ever having as much fun as we did at the reunion. Everyone looked great. Some of the folks there I first met in kindergarten, and most I had not seen in 50 years. One of the young ladies you see in the photos above had saved some of our high school newspapers, which had a column titled Exhaust Notes. And you can guess who wrote it more than half a century ago. That’s a story for another blog, and it’s coming your way soon.
Don’t miss a single ExhaustNotes blog! Sign up here for automatic notifications…



 Here’s the thing: my 2008 Husqvarna SMR510 single cylinder thumper has always gotten around 50 miles per gallon of gasoline. Sometimes it does 47mpg, other times 52mpg. These are mostly highway mile ratings because traffic doesn’t exist in La Luz, New Mexico. Rain or shine, for 12,000 miles the fuel usage has been consistent. That’s not bad mileage for a high-strung, near race bike engine so I’m happy.
 It seems like tents get larger the more time they spend exposed to sunlight. But the thing is, man, camps were made to be broken. As much as I liked the hot sun, dusty gravel lot and 4-mile walk to the KOA facilities, we had to go.
 We swung through Monticello, Utah, a place where 11 years ago me and Hunter left Dave at a motel room with a broken foot and two hamburgers on his night stand. The past days and present days are crashing together on this ride. If you let your mind wander it’s easy to lose track of where you are on the continuum. The hamburger place where we stocked Dave’s nightstand is still there. Maybe Dave is still in that room. 11 years has gone-and-went representing one tiny tremor of time. What happened?
 When the sample bolt was removed the captivated nut became a free range nut and it wandered off into the frame tube. Of course I had no idea any of this was happening.
 Back to Ace hardware for a $35 drill motor, a $14 drill bit set, and assorted 1/4″-20 bolts and nuts. That bastard rack was going to be secured by any means necessary. I drilled all the way through the frame tube and into the plastic inner fender. Now the longer bolt was slotted through into a locknut on the other side.
 A Ukrainian guy crashed his 900-volt electric bike at 150 miles per hour. He’s okay but the bike is a bit bent. It’s been a hard day on the salt for motorcycles and not much better for the cars. The course is rough and soft.
 A Buell rider was 5th from the start line when racing was called for the day. He’d been in line since 7:00 a.m. and the line is a mile long. It takes patience to go fast.
 Walking the pits is a 6-mile proposition. It’s huge and the blinding white salt burns your skin from underneath. You really need two hats: one on top as normal and one with the center cut out and the brim circling your neck like a Queen Elizabeth collar.
 Old Salts tell me attendance is down this year but that guy who waited all day for his run thinks that there are plenty of people. I’m a rookie so it looks fine to me.
 West Wendover, Nevada.
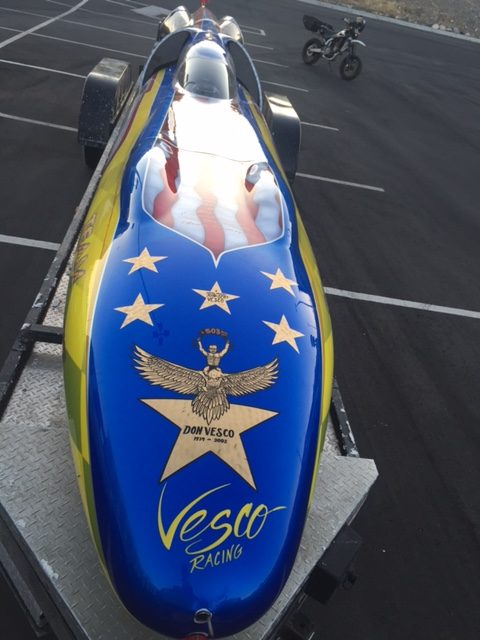 So many talented builders are in Bonneville. The trailers are works of art, their suspensions complex links and air bags. It’s like a superior race of mechanics from another planet has landed on Earth.
 Right now, in this town, the combined brain power could accomplish any task. And it would be accomplished with glossy paint and many, many holes drilled for light weight.
 I like going camping with a truck. You’ve got plenty of space to load your gear and when you get there you can set up a nice little spot. I guess I’ve already told you how much I hate carrying camping gear on a motorcycle and that motels near Bonneville, Utah are expensive. But it seems I can’t stop myself, I just keep complaining. I see those BMW earth-roamer types with all the gear piled up over their heads and I think, “Oh, Hell no! I’m cool as an ice cube, that’s not me.”
 Next I needed a few plastic bits to fit the existing rack and give my U-bolts something to tighten against without bending the metal straps. I knocked these out of some thick plastic I had left over from a boat job 35 years ago.
 My Safety Exhaust on the Husqvarna is high and tight so I riveted a metal heat shield on the left side of the Super MoTour bike. My buddy Mike loaned me the saddlebags, I don’t want them to catch fire in front of him. You’ll be hearing more about Mike, as this Bonneville ride is his idea. All told, I’ve probably doubled the poundage of the featherweight Husky with this jungle gym hanging off the back.
 Unrelated to the luggage situation but still needing sorting was the Husky’s headlight. The normal bulb is an incandescent 35-watt, both high and low beam. The bulb works ok in the daytime but it casts a feeble light for night use. It’s like having a Black Hole on the front of your motorcycle. The pattern reaches only a few feet into the gloom. On moonless nights it struggles to illuminate the front fender. It’s so dim bugs fly away from it. Hey, I’m here all week, invite your friends.
 I tried a bunch of different bulbs. LED, Halogen, HID, and incandescent; most of them ran too hot for the Husqvarna’s plastic reflector. For this trip I’ve settled on a cheap LED bulb with no watt rating or any information stamped into the metal housing. It is a very crummy bulb, perhaps even weaker than the incandescent bulb but I’m hoping it stands up to vibration better. A strange side effect of the LED electronics is that the high beam indicator light stays on all the time. I’m sure the bulb won’t short out and fry my electrical system. What could go wrong?
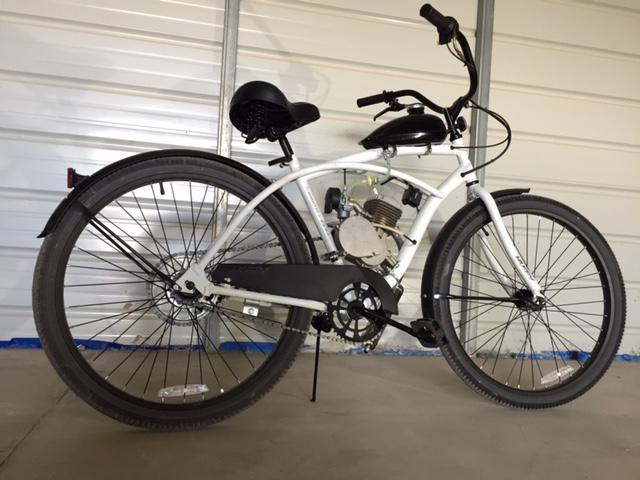 I managed to get all the cables routed and connected. The electrical wiring is concealed inside the large diameter front down tube along with the clutch and throttle. Mini Motor Madness was looking sharp but there were still a few more details to attend.
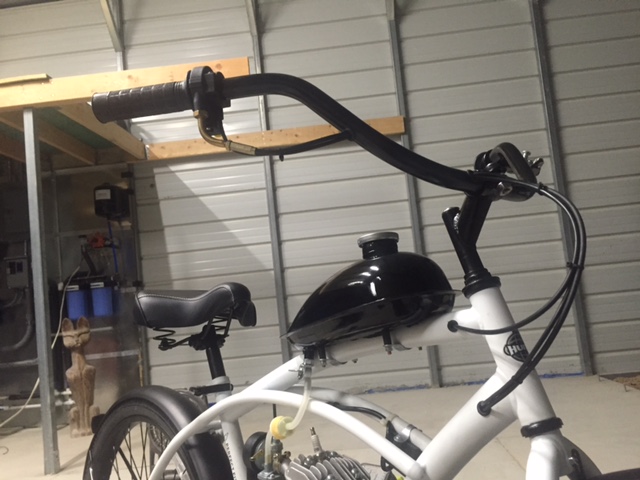 The cute little gas tank has studs spot-welded onto the underside of the tank. Thin brackets fit onto these studs and clamp the tank to the top frame tube. Except that the brackets are so thin they distort when tightened. The studs needed a few spacers to give the nuts something to tighten against.
 From there it was a simple matter to connect the supplied fuel line and filter. The fuel line feels like silicone, it’s very soft and flexible, I don’t think it will need clamps. The kit came with a rubber gasket for the fuel petcock but it looked like the gasket would squirt out the side when the petcock was tightened. I used Teflon tape instead. It hasn’t leaked so far. So many little pieces came with this kit. It really is complete.
 The Wal-Mart fender supports were made from ultra thin sheet metal. Just by looking at them I created a fracture. I cut some scrap L angle aluminum into braces and made a backing plate to spread the load a bit. Hopefully the fender won’t tangle in the wheel.
 Long time Mini Moto Madness readers will recall the chain alignment issue I was having in an earlier episode. I meant to get back to the problem but the bike was nearly complete. I had to hear it run, man. I turned on the gas, pedaled down Tinfiny’s steep, rutted driveway, popped the clutch and the little motor fired right up. For about a second.
 To ride this puppy I’d have to bite the bullet and take that damn rear sprocket off (again!) and fit spacers. Like I said earlier, this kit is complete. It had everything needed to shim the sprocket, although the shims were a little harder to access.
 After butchering the sprocket for shim stock I reinstalled the rear sprocket. Now on their 3rd round trip the elastic stop nuts were losing elasticity but I was all in, I had to ride the beast. The sprocket was a tad wobblier than I remember but my patented sprocket-tuning tool allowed me to true up the mess to a reasonable level.
 And it worked! The little beast fired up and settled into a retro idle, the smoke poured from the recommended 16:1 fuel mix ratio. I live in a steep, hilly area and the bike is geared too tall. I don’t know how fast it goes (that will have to wait for the full exhaustnotes.us road test) but it’s faster than any coaster brake bicycle should be going. The gearing would be ok in Florida but at 6000 feet elevation with 1st gear hills all around it’s Light Pedal Assist all the way.
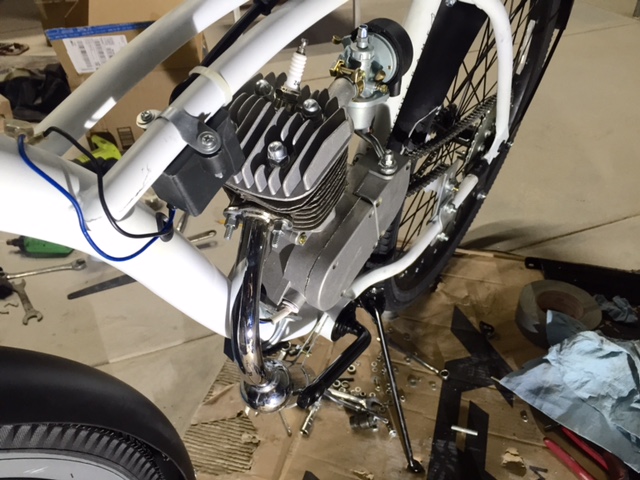 Not only do I rarely finish projects, it takes forever for me not to finish them. I’m a slow worker. I get bogged down in details and miss the big picture. Details like the front engine mount on Mini Moto Madness. The front down tube on the Huffy is a large diameter pipe and the smaller, cast in semi-circle on the engine crankcase will not fit. The engine kit comes with a steel adapter plate and a U-bolt that fits the fat tube but the thing looks like hell.
 I got to thinking and planning, figuring on a chunk of aluminum to fit the two different pipe diameters, holes drilled, cuts made, longer bolts, it was getting out of hand, man. This time I was able to catch myself. What the hell am I doing? Every other mini motor I looked at used the stock mounting plates so I said, “Screw it.” and went with the popular choice. Right there is a two-day labor saving decision.
 With the motor firmly in place I spent some time on the chain drive. The rear fender came in contact with the chain so I had to trim it and roll the sharp edge. It’ll need a paint job and stronger brackets but I’m going to wait until the mechanical is done before tackling cosmetics.
 It’s almost impossible to get two chains to agree on length so the mini motor kit comes with an idle roller for tension adjustment. The idler also turns the chain angle upwards before the lower frame tubes get narrow, keeping the chain from rubbing. I don’t like the thing but I’m not sure what to do about it. My rear sprocket is slightly misaligned; the chain doesn’t jump off the sprocket but it sure favors the hub side. To center the chain the rear sprocket needs to go outboard 1/16” so that means making a spacer and reassembling the sprocket onto the wheel. I’m also considering adjusting the countershaft sprocket instead. I’ve decided to deal with this situation later.
 The pretty chrome exhaust pipe didn’t quite clear the Huffy’s crank arms. I didn’t want to mess up the chrome by cutting and welding the pipe so instead clamped the exhaust flange in the vise and twisted the pipe a few degrees. The pipe twisted beautifully with no wrinkles or kinks. The crank arms clear with room to spare. Sadly, the chrome plating did not go along with the program and delaminated. Pro Tip: Buy the kit with the black painted exhaust. It’s easier to modify for your particular bike.
 The ignition coil was a straightforward install. I’ve upped the difficulty rating by routing the wiring through the frame. Most of these bike builds look cluttered with wires and cables. I’ll run the controls inside the frame as much as possible.
 The rotor output wiring will also run internally. I’m sure this will end in tears but I saved a lot of time not fabricating a front engine mount so I’m using that time credit to tidy up the job.
 The other sloppy area on these builds is the handlebar. Unlike a motorcycle, there is no speedometers or bodywork to hide the throttle/clutch/kill wiring. I’ve drilled holes and snaked the stuff through the bars. It looks cleaner to me. Yes, I’ve weakened the handlebars. I’m willing to risk a crash from structural failure in support of aesthetics. We are all artists and it’s about time we started living like it.