TJ’s Bulldog

What does a professional, world-class pistolsmith use for his personal weapon of choice?

I asked good buddy TJ (of TJ’s Custom Gunworks) that question, and the answer was surprising.  This is a man who knows handguns inside and out, and a guy who is one of the top men in the world for custom-crafted combat handguns.  SIGs, 1911s, Colt and Smith revolvers and autos, and more.  A guy who could have just about anything he wanted.  His guns are carried by law enforcement officers, special agents, and others the world over.  So what is TJ’s personal sidearm?

It’s a highly-customized Charter Arms Bulldog, chambered in the mighty .44 Special cartridge.  It’s the one you see here and in the photo above:

As you might imagine, TJ did not leave the gun stock.  These are the custom features TJ’s personal .44 carries:

      • Satin brushed hard chrome finish
      • 1.5-inch barrel (cutdown from stock barrel)
      • Radiused and polished trigger
      • “Melted” (rounded – sharp edges removed) contours throughout
      • Night sights with orange DayGlo highlighting
      • Custom-contoured front sight
      • Level 1 action work
      • Action modified to double action only
      • MagNaPorted barrel
      • Bobbed hammer
      • TJ custom prototype laser grips (modified from Crimson Trace S&W grips)

TJ explained that double action is the only way he uses revolvers.  You know, there’s a school of thought that a good man with a double action revolver can fire faster than can one with a semi-auto handgun.  You can read more about that in Ed McGivern’s Fast and Fancy Revolver Shooting, a good read for anyone interested in improving their handgun shooting with a double action revolver.

TJ’s Charter Arms custom Bulldog is a very impressive weapon.  You can see more photos of it, and a few of TJ’s other custom guns, on the TJ’s Custom Gunworks website.


Help us bring more content to you:  Please click on the popup ads!


More Tales of the Gun!


Never miss an ExNotes blog:  Sign up here for free!

Tough Rides: Brazil

We recently wrote a review of Tough Rides China, and as it turns out, that was one of three rides Ryan Pyle did that are available on Amazon Prime.  A couple of days ago I watched Tough Rides Brazil, one of the other two.  It was a six-part series about a circumnavigation around Brazil, and Ryan did this one without his brother Colin.

Although I enjoyed it, I didn’t think Tough Rides China was as good as the Himalaya Calling series about going overland from Germany to India, and I said so in my earlier review.  Tough Rides Brazil, however, was stellar, and it was every bit the equal of Himalaya Calling.  I thoroughly enjoyed it.

A gold-lined church in one of the mining towns in Brazil. Pyle took us into many worthy destinations on his Tough Rides Brazil series.

You know, it’s a funny thing.  I’ve been down on motorcycle adventure stories that focus too much on mysticism, philosophy, and other wordcount-inflating bullhockey and not enough on motorcycle riding (which is why I didn’t think much of Zen and the Art of Motorcycle Maintenance but I loved Dave Barr’s Riding the Edge).  Somehow in Tough Rides Brazil, Pyle focused only a bit on the riding and spent most of his time on the things he did in each of perhaps a dozen destinations on his 14,000 kilometer journey around Brazil, and it worked.  I watched all six Tough Rides Brazil episodes in a single sitting (it was that good).   It’s easy to do; they are each not that long and the story line and photography are superior.

You might check out Tough Rides Brazil on either Amazon Prime (by buying each episode) or by joining Amazon Prime and watching it on your TV or your computer.  Tough Rides Brazil is included with Amazon Prime.  Trust me on this:  I think you will enjoy it.  It’s got me thinking about visiting Brazil.  This is heresy, but I don’t think I’d want to do it on a motorcycle.  I’d like to fly there and see the place as a regular non-moto-borne tourist.  Brazil looks like a fascinating place and the Tough Rides Brazil series has me thinking deep thoughts in that direction.


See our other television, movie, and book reviews here.


Never miss an ExNotes blog.  Sign up here for free:

Let My Turtles Go

Hey, it’s a guest Baja blog from good buddy and fellow former US Army paratrooper Mike!  Check this out, folks.


As you travel through Baja Mexico and encounter so many beautiful and unique experiences that you just won’t find anywhere else in the world you really begin to appreciate all this area has to offer. This beauty arrives in the form of not only the people and their culture, but the form of raw nature that thrives on this magical peninsula. This rugged and hostile environment at first glance may not seem that inspiring but once you look closer and begin to absorb your surroundings you quickly realize how fragile, yet adaptable this ecosystem is.

This is true from plant life surviving in the driest of deserts to the sea life along the rugged Pacific Coast having to overcome predators and violent ocean conditions. It seems the challenges of nature never cease here. The encounter I am about to share with you highlights these conditions as well as the resiliency of nature in Baja.

Every day from around the 1st of December through the end of February there is a small, greenhouse-looking hut along the beach just north of Todo Santos, where the waves from the Pacific Ocean crash with such a concussion you almost feel nauseous from the vibration off this massive surf relentlessly slamming into the white sand beaches. This remote beach is where you can experience a magical wonder of life, baby sea turtles crawling into this violent ecosystem as their first test in their new world.

The turtles hatch in the early evening and four or five are placed into plastic buckets to await their release just after sunset. Timing is critical here as any earlier predatory birds are still out and will likely swoop in to gobble them up.

Once the sun begins to set it is time to set these little creatures free. We each take a bucket and walk about 20 feet away from where the surf is crashing and tip the bucket, thus releasing the sea turtles to crawl out onto the still sun-warmed sands.

Once these little guys exit the bucket it is difficult to imagine what they are thinking as they scurry towards the water with waves between 6-12 feet pummeling towards them. Some are fortunate and will hit the tide correctly and the water will suck them out to safety in the ocean, while others miss the tide, and it will toss them back violently 10-20 feet where they will start over. When this happens, you can hear a collective “Awwwww nooooo!!” from the group of us releasing them.

Ultimately (after three or four tries for some) all the baby sea turtles make it into the mighty Pacific Ocean just as the sun is fully dipping below the horizon. This is a beautiful piece of Baja life that should not be missed. We are very thankful to the Todos Tortugueos Volunteer organization for making this nightly event possible for the public.


Mike, that’s just awesome!  Thanks very much.  As always, we enjoy reading about your Baja adventures.  You wrote a fabulous story with amazing photos.  Ride safe, my friend.


Don’t ever miss an ExNotes blog!  Sign up for free notifications here:


If you’re headed into Baja, make sure you have your BajaBound motorcycle insurance!

img


Check out our choices:  The best budget bikes for Baja!

New Shoes for the Model 60

I visited with good buddy Paul up north last week, and while I was there he showed me a set of Altamont grips he had for his Smith and Wesson snubnose handgun.  When I saw the grips it was love at first sight, and I had to have them for my TJ-customized Model 60.  Paul was happy to oblige (thanks, Paul!), I came home with a new set of Altamont‘s finest, and they promptly went on the Model 60.  The Model 60 now looks like a scaled-down version of the big .45 ACP Smith & Wesson Performance Center Model 625, and I had to grab the shot you see above.   The 625 wears custom grips, too, but that’s a story for another blog.

There’s no question I’ve gone overboard in getting grips for the Model 60.  It came with the stock checkered walnut grips (the original equipment on this handgun), as well as a set of Pachmayr rubber grips.  The Pachmayrs would have been better for shooting, but I wanted a set of smooth rosewood grips and I found them on Ebay.  They looked great, but they were painful to shoot.

The Model 60’s OEM checkered walnut grips. Photo by TJ of TJ’s Custom Gunworks.
Smith and Wesson J-frame uncheckered rosewood grips. These are the same size as the walnut grips shown above.
The problem with both the OEM walnut grips and the replacement rosewood grips is that they are too small. My pinkie wraps around beneath the frame and takes a pounding with each shot.

The problem with the stock walnut grips and the Ebay rosewood grips is that my little finger gets under the grip.  The recoil from the little Model 60 is significant (as we engineers like to say, f = ma), and it would pound my pinkie every time I fired it.  Think about putting your pinkie sideways on a table and having someone whack it with a hammer, and you’ll have a pretty good idea what shooting this little snubbie was like.

All that’s changed with the Altamont grips Paul provided.  Take a look.  They’re beautiful.

Custom Altamont grips for the Model 60. Note the stippling (a crocodile pattern!) and the laser-engraved S&W logo.
The Altamont grips installed on the Model 60.

The new Altamont grips are extended just a bit below the frame and they have finger grooves.  It keeps my pinkie from getting underneath the frame, and with the new grips the Model 60 just feels right in my hand.

The Altamont grips provide a much better ergonomic hold. I like them a lot.

These new Altamont grips have a much better feel to them.  The wood-to-metal fit is way better than with the stock grips (the grips exactly contour to the Model 60’s frame, unlike the OEM grips).   The next obvious question, and the one that really matters is this:  How did the Model 60 shoot with the new grips?

In a word, it was amazing.  The new Altamont grips completely changed the character of the Model 60.  First, a couple of shots of the Model 60 on the range:

The Model 60 became an entirely different animal with the Altamont grips. It’s much easier to shoot now.
Good buddy TJ reworked my Model 60 extensively. It has an action job, selective polishing (ejector rod, cylinder, trigger, hammer, and cylinder release), and a red ramp front sight. TJ’s Custom Gunworks is the place to go if you want a bespoke handgun.

And here are two targets I shot at 15 yards (45 feet).  One has 10 shots on it; the other has 12 (each had two cylinders of 5 cartridges, and I had a couple left over to finish the box).

Two targets on the 15-yard line. That little Model 60 has near-target grade accuracy with the Altamont grips. If you have a snubbie, you need these grips!

Several things are amazing about the above targets.  The first is that it was windy as hell out on the range this morning, and even though I was shooting with both hands from a bench, I could see the sights swimming around as the wind gusted.  The second is that the groups are dramatically tighter than they had ever been before with this handgun.  And the third is that the revolver shot almost exactly to point of aim.  I was holding at 6:00 on the 50-foot slow-fire NRA targets you see above.  My load was the tried and true .38 Special target load:  2.7 grains of Bullseye propellant with the 148-grain Hornady hollow base wadcutter.  Before, with the OEM and rosewood grips shown above, this same load shot a good 12 inches to the right of the point of aim, and the groups were huge.  Evidently, as the revolver discharged, it was rotating to the right in my hands with those much smaller grips (and beating the hell out of me in the process).  The Altamont grips brought the point of impact essentially in line with the point of aim and just a bit high, which is what I want in a handgun.

You may recall from a recent blog that I have a load development test planned for the Model 60, and I’ll be firing the cartridges I loaded for it within the week.  I was up north on a secret mission last week and I didn’t get to shoot during that time.  I recently read that if you go 72 hours without firing a handgun your skills deteriorate.  I believe that, and I wanted to get in a little shooting before I shoot for group size.  Hopefully, the Santa Ana winds through the Cajon Pass will die down, conditions will be right, and I’ll get to do some real accuracy testing in the next few days.  You’ll get the full report right here.  Stay tuned, my friends.


More Tales of the Gun are right here!


Never miss an ExNotes blog:  Subscribe here for free:

Exhaustnotes Product Review: Gdrasuya 80-amp Battery Charger

You win some and you lose some on Amazon and with the Gdrasuya 80-amp battery charger I lost some. One of the few issues I have with my off-grid shed is snow. Here at normally sunny Tinfiny Ranch snow is infrequent which is not to say “never.” It does snow a few times each winter at 6000 feet and those times are when my solar panels get covered up and my batteries slowly lose power. Coincidently, when its cold and snowy I run pipe heaters to keep the shed’s PVC water pipes from freezing and splitting in the un-insulated space. It’s a double whammy: no power from the panels and a constant drain from the pipe heaters.

The system can go a few days like this but eventually the inverter shuts off and my pipes are left to live or die in New Mexico. To combat this I run a small 24-volt battery charger off my Harbor Freight Tailgator generator during the day to help resupply the batteries with precious electrons. I have an old Dayton 24-volt charger that puts out around 5 amps. With 12 batteries to charge it takes quite a while to bump them up.

Enter the Gdrasuya 80-amp charger. The Gdrasuya is 6v-12v-24v selectable and I assumed the 80-amp output was at 6 volts. That would mean the 12-volt setting would put out 40 amps and the 24-volt setting 20 amps. 20 amps charging is 4 times faster than the Dayton! I liked what I saw.

The charger arrived neatly packed and undamaged. The machine looked well made with beautiful glossy yellow paint and everything written in Chinese. No matter, battery chargers are easy to operate.

The first thing that gave me pause was the small diameter charge leads. The clamps looked pretty robust but no way was that small wire going to tote 80 amps without getting warm.

The small wires led me to investigate the inside of the charger to see how difficult it would be to install heavier wires. Once open I realized I didn’t need heavier wires because no way were these internals going to output 80 amps at any voltage.

The Gdrasuya uses a doughnut shaped transformer with various taps taken off the windings to select current to the battery. The wires are just a wee bit bigger than a human hair and the switching is very lightweight. Ok, I thought maybe they meant 8 amps instead of 80.

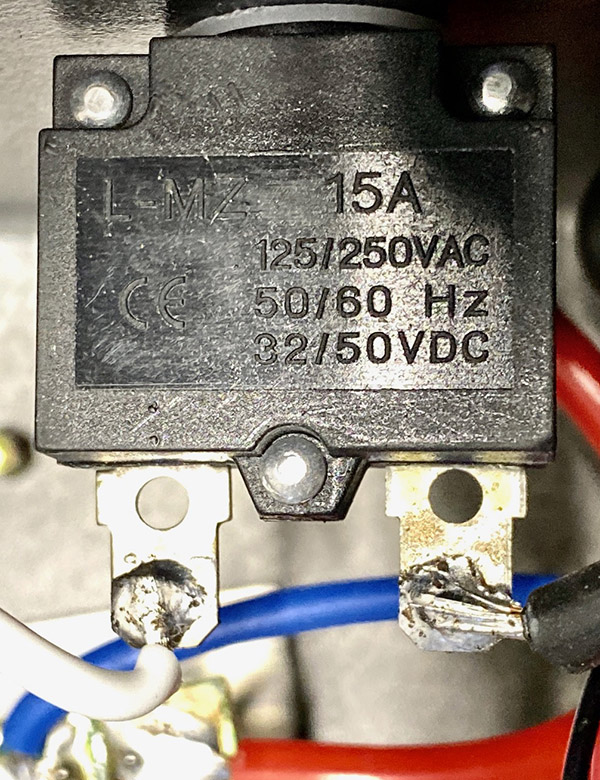
The main output breaker is rated 15 amps so no matter what you did to the thing 15 amps is all that’s passing through the breaker.

Worse than the misleading advertisement was the 120-volt AC input wiring. The green wire, or ground, from the plug was cut inside leaving the shiny yellow metal box in an ungrounded state. If the metal housing managed to short out to line voltage, a user touching the metal would receive a nasty shock.

Ok, the Gdrasuya 80-amp charger is dangerous and restricted on rated power by a 15- amp output breaker, but how does it work?

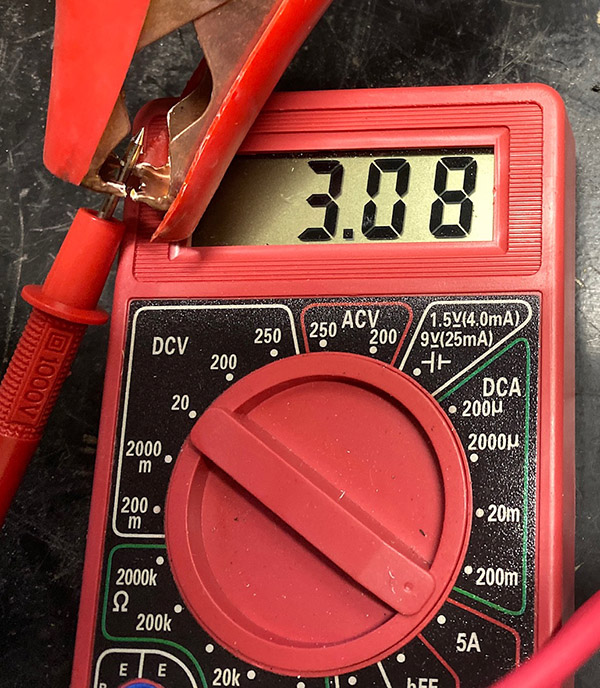
Turns out not too well. At 12-volt, max charging rate, the kilowatt showed the charger drawing 1 amp from the outlet, or 120 watts. On the DC charging side things looked bleaker. The Gdrasuya amp meter was reading 50 amps but my inline digital meter said 3.08 amps at a claimed 15 volts, a measly 46 watts. So not only was the Gdrasuya charger weak and dangerous, it was inefficient to boot.

In the description for the charger the 80-amp claim is made again along with a “power for 12V is 10A, for 24-v is 7A.” It does neither.

I haven’t tried it on 24-volts yet but you can figure maybe 2 amps tops or as we like to say in the electrical business, nothing. I was going to fix the ground issue but now that I’ve tested the charger it doesn’t seem like it’s worth the bother. That old Dayton putting out 5 amps looks like a champ in comparison.

It’s odd that someone would go through all this trouble to manufacture a charger that is pretty much useless. The thing consists of quite a few parts the sum of which is almost zero.

My recommendation is don’t buy the Gdrasuya. I’m not going to put an Amazon link in this story because I don’t want you to accidently buy one. I’ll put it back together and try to return the thing to Amazon. It serves no useful purpose in Tinfiny Ranch’s suite of electrical power products.


More ExNotes product reviews are here!


Subscribe to ExhaustNotes for free!