Hear me out. Like you I’ve read all the reviews on Harley’s new Pan America Adventure-Glide and they have been uniformly positive. Surprising is the word most frequently used by the tattered remnants of the moto-press when describing the Pan America. And it is surprising.
I’m not likely to ever test ride a Pan America. I offer Harley-Davidson nothing but suffering and heartache. Why would Harley loan me a bike in a category I pretty much despise? I can’t stand big Adventure bikes. I don’t like them one little bit. I think they are dangerous off road. Anyone who sends me one to test ride is a fool and Harley-Davidson’s marketing department is not populated by fools. Luckily I don’t need to ride one because Kevin Duke, the hardest working man in motorcycle journalism, says the Pan America is a good bike and that’s all you really need to know.
The no compromise hook in this story is the most impressive part of the new Pan America. It’s the first Harley (since the late 1960s) that competes head to head with the best the world has to offer and does it at a competitive price. In all areas the new bike is acceptable, meets expectations and is even, dare I say, good.
Most all the high-end, heavy, dangerously inadequate offroad Adventure bikes clock in at around 20,000 US dollars retail and they all weigh nearly the same ground-crushing 600 pounds. It must be a class requirement. Check out the manufacturer-provided spec sheets on a GS BMW, Ducati Multi Service, and KTM Breakdown. All of the numbers are within spitting distance of each other.
And that’s the amazing part. Harley-frigging-Davidson has made a competent motorcycle for the same price as everyone else. There’s no brand penalty. Harley-Davidson has made a motorcycle that the owner isn’t required to look through leather-fringed, nostalgia-tinted lenses to justify. No more having to tell non-Harley riders that they don’t get it when their questions turn pointed. Like all cults, the Harley cult requires actively looking the other way when hard facts and performance figures per dollar are bandied about.
With the Pan America there’s no need to believe in the Harley mystique. There’s no need to defend anemic performance by waving an American flag. The Pan America stands on its own merits as a motorcycle, nothing more. Is it as good as the other big Adventure bikes? I can’t say but the fact that it’s spoken of in the same breath and held up in comparison to the world’s best Adventure bikes is a stunning turnaround for a company that seemed hopelessly stuck in neutral by its mad marketing genius.
As much as I hate big Adventure bikes, I love the new Harley-Davidson Pan America.
I hope it’s a harbinger of change. I hope it succeeds beyond Harley’s wildest dreams and ushers in a new era of 150-horsepower Sportsters that handle, stop and are as fast as any other guy’s bikes. The late 1960s was the last time Sportsters were hot. That’s a long, long time to rest on your laurels. Let’s hope the Pan American gives stodgy old Harley-Davidson new life and a desire to be measured against the very best. Listen, if there’s any way you can afford to go out and buy one, go out and buy one. Tell Harley I sent you. Maybe they’ll even let me take one for a ride.
Berk, on right, telling Gresh to go back to Starbucks and fetch a Pumpkin Spice Latte for him.
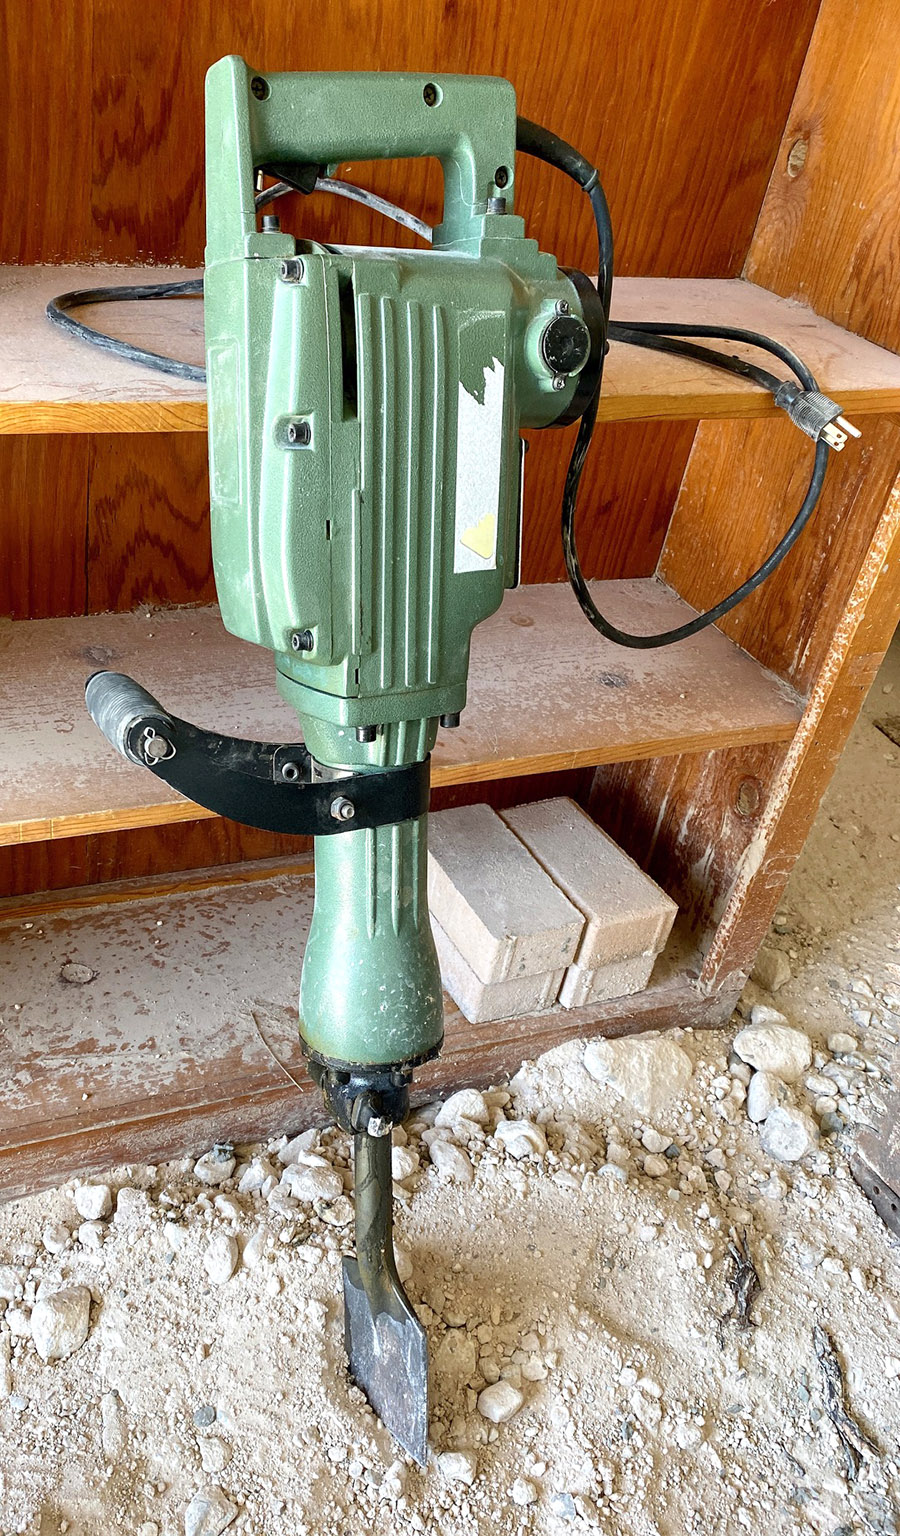
Whenever I’m not riding motorcycles I like to break things into smaller pieces. It makes life just that bit less tiresome and one of the best ways to break stuff is with a jackhammer. A real jackhammer weighs 90 pounds and is pneumatic, also called air-operated. I used to run one when I worked in construction. A 90-pound hammer is a wonderful tool, and the weight is not a burden since you don’t really lift the thing often. I’ve found laying the hammer on your leg and pivoting the 90 to relocate the chisel is easiest. It seems like the heavier a hammer is the less vibration is transmitted to you hands. Less vibration means fewer blisters and less hand-bleeding. Properly handled you can run a 90-pound machine all day long as your pants slowly become covered in compressor oil blown from the hammer’s exhaust port.
As fine a proposition as a 90-pound hammer is, for most homeowners the large, engine-driven compressor required to supply enough air is a deal killer. For more refined destruction and with a nod to apartment dwellers look to the many 35-pound electric jackhammers sold everywhere.
I bought this TR Industrial 35-pound jackhammer several years ago for a concrete spalling repair job. The job required a lot of work on a scaffold so I didn’t want a big, heavy hammer to lift. The TR worked great and when the job was done I put it away in the included storage case.
Fast-forward three house moves and I had forgotten all about the TR hammer. It wasn’t until I was almost finished with the shed footing project that I remembered the thing and dragged it out to break up the hard, rocky ground the shed sits on. What an improvement over the pickaxe! The TR cut my digging time and was less tiring to use. It felt like I was cheating.
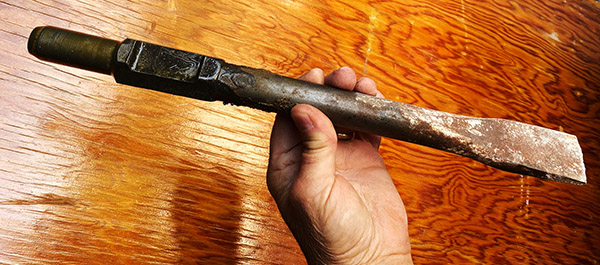
The TR jackhammer came with two tool bits: a flat chisel and a pointed bit. The flat chisel is great for breaking rocks and concrete. Remember, don’t start in the middle, you have to work from the edge when breaking concrete so that the broken piece has somewhere to go. If you’ve used a 90-pound air hammer don’t expect the blows from an electric 35-pounder to have the same effect. Everything will take longer.
I haven’t used this point bit yet but then I haven’t done everything yet either. It may come in handy on extra hard or thick concrete. Maybe I’ll split logs with it.
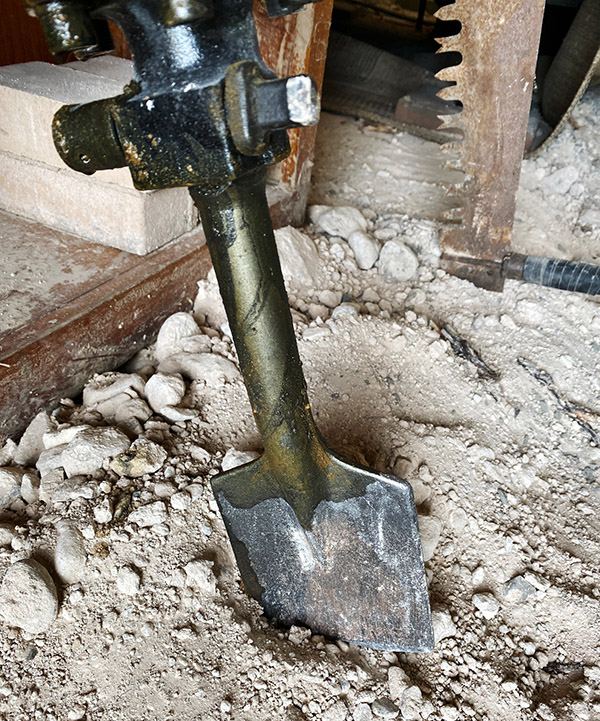
I recently bought a clay spade for the TR hammer and it is perfect for the ground conditions at Tinfiny Ranch. You wouldn’t use a clay spade on concrete but for rocky soil it plows right through. When lightly excavating an area to be formed, say you need to remove 2 inches of fill; the wide paddle makes it easy to eyeball grade and loosen just the top layer while not unduly disturbing the ground underneath.
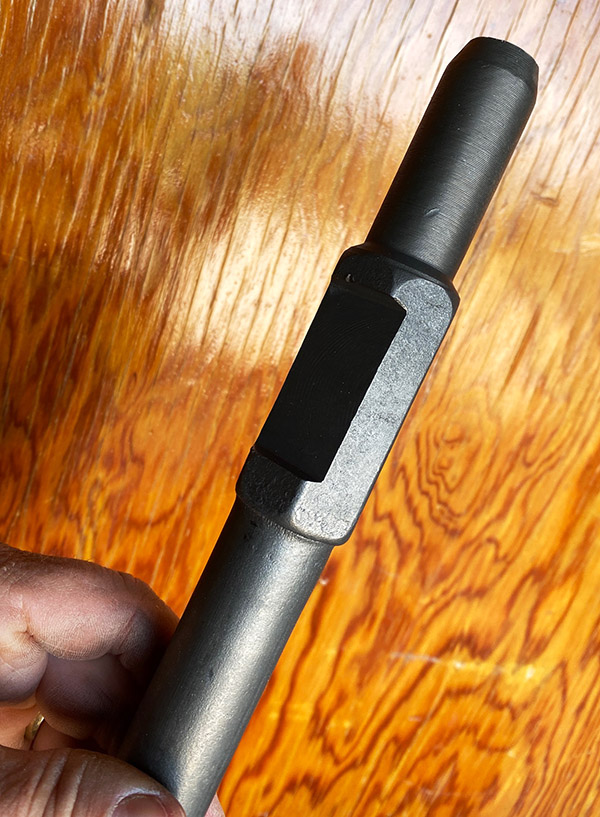
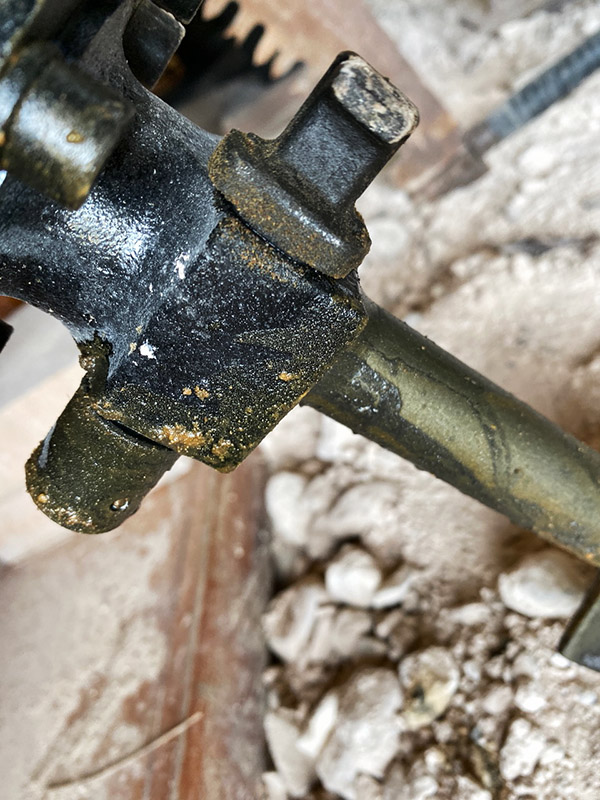
Not all hammer bits are the same. The TR takes this hex style but note the impact end is round. Some bits are hex all the way, some are fluted, and little ones have a mushroom shape. Bits for the TR are plentiful and easy to order online.
To change the bit you pull this little spring-loaded widget out and rotate it. Insert the bit with the cutaway facing the widget and reverse the operation. Bit changing takes seconds and the bits stay put.
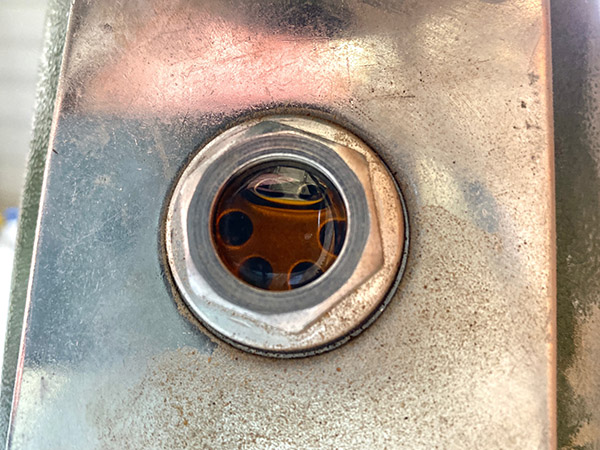
All jackhammers are oily but the electric ones are less so. There is an oil reservoir built into the TR hammer. Regular motor oil is recommended. To fill the hammer you unscrew the sight glass and dump whatever slippery stuff you have inside. If you ran the hammer for 8 hours you might need to refill the reservoir but for my sporadic use a fill lasts months. Note that oil will leak out of the machine even if you’re not using it, so plan accordingly.
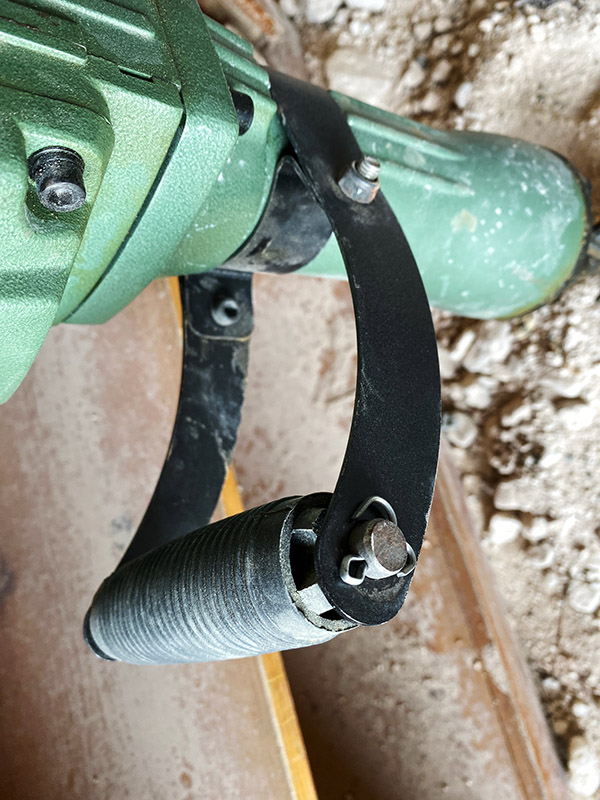
One of the things I don’t like on the TR jackhammer is the side handle. It looks flimsy as hell and no amount of tightening will keep it in place. I thought about wrapping duct tape around the hammer to make the handle fit tighter but decided the tape would just wear off in a few minutes. Since you don’t really push on the hammer I leave the thing as-is with the floppy handle. The floppy handle is convenient in tight quarters, swapping sides is easy.
The TR hammer is probably cloned from a well-known brand and there are quite a few hammers that look exactly like the TR on eBay and Amazon. The design seems to be open source now and I can’t comment on the quality of those other clones. I will say that which factory a tool or motorcycle engine comes from is important. There’s a lot of variation in things that look the same.
I give the TR Industrial version high marks and can recommend it if you like to break things. My hammer is an older version no longer produced but the one in the link is an updated machine with better electrical isolation for the operator. This might be important if you work in wet areas.
Winter’s bony fingers have released their icy grip so now is not the time to be testing a hand warmer. But we don’t follow the rules or the seasons here at ExhaustNotes. We do what we want, see? The Man and his stifling rules don’t apply to cool kids and the ExhaustNotes staff are cool with a bullet. I did test the Ocoopa hand warmer in cooler weather a few months ago so stock up now while the heat is on and Ocoopa has to give the things away.
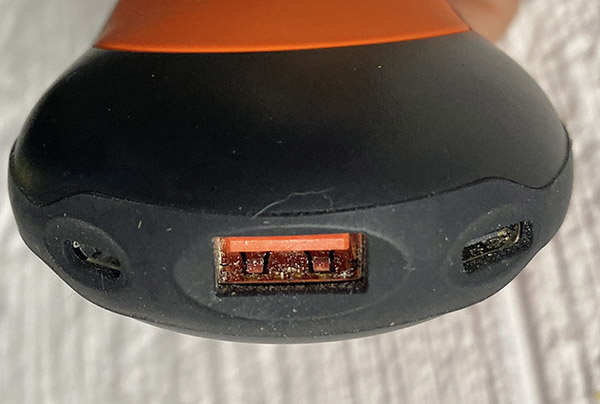
The Ocoopa hand warmer is a neat little device that replaces those old fashioned lighter-fluid type that if they didn’t set you on fire would kill you with fumes spilling up from your jacket. How it works is unclear but the unit charges from most any USB wall pig and then you select one of three heat settings and the sucker gets hot.
Pop one in your cell phone pocket of your jacket and cold rides become just that bit more toasty. It’s like having a live kitten in your pocket but without the constant need for feeding and potty breaks.
I’ve found the highest and best use for the Ocoopa hand warmer is camping. Last time I slept inside a polyester house in the woods the temperature was in the mid 30’s at night. I fired up the Ocoopa and tucked in my sleeping bag. The thing was on low, I slept like a six-legged baby atop Chernobyl’s concrete sarcophagus. The Ocoopa was still going strong in the morning so I left it on low to see how long the thing would heat.
Turns out the Ocoopa lasts around 12 hours. You really only need the low setting because medium and high are too hot to put near your body. Maybe a couple layers of thermal underwear could work with medium. High must be used for baking.
When it’s not cold outside the Ocoopa will also charge your phone or whatever plugs into a USB and you can recharge the thing from your motorcycle if the bike has a jack, Jack.
I’m not able to tell you about the lifespan of the machine or if it will catch on fire during the night but I will do a follow up report should events demand one. I’ll go ahead and recommend the thing just for keeping me warm in the polyester house.
Never miss an ExNotes blog, Dudes and Dudettes! Sign up here for free!
More ExNotes product reviews? Hey, no problem: Just click here!
Sixty-one miles north of my place in La Luz, New Mexico lies the town of Carrizozo. The seat of Lincoln County, Carrizozo’s streets are laid out at an angle to the intersection of Carrizozo’s two main highways, 380 and 54. There are colorful donkey statues stationed around, a junkyard church on the outskirts of town and the Carrizozo Mud Chuckers motorcycle club.
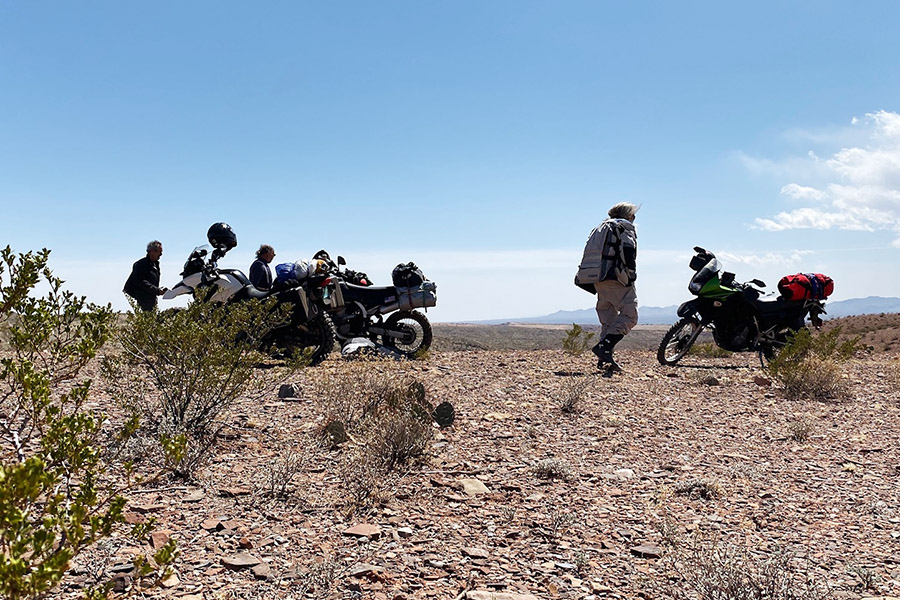
The Mud Chuckers MC, founded by my riding buddy, Mike, is primarily a dirt-based riding club. The area around Carrizozo has hundreds of graded farm roads and tight mountain trails. It’s an ideal spot for racking up miles on the dirt. I recently joined them on one of their frequent moto-camping rides. The Chuckers shun traditional campgrounds preferring instead to camp anywhere they can find a spot with no people around.
Like all the ‘Chuckers rides I’ve been on the pace was downright leisurely with frequent stops to look at old mine sites, hunt for geodes, gold deposits and old metal objects or just sit in the shade to discuss unimportant things. The ‘Chuckers are in no hurry to get anywhere and that suits me just fine.
On this day we rode west to Socorro, NM and took the Escondida Lake exit to the Back Country Byway. The Byway meanders generally east-west then south with the terrain ranging from desert scrub to medium-high trees. At the speed we operate it’s best to look for a campsite early because ‘Chuckers don’t like stress. We checked out several places but nothing looked appealing. There was either no shade or no firewood or a stinky dead cow rotting nearby so we pushed on.
Eddie dropped his KLR 650 in a sand wash and bent his clutch hand so that it didn’t want to work right. He was doing 45mph so the impact, while soft, still hurt. The ‘Chuckers are not spring chickens. In perfect tune we can hardly swing a leg over the motorcycle. Eddie called it a day. Since we never leave a man behind we short cut the Byway and followed him back to his house in Carrizozo where we had begun this adventure.
With Eddie’s DNF, that left me, Dan and Mike still on the lead lap. By now it was getting late so we abandoned our plan to camp on the Back Country Byway and decided the higher mountains behind White Oaks would be the best option. It was late and we still had a 30-mile ride to the forest.
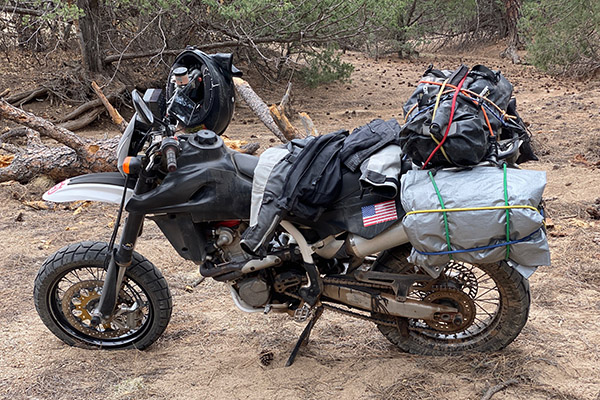
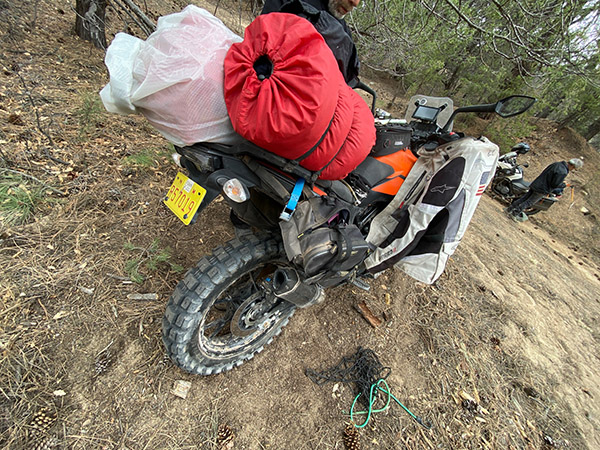
We found a spot with plenty of firewood and soft ground. We managed to get camp set up just before dark, which is always a good idea. Once they find a place to roost the Carrizozo Mud Chuckers really come on the pipe. The fire was roaring, Mike brought along pork chops and a metal grill to cook with. I don’t know where he stores all that junk on his 390 KTM. Sizzling pork chops, boiling coffee, cookies, beef jerky, Wheat Thins: man, things were hopping at camp this evening. The altitude we were camping was around 7000 feet, it got pretty cold, probably in the 30’s but around the fire it was 75 degrees.
Campfire nights last longer than regular ones and I turned in at midnight. Mike and Dan sat up longer. Flickering lights and murmured shadow conversation played across the inside of my tent. I felt safe knowing the bear would go after them before me. The next morning The Mud Chucker’s were in no hurry to leave. We restarted the fire and had coffee with whatever scraps of food we had left over from last night’s feast. The Mud Chuckers always leave their campsites cleaner than they found them and the way they put out a campfire borders on obsessive.
When I got back home it felt like I had been away a month instead of only two days. Camping on a motorcycle seems to distort time and distance. Changing your observation point really does have a profound effect.
Mike and Eddie want to start a motorcycle tour business. Their plan is to buy a few TW200 Yamahas and run all inclusive, guided camping tours around New Mexico. It sounds like a pain in the butt to me. Why ruin a nice motorcycle ride with business?
I’ll let you know if the tour company idea works out. Maybe a full ExhaustNotes.us tour review or something. Get the ‘Chuckers to kick in a free tour as an ExhaustNotes subscriber gimmick?
Like what you read? Sign up for a free subscription, leave a comment, and share the hell out of this blog!
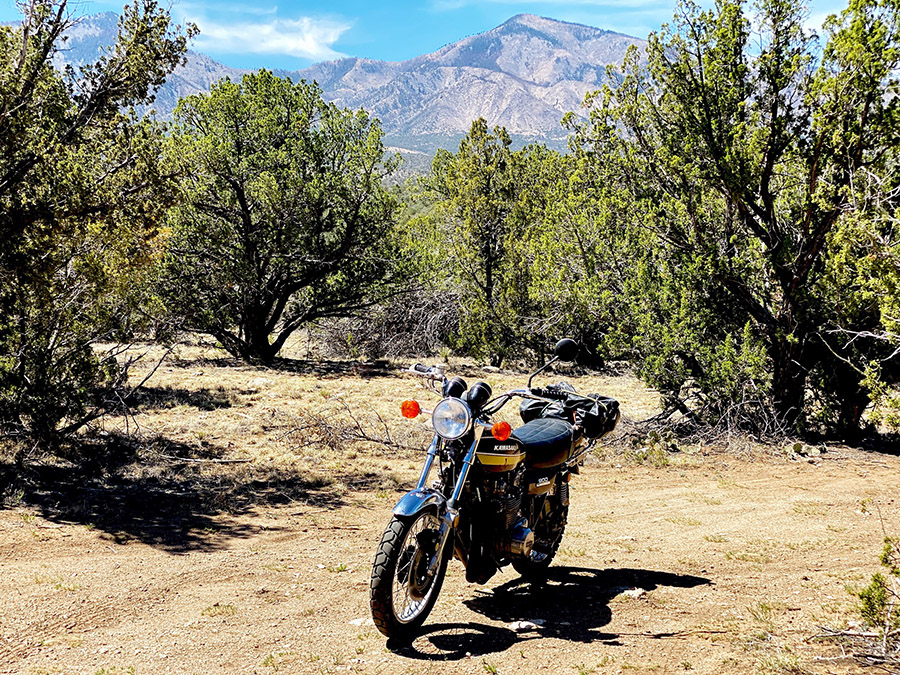
To really understand the cloud of confusion surrounding my brain you’ll have to go back to the very beginning. Back when Zed was left for dead. We don’t have time for that now so I’ll cut to the chase: Zed ran fine for 3000 miles and then the carbs started puking gas from the overflow tubes. The bike was running rich and fluffy as hell. Idle was hit and miss.
My natural assumption was that the old float needles had worn a groove into the sealing surface preventing the cone-shaped needle tip from seating. I purchased a cheap but shoddy set of needles/seats on eBay and with my deft touch soon had them fitted into Zed’s 4 carburetors.
And one of the carbs still puked fuel. If you’ve followed this saga online you’ll know that the brass seat was punched with some tiny, elfin numbers. This punching deformed the seat so that the fuel kept leaking into the float bowl and then overflowed onto the ground. I replaced the new seat with the best looking seat out of the old batch.
This cured the fuel leaking issue. I could leave the petcock in the “on” position and the bike stayed nice and dry.
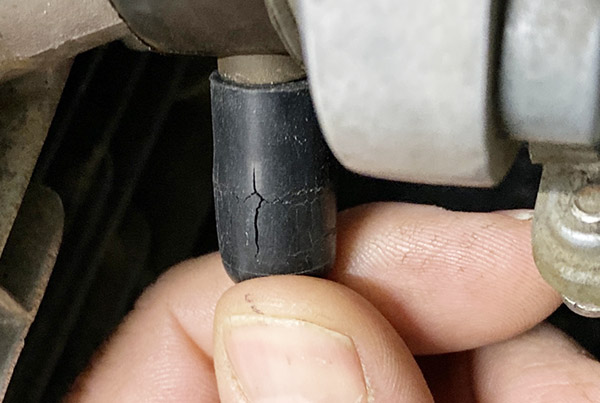
Yet Zed was still running poorly, cylinders would cut out randomly and the idle was inconsistent. Further investigation revealed that the rubber, year-old vacuum port plugs had dry rotted allowing air to seep past and upsetting the tenuous air/fuel ratio. I ordered new vacuum plugs and was sure the running problems would go away.
They didn’t. In fact, fixing the air leak seemed to make things worse. The bike would run on 3 cylinders and then 4 as your road speed increased. It seemed the longer it ran the worse it ran. I checked the ignition points. They were the original points that came with Zed and had served me well but now they were pitted badly. I filed the points back to good smooth contacts and now the filed points were so thin I couldn’t rotate the mounting plate enough to set the timing correctly.
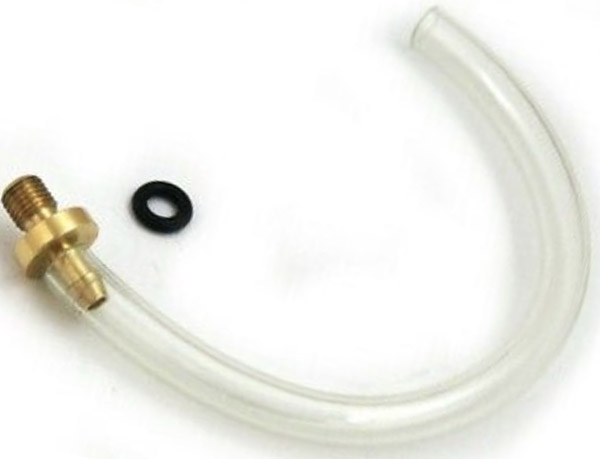
And so it continued. I ordered new points and reset everything. I had fat, blue spark. The Kawasaki ran terrible. I checked battery voltage, changed fuel filters and nothing worked. In my befuddled state I hit on the float level as a potential cause of the problem and ordered the cool little bowl drain fitting and clear tube tool used to set the float levels.
The float levels were all high. I reset the float levels to spec and now I was truly sure I had the bike problems licked. It ran worse each test ride. I could go about 10 miles before the bike would start missing. It seemed like cylinder 1 was the most likely culprit as removing the plug wire on #1 had no effect on the engine. Pulling the #1 sparkplug revealed a flooded cylinder. Cylinder #4 was also sort of weak, not exactly shouldering the load if you know what I mean and I think you do.
I checked coil resistance and coil 1&4 were exactly the same as coil 2&3. Must be the condensers, I told myself. Condensers are typically replaced along with points: they come as a set. I didn’t buy them that way because in my entire life I’ve only found one bad condenser. Anyway, the way reproduction parts are made you want to keep the original stuff if it still works.
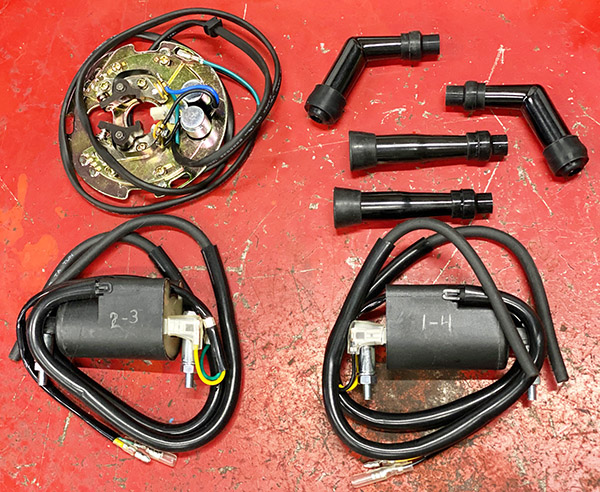
My frustration was growing. Instead of nickel and diming my way through the ignition system I bought new coils and an entire ignition backing plate with new points, condensers and fresh screws the heads of which were not stripped out. It was a whole new ignition system. I was sure something was heating up and fouling the plugs.
My $114 dollar ignition system bought me nothing but clarity. But it was a glorious clarity. The bike ran worse than ever. I didn’t get out of the shed before the #1 cylinder fouled. I was smiling; the odds were narrowing rapidly and in my favor. What are the chances of two completely different ignition systems having the exact same fault? Nearly zero, my brothers. You’ll not hear me complaining about blowing $114 on an ignition system I didn’t need because I was sure then that the problem was carburation. I re-checked the float level in the #1 carburetor. It was fine but I knew now that the only thing I had changed in that carburetor was that damn needle and seat.
I picked through the old needles and seats and selected the best looking set. I removed the eBay needle and seat and reinstalled the old ones. That was it. Zed ran on all four cylinders. I took the bike out for a test ride keeping my fingers crossed at the dreaded 10-mile mark but the bike kept running. I lugged the motor in high gear. The motor pulled cleanly without missing.
I know better than to assume anything was fixed without putting a few miles on the bike so I did a loop to Capitan, out to Roswell and then through Ruidoso to home, a trip right at 300 miles. At my first gas stop in Capitan I was astounded at the fuel mileage. Previously Zed was a steady 40 miles per gallon bike. That first fill-up netted 50 miles per gallon.
From Capitan to Roswell was a nice, winding, 4000 rpm tootle enjoying the breeze and the smooth running Kawasaki. I filled up again and the old Z1 returned 59 miles per gallon. Almost a 50% increase in fuel mileage.
In Roswell’s hot, stop-and-go road construction traffic Zed started to stumble. Crap, I was 100 miles from home and the problem had returned. One cylinder started dropping out and then another. The bike was dying in the middle of the road. Out of instinct I reached down and found the fuel petcock in the off position. Zed ran all the way home on 4 cylinders.
I can’t explain why it took so long to figure out the problem. There were so many distractions on the way to that moment of clarity. I’ll be looking for some OEM Mikuni needles and seats. They say the cheap man pays the most but I’ve found that value is very subjective. For example, what would I be writing about if I bought the correct parts the first time around?
You win some and you lose some on Amazon and with the Gdrasuya 80-amp battery charger I lost some. One of the few issues I have with my off-grid shed is snow. Here at normally sunny Tinfiny Ranch snow is infrequent which is not to say “never.” It does snow a few times each winter at 6000 feet and those times are when my solar panels get covered up and my batteries slowly lose power. Coincidently, when its cold and snowy I run pipe heaters to keep the shed’s PVC water pipes from freezing and splitting in the un-insulated space. It’s a double whammy: no power from the panels and a constant drain from the pipe heaters.
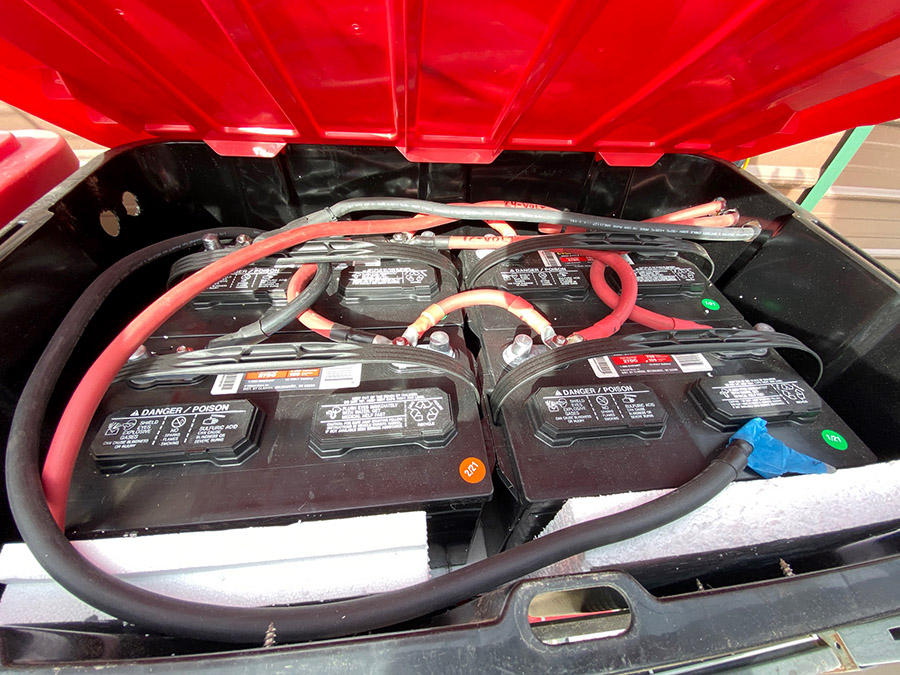
The system can go a few days like this but eventually the inverter shuts off and my pipes are left to live or die in New Mexico. To combat this I run a small 24-volt battery charger off my Harbor Freight Tailgator generator during the day to help resupply the batteries with precious electrons. I have an old Dayton 24-volt charger that puts out around 5 amps. With 12 batteries to charge it takes quite a while to bump them up.
Enter the Gdrasuya 80-amp charger. The Gdrasuya is 6v-12v-24v selectable and I assumed the 80-amp output was at 6 volts. That would mean the 12-volt setting would put out 40 amps and the 24-volt setting 20 amps. 20 amps charging is 4 times faster than the Dayton! I liked what I saw.
The charger arrived neatly packed and undamaged. The machine looked well made with beautiful glossy yellow paint and everything written in Chinese. No matter, battery chargers are easy to operate.
The first thing that gave me pause was the small diameter charge leads. The clamps looked pretty robust but no way was that small wire going to tote 80 amps without getting warm.
The small wires led me to investigate the inside of the charger to see how difficult it would be to install heavier wires. Once open I realized I didn’t need heavier wires because no way were these internals going to output 80 amps at any voltage.
The Gdrasuya uses a doughnut shaped transformer with various taps taken off the windings to select current to the battery. The wires are just a wee bit bigger than a human hair and the switching is very lightweight. Ok, I thought maybe they meant 8 amps instead of 80.
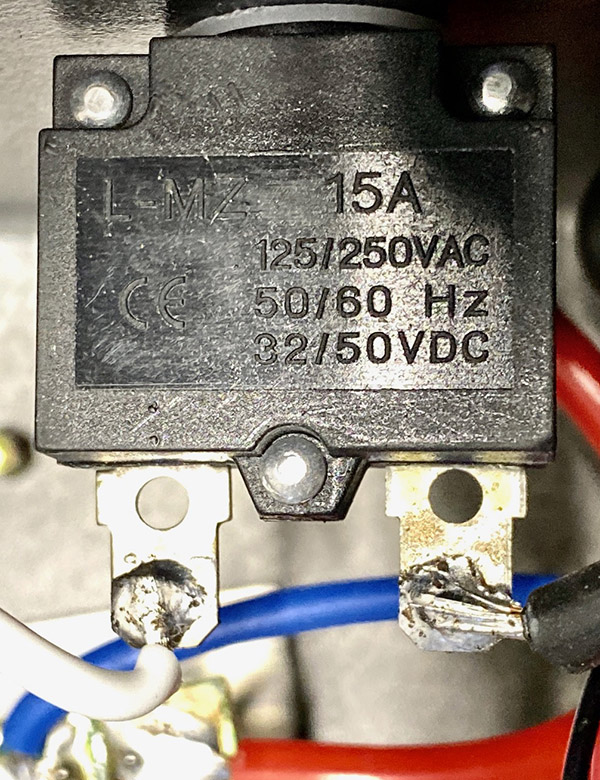
The main output breaker is rated 15 amps so no matter what you did to the thing 15 amps is all that’s passing through the breaker.
Worse than the misleading advertisement was the 120-volt AC input wiring. The green wire, or ground, from the plug was cut inside leaving the shiny yellow metal box in an ungrounded state. If the metal housing managed to short out to line voltage, a user touching the metal would receive a nasty shock.
Ok, the Gdrasuya 80-amp charger is dangerous and restricted on rated power by a 15- amp output breaker, but how does it work?
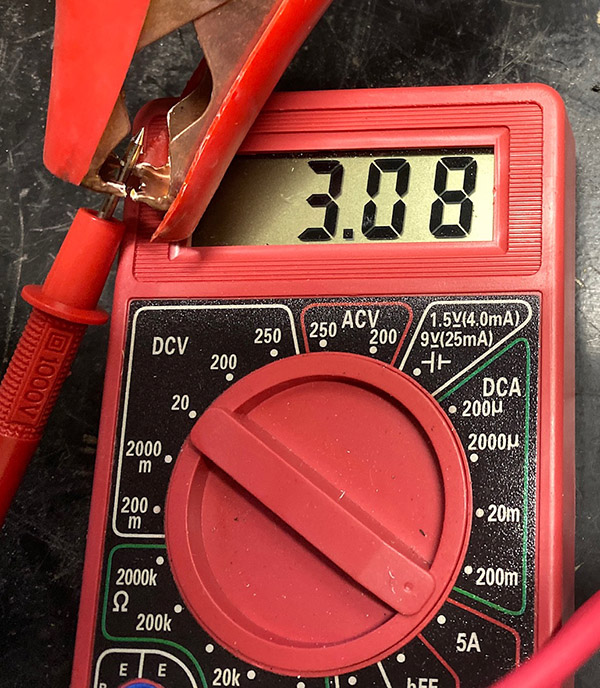
Turns out not too well. At 12-volt, max charging rate, the kilowatt showed the charger drawing 1 amp from the outlet, or 120 watts. On the DC charging side things looked bleaker. The Gdrasuya amp meter was reading 50 amps but my inline digital meter said 3.08 amps at a claimed 15 volts, a measly 46 watts. So not only was the Gdrasuya charger weak and dangerous, it was inefficient to boot.
In the description for the charger the 80-amp claim is made again along with a “power for 12V is 10A, for 24-v is 7A.” It does neither.
I haven’t tried it on 24-volts yet but you can figure maybe 2 amps tops or as we like to say in the electrical business, nothing. I was going to fix the ground issue but now that I’ve tested the charger it doesn’t seem like it’s worth the bother. That old Dayton putting out 5 amps looks like a champ in comparison.
It’s odd that someone would go through all this trouble to manufacture a charger that is pretty much useless. The thing consists of quite a few parts the sum of which is almost zero.
My recommendation is don’t buy the Gdrasuya. I’m not going to put an Amazon link in this story because I don’t want you to accidently buy one. I’ll put it back together and try to return the thing to Amazon. It serves no useful purpose in Tinfiny Ranch’s suite of electrical power products.
Going off-grid requires many design decisions, none of them exceptionally hard or final. With off-grid you can always change your mind to suit your needs although you can save a bit of money if you have a plan and stick with it. Of course that’s not how I do things. I generally screw up and get it right the third time, you know what I mean?
The going native part in the title of this story pertains to base system voltage. In my mind a native setup uses roughly the same voltage for the panels, batteries and inverter as opposed to running high voltage panels and stepping them down to battery voltage.
Going native makes your system more resilient to failure. The two most complicated devices in an off grid system are the inverter and the solar panel voltage regulator (not counting strange new battery technologies). When either of those two fail you are pretty much done until you purchase parts. With a native system the regulator can be bypassed completely by connecting the solar array directly to the batteries. Depending on the size of the array you’ll have to keep an eye on your charging to not overcook the batteries but by simply shading or un-shading a few panels with cardboard you will be able to control the charge rate at a reasonable level.
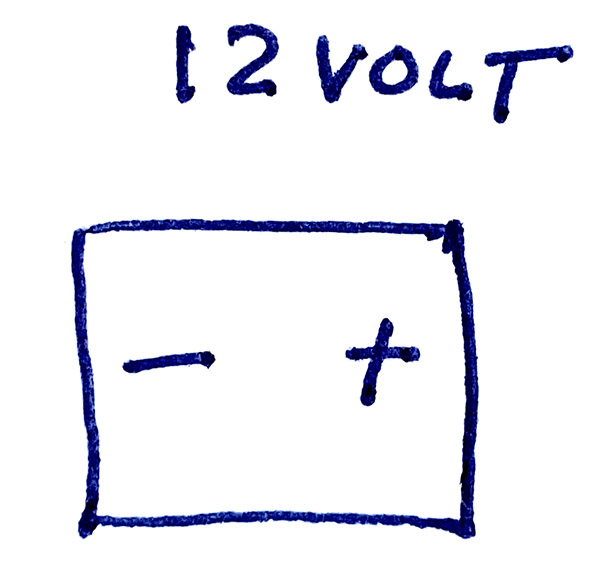
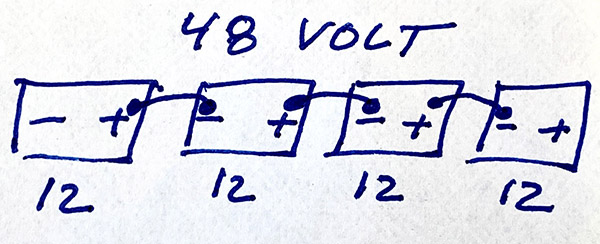
When it comes to common battery voltages for your off grid system you have effectively 3 choices: 12-volt, 24-volt or 48-volt. Fast thinkers will realize that these voltages are all multiples of 12 and that’s because 12-volt batteries are the most popular. You can get batteries in other voltages; there’s no real reason the basic building block had to be 12-volt. You can buy 2-volt batteries all the way to 48-volt batteries.
One or more batteries connected together and powering your house are called a bank and like a bank you have to deposit energy into the batteries in order to draw energy out. For smaller off-grid systems 12-volt battery banks are popular. Inverters in the 2000-watt range powered by a 12-volt battery bank will work fine and are the simplest to connect if you’re electrically impaired. 12-volt banks become less desirable as power needs rise due to the large, expensive battery wires you’ll need to supply the amperage big 12-volt inverters need.
In favor of going native with 12-volt batteries, thanks to the RV industry there are a zillion products that operate at 12-volt. You can get 12-volt refrigerators, 12-volt coffee pots, 12-volt light fixtures, 12-volt pumps, 12-volt air conditioners, 12-volt televisions, 12-volt chargers for your phone and computer and you can even get 12-volt toilets. In fact, you could build yourself a pretty comfortable off-grid house using nothing but 12-volt appliances and skip having an inverter altogether. 12-volt is also fairly safe as your chances of being electrocuted increase along with voltage. Unless you’re really sweaty you can touch both poles of a 12-volt battery and not feel a thing.
The appliances that operate from native voltage will continue to operate with a dead inverter. In my shed that means lights and water pump still work with the inverter shut off. Going native allows you to slowly back out of the complex into the simple and simple things are understandable and reliable.
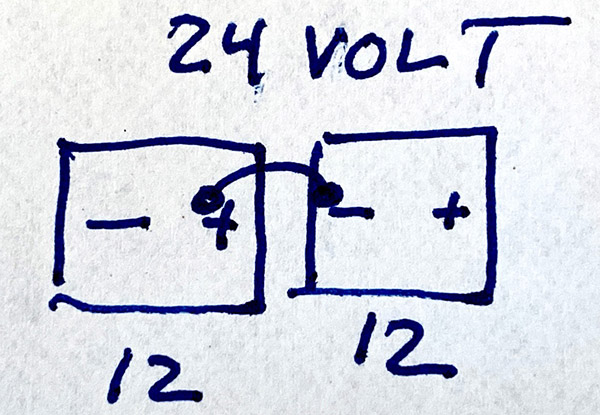
Going native at 24-volt limits the number of electrical devices you have to choose from. There are not nearly as many 24-volt things as there are 12-volt things. This is slowly changing and 24-volt stuff is becoming more popular. Most DC voltage LED lights are rated 10 to 30 volts. A lot of electronic devices and chargers are also rated 10 to 30 volts (read the fine print on that wall-pig that sucks up all the real estate on your outlets). Getting across 24-volts will give you a tingle and If you’re sweaty you’ll get a shock. Nothing that will kill you, we hope, but still it’s less safe than 12-volt for you electricityphobes out there.
In my off grid shed I’ve chosen 24 for my native voltage, kind of splitting the baby between 12 and 48. My solar panels are considered 24-volt (actually higher but close enough to connect directly). I only really need lights until I can rig up a small inverter to get critical things up and running. The water pump is 24-volt also. My 24-volt inverter is 6000 watts; if I went with a bigger inverter I’d probably go to 48-volt and lose some resiliency.
Going native at 48-volts is sort of useless because you can’t find very many things that operate off 48-volts except inverters. At this native voltage you should toss any hope of backing out of the system gracefully after a lightning strike and put your trust in the thousands of tiny electronic components inside those humming boxes. Go ahead and crank the solar panel voltage up and plan on being in the dark if the inverter fails. Safety wise, 48-volts will give you quite a shock and may even kill you if you are wet and have health issues.
There are devices that will allow you to run most any DC voltage from any other DC voltage. To me these are one more point to fail in the system and they aren’t cheap either. I have one to operate my 12-volt refrigerator from the 24-volt battery bank. It cost almost as much as the fridge!
If you’re planning an off grid system for a remote cabin consider going native. Give yourself the option to keep on keeping on when the buzzing widgets fail. And they will fail. Nothing lasts forever. By building resiliency into the system from the start you can use your head to make things work while others must scamper off to the Internet to order parts.
Here at ExhaustNotes we are not earthy crunchy, granola-eating oil-haters. Far from it as most of the fun things we like to do involve burning refined oil or playing with toxic products derived from oil. Hell, our entire 45-year working career depended on an oil-based economy. We’re not about to turn our backs on our old friend Petroleum. At the same time we enjoy building off-grid power systems isolated from The Man and his ever-increasing system development surcharges, power outages, readiness to serve fees and base facility charges.
It’s a shame that off-grid energy has been politicized along predictable fault lines because it really is nondenominational and serves everyone equally regardless of which clan they voted for. ExhaustNotes Off-Grid is not going to try to convince you to wear a tie-dyed shirt or stock up on ammunition for the coming civil war, but if you can shake off those tribal chains we think you’ll find off-grid energy appeals to the anti-government Far Right insurrectionist, the communist Far Left insurrectionist and that vast sea of reasonable anarchists who find themselves trapped between two crazy extremes.
At ExhaustNotes we are not electrical engineers, but with modern, home-based off grid equipment you don’t have to be. It’s so easy a child of 35 could do it. We go off grid not to make a point but because it’s more reliable than grid power, it’s nearly on par with grid cost-wise, the watts per dollar only get better the longer you operate your system, and it’s fun. One beauty of going off grid is its scalability: You can go full hog and cut the cord forever or take baby steps to energy independence.
This blog series will cover standard, easily-available systems found in houses or sheds. Grid-tied systems are not part of this series. There’s nothing wrong with grid-tie, but to my mind grid-tie systems defeat the purpose of going off grid in the first place: The Man still has his sticky fingers in your business. I’m going to ignore grid-tie because I don’t build those systems and I don’t want to get bogged down in things I know nothing about.
I’ll kick off with inverters. I have a bunch of the damn things. Inverters are kind of like backwards battery chargers. Instead of taking relatively high voltage alternating current (AC, the standard house power from the grid) and converting it into relatively low-voltage direct current (DC) to charge a battery, inverters change DC into AC. I say relatively high or low because the voltages we will be working with are 240-volt down to 12-volt. In the big picture, 240-volt is not that high. Many different voltages can be used in off-grid systems and sometimes the DC voltage is as high as the AC voltage.
AC voltage is fairly easy to step up or down using simple transformers. It’s the reason Tesla’s AC system beat out Edison’s DC system in the early years of electrification. Changing DC into AC and stepping up the voltage takes more electronic components. It requires an inverter.
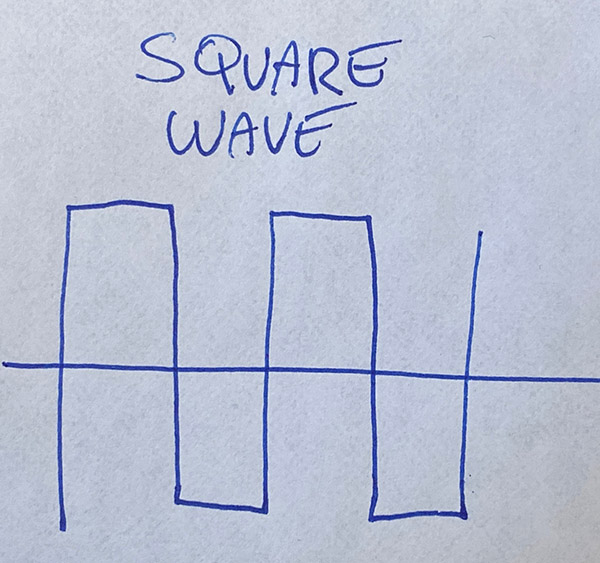
The simplest and cheapest inverters are called square wave inverters. These are getting harder to find due to inherent issues with their power output. Like all non-rotating inverters they flip the DC polarity back and forth 60 times a second (in the USA) to create alternating current then step that up to a higher voltage resulting in a square wave pattern. The null period between the two voltage peaks is blazingly fast, essentially zero. These inverters produce a waveform that is nothing like what you are getting from the grid. Square wave inverters will operate a lot of things but certain electronic equipment may not like it. Brush-type power drills, incandescent lights, resistance type heaters should work with square wave but I’m not promising anything.
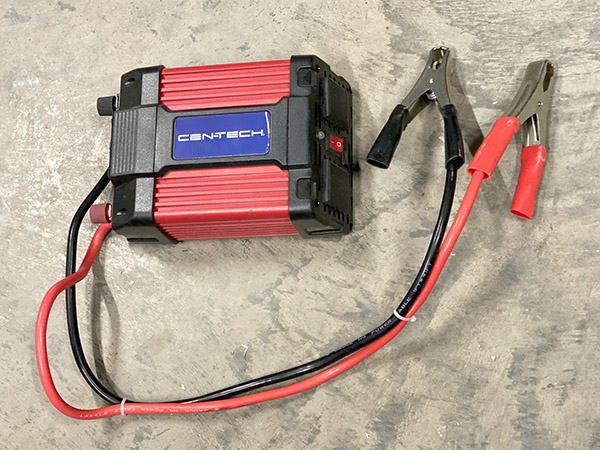
This is a cheap, Harbor freight 750-watt square wave inverter. Good for Christmas lights on your parade float.
If you test a standard, 120-volt square wave with a voltmeter it will probably show around 90 volts. This is due to that waveform switching back and forth instantly. Power under the curve is the closest way I can describe it: a normal grid waveform spends a lot of time rising and falling 60 times a second. The voltage rises, drops to zero then rises in reverse. For grid power 120 volts is an average. What this means is that over 1/60th of a second your electrical component is getting 120 volts some of the time, more than 120 volts some of the time, and no power at all some of the time. Electrical devices are built to this standard. A full, 120-volt square wave would most likely overheat whatever you plugged into it.
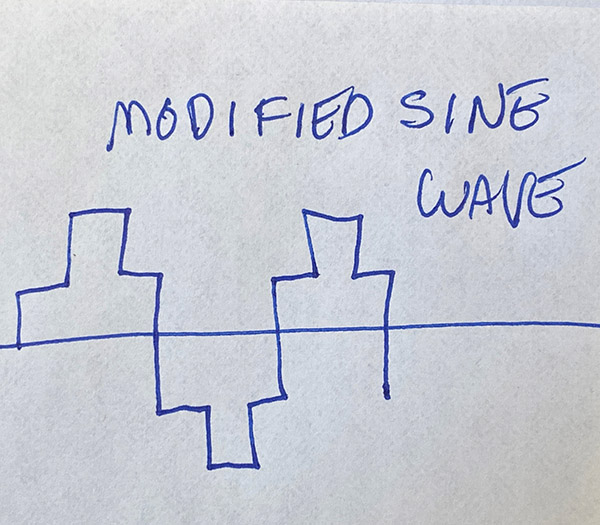
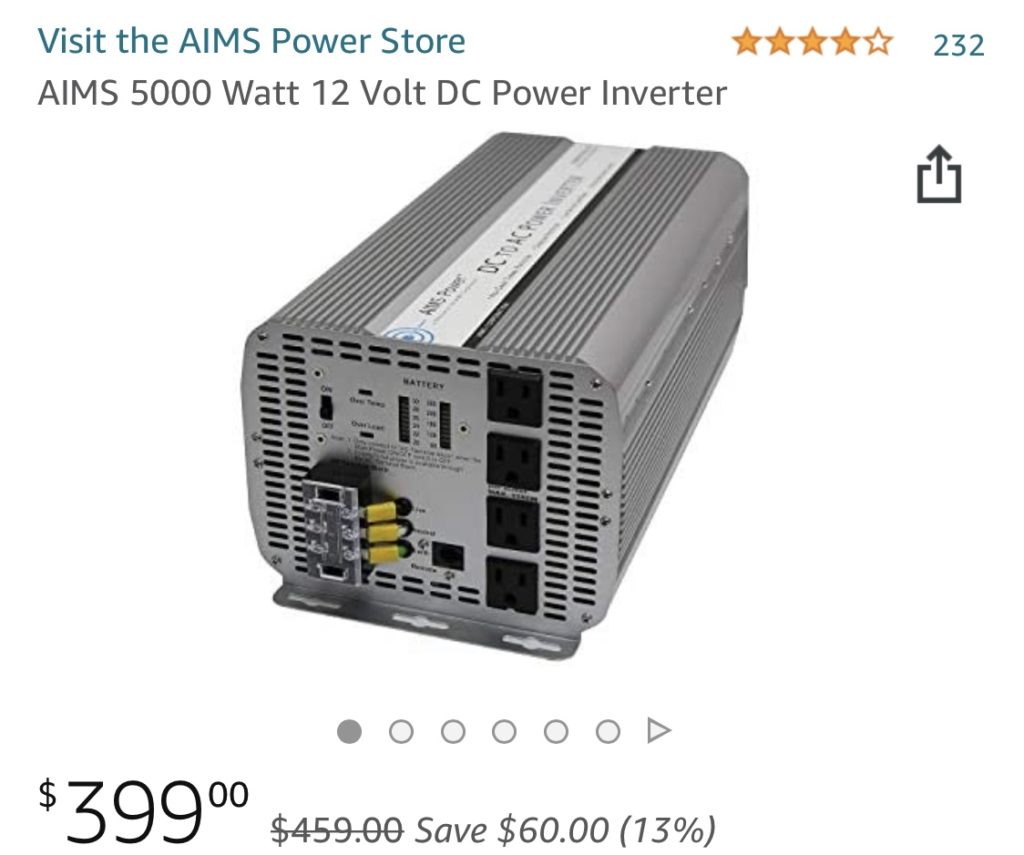
Modified sine wave inverters are an attempt to more closely mimic grid power. While a modified sine wave inverter is an improvement over square wave they are still sort of crude. Modified sine wave inverters are popular and will run most things but there’s still the possibility of frying a device if it happens to be really sensitive. Modified sine wave inverters cost a bit more than square wave inverters.
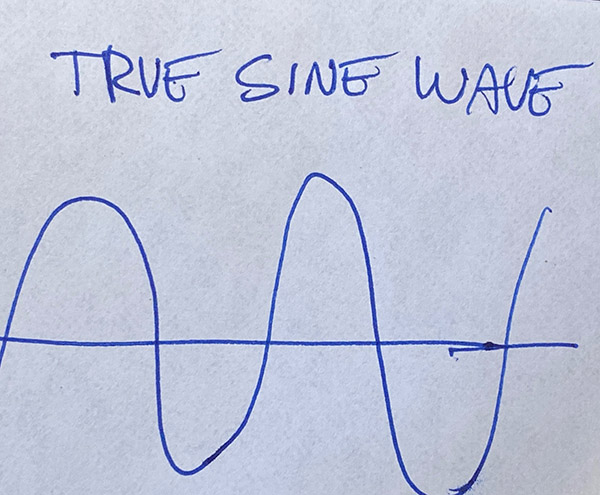
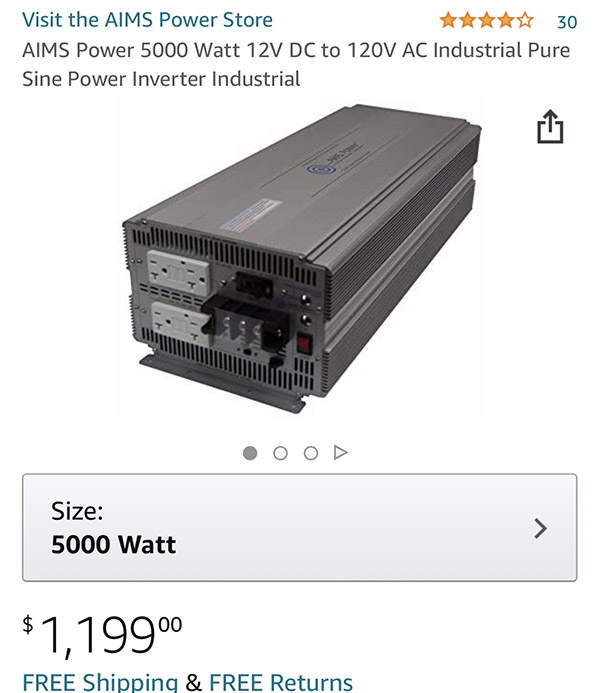
True sine wave inverters, also called pure sine wave inverters, are the most expensive and the closest thing you can get to grid power, maybe even better. These inverters produce a nice, clean waveform that looks the same as grid power to your electrical equipment. True sine wave inverters will run anything that you can run from grid power assuming the inverter has the capacity. True sine wave inverters used to be very expensive but the price has come down quite a bit. They still cost a lot more than a square wave.
While a 12-volt, 5,000-watt true sine wave like this one costs 1200 dollars, three times as much.
If you can afford it, always get a true sine wave inverter. If you’re really skint get a modified sine wave inverter, just assume the risk when plugging anything like computers or microwave ovens into the thing. If you just want to run incandescent lights, maybe fluorescent lights and simple, no-circuit-board electrical things get a square wave but be warned: I nearly fried my air compressor on a square wave and burned up a cell phone charger on one. I don’t buy square wave inverters anymore.
Inverters are sized in output watts and input volts. They are labeled sort of tricky some times. You’ll find a unit may be 12,000 watts surge capacity but only 5000 watts continuous. To make life simple ignore surge capacity and use the continuous rating. Now that you’ve decided to get a true sine wave inverter (if you’re smart), determine what your average operating load will be in watts and plan for an inverter with twice as much output. For a small house or shed I’d go with 5000 watts.
Since inverters need a DC power source, like batteries, you’ll also need to choose what input voltage your inverter will draw from your storage batteries. 12-volt DC input is most common for smaller inverters but as inverter output rises the input voltage usually goes up also. 24-volt and 48-volt DC input is normal on larger inverters.
Higher input voltage from the batteries helps keep wire sizes and voltage drop within reason. A 12-volt input, 6000-watt inverter running at full chat will be sucking 500+ amps out of your 12-volt battery bank. A 500-amp load requires huge battery cables to carry the current and puts a lot of stress on electrical connections. Terminal posts tend to get hot with 500 amps flowing through them. At max load that same 6000-watt inverter with 48-volt input will be sipping a mere 125 amps from your 48-volt battery bank. The reduced current at 48-volts allows for smaller and cheaper cables. The cost savings is significant. Big copper battery cables are expensive. You can use the money you saved on cables for more batteries.
With smaller inverters output power is usually single-phase 120 volt AC. They often have standard duplex outlets built right into the machine. These are a good way to gain a little independence from the grid without having to mess with high voltage wiring: You simply plug things directly into the inverter and go to town. You’ll only be able to run 120-volt equipment but most house stuff is 120-volt.
Another option is 120-volt/240-volt split phase output. These inverters usually require hard wiring to the output and you’ll need a breaker panel. No easy plug-ins. This setup is nice if you have 240-volt things like an air compressor or small South Bend Lathe you want to operate from the inverter in addition to regular 120-volt equipment. A split-phase inverter is kind of like two single-phase inverters joined at the hip, the hip being the neutral leg in this case. One half the total output is available on each of two, 120-volt circuits and all the output is available at 240-volts. On a 6000-watt split-phase you’ll be able to draw 3000-watts of 120-volt power from one side, 3000-watts of 120-volt power from the other 120-volt side or 6000-watts at 240-volts. Note that you cannot draw 3000 + 3000 + 6000 watts all at the same time. You’ve only got 6000 watts total no mater how many ways you divide it up.
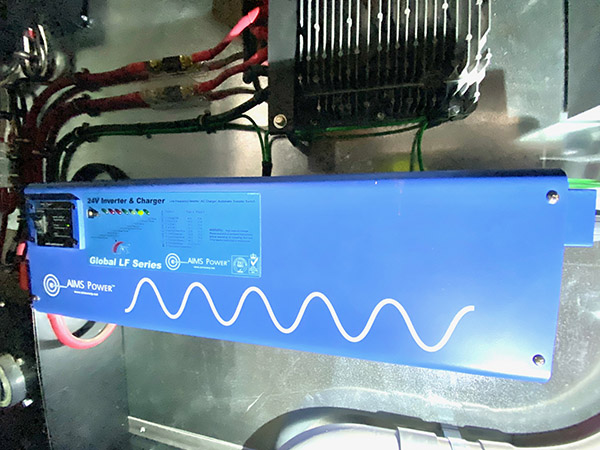
In my off-grid shed I run a 24-volt Aims 6000-watt, true sine wave, 120/240 split-phase output inverter that feeds a standard, household breaker panel. From the panel I have circuits for lights, outlets, and 240-volt outlets. I went with 24-volt input because I run LED, DC lights and a DC water pump. It’s harder to find these items in 48-volt. My system has been operating for two years without any problems. The inverter is kind of a watt-hog as it draws 3-amps “on” with no load attached. The Aims inverter has a pulsing, sleep circuit that reduces the no-load draw to 1 amp but it only senses one side of the 120-volt output. Turn on a load that is connected to the non-sensing side and nothing happens; the unit won’t wake up and make power. I don’t use sleep mode but it’s a good energy saving feature if you can make it work.
Another farkle I don’t use on the AIMS inverter is the pass-through relay. The pass through relay automatically stops the inverter when generator power is feeding your system. The generator power passes through the inverter relay and powers your shed/house/whatever. In addition the inverter can be set up to switch to battery charge mode when the generator is powering your load. I do the switching manually because I like to keep the inverter’s job as simple as possible.
The AIMS battery charge mode is great. If you kill the batteries you can input 240 volts from a generator and the inverter will become a 24-volt, 85-amp battery charger. This charger function is useful for cloudy or snowy days when your solar panels aren’t working. Of course I have my system set up for manual operation of the inverter charging. Like most inverters the AIMS shuts off at a selected low input voltage so as to not kill the battery bank completely or harm the inverter from operating on low voltage.
To give you an idea of what 6000 watts will do, I can run a small, wire feed arc welder or a ¾-horse air compressor. I use traditional power tools, a concrete mixer and a spot welder. I have yet to find something it won’t run, I just can’t run everything at once.
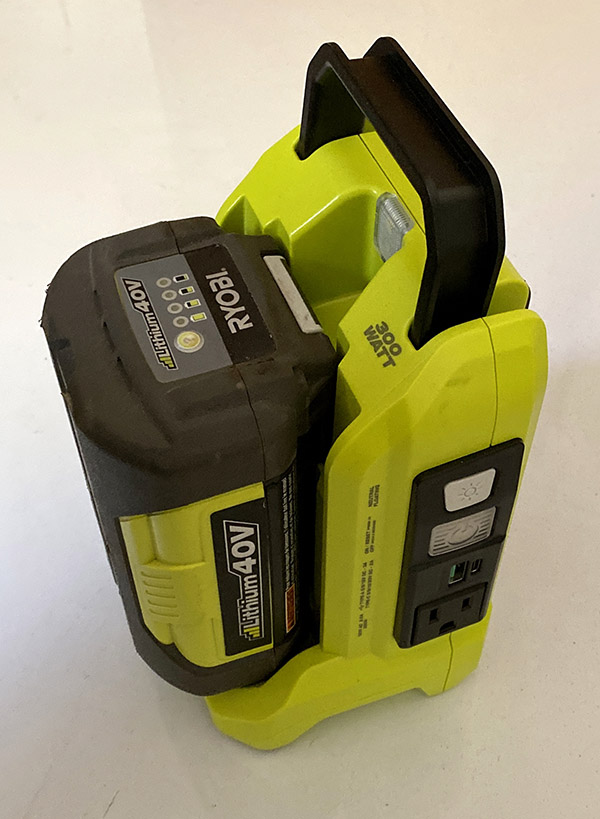
A super easy way to take the first steps on your path to grid independence is this little 300-watt, true sine wave, 40-volt input Ryobi. It doesn’t have a lot of power but if you already own 40-volt Ryobi tools like I do it makes a nice emergency back up power supply. You can run a lamp or an Internet router, maybe a small monitor or television. Also you can charge phones with a couple USB ports. Ryobi makes a 150-watt unit but 150 watts is too small to be much use.
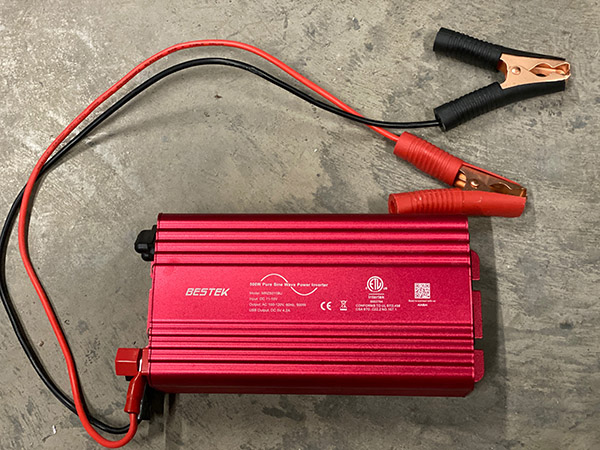
If you don’t have 40-volt Ryobi batteries this Bestek true sine wave, 500-watt, 12-volt input inverter will turn any 12-volt car battery into a 120-volt power source. If your power goes out during a big storm clip the leads onto your car battery and you’ll have back up power not reliant on The Man. Just remember to run the car every hour or so to recharge the battery or just leave the car running. At 500 watts you can do some damage with this thing (maybe even run a small refrigerator).
I mentioned earlier about rotating inverters. Back before the advent of fancy, complex inverters a brush-type DC motor turning an AC generator provided a simple, reliable method of inverting DC into AC. The waveform it produced was true sine. It wasn’t that long ago either as I worked on this type of inverter back in the 1970s. I’m guessing it wasn’t as efficient as the new ones and the frequency may drift a bit. The motor-inverter used a lot of copper compared to modern stuff but it worked ok. If you find an old rotating inverter in a junk pile grab it; it would be fun to mess with.
That’s enough inverter chat, it’s too much geeking for me. My head is spinning from typing about it. Hopefully this will help you decide which inverter will suit your needs. If you’re interested in this sort of stuff we’ll cover batteries, solar panels, generators, wind generators, loads, and how to tie the mess together in the future, so be sure to subscribe to our ExhaustNotes.us email alerts and you won’t miss a thing. Unless of course you want to miss a thing.
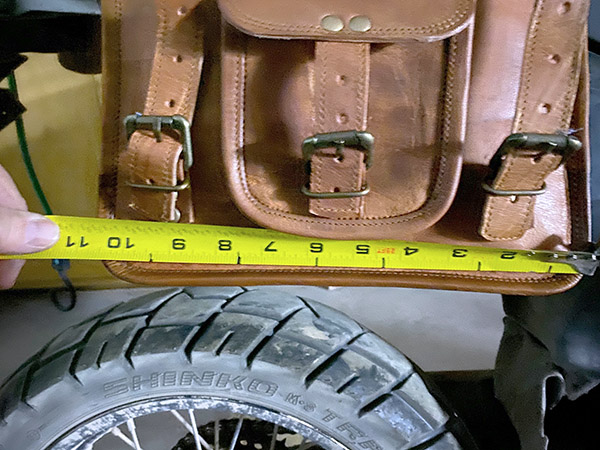
I’ve been working on Zed, my Kawasaki Z1, trying to get it ready for touring. I get the feeling that it will soon be safe to knock about the country again and if not, that the general population doesn’t give a damn whether they contract the virus or not. To that aim I purchased a pair of slick looking goatskin saddlebags from Amazon. I like to keep Bezos in the chips so I figured a pair of $33 Harshali bags all the way from Rajasthan would do the trick.
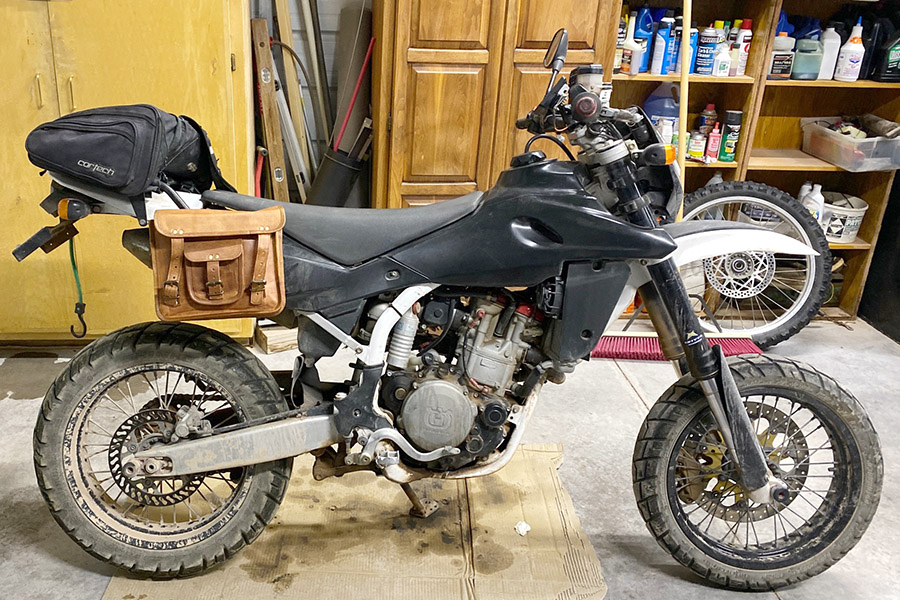
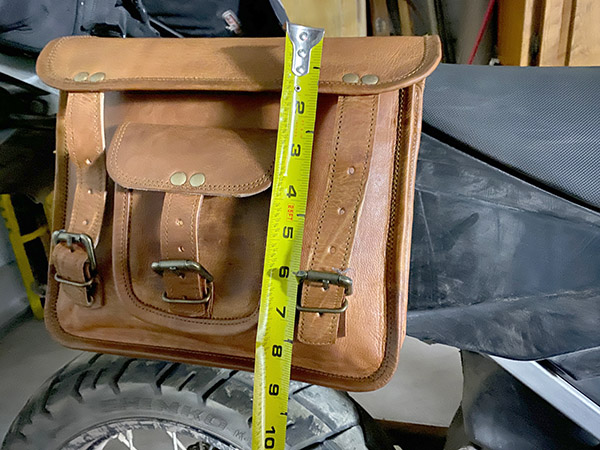
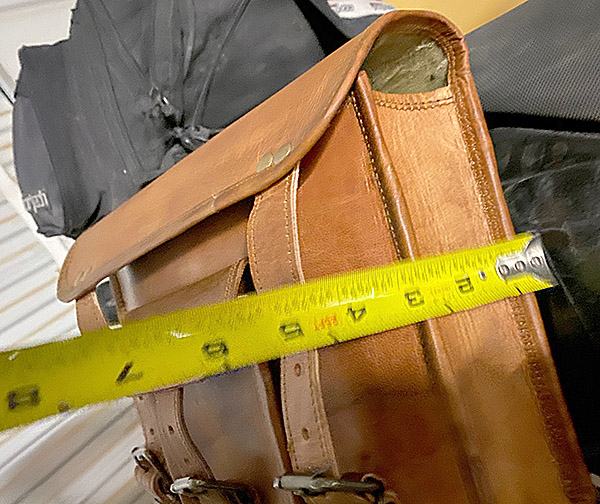
I didn’t want giant saddlebags, just something for tools and water maybe a snack so I thought the 11″ wide, 8″ tall, 3″ Harshali bags would be sufficient. Being male, I assumed 11-inches would be a fairly good-sized bag, you know? Turns out they looked pretty stupid on the Kawasaki. What looked stupid on the Kawasaki looks just right on the Husqvarna so that’s where the Harshali (one bag, right side) ended up.
The saddlebags look well made. The leather is as thick as a goat, I guess. The metal buckles seem sturdy and are a slightly tight fit for the straps. Like the long running joke in the British sitcom, Are You Being Served, I’m sure they will ride up with wear. One area I may reinforce is the frame strap-to-bag rivet. They seem sturdy enough for street riding but I bounce the Husqvarna of rocks and other hard objects. Two thin steel plates riveted with the leather sandwiched between might be the way to go.
The Harshali bags have several zipper compartments and dividers inside. Being only 3-inches deep these dividers seem pretty dumb but who am I to say. The saddlebag design looks like a lady’s purse missing the handle. That may actually be what they are but I’m secure enough to strap one on.
On the outside face of the bag there is a small pocket that would hold a pack of cigarettes if I smoked or a compact if I used face powder during a ride. It’s a good place for a couple-three candy bars or your bundle of sage.
The reviews on Amazon lead me to believe there may be two saddlebag factories in Rajasthan one building beautiful, sturdy bags and the other turning out stinky, ill-sewn, moldy trash. I got the good set. They smelled like leather the buckles and rivets were rust free.
I’m happy with the Harshali bags so far. Only time will tell if they hold up to the rough and tumble world of motorcycle touring. Which reminds me: I still need a set of bags for the Kawasaki. Bezos is laughing all the way to the bank.
Never miss an ExhaustNotes blog! Sign up here for free:
I may seem like a cranky old man but I’m not that old. I admit I don’t like many of the useless widgets and features coming out on new motorcycles. As a rule they do nothing to enhance the feel of the wind or the joy of riding. Oh sure, they may make motorcycling safer and protect riders from themselves but the additional weight, more frequent breakdowns, and costly repairs (due to excessive complications) hardly seems worth it to me. I would go as far as to say a 1985 Japanese bike is more reliable than most any 2021 motorcycle.
You know what to do…please click on the popup ads!
Listen, I’m a booster for motorcycling. I know manufacturers need to sell new bikes and new bikes need to appear improved over older models. I don’t want you to think of me as a negative person and a killjoy about your fancy-pants electronic-nanny bike. If you imagine you’ve found something you like and feel happy about I’m good with it. And there have been a few improvements to motorcycles since I started messing with them. Keep in mind that I’ve been riding since the late 1960’s so some of the things I think of as new are not actually all that new.
Modern disc brakes are the biggest improvement to motorcycles. I rode for many years on bikes that would not lock the front wheel no matter how hard you squeezed the lever. Not only were the old drum brakes weak, they faded so badly going downhill that often the rider was left with no brakes at all. The first mass produced disc brakes in the 1970’s were a huge leap but nothing like the new multi-piston, multi-disc brakes on modern bikes. Motorcycle brakes became so good manufacturers had to hobble them with anti-lock systems to keep riders from crashing in a panic situation. You really can flip over frontwards on some bikes. My Husky 510 has a dinner plate sized disc that is a miracle of stopping power and it doesn’t come with a safety net. In the dirt I use one, very light finger. On pavement two fingers will stand the bike on its nose. I like having that power even though I’ll probably wipe out using it.
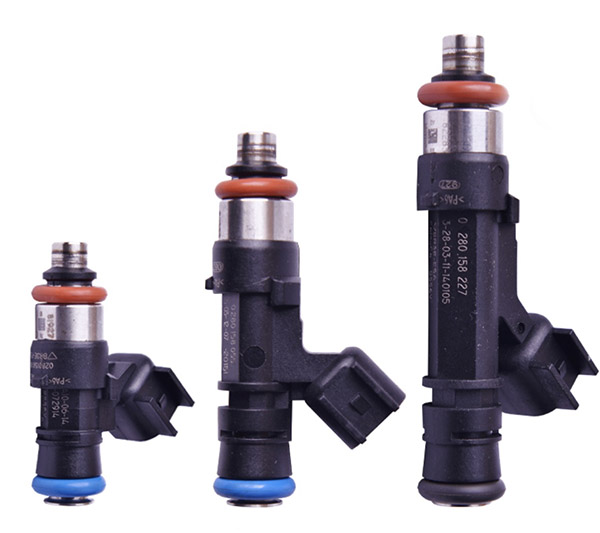
Fuel injection is the second best idea but you have to make compromises with complexity. Carburetors are relatively easy to adjust and owners can screw them up with just a few simple tools. Fuel injection requires some type of reader or display to tune. Aftermarket companies sell all manner of work-around black boxes and mapping programs. I’d say tune-ability is a toss up between the two fuel/air mixing systems.
At a fixed altitude, humidity, temperature and barometric pressure a carbed bike can run just as well as any injected bike. My token modern bike, the Husky 510, has FI but the rest of my bikes have carburetors and I manage to get from Point A to Point B just fine. I accept FI’s extra complexity because fuel injection works great. Over extreme altitude variations fuel injected motorcycles run so much better than carbed bikes you could almost miss their biggest advantage: less clogging. In a perfect world, a world without alcohol blended in, our gasoline carburetors do an acceptable job. The problem is modern fuel has such a short shelf life that, left to absorb moisture and drop out of suspension alcohol fuel can clog up carbs in just a few months of storage. Draining the carbs before parking the bike more than a month is mandatory.
Once past the fuel pump a fuel injection system is sealed off from oxygen and the elements, drastically improving gasoline’s shelf life. Even if the fuel does goes off in the tank the high fuel pressures of fuel injection tend to pump the crud on through. It’s still possible to gum up a fuel-injected bike sitting long periods of time but much less likely.
O-ring chains are not really new but the most recent versions are incredibly good. My early experience with O-ring chains saw the little o-rings go missing and the chain ended up no better than a plain old chain. After that I stopped using them for 30 years. Skip forward a few decades and it’s not unusual to get 20,000 miles or more out of a brand name O-ring chain. Give an O-ring chain a shot of 90–weight oil every 400 miles or so and you’ll be riding carefree minus the heavy parts of a shaft-driven motorcycle. Belt-drives are good, too, but every time I’ve taken a belt driven bike scrambling the belt starts squeaking and it takes a thousand miles for the noise to go away. On small displacement motorcycles O-ring chains do add a bit of drag but don’t trouble yourself over those things.
Tubeless, spoke rims are a recent development and they are a great new idea. Besides looking cool as hell, tubeless, spoke rims combine the easy hole patching ability of tubeless tires with the light, strong construction of spokes. I don’t know what took so long but I’m all for it, brother. One place I see a potential problem is running low pressures off-road but that has nothing to do with the wheel. If you’re trail riding at 15psi I suggest you stick a tube in your tubeless spoke wheel. I like the looks of spoke rims on a motorcycle but I also like being able to stab a tire plug in a flat tire and be on my way in 5 minutes. Tubeless spoke rims are a win-win idea. One day maybe I’ll have a bike with them fitted.
Liquid cooling has been around since gasoline engines were invented but I still think of the application in motorcycles as modern and one of the best ideas. Besides a few odd bikes like Scott and Suzuki most bikes were air-cooled until the mid 1980’s, and 1980 seems like yesterday to me. The big advantage to liquid cooling is the ability to tune the bike with one less variable to worry about: you know within a few degrees what temperature the engine will be 98% of the time. There’s also a sound deadening benefit that has become more important as we move forward into an eerily silent, clean world.
I own two liquid-cooled motorcycles and the extra complexity of the cooling system has not caused a problem on either one. I forget they are liquid cooled. My old Yamaha V-Max developed a leaky water pump at 80,000 miles but once fixed it rolled on to 112,000 miles without a hitch. Unfortunately, that bike was sunk in one of the many hurricanes that struck the Florida Keys during my time there.
These advancements in motorcycling have made bikes safer, quieter and more reliable, but not any more fun. I enjoy riding my old air-cooled, drum braked, carbureted, tube-tired, non-O-ring chained, Yamaha two-stroke best of all. It goes to show that as we move into the silent, safe, modern world the biggest and best ideas in motorcycling are still inside your mind.