Ruger’s .30 Carbine Blackhawk

I had a hard time selecting the title for this blog.  I ultimately went with the one you see above because I think it will show up better on the search engines.  But I almost went with Stupid is as Stupid Does (you know, from the Forrest Gump movie).   Read on.  You’ll see.

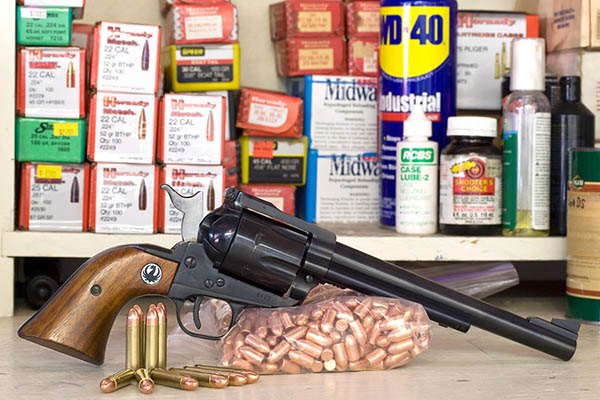
I am a big fan of the Ruger Blackhawk, and I wanted to try something different a few years ago, so I bought an older .30 Carbine Blackhawk on Gunbroker.  I was excited about getting it, but I have to tell you that revolver had issues, one of which led to its ultimate destruction.  One issue was that every case stuck in the cylinder after firing, and the other issue was that the cartridges dragged on the frame and the cylinder wouldn’t turn freely.

The first Ruger .30 Carbine I owned. It was the original design, informally referred to as the Old Model. It was a beautiful handgun, but it had problems.

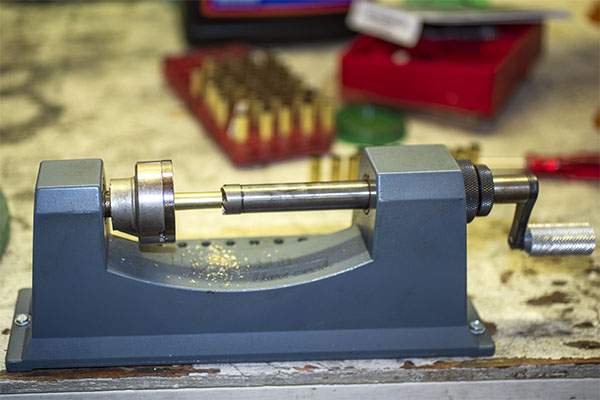
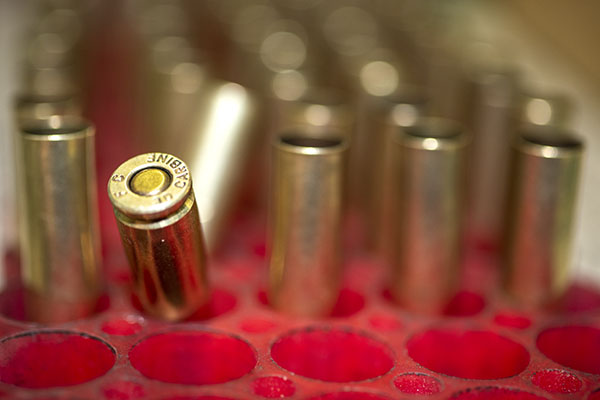
I doped out the cylinder drag issue fairly quickly.  You have to trim the brass after nearly ever firing, and you have to make absolutely certain the primer is at or below flush after seating (something you should do for all cartridges).  The .30 Carbine is a cartridge that is unusually sensitive to all this in the Blackhawk.  .30 Carbine cases shrink in length when fired, and then they grow in length when you resize them.   The cartridge headspaces on the case mouth so case length is critical, and the .30 Carbine case seems to grow and shrink more than others.  Let it get too long, even by just a few thousandths, and the based of the cartridge will drag on the frame and the cylinder won’t turn freely.  I learned to check case length every time I reload this cartridge, and I usually have to trim about half of them.

I use a old Lyman case trimmer I’ve had since the 1970s. It’s a little manual lathe (I’ll let Gresh handle the big ones).  That’s a .30 Carbine case you see in there.

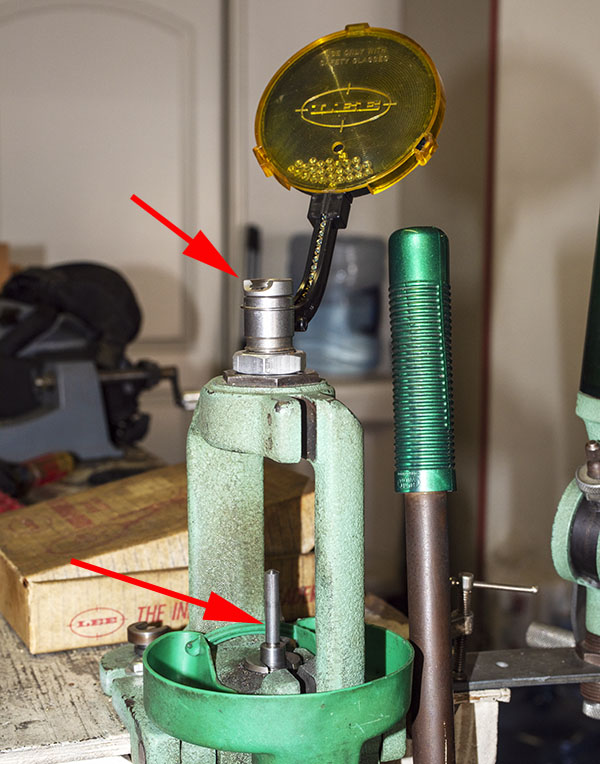
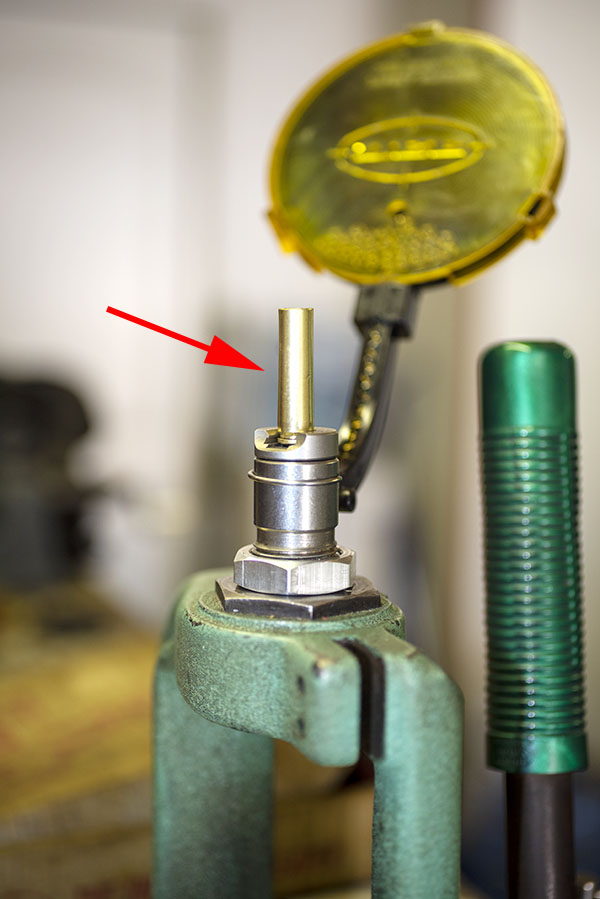
The next issue is primer seating.  Even though I clean the primer pockets each time I reload, I found that a handheld priming tool won’t always fully seat primers in a .30 Carbine case.  Hey, I’m not looking for an argument here and if you can do this with your hand priming tool, more power to you.  I’m telling what my experience has been.  I have another priming setup (also made by Lee), and it’s the Auto Prime tool that mounts on the press.  It positively seats the primer below flush on every cartridge.  It’s what I use now when priming .30 Carbine cases.

A Lee Auto Prime tool mounted on an RCBS Rockchucker reloading press. The shell holder mounts on top of the tool (upper arrow). A ram (lower arrow) pushes a machined rod that seats the primers.
A .30 Carbine brass case in the shell holder waiting for its primer.
A Winchester Small Rifle primer properly seated in a Federal .30 Carbine cartridge case.

All the above is a prelude.  I fixed the cylinder drag issue on my first .30 Carbine Blackhawk using the reloading process shown above, but I still had the extraction problem.  The cases just did not want to leave the cylinder. The extractor rod was bending and the cases still wouldn’t extract.  It was so bad that I usually had to take the cylinder out of the revolver to drive the cases out with a cleaning rod.  I tried everything to fix that problem.  I polished the chambers and I swabbed them with alcohol to remove any traces of oil (an oily chamber or cartridge case allows brass to flow into any machine marks in the chamber, locking it in place), but I still had the extraction problem.

Then I tried lighter loads.  A little bit lighter wasn’t doing it with the propellants I had been using, so I went to Trail Boss (a powder known for working well with lighter loads).  That’s how I got in trouble.  You have to understand that reloading manuals don’t include data on Trail Boss for many cartridges, and in particular, there was no data in any of the several reloading manuals I own on using this powder with the .30 Carbine.  The Trail Boss manufacturer’s guidance is to load to the base of the bullet for a max load, and not less than 70% of that amount as a minimum load.  I loaded at just under the max load.

I thought I was doing pretty good when I fired the first Trail Boss load and ejected the case.  It extracted easily.  This is progress, I remember thinking.  Things are looking good.  So I fired the remaining four rounds.  Then I walked downrange to check the target.

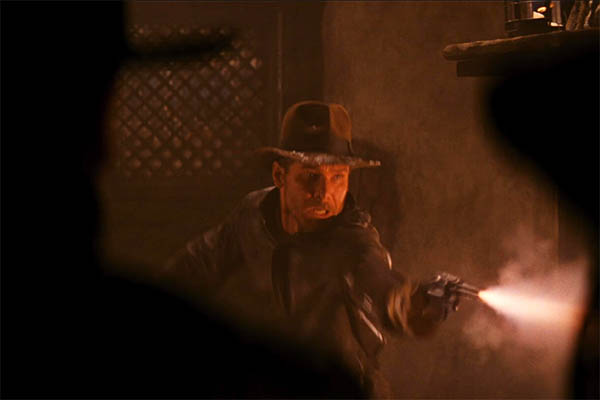
Hmmmm.  That’s odd.  Not a single shot was on the target.  My first thoughts were the load was either terribly inaccurate, or it was so light the bullets were hitting below the target.   Then, when I walked back  to the firing line, I saw it:  A sickening glint of copper peeking out of the Blackhawk’s barrel.  A stuck bullet.  Five of them, actually.  I got a bullet stuck in the bore and didn’t realize it.  Then I had fired another, and another, and…well, you know.  They liked that barrel, those bullets did, and that’s where they stayed.  I felt even worse when I ran my fingers along the length of the barrel.  I could feel the swells in its diameter from each bullet to the next.  Good Lord, they build Rugers tough (that’s why I’m here to tell this story).  Forrest Gump has nothing on me.  Like I said at the beginning of this blog, stupid is as stupid does.  The weird part to me was that I couldn’t feel anything different when firing the gun.

I was embarrassed and thoroughly disgusted.  It was the dumbest thing I’d ever done.  When I got home I put the gun in the back of my safe and I left it there for a year.   I didn’t want to think about it and I didn’t want to see it.  But I knew it was there, bearing silent witness to my stupidity.  I wanted to get it fixed, but I didn’t want to admit to anyone I had done something so dumb.  The barrel was toast, and the revolver’s frame looked a little distorted to me.  Best to just forget about it.  Maybe save it for a gun buyback program.

Then one day I figured I had waited long enough, and I called Ruger.  I told them my story and the nice lady on the other end told me I wasn’t the first one to call with stuck bullets in the barrel.  I felt a little better.  I asked if they could re-barrel my Blackhawk.  Sure, she  said, and off it went.  A few days later Ruger called me, and that same nice lady told me a new barrel would be $400.48, but they weren’t too sure about the gun’s structural integrity.  Or, they could sell me a brand new Blackhawk.  How much would that be, I asked.  $400.48, she said.  Ah, I get it.  What they were really telling me is to buy the new gun at the steeply-discounted price (MSRP on  a new .30 Carbine Blackhawk is $669).  I was in. Here’s my credit card number.  Send me the new gun.

So I received the Blackhawk, but like its predecessor it went in the safe.  I still didn’t want to be reminded of what I had done.  And, I had managed to convince myself that shooting a 40,000 psi M1 Carbine cartridge in a handgun maybe was just not meant to be.  What I was really afraid of was that the new Blackhawk would have case extraction issues like the first one.

Another three years went by, and then something clicked: I woke up and felt like shooting my .30 Carbine revolver.  I can’t say why it took three years.  It just did.  I had the urge and I loaded a box of .30 Carbine ammo in different flavors to test what worked best.  And a couple of days ago, we went to the range.

How did it go?  In a word, awesome.  Take a look:

Six different loads tested on two targets each. All groups are 5 shots, and all are at 15 yards.
The loads.  My .30 Carbine New Model Blackhawk seems to like everything.

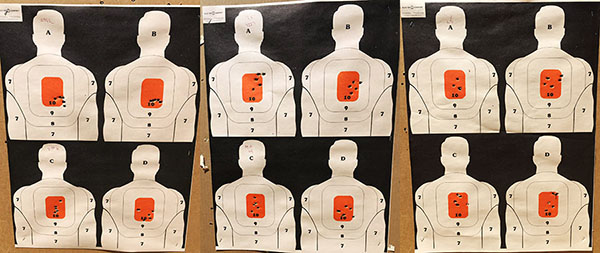
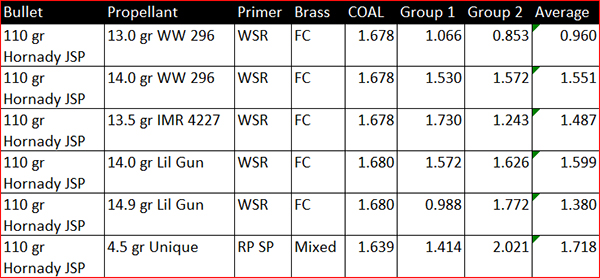
This new .30 Carbine Ruger Blackhawk revolver liked every load I tested.  One was exceptional:

The secret sauce: 13.0 grains of 296 and the 110-grain Hornady jacketed soft point bullet. It’s consistent, too.

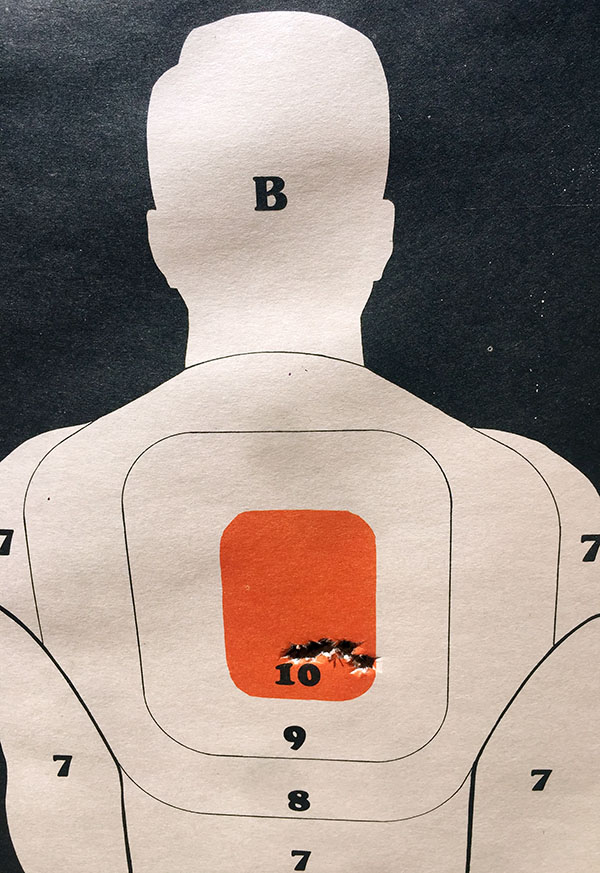
Shooting a .30 Carbine Blackhawk is fun.  You get massive muzzle blast, a huge muzzle flash, and major noise (hey, 40,000 psi is 40,000 psi), but little recoil.  And, as the above target and load data show, it is accurate.  This puppy can shoot.

You know what else?  The spent brass practically fell out of the cylinder when I emptied it.  The extraction problem is gone.  I’m wondering if something was wrong with the first .30 Carbine Blackhawk that caused the pressures to go excessively high and seize the brass cases in the cylinder (the chamber exit bores could have been too small, or maybe the barrel was undersized).  I’ll never know, but I don’t care.  This new Blackhawk is a honey.


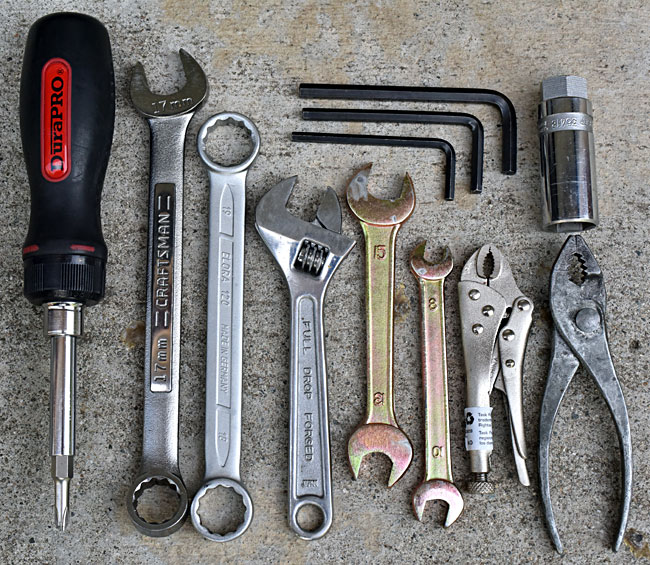
A bit about the gear I use in my .30 Carbine reloading activities.  I use Lee dies, although just about .30 Carbine reloading dies will do the trick.  I normally stick with RCBS reloading gear, but I could get the Lee dies quicker so that’s what I bought.   I like them.  Most of my other reloading gear is RCBS, including the RCBS powder dispenser, the RCBS Rockchucker press, and the scale.  Again, any brand will work.  In looking at the prices for RCBS gear, I notice that it has become fairly expensive.  If you want to get into reloading for a lot less, you might take a look at this LEE PRECISION Anniversary Challenger Kit.  It contains most of what you need except for the dies.  Knowing what I know after having been a reloader for 50 years, it’s what I would buy if I was starting out all over again.


Keep us afloat…please click on those popup ads!


More Tales of the Gun stuff?  Just click right here!

South By South Bend: Part 2

 The South Bend lathe project has been waylaid by several factors, none of them your fault. I did manage to wire the 4-pole, two-position, center-off toggle switch into the Harbor Freight ½ horsepower motor. So now I have forward and reverse. I’ll probably never use reverse but it’s good to have it in case you want to cut from the backside.

I could have made the motor reverse with a three-pole switch but since the motor is wired high voltage (240vac) you want all hot legs disconnected when the switch is in the off position. And I had the switch. The switch connections started out simple enough but soon I had wire coming out my ears. I ended up having to double up the metal junction box to allow enough space for the spaghetti.

I normally don’t like complicated things but I couldn’t come up with a better way and it was like 115 degrees in the shed. Not a good temperature for thinking. I’ve included a shot of the Harbor Freight motor’s faceplate in case anyone can come up with a simpler way of reversing the motor.

After the motor was running I had to file the 3/4-inch to 5/8-inch shaft-sleeve as it was too tight from the factory. I also cut down the tall key that was included in the sleeve package. The new belt is narrower than the original, or maybe not. The old one was pretty rotten. As it is situated, the inner face of the belt contacts the center of the motor pulley. The V-sides are supposed to do the contacting around here. I forget if A is wider than B in belt-speak but I’ll have to do a little work on the belt and pulleys. The thing works like it is so that’s good enough for now.

I’ve been relearning the various levers and knobs on the South Bend, levers and knobs that I knew blindfolded 40 years ago. My first cuts were ragged, a combination of no end support on the work piece and a cutting tool that has been in the lathe for eternity. I’ve since quelled the shaking by using a live center. That one change improved the appearance of the machined surface by 42%. The tool is still not what I want as it is tearing material more than cutting. I might try some of these newfangled carbide tools, the ones with a three-sided cutting edge that you can swap as it gets dull.

I’ve machined my test piece to roughly 5/8” so my next trick will be to dig around the junk box and see if I can find a thread cutting tool. You need a V with the correct angle. Watch this space for the threaded rod or mangled mess. I’ll also go over the remaining tooling I have for the South Bend. I’ve lost a lot of stuff over the years but there are still toys like steady rests, faceplates, and lathe dogs to clean up and experiment with.


You can read the first part of South Bend story here.

Slow Ride Home

The other day while surfing the offerings on Prime, we found Slow Ride Home, an indy movie about eight scooter dudes riding 3,700 miles from Jacksonville, Florida to Seattle.  The bikes were Yamaha Zumas, the displacement was 125cc, the top speed was 40 mph, some of it was kind of silly, and the language was crude, but hey, it was a good flick.  What struck me immediately were the similarities between this ride and the long-distance group rides I led for CSC Motorcycles.  Listening to the complaints about getting everybody on the road each morning was pure deja vu.  If you rode with me on any of those rides, you’ll really appreciate this one, and even if you didn’t, you’ll still like Slow Ride Home. There’s no hidden messages and this is not a movie that makes you think, and that’s what made it fun.

Here’s your link to Slow Ride Home.

A recommended TT250 toolkit…

We’ve been featuring toolkits and rider resources in recent blogs, and here’s another one.  It’s based on tailoring a toolkit for a specific bike (in this case, the CSC TT250).  It’s from a blog I wrote for CSC about 4 years ago when I led a group of TT250 riders through northern Baja.  The idea is to carry a tool for every likely need, without carrying any unnecessary tools.  This blog should be particularly useful for TT250 riders.  The concept can be extended to any motorcycle.


Originally posted on October 13, 2016

I promised a recommended TT250 toolkit a few blogs back, and this afternoon I put together a list of the tools I’m going to bring with me on the Baja trip.   The Internet being what it is, I have no doubt this will spark a firestorm of controversy from those of you who have different ideas.  Hey, as my personal hero (that would be Dubya) once said, bring it on.   Seriously.  If there’s something you think I missed, let us know and if I think it makes sense I’ll add it to the list.   That last part is important.  I’m bringing along the tools I think I might need in the unlikely event something goes south.   I’m not planning on doing an engine rebuild on the side of the road.  Knock wood, I’ve only ever had one serious breakdown on any of my rides (and it wasn’t on a Chinese bike; in fact, it was on a bike that costs about 10 times what a new TT250 goes for…and that bike didn’t come with any tools).

The TT250 comes with a modest tool kit mounted in a container along the frame, as you see below.

They say halitosis is better than no breath at all, and that’s kind of how I feel about the tool kits that come with new motorcycles (indeed, as mentioned above, some new motorcycles don’t include any tools).

Here’s what you get with the stock TT250 tool kit:

It includes a screwdriver with both blade and Phillips head drives, two wrenches with 8mm, 10mm, 13m, and 15mm ends, and a pressed steel socket that you’re supposed to turn with the screwdriver shaft.  The problem is that I don’t think that pressed steel socket would hold its shape under serious torque (and even if it did, and you probably couldn’t exert enough torque with the screwdriver shaft to adequately tighten or loosen the larger fasteners or the spark plug).

I took a hard look at the nuts and bolts on my TT250 this morning, and here’s what I’m putting in my tool kit for Baja:

From left to right, here you go:

    • A reversible drive screwdriver with both Phillips and blade drives.  It’s a big screwdriver, but I like the thing.   It’s one of those tools that’s gone on all of my rides.
    • A 17mm wrench.   There are a lot of 17mm bolts and nuts on the TT250, including the oil drain plug.  It’s a must-have item.
    • A cool wrench that has both 18mm and 19mm box ends.  This will come in handy for both the front and rear axles.
    • A crescent wrench.  This is a catchall and it’s a good thing to have.  I could have left out several other wrenches and just taken the crescent, but I wanted the others.
    • I kept the two wrenches that come with the standard TT250 tool kit.  They fit virtually all of the smaller fasteners on the bike.
    • A small channel lock pliers.   I mainly carry these because I once read about a guy using them when he lost his shift lever.   I’ve never had that happen, but these things were on sale for a buck at a Lowe’s and I couldn’t pass them up.   If I ever lose a shift lever, I’ll be good to go.
    • A pair of pliers.  These came with my 1965 Honda Super 90 tool kit, which I bought in 1966.  I’ve had them with me on every ride ever since.
    • Allen drives in 4mm (for the fuel tank filler cap), 5mm (for the body panels), and 6mm (for the handlebar clamps).  I could have bought one of those pocketknife-like things that have a bunch of Allen drives, but these are the only three I think I’ll need and I didn’t want to add the bulk of the larger multi-driver tool.
    • A spark plug socket.   You might wonder why I don’t have a socket driver for it.  The 18mm wrench fits it perfectly.

And that’s about it, folks.  All of the above won’t fit in the little plastic case the original factory tool kit occupied, so they’ll go in a tool roll that’s going in my soft luggage.   That plastic box for the original tool kit?   I may use it to carry a burrito.


Want to see our other rider tool and resources blogs?   Here you go:

Rider Tools.  Good buddy Mike Huber, our paratrooper-at-large, wrote a concise compendium of website and other resources every adventure rider needs to know.

Rider Tools: Part 2.  This blog covers the tools Joe Gresh carries with him.  It’s a good one.  He saved my butt in Baja with that jump start gizmo!

Baja Spares.  This is a list of the stuff I take with me when I ride in Baja.

Another 1917 S&W Record!

It had to happen, I guess.  We recently blogged about a Smith and Wesson 1917 .45 ACP revolver that sold for what, to me, was the incredibly high price of $2,525.  A couple of days ago, I saw another one that grabbed my attention.  It’s a Gunbroker.com auction for an N-frame Smith, but not just any N-frame:  This one is the original that Indiana Jones used in his first movie (Raiders of the Lost Ark).  I know, strictly speaking, it’s not a 1917.  But it’s built on the N-frame and chambered for a close-relative, the British .455 Webley.  This revolver played a key role in several Raiders scenes, including the Cairo swordsman and many others.

If you’re interested in bidding, the Indiana Jones revolver is on Gunbroker.com.  The good news is the minimum bid is the same as the Buy Now price.  The bad news?  That price is a cool $5,000,000.


More Tales of the Gun stories are here!

Big Boy!

Maybe it’s a guy thing. For me, motorcycles and trains go together like coffee and a donut. There’s the obvious: The travel and adventure suggested by motorcycles and trains.  There’s the subtle: The mechanical beauty, be it a locomotive or a motorcycle. There’s the analogy, one I often use for a fast motorcycle: This thing pulls like a locomotive. It’s an expression that makes no sense, considering the leisurely acceleration of a locomotive compared to even a small motorcycle (in engineering terms, you just can’t defeat f = ma). I still use that expression, though. It conveys power, an attribute I apply to my motorcycles.

Like a lot of guys, I grew up in the Lionel era, dividing my drooling between things like the maroon Pennsylvania Railroad GG-1 locomotives that ran by our place and a variety of British vertical twins (all of which I knew had to pull, you know, like a locomotive).

I had lunch one day a few years ago with the guys at our local BMW dealership (I don’t own a BMW, but they let me hang around).  One of the boys was pumped because he had seen Big Boy at the Pomona Fairgrounds earlier. Only half-listening to the conversation, I thought he was talking about a hamburger, and then I realized it was a steam locomotive. My Lionel antenna immediately went up and like everyone else at the table, I started paying attention. To cut to the chase, we decided to visit Big Boy after our lunch that afternoon.

As you can see from the photo, luck was with us.  We had a great lunch and then we snuck into the Pomona fairgrounds to see Big Boy. I grabbed all of these photos with my iPhone. They would have been better if I had my Nikon, but you go to war with the army you have, and all I had was a phone.

I didn’t know really anything about the Big Boy locomotives, so when I got home I Googled it.  These locomotives, and 4014 in particular, have a fascinating story.  They are the largest and probably the most famous steam locomotives ever manufactured.  Old 4014 has been restored to operating condition by Union Pacific’s Heritage Fleet operation in Cheyenne, Wyoming (the photos you’re seeing here are before the restoration).  As part of the restoration, 4014 was converted to use fuel oil instead of coal for the boiler.   It was an obvious move.  I mean, where do you go to buy coal these days?

Only 25 Big Boys were ever built, and they all went to the Union Pacific Railroad.  They were manufactured by the American Locomotive Company in the early 1940s.   Their primary purpose was to pull long and heavy trains (up to 4,040 tons) through the Wasatch Mountains and the main rail lines between Ogden and Cheyenne.  They were designed for 80 mph, but 60 mph was their normal cruising speed. Big Boys produced 6000 horsepower and God only knows how much torque.  They were 132 long (including the tender) and they weighed 1.2 million pounds.  The tender could carry 24,000 gallons of water and 28 tons of coal.  The locomotive is articulated (it’s so long that the wheels are hinged and can turn with respect to each other to get through curves).  Old 4014 was first delivered to the Union Pacific in 1941 and retired in 1961, and during that period, it traveled over a million miles.

Very cool stuff, folks, made all the more interesting by the fact that No. 4014 finished its restoration in 2019 and entered service for special runs.   It would sure be cool to take a trip on one of those special runs.  That would be a real adventure.


More railroad posts?  Hey, take a look at these:

The Nevada Northern: It’s Worth a Trip To Ely
Golden Spike National Historic Park
A TT250 Ride

Tools For a Motorcycle Trip Part 2: You’ll Need a Luggage Rack

ExhaustNotes.us contributor Mike Huber recently wrote a story about tools to carry on a motorcycle trip. The story threw me because I was expecting a list of actual tools. Instead, Huber wrote about high tech software and hardware to make a motorcycle trip safer and more enjoyable. He should know as he lives on a motorcycle.

I’m always scratching for something to write about. The Internet consumes content at an incredible pace so I figured I’d steal Huber’s idea and write about the tools I carry on a motorcycle. This tool set may seem like a lot but I bring it along on a 7-mile run to the post office or a cross-country ride. Much like a large, ugly tail rack I won’t leave home on a motorcycle without tools.

If your bike has a kick-starter these little jump starters are not a must-have but with a high-compression 500cc single cylinder and no kick starter the Husqvarna is a bear to push start with a dead battery. Luckily I haven’t needed to jump the Husky yet but I have used the jump starter to start cars, other motorcycles (see Royal Enfield Bullet) and just yesterday I used it to start the back-up generator when the power went out at Tinfiny Ranch.

My nephew, Anthony gave me this one and it’s a pricy unit but you can find them on Amazon for as low as $25. I have a cheapie in every car and they work well. Not only will the tiny, lightweight battery jumpstart a diesel tractor or large cruise ship, it will charge your cell phone many times over. The only flaw with them is that they hold a charge for so long you tend to forget about them. Remember to recharge the thing every 6 months or so.

If you have a 12-volt system, not a given with old motorcycles, a small electric air compressor will save you hours of pumping after fixing a flat tire. This one is Slime brand but any of them will work. For some reason I frequently get flat tires so this pump sees regular action.

Of course a pump is useless without a patch kit. Most of my motorcycles still run inner tubes, which are a PITA, compared to tubeless tires. If you can find access to the hole without further damaging the tube patching is easy and reliable. I also carry a spare tube in case a tube becomes irreparable from my ham-fisted repair attempts.

A Leatherman multi-tool pocketknife covers a lot of bases and takes up little space. There are other brands of multi-tool and they are ok but I still think the Leatherman is the best of the bunch. Leatherman also has a great warranty. If you break a blade just send it back and Leatherman will send you a new knife. I’ve done it twice and had no issues.

An assortment of basic tools will get you out of trouble most times. I carry vise grips, tire irons, a decent multi-tip screwdriver, a few wrenches and ¼-inch sockets with driver, and a little flashlight. Vise grips will most likely damage whatever you use them on but they will get the job done and you can replace the chewed up parts when you get back home. The small aluminum tin case seen in the cover photo contains a universal cable repair kit. This is a neat item with several different cable ends and a length of cable. The various ends screw on so you can make a temporary cable for damn near any motorcycle. I’ve never used this item but I will be well-chuffed (warning: Brit slang!) if I ever do need the thing.

I also carry a spare master link, electric tape for those melt downs, a bit of bailing wire, tie wraps and a length of measuring tape. The measuring tape is super for seal cleaning or shimming or even measuring.

In addition to the basic tool set I add a few motorcycle brand-specific bits as I swap the tool set from bike-to-bike. A tube of Seal All rides with me on the Kawasaki 900 because the gas tank was very rusty and might spring a leak at any time. The Yamaha 360 gets a flywheel puller, a jug of two-stroke oil and a 21-inch front tube that will fit both wheels if it has too. The Husqvarna gets a 17-inch tube to suit its odd-sized wheels.

The tool kit rolls up in a canvas bag along with a few paper towels. No two ways about it, this kit is heavy. I look at it this way: The extra weight of the tools is offset by the lightness of my soul knowing I have the ability to fix most any minor problem on the road.


Hey, check out our ExhaustNotes.us home page, where we now have a quick index to our most recent blogs!

Riding Tools

Our good buddy Mike Huber, who literally lives his life from a motorcycle, has shared several great stories with us in the past.  This one came in yesterday, it’s one of his best.   It’s about the websites and services that support you when in the field, and it’s a great read and a great resource. We’re happy to share it with our ExNotes readers.

Mike, thanks again!


Many people think motorcyclists just wake up, ride in whatever direction we want, have no plans, and live without a care in the world. This stereotype often is true, but for veteran riders who have battled weather, crashes, and other unforeseeable incidents we know that being prepared with the proper tools and having our awareness honed can not only save our lives, but will allow for a more enjoyable ride when we do encounter these obstacles.

There have been a lot of trial and error moments over the years living as a fulltime motorcyclist; some of these errors in hindsight could have been easily avoided with little planning and the use of a few tools. I want to share a few links and tips with you to improve your safety and riding experience while avoiding the headaches I have had to conquer in the past.

Camping

For me, dispersed camping is the only way to go. When beginning motorcycle camping KOAs and local state parks are great for training wheels to learn and overcome mistakes or equipment you forgot or need to purchase, but can be rather loud and unfulfilling as a camping getaway. After a few incidents with generators running at all hours, kids screaming, and dogs barking I realized this wasn’t communing with nature at all.  It was, however, testing my patience and destroying my Zen. From that moment on dispersed camping on a motorcycle is all I do (with the exception of some National Parks). Dispersed camping allows you to be alone deep in nature with a crackling fire reflecting off the steel of your motorcycle while embracing the silence. This is an experience not to be missed as a motorcyclist and these two links below have greatly helped in guiding me to some beautiful and unforgettable campsites that otherwise would never have been located.

freecampsites.NET
ioverlander.com

Riding Offroad

Everyone has different ability levels on their own style of motorcycle when it comes to off-roading. The links below provide information on the terrain you will likely encounter and difficulty levels which can keep you from getting in over your head while riding these beautiful roads. Along with these links, speaking to locals in coffee shops and bars can be an invaluable resource since many of them will be up to speed with the current conditions and be able to provide you with tips and suggestions that websites just can’t compete with.

alltrails.com
trailsoffroad.com

Weather/Area Warnings

The apps below are another must have for any serious rider. Storms in the mountains can appear very ferociously and with little warning at times. Staying current on weather and fire conditions will minimize your risk of being caught in a dangerous situation. These tools when used can enable you to avoid and even learn to wait out, outrun, or detour around many storms. An added suggestion would be to scout out the weather and fire conditions in the area you plan to camp. Dispersed camping often will leave you with no cell phone signal or other warning capabilities. Researching these conditions ahead of time will not only ensure you are comfortable from a weather standpoint, but can also save your life if there are adverse conditions or wild fires you aren’t prepared for.

myradar.com
windy.com
https://www.fireweatheravalanche.org/fire/

Emergency Support

When I began my journey I spoke with several riders (especially those doing the BDRs (Backcountry Discovery Routes) who swore on using a GPS or satellite communication device for emergencies. I thought at the time this was overkill even for my deep level of preparedness. Well it just took one solid fall while off-roading to convince me otherwise. I now keep this device in my riding jacket at all times (not on the bike, as in a crash you and the bike tend to part ways) in the event I do require help and am alone without cell phone coverage. The SPOTGen3 also has an “All OK” signal I use each evening when camping so my Mom knows I am safe and not in any danger.

https://international.findmespot.com/#/

These are the websites and apps I have learned to use and appreciate while riding and camping off my motorcycle. I am always interested in learning what other tools people are using on their motorcycle trips in order to continue and pass on ideas to others in our tightly knit motorcycle community.


Mike, that’s awesome.   Thanks so much for sharing this with us and our readers.  All the way, Amigo!

A Santa Cruz Mountains Loop

I had a great ride this week…a loop through the Santa Cruz Mountains down to the Pacific coast and back.  Think giant redwoods, beautiful scenes, great roads, and a rich history.

First, the route:  It’s a quick hop down the 280 to the Woodside exit (that’s Highway 84), and then a twisty ride west on the 84 to Highway 35.  Highway 35 is called Skyline Boulevard, which runs north to Highway 92, and 92 drops down to Half Moon Bay.  Then it was another left onto the world-famous Pacific Coast Highway.  I had an interesting stop at a very old cemetery just off the PCH, and after that I continued south to San Gregorio State Beach.  Another left put me back on 84 and on into La Honda.  From there, the 84 completed the loop.  Here’s what it looks like:

The area to the west of 280 is surprisingly rural for a location so close to San Francisco (about 30 miles to the north) and Silicon Valley (which sort of starts just on the other side of 280).   Highway 84 is a quick ride to the first town on this loop, and that’s Woodside.

Woodside is one of the wealthiest towns in America.  A partial list of the big names who live or have lived in Woodside include Charles Schwab (yes, that Charles Schwab), Steve Jobs, Michelle Pfeiffer (the classiest actress ever), Joan Baez, Nolan Bushnell (the founder of Atari and the Chuck E. Cheese restaurant chain), Scott Cook (the founder of Intuit), Carl Djerassi (a novelist and the guy who developed the birth control pill), Larry Ellison (the CEO of Oracle Corporation), James Folger (as in need a cup of coffee?), Kazuo Hirai (the CEO of Sony), Mike Markkula (the second Apple CEO), Gordon E. Moore (Intel’s co-founder and originator of Moore’s Law), Prince Vasili Alexandrovich (the nephew of Tsar Nicholas II of Russia), Shirley Temple, John Thompson (Symantec’s CEO), and Nick Woodman (founder and CEO of GoPro).  Woodside is within commuting distance of Silicon Valley, so it’s understandable, I guess, why so many high-rolling Silicon Valley types call it home.  Needless to say, I didn’t bump into any of these folks on my ride (if I had, you’d see photos here).  Given the choice, I’d like to meet Michelle Pfeiffer, but it just wasn’t in the cards that day.  Charles Schwab would be cool, too, as Charles Schwab & Company have done well for me.  Maybe next time.

After passing through Woodside and climbing into the Santa Cruz Mountains, it’s on to the intersection of Highways 84 and 35. Alice’s Restaurant is right at that intersection.   Getting there was fun.  The road has 15-mph hairpins and there are redwoods, eucalyptus, and other tall trees on either side.  In many cases they form a green leafy tunnel over the road. I would have liked to grab a photo or two, but there was literally no place to stop and truth be told, I had my hands full.

It’s only about 3 1/2 miles from the 280 to Alice’s on Highway 84.  Before you get too excited, it’s not that Alice’s Restaurant (you know, the one in the Arlo Guthrie song).  But the woman who started this restaurant is named Alice, and hey, why not ride that coattail?  I was there during the week and I was able to get a photo of the place.  When I went by on an earlier weekend, Alice’s was jammed with people, motorcycles, and Ferraris.

Highway 35 is called Skyline Boulevard.  I think of a boulevard as a city street, but this was nothing like that.   It was another twisting mountain road and the views were stunning.

Skyline Boulevard tees into Highway 92 at its northern end and my ride along it was only 13 miles, but 13 miles can take a while on mountain roads.  Part of it is the twisting nature of the roads and part of it is the scenery.  I had the road to myself and it was awesome.  Skyline Boulevard follows the ridge of the Santa Cruz Mountains.  There are places where you can see San Francisco Bay looking to the right, and the Pacific on the left.  The photo below shows the Crystal Springs Reservoir to the east, and if you look real hard, you can almost see San Francisco Bay beyond it.

When I reached Highway 92, another quick 5.4 miles brought me to Half Moon Bay.

Highway 92 has twists and turns, but it’s a busy road and Half Moon Bay is a tourist place.  Not needing any refrigerator magnets and having been there many times before, I didn’t stop in Half Moon Bay on this ride.  But it’s a cool place and based on my earlier visits, it’s impossible to find a bad restaurant (my favorite is the Greek Taverna on the left side of 92 as it nears the PCH; it’s a great walkup place for fresh seafood).  Bring money; things are not cheap in Half Moon Bay.  The major employer is the Ritz Carlton Hotel (it’s that kind of place).

Another interesting tidbit about Half Moon Bay: They used to host big wave surfing competition here.  They get 50 to 60 foot waves when conditions are right and the area attracts the best surfers in the world.  The organizers moved the competition someplace else about three years ago.  Me?  I’ll stick to something safer, like riding motorcycles.

Highway 92 ends at the Pacific Coast Highway (also called the Juan Cabrillo Highway) and it runs long the Pacific for about a dozen miles before our next turn comes up (and that’s Highway 84 again, to complete our loop).  Even though the road is the Pacific Coast Highway, it’s a fair way off to the Pacific and for most of that distance I couldn’t get a photo with the road and the ocean in the same frame, but hey, it’s the PCH, man.  It doesn’t get much better than that, as these two Triumph-riders near San Gregorio State Beach already knew (where I finally did get the photo I wanted).

Before I reached San Gregorio State Beach, though, I had a stop I wanted to make.  In researching this area before the ride, I discovered that there’s a ghost town and an old cemetery about four miles south of Half Moon Bay.  It’s Purissima (with two “s”s), not to be confused with the La Purisima Mission, the subject of a recent ExNotes blog.  The town of Purissima is long gone, but the cemetery is still there, and I stopped for a few photos.  It’s a left on Verde Road, and the cemetery is about a half mile up the road.

I like old cemeteries.   After snapping a few photos, I was back on the PCH pointed south.

Eight miles down the road at San Gregorio State Beach I made a left on Highway 84.  The town of San Gregorio is just up the road.  There’s not much there, but the people are friendly.  When I stopped for a shot of their general store there was a guy with a white beard taking in the day.  When he saw me taking pictures, he asked if I wanted him to move.  “No way,” I said. “Stay right there. You add character to the place.”

The Spaniards were the first Europeans to pass through this area in 1769 when they were expanding the Alta California mission chain.   They stayed for a bit and named the area San Gregorio after Pope Gregory I.  San Gregorio became a favored 1850s destination when San Franciscans visited the area for swimming, fishing, and hunting.  Grizzly bears used to live in these hills, you know. And mountain lion.  And deer (the ones the mountain lions didn’t get).  I’ll bet the hunting was good.  I’ve hunted California’s coastal mountains a hundred miles or so further south (we were chasing wild boar, but all I ever got was poison oak).  The thought of going after a grizzly bear with a single-shot muzzleloader 170 years ago crossed my mind more than a few times as I rode through this area.

Further up the 84 (heading east) I entered the tiny town of La Honda (the name means “the sling” in Spanish).  Impressive redwood trees made me stop for a photo, but before I could get to the trees this motorcycle whizzed by:

La Honda is a nice little place.  I chatted with an old guy who had an English bulldog.  I say old, but he was probably about the same age as me.  “I did that once,” he said. “Stopped because my car was making a noise and decided this is where I was going to retire.”  We had a nice conversation.  He’s a former aerospace guy like me, and we talked shop for a bit about the good old days.  You know, when the cold war was still in a full tilt boogie and the aerospace industry was the closest you could get to Heaven without a one-way ticket.

La Honda is a wide spot in the road that isn’t very wide at all, but it sure has a colorful background.  The outlaw Cole Younger and his brothers used to live here.  That’s the Younger brothers who ran with Jesse James (the real one, not the reality TV dude).  The Younger brothers hid out in La Honda because it was cool and it was remote.  Ken Kesey lived here (he wrote One Flew Over The Cuckoo’s Nest), and his drug-fueled La Honda exploits with Hunter S. Thompson and Tom Wolfe are documented in Wolfe’s The Electric Kool-Aid Acid Test.  And like I mentioned above, grizzly bears used to live in these mountains.  There are stories about a guy who survived a grizzly attack by killing the bear with his knife (not Davy Crockett, but the two would have probably got along).  Fewer than a thousand people live in La Honda (at least as recorded by the last census).  It’s a cool place made even cooler (literally and figuratively) by the giant redwood trees in the area.

So, about those redwoods:

I was hungry when I reached La Honda.  I  usually select a place to eat based on how many vehicles are parked in front (who needs Yelp?) and by that measure, the La Honda Country Market looked mighty inviting (I had to wait for other folks to leave to get the unobstructed photo you see below).  The Country Market has a killer deli bar.  I had a pastrami sandwich on toasted marbled rye and it was maybe the best pastrami sandwich I ever had.  Give it a shot. You can thank me later.

I’m up in this area fairly regularly, but this is the first time I’ve done the loop described here.  It’s a great ride best done during the week.  Because it is such a great ride (and because it’s close to both Silicon Valley and San Francisco), these roads are jammed on the weekends (motorcycles, Ferraris, Lamborghinis, Cobras, McClarens, and other motoexotica).  When I did the ride on Tuesday, the roads were delightfully open.

I’d advise avoiding speeding (especially on the weekends, as the roads had a significant CHP presence) and I’d also say don’t wear a tinted visor.  The giant redwoods and eucalyptus trees bathe the roads in alternating patches of bright sunlight and deep shade (the riding equivalent of chiaroscuro), and in the shade it’s tough to see through a dark visor.

The ride I described above is about 60 miles from the point you exit the 280 until you get back on it, as shown in the map at the top of this blog.  I’d allow about two hours for a relaxed ride during the week, and maybe throw in another hour or two if you want to stop for breakfast or lunch.


Want to see our other rides on one of the greatest roads in the world?   That would be California’s Pacific Coast Highway, and you can see it here.

Day 7: Volcan Nevado del Ruiz

On my 8th day in Colombia and 7th day on the road, we left the town of Honda and rode to the top of Volcan Nevado del Ruiz, which took us up to about 14,000 feet.   It was the highest I’d ever ridden and I was surprised at how well the RS3 (the carbureted version of the RX3) was doing.  But I’m getting ahead of myself…let’s get into the blog I wrote for CSC Motorcycles at the end of that fine day.


Posted on December 21, 2015

A delightful hotel, sweltering heat, more mountain twisties, freezing cold, fog that cut visibility down to 30 feet, dirt roads, riding at 13,576 feet, hot sulfur baths, and a burbling volcano that killed 23,000 people in 1985…all in a day’s ride for us.

The hotel first…it was the Epoque, a great little boutique hotel in Honda that was one of the coolest places (in one of the hottest cities) I’ve ever parked a motorcycle. It was arranged in a square around a small pool (which we enjoyed immensely the previous night). Here are a few shots of the courtyard, Juan and Carlos having breakfast, and an antique record player in the dining room…

From there, it was another trials ride following the boys from Medellin as we twisted, turned, climbed, and descended cobbleboulder streets in Honda. Juan took us to the first bridge to ever span the Magdalena River, where I grabbed this shot of a Colombian woman taking in the humid morning air of Honda…

Here’s the bridge. It has planks across the bottom as the road surface. It’s real Indiana Jones stuff….

We saw the Magdalena River museum, and stopped in to check it out. Folks, it was hot. I was soaking wet by now, drenched in sweat.

The museum was interesting and it had some bizarre art. This guy reminds me of a boss I had a couple of decades ago…

The Colombians used steamships on the Magdalena, just like we did on the Mississippi River.

We left Honda and started to climb. The temperatures dropped mercifully. We stopped in Fresno. Yep, Colombia has a Fresno, too.

That’s me in the town square. I’m the guy on the right.

Two young ladies in a small store in Fresno.

As we were sipping energy drinks, Juan pointed out our destination for that evening, the Volcan Nevado del Ruiz. It was showing a little steam, and I stuck an arrow in this picture so you could see it.

We continued our climb. The roads were magnificent.

The photo below shows my front tire, with chicken strips that are about as small as I’ve ever been able to make them. I was getting better at keeping up with the Colombian motorcycle community.

Our riding positions are Juan, me, and Carlos. Juan is amazing. I’m struggling to keep up in the twisties, and I know he’s dialed it back for me. He’ll ride through the corners (and the roads are all corners, folks) standing on the pegs. At one point, we were taking a set of curves at speeds way above those at which I would normally ride, with the bikes leaned over at an unimaginable angle, when I looked ahead and saw Juan. He was standing on the pegs, similarly leaned over, and while all this was going on, he was reaching back to check the latch on one of his saddlebags as if it was the most normal thing in the world to do. The guy is an incredible rider.

As we continued to climb, we entered the clouds. Literally. We left the pavement and got on a dirt road headed up to the volcano.

4,138 meters! That’s 13,576 feet, and it’s as high as you can go on a motorcycle anywhere in Colombia. Juan told me he once did this ride on a Yamaha DT100, carrying a passenger on the back!

That’s not dirt on my RX3, folks. It’s volcanic ash. This was not your typical motorcycle ride.

Yours truly, posing with Carlos, on the top of the world, on top of a volcano with indigestion. Wow. This volcano is the very same one that blew in 1985 and wiped out an entire community. It was like Pompeii, as the guys explained it to me. 23,000 people lost their lives in that event. And here we were, riding in conditions where I could barely see Juan’s tail light in front of me, on dirt roads, in bitter cold. Wow.

Here are a couple of shots showing my helmet and my jacket, dusted with Volcan Nevado del Ruiz ash.

We left the volcano, rode another 20 kilometers on this dirt road, and found our hotel in the middle of nowhere.

The hotel had hot springs, and they were awesome. I had a good soak, we had dinner, and that was the end of Day 7 on this epic journey.

Today is our last day. We’re finishing our great circumnavigation and headed back to Medellin. Much of our ride today will be on dirt. I’ll take a few shots and post about it tomorrow.

Later, my friends.


You can read the earlier blogs from this great trip, and a few other moto adventures, here on our Epic Rides page!


Please click on the popup ads!


Never miss an ExNotes blog: