I last time I was in Ely, Nevada I was riding motorcycles with my Dad. I had a Honda XL600 and he was on a Suzuki 450 twin street bike. This must have been in the mid-1980’s because my XL600 was a 1983 model and the bike wasn’t that old at the time. We were traveling east on The Loneliest Highway, Nevada’s Route 50, and made a turn south onto, if not The Loneliest, a damn lonely Highway 93. In doing this we skirted Ely having never seen the main part of town or even realized it existed. The impression that there was nothing at Ely except a gas station and a sandblasted alien curio shop stuck with me for the next 35 years. Until I recently turned east off of Highway 50 onto 93 heading north: There was a whole town with streets and a downtown area! So not nothing after all.
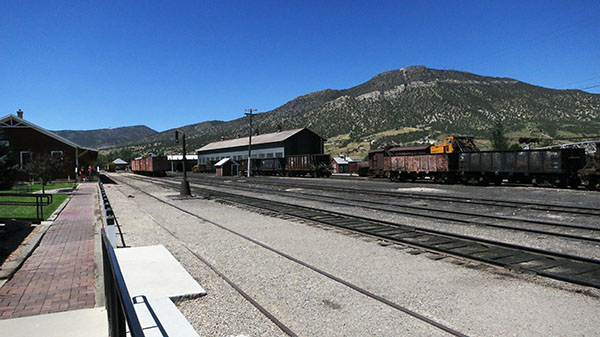
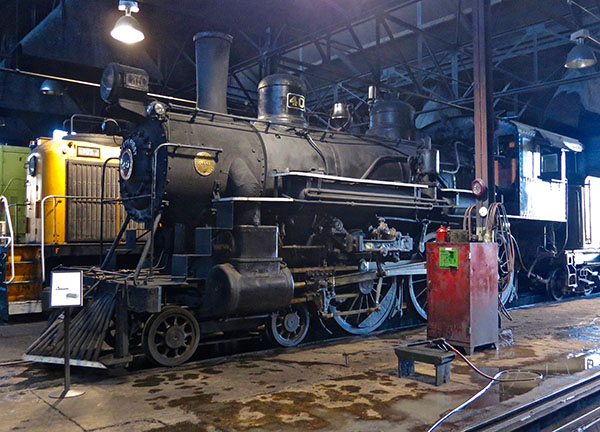
Ely, Nevada has a cool, working train museum just a few blocks off the highway. Look, I love trains. I like riding on them. I like sitting nearby when they rip down the tracks at speed. I like waiting at crossing guards, how the train takes precedence. I like how engineers will still blow the whistle when you ride alongside on your motorcycle making that whistle-blowing arm motion. I like the wheels of the train flattening the pennies I put on the tracks. (If they don’t shake off.) I like riding motorcycles on old railroad right-of-ways and rotting black ties full of termites. I mean, my bathroom towel holders are bent railroad spikes, man. The older the train the better; steam trains are at the top of the list. You get dirty just looking at a steam engine. I like a train that sets fire to the countryside and consumes coal and water like a Saturn Five consumes rocket fuel. I guess I just like a train, you know?
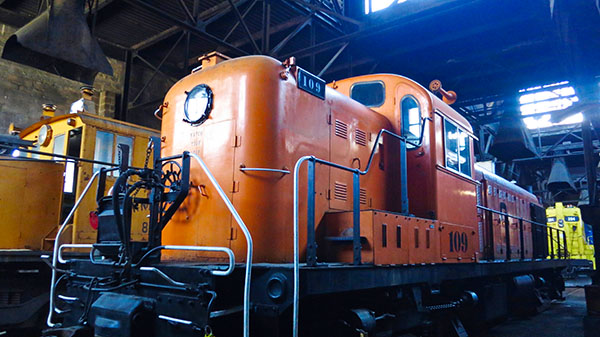
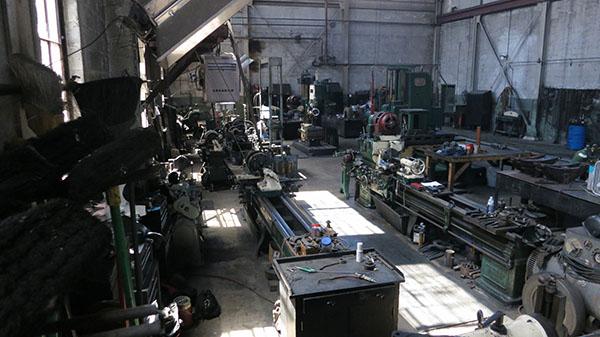
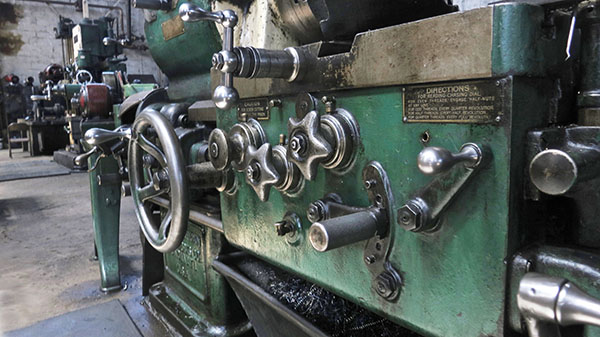
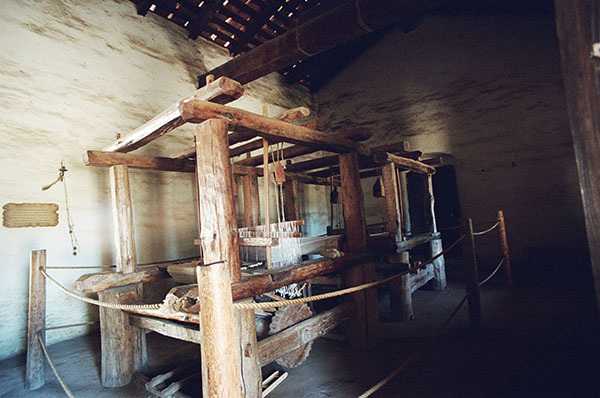
Inside the Nevada Northern Railway yard you can wander through the old workshops where huge machinery worn smooth by decades of human interaction await the call. And the stuff still works! Lifetimes have been spent spinning these wheels. The day I visited the action was kind of slow, even the shop cat was nowhere to be found but I did see new bronze axle bearings waiting to be finished.
The star of any train museum is the Steam Engine. For all the reasons mentioned above. Imagine cross-country travel cut from 3 months to 3 days. Telegraph lines ran alongside railroad tracks sending messages thousands of miles at the speed of light. (minus a few relay stations) For their time and impact on society, these smoking water-spewing monsters make the Internet’s capabilities look like two rusty baked bean cans and a length of string.
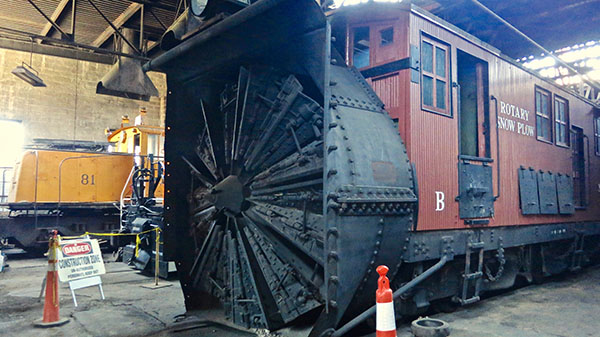
Things used to be a lot snowier in the west, miles-long snow sheds were built in the Rockies and where the sheds petered out giant snow blowers cleared the tracks. This one looks to be in pretty good condition. I can spend hours poking around this place daydreaming about being alive in that era. Maybe I could have been the one spinning those wheels or repairing leaking heat exchangers.
Check in with the Nevada Northern (https://www.nnry.com) and be sure to get a ride on the old trains. They still operate on a schedule, just not when I was there. There’s a gift shop full of cool train-a-phernalia and cold drinks. I walked for hours but I’ll be going back to Ely again. I want to ride!
Want more railroad stuff? Hey, here’s a great railroad story about Old No. 463. How about the Chattanooga Choo Choo? And another one about Golden Spike National Historic Site. We’ve got two more train stories coming up real soon about the railroad museum in Sacramento and Big Boy (Ol’ No. 4014), too, so stay tuned!
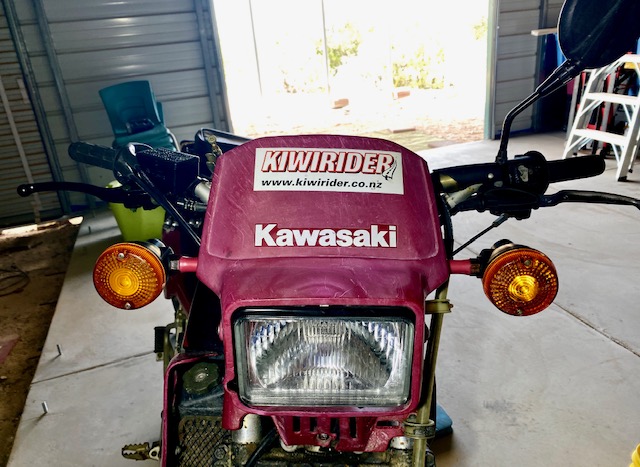
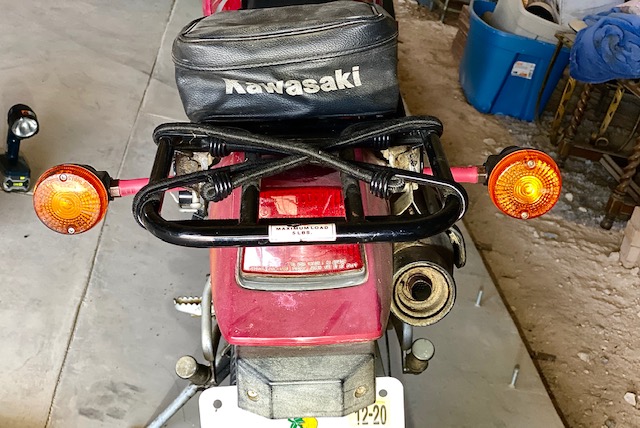
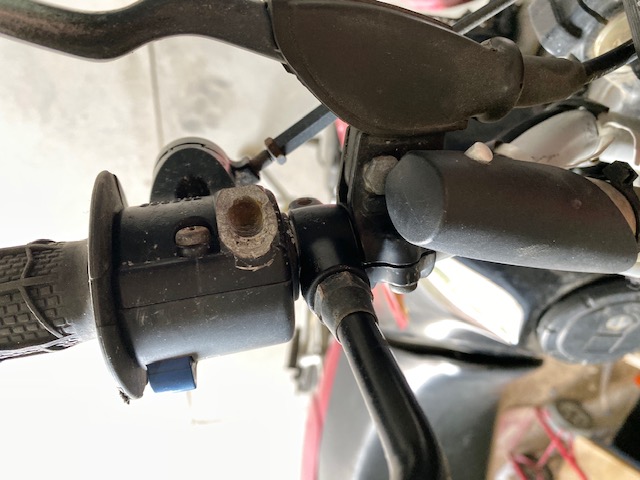
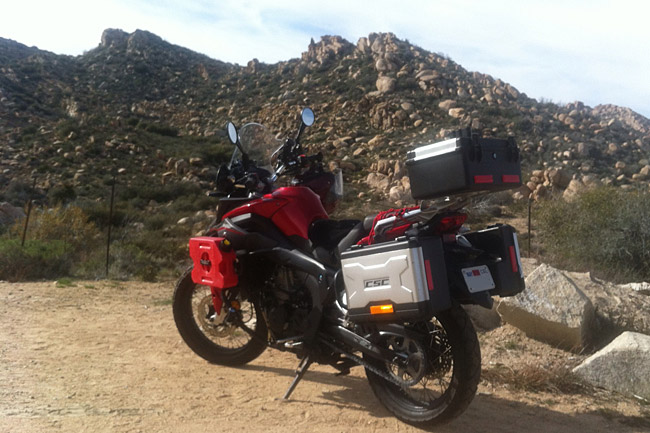
Blinkers on a dirt bike are kind of silly but lately I’ve been running The Widowmaker, my 2005 KLR 250, on the street more than is right or just. The KLR250 spends most of its time in Florida and the automobile drivers in that state are legendarily bad. With Nearly-Deads behind the wheel and blind rage as their co-pilot any blinking light that may draw attention is a good thing.
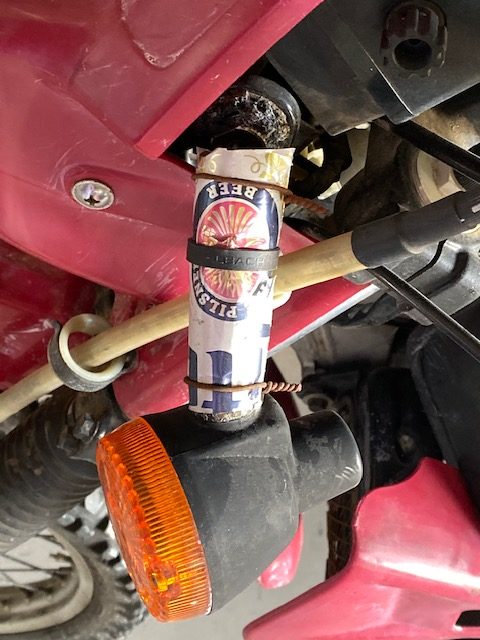
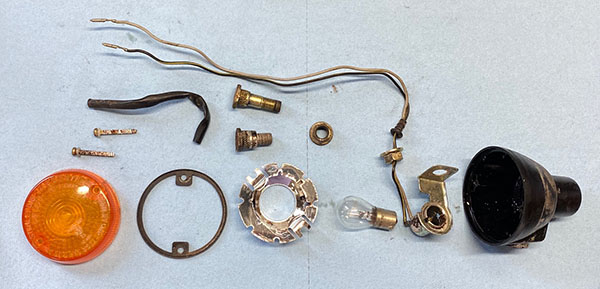
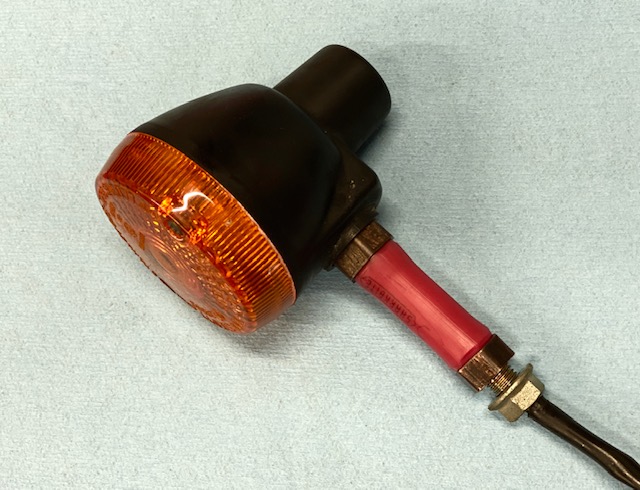
The Widowmaker’s blinkers have had a rough go of it. They worked fine when I bought the bike but several thousand miles of the Trans America Trail managed to put a pronounced sag in the rubber stalks holding the lamp fixtures. The rubber soon cracked and the blinkers hung down swinging on their electrical wires.
At first I managed to keep the original stalks in the game using the KLR rider’s best friend, duct tape. Soon the tape was not enough and I progressed to beer can wraps, bailing wire and spit. The rubber stalks crystallized and began to crumble into small, hard black cubes. It was a metamorphosis: soft, pliable rubber became fragile like chalk. The lamps, now free from their moorings swung in a crazy amber half circle pointing towards the ground. As they filled up with water the light fixtures quit blinking and they became memories of directional indicators slapping the side of the motorcycle.
I couldn’t find replacement stalks online. The complete blinker is sold as a unit and when your motorcycle needs as much attention as mine you can’t blow a bunch of money on parts that will break off soon anyway. I dismantled the old blinkers and decided to try to fix them for two reasons: Because I’m cheap like that and KLR riders will always take the hardest path.
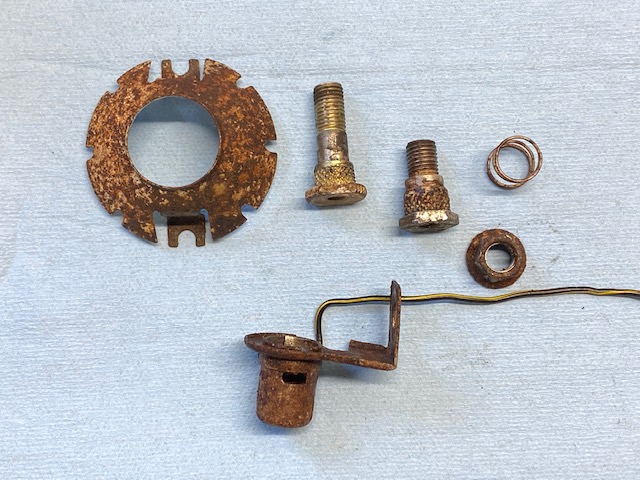
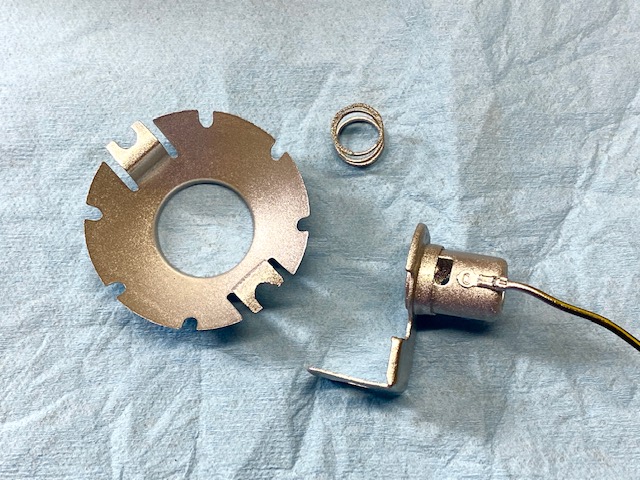
Two of the direction lamps weren’t rusty and came apart fairly easy. The rusty ones were more of a challenge. I had to soak them in penetrating oil and break the glass bulbs in order to remove the bulb base from the socket using pliers. After getting them apart I soaked the rusty bits in Evaporust for a few days and then painted the reflector and socket a fetching metallic silver.
Making new stalks was a conundrum: I needed something stiff enough to hold the lamp in position but flexible enough to bend during a crash, preventing destruction of the blinker lens and housing. I toyed with the idea of two thin strips of sheet metal to provide a malleable stem that could be bent back into position. I debated welding a thin tube between the threaded ends but didn’t have any tubing that would serve the purpose.
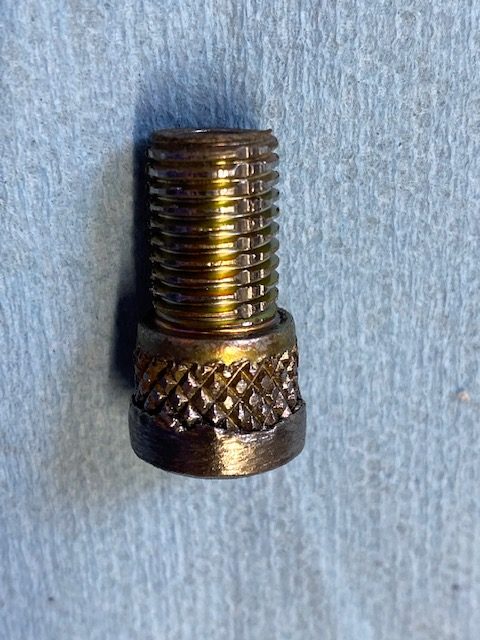
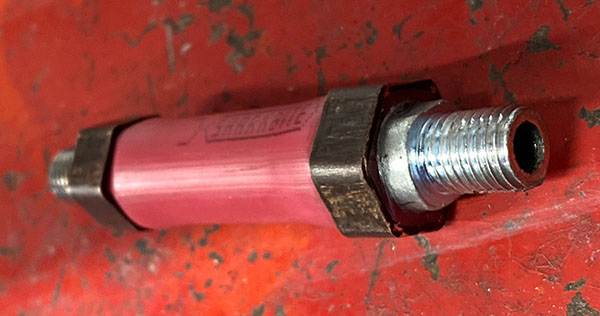
I settled on ½” Pex plastic plumbing tubing mainly because it comes in a red color than neatly matches The Widowmaker’s faded bodywork. The Pex copper crimp rings would make for a neat finished end to the Frankenstalks. The only problem was the threaded ends salvaged from the old rubber parts were a little too big for the Pex pipe.
I really could have used the South Bend lathe to turn down the ends but that project is not completed yet so I had to chuck the parts into a hand drill and grind them to size. Even cut down they were still too large for the Pex but I didn’t want to grind any more and lose the knurling. It’s amazing how a new tool opens up avenues of creativity. It frees your mind, man. My new tubing expander (bought for an air conditioning job) made short work of the Pex inside diameter and the threaded inserts fit perfectly.
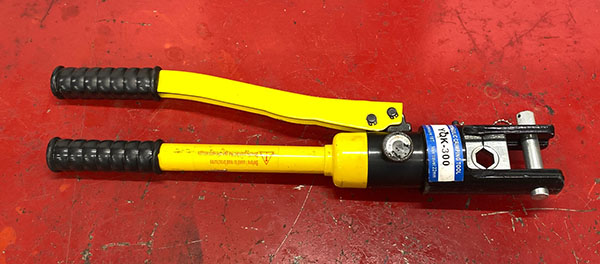
Next I used the tubing expander to resize the copper Pex crimp rings to fit the expanded pipe. Things were going well. After crimping the copper rings with a hydraulic cable crimper the stalks looked like 100 bucks.
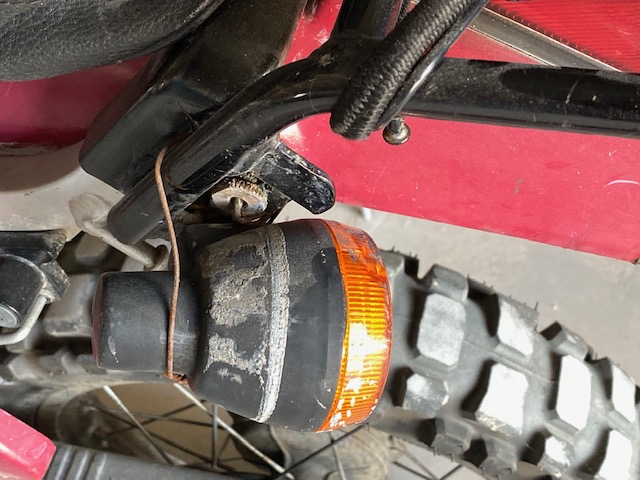
The grinding process put a divot in the threaded end so I had to run a 10mm die over the things to straighten out the divots. With 4 new blinker stalks it was only a matter of time before everything was reassembled and back on the motorcycle. I’ll need to put a battery in to see if the blinkers actually work (I’m using the same battery in the Z1, the Husky, and the KLR) but I remain confident they will work at least as good as they used to. Which is not at all.
A few questions remain. Will the crimped ends stay put on a rough trail? I assume they will rip out during a crash and that’s good. My new stalks cost about 67 cents apiece so I can replace them as often as I like. Will the plastic tube droop leaving me with a sad-eyed KLR250? Will the bike require a plumbing inspection now? I don’t know the answers but I’ll report back if these Frankenstalks actually work.
More “Bring ‘Em Back Alive” Gresh Resurrection stories are here!
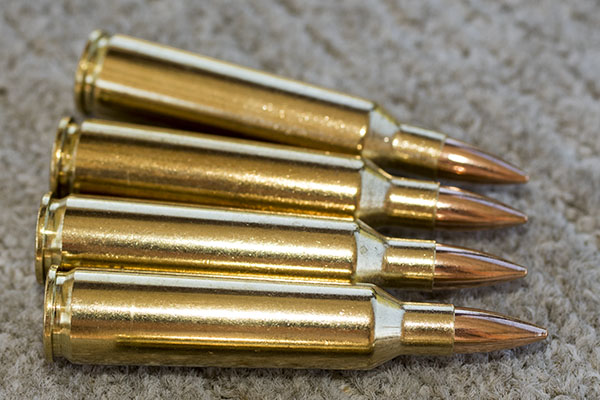
Custom-crafted .22 250 ammo. With the right loads, 4000 feet per second and sub-half-inch groups can be had from this cartridge.
One of the hottest .22 centerfires ever conceived, the .22 250’s wildcat ancestry goes all the way back to 1937, and to this day it is still one of the world’s hottest .22 centerfire cartridges. The concept was simple enough: Take the .250 Savage, neck it down to .224 caliber, stuff it full of the right powder, and oila, you get a .22 250. Capable of exceeding 4,000 feet per second with lighter bullets, it’s a cartridge so fast that if you pick the wrong bullets, they’ll disintegrate in flight due to aerodynamic heating and spin-induced centrifugal forces. That’s fast, folks.
Until 1963, if you wanted a .22 250 you had to build your own rifle. Browning offered a production rifle chambered for the .22 250 that year, but even then you couldn’t just walk into a store and buy ammo. No, the .22 250 was still a wildcat. You had to make your ammo: Form the brass from another cartridge case, and roll your own. Then in 1965 in a nod to the .22 250’s appeal, Remington changed all that. They offered a .22 250 rifle and the factory ammo to go with it, and it was an instant success.
My Dad was a member of an east coast woodchuck hunter/killer pack back in the 1960s and he regarded the .22 250 as the Holy Grail. Dad used a .243 Winchester Model 70 (another hotrod in its day), but he spoke of the .22 250 in hushed and reverential terms. Dad never owned a .22 250 and that might have been his only character flaw, a family deficiency I’ve been making up for ever since. I remember visiting Effinger’s with Dad before I shipped out to Korea (Effinger’s was an outstanding gunshop in central New Jersey that only recently closed their doors). They had a Ruger No. 1 .22 250 in stock and Dad came close to buying it. But he didn’t. He let it get away and he lamented that loss for years.
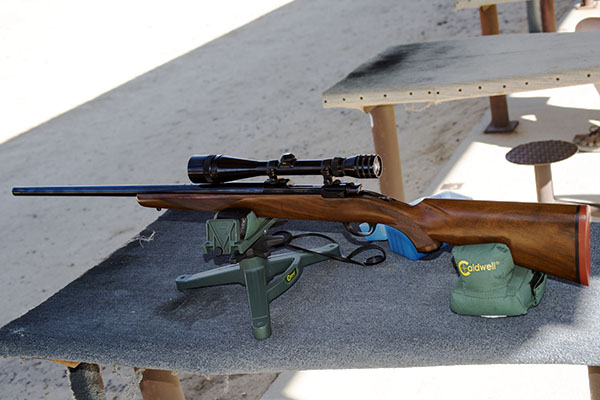
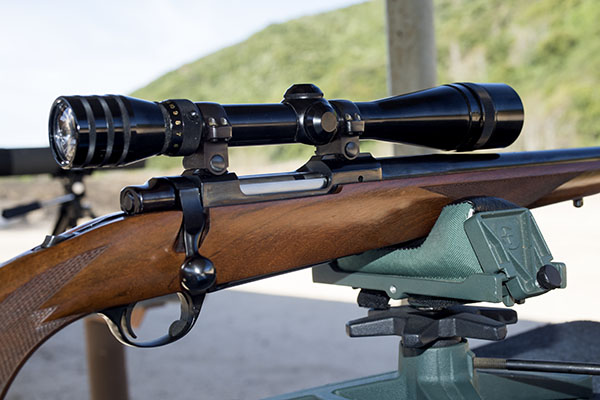
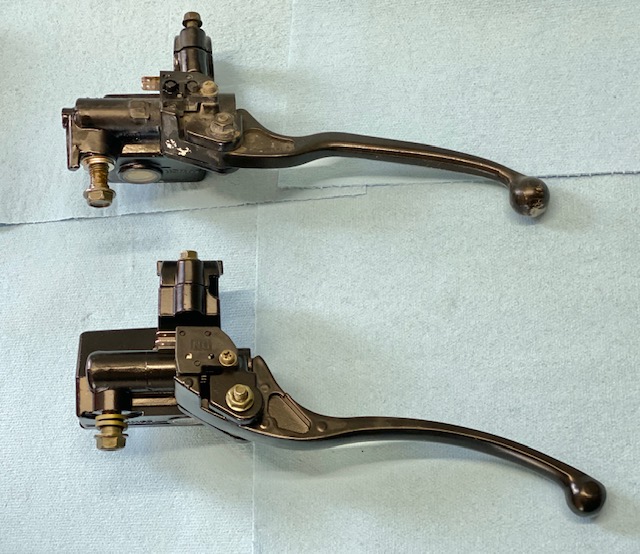
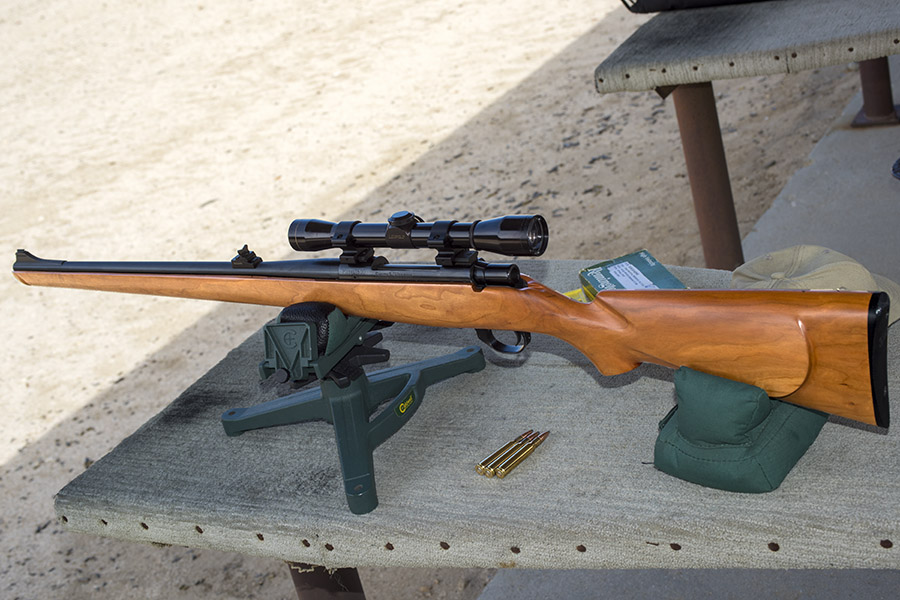
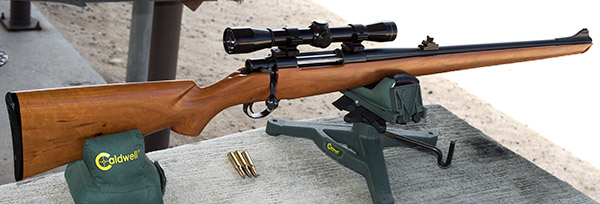
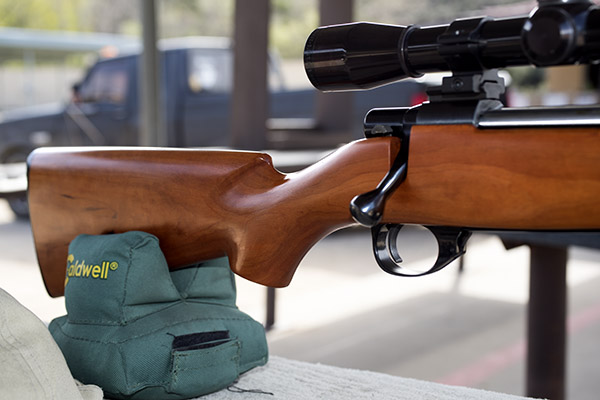
Life went on, I spent a year in Korea compliments of Uncle Sam, and then I came back to Fort Bliss, Texas. One night I was in a K-Mart in El Paso (when K-Mart sold guns), they had a bolt action Ruger Model 77 in .22 250, and you can guess the rest. I think I paid $169 (the list price on a Ruger Model 77 was $215 back then). It’s a beautiful rifle with classic American bolt action styling. The bluing is deeper than deep (infinitely richer than what you see on new rifles today), the hand-cut checkering is perfect (today’s rifles have mostly laser cut checkering that’s fuzzy as an old peach), and the profile is just right (thank you, Len and Bill). The walnut is a joy to behold even though it’s straight-grained and doesn’t have much figure, and that red recoil pad is classy. This rifle is nearly five decades old, but it still looks new.
My Ruger Model 77 in .22 250. It’s equipped with a Redfield 4×12 scope.Classy, huh? Based on my rifle’s serial number and info on the Ruger website, my rifle was manufactured 45 years ago.The period-correct 4×12 Redfield. The optics on current-production scopes and the ability to dial out parallax make today’s telescopic sights much better, but this one was what was in vogue in the mid-70s and I like the look.That’s not rust you see on the countersunk muzzle; it’s just muzzle-blast staining.
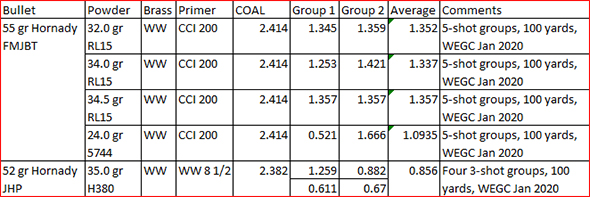
I tested the Ruger with Nosler 60-grain Varminter bullets at different H380 powder levels. H380 is the “go to” powder in .22 250, and I wanted to see what it would do with the Nosler bullets.
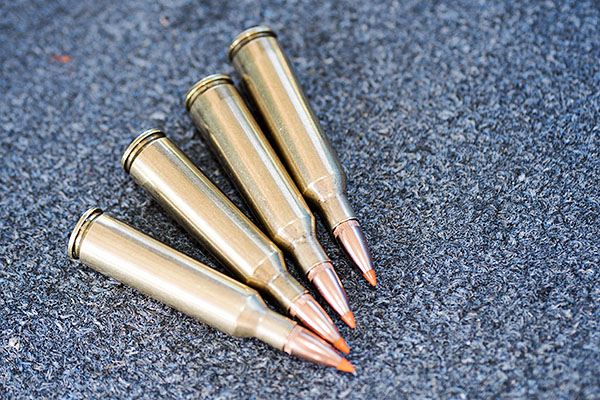
My .22 250 loads with 60-grain Nosler bullets and H380 powder. Win some, lose some.
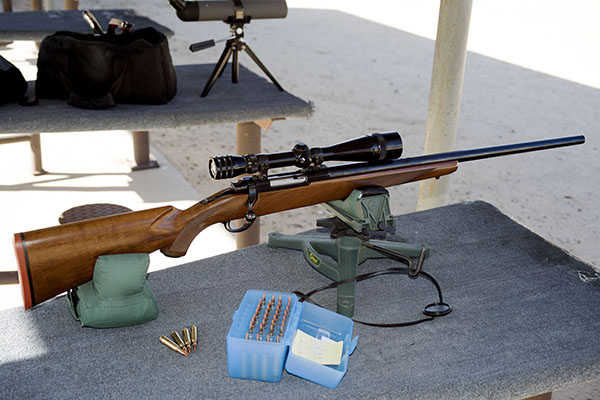
My buddy Greg recently acquired a .22 250, and that got me interested in shooting mine again. I dug it out of the safe, loaded some ammo, and settled on on the 100-yard line. I tried four different loads for a ladder test using H380 propellant and Nosler’s 60-grain ballistic tip bullet (the rounds you see in the photo above).
I’d like to brag about great groups with the above loads, but the results were disappointing. Sometimes that happens. You have to kiss a few frogs in the reloading game to find a prince (sometimes you have to kiss a lot of frogs), and let me tell you, every one of my loads during that range session was amphibious. But that’s okay. When you develop a load for a rifle, you find out what works and what doesn’t. My Ruger .22 250 doesn’t like Nosler 60-grainers and H380. Now I know.
I knew the rifle had potential, though. Here’s earlier data with lighter bullets:
That one load at the bottom of the table showed real promise, so I loaded a few more with the same 52-grain Hornady bullets and tested them a few days later. Here’s what I found:
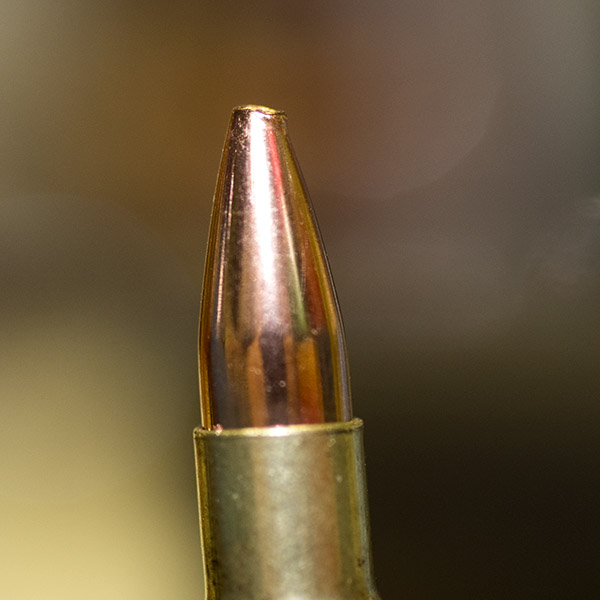
The above results were promising, but there were inconsistencies in how the lighter bullets grouped. What was driving that? Was it me being a Shakey Jake, or was it something else? I took a hard look at the bullets, and to my surprise, more than half of them had deformed tips.
Deformed tips on the 52-grain Hornady jacketed hollow point bullets. There are a few other things detrimental to good accuracy revealed in this photo, like the faint circumferential witness mark left by the bullet seater, and the shaved copper at the case mouth.
I called Hornady to ask about the deformed tips, and their guy explained to me that what I was seeing was indeed a bullet defect. He asked me for the lot number on the bullet box, and it turned out these bullets were manufactured in 2013 (which is weird, because I had only purchased them a year or two ago). You’ll remember that 2013 was in the Obama era when component shortages were common and the factories were struggling to keep up with demand. These bullets should have never left the factory, and the Hornady rep put a box of replacement bullets in the mail for me that same day. Hornady is a good company that stands behind their products.
Not content to wait for the new bullets, I screened the ones I had and selected bullets with no visible tip deformation for the next reloading lot. I also tried neck-sizing rather than full length resizing. The theory on this is that the cartridge case is fire-formed to the exact chamber dimensions of the rifle, and it should more precisely locate the bullet in the chamber (when you neck size only, you only resize the case where it grabs the bullet). With visually-screened bullets and neck-sized cases, the M77 returned about the same accuracy. But I was seeing more groups below an inch, and I even had one below a half inch:
There’s still variability and that’s probably due to me. There may still be issues I couldn’t see to screen in the bullets, but I think things are moving in the right direction. So what’s next? Varget is another powder reported to do well in the .22 250 (there’s a can of it on my bench), and the new box of Hornady bullets arrived last week. And I’ve got a few more accuracy tricks I want to try. We’ll see what happens.
As a New Jersey boy, our history courses in grade school and high school mostly focused on local and regional things, like the American Revolution and maybe a little bit of the Civil War, and then it was time to graduate. I grew up in the middle of a lot of significant Revolutionary War stuff, with maybe a little Gettysburg thrown in, and our class trips and studies tended to focus accordingly. What I’m getting at is I had never heard of the California or Baja missions until I moved to California, got married, and had kids. Then one day my young daughter came home from school and told me she had been assigned a mission.
“To do what,” I asked, thinking it was like getting a mission in the Army.
“San Gabriel,” she answered.
“Huh?” I was a curious and articulate parent.
My daughter patiently explained to her dumb old Dad what the California missions were. I had never heard of the missions until that day. But I’ve been making up for it ever since. I never pass on an opportunity to learn more about the Alta California and Baja missions, and it’s a story that’s far more interesting than the stuff I studied in school.
My favorite California mission, hands down, is La Purisima. It’s the best one there is north of the border. But I’m getting a little ahead of myself.
A bit on the photography first: I shot all the images here with a film camera (a Nikon N70). That’s how long I’ve been stopping in at the La Purisima Mission in Lompoc, California. It’s just a few miles inland off the Pacific Coast Highway. Surprisingly few people know of it, but if you’re planning a trip up the PCH, La Purisima is a must see destination.
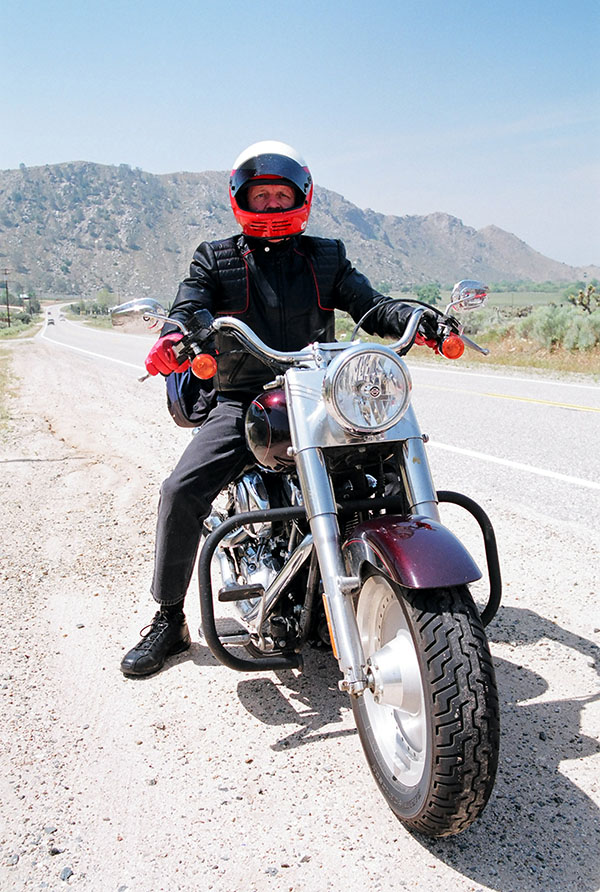
This California motorcycle ride occurred as a backup to a plan to dive deep into Baja 20 years ago that just didn’t work out. Good buddy Paul flew out from New Jersey and rented a Harley in San Diego, and the plan was to ride into Baja to see the whales. That’s how it started. I had my ’92 Softail, but it gave up the ghost somewhere around Ensenada. It happens, I guess. Paul and I had to turn around and head home. No problem. I owned four or five motorcycles in those days (I was like Joe Gresh back then, with lots of hair and lots of motorcycles). We’d just park my Harley and I’d grab another bike.
Yours truly and Paul, both suffering from the two of the worst cases of helmet hair ever captured on film. I no longer have that problem. That’s the Pacific Ocean in the background.
Paul had a Harley Fat Boy he rented from EagleRider in San Diego. It was a motorcycle that worked well for this trip. It would have been cool if I could have ridden my Harley, too, but on this trip the motorcycles were a two-wheeled odd couple.
A skinny guy on a Fat Boy somewhere on the Pacific Coast Highway.
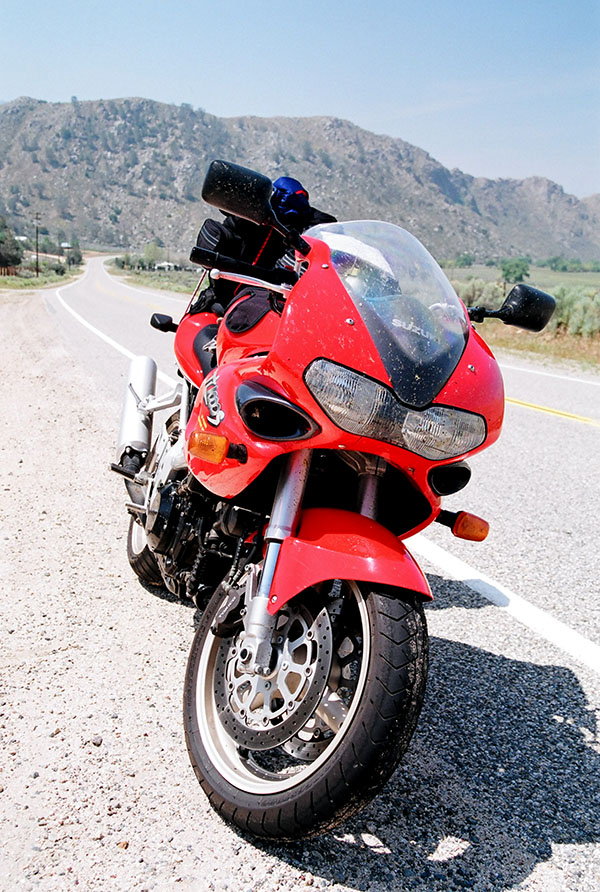
I switched over to my Suzuki TL1000S, a bike most people would think was totally unsuited for long-distance motorcycle touring. But it did the job and it did it well. I was younger then and I bent easier; I don’t think I could do a long ride on a sportbike today. The ADV style suits me better. So does a Subaru Outback, but I digress.
A tankbag and a tail pack, and oila, the TL became a touring machine.
Paul and I rode north on the 101 out of LA a bit and then took California’s 246 west from Buellton. I had been to the La Purisima Mission before and I wanted to show it to Paul. It’s not well known as a tourist destination, but it should be. The place is amazing.
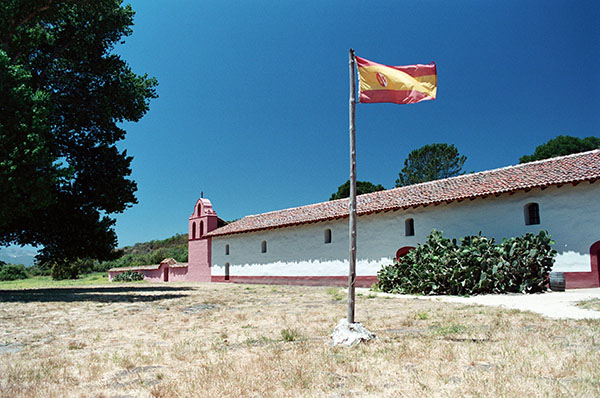
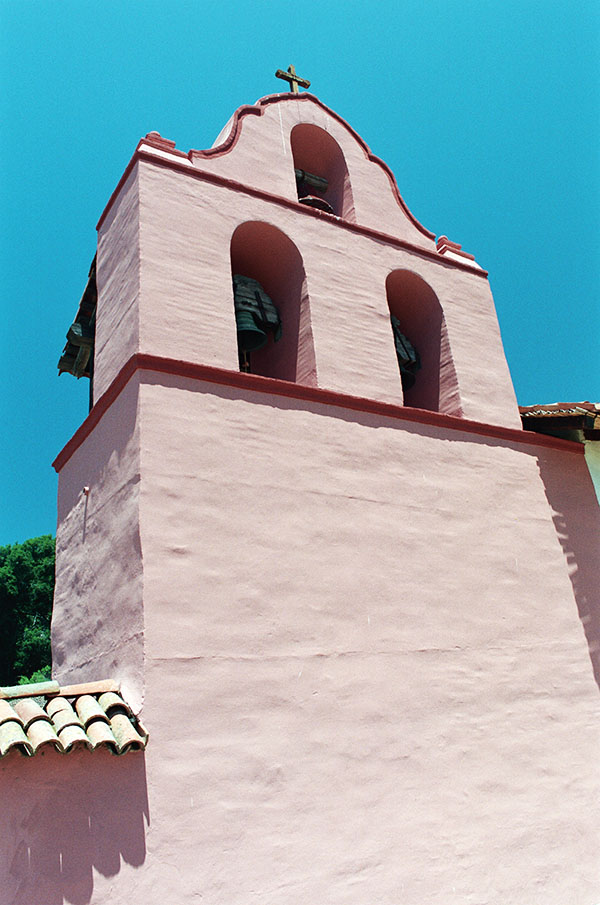
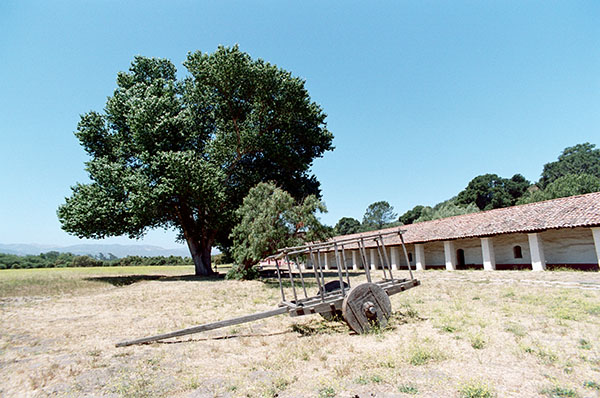
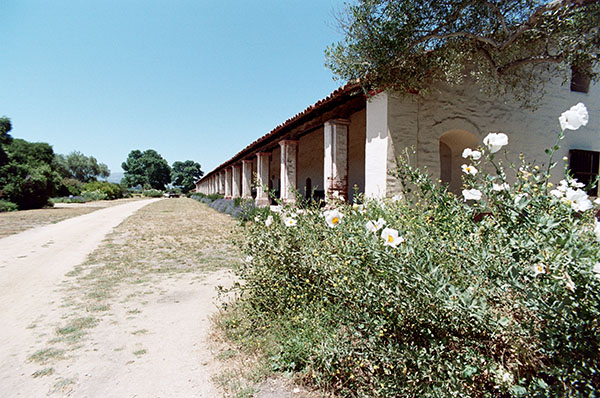
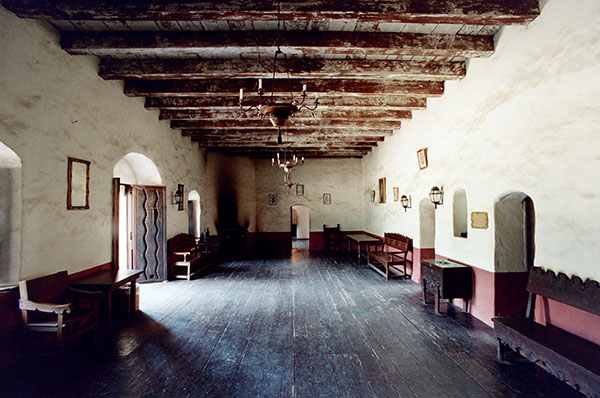
A view out front showing the length of the main building and the bell tower.
La Purisima Mission (Misión La Purísima Concepción De María Santísima, or Mission of the Immaculate Conception of Most Holy Mary) was founded in December of 1787. It was a good stop and I got some great photos with my old film Nikon.
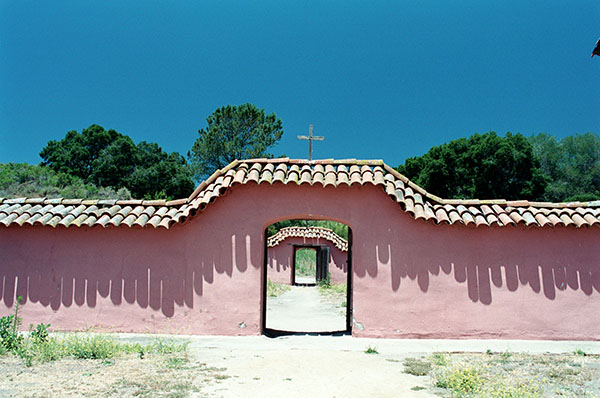
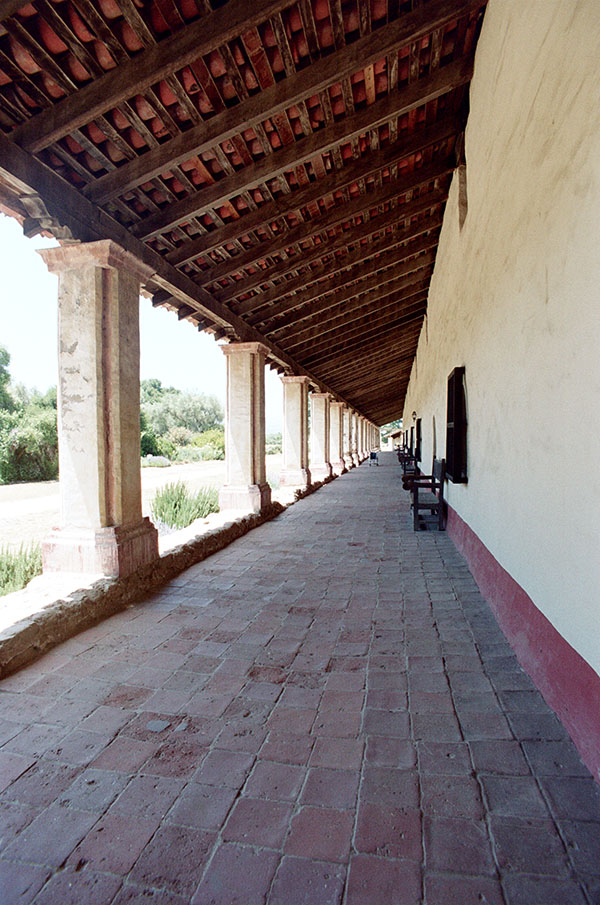
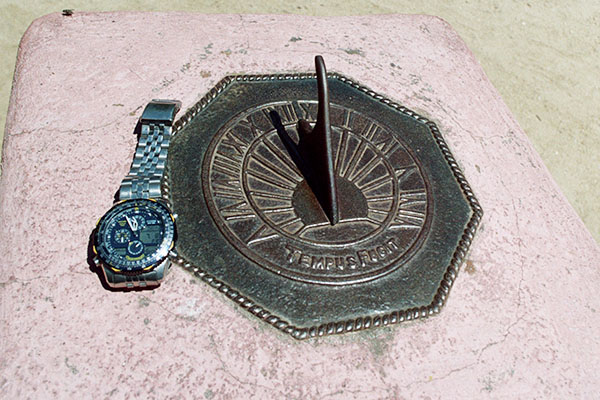
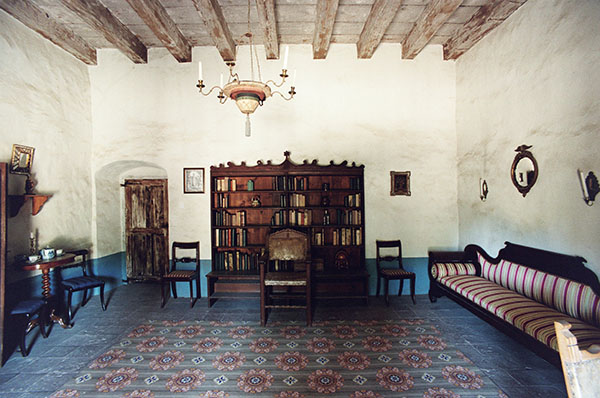
La Purisima Mission’s bell tower.A long hall.Concentric doors.A cool front porch. It’s easy to imagine the original inhabitants seeking shade under this roof.Another exterior view of the La Purisima Mission.A sundial that appeared to be keeping excellent time. A friend asked what the sundial did when it was time to switch to Daylight Savings Time. That watch is the first version of Citizen’s Blue Angels GMT. It has a bezel slide rule. I still wear it.
The 2000-acre La Purisima Mission is one of only two missions in California not run by the Catholic Church, and it is the only one that faithfully recreates a complete historic mission operation.
A bit of background: La Purisima sort of fell apart starting in the early 1800s. Things were not going well for Spain in the New World and things were especially not going well for the California missions. The mission’s enslaved Chumash natives rebelled, smallpox decimated the indigenous population, Mexico won its independence from Spain and disbanded the mission system, and things generally just went to hell in a handbasket if you were the guy running the missions. The La Purisima property went through several owners. Union Oil bought the place in 1903 and then donated it to California. A huge research and reconstruction effort commenced, and the La Purisima Mission was opened to the public on December 7, 1941 (yep, the same day as the Pearl Harbor attack). Everything at La Purisima had been resurrected as it existed in 1820, including the furniture, the buildings, and even the adobe bricks made from surrounding soil.
You’ve seen the exterior in the photos above. Let’s head into the buildings to see what life was like in the late 1700s and early 1800s for the mission inhabitants.
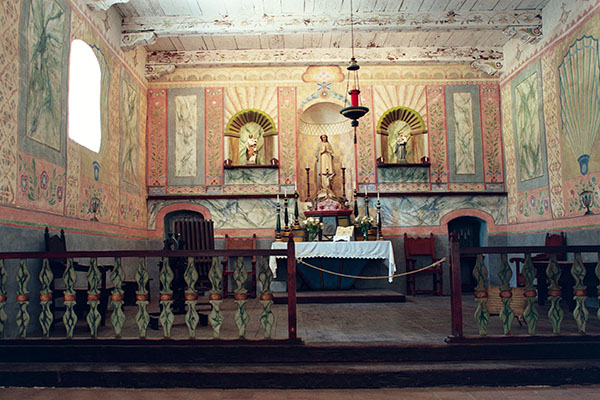
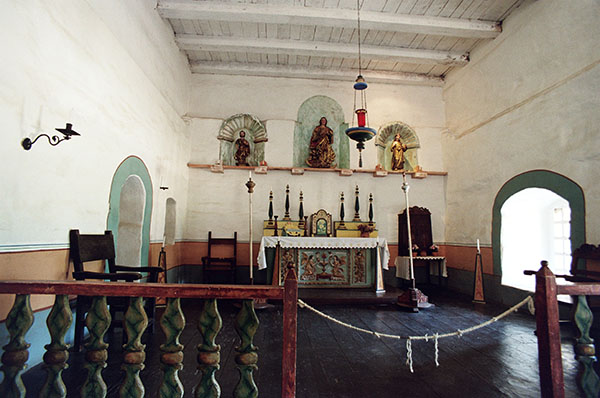
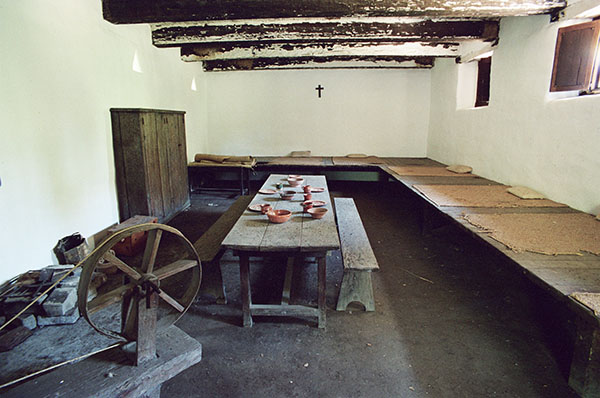
Inside the chapel. One of the Mission’s objectives was to convert the native Chumash to Catholicism.Another room in the chapel.A combined work and dining area.The Mission library and meeting area.Another one of the rooms in the La Purisima Mission.
There’s disagreement these days about whether the Spanish mission system provided enlightenment or enslavement for the natives. The missions were intended to establish a Spanish presence in Alta California. Spain had claimed Mexico and California (and large parts of the American southwest), but they didn’t really have anyone there watching the store until they started the missions in the second half of the 1700s. The Spanish had concerns about other nations claiming the territory. Teach the indigenous people a trade, keep them busy farming and making stuff, and let’s grow it from there. It didn’t quite work out that way.
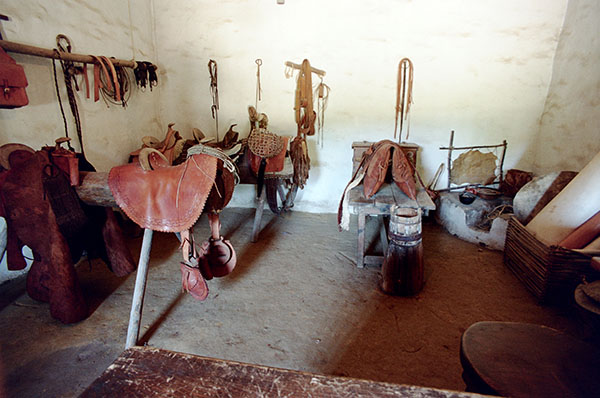
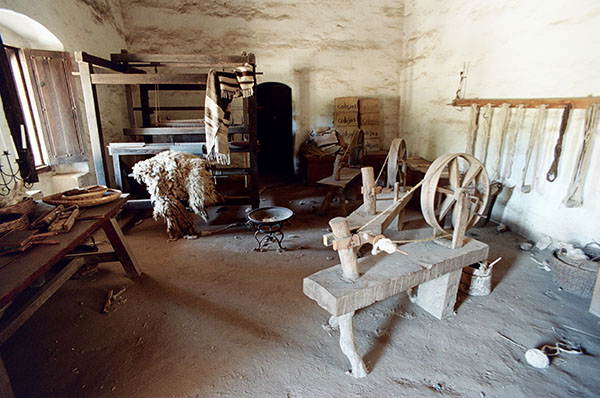
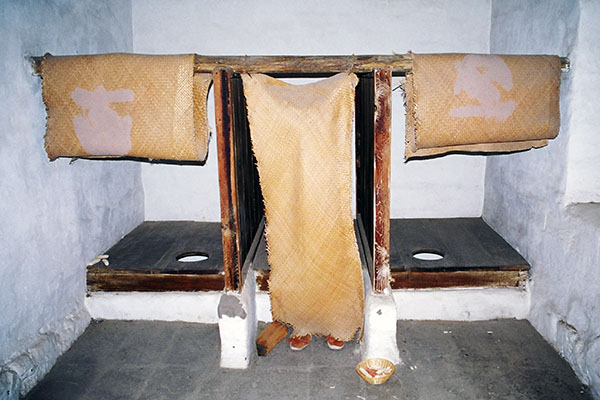
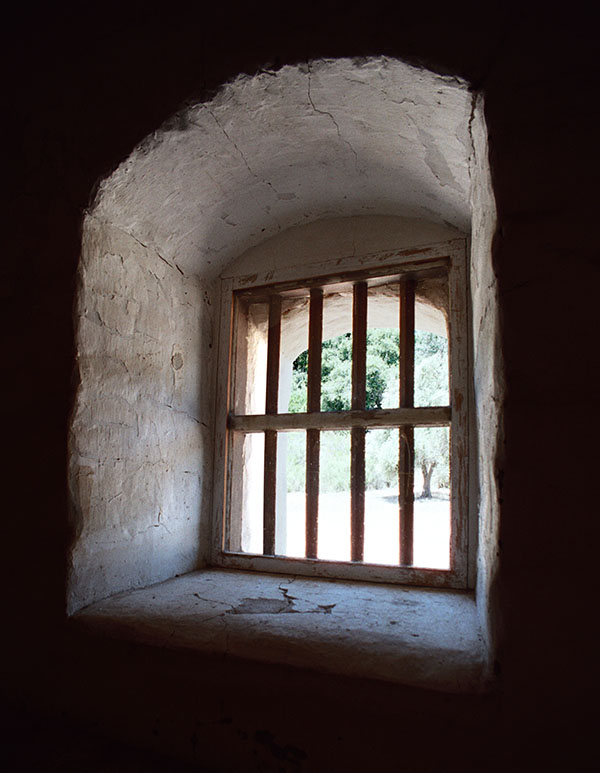
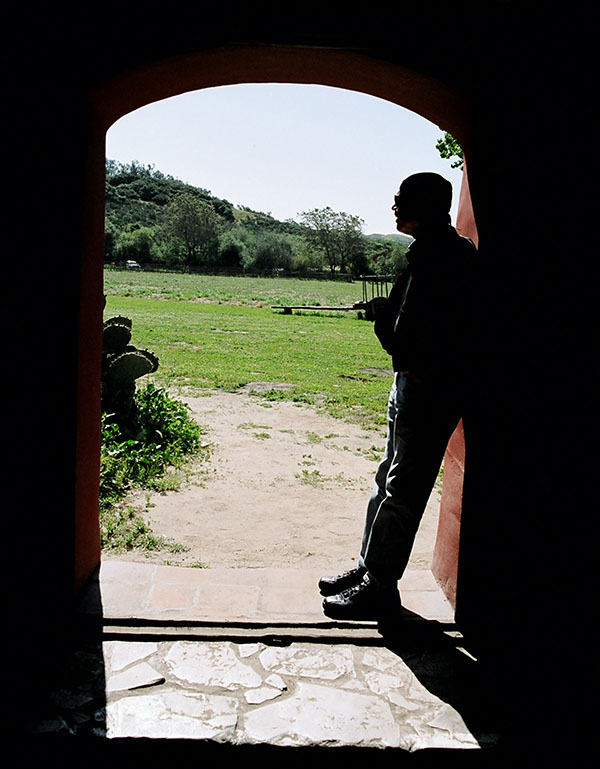
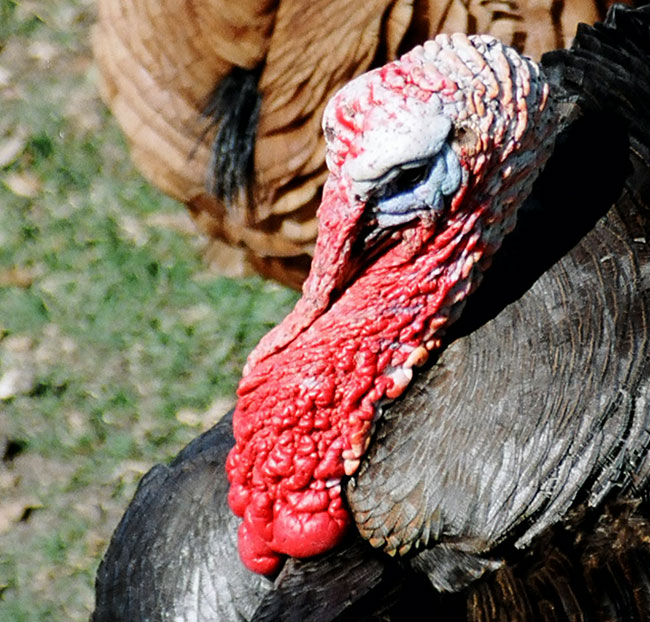
An objective of mission life was to teach leather work and other skills.The mission tended sheep and wove wool.I’m not sure what this equipment was used for, but that’s okay. It means I have a reason to return to La Purisima.The Mission’s original latrine. That’s Paul behind the curtain.Thick adobe walls kept the inside of the Mission cool.Paul in one of the Mission doorways.La Purisima is still an active farm and ranch. This rather photogenic turkey kept asking us how many days it was until Thanksgiving.This, my friends, is a Longhorn. Like the turkey above, he had no qualms posing for us.
If you’re planning that bucket list ride on the Pacific Coast Highway, my advice is to include a stop at the La Purisima Mission. You’re only about 13 miles inland from the PCH, and it’s too grand a destination to pass without a visit. You might want to allow a couple of hours to see and photograph this marvelous old place.
Another word on the images here: I’m going to use some of them in a story I recently wrote for my favorite motorcycle magazine. I knew I had these 20-year-old images squirreled away somewhere, but finding them was a challenge. I finally found the prints, but I couldn’t find the negatives. After another hour digging through old boxes, I miraculously found them, too. I thought I’d just have Costco’s photo department scan the negatives for me, and then I thought it might be a good idea to call first and make sure the photo department was open (you know, what with Covid 19 and all). They were, and I told the photo dude I’d be right over to get my negatives scanned.
“We don’t do that,” he said.
“Yeah, you do,” I answered, figuring I was talking to a new guy who just didn’t know. “You’ve done it for me before.”
“Sir, we haven’t touched anything with film in years,” he said.
Hmmmmm. Come to think of it, it had been a while since I’d seen any film for sale in Costco. And it had been a lot of years since I shot anything on film.
The Costco guy suggested a small mom and pop operation across the street from the Costco store, and that’s where I went. What you see here are the results of the Photo Factory’s scans (thanks, guys!).
The Colombia motoventure continues! This is Day 6 of my epic ride through Colombia’s Andes Mountains with good buddies Juan and Carlos, two great guys with whom I’ve stayed in contact ever since our Andean adventure. Without further ado, here we go!
Originally posted on December 20, 2015
Let me see if I can get this right: I’m a guy from California riding a Chinese motorcycle in Colombia headed to a town called Honda. Yep, that was yesterday’s ticket.
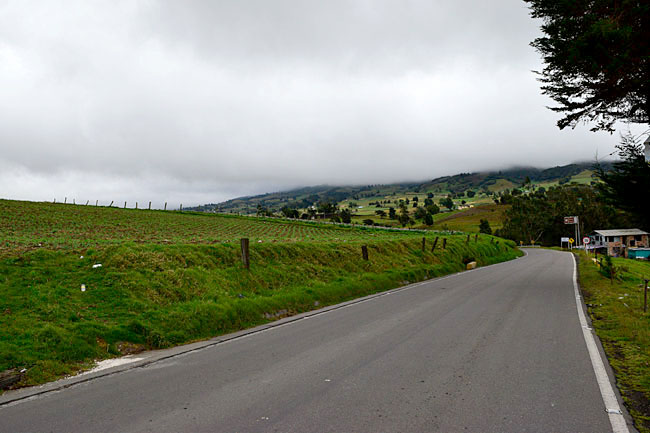
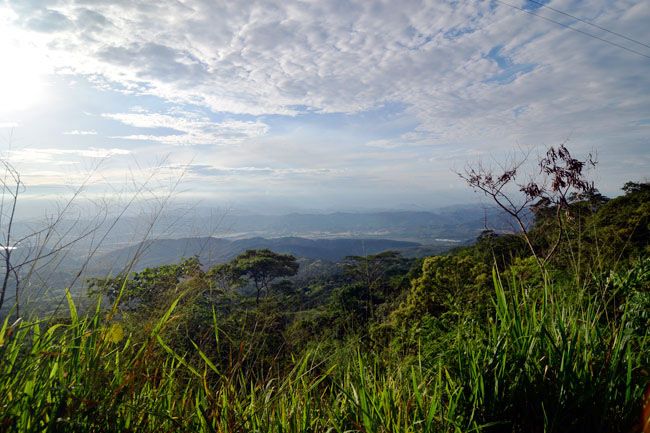
We left Villa de Leyva early in the morning, climbed higher into the Andes, and wow, was it ever cold. Juan Carlos stopped so we could grab a few photos..
As I was taking in the scenery, this Colombian SUV rolled into the scene…
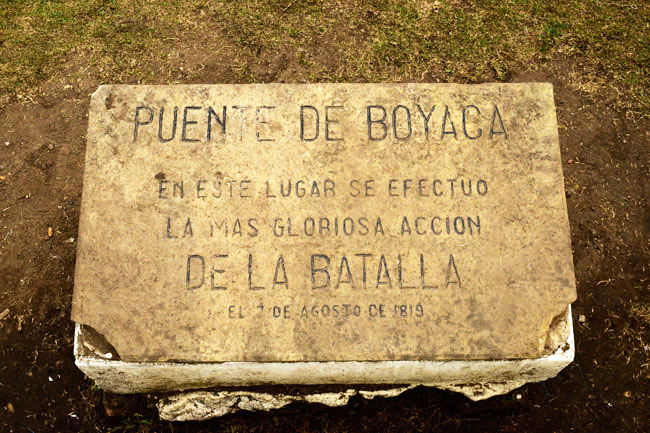
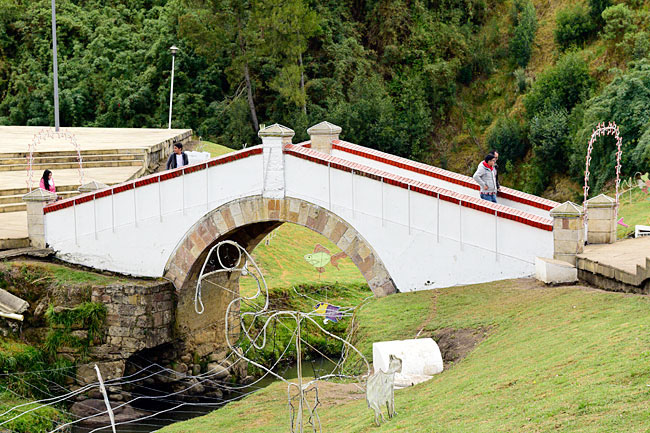
We next stopped at the point where Colombia was born. The last battle of the Colombian war of independence (against Spain) occurred right here at this bridge in Boyaga…
The Colombian rebels defeated the Spanish regulars here, and at that point, Colombia was born. There are a lot of parallels between how Colombia came into being and our Revolutionary War.
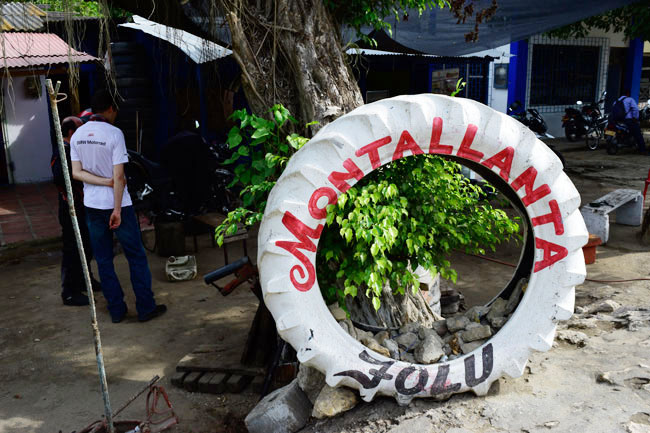
Boyaga is actually pronounced “boy-jogga.” In Colombian Spanish, a y is pronounced like a j. So is a double l (as in ll). A montallanta (a tire repair place) is called a “monta-jonta.” Interesting.
Following Juan through these small towns was fascinating and taxing. We’re up in the Andes, and everything is steep. Juan is incredible…we climb these steep cobblestone streets, cut across some guy’s front lawn, grab a dirt road, pick up a new street, every once in a while (while still riding) he pulls up alongside a guy on horse or a tractor to confirm directions (Juan’s GPS, as he calls it), and we cut across the Colombian countryside. It’s amazing. Here’s a sampling of what it looks like, both in the dirt (and there is a lot of dirt riding) and through the small towns…
We hit a last stretch of twisties (a 50-mile stretch) and then we pulled over for a photo of the Magdalena River valley. Our destination (the town of Honda) is down there somewhere…
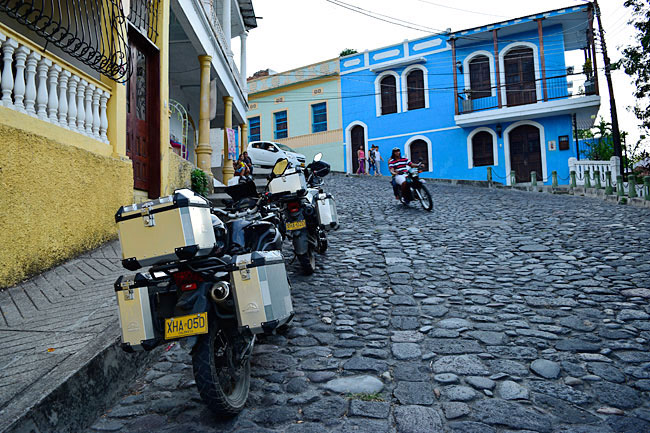
Honda is a another steep town. This street (that’s our hotel, the Epoque, on the left) is a typical super steep Colombian town road. The road is a one way road…I tried parking the bike facing down hill, but it was too steep. I thought I could just leave the bike in first gear and kill the ignition, but the street was so steep it pulled the bike through the compression stroke. That’s why the bikes are facing uphill. These are unusual riding conditions for me, but totally normal to the Colombians.
Today we’re headed to Santa Rosa de Cabal. You can read all about it in the next installment in this series!
You can read the earlier blogs in this series from Colombia here!
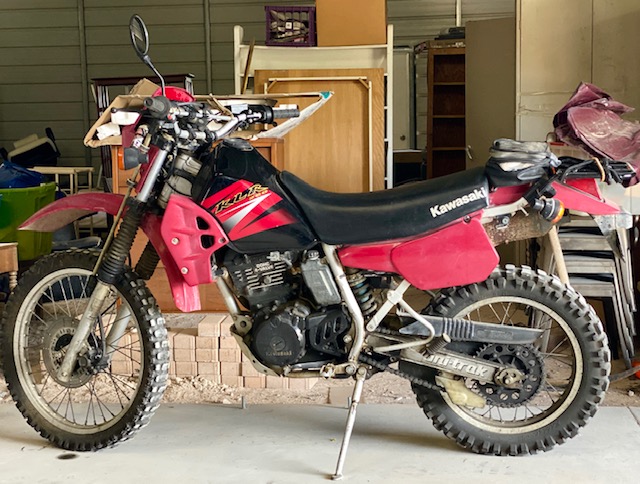
I’ve owned a KLR250 for a long time. I bought the thing on highway 40 between Ocala and Ormond Beach from a gator-meat seller named Street. When I bought it the KLR was nearly new and being a 2005 model it is the last in a long line of KLR250 Replicants that started in 1995. In 20 years of building the 250cc enduro-style bike all Kawasaki did was change the paint schemes and the seat colors.
My KLR, named “The Widowmaker” due to its extremely low power output, has done some long distance, cross country traveling but the last 7-8 years it has been stowed at The Love Shack for use in March during Daytona’s bike week. Long periods of inactivity broken up by a week of full throttle action has left The Widowmaker in a sad state so I brought her out to New Mexico for some tender loving care.
In no particular order The Widowmaker needs front brake work, blinker stalk replacement, a new front tire, valves adjusted, carb cleaned, air filter replaced, coolant and coolant hoses replaced (15 years!), back tire replaced, fork seals and a few other things I’m forgetting. It’s not that bad a list for the many years of neglect The Widowmaker has suffered under my care.
Last March The Widowmaker’s front disc brake was giving me trouble. It would not release and the disc got pretty hot from dragging. I could smell brake lining burning as I rode the bike. The Widow maker, never very fast to start with, was pushing the front forks down and struggling to make 40 miles per hour. Cracking open the bleeder on the caliper freed up the front wheel and I managed a few days of riding using only the rear drum brake.
Eventually I had to fix the brake as it was taxing my brain planning stops 300 feet in advance. I took the caliper off and the piston was firmly stuck inside with a crystalline white-ish gunk but I managed to extract the offending part without too much collateral damage. 2005 might as well be 500 years ago when you’re trying to find motorcycle parts. I went to a few brick and mortar motorcycle shops in Daytona but nobody had anything for a 15 year-old KLR. I didn’t have enough time to order online so I cleaned out the bore and stuck the caliper back together.
Bleeding the system was a challenge as the master cylinder seemed to move 2 pico-liters of fluid each stroke. The lever didn’t feel right but I pressed on. The Widowmaker’s brake was better but the caliper was still not releasing well and I determined the master cylinder was the culprit. All around me Florida was closing up due to Covid-19. I had no more time to work on the bike so I loaded The Widow maker into the truck and hauled it out west to New Mexico.
Looking online for a master cylinder rebuild kit I found new, complete, generic master cylinders with lever and all for $20! People complain about the global economy but $20 is $20. My Facebook post about the cheap master cylinder brought mixed reactions. Some said they are garbage and leak others said they use them all the time and that they work great. I went with the generic because I’m old now. If the brakes fail I haven’t lost much time.
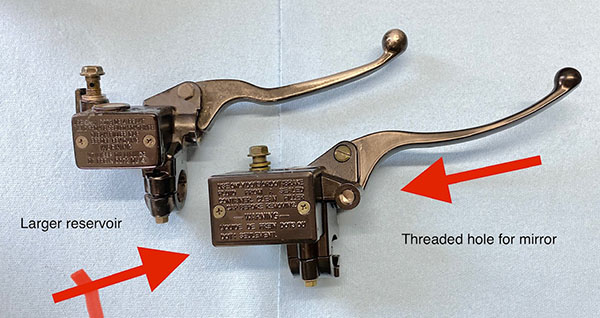
When I say complete I mean even down to the brake light switch. I opened up the unbranded box and the new unbranded lever looked great cosmetically. I could see no flaws in the construction and a side-by-side comparison with the original Nissan master showed there was nothing visual to make the OEM seem better than the generic. A few minor differences: the generic has a larger reservoir and includes a threaded hole for a mirror. The mirror mount was an unexpected bonus because I had broken the left side mirror mount in a violent side-trip through some sagebrush out in Utah. I was trying to follow Hunter at the time. The extra mounting hole allowed me to transfer the old, right side, stand alone mirror mount to the left side where I had wanted a mirror ever since the sagebrush incident .
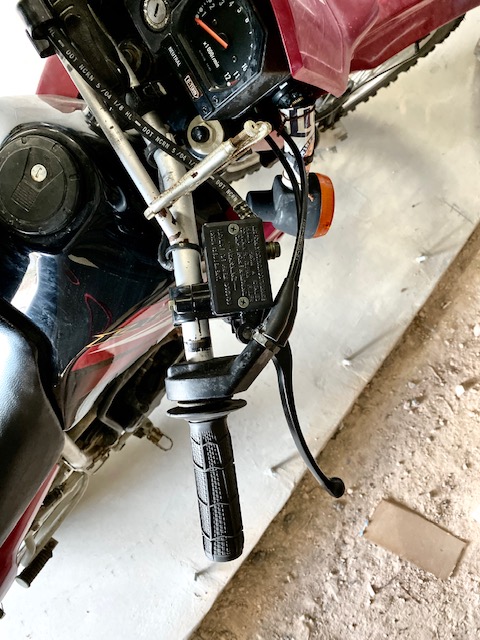
If you Safety Nazis are wondering where the handlebar kill switch is I can tell you that it broke off years ago in a less memorable crash. The key switch is only a foot away. The new master cylinder installed and bled out easily. The front brake has a firm lever, firmer than it ever was. The caliper releases nicely and all seems rosy. Time will tell if the replacement master cylinder lasts as long as the Nissan.
The left side of the handlebar has the (also broken) light/blinker/horn and all that works well. I had to thin down the mirror mount to fit between the clutch lever (not broken!) and the switch cluster.
I don’t want to give you the wrong impression. Realize it has taken many years to break all these parts. I’m not tossing the bike down the road everyday, you know? The Widowmaker’s features, like a boxer fighting past his prime, are becoming smoother and less distinct from the blows. If I don’t turn back the tide of destruction now The Widowmaker will look as bad as a 2021 Goldwing.
Want more of Gresh’s resurrection projects? Just click here!
I woke up last Friday with but one thought: I have got to get out on my motorcycle today.
Well, I did, and I had a glorious ride up through the Cajon Pass in southern California. That’s the pass that cuts between the San Gabriel Mountains and the San Bernardino Mountains. Most folks would just take Interstate 15 from So Cal to the High Desert through the Cajon, but to me riding a motorcycle on the freeway is a bit of a crime against nature. There are surface streets that get you through most of the Cajon Pass, and if you know where to look, there are dirt roads that do the same. Those roads are way more fun, but it’s like I said…you have to know where to look.
Me? I know where to look.
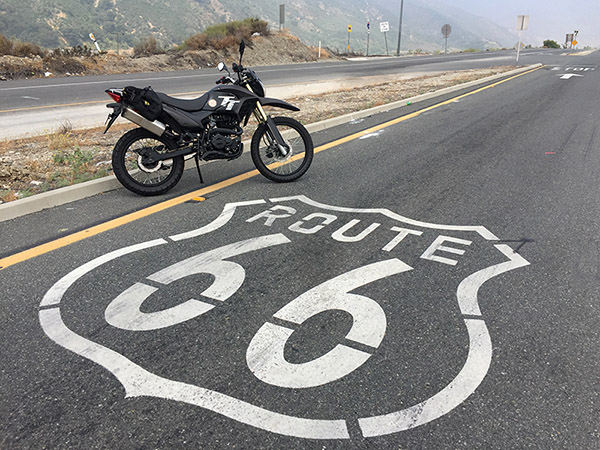
On old Route 66 through the Cajon Pass. Yep, it’s still there, and it was a perfect photo op with my black CSC TT250 on a cloudy June morning.
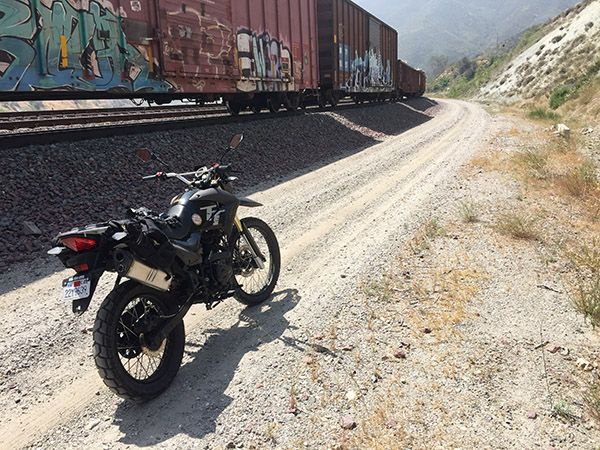
Big freight trains slog through the Cajon Pass on a regular basis, and there’s a dirt road that runs along the tracks for several miles. It was a perfect road for the TT250. I was out there on my own, having a good old time when I stopped to grab a photo, and that’s when I heard it. The rails, that is. They started singing. They do that when there’s a train downrange. You can actually hear the metallic buzz the rails emit miles before the train comes into view. Time to switch the cell phone camera to the video mode. I didn’t see anything for a couple of minutes, and then way down the hill in the distance I could just make out a headlight. Then that one orange orb became three blurry headlights, the signature of the first of several freight locomotives. They were working hard. It takes a lot of power to pull a train up a mountain pass. The lights grew in size, the indistinct three orange dots came into focus, and there it was:
The train was a monster. I finished the video, I took several stills, and then I mounted up and rode at a sedate pace in the opposite direction for a good five minutes before I saw the end of that train. I’ll bet it was three miles long. Maybe more. There were four locomotives pulling and there was a fifth on the tail end. It’s hard to imagine the weight and the energy of a freight train like the one I saw that morning. And it was doing it all going uphill, charging through the Cajon Pass from the Pomona Valley up to the High Desert. It was impressive.
That train just kept coming, and coming, and coming.
I had a hell of a ride that morning. A bit of freeway (but not too much), a fair amount of dirt, a stream crossing that was deeper than I thought it would be (and damn, there was no one to video me standing on the pegs with water splashing all over my boots and jeans), a train, Old Route 66, and nice, cool weather. It was grand.
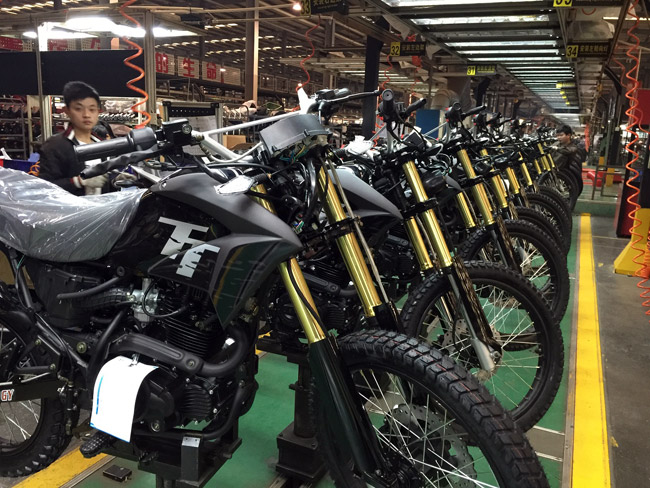
It was about 5 years ago that I was sitting in Zongshen’s marketing offices in Chongqing discussing this, that, and the other thing on the RX3 for CSC Motorcycles. All the while, I kept stealing peeks at a 150cc dual sport bike the Zongshen wizards had mounted on a display pedestal in their conference area. Finally, I asked…what’s the deal on that motorcycle? Can it be had with a 250cc engine?
My good friend Chongqing Fan smiled. I could read that guy like a book, and what I was reading was this: He knew, and he knew I knew: The guys at Zongshen, China’s largest motorcycle manufacturer, they can do anything. A few quick digital pics back to CSC, a recommendation, a quick decision from a CEO who’s not afraid to make decisions (that would be Azusa Steve), and the CSC TT250 was born. I own one of the very first to arrive in America, and it’s been a hoot. We’ve even done Baja on the TT250s (talk about brand loyalty…half the guys on that ride also own an RX3). CSC can barely keep TT250 motorcycles in stock; they sell as soon as they arrive. Most of the time, they’re sold before the ship gets here.
I selected black for my TT250 (one of three or four colors available in 2016) because I thought it would photograph well, and I was right. It does a lot more than just sit there and look pretty, though. The TT250 is a great motorcycle. It’s simple, torquey, easy to maintain, great handling, reliable, comfortable, and inexpensive. Plus, I know the factory and the people who make and import this motorcycle. Good buddy Gerry and I wrote the shop manual for this motorcycle, and I know the bike’s innards. You might say I know it inside and out. I think the fact that I know most everyone involved in creating and importing this motorcycle makes it even more of a hoot to ride.
TT250s on the production line in Chongqing. Mine was in there somewhere.Your mileage may vary.
The TT250 is about as simple as a motorcycle gets, and it has what has to be one of the most ubiquitous and reliable motorcycle engines on the planet. You see these motors in various versions (ranging from 125cc to 250cc) everywhere. They’re bulletproof. They’re designed to be rode hard and put away wet, and that’s what folks in South America, Central America, Asia, and the Middle East do. It’s no accident that my good buddies at Janus Motorcycles chose the same engine to power their amazing 250cc motorcycles. I’m going to ride my TT250 until the wheels fall off. Then I’ll buy replacement parts for probably something like $9 and repeat the process.
The TT250 is a light bike. It’s easy to ride and easy to keep vertical (they tell me it’s easy to pick up if you drop it, but I’ve never dropped mine). The TT250 weighs 309 pounds wet and in an age of overweight, bloated, and expensive monster motorcycles, riding it is fun. It’s not an ego statement. It’s a motorcycle. It’s what a motorcycle should be. I feel like a kid every time I get on it (and in six months, I’ll be 70 years old). I started riding motorcycles on a Honda Super 90 (a 90cc single) when Lyndon Johnson was in the White House. Riding a simple single makes me a hooligan again, braapping the mean streets of rural New Jersey before I was old enough to have a license and loving every second of it.
I have the 49T rear sprocket on my TT250 (one down from the stock 50T), and that’s about perfect for me. My bike tops out at about 66 mph indicated, and after my hundred mile ride through the Cajon Pass that morning I topped off and checked my fuel economy. 62.5 mpg. Just a little better than I usually get. Your mileage, as they say, may vary.
I have the Wolfman bags on my TT. They’re light, they don’t get in the way, they’ve held up well, and they’re handy if I want to carry stuff. That’s usually a few tools (just in case, but I’ve never needed them on the road), a bottle of Aleve, a change of underwear, and I’m good for a couple of weeks in Baja.
Speaking of Baja, good buddy Baja John is another guy with the same affliction as me: He owns both an RX3 and a TT250. And a .44 Magnum or two, but that’s a story for another blog. Baja John keeps his TT250 at a beachfront home in Baja, and as soon as this Covid 19 business is in the rearview mirror, I’m headed down there. I want to photograph one or two of the more remote missions, John knows the trails, and the TT250 is the motorcycle to get us there.
More good times are on the horizon, folks. Stay tuned.
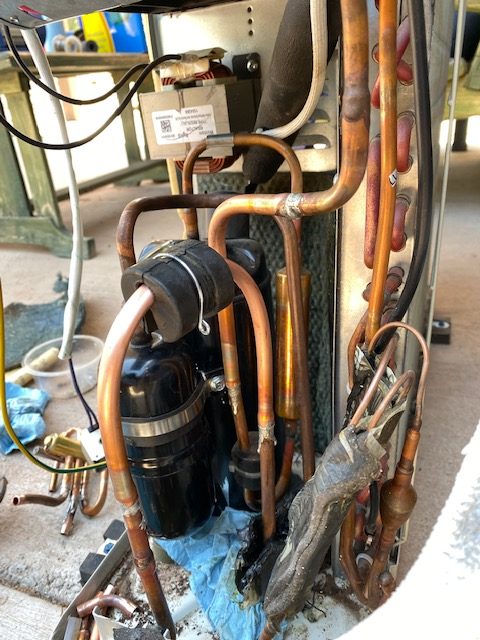
Summer has clawed its way up from the Tularosa valley and settled in here at 6000 feet. Tinfiny Ranch is hot. I have few real chores at Tinfiny except the ones I create for myself but keeping my wife cool is one of the prime directives. It’s hot enough to fire up the mini-split air conditioner, electric bill be dammed! I installed the mini-split 4 years ago; in fact I ordered it from China, in China, when me and Berk were out scrambling motorcycles in the Gobi desert. That was after we descended from high atop the Tibetan Plateau…for 40 days.
The mini-split installation was fairly easy: a Magic box that sits outside, a wall-mounted unit inside and a couple of copper pipes with a bit of wiring is all there is to the thing. The unit came pre-charged: all the gas was under pressure inside the magic box. I had to buy a vacuum pump to evacuate the line sets and then open the service valves. Presto! Nice cool air.
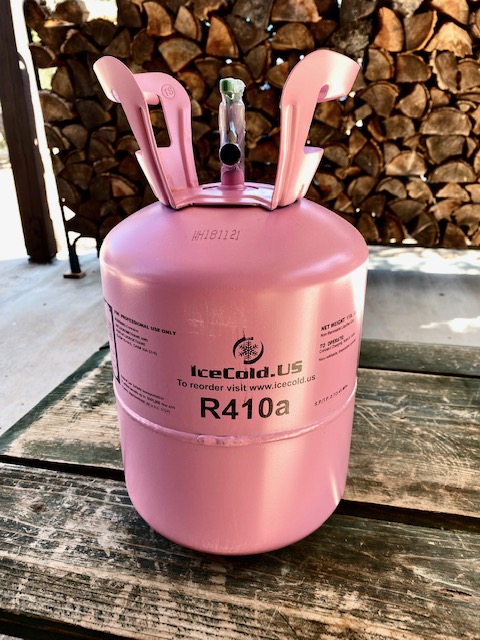
Unfortunately, sometime last winter the system sprung a leak: Tinfiny’s mini-split had lost its ability to keep my wife cool. If you’ve read ExhaustNotes.us before you’ll know that I have an aversion to calling in a repairman. Hiring someone who knows what they are doing clashes with the pioneer spirit here at Tinfiny. I googled the F3 error code and found the gas charge was low so I ordered an 11-pound container of 410A refrigerant. Pretty in pink and $80 with free shipping.
The tools required for the air conditioning trade used to be fairly expensive. A set of gauges and a vacuum pump might set you back $500 in the 1980s. A typical homeowner usually didn’t have that kind of equipment sitting next to the rake and that broken blue plastic kiddie pool. Thanks to the wonders of our modern global economy a middleclass pencil-pusher can set himself up in the air conditioning business for a couple hundred very devalued US dollars. Less if he doesn’t care to know what pressures his system runs.
Mini-split air conditioning systems are pretty simple at the mechanical-cooling level. A compressor squeezes the refrigerant gas into a liquid, increasing its heat. This hot, liquid refrigerant is then run through a condenser, which is nothing more than a radiator like the one in your car. The condenser cools the liquid refrigerant by transferring heat from the liquid to the outside air via the cooling fins of the condenser.
Next the cooled liquid refrigerant goes to the expansion valve. The expansion valve has a tiny hole that causes a pressure differential. The now low-pressure refrigerant travels to the evaporator which is another radiator located inside the room to be cooled. The room air temperature boils or expands the refrigerant, in the process drawing heat out of the room. After absorbing heat from the cooled space the refrigerant travels back to the compressor to start the cycle anew.
As this endless circle of suck, squeeze, condense, evaporate, return continues the room gets cooler and cooler until the thermostat shuts off the compressor or the room gets so cold the refrigerant won’t evaporate. Don’t hold your breath for the room to get that cold. While refrigeration theory is simple, all the extra components, controls and electronics involved with air-conditioning are not simple.
An interesting side note about mini-splits: The expansion valve is located inside the compressor/condenser unit that sits outside. This means that both refrigerant tubes going to the interior-mounted evaporator/fan unit are all part of the expansion cycle so both tubes get cold as opposed to one line hot, one line cold like in a traditional central air system.
Have all the fair-weather readers left the room? Good, because we’ve lost anyone with a functioning life and things are about to get even geekier. On my mini-split the only access for a pressure gauge is on the low-pressure side near the intake of the compressor. Gauge sets are usually the first thing a person buys when working on an air conditioner but to me they are the least important tool. My AC guru, Jerry, from The Florida Keys told me to feed the 410A in slowly until the evaporator gets uniformly cool and you’ve reached the right pressure. Who cares what the pressures are as long as the room gets cool, right?
I put the pressure gauge/manifold on the system anyway and fed a steady diet of 410A into the low-pressure side keeping things around 100-psi and it worked. For about 3 hours we had glorious cool air. My wife was happy. Was it me, or did each pass through the compressor seem like a little less cool air was blowing out? I had a leak. I kind of knew I had a leak before I started the filling process because it’s a sealed system: what else could cause low pressure?
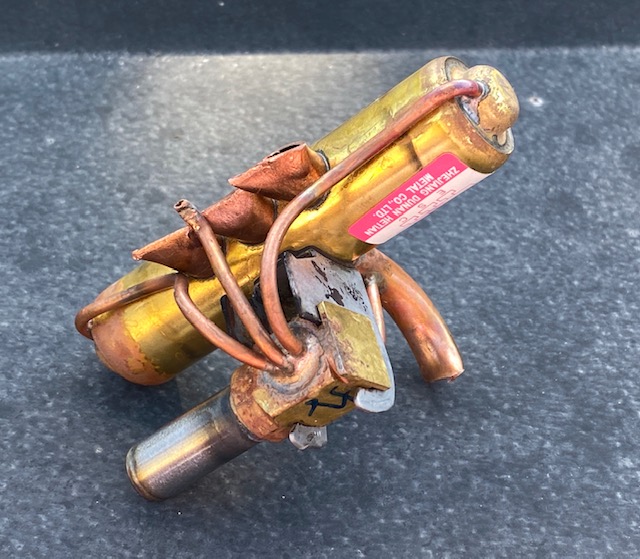
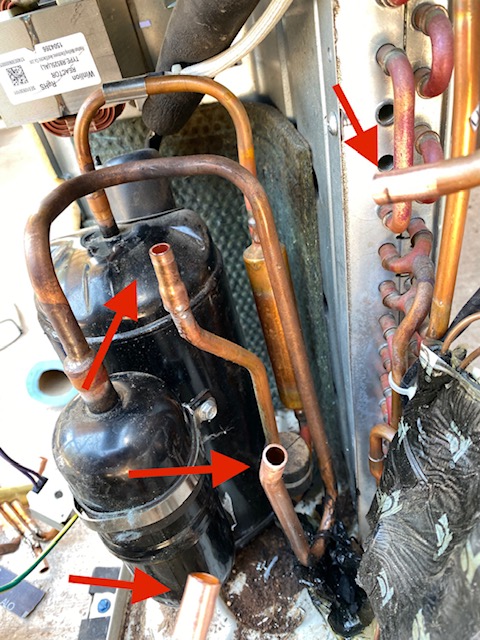
Much like finding a leak on a flat tire, soapy water revealed that the reversing valve was leaking where the tubes were soldered into the spool valve body. A quick note on reversing valves: They do exactly what they say they do. They reverse the direction refrigerant flows in the system making the evaporator the condenser and the condenser the evaporator. In reverse cycle, the unit tries to cool the outdoors and the interior unit warms the house. It makes a fairly efficient heat source as there are no heat strips or high wattage elements to suck up huge quantities of electricity.
The operative word in mini-split land is “mini.” Everything is crammed together inside a small space making the valve swap more difficult than it needed to be. There are three short pipes almost touching each other and then one more off to the side. To remove the valve gracefully you’d need to heat all 4 joints at once. I don’t have 4 torches or 4 hands so I cut the old valve out. I then tried to de-solder the left over stubs but whatever the manufacturer used to solder their joints had a higher melting point than the copper pipe! The job was turning bad, man. The copper pipe would turn rubbery and that damn solder still would not let go. The wiring and insulation were catching on fire. I had to take a break.
My new plan was to abandon the old joints and cut each tube, lowering the valve a bit but I couldn’t find my small tubing cutter. I had to bend each pipe out of the restricted space to cut them. Of course you know any time you move pipes that have sat in position for years the risk of creating another leak is pretty much 100%. Manhandling the copper pipes back into position was another chore and I began to mentally prepare myself for the cost of a new AC unit ($600).
If you’ve lost all the gas out of your mini-split system the best way to charge it is to weigh in the correct amount of refrigerant (32 ounces in this case, plus a few ounces for the tubing runs). I guess now would be a good time to discuss the merits of filling liquid vs gas. Depending on the orientation of the gas bottle you’ll get liquid refrigerant or gas refrigerant out of the bottle. From what I’ve read online liquid charging preserves the ratio of the blended crap they sell us now to close that Ozone hole and save mankind. Sure it worked, the hole closed and all but what about my rights? Gas charging ends up favoring the lighter elements of the blend so each fill alters the ratio of the remaining refrigerant. Worst case it will decrease cooling performance and leave behind a compromised bottle of AC juice. 410A is not as bad as some of the other exotic blends but I liquid charged anyway because I’m a cutting edge, risk taking sort of dude.
In actual fact as soon as the liquid hits a pressure differential it turns to a gas. Things like your pressure gauge manifold knobs turn into expansion valves. As long as you don’t dump the juice in too fast and lock up the compressor with a slug of liquid 410A. Keep the stuff coming out the bottle liquid and your ratios will remain correct.
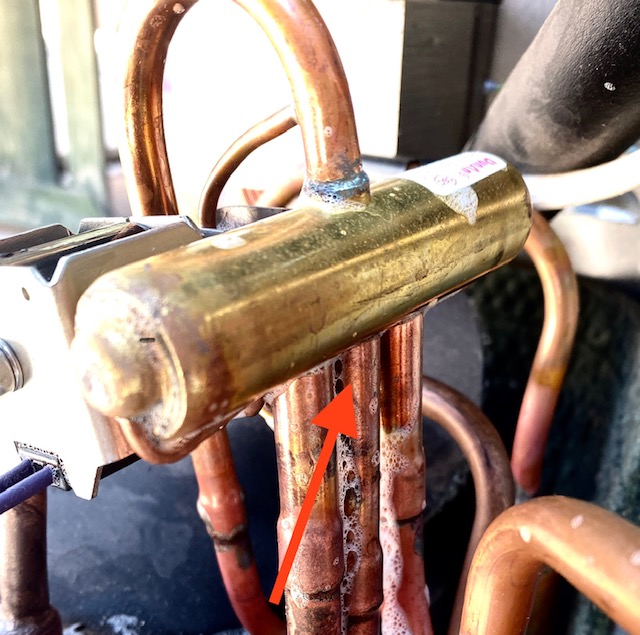
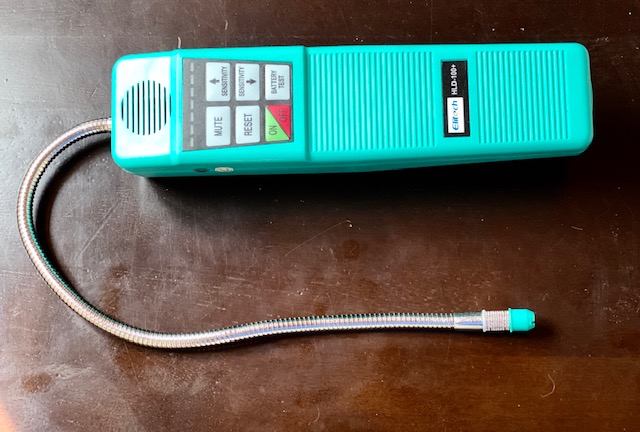
32 ounces of 410A bought us another few hours of nice, cool air before the mini-split began blowing room temperature air into Tinfiny’s living room (if you can call it living). The thing was still leaking. I never let a crisis go by without using it as an excuse to buy more tools. I used my new halogen sniffer on the condensing unit and found the new expansion valve leaking at my solder joints.
In retrospect I was rushing the job, frustrated with the confined space, fires and tired of messing with the stupid thing. I guess I didn’t get the pipes cleaned off enough or there might have been traces of oil that the solder flux didn’t get clean or who knows. The new valve passed the vacuum test but vacuum is nothing compared to the 300+psi high side running pressure.
Luckily a cool spell blew through Tinfiny Ranch, which bought me some time to think. I asked myself what was the main obstacle to success on this job? The main obstacle was the confined area to work on the valve. Then I said to myself, “Why not get rid of the valve?” it was like the blinding light of Jesus struck me! Of course! Make it cool only and I’ll worry about heat next winter!
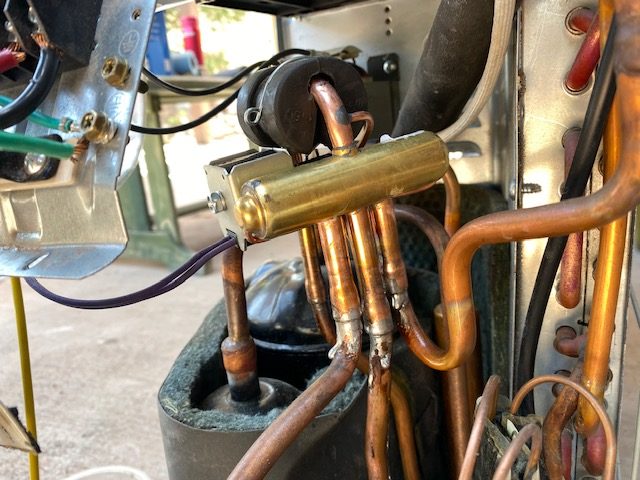
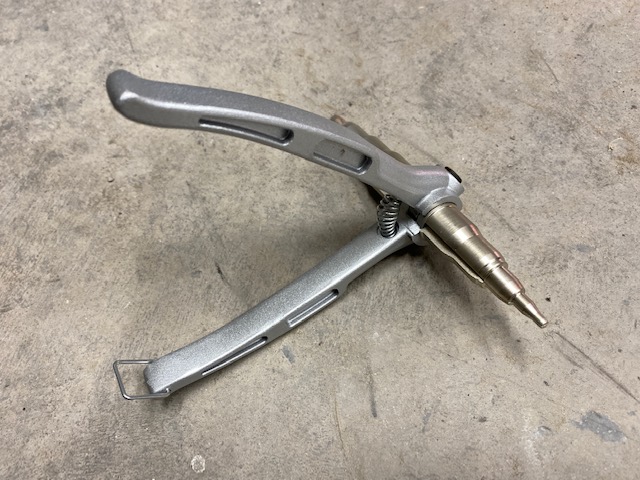
And so on the third day of working on the mini-split I bypassed the reversing valve. Using my new mini tubing cutter I made cuts in the pipe at different levels and wide apart, filling the gaps in the plumbing with new copper pipe. This also allowed me to use my new tubing expander on the jumper pipes. Anytime you can eliminate a solder joint it’s a good thing. The tubing expander gets rid of couplings and saves solder joints.
When I bought the pink, 11-pound bottle of 410A I figured it would last the rest of my life. After charging the system twice I was starting to worry I wouldn’t have enough gas to finish the job. I sanded the pipes with crocus cloth and wiped them down with paste flux. I might have gone a bit overboard with the solder as the stuff was running down the pipe. Usually when I solder copper pipe I let the solder wick into the joint then wipe the joints with a rag while the solder is still soft. It makes a clean looking joint. This time I didn’t touch anything for fear of causing a leak.
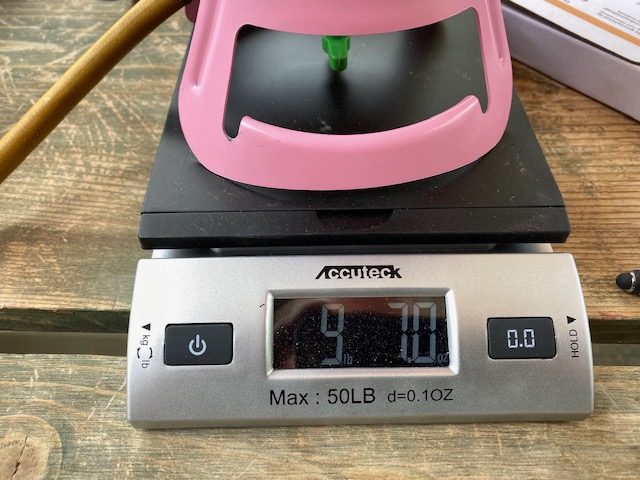
With the bypass pipes in place I charged the system yet again. 34 ounces of 410A put the low-side pressure near enough to 110 psi so I was in the ballpark charge-wise. Daytime temps have been in the mid-90’s and as I type this the mini-split has been cooling Tinfiny down to a crisp 70 degrees inside. And it’s been doing it for almost 5 days. If there’s a leak it’s a slow one.
Money-wise I may have to call it a wash. I bought a digital scale, a halogen sniffer, a mini tubing cutter, a bottle of 410A, a tubing expander and the rest of the tools I already owned. Maybe calling a pro would have been the way to go. I spent 3 days learning a lot about HVAC, cussing and thinking hard about the choices I make. And I would do the same thing again. It’s a good thing to peek inside the magic boxes of your life.
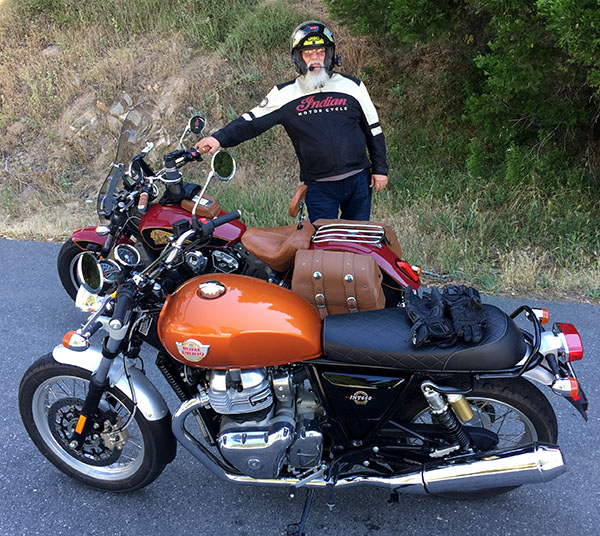
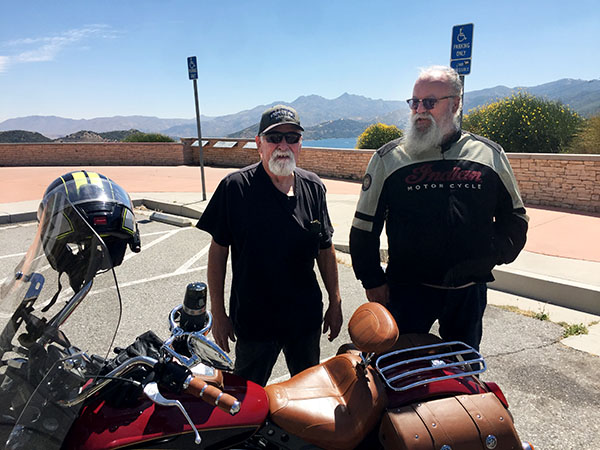
When the phone rings and it’s good buddy Duane wanting to head into the San Bernardino Mountains for a motorcycle ride, I know it’s time to hop to. That’s what I did last week and it was an awesome ride. East on the 210, up Waterman to Hwy 18 into the mountains, and then down the 138 on the other side to ride home through the Cajon Pass. Good times, and this trip was made all the more special because of two more good friends we connected with on the ride.
Duane and his magnificent Indian up in the San Bernardino Mountains. It was a glorious day.Geezers. Motorcycle geezers. CSC Mustang and RX3 geezers. Former Army motorcycle-riding geezers. Former Army motorcycle-riding gun nut geezers. Whatcha gonna do? Great minds work alike.
It was a grand ride through one of the greatest motorcycle playgrounds on the planet. The weather was perfect and the bikes were running like Chinese 250s (I was going to say like Swiss watches, but I have Swiss watches and I have Chinese 250s, and the Chinese 250s run better). Both the Indians were running great. My Indian is an Enfield made in India. Duane’s bike is an Indian made in America. It’s very confusing, I know.
A grand day for a grand ride. No polarizers or saturation sliders needed.
So we turned onto the 138 somewhere in one of the little mountaintop towns and we had a fun slalom down through the twisties. As we approached Silverwood Lake, I wanted to stop to get a photo of the bikes. There’s this huge parking lot and it was completely empty, so I thought we would park there and I could angle my shot for the best photo.
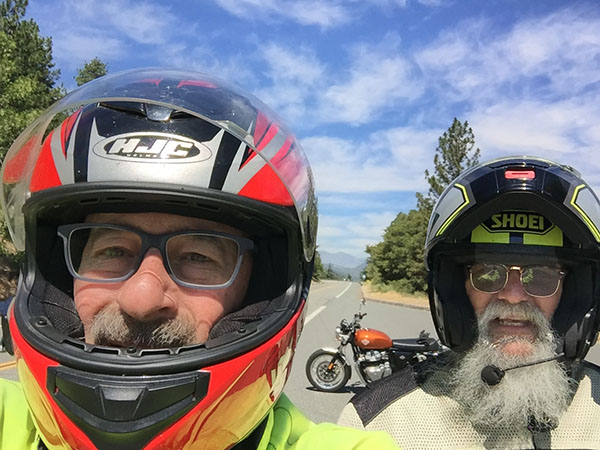
So we’re rolling to a stop and I noticed this silver SUV pulling in behind us, and wouldn’t you know it, the guy parks right next to us. I was thinking that would completely screw up my photo. You know the drill…a parking lot the size of Texas and the guy, this, this, this interloper parks right next to me. I was all set to dip into my not-such-a-nice-guy routine when Mr. Silver SUV stepped out of his car with a giant grin.
Twin Peaks Steve!
Twin Peaks Steve and Glendora Duane…two great guys!
Wow, we were ever surprised and happy. Duane and I have a lot in common, as alluded to in one of the photo captions above, and Twin Peaks Steve is right there with both of us in every regard.
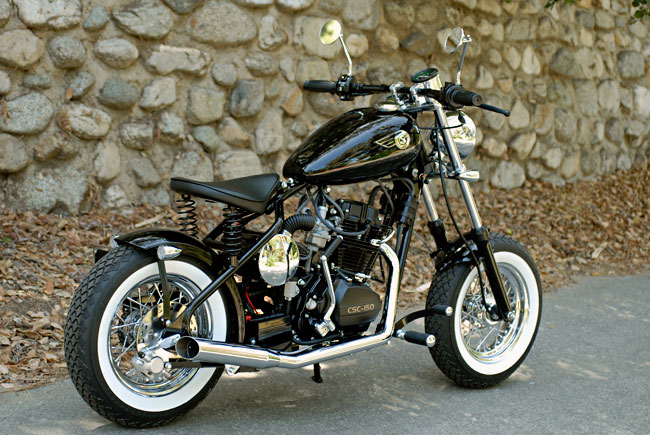
We had a real nice visit overlooking Silverwood Lake and caught up on things. Steve’s beautiful wife Rosemary was there, too, and we had a wonderful chat with her. I can’t tell you how great it was bumping into these two. Steve told me he recognized us when we rode by and he and Rosemary followed us down hoping to have a chance to connect. I’m glad he did. We all met back in the CSC Mustang days about 10 years ago, when Steve was the very first guy to order a custom CSC Bobber. It was one of the prettiest bikes we ever built at CSC.
Steve’s custom CSC 150 Bobber. It was a real show stopper…a visually arresting, gorgeous little jewel of a motorcycle.
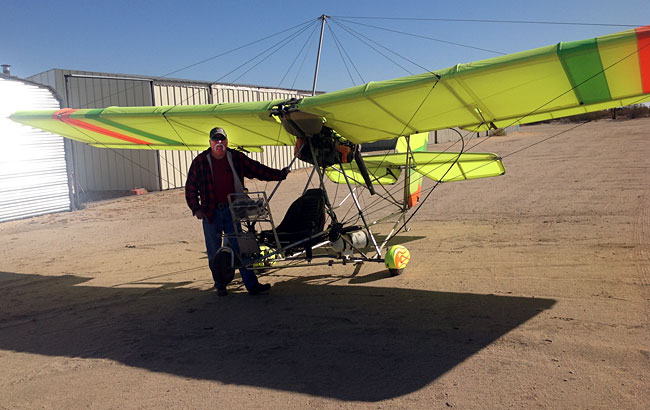
Twin Peaks Steve rode with Duane and me on a bunch of CSC rides, and the more we learned about him back in those days, the more impressed we were. How about ultra-lights as a hobby? Yep, Steve did that, too.
Ah, for the love of adventure. Twin Peaks Steve has done it all!
Then CSC went into the ADV motorcycle business by importing the RX3. Steve and Duane both bought bikes from the very first RX3 shipment to arrive in America, and we rode together (Duane, Twin Peaks Steve, and yours truly) on a bunch more rides.
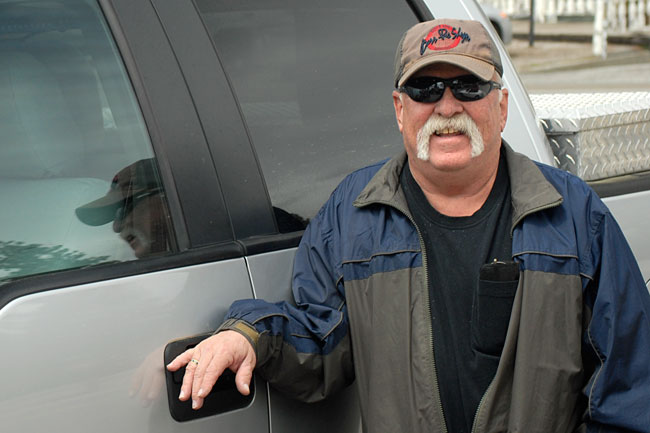
One of my favorite photos of Steve.
Steve is a serious rider and camper, and he outfitted his RX3 with all the good stuff for disappearing into the boonies. He did a lot of trips up and down the 395 (one of the prettiest highways in America), and the motormaestro even did a guest blog or two about his adventures when I was writing the CSC blog. If you poke around on the CSC blog and search on “Twin Peaks Steve” you’ll find he’s a regular there!
Steve’s RX3 somewhere up along Highway 395. Steve is the real deal; he’s done some amazing trips on his RX3.
What a ride and what a day!
So, how about you? Are you getting out on your motorcycle? Do me and yourself a favor and live large, like Steve, Duane, and the rest of us. Get off your computer, get your riding gear, and get on the road!
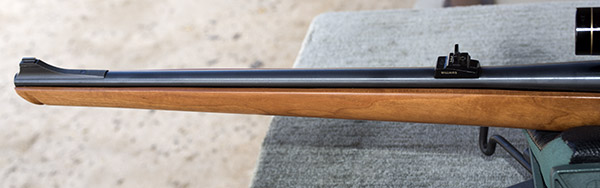
About 40 years ago, I bought a Howa 30 06 barreled action and a Bishop semi-inletted stock. It was to be the first rifle I had stocked and I wanted something different. In perusing the Bishop catalog, I selected cherry instead of walnut (not cherry as in cool, but cherry as in the kind of tree George Washington cut down). When I ordered it on the phone (this was way before the Internet came along), I asked the Bishop people if they could run the forearm out to the muzzle, because my concept was to make it like a Mannlicher rifle. I thought that would be cool (and I was right). As I recall, the semi-inletted stock was $57 plus postage (and postage wasn’t very much). Ah, times change.
Semi-inletted stocks were advertised as 95% complete. All you had to do, the ads said, was some minor finishing work to get a perfect fit (sanding and maybe a little filing in the stock’s inletted areas so the barreled action would drop in). But it took a ton of labor to make that happen. Maybe I just didn’t know what I was doing, but if what I put into the stock’s final inletting was 5%, Bishop must have spent a million hours doing the first 95%. But all’s well that ends well and this project ended well.
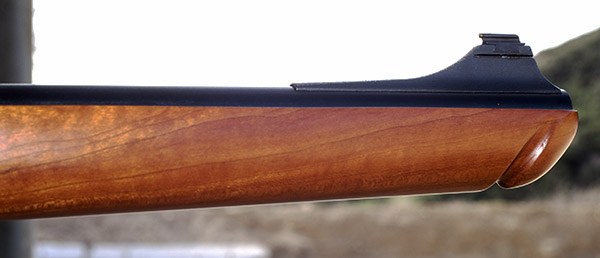
I finished the stock with what would become my preferred finish on all future gun projects, and that’s TruOil. After sanding with 320, then 400, and then 600 grit paper, and then buffing the wood with denim to get any remaining grain whiskers, the drill was to apply a coat of TruOil, wait a day for it to dry, beat it down with 0000 steel wool, and repeat the process the following day. You’re looking at 10 days of that on this stock. It deepened the color of the cherry nicely. It’s different, and it always causes folks who see it at the range to strike up a conversation.
I floated the barrel (that means sanding the barrel channel so the barrel doesn’t touch the stock at all) and glass-bedded the action (that means pouring an epoxy and fiberglass mix into the stock and allowing it to cure around the receiver, creating a perfect bed for the action). Glass bedding creates a stable platform. Free floating the barrel eliminates asymmetric loads on the barrel due to temperature and humidity changes, and temperature changes in the barrel that occur when a rifle is fired. Those two steps improve accuracy tremendously. It works.
I wanted something different for the forearm tip on this rifle, and I didn’t want to screw around with trying to fit a metal cap (what you typically see on a Mannlicher stock) because that would bring the barrel back into contact with the wood. I thought it would be cool to give it an Alex Henry forearm treatment (like the Ruger No. 1 style), and I carved it freehand with a Dremel. That turned out surprisingly well, too.
I didn’t checker the stock. There are two reasons for that…I can’t checker worth a damn, and I actually prefer the look of a rifle without checkering.
Three handloads I developed for use in other 30 06 rifles work well. The first is a near-max load of IMR 4320 with the Hornady 130-grain jacketed soft point bullet (that one shoots 1-inch groups all day long in a Ruger No. 1), the second is a couple of grains under max of IMR 4064 with either the Winchester or Hornady 150-grain jacketed soft point (both bullets work equally well, and this load is a tack driver in my Model 70), and the third is a max IMR 4064 load with the Remington 180-grain jacketed soft point (that’s the accuracy load in my Browning B-78).
Every rifle has a load it prefers, though, and this custom Howa is no exception. Here’s the secret sauce:
The load shown in the photos above is not a hunting load (the Sierra Matchkings would sail right through an animal without much expansion), but it sure is accurate and it doesn’t take much to kill a paper target. I like to think my marksmanship has improved with age; I probably ought to find some 760 powder and load a few more to see if I could better the groups you see above.
In the 1960s and 1970s (and on into the 1980s), there used to be several companies offering semi-inletted rifle stocks, but that business has largely gone away. There’s still Richard’s Microfit in the Valley; I used them for a .375 Ruger project I did about 5 years ago (and I could go there and personally select the wood I wanted).
Some of the gunstock companies were mismanaged and took shortcuts that bankrupted them, but I think the real reasons they folded fall into two categories. The first is that not many people want to expend the effort it takes to create a custom rifle like the one you see here, and most folks don’t have the skills to do so. Shop courses disappeared in the US a long time ago, and most people today are more adept at things like at operating a cell phone and posting on Facebook.
Another reason is that very few people want a rifle with real wood. Black plastic is all the rage. I was on the range last week, it was fairly busy, and I was literally the only guy shooting a rifle that didn’t have a Tupperware stock (everyone fancies themselves an operator; few have ever worn a uniform). Not that there’s anything wrong with that if a modern military rifle is what floats your boat, and there are some fine custom builds (as outlined in Jake Lawson’s blog last week).
Hell, even if you wanted to build a custom rifle like the one you see here, it’s hard to find a barreled action. In the 1970s it was not unusual for rifle companies to sell barreled actions; today, the only outfit I know of that does so is Howa and you don’t see them too often. If you come across one, let me know. I could go for another project.